

Page 1
TT700
Mending Machine
TT700 Instruction Manual
Table of Contents | Next Page
Page 2
TT700
TABLE OF CONTENTS
Handy Reference Guide 03
Getting Ready to Mend 07
Winding the Bobbin 08
Inserting the Wound Bobbin 11
Threading the Machine 12
Working Light 13
Raising the Bobbin Thread 14
Mending a Broken Seam 15
Securing a Seam 16
Free Arm Mending 16
Adjusting Tension 17
Changing Needles 18
Bobbin Case Replacement 19
Performance Checklist 25
TT700 Instruction Manual
Even if you have sewn before,
these instructions will make your
first use much easier!
Previous Page | Next Page
Page 3
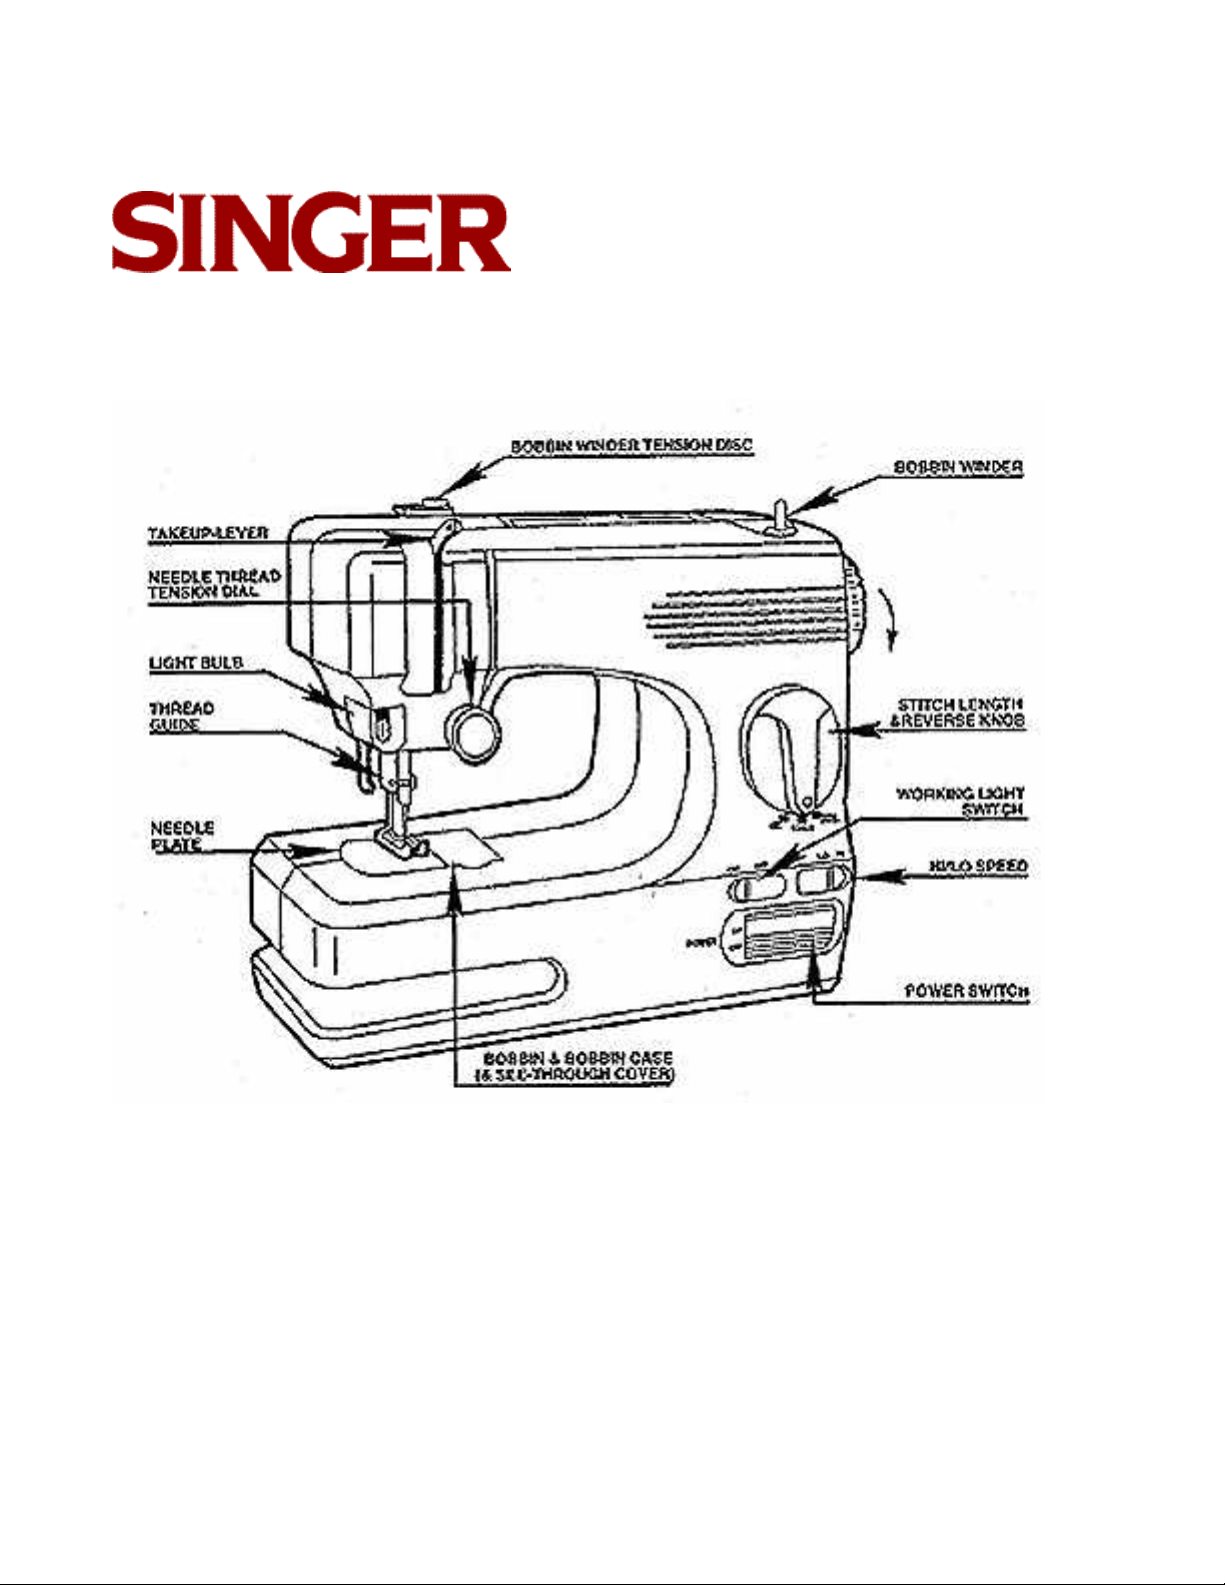
PARTS AND ACCESSORIES
TT700
Table of Contents Previous Page | Next Page
3
Page 4
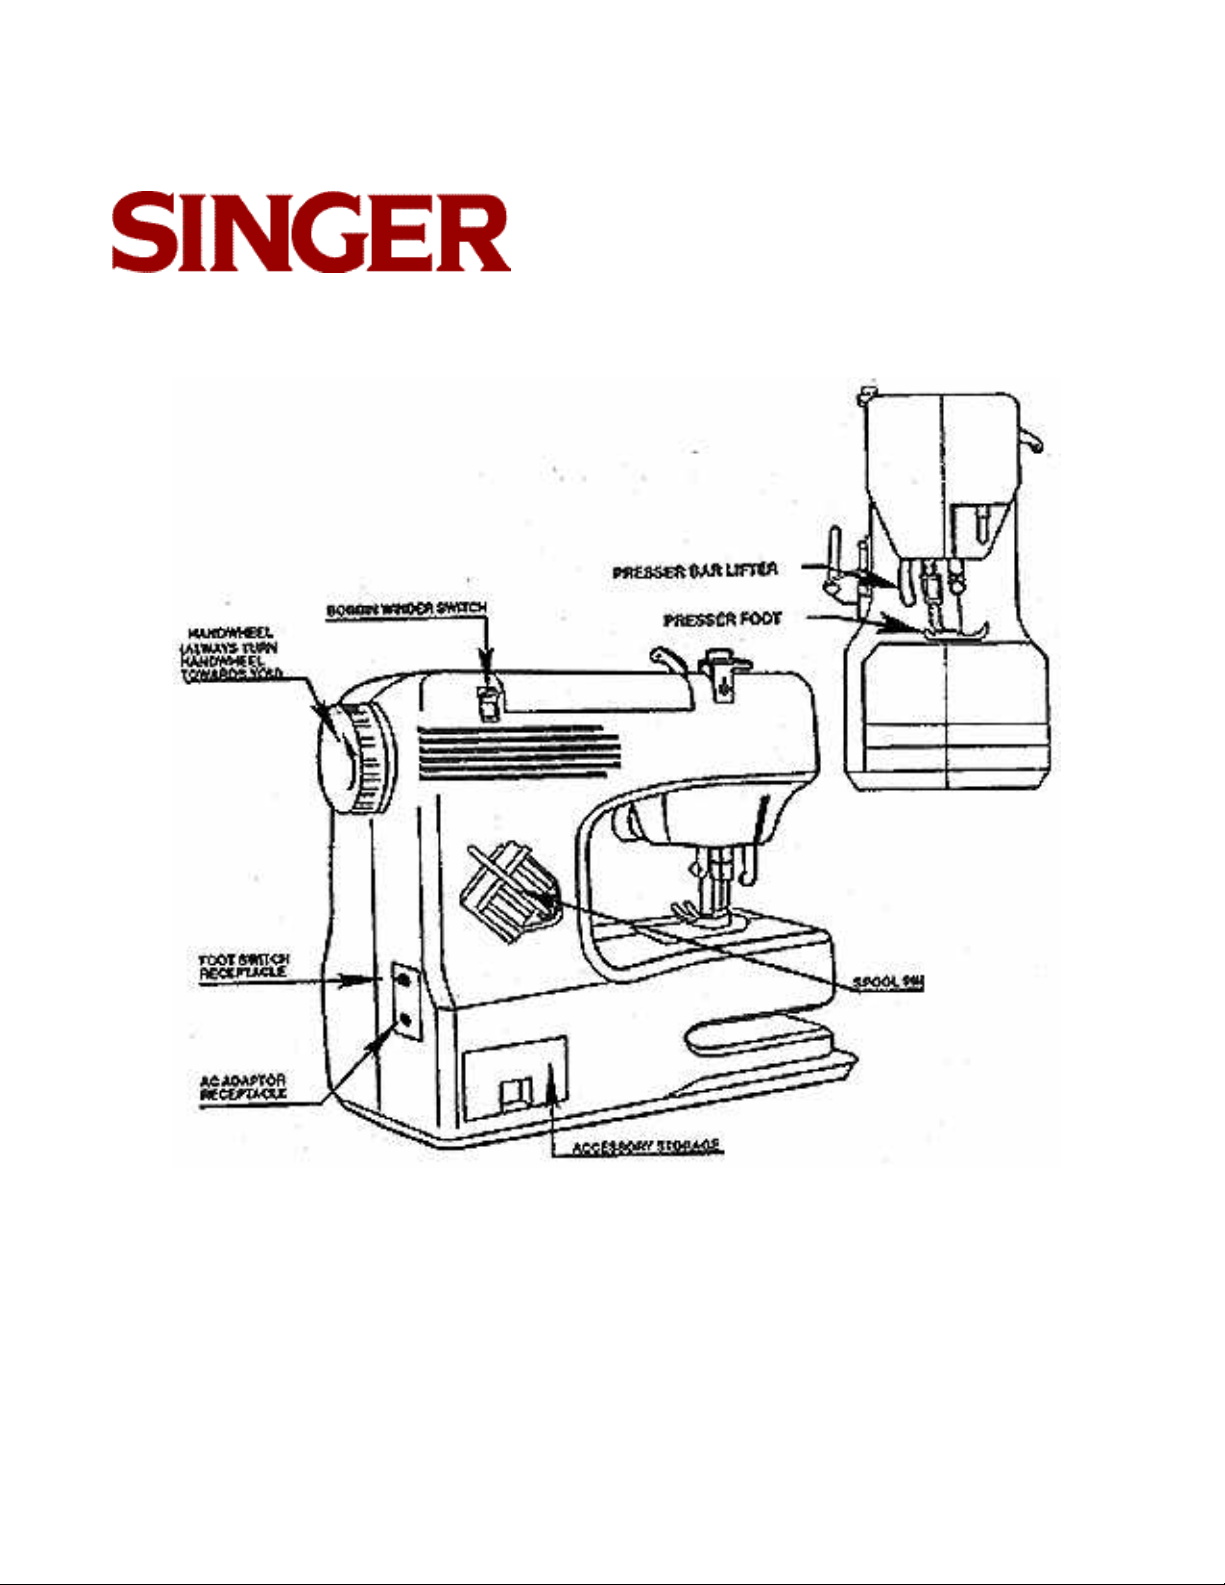
PARTS AND ACCESSORIES
TT700
Table of Contents Previous Page | Next Page
4
Page 5
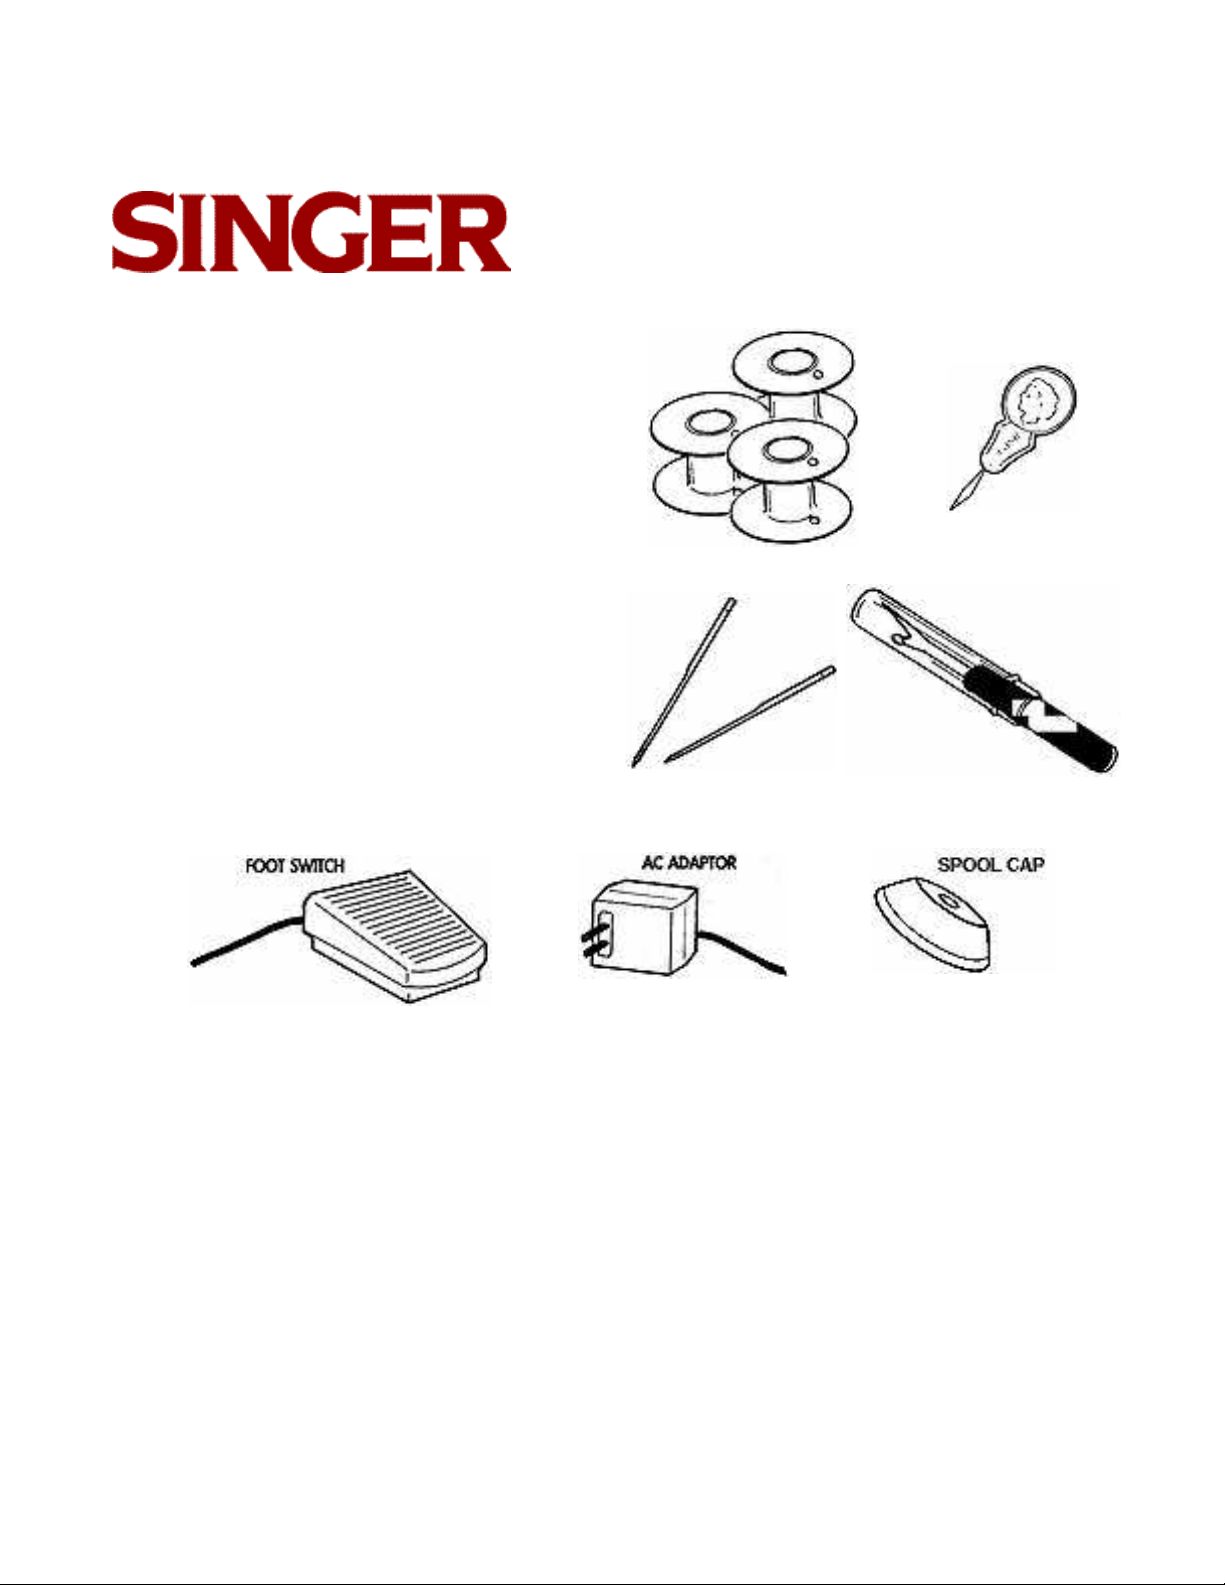
ACCESSORIES INCLUDED
in Accessory Drawer
• 3 Bobbins (1 in machine)
For replacement bobbins,
use Class 66 bobbins
• 1 needle threader
• 2 needles (1 in machine)
For replacement needles,
Use Size 90/14 needles.
• Combination seam ripper/thread
trimmer tool
TT700
Table of Contents Previous Page | Next Page
5
Page 6

TT700
IMPORTANT SAFEGUARDS
• Before connecting machine, be sure that the voltage on the AC adapter
matches your electrical supply.
• Always disconnect the foot switch or AC adapter when changing needles,
removing the bobbin, or cleaning the machine.
• Always disconnect the AC adapter whenever machine is unattended.
• Work carefully and watch the sewing area to avoid the needle during operation.
• Do not pull the fabric while mending as the needle may bend and break or
cause other damage
• Check that the machine is threaded carefully before mending.
• The bobbin case tension is Pre-set at the factory and cannot be adjusted.
• If the thread gathers underneath the material, this indicates that the tension
needs to be increased e.g., for cotton material the tension should be
tightened as far as it will go then turned anti-clockwise 2 and a half turns.
• Please avoid sideways pressure on the needle when sewing around corners
as this could cause the machine to jam and render it inoperative.
Table of Contents Previous Page | Next Page
6
Page 7
TT700
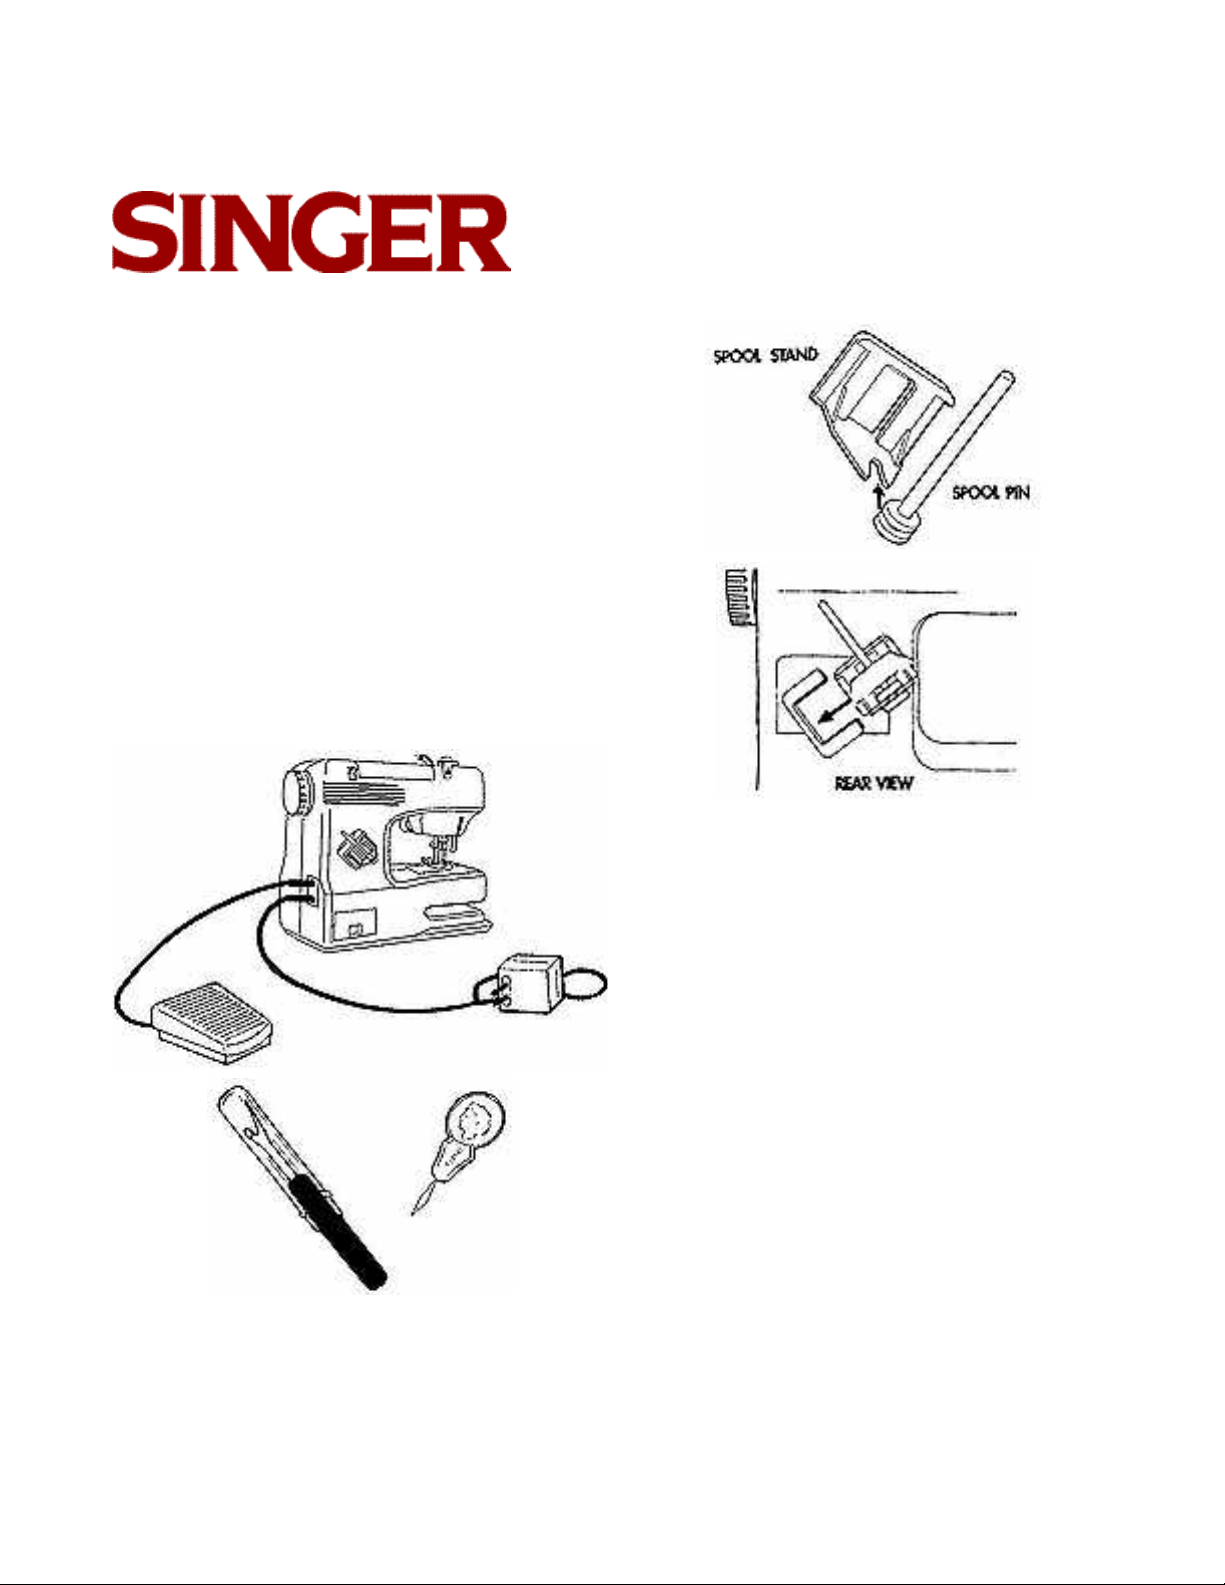
GETTING READY TO MEND
1. Assemble spool holder by snapping spool
pin into spool stand.
2. Slide spool stand into its holder on rear left
of machine, until it snaps firmly into place.
Then install spool cap on spool pin
3. Make sure that power switch is in the ON
position. Plug in foot switch and AC
adapter plugs.
4. Remove red-handled seam ripper/thread
trimmer and needle threader from
accessory drawer.
Table of Contents Previous Page | Next Page
7
Page 8
TT700
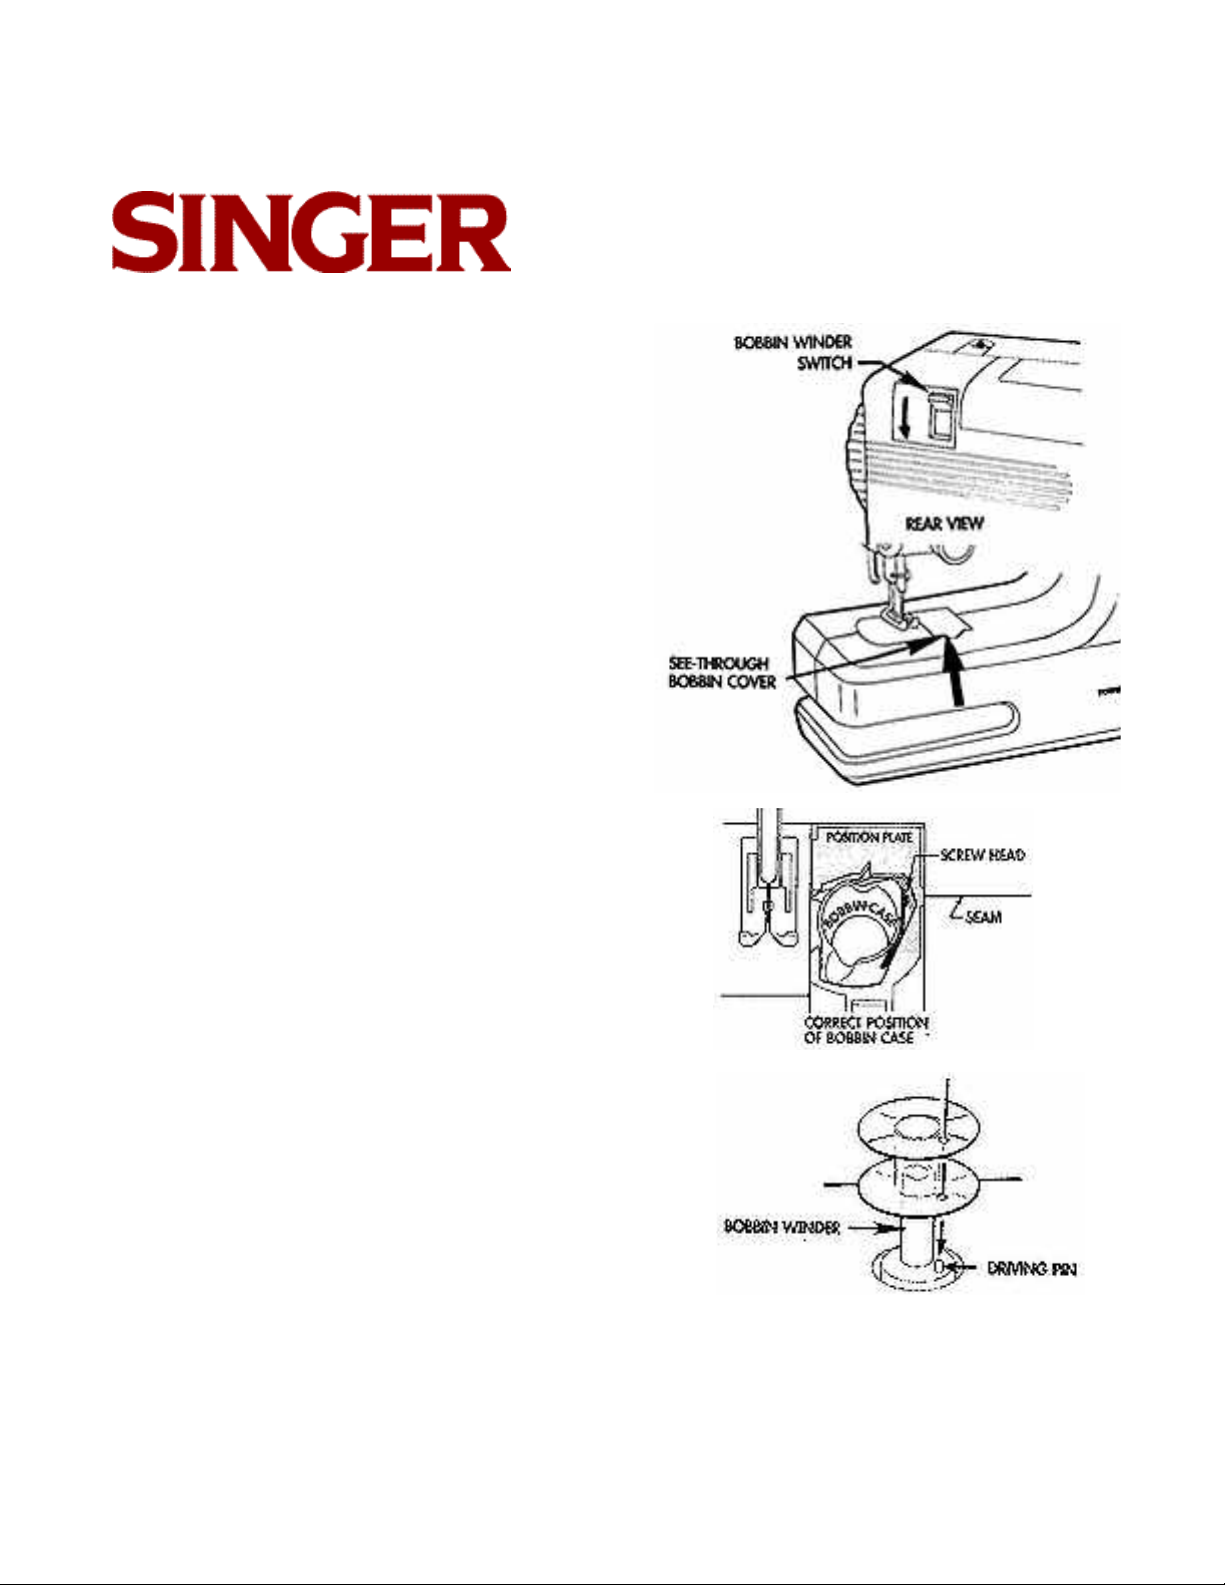
WINDING THE BOBBIN
1. Push bobbin winder switch down to raise
bobbin winder.
2. Remove see-through bobbin cover by
pulling it upwards.
Check that bobbin case is in proper position. The bobbin case is held in place by a
position plate which is designed to flex
slightly to allow the bobbin case to move
back and forth freely, about 1/16"
Screw head should line up with seam in
plastic casing of machine and bobbin case
should move back and forth slightly (about
1/16'') when handwheel is turned. If not,
refer to page 17 for repositioning instructions.
3. Remove empty bobbin from bobbin case.
The seam ripper may make removal easier.
Place bobbin on bobbin winder, aligning
hole in bobbin with driving pin on bobbin
winder. You may have to turn the handwheel
to help locate the driving pin.
Table of Contents Previous Page | Next Page
8
Page 9

TT700
WINDING THE BOBBIN continued...
4. Install spool cap on spool pin.
Slide spool of thread onto spool pin.
5. Pull thread from spool and, using two
hands, pull it through diagonal slit in first
thread guide.
First thread guide should look like this
when properly threaded.
6. Wrap thread one time counterclockwise
around tension disc.
Table of Contents Previous Page | Next Page
9
Page 10

TT700
WINDING THE BOBBIN continued...
7. Feed end of thread through small hole in
top of bobbin from the inside, leaving a 3"
tail.
8. Slide power switch into ON Position Hold
end of thread (the "tail") firmly and step
on foot switch until a few coils are wound
onto bobbin and stop.
9. Use thread trimmer to cut off tail, flush
with top of bobbin. Continue winding until
desired amount of thread is wound on
bobbin. A full bobbin holds 35 yards.
10. Cut thread about 4" from bobbin and
remove from machine. Leave spool of
thread on spool pin on back of machine.
Push bobbin winder switch up into off
position.
Table of Contents Previous Page | Next Page
10
Page 11

TT700
INSERTING THE WOUND BOBBIN
1. Insert wound bobbin into bobbin case with
thread spooling off to left side, as shown.
2. Guide end of thread to the back of the
bobbin.
3. Pull the thread toward you so that it hooks
on notch A (at 3 o'clock position) and then
pull to the left so that it passes through
notch B (at 4 o'clock position).
4. Leave several inches of thread laying
across top of bobbin toward the left of
machine. Slide cover back into position
ready for sewing.
Caution: If lower thread is not fixed
properly, the thread will be
very loose after sewing.
Bobbin threading is now complete.
(See Page 9 to raise lower thread for sewing)
Table of Contents Previous Page | Next Page
11
Page 12

TT700
THREADING THE MACHINE
There are five thread guides that the top
(needle) thread passes through. The diagram
at right shows an overview of the threading
procedure; refer to the specific instructions
below for important details.
Your spool of thread should be in the same
position as it was for winding the bobbin, on
the spool pin on the back of the machine. Cut
the thread near the spool and pull the tail out
of the thread guide and tension disc.
1. Pull thread from spool and, using two
hands, pull it through diagonal slit in
thread guide A. Do not wrap thread
around tension disc for sewing.
Thread guide A should look like this
when properly threaded.
2. Guide thread around tension dial B and
Pull thread between the tension discs.
Table of Contents Previous Page | Next Page
12
Page 13

TT700
THREADING THE MACHINE continued...
3. Turn handwheel toward you until take-up
lever is in highest position. Pass thread
through hole in take-up lever C from right
to left.
4. Turn handwheel toward you so that needle
lowers and thread guide D is accessible.
Place thread behind thread guide D to the
right side, and pull forward. The thread
guide will thread itself.
5. Turn handwheel toward you again to raise
needle to its highest position.
Feed wire needle threader through needle
eye from right to left.
Insert thread through wire loop and pull
needle threader back to the right.
The needle is now threaded.
WORKING LIGHT
Slide to "ON" Position for brighter area to
sew.
Table of Contents Previous Page | Next Page
13
Page 14

TT700
RAISING THE BOBBIN THREAD
1. Hold top (needle) thread and turn hand-
wheel toward you until needle goes to its
lowest and then its highest point.
Raise the presser foot using the presser
bar lifter.
2. Gently pull top (needle) thread until lower
(bobbin) thread comes up in form of a
loop.
3. Use the flat side of seam ripper/thread
trimmer to open up bobbin thread loop
until end is visible.
4. Pull both thread tails straight back under
presser foot.
5. Replace see-though bobbin cover by
sliding it back into place.
Table of Contents Previous Page | Next Page
14
Page 15

TT700
MENDING A BROKEN SEAM
1. Set stitch control knob to desired stitch
length. For most mending, the "long stitch"
setting is acceptable.
Turn hand wheel toward you to raise nee-
dle to highest position.
2. Lift presser foot using presser bar lifter.
Make sure that both needle (top) thread
and bobbin (lower) thread are pulled
straight back behind needle about 4".
3. Position area to be mended under presser
foot. Turn handwheel toward you to lower
needle into existing stitches in fabric.
Lower presser foot.
4. Step on foot switch and machine will start
to mend the broken seam. Continue until
new stitches overlap existing stitches by
about an inch and then step off foot switch.
5. Raise presser foot using presser bar lifter
and pull fabric straight back. Cut both
threads about 4" from edge of fabric.
NOTE: If it is difficult to pull thread toward
back without noticeably bending the
needle, a slight backward and forward
movement of the handwheel will
make it easier to remove the fabric.
Table of Contents Previous Page | Next Page
15
Page 16

TT700
SECURING A SEAM
There are two methods of securing the
threads at the start and end of the seam
repair.
METHOD #1: Backstitching
Turn stitch control knob to REVERSE (left)
position and backstitch 4-5 stitches at start
and end of seam repair
METHOD #2: Tying off
When seam is completed, use needle
threader to pull top thread to underside of
fabric. Tie a square knot with the bobbin
thread and trim.
FREE ARM MENDING
A free arm for mending sleeves, Pant legs.
etc. To utilize this handy feature just slip the
item onto the free arm.
Table of Contents Previous Page | Next Page
16
Page 17

TT700
ADJUSTING TENSION
All tension adjustment is accomplished
using the needle thread tension dial.
The bobbin case tension is pre-set at
the factory and cannot be adjusted.
The tension level may be determined by
using two different color threads for the needle and bobbin threads, and then analyzing
the resulting stitches.
When an even amount of thread is exerted
on both threads, a smooth, even stitch known
as a balanced stitch is produced.
A perfect, well balanced stitch will have the
needle and bobbin threads locked between
the two layers of fabric with no loops on top
or bottom and no puckering.
ALWAYS DOUBLE CHECK THREADING
BEFORE ATTEMPTING TO ADJUST
TENSION!
Too much tension will produce a tight stitch,
which will cause the fabric to pucker. To
decrease tension, turn the tension dial
Counter-clock-wise
Too little tension will produce a loose stitch,
which will cause loops in your seam. To
increase tension, turn the dial clockwise
Table of Contents Previous Page | Next Page
17
Page 18

TT700
CHANGING NEEDLES
IMPORTANT: For best results,
Use Size 90/14
needles.
1. Turn handwheel to raise needle to its highest position. Loosen needle clamp screw
just enough to remove needle. A small
screwdriver may be helpful.
2. With flat side of needle to the right (same
side as needle clamp screw), insert new
needle up into clamp as far as it will go.
3. Re-tighten needle clamp.
Table of Contents Previous Page | Next Page
18
Page 19

TT700
BOBBIN CASE REPLACEMENT
A special feature of the machine is the anti-thread jamming bobbin case. The bobbin case is
held in place by a positioning plate which is designed to flex slightly to allow the bobbin case
to move back and forth freely, about 1/16".
In the event that the bobbin case becomes displaced and does not move freely or pops out
completely, follow the three easy steps below. To assist you, the instructions are color coordinated to the illustrations.
STEP 1:
Remove bobbin from bobbin case.
If bobbin case has popped out, put back in
position as follows: Place bobbin case under
position plate so that screw head is under
notch in position plate. Then, slide bobbin
case around until metal bracket sits between
2 o'clock and 4 o'clock positions. Proceed to
step 2.
Table of Contents Previous Page | Next Page
19
Page 20

TT700
STEP 2:
Use left index finger to pull bobbin case
toward the right and up, until lower half of
metal bracket touches angled edge of posi-
tion plate. Rotate handwheel until bobbin
case rests in correct position. Proceed to
step 3.
STEP 3:
Check bobbin case for' proper positioning.
Screw head should line up with seam in plas-
tic casing of machine. From side view, top of
bobbin case will be level with (or slightly
above) position plate.
Table of Contents Previous Page | Next Page
20
Page 21

TT700
SPECIAL EDITION:
BOBBIN CASE REPLACEMENT
The bobbin case actually "floats" on top of the bobbin case housing. The bobbin case
is held in place by a position plate, and can only be removed with extreme pressure.
If for some reason the bobbin case is removed or displaced, follow the three steps below to reinsert.
STEP 1:
• Remove bobbin from bobbin case.
• Put bobbin case intobobbin case housing
• Have point A & B of bobbin case sit on top
of point C & D of position plate (See FIG 1).
• Make sure the screw head aligns
with opposite side of plastic joint
• Do not touch the tension spring.
STEP 3:
• Hold left finger inside bobbin case to hold
steady then with right finger press down
point E (See FIG 3)
• Turn the handwheel to make sure bobbin
case is free and bobbin case housing can
be rotated freely.
Table of Contents Previous Page | Next Page
STEP 2:
• Slightly turn the bobbin case counterclockwise (then clockwise) and position point A
of bobbin case underneath point C of posi-
tion plate Point B remains on top of point D
(See FIG 2).
21
Page 22

TT700
Drawing A
Breakdown view of bobbin case,
position plate and bobbin case housing
Drawing B
• Correct position of bobbin case after
installation.
• The screw head aligns with opposite side
of plastic joint.
• The scoop section located to right side of
point C
Table of Contents Previous Page | Next Page
22
Page 23

TT700
Drawing C
• Wrong position of bobbin case. As indicated, the scoop section will be stuck underneath point C. This is wrong.
Drawing D
• Correct relationship of bobbin case, position
plate and bobbin case housing.
• Most important is that the rim of bobbin
case supported by the rim of bobbin case
housing. The bobbin case is floating on top
of the bobbin case housing and the bobbin
case housing turns easily under the bobbin
case.
Table of Contents Previous Page | Next Page
23
Page 24

TT700
SPECIAL EDITION FOR ADJUSTING TENSION
• Please note the needle thread tension dial can be rotated 9 full circle turns (From MIN to
MAX).
An easy way to have a balanced stitch is to turn the tension dial to the half-way position
(4 or 5 full circle turns from the MIN position).
If you have difficulties in adjusting tension, follow instructions below:
• Turn the tension dial counterclockwise to
MIN position until it stops.
• Turn clockwise & count the number of circles you turn until it reaches 4 or 5 full circle
turns (a half-way position)
• Make a test sample to find proper tension
before sewing on your fabric.
• Some threads and fabrics require readjusting tension slightly to improve stitch appearance.
• Always double check threading before
attempting to adjust thread tension.
• Refer to Page 12, for detail adjusting ten-
sion instructions.
• The bobbin case tension is pre-set at the
factory and cannot be adjusted. DO NOT
TOUCH THE TENSION SPRING.
Table of Contents Previous Page | Next Page
24
Page 25

TT700
PERFORMANCE CHECKLIST
When sewing difficulties occur, refer back to this manual to make sure that you are correctly
following the instructions. If you are still having a problem, the reminders below may help you
correct it. Use only correct needles and bobbins (See Page 2).
Needle does not move
• Is machine connected to electrical supply?
• Is foot switch connected?
• Is bobbin case displaced? (pg. 14)
Needle moves, but stitch is not formed
• Is needle in backwards?
• Is needle defective?
• Is bobbin correctly inserted into bobbin
case?
• Is upper thread tension too tight?
• Is bobbin case properly inserted? (pg. 14)
• Is needle fully inserted into needle clamp?
• Are bobbin and needle correctly threaded?
Needle breaks
• Is needle straight and sharp?
• Is needle correct size?
• Is needle fully inserted into needle clamp?
Bobbin winding difficulties
• Is thread unwinding freely from spool?
• Is bobbin winder engaged?
• Is thread end securely held at start of wind?
• Is thread correctly lead around bobbin
winder tension disc?
Upper thread breaks
• Is machine properly threaded?
• Is thread freely unwinding from spool?
• Is needle size correct for thread?
• Is bobbin rim free of nicks?
Lower thread breaks
• Is bobbin correctly wound?
• Is bobbin correctly inserted into bobbin
case?
• Is bobbin case correctly threaded?
• Is bobbin case properly inserted? (pg. 14)
Skipped stitches
• Is machine properly threaded?
• Is fabric firmly held down?
• Is needle correct style and size?
• Is needle straight and sharp?
Fabric does not move properly
under presser foot
• Is presser foot lowered?
• Is stitch length correctly set?
Table of Contents Previous Page
25
 Loading...