

Page 1

SWM-FA70R
SWM-WSFR7
SL-SWMFR72
SWM-FAR75
SL-RFA75
SWM-FATL7R-BB
WASHING MACHINE
USER MANUAL
Page 2

CONTENTS
SAFETY INSTRUCTIONS 3
Important safety precautions ........................................................................................................ 3
INSTALLATION 8
Parts identication ........................................................................................................................ 8
Installation environment ................................................................................................................ 9
Levelling ...................................................................................................................................... 10
Installation of the water inlet pipe ............................................................................................... 11
Assembling the rat guard ............................................................................................................. 12
OPERATIONS 13
Adding detergent ........................................................................................................................ 14
Adding fabric softener ................................................................................................................. 15
Preparation for washing .............................................................................................................. 16
Caring of clothes ......................................................................................................................... 16
Control panel .............................................................................................................................. 18
Fully automatic operations .......................................................................................................... 24
Child lock .................................................................................................................................... 25
Fully automatic program ............................................................................................................. 27
Special features .......................................................................................................................... 28
Manual functions ......................................................................................................................... 29
MAINTENANCE 31
Cleaning ...................................................................................................................................... 31
Cleaning the lint lter .................................................................................................................. 32
Cleaning the detergent compartment ......................................................................................... 32
TROUBLESHOOTING 33
Malfunction display and solutions ............................................................................................... 33
Troubleshooting of washer ......................................................................................................... 35
SPECIFICATION 36
2
Page 3

SAFETY INSTRUCTIONS
Please note that the intention of following the precautions for safety is to prevent unpredictable danger
and damage caused to the property and read these contents carefully before use.
This symbol represents [cause attention], and detailed cautions will be displayed inside
the graphics. r
This symbol represents [operation prohibited], and detailed prohibitive items will be
displayed inside the graphics. f
This symbol represents [compulsory execution], and detailed forcible execution
J
items will be displayed inside the graphics.
IMPORTANT SAFETY PRECAUTIONS
WARNING: To reduce the risk of fire, electric shock,
or injury to persons when using your appliance, follow
basic precautions, including the following:
1. This appliance is not intended for use by persons (including children) with reduced physical, sensory or
mental capabilities or without experience and knowledge, unless they have been given supervision or
instruction concerning the use of the appliance by a person responsible for their safety.
2. Children should be supervised to ensure that they do not play with the appliance.
3. The new hose-sets supplied with the appliance are to be used and old hose-sets should not be re-used.
4. For washing machines having ventilation openings in the base, the installation instructions shall state
that the openings must not be obstructed by a carpet.
5. Please make sure that the water used for washing should not exceed 50°C. Plastic parts may be
deformed or damaged and an electric shock or a re may take place.
6. This appliance is intended to be used in households (domestic) only and it is not intended to be use
such as:
✱ staff kitchen areas in shops, ofces and other working environments
✱ farm houses, restaurant type environments
✱ by clients in hotels, motels and other residential type environments
✱ areas for communal use in blocks of flats or in launderettes
7. The product you have purchased is designed for domestic use only. The use for business purposes
qualies as product misuse, in which case, the product will not be covered by the standard warranty
provided by Singer and no responsibility can be attributed to Singer for malfunctions or damages
resulting from such misuse.
3
Page 4

SAFETY INSTRUCTIONS
WARNING ! There might be serious injury or fatal accident
when you violate these instructions
Please do not pull the electric cord
when pulling out the plug.
An electric shock or re may
take place.
Do not bend the power supply cord by force
or press it with heavy things.
An electric shock or a re may
take place.
Please do not pull out or insert the plug
with wet hands.
An electric shock or re
may take place.
Wet hands are prohibited
Please do not place on the washer a
burning candle, mosquito-repellent, incense,
cigarette and other flammable things, as well
as an electric stove, air heating
fan and other heating sources.
A re may take place.
Smoke and re
prohibited
小天
Do not put to the wash clothes, which have
touched with kerosene, gasoline, benzene,
alcohol and other flammable materials.
An explosion or a
re may take place
Prohibited
4
Do not insert your hand and take out
clothes inside the spin barrel before it is fully
stopped.
It may hurt your hands
No touching
Page 5

SAFETY INSTRUCTIONS
This appliance has to be connected to the
plug endurable to proper power consumption
and correct power source.
Do not place or let children
(or pets) play on the washer or
lay weights on the washer.
小天
Prohibited
There are no user-serviceable parts are
inside. Refer any servicing to qualied service
personnel. Otherwise, this may cause a
mechanical error, electric
shock, re or physical damage.
No dismantling
Please do not let children climb on the
machine or peer into the rotating spin barrel
to avoid accidents.
Prohibited
Please pull-out the plug from the socket if the
machine is not in use
Pull out the plug
Stay away from the washer when the water
at the bottom is still draining away from the
washer.
There might be an electric
shock. Please wait until the
water drains out completely.
During operation, do not put your hands or
any metal materials inside the washer.
You may be hurt by the
spinning board beneath the
washer.
Prohibited
Prohibited
5
Page 6

SAFETY INSTRUCTIONS
CAUTION: In order to avoid a hazard due to inadvertent re-
setting of the thermal cut-out, this appliance must not be
supplied through an external switching device, such as a timer,
or connected to a circuit that is regularly switched on and off by
the electricity providers.
CAUTION ! There might be a injury or damage when you violate
these instruction.
Do not install the machine in an
environment with moisture, rain or
outdoors to avoid electric shock, catching
re, faults and distortion accidents.
小天
No dampness
Do not directly rinse or spray the machine
with water when cleaning.
It may make its life span to shorten and
an electric shock or re
may take place
小天
No rinsing
Regularly clean the power plug
to remove dust and dirt to avoid
contact failure.
If the washer makes a strange noise, emits
a smell or smoke, unplug it promptly and call
the service agent.
An electric shock or a re may
take place.
小天
Do not use a the strong acid cleaning agent. Do not connect several appliances together
with an outlet.
A re may take place due to unusual heat.
ACID
ACID
ACID
Prohibited Prohibited
6
Page 7

SAFETY INSTRUCTIONS
Do not use a damaged flexible power cord
and power plug to avoid electric shock,
short circuit and catching re.
It should be replaced by the manufacturer,
service center or an authorized person in
order to avoid the risk.
Make sure that the water inlet pipe is
connected and the tap is open before
washing clothes.
+
+
The earth line of the socket should be
well connected to avoid electric shock by
accidental leakage. (Earthing)
Earthing Prohibited
Customers are not allowed to change
the power line without permission.
Please do not wash down jacket,
raincoats, shing coats and similar
clothes in the washer.
Prohibited
Prohibited
Do not press the button with a nail or pin.
An electric shock or a re
may take place.
小天
Prohibited
7
Page 8

INSTALLATION
PARTS IDENTIFICATION
Filter lint will be collected in the lter
Top lid
Be sure to keep the lid
closed during washing
and spinning.
Washing tub
Top frame
Softener Dispenser
during washing
Water supply hose (Cold)
Detergent Box
Cabinet
Base
Fixing ring is used
for the xation when
installing the drain
hose.
WASHING MACHINE
USER MANUAL
Accessories
SWM-FA70R
SWM-WSFR7
SL-SWMFR72
SWM-FAR75
SL-RFA75
SWM-FATL7R-BB
Pulsator
Control panel
Water drain
hose
Adjustable foot
Adjust the height of the
legs when installing the
washer
Drain hose
Manual
Water inlet hose
assembly (1)
Rat guard (1)
Self-tapping screws (3)
8
Page 9

INSTALLATION
Unpacking the washing machine
Remove package and take out the bottom board of the
cabinet on the foam cover.
Open the lid of the washer's door and take out
accessories. A trial operation or washing on the foamed
cushion is strictly forbidden.
This User’s Manual is a common document. Please use this as per your washing machine model.
INSTALLATION ENVIRONMENT
Base foamed
cushion
Leave some space
Maintain at least 10 cm between the washer and the wall.
Place the washer on a sturdy flat surface.
If the washer is placed on an uneven or weak surface, noise or vibration occurs.
(Allowable angle is 1˚)
Adjust the legs for even placement.
Never install the washer near water.
Do not place the washer in steamy rooms or where the washer is directly exposed to rain.
Moisture may destroy the electrical insulation causing an electrical shock hazard.
Avoid direct sunlight or heaters.
As plastic and electrical components are affected by direct heat, never place the washer near
furnaces, boilers, etc. Do not place under direct sunlight also.
9
Page 10

INSTALLATION
Loosen Lock
Installation of drain hose
Placement of water drain hose
If the water drain hose
needs to be extended, its
length should not exceed
3 meters, otherwise it will
affect the water discharging
time
The placed height of the water
drain hose shall not exceed
15 cm.
Completely sleeve the
drain hose over the
sewer.
Fix and tighten it with a
hoop. (As shown in the
gure)
Do not bend the water drain
hose and place it under the
washer.
LEVELLING
If the washer is not levelled with the ground, it makes the machine vibrate more and result
it being out of order. So, make sure that the washer is levelled
properly.
ENSURE THAT THE MACHINE IS PROPERLY LEVELLED BY
CHECKING THE POSITION OF THE WASHING TUB.
Open the lid of the machine, pour water into the tub up to the
level just below the pulsator, and adjust the legs so that the
pulsator is positioned at the center of the water as shown in the
gure.
Place the machine more than 10 cm away from the wall.
Adjust the legs on feet for levelling.
Water
10
Page 11

INSTALLATION
INSTALLATION OF THE WATER INLET PIPE
Fix the water inlet pipe to the tap.
Tightly screw the other end of the water inlet hose on to the water inlet valve (with rubber seal
ring inside).
Connect Separate
Connect: Tightly screw the clamping nut (with straight connector side) on the water inlet hose
to the water tap (with thread for garden nozzle). If it is required to feed water, simply
open the water tap.
Separate: Close the water tap and tightly unscrew the clamping nut.
Clamping nut
Water inlet hose
+
Note: When tightening the clamping nut, evenly apply the force and do not twist the water inlet
valve to avoid breaking of water inlet valve joint.
11
Page 12

INSTALLATION
Front
Connect the other end of the water supply hose to the inlet water
valve at the back of the washer. Screw the hose clockwise all the
way in.
Connect the other end of the water supply hose to the inlet water
valve at the rear of the washer. Unscrew the hose anti-clockwise
all the way out.
If the water tap is a screw type, assemble a water supply hose
that ts to the tap as shown. After completing connection, if
water leaks from the hose, then repeat the same steps.
After completing connection, if water leaks from the hose, then repeat the same steps. Use the
most conventional type of faucet for water supply.
ASSEMBLING THE RAT GUARD
Tilt the washer a little and lift up the panel until it clicks as shown in the gure.
1. Insert the rat guard to the
assembling hole on the
front side till it reaches the
end.
2. If you have difculty
inserting the panel lift up
the washer a little and
insert it.
3. Fix the shutter with three
screw to the base.
12
Page 13

OPERATIONS
1. Adjust the adjustable foot to make the washer stable.
Slightly incline the washer rst and loosen the adjustable foot knob. Adjust the adjustable foot
so as to ensure the four corners of washer are steadily contacted with the ground. Then tighten
the adjustable foot knob and lock it. If the ground is obviously not flat, correction should be
made on the ground surface, otherwise the washer barrel will incline and knock the cabinet.
2. Install the water inlet hose.
Connect the water inlet hose before washing.
3. Connect with power source.
4. Open water tap.
5. Put the drain hose into the down comer.
6. Put in clothes and suitable amount of washing powder
+
+
Adjustable foot (extends when
rotating clockwise and shortens when
rotating counter-clockwise).
13
Page 14

OPERATIONS
Test run
Make sure that you install your washing machine correctly by running the Rinse+Spin cycle after
the installation is complete.
ADDING DETERGENT
1. Open the detergent box by pulling in the direction of the arrow
as shown in the gure and then put the powder detergent in the
detergent box.
2. Put in the correct amount of detergent in one-time and evenly so
that the detergent may not brim over the box.
About Detergent
Use an appropriate amount of washing and detergent as bellow table.
Water
Level
8 About 65 <7.0kg
7 About 61 <6.5kg
6 About 56 <6.0kg
5 About 50 <5.0kg
4 About 42 <4.0kg
3 About 35 <3.0kg
2 About 27 <2.0kg
1 About 22 <1.0kg
Water
volume
(L)
Washing
of weight
(kg)
Standard dosage of detergent
The contracted washing
powder
Standard
of washing
power
Dosage of
washing
power
About 54g About 87g About 87ml
About 50g About 82g About 82ml
About 45g About 72g About 72ml
About 41g About 67g About 67ml
About 34g About 55g About 55ml
About 30g About 47g About 47ml
About 23g About 36g About 36ml
About 19g About 30g About 30ml
The
common
washing
power
Liquid
detergent
14
Page 15

OPERATIONS
CAUTION !
The use of excess amounts of detergent does not change the washing
result. It may cause to damage the garments due to not enough rinsing.
Bleaching agent may cause damages to garments due to strong alkali.
Insufficient rinsing may result in the powder detergent remaining on the
garment causing a bad odur.
If excess detergent is used, it doesn’t dissolve completely and remains on
the garments, hose or spin tub, causing contamination on clothes.
ADDING FABRIC SOFTENER
Apply fabric softener to the softener dispenser as appropriate. Then, the softener is
automatically dispensed in the rinse cycle.
Do not use detergent, bleach or starch into the softener dispenser.
Using too much softener may produce unsatisfactory results.
Do not open the lid during the spin dry cycle and if add softener, its effectiveness will decrease.
15
Page 16

OPERATIONS
PREPARATION FOR WASHING
You must follow the instructions given below in order to avoid machine problems or damages to garments.
Laundry that is not washable
Clothes those are easily transformable even by soaking in water.
Even by soaking in water, neckties, brassieres, jackets, suits and coats can be easily transformed like
shrinking and discoloring on the garment surfaces because they are mostly made of rayon, polynosic,
cuff and their blend fabrics.
The wrinkle-processed, embossed, or resin processed products are easy to transform even by soaking
in water.
Easily discoloring products made of cotton and wool, wrinkled silk, leather products, leather accessory,
leather ornamented clothes and its accessory.
Waterproof clothes (waterproof clothing, diapers. raincoats, umbrella covers, skiwear, car cover sheets,
jackets, shing coats and sleeping bags, etc) are not allowed to be washed and this may cause the
laundry to be ejected or cause the washing machine to vibrate abnormally. This may result in personal
injury or damage the washing machine
CARING OF CLOTHES
Remove all personal belongings from the pockets such as coins, hair pins,
screws, wire nails, keys and other hard goods. These cause damages to
clothes and to the washing machine.
If pants zippers are open while washing, the spin tub may be damaged.
The zipper should be closed and xed with a string before washing.
Metal on the clothing may cause damage to the clothes, rotating pulsator and
the tub.
Turn clothing with buttons and embroidered clothes inside out before washing
them.
Clothing with long strings may become entangled with other clothes and may
cause damage to the clothing. Make sure to x the strings before washing.
Shake dirt, soil, sand and small particles from clothes. These may rub
against delicate garments to cause damages and the washing result may be
unsatisfactory.
Pre-wash for stains and dirt on collars, sleeves, hems, pockets and white clothes.
Apply some detergent and apply it lightly with a brush for a better wash.
Use powdered or liquid detergent. Do not use soap as the tub gets dirty from the
dirt on it.
Curtains, floating garments or blue jeans shall be pressed so as not to float on the water. If they float
on the water, press Start/Pause button to stop and press them to soak into the water. Washing with
floating clothes may cause damages to the clothes and the washing machine also.
16
Page 17

OPERATIONS
CAUTION ! Make sure to soak inflatable items (such as
blankets, and cotton-filled or micro-fibre, quilts) in water before
you run a cycle.
Regardless of the size, blankets or quilts are safer and cleaner to wash
one item at a time. Two different-sized blankets in the same load may
compromise the drying performance due to unbalanced loads.
To input a blanket
Fold the blanket as shown below and then insert into the plastic ring level (A) of the tub.
A
CAUTION ! Make sure the laundry is inserted completely.
Any exposed part of the laundry may cause damage to the machine or the
laundry itself, or it may result in a water leak.
Make sure the laundry does not exceed the plastic ring level at the tub
marked as (A) in the above figure.
17
Page 18

OPERATIONS
CONTROL PANEL
For models SWM-FA70R, WM-WSFR7 and SL-SWM-FR72
7 8
5 6
3 4
1 2
WATER LEVEL
RINSEWASH
SPIN
NORMAL
ECONOMY
WOOL
CHID GARMENT
PROGRAM
SOAK
JEAN
PRESET (HOURS)
REMAINING TIME
PRESET
POWER
(MINS)
START/PAUSE
Digital
1
graphic
display
2 Water Level
Displays the remaining time of the programs.
Displays the error state if a problem occurs while operation of the washing
machine.
Press the button, you can reset water level according to the quantity of
clothes. At each press, the water level indicator light moves in turn.
Press the “Water Level” and “Wash “at the same time to lock buttons on
3 Child Lock
control panel.
Press the “water level” and “Wash “at the same time again to unlock buttons.
Press the button, you can reset wash time of the current program by
4 Wash
yourself, the corresponding wash time and surplus time are shown in the
corresponding
5 Rinse Press the button to select the process of rinse among 1-2-3-0 times.
Press the button and you can reset the spin time of current program by
6 Spin
yourself. The corresponding spin time and surplus time are shown in the
corresponding indicator
When the power socket is plugged in, press the Power button. The washer
enters the working state and automatically sets up for standard program.
7 Power
In the course of working, press the button to end the current program and the
washer enters the stopping state.
8 Start/Pause
18
After program selection, press the button to start. The flashing indicator light
means that the washer is working at the current state. Press the button to
pause in the course of operation, and the program continues at another press
till the program is nished.
Page 19

OPERATIONS
9 Program
Select full program of “Normal”, “Economy”, “Wool”, “Child’s clothes”, “Jean”
and “Soak”.
At each press, the indicator lights move in turn in the set up program. The
preset time for wash and spin, rinse times and expected total times are
shown in the indicator.
10 Preset
11 Cycle
Press the button to set up the preset time. At each press of the button, the
preset time adds an hour in the indicator
Fuzzy
Normal
Economy
Wool
Child’s garment
Jeans
Rotate the pulsator three turns to left and right
automatically before water enter to washing tub.
Powerful in washing and widely applicable for more
dirty cloths.
Wash for frequently used towels or less dirty laundry,
due to washing time is short. It is suitable for light or
less stained laundry.
The washing ability is weaker. Finally hydrates with
low speed to avoid the clothes getting shrunked.
The wash time is short, rinses many times and the
water level of rinse is high. Thoroughly washes away
the child garment, prevents the remaining detergent
from hurting the skin of the child.
Powerful in washing, applicable for seriously stained
clothes such as dirty union suit, jeans and etc. This
is applicable for washing blankets, wool towels, slipcovers and other items.
Soak
Normal program of water flow and dynamic soak,
applicable for the dirtier clothes
19
Page 20

OPERATIONS
For model SWM-FATL7R-BB
PRESET
WATER
LEVEL
WASH RINSE SPIN SPEED
Child Lock
1 Speed
2 Water level
3 Child Lock
Used to adjust the variable speed laundry flow. NO Speed Low Speed
MID Speed HIGH Speed
Press the button, you can re-set the water level according to the quantity of
clothes. At each press, the water level indicator light moves in turn.
Press the “Water level” and “Program “at the same time to lock buttons on the
control panel.
Press the “Water level” and “Program “at the same time again to unlock
buttons.
High
Middle
Low
PROGRAM
POWER
START
PAUSE
Press the button, you can re-set the wash time of the current program by
4 Wash
yourself. The corresponding wash time and the surplus time are shown in the
corresponding indicator.
5 Rinse Press the button to select the process of rinse among 2-3-4-1-0.
Press the button, you can re-set spin time of current program by yourself. The
6 Spin
corresponding spin time and the surplus time are shown in the corresponding
indicator.
The power socket is plugged in. Press the button, the washer enters to the
working state and automatically sets up for the standard program.
7 Power
In the course of working, press the button to end the current program, then
the washer enters to the stopping state.
When program is nished or no program is selected within 10 minutes after
power on, the washer power off automatically.
After program selection, press the button to start. The flashing indicator light
8 Start/Pause
means that the washer is working at the current state. Press the button to
pause in the course of operation, and the program continues at another press
till the program is nished.
20
Page 21

OPERATIONS
9 Preset
10 Program
Press the button to set up the preset time. (2-24 hours) Each press of the
button; the preset time add an hour in indicator. If you need to cancel pre-set,
press the Power button.
Select the full program of “Soak”, “Wash”, “Spin”, “Air dry”, “Normal”,
“Standard”, “Heavy”, and “Fast”.
At each press, the indicator lights move in turn to set up the program. The
pre-set time for wash and spin, rinse times and expected total times are
shown in the indicator.
11 Cycle
Normal
Heavy
Mini
Soak
Powerful in washing and widely applicable for more
dirty cloths.
The washing ability is weaker and it nally dehydrates
with low speed to avoid the clothes being shrunked.
The water time is short, rinses many times, the water
level of rinse is high, thoroughly washes away the
child garment and prevents the remaining detergent
from hurting the skin of the child.
Normal program of water flow and dynamic soak,
applicable for the dirtier clothes.
21
Page 22

OPERATIONS
For models SMW-FAR75 and SL-RFA75
LIGHT
FLASH
LIGHT
7
5
3
1
SOAK
8
WASH
6
SPIN
4
AIR DRY
2
FLASH
NORMAL
STANDARD
HEAVY
FAST
PRESET (HOURS)
REMAINING TIME (MINS)
SOAK
WASH
SPIN
AIR DRY
NORMAL
STANDARD
HEAVY
FAST
1 Preset
2 Water Level
3 Child Lock
WATER
LEVEL
Child Lock
PROGRAM
PRESET
START
PAUSE
POWER
Press the button to set up the preset time. (2-24 hours) Each press of the
button; the preset time add an hour in indicator. If you need to cancel pre-set,
press the Power button.
Press the button and you can re-set the water level according to the quantity
of clothes. At each press, the water level indicator light moves in turn.
When 1,3,5,7 levels reselected the light is always on.
When 2,4,6,8 levels are selected the light is flash.
Press the “Water level” and “Program “at the same time to lock buttons on the
control panel.
Press the “Water level” and “Program “at the same time again to unlock
buttons.
The power socket is plugged in. Press the button, the washer enters to the
working state and automatically sets up for the standard program.
4 Power
5 Start/Pause
6 Program
22
In the course of working, press the button to end the current program, the
washer enters to the stopping state.
When program is nished or no program is selected within 10 minutes after
power on, the washer power off automatically.
After program selection, press the button to start. The flashing indicator light
means that the washer is working and indicates the current state.
Press the button to pause in the course of operation, and the program
continues at another press till the program is nished.
Select full program of “Soak”, “Wash”, “Spin”, “Air dry”, “Normal”, “Standard”,
“Heavy”, and “Fast”.
At each press, the indicator lights move in turn to set up the program.
The preset time for wash and spin, rinse times and expected total times are
shown in indicator.
Page 23

OPERATIONS
7 Cycle
Normal
Standard
Heavy
Fast
Soak
Powerful in washing and widely applicable for more
dirty cloths.
The wash time is short and suitable if the stains on
the clothes are light.
The washing ability is weaker and nally dehydrates
with low speed to avoid the clothes getting shrunked.
The wash time is short, rinses many times, the water
level of rinse is high. Thoroughly washes away the
children's garments, prevents remaining detergent
from hurting the skin of the child.
Normal program of water flow and dynamic soak,
applicable for the dirtier clothes.
23
Page 24

OPERATIONS
FULLY AUTOMATIC OPERATIONS
HOW TO WASH AUTOMATICALLY
Before you start washing, check the following;
Connect the water supply hose to the water tap. Leave the tap open. Plug the power cord in. Make sure
to lay down the drain hose.
WASHING FOR THE FIRST TIME
Before washing clothes for the rst time, you must run a complete cycle without clothes. To do this:
1. Press the Power button.
2. Open the detergent drawer and insert a little detergent.
3. Select relevant program.
4. Turn on the water supply to the washing machine.
5. Press the Start/Pause button.
SPECIAL NOTES!
Automatic Weight Balancing Function
After the power is on, a program is selected and the Start /Pause button is pressed. Then, the pulsator
starts to rotate without water for three cycles. This action balances the weight of the clothes in the
washing basket and this is not a machine defect. After this balancing process, water is supplies
automatically.
Detergent and Softener
During the water inflow, it is possible to open the detergent box and add detergent. However, it is better
to press the Start/Pause button to stop the water supply and add detergent. Close the lid and press the
Start/Pause button again. This method is much more convenient.
The fabric softener is required to be inserted manually into the softener dispenser after the rst wash
cycle and it is automatically dispensed throughout the wash cycle.
Use the correct detergent for the fabrics that you are washing
Put the laundry into the washer.
Be careful not to overload with the laundry.
If the lid is open while spinning, the washing machine is stopped automatically for safety (It does not
stop during the washing cycle). It displays an error message, if the lid is not closed properly after
opening.
It is possible to control the washing time, rinsing cycle, and spinning time at every program during the
washing.
24
Page 25

OPERATIONS
CHILD LOCK
This function is to protect children in case they operate the washer unknowingly.
1. Press the Power button.
2. To activate the Child Lock function, press and hold both the following buttons (refer your model below)
simultaneously for 3 seconds (If the Child Lock function is activated, the Child Lock icon blinks.)
Wash and water level button (For models SWMFA70R, SWM-WSFR7, SL-SWMFR72)
Water level and program buttons (For models SWM-FAR75, SL-RFA75)
Rinse and Spin buttons (For models SWM-FATL7R-BB)
3. Operations after activating the Child Lock function.
Even if the Child Lock function is activated, every button works until the door opens.
When you open the door once the Child Lock is being activated, the alarm sounds and an error
message appears. (Displayed error message “CL”, “dE”). All the buttons will not operate when buttons
are pressed.
To add laundry after activating the Child Lock function, you must deactivate the Child Lock function by
pressing the same buttons.
4. To deactivate the Child Lock function, press and hold both buttons according to the above models
simultaneously for 3 seconds again. (If the Child Lock function is deactivated, the Child Lock icon is
turned off.)
5. To clear “CL” display, after draining is complete, close the door of the washing, turn the power off and
then on.
This function is for preventing injury and malfunction of the product because of inappropriate operations
or actions by children.
CAUTION !
To add laundry after activating the Child Lock function, you must deactivate
the Child Lock.
Even if the power is turned off and then on when the Child Lock is activated,
the Child Lock remains activated.
The Child Lock function cannot be deactivated when CL is displayed.
(However, the Child Lock function can be deactivated when the dE error is
displayed.)
When operating the Child Lock function, all buttons including the power
button cannot be operated.
25
Page 26

OPERATIONS
QUICK START
Program selection
1. Press the POWER button.
2. Select relevant program
3. The proper water level and other attached functions.
4. Press the Start/Pause key.
The wash stops
When the wash stops, the buzzer will buzz continuously 6 times and then the power will be
automatically cut off.
Turn off the water tap.
Although the power can be cut off automatically, the power plug must be pulled out for safety.
The main wash
NORMAL program
[Normal] wash program is the easiest, most convenient and most common washing program. When the
user presses the power switch and then press [Start/Pause] button, the normal washing program will start
to work.
Steps in details
1. Press the power switch.
2. According to the washing amount, choose the proper water level (if not selected, water level 6 will
select automatically).
3. Press Start / Pause button
Before washing, please take out coins,
NOTE
hair pins, screws, keys and other hard
goods, and close the zip fastener to
!
prevent clothes and barrel from damage.
26
Page 27

OPERATIONS
FULLY AUTOMATIC PROGRAM
Contents
Program
Normal 12 4’30” 2 40
Economy 6 5 1 24
Wool 6 5’30” 1 23
Child’s Clothes 6 4’30” 3 44
Jean 12 4’30” 2 40
Soak
Wash Time
(minutes)
20(soak)
+
12(Wash)
Spin Time
(minutes)
4’30” 2 30
Rinsing Times
Complete Time
(minutes)
NOTE: The time required will also vary with the water pressures of the in-take
pipe, different clothes textures and different water drain conditions.
27
Page 28

OPERATIONS
SPECIAL FEATURES
DELAY TIME PROGRAM
Preset time means the beginning time of washing.
1. Switch on the power, press "Power" button.
2. Open the tap and lay down the drain hose.
3. Put in the washing and detergent.
4. Select the proper water level according to the quantity of clothes.
5. Select the functions and programs.
6. Press the "Preset" button to select the beginning time of washing.
7. Press the "Start/Pause" button and close the lid.
Confirmation of the preset and inspection
After the preset is started, the corresponding light will be turned on, and other lights are turned off. After
the preset is started, press the surplus preset time, loosen the button and the program will automatically
come back to the preset status.
Cancel the preset, or alternate the preset time
Before the program is started, the preset indicator lights, the preset time is selected from 1 to 24 hours.
After the preset time is set over 24 hours, the preset indicator is turned off and the function will be
cancelled. Press the power switch to end the program, and to cancel the preset function at the same time.
To change the preset time, please press "Start/Pause", and then press the "Preset" button to re-preset.
Note: The degree of incoming water pressure may affect the ending time of
washing. By pressing the "Preset" button continuously, you may inspect the
program set.
Function of automatic power shut off
1. If the machine does not start to work within 10 minutes after power on, it will power off automatically.
2. After the end of operation and the buzzer sounding 6 times, it will power off automatically.
Automatic power shut off function to adjust for imbalance
1. If the laundry is placed unevenly before spinning, it is likely to cause vibration during spinning. The
washing machine has a function for adjusting imbalance. When working, the washing machine always
inspects the operation state automatically. If the spinning vibration is too great, the washing machine
automatically starts the adjusting program to balance.
2. When the machine adjusts imbalance, the rinse light will flash, and the machine will start to inject water
to the set water level. The machine adjusts imbalance automatically for about 1 minute, then drains
water and returns to the original spinning state. The washing machine can adjust the imbalance twice.
The alarm will be on, if the imbalance cannot be adjusted.
28
Page 29

OPERATIONS
MANUAL FUNCTIONS
MANUAL PROGRAM (INSTRUCTION FOR THE SINGLE WASH PROCEDURE)
Possible to select the function for each program. Example for a simple washing program of clothes with
little dirt.
Power Æ Select the little dirt program Æ Wash Æ Start/Pause
WASH ONLY
POWER
Wash
RINSE ONLY
POWER
Rinse
SPIN ONLY
POWER
Spin
WASH AND RINSE
POWER
Press the Power button. Press the Wash button.
Press the Start/Pause button. Washing goes on for 1 time.
START
PAUSE
When the Wash button is pressed during washing, the wash
time can be changed to between 6 and 30 minutes in duration.
Press the Rinse button.
Press the Start/Pause button. Rinsing goes on for 1 time.
START
PAUSE
When the Rinse button is pressed, the rinse times can be
changed to between 1 to 5 times in duration.
Press the Spin button.
Press the Start/Pause button. Spin drying goes on for 4
START
PAUSE
minutes.
When the Spin button is pressed, the spin time can be changed
to from 1 to 9 minutes.
Press the Wash and Rinse button. Press the Start/Pause
button once.
Detects the amount of laundry, and determines wash and rinse
START
RinseWash
PAUSE
time period automatically. (Option)
When the Wash and Rinse button is pressed, wash time
period is determined between 6 to 30 minutes, and rinse time is
determined between 1 and 5 times.
RINSE AND SPIN
POWER
Rinse Spin
WASH, RINSE AND SPIN
POWER
RinseWash Spin
START
PAUSE
START
PAUSE
Press the Rinse and Spin button. Press the Start/Pause button
once. Rinsing and spin drying follows.
When the Rinse and Spin button is pressed, the number of
rinse times is determined between 1 and 5, and spin time period
for drying is determined between 1 to 9 minutes.
Press the Wash, Rinse and Spin button. Press the Start/
Pause button once.
Wash, Rinse and Spin is performed.
29
Page 30

OPERATIONS
The user may freely select any single procedure, or any combination of procedures among Wash,
Rinse and Spin according to the requirement. It is only required to turn off any one or two of these three
indicators that are not needed for the user and keep the indicator that shows the process needed by
the user.
Single wash - after switching on the power, turn off the two indicators Rinse and Spin, by pressing
these two keys. The operation for single rinse and single spin is similar.
Single wash-spin - after switching on the power, turn off Rinse indicator by pressing that key. The
operation for single rinse-spin and single wash-rinse is similar.
NOTE
Close the top lid when the machine is running. Otherwise it will automatically
stop working during the spinning process and send out abnormal warning.
The washer will not work when the filled water does not reach the set water
level
The selection of rinse water level: the level is equal to wash water level.
Press "Rinse Level" button. The indicator light which stand for rinse level will
flicker. The user can select the rinse water level according to needs. Rinse
level exceeds that wash level all the time. When you press this button, it
shows the wash level. The rinse level is shown only when the rinse is taking
place.
After pressing "Power", if the "Start / Pause" button is not pressed, the power
will be automatically cut off after 10 minutes.
30
Page 31
MAINTENANCE
CLEANING
Please keep the washer clean and perform correct maintenance to prolong the service life of the washer.
Make sure to pull out the power plug before the cleaning and maintenance.
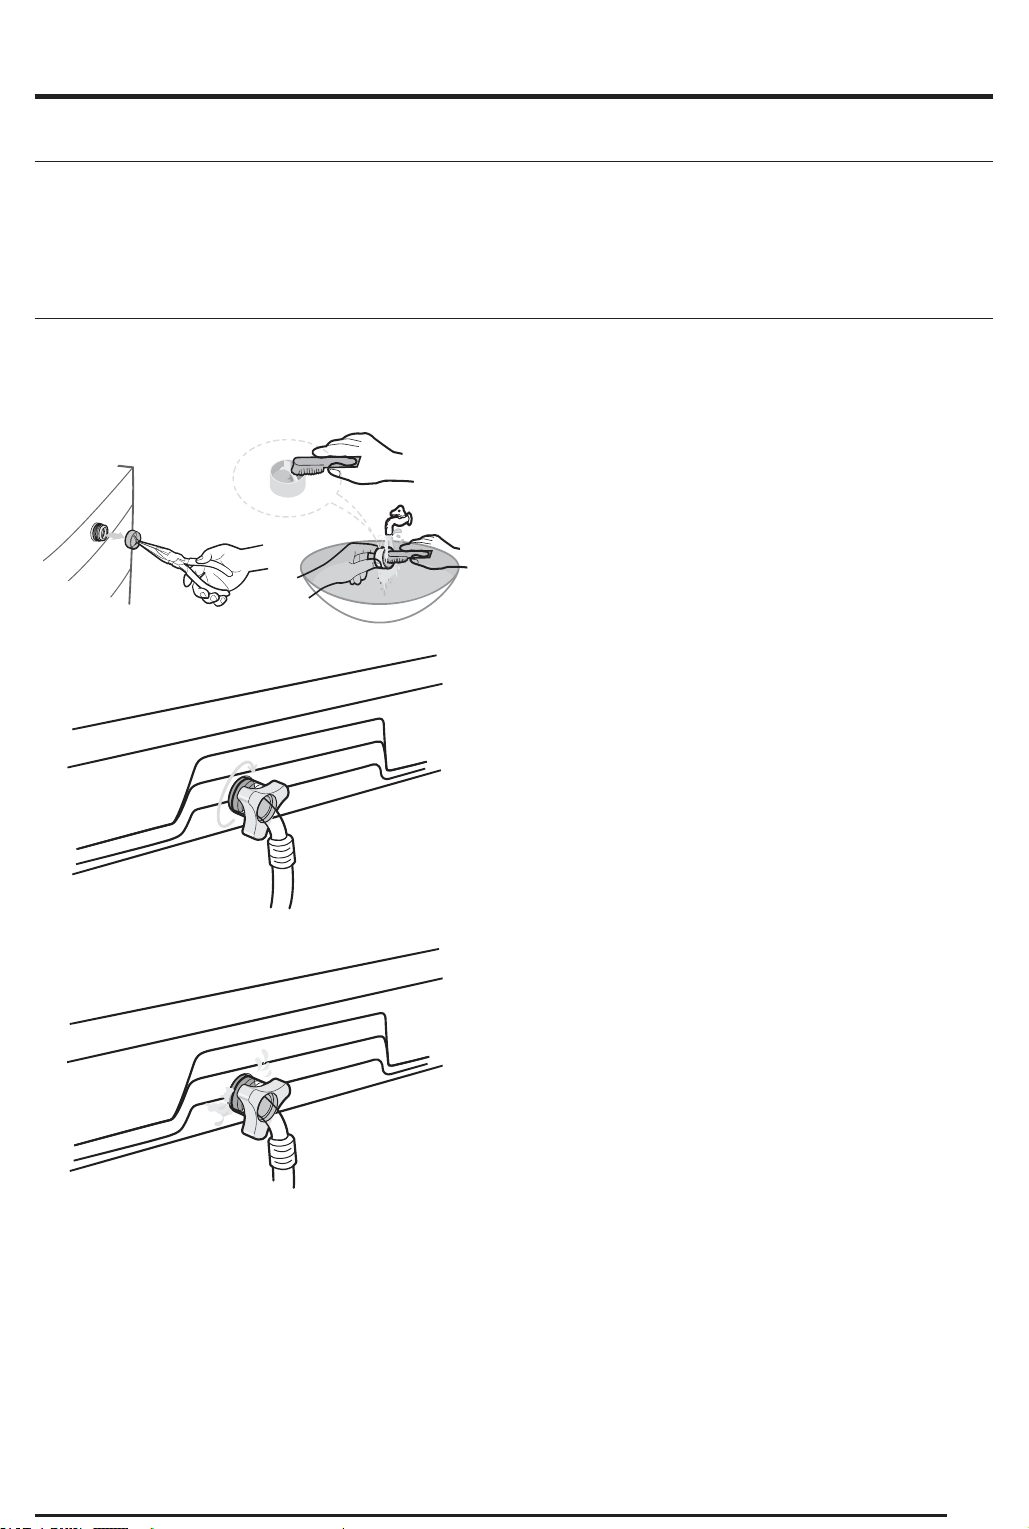
WATER SUPPLY CONNECTOR FILTER
Unscrew and remove the water inlet hose joint from the washer and clean the ltering screen of inlet valve
with brush.
Pull out the lter and wash well.
Pull in the lter and connect the hose to the inlet
water valve tightly.
Check if there is a leakage.
Make sure to tighten up the connector.
31
Page 32

MAINTENANCE
CLEANING THE LINT FILTER
Cleaning of filtering bag
The special circulation water flow is designed for this washer; thus, the flock powder and flock residues
will be automatically collected into the ltering bag. After application, the user should regularly clean the
ltering bag to remove the flock powder and flock residues. Detailed operation methods are given below.
Frame of ltering bag
Grasp the ltering bag frame and pull it upwards to dismantle the
ltering bag.
Pull out the ltering bag inside out and clean it with water.
Insert the ltering bag frame into the slot and then push it
downwards.
CLEANING THE DETERGENT COMPARTMENT
1. Separate the detergent compartment from the washer.
2. Separate and clean the Rinse-Cap from the detergent compartment.
3. Assemble the Rinse-Cap and insert the detergent compartment into the washer.
32
Page 33

TROUBLESHOOTING
MALFUNCTION DISPLAY AND SOLUTIONS
If the washer does not work normally or appear abnormal or the alarm buzzes, please check and correct
as follow. If the washer still malfunctions, please contact the service agent or the Singer shop.
The customer should not dismantle the machine without permission.
For models SWM-FA70R, WM-WSFR7 and SL-SWM-FR72
Fault Cause of fault
Alarm for
water inlet
Alarm for
opening lid
Imbalance
alarm
Drain alarm
For model SWM-FATL7R-BB
Fault Cause of the Fault
Alarm for
Memory
Alarm for
Water Inlet
Alarm for
Drain water
Alarm for
Opening lid
Alarm for
Spinning
Make an
attempt to
open
Alarm for
Child lock
Opening
Alarm for
Water level
sensor
Water injection for about 16
minutes. But do not reach
preset water level
Opening the lid after starting
the delay time. Opening the lid
when the washer is spinning.
Opening the lid when entering
into the child lock state.
Imbalance checked for the
third time
After draining for 4 minutes,
does not nish draining
Memory circuit failure E0
Water or ll water for more
than 20 mins
Drain water for more than
5 mins
When drain water user open
the lid.
Drain water hit bucket 3 times E4
Opening the lid when running
the PRESET program
Opening the lid When child
lock running
The water level sensor is
loose
Error
Message
“E1” flares
“E2” flares
“E3” flares
“E4” flares
Error
Message
E1
E2
E3 Close the lid
E3 Close the lid
E7 Close the lid
E6
Alarm of
the buzzing
sound
The buzzer
goes on
buzzing for
6 second. If
the fault is
not solved, it
buzzes again
for 6 seconds
in every 8
minutes
Alarm of
the buzzing
sound
Buzzer 10
seconds
Stopping
alarm for
Solutions
Open the lid
to deal with
faults, then
close the lid to
stop the alarm
Stopping
alarm for
Solutions
Shut off the
power supply
Open the lid
and close it
Open the lid
and close it
Open the lid
and close it
Turn off power
or restore
sensor
33
Page 34

TROUBLESHOOTING
For models SWM-FAR75 , SL-RFA75
Fault Cause of the Fault
Alarm for
Preset
Alarm for
Drain
Alarm for
Opening lid
Alarm for
Spinning
Alarm for
water Inlet
Alarm for
Water
protection
Open the Cover E0
Drain over 5 minutes E1
The program starts the
cover ( the dehydration
process is 300
milliseconds, the rest is
600 ms).
Hit tub 3 times E3
Inlet water over 50 min E4
Water level over Max
lever
Error
Message
E2
E6
Alarm of the
buzzing sound
Buzzer 10
seconds (except
overflow of
water )
Stopping alarm
and Solutions
Close the lid
cover
Open the lid
cover then close
Close the lid
cover and press
the " START/
PAUSE " Key
Open the lid
cover then closed
Open the lid
cover, then close
Drain the water
until it reaches
the max water
level
Alarm for
Water level
sensor
The water level sensor
is loose
F1
Articial power
failure or water
level sensor to be
repaired
34
Page 35

TROUBLESHOOTING
TROUBLESHOOTING OF WASHER
List of faults and corrective actions
Faults Corrective actions
if the power is off or the fuse is burned out.
if the water supply is cut off or the water pressure is too low
No water
flows in to
the washing
machine
No washing
operation is
taking place
No water
draining out
No spinning
or abnormal
noise
The power is
cut off.
The water
drains out
continuously.
Water does
not drain
Water leaks
at the water
supply side
if the inlet hose is not properly connected and the water tap is opened.
if the ltering screen of the inlet value is blocked by dirt.
if the inlet value is malfunctioned (The slight electromagnetic sound is a normal
phenomenon when the inlet value is switched on)
if the “Start / Pause” button is pressed after the power switch is pressed.
if the power is off or the fuse is burned out.
if the power support voltage is too low.
if the water amount not reached to the required water level. (The washer will not work
if the water amount does not reach the required water level)
if it is set to “Delay” washing mode. (It will only start to work until the reservation time
is reached.)
if the water drain hose is placed very high.
if the end of water drain hose is sealed in pond or gully.
if the internal rubber ring of the drain value is blocked by dirt
if the door lid is closed.
if the clothes are gathered largely at one side of tub or the load of clothes is
excessive.
if the washer is not placed in a stable condition or it is placed in an inclination state.
(The ground is not fat or levelling leg).
if the motor belt is loose.
Is the electric voltage normal?
Is the washer plugged in? Plug in the electric cord.
The drain is clogged with coins or pins.
The drain hose is hung over the drain hose hook.
If the faucet connection is loose, water may leak.
Check if the rubber packing of the water supply hose is in the right position.
Is the water supply hose damaged?
If the water supply is too strong, water may leak.
Is water leaking from the faucet itself?
Note : During the spinning process, if the clothes are piled at one side of the
spin tub, it will be result in the spin tub being unbalanced and may lead to
the tub striking the cabinet. When this happens, the machine will immediately
detect and correct the imbalance up to three times. If the imbalance is not
resolved by the auto-correction feature of the machine, the user has to
manually re-distribute the clothes inside the tub to solve the problem.
35
Page 36

SPECIFICATION
For models SWMFA70R, SWM-WSFR7, SL-SWMFR72, SWM-FAR75, SL-RFA75, SWM-FATL7R-BB
SWM-FAR75
MAX. MASS OF DRY
CLOTH IN kg
SL-RFA75
SWM-FATL7R-BB
SWMFA70R
SWM-WSFR7
SL-SWMFR72
7.5 kg
7.0 kg
POWER
CONSUMPTION
DIMENSIONS (mm) 560x575x915(mm)
WEIGHT 35kg
WATER PRESSURE 0.1MPa~0.6MPa
WASHING TYPE Stirring Type
STANDARD WATER
LEVEL
WATER USAGE 160 l
SPIN SPEED 700 rpm
WASH
220V~50Hz
480W
5 60 l
4 53 l
3 40 l
2 29 l
1 22 l
36
Page 37

Page 38

 Loading...