

Page 1
\
Page 2

straight & STRETCH Sewing Machine by SINGER
Congratulations,..
You are about to enter a new and wonderful world of sewing. Now you can
create many of the newest fashions from all over the world right in your own
home. And it’s so easy vdth your SINGER Straight & STRETCH sewing ma
chine. You will enjoy. . . . . . . . . . . . . . . . . . . . .
• The
simplicity
pressure and tension settings
•
Exclusive built-in threading chart
follow diagram at your fingertips
•
One-way needle clamp
backwards
•
Stitch control dial
straight stitching
•
Exclusive slant-needle design and simplified thread path
see better, sit better,
•
Guidelines
seams straight
•
Convenient power and light switch
speeds
of dial controls. Now you can simply dial a stitch length,
that flips open to keep an easy-to-
that makes it impossible to insert the needle
that lets you switch from regular to s-t-r-e-f-c-h
sew
better
on both sides of the throat plate, which help you keep
that gives you a choice of tv/o
that let you
•
Throat plate
secured by magnets that make it easy to lift out for
cleaning
»
Three-position presser loot lifter
that lets you place bulky fabric or
many layers under the presser foot
•
Built-in sewir)g light
that illuminates the sewing area
Your SINGER sewing machine is the key to your sewing success when
used properly. To achieve professional results, SINGER suggests you sit
down at your machine and go through this book step by step before you
start to
sevj.
You’ll discover all the many advantages of sewing with your
Straight & STRETCH sewing machine.
Enjoy sewing!
SINGER* Service is always close at hand. If your machine should need
servicing, call your local Singer Sewing Center to be sure of warranted
SINGER Parts and Service. You will find the address in the telephone direc
tory under SINGER COMPANY.
Form 2«7W
Rev
wn)
*A Tiadematk of THE SINGER CO-MPANY
Copyright 1971 by The Singer Coo'^par^y
Printed in U.S.A.
Page 3

Contents
1. Getting to Know Your (Machine.................................................................................................................... 2
Principal Parts and What They Do................................................................................................................... 3
Accessories .................................................................................................................................................... 4
2. Getting Ready lo Sew..................................................................................................-
Preliitunary Steps ............................................................................................................................................ 7
Choosing Needle and Thread.......................................................................................................................... 8
Threading the Machine
Winding the Bobbin ♦ Threading the Bobbin Case • Threading the Needle • Raising
Bobbin Thread
3. Tips on Stitching.................................................................................................................................................. 14
Adjusting Dials................................................................................................................................................ 14
Sewing a Seam.............................................................................................................................................. 17
Pin Basting • Placing Fabric • Starting a Seam • Guiding and Supporting Fabric « Keep
ing Seams Straight ♦ Turning Square Corners * Curved Seams ♦ Reinforcing End of Seam
4. Sewing the Professional Way
Sewing Knit and Stretch Fabric................................................................................................................... 21
Construction Details .................................................................................................................................... 23
Zippers ...................................................................................................................................................... 23
Corded Seams........................................................................................................................................... 23
Monograms and Decorative Designs........................................................................................................... 24
.......................................................
.................
......................................................................................................... 21
*.................................................................... 9
.................................
7
Darning........................................................................................................................................................... 26
5. Caring for Your Sewing Machine
Cleaning the Machine...................................................................................................................................... 26
Removing Covers, Bobbin Case, and Bulb.................................................................................................. 27
Performance Checklist.................................................................................................................................. 30
6. Fashion* Aids....................................................................................................................................................... 31
Index............................................................................................................................................................................ 32
......
................................................................................................................. 26
Page 4
Page 5

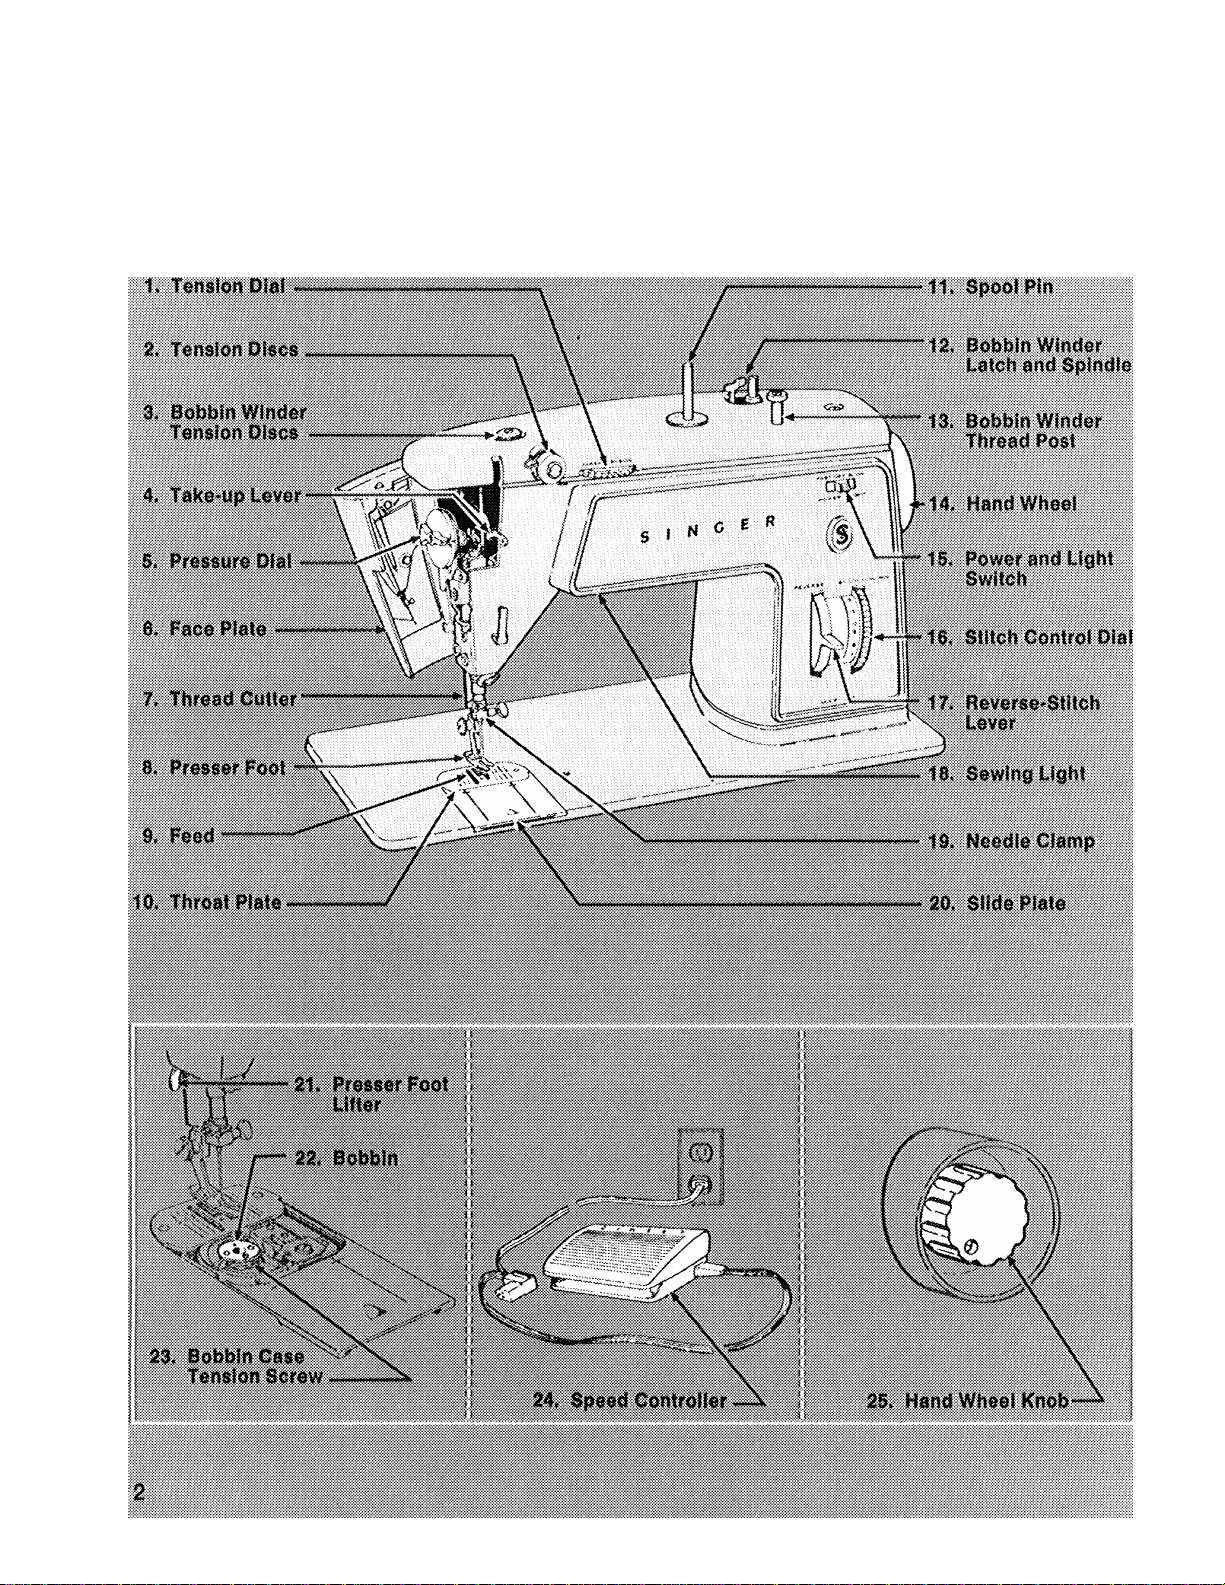
principal parts and what they do
1. Te n s i o n Di a l le t s yo u se l e c t ju st th e ri g h t
te n s i o n fo r yo u r s t i t c h , th r ea d, an d fa b r i c .
Th e nu m b e r s el i m i n a t e gu ess w o r k in d u
pl i c a t i n g s e t t i n g s .
2r Tension Discs,
di a l , re g u l a t e th e am o u n t of te n s i o n on
yo u r n e e d l e t h r e a d .
3. Bobbin Winder Tension Discs
th r e a d t e n s i o n f o r b o b b i n w i n d i n g .
4. Take-up Lever
th r e a d .
5. Pressure Dial
su r e on f ab r i c . I t ha s a n al l - p u r p o s e s e w
in g se t t i n g pl u s se t t i n g s fo r ex t r a - li g h t an d
ex t r a - h e a v y p r e s s u r e a n d f o r d a r n i n g .
6. Face Plate
th r e a d i n g c h a r t a n d p r e s s u r e d i a l .
7. Thread Cutter
sa f e t y a n d c o n v e n i e n c e .
8. Presser Foot
9. Feed
mo v e s f a b r i c u n d e r t h e p r e s s e r f o o t .
ho l d s f a b r i c a g a i n s t f e e d .
10. Throat Plate,
ou t fo r re m o v a l . Gu id e l i n e s on ri g h t an d
le f t si d e s of pl a t e he l p you ke e p se a m s
st r a i g h t .
co n t r o l l e d by th e te n s i o n
re g u l a t e
co n t r o l s fl o w of nee d l e
re g u l a t e s p r ess e r - f o o t pr e s
sw i n g s op en fo r a c c e s s to
is bu i l t in t o pr e s s e r ba r fo r
se c u r e d b y ma g n e t s , li f t s
15. Power and Light Switch
an d sew i n g lig h t sim u l t a n e o u s l y .
an d
SLOW
ch o o s e b e s t s e w i n g s p e e d f o r y o u r w o r k .
16. Stitch Control Dial
st i t c h le n gt h s; als o has
fo r s t r e t c h s t i t c h i n g .
17 .
Reverse-Stitch Lever
st i t c h i n g d i r e c t i o n .
18 .
19 .
20 .
21 .
Built-in Sewing Light
ar e a . P u l l - d o w n b r a c k e t m a k e s it e a s y t o
re p l a c e b u l b .
Needle Clamp
se l f - s e t t i n g an d el i m i n a t e th e po s s i b i l i t y of
in s e r t i n g n e e d l e b a c k w a r d s .
Slide Plate,
bi n . Se a m gu i d e l i n e s (e x t e n d e d fr o m
th r o a t pl a t e ) h ave cr o s s li n e s to he l p y o u
tu r n s q u a r e c o r n e r s .
Presser Foot Lifter,
al l o w s yo u t o r a i s e an d lo w e r pr e s s e r fo o t .
Ex t r a - h i g h li f t pos i t i o n pe r m i t s eas y pl ace
me n t o f b u l k y f a b r i c s .
22. Bobbin
re m o v e d f o r w i n d i n g .
sp e e d ra n g e se t t i n g s le t you
al l o w s f o r a v a r i e t y o f
is de s i g n e d to ma k e ne e d l e s
op e n s eas i l y , let s you se e bo b
sh o w s t h r ead su p p l y , I s ea s i l y
tu r n s on m a c h i n e
STRETCH
in s t a n t l y r e v e r s e s
il l u m i n a t e s se w i n g
at b a c k of m a c h i n e ,
FAST
se t t i n g
It. Spool Pin
ho l d s s p o o l s o f v a r i o u s s i z e s .
12. Bobbin Winder Latch and Spindle
fi l l b o b b i n q u i c k l y a n d e asi l y . L a t c h di s
en g a g e s w h e n b o b b i n i s f u l l .
13. Bobbin Winder Thread Post
th r e a d w h e n w i n d i n g t h e b o b b i n .
14. Hand Wheel
le v e r an d n e e d l e .
you.
co n t r o l s mo v e m e n t of ta k e - u p
Always turn it toward
gu i d e s the
le t y o u
23 .
Bobbin Case Tension Screw
bo b b i n - t h r e a d te n s i o n . Se l d o m ne e d s ad
ju s t m e n t .
re g u l a t e s
24. Electrical Connections and Speed Con
troller
an d s a f e t y .
25. Hand Wheel Knob
se w i n g mec h a n i s m . Lo os e n kn o b fo r bo b
bi n w i n d i n g .
ar e des i g n ed for you r co nve n i e n c e
en g a g e s h a n d w he el t o
Page 6

accessories
Th e ac c e s s o r i e s that co m e wi t h yo u r sew i n g
ma c h i n e ar e de si g n ed to he l p yo u d o ma n y
ki n d s o f s e w i n g e a s i l y a n d p e r f e c t l y .
To in c r e a s e t h e ver s a t i l i t y of y o u r m ac h i n e s t i l l
fu r t h e r , ad d i t i o n a l ac c e s s o r i e s ca n be pu r
ch a s e d at yo u r Si n g e r Sew i n g Ce n t e r . Fo r d e
sc r i p t i o n s , s e e p a g e 3 1 .
1. BOBBINS
Bobbin
(H0.17Z222)
Changing the Needle
Regular Bail-Point
Needle Needle
(Cat. 2020) (Cat. 2045)
• O n e d r o p - i n s t e e l b o b b i n i n y o u r m a c h i n e .
• Ex t r a d r o p - i n s t e e l bo b b i n s w i t h yo u r a c c e s
so r i e s .
2. NEEDLES
In p l a c e i n y o u r m a c h i n e —
• C a t a l o g 2 0 2 0 ( 1 6 x 1 )
Wi t h y o u r a c c e s s o r i e s —
• Cat al o g 20 2 0 (1 5 x 1 ) ne e d l e s , for al l - p u r p o s e
se w i n g .
• Ca t a l o g 204 5 ba l l - p o i n t (y e l l o w ba n d )
ne e d l e s , fo r se w i n g sy n t h e t i c kni t s an d
st r e t c h f a b r i c s .
Changing the Needle
Th e need l e cla m p ha s b e e n de s i g n ed so th at
th e n e e d l e ca n o n l y b e i n s e r t e d wi t h t h e f l a t
si d e o f t h e s h a n k t o w a r d t h e b a c k .
1. R a ise n e e d l e ba r t o it s h i g h e s t p o s i t i o n ,
lo o s e n ne e d l e - c l a m p sc r e w , an d re m o v e
ne e d l e .
Tension Screwdriver
2. In s e r t n e w ne e d l e i n c l a m p , wi t h t h e fla t
si d e o f t h e nee d l e t o t he b a c k , a n d pu s h
it u p a s f a r a s i t w i l l g o .
3. Tig h t e n n e e d l e - c l a m p s c r e w .
3. TENSION SCREWDRIVER
De s i g n e d t o fi t t h e bo b b i n ca s e t e n s i o n sc r e w ,
th i s sc r e w d r i v e r ma k e s ad j u s t m e n t of bo b b i n -
th r e a d te n s i o n qui c k an d ea s y . (Fo r inst r u c
ti o n s o n b o b b i n - t h r e a d t e n s i o n a d j u s t m e n t , s e e
pa g e 1 6 . )
Page 7
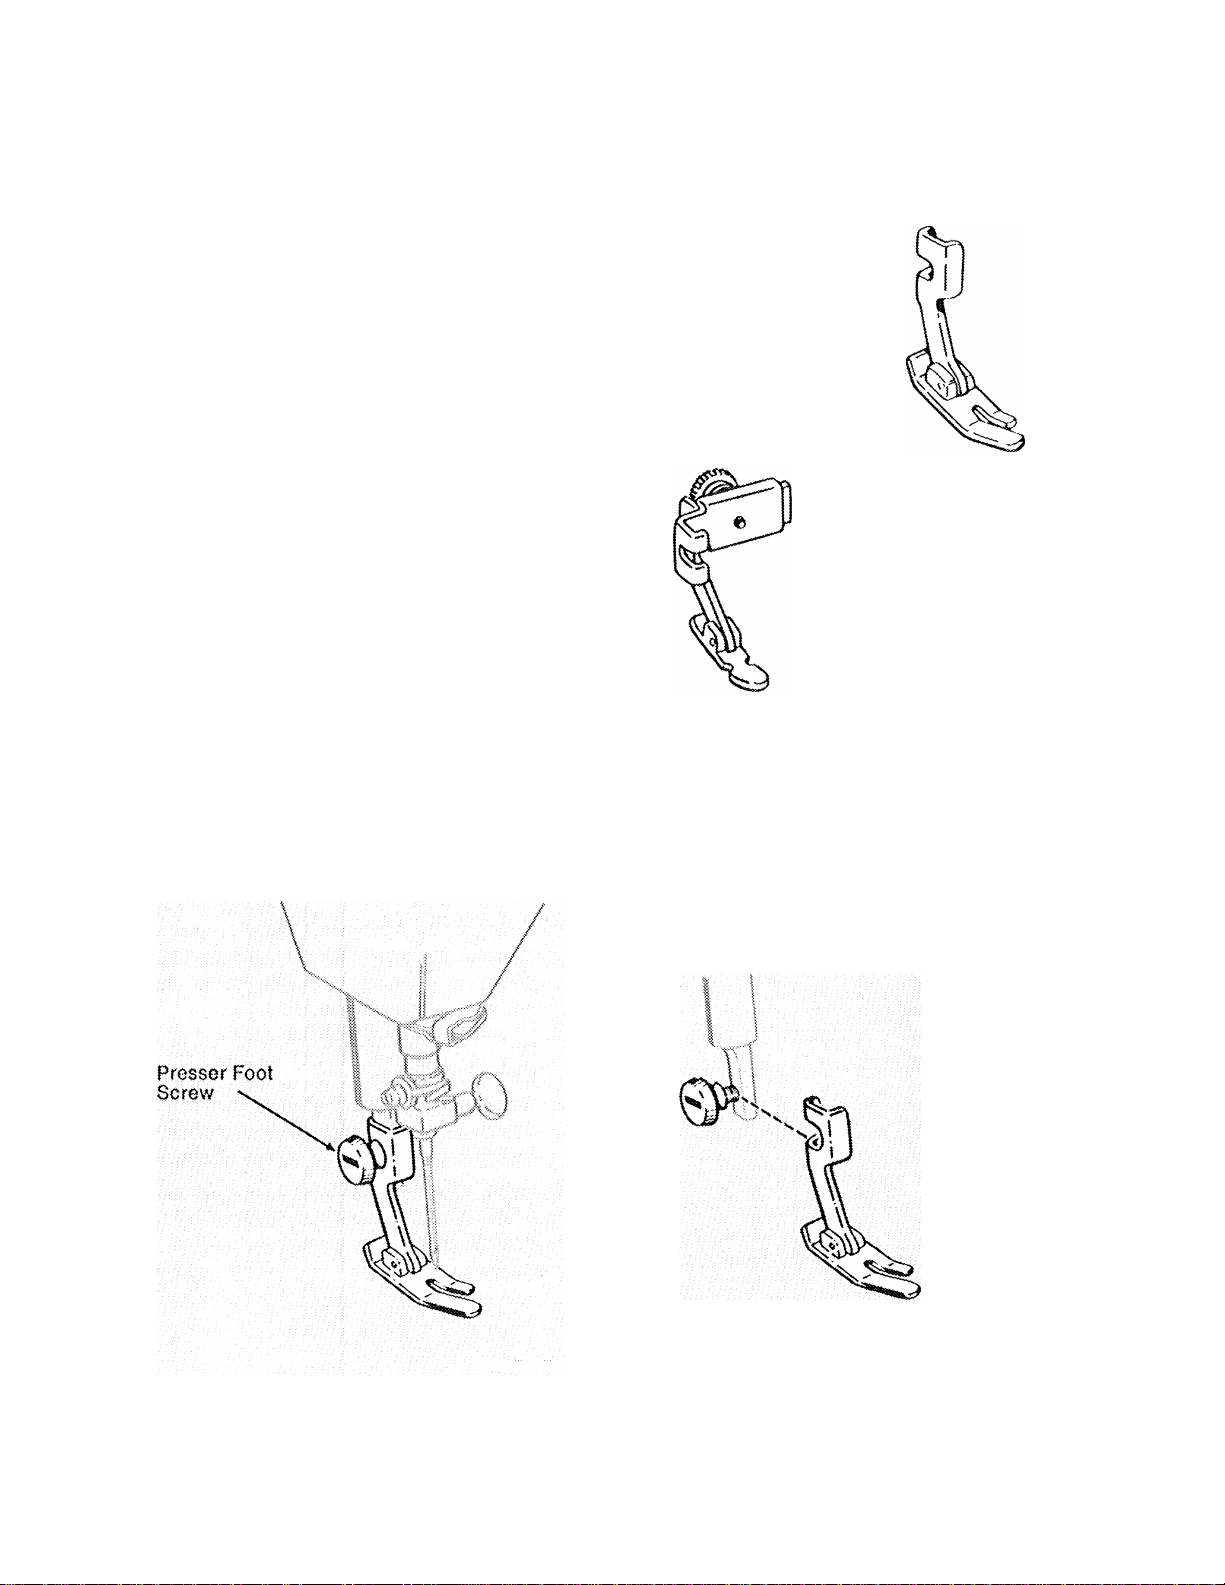
4. PRESSER FEET
• H i ng ed p r e s s e r f o o t o n y o u r m a c h i n e .
• Z i p p e r f o o t .
Hinged Presser Fool
Th e h i n g e d p r e s s e r fo o t o n y o u r ma c h i n e i s
us e d fo r mo s t of yo u r se w i n g . It is ma d e to ride
sm o o t h l y o ver va r y i n g f a b r i c th i c k n e s s e s and
pi n s .
Zipper Foot
Th i s fo o t is us e d t o pl a c e st i t c h i n g cl o s e to a
ra i s e d e d g e . T h u s , i t is a s u s e f u l f o r co r d e d
se a m s a n d t u b u l a r c o r d i n g a s i t i s fo r zi p p er
in s e r t i o n ( p a g e 2 3 ) . I t c a n b e a d j u s t e d t o e i t h e r
th e l e f t o r r i g h t s i d e o f t h e n e e d l e .
Changing Presser Feet
1. Ra i s e n e e d l e t o i t s h i g h e s t p o s i t i o n a n d
ra i s e t h e p r e s s e r f o o t ,
2. L o o s e n p r e s s e r f o o t s c r e w a n d r e m o v e t h e
fo o t ,
3. Hoo k n e w f o o t a r o u n d t h e p r e s s e r b a r a n d
ti g h t e n p r e s s e r f o o t s c r e v / .
Hinged Presser Foot
Zipper Foot
Pr e s s o r F e e l
Ch a n g i n g P r e s s e r F e e t
Page 8
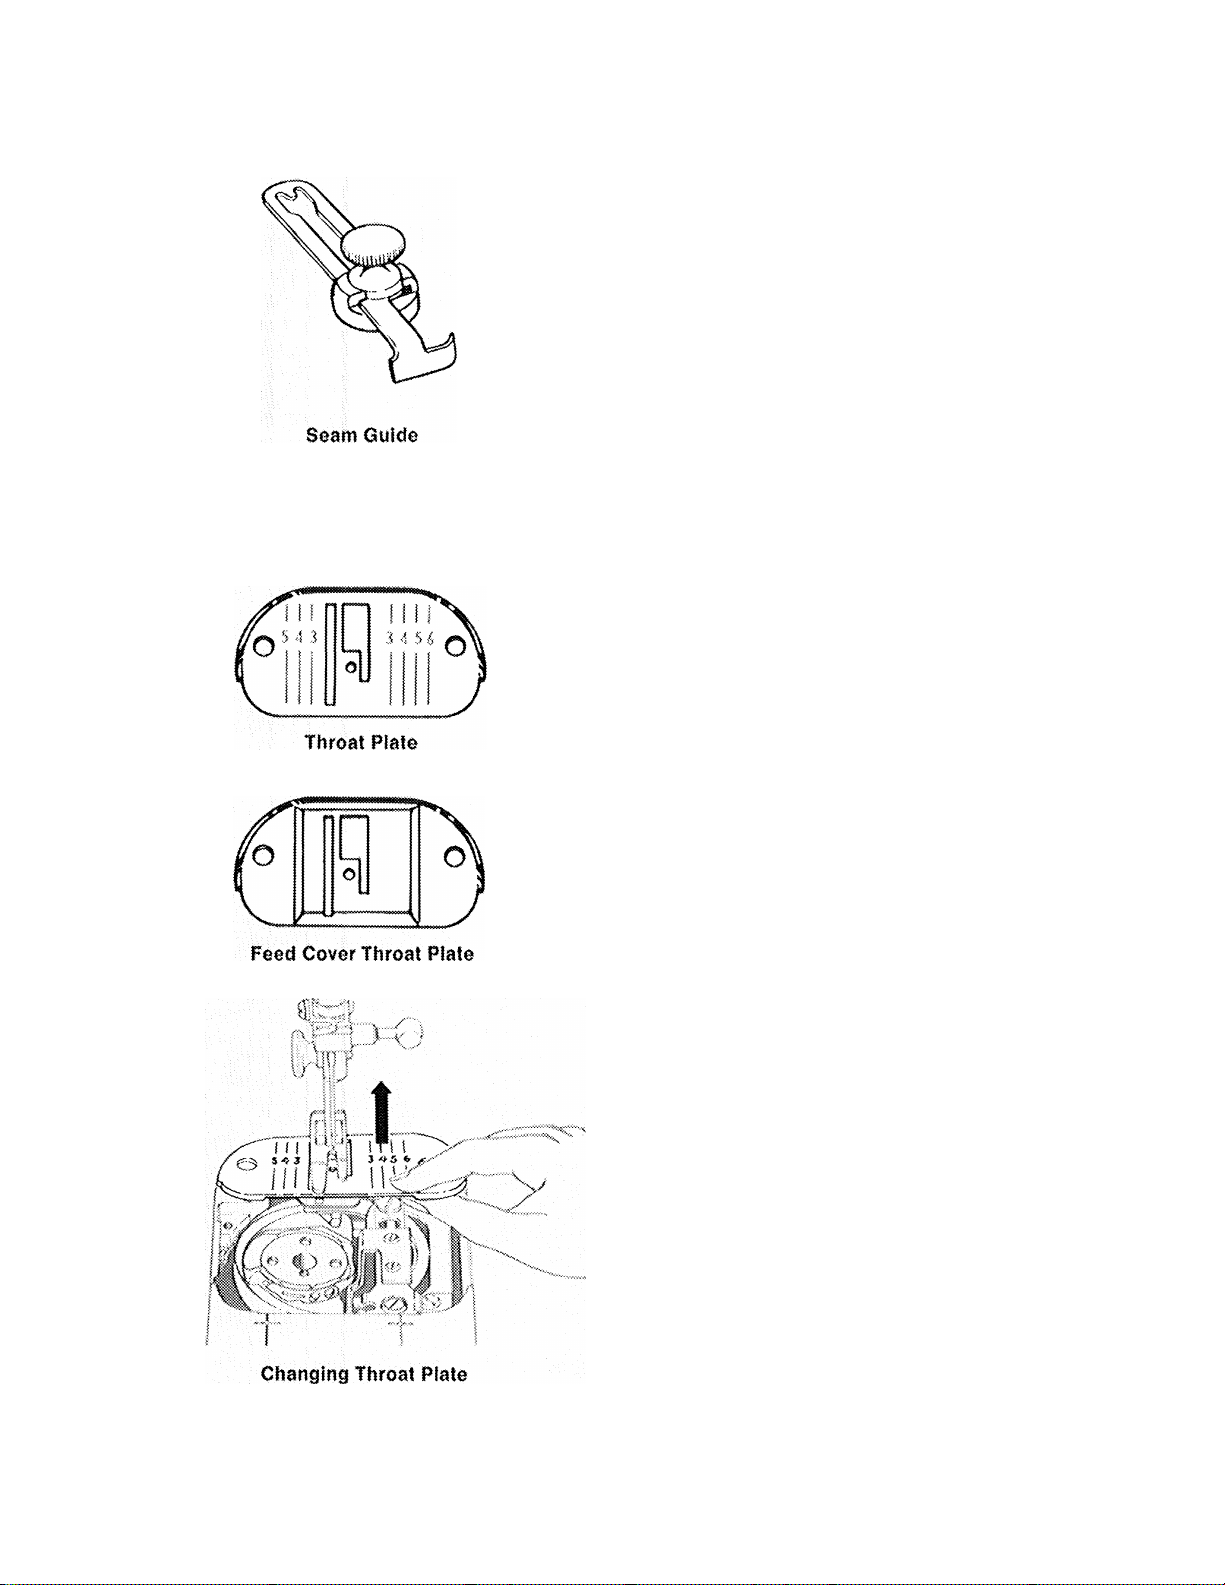
5. SEAM GUIDE
Th e se a m gu i d e w i l l h el p y o u t o st i t c h s e a m s
of pe r f ec t ly uni f o r m wid t h , it is esp ec i a l l y use
fu l f o r c u r v e d s e a m s or t o p st i t ch i n g , w h e n
ab s o l u t e ac c u r a c y is re q u i r e d . Al s o , be c a u s e
it a l l o w s yo u t o gu i d e s t i t c h e s at a n y di s t a n c e
be t w e e n
ed g e , it I s us e f u l f o r ve r y n ar r o w o r un u s u a l l y
wi d e s e a m s .
Vb
i n c h a n d IV4 I n c h e s f r o m f ab r i c
Attaching the Seam Guide
Pl a c e s c r e w i n ho l e t o t h e ri g h t o f th e s l i d e
pl a t e ; li n e u p s t r a i g h t e d g e of g u i d e wi t h t h e
th r o a t pl a t e g u i d e l i n e fo r de s i r e d se a m wi d t h ,
an d t i g h t e n s c r e w .
6. THROAT PLATES
• Th e re g u l a r th r o a t pl a t e is in pl ac e on yo u r
ma c h i n e .
• T h e fe e d co v e r th r o a t pl at e re p l a c e s th e
re g u l a r th r o a t pla t e whe n fab r i c fe edi n g is
not
de s i r e d . Us e i t fo r fr e e - m o t i on da r n i n g
an d emb r o i d e r y . For in s t r u c t i o n s on dar n
in g , r e f e r t o p a g e 25 ; f o r i n f o r m a t i o n o n e m
br o i d e r y , t u r n t o p a g e 2 4 .
Changing the Throat Plate
(N O T E : R e m o v e b o b b i n i f i t c o n t a i n s t h r e a d i n
or d e r t o p r e v e n t t h r e a d b e i n g c a u g h t w h e n
th r o a t p l a t e i s r e p l a c e d .
1. Ra i s e ne e d l e to it s hi g h e s t po s i t i o n a nd
ra i s e p r e s s e r f o o t .
2.
O p e n s l i d e pl a t e . Re m o v e t h r o a t pl a t e by
pl a c i n g thu m b und e r pl ate and lif t i n g it up
an d o u t .
3. P o s i t i o n n e w pl a t e o v e r t h e t w o p i n s a n d
re l e a s e . (T h r o a t pla t e is dra w n in t o pos i t i o n
by m a g n e t s . )
4. Clo s e s l i d e p l a t e .
Page 9
preliminary steps
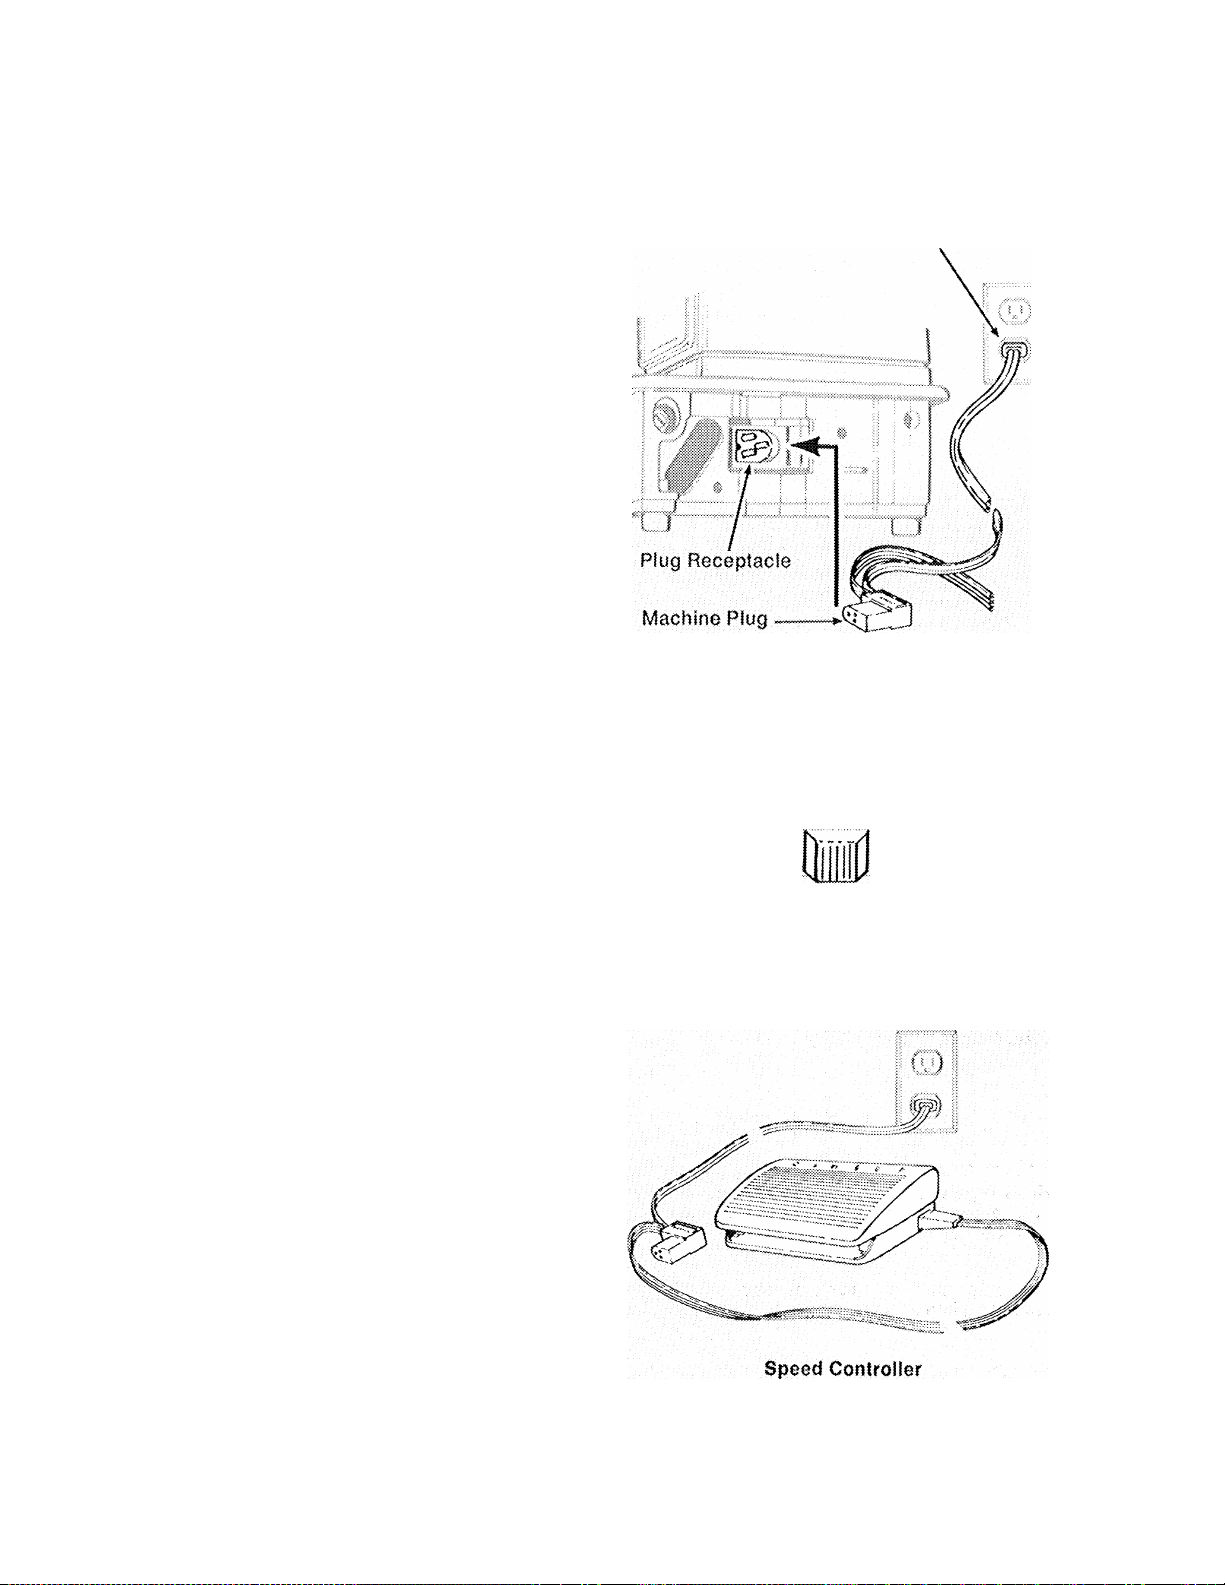
1. CONNECTING MACHINE
Be f o r e pl u g g i n g i n y o u r m a c h i n e , be s u r e t h a t
th e v o l t a g e a n d nu m b e r o f c y c l e s In d i c a t e d o n
to p su r f a c e o f fa c e p l a t e c o n f o r m t o y o u r e l e c
tr i c a l p o w e r s u p p l y .
Pu s h the ma c h i n e p l u g in t o t h e ma c h i n e r e
ce p t a c l e . Th e n co n n e c t th e powe r - l i n e pl u g to
yo u r e l e c t r i c a l o u t l e t .
2, OPERATING MACHINE AND
CONTROLLER
To t u r n o n bo t h t h e m a c h i n e a n d s e w i n g li g h t
an d s e t s p e e d ran g e , s l i d e th e p o w e r a n d l i g h t
sw i t c h t o t h e s e l e c t e d r a n g e .
• T h e FA S T se t t i n g a l l o w s fo r f u l l sp e e d c a
pa c i t y o f t h e m a c h i n e . I t i s b es t f o r l ong ,
st r a i g h t se a m s , ea s y - t o - h a n d l e fa b r i c s , an d
ge n e r a l sew i n g wh e r e a v a r i e t y of sp e e d s
ar e n e e d e d .
♦ Th e SL O W s e t t i n g al lo v/ s f o r ma x i m u m c o n
tr o l at l o v / e r s e w i n g s p e e d s . Us e th i s se t t i n g
fo r s p e c i a l j o b s w h e r e in t r i c a t e c o n s t r u c t i o n
de t a i l s r e q u i r e c l o s e c o n t r o l .
Power-Une Plug
Electrical Connoctfons
FV\3T 31-OW
F=»OW3F^ Si LJOhiT
Po w e r a n d L i g h t S w i t c h
CA U T I O N :
power and fight sv/itch before changing nee
dles, presser feet or throat plates and v/hen
leaving the machine unattended. This elimi
nates the possibility of starting the machine
by accidentally pressing the speed controller.
To ru n th e ma c h i n e , pr e s s t h e s p e e d co n t r o l
le r ( o r kn e e l e v e r ) . Th e h a r d e r yo u p r e s s , t h e
fa s t e r t h e mac h i n e wi l l s e w w i t h in t h e sel e c t e d
sp e e d r a n g e .
We recommend that you turn off the
Page 10

choosing needle and thread
Th e ne e d l e an d th r e a d yo u ch o o s e wi l l de p e n d
up o n t h e fab r i c b e i n g st i t c h e d . T h e ta b l e b e
lo w i s a pr a c t i c a l g u i d e to n e e d l e a n d th r e a d
FABRIC, THREAD AND NEEDLE TABLE
FABRIC
DELICATE — tulle, chiffon, fine lace, or
ganza
UGHTWEIQHT^batiste, organdy, jersey,
voile, taffeta, crepe, chiffon velvet, plas
tic film
MEDIUM WEIGHT
pique, linen, chintz, faille, satin, fine cor
duroy, velvet, suitings, knits, deep-pile
fabrics, vinyl
..........
gingham, percale,
se l e c t i o n . Re f e r to i t be f o r e s t a r t i n g a s e w i n g
pr o j e c t . Be sur e to use th e sam e si z e and ty p e
of t h r e a d i n b o t h n e e d l e a n d b o b b i n .
NEEDLES
THREAD
Fine mercerized cotton
Fine synthetic thread
60 mercerized cotton
silk
Synthetic thread
Polyester core/cotton
50 mercerized cotton
60 cotton
“A” silk
Synthetic thread
Polyester core/cotton
TYPE
CATALOG
2020
(16x1)
CATALOG
2020
(16x1)
CATALOG
2020
(16x1)
SIZE:
9
11
14
MEDIUM HEAVY -- gabardine, tweed, sail
cloth, denim, coatings, drapery fabrics,
vinyl, deep'pile fabrics
HEAVY - overcoatings, dungaree, uphol
stery fabrics, canvas
ALL WEIGHTS - decorative top stitching
SYNTHETIC KNITS AND STRETCH FAB
RICS — polyester doubleknit, nylon tri
cot, jersey, spandex, ciré tricot, panné
velvet
LEATHER — suede, kidskin, oaposkin,
lambskin, lined leathers
tUse with 60 mercerized cotton or “A” silk in bobbin
Heavy-duty
mercerized cotton
40 to 60 cotton
Synthetic thread
Heavy-duty
mercerized cotton
24 to 40 cotton
Synthetic thread
»‘D"’ sllkt
(Buttonhole twist)
“A’* nylon
60 mercerized cotton
silk
Polyester core/cotton
50 mercerized cotton
Synthetic thread
‘Wsilk
Polyester core/cotton
CATALOG
2020
(16x1)
CATALOG
2020
(15x1)
CATALOG
2020
(16x1)
CATALOG
2046
Ball Point
{Yellow Band)
CATALOG
2032
(15x2)
16
18
16
14
11
14
16
Page 11
threading the machine
Preparation
It i s b e s t t o w i n d t h e b o b b i n b e f o r e y o u t h r e a d t h e m a c h i n e .
WINDING THE BOBBIN
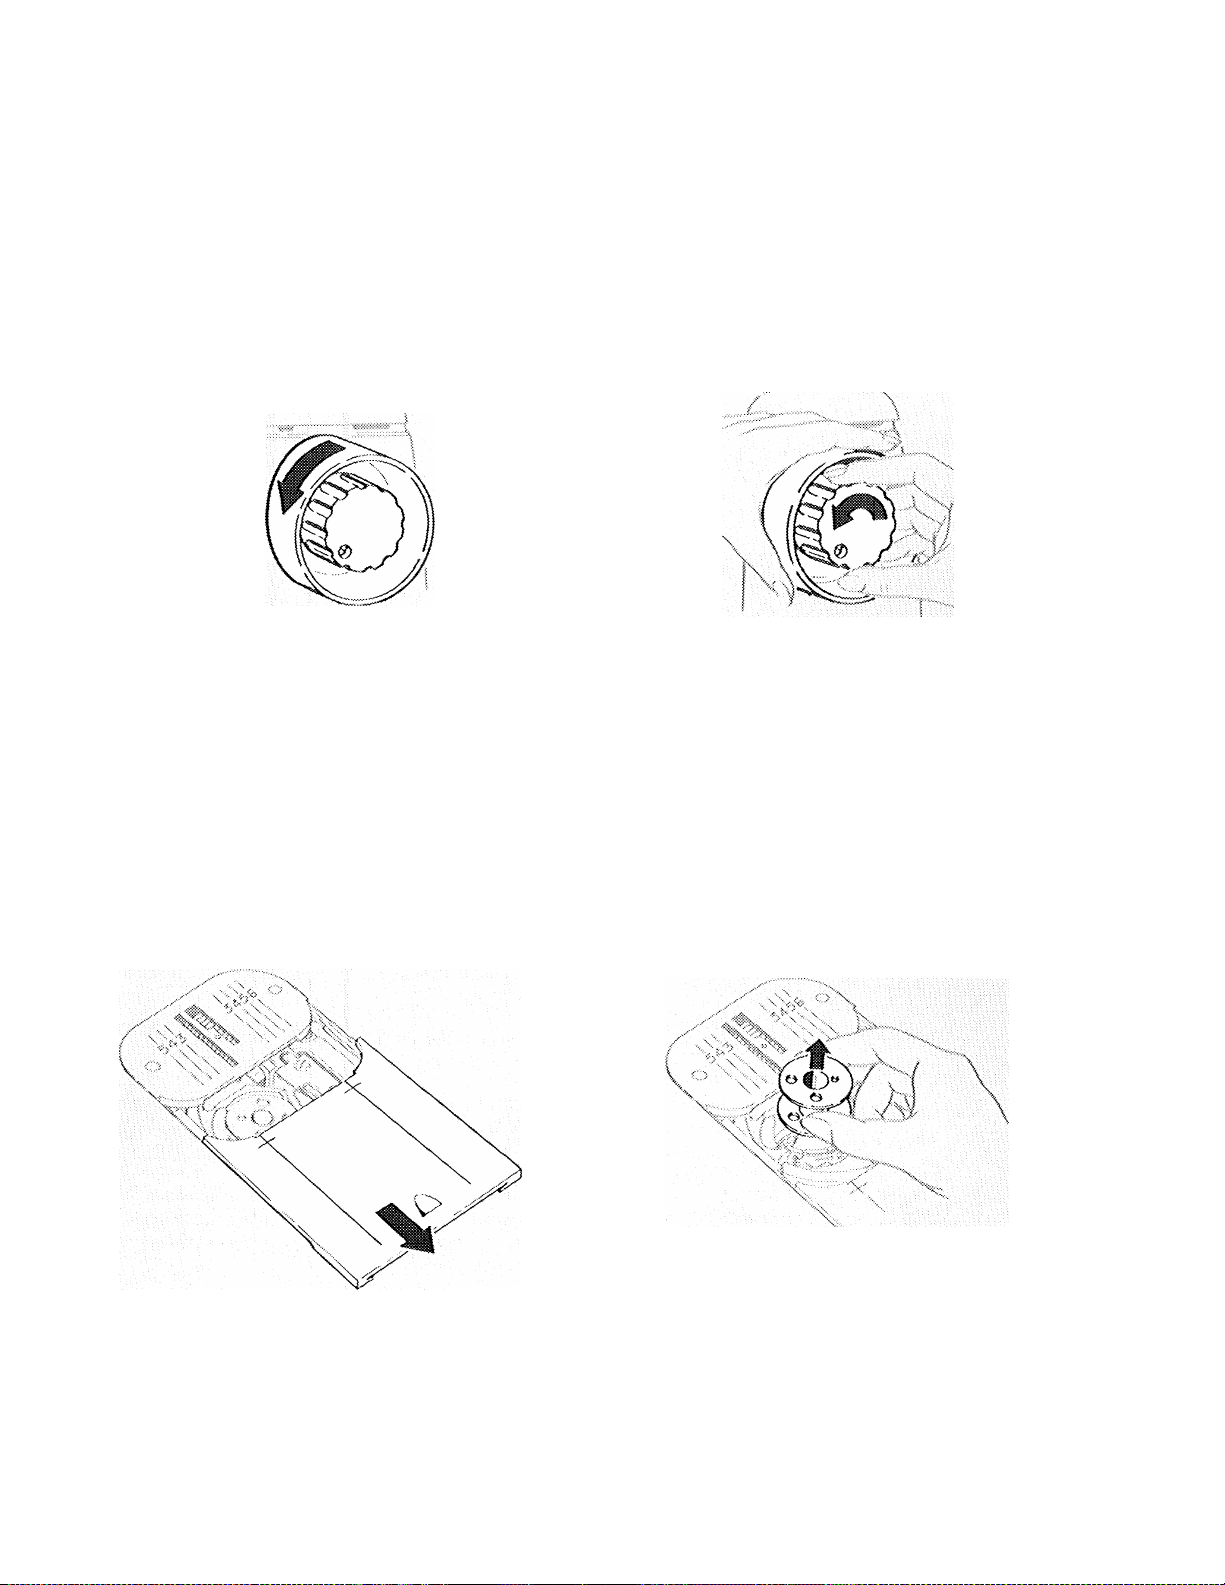
1. T u r n ha n d w h e e l t o w a r d y o u u n t i l n e e
dl e i s a t i t s h i g h e s t p o s i t i o n .
2. Di s e n g a g e h a n d w h e e l f r o m se w i n g
me c h a n i s m b y lo o s e n i n g t h e ha n d
wh e e l k n o b wi t h yo u r r i g h t ha n d wh i l e
ho l d i n g t h e h a n d w h e e l w i t h t h e l e f t .
3. Op e n t h e s l i d e p l a t e . 4. L i f t o u t t h e b o b b i n .
9
Page 12

Ho l d T h r e a d E n d t o S t a r t W i n d i n g
winding Steps
1. Pl a c e t h r e a d s p o o l o n sp o o l p i n o v e r t h e
sp o o l p i n fe l t . L e a d th r e a d b e t w e e n te n s i o n
di s c s ( a s s h o w n ) , ar o u n d t h r e a d po s t a n d
th r o u g h sm a l l ho l e In bo b b i n (fr o m th e in-
si d e o u t ) .
2. Pl a c e bob b i n on spi n d l e an d eng a g e la t c h
by p r e s s i n g i t t o w a r d t h e b o b b i n ,
3. H o l d t h r e a d en d a s s ho wn an d s t a r t th e m a
ch i n e . T h r e a d e n d wi l l s n a p o f f a f t e r a f e w
co i l s h a v e b e e n w o u n d o n t h e b o b b i n ,
4. W h e n re q u i r e d am o u n t of th r e a d has be e n
v^ ^ o u n d ( f u l l bo b b in w i l l a u t o m a t i c a l l y r e
le a s e ) , cut th r e a d an d re m o v e b o bb i n fr o m
sp i n d l e .
6. Ti g h t e n h a n d w h e e l kn o b b y t urn i n g i t aw a y
fr o m yo u w i t h yo u r ri g h t ha n d w h i l e h ol d i n g
th e h a n d w h e e l w i t h y o u r l e f t h a n d .
10
Page 13

1. H o l d bo b b i n so th a t th e th r e a d u n w i n d s
in di r e c t i o n sh o w n , an d pu t b o b b i n in
bo b b i n c a s e .
Pu l l t h r e a d I nt o n o t c h i n b o bb in c a s e ,
dr a w it un d e r the te n s i o n sp r i n g an d
in t o t h e s l o t .
3. D r a w a p p r o x i m a t e l y t h r e e i n c h e s o f
th r e a d d i a g o n a l l y a c r o s s t h e b o b b i n .
4. C l o s e s l i d e p l a t e , a l l o w i n g t h e t h r e a d
to e n t e r t h e s l o t i n t h e s l i d e p l a t e .
11
Page 14

THREADING THE NEEDLE
1. Tu r n ha nd wh e e l t o v ^ a r d you to r a i s e nee d l e to hi g h est
po s i t i o n w i t h l a k e - u p le v e r m id wa y in s l o t . F t ai se pr e s s o r
fo o t t o r e l e a s e t e n s i o n d i s c s .
2. P l a c e sp o o l o f th r e a d o n sp o o l p i n ov e r t h e sp o o l p i n fe l t .
Le a d t h r e a d t h r o u g h a l l p o i n t s a s s h o w n , m a k i n g s u r e t o :
♦ T h r e a d t e n s i o n d i s c s a s i l l u s t r a t e d .
♦ T h r e a d t a k e - u p l e v e r f r o m
♦ Th r e a d n e e d l e f r o m
front
right
t o
back,
t o
in c h e s o f t h r e a d t h r o u g h e y e o f n e e d l e .
left,
d r a w i n g a b o u t f o u r
Wi t h t wo h a n d s , sl i p th r e a d
ho r i z o n t a l l y
between
ten
si o n d i s c s f r o m t h e t o p .
T
Wi t h r i g h t han d , lea d thr e a d
under
th r e a d g ui d e o n r i g h t
si d e . . .
. . . a n d , w i t h le f t ha n d , le a d
th r e a d
der
over
s p r i n g a n d
g u i d e o n l e f t s i d e .
un
12
Al l o w sp r i n g t o re t u r n t o it s
no r m a l u p po s i t i o n an d c o n
ti n u e t h r e a d i n g t h e m a c h i n e .
Page 15

RAISING THE BOBBIN THREAD
No w th a t yo u h a v e wo u n d t h e bo b b i n a n d
th r e a d e d th e ne e d l e , yo u wi l l ne e d to r a i s e th e
bo b b i n th r e a d th r o u g h th e ne e d l e hol e i n th e
th r o a t p l a t e .
1. H o l d n e e d l e t h r e a d l i g h t l y v d t h the l e f t ha n d
an d tu r n t h e h a n d wh ee l
so t h a t t h e n e e d l e e n t e r s t h r o a t p l a t e .
2. Co n t i n u e tu r n i ng ha n d wh e e l an d ho l d i n g
ne e d l e thr e ad u n t i l need l e r i s e s a n d bri n g s
up b o b b i n t h r e a d i n a l o o p .
slov/ly
to w a r d yo u
i
3. U n d o t h e l o o p w i t h y o u r f i n g e r s .
4. Pl a c e b o t h n e e d l e a n d b o b b i n t h r e a d s u n
de r pr e s s e r fo o t a n d dr a w to ba c k of ma
ch i n e .
To re g u l a t e ne e d l e - t h r e a d and bo b b i n - t h r e a d
te n s i o n s , s e e p a g e 1 6 .
you are now ready to sew
Step 4
13
Page 16
adjusting dials
í
to
I
Re g u l a r St r a i g h t
St i t c h S e t t i n g s
If
n
St r e t c h St i t c h
Se t t i n g
Setting the iVlachine
Se t s t i t c h c o n t r o l f o r d e s i r e d s t i t c h l e n g t h .
[
• Fo r reg u l a r s t r ai g ht st i t ch i n g , tur n di a l t o a
nu m b e r .
• F o r s t r a i g h t st r e t c h st i t c h i n g , t u r n di a l to
ST R E T C H s e t t i n g .
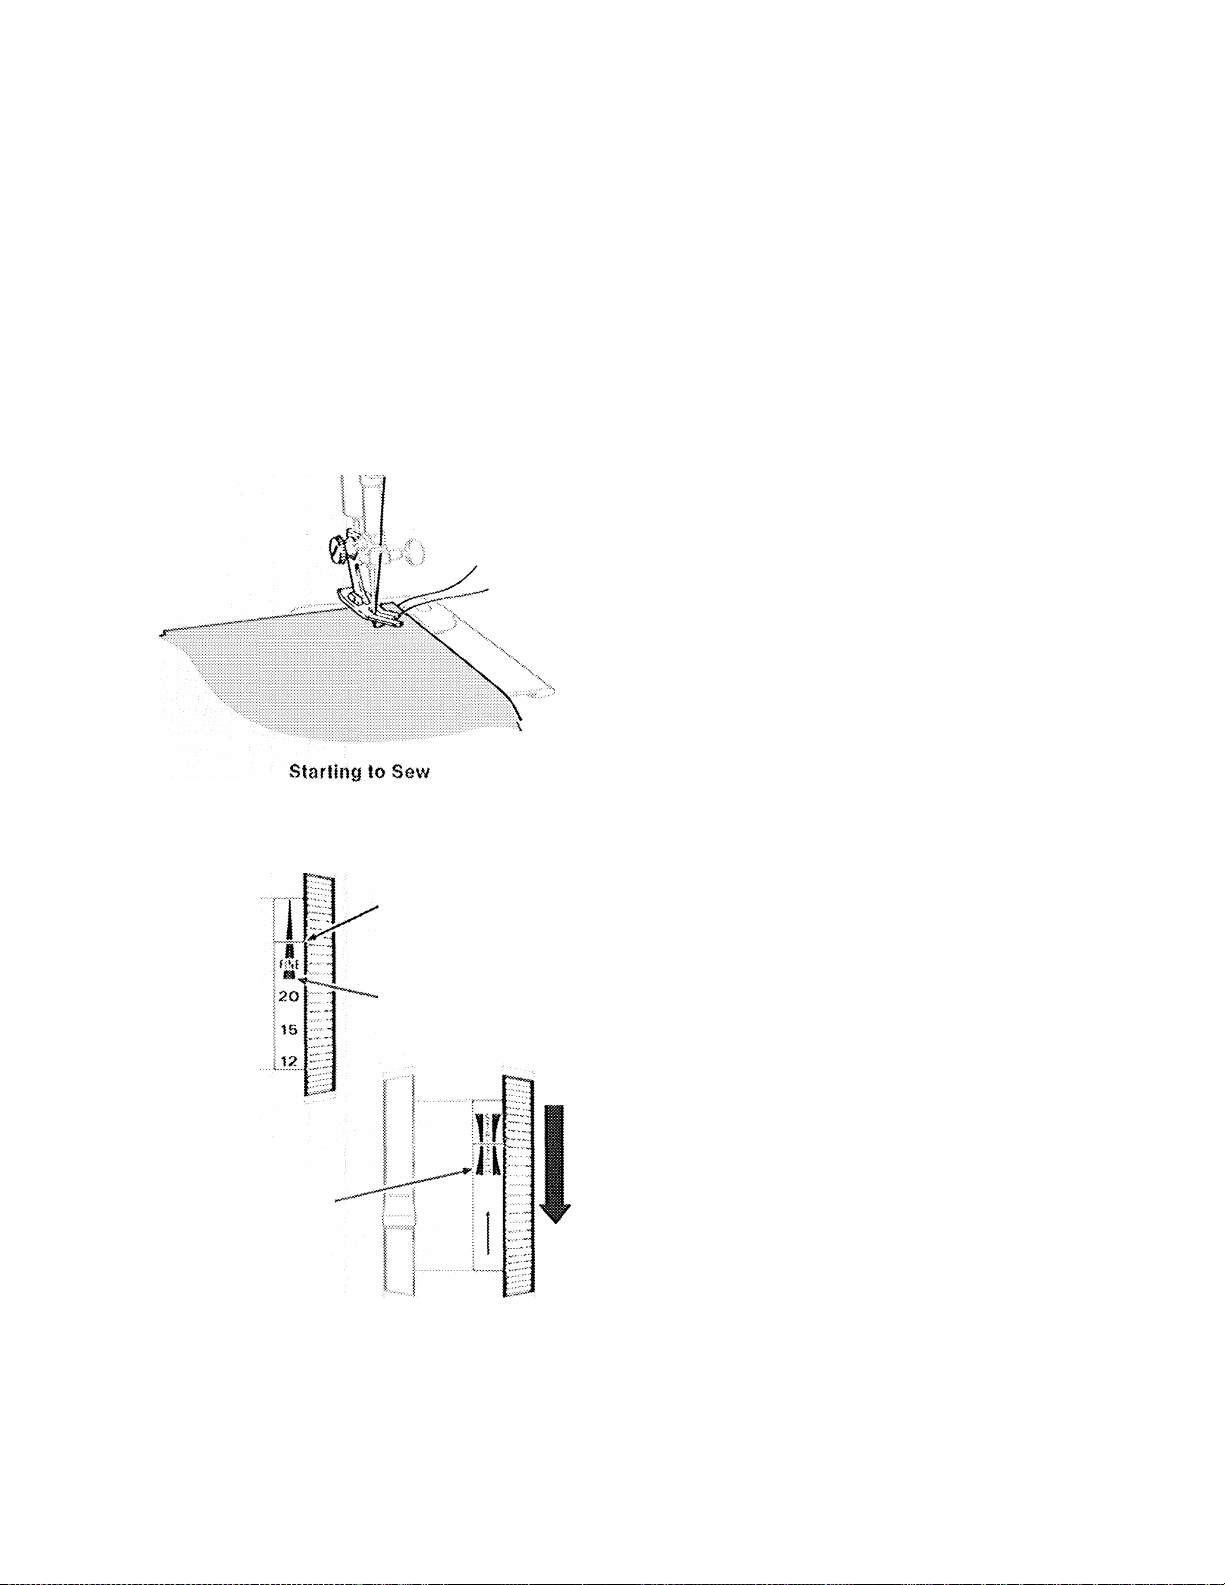
Starting to Sew
• Pl a c e nee d l e a n d bob b i n t h r ea d s u n d e r
pr e s s e r f o o t a n d d r a w t o b a c k o f m a c h i n e .
• P o s i t i o n t h e n e e d l e i n t h e f a b r i c wh e r e d e
si r e d f o r s t i t c h i n g s t a r t .
• L o w e r t h e p r e s s e r f o o t a n d s t a r t t h e m a
ch i n e .
To se w p e r f e c t l y o n a wi d e va r i e t y of f ab r i c s ,
ad j u s t st i t c h le n g t h , p r e s s e r fo o t pr e s s u r e an d
th r e a d t e n s i o n as i n s t r u c t e d b e l o w a n d o n t h e
fo l l o w i n g p a g e s .
Fo r i n f o r m a t i o n o n s t r e t c h s t i t c h i n g , tur n t o
pa g e 2 1 .
St r e t c h S y m b o l
St i t c h C o t i i f o l D i a l
Re d L i n e
Fi n e St i t c h Le n g t h s
{a b o v e 2 0 )
To S e t f o r St r e t c h S t i t c h i n g
Tu r n Di al Do w n w a r d u n t il
St r e t c h S y m b o l A p p e a r s .
Setting Stitch Length
Th e st i t c h co n t r o l di a l re g ul a t e s t h e l e n gt h o f
st i t c h e s . Th e nu m b e r s 6 to 2 0 re p r e s e n t th e
nu m b e r of st i t c h e s pe r in c h :
number, the shorter the stitch.
sh o r t e r s t i t c h e s ar e b est f o r li g h t w e i g h t fab r i c ;
lo n g e r on e s fo r he a v y f ab r i c . Cu r v e d s e a m s ,
bi a s - c u t se a m s , an d sc a l l o p s re q u i r e sh o r t
st r a i g h t s t i t c h e s (1 5 t o 2 0 ) f o r e l a s t i c i t y a n d
sm o o t h c o n t o u r s .
Th e tr i a n g u l a r sy m b o l on t h e di a l re p r e s e n t s
st i t c h l e n g t h s s h o r t e r t h a n 2 0 p e r i n c h .
Th e S T R E T C H se t t i n g i s u sed f o r st r a i g h t
st r e t c h s t i t c h i n g on l y . F o r in f o r m a t i o n o n
st r e t c h s t i t c h i n g , s e e p a g e 2 1 ,
• To se t st i t c h con t r o l fo r reg u l a r st r a i g h t
st i t c h i n g , tu r n di a l un t i l de s i r e d nu m b e r i s
un d e r t h e r e d l i n e .
• T o se t st i t c h co n t r o l f o r
in g , t u r n di a l do w n w a r d u n t i l t h e ST R E T C H
sy m b o l a p p e a r s u n d e r t h e r e d l i n e .
the higher the
G e n e r a l l y ,
stretch
s t i t ch
14
Page 17

Fo r re v e r s e s t i t ch i ng , s im p l y pr e s s re v e r s e -
st i t c h l e v e r a l l t h e w a y d o w n a n d h o l d i n p l a c e .
Re l e a s e l e v e r f o r f o r w a r d s t i t c h i n g .
Re v e r s e s t i t c h i n g c a n b e d o n e o n l y wh en
st i t c h co n t r o l is s e t fo r r e g u l a r str a i g h t st it c h
in g (6 t o 20 s t i t c h e s ) .
be reversed.
Stretch stitching cannot
REGULATING PRESSURE
Th e p r e s s u r e di a l r e g u l a t e s th e p r e s s u r e t h at
th e pr e s s e r f o o t ex e r t s o n t h e f a b r i c . C o r r e c t
pr e s s u r e is im p o r t a n t bec a u s e it wi l l help fa b
ri c fe e d sm o o t h l y an d ev e n l y . The NO R M (n o r
ma l ) s et t i n g i s an a l l - p u r p o s e se t t i n g t h a t c a n
be u s e d fo r a wi d e va r i e t y of f a b r i c s of di f f e r
en t w e i g h t s an d t e x t u r e s . In t e r m e d i a t e n otc h e d
se t t i n g s , abo v e and be l o w N O R M , are al so pr o
vi d e d . W h e n y o u n e e d ex t r a c o n t r o l to s e w v e r y
he a v y fa b r i c , us e the MA X (ma xi m u m ) se t
ti n g .
i 5
Reverse-Stitch Lever
Pressure Dial
To s e t p r e s s u r e d i al ,
lower the presser foot
an d o p e n t h e f a c e p l a t e .
• T o i n c r e a s e p r e s s u r e , t u r n d i a l f r o m N O R M
to w a r d M A X .
♦ To d e c r ea s e p r e s s u r e , t u r n d i a l f r o m N O R M
to v / a r d D A R N .
Fo r d a r n i n g , s e t d i a l o n D A R N .
Increase Decrease
Da r n i n g
16
Page 18

Noedle-Thread Tension
REGULATING THREAD TENSION
Co r r e c t t e n s i o n i s I m p o r t a n t be c a u s e t o o m u c h
or t o o l i t t l e wi ll w e a k e n y o u r se a m s o r c a u s e
yo u r fa b r i c to p u c k e r . Ma k e a te s t s a m p l e wi t h
th e f a b r i c a n d th r e a d y o u p l a n t o u se, a n d e x -
am i n e it , A p e r fec t st i t c h 'a u I I ha v e t h e ne e d l e
an d b o b bin th r e a d s l oc k e d b e t w e e n t he tw o
la y e r s o f f a br i c w i t h n o l o o p s o n t o p o r b o t t o m
an d n o p u c k e r s ,
Needle-Thread Tension
Th e t e n s i o n d i a l r e g u l a t e s t h e d e g r e e o f t en
si o n o n yo u r n e e d l e t h r e ad . S e t it a c c o r d i n g t o
th e typ e of th r e a d a n d fa b r i c y ou use . Th e
nu m b e r s on t h e d i a l el i m i n a t e gu e s s w o r k i n
du p l i c a t i n g s e t t i n g s .
If t h e s t i t c h e s i n y o u r t e s t s a m p l e lo o k l o o s e ,
in c r e a s e n e e d l e d h r e a d te n s i o n . I f t h e f a b r i c
pu c k e r s , d e c r e a s e t e n s i o n .
• To I n c r e a s e t e n s i o n , t u r n d i a l t o h i g h e r n u m
be r .
.¿X i ■ > X s iX,
•^k XXN
, i i\ -x ) ^ ■ i ^
"s. •. X : 1. \ii./ ■' ■;
.. ., . -"i-
^
....................
De c r e a s e
In c r e a s e
♦ To d e c r e a s e t e n s i o n , t u r n d i a l t o l o w e r n u m
be r .
Bobbin^Thread Tension
Bo b b i n - t h r e a d t e n s i o n I s c o nt r o l l e d b y a s c r e w
lo c a t e d o n th e b o b b i n ca s e . Y o u wi l l se l d o m
ne e d t o ad j u s t bo b b in - t h r e a d te n s i o n si n c e i t
is u s u a l l y p o s s i b l e t o ob t ai n t h e co r r e c t b a l
an c e by ad j u s t i n g ne e dl e- t h r e a d te n s i o n
al o n e .
On t h o s e r a r e o c c a s i o n s w h e n I t b e c om e s
ne c e s s a r y to adj u s t the bob b i n - t h r e a d te n
si o n , u s e t he sma l l t e nsi o n s cre w d r i v e r fu r
ni s h e d w i t h yo u r ac c e s s o r i e s . A v e r y s l i g h t
tu r n on th e s c r e w ne a r e s t th e th r e a d sl o t on
th e bo b b i n ca s e wi l l p r o d u c e a n o t i c e a b l e
ch a n g e i n b o b b i n - t h r e a d t e n s i o n .
• T o I n c r e a s e t e n s i o n , t u r n s c r e w c l o c k w i s e .
• To d e c r e a s e t e n s i o n , t u r n s c r e w c o u n t e r
cl o c k w i s e .
16
Bobbin-Thread Tension
Page 19

sewing a seam
PIN BASTING
Pi n b a s t i n g i s a t i m e s a ve r a n d c a n b e u s e d i n
pl a c e o f b a n d b a s t i n g w h e n yo u a r e s t it ch i n g
se a m s i n e a s y - t o - h a n d l e f a b r i c .
Us e f i n e p i n s a n d p l a c e t h e m s o t h a t :
♦ Th e y ar e at rig h t an g l e s to t h e pr e s s e r f o o t
an d ju s t ni p int o th e fa b r i c at t h e st i t c h i n g
li n e .
♦ Th e y do no t ex t e n d und e r bo t h si d e s of th e
pr e s s e r foo t .
side of the fabric in contact with the feed.
Never place pins on the under
Pin Placement V/hen
Seam Guide Is Used
l^i
Pi n s Ni p i nt o F a b r i c
at t h e S t i t c h i n g L i n o
Pin Placement When
Seam Guide Is Not Used
PLACING FABRIC
Mo s t f a b r i c c a n b e p l a c e d u n d e r t h e p r e s s e r
fo o t by r a i s i n g the pre s s e r f o o t lif t e r t o i t s
no r m a l up p o s i t i o n . Wh e n p la c i n g b u l k y f a b
ri c s , s u c h as c o a t i n g , k n i t o r te r r y c l o t h , o r
mu l t i p l e f a b r i c l a y e r s , yo u w i l l f i n d i t co n v e n
ie n t to ra i s e th e pr e s s e r fo o t li ft er to the hi g h ri s e p o s i t i o n . Hol d li f t er i n po s i t i o n ( s i n c e it
do e s no t lo c k ) wh i l e pl a c i n g f ab r i c un d e r t h e
pr e s s e r f o o t . Ma k e su r e t h e li f t e r is al l t h e
do w n b e f o r e s t a r t i n g t o s e w .
way
Pressor Foot Lifter Sottings
17
Page 20

I
starting a Seam
Guiding and Supporting Fabric
Ap p l y i n g G e n t l e T e n s i o n
Stitching a Seam
STARTIMG
1. Wi t h p r e s s e r fo o t r a i s e d , tu r n ha n d w h e e l
2. Pr e s s re v e r s e - s t i t c h l e v e r a l l t h e w a y d o w n
3. R e l e a s e r e v e r s e - s t i t c h lev e r a n d s t i t c h i n
A
SEAWl
to w a r d yo u to po s i t i o n ne e d l e i n fa b r i c
ab o u t
th e p r e s s e r f o o t .
an d ho l d I n p l a c e . Ba c k s t i t c h to ed g e of
fa b r i c f o r r e i n f o r c e m e n t .
fo r w a r d d i r e c t i o n .
V2
i n c h fr o m st a r t i n g e d g e . Lo w e r
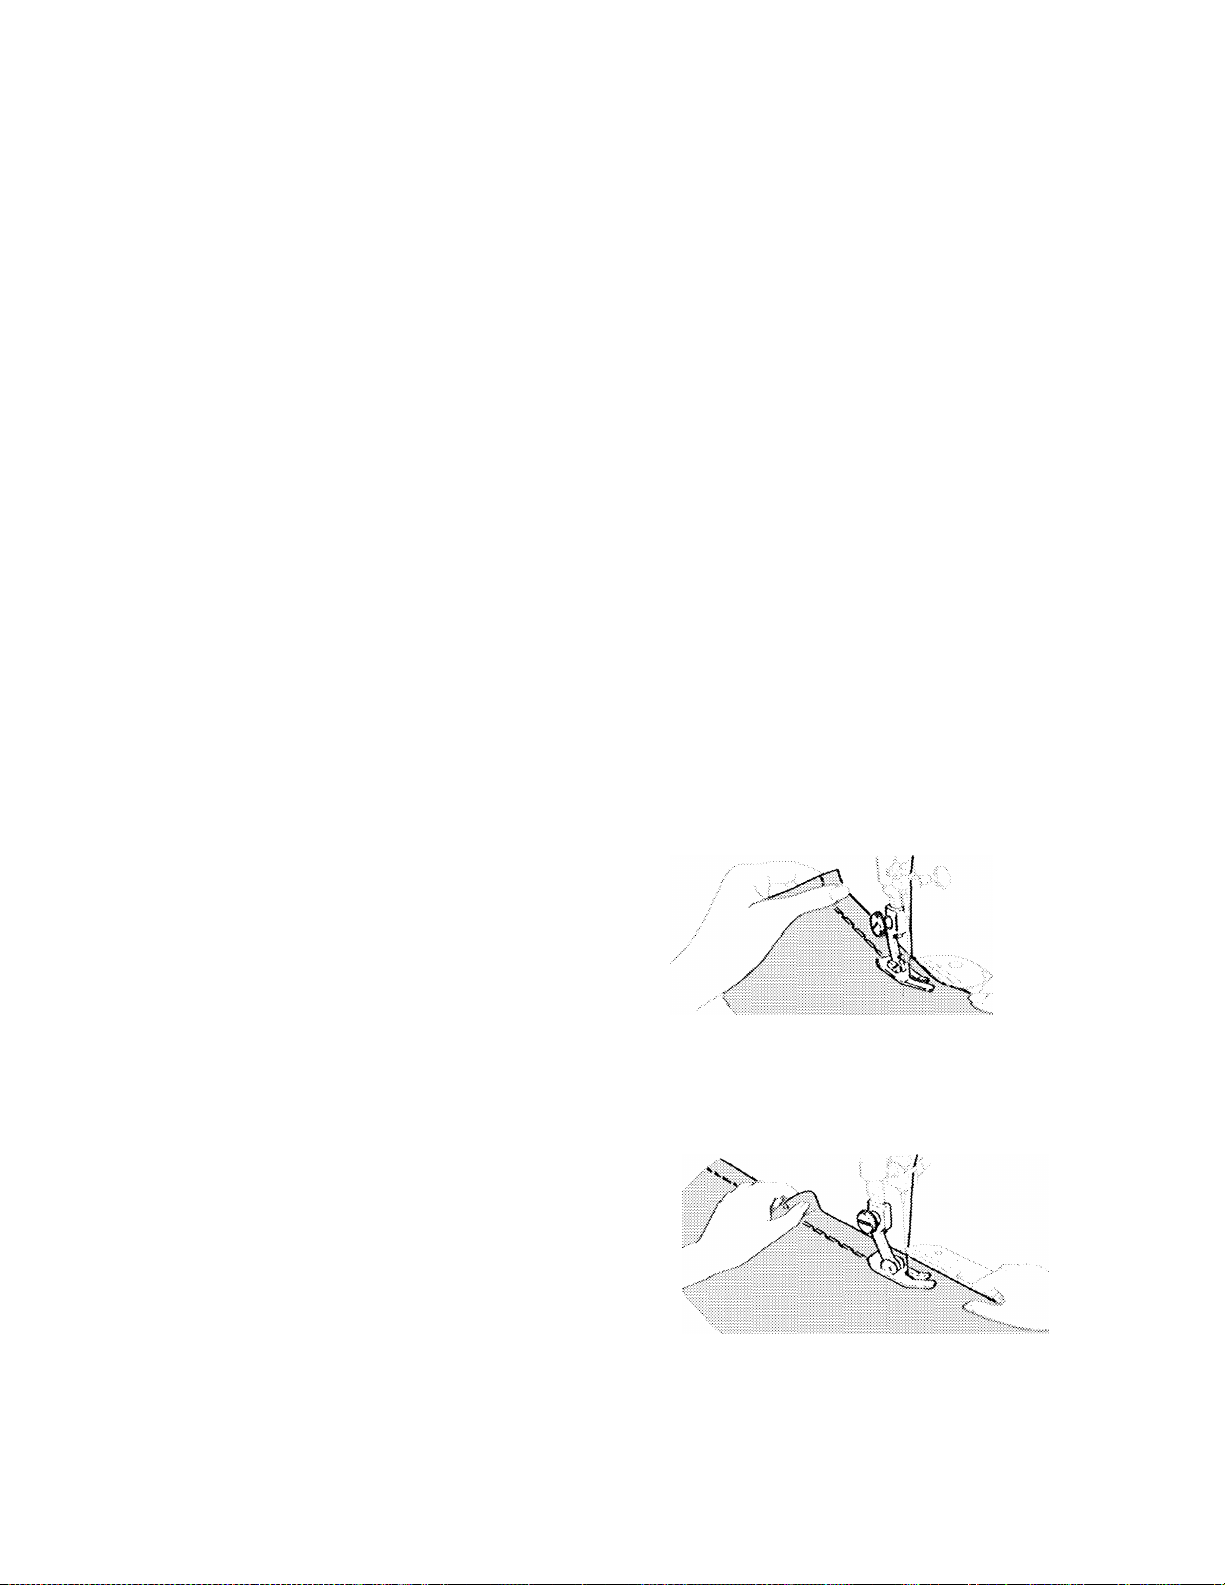
GUIDING AND SUPPORTING FABRIC
Mo s t fa b r i c s ne e d o n l y to b e gu i d e d i n fr o n t o f
th e p r es se r fo o t . So m e fa b r i cs , ho w e v e r , re
qu i r e s u p p o r t w h i l e b e i n g s t i t c h e d , a s i l l u s
tr a t e d .
18
Applying Firm Tension
♦ F o r f i l m y s h e e r s , kn i t s , t r i c o t s , et c . , a p p l y
gentle
te n s i o n b y h o l d i n g s eam i n fro n t a n d
ba c k o f t h e p r e s s e r f o o t .
♦ F o r s t r e t c h fa b r i c s , ap p l y
an d ba c k whe n st i t c h i n g in th e sam e di r e c
ti o n as th e st r e t c h . F o r se a m s no t on th e
st r e t c h di r e c t i o n , st i t c h in th e c o n v e n t i o n a l
ma n n e r , gu i d i n g fa b r i c i n fr o n t of th e p r e s s e r
fo o t .
firm
t e n s i on f r o n t
Page 21

¥s
KEEPING SEAMS STRAIGHT
To ke e p t h e s e a m s t ra i g h t , u s e o n e o f t h e nu m
be r e d gu i d e l i n e s on t h e t h r o a t pl a t e . Th e nu m
be r s i n d i c a t e di s t a n c e , i n ei g h t h s of a n in c h ,
fr o m th e n ee d l e . I f yo u wa n t a %- i n c h s e a m ,
fo r e x a m p l e , l i n e u p y o u r f a b r i c w i t h t h e n u m
be r 5 gu i d e l i n e . N o t e th a t b o t h n u m b e r 5
gu i d e l i n e s { t h e m o s t co m m o n l y u s e d ) a r e ex
te n d e d on t h e sl i d e p l a t e for yo ur con v e n i e n c e :
th e c r o s s l i n e s s e r v e a s c o r n e r i n g g u i d e s w h e n
st i t c h i n g a s q u a r e c o r n e r .
Fo r ex t r a he l p i n ke e p i n g the se a m st r a i g ht,
yo u m a y wi s h t o u s e t h e se a m g u i d e . B e c a u s e
it a l l o w s yo u t o gu i d e st i t ch e s be t w e e n
an d
VA
in c h e s fr o m t h e f a b r i c e d g e , it i s u s e
fu l f o r v e r y n a r r o w o r u n u s u a l l y w i d e s e a m s .
Vs
inch
TURNING SQUARE CORNERS
To tu r n a sq u a r e c o r n e r % inch f r o m th e
fa b r i c e d g e , yo u n e e d n o t m e a s u r e o r
ma r k th e se a m . S i m p l y us e th e c r o s s l i n e s
on t h e s l i d e p l a t e ,
♦ L i n e up y o u r f ab r i c w i t h r i g h t or l e f t
gu i d e l i n e 6 on t he t h r o a t p l a t e . S t i t c h
se a m , s l o w i n g sp e e d as yo u a p p r o a c h
co r n e r .
V2
%
5/8"
St o p s t i t ch in g ,
v/ h e n t h e b o t t o m e d g e o f the f a b r i c
re a c h e s th e co r n e r i n g c r o s s l i n e s on t h e
sl i d e p l a t e .
Ra i s e pr e s s o r f o o t an d t u r n fa b r i c o n
ne e d l e , br i n gin g bot t o m edg e of f a b r i c
in l i n e w i t h g u i d e l i n e 6 .
Lo w e r t h e g r o s s e r fo o t a n d s t i t c h I n n ew
di r e c t i o n .
with the needle down,
Fa b r i c a t C r o s s l i n e s
Pivoting at Corner
19
Page 22

I
CURVED SEAMS
1. U s e a s h o r t st i t c h fo r e l a s t i c i t y an d st r e n g t h .
Fo r ex a m p l e , if y o u us e 12 st i t c h e s t o th e
in c h f o r st r a i g h t s e a m s , se l e c t 1 5 t o 2 0 pe r
in c h t o st i t c h c u r v e d s e a m s i n th e s a m e
fa b r i c .
2. I f y o u u s e t h e s e a m g u i d e t o g u i d e s t i t c h
in g , at t ac h it at a n an g l e so th a t th e ed g e
th a t i s c l o s e r t o t h e n e e d l e a c t s a s a g u i d e .
REINFORCING END OF SEAM
1. S t i t c h t o t h e e d g e o f t h e f a b r i c .
2. Pr e s s re v e r s e - s t i t c h l e v e r a l l t h e w a y d o w n
an d ho ld in pla c e . Bac k s t i t c h ap p r o x i m a t e l y
V2 i n ch t o r e i n f o r c e e n d o f s e a m . R el ea s e
le v e r .
3. Ra i s e ne e d l e to it s high e s t pos it i o n , rai s e
th e pr es se r fo o t , and rem o v e the fabr i c by
dr a w i n g i t t o t h e b a c k a n d l e f t .
Beverse-Stltch Lever
= ■ :
Ending a Seam
4. C u t t h r e a d s on t h r e a d cut t e r at r e a r of
pr e s s e r b a r .
Cutting Threads
20
Page 23
sewing knit and stretch fabric
Th e st r e t c h st l t c h f i s es p e c i a l l y su i t a b l e
fo r sew i n g st r e t c h f a b r i c s , dou b l e k n i t , trh
♦ P l a i n s e a m s t h a t s - t - r - e T - c d i ( p r e s s - o p e n o r c l o s e d c o n s t r u c t i o n )
• Cro t c h s e a m s
• S l e e v e a n d g u s s e t i n s e r t i o n
• F l e x i b l e t o p s t i t c h i n g
• Li n g e r i e s e a m s
♦
Bv/m
a n d s k i s u i t c o n s t r u c t i o n
♦ P a t c h p o c k et s
* S e a m r e p a i r a n d r e i n f o r c e m e n t
Us e a b a l l - p o i n t ( y e l l o w b a n d ) n e e d l e i n
th e m a c h i n e , a n d i n c r e a s e p r e s s o r b a r
tîhîs sîiîch is designed for strength and permanence end cannot he readily ripped out without risk of fabric damage.
co t , a n d j e r s e y s i n c e i t b u i l d s s t r e t c h i n t o
th e s e a m . H e r e a r e a f e w a p p l i c a t i o n s :
pr e s s u r e w h e n yo u at t a c h el a s t i c o r se w
sy n t h e t i c k n i t o r s t r e t c h f a b r i c .
Guiding and Supporting Fabric
GUIDING AND SUPPORTING FABRIC
Mo s t f a b r i c s of s t r e t c h or k n i t co n s t r u c t i o n
ne e d o n l y t o b e g ui d e d i n f r o n t o f t h e p r e s s o r
fo o t w h e n y o u us e t h e st re t c h s t i t c h . Si mp l y
le t t h e ma c h i n e m o v e th e f a b r i c to m a k e t h e
st i t c h e s t h a t g i v e s - t - r - e - t - c - h t o t h e s e a m .
So m e fab r i c s - n y l o n t r i c o t and ela s t i c i z e c i
fa b r i c s , f o r e x a m p l e — d o r e q u i r e su p p o r t w h i l e
be i n g s t i t c h e d .
♦ Fo r ny l o n t r i c o t , ci r é , p a n n é ve l v e t , a n d s i m i
la r s y n t h e t i c k n i t s , a p p l y
ho l d i n g t h e sea m i n fr o n t a n d ba c k o f t h e
pr e s s o r f o o t a s y o u s e w .
* F o r e l a s t i c i z e d fab r i c , str e t c h lac e, and
kn i t s w i t h a n u n u s u a l a m o u n t of e l a s t i c i t y ,
ap p l y
pr e s s o r f o ot t o str et c h t h e se am a s t h e
st i t c h e s a r e b e i n g p l a c e d .
firm
t e n s i o n i n fr o n t an d ba c k of t h e
gentle
t en s i o n b y
Ap p l y i n g G e n t l e T e n s i o n
Applying Firm Tension
21
Page 24

PLAIN STRETCH SEAMS
Wh e n yo u us e t h e st r a i g h t st r e t c h s t i t c h to se w
se a m s in k n i t , s t r e t c h , an d el a s t i c i z e d fab r i c ,
s- t - r - e - t “ C - * h an d st r e n g t h a r e bu i l t in a s t h e
se a m is b e i n g se w n . B e c a u s e i t is e q u a l l y u s e -
fu i for cl o s e d or pr e s s - o p e n se a m c o n st r u c
ti o n a n d w i l l no t b r e a k t h r e a d u n de r s t r e s s , t h e
st r e t c h st i t c h is al s o g o o d fo r s e am s t h a t re
ce i v e a n u n u s u a l am o u n t o f st r a i n w h e n wo r n .
Fo r e x a m p l e : cr o t c h s e a m s , sle e v e i n se r t i on ,
an d co ns t r u c t i o n se a m s in s po r t s w e ar an d
ba t h i n g s u i t s .
Se t s t i t c h c o n t r o l f o r S T R E T C H s t i t c h i n g a n d
us e a m o d e r a t e s p e e d ( S L O W s p e e d s e t t i n g ) .
Pr o c e d u r e
1. M a k e a t e s t s a m p l e to d e t e r m i n e th r e a d
te n s i o n . Be sur e to in s e r t a b a l l - p o i n t (y e l
lo w ba n d ) ne e d l e in ma c h i n e if y o u are
st i t c h i n g a s y n t h e t i c k n i t f a b r i c .
2. Sti t c h a n d g u i d e f a b r i c a s y o u d o f o r p l a i n
se a m s s t i t c h e d wi t h t h e r e g u l a r s t r a i g h t
st i t c h , le t t i n g th e m a c h i n e ma k e t h e ba c k -
an d - f o r t h s t i t c h e s th at gi v e $ - t - r - e - t - c ~ h t o
th e seam . If fa b r i c h as an unu su a l amo u n t
of e l a s t i c i t y , it s h o u l d b e s t i t c h e d u n d e r
te n s i o n a s in s t r u c t e d u n d e r “G u i d i n g a n d
Su p p o r t i n g F a b r i c . “
3. Pr e s s s e a m a s wh e n u s i n g th e r e g u l a r
st r a i g h t s t i t c h .
Straight Stretch Stitching
LINGERIE SEAMS
A nar r o w , do u b l e - s t i t c h e d s e a m is I d e a l for
ny l o n t r i c o t l i n g e r i e . I t i s d u r a b l e a n d r e t a i n s
th e fl e x i b i l i t y of t h e fa b r i c . A r e gu l a r s t i t c h (1 0
or 12 p e r i n c h ) o r a s t r et c h s t i t c h m a y be us ed .
Ma k e a t e s t sa m p l e t o he l p yo u d e c i d e v ^ h i c h
is be s t fo r y o u r ga r m e n t . Se w wi t h a ba i l - p o i n t
(y e l l o w b a n d ) n e e d l e a n d f i n e s y n t h e t i c t h r e a d .
Procedure
1. All o w f o r a y a - i n c h s e a m a l l o w a n c e .
2. S t i t c h s e a m l i n e o n w r o n g s i d e o f f a b r i c , u s -
in g a r e g u l a r o r s t r e t c h s t i t c h .
3. Pl a c e a s e c o n d l i n e o f s t i t c h i n g ( i n s e a m
al l o w a n c e ) a b o u t V s i n c h f r o m t h e f i r s t l i n e .
4. T r i m f a b r i c c l o s e t o s e c o n d l i n e o f s t i t c h i n g
to p r o d u c e a n a r r o w s e a m e d g e .
22
Ungoflo Seams
Page 25

construction details
ZIPPERS
At t h e n o t i o n s c o u n t e r i n y o u r S i n g e r S e w i n g
Ce n t e r , you wil l f i n d man y d i f f er e n t k i n d s o f
zi p p e r s , o n e o f v^h i c h w i l l be j ust r i g h t f o r
wh a t e v e r yo u wi s h t o se w . Ho w th e z i p p e r i s
in s e r t e d wil l de p en d on t h e t y p e of ga r m e n t
an d th e lo c a t i o n o f th e zi p p e r . Th e z i p p e r
pa c k a g e w i l l co n t a i n e a s y - t o - f o l l o w in s t r u c
ti o n s , An d , i f yo u us e th e zi p p e r fo o t , yo u v/ i l l
fi n d i t e a s y t o fo r m a n e v e n l i n e of s t i t c h i n g
cl o s e t o t h e z i p p e r .
• S t i t c h C o n t r o l : 1 0 t o 1 5
• T h r o a t P l a t e
• Z i p p e r F o o t
Adjusting the Zipper Foot
Wh e n t h e z i p p e r i s t o t h e
1. Lo o s e n th e t h u m b s cr e w a t the bac k o f th e
fo o t , a n d s l i d e t h e fo o t t o t h e
ne e d l e .
2. C h e c k t h e po s i t i o n o f t h e f o o t b y t u r n i n g t h e
ha n d w h e e l to l o w e r th e nee d l e in t o t h e
si d e no t c h of th e fo o t , ma k i n g su r e it cl e a r s
th e f o o l .
3. L o c k t h e f o o t i n t o p o s i t i o n b y t i g h t en i n g t h e
th u m b s c r e w .
4. Low e r p res s e r ba r . M ak e s u r e th e ne e d l e
cl e a r s t h e f o o t o n a l l s i d e s o f t h e n o t c h .
Wh e n t h e zi p p e r i s to t h e
ad j u s t th e f o o t to th e
sa m e w a y .
right
o f t h e n e e d l e :
right
o f th e ne e d l e in the
left
of the
left
of th e ne e d l e ,
CORDED SEAMS
Th e co r d e d se a m Is a pr o f e s s i o n a l tr e a t m e n t
fo r sl i p cov e r s , c h i l d r e n ’ s cl o t h e s , b l o u s e s , and
li n g e r i e . T o m a k e a c o r d e d s e a m , m a k e t h e
we l t i n g fi r s t ( o r b u y it r e a d y - m a d e a t a n o t i o n s
co u n t e r ) , th e n st i t c h it in t o th e se a m . Fo r bo t h
st e p s , us e t he z i p per fo o t so th a t yo u ca n
pl a c e t h e s t i t c h i n g c l o s e t o t h e c o r d .
Making the Welting
23
Page 26

Froe-IVIotion Monogram
monograms and
: \
Br i n g B o b b i n T h r e a d U p T h r o u g h F a b r i c
a.
decorative designs
Fr e e - m o t i o n st i t c h i n g w i t h an e m b r o i d e r y h o o p
ca n b e us e d f o r m o no g r a n i m i n g a n d de c or a
ti v e w o r k . Yo u s e w w i t h o u t a p r e s s e r f o o t a n d
in s t e a d c o n t r o l fa b r i c m o v e m e n t (a n d h e n c e
st i t c h l e n g t h ) y o u r s e l f b y m e a n s o f a n em b r o i-
do r y hoo p . Des i gn s c a n b e “ e t ch e d ” b y o u t
li n i n g wi t h sh o r t ru n n i n g st i t c h e s or f i l l e d by
pl a c i n g st i t c h e s cl o s e to g e t h e r wi t h a ba c k-
an d - f o r t h h o o p m o v e m e n t .
PREPARATION
1. U s e a n e m b r o i d e r y h o o p i ar g e e n o u g h t o
en c o m p a s s t h e e n t i r e d e s i g n .
2. Rem o v e t h e p r e s s e r f o o t .
3. Re m o v e th e t h r o a t p l a t e an d I n s e r t t l ' i c f e e d
co v e r t h r o a t p l a t e .
4. S e t s t i t c h c o n t r o l d i a l t o s e t t i n g a b o v e
STITCHING A MONOGRAM
20.
Ou t l i n e L e t t e r i n g w i t h a R u n n i n g S t i t c h
Fi l l O u t l i n e w i t h C l o s e l y S p a c e d S t i t c h e s
1. A l w a y s m a k e a s a m p l e f i r s t t o f i n d t h e r i g h t
st i t c h l e n g t h a n d s p a c i n g ,
2. T r a c e o r ma r k l e t t e r i n g o n ri g h t s i d e o f
fa b r i c .
3. If f ab r i c I s s o f t o r l o o s e l y w o v e n , a dd a n
un d e r l a y o f c r i s p l a w n o r o r g a n d y .
4. Pl a c e w o r k in em b r o i d e r y ho o p . Be s u r e th e
fa b r i c i s h e l d t a u t .
5. Po s i t i o n v / o r k u n d e r ne e d l e a n d
presser bar to engage tension.
6. Ho l d ne e d l e th r e a d lo o s e l y wi t h le f t h an d ,
tu r n ha n d wh e e l to v ^ a r d yo u a nd br i ng
bo b b i n t h r e a d up t h r o u g h f a b r i c at s t a r t
of d e s i g n . H o l d b o t h th r e a d s a n d l o w e r t h e
ne e d l e i n t o t h e f a b r i c .
7. O u t l i n e l e t t e r i n g w i t h s h o r t r u n n i n g s t i t c h e s .
8. Fil l l e t t e r s wi t h c l o s e l y sp a c e d s t i t c h e s
us i n g a b a c k - a n d - f o r t h m o t i o n .
9. A f t e r l e t t e r s ar e f i l l e d , ou t l i n e ag a i n w i t h a
ru n n i n g s t i t c h .
lov/er the
24
Page 27

darning
Wo r n o r tor n s p o t s o n c h i l d r e n ’ s c l o t h e s , k n i t s ,
an d h o u s e h o l d li n e n s c a n b e d a r n e d ef f o r t
le s s l y an d qu i c k l y wi t h li t t l e pr a c t i c e . Yo u ma y
ch o o s e t o d a r n e i t h e r w i t h o r w i t h o u t an e m
br o i d e r y h o o p . Wh e n g r e a t e r co n t r o l i s ne e d e d ,
tr e e - m o t i o n s t i t c h i n g w i t h a n e m b r o i d e r y h o o p
is u s u a l l y b e s t .
WITHOUT EMBROIDERY HOOP
♦ S t i t ch C o n t r o l : 1 0 t o 1 5
♦ P r e s s u r e :
• T hr o at P l a t e
* Hi n g e d P r e s s e r F o o t
1. I f a r e a t o b e d a r n e d i s o p e n , b a s t e a n u n
2. Pla c e a r e a t o b e d a r n e d u n d e r p r e s s e r f o o t .
3. L o w e r p r e s s e r fo o t a n d st a r t s t i t c h i n g , al t e r
4.
DARN
de r l a y i n p l a c e .
na t e l y dr a w i n g f a b r i c to w a r d yo u an d pu l l
in g i t
gently
a w a y f r o m y o u .
Co n t i n u e th i s f o r w a r d an d ba c k w a r d mo t i o n
as y o u f i l l t h e a r e a w i t h p a r a l l e l l i n e s o f
st i t c h i n g .
WITH EMBROIDERY HOOP
♦ S t i t c h C o n t r o l : A b o v e 2 0
• F e e d C o v e r T h r o a t P l a t e
♦ No p r es s e r l o o t
• P r e s s e r B a r L o w e r e d
1. Tri m r a g g e d e d g e s f r o m a r e a t o b e d a r n e d .
2. Ce n t e r w o r n s ec t i o n i n e m b r o i d e r y h o o p .
3. P o s i t i o n w o r k u n d e r n e e d l e o v e r f e e d c o v e r
pl a t e a n d
tension.
4. Ho l d ne e d l e th r ea d lo o s e l y wi t h le f t ha n d ,
tu r n h a n d whe e l o v e r an d d r a w b o b b i n
th r e a d u p t h r o u g h f a b r i c . H o l d b o t h t h r e a d
en d s a n d l o w e r n e e d l e i n t o f a b r i c .
5. Ou t l i n e ar e a to be da r n e d wi t h ru n n i n g
st i t c h e s f o r r e i n f o r c e m e n t .
6. St i t c h a c r o s s o p e n i n g , m o v i n g h o o p u n d e r
ne e d l e at a sl i g h t an g l e fr o m lo w e r le f t to
up p e r ri g h t . Ke e p li n e s of st i t c h i n g cl o s e l y
sp a c e d a n d e v e n i n l e n g t h .
lower presser bar to engage
Fo r ad d i t i o n a l st r e n g t h , co v e r a r e a wi t h
6.
cr o s s w i s e l i n e s o f s t i t c h i n g .
Darning without Embroidery Hoop
7. Wh e n o p e n i n g is f i l l e d , co v e r a r e a wi t h
cr o s s w i s e l i n e s o f s t i t c h i n g .
Darning with Embroidery Hoop
26
Page 28

cleaning the machine
Yo u r ma c h i n e wi l l ser v e yo u per f e c t l y fo r man y
ye a r s i f yo u ta ke a fe w m ome n t s of you r ti m e
to k e e p i t cl e a n . H o w of t e n y o u wi l l ne ed to
cl e a n t h e ma c h i n e w i l l d e p e n d on h o v / o f t e n
yo u u s e i t .
CAUTION: Before cleaning your machine, dis
connect power-line plug from electrical supply.
Re m o v e l i n t o r f lu f f f r o m e x p o s e d p a r t s . Wi t h a
so f t c l o t h , c l e a n :
♦ Ten s i o n d i s c s , p r e s s e r b a r , a n d n e e d l e b a r
• T a k e - u p l e v e r a n d t h r e a d g u i d e s
♦ B o b b i n cas e (I f th e r e is a lo t o f li nt i n th e
ar e a , r e m o v e bo b b i n c a s e fo r cl e a n i n g . See
pa g e 2 8 f o r i n s t r u c t i o n s . )
• Ma c h i n e s u r f a c e (I f n e c e s s a r y , d a m p e n t h e
cl o t h a n d u s e a m i l d s o a p . )
Op e n t h e f a c e p l a t e an d c l e a n a r e a b e h i nd i t
wi t h a b r u s h .
Re m o v e t h r o a t p la t e a s i n s t r u c t e d o n p a g e 6
an d , u s i n g a b r u s h , c l e a n t h e r o t ati n g h o o k
ar e a u n d e r t h e t h r o a t p l a t e a n d s l i d e p l a t e .
Af t e r c l e a n i n g , a p p l y on l y SI N G E R * oi l a t
po i n t s i n d i c a t e d be l o w . S I N G E R oi l i s sp e c i
al l y p r e p a r e d a n d d o e s n o t c o n t a i n h a r m f u l
de p o s i t s tha t c a n int e r f e r e wit h t h e smo o t h
ac t i o n o f p r e c i s i o n p a r t s .
Ap p r o x i m a t e l y on c e e v e r y ye a r , r e m o v e t o p
an d b o t t o m co v e r s a s in s t r u c t e d on p a g e 27 ,
an d cl e a n an d lu b r i c a t e al l mo v i n g or r o t a t i n g
ma c h i n e c o n n e c t i o n s t o e n s u r e f r e e d o m o f
mo v e m e n t a n d t o p r o t e c t m e t a l p a r t s f r o m
ex c e s s i v e we a r . To d e t e r m i n e wh i c h c o n n ec
ti o n s are mov i n g o r r o t a t i n g , tur n h a n d V v ^h e e l
sl o w l y ( b y h a n d ) w h i l e c o v e r s a r e r e m o v e d .
26
Page 29

removing covers,
bobbin case, and bulb
CA U T i O N i
case, and light bulb, disconnect pov/erdine
plug from your electrical supply,
Before removing covers, bobbin
REMOVING AND REPLACING TOP COVER
Move take-up lever to a low point and lower
the pressor foot,
1. L o o s e n a n d rem o v e s c r e w A, l i f t u p r i g h t
en d of t o p co v e r , an d sl i d e co v e r to w a r d
le f t a n d o f f m a c h i n e ,
2. Re p l a c e c o v e r b y po s i t i o n i n g i t on t o p of
ar m w i t h a
3. E n g a g e bo b b i n w i n d e r la t c h an d s l i d e co v e r
to the rig h t
se c u r e l y t i g h t e n s c r e w A .
4. Re l e a s e b o b b i n w i n d e r l a t c h .
slight
o v e r h a n g o n l e f t s i d e ,
as far as It will go.
R e p l a c e a n d
REMOVING AND REPLACING BOTTOM COVER
If your machine Is a portable, first remove the
carrying case base as instructed below,
Removing and Replacing Top Cover
t
1. Ti l t m a c h i n e b ack a n d re m o v e s c r e w s fr o m
ce n t e r of bo t t o m co v e r . Pu l l co v e r st r a i g h t
up ( p a r a l l e l t o m a c h i n e b e d ) t o r e m o v e .
2. R e p l a c e bo t t o m c o v e r by po s i t i o n i n g s l o t s
in c o v e r o v e r b e d c u s h i o n p i n s a t t he f o u r
co r n e r s o f th e m a chi n e be d . P u s h do w n on
co v e r t o sn a p i t i n t o pl a c e . R e p l a c e a n d
ti g h t e n s c r e w i n c e n t e r o f c o v e r .
REMOVING AND REPLACING CARRYING CASE BASE
1. D i s c o n n e c t m a c h i n e p l u g f r o m e l e c t r i c a l
re c e p t a c l e a t r i g h t e n d o f m a c h i n e ,
2. T u r n ma c h i n e ov er on it s ba c k a nd r emo v e
sc r e w s an d w ash e r s fr o m ea c h en d o f b a s e .
Se t mac h i n e and bas e upr i g h t a n d lif t ma
ch i n e u p a n d o u t o f b a s e .
3. R e p l a c e m a c h i n e in b a s e a f t e r bo t t o m c o v e r
ha s be e n at t a c h e d . Tu r n m a c h i n e an d base
ov e r tog e t h e r to r e p l a c e was h e r s a n d
sc r e w s o n u n d e r s i d e . T i g h t e n s c r e w s .
Removing and Replacing Bottom Cover
Retaining Screv/s and Washers
0
0
Carrying Case Base
27
Page 30

Lift and Slide
Position Bracket
Y
:z.‘
.:■ ■ •• -.. Vs V.X- ‘■ •■ ■ ■ ii--
V
REMOVING THE BOBBIN CASE
im Out
Bobbin Case
Removing Bobbin Case
1. Tu r n h a n d w h e e l t o w a r d y o u t o r a i s e t a k e -
up l e v e r t o I t s h i g h e s t p o s i t i o n ,
2. O p e n s l i d e p l a t e , r e m o v e t h r o a t p l a t e { s e e
pa g e 6 f o r i n s t r u c t i o n s ) , a n d r e m o v e b o b b i n .
Positioning Stud
Slip Bobbin Case
into Hook Channel
Push Position
3. L i f t t h e p o s i t i o n b r a c k e t a n d s l i d e i t t o t h e
ri g h t .
4. Re m o v e b o b b i n c a s e b y t v ^ i s t i n g c a s e a s
sh o w n , a n d l i f t i n g i t o u t .
REPLACING THE BOBBIN CASE
1. T u r n h a n d wh e e l t o ra i s e ta ke - u p le v e r t o
it s h i g h e s t p o i n t .
2. Re p l a c e bob b i n cas e so tha t gro o v e und e r
te n s i o n s p r i n g f i t s on h o o k r a c e w a y a n d
fo r k of ca s e st r a d d l e s po s i t i o n i n g st u d
un d e r f e e d d o g .
3. T w i s t b o b b i n c a s e t o l e f t .
4. P u s h p osi t i o n br a c k e t t o le f t un t i l it sn a p s
do w n , l o c k i n g b o b b i n c a s e i n p l a c e .
5. Re p l a c e b o b b i n an d t h r o a t p l a t e; c l o s e s l i d e
pl a t e .
28
Replacing the Bobbin Case
Page 31

REPLACING THE SLIDE PLATE
You will not have any occasion to remove the
slide plate. Hov^ever, If it should accidentally
become disengaged from the machine, it is
easily replaced,
* Raise the presser foot and make sure needle
is in its highest position.
♦ Place slide plate in slide way with the front
edge close to, but not covering, the retaining
spring (as shown).
• With a small screwdriver, lift each end of the
spring into each of the side grooves on the
underside of the plate.
• Drav^' the plate gently toward you and fully
engage the spring.
♦ Close slide plate.
CHANGING THE LIGHT BULB
Make sure you have disconnected powertine plug from electrical outlet.
Removing Bulb. With thumb of right hand,
push in and down on tab of light lens and
lower the light bracket.
unscrev/ the bulb.
Do not attempt to
Press it up Into the
Replacing the Slide Plate
socket and at the same time turn bulb over
in direction shown to unlock bulb pin.
Replacing Bulb. Press
new
bulb into sock
et, with bulb pin entering slot of socket,
and turn It over In direction shown to lock
bulb in position. Push entire assembly up
until it snaps in position.
/ /'
Unlocks
29
Page 32

performance checklist
IF MACHINE FAILS TO START
• Are electrical plugs properly comiecled?
• Is power and light switch on?
REMEMBER TO
♦ Use a ball-point {yellow band) needle to
sew nylon tricot and synthetic double
knits.
• Use high-lift pressor bar setting to place
heavy fabric under presser foot.
♦ Start and finish sewing with take-up
lever in its highest position.
♦ Adjust stitch length, pressure, and
thread tension to suit your fabric.
♦ Test stitch on a fabric sample before
starting a sewing job.
♦ Replace bent or burred needles.
♦ Lower presser foot before setting pres
sure dial.
• Tighten hand wheel knob after winding
a bobbin.
• Remove feed cover throat plate after
free-motion darning or embroidery.
* Sew at a moderate speed
setting) when using the straight stretch
stitch.
(SLOW
speed
IF THREAD BREAKS
♦ Is the machine properly threaded?
♦ Is the bobbin case properly threaded?
♦ Is thread unwinding freely from spool?
♦ Is the needle securely tightened in the
needle clamp?
♦ Is the needle straight?
♦ Is the thread suitable for the size of the
needle and free of slubs and knots?
♦ Is the spool pin felt being used under
the thread spool?
♦ Is the needle-thread tension too tight?
♦ Is the bobbin-thread tension too tight?
♦ Is the bobbin-case area free of lint and
loose thread ends?
♦ Are the thread guides and tension discs
also free of lint?
IF FABRIC FAILS TO FEED
♦ Is the presser foot dov^n?
♦ Is pressure dial adjusted properly for
the weight and texture of your fabric?
♦ Is the stitch control dial properly set?
♦ Are you using the feed cover throat plate
instead of the regular throat plate?
30
If you have any questions, please write to:
Department of Sewing Education
The Singer Company
30 Rockefeller Plaza, New York, N.Y. 10020
Page 33

special accessories for special jobs
Fashion
the versatility of your sewing machine and
able
Buttonhoier
With this accessory, you can stitch straight or
eyelet-end buttonholes, plus eyelets for lacing
and studs, in a fraction of the time required by
other methods. Buttonholes can be sewn in
nine different lengths, from Vu of an inch to
B/u inches.
Binder Foot
The binder foot is used to apply ready-made
bias tape or unfolded bias binding to an un
finished edge. It can also be useful for binding
seam edges that might ravel.
Quilting Foot
The quilting foot is especially well adapted to
stitching lightly padded fabrics. It is excellent
for the placement of straight stitching in
block, floral, or scroll designs. This short, open
foot permits following curved lines with ease
and accuracy.
Aids have been designed to increase
en
you to give your sewing that extra pro
No. 489500 Darning and Embroidery Foot No. 161875
No. 81200 Edge Stitcher
No. 160691
fessional touch. The ones described below
are just a few of the complete selection avail
able at your local Singer Sewing Center.
This foot is recommended for all types of treemotion work. It is ideal for monogramming and
decorative designs because the transparent
toe fully reveals the line of the design to be
followed.
No. 160625
This accessory is ideal for the joining and in
serting of lace, tucking from pin width up to
Va
facing, and seam finishing.
Finger Guard
The finger
tecting fingers from the needle. It is ideal for
the student, beginner, or the blind person. A
permanently mounted, swing-av/ay type, No.
22663, is available on special order.
inch, French seaming and seam piping,
No. 161681
guatò
provides extra safety by pro
Büffler
This accessory offers a simple, effective way
to make gathered and pleated ruffles. Ruffles
can be made separately or made and applied
at the same time.
No. 161561
Hemmer Foot
Narrow hems can be turned and stitched in a
single operation if you use the hemmer foot.
Thus, you can eliminate basting or pinning.
No. 161195
31
Page 34

INDEX
Accessories ................................................................... 4
Adjusting Dials
Basting
Bobbin................................................................ 4, 9, 13
Bobbin Case.............................................................. 11, 28
Caring for Your Sewing Machine
Choosing Needle and Thread......................................... 8
Corded Seams
Curved Seams............................................................... 20
Darning
Electrical Connections.................................................... 7
Ending a Seam .............................................................. 20
Fabric, Thread and Needle Table................................... 8
fashion Aids
Guiding and Supporting Fabric
..........................................................................
Raising Bobbin Thread............................................. 13
Winding
Removing Bobbin Case ........................................... 28
Replacing Bobbin Case
Threading Bobbin Case
....
............................................................
.......................................................................
............................................ 28
..........................................
.................................
.............................................................
..................................................................... 26
...............................................................
............ 18, 21
14
17
11
26
23
31
9
Placing Fabric....................................................... 17
Power and Light Switch ........................................... 7
Presser Feet............................................................. 6
Changing Presser Feet
........................................
5
Hinged Presser F’oot............................................ 5
Zipper Foot
Pressure Adjustment
...................................................
..............................................
5, 23
15
Principal Parts..................................................... 2, 3
Reverse Stitching
Seams
............................
Corded
Curved
............................................................
...............................................................
.........................................
17, 18. 19, 20, 21, 22, 23
16, 18
23
20
Lingerie .............................................................. 22
Straight .............................................................. 19
Stretch
..............................................................
22
Seam Guide.............................................................. 6
Sewing Knit and Stretch Fabric.............................. 21
Slide Plate ............................................................. 29
Starting a Seam .................................................... 18
Stitch Control Dial................................................... 14
Keeping Seams Straight............................................... 19
Light Bulb
Monograms and Decorative Designs
Needle ........................................................................ 4, 12
Replacement ............................................................... 4
Threading................................................................... 12
Operating Machine and Controller
Performance Checklist
....
................................................................. 29
..........................
................................
...............................................
24
30
32
Thread Tension Adjustment
...
............................... 16
Bobbin Thread ................................................. 16
Needle Thread.................................................... 16
Throat Plate
..........................................................
6
Changing Throat Plate.......................................... 6
Feed Cover Throat Plate....................... 6, 24, 25
7
Turning Square Corners....................................... 19
Zippers ................................................................ 23
Page 35

GUARANTEE
WE GUARANTEE that each SINGER* sewing machine has
been carefully manufactured and is in perfect operating condilion on delivery. When subject to normal family use and
care, any parts requiring replacement at any time owing to
defects in material or workmanship will be replaced without
charge.
THIS GUARANTEE does not apply to parts requiring replace
ment owing to natural wear or to abuse or negligence of the
user or in the event the machine is serviced by other than a
SINGER representative or Approved Dealer or with parts
other than those supplied by The Singer Company,
IN ADDITION to the above guarantee of
will be inspected and adjusted whenever necessary v/ithout
charge for labor for a period of one year from date of pur
chase,
THIS GUARANTEE is effective only with respect to the person
making the purchase from The Singer Company or one of its
Approved Dealers, The original Sales Agreement, or Cash
Receipt, must be
guarantee,
AGREEMENTS inconsistent with the foregoing shall be void
and of no effect,
presenlod
to obtain the benefits of the
parís,
each machine
THE SINGER COMPANY
Page 36

flXr:l l'uniljnlüj
E:verything you need lo sew up fasiiion
is at a neart)y Singer Sewing Center.
!-abulous fabrics plus matcliing thread,
zippers, and all the trimmings that
add up to fashion excitement.,, special
sewing aids like buttonhoiers and
rnonogrammers to give your clothes a
designer touch,.. pamphlets and
books to tell you how to sew like a pro
... all these and many more products
for girls who like to sew are always
available at Singer. And if you need any
sewing help, Singer experts are always
glad to supply advice and suggestions.
 Loading...