

Page 1
: : : x : ли™
' , л, "л
<Г^ '' уу ™Лл
'' ' л'л --V' ' "^OiOiSi л 'Хо- л Í ' Лл^ л
хЖа f'^
'^MÇ-x.'V ™У^'^ллГл;7 ,,л I
■■ л- ®
"%■ 'л '
''Ví;¡C';Tí:"-:7,”Í
■ ' лч> .V ."Л- ^ ^ г г г
л^ ^Л XX
X л ' "ЛЛЛ^ л-Í^í,™?^ ^ л : л, „л
" 'л' '-' ' '"
/Г ^'1 '/
SSWWWWWSÍÍ
■
'хуххххх' ''х„у 'ху ху X у ху
«ÿ:*K-:w:r»*KK*»B
■^Sйíй:
Х-УХ-У-- ' ^ ^
' 'л'^ '""х'^'х'х' "'xxf' 'х' X Ш.
"ЧЛ
‘^V/xx^xxV^ ху
^ .«w^ ,Л<Чч /л> Й? jA/^ /. '" / ^/««^■■■■х>Н> v^«» /'^jw^/fr^ / ^
y X хХххУххухХхххУ ^ ху y^ y xy 'хуххУУХ, y x-x¡. x^ <>^ %ххУу ''хуууУ' ху x x xx
dV4444sy4^
gjiifeasssssssÿsssss!
Siiÿi««
rSWKWíKÍ^^
г Ф/%й.
Ml
л; л яг;;
^ г
г г Х" ■■
'™ Н:
jÿ «««4W
■■■■ AV Ф
^ ■■ф ■■ ■■
f г ^ ÿ^ Л- ■'
"'Tjr'':'^f;f
, x^'yf^xx
гЯ'^'
Page 2

Zig-Zag & STRETCH Sewing Machine by SINGER
Congratulations...
The new Zig-Zag & STRETCH model 714 sewing machine you are about to
use will take you into a wonderful new world of sewing. In addition to the
familiar Singer exclusives — Slant Needle and Front Drop-in Bobbin — this
sewing machine offers you:
• the simplicity of dial controls. Now you can simply dial a stitch length,
a stitch width, pressure and tension settings
• built-in stitch patterns, which let you produce a straight stitch and a
variety of zig-zag patterns by simpiy turning a dial, plus Flexi-Stitch*
patterns for stitching knit and stretch fabrics and producing intricate
stitch designs
• exclusive built-in threading chart that flips open to keep an easy-to-
follow diagram at your fingertips
• one-way needle clamp that makes it impossible to insert the needle
backwards
• stitch control dial that lets you switch from regular to s-t-r-e-t-c-h
stitching
• guidelines on both sides of the throat plate, which help you keep seams
straight
• convenient power and light switch that gives you a choice of two
speeds
• easy throat plate changing — throat plate secured by magnets is easy
to lift out for cleaning.
• three-position presser foot lifter that lets you place bulky fabric or
many fabric layers under the presser foot
• built-in sewing light that illuminates the sewing area
Your SINGER sewing machine is the key to your sewing success when used
properly. To achieve professional results, SINGER suggests you sit down
at your machine and go through this book step by step before you begin to
sew. You’ll discover all the many advantages of sewing with your ZigZag & STRETCH sewing machine.
Enjoy sewing!
SINGER* Service is always close at hand. If your machine should need
servicing, call your local SINGER Sewing Center to be sure of warranted
SINGER Parts and Service. You wiil find the address in the telephone direc
tory under SINGER COMPANY.
Copyright © 1973 THE SINGER COMPANY
All Rights Reserved Throughout the World
Page 3

CONTENTS
1. Getting to Know Your Machine.................................................................................................................... 2
Principal Parts and What They Do.......................................................................................................... 3
Accessories ............................................................................................................................................. 4
2. Getting Ready to Sew................................................................................................................................... 7
Preliminary Steps ................................................................................................................................... 7
Choosing Needle and Thread................................................................................................................. 8
Threading the Machine........................................................................................................................ 10
Winding the Bobbin • Threading the Bobbin Case • Threading the Needle • Raising the
Bobbin Thread
3. Straight Stitching ...................................................................................................................................... 14
Preparation .............................................................................................................................................. 14
Starting to Sew ....................................................................................................................................... 14
Adjusting for Your Fabric...................................................................................................................... 15
Sewing a Seam ....................................................................................................................................... 17
Pin Basting • Placing Fabric • Starting a Seam • Guiding and Supporting Fabric •
Keeping Seams Straight • Turning Square Corners • Curved Seams • Reinforcing End
of Seam
4. Ali about Zig-Zag Stitching...................................................................................................................... 21
Two Kinds of Zig-Zag Stitches.............................................................................................................. 21
Adjusting Dials ................................................................................................................................... 22
Setting Pattern Dial • Adjusting Stitch Placement • Adjusting Width of Design»Adjusting
Needle-Thread Tension • Adjusting Stitch Length
Satin Stitching
............
............................................................................................................................ 24
5. Buttons and Buttonholes.......................................................................................................................... 25
Buttons .................................................................................................................................................... 25
Buttonholes ............................................................................................................................................. 26
6. Sewing the Professional Way.................................................................................................................... 28
Construction Details .............................................................................................................................. 28
Zippers • Blindstitch Hems • Corded Seams • Seams in Fabrics That Ravel
Sewing Knit and Stretch Fabric............................................................................................................ 32
Stretch Stitch Chart • Guiding and Supporting Fabric • Finishes for Hems and Facings
• Plain Stretch Seams • Lingerie Seams • Overedged Seams • Mock Overedging
Hints on Sewing Special Fabric........................................................................................................... 36
Leather-Look Vinyl • Ciré • Deep-Pile Fabrics • Velvet and Velveteen
Decorative Touches
Border Designs • Applique
Keeping Up Appearances..................................................................................................................... 39
Mending a Tear • Blanket Binding • Repairing Seams • Repairing Stretch Garments •
Darning
7. Caring for Your Machine............................................................................................................................. 42
Cleaning the Machine............................................................................................................................. 42
Removing Covers, Bobbin Case, and Bulb
Performance Checklist.......................................................................................................................... 46
8. Fashion* Aids .......................................................................................................................................... 47
Index
.................................................
...
....................................................................................................................... 38
.....................................................................................
................................................................................................... 48
43
Page 4
■.■АУЛХ.?.ЧУЛ?ЛХЛУЛ?.?.?Лу.»
Page 5

principal parts and what they do
1. Stitch Pattern Dial can be set to produce
a smooth straight stitch or a practical (and
decorative) zig-zag stitch.
2. Tension Dial lets you select Just the right
tension for your stitch, thread, and fabric.
The numbers eliminate guesswork
plicating settings.
3» Tension Discs, controlled by the tension
dial, regulate the amount of tension on
your needle thread,
4. Bobbin Winder Tension Discs regulate
thread tension for bobbin winding.
5. Take-up Lever controls flow of needle
thread.
Pressure Dial regulates presser-foot pres
sure on fabric. It has an all-purpose sew
ing setting plus settings for extra-light and
extra-heavy pressure and for darning.
7. Face Plate swings open for access to
threading chart and pressure dial.
8. Thread Cutter is built into presser bar for
safety and convenience.
9. Presser Foot holds fabric against feed.
10. Feed moves fabric under the presser foot.
In du
17. Needle Position Dial places needle in
either L (left), A (center) or R (right)
stitching position.
18. Stitch Width Dial controls the width of
zig-zag stitching and positions the needle
for straight stitching.
19- Stitch Control Dial allows for a variety of
stitch lengths; also has a special STRETCH
setting for straight or zig-zag stretch
stitching,
20. Reverse-Stitch Lever instantly reverses
stitching direction at the touch of your
finger,
21. Built-in Sewing Light illuminates sewing
area. Pull-down bracket makes It easy to
replace bulb.
22. Needle Clamp is designed to make needles
self-setting and eliminate the possibility
of inserting needle backwards.
23. Slide Plate, opens easily, lets you see
bobbin. Seam guidelines (extended from
throat plate) have cross lines to help you
turn square corners.
11. Throat Plate, secured by magnets, lifts out
for removal. Guidelines on right and left
sides of plate help you keep seams straight.
12. Spool Pin holds spools of various sizes.
13. Bobbin Winder Latch and Spindle let you
fill bobbin quickly and easily. Latch dis
engages when bobbin is full.
14. Bobbin Winder Thread Post guides the
thread when winding the bobbin.
15. Hand Wheel controls movement of take-up
lever and needle. Alv/ays turn it toward
you.
18. Power and Light Switch turns on machine
and sewing light simultaneously. FAST and
SLOW speed range settings let you choose
the best sewing speed for your work.
24. Presser-Foot Lifter, at back of machine,
allows you to raise and lower presser foot.
Extra-high lift position permits easy place
ment of bulky fabrics.
25. Bobbin shows thread supply, is easily re
moved for winding.
26. Bobbin Case Tension Screw regulates
bobbin-thread tension. Seldom needs ad
justment,
27. Electrical Connections and Speed Con
troller are designed for your convenience
and safety.
28. Hand Wheel Knob engages hand wheel to
sewing mechanism. Loosen knob for bob
bin winding.
Page 6
accessories
The accessories that come with your sewing
machine are designed to help you do many
kinds of sewing easily and perfectly.
To increase the versatility of your machine still
iurther, additional accessories can be pur
chased at your Singer Sewing Center. For de
scriptions, see page 47.
1, BOBBINS
Bobbirt
(Ho. iraaaa)
Changiiig the Needle
Regular Balî«Poinî
Needle Needle
CCataoao) (Catao4S)
• One 6rop-m steel bobbin in your machine.
• Extra drop-in steel bobbins with your acces
sories.
2. NEEDLES
In place in your machine ~~
• Catalog 2020 (15x1)
With your accessories —
• Catalog 2020 (15x1) needles, for all-purpose
sewing.
• Catalog 2045 ball-point (yellow band)
needles, for sewing synthetic knits and
stretch fabrics.
Changing the Needle
The needle clamp has been designed so that
the needle can only be inserted with the flat
side of the shank toward the back.
1. Raise needle bar to its highest position,
loosen needle-clamp screw, and remove
needle,
Tension Screwdriver
2. Insert new needle in clamp, with the flat
side of the needle to the back, and push
it up as far as it will go,
3. Tighten needle-clamp screw.
3. TENSION SCREWDRIVER
Designed to fit the bobbin case tension screw,
this screwdriver makes adjustment of bobbinthread tension quick and easy. (For instruc
tions on bobbin-thread tension adjustment, see
page 16.)
Page 7
4. ZIG-ZAG FOOT AND THROAT PLATE
The zig-zag foot and the zig-zag throat plate
are in place on your machine, ideal for all util
ity sewing, these fittings can be used for either
straight or zig-zag stitching. Always use them
together when alternating between straight
and zig-zag stitching.
5. STRAIGHT STITCH FOOT AND
THROAT PLATE
The straight stitch foot and the straight stitch
throat plate are used when your fabric or sew
ing procedure requires close control Espe
cially useful for:
• Precision stitching of curved and scalloped
edges, topstitching, edge stitching, etc.
♦ Stitching on delicate or spongy fabrics, syn
thetics, and knits.
6. ZIPPERFOOT
The zipper foot is used to place stitching close
to a raised edge. Thus, it is as useful for corded
seams and tubular cording as it is for zipper
Insertion (page 28), It can be adjusteb to either
the right or left side of the needle and may be
used with the straight stitch or zig-zag throat
plate.
7. OVEREDGE FOOT
Zipper Foot
Overedge foot, used with overedge stretch
stitch, enables you to produce flexible over
edged seams and edge finishes. It is particu
larly useful in construction of garments made
of knit, stretch, and elastic fabric.
Changing Presser Foot
1. Raise needle to its highest position and
raise the presser foot,
2. Loosen presser foot screw and remove the
foot.
3. Hook new foot around the presser bar and
tighten presser foot screw.
Presser Foot
Screw
Changing Presser Foot
Page 8
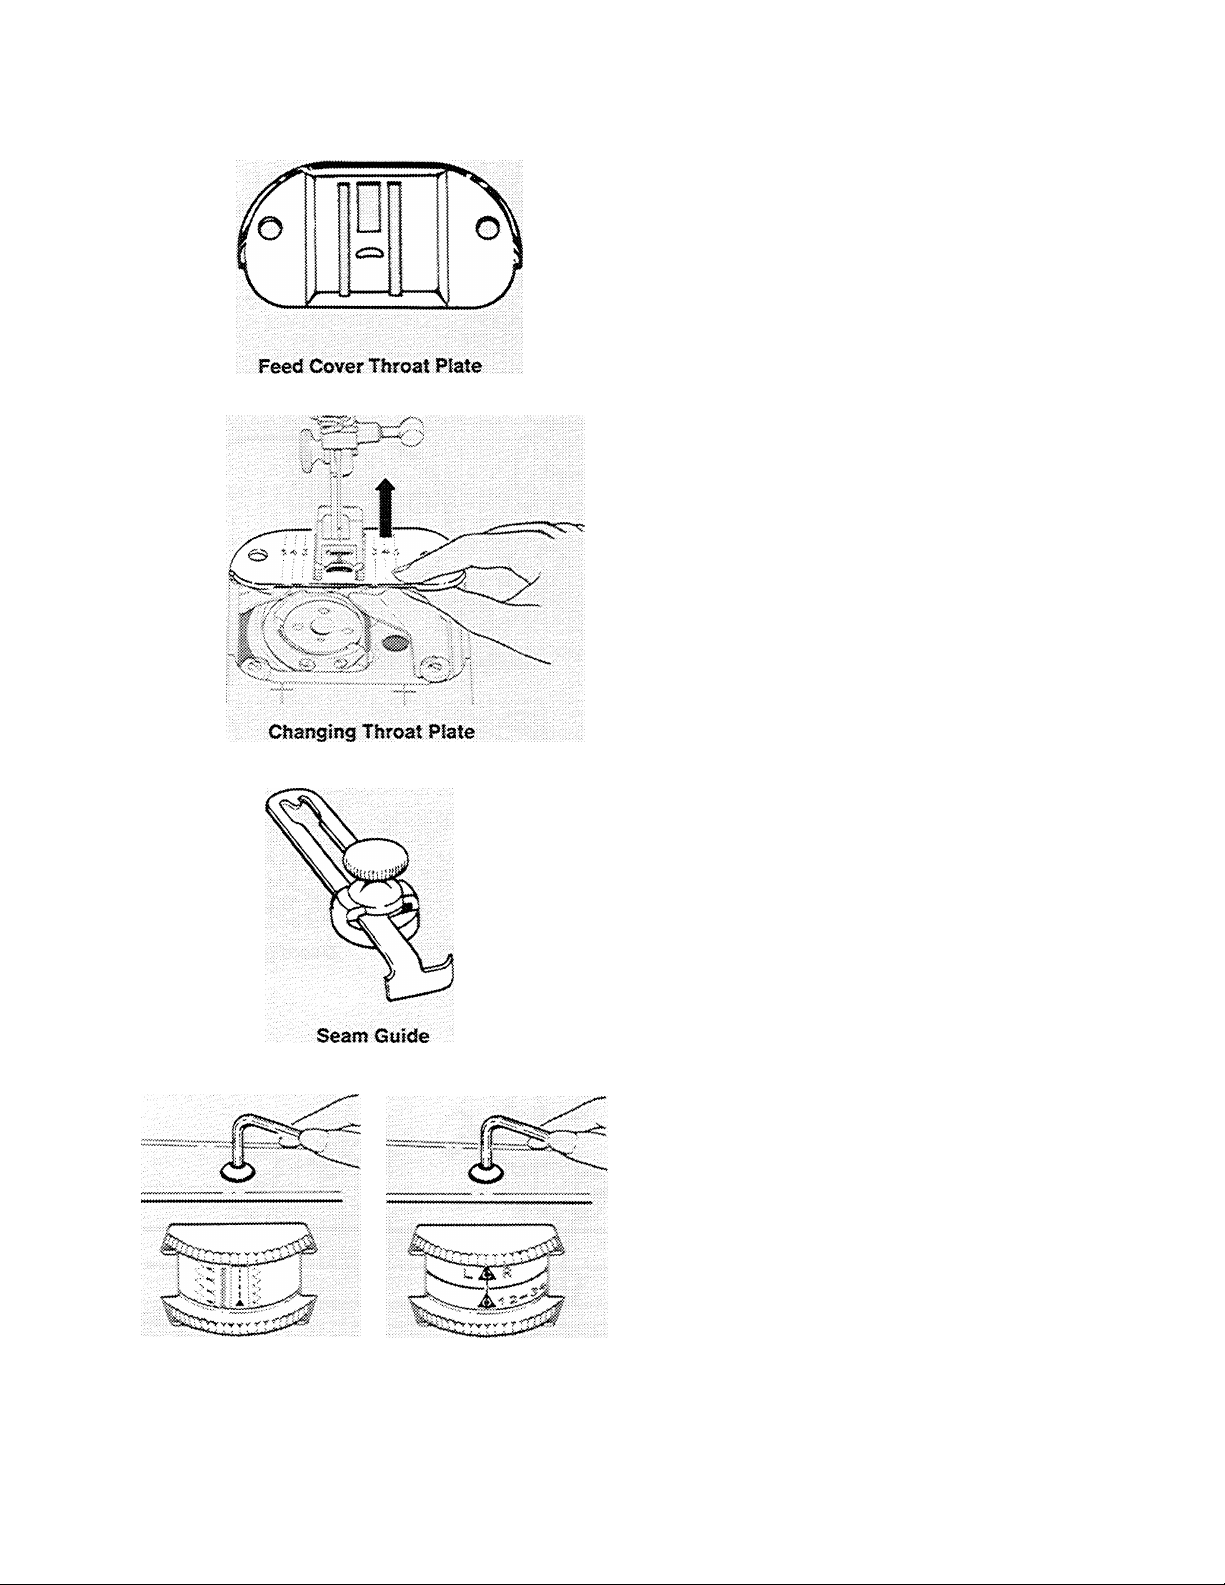
8. FEED-COVER THROAT PLATE
The feed cover throat plate replaces the throat
plate when fabric feeding is not desired. Use it
for button sewing (page 25) and free-motion
darning (page 41).
Changing Throat Plate
(NOTE: Remove bobbin if it contains thread in
order to prevent thread being caught when
throat plate is replaced.)
1. Raise needle to its highest position and
raise presser foot.
2. Open slide plate. Remove throat plate by
placing thumb under plate and lifting it up
and out.
3. Position new plate over the two pins and
release. (Throat plate is drawn into position
by magnets.)
4. Close slide plate,
a SEAM GUIDE
straight Stitch Locking Key
The seam guide will help you to stitch seams of
perfectly uniform width. It 1$ especially useful
for curved seams or topstitching, when ab
solute accuracy is required. Also, because it
allows you to guide stitches at any distance
between 1/8 inch (3mm) and 1-1/4 inches
(32mm) from fabric edge, it is useful for very
narrow or unusually wide seams.
Attaching the Seam Guide
Place screw in hole to the right of the slide
plate; line up straight edge of guide with the
throat plate guideline for desired seam width,
and tighten screw.
10, STRAIGHT STITCH LOCKING KEY
The locking key furnished with your acces
sories is used to remove the pins that lock the
dial controls for straight stitching in center
needle position. Insert key into locking pin and
turn key counterclockwise to remove pin. To
‘lock” the m.achine in straight stitch position,
set dials at A , A and i . insert pins from
top through dials and turn key clockwise.
Page 9
Z. GETTING READY TO SEW
preliminary steps
1. CONNECTING MACHINE
Before plugging in your machine, be sure that
the voltage and number of cycles indicated at
the right end of the machine, or on the inside
of the face plate, conform, to your electrical
power supply.
To connect machlm, push the machine plug
into the plug receptacle.Then Insertthe power«
line plug into your electrical cutlet
2. OPERATING MACHINE AND
CONTROLLER
To turn on both the machine and sewing light
and set speed range, slide the power and light
switch to the selected range.
♦ The FAST setting allows for full speed ca
pacity of the machine. It Is best for long,
straight seams, easy-to-handle fabrics, and
general sewing where a variety of speeds
is needed.
Power-Line Plug
Electrical Connections
for Household Machine
FA.3T OFF 3L.OW
• The SLOW setting allows for maximum con
trol at lower sewing speeds. Use this setting
for special jobs such as button sewing,
buttonhole making, and where construction
details require close controL
CAUTION: We recommend that you turn oft
the power and light switch before changing
needles, presser feet or throat plates and v/hen
leaving the machine unattended. This elimi
nates the possibiiity of starting the machine by
accidentally pressing .the speed controller.
To run the machine, press the speed controller
(or knee lever). The harder you press, the
faster the machine will sew within the selected
speed range.
F>OW3FR ^ L.ÍOFÍX
Power and tight Switch
Page 10

choosing needle and thread
The needle and thread you choose whf depend
upon the fabric being stitched. The table be
low is a practical guide to needle and thread
FABRIC, THREAD AND NEEDLE TABLE
FABRIC THREAD
DELICATE — tulle, chiffon, fine lace, or
ganza
LIGHTWEIGHT — batiste, organdy, jersey,
voile, taffeta, crepe, chiffon velvet, plas
tic film
MEDIUM WEIGHT — gingham, percale,
pique, linen, chintz, faille, satin, fine cor
duroy, velvet, suitings, knits, deep pile
fabrics, vinyl
Fine mercerized cotton
selection. Refer to it before starting a sewing
project Be sure to use the same size and type
of thread in both needle and bobbin.
NEEDLES
TYPE
CATALOG
Fine synthetic thread
50 mercerized cotton
silk
Synthetic thread
Polyester core/cotton
50 mercerized cotton
60 cotton
^‘A'^ silk
Synthetic thread
Polyester core/cotton
2020
(15x1)
CATALOG
2020
(15x1)
CATALOG
2020
(15x1)
SIZE
0
11
14
MEDIUM HEAVY — gabardine, tweed, sail
cloth, denim, coatings, drapery fabrics,
vinyl, deep pile fabrics
HEAVY — overcoatings, dungaree, uphol
stery fabrics, canvas
WOVEN FABRICS (ALL WEIGHTS) -decorative straight-stitch topstltching
SYNTHETIC KNITS AND STRETCH FAB
RICS — polyester doubleknit, nylon tri
cot, Jersey, spandex, ciré tncoi. panne
velvet
LEATHER *-suede, kldskin. capeskin,
lambskin, lined leathers
tUse with 50 mercerized cotton or ''A” silk
Heavy-duty
mercerized cotton
40 to 60 cotton
Synthetic thread
Heavy-outy
mercerized cotton
24 to 40 cotton
Synthetic thread
^^D^^silkf
(Buttonhole twist)
50 mercerized cotton
Polyester core/cotton
50 mercerized cotton
Synthetic thread
‘^A’’ silk
Polyester core/cotton
in bobbin
nylon
silk
CATALOG
2020
(15x1)
CATALOG
2020
(15x1)
CATALOG
2020
(15x1)
CATALOG
2045
Ball Point
(Yellow Band)
CATALOG
2032
(15x2)
16
18
18
14
11
14
16
Page 11
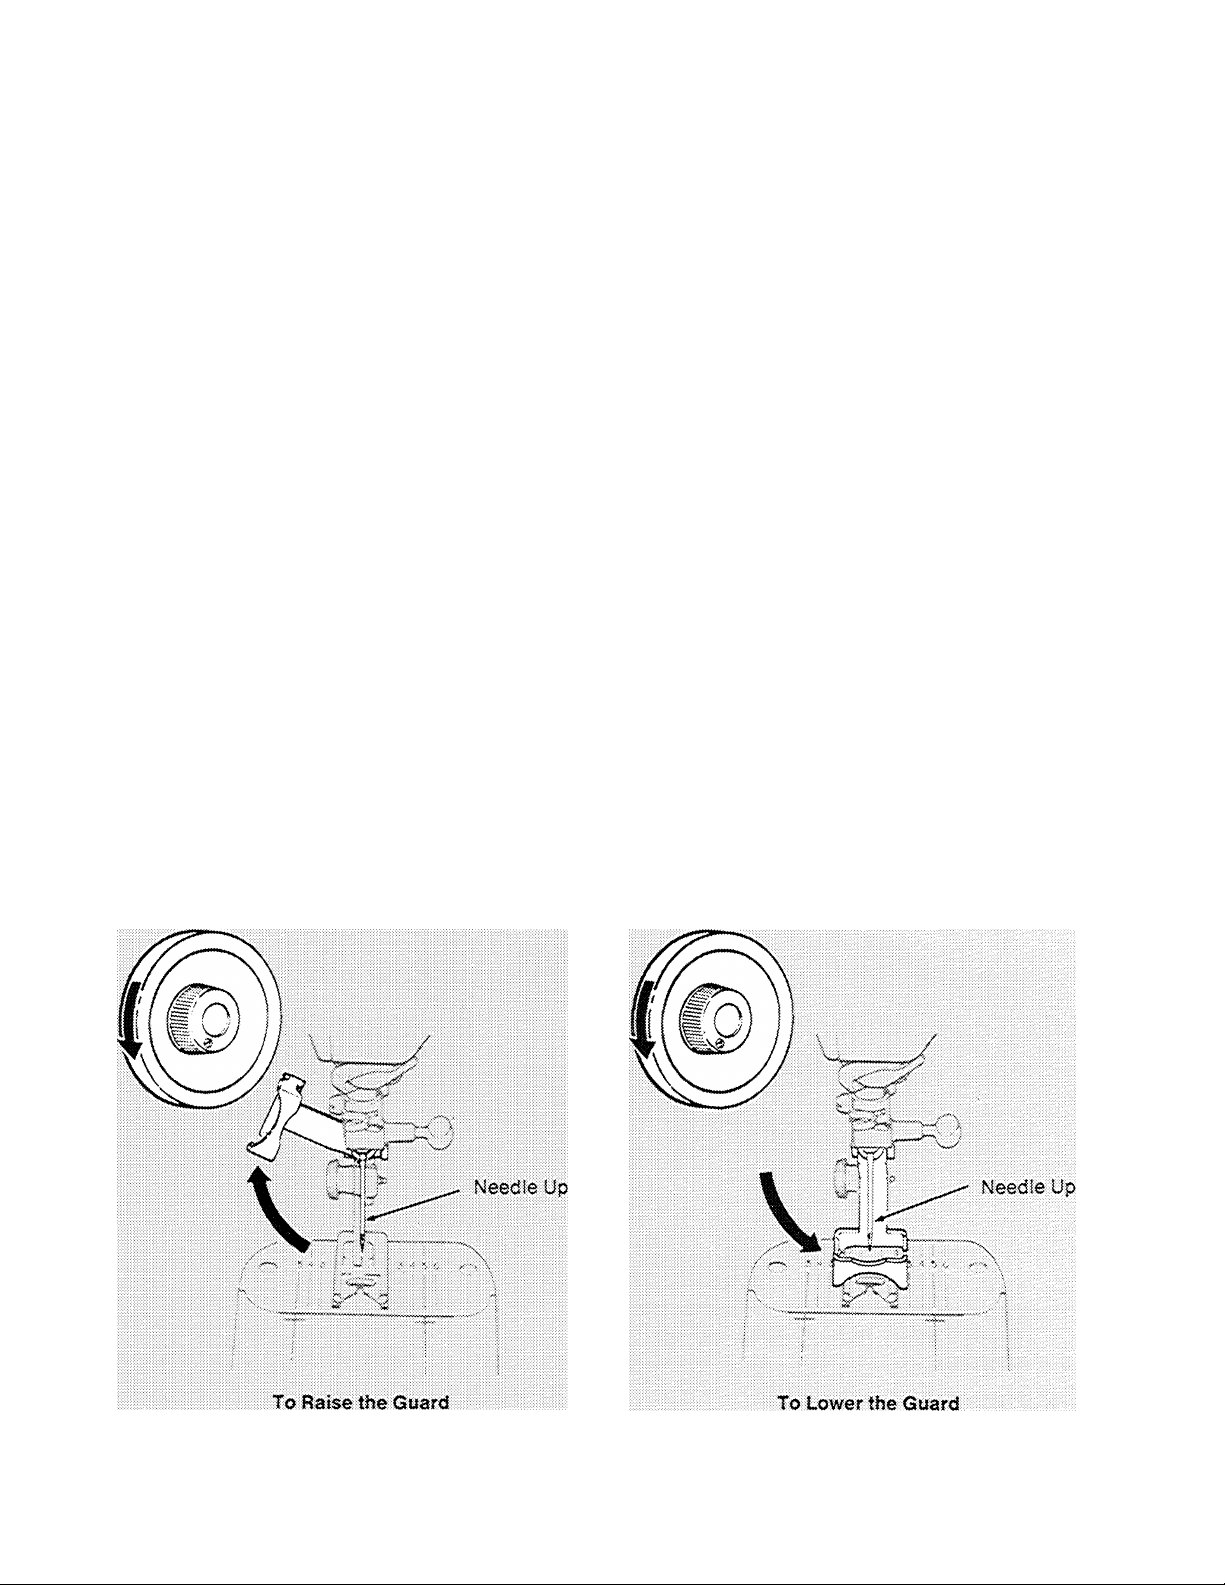
INSTRUCTIONS FOR USING THE FINGER
GUARD
{Furnished with classroom machines,)
Positioning the Guard
Before raising or lowering the guard, turn off
the power and light switch. This will avoid the
possibility of accidentally starting the machine
while the needle is unguarded.
Raising the Guard
To thread and replace the needle and change
the presser foot:
# Position the needle above the throat plate
by turning the hand wheel toward you,
• Swing the guard out to the left and raise it
to the position shov/n.
Lowering the Guard
For sewing and bobbin winding:
♦ Position the needle above the throat plate
by turning the hand wheel toward you.
•
• Swing the guard down and position it as
far to the right as it vnil go.
Using the Guard
The finger guard can be used with all of the
accessories supplied with your machine and
many of the Special Accessories available at
your local Singer Sewing Center. The standard
sewing procedures outlined in this instruction
manual should be used, except as noted below,
SPECIAL REQUIREMENTS
Darning with an Embroidery Hoop
When using the feed cover throat plate for
darning with an embroidery hoop, as explained
on page 41, swing the finger guard out of the
way. For hoop darning v/ith the finger guard,
use the general purpose or straight stitch
throat plate. Follow the same sewing pro
cedure with all plates.
Using the Seam Guide
To avoid the possibility of interference be
tween the finger guard and the seam guide,
lower the finger guard and the presser foot
before positioning and securing the seam
guide to the machine.
Page 12
threading the machine
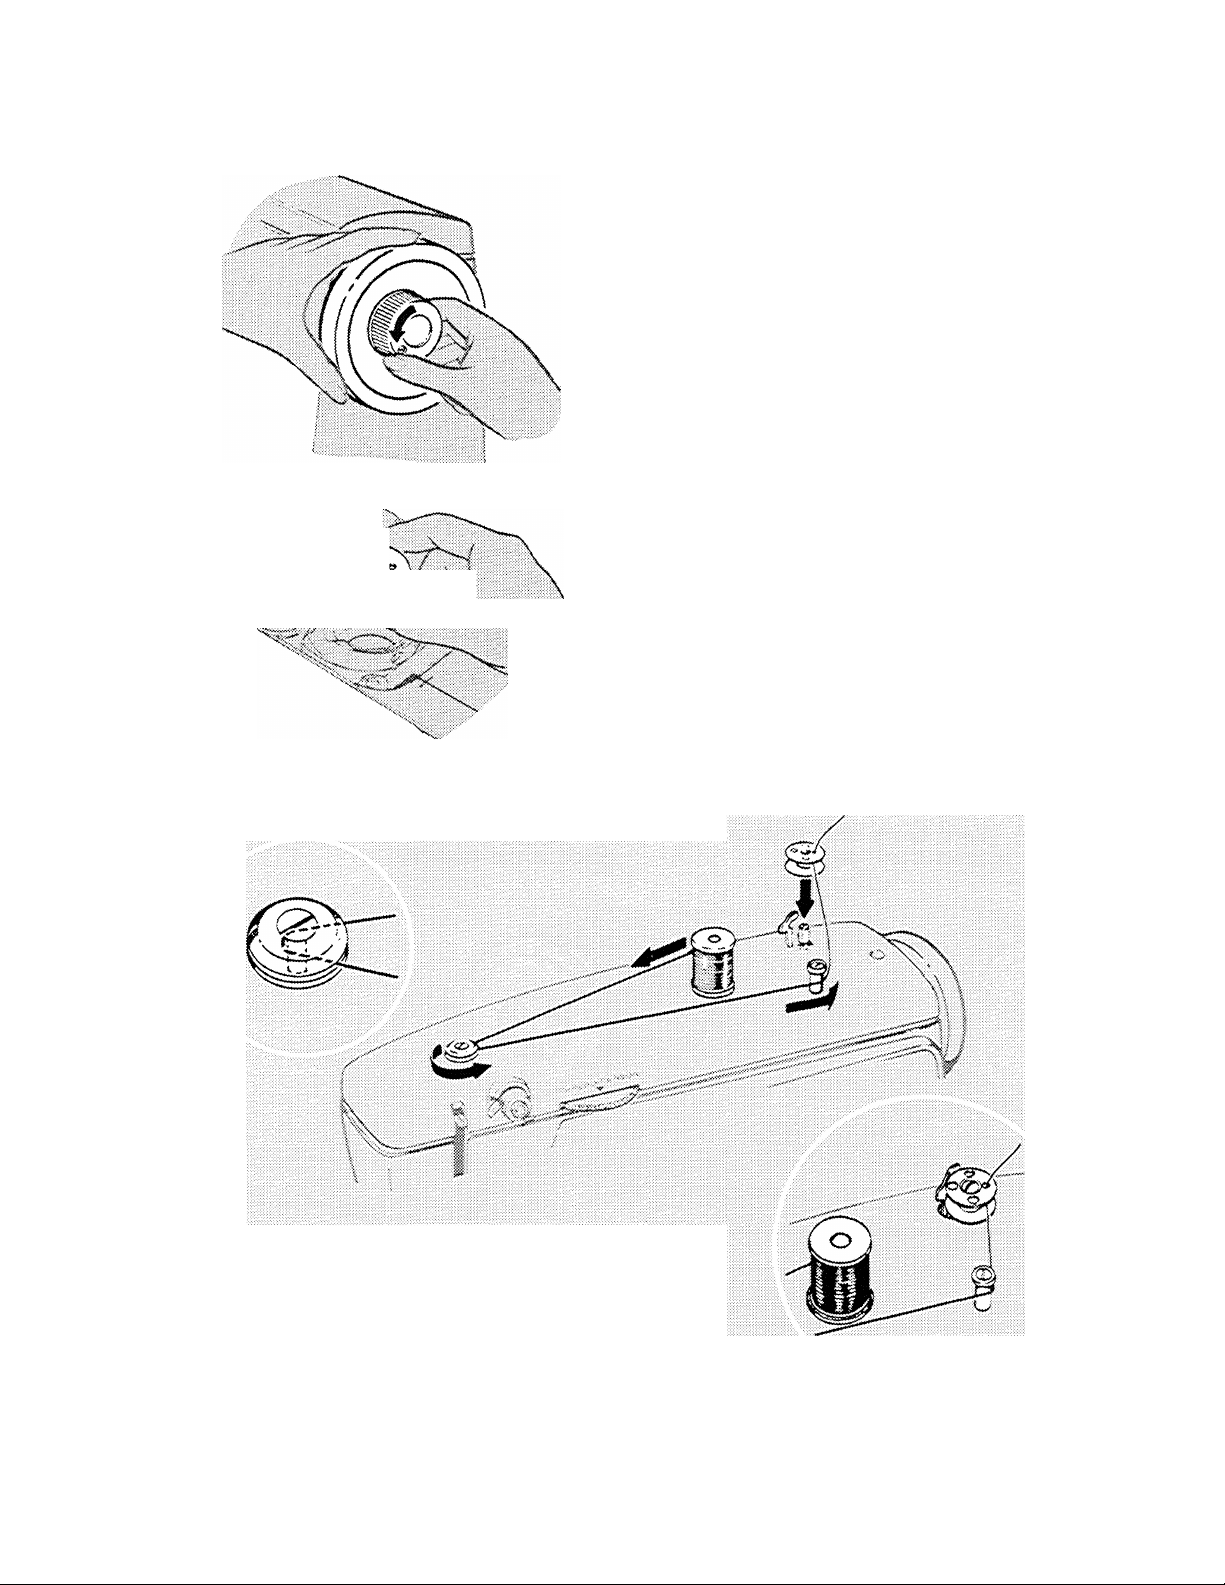
WINDING THE BOBBIN
Preparation
it is best to wind the bobbin before you thread
the machine*
1* Turn hand wheel toward you until needle is
at its highest position.
2, Disengage hand wheel from sewing mech
anism by loosening the hand wheel knob
with your right hand while holding the hand
wheel with the left.
3. Open the slide plate. Lift out the bobbin.
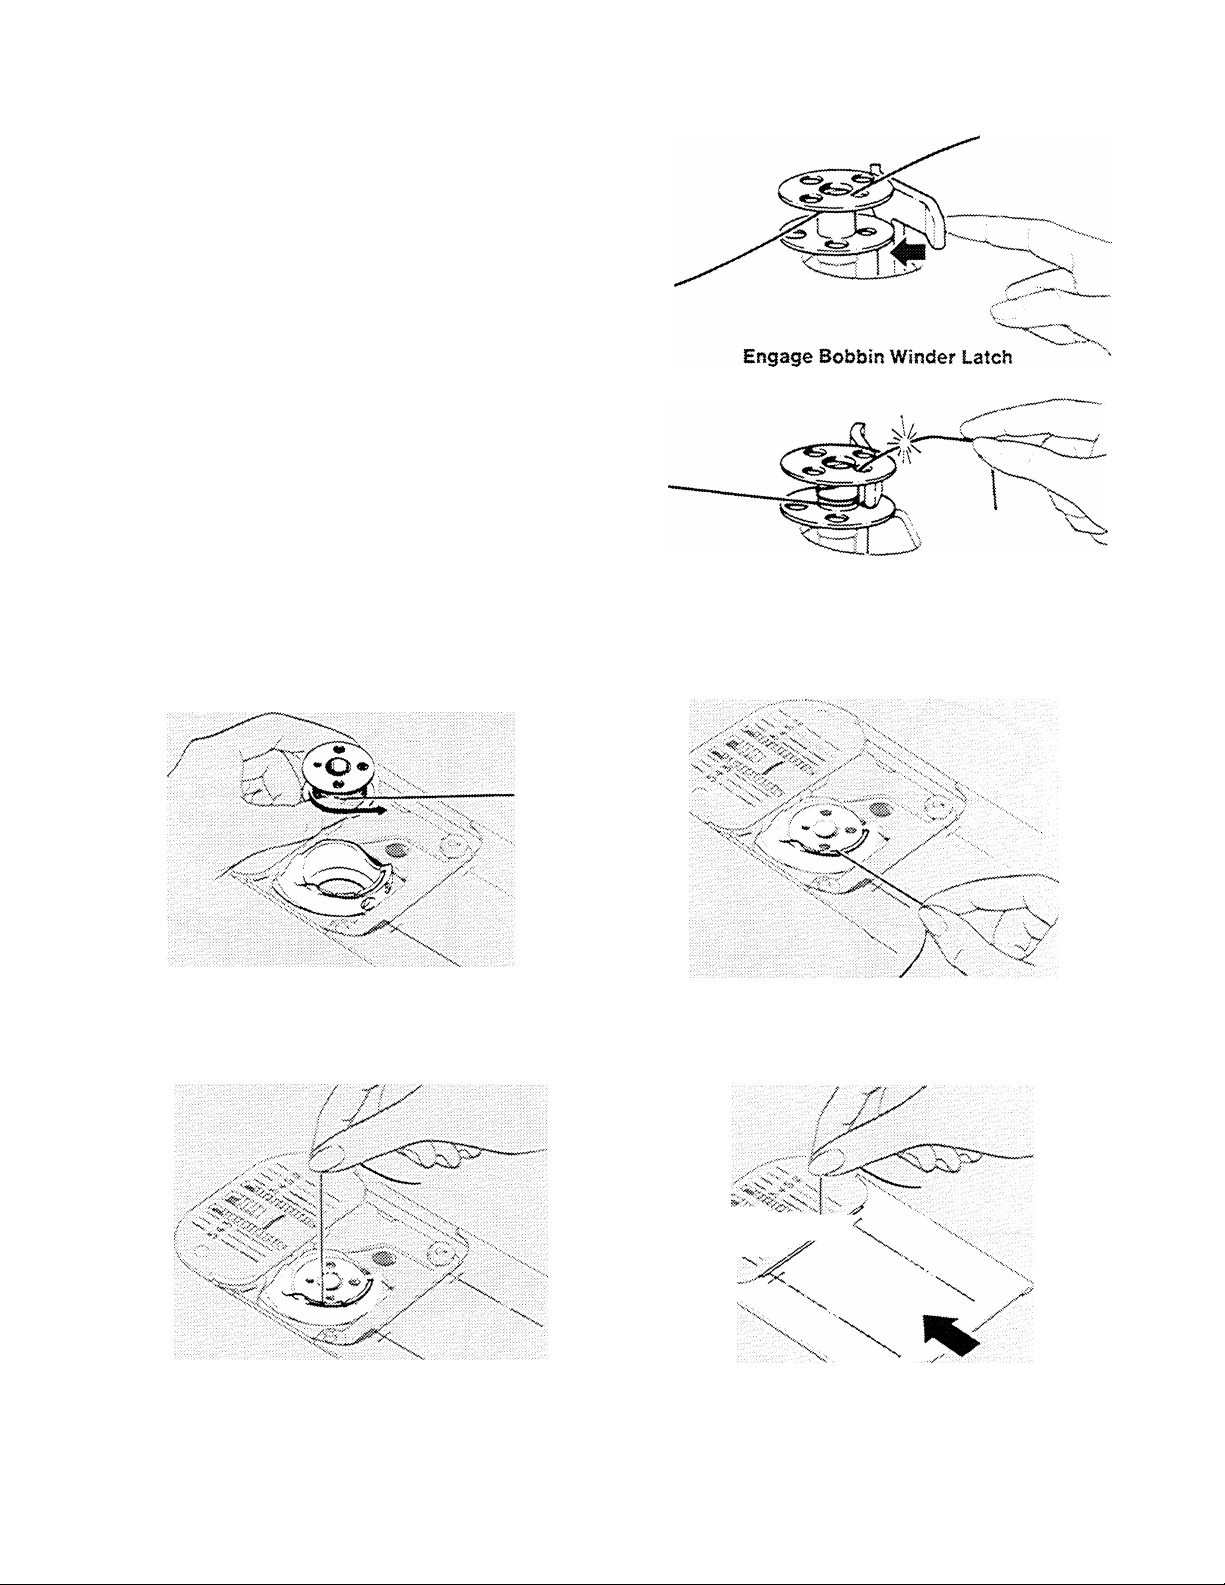
Winding Steps
1. Place thread spool on spool pin over the
spool pin felt. Lead thread between tension
discs (as shown), around thread post and
through small hole In bobbin (from the in
side out).
10
2, Place bobbin on spindle.
Page 13
Winding Steps (continyed)
3. Engage latch by pressing it toward the
bobbin.
4. Hold thread end as shown and start the ma
chine. Thread end will snap off after a few
coils have been wound on the bobbin.
5. When required amount of thread has been
wound (full bobbin will automatically re
lease), cut thread and remove bobbin from
spindle.
6. Tighten hand wheel knob by turning it away
from you with your right hand while holding
the hand wheel with your left hand.
THREADING THE BOBBIN CASE
Hold Thread End to Start Winding
1. Hold bobbin so that the thread unwinds
in direction shown, and put bobbin in
bobbin case.
3. Draw approximately three inches of
thread diagonally across the bobbin.
2. Pull thread into notch in bobbin case,
draw it under the tension spring, and
into the slot
4. Close slide plate, allowing the thread
to enter the slot in the slide plate.
11
Page 14
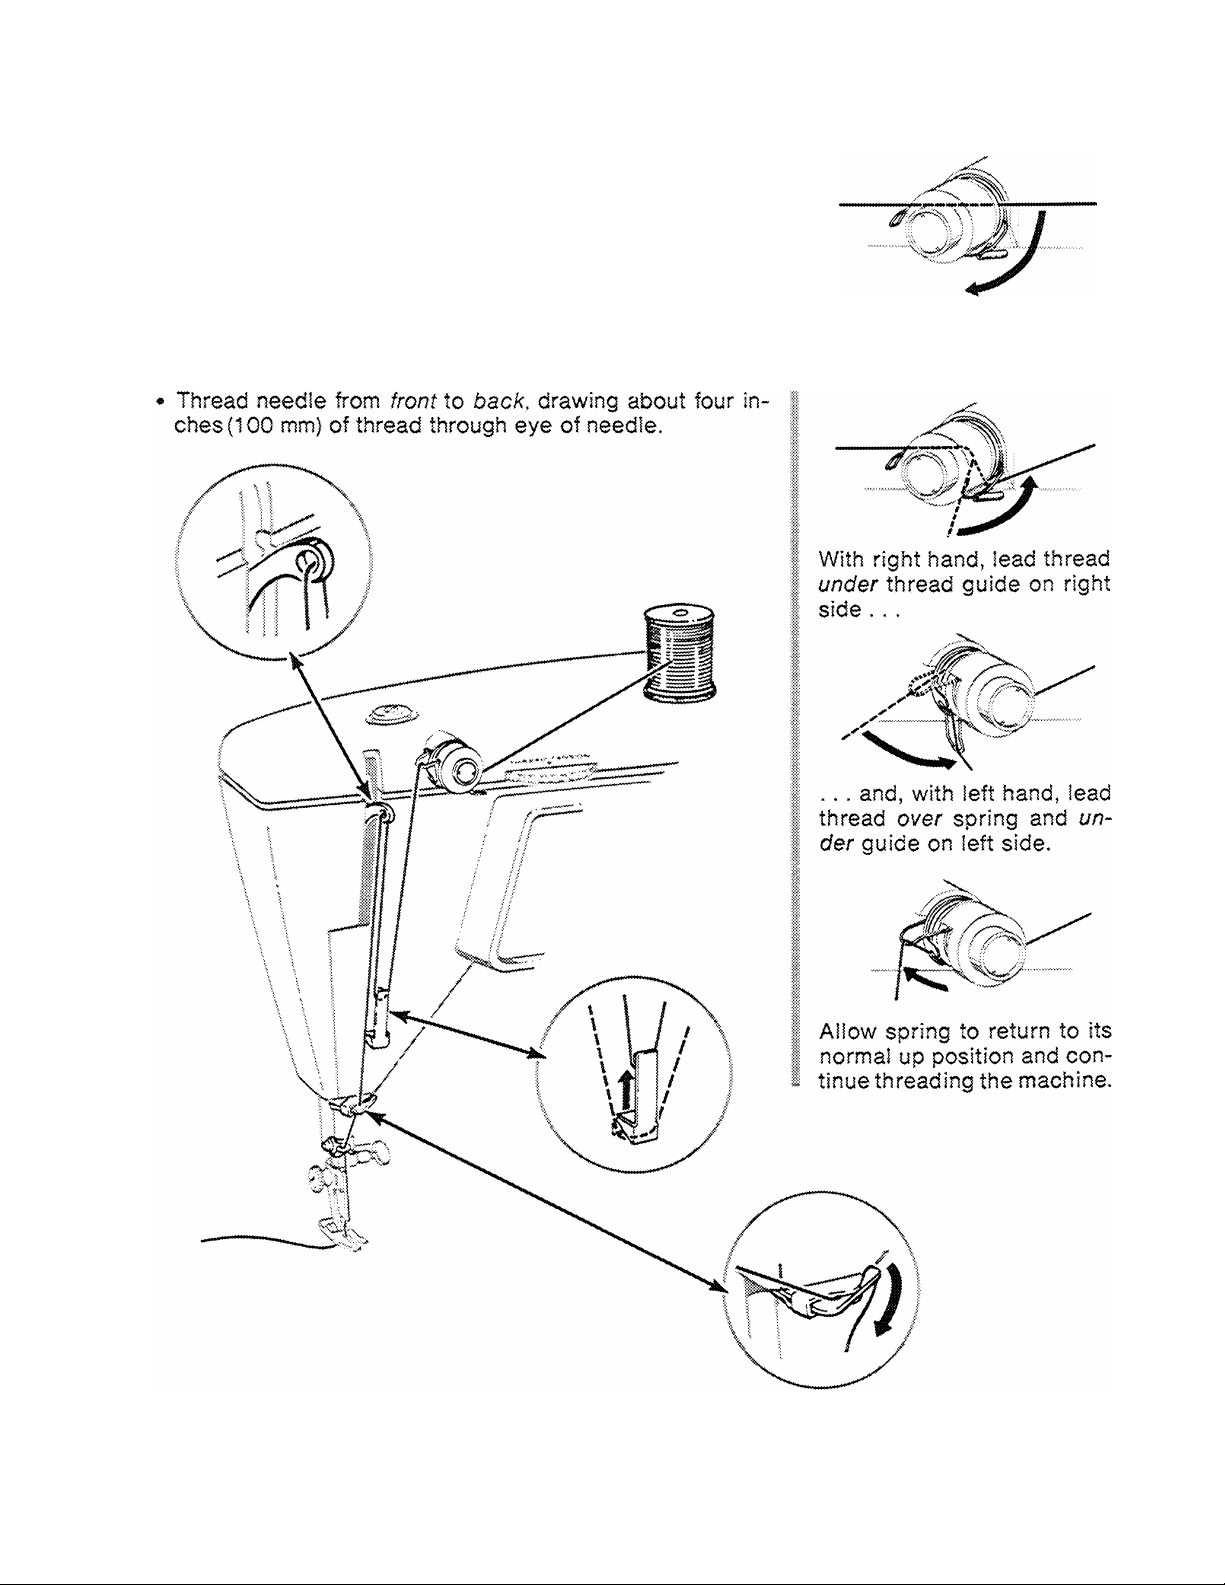
THREADING THE NEEDLE
1. Turn hand wheel toward you to raise needle to highest
position with take-up lever midway in slot Raise presser
foot to release tension discs,
2, Place spool of thread on spool pin over the spool pin felt.
Lead thread through all points as shown, making sure to:
• Thread tension discs as illustrated, W3^
* Thread take-up lever from right to left
With two hands, slip thread
horizontally between ten
sion discs from the top.
12
Page 15
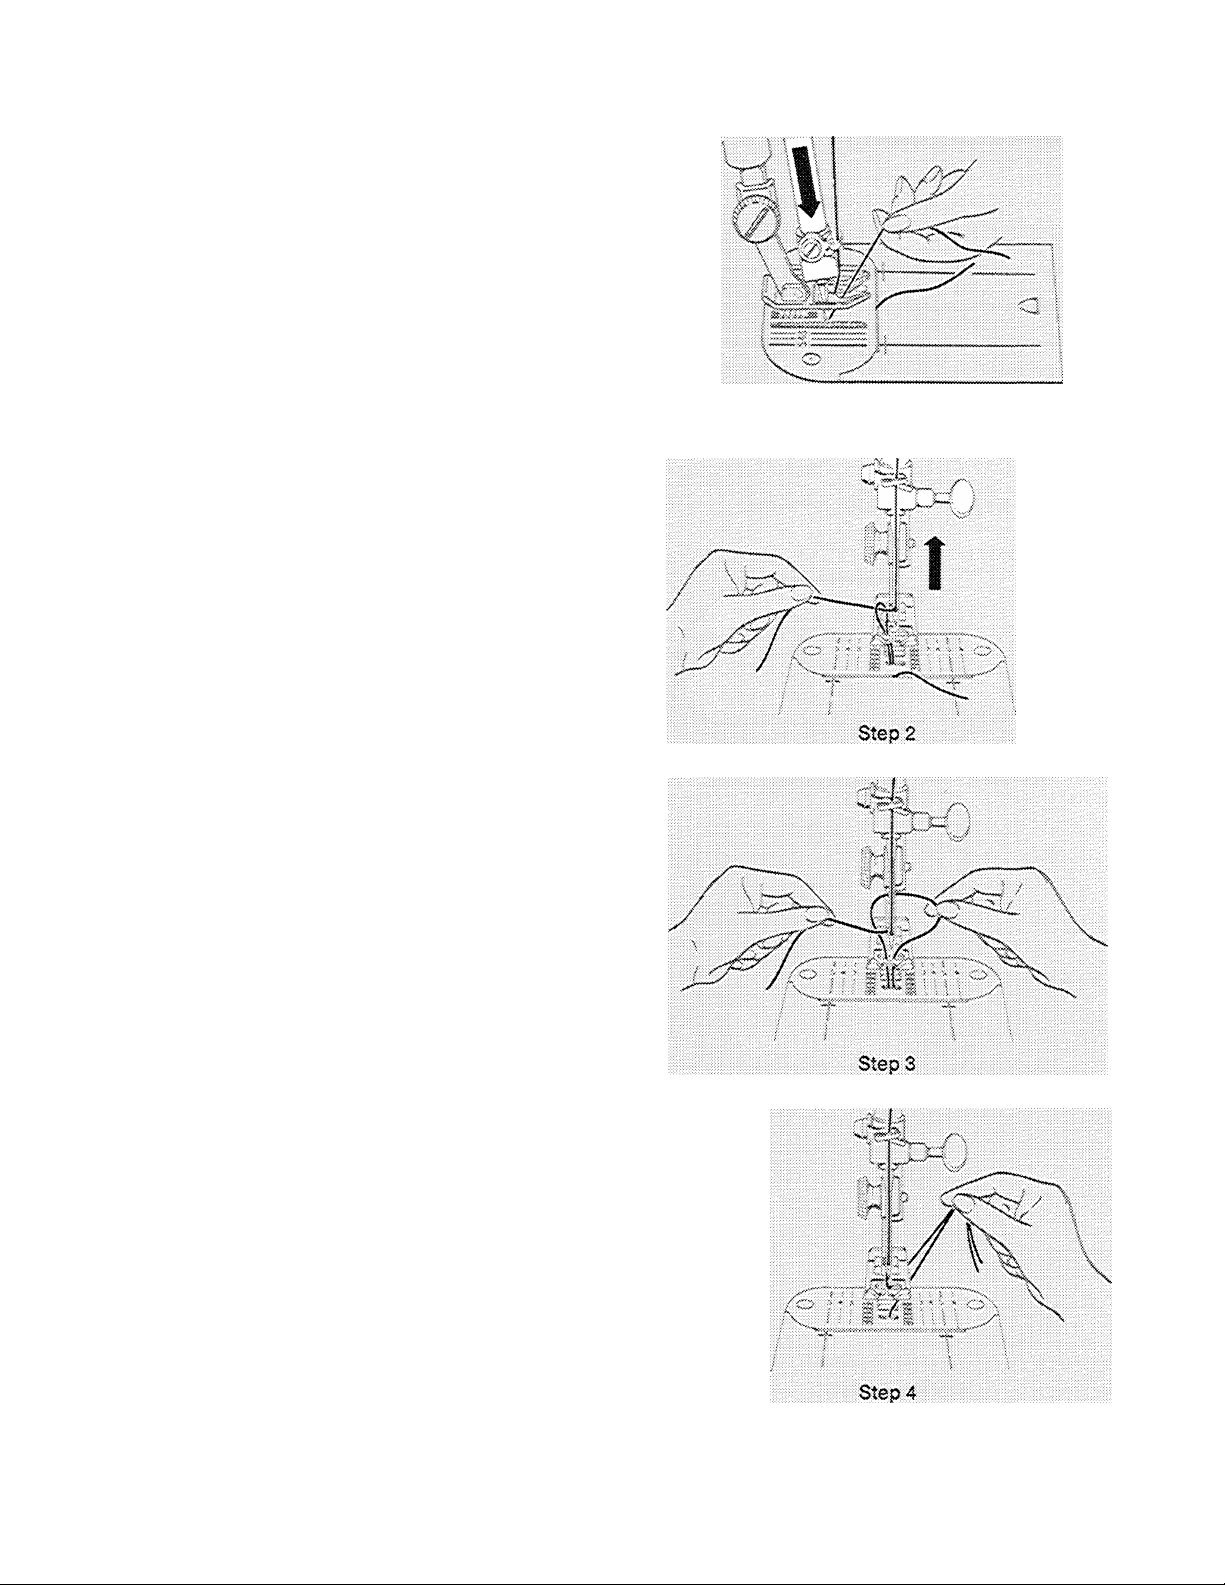
RAISING THE BOBBIN THREAD
Now that you have wound the bobbin and
threaded the needle, you will need to raise the
bobbin thread through the needle hole In the
throat plate.
1, Hold needle thread lightly with the left hand
and turn the hand wheel slov/ly toward you
so that the needle enters throat plate.
2, Continue turning hand wheel and holding
needle thread until needle rises and brings
up bobbin thread in a loop.
Step 1
3. Undo the loop with your fingers.
4. Place both needle and bobbin threads un
der presser foot and draw to back of ma
chine.
... you are now ready to sew
13
Page 16
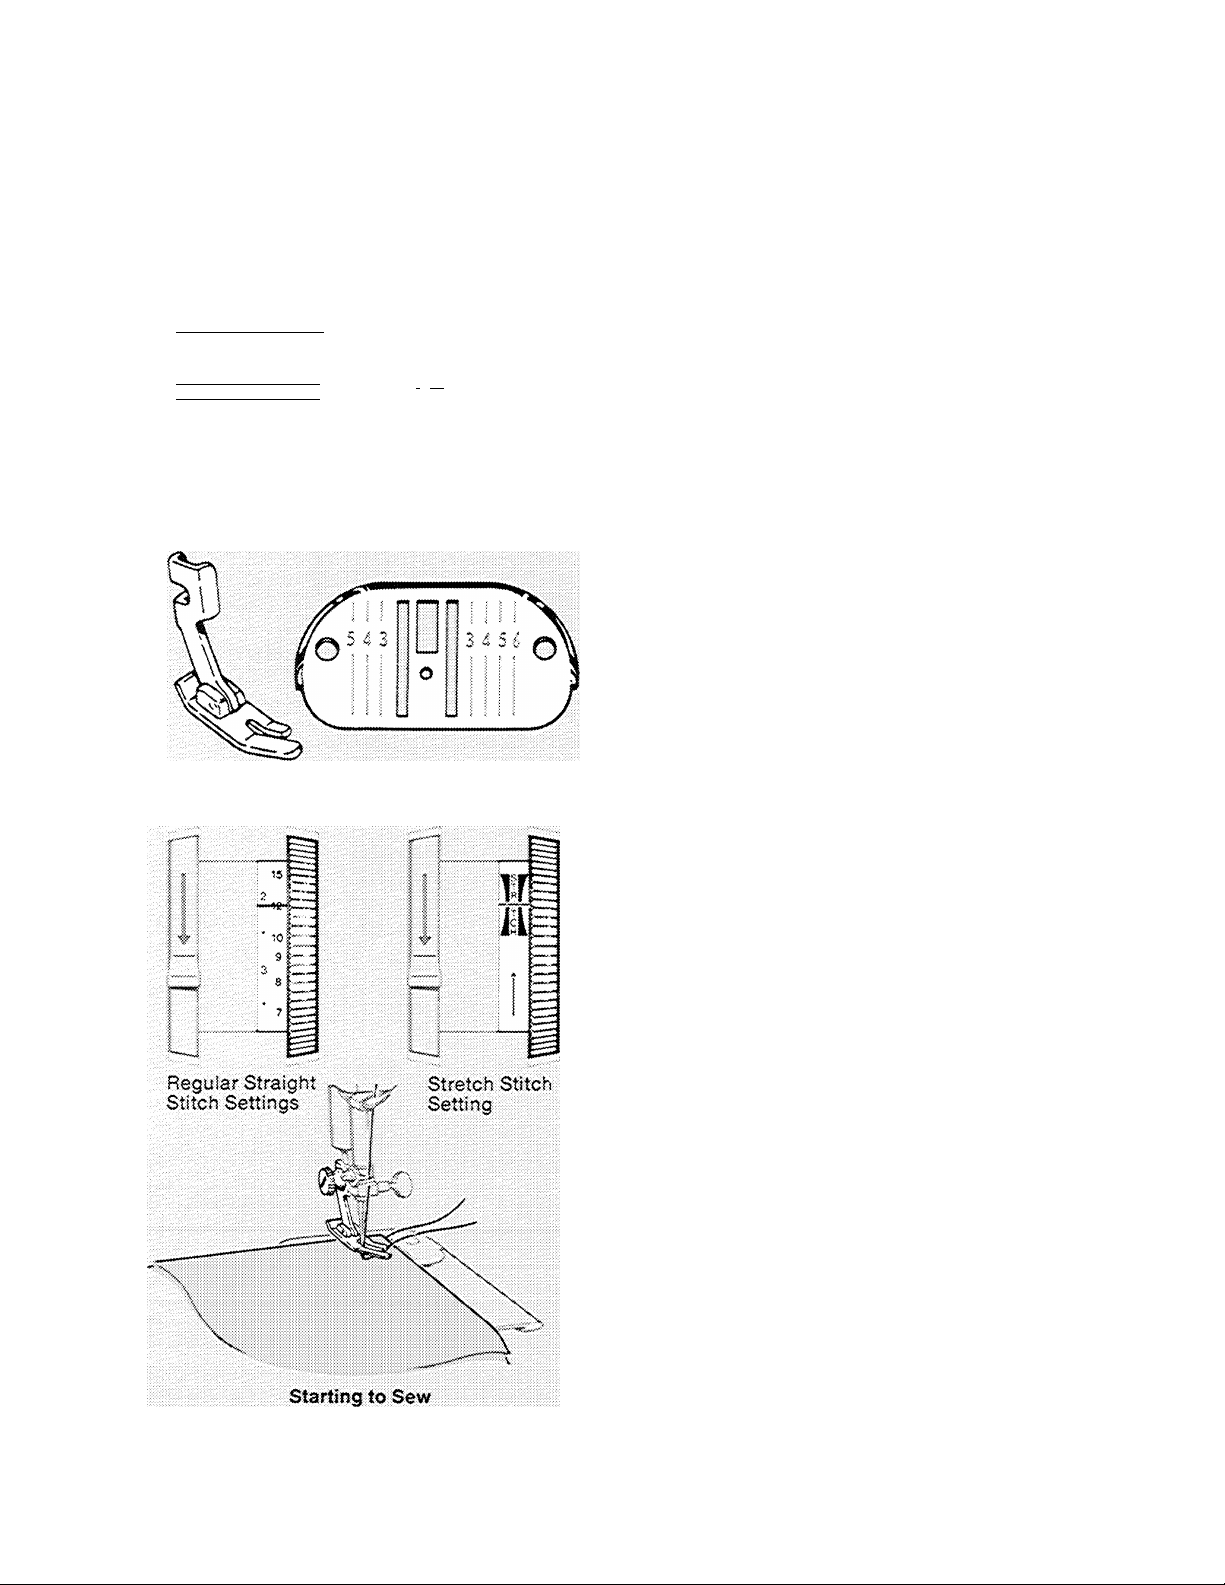
3. STRAIGHT STITCHING
Pattern: Straight Stitch
Needle Position: A
Stitch Width: A
Stitch Control: To suit fabric
Straight Stitch Throat Plate o;
Zig-Zag Throat Plate
Straight Stitch Foot or
Zig-Zag Foot
preparation
Before you set the dials for straight stitching,
turn the hand wheel toward you until the needle
is above the throat plate.
s;
: i > ;'
■ ■' - :i; ! ;
I
Dials Set for Straight Stitching
I Ij IJ I I ,i II II II l
X
•vrm-
Straight Stitch Foot an<i Needle Plate
SETTING THE MACHINE
5
1. Set pattern dial selector at .
2. Move needle position dial to A .
3. Set stitch width dial on A *
4. Set stitch control for desired stitch length.
For regular straight stitching, turn dial to
a numbered setting; for straight stretch
stitching, turn dial to STRETCH setting.
CHOOSING ACCESSORIES
Best results will be obtained if you use the
straight stitch foot and throat plate. However,
the zig-zag foot and throat plate may also be
used.
starting to sew
♦ Place needle and bobbin threads under pres-
ser foot and draw to back of machine.
♦ Position the needle in the fabric where de
sired for stitching start.
14
♦ Lowerihe presser foot and start the machine.
To sew perfectly on a wide variety of fabrics
adjust stitch length, pressure and thread ten
sion as instructed on the following pages.
For information on straight stretch stitching,
turn to page 34.
Page 17

adjusting for your fabric
Red Line
SETTING STITCH LENGTH
The stitch control dial regulates the length of
both straight and zig-zag stitches. The numbers
6 to 20 represent the number of straight
stitches per inch and the numbers 1 to 4 repre
sent stitch length in millimeters. Generally,
shorter stitches are best for lightweight fabric,
longer ones for heavy fabric. Curved seams,
bias-cut seams, and scallops require short
straight stitches for elasticity and smooth contours.
The FINE area is used for adjustment of zig-zag
satin stitching (page 24).
The STRETCH setting is used for straight-
stretch stitching and FlexhStitch patterns only.
For information on Flexi-Stitch patterns and
straight-stretch stitching, see pages 21 and 32.
• To set stitch control, turn dial until setting
desired is under the red line.
For reverse stitching, simply press reversestitch lever all the way down and hold in place.
Release lever for forward stitching.
Setting for
Stretch Stitching
Reverse Stitch Lever
Stitch Control Dial
REGULATING PRESSURE
The pressure dial regulates the pressure that
the presser foot exerts on the fabric. Correct
pressure is important because it means fabric
feeds smoothly and evenly. The HOHM (nor
mal) setting is an all-purpose setting that can
be used for sewing a wide variety of fabrics
of different weights and textures. Intermediate
notched settings, above and below NORIVI,
are also provided. When you need extra con
trol to sew very heavy fabric, use the MAX
(maximum) setting.
Lov/er the presser foot before setting pressure,
♦ To increase pressure, turn dial from NORM
toward MAX.
♦ To decrease pressure, turn dial from NORM
toward DARN.
♦ For darning, set dial on DARN,
\V„//7
Decrease
Pressure Dial
Darning
15
Page 18

Meedle-Thread Tension
REGULATING THREAD TENSION
Correct tension Is important because too much
or too little will weaken your seams or cause
your fabric to pucker. Make a test sample with
the fabric and thread you plan to use, and ex
amine it A perfect stitch will have the needle
and bobbin threads looked between the two
layers of fabric with no loops on top or bottom
and no puckers.
Needfe-Ttiread Tension
The tension dial regulates the degree of ten
sion on your needle thread. Set it according to
the type of thread and fabric you use. The
numbers on the dial eliminate guesswork in
duplicating settings.
If the stitches in your test sample look loose,
increase needle-thread tension. If the fabric
puckers, decrease tension.
♦ To increase tension, turn dial to higher num
ber.
• To decrease tension, turn dial to lower num
ber.
Bobbin-Thread Tension
Bobbm-thread tension is controlled by a screw
located on the bobbin case. You will seldom
need to adjust bobbin-thread tension since It
is usually possible to obtain the correct bal
ance by adjusting needle-thread tension
alone.
On those rare occasions when it becomes
necessary to adjust the bobbin-thread ten
sion, use the small tension screwdriver fur
nished with your accessories, A very slight
turn on the screw nearest the thread slot on
the bobbin case will produce a noticeable
change in bobbin-thread tension.
^ To increase tension, turn screw clockwise,
* To decrease tension, turn screw counter
clockwise.
16
Page 19

sewing a seam
PIN BASTING
Pin basting is a time saver and can be used in
place of hand basting when you are straight
stitching seams in easy4o-handie fabric.
Use fine pins and place them so that:
• They are at right angles to the presser foot
and just nip into the fabric at the stitching
line.
♦ They do not extend under both sides of the
presser foot. Never place pins on the under
side of the fabric in contact with the feed.
Pin Placement When
Seam <5uide Is Used
PLACING FABRIC
Most fabric can be placed under the presser
foot by raising the presser-foot lifter to its
normal up position. When placing bulky fab
rics, such as coating, knit or terry cloth, or
multiple fabric layers, you will find it conven
ient to raise the presser-foot lifter to the highrise position. Hold lifter in position (since it
does not lock) while placing fabric under the
presser foot. Make sure the lifter is all the way
down before starting to sew.
Presser Foot Lifter Settings
17
Page 20

I
Starting a Seam
Guiding and Supporting Fabric
Applying Gentle Tension
Stitching a Seam
STARTING A SEAM
1« With presser foot raised, turn hand wheel
toward you to position needle in fabric
about 1/2 inch (13mm) from starting edge.
Lower the presser foot.
2, Press reverse-stitch lever all the way down
and hold in place. Backstitch to edge of
fabric for reinforcement.
3. Release reverse-stitch lever and stitch in
forward direction.
GUIDING AND SUPPORTING FABRIC
Most fabrics need only to be guided in front of
the presser foot. Some fabrics, however, re
quire support while being stitched, as shown.
These fabrics require using the straight stitch
presser foot.
18
Applying Firm Tension
* For filmy sheers, knits, tricot, etc., apply
gentle tension by holding seam in front and
back of the presser foot.
* For stretch fabrics, apply firm tension front
and back when stitching in the same direc
tion as the stretch. For seams not on the
stretch direction, stitch in the conventional
manner, guiding fabric in front of the presser
foot.
Page 21

KEEPING SEAMS STRAIGHT
To keep the seam straight, use one of the num
bered guidelines on the throat plate. The num
bers indicate distance, in eighths of an inch,
from the needle. If you want a 5/8 inch (16mm)
seam, for example, line up your fabric with the
number 5 guideline. Note that both number 5
guidelines (the most commonly used) are ex
tended on the slide plate for your convenience:
the crosslines serve as cornering guides when
stitching a square corner.
For extra help in keeping the seam straight, you
may wish to use the seam guide. Because it
allows you to guide stitches between 1/8 inch
(3mm) and 1*-1 /4 inches (32mm) from the fabric
edge, it is useful for very narrow or unusually
wide seams.
TURNING SQUARE CORNERS
To turn a square corner 5/8 inch (16mm)
from the fabric edge, you need not measure
or mark the seam. Simply use the
crosslines on the slide plate.
Line up your fabric with right or left
guideline 5 on the throat plate. Stitch
seam, slowing speed as you approach
corner.
Pivoting at Corner
Stop stitching, with the needle down,
when the bottom edge of the fabric
reaches the cornering crosslines on the
slide plate.
Raise presser foot and turn fabric on
needle, bringing bottom edge of fabric
in line with guideline 5.
Lower the presser foot and stitch in new
direction.
Fabric at Crosslines
Fabric after Turning
19
Page 22

CURVED SEAMS
1. Use a short stitch for elasticity and
strength. For example, if you use 12
stitches to the inch (stitches approximately
2mm long) for straight seams, select 15 to
20 per inch (stitches approximately 1.5mm
long) to stitch curved seams in the same
fabric.
2. If you use the seam guide to guide stitch
ing, attach it at an angle so that the edge
that is closer to the needle acts as a guide.
REINFORCING END OF SEAM
1. Stitch to the edge of the fabric.
2. Press reverse-stitch lever all the way down
and hold in place. Backstitch approx
imately 1 /2 inch (13mm) to reinforce end of
seam. Release lever.
3. Raise needle to its highest position, raise
the presser foot, and remove the fabric by
drawing it to the back and left.
4. Cut threads on thread cutter at rear of
presser bar.
20
Ending a Seam
Page 23

4. ALL ABOUT ZIG-ZAG STiTCHliyG
two kinds of zig-zag stitches
The zig-zag stitches buiit into your machine
include basic zig-zag stitches and Flexi-Stitch
patterns, in addition to the obviousiy decora
tive uses of these stitches, some aiso serve
praoticai purposes. Under the section called
“Sewing the Professional Way” beginning on
BASIC ZIG-ZAG STITCHES AND THEIR DIAL SETTINGS
Stitch Pattern
mmHmmmmmmmmmmm
Flam Ztg-Zag Stitch
Multi-Stttch Zig-Zag
rVT'VTT'TTTTT
Bhndstitch
page 28, you will find instructions for both
decorative and practical uses of these stitches.
Ail of the basic zig-zag stitches and some of
the Flexi-Stitch patterns are charted below.
(When sewing Fiexi-Stitch patterns, set speed
range at SLOW.)
Pattern
Dial
I
/
%
-<
Stitch
Width
Diai
1-5
1-5
1-5
Position
Needle
Diai
L A R
L A R
L A R
Stitch
Control
Numbered
Area thro
FINE
Humbered
Area
Numbered
Area
FLEXI-SmCH PATTERNS AND THEIR DIAL SETTINGS
Stitch Fatter«
wvswwwwwww
Ric-Rac Stitchf
Semaphore Stitch
Fatter«
Dial
1
i
rffrrjrrmiTTTrmTm
Slant Overedge Stretch Stitchf
VAAAAAAAAAAAA
Overedge Stretch Stitch
tThis stitch is designed for strength and permanence and cannot be readily ripped out without risk of fabric damage.
<<
1
g
Stitch
Width
Dial
2-5
2-5
2-5
2-5
Needle
Position
Dial
L A R
L A R
L A R
L A R
Stitch
Control
6.
c
H
S
T
R
T
c
K
r
«
t.
T
c
H
T
«
e
T
c
«
21
Page 24

adjusting dials
SETTING PATTERN DIAL
Before moving the dial, make sure needle is
above the fabric.
Push the pattern dial in and turn it until de
sired zig-zag stitch pattern is between the red
lines.
To produce a Flexi-Stitch pattern, the stitch
control dial must be turned until the symbol
STRETCH appears under the red line.
Miiiliiiili.
i <-i|
1 >:lil
1 ■ > i 1
“|K
-ai—1,
iminiM.
Push In
Rotate
Release
Adjusting Stitch Placement
ADJUSTING STITCH PLACEMENT
Before moving needfe position dial, move
stitch width to 5, and make sure needle is
above the fabric.
Needle position setting A places the needle
in center stitching position. Settings L and R
place the needle in left and right stitching
positions at stitch widths less than 5,
Setting A is used most often. Settings L and
R are for special placement of stitching. For
example, an L setting is required for buttonholing and button sewing. An L or R setting
can be used to place narrow zig-zag stitching
to the left or right of center in decorative work.
To adust stitch placement, turn needle posi
tion dial until desired setting is aligned with
the red line.
nunninF^
Left Needle Position
Center Needle Position
...........^.....
Right Needle Position
22
Page 25

ADJUSTING WIDTH OF DESIGN
Before moving dial, make sure needle is above
the fabric.
To produce a zig-zag stitch, turn the stitch
width dial to any setting between 1 and 5. The
higher the number, the wider your stitch wiil
be. A stitch width setting of 2 or more is rec
ommended for Flexi-Stitch patterns.
ADJUSTING NEEDLE-THREAD TENSION
Zig-zag stitching usually requires less needlethread tension than straight stitching. Make a
test sample with the fabric and thread you plan
to use so that you can adjust tension to suit the
stitch pattern you have chosen. The stitches
should lie flat against the fabric without causing
the fabric to pucker.
if the stitches are not flat and the fabric is
puckered, lower the needle-thread tension by
turning the dial to a lower number.
Adjusting Width of Design
ADJUSTING STITCH LENGTH
Any stitch control setting in the numbered area
will give you an open zig-zag stitch of the pat
tern you select except Flexi-Stitch patterns.
The triangular symbol on the dial designates
the FINE stitch area and is used for the adjust
ment of zig-zag satin stitching (see page 24 for
specific instructions).
To produce the overedge stretch stitch or any
other Flexi-Stitch pattern (refer to stitch pat
tern chart), the stitch control dial must be set
on the STRETCH symbol. Simply turn the dial
downward until the symbol is centered under
the red line. No further adjustment is neces
sary.
V/hen using the STRETCH setting of the stitch
control, you cannot backstitch the stitch pat
tern.
'
.....
Ц-
:! ;! ; \fi\t
i 20
----
1^ *
i i i ’*
Stitch Control Dial
Correct
If
Emiim
>«~v~
23
Page 26

mm.
wm:>
''
li; li;
Stitch Control in FINE Area
I
As the Dial Is Rotated, Stitches Close Up
satin stitching
Satin stitching, a series of closely spaced zig
zag stitches that form a smooth, satin-like sur
face, is useful for both practical and decorative
work. The plain zig-zag stitch, for example, is
suitable for bar tacks and applique when
closed up to form a satin stitch. The f/ex/-
Stftch patterns, however, have a single stitch
length setting (STRETCH) and cannot be satinstitched.
When you wish to produce a satin stitch, make
a test sample first so that you can adjust the
stitch length and threa6 tension properly. Soft
fabrics may require a backing to ensure firm
satin stitching. Crisp lawn or organdy is suit
able for this purpose. For best results use the
special purpose foot.
DIAL SETTINGS
Pattern: Plain Zig-Zag I
Needle Position: A *
Stitch Width: a to $
Stitch Control: In FINE area
Zig-Zag Throat Plate
Zig-Zag Foot or
Special Purpose Foot (see note)
Adjusting Thread Tension
Adjusting Stitch Length
1. Set stitch control dial at bottom of FINE
area.
2. Run machine at SLOW speed.
3. Gradually turn dial downward until stitches
are closely spaced and form a smooth sur
face.
Correct
Adjusting Thread Tension
Satin stitching requires less tension than
straight stitching or open zig-zag stitching.
Furthermore, the wider the satin stitch, the
lighter the tension on the thread must be. No
tice the stitching on your sample. If the fabric
is puckered, lower the needle-thread tension
by turning the tension dial to a lower number.
NOTE: For best results in satin stitching, the spe
cial purpose foot is recommended {available for
purchase, see page 47).
24
Page 27

5. BUTTONS AND BUTTONHOLES
buttons
Pattern: Plain Zig-Zag I
Stitch Width: À and 4
Needle Position: L
Feed Cover Throat Plate
Zig-Zag Foot
The space between the holes in the button de
termines the stitch width settings. The A set
ting must always be used to position the needle
over the left hole and fasten stitching. For but
tons with standard hole spacing, use settings
A and 4. For buttons with unusual hole spac
ing, use setting A and increase or decrease
the width setting 4 as necessary.
To sew on two- or four-hole buttons, approxi
mately one inch ( 25 mm) in diameter or larger:
1. Set stitch width dial at A . Position button
under foot so that the needle will enter the
left hole. Lower foot. Turn hand wheel to
ward you until needle rises out of button
and is just above the foot.
2. Set stitch width at 4. Then, when you begin
to stitch, the needle should enter the right
hole of button. Take six or more zig-zag
stitches at this setting, ending on left side.
3. To fasten stitching, return to stitch width
A and take about three stitches.
For best results with buttons smaller than one
inch (25mm) in diameter, it is recommended that
the Button Sewing Foot be used. See page 47.
mwmbuhrnlllll
25
Page 28

buttonholes
• Pattern: Plain Zig-Zag |
• Stitch Widtix: i^V2 and 5 or to suit fabric
• Needle Position: L
• Stitch Control: FINE
• Zig-Zag Throat Plate
• Zig-Zag Foot or Special Purpose Foott
Always make a test buttonhole on a sample of
your fabric. Be sure to duplicate the thickness
of the garment and include interfacing if ap
propriate,
BUTTONHOLE LENGTH
First decide how long the opening needs to be.
This will depend on the diameter and the thick
ness of the button. To find the right length, cut a
small slit in a scrap of your fabric and gradually
enlarge it until the button slips through easily.
Then add at least 1 /8 inch or 3mm (1 /16 inch or
1.5mm for each bar tack), and mark the fabric as
illustrated. This bar-tack measurement Is ap
proximate: on some buttonholes, you may need
to increase it to arrive at pleasing proportions.
IVIarking Lines
STITCH WIDTH SETTINGS
Next, determine the two stitch width settings
that you will need: one for side stitching and
one for bar tacks (closings at ends of button
hole). Settings 2Vz and 5 are illustrated below,
although other combinations may be used, as
long as the combined width of side stitching
does not exceed the width of the bar tacks.
m
rrrTTmnV
.iiiiiiiiiiiiiiitiiitiiiiiUiiii
Selector
m
atZVa
Side Sistching
Length of
Cutting Space
Bar Tacks
Bar Tacks and
Side Stitching
ErmfTfj
Selector
atS
i I
TппппппiilJl
tlhe Special Purpose Foot described on page 47 is designed to aid in making buttonholes,
26
Page 29

PROCEDURE FOR MAKING BAR-^TACK BUTTONHOLES
With needle position dial at L, set stitch width
dial on 2Y2 for side stitching of buttonhole.
Place work under needle, aligning center mark
ing of buttonhole with slot in the presser foot.
Side Stitching: Position needle in fabric at
point A. Lower the foot and stitch to end of
marking. Leave needle in fabric at point B,
Raise the foot and pivot work on needle. Lower
the foot. Take one stitch without changing
width setting, bring needle to point
Bar Tack: Adjust stitch width for bar tacks and
take at least six stitches. Stop at point D,
C.
■"■¿iUUij.,
±i
it
EmShiiiiä
Side Stitching
A*::
4 i 1
C B
Side Stitching: Readjust stitch width for side
stitching. Complete work to point £. Leave
needle in fabric.
Final Bar Tack: Adjust stitch width for bar
tacks, and take at least six stitches in reverse,
ending at point F.
Fastening Stitch: To secure stitching, move
stitch width dial to A and take three stitches.
Remove work, draw threads to underside,
fasten and trim. Cut opening for button with
sharp scissors.
rrrm
Uilniiiiilii
1
man. mam
1
----
;r-....T
4
Bar Tack
4 5
Side Stitching
Ar*.
nrrrrrn
1-
Final Bar Tack
27
Page 30

6. SEWING THE PROFESSIONAL WAY
construction details
ZIPPERS
At the notions counter in your Singer store,
you will find many different kinds of zippers,
one of which will be just right for whatever you
wish to sew. How the zipper is inserted will
depend on the type of garment and the loca
tion of the zipper. The zipper package will con
tain easy-to-follow instructions. And, if you use
the zipper foot, you will find it easy to form an
even line of stitching close to the zipper.
Pattern: Straight Stitch
Stitch Width:
Needle Position: A
Stitch Control: 10 to 15 (approximately 1,5 to 2,5)
Zig-Zag or Straight Stitch Throat Plate
Zipper Foot
Adjusting the Zipper Foot
When the zipper is to the right of the needle:
1. Loosen the thumb screw at the back of the
foot, and slide the foot to the left of the
needle,
2. Check the position of the foot by turning the
hand wheel to lower the needle into the side
notch of the foot, making sure it clears the
foot,
3. Lock the foot into position by tightening the
thumb screw.
4. Lower presser bar. Make sure the needle
clears the foot on all sides of the notch.
When the zipper is to the left of the needle,
adjust the foot to the right of the needle in the
same way.
28
Adjusting the Zipper Foot
Zipper Foot to
Right of Needle
Zipper Foot to
Left of Needle
Zipper Insertion
Page 31

BLIMDSTITCH HEMS
Pattern: Blindatiteli -è
Stitch Width: 2 to 5
Needle Position: A
Stitch Control: 10 to 20 (approximately 1 to 2.5)
Zig-Zag Throat Plate
Zig-Zag Foot
Seam and Blindstitch Hem Guide
Blindstitching provides a durable hem finish
that is almost invisible. It is best suited to
straight or slightly curved hems. Taped, bound,
turned, or unfinished hem edges can be blind-
stitched with equal ease. Blindstitching takes
a little practice, however, so make a test sam
ple first.
1. Mark, turn, and press hem in the usual way.
2. Baste a guideline 1/4 inch (6mm) from top
of hem edge.
3. With the work wrong side up, turn the hem
under, creating a soft fold about 1/4 inch
(6mm) from top of hem.
Blindstitch Hem
4. Place hem edge over feed of machine with
bulk of fabric to the left.
5. Screw seam and hem guide into hole at
right of slide plate and adjust it over the
right toe of the presser foot so that it rests
next to the soft fold.
6. Stitch so that straight stitches fall on hem
edge and sideward stitches pierce the soft
fold. While stitching, guide the fold evenly
against edge of hem guide.
7. When stitching is completed, swing guide
out of position before raising presser foot
Remove basting stitch.
Basted Guideline
Blindstitching a Hem
29
Page 32

I
Making the Welting
Making a Corded Seam
CORDED SEAMS
The corded seam is a professional treatment
for slipcovers, children’s clothes, blouses, and
lingerie. To make a corded seam, make the
welting first (or buy it ready-made at a notions
counter), then stitch it into the seam.
Pattern: Straight Stitch
Stitch Width:
Needle Position: A
Stitch Control: Slightly longer than for regular
seaming
Zig-Zag or Straight Stitch Throat Plate
Zipper Foot
Making the Welting
1. Buy cabie cord of desired size.
2. Cut bias strips of fabric to cover cord
(width: three times the diameter of the cord
plus 1-1/4 inches or 32mm).
3. If it is necessary to sew strips together to
obtain desired length, Join on the length
wise fabric grain.
4. Fold bias fabric strip over cord, raw edges
even.
5. Adjust zipper foot to ieft side of needie.
6. Lower the presser foot.
7. Stitch dose to cord {do not crowd stitching
against cord), pulling gently on the strip,
both in front and in back of the zipper foot.
Stitching Welting into Seam
1. Adjust zipper foot to the right of the needle
so that the bulk of the fabric will fail to left.
2. Stitch welting to the right side of a single
seam edge; guide the edge of the foot next
to the cord but do not crowd.
30
3. Place the attached welting over the second
seam edge, and pin or baste together.
4. Place the work under the needle, with the
first stitching on top so that you can use it
as a guide.
5. Stitch, crowding the foot against cord.
Page 33

SEAMS IN FABRICS THAT RAVEL
Seam edges support the garment and should
be given a durable finish if the fabric is likely
to ravel There are two ways of finishing
seams in such fabrics: trimming seam edge or
overedging. Make a test sample first to deter
mine whether method #1 or method #2 best
suits your fabric.
Method ¿¿t — Trimmed Seam Finish
Pattern: Plain Zig-Zag | or
Multi-Stitch Zig-Zag <
Stitch Width: 4 or 5
Needle Position: A
Stitch Control: 8 to 20 (approximately 1 to 3).
to suit stitch and fabric
Zig-Zag Throat Plate
Zig-Zag Foot
1. Select the stitch pattern that best suits your
fabric.
2. Adjust stitch width and stitch length to give
the most ‘'open'' stitch that will secure the
fabricedge; avoid harsh over-stitching.
3. Place stitching near the edge of the seam
allowance.
4. Trim seam edges evenly, as shown, after
stitching is completed.
Method #2 — Overedged Seam Finish
♦ Pattern: Piain Zig-Zag | , Blindstitch ^ ,or
Multi-Stitch Zig Zag <
♦ Stitch Width: 4 or 5
♦ Needle Position: A
♦ Stitch Control: 8 to 20 (approximately 1 to 3),
to suit stitch and fabric.
^ Zig-Zag Throat Plate
♦ Zig-Zag Foot
1. Adjust stitch length and stitch width to suit
your fabric.
2. Trim seam edges evenly.
3. Place trimmed seam under the presser foot
and stitch so that the zig-zag stitches fall
over the edge of the seam allowance.
Overedged Finish
31
Page 34

I
sewing knit and stretch fabric
When you are sewing stretch fabrics, double-
knit, tricot or jersey, choose one of the stretch
patterns that build s-t-r-e4-c-h into the seam.
The table below will help you make the right
selection.
STRETCH STITCH CHART
Stitch
Straight Stretchf
Straight Stitch — Stitch Width A
Stitch Control on STHETCH
Multl-SlUch Zig-Zag
Built-in Pattern
Remember to use a ball-point (yellow band)
needle, Catalog 2045, in the machine, and In
crease presser foot pressure when you are at
taching elastic or sewing a synthetic knit or
stretch fabric.
Where to Use
Plain seams that s-t-r-e-t-c-h (press-open or
closed construction) -* Crotch seaming —
Sleeve and gusset Insertion — Flexible top
stitching — Swim and ski suit construction
Attaching patch pockets — Repairing and
reinforcing seams.
Attaching elastic and stretch lace — Linge
rie and swimsuit construction — Girdle seams
— Seam finishes — Casings and waistband
finishes.
Plain Zig-Zag
Buiit-ln Pattern
Ric-Rao Stltchf
(See Stitch Pattern Chart on Page 21)
Blindstitch
Built-in Pattern
Overedge Stretch
Built-in Pattern
Slant Overedge Stretch Stitchf
(See Stitch Pattern Chart on Page 21}
All-purpose stretch sewing — Lingerie seams
— Attaching stay tapes *- Seam finishing —
Edge finishing — Attaching stretch lace.
Heavy-duty, all-purpose stretch sewing
Reversible topstitch applications.
Flexible blindstitch hemming *- Overcast
seam finishing — Shell hems in lingerie.
Overedge seams that stretch—Crotch seams
—Waistband and seam finishes in shorts and
slacks — Ski-suit, snow-suit, and swimsuit
construction.
Sweater and swimsuit construction — Over
cast seams in bulky knits and stretch terry
cloth — Attaching elastic and stretch lace —
Edge finishes for seams, hems, and facings.
tThis stitch is designed for strength and permanence and cannot be readily ripped out without risk of fabric damage.
32
Page 35

GUIDING AND SUPPORTING FABRIC
Most fabrics of stretch or knit construction
need only to be guided in front of the presser
foot when you use one of the stretch stitches.
Simply let the machine move the fabric to
make the stitches that give to the
seam.
Some fabrics — nylon
fabrics, for example-
tricot and elasticized
-do require support
while being stitched.
For nylon tricot and similar synthetic knits,
apply gentle tension by holding the seam in
front and back of the presser foot as you
sew.
For elasticized fabric, stretch lace, and knits
with an unusual amount of elasticity, apply
firm tension in front and back of the presser
foot to stretch the seam as the stitches are
being placed.
FINISHES FOR HEMS AND FACINGS
• Pattern: Multi-Stitch Zig-Zag ;> or
Slant Overedge Stretch ^ (see page 21)
• Stitch Width: 5 ^
• Needle Position: A
• Stitch Control: 8 to 20 (approximately 1 to 3)
for Multi-Stitch Zig-zag or STRETCH for Slant
Overedge Stitch
• Zig-Zag Throat Plate
• Zig-Zag Foot
Applying Gentle Tension
Applying Firm Tension
Hem and facing edges in knit and stretch fab
rics will be less apt to press through and mark
when given a flat edge-finish. Edge finishing
with the slant overedge stitch or multi-stitch
zig-zag eliminates the bulk of turneúAn edges
and retains fabric flexibility.
1. Make a test sample to check thread tension
and stitch length if you are using the multistitch zig-zag.
2. Place stitching about 1 /2 inch (13mm) from
hem or facing edge.
3. Press after stitching and trim away excess
fabric close to the stitching line.
33
Page 36

PLAIN STRETCH SEAMS
Pattern: Straight Stitch
Stitch Width: A
Needle Position: A
Stitch Control: STRETCH
Zig-Zag Throat Piate
Zig-Zag Foot
of elasticity, it should be stitched under
tension as instructed on page 33 (Guiding
and Supporting Fabric).
3. Press seam as when using the regular
straight stitch.
LINGERIE SEAMS
When you use the straight stretch stitch to
seam knit, stretch, and elasticized fabric,
s-t-r-e-t-c-h and strength are built in as the
seam is being sewn. Because it is equally use
ful for closed or press-open seam construction
and will not break thread under stress, the
straight stretch stitch is also good for seams
that receive an unusual amount of strain when
the garment is worn. For example: crotch
seaming, sleeve insertion, and construction
seams in sportswear and swimsuits.
Procedure
1. Make a test sample to determine the cor
rect thread tension. Be sure to insert a yel
low-band needle in the machine if you are
stitching a synthetic knit fabric.
2. Stitch and guide fabric as you do for plain
seams stitched with the regular straight
stitch, letting the machine make the backand-forth stitches that give
the seam, if fabric has an unusual amount
s-t-r-e-t-c-h to
Pattern: Plain Zig-Zag I
Stitch Width: 1 to 2V2 *
Needle Position: A
Stitch Control: 12 to 20 (approximately 1 to 2)
Zig-Zag Throat Plate
Zig-Zag Foot
To make a lingerie seam durable and flexible,
use the plain zig-zag stitch at a narrow width
setting. This seam treatment is particularly
suitable for bias seams. When seaming nylon
tricot, insert a yellow-band needle in the ma
chine before you begin to sew,
♦ Straight-stitch the seam (dials set on black
A sym.bols) on wrong side of fabric.
♦ Press both seam allowances in the same di
rection.
♦ From the right side, topstitch with narrow
zig-zag stitching, letting the needle alter
nately enter the seam line and the seam
thickness.
34
straight Stretch Stitching Lingerie Seam
Page 37

OVEREDGED SEAMS MOCK OVEREDGING
Pattern: Overedge Stretch
Stitch Width: 5
Needle Position:
Stitch Control: STPETCH
Speed: In SLOW range
Zig-Zag Throat Plate
Overedge Foot
A
Seams m knit and stretch fabrics can be
joined and finished in one operation when you
use the overedge stretch stitch.
Procedure
1. Make a test sample before beginning gar
ment construction to test machine settings.
Be sure to duplicate the cut of the garment
seam in your test, and use a bail-point
(yellow band) needle if you are sewing a
synthetic knit fabric.
2. Cut and fit the garment in the regular way,
using a 6/8 inch (16mm) seam allowance.
Baste seam line.
3. Trim seam edge evenly to a scant 1 /4 inch
(6mm) from seam-line basting.
Pattern: Slant Overedge ^ (see page 21)
Stitch Width: 5
Needle Position: A
Stitch Controi: STRETCH
Speed: In SLOW range
Zig-Zag Throat Plate
Zig-Zag Foot
When it is not practical to overedge a seam
because of the construction of the fabric, a
mock overedge finish can be applied. This
finish IS appropriate for bulky knits, fine tri
cots, and fabrics that curl or ravel.
Procedure:
1. Make a test sample to check machine ad
justments before beginning garment con
struction.
2. Cut and fit the garment, allowing for 5/8-
inch (16mm) seam allowance. Baste seam
line.
3. Place seam under the presser foot so that
the straight stitches fall on the seam-line
basting.
4. Place trimmed seam under the overedge
foot so that the straight stitches fali on the
basted seam line and zig-zag stitches fall
over the seam edge.
Overedged Seam
4. Press after stitching and trim away fabric
to produce a narrow seam. When the seam
supports the garment, omit the trimming
step.
35
Page 38

hints on sewing special fabric
LEATHER-LOOK VINYLf
• Use masking tape or zipper adhesive tape
instead of pins or basting to hold seams, zip
pers and hems in place for stitching.
• Stitch with a long stitch {setting of 8 to 10 or
2.5 to 3). A short stitch may cut the fabric.
• Sew with a steady, even pace and stitch ac
curately. Seams cannot be ripped out with
out leaving needle marks in the fabric.
• The shiny side of some vinyls tends to stick
to metal surfaces. Use a strip of tissue paper
between the fabric and metal machine sur
faces to prevent this.
• Reinforce button and buttonhole areas with
interfacing. Bound buttonholes are the best
choice for vinyls with knit backing.
• Topstitching holds seams and garment edges
smooth and flat, and adds a decorative note.
• For sharp points on collars and lapels, take
one or two stitches diagonally across the
point to allow enough space to enclose the
seam edge smoothly.
CIRÉ {Wet-Look Taffeta and Tricot)f
• Do not use pins in any area of the garment
that will be visible when completed.
• Use masking tape or zipper adhesive tape
instead of pins or basting to hold seams, zip
pers and hems in place for stitching.
• Stitch accurately; seams cannot be ripped
out because needle marks remain in the
fabric.
Sew seams under gentle tension by holding
fabric slightly taut at front and back of
needle.
Stitch ciré taffeta with a fairly long stitch and
use an enclosed edge finish for seams and
hems.
Stitch ciré knits with a medium-length stitch
(setting of 12 or approximately 2) and use a
fine bail-point needle.
Machine-worked buttonholes, as well as
bound buttonholes can be made in ciré fab
ric. Always use an interfacing and make sure
the close zig-zag stitches do not cut the
fabric.
Turning a Sharp Comer on Leather-Look Vinyi
+The Even-Feed Foot described on page 47 is designed to aid in sewing this fabric.
36
Page 39

DEEP-PILE FABRICS (Fake Fur) f
• Pin, rather than baste, seams. Place pins at
short intervals at right angles to the seam
line. Pins with colored heads are easy to see
and remove.
• Sew in direction of nap.
• Stitch with a fairly long machine stitch (set
tings of 8 to 10 or approximately 2.5 to 3)
and use polyester/cotton thread in a size 14
or 16 Catalog 2020 needle.
• As seam is stitched, smooth pile away from
seam allowance with a darning needle or up
holstery pin.
• After stitching seams with a 5/8 inch (16mm)
seam allowance, use small hand scissors to
shear pile from entire seam allowance to
reduce buik.
• Stitch 1/4 inch (6mm) preshrunk tape into
neckline and shoulder seams for stability and
reinforcement, or stitch with the straight
stretch stitch (stitch control set on
STRETCH).
• Leather and leather-look fabrics comple
ment fur fabrics; use them for bound button
holes and easy button loops.
Smoothing Pile Away
from Seam Allowance
• Coat hems are less bulky if narrow and
finished with a 3 inch (76mm) fabric facing or
gros-grain ribbon.
• Slash through the center fold of darts and
Stitching Deep-Piie
Fabrics {Fake Fur)
finger-press open or stitch with a narrow zig
zag stitch and trim away excess fabric after
stitching.
VELVET AND VELVETEEN f
• Use a light pressure dial setting to prevent
crushing pile.
• Mark and baste with siik thread.
• Use a Catalog 2020, size 11 needle and a
fine thread for seaming. “A” silk or nylon
thread is recommended for sewing velvet
and velveteen.
• Always stitch in the direction of the nap.
tThe Even-Feed Foot described on page 47 is designed to aid in sewing this fabric.
Pin or hand-baste seams and sew under
gentle tension by holding fabric slightly taut
at front and back of needle {see page 18).
Extra-long straight seams may be machine
basted with a long, wide zig-zag stitch.
To sew panne velvet, use a bail-point needle
(yellow band) and a shorter-than-normai
stitch length (settings of 12 to 15 or approx
imately 1.5 to 2).
37
Page 40

decorative touches
BORDER DESIGNS
Border designs that add a decorative touch to
wearing apparel and househoid items can be
created by combining different types of
straight stitching and zig-zag stitching. Simple
or elaborate, delicate or bold, they can be var
ied to suit the application. Use them as you
would a braid or to simulate horizontal, vertical
or bias stripes on plain fabric.
Procedure
Mark or crease fabric for the center line of first
row of stitching. If spacing between rows is not
greater than 1 /2 inch {13mm), gauge additional
rows with the pressar foot. If spacing is wider,
iM
mark for each line of stitching. Use a backing of
crisp lawn, organdy or organza and be sure to
make a test sample on a swatch of your fabric
to check stitch settings and thread tension.
APPLIQUE
Applique adds beauty and interest to clothing
and household linens. You can create your
own design, trace a simple outline from a col
oring book, or use a motif cut from a printed
fabric. Fabrics of like or different texture com
bine equally well.
Use a closely spaced, fairly narrow zig-zag
stitch. Although you may vary stitch width to
accommodate fabric weave or texture, never
allow the stitch to be too wide.
When appliqueing, make a test sample to help
you decide which of the foilowing methods is
more appropriate for your fabric and design.
Preparation
• Baste applique design to fabric.
• Outline design with straight stitching (use a
short stitch).
• Remove basting and press.
Border Design
• Attach zig-zag throat plate and foot.
Method #t
1. Set stitch width dial. Adjust stitch length in
the FINE area of the stitch control.
2. Outline the entire design with applique
stitching.
3. Cut away the fabric on the outer edges of
the stitching with embroidery scissors.
Method
1. Trim outside edges close to straight stitch
2. Set stitch width dial. Adjust stitch length in
3. Overedge the design with satin stitching.
MeUiod #1—^Trimming after Stitching
NOTE: For best results In satin stitching, the special purpose foot is recommendeci (available for purchase, see page 47).
it
2
outline of design.
the FINE area of the stitch control.
This step will produce a smooth, lustrous
finish that requires no additional trimming.
38
Page 41

keeping up appearances
Many zig-zag siiich patterns are Just as useful
for mending as they are for creative sewing.
The muiti-stitch zig-zag (a built-in pattern)
forms a firm, flexible bond that is ideal for re
pairing tears.
MENDING A TEAR
• Pattern: Muiti-Stitch Zig-Zag
• Needle Position: A
• Stitch Width: 2 to S
• Stitch Control: Approximately 20 (1 to 1.5)
• Zig-Zag Throat Plate
• Zig-Zag Foot
1. Trim ragged edges.
2. Place underlay on the wrong side of tear for
reinforcement. (It is best not to baste or pin
the underlay, since you will be bringing the
edges together in the next step.)
3. Stitch on the right side, bringing the edges
of the tear together. Shorten stitch length at
ends and corners to give extra strength.
4. Trim underlay.
Tear amended with Multi-Stiteh Zig-Zag
BLANKET BINDING
Often you can make an old blanket look almost
new by replacing the binding.A zig-zag stitch
pattern such as the plain zig-zag or muitistitch zig-zag or the semaphore Flexl-Stltch
pattern may be used.
• Pattern: Desired zig-zag stitch (see above)
♦ Stitch Width: 5
• Needle Position: A
• Stitch Control: STRETCH for Flexi-Stitch pattern,
or approximately 15 to 20 (1.5), to suit stitch and
fabric
♦ Pressure: NORM or less
* Zig-Zag Throat Plate
♦ Zig-Zag Foot
1, Make a sample to determine correct dial
settings. Reduce pressure on fabric and
increase stitch length, if necessary, so that
blanket feeds freely.
2, Remove worn binding and baste new bind
ing securely in place.
Blanket Binding
3, Stitch, and remove basting.
39
Page 42

REPAIRING SEAWfS
Breaks in press-open garment seams can be
repaired quickly and easily when you use the
straight stretch stitch (stitch pattern ^ , stitch
width A and stitch control on STRETCH set
ting). This reinforced stitch is both strong and
flexible. It is ideal for knit and stretch fab
rics and particularly useful for repairing or
strengthening curved seams or seams that will
receive strain when worn.
1. Make a test sample to check dial settings.
2. Remove loose thread along the break and
press the seam edges together.
3. Re-stitch along original seam line, guiding
seam under presser foot without stretch
ing fabric, letting the machine move the
fabric to make the back-and-forth stitches
that give s-t-r-e-t-c-h to the seam. Overlap
stitching one inch at each end. Press seam
open.
Seam Repair
Stretch Garment Repair
REPAIRING STRETCH GARMENTS
Pattern: Plain Zig-zag I
Needle Position; A *
Stitch Width: 3 to 5
Stitch Control: 20 {approximately 1 to 1.5) or
to suit fabric
Zig-Zag Throat Plate
Zig-Zag Foot
Seams and hems in stretch and elasticlzed
garments retain their elasticity when stitched
with the plain zig-zag stitch. This stitch is par
ticularly effective when used In topstitch ap
plications (as shown) or to overedge. Make a
test sample to check dial settings.
Bar Tacks
Bar tacks, to reinforce points of strain, are
made with the plain zig-zag stitch at satin
stitch length. Use them at pocket corners, to
attach garters, secure shoulder straps, belt
loops and zipper openings.
40
Page 43

DARNING
With Embroidery Hoop
Worn or torn spots on children’s clothes, knits,
and household linens can be darned effort-
lessly and quickly with little practice. You may
choose to darn either with or without an em
broidery hoop. When greater control is needed,
an embroidery hoop is usually best.
Without Embroidery Hoop
Pattern: Straight Stitch
Needle Position: A ^
Stitch Width: A
Stitch Control: 10 to 15 (approximately 1.5 to 2.5)
Pressure: DARN
Zig-Zag Throat Plate
Zig-Zag Foot
1. If area to be darned is open, baste an under
lay in place.
2. Place area to be darned under presser foot;
lower presser foot and start stitching, al
ternately drawing fabric toward you and
pulling it gently away from you.
3. Continue this forward and backward motion
as you fill the area with parallel lines of
stitching. For additional strength, cover
area with crosswise lines of stitching.
Pattern: Straight Stitch
Needle Position: A
Stitch Width: A
Stitch Control: In FINE area
Feed Cover Throat Plate
No presser foot
1. Trim ragged edges from area to be darned.
2. Center worn section in embroidery hoop.
3. Position work under needle over feed cover
plate and lower presser bar to engage ten
sion.
4. Hold needle thread loosely with left hand,
turn hand wheel over and draw bobbin
thread up through fabric. Hold both thread
ends and lower needle into fabric.
5. Outline area to be darned with running
stitches for reinforcement
6. Stitch across opening, moving hoop under
needle at a slight angle from lower left to
upper right Keep lines of stitching closely
spaced and even In length.
7. When opening is filled, cover area with
crosswise lines of stitching.
Darning without Embroidery Hoop
Darning With Embroidery Hoop
41
Page 44

7. CARING FOR YOUR SEWING MACHINE
cleaning the machine
Your machine will serve you perfectly for many
years if you take a few moments of your time
to keep it dean. How often you will need to
clean the machine will depend on how often
you use it
CAUTION: Before cleaning your machine, dis
connect power-line plug from electrical supply.
Remove lint or fluff from exposed parts. With a
soft cloth, clean:
• Tension discs, presser bar, and needle bar
• Take-up lever and thread guides
• Bobbin case (If there is a lot of lint in the
area, rernove bobbin case for cleaning. See
page 44 for Instructions.)
• Machine surface {If necessary, damperi the
cloth and use a mild soap.)
Open the face plate and clean area behind it
with a brush.
Remove throat plate as instructed on page 6
and, using a brush, clean the rotating hook
area under the throat plate and slide plate.
After cleaning, apply only SINGER* oil at
points indicated below. SINGER oil is speci
ally prepared and does not contain harmful
deposits that can interfere with the smooth
action of precision parts.
Approximately once every year, remove top
and bottom covers as instructed on page 43,
and clean and lubricate all moving or rotating
machine connections to ensure freedom of
movement and to protect metal parts from
excessive wear. To determine which connec
tions are moving or rotating, turn hand wheel
slowly (by hand) while covers are removed.
42
Page 45

removing covers, bobbin case, and bulb
CAUTION: Before removing covers, bobbin
case, and light bulb, disconnect power-line
plug from your electrical supply.
RES/fOVlNG AND REPLACING
TOP COVER
Move take-up lever to a low point and lower
the presser foot
1 Open face plate and remove screw A, llfi
up right end of top cover, and slide cover
toward left and off machine,
2. Replace cover by positioning it on top of
arm with a slight overhang on left side.
3. Engage bobbin winder latch and slide cover
to the right as far as it will go. Replace and
securely tighten screw A«
4. Release bobbin winder latch.
REMOVING AND REPLACING
BOTTOM COVER
If your machine is a portable, first remove the
carrying case base as instructed on next page.
Hoysehoid Machme
1. Tilt machine back, remove screw from cen
ter of bottom cover, and pull cover straight
up (parallel to machine).
2. Replace bottom cover by positioning slots
in cover over the cushion pins. Push down
on cover to snap it into place. Replace and
tighten screw in center of cover.
I
Removing and Replacing Top Cover
Removing and Replacing Sottom Cover
on Household Machine
Power-Line
Retainer
Power-Line
Retainer and
Classroom Machine
1. Tilt machine back, remove screw from cen
ter of bottom cover, loosen the four corner
screws, and pull cover straight up (parallel
to machine).
2. Replace bottom cover by positioning slots
in cover over the four corner screws. Push
down on cover, make sure cover is between
power-line retainer at bottom left corner
and machine casting, and snap cover into
position.
3. Replace and tighten center screw and
powerline retainer. Tighten the four corner
screws.
Removing and Replacing Bottom Cover
on Classroom Machine
43
Page 46

Retaining Screws and Washers
REMOVIMG AND REPLACING
CARRYING CASE BASE
1. Disconnect machine piug from electrical
receptacle at right end of machine.
2. Turn machine over on its back and remove
screws and washers from each end of base.
Set machine and base upright and lift ma
chine up and out of base.
3. Replace machine in base after bottom cover
has been attached. Turn machine and base
over together to replace washers and
screws on underside. Tighten screws.
REMOVING THE BOBBIN CASE
1. Turn hand wheel toward you to raise takeup lever to its highest position.
2. Open slide plate, remove throat plate (see
page 6 for instructions), and remove bob
bin.
Removing the Bobbin Case
3. Turn bobbin case holder to back as far as
it will go.
4. Lift out bobbin case.
REPLACING THE BOBBIN CASE
1. Turn hand wheel to raise take-up lever to
its highest position.
2. Insert bobbin case with a back-and-forth
motion so that the front of the case is under
the position plate as illustrated.
3. Turn holder all the way forward to lock bob
bin case in position.
4. Replace bobbin and throat plate and close
slide plate.
44
Replacing the Bobbin Case
Page 47

REPLACING THE SLIDE PLATE
You wii! not have any occasion to remove the
slide plate. However, if it should accidentally
become disengaged from the machine, it is
easily replaced.
• Raise the presser foot and make sure needle
is in its highest position.
• Place slide plate in slide way with the front
edge close to, but not covering, the retain
ing spring (as shown).
• With a small screwdriver, lift each end of the
spring into each of the side grooves on the
underside of the plate.
• Draw the piate gently toward you and fully
engage the spring.
• Close slide plate.
V
Replacing the Slide Plate
CHANGING THE LIGHT BULB
Caution: Before changing light bulb make
sure you have disconnected power-line
plug from electrical outlet.
Removing Bulb. With thumb of right hand,
push in and down on tab of light lens and
lower the light bracket. Do not attempt to
unscrew the bulb. Press it up into the
socket and at the same time turn buib over
in direction shown to unlock the bulb pin.
Replacing Buib. Press new bulb into
socket, with buib pin entering slot of
socket, and turn it over in direction shown
to lock bulb in position. Push entire as
sembly up until it snaps in position.
45
Page 48

performance checklist
REMEMBER TO
Make sure eiectricai piug is properly
connected.
Turn on power and light switch.
Turn hand wheel toward you to raise
needle above fabric or throat píate be
fore making adjustments to stitch width
or needle position.
Use a bail-point (yeiSow band) needle to
sew nylon tricot and synthetic doubleknits.
Use high-lift presser bar setting to place
heavy fabric under presser foot.
Start and finish sewing with take-up
lever in its highest position.
Adjust stitch length, pressure, and
thread tension to suit your fabric.
IF THREAD
Is the machine properly threaded?
is the bobbin case properly threaded?
is thread unwinding freely from spool?
is the needle securely tightened in the
needle clamp?
is the needle straight?
Is the thread suitable for the size of the
needle and free of siubs and knots?
Test stitch on a fabric sample before
starting a sewing Job.
Replace bent or burred needies.
Lower presser foot before setting pres
sure dial.
Tighten hand-wheel knob after winding
a bobbin.
Use the zig-rag throat plate and zig-zag
foot for ail zig-zag stitching, and for
straight stitching in L (left) or R (right)
needle positions.
Remove feed cover throat plate after
button sewing and after free-motion
darning or embroidery.
Sew at a moderate speed (SLOW speed
setting) when using the straight stretch
stitch or Flexi-StHch patterns.
BREAKS
• is the spool-pin felt being used under
the thread spool?
• Is the needle-thread tension too tight?
• is the bobbin-thread tension too tight?
• is the bobbin-case area free of lint and
loose thread ends?
• Are the thread guides and tension discs
also free of lint?
• is the presser foot down?
• Is pressure dial adjusted properly for
the weight and texture of your fabric?
30 Rockefeller Plaza, New York. N.Y. 10020
46
IF FABRIC FAILS TO FEED
Is the stitch control dial properly set?
Are you using the feed-cover throat
plate instead of the regular throat plate?
If you have any questions, please write to;
Department of Sewing Education
The Singer Company
Page 49

8. FASHION AIDS
special accessories for special jobs
Fashion Aids have been designed to increase
the versatility of your sewing machine and
enable you to give your sewing that extra
professional touch. The ones described below
are just a few of the complete selection avail
able at your local Singer Sewing Center.
Professional* Buttonholer
The Professional Suttonhofer sews six kinds
of buttonholes, plus eyelets in a wide variety
of fabrics. You choose the style and length and
make perfect buttonholes every time.
Monogrammer
With the monogrammer, you can stitch initials
3/8 inches (9mm) high, to form monograms or
names that add a charming individual touch to
handkerchiefs, blouse collars, ties, etc.
Deluxe Wlonogrammer
With the deluxe monogrammer you will have the
pleasure of stitching initials 1-1/2 inches
{38mm) high to create monograms that are ideal
for adding a personal touch to table linens,
towels, and wearing apparel. An attractive
flower motif can also be made.
No. 102991
No. 171256
No. 171276
Ryffler
This accessory offers a simple, effective way
to make gathered and pleated ruffles. The
ruffler is used for straight stitching only.
Binder Foot No. 81200
The binder foot is used to apply ready-made
bias tape or unfolded bias binding to an un
finished edge. It can also be useful for binding
seam edges that might ravel.
Speeiai Purpose Foot No. 163483
This light, flexible foot is specially designed
for zig-zag satin stitching, applique and but
tonholing. It has a raised center section that
allows closely spaced zig-zag stitches to feed
evenly. The small eyelets at the front of the
foot hold a filler cord when desired.
Darning and Embroidery Foot No. 161875
This foot is recommended for all types of free-
motion work. It Is ideal for embroidery, monogramming, and decorative designs because
the transparent toe fully reveals the line of the
design to be followed.
No. 161561
Even Feed Foot No. 506415
The Even Feed Foot is effective in keeping
fabric piles even, and in matching plaids,
stripes, and patterns, it is an invaluable aid for
sewing hard-to-feed vinyl and fake fur, pile,
stretch, banded and laminated fabrics. Ideal
for topstltching.
Hemmer Foot No. 171145
Narrow hems can be turned and stitched in a
single operation if you use the hemmer foot.
Thus, you can eliminate basting or pinning
whenever you are making ruffle edges, lingerie
finishes, and the like.
Button Sewmg Foot No. 161168
This short, open foot holds any two-hole or
four-hole button securely for stitching. The
groove in the foot can be used to hold a
needle, over which a thread shank can be
formed.
Finger Guard
The finger guard provides extra safety by pro
tecting fingers from, the needle. It is idea! for
the student, beginner, or the blind person.
No, 161681
47
Page 50

INDEX
Accessories ................................................................. 4
Adjusting Dials
Applique ..................................................................... 38
Bar Tacks
Blanket Binding ........................................................ 39
Blindatiteli Hems
Bobbin
Bobbin Case
Border Designs.......................................................... 38
Buttonholes ............................................................... 26
Buttons ...................................................................... 25
Caring for Your Machine
Choosing Needle and Thread
Darning ...................................................................... 41
Fabric, Thread and Needle Table
......................................................................
Raising Bobbin Thread......................................... 13
Winding............................................................. 10, 11
Removing
Threading .............................................................. 11
Fashion Aids
Finishes for Hems and Facings............................... 33
Guiding and Supporting Fabric
Hints on Sewing Special Fabric
Ciré (Wet-Look Taffeta and Tricot)
Deep-Pile Fabrics (Fake Fur)
Leather-Look Vinyl............................................... 36
Velvet and Velveteen............................................. 37
Light Bulb................................................................... 45
Mending a Tear
Needle......................................................
Position
Replacement
Threading
Performance Checklist
Pin Basting................................................................ 17
Power and Light Switch.............................................. 7
Preliminary Steps
Presser Feet ................................................... 5, 14, 23
Changing Presser Foot........................................... 5
Zig-Zag Foot
Overedge Foot
Straight Stitch Foot
Zipper Foot ......................................................... 5, 28
.....................................................
...................................................................
......................................................
..........................................................
..............................................................
..........................................
....................................
..............................
..............................................................
..........................
..........................
......................
...............................
..........................................................
.................
............................................................
...........................................................
...........................................................
.............................................
........................................................
.......................................................
..........................................................
.................................................
15, 22
11, 44
18,33
36, 37
14,22
40
29
4,10
44
42
47
36
37
39
4, 8
12
46
5, 23
8
8
4
7
5, 35
5
Presser Foot Lifter
Pressure Adjustment
Principal Parts and What They Do
Repairing Seams
Repairing Stretch Garments
Reverse Stitching
Satin Stitching ......................................................... 24
Seam Guide...................................................... 6, 17, 19
Seams
........................................................................
Corded ................................................................... 30
Curved
In Fabrics That Ravel
Lingerie.................................................................. 34
Overedged ............................................................. 35
Plain Stretch .......................................................... 34
Reinforcing End of Seam
Straight
Sewing Knit and Stretch Fabrics
Slide Plate .................................................................. 45
Stitch Control Dial
Stitch Pattern Dial...................................................... 22
Stitch Width Dial ................................................... 14, 23
Starting to Sew
Straight Stitching ..................................................... 14
Choosing Accessories.......................................... 14
Curved Seams .................................................... 20
Starting a Seam
Straight Seams
Turning Square Corners
Tension Adjustment
For Zig-Zag Satin Stitching
Thread Cutter
Throat Plates .............................................................. 5
Changing Throat Plate
Feed Cover Plate......................................... 6, 24, 37
Zig-Zag ................................................................ 5, 23
Straight Stitch ..................................................... 5, 14
Zig-Zag Stitching....................................................... 21
Zig-Zag Stitch Patterns
Satin Stitching
Zipper Insertion ......................................................... 28
............................................................... .. 20
...................................................................
....................................................
.............................................. . 15
............................
.....................................................
....................................
....................................................
...........................................
.....................................
.............................
.................................. 14, 15, 22
........................................................
.....................................................
......................................................
.......................................
.............................................
..................................
............................................................
............................................
........................................
.....................................................
16,23
17
3
40
40
15
17
31
20
19
32
14
18
19
19
24
20
6
21
24
48
Page 51

Here, there, everywhere... SINGER
Form 21714 (Rev. 575)
‘A Trademark of THE SINGER COMPANY
Printed in U.S.A
Page 52

Everything you need to sew up fashion
is at a nearby Si nger Sewing Center.
Fabulous fabrics plus matching thread,
zippers, and ail the trimmings that
add up to fashion excitement... special
sewing aids like buttonhoiers and
monogrammersto give your clothes a
designer touch... pamphiets and
books to tell you howto sew like a pro
... all these and many more products
are always available at Singer. And if
you need any sewing help. Singer
experts are always glad to supply
advice and suggestions.
. ■ ■ ■ ■■■ ■
w. ■
= " - ■ ■
 Loading...