

Page 1

Little Touch & Sew 67A
the little
Touch & Sew
Sewing Machine
SINGER
INSTRUCTION MANUAL
What's new for tomorrow is at SINGER today!*
Table of Contents | Next Page
Page 2
Table of Contents
AMessage to the Young Seamstress
AMessage to Mother
Happy Birthday to You, a story
Assembling the Sewing Table
Setting Up Your Sewing Machine
Replacing the Machine
AName for Everything
AJob for Everything
The Bobbin
How to Thread the Needle
How to Change the Needle
The Tension Dial
How to Place Your Fabric
How to Start Stitching
How to End a Seam
The Adapter
Dog's Coat Pattern
Hankie Holder Pattern
Stocking Holder Pattern
Apron Pattern
Doll's Nightie Pattern
Scarf Pattern
Contact Singer
Little Touch & Sew 67A
Amessage
to the young seamstress!
THE SINGER COMPANYdesigned the Little
Touch & Sew sewing machine especially for
little ladies like you. It's lots of fun to play with
and you can make grown-up things, too.
Your sewing machine has a real bobbin and
will make a real lockstitch. It has many other
special Singer features just like those on big
machines. You must learn how to use every
part correctly.
Before you begin to sew anything, ask
Mother to read this book with you. Look carefully at every picture and read every word
with her.Then ask her to explain anything
you don't understand. When you know all
about your machine, you will be ready to
begin sewing. It's easy when you do it the
right way.
Previous Page | Next Page
Page 3

Little Touch & Sew 67A
A Message To Mother
Sewing is fun and a big accomplishment for a young girl. With a little encouragement, your
daughter can learn this basic domestic skill quickly and easily. It's never too early to start
developing an awareness of style and good taste.
THE SINGER COMPANY designed the Little Touch & Sew sewing machine with safety and
simplicity in mind. Perhaps a mother's most common fear is that her child will accidentally
sew over a finger or hand. This is virtually impossible with the molded plastic presser foot on
your child's machine. As you look over this machine, you'll find many other features designed
for safe and simple sewing.
If your daughter is very young, you can remove the batteries that come in her machine and
let her begin sewing by using the hand crank. When you feel your daughter has become
more adept at sewing, you may wish to purchase the electrical adapter available at your local
Singer Center.
This instruction book has been especially prepared to teach the young beginner how to
thread and operate her sewing machine safely and efficiently. For best results, however, we
suggest that you sit down with your daughter and go over each page with her step by step. In
no time at all she'll be sewing by herself.
Table of Contents Previous Page | Next Page
3
Page 4

Little Touch & Sew 67A
Stephanie's family stood around her bed and sang as loudly as they could to wake her up.
"Good morning, everyone," said Stephanie as she sat up in bed. She laughed as she looked
around the room and saw lots of gifts.
Her mother handed her a flat red one with lacy silver ribbons.
Stephanie opened it in a hurry. Something pink was showing through all the tissue paper. She
pulled out a long bathrobe with baby kittens appliqued on the pockets.
Mother said, "I hope you like it, honey. I made it myself with the Touch & Sew sewing
machine that Daddy gave me last Christmas."
"Oh yes, yes. It's beautiful, Mummy," replied Stephanie. "Thank you. Then she ran to give
her mother a big hug and kiss.
"Open my package next," demanded her sister Barbara. She handed Stephanie a square
package wrapped in blue paper and wide ribbons of golden velvet.
"I can hardly wait to see what it is," said Stephanie as she took off all the wrappings.
"Oh, she's lovely!" exclaimed Stephanie. She pulled out a beautiful doll with long blond hair
and big blue eyes just like her own.
Table of Contents Previous Page | Next Page
4
Page 5

Little Touch & Sew 67A
"I'm going to name her Carolyn. Then she will have the same name as Mother," said
Stephanie.
"Thank you, Barbara," she said. She threw her sister a kiss from across the room.
All of a sudden Stephanie heard a squeaky little noise. "Where did that come from?" she
asked.
Father pointed to a shiny gold package on the floor.
Stephanie jumped out of bed to see what it was. "Why is that funny hole in the lid?" she won-
dered.
Carefully Stephanie opened the lid. A soft little black and white spotted puppy was in the box.
Stephanie put her hand in to touch the puppy's wet little nose. The puppy jumped up and
licked her hand with his tiny pink tongue.
"That's how a puppy kisses you," explained Father.
Stephanie kissed her puppy on the top of his spotted head. "You are so cute, little puppy,"
she told him. "I will name you McGurk."
Stephanie said, "Thank you, Daddy, thank you." Then she ran across the room to kiss her
father.
There was only one present left to open. Grandmother handed her a big box all wrapped in
pink flowered paper. "Whatever could that be?" asked Stephanie.
"Open it and see," replied Grandmother.
Table of Contents Previous Page | Next Page
5
Page 6

Little Touch & Sew 67A
Stephanie took the paper off in a big hurry. Father helped her open the box. Stephanie's eyes
lighted up when she saw what was inside.
"Look, look!" she exclaimed, "a Little Touch & Sew sewing machine just like Mummy's big
one."
"Oh, look," said Barbara, "it even has a real bobbin."
"Yes, that is so it can make a strong lockstitch just as Mother's machine does," Father
explained
"Now that you are a big girl,' said Grandmother, "you should learn how to sew. Right after
breakfast we'll sit down together and I'll show you how easy it is."
"A real sewing machine just like Mother's," sang Stephanie. "A real sewing machine just like
Mother's. I really am a big girl now."
"I'll take good care of it, Grandmother," she promised. "I'll take good care of it just as Mother
does with hers."
"Thank you, Grandmother," she said. Then she gave her grandmother a big hug and kiss.
McGurk gave a squeaky little bark.
"Oh, oh! I think McGurk is hungry," said Barbara.
"So am I," said Stephanie.
"And so am I," said Daddy and Mother and Grandmother.
Table of Contents Previous Page | Next Page
6
Page 7

Little Touch & Sew 67A
So they all went downstairs to eat Stephanie's favorite breakfast of pancakes covered with
Grandmother's homemade strawberry jam.
"Mmmm, mmmm, it's all so good," declared Stephanie. "This is my happiest birthday."
Even before she was finished eating, Stephanie began planning all the things she would
make with her Little Touch & Sew machine.
"First I think I'll make a yellow scarf trimmed with white ribbons for Barbara to wear at the
beach."
"Then I'll sew a nightie for Carolyn. I will make it pink to match the bathrobe that Mummy
made for me."
"I'll make Daddy a hankie holder. That will keep his top drawer from being such a mess."
"Grandmother needs a new apron. I will sew a pretty new apron for her."
"After I finish sewing the apron, I will make a soft stocking holder for Mummy. Then she won't
get any more snags in her stockings."
"Oh, McGurk! Did you think I forgot you ? I'm going to sew a coat for you. Then you won't get
cold when we go for long walks in the winter."
Everyone laughed at Stephanie's enthusiasm.
"We will make one thing at a time," Grandmother told her. "First, let's clear the table and then
we'll start."
Table of Contents Previous Page | Next Page
7
Page 8

Little Touch & Sew 67A
Stephanie helped her grandmother clear the table. Grandmother washed the dishes while she
dried them.
"Hurry, Grandmother, I can't wait to start," she said.
At last they were ready to begin!
Grandmother explained, "First we will read the instruction book together to make certain we
understand everything."
"It is very important that you take good care of your machine. Once you learn how easy it is,
you will have hours of fun sewing."
"Today I will help you sew," said Grandmother, "but soon you'll be sewing all by yourself."
Turn to the back of the book to see how to make the presents that Stephanie gave to her
family. You can have lots of fun making them.
Table of Contents Previous Page | Next Page
8
Page 9

Little Touch & Sew 67A
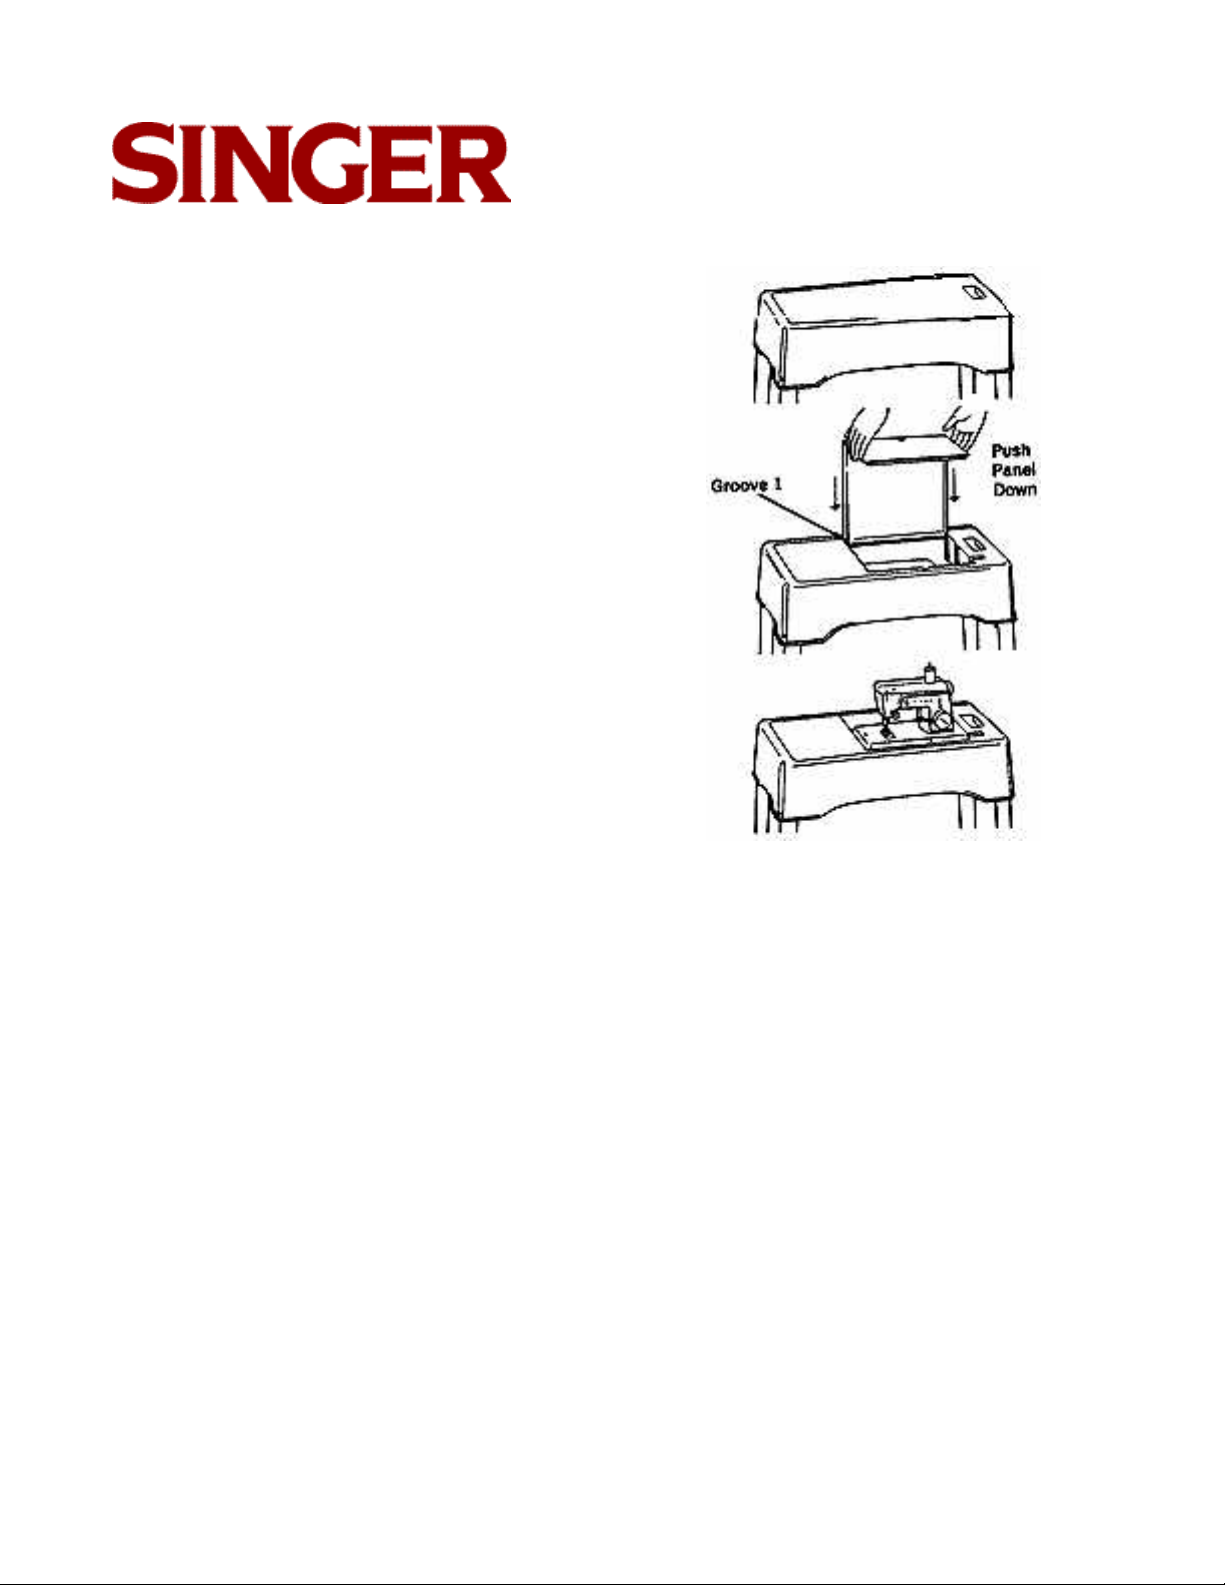
Assembling the Sewing Table
Ask your mother or father to follow these
directions in setting up your new sewing
table.
1. Remove the panel and machine from the
tabletop as instructed on the opposite
page.
2. Place the tabletop face down on a table or
the floor, with the opening away from you.
3. Place the two legs with the feet in the right
and left sockets nearer you. Make sure the
feet are pointed inward. (When your
daughter is sewing, she can place her feet
on these to steady the table if she wishes.)
Place the other two legs at the back of the
table. Fasten all four legs with screws,
washers and nuts, which you will find in
the envelope.
Table of Contents Previous Page | Next Page
9
Page 10
Little Touch & Sew 67A
Setting Up Your Sewing Machine
1. Lift the panel in the tabletop by placing one
finger in each of the two finger holds. Be
sure to lift it gently, straight up. Set the
panel aside.
2. Lift the sewing machine out of the well and
set it aside.
3. Hold the panel by the short end and slide
the long end into groove 1 at both sides of
the very back of the table. Set the machine
in the space at the front of the table. Now
you are ready to sew.
Table of Contents Previous Page | Next Page
10
Page 11

Little Touch & Sew 67A
Replacing the Machine
When you have finished sewing, you can
leave the machine in place, or you can put it
away and have a handy table for other uses.
1. Remove the machine and set it aside.
2. Lift out the panel, pulling it gently straight
up. Set the panel aside.
3. Place the machine face down in the well.
Make sure the ridge on the machine slides
into groove 2 on both sides.
4. Grasp the long side of the panel and slide
the small side into groove 1 at both sides
of the back of the table.
Table of Contents Previous Page | Next Page
11
Page 12

A Name For Everything
Little Touch & Sew 67A
Your Little Touch & Sew sewing machine has
some very important parts. Each part has a
special job to do. Each one has its own name.
See how fast you can learn every name.
Table of Contents Previous Page | Next Page
12
Page 13

A Job For Everything
Little Touch & Sew 67A
See how fast you can learn what every part
does.
1. The SPOOL PIN holds the spools of
thread.
2. The TAKE-UP LEVER pulls the thread
from the spool to the needle.
3. The PRESSER FOOT LIFTER raises and
lowers the presser foot.
4. The NEEDLE carries the thread through
the fabric when you sew.
5. The PRESSER FOOT holds the fabric
against the feed dog. (Note: Always put
fabric under the presser foot when you
sew.)
6. The FEED DOG moves the fabric as you
sew.
7. The SLIDE PLATE opens so you can take
the bobbin out. Slide it to the left to open.
Slide it to the right to close.
8. The THROAT PLATE is the working place
for your fabric. The numbered guidelines
to help you sew straight seams.
9. The TENSION DIAL decides how hard
the needle should pull the thread.
10. The TABLE CLAMP holds the machine
tightly to your work table.
11. The BOBBIN WINDER holds the bobbin
when you wind it. Never leave a bobbin
on the winder while you are sewing.
12. The HAND WHEEL moves the take-up
lever and the needle at the same time.
Always follow the arrows when you turn
the hand wheel.
13. The HAND CRANK fits into the slot and
holes of the hand wheel so that you can
work your machine by hand. You must
turn the power switch to OFF before you
use the hand crank. Take the hand crank
out of the hand wheel if you run your
machine by battery or electric power.
Table of Contents Previous Page | Next Page
13
Page 14

Little Touch & Sew 67A
How to wind the Bobbin
1. Place a spool of No. 50 Mercerized cotton
thread on spool pin. Pull thread through
thread guide number 1.
Bring thread through hole in rim of bobbin
from the inside out. Leave about two inches of thread hanging outside of hole.
2. Gently press bobbin winder spring and
place bobbin on bobbin winder. The hole
you threaded in the rim must face you.
3. Hold thread end with your fingers. Turn
hand crank in direction of arrows to wind
thread onto bobbin.
Wind only a few coils of thread.
Table of Contents Previous Page | Next Page
14
Page 15

Little Touch & Sew 67A
How to Wind the Bobbin continued...
4. Cut off the extra thread hanging from hole
in bobbin rim. Be sure you remove the
hand crank if you turn on the power switch.
5. Then continue winding bobbin with the
hand crank or with the power switch turned
to ON. Be sure to guide the thread with
your fingers so that it winds evenly on the
bobbin.
6. When bobbin is full, cut the thread about 2
or 3 inches away from the bobbin. Then
remove bobbin from bobbin winder.
Table of Contents Previous Page | Next Page
15
Page 16

Little Touch & Sew 67A
How to replace the Bobbin
1. Put bobbin into bobbin case with thread
hanging as shown in the illustration.
2. Hold your finger against end of bobbin to
keep it from turning. Pull end of thread
down into slot of bobbin case and up under
the tension spring.
3. Put bobbin case into bobbin case holder
with the flat side toward you.
4. Hold thread end and close slide plate.
Guide thread into cutout slot of slide plate.
Let about 2 inches of thread hang outside
of slot.
Table of Contents Previous Page | Next Page
16
Page 17

Little Touch & Sew 67A
How to thread the Needle
It is very important that you thread your needle correctly. The numbers on your machine
show you each step you must follow. After a
little practice you won't have to look at the
numbers. See how fast you can learn to
thread your needle correctly.
1. Turn hand wheel until needle is as high as
it will go.
2. Lower the presser foot.
3. Put a spool of No. 50 Mercerized cotton
thread on spool pin.
4. Follow the arrows and thread each step as
shown. (At step 2, make sure you place
the thread between the two tension discs.)
5. Thread the needle from front to back. Pull
out a loop of thread between the tension
dial and take-up lever and draw about 3
inches of thread through eye of needle.
Table of Contents Previous Page | Next Page
17
Page 18

Little Touch & Sew 67A
How to change the Needle
When your needle becomes blunt or bent,
change it right away. Use only a Catalog No.
2020 (15X1) needle, size 14.
1. Be sure the ON-OFF Power Switch is in
the OFF position.
2. Turn hand wheel until the take-up lever is
raised to its top position.
3. Lower the presser foot.
4. Loosen the screw and pull out the old needle.
5. Insert a new needle. Make sure the flat
side of needle is toward the back of
machine. Then push it up as far as it will
go and tighten the screw.
Table of Contents Previous Page | Next Page
18
Page 19

Little Touch & Sew 67A
The Tension Dial
When the spool thread locks with the bobbin
thread they should both hold tightly to each
other. This is called equal tension. When the
top thread is tighter or looser than the bottom
thread, the tension is unequal and you must
adjust the tension dial.
When the tension is just right, you will get a
smooth, flat seam. Test the tension on some
scrap material. If your tension is unequal, turn
the tension dial a little at a time until you get
a perfect seam.
How to adjust tension
If your stitching looks like this, make it
tighter by turning the tension dial to the
right.
If your stitching looks like this, make it looser by turning the tension dial to the left.
When your stitching looks like this, the tension is just right.
Table of Contents Previous Page | Next Page
19
Page 20

Little Touch & Sew 67A
How to sew a seam
A seam is made by stitching two fabric edges together. It must be started, stitched and
ended just so to be perfect. Practice each step until you can sew a perfect seam.
How to begin
1. Raise the presser foot.
2. While you hold the needle thread in your
left hand, turn the hand wheel slowly in the
direction of the arrows so that the needle
enters the needle hole.
3. Keep on turning the hand wheel until the
Table of Contents Previous Page | Next Page
needle rises and brings up the bobbin
thread in a loop.
4. Undo the loop with your fingers. This is
easier to do if you lower the presser foot
first.
5. Raise the presser foot and place both the
needle and bobbin threads under the foot
to the back of the machine.
20
Page 21

Little Touch & Sew 67A
How to place your fabric
1. Place layers of fabric under presser foot so that the fabric goes to the edge
of the foot or past it.
2. Line up the edge of your fabric with one of the guide lines beside the presser foot.
Table of Contents Previous Page | Next Page
21
Page 22

Little Touch & Sew 67A
How to start stitching
1. Turn the power switch ON or turn hand
crank in the direction of the arrows.
2. Guide your fabric along the guide line you
have chosen. Stitch to the edge of the
fabric.
Table of Contents Previous Page | Next Page
22
Page 23

Little Touch & Sew 67A
How to end a seam
1. Move power switch to OFF position and
turn hand wheel until needle is as high as
it will go.
2. Raise the presser foot.
3. Pull out a loop of thread between the ten-
sion dial and take-up lever.
4. Pull fabric back and out from under the
presser foot.
5. Cut the threads close to the fabric. Let the
thread ends under the presser foot go to
the back of your machine.
Table of Contents Previous Page | Next Page
23
Page 24

Little Touch & Sew 67A
The Adapter
The electrical adapter converts your Little
Touch & Sew machine from battery or hand
power** to regular household electric power.
You can buy one at your local SINGER
CENTER.
The adapter is safe and easy to use. Just follow these few simple steps:
1. Make sure the ON-OFF switch is at OFF.
2. Insert the small plug that is on one end of
the adapter cord into the hole in the right
side of machine.
3. Insert the large plug into any regular wall
outlet.
4. Turn the ON-OFF switch to ON.
5. Operate your sewing machine just as if you
were using battery power.
**Regular household current is 110-120 volts AC 60
cycle.
Table of Contents Previous Page | Next Page
24
Page 25

Little Touch & Sew 67A
Here are the presents that Stephanie made for her family
You can make presents for your family, too. They are easy to make and lots of fun.
You will have a good time choosing pretty materials that your family will like. Always be cer-
tain to use the type of fabric suggested in the instructions.
Table of Contents Previous Page | Next Page
25
Page 26

Little Touch & Sew 67A
Coat for McGurk
Choose a lightweight felt in a solid color.
Choose matching or contrasting grosgrain
ribbon for ties.
1. Cut a piece of felt to fit your dog from his
neck to his tail. Make sure it covers his
sides but not his stomach.
2. Trim the corners. Use the illustration as a
guide. The - - - lines show you where to
cut.
3. Pin a strip of grosgrain ribbon to the middle
of each side. One strip should be longer
than the other.
4. Stitch ribbon to the felt 1 inch in from the
edge.
5. Tie the ribbon in a bow at your dog's side.
Table of Contents Previous Page | Next Page
26
Page 27

Little Touch & Sew 67A
Hankie holder for Father
Choose either lightweight felt or flannel for
your hankie holder.
1. Cut an oblong of material 14 inches long
and 8 inches wide.
2. If you use flannel, trim the top and sides
with pinking shears. It is not necessary to
pink felt, but you can do it for decoration if
you wish.
3. Fold up 5 inches at the bottom, with the
wrong side on the inside, to form a pocket.
4. Stitch along pocket sides. Use the illustra-
tion as a guide. The --- lines show you
where to stitch.
5. Sew a pretty button on the pocket part. Be
careful to sew through only one thickness
of material. If you sew through both, you
will sew the pocket together.
6. Fold top flap over to 1 inch past the button.
Make a light pencil mark where the button
is.
7. Cut a buttonhole where you mark. Make it
a little longer than the width of your button.
Table of Contents Previous Page | Next Page
27
Page 28

Little Touch & Sew 67A
Stocking holder for Mother
Choose either lightweight felt or flannel for
your stocking holder. Choose matching or
contrasting grosgrain ribbon or lace.
1. Cut an oblong of material 22 inches long
and 16 inches wide.
2. Fold up 5 inches at the bottom, with the
wrong side on the inside, to form a pocket.
3. Stitch along pocket sides. Use the illustra-
tion as a guide. The - - - lines show you
where to stitch.
4. Section the pocket part into 4 equal
spaces. Each space should be 4 inches
wide. Mark with pins.
5. Draw light lines where you should stitch.
Look at the illustration for a guide.
6. Stitch over your lines.
7. Sew a 16-inch strip of lace or grosgrain rib-
bon over the top outside edge for decoration.
Table of Contents Previous Page | Next Page
28
Page 29

Little Touch & Sew 67A
Apron for Grandmother
Choose a pretty linen or linen-like fabric,
either printed or solid color. Choose 2 yards
of matching or contrasting grosgrain ribbon
2 inches wide.
1. Cut a piece of linen 18 inches long and 16
inches wide.
2. Stitch around 3 sides, 1 inch from each
edge. Use the illustration as a guide.
The - - - lines show you where to stitch.
3. Sew ribbon on top edge. Make sure the
ties that hang over each side are 28 inches
long on each side. The -- - -- lines show
you where to stitch. Each row of stitching
should be 1/4 inch from edge of ribbon.
4. With a pin, pull away threads to stitching
line to form a fringe.
Table of Contents Previous Page | Next Page
29
Page 30

Little Touch & Sew 67A
Nightie for Carolyn
Choose a pretty cotton, either printed or solid
color. Choose matching or contrasting grosgrain ribbon or lace.
1. Measure your doll from her shoulders to
her feet. Cut material the same length.
2. Cut width of material to fit around your doll
plus 2 inches.
3. Fold over top and bottom edges to make
hems. Make each hem about 3/4 inch wide
and stitch 1/4 inch from the edge.
4. Fold over side edges with the wrong side
on the outside. Sew side edges together.
Use the illustration as a guide. The - - lines show you where to stitch.
5. Press the seam open. The seam goes in
the back.
6. On the top edge of the wrong side, sew 4
strips of grosgrain ribbon or lace equal distances from each other.
7. Turn right side out.
8. Tie bows in the ribbons or lace to form
shoulder straps.
9. Tie matching ribbon or lace around the
waist for a sash.
Table of Contents Previous Page | Next Page
30
Page 31

Little Touch & Sew 67A
Scarf for Barbara
Choose a pretty linen, either printed or solid
color. Choose matching or contrasting grosgrain ribbon 2 inches wide.
1. Fold a square of material to form a trian-
gle.
2. Cut on the fold line. Set one triangle angle
aside.
3. Stitch around the two short sides, 1 inch
from the edge. The - - - lines show you
where to stitch.
4. Sew the ribbon along the longest edge.
Make sure the ties on each side are 12
inches long. Each row of stitching should
be 1/2 inch from the edge of the ribbon.
5. With a pin, pull away fabric threads up to
stitching line to form a fringe.
Use the other triangle to make a matching
Table of Contents Previous Page | Next Page
31
Page 32

Little Touch & Sew 67A
We hope you have fun sewing. If you have any questions about sewing, we will be glad to
answer them for you. If you have any problems with something you are trying to sew, we will
try to help you solve them.
Please write to:
Department of Sewing Education
The Singer Company
30 Rockefeller Plaza, New York,
N.Y. 10020
Table of Contents Previous Page
32
 Loading...