

Page 1
You are about
you
going
are
to begin
to
an adventure
sew with one
of the
in creativi$:
easiestto
use
going
You are
machines ever
to sew!
made'
And,
The following
rewarding
.
Clearly
.
Electronic
o
Autotension,
features
hours
defined
speed
requiring
projects.
r
One-step
In addition,
both
removed
impossible
pattern
this
flat and
and easily
to
free-arm
put
Take some time
machine.
cover
Whether
how easy
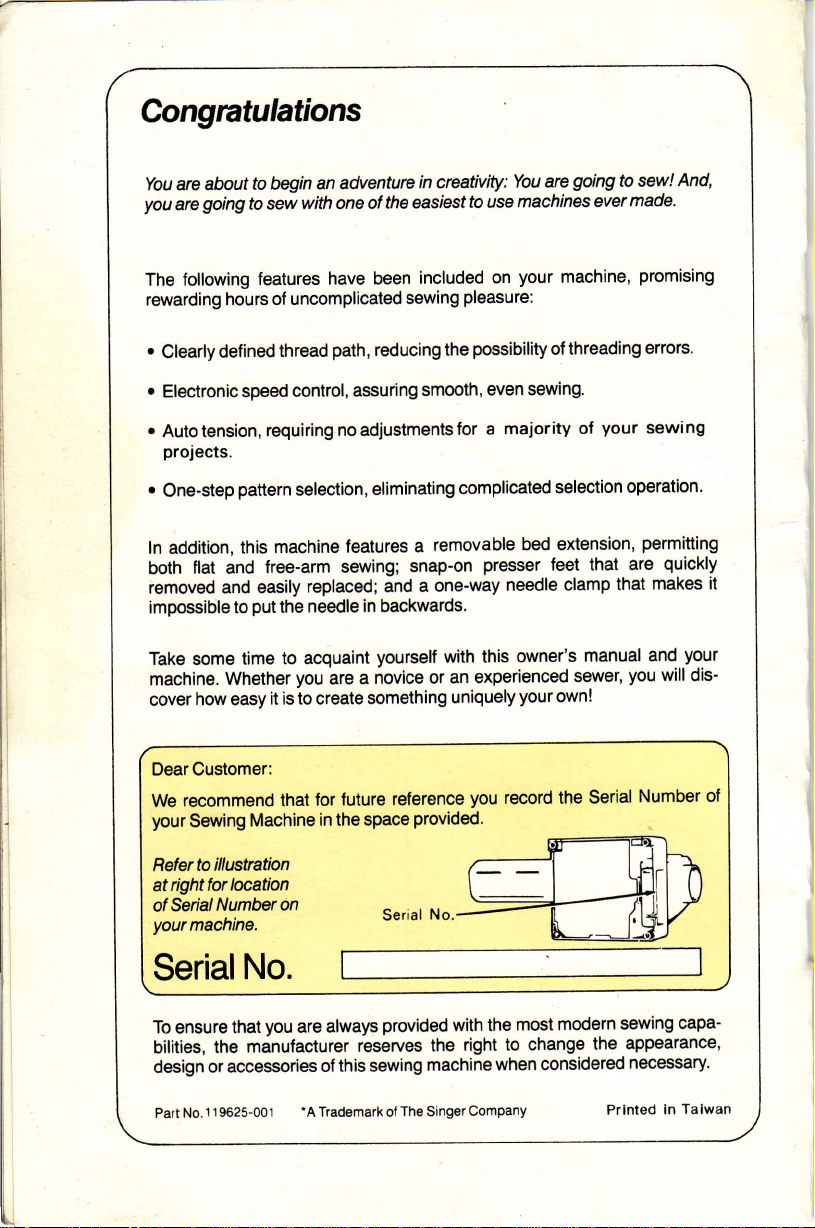
DearCustomer:
recommend that
we
your
Sewing
Machine
have
of uncomplicated
path,
thread
sewing
reducing the
included
been
control, assuring
noadjustmentsfor
selection,
machine
replaced;
needle in backwards.
the
to acquaint
you
is
it
to
eliminating
features
sewing;
a
snap-on
a one-way
and
yourself
novice or
are a
create something
for future
in the space
reference
provided.
your
on
pleasure:
possibility
smooth,
even sewing.
majority
a
complicated
removable
bed extension,
presser
needle
with this
owner's
an experienced
uniquely
your
you
record the serial
machine,
of threading
of
selection
promising
errors.
your
operation.
permitting
that are
feet
clamp
that
manual
you
sewer,
own!
Number
sewing
quickly
makes it
your
and
will dis-
of
to illustation
Refer
righttorl@ation
at
of
Numberon
Serial
yourmachine.
Serial
To
ensure
bilities,
design or
No.
Part
No.
that
manufacturer
the
accessories
1 1
9625-001
you
are always
'A
Serial
provided
reserves
of this sewing
Trademark ol
The Singer
No.
the
with
right
the
machine
when considered
Company
most modern
to change
the
capa-
sewing
appearance'
necessary.
Taiwan
in
Printed
Page 2
Table of Contents
1. Getting lo
Principal Parts
Accessories
2. Getting
Fabric, Thread
lmportantsafeguards
ConnectingtheMachine/RunningtheMachine
ChoosingandChangingNeedles
Free Arm Sewing
Changing the
Attaching Feed
Winding a Bobbin
Inserting
Threading
Raising the Bobbin
SelectingaPattern
3. Straight Stitching
Preparation
Sewing a Seam
lnserting
Know Your Machine
. .
Ready lo
and
Presser Foot . .
Bobbin
a
Machine
the
aZipper
. . 5
Sew
Needle Table
Cover
Thread . .
. .
.
..:....
Preparation
Zig-Zagstitch .
Zig-Zag Blindstitch
Multi-Stitch Zig-Zag.
"M"
Stitch
CrescentStitch . .....
StretchOveredgeStitch . . . .
Fagoting
Ric-Rac/Straight
Stitch.
Stretch Stitch
.
........ 6
........ 7
...,.
.. .. .. . .
.
2
2
4
5
.. I
8
9
I
12
13
14
14
14
16
18
19
19
21
21
22
23
23
24
24
25
Four-Step Buttonholing
5.
6. Caring for Your Machine
Removing
Removing
Cleaning
Performance
and Replacing Bobbin Case.
and Replacing Light Bulb
the Machine
Checklist
Additional Accessories
.
lndex
26
28
.
28
29
30
31
32
33
Page 3
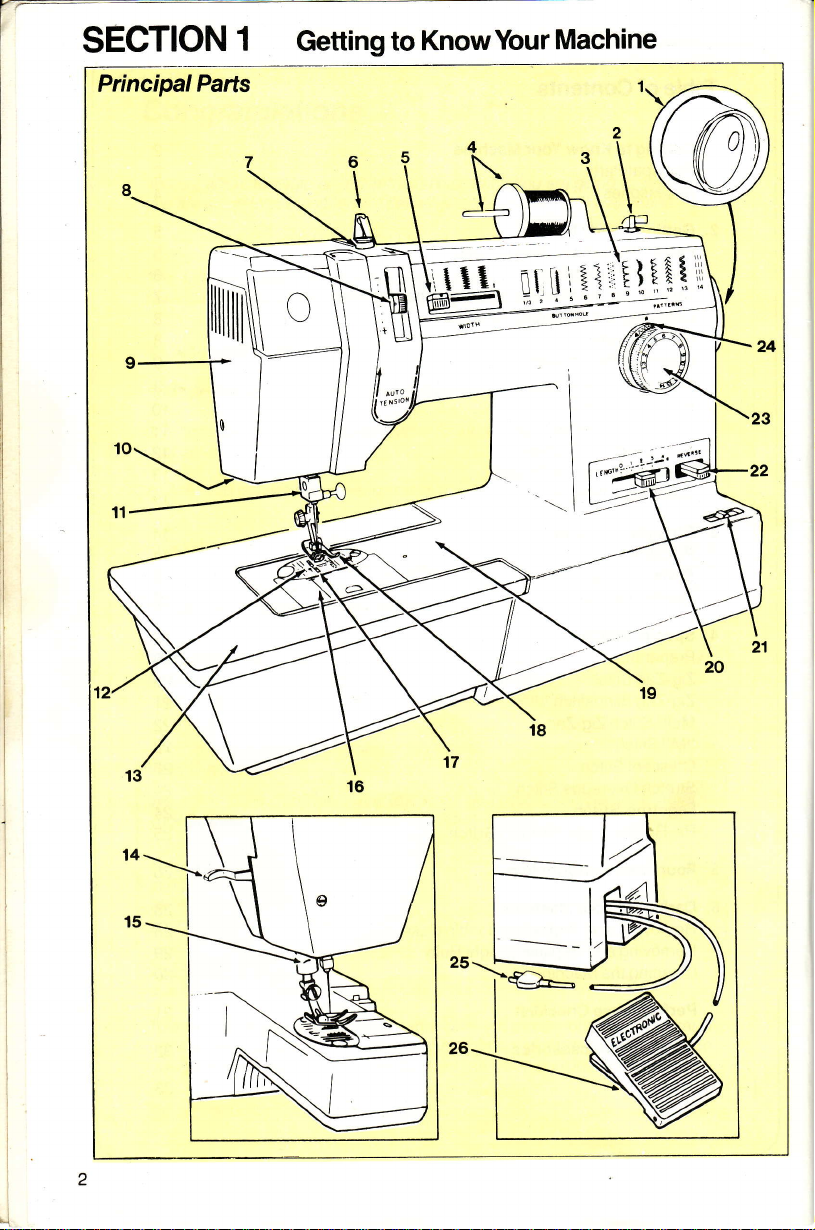
SECTION
Principal Parts
1
Getting
to KnowYour
Machine
13
14
15
__1,
25
26
Page 4

Principal
Parts
1. Hand Wheel
raising
2. Bobbin Wlnder lets
with thread
3. Pattern Display Panel
4. Friction-Free
5. Stitch
6. Snap-ln Thread Guide helps to insure
7.
8. Auto Needle Thread Tension
9. Face
10.
11.
12. Needle Plate
13.
patterns
ety of
ing needs.
hold
the top thread supply and allow it
to unwind
notturn.
Width
patterns
of
straight stitching.
a smooth flow
to the
spool
Bobbin Winder Tension Disc
vides thread
winding.
controls
Plate
tecting movable
light.
Sewing Light illuminates
area.
One-Way Needle
needle in machine
rect
insertion.
during sewing.
Removable
change the machine bed
free
arm.
provides
lowering
or
quickly
available
Spool
smoothly as the spool does
Lever controls the width
and
tension.
tension
top thread tension.
is a removable
supports the fabric
Exlenglon
a means
the needle.
you
fillthe
and easily.
shows a vari-
for
Pin and
the needle
sets
thread from
of
for
parts
and
Glamp
prevents
and
Table lets
from flat to
your
cover
bobbin
sew-
Cap
the
pro.
bobbin
Lever
pro-
sewing
sewing
holds
incor-
you
for
14. Presser Foot Lifter.
machine, lets
"
presserfoot.
15. Thread Cutter,
16.
17. Feed system moves fabric under
18.
19. Bed is the work surface of the
for
20.
21. Power and Light
22. Reverse Lever
23.
24. Stitch
25. Electrlcal Power
26.
is
sleeve,
Slide
and
presserfoot.
Presser Foot holds fabric against
feed system and snaps on and off.
machine.
Stitch
variety of stitch lengths.
machine
time.
momentary or continuous
fabric movement.
Pattern
any
shown on the
ance of Special
buttonholes.
machine
Speed Controller, designed
and convenience, regulates
tronic solid state speed control.
built-in for ease.
Plate
replacement
of the
opens for easy removal
Length Lever allows for a
and sewing
Selector Dialturns directly to
patterns, plus
10
pattern
Balance
your
to
al
you
raise
presser
on
of bobbin.
Switch
light
provides
display
Ring adjusts appear-
electrical outlel.
Stitch
Cord
patterns
the
back of
and lower
foot
the
turns on the
the
at
same
either
reverse
buttonhole,
panel.
and
connects
forsafety
the
elec-
Page 5
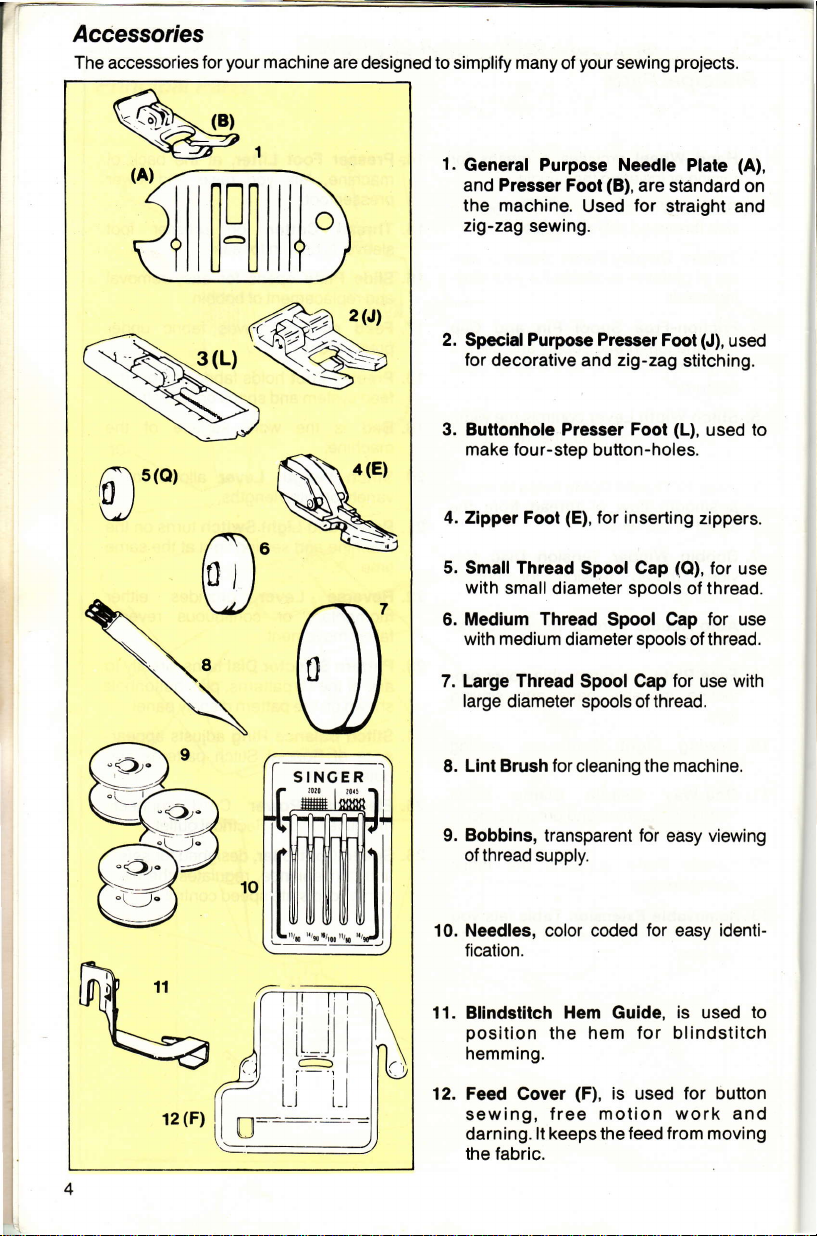
Accessories
The accessories
for
your
machine
are designed to simplify many
of
your
projects.
sewing
il!tl
tl
?l
[]-IJ
cs(o)
tl
t+
1.
General Purpose Needle
and Presser
the machine.
zig-zag
Speclal Purpose Presser
tor
3.
Butlonhole Presser
make four-step
4.
Zipper Foot
5.
SmallThread
with
Medium Thread
6.
with
7. Large Thread Spool Cap
large diameter spools of thread.
sewing.
decorative and
small diameter spools
medium
(B),
Fool
(E),
diameter spools of thread.
are standard
for
Used
Foot
zig-zag
Fool
button-holes.
for inserting
Cap
Spool
Spool
(A),
Plate
on
straight and
(J),
used
stitching.
(L),
(Q),
of thread.
Cap for use
for
to
used
zippers.
for use
use with
Lint Brush for
8.
9. Bobbins,
of thread supply.
Needles, color
fication.
11.
Blindetitch
position
hemming.
Feed Cover
12.
sewing,
darning.
the fabric.
4
cleaning the
transparent for easy viewing
coded for easy identi-
Hem
Guide,
hem for blindstitch
the
(F),
is
motion work
free
lt keeps the feed from moving
used
machine.
is used
for button
and
to
Page 6
SECTION
2
Getting
Readyto Sew
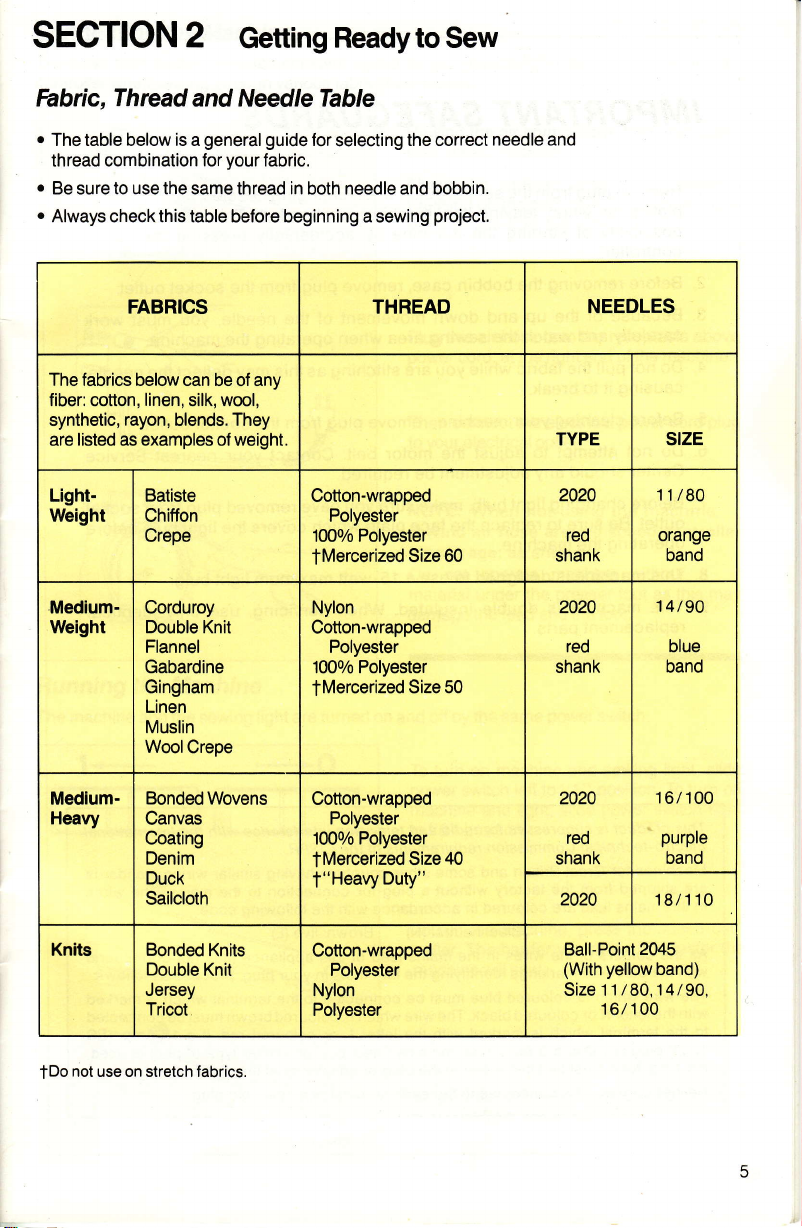
Fabric,
r
The table below is a
thread combination for
o
Be sure to use the same thread in both needle and bobbin.
.
Always check this table before beginning a sewing
The fabrics below can be of any
fiber:
synthetic,
are
LightWeight
Medium-
Weight
Thread
FABRICS
cotton,
rayon,
listed as examples of weight.
and NeedleTable
general guide
your
fabric.
linen,
Batiste
Chiffon
Crepe
Corduroy
Double Knit
Flannel
Gabardine
Gingham
Linen
Muslin
WodCrepe
wool,
silk,
blends. They
for
selecting
the correct
project.
THREAD
Cotton-wrapped
Polyester
1000/o Polyester
Mercerized Size 60
f
Nylon
Cotton-wrapped
Polyester
1000/o Polyester
tMercerized Size 50
needle and
TYPE stzE
2020
shank
2020
shank
NEEDLES
red
reo
11/80
orange
band
14 /90
blue
band
MediumHeayy
Knits Bonded
not use on stretch fabrics.
tDo
Bonded Wovens
Canvas
Coating
Denim
Duck
Sailcloth
Double
Jersey
Tricot
Knits
Knit
Cotton-wrapped
Polyester
1000/o Polyester
Mercerized Size 40
f
t"Heavy
Cotton-wrapped
Nylon
Polyester
Duty"
Polyester
2020
red
shank
2020 18/1 10
Ball-Point
(With
Size 11
16/100
purpE
2045
yellow
band)
/80,14/90.
16/100
band
Page 7

IMPORTANT
SAFEG
UARDS
1. Remove
plates,
possibility
plug
f rom the
or when
of starting
controller.
2. Before
3. Because
removing the
the up
of
carefully and watch the
4. Do not
5. Before
6.
7. Before
8. This machine
9. This
pull
causing it
the fabric while
to break.
cleaning
Do
not
attempt
Center should
changing light
outlet. Be
operating
sure to replace
the machine.
machine is
replacement
parts.
your
to
any
is designed
socket outlet
leaving
the machine
the machine
bobbin case, remove
when
changing needles, feet,
unattended. This eliminates the
by accidentally
plug
from the
and down movement of the needle,
sewing area
you
machine, remove
adjust the motor belt.
adjustment
bulb, make sure
the face
to use a
when
operating the machine.
are stitching as this may
plug
from
the socket outlet.
Contact
your
be required.
you
plate
have removed
which
1S-watt
covers the light bulb
maximum light bulg.
double insulated. When servicing,
pressing
the
socket outlet.
you
must
the needle,
deflect
nearest
plug
from
use only
or needle
speed
work
Service
socket
before
identical
product
This
Electrolechnical
Machines for
are shipped trom the tactory without a
in this
As the
with the
The wire which
with the
to the terminal
1363)
a 5 Amp. tuse must be fitted
Neither
ls
suppressed
Commission
Great Britain and
mains lead are coloured in accordance
colours of
coloured
letter N
plug
core
the wires in the mains lead of this appliance
markings identifying
is coloured blue must be
or coloured
which
is
used,
is to be connected to the
tor
radio and television
requirements
gome
other countries having
Blue: neutral
black. The wire which is coloured
is
marked
a 3 Amp. fuse must be fitted, or
either
with
in the
of
plug
for connection
(N)
Brown: live
terminals in
the
connected to
letter L
the
plug
or
terminal
earth
interfercnce with the
the CISPR.
similar wiring standards
with the following code:
or coloured
if
adaptor
of a three-pin
to the mains. The
(L)
may not
plug, proceed
your
the terminal
any
or
must be connected
brown
red. lf a
type of
other
at the distribution
plug.
lnternational
correspond
as follows:
which
13 Amp.
plug
wires
is
marked
is used,
board.
(BS
Page 8
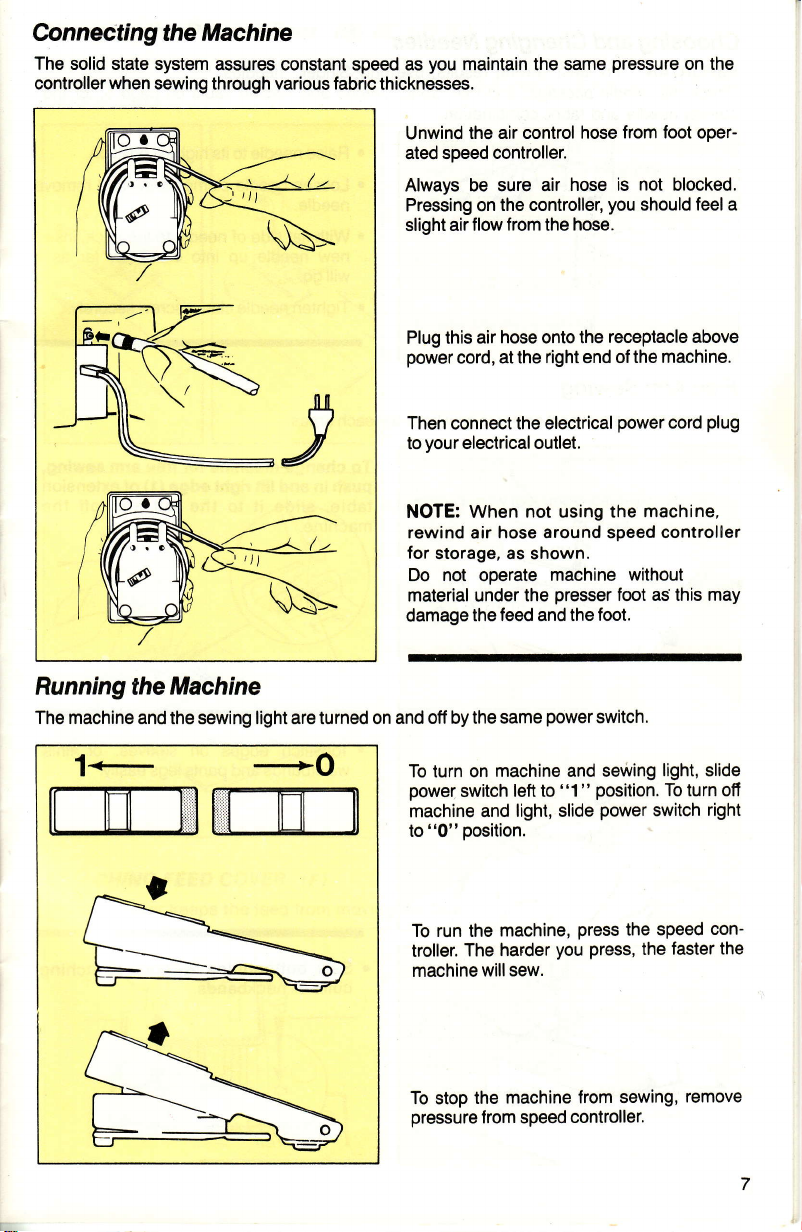
Connecting the Machine
The solid state system
controller
when
sewing
assures constant speed as
through
various fabric
you
thicknesses.
maintain the same
pressure
on the
RunningtheMachine
The machine
and the sewing light are turned on and
Unwind
ated
Always be sure air
Pressing on
slight air flow
Plug this air
power
Then connect the electrical
to
NOTE: When not using
rewind air hose around speed
for
material
damage
the air control hose
speed controller.
the controller,
from
hose onto the
at the
cord,
your
electrical outlet.
storage. as shown.
not
Do
oDerate
the
under
feed
the
otf by the same
the
right
machine
presser
and
power
from foot oper-
hose is
hose.
the foot.
not
you
should
receptacle above
of the machine.
end
power
the machine,
without
foot as this may
switch.
blocked.
feel a
plug
cord
controller
1-
+-o
To turn on
power
machine and
to
"0"
To run the
troller.
machine
To stop
pressure
machine and sewing
switch
position.
machine,
harder
The
will sew.
machine from sewing,
the
from speed
left
to
"1"
light, slide
press
press,
you
controller.
position,
power
light, slide
To turn ofi
switch
speed
the
the faster
right
con'
the
remove
Page 9
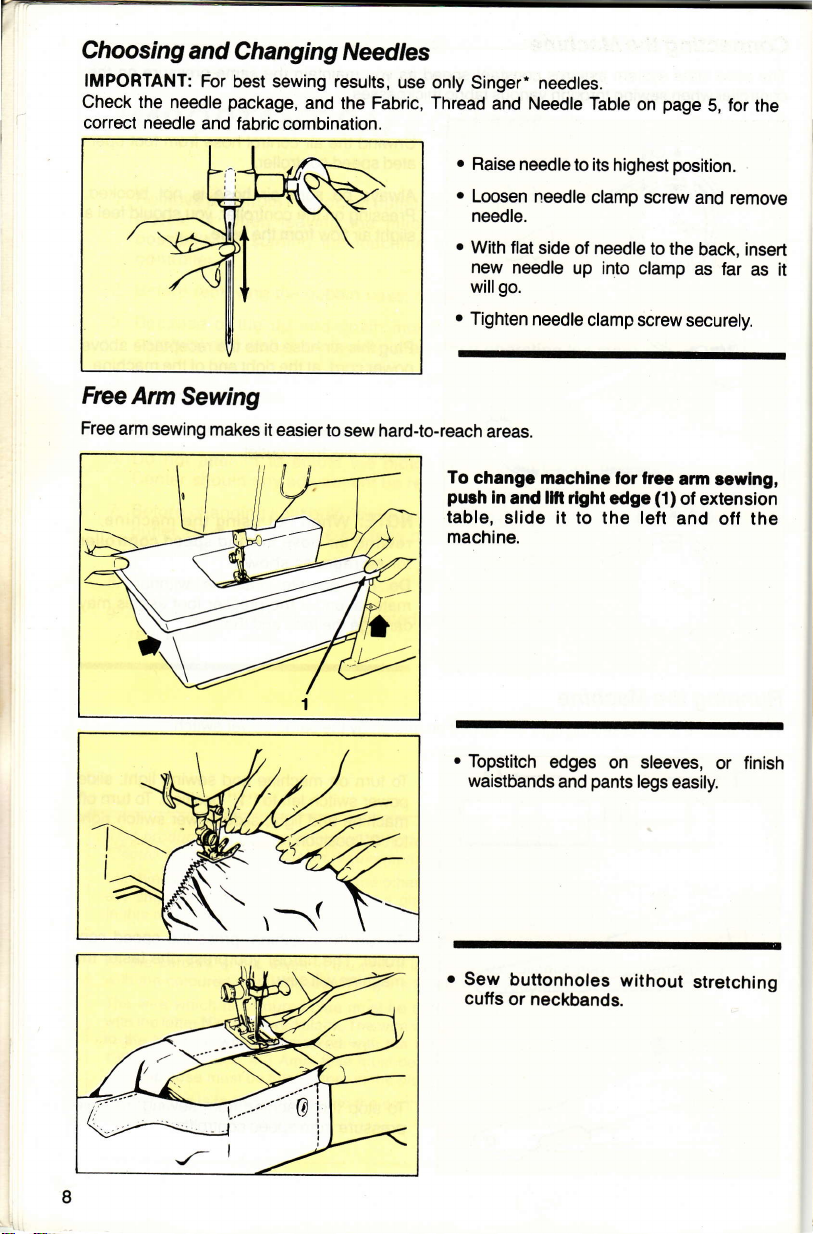
Choosing
IMPORTANT:
Check the needle
correct needle
Free
Arm
Free
arm
and
For
and
Seuhg
sewing
makes
Changing Needles
sewing results,
best
package,
fabric combinalion.
and the Fabric, Thread
it easierto
use only
sew
hard-to-reach
Singer- needles.
Needle
and
o
Raise
needle
to its highest
r
Loosen needle
needle.
.
With flat
new needle
willgo.
.
Tighten
side
of needle
up into clamp
needle
areas.
To
changc machlnc for
push
in
table,
and llfl rlghl
slide it to the left
machine.
on
lree
edge
page
position.
to the
arm
(1)
Table
clamp screw
clamp screw
and
for
S,
and remove
back, insert
as far
securely.
cewlng,
of
extension
off the
the
as it
.
Topstitch
waistbands
o
Sew buttonholes
cuffs
edges
and
or neckbands.
on sleeves,
pants
legs
easily.
without
finish
or
stretching
Page 10
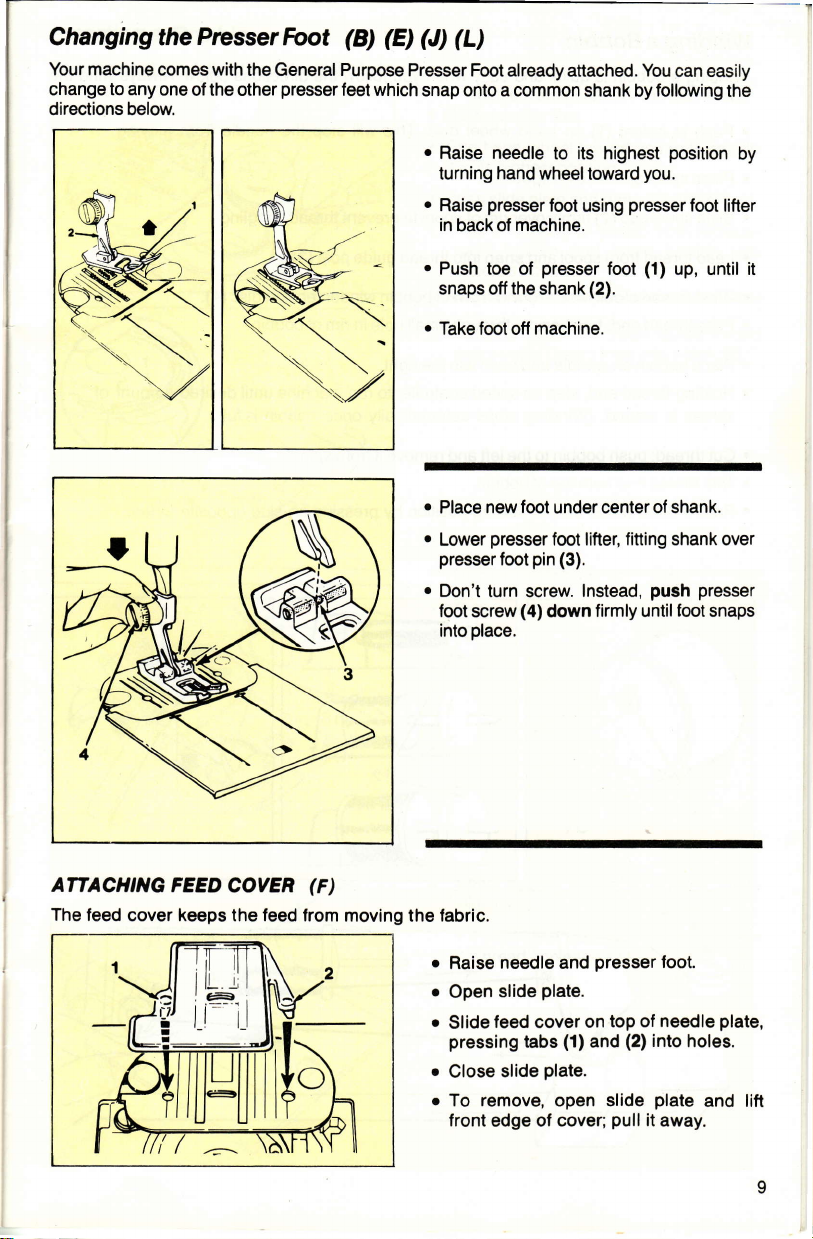
Changing thePrcsserFoot
Your machine comes
change to any one
directions below.
with the General Purpose
of the other
presser
(E) (J)
(B)
Presser Foot
feet which
(L)
snap onto a common
already attached.
shank by
You
can easily
following
the
.
Raise needle
turning hand
.
r
Raise
in
back ol
Push
presser
toe of
snaps otf
.
Take foot otf machine.
.
Place new
r
Lower
presser
presser
r
Don't turn
foot screw
place.
into
to its highest
wheel toward
foot using
machine.
presser
the
shank
foot
under center of shank.
foot
pin (3).
fool
screw.
(4)
down
position
by
you.
presser
foot
(1)
up, until it
foot
lifter
(2).
lifter, fitting shank over
Instead,
push presser
firmly until foot snaps
ATTACH,NC
The feed
cover keeps the feed lrom
FEED COVEN
G)
moving the
fabric.
o
o
o
o
o
needle and
Raise
slide
Open
feed
Slide
pressing
Close
To remove, open slide
front
tabs
slide
edge of
plate.
cover
(1)
plate.
cover;
presser
on
and
top of
(2)
pull
it away.
foot.
needle
into
holes.
plate
plate,
and litt
Page 11
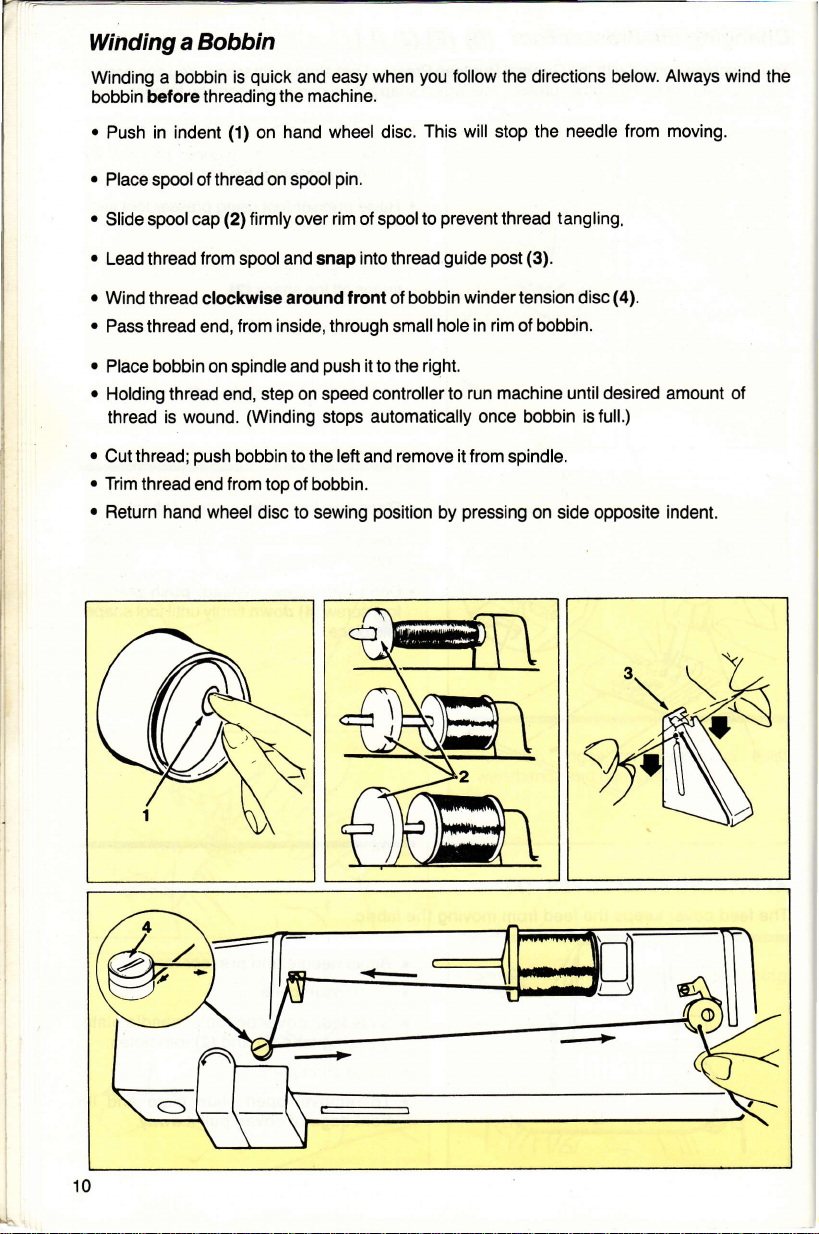
Winding a
Push
a bobbin is
before
in indent
Winding
bobbin
r
Bobbin
quick
threading
('l)
on hand
easy
and
the machine.
wheel disc,
you
when
follow
the directions below.
This will stop the needle from
Always
moving.
wind the
o
Place spool of
r
Slide spool cap
o
Lead thread from spool and snap
o
Wind
thread clockwise
.
Passthread end, from
r
r
o
o
.
bobbin
Place
Holding thread
thread is wound.
Cut thread;
Trim thread
Return hand wheel
thread on spool
(2)
firmly over rim of spoolto
around front of bobbin
inside, through
on spindle
end,
push
end from top of bobbin.
and
step on speed controller
(Winding
bobbin to the left and remove it from spindle.
disc to sewing
pin.
prevent
post (3).
into
push
it
to the
stops automatically once bobbin
position
guide
thread
winder
in rim
hole
small
right.
to run machine until desired amount of
pressing
by
tangling,
thread
tension
of bobbin.
on side opposite
(4).
disc
isfull.)
indent.
10
Page 12

lnserting
To insert
a bobbin,
a
Bobbin
followthe instructions
below
.
.
.
1. Pull 4"
2.
presser
Raise
Turn
hand wheel
foot.
is in its highest
Open slide
plate
(10cm)
ment
bobbin
case, as
Holding
into notch
shown.
bobbin
(1),
toward
position.
remove
and
of thread from replace-
and insert
place, guids
in
then into notch
and
3. Draw several inches
bobbin.
you
until needle
bobbin.
bobbin into
thread
of
thread
(2).
across
4. While holding
plate.
slide
o
Follow
directions
Thread"
on
page
thread on outside,
"Raising
for
close
Bobbin
13.
Page 13

Threading
Your
sewing machine is
have been designed as internal
threading
clear
To thread
r
Raise
a
Raise needle to its highest
a
Place
a
Slide spool cap
a
Snap thread into thread
a
Following
firmly
Thread
the Machine
path
your
machine
presser
spool of
pull
foot lifter.
arrows,
thread.
needle
easily
helps
correctly, simply follow the steps below:
thread
on spool
(2)
firmly over the
guide
from
front to back.
you
position
guide post
thread
threaded. Tension discs,
parts,
eliminating many extra threading steps.
threading
avoid
by turning hand wheel toward
pin
(1).
rim
(3).
into auto
errors.
of the spool
tension
guides
prevent
to
channel
3
(4)
and take-up
you.
tangling.
thread
needle
to
down
lever
The
and
12
I
--<
Page 14

Raising
the needle
Once
thread must be brought up through the hole in the needle
the
Bobbin
has
Thread
been threaded and the
bobbin
placed
plate.
in the
bobbin case, the
bobbin
tFHl[i
f
iltffiilllt
1. Hold needlethread
.
Turn hand wheel
lowering
2.
Continue to do
above
o
Pull
up
3. Open
bobbin thread.
needle into hole in
needle
gently
bobbin thread in a loop.
loop with fingers to tind
with
slowly toward
this until needle rises
plate.
on needle thread and bring
left
hand.
you,
plate.
end of
Draw needle thread
4.
opening
r
Pull both threads
presser
in
through
foot.
to back
left
side
of machine.
13
Page 15

Selecting
pattern
The
trated
selector
patterns.
a Pattern
dial is numbered
1
through 14,
and matches the numbers of the illus-
!:l:iFlEaliii
5678910r.t1213ta
ffi
With
each application, recommended
easy identification.
force
to
select
SECTION
Before
beginning
the best needle
You
patterns
a sewing
and thread combination for
can adjust each setting, however, as desired. To reduce
the
stitch length
3
Straight
project,
settings are
control can be
Stitching
check the
your
r
Select
on the
the
o
For
you
lines
o
To
tern
number.
given.
Fabric, Thread
fabric.
RECOIT'MENDED
pattern
a
dial with
dial.
instance,
would
turn the
up under indicating
change
the stitch
selector
dial
These have
moved to
and
by aligning
the indicating
to
sew a Zig-Zag
selector dial
pattern,
left
right
or
highlighted for
been
position.
"O"
Needle Table
SETTINGS
the
dot above
dot.
turn
to
the
page
on
number
Stitch,
until 116
pat-
the
desired
dial
for
5
Stltch Selectlon:
i:l::iFlFAliil
5C7a0r0ilt21314
PATTEFNS
Adjusting Stitch
REVERSE
I nn-im
14
[i"
I
The stitch length indicator
The lower numbers are
Shorter stitches
fabrics; longer ones for
adjust the
stitch
wtdrh:
silrbh
Length:
Stllch
Foot:
Needle Plate:
length
length levertothe
Straight StitchffiJ
lln
Lill
1-112lo 4
General Purpose
General
Length
are best
your
of
Purpose (A)
is numbered 0-4.
shorter stitches.
for lightweight
heavy fabrics.
stitches, slide
left
right.
or
(B)
To
the
Page 16

Adjusting
The
sewing applications. This
tension lever for
T h read
thread tension
the majority of
Tension
your
on
sewing machine has
auto tension feature
your
sewing
projects.
pre-set
been
eliminates the need for
in the
auto
position
you
to adjust
to suit most
the
Proper tension will
stitches on both the front and back of
(1).
fabric
Too much tension will
stitch, causing
tension by moving lever up toward a looser
setting.
"
"
-
a
produce
produce
puckered
seam
identical
vour
a tight
(2).
Adjust
F]
Too little tension
stitch, causing
Adjust tension by
atighter"+"setting.
will
loops in
moving
produce
your
seams
lever
down
loose
a
(3).
toward
lA
Page 17

Sewing a Seam
You
can sew seams
easily and accurately when
you
follow
suggestions
the
Basting
Pin
basting and hand basting are
to make
temporary seams before machine
sewing.
.
pin
To
NEVER
fabric
in contact with the feed. Do not
plns;
over
r
To
hand baste, make long, loose
insert
baste,
place pins
pull
them out as
that can be easily removed.
below.
easy ways
pins
at stitching line.
on the underside
sew
you
stitch.
stitches
of
1+
REVERS€
YZ
Placing Fabric
o
place
To
presser
(2),
where it locks
o
The lifter
"extra
high"
Under Presserfuot
fabric under
foot lifter
(1)
place.
in
can be raised
position (3)
to its
Stitchrngin Reyerse
.
To reinforce
push
straight stitch in
hold
o
For
lever in and slide
lock
right
beginnings or ends of seams,
in reverse lever, Machine will
reverse for
lever in.
the
continuous reverse stitching,
the left
it to
reverse lever by sliding it
letting
and
it return to its normal
position.
presser
foot, raise
"up"
position
and held in the
for
bulky
fabrics.
as long as
to lock. Un-
back to the
you
push
16
Page 18

Keeping
SeamsStraight
To keep seams straight, use one
guidelines
commonly used
slide
guides
Turnlng
To
turn a square corner, use crosslines on
slide
o
Line up fabric with
needle
speed as
o
When
on
the
line
plate.
The crosslines
when stitching square corners.
Sguare Corners
plate.
plate
and stitch seam, slowing
you
approach corner,
edge of fabric reaches
bottom
nering crosslines
plate.
needle
(1)
is extended onto the
(2)
extended
(2)
guidelines
on slide
plate,
The
serve as
stitching.
o
Be sure needle
o
Raise
presser
bringing
(1).
line
o
Continue stitching seam.
is
in fabric,
down
foot slightly.
Turn fabric,
bottom edge in line with
the
of
most
on
cor-
stop
guide-
Sewing Curved Seams
r
Baste
o
Use a
line.
seam
short stitch
strength.
r
Guide fabric to
follow
curve,
for
elasticity
and
17
Page 19

lnserting
The
zipper
package
aZipper
will
provide
complete instructions
for inserting
zippers.
ciY
W
RECOMMENDED
StitchSelectlon:
s*rch
wrdrh:
Stitch
Length:
Foot
Needle
.
.
Plate:
When zipper
left
side of zipper
dle will
close along zipper
Attach right
when
needle.
of foot,
enter left notch
a zipper is to the right
The needle
sewing close along
SETTINGS
Hl
Zipper (E)
General
is to the left
foot to
teeth.
side
of
StraightStitchi#fl
I
1-1t2lo
zipper
will enter right
= o
4
puroose
of needle,
shank. The nee-
of foot,
zipperteeth.
foot to
side of
attach
sewing
shank
the
notch
Page 20

SECTION4
The 9
Special Stitches on
section are
for many other
recommended
sewing
projects.
Speciatstltches
your
machine
applications for each
have a variety of
stitch.
practical
However,
and decorative uses. In
these stitches
can be used
this
:lrffFn:i!
PATTEFIS
I
A
Before beginning a sewing
Fabric, Thread
the
page
for
the best
5
bination for
With
tings
highlighted for easy identificalion.
adjust
your
each application,
have
been
setting, however, as desired.
each
Adjusting
To widen or narrow a Special Stitch
move the stitch width
Stitch,
at the
toward any other width sefting
,
i
right.
and
needle
fabric.
given.
Stitch
project,
Needle Table
and thread com-
recommended set-
These have
You
Width
lever
off Straight
check
on
been
can
pattern,
!!lr-
=:
ReveRse
justing
Ad
The
stitch length indicator is numbered
The
area between 0 and 1 will
dense stitching. For more open stitching,
slide the stitch length lever
to 4. When sewlng
and13/14 numbered In
panel,
3r/z-4 area.
Stitch Length
length
the
produce
anywhere
Speclal Stltches
rcd on
MUST be set
from 2
thedisplay
In
0-4.
very
11,12
the
19
Page 21

ju
Ad
sti
Special Stitch
Some
proper
tension
be using.
ng T h read Te n
patterns
your
for
application,
n
sio
may
require looser thread tension than
make a test sample with the thread
others. To find
and fabric
you
the
will
C_-l
::"lH
I
:llli
ll!
J
:"F I
.ill
Proper tension
(1).
stitch
much
Too
(2),
causing
by moving
setting.
little tension
Too
(3),
causing
tension by
tighter"+"setting.
produces
tension
fabric
lever up
will
loops in
moving
will
to
toward a
a
smooth, even
produce
pucker.
lever down toward
Adjust tension
produce
pattern.
your
stitch
a tight
looser
"
loose stitch
a
Adjust
-
"
a
Adjusting Stitch
You
on
20
change the appearance of Special Stitch
can
the display
panel,
Balance
byturning
the stitch
patterns
balance
By turning
the
anced
illustrated
When stitches
separate them
ring to the
When stitches
them
balance
11,12 and
ring.
the stitch balance
pattern
selector
fagotingstitch #12 should
(3).
right.
closer
ring to the left.
13/14, numbered in
dial(2),
are too close
by turning
too far apan
are
together
(1)
ring
behind
a correctly bal.
appear as
together
the stitch balance
(5),
by turning
the stitch
red
(4),
bring
Page 22

Zig-Zag Stitch #6
The Zig-Zag
decorating.
:
6
can be used when sewing
Stitch
7A/r
seams, appliqu6ing,
SeamFinishi,ng
a zig-zag stitch to finish
Use
fabrics
o
Sew seams as desired; trim and
open.
are likely to
that
RECOMMENDED
Stitchselccilcn:
wrdth:
strtch
Length:
Slftch
Foot
Needle
Plate:
monogramming
seam edges of
unravel.
SETTINGS
Zig-ZagStitchlffi-l
r[i-F?l
ilt
I
to 4
I
General
General
Purpose
PurPose
-lfl
or
press
(B)
(A)
Zig-Zag
Blindstitching
weight fabrics. Blindstitching trakes a little
first.
;
7
Blindstitch
provides
#7
a durable hem
finish that
o
Place
as shown,
o
Stitch close
fallover
can be
practice,
however,
Stitch Sefecti on:
Lengthz 2lo
Stitch
Foot: General
Attach
Prepare
pressing
want
to baste the
as
shown.
basting
the
top
Wth the wrong
most,
turn the hem under,
creating
hem.
Pin or
together in
of seam
edge
edge.
used on
blindstitch
the hem by folding it
it in
lf
least
at
edge of the
a softfold
place.
allowance under
to edge,
so
Purpose
so,
letting outer zig-zag
variety ol different
a
a test sample
make
Zig-Zag
4
(B)
guide
hem
the usual way. You may
hem
to hold it in
be sure to
th
inch
hem
side of fabric
from
all three layers
baste
Blindstitch@
and
place,
place
(12mm)
allowance.
as shown,
thetop
the
below
upper-
edge of
foot,
21
Page 23

Position the hem under the
foot with the
wall
the
of
guide
the
the top of the
is belween
soft
guide.
hem, as
fold resting
Be
sure the
the
shown.
soft
presser
against
flange
fold
and
of
Multi
-Stitch
Zig
Mending, overcasting,
i:i
I
22
-Zag
joining
#8
or reinforcing
.
and
the
the wall
.
can all be done
the
Lower
sewing
stitches
width il necessary.
guide
and
lf layers of fabric
remove
not sew over
making certain the straight
fall on
the zig-zag stitches
fold of the
soft
the hem edge
feed the
of
pins
using the
MendingaTear
r
Trim ragged edges
o
lining
a
Cut
.
Bring the edges
lining to
wrong side
RECOMMENOED
Slltch
Selectlon:
Stltch Wldth:
Stltch Lenglh:
Fool:
Needle Plate:
r
Place tear, right side up, under
foot.
.
o
r
.
over the
Stitch
length at each end for
stitch
ment.
Trim
thread ends close
lf needed,
Trim away lining close to stitching.
presser
soft
the
as
loot
the edge
work. Adjust
While
in a
fold
guide.
pinned
are
you
cometo
pins.
evenly against
Multi-Stitch Zig-Zag.
tear.
of
for reinforcement.
fabric
of
otteartogether
of fabric.
SETTINGS
Multi-Stitch
Zig-Zag@
itFElo
1 or l5li67
Special Purpose
General Purpose
line
the
of
to fabric.
over tear again.
sew
and begin
the hem
of
just
pierce
stitch
stitching,
straight
together,
them. Do
and baste
presser
shortening
tear,
reinforce-
line
(J)
Page 24

t.
"M"
Stitchl#)
This
stitch can be used for
E
9
stretch seams
and decorative stitching.
LaceTrim
Lace
and children's wear.
r
.
may
trim
lace to
Cut
Pin lace
desired.
desired size.
to
RECOMMENDED
Slitch
Selectlon:
be added to
right
side of
SETTINGS
"M"
blouses, lingerie
fabric
where
StitchlF-l
l'
Crcscent Stitch
This stitch is ideal for
borders, edges, smocking and embroidering.
#10
Stllch Wldth:
Stltch Length:
Foot:
Needle
o
r
Border designs decorate clothing and many
household items.
.
RECOMMENDED
SlllchSelectlon:
Stltch Wldth:
Stltch Lsnglh: 1 or
Fook
Needlc Platc:
Plale:
Carefully stitch along both
as shown.
Trim away the fabric
stitching lines.
BorderD*ign
r
Sew seams
Mark stitching lines on fabric where
desired.
in
iFE-90
2
or lower
Special
General
usual
SETTINGS
CrescentStitchlF[6'l
Special
General
Purpose
Purpose
edges
the lace near
under
manner
rlF-3|
I
,,i I
ll
and
< <'
lower
Purpose
Purpose
=10
(J)
lace,
of
press.
(J)
.
Center
and stitch.
o
Pull threads to wrong side of fabric; tie
and trim.
marked line under
presser
foot
23
Page 25

St etch Overedge
This stitch is
primarily
Stitch #11
used
F
'tt
to finish
seams, hems and lacings requiring
OveredgeSeam
.
Baste
seams.
r
Trim
line.
seam
edge
1/a"
stretch.
(6mm)
from
basting
Fagoting
this
Use
stitch for fagoting,
Stitch #12
embroidery,
patchwork
Stltch
Selectlon:
ffit"n
$irchwrdrh:
Stilch Lang[hz
Foo[
Needle
Adjust
.
o
r
o
Fagoting
two
o
o
.
Plale:
balance, if necessary
Position
foot. as
Stitch along
Straight stitches should fall
line; zig-zag
seam eoge.
Remove
or
strengthening
Fagoting
Fold
Baste
sheet of tissue
Position
presser
trimmed seam under
shown.
basting stitches
is an open, lacy
oieces of fabric.
under
edges
the edges
center of work under
foot.
I
llF=I,
3-11ffi
Special Purpose
General
line.
basting
stitches should fall
seams.
stitch used to
joined
to be
t1t"
(3mml
paper
for support.
Overedge
Purpose
on basting
press.
and
and
apart onto
center of
(J)
presser
over
join
press.
a
24
RECOMMENDED
Stitch
Selection:
Slilch Widlh:
Stitch Length:
Fool:
Needle
Adjust
o
.
Plate:
balance, if necessary
you
As
stitch
the other.
After
sue and basting.
sew, the
first in one fabric strip, and
stitching
needle should
is completed, remove
SETTINGS
Fagoting
llm,
3-l12lo 4
Special Purpose
General Purpose
make
then in
(J)
a
tis-
Page 26

Patchwork
Patchwork
it
both durable and flexible.
can be used for
both household
items
and clothing;
.
Cut square
r
Turn
patch,
o
Cut a backing to fullsize of finished work.
r
Baste
being
another.
and the Fagoting
patches
under 7e"
and
patches
sure all edges
(6mm)
press.
to backing where desired,
to desired size.
line
Stitch
makes
around edges of
next
up
to one
Ric-Rac
This
is a heavy-duty,
g
13
/Straight
#13
stretch
stretch slitch that
RECOMMENOED
StilchSelectlon: Fagotingstitchl#l21
Slitch Width:
Slilch Lenglh:
Foot:
Needle Plate:
Adjust
r
Stitch
ping patches,
o
lf
desired, sew a binding along
edges of
o
Pull threads
trim.
stitch
can also be used
#14
Topstitching
Topstitching is
rate
and
.
Sewseams
r
For topstitching
vert
RECOMMENDED SETTINGS
Slllch Selectlon:
Stitch widih: m IE-l^
Slltch Lengthz
Foot Special
Needle Plate:
Adjust balance, if necessary
balance,
lengthwise
as shown.
work.
to underside
for
topstitching.
a
reinforce
in
machine to
SETTINGS
ilm,
3-112to
Special
General
il necessary
and crosswise, overlap-
practical
your garment.
mannerand
usual
hard-to-reach
free
arm sewing.
Ric-Rac
Stretch Stitch
l,lt
General
4
Purpose (J)
Purpose
of work:
way to
l#131 /Straight
ll
3-112to
Purpose
both deco-
press.
areas, con-
liiTill
=lo
4
Purpose
outer
tie and
r
.
garment
Place
Slowlytopstitch desired
r
Pull threads to
and trim.
.
To
create
stitch
set
length to
stitch
right
wrong
a straight stretch stitch,#
width
#4.
side up, under
areas.
of fabric;
side
to the
left
and
foot.
tie
14
25
Page 27

SECTION 5
Your machine
You never need to move the fabric or
'
reposition the needle.
.
Always make a
sample
.
Be sure bobbin contains enough thread.
[il
1/3 2 4
makes buttonholes
practice
your
of
fabric.
G
Four-Step
in four easy steps.
buttonhole on a
Buttonholing
.
When making buttonholes on hard-to-
reach
areas convert
arm sewing.
.
Mark
buttonhole
pattern.
in
cated
.
When
sewing
piece
positioning
presser
from
the teeth on the underside
from
paper
of
the
foot
the foot. This will
under
picking
machine
position
delicate fabrics,
over the fabric when
garment.
and slip
and
on fabric
the
pulling
Lower
paper
the fabric.
Settlngs
bed to free
as
place
the
out
prevent
foot
of the
indi-
a
___r
Selecllon
: Buttonhole
widrh:ill-il
Lensth:
Buttonhole
Plate:
7
Step
.
.
.
o
r
o
o
Step2
.
.
o
presser
Raise
Place fabric underfoot.
Center a red
around beginning line
Select Buttonhole Stitch
Position
Lower
portion
ing
ward. Make 4
point
(3).
needle.
Raise
Sefect
Stitch
down
Raise needle.
g--t-+l....''Fll
(L)
General
foot,
guideline (1)
needle
the foot and make
Buttonhole
in
of the
or
point
to
fabric
foot
5 stitches
Stilch #2.
Stitch
Purpose
(4).
(A)
of foot
of buttonhole.
#1/3.
point
(2).
at
the
sure
is all the way for-
ending at
slid-
26
rS
Step3
r
.
.
Buttonhole Stitch #1
Select
Make four or five stitches,
point
(5).
Raise needle.
/3.
ending at
Page 28

Step 4
o
Select
Buttonhole
.
Stitch
up to
o
Raise needle.
point
Stitch #4.
(6).
.
.
=ffi
r
Adjusting Balance
lf the two stitching sides
are unequal,
located
On some heavy
ment might be necessary.
.
)
presser
Raise
from machine.
Clip thread ends.
Carefully
ripper
seam
behind
lf
right
the
turn stitch balance ring
until
both sides are equal.
foot and
cut buttonhole
small,
or
turn the stitch balance ring
the
weight fabrics
side of
remove
sharp
ol Buttonhote
of
selector dial.
stitching
slightly to the right
garment
opening with a
scissors
your
buttonhole
adjust-
an
is too
open
(7),
(8),
$,
il
)
*,
il
.
lf the left side of stitching
turn stitch balance
left
until both sides are equal.
ring slightly to the
is
too open
(9),
27
Page 29

SECTION 6
Caring forYour Machine
Removing
and Replacing
Bobbrn
Case
CAUTION: Before
the
machine,
socket
.
.
o
.
To
o
r
outlet.
presser
Raise
Open slide
To
remove the bobbin case, the
must be removed first.
olate
Lift needle
slide out from under foot.
Remove Bobbin Case
With a small screwdriver, turn
back as
Lift out bobbin case.
far as it will
remove
foot and
plate
and remove
plate
(1)
cleaning
plug
needle.
from right
go.
or adjusting
from
the
bobbin.
needle
corner and
lever
(2)
28
To
Replace Bobbrn
.
Guide forked end
under feed
.
Draw
plate
.
Turn lever
case in
NOTE: After locking
is not tight, but
r
To
pin
o
Press needle
o
Insert
(4).
rim
of
bobbin
(5).
(2)
toward
place,
can
replace
(6)
needle
push
and
bobbin and close slide
it to the left.
plate
Case
(3)
of bobbin case
case under
you,
in
case
move
slightly.
plate,
in
down
position
locking bobbin
place,
be sure
it under
slide
place.
plate,
it
Page 30

Removing
Replacing LightBulb
and
rrrrrul
/
\
\*-
\k
CAUT:I,pN:
r
Before
you
outlet. Be
which
operating the machine.
o
This machine is designed
To change the
first
changing
have
covers
maximum
be removed.
sure
light bulb.
light
removed
to replace the
the light bulb before
light bulb, the
bulb,
plug
to use
from
face
make
socket
plate
face
a 1s-Watt
plate
must
sure
G
ddd
.
.
To Removethe Light Bulb
.
o
To Replace
.
o
.
r
and remove
Loosen
plate
face
Slide
rnachine,
Push bulb up into
to the
Pull bulb down
Push new
to the right
Reposition
plate
of
Line
hole in machine.
Insert
to unlock bulb
left
the
bulb
until
face
under edge of top cover.
up screw hole in
screw
down
and out of
Light
up into
pins
plate
tighten.
and
screw
and away
socket
pins.
Bulb
socket
lock into
by sliding top edge
plate
(1).
(2)
socket.
position.
with
from
and turn
and
turn
screw
29
Page 31

Cleaningthe
Your machine
reliability, take a few minutes
how often
you
Machine
is
designed to
use it.
give you
keep
to
years
many
machine clean. How often
the
of dependable service.
you
To
clean it
ensure this
depends on
ilt[ilil
the lint brush,
Using
from:
-presser
-needle
-bobbin
area,
cleaning)
-machine
a soft cloth and use
the surface)
Remove needle
clean exposed area
oar
bar
(if
case
remove
there
surface
plate
the bobbin case
remove
(if
necessary,
a mild
with a
lint
is a lot of lint in this
dampen
soap
as instructed and
lint
brush.
or dust
for
to clean
Page 32

Pertormance
When
sewing
correctly following the instructions. lf
you
help
to correct it.
Checklist
difficulties
occur,
look back through
you
still
have a
manual to make
this
problem,
the reminders below
sure
you
are
may
NeedleDoesNotMoye
ls machine connected
supply?
power
ls
the
ls
controller connected?
ls
air supply
Needle Moves
lsNotFormed
ls needle
ls needle fully inserted
clamp?
Are
bobbin and needle
threaded?
ls bobbin correctly
bobbin case?
NeedleBreafts
ls needle
ls
needle correct
ls needle
clamp?
Are controls
Are
accessories
Bobbi
ls thread
ls
bobbin winder
ls
thread end securely held
of
and light
from
defective?
straight and sharp?
fully inserted into needle
properly
n W i ndi ng Dilticulties
unwinding freely from
wind?
to electrical
switch on?
controller
But
Stitch
into needle
correctly
inserted into
size?
set?
for
correct
engaged?
clear?
application?
at start
spool?
UpperThread
ls
machine
ls
thread freely
proper
ls
ls needle
ls upper
ls
ls
LowerThread
ls
ls
ls
SkrppedStitches
ls
ls fabric firmly
ls
ls needle
Fabric Does
Under Presser Foot
ls
ls
ls
thread tension too tight?
bobbin case
bobbin
bobbin correctly
bobbin correctly inserted into
bobbin
bobbin
machine
needle correct
presser
to machine?
presser
stitch length
Breaks
properly
spool
correct
rim free
case?
case correctlythreaded?
properly
straight
foot
foot
threaded?
unwinding from
cap being used?
for thread?
size
properly
held
NotMove Proper$
correctly attached
lowered?
correctly set?
inserted?
of nicks?
Breaks
wound?
threaded?
down?
style and size?
and sharp?
spool?
QI
Page 33

Ad d i
Additional
sewing center.
o n a I A
ti
Accessories for
ccessories
your
sewing
machine
are available at
your
St'trvt
K ffi,.*,
.",u
Fl
9
@
u,g"k
sM,ru
@
1.
Seam Gulde
allowance
2. Blindstitch Presser Foot
guide
fabric for nearly invisible
hems.
stitch
3. Button
4. Darning
5. Even Feed Fool
6. Oveledge
7. Seam
.
Sewlng
securely
recommended
such as embroidery,
and decorative designs.
hard
to
fabrics. Also
and topstitching.
Stretch Stitch for seams in stretch
fabrics.
Ripper,
threads
(N),
even.
Foot
for fastening.
Embroidery Foot
and
for
(M),
pile,
feed
quickly
stretch and bonded
excellentfor
Foot, use wilh
used to
and
helps
keep
(K),
(H),
holds buttons
free
motion work,
monogramming
is
used for
neatly.
plaids,
Overedge
pick
and
sewing
seam
helps
blind-
(G),
is
stripes
cut
\
*|]\
ilil+w,
v,'[R
tN
ffiK
32
Twln
8.
9.
10.
11.
Needle and Spool Pln
used for decorative twin
threads)
labrics.
Needle Threader
threading machine
Narrow Hemmer Foot
a narrow
Stralght Stitch
Needle Plale
stitching light-weight
stitching
hem in
a single
Preeser Fool
(C),
are used
on woven
needle.
needle
(P),
assists
is
used
operation.
when
fabrics,
(R),
are
(2
and knit
in
to
stitch
(D),
and
straight
Page 34

lndex
Accessories
Balance
Basting
Blindstitch Hems. .......21
Blindstitch
Bobbin .
Bobbin
Bobbin Thread,
Border
Buttonhofe Presser
Buttonholing,
Caring
Cleaning The Machine
Connecting The
Corners, Turning
Fabrics
FacePlate
Feed
Fagoting .
Free-Arm
Lace
LightBulb
LintBrush
Needles
NeedlePlate
OperatingTheMachine
Hem
Guide 4,22
Winding
Inserting
Case ...... .. 28
Removing
Cleaning
Designs
For Your
Placing
Cover
Trim ..........
Replacing .......29
Selecting .........5
Changing ........8
Changing ........28
Raising ..... 13
..... ....... 23
Foot
Four
Step . 26,27
Machine
Machine .......,...
Square
Fabric
Under
Sewing
......4,32
.. 20.27
.....16
...... 4
.........10
........11
.......28
........30
.. ....... 4.26
.... 28,29,3O
. .. . .
.......... 17
.......5
Foot .......
.........29
.......
.... . 8,25,26
..........29
........4,30
..
.........4
...... 7
.22
30
16
... 9
... 24
23
.... 4
Patchwork
PerlormanceChecklist
Presser Feet
Changing
General Purpose
Special
PresserFootLifter
Principal
ReverseStitching
Seams:
Curved ..........17
Finishes
KeepingStraight
Overedge Seam .
SewingASeam
Spool Caps
Stitch
7
Blindstitch
CrescentStitch . .,......23
Fagoring
"M"
Multi-StitchZig-zal
Ric-Rac/Straight
StraighrStirch.
Stretch Overedge
Zig-Zagstitch . ..........
Stitch
stitchwidth
Tears, MeldinS . .... ..... . . 22
Tension ........15.20
Thread ....... 5
Threading The
Topstitching ........25
ZipperFoot
Zipper,lnsertingA ..
..
Purpose .......... 4
Parts . ....2,3
Patterns
Zig-Za7
Stitch..
Sritch
Srrelch
Stitch
Lenglh ...
Machine
..........25
....31
.
...... 4
........9
.........4
.........
.......... 16
......21
........17
........24
.....16, 17
....... 4,10
........24
. ..... . 23
Stitch. . .
.........14
. ....... 24
........19
.......4,18
16
,24
. ..... 22
..... 22
25
21
14,19
.. . . 12
....... 18
33
Page 35

Part No.
119625-O01
(B:Oo
Page 36

.€
'r,
;l
."
1&.
4
.&4r-
Llt
t
t
(\a^
/
n {11
\)a)\)
SINGER
 Loading...