

Page 1
Page 2

CONGRATULATIONS .
You are about to discover the wonderful pleasure of sewing with your new
Sty/zst* Special Zig-Zag Sewing Machine by SINGER. We know you are
eager to get started on a sewing project . . . but we urge you to become
familiar with this book before you begin. It is designed to help you get the
benefit of all the capabilities of your machine. Especially, we recommend that
you keep the following points in mind :
choose the correct needle and thread for your fabric—if either is the
d&
wrong size or type, you may encounter broken or knotted thread, or
faulty stitching. The Fabric, Thread, and Needle Table on page 11 will
help you make a perfect choice.
sew with a bent or blunt needle. If the needle is damaged—or
improperly inserted in the machine—it can cause skipped
stitches. See page 9 for Instructions.
follow the instructions on page 15 for threading the machine. Note
particularlythedirectionsforthreading the tension discs.
forget to place the thread properly when you insert a wound
bobbin. Page 14 tells you how to do this perfectly.
become familiar with the instructions for regulating stitch length
(page 18), presser-foot pressure (page 19), and thread tension
(page 20). Take advantage of the capability of your sewing machine !
allow lint and thread ends to accumulate In the bobbin case
area—they can cause jamming or excessive noise. Clean
your machine regularly, as Instructed on page 61.
remember that expert, dependable SINGER* service is always
do'
Above all, i/o enjoy sewing !
Form K8749 (jU (878)
(Part No. 116288-001)
available. If your sewing machine should require maintenance or
repair, be sure to call your Singer Sewing Center or Authorized
Singer Dealer. You will find the number listed under SINGER
COMPANY in your telephone book.
Copyright (g) 1972 THE SINGER COMPANY
All rights reserved Printed in Great Britain
Page 3

CONTENTS
Page
Getting to Know Your SINGER * Sewing Machine
Principal Parts—^And What They Do..................................................... 2
Accessories—And When to Use Them................................................... 6
Getting Ready to Sew ................................................................................... 10
Preliminary Steps .................................................................................. 10
Choosing Needle and Thread............................................................... 11
Threading Your Sewing Machine.......................................................... 12
----------------------------
2
Straight Stitching
Adjusting Selectors ............................................................................... 18
Sewing a Seam ..................................................................................... 21
Zig-Zag Stitching
Fashion^ Disc Patterns.......................................................................... 26
FlexFStitch* Disc Patterns.................................................................... 30
Twin-Needle Stitching ................................................................................... 33
Preparation ............................................................................................ 33
Threading the Needle ............................................................................ 34
Buttons and Buttonholes.............................................................................. 35
Buttons................................................................................................... 35
Buttonholes............................................................................................ 36
Sewing the Professional Way
Sewing Knit and Stretch Fabrics
Hints on Sewing Special Fabrics
Construction Details.............................................................................. 47
Decorative Touches .............................................................................. 52
Keeping Up Appearances...................................................................... 57
...........................................................................................
......................
..................................................................... 25
......................................................................
.......................................................
........................................................
17
39
39
45
Caring For Your Machine.............................................................................. 61
Cleaning and Lubricating the Machine ............................................... 61
Removing Covers, Bobbin Case and Bulb
Removin^j Machine from Cabinet
Performance Checklist.......................................................................... 66
Fashion* Aids................................................................................................. 68
Your Personal Measurement Chart ............................................................. 71
Index ............................................................................................................. 72
........................................................
..........................................
62
65
Page 4
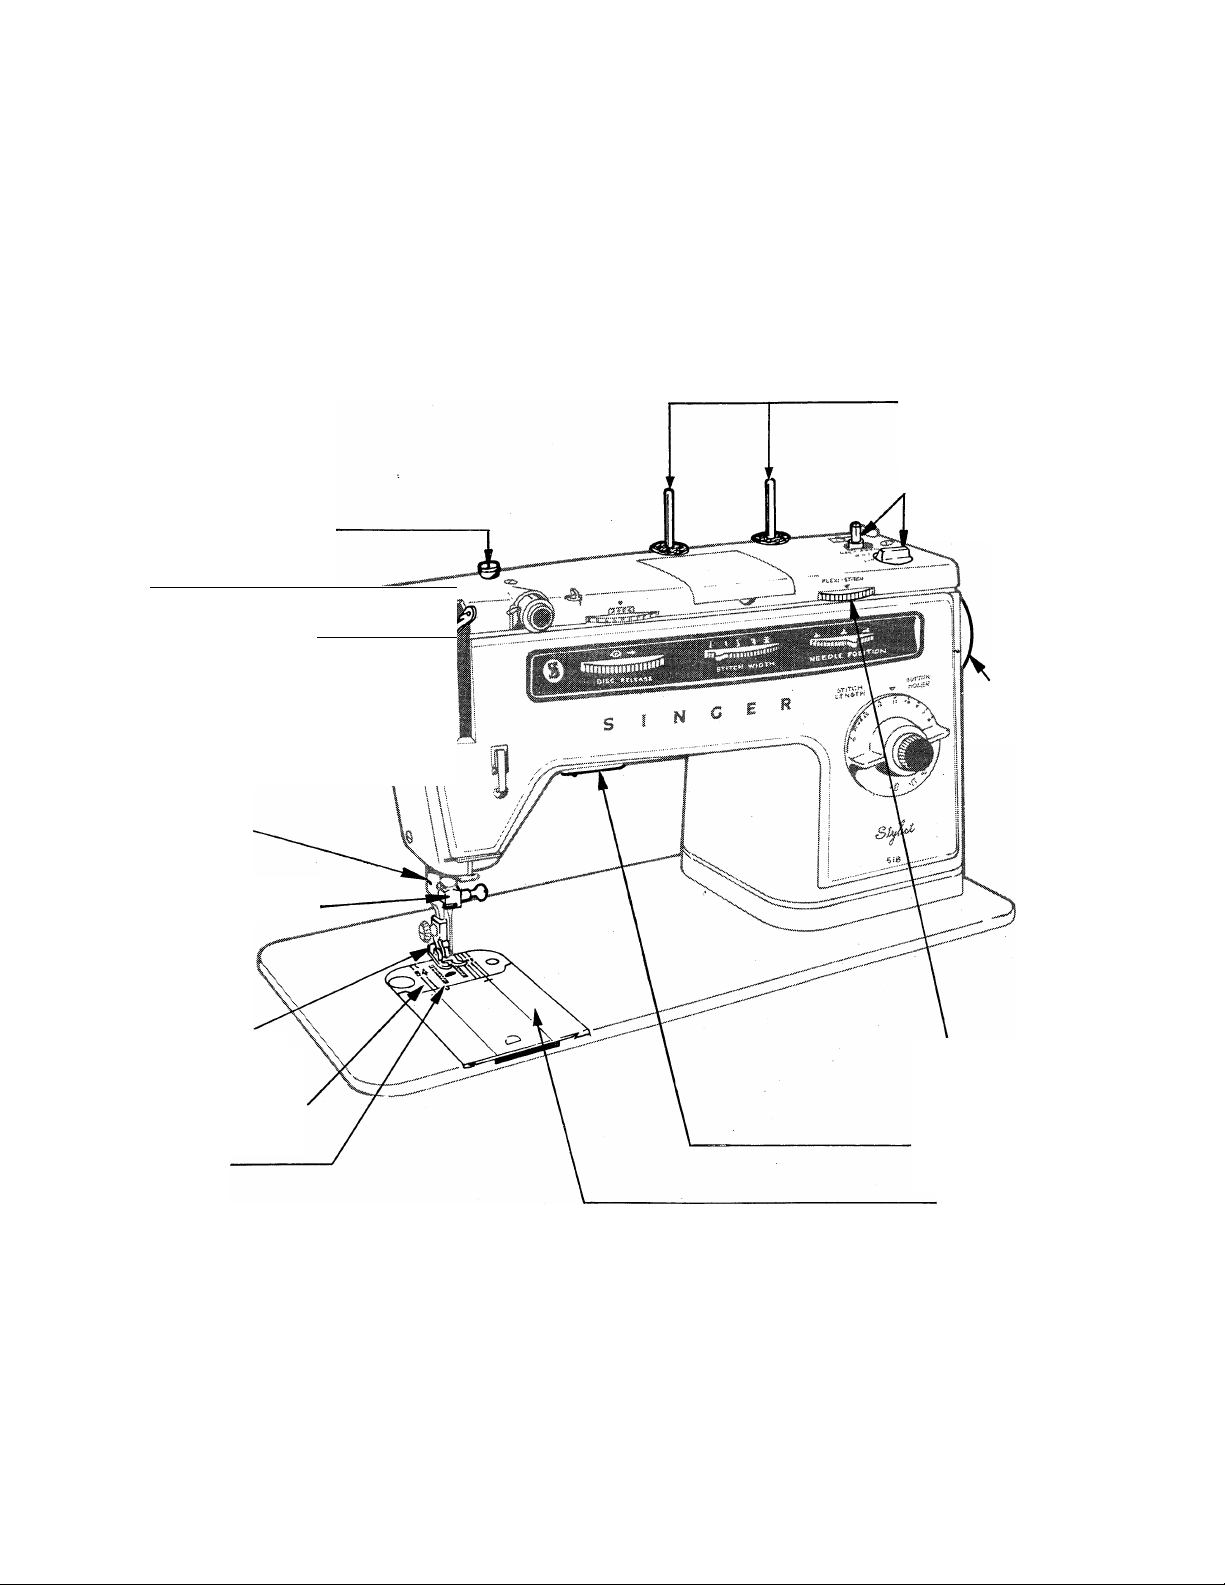
1 Bobbin Winder
Tension Disc
principa! parts
10 Spool Pin
and Felt
11 Bobbin Winder
Switch and
Bobbin Holder
2 Pressure
Dial
3 Take-up
Lever
4 Presser-
Foot Lifter
5 Thread
Cutter
6 Needle Clamp
7 Presser
Foot
8 Needle Plate
9 Feed
---------
-------
■—^ w
1 Mi i
1 Us
1 U1
1 \ i
Ì ‘
12 Hand
Wheel
13 Flexi-Stitch
Disc Dial
14 Sewing Light
15 Slide Plate
Page 5

and what they do
1. Bobbin Winder Tension Disc regulates thread tension for bobbin winding.
2. Pressure Dial regulates presser-foot pressure on fabric. It has an all-purpose
setting plus settings for extra-light and extra-heavy pressure, and for darning.
3. Take-up Lever controls flow of needle thread.
4. Presser-Foot Lifter, at back of machine, allows you to raise and lower presser
foot. The high-lift position allows easy placement of bulky fabrics.
5. Thread Cutter is built into presser bar for safety and convenience.
6. Needle Clamp holds single and twin needles and is designed to eliminate the
possibility of inserting needle backwards.
7. Presser Foot holds fabric against feed. The feet snap off for quick removal.
8. Needle Plate lifts out for easy removal. Guidelines on right and left sides extend
to slide plate to help you keep seams straight.
9. Feed moves fabric under the presser foot.
10. Spool Pin and Felt. Pin holds thread spools of various sizes. Felt helps thread
unwind smoothly.
11. Bobbin Winder Switch and Bobbin Holder let you fill the bobbin with thread
quickly and easily.
12. Hand Wheel positions take-up lever and needle. Always turn it towards you.
13. Flexi-Stich Disc Dial sets the machine for/^/ex/-Sf/ic/7 disc sewing and varies
the balance oi Flexi-Stitch disc patterns in order to obtain desired pattern appearance.
Dial must be set on 0 {off) position when not in use.
14. Sewing Light illuminates the sewing area.
15. Slide Plate opens for easy removal and replacement of the bobbin, and raises
and lowers the pin that holds the needle plate in place.
3
Page 6
PRINCIPAL PARTS (Continued)
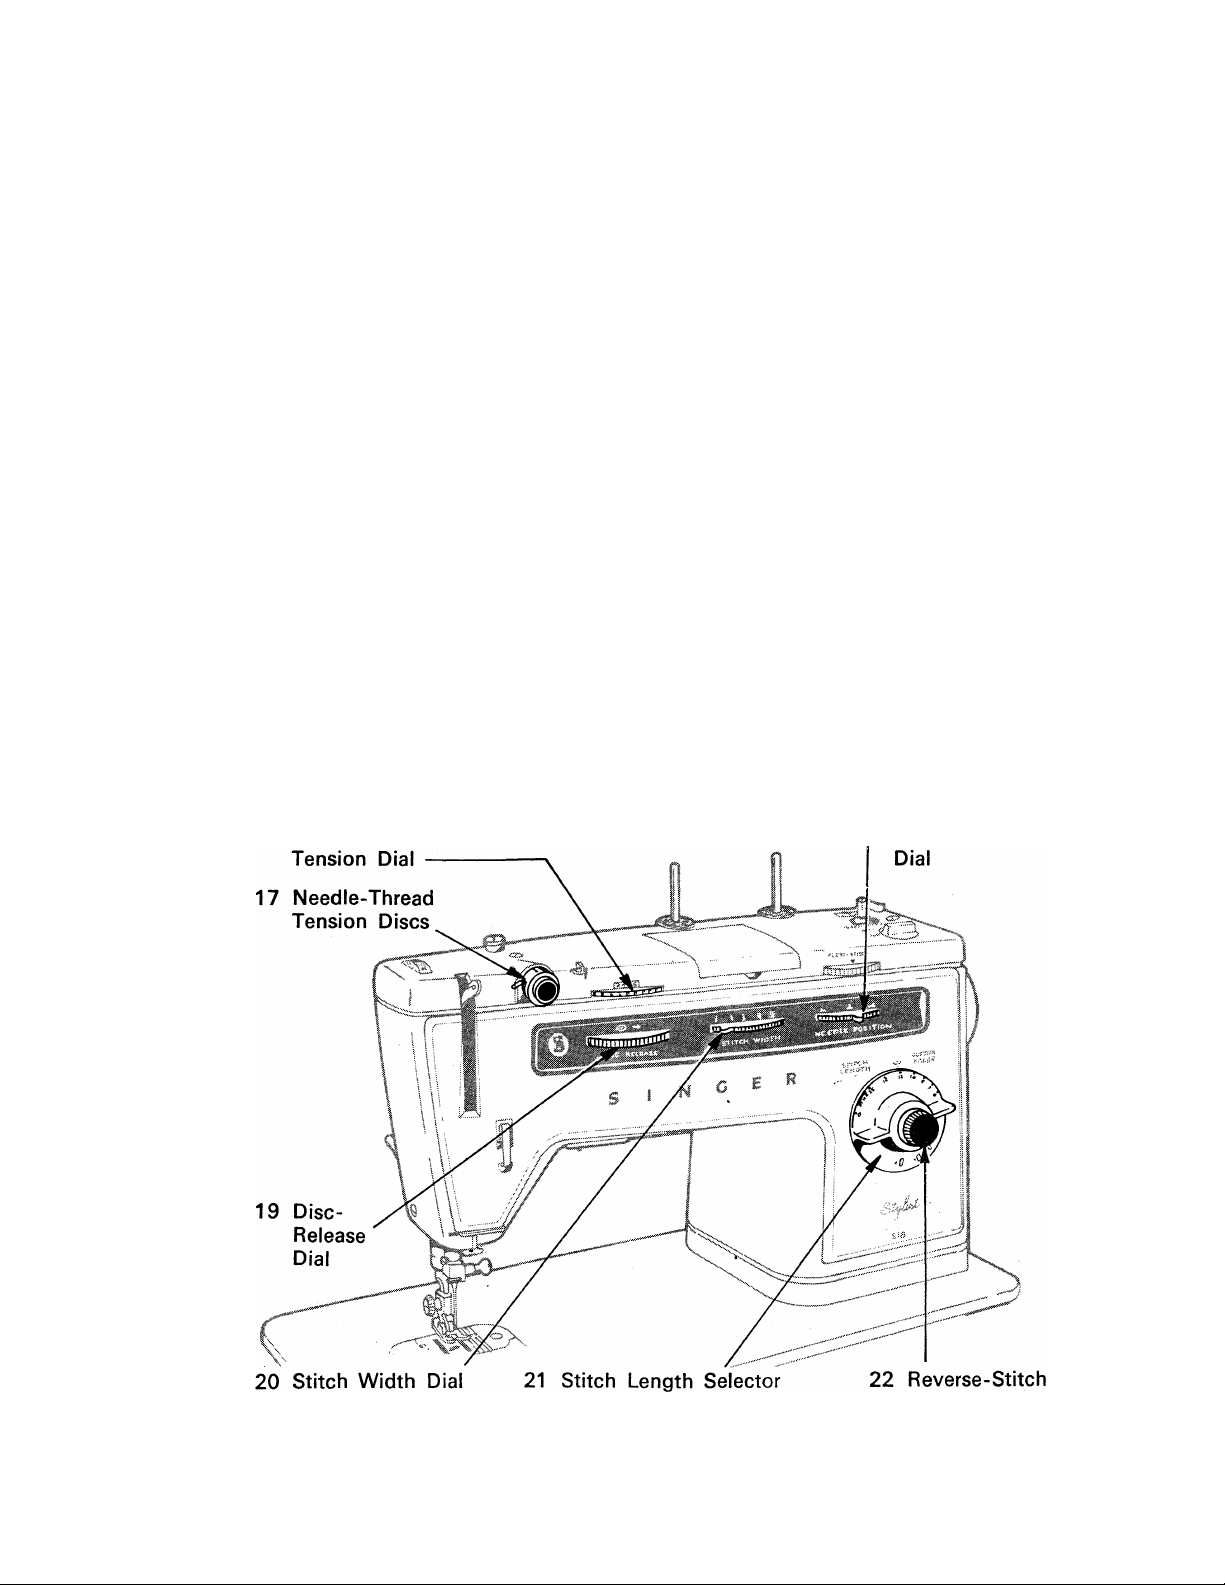
16. Needle-Thread Tension Dial lets you select just the right tension for your stitch,
thread, and fabric. The numbers eliminate guesswork in duplicating settings.
17. Needle-Thread Tension Discs, controlled by the tension dial, regulate the amount
of tension on your needle thread.
18. Needle-Position Dial places needle in either left, center or right stitching
position. Use center position for straight stitching.
19. Disc-Release Dial releases pattern disc from disc holder for quick and easy
pattern changes. Always turn dial to the right.
20. Stitch Width Dial controls the width of zig-zag stitching and positions needle
for straight stitching. Use i setting for straight stitching.
21. Stitch Length Selector and Buttonhole Dial allows for a variety of stitch
lengths. Including FINE for zig-zag satin stitching. Has special settings for button
holing and F!exi‘Stitch disc sewing.
22. Reverse-Stitch Push Button has two separate functions. It lets you reverse
stitching direction and balance buttonhole stitch density.
16 Needle-Thread
18 Needle-Position
and Buttonhole Dial
Push Button
Page 7
23. Interchangeable Stitch Pattern Discs
provide for a variety of decorative uses as
well as serving such practical purposes as
sewing stretch fabrics. There are two kinds
of discs: Fashion discs (black), and Flexi-
Stitch discs (light colored). Each disc is
numbered and its design is reproduced on
its surface for quick recognition. Flexi-
Stitch disc patterns are shown in red on
Fiexi-Stitch discs. Always keep a disc on
the disc holder, even when you are straight
stitching.
24. Stitch Pattern Disc Holder holds any
one of the interchangeable stitch pattern
discs. Always keep a disc on the holder,
even when straight stitching.
23 Interchangeable Stitch Pattern Disc
24 Stitch Pattern Disc Holder
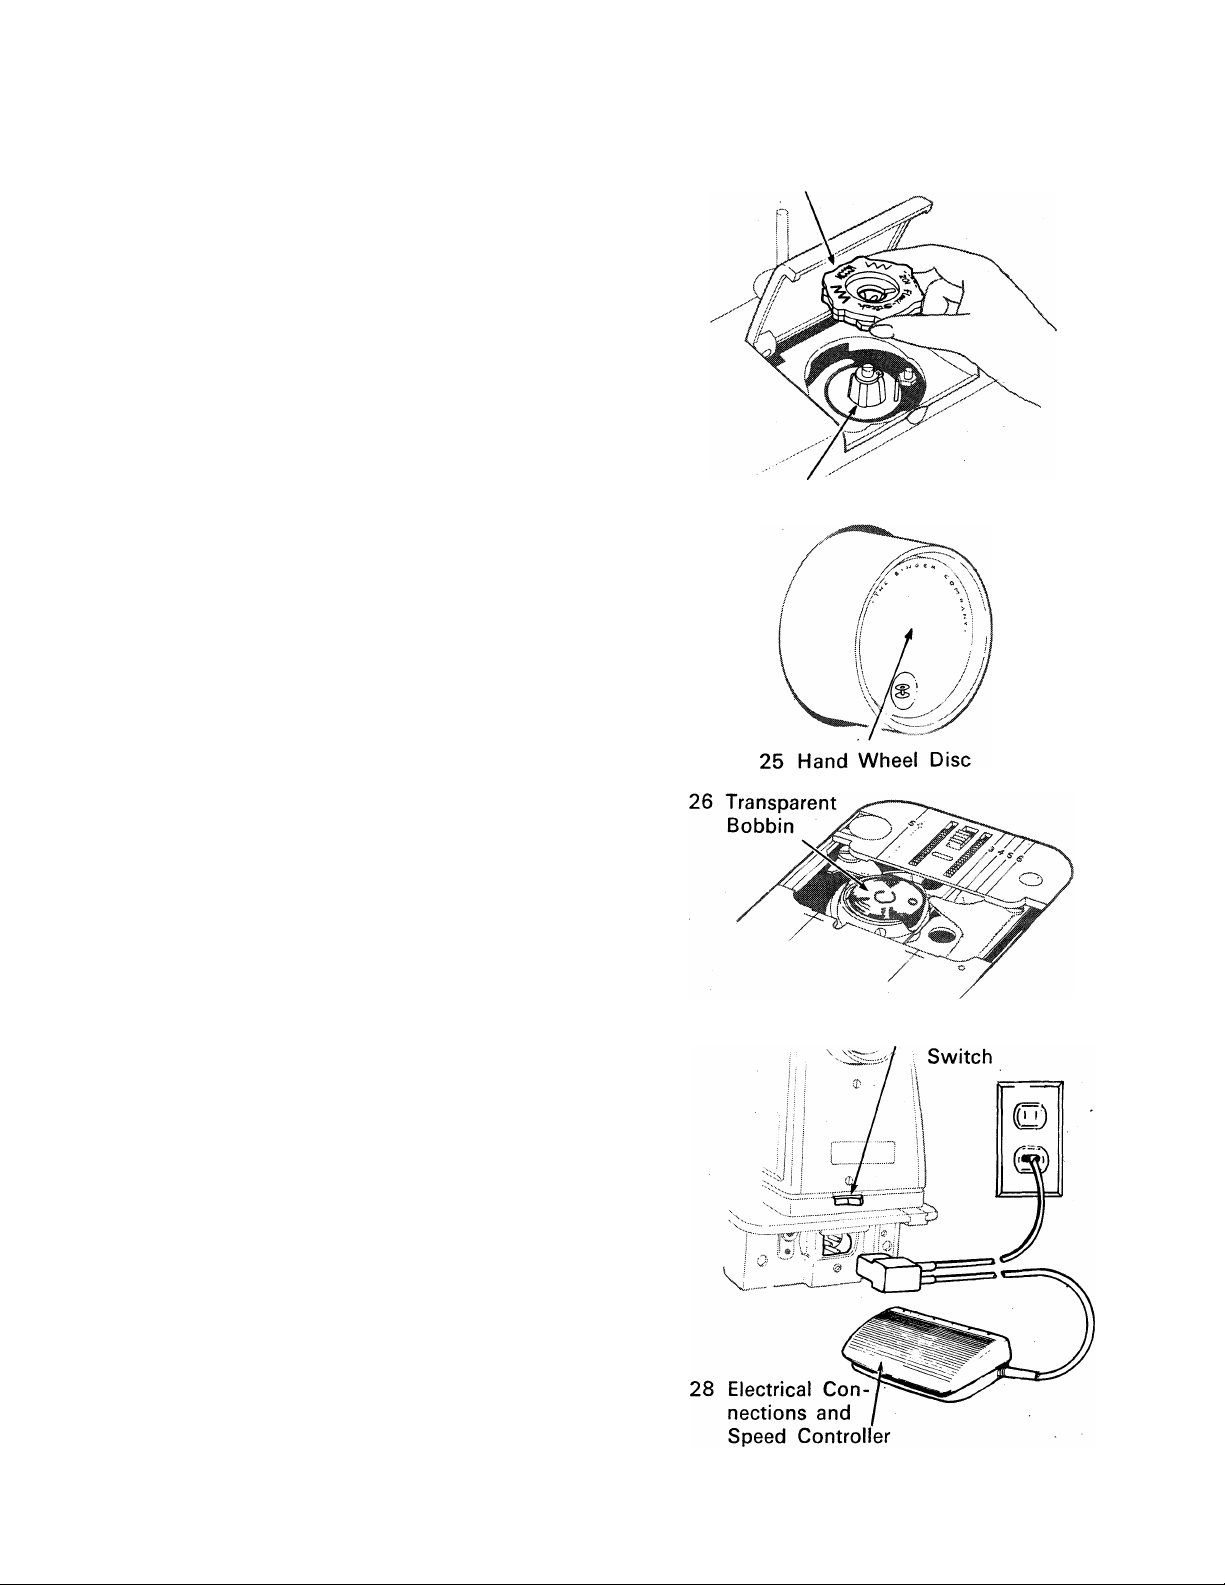
25. Hand Wheel Disc engages hand wheel
to sewing mechanism. Disengage hand
wheel for bobbin winding by pressing©
bobbin symbol on disc.
26. Transparent Bobbin shows thread supply
... is easily removed for bobbin winding.
27. Power and Light Switch turns on the
power and the sewing light simultaneously.
28.
Electrical Connections and Speed
Controller are designed for convenience
and safety.
See instructions for connecting machine
and operating machine and controller on
page 10.
27 Power and Light
Page 8
accessories . . . and when to use them
The accessories that come with your Sty/ist sewing machine are designed
tp help you do many kinds of sewing easily and perfectly. Additional
accessories, listed on page 68 at the back of this instruction book, are
available for purchase at your local Singer Sewing Center.
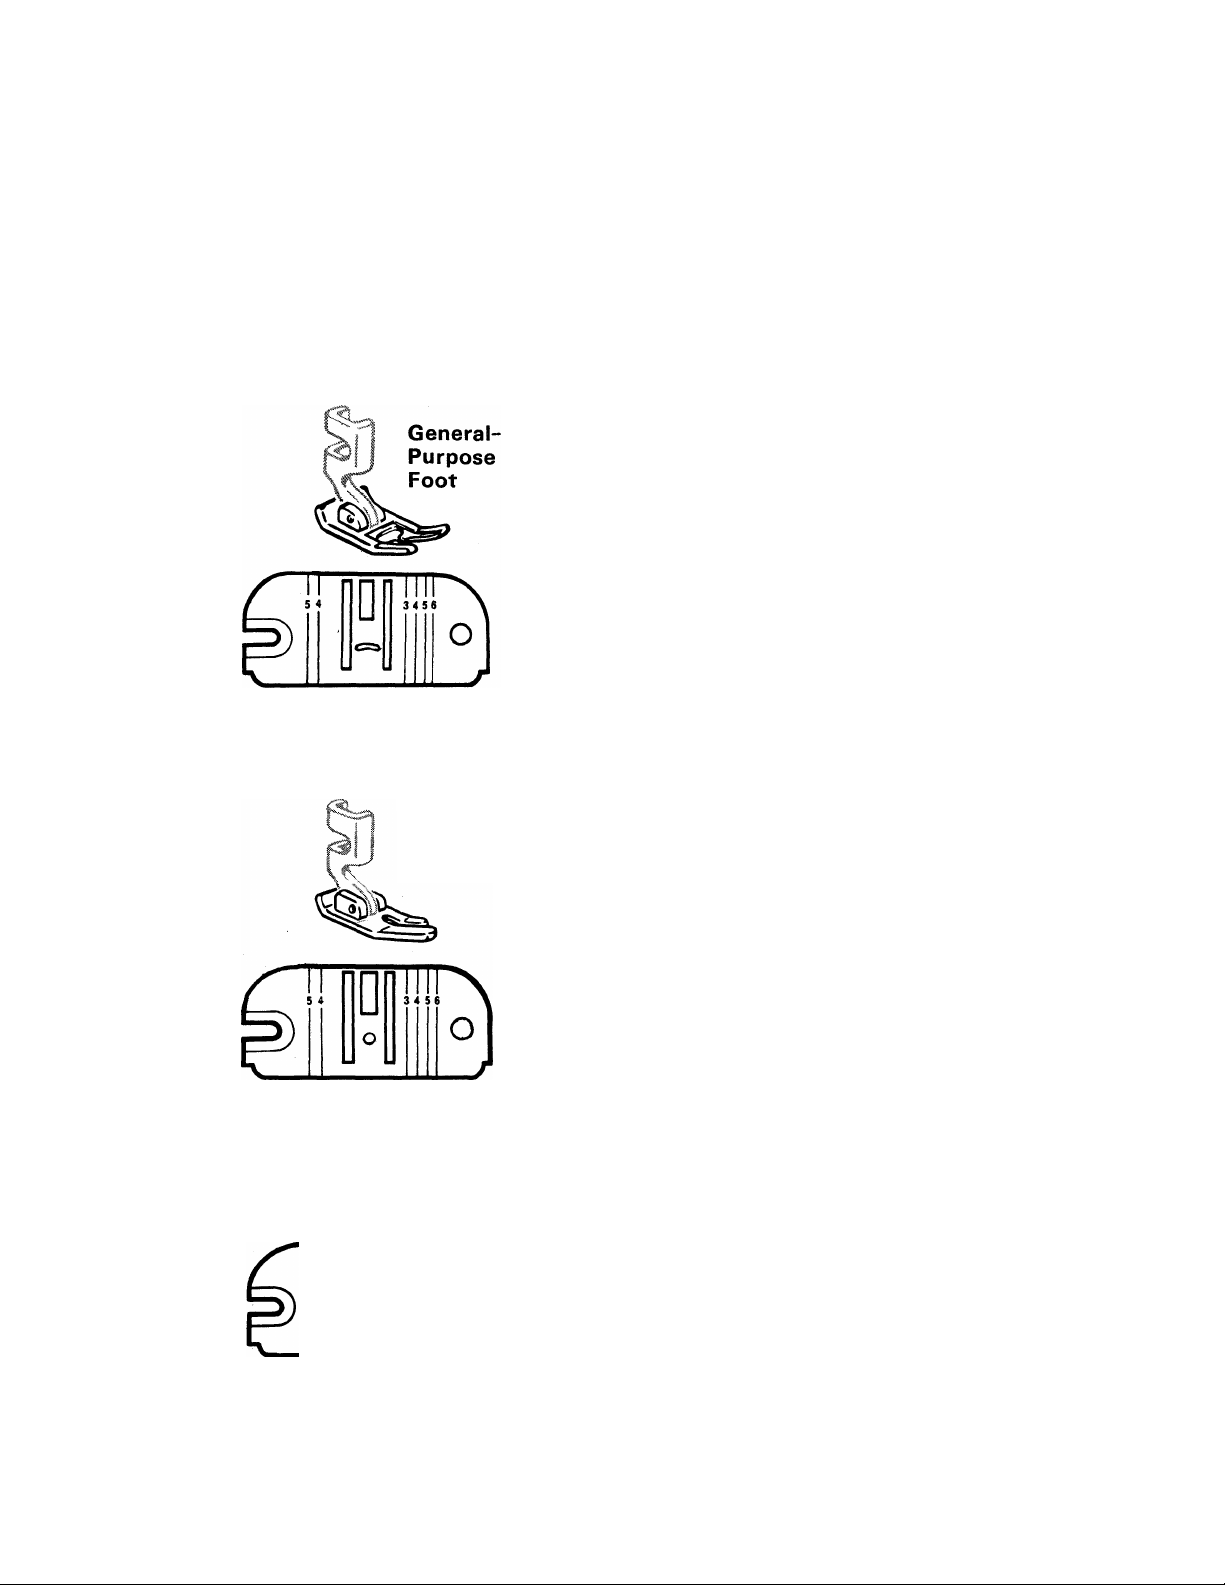
GENERAL PURPOSE FOOT
AND NEEDLE PLATE
The general purpose foot and the general
purpose needle plate are in place on the
machine. Ideal for all utility sewing, these
fittings can be used for either straight or
zig-zag stitching. Always use them to-
gether when alternating between straight
and zig-zag stitching.
General-Purpose Needle Plate
StraightStitch
Foot
Straight-Stitch Needle Plate
D
Feed Cover Needle Plate
STRAIGHT STITCH FOOT AND NEEDLE PLATE
The straight stitch foot and the straight
stitch needle plate are used when your
fabric or sewing procedure requires
close control.
Especially useful for:
• Precision stitching
scalloped edges,
stitching, etc.
Stitching delicate or spongy fabrics,
synthetics, and knits.
FEED COVER NEEDLE PLATE
The feed cover needle plate replaces the
general purpose needle plate (or straight
stitch needle plate) when fabric feeding
is not desired. Use it for button sewing
(pag^SB) and free-motion darning (page
of curved and
topstitching, edge
60).
Page 9
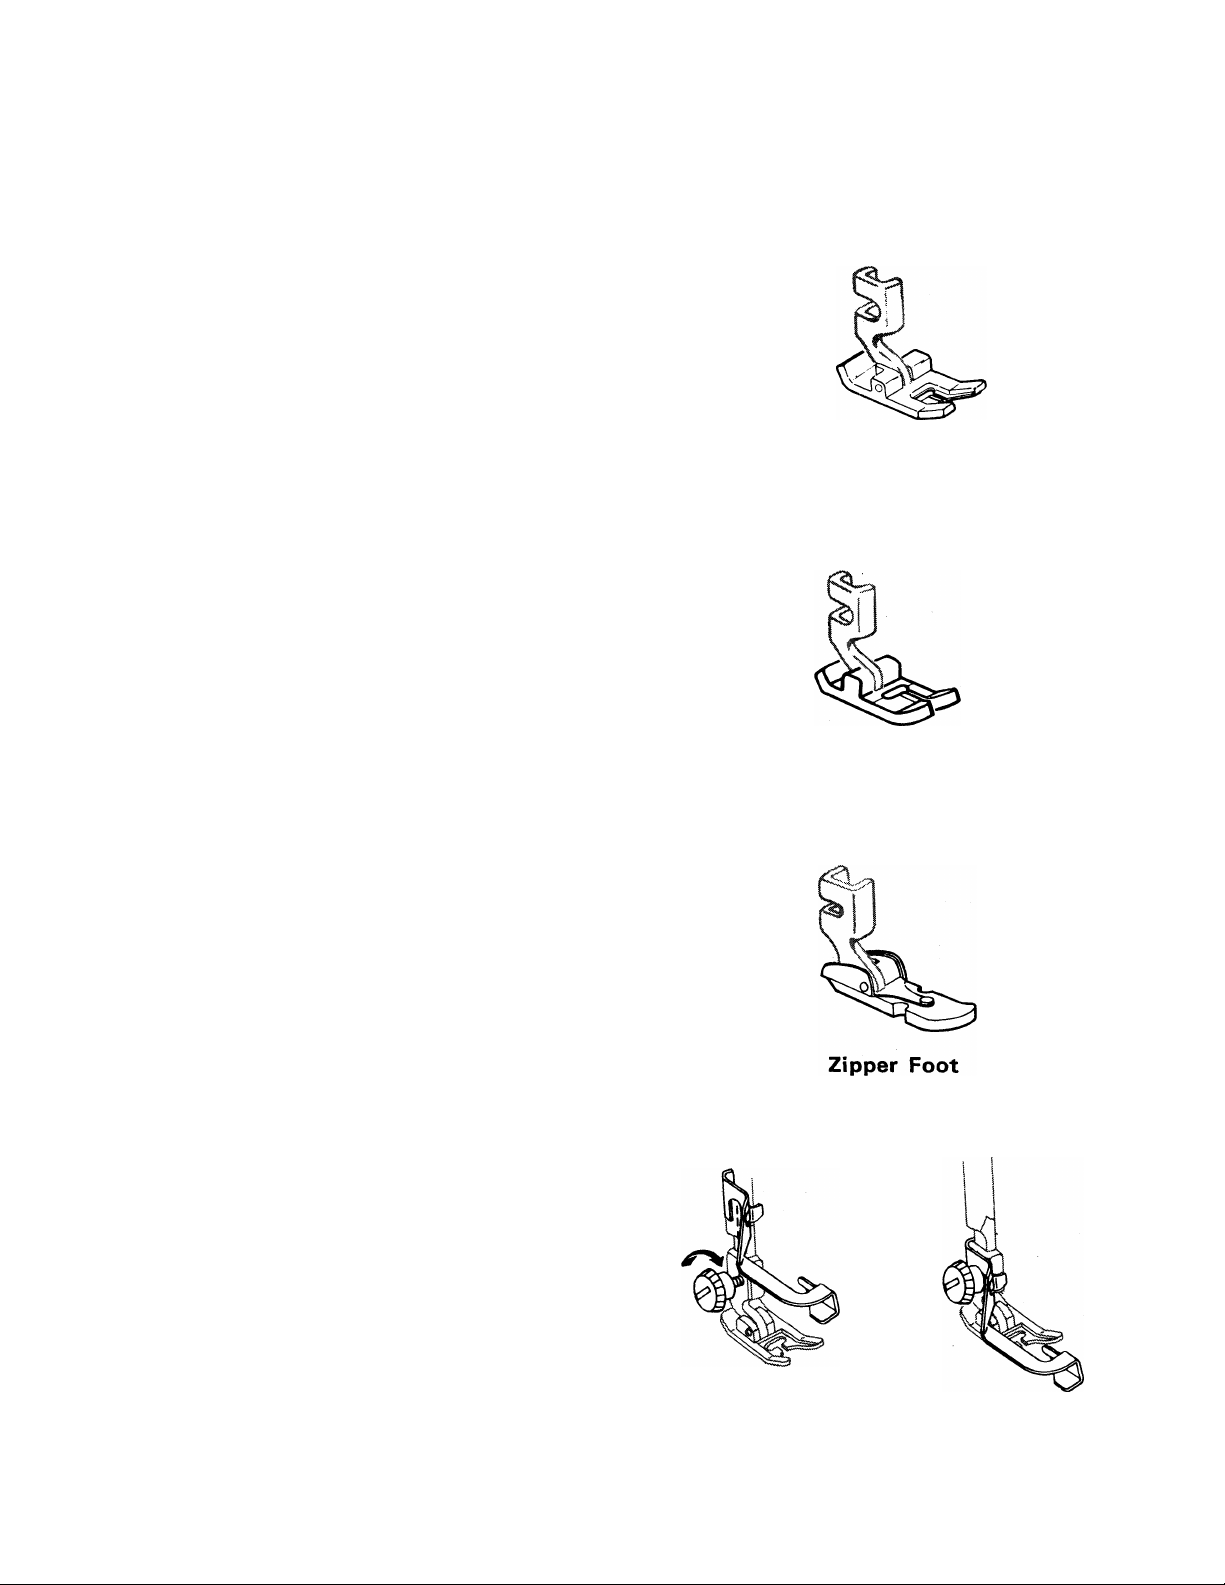
SPECIAL PURPOSE FOOT
The special purpose foot is used with the
general purpose needle plate for all kinds
of decorative zig-zag stitching. Use it for;
• Zig-zag satin stitching
• Ornamental stitching with Fiexi-Stitch
disc patterns
• Appliqué
• Twin-needle stitching
BUTTONHOLE FOOT
The buttonhole foot is used with the
general purpose needle plate to make
four-step, bar-tack buttonholes in fabrics
of light and medium weight. For instruc
tions, see page 37.
ZIPPER FOOT
The zipper foot is used to place stitching
close to a raised edge. Thus, it is as useful
for corded seams and tubular cording as
it is for zipper insertion (page 47). It can
be fitted to either the right or the left side
of the needle and may be used with the
straight stitch or general purpose needle
plate.
Special Purpose Foot
Buttonhole Foot
BLINDSTITCH HEM GUIDE
The blindstitch hem guide is used with
the general purpose foot to position the
hem fold for blindstitch hemming (page
49). To attach, simply loosen presser-foot
screw and slip guide between screw and
presser-foot shank. Position guide so that
it clears both slide plate and presser-foot
toe. Tighten screw.
Blindstitch Hem Guide
Page 10
ACCESSORIES (Continued)
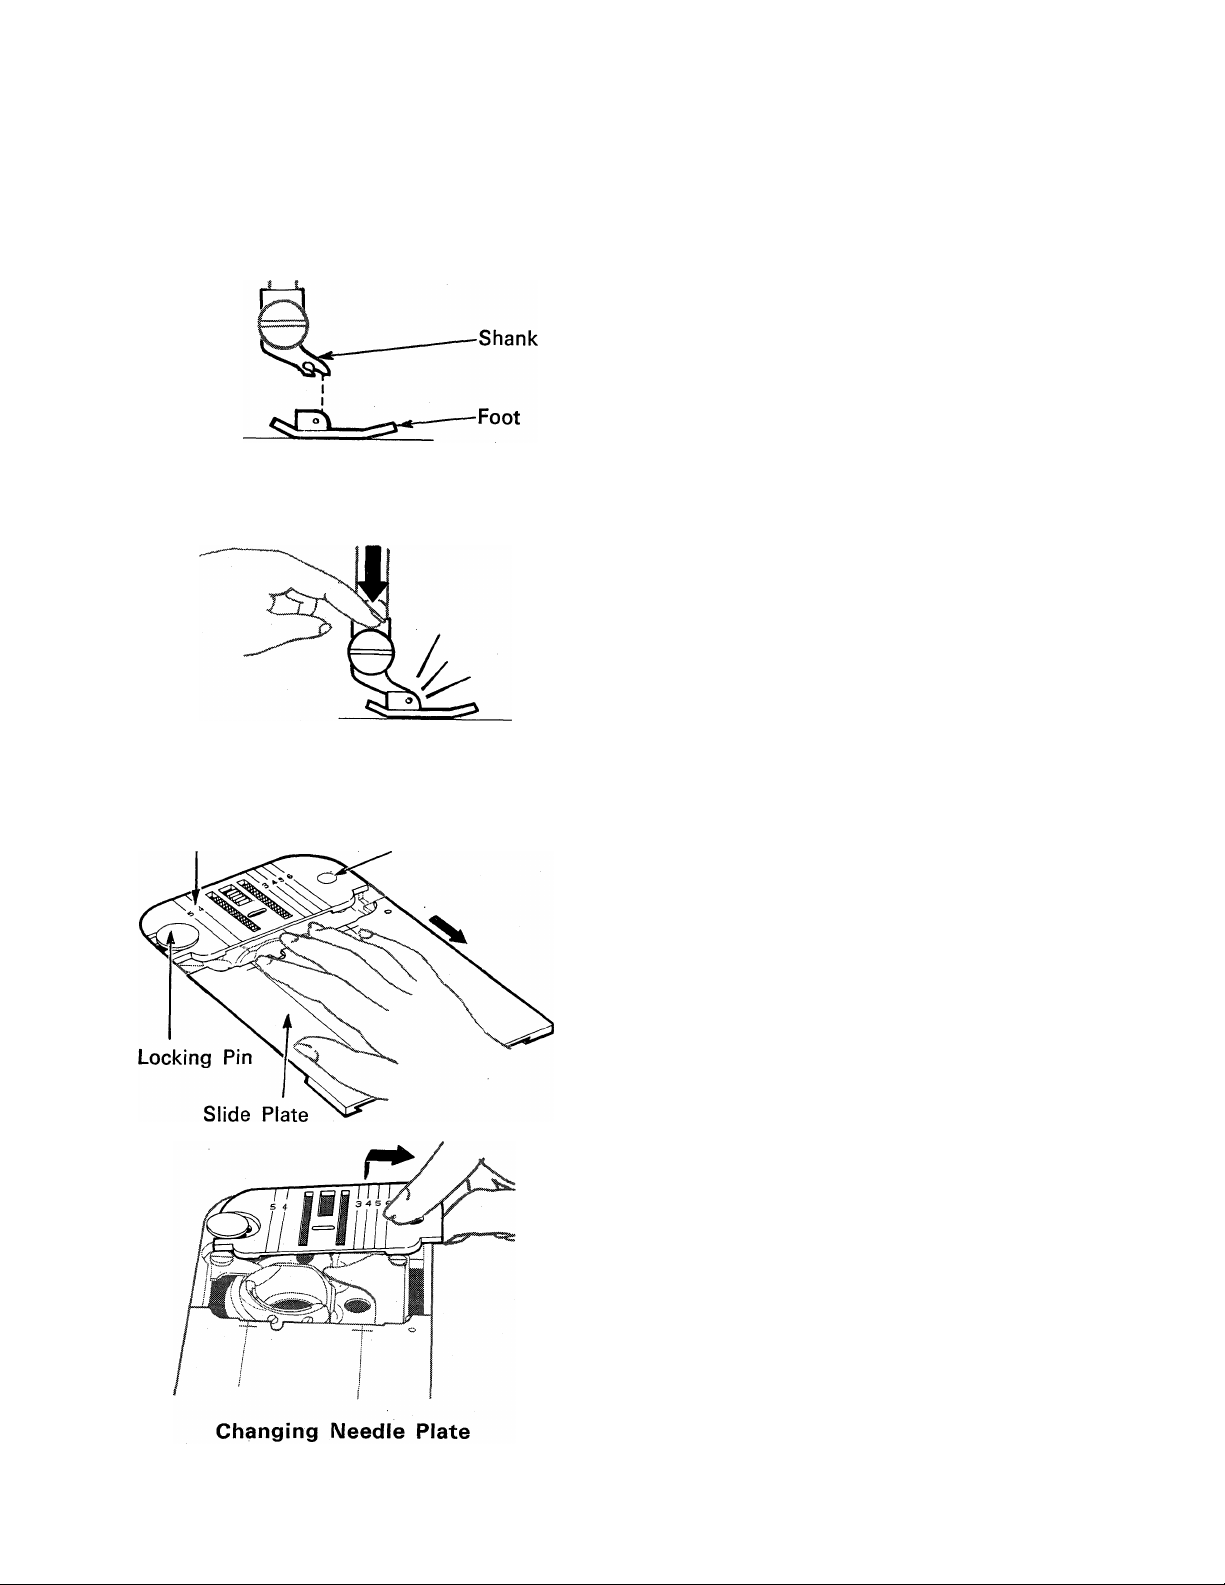
Changing Presser Foot
CHANGING PRESSER FEET
The presser feet that are supplied with
your machine snap on and off a common
shank. To change the foot:
1. Raise presser foot lifter and turn
handwheel toward you to raise needle
to its highest position.
2. Press toe of presser foot upward (as
far as it will go) and then snap down
to remove the foot.
3. Center the new presser foot under the
shank and lower the presser-foot
lifter so that the shank fits over the
presser-foot pin.
4. Press down on presser-foot screw until
foot snaps into place.
To remove the complete foot (with
shank), as for free-motion darning or
embroidery instructed on page 60,
loosen the presser-foot screw and
remove shank and foot together.
Needle Plate
Positioning Pin
CHANGING NEEDLE PLATES
1. Raise needle to its highest position and
raise the presser-foot lifter (you do not
need to remove the presser foot).
2. Open slide plate with downward finger
pressure. Draw plate toward you,
opening it all the way to raise the
locking pin that holds the needle plate
in place.
3. Place thumb under right side of needle
plate; lift and withdraw plate to the
right.
4. Insert new needle plate under locking
pin and over positioning pin.
5. Close slide plate to lower locking pin
and secure the needle plate.
8
Page 11
BOBBINS
Transparent drop-in bobbin, # 172336,
shows thread supply at a glance.
NEEDLES
• Style 2020 needles for all-purpose
sewing.
• Style 2045 ball-point (yellow band)
needles for sewing knits and stretch
fabrics.
• Style 2028 twin needle for decora
tive twin-needle stitching.
Transparent Bobbin
IMPORTANT: Your SINGER sewing
machine has been designed to obtain
best results with SINGER needles. You
should follow the recommendations in
this instruction book and on the needle
package for correct style and size of needle
for different types and weights of fabrics.
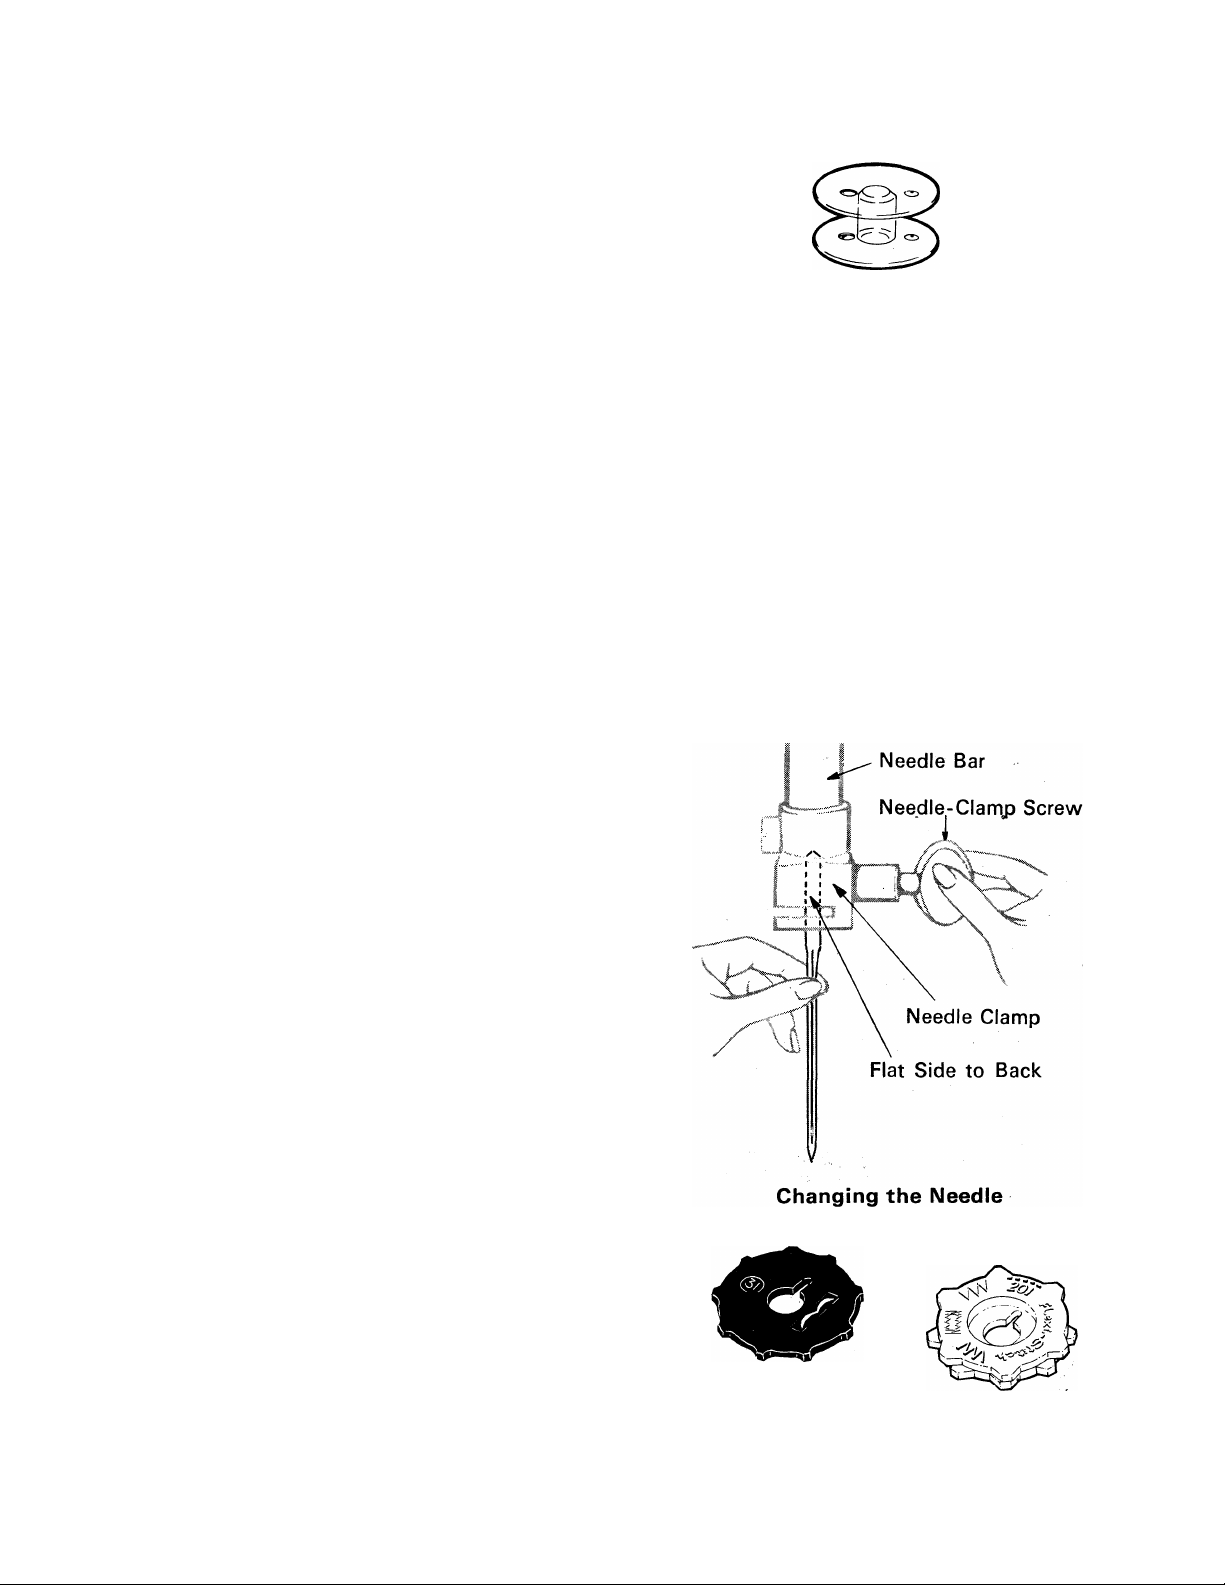
CHANGING THE NEEDLE
The needle clamp is designed so that the
needle can only be inserted with the flat
side of the needle to the back. To change
the needle:
1. Raise needle bar to its highest position,
loosen needle-clamp screw, and re
move needle.
2. Insert new needle in clamp, with the
flat side of the needle to the back;
push It up as far as it will go.
3. Tighten needle-clamp screw.
Regular Needle
(Yellow Band) Needle
vv
Twin Needle
Ball-point
STITCH PATTERN DISCS
• Six Fa5/7/OA7 discs (black).
• Five Flexi-Stitch discs (white).
Turn to page 25 for Information on
changing stitch pattern discs.
Fashion Disc
F/exi-Stitch Disc
Page 12
preliminary steps
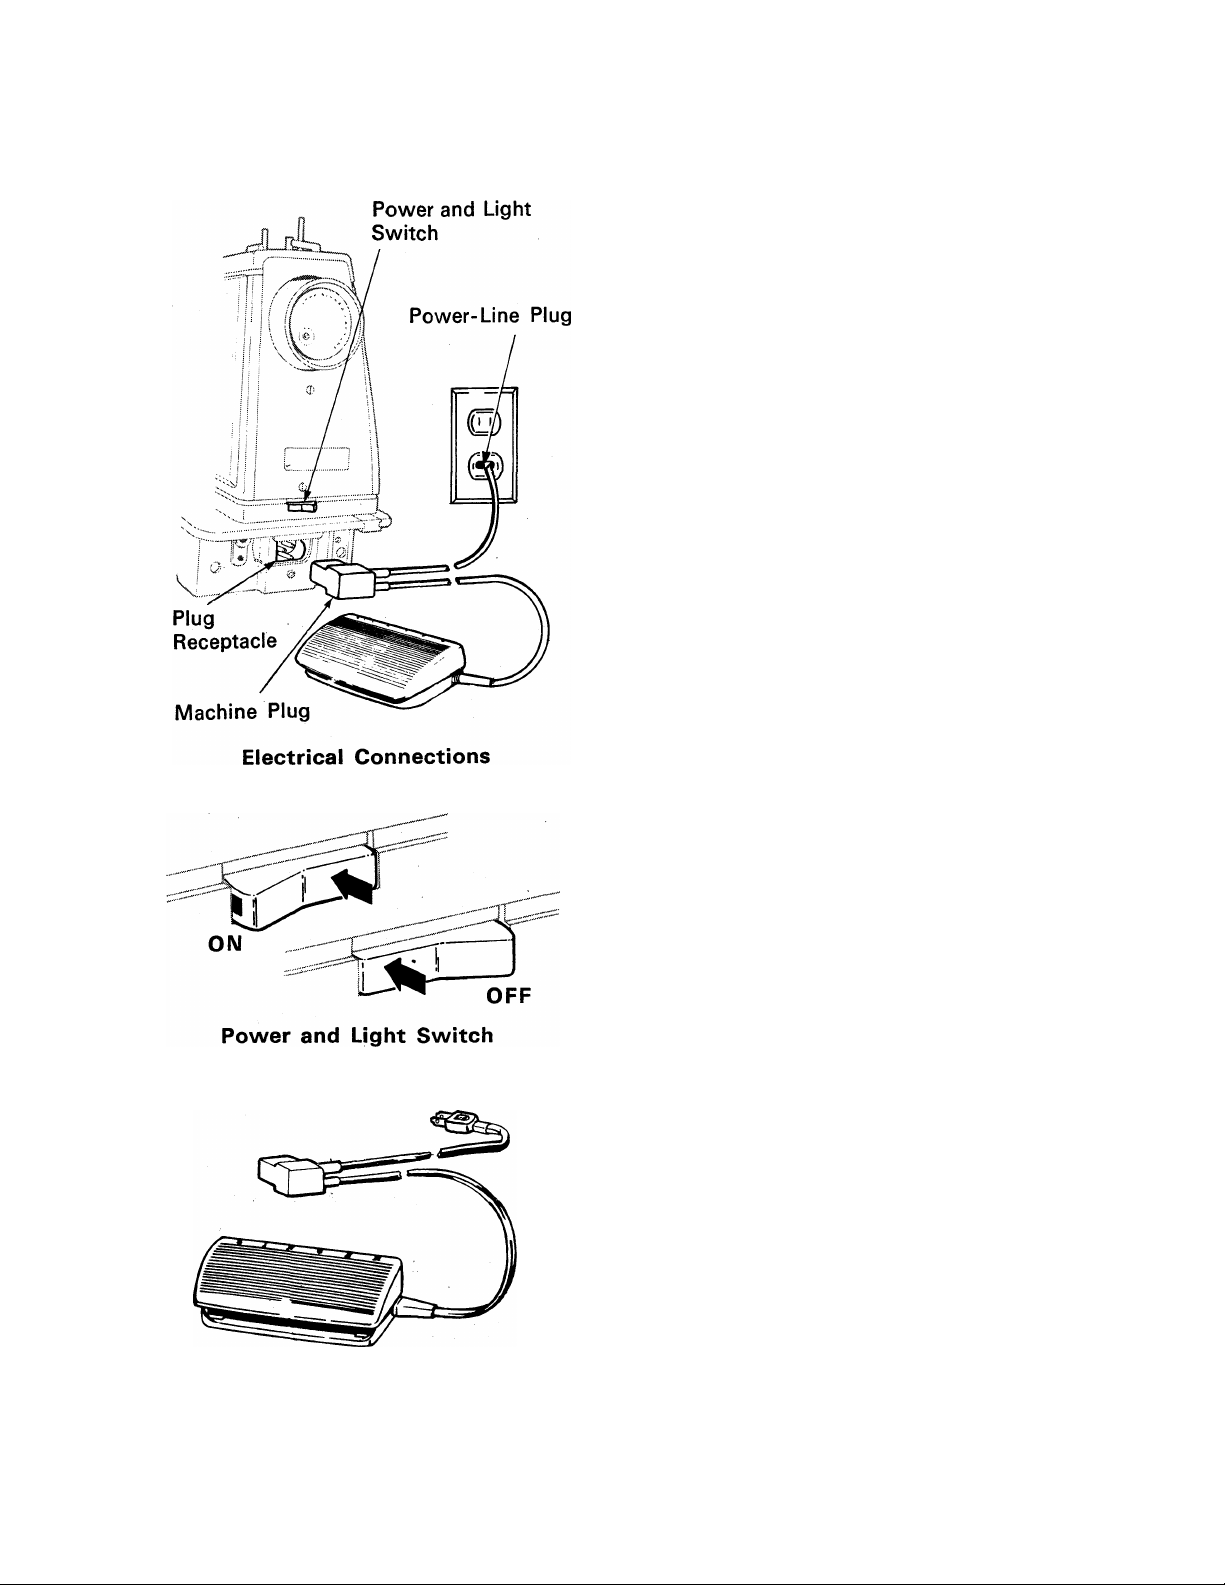
CONNECTING THE MACHINE
Before plugging in your machine, be sure
that the voltage and number of cycles
indicated on the plate under the hand
wheel conform to your electrical power
supply.
Push the machine plug into the receptacle
at the right end of the machine bed. Then
connect the power-line plug to your
electrical outlet.
OPERATING MACHINE AND
CONTROLLER
To turn on both machine and sewing
light, press power and light switch to
ON position (red bar on switch will be
visible). To turn off machine and light,
press switch at red bar to OFF position.
CAUTION: We recommend that you
turn off the power and light switch before
changing needles, presser feet, and needle
plates and when leaving the machine
unattended. This eliminates the possibility
of starting the machine by accidentally
pushing the speed controller.
To run the machine, press the speed
controller. The harder you press, the
faster the machine will sew.
To stop the machine from sewing,
remove pressure from speed controller.
Speed Controller
10
Page 13

choosing needle and thread
The needle and thread you choose selection. Refer to it before starting
will depend upon the fabric being a sewing project. Be sure to use the
stitched. The table below is a same size and type of thread in both
practical guide to needle and thread needle and bobbin.
FABRIC, THREAD AND NEEDLE TABLE
Needles
Fabric
Thread
Type
Size
DELICATE —tulle, chiffon,
fine lace, organza
LU3 HTWEIG HT — batiste,
organdy, jersey, voile, taffeta,
crepe, chiffon, velvet, plastic film
MEDIUM WEIGHT —gingham,
percale, piqué, linen, chintz,
faille, satin, fine corduroy, velvet,
suitings, deep-pile fabrics,
vinyl
MEDIUM HEAVY —gabardine,
tweed, sailcloth, denim, coatings,
drapery fabrics, vinyl, deep-pile
fabrics
H EAVY — overcoatings,
denim, upholstery fabrics,
canvas
Fine polyester, nylon,
and cotton thread
50 mercerized cotton
"A” silk
Polyester thread
Cotton-wrapped polyester
50 mercerized cotton
60 cotton
“A” silk
Polyester thread
Cotton-wrapped polyester
Heavy-duty
mercerized cotton
40 to 60 cotton
Polyester thread
Heavy-duty
mercerized cotton
24 to 40 cotton
Polyester thread
STYLE
2020
(15 X 1)
STYLE
2020
(15x1)
STYLE
2020
(15 X 1)
STYLE
2020
(15 X 1)
STYLE
2020
(15 X 1)
9
11
14
16
18
ALL WEIG HTS — decorative
straight stitch topstitching
in woven fabrics
KNIT, WOVEN STRETCH
and ELASTIC FABRICS —
polyester doubleknit, spandex,
nylon tricot, ciré tricot, jersey,
panné velvet
LEATHER — suede, kidskin.
capeskin, lambskin, lined
leathers
LIGHT and MEDIUM
WEIGHTS — decorative
twin-needle stitching
In woven fabrics
t Use with 50 mercerized cotton or "A" silk in bobbin.
"D" silkf
(Buttonhole twist)
"A" nylon
50 mercerized cotton
"A” silk
Cotton-wrapped
polyester
50 mercerized cotton
Polyester thread
"A” silk
Cotton-wrapped
polyester
50.mercerized cotton
STYLE
2020
(15x1)
STYLE
2045
Bail-Point
(Yellow Band)
STYLE
2032
(15x2)
STYLE
2028
(twin)
16
or
18
14
11
14
16
14
11
Page 14
Press Here
for Bobbin Winding
threading your
sewing machine
Like all sewing machines that produce
what is called a “lockstitch", your Stylist
sewing machine sews with two threads.
The upper thread comes from the spool
and is threaded through the eye of the
needle. The lower thread comes from the
bobbin, the small transparent spool that
you wind using the machine. It is best to
wind the bobbin before threading the
needle.
Removing Bobbin
THE BOBBIN THREAD
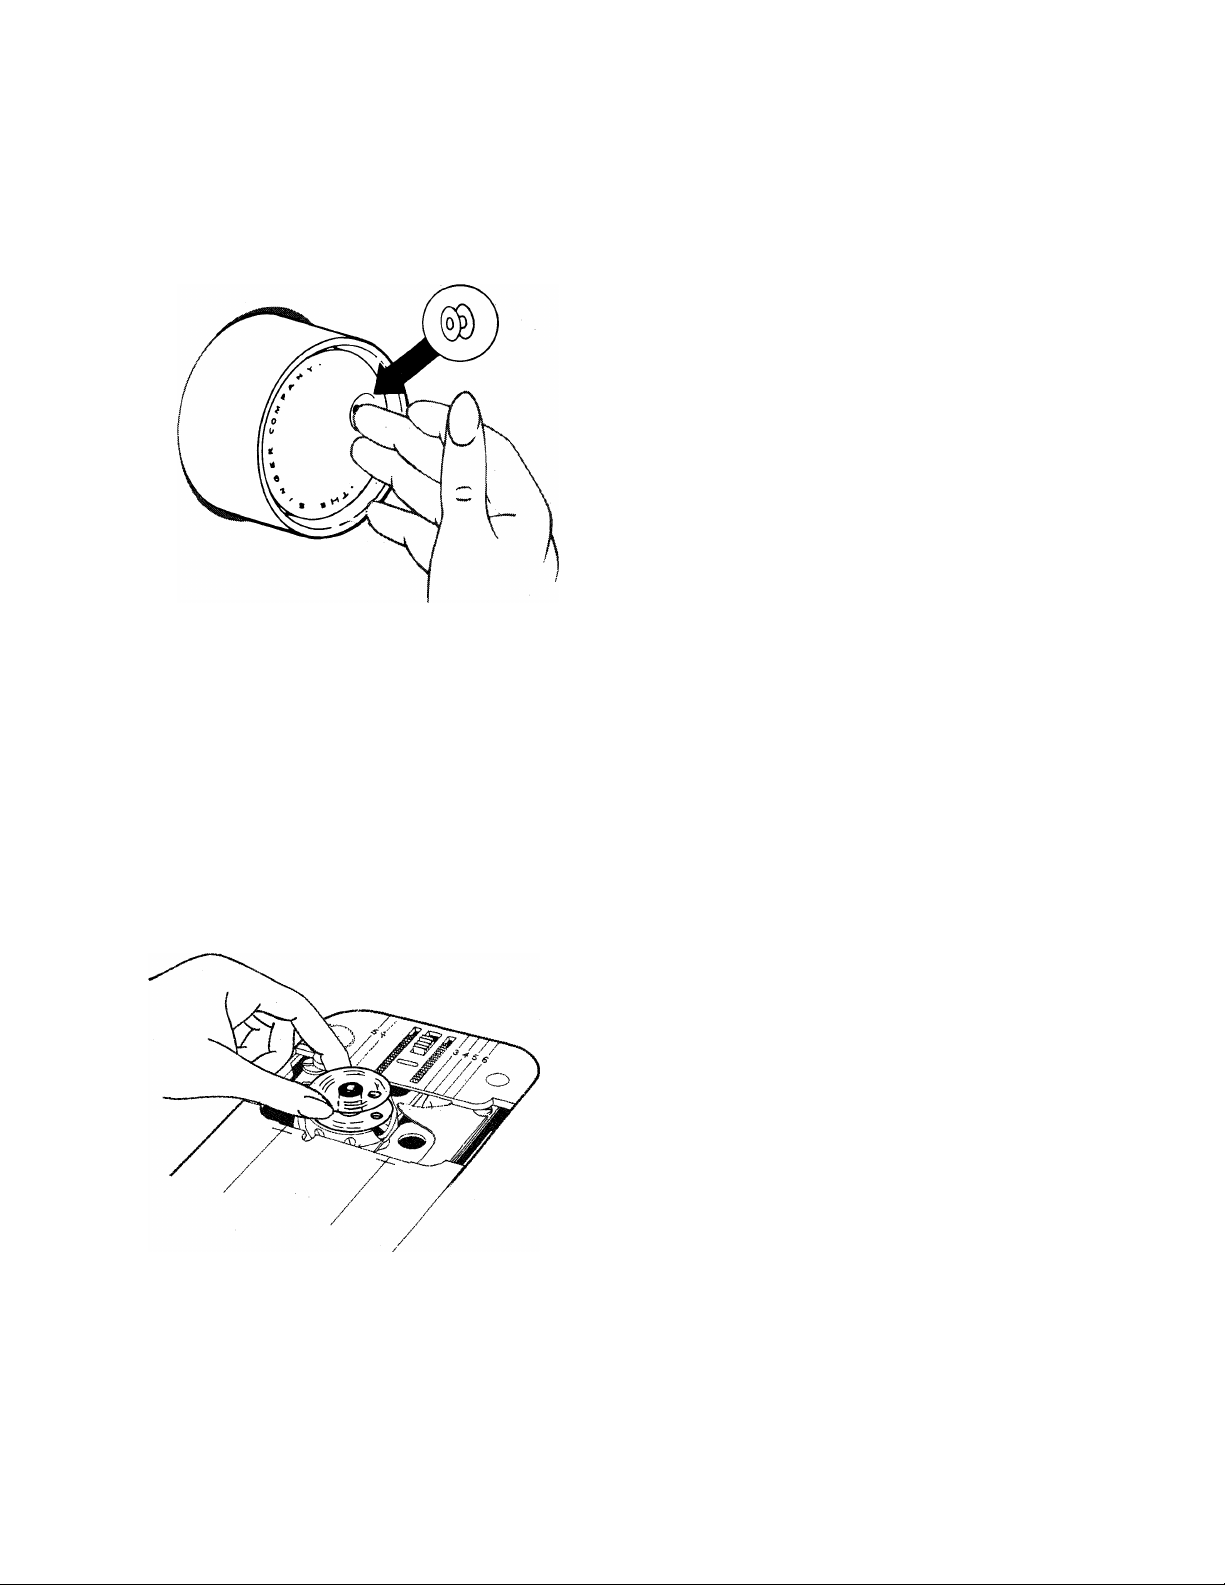
Winding the Bobbin
• Press hand wheel disc at bobbin
symbol .
• Open slide plate. Draw plate toward
you to make bobbin accessible.
• Lift out the bobbin and close slide plate
to make sure needle plate Is secure
while winding.
•
12
Page 15
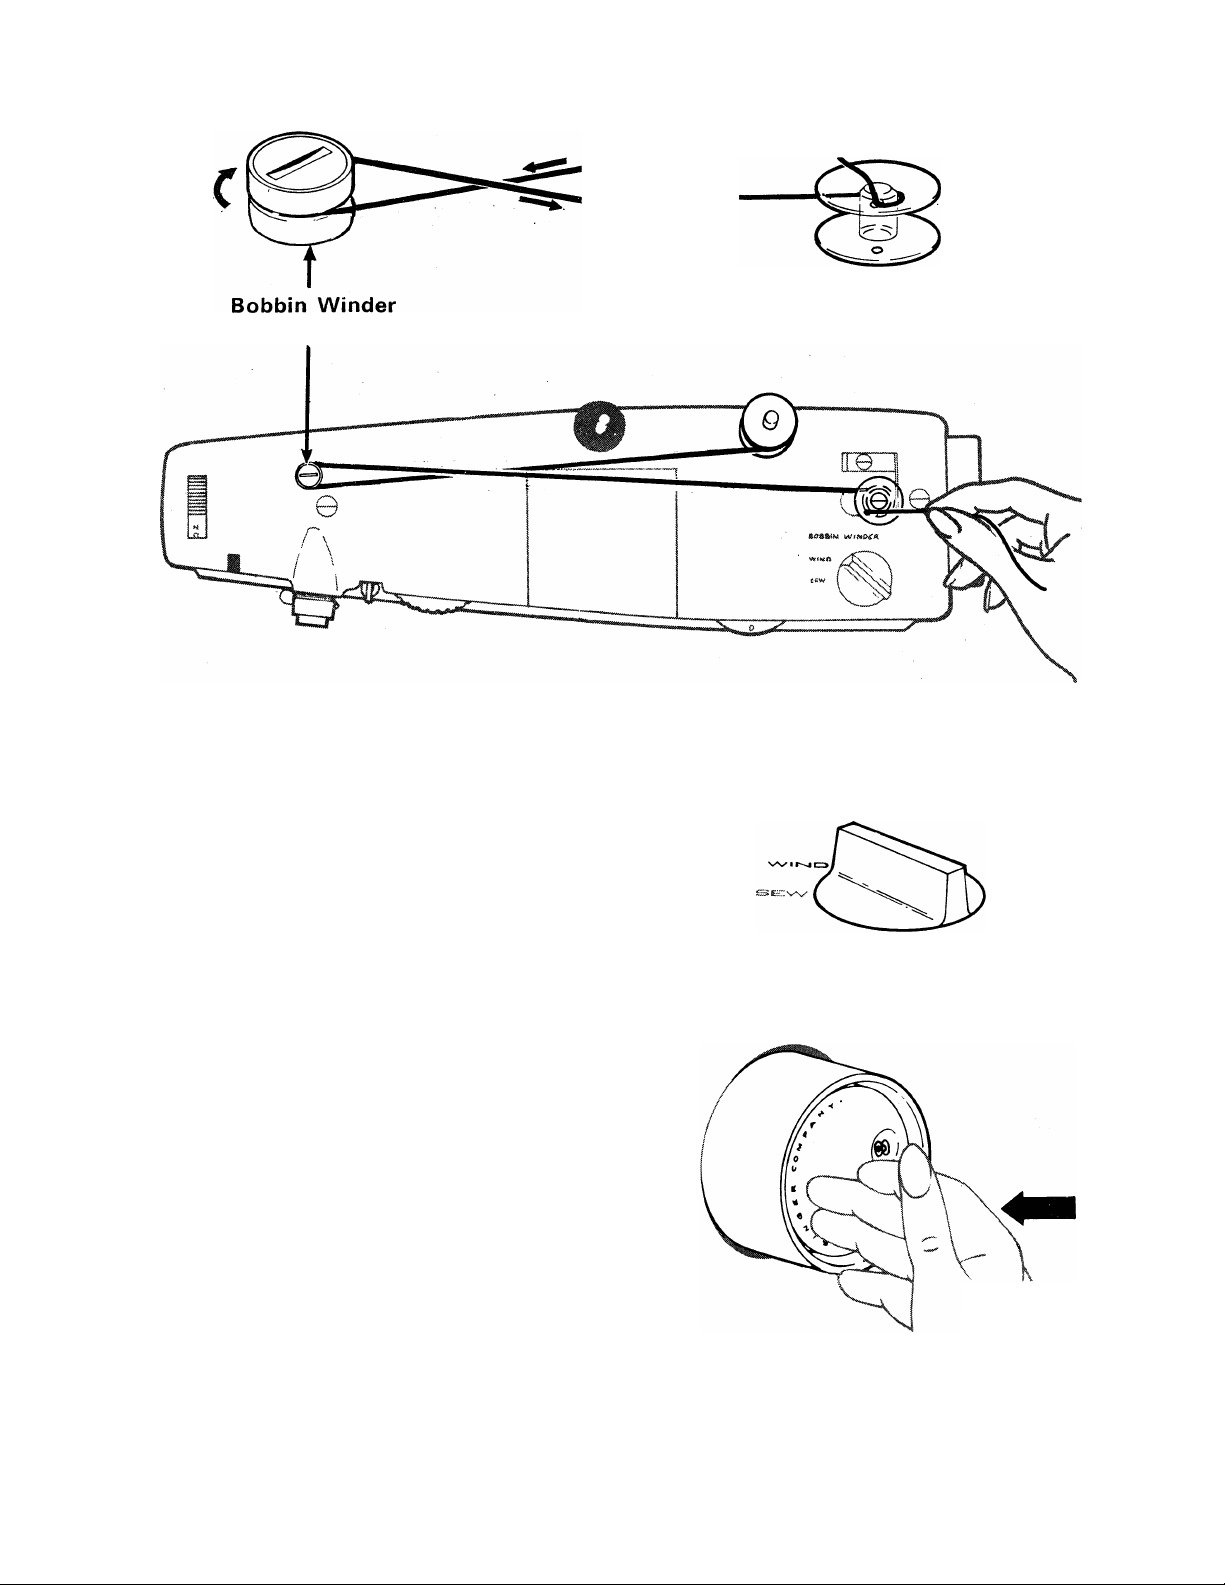
Tension Disc
• Place thread spool on spool pin over
felt. Lead thread around bobbin winder
tension disc and through small hole in
bobbin (from the inside).
Pass Thread Through
Hole in Bobbin
• Place bobbin on holder and turn bobbin
winder switch to WIND.
• Hold thread as shown and start the
machine. Cut off thread end when
winding is well under way.
• When required amount of thread has
been wound (winding will stop by
itself when bobbin is full), stop the
machine and cut connecting thread.
• Turn bobbin winder switch to SEW
and remove bobbin from holder.
•
• Press hand wheel disc for sewing.
Bobbin Winder Switch
Press Here
for Sewing
13
Page 16
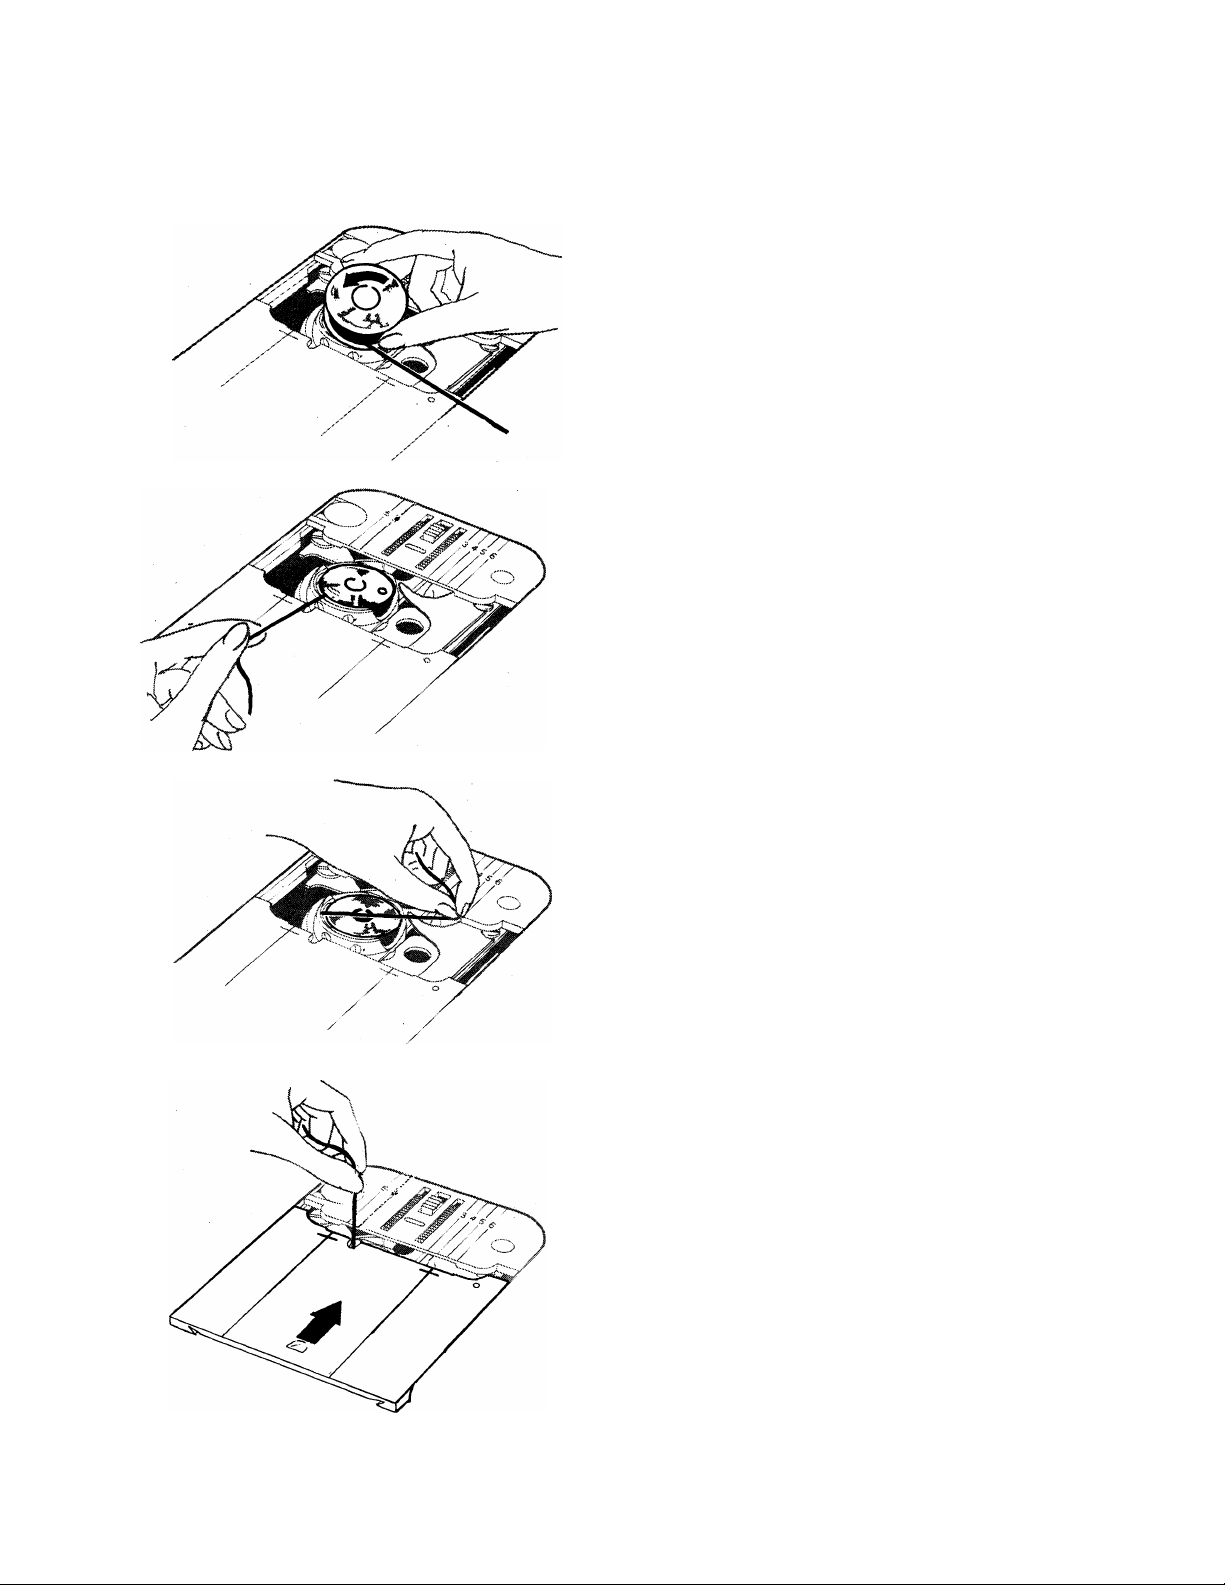
THREADING THE BOBBIN CASE
1. Open slide plate. Hold bobbin so that
thread unwinds in direction shown, and
put bobbin in bobbin case.
2. Pull thread into notch, draw it under
tension spring and back into slot.
14
3. Draw about three inches of thread
diagonally across the bobbin.
4. Close slide plate allowing thread to
enter slot between the needle plate and
slide plate.
Page 17
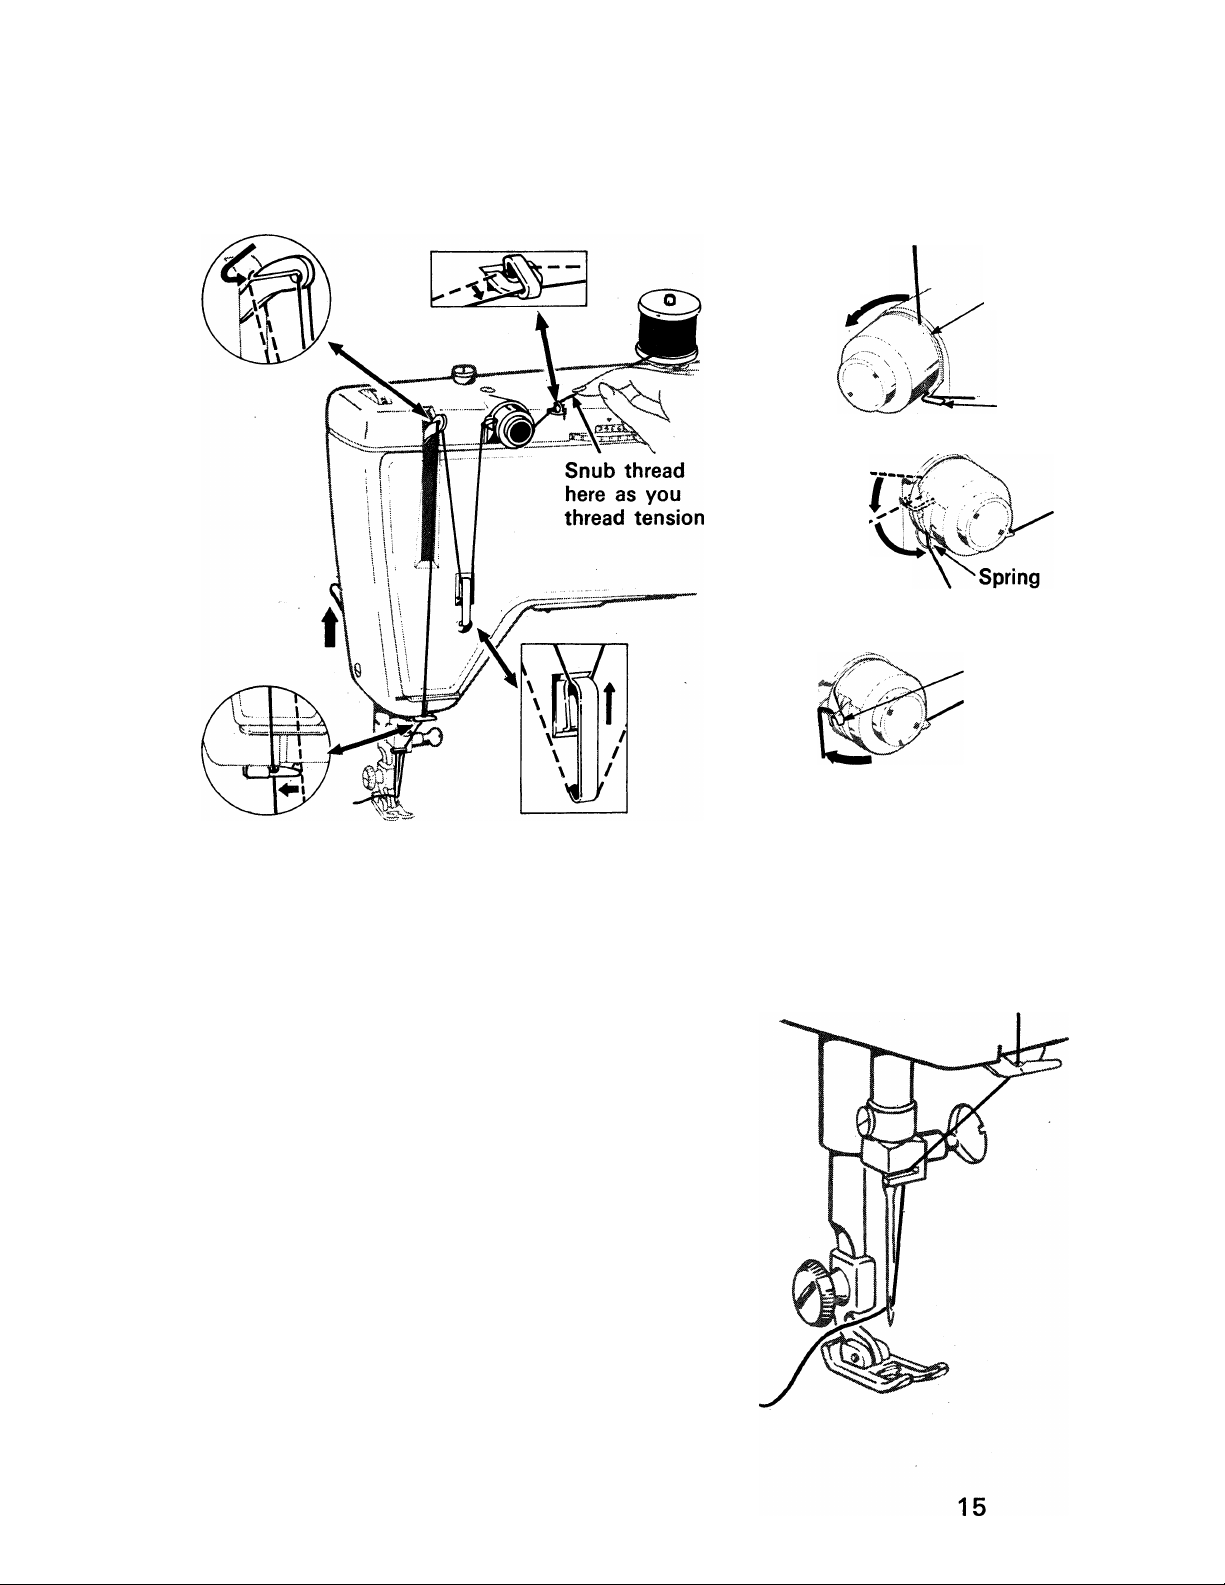
THE NEEDLE THREAD
Lead thread
under right
guide, up, and
into tension
discs
Lead thread over
spring and under
left guide
Tension
Discs
Right
Guide
Left
Guide
Threading the needle
1. Turn hand wheel to raise take-up
lever to its highest position, and raise
presser foot to release the tension
discs.
2. Lead thread through all points as
shown, making sure to:
• Snub thread as illustrated while guiding
thread into tension discs.
• Thread tension discs as illustrated.
• Thread take-up lever from back to front,
guiding thread down over top of lever
and then up Into eyelet.
•
Allow spring to return to its
normal up position and con
tinue threading the machine.
• Thread needle from front to back,
drawing about four inches of thread
through eye of needle.
Page 18
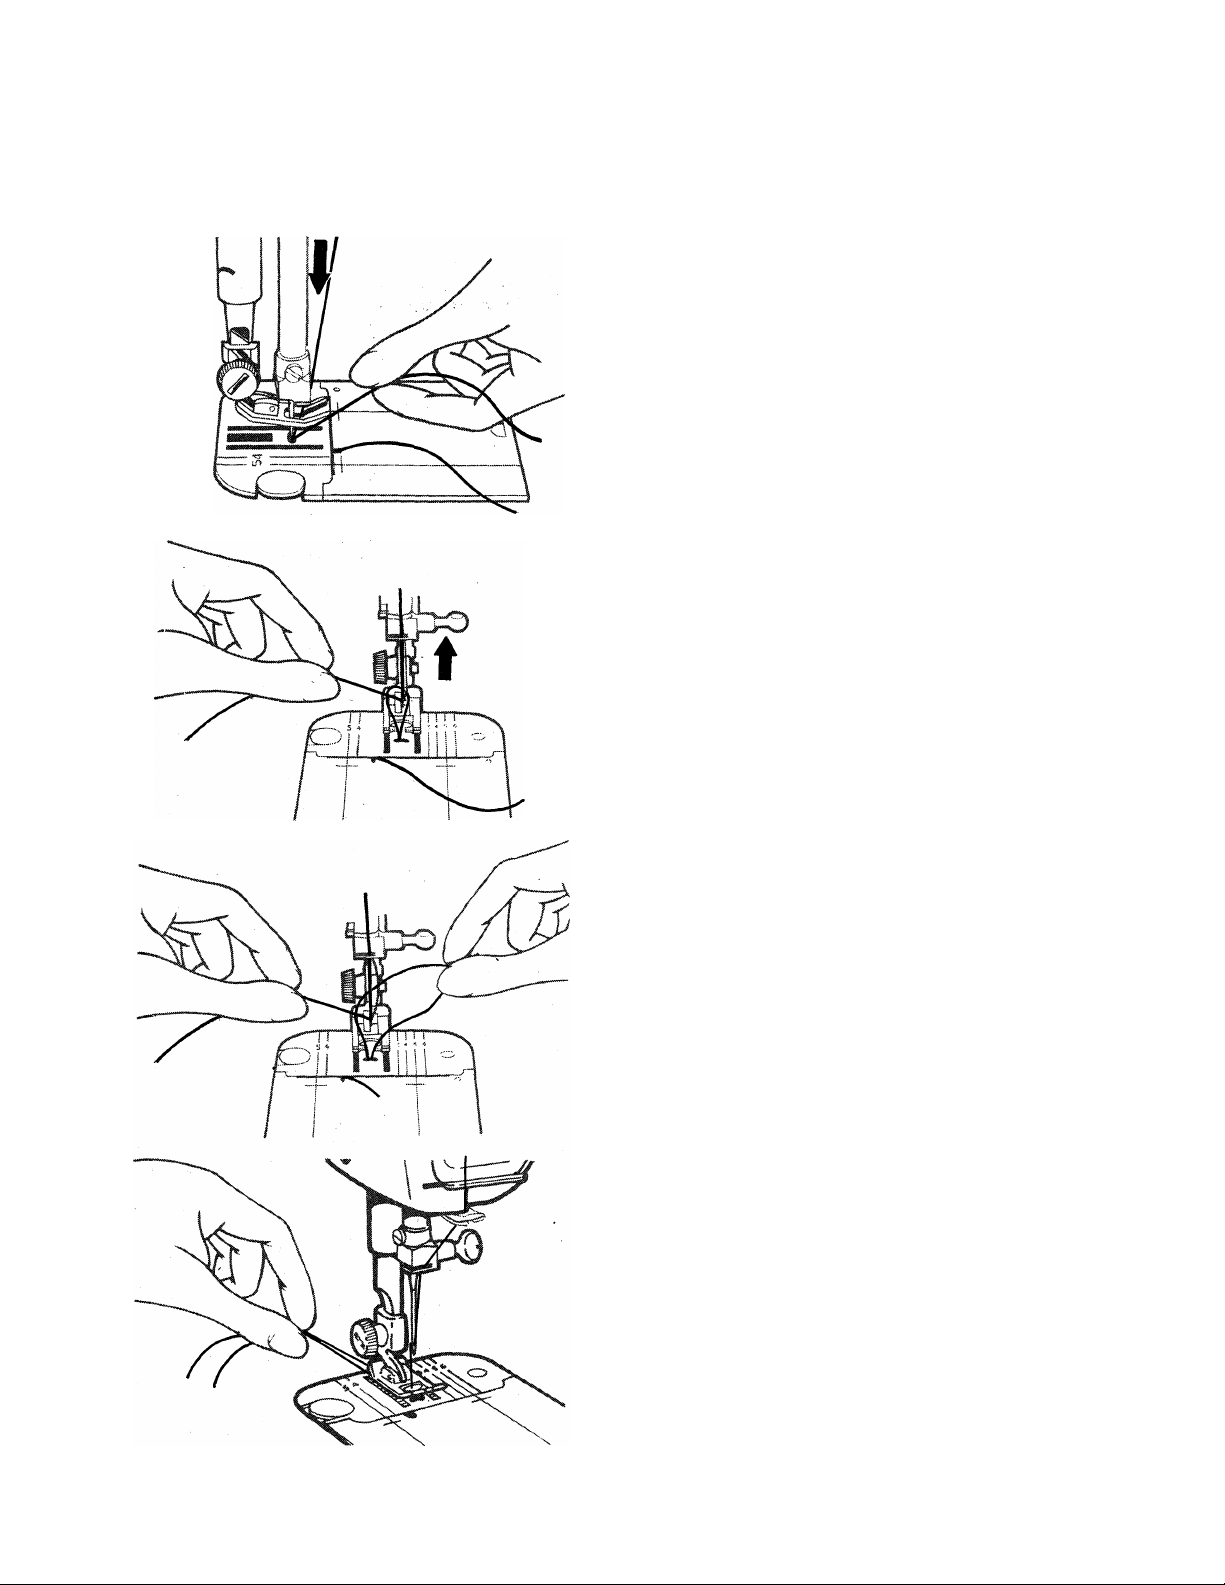
RAISING THE BOBBIN THREAD
Now that you have wound the bobbin
and threaded the needle, you will need to
raise the bobbin thread through the needle
hole in the needle plate.
1. Hold needle thread lightly with left
hand and turn hand wheel slowly
toward you so that needle enters hole
in needle plate.
2. Continue turning hand wheel and
holding needle thread until needle
rises. Tighten your hold on the needle
thread and bring up bobbin thread in
a loop.
16
3, Open the loop with your fingers.
4. Place both needle and bobbin threads
under presser foot, and draw to back
of machine.
You are now ready to sew
Page 19
• Flexi-Stitch Disc Dial; O (Off)
• Needle Position : (center)
• Stitch Width : i
• Stitch Length : To suit fabric
• Straight Stitch Needle Plate or
General Purpose Needle Plate
• Straight Stitch Foot or
General Purpose Foot
O
Flexi-Stitch Disc Dial Off
Before you move the selectors to set your
sewing machine for straight stitching,
turn the hand wheel toward you until the
needle Is above the needle plate.
SETTING THE MACHINE
• Turn Flexi-Stitch disc dial to off
position 0.
• Move needle position selector to
center^.
• Set stitch width selector on i .
CHOOSING ACCESSORIES
Best results will be obtained if you use
the straight stitch foot and needle plate.
However, the general purpose foot and
needle plate may also be used.
STARTING TO SEW
• Place needle and bobbin threads under
presser foot and draw to back of
machine.
JL J
Needle Position
Stitch Width
• Position the needle In the fabric where
stitching should start.
• Lower the presser foot and start the
machine.
To sew perfectly on a wide variety of
fabrics adjust stitch length, pressure and
thread tension as Instructed on the
following pages.
For information on straight stretch
stitching turn to page 40.
Straight Stitch Accessories
17
Page 20
STRAIGHT STITCHING (Continued)
adjusting selectors for your fabric
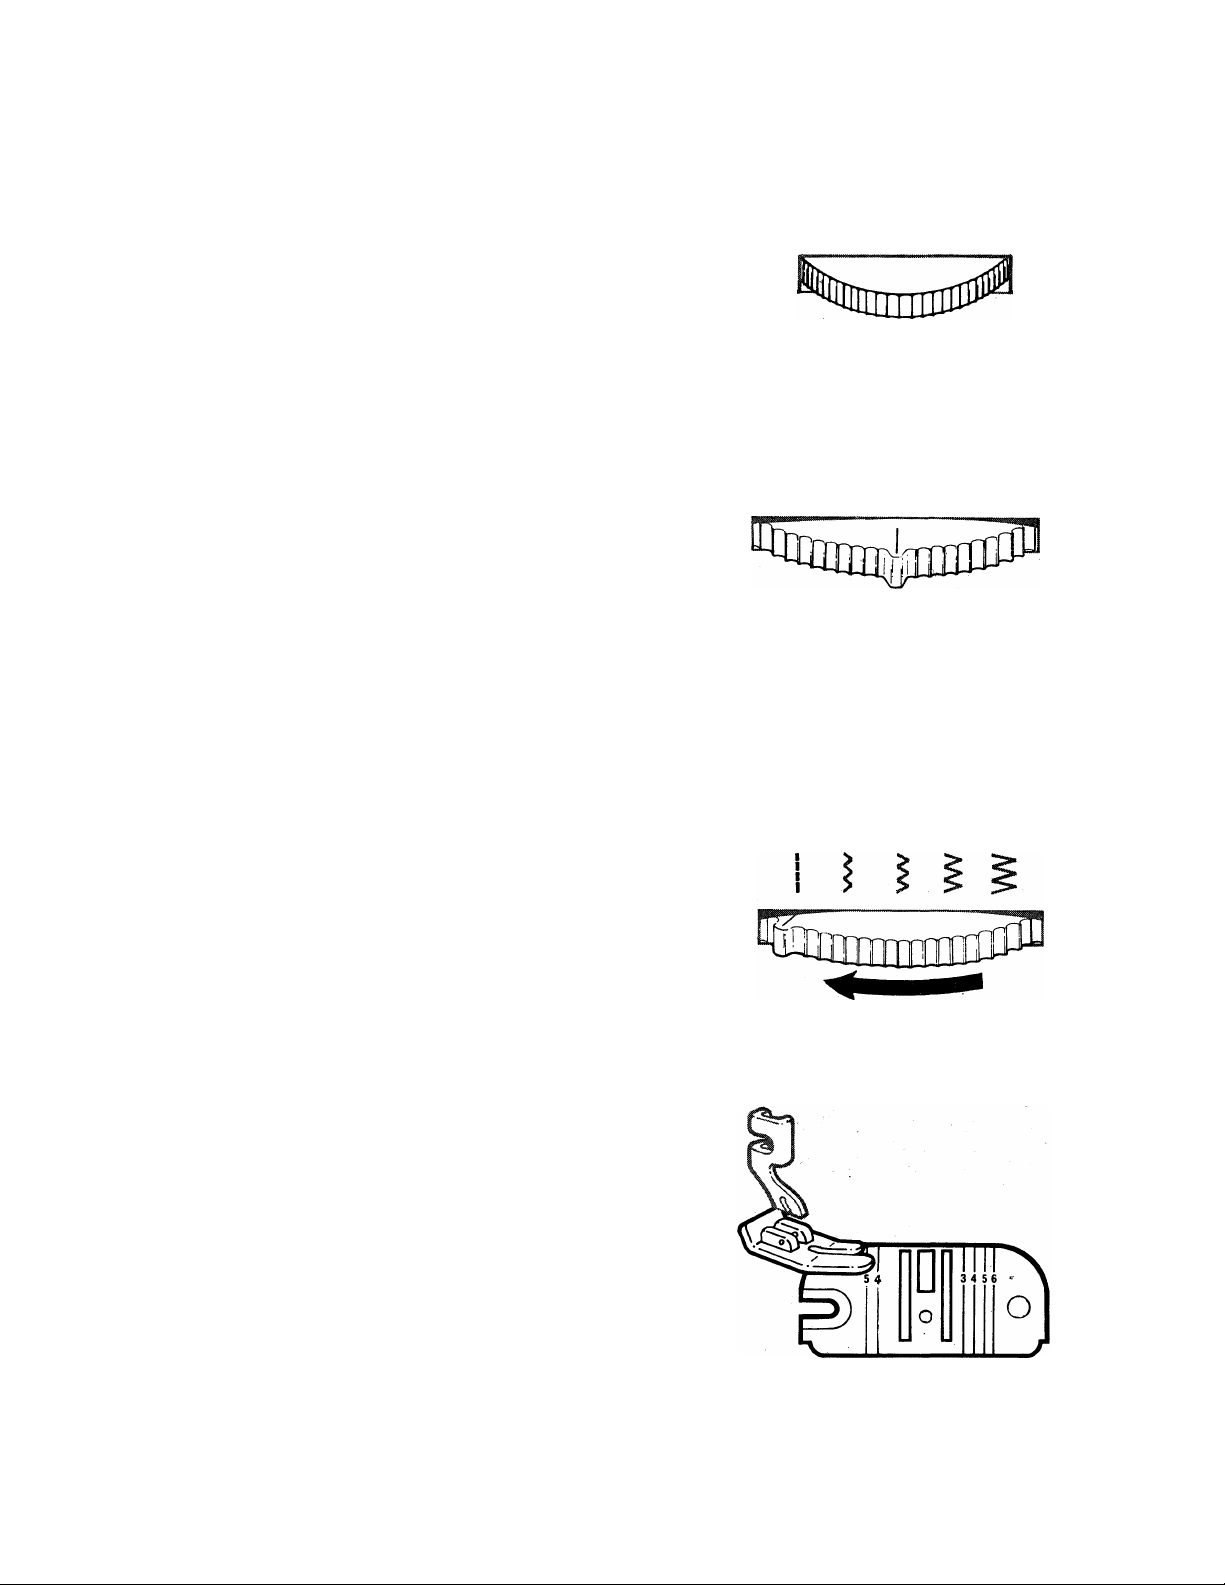
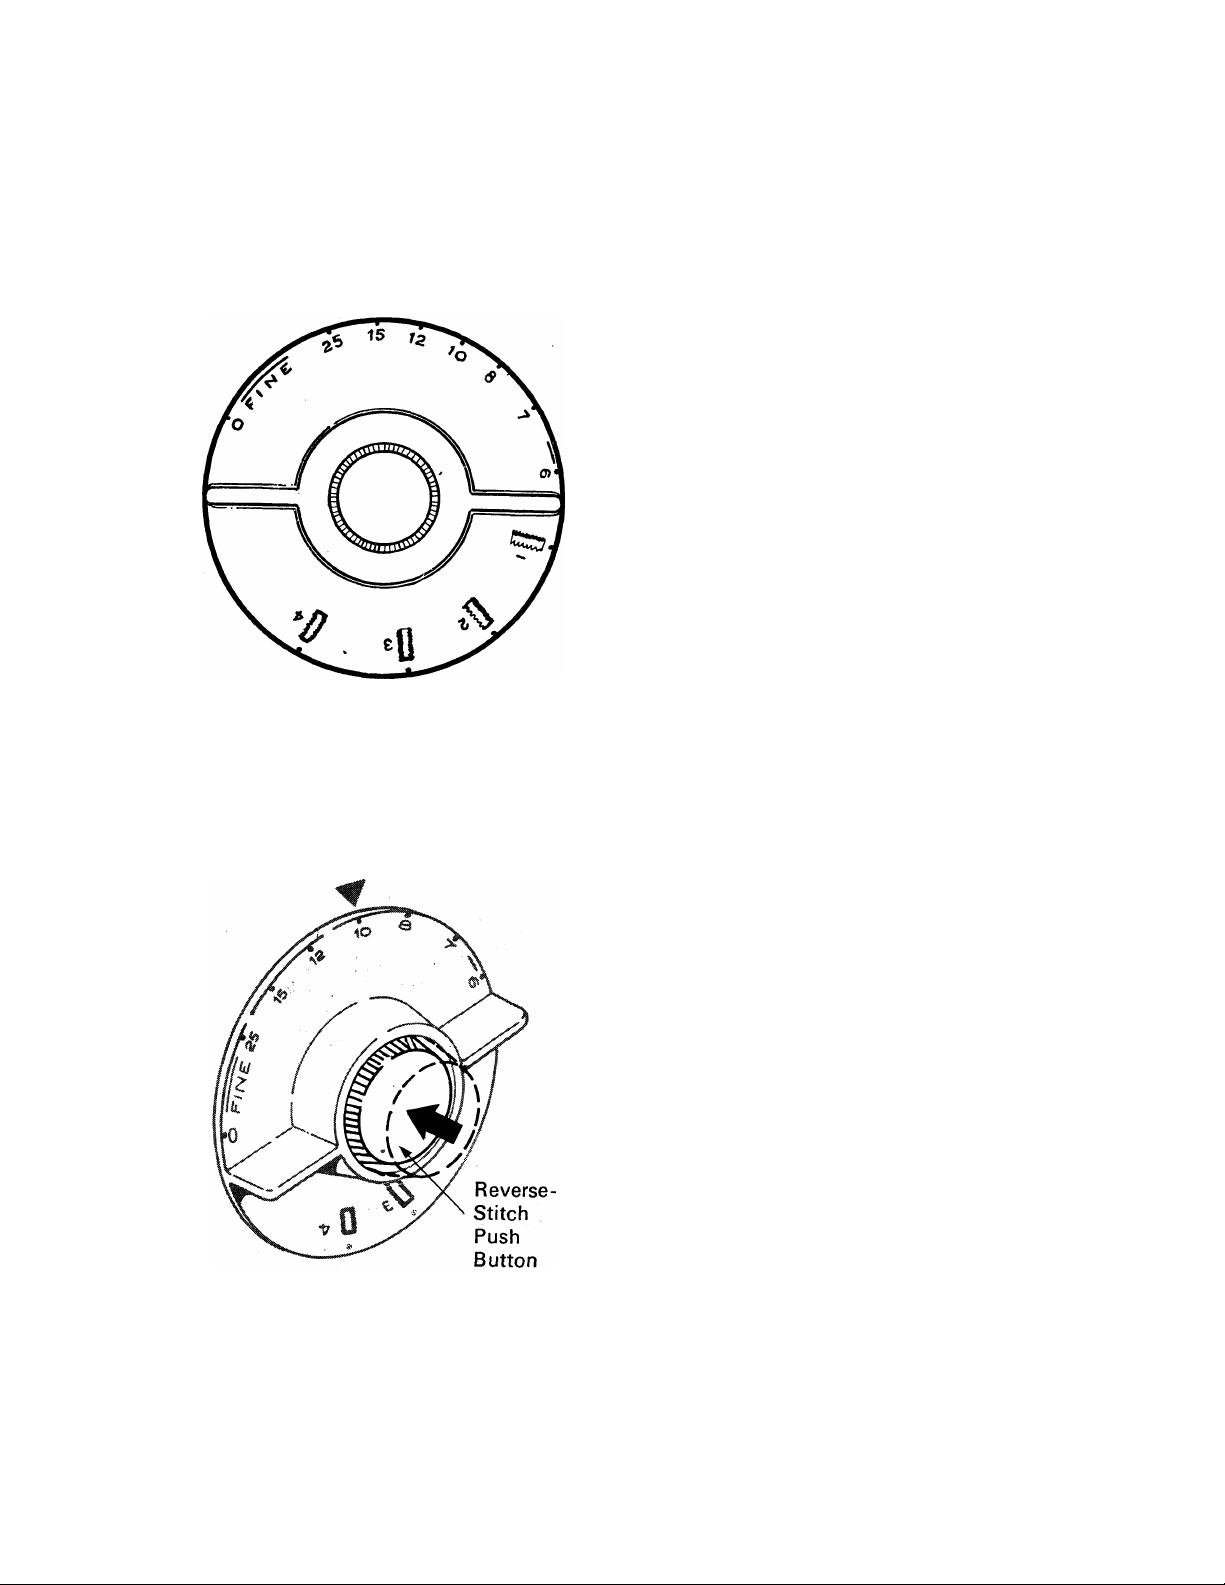
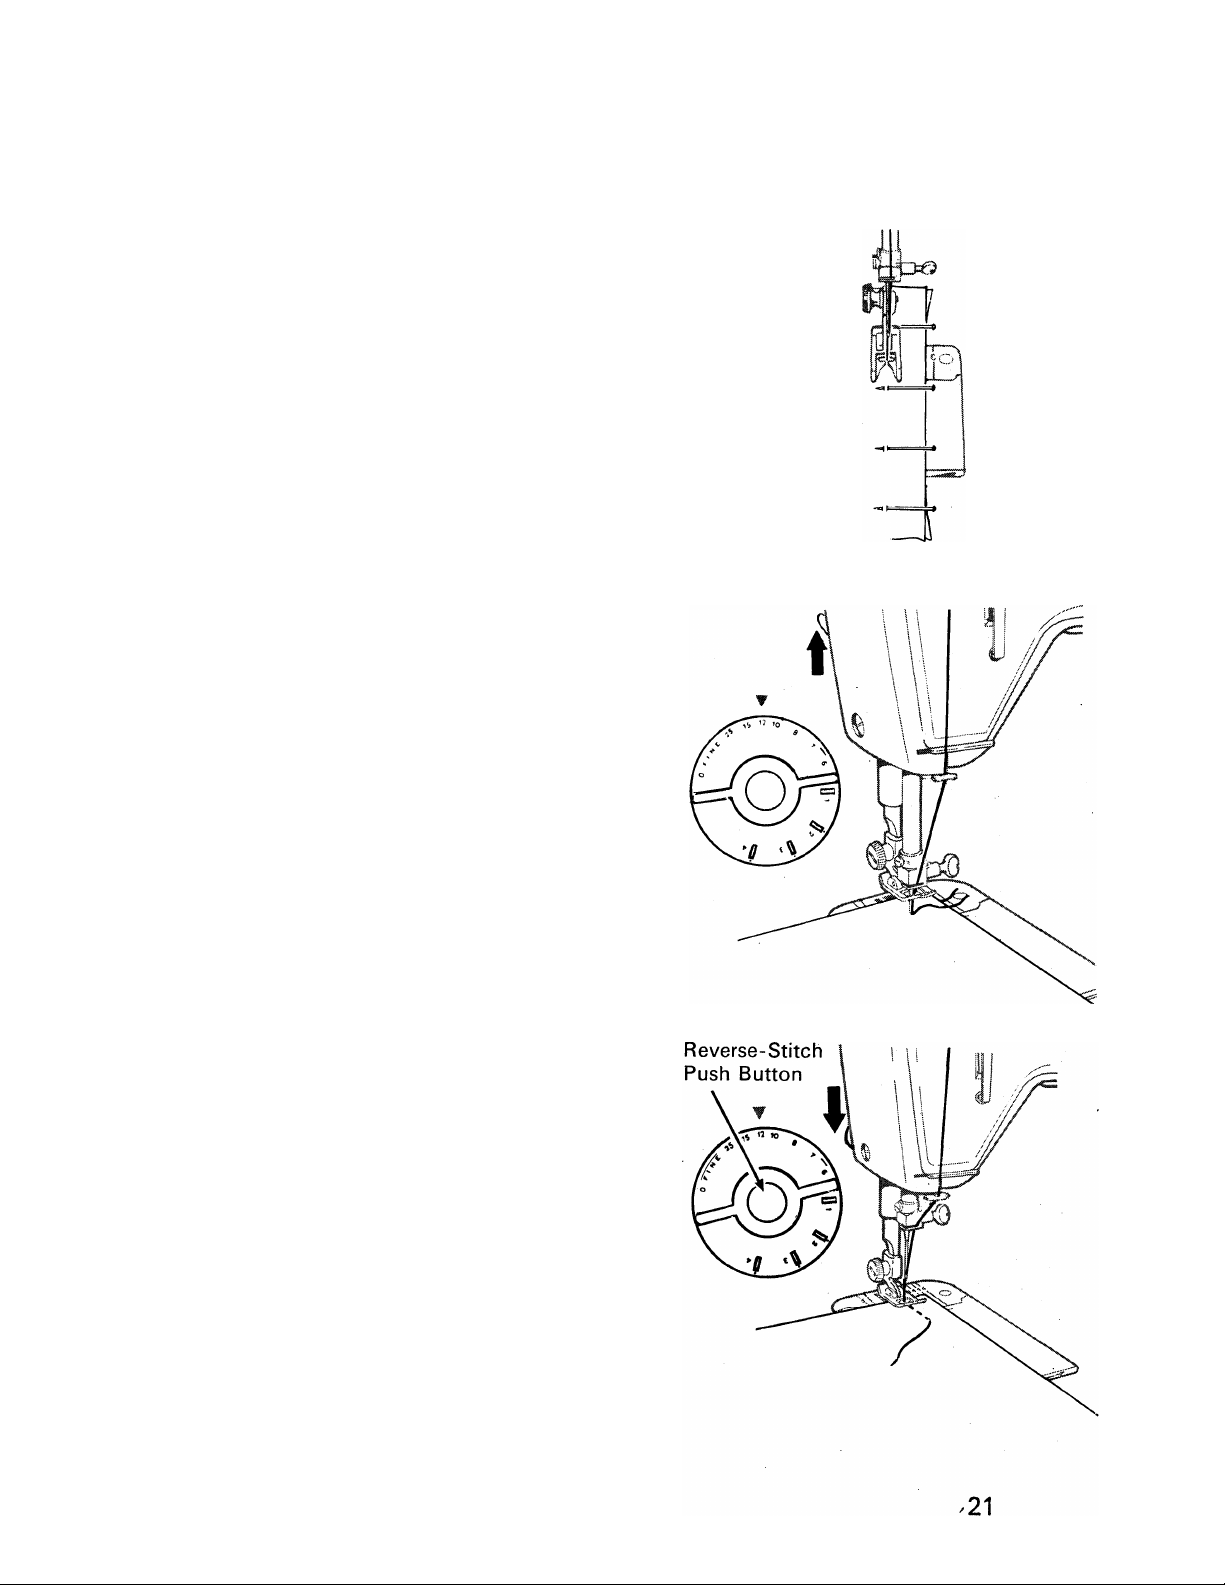
ADJUSTING STITCH LENGTH
The stitch length selector controls the
length of stitches. The numbers around
the edge of the selector dial express stitch
length in stitches per inch; the higher the
number, the shorter the stitch. Generally,
shorter stitches ^re best for lightweight
fabric; longer ones for heavy fabric. The
FINE area is used for the adjustment of
zig-zag satin stitching.
Setting Selector
• Turn dial so that the stitch length
desired is positioned under the arrow
head ▼ on the control panel.
• To shorten the stitch, turn the dial
clockwise to a higher number.
• To lengthen the stitch, turn the dial
counterclockwise to a lower number.
For reverse stitching, press the reversestitch push button (located In the center
of the dial) in as far as It will go and hold
in place (the button can be pushed In
while the machine is sewing). Release
pressure on the push button to return to
forward stitching.
Stitch Length Dial
18
{For detailed instructions on adjusting
the stitch length for zig-zag satin stitching,
see page 29.)
Page 21
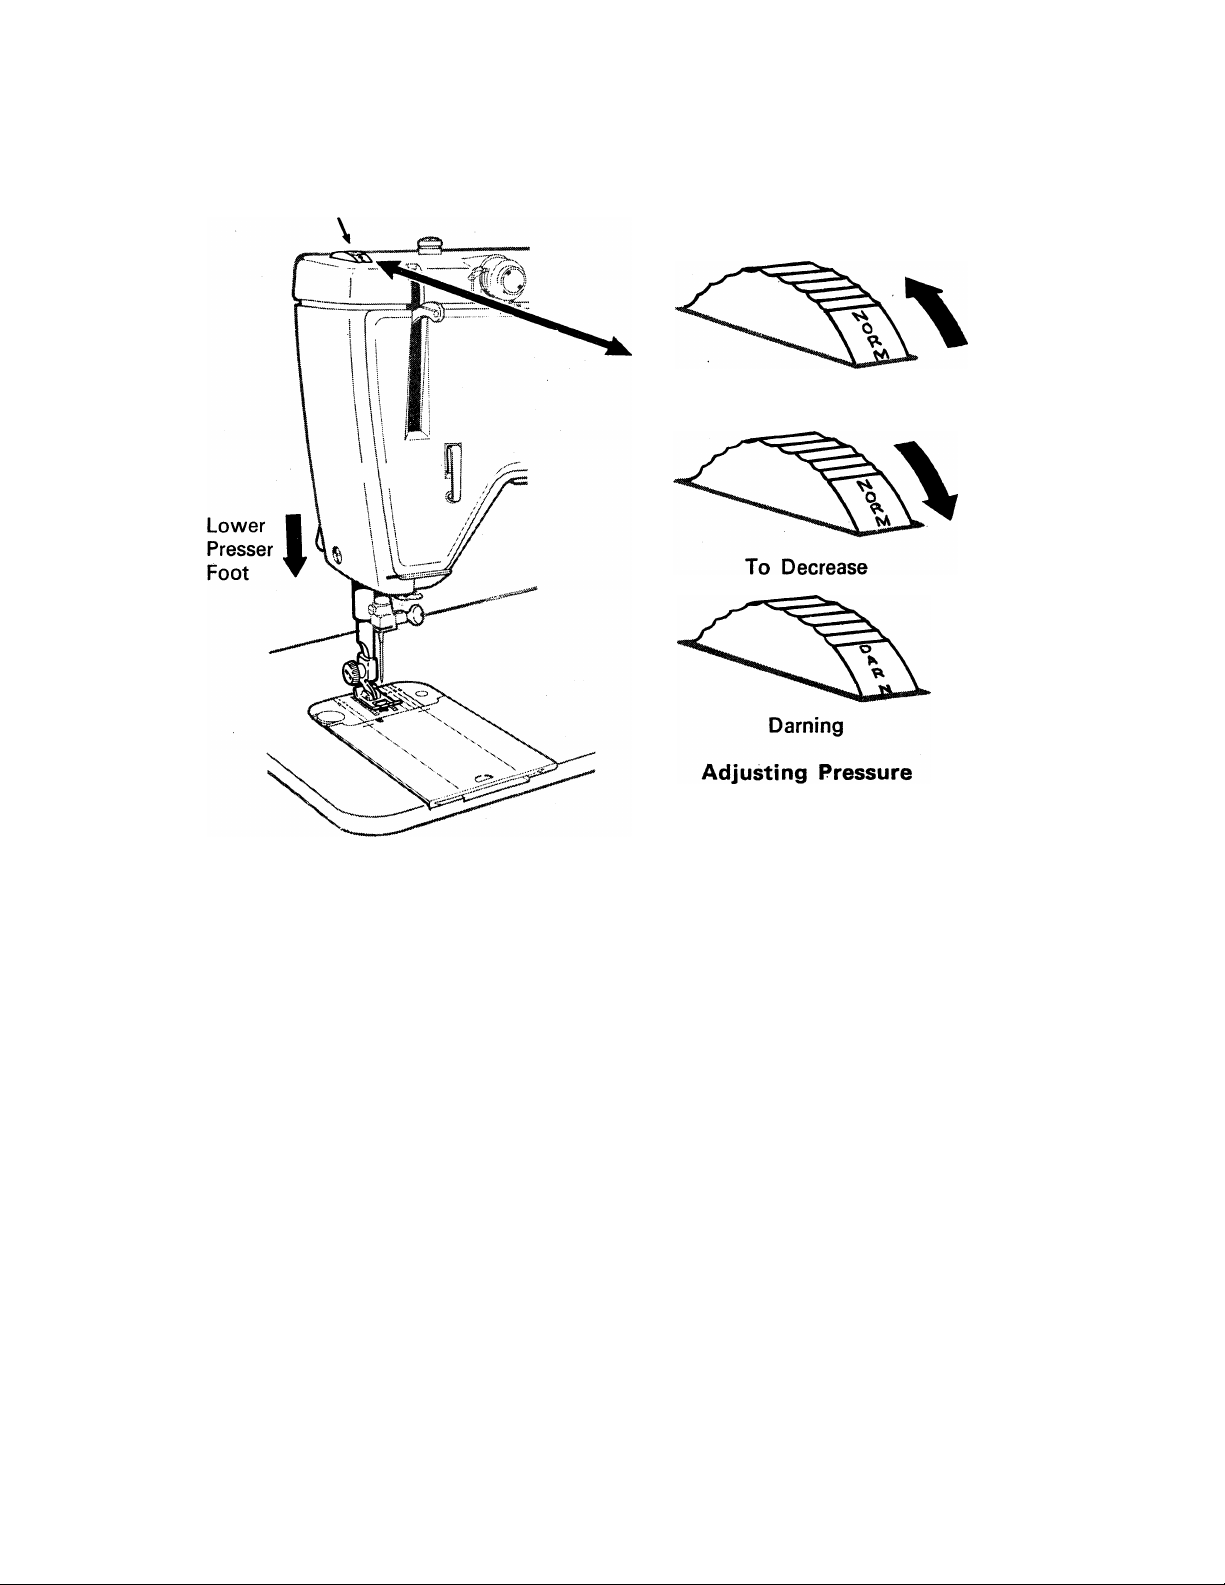
ADJUSTING PRESSURE
Pressure Dial
To Increase
Dial
The pressure dial regulates the pressure that the presser foot exerts on the
fabric. Correct pressure is important because it enables the fabric to feed
smoothly and evenly, without being marred. The NORM (normal) setting
is an all-purpose setting that can be used for sewing a wide variety of
fabrics of different weights and textures. Intermediate notched settings,
above and below NORM (normal), are also provided. When you need extra
control, regulate the setting for heavier or lighter pressure to suit the fabric
being sewn.
When darning without an embroidery hoop, set the dial at the lowest
setting, DARN. See page 59 for instructions.
Lower the presser foot before setting pressure.
• To increase pressure, turn dial from NORM (normal) toward MAX
(maximum).
• To decrease pressure, turn dial from NORM (normal) toward DARN.
• For darning, set dial on DARN.
19
Page 22
STRAIGHT STITCHING (Continued)
Needle-Thread Tension
THREAD ▼ TENSION
|2.iS
......
rnrnrTT^iHrnrt
THREAD ▼ TENSION
L13 4 SJ
rsl
JDrmU
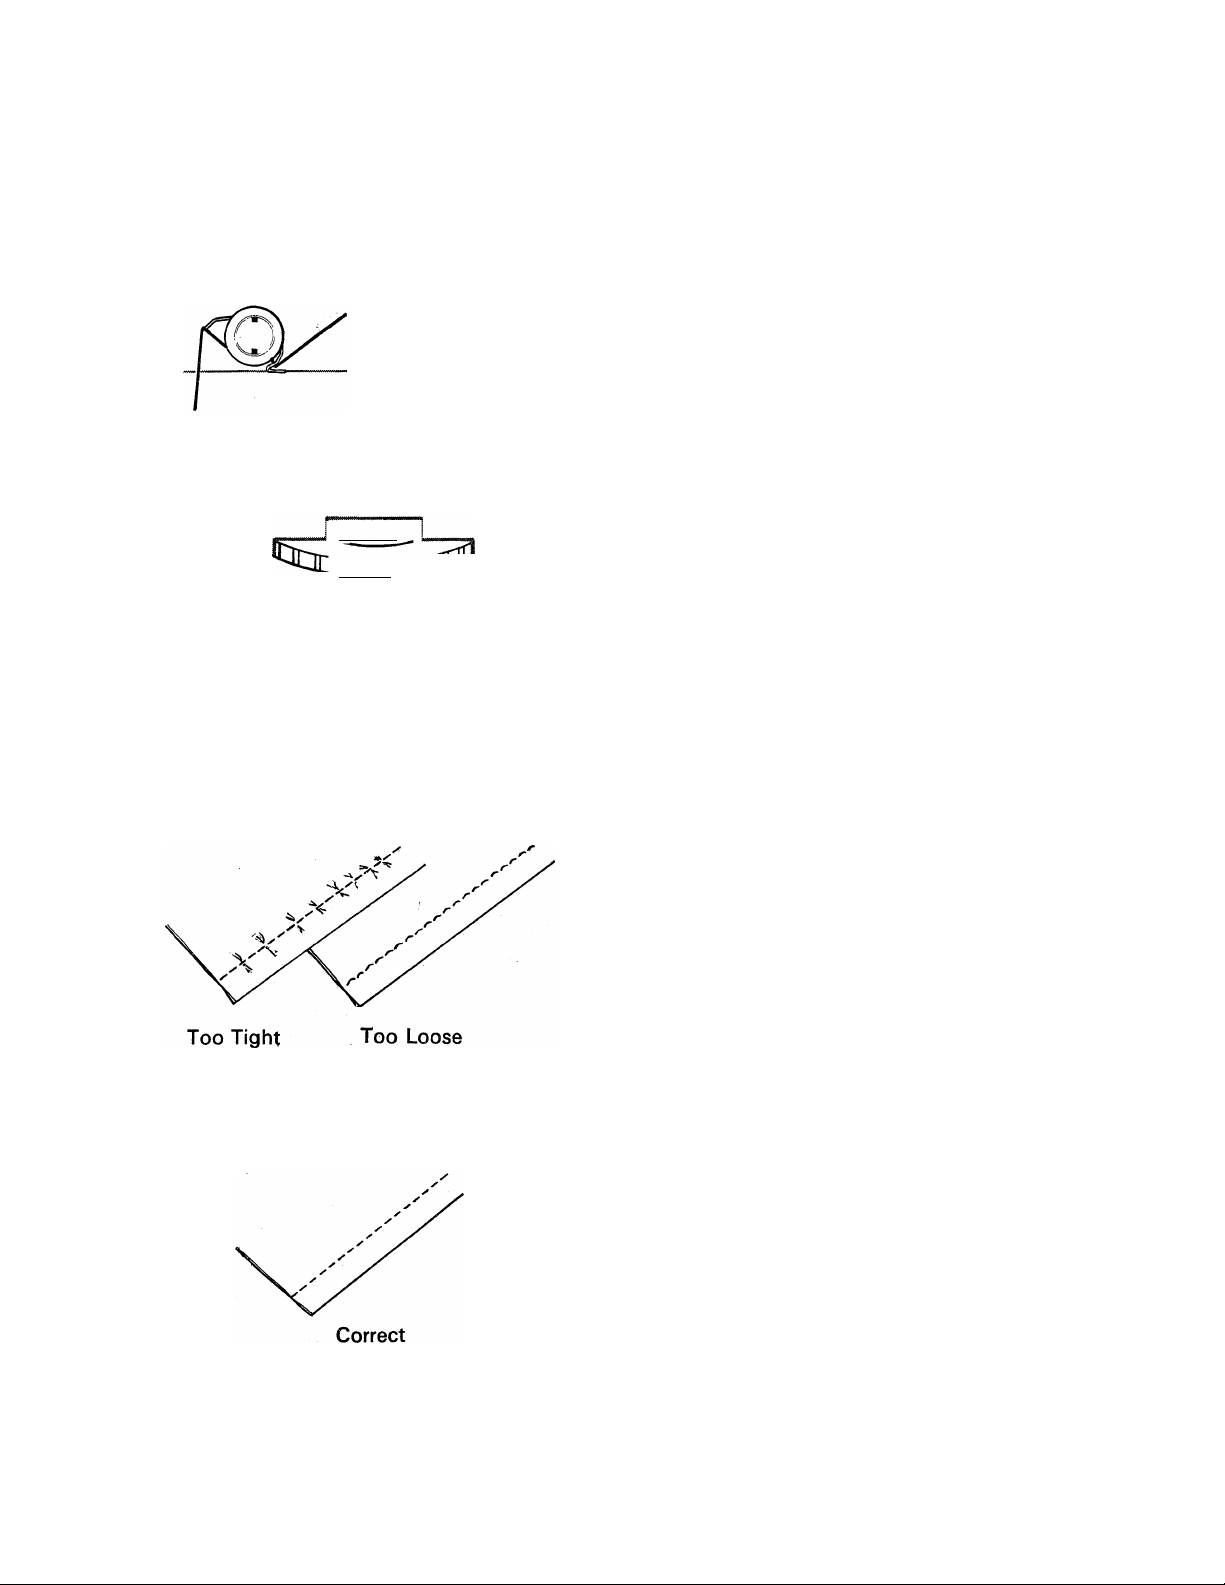
REGULATING THREAD TENSION
Correct tension is important because too
much or too little will weaken your seams
or cause your fabric to pucker. Make a
test sample with the fabric and thread
you plan to use and examine it. A perfect
stitch will have the needle and bobbin
threads locked between the two layers of
fabric with no loops on top or bottom and
no puckers.
Increase Decrease
Needle-Thread Tension
The tension dial regulates the degree of
tension on your needle thread. Set it
according to the type of thread and fabric
you use. The numbers on the dial eliminate
guesswork in duplicating settings.
If the stitches in your test sample look
loose, increase needle-thread tension. If
the fabric puckers, decrease tension.
To increase tension, turn dial to
higher number.
20
To decrease tension, turn dial to
lower number.
Page 23
sewing a seam
PIN BASTING
Pin basting is a time-saver and can be
used when you sew easy-to-handle
fabric. Use fine pins and place them :
• On top of the fabric (never on the
underside in contact with the feed).
• At right angles to the stitching line.
• Just nipping into the fabric at the
stitching line (never extending under
both sides of the presser foot).
STARTING A SEAM
1. Set stitch length selector for desired
number of stitches per inch.
2. With presser foot up, align fabric with
appropriate seam guideline on needle
plate (as described on the following
page). Position needle in fabric about
i inch from the back edge.
3. Lower presser foot. Backstitch to the
edge of the fabric for reinforcement
by pushing in the reverse-stitch push
button located in the center of the
stitch length selector dial. Hold the
button until the stitches reach the edge
of the fabric and then release for
forward stitching.
Page 24

STRAIGHT STITCHING (Continued)
KEEPING THE SEAM STRAIGHT
.3/8'
.1/2'
•3/4"
5/8'
As you stitch, use one of the numbered
lines on the needle plate as a guide for
keeping the seams straight. Numbers
indicate distance, in eighths of an inch,
from the needle. If you want a f-inch
seam, for example, keep the right-hand
edge of your fabric on the number 5
guideline;
TURNING SQUARE CORNERS
To turn a square corner |-inch from the
fabric edge, you need not measure or
mark the seam. Simply use the crosslines
on the slide plate.
Pivoting at Corner
•. Line up your fabric with right or left
guideline 5 on the needle plate. Stitch
seam, slowing speed as you approach
^corner.
• Stop stitching, with the needle down,
when the bottom edge of the fabric
reaches the cornering crosslines on the
slide plate.
• Raise presser foot and turn fabric on
needle, bringing bottom edge of fabric
in line with guideline 5.
•
• Lower the presser foot and stitch in
new direction.
22
Page 25

GUIDING AND SUPPORTING
THE FABRIC
Most fabrics need only to be guided in
front of the presser foot. Some fabrics,
however, require support while being
stitched. Filmy sheers, panne velvet, and
tricots, for example, need to be held taut
in front and back of the presser foot while
being sewn.
For information on sewing knit and
stretch fabrics with zig-zag stitching,
refer to page 30.
CURVED SEAMS
1. Use a short stitch length for elasticity
and strength. For example, if you
use 12 stitches per inch for straight
seams, select 15 to 20 per inch to
stitch curved seams in the same fabric.
2. For the greatest accuracy, use the
straight stitch foot and needle plate.
Supporting Fabric
23
Page 26

STRAIGHT STITCHING (Continued)
REINFORCING END OF SEAM
1. Stitch to the fabric edge. Backstitch
i inch to reinforce the end of the
seam by pushing in the reverse-stitch
push button and then releasing.
2. Turn hand wheel toward you to
bring needle to its highest point.
24
3. Raise presser foot and remove fabric
by drawing it to the back and left.
4. Cut threads on thread cutter at rear
of presser bar.
Page 27

how patterns are
produced
All stitch patterns are produced from
interchangeable discs that are inserted
into the machine. Fashion discs (black)
control side-to-side needle movement
and produce basic zig-zag stitches.
Flexi-Stitch discs (light colored) control
needle and fabric movement and produce
a variety of decorative and utility stitches,
including stitches that stretch. Instructions
for both decorative and practical uses of
these stitches begin on page 30. Informa
tionen stretch stitching begins on page 39.
CHANGING FASHION AND
FLEXI-ST/TCH DISCS
Make sure the needle is above the presser
foot.
Releasing Pattern Disc
1. Set stitch width dial at j.
2. Set Flexi-Stitch dial at 0.
3. Turn disc release dial all the way to
the right until it clicks, Indicating
pattern disc is released.
4. Open disc cover and remove disc.
5. Position new pattern disc on holder,
aligning slot in disc with locating pin
of disc holder. Press down on pattern
disc until disc is seated.
6. Set stitch width selector and Flexi-
Stitch disc control dial on desired
settings. See pages 26 and 30.
Always keep a stitch pattern disc on the
holder, even when you are straight
stitching.
25
Page 28

ZIG-ZAG STITCHING (Continued)
FASHION discs
The six interchangeable Fashion discs (black) that come with your
machine produce the stitches illustrated below.
FASHION DISC PATTERNS
Circled numbers indicate Fashion disc numbers.
I
0 © © ©
BUndstitch. Indispensable
for finishing hems and seam
edges and for zipper in
sertions.
Straight Stitch Scallop. Pro
duces tiny, evenly spaced
scallops for faced edge
finishes.
Arrowhead Stitch. Ideal for
motifs and decorative
borders.
TO USE A FASHION DISC
• Insert disc in machine.
• Set Flexi-Stitch disc control dial in off position 0.
• Adjust needle position, stitch width, stitch length and
needle-thread tension as instructed on following pages.
Domino Stitch. A decora
tive pattern for single- and
twin-needle work.
Walls of Troy. An inter
esting pattern for decor
ative stitching.
Crescent Stitch. Produces
perfectly formed satinstitch scallops for a decor
ative edge or surface
trim.
26
Page 29

ADJUSTING WIDTH OF DESIGN
To produce the stitch pattern of a Fashion
disc or the basic zig-zag pattern of
Flexi-Stitch discs, 201, 202, 232, move
the stitch width selector dial from the
straight-stitch setting i to any zig-zag
setting to the right. Stitch width is
increased as the dial is moved to the
right
ADJUSTING STITCH PLACEMENT
Most of your basic zig-zag stitching will
be done in center (¿) needle position.
Left (l^) and right (Jj^) settings are used
for sp^ial stitch placement as in button
sewing and twin-needle work.
Adjusting Stitch Width
ADJUSTING NEEDLE-THREAD TENSION
Basic zig-zag stitching requires less
needle-thread tension than straight stitch
ing. Make a test sample with the fabric
and thread you plan to use so that you
can adjust the tension properly. The
stitches should lie flat against the fabric
without causing the fabric to pucker.
If the stitches are not flat and the fabric is
puckered, lower the needle-thread tension
by turning the dial to a lower number.
Before moving stitch width and needle
position selectors, make sure needle is
above fabric and stitch length dial is not
on a buttonhole setting.
Setting for
Single-Needle
Work
Adjusting Stitch Placement
Correct
Adjusting Needle-Thread Tension
27
Page 30

ZIG-ZAG STITCHING (Continued)
ADJUSTING STITCH LENGTH
Any stitch length setting from 6 to 25 will
give you an open zig-zag stitch of the
basic zig-zag stitch pattern you select.
The lower the number, the more open, or
farther apart, your stitches will be. The
FINE stitch area, between 0 and 25 on
the dial is used for adjusting zig-zag satin
stitching (see next page for specific
instructions).
When using Flexi-Stitch discs 201, 202
and 232 for basic zig-zag stitch patterns
be sure the FfexFStitch disc dial is in off
position 0.
ADJUSTING PRESSURE AND CHOOSING ACCESSORIES
Turn to page 19 under "Straight Stitching" for instructions on
adjusting pressure.
For information on choosing accessories refer to pages 6 and 7
and to detailed instructions for sewing with zig-zag stitch patterns
included In the section called "Sewing the Professional Way"
that starts on page 39.
0
General Purpose
Needle Plate
General Purpose
Foot
28
Special Purpose
Foot
Page 31

satin stitching
Satin stitching, a series of closely spaced
zig-zag stitches that form a smooth, satin
like surface, is useful for both practical
and decorative work.
When you wish to produce a satin stitch,
for appliqué or bar tacks, for example,
make a test sample first so that you can
adjust the stitch length and thread tension
properly. Soft fabric may require a backing
to ensure firm satin stitching. Crisp lawn
or organdy Is suitable for this purpose.
ACCESSORIES AND SELECTOR SETTINGS
• Flexi-Stitch Disc Dial: O
• Flexi-Stitch Disc: Super Zig-Zag 201 or
Fashion Disc: Desired Pattern
• Needle Position : ^ (center)
• Stitch Width • ^ to ^
• Stitch Length: FINE (25 or above)
• General Purpose Needle Plate
• Special Purpose Foot
• Pressure: NORM
Adjusting Stitch Length
Adjusting Stitch Length
1. Turn stitch length selector dial to 25
(the beginning of FINE area).
2. Run the machine at a slow speed.
3. Gradually turn the stitch length dial
clockwise until stitches are closely
spaced and form a smooth surface.
Adjusting Thread Tension
Satin stitching requires less tension than
straight stitching or open zig-zag stitching.
Furthermore, the wider the stitch, the
lighter the tension on the thread must be.
Notice the stitching on your sample. If
the fabric is puckered, lower the needle-
thread tension by turning the tension dial
to a lower number.
THREAD ▼ TENSION
io i 2^
nrir^ii II 11 n-mn
Incorrect
Adjusting Thread Tension
29
Correct
Page 32

FLEXI-STITCH discs
Five interchangeable Flexi-Stitch discs (light colored) come with your
machine. Each produces one or more Flexi-Stitch disc patterns and several
produce a basic zig-zag stitch pattern as well.
Flexi-Stitch disc designs are shown in red on each disc.
PATTERNS PRODUCED BY FLEXI-STITCH DISCS
FLEXI-STITCH DISC
PATTERNS
>¿7
Y?
Y-’’
201
202
232
Boxed Numbers Indicate Flexi-Stitch Disc Numbers
FLEXI-STITCH DISC PATTERNS
201
201
202
232
242
Straight Stretch Stitch (Super Ziz-Zag Disc). For stretchable seams in
knit and stretch fabrics.
Ric-Rac Stitch (Super Zig-Zag Disc). For decorative applications and
heavy-duty stretch sewing.
Feather Stitch. Appropriate for fagoting, embroidering and quilting.
Overedge Stretch Stitch. For seams that are overedged and reinforced in
one operation.
Multi-Stretch St/tch. Ideal for finishing hem and facing edges.
f242l
243
BASIC ZIG-ZAG
PATTERNS
1
<>
201
202
1
1
>
1
>
|232|
243
Slant Overedge Stitch. Lets you seam and overedge in one operation.
Also ideal for hemstitching, picot edging and applique.
BASIC ZIG-ZAG PATTERNS
I 2011 Plain Zig-Zag Stitch (Super Zig-Zag Disc). For buttonholing, button
_____ sewing, making bar tacks and appliqueing.
I 2021 Multi-Stitch Zig-Zag Stitch. For mending, joining and reinforcing without
bulk.
232
Overedge Stitch.*?ox making a flexible overedge seam finish.
To Produce a Flexi-Stitch Disc Pattern
• Insert Flexi-Stitch disc in machine.
• Set Flexi-Stitch disc and stitch length dials on red symbols.
• Adjust stitch placement, stitch width, thread tension, and stitch balance as
instructed on following pages.
• Sew at moderate speed.
To Produce a Basic Zig-Zag Pattern
O
with a Flexi-Stitch Disc
• Insert Flexi-Stitch disc in machine.
• Set Flexi-Stitch disc dial on off position 0 and adjust selectors as when
using a Fashion disc. See pages 27, 28 and 29.
30
Page 33

Adjusting Width of Design
To produce a Flexi-Stitch disc pattern,
the stitch width selector must be,moved
from the straight-stitch setting j to a^
setting from ^ to § . Stitch width is
increased as the dial is moved to the right.
Adjusting Stitch Placement
Flexi-Stitch disc patterns can be sewn in
either L(left), (center) or (right)
needle positions^HSenter needle position
is recommended.
Adjusting Needle-Thread Tension
Some Flexi-Stitch disc patterns require
more needle-thread tension than others.
Make a test sample with the fabric, thread
and presser foot you plan to use so that
you can adjust tension to suit the stitch
you have chosen.
For your test sample, set the tension dial
on 3 or 4. Notice the stitching; if the fabric
puckers, decrease tension by turning the
dial to a lower number. Sew at moderate
speed.
Adjusting Width of Design
Special I Special
Stitch I Stitch
Placement Most Used Placement
Only Setting Only
Adjusting Stitch Placement
THREAD ▼ TENS i ON
i2 '¿ 4 sS
CIOrxTl II
-IT
................IT.
rn
Before moving needle position and stitch
width selectors make sure needle is above
fabric and the stitch length dial is OFF
buttonhole settings.
Adjusting Needle-Thread Tension
31
Page 34

FLEXI-STITCH DISCS (Continued)
Red Bar
Stitch Length Dial
Incorrect
<<<<<<<<<<<W<<<<
Turn Dial to Right to Bring
Stitches Together
SETTING STITCH LENGTH DIAL
When you use a Flexi-Stitch disc pattern,
stitch length is controlled with a single
setting of the stitch length dial. No
further adjustment should be made.
To set turn dial until red bar* is centered
under the arrowhead ▼ on the control
panel.
NOTE : Stitching cannot be reversed
when the Flexi-Stitch disc dial
is on red Flexi-Stitch disc setting.
Use numerical setting for stitch length
adjustment when using a Fiexi-Stitch
disc to produce a basic zig-zag stitch
pattern.
Correct
ADJUSTING STITCH BALANCE
You may need to adjust the Fiexi-Stitch
disc dial when using a Fiexi-Stitch disc
pattern in order to achieve the correct
pattern appearance. Before you move the
Fiexi-Stitch disc dial from its neutral
position (red bar | centered under
arrowhead ▼), make a test sample. If
adjustment is required, stitch slowly and
move the dial as you sew.
Incorrect
Turn Dial to Left to
Separate Stitches
Adjusting Stitch Balance
32
Correct
• Turn the dial to the right to bring
stitches of the pattern together.
• Turn the dial to the left to separate
stitches of the pattern.
ADJUSTING PRESSURE AND
CHOOSING ACCESSORIES
Turn to page 19 under "Straight Stitching"
for instructions on adjusting pressure.
For information on choosing accessories
refer to detailed instructions for sewing
with Fiexi-Stitch disc patterns included in
the section called "Sewing the Pro
fessional Way", which starts on page 39.
Page 35

By using a twin needle, you can produce
two parallel, closely spaced, decorative
lines of stitching simultaneously. You can
use either one or two colors of thread,
and you can choose either a straightstitch, zig-zag stitch, or a Fashion disc
pattern.
preparation
SETTING THE MACHINE
F/exi-Stitch Disc Dial Off
f—
----------
1
L i. J
Straight Stitching
O
Straight Stitching
• Flexi-St/tch Disc Dial: O (Off)
• Needle Position : JL o'" only
• Stitch Width : i
• Stitch Length: Optional
• General Purpose Needle Plate
• General Purpose Foot
Zig-Zag Stitching
• Flexi-Stitch Disc Dial : O (Off)
• Fashion Disc : All Patterns or
Super Zig-Zag Disc (for Plain Zig-Zag)
• Needle Position: jL^ only
• Stitch Width : See illustration at right
• Stitch Length : Optional
• General Purpose Needle Plate
• General Purpose Foot (Open Stitching)
• Special Purpose Foot (Satin Stitching)
Flexi-Stitch Disc Dial Off
Super Zig-Zag or Fashion
Disc Disc
Left On I
Maximum
Stitch Width
X À
Page 36

TWIN-NEEDLE STITCHING (Continued)
Use SINGER twin needle. Style 2028 (size 14).
INSERTING THE TWIN NEEDLE
Before inserting the twin needle, make
sure you are using the general purpose
needle plate and that the needle position
dial is set at (left), and the stitch
width does not exceed the settings shown
on page 33.
To insert the twin needle, simply raise
needle to its highest point and loosen the
needle-clamp screw. Remove the single
needle and insert the twin needle in Its
place. Tighten needle-clamp screw
securely.
threading for twin-needle stitching
For best results, use No. 50 mercerized cotton thread.
Thread the machine In the same manner as for single-needle stitching
except:
• Be sure that threads are separated by center tension disc as they pass
around tension assembly.
34
Page 37

buttons
• Flexi-Stitch Disc Dial: 0 (Off)
• Super Zig-Zag Disc: 201
• Needle Position: (left)
• Stitch Width: See Illustrations at Right
• Feed-Cover Needle Plate
• General Purpose or Special Purpose
Foot
Flat buttons can be sewn on quickly and
easily using the plain zig-zag stitch
pattern. The space between the holes in
the button determines stitch width set
tings. For buttons with standard hole
spacing, use settings | and ^ as shown.
For buttons ,with unusual hole spacing,
use setting | and increase or decrease
the width (^) as necessary.
Attach feed-cover needle plate (see page
8), and turn Flexi-Stitch disc dial to 0.
ATTACHING A BUTTON
1. Set stitch width at j and needle
position at L (left)- Position button
under foot and lower needle Into
center of left hole by turning hand
wheel toward you. Lower foot. Turn
hand wheel toward you until needle
rises out of button and is just above
the foot.
2. Set stitch width at zig-zag (|)
setting (see Step 2). Check stitch
width by turning hand wheel slowly
toward you; the needle should enter
the right hole of the button. Take six
or more zig-zag stitches to attach
button. End on left side.
3. To fasten stitching, return to stitch
width i and take three or four stitches.
Replace feed-cover needle plate with the
general-purpose needle plate when work
is completed.
NOTE: For best results, and when using
buttons less than one inch in diameter,
the Button Sewing Foot is recommended
(see page 68).
35
Page 38

Horizontal Placement
on Crosswise Grain
Vertical Placement on
Lengthwise Grain
buttonholes
BUTTONHOLE POSITION
Accurate guidelines are essential to keep
buttonholes a uniform distance from
faced edge of garment, evenly spaced,
and on grain of fabric. For center
closures, place guidelines as follows:
1. Mark center line of garment as
indicated on your pattern. This guide
line can be hand basted and should
follow a lengthwise fabric thread.
2. Mark a position guideline for each
buttonhole.
• Horizontal buttonholes are placed to
extend ^ inch beyond center-line
basting of garment. Horizontal guide
lines for buttonholes should follow a
crosswise thread of fabric and, if
basted, be longer than finished length
of buttonhole. Determine length of
buttonhole (as described below) and
mark ends of each buttonhole vertically.
Button
Opening
Length of
Button
Opening
36
Buttonhole
Length Guide
Markings
Button
Opening
Buttonhole
Stitching
• Vertical buttonholes are placed so that
center-line basting of garment Is in
center of buttonholes. Determine
buttonhole length and mark ends of
each buttonhole horizontally across
center line and use center-line basting
as a buttonhole guide when stitching.
BUTTONHOLE LENGTH
First, decide how long button opening
must be. Then, add VW i^ich to measure
ment for each bar tack (closing stitches
at each end of buttonhole). To find
length of button opening, cut a slit in a
scrap of fabric the diameter of button you
intend to use. Increase length of opening
until button slips through easily.
Page 39

FOUR-STEP BUTTONHOLES
• Flexi-Stitch Disc Dial; O (Off)
• Super Zig-Zag Disc: 201
• General Purpose Needle Plate
• Buttonhole Foot
• Stitch-Density Balance: Neutral
The four dial settings for buttonholing
are located on the stitch length selector
dial. As you turn dial for each step, your
machine Is set for correct needle position,
stitch width, and stitch length, as well as
stitching direction for that step. You need
not turn fabric during buttonholing.
Always make a test buttonhole on a
sample of your fabric. Be sure to duplicate
thickness of garment and include inter
facing. if the two lines of stitching in your
sample are of unequal density, see page
38.
Raise the needle above the fabric before
turning the buttonhole dial.
PROCEDURE
Place work under buttonhole foot, align
center marking of buttonhole with center
line on foot, and align end marking of
buttonhole with horizontal line on foot.
Do not lower the needle.
Step 1 : Side Stitching
Turn buttonhole dial clockwise to step 1
(aligning it with arrowhead above dial).
Position needle in fabric at point A.
Lower foot and stitch to end of buttonhole
(point B). End marking should be
aligned with horizontal line on foot.
I
I
I
I
4-
Starting Position
Step 2: Bar Tack
Raise needle above fabric by turning
hand wheel toward you.
Turn buttonhole dial counterclockwise
to step 2. Take four or five stitches
(point C).
37
Page 40

BUTTONHOLES (Continued)
Step 3
Step 3: Side Stitching
Raise the needle above the fabric.
Turn buttonhole dial counterclockwise
to step 3. Stitch to within a few stitches
of the end of the buttonhole (point D).
Step 4: Bar Tack
Raise the needle above the fabric.
Turn buttonhole dial counterclockwise
to step 4. Take four or five stitches
(point E).
For a heavier buttonhole, stitch around the
buttonhole twice. When stitching the
second time, follow the same procedure
as for stitching once around. It is not
necessary to reposition your garment.
Remove the work, draw threads to the
underside, tie, and trim. Use a pair of
small, sharp scissors to cut button
opening. Insert blade in center of button
hole cutting space and cut from this
point In either direction. Place a pin
across cutting space at each end of
buttonhole to protect bar tack stitching.
Incorrect Correct
Stitch Balance
Arrowhead
Stitch-Density
Balance Line
in Neutral Position
Push Button
Stitch Balance Control
BALANCING THE TWO LINES OF STITCHING
On some kinds of fabrics, there may be a
difference in the density of the stitches on
the right and left sides of the buttonhole.
This is easily adjusted by turning the push
button to balance the stitching. A very
slight turn will produce a noticeable
change.
• Begin with the stitch-density balance
line in a neutral position (aligned with
arrowhead above dial).
• Turn the push button to the left to
increase the density of the stitches on
the left and decrease on the right.
• Turn the push button to the right to
increase the density of the stitches on
the right and decrease on the left.
When buttonholing is completed, bring
stitch-density balance line back to its
neutral position, if it has been altered.
38
Page 41

sewing knit and stretch fabric
When you sew stretch fabric, doubleknit, tricot and jersey, choose one of
the stitch patterns that sew stretch into the seam. A wide variety of
different stitches are available so you can choose just the right one for
your fabric and sewing job. The table below will help you make the right
selection.
Remember to use a ball-point needle (Style# 2045) in the machine
when you attach elastic or sew a knit or stretch fabric.
STRETCH STITCH CHART
Stitch
Straight Stretch Stitch
Super Zig-Zag Disc 201
Overedge Stretch Stitch
F/exi~Stitch Disc 232 or
Slant Overedge Stitch
Flexi-Stitch Disc 243
Multi-Stretch Stitch
Flexi-Stitch Disc 242
Multi-Stitch Zig-Zag
Stitch
Flexi-Stitch Disc 202
Plain Zig-Zag
Super Zig-Zag Disc 201
Where to Use
Plain seams that s-t-r-e-t-c-h (press-open or
closed construction) — Crotch seaming — Sleeve
and gusset insertion — Flexible topstitching —
Swim and ski suit construction — Attaching
patch pockets— Repairing and reinforcing seams.
Overedge seams that stretch in sportswear,
knitwear, slacks, and swimsuits.
Overcast seams in bulky knits and terry cloth —
Sweater construction — Attaching elastic and
stretch lace — Seam, hem and facing edge
finishes.
Attaching elastic and stretch lace — Lingerie
and swimsuit construction — Girdle seams —
Seam finishes— Casings and waistband finishes.
All-purpose stretch sewing — Lingerie seams —
Attaching stay tapes — Seam finishing — Edge
finishing — Attaching stretch lace.
Ric-Rac Stitch
Super Zig-Zag Disc 201
¡ Blindstitch
C Fashion Disc 3
A
Feather Stitch
Flexi-Stitch Disc 202
Heavy-duty, all-purpose stretch
Reversible topstitch applications.
Flexible blindstitch hemming — Overcast seam
finishing — Shell hems In lingerie — Ladder
seams — Blindstitch zipper insertion.
Swimsuit seams — Attaching stretch lace
Lingerie and girdle seams.
sewing —
39
Page 42

SEWING KNIT AND STRETCH FABRIC (Continued)
PLAIN STRETCH SEAMS
• Flexi’Stitch Disc Dial: Red I
• Super Zig-Zag Disc 201
• Needle Position : (center)
• Stitch Width: j (straight stitch)
• Stitch Length Dial: Red *
• General Purpose Needle Plate
• General Purpose Foot
Straight Stretch Stitching
• Speed: Moderate
When you use the straight stretch
stitch to seam knit stretch, and
elasticized fabric, s-t-r-e-t-c-h and
strength are built in as the seam is
being sewn. Because it is equally
useful for closed or press-open seam
construction and will not break
thread under stress, the straight
stretch stitch is also good for seams
that receive an unusual amount of
strain when worn. For example:
crotch seaming, sleeve insertion,
and construction seams in sports
wear and bathing suits.
Procedure
1. Make a test sample to determine
thread tension and stitch balance.
GUIDING AND SUPPORTING
FABRIC
Be sure to insert a bail-point
(yellow band) needle in machine
if you are stitching a synthetic
knit fabric, and increase presser
bar pressure If necessary.
2. Stitch and guide fabric as you do
for plain seams stitched with the
regular straight stitch, letting the
machine make the back-and-
forth stitches that give
s-t-r-e-t-c-h to the seam. If
fabric has an unusual amount of
elasticity, it should be stitched
under tension as instructed below
under "Guiding and Supporting
Fabric."
3. Press seam as when using the
regular straight stitch.
Most fabrics of stretch or knit
construction need only to be guided
in front of the presser foot when you
use one of the stretch stitches.
Simply increase presser bar pressure
and let the machine move the fabric
to make the stitches that give
s-t-r-e-t-c-h to the seam.
40
Some fabrics, however, require
support while being stitched.
• For nylon tricot, ciré, panné velvet
and similar synthetic knits, apply
gentle tension by holding fabric
taut in front and back of the
presser foot as you sew.
Page 43

ATTACHING ELASTIC
Elastic will remain stretchable when it is
attached with the multi-stitch zig-zag.
The flexible joining produced by this
stitch allows elastic banding to be
stitched under, over, or between fabric
layers, making it particularly useful in the
construction of lingerie and swimsuits.
• flexi-Stitch Disc Dial: 0 (Off)
• Flexi-Stitch Disc: 202
• Needle Position : (center)
• Stitch Width: ^ or ^ (maximum)
• Stitch Length: About 20
• General Purpose Needle Plate
• General Purpose Foot
LADDER SEAMS
Attaching Elastic with
Multi-Stitch Zig-Zag
A ladder seam made with blindstitching
is both functional and decorative. Partic
ularly appropriate for knit and stretch
fabrics, the blindstitch provides stretch
able, decorative construction seams, and
edge finishes for necklines, pockets and
collars In sportswear and swimwear.
• Flexi-Stitch Disc Dial: 0 (Off)
• Fashion Disc: 3 (Blindstitch)
• Needle Position: ^ (center)
• Stitch Width: ^ (maximum)
• Stitch Length: 10 to 15
• Thread Tension: Light
• General Purpose Needle Plate
• General Purpose Foot
After stitching, open seam by pulling
fabric back on opposite sides of seam to
produce ladder effect. Press seam allow
ances of construction seams to one side.
Seam allowances of enclosed seams are
pressed together in the usual way after
seam has been opened.
Blindstitching Ladder Seams
Opening Seam to Form
Ladder Effect
41
Page 44

SEWING KNIT AND STRETCH FABRICS (Continued)
OVEREDGED SEAMS
Seams in knit and stretch fabric can be
joined and finished in one operation with
the overedge stretch stitch {Flexi-Stitch
Disc 232). Two different methods may be
used. Method# 1 (overedging) is recom
mended for firm fabrics in garments where
a ¿-inch seam allowance is adequate.
Method# 2 (mock overedging) is most
appropriate for bulky knits and fabrics
that have a tendency to curl or fray and
should be used where a wider seam
allowance is needed. Make a test sample
to help you decide which method is best
for your fabric and garment. Be sure to
duplicate the cut of the garment seam in
your test.
Remember to use a bail-point {yellow
band). Style 2045, Size 14 needle in your
machine if you are sewing a synthetic
knit.
Method 1—Overedging
• Flexi-Stitch Disc Dial : Red I
• Flexi-Stitch Disc: 232 (Overedge Stretch)
—Method# 1
• Fiexi-Stitch Disc: 232 (Overedge Stretch)
or 242(Multi-Stretch)
—Method# 2
• Needle Position : (center)
• Stitch Width: ^ (maximum)
• Stitch Length Dial: Red ■■
• General Purpose Needle Plate
• General Purpose Foot
• Speed: Moderate
Method #1 — Overedging
1. Cut and fit the garment allowing for a
f-inch seam allowance. Baste seam
line,
2. Trim seam edges evenly to a scant
i inch from seamline basting.
the Multi-Stretch Stitch
42
3. Place trimmed seam under the presser
foot so that the straight stitches fall on
the basted seamline and the zig-zag
stitches fall over the seam edge.
Page 45

Method #2 — Mock Overedging
When it is not practical to overedge
a seam because of the construction
of the garment or the fabric, a mock
overedge finish can be applied. This
finish is appropriate for bulky knits,
fine tricots, and fabrics that curl
or fray.
1. Make a test sample before
beginning garment construction
to help you decide which stitch
Is best for your fabric. Be sure
to duplicate the cut of the
garment seam in your test, and
use a bail-point (yellow band)
FINISHES FOR HEMS AND FACINGS
• Flexi-Stitch Disc Dial: Red
• Flexi-Stitch Disc: 242 (Multi-Stretch
Stitch)
• Needle Position: (center)
• Stitch Width: g (maximum)
• Stitch Length Dial: Red —
• General Purpose Needle Plate
• General Purpose Foot
I
needle if you are sewing a
synthetic knit fabric.
2. Cut and fit the garment allowing
for a f-inch seam allowance.
Baste seamline.
3. Place seam under the presser
foot so that the straight stitches
fall on the seamline basting.
4. Press after stitching and trim
away excess fabric to produce a
narrow seam edge. When the
seam supports the garment, omit
the trimming step.
Hem and facing edges in knit and stretch
fabrics will be less apt to press through
and mark when given a flat edge finish.
Edge finishing with the multi-stretch
stitch {Flexi-Stitch Disc 242) eliminates
the bulk of turned-in edges and retains
fabric flexibility. The multi-stitch zig-zag
stitch, produced with Flexi-Stitch Disc
202, may also be used.
1. Make a test sample.
2. Place stitching close to hem or facing
edge.
3. Press after stitching and trim away
excess fabric close to the stitching line
If necessary.
Applying Facing Finish
Finished Hem Edge
43
Page 46

SEWING KNIT AND STRETCH FABRIC (Continued)
LINGERIE SEAMS
To make seams in lingerie durable and
flexible, use a combination of straight
and zig-zag stitching. Make a test sample
to help you decide which of the following
methods is most appropriate for your
fabric and garment. Method # 1 is
particularly suitable for |-inch bias seams
in woven fabric and Method #2 is best
for seams in nylon tricot.
Method # 1
For a f-inch seam:
• Straight-stitch the seam (with stitch
width at i ) on wrong side of fabric.
For a 5/8-inch Seam
For a Narrow Seam
• Press both seam allowances in the same
direction.
• From the right side, topstitch with
narrow zig-zag stitching, letting needle
alternately enter seamline and seam
thickness.
Method# 2
For a narrow seam:
• Cut the fabric for a |-inch seam
allowance.
• Straight-stitch seamline on wrong side
of fabric, using a regular or stretch
stitch.
• Place a line of medium-width, open
zig-zag stitching close to the straight
stitching. (Stitch width medium to
medium-wide; stitch length 20.)
44
• Trim away excess fabric close to
stitching to produce a narrow seam
edge.
Page 47

hints on sewing special fabrics
LEATHER-LOOK VINYL t
• Use masking tape or zipper adhesive
tape instead of pins or basting to hold
seams, zippers and hems in place for
stitching.
• Stitch with a long stitch (8 to 10
straight stitches per inch). A short
stitch may cut the fabric.
• Sew with a steady, even pace and
stitch accurately. Seams cannot be
ripped out without leaving needle
marks in the fabric.
• Topstitching holds seams and garment
edges smooth and flat and adds a
decorative note.
• The shiny side of some vinyls tends to
stick to metal surfaces. Use a strip of
tissue paper between the fabric and
metal machine surfaces to prevent this.
• Reinforce button and buttonhole areas
with Interfacing. Bound buttonholes
are the best choice for vinyls with
knit backing.
• For sharp points on collars and lapels,
take one or two stitches diagonally
across the point to allow enough space
to smoothly enclose the seam edge.
Across the Point
CIRÉ (Wet-Look Taffeta and Tricot) f
• Use masking tape or zipper adhesive tape instead of pins or basting
to hold seams, zippers and hems in place for stitching.
• Stitch accurately; seams cannot be ripped out because needle marks
remain in the fabric.
• Sew seams under light tension by holding fabric slightly taut at front
and back of needle.
• Stitch ciré taffeta with a fairly long stitch (8 to 10 straight stitches per
Inch) and use an enclosed edge finish for seams and hems.
• Stitch ciré knits with a medium-length stitch (12 straight stitches per
inch) and use a fine bail-point needle.
• Machine-worked buttonholes (as well as bound buttonholes) can be
made in ciré fabric. Always use an interfacing and make sure the close
zig-zag stitches do not cut the fabric.
fThe Even Feed Foot (see page 68) is especially designed to aid in sewing this fabric.
45
Page 48

HINTS ON SEWING SPECIAL FABRICS (Continued)
DEEP-PILE FABRICS (Fake Fur) t
• Pin, rather than baste, seams. Place
pins at close intervals at right angles
to the seam line. Pins with colored
heads are easy to see and remove.
• Sew In direction of nap.
• Stitch with a fairly long machine stitch
(8 to 10 straight stitches per inch) and
use polyester/cotton thread in a size
14 or 16 Style# 2020 needle.
• As seam is stitched, smooth pile away
from seam allowance with a darning
needle or upholstery pin.
• After stitching seams with a f-inch
seam allowance, use small hand
scissors to shear pile from entire seam
allowance to reduce bulk.
• Stitch ¿-inch pre-shrunk tape into
neckline and shoulder seams for sta
bility and reinforcement or stitch with
the straight stretch stitch.
• Leather and leather-look fabrics com
plement fur fabrics; use them for bound
buttonholes and easy button loops.
Deep-Pile Fabrics
• Coat hems are less bulky if they are
narrow and finished with a 3-inch
fabric facing or grosgrain ribbon.
• Slash through the center fold of darts
and finger-press open, or stitch with a
narrow zig-zag stitch and trim away
excess fabric after stitching.
VELVET AND VELVETEENf
• Use a light-pressure dial setting to prevent crushing pile.
• Mark and baste with silk thread.
• Use a Style# 2020, size 11 needle, and a fine thread for seaming.
"A” silk or nylon thread is recommended for velvet.
• Always stitch in the direction of the nap.
• For unpuckered seams, pin or hand baste together and then stitch under
light tension (see page 20). Extra-long, straight seams may be machine
basted with a long, wide zig-zag stitch.
• When inserting a zipper, use the blindstitch for an almost invisible finish
(see page 48).
• To sew panne velvet, use a ball-point needle and a shorter-than-normal
stitch length (12 to 15 straight stitches per inch).
fThe Even Feed Foot (see page 68) is especially designed to aid in sewing this fabric.
46
Page 49

construction details
ZIPPERS
At the notions counter in your Singer
Sewing Center, you will find many dif
ferent kinds of zippers, one of which will
be just right for whatever you want to
sew. The zipper package will contain
easy-to-follow instructions for inserting
the zipper. And, with the zipper foot, you
will find it easy to form an even line of
stitching close to the zipper.
• Flexi-Stitch Disc Dial: 0 (Off)
• Any Pattern Disc
• Needle Position: ^ (center)
• Stitch Width: i (straight stitch)
• General Purpose Needle Plate or
Straight Stitch Needle Plate
• Zipper Foot
Zipper Insertion
Position
Block
Attaching the Zipper Foot
When the zipper is to the right of the
needle:
• Move position block on zipper foot to
left, to allow shank to enter right side
of foot, so that needle will enter right
notch in foot.
When the zipper is to the left of the needle:
• Move position block on zipper foot to
right, to allow shank to enter left side
of foot, so that needle will enter left
notch in foot.
(The zipper foot is snapped onto shank as
Instructed on page 8.)
CORDED SEAMS
The corded seam is a professionaf treat
ment for slipcovers, children's clothes,
blouses, and lingerie. To make a corded
seam, make the welting first (or buy it
ready-made at a notions counter), then
stitch it into the seam. For both steps,
use the zipper foot to place the stitching
close to the cord.
Zipper Foot Zipper Foot
to Left of Needle to Right of Needle
Making Welting for a
Corded Seam
47
Page 50

ZIPPERS (Continued)
BLINDSTITCH ZIPPER
INSERTION
• Flexi-St/tch Disc Dial : 0 (Off)
• Fashion Disc: 3 (Blindstitch)
• Needle Position: |iL, (Left)
• Stitch Width: ^ (Narrow)
• Stitch Length : 12
• Zipper Foot
• General Purpose Needle Plate
Blindstitching, used instead of straight
stitching for the final step in zipper
insertion, gives a fine finish that is almost
invisible. Indispensable for knits, napped
fabrics, and sheers.
1. Allow for a |-inch seam allowance In
the zipper area when you cut garment.
Final Step of Blindstitch
Zipper Insertion
Completed! Blindstitch
Zipper Insertion
2. Insert zipper In the usual way up to
the final step ; then, turn garment right
side out and spread flat with zipper
face up.
3. Work from the right side and pin
zipper tape into position.
4. Baste a guideline for blindstitching
alongside zipper, about | inch from
garment seam. Make sure basting
stitches go through all fabric layers
and zipper tape. Remove pins.
5. Adjust zipper foot to right side of
needle.
6. Turn garment wrong side out. Place
lower end of zipper tape over feed and
turn front section of garment back to
line of basting, creating a soft fold to
the left of the needle.
7. Set stitch width selector and position
work so that the straight stitches will
go through the seam allowance and
zipper tape, and the sideward stitches
catch a few threads of the fold.
8. Lower zipper foot and stitch slowly.
After stitching, remove basting and
press lightly.
48
Page 51

BLINDSTITCH HEMS
• Flexi-Stitch Dial: 0 (off)
• Fashion Disc: 3 (Blindstitch)
• Needle Position or J
• Stitch Width: | to ^
• Stitch Length: 10-20
• General-Purpose Needle Plate
• General-Purpose Foot
• Blindstitch Hem Guide
Blindstitching provides a durable hem
finish that can be used on a variety of
light and medium weight fabrics. It is best
suited to straight hems. Taped, bound,
turned, or unfinished hem edges can be
blindstitched with equal ease. Blind-
stitching takes a little practice, however,
so make a test sample first.
1. Attach blindstitch hem guide as In-
Instructed on page?.
2. Mark, turn, and press hem In the usual
way. (You may want to baste the
turned hem to hold it in place. If so,
be sure to place the basting at least
i inch from hem edge.)
3. With the work wrong side up, turn the
hem under, creating a soft fold about
i Inch from hem edge. Press lightly.
4. Position the hem under the foot with
the soft fold resting against wall of
guide. Make sure flange of guide Is
between the soft fold and top of hem.
5. Lower the presser foot and stitch so
that the straight stitches fall on the
hem edge and the sidward stitches
pierce the soft fold. While stitching,
guide hem edge in a straight line and
feed the soft fold evenly against the
wall of the hem guide.
Blindstitching Hem
Blindstitch Hem Completed
49
Page 52

Trimming Seam Edges after
Stitching with
Multi-Stretch Stitch
SEAMS IN FABRICS THAT RAVEL
• Flexi-Stitch Disc Dial: Red I or 0 (Off)
• flexFStitch Disc: 242 Multi-Stretch,
232 Overedge Stretch
or 201 Super Zig-Zag
• Fashion Disc: 3 Blindstitch
• Needle Position: (center)
• Stitch Width: ^ oi' ^ (maximum)
• Stitch Length: 8-20, depending on
choice of stitch and
fabric
• General Purpose Needle Plate
• General Purpose Foot
Seam edges support the garment and
should be given a durable finish if the
fabric is likely to ravel. There are two
methods of finishing seam edges in such
fabrics: overedging or trimming after
stitching.
Overedging Trimmed Seam Edge
with Blindstitching
1. Make a test sample first to determine
the stitch pattern and method that best
suits your fabric.
2. Adjus't stitch length and stitch width to
suit fabric. Choose the settings that
will give you the most "open'' stitch
that will secure the fabric edges;
avoid harsh, over-stitched edges.
3. Trim the seam edges evenly.
Place stitching near the edge of the
seam allowance or over the raw edge
as illustrated.
4. If stitching Is placed near the edge of
the seam allowance, trim away the
excess fabric after stitching.
50
Page 53

TOPSTITCHING
A practical, simple way to accent the lines
of a dress or coat is to place one or more
rows of stitching along collars, lapels,
facing edges, pockets, seams, etc. For a
tailored look, use lines of regular straight
stitching; use the straight stitch foot and
sew them with buttonhole twist for added
emphasis. For decorative interest, use a
decorative Fashion disc or Flexi-Stitch
disc pattern . To add firmness to hems and
seams in knit and stretch garments, topstitch with the straight stretch stitch. The
seam guide, available at your local
Singer Sewing Center, will help you
place stitching accurately.
Darts in Interfacing
• Flexi-St/tch Disc Dial: 0 (Off)
• Flexi-Stitch Disc: 202 Multi-Stitch
Zig-Zag or
201 Super Zig-Zag
• Needle Position: ^ (center)
• Stitch Width: ^ (maximum)
• Stitch Length: 20 or to suit Fabric
• General Purpose Needle Plate
• General Purpose Foot
With zig-zag stitching, interfacings
can be shaped without bulk.
1. Cut out the dart allowance on
the stitching line.
2. Bring raw edges together and pin
or baste in place over a muslin
stay.
3. Stitch, backstitching at both ends
of dart for reinforcement.
Step 1 Step 2 Step 3
iM
M If
-=l 1=1
Steps in Making a Dart in Interfacing
51
Page 54

decorative touches
APPLIQUÉ
Appliqué adds beauty and interest to clothing and household linens. You
can create your own design, trace a simple outline from a coloring book,
or use a motif cut from a printed fabric. Fabrics of like or different texture
combine equally well.
A closely spaced zig-zag stitch (produced with the Super Zig-Zag disc) is
most commonly used In appliqué work, but decorative stitch patterns may
also be used effectively. Although you may vary stitch width to accommo
date fabric weave or texture, never allow the stitch to be too wide.
When appliquéing, make a test sample to help you decide which of the
following methods Is most appropriate for your fabric and design.
Preparation
• Baste appliqué design to fabric.
• Outline design with straight stitching
(use a short stitch).
• Remove basting and press.
• Attach special purpose foot (and
general purpose needle plate).
Method 1
Trimming after Stitching
Method# 1 —Trimming after
Stitchirrg
1. Set machine for desired appliqué
stitch and set stitch width. Adjust
stitch length in the FINE area of the
stitch length dial.
2. Outline the entire design with appliqué
stitching.
3. Cut away the fabric on the outer edges
of the stitching with embroidery
scissors.
Method# 2
Stitching after
Trimming
1. Trim outside fabric edges close to
straight stitch outline of design.
2. Set machine for plain zig-zag stitching
and set stitch width. Adjust stitch
length in the FINE area of the stitch
length dial.
Method 2
Stitching after Trimming
52
3. Overedge the design with zig-zag satin
stitching. This step will produce a
smooth, lustrous finish that requires no
additional trimming.
Page 55

Hemstitched Appliqué
Designs applied with the slant overedge
stitch, Flexi-Stitch Disc 243, are particu
larly beautiful and especially effective on
closely woven, smooth-textured fabrics
when a fine thread and large needle are
used to emphasize a hemstitched effect.
• FlexFStitch Disc Dial: Red I
• Flexi-Stitch Disc : 243 Slant Overedge
• Stitch Width: I to ^ (medium width)
• Needle Position : ^ (center)
• Stitch Length Dial: Red ■■
• Speed: Moderate
• General Purpose Needle Plate
• General Purpose Foot
1. Insert a size 18 needle and
thread the machine with a fine
sewing thread.
HEMSTITCHING
A touch of quiet elegance is added to
fable and bed linens when hems are
finished with the slant overedge stitch.
This decorative treatment is effective on
firm, plain-weave fabrics such as lawn or
organdy, or fabrics from which threads
can be drawn readily, such as linen.
• Flexi-Stitch Disc Dial : Red |
• Ftexi-Stitch Disc: 243 Slant Overedge
• Stitch Width: ^ or | (narrow to medium)
• Needle Position : (center)
• Stitch Length Dial : Red “
• Pressure: Light
• Speed: Moderate
• General Purpose Needle Plate
• General Purpose or Special Purpose Foot
Preparation
1. Insert a size 18 needle (because
large needle holes are desirable
in hemstitching), and thread the
machine with a fine sewing
thread.
2. Follow instructions of either
method # 1 or method # 2 for
appliqueing, described on pre
vious page.
2. Turn edge of fabric over twice
to make hem of desired width.
Fold and press on lengthwise or
crosswise thread of fabric. Baste
in place.
3. Draw out 2 to 4 threads just
above top edge of hem. The
number of threads drawn will
depend on the texture of the
fabric and the depth of the open
work desired. (If threads cannot
be drawn, mark or baste a guide
line on the right side of fabric.)
53
Page 56

DECORATIVE TOUCHES (Continued)
Stitch with Hem Toward Left
4T>-
Hemstitched Corner
HEMSTITCHING (Continued)
Procedure
1. Place work, right side up, under
presser foot with the hem toward the
left
2. Lower the presser foot and stitch,
guiding the hem edge under the
needle so that the straight stitches are
made in the drawn-thread channel (or
through the single thickness of fabric)
and the sideward stitches (or points)
in the hem.
PICOT EDGES
• Flexi-Stitch Disc Dial: Red I
• Flexi-Stitch Disc: 243 Slant Overedge
• Stitch Width: ^ (narrow)
• Needle Position: (center)
• Stitch Length Dial: Red
• Speed: Moderate
• General Purpose Needle Plate
• General Purpose or Special Purpose Foot
mm
Trim Fabric Close to Stitching
A dainty picot-like edge can be made in
fine, crisp fabrics, such as organdie,using
the slant overedge stitch. Appropriate
for edging ruffles because it eliminates
bulk, it is also useful as a foundation stitch
for hand-rolled hems. Soft fabrics such as
chiffon or voile should be supported with
an underlay of crisp fabric while being
stitched. Make a test sample to determine
the need for an underlay, and to find the
correct thread tension and stitch balance.
Procedure
1. Mark stitching line approximately i
inch in from raw edge of fabric. Stitch
along marked line,^ placing fabric so
that the edge to be finished is turned
to the right.
2. Trim fabric close to the right side of
line of stitching as shown.
54
Page 57

FAGOTING
• flexi’Stitch Disc Dial: Red I
• Flexi-Stitch Disc : 202 Feather Stitch
• Needle Position : (center)
• Stitch Width : § (maximum)
• Stitch Length Dial : Red "
• General Purpose Needle Plate
• General Purpose Foot
• Speed : Moderate
The art of joining two pieces of fabric with
an open, lacy decorative stitch is called
fagoting. You can create this attractive
trimming with the feather stitch. Use it
for decorative stretch seams in bathing
suits or for joining together narrow strips
of fabric to make an entire garment
section.
• Turn under (and hem by slipstitching)
the raw edges of the fabric strips or
seams to be joined. Press flat.
Fagoting a Seam
• Stitch, guiding the two fabric edges
under the center of the presser foot a
scant ¿-inch apart (abut edges for
bathing suit seams). Allow the needle
to alternately make a stitch in each
fabric strip and two stitches in the
center of the opening.
PATCHWORK QUILTING
Patchwork for quilts and wearing apparel,
formerly put together with hand stitching,
can be quickly "pieced" and decorated at
the same time by using the feather stitch
{Flexi-Stitch Disc 202). Joinings are both
flexible and durable when this Flexi-Stitch
disc is used.
Procedure
1. Set machine to sew the feather
stitch at maximum stitch width.
Make sure Flexi-Stitch disc dial
is on Red I .
3. Prepare patches, turning under
4 Baste patches to underlay in
Patchwork Quilting with
the Feather Stitch
¿-inch seam allowance. Press.
arrangement desired, butting all
edges.
2. Cut a fabric underlay to size.
(Baste a light layer of padding to
underlay If a quilted effect is
desired.)
5. Stitch at moderate speed in
lengthwise and crosswise rows,
allowing stitches to straddle
patches.
55
Page 58

DECORATIVE TOUCHES (Continued)
SHELL EDGING
• Flexi’St/tch Disc Dial: 0 .(0^^)
• Fashion Disc: 3 Blindstitch
• Needle Position: ^ (center)
• Stitch Width : ^ ^
• Stitch Length: 12 to 25
• General Purpose Needle Plate
• General Purpose Foot
On soft fine fabrics such as tricot voile
and crepe, shell edging makes an attrac
tive finish for narrow hems or bias folds
in blouses, slips, and petticoats.
Shell Edglhg with
the Blindstitch
Gathering Stitches for
Smocked Band
Make a test on a sample of your fabric to
find the right thread tension, stitch length,
and stitch width.
1. Place folded hem (basted, if neces
sary) or bias fold under presser foot
with hem or fold to the left.
2. Stitch slowly, guiding fabric so that
the sideward stitches are made over
the folded edge.
SMOCKING
Smocking is a youthful decorative detail
that is particularly charming when used
for a yoke, insert or band on baby clothes,
little girls' dresses, or lingerie.
Procedure
1. Space rows of straight stitching, J inch
apart, on the crosswise fabric grain,
2. Pull up evenly for the amount of
fullness desired.
Smocked Band Completed
56
3. Baste to underlay.
4. Stitch over and between rows of
shirring with decorative stitching.
Create your own design or adapt the
one illustrated. Use thread that con
trasts with or matches your fabric,
depending on the effect desired.
A te'st sample is always advisable to check
stitch settings. Be sure to use the same
fabric and degree of fullness you plan for
your garment.
Page 59

keeping up appearances
MENDING
Many zig-zag and Flexi-Stitch disc pat
terns are just as useful for mending as
they are for creative sewing. A few of
the ways in which you will find them
useful are shown on this and following
pages. You will enjoy discovering others
for yourself.
Mending a Tear
• Flexi-Stitch Disc Dial: 0 (Off)
• Flexi-Stitch Disc: 202
• Needle Position ^ (center)
• Stitch Width: ^ or ^ (maximum)
• Stitch Length: About 20
• General Purpose Needle Plate
• General Purpose Foot
Tear Mended with
Multi-Stitch Zig-Zag
1. Trim ragged edges.
2. Place underlay on the wrong side of
tear for reinforcement. (It is best not
to baste or pin the underlay since you
will be bringing the edges of tear
together in the next step).
3. Stitch on the right side, bringing the
edges of the tear together.
4. Shorten stitch length at ends and
corners to give extra strength.
5. Trim underlay.
Bar Tacks
Bar tacks, to reinforce points of strain,
are made with the plain zig-zag stitch
(Super zig-zag disc 201) at satin stitch
length. Use them at pocket corners, to
attach garters, secure shoulder straps,
belt loops and zipper openings.
Bar-Tacked Belt Loops
57
Page 60

Stretch Germent Repair
Repairing Stretch Garments
• Flexi-Stitch Disc Dial: Red I
• Flexi-Stitch Disc: 242 Multi-Stretch Stitch
• Needle Position: ^ (center)
• Stitch Width: I to ^
• Stitch Length Dial; Red —
• General Purpose Needle Plate
• General Purpose Foot
• Speed: Moderate
Seanns in stretch garments and lingerie
retain their elasticity when stitched with
the multi-stretch stitch. This Flexi-Stitch
disc pattern builds s-t-r-e-t-c-h Into the
seam as it is being sewn and is equally
suitable when used to topstitch (as
shown) or to overedge. Make a test
sample to check dial settings.
Seam Repair
Repairing Seams
Breaks in press-open seams can be
repaired quickly and easily when you use
the straight stretch stitch (Super Zig-Zag
Disc 201). This stitch is ideal for knit and
stretch fabrics and particularly useful for
repairing or strengthening curved seams
or seams that will receive strain when
worn.
1. Make a test sample to check dial
settings.
2. Remove loose thread along the break
and press seam edges together.
3. Re-stitch along original seamline,
guiding seam under presser foot
without stretching fabric, letting the
machine move the fabric to make the
back-and-forth stitches that give
S‘t-r-e-t~c-h to the seam. Overlap
stitching one Inch at each end. Press
seam open.
58
Page 61

DARNING
Worn or torn spots on children's clothes,
knits, and household linens can be
darned effortlessly and quickly with little
practice. You may choose to darn either
with or without an embroidery hoop.
When greater control is needed, an
embroidery hoop Is usually best.
Darning without Embroidery Hoop
• Flexi-Stitch Disc Dial: 0 (Off)
• Any Pattern Disc
• Needle Position: ^ (center)
• Stitch Width : ! (straight stitch)
• Stitch Length: 12
• General Purpose Needle Plate
• General Purpose Foot
• Pressure: DARN
1. If area to be darned is open, baste an
underlay in place.
2. Place area to be darned under presser
foot; lower presser foot and start
stitching, alternately drawing fabric
toward you and pulling it gently away
from you.
3. Continue this forward-and-backward
motion as you fill the area with
parallel lines of stitching. For additional
strength, cover area with crosswise
lines of stitching.
Darning Without
Embroidery Hoop
59
Page 62

0
o
Feed-Cover Needle Plate
Darning with Embroidery Hoop
• Flexi-Stitch Disc Dial: 0 (Off)
• Any Pattern Disc
• Needle Position: ^ (center)
• Stitch Width: j (straight stitch)
• Stitch Length: In Fine Area
i
• Feed-Cover Needle Plate
• N6 Presser Foot
• Presser Bar: Lowered
Preparation
Remove presser foot with shank (by re
moving the screw which fastens the
shank to the presser bar). Attach feedcover needle plate. Instructions for chang
ing the needle plate are given on page 8.
1. Trim ragged edges from area to be
darned.
Darning With Embroidery Hoop
2. Center worn section in embroidery
hoop.
3. Position work under needle over feedcover plate and /ower presser bar to
engage tension,
4. Hold needle thread loosely with left
hand, turn hand wheel over, and draw
bobbin thread up through fabric. Hold
both thread ends and lower needle
Into fabric.
5. Outline area to be darned with running
stitches for reinforcement.
6. Stitch across opening, moving hoop
under needle at a slight angle from
lower left to upper right. Keep lines
of stitching closely spaced and even
in length.
7. When opening is filled, cover area with
crosswise lines of stitching.
This method of controlling fabric move
ment with an embroidery hoop may be
used to do embroidering and monogramming.
60
Page 63

cleaning the machine
Your machine will serve you perfectly for many years if you take a few
moments of your time to keep it clean. How often you will need to clean
the machine will depend on how often you use it.
CAUTION: Before cleaning your machine, disconnect power-line
plug from electrical supply.
Remove lint or fluff from exposed parts.
With a soft cloth, clean:
• Tension discs, take-up lever,
thread guides.
• Presser bar and needle bar.
• Bobbin case. (If there is an excessive
amount of lint In the area, remove the
bobbin case for cleaning. See page 63
for Instructions.)
• Machine surface. (If necessary, dampen
the cloth and use a mild soap.)
Remove face plate as instructed on
page 62, and clean area behind it with a
lint brush f.
Remove needle plate as instructed on
page 8 and, using a brush, clean the
rotating hook area under the needle plate
and slide plate.
and
Clean between
tension discs
After cleaning, apply SINGER* oil at
points indicated on these pages.
Approximately once every year under
normal conditions, clean and lubricate all
moving or rotating machine connections
to ensure freedom of movement and to
protect metal parts from excessive wear.
To remove top and bottom covers, follow
instructions on page 62.
|A lint brush designed for this purpose is avail
able for separate purchase at your local Singer
Sewing Center.
Clean
Page 64

removing covers, bobbin case and bulb
CAUTION: Before removing covers, bobbin case, and light bulb,
disconnect power-line plug from electrical supply.
REMOVING AND REPLACING
TOP COVER
• To remove, loosen and remove screws
A and lift off top cover.
• To replace, make certain lever B is
against arm top cover to eliminate possi
bility of damage. Position cover on top
of machine and replace and tighten
screws A.
REMOVING AND REPLACING BOTTOM COVER
If your machine is a portable, remove the
carrying case base as instructed below.
• To remove, tilt machine back and
remove retaining nut C, being careful
not to lose felt washer, and remove
cover from underside of machine.
• To replace, position cover over bottom
of machine and replace felt washer and
retaining nut. Tighten retaining nut
with a screwdriver.
REMOVING AND REPLACING
CARRYING CASE BASE
• Turn machine so that back is toward
you. Tilt machine back and loosen and
remove the retaining nut C from the
center.
• Set machine upright and lift up and
out of base.
• Replace machine in base, after bottom
cover has been attached.
• Turn machine so that back is toward
you; tilt back and replace retaining nut.
Tighten retaining nut with a screwdriver.
D
REMOVING AND REPLACING
FACE PLATE
• Loosen and remove screw D and
remove face plate by sliding it down
ward.
• Replace face plate by sliding top edge
of plate under edge of arm top cover.
• Align screw hole in plate with screw
hole in machine and replace and tighten
62
screw D.
Page 65

REMOVING AND REPLACING BOBBIN CASE
• Raise presser foot.
• Turn hand wheel toward you until
needle is in its highest position.
• Open slide plate with downward finger
pressure. Draw plate toward you,
opening it all the way to raise the
needle plate locking pin.
• Remove needle plate.
• Remove bobbin.
• To remove bobbin case:
Turn bobbin case holder to back as far
as it will go. Lift out bobbin case.
• To replace bobbin case:
Guide the forked end under the feed
and then draw the bobbin case under
the position plate as illustrated. Turn
bobbin case holder all the way for
ward to lock bobbin case In position.
After locking the bobbin case in posi
tion, check that the bobbin case does
not bind but has slight rotational
movement.
• Replace bobbin.
• Replace needle plate.
• Close slide plate to lower needle plate
locking pin and secure needle plate.
Page 66

Locks
CHANGING THE LIGHT BULB
CAUTION: Before removing bulb,
disconnect power-line
plug from electrical sup
ply.
Unlocks
Changing the Light Bulb
Raise Presser Foot
and Needle
This machine
is designed to
use a 15 watt
maximum light
bulb
Lift Retaining
Spring into Slide
Plate Grooves
Removing the Bulb
With thumb and forefinger lower the
light bracket. Do not attempt to unscrew
bulb. Press it up into socket and at same
time turn bulb over in direction shown to
unlock bulb pin.
Replacing the Bulb
Press new bulb into socket, with bulb pin
entering slot of socket, and turn it over in
direction shown to lock bulb in position.
Push bracket back into recess.
REPLACING THE SLIDE PLATE
You will not have any occasion to remove
the slide plate. However, if it should
accidentally become disengaged from the
machine, it is easily replaced.
• Raise presser foot and needle.
• Place slide plate in slideway with the
front edge close to, but not covering,
the retaining spring (as shown in
illustration).
• With a screwdriver, lift each end of the
spring into each of the side grooves on
the underside of the slide plate.
Replacing the Slide Plate
64
• Draw the plate gently toward you and
fully engage the spring.
•
• Close slide plate.
Page 67

REMOVING MACHINE
FROM CABINET
IMPORTANT;
• Do not attempt to remove hinges from
cabinet as this may result in damage to
the wood of the cabinet.
• Pull cabinet away from wall to avoid
damage to wall or machine.
• Remove machine power-line plug from
electrical outlet
To Remove Machine From Cabinet:
1. Tilt machine back until it rests on
hinges. Remove machine plug from
receptacle.
NOTE: On models equipped with
spring-assist plate (see Inset, Step 1),
remove screw which fastens clip to
machine. Remove electrical cord from
clip, then replace clip and screw (to
avoid loss of these items).
Step 2
2. Loosen set screws that hold machine
on hinge pins by turning them counter
clockwise.
3. Lift machine straight up and off pins.
For ease of removal, stand behind
cabinet when lifting machine.
To Replace Machine in Cabinet:
Reverse the procedure used for removing
the machine.
• Be sure set screws in machine are un
screwed far enough to clear the open
ings forthe hinge pins.
• To keep hinge pins pointing up while
replacing the machine, slip an elastic
rubber band around both pins, making
sure the elastic band is over the
shoulder of each hinge as illustrated.
• Be sure set screws are firmly tightened
against hinge pins before lowering
machine into sewing position or into
storage position.
Step 3
Hinge Pins
NOTE: On Models equipped with
spring-assist plate, lead electrical cord
into recess at bottom of plate; fit clip
on cord and fasten to machine, as
shown in inset. Step 1.
Elastic Band
65
Page 68

performance checklist
Should sewing difficulty be encountered, review the sections of this
instruction book that explain the sewing operation you are performing.
If the problem still exists, the following hints will help you correct it.
If .the machine does not sew, make sure . . .
• Machine is connected to electrical supply.
• Power and light switch is on.
• Hand wheel disc is in sewing position. (See page 13).
If needle bar moves but stitch is not formed, make sure . . .
• Needle is straight and sharp.
• Needle size is correct for the thread you are using. (See page 11).
• Machine is correctly threaded.
• Bobbin contains thread.
• Bobbin and bobbin case are correctly inserted in machine.
• Bobbin case area is free of lint and loose thread ends.
If fabric does not move, make sure ...
• Presser foot is down and that pressure dial is adjusted for the weight
and texture of your fabric.
• Stitch length selector is correctly set.
• Feed cover needle plate has been replaced with the correct needle plate
for the stitching you are doing.
• All lint is removed from' around the feed.
If needle breaks, make sure . . .
• Needle is not bent or burred, and that it is correct for machine, and
proper size for the thread you are using.
• Needle is fully inserted In needle clamp.
• Machine is set for straight stitching at center needle position when you
are using the straight stitch needle plate and foot.
• Twin needle does not strike needle plate when doing twin-needle
stitching. (See page 33).
• Presser-foot shank is securely fastened to presser bar.
• Needle plate is correctly seated and slide plate is fully closed.
• Fabric being guided or supported behind the needle is not being pulled
too hard or too fast.
66
Page 69

If stitching is irregular, or needle thread breaks, make sure . . .
• Flexi-Stitch dial is set at 0 when straight or zig-zag stitching.
• Flexi-Stitch dial is balanced when sewing Flexi-Stitch patterns.
• Machine is correctly threaded.
• Thread is even and free from knots.
• Needle is straight and sharp, and correct size for thread.
• Needle-thread tension is not too tight.
• Bobbin case is correctly threaded and properly inserted.
• Threads are correctly placed under presser foot when you start to sew.
• Bobbin case area is free of lint and loose thread ends.
• Bobbin or bobbin case is not damaged.
• Stitch pattern disc is seated properly on disc holder.
Also remember to . . .
• Turn hand wheel toward you to position needle and take-up lever.
• Keep a stitch pattern disc on the holder at all times, even when you
are straight stitching.
• Turn stitch pattern disc release dial to the right before removing or
replacing pattern disc.
• Raise needle above fabric before making adjustments to stitch width
and needle position.
• Use red selector settings for Flexi-Stitch disc sewing.
• Turn Flexi-Stitch disc dial to 0 when making buttonholes.
• Start and finish sewing with take-up lever in Its highest position.
• Adjust stitch length, pressure, and thread tension to suit your fabric.
• Test stitch on a fabric sample before starting a sewing job.
• Lower presser foot before setting pressure dial.
• Press hand wheel disc for sewing and move bobbin winder switch to
SEW after winding a bobbin.
• Remove feed-cover needle plate after button sewing and after darning
with an embroidery hoop.
• Sew at a moderate speed when using a Flexi-Stitch disc pattern.
• Clean and oil your machine periodically.
Enjoy Sewing!
If you have any questions, please write to:
The Singer Company
Consumer Affairs Department
321 First Street, Elizabeth, N.J. 07207
67
Page 70

special accessories for special jobs
Fashion aids have been designed to
increase the versatility of your sewing
machine and enable you to give your
sewing that extra professional touch.
The ones described on this and the
following pages are just a few of the
complete selection available at your local
Singer Sewing Center.
Professional Button holer
Professional^ Buttonholer No.102878
sews six kinds of buttonholes, plus
eyelets, in a variety of fabrics.
Even Feed Foot No. 507806 is effective
in keeping fabric plies even and in
matching plaids, stripes and patterns. It
is an invaluable aid for sewing hard-to-
feed vinyl and fake fur, pile, stretch,
bonded and laminated fabrics. Ideal for
topstitching.
Ruffler
Ruffler No. 86742 offers a simple,
effective way to make gathered and
pleated ruffles. The ruffler is used for
straight stitching only.
Binder Foot No. 81245 is used to apply
ready-made bias tape or unfolded bias
binding to an unfinished fabric edge. It
is particularly useful for binding seam
edges that might ravel.
Button Foot No. 161613 holds any
two-hole or four-hole button securely for
stitching. The groove in the foot can be
used to hold a needle, over which a
thread shank can be formed.
68
Page 71

Seam Guide No. 161172 helps keep
seam width uniform when extra control is
needed, especially on unusually wide or
narrow seams. Used as a guide for topstitching and blindstitch hemming.
Edgestitcher No. 36865, used with the
straight stitch setting, is ideal for joining
and inserting lace, tucking from pin
width up to ^ inch, French seaming and
seam piping, facing, and seam finishing.
Gathering Foot No. 161659 can be
used for evenly spaced shirring as well as
for a single line of gathering. This foot is
used for straight stitching only.
Hemmer Foot No. 161671 is used for
turning and stitching narrow hems in one
operation. Thus, you can eliminate basting
or pinning whenever you are making
ruffle edges, lingerie finishes, and the
like.
Darning and Embroidery Foot No.
161876 is recommended for ail types of
free-motion work. It is ideal for em
broidery, monogramming and decorative
designs because the transparent toe fully
reveals the line of the design to be
followed.
Hemmer
Foot
Darning and Embroidery Foot
69
Page 72

FASHION AIDS (Continued)
Fashion Discs
The following additional Fashion discs are available at your Singer
Sewing Center:
7. Shell Edge
8. Solid Scallop
9. Icicle 18. Three Step
AAA
0 \ 0 \ 0 \
liVlIPlF'
10. Banner
11. Key
13. Diamond
14. Zig-Zag Point
15. Long Oblique
m! Iwl fin
yVyN,
..
........
.
16. Shingle
17. Pennant
19. Ball
20. Curved Mending
21. Thunderbird
22. Semaphore
23. Solid Pyramid
Needles
LVryiyii
mmm
24. Open Pyramid \/\/\/
25. Spiny
26. Block
27. Fagoting
28. Comb
29. Pavilion
30. Platform
Amuj iMuy ^u| uij
/ niM' mfuf M
VMVvVAV
111111U-LL
AAAAAAM
MW «N JMA MM
/ 1 » 1 < • » 1
r MM MM M IM
• Ball-Point (Yellow Band) Needle, Style 2045, is used for sewing
stretch fabrics and knits. Including nylon tricot.
• Twin Needle, Style 2028, is used for stitching two lines of decorative
stitching simultaneously.
• Leather-Sewing Needle, Style 2032, is used for sewing leather
and suede.
SINGER Oil
Available in tube or one-application capsules, this oil is especially
prepared for leaving a fine film of lubricant on the precision bearing
surfaces of your machine. It ensures freedom of parts movement and
protects metal parts from excessive wear.
DELUXE MONOGRAMMER No. 171278
With the deluxe monogrammer you will have the pleasure of stitching
initials 1i inches high to create monograms that are ideal for adding a
personal touch to table linens, towels, and wearing apparel. An attractive
flower motif can also be made.
70
Page 73

your persona! measurement chart
This chart will enable you to keep a record of your measurements. Have someone assist
you in taking the measurements carefully with an accurate tape measure.
The illustrations below show where the tape measure should be placed when taking each
measurement.
Inches
1. BUST—Fullest part —
slightly higher in back
2. WAIST — Around natural
waistline................................
3. HIP —
4. SHOULDER — From base
5. FRONT BODICE WIDTH
6. BACK BODICE WIDTH—
7. SHOULDER TO BUST—
8. FRONT WAIST LENGTH
9. BACK WAIST LENGTH —
10. SLEEVE WIDTH—Around
11. SLEEVE LENGTH —
12. SLEEVE LENGTH —Elbow
13. FRONT SKIRT LENGTH—
14. BACK SKIRT LENGTH —
..........
inches below
natural waistline (fullest
part)
of neck to top of arm
— From armhole to arm
hole 5 inches down from
center shoulder
From armhole to armhole 4
inches down from center
shoulder .. ..
From neck base at shoulder
to a line even with point of
bust
.......................................
—From neck base at
shoulder over fullest part of
bust to waistline ..
From the prominent bone
at base of neck to natural
waistline
arm at upper edge of under
arm seam ..
Shoulderto elbow
to wrist
Down center from waist
line to hem ..
Down center from waist
line to hem
SLACKS MEASUREMENT CHART
15. FULL LENGTH—Waistto
floor at side seam ..
16. SLACKS LENGTH—Waist
to ankle .................................
17. CROTCH SEAM (stand-
ing)— ....................................................
18. CROTCH SEAM (seated)
— Waist to chair at side
seam
.....................................
71
Page 74

INDEX
Page
Accessories ........................................
Appliqué ..............................................
Blindstitch Hem Guide
Blindstitch Hems
Bobbin
Bobbin Case
Buttonhole Foot
Buttonholes
Buttons................................
Carrying Case Base ...........................
Changing Pattern Discs
Checklist
Cleaning the Machine
Darning
Darts in Interfacing
Elastic, Attaching
Electrical Connections
Embroidering
Fabric, Thread and Needle Table . . 11
Fagoting....................................................... 55
Fashion Aids ............................................... 68
Fashion Discs
Feed-Cover Needle Plate
Feed ............................................................... 3
Finishes for Hems and Facings 43
Flexi-Stitch Discs
Free-Motion Stitching
General Purpose Foot .................................
Guiding and Supporting Fabric .. 23, 40
Handwheel .................................................... 3
Hand Wheel Disc .......................................... 5
Hems, Blindstitch
Hemstitching............................................... 53
Knit Fabrics, Sewing
Light Bulb
Lubrication
Mending ...................................................... 57
Needle
Needle Clamp
Needle Position Dial
Needle Plate ........................................ 3, 6
................................................
Winding
Removing and Replacing ....
Threading
Stitch Density Balance
Removing and Replacing .... 62
Speed Controller
Adjusting Stitch Balance
Changing .................................................. 9
Threading ............................................... T5
Twin Needle ............................................ 34
Changing .................................................. 8
...........................................
.......................................
..................................
.......................
.....................................................
........................................................
..............................................
..............................
...
................................................ 64
................................................
...........................................................
............................................
......................
...............................
.........................................
.............................
...............................
....................................
......................................
...........................
.................................
.................
.........................
...............
................................
......................................
.................................
.....................
7,49
7, 37
___
36
.......
38
5, 9, 25, 26
6, 25, 60
5, 9, 25, 30
32
4,17,27,31
5, 9
25
66
61
59
51
41
5,10
5,10
60
60
49
39
61
3,9
Oiling ...................................................... 61
Patchwork Quilting.............................
6
Personal Measurement Chart ....
52
PIcot Edges
Pin Basting
49
Power and Light Switch
12
6
9
PresserFoot
Changing
Presser Foot Lifter .............................
63
Pressure Adjustment
14
Principal Parts ....................................
Removing Machine from Cabinet
Reverse-Stitch Push Button ... .4,
35
Satin Stitching
Seams, Sewing ...................................
Corded ............................................
Curved
Finishes
Ladder
Lingerie
Overedged.......................................
Plain Stretch
Shell Edging
Slide Plate
Smocking
Special Fabrics, Sewing ........
Special Purpose Foot..................7, 28,
Spool Pin .............................................
Stitch Density Balance
(Buttonholes) .................................
Stitch Length Dial
Stitch Width Dial
Straight Stitch Foot
Straight Stitching
Adjusting Selectors
Stretch Fabrics, Sewing
Take-up Lever
Tension Adjustment ...........................
For Straight Stitching ..................
For Zig-Zag Stitching................27,
Thread ..................................................
Thread Cutter.......................................
Threading the Machine ......................
Topstitching
Twin-Needle Stitching
Winding the Bobbin
Zig-Zag Stitching ................................
Fashion Discs
Flexi-Stitch Discs .
Needle Position
Satin Stitching
Stitch Length
Stitch Width
Zipper Foot ..........................................
Zippers
Blindstitch Zipper Insertion
........................................
.........................................
......................................
..........................
.................................
............................................
...................
............................................
...........................................
..................................
.......................................
............................................
............................................
......................
........................
............................
...............................
.....................................
..............................
...........................
..........................
..............................
..............
.............................
...................................
...
.............................................
.....................
........................
.......................
4, 18,
4, 17,
.......................
.....................
.......................
5,9,
...
..............
5, 9,
................
28,
3,
Page
55
71
54
21
5, 10
6, 7,8
8
3
3, 19
2
65
18, 21
29
21
47
23
50
41
44
42
40
56
3, 64
56
45
33, 52
3
38
28, 32
27, 31
6, 17
17
18
39
3
4
20
29, 31
11
3
12, 34
51
33
12
25
25, 26
25, 30
27, 31
29
29, 32
27, 31
7, 47
47
48
72
Page 75

CONGRATULATIONS . . .
You are about to discover the wonderful pleasure of sewing with your new
Sty/ist* Special Zig-Zag Sewing Machine by SINGER. We know you are
eager to get started on a sewing project . . . but we urge you to become
familiar with this book before you begin. It is designed to help you get the
benefit of all the capabilities of your machine. Especially, we recommend that
you keep the following points in mind :
choose the correct needle and thread for your fabric—if either is the
wrong size or type, you may encounter broken or knotted thread, or
faulty stitching. The Fabric, Thread, and Needle Table on page 11 will
help you make a perfect choice.
sew with a bent or blunt needle. If the needle is damaged—or
(Ayri^
iv /V instructions on page 15 for threading the machine. Note
particularlythedirectionsforthreading the tension discs.
improperly inserted in the machine—it can cause skipped
stitches. See page 9 for Instructions.
forget to place the thread properly when you insert a wound
bobbin. Page 14 tells you how to do this perfectly.
become familiar with the instructions for regulating stitch length
(page 18), presser-foot pressure (page 19), and thread tension
(page 20). Take advantage of the capability of your sewing machine !
allow lint and thread ends to accumulate In the bobbin case
SjQnn^
remember that expert, dependable SINGER* service is always
cLy
Above all, i/o enjoy sewing !
Form K8749 (|m (878)
(Part No. 116288-001)
available. If your sewing machine should require maintenance or
repair, be sure to call your Singer Sewing Center or Authorized
Singer Dealer. You will find the number listed under SINGER
COMPANY in your telephone book.
area—they can cause jamming or excessive noise. Clean
your machine regularly, as Instructed on page 61.
Copyright (g) 1972 THE SINGER COMPANY
All rights reserved Printed in Great Britain
Page 76

9€WinG Micmtii 01BIM€T;
With the home sewer’s needs comfortable and ample work
in mind, Singer combines ex- space. Shown here are just a
pert craftsmanship with imag- few of the contemporary and
inative design in sewing traditional styles available,
cabinets that provide both
Beautiful carving and handsome
hardware enhance the Mediter
ranean look of the Monaco.
Basketwork design adds a hand- The warmth of Early American decrafted mellowness to the trim, sign distinguishes the maplemodern lines of the Greenbrier. toned Saratoga cabinet.
Sleek lines and rich walnut ve
neers make the Pacesetter an
elegant addition to any room.
Chairs and benches in coordinated wood tones áre also available.
*A Trademark of THE SINGER COMPANY
 Loading...