

SINGER 514 User Manual


SINGER Service
Wherever you go you wil! find expert, dependable SiMGER Service close at
hmd, SINGER will always assist you to keep your SINGER Sewing Machine
properly functioning. For this reason you should always call your SINGER
Sewing Centre or an Authorised SINGER Dealer's Shop if your sewing
machine requires maintenance or repair. There you oan obtain the services of
a trained SINGER repair man. and warranted SINGER parts.
To ensum that you am aiways provkiad wkh the most modem sewing
capabHities^ The Singer Company reserves the right to change the appear
ance, design or accessories of this sewing machine when considered
necessary.
tlMPQRTANT ElECTRlCAl INFORMATION
The wires in the mains lead are coloured in accordance with the following
Blue — Neutral (N) Brown — live (t)
As the coiours of the wires in the mains lead of this appliance m<ty not
correspond with the coloured markings identifying the terminais in your
plug, proceed as follows:
The wire which is coloured blue, must he connected to the terminal
which is marked with the letter N or coloured black
The wire which is coloured brown, must be cormected to the terminal
which is marked with the letter L or coloured red.
tWIre colours in the meins iead for Australia may be red Active {A) or
Live {L) arKi black Neutral (N) and should be correspondingly connected.
Form KB772 (376) Copyright ;c: tB73 by The Siegor Company (U*KT Umited
Pfinted in Groat Brilain All nght$ reservùd thfoughùut thè worki

CONTENTS
Page
Principal Parts
Accessories
Changing Neecilo Plate .....................
Changing Noodle
Changing Foot
Operating your Sewing Machine.
Fabric, Thread and Noodle Chart
Threading your Machine
Straight Stitching
Zig-Zag Stitching .................................
Ffoxi-Smeh* Sowing
Twin-Needle Stitching
Sewing the Professional Way
Seams
......................................
................................
....................................
.......
......................
...............................
.........................
..........................
............................
3-4
6-7
a
8
9
10-11
12
13-17
18-21
22-24
.
25-27
28-29
30-68
30-36
Seam Finishes.................
Darts
..............................
Zipper Insertion
Corded Seams
Buttonholes—
Buttons. < >... <
Hems...............................
Finishing Touches .....
Hints on Sewing Special Fabrics ..
Keeping up Appearances
Mending
Tears
Darning..........................................
Caring for your Machine ... <
Hints for Home Service ................
........................................
...............................................
..............
...
.............
.
.
...........
36-38
39
40
40
41-44
46
46-48
49-61
62-64
56-68
6b
66
.
67-68
59-63
64-66
Your Personal Measurement Chart
Index
.............................................
66
67
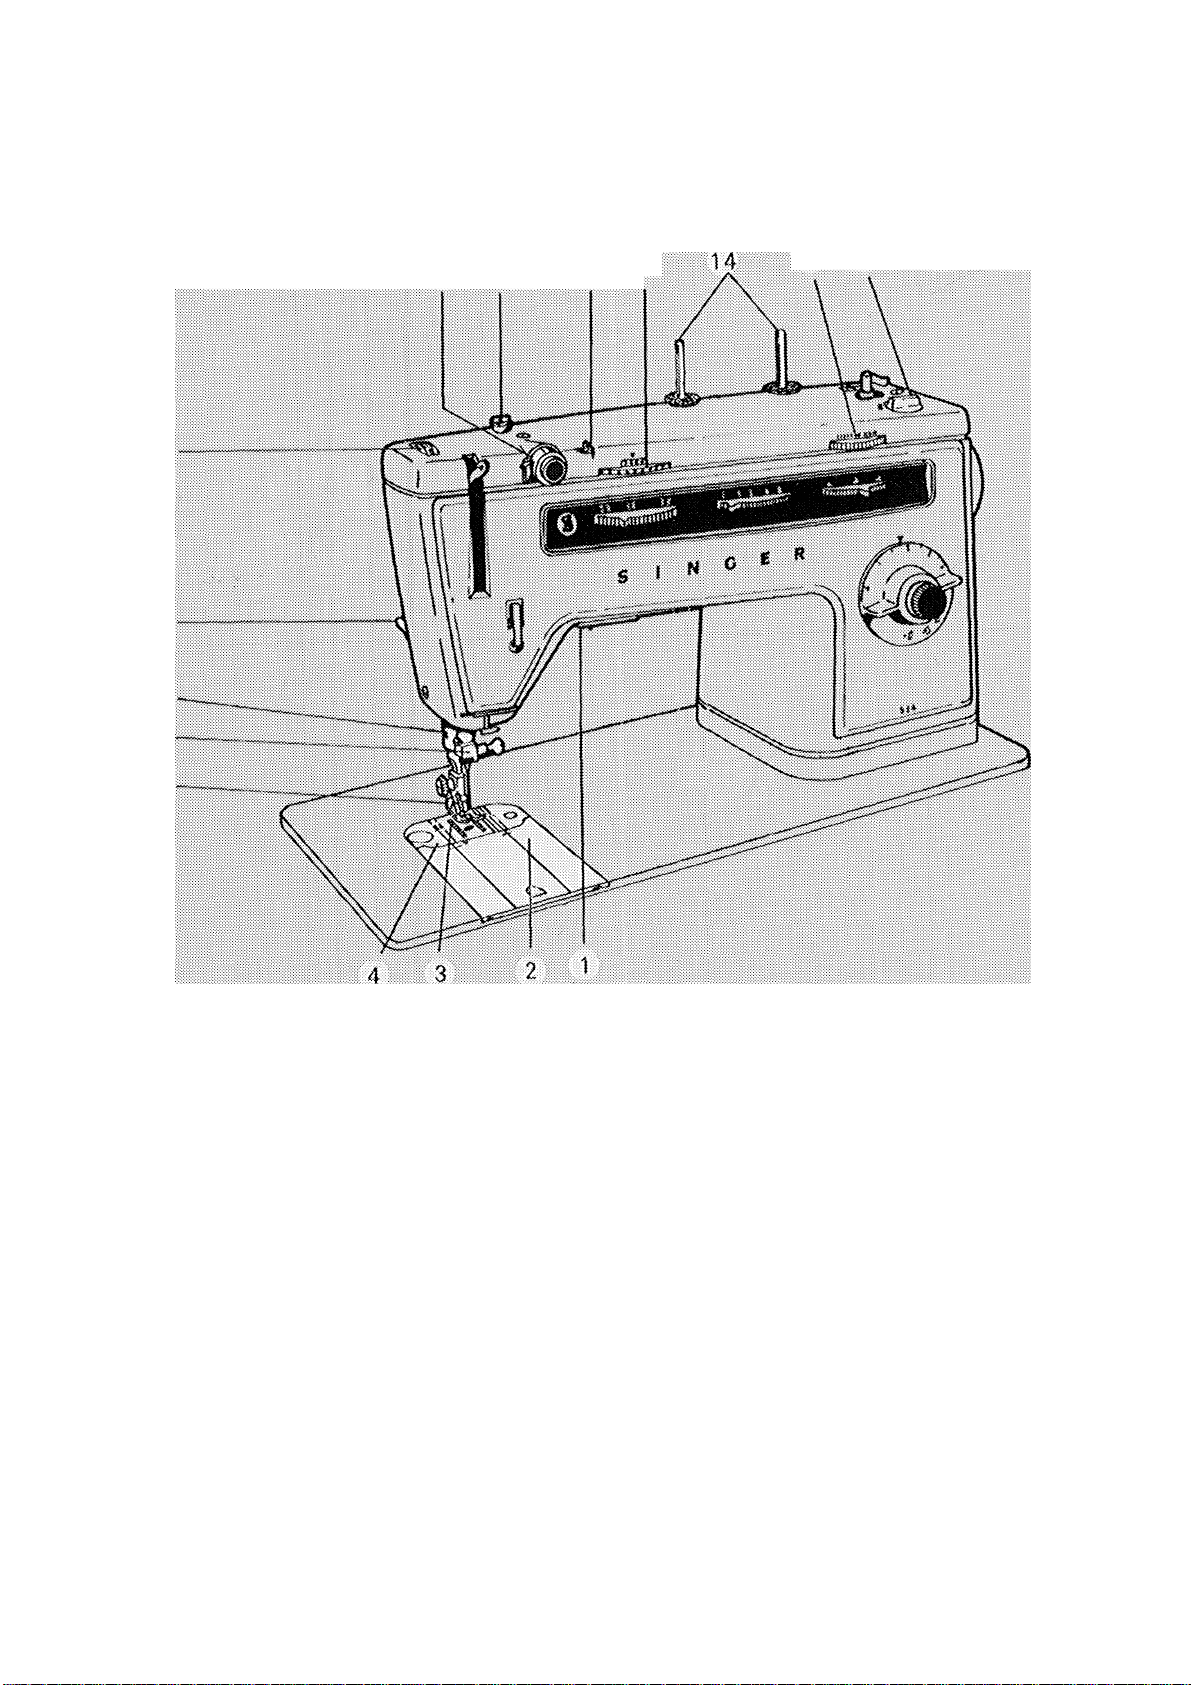
Pri nc ip al P ar ts
10 11
12 13
15 16
1. Sewing Light
2. Slide Plate
3. Peed
4. Needle Piate
5. Presser Foot
6. Needle Clamp
7: Thtèad Ciittef
8. Presser Foot Lifter
9. Pressu re Dia i
........ ................
10. Tension Discs
11. Bobbin Winder Tension
12. Thread Guide
13i Needle-iThread Tension
14. Spooi Pin and Felt
16. Dial
16. Bobbin Winder
PRINCIPAL PARTS (Continued)
17 18
17, Thread Take-up Lever
18, Thread Guide
19, Pattern Selector Dial
20, Stitch Width Dial
21, Needle Position Dial
22. Stitch Length/
Buttonhole Dial
23. Reverse-Stitch Push
Button
24. Hand Wheel
28. Hand Wheel Disc
26. Power and Light Switch
■ ! -
. . . and when to use them
The accessories that come with your
sewing machine will help you to sew
with ease and comfort. They are simple
to use and place an almost limitless
variety of sewing effects at your finger
tips.
The eccessorfos shown in this instruction
book me not necessariiy furnished with
your machine. Those that are not in
cluded are avaiiahie for separate purchase
at your Singer Sewing Centre.
General Purpose fittings
The general purpose presser foot and
needle plate are in place on the machine
and can be used for either straight or
zig-zag stitching. These fittings must be
used when alternating between straight
stitching and any kind of zig-zag stitch
ing.
Straight Stitch Fittings
The straight stitch presser foot and
needle plate are used only with the
stitch width selector at \ and the
needle position selector at X , Use these
fittings for:
# Precision stitching of curved edges,
top stitching, edge stitching, eta
# Stitching delicate fabrics.
straight Stitch Fittings
ii—ii*******««
■iilllll
Ч1И
¡IIP
ШШ
Feed Cover Needle Plate
The feed cover needle plate is used for
free motion darning and embroidery and
for sewing on buttons. It covers the feed
so that the fabric does not move.
I
Feed Cover Needle Flate
Ö
ACCIESSORIES {Contiriuod)
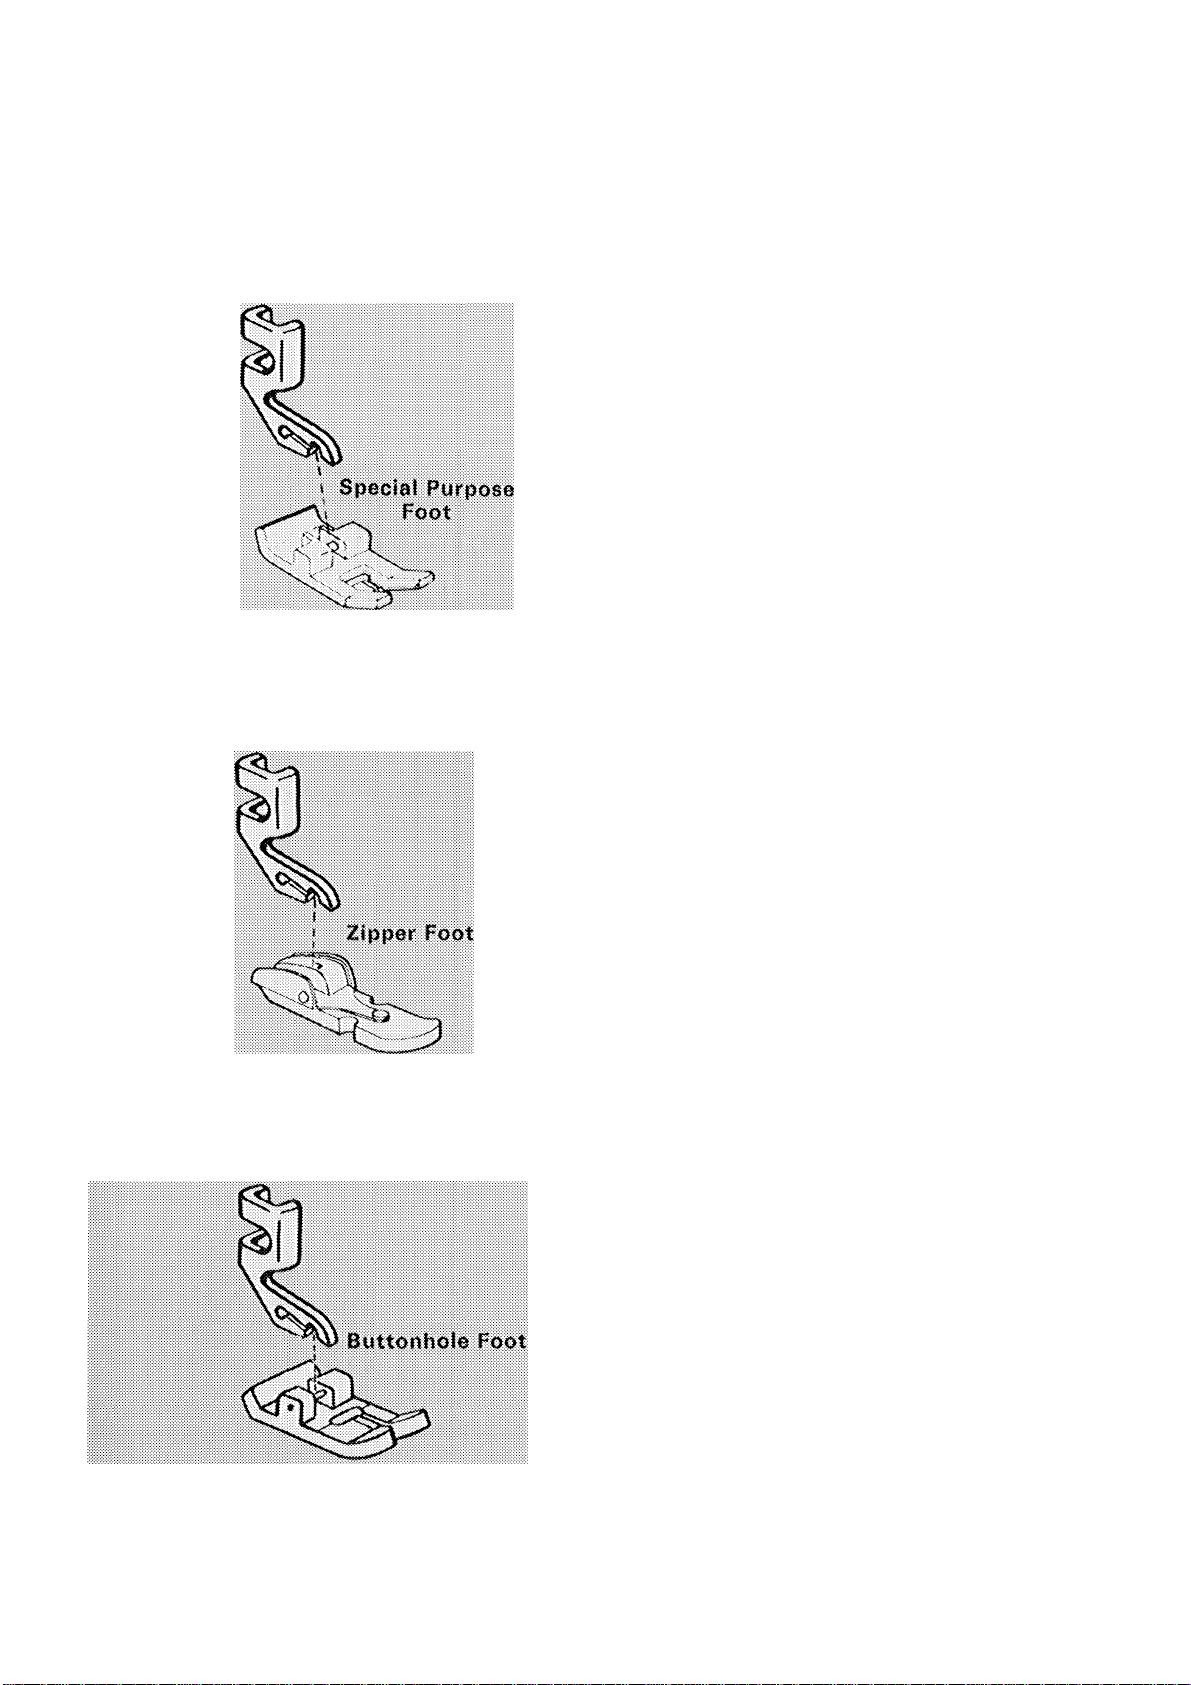
Special Purpose Foot
The special purpose foot is designed for
zig-zag stitching, buttonholing, and ap
plique, The channel on the underside
allows closely spaced zjg-zMg stitches to
feed evenly.
Zipper Foot
This foot makes it easy to place stitching
close to a raised edge. Thus, it is useful
for corded seams as well as zippoi'
insertions (page 40), The hinged foot
easily rides over pins, heavy layers of
fabric, or seams.
This foot is used to make 4-step bar tack
buttonholes. The channels on the under
side allow closely spaced zig-zag stitches
to feed freely and permit buttonholes to
be double stitched when extra strength
is needed. Guidelines on the foot simplify
buttonhole placement and make it easy
to gauge buttonhole length.
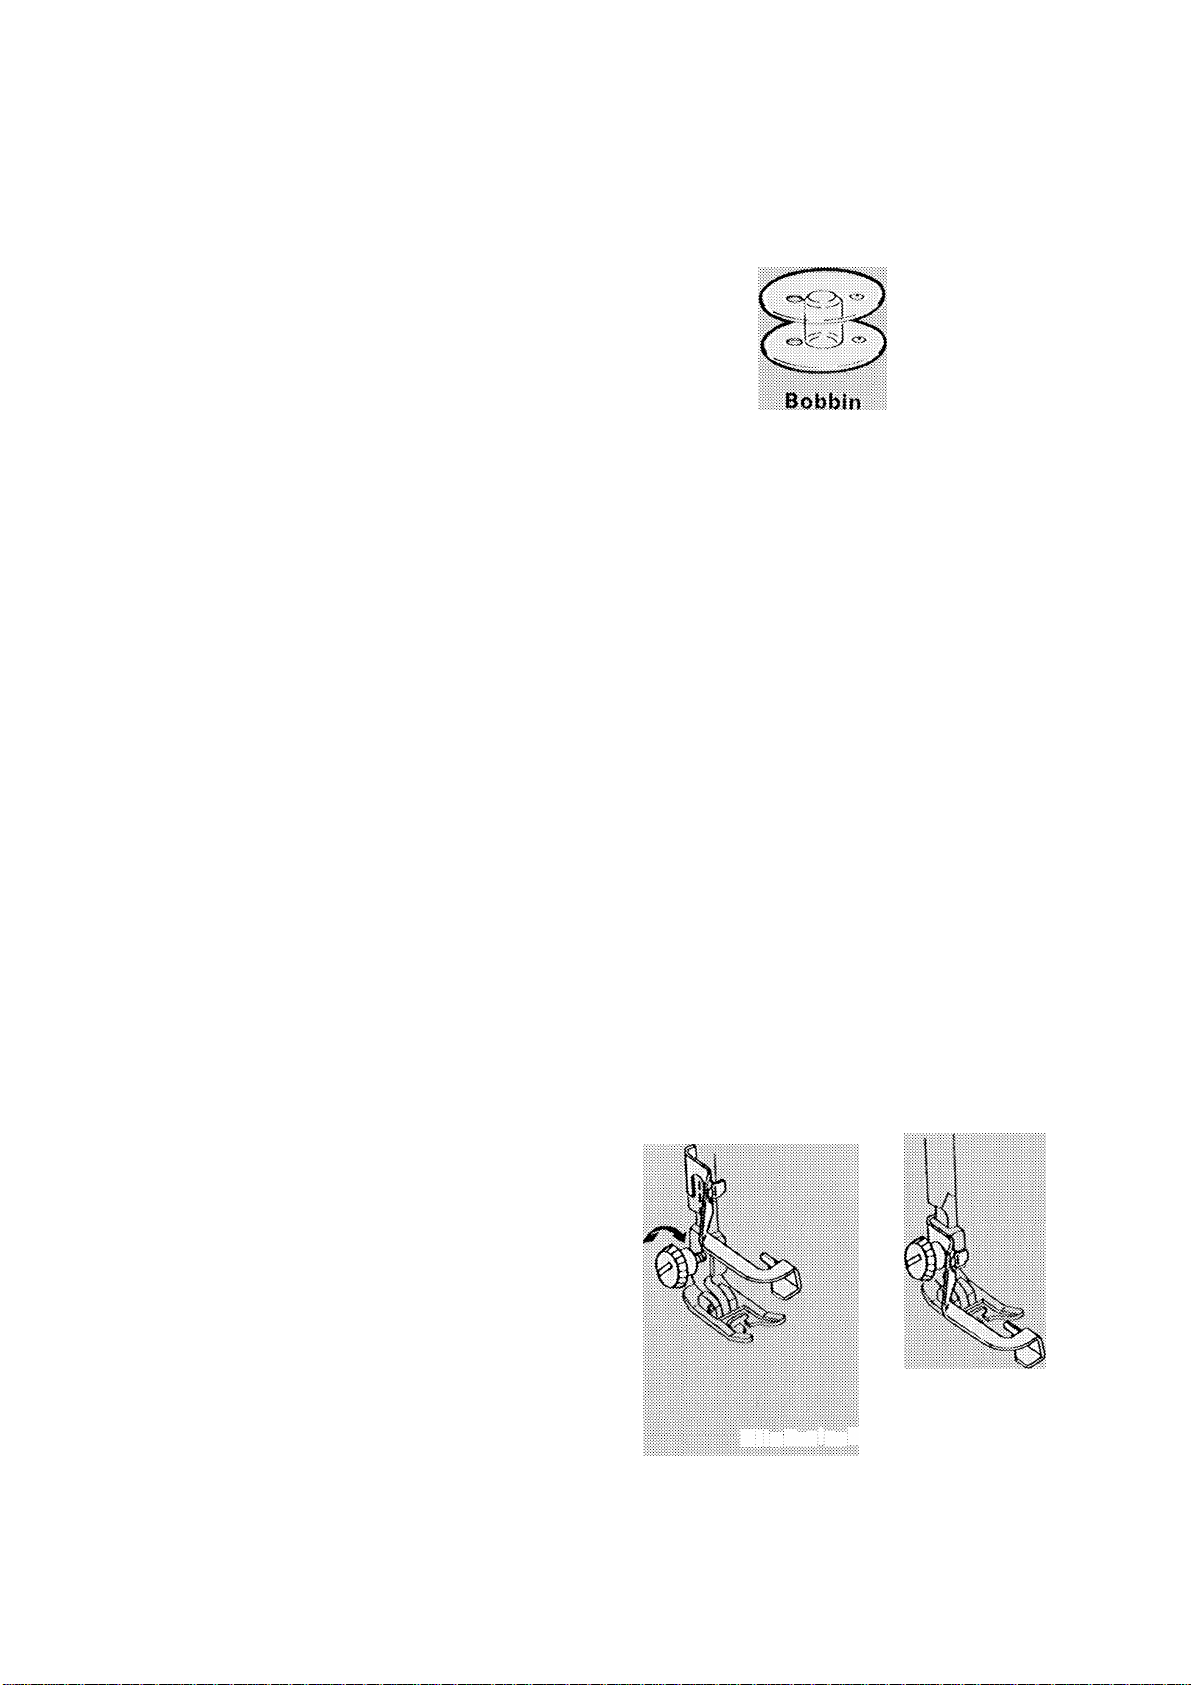
The tfanspareni bobbin shows thread
supply at a glance*
One bobbin Is in place in your machine.
Icxtra bobbins are among your acces
sories*
Needles
Regular Meedles (Catalogue 2020) for
all-purpose sewing*
Yellow-Band Needles (Catalogue
2046) for sewing knits and stretch
fabrics.
II
Twin Needle (Catalogue 2028) for
decorative twin-needle stitching.
Biindstitch Hem Guide
The biindstitch hem guide, used with the
general purpose foot, positions the hem
fold in front of the needle for biindstitch
hemming. To attach, simply loosen
presser foot screw and slip the guide
between presser foot screw and presser
foot shank. The guide is then positioned
over the left toe of the foot For biind
stitch hemming instructions, see page 46,
Regular
Noedle
(Cat. 2020)
Yellow-Band Noodle
Blindstitoh Hem Guide
Twin
Needle
(Cat* 2028)
(Cat. 2045)
ACCESSORIES (Continued)
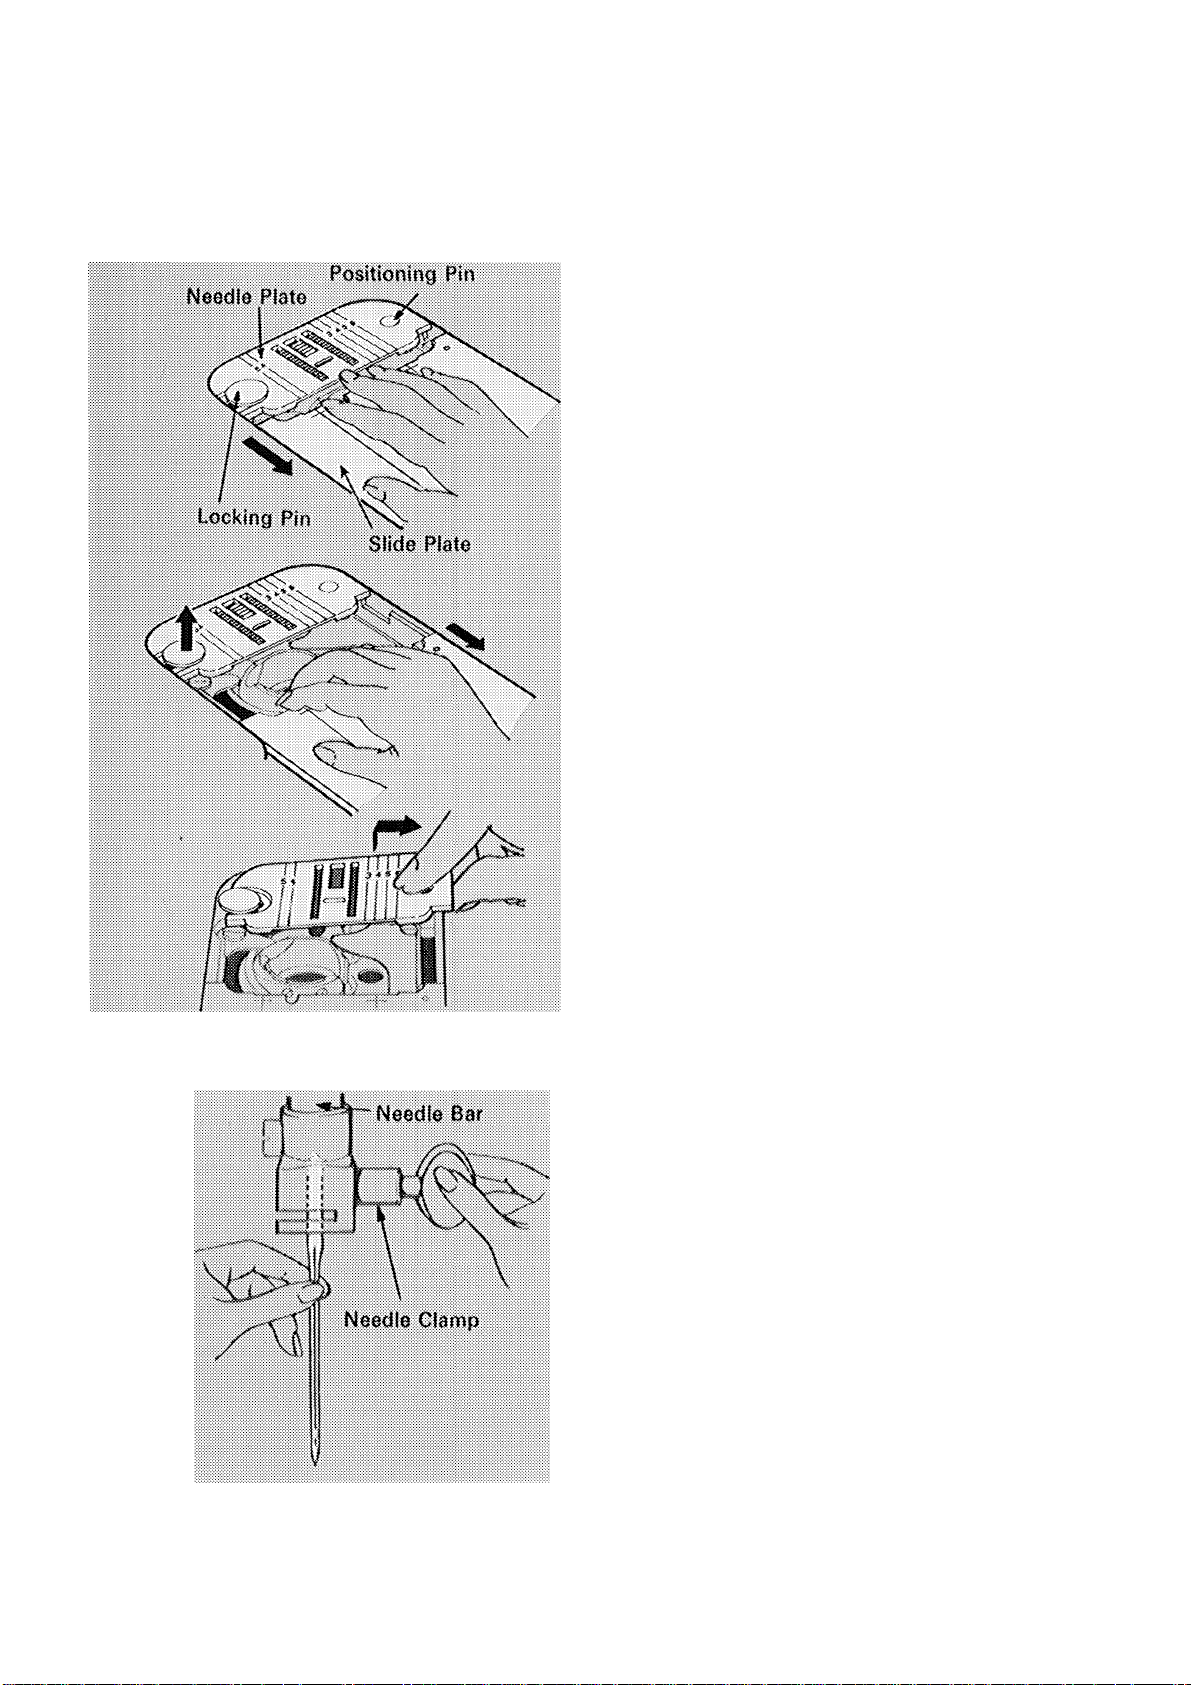
CHAN6JN<3 NEEDLE PLATl
Changing Needle Plates
1 > Raise the pressor foot.
2> Turn hand wheel toward you until the
needle is above the pressor foot>
3. Open slide plate as Illustrated until
bobbin is fully revealed
4. Place fingers on edge of slide plate
as illustrated and apply pressure to
fully open the slide plate and release
the locking pin,
5. Insert thumb under needle plate and
\mth6raw needle plate to the right to
remove.
6. Insert new needle plate under locking
pin and locate on position pin. Fully
close slide plate to lower the needle
plate locking pin and secure the
needle plate.
CHANGING THE NEEOM
a
Changing the Needle
The needle clamp has been designed so
that the needle can only be inserted one
way—the correct vv^ay, with the flat side
of the shank to the back.
1. Turn hand wheel toward you until
needle is at highest position.
2. Loosen needlC'Clamp screw and re
move needle.
3. Insert new needle in clamp with the
fiat side of the needle to the back and
the long groove toward you; push it
up as far as it will go.
4> Tighten needle clamp screw.
For regular sewing, this machine uses
SINGER needles Catalogue 2020 (15x1).
available in sizes 9. 11. 14. 16 and 18,
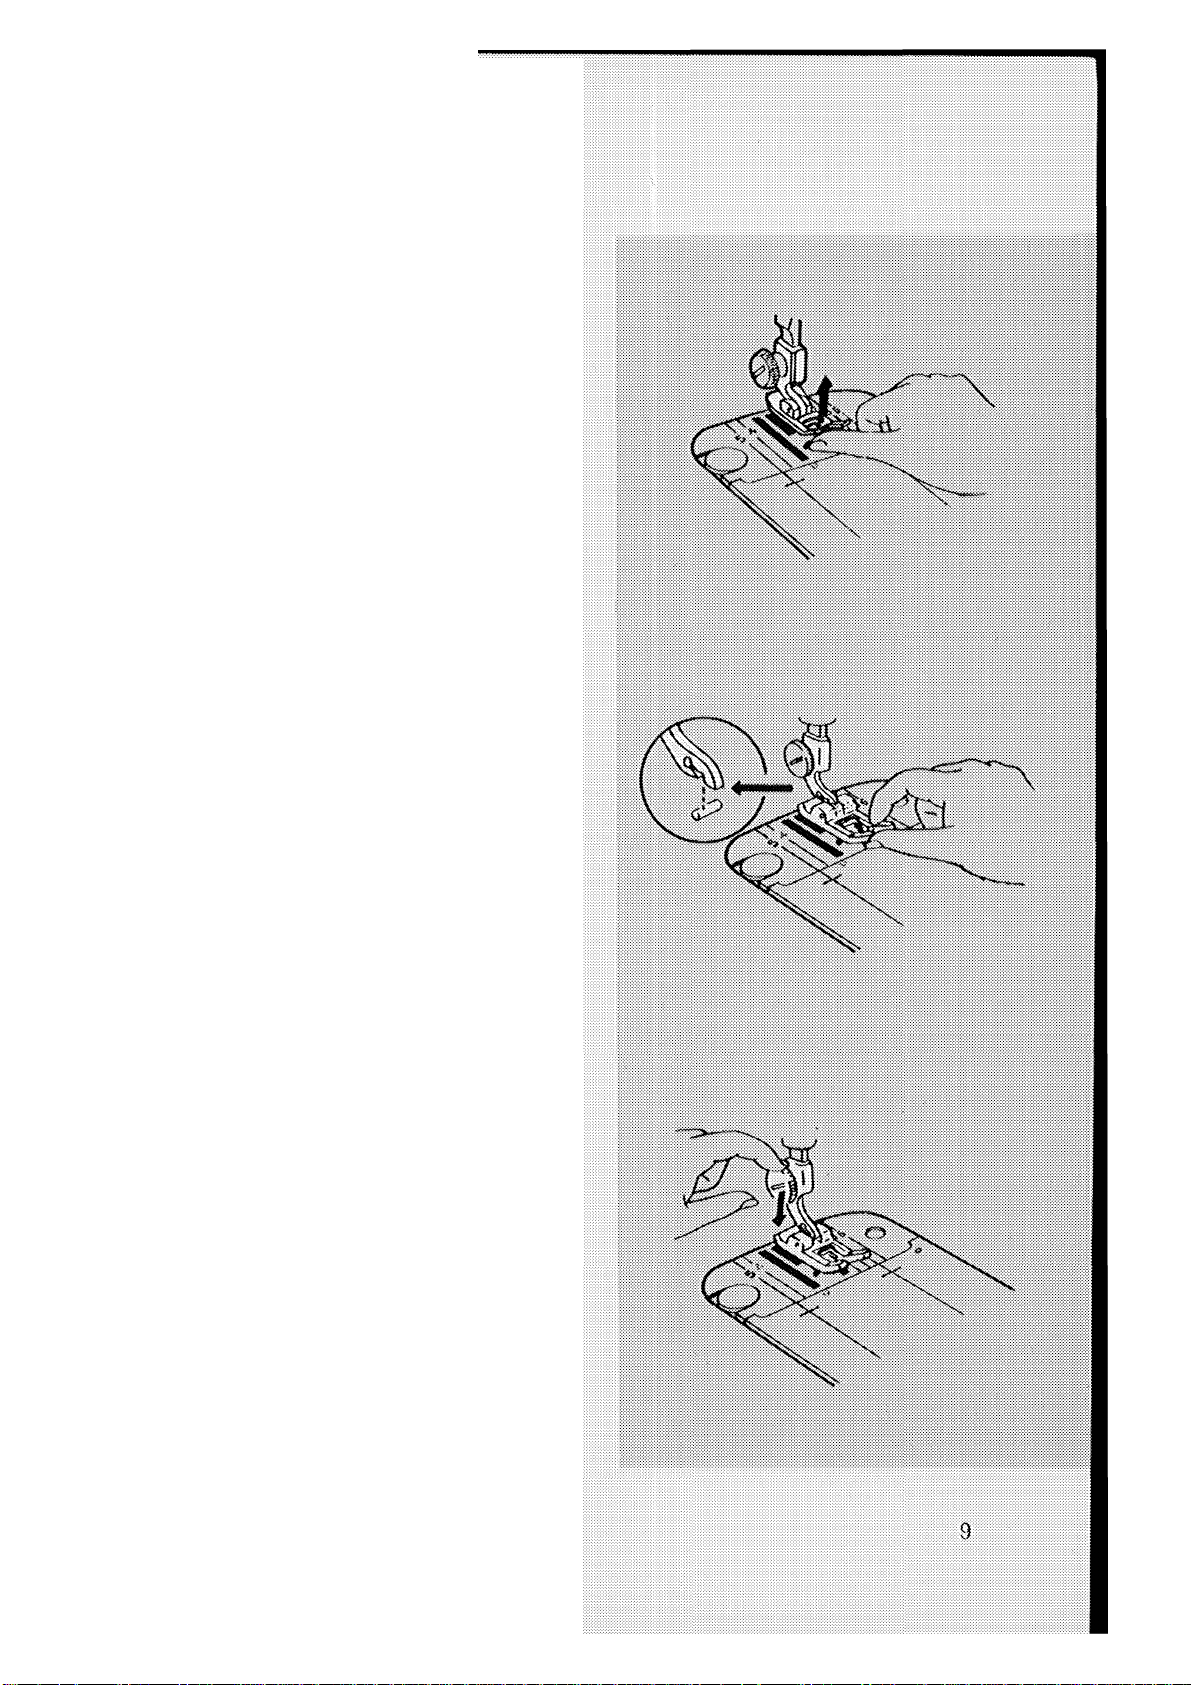
Changing Presser Feet
1. Raise the prosser foot and make sure
the needle Is at Its highest point.
2. With youf thumb under the prosser
foot and your Index finger at the back,
tilt prosser foot away from you and
remove it.
3. Centre the new pressor foot under the
shank and hold it in position,
4. Lower die presser bar so that the
front opening in the shank fits over
the pin in the presser foot.
b. Press down on the presser foot screw
until the foot snaps into place.
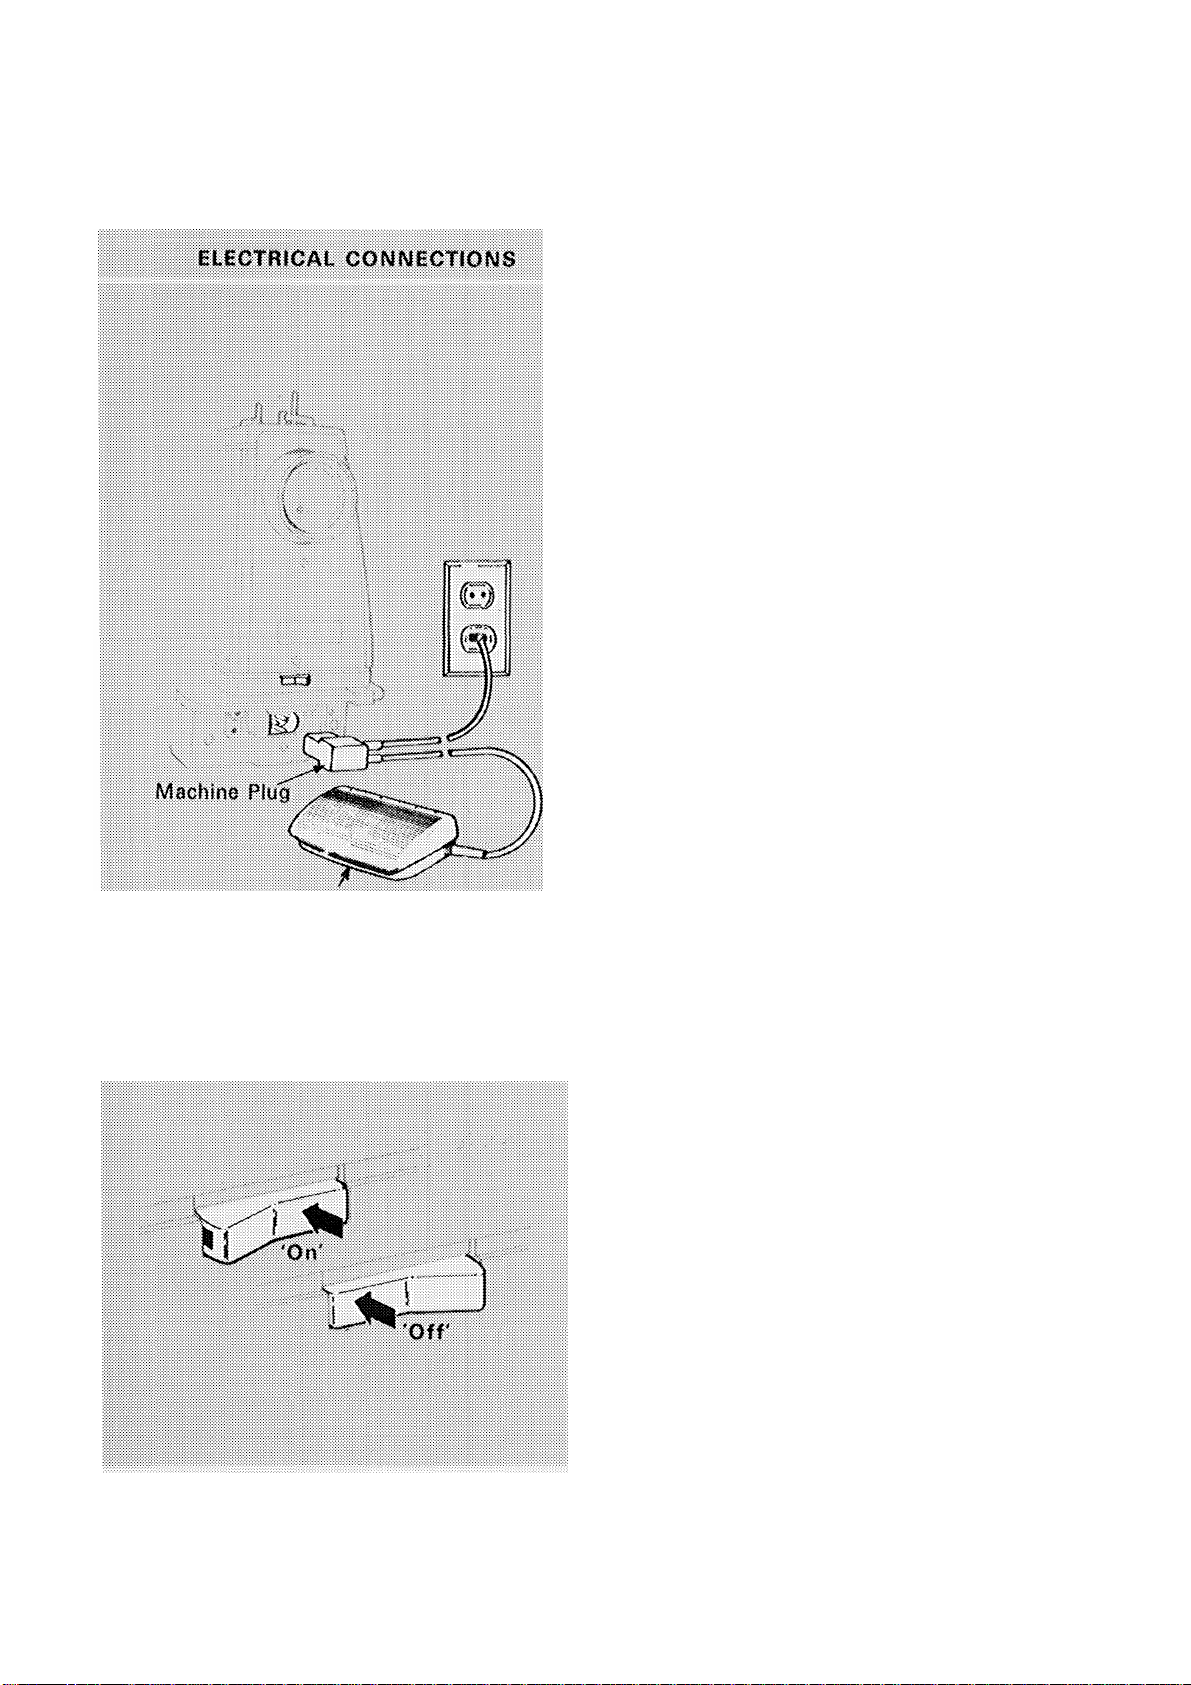
Ope ra ti ng y ou r se wi ng ma ch in e
Before plugging in your machine, be sure
that the voltage and number of cycles
indicated on the plate under the hand
wheel conform to your electrical power
supply. .
CAUTION: Because of the up and
down movement of (he needle, you
must work carefully and watch the
sowing area when operating the
machirm. We recommend that you
switch off the power and light before
changing needles, pressor feet and
needle plates and when leaving the
machine unattended. This eliminates
the possibility of starting the machine
by accidentally pressing the speed
controller.
■I
IIIIII!
Electrical Speed ContfOllcr i
POWER AND UGHT SWITCH
ELECTRIC DRIVE
# liaise the presser foot (the higher
lifting position allows placement of
bulky fabrics).
# Place material under the presser foot
and lower presser foot.
# Insert machine plug Into the recep-'
tacle at the right end of the machine,
and connect the wall plug to the
electrical outlet. Switch on the pow-^er
and light. Start the machine by
pressing down on foot controller. The
speed of the machine is regulated by
amount of pressure on foot controller.
# Practice operating machine (without
thread) until you become accustomed
to guiding material and regulating
machine speed.
NOTE: Do not operate machine wittv
out material under presser foot
as this may damage the feed
and presser foot.
10
TREADLE DRIVE
# Loosen hand wheel knob.
# Place feet on tfeadle.
# Turn hand w4ieel over toward you and
allow feet to move freely and lightly
with motion of treadle.
# Practice this motion until you are able
to redstart machine v/ith hand wheel
turning over toward you<
# Tighten hand wheel knob.
# For light, insert machine plug and
connect wall plug. Switch on light,
# Place material under presser foot and
lower the presser foot.
# Operate machine (without thread} until
you become accustomed to guiding
the material
# To disengage belt—operate treadle
and throw-off belt to the right.
# To engage belt—operate treadle with
hand wheel turning toward you and
guide belt on to band wheel
DISENGAGING HAND WHEEL
ENGAGING BELT DRIVE
NOTE; Belt tension should be only
heavy enough to keep belt
from slipping.
DUAL PURPOSE ELECTRIC/TREADLE DRtVE
Electric Drive
CAUTION: Before insermg machinem
plug and wall plug (he beh for treacHe |
drive must be disengaged as instructed |
above, 11
# Operate the machine as instructed for
electric drive on page 10.
Treadle Drive
# Disconnect rnachine/controller plug
from machine and wall plug from
electrical outlet as shown. (If light
connection is required a special light
lead must be used—please consult
your SINGER Sewing Centre.)
# Operate machine as instructed above.

FABRIC, THREAD, NEEDLE AND STITCH LEN6TH TABLE
STRAIGHT STITCHING
Uso the chart as a general guide: with the ever Increasing development of
symhetic fibres, all fabrics are not covered. We recommend as a golden rule
to use a synthetic fibre thread to sew synthetic fibre fabrics and natural
fibre thread to stitch natural fibre fabrics. Be sure to use the same size
thread In both needle and bobbin.
THREAD
TABRICS
DKUCATB—tulle, chiffon,
fine lace, silk, organdie.
SIZES
Fine mercerized
cotton.
fine synthetic
LIGHTWeiGHT-lawn.
organdie, voile, taffeta, silk.
crepe, chiffon velvet plastic
50 mercerized
cotton.
silk.
fine synthetic
SYNTHETIC KNITS AND
STRETCH FABRICS-polyester double knit nylon
60 mercerized
cotton.
silk.
tricot, jersey, bonded fabrics.fine synthetic
ciré, panné velvet, rascheL
MBmumwmmr--
50 mercerized 14 1.8-2
gingham, percale, pique. cotton.
linen, chintz, faille, satin, silk.
fine corduroy, velvet
suitings, stretch fabric.
fine synthetic.
60 cotton
NEKDŒ
SIZES
9
(Cal. 2020)
11
(Cat. 2020)
14
(Cat. 2045)
(Cat. 2020)
STITCH LSNGTH
SETTINGS
1-1.5
1.8-2
(2.8*3 for plastic)
1.6-2
MEDIUM HEAVY--»
gaberdine, tweed, sailcloth.
Heavy-duty
mercerized cotton.
16 2-2,5
(Cat- 2020)
denim, coatings, drapery 40 to 60 cotton.
fabrics, deep-pile fabrics. synthetic thread
....------
-----------------------------
............
H EAVY—overcoatings. Heavy-duty 18 2.5-3
dungaree, upholstery fabrics.mercerized cotton.
(Cat. 2020)
canvas. 24 to 40 cotton
ALL WEIGHTS-
decorative lop stitching.
Buttonhole twist t
18 2-4
(Cat 2020)
LEATHERS—suede. 60 mercerized 11. 14, 16
kidskln. lined leather.
cotton or
(Cat. 2032)
synthetic ihrmd
tUse with No, SO mercerized cotton thread or fine silk thread in bobbin.
12
2-4
you r se wi ni
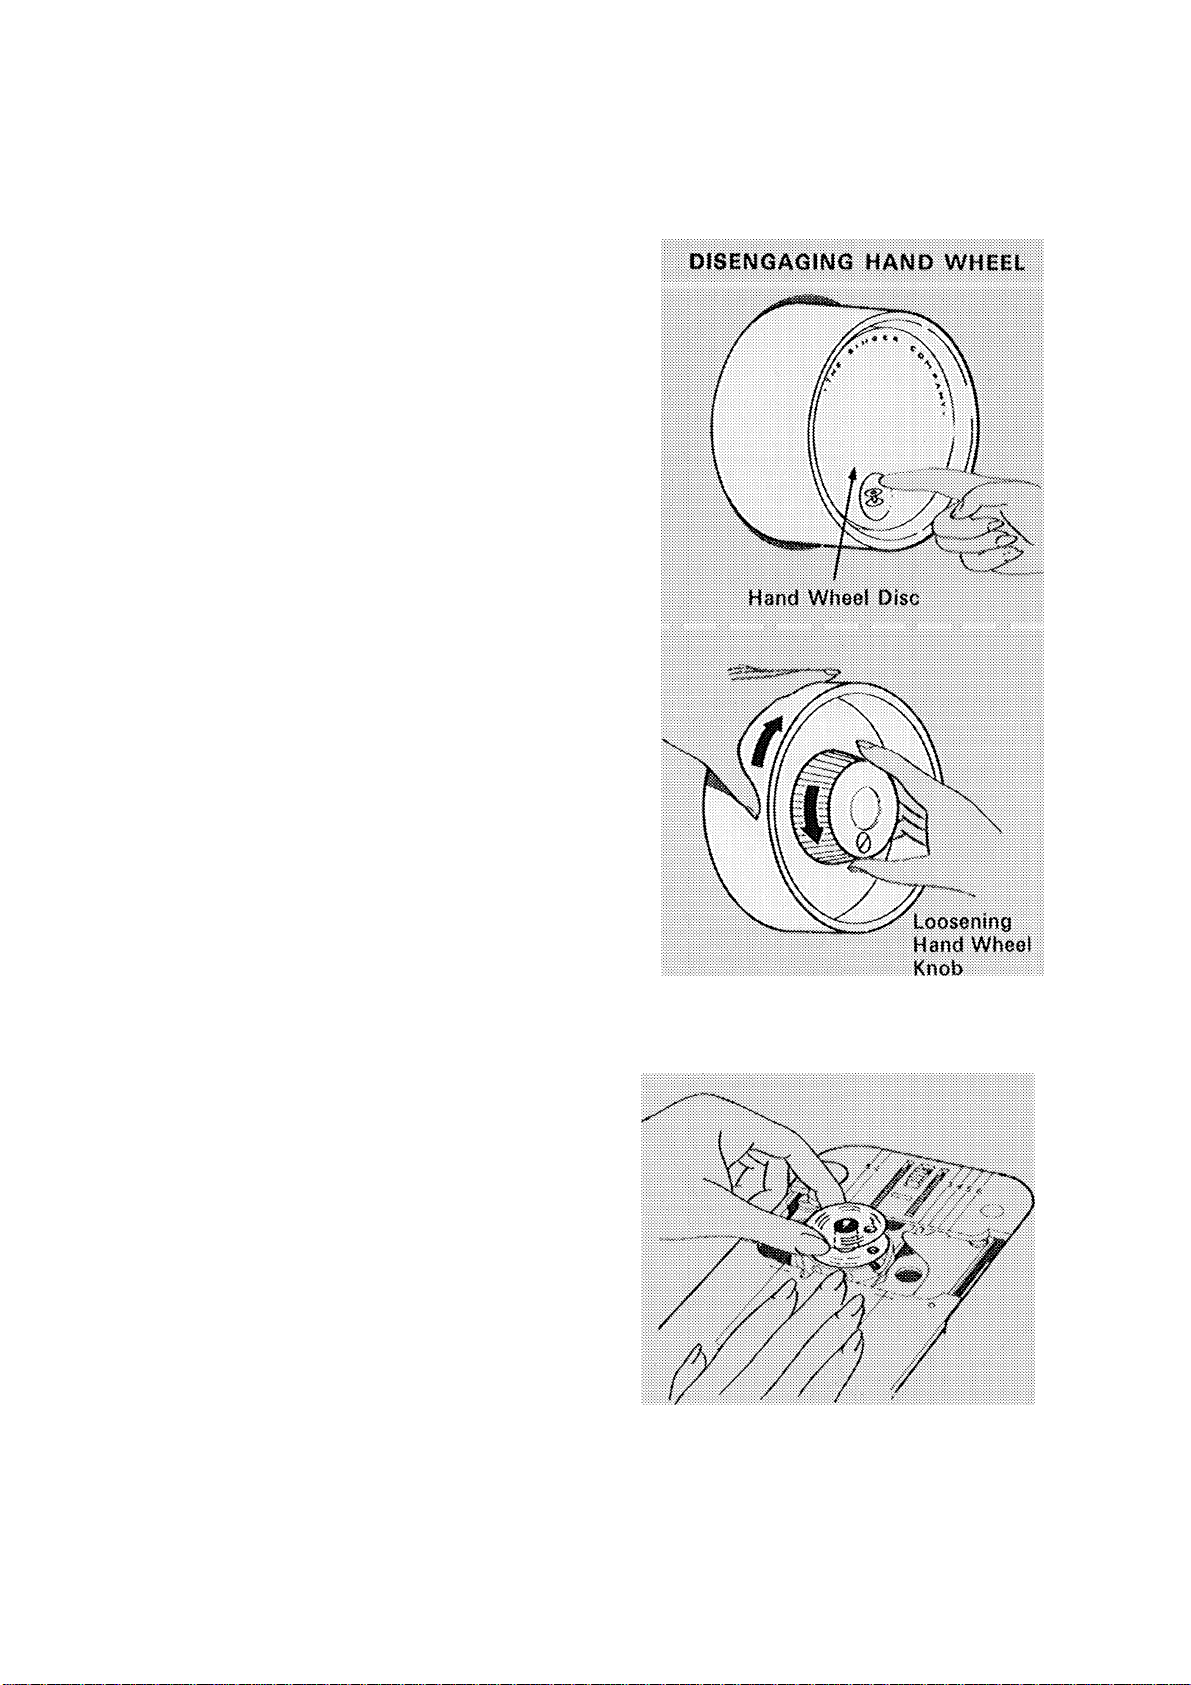
THE BOBBIN THREAD
Winding the Bobbin
Always wind the bobbin before threading
the needle,
1. Raise the presser foot.
2. Turn hand wheel toward you imtil
needle is above the presser foot.
3. Disengage hand wheel by pressing
bobbin symbol (@) on hand wheel
disc.
(For treadle drive, loosen the hand
w4ieef knob.)
4. Open slide plate with finger pressure
as Illustrated.
6, Lift out bobbin,
6. Fully close slide plate to make sure
that needle plate is secure.
REMOVIIMG BOBBIM
13

...........................................
--------- B 0bt ■ "
................
mmmmmmmmmmmmmm
............ :
I
........^.
......
WISSS^
mmF"
BOBBIN WINDER SWITCH
ENGAGING HAND WHEEL
7. Place spool of thread on spool pin
over the spoof pin felt and lead
thread around bobbin winder tension
disc.
8. Pass thread, from the inside, through
hole in bobbin and place bobbin on
spindle.
9. Turn bobbin winderswitch clockwise
to "wind“ position, hold thread end
as shown and start the machine<
10, Cut off thread end after a few coils
have been wound on the bobbin,
11, When required amount of thread has
been wound (winding will stop when
bobbin is full), turn bobbin winder
swatch counterclockwase to “sew/“
position and cut thread.
12, Press hand wheel disc for sewing or
tighten the hand w/heel knob.
14
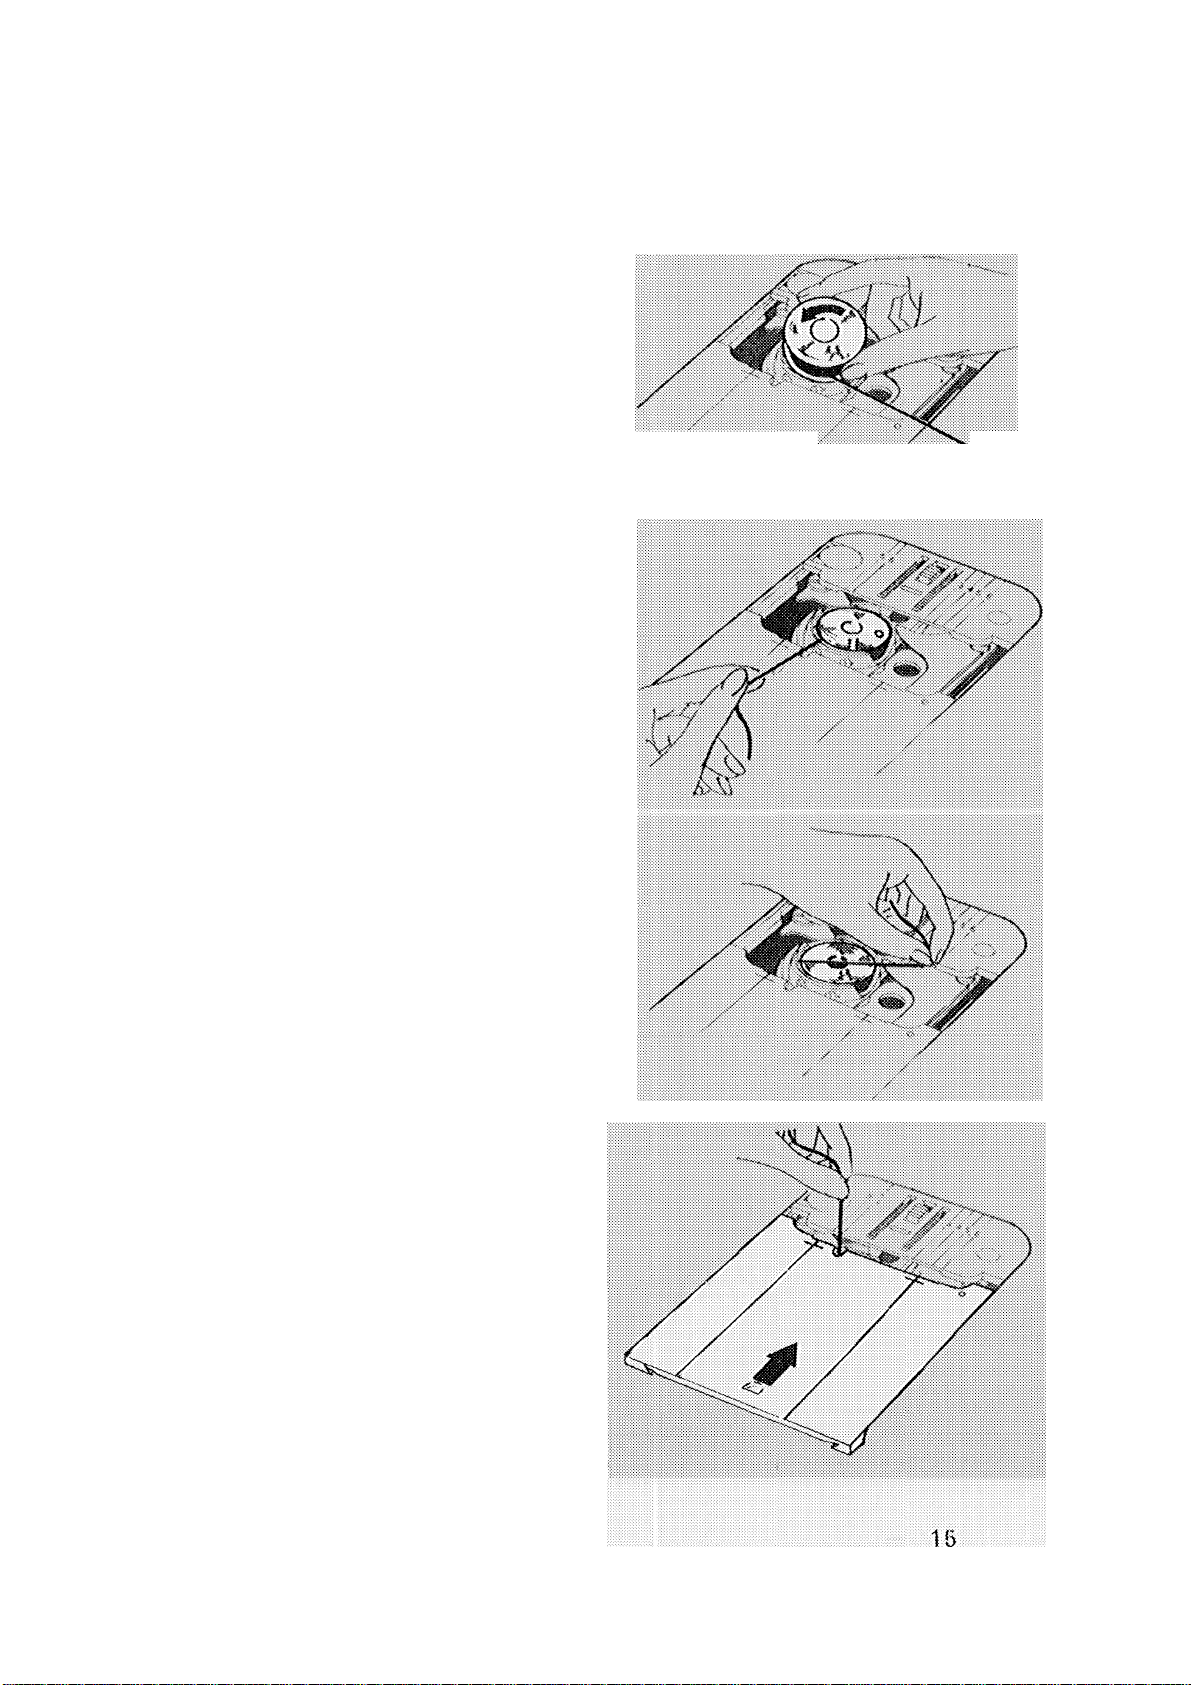
Threading the Bobbin Case
1. Raise the presser foot.
2, Turn hand wheel toward you until
needle is above the presser foot,
3. Open slide plate.
4, Hold bobbin so that thread unwinds in
direction shown, and insert bobbin in
bobbin case.
6, Pull thread into notch, draw it under
tension spring, and into slot.
iíiíiíSiiiíS;:
0. Draw about 10cm (4") of thread
diagonally across the bobbin.
7. Fully close slide plate with the thread
in slot between the needle plate and
slide plate. Make sure that needle
plate Is secure.
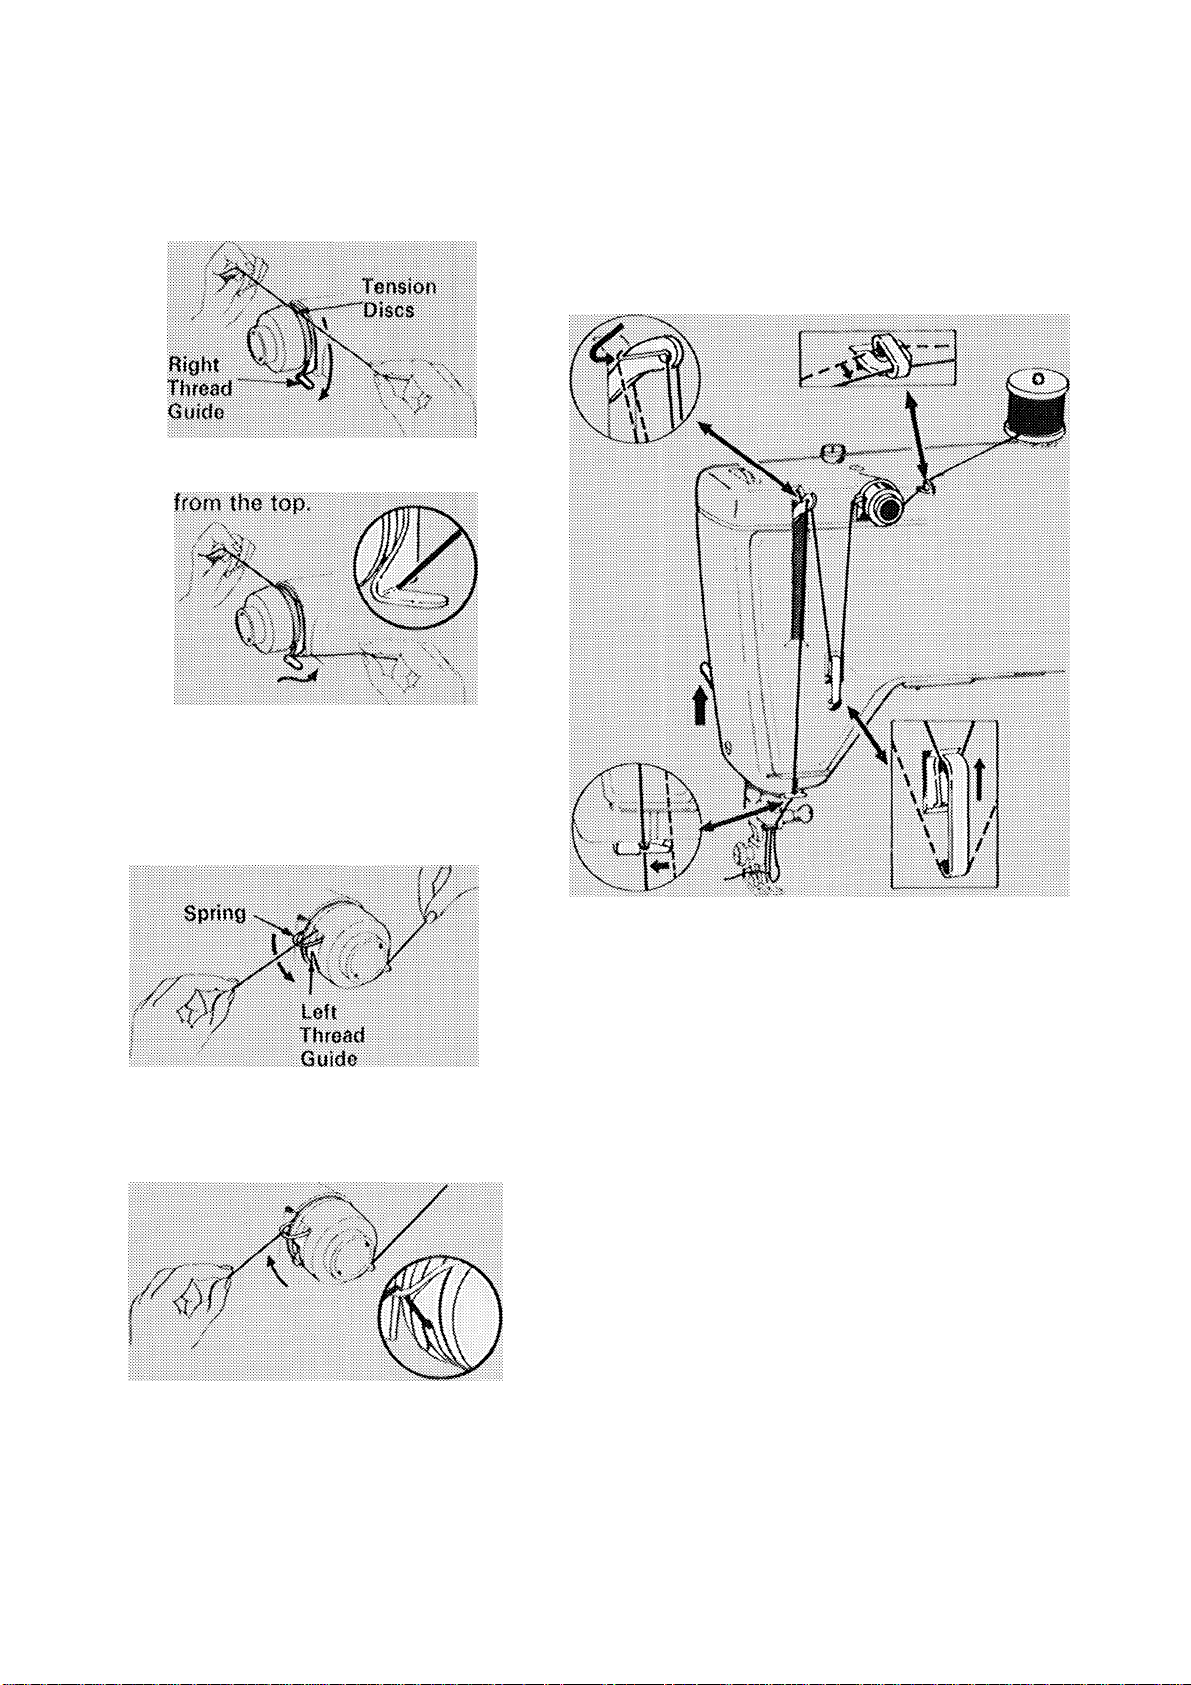
With tv>/o hands, slip Ihmad horii^onially between tension discs
THE NEEDLE THREAD
Hold thread firmly with left hand
and. with the right hand, lead the
thread down past the right throacl
guide and up to catch behind the
guide.
With left hand lead thread over
spring, pulling thread down in
direction of arrow and under guide.
Allow the gyring to return to its
normal 'up' position and continue
threading the machine.
Threading the Needle
1. Raise pressor foot to release the
tension discs and turn hand wheel to
raise the needle to its highest position,
2. Place spool of thread on spool pin
over felt and lead thread through to
points as shown, making sure to
# Thread tension discs as illustrated.
# Thread take-up lover from back to
front, guiding thread down over top
of lover and then up into eyelet.
# Thread needle from front to back
drawing about 10cm (4'0 of thread
through eye of needle.
16
RAISING THE BOBBIN THREAD
Nov\/ that you have wound the bobbin
and threaded the needle, you will need
to raise the bobbin thread through the
needle hole in the needle plate.
1> Hold needle thread lightly with left
hand and turn hand wheel slowly
toward you so that needle enters
hole in needle plate.
2. Continue turning hand wheel and
firmly hold needle thread until needle
rises and brings up bobbin thread in
a loop.
3. Undo the loop with your fingers.
4. Place both needle and bobbin threads
under presser foot, and draw them
toward the back of the machine.
. . . You are now ready to sew
Str ai gh t st it ch in g
DIAL SETTINGS
F/exi^$tk€h Dial
Stitch Width Dial
L X
F/exhStkch Dial: 0
Stitch Width * j i 1 ^ I ^ ^
Needle Position: 5L i J 1 ?
Stitch Length; See page 19
Pressure: See page 21
Tension: See page 20
General Purpose or Straight Stitch
Presser Foot
General Purpose or Straight Stitch
Needie Plate
0^ j
SETTING NEEDLE POSITION
Before you set your sewing machine for
any kind of stitching, turn the hand wheel
tov^/ard you until the needle is above the
needle plate.
Check:
# That the Ffoxi-Stitch dial is set at 0<
# That the stitch length/buttonhoie dial
is not set at any of the four bullón-
holing positions,
Meedic Position Old
ACCESSORIES
FITTINGS
Best sewing results will be obtained if
you use the straight stitch presser foot
and needle plate (see page b). However,
the general purpose presser foot and
needle plate may also be used,
ADJUSTING FOR YOUR FABRIC
As you get ready to sew, take advantage
of the versatility of your sewing machine.
With a choice of needle si^es and three
easy-to-use selectors for stitch length,
pressure, and needle-thread tension, you
can adjust the macliine to sew perfectly
on a wide variety of fabrics. The table on
page 12 will guide you in selecting the
correct thread, needle size and stitch
length according to the vv^eight of your
fabric.
18
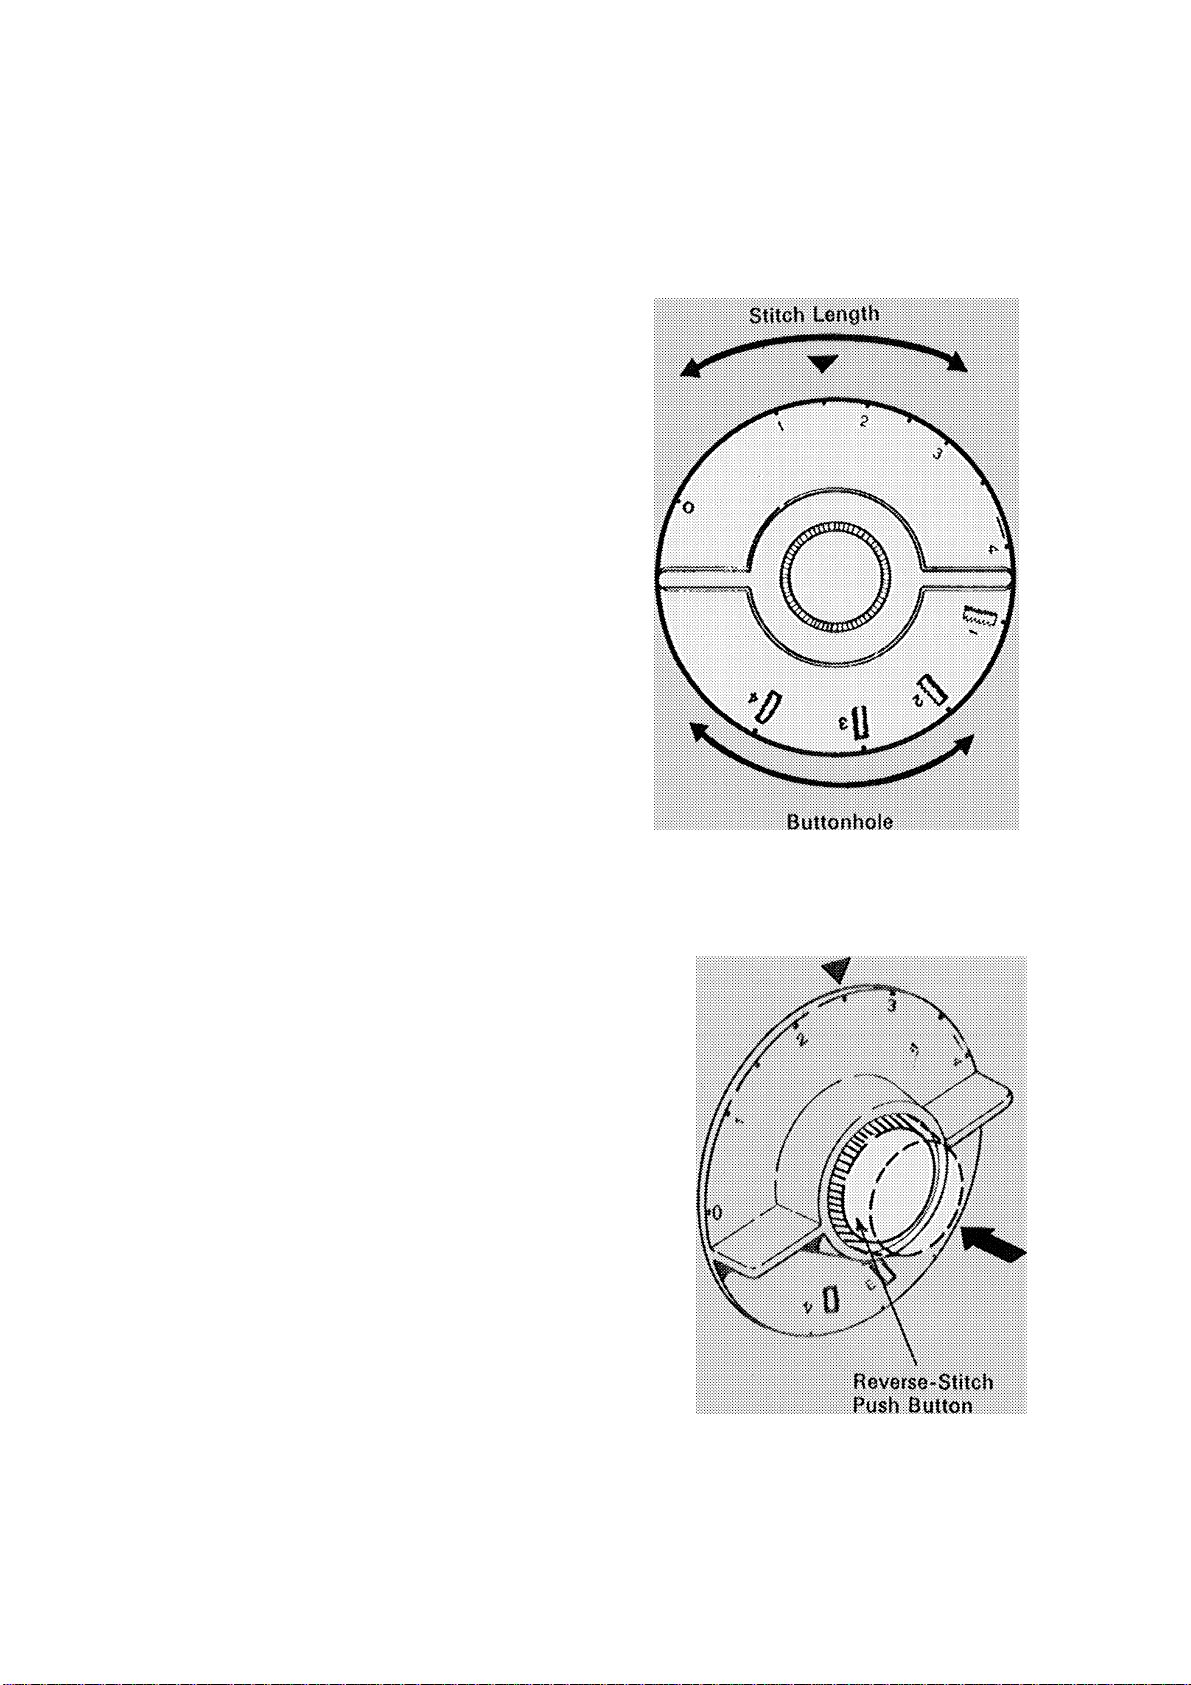
Adjusting Stitch Length
The Stitch fengtii dial controls the length
of the stitch. It is graduated from
0-4: the higher the number, the longer
the stitch>
Generally, shorter stitches are best for
lightweight fabric; longer ones for heavy
fabric. The area between 1 and 0 is used
for ^ig-:!ag satin stitching only.
Setting Selector
# Turn dial so that the stitch length
desired is positioned under the arrow
head 'W on the control panel.
#To shorten the stitch, turn dial to the
right
# To lengthen the stitch, turn dial to the
left.
STITCH lENGTH DIAL
mvBnsB STiTCHHsic
For reverse stitching, press the reversestitch push button In as far as it will go
and hold in place (the button can be
pushed in while the machine is sewing).
Release pressure on the push button to
return to forward stitching.
19
 Loading...