

Page 1
Instruction Manual
Page 2

Contents
For European territories
Important safety instructions
Getting to know your machine
Principal parts
Accessories
Connecting the machine
Running the machine
Choosing and changing needles
Changing the needle plate
Changing screw-on presser feet
Attaching the feed cover
Changing snap-on presser feet
Fabric, thread and needle table
Inserting a bobbin
Winding a bobbin
Threading the machine
Raising the bobbin thread
Adjusting thread tension
Sewing a seam
Starting a seam
Straight stitching
Stitch width selector
Needle position selector
Stitch length selector
Reverse stitch button and sewing in reverse
Darning
Inserting a zipper
Zig-zag stitching
Needle position selector
Stitch width selector
Adjusting stitch length
Pattern groups selection
Flexi-stitch patterns
Balancing flexi-stitches
Pattern stitching
Removing and replacing pattern module
Decorative stitch patterns
Flexi-stitch patterns
Attaching a button
Free arm sewing
Removing the extension table
Four step buttonhole
Twin needle sewing
Additional accessories / Accessory storage
Caring for your machine
Removing and replacing bobbin case
Cleaning the machine
Lubricating the machine
Changing the light bulb
Performance checklist
Page 3
Dear Customer,
DANGER
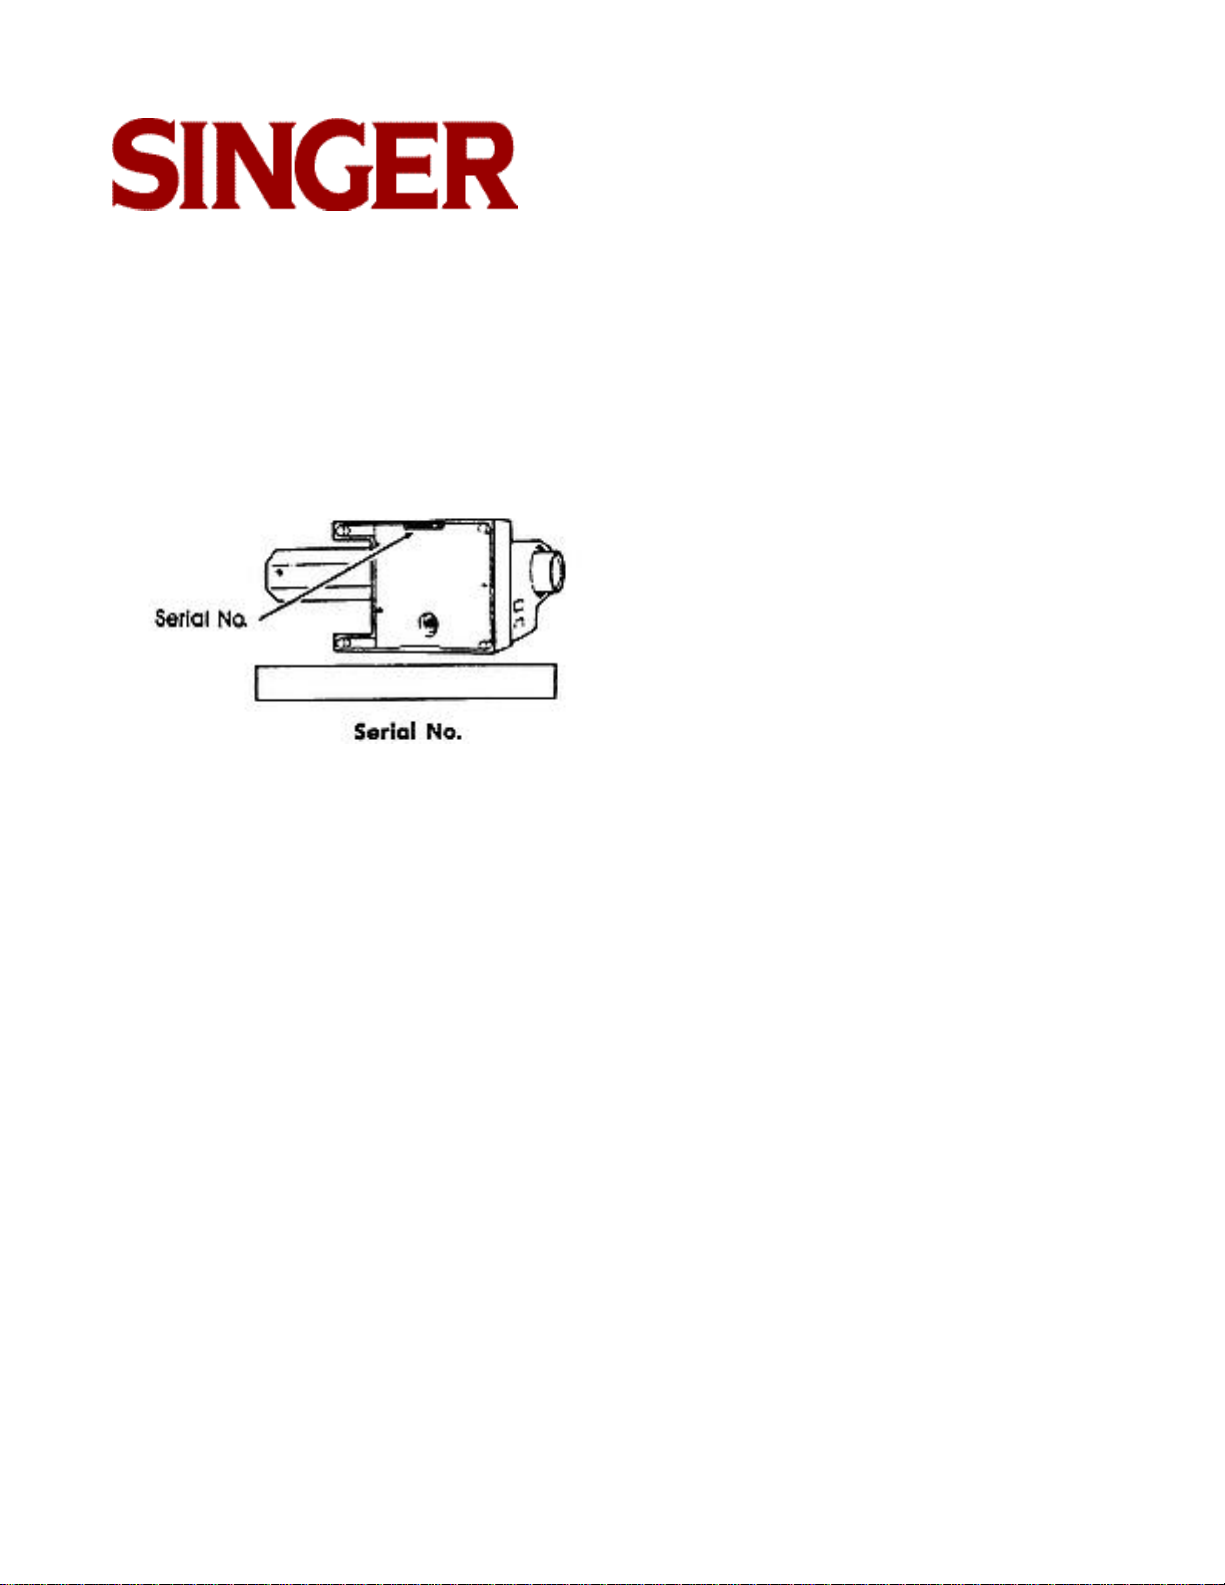
We recommend that for future reference you
record the Serial Number of your Sewing
Machine in the space provided.
Refer to illustration for location of Serial
Number on your machine.
IMPORTANT SAFETY INSTRUCTIONS
When using this machine, basic safety precautions should always be followed including
the following:
Read all instructions before using this
machine.
To reduce the risk of electric shock:
• The machine should never be left unattended when plugged in. Always unplug the
machine from the electric outlet immediately
after using and before cleaning.
• Always unplug before relamping. Replace
bulb with the same type rated 15 watts. Be
sure to replace the face plate which covers
the light bulb before operating the machine.
WARNING
To reduce the risk of burns, fire, electric
shock or injury to persons:
• Be sure that the electrical voltage of the
socket outlet (wall receptacle) is the same
as the rated voltage of the motor.
• Use this machine only for its intended use
as described in this Operator's Guide. Use
only attachments recommended by the
manufacturer as contained in the Operator's
Guide.
• To disconnect, turn all controls to the off
("0") position, then remove plug from outlet.
3
Page 4

WARNING continued...
• Disconnect the power-line plug from the
socket outlet or switch the machine off when
making any adjustments in the needle area,
such as threading needle, changing needle,
changing throat plate or changing presser
foot, etc.
• Always unplug the machine from the electrical outlet when removing covers, lubricating,
or when making any other user servicing
adjustments mentioned in the Operator's
Guide.
• Do not attempt to adjust the motor belt.
Contact your nearest Service Center should
any adjustment be required.
• Do not unplug by pulling on cord. To unplug,
grasp the plug, not the cord.
• Handle the foot controller with care and
avoid dropping it on the floor. Be sure not to
place anything on top of it.
• Always use the proper throat plate. The
wrong plate can cause the needle to break.
• When sewing, keep fingers away from all
moving parts. Special care is required
around the sewing machine needle.
• Do not pull or push fabric while stitching. It
may deflect the needle causing it to break.
• Before removing the bobbin case, remove
plug from the socket outlet.
• For double insulated machines, when servicing use only identical replacement parts.
• Never operate the machine if it has a damaged cord or plug, if it is not working properly, if It has been dropped or damaged, or
dropped into the water. Return the machine
to the nearest authorized dealer or Service
Center for examination, repair, electrical, or
mechanical adjustment.
• Never operate the machine with any air
openings blocked. Keep ventilation openings of the machine and foot controller free
from the accumulation of lint, dust, and
loose cloth.
• Do not use bent needles.
• Never drop or insert any object into any
opening.
4
Page 5

For European Territories:
This product is suppressed for radio and television interference with the International
Electrotechnical Commission requirements of
the CISPR.
Machines for Great Britain:
Machines for Great Britain and some other
countries having similar wiring standards are
shipped from the factory without a plug for
connection to the mains. The wires in this
mains lead are coloured in accordance with
the following code:
Blue: neutral (N) Brown: live (L)
As the colours of the wires in the mains lead
of this appliance may not correspond with the
coloured markings identifying the terminals in
your plug, proceed as follows:
Neither core is to be connected to the earth
terminal of a three-pin plug.
• Do not use outdoors
• Do not operate where aerosol (spray) products are being used or where oxygen is
being administered.
• Do not allow to be used as a toy. Close
attention is necessary when the machine is
used by or near children.
The wire, which is coloured blue must be
connected to the terminal which is marked
with the letter N or coloured black. The wire,
which is coloured brown must be connected
to the terminal which is marked with letter L
or coloured red. If a 13 Amp. (BS 1363) plug
is used, a 3 Amp. fuse must be fitted, or if
any other type of plug is used, a 5 Amp. fuse
must be fitted either in the plug or adapter or
at the distribution board.
SAVE THESE INSTRUCTIONS
Servicing should be performed
by an authorized service representative.
This product is intended for household use.
5
Page 6

Getting to know your machine
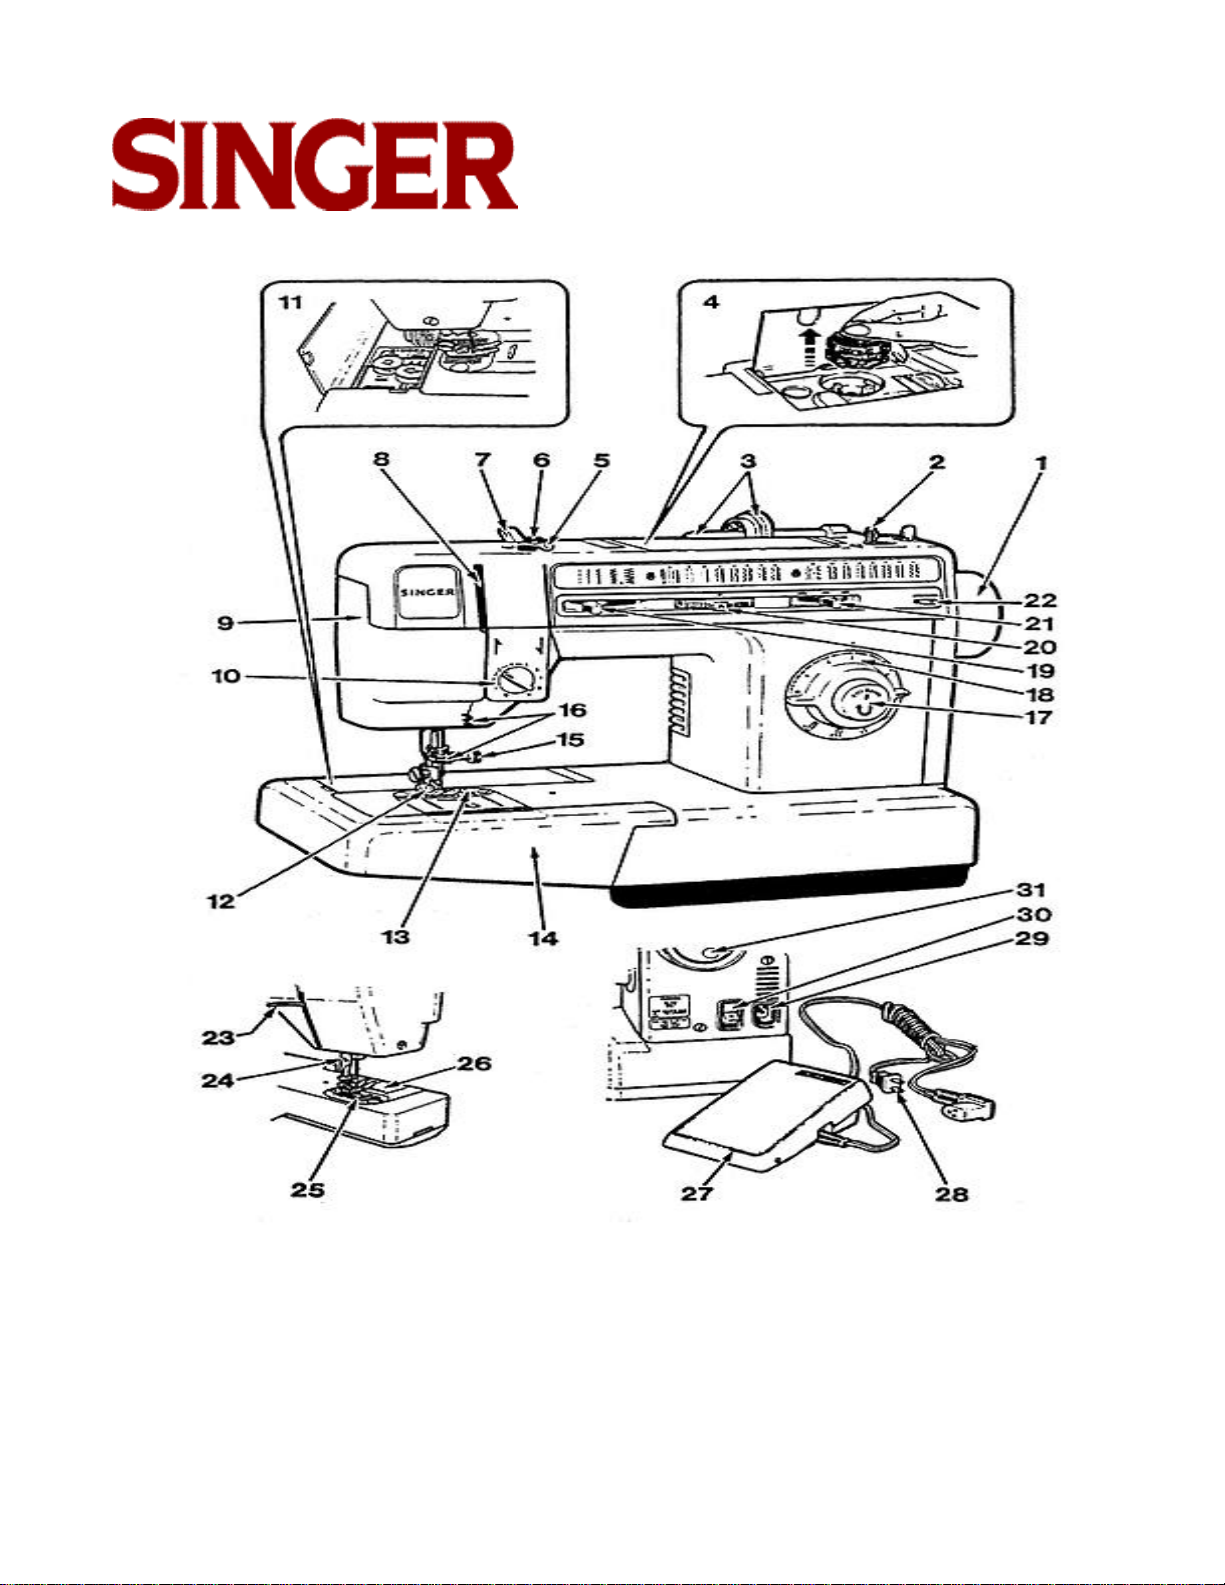
Principal parts
1. Hand wheel
2. Bobbin winder
3. Horizontal spool pin and holder
4. Top cover lid
5. Thread guide
6. Bobbin winder tension disc
7. Snap-in thread guide
8. Take up lever
9. Face plate
10. Needle thread tension dial
16. Thread guides
17. Push button reverse
18. Stitch length dial/four-step buttonhole
19. Stitch width lever
20. Pattern selector dial
21. Needle position selector
22. Stitch balance control
23. Presser foot lifter
24. Thread cutter
25. Feed system
26. Slide plate
11. Accessory storage
12. Snap on presser foot
13. Needle plate
14. Removable extension table
15. One-way needle clamp
27. Foot control
28. Electrical lead
29. Machine plug
30. Power and light switch
31. Bobbin winding indent
6
Page 7
7
Page 8

Accessories
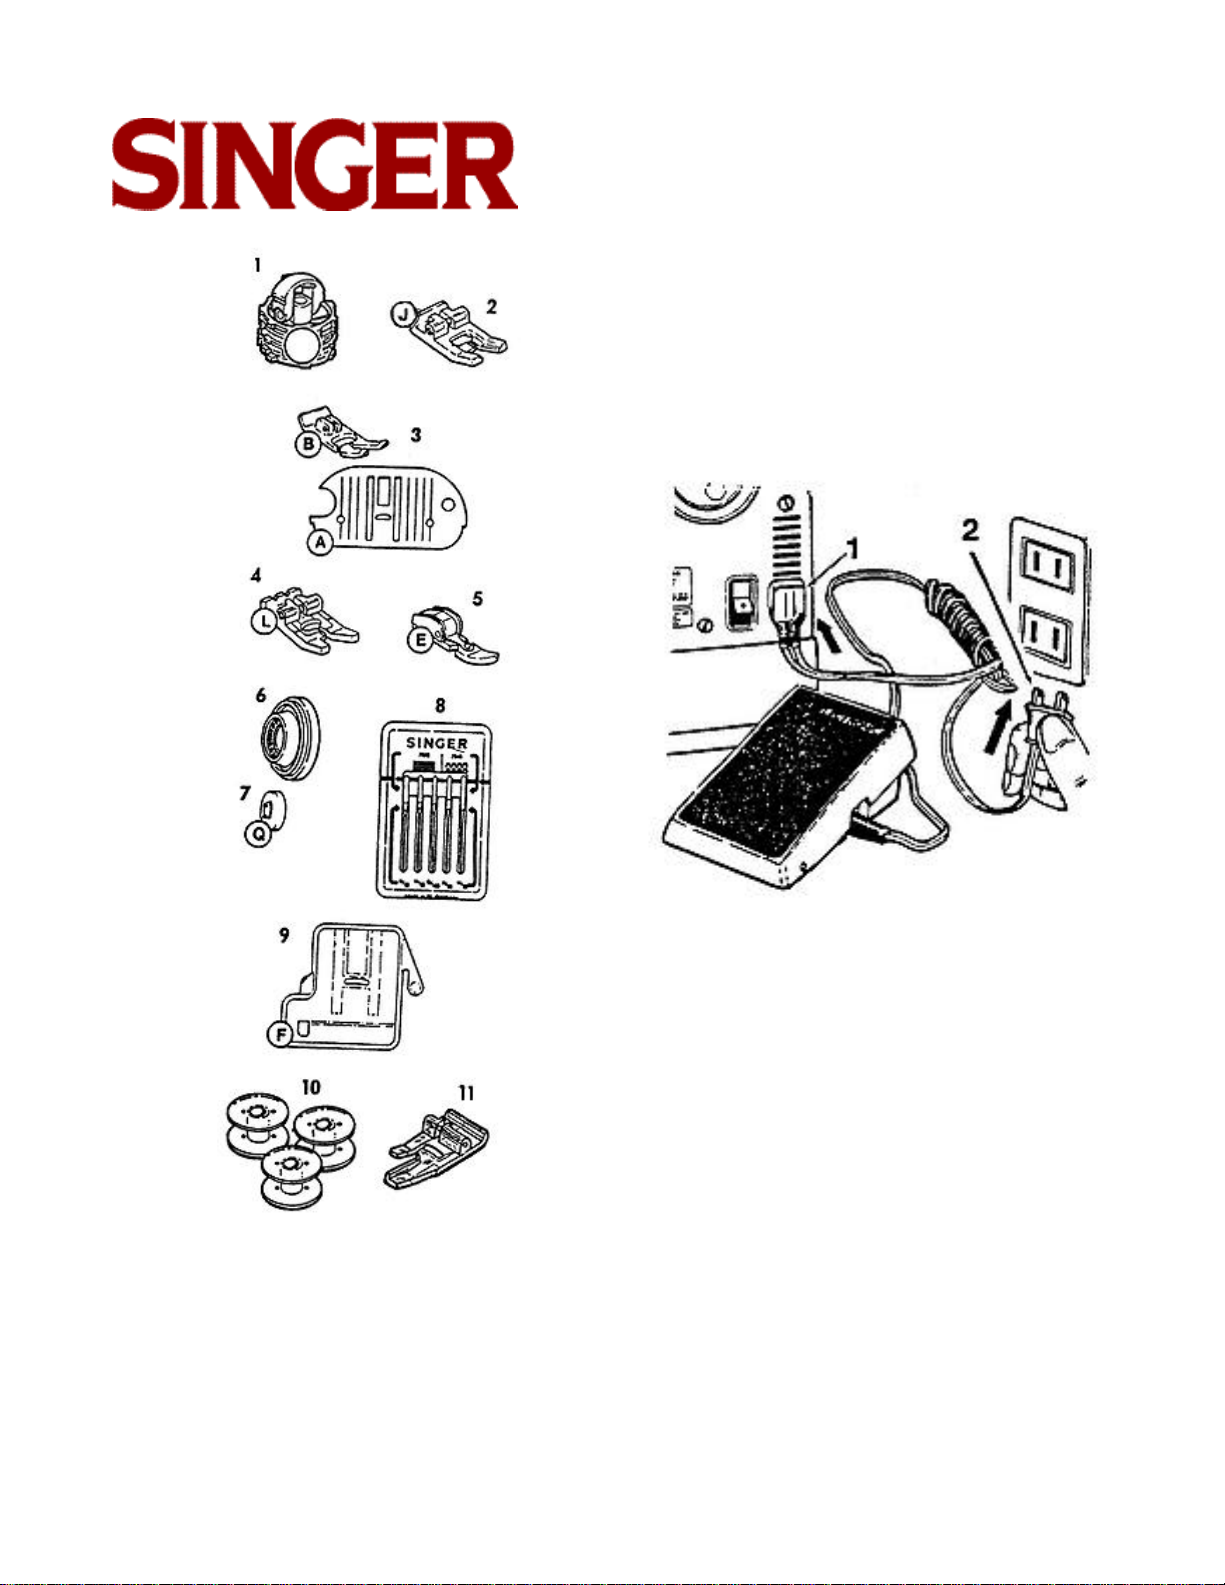
The following accessories furnished with your
sewing machine are designed to simplify your
sewing projects and increase the versatility of
your machine.
The letter in a circle adjacent to the illustrated
part is reproduced on the part itself to help
you select the correct attachment for the type
of work you are doing.
1. Interchangeable pattern module.
2. Special purpose presser foot (J) is used
for decorative and zig-zag sewing.
3. General purpose needle plate (A) and
presser foot (B) are on your machine
when delivered. Use together for alternating between straight and zig-zag stitching.
4. Buttonhole presser foot (L) is used with
the General Purpose Needle Plate to make
four-step buttonholes
5. Zipper foot (E) is used for inserting zippers and stitching corded seams.
6. Friction free spool holder is used to hold
various size spools and allows thread to
unwind smoothly. The spool does not turn.
7. Small thread spool holder (Q) for use
with small diameter spools of thread.
8. Needlepack includes an assortment for
sewing various types of fabrics.
9. Feed cover (F) is used to prevent the feed
from moving the fabric when darning or
free motion embroidery.
10. Transparent bobbins for easy viewing of
thread supply.
11. Blindstitch hem presser foot is used to
position the hem for blindstitch hemming.
8
Page 9
Connecting the machine
Push plug into the receptacle (1) at the right
end of the machine. Then connect plug (2) to
your socket outlet.
9
Page 10
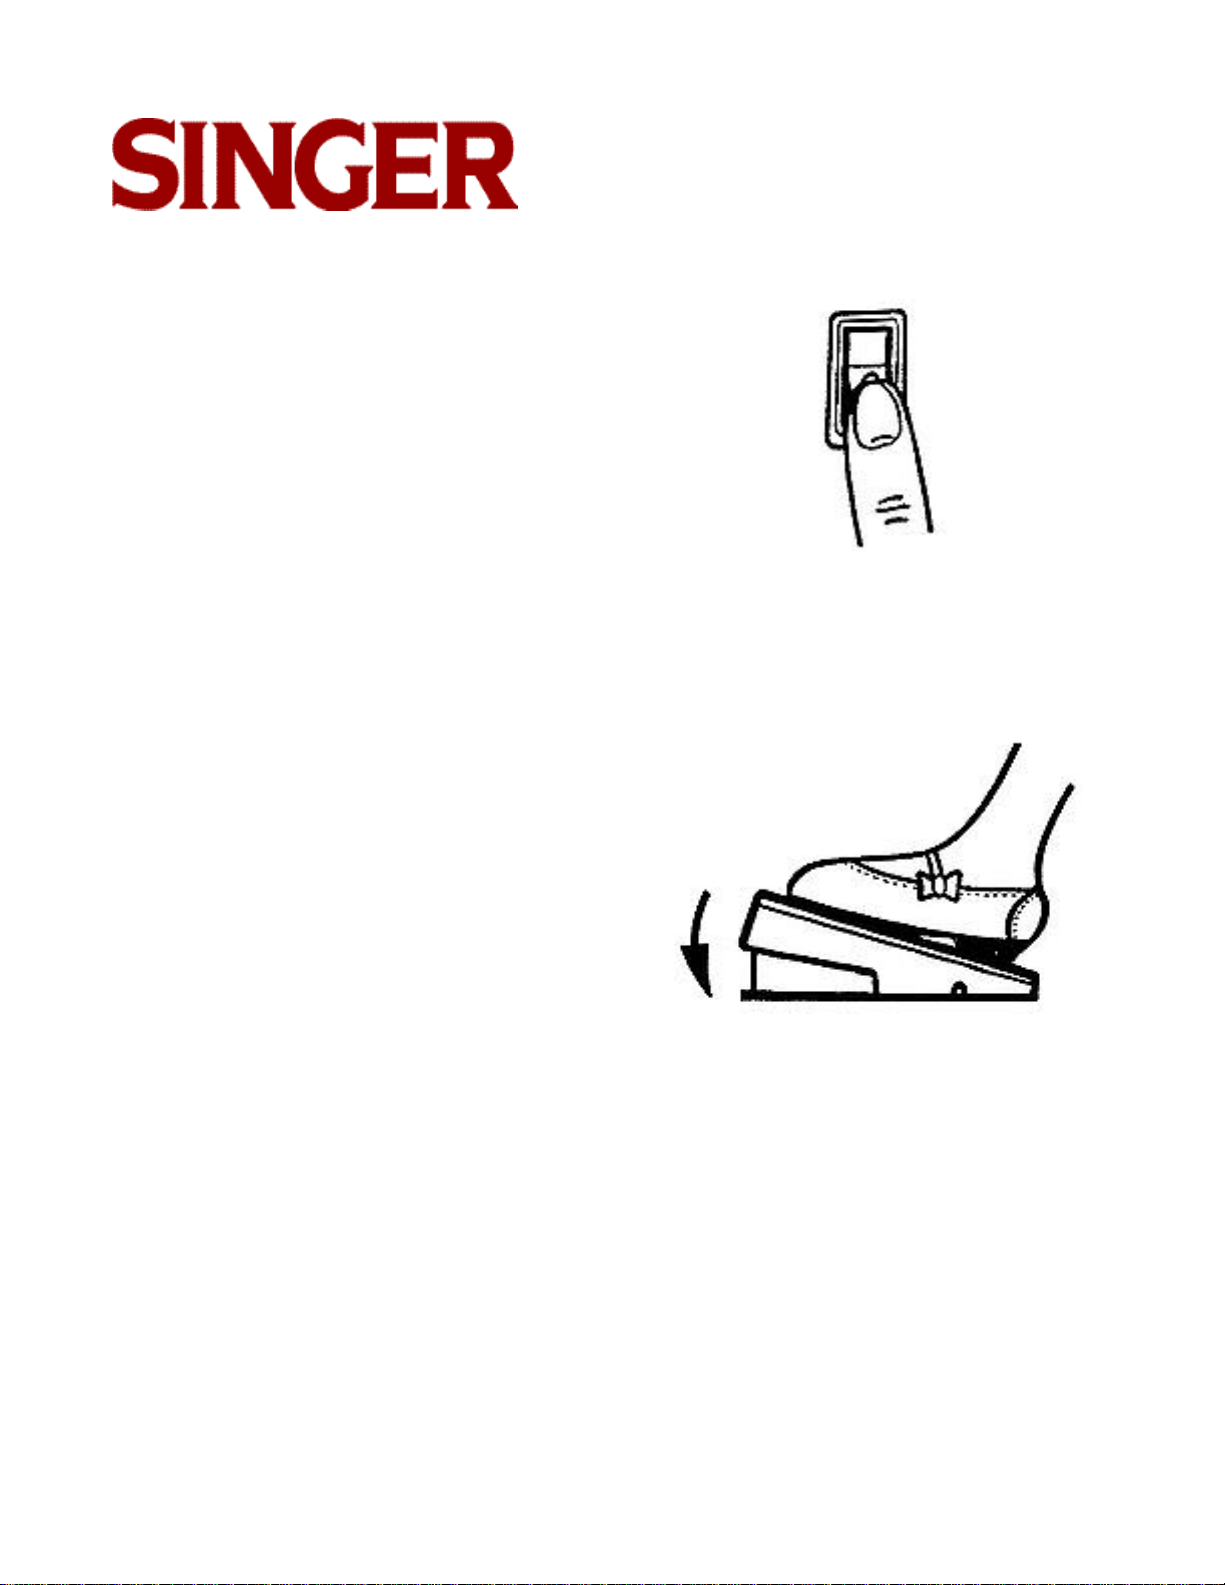
Running the machine
To turn on machine and sewing light, press
upper portion of power switch. To turn off
machine and light, press lower portion "O" of
power switch.
To run the machine and control speed, press
the foot control with your foot. The harder you
press, the faster the machine will sew. To
stop machine, remove foot from control.
Note: Do not operate machine without fabric
under the presser foot as this may
damage the feed and the presser foot.
10
Page 11
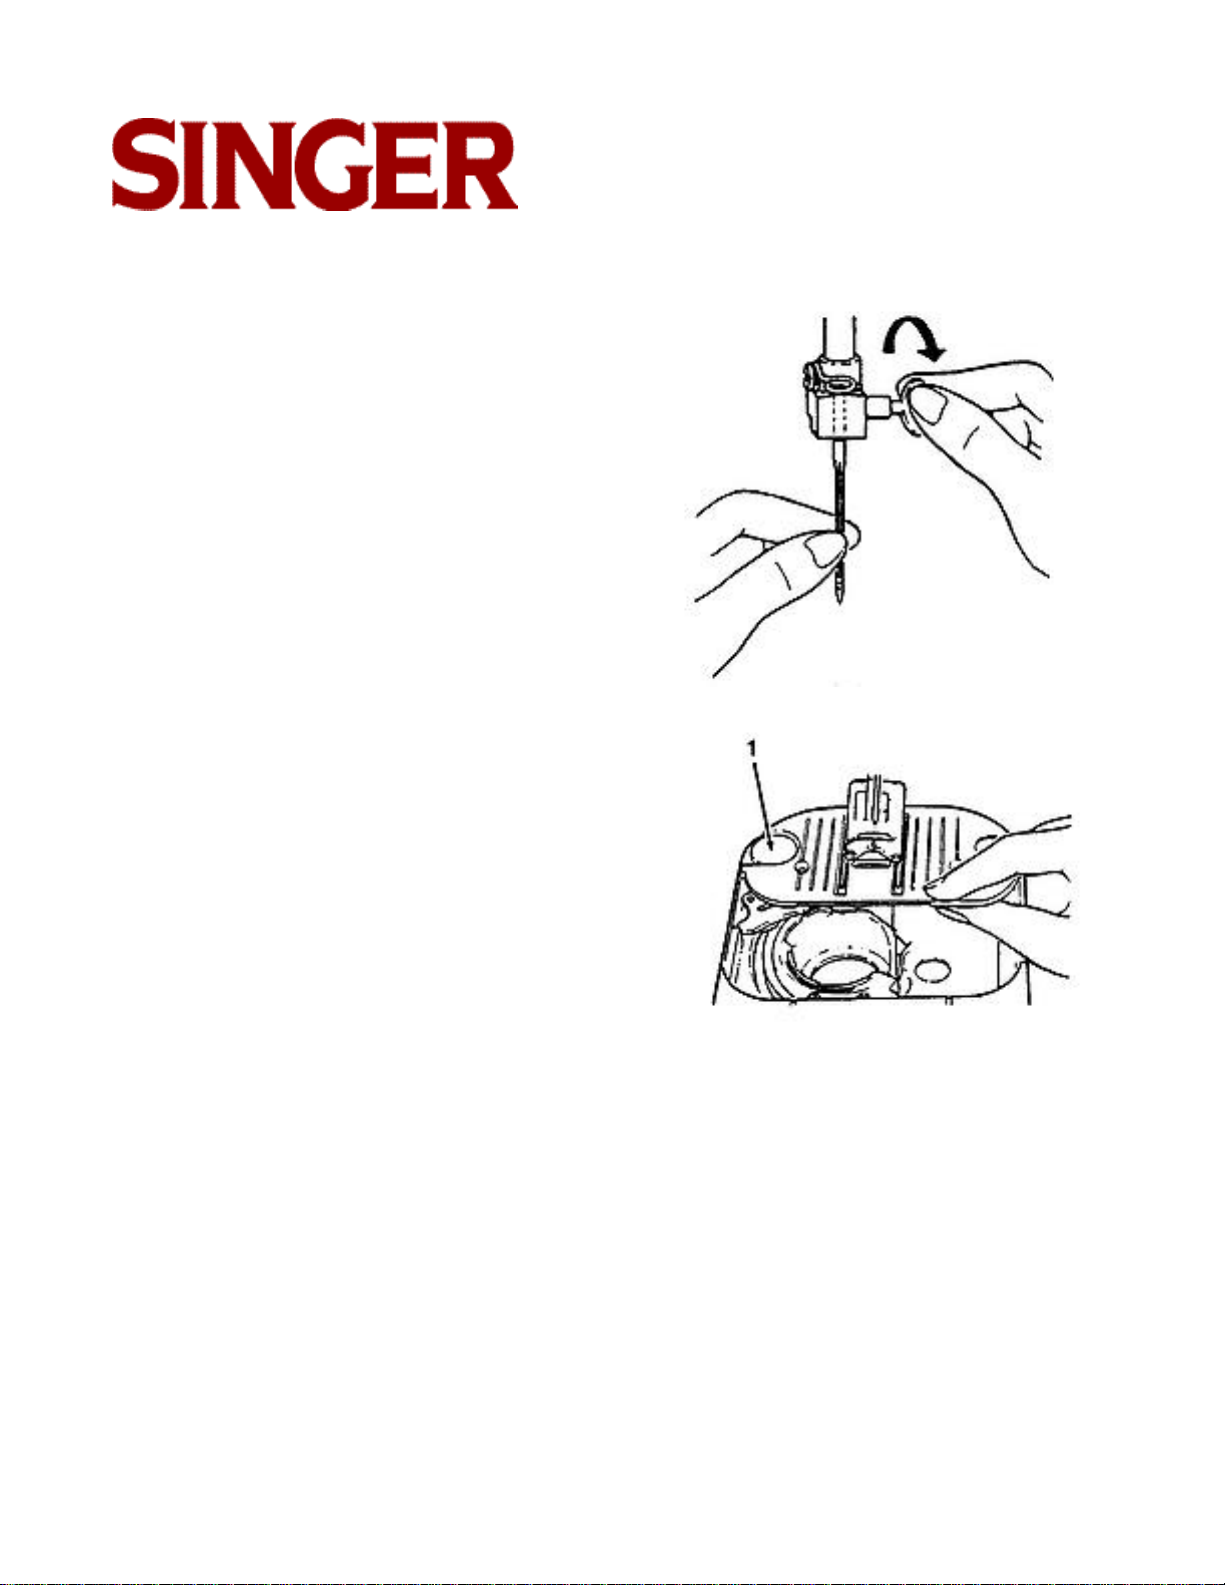
Choosing and changing needles
• Raise needle to its highest position.
• Loosen needle clamp screw and remove
needle.
• With flat side of needle to the back. Insert
new needle up into clamp as far as it will go
• Tighten needle clamp screw securely.
Changing the needle plate (A), (C)
• Raise needle and presser foot.
• Open slide plate.
• Lift up needle plate from right corner and
slide out from under foot.
• To replace needle plate, slide it under pin
(1) and push it firmly to the left.
• Press down until it snaps into place.
11
Page 12
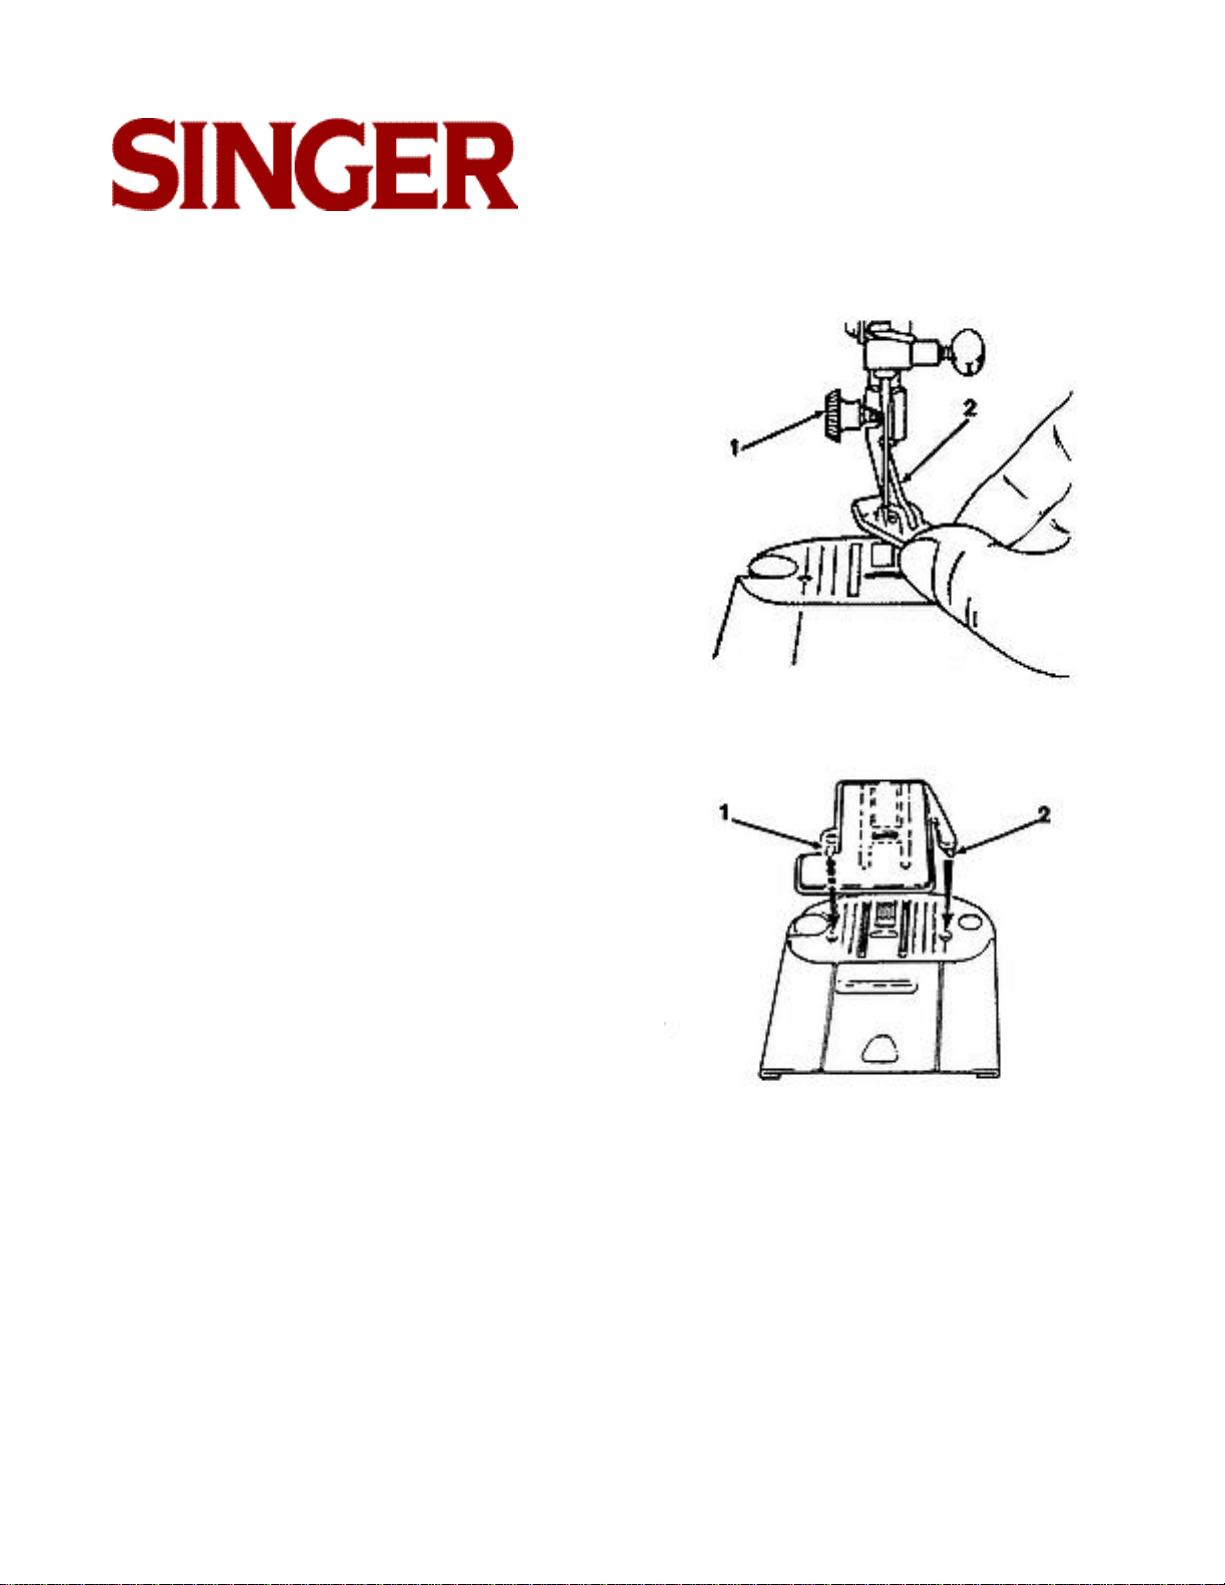
Changing screw-on presser feet (H)
• Raise needle and presser foot.
• Loosen presser foot screw (1) and remove
presser foot with shank (2), guiding it toward
you and to the right.
• To replace presser foot with shank, hook
shank around the presser bar and tighten
presser footscrew with the use of a coin.
Attaching the feed cover (F)
The feed cover is used to keep the feed from
moving the fabric when attaching a button,
darning or sewing free-motion embroidery. To
attach it, follow the directions below:
• Raise needle and presser foot.
• Open slide plate.
• Slide feed cover on top of needle plate,
pressing tabs (1) and (2) into holes.
• Close slide plate.
• To remove, open slide plate and lift front
edge of cover; pull it away.
12
Page 13
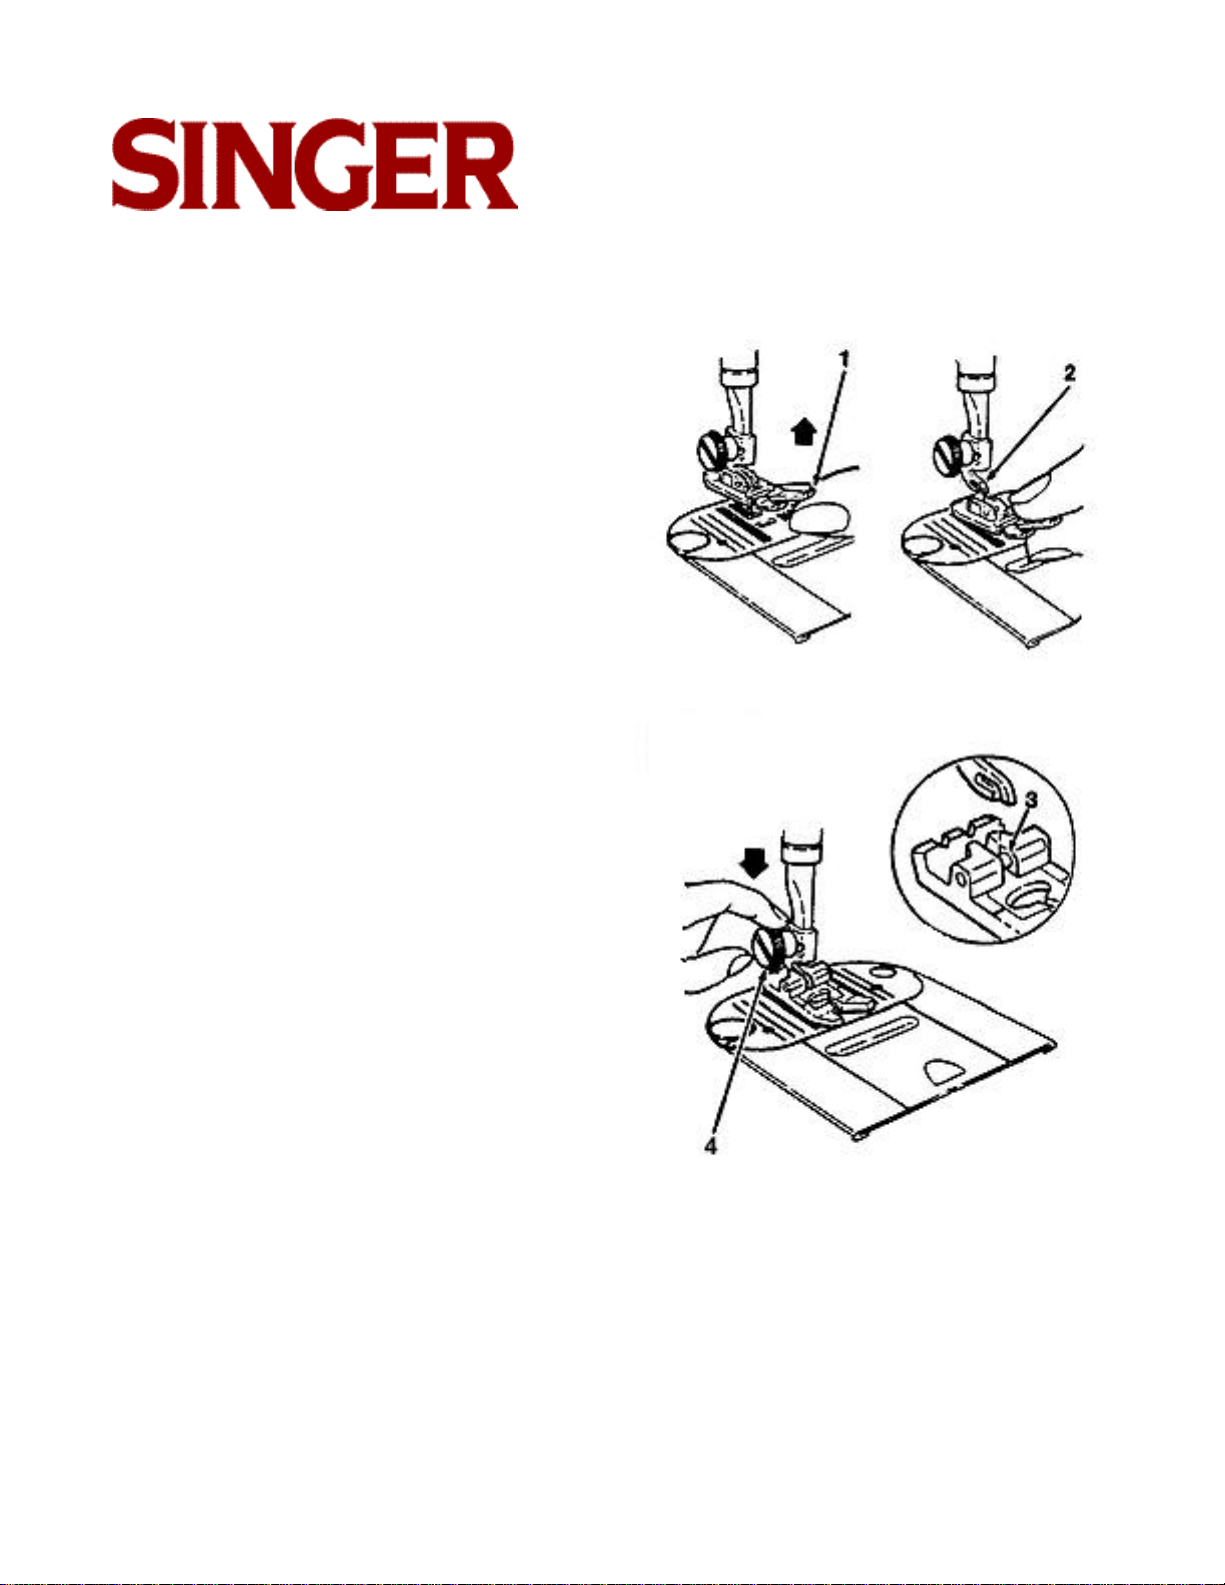
Changing snap-on presser feet
(B), (D), (J), (L)
• Raise needle to its highest position by turning hand wheel toward you.
• Raise presser foot using presser foot lifter at
back of machine.
• Push toe of presser foot (1) up, until it
snaps off the shank (2).
• Remove foot from machine.
• Place new foot under centre of shank.
• Lower presser foot litter, fitting shank over
presser foot pin (3).
• Don't turn screw. Instead, push presser foot
screw (4) down, firmly until foot snaps into
place.
13
Page 14
Fabric, thread and needle table
The needle and thread you choose will depend upon the fabric being sewn. The table below
is a practical guide to needle and thread selection. Always refer to it before beginning a
sewing project. Be sure to use the same size and type of thread in both needle and bobbin.
The fabrics below can be of any fiber: cotton, linen, silk, wool,
synthetic rayon, blends. They are listed as examples of weight.
Light Weight
Medium Weight
Fabrics
Batiste
Chiffon
Crepe
Organza
Voile
Corduroy
Flannel
Gabardine
Thread
Cotton-wrapped
Polyester Core
100% Polyester (Extra Fine)
• Mercerized Size 50
Nylon
Cotton-wrapped
Polyester
100% Polyester
Gingham
Linen
Muslin
• Mercerized Size 50
Nylon
Wool Crepe
Medium Heavy
Canvas
Coating
Denim
Cotton-wrapped
Polyester
100% Polyester
Duck
Sailcloth
Upholstery
• Mercerized Size 40
• "Heavy Duty"
Needles
Thread Size
2020
2020
2020
2020
11/80
14 /90
16/100
18/110
Knits
Single Knits
Double Knit
Jersey
Tricot
• Not recommended on stretch fabrics.
14
Cotton-wrapped
Polyester
100% Polyester
Nylon
Ball-Point 2045
Size 11/80, 14/100,
16/110
Page 15

Inserting a bobbin
• Raise presser foot.
• Turn hand wheel toward you until needle is
in its highest position.
• Open slide plate and remove empty bobbin.
1. Pull 4" (10 cm) of thread from replacement
bobbin and insert bobbin into case, as
shown.
2. Holding bobbin in place, guide thread into
notch (1) and then down the slot to the left
and guide around into notch (2).
3. Draw several inches of thread diagonally
across the bobbin toward the back of the
machine.
4. While holding thread on outside, close the
slide plate, allowing thread to extend
through the slot between the slide plate
and needle plate.
15
Page 16

Winding a bobbin
Winding a bobbin is quick and easy when you follow the directions below. Always wind the
bobbin before threading the machine and needle.
• Push in indent (1) on hand wheel disc This will stop the needle from moving.
• Place spool of thread on spool pin.
• Slide spool cap (2) firmly over rim of spool to prevent thread tangling.
• Lead thread from spool and snap into thread guide post (3).
• Wind thread clockwise around front of bobbin winder tension disc (4).
• Pass thread end, from inside, through small hole in rim of bobbin.
• Place bobbin on spindle and push it to the right
• Holding thread end, step on speed controller to run machine until desired amount of thread
is wound. (Winding stops automatically once bobbin is full).
• Cut thread; push bobbin to the left and remove it from spindle.
• Trim thread end from top of bobbin.
• Return hand wheel disc to sewing position by pressing on side opposite indent.
16
Page 17

Threading the machine
• Raise take-up lever to highest position
by turning hand wheel toward you.
• Raise presser foot to release thread
tension.
• Place spool of thread on spool pin.
• Slide spool cap firmly over rim of spool
to prevent thread tangling.
• Lead thread from spool and snap into
thread guide (1) and with only one
hand pass the thread under the guide
and through the slot, as illustrated (2).
• Thread the tension discs by leading the
thread down and around the tension
(3). Hold the spool lightly and pull the
thread up, lifting the spring and allowing the thread to slip into thread guard.
• Slip thread into take-up lever as illustrated (4).
• Pass thread through guides (5) and
(6).
• Thread needle from front to back,
pulling 4" (10 cm) of thread through
eye (7).
17
Page 18

Raising the bobbin thread
1. Hold needle thread loosely with left hand.
• Turn hand wheel slowly toward you, lowering needle into hole in plate.
2. Continue to do this until needle rises above
needle plate.
• Pull gently on needle thread and bring up
bobbin thread in a loop.
3. Open loop with fingers to find end of bob-
bin thread.
4. Draw needle thread through left side open-
ing in presser foot.
• Pull both threads to back of machine.
18
Page 19

Adjusting thread tension
(For straight stitching)
A perfect, well balanced stitch (1), will have
the needle and bobbin threads locked
between the two layers of fabric with no loops
on top or bottom and no puckering.
Too much tension will produce a tight stitch
(2) which will cause the fabric to pucker.
• To decrease tension, turn the dial to a lower
number.
Too little tension will produce a loose stitch
(3) which will cause loops in your seam.
• To increase tension, turn the dial to a higher
number.
Adjusting thread tension
(For zig zag stitching)
The correct tension setting will produce a
smooth even stitch (1).
Too much tension will produce a tight stitch
(2), causing fabric to pucker. Loosen tension
by turning dial to a lower number.
Too little tension will produce a loose stitch
(3), causing loops in your pattern. Tighten
tension by turning dial to a higher number.
19
Page 20

Sewing a seam
You can sew seams easily and accurately
when you follow the suggestions below.
Placing fabric under foot
Most fabrics can be placed under the foot by
raising the presser foot lifter (1) to its normal
"Up" position (2), where it locks in place,
When using bulky fabric, multiple fabric layers, or an embroidery hoop, raise the lifter to
the high rise position (3), thus increasing the
space between the foot and the needle plate.
• Lower presser foot lifter all the way down
and you are ready to sew.
Basting
Pin basting and hand basting are easy ways
to make temporary seams before machine
sewing.
• To pin baste, insert pins at stitching line.
NEVER place pins on the underside of fabric in contact with the feed. Do not sew over
pins; pull them out as you stitch.
• To hand baste, make long stitches that can
be easily removed.
20
Page 21

Keeping seams straight
To keep seams straight, use one of the guidelines on the needle plate.
• The most commonly used line (1), the 5/8
inch (1.6 cm) seam allowance, is extended
onto the slide plate.
Starting a seam
Place fabric under presser foot 1/2 inch (12
mm) from rear of fabric Align the right edge
with one of the seam guidelines on the needle plate. Lower the presser foot.
Backstitch to the edge of the fabric for reinforcement by pushing in the reverse button
located in centre of the stitch length dial. Hold
button in until stitching reaches edge of fabric.
Release push button for forward stitching.
21
Page 22

Guiding and supporting fabric.
• For tricot, and other similar synthetic knits,
apply gentle tension by holding the fabric at
the front and back of presser foot as you
sew. Do not pull fabric
• For elasticated fabric, stretch lace, and knits
with an unusual amount of elasticity, hold
the fabric firmly in front and back of the
presser foot to stretch the seam as the
stitches are being placed.
22
Page 23

Straight stitching
Stitch width selector
Before you move the selectors to set your
machine for straight stitching, turn the hand
wheel toward you until needle is at its highest
point.
Straight stitching can be performed with pattern selector in any position; stitch width lever
must be set at ( ) only
Needle position selector
Needle Position Selector positions the needle
in left ( ), center ( ) or right ( ) needle
positions.
Stitch length selector
To adjust the length of your stitches, turn the
dial so that desired stitch length is positioned
under (•) symbol.
• To shorten stitch length, turn dial toward a
lower number.
• To lengthen stitch length, turn dial toward a
higher number.
23
Page 24

Applications with
straight stitching
Darning
Recommended settings
Stitch Selection: Straight Stitch
Needle Position:
Stitch Width:
Stitch Length: 2-5
Foot: General Purpose (B)
Needle Plate: General Purpose (A)
Attach feed cover plate (F)
Reverse stitch button
The reverse stitch button, with the ( )
symbol, is located in the centre of the stitch
length selector.
• For reverse stitching, push in the button
and hold in place. The machine will stitch
in reverse only as long as you keep the
button pushed in.
Sewing in reverse
To neaten the end of a seam, push in the
reverse button and backstitch 3-4 stitches.
Raise needle and presser foot and remove
fabric by drawing it to the back and left. Cut
thread on thread cutter on presser bar.
24
Page 25

Inserting a zipper
Preparation
Pattern:
Neeale position:
Stitch width:
Stitch length: 2-5
Foot: Zipper (E)
Needle plate: General Purpose (A)
Adjusting the zipper foot
When the zipper teeth are to the left of the
needle (A):
• Slide the adjusting block (1), which slides on
the pin, across to the right.
• Snap-on the foot to the left side of the pin.
25
Page 26

Zig zag stitching
Before moving selector, make sure needle is
fully raised.
Needle position selector
Most of your zig-zag stitching will be done
with the needle in the centre ( ) position.
Left ( ) and right ( ) settings are used for
special stitch placement.
Stitch width selector
To produce any of the zig-zag stitches, the
stitch width selector is moved from its straight
position ( ) to any of its other positions. The
further you move the selector lever toward
the right, the wider your stitch will be.
Adjusting stitch length
Any stitch length setting from 1 to 5 will give
you an open zig-zag stitch.
The higher the number, the more open, or
further apart your stitches will be.
The area between 0 and 1 on the dial is used
for satin stitching, a series of closely spaced
plain zig-zag stitches that form a smooth
satin-like surface.
26
Page 27

Pattern groups selection
The dial localized on the panel of your machine, lets you choose pattern groups.
Raise the needle to its highest position.
Adjust the stitch width selector to straight position ( ).
This will see to it that the stitch pattern dial moves easier.
In order to single out the desired pattern group, just turn the dial until the corresponding letter
to this pattern group appears on the dial, under symbol .
After carrying out the embroidery selection, turn back the stitch width selector to the zig-zag
position ( ).
Adjust the stitch length as indicated on each kind of embroidery (from 1/2 to 2 1/2).
27
Page 28

Flexi stitch patterns
Note: The pattern groups selection, needle position selection and stitch width selection are
similar to zig-zag stitching.
These stitch patterns are used for sewing knits and other stretch fabrics. Flexi Stitch patterns
are made by the side to side movement of the needle along with the backward and forward
movement of the feed.
The flexi-stitch only accepts stitch work,
which is to the right of each pattern group on
the panel.
Act upon the following manner:
• Turn the stitch length dial to the left until the
dot on the dial lines up with the dot on the
machine, as shown.
Note: If for any reason the machine does not
start sewing your desired pattern after
aligning the two dot symbols, push in
on the reverse stitch button.
28
Page 29

Balancing
Flexi-stitches
You may need to adjust the Flexi-stitch
Balance selector when using a flexi-stitch pattern in order to achieve the correct pattern
appearance.
Before you move the stitch balance dial from
its neutral position. Make a test sample using
two layers of scrap fabric. If adjustment is
required stitch slowly and move the selector
as you sew.
• Move selector to the right to separate stitches of pattern.
• Move selector to the left to bring stitches of
the pattern together.
29
Page 30

Pattern stitching
In addition to straight stitch and zig-zag stitch,
your machine can produce a variety of stitch
patterns. There are two types of stitch patterns built into your machine:
• Decorative stitch patterns are produced by
side-to-side movement of the needle.
• Stretch stitch patterns are produced by both
the side-to-side movement of the needle,
and the back-and-forth movement of the
feed.
Two pattern modules come with your
machine. One is already in the machine and
is interchangeable with the other in the
accessory storage. Each produces an individual design that will add a personal touch to all
your sewing. Some patterns are purely decorative while others are used for practical purposes as well.
30
Page 31

Decorative stitch patterns
Pattern
Straight stitch 1
Zig-zag stitch
Blind hem stitch
Multi zig-zag
stitch
Overedge Stttch
Crescent stitch
Needle
position
Stitch
width
Stitch
length
Any
setting
Any
setting
1.5 to 2.5
1.0 to 2.0
1.0 to 2.0
0 to 2.0
Foot
General
purpose
General
purpose
Special for
blindstitch
Special
purpose
Special
purpose
Special
purpose
Needle
plate
General
purpose
General
purpose
General
purpose
General
purpose
General
purpose
General
purpose
Application
General
sewing
Stretch sewing
and embroidery
Finishing
hems
Bar
tacking
Seams in knit and
stretch fabric
Ornamental
borders
Domino stitch
Rampart stitch
Fagotting stitch
0 to 2.0
1.0 to 2.0
1.0 to 2.0
31
Special
purpose
Special
purpose
Special
purpose
General
purpose
General
purpose
General
purpose
Decoratice
stitching
Borders and
smocking
Swimsuit
seams
Page 32

Flexi-stitch patterns
Pattern
Straight stitch 1
Ric-rac stitch
Slant overedge
stitch (left)
Feather stitch
Overedge
stretch stitch
Mountain stitch
Needle
position
Stitch
width
Stitch
length
( )
( )
( )
( )
( )
( )
Foot
Special
purpose
Special
purpose
Special
purpose
Special
purpose
Special
purpose
Special
purpose
Needle
plate
General
purpose
General
purpose
General
purpose
General
purpose
General
purpose
General
purpose
Application
Ideal for plain
seams that stretch
Heavy-duty
general purpose
sewing
Sweater and
swimsuit
construction
Flexible seam
in lingerie
Joining and
overcasting
seams
Hemming and
ornamental
edges
Crown stitch
Chevron stitch
Thorn stitch
( )
( )
( )
32
Special
purpose
Special
purpose
Special
purpose
General
purpose
General
purpose
General
purpose
Edge
decoration
Classical
decorative
seams
Ideal for
flat-butted seam
Page 33

Attaching a button
Recommended settings
Stitch Selection: Zig-Zag Stitch (1 A)
Needle Position:
Stitch Width: To suit Button
Foot: Button Sewing (H)
Needle Plate: General Purpose (A)
Attach Feed Cover (F)
Note: Before you can attach a button, the
bob bin thread must be brought up
through the hole in the feed cover.
1. Set stitch width at ( ), and needle position
selector at ( ). Position button under foot
and lower the needle into the center of the
left hole. Lower the foot. Turn hand wheel
toward you until needle rises out of button
and is above the foot.
2. Move stitch width selector until needle is
over the other hole in the button. Then,
when you begin to stitch, the needle
should enter into the right hole of the button. Take six or more zig-zag stitches to
attach button and finish with the needle on
the left side.
3. To fasten stitching, adjust width to ( ) and
take three or four stitches. Remove work,
draw threads to underside, fasten, and
trim.
33
Page 34

Free-arm sewing
Removing the extension table
To change machine for free-arm sewing, lift
right edge (1) of extension table, slide it to
the left and off the machine (2).
To replace the extension table, slide it to the
right keeping it even with the free-arm, until
the tabs on the right lock into place.
Fabric handling when sewing tubular and
hard to reach garment areas is simplified and
made easier when you use the free-arm
sewing capability of your sewing machine.
Applications
Sleeves
• Free-arm sewing takes the difficulty out of
topstitching. Sleeves, finishing waistbands
and trouser legs rotate smoothly under the
needle, around the arm, allowing you to
place your stitching accurately.
Buttons
• Sewing buttons on a cuff or neckband is
easy with free-arm sewing. The sewing arm
allows room for cuffs to slip onto without
being stretched out of shape, and you can
also see and handle the stitching area more
easily.
34
Page 35

Bar tacks
• Bar tacks reinforce areas of strain and can
be applied to ready made garments, as well
as to those hose sewn at home. Use the
free-arm surface to avoid fabric bulk around
the needle when you apply bar tacks to
pockets pleats and waistlines
Four-step buttonhole
Your machine makes buttonholes to any size
you choose in only four, easy steps.
• You never need to move the fabric or reposition the needle.
• Always make a practice buttonhole on a
sample of your fabric.
• Be sure bobbin contains enough thread.
• When making buttonholes on hard-to-reach
areas, convert machine bed to free-arm
sewing.
• Mark buttonhole position on fabric as indicated In pattern.
35
Page 36

Buttonholes
Recommended settings.
Stitch Selection: Buttonhole Stitch (1A)
Stitch Width: Pre-set hot: Buttonhole (L)
Needle Plate: General Purpose (A)
Step 1
• Raise presser foot.
• Place fabric under foot.
• Centre 3 red guidelines (1) of foot around
beginning line of buttonhole.
• Turn buttonhole dial to the buttonhole symbol (1) for the first step.
• Position needle in fabric at point (2) by turning the hand wheel towards you.
• Stitch down to point 3.
Step 2
• Raise needle out of fabric.
• Turn buttonhole dial to the buttonhole symbol (2) for the second step.
• Make at least four stitches ending at point
(4)
36
Page 37

Step 3
• Raise needle out of fabric
• Turn buttonhole dial to the buttonhole
symbol (3) for the third step.
• Stitch up to point (5)
Step 4
• Raise needle out of fabric.
• Turn buttonhole dial to the buttonhole symbol (4) for the fourth step.
• Make at least four stitches, ending at point
(6).
• Raise presser foot and remove garment
from machine.
• Clip thread ends.
• Carefully cut buttonhole opening with a
seam ripper or small, sharp scissors.
37
Page 38

Balancing the buttonhole
On some kinds of fabrics, there may be a difference in the density of the stitches on the
right or the left side of the buttonhole.
This is easily adjusted by turning the balance
knob (1), in the center of the stitch length dial
to balance the density of the stitching.
A very slight turn of the dial will produce a
noticeable change.
• If the stitches on the right side of the button-
hole (I) are too open, turn the balance dial
slightly to the right, until the density of the
stitches increases.
• If the stitches on the left side of the button-
hole (II) are too open, turn the balance slightly
to the left, until the density of the stitches
increases.
38
Page 39

Twin needle sewing
Caution: Make sure not to use a stitch width
greater than what is recommended
for twin needle stitching.
Recommended settings
Stitch Selection: Desired stitch
Needle Position: Position:
Stitch Width:
Stitch Length: 2-5
Foot: General Purpose (B)
Needle Plate: General Purpose (A)
39
Page 40

Twin Needle Sewing continued...
Procedure
• Turn the machine off.
• Insert the twin needle with the flat side of
shank toward the rear of the machine.
• Thread the machine as you normally would
for single needle stitching, and pass thread
through the left eye of the twin needle.
• Insert a second spool pin into the hole on
the top cover of the machine, as illustrated.
• Thread the machine in the usual way.
• Pass the thread through the remaining
points making certain to omit the thread
guide above the needle and pass thread
through the right eye of needle.
• Draw both threads under the foot and along
with the bobbin thread.
• Slowly lower the needle into the hole in the
needle plate by turning the hand wheel
toward you to make sure the needle clears
the plate.
40
Page 41

Additional Accessories
Additional accessories for your sewing
machine are available for purchase at your
SINGER stockist.
1. Straight stitch presser foot (D) and nee-
dle plate (C) are used together when
straight stitching light weight fabrics or
when your fabric or sewing procedure
requires close control.
2. Button sewing foot (H) is used to hold
any two-hole or four-hole button securely
for stitching.
3. Lint brush is used for cleaning hard to
reach areas on your sewing machine.
4. Oil container for machine lubrication.
5. Twin needle and spool pin are used to
stitch two parallel rows of decorative stitching simultaneously. When using twin-needle for decorative stitching, set stitch width
selector no greater than midrange of zigzag graphics.
6. Felt for twin needle spool pin.
Accessory storage
You can use this area to store some
accessories.
The accessories leave from factory in this
area.
41
Page 42

Caring for your machine
Removing and replacing bobbin case
Caution: Before cleaning or adjusting the
machine, remove plug from the socket outlet.
• Raise presser foot and needle.
• Open slide plate, remove bobbin and
remove needle plate.
To remove bobbin case
• With a small screwdriver, turn bobbin case
holder (1) to the rear as far as it will go.
• Lifting the left side of the bobbin case, slide
it out from machine.
To replace bobbin case
• Guide forked end (2) of bobbin case under
feed (3).
• Draw rim of bobbin case under position
plate (4). Be sure bobbin case is freely
seated on hook race.
• Turn bobbin case holder (1) forward as far
as it will go, locking bobbin case in place.
Note: Turn handwheel towards you to check
to make sure it is properly replaced.
• Replace needle plate
• Insert bobbin and close slide plate.
42
Page 43

Cleaning the machine
The machine surfaces and covers can be
cleaned when necessary, with a damp, soft
cloth and a mild soap.
Remove lint and fluff from exposed parts and
clean these parts with a lint brush.
• Take-up lever and thread guides.
• Presser and needle bars.
• Bobbin case and needle plate areas.
Your machine should be periodically checked
by your local SINGER dealer for wear.
43
Page 44

Lubricating the machine
Approximately once a year, lubricate all moving connections, as shown, to ensure freedom of movement and to protect metal parts
from excessive wear.
To determine which connections move and
need lubrication, turn the handwheel slowly,
by hand, while face plate is removed.
When lubricating, apply only SINGER oil at
the points shown. SINGER oil is specially
prepared and does not contain harmful
deposits hat can interfere with the smooth
action of precision parts.
44
Page 45

Changing the light bulb
Caution: Before changing light bulb, make
sure you have removed plug from socket outlet and remove face plate which covers the
light bulb. Be sure to replace the face plate
which covers the light bulb before operating
the machine.
This machine is designed to use a 15 watt
maximum light bulb with a bayonet fitting.
1. Removing bulb
• Loosen and remove screw (1) located on
face plate.
• Remove face plate by grasping it around the
bottom edge and pulling toward the left,
then down and away from machine.
• Do not attempt to unscrew light bulb.
• Push bulb up into socket and turn in the
direction of arrows to unlock bulb pin.
• Pull bulb down and out of socket.
2. Replacing bulb
• Push new bulb up into socket and turn in
the direction of arrows until pins lock into
position.
• Replace face plate again and tighten screw.
45
Page 46

Performance checklist
When sewing difficulties occur, look back
through this manual to make sure you are
correctly following the instructions. If you still
have a problem, the reminders below may
help you to correct it.
Needle does not move
Is machine connected to electrical supply?
Is the power and light switch on?
Is controller connected?
Is the handwheel engaged for bobbin
winding?
Needle moves, but stitch is not formed
Is needle defective?
Is needle fully inserted into needle clamp?
Are bobbin and needle correctly threaded?
Is bobbin correctly inserted into bobbin case?
Needle breaks
Is needle straight and sharp?
Is needle correct size?
Is needle fully inserted into needle clamp?
Are controls properly set?
Are accessories correct for application?
Bobbin winding difficulties
Is thread unwinding freely from spool?
Is bobbin winder engaged?
Is thread end securely held at start of wind?
Is thread hanging up on the slit on the thread
spool?
Upper thread breaks
Is machine properly threaded?
Is thread freely unwinding from spool?
Is proper spool cap being used?
Is needle correct size for thread?
Is upper thread tension too tight?
Is bobbin case properly inserted?
Is bobbin rim free of nicks?
Lower thread breaks
Is bobbin correctly wound?
Is bobbin correctly inserted into bobbin case?
Is bobbin case correctly threaded?
Is thread hanging up on the slit on the thread
spool?
Skipped stitches
Is machine properly threaded?
Is fabric firmly held down?
Is needle correct style and size?
Is needle straight and sharp?
Fabric does not move properly under
presser foot
Is presser foot correctly attached to machine?
Is presser foot lowered?
Is stitch length correctly set?
46
 Loading...