

Singer 2754 User Manual
SINGER®
INSTRUCTION MANUAL
ILLUSTRATED PARTS LIST
FOR
HIGH-SPEED FLAT-BED
INTERLOCK SEWING MACHINE
2754A
331
300
303
308
309
311
313
341
®Singer
The
Singer
Copyright@
is
a registered
Company
2008 The
Ltd
Singer
trademark
or
its
affiliates
Company
of
Limited
1
IMPORTANT
2
FOR
SAFE
CONTENTS
SAFETY
OPERATION
INSTRUCTIONS
PAGE
ii
3 MACHINE SPECIFICATIONS
4 CUTTING
5
ASSEMBLING
6 MOTOR PULLEY AND V-BEL T
7 BEFORE
a
MANUAL
b LUBRICATION
c FILLING THE HR DEVICE
d THREADING (1)
DIAGRAM
THE
MACHINE
OPERATING
LUBRICATION
OF THE
WITH
e THREADING (2)
8 TEST SEWING
a PRESSER FOOT PRESSURE
MACHINE
SUPPORTING
SILICON OIL
TABLE
COMPONENTS
iii
iv
v
vi
1
2
3
4
5
6
b DIFFERENTIAL FEED RATIO
ADJUSTMENT
c STITCH LENGH ADJUSTMENT
d THREAD
9 MAINTENANCE DURING USE
a
CLEANING
b REPLACING THE NEEDLE
TENSION
THE
MACHINE
c CHECKING THE OIL CIRCULATION
d CHECKING AND REPLACING THE OIL FILTER
e REPLACING THE OIL
f
ADJUSTMENT
10 ILLUSTRATED PARTS LIST
11
GAUGE PARTS LIST
DIMENSIONS
7
8
9
10
11
12
13
14
15
16
79

IMPORTANT SAFETY INSTRUCTIONS
When using this machine, basic safety precautions should always be followed. Read all
instruction before using the machine.
1.
Whenever using the machine, understand the basic safety instructions which are not
just
limited to the following items.
2.
Read all instructions and take care
moment.
3.
Before operating, confirm the relevant safety specifications and standards of this
machine are fit
4. The machine
5.
General operation must only be carried out by the appropriately trained person.
6.
For your personal safety, it is recommended that suitable safety glasses should be
wom when operating the machine
In
7.
8.
9.
10. Repairs, conversion and special maintenance work must only
11.
12.
13. Clean the machine periodically.
14. Before commencing full operation
15. The machine
16.
17. The machine
the following situation, switch off the machine
electrical outlet.
7.1
Threading the needle and replacing bobbin
7.2 Replacing the needle, presser foot, throat plate, feed dog and sliding plate, etc ..
7.3 During service work.
7.4 When the
If
lubricating oil comes into contact with the eyes
washed with a generous amount
If
any lubricating oil is ingested, medical advice should be sought immediately.
Whether the machine is running
parts and the
technicians.
Normal repairs and maintenance work must only be carried
special training.
Service work on the electrical equipment should always be carried out by qualified
electricians
damaged, the machine must be stopped immediately.
ensure that
The machine
frequency
earthing.
Singer will not bear any responsibility
modifications to the machine.
indicated in the accompanying instructions for operation.
for
your country.
should not be used without its relevant safety devices.
workplace is left unattended.
relevant device
or
appropriately trained persons. Once an electric element is found to
it
is capable
should not be located next to a source
welding machine, etc.
should only be operated with the appropriate plug and cord with proper
should only be used
of
performing the task required.
of
the instruction book
or
or
looper.
or
skin, they should immediately be
of
cold water.
or
not, you never casually change
of
the machine.
of
the machine, a trial run should be carried out
of
for
damage
for
sewing the type
or
for
your reference at any
unplug the machine from the
or
fiddle with the
be
carried out by trained
out
by persons with
be
to
strong noise such as a high
injurycaused by unauthorized
of
materials and in the manner
-i-

FOR SAFE OPERATION
1.
To
avoid electrical shock hazards, neither open the cover
nor
motor
2.
To
avoid personal injury, never operate the machine with any
guard
3.
To
prevent possible personal injuries caused by being caught in the machine, keep
your fingers, head and
while the machine is
To
avoid personal injury, never put your hand under the needle when you tum "ON"
4.
the power switch
To
avoid personal injury, never put your fingers into the thread take-up cover while the
5.
machine is in operation.
6. The hook rotates at a high speed
possible injury
hook during operation.
when
7.
To
avoid possible personal injuries, be careful not
when
8.
To
avoid possible accidents because
power to the machine when
the V
9.
If
your machine is equipped with a servo-motor, the motor does not produce noise
while the machine is
machine, be sure to turn
10.
To
ground wire for the power
11 . To
component(s), turn OFF the power switch
the power plug.
touch the components mounted inside the electrical box.
or
safety devices removed.
clothes away from the Handwheel, V belt and the motor
in
operation.
or
operate the machine.
to
hands, be sure to keep your hands away from the vicinity
In addition, be sure
replacing the bobbin.
tiling/raising the machine head.
belt.
at
rest.
OFF the power
avoid electrical shock hazards, never operate the sewing machine with the
supply removed.
prevent possible accidents because
In
addition, place nothing around them.
while the machine
to
tum OFF the power to the machine
to
of
abrupt start
tilting the machine head
To
avoid possible accidents due to abrupt starting
to
the machine.
of
electric shock
in
prior to the connection/disconnection
of
the electrical box for the
of
the belt cover, finger
is
in operation.
allow your fingers
of
the machine,
or
removing the belt cover and
or
damaged electrical
To
in
the machine
tum
prevent
of
the
OFF the
of
the
of
-ii-
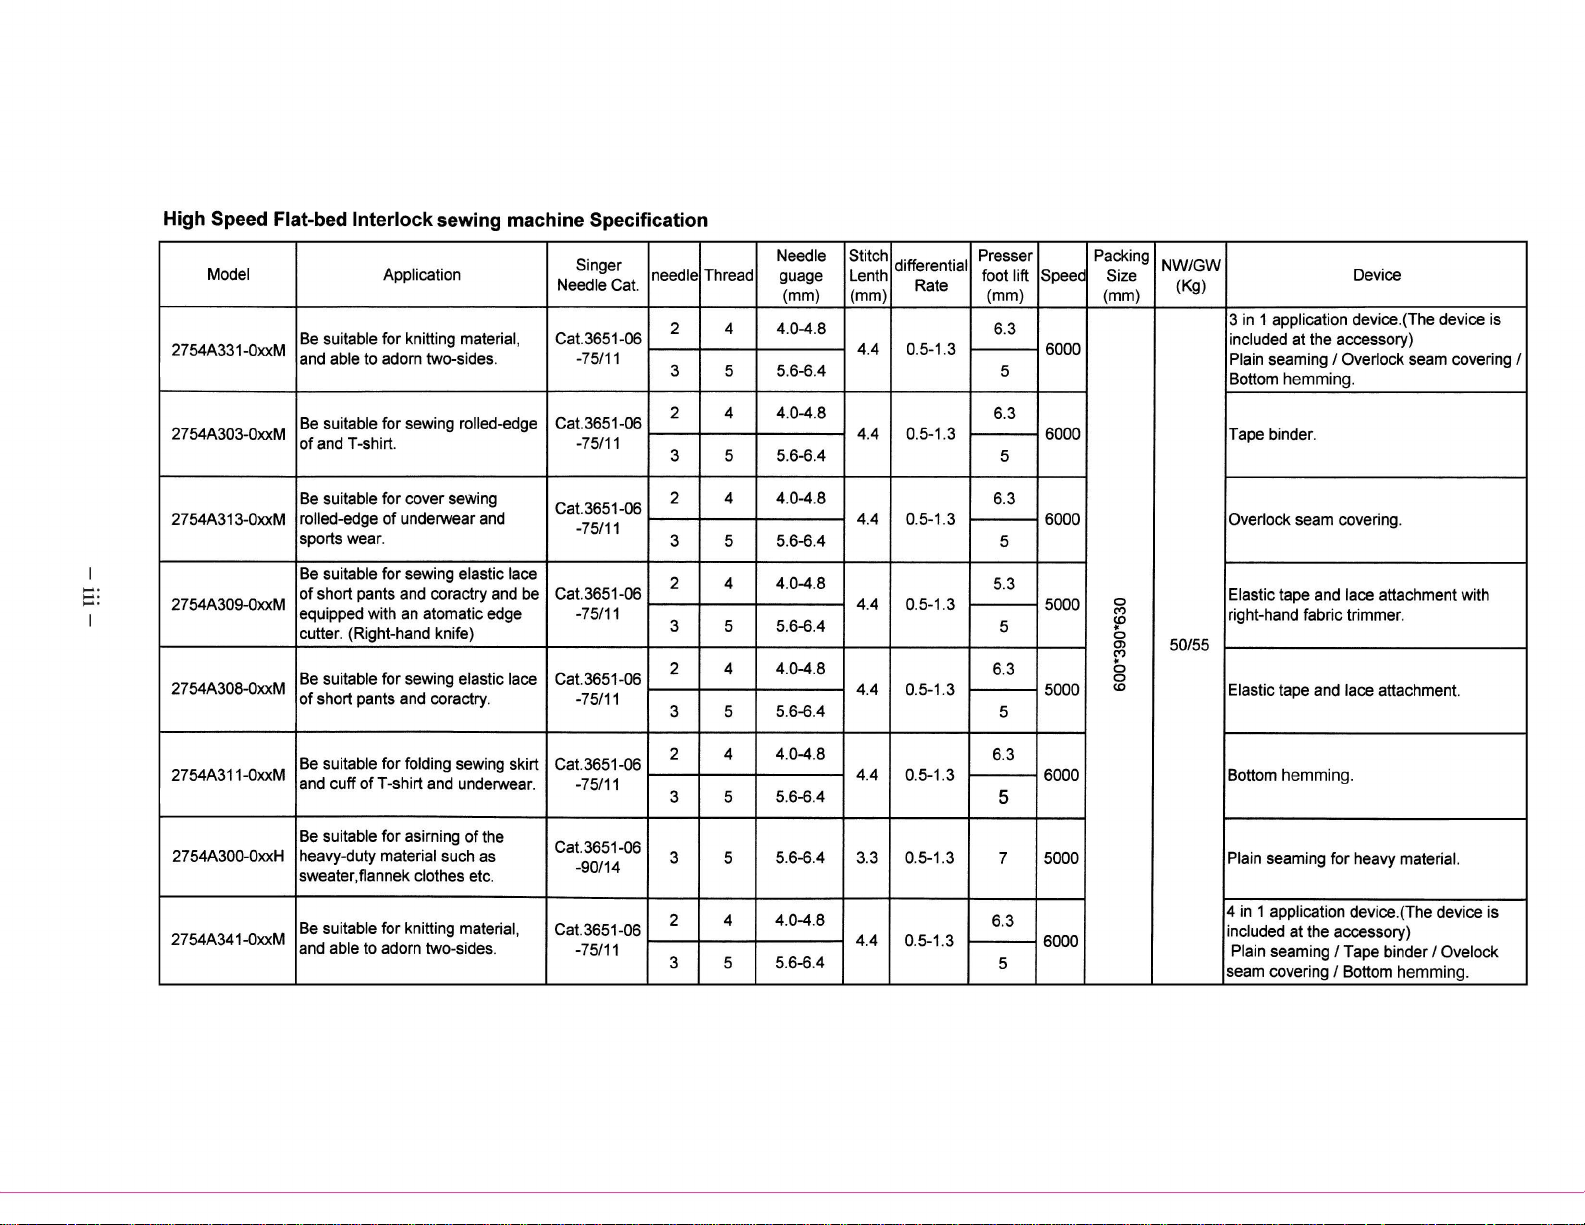
High Speed Flat-bed Interlock sewing machine Specification
.......
.......
......
.
Model Application
Be
2754A331-0xxM
2754A303-0xxM
2754A313-0xxM
2754A309-0xxM
2754A308-0xxM
2754A311-0xxM
suitable for knitting material, Cat.3651-06
and
able to adorn two-sides.
suitable for sewing rolled-edge
Be
of
and T-shirt.
suitable for cover sewing
Be
rolled-edge
sports wear.
Be
suitable for sewing elastic lace
of
short pants and coractry and be Cat.3651-06
equipped with
cutter. (Right-hand knife)
Be
suitable for sewing elastic lace
of
short pants and coractry.
suitable for folding sewing skirt
Be
and cuff
ofT
of
underwear and
an
atomatic edge
-shirt and underwear.
Singer
Needle Cat.
-75111
Cat.3651-06
-75111
Cat.3651-06
-75111
-75111
Cat.3651-06
-75111
Cat.3651-06
-75111
needle
2 4
3 5
2 4
3 5
2 4
3 5
2 4
3 5
2
3 5
2 4
3 5
Thread
4
Needle
guage
(mm) (mm)
4.0-4.8
5.6-6.4
4.0-4.8
5.6-6.4
4.0-4.8
5.6-6.4
4.0-4.8
5.6-6.4
4.0-4.8
5.6-6.4
4.0-4.8
5.6-6.4
Stitch
Lenth
4.4
4.4
4.4
4.4
4.4
4.4
differential
Rate
0.5-1.3
0.
5-1
.3
0.5-1.3
0.5-1 .3
0.5-1.3
0.5-1.3
Presser Packing
foot
lift Speed
(mm) (mm)
6.3
6000
5
6.3
6000
5
6.3
6000 Overlock
5
5.3
5000
5
6.3
5000
5
6.3
6000
Size
0
C')
<0
.
0
0)
C')
.
0
0
<0
5
NWIGW
(Kg)
50155
Device
3
in
1 application device .(The device is
included
Plain seaming I Overlock seam covering I
Bottom hernrning .
Tape binder.
Elastic tape and lace attachment with
right-hand fabric trimmer.
Elastic tape and lace attachment.
Bottom hemming.
at the accessory)
seam covering.
suitable for asirning
27
54A300-0xxH heavy-duty material such as
2754A341-0xxM
Be
sweater,flannek
suitable for knitting material,
Be
and able to adorn two-sides.
of
clothes etc.
the
Cat.3651-06
-90114
Cat.3651-06
-75111
3
2 4
3 5
5
5.6-6.4
4.0-4.8
5.6-6.4
3.3
4.4
0.5-1.3
0.5-1 .3
7
5000 Plain seaming for heavy material.
6.3
6000
5
4 in 1 application device.(The device is
included
seam covering
at the accessory)
Plain seaming I Tape binder I Ovelock
I Bottom hemming.
MACHINE
CUTTING
TABLE
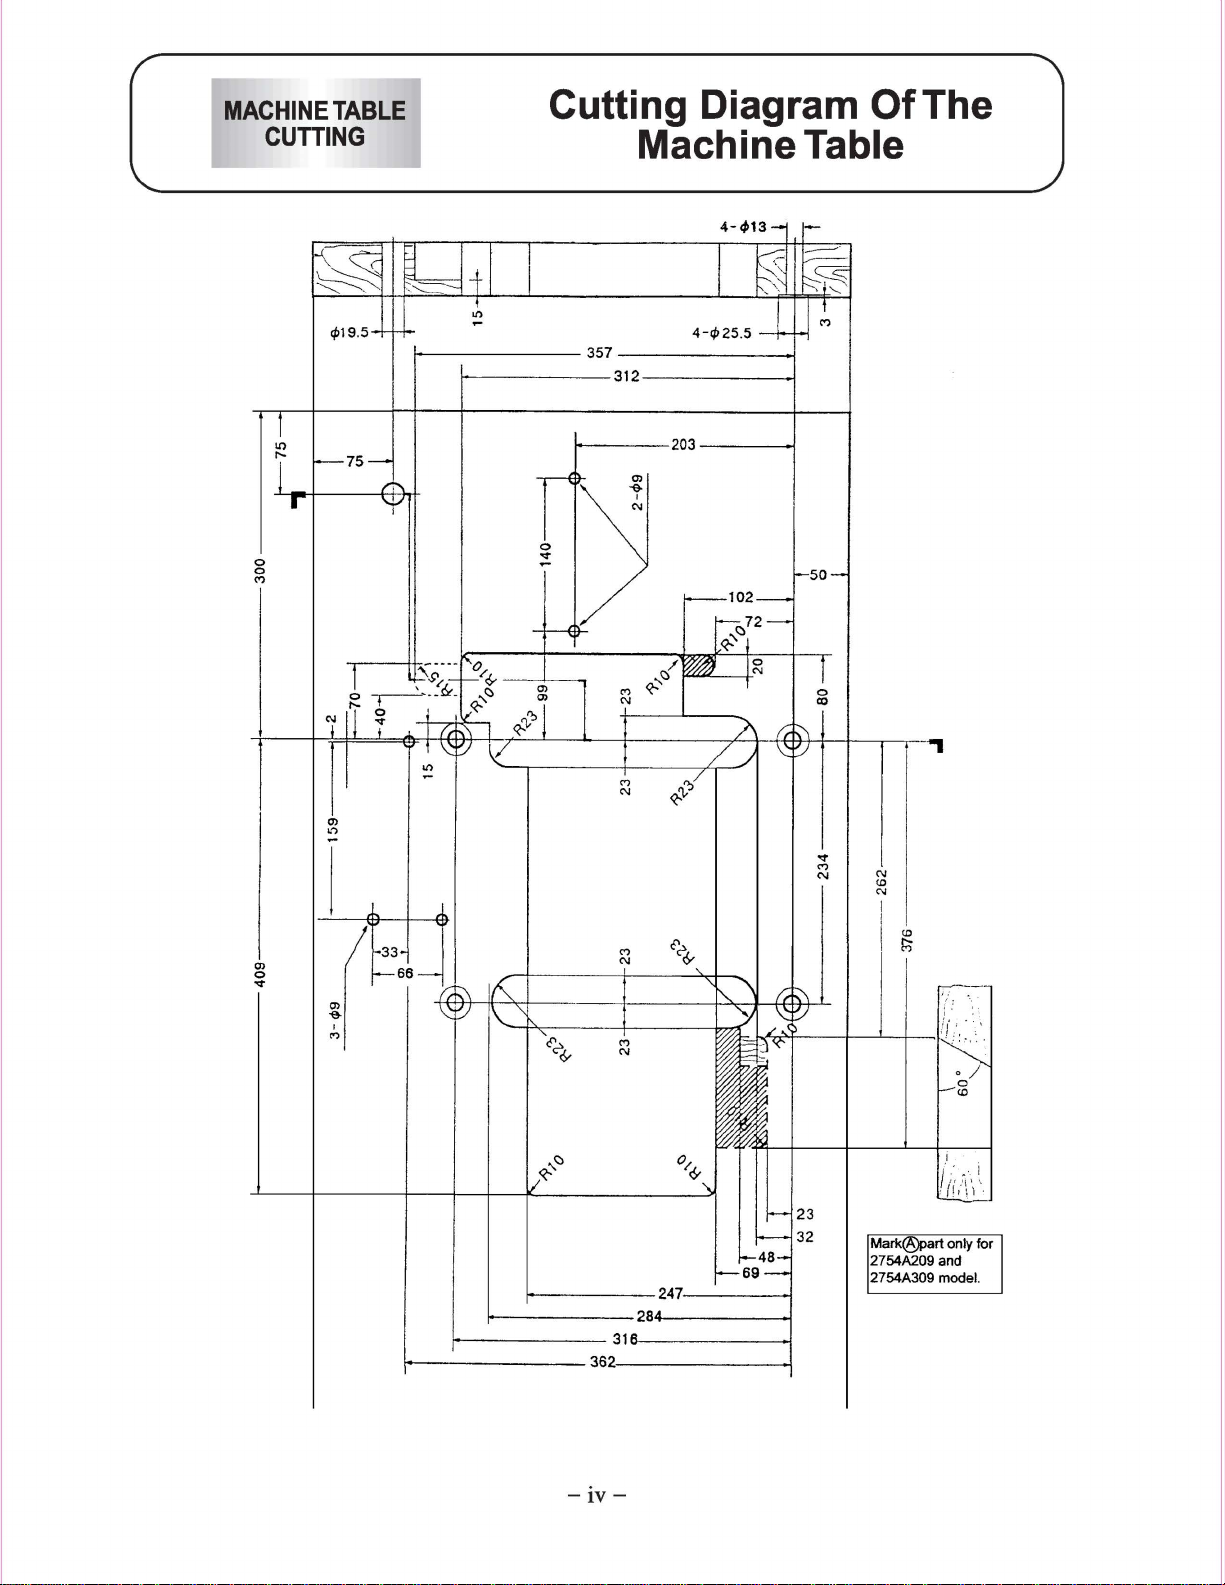
Cutting Diagram
Machine Table
OfThe
cP19.5-
I
0
0
(")
0>
l{)
1-
1---------357
'-V
1------312-----!
_____
4-c/l2s.slU
t------~'">0''3"
------1
_.,
~
N
<D
N
I
0>
0
-.:-
1--
23
1----
'JA7
~----£"'aD~A----~
1----------~~'o,."£------!
-IV-
,
..
f--
l--4
'-
32
~-
Mark@part
2754A209 and
2754A309
only for
model.
MACHINE
INSTALLATION
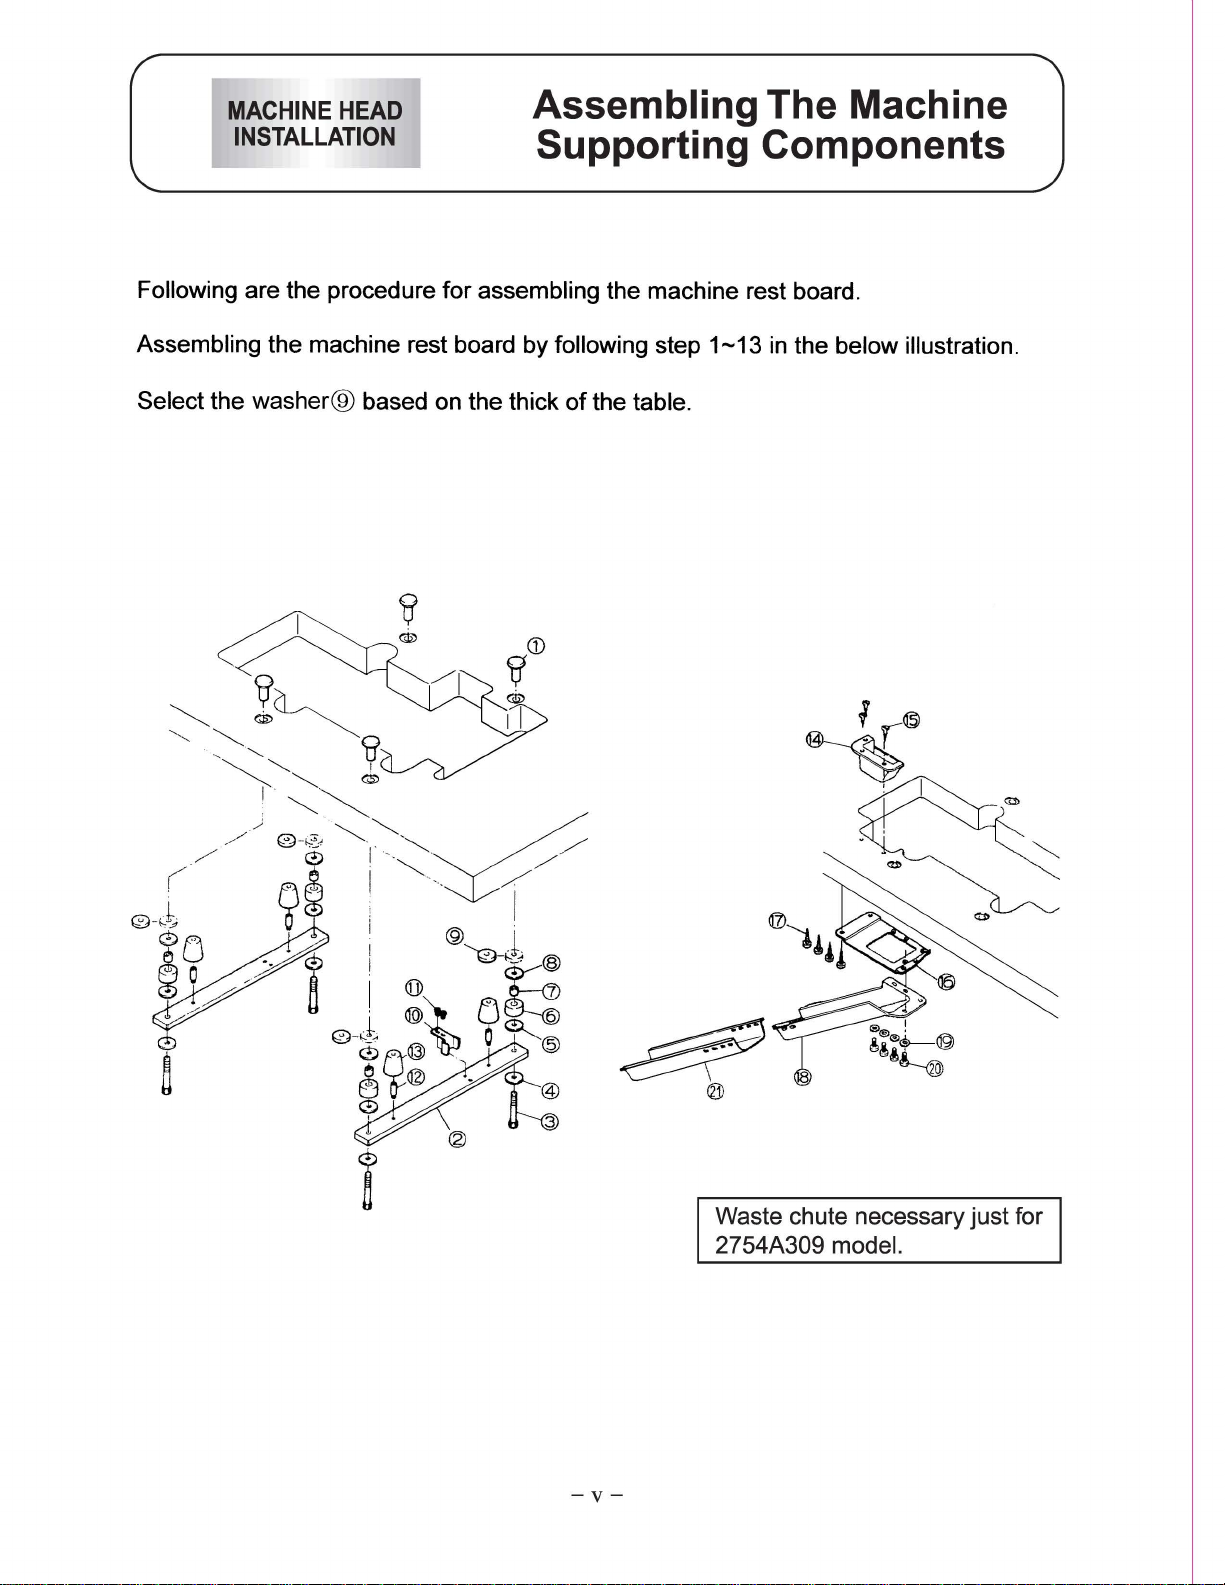
Following are the procedure for assembling the machine rest board.
HEAD
Assembling The Machine
Supporting Components
Assembling the machine rest board by following step
Select
the
washer®
based on the thick
of
the table.
1-13
in the below illustration.
~-
@
Waste chute necessary just for
2754A309
-v-
model.
MOUNTING
ADJUSTMENT
AND
Motor Pulley And V-belt
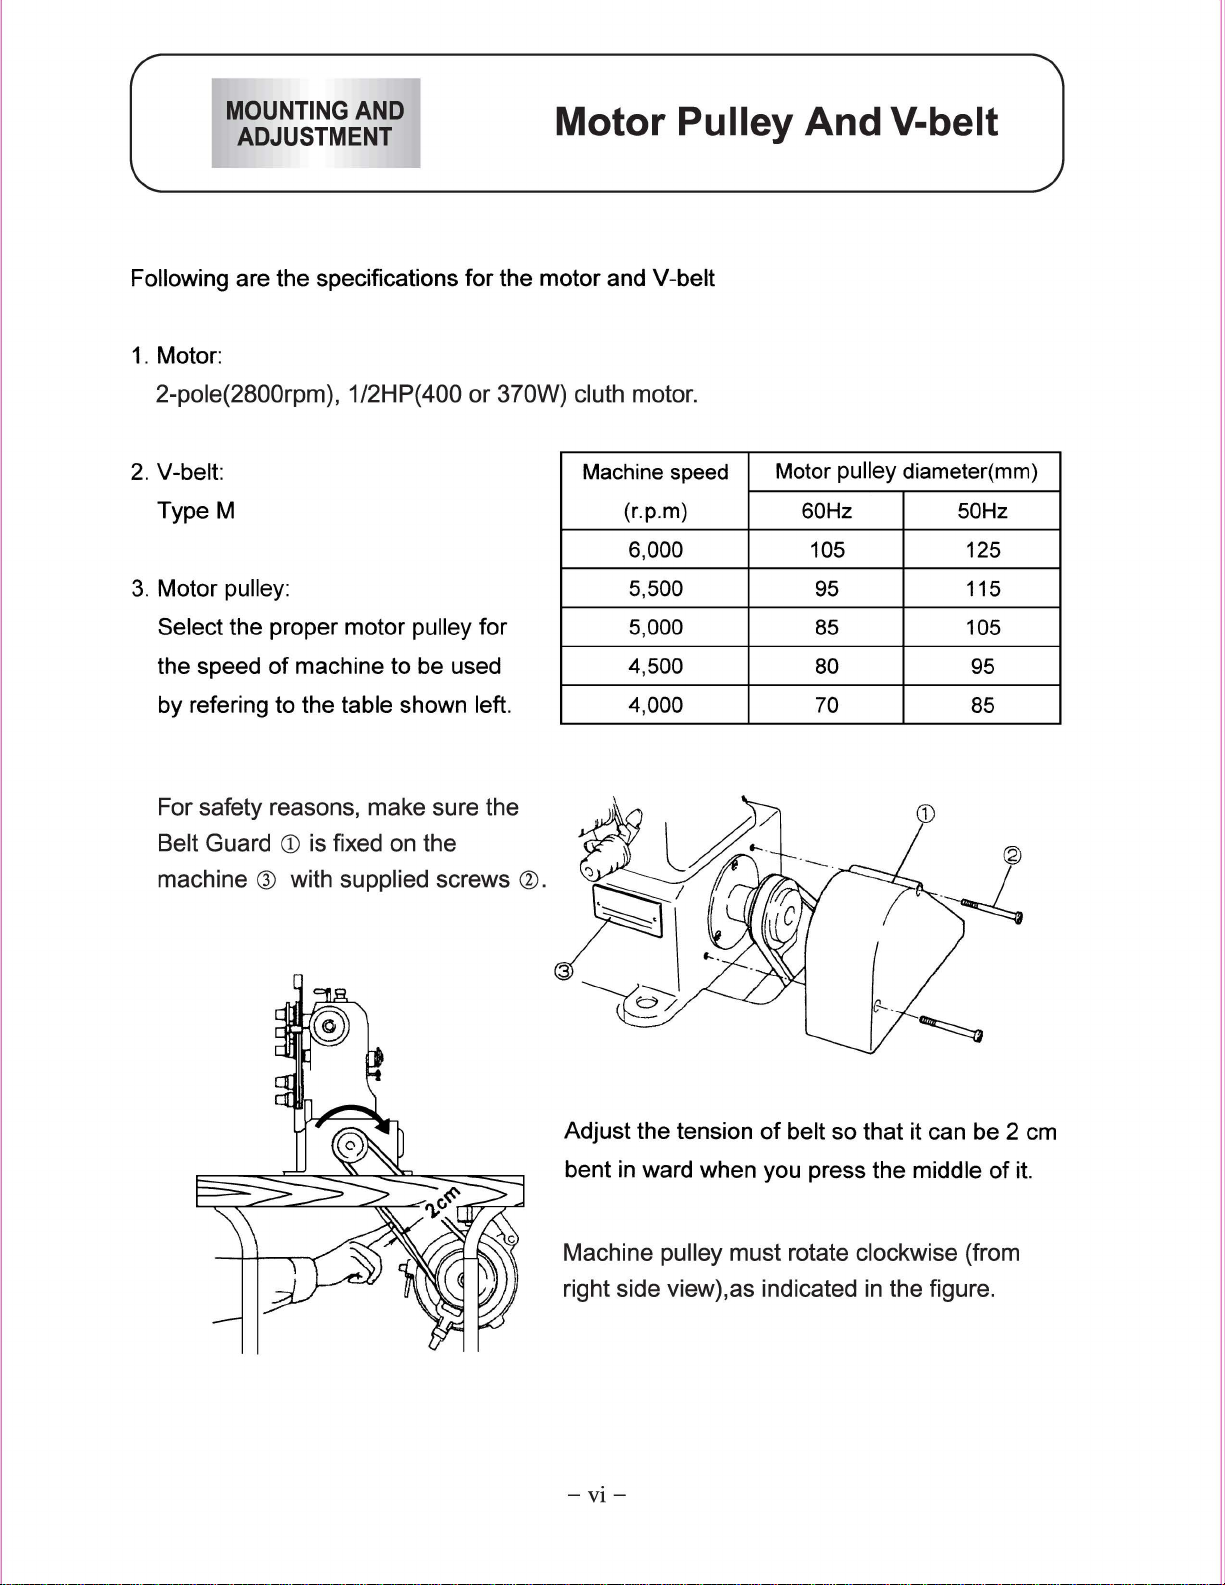
Following are the specifications for the motor and V-belt
1.
Motor:
2-pole(2800rpm), 1/2HP(400 or 370W) cluth motor.
2. V-belt:
Type M
3. Motor
pulley:
Select the proper motor pulley for
the speed
of
machine to be used
by refering to the table shown left.
For safety reasons, make sure the
Belt Guard
CD
is fixed on the
Machine speed
(r.p.m)
6,000 105 125
5,500
5,000
4,500
4,000 70
Motor
pulley diameter(mm)
60Hz 50Hz
95 115
85
80
105
95
85
Adjust the tension
bent
in
ward when you press the middle
Machine pulley must rotate clockwise (from
right side view),as indicated in the figure.
-vi-
of
belt so that it can be 2
of
em
it.
BEFORE
OPERATING
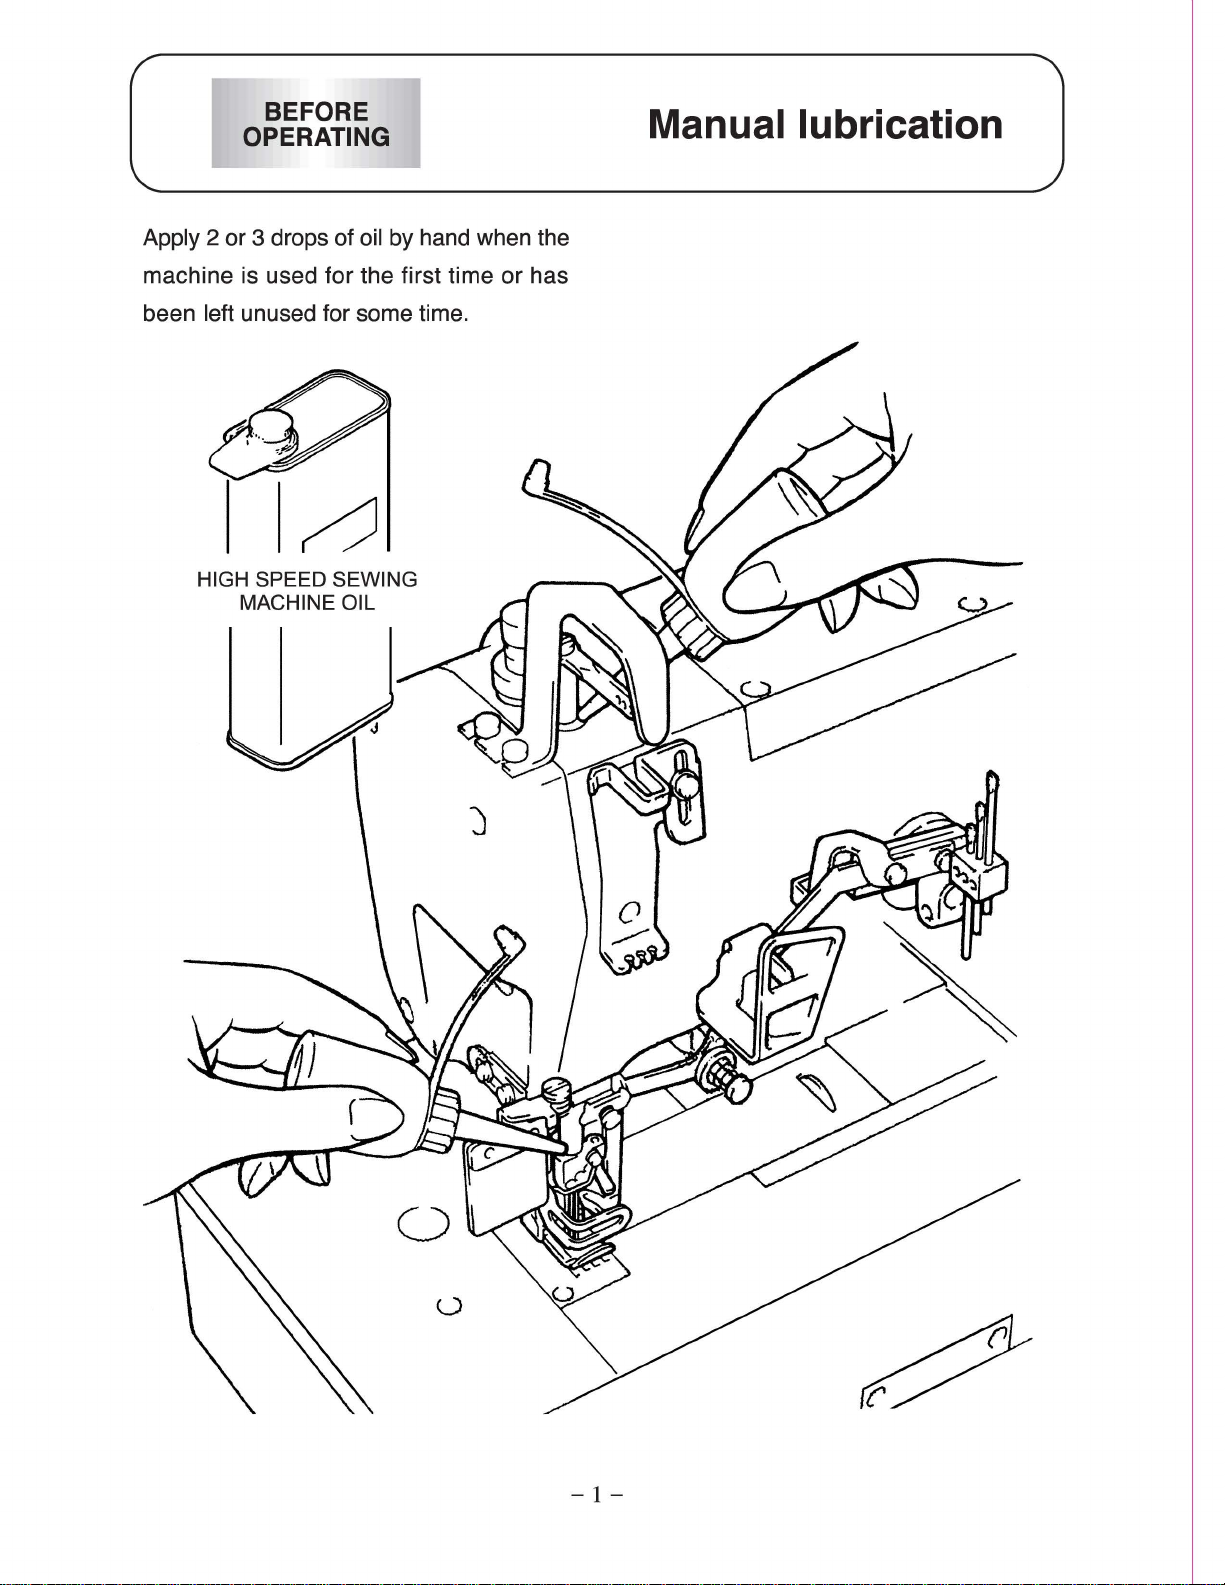
Apply 2 or 3 drops of oil by hand when the
machine is used for the first time or has
Manual lubrication
been
left unused for some time.
HIGH SPEED SEWING
MACHINE OIL
0
-1-
BEFORE
OPERATING
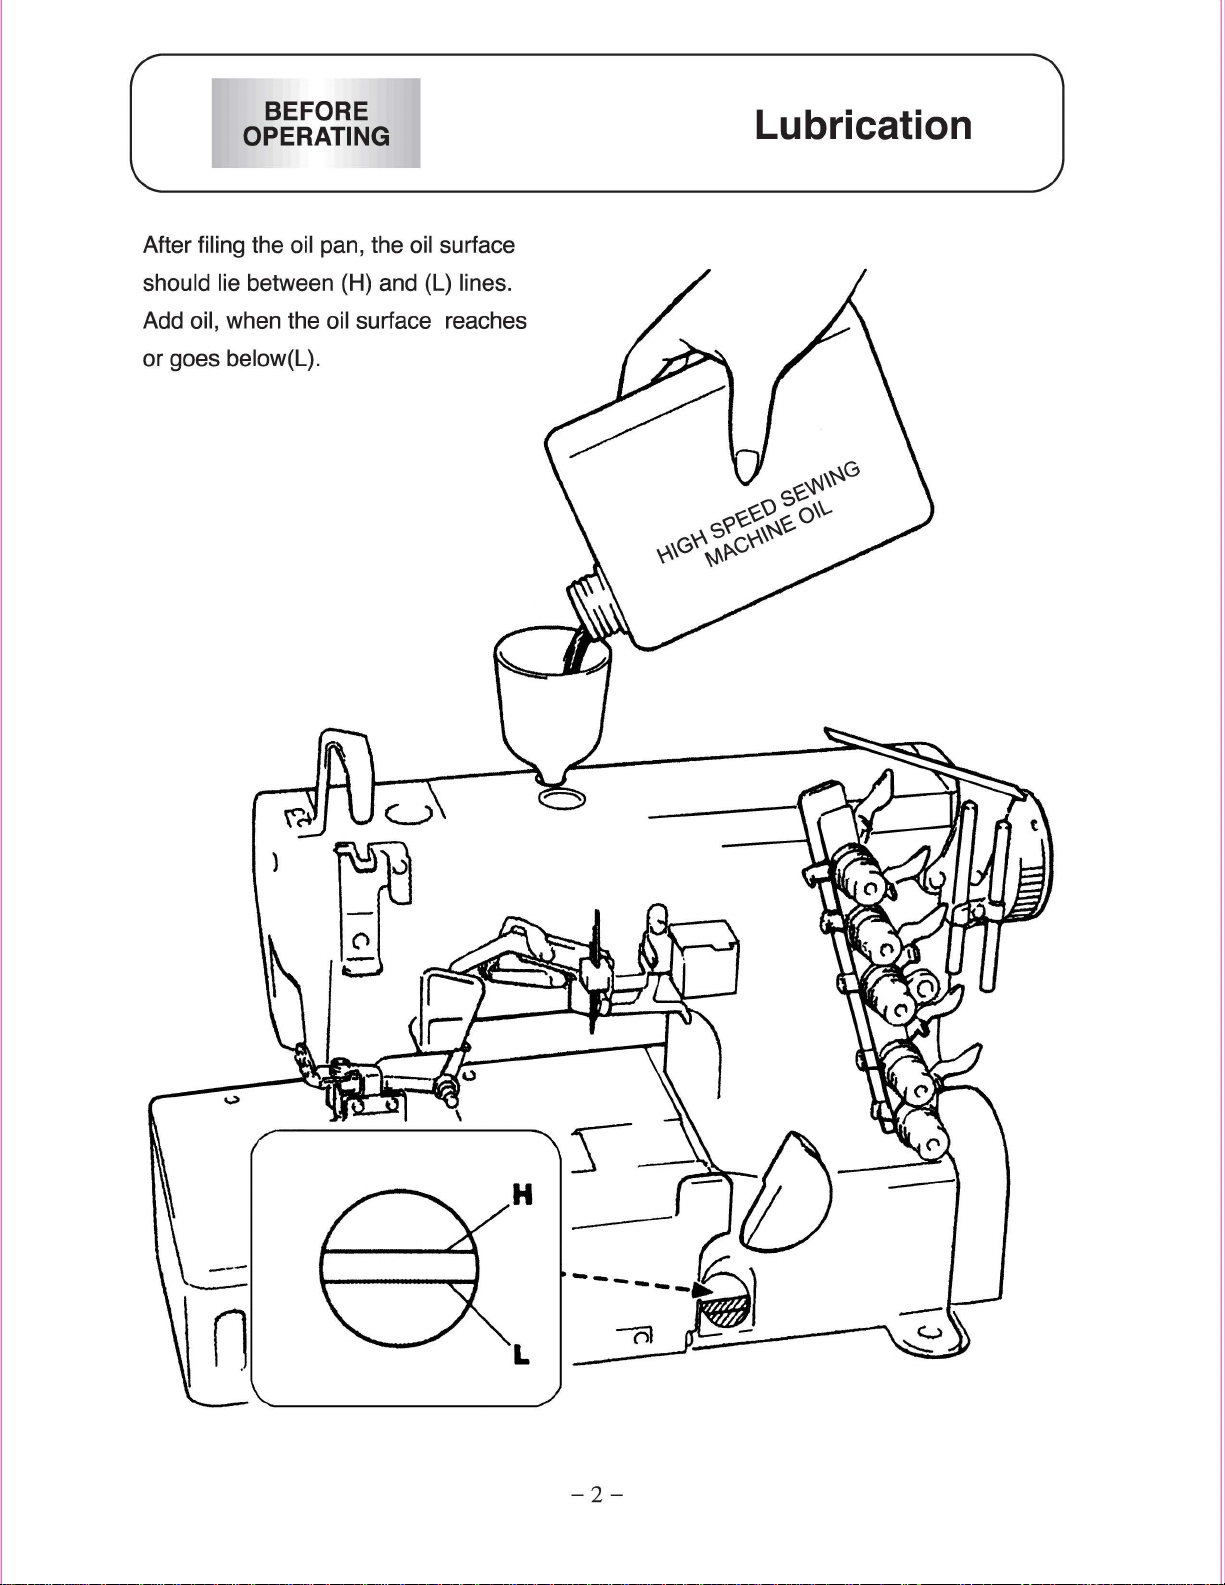
After filing the oil pan, the oil surface
should lie between (H) and (L) lines.
Add oil, when the oil surface reaches
Lubrication
or goes
below(L).
-2-
BEFORE
OPERATING
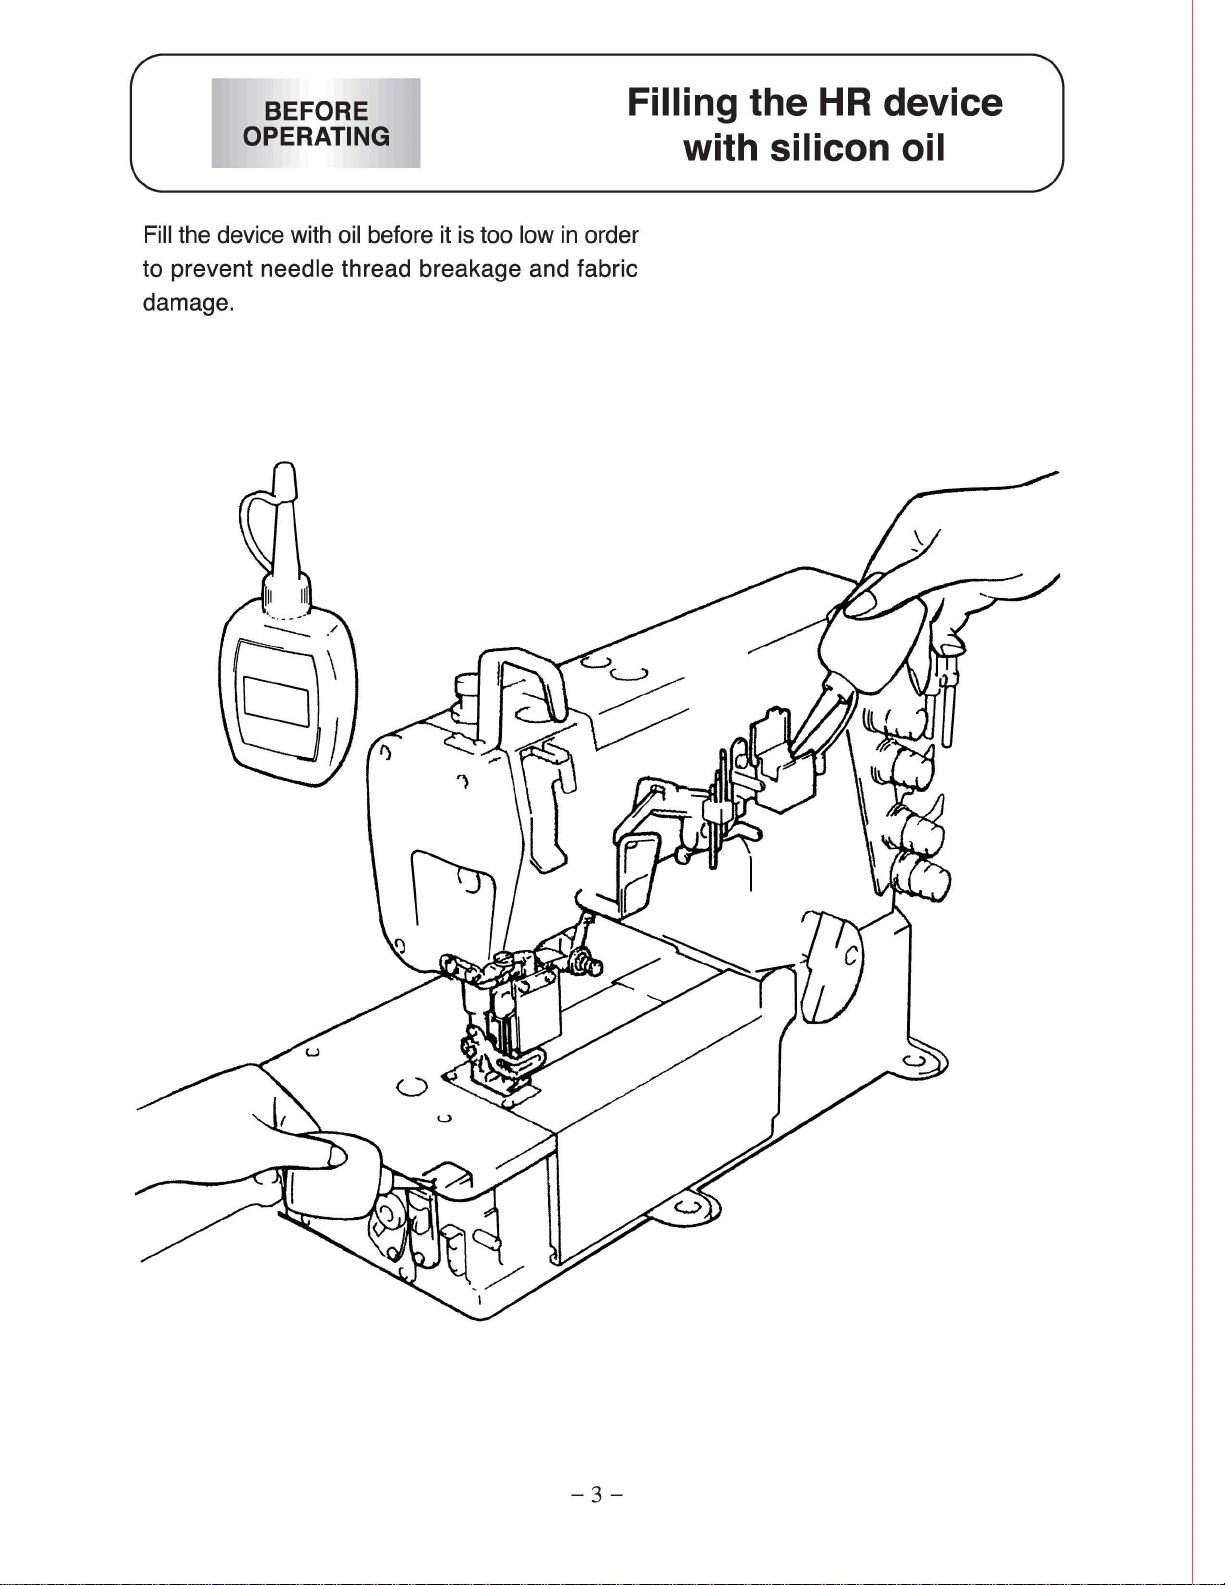
Filling the
with
silicon oil
HR
device
Fill the device with oil before
to prevent needle thread breakage and fabric
damage.
it
is too low
in
order
-3-
BEFORE
OPERATING
(.i\
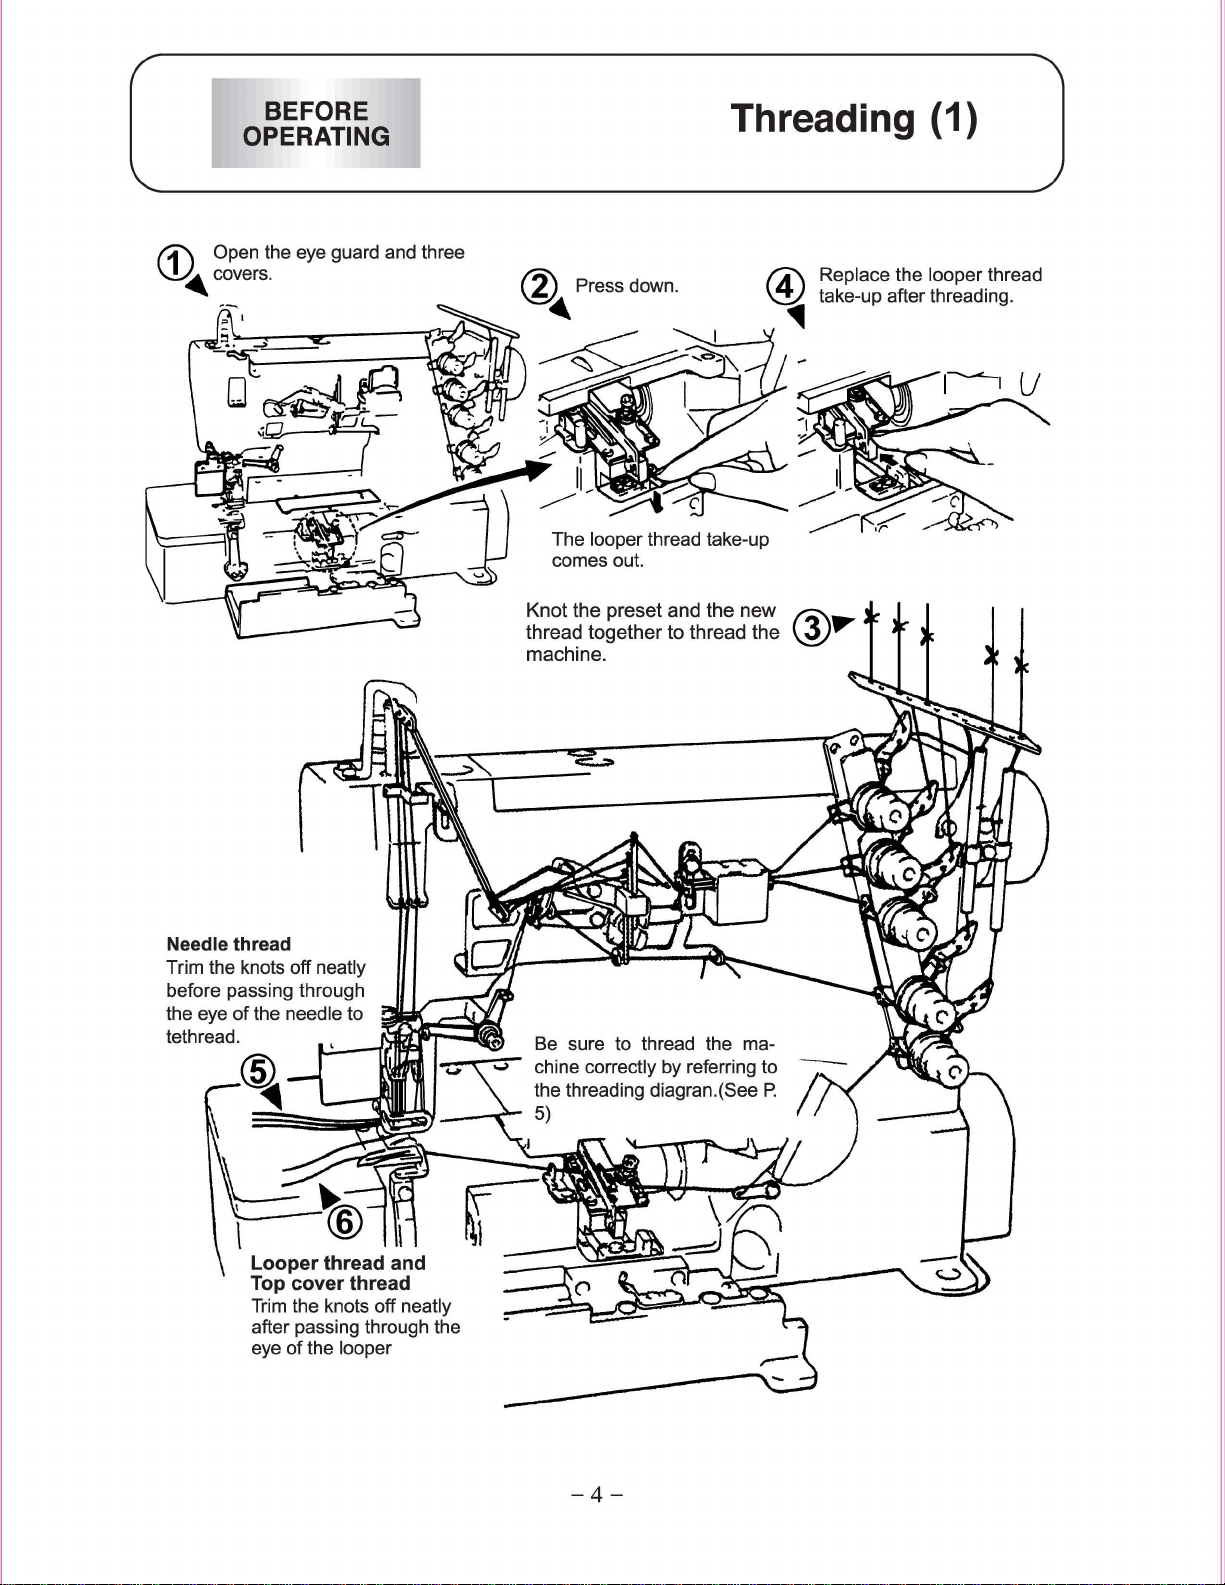
Open the eye guard and three
\..!)~
covers
.
(?\
~~
Press down.
~-
Knot
the
preset and
thread
machine.
together
\
to
thread
Threading (1)
f4\
Replace the looper thread
~
take-up after threading.
the
new
(?\
the
~~
Needle thread
Trim the knots off
before passing through
of
the eye
tethread.
the needle to
neatly
======-~~~
Looper thread and
Top cover thread
Trim the knots off neatly
after passing through the
eye
of
the looper
•--~
--~
Be sure to thread the
chine correctly by referring to
the threading diagran.(See
5)
rna-
P.
-4-
BEFORE
OPERATING
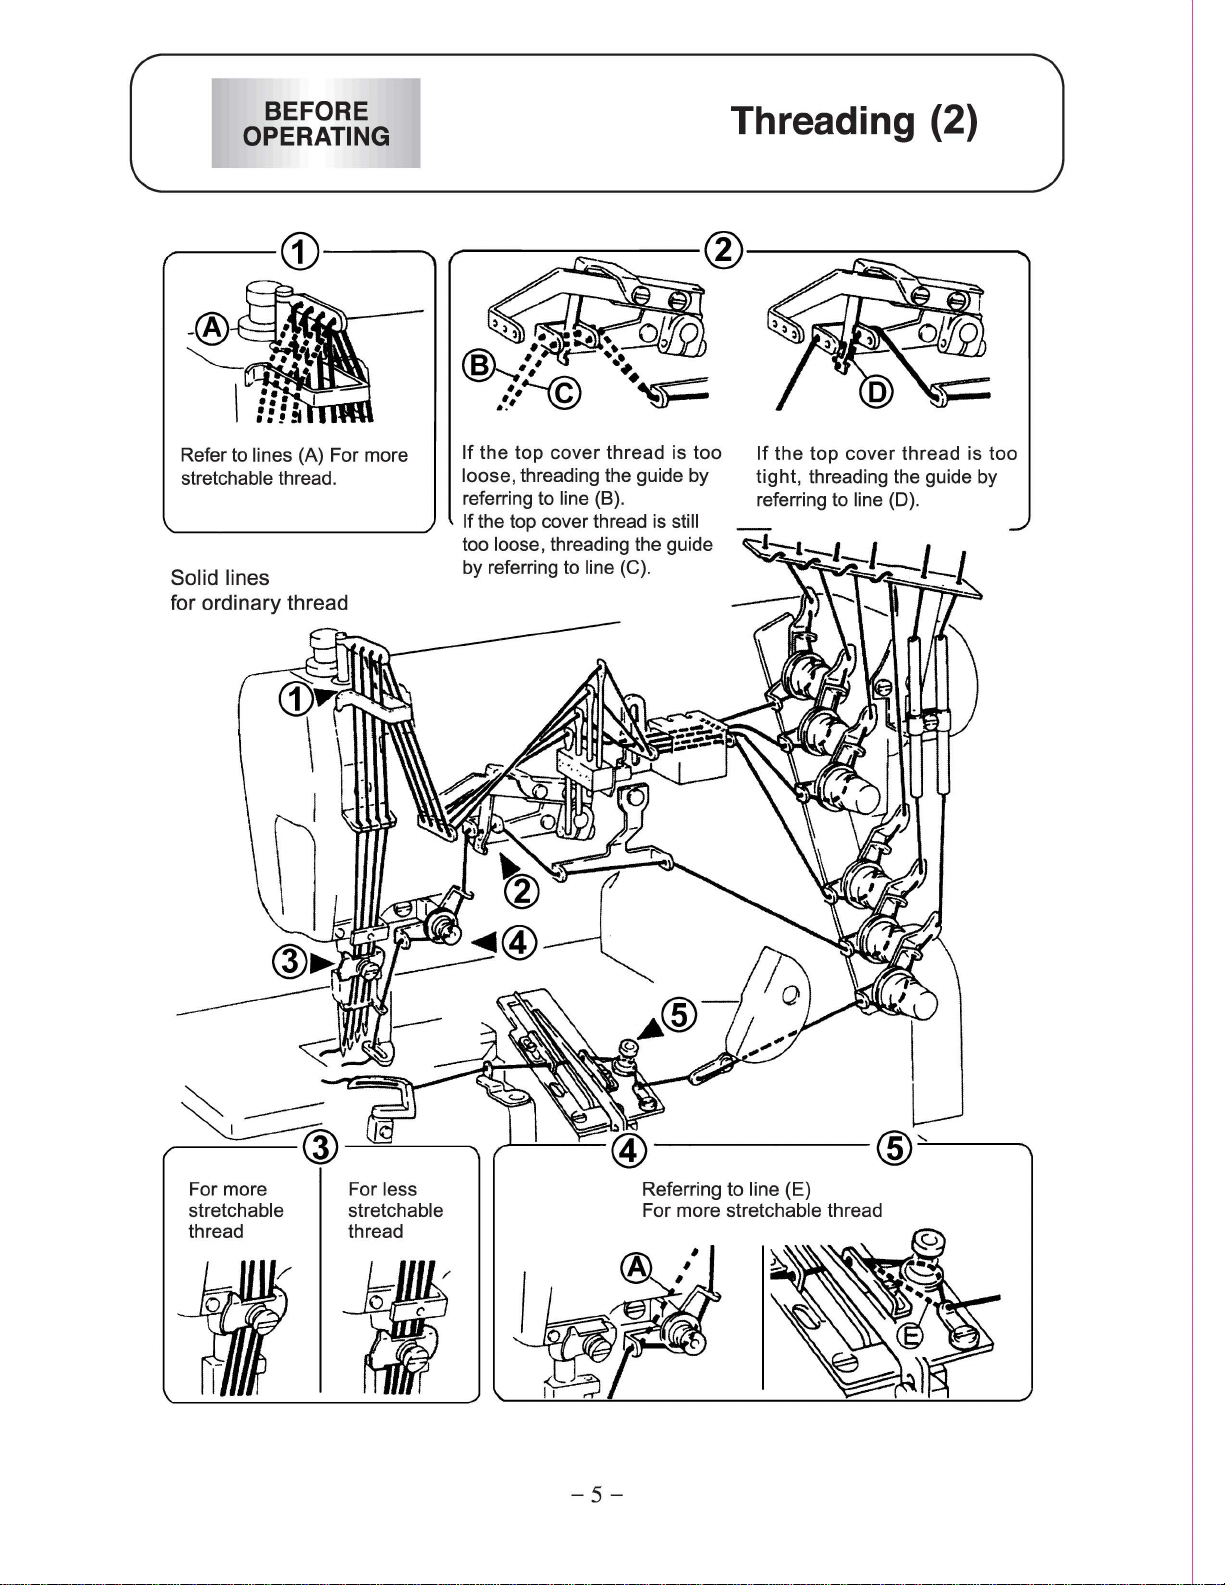
~--CD---
Refer to lines (A) For more
stretchable thread.
Solid lines
for ordinary thread
If
the top cover thread is too
loose, threading the guide by
referring to line (B).
If the top cover thread
too loose, threading the guide
by referring to line (C).
is
still
Threading (2)
If
the top cover thread is too
tight
, threading the guide by
referring to line (D).
For more
stretchable
thread
For less
stretchable
thread
Referring to
For more stretchable thread
-5-
line (E)
TEST SEWING
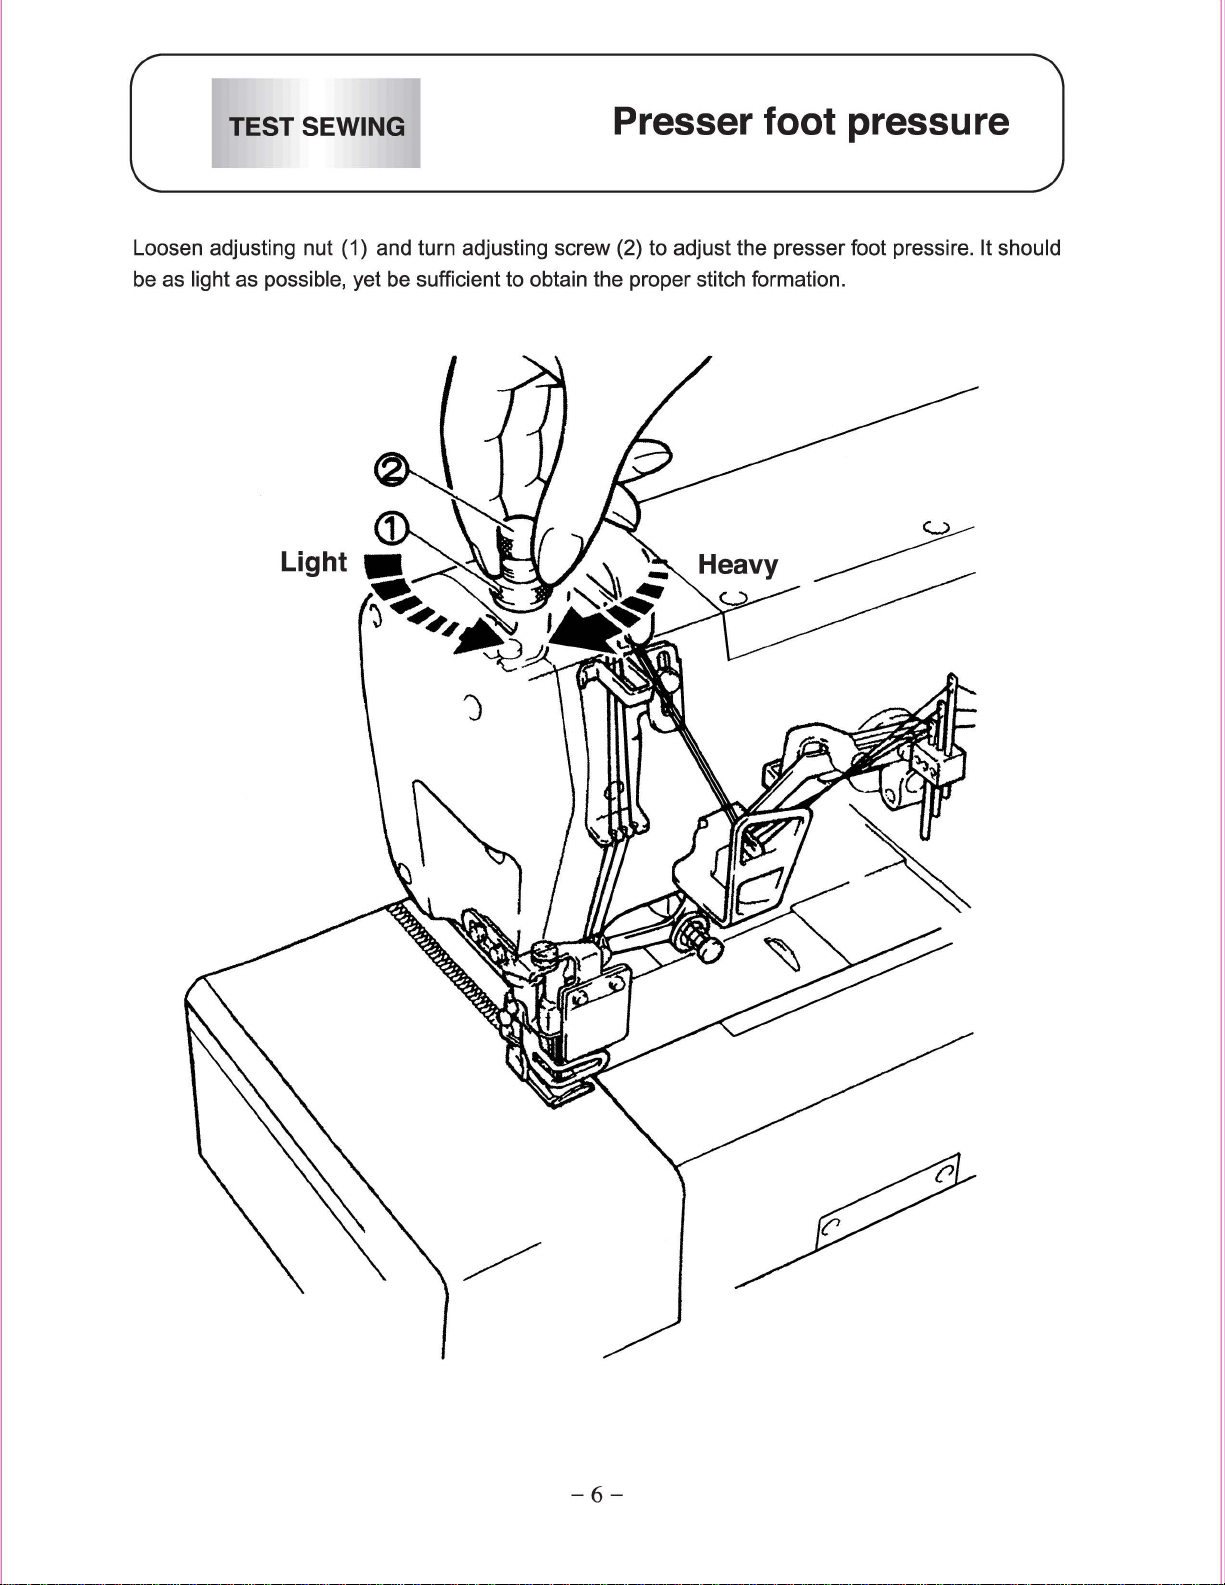
Loosen adjusting nut (1) and turn adjusting screw (2) to adjust the presser foot pressire. It should
be as light as possible, yet be sufficient to obtain the proper stitch formation.
Presser foot pressure
Heavy
-6-
TEST SEWING
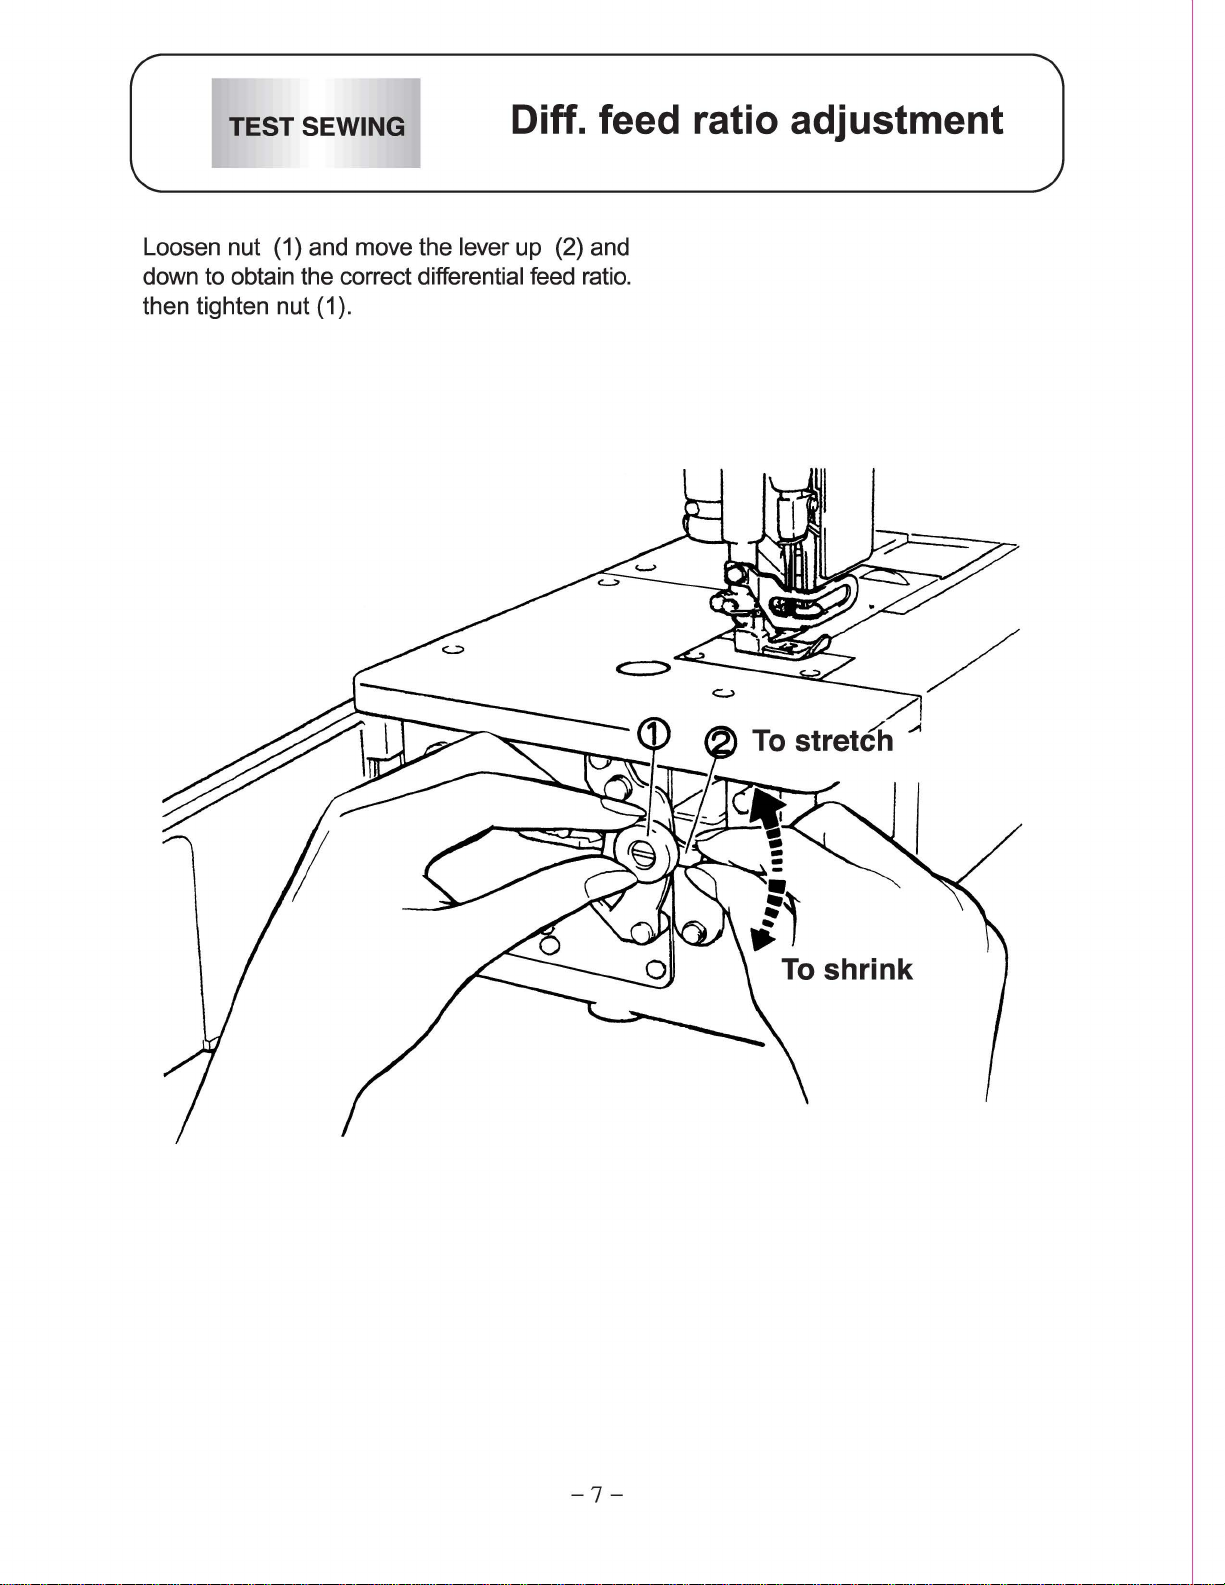
Loosen nut (1) and move the lever up (2) and
down to obtain the correct
then tighten nut
(1
).
differential feed ratio.
Diff. feed ratio adjustment
-7-
TEST SEWING Stitch length adjustment
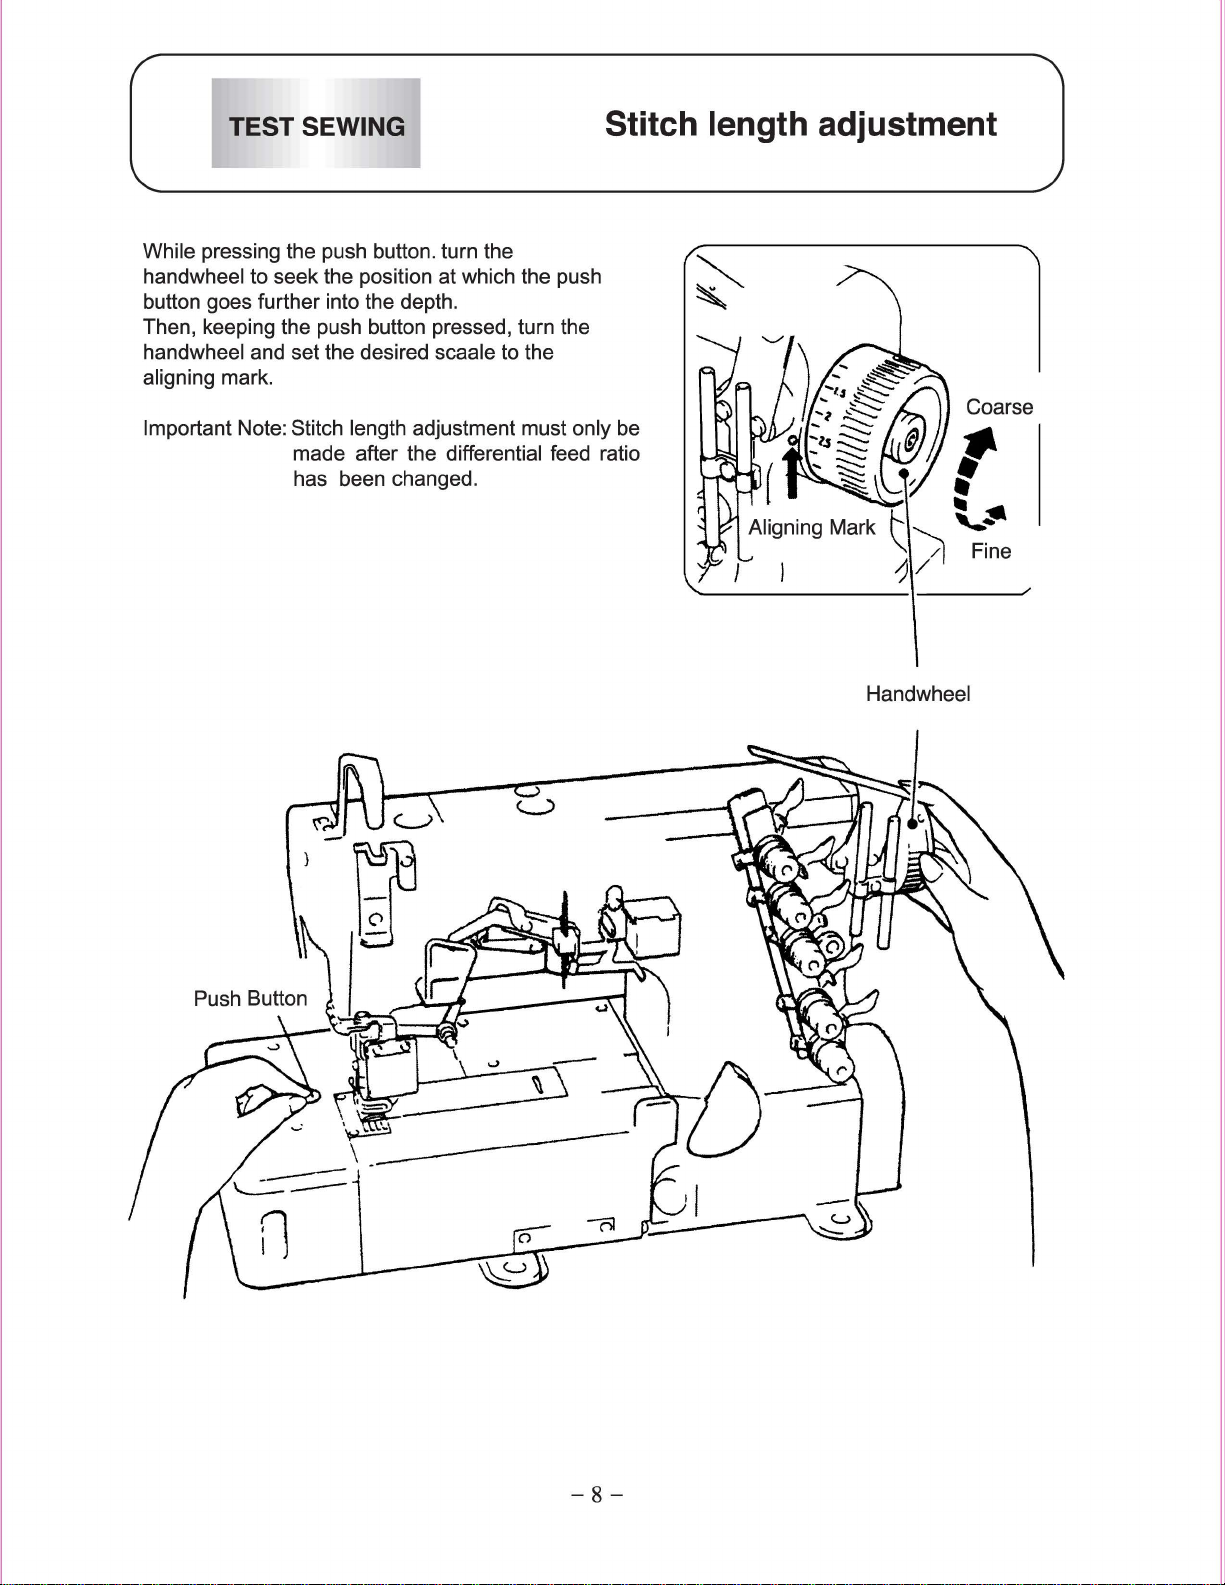
While pressing the push button. turn the
handwheel to seek the position at which the push
button goes further into the depth .
Then, keeping the push button pressed, turn the
handwheel and set the desired scaale to the
aligning mark.
Important Note: Stitch length adjustment must only be
made after the
has been changed.
differential feed ratio
~
~
Handwheel
-8-

TEST SEWING
Mack tension adjustments with the needle
thread knob
and
looper thread knob (3).
(1
),
top cover thread knob (2),
Thread tension
'•
,~;.
'##
~
To loosen
To tighten
)
---
-9-
MAINTENANCE
DURING USE
Cleaning the machine
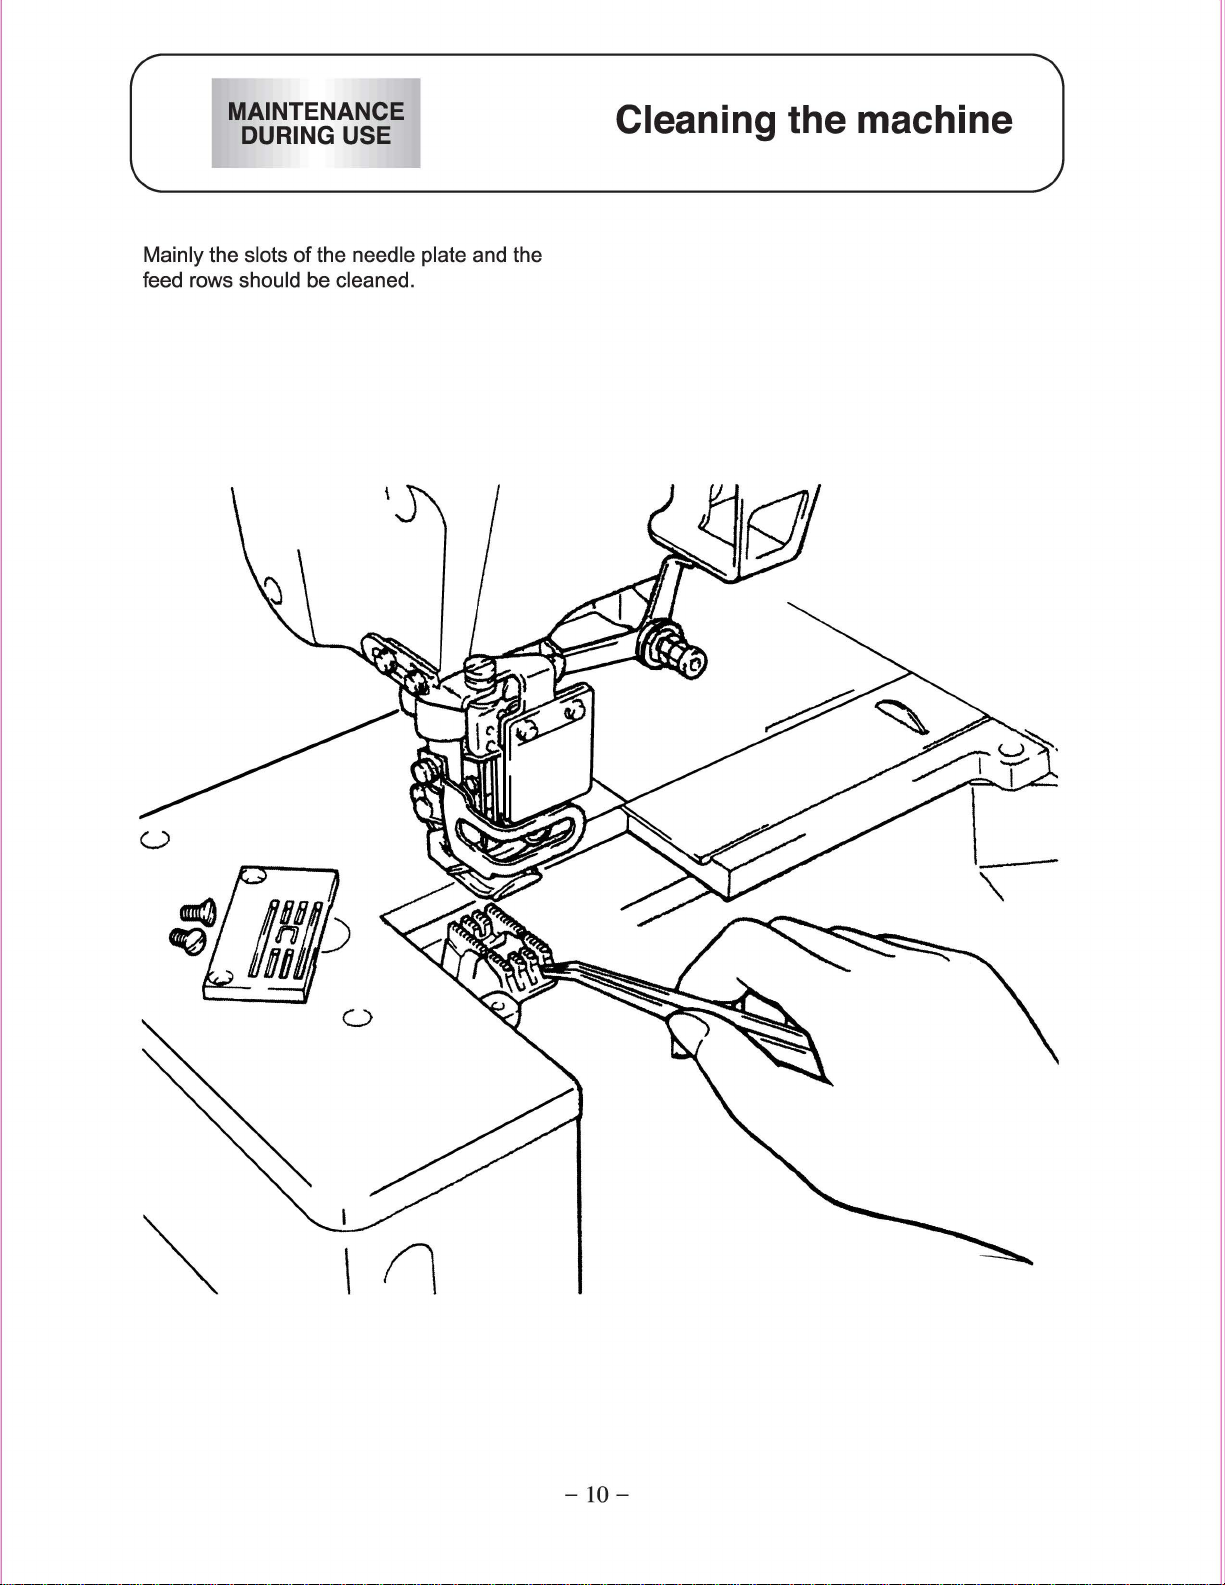
Mainly the slots
feed rows
should be cleaned.
of
the needle plate and the
-10-
MAINTENANCE
DURING USE
Replacing the needle
OK! WRONG!
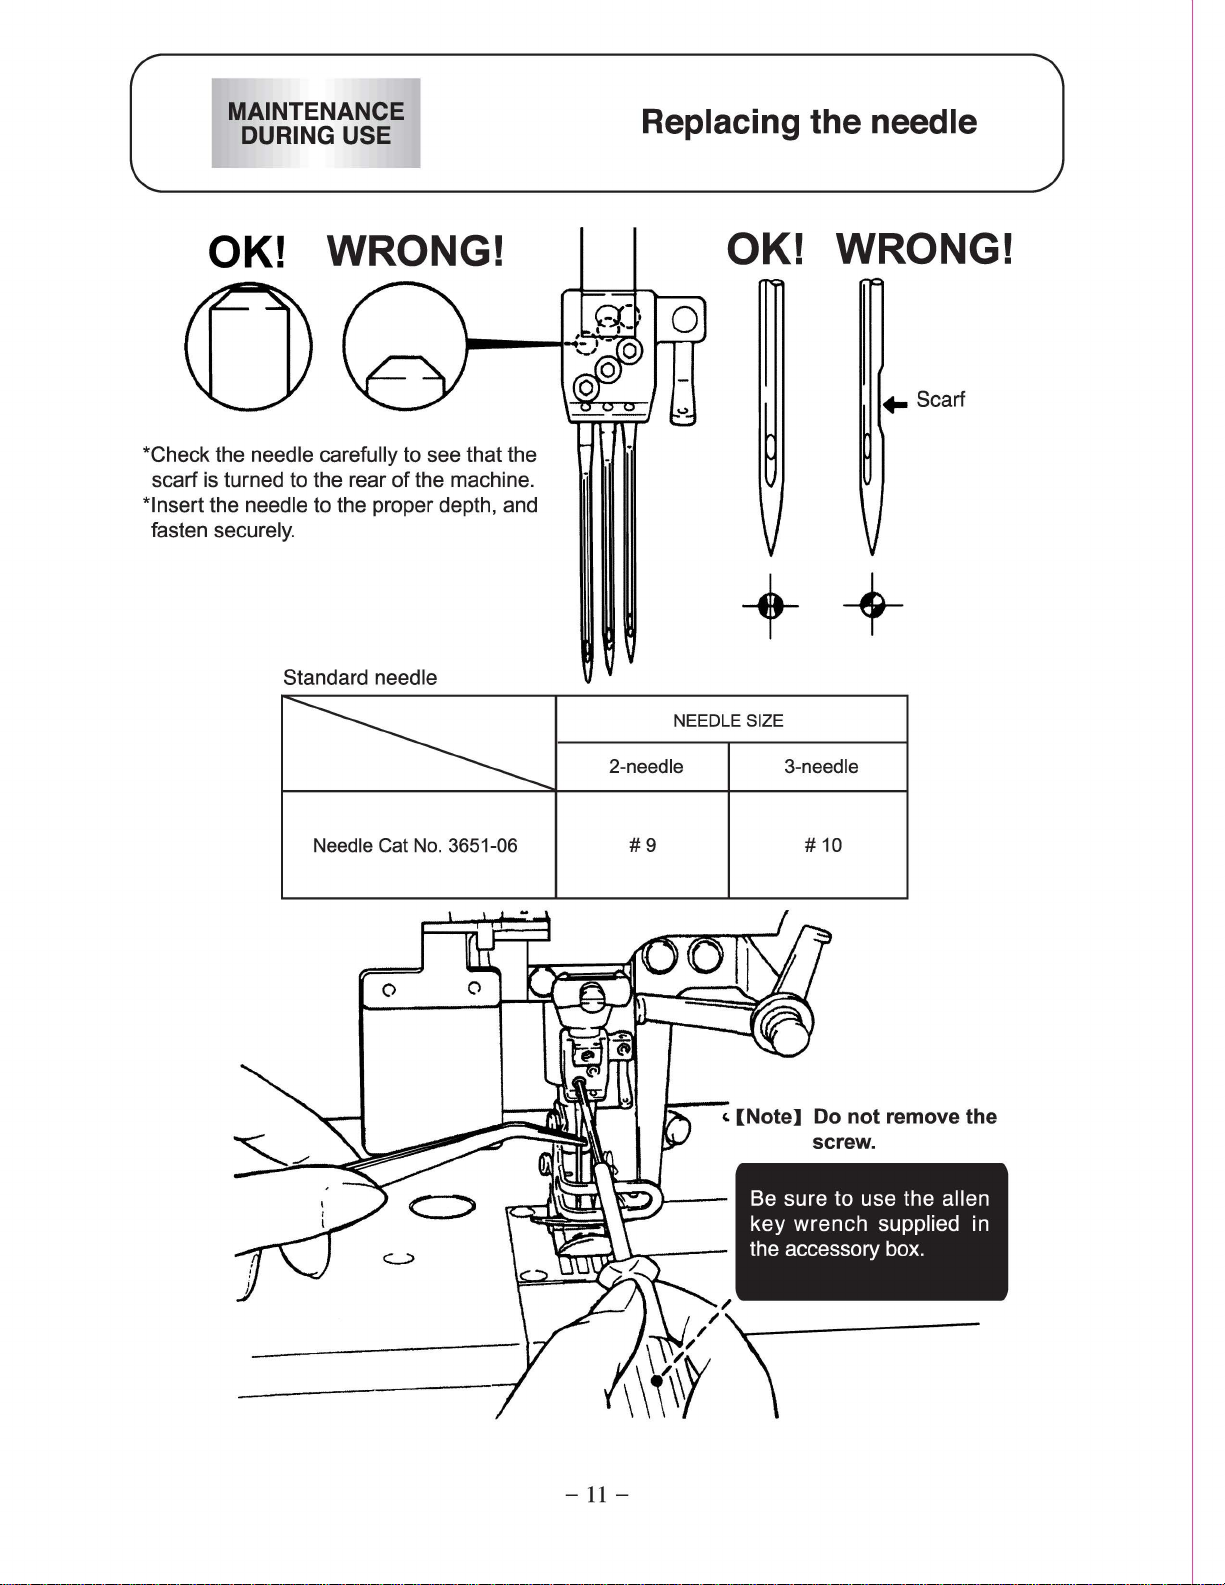
*Check the needle carefully to see that the
of
scarf is turned to the rear
*Insert the needle to the proper depth, and
fasten
securely.
Standard needle
the machine.
~
OK! WRONG!
++
NEEDLE SIZE
2-needle 3-needle
+-
Scarf
Needle Cat No. 3651-06
0
#9
/
//'~--------------
\\\~
\
# 10
-11-
MAINTENANCE
DURING USE
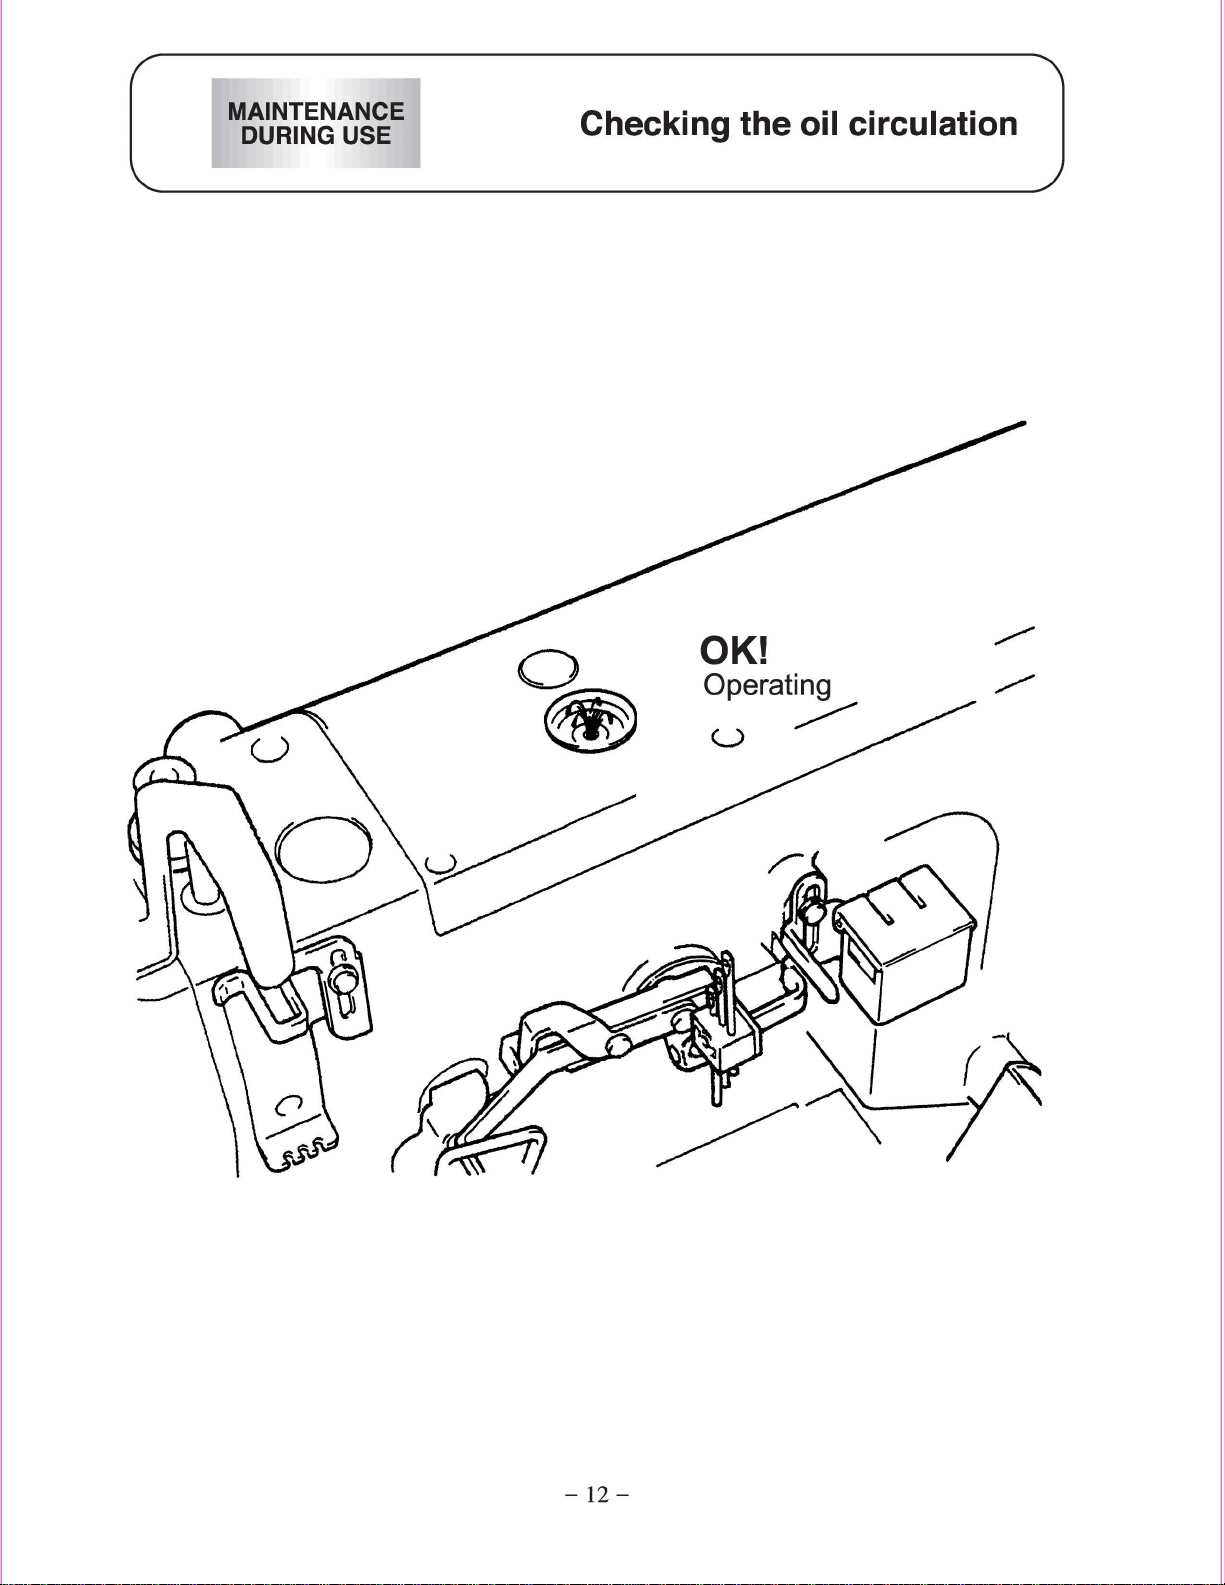
Checking the oil circulation
OK!
Operating
u
~
-12-
MAINTENANCE
DURING USE
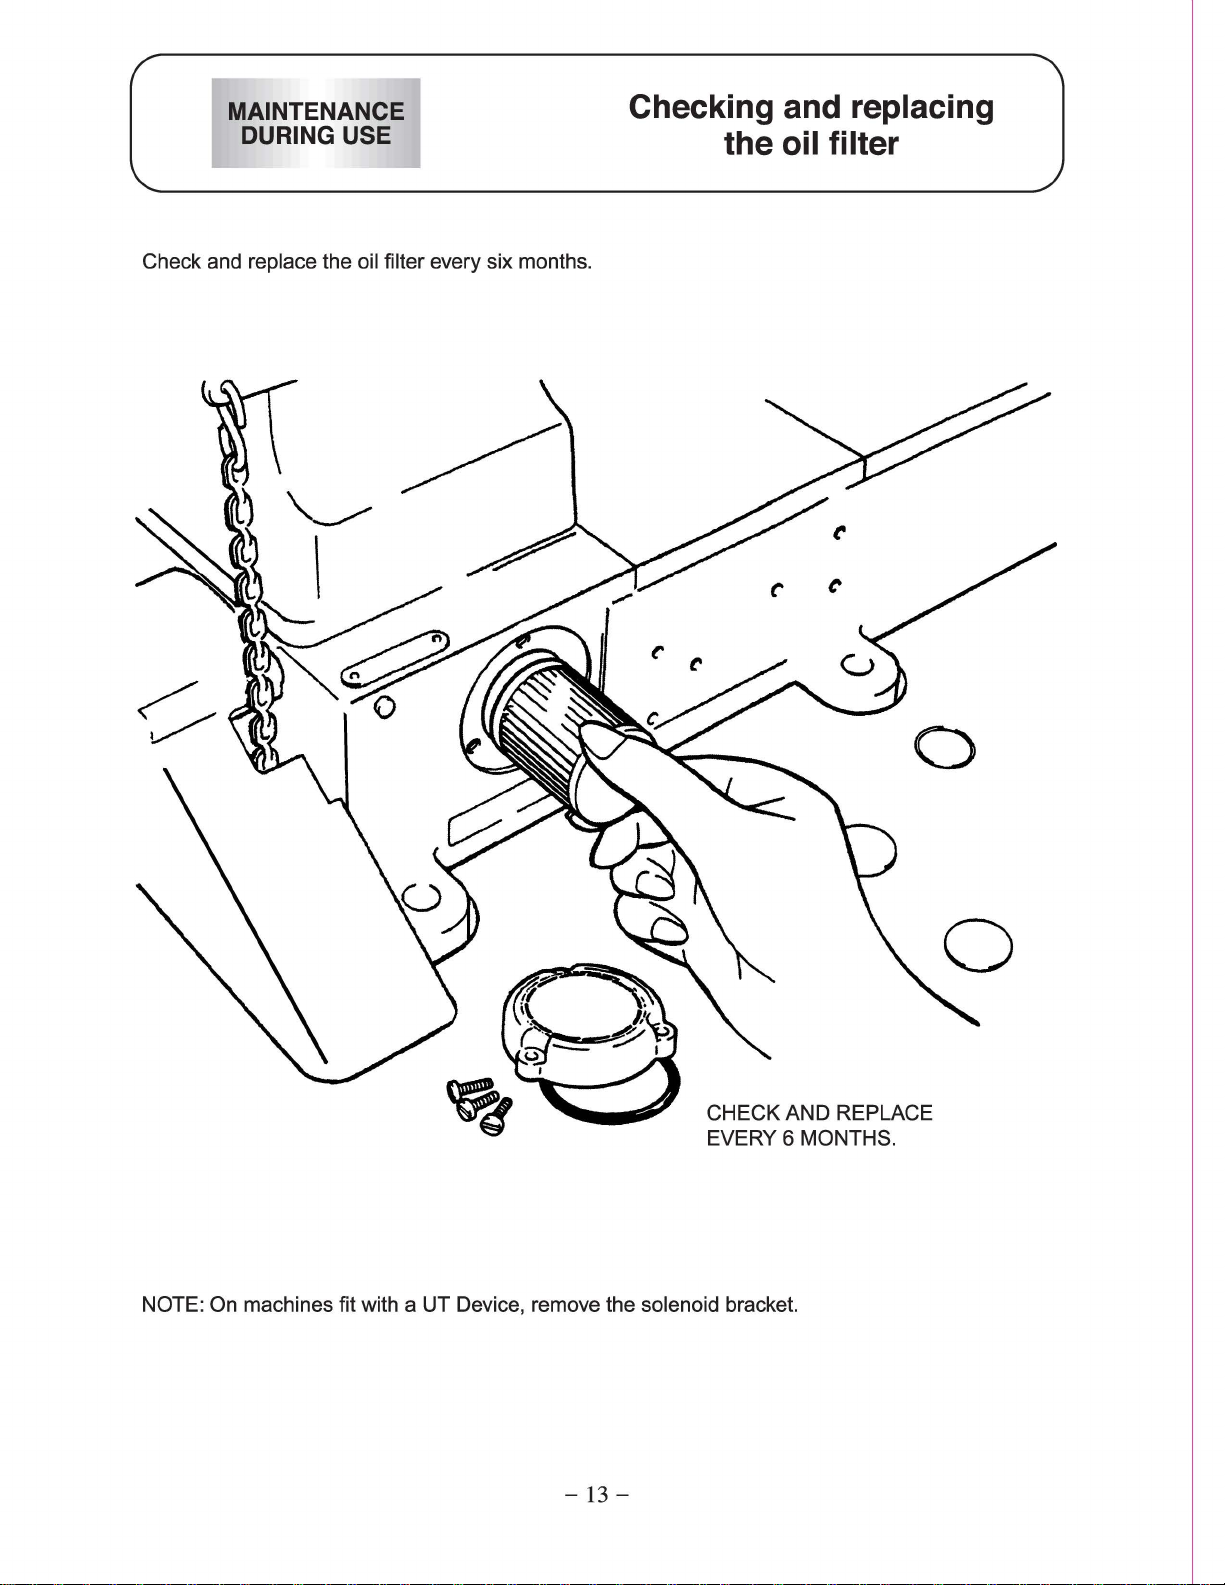
Check and replace the oil filter every six months.
~
I
Checking and replacing
the oil filter
NOTE: On machines
CHECK AND REPLACE
EVERY 6 MONTHS.
fit
with a UT Device, remove the solenoid bracket.
0
-13-
MAINTENANCE
DURING USE
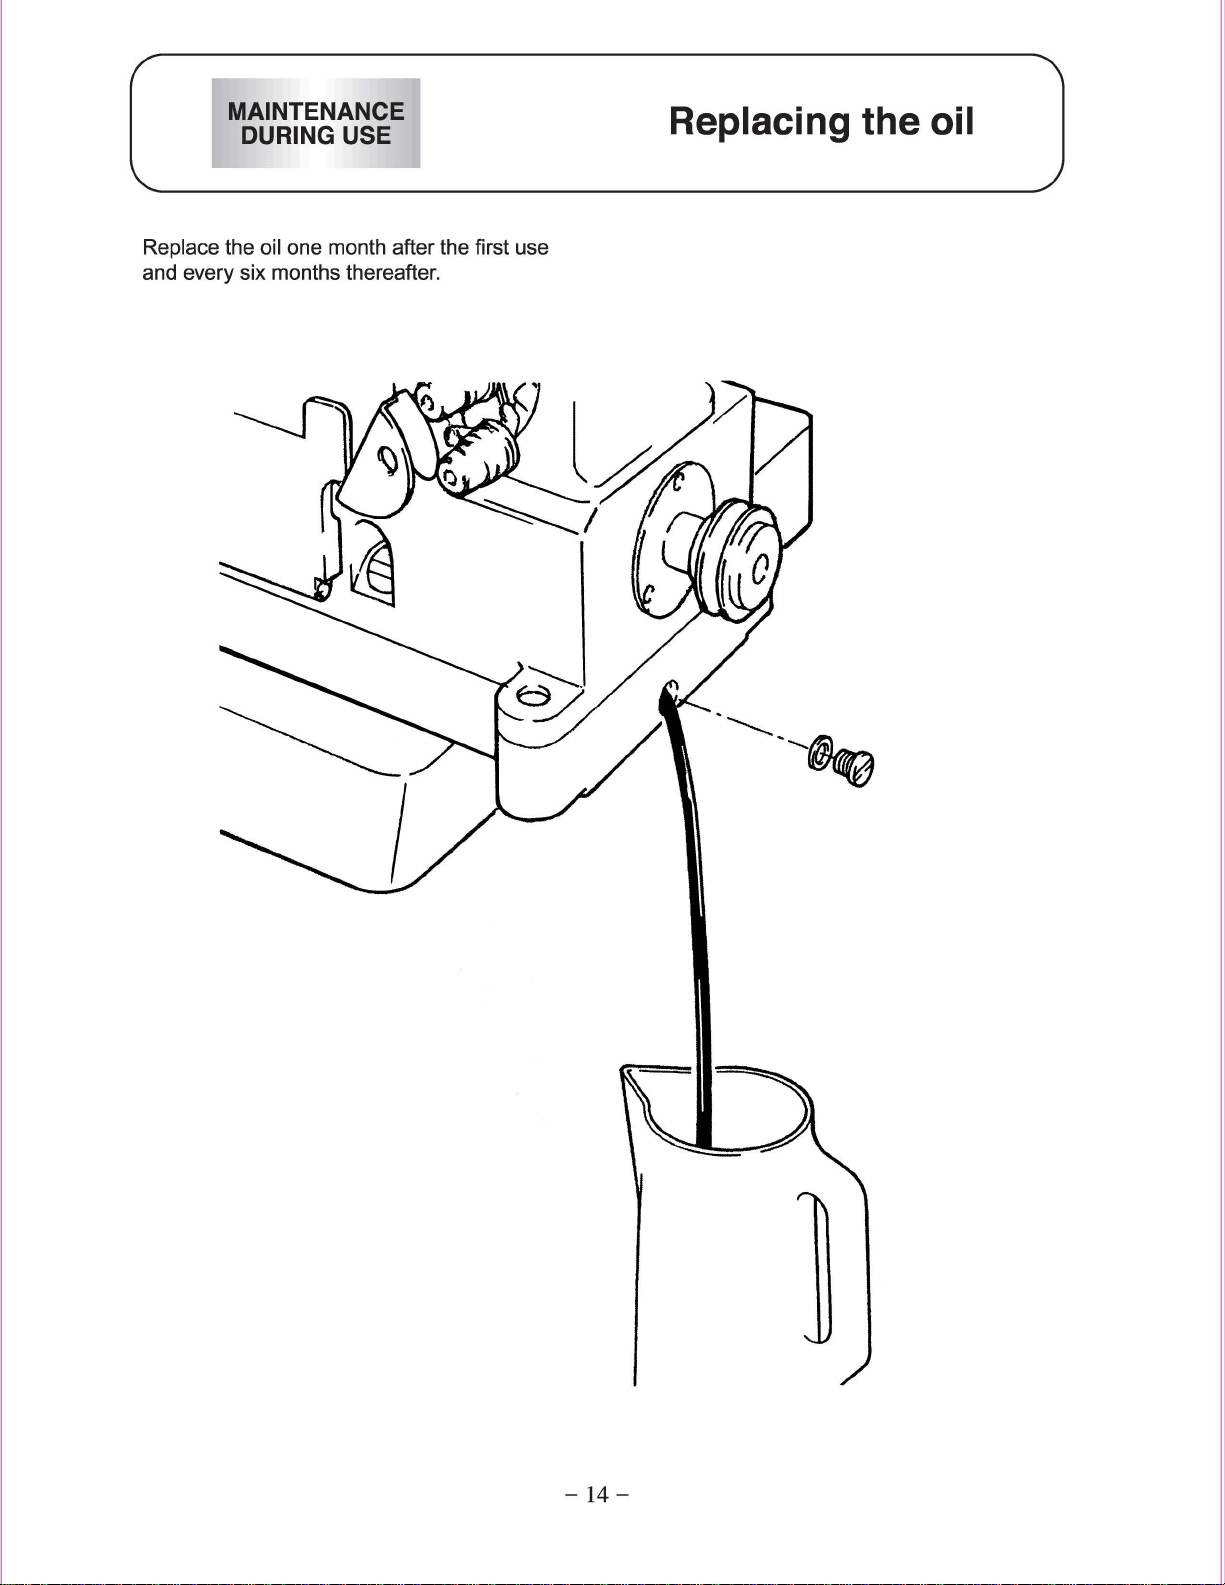
Replace the oil one month after the first use
and every six months thereafter.
Replacing the oil
-14-
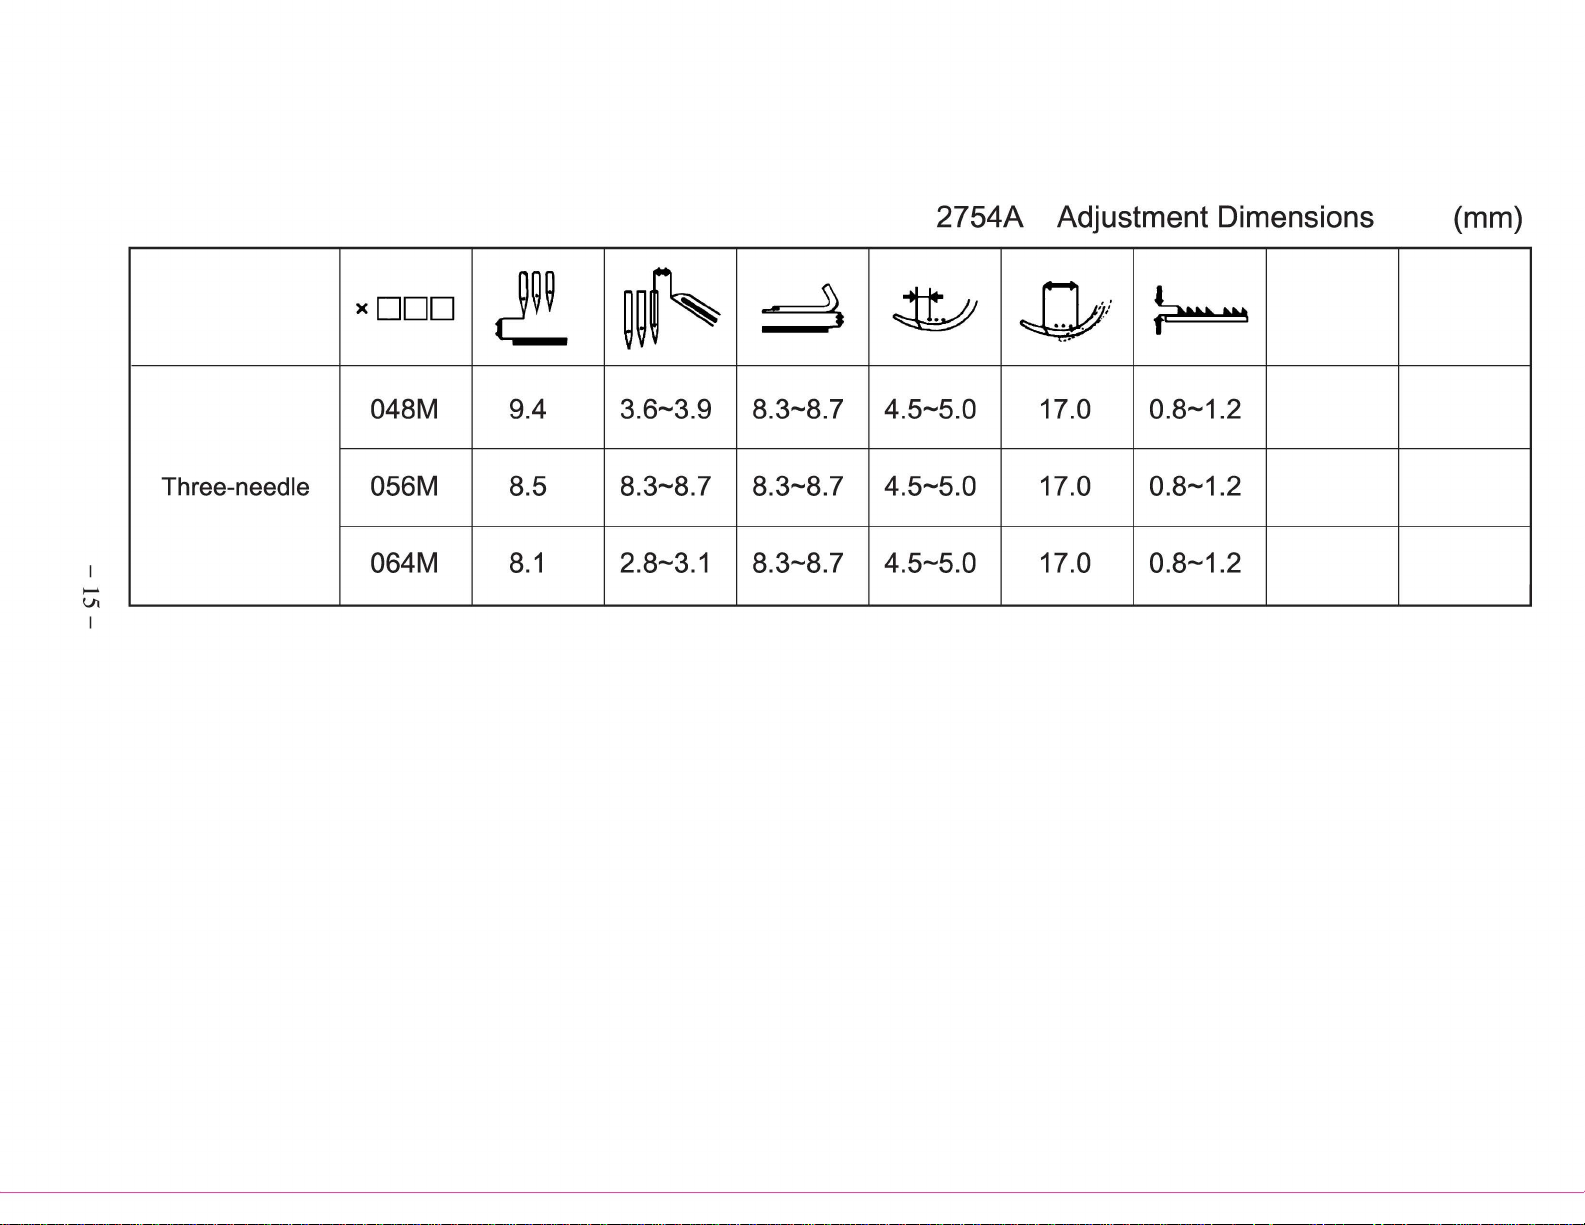
2754A Adjustment Dimensions (mm)
.......
Ul
I
xDDD
048M
Three-needle 056M
064M
d!
9.4 3.
8.5
8.1
ijijf'
6-3.9
8.
3-8.7
2.8-3.1
~
8.3-8.7
8.3-8.7
8.3-8.7
~
4.
5-5.0
4.
5-5.0
4.
5-5.0
~
17.0
17.0
17.0
/
-
.
~
8-1.2
0.
0.
8-1.2
0.
8-1.2

ILLUSTRATED PARTS LIST
-
16-

1.
Bushing
Components
-
17-

1. Bushing Components
No.
1
2
3
4
5
6
7
8
9
10
11
12
13
14
15
Parts
No.
30101003
30103036
30103037
30103042
30103018
30103039
30103017
Description
machine
bushing
bushing
bushing
bushing
bushing
bushing
001039 o
30103038
30103035
30122039
30103021
30103010
30103019
20103014
bushing
bushing
plug
bushing
bushing
bushing
bushing
ring
frame
QTY
1
1
2
3
1
2
1
1
1
1
1
1
1
1
3
16
17
18
30121001
P03005
20622019
pipe
pin
plug
1
1
1
-
18
-
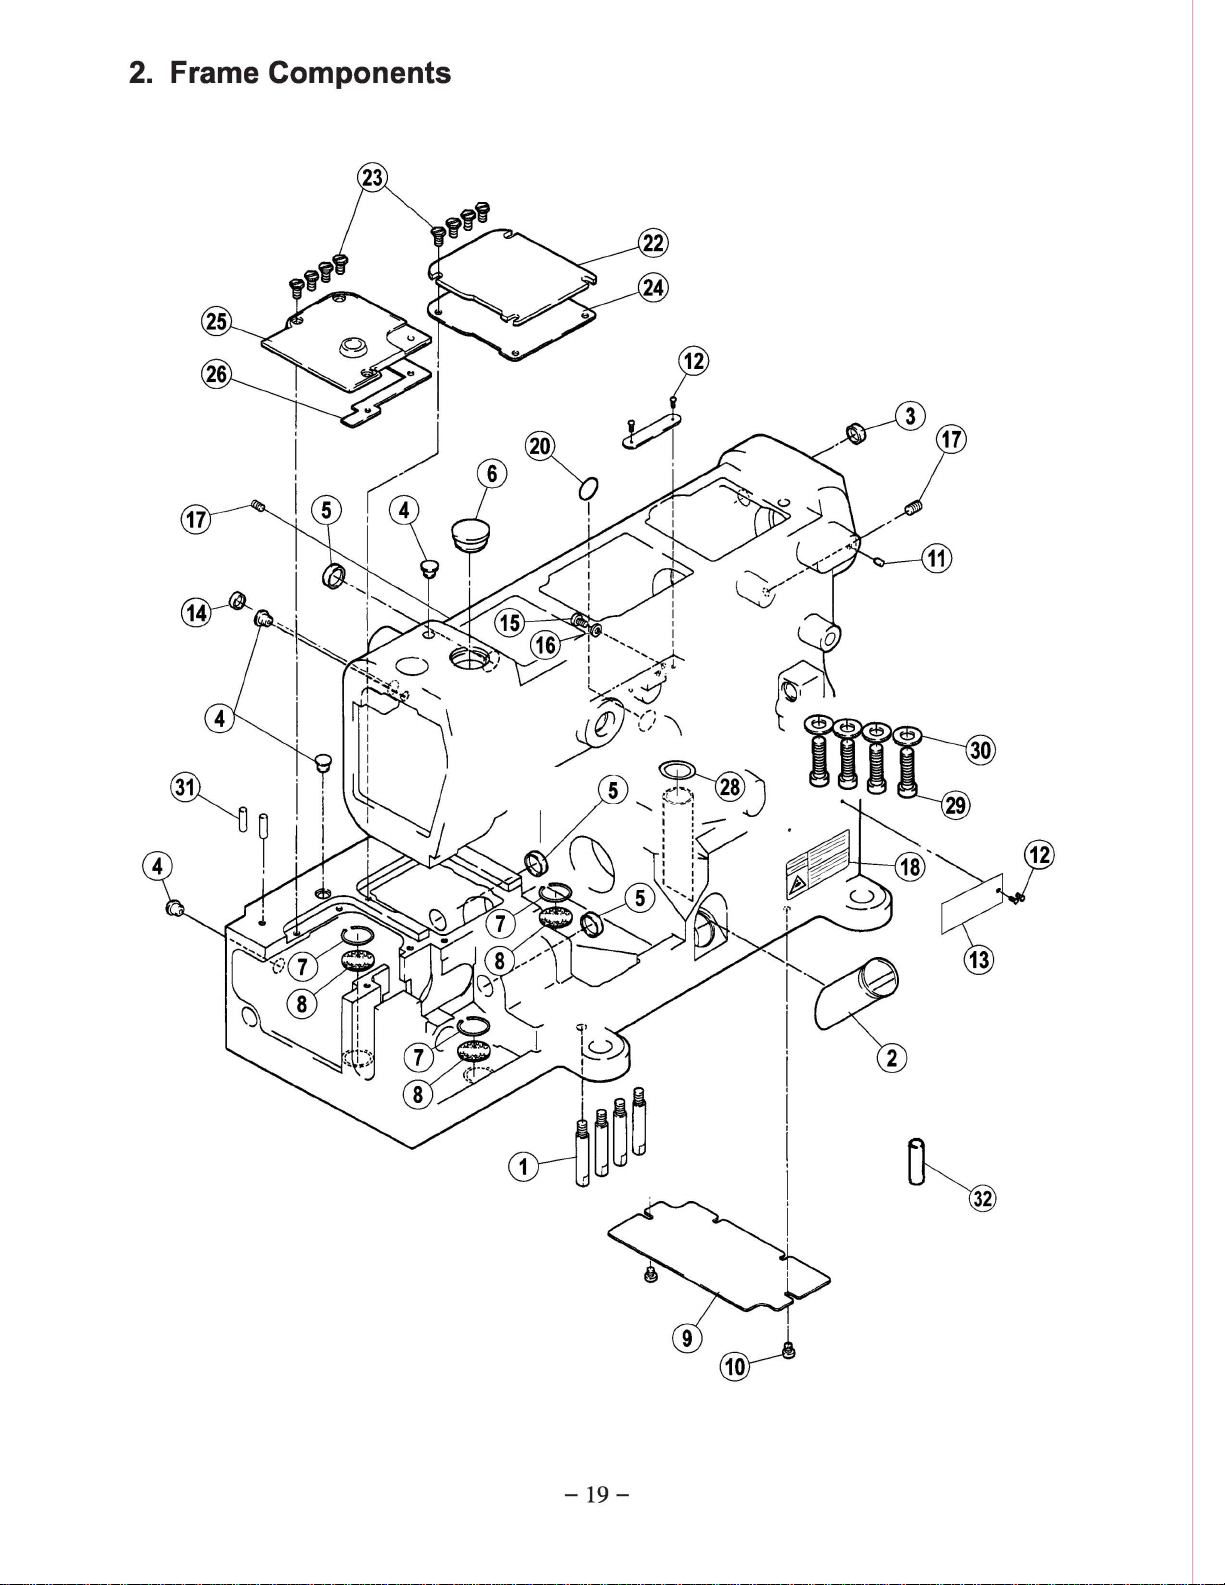
2.
Frame o
C
mponents
-19-
 Loading...