

singer 177, 217, 239, 257, 505 Instruction Manual

Congratulations!
As the owner of a Fashion Mate* Sewing
Machine/Model 237 by Singer, you are
about to enter a wonderful new world of
sewing! From the moment you begin to
sew on your Fashion Mate sewing
machine, you will be delighted with its
easy dependable operation.
May we recommend that before you begin
to sew you discover all the many
advantages of your Fashion Mate machine by going through this instruction
book step by step while seated at your
machine.
SINGER* service is always close at hand.
If your sewing machine should need
servicing, call your local SINGER
CENTER to be sure of warranted
SINGER parts and service. You will find
the address under THE SINGER
COMPANY in the telephone directory.
*A Trademark of THE SINGER COMPANY Copyright © 1968 The Singer Company
Form 680 (9/69) All rights reserved Printed in Italy

Contents
GETTING TO KNOW YOUR SINGER SEWING MACHINE
Principal Parts……………………………………………………………. 2
Accessories………………………………………………………………. 4
THREADING THE MACHINE
The Bobbin Thread………………………………………………………. 5
The Needle Thread………………………………………………………. 9
Raising Bobbin Thread…………………………………………………… 10
STRAIGHT STITCHING
Positioning the Needle…………………………………………………… 11
Regulating the Machine for Your Fabric………………………………… 12
Fabric, needle, thread, and stitch length chart…………………... 13
Stitch length……………………………………………………… 14
Thread tension…………………………………………………… 15
Pressure………………………………………………………….. 17
Feed Height……………………………………………………… 17
Sewing a Seam…………………………………………………………… 18
Pin Basting……………………………………………………………….. 20
Sewing Darts……………………………………………………………… 21
Darning without Embroidery Hoop……………………………………… 22
ZIG-ZAG STITCHING
Stitch Width………………………………………………………………. 23
Needle Position…………………………………………………………… 23
Stitch Length……………………………………………………………… 24
Open zig-zag stitching…………………………………………… 24
Satin stitching……………………………………………………. 24
Needle-Thread Tension……………………………………………………24
Seams……………………………………………………………………... 25
Darts in Interfacing……………………………………………………….. 26
Mending………………………………………………………………….. 27
Applique………………………………………………………………….. 28
Buttonholes………………………………………………………………. 29
FREE-MOTION STITCHING
Preparation……………………………………………………………….. 32
Darning with Embroidery Hoop…………………………………………..33
Script Lettering…………………………………………………………… 34
Embroidery………………………………………………………………..35
CARING FOR YOUR SEWING MACHINE
Cleaning………………………………………………………………….. 36
Oiling and Lubricating…………………………………………………….37
Adjusting Belt Tension…………………………………………………… 39
Changing Light Bulb……………………………………………………... 39
INDEX ……………………………………………………………………………. 40
1
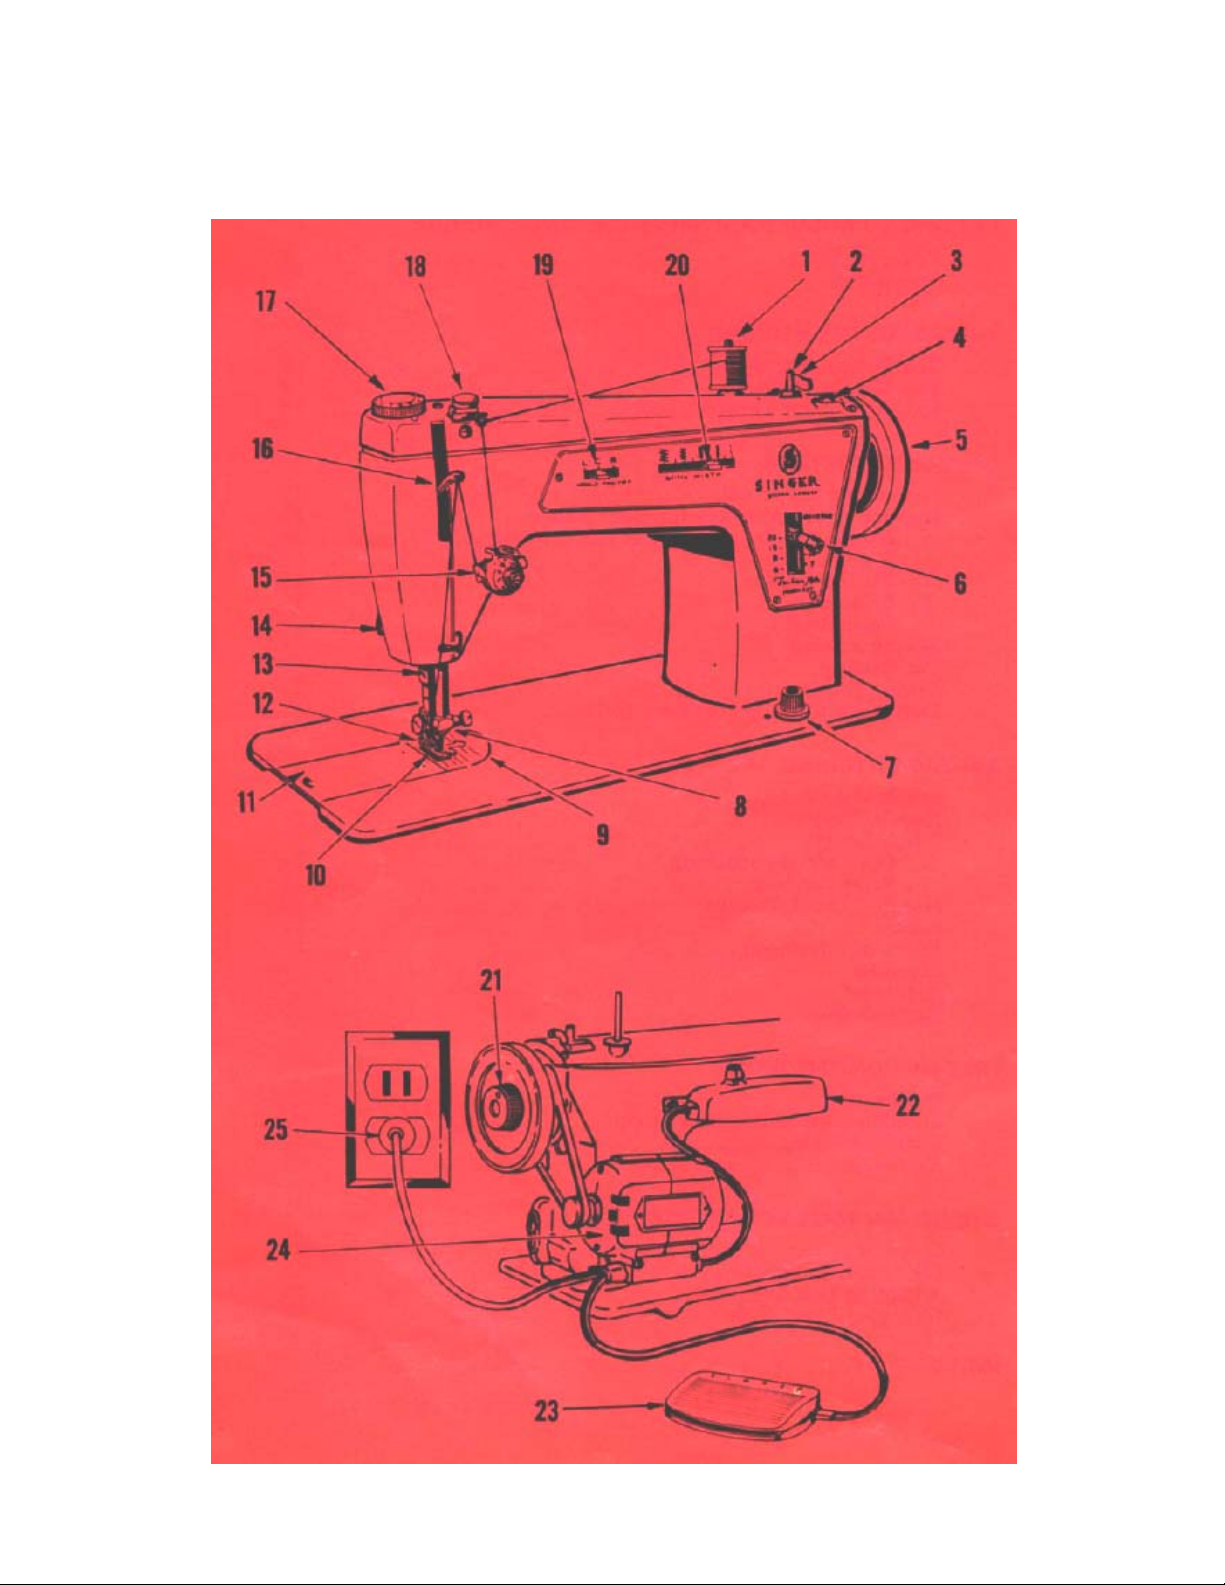
Getting to know your SINGER
principal parts
2

sewing machine
……and what they do
SPOOL PIN AND FELT – Pin holds thread spools of various sizes and felt helps
1
thread unwind smoothly.
2
BOBBIN WINDER SPINDLE – Holds bobbin for winding.
3 BOBBIN WINDER STOP – Controls amount of thread on bobbin.
4 BOBBIN WINDER LEVER – Move to right to wind bobbin.
5 HAND WHEEL – Controls movement of take-up lever and needle.
Always turn it toward you.
6 STITCH LENGTH SELECTOR – Lets your stitch forward and in reverse.
Numbers indicate number of stitches per inch.
FEED REGULATING KNOB – Controls feed dog height for sewing and darning.
7
8
NEEDLE CLAMP – Holds needle in place.
9 THROAT PLATE – Numbered guidelines help you keep seams straight.
FEED DOG – Feed fabric as it is being stitched.
10
11
SLIDE PLATE – Opens easily for removal and replacement of bobbin.
12 PRESSER FOOT – Holds fabric against feed dog.
13 THREAD CUTTER – Cuts thread conveniently and safely.
14 PRESSER FOOT LIFTER – At back of machine, it raises and lowers presser
foot.
15 NEEDLE-THREAD TENSION REGULATOR – Numbers allow for exact, easy
–to-duplicate tension settings.
16 TAKE-UP LEVER – Controls needle thread.
17 PRESSURE REGULATING DIAL – Regulates degree of pressure exerted on
fabric by presser foot. Has special setting for darning.
18 BOBBIN WINDER TENSION BRACKET AND THREAD GUIDE – Disc
regulates thread tension for bobbin winding and eyelet guides thread from
spool to tension regulator for sewing.
NEEDLE POSITION SELECTOR – Allows choice of three different positions.
19
20 STITCH WIDTH SELECTOR – Allows four settings for zig-zag stitching and
one for straight stitching.
21 STOP-MOTION SCREW – Directs power to the needle. Loosen the screw for
bobbin winding.
22
SEWING-LIGHT – Located at back of machine, it pours light on sewing area.
23 ELECTRICAL SPEED CONTROLLER – Controls speed of the machine; the
harder you press, the faster it will sew.
24 ELECTRIC MOTOR – Located at back of machine.
25 PLUG – Before plugging in the machine, be sure that the voltage and number
of cycles stamped on the plate under the hand wheel are within the range
marked on your electric meter.
GETTING TO KNOW YOUR SINGER SEWING MACHINE (continued)
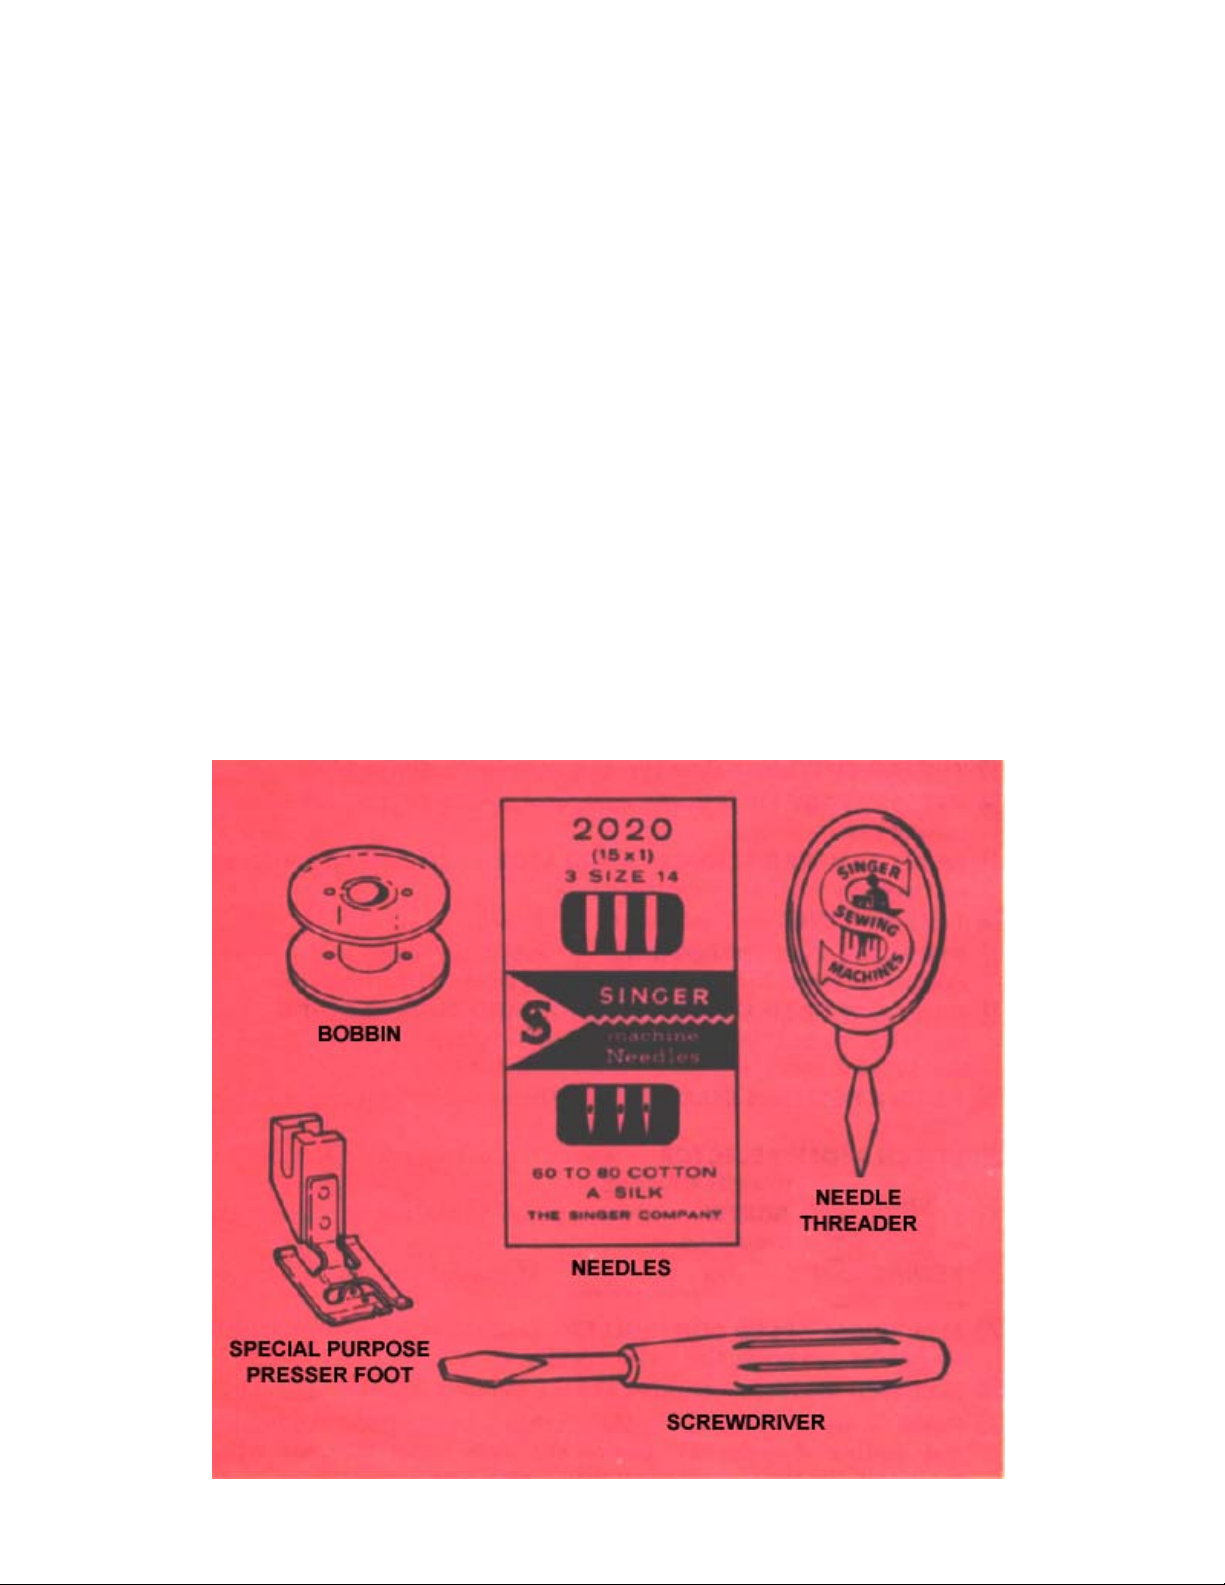
Accessories ….. and their uses
In the envelope accompanying your sewing machine you will fins the following
accessories:
Three bobbins – these extra bobbins allow you to have various color threads ready
to use.
Three needles – catalog 2020 (15 x 1) size 14, are replacements for the needle in
your machine.
One needle threader – make threading the sewing machine needle simpler.
One small screwdriver – use to turn screw in bobbin case to regulate bobbin
tension.
One Special Purpose Presser Foot – designed for zigzag satin stitching,
ornamental stitching, buttonholing, and applique work. This light, flexible foot
has a raised center section that allows closely spaced zig-zag stitches to feed
evenly. The small eyelets at the front of the foot hold a filler cord when desired.
4
Threading the machine
Like all sewing machine that produce what is called a “lockstitch,” your sewing
machine sews with two threads. The upper thread comes from the spool and is
threaded through the eye of the needle. The lower thread comes from the bobbin,
which is simply a small spool that you wind yourself, using the machine. On the
Fashion Mate machine it is best to wind the bobbin before threading the needle.
the bobbin thread
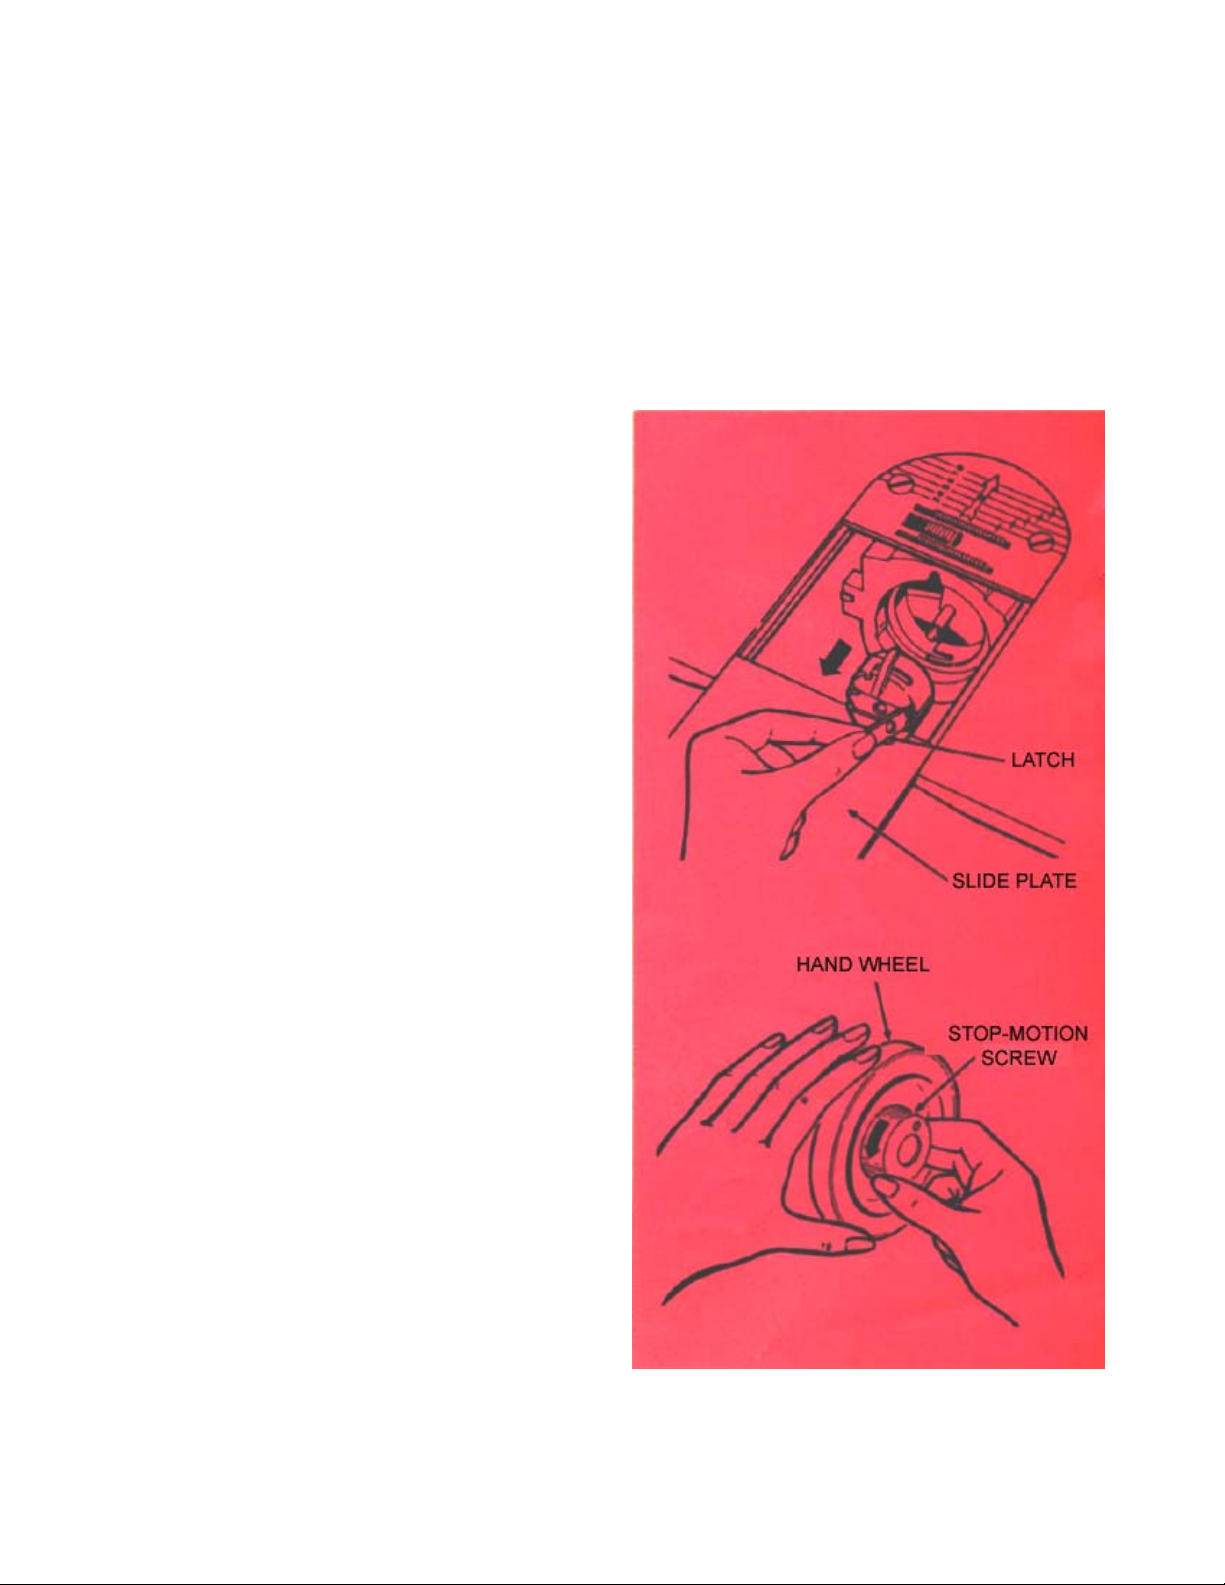
REMOVING THE BOBBIN
1 Turn hand wheel toward you until
needle is at its highest position.
2 Open slide plate.
3 Reach down with left hand, open
bobbin case latch, and lift out
bobbin case.
4 Release latch and remove bobbin
from bobbin case.
WINDING THE BOBBIN
1 Stop motion of needle by loose-
ning stop-motion screw. Hold
hand wheel with left hand while
turning stop-motion screw toward
you with right hand.
5
THREADING THE MACHINE (continued)
6
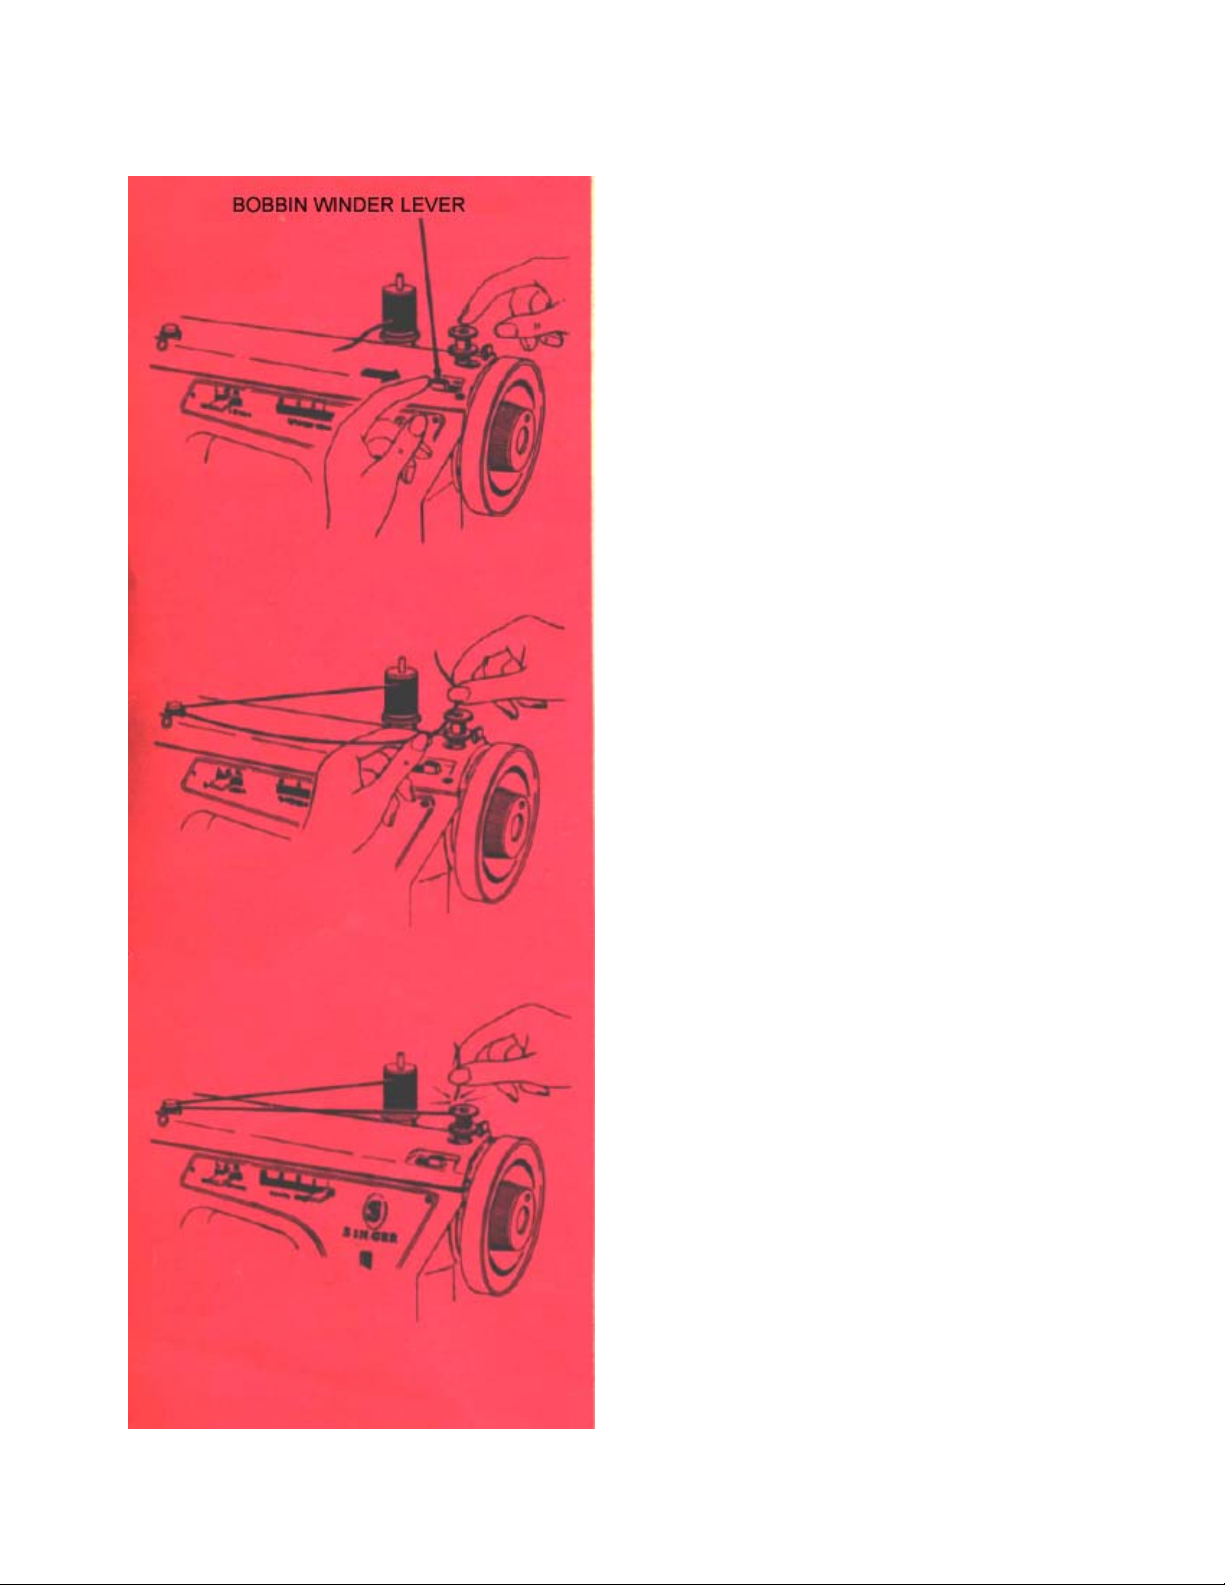
WINDING THE BOBBIN
(continued)
2 Place empty bobbin on spindle.
3 Move bobbin winder lever to the
right.
4 Place spool of thread on spool pin
over the spool pin felt and pass
thread around bobbin winder tension bracket disc.
5 Draw thread, from the inside,
through a hole in the top side of
the bobbin.
6 Hold thread end as shown and start
the machine. Thread end will
break off after a few coils have
been wound.
7 Do not guide or hold thread while
winding bobbin – let the machine
do the work. Winding will stop
when bobbin is full.

8 Stop machine and move bobbin winder lever to the left.
9 Cut connecting thread about three inches from bobbin and remove bobbin from
spindle.
10 Tighten stop-motion screw with right hand while holding handwheel with left
hand.
IF THREAD DOES NOT WIND EVENLY
1 Loosen tension bracket screw.
2 Lower bracket if too much thread
is wound on top of bobbin.
3 Raise bracket if too much thread is
wound on bottom of bobbin.
4 Tighten tension bracket screw.
TO CONTROL AMOUNT OF THREAD ON
BOBBIN
1 Loosen stop latch screw.
2 Move stop latch to left for less
thread on bobbin.
3 Move stop latch to right for more
thread on bobbin.
4 Tighten stop latch screw.
7
8
THREADING THE MACHINE (continued)
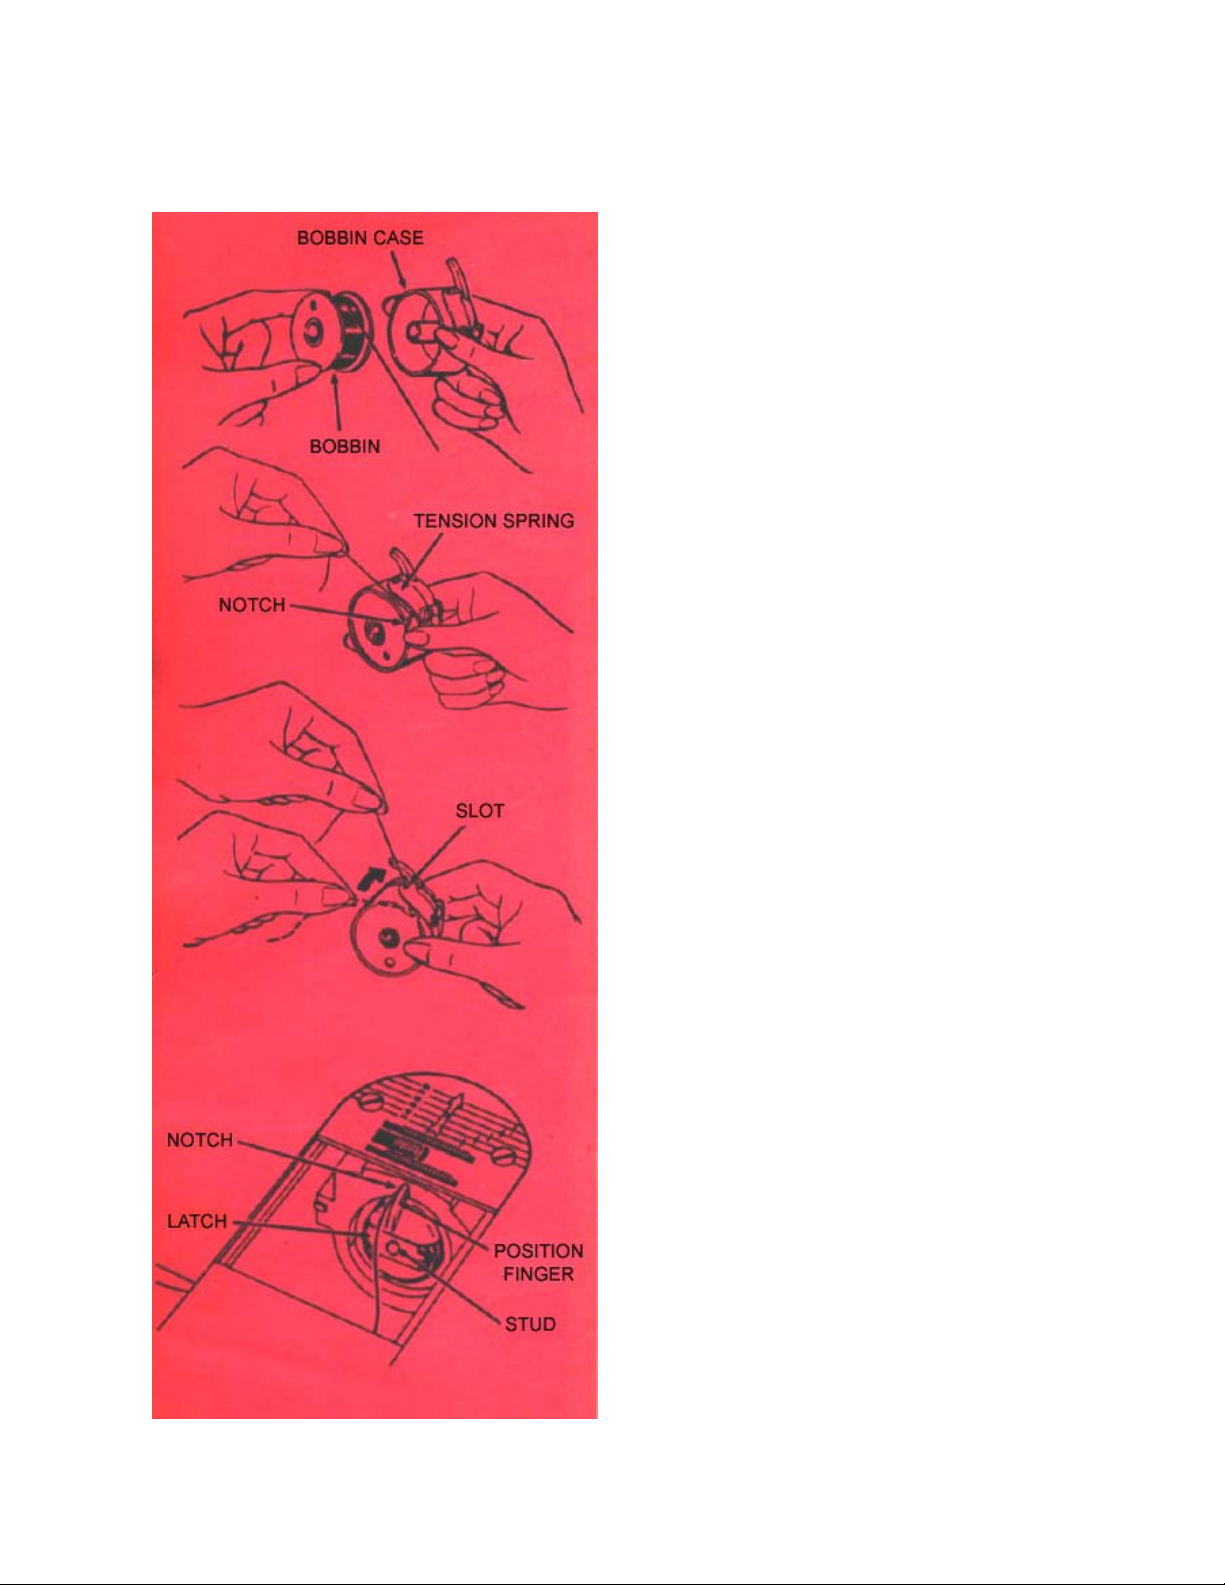
REPLACING THE BOBBIN
1 Hold bobbin so that thread unwind
in the direction shown, and put
bobbin in bobbin case.
2 Pull thread into notch; draw it
under tension spring and into slot.
Allow about three inches of thread
to hand freely from bobbin case.
3 Raise take-up lever to highest
point.
4 Hold bobbin case by open latch
and place it on spindle of shuttle
body so that position finger enters
notch at top of shuttle.
5 Thread should draw from top of
bobbin case, as shown.
6 Release latch and press bobbin
case until it clicks into place.
7 Close slide plate.
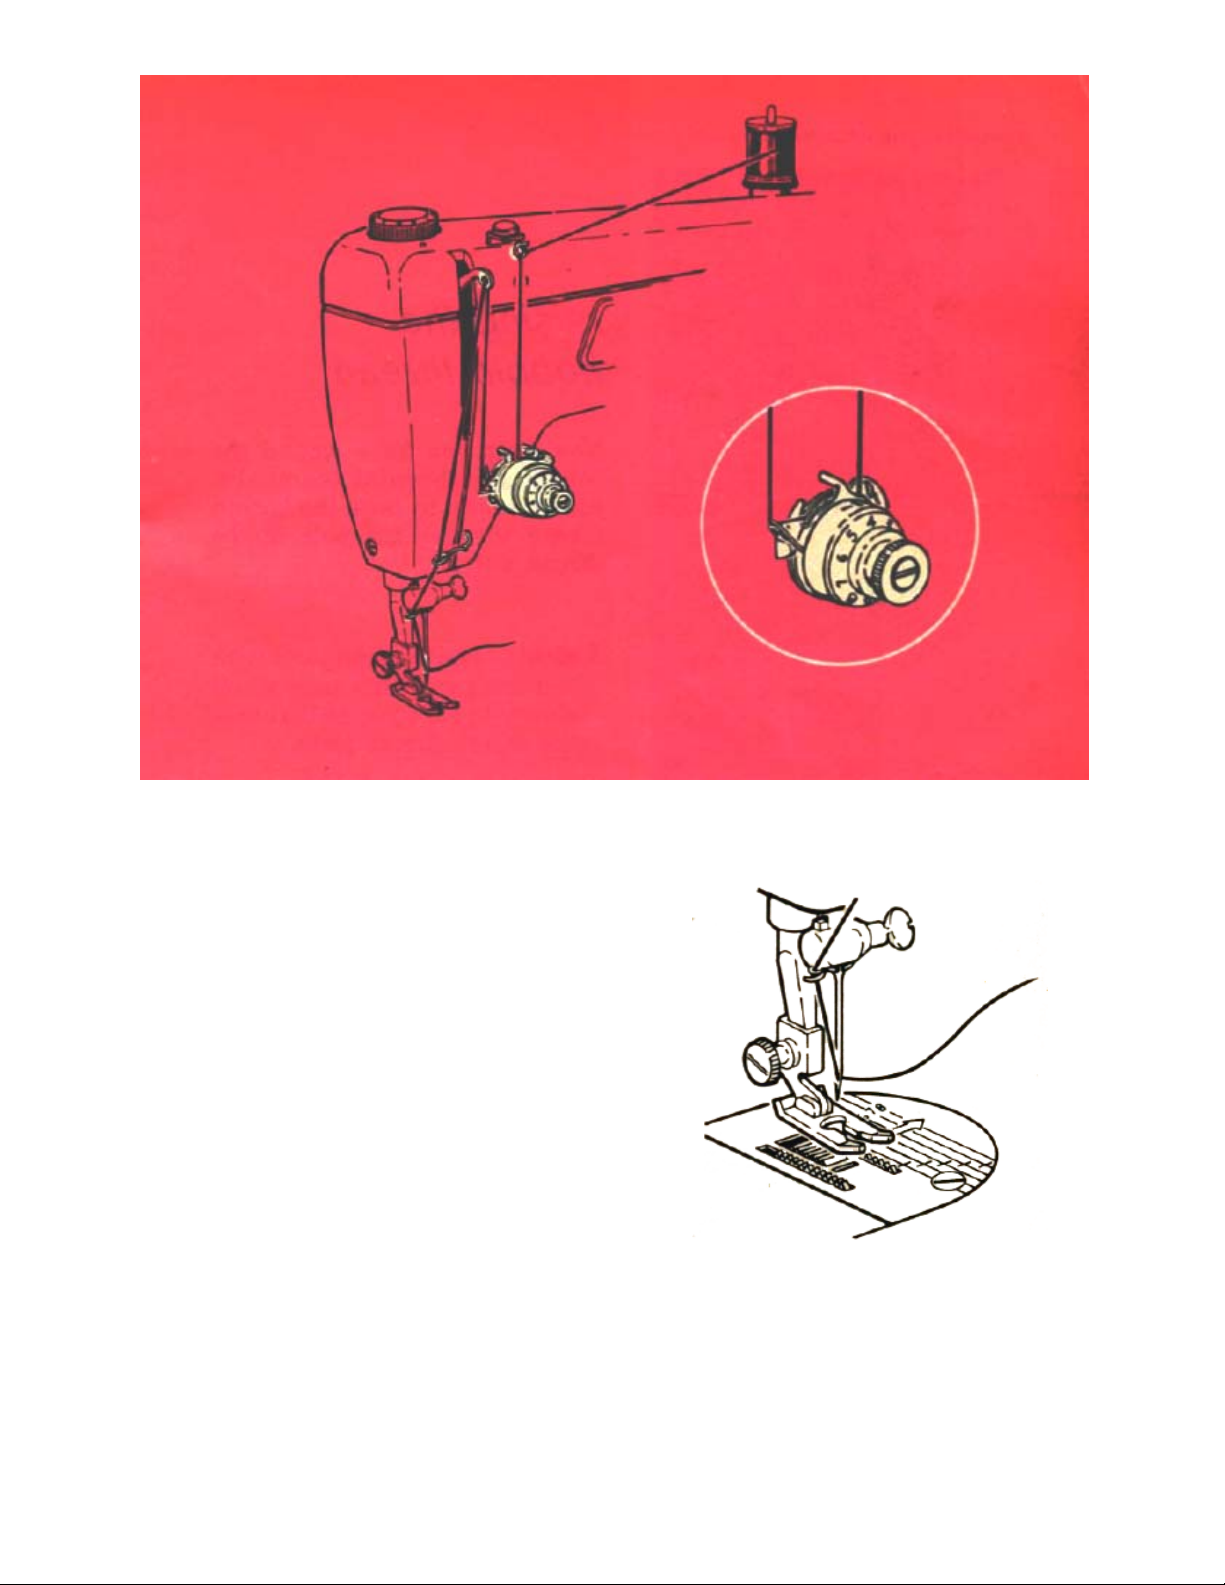
the needle thread
1 Turn hand wheel toward you to
raise needle to its highest position.
2 Make sure spool pin felt is on
spool pin.
3 Place spool of thread on spool
pin and lead thread through
threading points shown. Thread
the needle from left to right. The
arrow on the throat plate shows
the correct threading direction.
4 Draw about three inches of
thread through eye of needle.
9
THREADING THE MACHINE (continued)
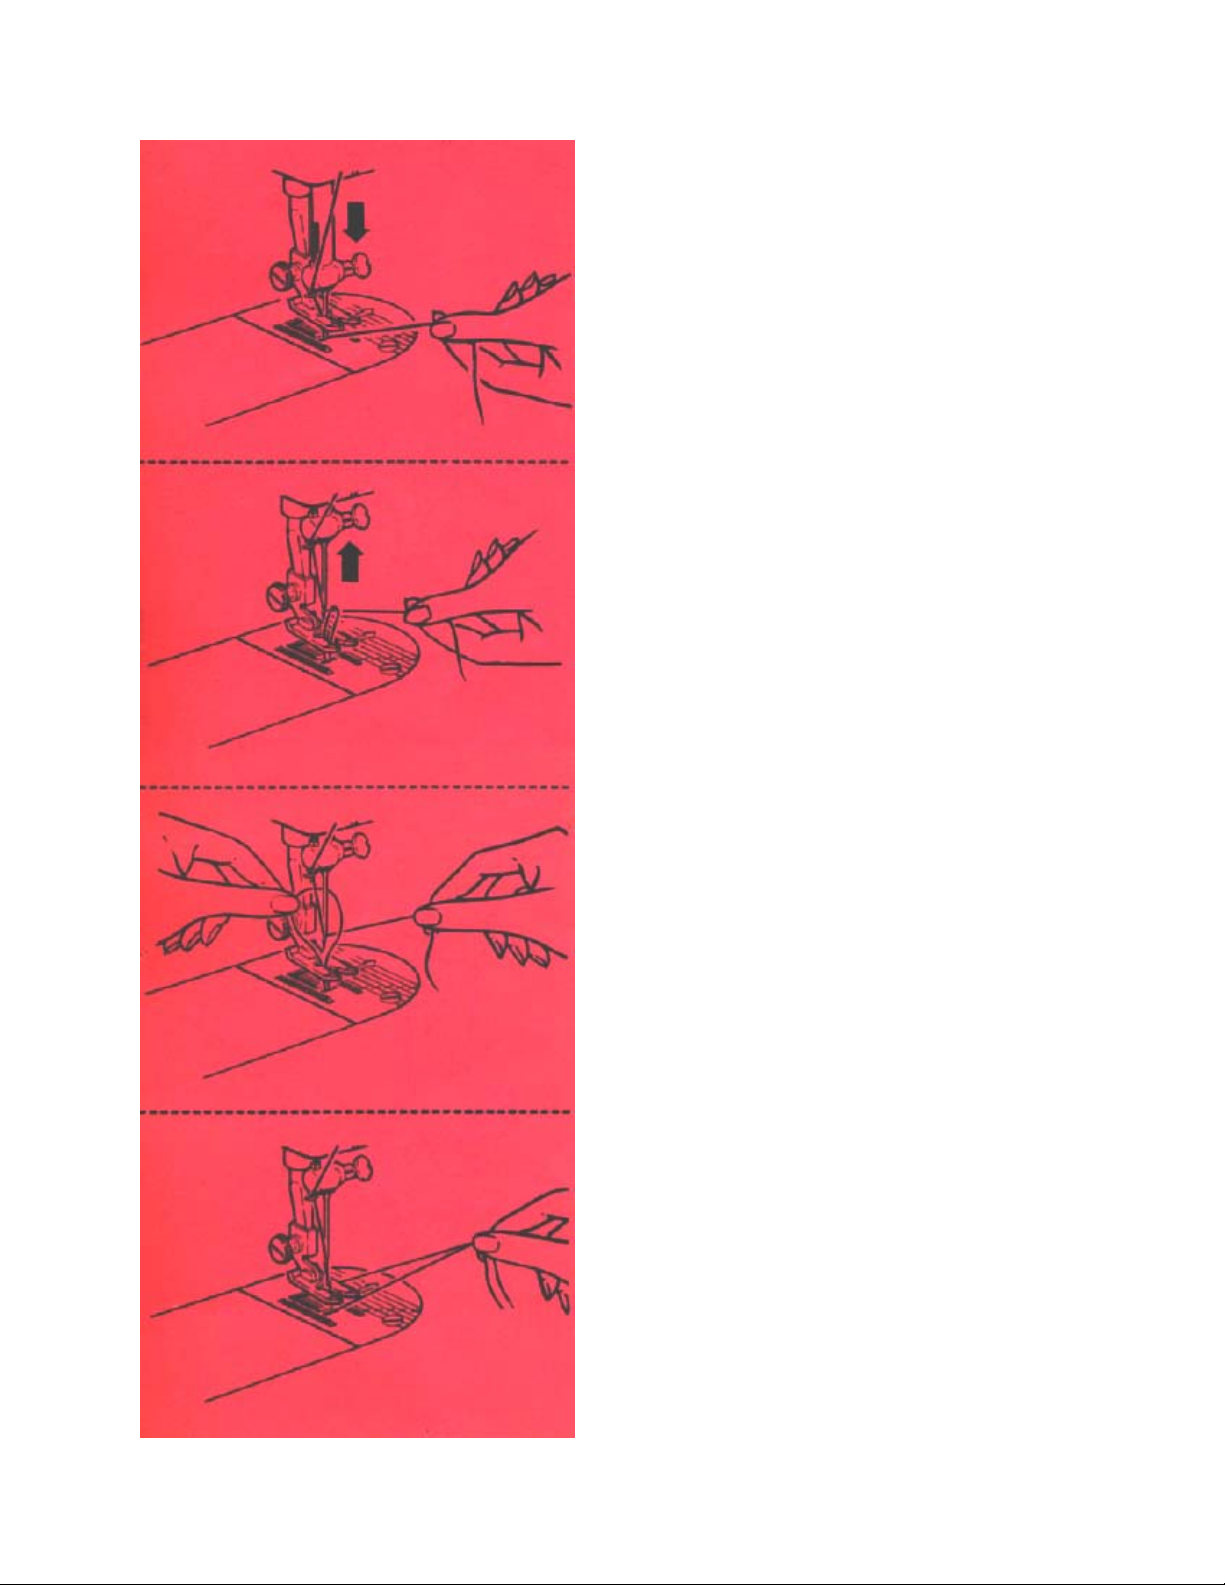
raising the
bobbin thread
Now that you have wound the
bobbin and threaded the needle, you
will need to raise the bobbin thread
through the hole in the throat plate.
1 Hold needle thread lightly with left
hand and turn hand wheel slowly
toward you so that needle enters
throat plate.
2 Continue turning hand wheel and
holding needle thread until needle
rises and brings up bobbin thread
in a loop.
3 Undo the loop with your finger.
4 Place both needle and bobbin
threads under presser foot and lay
them diagonally to the right.
10
… you are now
ready to sew
Straight stitching
positioning
the needle
Before your set your Fashion Mate
sewing machine for any kind of
stitching, turn the hand wheel toward
you until the needle is above the
throat plate.
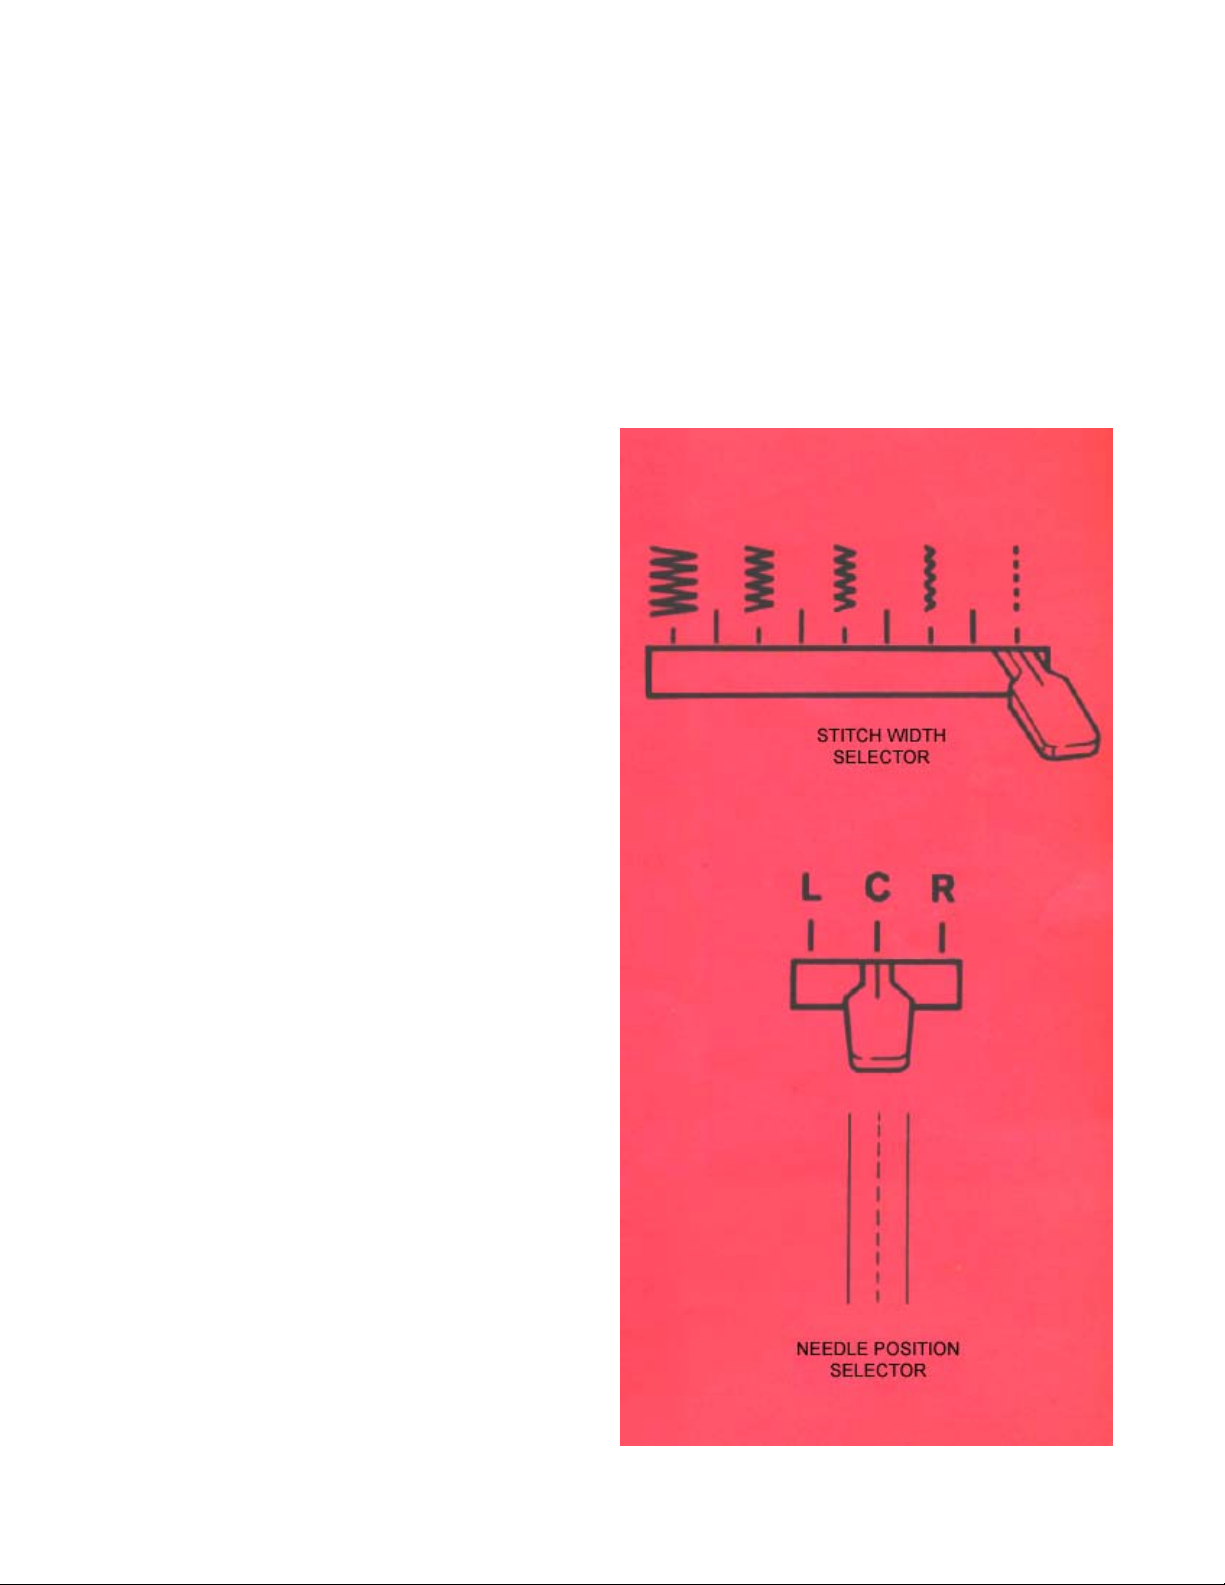
THE STITCH WIDTH SELECTOR
To set for straight stitching, press
down on the Stitch Width Selector
and move it to the far right.
THE NEEDLE POSITION
SELECTOR
Press down on the Needle Position
Selector and move it to center (C)
position. this setting locates the
needle hole in the throat plate.
For instructions on setting the Stitch
Width Selector and the Needle
Position Selector in other position,
see page 23.
11
THREADING THE MACHINE (continued)
regulating
the machine for
your fabric
As you get ready to sew, take advantage of the flexibility of your
sewing machine. With a choice of
needle sizes and four easy-to use
selectors for stitch length, pressure,
feed height, and needle-thread tension, you can adjust the machine to
sew perfectly on a wide variety of
fabrics. The table on page 13 will
guide you in selecting correct thread,
needle sizes, and stitch length according to the weight of your fabric. Be
sure to use like threads for both
needle and bobbin.
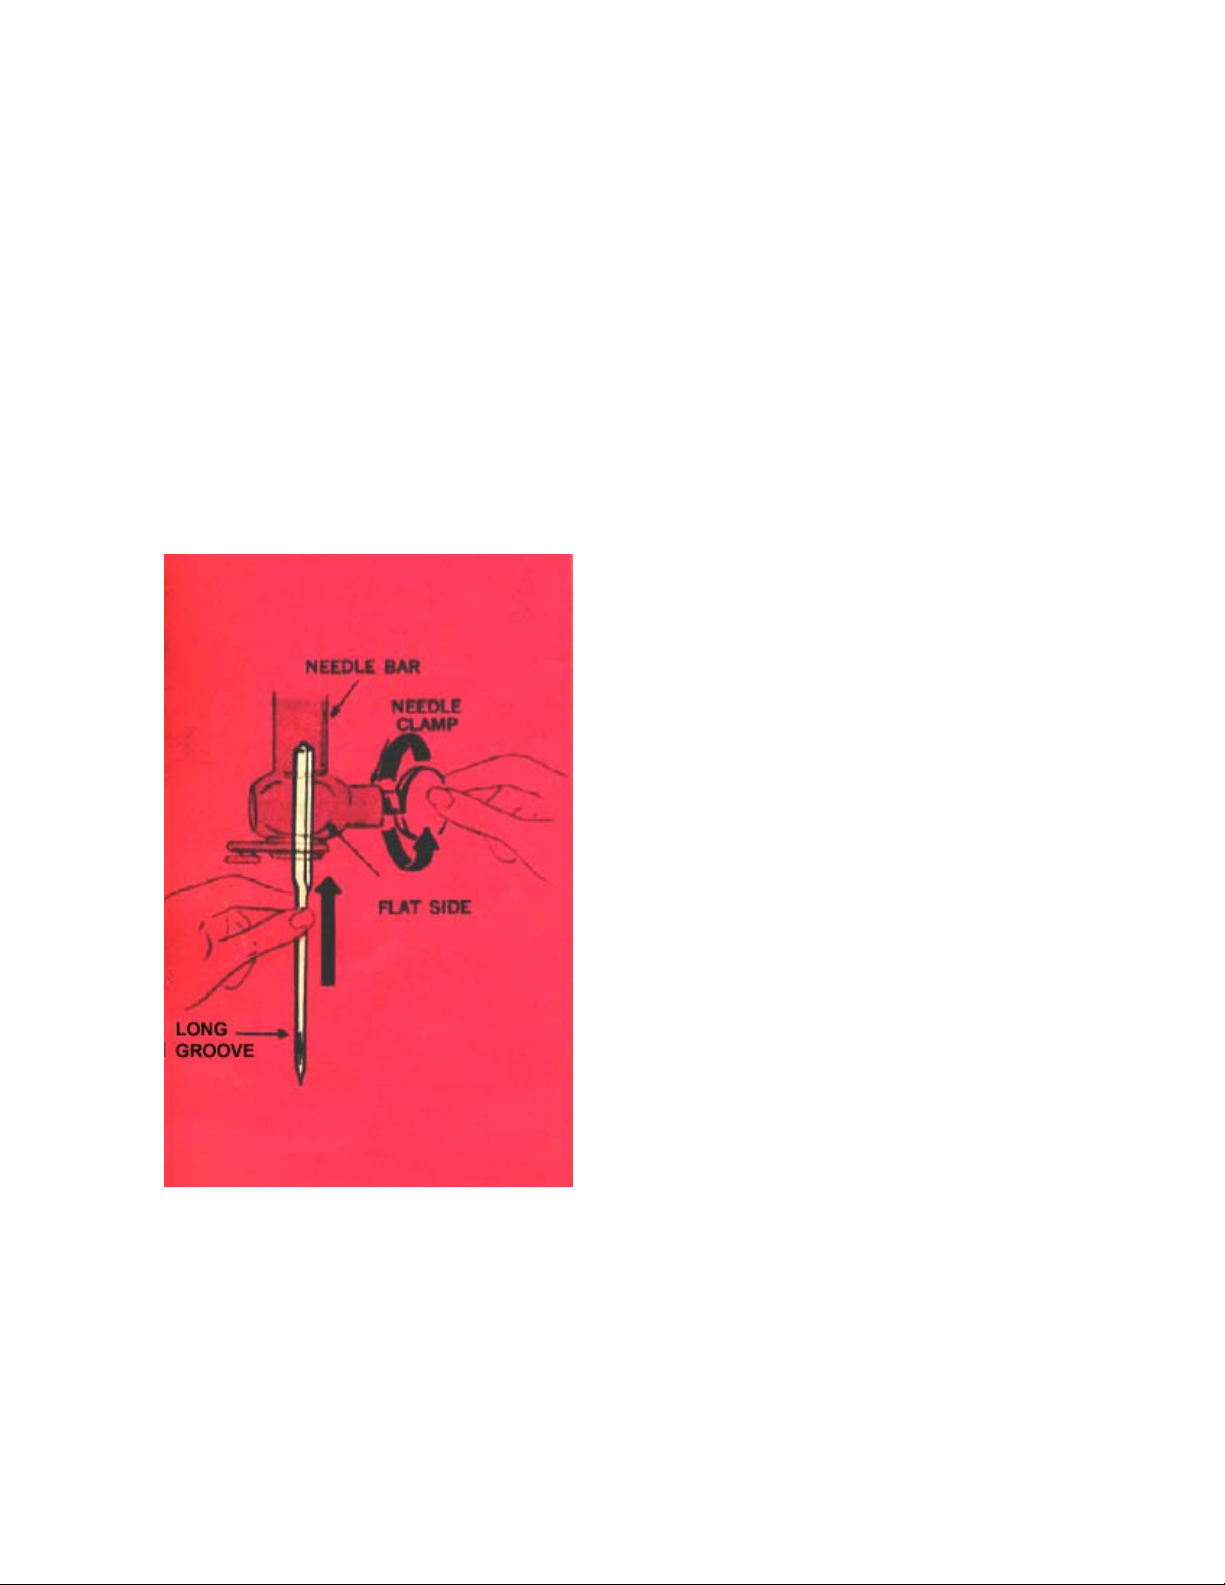
CHANGING THE NEEDLE
1 Turn hand wheel over toward you
until needle is at highest position.
2 Loosen needle-clamp screw and
remove needle.
3 Insert new needle into clamp with
the flat side of the needle to the
right and the long groove to the
left; push it up as far as it will go.
4 Tighten needle-clamp screw.
This machine uses needle Catalog
2020 (15x1), available in sizes 9,
11, 14, 16, and 18.
12
 Loading...