

Page 1
Page 2
Instruction Book for the
Singer* Sewing Machine
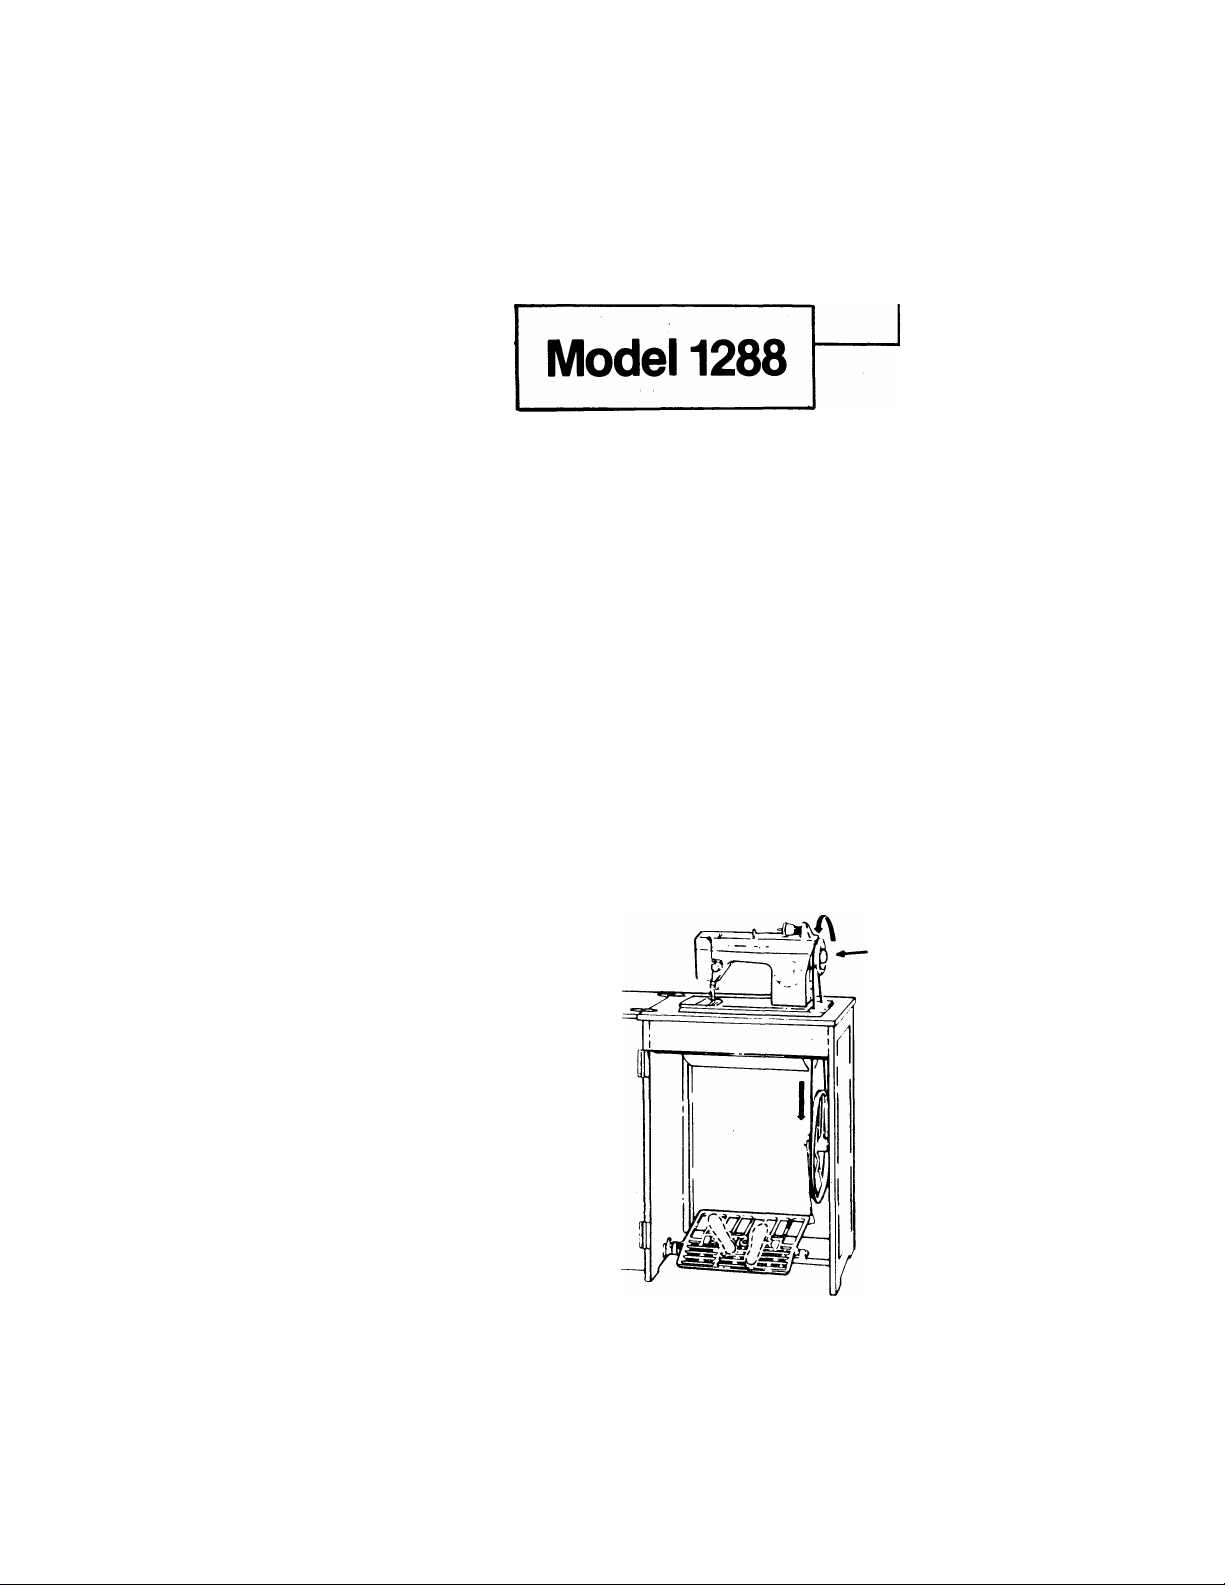
For Treadle Machine Owners
To adjust your machine for treadle sewing,
loosen hand wheel knob A by turning it toward
you with the right hand while holding hand wheel
with the left hand.
Place both feet on the treadle as illustrated. Turn
hand wheel over toward you, allowing your feet to
move freely with the motion of the treadle. Prac
tice this motion until you are able to start and
keep the machine in operation with the hand
wheel turning toward you. Remember that the
faster you operate the treadle, the faster the
machine will sew.
When you have
become accustomed
to the treadle motion,
tighten the hand wheel
knob by turning it away
from you. Place a
piece of material under
the presser foot and
lower the presser foot
lifter. Now operate the
machinefwithout
thread) until you
become accustomed
to guiding the material.
Enjoy Sewing!
Copyright © 1982 THE SINGER COMPANY
All Rights Reserved Throughout the World
*A Trademark of The Singer Company
1
Page 3
For European Territories —
This product is suppressed for radio and television
interference in accordance with the International
Electrotechnical Commission of the CISPR.
IMPORTANT: Machines for Great Britain and some
other countries having similar wiring standards are
shipped from the factory without a plug for connection
to the mains. The wire in this mains lead are coloured
in accordance with the following code:
Blue: neutral (N) Brown: live (L)
As the colours of the wires in the mains lead of this
appliance may not correspond with the coloured mark
ings identifying the terminals in your plug, proceed
as follows:
The wire which is coloured blue must be connected
to the terminal which is marked with the letter N or
coloured black. The wire which is coloured brown
must be connected to the terminal which is marked
with the letter L or coloured red. If a 13 Amp. (BS1363)
plug is used, a 3 Amp. fuse must be fitted, or if any
other type of plug is used, a 5 Amp. fuse must be fitted
either in the plug or adaptor or at the distribution
board.
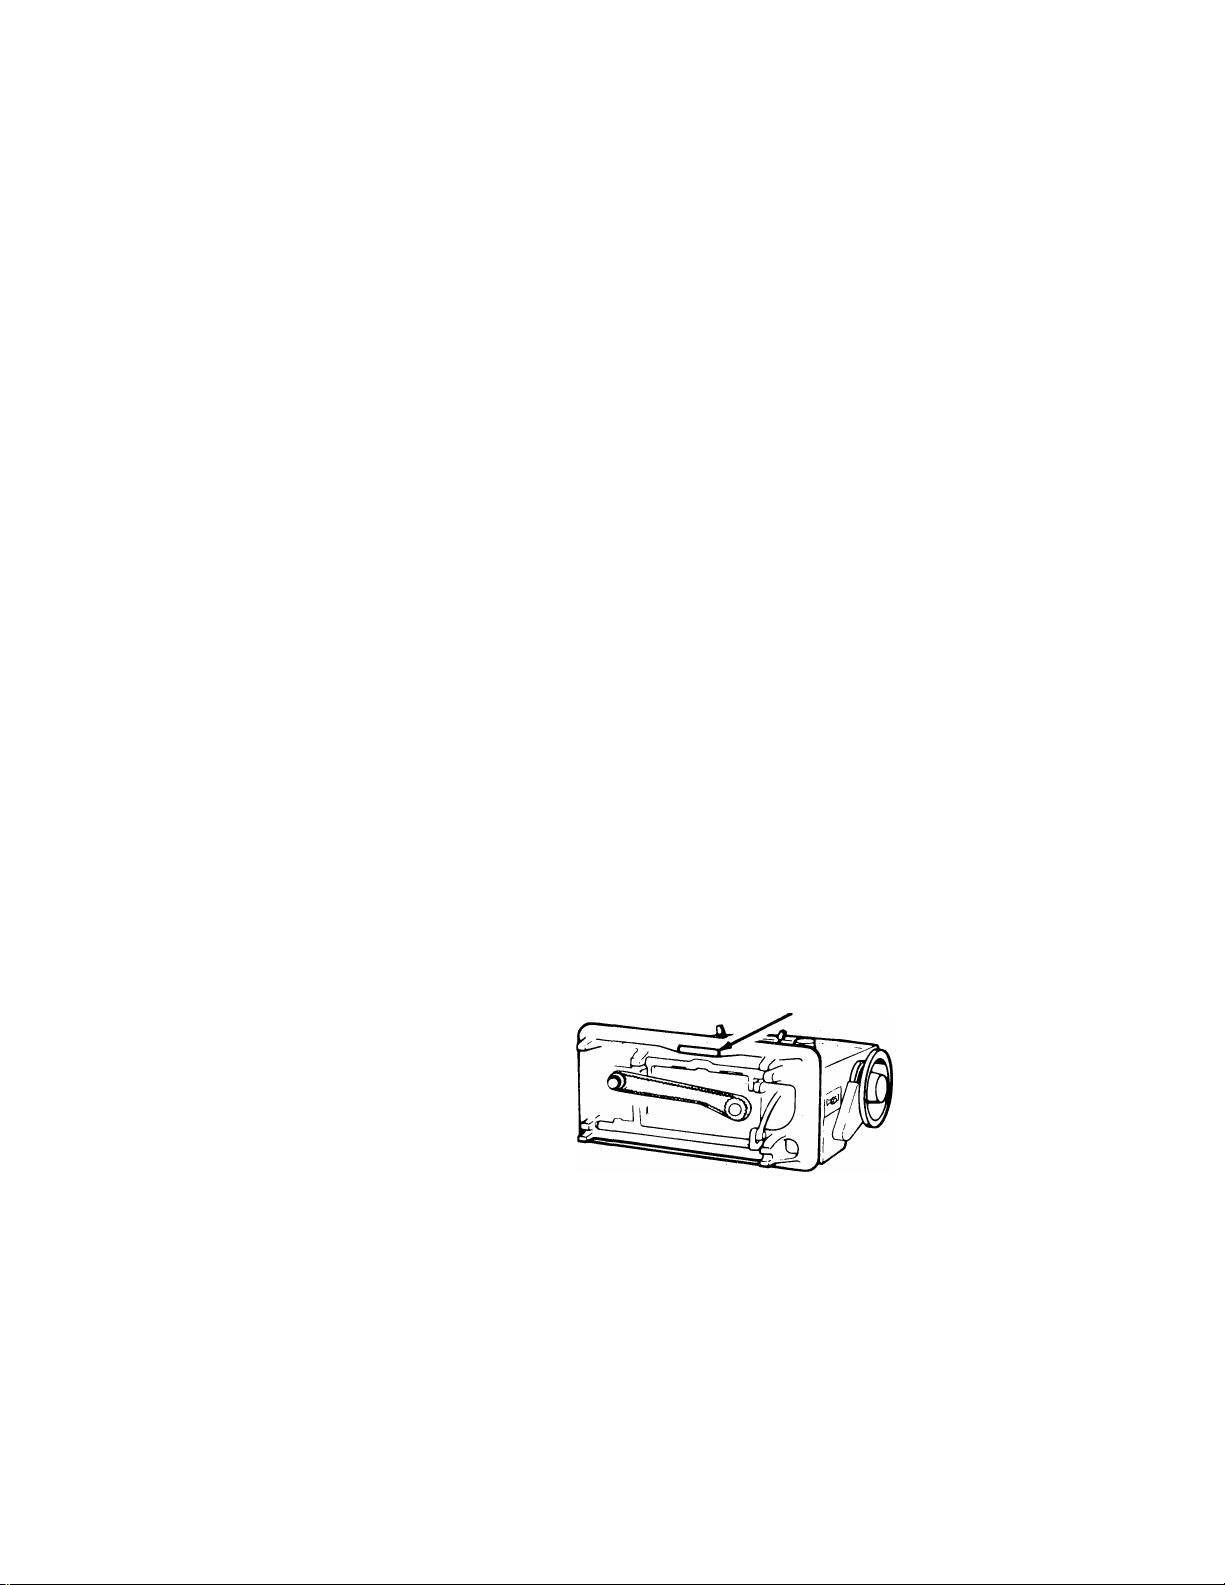
Dear Customer:
We recommend that for future reference you record
the serial number of your Sewing Machine in the
space provided.
Refer to illustration
at right for location
of serial number on
your machine.
Serial No.
Serial No.
Page 4

Contents
1. Getting to Know Your Machine 4
Principal Parts.......................................................... 4
Accessories............................................................ 6
Z Getting Ready to Sew 10
Choosing and Changing Accessories
Operating Machine..................................................18
The Bobbin Thread
Threading the Machine
3. Straight Stitching 28
Setting Selectors.................................................... 28
Sewing a Seam...................................................... 32
Applications........................................................... 34
4. Basic Zig-Zag Stitching 38
Setting Selectors ................................................... 38
Satin Stitching
Stitch Usage......................................................... 42
................................................
..........................................
.............
.........................................
....................
10
20
24
40
5. Pattern Stitching 46
Selecting a Stitch
Stitch Pattern Chart
Adjusting Stitches for Stretch Fabrics
Decorative Stitching...........................
6. Buttonhoies and Buttons 66
Garment Preparation
Four-Step Buttonholing......................................... 70
Buttons................................................................... 74
7. Caring for Your Machine 76
8. Twin Needie Stitching 84
9. Home Service Hints 86
index .88
.................................................
..............
...........................................
.................................
...................
................. . 62
46
48
50
66
Page 5

1. Getting to Know
Your Machine
Principal Parts
1. Spool Pin
2. Thread Guides
3. Bobbin Winder Tension Disc
4. Take-up Lever
5. Needle-Thread Tension Dial
6. Face Plate
7. Presser Foot Lifter
8. Thread Cutter
9. Presser Foot Screw
10. General Purpose Presser Foot
11. Thread Guides
12. Feed
13. General Purpose Needle Plate
14. Slide Plate
15. Bobbin Case
16. Bobbin
17. Needle Clamp
18. Electrical Connections and Speed Controller
19. Hand Wheel
20. Hand Wheel Knob
21. Stitch Width Selector
22. Needle Position Selector
23. Stitch Length Selector
24. Reverse Stitch Push Button and Buttonhole
Balance Knob
25. Bobbin Winder Spindle
Page 6

сл
Page 7

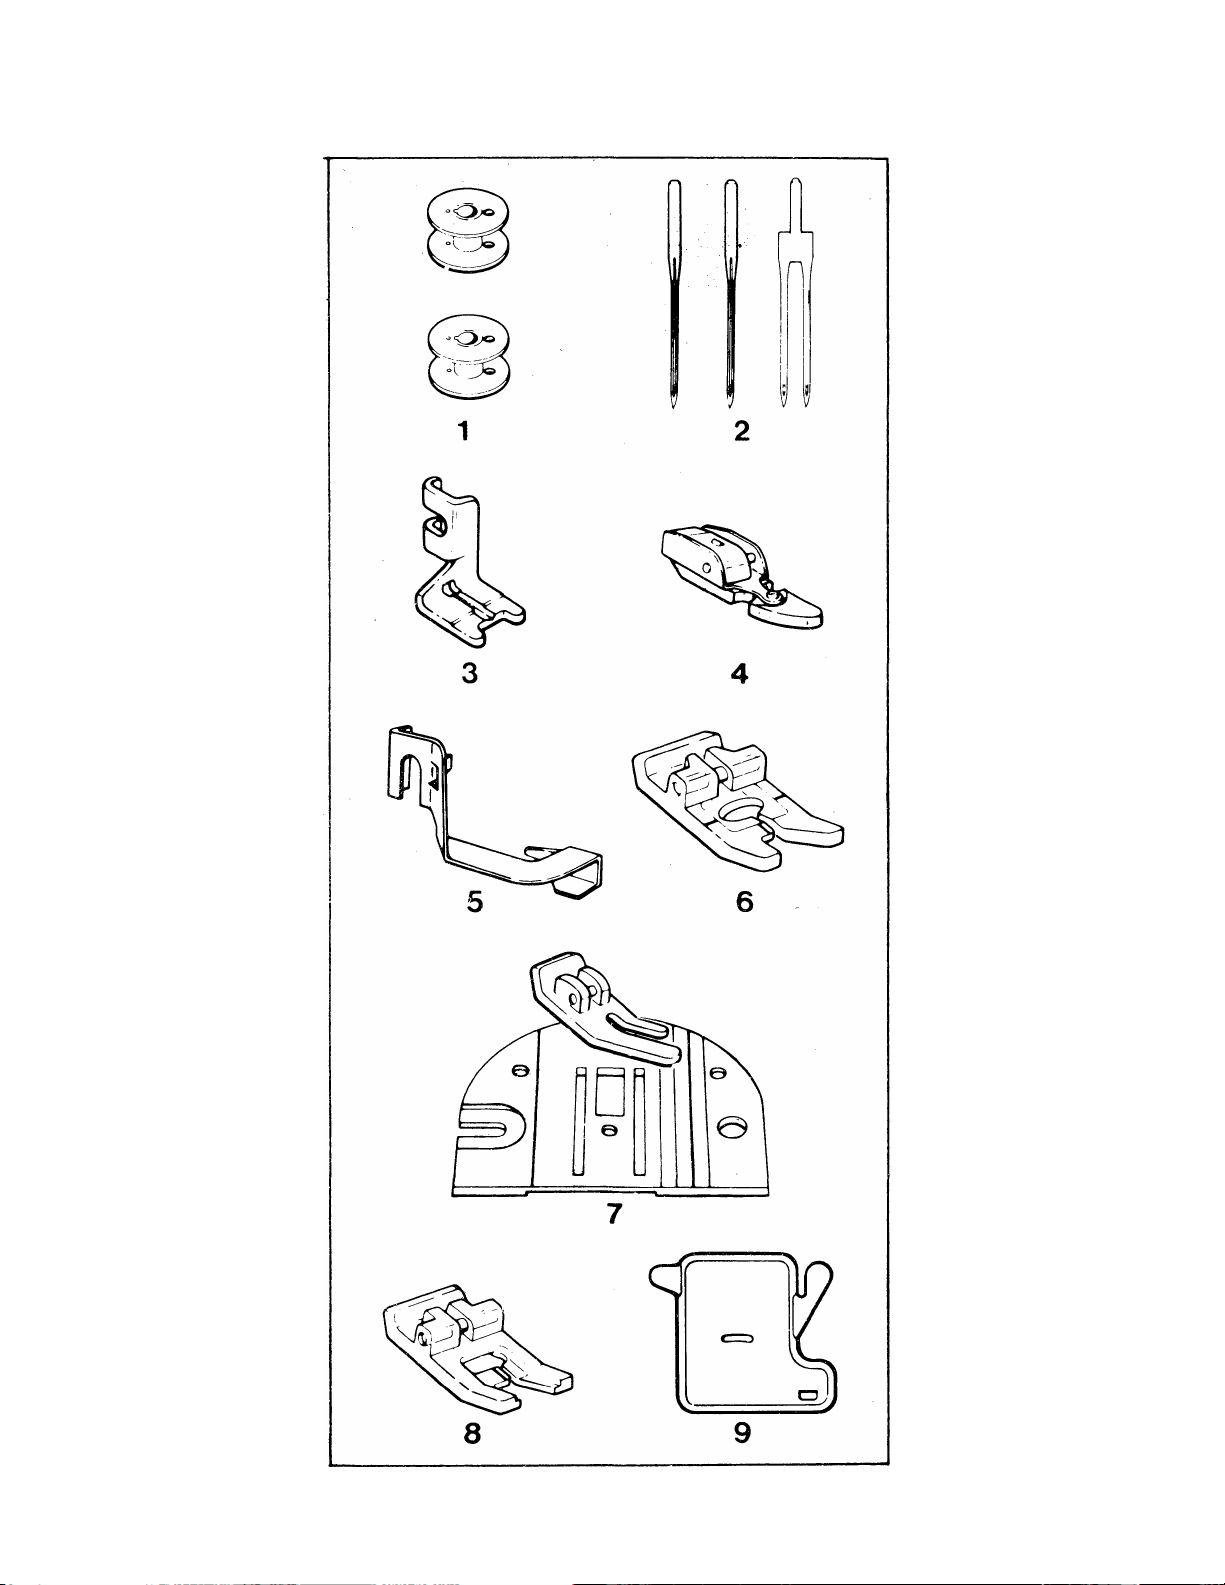
Accessories
The accessories provided with your sewing machine
are designed to help you do many kinds of sewing
easily.
1. Transparent Bobbins (No. 172336)
2. Singer* Needles
• Style 2020 for general sewing.
• Style 2045 for sewing knits, stretch fabrics and
elastic.
• Style 20251 for twin-needle decorative stitching.
3. Button Foot holds most flat buttons securely for
fastening.
4. Zipper Foot for inserting zippers and stitching
corded seams.
5. Blindstitch Hem Guide. Use this with the gen
eral purpose foot to position and guide the hem.
6. Buttonhole Foot-is used to make bar tack but
tonholes in four steps.
7. Straight Stitch Foot and Straight Stitch Needle
Plate are used when your fabric or sewing pro
cedure requires close control. These accessories
are recommended for all straight stitch sewing.
8. Special Purpose Foot. Use this for all kinds of
decorative stitching.
9. Snap-in Feed Cover for button sewing, free-
motion work and darning.
tCAUTION: Use this needle with the general pur
pose needle plate and general purpose or special pur
pose foot only. Do not use any other accessories with
this needle as needle breakage will occur.
To ensure that you are always provided with the most
modern sewing capabilities, THE MANUFACTURER
reserves the right to change the appearance, desigp
or accessories of this sewing machine when con
sidered necessary.
6
Page 8
Page 9

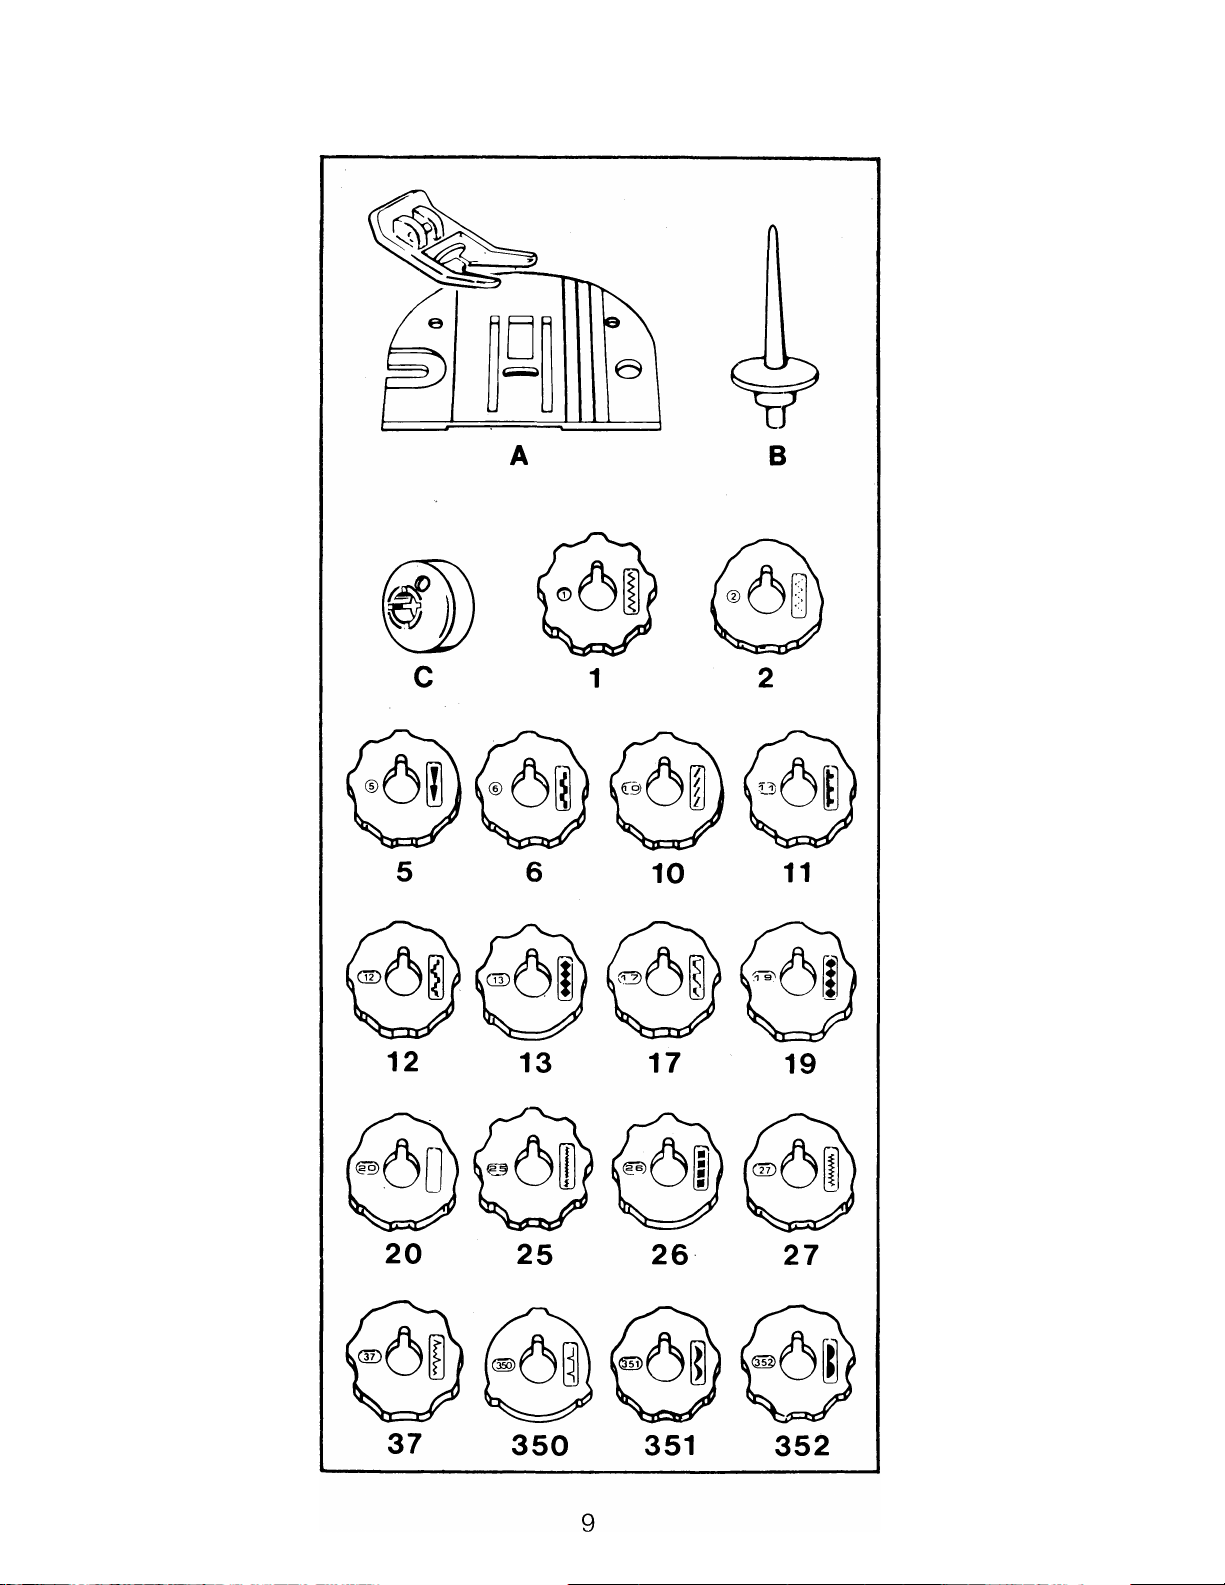
A. General Purpose Foot and General Purpose
Needle Plate are on your machine when deliv
ered. Use them tor alternating between straight
and zig-zag stitching.
B . Spool Pin is used for twin-needle sewing.
C. Small Spool Holder for use with small diameter
spools of thread.
stitch Pattern Discs
The following stitch pattern discs are included in your
accessory set. Sewing application information for
each disc may be found on page 48.
Basic Zig-Zag Disc 1
(in place on your machine when delivered.)
Multi Stitch Zig-Zag Disc 2
Arrowhead Stitch Disc 5
Domino Stitch Disc 6
Banner Stitch Disc 10
Key Stitch Disc 11
Walls of Troy Stitch Disc 12
Solid Diamond Stitch Disc 13
Pennant Stitch Disc 17
Ball Stitch Disc 19
Curved Mending Stitch Disc 20
Spiny Stitch Disc 25
Block Stitch Disc 26
Faggoting (Feather Stitch) Disc 27
Elastic Stretch Stitch (Alpine) Disc 37
Blindstitch Disc 350
Crescent Stitch Disc 351
Solid Scallop Stitch Disc 352
8
Page 10
Page 11

2. Getting Ready to Sew
Choosing and Changing
Accessories
CAUTION: Disconnect the power tine plug from the
socket outlet when changing needles, feet, or needle
plates, or when leaving the machine unattended. This
eliminates the possibility of starting the machine by
accidentally pressing the speed controller.
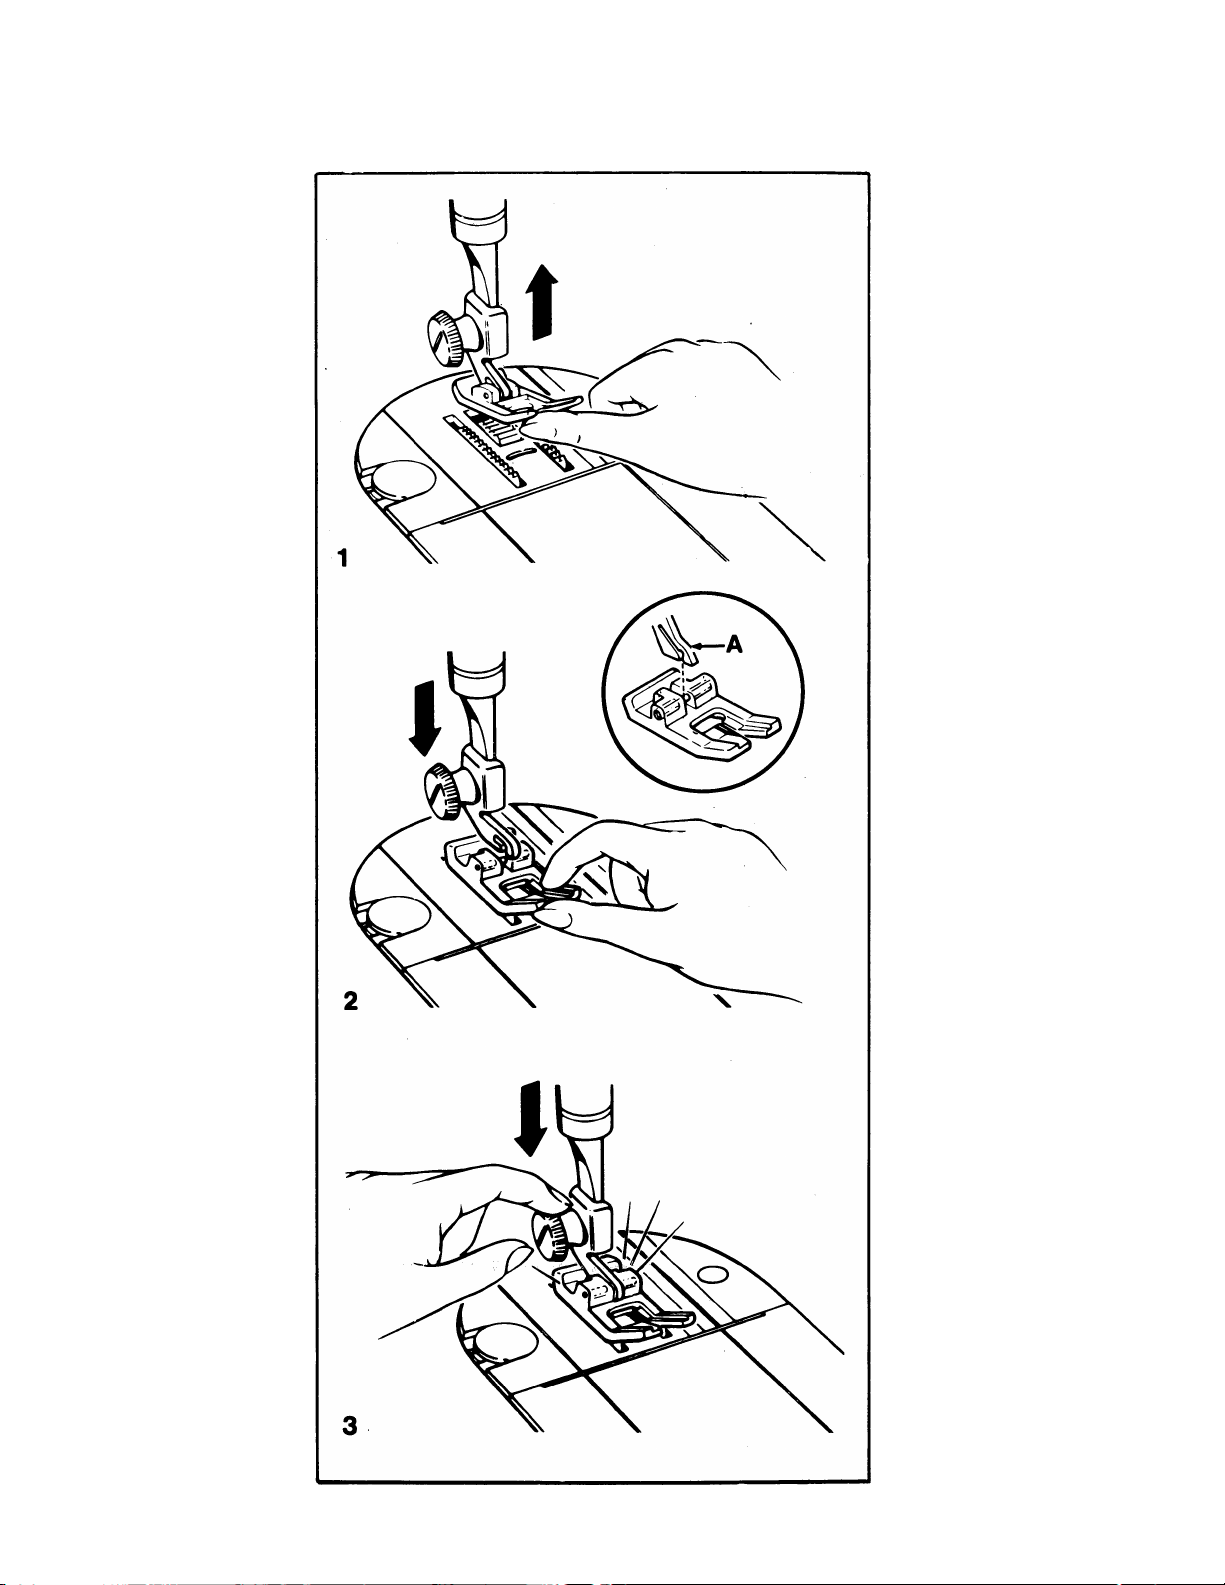
Changing Presser Feet
• Raise needle to highest position by turning the hand
wheel toward you.
• Raise presser foot.
1. Press toe of presser foot upward as far as it will go
until it snaps free.
2. Centre the new presser foot under the shank A.
Lower the presser foot lifter so that the shank fits
over the presser foot pin.
3. Press presser foot screw down firmly until foot
snaps into place.
10
Page 12
11
Page 13

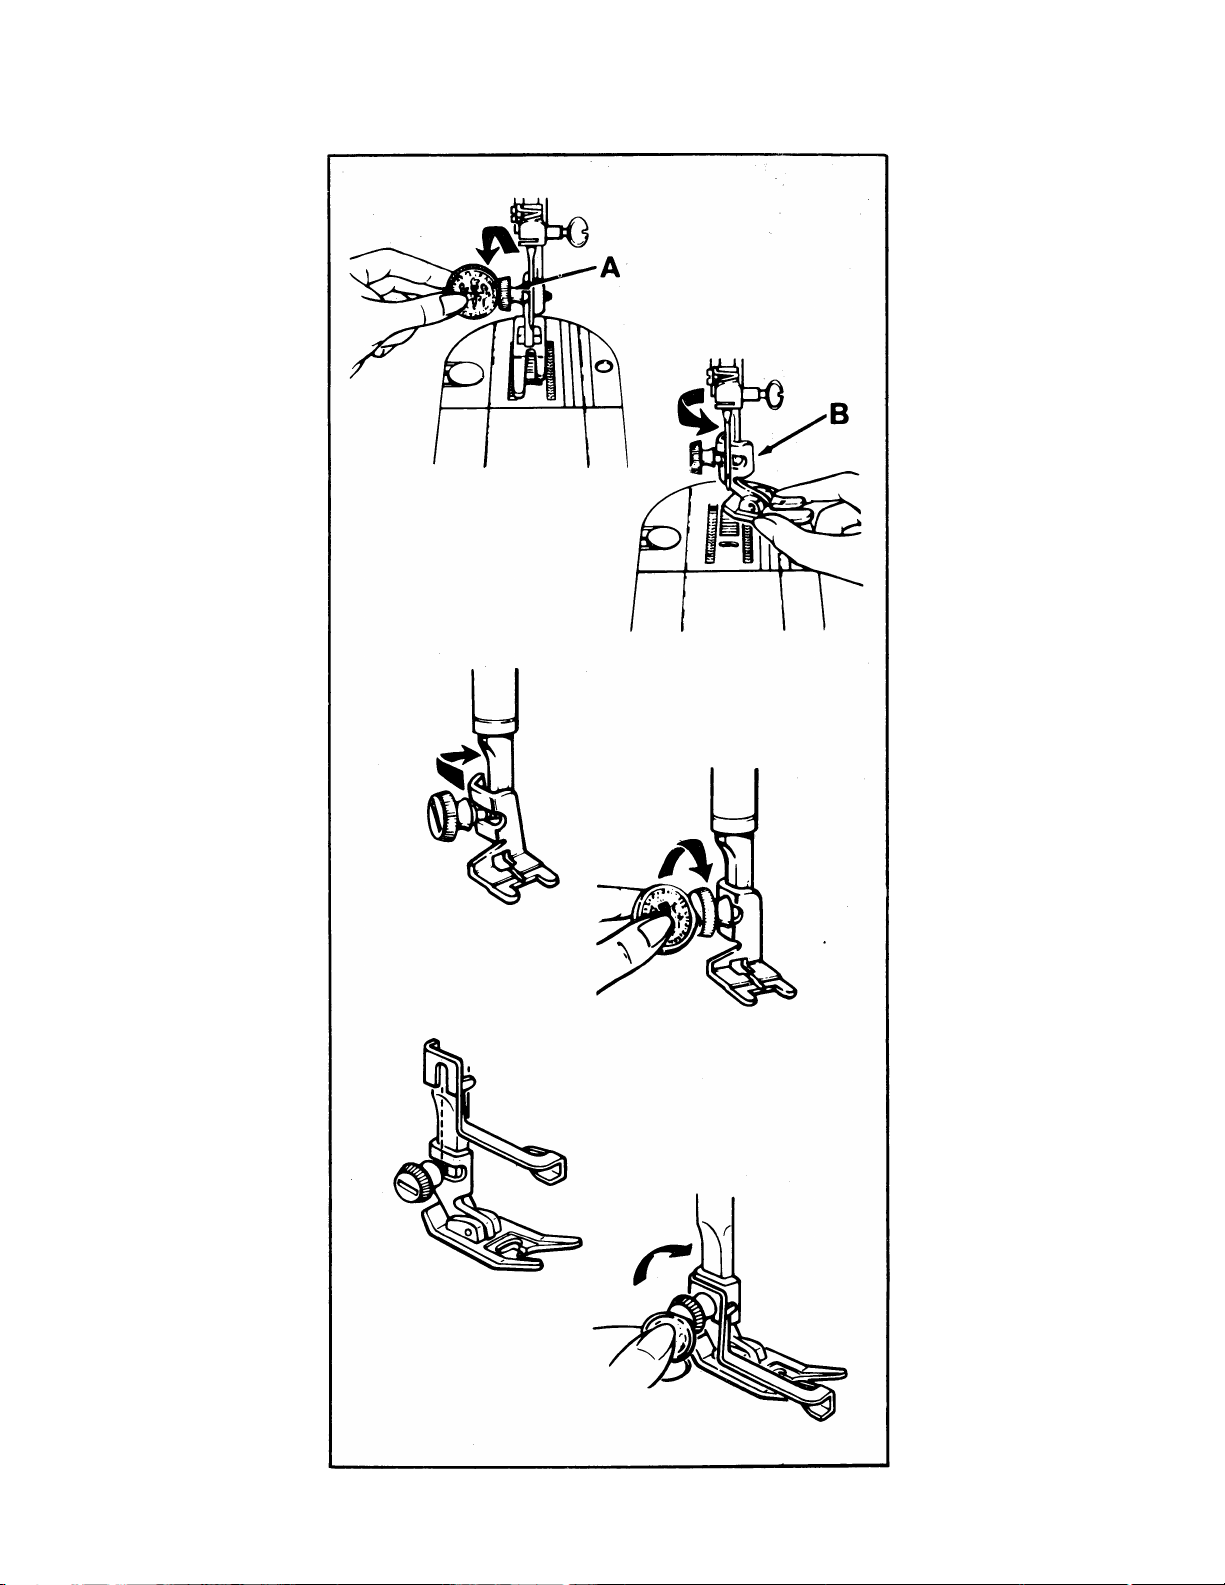
Removing and Replacing the
Button Foot and Presser Foot Shank
• Raise needle to highest position by turning the hand
wheel toward you.
• Raise the presser foot.
• Loosen presser foot screw A and remove the shank
B, guiding it to the right.
• To replace the accessory, hook shank around the
presser bar and tighten the presser foot screw.
NOTE: Insert the edge of a coin in the seat of the
presser foot screw to loosen it and tighten it securely.
Attaching Blindstitch Hem Guide
• Raise presser foot, loosen presser foot screw and
slip blindstitch hem guide between screw and shank
of the general purpose foot.
Be sure underside of the guide clears the slide plate
and front of foot.
Tighten screw with a coin.
12
Page 14
13
Page 15

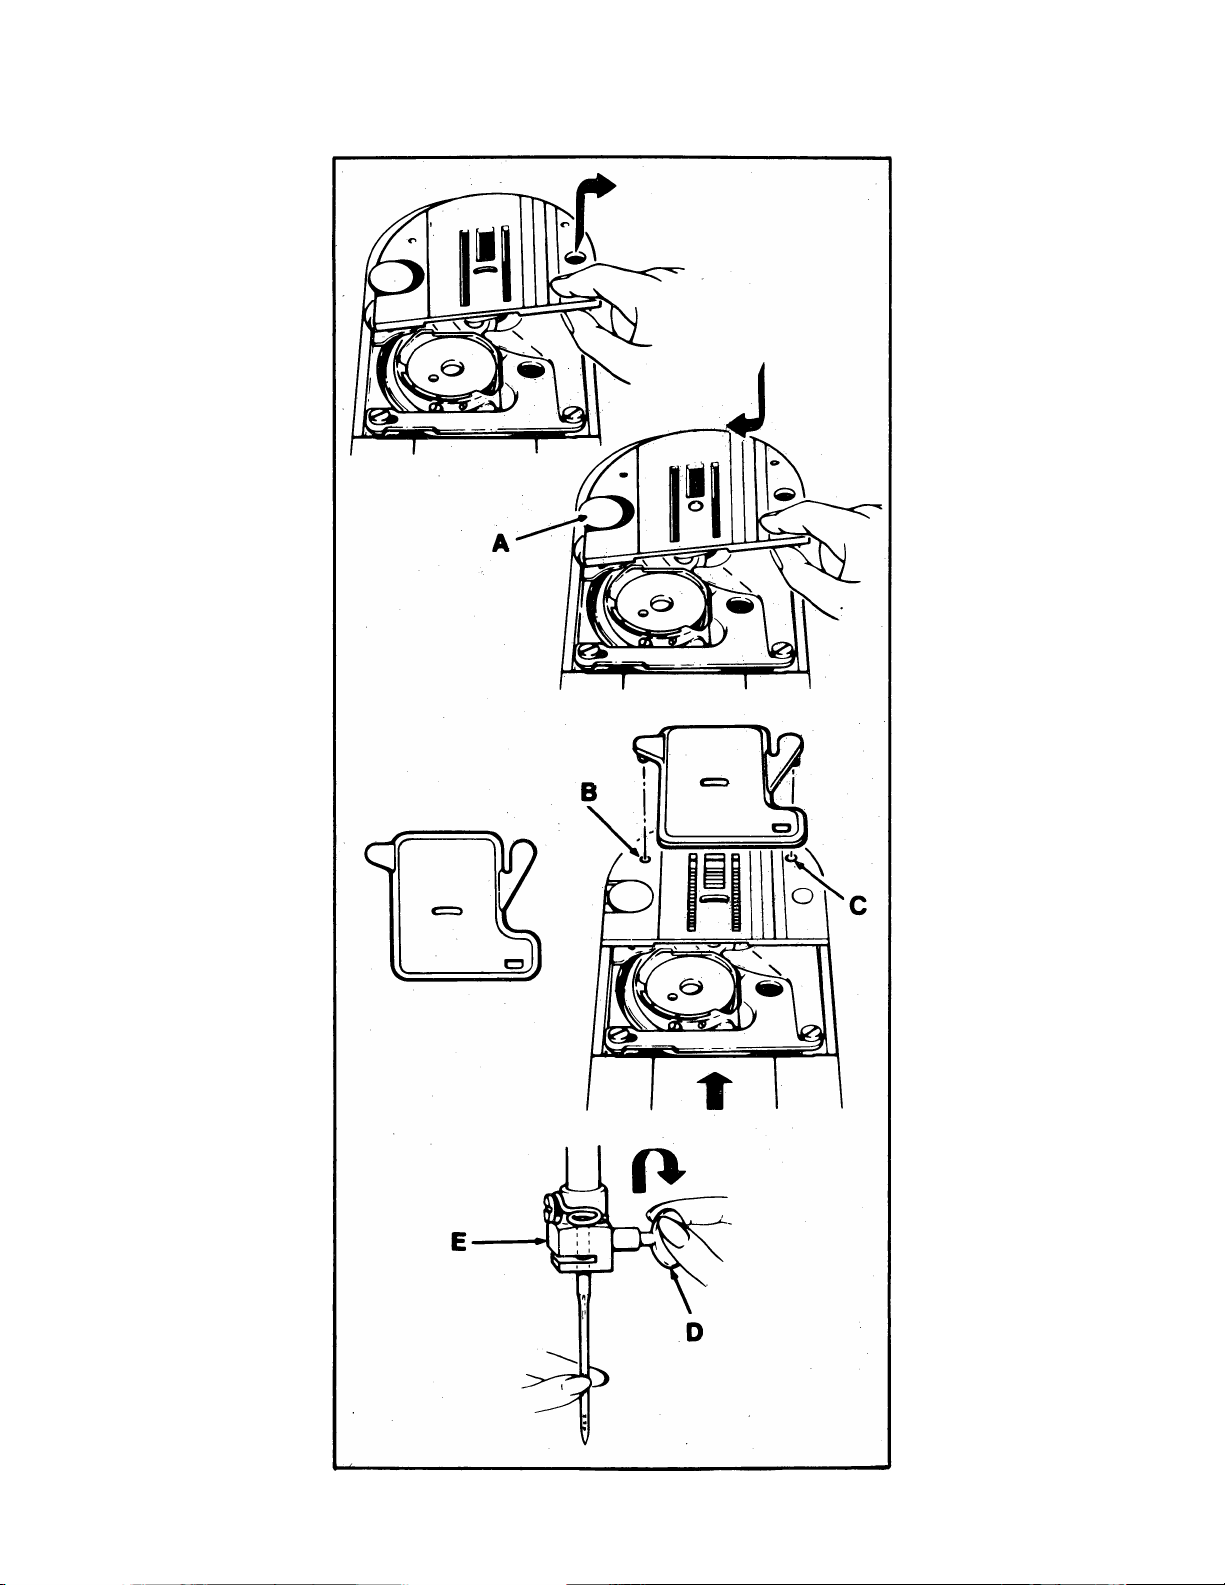
Changing Needle Plates
NOTE: Remove bobbin if it contains thread in order
to prevent thread being caught when plate is replaced.
• Raise needle to highest position by turning the hand
wheel toward you.
• Raise presser foot.
• Open slide plate. Place thumb under right side of
needle plate, lift it up and withdraw it to right.
• Replace needle plate under clamping pin A, push it
firmly to the left and press down until it snaps into
place.
• Close slide plate.
Attaching Snap-in Feed Cover
• Raise needle to highest position by turning hand
wheel toward you.
• Raise presser foot, open slide plate and insert gen
eral purpose needle plate.
• Slide snap-in feed cover away from you over needle
plate until points B and C are positioned directly
over holes inmeedle plate as illustrated. Snap in
point B. Then push point C in toward point B until it
snaps into place. Close slide plate.
• To remove, open slide plate, then simply lift up front
edge of feed cover and remove. Close slide plate.
Changing the Needle
• Raise needle to its highest position by turning the
hand wheel toward you. Loosen the needle-clamp
screw D and remove the needle.
• Insert new needle with the flat side of the needle to
the back, up into/clamp E as far as it will go.
• Tighten needle-clamp screw.
14
Page 16
15
Page 17

Fabric, Thread
The needle and thread you choose will depend upon
the fabric to be stitched. The needle should be fine
enough to prevent the fabric from being marred with
large punctures, yet heavy enough to pierce the fabric
without being bent or deflected.
FABRIC
FILMY—Chiffon, Organza, Tulle, Voile
SHEER —Net, Lace, Ninon, Crepe de Chine, Voile
LIGHT—Velvet, Crepe de Chine, Shantung, Faille,
Organdy, Muslin, Batiste, Dimity, Lawn,
Percale, Piqué, Poplin Cashmere, Flannel,
Mohair, Felt, Taffeta, Satin, Challis, Eyelet,
Gingham, Crepe, Broadcloth
MEDIUM—Velvet, Crepe de Chine, Shantung,
Suiting, Satin, Crepe, Velveteen, Corduroy,
Fleece, Flannel, Gabardine, Felt, Serge, Mohair
HEAVY—Brocade, Taffeta, Satin, Crepe Corduroy,
Linen, Drapery Fabric, Burlap, Suiting,
Gabardine, Poplin Denim, Ticking, Canvas
VERY HEAVY—Denim, Duck, Canvas, Sailcloth,
Coating, Blanketing, Upholstery Fabric
KNITS, STRETCH AND ELASTICS—Jersey, Cire,
Sweater Knit, Bonded Knit, Tricot, Stretch Terry,
Double Knit, Spandex, Deep Pile, Fake Furs
LEATHER, PLASTIC, VINYLS—Kidskin, Patent
Leathers and Suedes, Plastic Film, Imitation
Upholstery Vinyl and Leather
16
Page 18

and Needle Table
The eye of the needle must be large enough for the
thread to pass through it freely: too fine a needle will
cause the thread to fray.
The table below is a guide to needle and thread selec
tion. Refer to it before starting a sewing project.Be
sure to use the same size and type of thread in both
needle and bobbin.
THREAD
Fine silk, cotton,
mere, or synth.
Fine silk, cotton.
mere, or synth.
Fine silk, cotton.
mere, or synth.
Medium cotton.
mere, or synth.
Medium silk, cotton.
mere, or synth.
Heavy silk, cotton,
mere, or synth.
Style
2020
2020
2020
9090
ZUZU
2020
NEEDLE
Size
9.11
9,11
11
11
14
14
16
Heavy silk, cotton.
mercerized or or
synthetic
Fine, medium, or
heavy synthetic
Fine mere. & synth.
Med. mere. & synth. or
Hvy. mere. & synth. 2032
2020
2026 18
90/ C,
2020
17
14
16
11
1/
16
11.14.16
11.14.16.18
Page 19

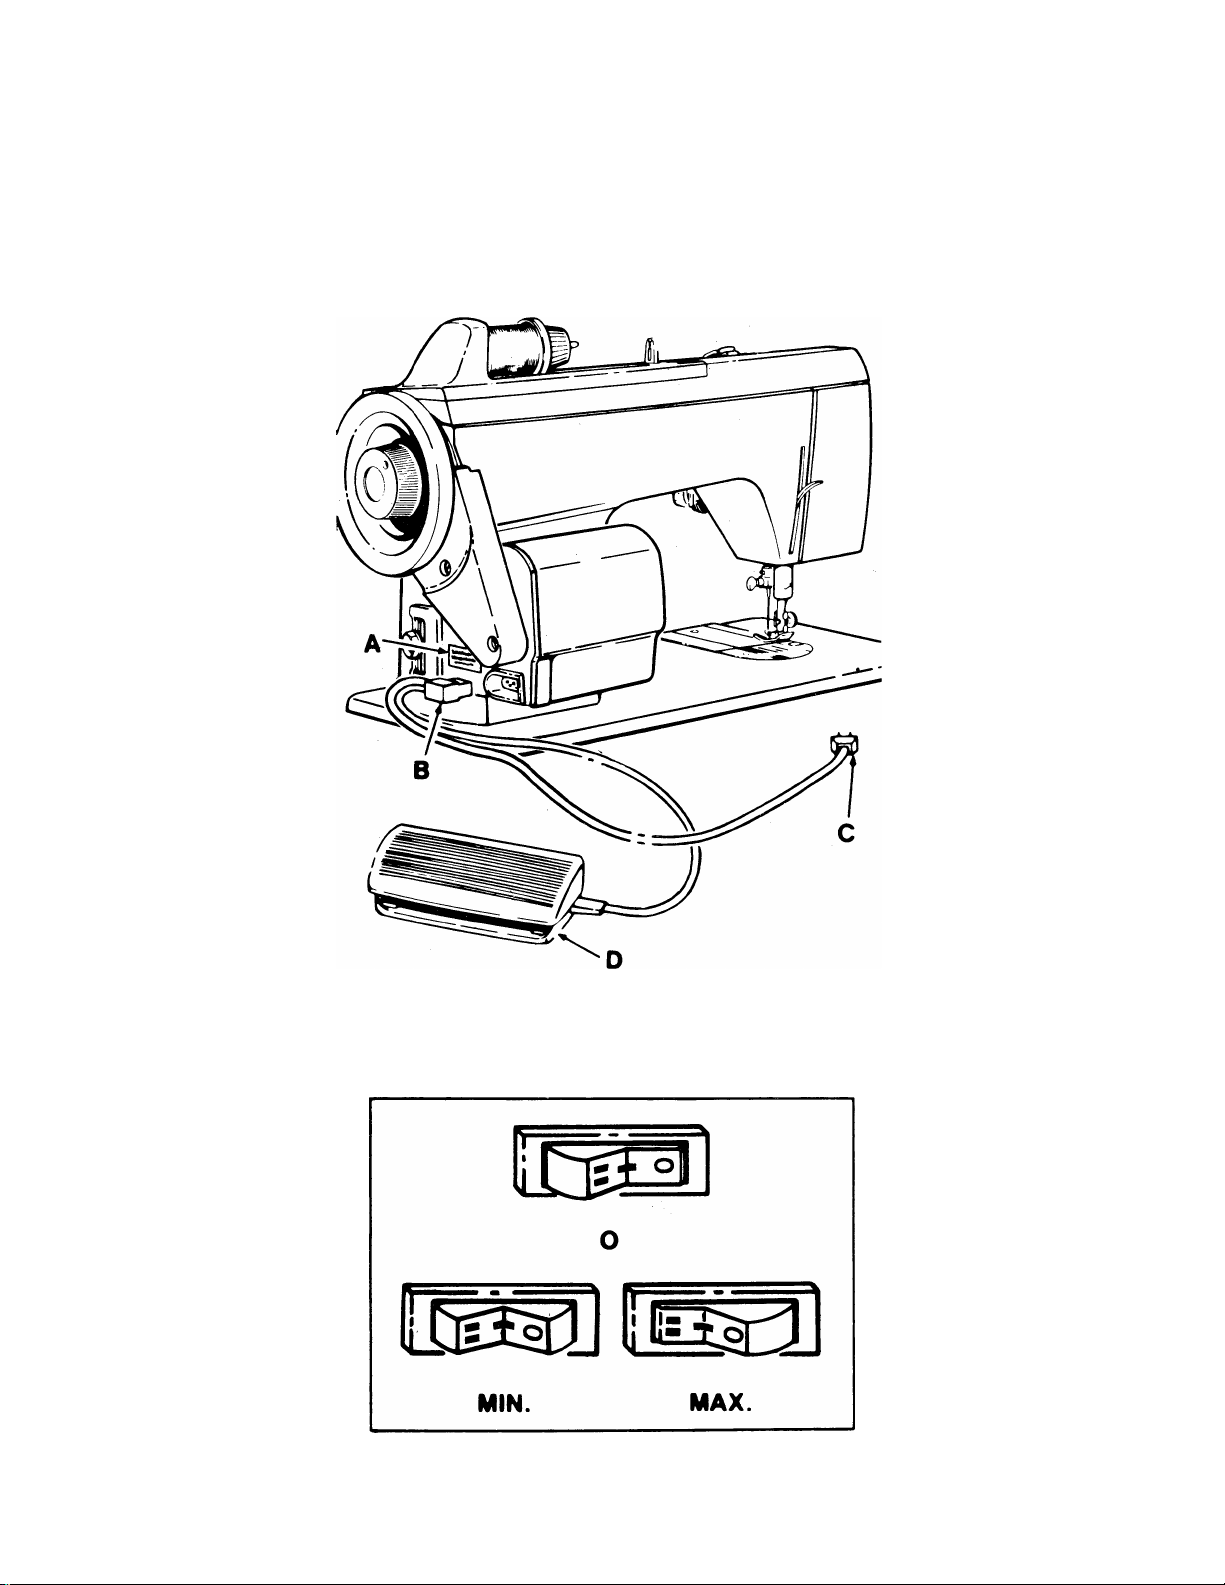
Operating Machine
Connecting Machine
Before plugging in your machine, be sure that the volt
age and number of cycles indicated on the electrical
nameplate A, conform to your electrical power supply.
If your speed controller cord has a motor discon
nect plug, push plug B into the receptacle at the right
end of machine. Then connect plug C to your socket
outlet.
If the speed controller cord is wired directly to the
motor, simply connect plug C to your socket outlet.
CAUTION: Disconnect the power line plug from the
socket outlet when changing needles, feet, or needle
plates or when leaving the machine unattended. This
eliminates the possibility of starting the machine by
accidentally pressing the speed controller.
If your machine has a sewing iight switch, press or
turn switch on the machine, as required.
if machine has a three-position switch:
• The OFF setting (switch moved to O symbol).
• The MIN. setting (switch moved to — symbol) al
lows the maximum control for special jobs.
• The MAX. setting (switch moved to = symbol) al
lows for full speed capacity of the machine.
To run the machine and controi speed, press the
speed controller D with your foot. The harder you
press, the faster the machine will sew. To stop ma
chine, remove foot from controller.
CAUTION: Because of the up and down movement
of the needle, you must work carefully and watch the
sewing area when operating the machine.
18
Page 20
19
Page 21

The Bobbin Thread
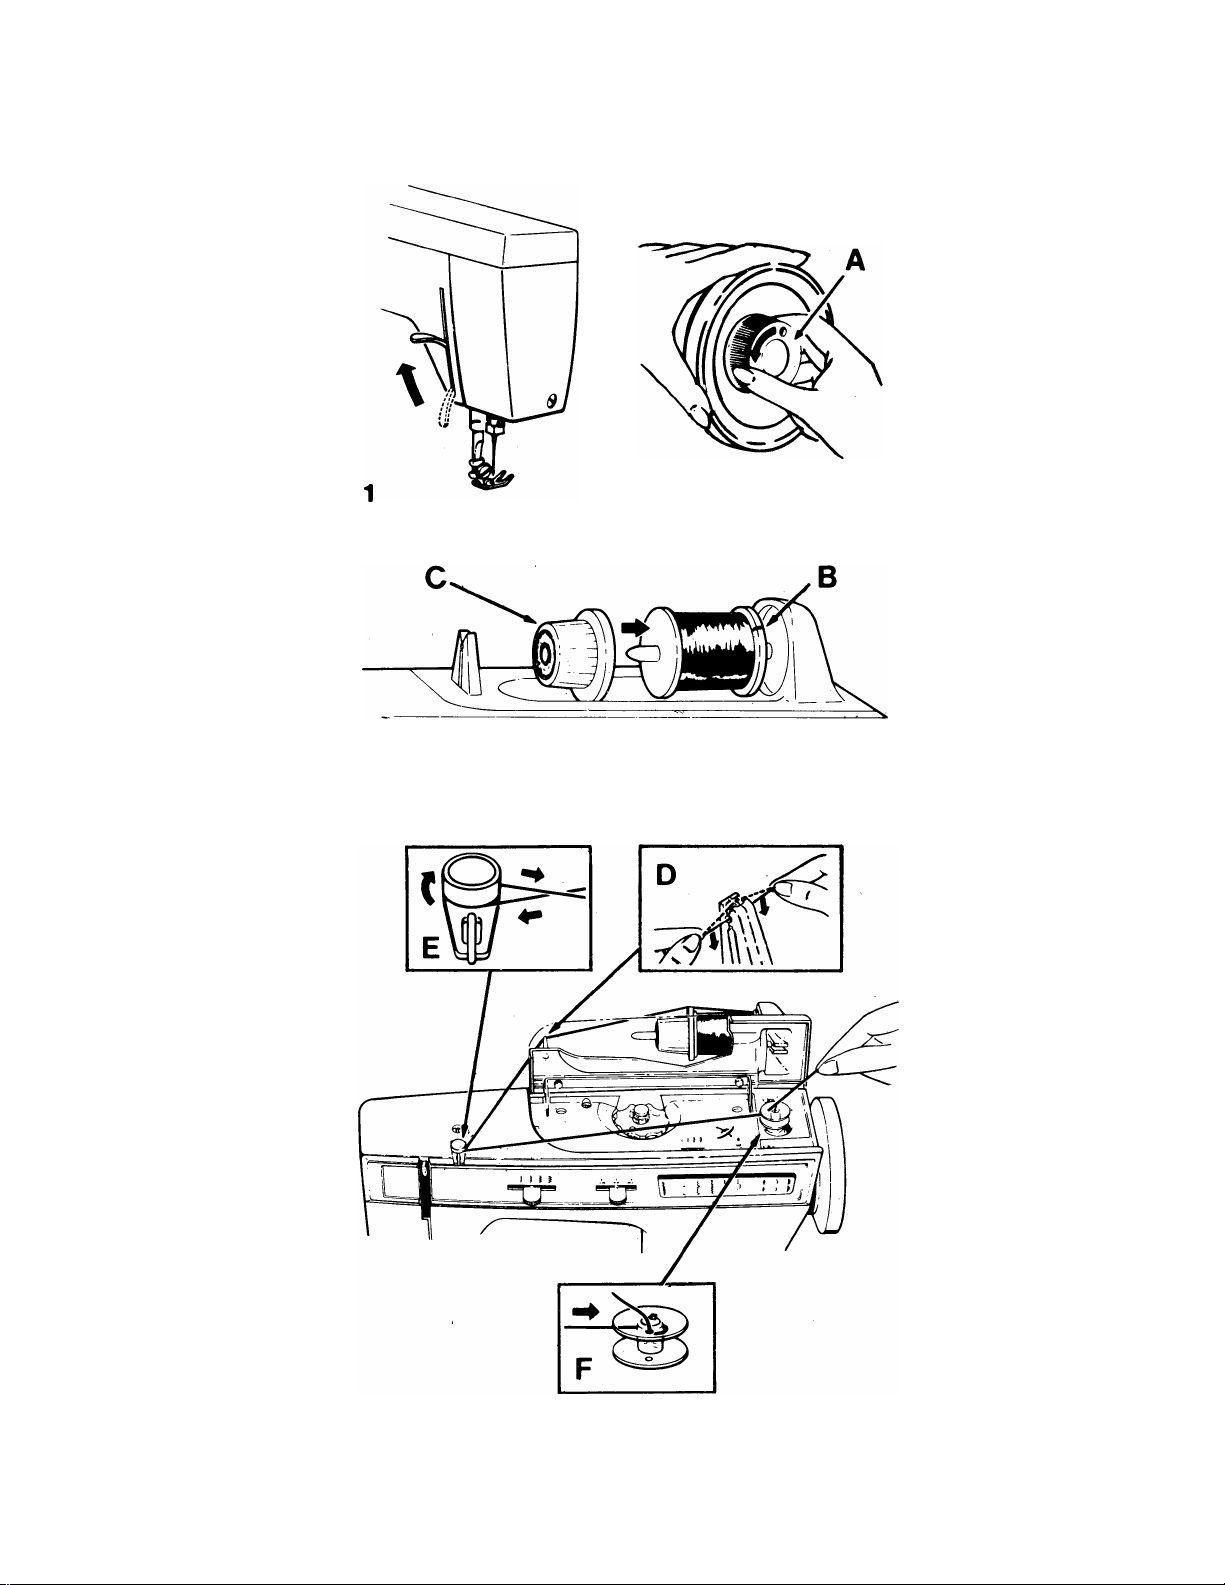
Winding the Bobbin
Preparation Steps
1. Raise the presser foot and turn hand wheel toward
you until needle is in highest position.
2. Loosen hand wheel knob A by turning it toward you
with the right hand while holding hand wheel with
the left hand.
3. Place thread spool on spool pin with thread retain
ing slit B to the right. (Break paper at the end of
spool if necessary.)
• Place spool holder C on spool pin and press firmly
against the thread spool.
Winding Steps
• Snap thread into thread guide post D and open top
cover.
• Lead thread around bobbin winder tension disc E,
as illustrated, and through small hole in bobbin from
inside out.
• Place bobbin on spindle and move bobbin winder
F to right.
• Hold thread end and start the machine. Cut off
thread end after a few coils have been wound.
• When required amount of thread has been wound
(winding will stop when bobbin is full) stop machine
and cut connecting thread.
• Move bobbin winder to the left and remove bobbin.
• Hold hand wheel and tighten hand wheel knob.
20
Page 22
21
Page 23

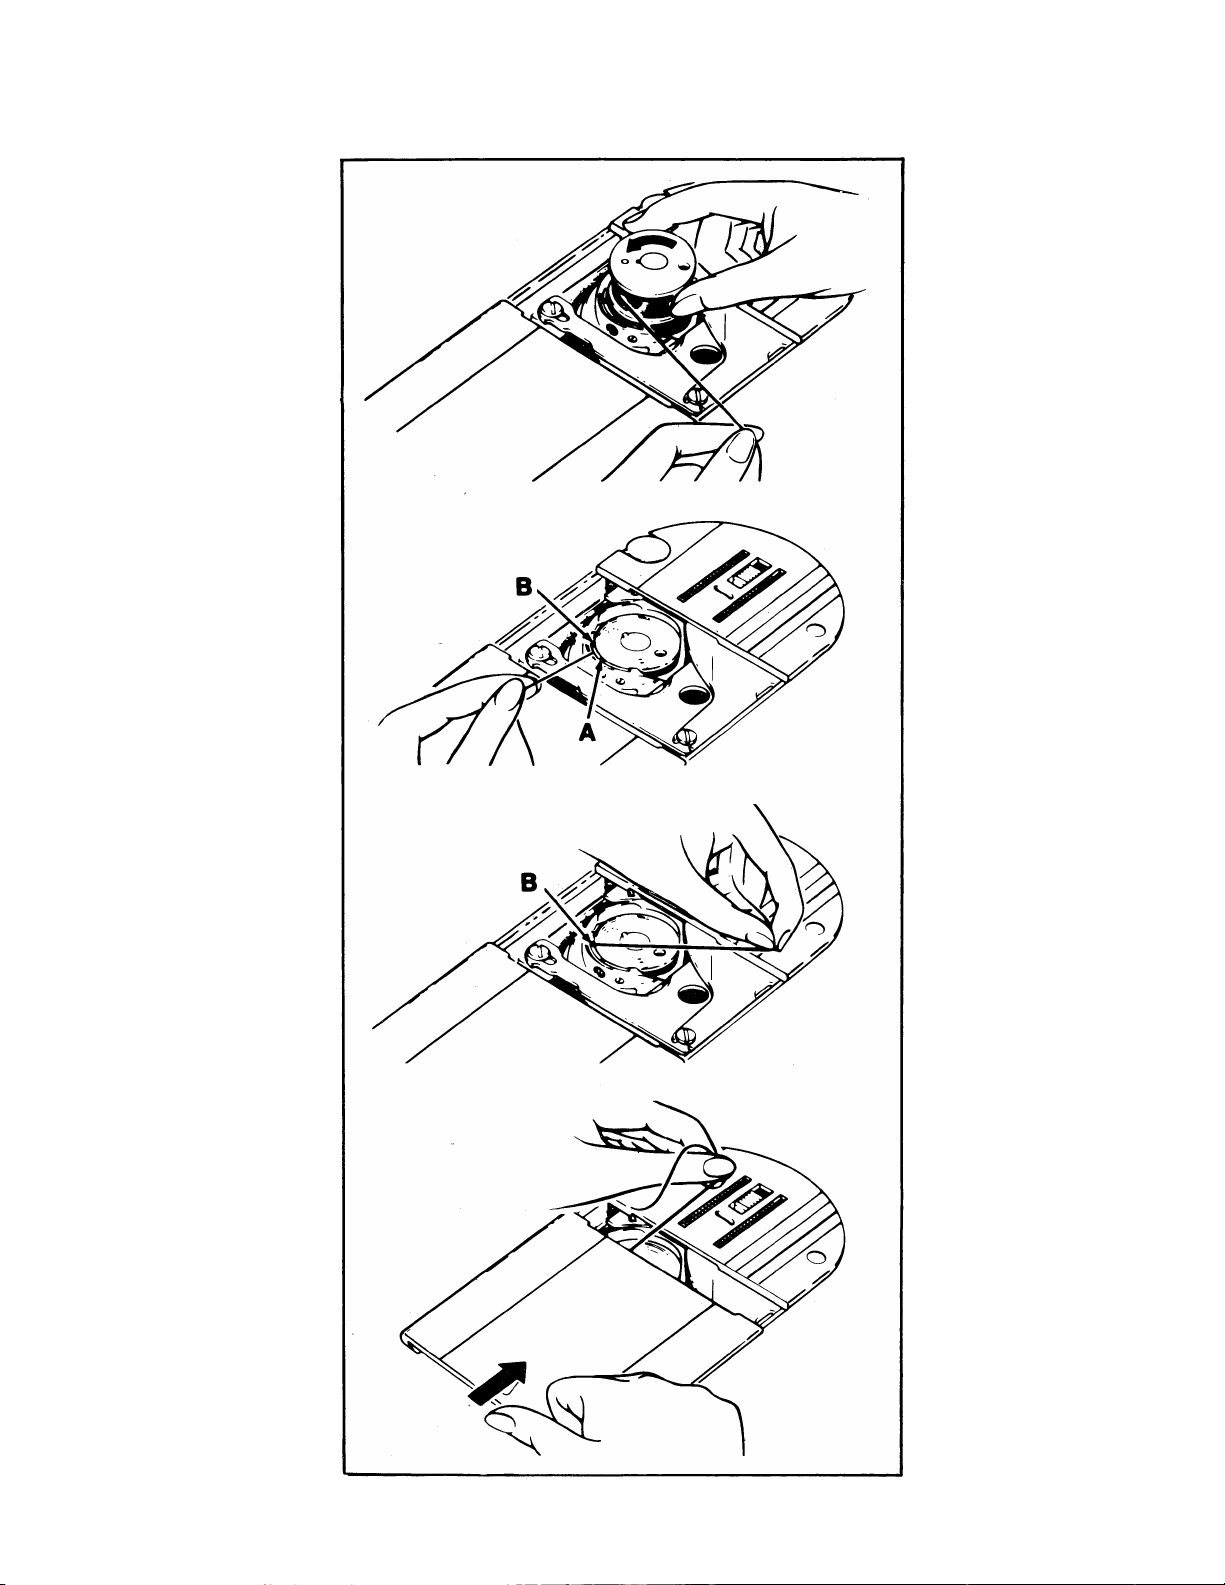
Threading the Bobbin Case
1. Hold bobbin so that thread unwinds in direction
shown, and insert bobbin in bobbin case.
2. Pull thread into notch A in bobbin case, draw it
toward left and into slot B.
3. Draw approximately 10cm (4 inches) of thread diag
onally across the bobbin.
4. Close slide plate, allowing thread to extend through
the slot between the slide plate and the needle plate.
22
Page 24
23
Page 25

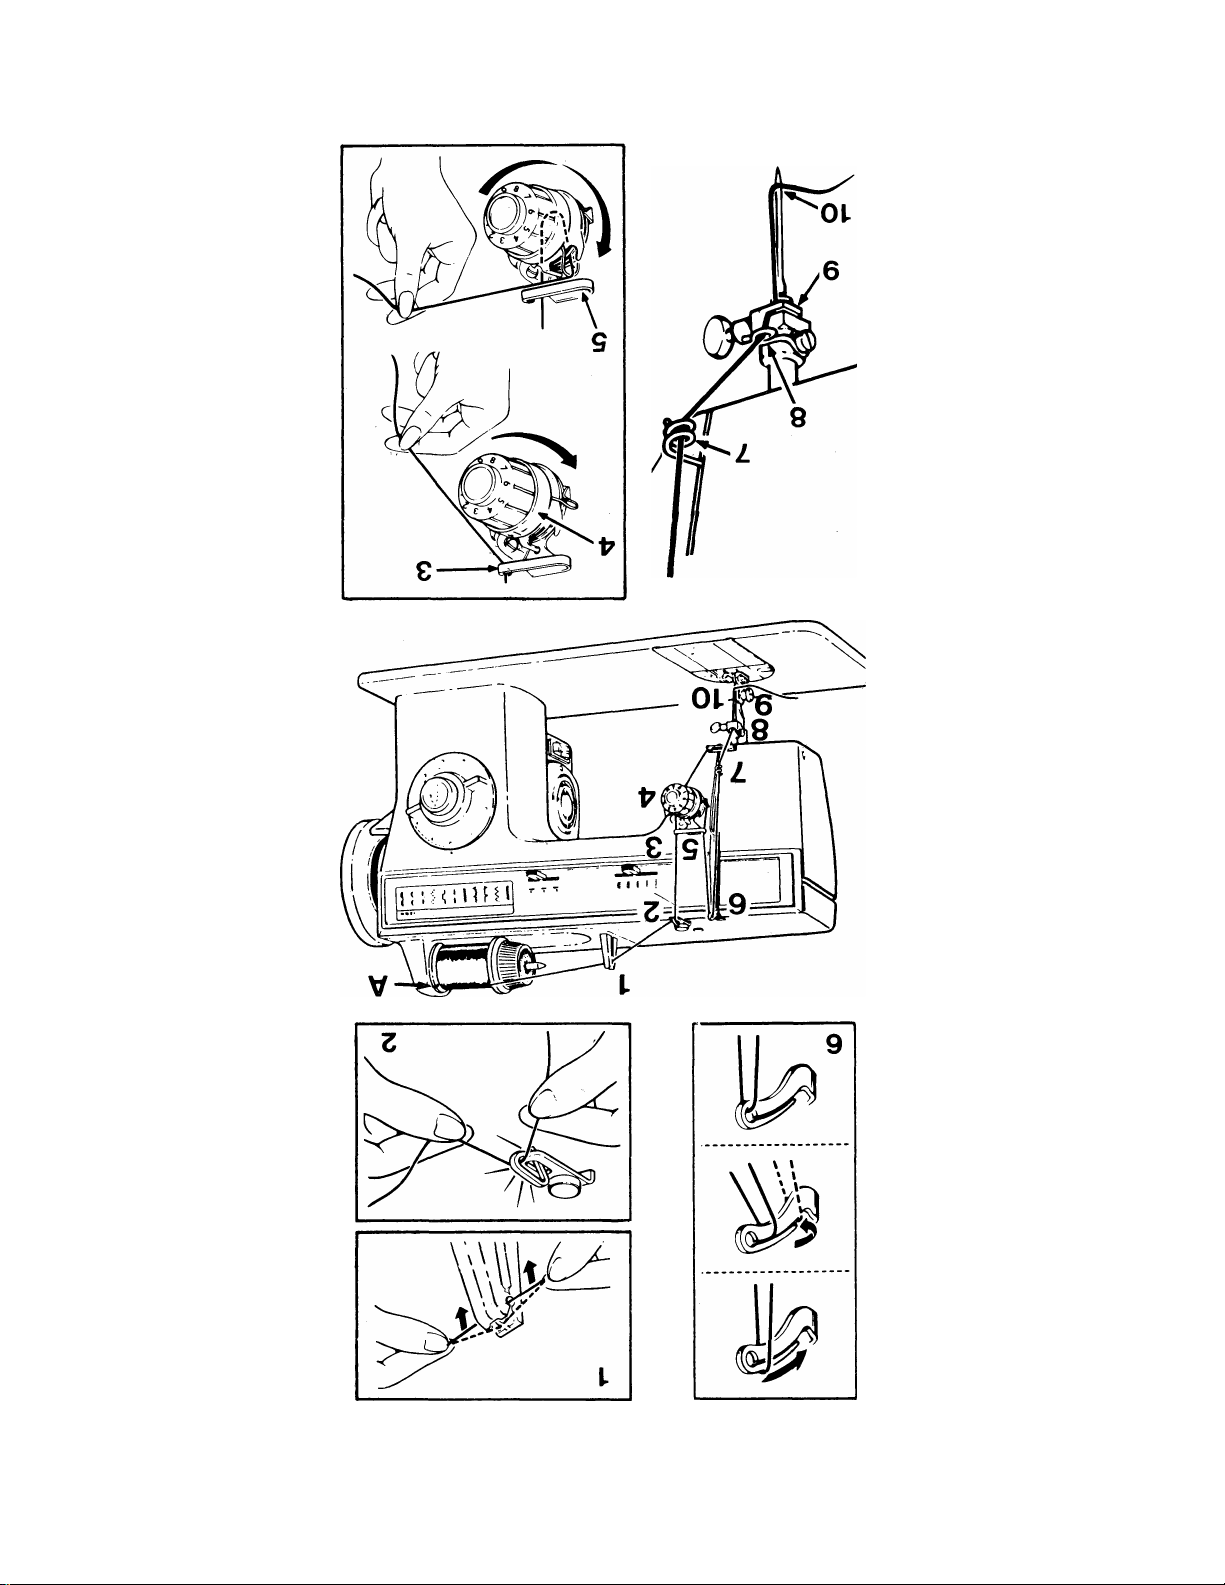
Threading the Machine
• Place spool of thread on spool pin. If spool being
used hasathread retaining slit A, it should be placed
to the right, as illustrated.
• Raise the presser foot, to release thread tension.
• Raise the take-up lever to highest position by turn
ing hand wheel toward you.
• Snap thread into thread guide post 1.
• Holding thread ends in each hand, snap thread into
upper thread guide 2.
• Pass thread through thread guide 3.
• With right hand on thread spool, thread the needle
thread tension 4. Slide thread over metal plate be
tween tension discs with left hand. Lead thread
under tensfon and tension wire. Thread tension wire
by firmly pulling thread up and over to the right.
• Guide thread through point 5.
• Thread take-up lever 6, as illustrated.
• Draw thread through points 7 and 8, guiding thread
from rear of each guide to the right.
• Pass thread through guide 9. Thread the needle 10
fromfrontto back, drawing10cm(4inches)ofthread
through the needle eye.
24
Page 26
9Z
Page 27

Raising the Bobbin Thread
Hold needle thread lightly with left hand and turn hand
wheel slowly toward you until the needle enters plate.
Continue turning hand wheel and holding needle
thread until needle rises. Tighten your hold on the
needle thread and bring up bobbin thread in a loop.
Open the loop with your fingers. Draw approximately
10 cm (4 inches) of both threads under the presser foot
and place them diagonally to left. Close slide plate.
26
Page 28

27
Page 29

3.
Setting Selectors
Before you move the selectors to set your machine for
straight stitching, turn the hand wheel toward you until
the needle is above the needle plate.
• Needle Position: L [X] JL
• Stitch Width. □ Ilii
• Stitch Length; 1.5-4 to suit fabric
Straight stitching can be performed with any one of
the stitch pattern discs in place and stitch width lever
at j only.
Adjusting Stitch Length
The stitch length dial controls the length of stitches.
The numbers around the edge of the dial express
stitch length in mm; the lower the number, the shorter
the stitch. Generally, shorter stitches are best fdr light
weight fabric. The area from 0 to 1 is used for the
adjustment of zig-zag satin stitching (see page 40).
Setting the Dial
• Turn dial so that stitch length desired is positioned
under symbol.
• To shorten stitch length, turn dial toward a lower
number.
• To lengthen stitch length, turn dial toward a higher
number.
For reverse stitching, depress push button located in
centre of dial, hold in until reverse stitching is com
pleted, then release push button.
28
Page 30

Page 31

Needle Thread Tension
Having selected the correct needle and thread com
bination for the fabric being used, it may be necessary
to adjust the tension of the sewing machine to insure
a well-balanced stitch.
A well-balanced stitch is produced when the top and
under thread appear the same on the fabric.
Your machine has an adjustable top tension control
system. This control exerts tension on the threads as
they pass through the machine to form a stitch.
• Too much tension will produce a tight stitch which
will cause puckered seams.
• Too little tension will produce a loose stitch.
When an even amount of tension is exerted on both
threads, a smooth even stitch known as a balanced
stitch, is produced.
Tension Test
To help understand the effect of tension on fabric and
thread, try this simple test:
• Take two pieces of a medium weight woven fabric
in a solid light colour about 15cm (6 inches) long.
• Place a 2020 size 14 needle in the machine.
• Thread the top of your machine with a polyester or
cotton dark colour thread and use a lighten colour
thread of the same fibre and size in the bobbin.
• Select straight stitch.
• Seam the two pieces of fabric together starting with
the top tension control at 1. Then as you sew, slowly
turn the tension control from 1 through 9.
• Sew another row turning the dial back to 1. You
should have a balanced stitch on each row mid-way
between the start and finish in each case.
• The different coloured threads will help you to see
the effect that the tension has on the top and bottom
threads.
Now that you have observed the effects of tension,
we suggest that you perform a similar test on a scrap
of fabric you plan to use, being sure to duplicate the
number of thicknesses of your garment.
30
Page 32

31
Page 33

Sewing a Seam
1. Select straight stitch and set the stitch length dial
on desired setting. Raise presser foot. Pull thread
back under presser foot leaving at least 10cm
(4 inches) of thread.
2. Position needle approximately 1.3cm (1/2 inch) from
fabric edge. Then lower presser foot and backstitch
almost to the edge of the fabric for reinforcement
by stitching in reverse direction. For additional in
formation on reverse stitching refer to page 28.
Stitch forward to end of seam and stop machine
before the end of stitching line. (Do not sew beyond
edge of fabric.)
CAUTION: Do not pull the fabric while you are
stitching as this may deflect the needle causing it
to break.
3. Raise needle by turning hand wheel toward you.
Press reverse stitch push button, and back stitch
1.3cm (1/2 inch) to reinforce end of stitching.
4. Raise needle by turning hand wheel toward you.
Raise foot and remove fabric by drawing if to the
back and to the left. Cut threads on thread cutter at
rear of presser bar.
32
Page 34

33
Page 35

Applications
Darning with an Embroidery Hoop
• Needle Position: JL E -I
• Stitch Width; Q] I I 1 1
• No Presser Foot
• Snap-in Feed Cover
• Embroidery Floop Designed for Machine Use
• Position work under needle and lower presser bar.
• Flold needle thread loosely with left hand, turn hand
wheel toward you, and draw bobbin thread up
through fabric. Flold both thread ends and lower
needle into fabric.
• Stitch across opening, moving hoop under needle
at a slight angle from lower left to upper right. Keep
lines of stitching closely spaced and even in length.
When opening is filled, cover area with crosswise
lines of stitching.
Quilting
Quilting is the art of stitching two or more thicknesses
of fabric together in a planned design. A padding is
stitched to the underside of the fabric to produce a
soft, puffed effect that is becoming to some wearing
apparel and to many fabric furnishings.
Preparing the Fabric
Baste a light padding of cotton flannel, synthetic quilt
batting, sheet wadding, or a lightweight wool interlin
ing to the underside of the fabric. When using sheet
wadding, first back it with voile, batiste, or net to pre
serve the sheet wadding through wear. Baste the lay
ers of fabric and padding together on the lengthwise
and crosswise grains.
Basic Procedure
• Draw both threads under the foot and diagonally
across feed to left.
• Position the needle, lower the foot and start stitching.
34
Page 36

35
Page 37

Zipper Insertion
How the zipper is inserted will depend on the type of
garnnent and the location of the zipper. With the adjust
able zipper foot, you will find it easy to sew an even
line of stitching close to the zipper. For instructions On
inserting zipper foot on machine, see page 10.
Needle Position: i-Ei
Stitch Width; □ Hii
Stitch Length; To suit fabric
General Purpose Needle Plate
Zipper Foot
Speed; MIN.
The zipper foot can be used either to the left or right
of the needle, depending on where the teeth of the
zipper are placed.
Adjusting the Zipper Foot
When the zipper is to the right of the needle:
A. Attach right side of zipper foot to shank (needle will
enter right notch in foot).
When the zipper is to the left of the needle;
B. Attach the left side of zipper foot to shank (needle
will enter left notch in foot).
36
Page 38

37
Page 39

4. Basic Zig-Zag Stitching
Wv^^^WAAAAAAA/mWA
Setting Selectors
Begin by inserting your zig-zag stitch pattern disc 1
onto your sewing machine, following the steps given
on page 46.
Before turning selector, make sure needle is out of
the fabric.
Needle Position Selector
Most of your zig-zag stitching will be done in centre
JL
needle position.
Left L and right JL settings are used for special
stitch placement.
stitch Width Selector
To produce a plain zig-zag or a decorative stitch, the
stitch width selector is moved-from its straight stitch
position : to any of its other four positions. The fur
ther you nrlove the selector toward the right, the wider
your stitch will be.
Adjusting Stitch Length
Any stitch length setting from 1 to 4 will give you an
open zig-zag stitch.
The higher the number, the more open, or farther
apart your stitches will be.
The area between 0 and 1 on the dial is used for the
adjustment of zig-zag satin stitching, a series of closely
spaced plain zig-zag stitches that form a smooth,
satin-like surface. (Refer to page 40 for information
on satin stitching.)
Bobbin Thread Tension
Bobbin thread tension iscontrolledby screw A located
on the bobbin case. The tension is set at the factory for
regular sewing and should not be adjusted unless the
corners of a zig-zag stitch cannot be locked by adjust
ing the needle thread tension.
On those rare occasions when it becomes necessary
to adjust the bobbin thread tension, use a very small
screwdriver. A very slight turn of screw A will change
the appearance of your stitching.
• To increase tension, turn screw to the right.
• To decrease tension, turn screw to the left.
38
Page 40

mi
WW -
WW -
ш
VWW "
www "
л/wwwv -
МШ ¿
O)
00
Page 41

Satin Stitching
When you wish to produce a satin stitch, make a test
sample first so you can cidjust stitch length and thread
tension properly. Soft fabric may require a backing to
insure a firm stitch. Crisp organdy, lawn or a fusible
interfacing are suitable for this purpose.
Accessory and Selector Settings
• Pattern: Zig-Zag Disc 1
• Needle Position; JL [X] A
• Stitch Width:
Stitch Length: 0 to 1
General Purpose Needle Plate
General Purpose Foot
TIT
Adjusting Stitch Length
• Turn stitch length selector dial to 1.
• Run the machine, at a slow speed and slowly turn
stitch length dial toward the right until stitches are
closely spaced and form a smooth surface.
Adjusting Needle Thread Tension
Zig-zag stitching usually requires less needle thread
tension than straight stitching. Thread machine cor
rectly and make a test sample with the same fabric,
thread, needle and stitch pattern combination you
plan to use. Stitches should lie flat without causing
fabric to pucker.
If puckering occurs, lower the tension by turning dial
to a lower number. An underlay or tissue paper back
ing may be needed.
Satin stitching requires less tension than straight
stitching or open zig-zag stitching. Furthermore, the
wider the stitch,, the lighter the tension on the thread
must be. Notice the stitching on your sample. If the
fabric is puckered, lower the needle-thread tension
by turning the tension dial to a lower number.
40
Page 42

Page 43

Stitch Usage
Appliqué
The stitch most commonly used in appliqué is a plain
zig-zag, closely spaced to form a satin stitch. The
width of this stitch can be varied to accommodate
fabrics of different weaves and textures. Other stitch
patterns can also be used.
Preparation
Make a test sample to decide which of the following
methods is the most appropriate for your fabric and
design. Mark design on piece of fabric to be appliquéd.
Cut out design leaving about 2 cm (3/4 inch) margin
all around. Position the design. Baste it to the fabric.
Method 1
• Select pattern and adjust stitch width dial for desired
appliqué stitch. Adjust stitch length to fine setting,
between 1 and 0.
• Follow the outer edge of the design with a decora
tive stitch.
• Trim away the excess fabric on the outer edges of
the stitching.
Method 2
• Select straight stitch.
• Outline the entire design with a short stitch
• Trim raw edges to the stitching and remove basting.
• Select stitch pattern and stitch width desired, and
set stitch length on a satin stitch setting for a closely
spaced stitch, between 1 and 0.
• Stitch, following the straight stitch outline. This
method will produce a smooth overedged finish,
with no raw edges to be trimmed after stitching.
Methods
• Purchased motifs can be appliqued quickly and
easily by using either a straight or decorative stitch.
42
Page 44

43
Page 45

Zig-Zag Seam Finishes
Seam edges support the garment and should be given
a durable finish if the fabric is likely to ravel. There are
two methods of finishing seams in such fabrics: trim
ming seam edge or overedging. Make a test sample to
determine which method best suits your fabric.
• Pattern: Zig-Zag Disc 1
• Needle Position: !• [2 -I
• Stitch Width: i ||| ^ § |
• Stitch Length: 1 to 3 to suit fabric
• General Purpose Needle Plate
• General Purpose Foot
Method 1 — Trimmed Seam Finish
• Adjust stitch width and length to give you the most
open stitch that will secure the fabric edge; avoid
harsh overstitching.
• Stitch near the edge of seam allowance and trim
seam edges evenly after stitching.
Method 2—Overedge Seam Finish
• Adjust needle thread tension, stitch width and stitch
length to suit fabric.
• Trim seam edges evenly.
• Place trimmed seam under the foot and overedge
the seam allowance as illustrated.
Lingerie Seams
To make a lingerie seam durable and flexible use the
plain zig-zag stitch at a narrow width setting. This
seam treatment is particularly suitable for bias seams.
When seaming nylon tricot insert a 2045 needle in the
machine before you begin to sew.
• Straight stitch the seam line on wrong side of fabric.
• Press both seam allowances in the same direction.
• From the right side, topstitch with narrow zig-zag
stitching, letting the needle alternately enter the
seam line and seam thickness. (Stitch width narrow;
stitch length 1 to 1.5.)
44
Page 46

45
Page 47

5. Pattern Stitching
Selecting a Stitch
Your sewing machine comes with eleven pattern discs
which will allow you to produce a variety of stitch patr
terns by simply inserting the disc of the pattern desired.
Each pattern disc is numbered and has the stitch
printed on its surface to aid your selection.
Choose a stitch that best suits your sewing applica
tions. For additional information on stitch pattern
usage, refer to the next page.
Changing Pattern Discs
1. Move the stitch width selector to its straight stitch
position.
2. Raise pattern disc lid A and pull up on the disc re
lease bar B.
3. Remove the pattern disc.
4. To replace a pattern disc, be sure that the num
bered side of disc is face up and that the notch in
the centre of the disc fits over the positioning key
on the disc holder D.
• Push disc down firmly.
• Disc will click into place when inserted correctly.
C
46
Page 48

-1^
•vj
Page 49

Stitch Pattern Chart
1. Basic Zig-Zag Stitch: used for general pur
pose sewing, bar tacks, finishing seams,
embroidery and applique^
2. Multi-Stitch Zig-Zag: lets you mend, join
and reinforce without bulk. Ideal for bar tack
ing.
5. Arrowhead Stitch: combines beauty and
utility. Individual pattern units reinforce points
of strain. Usethem on pocket corners in place
of bar tacks.
6. Domino Stitch: ideal for quilting and joining
fabric pieces with a decorative stitch appear
ance.
10. Banner Stitch: A decorative stitch for crea
tive border and edge designs: may also be
used for topstitching.
11. Key Stitch: Usedfor ornamental borders and
for lace applications.
12. Walls of Troy Stitch: for applique and
smocking. Useful for ornamental edges and
borders.
13. Solid Diamond Stitch: useful in sewing
decorative borders, monograms and
applique.
17. Pennant Stitch: For interesting borders and
smocking.
19. Ball Stitch: For motifs, monograms and
border designs.
20. Curved Mending Stitch: For mending, join
ing and reinforcing without bulk on stretch
fabrics.
25. Spiny Stitch: Ideal for creative effects on
edges and borders.
26. Block Stitch: Perfect for smocking and bor
der applications.
27. Faggoting (Feather Stitch): extremely ver
satile; use it for joining fabric pieces, embroi
dering, quilting and lattice seams.
37. Elastic Stretch Stitch (Alpine): a useful
stitch when sewing elasticized fabrics, seam
finishes and trim.
350. Blindstitch: for finishing hems and making
ladder seams.
351. Crescent Stitch: useful for ornamental
edges and borders.
352. Solid Scallop Stitch: for decorative borders,
applique and smocking.
48
Page 50

1 штттттш
АААААААА
ч / Ч / ч/ ч/ ч/ ч/ ч/ ч/ ч/
% / Ч /Ч /Ч /ч /Ч /ч /* ^Ч #
VVVVVVVVV
liááA^^J¡ÍÉá¡UMg,,J¡ááááA^^
5
ллл^ à^àA à^AA Л^АЛ
10 VVV1HH»<»'V^
11 ^JUiUWLJUU
12 ^ЧЛ/ЧАЛЛ/
13
17 %J^\J^P4u,P4v^^
19
20
*•
Ч. ./
♦• *N
25 М||м|^м|Ц|*^^
ШШШШШШШШШ\
27 штттт^
37 ,WVMлЛ^v\ЛлyЛv^ЛллW
350 y"Y"Y"Y"Y"Y"'\
35*1
352
49
Page 51

Adjusting Stitches
for Stretch Fabrics
Guiding and Supporting Fabric
Most fabrics of stretch or knit construction need only
to be guided in front of the presser foot when you use
one of the stretch stitches. Some fabrics—nylon tricot
and eiasticized fabrics, for example—do require sup
port while being stitched.
1. For nylon tricot and similar synthetic knits, apply
gentle tension by holding the seam in front and back
of the presser foot as you sew.
2. For eiasticized fabric, stretch lace, and knits with an
unusual amount of elasticity, apply firm tension in
front and back of the presser foot to stretch the
seam as the stitches are being placed.
CAUTION: Do not pull the fabric while you are stitching as
this may deflect the needle, causing it to break.
50
Page 52

51
Page 53

Blindstitch Hems
Blindstitching provides a durable hem finish that is
almost invisible. While it is best suited to straight or
slightly curved hems, taped, bound, or turned hem
edges can also be blindstitehed with ease.
Stitch: Blindstitch Disc 350
Needle Position: [X] ^
Stitch Width: i iDii
Stitch Length: To suit fabric
General Purpose Needle Plate
General Purpose Foot
Blindstitch Hem Guide
1. Raise presser foot, loosen screw, and slip blind
stitch hem guide between screw and shank of foot.
Make sure underside of the guide clears the slide
plate and front of foot. Tighten screw with coin.
2. Prepare hem in the usual way. It is advisable to
baste the hem. Place the basting at least 1.3 cm
(V2 inch) below the edge of hem allowance to avoid
catching the flange of guide as you stitch.
3. With the wrong side of work uppermost, turn the
hem under, creating a soft fold from the top edge
of hem.
4. Position hem under the foot with the soft fold resting
against the wall of guide. Make sure the flange of
the guide is between soft fold and top of hem, as
shown.
5. Lower presser foot. Stitch so that the straight
stitches fall on the hem allowance and zig-zag
stitches pierce the soft fold of work. Adjust stitch
width if necessary. While stitching, guidejiem edge
in a straight line and feed soft fold evenly against
wall of the guide.
52
Page 54

53
Page 55

Ladder Seam
The blindstitch ladder seam is particularly appropriate
for knit and stretch fabrics. It is ideal for stretchable
construction seams, and edge finishes for necklines,
pockets and collars in sportswear and swimsuits.
• Pattern: Blindstitch Disc 350
• Needle Position: 1» . JL
• Stitch Width:
• Stitch Length: 1.5 to 2.5
• General Purpose Needle Plate
General Purpose Foot
• Make a test sample to adjust stitch width and length
and needle thread tension to suit the fabric. Needle
thread tension should be lighter than normal.
• Cut and fit garment, allowing for 1.5 cm (5/8 inch)
seam allowance. Baste seam line.
• Place fabric under presser foot so that the straight
stitches fall on the seam line basting and the points
toward the centre of the garment.
Mil
• After stitching, open seam by pulling fabric back on
opposite sides of the seam to produce ladder effect.
Press seam allowance after opening.
54
Page 56

ю
LD
Page 57

Construction Stitches
Multi-Stitch Zig-Zag
The multi-stitch zig-zag is an extremely versatile stitch.
Use it to mend, join, or reinforce without bulk. With this
stitch you may attach elastic and stretch lace, con
struct lingerie and swimsuits, and finish seams. There
are many other useful applications for the multi-stitch
zig-zag.
Mending a Tear
• Stitch; Multi-Stitch Zig-Zag Disc 2
• Needle Position: SI JL
• stitch Width: i } I I [j]
• Stitch Length: .5 to 1
• General purpose needle plate.
• General purpose foot or special purpose foot.
• Trim ragged edges.
• Place underlay on the wrong side of tear for rein
forcement. Baste one side of underlay in place.
• Stitch on the right side, bringing the edges of the tear
together. Shorten stitch length at ends and corners
to give extra strength.
• Trim underlay.
Finishes for Hems and Facings
Hem and facing edges in knit and stretch fabrics will
be less apt to press through and mark when given a
flat edge finish. Edge finishing with the multi-stitch
zig-zag eliminates the bulk of turned-in edges and re
tains fabric flexibility.
• Make a test sample to check thread tension and
stitch length if you are using the multi-stitch zig-zag.
• Place stitching about 1.3 cm (1/2 inch) from hem or
facing edge. Avoid stretching edge while sewing.
• Press after stitching and trim away excess fabric
close to the stitching line.
56
Page 58

57
Page 59

Multi-Stitch Zig-Zag Bar Tacks
With the multi-stitch zig-zag you can make strong bar
tacks. Multi-stitch zig-zag bar tacks are effective for
tacking belt loops on heavy fabrics such as denim. Be
sure to check the Fabric, Thread and Needle Table on
page 16 for correct thread and needle selection with
your choice of fabric.
• Stitch; Multi-Stitch Zig-Zag Disc 2
• Needle Position:]^ Wi JL
• Stitch Width: i I I I (j]
• Stitch Length: 0 to 4
• Snap-in feed cover.
• General purpose foot or special purpose foot.
We recommend making a test sample first using
scraps of the material you will be sewing the bar tacks
on, duplicating all thicknesses.
1. Mark position for the finished end of belt loop on
the fabric.
• Place belt loop, wrong side up, straight stitch with
cut end 3 mm (1 IS inch) from edge of garment; do
not stitch beyond edges of the belt loop. Trim the
end close to the stitching and press.
2. Fold belt loop back on the stitching line and press.
• Set your machine according to the code above.
• Stitch 3 mm (1/8 inch) from the fold using the
multi-stitch zig-zag.
3. Fold over loose end and bar tack.
58
Page 60

Page 61

Patchwork Quilting
• Stitch; Domino Disc 6
• Needle Position: L [X] J.
• Stitch Width: i I I I [jj
• Stitch Length: .5 to 1
• General purpose needle plate.
• General purpose foot or special purpose foot.
Patchwork for quilts and wearing apparel formerly put
together with hand stitching, can be quickly pieced
and decorated at the same time by using the domino
stitch. Joinings are both flexible and durable when
this method is used.
Procedure
• Cut a fabric underlay to size. Baste a light layer of
padding to underlay if a quilted effect is desired.
Prepare patches, turning under 6 mm (1/4 inch)
seam allowance. On non-woven fabric this step is
not necessary.
Baste patches to underlay in arrangement desired,
butting all edges.
Stitch in lengthwise and crosswise rows, allowing
stitches to straddle patches.
60
Page 62

61
Page 63

Decorative Stitching
Your sewing machine has several stitches which are
purely decorative. These versatile stitches allow you
to add imagination and creativity to your sewing proj
ects. With these decorative stitches, you can apply to
clothes and household items: interesting details,
youthful and feminine accents, and personalized ef
fects. Some of the many applications of the decorative
stitches include border designs, applique, twin-needle
stitching, finished hems, smpcking, embroidering,
monograms and topstitching accent lines on clothes.
The following pages illustrate decorative stitches on
your machine and provide examples for their creative
use.
Border Designs
Border designs that add a decorative touch to wearing
apparel and household items can be created by com
bining different types of straight stitching and zig-zag
stitching. Simple or elaborate, delicate or bold, they
can be varied to suit the application. Use them as you
would a braid or to simulate horizontal, vertical or
bias stripes on plain fabric.
Procedure
Mark or crease fabric for the centre line of first row of
stitching. If spacing between rows is not greater than
1.3 cm (1 /2 inch), gauge additional rows with the pres
ser foot. If spacing is wider, mark for each line of
stitching. Use a backing of crisp lawn, organdy or a fu
sible interfacing. Be sure to make a test sample on a
swatch of your fabric to check stitch settings and
thread tension, being sure to duplicate thickness and
interfacing or backing if appropriate.
62
Page 64

13
—
----------------------^---------------
351
---------------------7^------
352
/ \ / \ / \ / /
^
_____
_____
^ч/_
-----------
\/ \ / \/ \ / \
\/ \/ \/ \/ \
________________________
--------------
v:_,
---------------
_________
\¿-
.V.
----------------
----
---
^
-----------
--------------
^-------------7V-“-
-------
\ / \ / \. /^v /
__
_-\/
______________VÍ_______
7т 7ч
L
__________
___________V_________
V_______>
-V.
____________.Т_____
63
—
Page 65

Monograms
Many decorative stitch patterns can be used tor mon
ograms and motifs—to add a personal touch to a
blouse collar, for example, or for initialing household
linens. You can buy designs or create them yourself
to suit the stitch pattern you wi^h to use.
Very simple straight-line monograms can be made
with the plain zig-zag stitch, or you can create a motif
by arranging individual pattern units to form a design.
Refer to page 38 for information on setting selectors
for zig-zag and decorative stitching.
When you use a decorative stitch pattern to form a
motif,, you will want to start at the beginning of the
arrowhead, crescent or whatever pattern you have
selected.
Finding Beginning of Pattern Unit
1. On a scrap of material, stitch until you come to the
end of a complete pattern unit, as indicated A. Now
you are ready to start stitching at the beginning of
the next unit.
2. Raise presser foot and remove scrap.
3. Position motif under needle, lower the presser foot
and stitch.
64
Page 66

65
Page 67

6. Buttonholes
and Buttons
Buttonholes can be made easily with the manual four-
step method. Before sewing on your garment, always
make a test buttonhole duplicating the number of
thicknesses of fabric and interfacing if appropriate.
Garment Preparation
Buttonhole Position
Accurate guidelines are essential to keep buttonholes
at a uniform distance from the edge of the garment,
evenly spaced, and on the grain of the fabric.
1. Mark the centre line on the garment. This guideline
can be made by machine or hand basting or using
tailor’s chalk.
Be sure that the space from the centre line to the
finished edge of the garment is at least equal to
three-quarters the diameter of the button. With this
spacing, the button will not extend beyond the edge
when the garment is buttoned.
Make sure that the centre line marking follows a
lengthwise fabric thread.
A. Centre line
B. Buttonhole
C. Finished Edge of Garment
D. Diameter of Button
2. Mark a position guideline for each buttonhole.
Horizontal buttonholes B are placed to extend 3mm
(1/8 inch) beyond the centre line A of the garment, as
shown, so that the buttons will be in the centre of the
figure when the garment is fastened.
Horizontal buttonhole guidelines should follow a
crosswise fabric thread.
• Mark the horizontal buttonhole guideline for each
buttonhole. If should be longer than the finished
length of the buttonhole.
• Mark the starting point for each buttonhole 3mm
(1/8 inch) beyond the centre line (see illustration).
66
Page 68

в
67
Page 69

Vertical buttonholes C are placed so that the centre
line Act the garment is in the centre of the buttonhole,
as shown.
• Mark the ends of each buttonhole horizontally
across the centre line basting and use the centre
line marking as the buttonhole guide when stitching.
Buttonhole Length
• The buttonhole length should be just long enough to
allow the button to slip through the opening without
stretching it.
• To make sure the measurement is correct, cut a slit
in a scrap of fabric equal to the diameter of the but
ton you intend to use.
• Increase length of opening until button slips through
easily.
This test is particularly advisable for buttons of un
usual shape or thickness.
68
Page 70

69
Page 71

Four-Step Buttonholing
The four dial settings for buttonholing are located on
the stitch length selector. As you turn the dial for each
step, your machine is automatically set for the correct
needle position, stitch width, and stitch length, as well
as for stitching direction for that step. You need not
turn the fabric during buttonholing.
• Pattern: Zig-Zag Disc 1
• General Purpose Needle Plate
• Buttonhole Foot
Preparation
• Prepare and mark your garment, as instructed on
page 66
•: Position work under needle, aligning centre marking
of buttonhole with centre line on the foot. Align end
marking of buttonhole with the horizontal lines on
the foot.
• Set the buttonhole balance knob K in neutral posi
tion, as illustrated. The buttonhole balance knob,
when turned slightly to the right or left, enables you
to balance the stitch density of both sides of the
buttonhole. Refer to the next page for information on
balancing buttonhole stitch density.
Step 1: Side Stitching
Raise needle above the fabric and turn the buttonhole
dial to step 1. Position needle in fabric at point A.
Lower the foot and stitch to end of buttonhole (point B).
The end marking should be aligned with the horizontal
lines on the foot.
Step 2: Bar Tack
Raise the needle out of the fabric. Turn buttonhole dial
to step 2 and take at least four stitches. Stop at point C.
Step 3: Side Stitching
Raise the needle out of the fabric.Turn buttonhole dial
to step 3. Complete work to point D. Raise needle.
Step 4: Bar Tack
Raise the needle out of the fabric and turn buttonhole
dial to step 4. Take at least four stitches ending at
point E. For a smooth, satin appearance and greater
durability, stitch around the buttonhole a second time
by repeating the four-step sequence.
70
Page 72

71
Page 73

Balancing the Buttonhole
Stitch density on left and right sides of the buttonhole
may be balanced by adjusting the buttonhole balance
knob K. Use the buttonhole balance knob to obtain
similar stitch appearance on left and right sides of the
buttonhole. A very slight turn will produce a noticeable
density change.
To change the density on either side of your test but
tonhole follow the procedure below. Before sewing on
your garment, be sure to make a test buttonhole on a
sample of your fabric to check that the stitch density
is similar on left and right sides of your buttonhole.
1. Make a test buttonhole with the balance knob in
neutral position (indicator line or dot directly
below ▼symbol on control panel).
2. If the stitches on the right side of the buttonhole
are too open, turn the balance knob from its neutral
position to the right to increase density of the side
stitching.
3. If the stitches on the left side of the buttonhole are
too open, turn the blance knob from its neutral
position to the left to increase density of the side
stitching.
After buttonhole stitching is completed, return bal
ance knob to its neutral position (indicator line or dot
directly below ^symbol on control panel).
72
Page 74

73
Page 75

Buttons
Most flat buttons can be sewn quickly and easily using
the zig-zag stitch.
Pattern: Zig-Zag Disci
Needle Position: L [XI JL
Stitch Width: j | im
stitch Length: 0
General Purpose Needle Plate
Snap-in Feed Cover
Button Foot
Sewing on a Button
• Set your machine up according to the code above.
• Mark position of button on garment. Place garment
under foot. Align garment so that the button is
directly under the foot. Lower the presser foot to grip
button centrally.
t Turn hand wheel very slowly toward you until nee
dle point aligns with hole of the button. Adjust zig
zag stitch width, if necessary to permit clean entry
of the needle.
2. Continue turning hand wheel one complete
revolution and observe thatthe needle point is pro
perly positioned to enter the other hole.
• Take six to twelve stitches.
Remove garment from machine. Pull threads to un
derside of garment and trim.
74
Page 76

75
Page 77

7. Caring for Your Machine
Cleaning the Machine
CAUTION: Before cleaning your machine, discon
nect the power line plug from the socket outlet.
Periodically, depending on machine use, clean
and oil 6 your machine, using one drop of oil on
illustrated areas.
Top and Bottom Covers
Clean and oil the top and bottom areas marked on the
illustrations. Use a large screwdriver to remove the
screws.
To replace the covers, simply line up the screwholes
and replace screws with a large screwdriver.
76
Page 78

■иНМЛ
4 ^ А А
О
4 4 4
4 4
77
Page 79

Face Plate Area
To clean | and oil A the front interior of machine,
remove screw from face plate. With a soft cloth or lint
brush, clean and oil points indicated by arrows. Re
place face plate and screw.
Bobbin and Feed Areas
To clean bobbin and feed areas, remove needle plate,
as instructed on page 14 . Remove bobbin case as in
structed on next page. Using soft cloth or brush, clean
area as illustrated. Replace needle plate and bobbin
case, as instructed on pages 14 and 80.
Exterior Areas
If necessary, a mild solution of soap and water may be
used on exterior areas to remove stubborn stains. No
other cleaning liquid or powder should be used.
CAUTION: Do not attempt to adjust the motor belt.
Contact your nearest Service Centre should any ad
justment be required.
78
Page 80

79
Page 81

Removing and Replacing Bobbin Case
CAUTION: Before removing bobbin case, dis
connect the power-line plug from the socket out
let.
IMPORTANT: The bobbin case is manufac
tured from a special phenolic compound specially
designed to provide smooth friction-free sevving.
With proper handling the bobbin case will give you
years of reliable, trouble-free sewing. The bobbin
case is the most important part of your sewing
machine. Please handle with care and do not
force when removing and replacing it.
• Turn hand wheel toward you to raise needle to its
highest position.
1. Open slide plate, remove needle plate and
remove bobbin.
2. Insert screwdriver into bobbin case holder A and
turn it toward the rear as illustrated.
3. To remove bobbin case:
• Insert index finger into centre of bobbin case.
With index finger and thumb gently lift and
push bobbin case away from you until the case
is released from holder.
4. To replace bobbin case:
• Insert index finger into centre of case and grip
with thumb above the screws. Gently slide the
flat tab at the rear of the bobbin case under
neath the curved section of feed B while main
taining slight upward pressure, then slide bob
bin case all the way to the rear. Lower the bob
bin case and draw it toward you so that tab C is
positioned under plate D. Gently wiggle case to
insure proper seating in the rim of the rotating
hook. In this position bobbin case should be
free to float slightly from side to side.
• When you are sure bobbin case is properly
seated lock case into position by turning holder
Aback,as illustrated.
Replace bobbin, needle plate and close slide
plate.
80
Page 82

81
Page 83

Changing the Light Buib
CAUTION: Before changing light bulb make sure
you have disconnected power line plug from socket
outlet. This machine is designed to use a 15-watt max
imum bayonet base bulb only.
The screw iocated on the machine face plate must
be removed before the face plate can be opened.
• Remove face plate.
• Do not attempt to unscrew the bulb.
1, Press it up into the socket and at the same time turn
bulb over in direction shown to unlock the bulb pin
and guide out of^ socket.
• Press new bulb into socket, with bulb pins enter
ing slot of socket.
2. Turn it over in direction shown to lock bulb in
position.
• Replace face plate.
Replacing the Slide Plate
You will not have any occasion to remove the slide
plate. However, if it should accidentally become dis
engaged from the machine, it is easily replaced.
• Raise the presser foot and make sure needle is in its
highest position.
• Place slide plate in slide way with the front edge
close to, but not covering, the retaining spring (as
shown).
• With a small screwdriver, lift each end of the spring
into each of the side grooves on the underside of the
plate.
• Draw the plate gently toward you and fully engage
the spring.
• Close slide plate.
82
Page 84

83
Page 85

8. Twin-Needle Stitching
Twin-needle sewing capability has been built into this
sewing machine. The twin-needle simultaneously
produces two parallel, closely spaced lines of pattern
stitching. You can stitch with either one or two colours
of thread.
• Stitch: Pattern desired
• Needle Position: J. «L only
stitch Width:
• Stitch Length: .5-4 to suit fabric
• General Purpose Needle Plate
• General Purpose Foot
U]t
onlyt
tCAUTION: Do not use a stitch width greater than
what is recommended. A wider stitch will result in
needle breakage.
Procedure
• Insert twin-needle.
• Thread as for single-needle stitching and through
eye of left needle.
• Insert a second spool pin with felt washer into hole
on the top cover of machine, as illustrated.
• Place second spool of thread on this spool pin andfelt.
• Thread the machine in the usual way with the sec
ond spool of thread, making certain to omit the
thread guide above the needle and pass thread
through eye of right needle.
84
Page 86

98
Page 87

9. Home Service Hints
Whenever sewing difficulty is encountered, review the
sections of the instruction book that explain the opera
tion you are performing to make sure you are using the
machine correctly. If the problem still exists, the fol
lowing checklist may help you to correct it.
If you still have difficulties, call your nearest Sewing
Centre.
What to Do If...
Needle Breaks
• Make sure needle is fully in
serted into needle clamp
• Make sure needle is not being
pulled to one side as fabric is
removed from the machine
......................
.................
see page 14,15
see page 32,33
• Make sure presser foot or
accessory is securely fas
tened to presser bar..............................see page 12,13
• Make sure fabric is not being
pulled while sewing
• Make sure stitch width does
not exceed Hill i i when a
twin-needle is used . ..........................
.............................
see page 32,33
see page 84,85
Thread Breaks
• Make sure machine is prop
erly threaded ....
• Make sure needle-thread ten
sion is not too tight.....................see page 30,31,40,41
• Make sure thread is unwind
ing freely from spool
• Make sure bobbin case area
is free of lint and loose
threads ....................................
• Make sure the needle is
straight and sharp
............................
.................
.................................
see page 20,21,24,25
see page 78,79,80,81
see page 24,25
see page 16,17
86
Page 88

Fabric Does Not Feed Properiy
• Make sure presser foot is cor
rectly attached to machine
• Make sure stitch length dial Is
correctly set
• Make sure lint has not accu
mulated around feed............................see page 78,79
...............................
....................
see page 28,29,40,41
see page 12,13
Skipped Stitches
• Make sure needle is correct
style for machine and size for
thread
• Make sure machine is cor
rectly threaded
• Make sure needle is securely
fastened to needle bar
• Make sure the needle is nei
ther bent nor damaged........................ see page 16,17
....................................................
.....................................
..........................
see page 16,17
see page 24,25
see page 14,15
Fabric Puckers
• Make sure needle-thread ten
sion is not too tight
.....................
see page 30,31,40,41
Needie Thread Breaks Whiie Winding Bobbin
• Make sure machine is cor
rectly threaded
• Make sure thread is unwind
ing freely from'spool
.....................................
.............................
87
see page 20,21
see page 20,21
Page 89

Index
Accessories................................................................... 6,7;8,9
Applique,
Bobbin
Bobbin Case.................................................................... 22,23
Bobbin Thread......................................... 20,21,22,23,26,27
Buttons........................................................................ 74,75
Buttonholes..................................................................... 66-73
Caring for Your Machine
Cleaning the Machine
Connecting the Machine
Construction Stitches
Darning.............................................................................34,35
Decorative Stitching....
Fabric, Thread and Needle Table
Feed Cover
Finishes, Hems and Facings...........................................
Handwheel.......................................................................... 4,5
Light Bulb.........................................................................82,83
Need le........................................ 6,7,14-17,24,25,30,31,38,41
Needle Plates...................................................... 6,7,8,9,14,15
Operating the Machine...................................................
Oiling the Machine
PresserFeet
Presser Foot Lifter......................;........................................
Principal Parts.................................................................... 4,5
Quilting................................................................ 34,35,60,61
Reverse Stitching................................................
Satin Stitching..................................................................40,41
Seams.................................................................. 32,33,54,55
Seam Finishes..................................................................44,45
Speed Controller
Stitch Length
Stitch Pattern Chart
Stitch Pattern Discs................................................... 8,9,46-49
Stitch Width.............................................................. 4,5,38,39
Straight Stitching........................................................... 28,29
Stretch Fabrics, Adjusting Stitches................................. 50,51
Take-up Lever
Threading the Machine.................................................... 24,25
Twin-Needle Stitching
Zig-Zag Stitching
.........................................................................
...................................................................
Winding......................................................................
Removing
Threading..................................................................... 22,23
Raising
Position........................................................................ 66-69
Procedure.................................................................. 70-73
Attaching and Removing.............................................. 14,15
Changing
Position.........................................................................38,39
Thread Tension................................................. 30,31,40,41
Threading................................................................... 24,25
Changing Plates.........................................................
General Purpose
Changing Feet
Changing..'....
.....................................................................
.....................................................................
.................................................
......................................................
.................................................
.......................................................
.................................................
...................................
...............................................................
...................................................................
............ ...........'............. ......................
..........................................................
......................................................................
..........
.........................................
.......................................................
.....................................
.......
...............................................
..............................................................
....................................................................
......................................................
..................................
4,5,28,29,38,39,40,41
.........
.................,... 38
42,43
6,7,20,21
20,21
22,23
26,27
76-83
76-79
18,19
56,57
62,63
16,17
6,7,14,15
56,57
14,15
14,15
8,9
18,19
76,79
6-13
10,11,12,13
4,5
28,29,32,33
4,5,18,19
48,49
46,47
4,5
84,85
Form No. 21896 Printed in Taiwan
Part No. 119644-001 88
 Loading...