

Page 1
C
___
sewing machine • model 1200 • two way sewing surface
^ _
'
..........................
Page 2

■state
Congratulations ...
You are about to sew on the new. advanced electronic sewing machine .. .
Athens' 1200.
It makes sewing simple, foolproof and fun!
After years of Singer research, the Athens 1200 sewing machine features
these important technological breakthroughs;
«> Exclusive Solid-state Electronic Sewing System. Athens 1200 is the
sewing machine with the electronic “brain.” A wealth of stitch patterns. It
automatically programs your machine to sew any one of twenty-one
different practical and decorative stitches plus the two-step buttonhole.
® Exclusive Light Toych Fingertip Controls. They’re the buttons on the
front of the machine. You simply touch the one under the stitch you
want — the red indicator light comes on — and the Athens 1200 is ready
to sew. Any stitch Is instantly available at the touch of a button.
9 Exclusive individual Preference Panel Your own "control panel,” it
allows you to modify the programmed stitch dimensions to suit special
fabrics and satisfy personal preferences.
V..«
And that is only the beginning! There are many more new features. Such as
the Exclusive Pattern Repeat Sutton —that lets you sew one unit of a pattern,
for original decorative touches. And Exclusive Light Touch Fingertip Reverse
Button — for an instant reverse straight stitch. The Athens 1200 also has such
Singer advantages as the Exclusive flip & Sew* panel for both flat and In-theround sewing. Soft-Touch Fabric Feed that protects even the most delicate
fabrics. A variable speed Solid-state Controi System, that enables you to
maintain the same pressure on the speed controller as you sew through vary
ing fabric thicknesses.
In addition, the Athena 1200 has these Singer design features — a one-way
needle clamp that makes it impossible to put the needle in backwards, snapon presser feet that are quickly removed and easily replaced, and easy-tochange needle plates secured by magnets.
We suggest you take a few moments to read through this operator's guide, as
you sit at your new machine. You will quickly discover how simple It is to do
any sewing operation you desire on Athena 1200.
Cosyrisf!; ® 1977 5y THE SSNOES COUPAHy
Aii ae$0rveci Throughou; Sne WOficS
Page 3

Contents
Page
1. Getting to Know Your Machine ..................................................................................................................................... 2
Principal Parts............................................................................................................................................................ 2
Accessories ................................................................................................................................................................... 3
2. Getting Ready to Sew.................................................................................................................................................... 6
Choosing Needles ......................................................................................................................................................... 6
Choosing and Changing Accessories ........................................................................................................................... 7
Operating the Machine................................................................................................................................................... 9
Fabric Weight Table .................................................................................................................................................... 1C
Fabric. Thread, and Needle Table.............................................................................................................................. 12
Threading the Machine............................................................................................................................................... 14
The Bobbin................................................................................................................................................................... 16
Winding the Bobbin • Changing the Bobbin
3. Electronic Sewing..................................................................................................................................................... 20
Seiecting a Stitch.......................................................................................................................................................... 20
Patter.n Repeat Button © individual Preferences
Stitch Adjustments........................................................................................................................................................ 22
Stitch Width « Stitch Length « Stitch Length Guidance Table » Reverse Stitch-Balance «
Twin-Needle Switch
4. Straight Stitching ............................................................................................................................................................. 25
Preparation................................................................................................................................................................... 25
Fabric Handling.......................................................................................................................................................... 27
Pin Basting ® Speed Basting
Sewing a Seam ........................................................................................................................................................... 2S
Placing Fabric under Foot ® Sewing with a Newly Wound Bobbin « Keeping Sea.ms Straight ®
Turning Square Corners ® Curved Seams ® Reinforcing End of Seam
Applications................................................................................................................................................................ 32
Darning « Quilting * Chainstitchlng
5. Basic Zig-Zag Stitching ................................................................................................................................................. 40
Zig-Zag Stitching .......................................................................................................................................................... 40
Creative Applications .................................................................................................................................................. 41
6. Machine Stitch Patterns................................................................................................................................................... 46
Adjusting Stitches for Stretch Fabrics .......................................................................................................................... 46
Handling Special Fabrics.............................................................................................................................................. 47
Stitch Centering ........................................................................................................................................................... 48
Stitch Usage: Functional and Decorative..................................................................................................................... 49
Decorative Stitching ................................................................................................................................................... 64
Border Designs • Monograms • Topstitching « Smocking »Twin-Needle Stitching
7. Buttons and Buttonholes ................................................................................................................................................. 69
Buttons ........................................................................................................................................................................ 69
Buttonholes .................................................................................................................................................................. 70
Buttonhole Position » Buttonhole Length • Buttonhole Interfacing »Two-Step Buttonholing «
Balancing the Buttonhole » Stitching a Series of Button.holes » Cutts.ng Button Opening »
Corded Buttonholes
8. Free-Arm Sewing ............................................................................................................................................................ 75
9. Performance Checklist................................................................................................................................................... 79
10. Caring for Your Machine................................................................................................................................................. 82
11. Sewing Aids ................................................................................................................................................................... 84
Index........................................................................................................................................................................................ 87
Page 4
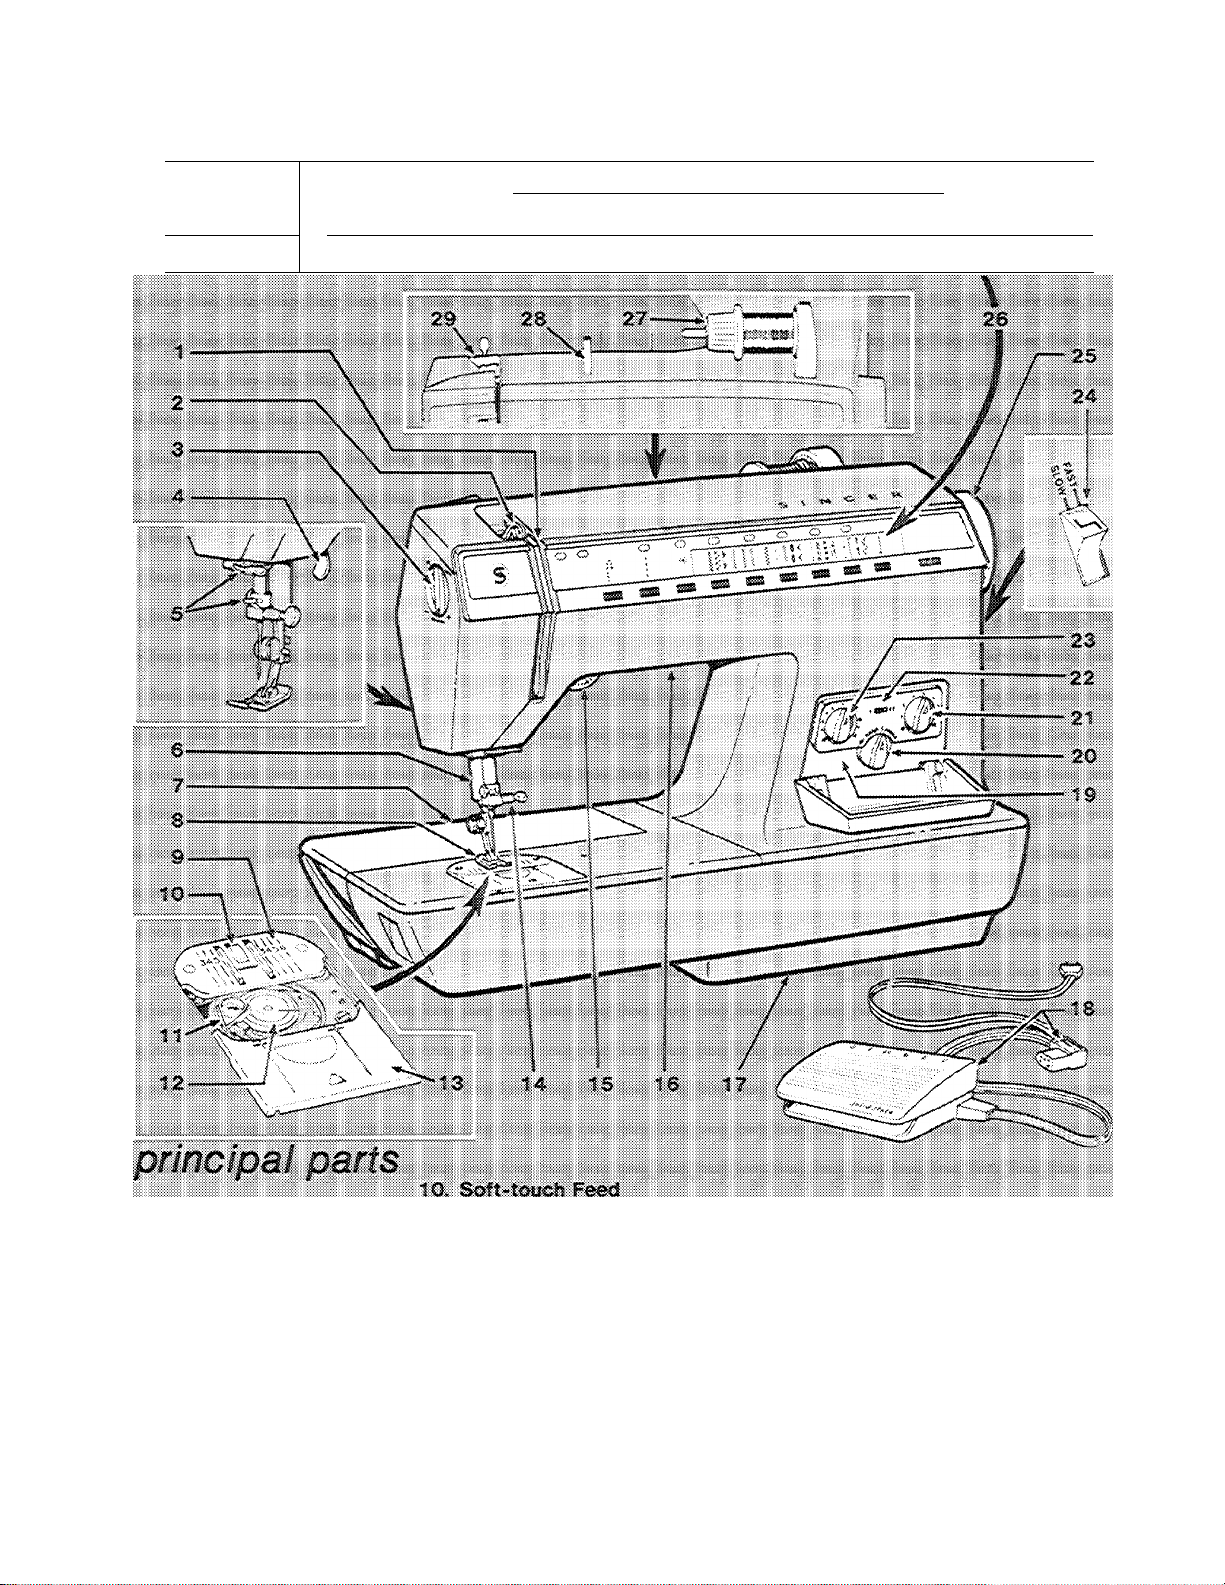
1. GETTING TO KNOW YOUR MACHINE
1
li
s
1
____________
o o o O
1
SSB88888 ISBSSSf
¡1
«« t
\ i IK i V;i'i
€> f
3SB6SS
asfflflgBEs
o
1-1
o
i i . s
1
o o
H < ^ s 1
o
r I y 1
jk j
B B
N||
' 1
t. Tension Discs
2. Take-up Lever
3. Pressure Dial
4. Presser-fooi Lifter
5. Thread Guides
6. Thread Cutter
7. Hinged Plate
8. Presser Foot
9. General Purpose
Needle Plate
Vi. Sobiwn Latch
12. Transparent Bobbin
13. Slide Plate
14. Needle Clamp
15. Tension Dial
16. Suilt-sn Sewing Light
17. Circuit Breaker
18. Hiectricai Conrjectionsi
and Speed Controller
19. I.ndividual Preference
2C. Reverse Stitch-balance Contra:
21. Stitch-length Cont-ol
22. Twin-needie Swlt«^
23. Stitch-width Control
24. Power and Light Switch
25. Hand Wheel
26. Stitch Selection Pa.nel
27. Friction-free Spoof Holder
28. Snap-in Thread Guidepost
29. Hear Tinread Guide
Page 5
accessories
The accessories provided with your Model
1200 sewing machine are designed to help
you do many kinds of sewing easily and per
fectly. To increase the versatility of your
machine, additional accessories can be
purchased at your Singer store.
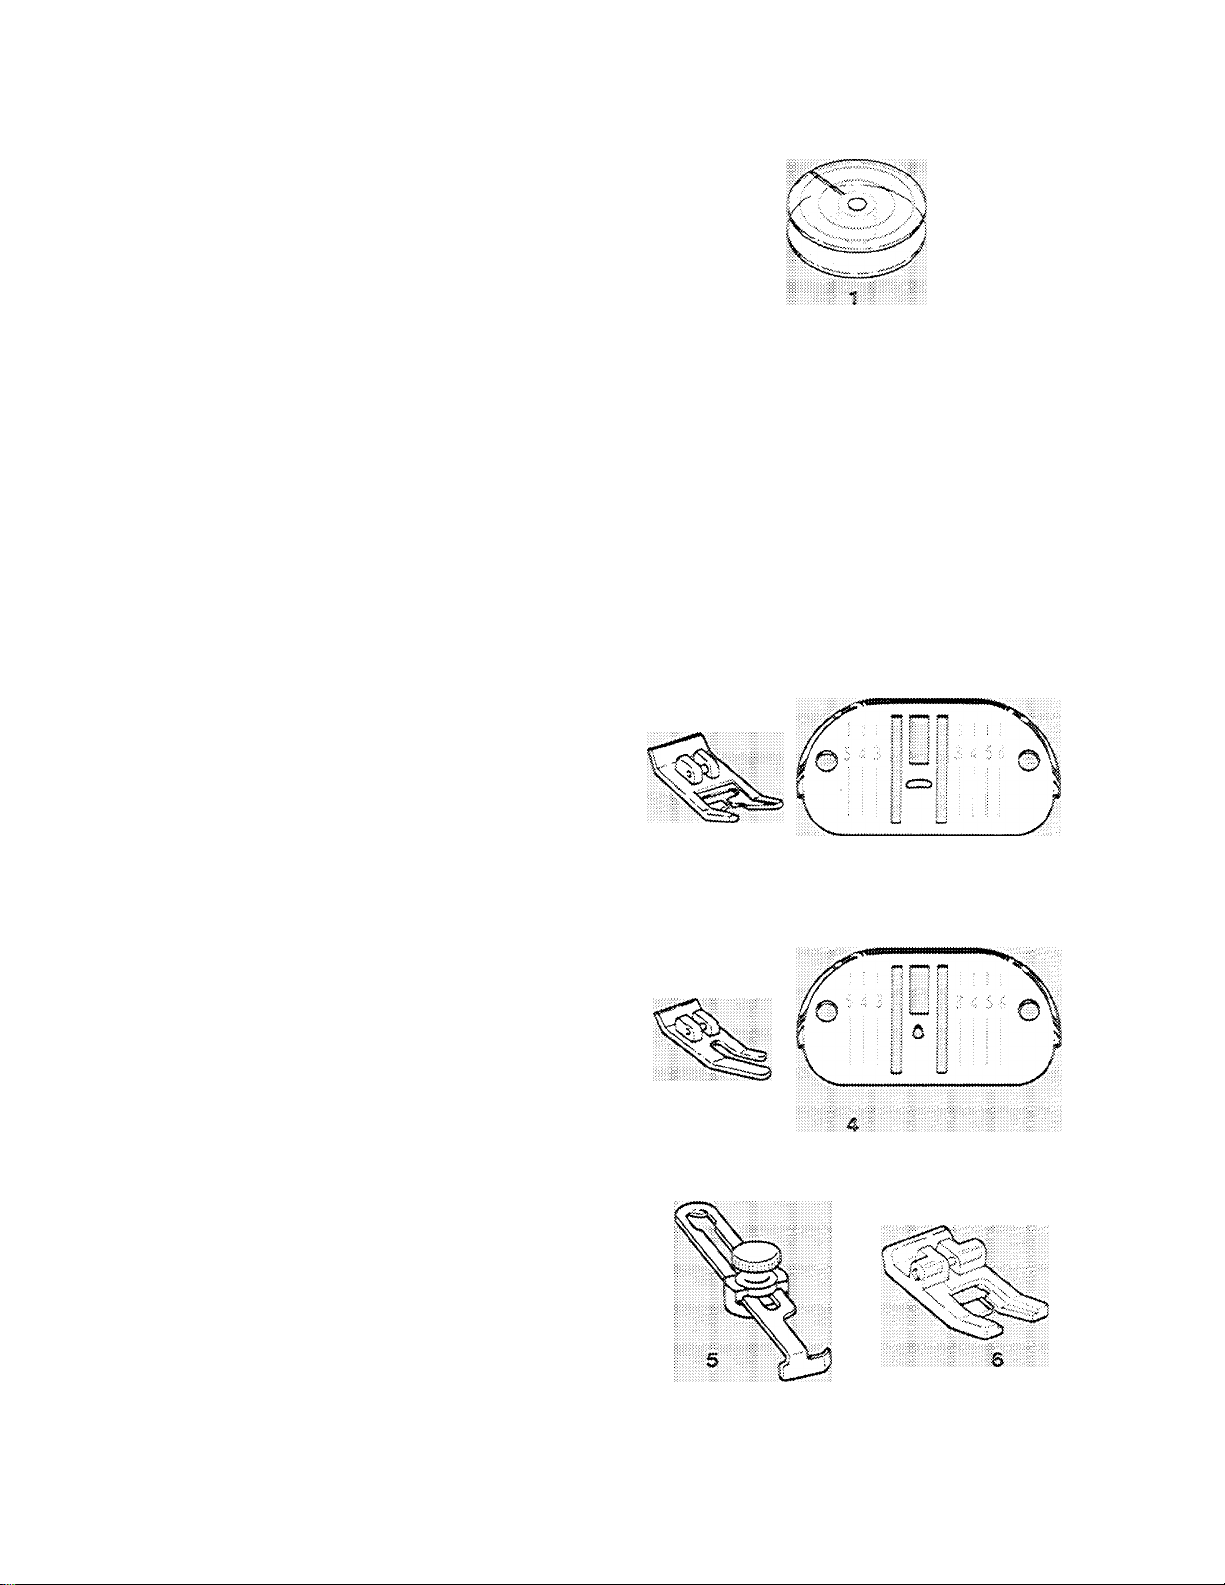
1. Transparent Bobbins (No.181551)
2. Meedies
e Style 2020 for all-purpose sewing.
e Style 2045 for sewing knits, stretch
fabrics and elastic.
e Style 2025 for twin-needle decorative
stitching.
тРОПТАНТ: Your SINGER sewing
machine has been designed to obtain
best results with SINGER* needles. You
should follow the recommendations in
this instruction book and on the needle
package for correct style and size of nee
dle for different types and weights of
fabric.
Л
3. General Purpose Foot and General Pur
pose Needle Platet are on your machine
when delivered. Use them for alternating
between straight and zig-zag stitching as
well as utility zig-zag sewing. They can
also be
fabrics.
4. Straight-stitch Foot and Straight-stitch
Needle Platet. Use these when your
fabric or sewing procedure requires
close control.
These accessories, recommended for all
straight-stitch sew'ing, are especially
helpful for edge stitching and collar
pointing, or for stitching delicate or
spongy fabrics.
5. Seam Guide helps you keep seam
allowances perfectly even.
6. Special-purpose Foot. Use this for all
kinds of decorative zig-zag stitching.
used for straight-stitching firm
tNytnbers on plate indicate distance from needle in eighths of an inch.
Page 6
!N!C«£
8/'i ■; p ;i
r
h
ps
\
p"
r*" V
1 ~~csi 2 & ; I
1 ,■’2 —ccd, — 28
' —eg: i=3—
S2NGER
1 3
___
: 1 “
'N"****
..
.w
......
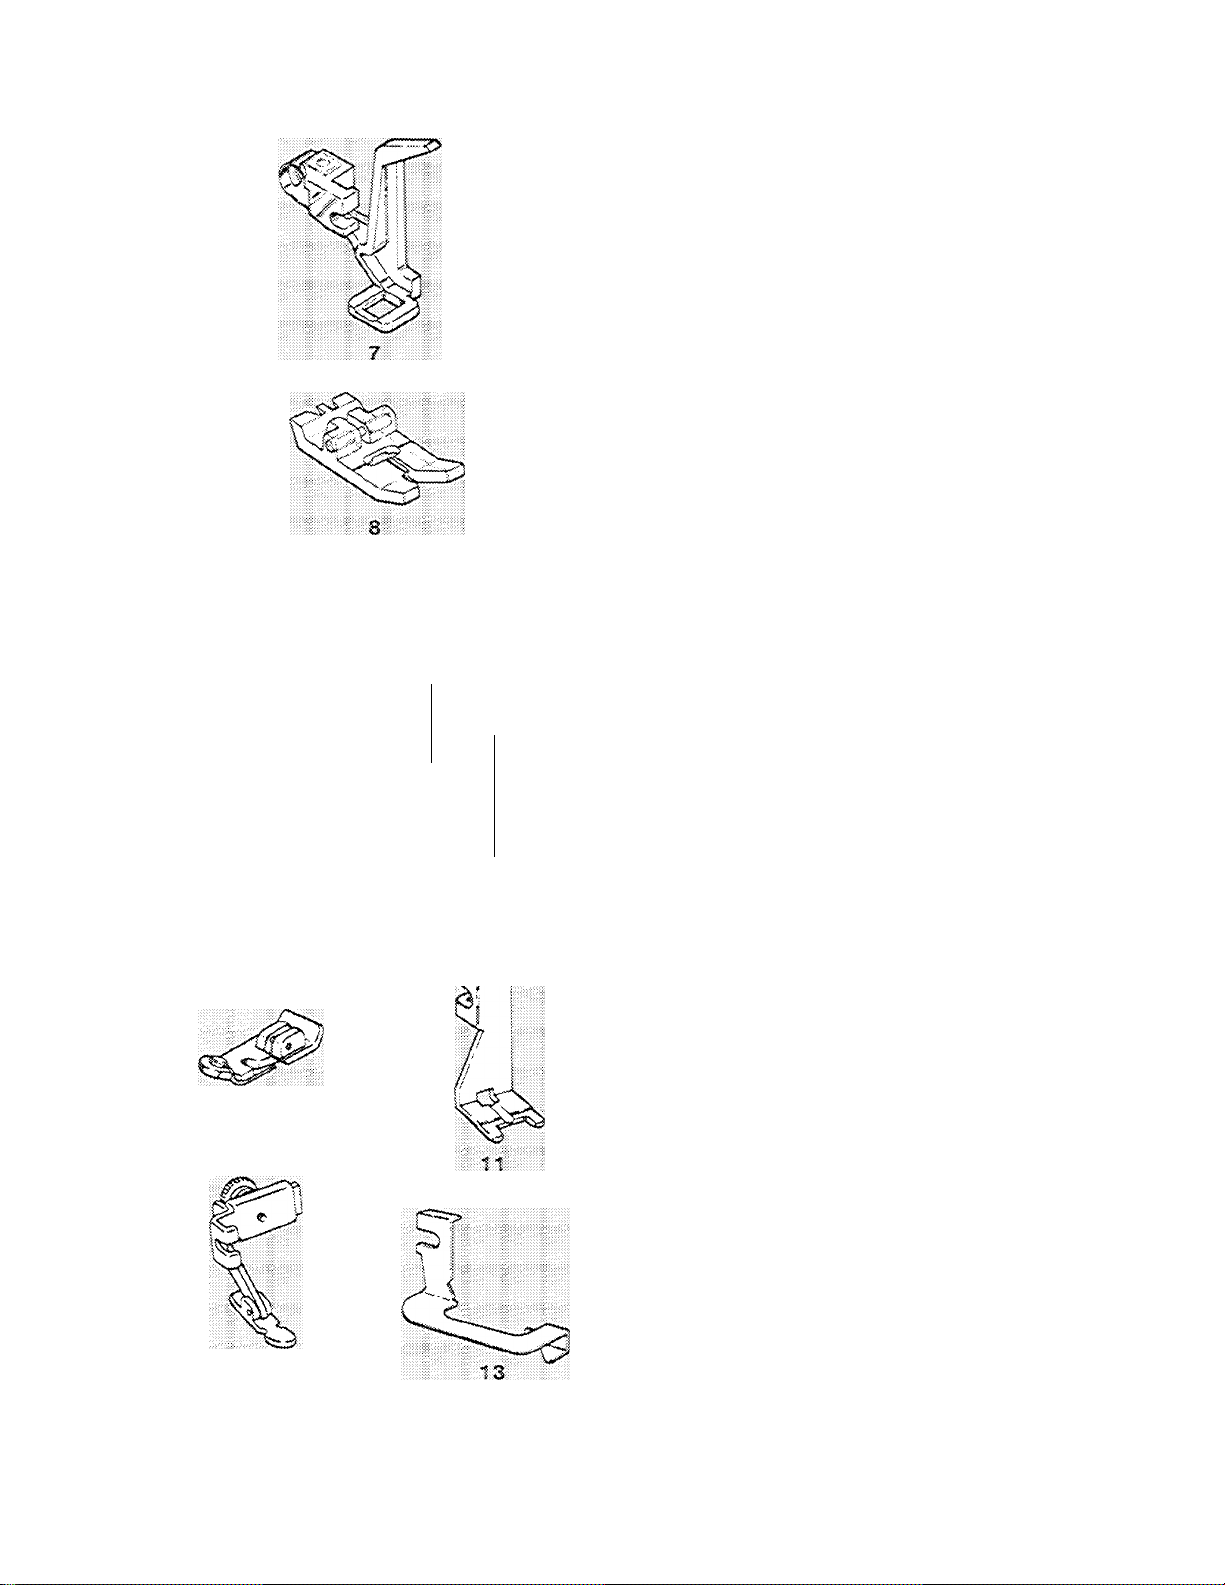
7. Darning and Embroidery Foot is recom
mended for all types of free-motson work.
It is ideal for embroidery, monogramming
and decorative designs because the
transparent toe fully reveals the line of
the design to be followed.
8. Two-step Byttorshole Foot lets you stitch
buttonholes of any length In two easy
steps.
9. Buttonhole Gauge has slots for marking
buttonhole guidelines.
10. Overedge Fool used with overedge
.
stretch stitch for seams In stretch
fabrics.
10
11. Button Foot holds most buttons securely
for stitching.
12. Zipper Foot for inserting zippers and
stitching corded seams.
13. Blindstitch Hem Guide. Use this with the
general purpose foot to position the hem
for blindstitch hemming.
Page 7
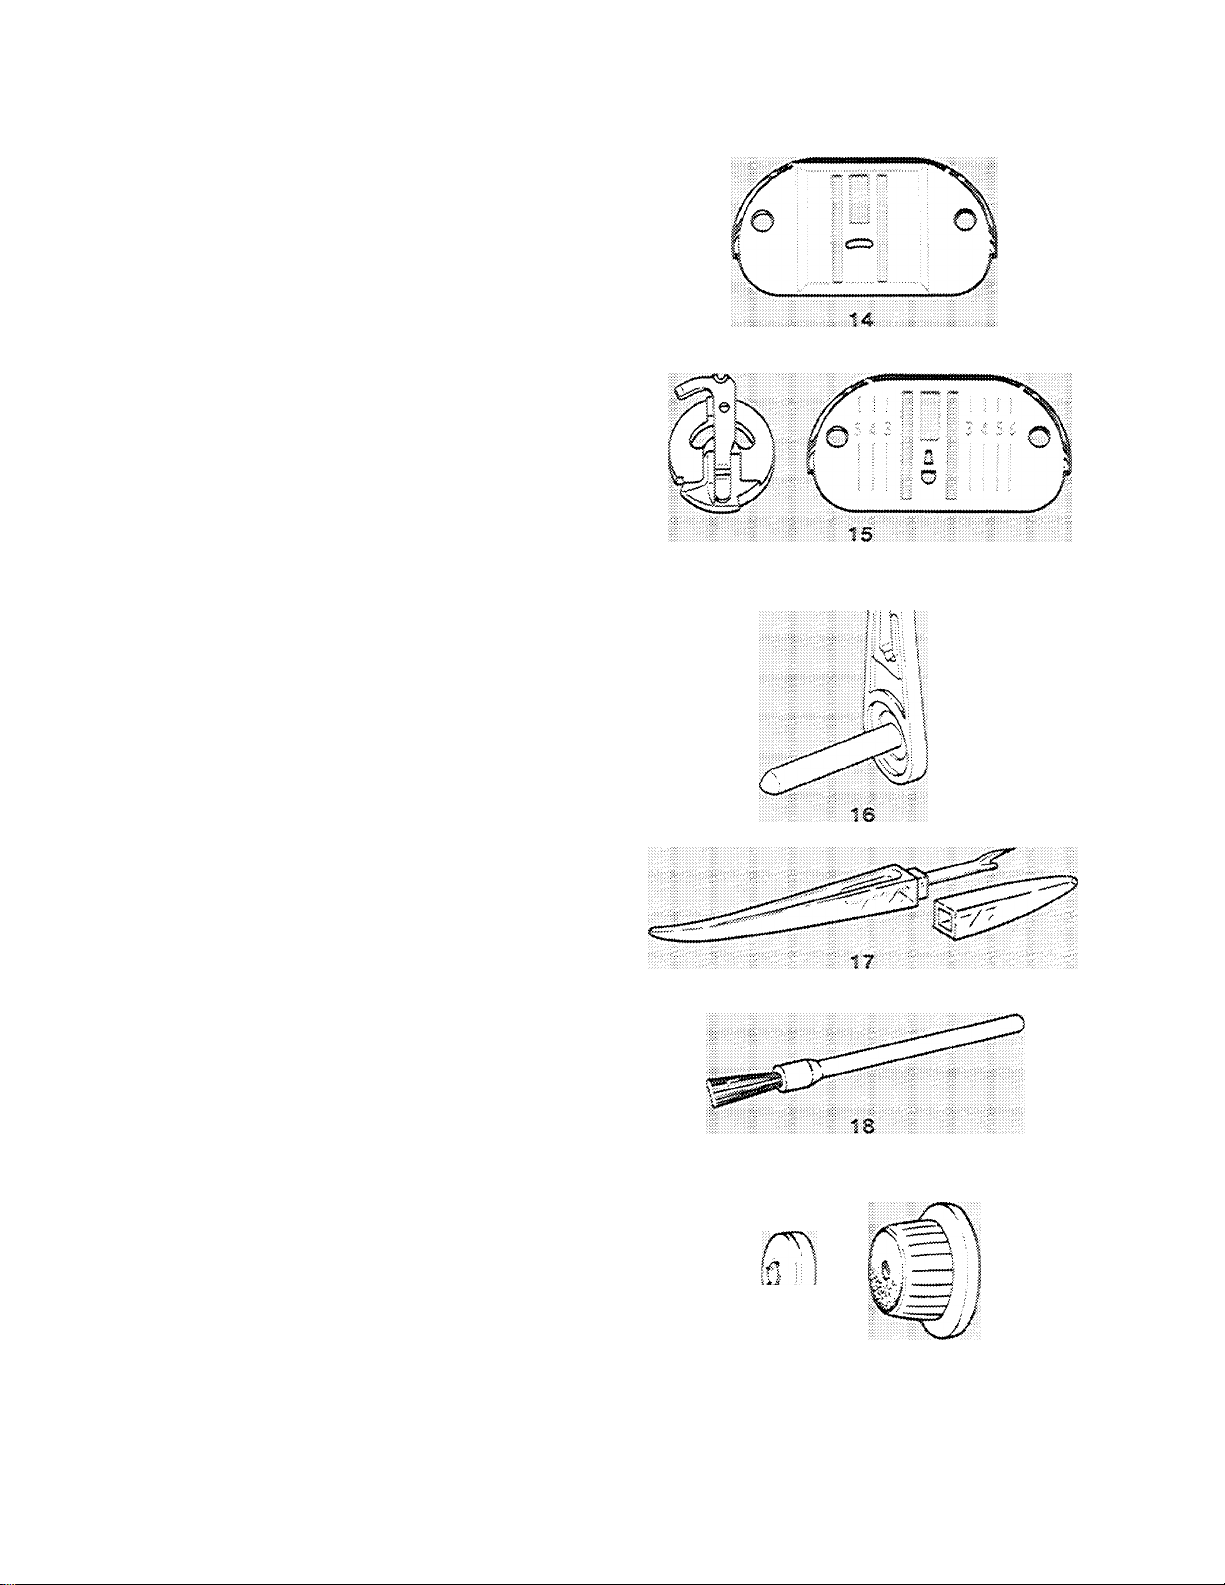
14. Feed Cover Plate for button sewLng and
free-motion work.
15. Chainstitch Fittings
a. Bobbin-case insert
b. Chainstitch Piaiet
16. Detachable Spool Fin for decorative
twln-needie stitching and two-thread
topstitching.
17. Seam Ripper to pick and cut threads
quickly and neatly without damage to the
fabric.
Lint Brysh for cleaning your sewing
machine.
9. Small Spool Holder
a For use with small diameter tubes of
thread.
20. Large Spool Holder on your machine
when delivered. For use with medium! and
large spools of thread. ig
tNumbers on plate incicate Ussiance from nestiia in eighths of an inch.
¡20':
Page 8
ETTING READY TO S
The needles you use should be straight to en
sure perfect stitch formation. The needle
should also be fine enough to prevent the
fabric from being marred' with large
punctures, yet heavy enough to pierce the
fabric without being bent or deflecied.
Remember too, that the eye of the needle
Regular Meedle
jl I
Vn’i
H A
Sail Point
Ye::ow 33r,d* Kee€\t
P
must be large enough for the thread to pass
through freely: too fine a needle will cause the
thread to fray. See Fabric, Thread and Needle
Table, page 12.
For general-purpose sewing in a wide range
of fabrics, the Style 2020 needle, in sizes 9
18, will give you excellent results.
¡i'
*■ V ”1....
Style 2025
ITwin-Needle
.......
For best results when sewing on knits, woven
stretch fabrics, bonded vinyls, and elastic use
Style 2045 ball point Yellow Band* needle,
available in sizes 11, 14, and 16.
:
For decorative stitching on light and medium-
weight woven fabrics, use the twin needle.
Style 2025.
For sewing leathers, real and simulated, the
Style 2032 needle, available for purchase at
your Singer Sewing Center, is recommended.
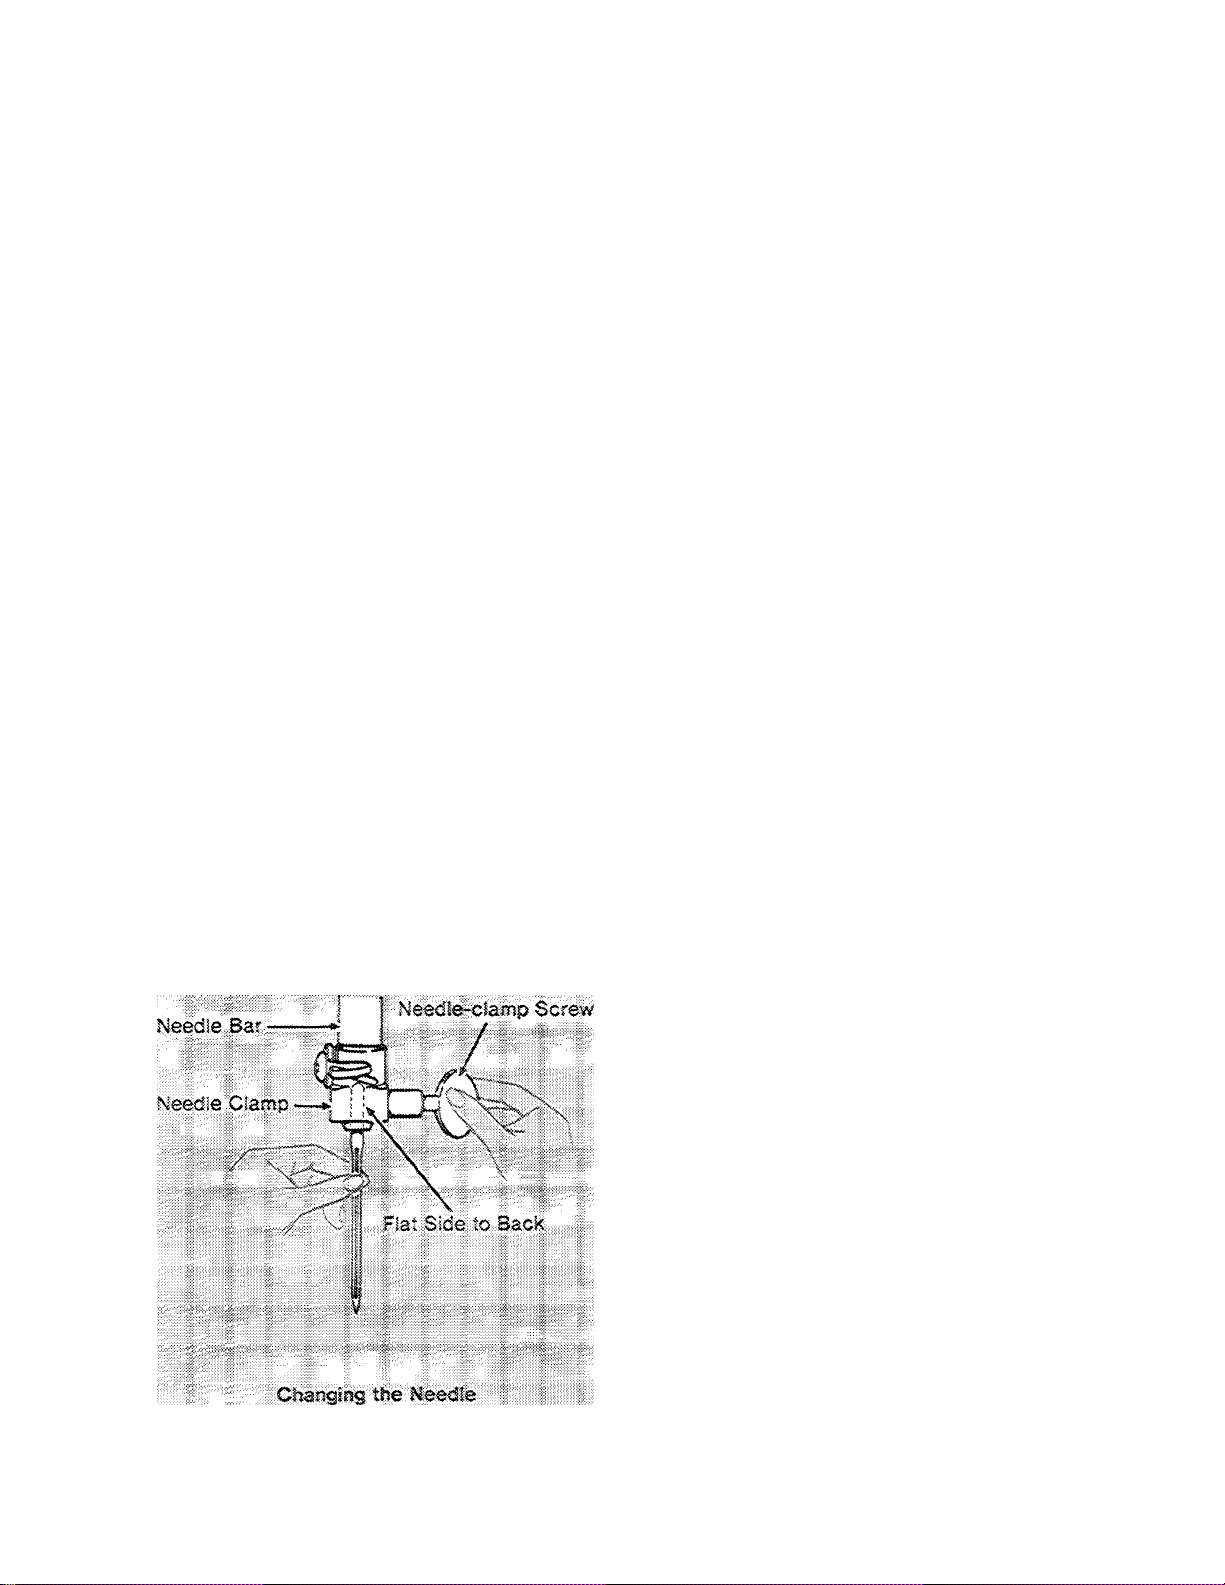
Changing the Needle
® Raise needle to its highest point by turning
the hand wheel toward you. Loosen needleclamp screw, and remove the needle.
® Insert new needle up into clamp as far as it
will go. with the flat side of the needle to the
back.
« Tighten needle-damp screv/.
Page 9
choosing and changing
accessories
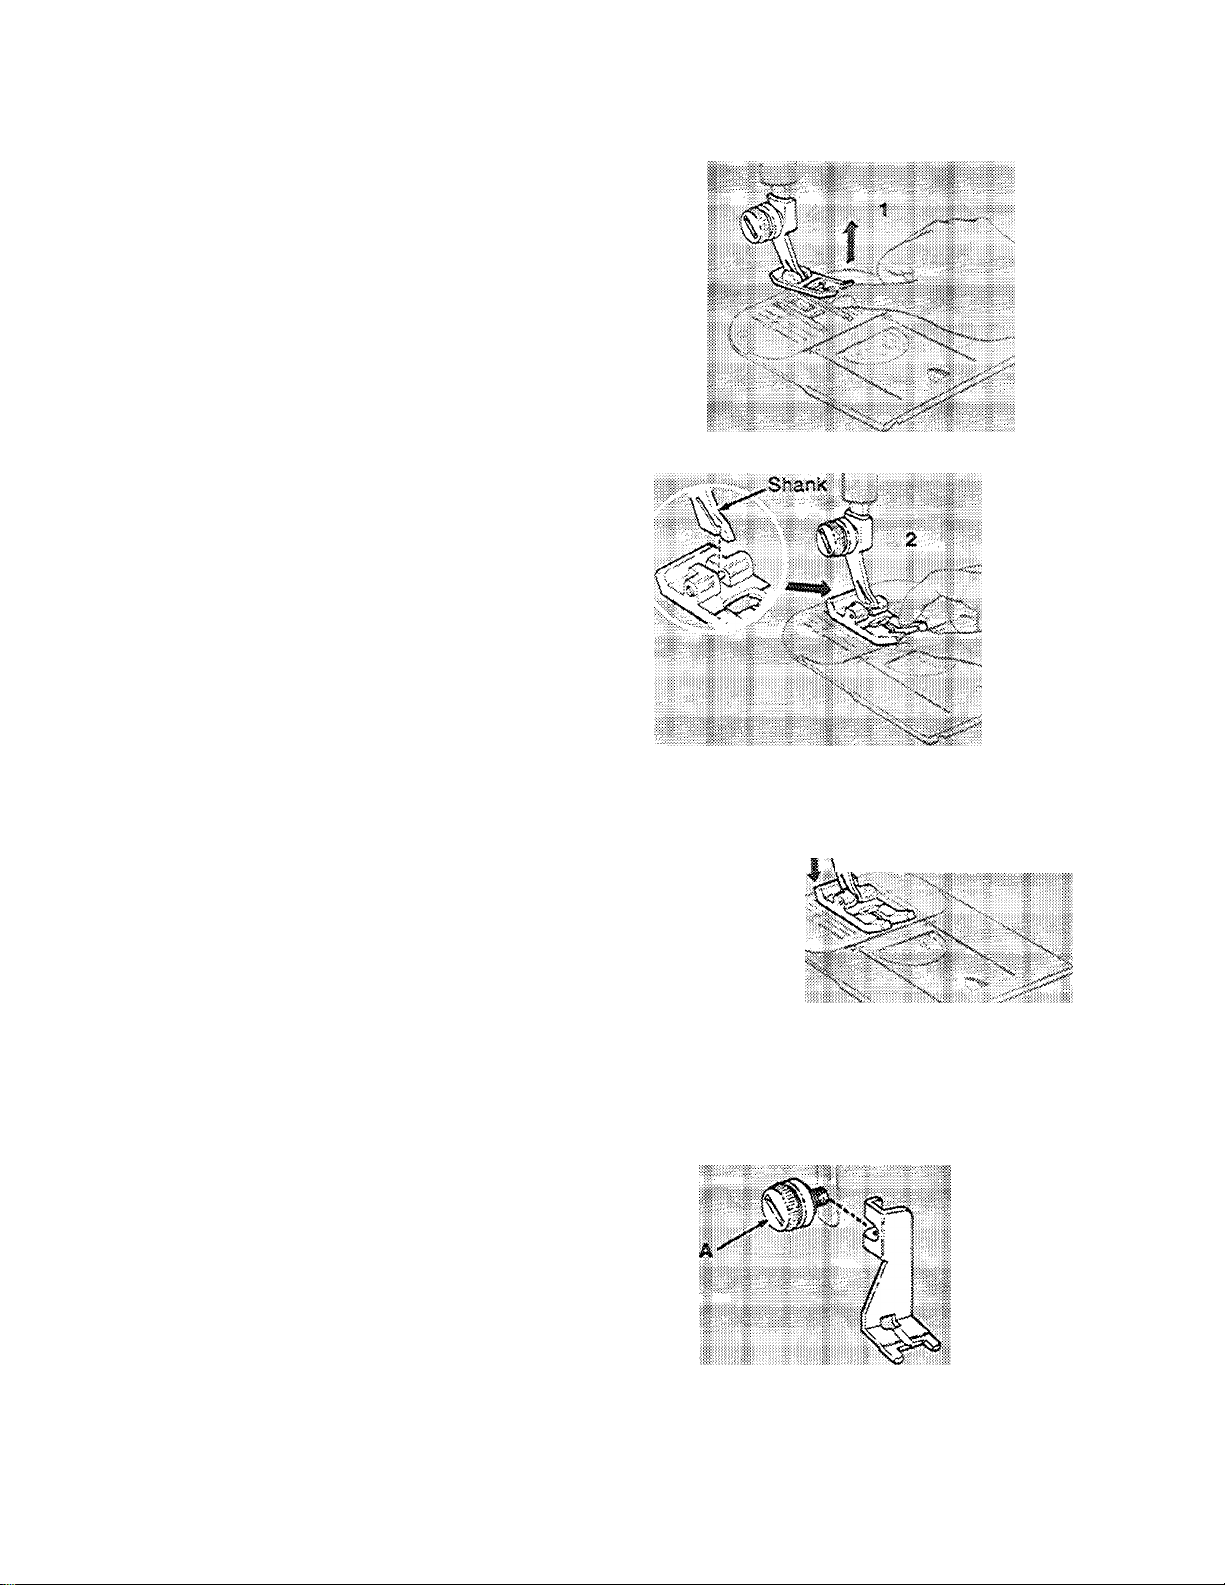
CHANGIMG PRESSEH FEET
Snap-on Presser Feet
Most of the presser feet furnished with your
machine snap on and off a common shank,
e Raise needle and take-up lever to highest
position by turning the hand wheel toward
you.
» Raise presser foot.
1. Press toe of presser foot upward (as far as
it will go) and then snap down to remove.
2. Center the new presser foot under the
shank and lower the presser-foot lifter so
that the shank fits over the presser-foot
pin.
3. Press presser-foot screw down firmly until
foot snaps into place.
To remove and replace the shank of snap-on
presser feet, follow instructions below for
one-piece presser feet.
One-piece Presser Feet
CButton Foot and Zipper Foot)
• Raise needle and take-up lever to highest
position by turning the hand wheel toward
you.
« Raise presser foot.
e Loosen presser foot screv»^ (A) and remove
the foot, guiding it to the right.
Note: When changing one-piece presser
feet, you should insert the edge of a coin in
the slot of the presser foot screw to tighten
presser foot securely.
To Replace One-piece Feet
® Hook one-piece foot around the presser bar
and tighten presser-foot screw.
Changing Snap-on Presser Feet
Changing One-piece Presser Foot
Page 10
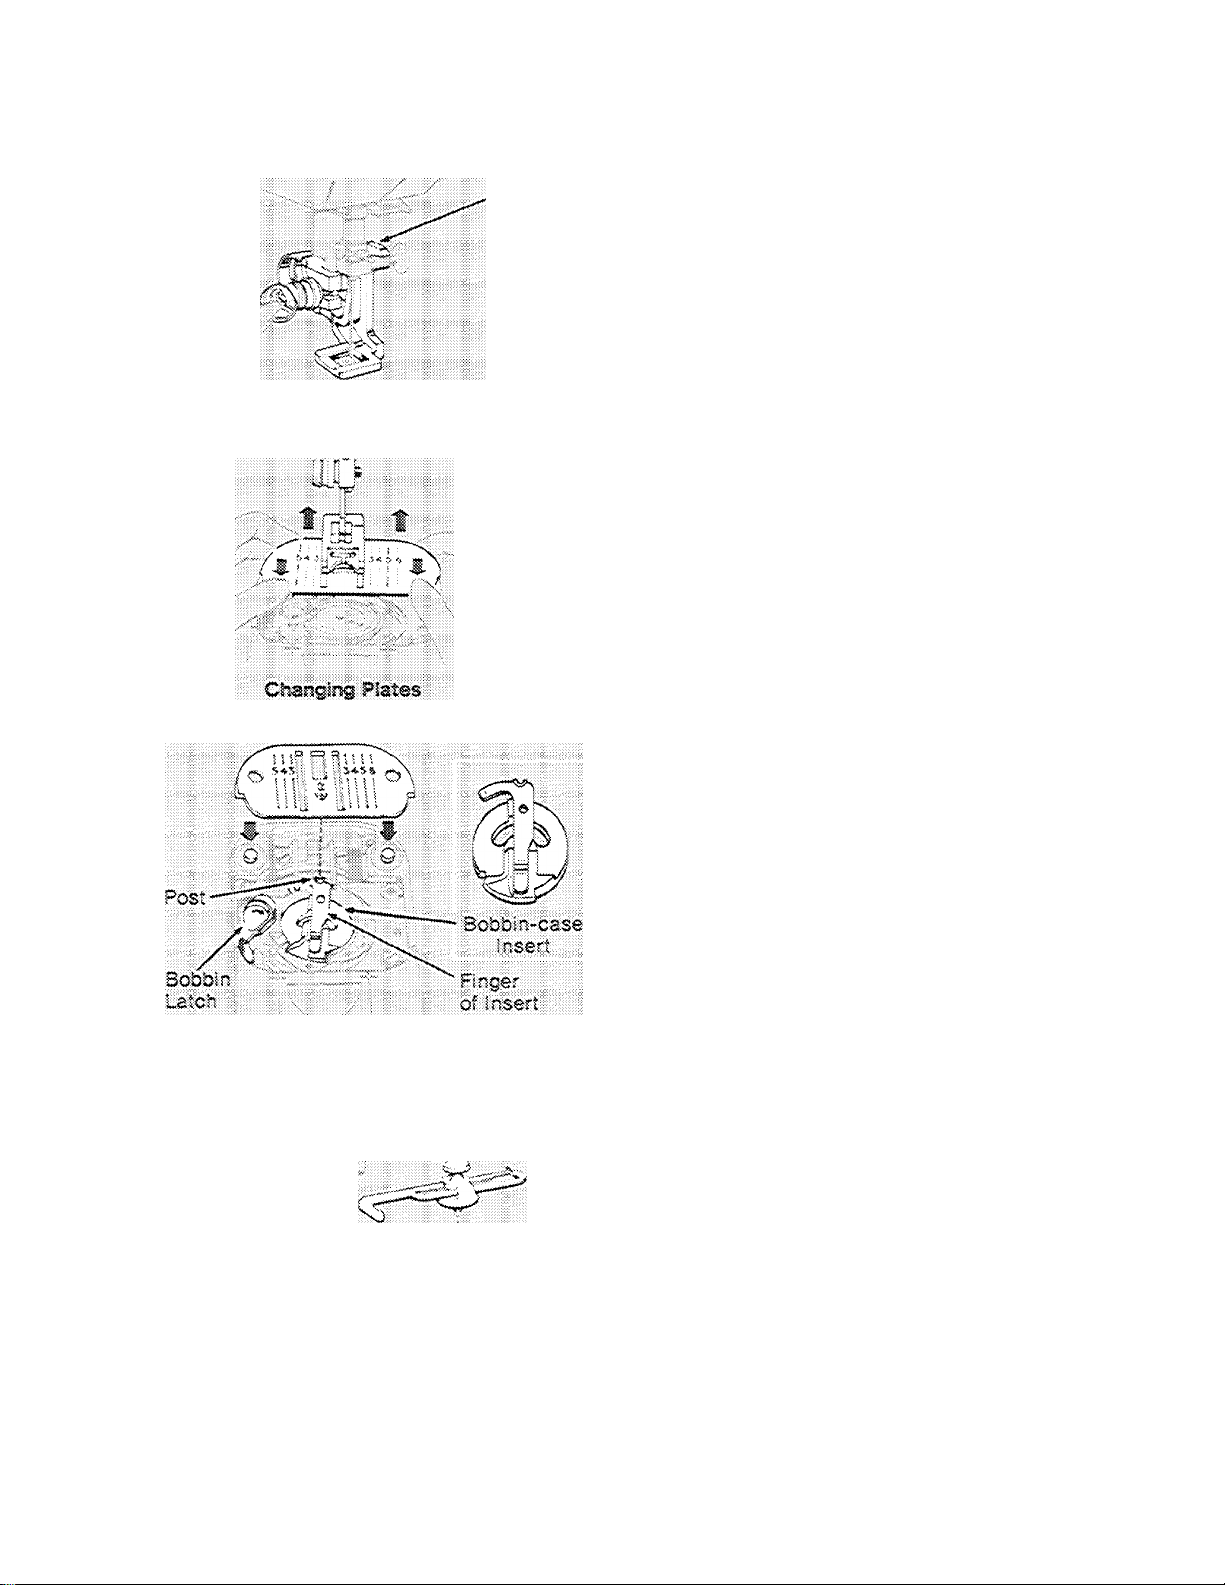
Aítachins Darning and Embroidery Foot
Darning and Embroidery Foot
1. Raise needle and take-up lever to highest
position by turning hand vsrheel toward you.
2. Raise foot.
3. Loosen presser foot screw and remove
presser foot shank.
4. Guide darfiing and embroidery foot into
position from back of machine. Make sure
lifting finger (B) is above needle clamp.
5. Tighten presser foot screw with coin.
CMAmmuB i^eeole plates
Mote: Remove bobbin if it contains thread in
order to prevent thread being caught when
piate is replaced.
1. Raise needle and take-up lever to highest
position by turning the hand wheel toward
you.
2. Raise presser foot.
3. Open slide plate. Press down on front edge
of plate and lift up and out.
Attaching Cbalnstitch Fittings
4. Position new plate over pins and release.
Plate is drawn into position by magnets.
See special Instructions below for attach
ing chainstitch plate.
5. Close slide plate.
Chainstitch Plate and Insert
1. Raise needle and take-up lever to highest
position and raise presser foot.
2. Open slide plate.
3. Move bobbin latch to left and remove bob
bin and needle plate from machine.
4. Place bobbin-case Insert in bobbin case as
shown, with finger of insert positioned
under the feed.
5. Position chainstitch plate over holding
pins, making certain that the post of the
bobbin-case insert finger enters the hole in
the plate.
6. Close slide plate.
ATTACHIMC THE SEAÜ GUIDE
SieamLGMsde,,
Place screw in hole to the right of the slide
piate; line up straight edge of guide with the
needle plate guideline for desired seam width,
and tighten screw.
Page 11
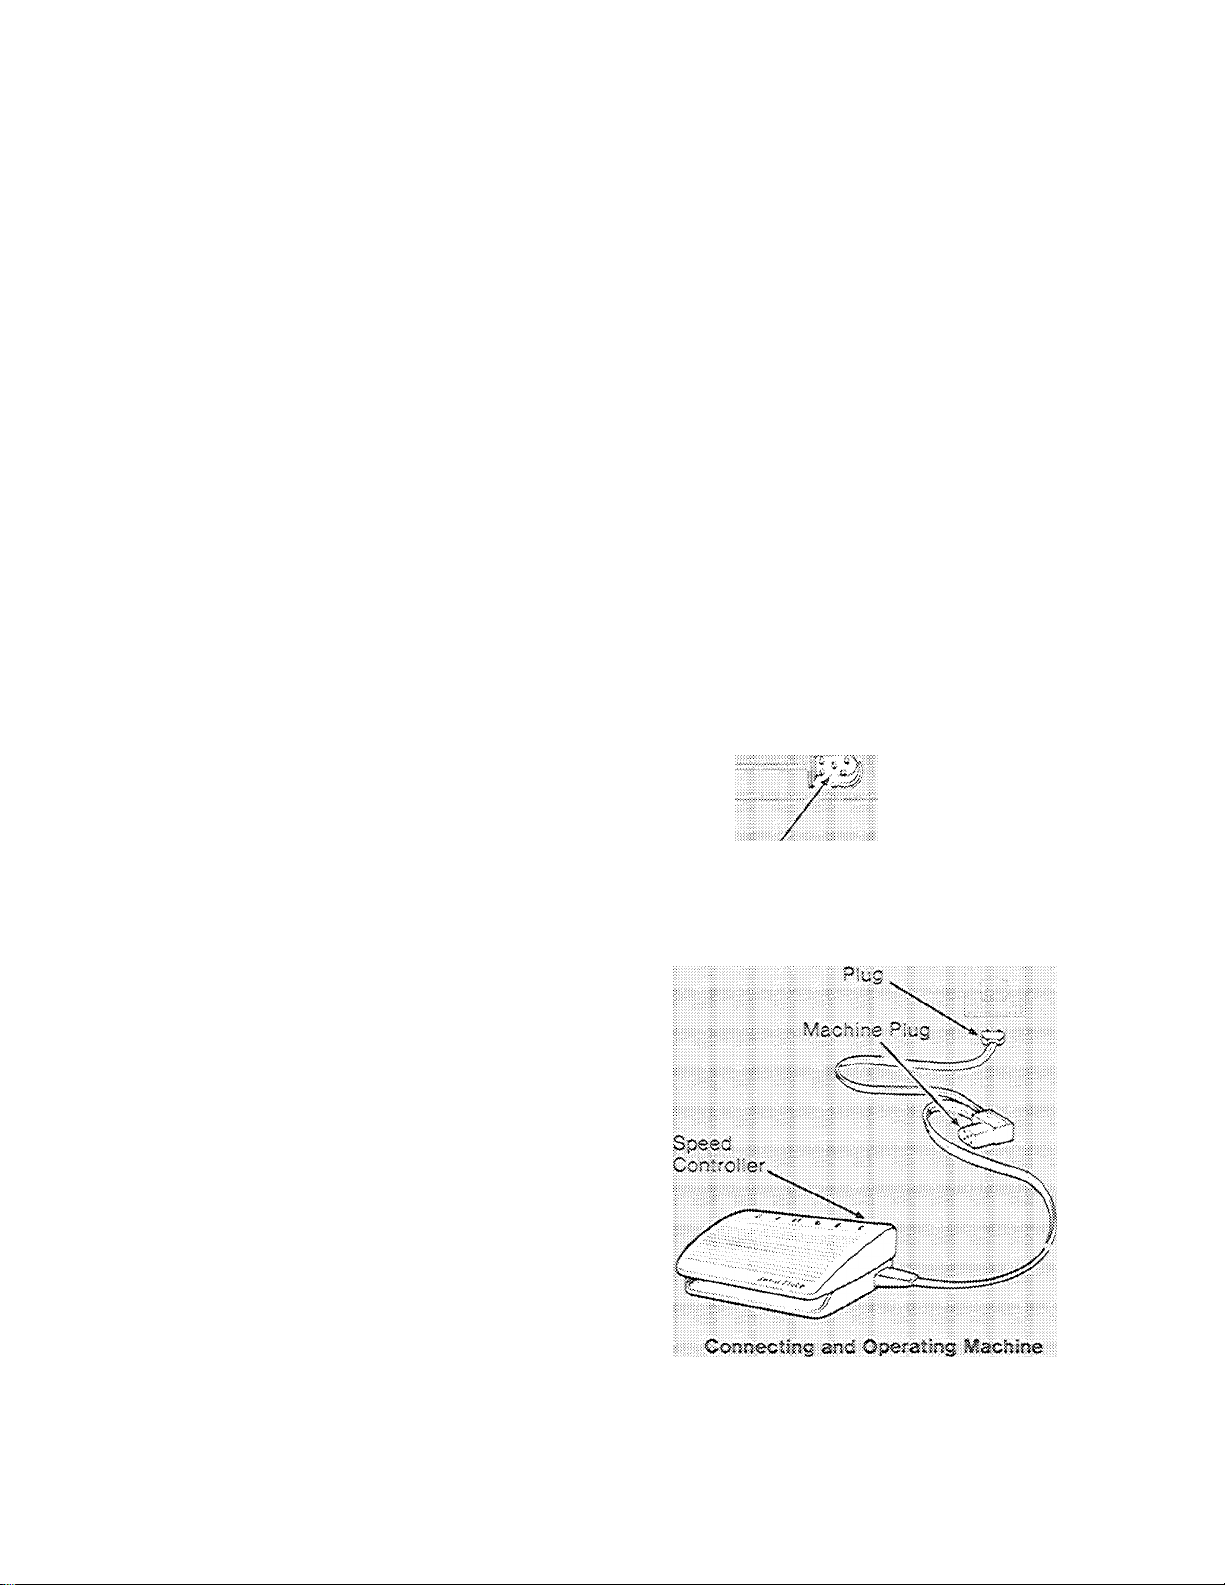
operating machine
CONNECTING mCHINE
® Push the machine piug into the machine
socket.
« Connect the power-Hne piug to your eiectn-
cai outiet
To turn on the machine and set speed range,
push the power and light switch to desired
speed. This will also turn on the sewing light.
• The SLOW setting A (switch pressed in
halfway) allows for maximum control. Use
this setting for special jobs such as button
sewing and buttonhole making, decorative
patterns, bobbin winding, and where Intri
cate details require close control,
• The FAST setting B (switch pressed In all
the way) allows for full speed capacity of the
machine. It is best for long, straight seams,
easy-to-handle fabrics, and general sewing
where a variety of speeds are needed.
s0ower and Li^ht Switch
..
...............
CAUTION: We recommend that you turn off
the power and light switch before changing
neadies, presser feet or plates ana when leav
ing the machine unattended. This eliminates the
possibility of starting the machine by acciden-
tafiy pressing the speed controller.
To run the ríiachine, press the foot or knee
speed controller. The harder you press, the
faster the machine wili sew within the
selected speed range. The lighter you press,
the slower the machine will sew within the
selected speed range.
Vach'ne Soco:
Power-
Line
Page 12

There are thousands of fabrics around the world; each manufactured with a specific fiber and
weight. The fabrics below have been classified according to weight to give a small sample of
what is available for purchase.
TYPE à
.
Ill.li
.......
|#o|énÌ"
...
.
..
..
.
rìLKY W4*M ^ yCSHT
I®
phi ten 1"'
ITuii 1
iteti"
Lace
Ninon
Crepe deChine
tesn|ung| 1
fTilllilil
Jersey
,.:sTite|ai
.
PtenT
i;'Qire''r|r|:'li||'-|'^
.
Polli
..
..........
If;
"ipibiilt:
pati
Ciallls
.
...
VERY
y.EDTJsi
HEA\-Y
HEAVY
iteilet 1'"
.
iCribedechinei?i!i
¡Shintuig 1
|tel|ei 1'
.
;.||Taielas|::
.
pirolteiltt ;|r::
iijlTafflsia
........
........................
?l|Crepe?fi||f:i
itesfeteih 1
Cbriuroy
■"titenipi.........t||ii
Denim
l"|d|bii^
...........
L|wnp''
:;:0erealei;v::||s.:::~:3Ì
Eyelet
Gingham
Ribuli
Pishmereiff'1'-^
ifiannil....ii
“yohair''' I"''
.
..............
dfepi'"'
t Usyaiiy contain some synthetic fiisers also.
10
■■ICahyasfii:i'i|^
|; Spie l dp " I
Upholstery:,
ITerly ¡t
Drapery Fabric
i ■ ;Fab|d^ |
■::s:::i8:Urlap::i:::||i<y
ptri tchlteldur b ft
stretch Terry t
SUitiig
y|pia|neli|.yyiysls,.
Ipaterdine | ■ ■
.
-IReliiSy-sh'i?^^
..lW®:id
.
1'■
iPoplhi'i"'1
Slanketlng
iSepe 1
"i|yo|alrt|"'r~”i||t
tperfey'l|iJ''1|iJ'J
Page 13

FABRIC WEIGHT TABLE (coni.
FIBER
iSYNTHETIC
'|Vliveh| ■ ^
SYNTHETIC
SLENDS
..
FILMY SHEER
CHsffoo
'Èssili,,: !Il:
Olgahza
Talle
Mmon ,„
Crepé deChiae
Voile
UGHI
iCrééeY:i:..i: :i :..
1.BiHilliiiii
iiVelyet ..:
::vei®i::i
„.Tafteta i::::::: j::
fiSatin
jglallela,,;
I'isain :::
.
.
...............
ilJacdoard |
Single Knil
jiswiater Khi|:i:::i,
Í::
.Bonded Knit
;Trlodtti|'"'t?
:;Cir4
^iTridbt 3
.
iCíréíchiTerry
|Slreich:;yeloor
iFaKeFuirs
ILinln 7§pq W}
Batiste
Eyelet
„.poplin ,l„
iCordurdy ibraperylFabhic
Gingham
Poplin *
Crepé
Gadardlsne i:
Double Knii
Bonded Knit
Spandey
Deep Pile
..
Gabardine
HEAVY
Double Knit
::iHi¡enoá:
:||aK|:Fu|s Í5
..
:::i|Denim i
.
pabprdipe
HEAVY
...
CKnl)
%EmmB
PLASTIC
vinyls:
Plasió rim
Single kiit " 1 Terry Knit
iKidskin
Patent
iPaiInt I
Jmltatioh-
Chamois Leathers &
Irnitaiioii-
iSuedes
.......
Leathers & ■Leather
Suedes
teatiar :|
Suede
iBeptile '
Suedei:i|i-!t;i
Plastic Film S
Bonded Vinyl
|Knit Back! :|
^IliBateht 1,
Embdssdd:,
Printed 3
..
DoubleKnIt
Buckskin
palfskin::,
Suede
Beptile .......
Upholstery i
Vinyl
....
lipHolstes^y
.
Leal he rs;
Upholstery
,;i,. vilyl.,,..:::,,,.
Page 14

FABRIC, THREAD AMD UEEDIM TABLE
Choosing the correct needie and thread for your fabric is of utmost importance. Correct choice
wiii make the difference in the wear and appearance of your new garment. The Fabric Weight Ta
ble on the previous page: and the Fabric. Thread and Needle Table below are practical guides to
needie and thread selection. Refer to them before starting a sewing project. Se sure to use the
same size and type of thread in both needie and bobbin.
To select the correct needle and thread for your fabric, first refer to the Fabric Weight Table to
determine the weight and type of the material you are using.
Next refer to the Fabric, Thread and Needie Table.
TYFE
OF
FABRIC
t|iiiiiiiii|ii
.........
t|i::l|^:C|ys
.....
SYNTHETIC
SYNTHETIC
SiEiidsf
........
1 Fine Silk
f||
iiiPihpiiM|tde|zedii I..||dS|3f9i|iit
i:|;lih^;Siiiikss..
Fine Mercerized
.
Fine Mercepzeá
tp||5|pd|piii
.
|iii■
..
j;pi" IpF! riiCiSintih i
...iiilitill''
NEEDLES
..................
|2d:2|nS|
...
SHEER
LIOHT
THREAD NEEDLES THREAD
fiheiSilki
iipeiipdr|erli|ediil;
.
IPeÉílkl
....
.
Fine Mercsr;zed ;
Til.2|2b|TlT|
r.."|02ü|Í'^f
Finé Silk ii
:^::Fi||ejS|k..
Fi|é Mérc|rizid
.....
TlhiiCbtpi:''”it
ij,:.,.
......
lIsÉglll
Fine Sii.k
F ne Mercerized i
iigiiniSiSynlhetlc i:...,:2|:20|3;::|| I í|i||éiiS|n:thetlc:|Híií>^^
.
li;l|2Í20:||iid^ti|
..
..
Mecij-^ Mercerized
Fi|eS|k I;
1 :Pi;|e‘pifcirizdpi'l^
tiFt|é'%ihthiptld||tlt'”
\EED_ES
Í02Í-íl|r
::::f|Q:2|Ui5s|:
ti!|p||U|i|p
LEATHER
PLASTIC:
Size 9 needie is recommended for severing oniy. For bobbin winding, use iarger size needie
Yeciurr, Synmetic 2C32-'
Fine Mercerized
Fine Syntheuc
Pipe Mercerized
Filpii|hthitlclTi
2C2C
Page 15

Find the fabric you are using in Type of Fabric column at left. (Silk, rayon, etc.) Then locate the
fabric weight column (filmy, sheer, etc.) for your fabric at top of table. Read across from Type of
Fabric column to correct weight of fabric column. There, the correct thread and needle choice
for your fabric will be found.
Example: If you are sewing a medium weight wool, find wool in Type of Fabric column. Read
across to Medium (weight) column arid you will see that a medium silk or mercerized thread artd
a size 2020-14 needle are to be used.
VERY HEAVY
rmmAU NEEDLES
Medium Silk |
Mec&m: lierderizidI
Med ium By
iedlum :§ercehz|d j
Med^l|rn=ldl!dh'‘'Medium Mercehzec
Mediumj^iik™
.
Medru-m Mercerized
i§ddi|m::Syhlplfdi.ih'i
fl edid m iy hifetidl t'
Medium Mercerized
Medfcm Svnthetidiiiii..
.
.
.....
k 2020-11 1
202Z-U
2045-t4
2045-14
d:2m2-|4 1
THREAD
|lepy§|k ,,,,
Heavy Mercerized
,ipeaiyiS|nthitid;ii
Heavy Mercerized
...gea|yl|:|ftdif''
...
Heavy Mercerized
Heavy Mercerized
r'ttiiieaiyiSfhthi*id;ti
Sinihet id' 1
Heavy Mercerized
Heavy Synthetic
NEEDLES
1 2020-14
..
1 2020l4"l
1 2|20-i::6;i|i
2020-16
.
|i ,2i45ii6i(|':
.
.
..................
,, 2D32J.6 1,..
THREAD
Heavy Silk
!|:;pieai|ysSynthetic
H |H ealy Mercirlzel
ttipeayy''0ctldi'‘i’^^
p|pe#yi5||drcerize|;»....
Heavy Mercerized 2020-16
|iped|yiSyh|h|l
..
;(.2|20y|eid|
If liibppo
Heavy Mercerized
..
Mdayy Synthetic,;;
.
MEEDIES
2020-14
2020-14
|2D|S-:1|«S
..
iilSIg-lS !
...
M
..............
Medium Mercerized
.
................................ if
Meclum Mercerized
Medlim ¿yhlietldi ''
2D20-t 1
'''2$blni"l|
Medium Mercerized :
: iOpediimiSf bi|d|id
Medium Me-'cenzed i
Medium Sy.ntnetic "
...2|20|it4ii||
...
............
................
”■ ;peiyy'li:erc|f 1^^ if
...
.
iilipielfiSynlpidil^
Heavy MercIriZidli..
'’1
" ilN
If""'
.....
O’^ ■* ib
............
(
Page 16
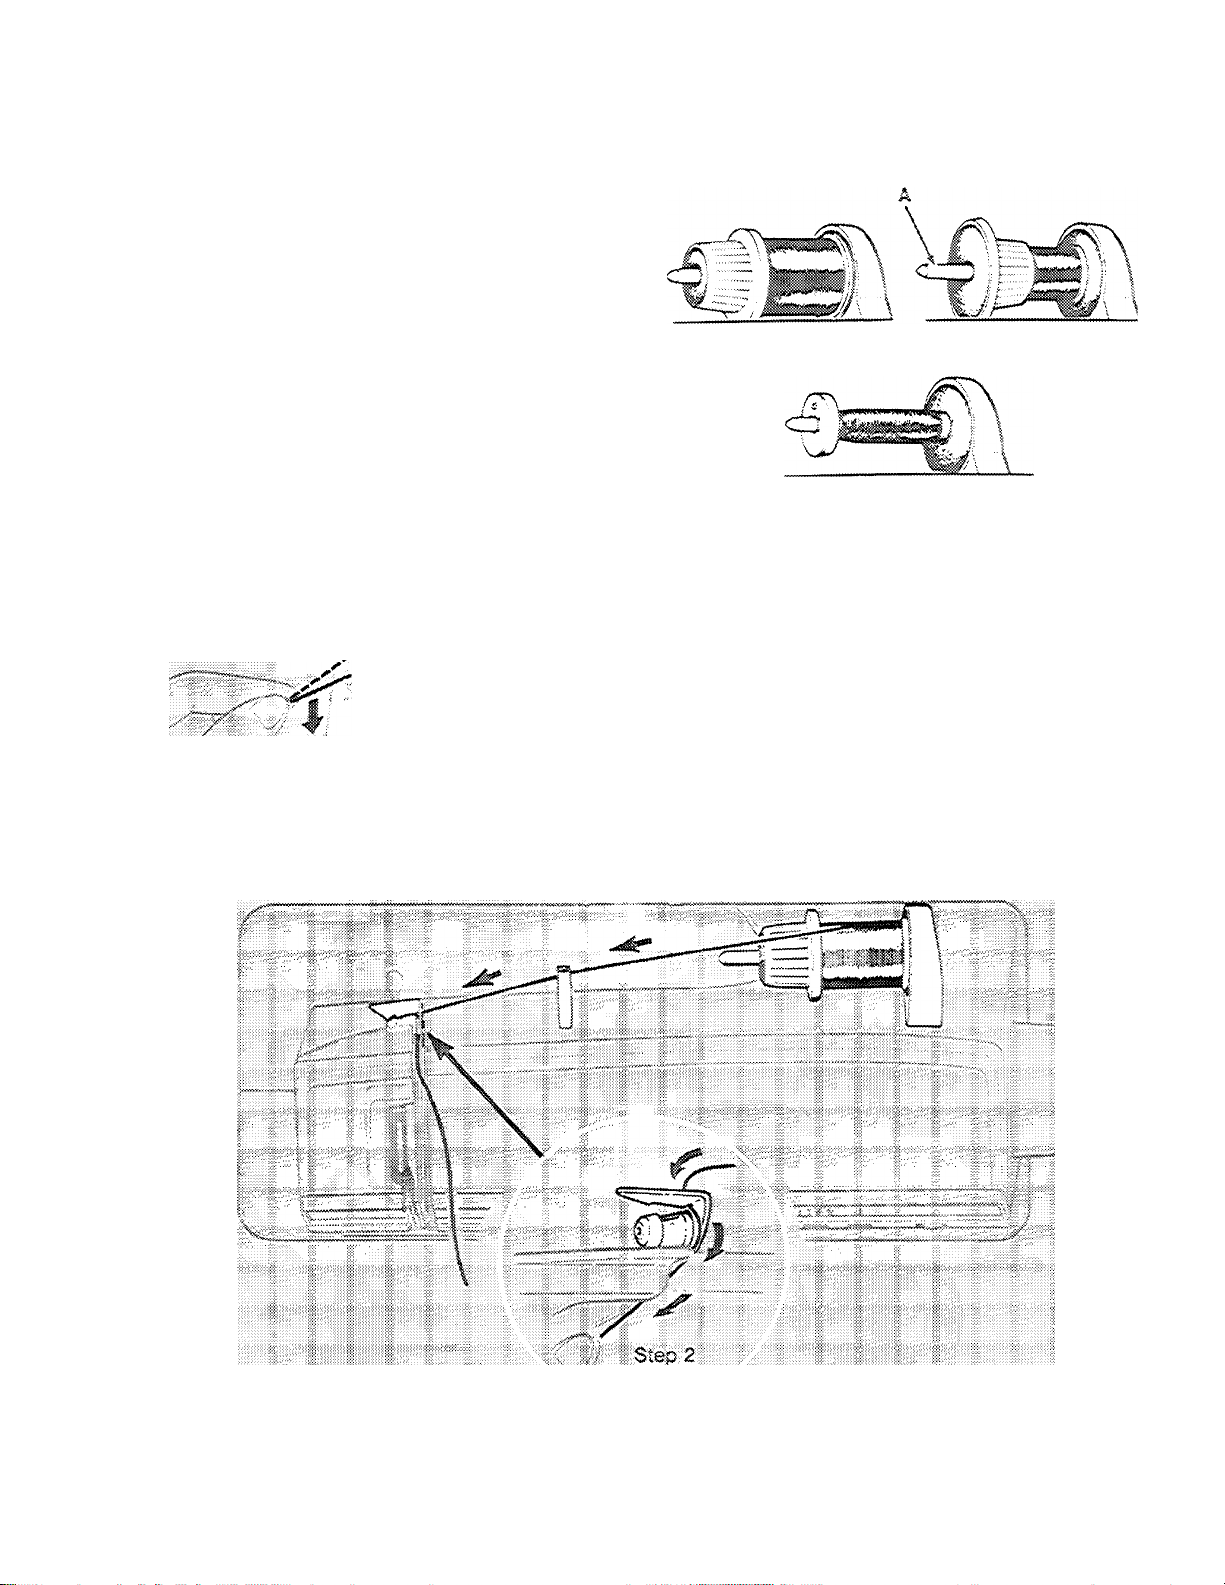
• Place spool of thread on horizontal spool pin
{A). If spool being used has a thread retain
ing silt, this should be placed against the
spool cushion to the right,
» Select correct spool holder according to
type and diameter of spool being used. The
diameter of the end of the spool holder
should always be larger than that of the
spool itself.
® Press spool holder firmly against spool.
i‘R|isi[fhih^
'
''' ■ ^<0.:
Step I
........
...... .
.....
.
you.
* Raise the presser foot.
1. Snap thread into thread guide post.
"\1
2. Thread the rear thread guide. Pas|i
threac under flange then over to the far
llll'righiiphliPi^
.
Page 17
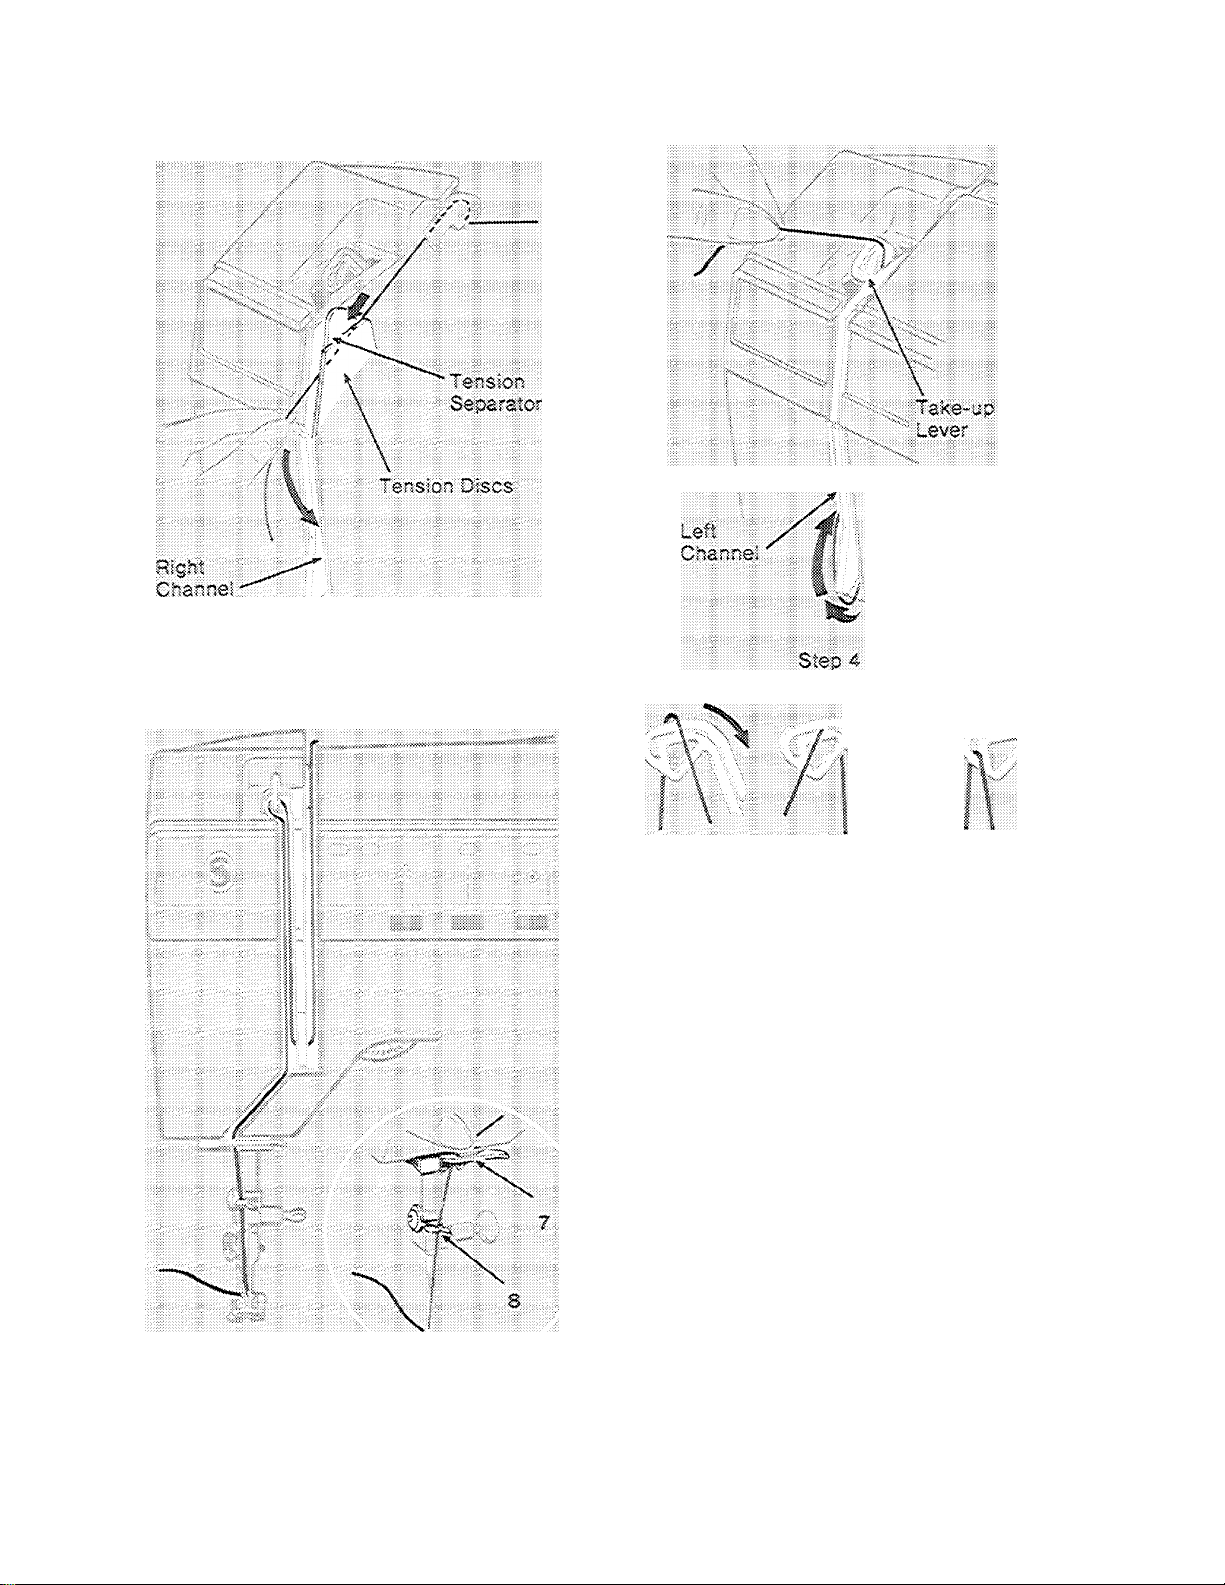
Step 3
v\i
\ ■
, I, Stip; ^ 5| J
3. Draw thread firmly into tension disc on
I ri|Nt |f tsnsibri ie|Jirat|r;^ I
4. Draw thread down right ohannei and up
"W....................................................
,:i|:,,,td|::bai:i^sd Ie|b:h iidlliCbilPdl:^
......
^1:,:: :>
Bring thread through slit by pulling it
:|:|ridpaibtyi|!a:^
.
6. Follow thread back down through left
channel and then diagonally toward
lr|
....
Iipi|
..........
W.
g|iiii;1|fPi|d-B|^
...
..................
ili|
diagonal thread channel, guide thread to
I t|d tip n td| tb pad|g uf18ti| |
Step 6:;
;ir :7iei|driw f IreiSit
Drawing 4 inches (10cm) of thread down
ri|is|pwpi|let|eeileiiopers^
I thread needle front to back.
15
Page 18
Step
Step 1
Step 3
lMÉ¡M
wmmuQ THE bobbiu
You wiH find a bobbin in place under the slide
piate of your machine. (To open shoe piafe,
simpiy draw it gerttiy toward you.) if the bob
bin runs out of thread during sewing, you can
rewind it without removing it from the
machine. The window in the slide piate iels
you see bobbin-thread supply at a glance, to
help avoid running out of thread in the middie
of a seam.
Preparation Steps
® Raise the needie and iake-uo lever to high
est position by turning the hand wheel
toward you.
® Raise the presssr foot to release tension
discs.
® Open slide piate and make sure bobbin is
empty. For removal of bobbin and thread,
see page 17.
1. Rotate group selector dial to right until
blindstitch symbol ^ appears in the yellow
field above pattern selector button,
2. Activate blindstitch ^ by pressing button
under the graphic on stitch panel.
3. Then press pattern repeat symbol 0 to
stop needie from its up and down motion.
This Will ensure a smooth flow of thread
from the thread spool to the bobbin.
Detailed information on seiecting stitches is
found on page 20.
;í:,íS
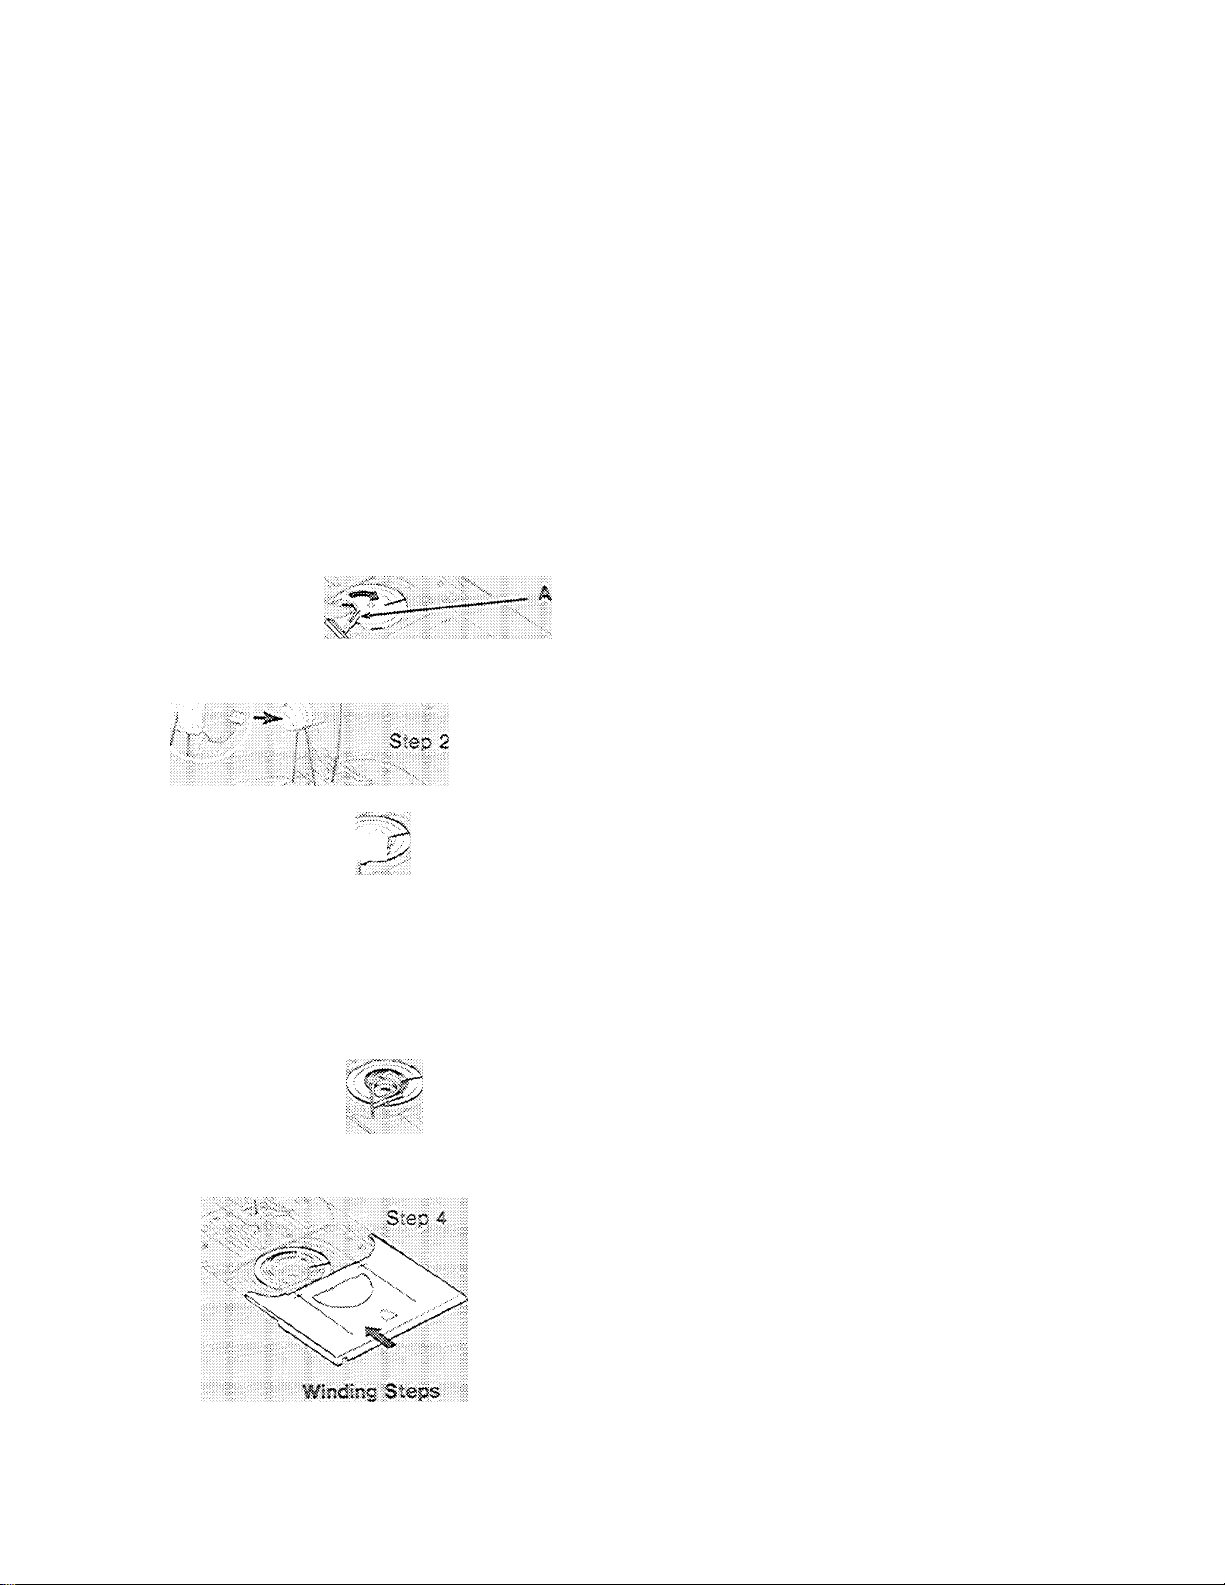
Winding Steps
1. ypve bobbin latch A to extreme right (wind
position).
2. Draw needie thread back between toes of
presser foot, under left side of prssser foot
then up, into and around thread retainer.
Start machine, running it at a moderate
speed.
3. Puli thread end away alter it has separated
from bobbin.
« Watch the bobbin as it fliis. Do not allow
thread to wind beyond the outside FULL
ring B.
4. Close slide piate to release bobbin latch to
sewing position.
Page 19
To start sewmg, puli thread back under
presser foot and cut. Place threads diagonally
under foot to left side, position needle In
fabric where desired, lower presser foot and
start machine.
CHAIIGIMQ THE BOBBIH
Remo¥ing tlie BoiJbin
Raise media and take-up lever to its highest
position by turning the hand wheel toward you.
1. Open slide plate; move bobbin iatcn to left.
J^erngving;: Sobbin;:
2. Remove bobbin by Inserting finger
mder
rim of bobbin.
Replacing an Emptf Bobbin
1. Slip bobbin (thread slot on top) Into bobbin
case.
2. Move bobbin latch to extreme right (wind
position).
® Leave slide plate open until you have
finished winding the bobbin.
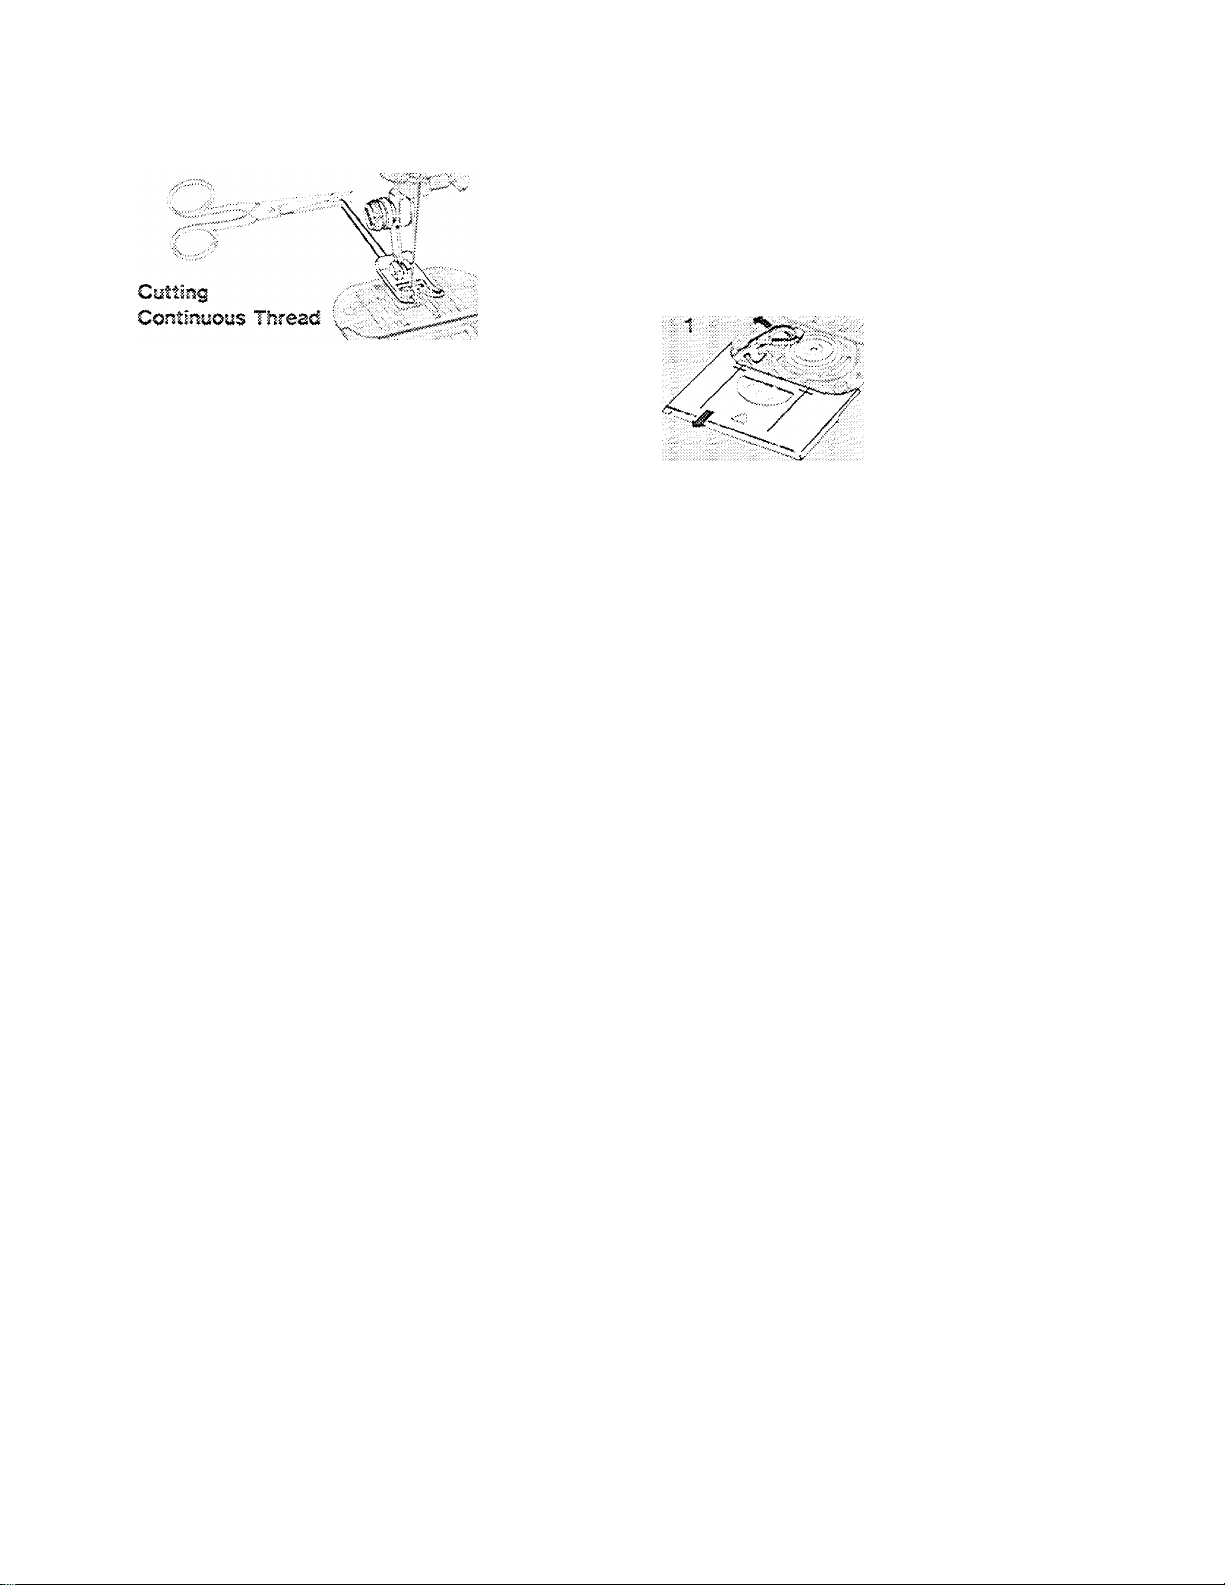
Removing Tbread from Bobbin
You can leave the bobbin in plaoe while
removing thread. With slide plate closed, pull
thread end through the plate with a steady
motion. Do not pull the thread across the feed
as this may damage It.
Thread Slot
Bepisacing EmptytSdfebifs
17
Page 20
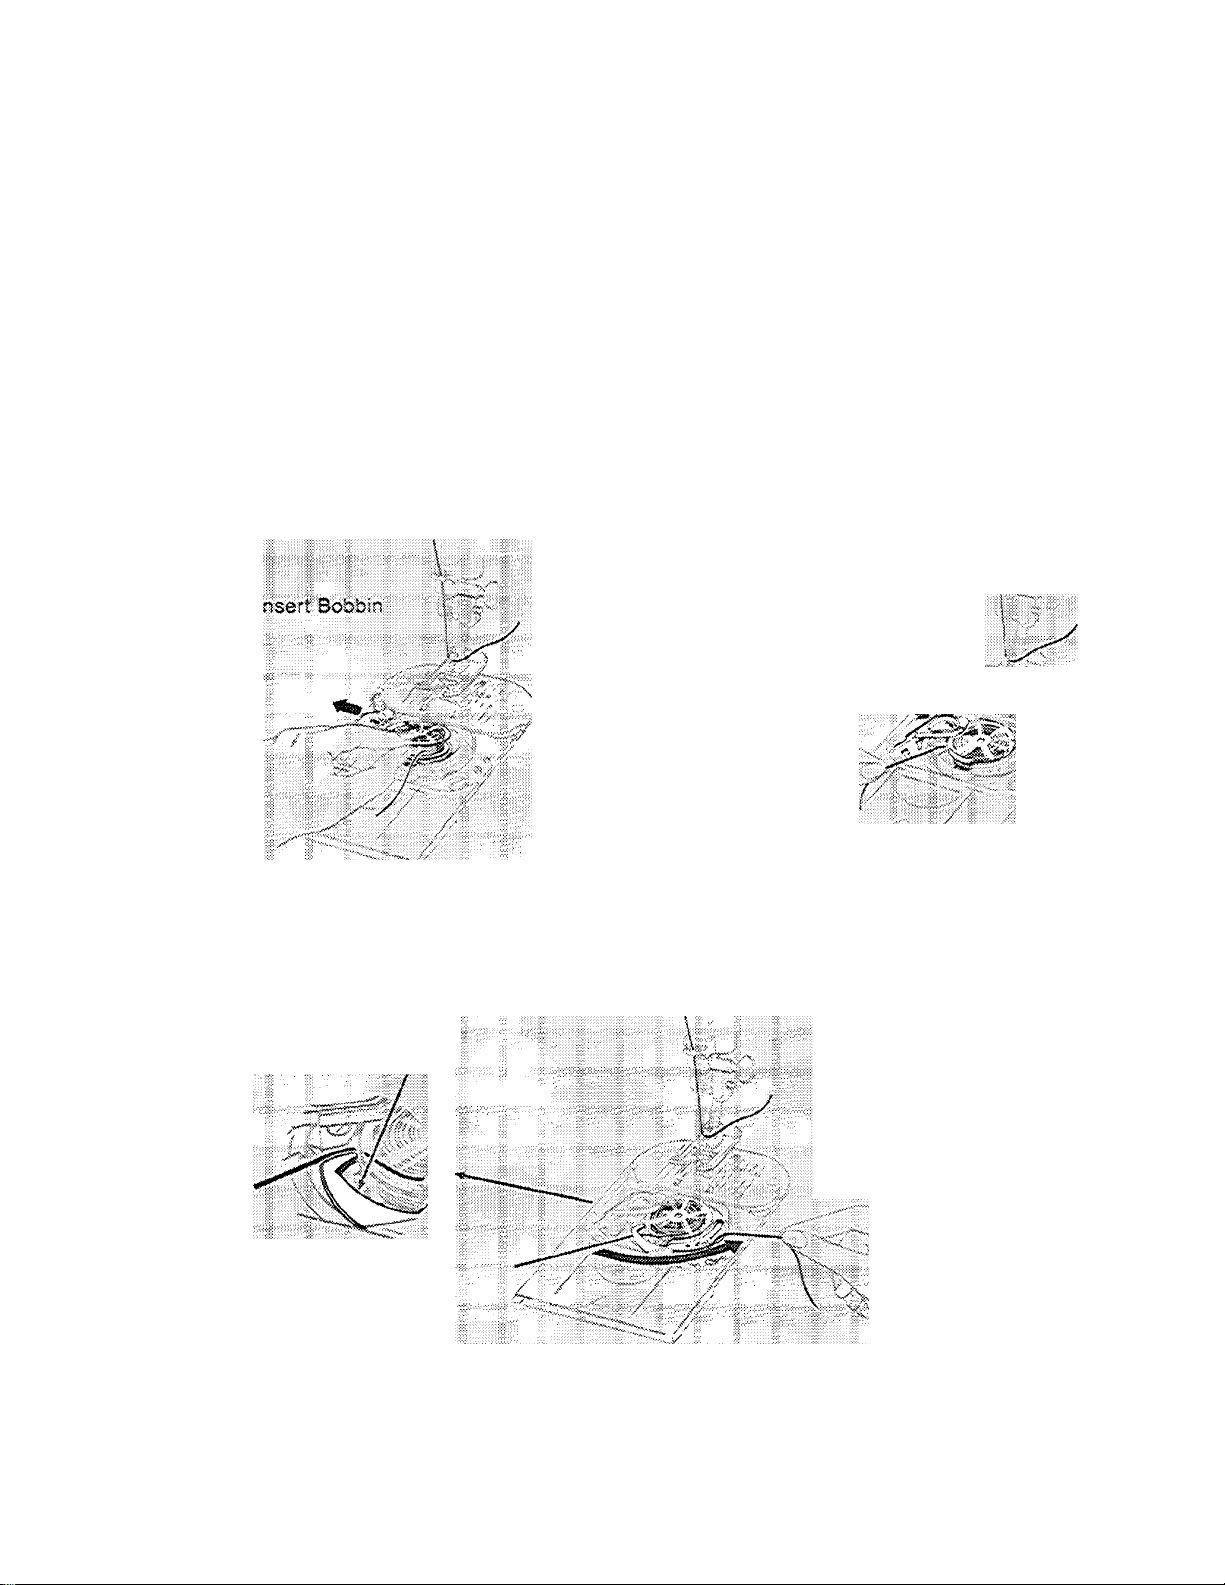
Hepiacing a Wound Bobbin
Raise needie and take-up iever to its highest
position by turning hand wheel toward you.
A. Open slide plate; move bobbin latch to left.
B. Draw about an inch (2.5cm) of thread from
bobbin and insert bobbin in case. Move
bobbin latch slightly to the right (sewing
position).
■Replacing aiWoéml Bobbin
C. Puli thread into bobbin-case slot (1), draw
it under flat spring and around to and past
point (2) leaving three inches (7cm) of free
thread.
D. Close slide plate. Closing slide plate
makes raising bobbin thread easier
because this step prevents the thread from
coming out of the threading points.
Flat Spring:
Draw Thread ■
i^roind fas t|Po I |t (iil
Page 21
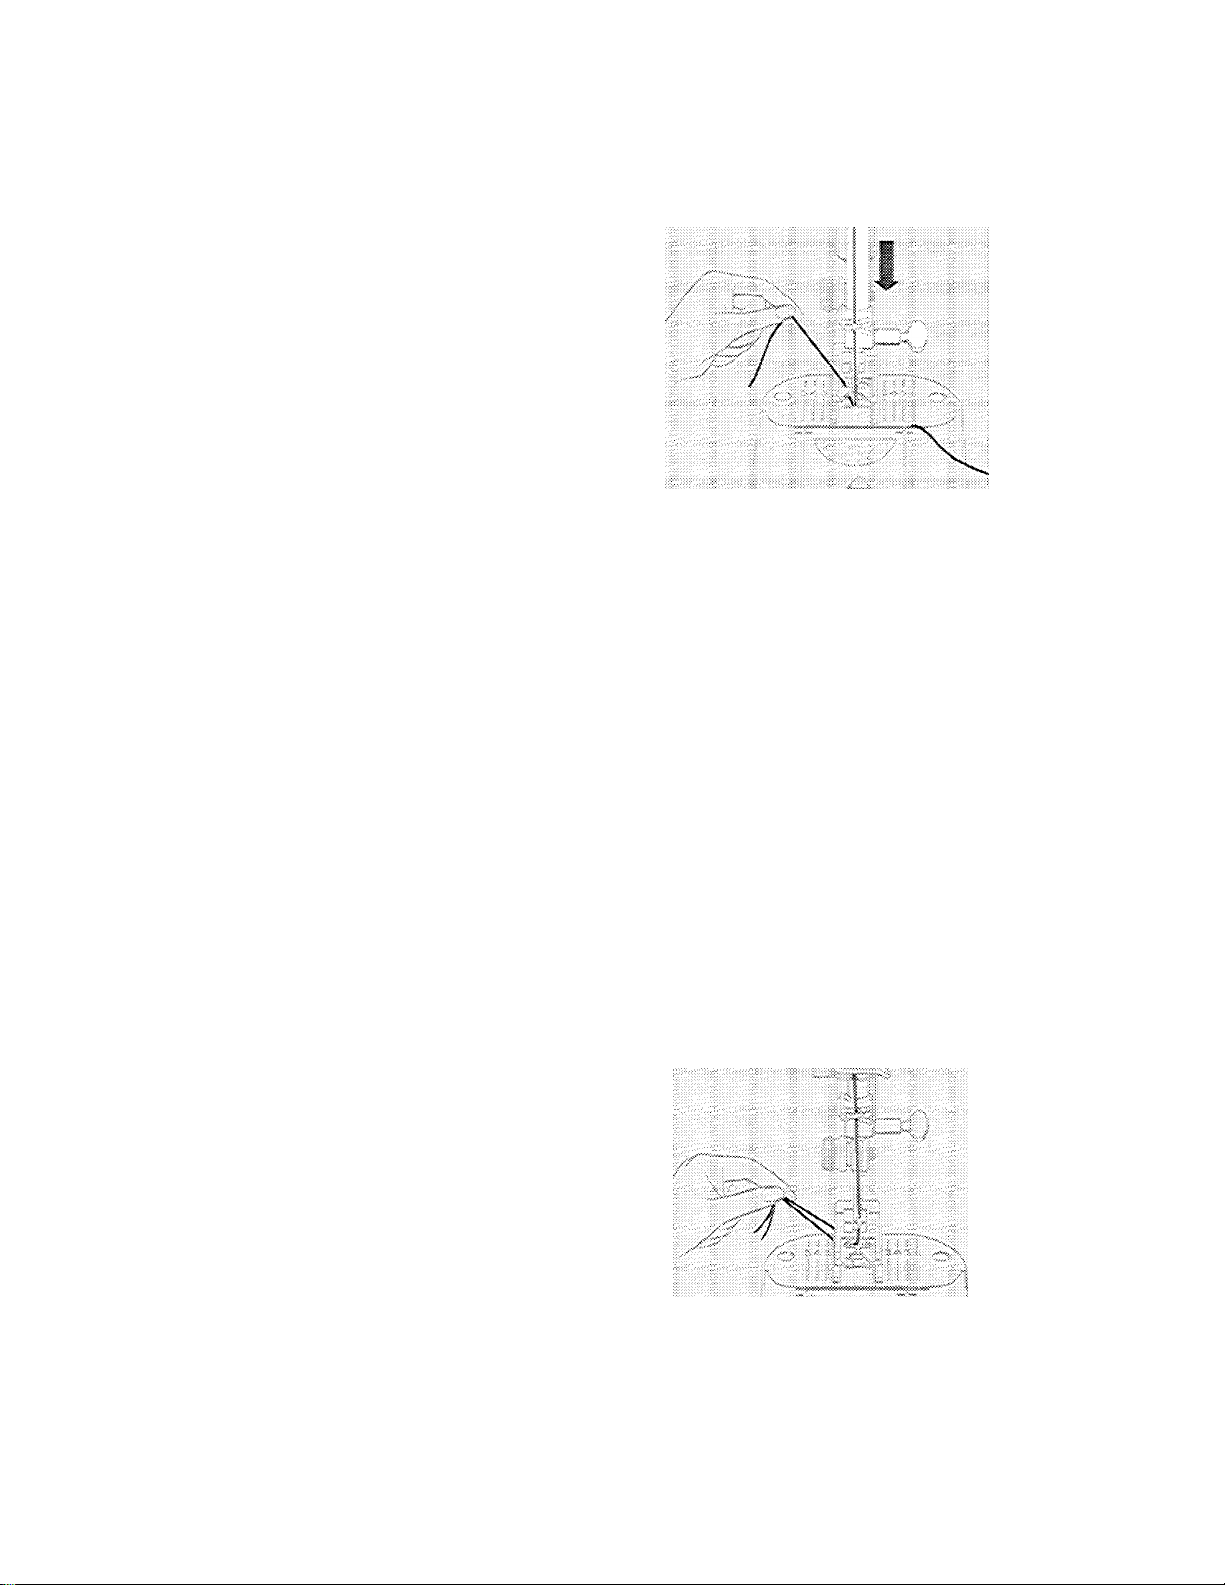
hand and turn hand wheel slowly
toward you so the needle enters plate.
4
2. Continue turning hand wheel and hold*
'r||fih|rhdid:ii'''"
■ ¡rani bing'p
3. open the loop with your fingers, draw
■' rt|nd|iie|ini''idibi|XP
proximately 4 inches |lOcm), under
■ ¡the: piesier |fodl 'aihd |pldde |tlie:m
■■■rifidiii®
.
I
'#SSS6;is!!;i
Page 22

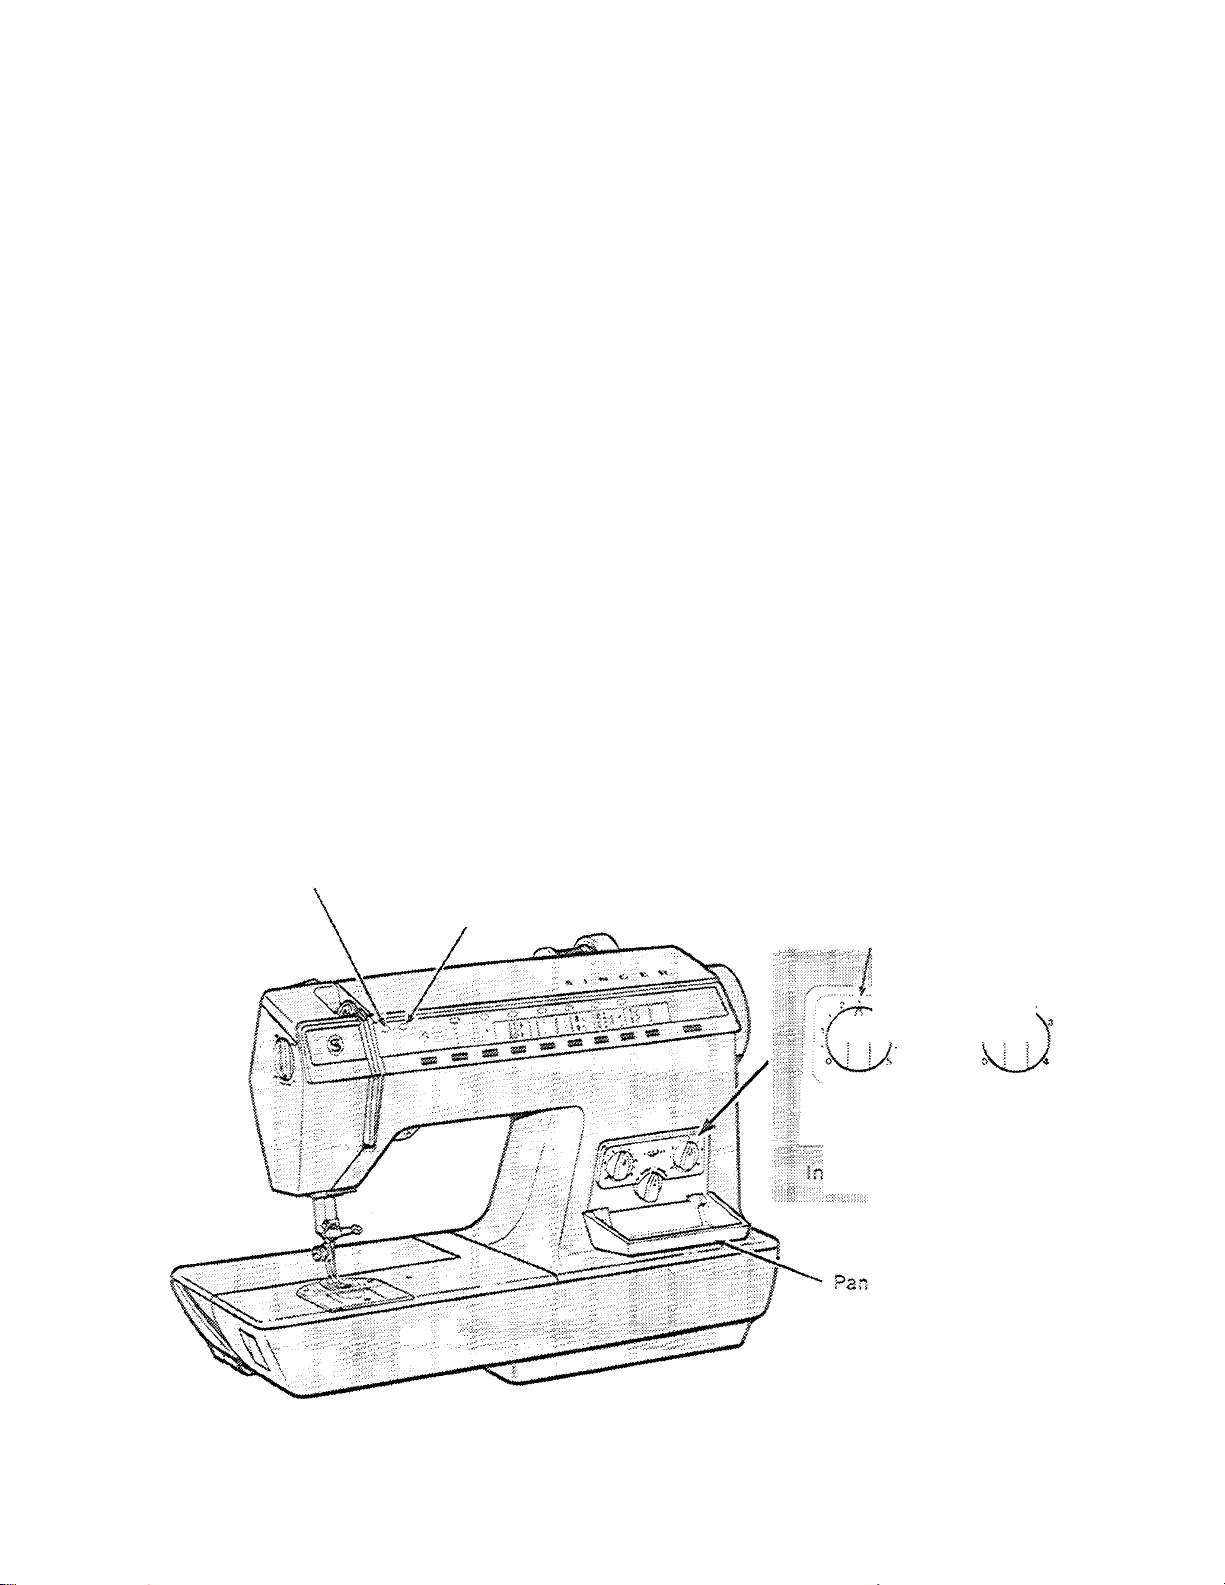
select
i urn macnme on.
(You win note a slight movement of needle
each time power switch is activated)
Rotate group selector dial to the right or left,
to choose one of four different pattern groups
whloh will contain the particular paitern you
wish to sew.
After rotating group selector dial, press button
under the desired pattern. A red light will ap
pear above seleoted pattern.
I О
О
0
I
0 О О О
- > ■ > 'Ч -tN А. у J 0^ if; 1 Si U? ^
^^^----------------------------------------------^|5
1
■Srcc?
sr ,,,
.
.
■>
• ^-Tl -••'si • ••••-•
•4-.
2
4
.
N
Ч
3
1
A
■Щ
'mZ
5
Stitch width and length are automatically pro
grammed, but can be changed for individual
preferences or fabric requirements, as de
scribed on page 22.
Follow same procedure for stitch selection to
automatically switch to another pattern.
Mote; We recommend use of the SLOW
speed setting when sewing buttonholes, bast
ing stitch, decorative patterns, or maxi
stretch stitch.
____________________
-------
-
.
0|шр)2
Flair; Zig-Zag
31
p uli-Stiic'h Zlg-iag |
4
.
..
iplptsidtllliiiii
m
Blind Stitch
tSastir.g Stitch
ffRexi-Stitch Patterns
tttVtaxi-Sirstch Stitch
;
Group 1
Group 3
.
.
ttf
..
IItOybred^e itreph' l| ■ ■
stllhiEdithliih
11 Hdheypdmb"
Greek Key
i. 1. Lelt aid R|^ht|iidgL,|,,,
iff'
, tt
J QfbupiS I ;
Ifidfer'i'
Scallop
1 ■ ■ ;iead|r :
ill: ArrovlKead ^" 1
Group 4
.
II Grduplp :il
lir..Zic-Zid'Fpnt:'
|||||li|)|l!iil|i|j|^
II ilOdaf Jillll 1
ft
Page 23
РАттЕшы шРЕт вттоп
Single Unit Sewing
The pattern repeat button 0 on your machine
lets you sew one unit of a pattern. For exam
ple; one arrowhead, one dog.
Procedure
Select desired pattern (such as arrowhead
shown here).
Press pattern repeat button 0.
Red light will appear above symbol.
Press down on controHer,
Machine will stitch one unit of the pattern
each time you follow this procedure.
You can also use pattern repeat button to
stitch a series of identical buttonholes, as de
scribed on page 73; and to aid in bobbin wind
ing as described on page 16.
INDIVlOyAL PREFEBEHCES
Your sewing machine will produce most of
your stitching requirements at a preprogram
med stitch width and stitch length.
Stitch Width Light
Stitch Length Light
О
S
Pattern Repeat Button
\ I / ‘Sect Ligh
+ ®
V ^
To accom.m,odaie different fabric charac
teristics or satisfy a personai preference, you
can change the settings by opening the cover
of the individual preference panel and then
manually adjust the controls located on the
panel as described on page 22.
liiiili'
Arrowhead
Stitch-width Control
Individual Preference Controls
ё i V i did a 3 P relerehde Ria ne i
Bi Cover
Page 24
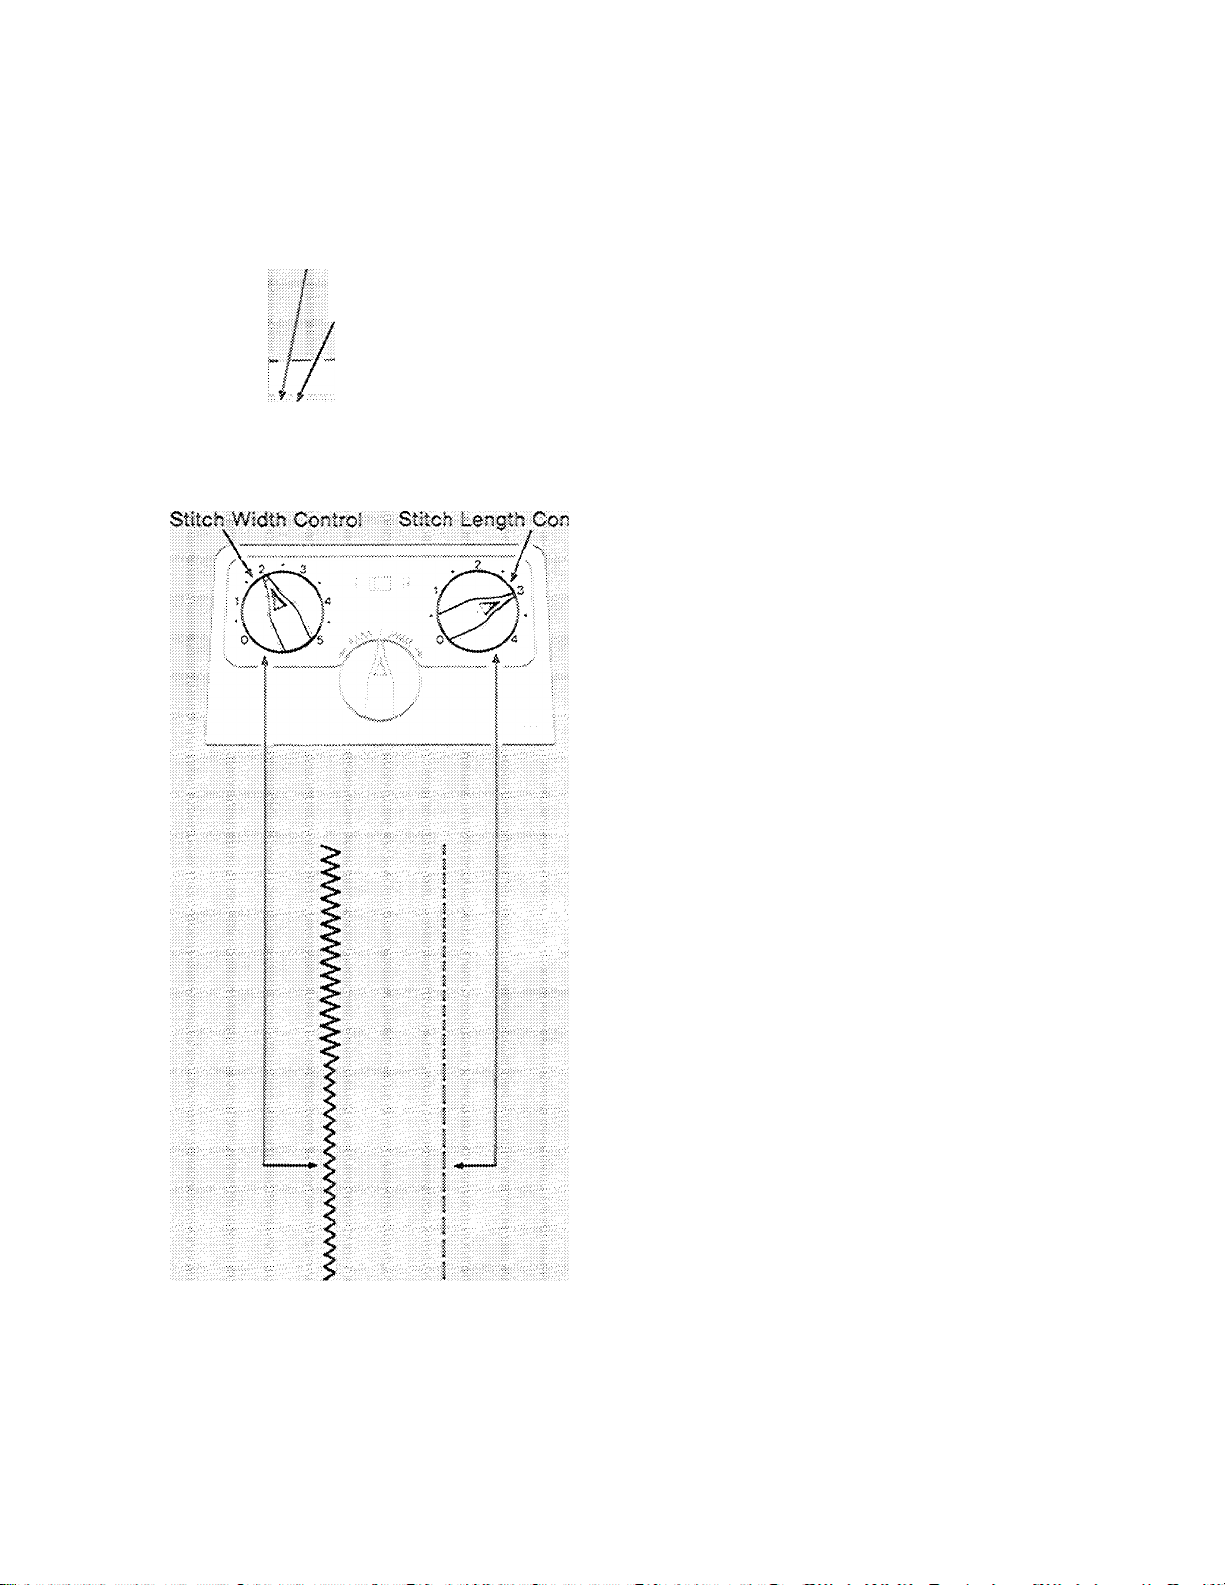
STITCH WIDTH
Stitch Width Ughi
Stitch Length Light
® Select desired pattern.
« Open cover of individual preference panel.
Lightly touch stitch width pointer to activate
stitch width control, indicated by a red light
on sts
r* H
panel.
« Turn pointer siowiy and sew until desired
width is obtained.
Machine will now stitch at preferred width.
STITCH LEMGTH
® Select desired pattern.
«- Lightly touch the stitch length pointer with
your finger to activate the stitch length con
trol, Indicated by a red light on stitch panel.
o Turn pointer slowly and sew until desired
length is obtained.
Machine will now stitch at the preferred
length.
Mote: Both stitch width and stitch length con
trols may be used simultaneously.
® To cancel, press any button except those for
reverse or pattern repeat sewing.
22
Page 25

Choosing the correct stitch length is of utmost importance, i he correct choice will make the
differer^ce in the wear and appearance of your new garment. The table below is a practical guide
to stitch length selection. Refer to it before starting a sewing project. Remember to make a test
sample on a scrap piece of the fabric you will be using.
STITCH LENGTH GUIDANCE TABLE
PART OF
ARTICLE OR
GARMENT
i'sSiBAlOlli
......
II
CURVED
MAIMSEAMSf"
.
FILMY
2|| ‘
.
SHEER
ifGty
Eif
WEIGHT OF FABRICS
LIGHT
MEDIUM
E''f.:s;;|2|||
f0m§2
..
Ifsp
.
.
.
...
ill
...
... ...
4 " ;
i||2-;;2tB;|:E:. 2.5
..
,
HEAVY
VERY HEAVY
2.5
j2;i2tSii;l
..
|?2!|2t5:li'i
S|2^i|;|.S|i
||:2t4i2t5||||:
lii
4 ■:
.
........
::i
..
4
TOPSTITCHIMG'^
STRESS AREAS
.
..........................J:.:,
:#tsi2l|lt
z
|pSit2i|ii
1.5-2"
4
1.5-2?^
4
.
El
■f Slow to iooderats speed.
Stress Areas In Knit or Stretch Fabrics
Contrary to common belief it is not always necessary to use a S-t-r-e-t-c-h stitch on all seams in
garments made from these fabrics. Always consider the “Stress” areas, for example; arm,holes,
crotch seams, also now much the garment 'will be required to “give” and where. Use a stretch
stitch where needed. Moreover, always ascertain that the fit of the garment is correct before
sewing any seam v/ith a S-t-r-e-t-c-h stitch. Ripping out a S-t-r-e-t-c-h stitch is difficult and may
damage fabric. See page 46 for sewing on stretch fabrics.
23
Page 26
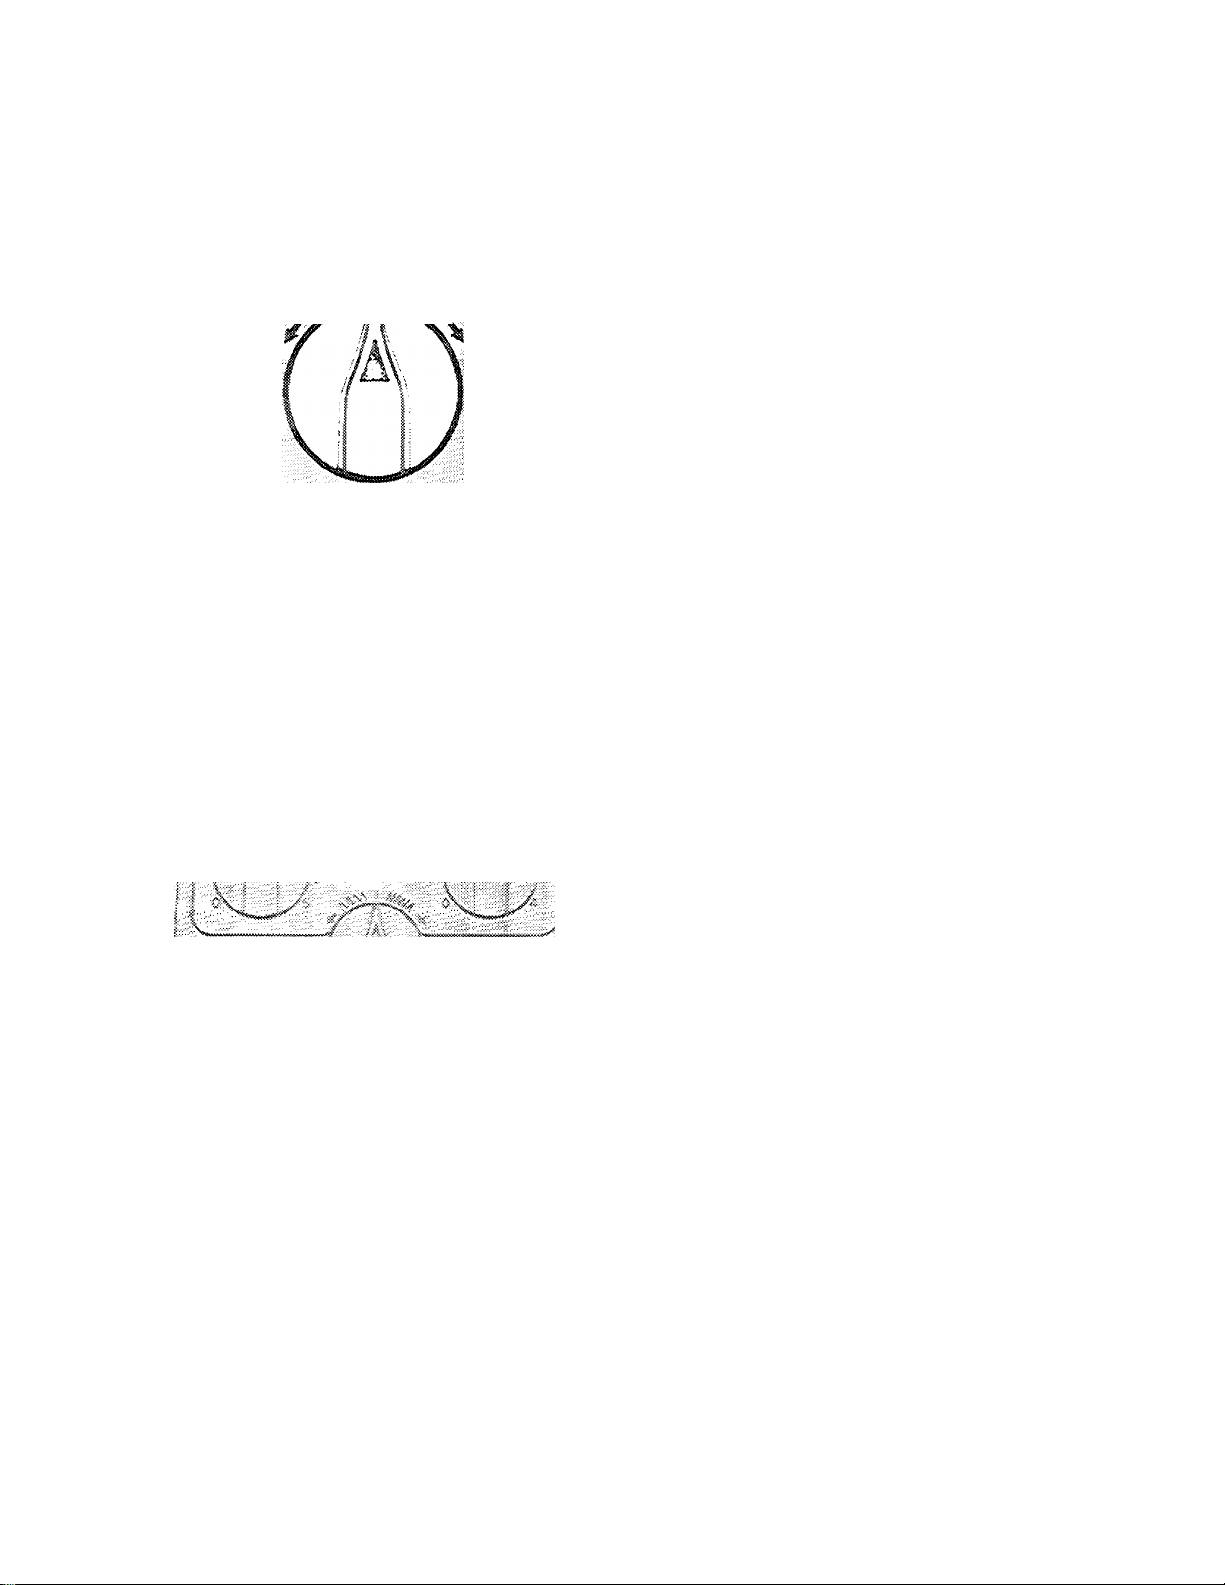
B«ve?se StItCih- Balat?ce Centres!
■A
/
ttSSipif'
n
REVERSE STfTCH-BALAI^CE
To change the appearance of a Rexi-Stitch
pattern or buttonholes, adjust the reverse
stitch-balance control.
Before moving the pointer from its neutral
position, make a test sample.
If adjustment is required, stitch slowly and
move the reverse stitch-balance pointer in
either direction as you sew, until desired pat
tern appearance is obtained.
For information on balancing a buttonhole see
page 73.
Return pointer to neutral position {A) after
sewing Flexi-Stitch patterns and buttonholes.
Fiexi-Stitches illustrated on page 20.
4 i
J !
■3 !
i !
i S
.5 i
3 I
i s
s s
5 i
5 S
i i
3 s
4 I
:s s
i i
s i
i s
;,iS
sr r
.. $
5
Mi
1 s
i s
ML ^
TWm-HEEQLE SWITCH
Always move twin-needle switch, located on
individual preference panel, to the right (|| )
symbol before doing twin-needle sewing.
Caution: Unless switch has been activated,
needle breakage can result.
When you have completed twin-needle sew
ing, be sure to return switch to the left ( f )
position.
See page 68 lor twin-needle sewing.
Remember: If, when adjusting a control, you
accidentally touch another control: re-select
desired pattern, then readjust desired control.
Close individual preference panel cover when
you have attained desired stitch appearance.
24
Page 27
.li
For straight stitching, ^ press button under
straight stitch symbol {i) on stitch panel.
A red light will appear above symbol to indi
cate that machine is ready to produce a basic
straight stitch.
Straight-stitch needle plate and foot are best
for all straight stitching. Use these accesso
ries when fabric requires close control. They
are especiaily
telpful for stitching delicate
fabrics.
If you use the straight-stlich foot with a nee
dle plate other than the straight-stitch needle
plate, be sure to set the rmchine for straight
stitching to prevent possible needle breakage.
Note however, that when you use the straight-
stitch needle plate, you get this exclusive
feature: If you press another buiton by
mistake, your machine will still sew a straight
stitch.
Always change back to the appropriate nee
dle plate and presser foot when sewing other
than straight stitching.
SEWIMQ 11^ HEVEBSE
If you wish to reinforce the beginning or end of
a seam, press and hold the reverse stitch
button.
Machine will only sew a straight stitch in
reverse for as long as you hold the button,
regardless of the stitch pattern you have been
sewing.
1 O O
Reverse Stitch '
StraightiStitih bight ;
o o
® I I S I § I^ - j I^ I
1 g|N 1^. I sil< 1 J i
■!Ì|ÌÌi|||:StÌC|#
o
25
Page 28

M«e<Sie-Thread Tension
I^EEOLE-THliEAO TEMSIOf^
Havmg selected the correct needle and
thread combination for the fabric being used,
it may be necessary to adjust the tension of
the sewing maohine to ensure a well balanoed
stitch.
A well balanced stitch is when the top and
under thread appear the same on the fabric.
Your new machine has an adlustable tension
control system. This control exerts tension on
the top and under thread as they pass through
the machine to form a stitch.
« Too much tension will produce a tight stitch
which will cause puckered seams.
o Too little tension will produce a loose stitch.
When an even amount of tension is exerted on
both threads, a smooth even stitch known as a
balanced stitch, is produced.
To help understand the effect of tension on
fabric and thread, try this simple test:
® Take two pieces of a medium weight woven
fabric in a solid light color about six inches
long.
o Place a 2020 size 14 needle in the machine.
« Thread the top of your machine with a
polyester or mercerized dark color thread
and use a lighter color thread of the same
fiber and size in the bobbin.
o Select a medium stitch length.
Seam the two pieces of fabric together start
ing with the top tension control at “0”. Then
as you sew, slowly turn the tension control
from “0” through to its highest setting.
6 Sew another row turning the dial back to
“0”, You should have a balanced stitch on
each row mid-way between the start and
finish in each case.
«The different colored threads will help you
to see the effect that the tension has on the
top and bottom threads.
Now that you have observed the effects of
tension, we suggest that you perform a similar
test on a scrap of the fabric you plan to use.
being sure to duplicate the number of
thicknesses of your garment.
26
Page 29

' O'
/г
Pin basting is a time saver and can be used
when you sew easy-to-handle fabrics. Use
fine pins and place them so that:
• They are at right angles to the presser foot
and just nip into the fabric at the stitching
line.
• They do not extend under both sides of the
presser foot. Never place pins on the under
side of the fabric in contact with the feed.
SPEED BASTIUO
The basting stitch produces temporary long
stitches in a variety of lengths. This allows
you to choose the correct length for your sew
ing job, considering the weight of your fabric
and how securely the pieces need to be held
together. A few of the many sewing jobs for
which you will find speed basting particularly
useful are;
at the Stitching Line
Pin Placement
e Joining seams for trial fittings
• Marking construction guidelines
c Basting pleats, hems and seams
® Stitch: speed basting j
e. Length: to suit fabric
® General purpose plate
e General purpose foot
Mote: The even feed foot cannot be used for
speed basting.
Select needle and thread according to your
fabric. A fine needle and a soft pliable thread
are recommended when basting stitches are
not to be removed before pressing, as in the
case of pleats or hems. Choose a thread color
to contrast with your fabric so that it can be
seen easily.
Stitch
■<v.c:h
stitch
Length
27
Page 30

Pfocedyre
Thread the machine in the usual way.
1. Set machine for basting at a short stitch
length, and take a few stitches to position
and secure basting start.
2. Adjust to the length of basting stitch
desired — stitches approximately 1 inch
(2.5cm) long are recommended for seam
basting — and proceed. Stitch slowly, sup
porting the fabric in front and back of the
presser foot if stitches are more than 112-
inch (1.3cm) long.
Caution: Do not puli the fabric while you are
stiiChmg as this may deflect the needle, caus
ing It to break.
3. Take a few short stitches to secure end of
basting.
Stitch Length
The stitch length control dial on the personal
preference panel (see page 22) regulates the
length of basting stitches. Because the Inter
val at which the needle enters the fabric is
changed when you machine baste, the length
of the stitch is no longer the same as for regu
lar stitching.
Ecstir.g a Saarr:
Very short stitches are recommended to
fasten stitching starts and endings.
For Longer
Basting Stitches
bread Tension
Speed basting requires a light needle-thread
tension. When tension is correctly adjusted,
stitches up to 1 inch (2.5cm) long should lie.
flat In firm fabrics. If stitches are longer than 1
inch, place tension on the fabric by holding it
lightly in front and back of the presser foot as
you sew. to prevent pucker.
See page 26 for further information on nee
dle-thread tension.
28
Page 31

pmpmmon
«> Stitch: straight t
• Length: to Suit fabric
« Straight stitch needie piateor
genera: purpose piate
■9 Straight stitch foot or generai purpose foot
Thread nnachine in the usual way.
PLACE FABRIC UMPEB FOOT
Most fabrics can be piacec under the foot by
raising the presser foot lifter (A) to its normal
up position (1), where It locks. When using
bulky fabric, multiple fabric layers, or an
embroidery hoop, raise the presser foot lifter
to the high rise position (2), thus increasing
the space between foot and needle plate.
Hold presser foot lifter In position while plac
ing fabric under the presser foot.
• Lower presser foot lifter all the way down
and start to sew.
J,
.....
.......
SEWmO WITH A MEWLY WOUUB
BOBBIU
When starting to stitch at the fabric edge:
• Position needle in very edge of fabric, by
turning the hand wheel toward you.
® Lower the presser foot and stitch. Thread
will lock over fabric edge.
OR
When starting to stitch away from fabric edge;
® Leave presserfoot in its upper position.
« Pull thread back under presser foot and cut.
« Position needie in from fabric edge, then
lower the presser foot and stitch.
Page 32

„it|C5|si|g yfo§ ■
|!:i«iswi
........
^ ^uislelifses
«0§m
------
. . —5/c" ;■: .6c~.
—u—(1,9cm)
^Crossisne
m
i|i||;i;i;i|: ,: i.^ i:;:;;;
lltt
Pivoting at Comer
3/S" C9:nm)
lEPiMCS SEmS STRAICsH"
To keep the seam straight, use one of the
numbered guideNnes on the plate. The num
bers indicate distance, in eighths of an inch,
from the needle, if you want a 5/S-lnch
(1,6cm) seam, for example, line up your fabric
with the number 5 guideline. Note that both
number 5 guidelines (the most commonly
used) are extended on the slide plate for your
oonvenience; the crosslines serve as guides
when stitching a square corner.
For extra help In keeping the seam straight,
you may wish to use the seam guide. Because
it allows you to guide stitches evenly between
1/8-inch (Smm) and 1-1/4 inches (3cm) from
the fabric edge, it is particularly useful for
very narrow or very ’wide seams.
To insert seam guide on machine see page 8.
TyRriiMG SQUARE CORNERS
To turn a square corner 5/8~lnch (1.6cm)
from the fabric edge, you need not measure or
mark the seam. Simply use the crosslines on
the slide plate.
♦ Line up your fabric with right or left
guideline 5 on the plate. Stitch seam, slow
ing speed as you approach corner.
Fabric after Turning
♦ Stop stitching, with the needle down, when
the bottom edge of the fabric reaches the
cornering crosslines on the slide plate.
♦ Raise presser foot slightly end turn fabric on
needle, bringing bottom edge of fabric in
line with guideline 5.
® Lower the presser foot and stitch in new
direction.
30
Page 33

1. For example. If the stitch length control on
your machine is set on 2 the machine will
sew approximately 12 stitches to the inch
for straight seams. Adjust the control bet
ween 1 .S to 2 or 15 to 20 stitches per inch
to stitch curved seams in the same fabric.
2. if you use the seam guide, attach it at an
angle so that the edge that is closer to the
needle acts as a guide.
IMF
EMU
1. Stitch to the edge of the fabric. (Do not sew
beyond edge of fabric)
2. Press reverse stitch button and hold in
place. Backstitch approximately 1/2-inch
(1 -3cm) to reinforce end of seam. Release
reverse stitch button.
3. Raise needle to its highest position by
turning hand wheel toward you and raise
presser foot. Remove the fabric by drawing
it to the back and left.
4. Cut threads on thread cutter at rear of
presser bar.
iiig
r V
l^everse Stitching
Stitching a Curved Seam
.
..
Page 34

applications
DARNING
Worn or torn spots on children’s clothes,
knits, and household linens can be darned
effortlessly and quickly with little practice.
You may choose to darn either with or without
acoessories. When greater control is needed,
use the accessories.
With Accessoriest
6 Stitch; straight stitch i
• Stitch length: 0
6 Cover plate
® Darning and embroidery foot
1. Trim ragged edges from area to be darned
and center worn section in embroidery
hoop.
2. Select straight stitch.
3. Position work in hoop and place hoop
under foot, then lower the presser bar to
engage tension.
4. Hold needle thread loosely with left hand,
turn hand wheel to'ward you, and draw bob
bin thread up through fabric. Hold both
thread ends and lower needle into fabric.
Snip off after a few stitches.
5. Outline area to be darned with running
stitches for reinforcement as illustrated.
6. Stitch across opening, moving hoop back
and forth underfoot. Keep lines of stitching
closely spaced and even in length.
7. When opening is filled, cover area with
crosswise lines of stitching.
32
Darning with Embroidery Hoop
tFor best resuiis, hinged piste shcuic be up v.'hen darning with embroidery hoop.
Page 35

BAUmUQ
Wiilloyt Accessories
9 Stitch: straight stitch i
® Stitch iength: between 1 and 1.5
« Generai purpose needle plats
» Special purpose foot
« Pressure setting; (darn)^
1. Select straight stitch.
2. if area to be darned is open, baste an un
derlay in place.
3. Place area to be darned under presser
foot; lower presser foot and start stitching,
alternately drawing fabric toward you and
pulling It gently away from you.
A. Continue this forward and backward mo
tion as you fill the area with parallel lines of
stitching. For additional strength, cover
area with crosswise lines of stitching.
Dammg Without Accessories
HESITATION EMBROiOERY
Hesitation embroidery is free-motlon
embroidery using speed basting. The time
lapse that occurs between needle penetra
tions permits unhurried hoop movement (ap
preciated by the beginner), it also permits
unusually long stitches, as well as short ones
for unique decorative effects.
e Stitch; basting stitch |
o Stitch iength: 0
« Cover plate
« Darning and embroidery foot
« Speed range: SLOW
1. Trace or transfer design outline to fabric
and center in embroidery hoop. Designs
and motifs with shaggy outlines and tex
tured surfaces are usually best.
2. Select speed basting.
3. Position hoop under needle, lower presser
bar, and raise bobbin thread.
4. Move hoop back and forth, filling design
with long and short stitches as in regular
free-moilon embroidery, as described on
page 45.
33
Page 36

Quilting is the art of stitching two or more
thicknesses of fabric together in a planned
design. A padding is stitched to the underside
of the fabric to produce a soft, puffed effect
that is becoming to some wearing apparel and
to many fabric furnishings.
V'
R'
«Stitch: straight stitch ]
o Stitch length: to suit fabric, design,
and effect desired
» General purpose needle plate
® Straight-stitch foot
>te: For best results use the quilting foot
available for separate purchase at your local
Singer store.
Preparing the Fabric
Baste a light padding of cotton fiannsl, syn
thetic quilt batting (split), sheet wadding, ora
lightweight wool interlining to the underside of
the fabric. When using sheet wadding, first
back it with voile, batiste, or net to preserve
the sheet wadding through ’wear. Baste the
layers of fabric together on the lengthwise
and crosswise grains.
Basic Procedyre
1. Select straight stitch.
2. Draw both threads under the foot and
diagonally across feed to left.
3. Position the needle, lovj&r the foot and
start stitching.
Mote: If you are quilting a very large piece,
work from the center of the fabric to the
edges. Guide the fabric with both hands.
34
If the fabric has a floral or scroll design, the
pattern in the fabric can be your quilting
design. Stitch it from the top side.
Page 37

cmmsTiTcmuQ
Single-thread chainstitching looks like regu
lar straight stitching on top but is a series of
interlocking loops on the underside of the
fabric. The stitches are produced by the nee
dle thread alone so you do not need a bobbin
thread or a bobbin. Because the stitches are
formed by a single thread, the interlocked
loops ravel easily, allowing the entire line of
stitching to be removed with just a pul! on the
thread end.
Here are a few of the many sewing jobs for
which you will find chainstitching useful.
Prefsafsng Machine
* Threedins Take-up Eyelet
lii
:iil
5kr-5i 3: S;::: !; if 5^54 '
^ ^' Ul Y ilu n ^
Hi 'a? yp.i i 11
iU ii ili
® Sewing temporary hems and tucks to extend
the life of children’s clothes, and curtains
and linings that might shrink.
6 Hemming curtains and draperies that may
need to be altered.
e Attaching woven and stretch hem tape.
e Making stay chains (French tacks) to
anchor linings.
« Basting for trial fittings.
Preparation
» Select needle and thread according to your
fabric. (See Fabric, Thread and Needle
Chart on page 12.) Thread the machine in
the usual way except for the take-up lever.
For chainstitching, pass the thread through
the triangular eyelet as shown.
1. Raise take-up lever to its highest position
and raise presser foot. Open slide plate.
2. Move bobbin latch to left and remove bob
bin and plate.
Post
Finger
0 I G
/r\.
of
Insert
rki
Adjusting Tension
To find the correct tension setting for
chainstitching, set the tension dial on 3 and
make a test sample in your fabric. If the loops
in the chain on the underside of the fabric are
loose and irregular in size, increase tension.
When the tension is correctly adjusted, the
chain will be flat and smooth and the fabric
unpuckered.
® To increase tension, turn dial to a higher
number.
* To decrease tension, turn dial to a lower
number.
3. Place bobbin-case insert in bobbin case as
shown, with finger of insert positioned under
the feed.
4. Position chainstitch plate over holding
pins, making certain that the post of the
bobbin-case insert finger enters the hole in
the plate. Close slide plate.
35
Page 38

Releaslsig liie Chain from Machine
SEWmQ A CHMUSTITCH SEAM
9 Stitch: straight stitch !
® Stitch length: 2.5-3
« Soboin case insert
o Chainstitch needle plate
® Straight stitch foot
Starting and Chaining Off
1. Turn hand wheei toward you to position
needle in very edge of fabric. Lower the
presser foot.
2. Start the machine, and stitch to end of
seam. Continue stitchi.ng beyond edge of
fabric, making a chain from one to two in
ches long (2.5 to 5cm). Do not attempt to
stitch in reverse. Chalnstitching can be
sewn in a forward direction only.
3. Cut chain between fabric and presser foot.
4. After chaining off. start a new line of stitch
ing by raising the presser foot slightly and
positioning the fabric in front of needle.
Lower presser foot and stitch to end of
seam.
' V
^ it
' ' V '
I
f , -A
Beleasiog the Chain from the Machine
When you finish chainstitching, the chain can
easily be removed from the machine.
1. Raise presser foot.
2. Hold end of chain with your left hand.
3. Turn hand wheel slowly toward you with
your right hand until needle is ail the way
down in the needle hole.
4. Then turn hand w'heel slowly away from
you. pulling gently on chain, which will
unravel as needle rises.
Mote: This is the only time you should ever
turn hand wheel away from you.
36
Page 39

Removing Stitching from fabric
Chainstitching can be removeci smoothly and
cleanly in seconds by freeing the last stitch
formed in the fabric.
1. Simply cut the last loop formed on the un
derside of the fabric.
2. Pick up the free thread end from the top of
the fabric.
3. Pull the free thread end, rem.oving entire
line of stitching.
Removing the Chainstitch Accessories
« Raise take-up lever to its highest position
and raise presser foot.
« Open slide plate and remove the cnainsiitch
plate.
» Move bobbin latch to left and lift out the bob
bin-case insert.
« Replace zig-zag or straight stitch plate and
bobbin (see pages 8 and 17). Close slide
plate.
Hemoving the Stitching
o Unthread chainstltch eyelet in take-up lever
and reihread for regular sewing.
I i r? t i I ;
o o\
t., U “
^ ''
r."... Xt
oX
II
}
...
Cl
wX
Removing Chainstltch Plate
37
Page 40

V ' Y f ****•, ^
г
»1
■
iiliiiiii
li■iЯi■iИi■i
11в1Ш1Ш1М1Ш®
Ш
i
CHAINSTITCH APPLICATIONS
Here are several ways in which you will fine
chainstitching quicker than either regular
straight stitching or hand basting.
Garment Fitting
Time and energy can be saved when
chainstitching is used to baste garment sec
tions or muslin shells for trial fittings. The
firm.ness of the stitch ensures accuracy in fit
ting. yet the stitching can be ripped out in sec
onds if adjustments are necessary.
Constryctioii Gyidelioes
in many instances, construction guidelines
for pockets, buttonholes, and other details
can be advantageously marked with
chainstitch Pasting. The stitching will give a
clearly defined line marking. Yet, unlike chalk
or pins, it will not rub off or become lost as the
fabric is handled. This method lends itself
particularly to use on wools and other fabrics
that do not retain the penetration ma.i-ks of the
needle.
38
stay Stitcliing
h
'"y-»
Chainstitching can be used to stay-stitch
neckhnes, shoulderlines, and waistlines
before gar.meni assembly. Flexible, yet firm,
this stitching will hold the original shape of
these areas and prevent stretching.
Page 41

Slipcover Welting — Tubylar Trimming
Chainstitching has an affinity for fabrics cut
on the bias. The loop formation of the
chainstitch is a natural lor corded welting and
tubular trimming where a certain amount of
elasticity is needed to prevent stitchses from
“cracking”.
Beit Carriers and Stay Cbalos
Stay chains (sometimes called French tacks)
and belt loops, normally time-consuming
hand-worked detail finishes, can now be
quickly made by machine. To produce a
chain, place the first stitch in the fabric. Stitch
off fabric and continue stitching until a suffi
cient length of chain is produced. Thread
chain through emibroidery or darning needle
and tack to garment or lining. A stitch length
setting of 12 is recommended.
Growlb and Shrinkage Tucks
Tucks are frequently put into curtains, linings,
and children’s clothes to allow for fabric
shrinkage and child’s growth. “Letting down”
is no longer a chore when tucks are
chalnstitched. Simply unlock the last loop of
the chain formed on the unde.»-side of the tuck
and puli out the stitching.
39
Page 42

.I?
о
1|И
Ш% И,
о
I ;-11;
о
Г?!
« Si:ten: zig-zag §
« Stitch width: to suit fabric
» Stitch length; to suit fabric
a General purpose needle plate
® General purpose foot
Too Tight
» Rotate the group selector dial (A) to the right
as far as it will go. The zig-zag symbol wil
now appear in the yellow field above patterrt
selector button |S).
® Press pattern selector button {8). A red light
will appear above the zig-zag syrrsboi to indi
cate that machine is ready to produce a
basic zig-zag stitch at maximum stitch width
and medium stitch lenath.
cnmmuQ sTi
To change stitch length or width see page
22 in Chapter 3. Electronic Sewing.
Zig-Zag stitching usually requires less needie-thread tension than straight stitching. Be
sure your machine is threaded correctly and
make a test sample v^ith the fabric and thread
you plan to use so that you can adjust tension
to suit the stitch pattern you have chosen. The
stitches should lie flat against the fabric with
out causing the fabric to pucker.
tne st:to.ne$ are not
puckered, lower the needle-thread tension
turning the dial to a lower number.
flat
an
the fabric is
Page 43

Zig-zag stitching has found a solid place in
home sewing. The zig-zag stitch can be used
creatively as well as practically. The following
examples are effective uses of the zig-zag
stitch. The results are left up to your imagina
tion and ingenuity.
ZIG-ZAG SEAI^ FINISHES
Seam edges support the garment and shou
be given a durable finish if the fabric is likely
to ravel. There are two methods of finishing
seams in such fabrics: method 1. trimming
after stitching seam edge, or method 2, over
edging. Make a test sample first to determine
which method best suits your fabric.
f^ethod No. 1 —Trimmed Seam Finish
«Stitch; zig-zag g or multi-stitch zig-zag T
• Stitch width: to suit fabric
« Stitch length: to suit fabric
« General purpose needle plate
» General purpose foot
1. Select appropriate stitch pattern.
2. Adjust stitch width and length if necessary.
3. Place stitching near the edge of the seam
allowance.
4. Trim seam edges evenly, as shown, after
stitching is comipleted.
THmmlng Edges
41
Page 44

Overedged Fmish
Method Mo. 2 — Overedged Seam Finish
Stitch: zig-zag $ or muiti-stitch zig-zag >
Stitch width: to suit fabric
Stitch length: to suit fabric
General purpose rseedie plate
Genera! purpose foot
1. Adjust stitch length and width if necessary.
2. Trim seam edges evenly.
3. Place stitching over the trimmed edge of
the seam allowance as illustrated.
LINGERIE SEAMS
• Stitch: zig-zag g
® Stitch width: narrowortosuitfabrlc
« Stitch iength: to suit fabric
« General purpose needle plate
e General purpose foot
To make a lingerie seam durable and flexible,
use the plain zig-zag stitch at a narrow width
setting. This seam treatment is particularly
suitable for bias seams. When seaming nylon
tricot, insert a Yellow Band needle in the
machine before you begin to sew.
Lingerie Seam
® St.>'alghi-stitch the seam on wrong side of
fabric.
• Press both seam allowances in the same
direction,
« From the right side, topstitch with narrow
zig-zag stitching, letting the needle alter
nately enter the seam line and the seam
thickness.
42
Page 45

SATIN STITCNING
* Stitch: zig-zag §
® Stitch width: to suit fabric
® Stitch length: 0 to 1
* General purpose r4eedle plate
« Special purpose foot
Note: Other decorative stitch patterns ex
cept stretch stitch patterns, may be sewn at
satin-stitch length.
Satin stitching, a series of closely spaced zig
zag stitches that form a smooth, satin-like
surface, is useful for both utility and decora
tive work. It is accomplished by sewing a zig
zag stitch with stitch length pointer In the area
between 0 and 1. For best results, the special
purpose foot must be used.
When you wish to produce a satin stitch,
make a test sample first so that you can adjust
the stitch length and thread tension properly.
Soft fabrics may require a backing to ensure
firm: satin stitching. Crisp organdy or lawn is
suitable for this purpose.
lUfclBl®!
5-^^ wi i!W> aw \
Adjusting Stitch Length for Satin Stitching
1. Open the personal preference panel, (A).
Set the stitch length pointer on 1.
2. Run the machine at a slow speed.
3. Gradually m,ove pointer from 1 toward 0 by
rotating the pointer downward until
stitches are closely spaced and form a
smooth surface.
Stitch width may be varied in a similar man
ner. Move stitch width pointer to any desired
setting: the higher the number, the wider the
stitch.
Adjusting Tension for Satin Stitching
Satin stitching generally requires even less
tension than open zig-zag stitching. Further
more, the wider the satin stitch, the lighter the
tension on the thread must be. Thus, a stitch
width setting of 5 requires the least tension;
narrower stitching requires somewhat .more.
Notice the stitching on your sample. If the
stitching looks too taut, or if the fabric is
puckering, lower the needle thread tension by
turning the tension dial to a lower number.
Incorrect
Correct
43
Page 46

lifc
/
APPLIQUE
Make a test sarr^ple to decide which of the
foHowing methods is the most appropriate for
your fabric and design. Mark design on piece
of fabric to be appHqued. Cut out design ieav-
ing about 3/4-inch {2cm) margin ali around.
Position the design.
Baste it to the fabric.
Method 1
® Set pattern seiector and stitch-width dial for
desired applique stitch. Adjust stitch length
to a fine setting, between 1 and 0.
• Follow the outer edge of the design with a
decorative stitch.
» Trim away the excess fabric on the outer
edges of the stitching.
Hettiod 2
sMoîhod 2
« Select straight stitching.
lit
« Outline the entire design with a short stitch.
e Trim raw edges to the stitching and remove
basting.
• Select stitch pattern and stitch width
desired, and set stitch iength on a satin
stitch setting lor a ciosely spaced stitch,
between 1 and 0.
® Stitch, foiiowing the straight stitch outiine.
This method wlli produce a smooth overedged finish, with no raw edges to be trim
med after stitching.
Method 3
® Purchased motifs can be appliqued quickly
and easily by using either a straight or
decorative stitch.
44
Method 3
Page 47

¥ПЕЕ-ШОТЮЫ STITCHiHG
In free-motion stitching, you sew without a
presser foot and control fabric movement by
means of an embroidery hoop. Either a
straight or a plain zig-zag stitch can be used.
Because you can move the hoop in any direc
tion — forward or backward, from side to side,
or even diagonally — free-motion stitching is
extremely useful for embroidery designs. On
the other hand, it is equally useful for darning.
if you are embroidering, you can vary the
length of stitches simply by moving the hoop
faster or slower under the needle. The faster
you move the hoop, the longer the stitches will
be. You can also vary the width of zig-zag
stitches from wide to narrow by controlling the
angle at which the hoop is placed and moved
under the needle.
For darning, the embroidery hoop used in
free-motion stitching enables you to hold the
fabric taut — a real advantage when your
fabric is lightweight or soft and thus likely to
pucker. See page 32 for directions.
2. Hold needle thread loosely and turn hand
wheel toward you to bring bobbin thread up
through fabric. Hold both thread ends and
lower needle Into fabric.
3. Stitch, outlining or filling in design with zig
zag stitches. For a smooth, satiny surface,
place parallel stitches close together, mov
ing hoop slowly and steadily. For an irregu
lar texture, move the hoop more rapidly,
allowing some stitches to overlap.
A series of bar-tacks can be used to form
spray-like leaves or flowers. This technique
adds variety and lightness to many designs.
Leaves and petals formed in this way may
carry the thread from one bar tack to the next.
This carrying thread eliminates tying of the
thread ends.
FLOWER EliBROIOERY
Pattern; zig-zag §
® Stitch width: to suit fabric
® Feed cover needle plate
a No presser foot
Preparation
Trace design on right side of fabric. .P.*'epare
the area to be embroidered using an underlay
if the fabric is soft. Place the work in an
embroidery hoop approximately 7 inches
(18cm) in diameter. If the design to be
embroidered covers a large area, it will be
necessary to reposition the work in the hoop
as each section is completed.
The darning and embroidery foot may be used
to assist fabric control.
Procedure
1. Position work under needle and lower
presser bar to engage tension.
Compfeted Flower Design
liiiiiii
45
Page 48

6. MACHINE STITCH PATTERNS
adjusting stitches
GUIDING AND SUPPORTING FABRIC
Most fabrics of stretch or knit construction
need only to be guided in front of the presser
foot when you use one of the stretch stitches.
Some fabrics —nylon tricot and elasticized
fabrics, for example — do require support
while being stitched.
o For nylon tricot and similar synthetic knits,
apply gentle tension by holding the seam in
front and back of the presser foot as you
sew.
« For elasticized fabric, stretch lace, and knits
with an unusual amount of elasticity, apply
firm tension in front and back of the presser
foot to stretch the seam as the stitches are
being placed.
Applying Firrri Tension
MAX
mnm.
CAUTION: Do not puli the fabric while you are
stitchi,ng as this may deflect the needle, caus
ing it to break.
ADJUSTING PRESSURE WHEN
SEWING KNIT AND STRETCH FABRIC
Some knit and stretch fabrics, because of
their structure, require either more or less
than normal (NORU) presser-bar pressure to
feed smoothly and evenly.
e For thick, soft or very stretchy knits,
decrease pressure by turning dial from
NORM (normal) toward DARN.
e For nylon tricot, ciré and similar hard sur
face synthetic knits, increase pressure by
turning dial from NORM (normal) toward
MAX (maximum).
46
Page 49

handling special fabrics
Many fabrics, because of their construction or finish, demand special attention in sewing. Tech
niques used in stitching and handling, and choice of machine accessories, will vary with the
fabric. Let the table below guide your selection.
FABmc-HAmLmQ table
FABHiC
leptiie
veive:,
epss:|ii||gyi||i|s|
0eEiFlu|L-::i-:
FERMANiiMT i'i
PRESS —
pfercalCfllf!
b'roadbioihr
SPSCtAL HAKDLiKG
iriKpifeht:ppe%s:aiiibi^
basting—Topstitch to hold seams and edges
bound butiDAholes.
Stjlph^lhdirectibhipflhap
ini—ir^i:dveia:ailf-Pltnc1ltPthit-L
Pin rather than baste seams —Stitch in directibl ''oi|hd:piip;iie piph' :pBiiip|ishdrt^hai
tuns; narrow overedged seams for shaggy, bulky
'educe ou <
Controi seam tension as it passes under "e
presser foot. Sew at moderate speed.
STITCH
Length-Type
Long Straight
hifedium Straight
jflldiildr Yarns':
Medium Zig-Zag
Stitch for
®irdiityg*f;
rfchgiStralght, L-
Stitch for plain
Medium to Short
-cr jva-ecgeC
Meciurr St'dign;
NEEDLE
Styie-Size
Style 2020
i^ildrWb^edi'*'-
backing
Size 14or 16 ■
.
..............
<:iSiylei:2b2b :
Style 2045
for panne
velvet
Iplpiibiili
style 2020
.
Tp28ife|l4
NiACHINE
ACCESSORIES
6 1
S: GdiiraiPdrpcsel
r'CeiirafiFdiib^':|
iiipaiaiiiiiiiiiis
General Purpose
1; Fo|tifiili|i|:i|i;,,
I■
lilsFclIiillidri
overcasting)
General Purpose
). Piaie 1 .17 IT'''''''.
i: GeiiEi'pipbse |
! Fo<itti'\f|'''''''':'''i'
li'Ptiie::. f| ’ "
Straight-Stitcn
P Fo<|pb:hiSlap ■
FlHEiii...
KXSTS —
;r cc; ,e'sey
BiKDiMG —
satin face
SOFT
SH££R~4-|
t For best resuits
.
..
FABRIC —
aiohalr, carnel ;?
Center,
Psi'''hprdvif'Pemdiidr
sFrlridhlipp^iSlldli IhiliiiP
a fbw 'sltdbiiiiltari P seiP'PbdiPrfseams''
while stitching. See page 46 —mcrease
presseifdcipt^#um;-: '
' shdw)’‘pi'Sjtliikbd|hP4
bsd:>F||hdi!i'*Se|Ps,idbpiii^t^^
ertds of .needle and bobbin thread when you
Cu|, whlsbai
of td hoilliliiiiisSndledges.
fiat.
when sewing this fabric, we recommend use of
...
|ui|ings|dcvi^i::—Je^ili
Medium Stralg.hi
ijdtltpi:...
Zig^
or Marrow
f village jj,..
Long Straight
fditbii®...
Medium to Long
Zig-Zag Stitch
iiiriiteioraive i
Stitch
iMediimtdlShc#
Straight Stitch
Straight Stitch
the Even Feed Foot. avaiSable at your Singer Sewi.ng
.
■iipii2d4|ii|i‘
rp2i|:tbdl'4
.
.
■»i'p2ei|i'dipi^
ijtyiioalli:
....
..........
iiipbeiiiidiiifc
Size 11 or 14
Straight-Stitch
1 |iPdd|idn||Pla|bf L:
(for straight
General Purpose
Foot and Plate
ii: {foiblgrl^g:.il........,.,.„i.,..
il'siitpliiiiiil'l
:|'Gehesal|Fdrpose if
ii GfeiifaiiPirpbse f
ii..Strdigt^iStit|hi.'.i.i:|
.
i|ip||piipbpisifiiii|^
ii GeptbllPuriose J
Gerseral Purpose
|Pla||ii|i||ft^^^^^
47
Page 50

stitch centerint
e Stitch; stitch desired
* Width: to suit fabric a.nd desired effect
» Ler^gth: to suit fabric and desired effect
» General purpose needle plate
« Special purpose foot
® Speed range: SLOW
When sewing, it is important to correctly
guide the stitches on your fabric to achieve
centered stitching. A line of stitching is cen
tered when it lies evenly on an imaginary line
on the fabric. To clearly see what stitch cen
tering is, and to practice even stitch guidance
and machine control, try the test below.
Use a light color top and under thread for this
test. This will dem.onstrate to you how a cor
rectly centered line of stitching lies on a given
line.
« Set machine on straight stitch.
« Attach special purpose foot
(Notice that foot is clear plastic for better
visibility and has vertical black line in the
center to guide stitch placement on fabric.
« Draw a vertical line on a sheet of paper or
use graph paper, if available.
® Place paper under presser foot with drawn
line centered under black vertical guideline
of special purpose foot.
o Lower presser foot.
« Lower needle by turning hand wheel toward
you, and position it on drawn line of paper.
® Carefully sew along the drawn li.ne on the
paper, using black vertical guideline of foot
to guide stitching.
(Do not ’watch needle.)
« After you have sewn along the drawn line,
carefully remove paper from under presser
foot.
if you have correctly guided the paper while
sewing, the stitched line will be centered.
Notice that the stitching lies evenly on the
drawn line.
Try a paper sampler using a variety of stitches
to practice stitch centering.
To assure centered stitching on the fabrics
you sew, use a guideline marked with tailor
chalk.
48
%
Ov
Os
Os
Os
I
Y
4. I
*/*
‘V
V
i.<
V
>
*
Page 51

stitch usage: functional and decorative
Many stitches on your new machine have
both functional and decorative applications.
The following pages include examples to il
lustrate the versatility of these stitches.
ihough many stitches can perform in a giver
FEATHERSTITCH
Fagoting
® Stitch; featherstitch ^
6 Stitch width: to suit fabric and design
® Stitch length: to suit fabric and design
o General purpose needle plate
® General purpose foot
® Speed range: SLOW
application, to avoid repetition only one stitch
has been used in each example. We,
therefore, hope that the examples provided
will help you to use your own creative talents.
I
The art of Joining two pieces of fabric with an
open, lacy decorative stitch is called fagoting.
You can create this attractive trimming with
the feather stitch. Use it for decorative stretch
seams in bathing suits or for joining together
narrow strips of fabric to make an entire gar
ment sectio.n.
• Turn under (and hem by slipstitching) the
raw edges of the fabric strips or seams to be
joined. Press flat.
« Stitch, guiding the two fabric edges under
the center of the presser foot a scant 1 /8inch (3mm) apart (abut edges for bathing
suit seams). Allow the needle to alternately
make a stitch in each fabric strip and two
stitches in the center of the opening.
49
Page 52

Patchwork Quìiiing
ilÉIii
Patchwork Qyiltirtg
0 Stitch; featherstitch |
«• Stitch width: to suit fabric and design
• Stitch iength; to suit fabric and design
• Generai purpose needle piate
• General purpose foot
• Speed range: SLOW
Patchwork for quilts and wearing apparel, for
merly put together with hand stitching, can be
quickly “pieced” and decorated at the same
time by using the feather stitch. Joinings are
both flexible and durable when this method is
used.
Procedyre:
1. Cut a fabric underlay to size. Baste a light
layer of padding to underlay if a quilted
effect Is desired.
2. Prepare patches, turning under 1/4-inch
(6mm) seam allowance.
3. Baste patches to underlay In arrangement
desired, butting all edges.
4. Stitch in lengthwise and crosswise rows,
allowing stitches to straddle patches.
50
Page 53

PAMS ротт STITCH
..
tern used for OemstUching, drawn-thread i
.
et^|eii:aniisji|pi
fabrics from which threads can be drawn
readily such as linen. There are many ap-
and bed linens when hems are finished i
Picot Edges
» Stitch: Paris Point stitch ^
® Stitch width: to suit fabric and effect
® Stitch length: to suit fabric and effect
General purpose needle plate
® General purpose foot
® Speed range: SLOW
A dainty and decorative picot-like edge can
be very simply made in fine, sheer fabrics
when you use the Paris Point stitch. The fine
hemstitched finish produced by this stitch is
particularly appropriate for edging ruffles
because it eliminates bulk. Use it too, as a
foundation stitch for hand rolled hems, it will
make bias cut edges firm and easy to handle.
Soft fabrics such as chiffon and voile, can be
given a picot edge if they are supported by a
crisp fabric underlay while being stitched. Al
ways make a test sample to determine the
need for an underlay and the correctness of
stitch width, stitch length, and thread tension.
pies have been provided which we hope
ZÀ •
® Use a large needle (size 18 is recom
mended) and a fine mercerized cotton
thread.
e Mark stitching line approximately 1/2-inch
(1.2cm) in fromi rav^ edge of fabric.
® Stitch along marked line, placing fabric sc
that the edge to be finished is turned to the
right.
® Trim fabric close to the right side of line of
stitching as shown.
51
Page 54

Ш
Steps 1, 2 and 3
Paris Point Hemstitcliing
• Stitch; Paris Point stitch ^
• Stitch width: to suit fabric and effect
® Stitch ieiigth; to suit fabric and effect
e General purpose needle plate
• General purpose foot or
• Special purposefoot
• Speed range; SLOW
Paris Point hemstitching is most effective
when used on firm, plain weave fabrics such
as lawn or organdy, or fabrics from which
threads can be drawn readily, such as linen.
1. Insert a size 18 needle and thread the
machine with a fine mercerized cotton, silk,
or synthetic sewing thread.
2. Turn edge of fabric over twice to make hem
of desired width. Fold and press on length
wise or crossv/ise thread of fabric. Baste in
place.
3. Draw out 2 to 4 threads just above top edge
of hem. The number of threads drawn will
depend on the texture of the fabric and the
depth of the open work desired.
4. Place work, right side up, under presser
foot with the hem toward the left.
5. Lower the presser foot and stitch, guiding
the hem edge under the needle so that the
straight stitches are made in the drawn
thread channel (or through the single
thickness of fabric) and the sideward
stitches (or points) in the hem.
Fririged Edges
® Cut fabric carefully to correct size.
* Draw a thread for depth of fringe along each
edge.
e Place fabric so that the edge to be fringed is
turned to the right.
® Stitch with matching or contrasting thread
along marked lines, pivoting on the needle
at corners.
• Fray fabric threads between stitching and
fabric edges to form fringe.
52
Page 55

OVEmDQE STRETCH STITCH
MAAMAMAAAAAAAAA
be used creatively, it is primarily applied
"I'i":
....
iilii|fl|i|fbirii|
edges. Use it to overedge seams that re
quire stretch such as crotch seams.
........
Overedged Seams
9 Stitch: overedge stretch stitch ^
® Stitch width: 5t
® Stitch length: to suit fabric and effect
® General purpose needle plate
o Overedge fodt
* Speed range: SLOW
Method 1
Make a test sample to determine the
suitability of an overedge seam finish for your
garment. Duplicate the grain of your garment
seam. Adjust thread tension to suit fabric. Use
an appropriate YeZ/ow Band* needle in the
machine for a synthetic knit. (See Fabric,
Thread, and Needle table on page 12.)
suit and svirim suit construction. Exam
ples of how to use the overedge stretch
stitch follow.
Method 1
Baste the garment together on the seam line
allowing for 5/8-inch (1.5cm) seam allowance
and fit in the usual way.
After making any necessary adjustments, trim
seam edge evenly to a scant 1/4-inch (5mm)
from! seam-line basting.
Place trimmed seam under the foot so that the
straight stitches fall on the basted seam line
and zig-zag stitches fall over the seam edge.
tSf a narrower stitch width is desired, as for seam finishing
of fine fabrics, use the general purpose foot in place of
the overedge foot.
Stsichrng Seam
Page 56

Method 2
Mock Overedging
l^ock Overedge
This finish is appropriate for bulky knits, fine
tricots and fabrics that curl or fray.
Method 2
Make a test sample.
Baste the garment together on the seam line
and fit in the usual way.
After making any necessary adjustments,
suggested in Method 1, place seam under
foot. Stitch so that the stitches on the left sice
of the pattern penetrate the basted seam line.
Press after stitching and trim away excess
fabric to produce a narrow seam. edge. When
the seam supports the garment, omit the trim
ming step and press seam open in the usual
way.
Overedged Seam Finish
Overedged Seam Finish
9 Stitch: overedge stretch stitch ^
o Stitch width: 5 onlyt
® Stitch length: to suit fabric and effect
« General purpose needle plate
a Cveredge foot
« Speed range: SLOW
Adjust stitch length to suit your fabric.
Trim seam edges evenly.
Place stitching over the trimmed edge of the
seam allowance as illustrated.
tif a narrower stitch width Is desired, as for overedging
fine fabrics, use the general purpose foot in place of the
overedge foot.
54
Page 57

BumsincH
A
---------
5®|ii|iS|i|l|ii:i|iii'S
fynctloiial uses. Its most common use
provides a durable hem finish. However
Am,.
m wwM» w ww mm M»
Blifidstitcli Hems
Slindstitchirsg provides a durable hem finish
that is almost invisible. It is best suited to
straight or slightly curved seams. Taped,
bound, or turne6 hem edges can also be
blindstitched with equal ease.
Stitch: biindstltch
Stitch width: to suit fabric
Stitch length: to suit fabric
General purpose needle plate
General purposefoot
provided which we hope will help to trig
ger your imagination.
1. Raise foot, loosen screw, and slip blind
stitch hem guide between the screw and
the shank of the foot. Make sure the under
side of the guide clears the slide plate and
the front of the foot. Tighten screw with
coin.
2. Prepare hem in the usual way. It Is advisa
ble to baste the hem. Place the basting at
least 1/2-inch (1.3cm) below the edge of
the hem allowance to avoid catching the
flange of the guide as you stitch.
3. With the wrong side of the work uppermost,
turn the hem under, creating a soft fold
from the top edge of the hem.
4. Position the hem under the foot with the
soft fold resting against the wall of the
guide. Make sure the flange of the guide is
between the soft fold and top of hem, as
shown.
5. Lower the foot, stitch so that the straight
stitches fall on the hem allowance and the
zig-zag stitches pierce the soft fold of the
work. Adjust stitch width If necessary.
While stitching, guide the hem edge in a
straight line and feed the soft fold evenly
against the wall of the guide.
55
Page 58

SHndstitohsrig a Ladder Seam
Ladder Seam
The blindstitch ladder seam Is particularly ap
propriate for kr^it and stretch fabrics. It is ideal
for stretchable construction seams, and edge
finishes for necklines, pockets and collars in
sportswear and swimsuits.
« Stitch; blindstitch
® Stitch width: to suit fabric
» Stitch length: to suit fabric
® General purpose needle plate
® General purpose foot
1. Make a test sample to adjust stitch width
and length and needle-thread tension to
suit the fabric. (Needle-thread tension
should be lighter than normal)
2. Cut and fit garment, allowing for 5/8-lnch
(1.5cm) seam allowance. Baste seam line.
3. Place fabric under presser foot so that the
straight stitches fall on the seam line bast
ing and the points toward the center of the
garment.
Opening Seam to Fixm Ladder Effect
4. After stitching, open seam> by pulling fabric
back on opposite sides of the seam to pro
duce ladder effect. Press seam allowance
after opening.
56
Page 59

SCALLOP STITCH
...I................................IS.....
........................ ...........
Scalloping aacs interest to blouses,
dresses, lingerie, and children's clothes.
S|all|ps|: wl|L:te
..
gii,::
■stitch. Twin needle scaiiop stitching adds
® Stitch: scaiscp ,i
• Stitch width: to suit fabric and design
o Stitch length: to suit fabric and design
* General purpose needle plats
® General purpose foot
1. Place right sides of fabric together.
(Shaped or bias edges should be inter
faced.) Stitch scaiiops.
2. After stitching, trim seam allowance to
1 /8-inch (3mm) or less,
a touch of femininity to garmerits. The
decorative uses of this stitch are unendo
„Jlgj.iiySÉ:igP|Ì:xffi;2:Ìld^^
........
Notch
3. Clip points down to fiat stitch of scaiiops
with scissors and, if necessary to make
points lie flat, notch curves.
4. Turn to the right side and gentiy pust
ih
scaiiops out. Press fiat.
Wrons Side of Scalloped Edge
Right Side of Scalloped Edge
57
Page 60

:liyLTI-STiTCH ZIG-2A0 ■
/ V"* V' V* V' V V^ 'v' V' V N
■]ThÍr:;mÍIP|tif®'fl||~^^
versatile stitci^. Use ít to mentí. Join, or
"foo-miy"iiití aid dfMdli'lioil"::
construct lingerie and swimsuits, as we'.'.
i^yi ■
i^-% *^\
useful applications for the mylti-stltch
|;z:|||za|. ilampiellSilejii^^
Pyddr
lending a Tear
• Stitch; multi-stitch zig-zag ’>
® Stitch width: 2 to 5
® Stitch length; programmed
o General purpose needle plate
o General purpose foot
Many zig-zag stitch patterns are just as useful
for mending as they are for creative sevring.
The multi-stiich zig-zag forrrts a firm, flexible
bond that is ideal for repairing tears.
1. Trim ragged edges.
2. Place underlay on the wrong side of tear
for reinforcement. (Do not baste or pin the
underlay, since you wlH be bringing the
edges together in the next step.)
3. Stitch on the right side, bringing the edges
of the tear together. Shorten stitch length
at ends and corners to give extra strength.
4. Trim underlay.
53
Page 61

Replacing Lingerie Elastic
® Stitch; muiti-stiich zig-zag <
® Stitch width; 2 to 5
® Stitch length: 1.5
® General purpose needle plate
« General purpose foot
1. Fit elastic for desired snugness at
waistline, allowing one inch (2.5cm) for
joining. Lap ends and stitch together as
shown using a ball point needle.
2. Divide elastic band into four equal seg
ments and mark with pins. Do the same to
the garment Then pin together a! corres
ponding points, pinning elastic over right
side of fabric, top edges even.
3. Select multi-stitch zig-zag. Plain zig-zag,
elastic stretch stitch, honeycomb or
featherstitch are also effective for replac
ing lingerie elastic.
4. Take a few stitches to anchor elastic to
fabric. Then hold elastic and garment edge
taut as you stitch so that It will remain
stretchable after stitching is completed.
Caution: Do not puU the fabric vrhUe you are
stitching as this may deflect the needle, caus
ing it to break.
FIMISHES FOR HEMS AUB FACINGS
'■J'
:
5
Vic:
Jcin.ng E cstic
Beplacing Lingerie Elastic
o-'*: ■
® Stitch; mulil-stitch zig-zag <
® Stitch width; 5
« Stitch length; 1.5 to 3
® General purpose needle plate
6 General purpose foot
Hem and facing edges in knit and stretch
fabrics will be less apt to press through and
mark when given a flat edge-finish. Edge
finishing with the multi-stitch zig-zag elimi
nates the bulk of turned-in edges and retains
fabric flexibility.
1. Make a test sample to check thread ten
sion and stitch length if you are using the
multi-stitch zig-zag.
2. Place stitching about 1/2-inch {1.3cm)
from hem or facing edge.
3. Press after stitching and trim away excess
fabric close to the stitching line.
59
Page 62

HONEYCOMB STITCH
The honeycon^b stitch is ideal for s.TOok-
ir:s ar^d useful for meriting, overcasting
and attaching eiastic, stretch iace and
blanket binding, dse this versatile stitch
to create decorative designs or; fabrics
iiil
.....
iiiiPit’i'hi
Blanket Binding
Stitch; honeycomb %
Stitch width; to suit fabric and effect
Stitch length: to suit fabric and effect
General purpose needle plate
General purpose foot
Speed range; SLOW
Often you can make a blanket look almost
new by replacing the binding. The honeycomb
stitch is particularly suitable because it com
bines utility with beauty.
1. Make a sample first to determine the cor
rect stitch width and length setting.
Reduce pressure (on pressuredial) and in
crease stitch length if necessary, so that
blanket feeds freely. See page 22 for In
structions on adjusting stitch length.
60
:^anket
2. Remove worn binding and caste new bind
ing securely in place.
3. Stitch, and remove basting.
The even feed foot which can be purchased at
your Singer Sewing Center is most suitable
for this application, it ensures smooth feeding
and prevents fabric slippage.
Page 63

lilAXI-STHETCH STITCH
Tha maxi-stretch stitch is an invaluahis
stitch most commonly used for sewingsia^rri^i;OiJa|5fics
it can be made in various lengths, the
maxi-stretch stitch is particularly useful
for seaming extra-heavy and extra-bulky i
Maxi-Stretcli Stitch Seam
® Stitch; maxi-stretch stitch |
® Stitch length: to suit fabric
9 General purpose needle plate
* General purpose foot
® Speed range; SLOW
Make a test sample first to determine the best
stitch length, pressure and tension settings
for your fabric. To be sure that you are using
the correct needle and thread combination for
your fabric, see the Fabric. Thread, and Nee
dle Table on page 12.
Adjusting Stitch Length
.
i^bib
...
a|d..|S:.elssili....................
Illiiiiisl
■ftri|ch'|stitihe|f Ipe^^ p
creativity with this stitch to ornament gar-
.
........................
......
...pcbpibt|ti''i'';:pbfpit^ ^ilhbairipl
rAdjusting Reverse Stitch-Balance
.
Maxi-stretch stitch length is adjusted in the
same way as regular straight stitch length.
Longer stitches are most appropriate in firm
woven and bonded fabrics, heavy double
knits and sweater knits; shorter stitches are
best for medium-weight knits and woven
stretch fabric. For maximum strength, use the
shortest stitch compatible with fabric weight.
Page 64

Maxi-Sireich Stitch {Continued)
Adjysting Heversc Stitches
For maximum strength and good appearance,
forward and reverse stitches that make up the
maxi-stretch stitch should be balanced and of
equal length. See page 24 on how to adjust
reverse stitch balance control.
Procedyre
1. Pin or baste seam.
2. Draw needle and bobbin threads under foot
to back of machine. Hold thread ends and
by turning the hand wheel toward you, posi
tion needle In fabric a scant 1/4-inch
(6mm) in from starting edge.
3. Lower presser foot and start machine,
toidlng thread ends at back of foo t as first
few stitches are made.
4. Guide fabric lightly, let
make the back-and-forth
;mg
stitci
he machine
stretch to the seam.
CAUTION: Do not puU fabric while you apply
gentle or firm tension, as this may deflect nee
dle, causing it to break.
When stitching across folds and seam join
ings. apply tension by holding seam, in front
ana oack
of
assist feeding,
tial for thick.
ie presser foot, as shown, to
This type of support Is essen-
fabrics.
62
Straight Stretch
Page 65

ELASTIC STHETCH for STITCH
Ti-.e e.astic straxr. s::tch or "V" stitch .s
an attractive stitch which, may effectiveiy
Stretch Garinent Repair
® Stitch; “M” stitch I
® Stitch width: to suit fabric
» Stitch length: to suit fabric
• General purpose needle plate
® General purpose foot
© Speed range: SLOW
Seams in stretch garments retain their
elasticity when stitched with the “ivT stitch.
This stitch pattern builds stretch into the
seam as it is being sewn and is equaily suita
ble when used to topsiitch (as shown) or to
overedge. Make a test sample to check stitch
width and length settings.
stretch garment repair and may be used
for pia:n anc cvereccec seams in knit and
! I 1^
Lace Insertion
Fine iace insertion and edging add a feminine
touch to biouses, dresses and children’s
wear. Such trimming can be made decorative
and durable when applied with the “M" stitch.
Insertion
1. Mark position of lace and baste lace in
position.
2. Stitch, guiding work under needle so that
the top of the stitches fail along the edge of
the lace as illustrated.
3. Trim fabric away under lace insertion after
stitching both edges.
with Elastic Stretch Tcpstitching
Lace Insertion
Page 66

Your new SINGER sewing machine has
several decorative stitches. These versatile
stitches allow you to add imagination and
creativity to your sewing projects. With these
decorative stitches, you can apply to clothes
and household items: interesting details,
youthful and feminine accents, and per
sonalized effects.
Some of the many applications of the decora
tive stitches include border designs, appli
qués. twin-needle stitching, finished hems,
smocking, embroidering, monograms and
topstltching accent lines on clothes. The
following pages i!lustrate several of the
decc^ative stitches on your machine and pro
vide examples for their creative use.
Border Desïcn
ВОВОЕВ OESIOriS
Border designs that add a decorative touch to
wearing apparel and household item,s can be
created by combining different types of
straight stitching and zig-zag stitching. Sim
ple or elaborate, delicate or bold, they can be
varied to suit the application. Use them as you
would a braid or to simulate horizontal, verti
cal or bias stripes on plain fabric.
64
Procedyre
Mark or crease fabric for the center line of
first row of stitching. If spacing between rows
is not greater than 1/2-inch (1.3cm), gauge
additional rows with the presser foot. If spac
ing is wider, mark for each line of stitching.
Use a backing of crisp lawn, organdy or a fusi
ble interfacing and be sure to make a test
sample on a swatch of your fabric to check
stitch settings and thread tension.
Page 67

yOMOGRAMS
Many decorative stitch patterns can be used
for monograms and motifs — to add a per
sonal touch to jacket yokes, for example, or
for initialing household linens. You can buy
designs or create them yourself to suit the
stitch pattern you wish to use.
Very simple straight-line monograms can be
made with the plain zig-zag stitch, or you can
create a motif by ar.^'anglng individual pattern
units to form a design. (Detailed information
on pattern repeat button on page 21.)
When you use a decorative stitch pattern to
form a motif, your machine will autom.atically
be programmed to start at the beginning of the
pyramid, bead, or whatever pattern you have
selected.
^ionograrri’^ In Ìlaìht2S#Zai'lÌnB Sticbl
Insilai In Plain Zig-Zag and Bead Stitch
::Lthe...Édnogram in Plain Zig-Zag Stitch
65
Page 68

Topstltching with Leaf Stitch
TOPSTITCHING
A practscaL simple way to accent the lines of a
dress or coat is to place one or more rows of
stitching along collars, lapels, facing edges,
hems, pockets, seams, etc. For a tailored
;ooK, use
sew them
strands
emphasis.
zag stitch. The even feed foot, available for
separate purchase at your local SINGER
store, will help you place stitching evenly and
accurately. To keep stitching at an even dis
tance from the fabric edge, use the seam
guide.
ines of regular straight stitching;
with buttonhole twist (or double
of
or decorative interest, use a zlg-
regular thread) for added
Two-thread TopstitcNfig
Sold, well-defined topstitchlng is produced by
using two strands of regular thread in the nee
dle instead of a single strand. Ideal for sum
mer knits, linens, cottons, denims, and vinyls,
two thread topstitchlng is economical and
particularly appropriate for use v/hen a ncn-
lustrous, washable finish is required.
o Select a size 16. Style 2C20 needle for
woven fabric and use a size 14, Style 2045
Yellow Sand needle for knits. Refer to
Fabric, Thread and Needle Chart on page
12.
• Select straight stitching.
»Clip detachable spool pin to thread
guidepost,
o Using the two threads, th.^ead the machine
In the regular way for single-needle stitch
ing. For best results, use size 50 mercerized
cotton thread or cotton-wrapped polyester
thread.
® Pass threads together into tension discs
and threading points above the needle.
» Cut thread ends diagonally and draw both
through the eye of the needle.
« Make a stitching test to determine the best
stitch length and needle-thread tension. A
long stitch, 2.5 to 4 on your stitch length
dial, is usually best.
68
Two-ihread Topstiiching
® Sew at moderate speed.
Page 69

SMOCKIMG
Smocking is a youthful decorative detail that
is particularly charming when used for a yoke,
insert or band on baby clothes, little girls’
dresses, or lingerie.
When worked by hand, smocking is a timeconsuming process. Ho'wever, the heavystitched look, typical of hand work, can be
stitched quickly and easily with your machine
when you use decorative patterns.
Procedure:
1. Space rows of straight stitching with stitch
length pointer set on 5; 1/4-inch (6mm)
apart, on the crossv/lse fabric grain.
Set tension dial betv/een 0 and 1.
2. Pull up evenly for the amount of fullness
desired. Secure thread ends by tying knots
close to the fabric to prevent gathers from
puiling out of position.
3. Baste section or area to be s.mocked to un
derlay.
4. Stitch over and between rows of gathering
with decorative stitching. Create your own
design or adapt the ones illustraiec. Use
thread that contrasts with or matches your
fabric, depending on the effect desired.
A test sample is always advisable to check
stitch settings. Be sure to use the same fabric
and degree of fullness you plan for your gar
ment.
: Smocked iand"
_
____ ,
_____
_
Smocked Sand Accented
with Cording
Smocked Band Con^leted
67
Page 70

Take-jp
■_ever
.....
Hear Thread Guide
-yy :
TWIM-NEEDLE STITCHING
The twin-needle simultaneously produces
two parallel, closely spaced lines of decora
tive stitching. You can stitch with either one or
two colors of thread.
* Stitch length; to suit fabric
» Stitch width: to suit fabric
® General purpose foot
» General purpose needle plate
Caution: Always move the tv/ln-needle
switch to the right {f| symbol) before stitch
ing with the twin-needle. Unless this switch
has been activated, needle breakage will
result. Upon completion of your twin-needle
sewing, return switch to its ieft position
( I symbol).
Twin-Needle Switch
TensipaJMC.:.:.,
SeiMfa(pr: f ai ?lpf P j‘|;r
..
...........................................................................
i^:Gha?5nel
m ri
i
....
M,
.......Ì
Procedyre
® Thread machine with first thread in usual
manner, making certain it passes between
tension separator and right-hand tension
disc.
® Wind bobbin with enough thread to com:-
plets stitching. (Since a bobbin cannot be
filled after a twin-needle is inserted, it is
wise to keep an extra wound bobbin on hand
for replacement)
® Unthread and remove needle.
« Attach detachable spool pin to thread
guidepost and insert the twin needle.
® Pass first thread through right eye of needle.
® Place second spool of thread on detachable
spool pin and thread as before, except
bypass snap-in thread guidepost and pass
thread between tension separator and left-
hand tension disc and through left eye of
needle.
68
Page 71

I o LES
taking two or three tying stitches.
»Stitch: overedge stretch stitch
o Stitch width: to suit button
« Stitch length; C
® Sutton foot
o Feed cover plate
ATTACHIMG A BrnrOH
» Attach button foot and feed cover plate to
machine and turn on machine.
® Select cveredge stretch stitch ^ .
»Turn hand wheel toward you
moves to left side.
• Place garment under foot, then position but
ton on garment.
® Turn hand wheel again to lower needle Into
left hole of button, and lower foot.
» Turn hand wheel again carefully until needle
is just above right hole. Adjust stitch width,
if required, so that needle will enter right
hole of button. See page 22 for Information
on stitch width control.
» Run machine slowly. Allow at least three
groups of crossover stitches to enter right
hole of button. Finish sewing on left side.
;;nti
neecie
® Remove work from machine leaving 4 In
ches \10cm) of thread, pull thread ends
through to inside of garment, and knot them
close to fabric to form a secure finish.
fOnmmB A THREAD SHAHK
Buttons sewn on coats and jackets should
have a thread shank to make them stand away
from the fabric. A thread shank is formed by
sewing over the blade of a regular machine
needle.
® Position needle, garment and button as de
scribed above.
® Place needle in groove of foot so that point
enters hole in foot first, as shown. The
further in you push needle, the longer the
shank will be.
® After stitching, remove needle from groove
of button foot, remove work from machine,
and cut threads about 6 inches (15cm) from
fabric.
® Pull needle thread ends to back of button,
form a firm shank between button and fabric
by winding threads tightly around attaching
stitches, and tie thread ends securely.
Attaching a Button
.
'A'
i
.
Shianki
69
Page 72

Bar-Tack Suttc«ihole,
Finisi-^ed Edqe of Garmeni
buttonholes
Your new machine comes complete with a
built-in two step buttonhole system. Before
sewing on your garment always make a test
buttonhole dupUcating the number of
thicknesses of fabric and interfacing if ap
propriate.
syiTONHOLE posmon
Accurate guidelines are essential to keep but
tonholes at a uniform distance from the edge
of the garment, evenly spaced, and on the
grain of the material.
1. Mark the center line of the garment using
hand basting, machine speed basting or
with the buttonhole gauge found in the ac
cessory box, and tailor’s chalk. For
machine speed basting information see
page 27.
® Se sure that the space fromi the center
fine to the finished edge of the garment is
at least equal to three-quarters the
diameter of the button. (With this spac
ing, the button will not extend beyond the
edge -when the garment is buttoned.)
'■8pizdfr^ai№
on Crosswise Grain
t op:
e Make sure that the center line marking
follows a lengthwise fabric thread.
2. Mark a position guideline for each but
tonhole.
6 Horizontal buttonholes are placed to ex
tend 1 /8-inch (3mm) beyond the center
line of the garment, as shown, so that the
buttons will be in the center of the figure
when the garment Is fastened.
* Horizontal buttonhole guidelines should
follow a crosswise fabric thread and be
longer than the finished length of the but
tonhole.
« Mark ends of each buitonhole vertically.
e Vertical buttonholes are placed so that
the center line of the garment is in the
center of the buttonhole, as shown.
® Mark the ends of each buttonhole
horizontally across the center line bast
ing and use the center line marking as
the buttonhole guide when stitching.
70
Page 73

BUTTOMHOLE LENGTH
A buttonhole length should be just long
enough to allow the button to slip through the
opening without stretching it,
« Estimate the proper buttonhole length by
measuring the width plus the thickness of
the button.
o To make sure the measurement is correct,
cut a slit in a scrap of fabric equal to the
diameter of the button you intend to use.
« increase length of opening until button slips
through easily.
This test is particularly advisable for buttons
of unusual shape or thickness.
^tarking Lines
BUTTONHOLE INTEHFACING
It is almost always advisable to use an inter
facing in the buttonhole area. An interfacing
holds the fabric firmly so that a neat but
tonhole may be stitched and keeps the
finished buttonhole In shape, interfacing is
essential when the fabric is loosely woven or
is a crepe or knit that stretches easily.
When planning your garment, remember that
bar tack buttonholes are stitched through
three thicknesses of fabric — garment, inter
facing and facing —after the facing has been
attached.
putting Space Side Stitching
Testing Suîtonhole Length
Page 74

MAl
IT
TWO-STEP BOTTOriHOLlNG
Make a test buttonhole on a sample of your
fabric, with interfacing if being used, before
working on your garment.
• Determine length of button and mark start
and end line of buttonhole on fabric.
• Attach general purpose needle plate and
iwo-sieo buttonhole foot.
® Draw needle and bobbin threads under foot
towards back of machine.
» Place fabric under foot so that buttonhole
start line is aligned with red guideline on
foot. Lower foot.
72
• Select left side of buttonhole by pushing
button on pattern selection panel.
« Select slow speed, start machine and let it
complete left side of buttonhole.
« Stop machine just before guideline on but
tonhole foot reaches the buttonhole end line
of the fabric.
9 Select right side of buttonhole by pushing
button on pattern selection panel.
• Start machine and let it complete right side
of buttonhole. Stop sewing when stitching
reaches starting bar tack.
Page 75

if the test buttonhole Is not to your liking or does not suit your fabric for any of the following
reasons, the procedure below shows you how to correct the appearance.
I..Ill
...
Ill
........
.....................................................................................................................................................................................................................................................................................................
.I ....
teii
THEN DO THIS
^rslbocibset
R cht leg who $t tones
|teyo|i:iw|b!i:|be*|iifiibeiiid‘i'#er|dg||hprt
|he,,iti||;h' .yingil M&Ml J::,:::::; ™:|ii •
tP i'"'" ^
Siltdhesiare Ipo iir apart i
.. §HS'ooTHis ^ j ffeiiolT |
HESbUT
|pi|Lc§,us
Decorrte *arther aoart or.
t| e r! |hl l|g 11 beipnt I
closer togetnef
...
• l l I l..i.| f:.i....iyt....i.h J
Will cause stitches to
sSiiipfeieSiereiiiOPsoios
Stitching a Series of Buttonholes
If the test buttonhole suits your purpose, you
may stitch additional indenticai buttonholes
by using the pattern repeat button on your
machine. To use this method foilow the pro
cedure oeiow.
Step 1. Sew one complete buttonhole on your
machine.
Step 2, Press the pattern repeat button on
your machine. (This will stitch the left
side of your buttonhole automaticaiiy
for you.) Stop machine when desired
buttonhole length is reached.
Step 3. Press the stitch selection button for
the right side of your buttonhole.
Will cause shtches to
i"bicopi:'f|fih|fiipefi^
\ i /
j =
r'5 r i
Step 1
Follow steps 2 and 3 until your series of but
tonholes Is completed.
w ^
step 2
Step 3
Page 76

""'■A
I Spur
COTTIMO BOTTOM
* Place a pin across the cutting space at each
end of the buttonhole to protect bar tacks.
e Use a pair of small, sharp scissors to cut the
button opening.
« Insert blade in center of the buttonhole cut
ting space and cut from this point in either
direction.
CORDED SUTTOMHO
Soft threads used for embroidery and
crocheting make suitable filler cords for
raised buttonholes. A fine pearl cotton or silk
buttonhole twist is generally used.
Inserting Cord in Two-step Buttonhole
Foot
3 With foot up, pass a loop of filler cord
around the spur at the back of the foot. Draw
ends of cord under the foot and pull taut to
secure in spur notches.
Inserting Cord in Two-step Buttonhole Foot
74
• Hold cord ends, as shown, during stitching.
• Insert cord in buttonhole foot as shown and
sew buttonhole in the usual way.
• Remove work from machine when the but
tonhole is completed.
o Hold end of buttonhole where cord is
looped, with one hand, and pull the loose
ends of the cord firmly to draw the surplus
loop of cord back through the buttonhole.
a Trim away ends of cord.
a Secure ends of buttonhole threads.
• Cut buttonhole opening in the usual way.
Page 77

fabric hanahng, wnen sewmg tuoular and
hard to reach garment areas, is simplified
when you convert your sewing machine to
free-arm sewing. Some of the sewing jobs for
which you will find the free arm particularly
useful are shown on pages 75 through 78.
You will discover many more for yourself. The
following simple steps tell you how to convert
your machine for free-arm sewing.
To convert to tree-arm sewhng, simply press
down on corner of Flip & Sew panel on sewing
machine.
lUTTONHOLES Am BUTTONS
111
liii
\
i■l
IISiiSlBii
Stitching buttonholes or sewing buttons on a cuff or neckband is no longer a task when the freearm surface is used. Cuffs slip around the sewing surface without being pulled out of shape, so
you can see and handle the stitching area easily.
For buttonholing, follow the instructions for two-step buttonholes that start on page 72. Button
sewing instruction is given on page 69,
75
Page 78

SLEEVES
ттшт
Free-arm sewing takes the difficulty out of topstitching a sleeve. The armhole rotates smoothly
under the needle so that you can place stitching accurately. The extra control afforded by the
free arm Is especially helpful for topstltching flat-fell seams.
Badges, emblems and Insignia of all sizes and shapes can be quickly attached to shirts and
uniforms by slipping sleeve or hard-to-reach area over the sewing surface.
7в
Page 79

IBQE FiMSHES
'"-x.
The free-arm surface makes it easy to finish sleeves, pant legs and waistlines. These circular
garment areas rotate smoothly around the sewing surface, giving you full visibility and control as
you biindstitch hems, attach elastic, or topstitch cuffs.
77
Page 80

DARNING AND HENDING
Knees, elbows and other areas of wear in children’s clothes, sweaters, jackets and shorts
become readily accessible for darning, mending or patching when the free-arm surface is used.
The sewing surface fits inside the enclosed sleeve and leg areas, making it unnecessary to open
seams or roll the garment. For darning, follow the instructions on page 32 and refer to page 58
for mending information.
3ar tacks reinforce areas of strain and can be applied to ready-made garments, as well as to
those sewn at home. Use the free-arm surface to avoid fabric bulk around the needle when you
apply this detail to pockets, plackets, and waistlines.
78
Page 81

Whenever sewing difficulty Is encountered,
review the sections of the instruction book
that explain the operation you are performing
to make sure you are using the machine cor
rectly. If the problem still exists, the following
check list may help you to correct it.
• Needle is fully inserted into needle clamp.
Needle bar does not move.
Make sure . . .
® Power and light switch is on.
® Motor is connected to electrical supply.
(Turn to page 9 for additional information.)
Needle bar moves but stitch is not formed.
Make sure . . .
• Needle is straight and sharp.
• Needle style is correct for machine.
« Needle size is correct for thread being used,
e Machine is correctly threaded.
(Turn to page 6 for additional information.)
s Bobbin contains thread.
® Bobbin latch is in SEW position.
(Turn to page 6 for additional information.)
® P.'esser foot or accessory is securely
fastened to presser bar. (See page 7.)
« Fabric is not being pulled to one side as
work is removed from machine.
® Fabric being guided or supported behind the
needle Is not being pulled too hard or too
fast.
(Turn to page 46 for additional information.)
SOBSIN WII^OING DIFFICyLTIES
Turn to page 16 for bobbin winding Informa
tion.
Needle thread breaks while winding bobbin.
Make sure .. .
® Presser bar Is raised.
• Bobbin case area is free of lint and loose
threads.
® Circuit breaker is depressed. (See page 83.)
(Turn to page 16 for additional Information.)
Needle breaks.
Make sure .. .
♦ Needle is straight and sharp, correct class
for machine, and proper size for thread
being used.
« Thread is unwinding freely from spool.
® Thread spool is secured by correct spool
holder.
• Machine is correctly threaded.
Thread does not wind onto bobbin.
Make sure . . .
6 Bobbin latch is in winding position.
• Thread end is held securely by thumb screw
spring at start of wind.
79
Page 82

Bobbin displaced during winding.
Make sure . . .
« Bobbin is being wound a! SLOW speed
range,
® Bobbin is properiy seated and secured by
the iatch in the bobbin case.
« Threads are correctly placed under presser
foot when starting to sew, (See page 1 6.)
® Presser foot is securely fastened to presser
bar. (See page 7.)
(Turn to page 7 for accitionai information.)
Bobbin thread breaks.
Thread breaks on sewing starts after winding
bobbin.
Make sure . . .
® Bobbin has not been wound too fuH (beyond
the FULL ring). Turn handwheei away from
operator to free over wound bobbin. (See
page 16).
o Bobbin case area is free of iint and iocse
threads. (See page 82.)
(Turn to page 16 for bobbin information.)
THREAD BREAKS WHILE SEWIKG
Needle thread breaks.
Make sure . . .
® Machine is properiy threaded.
® Thread is unwinding freeiy from spoci.
® Thread spool is seoured by correct holder.
Make sure . . .
«> Bobbin has been correctly wound.
® Bobbin case area Is free of iint.
® Bobbin has been correctly inserted into
bobbin case.
® Bobbin has not been wound too full.
(Turn to page 7 for additional Information.)
STITCHII^G OlFFiCOLTIES
Skipped stitches.
Make sure . . .
® Needle is straight and sharp.
♦ Needle Is correct style for machine and size
of thread (See page 12).
« Machine is orooeriy threaded. (See cage
14.)
® Thread is even and free from knots.
(Turn to page 14 for additional information.)
® Needle Is correct size for thread.
® Needle Is straight and sharp.
(Turn to page 6 for additional information.
® Needle thread tension is not too tight. (See
page 26.)
« Bobbin is oorrectiy inserted in machine.
(See page 1 7.)
® Bobbin rim is free of nicks.
* Needis- plate hole and presser foot are un
damaged.
«> Fabric Is held down firmly (particulariy when
doing free-motlon darning and embroidery),
* Correct presser foot and needle plate are
being used.
Loose stitches on underside of fabric.
Make sure . . .
« Needle is straight and sharp.
® Needle Is correct style for machine and size
for thread (See page 12).
® Sufficient tension is being exerted on nee
dle thread. (See page 26.)
e Bobbin case area is free of lint.
Page 83

e Bobbin has not been wound beyond the
FULL ring.
• Presser bar has been iowered (particulariy
when sewing dense fabric or doing free-mo-
tion darning and embroidery).
Correct presser foot is being used.
Machine is correctly threaded. (See page
FEEDING DIFFICyLTIES
Loose irregular straight stitches.
Make sure . . .
e Needle thread has sufficient tension. (See
page 26.)
« Needle plate and presser foot are correct for
fabric being sewn.
Fabric does not lie flat after stitching.
Make su.^-e - . .
9 Needle-thread tension Is light enough. (See
page 28.)
« There is sufficient presser foot pressure to
hold fabric. (See page 46.)
9 Stitch length is short enough for fabric. (See
page 22.)
Fabric does not move properly under presser
foot.
Make sure . . .
9 P.-esser bar pressure is correct for fabric
being stitched. (See page 46.)
9 Presser foot or accessory Is correctly at
tached to machine. (See page 7.)
9 Lint has not accumulated around feed.
SLUGGISH OR MOiSY yACHINE
Hand wheel difficult to turn over manually or
increase in operating noise level.
Make sure . . .
9 Bobbin case and feed area are free of ilnt
and loose thread ends.
Page 84

10. CARING FOR YOUR MACHINE
CLEANING THE MACHINE
Caution: Before cleaning your machine, dis
connect power-line plug from electrical supply.
With a soft doth or lint brush, dean at pdnis
indicated by arrows.
Your machine requires no oiiing under normai
conditions. Your SiNGER representative, or
t!| ...
Olei|
Approved Dealer, will examine the perma
nently lubricated parts whenever your sewing
machine requires servicing.
There are no user-serviceable parts in
side the Athena 1200 electronic sewing
machine. Therefore any unauthorized tamper
ing inside the machine will void the warranty.
82
Page 85

CHAMGIMG THE LIGHT BULB
Caution: Before changing Ught bulb make sure
you have disconnected power-line plug from
electrical outlet.
Removing Bulb. With thumb of right hand,
push in and down on tab of light lens and
lower the light bracket. Do not attempt to
unscrew the bulb. Press it up into the socket
and at the same time turn bulb over in direc
Unlocks
tion shown to unlock the bulb pin.
Caution: Be sure to use a 15 watt bulb only.
Replacing Bulb. Press new bulb into socket,
with bulb pin entering slot of socket, and turn
it over in direction shown to lock bulb in posi
tion. Push entire asserribly up until it snaps in
position.
Locks
The electronic system of your miachine is pro
tected by a circuit breaker. If the sewing light
goes on and the needle bar moves up and
down, but you cannot select a pattern, you
must push the red circuit breaker button (A)
to reaotivate the machine. If your machine is a
portable model, carefully lift or tilt it to gain
access to the button. Push button in. If your
machine is secured to a cabinet, reach under
front of cabinet and locate the special hole
which gives you access to the button. Push
button. Certain cabinet models may not have
an access hole. In such instances, release
the machine from the cabinet, tilt machine,
and push button. Re-secure machine to
cabinet. Re-select desired pattern.
Note: If button continues to disengage, con
tact your Singer representative or Approved
Dealer.
Page 86

special accessories for special jobs
Sewing Aids have been designed to increase
the versatiiity of your sewing machine and
enable you to give your sewing that extra pro
fessional touch. The ones described below
are just a few of the complete selection
available at your local Singer store.
Professional* Buttonhoier No. 381116
The Professional Suttonholer sews six kinds
of buttonholes, plus eyelets, In a wide variety
of fabrics. You choose the style and length
and make perfect buttonholes every time.
84
Ryffler No. 161561
This accessory offers a simple, effective way
to make gathered and pleated ruffles. The
ruffler Is used for straight stitching only.
Sisfffc
Page 87

No. 160891
The Quoting foot is especially well adapted to
stitching lightly padded fabrics. It is excellent
for the placement of straight stitching in
block, floral, or scroll designs. This short,
open foot permits following curved lines with
ease and accuracy.
No. 81 200
The binder foot is used to apply ready-made
bias tape or unfolded bias binding to an un
finished edge. It can also be useful for binding
seam edges that might ravel.
The Even Feed Foot
The even feed foot is a perfect aid for stitch
ing difficult to match fabrics such as plaids
and stripes and dlfficuli-to-fesd fabrics such
as fabrics that have a pile, nap or a shiny sur
face. All these fabrics can be sewn without
puckering and slipping.
No. 506415
85
Page 88

This chart wii! enable you to keep a record of your
measurements. For perfect accuracy, ask a friend to
take your measurements.
1. Chest, entire (Take above bust and straight across back)
2. Bust (Take over fuiiest pari of bustiine a.nd straight across back)
3. Shocider length (right) .........................................................................................................
4. Shouider to shoulder (back) (Take from armhole to armhole at shoulder seam)
5. Back width (Take 3"-7cm-to 4"--iocm-below shoulder seam at back armhole)
6. Sackwaist length (Take from neckline to vvaistiine, center).................................................
7. Shoulder to bust, apex..........................................................................................................
S. Shoulder to waist, over apex.................................................................................................
9. Front chest (Take 3" -7cm- dov/n from shoulder at armhole, and from armhole
to armihde)...........................................................................................................................
10. Waistline (Around natural waistline) ......................................................................................
lla. Hipline (Entire. 7" -I7cm- from waistline) ...........................................................................
llb. Hip line (Entire, 9" -22cm- from waistline)
........................................................................
...................................................
.......................................
86
m..
11b
Page 89

Index
Accessories ............................................................ 3, 4, 5
Appiique
Basting....................................................................... 27. 35
Slincstiich Hem Guice................................................... 4, 55
Blindstitch Hems
Bobbin .............................................................................. 3
Butionhoies
Buttons ........................................................................... 69
Caring for Your Machine
Chaining Off
Chainstitching.................................................................. 35
Circuit Breaker ................................................................ 83
Darning
Decorative Stitches
Elastic Replacing ............................................................ 59
Electncai Connections ...................................................... 9
Embroidery
Fabric-Handling Table .................................................... 47
Fabric. Thread, and Needle Table
Fabric Weight Table................................................... 10, 11
Finishes for Hems and Facings....................................... 59
Free-Arm Sewing ........................................................... 75
Free-Motion Stitching .................................................... 45
Functional and Decorative Stitches
Guiding and Supporting Fabric ....................................... 46
Individual Preferences ................................................... 21
Light Bulb ....................................................................... S3
Mending........................................................... 58. 63. 78
Mock Overecging
Needle.......................................................................... 3, 6
Needle Plates.............................................. 2, 3. 5, 8, 37
Feed Cover Plate ........................................................... 5
.........................................................................
Chainsiiiching
Pin............................................................................... 27
Speed Basting by Machine.......................................... 27
NewSy Wound............................................................. 29
Raising Bobbin Thread................................................ 19
Removing Bobbin ....................................................... 17
Removing Thread ........................................................ '7
Replacing an Empty Bobbin ....................................... 17
Replacing a Wound Bobbin......................................... 18
Winding
Balancing
Corded Buttonholes..................................................... 74
Series of Buttonholes
............................................................
Changing....................................................................... 6
Threading ................................................................... 15
Thread Tension ..................................................... 26, 40
Chalnstitch Plate and Insert
Changing Plates
General Purpose
.............................................................
............................................................
......................................................................
................................................................
...................................................................
.................................................
.................................................
.................................................................... 36
32, 33, 78
.........................................................
...............................................................
..........................
...........................
............................................................
..............................
..........................................................
.....
..................................................... 3
44
35
55
16
70-72
73
73
82
64
33, 45
12, 13
49-63
54
5. 8, 37
S
Straight-Stitch............................................................... 3
Operating the Machine...................................................... 9
Overecged Seams
Pattern Repeat Button............................................. 2i. 73
Perfor.—iance Checklist
Personal Measurements
Power and Light Switch................................................ 2, 9
Presser Feet............................................................ 3, 4, 7
Sutton Foot .............................................................. 4, 7
Buttonhole Foot............................................................. 4
Changing Presser Feet
Darning and Embroidery .Foot
General Purpose
Overedge Foot
Special Purpose Foot
Straight-Stitch Foot ....................................................... 3
Zipper Foot
Pressure Adjustments..................................................... 46
Principal Parts................................................................... 2
Quilting ........................................................................... 34
Reverse Stitching............................................................ 25
Reverse Stitch-Balance................................................... 24
Satin Stitching
Seam Guide.................................................................... 3, 8
Seams ....................................... 20. 29. 31.36. 42. 46
Chalnstitch................................................................... 36
Curved........................................................................ 31
Overedged ................................................................. 42
Straight ....................................................................... 29
Stretch....................................................................... 46
Sea.m Finishes............................................................... 41
Selecting a Stitch............................................................. 20
Sewing Knit and Stretch Fabric
Speed Controller
Spool Holders............................................................... 5. 14
Stitch Centering .............................................................. 48
Stitch Length ............................................................. 22, 28
Stitch Length Guidance Table......................................... 23
Stitch Width .................................................................... 22
Straight Stitching ............................................................ 25
Curved Seam.s........................................................... 31
Reinforcing End of Seam............................................ 31
Straight Seams ........................................................... 30
Turning Square Corners.............................................. 30
Stress Areas ................................................................... 23
Tension Test ................................................................... 26
Th.'eading the Machine........................................... 14,15
Topstitching..................................................................... 66
Twin-Needle Stitching
Twin-Needle Switch
Zig-Zag Stitching ............................................................ 40
.........................................................
.................................................
................................................
.................................................
..................................
...........................................................
.....
......................................................... 4
...................................................
.................................................................
.................................................................
.......................................
...........................................................
.....................................................
........................................................
53
79
86
4, 8
4, 7
43
46
2, 9
68
24
7
3
3
Form 2t7-i6 (1177)
Pari ,No. 173314
87
Page 90

Hi
‘A TrsCer^a^K 0? THH SiiNSSR COMPANY
you have any questions, please write to:
The Singer Company
Consumer Affairs Department
321 First Street
Elizabeth. NJ. 07207
Pririte-d in US.A,
 Loading...