

Page 1
\o
Page 2

Contents
Chapter 1: Getting to Know Your Machine
Principal Parts 2
Accessories 4
Choosing and Changing Accessories 6
Changing Snap-on Presser Feet 6
Changing One-piece Presser Feet 7
Changing Needle Plates 7
Attaching Snap-on Feed Cover 7
Attaching Seam Guide 7
Choosing Needles 8
Needle-Fabric Combinations 9
Fabric Weight Table 10
Fabric, Thread and Needle Table 12
Operating Machine 14
Connecting Machine and Speed
Settings 14
Run Machine 15
Lifting the Presser Foot 15
Threading the Machine 16
The Bobbin 20
Winding • Changing ■ Removing ■
Replacing Bobbin
Raising the Lower Thread 23
Chapter 3: Electronic Sewing
Selecting a Stitch 24
______________
Chapter 4; Straight Stitching
Preparation • Sewing in Reverse 25
Adjusting Machinete Your Fabric
Adjusting Stitch Length 26
Regulating Presser Foot Pressure 26
Stitch Length Guidance Table 27
Upper Thread Tension 28
Tension Test 29
Lower Thread Tension 29
Sewing a Seam
Preparation 30
Placing Fabric Under Foot 30
Sewing with a Newly Wound Bobbin 30
Keeping Seams Straight 31
Turning Square Corners 31
Curved Seams 32
Reinforcing End of Seams 32
Applications
Darning 33
Darts 34
Quilting 35
Zipper Insertion 36
Chapter 5: Basic Zig-Zag Stitching
Adjusting Stitch Width and Length 38
Adjusting Upper Thread Tension 39
Adjusting Lower Thread Tension 39
Applications
Zig-Zag Seam Finishes 40
Lingerie Seams ■ Satin Stitching 41
Appliqué 42
Free-Motion Embroidery 43
_________
Chapter 6: Machine Stitch Patterns
How Stitches are Produced 44
Stitch Pattern Chart 44
Adjusting Stitches for Stretch Fabrics
Guiding and Supporting Fabric 45
Adjusting Pressure 45
Fabric Handling Table 46
Stitch Centring 48
Stitch Usage: Functional and Decorative
Arrowhead -
Arrowhead Stitch Finish 49
Featherstitch -
Fagoting 50
Patchwork Quilting 51
Overedge Stretch Stitch -
Overedged Seams 52
Seam Finishing 53
Blindstitch -
Hems 54
Ladder Seam 55
Honeycomb -
Replacing Lingerie Elastic 56
M-Stitch -
Stretch Garment Repair 57
Multi-Stitch Zig-Zag -
Mending a Tear 58
Finishes for Hems and Facings 58
Bar Tacks 59
Scallop Stitch -
Scalloping Seams and Edges 60
Straight Stretch Stitch -
Seams 61
Decorative Stitching
Border Designs 62
Smocking 63
Twin-Needle Stitching 64
Chapter 7: Buttonholes and Buttons
Buttonholes
Buttonhole Position
Buttonhole Length
Two-Step Buttonholing
Buttons
Attaching a Button
Forming a Thread Shank
Chapter 8: Free-Arm Sewing
Chapter 9: Caring for Your Machine
Cleaning the Machine 76
Removing and Replacing
the Bobbin Case 77
Replacing the Slide Plate 78
Changing the Light Bulb 78
Chapter 10: Performance Checklist 79
Your Personal Measurements 82
Personal Notes 83
Index 84
66
67
68
72
73
74
Copyright © 1978 THE SINGER COMPANY
All Rights Reserved Throughout the World
Page 3

©Bis^pier Getting to Know Yoyr Haehiiia
Congratulations...
You are about to sew on the
new advanced electronic
model 1050 sewing machine.
This Futura* sewing
machine features numerous
technological breakthroughs
as a result of years of SINGER
research.
We suggest you take time to
read through this operator’s
guide, as you sit at your new
machine. You will discover
how simiple it is to do the
sewing operation you desire
on the Futura* 1050.
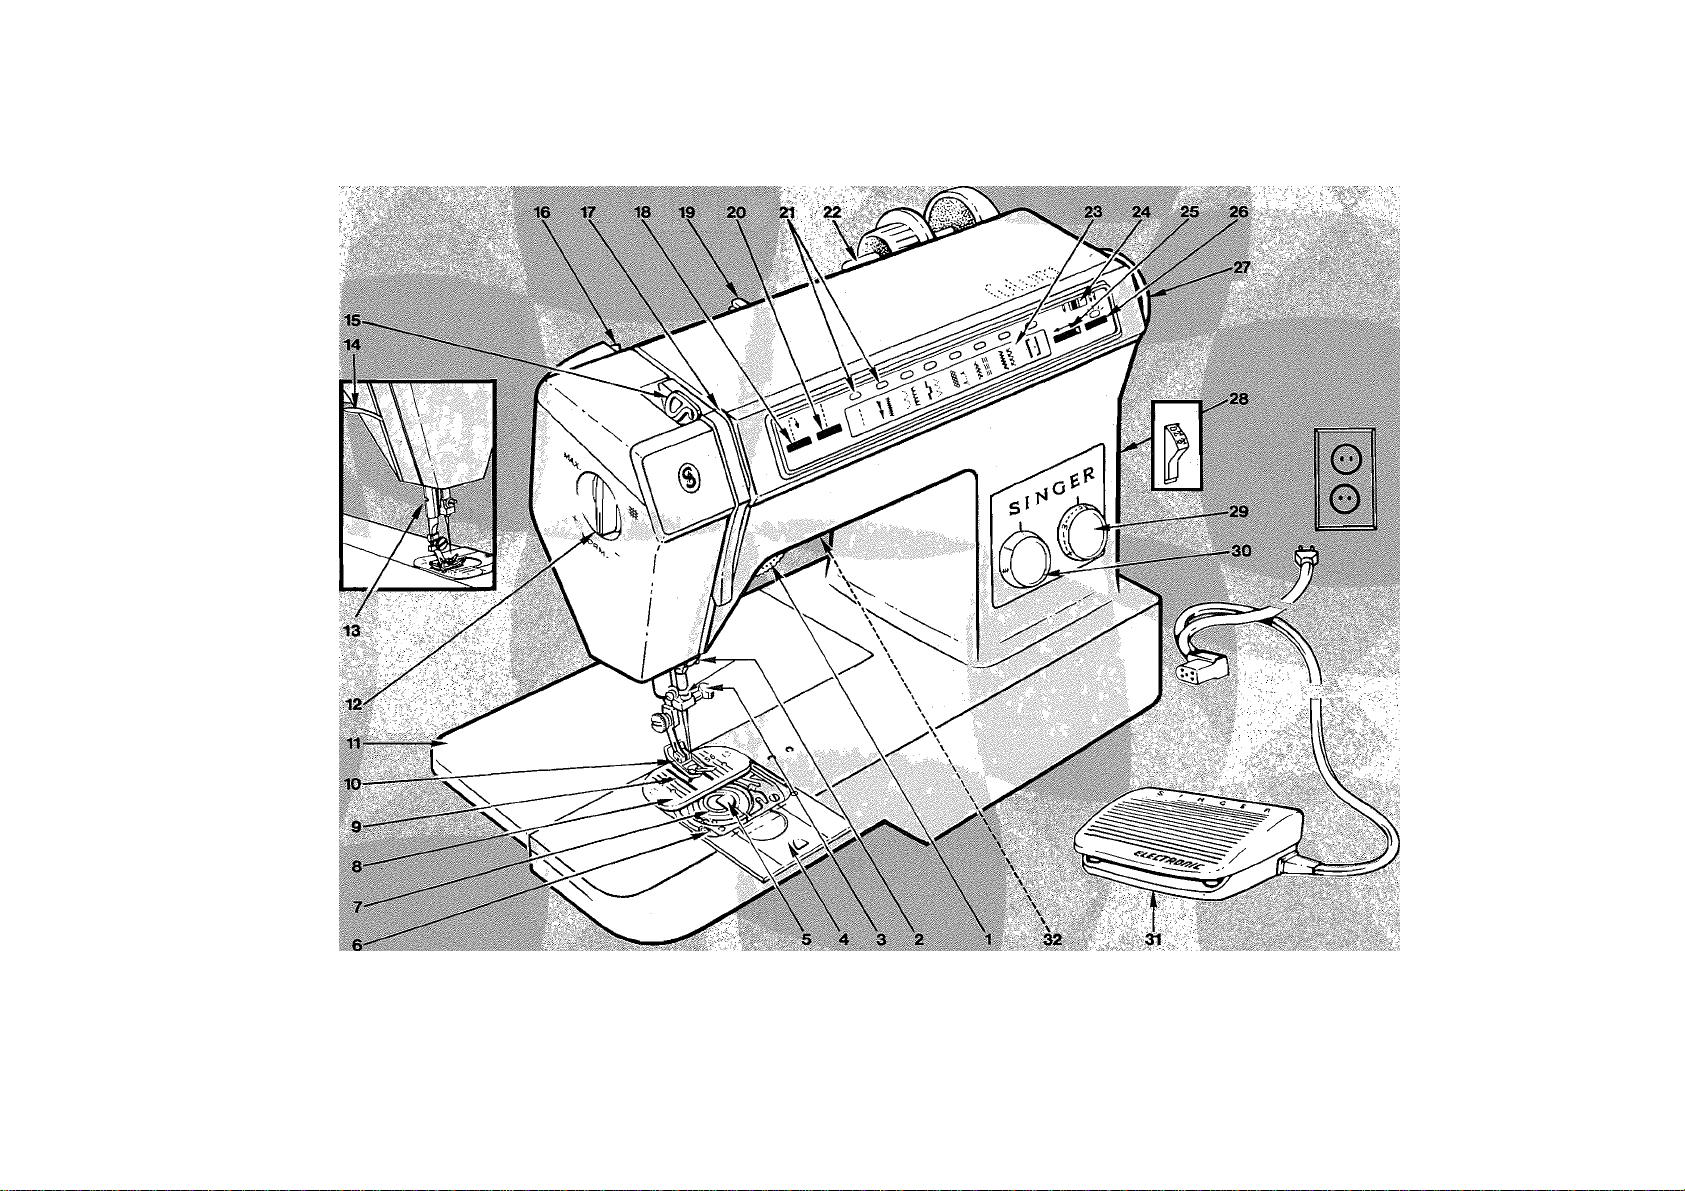
principal parts
1 Upper Thread Tension Dial
2 Thread Guides
3 Needle Clamp
4 See-through Slide Plate
5 Bobbin Latch
6 Bobbin Winding Push-button
7 Transparent Bobbin
8 General Purpose Needle Plate
9 Soft-touch Fabric Feed
10 General Purpose Presser Foot
11 Flip & Sew * Panel
12 Pressure Dial
13 Thread Cutter
14 Presser Foot Lifter
15 Take-up Lever
16 Rear Thread Guide
17 Tension Separator
18 Reverse Stitch Button
19 Snap-in Thread Guide
20 Straight Stitch Button
21 Stitch Selection Indicator Lights
22 Friction-free Spool Flolder
23 Stitch Panel
24 T\A/in Needle Safety S\«itch
25 Pattern Group Selector
26 Pattern Selector Button
27 Fland Wheel
28 Po\A/er and Light S\A/itch
29 Stitch Length Dial
30 Stitch Width Dial
31 Electronic Speed Controller
32 Se\A/ing Light
To ensure that you are always provided with the most modern
sewing capabilities THE SINGER COMPANY reserves the right
to change the appearance, design or accessories of this
sewing machine when considered necessary.
Page 4
Page 5
л ' '".А
o|}i
h:
У ^
8
|]
13
10
14
11
15
12
16
17
Page 6

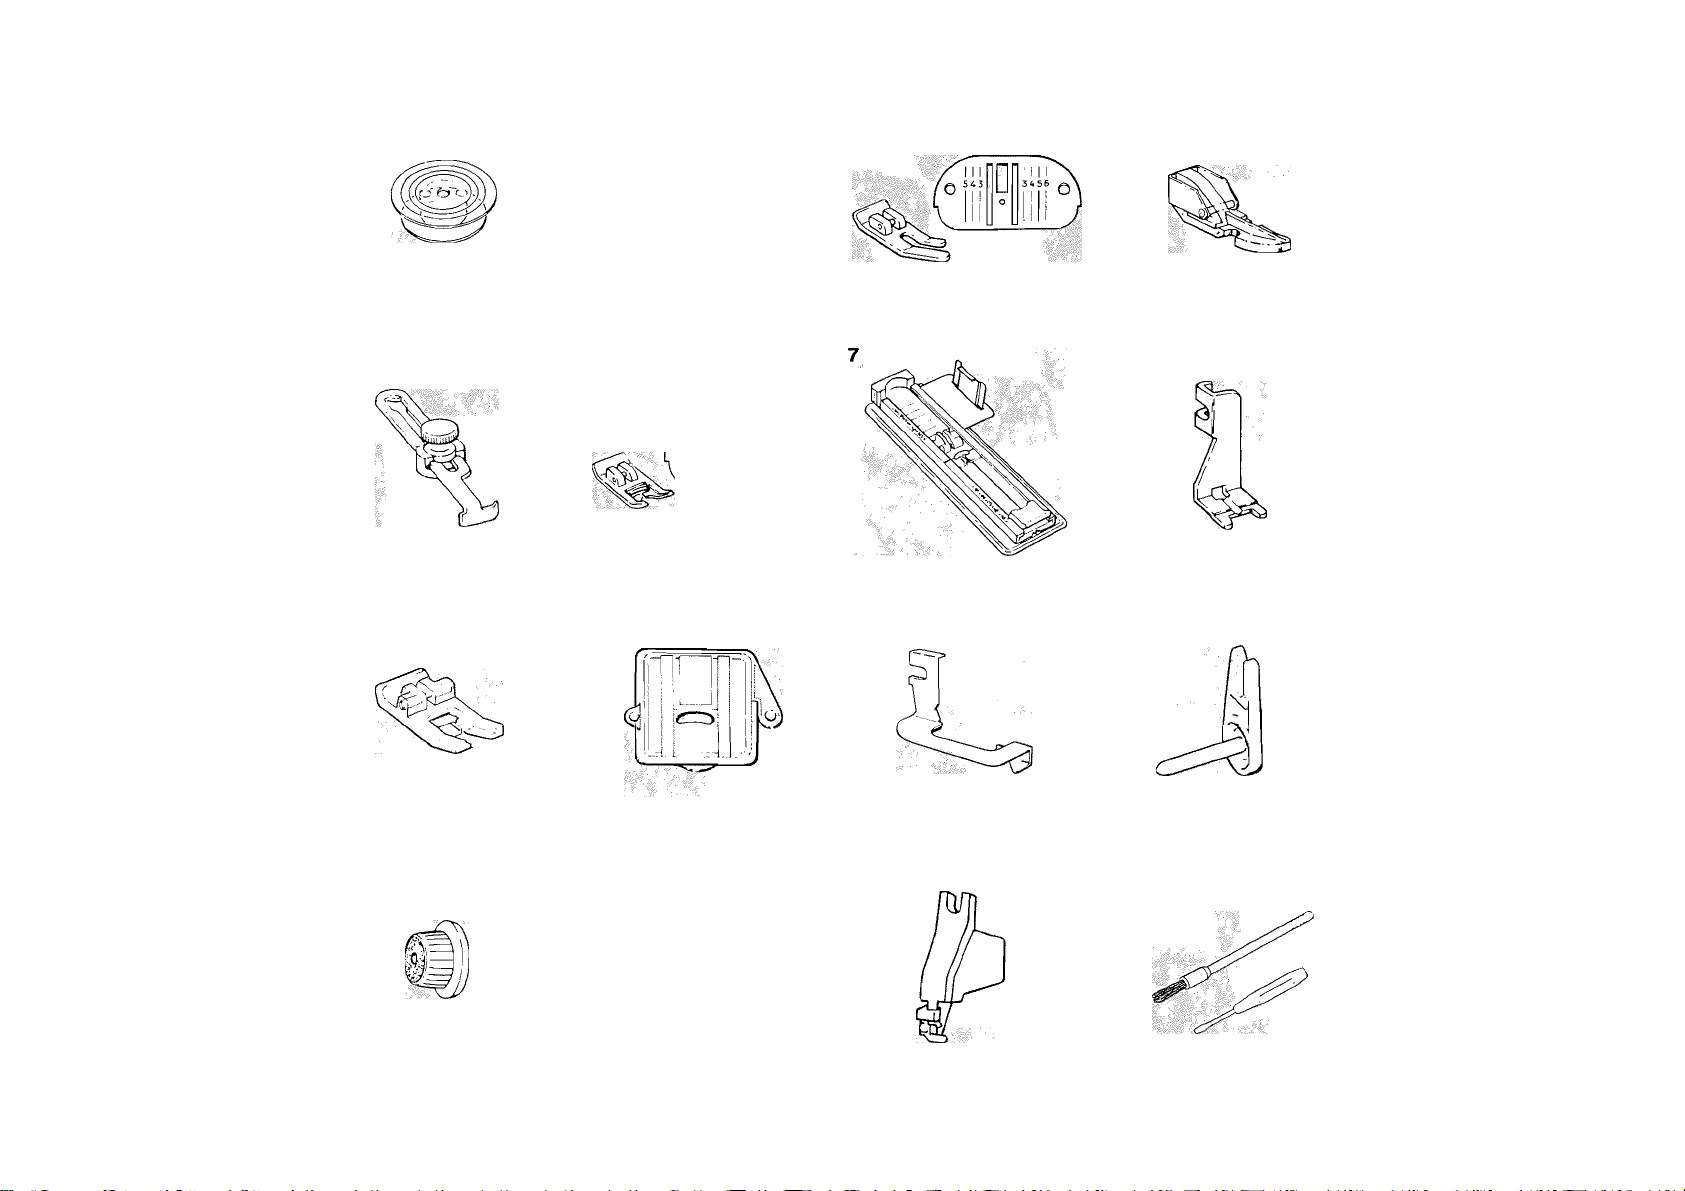
accessories
The accessories provided with your sewing machine are
designed to help you do many kinds of sewing easily.
1. Transparent Bobbins (No. 506417)
2. Needles
• Style 2020 for general sewing.
• Style 2045 for sewing knits, stretch fabrics and elastic.
• Style 2025 for twin-needle decorative stitching on
woven and knit fabrics.
3. Straight Stitch Foot and Straight Stitch Needle Plate.
Use these when your fabric or sewing procedure requires
close control.
These accessories, recommended for all straight stitch
sewing, are especially helpful for edge stitching and collar
pointing, or for stitching delicate or spongy fabrics.
4. Zipper Foot for inserting zippers and stitching corded
seams.
5. Seam Guide helps you keep seam allowances even.
6. General Purpose Foot and General Purpose Needle Plate
are on your machine when delivered. Use them for alter
nating between straight and zig-zag stitching as well as
utility zig-zag sewing. They can also be used for straight
stitching on firm fabrics.
7. Two-step Buttonhole Measuring Foot allows you to stitch
buttonholes for flat buttons up to 3.5 cm (1% inches) in
diameter. It also allows you to determine correct button
hole length by using gauge lines on foot.
8. Button Foot holds most buttons securely for stitching.
9. Special Purpose Foot Use this for all kinds of decorative
stitching.
10. Snap-on Feed Cover for button sewing, free-motion work
and darning.
11. Blindstitch Hem Guide. Use this with the general purpose
foot to position the hem for blindstitch hemming.
12. Detachable Spool Pinfor decorativetwin-needlestitching.
13. Large Spool Holder on your machine when delivered. For
use with medium and large spools of thread.
14. Small Spool Holder for use with small diameter tubes of
thread.
15. Needle Threader
16. Lint Brush for cleaning your sewing machine.
17. Screwdriver for regulating lower thread tension.
To increase the versatility of your machine, additional acces
sories can be purchased at your Singer store.
Page 7
■gfei?p'lcï' i,’ôüfiïp gî ■
choosing and changing accessories
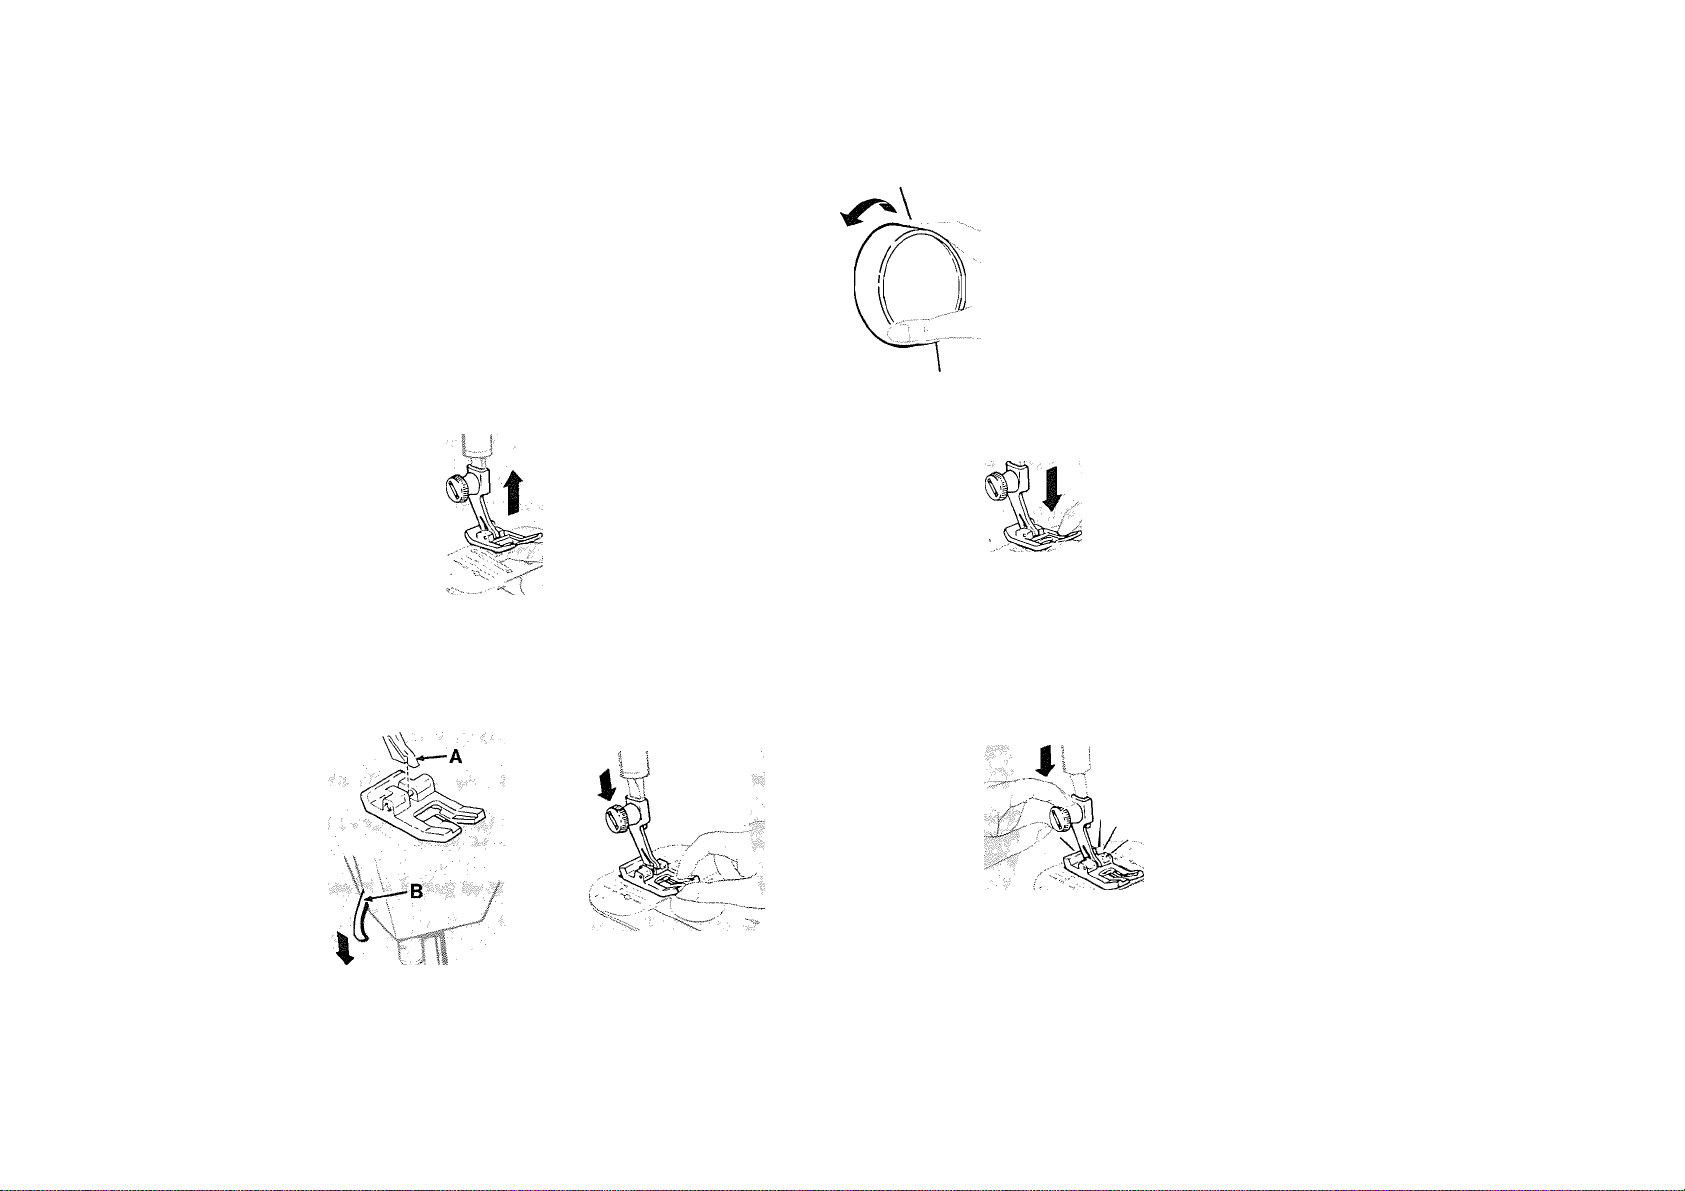
Changing Presser Feet
Snap-on Presser Feet
Most of the presser feet furnished with your machine snap on
and off a common shank.
• Raise needle and take-up lever to highest position by
turning the hand wheel toward you.
Caution: Disconnect the power
line plug from the socket outlet
when changing needles, feet or
needle plates or when leaving the
machine unattended. This elimi
nates the possibility of starting
themachinebyaccidentallypressing the speed controller.
• Raise presser foot.
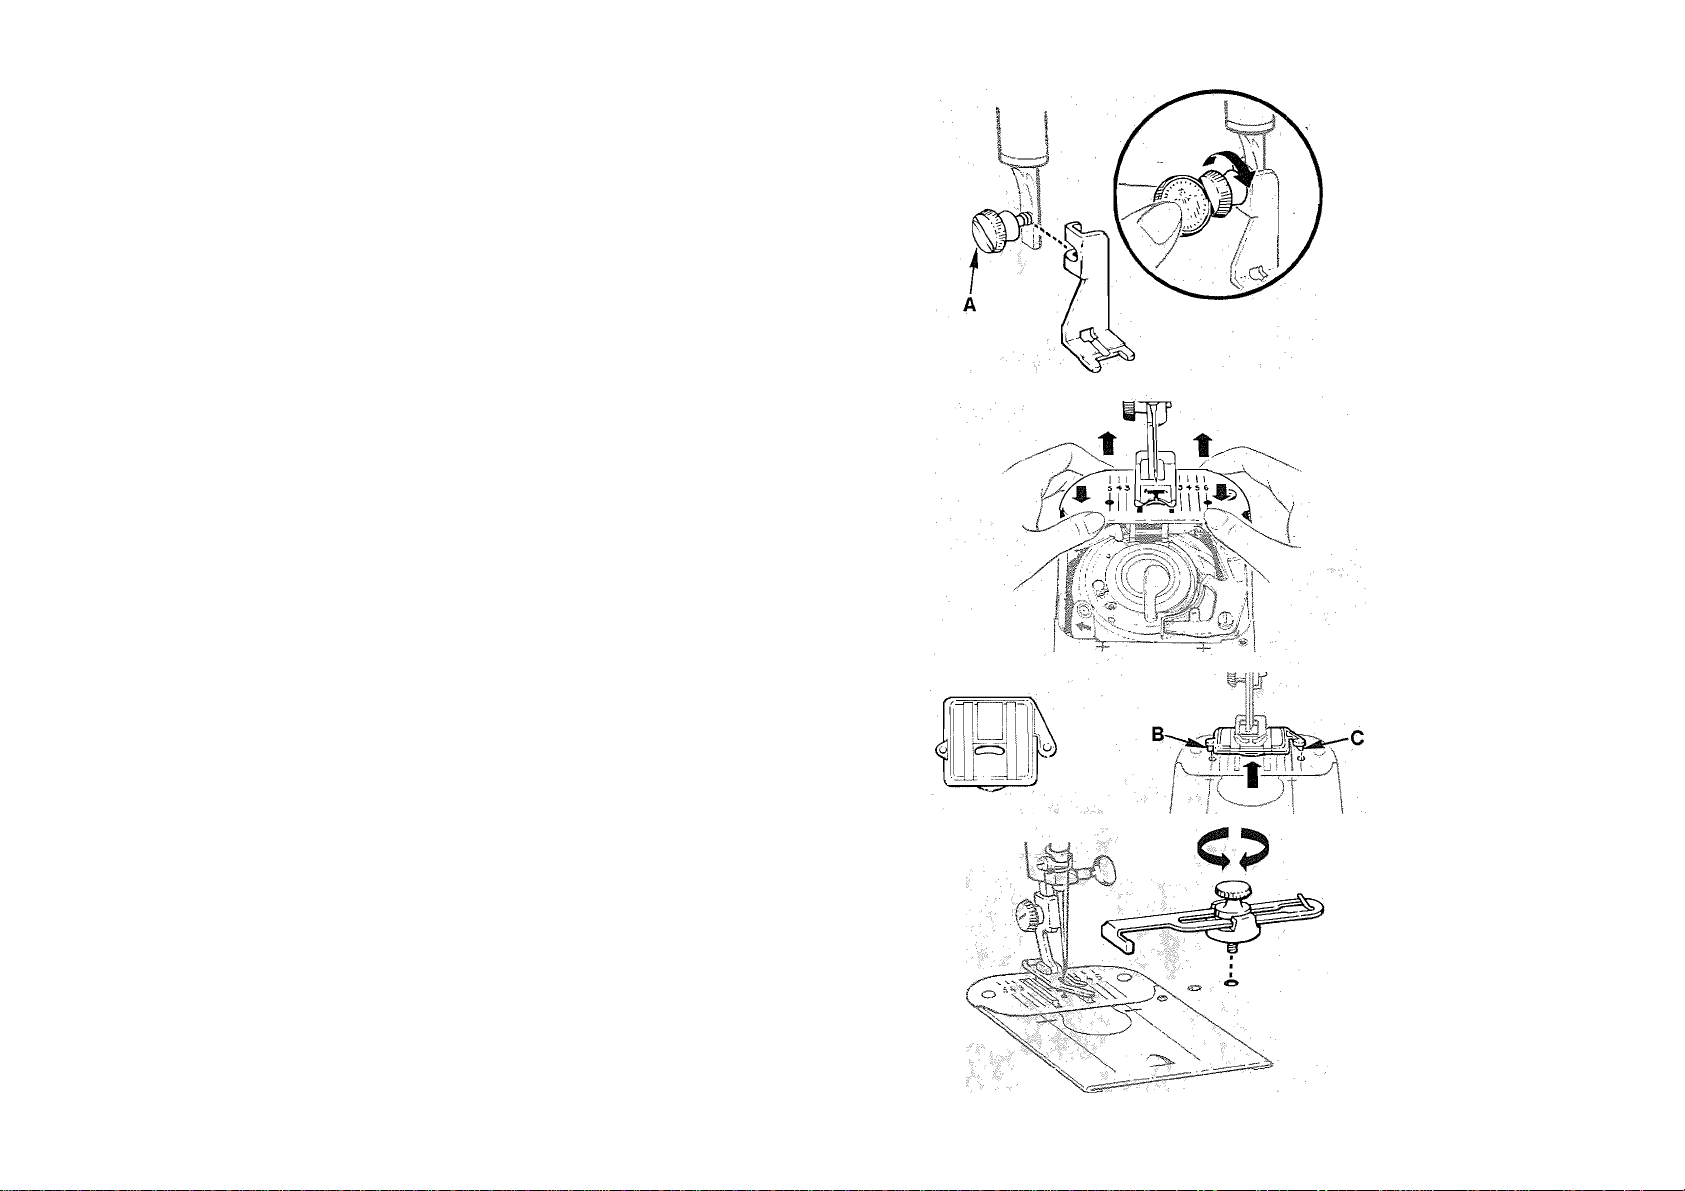
To Remove Foot
■ ■ ■
1a. Press toe of presser foot upward as far as it will go. 1b. Then snap down to remove.
2. Centrethe new presser foot under the shank A. 3. Press presser foot screw down firm/y until foot snaps into
/.ower ihe presser foot//ffer B so that the shank fits over place.
the presser foot pin. To remove and replace the shank of snap-on presser feet,
follow instructions on next page for one-piece presser feet.
Page 8
One-piece Presser Feet (Button Foot)
• Raise needle and take-up lever to highest position by
turning the hand wheel toward you.
• Raise presser foot.
• Loosen presser foot screw A and remove the foot, guiding
it to the right.
To Replace One-piece Feet
• Hook one-piece foot around the presser bar and tighten
presser-foot screw.
Note: Insert the edge of a coin in the slot of the presser-foot
screw to loosen it and to tighten it securely.
Changing Needle Plates
Note: Remove bobbin if it contains thread in order to prevent
thread being caught when plate is replaced.
• Raise needle and take-up lever to highest position by
turning the hand wheel toward you.
m Raise presser foot.
• Open slide plate. Press down on front edge of needle plate
and lift up and out.
• Position new plate over pins and release. Plate is drawn
into position by magnets.
® Close slide plate.
Caution: The straight stitch foot and zipper foot must oniy be
used with the straight stitch needie píate. Needie breakage
can occur if the straight stitch foot or zipper foot is used with
any other needie piate.
Attaching Snap-on Feed Cover
• Raise needle and take-up lever to highest position by
turning hand wheel toward you.
• Raise presser foot.
• Slide snap-on feed cover away from you, as illustrated over
needle plate until points B and C are positioned directly
over holes in needle plate. Then snap down.
To remove, open slide plate then simply lift up front edge of
feed cover.
Attaching the Seam Guide
Place screw in the right hand hole to the right of the slide
plate; line up straight edge of guide with the needle plate
guideline for desired seam width, and tighten screw.
Page 9
\l
2020
J
V V
2025
2045
2032
choosing needles
Important: Your SINGER sewing machine has been designed
to obtain best results with SINGER* needles. You should follow
the recommendations in this instruction book and on the
needle package for correct style and size of needle for dif
ferent types and weights of fabric.
The needles you use should be straight to ensure perfect
stitch formation. The needle should also be fine enough to
prevent the fabric from being marred with large punctures,
yet heavy enough to pierce the fabric without being bent or
deflected.
Remember too, that the eye of the needle must be large
enough for the thread to pass through freely; too fine a needle
will cause the thread to fray. See Fabric, Thread and Needle
Table, page 12.
For general purpose sewing in a wide range of fabrics, the
Style 2020 needle, in sizes 9 through 18, will give you excellent
results.
For best results when sewing on knits, woven stretch fabrics,
bonded vinyls, and elastic use Style 2045 ball point Yellow
Band* needle, available in sizes 11,14, and 16.
For decorative stitching on light and mediumweight woven
and knit fabrics, use the twin-needle. Style 2025.
For sewing leathers, real and simulated, the Style 2032 needle,
available for purchase at your Singer Sewing Centre, Is re
commended.
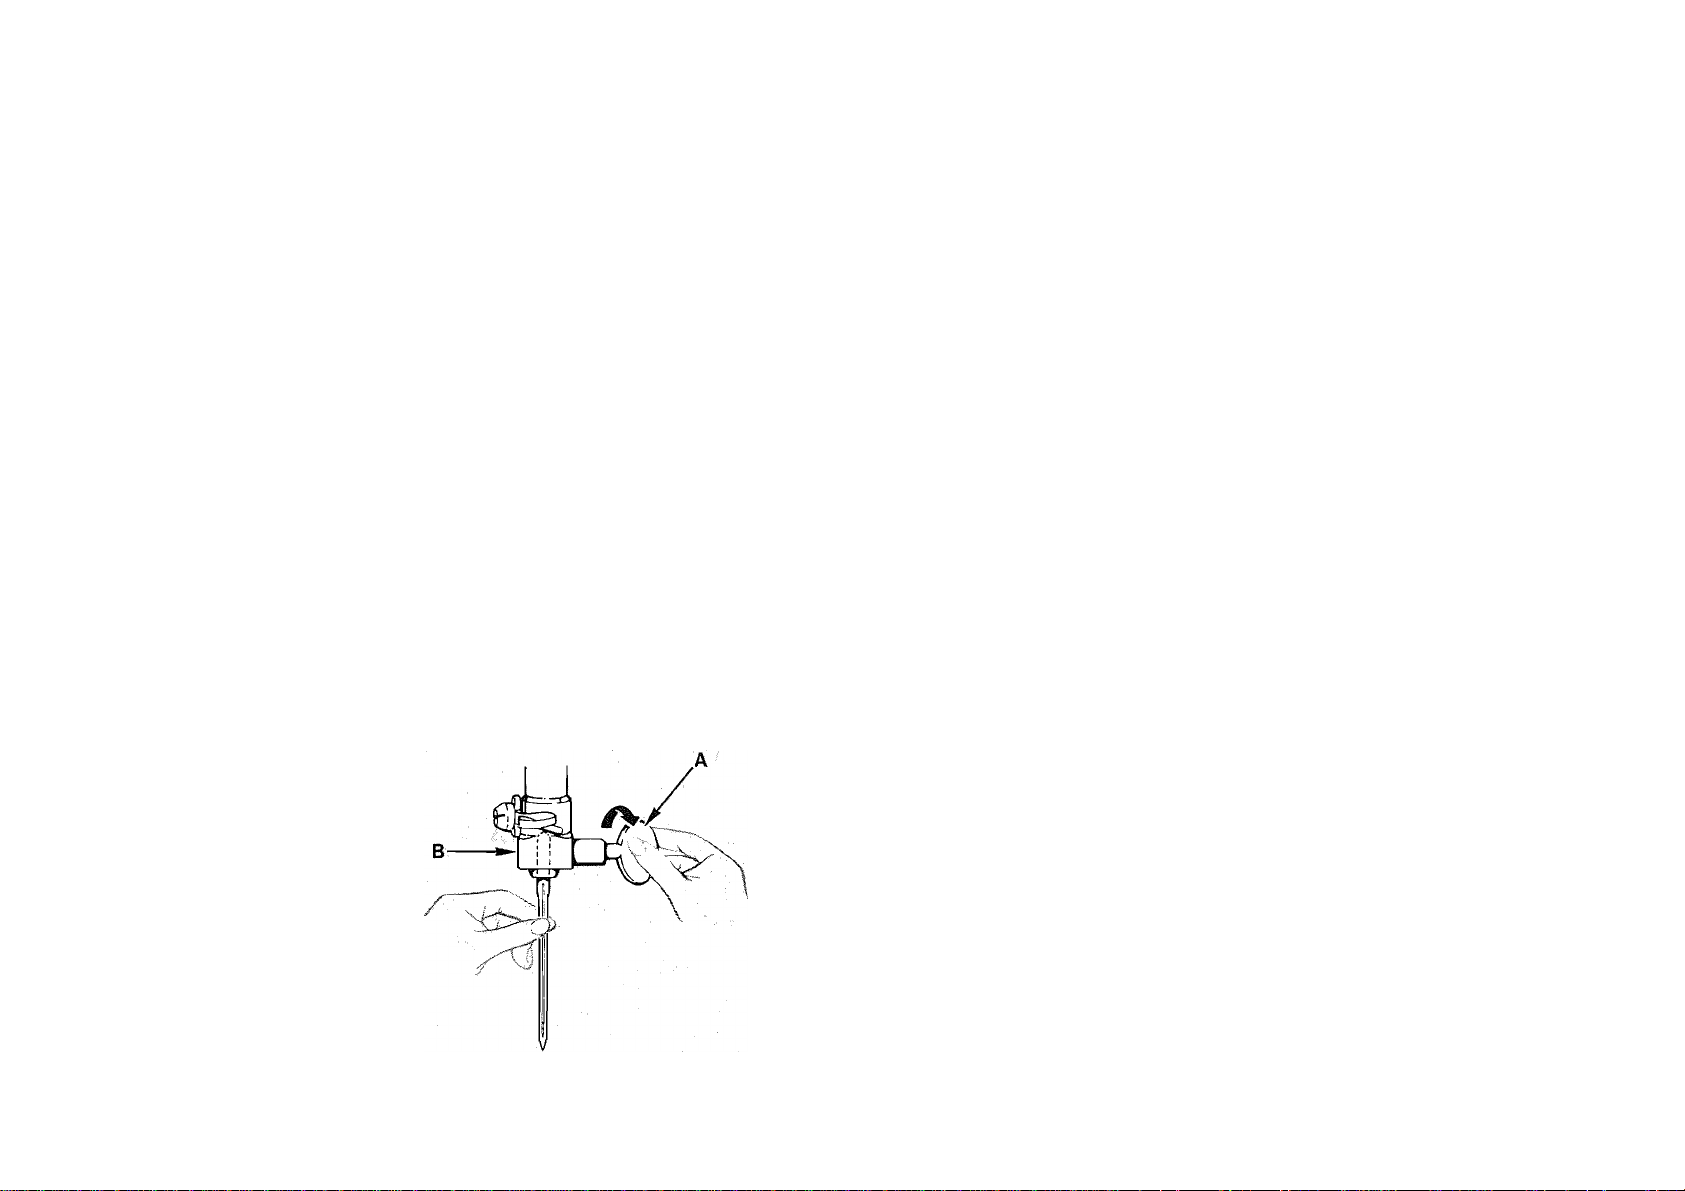
Changing the Needle
Caution: Disconnect the power line plug from the socket
outlet before changing needles.
• Raise needle to its highest point by turning the hand wheel
toward you. Loosen needle-clamp screw A and remove the
needle.
• Insert new needle up into clamp B as far as it will go, with
the flat side of the needle to the back.
@ Tighten needle-clamp screw.
Page 10
Needle-Fabric Combinations
Be sure to check the Fabric, Thread and Needle Table on
page 12 before you begin to sew. The importance of selecting
the correct size, as well as the correct type needle for the
fabric and thread you are using, cannot be emphasized too
greatly.
Correct needle selection is closely related to stitch quality
and appearance. Damaged fabric is almost always caused bya
needle that is bent, burred, or that is an inappropriate style
for the fabric and thread you are using.
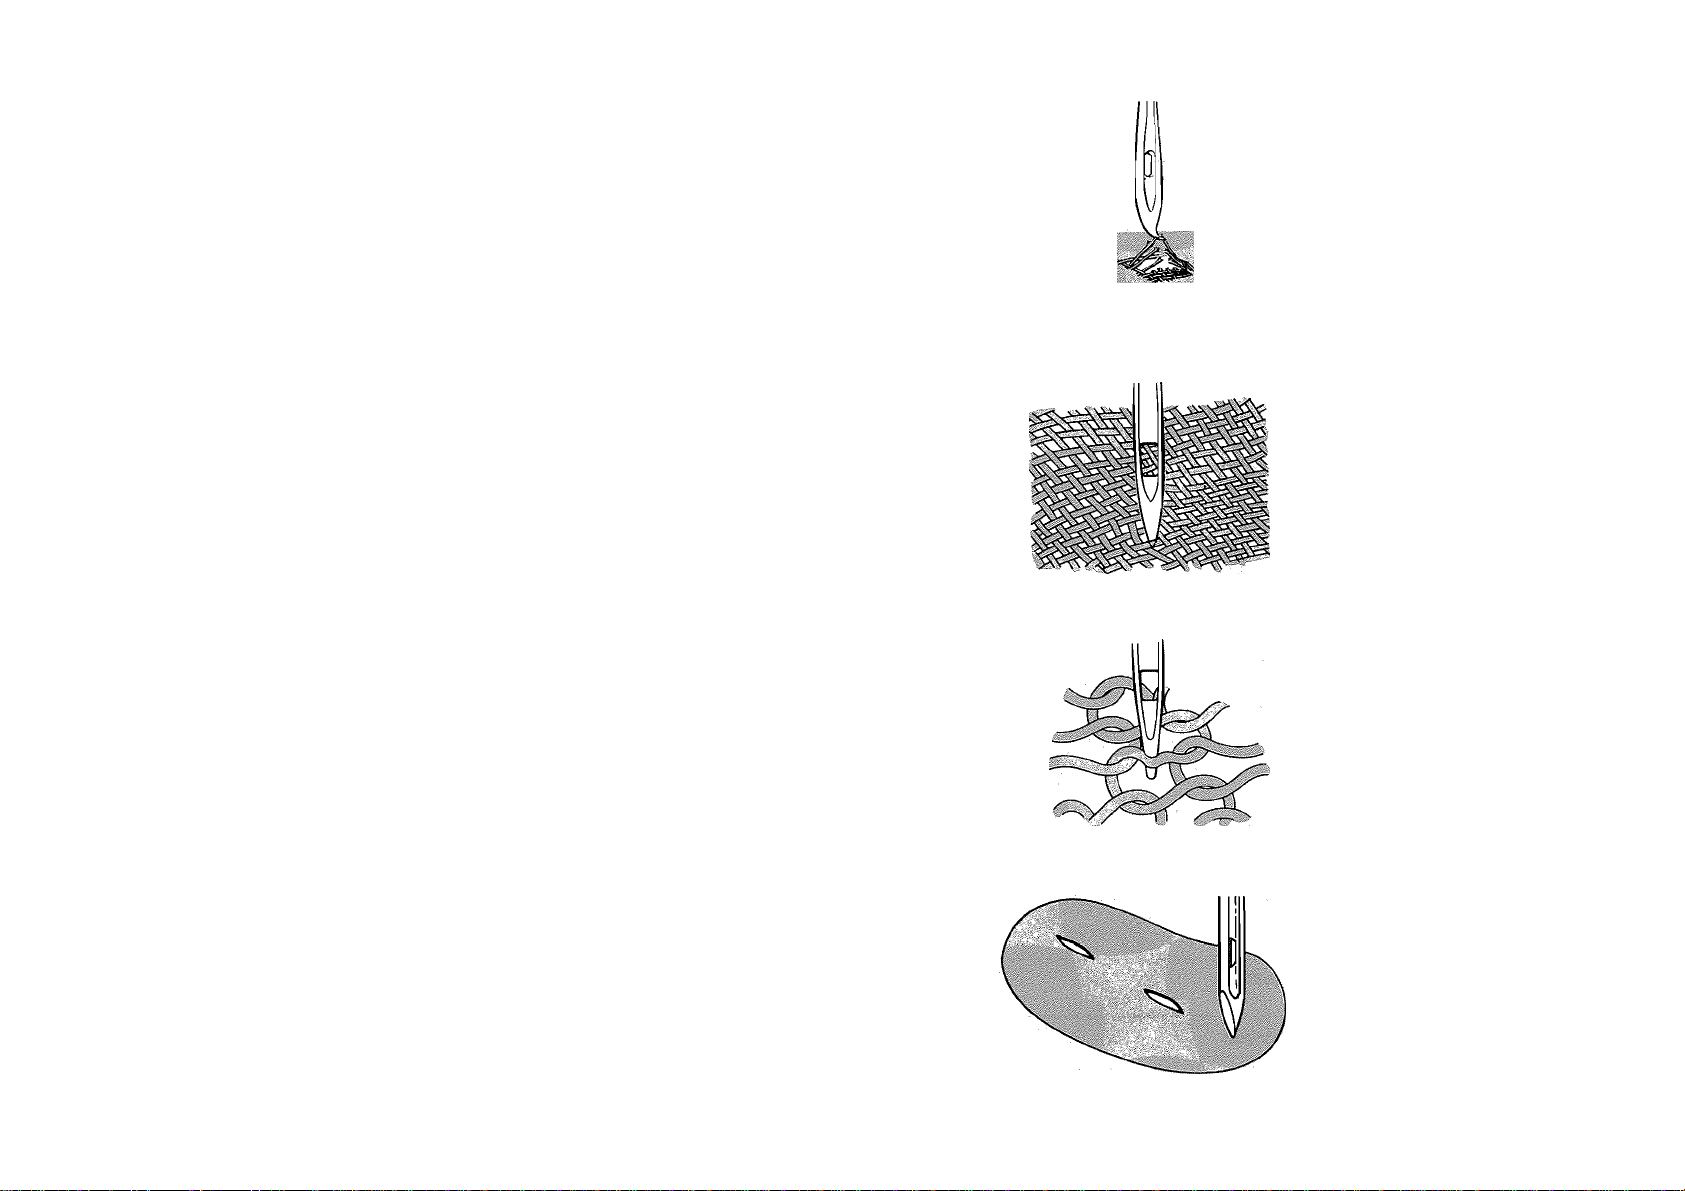
The three types of needles most commonly used by sewers are
the regular, ball point, and wedge. To obtain good results, the
correct size and type of needle for the fabric and thread you
are using, must be chosen.
The regular needle, Style 2020, which is called a set-point
type needle, is for stitching woven fabrics such as denim,
gabardine, and drapery coating.
2020
2045
Ball point needles, Style 2045, are appropriate for stitching
most knits, lingerie, lace, mesh, stretch fabrics, and elastic
materials. The special rounded tip of the ball point needle
ensures gentle separation of the fabric yarns.
The wedge needle. Style 2032, is the best for stitching leather,
vinyl, and dense materials. It is designed to cut through with a
minimum of friction and also shape the punctures to ensure a
desired appearance.
2032
Page 11

Fabric Weight Table There are thousands of fabrics around the world, each manu
factured with a specific fibre and weight. The fabrics below
have been classified according to weight to give a small sample
of what is available for purchase.
Referto this tabletodeterminethe weight and type of fabric you
Fibre
and
Construction
Filmy Sheer
Silk
(Woven)
Chiffon,
Organza,
Tulle
Net, Lace, Ninon
(Knit)
Rayon
Tulle
Net, Lace
(Woven)
(Knit)
Cotton
(Woven)
Voile,
Tulle
Net, Lace Challis, Organdy, Muslin, Batiste, Dimity,
(Knit)
Wool
(Woven)
(Knit) Jersey
Synthetic
(Woven)
Chiffon,
Organza,
Tulle
Net, Lace, Ninon,
Crepe de Chine
(Knit)
Synthetic
Blends
Voile Broadcloth, Batiste, Eyelet, Gingham,
(Woven)
(Knit)
Velvet, Crepe de Chine, Shantung, Faille
Jersey
Velvet, Taffeta, Satin
Ciré
Lawn, Percale, Eyelet, Gingham, Piqué, Poplin
Jersey
Cashmere, Rannel, Mohair, Felt, Crepe
Crepe, Velvet, Taffeta, Satin
Raschel, Single Knit, Sweater Knit,
Bonded Knit, Tricot, Ciré
Poplin
Single Knit
10
Leather
Plastic
Vinyls
Kidskin, Patent, Chamois, ImitationLeathers & Suedes, Leather, Suede
Plastic Film Plastic Film
Page 12

will be using in order to select the correct needle and thread
combination.
For correct needle and thread combination for your fabric, refer
to the Fabric,Thread and Needle Table on the following page.
Medium
Velvet, Crepe de Chine, Shantung,
Suiting, Brocade
Velvet, Taffeta, Satin, Crepe
Velveteen, Corduroy, Velvet, Reece,
Velour, Terry, Chintz
Stretch Velours ■, Stretch Terry ■
“ Usually contain some synthetic fibers also.
Suiting, Rannel, Gabardine, Felt, Serge, Mohair
Jersey
Velvet, Crepe, Taffeta, Satin, Gabardine
Jacquard, Double Knit, Sweater Knit, Bonded Knit, Tricot,
Spandex, Stretch Terry, Stretch Velour, Deep Pile, Fake Furs
Very
Heavy
Brocade, Taffeta, Satin, Crepe
Corduroy, Denim, Ticking, Canvas,
Linen, Drapery Fabric, Burlap
Suiting, Tweed, Duffel Coating, Blanketing
Double Knit, Flelenca, Fake Furs
Denim, Duck, Canvas,
Sailcloth, Upholstery
Fabric
Linen Type, Poplin, Corduroy, Gabardine
Terry Knit
Patent, Imitation-Leathers & Suedes,
Leather, Suede, Reptile
Bonded Vinyl (Knit Back), Patent, Embossed, Printed
Denim, Gabardine, Drapery Fabric
Double Knit
Buckskin, Calfskin, Suede, Reptile Upholstery Leather
Upholstery Vinyl Upholstery Vinyl
11
Page 13
Fabric, Thread and Needle Table
Choosing the correct needle and thread for your fabric is of
utmost importance. Correct choice wiil make the difference
in the wear and appearance of your new garment. The Fabric
Weight Tabie on the previous page; and the Fabric, Thread
and Needle Table below are practical guides to needle and
thread selection. Refer to them before starting a sewing pro
ject. Be sure to use the same size and type of thread in both
needle and bobbin.
Type
of
Fabric
Silk
Rayon
Cotton
Wool
Synthetic
Synthetic
Blends
Leather
Filmy Sheer
Light
Threads Needles Threads Needles Threads Needles
Fine Silk
Rne Mercerized
Rne Silk
Rne Mercerized
Rne Cotton
Rne Mercerized 2020-9 ■
Rne Synthetic 2020-9 ■ Rne Synthetic
Rne Synthetic 2020-9 ■
2020-9 "
2020-9"
Rne Silk
Rne Mercerized 2020-9 ■
Rne Silk
Rne Mercerized
Fine Cotton
Rne Mercerized 2020-9 ■
Rne Silk
Rne Mercerized
Rne Synthetic 2020-9"
2020-9 ■
2020-11
2020-9" Rne Synthetic 2045-11
Rne Silk
Fine Mercerized 2020-11
Fine Silk
Fine Mercerized
Medium Cotton
Medium Mercerized 2020-11
Rne Silk
Fine Mercerized
Fine Synthetic
Medium Mercerized
Medium Synthetic 2032-11
2020-11
2020-11
2045-11
12
Plastic
Vinyls
' Size 9 needle is recommended for sewing only. For bobbin winding, use larger size needle.
I I
Fine Synthetic
I
Rne Mercerized
1 Rne Mercerized
Rne Synthetic
2020-11
2020-11
Page 14

To select the correct needle and thread for your fabric, first
refer to the Fabric Weight Table to determine the weight and
type of the material you are using.
Next refer to the Fabric, Thread and Needle Table.
Find the fabric you are using in Type of Fabric column at left.
(Silk, rayon, etc.) Then locate the fabric weight column (filmy,
sheer, etc.) for your fabric at top of table. Read across from
Type of Fabric column to correct weight of fabric column.
There, the correct thread and needle choice for your fabric
will be found.
Example: If you are sewing a medium weight wool, find wool
in Type of Fabric column. Read across to Medium (weight)
column and you will see that a medium silk or mercerized
thread and a size 2020-14 needle are to be used.
Medium
Threads
Medium Silk
Medium Mercerized 2020-11
Medium Synthetic
Medium Mercerized 2020-11
Medium Cotton
Medium Mercerized 2020-14
Medium Silk
Medium Mercerized
Medium Synthetic
M,edium Synthetic 2045-14 Heavy Synthetic 2045-16 Heavy Synthetic
Medium Mercerized
Medium Synthetic
Needles
V'/' ■ ■ . ..
2020-14
2045-14 Heavy Synthetic 2045-16 Heavy Synthetic
2032-14
Threads Needles Threads Needles
Heavy Silk
Heavy Mercerized 2020-14 Heavy Silk 2020-14
Heavy Synthetic
Heavy Mercerized
Heavy Cotton
Heavy Mercerized 2020-16
Heavy Mercerized 2020-16 Heavy Mercerized 2020-16
Heavy Mercerized
Heavy Synthetic 2032-16
Heavy
2020-14
Heavy Synthetic
Heavy Mercerized
Heavy Cotton
Heavy Meroerized
Heavy Mercerized
Heavy Synthetic 2032-18
Very Heavy
2020-14
2020-18
2045-16
or
2020-18
2045-16
or
2020-18
Medium Mercerized
Medium Synthetic
Medium Mercerized
Medium Synthetic
2020-11
2020-11
Medium Mercerized
Medium Synthetic
Medium Mercerized
Medium Synthetic
2020-14
2020-14
Heavy Mercerized
Heavy Synthetic 2020-16
Heavy Mercerized
Heavy Synthetic
2020-16
13
Page 15
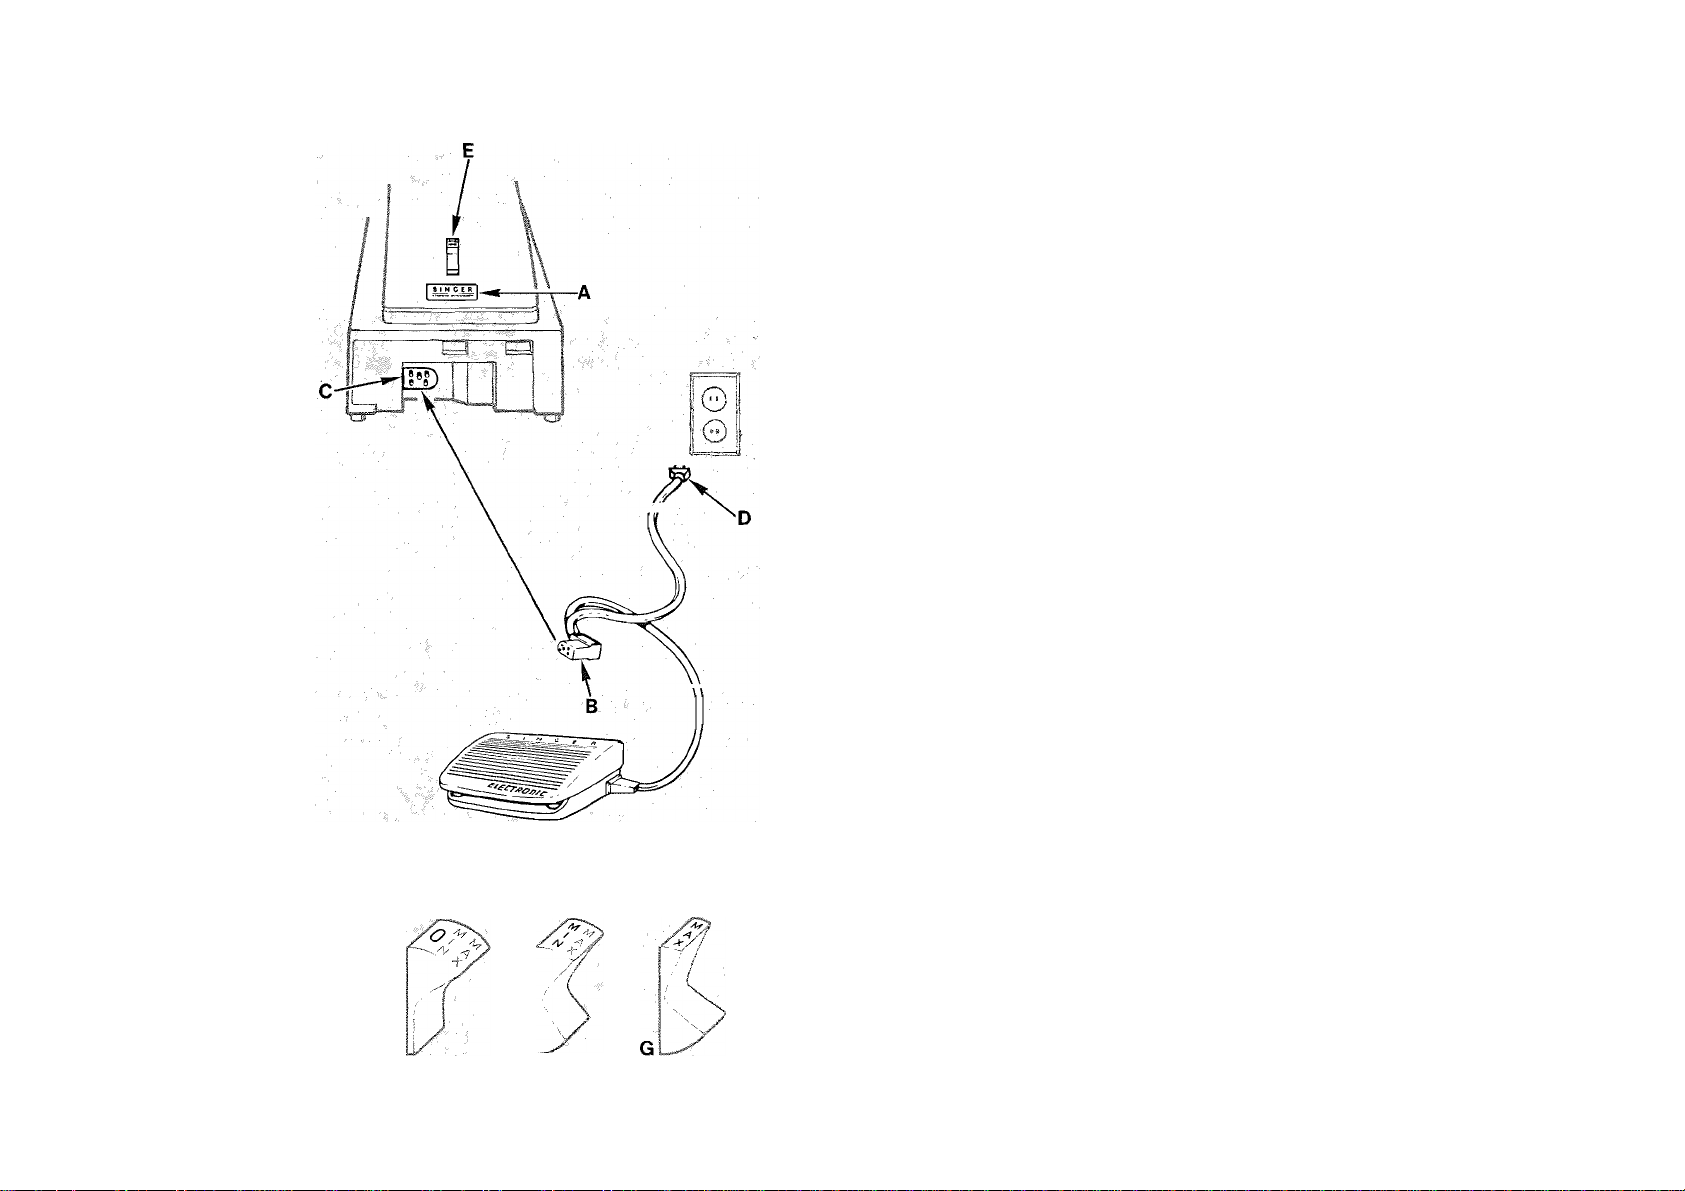
operating machine
Connecting Machine
Before plugging in your machine, be sure that the voltage
and number of cycles indicated at the electrical nameplate
A on the right end of the machine, conform to your electrical
po\wer supply.
e Push the machine plug B into the machine socket C.
e Connect the po\wer-line plug D to your electrical outlet.
Important: Machines for Great Britain and some other countries
having simiiar \«iring standards are shipped from the factory
\«ithout a piug for connection to the mains. The \«ires in this
mains lead are coloured in accordance \«ith the follow/ing code:
Biue - Neutral (N) Bro\«n - Live (L)
Note: As the colours of the \«ires in the mains iead of this
appliance may not correspond \«ith the coloured markings
identifying the terminals in your plug, proceed as follow/s:
Connect bro\«n \«ire to terminal marked L or coloured red.
Connect blue \«ire to terminal marked N or coloured black.
When using a BS 1363 (British Standard) fused plug a 3Amp.
fuse must be fitted. If the terminals of the plug are unmarked
consult a qualified electrician before use.
14
To turn on the machine and set speed range, push the po\wer
and light s\witch E to desired speed. This \will also turn on the
sev/ing light.
® The MIN setting F (s\witch pressed in halfway) allows for
maximum control. Use this setting for special jobs where
intricate construction details require close control.
9 The MAX setting G (switch pressed in all the way) allows
for full speed capacity of the machine. It Is best for long,
straight seams, easy-to-handle fabrics, and general sewing
where a variety of speeds are needed.
Caution: Disconnect the power line plug from the socket
outlet when changing needles, feet or needle plates or when
leaving the machine unattended. This eliminates the possi
bility of starting the machine by accidentally pressing the
speed controller.
Page 16
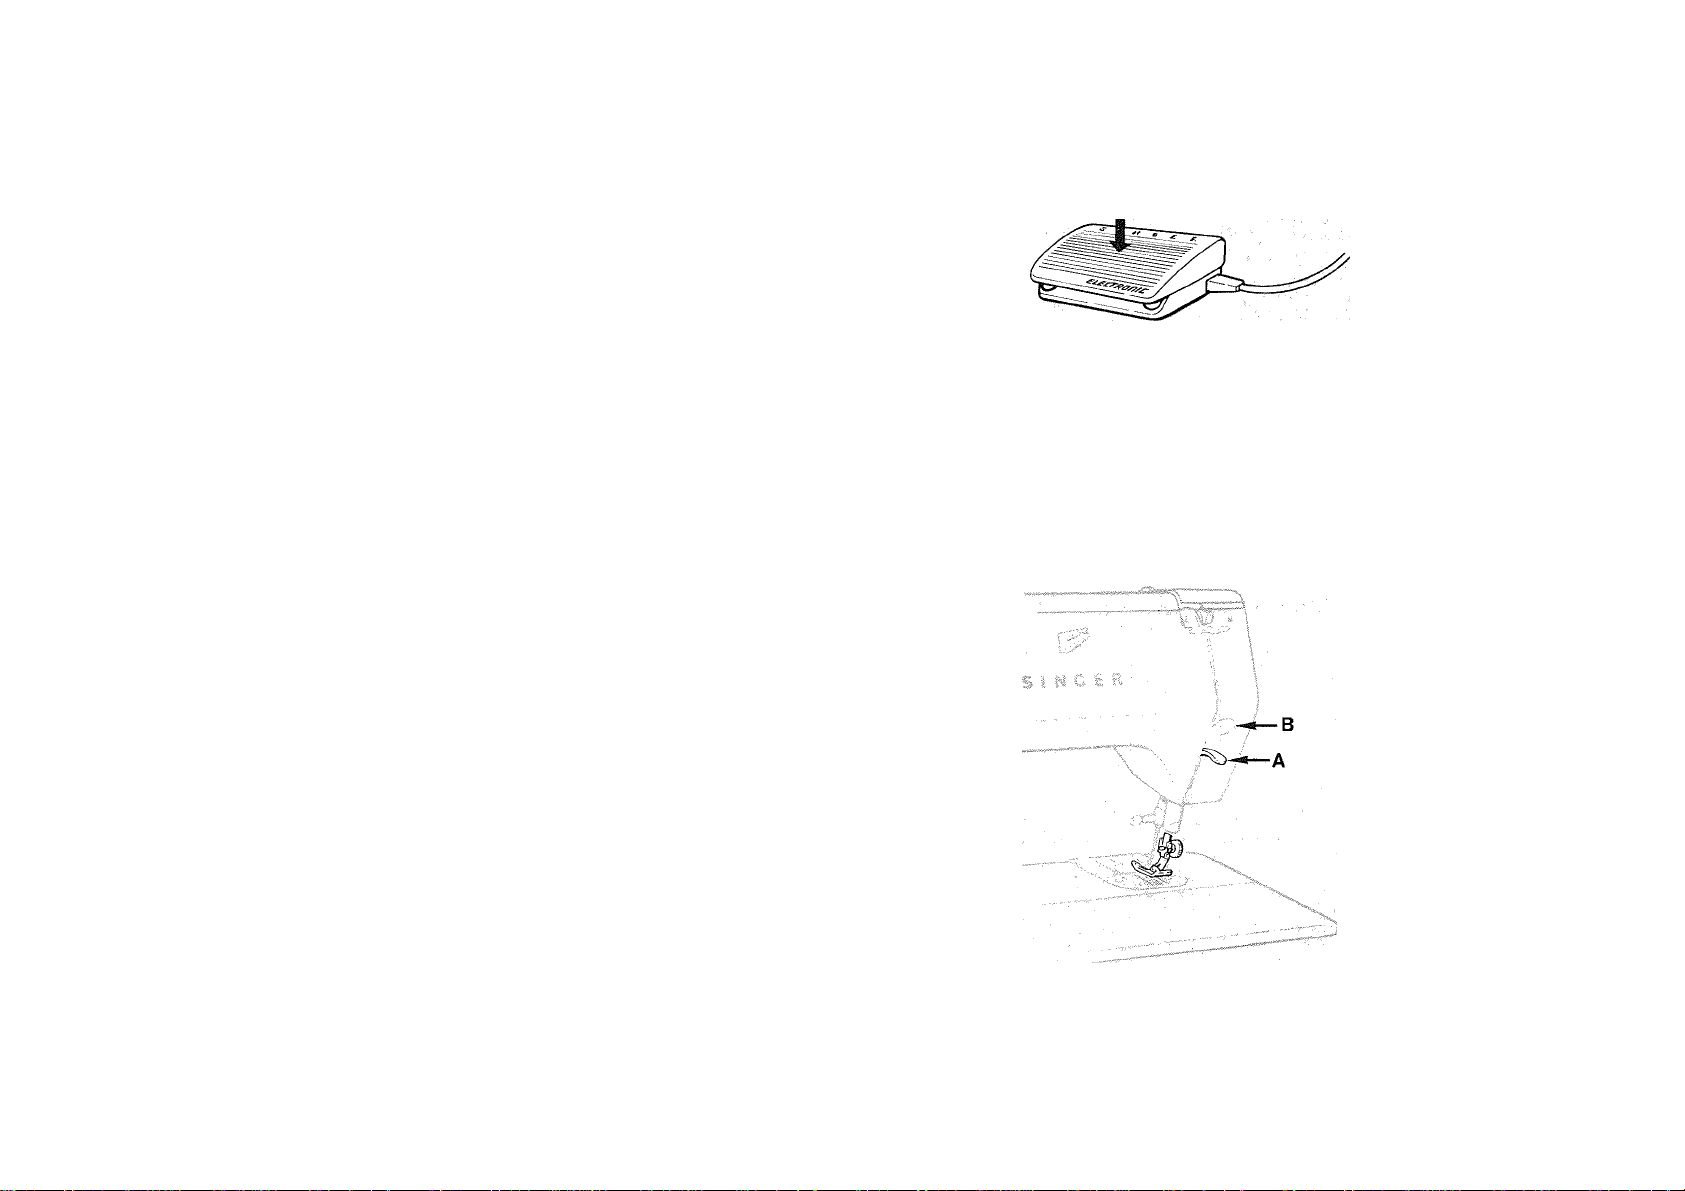
To run the machine, press the foot operated speed controller.
The speed controller has an electronic circuit which provides
constant speed when sewing on fabrics of varying density in
either speed range. You may also set your own speed for
sewing on delicate, light or heavy fabric. The harder you press,
the faster the machine will sew within the selected speed
range. The lighter you press, the slower the machine will sew
within the selected speed range.
Note: Your machine has a built-in fuse which protects its
electronic brain. If the machine does not operate (stitch selector
lights do not light up) after making electrical connections and
turning on switch, the fuse may need to be replaced. Contact
your local Singer Sewing Centre for additional information.
Lifting the Presser Foot
The presser-foot lifter A allows you to raise and lower the
presser foot. Extra-high lift position B permits easy placement
of bulky fabrics. Make sure the lifter is all the way down
before starting to sew.
15
Page 17
threading the machine
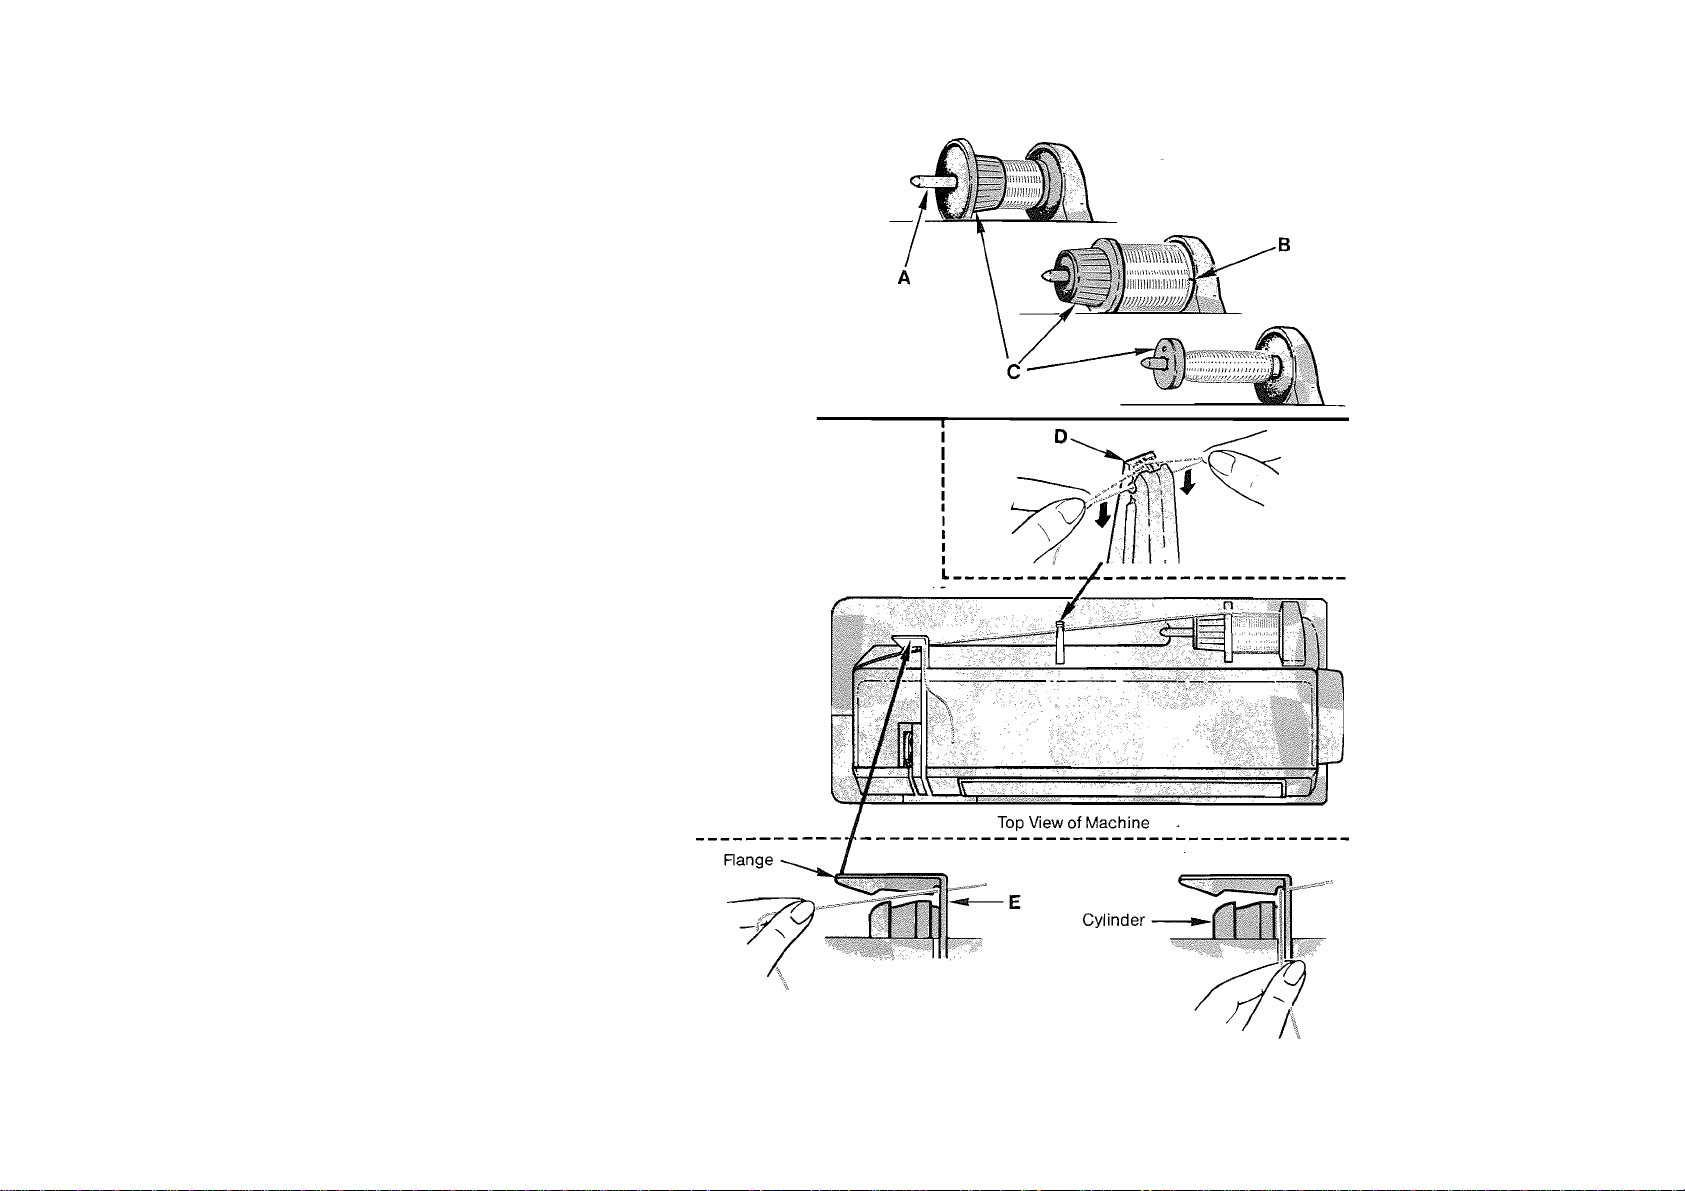
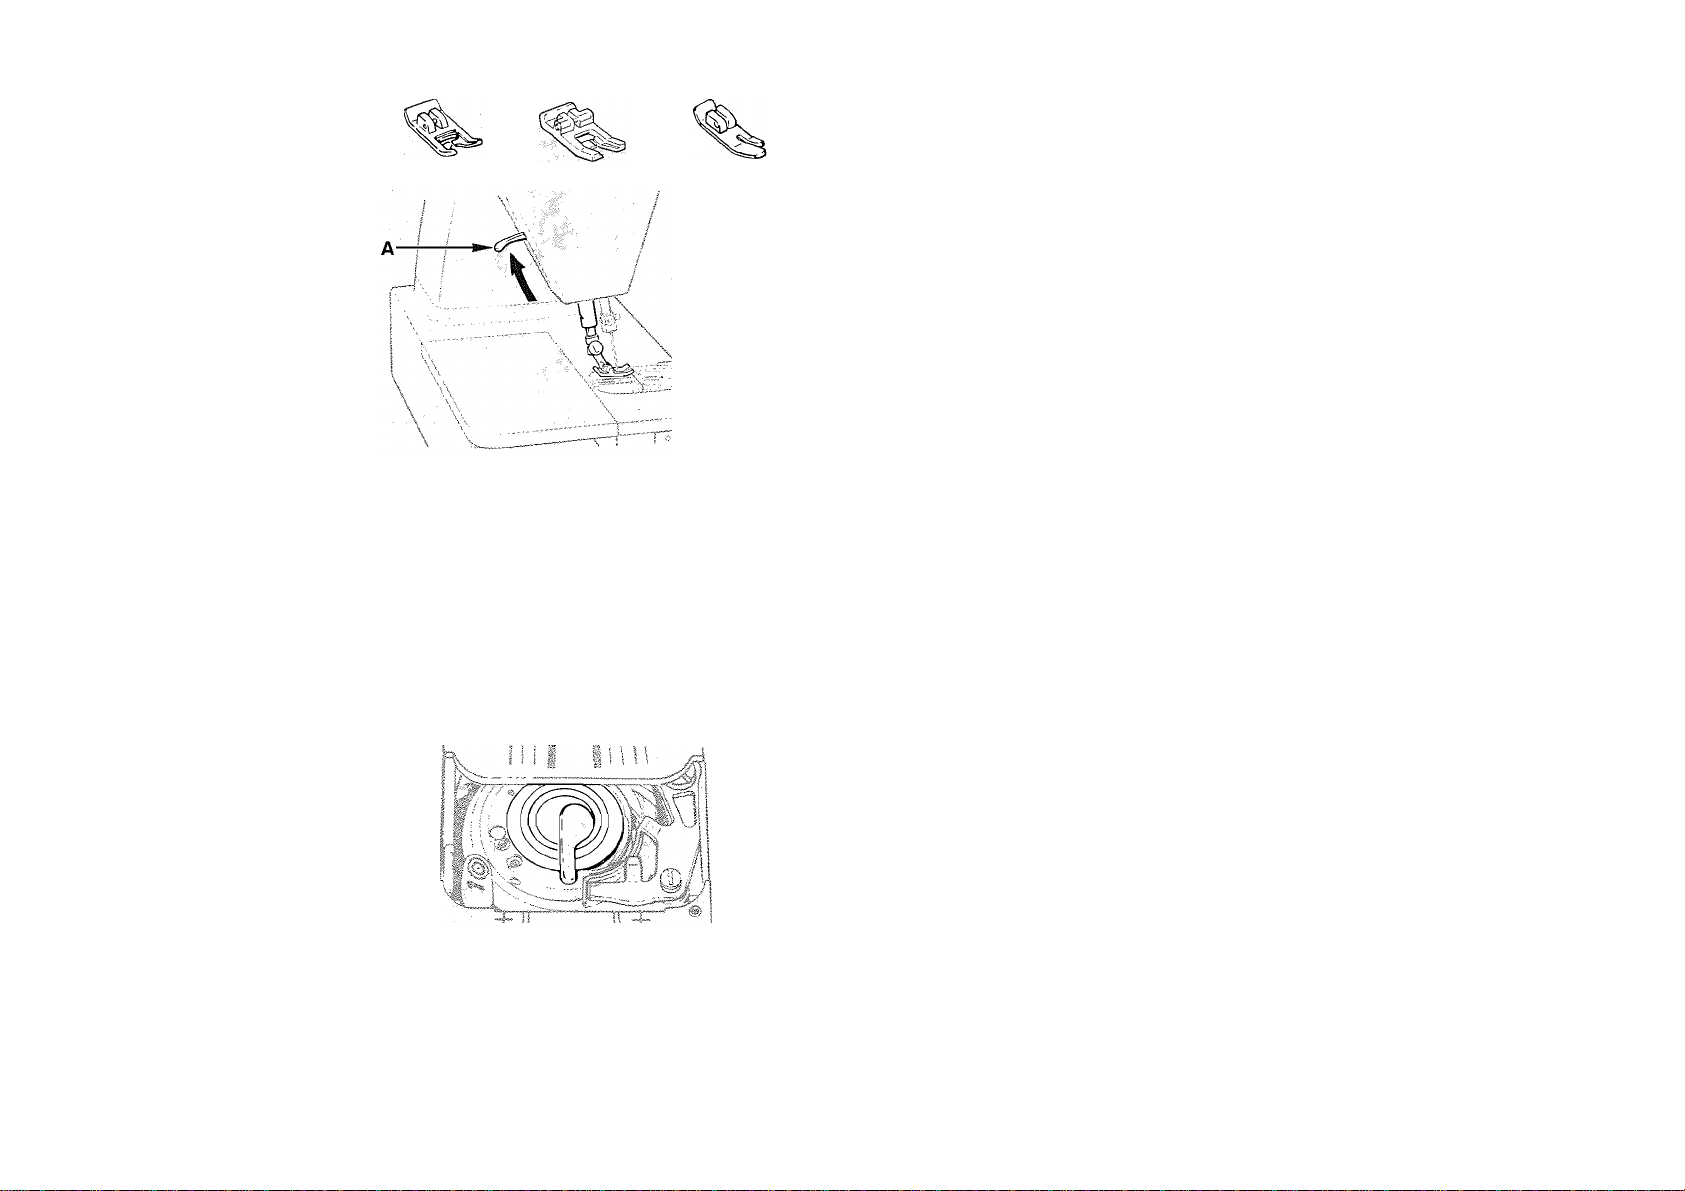
Preparation
• Place spool of thread on horizontal spool pin A. If spool
being used has a thread retaining slit B, it should be placed
against the spool cushion to the right.
• Select correct spool holder according to type and diameter
of spool being used. The diameter of the end of the spool
holder should always be larger than that of the spool itself.
• Press spool holder C firmly against spool.
• Raise the needle and take-up leverto highest position
by turning the hand wheel toward you.
• Raise the presser foot, to release thread tension.
Step1
• Snap thread into thread guide post D.
Step 2
• Thread the rear thread guide E Pass thread under
flange, then over to the far right end of cylinder.
16
Page 18
Principal Threading Parts
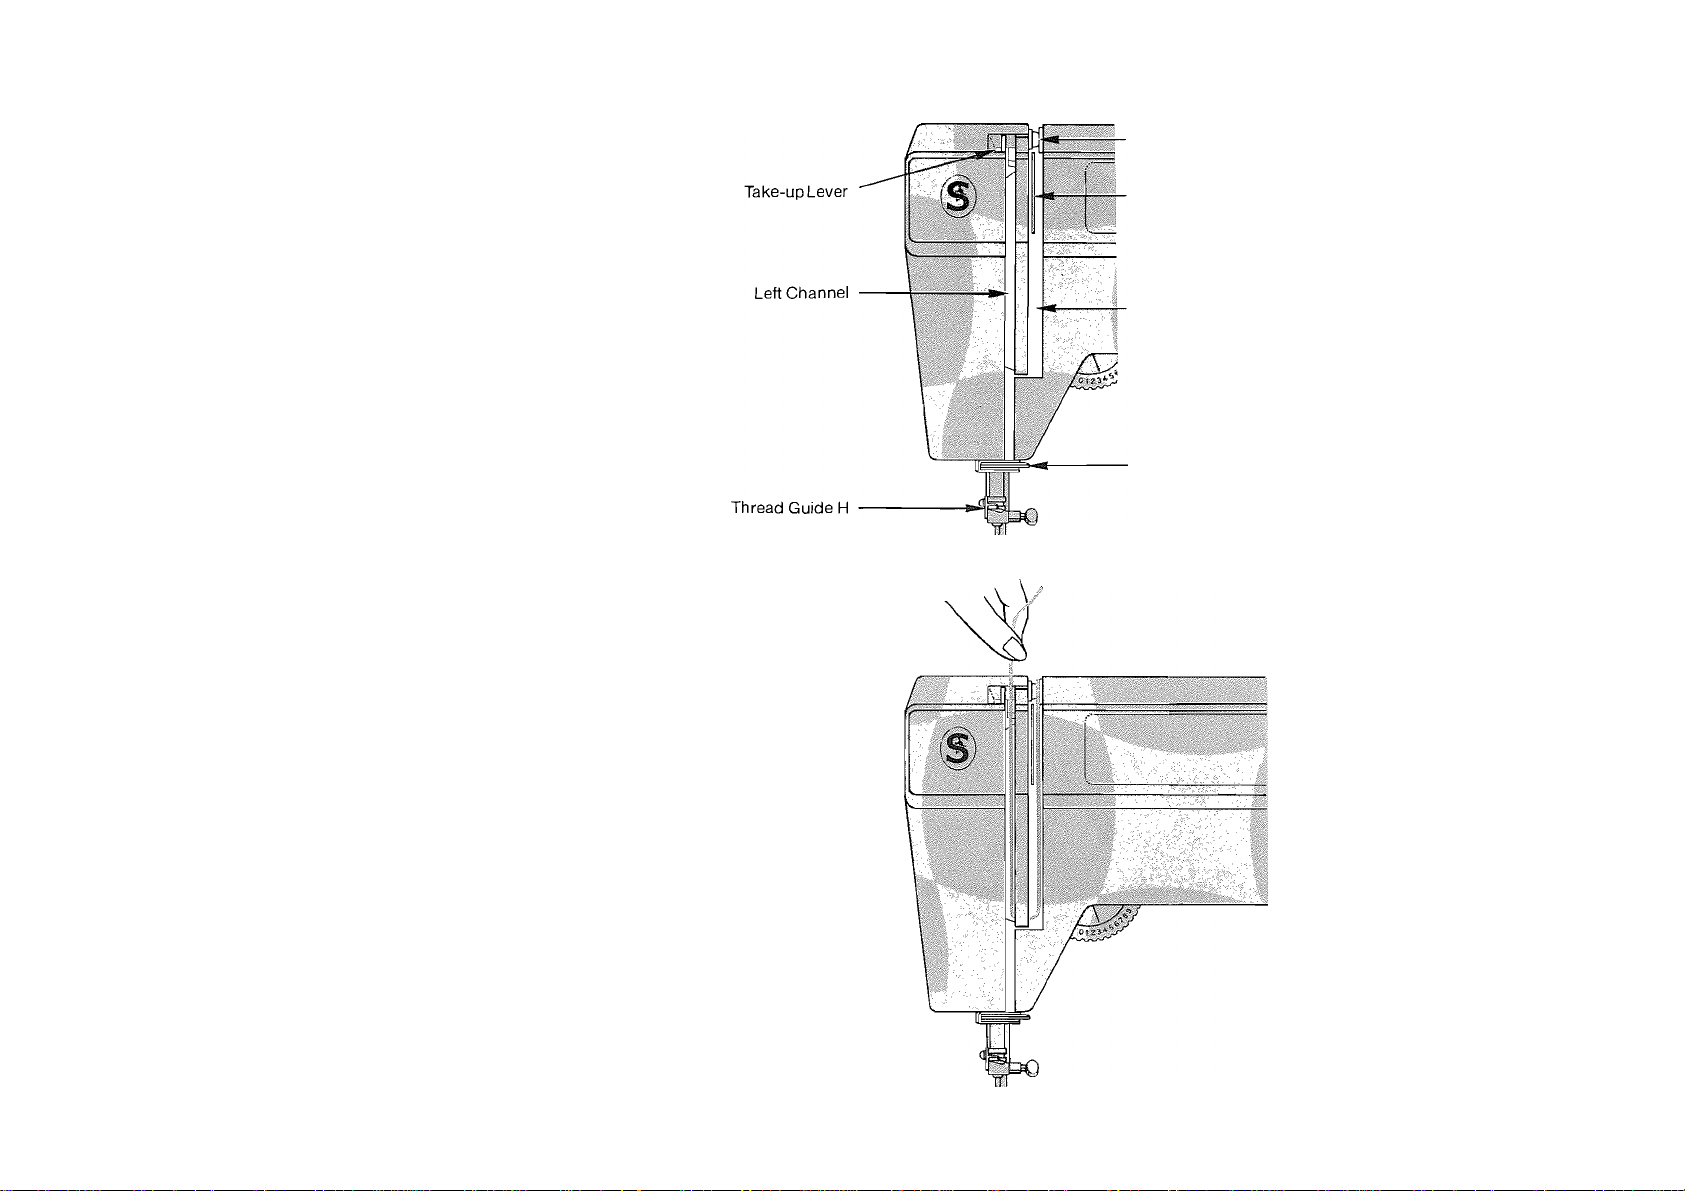
Step 3
® Draw thread firmly into tension disc on right of
tension separator.
• Draw thread down right channel and up left channel
toward the take-up lever.
RearThread Guide
Tension Separator
Right Channel
Thread Guide G
Continued Next Page
17
Page 19
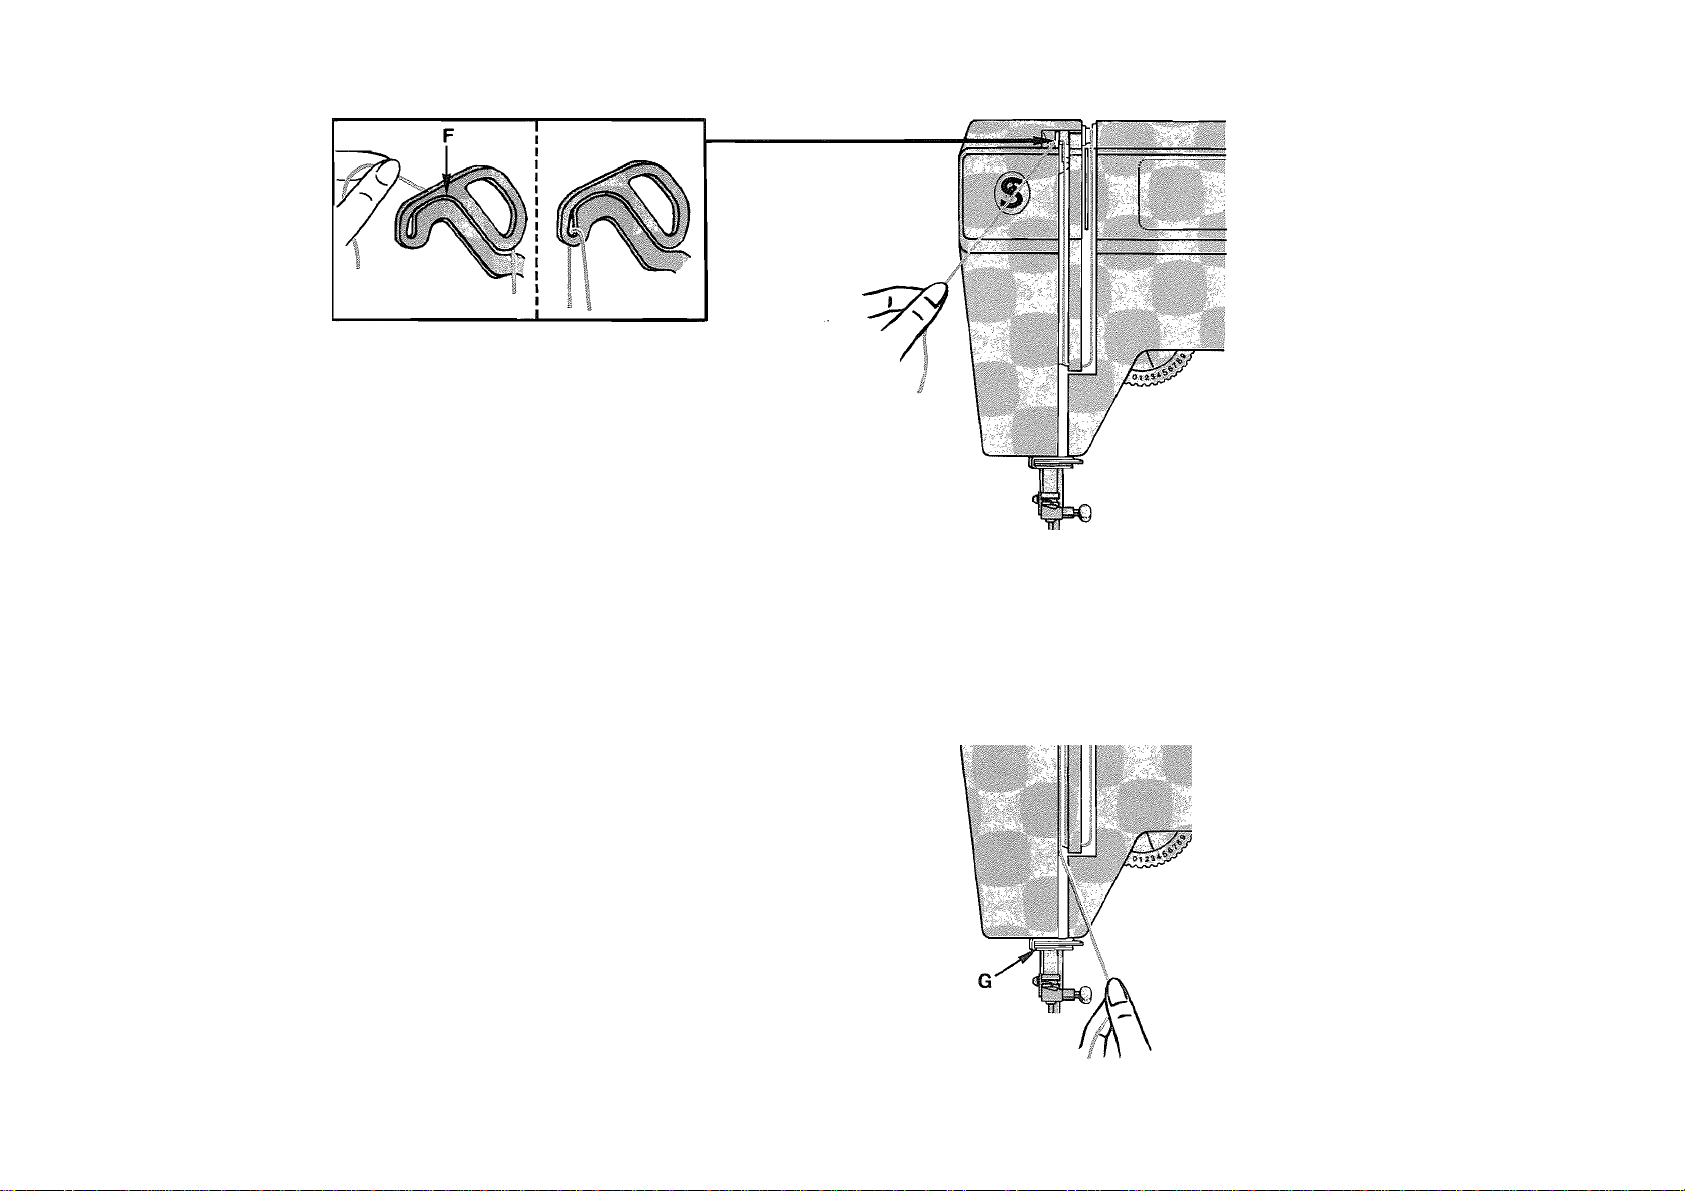
step 4
e Thread take-up lever by guiding thread to back of
lever and around to your left. Bring thread through
slit F by pulling it tow/ard you and into eyelet.
Step 5
• Follow/ thread back dow/n through left channel and
then tow/ard thread guide G.
FIT
Continued Next Page
18
Page 20
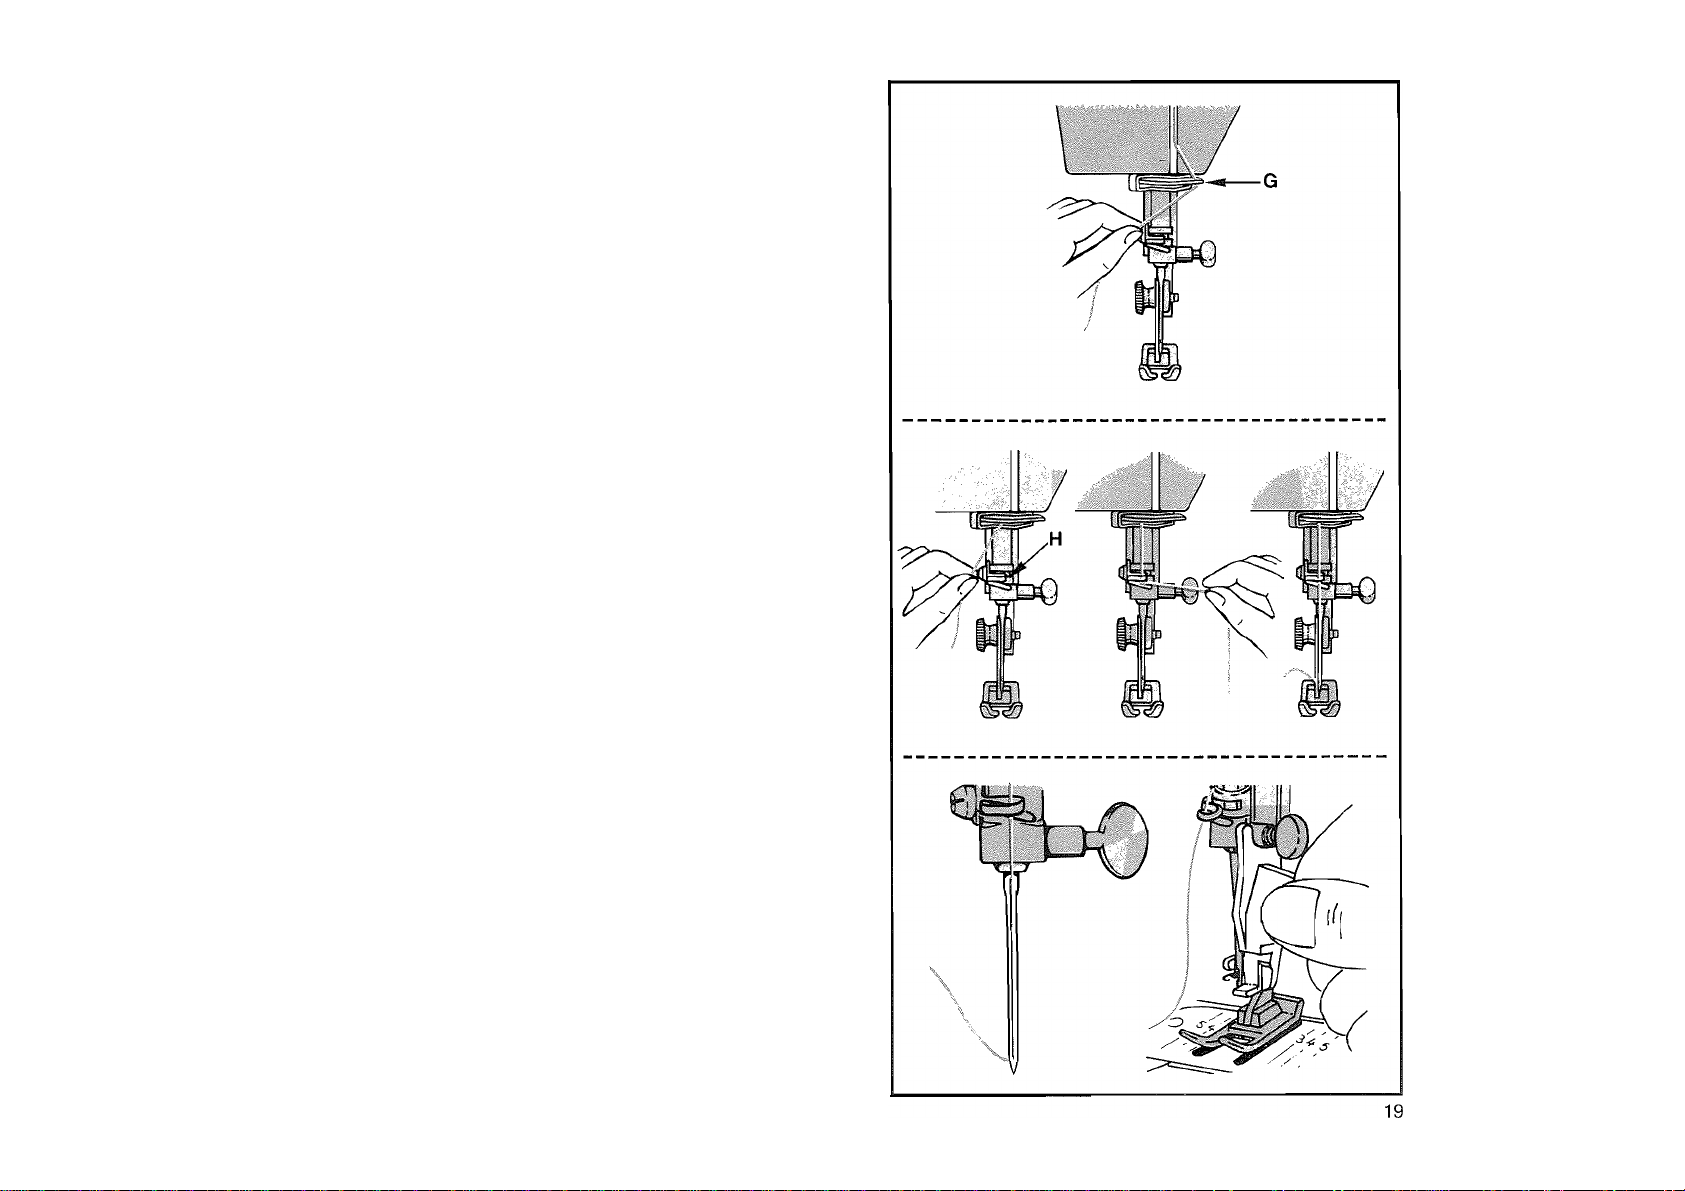
step 6
Lead thread into thread guide G by drawing thread lightly to
the left until it completely slips into the left channel.
Step?
• Then draw thread through guide H from the rear of guide
to the right.
steps
Drawing 10 cm (4 inches) of thread down toward needle, lower
presser foot and thread needle front to back.
Using the Needle Threader
Lower the presser foot.
Position the needle threader as illustrated, with the top of
the needle threader resting against the needle clamp which
correctly aligns the needle threader hook to the needle eye.
Pass the hook through the needle eye, guide thread into the
hook and draw the hook and thread through the needle eye.
Page 21
the bobbin
Winding the bobbin
The push-button bobbin will make your sewing go faster than
ever before - whether you are using a lot of one kind of thread
or small quantities of different threads.
You will find a bobbin in place under the slide plate of your
machine. To open slide plate, simply pull it gently toward you.
If the bobbin runs out of thread while you are sewing, you can
rewind it without removing it from the machine. The window
in the slide plate lets you see lower thread supply at a glance,
to help avoid running out of thread in the middle of a seam.
..I*-,
li ■'3
Preparation Steps
№
1. Use general purpose,
presser foot.
special purpose, or straight stitch
j
2. Raise presserfoot by raising presserfoot lifter A to release
tension on thread, and raise the needle and take-up lever
to highest position by turning hand wheel toward you.
(Make sure your needle is larger than a size 9.)
3. Open slide plate and make sure bobbin is empty. For
removal of bobbin and thread, see pages 22 and 23.
B
4. Set machine for straight stitching by pressing button B
under stitch symbol on stitch panel. For additional infor
mation on pattern selection, see page 24.
20
Page 22
Winding Steps
B
We recommend the use of a moderate speed when winding
a bobbin.
1. Move bobbin winding button Ato extreme left.
.r'x
4. Close slide plate to release bobbin winding button tosewing
3. Pull thread end away after a few coils have been wound,
e Watch the bobbin as it fills. Do not allow thread to wind
beyond the outside FULL ring C.
2, Draw upper thread away from you between toes of presser
foot under left side of presser foot, then up from the front
and around presser foot screw B. Hold end of thread firmly.
Start machine, run at moderate speed.
position.
To start sewing, pull thread back under presser foot and cut.
Place threads diagonally under foot to left side, position
needle in fabric where desired, lower presser foot, and
start machine.
21
Page 23
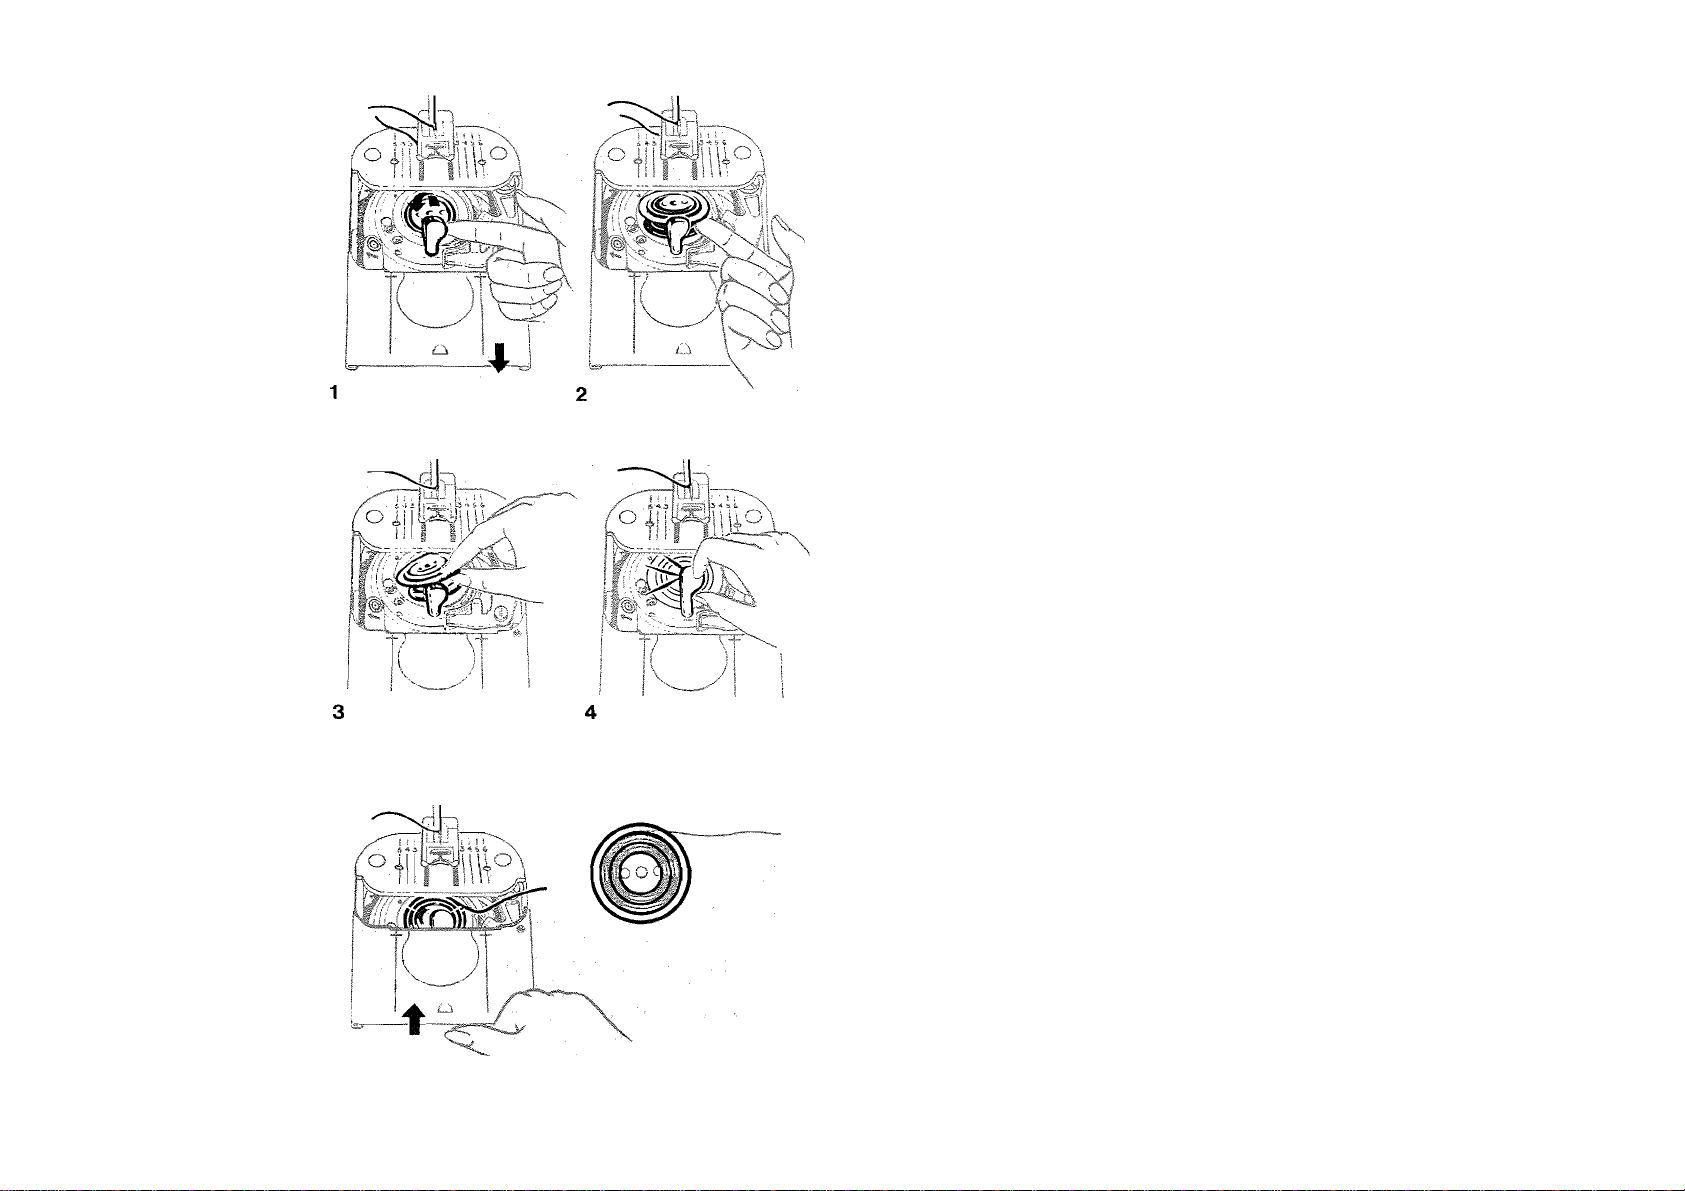
Removing and Changing the Bobbin
f there isafull bobbin in the machine and you wish to change it:
1. Raise needle and take-up lever to highest position by
turning hand wheel toward you. Open slide plate. Raise
bobbin latch by inserting tinger under end ot latch at centre
ot bobbin.
2. Insert tinger under rim ot bobbin immediately to right ot latch
and remove bobbin.
3. Check empty bobbin tirst to ensure that both halves are
tightened securely as described on page 23, Removing
Thread trom Bobbin. With latch raised, slide bobbin with
circle side up into bobbin case.
4. Snap latch down to secure bobbin,
e Wind the bobbin. See page 21.
Using Previously Wound Bobbin
A tull bobbin is inserted in the same manner as an empty one.
5. Place bobbin into case with at least 10cm (4 inches) otthread
leading ottto right side ot latch. Allow the thread to lay in the
slot in the slide plate when closed.
22
Page 24
1
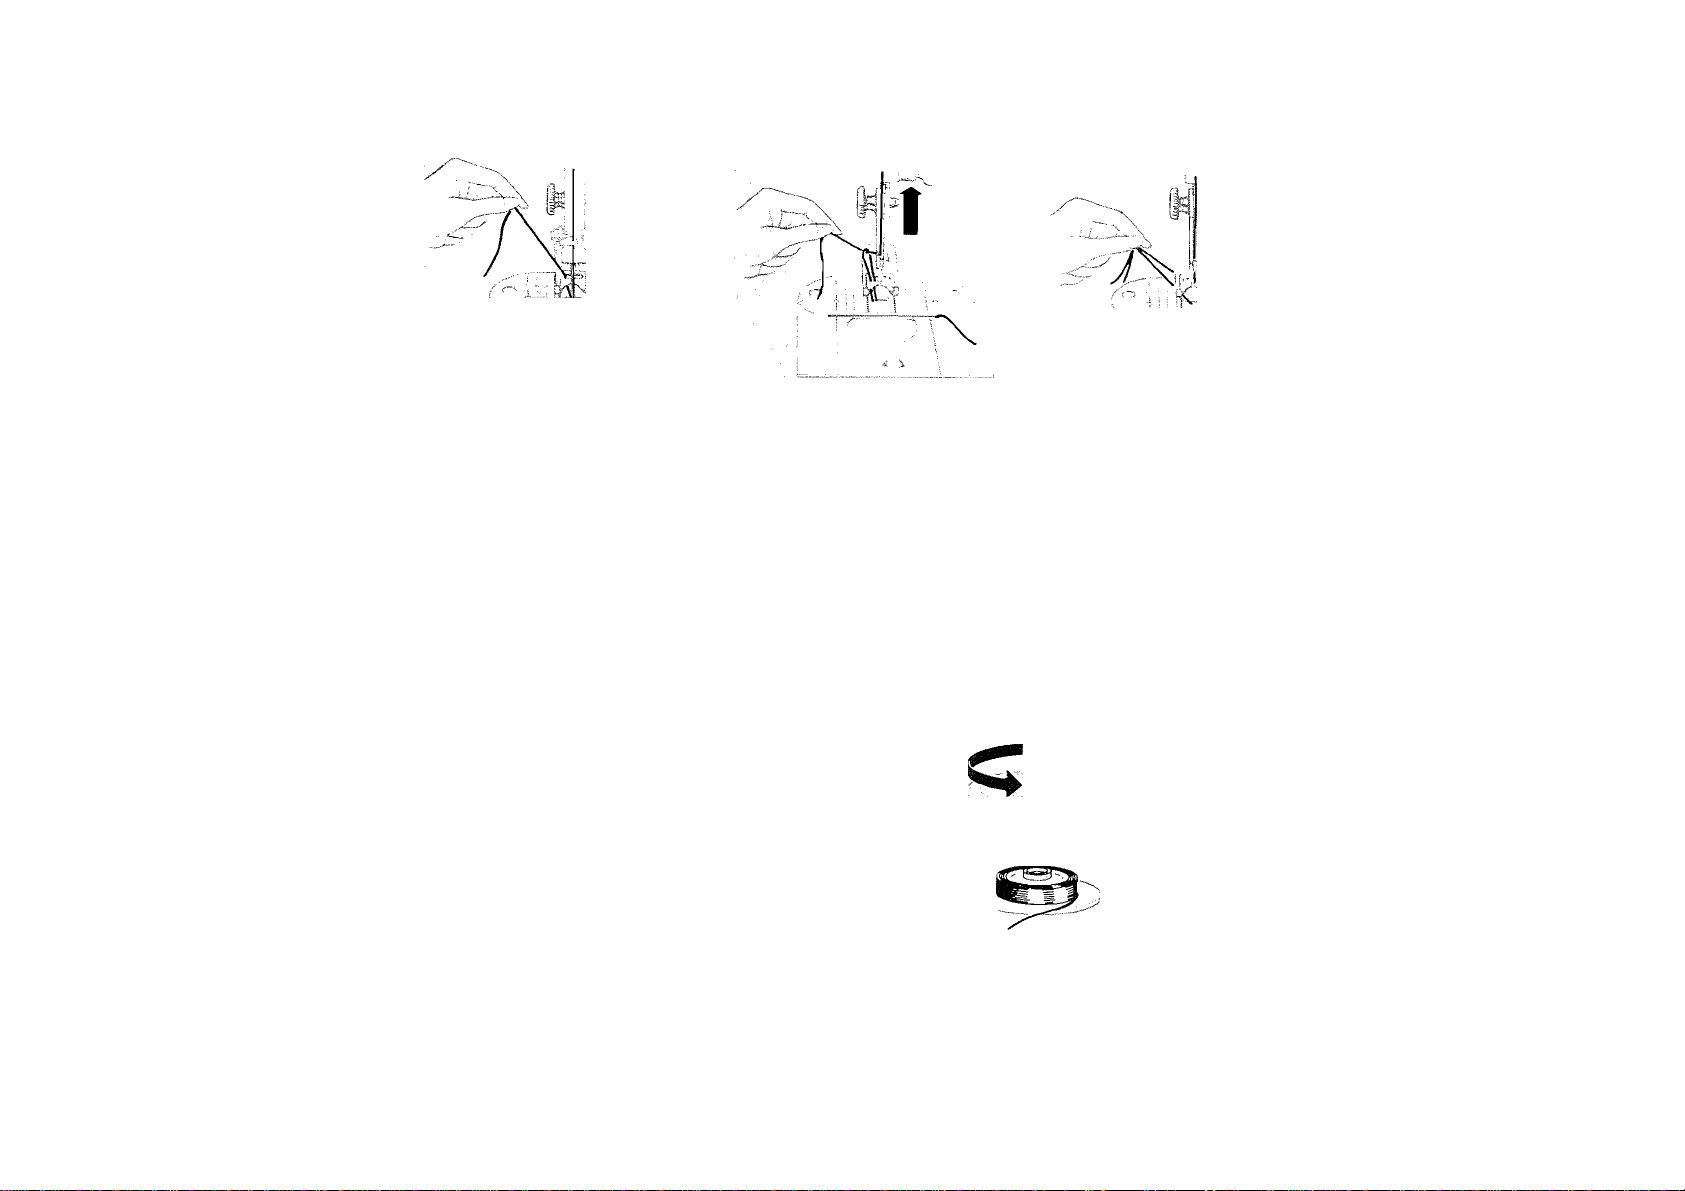
Raising the Lower Thread
1. Hold upper thread lightly
with left hand and turn hand
wheel slowly toward you so
the needle enters plate.
2., Continue turning hand
wheel and holding upper
thread until needle rises.
Tighten your hold on the
upper thread and bring up
lower thread in a loop.
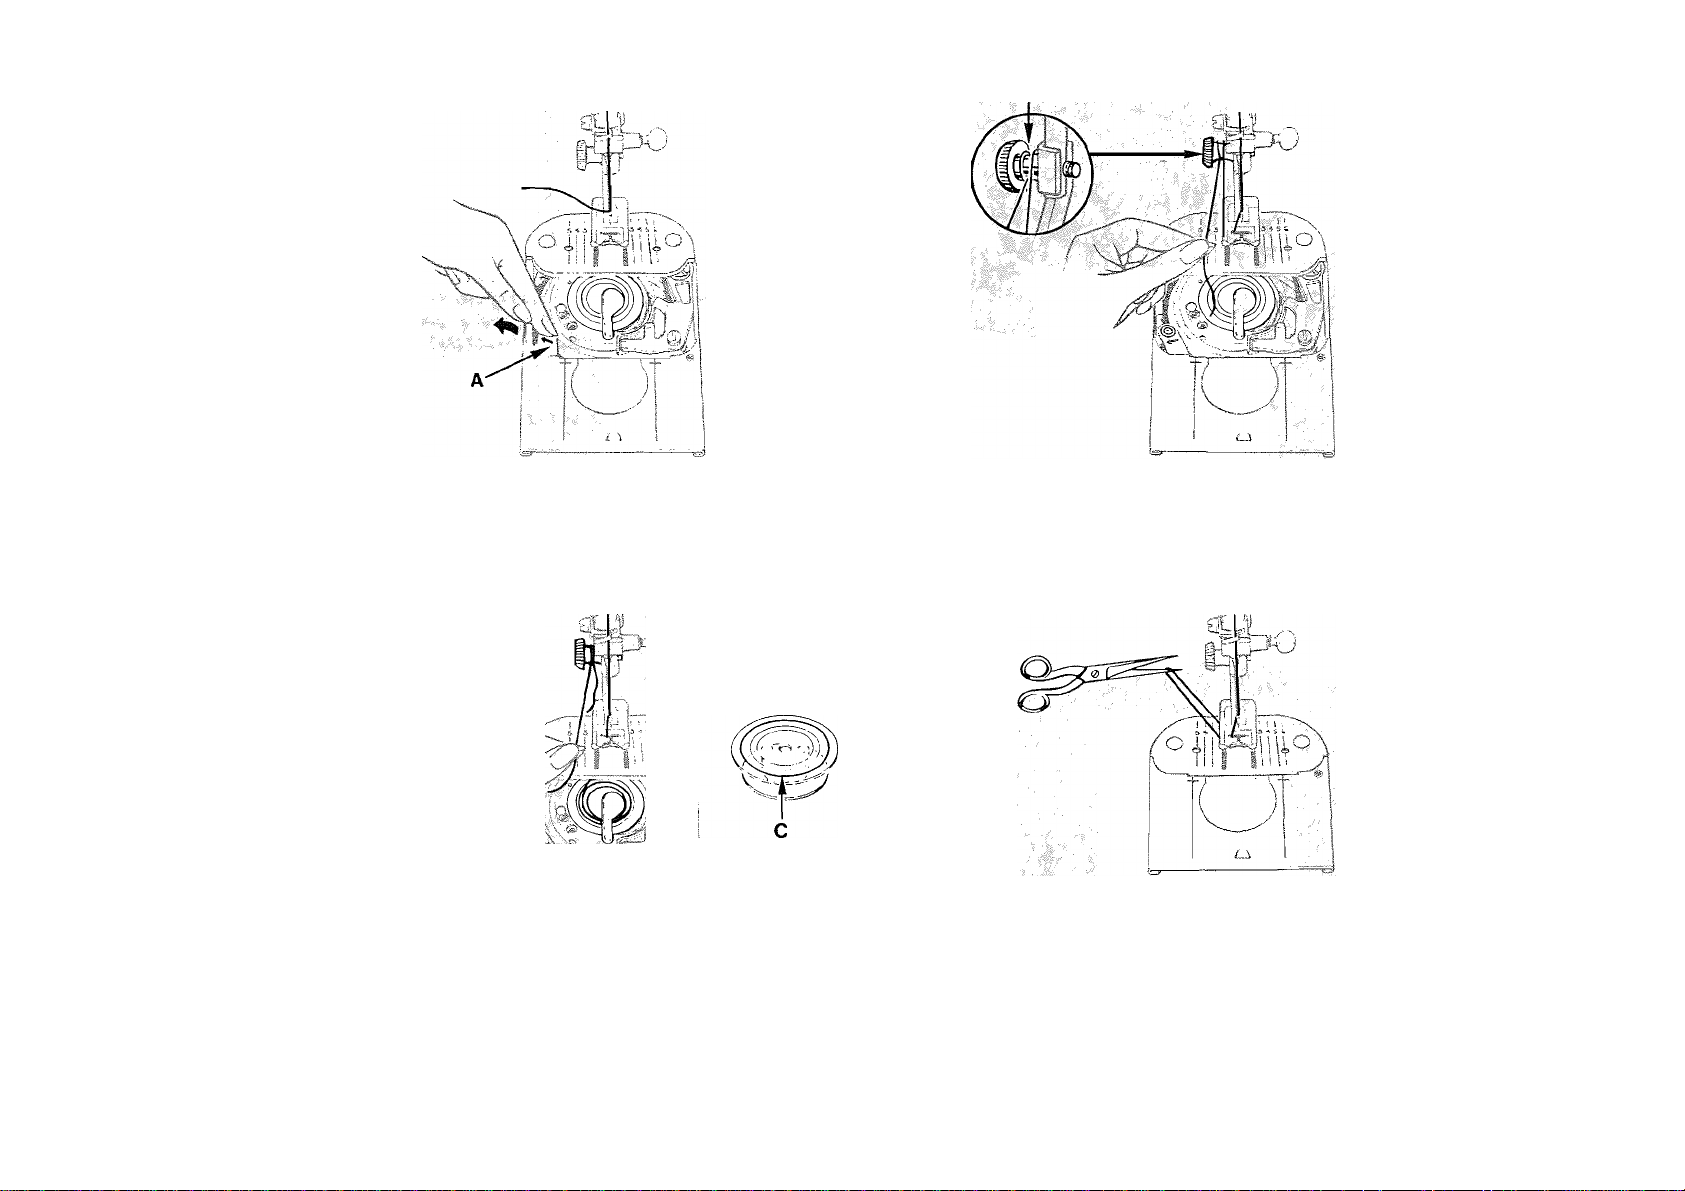
Removing Thread from Bobbin
1. If there is not much thread left on the bobbin in the
machine, simply pull the thread end through the
needle plate until bobbin is empty.
3. Open the loop with your
fingers, draw approximately
10 cm (4 inches) of both
upper and lower threads
under the presser foot and
place them diagonally to
left.
If there is a lot of thread on the bobbin, remove bobbin,
unscrew the two halves of the bobbin and remove all
the thread. Then tighten bobbin halves securely.
23
Page 25

ei SeLJImg
selecting a stitch
• Turn machine on.
(Note movement of needle each time power switch is
turned on.)
• When machine is turned on, it will automatically be pro
grammed to produce a straight stitch as indicated by the
red light which will appear above the straight-stitch
symbol i .
• To select a particular stitch pattern, press pattern selector
button A until the red light B appears above the pair
of stitches in which desired stitch is contained.
Each press of the button advances the indicator light one
pair of patterns to the right.
B
!♦
o o
'i it
4^
If necessary, slide pattern group selector C to position
desired stitch under light. Machine is ready to sew desired
pattern when red light appears above it.
The two red patterns at the end of the panel represent the
buttonhole. For additional information on buttonhole, see
page 66.
Press straight-stitch selector button D if you want to return
to straight stitching after pattern stitching.
For reverse stitching, press and hold in reverse stitch
selector button E while sewing.
Note; The machine will only reverse in straight stitch.
o o o ^
11
-i il!
■J
24
4' 5‘ 6‘ 7
Group 1
1 Arrowhead
2 Scallop
3 Domino Stitch
4 Honeycomb
5 Feather
6 Ric-Rac
7 left Side of Buttonhole
Flexi-Stitch • Patterns
5" 6*
Group 2
1 Plain Zig-Zag
2 Elastic Stretch
3 Multi-Stitch Zig-Zag
4 Blindstitch
5 Straight-Stretch Stitch
6 Overedge Stretch
7 Right Side of Buttonhole
Straight-Stretch Stitch
Page 26
(SI‘2a®aSii Siragg].# Stlfreihimg
preparation
Select straight stitch.
A red light wiil be seen above the stitch symbol to indicate
that the machine is ready to produce a straight stitch.
Straight stitch needie plate and foot are best for all straight
stitching. The straight stitch foot ailows you to controi the
fabric easily when stitching around a curve or close to the
fabric edge. The design of the foot helps prevent skipped
stitches.
The straight stitch foot is to be used oniy with the straight
stitch needle plate. When you use the straight stitch needle
plate your machine will only sew a straight stitch even if you
touch another pattern symboi by mistake.
Always change back to the appropriate needle plate and
presserfoot when doing sewing other than straight stitching.
Use of Reverse Stitch
If you wish to reinforce the beginning or end of a seam, keep
finger on the reverse stitch button.
Machine will only sew a straight stitch in reverse for as long
as you keep your finger on the button.
25
Page 27

adjusting machine to your fabric
' \i
Vi,
№ 'll
Adjusting Stitch Length ”
Before starting to sew, adjust the stitch length of your pattern
on a scrap of fabric.
Turning the stitch length control toward 4 increases the length
of your stitch, and turning the control toward 0 decreases the
length. Turn the control until desired length is obtained.
Note: When sewing FlexiStitch patterns, adjust stitch length
control within yellow FlexiStitch area--. FlexiStitch patterns
are illustrated on page 24.
For information concerning appropriate stitch iength see chart on
opposite page.
26
MAX.
(
Regulating Presser Foot Pressure
Correct pressure is important to feed fabrics smoothly and
evenly. The NORM, (normal) setting is an all-purpose setting
that can be used for sewing a wide variety of fabrics of different
weight and texture. Alternative settings + and — above and
below NORM, (normal) are also provided.
Lower presser foot before setting pressure.
1. To increase pressure, turn dial from NORM, toward MAX.
2. To decrease pressure, turn dial from NORM, toward
3. For darning, set dial on ^.
I
NORM.
1
Page 28

Choosing the correct stitch length is of utmost importance. guide to stitch length selection. Refer to it before starting a
The correct choice will make the difference in the wear and sewing project. Remember to make a test sample on a scrap
appearance of your new garment. The table below is a practical piece of the fabric you will be using.
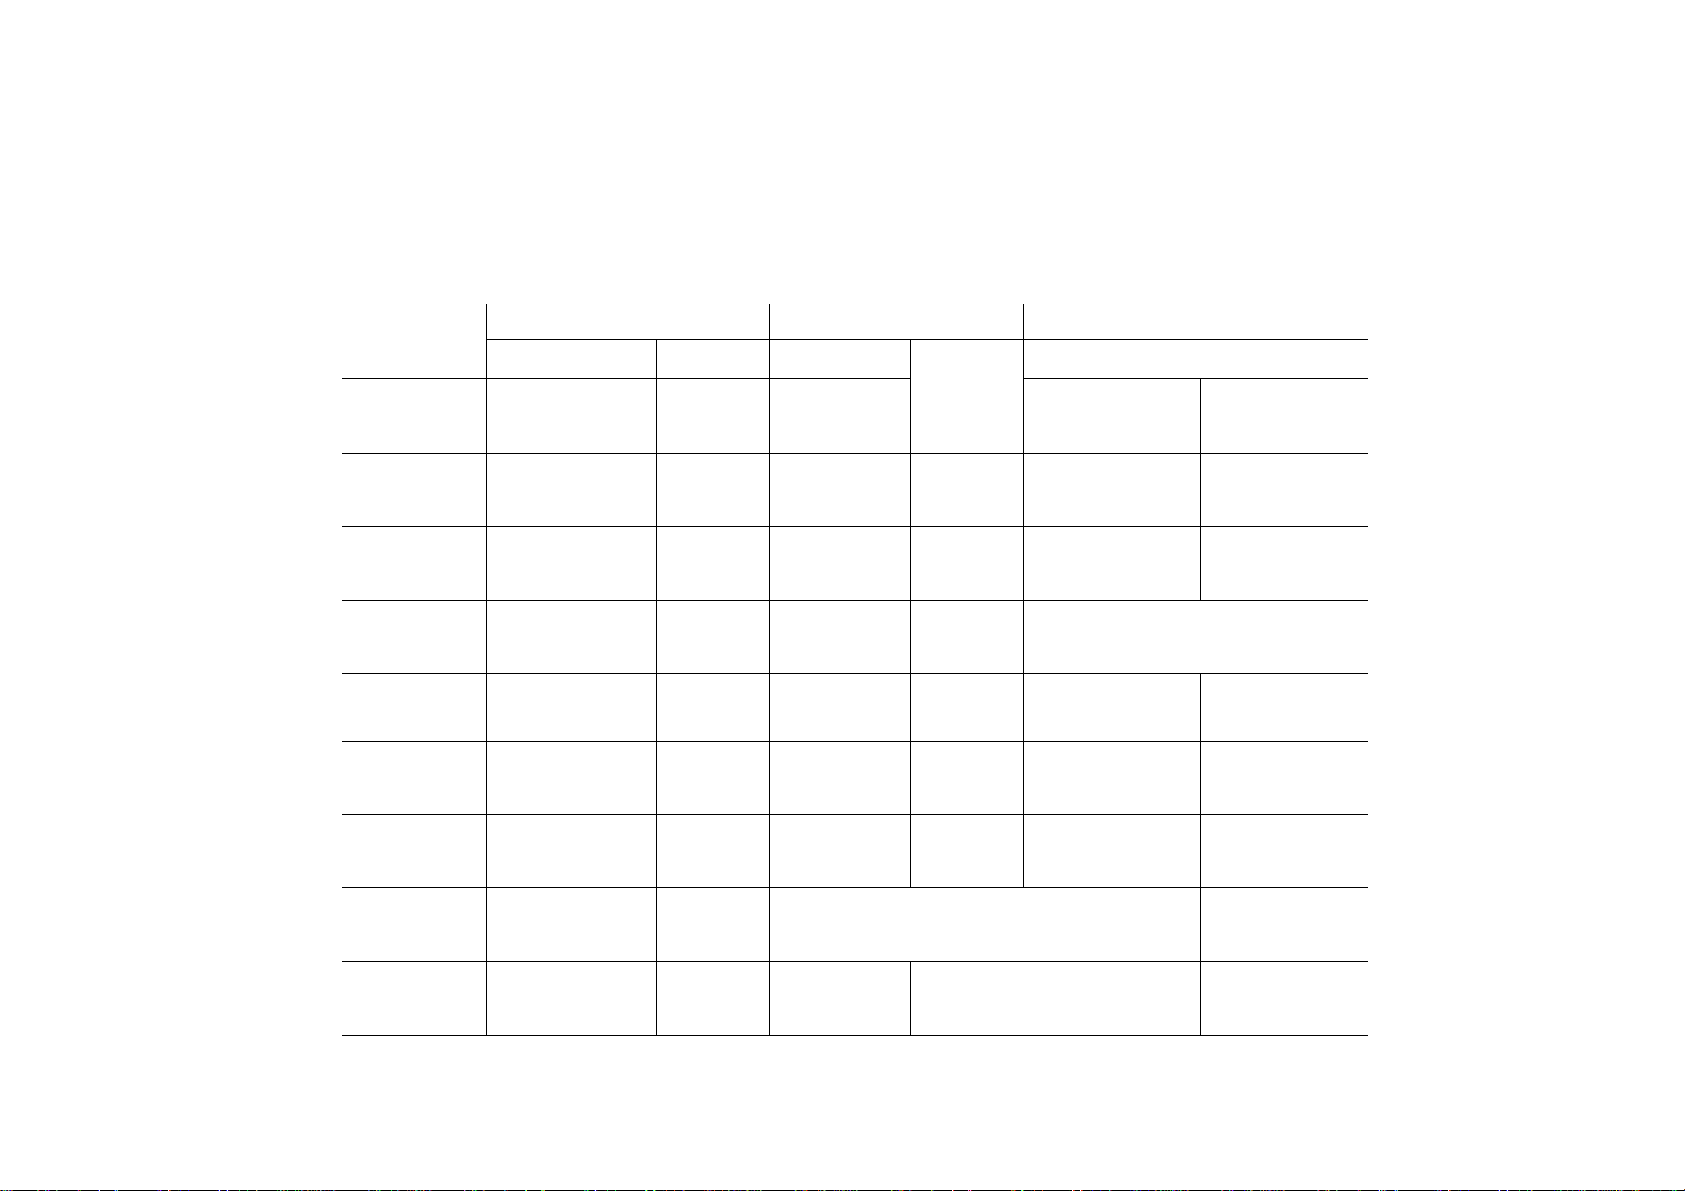
Stitch Length Guidance Table
Part of
Weight of Fabrics
Article or
Garment
Straight Main Seams 1.5-2 1.5-2 2-2.5
Curved Main Seams 1.5-2 1.5-2 1.5-2
Neckline* &Armholes 1.5-2
Stay Stitching * 1.5-2 1.5-2 1.5-2 1.5-2
Gathering 3-4 3-4 3-4 4 4
Zippers * 1.5-2
Top Stitching * 3 3
Stress Areas or Seams
Rimy Sheer
1.5-2 1.5-2
1.5-2 2-2.5 2-2.5
1.5-2
1.5-2 1.5-2 1.5-2 1.5-2
Light Medium Heavy Very Heavy
2-2.5 2.5
2-2.5 2-2.5 2.5
2-2.5 2-2.5 2 - 2.5
2-2.5 2-2.5
2.5
3-4 3-4 4 4
2.5-3
4
2.5
1.5-2
Slow to moderate speed.
Stress Areas in Knit or Stretch Fabrics
Contrary to common belief it is not always necessary to use
a s-t-r-e-t-c-h stitch on ail seams in garments made from
these fabrics. Always consider the ’’stress” areas, for example;
armholes, crotch seams, also how much the garment will be
required to ’’give” and where. Use a stretch stitch where
needed. Moreover, always ascertain that the fit of the garment
is correct before sewing any seam with a s-t-r-e-t-c-h stitch.
Ripping out a s-t-r-e-t-c-h stitch is difficult and may damage
fabric. For sewing on stretch fabrics, see pages 45 and 61.
27
Page 29

Upper Thread Tension
Having selected the correct needle and thread combination
for the fabric being used, it may be necessary to adjust the
tension of the sewing machine to ensure a well balanced stitch.
A well balanced stitch is produced when the upper and lower
threads appear the same on the fabric, illustration A.
Yourmachine has an adjustable uppertension control system.
This control exerts tension on the upper and lower thread
as they pass through the machine to form a stitch.
• Too much tension will produce a tight stitch which will
cause puckered seams, illustration B.
To decrease tension, turn dial to a lower number.
28
• Too little tension will produce a loose stitch, illustration C.
To increase tension, turn dial to a higher number.
When an even amount of tension is exerted on both threads,
a smooth even stitch known as a balanced stitch, is produced.
Page 30

Tension Test
To help understand the effect of tension on fabric and thread,
try this simple test:
• Take two pieces of a medium weight woven fabric in a solid
light colour about 15 cm (six inches) long.
• Place a 2020 size 14 needle in the machine.
• Thread the top of your machine with a polyester or mer
cerized dark colour thread and use a lighter colour thread
of the same fibre and size in the bobbin.
• Select straight stitch.
• Seam the two pieces of fabric together starting with the
upper tension control at 0. Then as you sew, slowly turn the
tension control from 0 through 9.
• Sew another row turning the dial back to 0. You should
have a balanced stitch on each row mid-way between the
start and finish in each case.
• The different coloured threads will help you to see the
effect that the tension has on the upper and lower threads.
Now that you have observed the effects of tension, we suggest
that you perform a similar test on a scrap of the fabric you
plan to use, being sure to duplicate the number of thicknesses
of your garment.
Lower Thread Tension
The lower thread tension has been set at the factory for most
types of stitching. However, for fine fabrics, we recommend
reducing lower thread tension by turning screw A counter
clockwise as far as possible, using the small screwdriver from
accessories.
When stitching is completed, be sure to turn screw A clock
wise back to its position for regular sewing.
29
Page 31

sewing a seam
Preparation
• stitch: straight stitch |
• Stitch length: to suit application or fabric
• Straight stitch needle plate
• Straight stitch foot
Thread machine in the usual way.
Placing Fabric Under Foot
Most fabrics can be placed under the foot by raising the
presser foot lifter A to its normal up position 1, where it locks.
When using bulky fabric, multiple fabric layers, or an embroi
dery hoop, raise the presser foot lifter to the high rise position
2, thus increasing the space between foot and needle plate.
Hold presser foot lifter in position while placing fabric under
the presser foot.
• Lower presser foot lifter all the way down and start to sew.
30
>
When starting to stitch at the fabric edge:
• Position needle in very edge of fabric, by turning the hand
wheel toward you.
• Lower the presser foot and stitch. Thread will lock over
fabric edge.
OR
When starting to stitch away from fabric edge:
• Leave presser foot in its upper position.
• Pull thread back under presser foot and cut.
• Position needle in from fabric edge, then lower the presser
foot and stitch.
Backstitch to lock stitching by pressing the reverse button
while sewing. Only a few stitches are needed to lock stitching
line in place. Do not go over edge of fabric.
Sewing with a Newly Wound Bobbin
Page 32

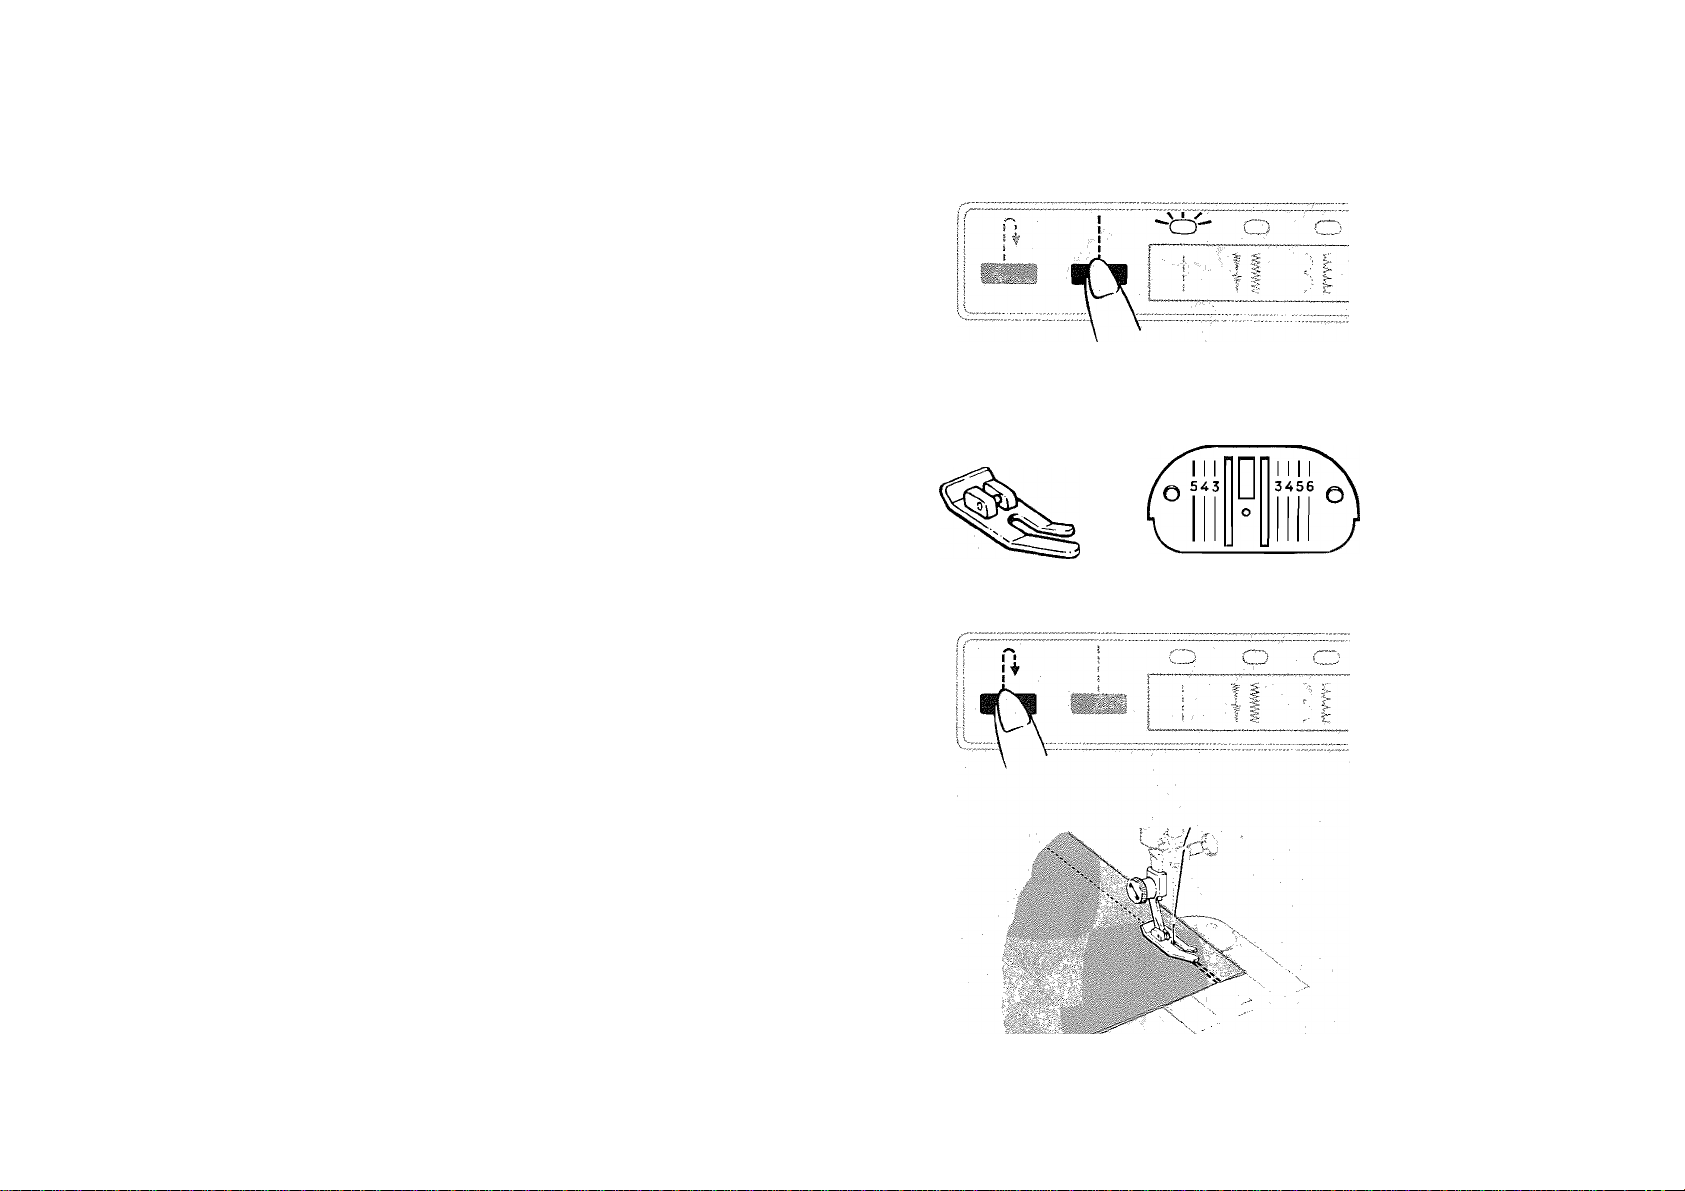
Keeping Seams Straight
To keep the seam straight, use one of the numbered guide
lines A on the needle plate. Line 5, the most commonly used,
is extended on the slide plate for you convenience.
The crosslines B serve as guides when stitching a square
corner.
For extra help in keeping the seam straight, you may wish
to use the seam guide. Because it allows you to guide stitches
evenly between 3 mm (Vs inch) and 32 mm (1 'A inches) from
the fabric edge, it is particularly useful for very narrow or very
wide seams.
To attach seam guide to machine, refer to page 7.
Turning Square Comers
To turn a square corner 1.6 cm (Vs inch) from the fabric edge,
you need not measure or mark the seam. Simply use the
crosslines A on the slide plate.
• Line up your fabric with right or left guideline 5 on the plate.
Stitch seam, slowing speed as you approach corner.
e Stop stitching, with the needle down, when the bottom
edge of the fabric reaches the cornering crosslines on the
slide plate.
e Raise presserfoot slightly and turn fabric on needle, bringing
bottom edge of fabric in line with guideline 5.
• Lower the presserfoot and stitch in new direction.
31
Page 33

Curved Seams
• Use a short stitch for elasticity and strength. For example,
if the stitch length control on your machine is set on 2
for straight seams, adjust the control between 1.5 to 2 to
stitch curved seams in the same fabric.
• If you use the seam guide, attach it at an angle so that the
edge that is closer to the needle acts as a guide.
Reinforcing End of Seam
• stitch to the edge of the fabric. (Do not sew beyond edge
of fabric)
• Press reverse stitch button and hold in place. Backstitch
approximately 1.5 cm (’/2 inch) to reinforce end of seam.
Release reverse stitch button.
• Raise needle and take-up lever to highest position by
turning hand wheel toward you and raise presser foot.
Remove the fabric by drawing it to the back and left.
• Cut threads on thread cutter at rear of presser bar.
o
! +
II
o
& :i'
^ III
32
Page 34

applications
Darning
With Embroidery Hoop
• Stitch: straight stitch j
• Stitch length: 0
• Snap-on feed cover (To attach feed cover see page 7)
• No presser foot or shank
• Embroidery hoop
For best results. Flip & Sew panel should be up when darning with
embroidery hoop.
Without Embroidery Hoop
• stitch: straight stitch |
• Stitch length: between 1 and 1.5
• General purpose needle plate
• Special purpose foot or general purpose foot
• Pressure setting: ^
* •
• Trim ragged edges from area to be darned and centre worn
• Select straight stitch.
• Position work in hoop and place hoop under presser bar,
• Hold upper thread loosely with left hand, turn hand wheel
• Select straight stitch.
• If area to be darned is open, baste an underlay in place.
• Place area to be darned under presser foot; lower presser
foot and start stitching, aiternately drawing fabric toward
you and pulling it gently away from you.
• Outline area to be darned with running stitches for rein
• Stitch across opening, moving hoop back and forth under
• Continue this forward and backward motion as you fill the
area with parallel lines of stitching. For additional strength,
cover area with crosswise lines of stitching.
• When opening is filled, cover area with crosswise lines of
section in embroidery hoop.
then lower the presser bar to engage tension.
toward you, and draw lower thread up through fabric. Hold
both thread ends and lower needle into fabric.
Snip off thread ends after a few stitches.
forcement as illustrated.
foot. Keep lines of stitching closely spaced and even in
length.
stitching.
33
Page 35

Darts
Darts can be made in the usual way on your machine. That is,
you begin stitching at the wide end of the dart, stitch to the
point, and then fasten the two thread ends.
However, you can avoid the problem of fastening the thread
ends by making a "continuous-thread” dart and stitching in
the opposite direction. This method is particularly useful for
darts in sheer fabrics, where transparency requires a neat,
clean finish. It is also useful for darts made on the right side
of a garment as a style detail.
Regular Darts (Illustration A)
® Stitch: straight stitch |
B
e Stitch length: to suit fabric
® Straight stitch needle plate
m Straight stitch foot
•
Stitch from the seam edge, tapering gradually to the point.
Stitch beyond the fabric to form a thread chain 1.5 cm
('/2 inch) to 2 cm (3/4 inch) long.
Clip thread ends about 5 cm (2 inches) from dart point
and tie the ends into a single knot close to the stitching.
34
Continuous-thread Darts (Illustration B)
• Set the machine as for regular darts.
e To wind an empty bobbin with enough thread for a single
thread dart up to 20 cm (8 inches) long, turn hand wheel
over once by hand and cut off thread end. Make four
additional turns of the hand wheel.
• Close slide plate, and position the needle in the very edge
of the fold, at the point of basted or pinned dart. Lower
presserfoot.
• Stitch carefully, making the first three or four stitches in
the fold of the fabric, then sew towards the wide end of
the dart.
• Reinforce wide end of dart with reverse stitching and as
work is removed from machine, bobbin will be completely
emptied, ready for rewinding for next dart.
Page 36

Quilting
Quilting is the art of stitching two or more thicknesses of fabric
together in a planned design. A padding is stitched to the
underside of the fabric to produce a soft, puffed effect that is
becoming to some wearing apparel and to many fabric
furnishings.
e Stitch; straight stitch |
e Stitch iength: to suit appiication or fabric
« Straight stitch needie piate
e Straight stitch foot
sheet wadding, or a lightweight wool interlining to the under
side of the fabric. When using sheet wadding, first back it with
voile, batiste, or net to preserve the sheet wadding through
wear. Baste the layers of fabric and padding together on the
lengthwise and crosswise grains.
Basic Procedure
9 Select straight stitch.
9 Draw both threads under the foot and diagonally across
feed to left.
• Position the needle, lower the foot and start stitching.
Note: For best results use the quilting foot availablefor separate
purchase at your local Singer store.
Note: If you are quilting a very large piece, work from the
centre of the fabric to the edges. Guide the fabric with both
hands.
Preparing the Fabric
Baste a light padding of cotton flannel, synthetic quilt batting,
If the fabric has a floral or scroll design, the pattern in the fabric
can be your quilting design. Stitch it from the top side.
■
:■ ,
i
Mf\
t .»
I / V
35
Page 37

Zipper Insertion
How the zipper is inserted will depend on the type of the
garment and the location of the zipper. With the adjustable
zipper foot, you will find it easy to sew an even line of stitching
close to the zipper. For inserting zipper foot on machine, see
page 6.
• Stitch; straight stitch |
• Stitch length: to suit fabric
• Straight stitch needle plate only
• Zipper foot
The zipper foot can be used either to the left or right of the
needle - depending on where the bulk of the garment is
placed.
Attaching the Zipper Foot
When the zipper is to the left of the needle:
• Attach left side of zipper foot to shank (needle will enter
left notch in foot) - see illustration A.
When the zipper is to the right of the needle:
• Attach right side of ^pper foot to shank (needle will enter
right notch in foot) - see illustration B.
* •
36
Zipper inserted under left Lapped Seam
• Baste the seam line the exact length of the garment opening
and press the seam open.
• Attach thezipperfoot to the right of the needle (illustration A),
e Open the zipper.
• Ratten out the back seam allowance and place the zipper
face down on it, as illustrated, with the edge of the zipper
teeth following the seam line.
• Stitch the zipper tape onto the seam allowance.
Continued on next page.
Page 38

• Adjust the foot to the left of the needle (illustration B on
page 36).
• Close the zipper and turn it face up.
• Smooth back the seam allowance at the edge of the zipper.
• Top stitch to the tape close to the folded edge.
• Spread garment flat and turn zipper face down over front
seam allowance.
• Hand baste zipper to garment from wrong side, through
zipper tape, seam allowance, and front of garment.
Turn garment right sidecut.
Adjust zipper foot to right side of needle and stitch across
the lower end of the zipper and up to the waistline, using
the basting stitches as a guide.
Remove bastings. Press.
37
Page 39

-v' >J3 ij
la&ic
Wi
Stiff
Zig-Zag Stitching
• stitch: zig-zag ^
• Stitch width; to suit application or fabric
• Stitch length: to suit application or fabric
• General purpose needle plate
• General purpose foot
Adjusting Stitch Width
Before starting to sew, adjust the stitch width of your pattern
on a scrap of fabric.
Turning the stitch width control toward the largest zig-zag
symbol increases the width of your stitch, and turning the
control toward the straight stitch symbol decreases the width.
Turn the control until the desired width is obtained.
Note: When sewing Flexi-Stitch patterns, set stitch width con
trol on yellow Flexi-Stitch dot ».
38
* •
Adjusting Stitch Length
Before starting to sew, adjust the stitch length of your pattern
on a scrap of fabric.
Turning the stitch length control toward 4 increases the length
of your stitch, and turning the control toward 0 decreases the
length. Turn the control until desired length is obtained.
Note: When sewing Flexi-Stitch patterns, adjust stitch length
control within yellow Flexi-Stitch area
D
--
.
Page 40

Adjusting Upper Thread Tension
Zig-Zag stitching usuaily requires iess upper thread tension
than straight stitching. Be sure your machine is threaded
correctly and make a test sample with the fabric and thread
you plan to use so that you can adjust tension to suit the stitch
pattern you have chosen. The stitches should lie flat against
the fabric without causing the fabric to pucker, illustration A.
If the stitches are not flat and the fabric is puckered, illustration
B, lower the upper thread tension by turning the dial to a
lower number.
Lower Thread Tension
Lower thread tension has been set at the factory for most
types of stitching.
Adjusting Lower Thread Tension for Balanced Open Zig-Zag Stitching
A balanced open zig-zag stitch where both lower and upper
threads lock at the corner of each stitch in the fabric as shown,
can be achieved by turning screw A to the left (counterclock
wise) as far as it will go, using the small screwdriver in your
accessory box.
® Set upperthread tension dial on 1.
• Using two layers of scrap fabric, sew slowly stitch by stitch,
gradually rotating tension dial to higher number until the
upper and lower threads lock at the corner of each stitch
and the stitch formation is the same on both sides of the
fabric.
When stitching is completed, return screw A to position for
regular sewing by turning to right (clockwise) as far as it will go.
\
39
Page 41

applications
Zig-Zag Seam Rnishes
Seam edges support the garment and should be given a
durable finish if the fabric is likely to ravel. There are two
methods of finishing seams in such fabrics: method 1 .trimming
iAAMAAAVVVVVVWVVXVVVVVVVVVVVVVVVV
hAMANW\/W^W)/^
after stitching seam edge, or method 2, overedging. Makea test
sample first to determine which method best suits your fabric.
Method 1 - Trimmed Seam Finish
• Stitch: zig-zag ^ or multi-stitch zig-zag
• Stitch width: to suit application or fabric
• Stitch length: to suit application or fabric
• General purpose needle plate
• General purpose foot
• Select appropriate stitch pattern.
• Adjust stitch width and length if necessary.
• Place stitching near the edge of the seam allowance.
• Trim seam edges evenly, as illustrated, after stitching is
completed.
40
Method 2 - Overedged Seam Rnish
• Stitch: zig-zag ^ or multi-stitch zig-zag <;
• Stitch width: to suit application or fabric
• Stitch length; to suit application or fabric
• General purpose needle plate
• General purpose foot
•
• Trim seam edges evenly.
• Adjust stitch length and width if necessary.
• Place stitching over the trimmed edge of the seam allowance as iilustrated.
Page 42

Lingerìe Seams
To make a lingerie seam durable and flexible, use the plain
zig-zag stitch at a narrow width setting. This seam treatment
is particularly suitable for bias seams. When seaming nylon
tricot, insert a Yellow Band needle in the machine before you
begin to sew.
• Straight stitch the seam on wrong side of fabric.
• Press both seam allowances in the same direction.
• From the right side, topstitch with narrow zig-zag stitching,
letting the needle alternately enter the seam line and the
seam thickness.
Satin Stitching
Satin stitching, a series of closely spaced zig-zag stitches
that form a smooth, satin-like surface, illustration A, is useful
for both practical and decorative work. Stitch patterns can be
sewn at satin-stitch length.
Set your machine for desired stitch. Adjust stitch length for
satin stitching (see below); stitch width in narrow to medium
range. Use general purpose plate and special purpose foot.
Adjusting Stitch Length
• Set machine for a medium length stitch.
• Run machine at slow speed.
• Gradually adjust stitch length from 1 toward 0 until stitches
are closely spaced and form a smooth surface.
/M/WV\AAAAAA/\AAMM
Adjusting Upper Thread Tension
Satin stitching usually requires less tension than straight
stitching and open zig-zag stitching. Furthermore, the wider
the satin stitch, the lighter the tension on your thread must be.
Notice the stitching on your sample. If the fabric is puckered,
illustration B, or the lower thread is pulled to the fabric sur
face, lower the upper thread tension by turning the dial to a
lower number.
41
Page 43

Appliqué
The stitch most commonly used in appliqué is a plain zig-zag,
closely spaced to form a satin stitch. The width of this stitch
can be varied to accommodate fabrics of different weaves and
textures. Other stitch patterns can also be used.
Preparation
Make a test sample to decide which of the following methods
is the most appropriate for your fabric and design. Mark design
on piece of fabric to be appliqued. Cut out design leaving
about 2 cm pA inch) margin all around.
Position the design.
Baste it to the fabric.
Method 1
® Set pattern selector and stitch width dial for desired
applique stitch. Adjust stitch length to fine setting, between
1 and 0.
• Follow the outer edge of the design with a decorative stitch.
• Trim away the excess fabric on the outer edges of the
stitching.
Method 2
® Select straight stitch.
• Outline the entire design with a short stitch.
• Trim raw edges to the stitching and remove basting.
• Selecht stitch pattern and stitch width desired, and set stitch
length on a satin stitch setting for a closely spaced stitch,
between 1 and 0.
® Stitch, following the straight stitch outline. This method will
produce a smooth overedged finish, with no raw edges to
be trimmed after stitching.
42
Method 3
® Purchased motifs can be appliqued quickly and easily by
using either a straight or decorative stitch.
Page 44

Free-Motion Embroidery
In free-motion embroidery, you sew without a presser foot and
9 Stitch, outlining or filling in design with zig-zag stitches.
control fabric movement by means of an embroidery hoop.
Either a straight ora plain zig-zag stitch can be used. Because
you can move the hoop in any direction - forward or back
ward, from side to side, or even diagonally - free-motion
stitching is extremely useful forembroidery designs. The hoop
should be one designed for machine use.
You can vary the length of stitches simply by moving the hoop
faster or slower under the needle. The faster you move the
hoop, the longer the stitches will be. You can also vary the
A series of bar-tacks can be used to form spray-like leaves or
flowers. This technique adds variety and lightness to many
designs. Leaves and petals formed in this way may carry the
thread from one bar tack to the next. This carrying thread
eliminates tying of the thread ends.
width of zig-zag stitches from wide to narrow by controlling
the angle at which the hoop is placed and moved under the
needle.
Flower Embroidery
• stitch: zig-zag ^
@ Stitch width: to suit application or fabric
9 Snap-on feed cover (To attach feed cover see page 7)
9 No presser foot or shank
Preparation
Trace design on right side of fabric. Prepare the area to be
embroidered using an underlay if the fabric is soft. Place the
work in an embroidery hoop approximately 18 cm (7 inches)
in diameter. If the design to be embroidered covers a large
area, it will be necessary to reposition the work in the hoop as
each section is completed.
For a smooth, satiny surface, place parallel stitches close
together, moving hoop slowly and steadily. For an irregular
texture, move the hoop more rapidly, allowing some stitches
to overlap.
•¡t
*>(-
Procedure
® Position work under needle and lower presser bar to engage
tension.
9 Hold upper thread loosely and turn handwheel toward you
to bring lower thread up through fabric. Hold both thread
ends and lower needle into fabric.
43
Page 45

Chapter 6: Machine Stitch Patterns
how stitches are produced
In addition to the straight stitch, your machine can produce
a variety of stitch patterns. Fashion* Stitch patterns (white on
panel) are produced by the side-to-side movement of the
Stitch Pattern Chart
Pattern group selector moved to right
Arrowhead Stitch - Combines beauty and utility.
Individual pattern units reinforce points of strain.
Use them on pocket corners in place of bartacks.
Scallop Stitch - Makes perfectly formed, evenly
spaced scallops for edgings and tucks.
Domino Stitch - An interesting pattern for
decorative stitching.
Honeycomb Stitch - Ideal for smocking and
useful for mending, overcasting and attaching
elastic and stretch lace.
needle. Fiexi-Stitch* patterns (yeiiowon panel) are produced
by both the side-to-side movement of the needle and the
back-and-forth movement of the feed.
Pattern group selector moved to left
Plain Zig-Zag Stitch - Used for general-purpose
stretch sewing, bar tacks, finishing seams,
embroidery and appliqué.
Elastic Stretch (or ”M”) Stitch - Ideal for plain
and overedged seams in knit and stretch fabrics,
stretch garment repair and for attaching elastic.
Multi-stitch Zig-Zag - Lets you mend, join and
reinforce without bulk. Ideal for bar tacking.
Blindstitch - For finishing hems and making
ladder seams.
44
Featherstitch - Extremely versatile. Use it for
fagoting, embroidering, quilting and lattice
seams.
Ric-Rac Stitch - For heavy-duty general-purpose
stretch sewing. Also reversible topstitching.
Straight Stretch Stitch - Ideal for plain seams
that stretch and for repairing and reinforcing
seams.
Overedge Stretch Stitch - Used for joining and
overedging seams in woven, knit and stretch
fabrics in one operation.
Page 46

adjusting stitches for stretch fabrics
Guiding and Supporting Fabric
Most fabrics of stretch or knit construction need only to be
guided in front of the presser foot when you use one of the
stretch stitches. Some fabrics - nylon tricot and eiasticized
fabrics, for example - do require support while being stitched.
1. For nyion tricot and similar synthetic knits, apply gentle
tension by holding the seam in front and back of the presser
foot as you sew.
2. For eiasticized fabric, stretch lace, and knits with an unusual
amount of elasticity, apply firm tension in front and back of
the presser foot to stretch the seam as the stitches are
being placed.
Caution: Do not pull the fabric while you are stitching as this
may deflect the needle, causing it to break.
Adjusting Pressure
when Sewing Knit and Stretch Fabric
Some knit and stretch fabrics, because of their structure, re
quire either more or less than normal (NORM.) presser bar
pressure to feed smoothly and evenly.
• For thick, soft or very stretchy knits, decrease pressure by
turning dial from NORM, (normal) toward ^ (darn).
• For nylon tricot, ciré and similar hard surface synthetic knits,
increase pressure by turning dial from NORM, (normal)
toward MAX (maximum).
X
45
Page 47

handling special fabrics
Fabric Handling Table
Many fabrics, because of their construction or finish, demand
special attention in sewing. Techniques used in stitching and
handling, and choice of machine accessories, will vary with
the fabric. Let the table below guide your selection.
Fabric
Vinyl-
leather-look, patent, suede, reptile
Pile-
velvet, velveteen, oorduroy
Deep Pile -
fake fur
Permanent Press-
peroale, broadoloth, shirting
Rne Knits -
trioot, jersey
Blanket Binding-
satin faoe
Special Handling
Use transparent tape as a substitute for pins or basting - Topstitch to hold seams and
edges flat - Avoid worked (maohine) buttonholes. Use bound buttonholes.
Stitch in direction of nap - Use plain seams - Zig-Zag or bind seam edges to prevent
fraying - Press over a self-fabric cloth.
Pin rather than baste seams - Stitch in direction of nap - Use plain seams for short-hair furs;
narrow overedged seams for shaggy, bulky furs - Shear pile from seam allowances to reduce
bulk
Control seam tension manually by holding fabric taut as it passes under the presser
foot. Sew at moderate speed. -
Use namow overedged, double stitched, or French seams - Hold thread ends securely for
a few stitches at start of seam - Support seams while stitching. See page 45 to increase
presser-foot pressure.
Hand-baste binding to blanket (pin marks show) - Miter corners.
46
Soft Sheer-
chiffon, voile, China silk
Napped Fabric -
cashmere, mohair, camel hair
Use French seams, double stitched - Hold ends of upper and lower thread when you
begin to stitch - Support fabric while stitching.
Cut with nap running down - Sew in direction of nap - Topstitch to hold seams and
edges flat.
Page 48

Stitch Length-Type Needle Style-Size Machine Accessories
Long straight stitch
Medium Straight Stitch for seams
Medium Zig-Zag or Honeycomb Stitch
for overcasting
Long Straight Stitch for plain seams
Medium to Short Zig-Zag Stitch
for overedged seams
Medium Straight Stitch Style 2020 Size 11 or 14
Medium Straight Stitch
Medium to Short Namow Zig-Zag or
Narrow Overedge
Long Straight Stitch
Medium to Long Zig-Zag Stitch or
Decorative Stitch
Style 2020 Size 14 or 16 for woven backing.
St^e2045 Size 14 or16 for knit backing
Style 2020 Size 14.
Style2045
Size 14 or 16 for panne velvet
Style 2020 Size 16
Style 2045 Size 11 or 14
Style 2020 Size 11 or 14
General Purpose Foot ■
General Purpose Needle Plate
General Purpose Foot “
(General Purpose Foot onlyior overcasting)
General Purpose Needle Plate
General Purpose Foot ■
General Purpose Needle Plate
Straight Stitch Foot
and Needle Plate
Straight Stitch Foot
and Needle Plate (for straight stitching).
General Purpose Foot
and Needle Plate (for zig-zag stitching).
General Purpose Foot “
General Purpose Needle Plate
Medium to Short Straight Stitch
Medium to Long Straight Stitch
■ For best results when sewing this fabric, we recommend use of the Even Feed Foot, available at your Singer Sewing Centre.
Style 2020 Size 9 or 11
Style 2020 Size 11 or 14
Straight Stitch Foot and Needle Plate
General Purpose Foot ■
General Purpose Needle Plate
47
Page 49

stitch centring
• stitch: stitch desired
• Stitch width: to suit application or fabric
• Stitch length: to suit application or fabric
• General purpose needle plate
• Special purpose foot
• Speed range: MIN.
* •
• Draw a vertical line on a sheet of paper or use graph paper,
if available.
• Place paper under presser foot with drawn line centred
under black vertical guideline of special purpose foot.
• Lower needle by turning hand wheel toward you, and posi
tion it on drawn line of paper.
• Lower presser foot.
• Carefully sew along the drawn line on the paper, using
When sewing, it is important to correctly guide the stitches
on your fabric to achieve centred stitching. A line of stitching
is centred when it lies evenly on an imaginary line on the fabric.
To clearly see what stitch centring is, and to practice even
black vertical guideline of foot to guide stitching. Do not
watch needle.
• After you have sewn along the drawn line, carefully remove
paper from under presser foot.
stitch guidance and machine control, try the test below.
Use a light colour upper and lower thread for this test. This
will demonstrate to you how a correctly centred line of stitch
ing lies on a given line.
• Attach special purpose foot.
Notice that foot is clear plastic for better visibility and has
vertical black line in the centre to guide stitch placement
on fabric.
• Select straight stitch.
If you have correctly guided the paper while sewing, the
stitched line will be centred. Notice that the stitching lies
evenly on the drawn line.
Try a paper sampler using a variety of stitches to practice
stitch centring.
To assure centred stitching on the fabrics you sew, use a
guideline marked with tailor’s chalk.
Centred Stitching
on Sampler
48
Page 50

stitch usage: functional and decorative
Many stitches on your new machine have both functional and
decorative applications. The foiiowing pages inciude exampies
to illustrate the versatility of these stitches. Though many
stitches can perform in a given application, to avoid repetition
-Hm
only one stitch has been used in each example. We, there
fore, hope that the examples provided will help you to use
your own creative talents.
Arrowhead Stitch
The arrowhead stitch provides a decorative and secure finish on fashion seams or darts that end on the outside
of a garment, at the top of pleats, and at the ends of pockets in tailored clothes. Individual pattern units reinforce
points of strain. Use the arrowhead stitch on pocket corners in place of bar tacks or in a border design for an
effective decorative touch.
Arrowhead Stitch Finish
Stitch: arrowhead stitch y
Stitch with:
Stitch length: 0-1 to suit application or fabric
General purpose needle plate
Special purpose foot
• Set machine according to the code above.
•
To Find Beginning Of Pattern Unit
• On a scrap of fabric, stitch until you come to the end of a
complete pattern unit. Now you are ready to start stitching
at the beginning of the next unit.
• Raise presser foot and remove scrap.
• Position motif or design under needle, lower presser foot,
and stitch.
To create effective border designs, as illustrated, stitch arrow
heads from the middle of each side and work out in both
directions toward the corners.
^ ^ ^ /
\\\/// /
Viv'
V
T r
“St
i
T r
1 »
49
Page 51

y Featherstitch ^
^ The featherstitch is an extremely versatile stitch. Use it for fagoting, embroidering and quilting. There are numerous
^ applications for the featherstitch. Two of them have been provided below. ^
A^>V999>V>V>^>V999>V>V>^9>V999>V>V>^>V999>^999>V9>^>^'>V9'>^y‘>V'>V>^'>V99>^>V'>V>^'>^>^
Fagoting
• Stitch: featherstitch ^
X.
iitf
• Stitch width: ij ^ ^
• Stitch length: 2-2.5
• General purpose needle plate
• General purpose foot or special purpose foot
The art of joining two pieces of fabric with an open, lacy
decorative stitch is called fagoting. You can create this attrac
tive trimming with the featherstitch. Use it for decorative
stretch seams in bathing suits or for joining together narrow
strips of fabric to make an entire garment section.
• Turn under (and hem by hand slipstitching) the raw edges
of the fabric strips or seams to be joined. Press flat or you
may zig-zag raw edges.
• Baste two fabric edges to be joined on to tissue paper
leaving approximately 3 mm (Ve inch) gap between the two
edges. Stitch, guiding two fabric edges under the centre
of presser foot. Allow the needle to alternately make a stitch
in each fabric strip and two stitches in the centre of the
opening. The tissue paper should be gently pulled off when
fagoting is completed.
50
Page 52

Patchwork Quilting
• Stitch: featherstitch ^
• Stitch width: ! ^ ^ i ^ ^
• Stitch iength: 2 - 2.5
• Generai purpose needle plate
• General purpose foot or special purpose foot
* •
Patchwork for quilts and wearing apparel, formerly put together
with hand stitching, can be quickly pieced and decorated at
the same time by using the featherstitch. Joinings are both
flexible and durable when this method is used.
Procedure:
• Cut a fabric underlay to size. Baste a light layer of padding
to underlay if a quilted effect is desired.
• Prepare patches, turning under 6 mm ('A inch) seam allow
ance. On non-woven fabric this step is not necessary.
• Baste patches to underlay in arrangement desired, butting
all edges.
0 Stitch in lengthwise and crosswise rows, allowing stitches
to straddle patches.
51
Page 53

Overedge Stretch Stitch
Although the overedge stretch stitch may be used creatively, it is primarily applied in finishing seams, hems, and
facing edges. Use it to overedge seams that require stretch such as crotch seams. It is particularly helpful in ski suit,
snow/suit and swimsuit construction. Examples of how to use the overedge stretch stitch follow.
I ■
A
Overedged Seams
® Stitch: overedge stretch stitch ^
• Stitch width: i ^ i % § ^
• Stitch length: 2 - 2.5
o General purpose needle plate
® General purpose foot
Method 1
Make a test sample to determine the suitability of an overedge
seam finish for your garment. Duplicate the grain or direction
of knit of your garment seam. Adjust thread tension to suit
fabric. Use an appropriate Yellow Band needle in the machine
for a synthetic knit. (See Fabric, Thread and Needle Table on
page 12.)
m Baste the garment together on the seam line allowing for
1.5 cm (% inch) seam allowance and fit in the usual way.
@ After making any necessary adjustments, trim seam edge
evenly to a scant 5 mm ('A inch) from seam line basting.
• Place trimmed seam under the foot so that the straight
stitches fall on the basted seam line and zig-zag stitches fall
over the seam edge.
52
Page 54

Mock Overedge
This finish is appropriate for buiky knits, fine tricots and fabrics
thatcuri or fray.
Method 2
» Makeatestsampie.
• Baste the garment together on the seam iine and fit in the
usuai way.
• After making any necessary adjustments, suggested in
Method 1, piace seam under presser foot. Stitch so that
the stitches on the ieft side of the pattern penetrate the
basted seam iine.
9 Press after stitching and trim away excess fabric to produce
a narrow seam edge. When the seam supports the garment,
omit the trimming step and press seam open in the usuai
way.
.1
Overedged Seam Finish
® Stitch: overedge stretch stitch ^
e Stitch width: i ^ i 5 ?
• Stitch length: 2 - 2.5
• General purpose needle plate
• General purpose foot
* •
o Trim seam edges evenly.
• Place stitching over the trimmed edge of the seam allowance as illustrated.
A.
53
Page 55

-y- -y
--------y---------y-.........
y-
-y-
-y y-
-y- -y y y--------------------------y- -y-
-y-
-y-
Blindstitch
The blindstitch has many practical and functional uses. Its most common use provides a durable hem finish. The
ladder seam, as described on the next page, is one creative application of the blindstitch. However, the creative
ways one might apply this stitch are unending.
-A.
A. -A
____A____A____A-------A____A____A____A____A____A____A____A____A____A___
Blindstitch Hems
Blindstitching provides a durable hem finish that is almost
invisible. It is best suited to straight or slightly curved hems.
Taped, bound, or turned hem edges can also be blindstitched
with equal ease.
• Stitch: blindstitch
■
2
, - M
3 ^
• Stitch width: to suit application orfabric
• Stitch length: 1-2
• General purpose needle plate
• General purpose foot
• Blindstitch hem guide
1. Raise presser foot, loosen screw, and slip blindstitch hem
guide from the front between screw and shank of foot.
Make sure underside of the guide clears the slide plate
and front of foot. Tighten screw with coin.
2. Prepare hem in the usual way. It is advisable to baste the
hem. Place the basting at least 1.3 cm (V2 inch) below the
edge of hem allowance to avoid catching the flange of
guide as you stitch.
j
54
3. With the wrong side of work uppermost, turn the hem
under, creating a soft fold from thetop edge of hem.
4. Position hem under the foot with the soft fold resting
against the wall of guide. Make sure the flange of the guide
is between soft fold and top of hem, as shown.
5. Lower presser foot. Stitch so that the straight stitches fall
on the hem allowance and zig-zag stitches pierce the soft
fold of work. Adjust stitch width if necessary. While stitch
ing, guide hem-edge in a straight line and feed soft fold
evenly against wall of the guide.
Page 56

Ladder Seam
The blindstitch ladder seam is particularly appropriate for knit
and stretch fabrics. It is ideal for stretchable construction
seams, and edge finishes for necklines, pockets and collars
in sportswear and swimsuits.
Stitch; blindstitch ^
Stitch width; i J ^ ^ S
Stitch length: 1.5-2.5
General purpose needle plate
General purpose foot or special purpose foot
Make a test sample to adjust stitch width and length and
needle thread tension to suit the fabric. Needle thread
tension should be lighter than normal.
Cut and fit garment, allowing for 1.5 cm (Vs inch) seam
allowance. Baste seam line.
Place fabric under presserfoot so that the straight stitches
fall on the seam line basting and the points toward the
centre of the garment.
After stitching, open seam by pulling fabric back on oppo
site sides of the seam to produce ladder effect. Press seam
allowance after opening.
55
Page 57

Honeycomb Stitch
The honeycomb stitch is ideai for smocking and it is useful for mending, overcasting and attaching eiastic, stretch
lace and blanket binding. Use this versatiie stitch to create decorative designs on fabrics that stretch.
Replacing Lingerie Elastic
® Stitch: honeycomb stitch §
•
Stitch width:
• Stitch length: 2 - 2.5
• General purpose needle plate
• General purpose foot or special purpose foot
I ^ j ^ ^ |
e Fit elastic for desired snugness at waistline, allowing 2.5 cm
(one inch) for joining. Lap ends to form a band and stitch
together as shown using a ball point needle.
• Divide elastic band into four equal segments and mark with
pins. Do the same to the garment. Then pin together at
corresponding points, pinning elastic over right side of
fabric, top edges even.
• Sew a few straight stitches to anchor elastic to fabric.
• Select honeycomb. Plain zig-zag, elastic stretch stitch, or
featherstitch are also effective for replacing lingerie elastic.
® Then hold elastic and garment edge taut as you stitch so
that it will remain stretchable after stitching is completed.
Caution: Do not pull the fabric while you are stitching as this
may deflect the needle, causing It to break.
56
Page 58

Elastic Stretch (or ”M”) Stitch
The elastic stretch stitch or ”M” stitch is an attractive stitch which may effectively be used in functional and
decorative stitching. It is an indispensable stitch for stretch garment repair and may be used for plain and over
edged seams in knit and stretch fabrics. The ”M” stitch lends itself to many creative uses.
Stretch Garment Repair
• Stitch: ”M” stitch ^
• Stitch width: to suit application orfabric
® Stitch length: 0.5 -1.5
• General purpose needle plate
• General purpose foot or special purpose foot
Seams in stretch garments retain their elasticity when stitched
with the ”M” stitch. This stitch pattern builds stretch into the
seam as it is being sewn and is equally suitable when used to
topstitch as shown, or to overedge. Make a test sample to
check stitch width and length settings.
* •
Lace Insertion
Fine lace insertion and edging add a feminine touch to
blouses, dresses and children’s wear. Such trimming can be
made decorative and durable when applied with the ”M”
stitch.
• Mark position of lace and baste in position.
m Stitch, guiding work under needle so that the top of the
stitches fall along the edge of the lace as illustrated.
e Trim fabric away under lace insertion after stitching both
edges.
pr
57
Page 59

Multi-Stitch Zig-Zag
The multi-stitch zig-zag is an extremely versatile stitch. Use it to mend, join, or reinforce without bulk. With this
stitch you may attach elastic and stretch lace, construct lingerie and swimsuits, and finish seams. There are many
other useful applications for the multi-stitch zig-zag.
Mending a Tear
• Stitch: multi-stitch zig-zag
• Stitch width: ^ §
• Stitch length: 0-1
• General purpose needle plate
• General purpose foot or special purpose foot
Trim ragged edges.
Place underlay on the wrong side of tear for reinforcement.
Do not baste or pin the underlay, since you will be bringing
the edges together in the next step.
Stitch on the right side, bringing the edges of the tear
together. Shorten stitch length at ends and corners to give
extra strength.
Trim underlay.
58
Rnishes for Hems and Facings
Hem and facing edges in knit and stretch fabrics will be less
apt to press through and mark when given a flat edge-finish.
Edge finishing with the multi-stitch zig-zag eliminates the bulk
of turned-in edges and retains fabric flexibility.
• Make a test sample to check thread tension and stitch
iength if you are using the multi-stitch zig-zag.
• Place stitching about 1.3 cm {'/2 inch) from hem or facing
edge. Avoid stretching edge while sewing.
• Press after stitching and trim away excess fabric close to
the stitching line.
Page 60

Multi-Stitch Zig-Zag Bar Tacks
With the multi-stitch zig-zag you can make strong bar tacks.
Multi-stitch zig-zag bar tacks are effective for tacking beit
ioops on heavy fabrics such as denim. Be sure to check the
Fabric, Thread and Needie Table on page 12 for correct thread
and needle selection with your choice of fabric.
■■■■
• Stitch: multi-stitch zig-zag <
• Stitch width: ^ ? i
e Stitch length: 0
• Snap-on feed cover (To attach feed cover see page 7)
® General purpose foot or special purpose foot
We recommend making a test sample first using scraps of
the material you will be sewing the bar tacks on, duplicating
all thicknesses.
1. Mark position for the finished end of belt loop on the fabric.
• Place belt loop, wrong side up, straight stitch with cut end
3 mm ('/8 inch) from edge of garment; do not stitch beyond
edges of the belt loop. Trim the end close to the stitching
and press.
2. Fold belt loop back on the stitching line and press.
• Program your machine according to the code above.
• Stitch 3 mm ('/a inch) from the fold using the multi-stitch
zig-zag.
3. Fold over loose end and bar tack.
■
3 ,
59
Page 61

Scallop Stitch
Scalloping adds interest to blouses, dresses, lingerie, and children’s clothes. Scallops will be perfect in form and
evenly spaced when you use the scallop stitch. This stitch is formed with one straight stitch between each scallop
to prevent pucker between scallops on a seam. The decorative uses of this stitch are numerous. Use your imagina
tion to create new uses for this stitch.
ifX
Scalloping
® Stitch: scallop <
® Stitch width; to suit application or fabric
• Stitch length: to suit application or fabric
e General purpose needle plate
® Special purpose foot
V Place right sides of fabric together. Shaped or bias edges
should be interfaced. Stitch scallops.
After stitching, trim seam allowance to 3 mm ('/s inch) or less.
Clip points down to flat stitch of scallops with scissors and,
if necessary to make points lie flat, notch curves.
Turn to the right side and gently push scallops out. Press flat.
60
\
1
Page 62

straight Stretch Stitch
The straight stretch stitch is an invaluable stitch most commonly used for sewing seams on fabrics with elasticity.
The straight stretch stitch is particularly useful for seaming extra-heavy and extra-bulky fabric.
Straight Stretch Stitch Seam
• Stitch; straight stretch stitch ||
• Stitch iength: 2-2.5
• General purpose needle plate
• Special purpose foot
Make a test sample first to determine the best pressure and
tension settings for your fabric. To be sure that you are using
the correct needle and thread combination for your fabric,
seethe Fabric, Thread and Needle Table on page 12.
Procedure
• Pin or baste seam.
• Draw upper and lower threads under foot to back of
machine. Hold thread ends and by turning the hand wheel
toward you,
in from starting edge.
• Lower presser foot and start machine, holding thread ends
at back of foot as first few stitches are made.
• Guide fabric lightly, letting the machine make the back-
and-forth stitches that give stretch to the seam.
* •
\
position needle in fabric a scant 6 mm ('A inch)
When stitching across folds and seam joinings, apply tension
by holding seam in front and backofthepresserfoot, as shown,
to assist feeding. This type of support is essential for thick,
soft fabrics.
Caution: Do not pull fabric while you apply gentle or firm ten
sion, as this may deflect needle, causing it to break.
61
Page 63

decorative stitching
Your sewing machine has several stitches which are purely
decorative. These versatile stitches allow you to add imagina
tion and creativity to your sewing projects. With these decora
tive stitches, you can apply to clothes and household items;
interesting details, youthful and feminine accents, and
personalized effects. Some of the many applications of the
decorative stitches include border designs, appliqués, twin-
needle stitching, finished hems, smocking, embroidering,
monograms and topstitching accent lines on clothes. The
following pages illustrate decorative stitches on your machine
and provide examples for their creative use.
Border Designs
Border designs that add a decorative touch to wearing apparel
-------------------------------------------------------------------------and household items can be created by combining different
types of straight stitching and zig-zag stitching. Simple or
/ \ / \ \ / \ / \ /■' elaborate, delicate or bold, they can be varied to suit the appli-
^
---------K-------V X \ / \ / \ / \ / \ / \ vertical or bias stripes on plain fabric.
__\L_____i/____________
-------------------------------------------------------------------------Mark or crease fabric for the centre line of first row of stitching.
___________________________________________
^---------7^
\ y' y' y' \ / mark for each line of stitching. Use a backing of crisp lawn,
__^______^_____
-----------^---------
--------7^--------
------------
-----------
Ju'
____iZ_____i/______
-----------7s-------7^--------
-----------
-----------
-----------
-----------
7^— cation. Use them as you would a braid orto simulate horizontal,
~ Procedure
If spacing between rows is not greater than 1.3 cm {V2 inch),
— gauge additional rows with the presser foot. If spacing is wider,
organdy or a fusible interfacing. Be sure to make a test sample
y \ / y \ / \ / \ y on a swatch of your fabric to check stitch settings and thread
/
____
_______
-------------------------------------------------------------------------
______
______________
tension, being sure to duplicate thickness and interfacing or
backing if appropriate.
62
Page 64

WViTTV/iViTiWTtViTtTifVTVVWVVVVVVYVVVVVVVVVVVWVVIlTVWVW
Smocking
Smocking is a youthful decorative detail that is particularly
charming when used for a yoke, insert or band on baby clothes,
little girls’ dresses, or lingerie.
When worked by hand, smocking is a time-consuming pro
cess. However, the heavy-stitched look, typical of hand work,
can be accomplished quickly and easily with your machine
when you use decorative patterns.
Procedure:
A test sample is always advisable to check stitch settings.
Be sure to use the same fabric and degree of fullness you
plan for garment.
• Set tension dial between 0 and 1.
• Space rows of straight stitching with stitch length on 4
(maximum length), 6 mm {'A inch) apart, on the crosswise
fabric grain.
• Pull up evenly, gathering for the amount of fullness desired.
Secure thread ends by tying knots close to the fabric to
prevent gathers from pulling out of position.
• Baste section to be smocked to underlay.
• Stitch over and between rows of gathering with decorative
stitching. Create your own design or adapt the ones
illustrated. Use thread that contrasts with or matches your
fabric, depending on the effect desired.
lwm^/vwv^Avwvwwvw*
WWWVVWWArtMA/W^^
yVVWWVWWWWVVWW\A
WVWWWWWW\/WWWVAA
63
Page 65

Twjn-Needle Stitching
The twin-needle simultaneously produces two parallel, closely
spaced lines of decorative stitching. You can stitch with either
one or two colours of thread.
• Stitch: stitch desired
• Stitch length; to suit application or fabric
• Stitch width: to suit application or fabric
• General purpose foot
• General purpose needle plate
Step 1
Thread machine with first
thread in usual manner,
making certain it passes
into tension disc on right
of tension separator A.
Caution: Always move the twin-needle switch to the right (
symbol) before stitching with the twin-needle. Unless this
switch has been activated, needle breakage will result. Upon
completion of your twin-needle sewing, return switch to its left
position (5 symbol) .
Step 2
Unthread needle and
remove It from machine.
• Insert twin-needle.
• Pass first thread
• Sinceabobbincannot
be filled after a twinneedle is inserted, it is
• Move twin-needle
wise to keep an extra
wound bobbin on
hand for replacement.
through right eye of
needle.
switch to the right
64
Note; Dotted lines in illustrations represent thread path hidden by machine.
Page 66

step 3 Attach detachable spool pin B to thread guide-
post.
« Place second spool of thread on detachable
spool pin and thread as before, except by
pass snap-in thread guidepost and pass
thread into tension disc on left of tension
separator A and through left eye of needle.
65
Page 67

Chapter 7% Buttonhoies and Biittoas
buttonholes
Your new machine comes complete with a built-in two step
buttonhole system. Before sewing on your garment always
make a test buttonhole duplicating the number of thicknesses
of fabric and interfacing if appropriate.
Buttonhole Position
—1--
Centre Line
Accurate guidelines are essential to keep buttonholes at a
uniform distance from the edge of the garment, evenly spaced,
and on the grain of the fabric.
1. Mark the centre line of the garment using hand basting,
or using tailor’s chalk.
Buttonhole
• Be sure that the space from the centre line to the finished
edge of the garment is at least equal to threequarters the
diameter of the button. With this spacing, the button will
Finished Edge
of Garment
not extend beyond the edge when the garment is buttoned.
• Make sure that the centre line marking follows a length
wise fabric thread.
I
Diameter of Button
66
Page 68

2. Mark a position guideline for each buttonhole.
Horizontal buttonholes A are placed to extend 3 mm
('/8 inch) beyond the centre line B of the garment, as shown,
so that the buttons will be in the centre of the figure when
the garment is fastened.
Horizontal buttonhole guidelines should follow a crosswise
fabric thread.
« Markthehorizontalbuttonholeguidelineforeach button
hole. It should be longer than the finished length of the
buttonhole.
e MarkthestartingpointforeachbuttonholeSmm(Vsinch)
beyond the centre line (see illustration).
B
B
J
IIW
ms
Vertical buttonholes C are placed so that the centre line B
of the garment is in the centre of the buttonhole, as shown.
m Mark the ends of each buttonhole horizontally across
the centre line basting and use the centre line marking
as the buttonhole guide when stitching.
3 mm ('/a inch) •
Buttonhole Length
• The buttonhole length should be just long enough to allow
the button to slip through the opening without stretching it.
A. When you use the two-step method of stitching button
holes, the buttonhole foot will gauge the buttonhole
length for you on most buttons.
B. When button is of an unusual shape orthickness, button
hole length is not automatically gauged with the button
hole foot. It is then necessary to adjust the buttonhole
foot. For additional information on adjustment of button
hole foot refer to page 68.
• To make sure the measurement is correct, cut a slit in a
scrap of fabric equal to the diameter of the button you
intend to use.
• Increase length of opening until button slips through easily.
This test is particularly advisable for buttons of unusual shape
orthickness.
—
1 Marking Lines
2 Length of Cutting Space
3 Bar Tacks and Side Stitching
67
Page 69

Two Step Buttonholing
Make a test buttonhole on a sample of your fabric, with inter
facing if being used, before working onyourgarment.
• Stitch: buttonhole if zj
• Stitch width: red buttonhole area
• Stitch length: within red buttonhole area
• Two-step buttonhole measuring foot
• General purpose needle plate
• Raise presser foot lifter.
• Remove presser foot.
1. Attach two-step buttonhole measuring foot by placing
buttonhole foot on right side of needle, then guiding it to
the left. Centre the foot under the shank and lower the
presser foot lifter so that the shank fits over the presser
foot pin.
Press presser foot screw A down firmly until foot snaps
into place.
2. Determine setting for length of button on buttonhole foot,
by first placing button in carrier B, and observing the line
on which the longest part of the button falls.
68
3. With index finger press down on point C and slide pointer
to the corresponding number observed on button carrier.
Remove button from carrier.
Note: When button is of an unusual shape or thickness,
buttonhole length is not automatically gauged with the
buttonhole foot. Estimate the additional thickness of the
button and slide pointer accordingly to a higher number.
Make a test buttonhole to check setting.
• Switch machine on MIN.
Page 70

4. Raise presser foot lifter. Hold upper thread lightly with left
hand and turn hand wheel slowly toward you until needle
enters the plate. Be careful that you do not run the machine
during this procedure. Continue turning hand wheel and
holding upper thread until needle rises. Tighten your hold
on upper thread and bring up lower thread in a loop.
Release upper thread. Slide scissors between foot D and
underplate E and draw both upper and lower threads
diagonally toward the back of the foot, leaving approxi
mately 10 cm (4 inches) of thread.
5. Place fabric between foot D and underplate E.
To bring the foot in sewing position pull foot from back of
button carrier gently toward you, making sure guideline F
is aligned with horizontal red guideline on buttonhole foot.
With the foot in this position align buttonhole start line on
fabric with horizontal red guideline on foot. Then align centre
line of buttonhole marked on fabric with vertical guideline
of buttonhole foot.
Check again that the guideline F is aligned with the red
guideline on foot, as illustrated.
Lower buttonhole foot.
69
Page 71

6. Select left side of buttonhole ' ^ . To do this, slide pattern
group selector to right, then push pattern selector button
until light appears over the symbol.
7. Set stitch width control within the red buttonhole area G.
Start machine. Adjust the stitch width control within red
buttonhole area in order to obtain the desired width of
starting bar tack.
70
8. Complete left side of buttonhole. Stop machine when H
is aligned with K on buttonhole foot and the needle enters
the left side of side stitching. See illustration.
9. Select right side of buttonhole ¡J by sliding pattern
selector button to the left. (This side must always be
stitched last.)
Page 72

10. Set the stitch length control within red buttonhole area.
Start machine and if needed, adjust stitch appearance of
this side of buttonhole to match left side within the red
buttonhole area of stitch length control. Turn dial to the
right to open stitches or left to close up the stitches.
11. Stop sewing when stitching reaches the starting bar tack,
e Remove work from machine, secure and clip thread ends.
10
11
12
• Switch machine off.
12. Remove two-step measuring foot by snapping down L.
Cutting Button Opening
e Place a pin across the cutting space at each end of the
buttonhole to protect bar tacks.
• Use a pair of small, sharp scissors to cut the button
opening M.
• Insert blade in centre of the buttonhole cutting space and
cut from this point in both directions.
71
Page 73

buttons
• stitch: overedge stretch stitch ^
• Stitch width: to suit button
• Stitch length: digitally fine tuned at 0
• Button foot
• Snap-on feed cover (To attach feed cover see page 7)
Attaching a Button
• Attach button foot and snap-on feed cover to machine
and turn on machine.
• Select overedge stretch stitch.
• Turn hand wheel toward you until needle moves to left side.
• Place garment underfoot, then position button on garment.
1. Turn hand wheel again to lower needle into left hole of
button, and lower button foot.
2. Turn hand wheel again carefully until needle is just above
right hole. Adjust stitch width, if required, so that needle
will enter right hole of button. Refer to page 38 for infor
mation on stitch width.
3. Run machine slowly. Allow at least three groups of cross
over stitches to enter right hole of button. Finish sewing on
left side, taking two or three tying stitches.
72
• Remove work from machine leaving 10 cm (4 inches) of
thread. Pull thread ends through to inside of garment, and
knot them close to fabric to form a secure finish.
Page 74

Forming a Thread Shank
Buttons sewn on coats and jackets should have a thread
shank to make them stand away from the fabric. A thread
shank is formed by sewing over the blade of a regular machine
needle.
Position needle, garment and button as described on
previous page.
Place needle in groove of foot so that point enters hole in
foot first, as shown. The further in you push needie, the
ionger the shank wili be.
Foliow procedure on previous page for button sewing.
After stitching, remove needle from groove of button foot,
remove work from machine, and cut threads about 15 cm
(6 inches) from fabric.
Pull upper thread ends to back of button. Form a firm
shank between button and fabric by winding threads tightly
around attaching stitches, and tie thread ends securely.
10 B
73
Page 75

■ i
Fabric handling, when sewing tubular and hard to reach gar
ment areas, is simplified when you convert your sewing
machine to free-arm sewing. Some of the sewing jobs for
which you will find the free arm particularly useful are shown
on this and the following pages. You will discover many more
for yourself.
preparation
To convert to free-arm sewing, simply press down on corner
of Flip (SSew panel on sewing machine with heel of right hand.
Sewing
applications
Buttons
Sewing buttons on a cuff or neckband is no longer a task
when the freearm surface is used. Cuffs slip around the
sewing surface without being pulled out of shape, so you
can see and handle the stitching area easily.
Button-sewing instruction is given in Chapter 7, page 72.
74
Page 76

To raise Flip & Sew panel, place hand under panel and lift
up until it locks into place. A click will be heard when panel
Is locked in position.
Sleeves
Free-arm sewing takes the difficulty out of topstitching a sleeve.
The armhole rotates smoothly under the needle so that you
can place stitching accurately. The extra control afforded by
the free arm Is especially helpful for topstitching flat-fell seams.
Badges, emblems and insignia of all sizes and shapes can
be quickly attached to shirts and uniforms by slipping sleeve
or hard-to-reach area over the sewing surface.
75
Page 77

i's CVirlL 9 /jr 1 JLir 1
cleaning the machine
Your machine will serve you perfectly for many years if you
take a few moments of your time to keep it clean. How often
you will need to clean the machine will depend on how often
you use it.
Caution: Before cleaning your machine, disconnect the power line plug from the socket outlet.
Remove lint orfluff from exposed parts. With a soft cloth, clean:
« PresserbarA, and needle barB.
• Take-up lever C and thread guides D, E and F.
• Remove needle plate as instructed on page 7 and, using
a brush, clean the rotating hook area G under the needle
plate and slide plate.
« Remove bobbin case H if there is a lot of lint in the area,
for cleaning. See page 77 for instructions.
• Machine surface (If necessary, dampen the cloth and use
a mild soap).
76
To remove lint which may collect under the window of the
see-through slide plate pull slide plate towards you and clean
from underneath with the lint brush.
Your machine requires no oiling under normal conditions.
Your SINGER representative or Approved Dealer will examine
the permanently lubricated parts whenever your sewing
machine requires servicing.
Page 78

Removing the Bobbin Case
Caution: Before removing the bobbin case disconnect the
power line plug from the socket outlet
Make sure needle is at its highest position.
o Open slide plate and remove needle plate (see page 7 for
instructions).
e Remove bobbin. Keep bobbin push button in sewing
position.
1. To unlock bobbin case, lift position bracket with the small
screwdriver and slide to right.
2. To remove bobbin case, hold latch, twist to right and lift out.
Replacing the Bobbin Case
Make sure needle is at its highest position.
• Keep bobbin push button in sewing position.
3. Hold bobbin case by latch and, with latch to right of needle,
slip case in position so that the groove engages hook
channel. Twist latch to left until it is in centre.
4. Push position bracket to left until it snaps down, locking
bobbin case in place.
• Replace bobbin and snap latch down.
• Replace needle plate and close slide plate.
77
Page 79

Replacing the Slide Plate
You will not have any occasion to remove the slide plate.
However, if it should accidentally become disengaged from
the machine, it is easily replaced.
• Raise the presser foot and make sure needle is in its highest
position. Remove needle plate.
• Place slide plate in slide way with the front edge close to,
but not covering, the retaining spring (as shown).
• With a small screwdriver, lift each end of the spring into
each of the side grooves on the underside of the plate.
• Draw the plate gently toward you and fully engage the
spring.
• Replace needle plate and close slide plate.
Changing the Light Bulb
Caution; Before changing light bulb make sure you
have disconnected the power line plug from the socket
outlet
Caution: This machine is designed to use a 20 watt maximum light bulb.
78
Removing Bulb. With thumb of right hand, push in and
down on tab A of light lens and lower the light bracket.
Do not attempt to unscrew the bulb. Press it up into the
socket and at the same time turn bulb over in direction
shown to unlockthe bulb pin B.
Replacing Bulb. Press nevv bulb into socket, with bulb
pin B entering slot of socket, and turn it over in direction
shown to lock bulb in position. Push entire assembly
up until it snaps in position.
Page 80

what’s wrong
...
and why!
Whenever sewing difficulty is encountered, review the
sections of the instruction book that explain the operation
you are performing to make sure you are using the machine
correctly. If the problem still exists, the following checklist
may help you to correct it.
Machine does not Sew
Needle does not move.
Make sure...
« Power and light switch is on.
• Machine is connected to electrical supply.
(Turn to page 14 for additional Information.)
Needle moves but stitch is not formed.
Make sure...
® Needle is straight and sharp.
@ Needle style is correct for machine.
• Needle size is correct forthread being used.
• Needle is fully Inserted into needle-clamp.
e Machine is correctly threaded (See page 16).
(Turn to page 8 for additional Information.)
• Bobbin contains thread.
• Bobbin push-button is in SEW position.
• Bobbin case area is free of lint and loose threads.
(See page 76.)
(Turn to page 20 for additional information.)
• Built-in fuse does not need to be replaced (See page 15).
Needle and/or thread breaks.
Make sure...
• Needle is straight and sharp, correct style for machine, and
correct size for thread being used.
• Needle Is fully inserted into needle-clamp.
(Turn to page 8 for additional information.)
• Presser foot or accessory is securely fastened to presser
bar. (See page 6.)
® Fabric Is not being pulled to one side as work is removed
from machine.
• Fabric being guided or supported behind the needle Is not
being pulled too hard or too fast.
(Turn to page 45 for additional information.)
e When doing twin-needle sewing, twin-needle switch is
activated. (See page 64.)
Continued Next Page
79
Page 81

Bobbin Winding Difficulties Thread Breaks While Sewing
Upper thread breaks while winding bobbin.
Make sure...
Upper thread breaks.
Make sure...
• Presser foot is raised. • Machine is properly threaded.
• Thread is unwinding freely from spool.
• Thread spool is inserted correctly on spool holder.
• Thread is not pulled too tightly when starting to wind
bobbin.
• Machine is correctly threaded. (See page 16.)
(Turn to page 20 for additional information.)
Thread does not wind onto bobbin.
Make sure ...
• Bobbin push-button is in winding position.
• Thread passes under toe of presser foot before being
held securely on presser foot screw.
• Thread end is held securely at start of wind.
• Bobbin haives are securely tightened. (See page 23.)
(Turn to page 20 for additional information on bobbin
winding.)
• Thread spool is inserted correctly on spool holder.
• Thread is unwinding freely from spool.
• Thread spool is secured by correct holder.
• Thread is even and free from knots.
(Turnto pagelBforadditional information.)
• Needle is correct size for thread.
• Needle is straight and sharp.
(Turn to pages 9 and 12 foradditional information.)
• Upper thread tension is not too tight. (See page 28.)
• Bobbin is correctly inserted in machine. (See page 22.)
• Bobbin rim is free of nicks.
• Needle plate hole and presserfoot are undamaged.
• Threads are correctly placed under presser foot
when starting to sew. (See page 21.)
• Presser foot is securely fastened to presser bar.
(See page 7.)
Bobbin displaced during winding.
Make sure ...
• Bobbin is being wound at a moderate speed.
• Bobbin is properly seated and secured by the latch in
the bobbin case.
Thread breaks when sewing starts after winding bobbin.
Make sure ...
• Bobbin has not been wound beyond the FULL ring.
Turn hand wheel away from operator to free over wound
bobbin.
• Bobbin case area is free of lint and loose threads. (See
page 76.)
(Turn to page 21 for bobbin information.)
Lower thread breaks.
Make sure...
• Bobbin has been correctly wound.
• Bobbin case area is free of lint and loose threads.
(See page 76.)
• Bobbin has been correctly inserted into bobbin case.
• Bobbin has not been wound too full.
(Turn to page21 foradditional information.)
80 Continued Next Page
Page 82

stitching Difficuities
Feeding Difficulties
Skipped stitches.
Make sure ...
• Needle is straight and sharp.
• Needle is correct style for machine and size of thread.
(See page 12.)
• Machine is properly threaded. (See page 16 for
instructions.)
• Fabric is held down firmly (particulary when doing free-
motion darning and embroidery).
• Correct presser foot and needle plate are being used.
Loose stitches on underside of fabric.
Make sure ...
• Needle is straight and sharp.
• Needle is correct style for machine and size for thread.
(See page 12.)
• Sufficient tension is being exerted on upper thread.
(See page 28.)
• Bobbin case area is free of lint and loose threads. (See
page 76.)
• Bobbin has not been wound beyond the FULL ring.
• Presser bar has been lowered (particulary when sewing
dense fabric or doing free-motion darning and
embroidery).
Fabric does not move properly under presser foot
Make sure...
• Machine is threaded correctly.
• Presser foot pressure is correct for fabric being stitched.
(See page 26.)
• Presser foot or accessory is correctly attached to
machine. (See page 7.)
• Line of stitching is started in from fabric edge.
• Stitch length selector is set correctly.
• Bobbin case area is free from lint and loose thread ends.
(See page 76.)
• Lint has not accumulated around feed.
Sluggish or Noisy Machine
Hand wheel difficult to turn over manually or increase in
operating noise level.
Make sure ...
• Bobbin case and feed area are free of lint and loose
thread ends.
Loose irregular straight stitches.
Make sure ...
• Upper thread has sufficient tension. (See page 28.)
• Needle plate and presser foot are correct for fabric
being sewn.
Fabric does not lie flat after stitching.
Make sure ...
• Upper thread tension is light enough. (See page 28.)
• There is sufficient presser foot pressure to hold fabric.
(See page 26.)
• Stitch length is short enough for fabric. (See page 26.)
• Correct presser foot is being used.
• Machine is correctly threaded. (See page 16 for
instructions.)
81
Page 83

your personal measurements
This chart will enable you to keep a record of your measure
ments. You will need the assistance of someone to help you
to take the measurements carefully with an accurate tape
measure.
1. Bust - Fullest part - slightly higher in back .....................................................................
The illustrations show where tape measure should be placed
when taking each measurement.
As a starting point, use a ribbon firmly but comfortably tied at
the waist before taking measurements.
2. Waist - Around natural waistline .....................................................................................
3. Hip - ... cm (inches) below natural waistline (fullest part) ..............................................
4. Shoulder - From base of neck to top of farm ..................................................................
5. Front Bodice Width - From arm hole to arm hole 13 cm (5 inches) down from centre shoulder
6. Back Bodice Width - From arm hole to arm hole 10 cm (4 inches) down from centre shoulder
7. Shoulder to Bust - From neck base at shoulder to point of bust
8. Front Waist Length - From neck base at shoulder over fullest part of bust to waistline
9. Back Waist Length - From the prominent bone at base of neck to natural waistline
10. Sleeve Width - Around arm at upper edge of underarm seam
11. Sleeve Length - Shoulder to elbow...................................................................................
12. Sleeve Elbow to Wrist........................................................................................................................
13. Front Skirt Length - Down centre from waistline to hem
..................................................
.....................................
...
........
.........................................
14. Back Skirt Length - Down centre from waistline to hem...................................................
Pants Measurement Chart
15. Full Length - Waist to floor at side seam
.........................................................................
16. Pant Length - Waist to ankle............................................................................................
17. Crotch Depth (seated) - Waist to chair at side seam.........................................................
18. Crotch Seam (standing) - Crotch depth 17 to be deducted from pant length 16
...............
cm (inches)
82
16
4li
Page 84

personal notes
83
Page 85

Index
Accessories
Appliqué
Attaching a Button
.........................
4,5
..................................
...................
42
72
Blindstitch Hem Guide............... 5
Blindstitch Hems
Bobbin
.......................................
Newly Wound
.....................
......................
54
5
30
Raising Bobbin Thread .... 23
Removing Bobbin
Removing Thread
.................
.................
22
23
Replacing a Wound Bobbin . 22
Thread Tension
Winding
................................
................
29,39
21
Bobbin Case............................ 77
Buttonholes
............................
66
Position................................. 66
Length
Buttons
..................................
....................................
67
72
Caring for Your Machine .... 76
Choosing and Changing
Accessories
............................
6
Connecting Machine................ 14
Darning.................................... 33
Darts........................................ 34
Elastic Replacing..................... 56
Electrical Connections
Embroidery
..............................
Fabric-Handling Table
............
.............
14
43
46
Fabric, Thread and Needle Table 12, 13
Fabric Weight Table
Flexi-Stitch Patterns
Free-Arm Sewing
Free-Motion Stitching
............
10, 11
...................
....................
..............
24
74
43
Guiding and Supporting Fabric 45
Light Bulb ................................ 78
Lower Thread Tension
........
29,39
Mending................................... 58
Mock Overedging
Needle
.......................................
....................
53
8
Changing................................. 8
Threading ............................. 16
Thread Tension.................28, 39
Needle-Fabric Combinations . . 9
Needle Plate
Changing Plates
........................
.....................
2, 4, 7
7
Feed Cover............................. 7
General Purpose..................... 5
Straight-Stitch ........................
Operating the Machine
............
5
14
Overedged Seams................... 52
Patterns
Arrowhead
Blindstitch
Featherstitch
Honeycomb
M-Stitch
Multi-Stitch Zig-Zag
............................
.............................
.........................
..........................
................................
..............
49
54
50
56
57
58
Overedge Stretch Stitch ... 52
Scallop Stitch
........................
60
Straight Stretch Stitch .... 61
Zig-Zag.................................. 40
Performance Checklist
Personal Measurements
............
.....
82
79
Power and Light Switch .... 2,14
Presser Feet
Button Foot
Buttonhole Foot
..............................
.......................
................
5, 7
5, 68
5
Changing Presser Feet.... 6
General Purpose
....................
5
Special Purpose Foot .... 5
Straight-Stitch Foot
...........
5, 25
Zipper Foot.......................... 5, 36
Pressure Adjustments
Principal Parts
.....................
Reverse Stitching
Satin Stitching
..................
.........
............
26, 45
2, 3
25
41
Seam Guide......................... 5, 7
Seams
Curyed
Overedged
..........................
....................
32
53
Straight.......................... 30
Seam Finishes
Selecting a Stitch
......................
.............
24
40, 53
Sewing Knit and Stretch Fabric 45
Slide Plate.............................. 2, 78
Smocking ................................ 63
Speed Controller
Spool Holders
Stitch Centring
Stitch Length
...................
.................
5,16
........................
........................
14, 15
48
26, 38
Stitch Length Guidance Table . 27
Stitch Pattern Chart
.........
44
Stitch Width...................... 38
Straight Stitching
Curved Seams
....................
..............
32
25
Reinforcing End of Seam . . 32
Straight Seams
.............
31
Turning Square Corners ... 31
Stress Areas
Tension Test
....................
....................
27
29
Threading the Machine .... 16
Twin-Needle Stitching ..... 64
Twin-Needle Switch
.........
64
Upper Thread Tension..28,39
Zig-Zag Stitching.............. 38
Zipper Insertion
.......................
36
Form 30 - 840 G (878) Engl. Part No. 0-421 401-002
84
‘ A Trademark of THE SINGER COMPANY
Printed in Western Germany
 Loading...