

Page 1
Card Printer
CHC-C320
Operation manual
http://www.sinfo-t.jp
Page 2

Handling of this Manual
Notice
Handling of this Manual
Handling of this ManualHandling of this Manual
1. All rights reserved. No part of this operation manual covered by the copyright herein
maybe reproduced or copied in any form or by any means, including translation, without
the written permission of SINFONIA TECHNOLOGY Co., Ltd.
2. The specifications in this operation manual are subject to change without prior notice.
3. In case of having any difficulties or finding the fault in this manual, your information to
SINFONIA TECHNOLOGY will be highly appreciated.
IIIIntroduction
ntroduction
ntroductionntroduction
This manual describes detailed instructions for handling of and basic operation of Digital
Photo Printer CHC-C320.
We will describe this product as “the printer” in the manual.
Read this manual thoroughly to understand how to install and operate the printer before
● Keep this manual near the printer and operators can refer to this manual
periodically.
● In case, lost or damaged this manual, contact your dealers.
● In the case of transfer, do not forget to put this manual together with the printer.
Page 3

CONTENTS
PREFACE
PREFACE
Chapter 1. Important Safety Instruction ・・・・・・・・・・・・・・・・ 1-1
Environments ・・・・・・・・・・・・・・・・・・・・・・・・・・・ 1-1
Handling Instruction ・・・・・・・・・・・・・・・・・・・・・・・ 1-2
Handling Instruction for Consumable and Printed Output ・・・・・ 1-3
Chapter 2. Installing and Set Up ・・・・・・・・・・・・・・・・・・・・ 2-1
Unpacking and Checking the Accessories ・・・・・・・・・・・・ 2-1
Parts Name and Function ・・・・・・・・・・・・・・・・・・・・・ 2-2
Printer Status Lamps Name and Printer Status ・・・・・・・・・・ 2-3
Connecting Power Cable ・・・・・・・・・・・・・・・・・・・・・ 2-4
Connecting USB Cable ・・・・・・・・・・・・・・・・・・・・・・ 2-4
Attaching the cleaning roller ・・・・・・・・・・・・・・・・・・・・ 2-5
Setting Color Ink Ribbon ・・・・・・・・・・・・・・・・・・・・・・ 2-6
Setting Hologram Ink Ribbon ・・・・・・・・・・・・・・・・・・・・ 2-7
Setting Card ・・・・・・・・・・・・・・・・・・・・・・・・・・・・ 2-8
Transporting the Printer ・・・・・・・・・・・・・・・・・・・・・・ 2-10
Print ・・・・・・・・・・・・・・・・・・・・・・・・・・・・・・・・ 2-10
Chapter 3. Routine Maintenance ・・・・・・・・・・・・・・・・・・・ 3-1
Cleaning of Thermal Head, Platen, and Cleaning Roller ・・・・・・・ 3-1
Cleaning of Outer Cover ・・・・・・・・・・・・・・・・・・・・・・ 3-3
Cleaning of Filter ・・・・・・・・・・・・・・・・・・・・・・・・・・ 3-3
Chapter 4. Error Handling ・・・・・・・・・・・・・・・・・・・・・・・ 4-1
Printer Status lamps are displayed in red ・・・・・・・・・・・・・・ 4-1
Failure Symptoms ・・・・・・・・・・・・・・・・・・・・・・・・・ 4-2
Card Jam ・・・・・・・・・・・・・・・・・・・・・・・・・・・・・ 4-3
Power Supply Interrupted during Printing ・・・・・・・・・・・・・ 4-7
When the Ribbon is snapped ・・・・・・・・・・・・・・・・・・・・ 4-7
Chapter 5. In order to more comfortably use ・・・・・・・・・・・・・ 5-1
For longer Printer usage ・・・・・・・・・・・・・・・・・・・・・・ 5-1
After-sales Service
Page 4
Attention:
Explanation about the cause of
condition.
Caution:
Inappropriate handling
Attention:
Do not place the printer under
Warning:
Do not block the
Caution:
Do not place the printe
r
Caution:
Do not pl
ace the printer
hot spring, on the street.
Warning:
Do not put vase,
Warning:
Do not insert or fall the
Caution:
Do not let children to
Chapter 1. Important Safety Instruction
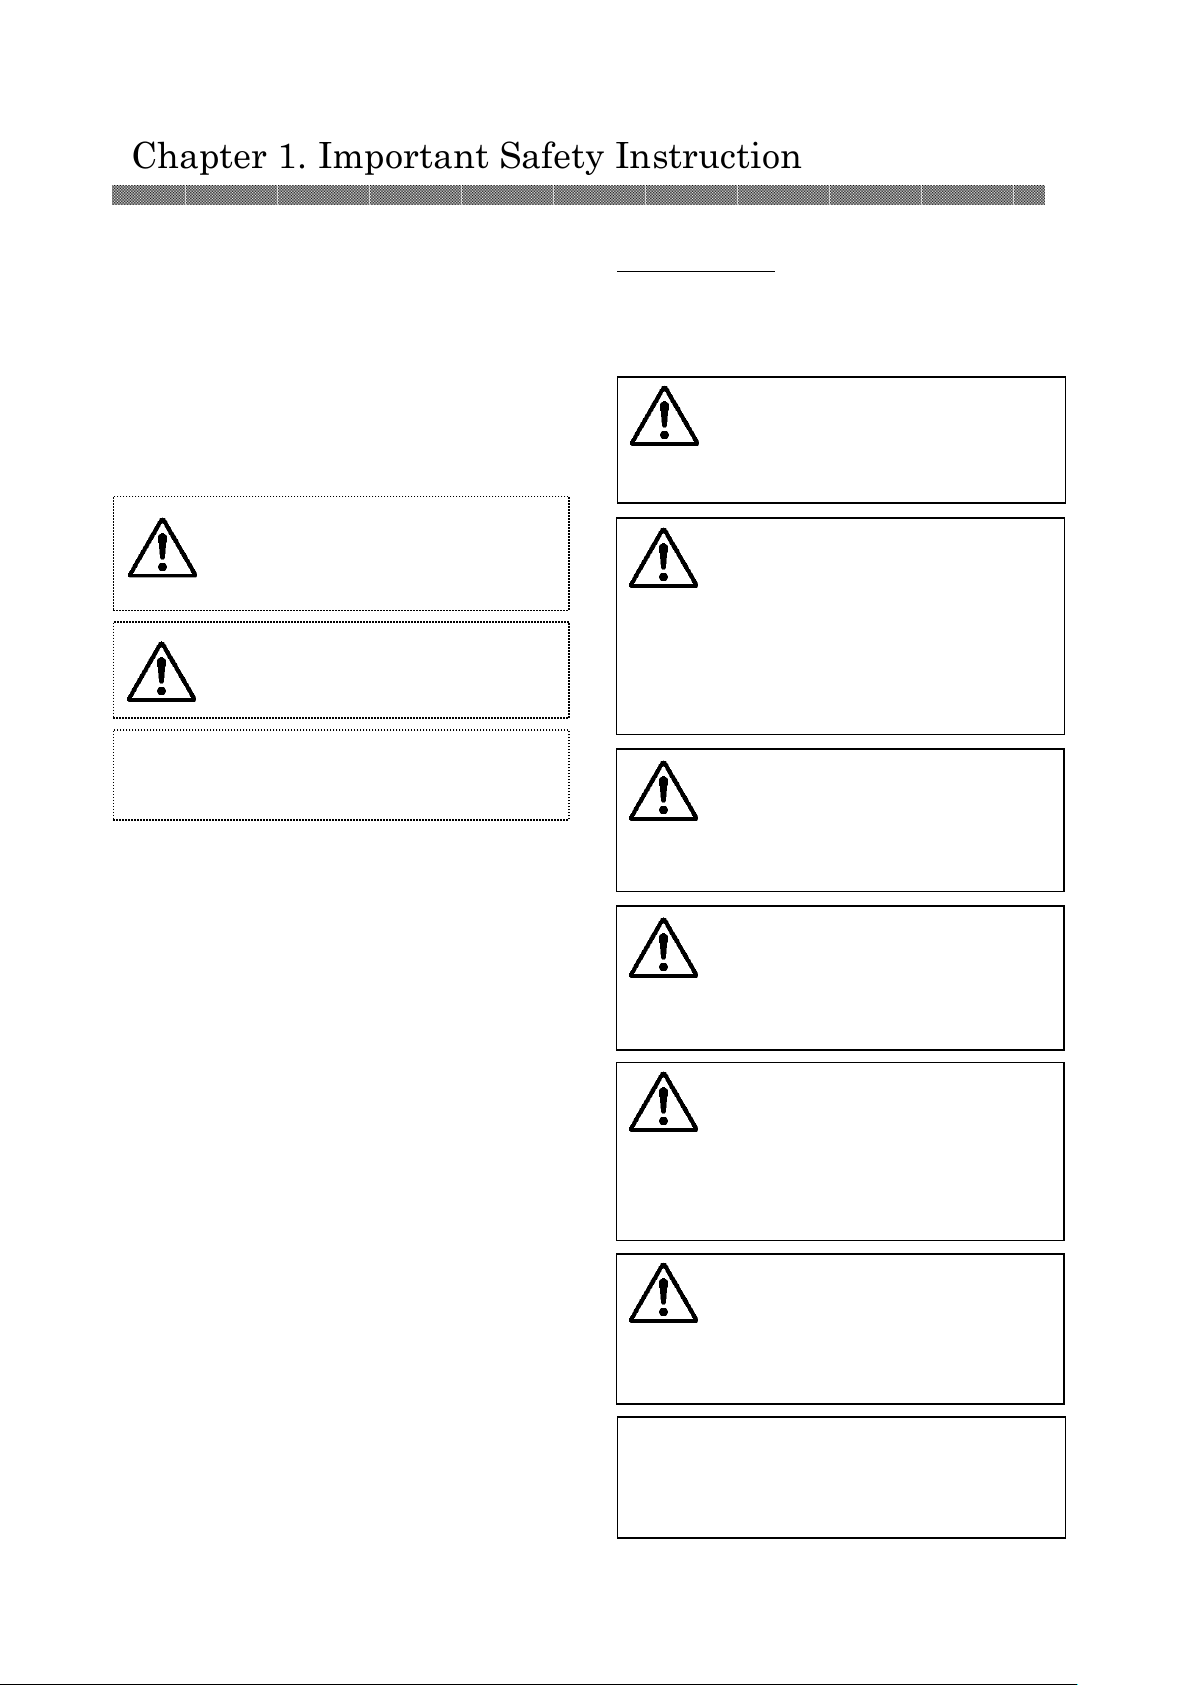
This manual provides detailed instructions for
the safety use of the printer.
Read this manual before operating the printer
to ensure to have proper use.
◆In this manual, there are notes that require
special attention.
◆
For your safety operation, Safety notices are
separated as follows;
Warning: Inappropriate handling
can cause the death or serious
wound.
can cause the wound for the users
and/or cause the physical damage.
the trouble and the environmental
◆
It is difficult to forecast all the danger in
setting and use of the printer.
Therefore, warnings in this Operation
Manual, in the other documents on the
printer cannot cover all the cases.
In case of performing the operation or
maintenance which are not described in this
manual, all the concern for the safety have to
be taken care of at the customer side.
Operations and the notification for the
◆
maintenance described in this manual and
other documents are for the proper use of the
printer.
In case of using the printer for the other
purpose, all the concern for the safety has to
be taken care of at the customer side.
◆
Do not perform the operation which are
prohibited in this manual and other
documents.
The contents that cannot be printed due to a
◆
failure while using the use of this printer are
not guaranteed.
Environments
To use the printer safety, please pay attention
to the followings:
touch the printer or the cables.
It can cause accidents or electric
shock.
under humid or dusty place.
It can cause a fire, electric shock
or printer problem.
Do not place the printer with
dust, sand and high humidity
such as bathing place, bathroom,
on rickety place and/or inclined
place.
Printer may fall down or tumble
and it can cause injury.
metallic items or flammable items
into the printer through the
openings of the printer, it can
cause the fire and electric shock.
flowerpot, and cup with water
inside or metric items.
In case the water spilt or metric
items fall into the printer, it can
cause the fire and electric shock.
openings of the printer. In case,
the opening blocked, the heat will
remain inside and it can cause
the fire.
the low temperature such as ski resort,
skating rink or open-air with direct
sunlight.
1-1
Page 5
Warning:
Secure the power cable
Warning: This product must be
center.
Warning:
The thermal head
Warning:
Do not attempt to
Warning:
Do not disman
tle or
Attention:
At installation, appropriate
Warning:
Lift the printer from i
ts
Warning:
At nearly
20Kg, the
Warning:
Be careful when you
Warning:
In case you drop the
Attention:
Touching the surface of the
Chapter 1. Important Safety Instruction
Handling Instruction
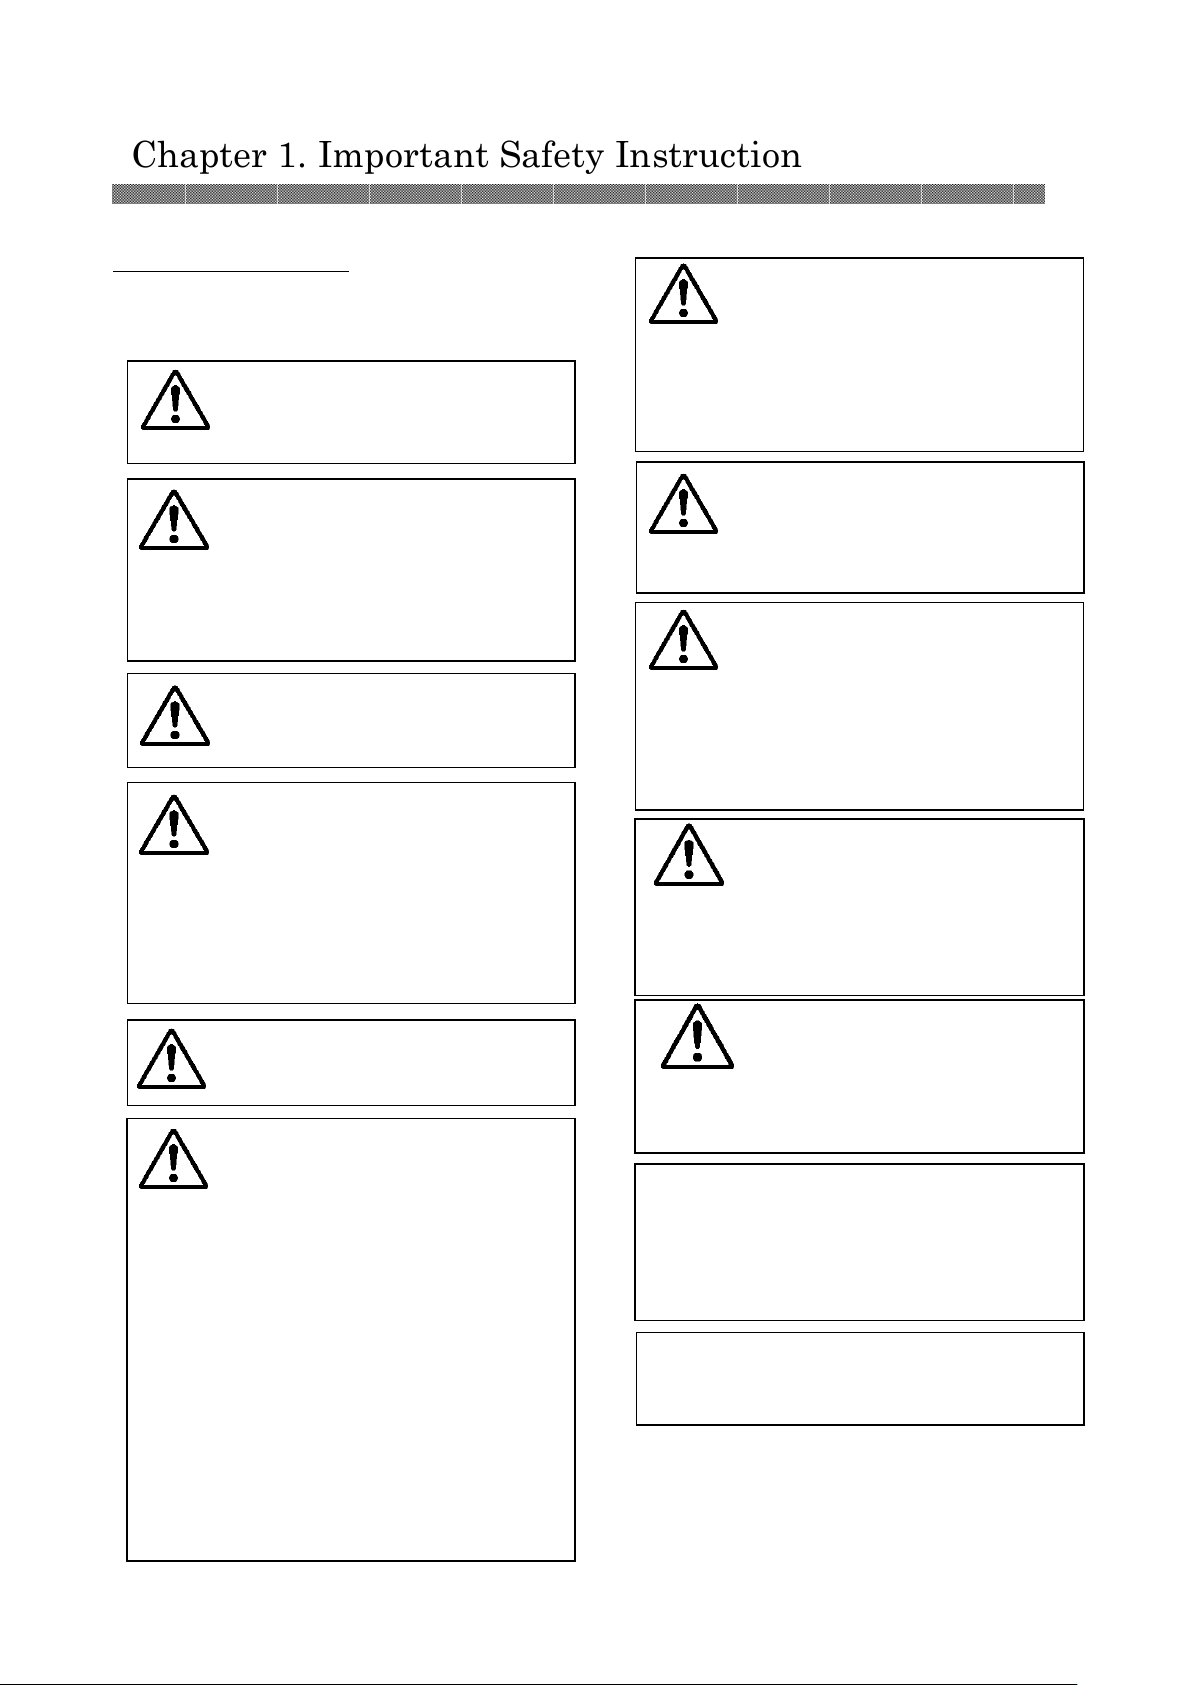
In handling the printer, please pay attention to
the followings;
box and put it onto a flat table or
desk.
printer is too heavy to be lifted by
one person.
Also please take a good care of
your hands and fingers when
lifting the printer from the box.
transport the printer on the
slippery floor.
printer, firstly turn off the power
of the printer and remove the
power cable, then contact the
dealers or service center. To use
the printer without any checking,
can cause the fire or electric
shock.
firmly.
grounded, and always used with
only the specified power cable or
the power cable accompanying
this product.
If the product is used without
ground, and current leakage
occurs, fire or electrical shock is
most likely to result, and also
cause signal-receiving
interference to a radio, a
television receiver, and other
similar electric appliances.
If the proper grounding
connection is not possible, please
contact to the dealers or service
service the printer beyond the
instruction specified in this
document. In case, impossible to
recover from the problem, please
contact to the dealers or service
center.
reaches high temperature during
operation but this is normal. Do
not touch the thermal head.
remodel the printer.
Some sections of the printer
contain a high voltage or become
very hot. Ignoring this warning
may cause electric shock, fire, or
burns.
Warning: Printed cards are out
fast from paper outlet. So do not
look into the paper outlet. It can
cause the blindness or injury.
Warning: When a fan motor
fails, it can cause a fire. At
exchange, please ask the
dealers or service center.
thermal directly can cause the damage to
thermal head. When a hard object get
into the printer, it can cause the damage to
the printer mechanism. In such case,
please do not use the printer.
interface cable will be required with your
computer.
1-2
Page 6
Attention:
Card
Handling
Attention:
Ink Ribbon Handling
Attention:
Printed Output Handling
Caution:
When abandon the ink
Caution:
Be careful not to injure
Chapter 1. Important Safety Instruction
Handling Instruction for Consumable and
Printed Output
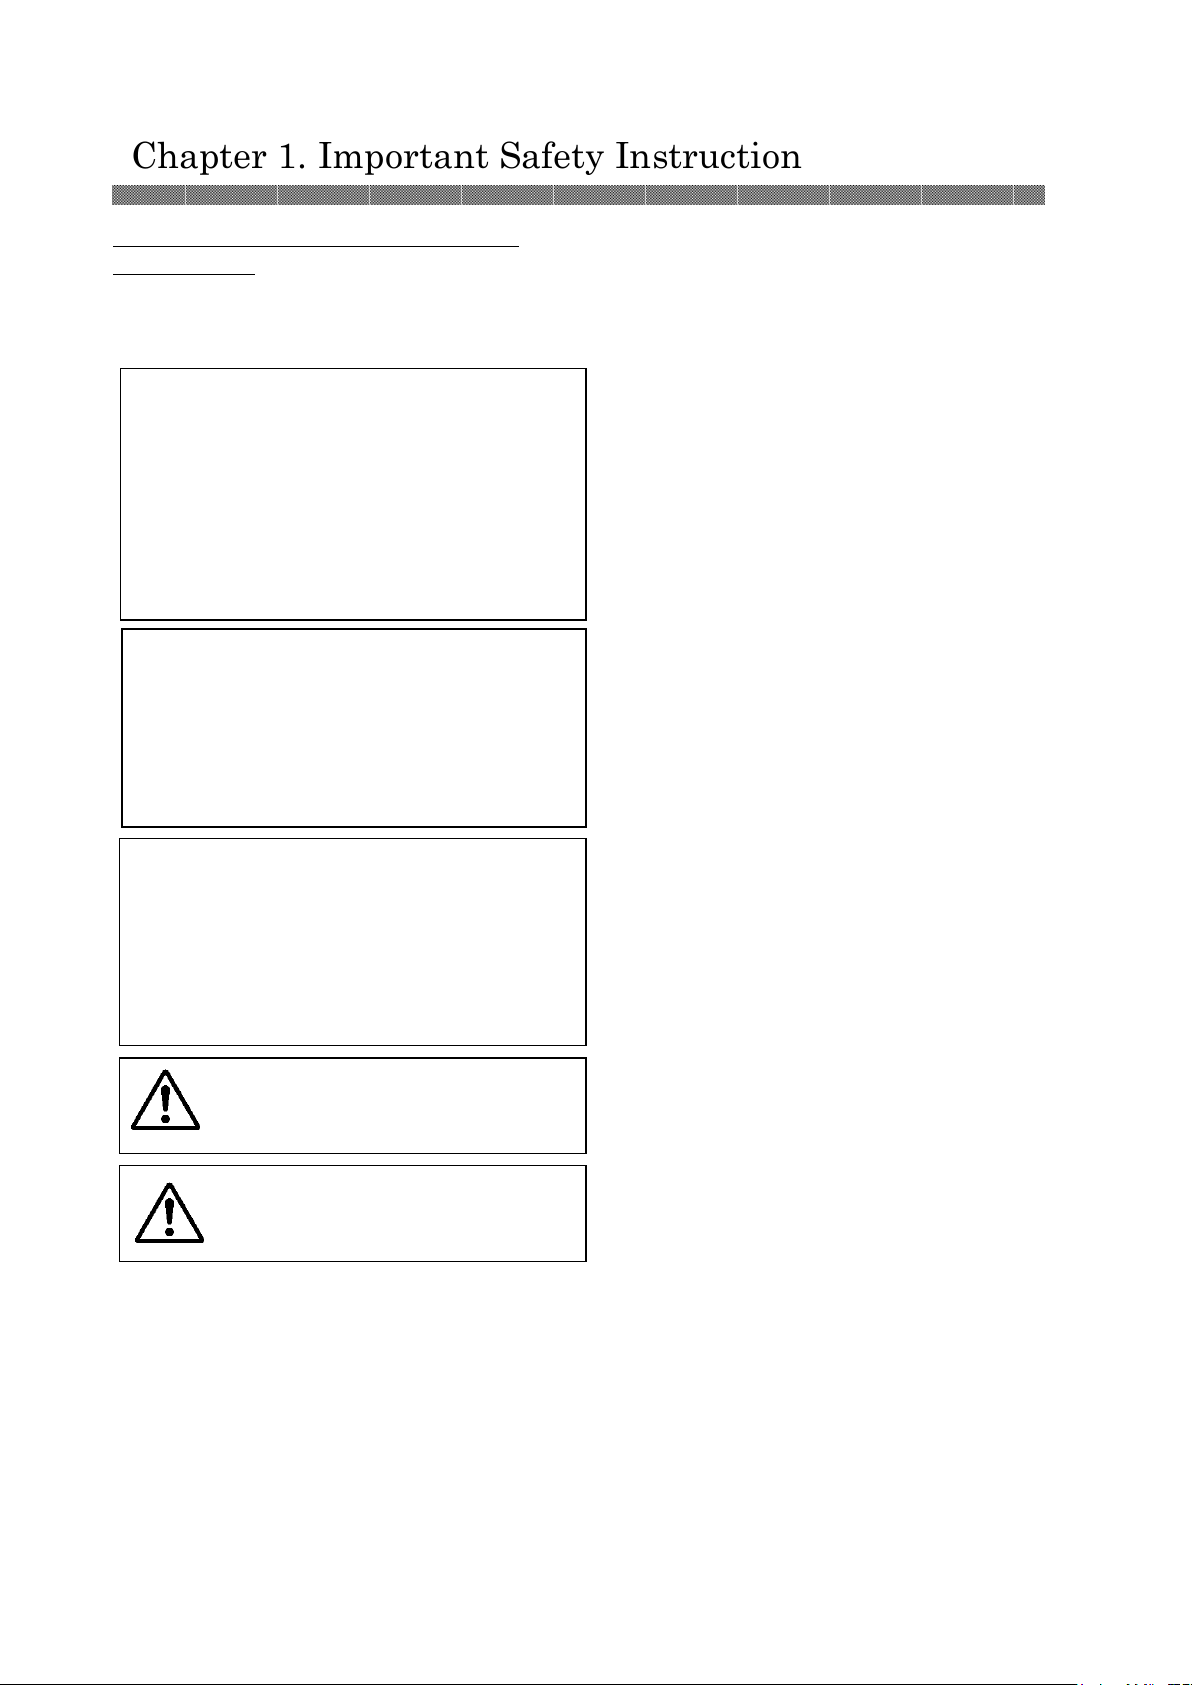
In handling the ink ribbon, card and printed
output, please pay attention to the followings;
・Use the card specified by SINFONIA
TECHNOLOGY.
・Store the card flat.
・ Store the card in a dry and dark place
to avoid the direct Sunlight.
(Temperature less than 30°C, Humidity
less than 60%).
・Do not touch the card surface before
・ Use the ink ribbon specified by
SINFONIA TECHNOLOGY.
・ Store the ink ribbon in cool place to
avoid the direct sunlight.
(Temperature less than 30°C, Humidity
less than 60%)
・Store the printed output in a dark place to
avoid the direct sunlight.
・Store the printed output away from the
organic fluid such as benzene, thinner
and alcohol which may change or
deteriorate the colors.
ribbon, please handle it as harmful
industrial waste.
your hands with the card edge
when handling card.
1-3
Page 7
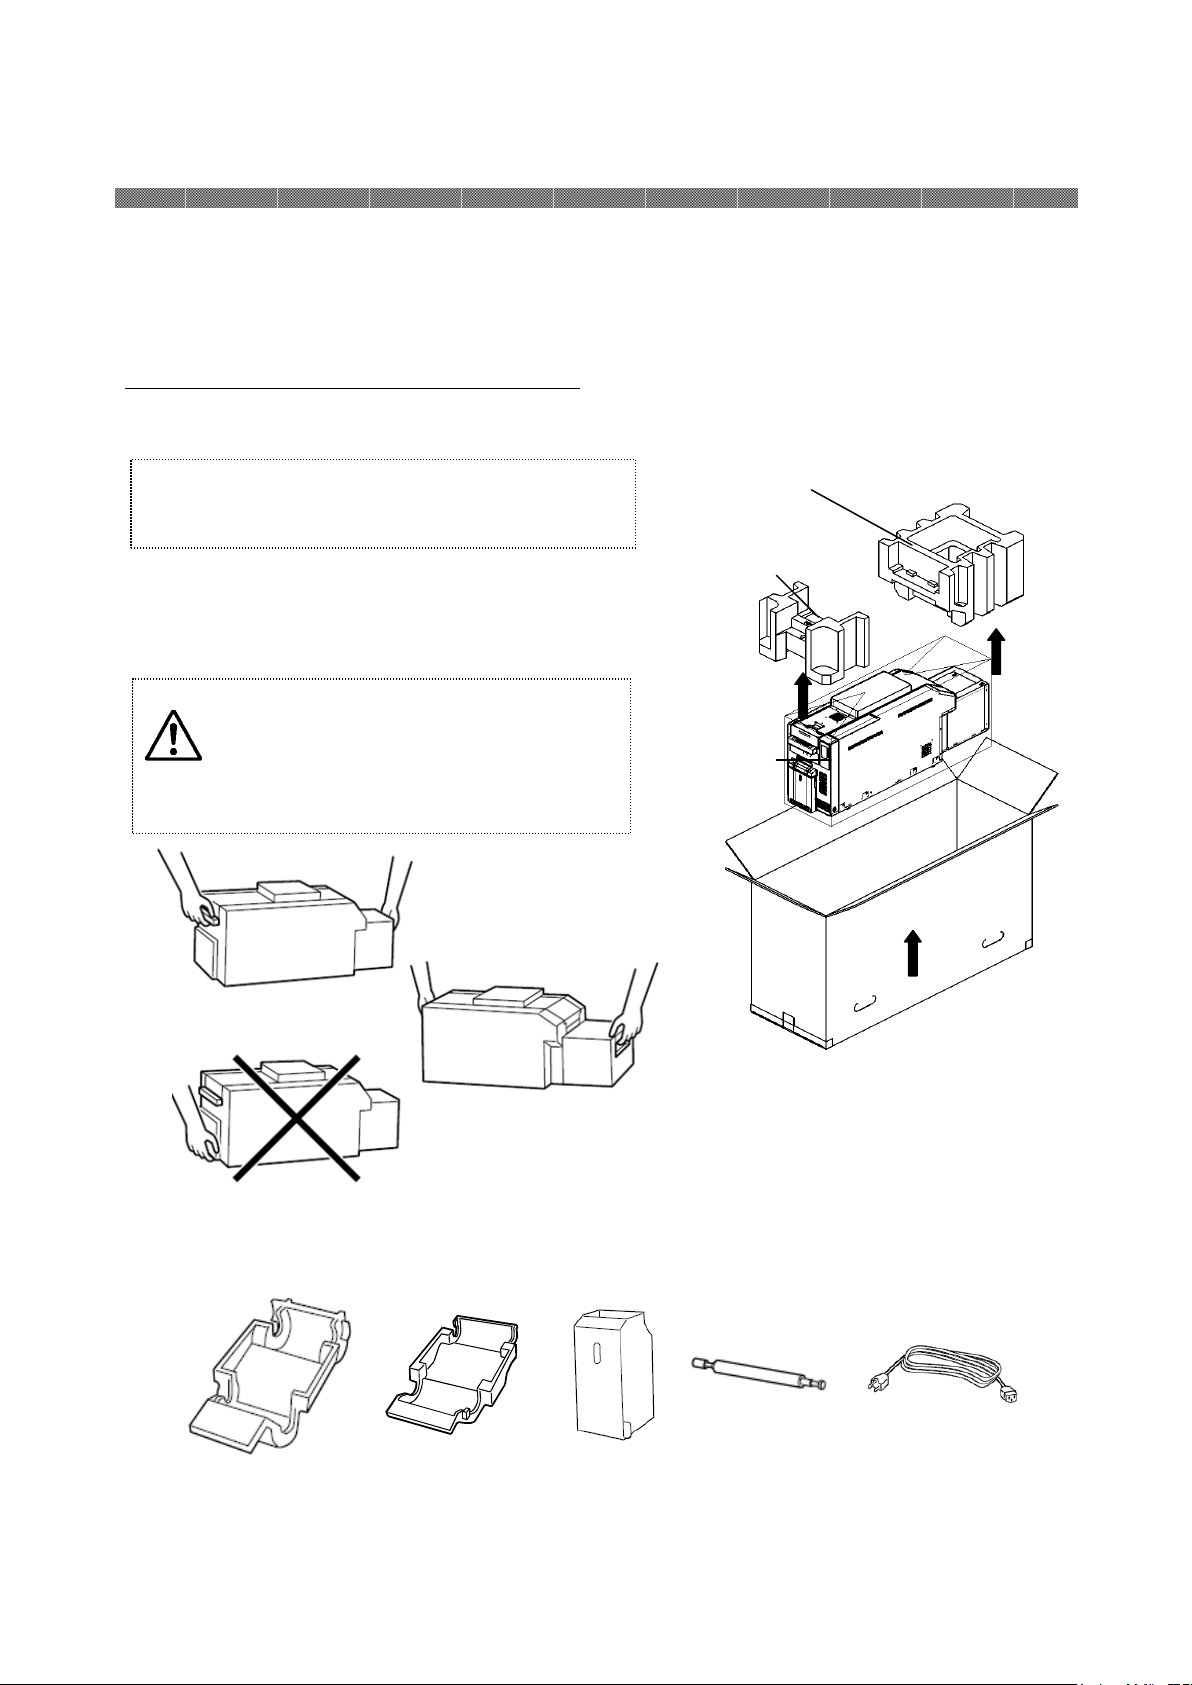
3. Take out the accessories from the accessory box and check the contents.
Attention:
Keep the packaging materials.
The
necessary when movin
g or
Caution:
This printer weighs about
20Kg.
Printer
Accessories box
Cushion
Chapter 2. Installing and Set Up
This chapter explains the unpacking and set up of the printer.
Before proceeding to this chapter, please make sure to read Chapter 1. Important Safety
Instruction.
Unpacking and Checking the Accessories
1. Open the box and remove the box containing the accessories and protection materials.
2. Take out the printer by holding bottom of the pri
nter.
box and protection materials are
Please handle it carefully.
When lifting the printer, always hold
bottom of printer. Otherwise, the
printer may be damaged.
Rib b o n Cas s e t te
( C o l o r)
Rib b o n Cas s e t te
( S P )
Dust Box
Cleaning Roller Pow e r Cab l e
2-1
Page 8
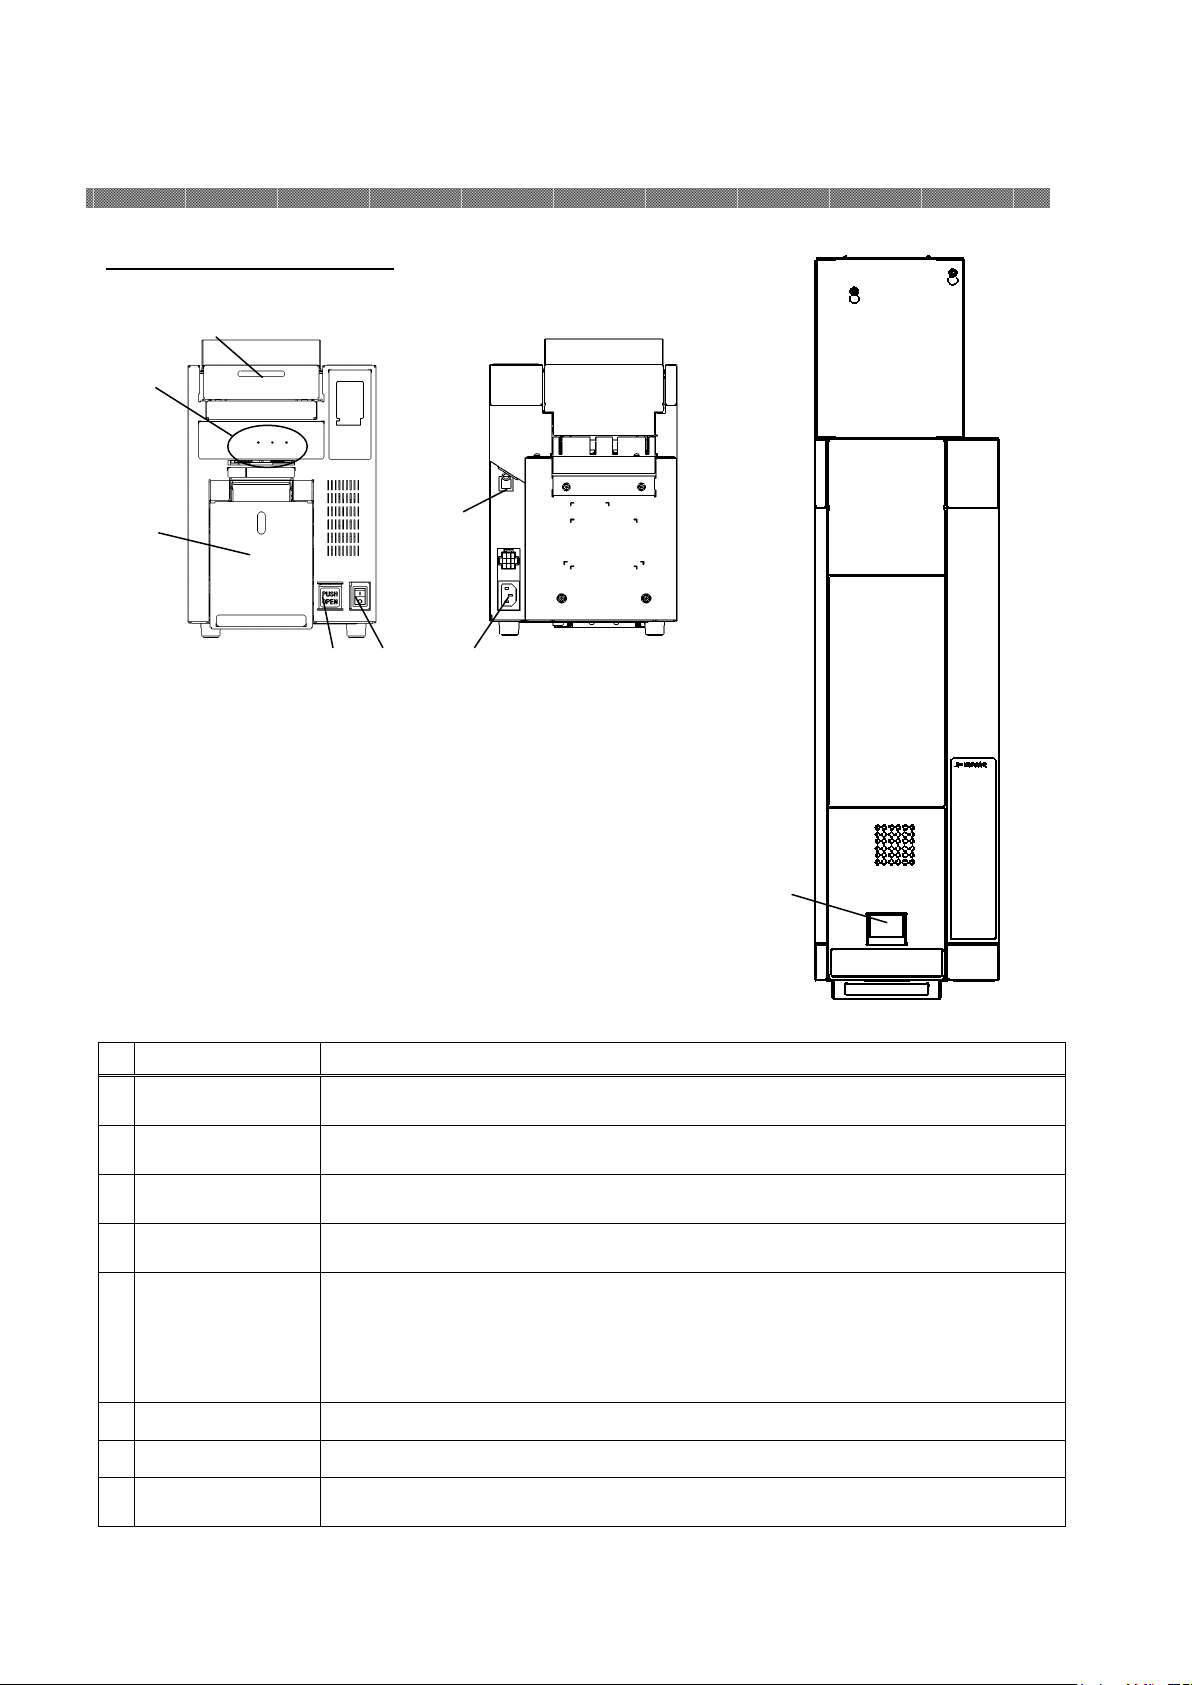
Printer Status
Open the
upper
unit when replacing an ink ribbon or
card
, or when
Open the ca rd se t unit when
card set
ting, or when performing
Card set unit
Upper Unit
Chapter 2. Installing and Set Up
Parts Name and Function
①
③
②
(
Front View
№
Name Function
⑦
④ ⑥ ⑤
) (
Rear View
)
⑧
(Upper View)
①
Indicator
②
Upper Un it
③
Card se t unit
④
open bu tton
⑤
Power Switch
⑥
Power Connector To be used to connect the power cable.
⑦
USB Connector To be used to connect the USB cable.
⑧
Open Lev er
Printer status display lamps are located on the panel.
performing maintenance.
maintenance.
When open the ca rd set unit, pu sh this button.
This switch turns on/off the power of the printer. When the “|” marked
side of the switch is pressed, the power is turned on.
When the “○” marked side of the switch is pressed, the power is turned off.
<Caution> Once the printer is turned off, wait at least 3 seconds before
When open the op en guide unit, hold this lever.
2-2
turning it on again.
Page 9
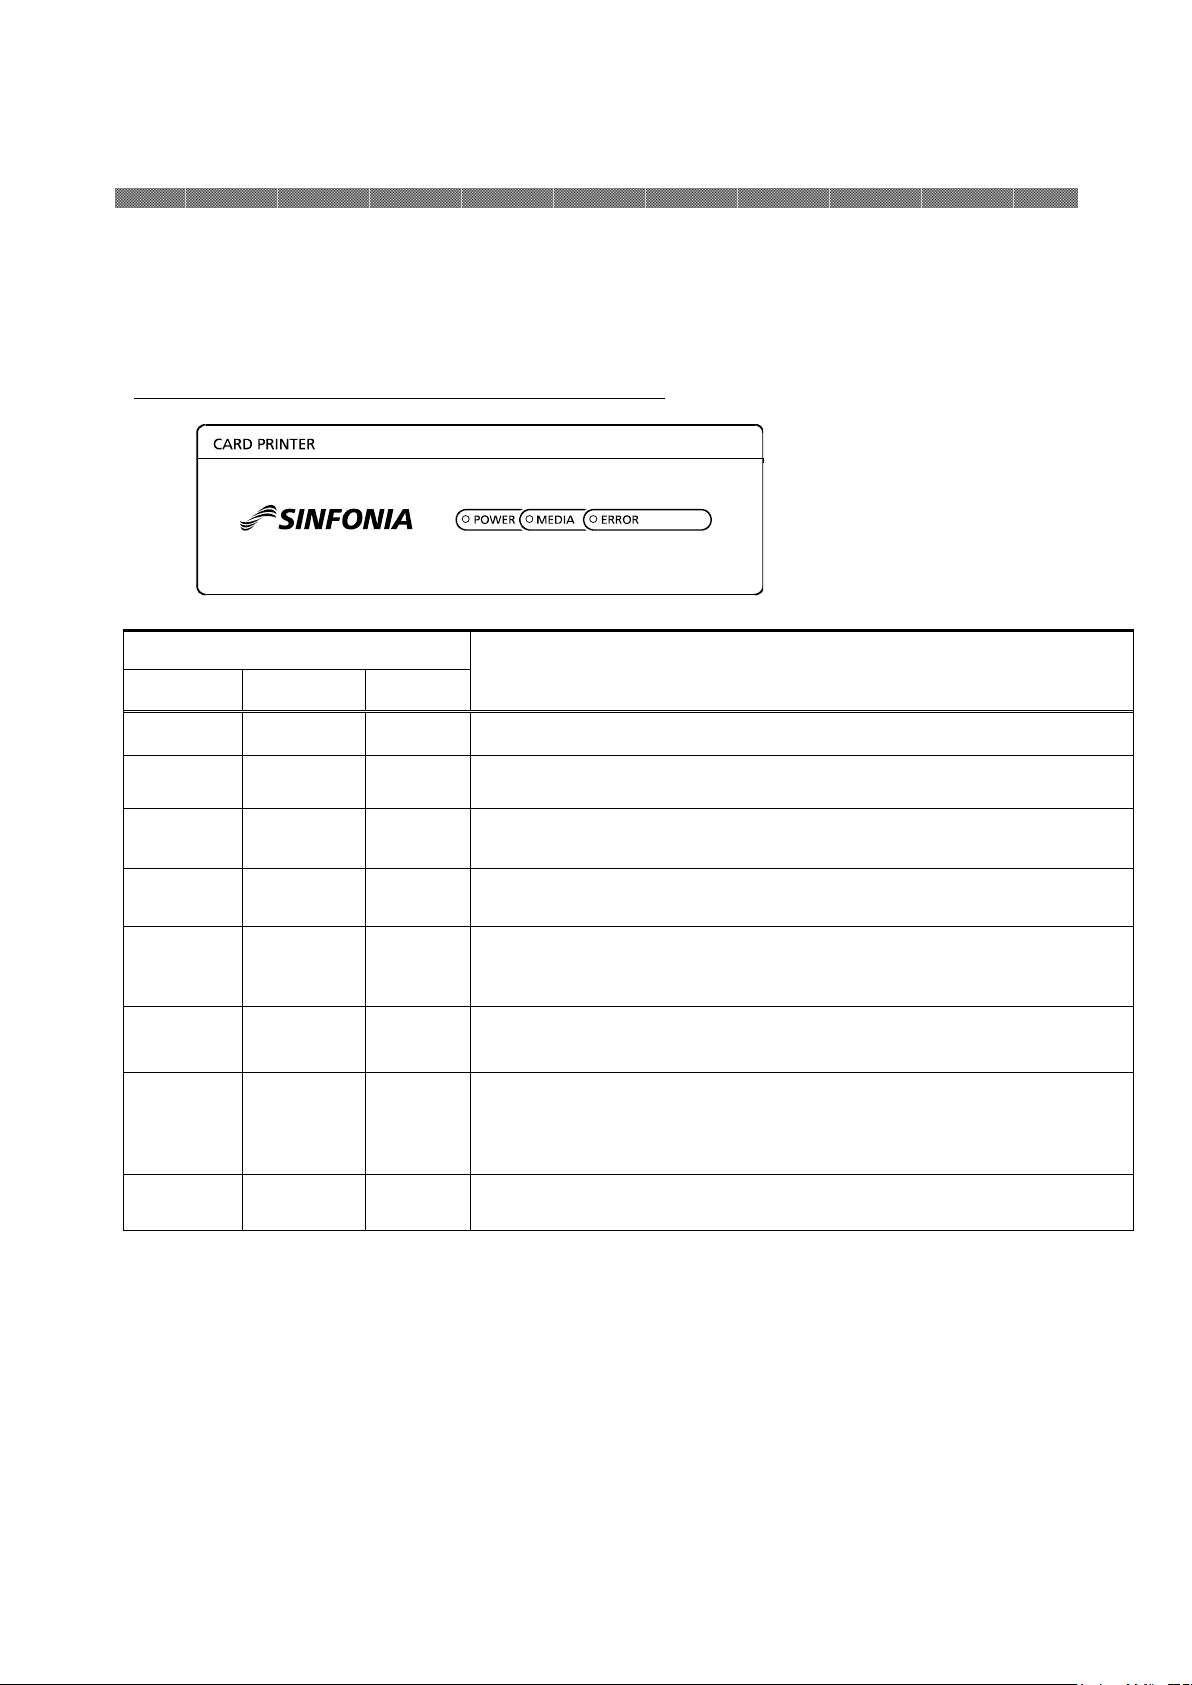
Card
is not set.
Chapter 2. Installing and Set Up
Printer Status Lamps Name and Printer Status
LED Display
POWER MEDIA ERROR
Description
○ ○ ○
* ○ ○
● ○ ○
● ○ *
● ○ ●
● * ●
● ● ●
● * ○
Printer status lamp display ●:on, ○:off, *:flashing
The power of printer is off.
The printer is initializing after turn on the power
Thermal head is cooled/heated on printing.
The printer is ready to make prints.
The card set unit or upper unit are opened.
Card jammed in printer.
Mechanical part is faulty.
Trouble of printer control board.
The ink ribbon loaded is not supported.
Out of card.
The ink ribbon is not loaded.
The ink ribbon is empty.
The printer is initializing for the ink ribbon.
2-3
Page 10
Warning:
In case of not using the
Warning:
Make sure to turn off
Warning:
Make sure to insert the
problem.
Warning:
Do not insert or remove
Warning:
Do not make any
th
e fire and electric shock.
Warning:
Avoid “piled up”
Warning:
When moving the
Attention:
To remove the USB cable,
Chapter 2. Installing and Set Up
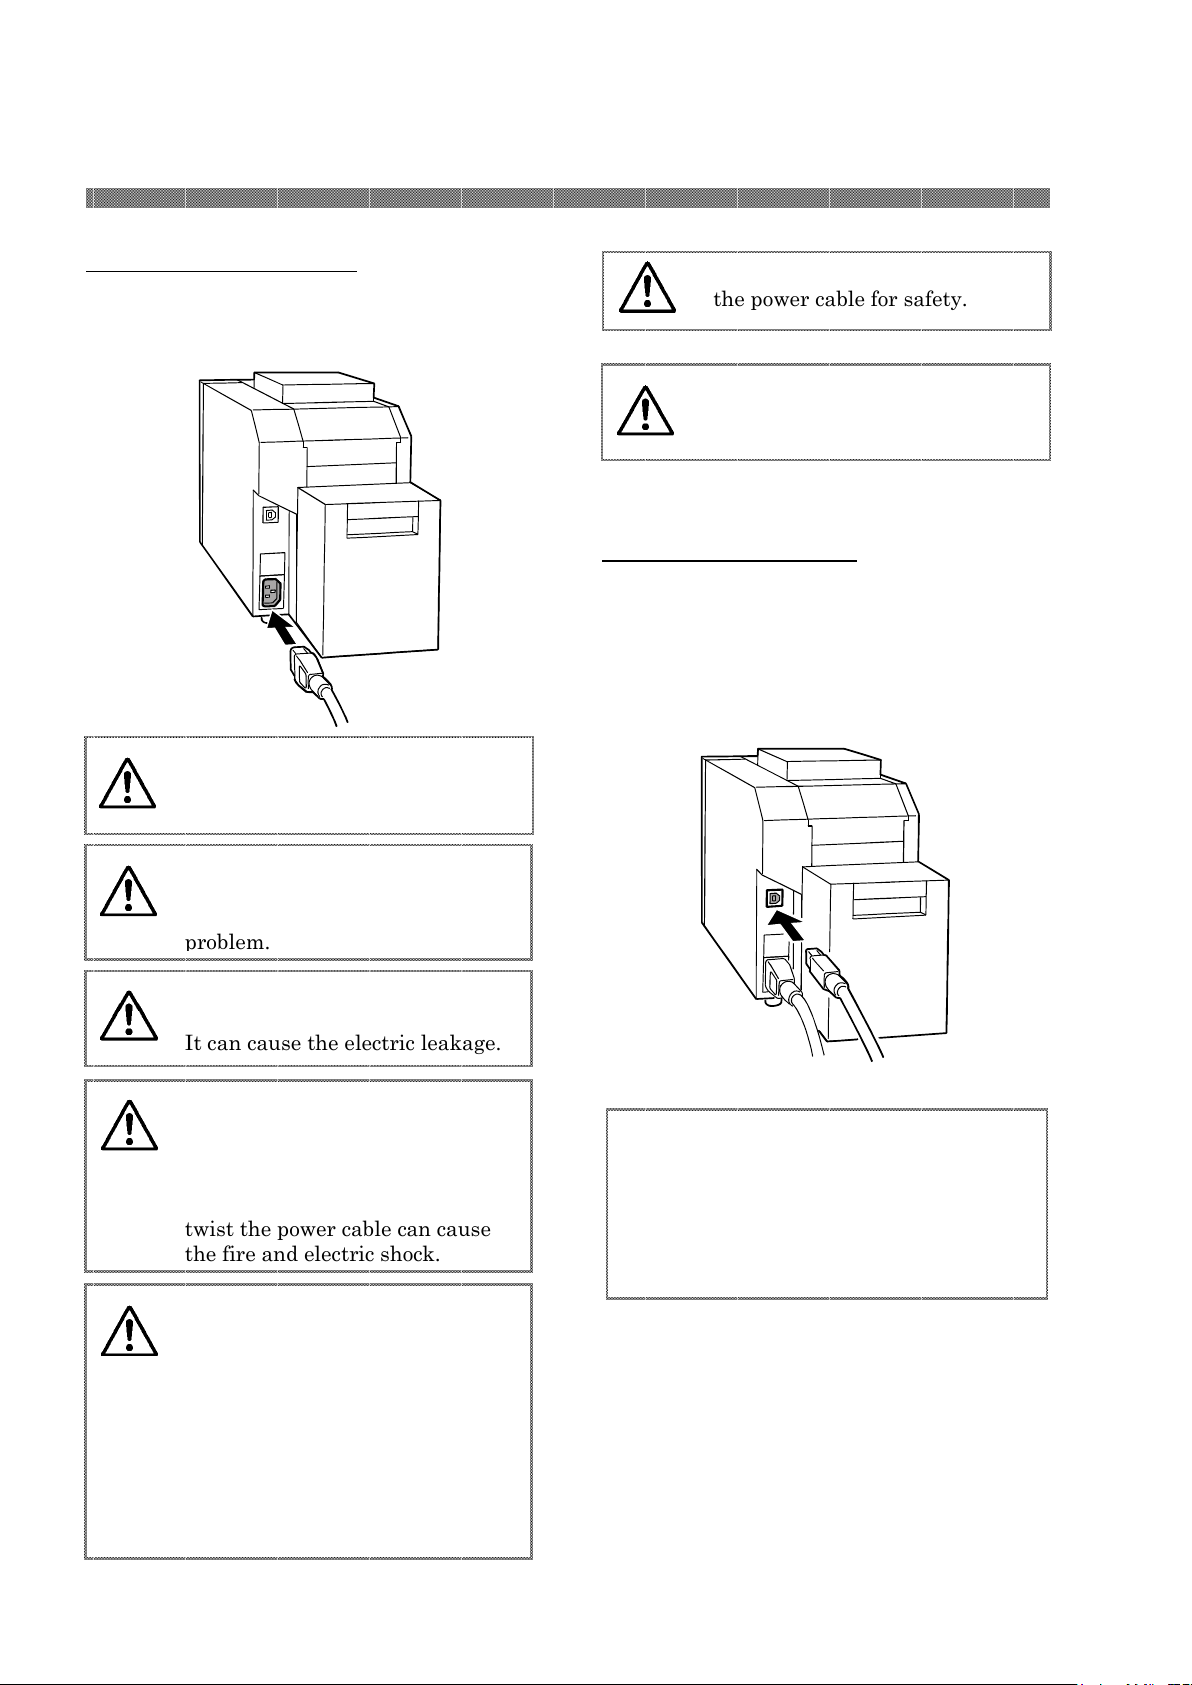
Connecting Power Cable
Insert the power cable attached to the printer
into the power connector located on the rear of
the printer.
the power of the printer before
inserting the power cable.
power cable correctly. If not, it
can cause the fire or the printer
the power cable with wet hands.
It can cause the electric leakage.
damage or any modification to
the power cable. Put the heavy
items on the power cable, give a
strong pull to the power cable and
twist the power cable can cause
printer, make sure to turn off the
power of the printer, remove the
power cable in order to have no
connection with other devices.
Otherwise, the power cable might
be damaged and it can cause the
fire and electric shock.
Also there is a possibility to fall
down caught by the cable.
Connecting USB Cable
Connect the USB cable from the personal
computer to the USB connector located on
the left rear side of the printer.
Be sure to insert the USB cable all the way.
make sure that the printer is in the
waiting status.
Removing the USB cable during data
transfer may not be able to print data
correctly.
the power cable for safety.
connection. It can cause the fire
and electric shock.
2-4
Page 11
Little
Large
Left
Right
Chapter 2. Installing and Set Up
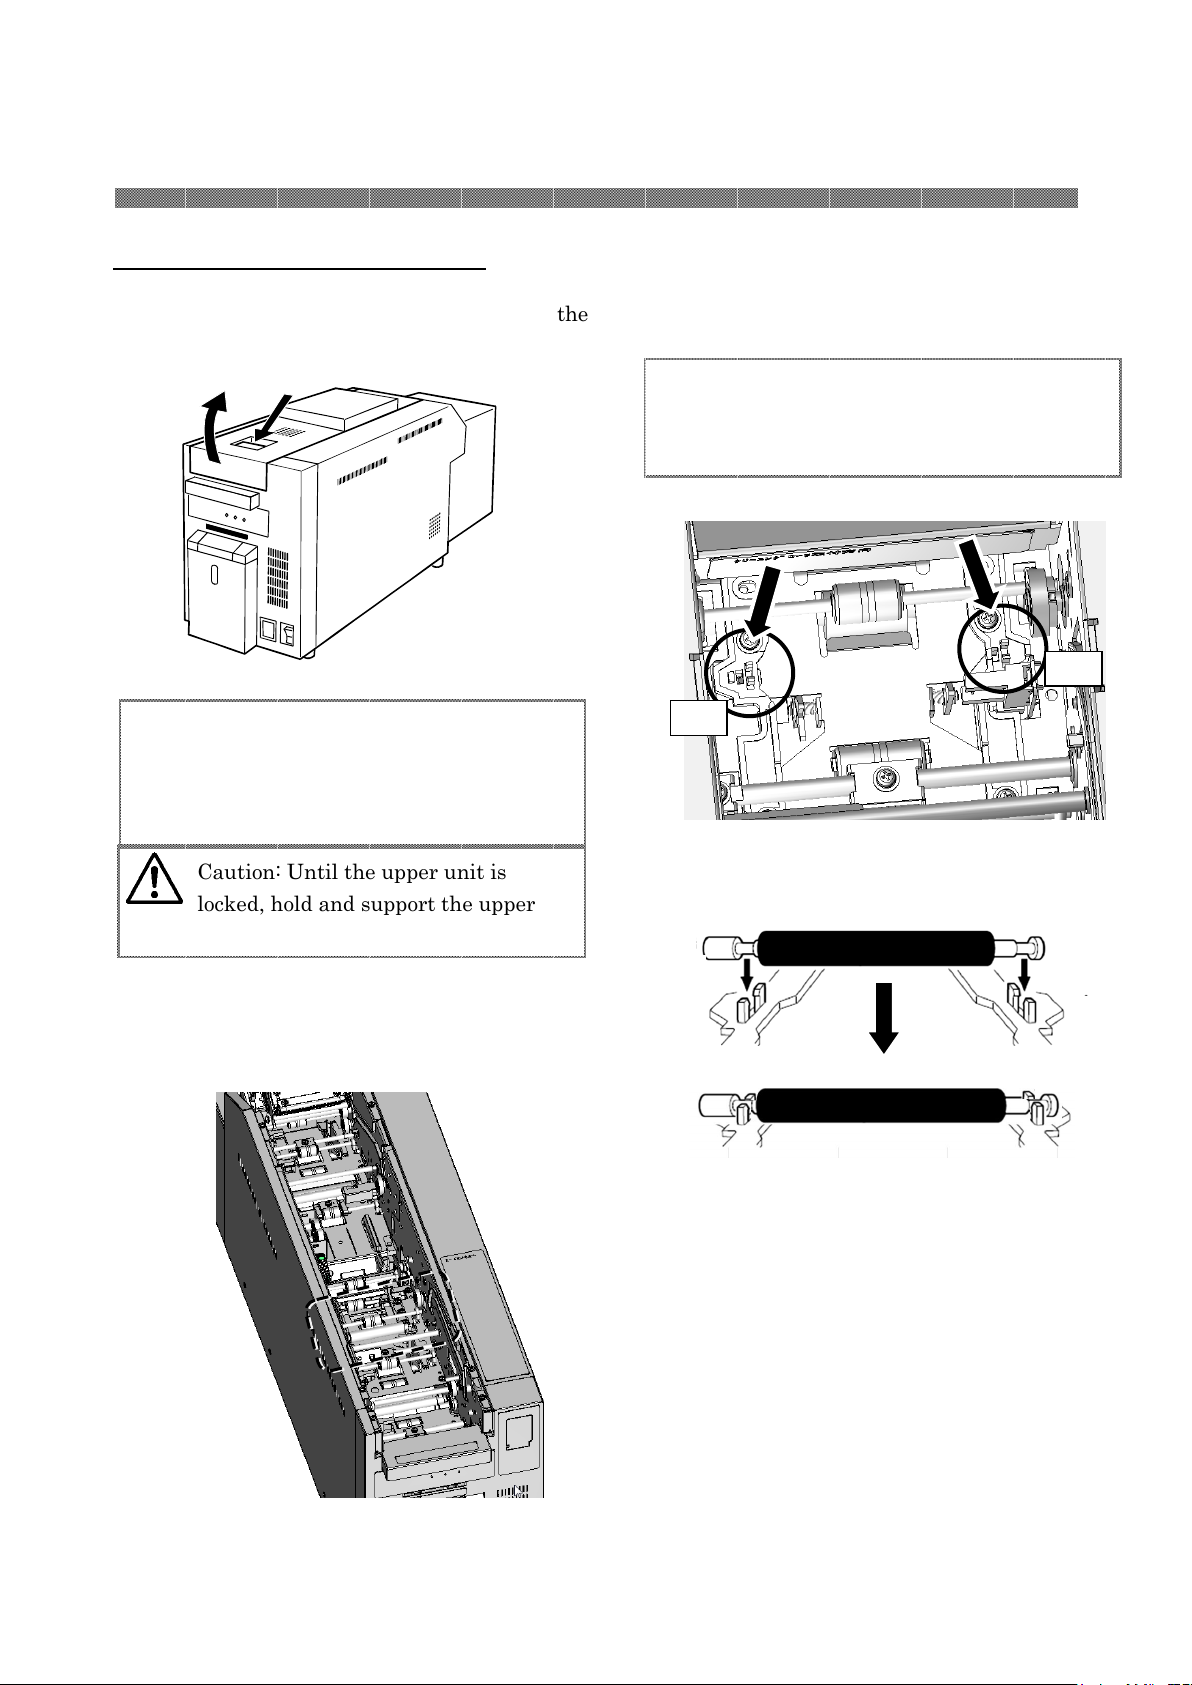
Attaching the cleaning roller.
1. Pull the upper unit open lever, and open the
upper unit.
When opening the upper unit, slowly move
it upward with pulling the upper unit open
lever. And until the upper unit is locked,
hold and support the upper unit by hand.
Caution: Until the upper unit is
locked, hold and support the upper
unit by hand.
2. Place the cleaning roller to the printer.
Push the cleaning roller to the place shown
in the following figure. (Push the cleaning
roller until you hear an audible ‘click’.)
( Direc tion of the clean ing rol ler)
Tip
3.
Close the upper unit.
RRRR
LLLL
Tip
2-5
Page 12
White
Blue
B
lue
Chapter 2. Installing and Set Up
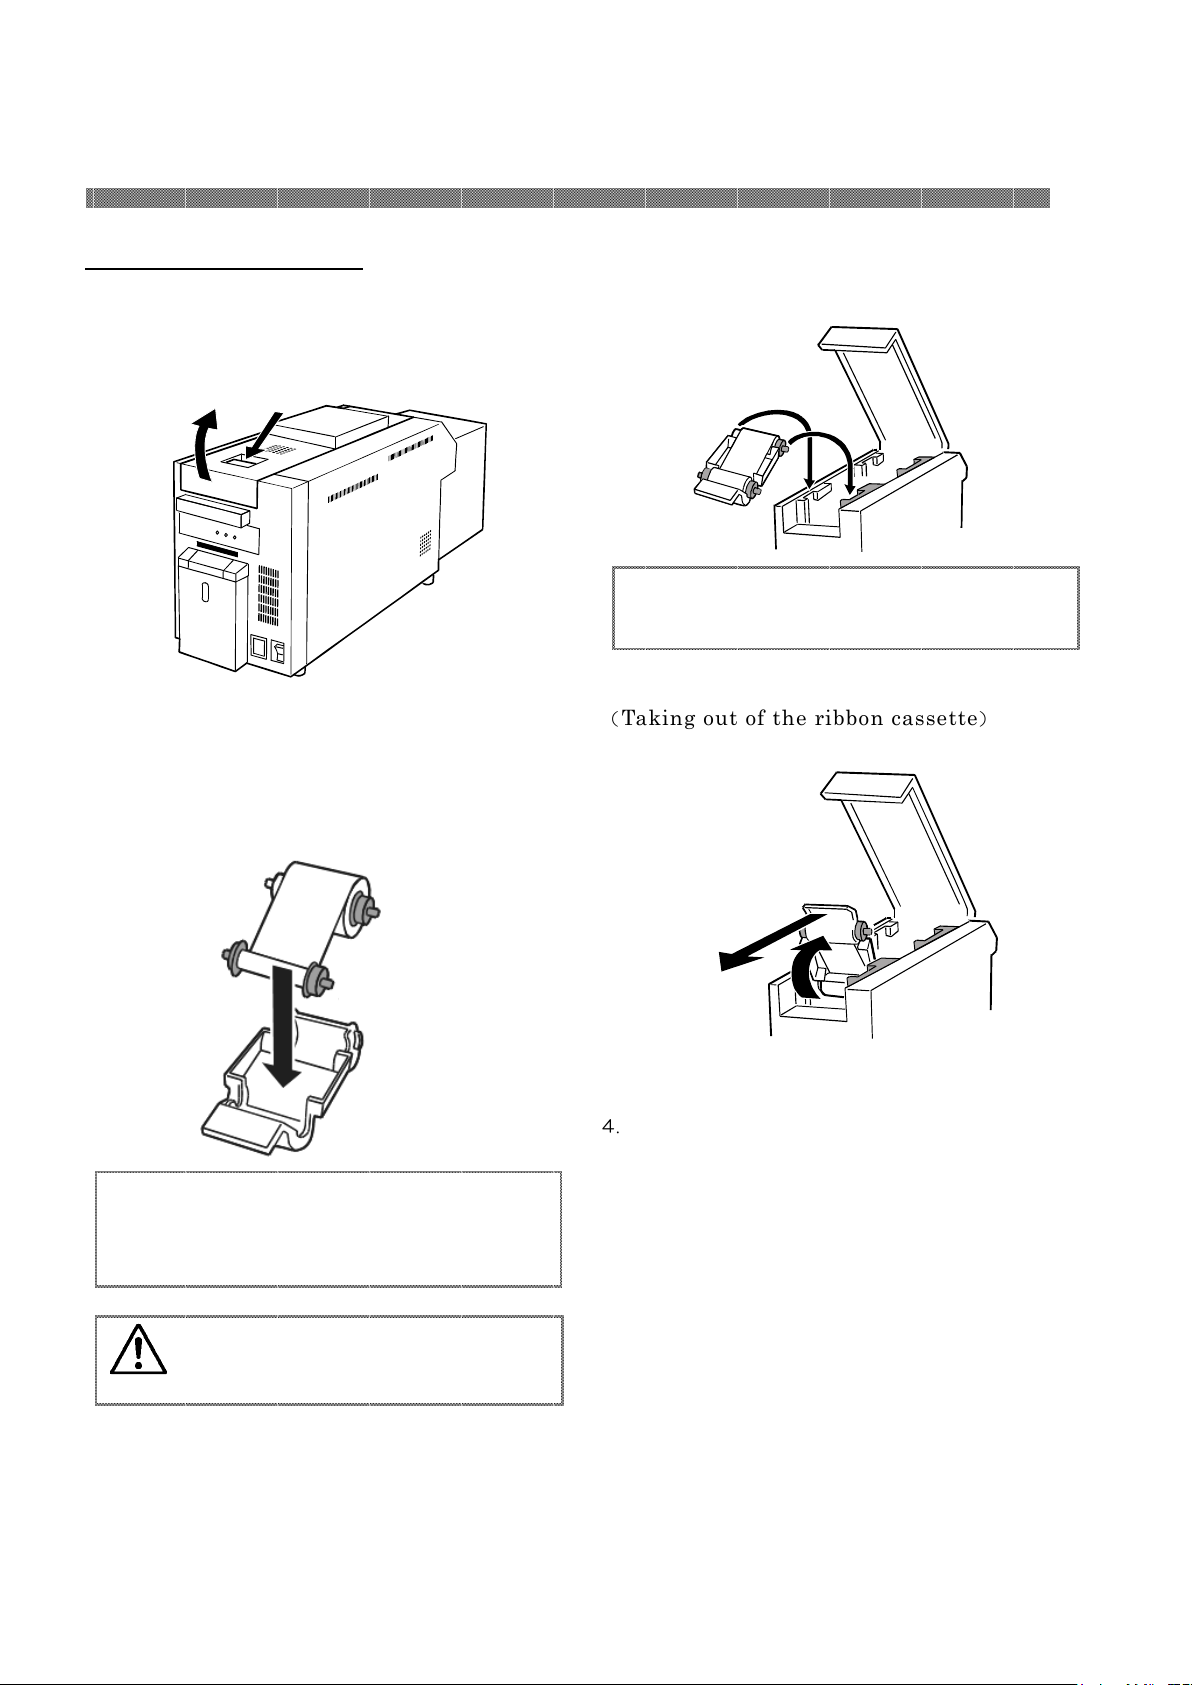
Setting Color Ink Ribbon
1. Pull the upper unit open lever, and open
the upper unit.
2.
Place the ink ribbon to the ribbon
cassette.
Blue
Insert the ribbon into the ribbon cassette
until it clicks into position.
Caution: Be careful not to get any
dust, etc. on the ink ribbon.
2-6
3.
Place the ribbon cassette to the printer.
If there is any slack in the ink ribbon,
remove it before setting.
(
Taking out of the ribbon cassette
4.
Close the upper unit.
)
Page 13
before setting.
U
sed part
Unused part
White
Blue
Blue
Blue
Chapter 2. Installing and Set Up
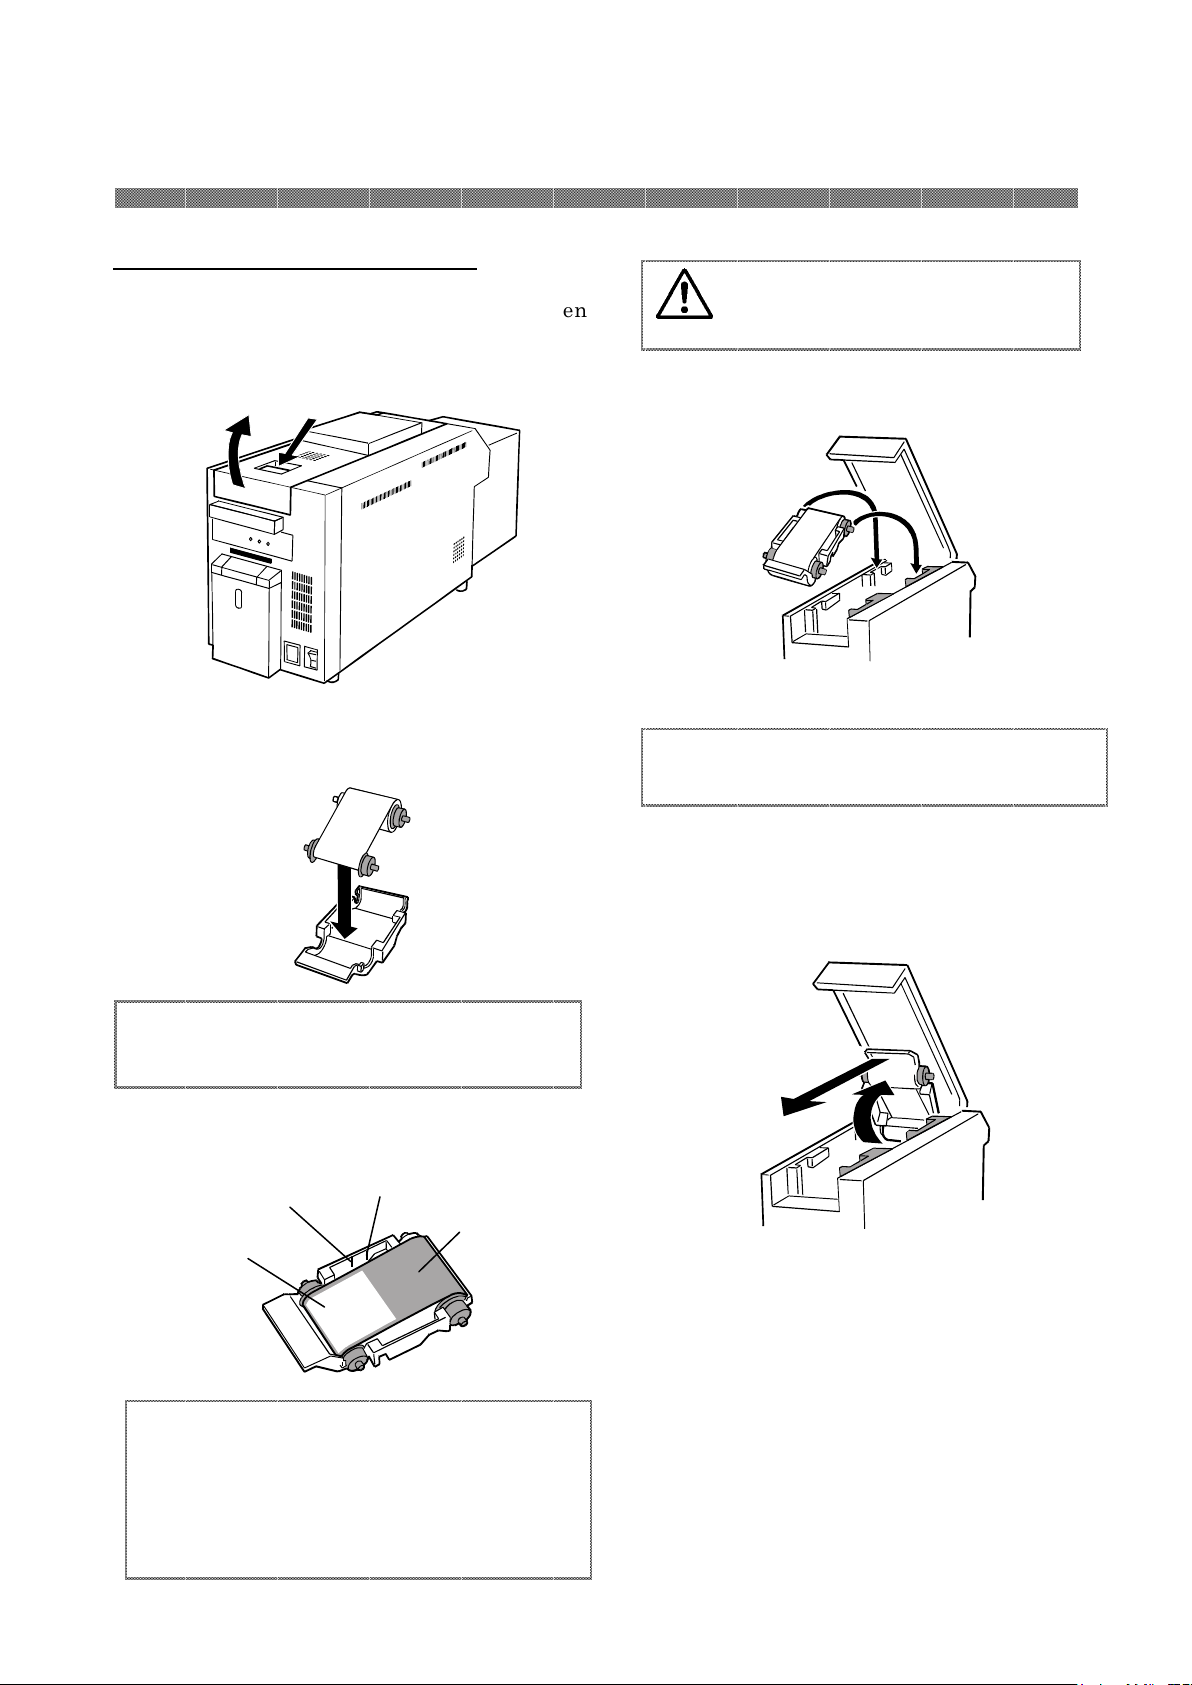
Setting Special Color Ink Ribbon
1. Pull the upper unit open lever, and open
the upper unit.
2. Place the ink ribbon to the ribbon
cassette.
Insert the ribbon into the ribbon cassette
until it clicks into position.
Mark①
Mark②
When resetting the used ink ribbon used on
the way, please set it in accordance with
boundary of the used and unused part in
accordance with “Mark①,②” of the ribbon
cassette.
3. Place the ribbon cassette to the printer.
If there is any slack in the ribbon, remove it
(
Taking out of the ribbon cassette
4. Close the upper unit.
Caution: Be careful not to get any
dust, etc. on the ink ribbon.
)
2-7
Page 14
Loading
direction of
the
card
film.
Chapter 2. Installing and Set Up
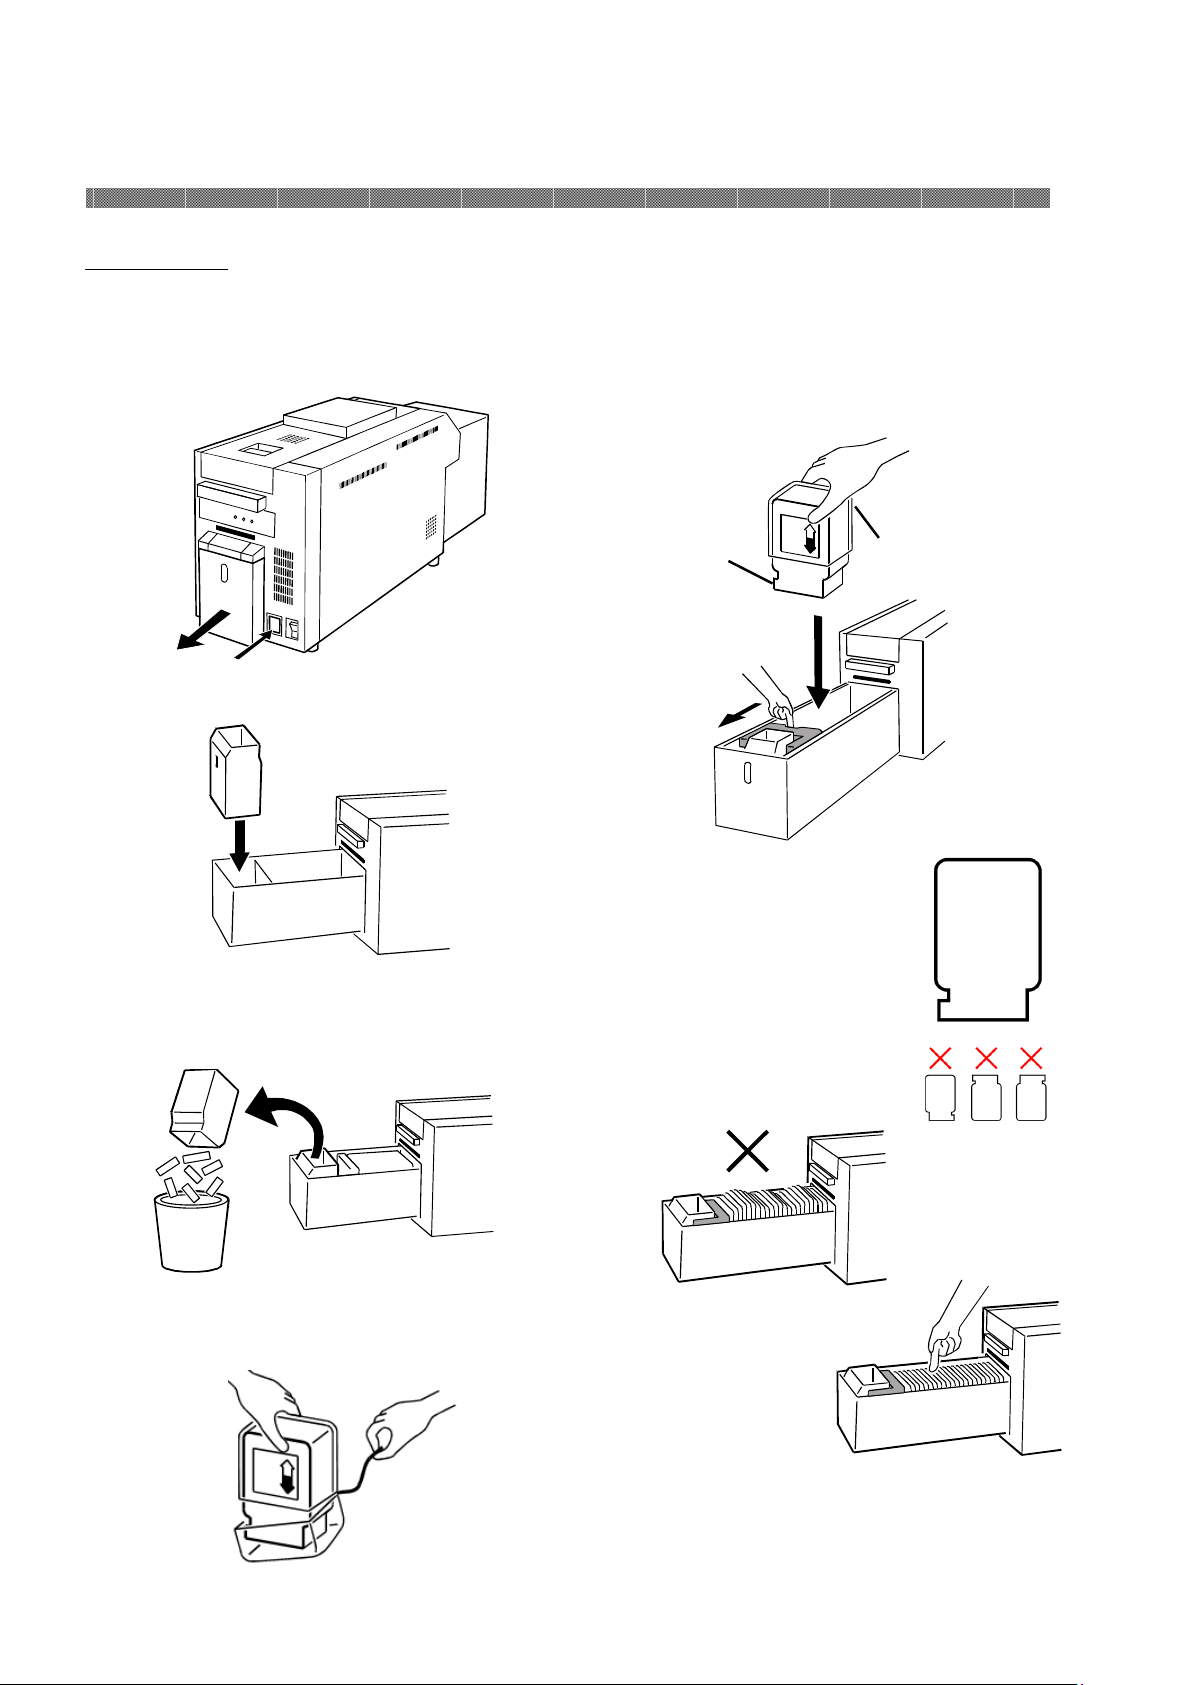
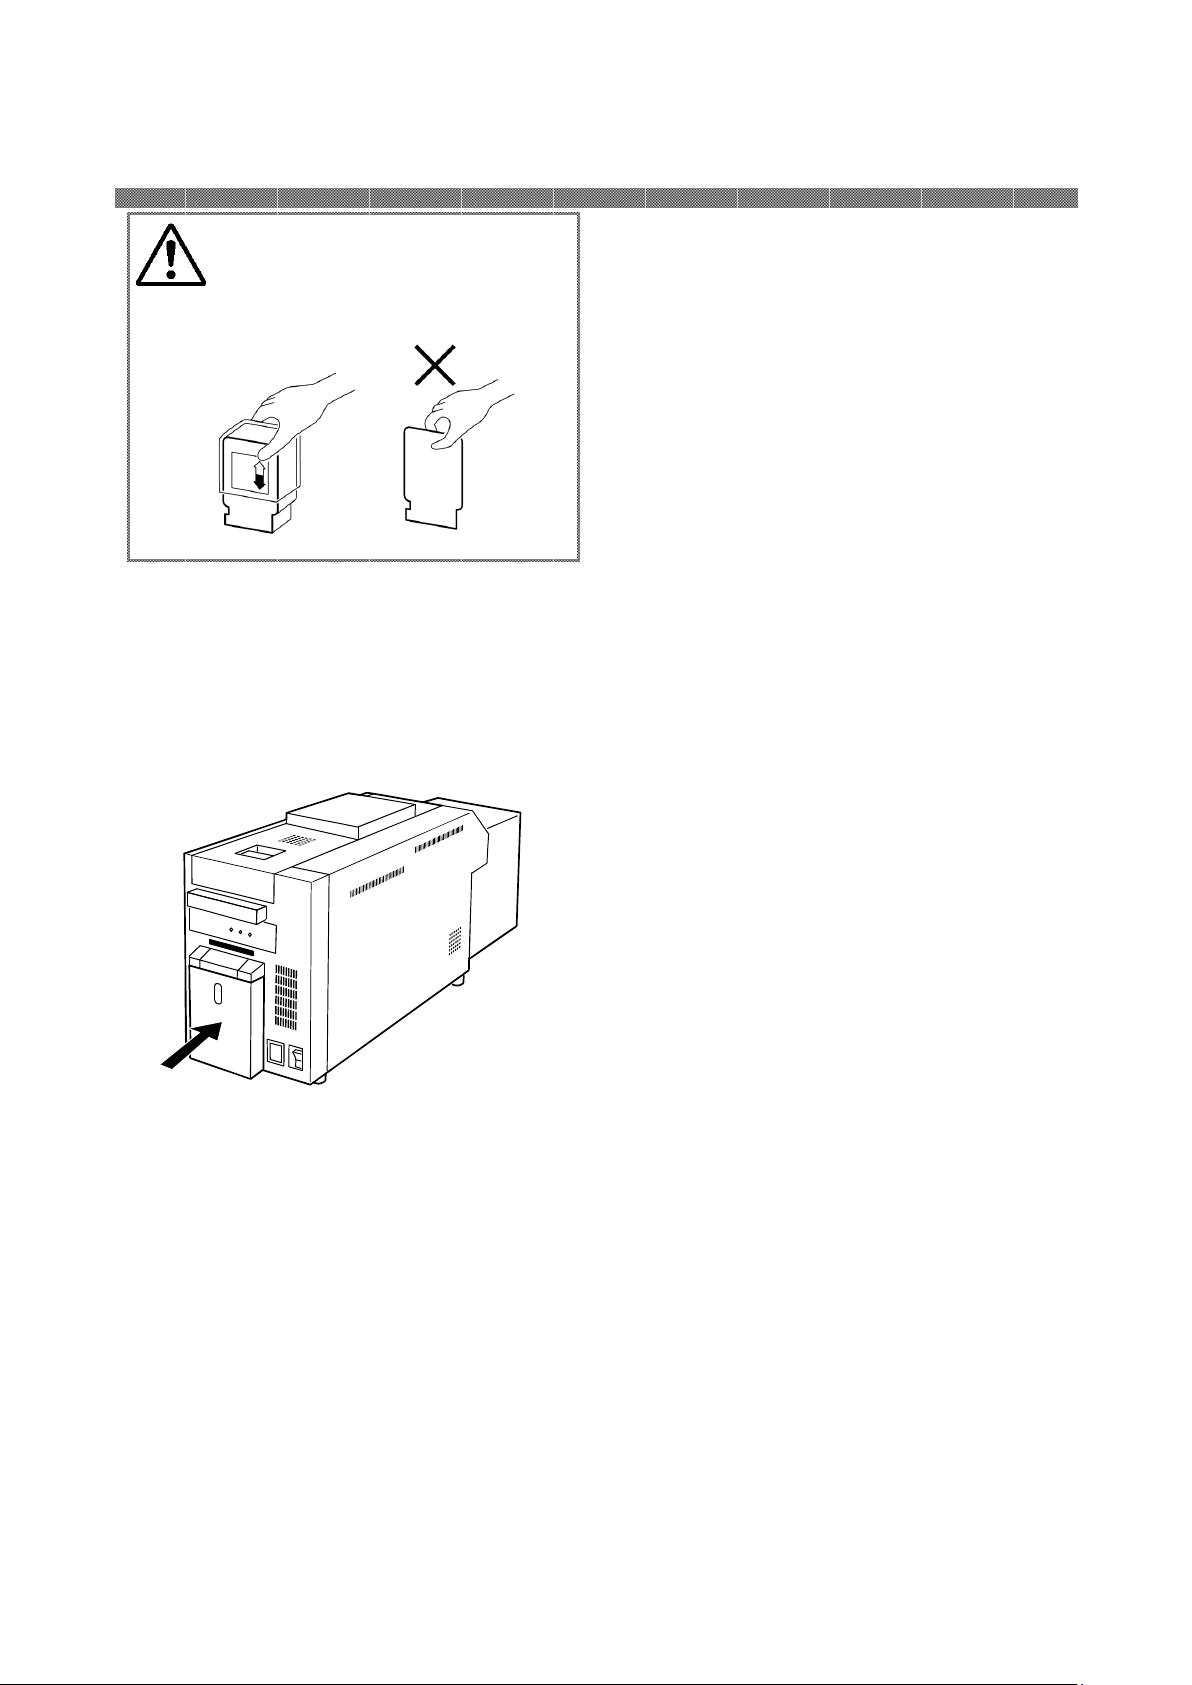
Setting Card
1. Push the card set unit open button, and
draw out the card set unit.
2. Place the dust box to the card set unit.
Empty the dust box if there is any trim in it.
3. Remove only the underside of the card
packing film.
2-8
4. While pulling the card guide (blue lever),
turn the printing surface on the front
side and place it in the printer. And
remove the upper side of the packing
film.
Put the card in
the far side of
the blue lever.
Convex
portion is
the lower
left.
Place the card in
the printer. And
remove the upper
side of packing
Please arrange
the card height
in order flatly.
Page 15
Chapter 2. Installing and Set Up
5. Close the card set unit.
Caution: Do not touch the printing
surface (white side) by finger. Be
careful not to get any dust,,,, etc. on
the card.
2-9
Page 16

Chapter 2. Installing and Set Up
Transporting the Printer
The following cautions are necessary in
transportation of the printer.
Since an incorrect transportation method causes
a printer fault, follow the correct method.
1. Remove the ink ribbon and card from the
printer before transporting the printer.
If the ink ribbon or card cannot be removed
due to a fault, consult with the distributor.
2. Use a genuine box.
If the box used at the purchase cannot be
used, consult with your distributor and
purchase a new box.
Print
Follow the oper ation man ual of the PC o r
applica tion sof tware.
In addit ion, pl ease note that we do no t
guarante e for th e print result .
2-10
Page 17
Caution:
Make sure that the power is turned off before starting cleaning.
Chapter 3. Routine Maintenance
Thermal Head reaches high temperature just after printing. Do not touch directly
by hand. Make sure that the thermal head has been sufficiently cooled down before
starting cleaning.
When fingerprint stick to the heat element, it can damage the Thermal Head. Do
not touch directly by hand.
Be careful not to be hurt by the projections of the printer.
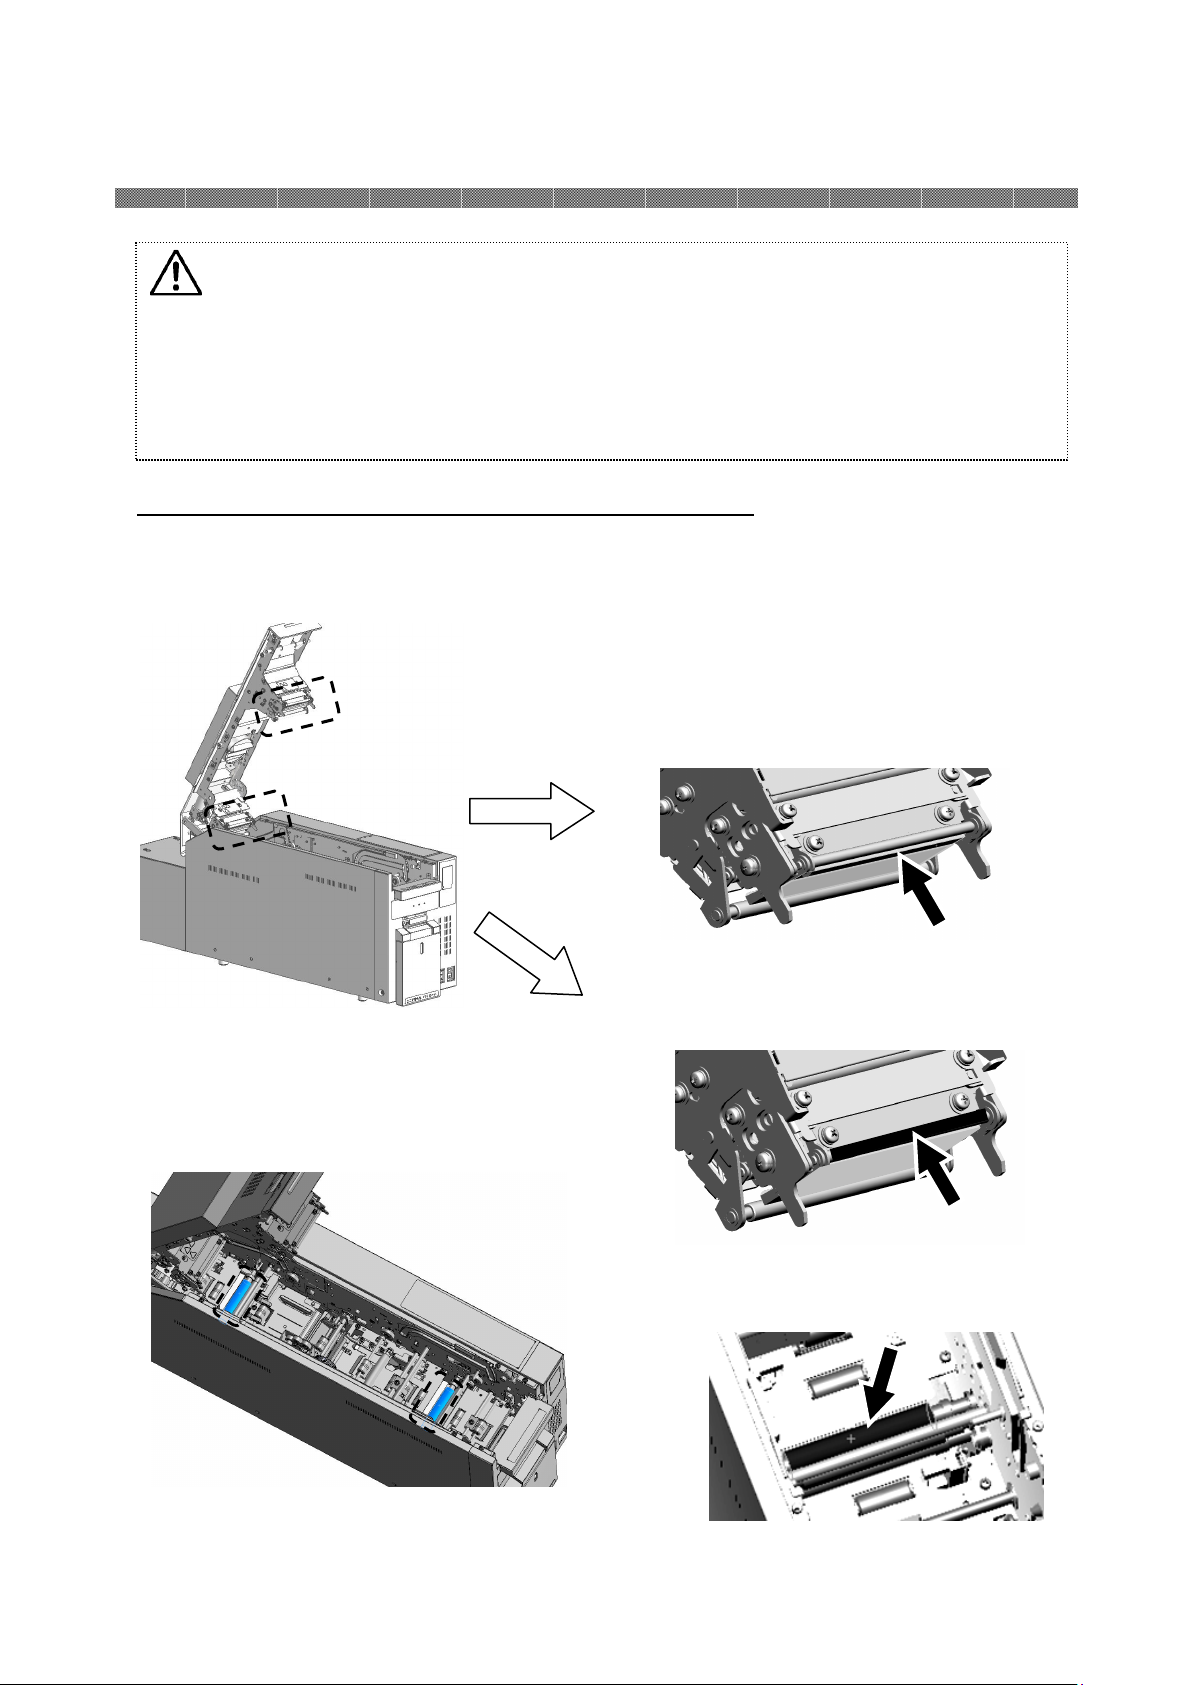
Cleaning of Thermal Head, Platen, and Cleaning Roller
By using thermal transfer technology, daily maintenance is not really necessary if the printer is
being use properly.
However, in order to keep the best print quality, it is recommended to do the cleaning of Thermal
Head, Platen, and Cleaning Roller once in a month.
1.Using gauze, clean the heat element (glass
bar) of the thermal head with isopropyl alcohol
or ethyl alcohol.
2. Using gauze dipped with isopropyl alcohol or
ethyl alcohol, clean the edge of the peeling
roller.
3. Using gauze dipped with isopropyl alcohol or
ethyl alcohol, clean the rubber section of the
platen roller.
3-1
Page 18
Attention:
Print
ing should be performed after the alcohol dried up completely (approx. 5
Chapter 3. Routine Maintenance
minutes)
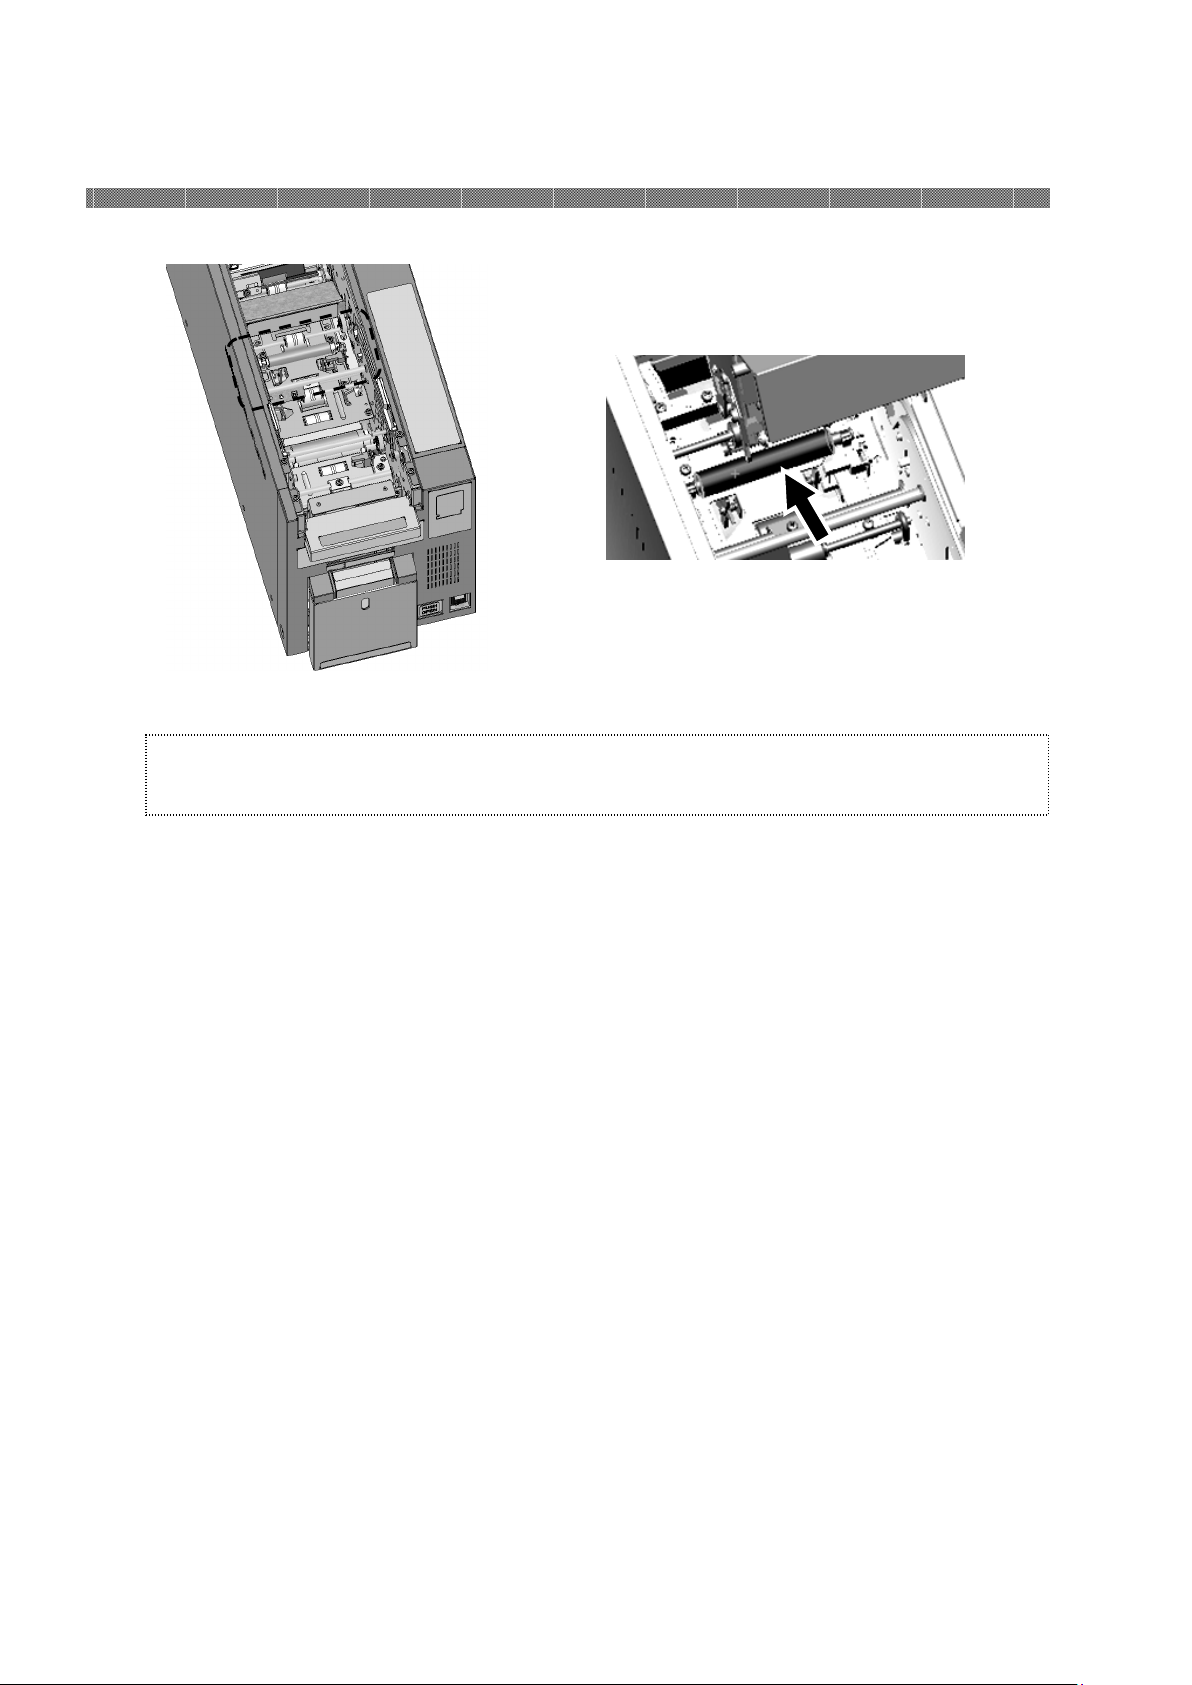
4. Using gauze dipped with isopropyl alcohol
or ethyl alcohol, clean the rubber section of the
cleaning roller
3-2
Page 19
Caution:
Do not use volatile solvents or spray insecticide on the printer outer
Warning:
Continuous use under the abnormal condition such as high
Warning:
In case, the foreign substance
get into the printer, turn off the power
the fire and electric shock.
Chapter 3. Routine Maintenance
Cleaning of Outer Cover
Wipe the printer outer cabinet with a soft cloth.
If the stains are not removed, wet the cloth and apply weakened neutral Detergent to it.
of printer, remove the power cable and contact the dealers or service
center. Continuous use of the printer under such condition can cause
temperature, smoke and strange smell can cause the fire and electric
shock. Turn off the power and make sure to remove the power cable,
then contact the dealers or service center.
cabinet. Otherwise, discoloration or crack may result.
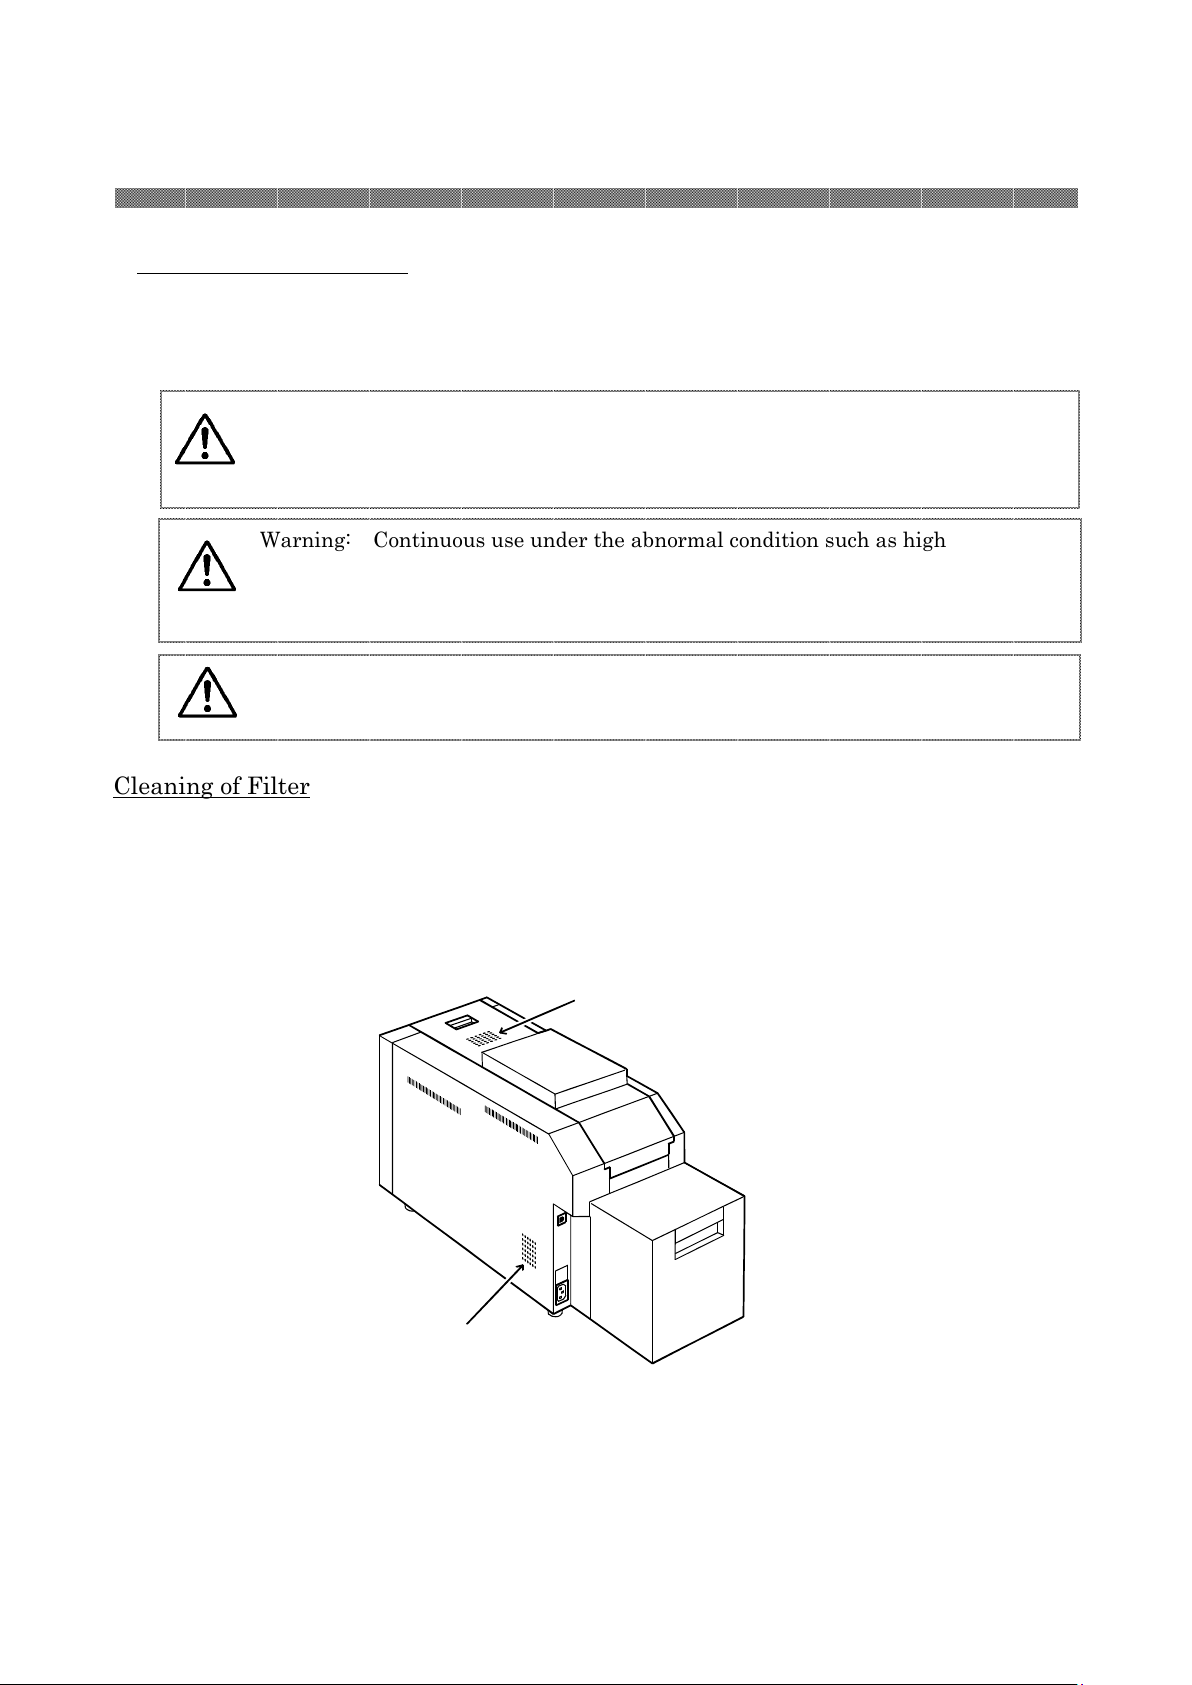
Cleaning of Filter
If the dust collects on the openings, clean it with vacuum cleaner
3-3
Page 20
Close the card set unit and
Remove the car
d. If card
Trouble of printer control
Ink ri
bbon or printer
The card is not set.
The ink ribbon is not
Chapter 4. Error Handling
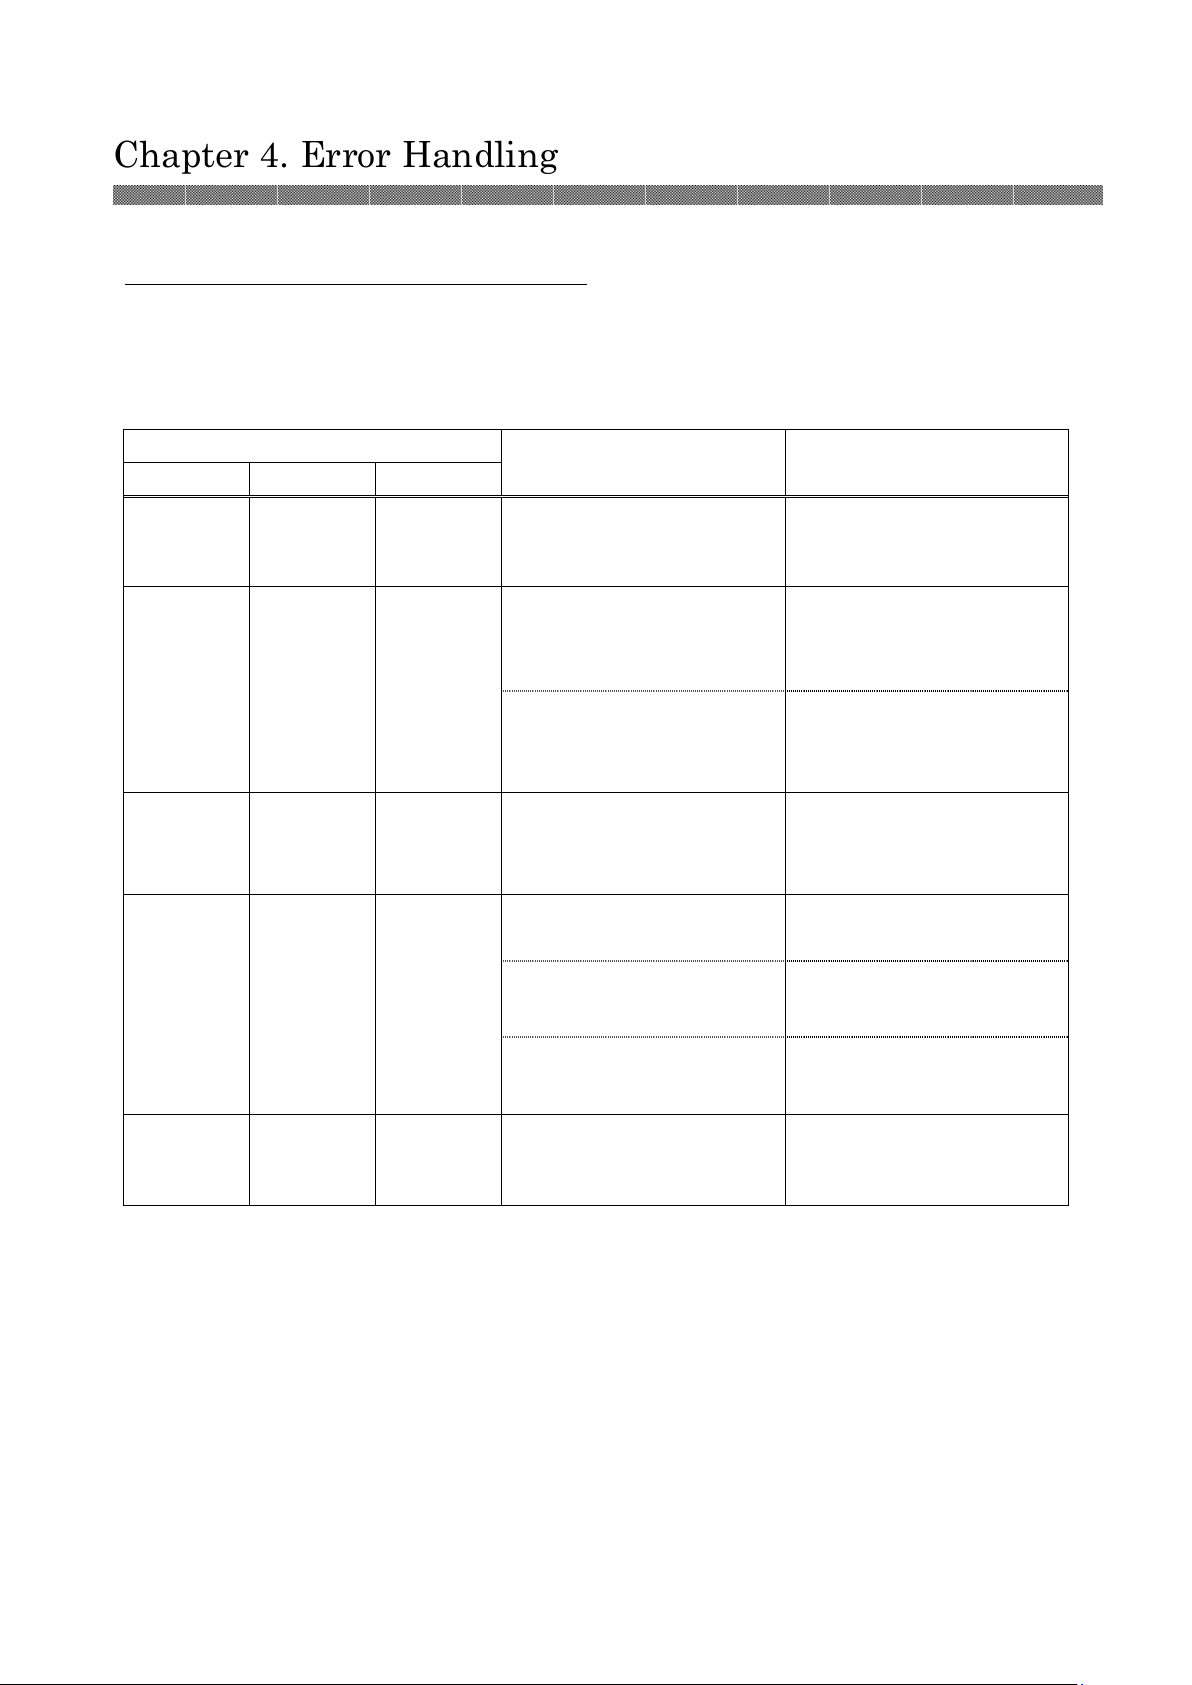
Printer Status lamps are displayed in red
When the error happens, the details of the error can be confirmed with the printer status lamps.
Printer Status Lamps and Card Setting Lamp display ●:on、○:off、*:flashing
/ : Indicates that irrespective lit
LED Display
POWER MEDIA ERROR
Status Corrective Action
● ○ *
● ○ ●
● * ●
● ● ●
The card set unit or the
upper unit are opened.
Card jam occurred.
board.
The printer mechanical
section is faulty.
The ink ribbon set is not
supported.
Trim box is full. Empty the trim box.
Card empty.
loaded.
Ribbon empty.
the upper unit.
jam occurs frequently,
consult with the service
center.。
If it occurs frequently,
consult with the service
center.
abnormality is assumed.
Consult with the Service
Department.
Set the card.
Set the ink ribbon.
Replace the ink ribbon.
● * ○
The ink ribbon is during
the initial setting.
Wait the initial setting of
the ink ribbon is complete.
4-1
Page 21
Chapter 4. Error Handling
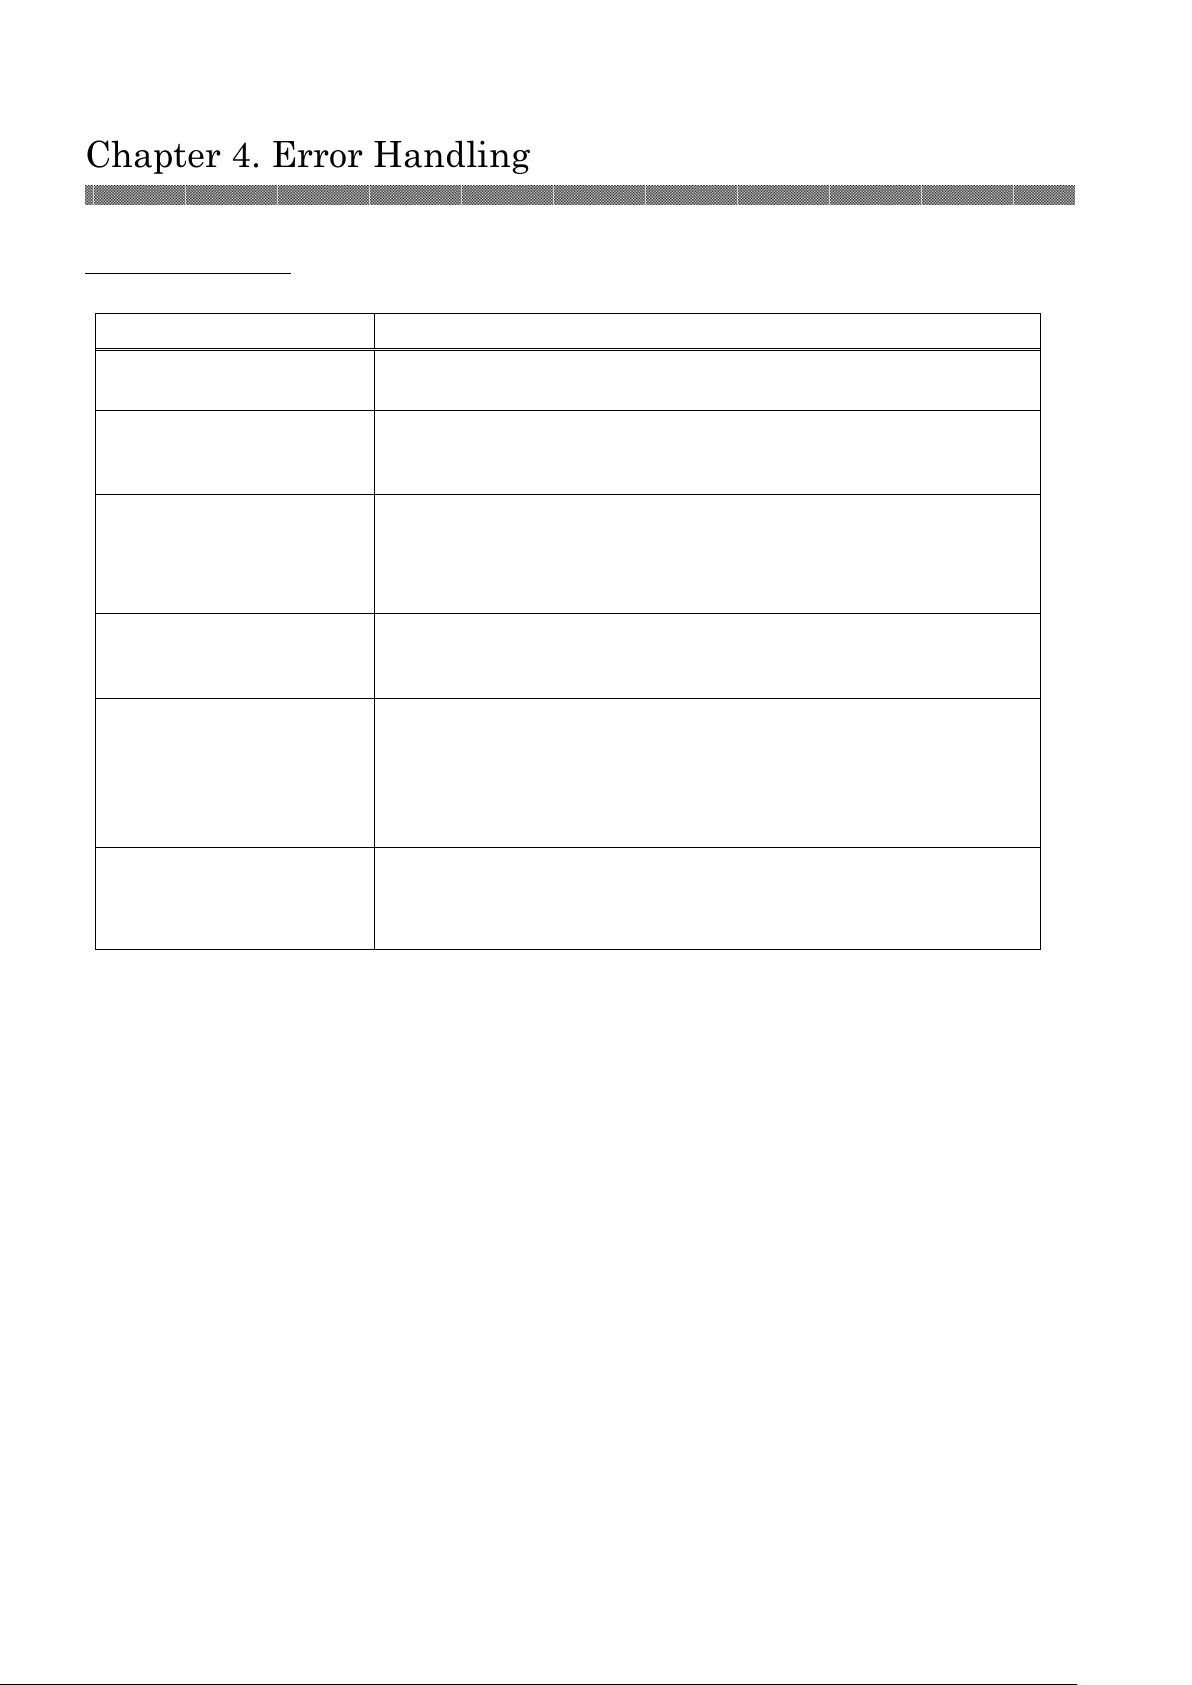
Failure Symptoms
When detecting a failure symptom, check the printer using the following table.
Symptom Action
Power is not turned on.
The personal computer
does not recognize the
printer.
The printer does not
become ready.
The card set unit does not
open.
A straight stripe area is
not printed.
Dotted areas are not
printed.
Check if the power cable is connected to the plug socket or the
printer.
Check if the USB cable is connected to the personal computer or
printer.
Check if the card set unit and the upper unit are closed.
Check if card is jammed in the printer.
When the card setting lamp is blinking, remove the edge of the
card until the card setting lamp goes off.
Check if the printer is installed in a flat location.
Check if any object is placed in front of the front cover.
The thermal head may be dirty. Clean the thermal head as
described in Chapter 3, "Routine Maintenance".
If the blank area remains after cleaning the thermal head, the
head may have been disconnected. Consult with the Service
Department.
The cleaning roller may be dirty. Clean the thermal head as
described in Chapter 3, "Routine Maintenance".
4-2
Page 22
Attention:
when the
same symptoms
occur
Knob
Card
Chapter 4. Error Handling
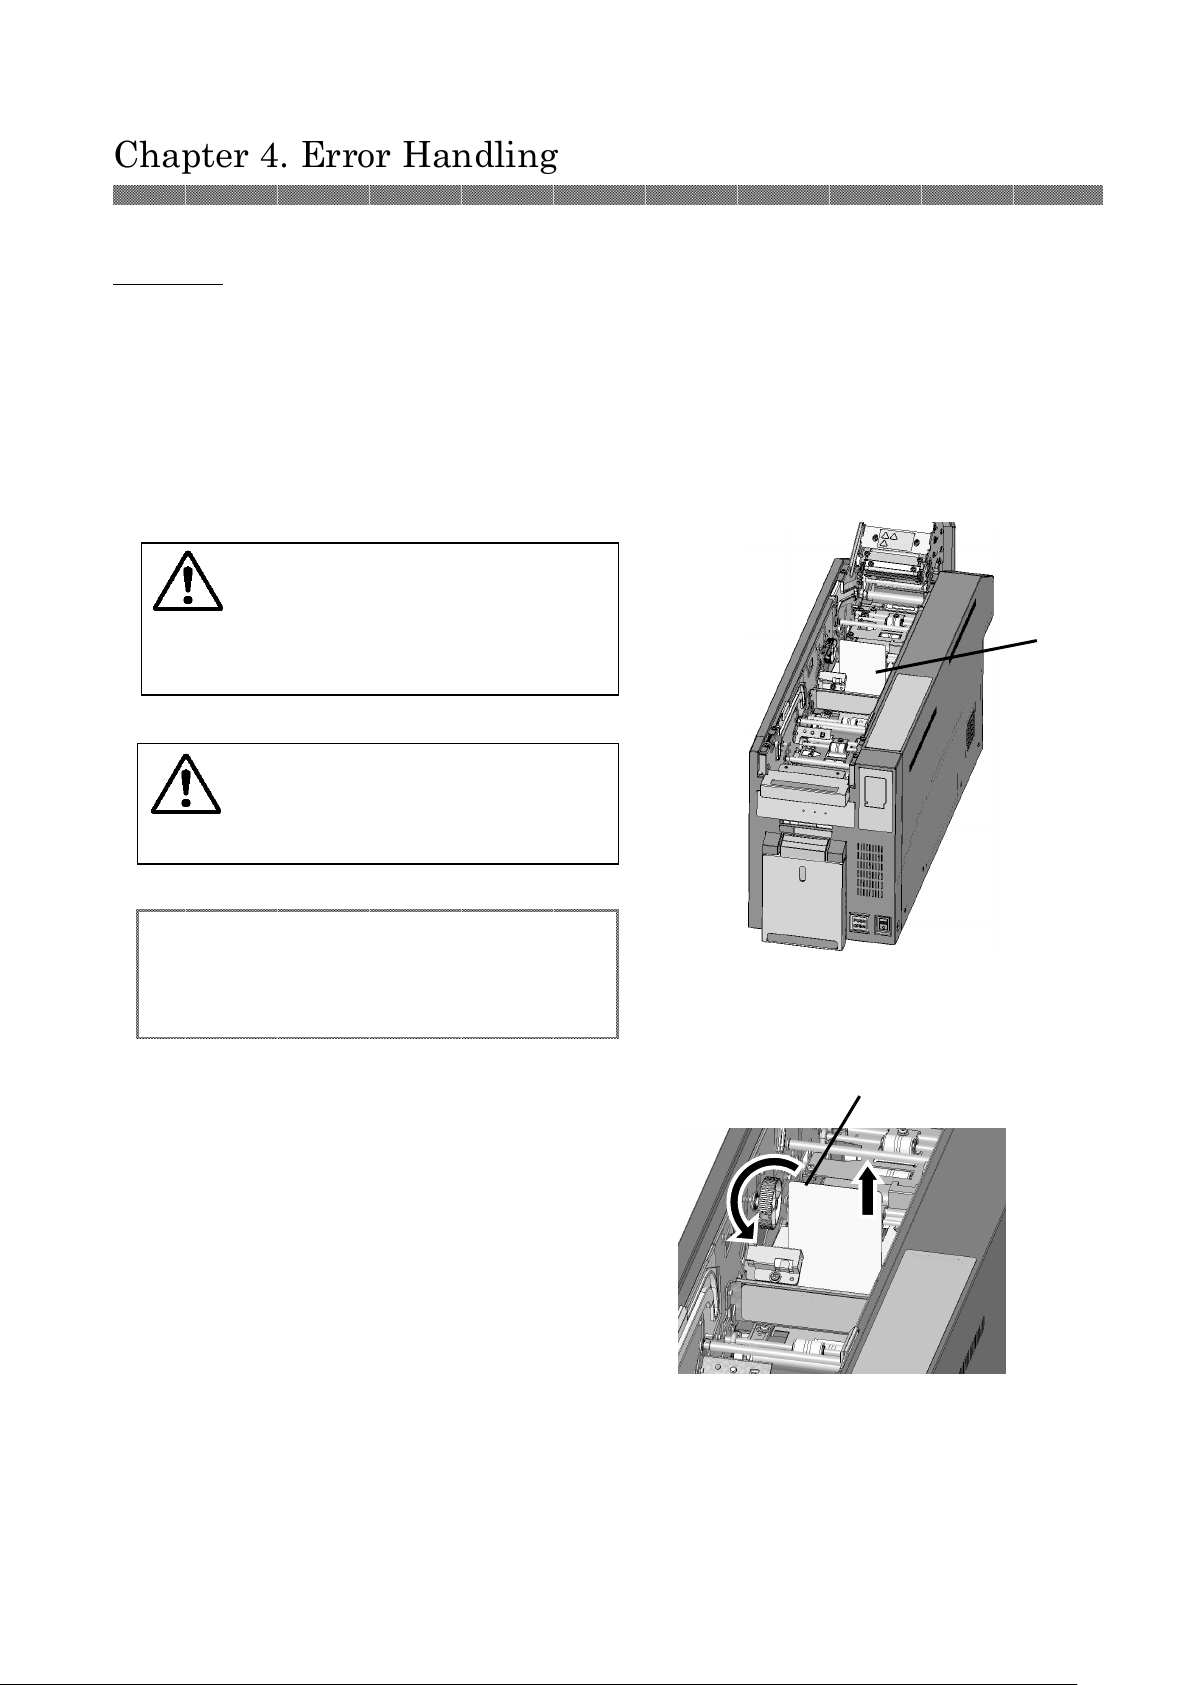
Card Jam
1. Open the upper unit, and remove the
ribbon cassette.
2. Confirm the card jamming position and
remove the card according to the following
procedure.
frequently, contact the after-sales service
department.
Warning: When removing the card,
do not pull the card strongly not to
be injured by the part of the printer.
Warning: Please abrogate the
removed card without reuse. It may
cause card jam or printer damage.
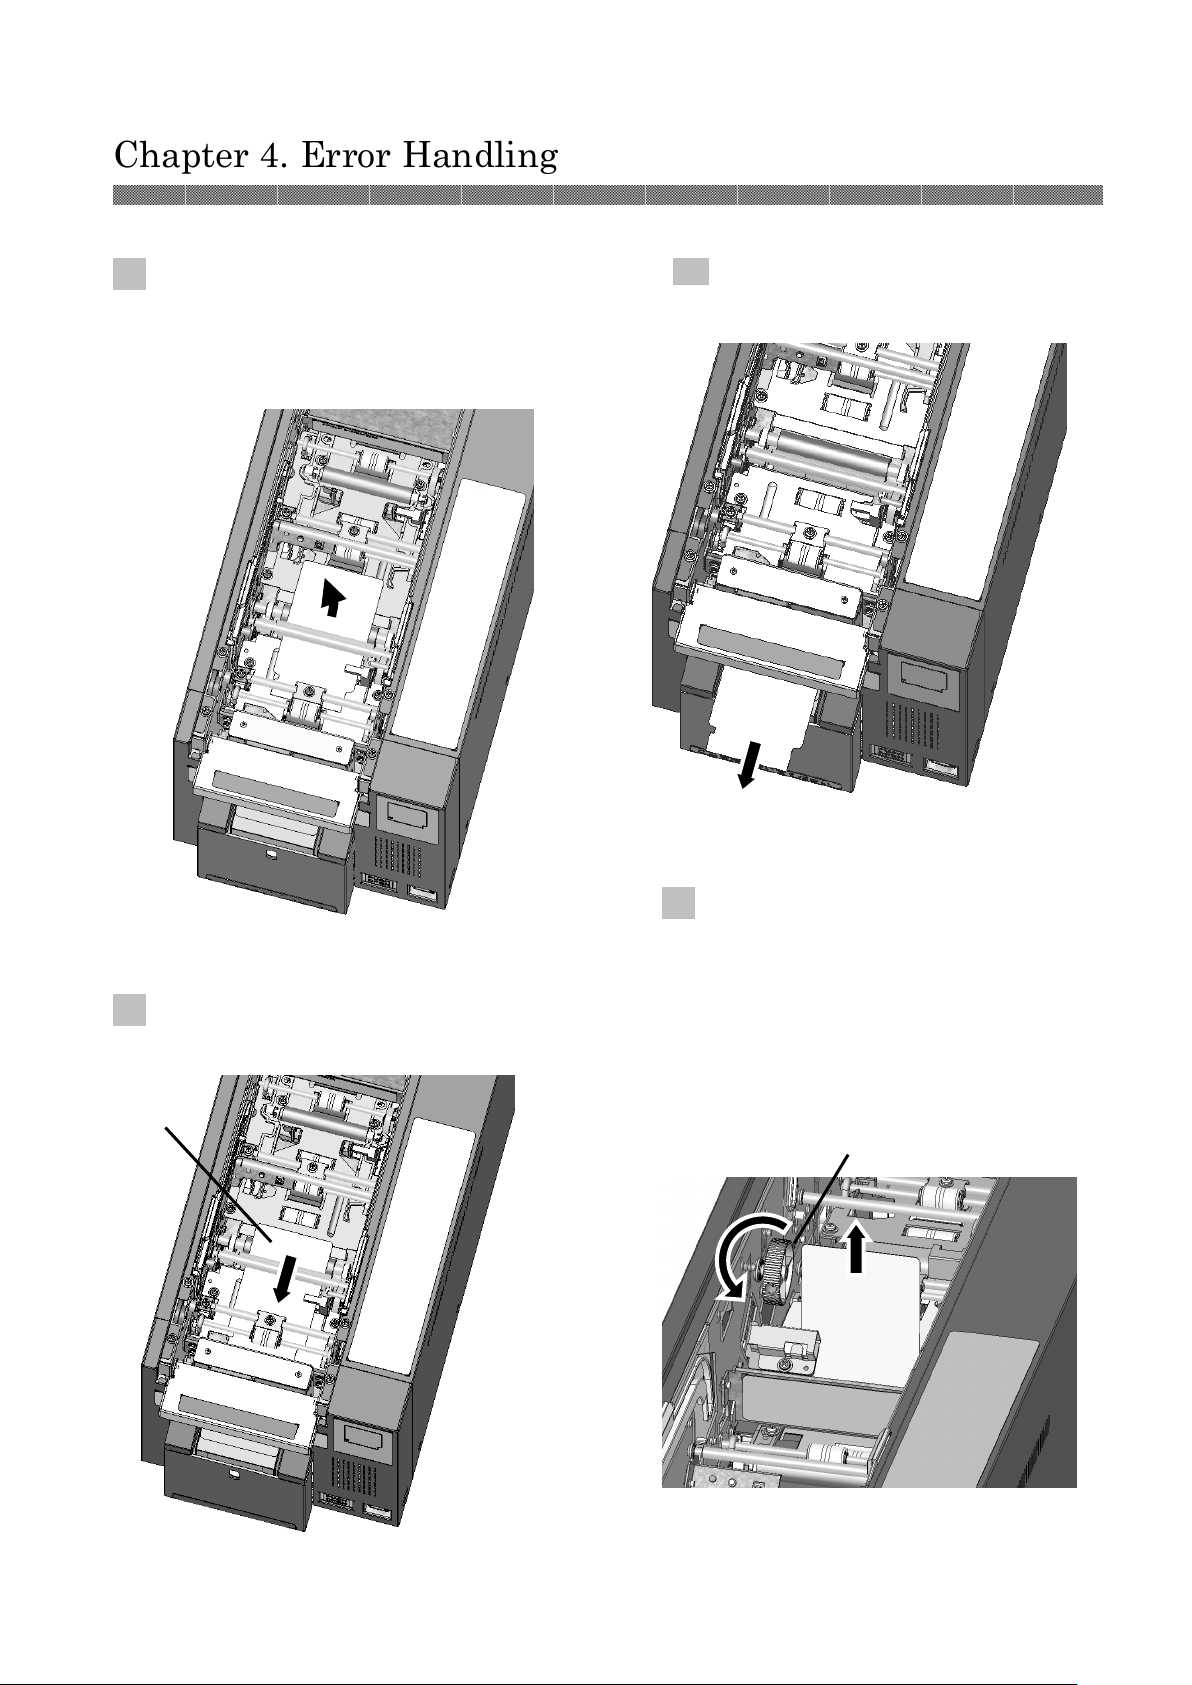
(When there is a card around the center of the
printer and it is vertical as shown in the
following figure.)
Turn the knob(green) of the left side of the
・
printer, move the card to the upper and pull
it to upward and remove.
4-3
Page 23
Knob
Card
Chapter 4. Error Handling
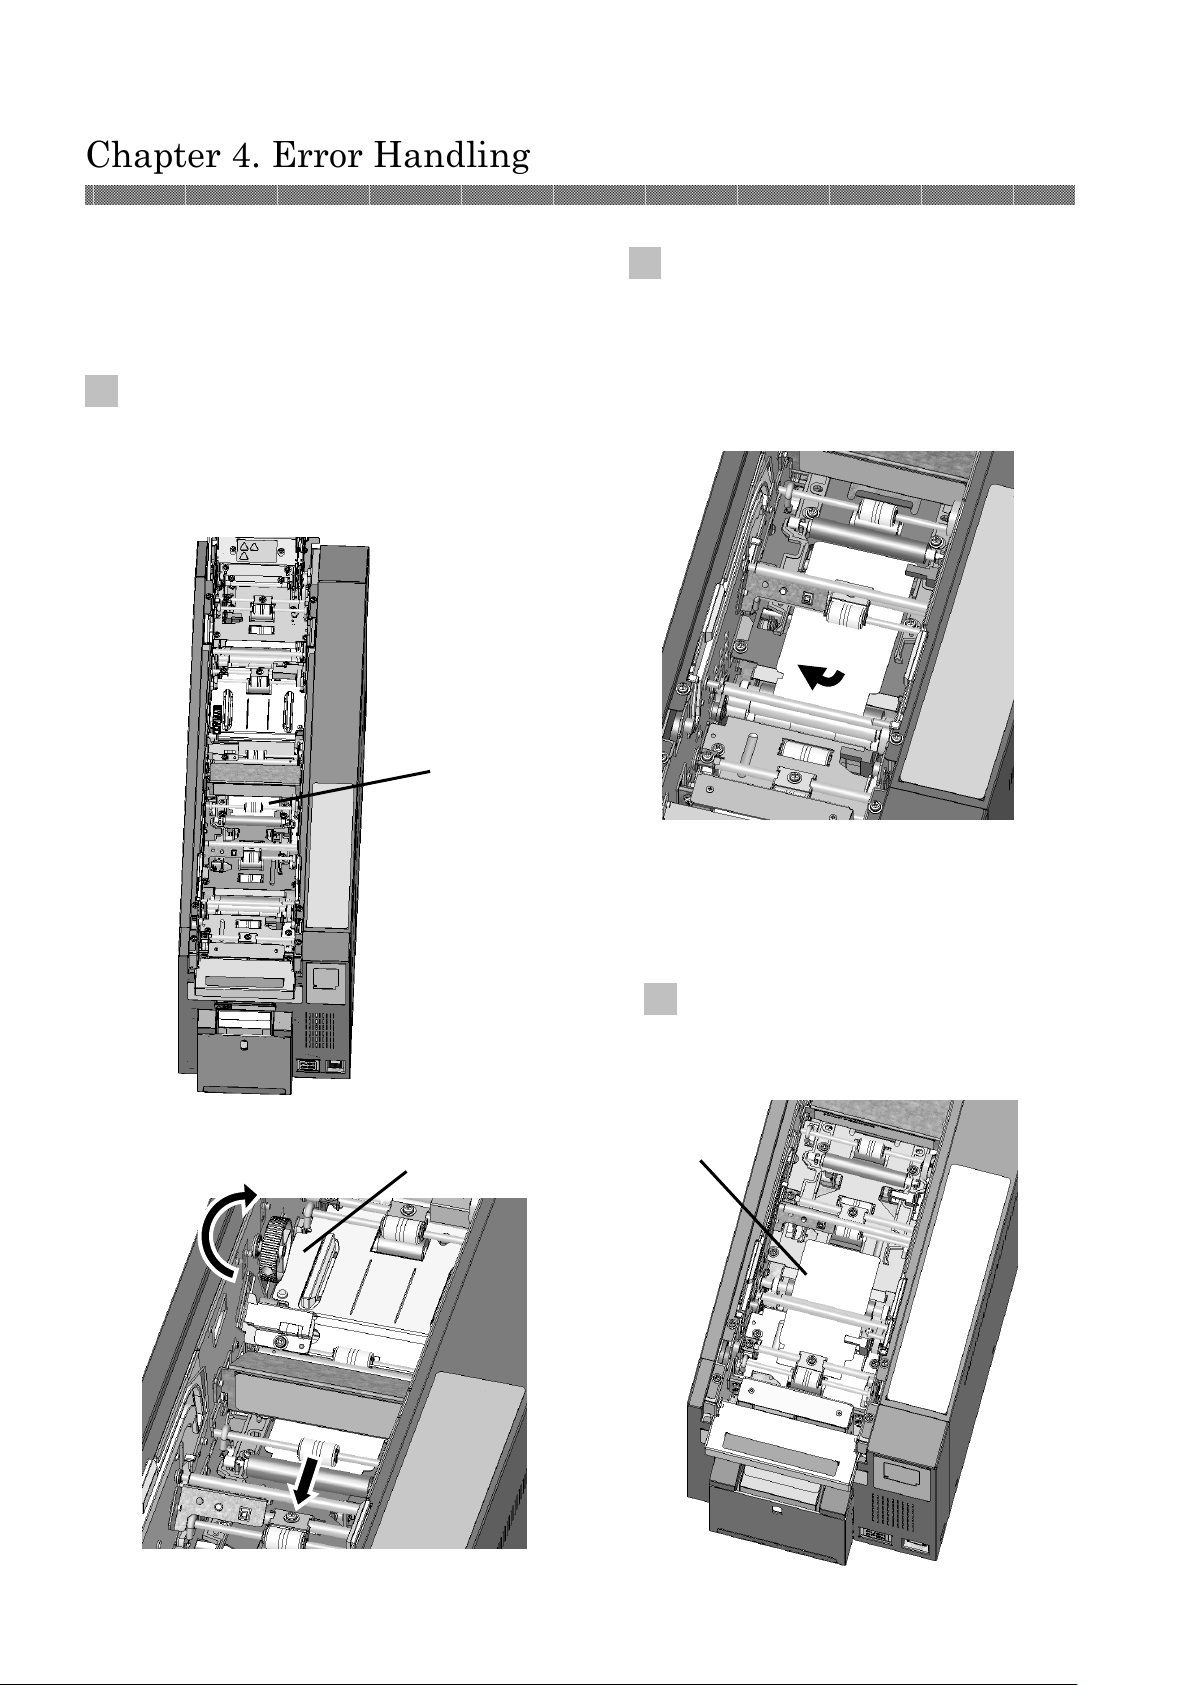
(When there is a card around the printer
center and it is horizontal as shown in the
figure.)
1)Turn the knob (green) of the left side of
the printer, and move the card to the front
side.
4-4
Card
2)If the card move to the position shown in
the following figure, pick up the top of the
card and pull it up (as tilt it slightly
forward), and remove it.
(When there is the card at front part of the
printer).
1)Move the card by finger to the position
shown in the following figure.
Page 24
Card
Chapter 4. Error Handling
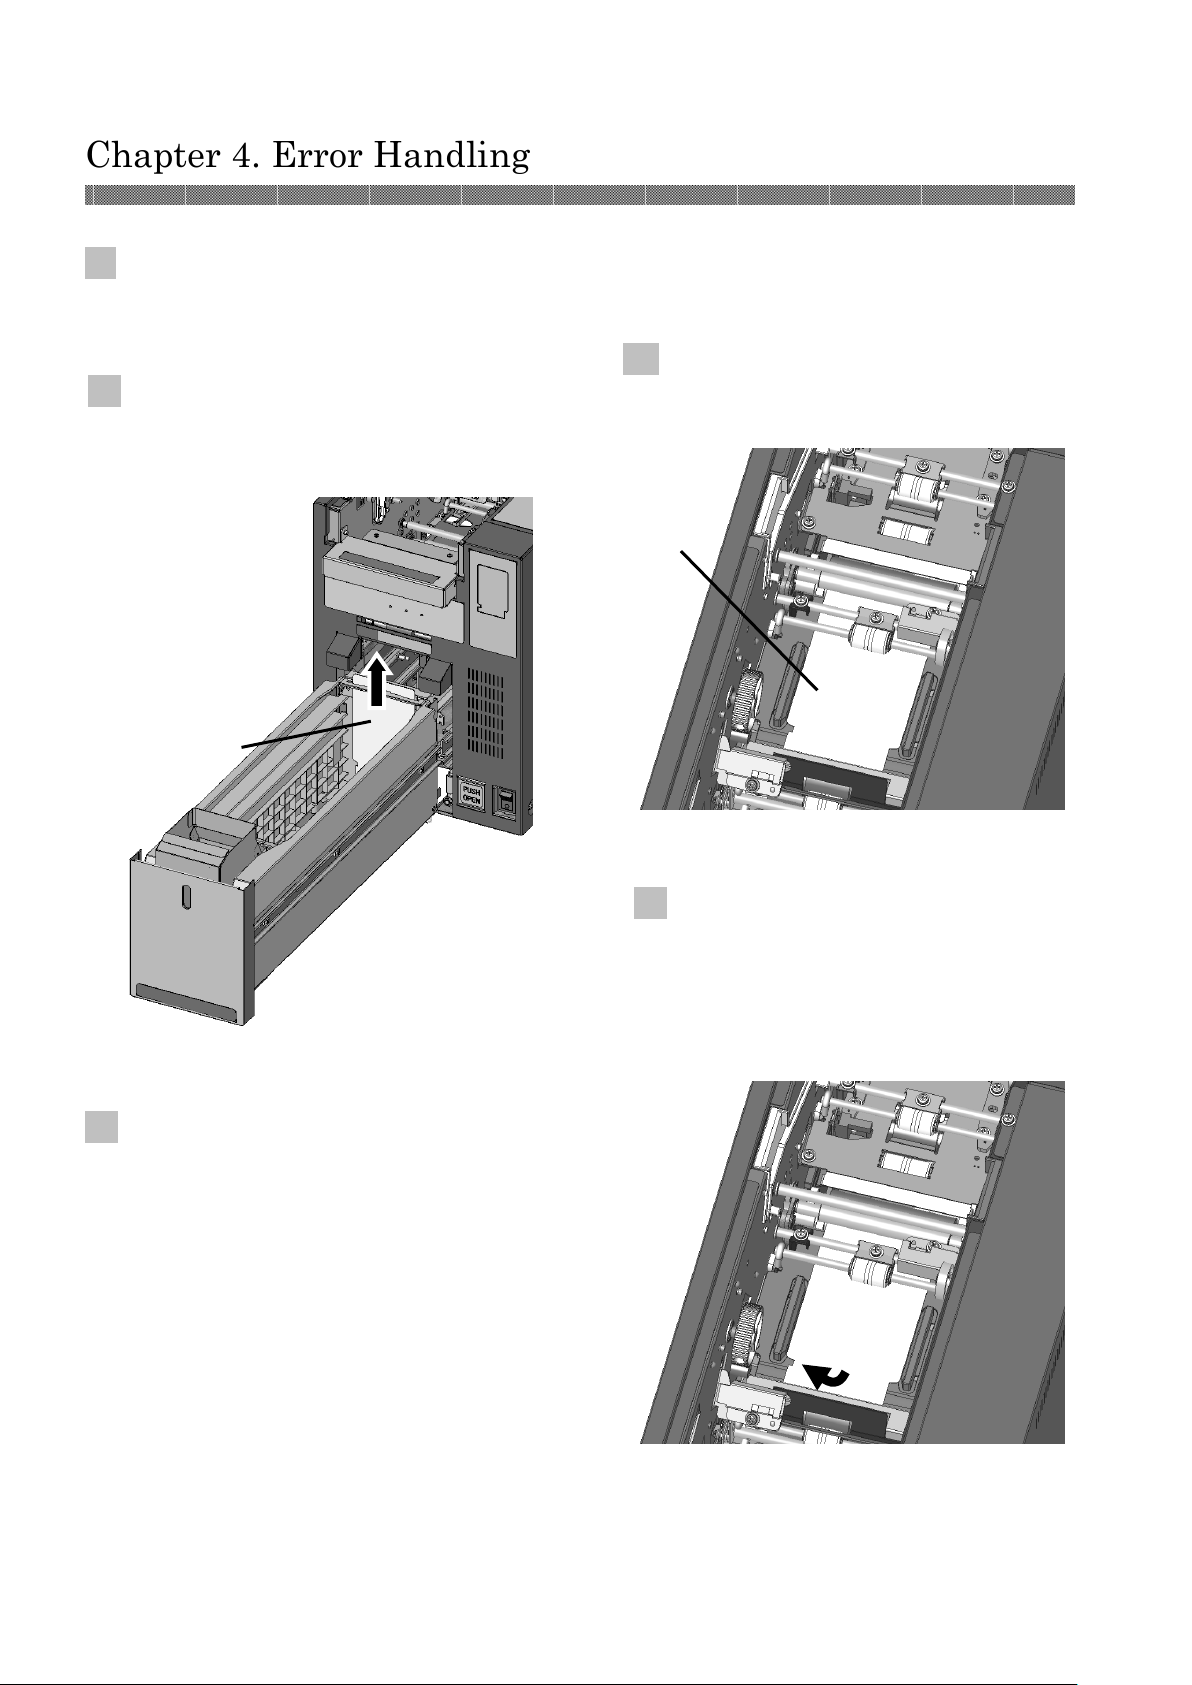
2)If the card move to the position as shown in
the following figure, pick up the end of the
card and pull it up (as tilt it slightly
backward), and remove it.
(When there is the card at the paper outlet side.)
1)Turn the knob (green) on the left side of the
printer, and move the card to the front side.
2)If the card comes out from the paper
outlet, pull it up forward, and remove it.
(When the card do not be seen.)
1)Turn the knob (green) on the left side of
the printer to the direction of the
directing arrow shown in the following
figure. The card comes out shown in the
following figure after turning the knob for
the while (about 5 rotations), and pull it
to upward and remove.
Knob
4-5
Page 25
Chapter 4. Error Handling
2)If the card does not come out despite continue
to turning knob for a while (about 5
rotations), pull up the card set unit
3)If tip of the card protrude little from Gate
unit, move the card to the upper and pull it
to upward and remove.
4) I If tip of the card does not protrude from
Gate
Gate unit, close the card set unit as it is and
switch the power from OFF to ON. And
restart print.
(When there is the card at rear part of the
printer).
1)Move the card by finger to the position
shown in the following figure.
Card
2)If the card move to the position shown in
the following figure, pick up the top of the
card and pull it up (as tilt it slightly
forward), and remove it.
4-6
Page 26
Chapter 4. Error Handling
Power Supply Interrupted during Printing
In case, power supply interrupted during the
printing, Thermal Head will be kept pushing to
Platen. Leaving this situation for a long time,
shape of Platen can be warped. In order to avoid
this situation, please follow the instruction
below.
1. Turn off the power of the printer.
2. Turn on the power for 3 or more seconds after
turning off the power.
3. Card Jam is displayed on the printer status
lamps, open the front cover and take the
necessary action according to the instruction
provided in 4-2, "Card Jam".
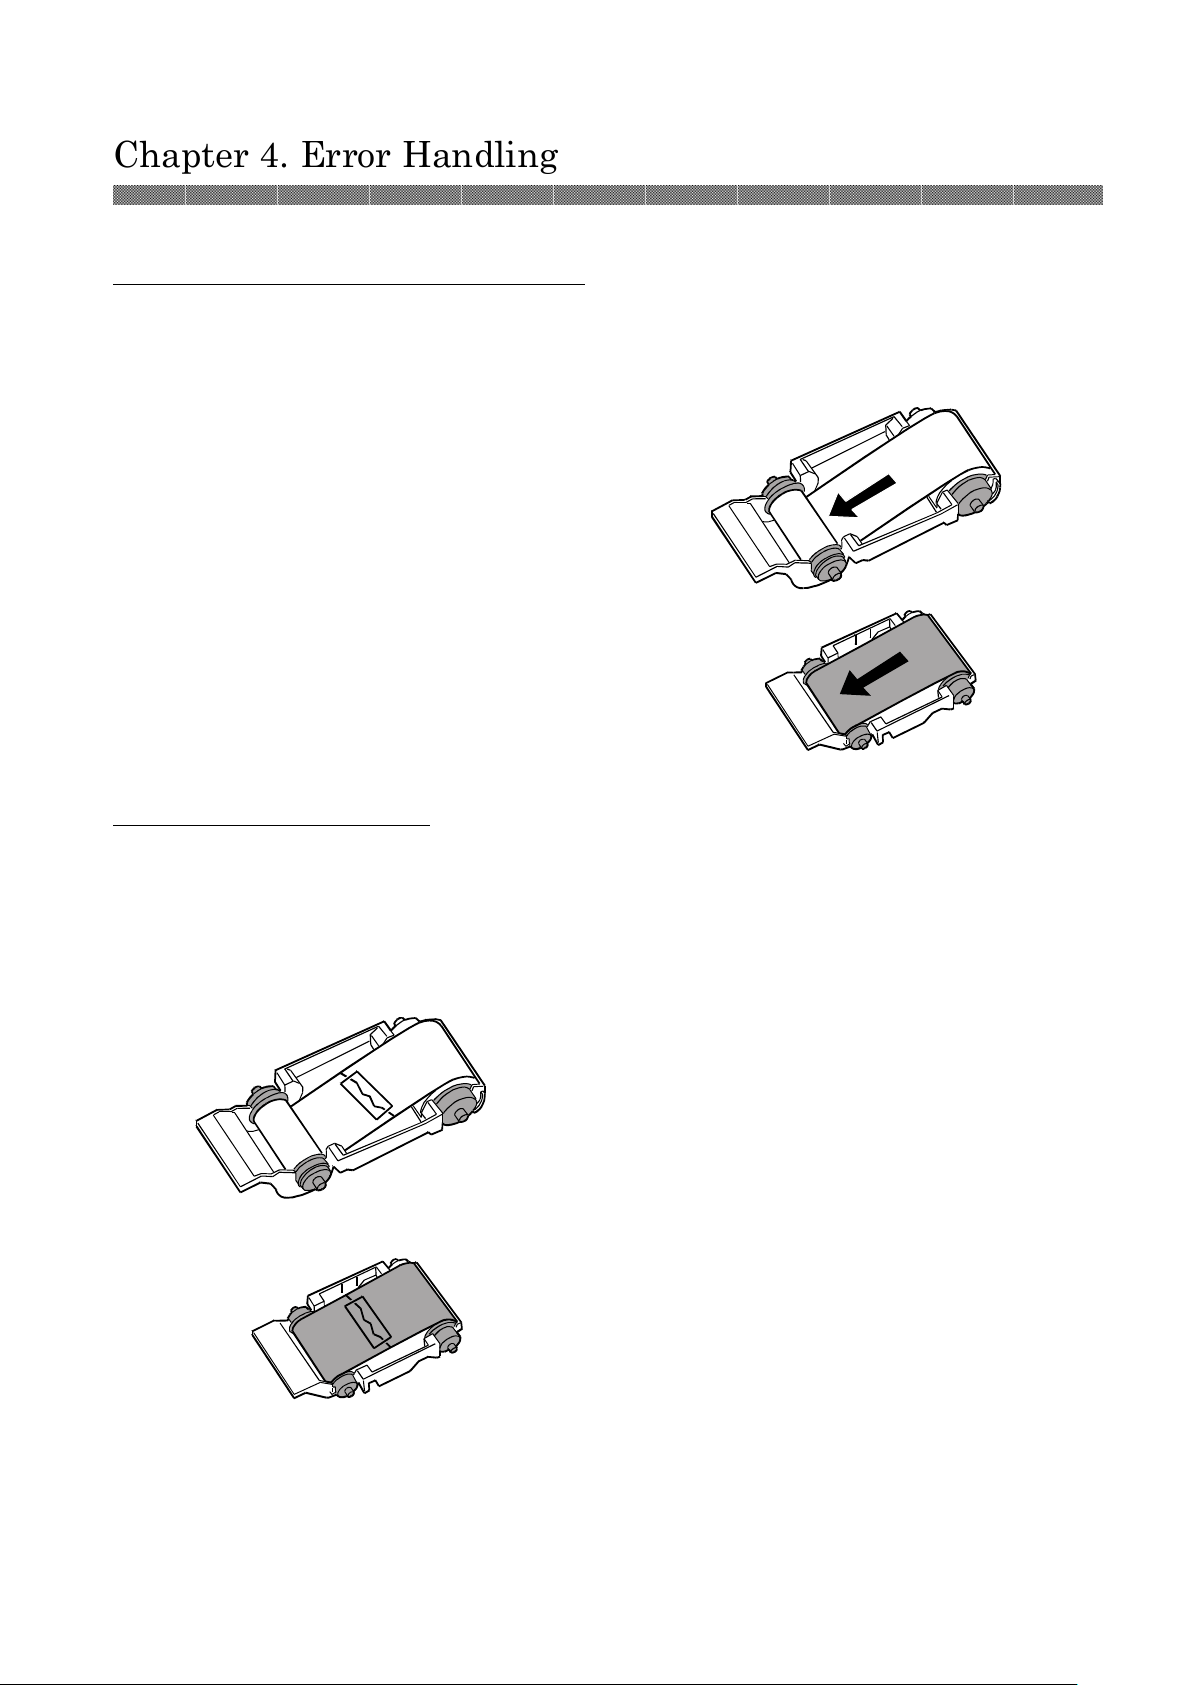
When the Ribbon is snapped
3. Turn the ribbon on the winding side and
rewind the taped section completely.
1. Remove the ink ribbon.
2. Stick the broken part of the ribbon with a
tape.
4-7
Page 27
Note:
Note:Note:
Note:
This equipment has been tested and found to comply with the limits for a Class A
Chapter 5. In order to more comfortably use
For longer Printer usage
Caution: Printing continuous pattern of high density image in limited part
may cause uneven density print. Recommend not to print those images
continuously.
The consumable part of the printer (Periodic replacement recommended parts) is as follows. Check for
details to after-sales service department.
・Thermal Head,
・Platen Roller
・DC MOTOR ASSY (9 type)
・Card Feeding claw
For the Customers in the U.S.A.
FCC WARNING
FCC WARNING
FCC WARNINGFCC WARNING
Changes or modifications not expressly approved by the party responsible for compliance
could void the user’s authority to operate the equipment.
digital device, pursuant to part 15 of the FCC Rules. These limits are designed to provide
reasonable protection against harmful interference when the equipment is operated in a
commercial environment. This equipment generates, uses, and can radiate radio
frequency energy and, if not installed and used in accordance with the instruction
manual, may cause harmful interference to radio communications. Operation of this
equipment in a residential area is likely to cause harmful interference in which case the
user will be required to correct the interference at his own expense.
5-1
Page 28
After-sales Service
Contact your dealers or service center for the details about after-sales service.
Ⓒ 2016
 Loading...