

Page 1
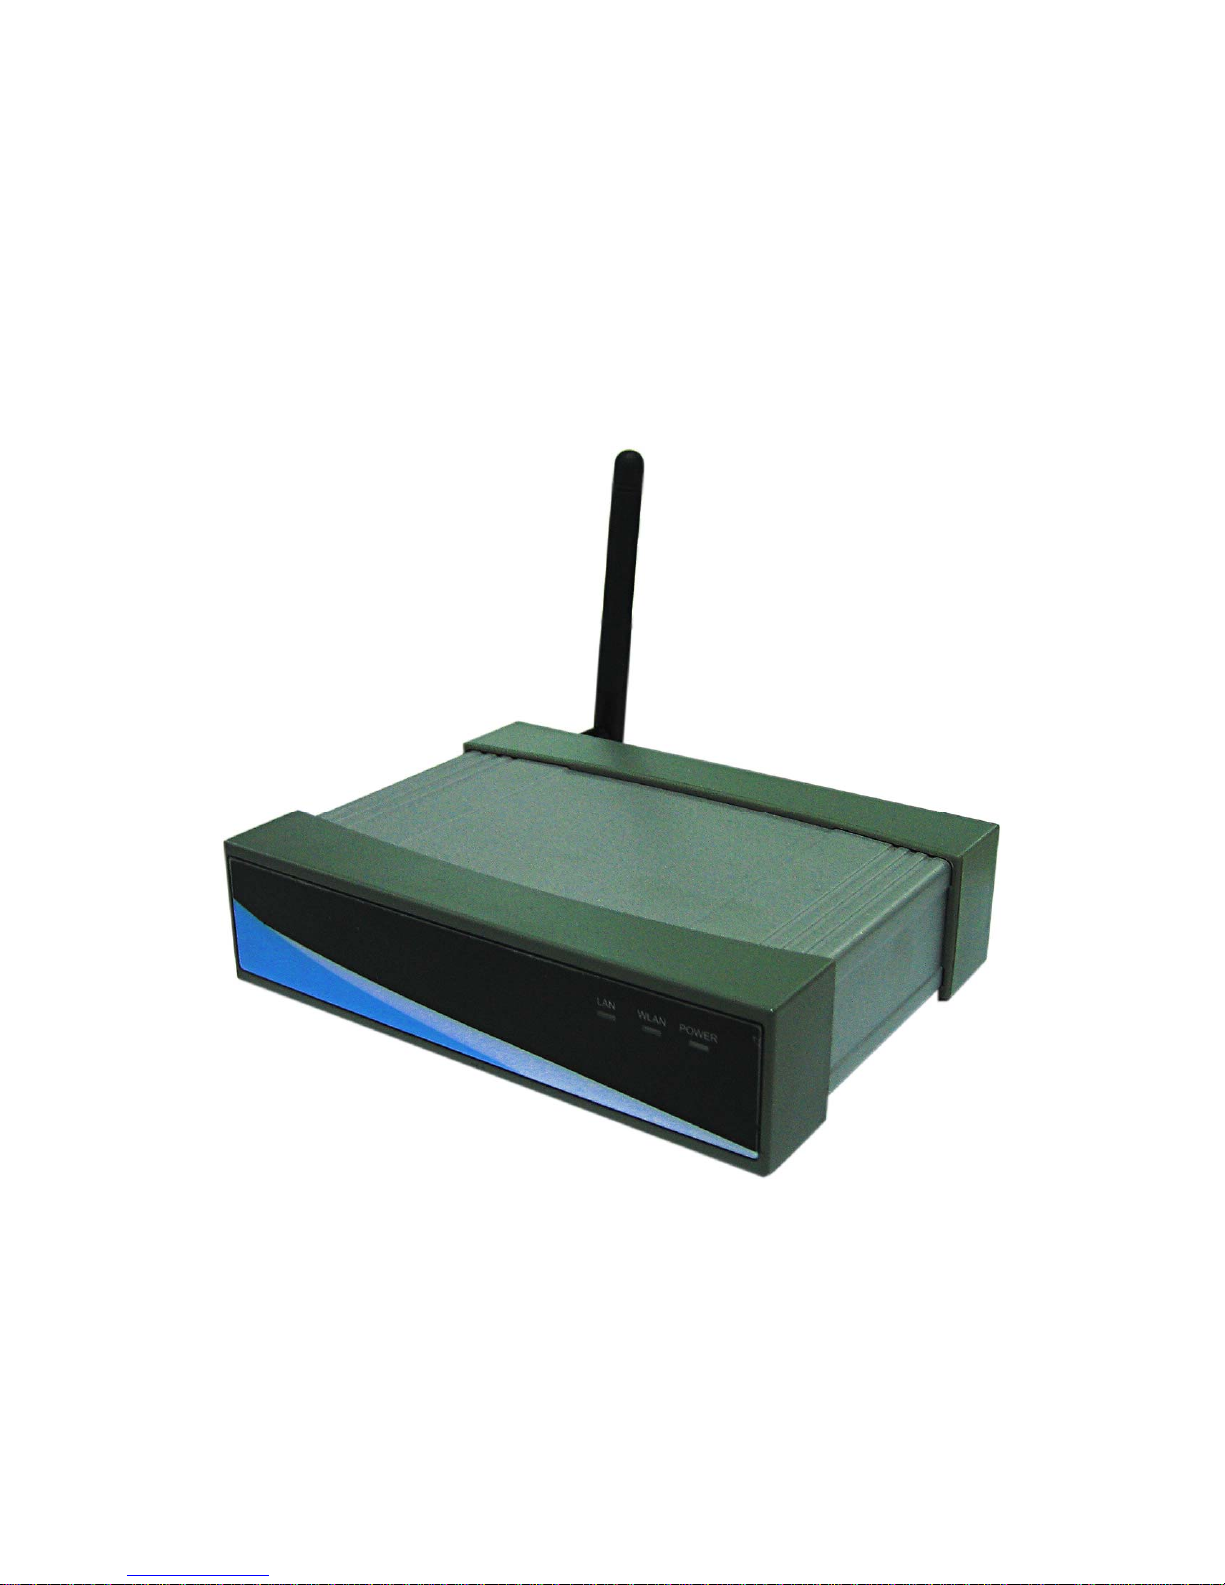
VPS-300D
Video Presentation System
Version: 1.0 Date: Nov. 3rd, 2009
Page 2

2
Table of Contents
1. Overview
..................................................................................................... 3
2. Specification
.............................................................................................. 5
3. Quick Start
................................................................................................. 6
4. Client Utility
.............................................................................................. 9
4.1 Starting Program
................................................................................. 9
4.2 Login
...................................................................................................... 10
4.3 Buttons Description
.......................................................................... 10
4.4 Start/Stop Presentation
................................................................. 11
4.5 Open Admin Web Page
.................................................................... 11
4.6 Searching Server
............................................................................... 12
4.7 Make VPS Token
................................................................................ 13
4.8 System Information
......................................................................... 15
4.9 VPS for PDA
......................................................................................... 15
4.10 Exit Program
................................................................................... 16
5. Web Management
................................................................................. 16
5.1 Home Page
........................................................................................... 16
5.2 Download Software
.......................................................................... 17
5.3 Conference Control
........................................................................... 18
5.4 Login Web Admin
.............................................................................. 20
5.5 System Status
..................................................................................... 20
5.6 Network Setup
................................................................................... 21
5.7 Projection Setup
................................................................................ 23
5.8 Change Passwords
............................................................................ 24
5.9 Reset to Default
................................................................................. 25
5.10 Firmware Upgrade
........................................................................ 26
5.11 Reboot System
............................................................................... 27
5.12 Logout
................................................................................................ 27
6. Appendix
................................................................................................... 28
6.1 Accessories
.......................................................................................... 28
6.2 Packaging Specification
.................................................................. 28
6.3 Wall Mounting Instruction (Optional)
....................................... 29
Page 3

3
1. Overview
VPS is a must-have device for your meeting room! It turns your existing
"wired" projector into a "high-end wireless" projector. With the revolutionary
Plug-and-Show, 4-to-1 split screen and PDA wireless projection features, VPS
makes every of your presentation and meeting efficient and successful.
Plug & Show
With the accompanied Plug & Show USB Token, wireless presentation becomes
easy! Just link your PC/Laptop to VPS (through WLAN or Ethernet), plug the
token into a USB port, and in seconds, your screen will be wireless projected to
the connected projector!
4-to-1 Split Screen Projection
With this 4-to-1 split screen feature, up to four PC screens can be projected to
one projector in the same time. Thus you can easily do side-by-side
comparison from four PC / PDAs to increase meeting productivity!
PDA wireless Projection
You don't have to bring the laptop for business presentation anymore. Just
connect your PDA phone to VPS through WiFi, and start your professional and
stylish presentation right away!
Conference control
VPS supports Conference Control function for easily moderating the conference.
The conference moderator can control projection from connected PCs through
a web-based control page. So you can streamline your meeting/presentation
to be more fluent and in order.
Page 4

4
¾ Features
■ Support Windows Vista, XP, 2000 and Mobile 5/6
■ Plug and Show! No installation required … just plug in the
accompanied token to a USB port, and hassle free presentation can be
started in seconds.
■ 4-to-1 split screen projection! Turn one projector into four, increase
meeting productivity right away.
■ PDA wireless projection! PC-less stylish presentation becomes
possible!
■ Conference control! Allows moderators to streamline grand meetings.
■ Provide session security login, wireless WEP key and Gatekeeper
function to protect presentation contents and keep good security to
office networks.
Page 5

5
2. Specification
Dimension 117mm(W) x 140mm(D) x 27mm(H)
Weight 279g
Wireless Standards IEEE 802.11g
LAN Standards IEEE 802.3u
Data Rate Wireless: up to 54Mbps
LAN: 10/100 Mbps with auto MDI/MDIX
Wireless Channels 11 (US, Canada)
13 (Europe)
14 (Japan)
Protocol TCP/IP
IP Configuration Automatic: DHCP
Manual: static IP address
Management Web-based Configuration
Security IEEE Standard 64/128 bit WEP
Antenna Detachable antenna with SMA connector
Transmission Power 2dBi external dipole antenna
Receiving Sensitivity – 65dBm @ 54Mbps
– 80dBm @ 11Mbps at 10-5 BER
Wireless Link Coverage Up to 300 feet/100 meters, depends on
environment
Supported PC/NB
Resolution Color Depth
16/32 bit color depth
Supported PC/NB
Resolution
SVGA (800x600), XGA (1024x768), WXGA
(1280x768)
Supported Output
Resolution
SVGA (800x600). XGA (1024x768), WXGA
(1280x768)
Supported Operation
System
Windows Vista/XP/2003/2000, Windows Mobile
5.0
Supported Windows
Account Right
Administrator, Limited User, Guest
Power DC5V, 2.5A
Interfaces 15-pin VGA, RJ-45, Power switch, Reset button
Environmental conditions Operating temperature: 0~40°C
Page 6
6
3. Quick Start
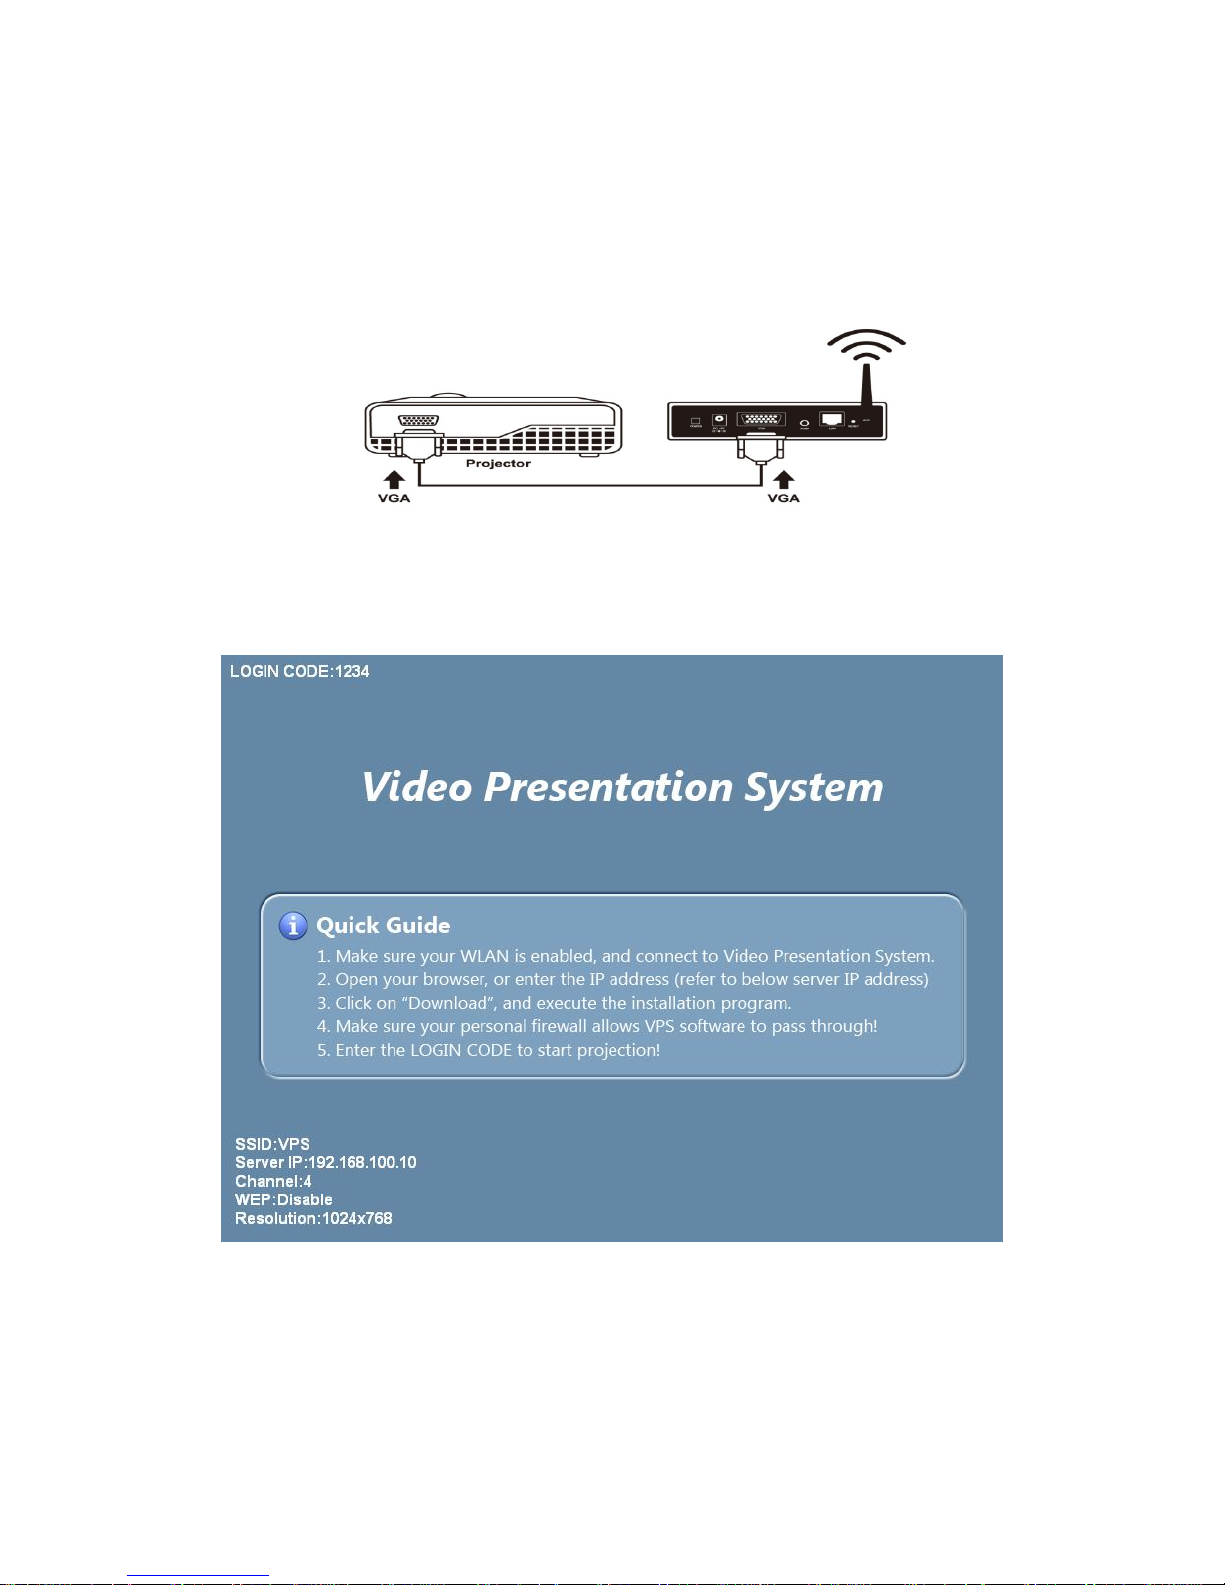
1) Connect projector VGA cable to VPS box VGA connector and turn on
projector power.
2) Turn on VPS box.
♦ When Projector shows the default menu on the screen as below, it
indicates the VPS box is ready now.
3) Make sure your PC WLAN is enabled already, and connect your PC with VPS
box.
4) Open your browser and it will redirect to VPS main page automatically, or
you can enter the IP address to access the VPS web home page.
♦ The default IP address of VPS is 192.168.101.15 or refers to the IP
Page 7

7
address shown on the left corner of projector screen.
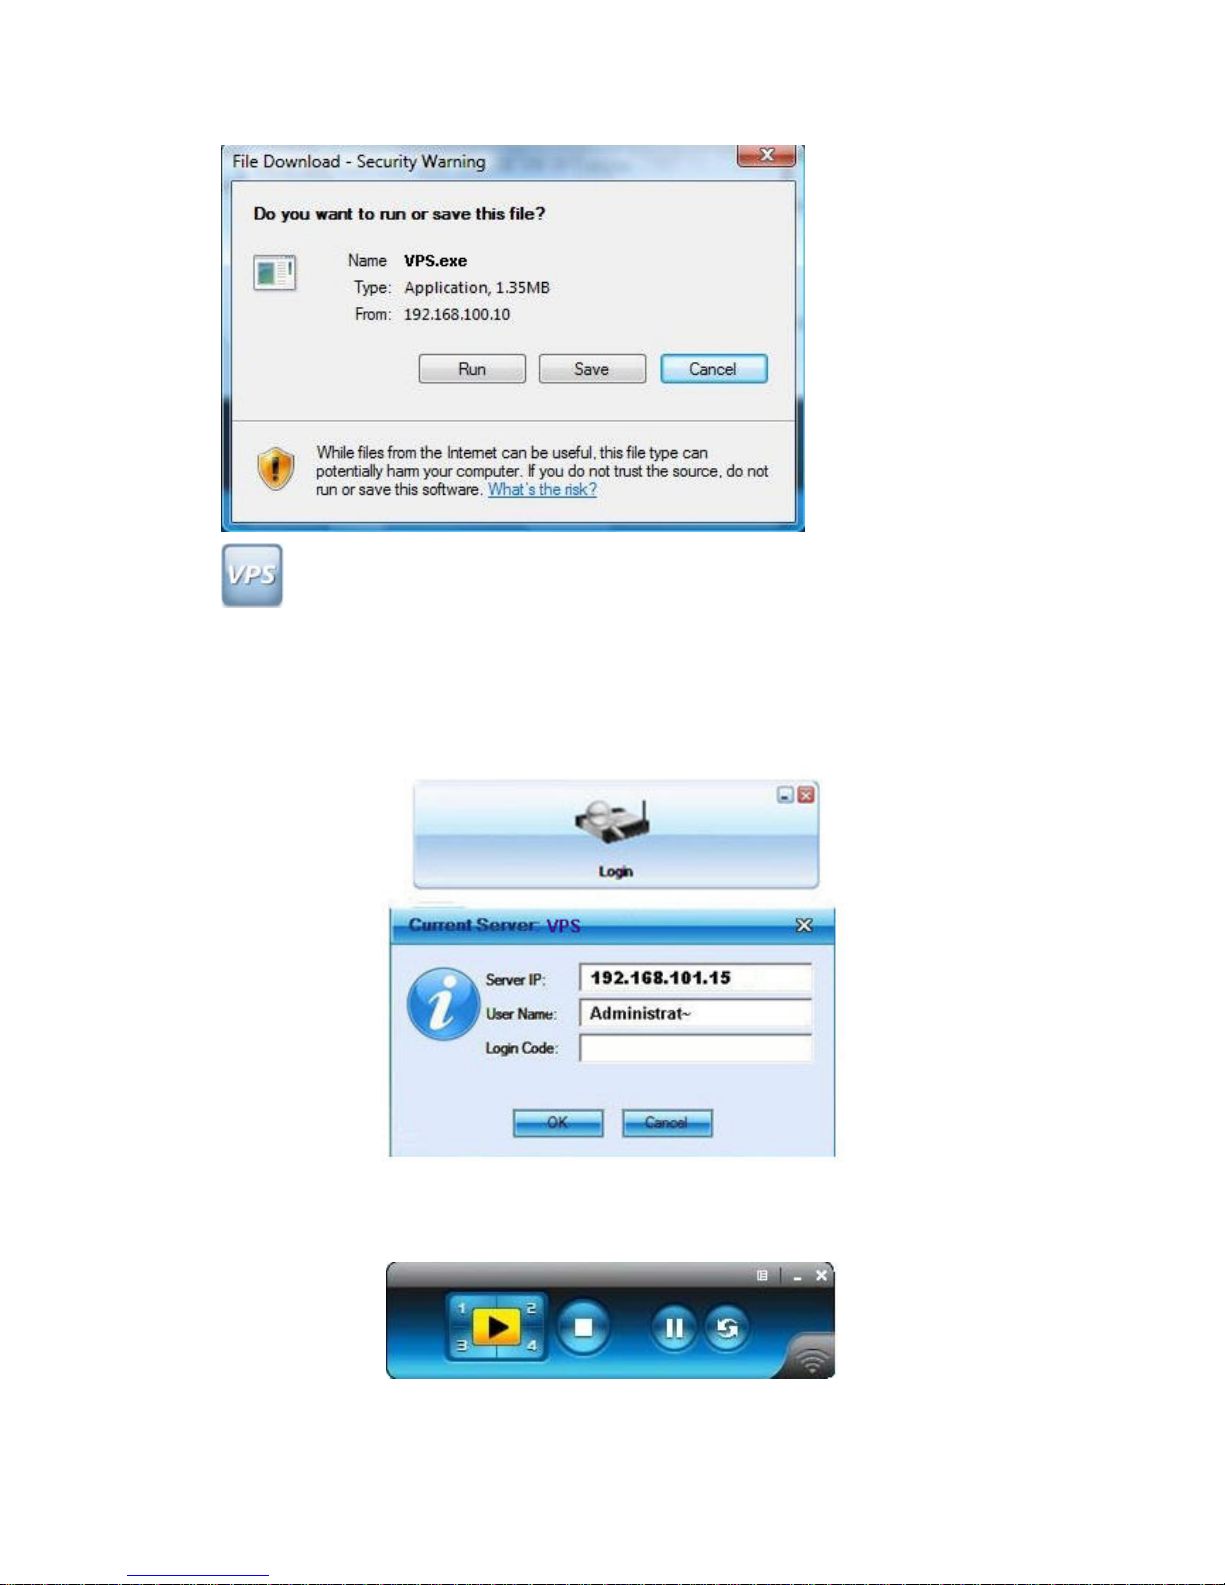
5) Download the client software. Please select the” Windows Vista / XP /
2000” or ”Windows Mobile 5.0” and execute the installation program.
♦ After install the program, VPS shortcut will come out on the PC screen.
Page 8
8
6) Make sure your personal firewall allows VPS software to pass through.
7) Enter the LOGIN CODE and
♦ You can see the login code on the projector screen
8) Click the “Play” button to start projection!
Page 9
9
4. Client Utility
4.1 Starting Program
After you download VPS Windows program via web page successfully, then
follow below steps to start.
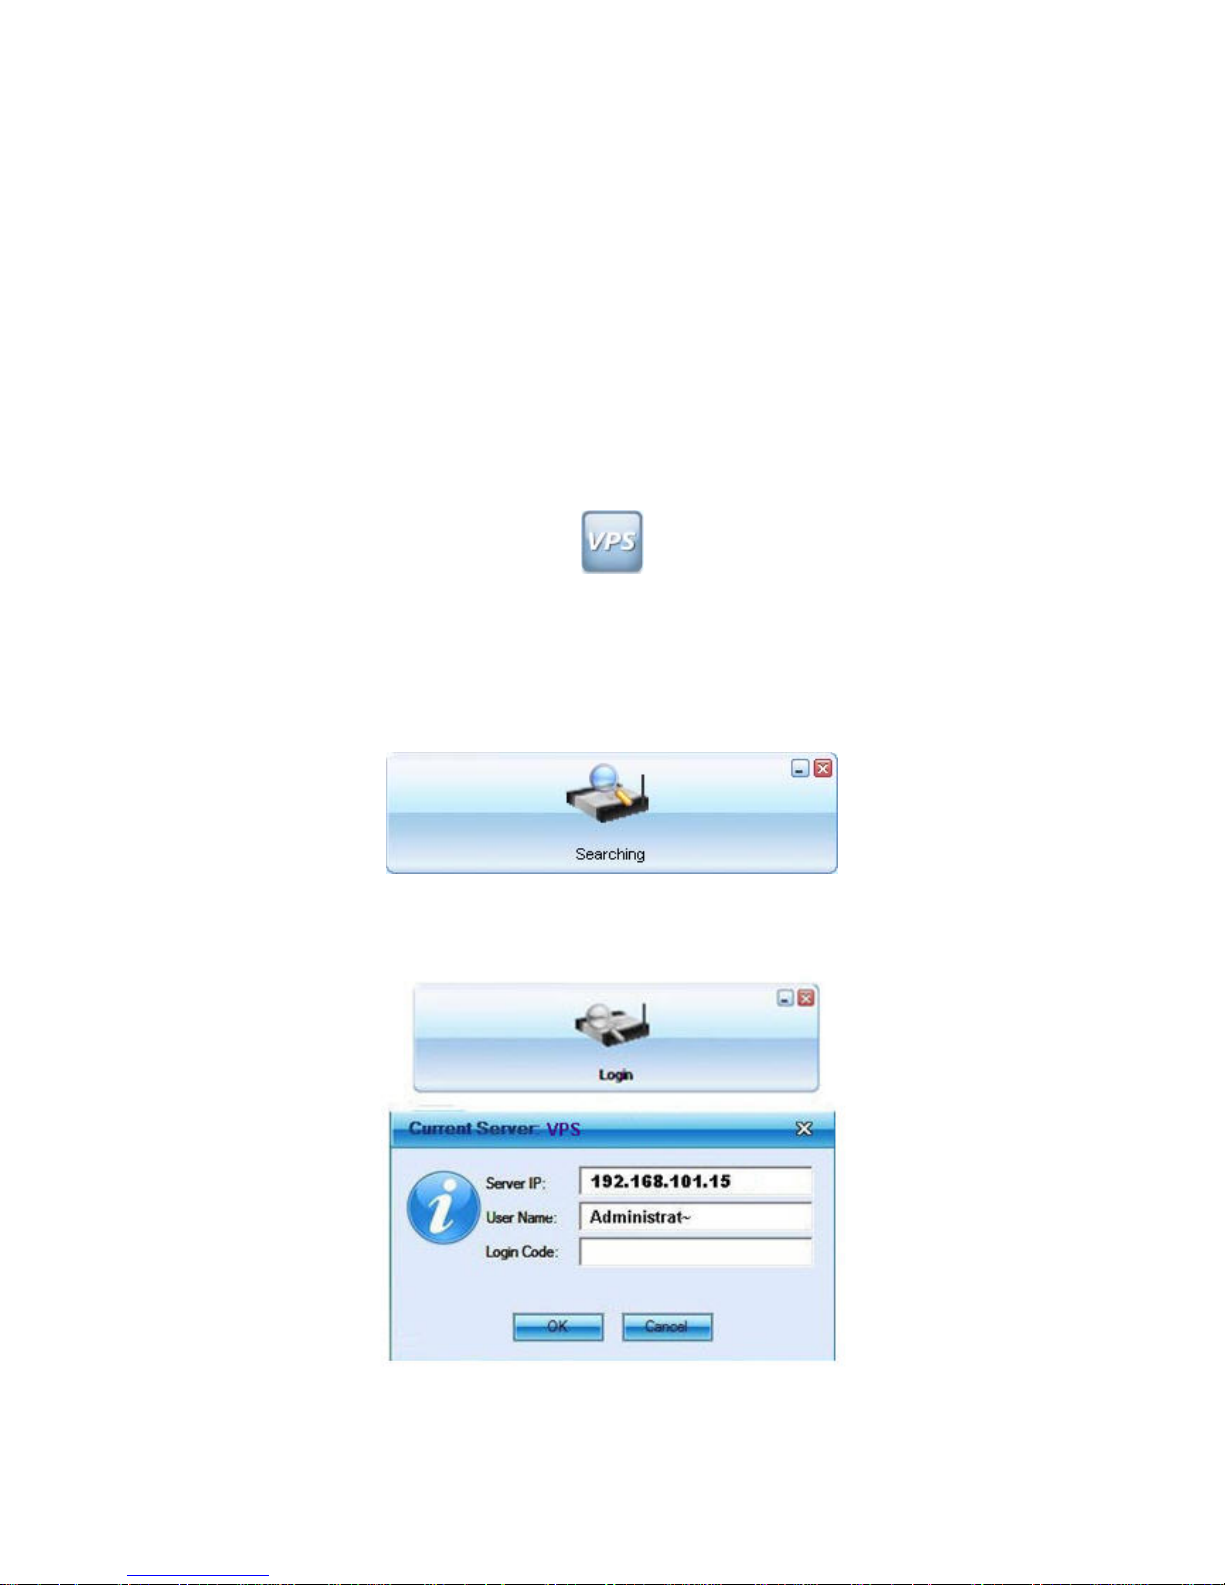
1) Click VPS icon to execute the program.
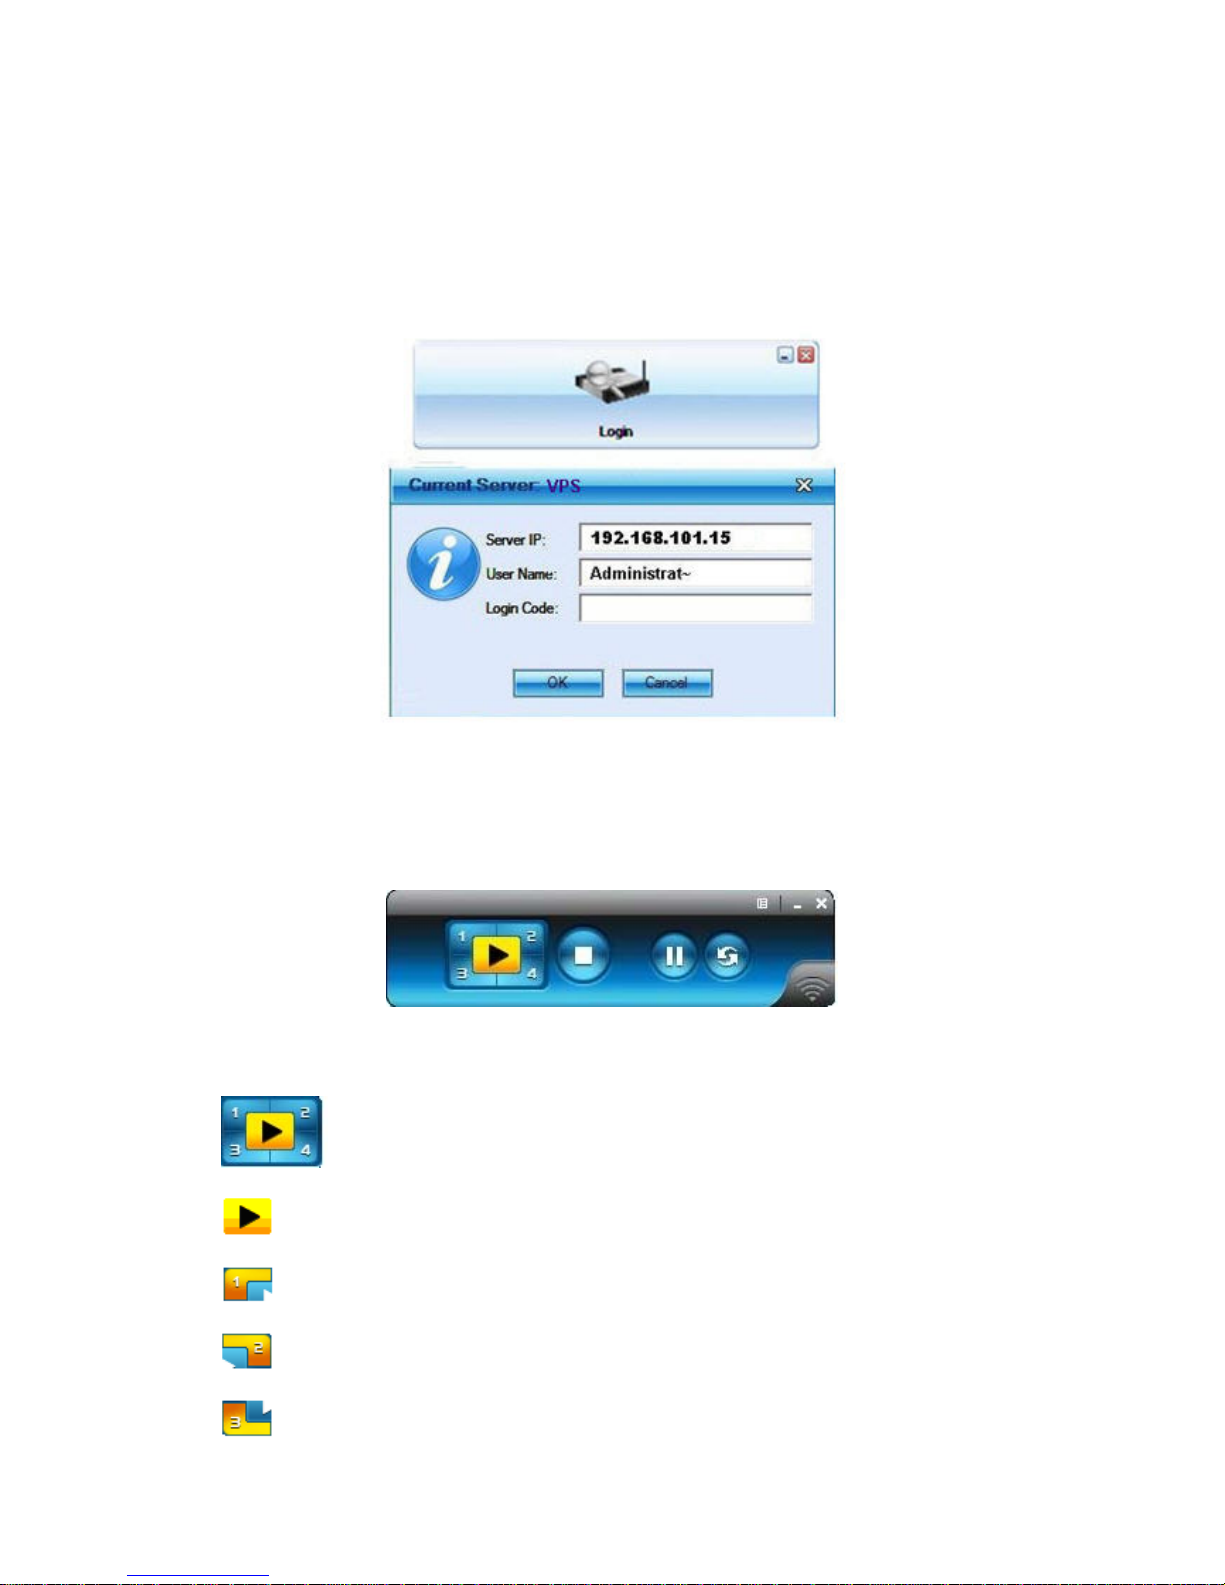
2) Program start to search for VPS box automatically,
3) If VPS box founded then “Login Code” dialog box will be pop up on the PC
screen.
z Searching for VPS box
z VPS box is founded and enter login code to start.
Page 10
10
4.2 Login
1) After “Login Code” dialog box shown, enter login code to start presentation.
2) You can see the login code shown on the projector screen.
4.3 Buttons Description
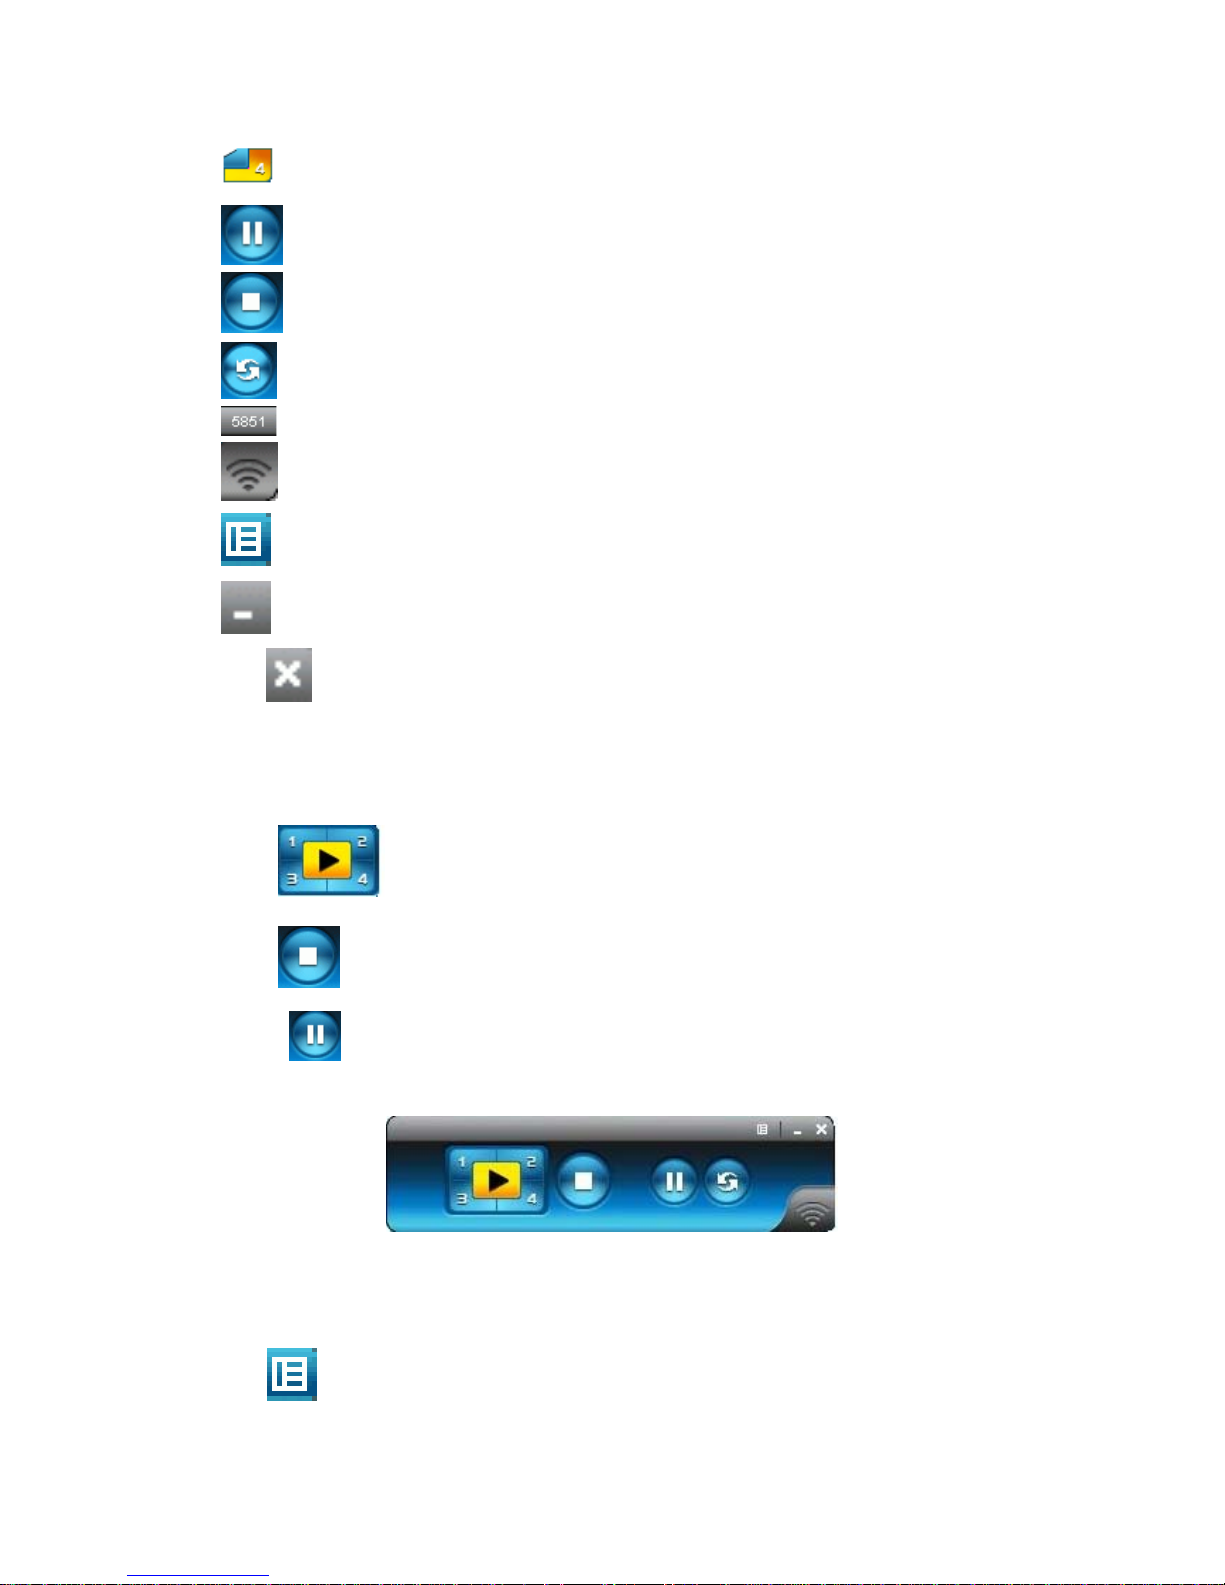
1) After login successfully, you will see main UI of VPS application.
2) Click following buttons to manipulate VPS Application.
Project desktop screen to Full screen or split screen
Full Screen projection
Project to Split #1
Project to Split #2
Project to Split #3
Page 11
11
Project to Split #4
Pause projecting
Stop projecting
Refresh projecting screen
Server Login Code
While projecting in progress, this icon is blinking
Function menu
Minimize the program
Exit the program
4.4 Start/Stop Presentation
Click to project desktop (Full screen or split screen)
Click
to stop presentation.
Click to pause presentation, which will hide any activities of your PC
screen.
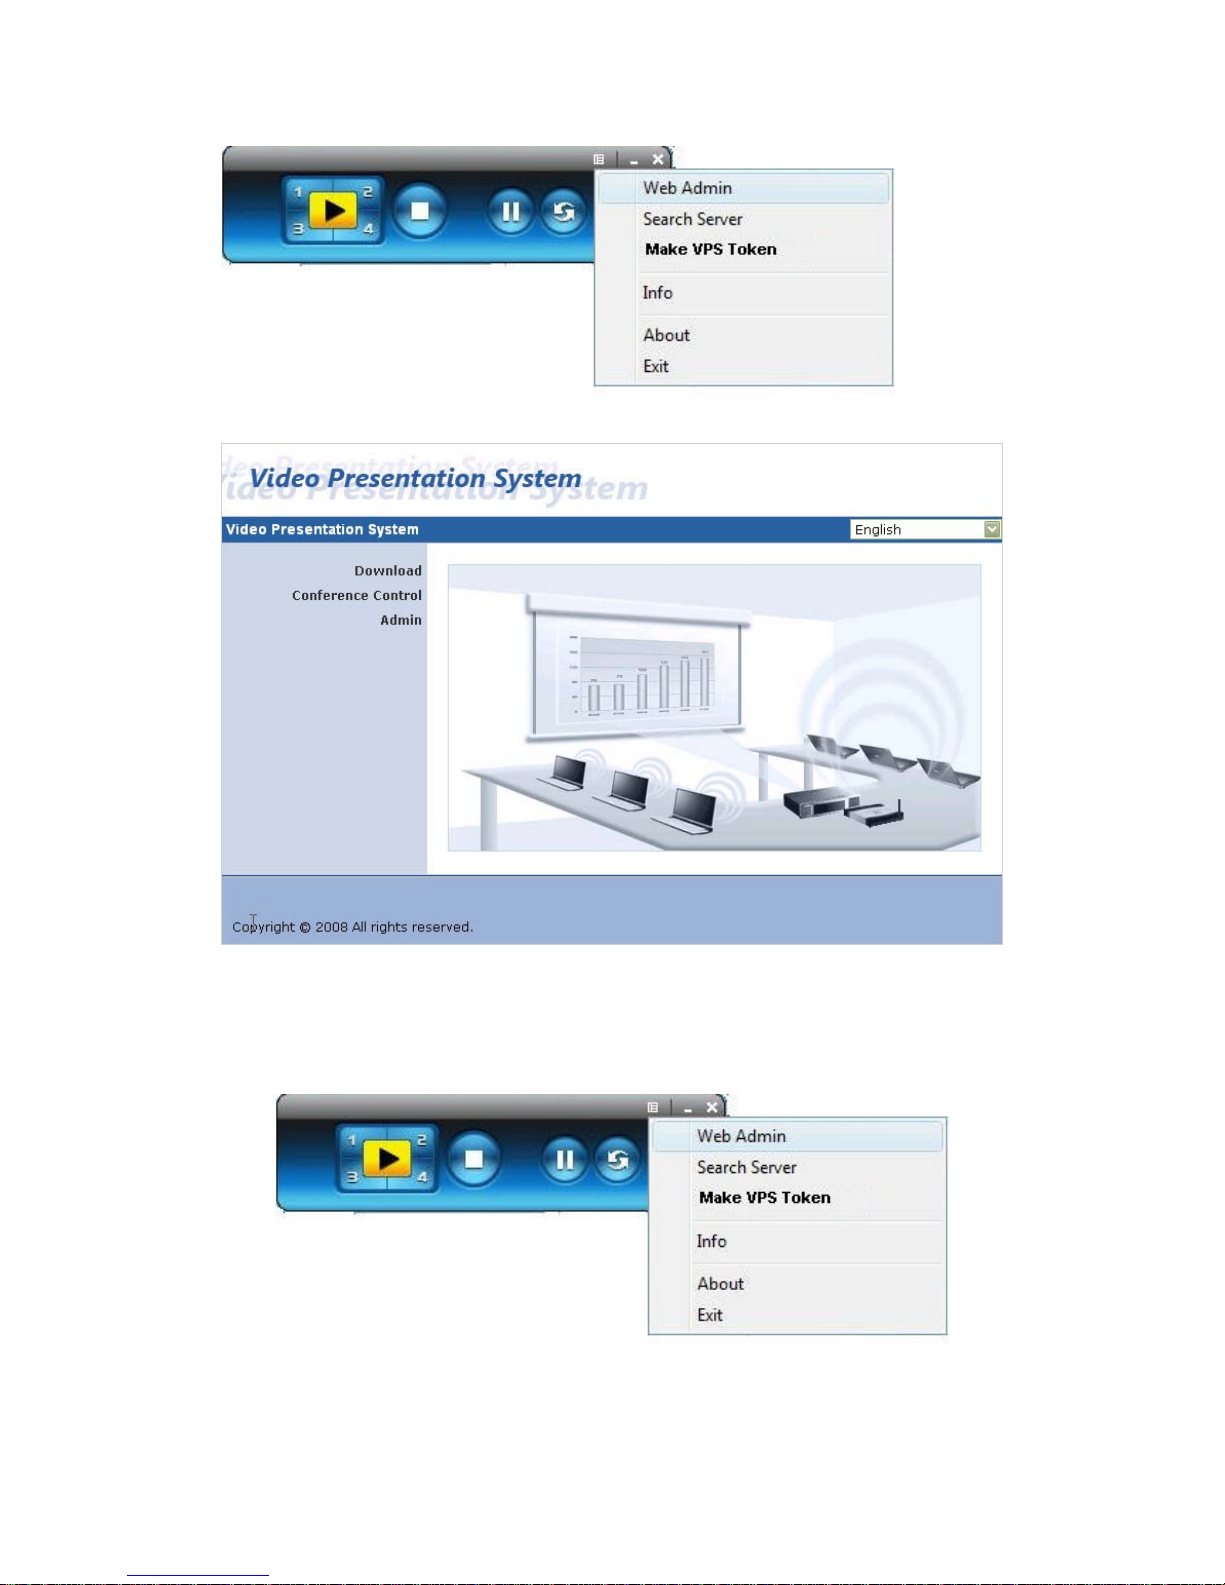
4.5 Open Admin Web Page
Click to open function menu and select “Web Admin” management web
page. The web page detailed functions will be described on next chapter.
Page 12
12
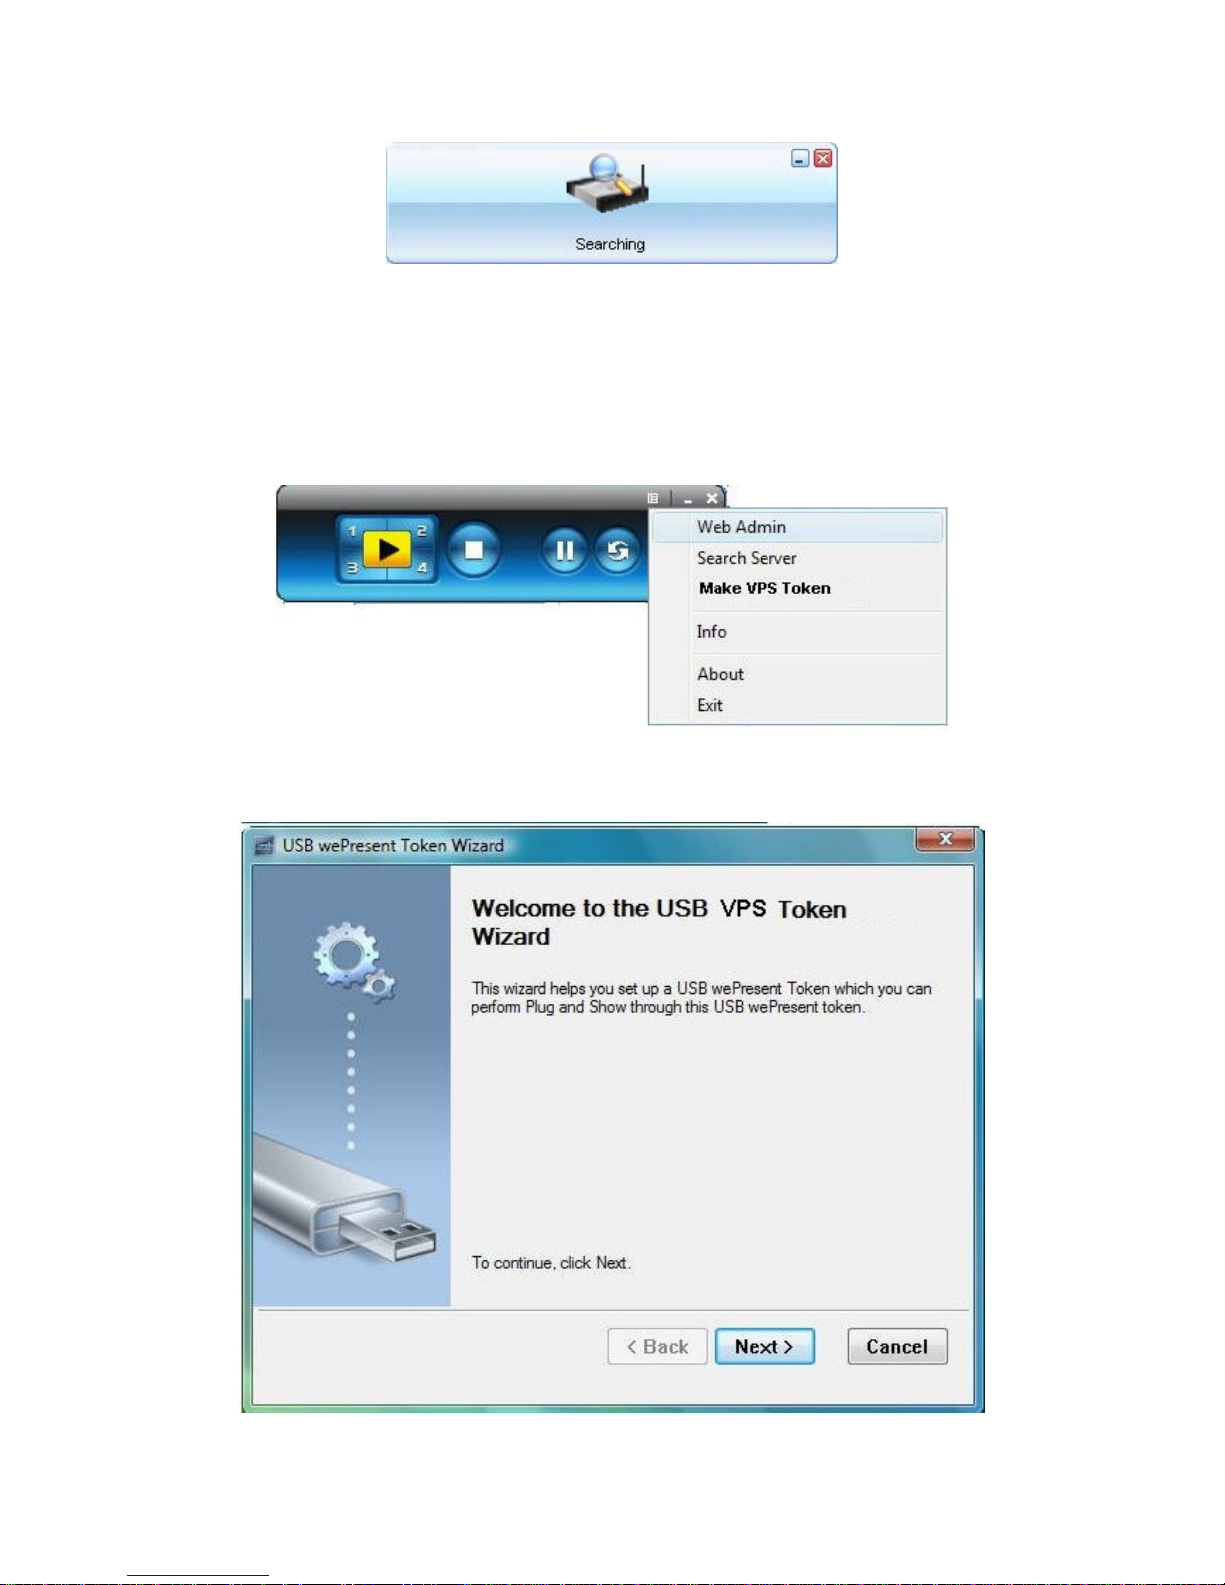
4.6 Searching Server
Click “Search Server” to search for VPS box.
Page 13
13
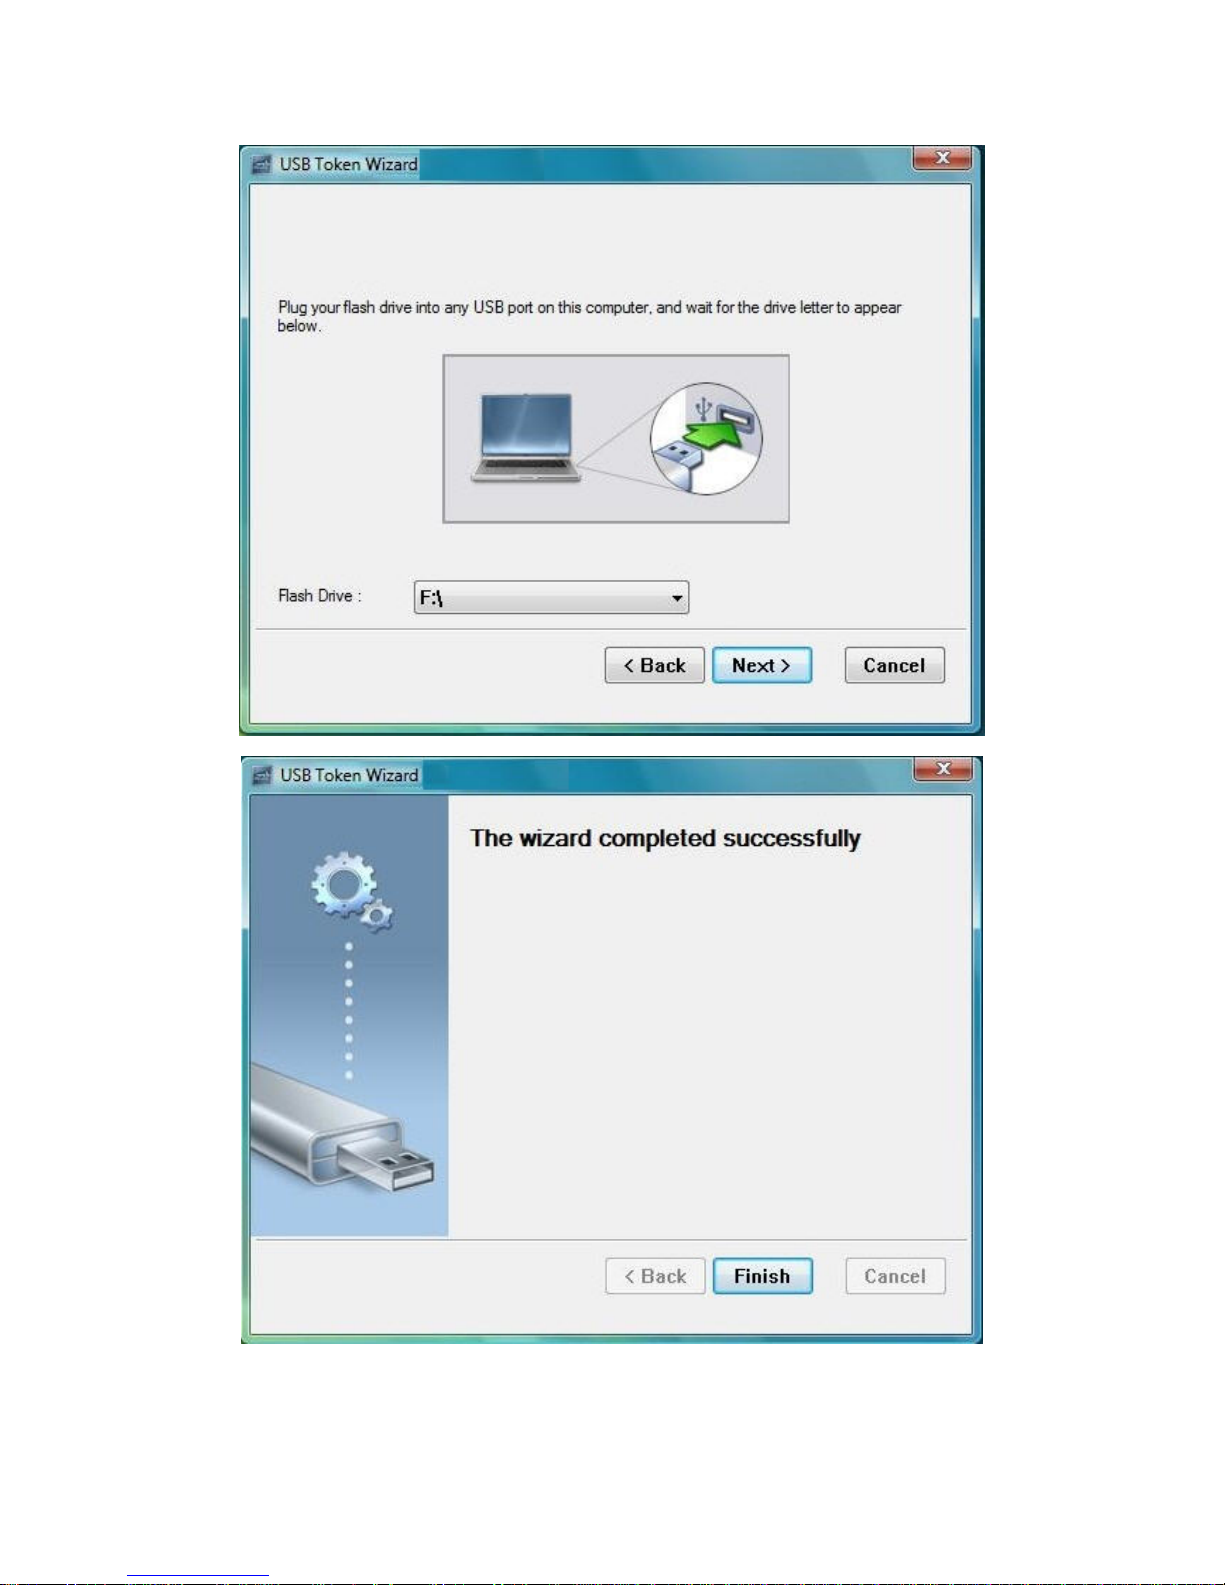
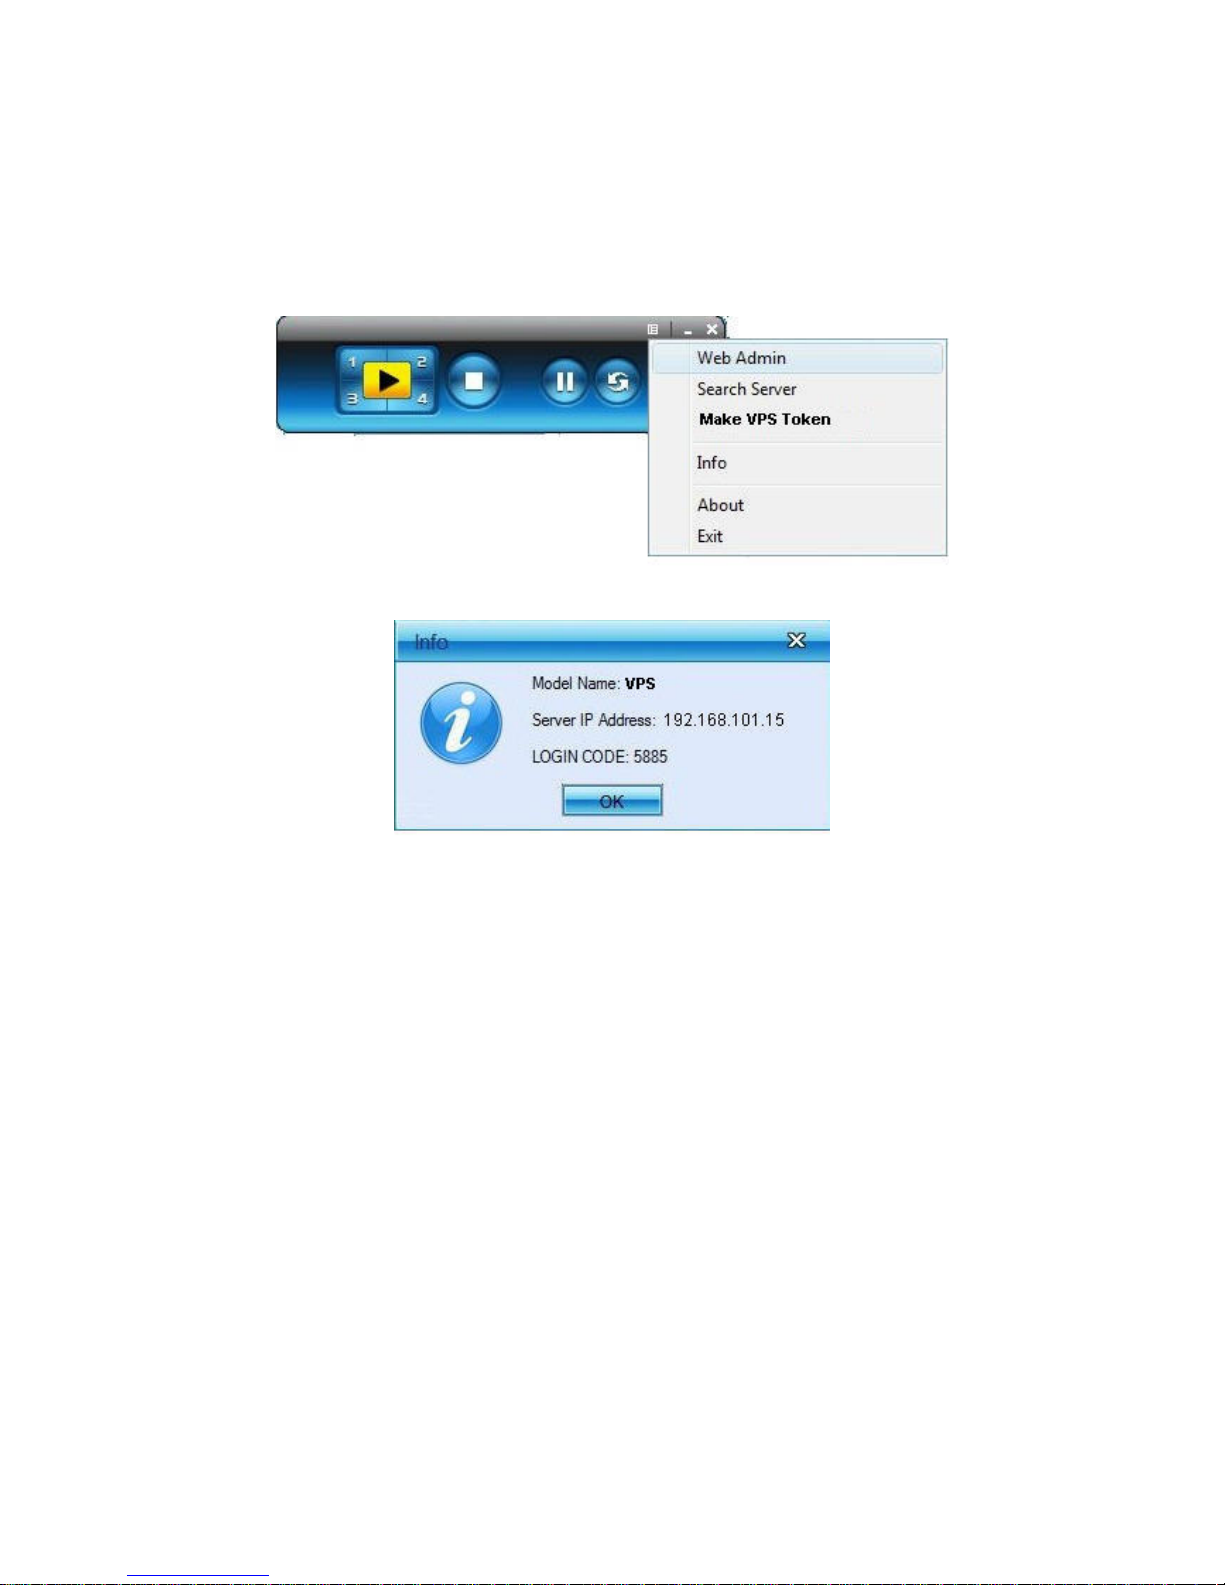
4.7 Make VPS Token
Click “Make VPS Token” to make a USB VPS Token, please follow the steps
with the wizard:
Page 14
14
Page 15
15
4.8 System Information
Click “Info” to show system information. It includes product model name, IP
address and other information.
4.9 VPS for PDA
To project your PDA screen with VPS, please follow the steps:
1) Enable your WiFi and connect to VPS
2) Open the browser and enter Server IP address to download VPS client
software for PDA version.
3) Install VPS client software.
4) Launch VPS software and enter the login code.
5) Start Projection.
Page 16

16
4.10 Exit Program
Click to exit this program.
5. Web Management
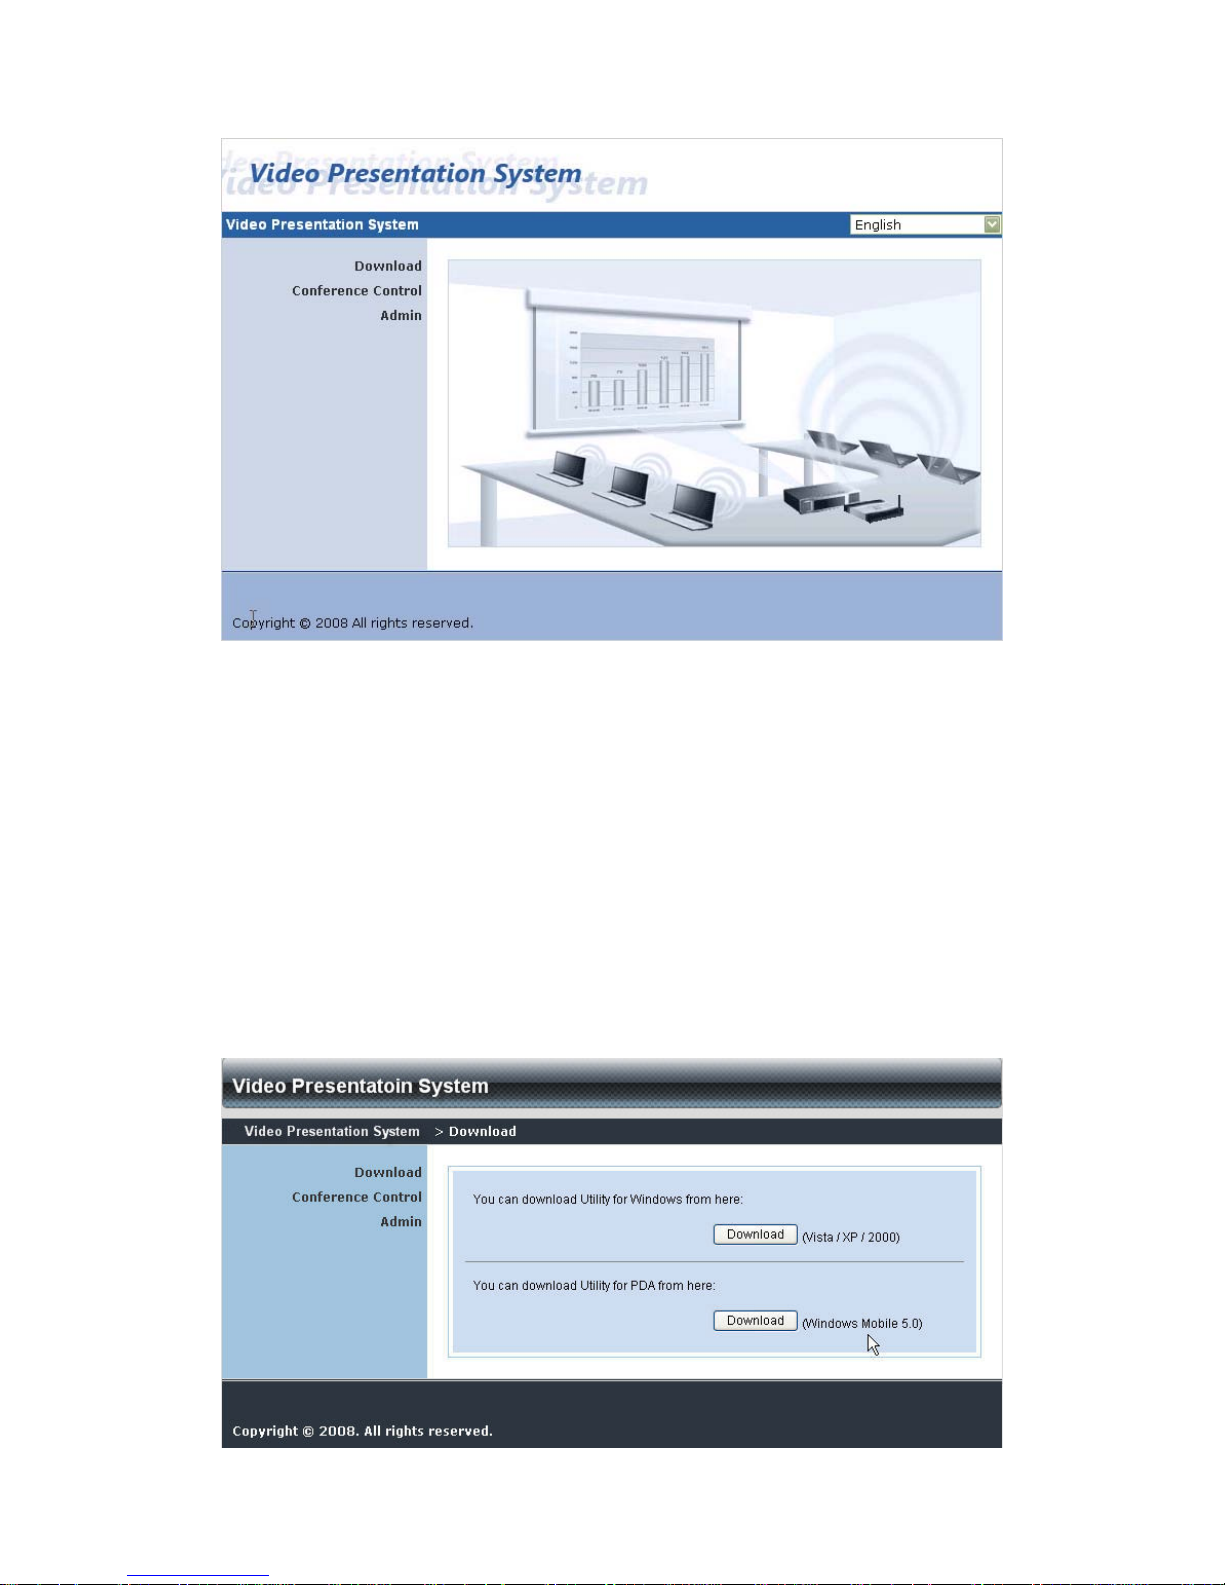
5.1 Home Page
6. Make sure your PC connect to VPS box successfully.
7. Open your browser, it will enter VPS home page automatically.
8. If not, enter your IP address on the browser, you can see the IP on the
projector screen.
9. The default IP is 192.168.100.10
Page 17
17
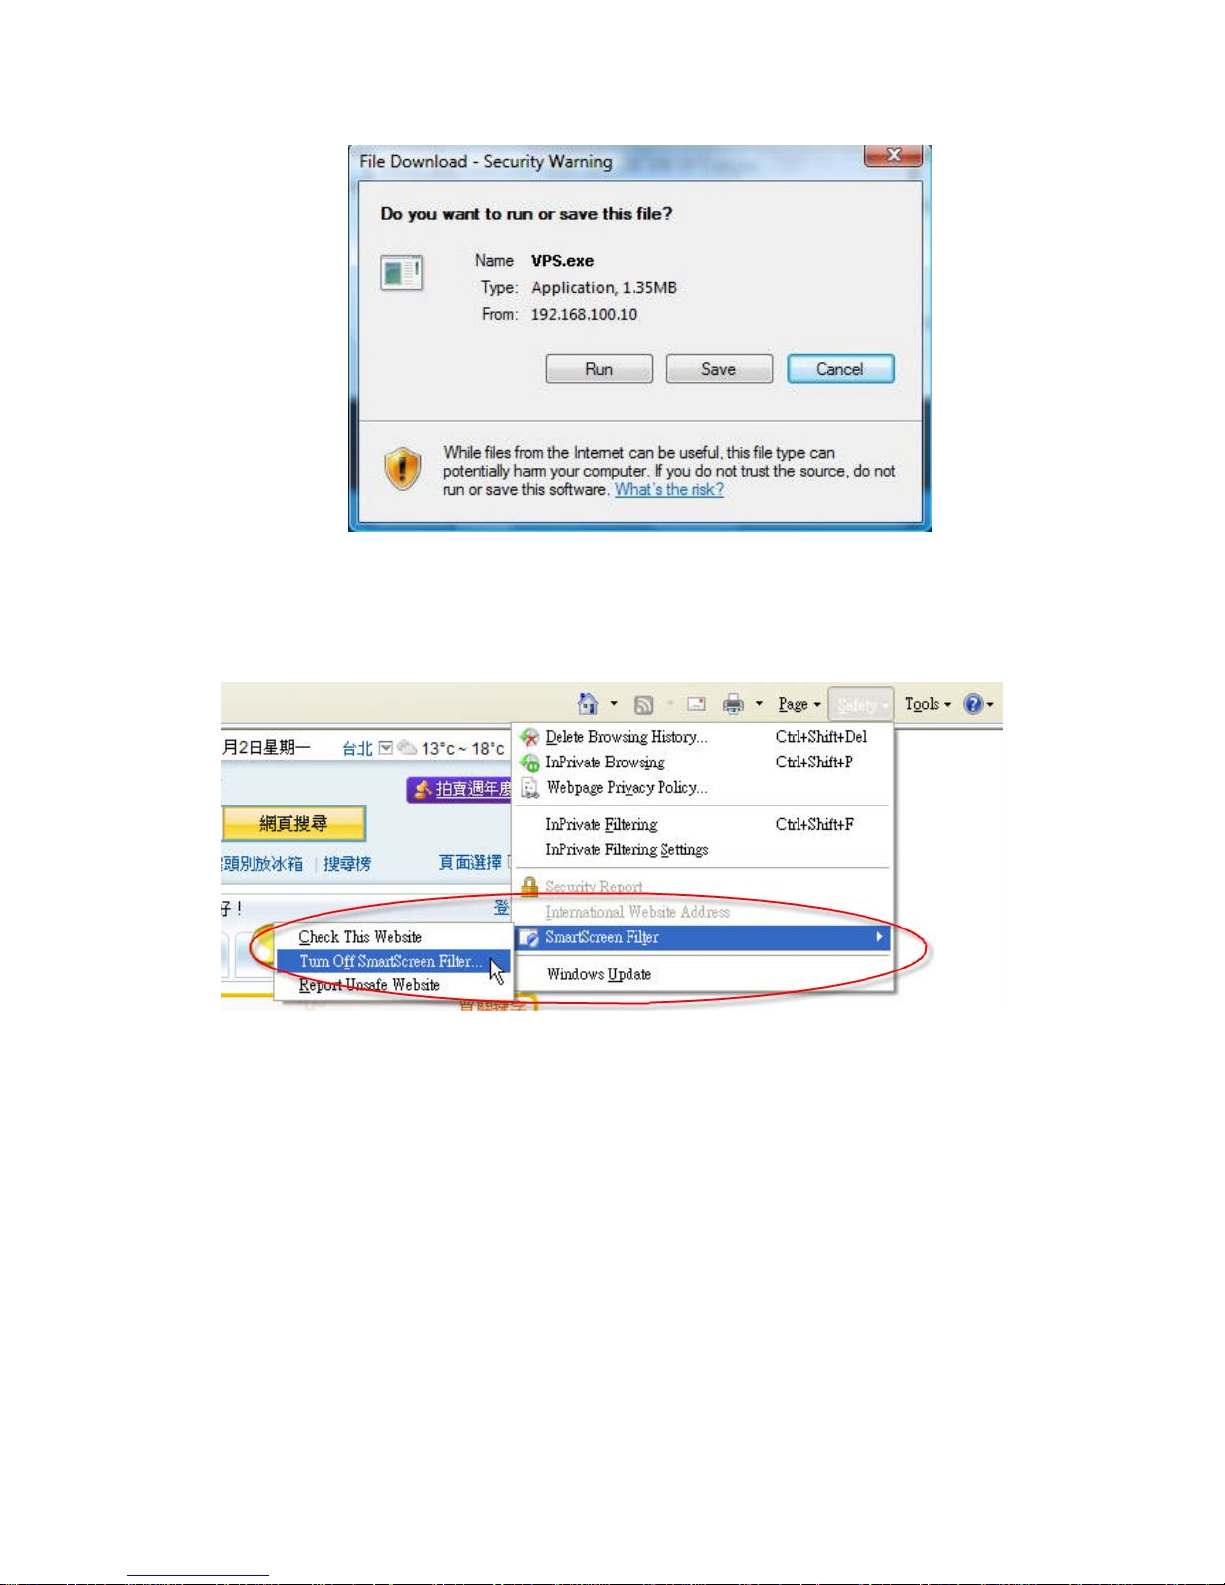
5.2 Download Software
1. Select “Download software” function.
2. Please select the”Windows Vista / XP / 2000” or ”Windows Mobile 5.0” and
execute the installation program.
3. Follow Installation Wizard instructions to proceed till the installation process
complete.
4. If pop up “Windows Security Alert” because Windows firewall block this
program. You just press “Unblock” button to continue installation.
5. Once installation complete, a utility shortcut come out on the screen.
Page 18
18
Notice:
When using IE8.0 version, please close the “Smart Screen Filter” under
safety settings. Then re-access VPS web management again to download the
driver.
5.3 Conference Control
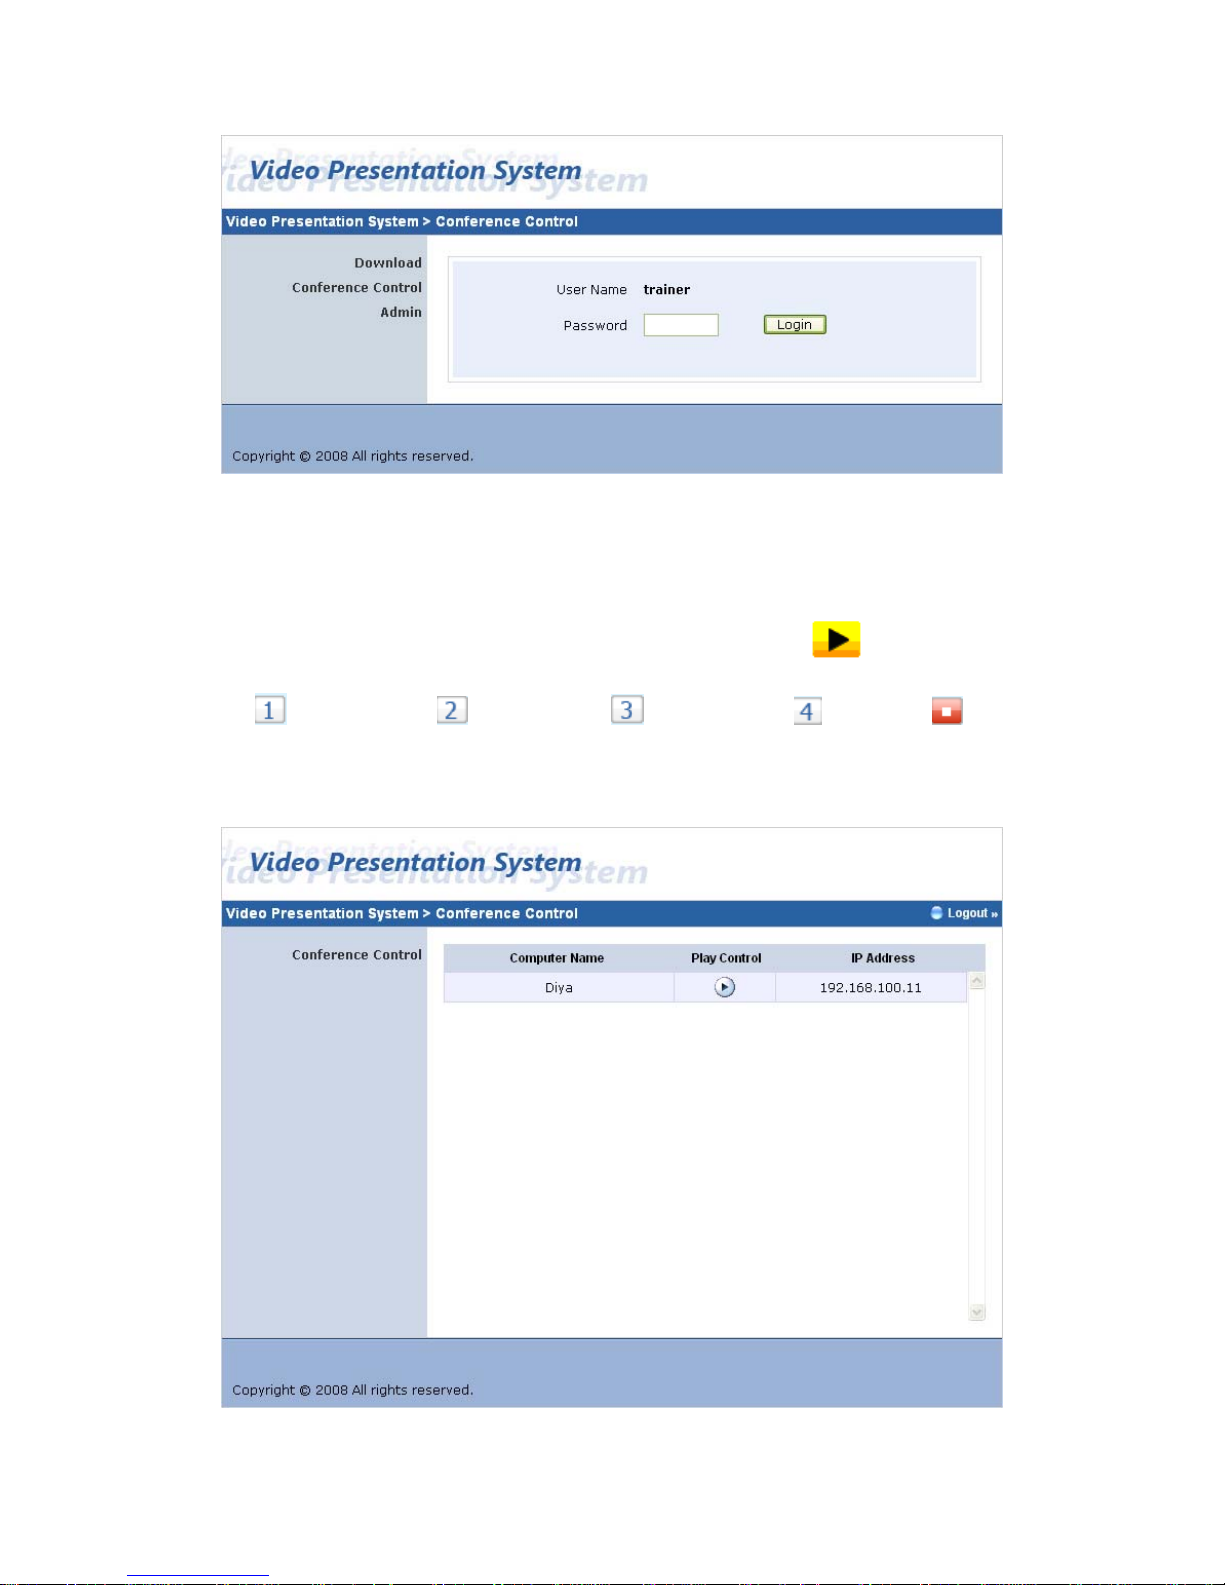
1) This function allows you to host a meeting smoothly without projector cable
swapping and each participant can show their presentation easily.
2) Select “Conference Control” function.
3) Enter password, the default value is “trainer”, and then press [Login].
Page 19
19
4) After login, you can see a User List on the screen which indicates all of users
connected to VPS box.
5) There are three columns, “Computer Name”, “ Play Control” and “IP
Address”.
6) Play Control,There are six buttons, including Play(Full) , Play Split #1
, Play Split #2 ,Play Split #3 , Play Split #4 and Stop .
7) User List
Page 20
20
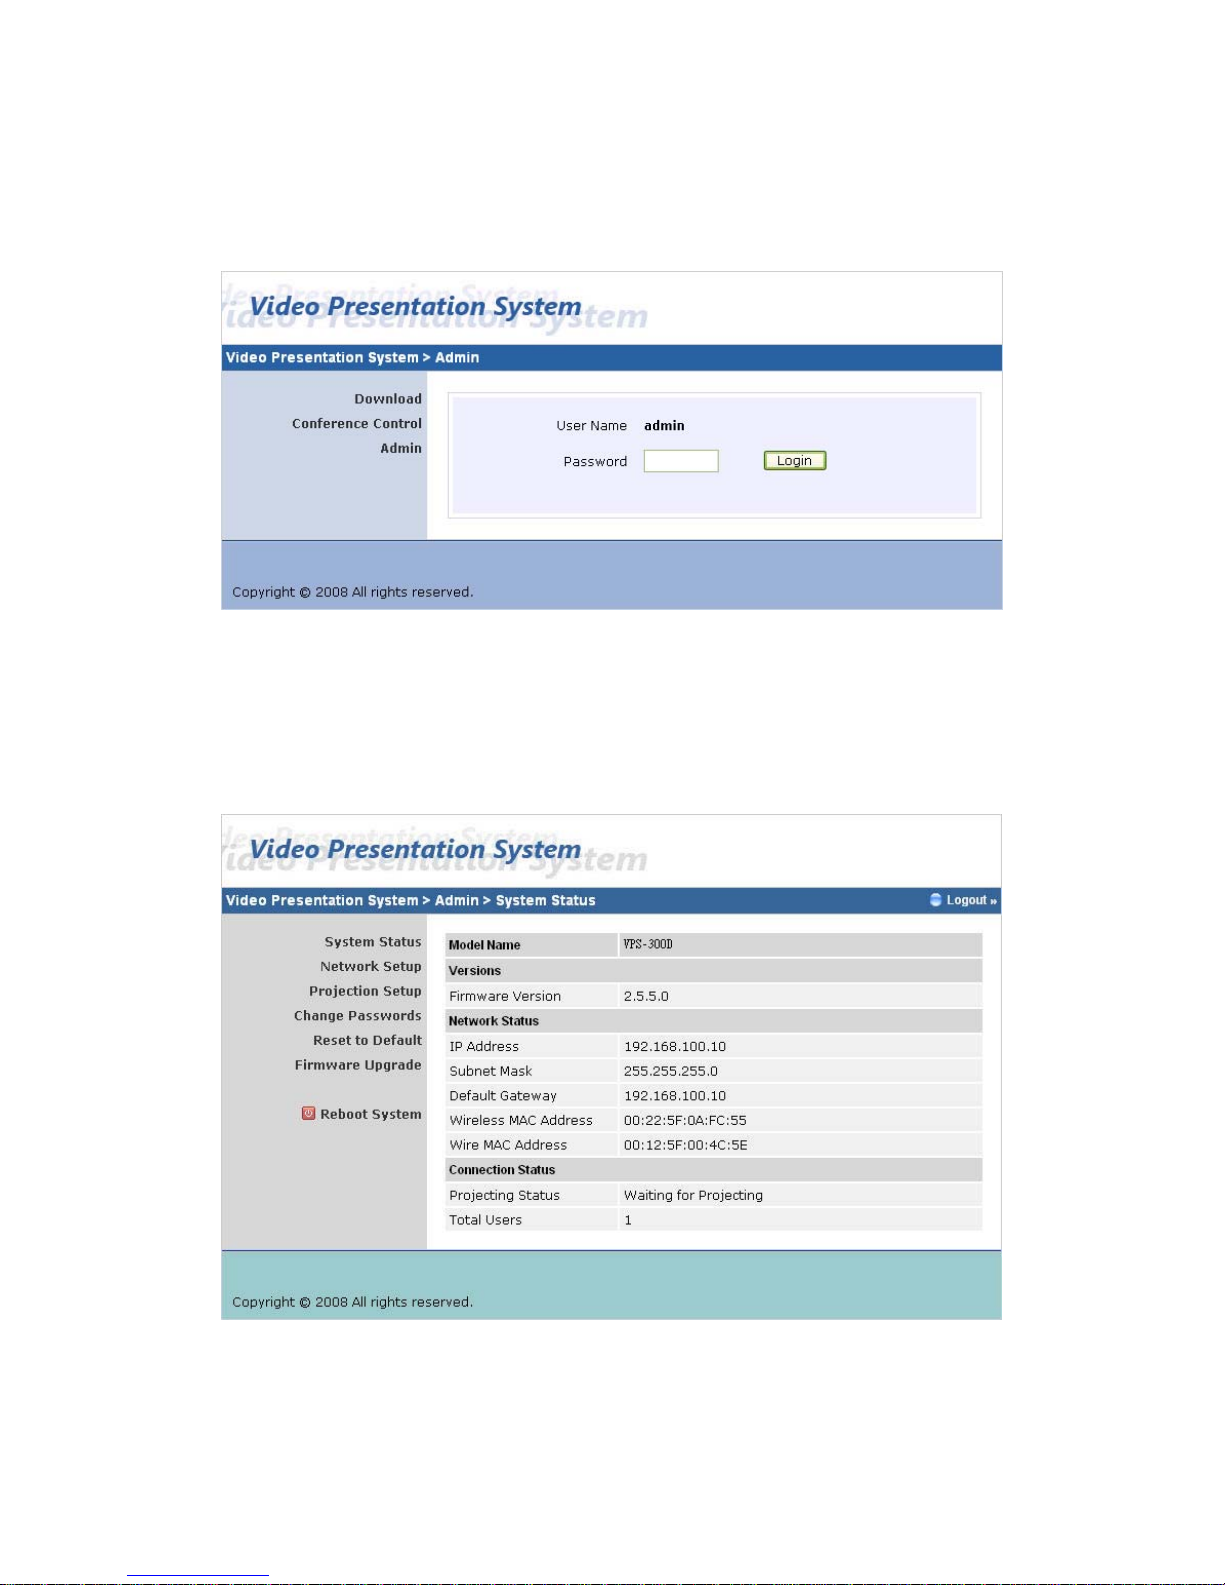
5.4 Login Web Admin
1. Click [Admin] and then enter password to login web page.
2. The password default value is “admin”.
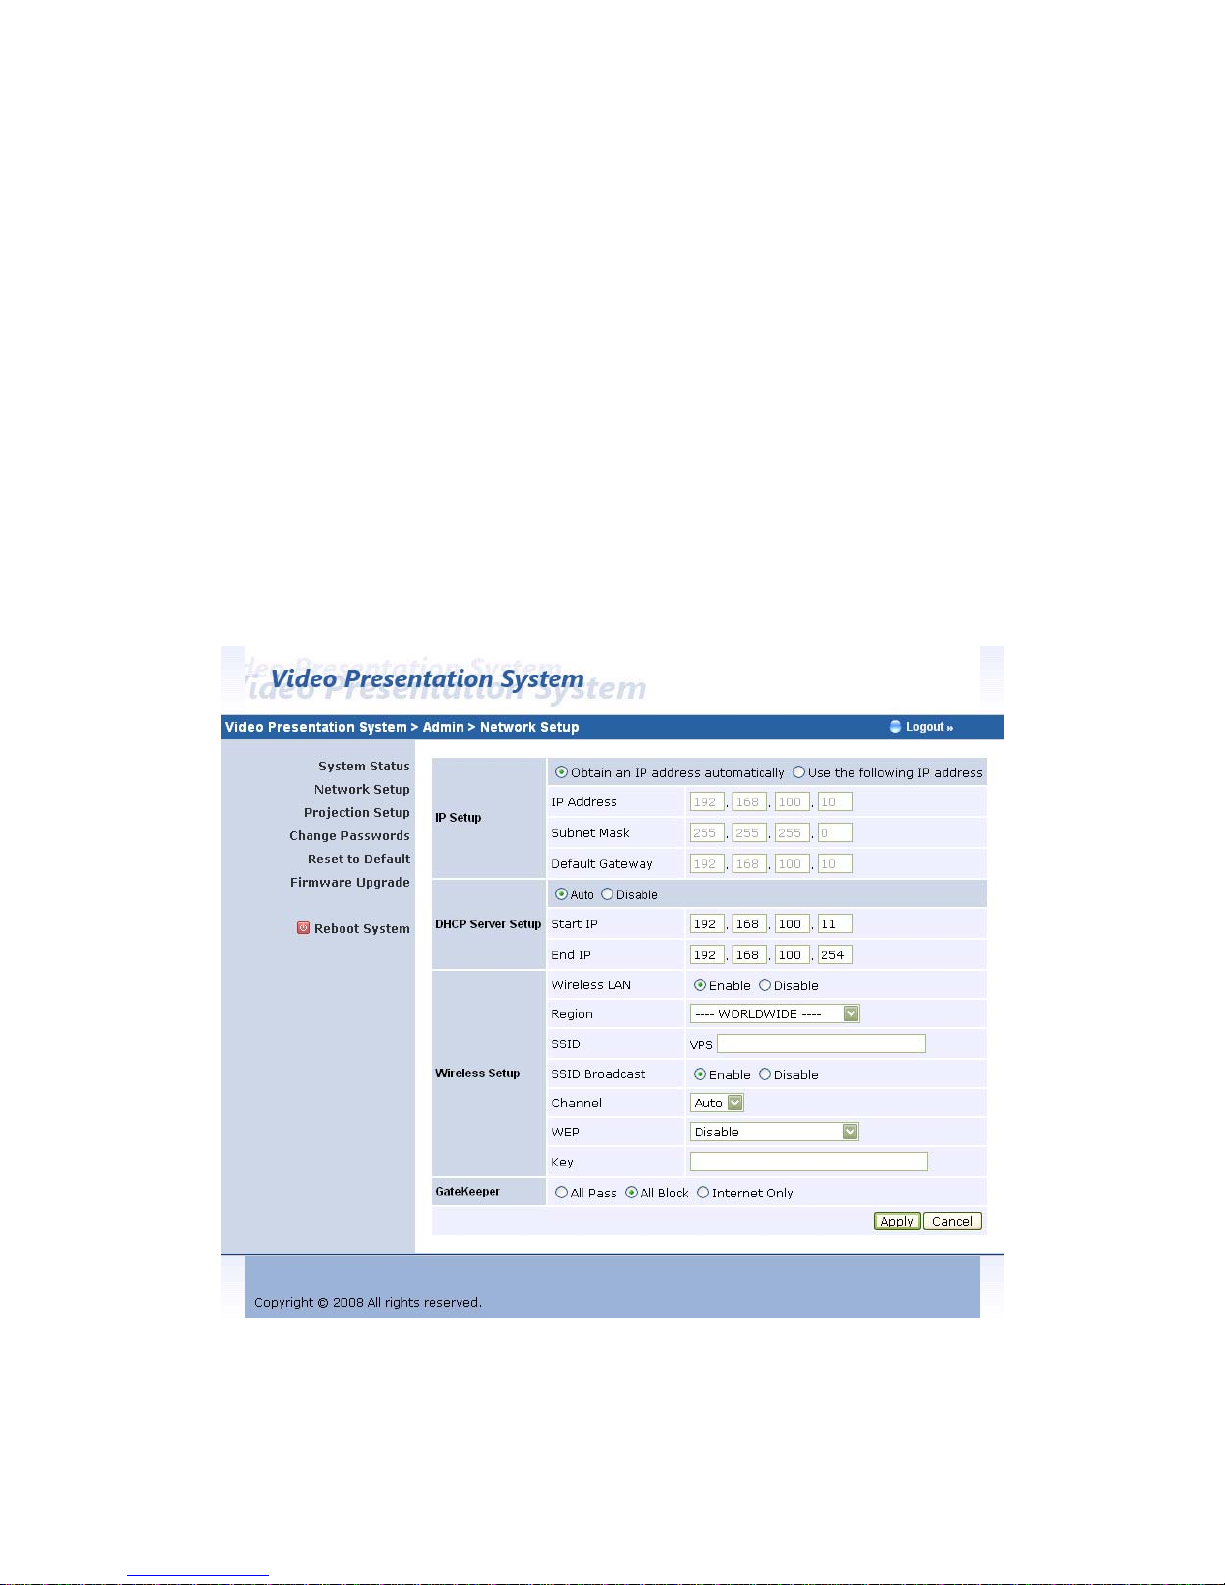
5.5 System Status
Click [System Status], shows current system status.
Model Name: Product model name
Versions:
Page 21
21
1. Firmware version no.: Product firmware version number.
Network Status:
1. IP address:IP address of VPS device.
2. Subnet Mask:subnet mask
3. Default Gateway:default gateway
4. Wireless MAC address:wireless MAC address
5. Wire MAC address:wire MAC address
Connection Status:
1. Projecting status: which is “Waiting for projecting” or “Projecting”
2. Total Users: It shows how many users login into VPS box.
5.6 Network Setup
There are many kinds of operating configurations as below.
< Auto-Configuration Network Setup>
The default setting of the VPS box is DHCP client. When the VPS box is
connected to a LAN that already has a DHCP server present, the VPS box takes
Page 22

22
an IP address assigned to it by the server. When the VPS box is connected to a
LAN that does not have a DHCP server, the VPS box becomes the DHCP server
in the network.
< IP Setup>
♦ You can select “obtain IP address automatically” or “Use the following
IP address”
♦ IP Address: The default value is 192.168.100.10.
♦ Subnet Mask: The default value is 255.255.255.0
♦ Default Gateway: The default value is 192.168.100.10
<DHCP Server Setup>
♦ You can select “auto(Enable/Disable DHCP Server” or “Disable”)
♦ Start IP: The start IP address of DHCP Server.
♦ End IP: The end IP address of DHCP Server.
< Wireless Setup>
♦ Region: default value is “Worldwide”.
♦ SSID: SSID string, max. Length is 32 bytes.
♦ Channel: to set fixed channel or Auto. The “Auto” means after power
on VPS, it will scan all of wireless channel and select clear one channel
automatically.
♦ WEP: you can Disable WEP key or select one of 64bit or 128bit in ASCII
or HEX string.
♦ Key: If WEP is enabled, you have to set key value according to WEP
mode you selected.
< Gatekeeper>
Gatekeeper is designed for ensuring the enterprise network security within
VPS box
♦ All Block can block Guest Users(through wireless) to access all office
network(LAN),
♦ All Allow can pass Guest Users(through wireless) to access all office
network
♦ Internet Only can block Guest Users (through wireless) from office
network (LAN) but still reserve internet connection capability.
<Apply >: press button to select this mode
<Cancel>: press button to abort action.
<Back>: Back to Operating mode main menu
Page 23
23
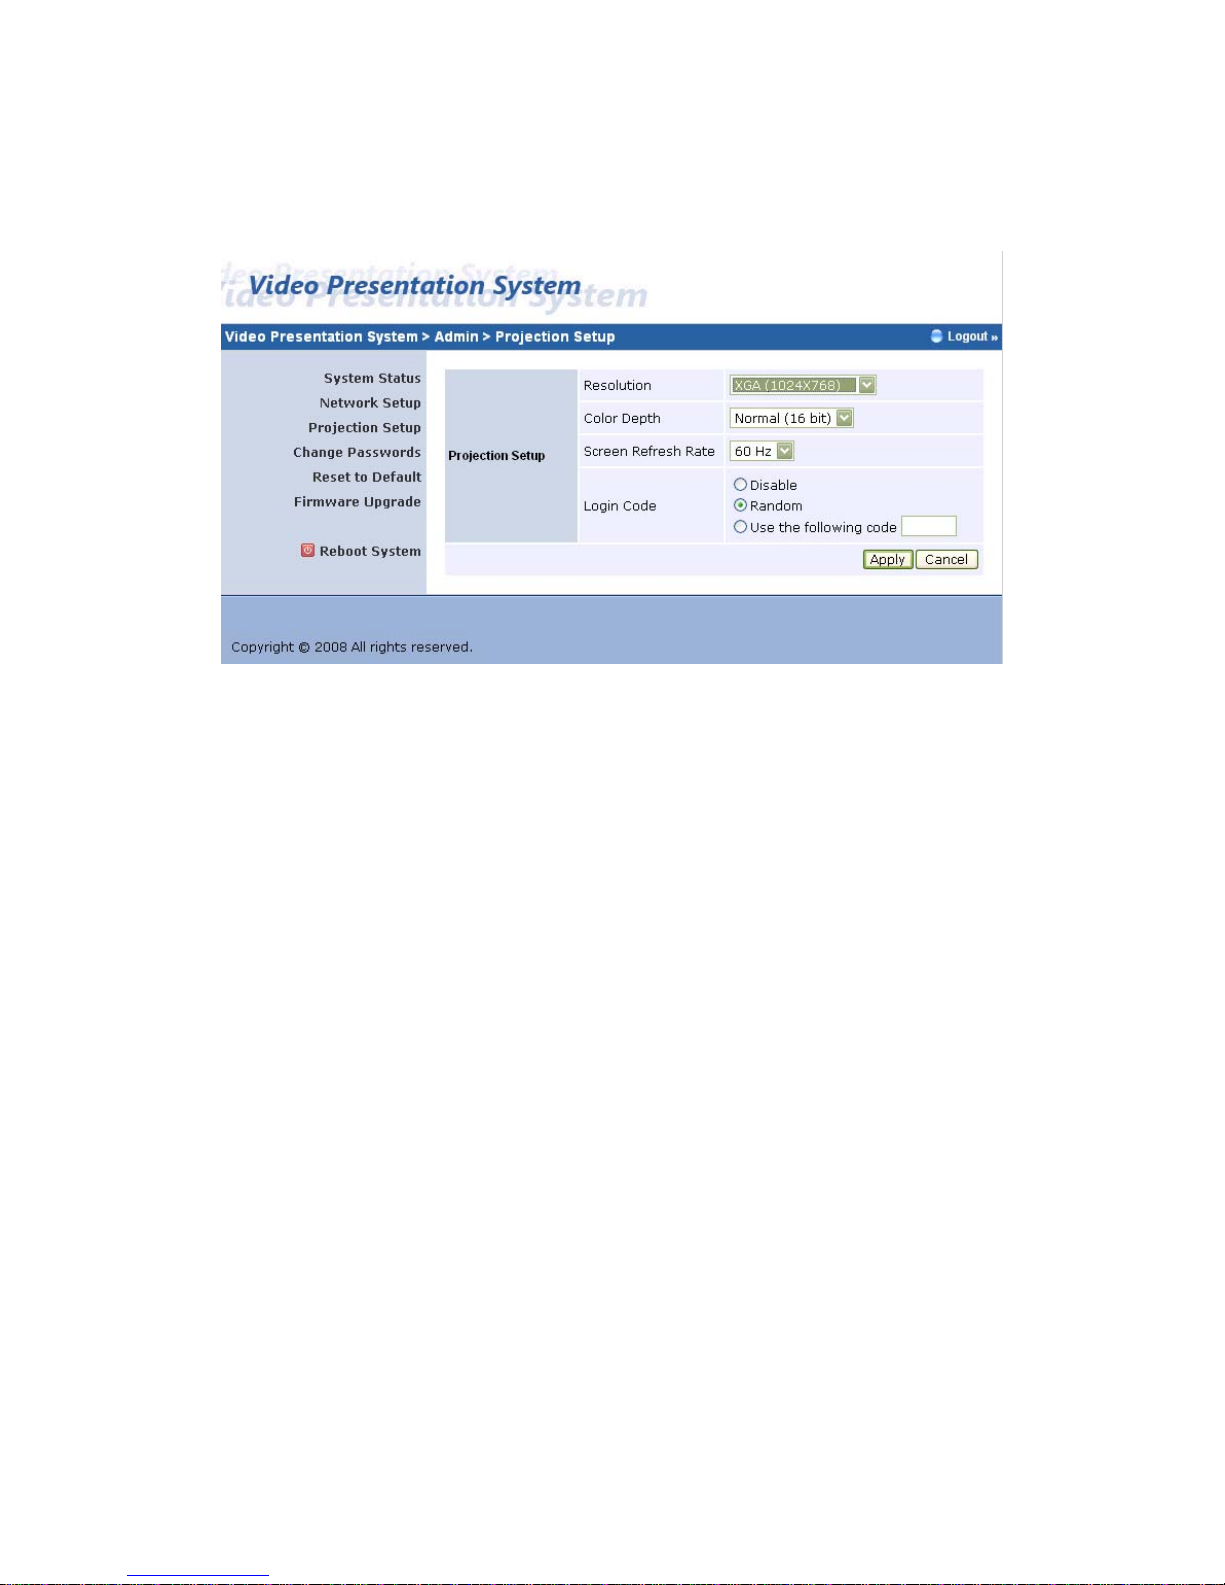
5.7 Projection Setup
Click [Projection Setup] button
♦ <Resolution>: 1024*768, 1280x768 and 800*600.
♦ <Color Depth>: provide VPS output with 16bit or 32 bit color
depth. It depends on your PC settings.
♦ <Screen Refresh Rate>: This is VGA output refresh rate, provides
60 Hz and 75Hz to suit for different kinds of projectors.
♦ <Login Code>: You can select “Disable”, “Random”, or “Use the
following code” to set a specified 4-characters Number.
♦ <Apply>:Confirmation and Save modifications
♦ <Cancel>: Cancel all the modifications
Page 24
24
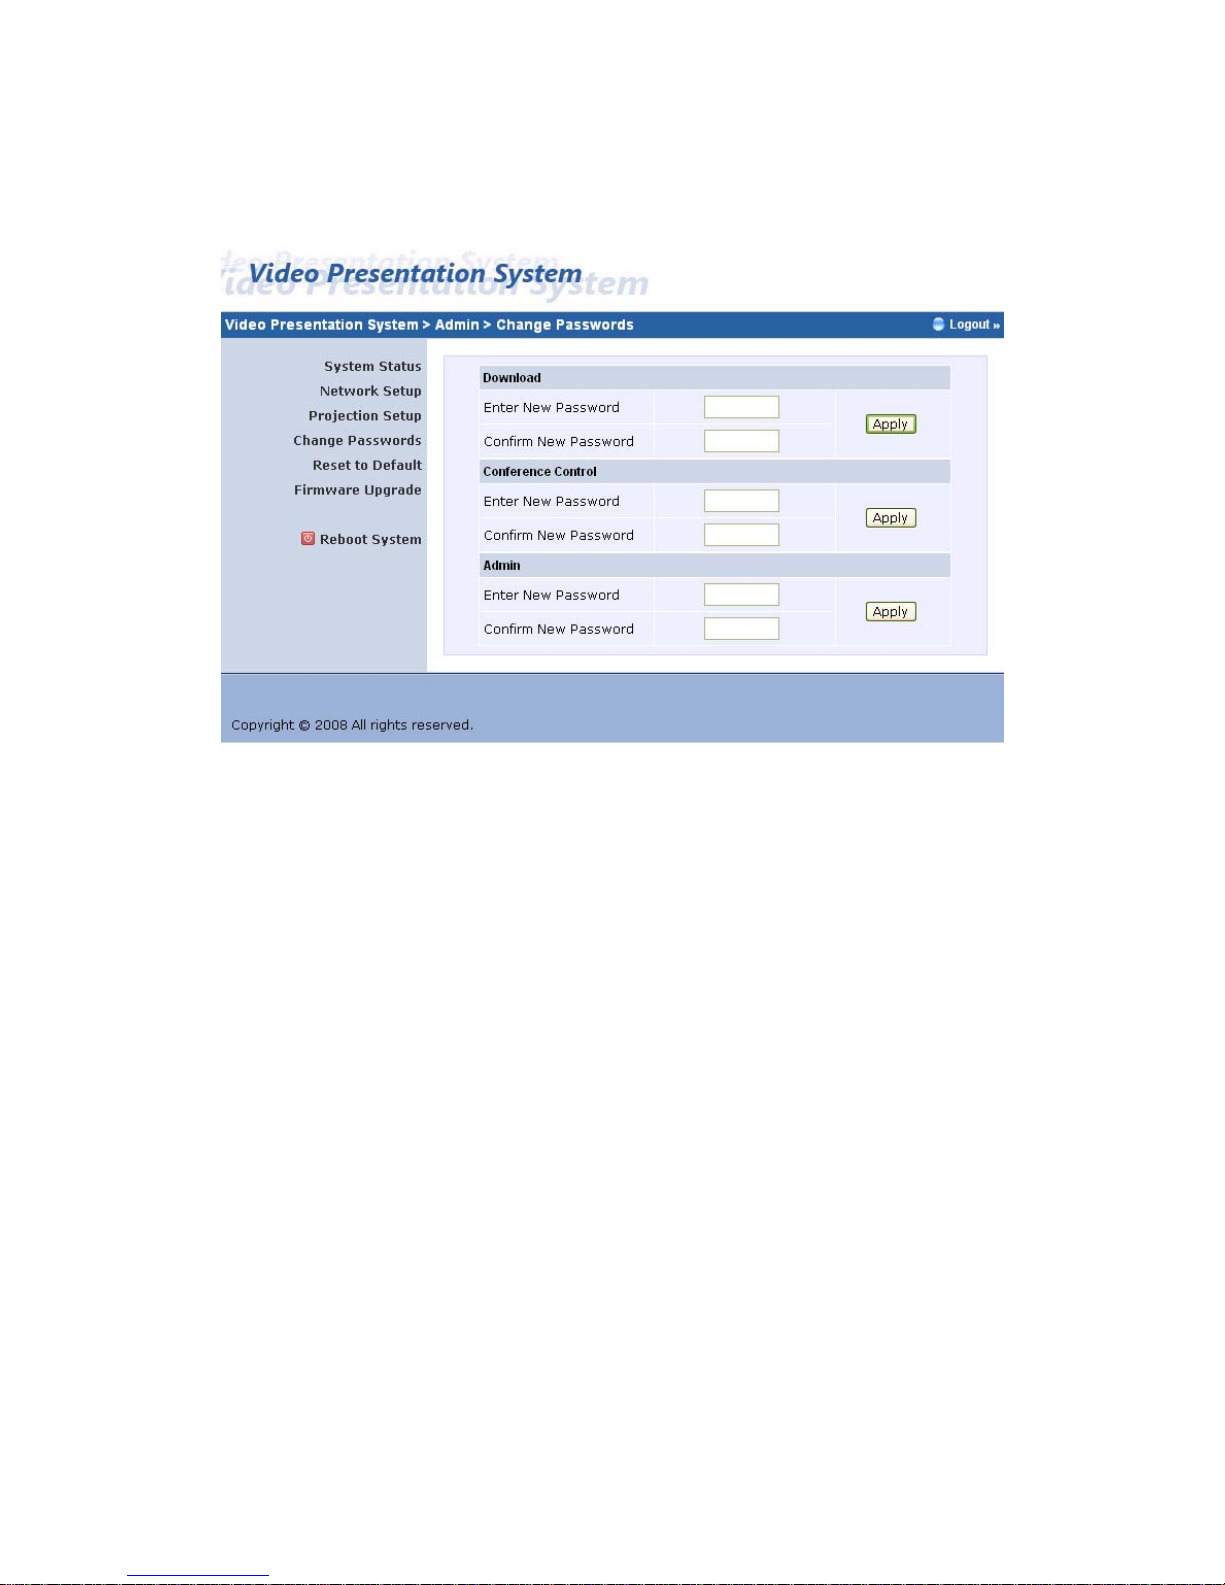
5.8 Change Passwords
Click [Change Password] button, to change password value.
♦ <Enter New Password>: enter new password you want to change
for each category.
♦ <Confirm New Password>: double confirm new password.
♦ <Apply>: Confirmation and Save modifications.
Page 25
25
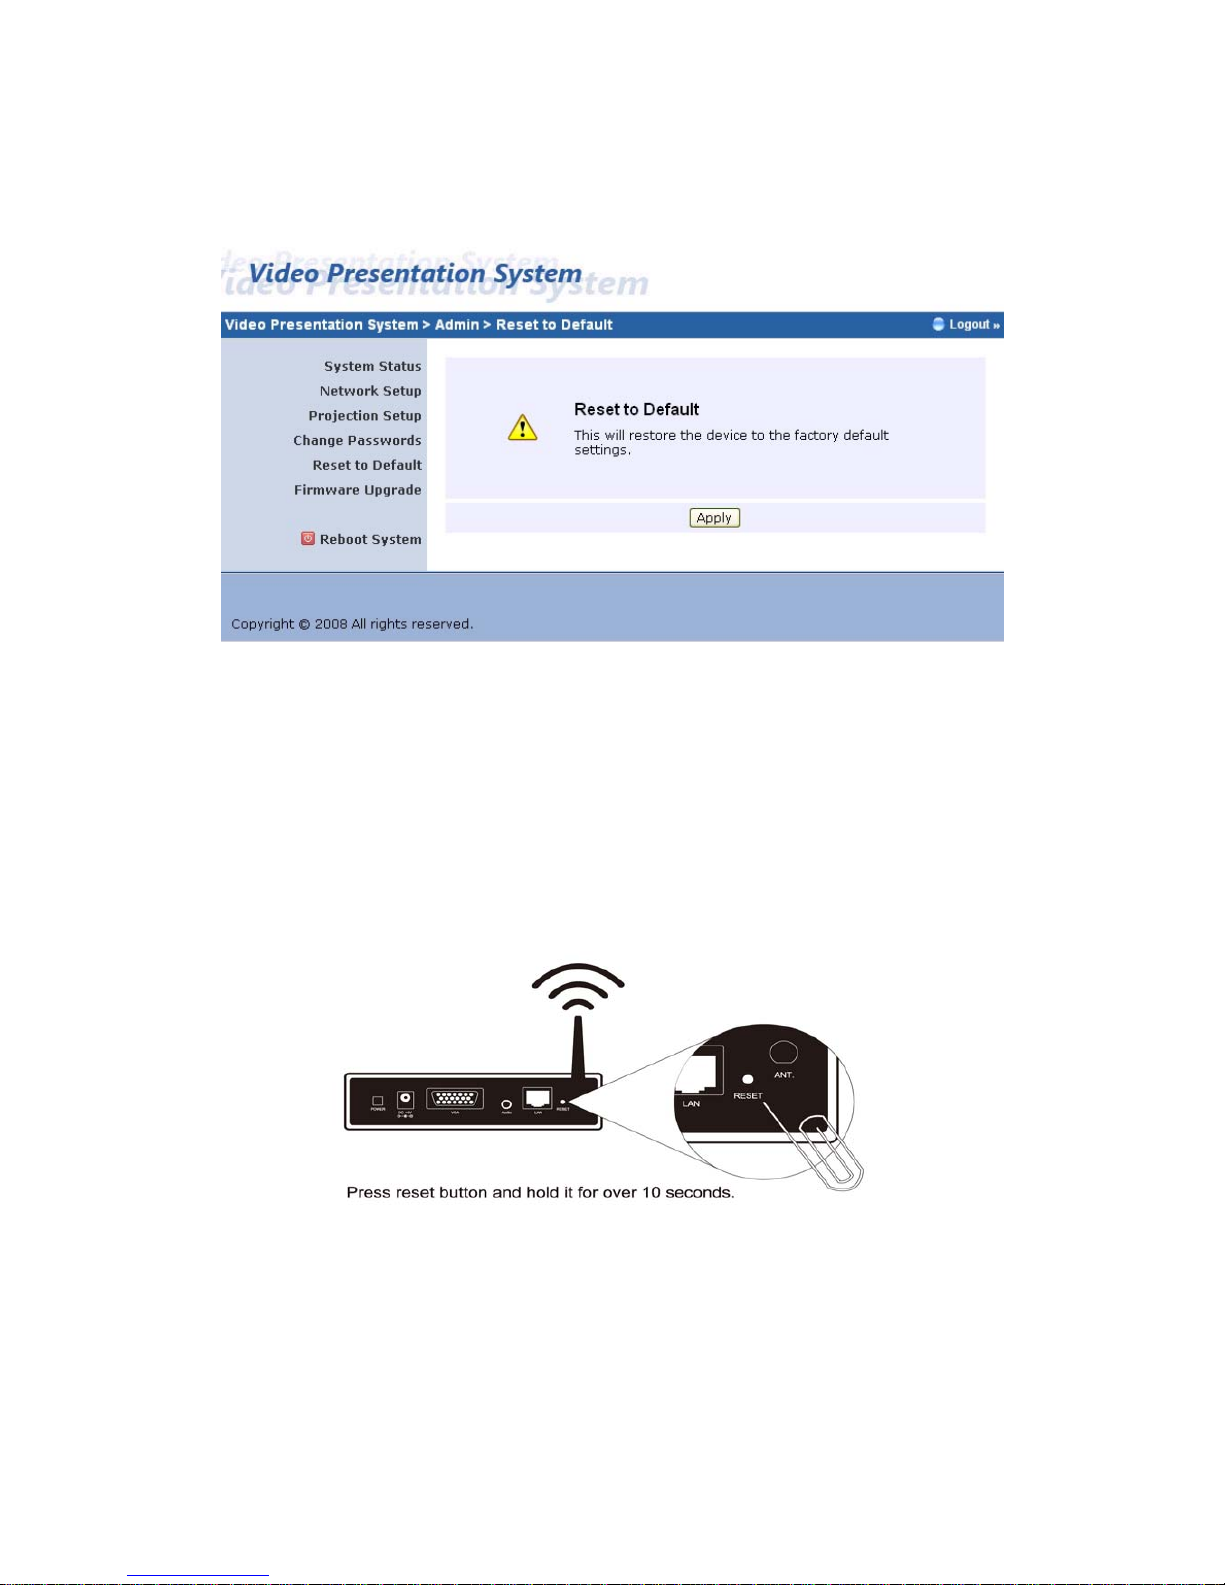
5.9 Reset to Default
Click [Reset to Default] button to restore factory default settings.
<Apply>: Confirmation and action.
*** Another way to restore Factory Default Settings, Follow below
procedures.
1. Press [Reset] button and Hold.
2. Turn on VP S box .
3. Wait for over 10 seconds and relief [Reset] button.
4. It will take effect to restore factory default settings.
Page 26
26
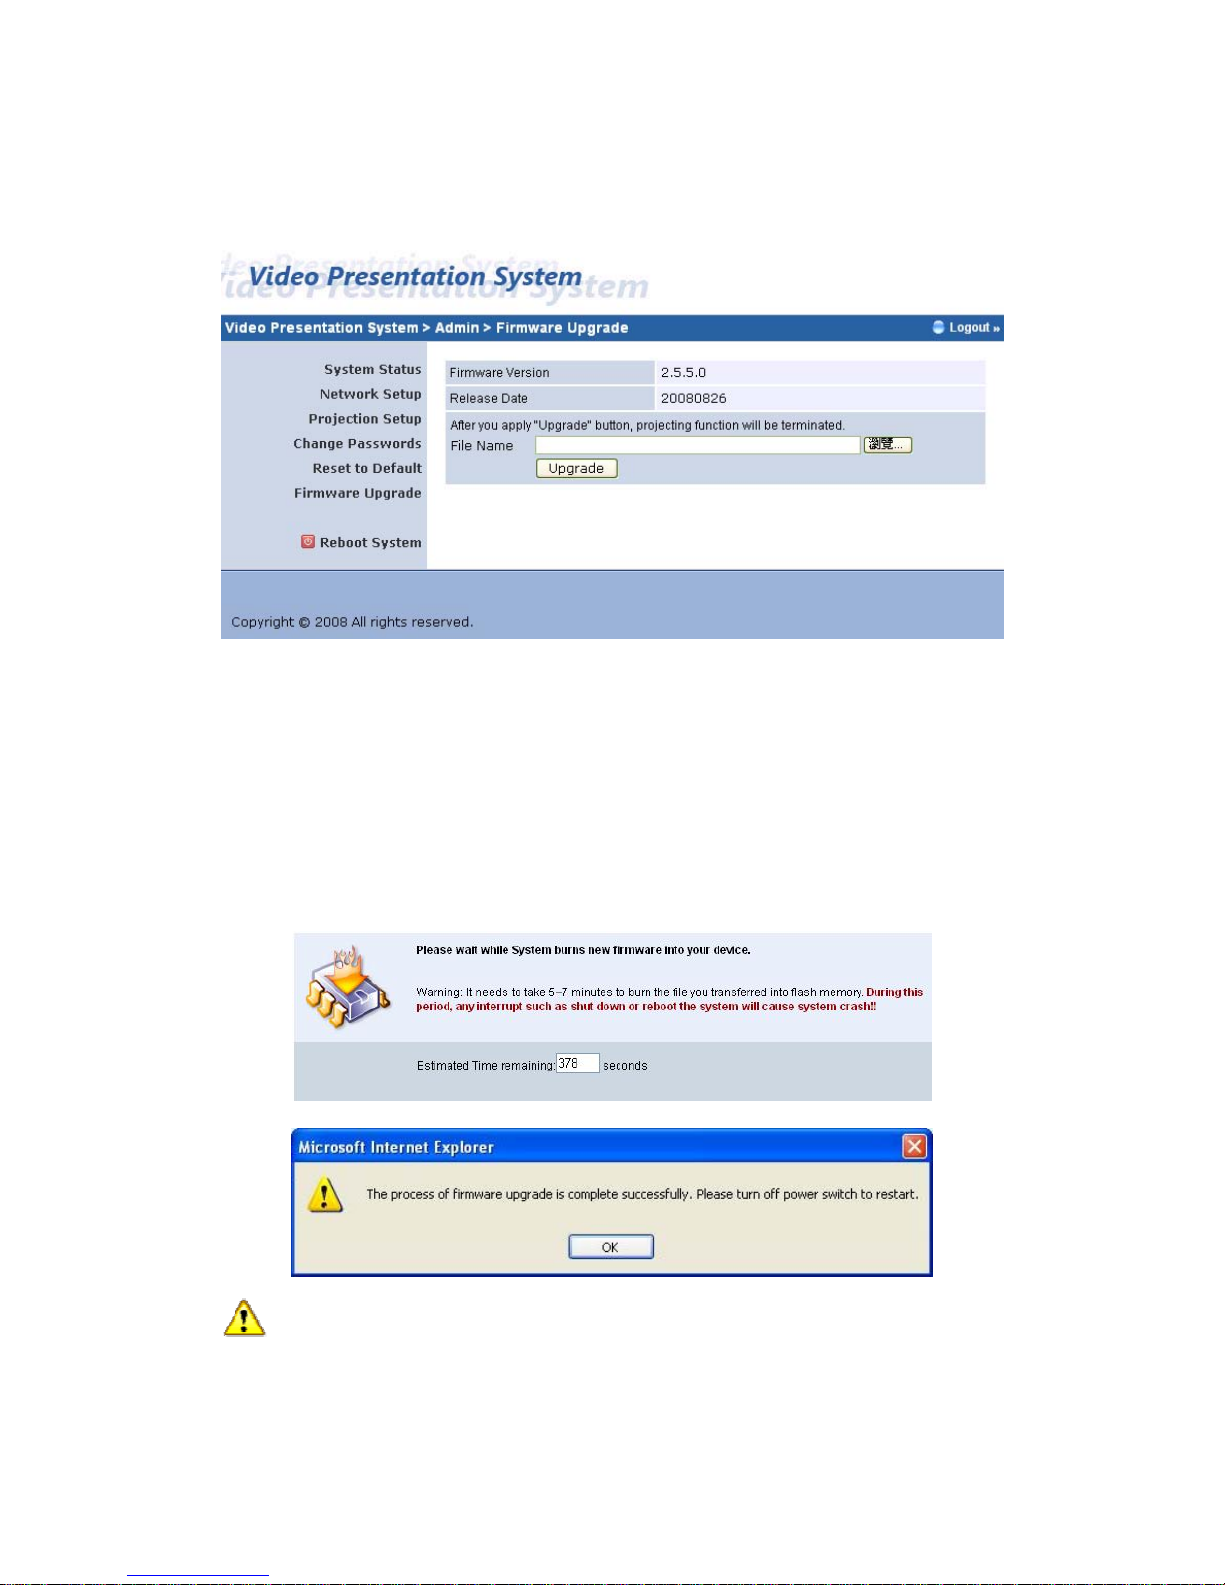
5.10 Firmware Upgrade
Click [Firmware Upgrade] button to upgrade firmware.
1. Firstly, you have to get latest firmware image file from your vendor.
2. Click <Browse> to specify file name you want to upgrade.
3. Click <Upgrade> to start.
4. A warning message shown and count down counter on the screen.
5. After a few minutes, a complete message shown on the screen.
6. Restart VPS box to take effect.
Warning: Don’t power off VPS while firmware upgrade in progress,
otherwise will cause your Box doesn’t work and have to return device to your
vendor for fixing.
Page 27
27
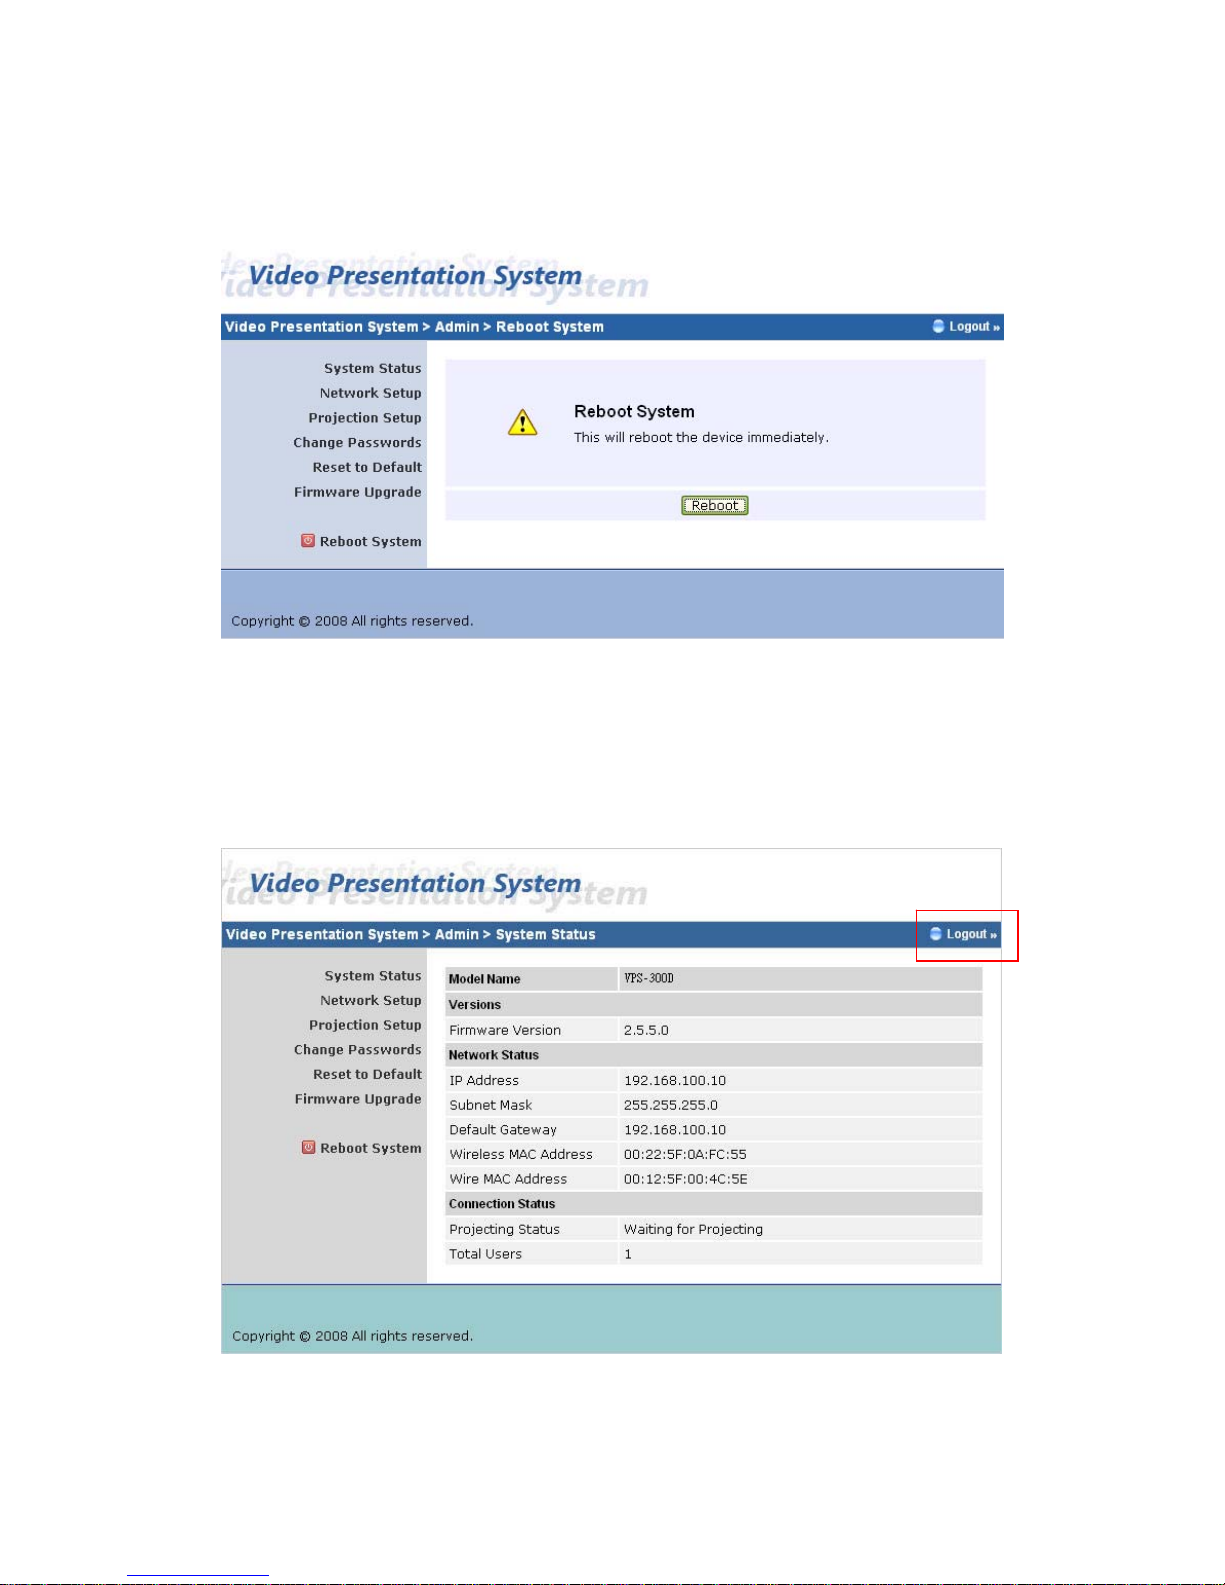
5.11 Reboot System
Click [Reboot System] button, to restart system
♦ <Reboot>: reboot system automatically.
5.12 Logout
Page 28
28
6. Appendix
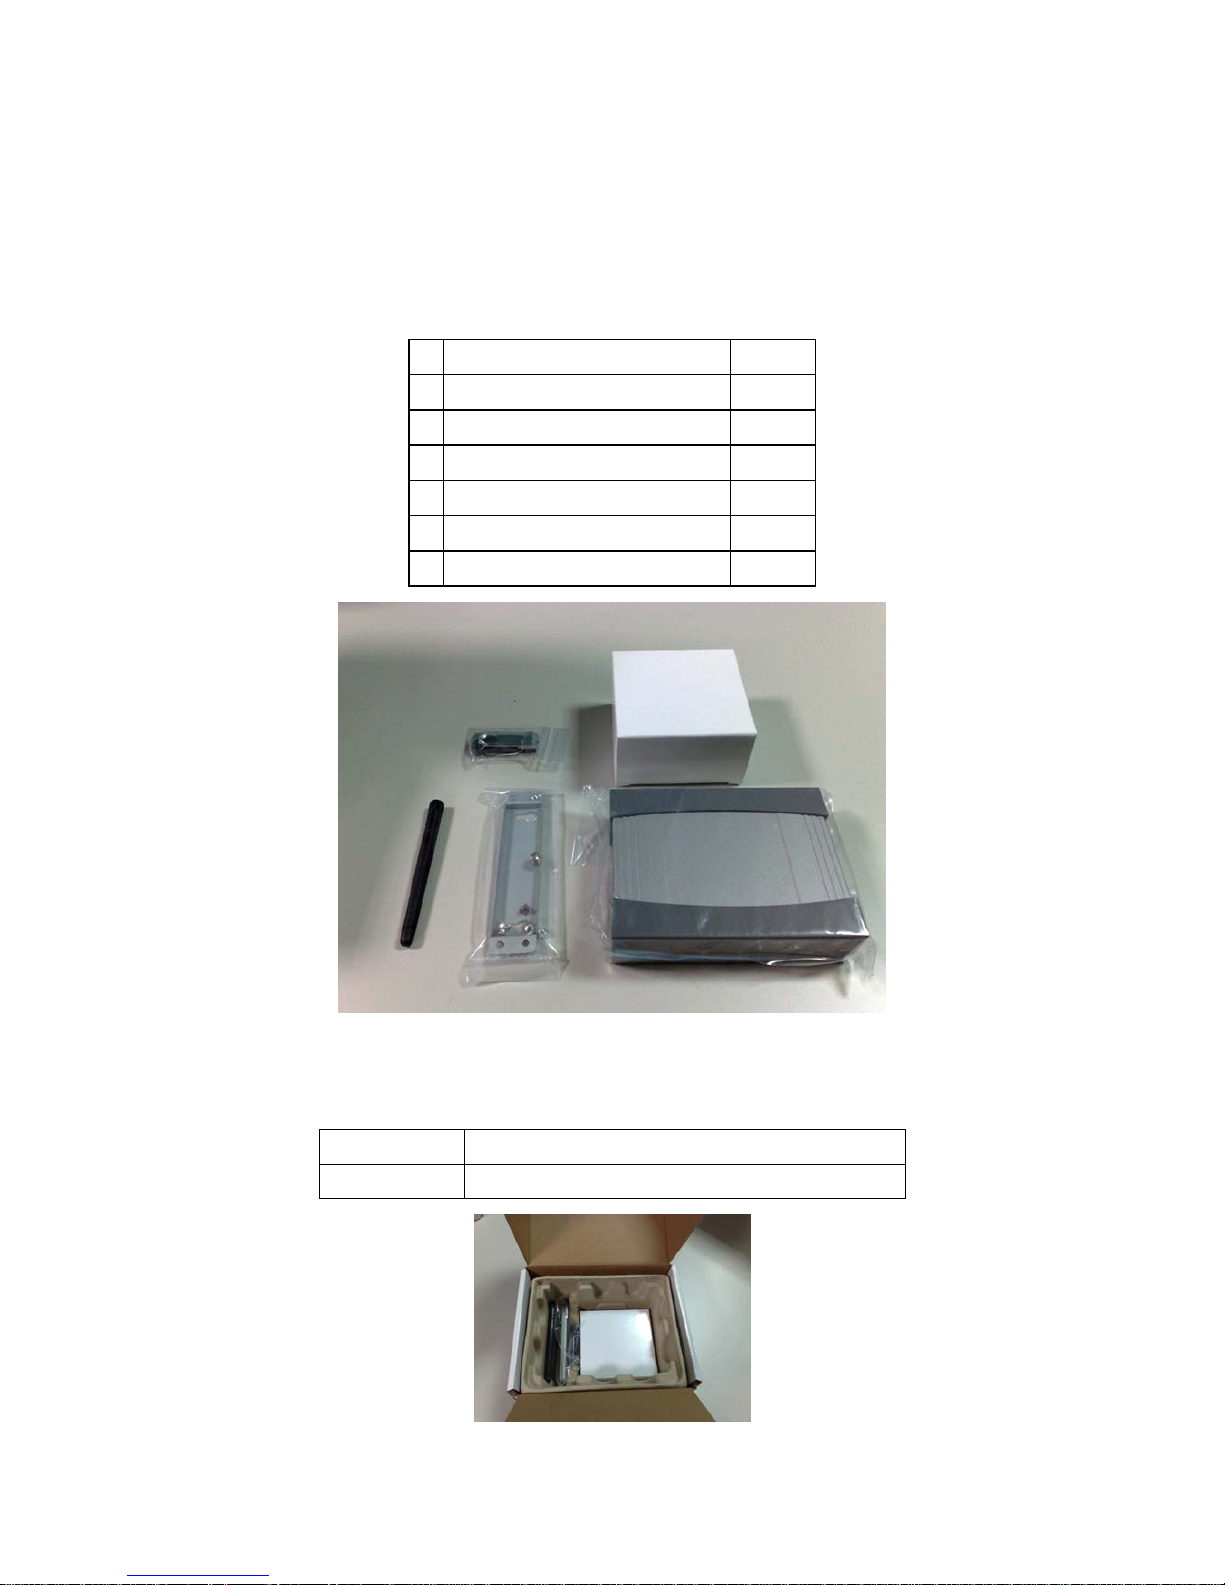
6.1 Accessories
1 VPS-300D 1PC
2 VPS-300D Antenna 1PC
3 USB Token 1PC
4 Adaptor DC 5V, 2.5A 1PC
5 Mounting Bracket 1PC
6 Bracket Fix Screws 4PCS
7 Mounting Screws 2PCS
6.2 Packaging Specification
Dimension 155mm(W) x 195mm(D) x 110mm(H)
Weight 900g
Page 29
29
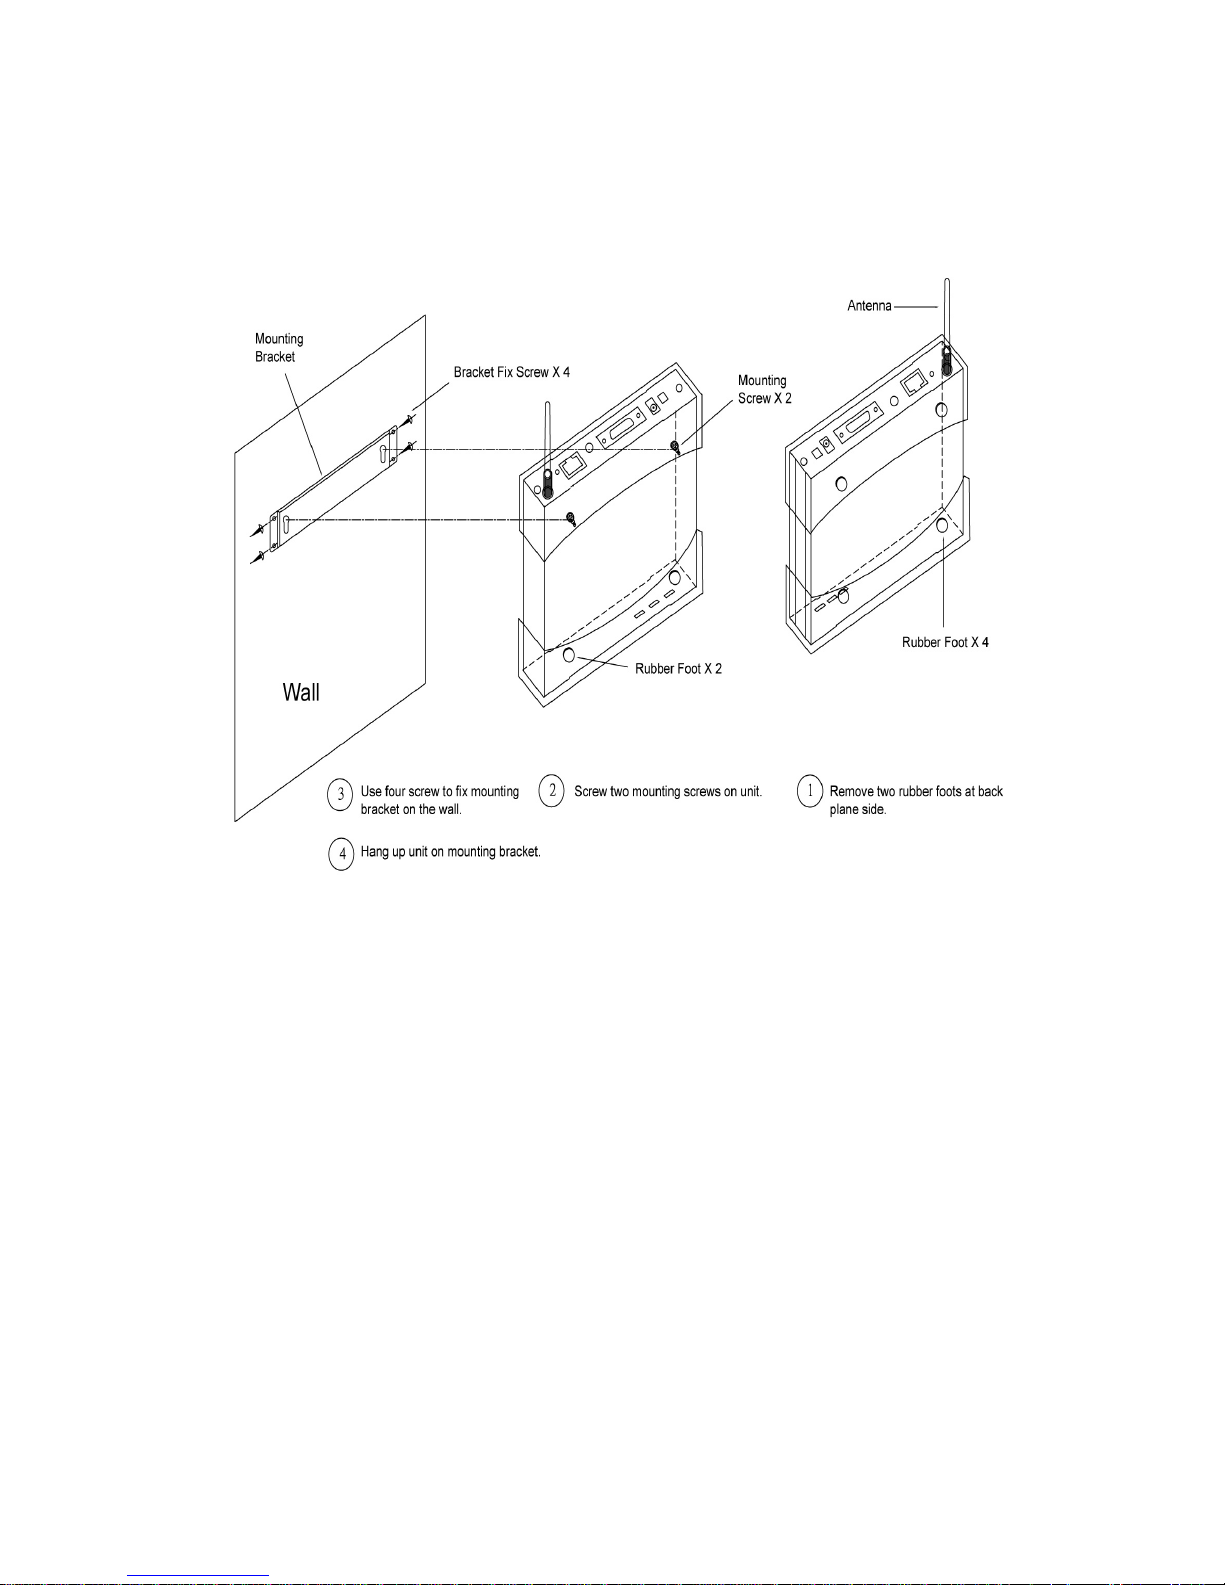
6.3 Wall Mounting Instruction (Optional)
 Loading...