

Page 1
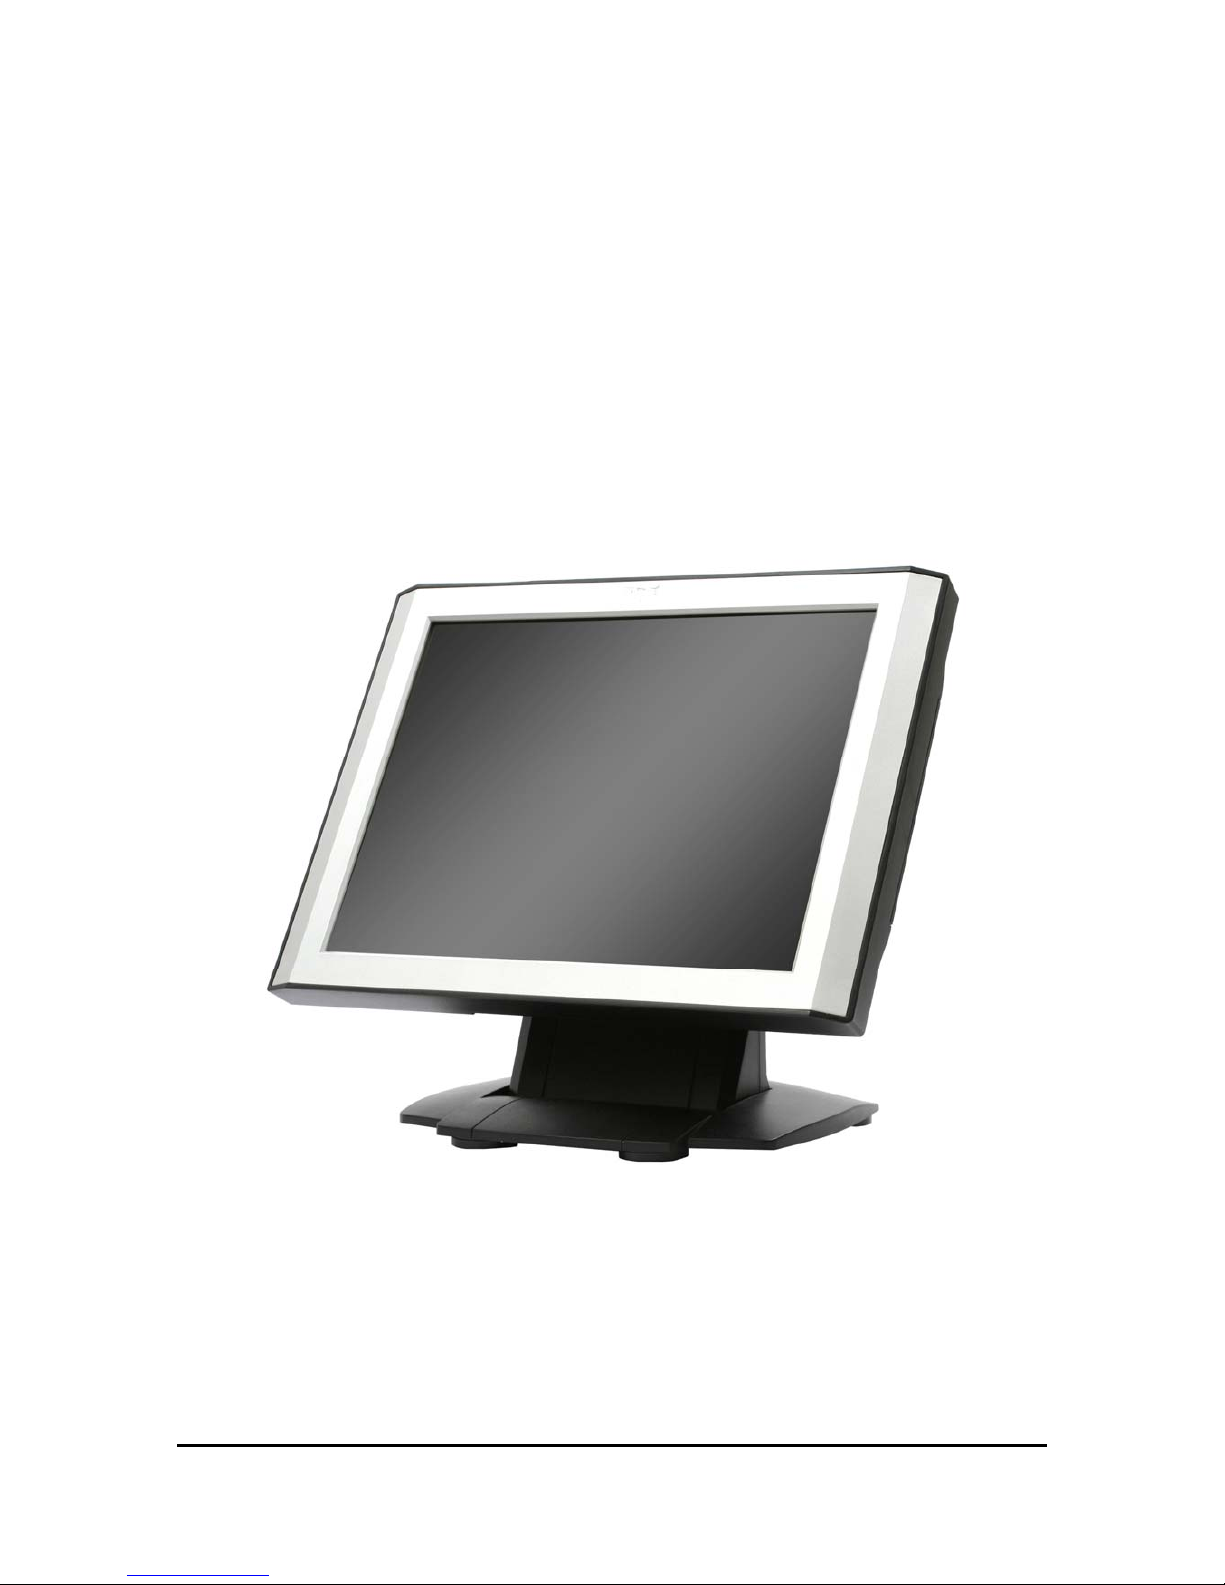
PM-150
LCD Color Monitor
User Manual
1 Manual Version: 3.0
Release Date: 10/28/2007
Page 2

2 Manual Version: 3.0
Release Date: 10/28/2007
Index of Contents
0. Before Installation……………………………………………………………...3
1. Appearance
………………………………………………………………….....4
2. Control Panel
…………………………………………………………………..6
2.1 Push Button………………………………………………………………6
3. Rare Panel I/O Connector
……………………………………………………...7
4. Hardware Installation
..........................................................................................8
5. Touch Driver Installation
………………………….…………………………..9
5.1 Liyitec Touch
……………………………………………………………..9
5.2 ELO Touch
……….....................................................................................14
6. OSD Function
………………………………………………………………...21
6.1 Color.........................................................................................................21
6.2 Image Setting
............................................................................................22
6.3 Position
.....................................................................................................22
6.4 OSD Menu
................................................................................................23
6.5 Language
..................................................................................................23
6.6 MISC
……………………………………………………………………24
7. Cleaning and Safety..........................................................................................25
7.1 Cleaning Touch LCD Monitor................................................................ 25
7.2 Screen
.......................................................................................................25
7.3 Case
..........................................................................................................25
7.4 Safety
........................................................................................................25
Care and handling of your touch monitor
……………………………26
8. Troubleshooting
………………………………………………………………27
9. Specifications
…………………………………………………………………28
Attention
1. This manual contains important information for the proper setup and
maintenance of the products. Before setup and using of the products, please read
through this manual clearly.
2. This specification shall apply only to the product(s) coming along with
this manual inside.
3. The specification may be modified without any notice in advance. Please
inquire your supplier for latest specification, driver, or manual.
Page 3

3 Manual Version: 3.0
Release Date: 10/28/2007
0. Before Installation
When unpacking please check you have the following items.
♦ PM-150 LCD Color Monitor
♦ Accessory Package
¾ User Manual
¾ Driver CD-ROM
¾ AC/DC adaptor and Power cord
¾ D-Sub VGA cable
¾ D-Sub Touch cable (for touch panel model only)
Page 4
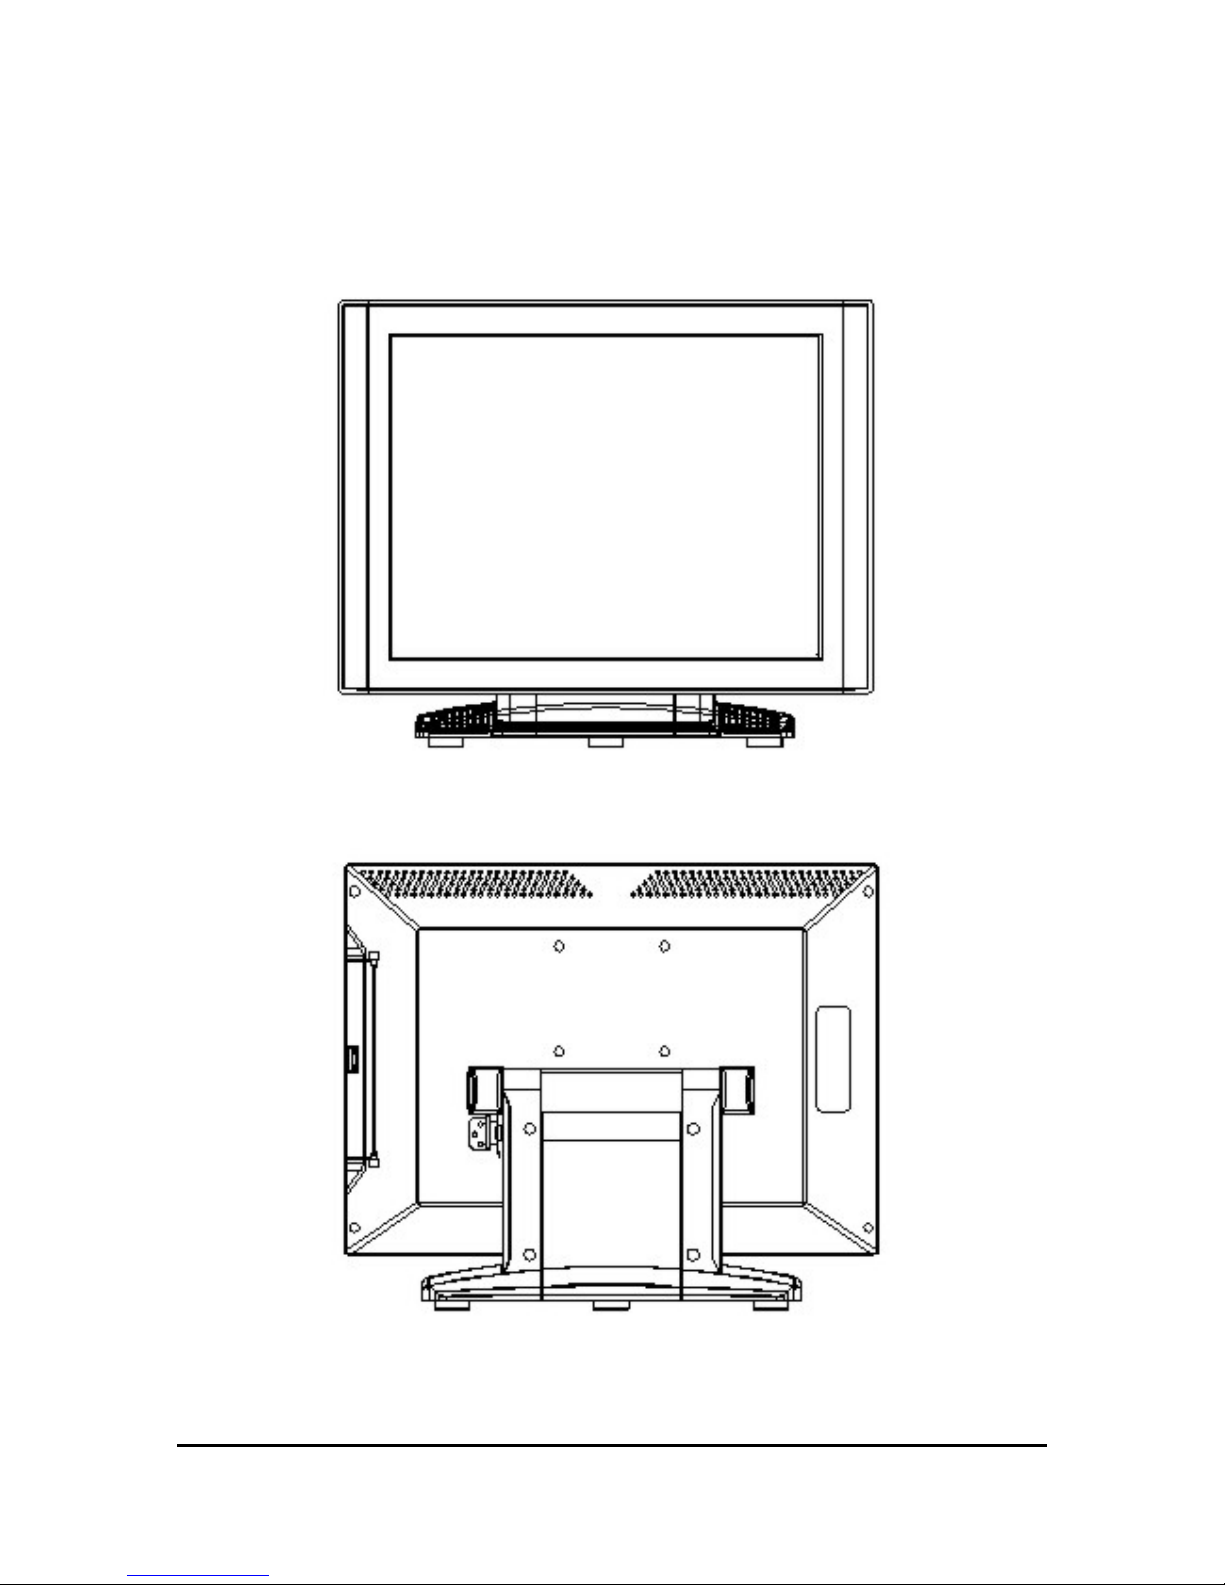
1. Appearance
Front View
Back View
4 Manual Version: 3.0
Release Date: 10/28/2007
Page 5
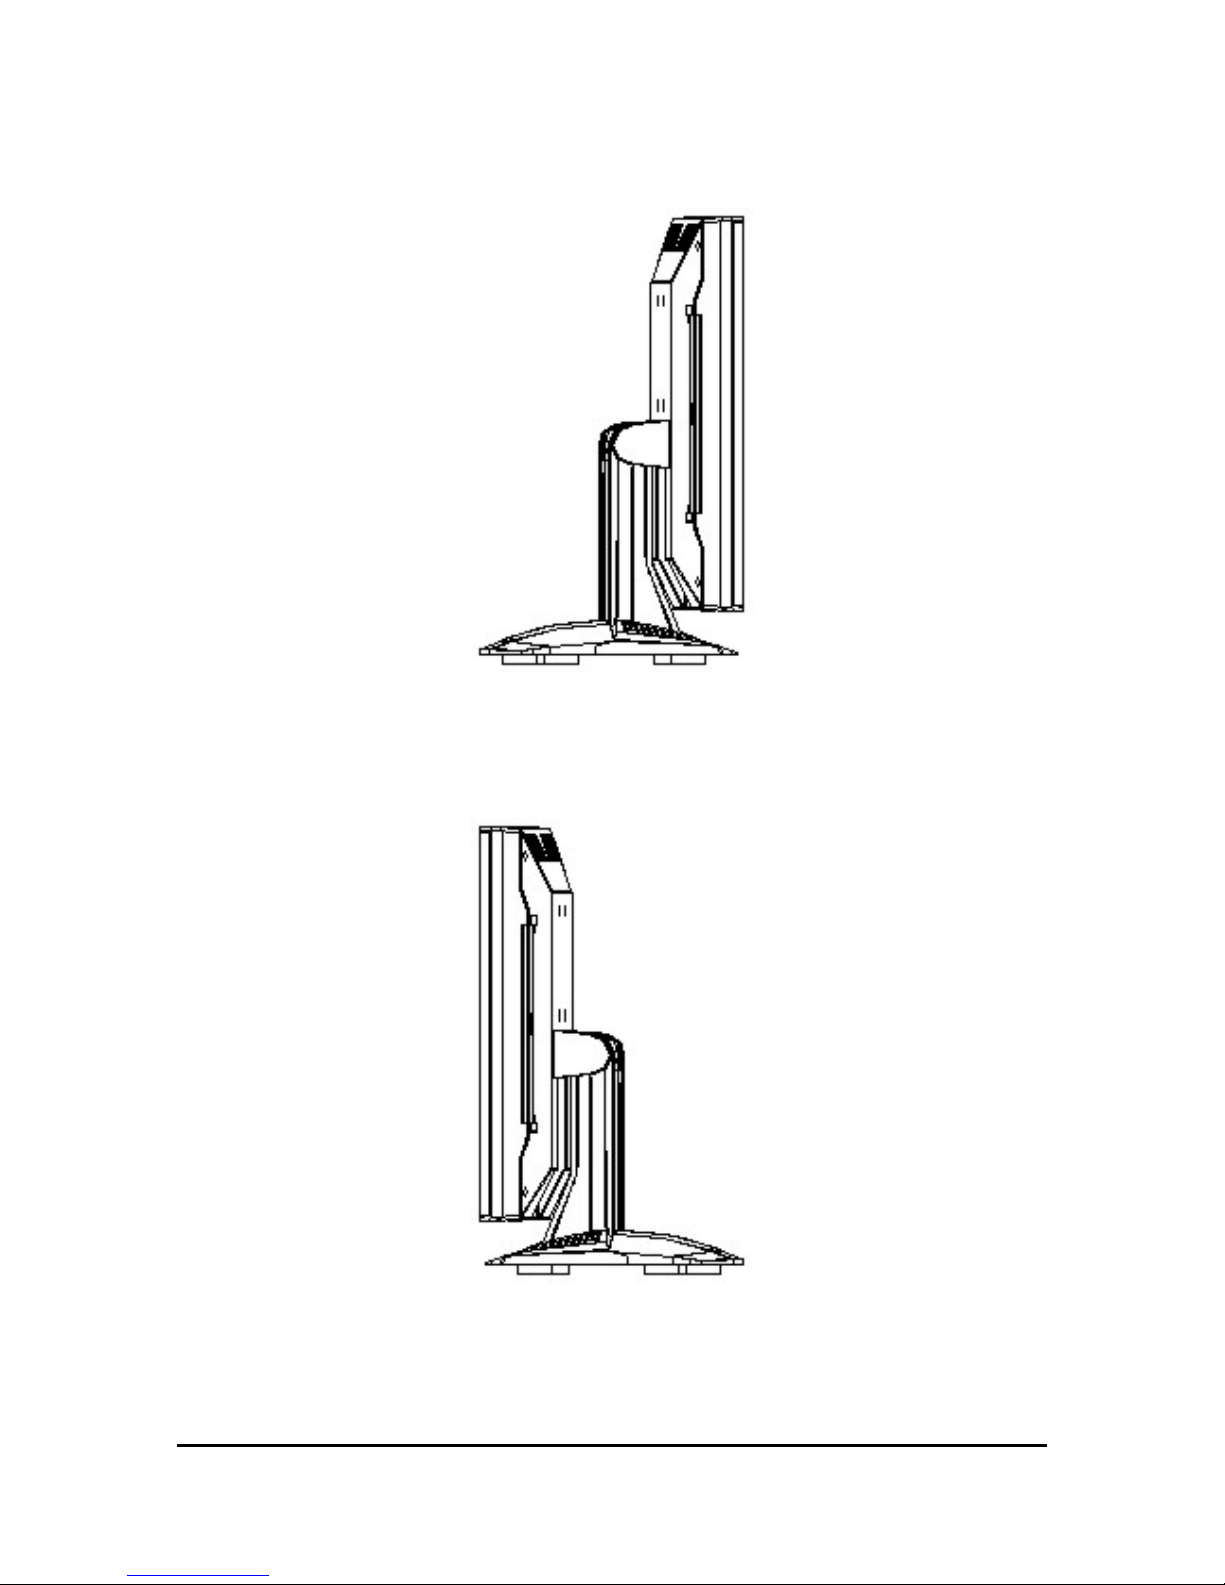
Left View
Right View
5 Manual Version: 3.0
Release Date: 10/28/2007
Page 6
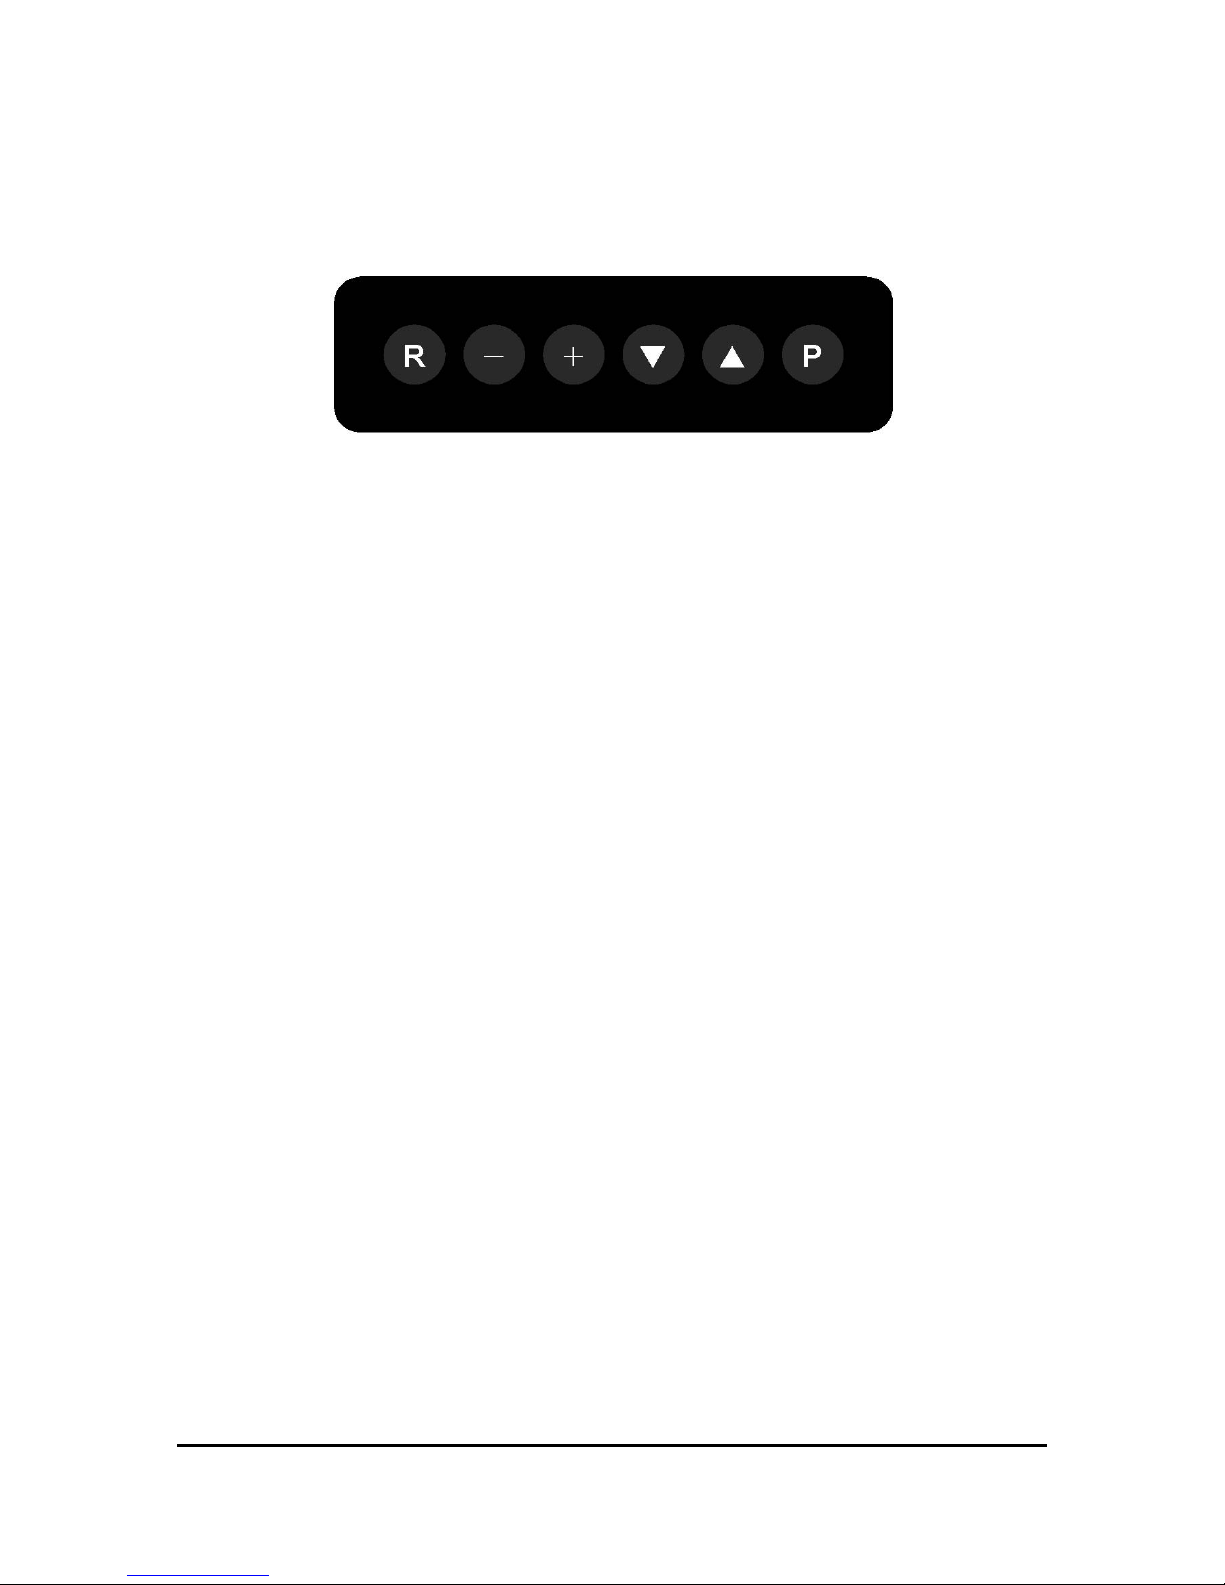
2. Control Panel
2.1 Push Button
Push Button Description of Function
P Power On/Off
▲ Auto Setting
▼ OSD Menu & Confirmation
+-
Change and Selection for Detail of Each Setting
R
Reserved
6 Manual Version: 3.0
Release Date: 10/28/2007
Page 7
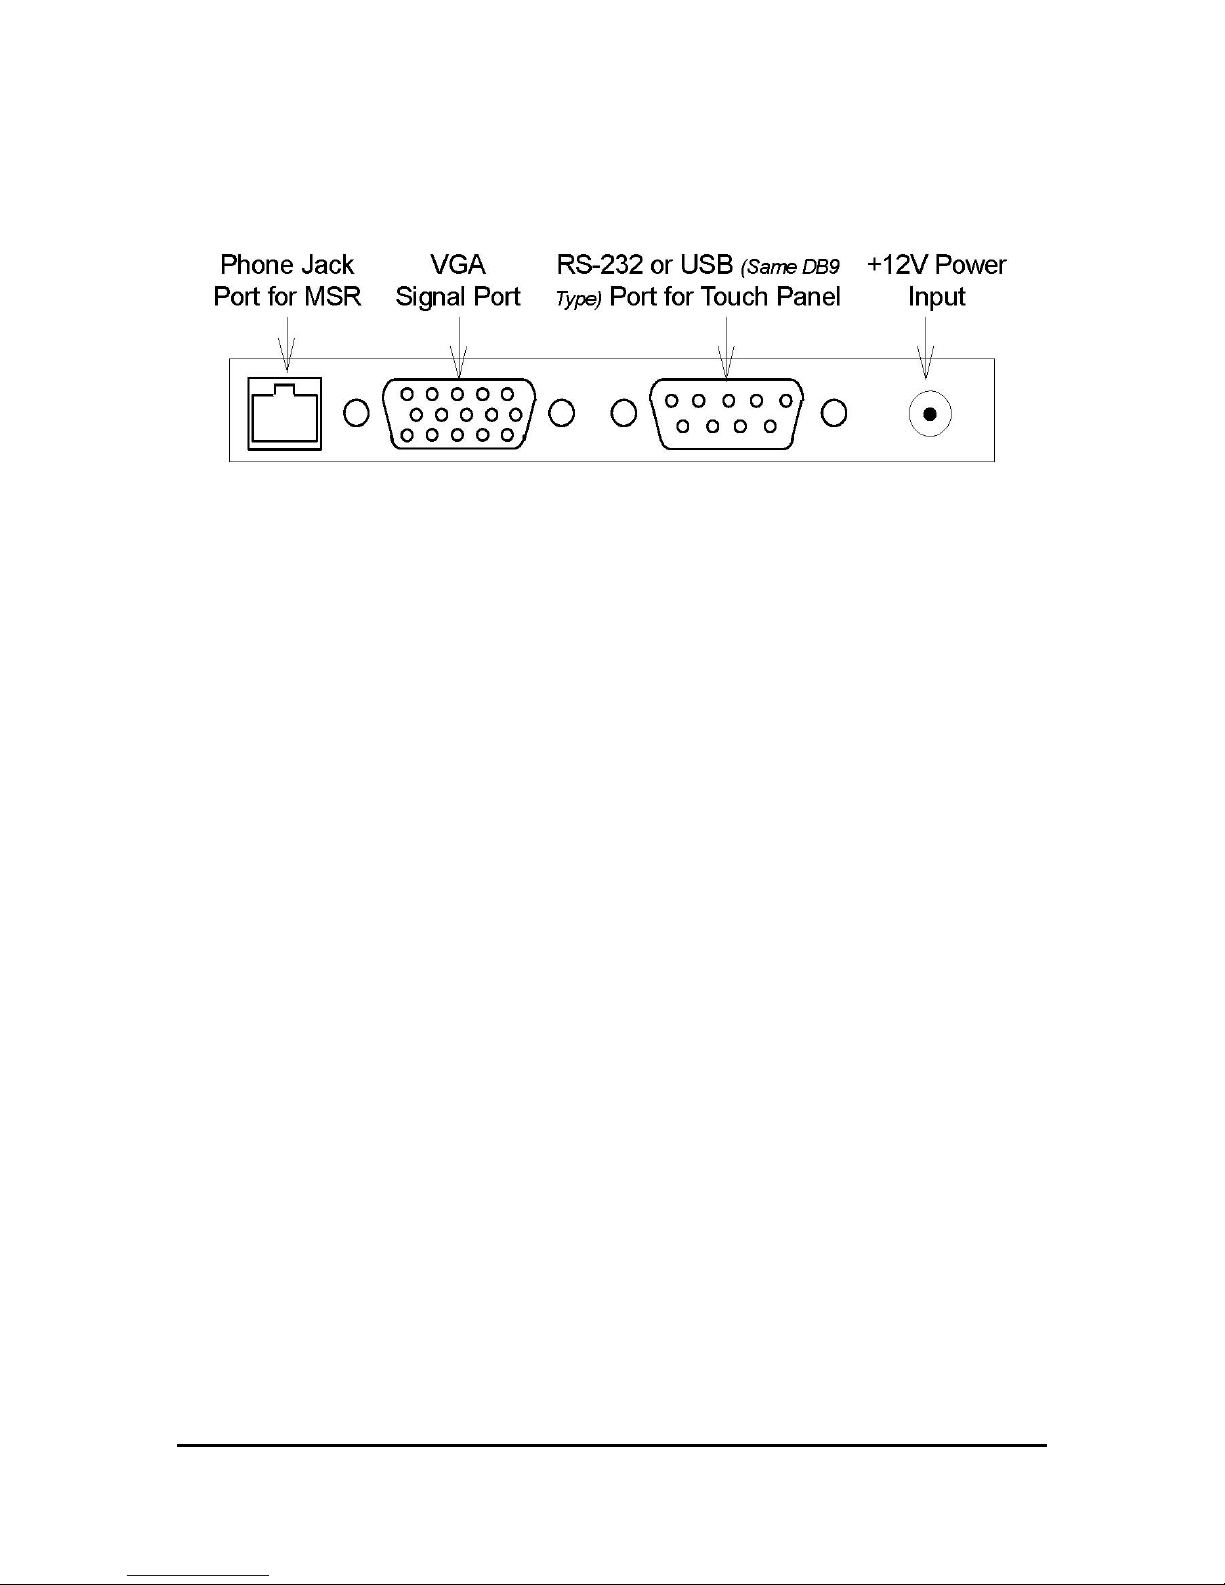
3. I/O Connector
7 Manual Version: 3.0
Release Date: 10/28/2007
Page 8
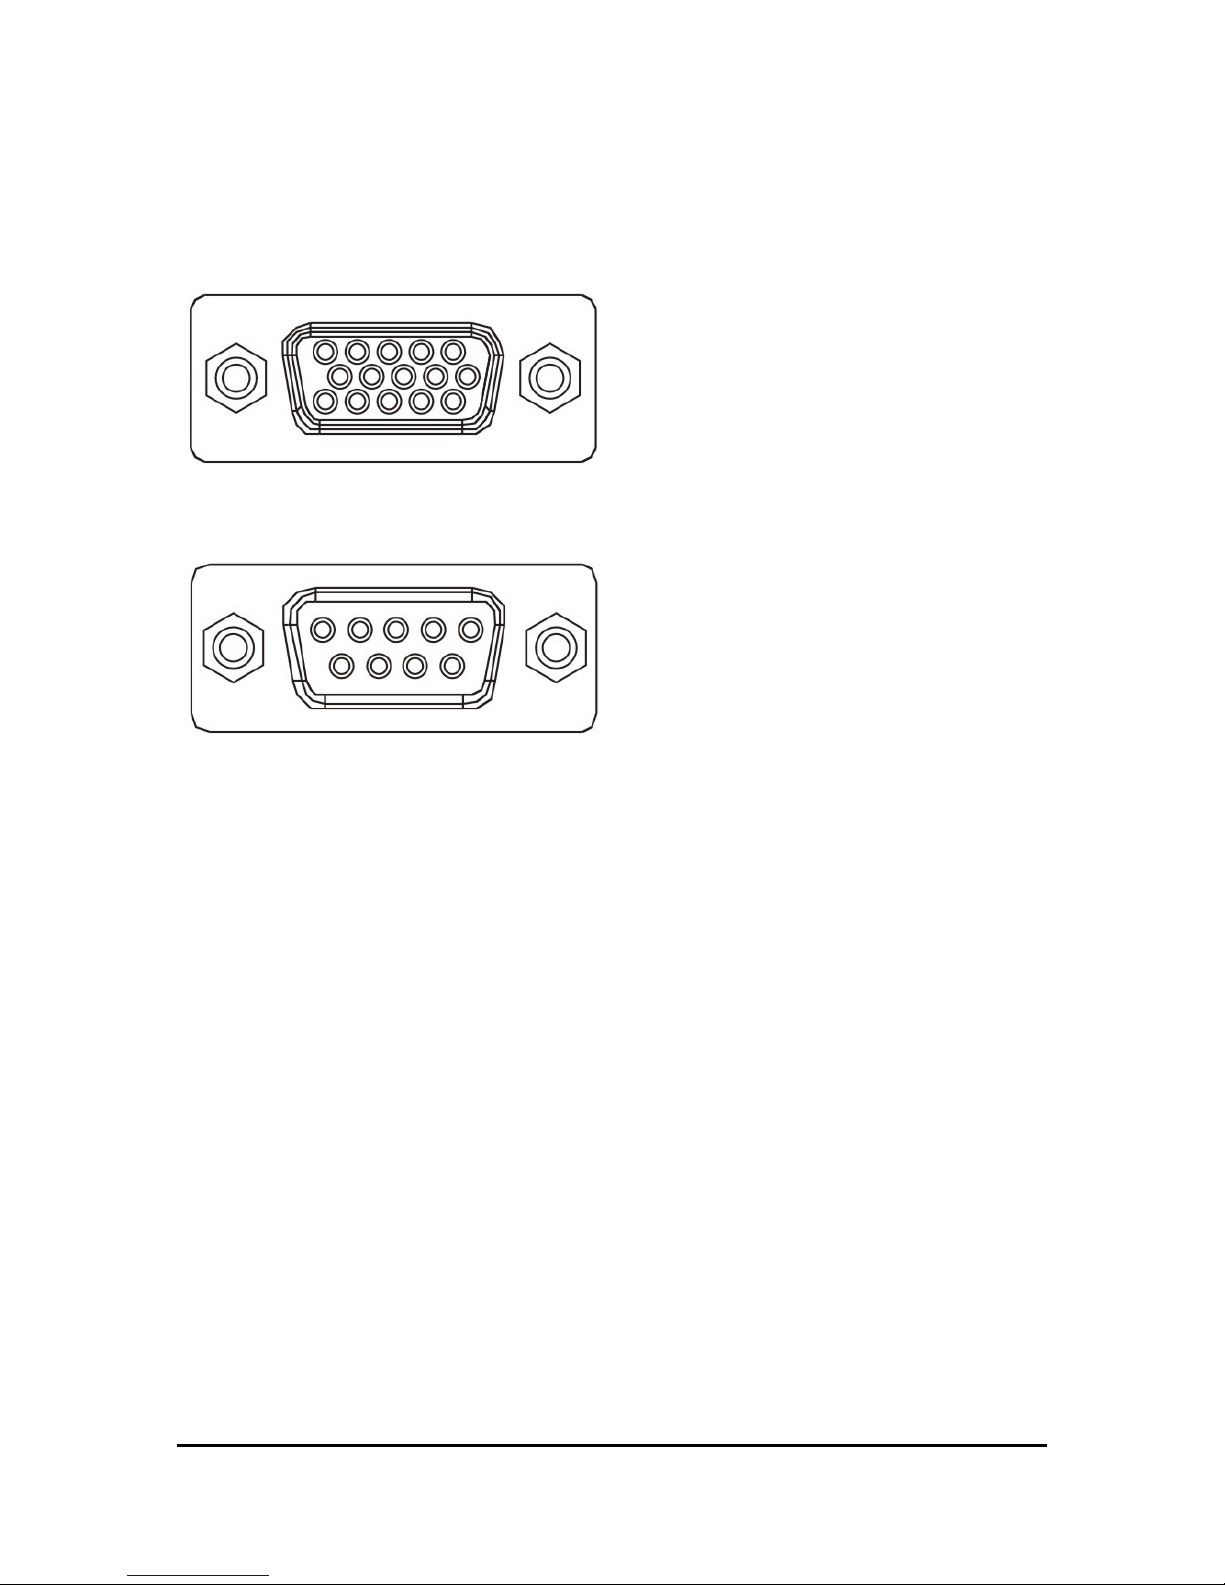
4. Hardware Installation
1. Connect VGA signal cable to PM-150
2. Connect Touch signal cable to PM-150 (for touch panel model only)
3. Connect the AC/DC adaptor to PM-150
4. Connect the other end of signal cables to the signal connectors of
your computer
5. Connect the power cord to an AC power socket
8 Manual Version: 3.0
Release Date: 10/28/2007
Page 9
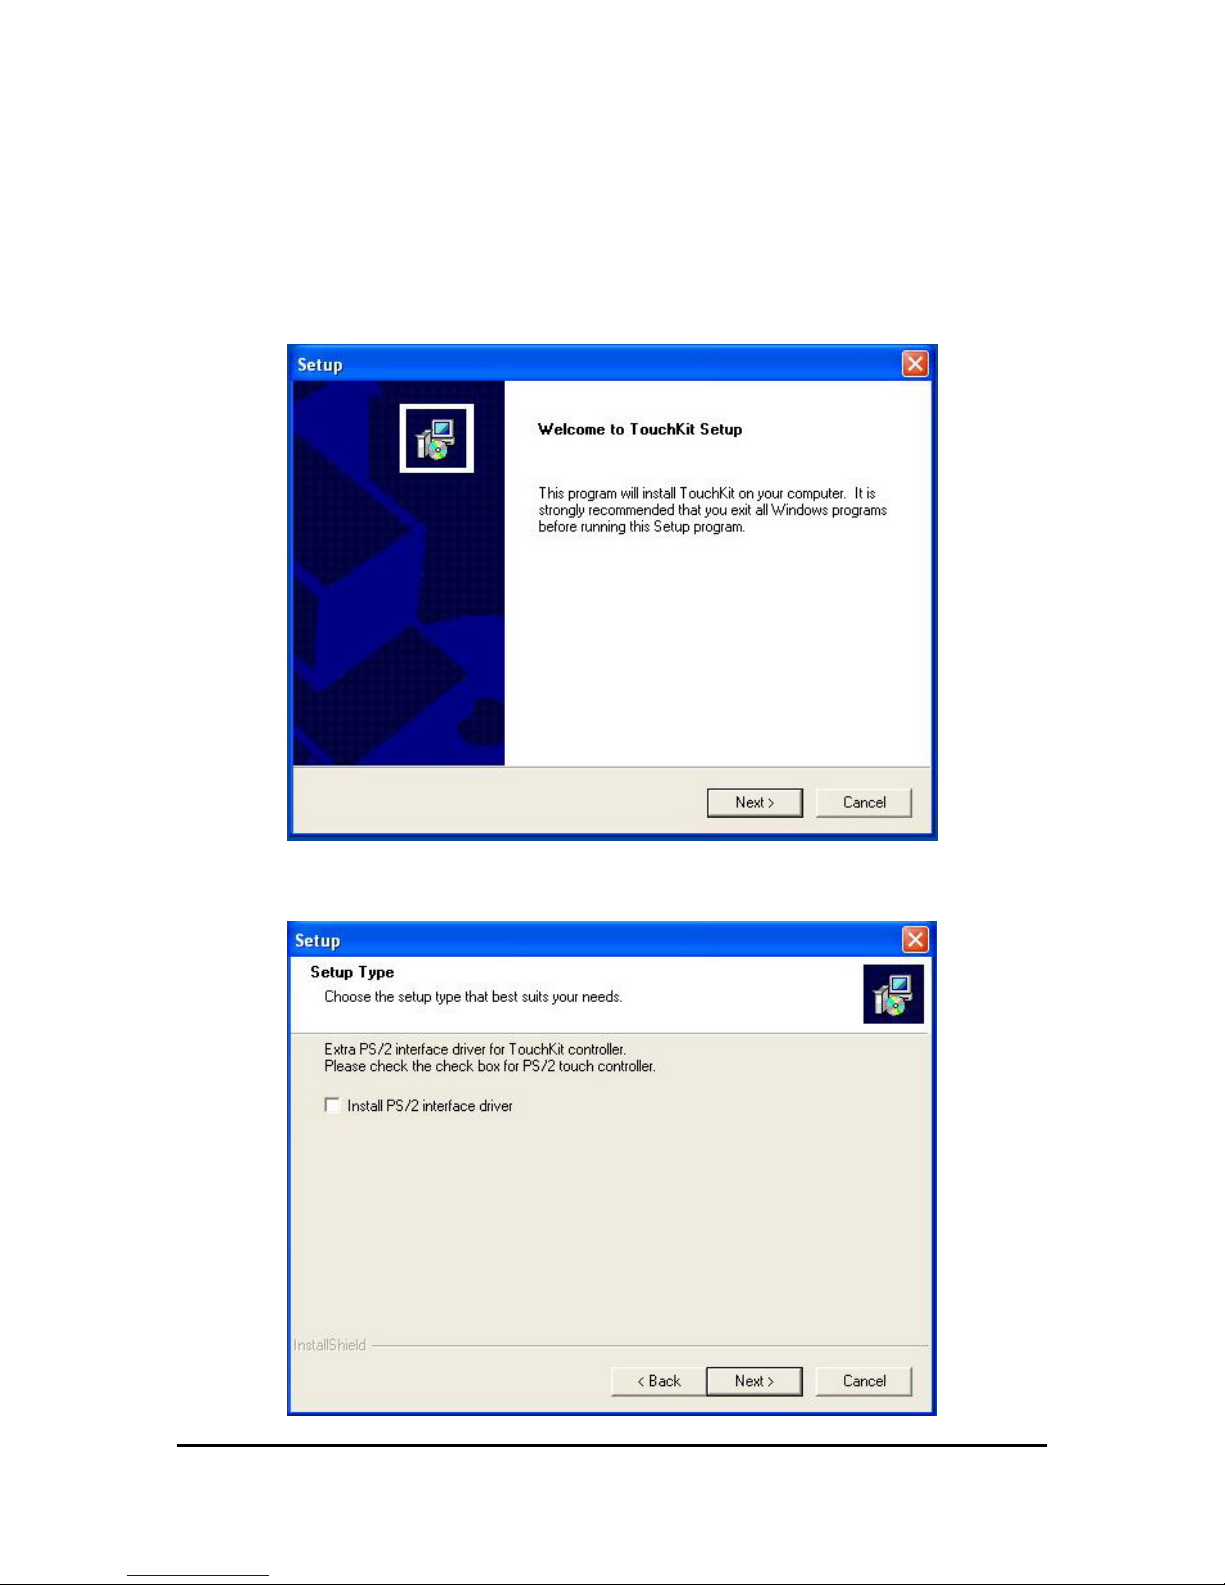
5. Driver Installation
5.1 Liyitec Touch
1. Double click on “setup.exe” in driver folder and then press “Next” button to
start driver installation.
2. Press “Next” to continue.
9 Manual Version: 3.0
Release Date: 10/28/2007
Page 10
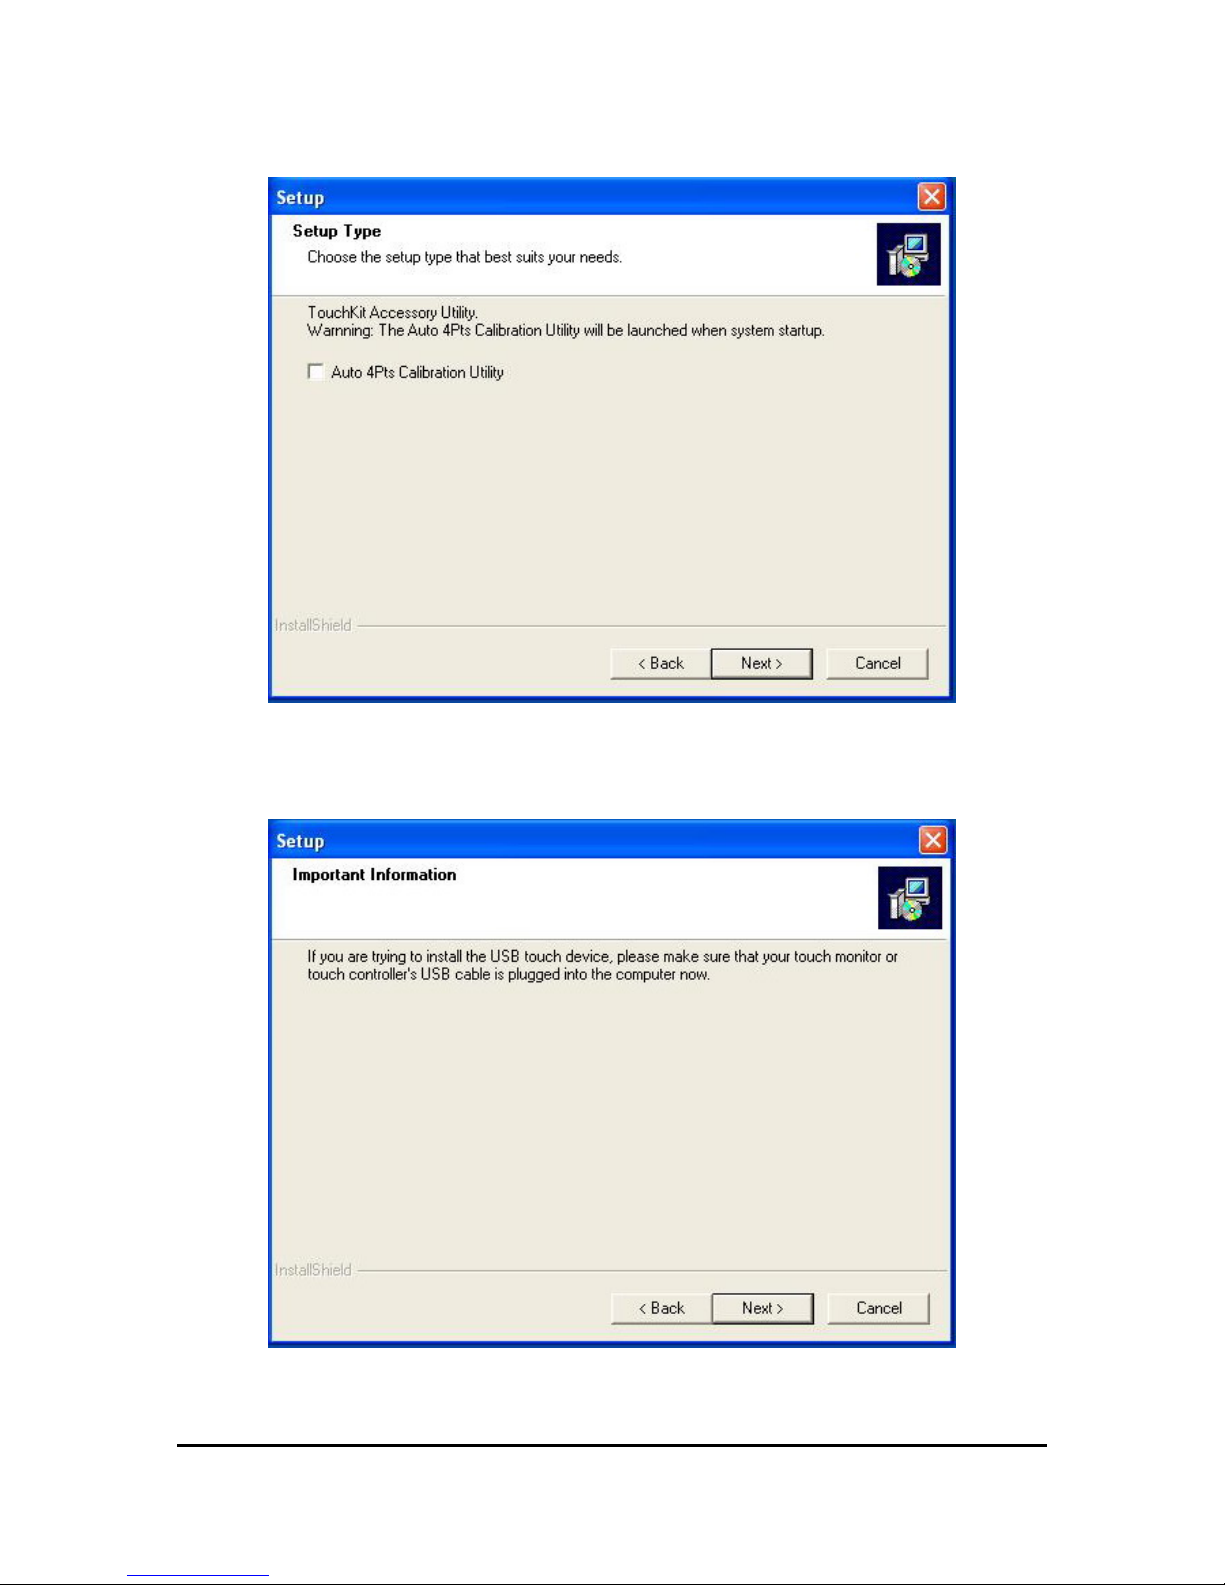
3. Press “Next” to continue.
4. Press “Next” to continue.
10 Manual Version: 3.0
Release Date: 10/28/2007
Page 11
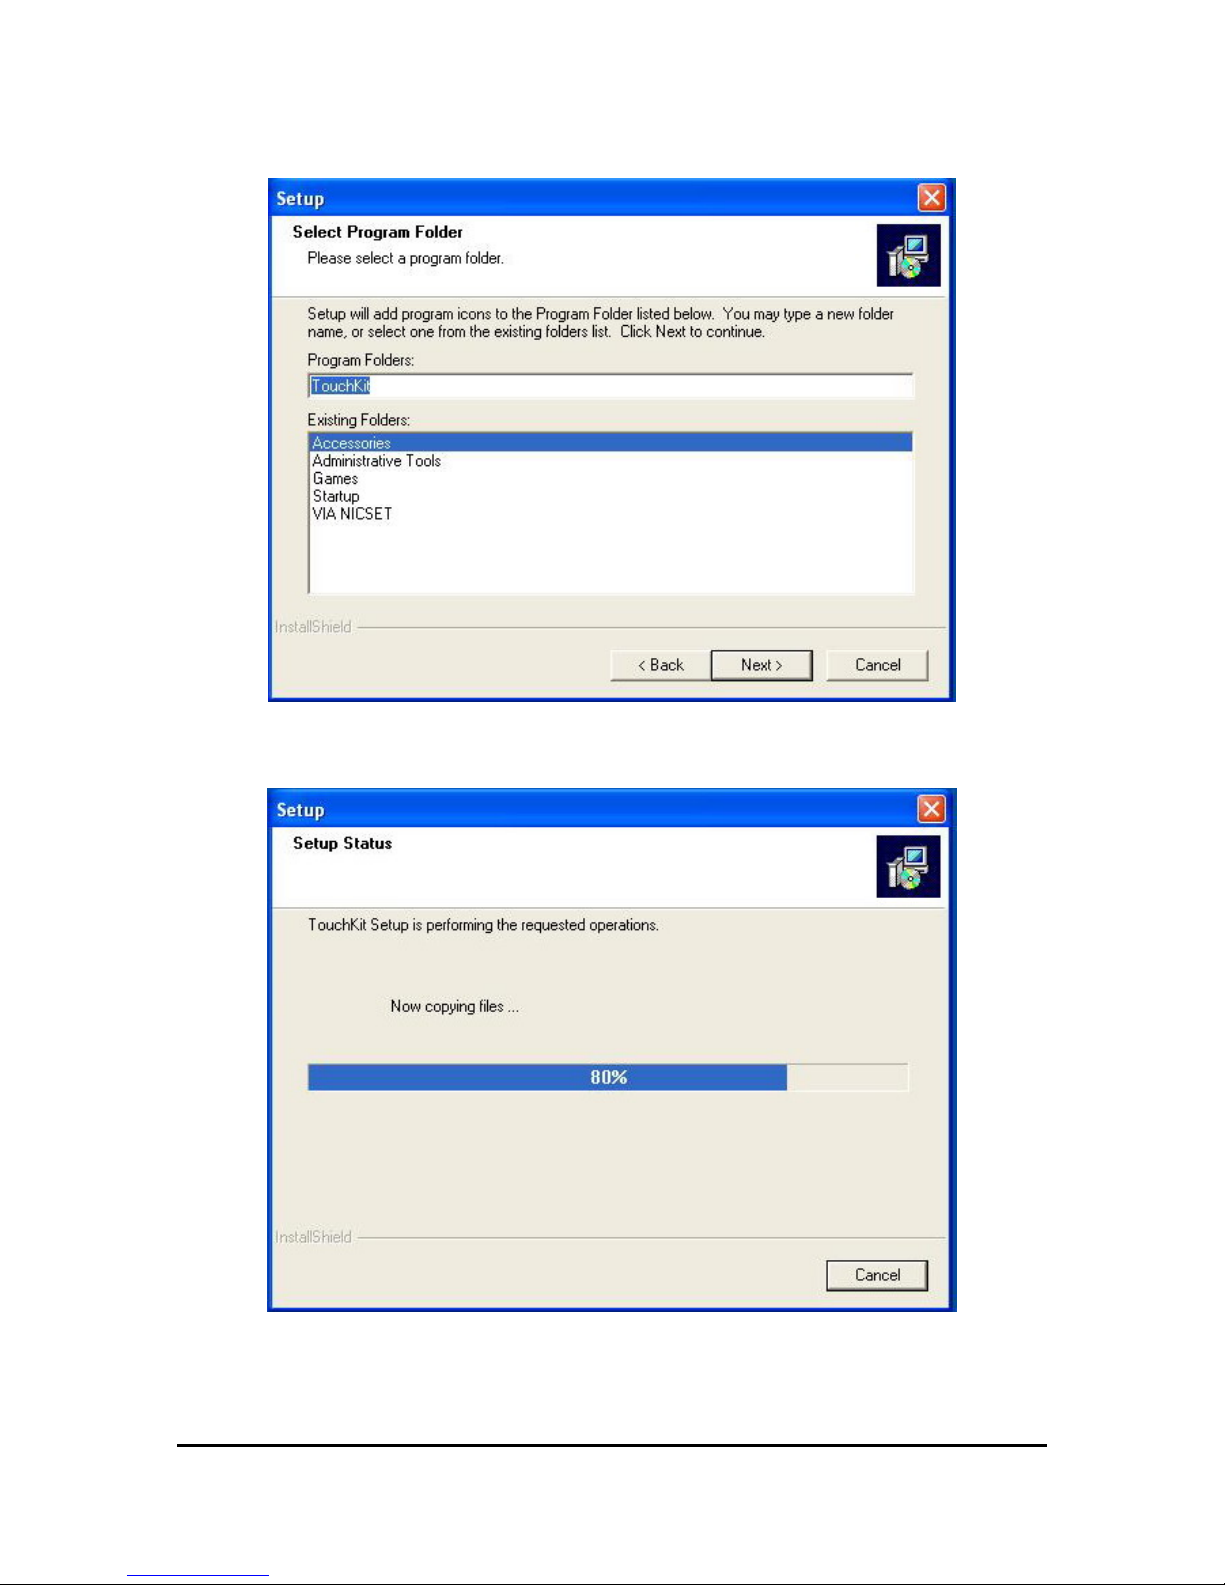
5. Press “Next” to continue.
6. Wait the setup program copying files.
11 Manual Version: 3.0
Release Date: 10/28/2007
Page 12
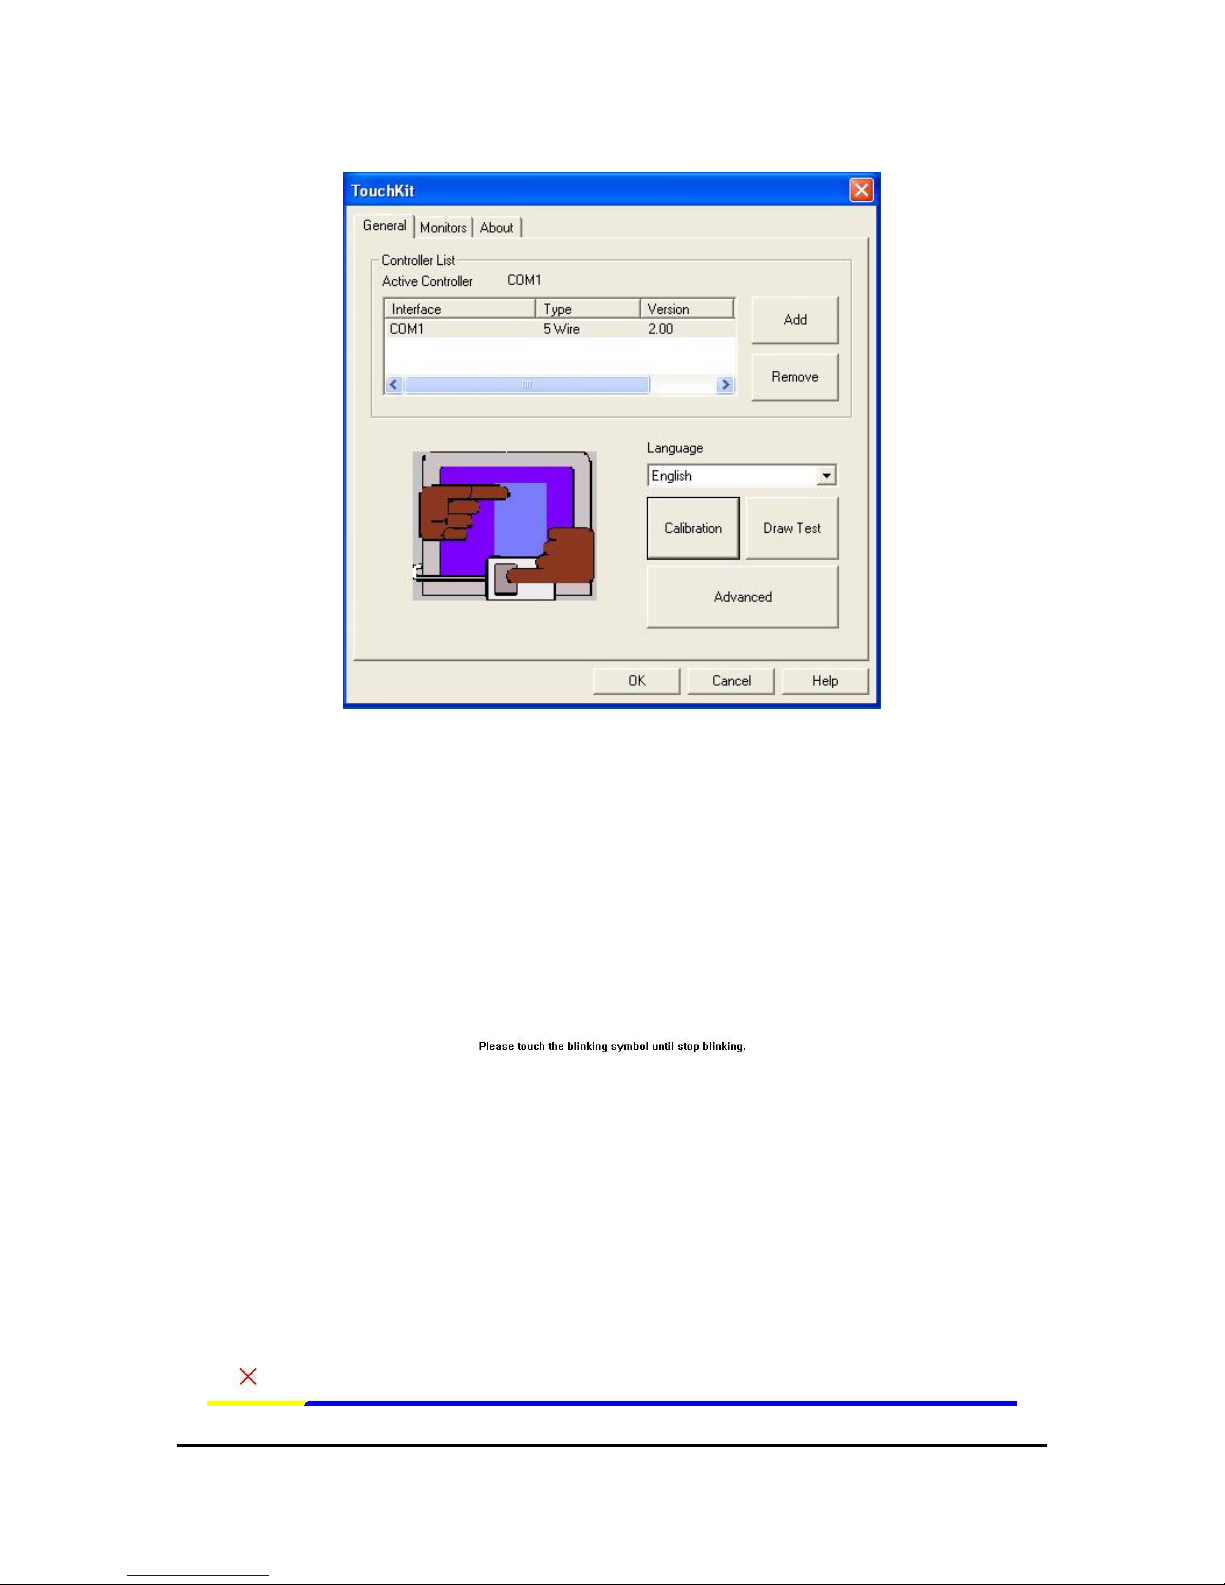
7. Your Touch will be shown in this form.
8. Press the “Calibration” button to process the four points calibration.
12 Manual Version: 3.0
Release Date: 10/28/2007
Page 13
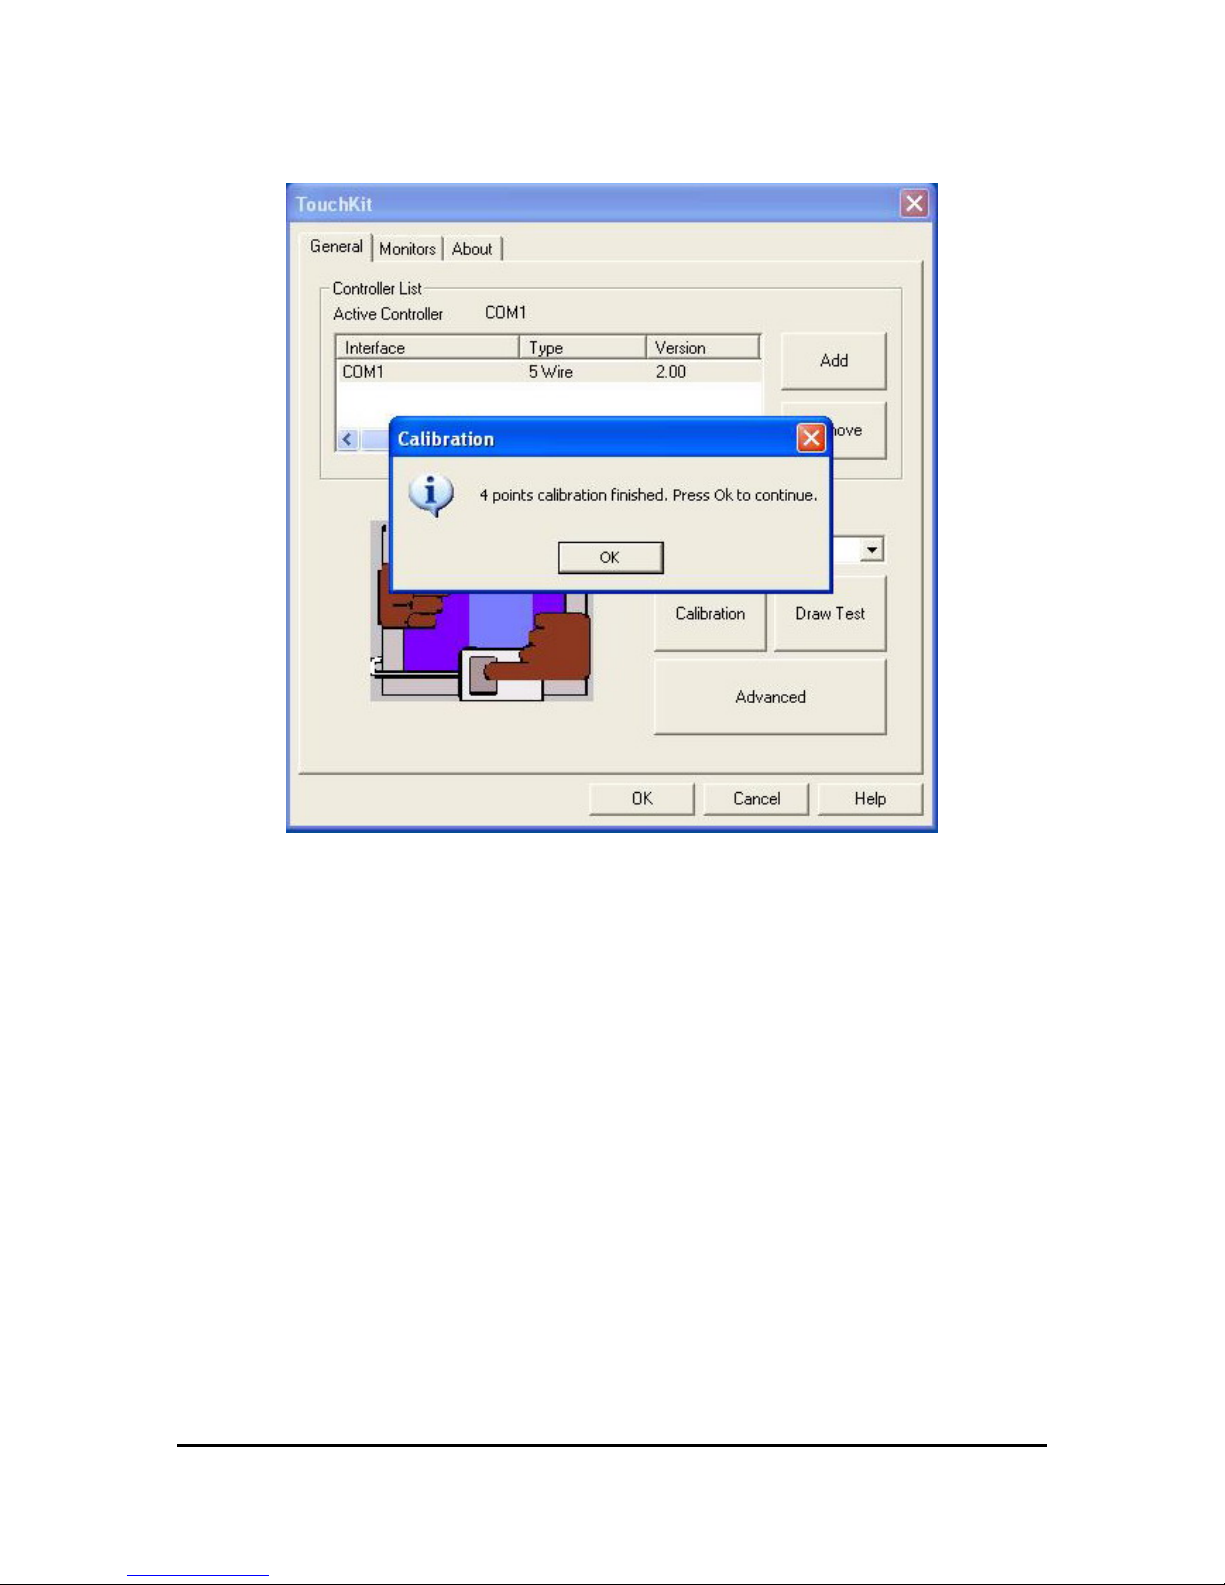
9. Press “OK” to finish.
13 Manual Version: 3.0
Release Date: 10/28/2007
Page 14
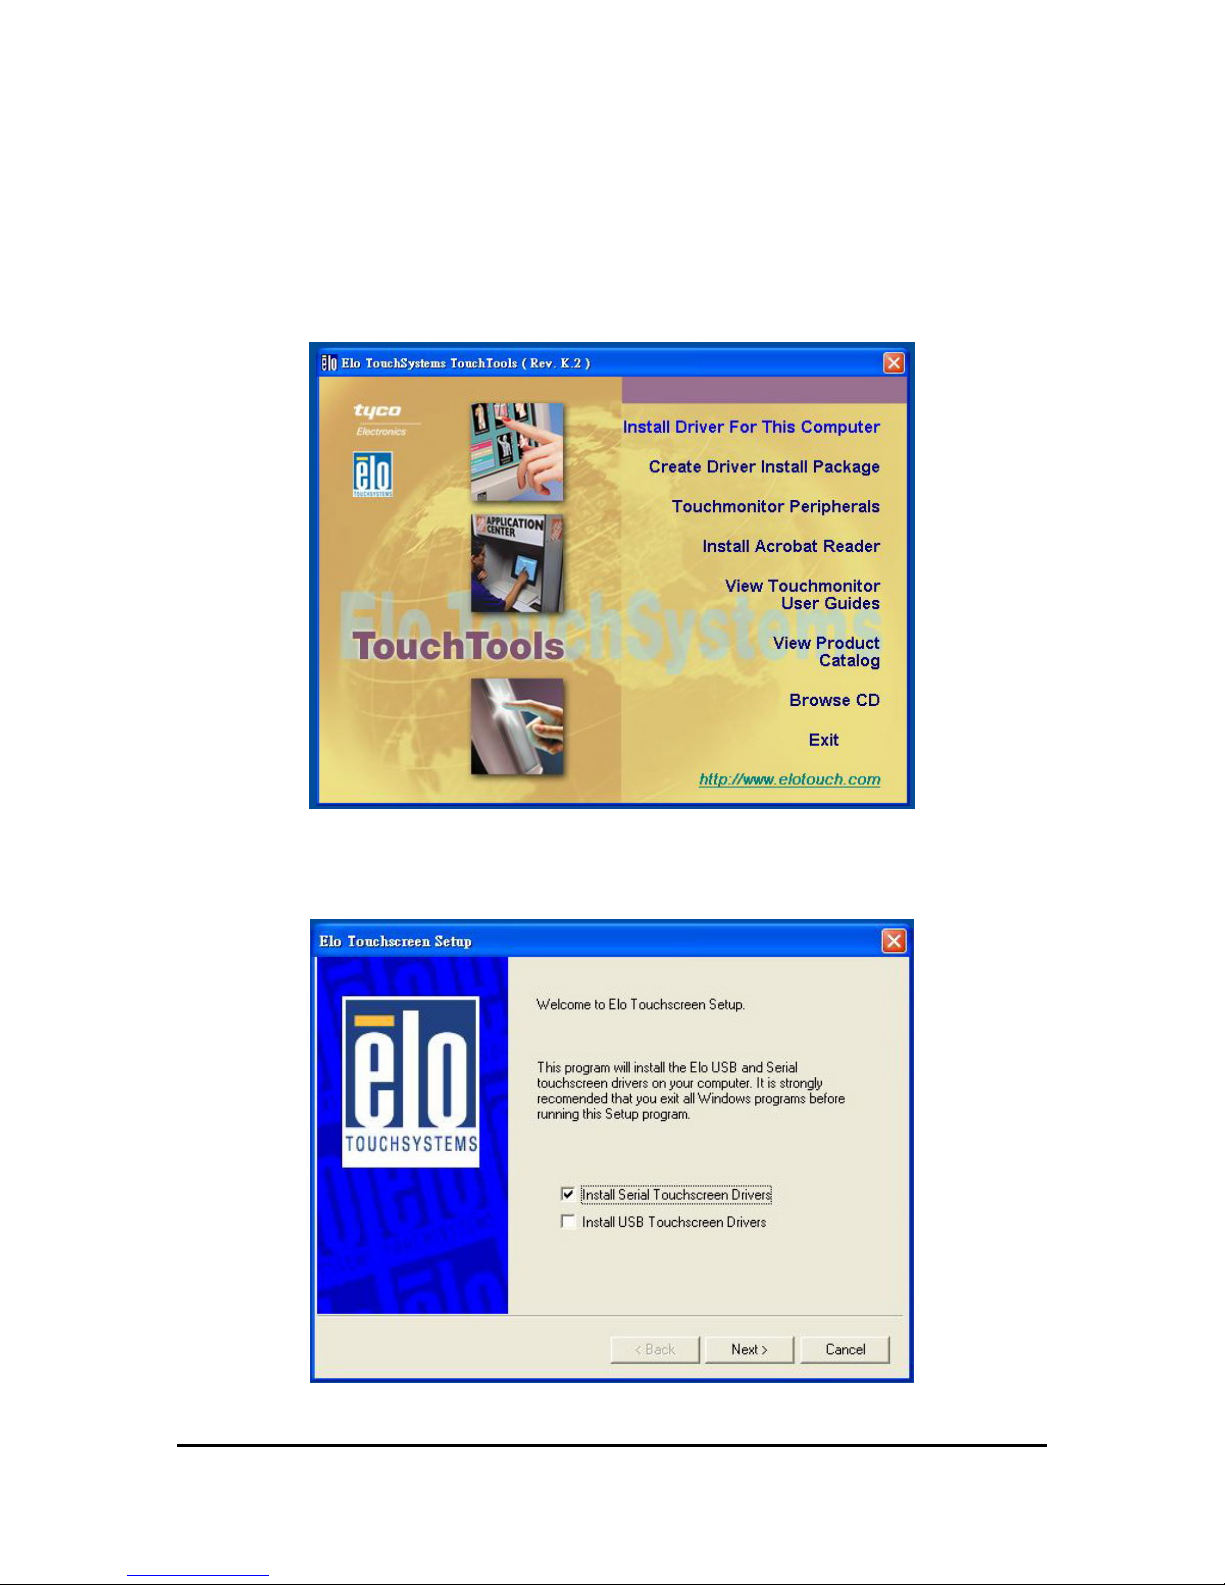
5.2 ELO Touch
1. Insert Driver CD-ROM into CD-ROM driver. The setup program will auto run.
If the setup program does not auto run, click the “EloCD.exe” program in the
Driver CD-ROM. Press “Install Driver For This Computer” to start driver
installation.
2. Check “Install Serial Touchscreen Drivers and press “Next”.
14 Manual Version: 3.0
Release Date: 10/28/2007
Page 15
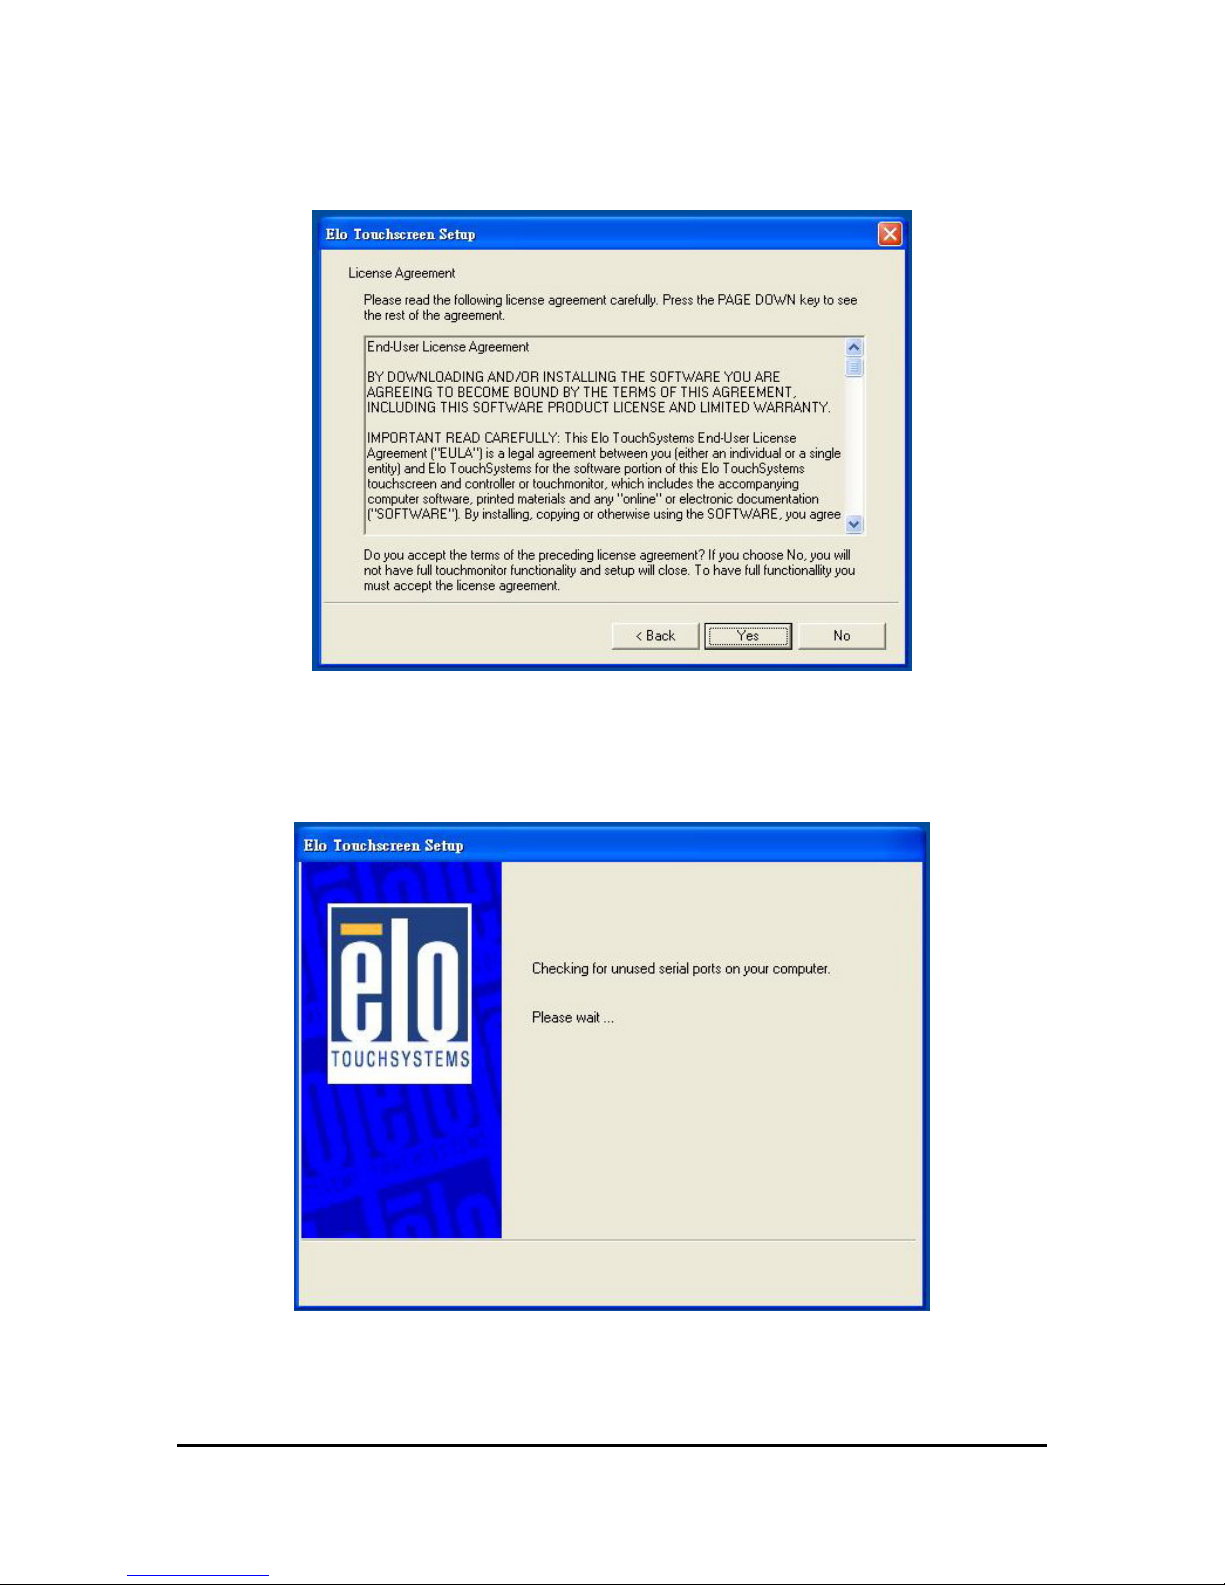
3. Read the License Agreement and then press the “yes” button.
4. Wait the setup program checking serial ports.
15 Manual Version: 3.0
Release Date: 10/28/2007
Page 16
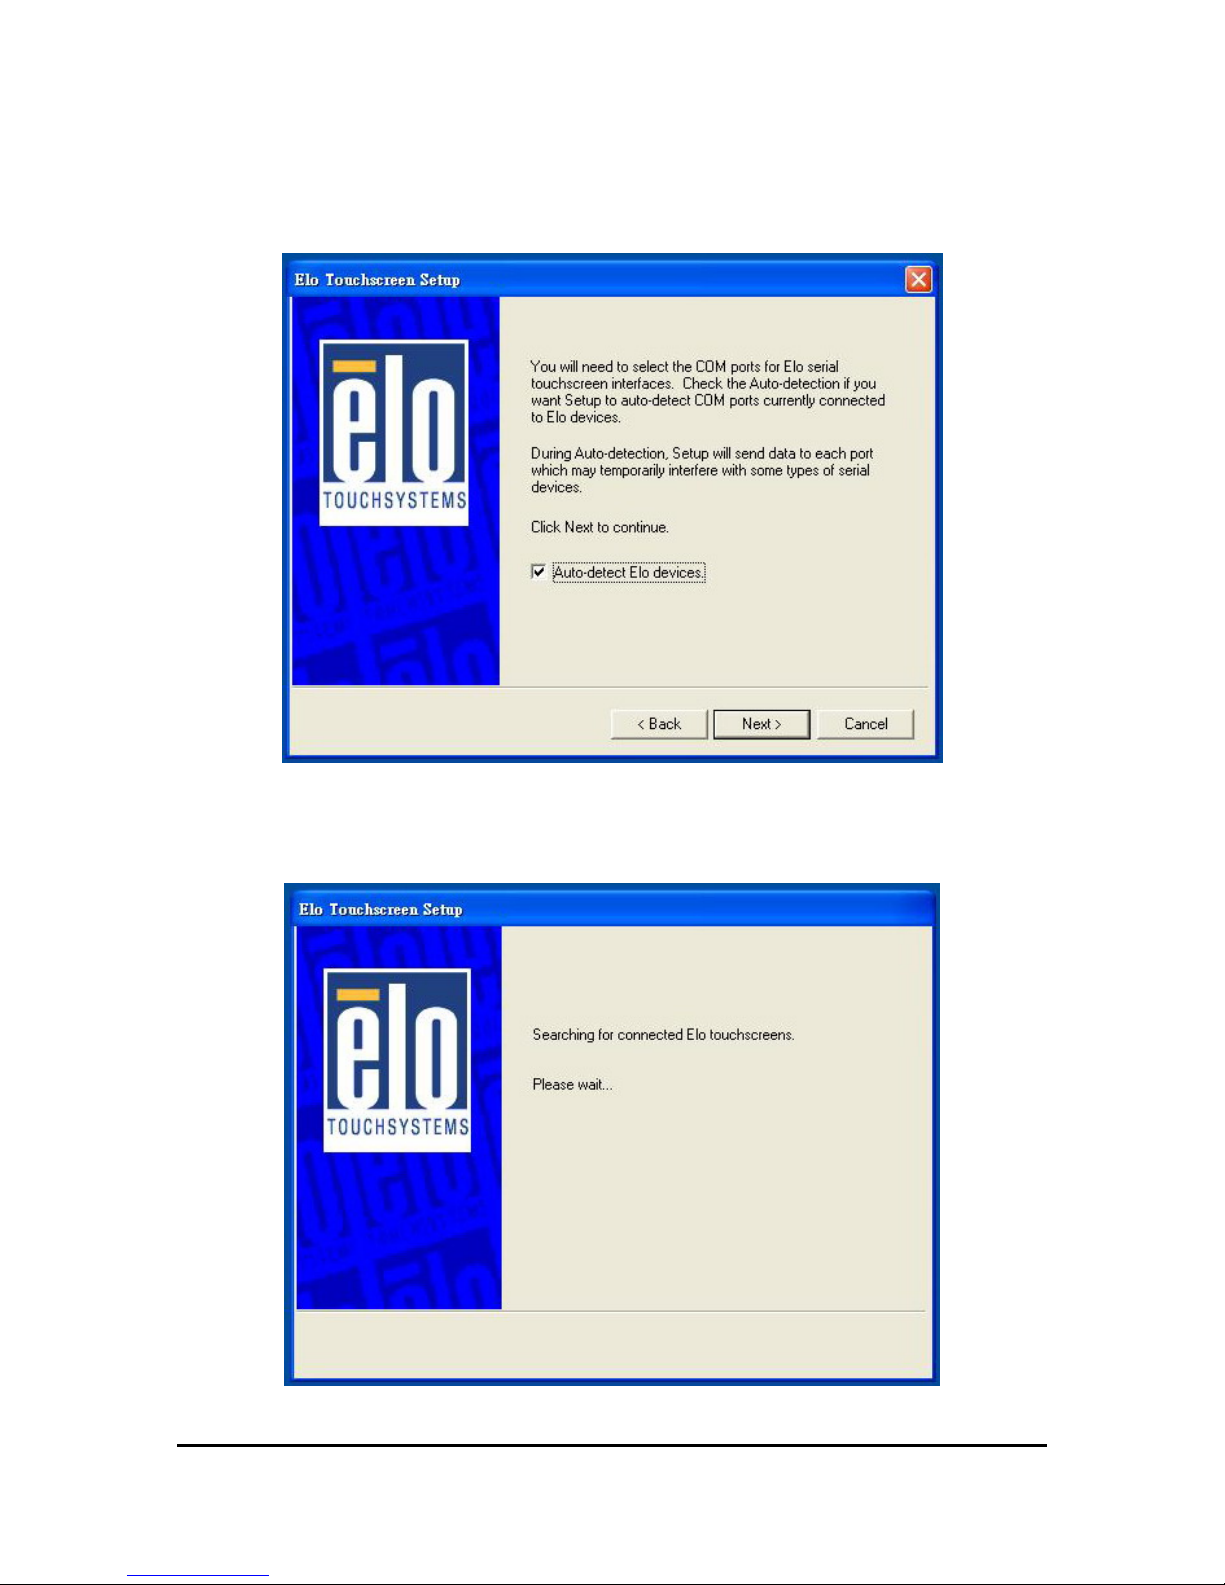
5. Check “Auto-detect Elo devices” to select the COM port that connected to Elo
devices.
6. Wait the setup program searching for connected touchscreen.
16 Manual Version: 3.0
Release Date: 10/28/2007
Page 17
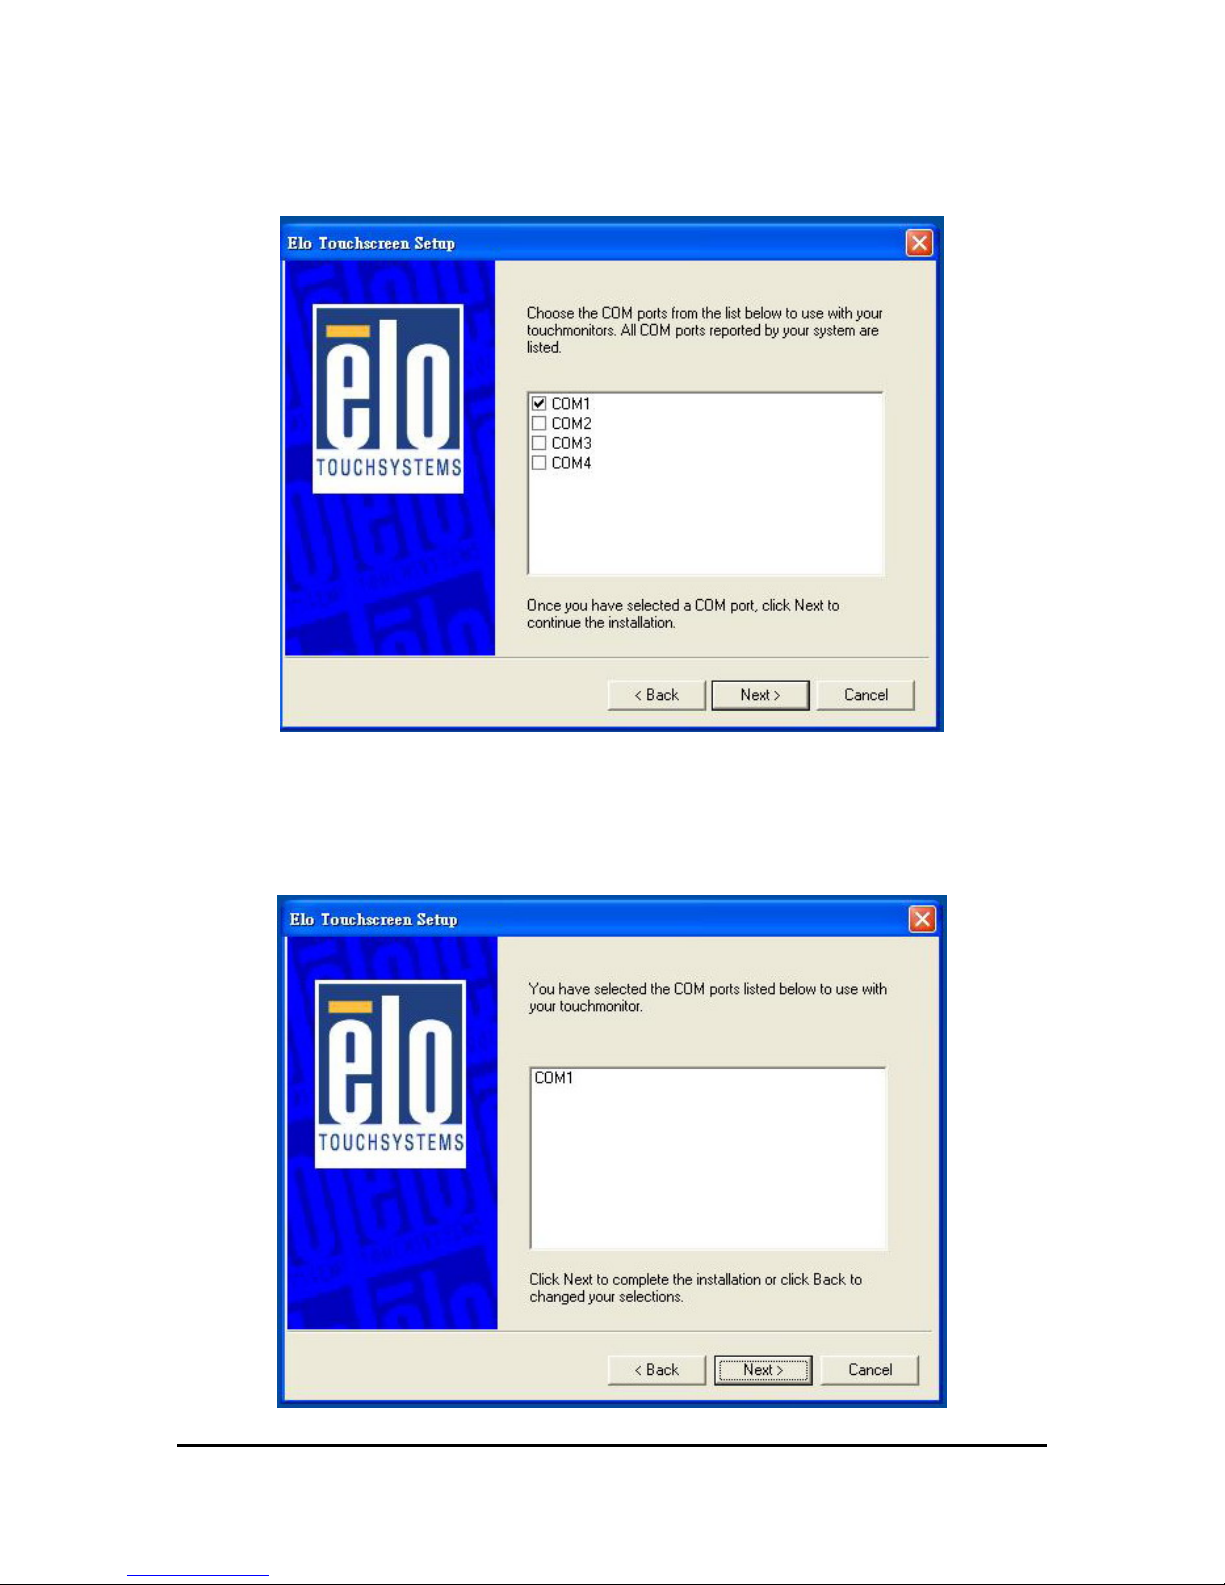
7. Choose one COM port and press ”Next” to continue.
8. Make sure the COM port listed and press “Next” button.
17 Manual Version: 3.0
Release Date: 10/28/2007
Page 18
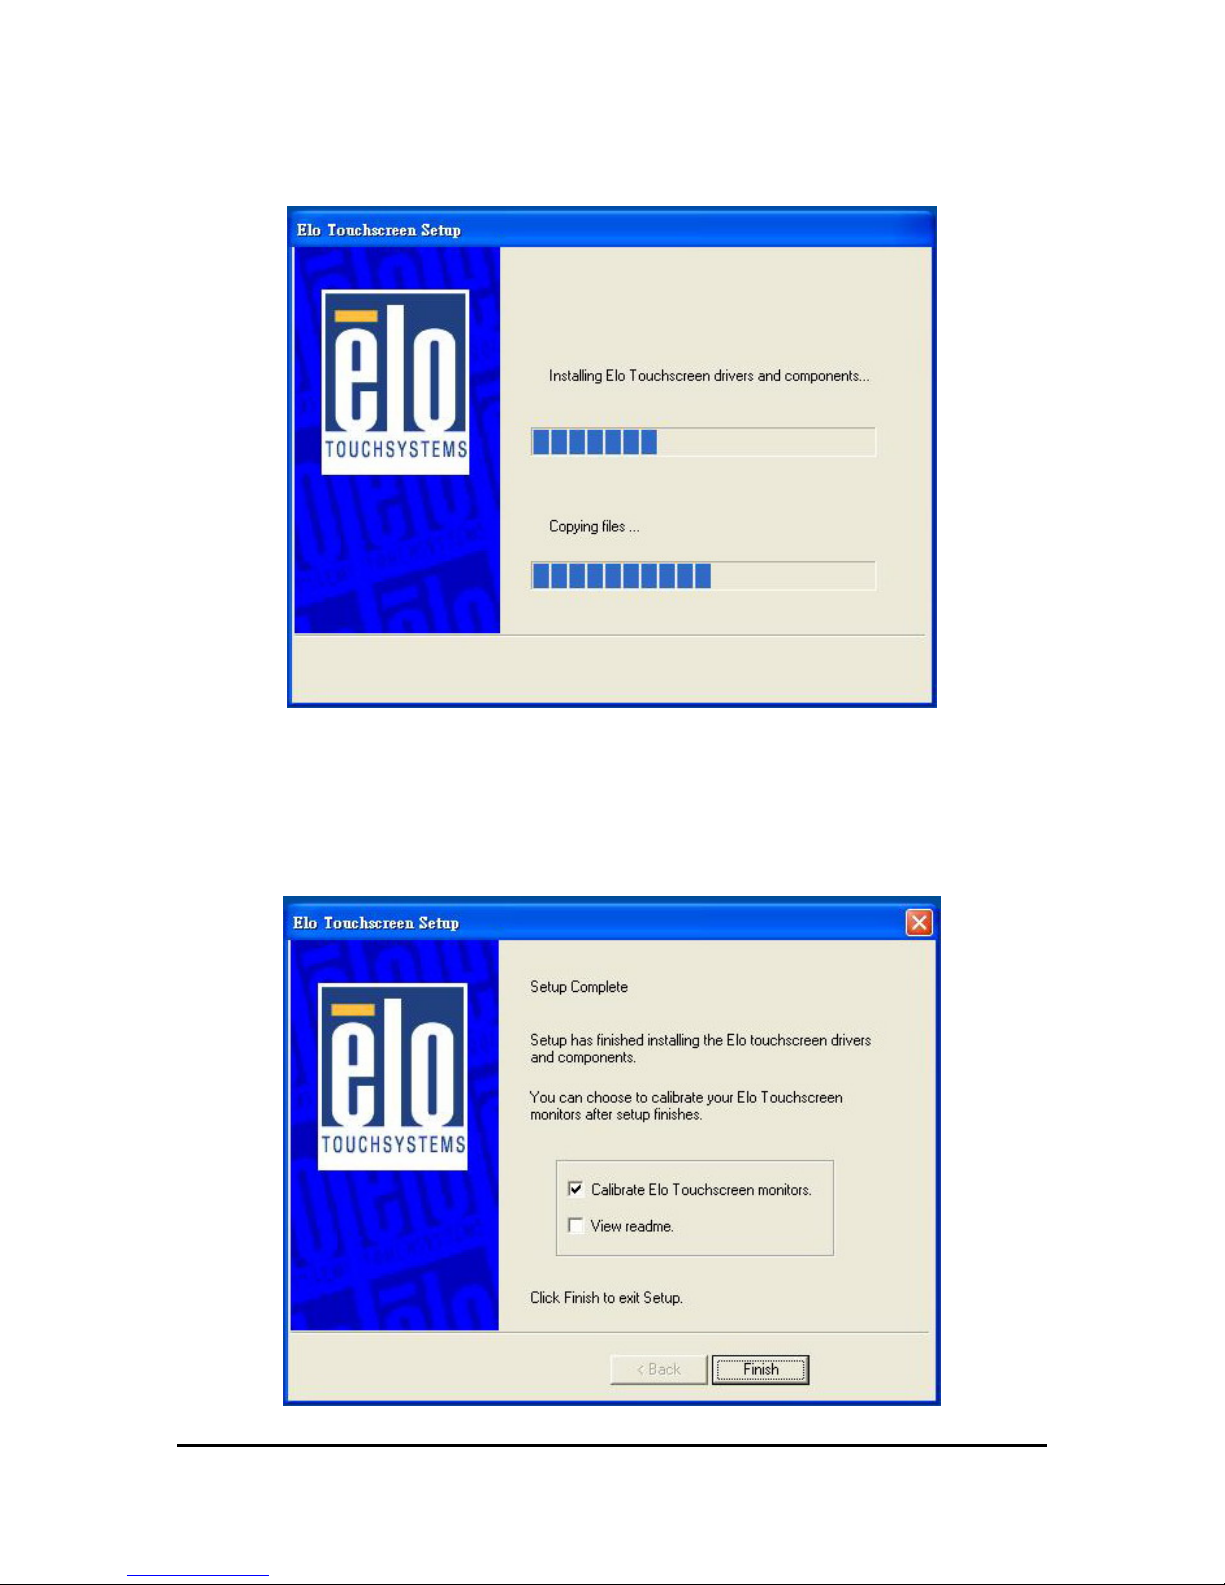
9. Wait setup program to complete.
10. Check “Calibrate Elo Touchscreen Monitors” and press “Finish” button to
complete driver setup and start to calibrate touchscreen.
18 Manual Version: 3.0
Release Date: 10/28/2007
Page 19
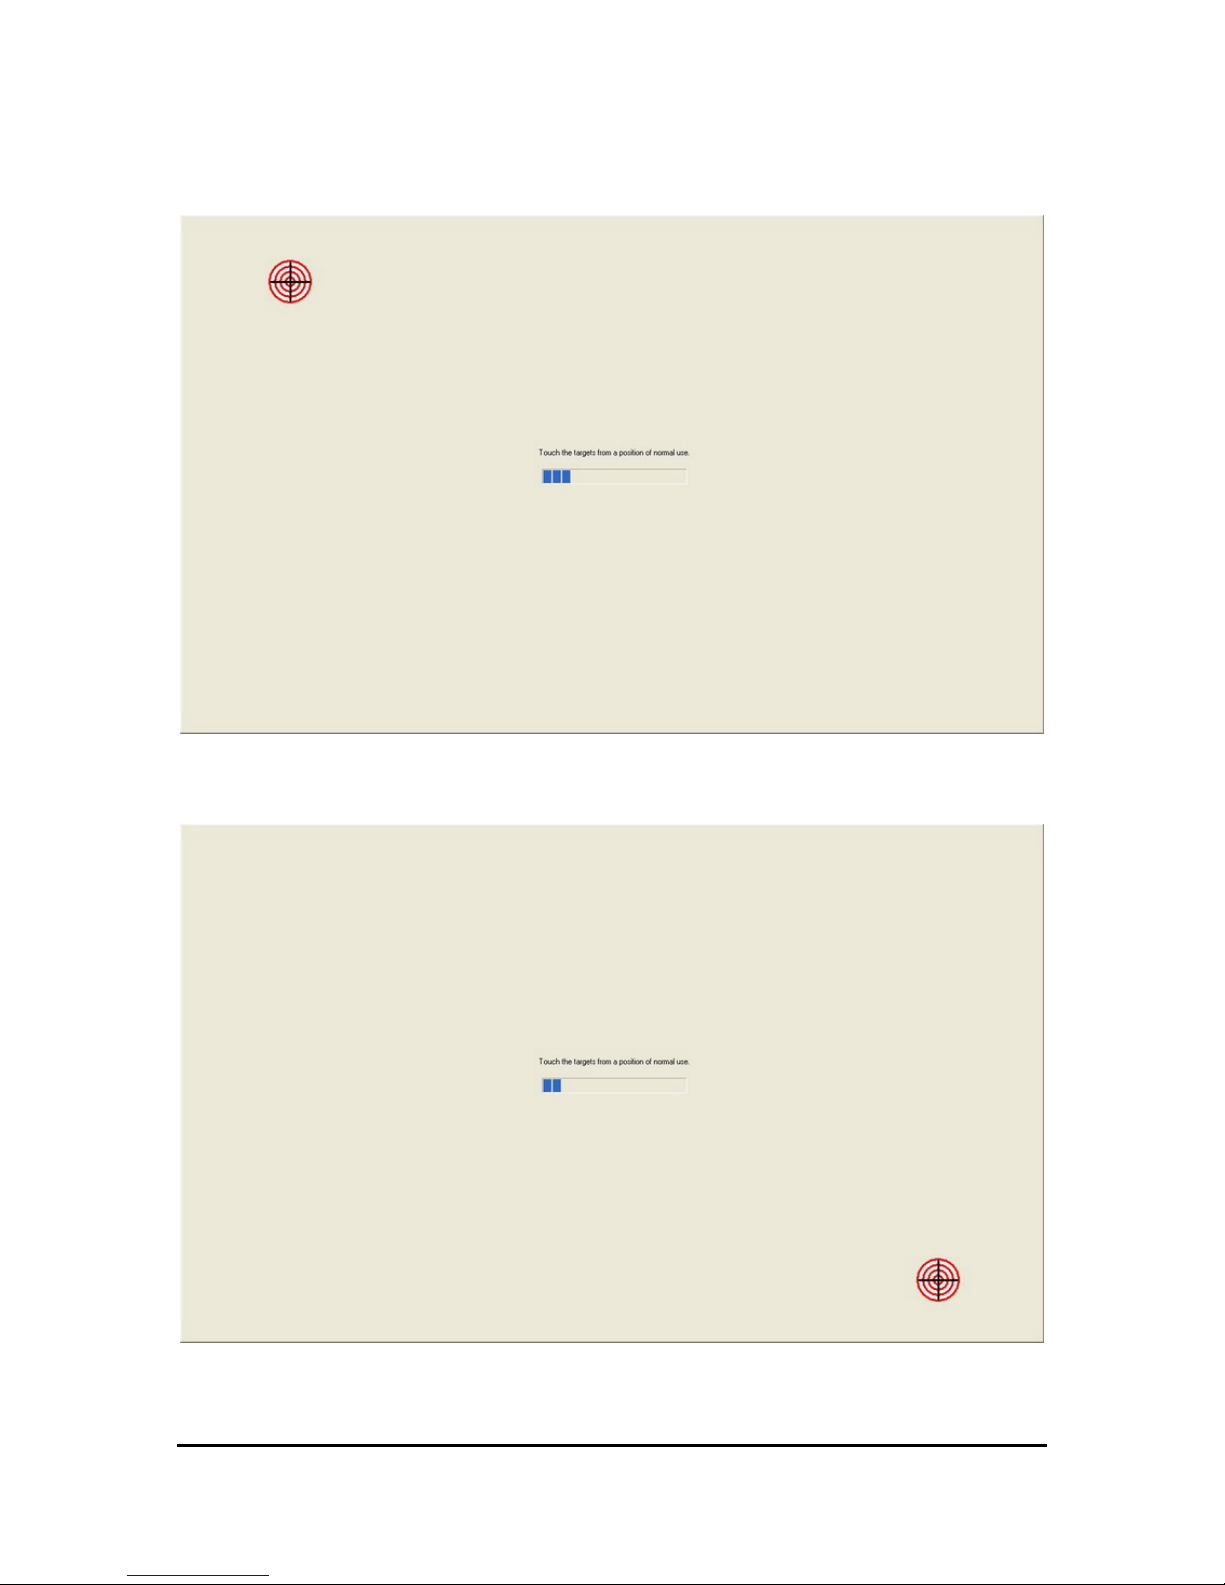
11. Press the targets with one finger to calibrate touchscreen.
19 Manual Version: 3.0
Release Date: 10/28/2007
Page 20
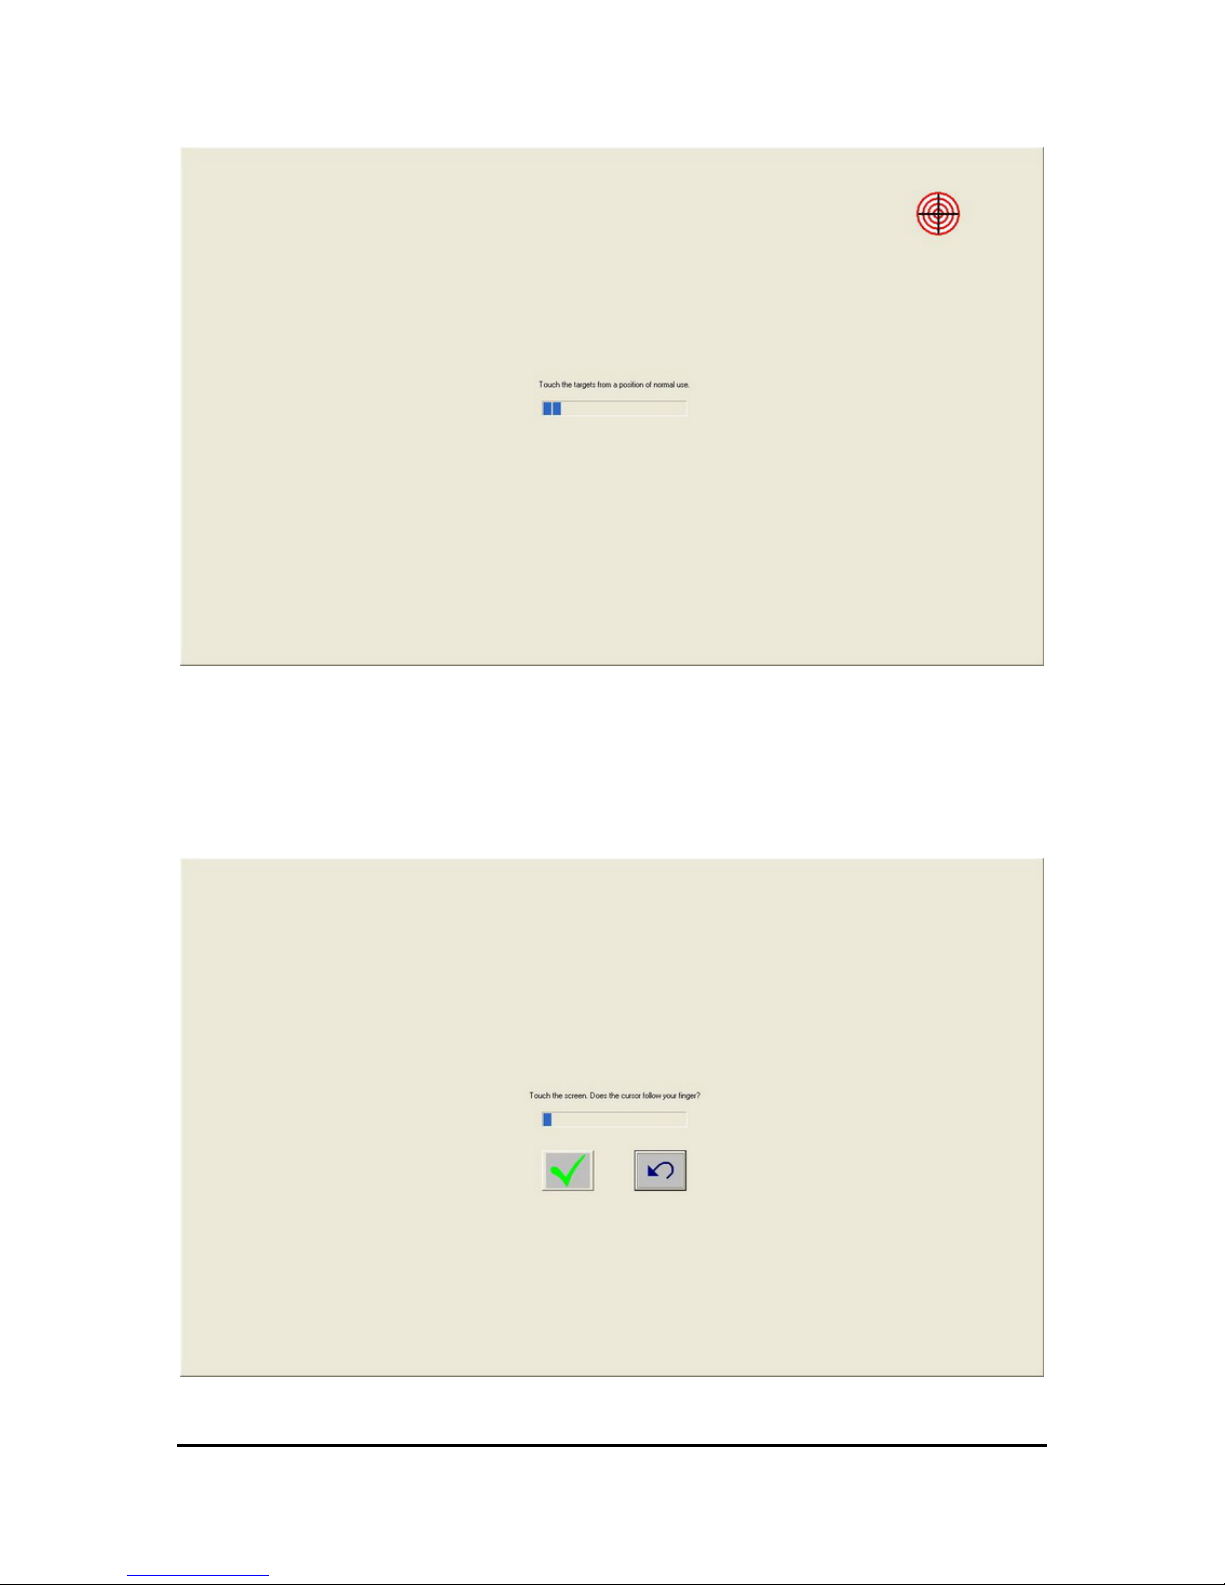
12. Press the “ˇ” button to finish calibration.
20 Manual Version: 3.0
Release Date: 10/28/2007
Page 21
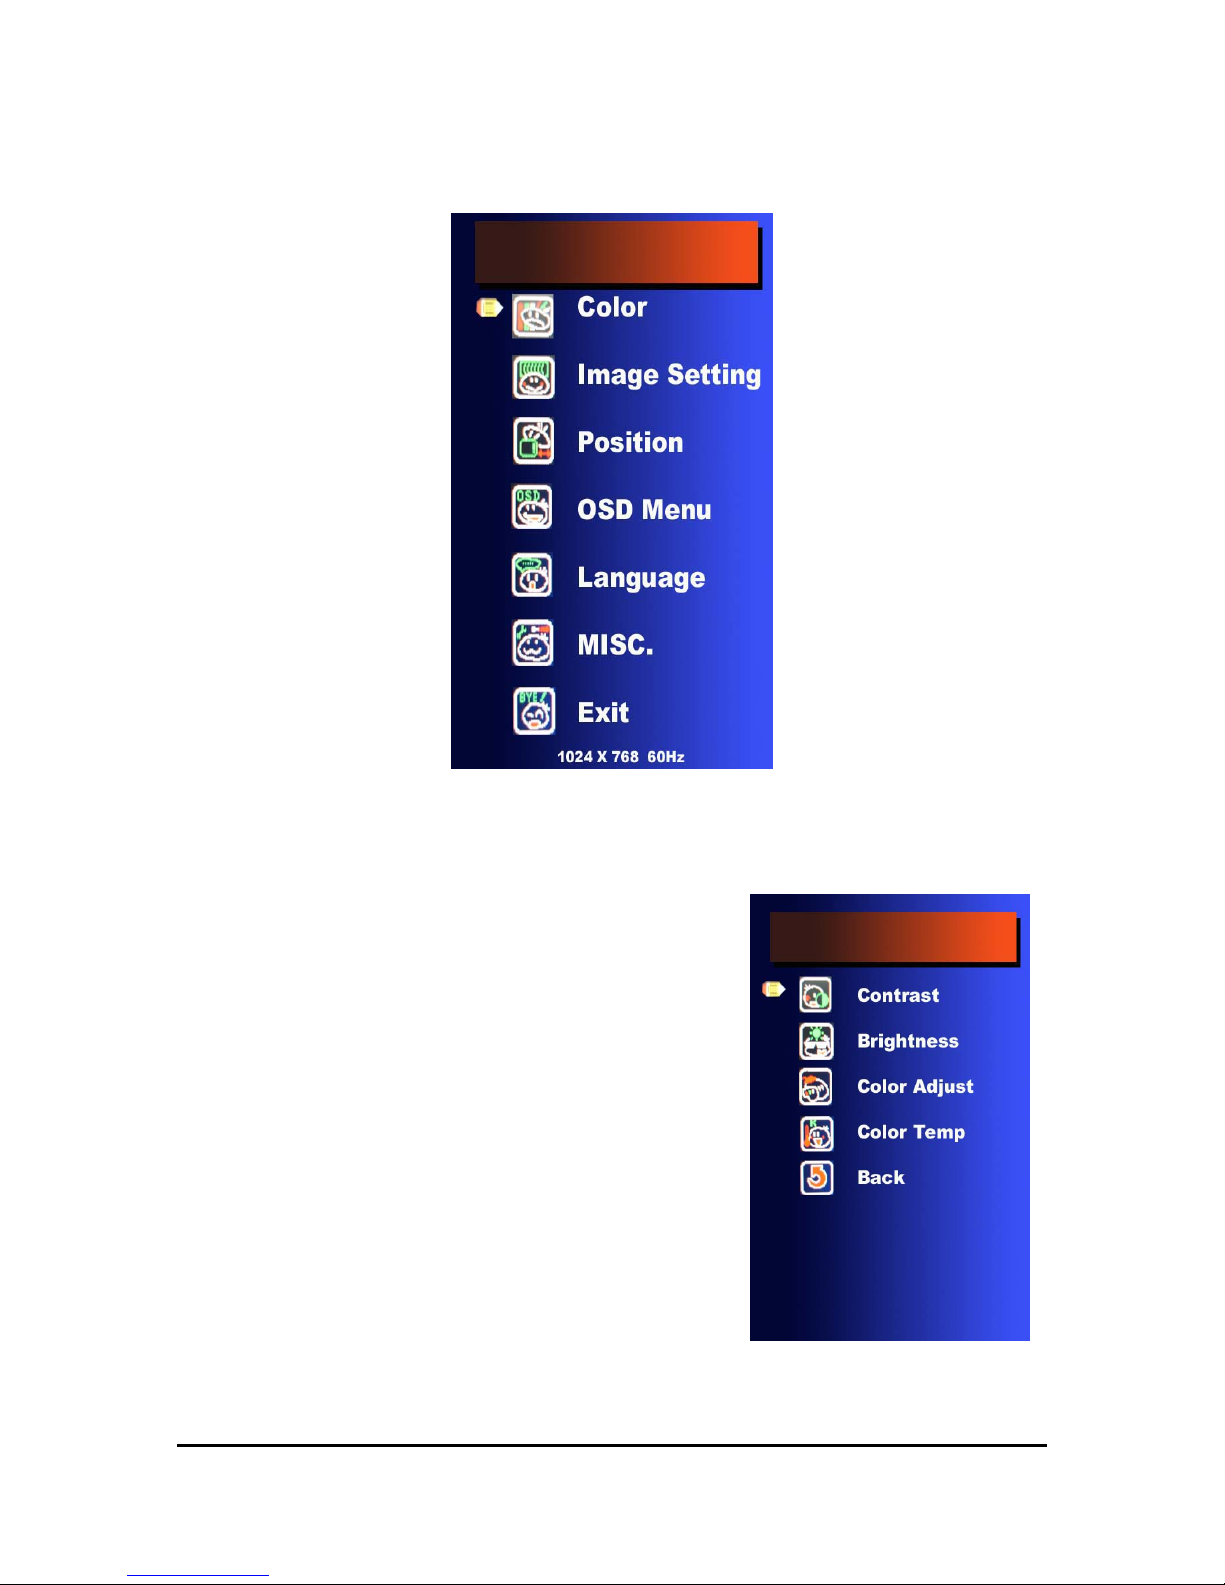
6. OSD Function
Color
Contrast
It can be adjust image get distinct or
vague
Brightness
It can be adjust image get dark or bright
Color Adjust
Set favorite color of red, green, and
blue
Color Temp
Set color to 9300,6500,5500
Back
Go back MENU
21 Manual Version: 3.0
Release Date: 10/28/2007
Page 22
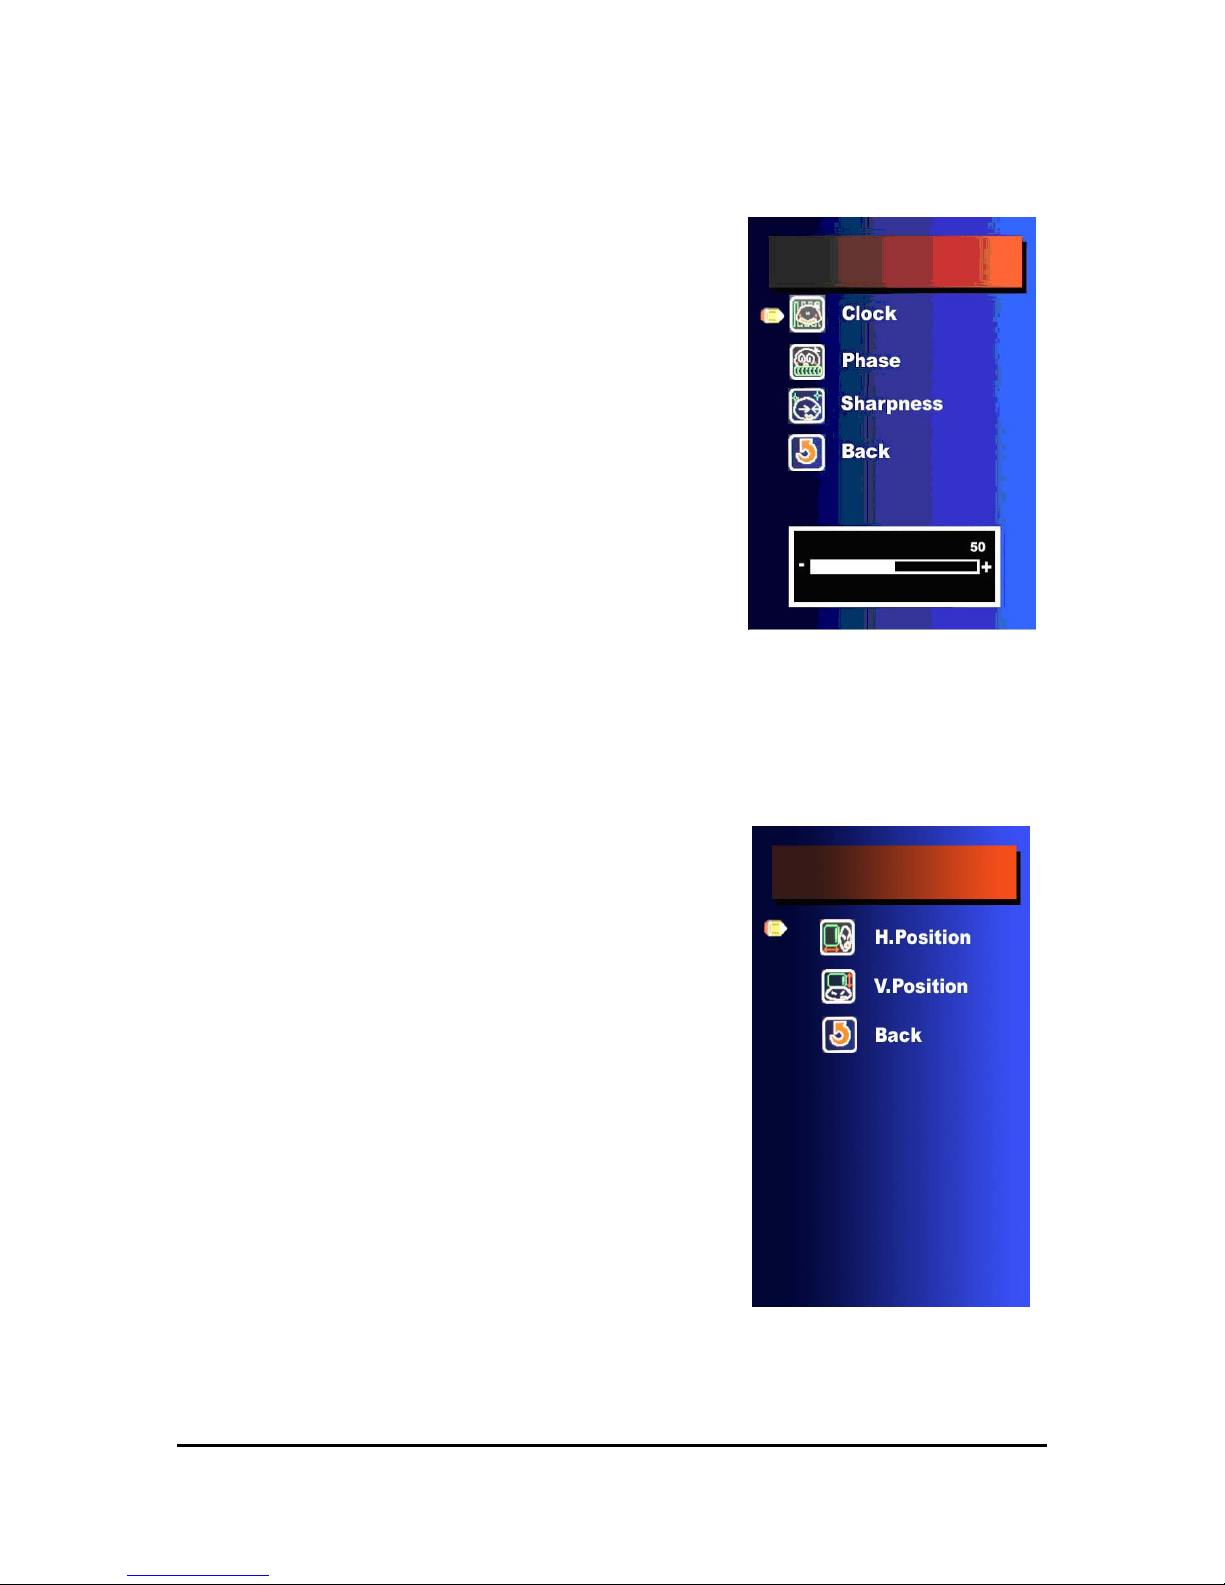
Image Setting
Clock
Adjust frequency to fill display
Phase
Adjust remove noise and sharpen the
image
Gamma Correct
Set gamma (0) 1.0, (1) 1.1, (2) 1.2, (3)
1.3
Sharpness
To mark the image become soft
Exit
Go back MENU
Position
H. Position
It can be moved to left or right side of
image
V. Position
It can be moved to up or down side of
image
BACK
Go back MENU
22 Manual Version: 3.0
Release Date: 10/28/2007
Page 23
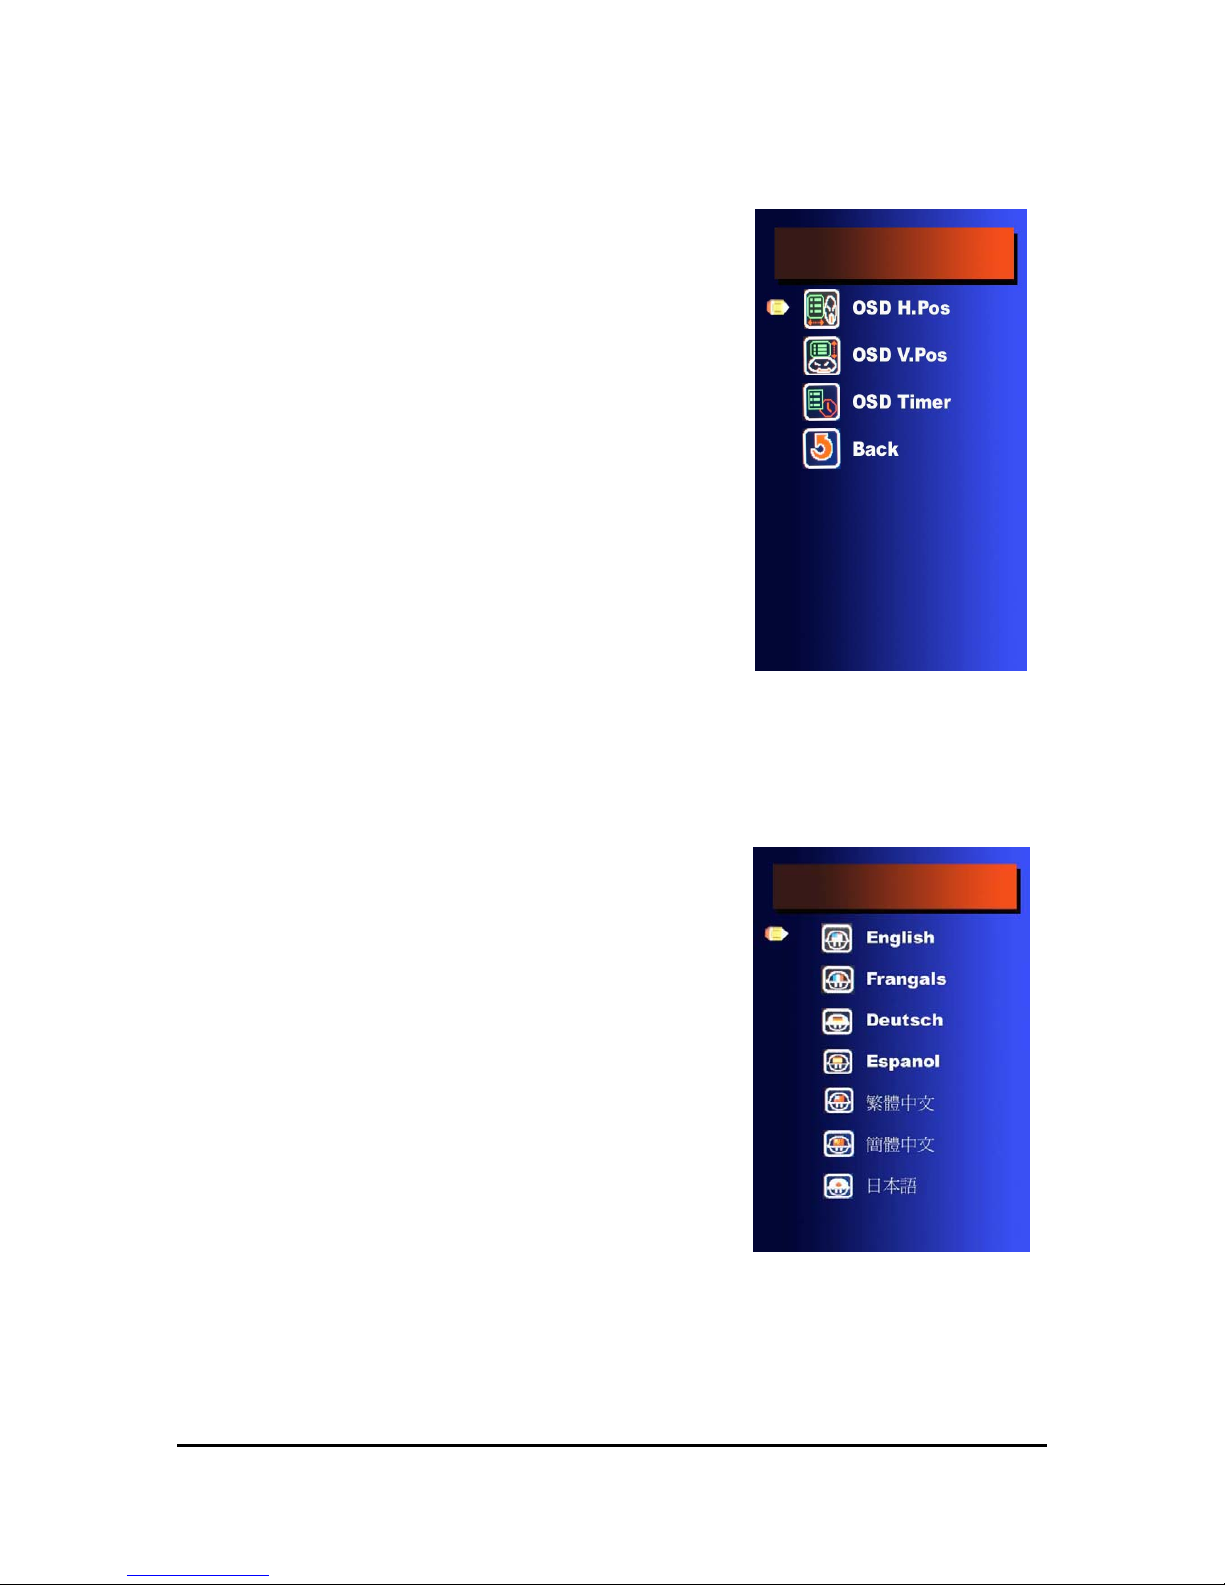
OSD Menu
OSD H. Position
It can be moved to left or right side of
OSD
OSD V. Position
It can be moved to up or down side of
OSD
OSD Time
It can adjust OSD display time
BACK
Go back MENU
Language
English
English
France
France
German
German
Spanish
Spanish
Chinese
Traditional
Chinese Traditional
Chinese Simple
Chinese Simple
Japan
Japan
23 Manual Version: 3.0
Release Date: 10/28/2007
Page 24
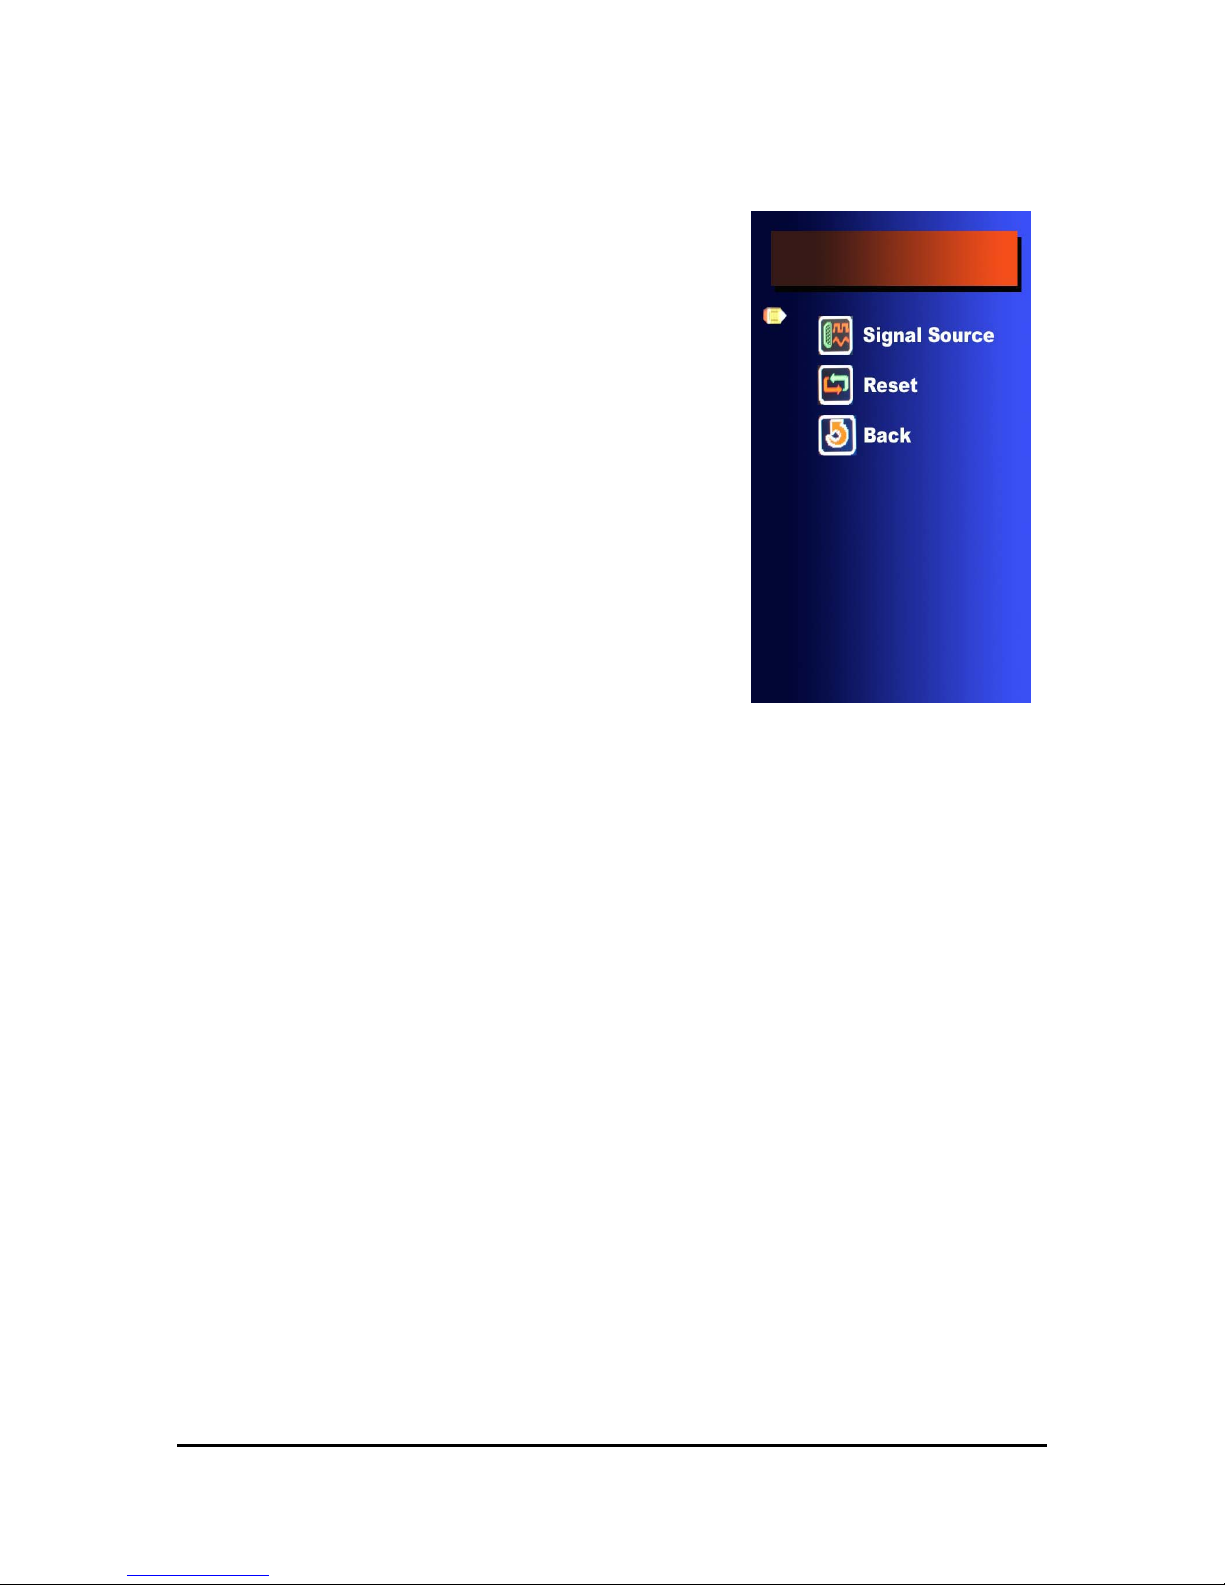
MISC.
Signal Source
D-SUB or DVI(Optional)
Reset
Recall Default value
BACK
Go back MENU
24 Manual Version: 3.0
Release Date: 10/28/2007
Page 25

25 Manual Version: 3.0
Release Date: 10/28/2007
7. Cleaning and Safety
7.1 Cleaning Touch LCD Monitor
Before cleaning, please power off the computer system and disconnect
the monitor from the AC outlet to prevent the damage. After finishing of
cleaning, please make sure the monitor is completely dry before you
reconnect the cables and power it on. Do not use any liquid or spray
cleaners directly on surface of screen or cabinet. Please use a soft, clean,
lint-free cloth with cleaners to clear your monitor.
7.2 Screen
Please use a soft, clean, lint-free cloth to remove the dust and dirt from
your monitor. For the fingerprints and smudges, please use a soft cloth
with cleaners to clean them.
7.3 Case
Please clean the cabinet of monitor with a soft cloth slightly moistened
with a mild detergent solution. Please rinse the cloth with clear water,
wring it dry, and wipe the cabinet to remove any detergent residue.
7.4 Safety
(1) To reduce risk of electric shock, please follow all safety notices,
never open the case of monitor by yourself, and turn off the power
before cleaning.
(2) The monitor is equipped with a power cord. (The type of power cord
may be different according to different countries.) The power cord
plug only fit into a safety ground outlet. Do not attempt to fit the plug
into an outlet that has not been configured for this purpose. Do not use
a damaged power cord. Please use the only power cord that comes
with your monitor. Using an unauthorized power cord may invalidate
the warranty of the products.
(3) Please do not insert or block anything inside the four internal edges
of the screen.
(4) Please remain dry for monitor when you use. Please do not pour
liquid into or onto monitor. If your monitor becomes wet, please do
not attempt to repair by yourself and please ask a qualified service
technician to check it before you turn on the power.
Page 26

26 Manual Version: 3.0
Release Date: 10/28/2007
Care and handling of your touch monitor
The following tips will help you keep your touch monitor functioning at the
optimal situation:
¾
Please protect your touch monitor away from extremely high or low
temperatures.
¾ Please keep your touch monitor dry and away from humid environment.
¾ Please do not wash with a wet cloth or pour fluid on it.
¾
Under the condensation for your touch monitor, please do not power on until
the condensation is evaporated completely.
¾ Please keep your touch monitor away from bumps and drops.
¾ Please keep your touch monitor away from dust, sand, and dirt.
Page 27

6. Troubleshooting
No image can be seen
Check if the power cord is properly connected. If not, connect it
again.
Check if the VGA signal cable is properly connected. If not, connect
it again.
Check if the power is on. If not, press the “P" button to turn it
on.
The image is distorted, flashes or flickers
Read the “OSD Function” (Page 18) section for tuning.
Select the correct resolution, refresh rate and make adjustments.
The image is displaced in one direction
Read the “OSD Function” (Page 18) section for tuning.
Select the correct resolution, refresh rate and make adjustments.
ٛ
The image has a faulty coloration.
It has a yellow, blue or pink appearance.
Read the “OSD Function” (Page 18) section for color tuning.
Check if the VGA signal cable is good. Change one VGA signal
cable to make sure.
The image is blurred
Change the resolution, refresh rate and make adjustments.
27 Manual Version: 3.0
Release Date: 10/28/2007
Page 28

28 Manual Version: 3.0
Release Date: 10/28/2007
9. Specifications
Display T ype Active Matrix TFT LCD
LCD Size 15"
304x228
Display Area (mm)
W x H
381x312.5x172 mm
Monitor Dimensions
W x H x D
Max. Resolution 1024 x 768
Colors 16.7 million
Brightness 200-400 cd/m2
Contrast Ratio 200-400 : 1
Input Signal RGB Analog
Input Connector D-Sub 15 Pin Female
2.0 A
Power Supply
12V External Power Adaptor
Color of Case Black with Silver Front Panel
Temperature Operation : 0° C to 40° C
Humidity 10% to 90%
Touch Panel Resistive, Capacitive, or SAW Type
Optional Device
Embedded MSR Reader (Triple Track by K/B Wedge or RS-232
Interface
 Loading...