


DS6X Series
Model: DS6201/6301/6401/6501/6601/6701
DS6202/6302/6402/6502/6602/6702
DS6203/6303/6403/6503/6603/6703
DS6205/6305/6405/6505/6605/6705
User Manual
Total 50W
36 Inches Stereo
TV Sound Bar System

Table of Contentss
Important Notes --------------------------------------------------------------------------------- 1
Important Safety Instructions ----------------------------------------------------------------- 2
Safety instructions i-------------------------------------------------------------------------- 2
Battery precautions ------------------------------------------------------------------------- 3
FCC information ----------------------------------------------------------------------------- 4
Package Contents ------------------------------------------------------------------------------ 5
Features and Specifications ------------------------------------------------------------------ 6
System Overview i------------------------------------------------------------------------------- 7
Front view ii------------------------------------------------------------------------------------ 7
Connector panel i---------------------------------------------------------------------------- 7
Remote control ii----------------------------------------------------------------------------- 8
Setting Up the System i------------------------------------------------------------------------- 9
Unpacking i------------------------------------------------------------------------------------ 9
Preparation ii---------------------------------------------------------------------------------- 9
Wall mounting i------------------------------------------------------------------------------- 10
Optical and coaxial cable connection i-------------------------------------------------- 11
Audio cable connection 1 ----------------------------------------------------------------- 12
Audio cable connection 2 ----------------------------------------------------------------- 13
Using the System i------------------------------------------------------------------------------ 14
Using the remote control i----------------------------------------------------------------- 14
Get power and started i-------------------------------------------------------------------- 16
Selecting a sound mode ------------------------------------------------------------------ 16
Basic functionsi----------------------------------------------------------------------------- 17
Bluetooth function -------------------------------------------------------------------------- 18
Troubleshooting -------------------------------------------------------------------------------- 19
Care and Maintenance i----------------------------------------------------------------------- 21
Cleaning ii------------------------------------------------------------------------------------- 21
Warranty information ---------------------------------------------------------------------- 21
English

Important Notess
Before using the TV sound bar system, please read the following important notes.
Please read this user manual carefully and save it for future reference.
For optical and coaxial cable connection, change your source device’s audio output
setting to “PCM” format . Refer to your source device’s user manual for more
information.
For the better sound quality, please set the volume of the sound bar to 75 percent of
maximum(Note: the maximum volume drop 3 levels is 75 percent) and set the volume
of your source device to a suitable level.
To get a better sound effect, press the movie, music or news button on the remote
control to select a suitable sound mode.
The recommended sound mode selections as below:
Program source
Sound mode
Program source
Sound mode
Strong bass film
Music or news
Strong bass music
Music or news
General film
Movie or music
Pop music
Movie or Music
Documentary
Music or news
Light music
Music or news
Variety show
Music or news
News / Dialog
Music or news
The sound mode selection and the volume settings are saved in the memory even after
the sound bar is powered off, and the volume settings from 75 percent to maximum will
be saved to 75 percent.
For audio cable connection, you can boost / restore the volume by double clicking the
boost button on the remote control.
The audio output of the sound bar is affected by the settings of the connected source.If
necessary, adjust the settings of the source to improve the audio output.
Not all remote control functions can be found on the sound bar. Please keep the
remote control properly.
Disconnect the power adapter from the electrical outlet to power off your sound bar
completely.
The lightning flash with arrowhead symbol within an equilateral triangle
alerts the user to the presence of uninsulated, dangerous voltage within the
system enclosure that may be of sufficient magnitude to constitute a risk of
electric shock.
The exclamation point within an equilateral triangle, as marked on the
system, is intended to alert the user to the presence of important operating
and maintenance instructions in this user manual.
English - 1
Important Safety Instructionss
Do not make unauthorized alterations to the system, doing so may compromise safety,
regulatory compliance, and may void the warranty.
This system contains magnetic material, contact your physician if you have
questions on whether this might affect the operation of your implantable
medical device.
Do not place naked flame sources,such as lighted candles,on or near the system.
Safety instructions
1. Follow all safety instructions, and keep the user manual for further use!
2. Check that the power supply voltage and current rating corresponds with the power
supply details shown on the system rating label before connecting the system to the
main power supply.
3. Never use a system that is damaged! Disconnect the system from the power supply
and contact your supplier if it is damaged.
4. Danger of electric shock! Never try to repair the system yourself. In the event of any
malfunction, repairs are to be conducted by qualified personnel only.
5. Warning! The system should not be used near water. Do not operate the
system with wet hands or while standing on a wet floor.
6. Warning! This system must be used indoors. It is neither designed nor
tested for use outdoors, in recreational vehicles, or on boats.
7. Do not open the system casing under any circumstances. Do not insert any foreign
objects into the inside of the casing.
8. Never use accessories which are not recommended by the manufacturer. They could
pose a safety risk to the user and might damage the system. You must therefore use
original accessories only.
9. The system is only suitable for use at moderate degrees of latitude. Do not use in the
tropics or in particularly humid climates.
10. Keep the system away from any hot surfaces and open flames. Always operate the
system on a level, stable, clean and dry surface. Protect the system against heat and
cold, dust, direct sunlight, moisture, dripping and splashing water.
11. This system is not intended for use by persons (including children) with reduced
physical, sensory, or mental capabilities, or by those who lack experience and
knowledge, unless they have been given supervision and instruction concerning
2 – English

Important Safety Instructionss
ithe use of the system by a person responsible for their safety.
12. Children should be supervised to ensure that they do not play with the system.
13. This system is classified as protection class II and must not be connected to a
protective ground.
14. Regularly check the power plug and power cord for damage. If the supply cord is
damaged. The adapter cannot be used and need to replace.
15. Avoid damage to the power cord. Do not crush, squeeze, bend, or scour on sharp
edges. Keep the power cord away from hot surfaces and naked flames.
16. Lay the cables in such a way that nobody can inadvertently pull them or trip over them.
17. Do not pull the plug out of the socket by the power cord, and do not wrap the power
cord around the system.
18. If an extension cord is used, its capacity needs to be suitable for the power consumed
by the system.
19. Connect the power adapter to an easily reachable electrical outlet so that in case of
an emergency the system can be unplugged immediately, Pull the power adapter out
of the electrical outlet to completely switch off the system, Use the power adapter as
the disconnection device.
20. Disconnect the power adapter from the electrical outlet when not use and before
cleaning.
21. Always switch the system off before disconnecting the power adapter.
22. Caution! Only use this system with the supplied power adapter.
23. Caution! In the event of a malfunction as a result of electrostatic discharge
and momentary electrical surges, unplug the system and plug it in again.
24. Make sure that no electrical wire, water, gas or other lines are located around the
installation location.
25. Ensure that there is sufficient ventilation, keep a minimum distance of 2 inches (5cm)
between the system and other objects or walls.
Battery precautions
Follow these precautions when using a battery in this device.
1. Use only the size and type of battery specified.
2. Be sure to follow the correct polarity when installing the battery as indicated in the
battery compartment, a reserved battery may cause damage to the device.
English - 3

Important Safety Instructionss
3. Do not mix different types of batteries together ( e.g: Alkaline and Carbon-zinc) or old
batteries with fresh ones.
4. If the batteries in the device are consumed or the device is not to be used for a long
period of time, remove the batteries to prevent damage or injury from possible
leakage.
5. Do not try to recharge the battery not intended to be recharged; it can overheat and
rupture. (Follow battery manufacturer’s instructions.)
6. The batteries shall not be exposed to excessive heat such as sunshine, fire or the like.
7. Clean the battery contacts and also those of the device prior to battery installation.
FCC information
This device complies with part 15 of the FCC Rules. Operation is subject to the following
two conditions:(1) this device may not cause harmful interference, and (2) this device must
accept any interference received, including interference that may cause undesired
operation.
Changers or modifications not expressly approved by the party responsible for compliance
could void the user’s authority to operate this equipment.
Note: This equipment has been tested and found to comply with the limits for a Class B
digital device, pursuant to Part 15 of the FCC Rules. These limits are designed to provide
reasonable protection against harmful interference in a residential installation. This
equipment generates, uses, and can radiate radio frequency energy and, if not installed
and used in accordance with the instructions, may cause harmful interference to radio or
television reception, which can be determined by turning the equipment off and on, the
user is encouraged to try to correct the interference by one of more of the following
measure:
Reorient or relocate the receiving antenna.
Increase the separation between the equipment and receiver.
Connect the equipment into an outlet on a circuit different from that to which the
receiver is connected.
Consult the dealer or an experienced radio/TV technician for help.
This device has been evaluated to meet general RF exposure requirement. The device
can be used in portable exposure condition without restriction.
4 – English
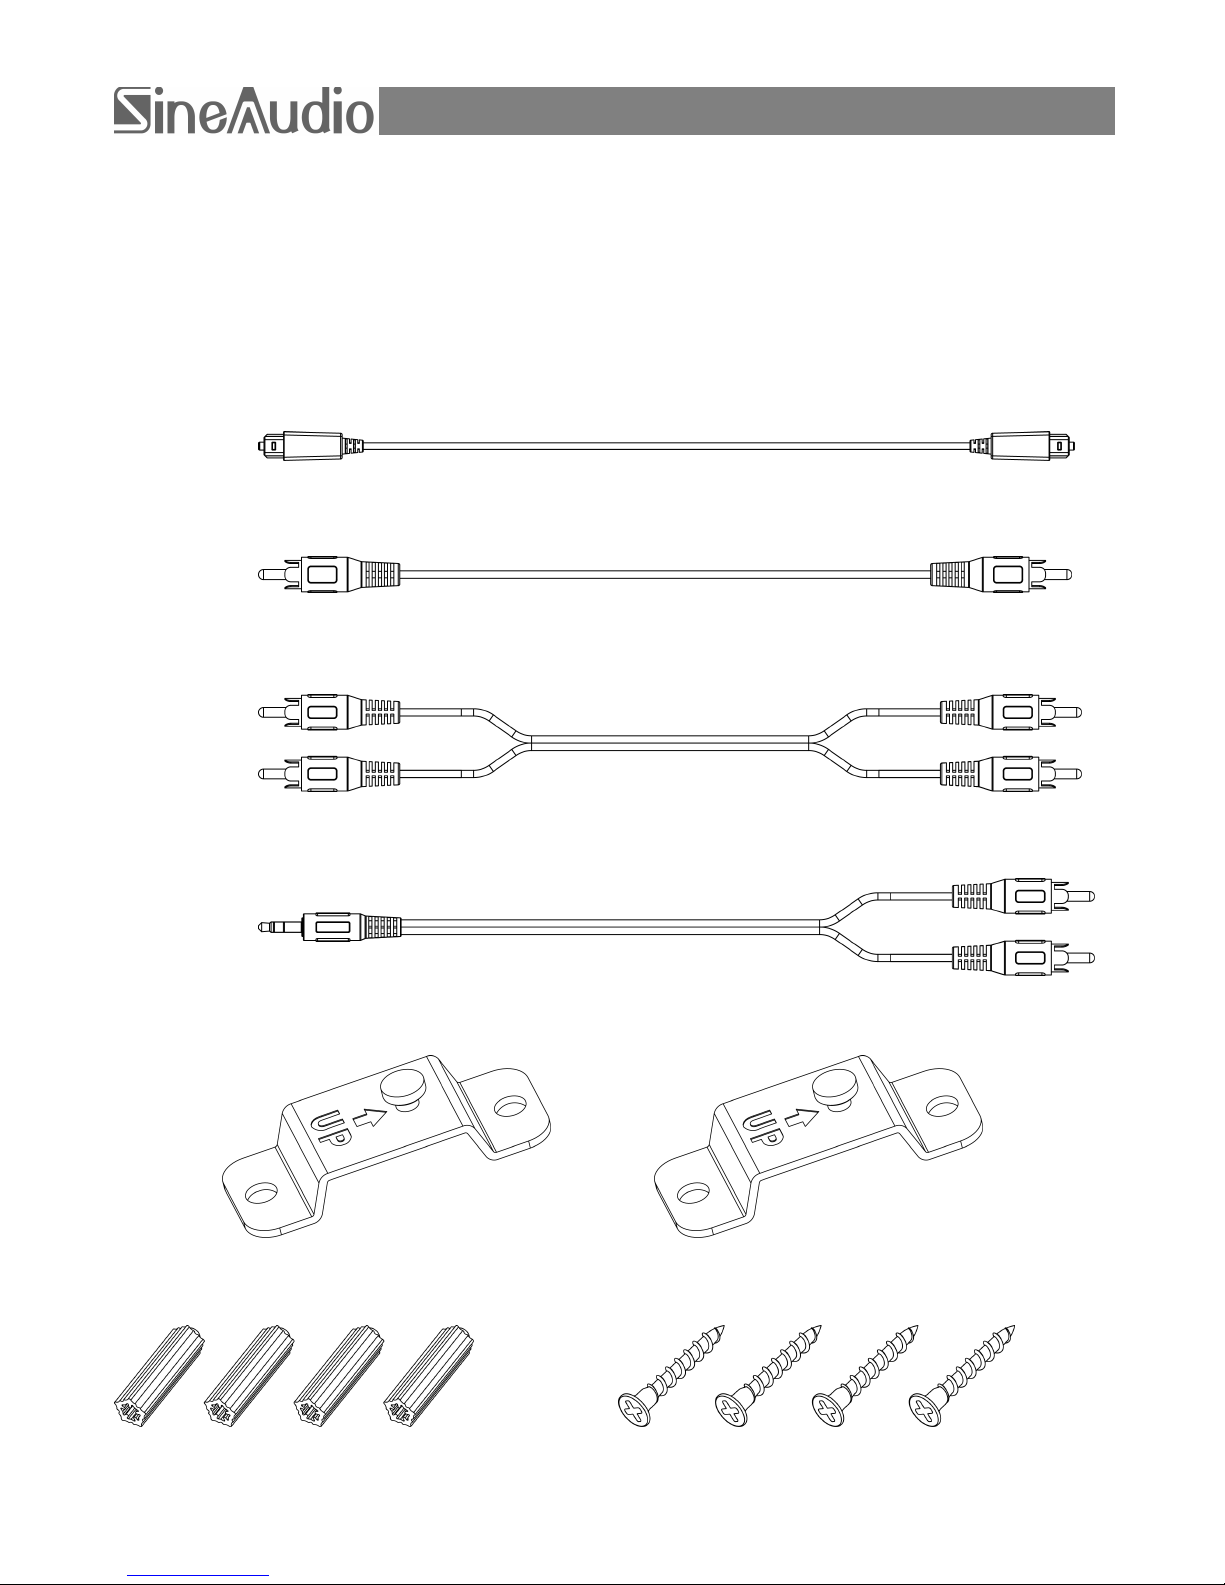
Package Contentss
1 X Sound bar
Accessories:
1 X Power adapter
1 X User manual
1 X Remote control
1 X Optical cable
1 X Coaxial cable
1 X Audio cable (RCA to RCA)
1 X Audio cable (stereo 1/8 inch(3.5mm) to RCA)
2 X Wall mount brackets
4 X Wall anchors 4 X Screws (M4 X 30mm)
Note: Accessories are subject to change without notice.
English – 5

Features and Specificationss
Features
Total 50 W power usage
36 inches TV sound bar
2.0 Channel two way speaker system
6 speaker drivers (4 woofer and 2 tweeter)
Analog audio interface (AUX input)
Digital audio interface (optical input and coaxial input)
Stream music from smart phone or tablet
The sound bar system can be mounted on the wall
Full function infrared remote control
Digital controlled audio processing sound mode
Specifications
Power supply
Input :
Output :
Protection class:
Energy efficiency level:
Remote control:
100-240VAC 50/60Hz
15VDC 2.4A ( OCP>5.2A )
Class II
Level VI
2 X 1.5V AAA batteries (not supplied)
Sound bar
Output power :
Frequency response :
Signal to noise ratio :
Total harmonic distortion:
Standby power:
25W X 2 (50W)
70Hz – 20KHz
80dB ( A-weighting)
-70dB ( A-weighting)
Less then 0.5W
Digital audio interfaces:
Audio format:
Sampling frequency:
Sampling bit-rate resolution
Optical and coaxial
PCM
32KHz, 44.1KHz, 48KHz, 96KHz, 192KHz
16 to 24 bit
Note: Specifications are subject to change without notice.
6 – English

System Overviews
Front view
Buttons
1. Mode (Source)
2. Play / Pause
3. Power(Standby)
4. Volume down
5. Volume up
Source indicators
6. OPT (Optical)
7. COAX (Coaxial)
8. Power(Standby)
9. BT (Bluetooth)
10. AUX (Auxiliary)
11. Speaker driver (Tweeter)
12. Speaker driver (Woofer)
14.Remote control sensor
Connector panel
15. Optical input socket
16. Coaxial input socket
17. AUX input sockets
18. SUB output socket
19. DC IN socket
Note: SUB output socket is only for the powered subwoofer (not supplied) or wireless
subwoofer (not supplied) connection.
INPUT
OPT
COAX
R AUX L
POWER
DCIN
12345
67891015161719
SUB
OUT
18
11
14
12
12
12
12
11
English - 7

System Overviews
Remote control
Buttons
Note: HDMI button is only for the HDMI converter (not supplied).
20. Power
21.Bluetooth
22. HDMI
23. Volume +
24. Previous
25. Play pause / mute
26. Next
27. Volume-
28. Movie
29. Music
30. News
31. Optical
32. Coaxial
33. AUX / boost
20
21
22
242526
2728293031
32
33
23
8 – English
Setting Up the Systems
Unpacking
Remove all packaging.
Check for the presence of all parts and for transport damage. In case of damage or
incomplete delivery, please contact your dealer.
Please keep the packaging. The system can be stored in it, if not used for a longer
period of time.
Preparation
The Sound bar system serves as an audio output device and features wireless and wired
connections. You can place the sound bar on a horizontal surface or mount it on a wall.
When mounting it on a wall, pay attention to the following:
The supplied wall mount brackets, wall anchors and screws can be used to fix the
sound bar to a wall. The wall mount brackets are designed for vertical walls constructed
of solid concrete, bricks or wooden.
When installing on a cinder block wall, first verify that the blocks have a minimum of 1.2
inch (3cm) of actual concrete wall thickness to be used for the wall anchors.
If you are uncertain about the construction of your wall, please consult a qualified
contractor or installer for assistance.
Ensure that the wall anchors and screws you use are stronger enough to support the
weight of the sound bar and long enough to sufficiently grip the wall.
It is strongly recommended to use the supplied wall anchors and screws.
Additional tools (not included) are required for the installation.
Do not over tighten screws.
Use an electronic stud finder to check the wall type before drilling and mounting.
During mounting, keep away children and pets.
Make sure the sound bar is mounted in reach of a wall outlet.
Caution!
When placing the sound bar on an entertainment center, bookshelf, or any
type of enclosed space, be sure to allow at least 2 inches (5cm) of space
around the sound bar for ventilation. If the sound bar is enclosed in a tight
space, without ventilation, heat generated from the sound bar could
produce a potential heat hazard.
English - 9
Setting Up the Systems
Caution!
Make sure the power adapter is disconnected from the electrical outlet
before making any mounting and connection.
During operation, if the cables require to be reconnected, the power
adapter must be disconnected first, otherwise damage to the system
may result.
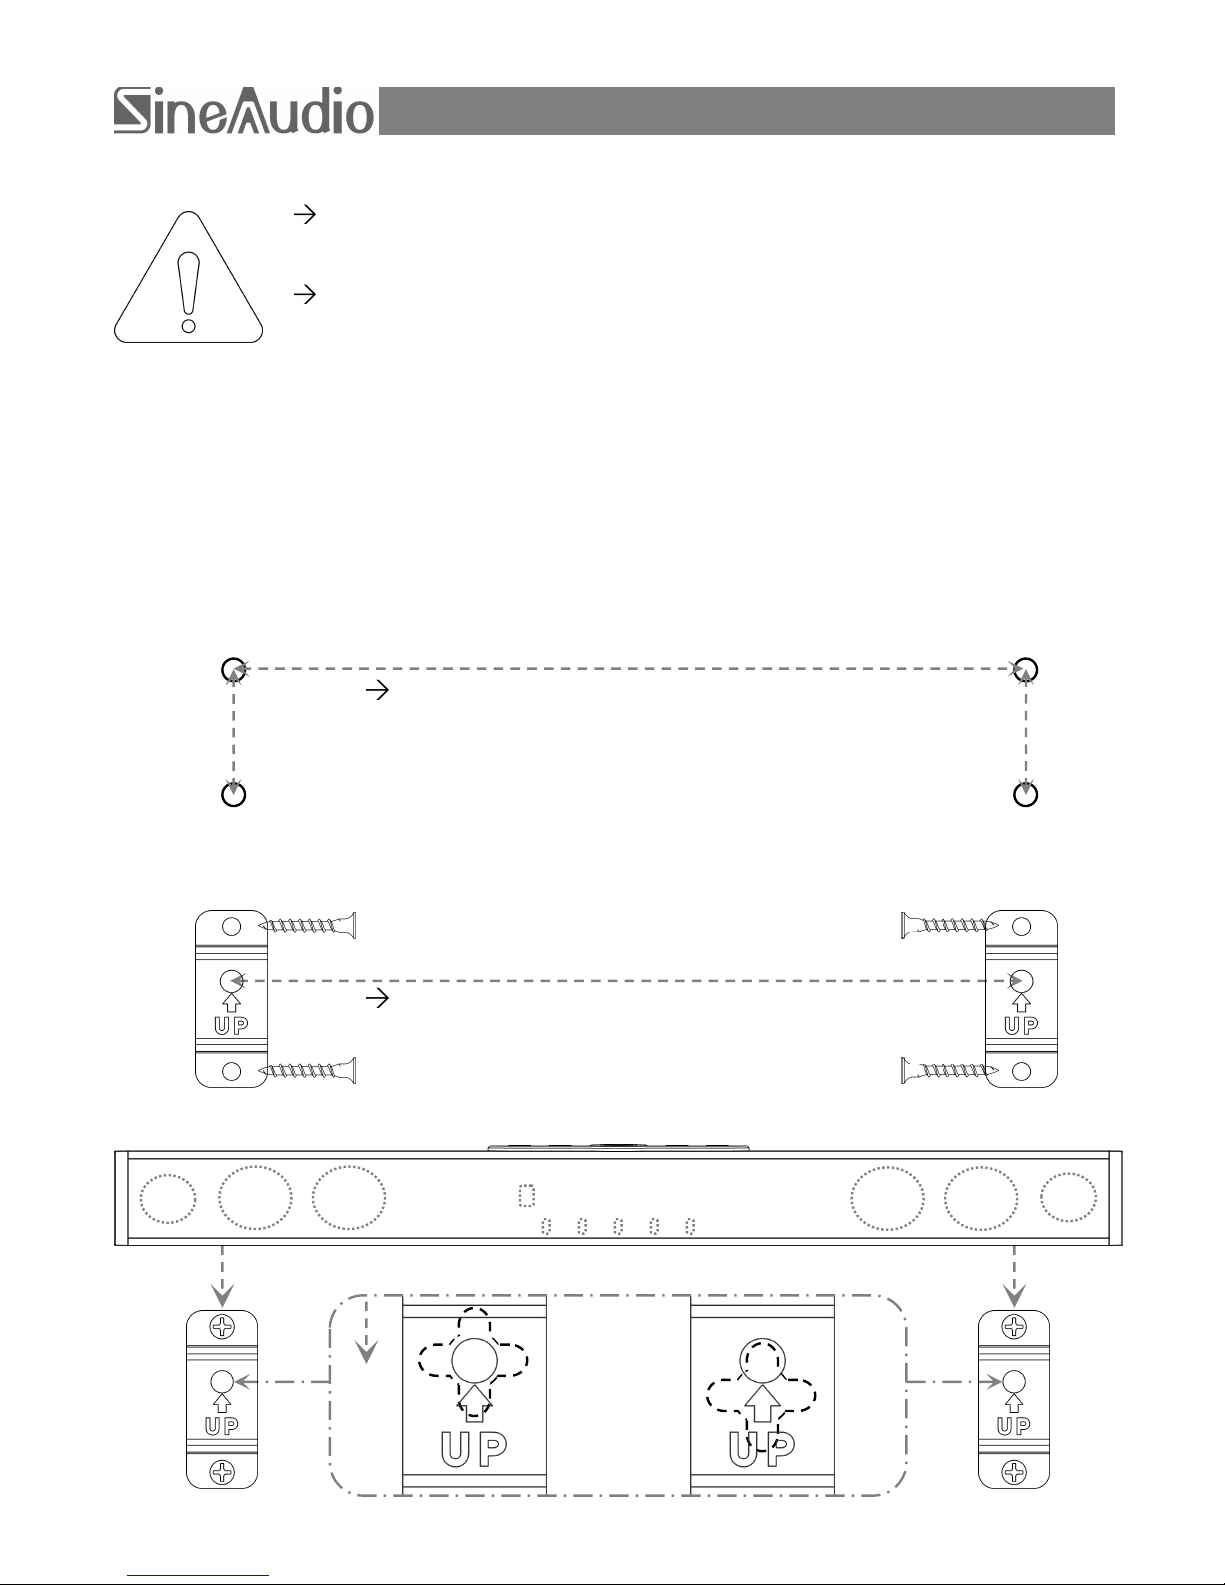
Wall mounting
1. The distance between the two brackets.
DS6501: 32.60inches(82.8cm)
DS6502: 32.52inches(82.6cm)
DS6503: 32.13inches(81.6cm)
DS6505: 31.97inches(81.2cm)
2. Mark the position and drill 4 holes in the wall.
The distance between the two brackets
refers to the first item above.
3. Insert 4 wall anchors into the holes, use a hammer if necessary.
4. Use 4 screws to mount the brackets to the wall. Secure the screws.
The distance between the two brackets
refers to the first item above.
5. Hang the sound bar onto the brackets. Make sure they are firm and stable.
>>>
10 - English
1.78 inches
(4.52 cm)
(4.52 cm)
1.78 inches
Setting Up the Systems
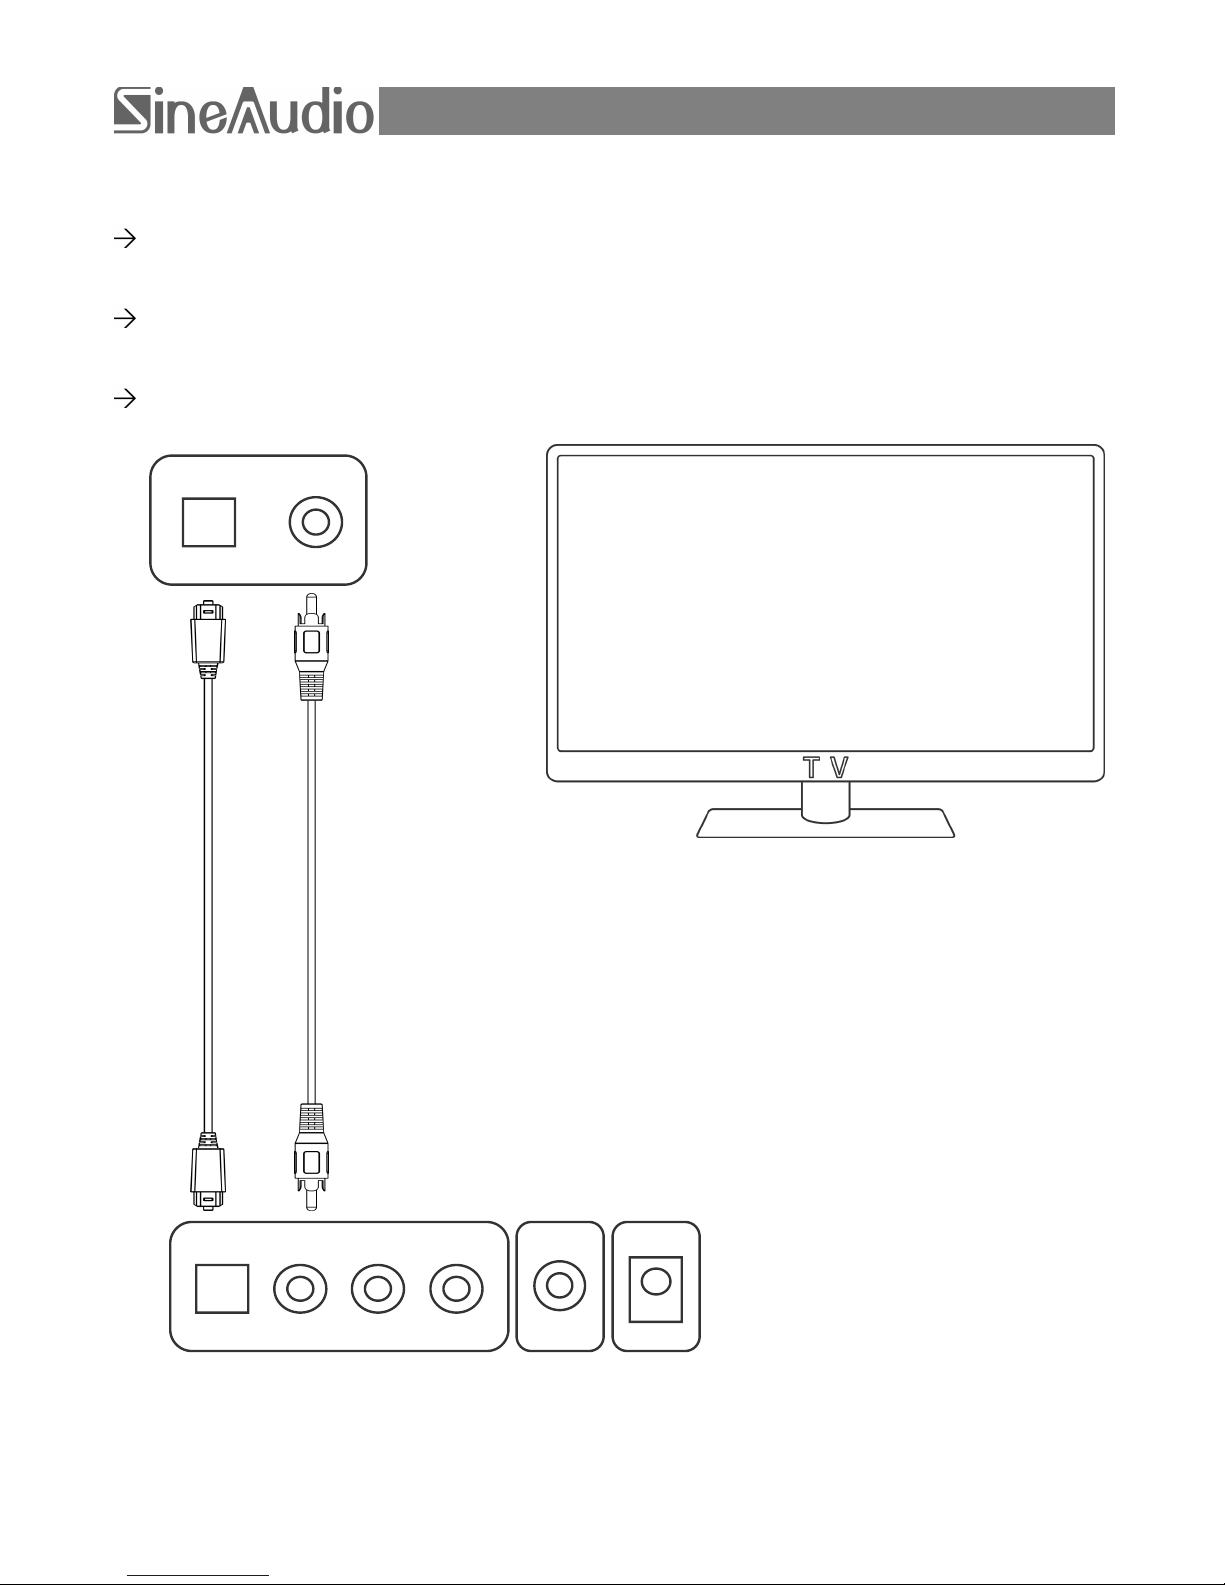
Optical and coaxial cable connection
Use the supplied optical cable or coaxial cable to connect the sound bar to a TV, DVD,
Blu-Ray Player or other suitable devices.
Connect one end to the optical or coaxial out socket of the TV, DVD, Blu-Ray Player or
other suitable devices.
Connect the other end to the optical or coaxial input socket of the sound bar.
Note: For optical and coaxial cable connection, change your source device’s audio output
setting to “PCM” format. Refer to your source device’s user manual for more information.
Audio OUT
Coaxial
Optical
English - 11
INPUT
OPT
COAX
R AUX L
DCIN
POWER
SUB
OUT

Setting Up the Systems
Audio cable connection 1
Use the supplied RCA to RCA audio cable to connect the sound bar to a TV, DVD,
Blu-Ray Player or other suitable devices.
Connect one end to the headphone or line out socket of the TV, DVD, Blu-Ray Player
or other suitable devices.
Connect the other end to the AUX(L/R) input sockets of the sound bar.
Note: For audio cable connection, you can boost / restore the volume by double clicking
the boost button on the remote control.
R L
Audio OUT
INPUT
OPT
COAX
R AUX L
DCIN
POWER
SUB
OUT
12 - English

Setting Up the Systems
Audio cable connection 2
If your TV or other source device only has a headphones socket, use the supplied
stereo 1/8 inch (3.5mm) to RCA audio cable to connect the sound bar to your TV or
other source devices.
Connect one end to the headphones socket of the TV or other source devices.
Connect the other end to the AUX(L/R) input sockets of the sound bar.
Ensure your TV speakers are turned on. Refer to your TV’s user manual for more
information.
Set your TV or other source device’s volume to the maximum.
Note: For audio cable connection, you can boost / restore the volume by double clicking
the boost button on the remote control.
Headphone
English - 13
INPUT
OPT
COAX
R AUX L
DCIN
POWER
SUB
OUT
Using the systems
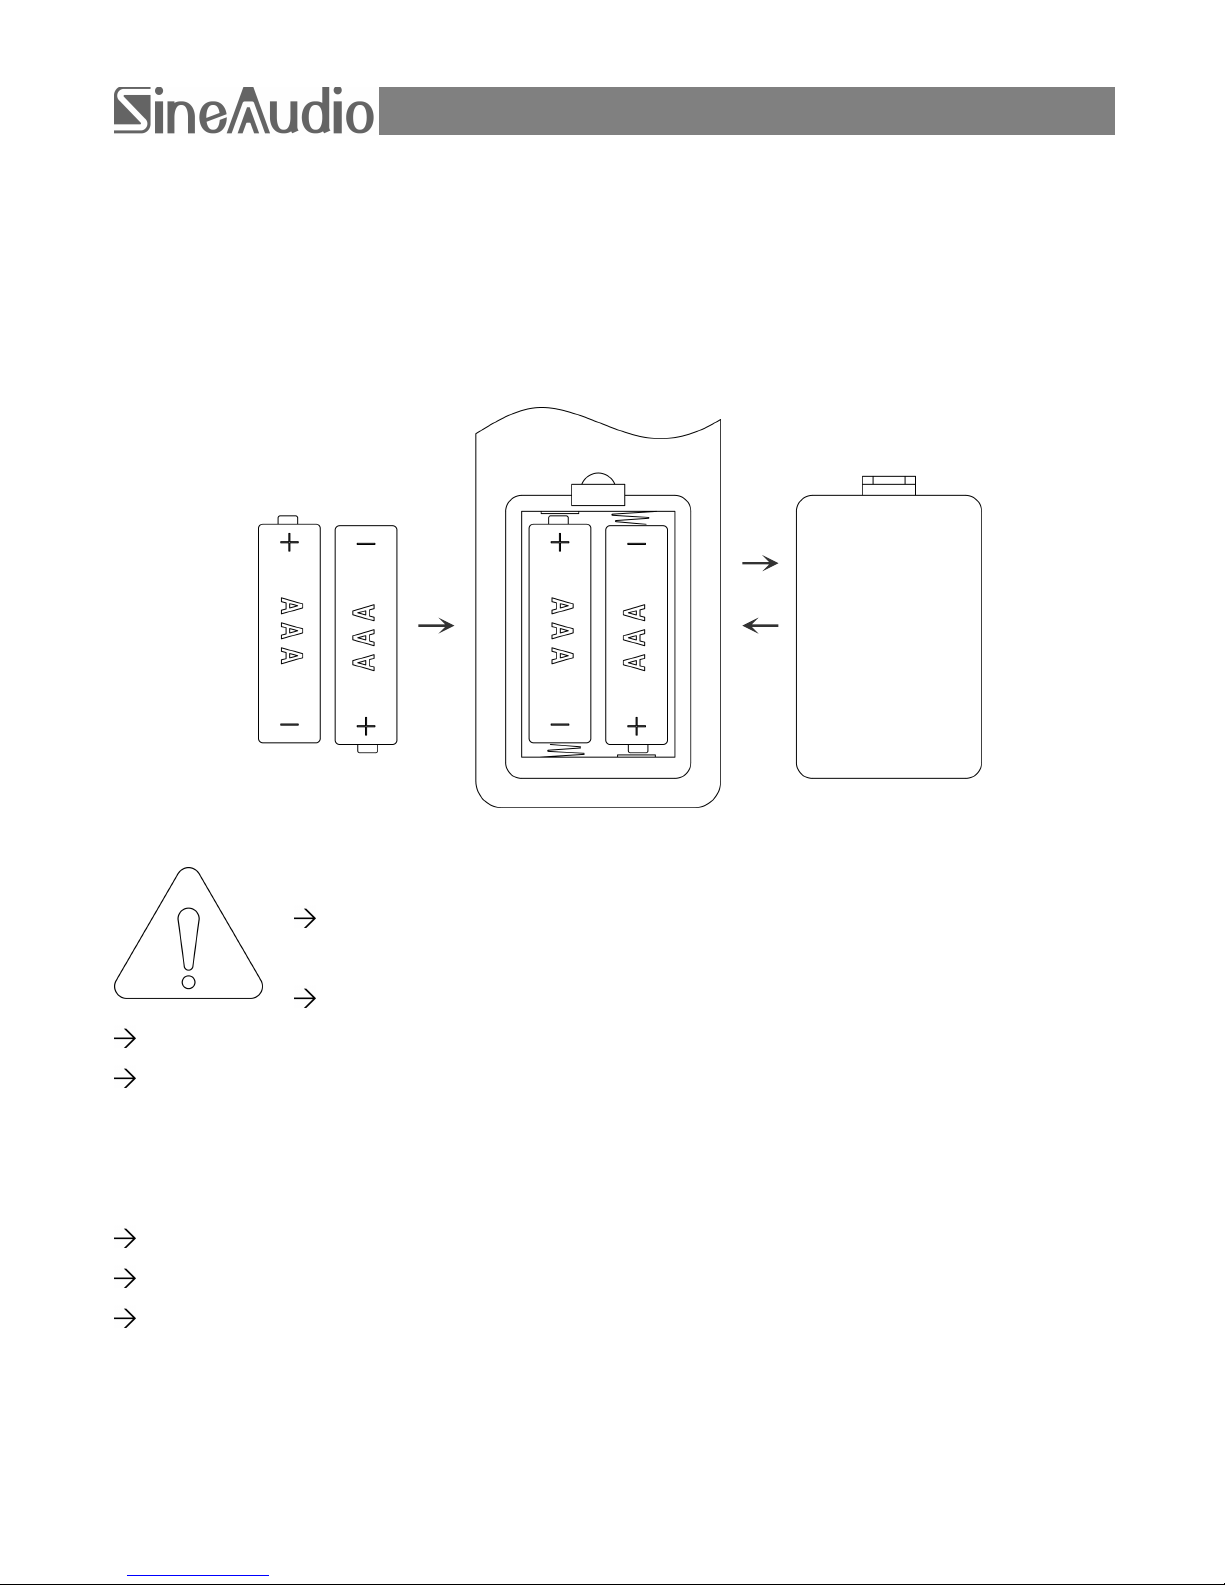
Using the remote control >>> Inserting/replacing batteries
1. Slide to open the battery compartment cover.
2. Insert 2 X 1.5V AAA batteries (not supplied) into the battery compartment. Match the
polarity markings in the battery compartment.
3. Close the battery compartment cover.
Caution!
The sound bar can only work with the remote control package included,
not compatible with universal remote control.
Always insert the batteries according to the correct polarity markings.
Use only high quality batteries, low quality batteries might leak and cause damage.
Remove the batteries from the remote control if you are not using it for an extended
period. The remote control could become damaged in case of battery leakage.
Tips for usage
If the remote control does not work properly, replace the batteries.
Make sure there are no obstacles between the remote control and Sound bar.
The remote control may be less effective if:
1. There are obstacles between the remote control and the infrared receiver.
2. Other remote controls are operated at the same time.
3. The battery power is low.
14 - English
1
3
2

Using the systems
Using the remote control >>> Remote control operation range:
Caution!
Not all remote control functions can be found on the sound bar. Please
keep the remote control properly.
Remote sensor
30 degree
30 degree
Approx. 16.5 feet (5 meters)
English - 15
Notes:
When there is an obstacle between the
remote sensor of the sound bar and the
remote control, the remote control may not
operate
When direct sunlight, an incandescent
lamp, fluorescent lamp or any other strong
light shines on the remote sensor of the
sound bar, the operation of the remote
control may be unstable

Using the Systems
Get power and started
Make sure all the source connections are made properly before you connect the power
adapter. Plug the power adapter to the DC IN socket, then to a suitable electrical outlet.
The power indicator lights up red. Indicating the sound bar is in standby mode.
Turning off your TV speakers: To avoid hearing distorted sound, turn off your TV
speakers. Refer to your TV’s user manual for more information.
Power on your sound bar: Press the Power button on the sound bar or remote control.
The power indicator lights up green.
Check if sound is coming from the sound bar.
Selecting a digital controlled audio processing sound mode
The digital controlled audio processing includes three sound mode: movie, music and
news.(Note:There is no sound mode indication on the sound bar)
To get a better sound effect, press the movie, music or news button on the remote
control to select a suitable sound mode.
The recommended sound mode selections as below:
Program source
Sound mode
Program source
Sound mode
Strong bass film
Music or news
Strong bass music
Music or news
General film
Movie or music
Pop music
Movie or Music
Documentary
Music or news
Light music
Music or news
Variety show
Music or news
News / Dialog
Music or news
Notes:
For the better sound quality, please set the volume of the sound bar to 75 percent of
maximum(Note: the maximum volume drop 3 levels is 75 percent)and set the volume
of your source device to a suitable level.
The sound mode selection and the volume settings are saved in the memory even after
the sound bar is powered off, and the volume setting from 75 percent to maximum will
be saved to 75 percent.
Set the volume of your source device to a low level before switching on the sound bar.
Then increase the volume of your source device to a comfortable level.
Disconnect the power adapter from the electrical outlet to power off your sound bar
completely.
16 - English

Using the Systems
Basic functions >>> Selecting a source
You can have several source devices connected permanently to the sound bar.
Available sources are: OPT / COAX / BT / AUX
Source
Function
OPT
Optical , connection with an optical fiber cable.
COAX
Coaxial, connection with a coaxial cable.
BT
Bluetooth, Connection to a Bluetooth Device.
AUX
Auxiliary, Connection with a RCA to RCA audio cable.
Auxiliary, Connection with a 1/8 inch(3.5mm) to RCA audio cable.
Press the M(Mode)button repeatedly on the sound bar or press the OPT, COAX, BT,
AUX button on the remote control to toggle between the sources, The OPT, COAX, BT,
AUX source indicator will light up blue accordingly.
You can boost / restore the volume by double clicking the boost button on the remote
control when you use AUX source (audio cable connection).
Basic functions >>> Play back functions
Normally playback functions can be managed through the controls of the connected
source device.
Alternatively, use the remote control and the buttons of the sound bar.
Key
Press Key
Function
M
1 X
Source selection
Long press 2 second
Disconnecting the Bluetooth device
I< / >I
1 X
Skip to the beginning of the previous / next title
- / +
1 X
Volume down / Volume up
>II / mute
1 X
Pause / Mute sound (Flash the indicator light).
2 X
Play / Restore sound.
Notes:
The volume boost and mode (source) selection is saved in the memory even after the
sound bar is powered off.
The audio output of the sound bar is affected by the settings of the connected source. If
necessary, adjust the settings of the source to improve the audio output.
English - 17

Using the Systems
Bluetooth function
External Bluetooth devices can be connected to the TV sound bar system via Bluetooth
connection.
1. Press the BT button on the remote control to enter the Bluetooth mode. The Bluetooth
indicator lights up blue.
2. Activate the Bluetooth function of the external device and search for Bluetooth devices.
3. Select Sine Audio from the Bluetooth device list.
4. Follow the instructions shown on your device’s screen.
5. When the Bluetooth connection is established, files from your connected Bluetooth
device will be played through the sound bar.
Disconnecting the Bluetooth device:
Press M (Mode) button on the sound bar to enter AUX, OPT or COAX mode.
Press the OPT, COAX or AUX button on the remote control to enter AUX, OPT or
COAX mode.
Disconnect using your Bluetooth device. The sound bar starts searching for another
Bluetooth device.
Long press the BT button on the remote control or M (Mode) button on the sound bar
about 2 seconds to disconnect the current Bluetooth device. Long press about 2
seconds again to reconnect the current Bluetooth device.
Notes:
Bluetooth works best within a range of up to 33 feet (10 meters).
The music streaming may be interrupted by obstacles between the Bluetooth device
and sound bar, such as walls, metallic casing that covers the device, or other devices
nearby that operate in the same frequency.
If the connected device goes out of Bluetooth range, the system will reconnect
automatically when the device comes back within range.
The current Bluetooth device connection is saved in the memory even after the sound
bar is powered off.
18 - English

Troubleshootings
Problem
Solution
No power
Check the power adapter is properly connected to an electrical outlet.
Check the DC plug is properly connected to the DC IN socket.
Unplug the power adapter for at least one minute and reconnect.
No Sound
Press the Power button on the sound bar or remote control to turn on
the sound bar. The power indicator lights up green.
Increase your TV’s volume to maximum.
Press MUTE button on the remote control to restore sound.
Ensure that the source device has correct volume settings and is
playing a track.
Ensure the correct source device is selected.
Plug the audio cable into a connector on your TV labeled Audio
Output or Audio OUT, not Audio Input or Audio IN.
Optical and coaxial cable connection:
Plug the optical cable into a connector on your TV labeled Optical
OUT or Digital OUT, Optical IN or Digital IN.
Plug the coaxial cable into a connector on your TV labeled Coaxial
OUT or Digital OUT, Coaxial IN or Digital IN.
Activate PCM(Pulse Code Modulation)in the audio settings menu of
your source device(see your source device’s user manual).
Audio cable connection (connect to the headphone socket of TV):
Turn on your TV speakers, Refer to your TV’s user manual for more
information.
Poor audio
quality
Press the movie, music or news button on the remote control to
select a suitable sound mode.
Set the volume of the sound bar to 75 percent of maximum(Note: the
maximum volume drop 3 levels is 75 percent).
Secure cable connections on the sound bar and TV (or other
connected sources).
Try with different source devices. If the problem still exists, check the
cable connections.
Ensure that the cables connected to the source devices are correctly
plugged in and the plugs are fully inserted.
English - 19

Troubleshootings
Problem
Solution
Poor audio
quality
Reduce the volume of your source device.
Audio cable connection:
Double clicking the boost button on the remote control to restore the
volume.
Bluetooth connection:
Bring the Bluetooth device closer to the sound bar and make sure
that no obstacles are disturbing the connection.
Remote
control does
not work
Ensure that the batteries are correctly inserted; if necessary, replace
the batteries.
Bring the remote control closer to the sound bar and make sure there
are no obstacles in between. Ensure the remote control is within 16.5
feet (5 meters) of the system.
Aim the remote control directly at the infrared receiver of the system.
System
doesn’t react
It is malfunction probably due to electrostatic discharge.
Unplug the power adapter for at least one minute and reconnect.
Bluetooth
device cannot
be connect
to the sound
bar
Bring the Bluetooth device closer to the sound bar.
Switch off your device and/or sound bar, then back on, repeat the
pairing process.
Make sure the sound bar is not connected another Bluetooth device.
Make sure that you have selected Sine Audio from the Bluetooth
device list on your device.
Ensure you are using the correct device.
If the device is still not connected, try the following:
Remove the sound bar (Sine Audio) from the list of “paired devices”
on your phone/tablet.
Turn the sound bar off and then on again.
Pair it again with your phone/tablet. It should now successfully
establish the pairing.
Note: If none of the above solutions works, the Bluetooth device may be
malfunctioning. Try another Bluetooth device. If not even the new device
can be connected, the sound bar may be malfunctioning. In this case,
please consult your dealer for repair.
20 - English

Care and Maintenances
Cleaning
Warning!
Before cleaning, ensure to switch the system off and disconnect the
power adapter from the electrical outlet.
Do not use petrol, alcohol or other abrasive cleansers to clean the
exterior.
Clean the surface of the system with a soft , dry cloth.
Do not use any sprays near the system. Do not use any solvents, chemicals or cleaning
solutions containing alcohol, ammonia or abrasives.
Do not allow liquids to spill into any openings.
Use the original packaging if it is necessary to transport the system
Warranty Information
The warranty period for this product is 12 months from the date of its original purchase. If
manufacturing defects occur, please contact your dealer at the first time, we will instruct
you on how to return the defective unit back to us for repair or replacement.
The following are excluded from the Sine Audio warranty coverage:
Product over warranty.
Damage resulted from misuse and abusive action.
Damage resulted from chemical, fire, radioactive substance, and poison, liquid.
Damage resulted from natural disaster.
English - 21

English - V1.0
Printed in China (2018)
Ten years, just for original sound
 Loading...