

Page 1
SINCLAIR VISION-QL OWNER'S GUIDE
R.G.B. COLOUR MONITOR DISPLAY
Recommended by Sinclair Research Ltd. For use with the
Sinclair QL computer. Manufactured for and sold,
guaranteed and serviced by MBS Data Efficiency Ltd.
BEAB approval applied for.
Home
Edition
This PDF created with the FREE RoboPDF Home Edition (not legal for business or government use)
Get RoboPDF: An Easy, Affordable Alternative for Creating PDFs - www.robopdf.com
Buy RoboPDF
Home
Edition
This PDF created with the FREE RoboPDF Home Edition (not legal for business or government use)
Get RoboPDF: An Easy, Affordable Alternative for Creating PDFs - www.robopdf.com
Buy RoboPDF
Page 2
INTRODUCTION
Congratulations on your purchase of the VISION QL MONITOR Full Colour Computer
Monitor. We know you will be pleased with its performance.
Please take the time to carefull read the following instructions, operating
procedures and information. Your new monitor is a well crafted, precision
instrument that will provide long use, if properly interfaced to the computer
and regularly maintained.
The monitor features the latest type of 12 inch (30.5cm) 90degree deflection
colour tubes, for a bright and clear display. The video circuitry is designed
with Linear Amplifiers to allow virtually unlimited colour rendition from one
end of the spectrum to the other.
Home
Edition
This PDF created with the FREE RoboPDF Home Edition (not legal for business or government use)
Get RoboPDF: An Easy, Affordable Alternative for Creating PDFs - www.robopdf.com
Buy RoboPDF
Home
Edition
This PDF created with the FREE RoboPDF Home Edition (not legal for business or government use)
Get RoboPDF: An Easy, Affordable Alternative for Creating PDFs - www.robopdf.com
Buy RoboPDF
Page 3

CAUTION! DISCONNECT BOTH THE MONITOR AND THE COMPUTER FROM THE AC POWER SOURCE
WHILE INTERCONNECTING THE TWO UNITS.
INPUT SIGNAL
Signal types : Separate R,G,B, H/V Composite sync.
Signal levels : All TTL
Signal Polarity : VIDEO....................Positive
H/V Composite Sync.......Negative
OPERATION
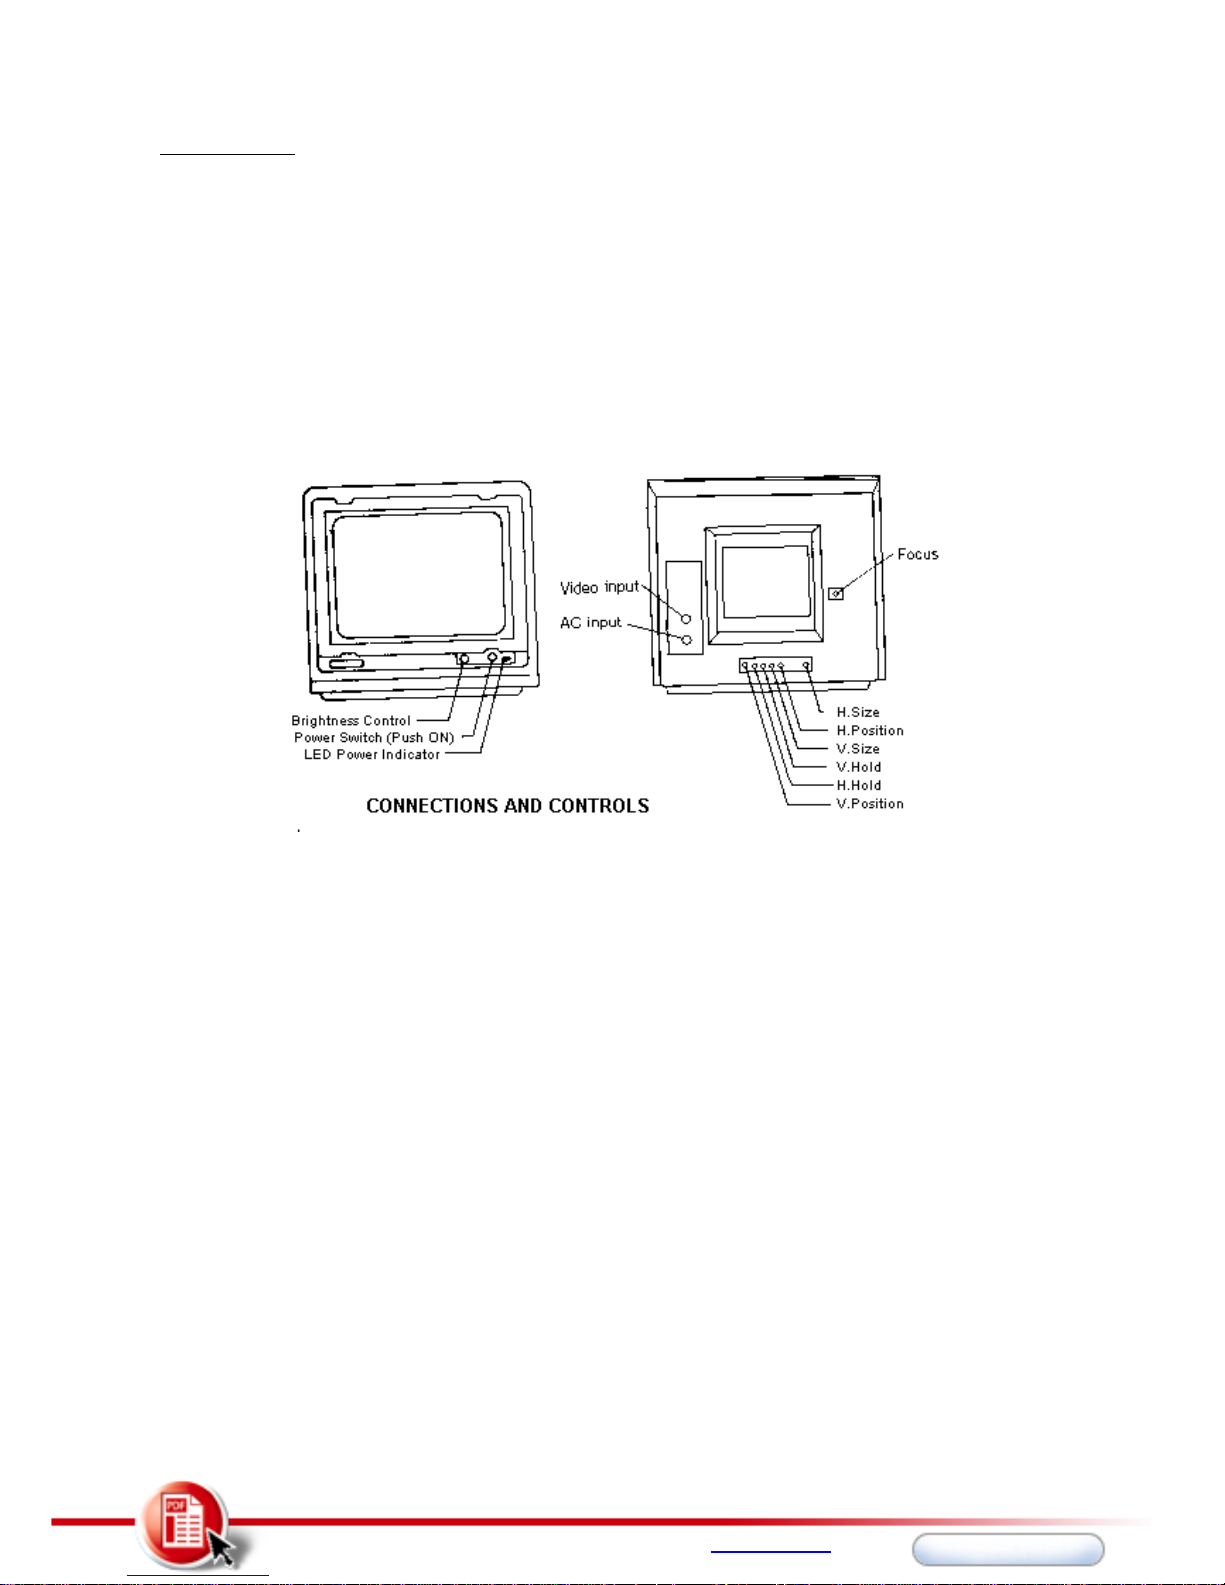
1. Connect the 8-way DIN connector cable of the monitor to the mating computer
connector
2. Plug both the monitor and the computer into the AC power source
3. Turn on the monitor and computer power switches.
4. After a brief warmup period, adjust the front panel BRIGHTNESS control for
comfortable viewing. Lower levels will increase tube life and lessen screen
burn.
5. Video stability, focus, width and height have been preset at the factory and
should not require further attention. However, if you cannot obtain a
satisfactory display, return your monitor to the SINCLAIR dealer for
readjustment.
WARNING! After extended periods of operation at high temperature, turning off
the computer will activate an x-ray protection circuit in the monitor, cutting
off its raster. To restore the raster for maintenance or adjustment of the
monitor, turn off the monitor AC power switch and wait for a while before
turning it on again.
Home
Edition
This PDF created with the FREE RoboPDF Home Edition (not legal for business or government use)
Get RoboPDF: An Easy, Affordable Alternative for Creating PDFs - www.robopdf.com
Buy RoboPDF
Home
Edition
This PDF created with the FREE RoboPDF Home Edition (not legal for business or government use)
Get RoboPDF: An Easy, Affordable Alternative for Creating PDFs - www.robopdf.com
Buy RoboPDF
Page 4

PLEASE OBSERVE THESE PRECAUTIONS WHILE YOU ARE OPERATING YOUR SINCLAIR MONITOR!
1. Do not place objects on top of the monitor cabinet which will fall into the
vents or which will cover them and prevent proper cooling of the electronics.
This could cause circuit damage or fire hazard.
2. Never place any liquids on top of the cabinet.
3. Do not use or store the monitor in direct sunlight, or in excessively dusty,
hot or humid areas.
4. Be certain that the monitor is firmly positioned on its supporting surface,
and that it can not be easily bumped or vibrated out of position.
Home
Edition
This PDF created with the FREE RoboPDF Home Edition (not legal for business or government use)
Get RoboPDF: An Easy, Affordable Alternative for Creating PDFs - www.robopdf.com
Buy RoboPDF
Home
Edition
This PDF created with the FREE RoboPDF Home Edition (not legal for business or government use)
Get RoboPDF: An Easy, Affordable Alternative for Creating PDFs - www.robopdf.com
Buy RoboPDF
Page 5

5. Keep monitor away from speaker systems or other strong magnetic fields.
6. Route the AC power cord so that it cannot be stepped on or tripped over
7. Always remove the power cord and interface cables by grasping the plugs and
pulling, never pull on the cords or cables
USER MAINTENANCE WARNING!
There are no user serviceable components located inside the monitor cabinet. Do
not remove the monitor covers, as you may be exposed to a severe shock hazard!
Home
Edition
This PDF created with the FREE RoboPDF Home Edition (not legal for business or government use)
Get RoboPDF: An Easy, Affordable Alternative for Creating PDFs - www.robopdf.com
Buy RoboPDF
Home
Edition
This PDF created with the FREE RoboPDF Home Edition (not legal for business or government use)
Get RoboPDF: An Easy, Affordable Alternative for Creating PDFs - www.robopdf.com
Buy RoboPDF
Page 6

EXCEPT AS NOTED BELOW, REFER ALL MAINTENANCE TO AUTHORISED REPAIR FACILITIES.
1. Keep the outer surfaces of the cabinet free of dust and dirt by periodically
wiping with a soft, dry cloth. DO NOT USE ANY CLEANER, WAXES OR SOLVENTS OF
ANY KIND!
2. On extremely stubborn dirt or stains, disconnect all power from the monitor
and allow it to cool. Then wipe with a soft cloth dampened with mild
detergent, wipe off any remaining detergent with a cloth dampened with clean
water
3. The DISPLAY TUBE face can be wiped with a damp cloth to remove any
accumulation of dirt. TURN OFF THE MONITOR FIRST! DO NOT USE SPRAY CLEANERS!
4. You may see the following pictures on the display when signals other than
recommended signal are received. Adjust the rear controls of monitor to set
the proper picture accordingly by using plastic tuning tool provided.
5. Instability of the display is usually caused by a failure or misadjustment of
the video circuitry in the computer, since it generates all of the sync
signals used by the monitor for picture stability. We suggest you take both
the monitor and the computer to your dealer if this trouble occurs.
Home
Edition
This PDF created with the FREE RoboPDF Home Edition (not legal for business or government use)
Get RoboPDF: An Easy, Affordable Alternative for Creating PDFs - www.robopdf.com
Buy RoboPDF
Home
Edition
This PDF created with the FREE RoboPDF Home Edition (not legal for business or government use)
Get RoboPDF: An Easy, Affordable Alternative for Creating PDFs - www.robopdf.com
Buy RoboPDF
Page 7

RECOMMENDED SIGNAL
Home
Edition
This PDF created with the FREE RoboPDF Home Edition (not legal for business or government use)
Get RoboPDF: An Easy, Affordable Alternative for Creating PDFs - www.robopdf.com
Buy RoboPDF
Home
Edition
This PDF created with the FREE RoboPDF Home Edition (not legal for business or government use)
Get RoboPDF: An Easy, Affordable Alternative for Creating PDFs - www.robopdf.com
Buy RoboPDF
Page 8

SPECIFICATIONS
CRT : 12" Diag. 90 degree Def. Self Convergence 0.38 pitch
IC : 2 pcs
Transistor : 30 pcs
Diode : 29 pcs
Input Signal : Separate RGB H/V Composite sync
Cable connector : 8-way DIN connector cable
Scanning frequence : Horizontal 15.625 kHz, Vertical 50Hz
Characters (Example) : 2000 characters (5x7 dots, 80 charx25 lines)
Display colour : 8 colours
Display area : 238(W)x176(H) mm:Max
[9.4(W)x6.9(W) inches: Max]
Power Input : AC 240V 50Hz
Power consumption : 69W
Dimensions (SET) : 320(W)x303(H)x393(D) mm
[12.6(W)x11.9(H)x15.5(D) inches]
Weight (SET) : 12 kg (26.5 lbs)
Due to constant research, specifications are subject to change without notice.
DISTRIBUTED EXCLUSIVELY IN THE UK BY MBS DATA EFFICIENCY LTD.
MAXTED ROAD, MAYLANDS AVENUE, HEMEL HEMPSTEAD, HERTS HP2 7LE
TELEX : 825554 DATEFF G
TEL : 0442-60155
BY:
KAGA ELECTRONICS CO. LTD
3-14-2 YUSHIMA BUNKYO-KU TOKYO 113 JAPAN
TELEX : 02655459 KAGA TK-J
TEL : 03-836-5521~5529
Home
Edition
This PDF created with the FREE RoboPDF Home Edition (not legal for business or government use)
Get RoboPDF: An Easy, Affordable Alternative for Creating PDFs - www.robopdf.com
Buy RoboPDF
Home
Edition
This PDF created with the FREE RoboPDF Home Edition (not legal for business or government use)
Get RoboPDF: An Easy, Affordable Alternative for Creating PDFs - www.robopdf.com
Buy RoboPDF
 Loading...