

Page 1

SERVICE MANUAL
SP-300A
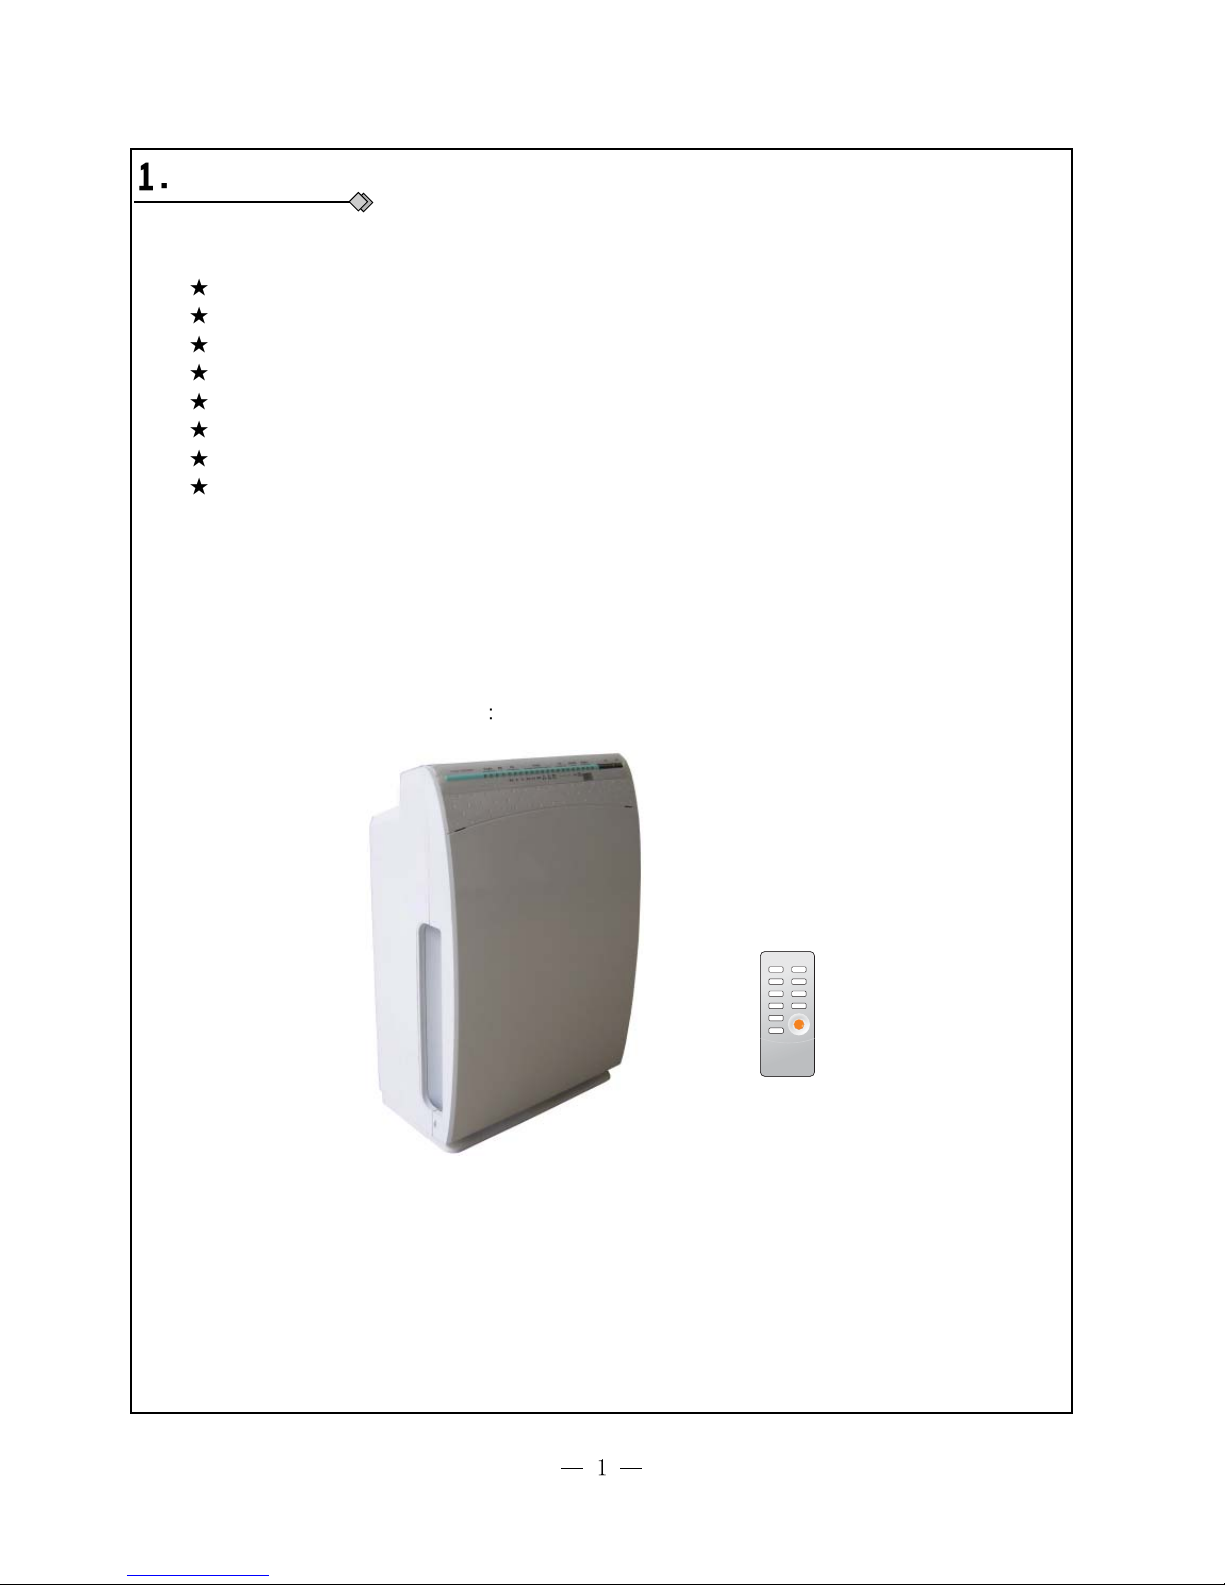
AIR PURIFIER
Page 2

Page 3
Lock Lum
Auto Speed
Turbo Sleep
Anion Odor
Timer
Electrostatic
On/Off
Summary and Features
Main Function Feather:
Silver ion sterilizing anti-mildew
Cold catalyst
HIMOP High efficiency dispel formaldehyde
HEPA High efficiency filtering
Active carbon adsorb hramful gas high efficient
Plasma
Anion
Quiet design
Model
SP-300A
Page 4
P
K
:
G%
P
PP
NJ
9+]
h
h
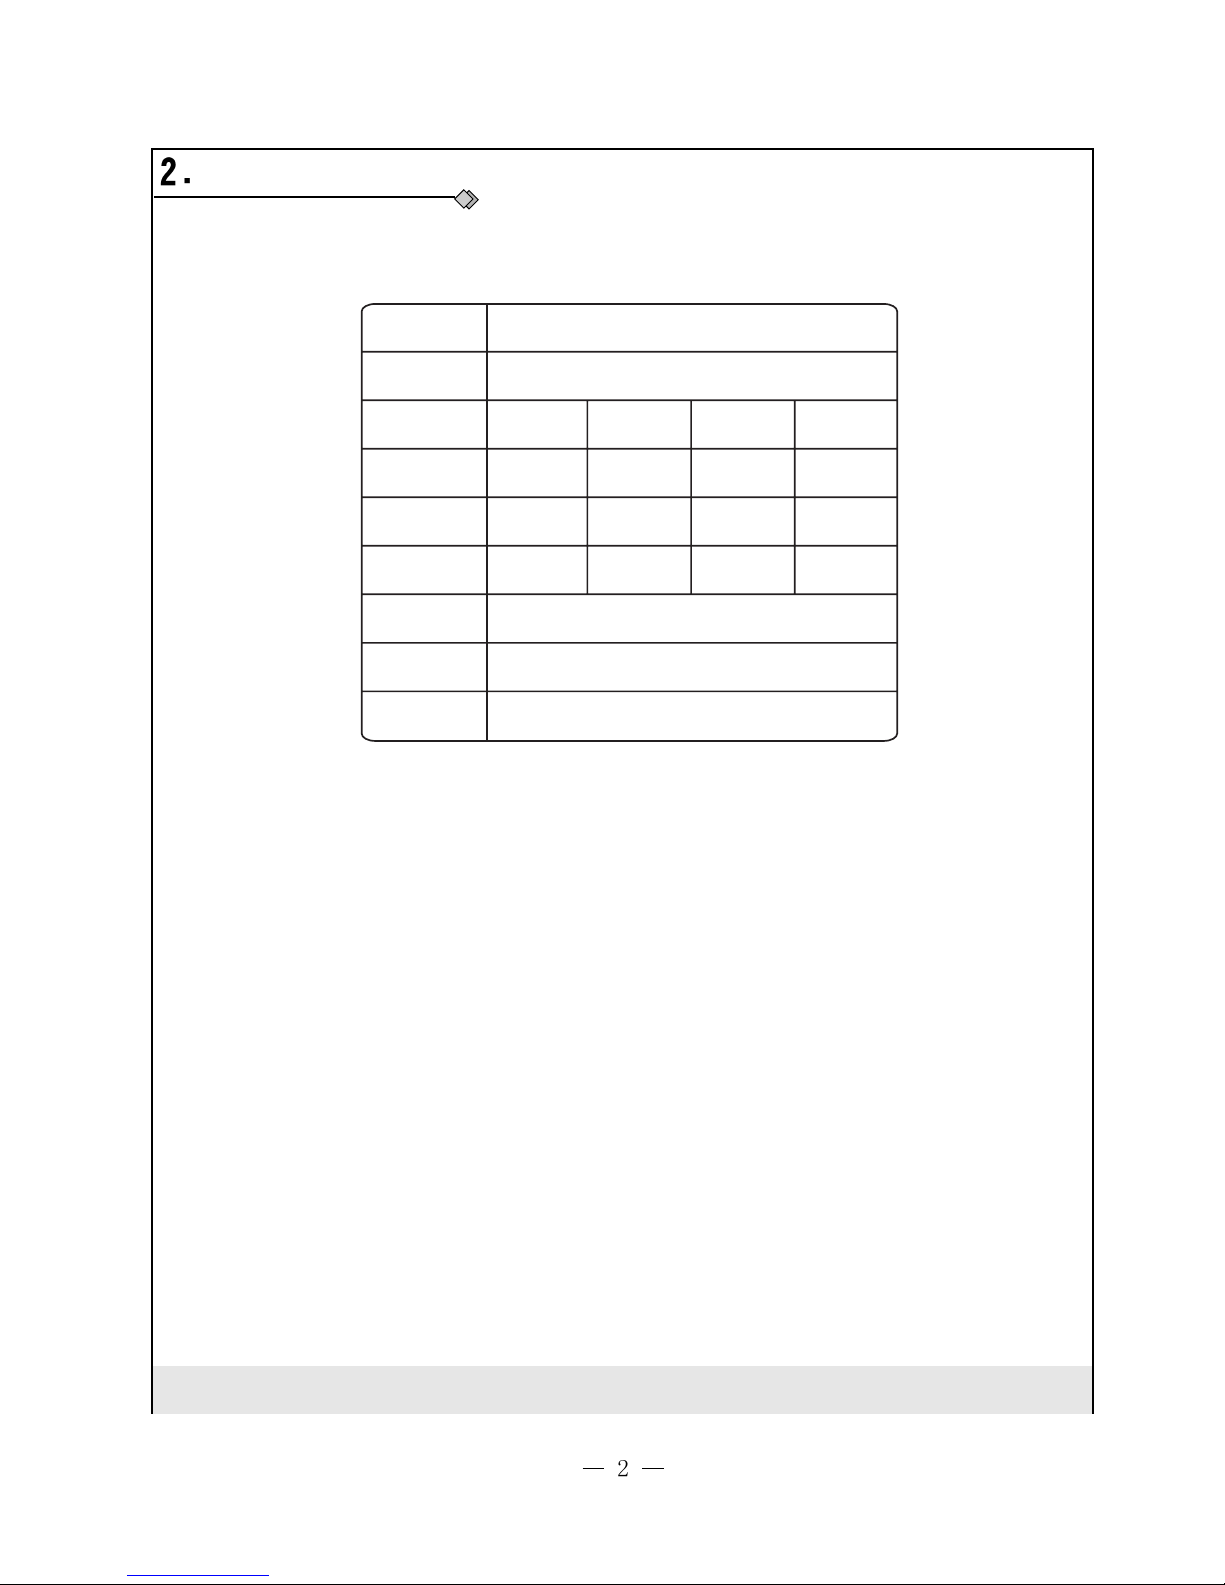
Technical Specifications
Model
Power
Fan Speed
Turbo
High
Low
Quiet
Air Flow
Volume
Power
Noise
Surface
Product
Size
Product
Weight
W
D
H
The surface is the surface influenced by which
the unit runs under high fan speed.
The above data is subject to change without notice. Please refer to the nameplate of the unit.
SP-300A
Page 5
Filternetzkomponenten
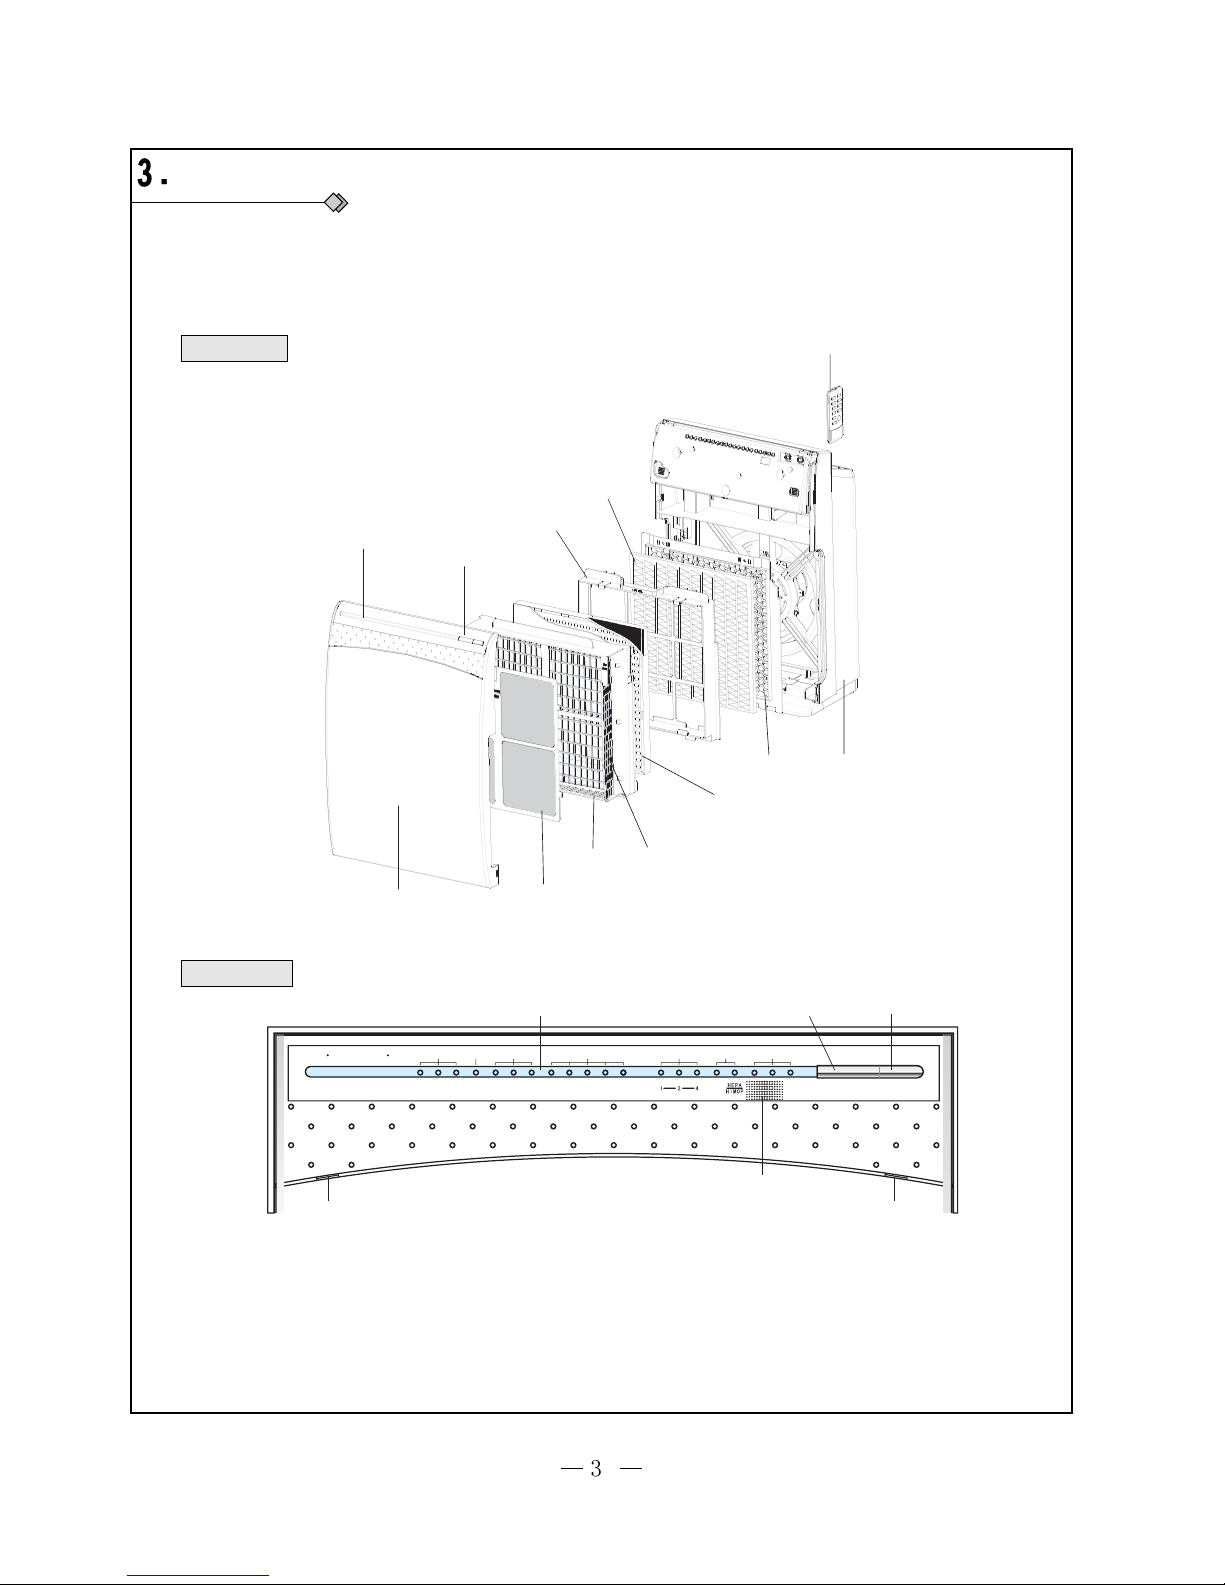
Filter Components
(Cotton filter, HIMOP + HEPA filter components)
Panel
Dust Frame
Activated carbon net rack body
Button
HIMOP net rack
Filter screen
(Activated carbon)
Host display screen
Air inlet
Remote control
On/off
Mode
Odor sensor
Clean/Change
Timer
Running mode
Fan Speed
Lock
Dust sensor
Mute
Low
High
Turbo
Auto
Sleep
Anion
Odor
Dedust filter
Indicator light
Remote control
receiver window
Dust sensor Odor sensor
On/Off button
Mode button
AIR PURIFIER
Part Name
Unit Parts
Unit display screen
Page 6
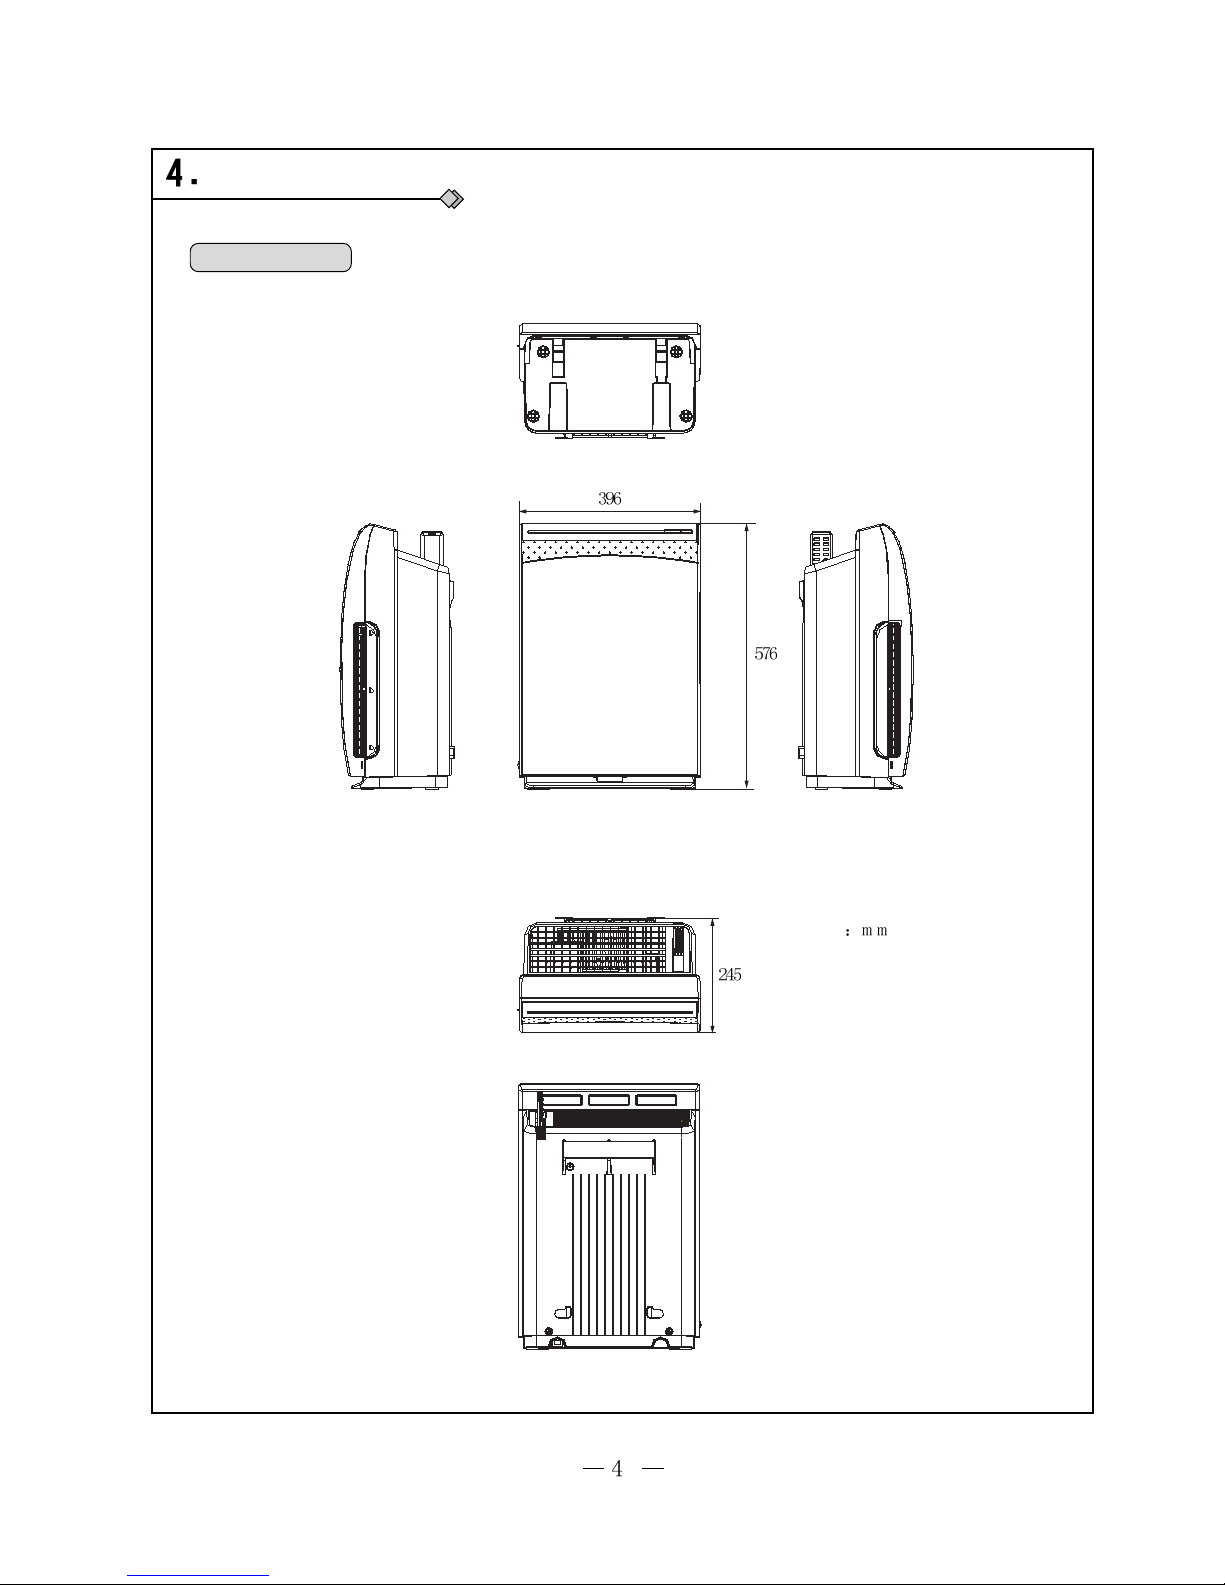
Outline Dimension
Outline Dimension
Unit
Page 7
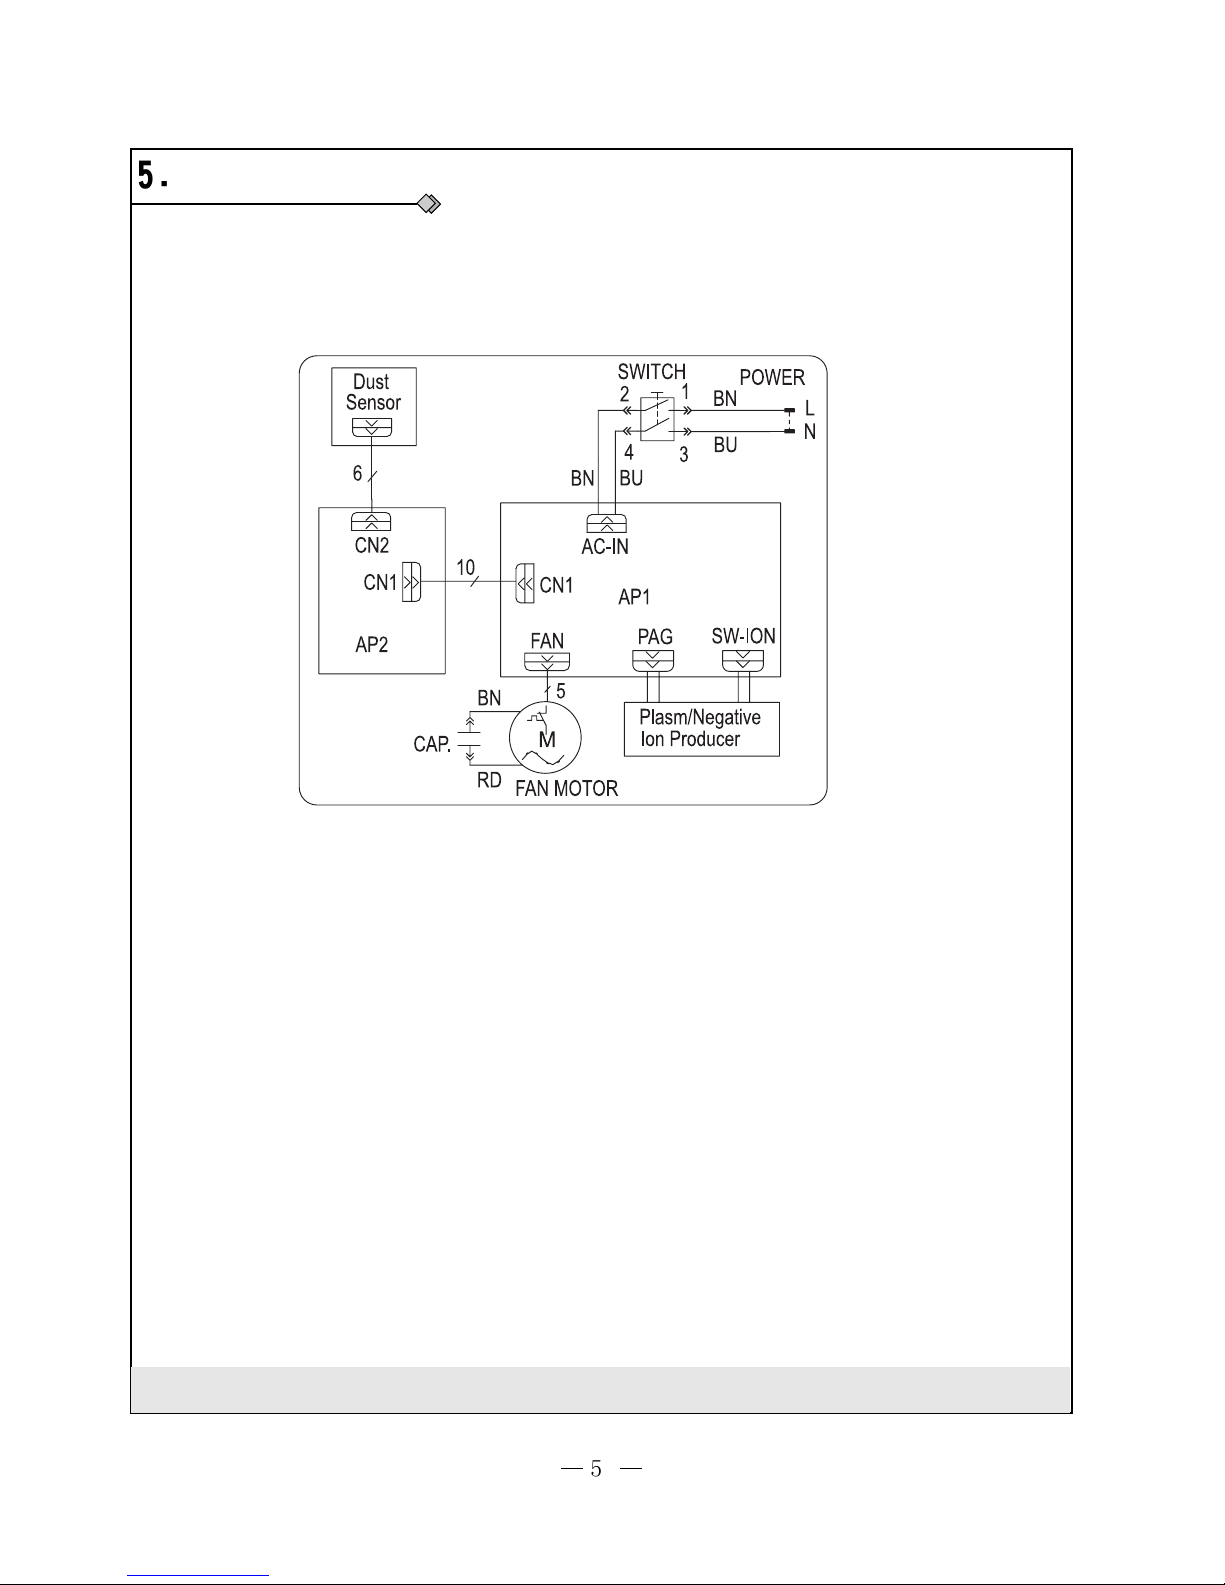
Electrical Circuit Diagram
These circuit diagrams are subject to change without notice, please refer to the one supplied with the unit
Model:SP-300A
Page 8
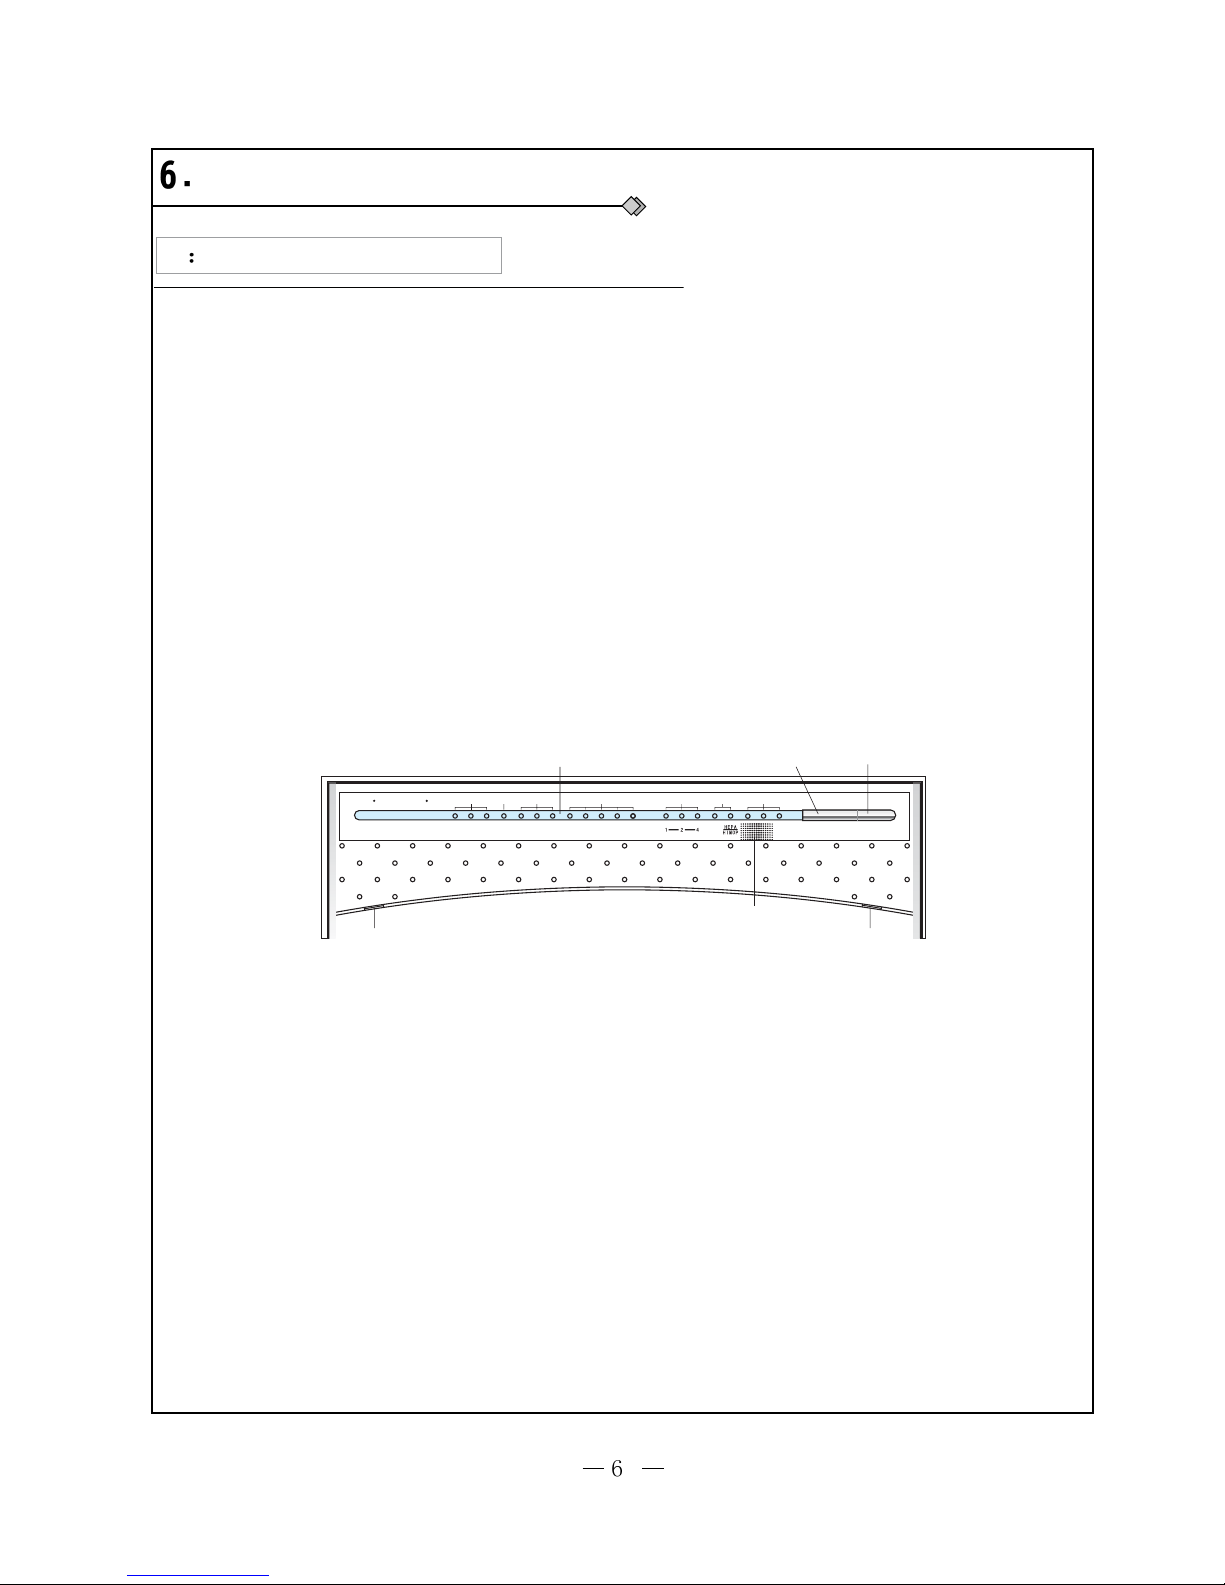
On/off
Mode
Odor sensor
Clean/Change
Timer
Running mode
Fan Speed
Lock
Dust sensor
Mute
Low
High
Turbo
Auto
Sleep
Anion
Odor
Dedust filter
Indicator light
Remote control
receiver window
Dust sensor Odor sensor
On/Off button
Mode button
AIR PURIFIER
Controller Function Manual and Operation Method
Manual of Controller Function
1. Basic Function Mode
◆ Auto Mode
The fan speed can be adjusted automatically under auto mode, but if press the FAN key on the remote controller,
the fan speed can not be adjusted. When the auto lamp is light, the corresponding fan speed lamp is light. When the
fan runs with turbo, it will runs with turbo mode, and turbo lamp is light.
When the degree of off-flavor or dust is “low”, the green lamp is light; when the degree of off-flavor or dust is “med”,
the green lamp and orange lamp are light; when the degree of off-flavor or dust is “high ”, the green lamp, orange
lamp and red lamp are light.
◆ Turbo Mode
When the plasma is open and anion is close, the fan speed defaults turbo running, the turbo indicator lamp is light,
the fan speed can not be adjusted if press remote controller.
◆ Sleep Mode
The fan speed can be adjusted automatically (low and quiet will change circularl y) according to the air quality, the
fan speed can not be adjusted if press remote controller, the sleep indicator lamp is light. The time is clearanc e
when the unit is off or shift mode.
◆ Anion Mode
When the anion is open and plasma is close, the fan speed defaults low running, the anion indicator lamp is light, the
high, low and quiet can change circularly if pressing FAN key.
◆ Clear off-flavor Mode
When the plasma is open and anion is close, the fan speed defaults high running, the clear off-flavor indicator lamp
is light, the high, low and quiet can change circularly if pressing FAN key.
2 The display function of indicator lamp
◆ Operation Mode Lamp: The auto lamp is light under auto mode; the turbo lamp is light under turbo mode; the sleep
lamp is light under sleep mode; the anion lamp is light under anion mode; the anti-off flavor is light under anti-off flavor.
◆ Fan speed Lamp: When the high, med, low lamp are light, that means the fan runs with high, med, low fan speed.
◆ Timer Lamp: When the timer 1,2,4 lamp are light, that means the timer time is 1h, 2h, 4h respectively; when the unit is
on, the lamp is light shows setting timer is off; when the unit is off, the lamp is light shows setting timer is on, and there is
no timer when the light is dark.
◆ Clear/Replace Lamp: When the “clear lamp” is blinking, that means the unit runs 480h totally and remind to clean filter.
The lamp is dark when the conditions are not satisfied or resetting after clean.
When the “clear lamp” is blinking, that means the unit runs 2000h totally and re min d to replace HEPA+HIMOP filter. The
lamp is dark when the conditions are not satisfied or resetting after clean.
◆ Child Lock/ Dust Induction/ Off-flavor Induction: Controlled by remote controller.
3 Functions of front panel button
There are ON/OFF button and MODE button on the front panel.
a. After the unit is first energized, press ON/OFF when the unit is off, it will run with auto mode, if turn on the unit again
it will run with the previous mode, the unit is off if pressing ON/OFF when the unit is on.
b. Press MODE when the unit is on, it will choose circularly by auto->turbo->sleep->anio n->clear off-flavor->auto, and
the fan speed runs with default fan speed of each mode.
c. When the unit is stand-by, press mode key for 5S, all the indicator lamps are light and buzzer gives out beep, the
cumulate time is clearance.
Page 9

Note: When the unit runs 0.5h, the time cumulates one time, and no cumulation if runs less than 0.5h. The corresponding
indicator lamp blinks to remind customer clean or replace it when the total cumulate time reaches. Before the cumu late
time haven’t been cleared, the indicator blinks if re-energized. If both c umulate time of clean and replace do not reach,
they are clearance after resetting (used for factory-zero clearing), if one cumulate time reaches, only clear it after
resetting, the other continues to run; if both of them reach, clear them after resetting.
4 Function of remote control button
◆ ON/OFF: After the unit is first energized, press ON/OFF when the unit is off, it will run with auto mode, if turn on the
unit again it will run with the previous mode, the unit is off if pressing ON/OFF when the unit is on.
◆ Child Lock: Press it for 2S, the unit runs under this mode; it will be cancelled for 2 ways: lock function key with remote
controller (press for 2S) or the unit is power-fail.
◆ Six mode keys: There are below modes: auto, turbo, sleep, anion, clear off-flavor. The button is valid when the unit is
on.
a. If the current modes are auto, sleep and turbo, it will shift to the default status of this mode if pressing anion and anti
off-flavor. If the current modes are anion and anti off-flavor, press the mode key which the same as the current mode, the
buzzer gives out beep and no action for controller.
b. If the current mode is DUST:
Enter anion mode if press anion button, and default the status operation if press anion mode.
Enter clear off-flavor mode if press off-flavor button, and default the status operation if press clear off-flavor mode.
There is no change if press dedust button.
c. If the current mode is anion: Enter clear off-flavor mode if press off-flavor button, and default the status operation if
press clear off-flavor mode. There is no change if press anion/static dedust button.
d. If the current mode is clear off-flavor: Enter anion mode if press anion button, and default the status operation if press
anion mode. There is no change if press clear off-flavor /static dedust button.
◆ Timer Key: The unit will choose circularly by timer 1h->2h->4h->cancel if press this button.
Press timer if the unit is off, that means set timer on; press timer if the unit is on, that means set timer off. Eg: set the
current timer to turn off the unit 1h later, then repress it is to turn off the unit 2h later, and then repress is to turn off the
unit 4h later, last press it is cancel it. Then press it is to turn off the unit 1h later, cycle like this.
Note: If the current setting timer is 1h and does not reach, presses TIMER, the timer time will update to2h, and restart to
time regarding 2h.
If the unit is on and is set timer time off already, receiving the signal to turn off the unit, the unit is off and clears timer
information.
If the unit is off and is set timer time on already, receiving the signal to turn on the unit, the unit is on and clears timer
information.
◆ Fan Key: It cycles by quiet->low speed->high speed (It is invalid with stand-by, auto, sleep and turbo mode). The fan
speed runs with initial fan speed of each model when shift mode by remote control.
◆ Setting Key: The brightness of indicator lamp will be adjusted per press, the dust induction lamp and off-flavor
induction lamp will display circularly by bright->dark->go out, and other lamps will display circularly by
bright->dark->dark->bright.
Page 10
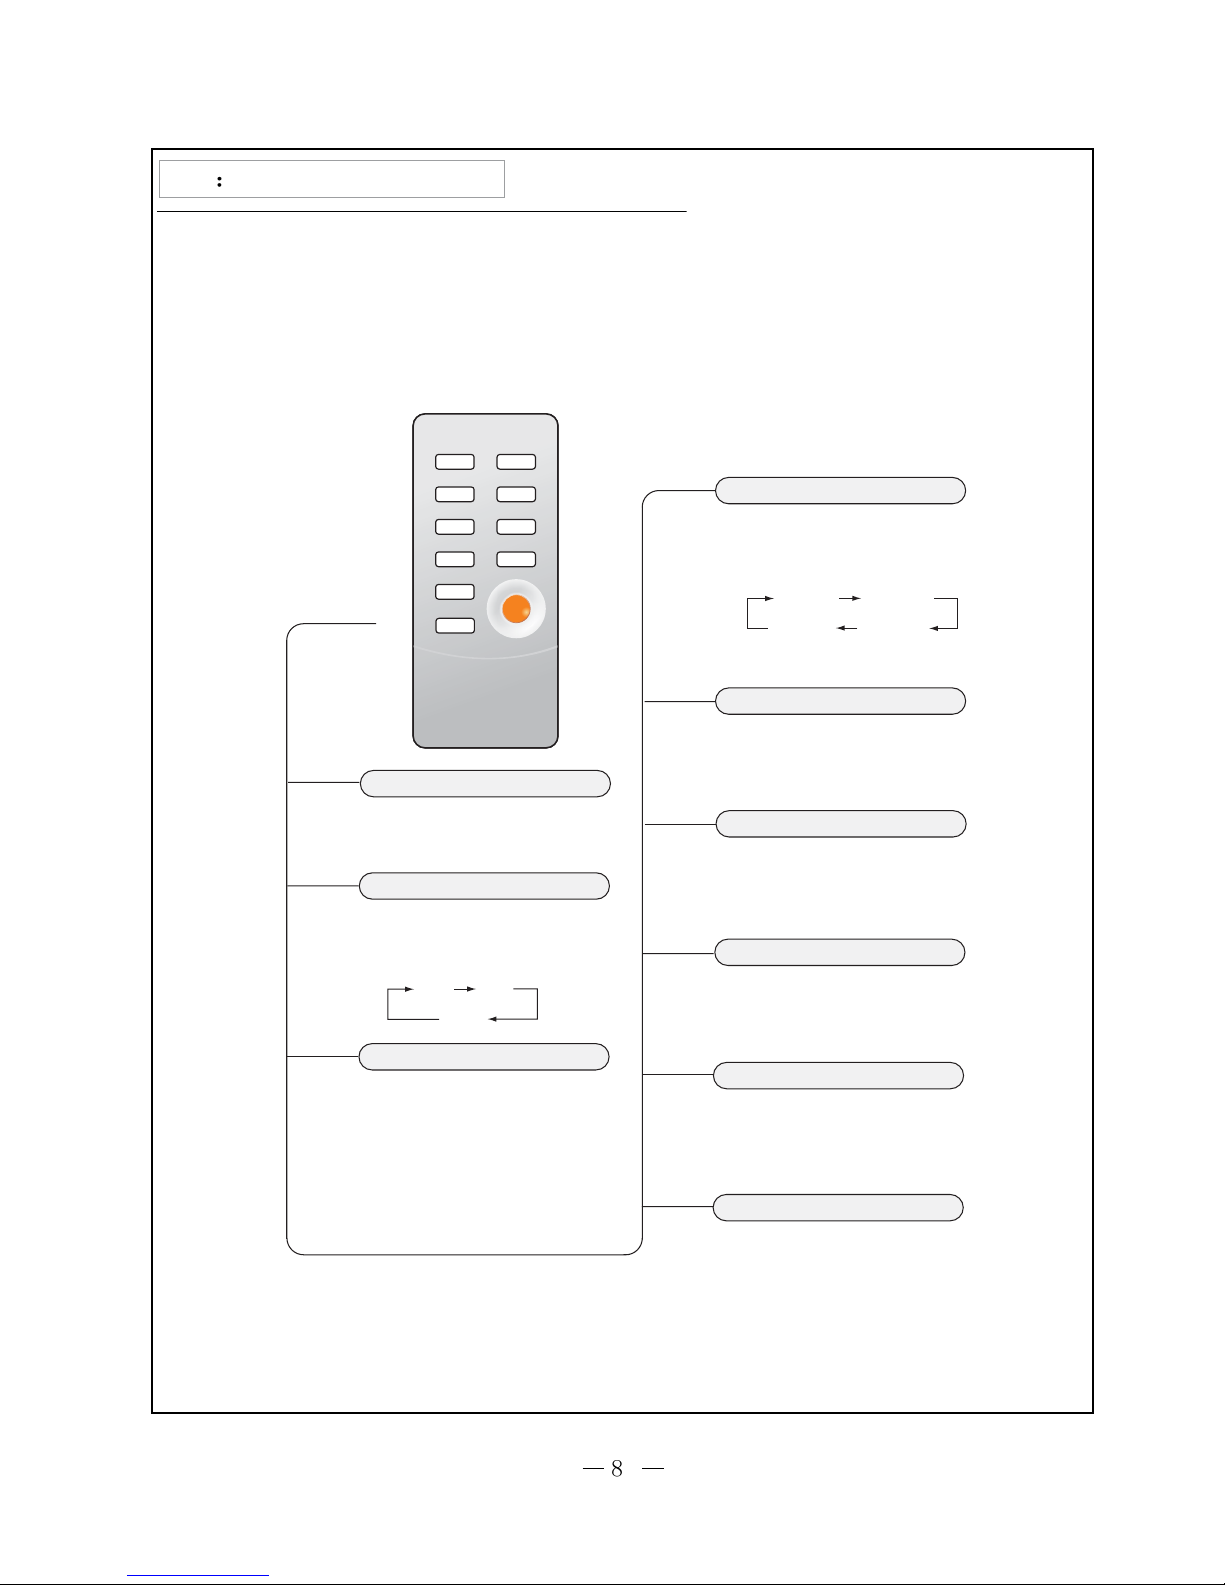
On/Off
ƽ
On/Off button
Speed button
ƽ
High
Low
6peed
TimHU button
ƽ
TimHU
ƽ
Remote control
Mute
Turbo button
ƽ
Turbo
˄ hour˅
˄hour˅
˄hour˅
Cancel
ĆYou can change the IDQ speed through the speed button.
Anion
ƽ
Anion button
Ć
Auto
ƽ
Auto button
Ć
ƽ
Ć
Sleep
Sleep button
Odor
Odor button
The perfect functional regulation need to be completed by remote control.
Ć
Electrostatic
ƽ
The button is invalid on this machine.
Electrostatic cleaning
Lock Lum
Auto Speed
Turbo Sleep
Anion Odor
Timer
Electrostatic
On/Off
If it in power state, every time you press the
button, the timing will change according to
the following sequence. And the timing light
of host computer will flash accordingly, then
you can you can select the time.
Note: when it is at power on, the timing is for
timed shutdown; when it at power off, the timing
is for timed power on.
When it is in running state, click the button,
the machine will be in this mode. The
plasma opens, and the IDQ will run at the
highest speed.
When it is in running state, click the button,
the machine will be in this mode. The
negative ion opens, and the IDQ will run at
low speed.
You can change the IDQ speed through the speed button.
When it is in running state, click the button.
The machine automatically adjust mute
IDQ speed or low speed according to air
quality.
In this mode, the "speed" button is invalid.
When it is in running state, click the button.
The machine automatically adjust the on/off
switch of plasma according to air quality.
In this mode, the "speed" button is invalid.
Click the button when it is in standby mode,
and the machine will begin to run. If you
press it again, the machine will stop running.
When it is in running state, IDQ speed will
switch according to the following sequence.
And the speed light of host computer will
flash, then you can select the IDQ speed.
When it is in running state, click the button
and the machine will be in this mode.
Plasma opens, and the IDQ runs in ultra-
high speed.
High air-flow can quickly remove dust in the
air, and it is easy to use in cleaning the air.
Names and Functions of Remote Control Buttons
Page 11
If it is not in use for a long term
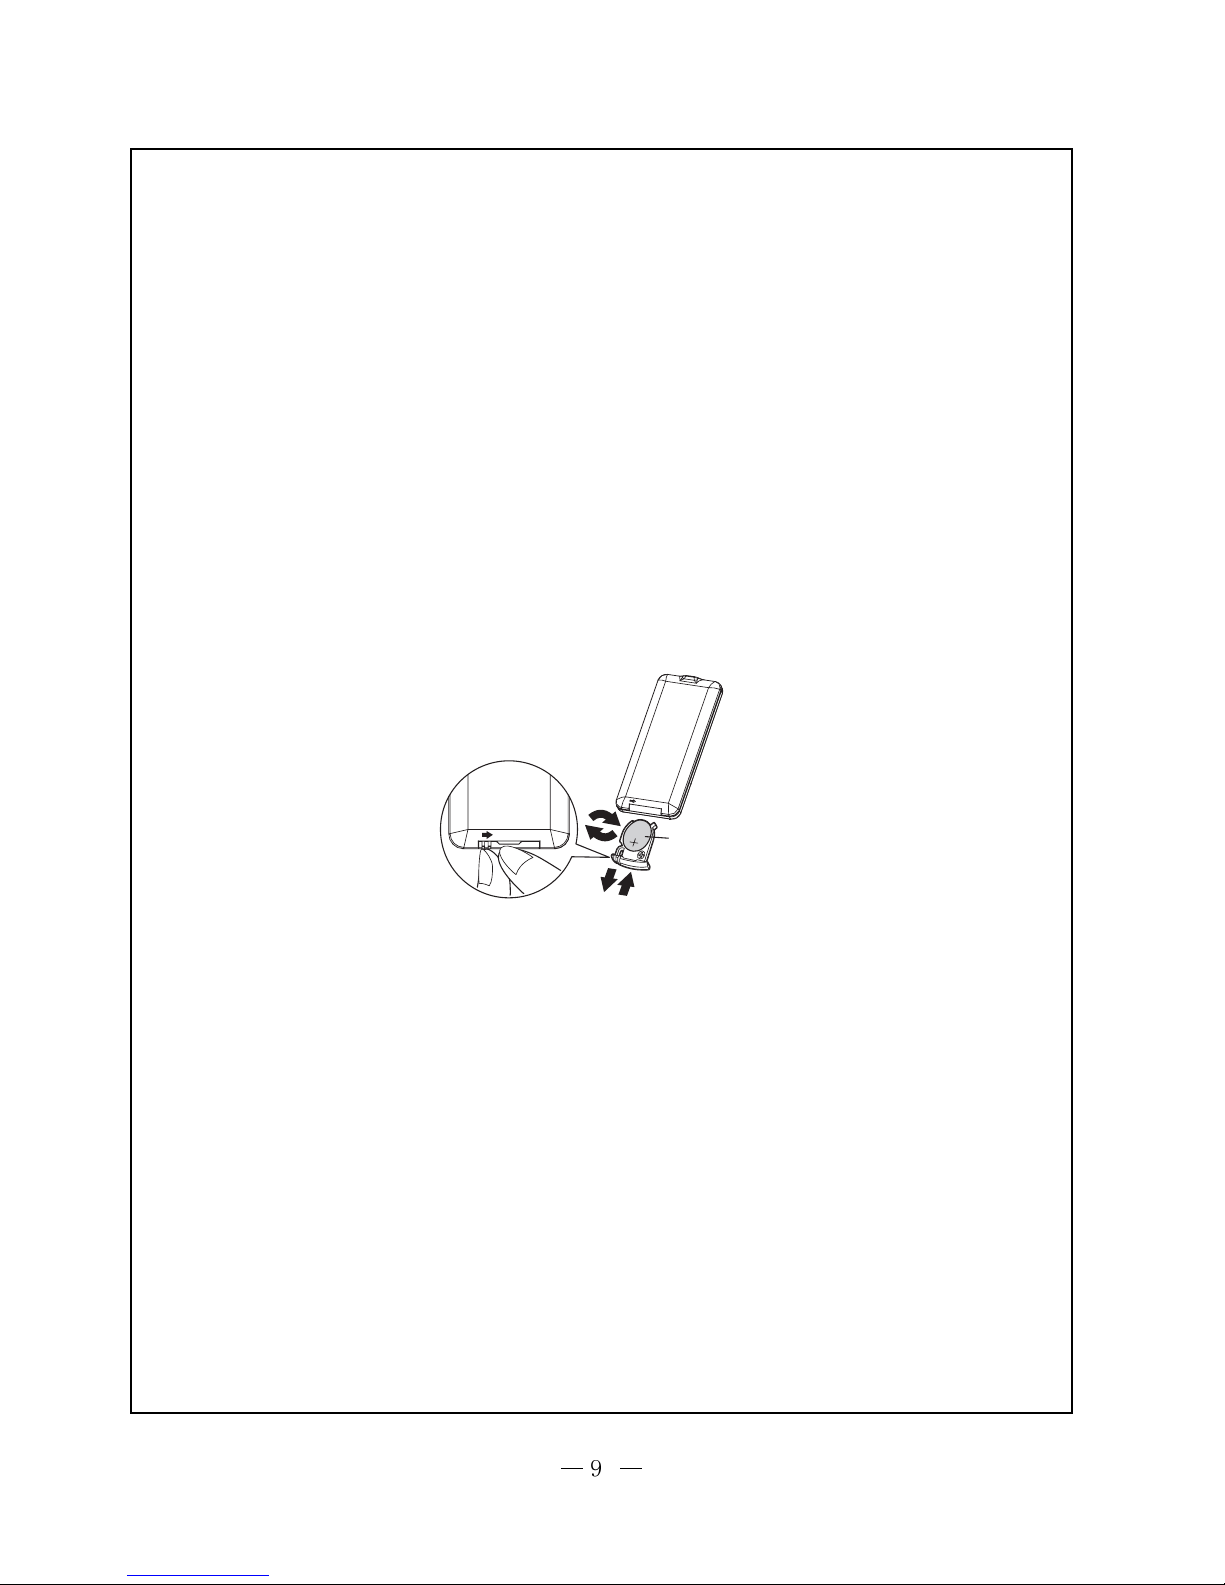
Replace Battery
1. Please switch off, unplug the power plug, and tie up power cord.
2. Clean each filter part, air inlet, outlet and the host body.
3. Place the carbon filter in a suitable plastic bag, seal it, and put it in the machine.
4. Cover it with dust cover, and place it in a shade and well-ventilated place.
1. Open the back cover of the remote
control according to the arrow direction.
2. Replace it with CR2025 battery, and then
close the lid.
Note:
• The battery should be placed where children can not reach. If a child
accidentally swallow the battery, you should quickly get in touch with
the doctor.
• Before the battery is discarded, please use the tape etc. wrap it at both
ends of positive and negative poles to prevent mixing with other metals
or batteries and causing fever, rupture, fire and so on.
• When the battery is not used any longer, please put it into battery
recycling place at the nearest electrical shop, watch, or camera stores.
• The criteria for replacing battery is 1 year. However, if it is not found
insensitive in receiving signals, please replace the battery.
• Please replace the battery as soon as possible when it is close to the
battery lifespan.
• In order to avoid the failure and injury caused by fluid leakage or rupture,
please remove the battery if it is not in use for a long time.
Battery
Page 12
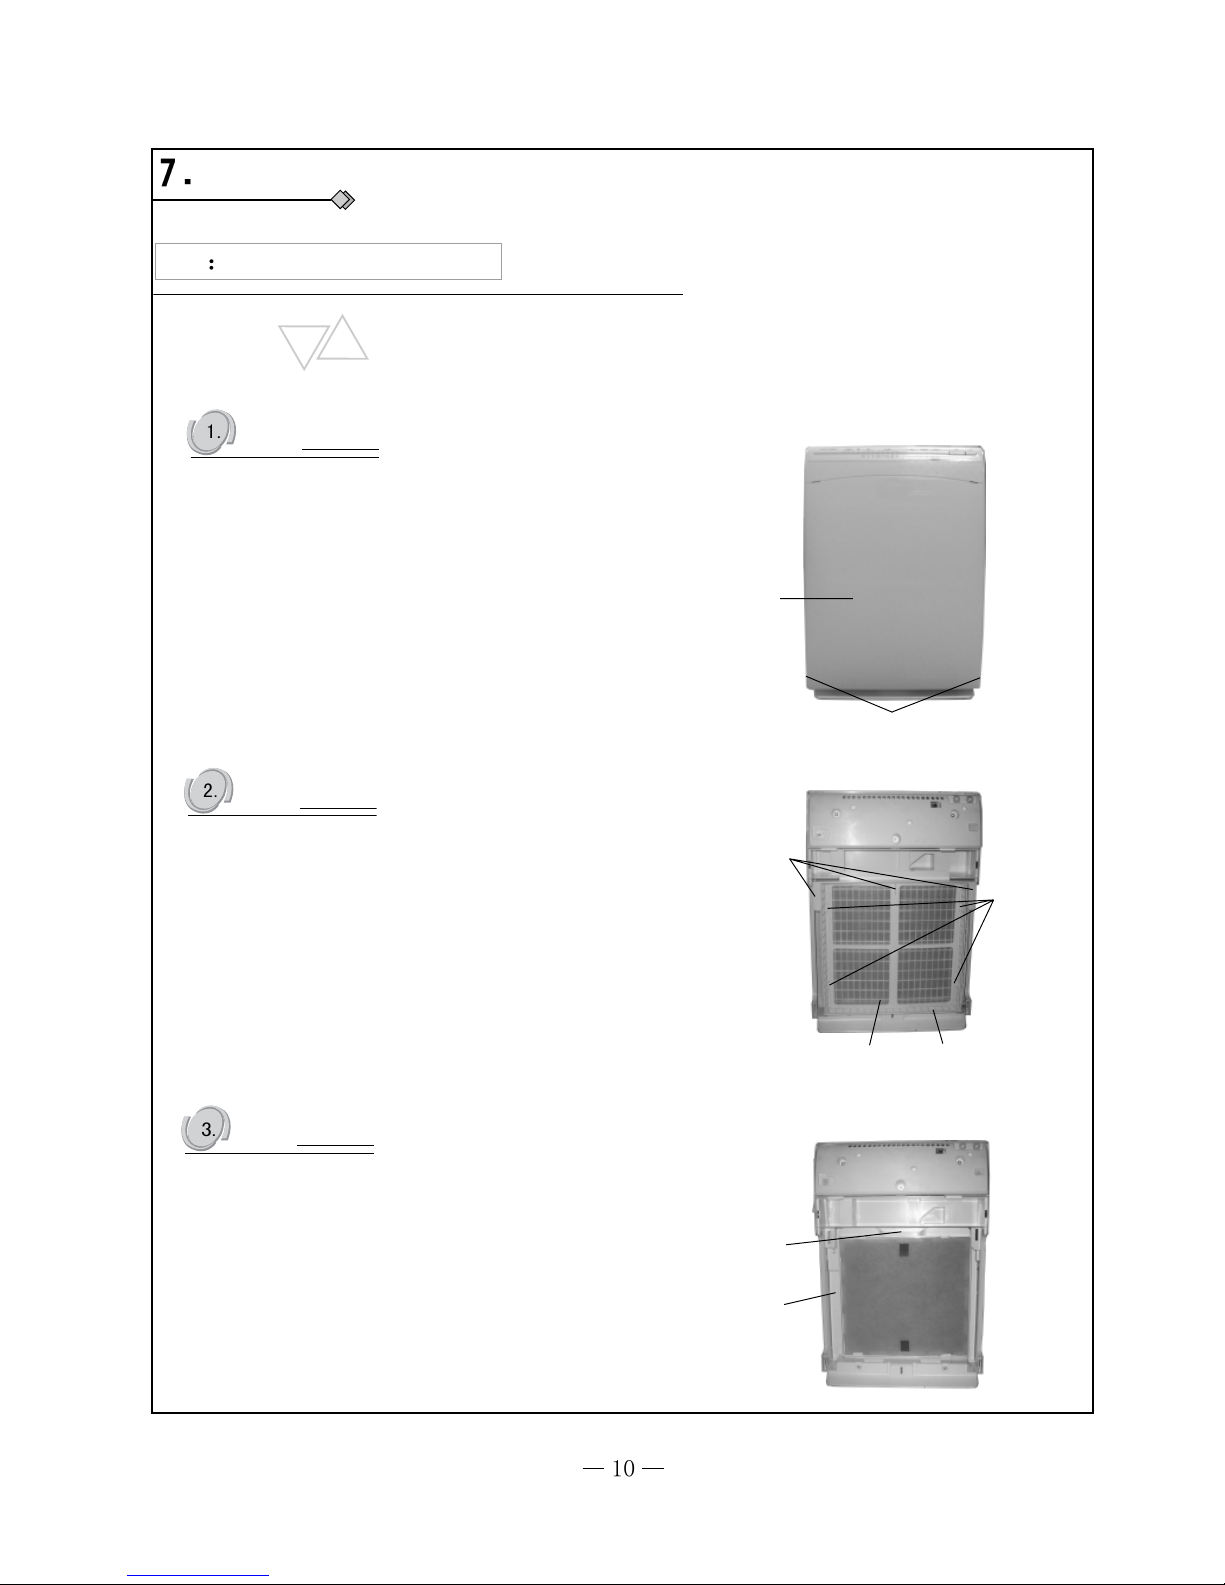
Disassembly Procedures
Disassembly Process
Operating Procedures / Photos
Disassemble front panel
Press the both buttons of front opanel, open the front
panel onwards and lift it upwards to remove the front
panel.
front panel
button
Disassemble filter subassembly and dust shelf
Hold the top handle of filter subassembly and pull it outwards,
take out the top both clasp, then take out the bottom
clasp to remove the filter subassembly.
Hold the twi handles of dust shelf and pull it outwards to remove
the dust shelf.
handle
clasp
filter subassembly dust shelf
Disassemble filter subassembly and HIMOP grid
Hold the handle of grid and pull it outwards to remove
the HIMOP grid.
The filter subassembly is on the HIMOP grid and including
filter cotton and HIMOP+HEPA filter, tear the filter cotton
directly, then loose the two clasps of HIMOP+HEPA filter
to remove the HIMOP+HEPA filter.
handle
HIMOP
grid
Page 13
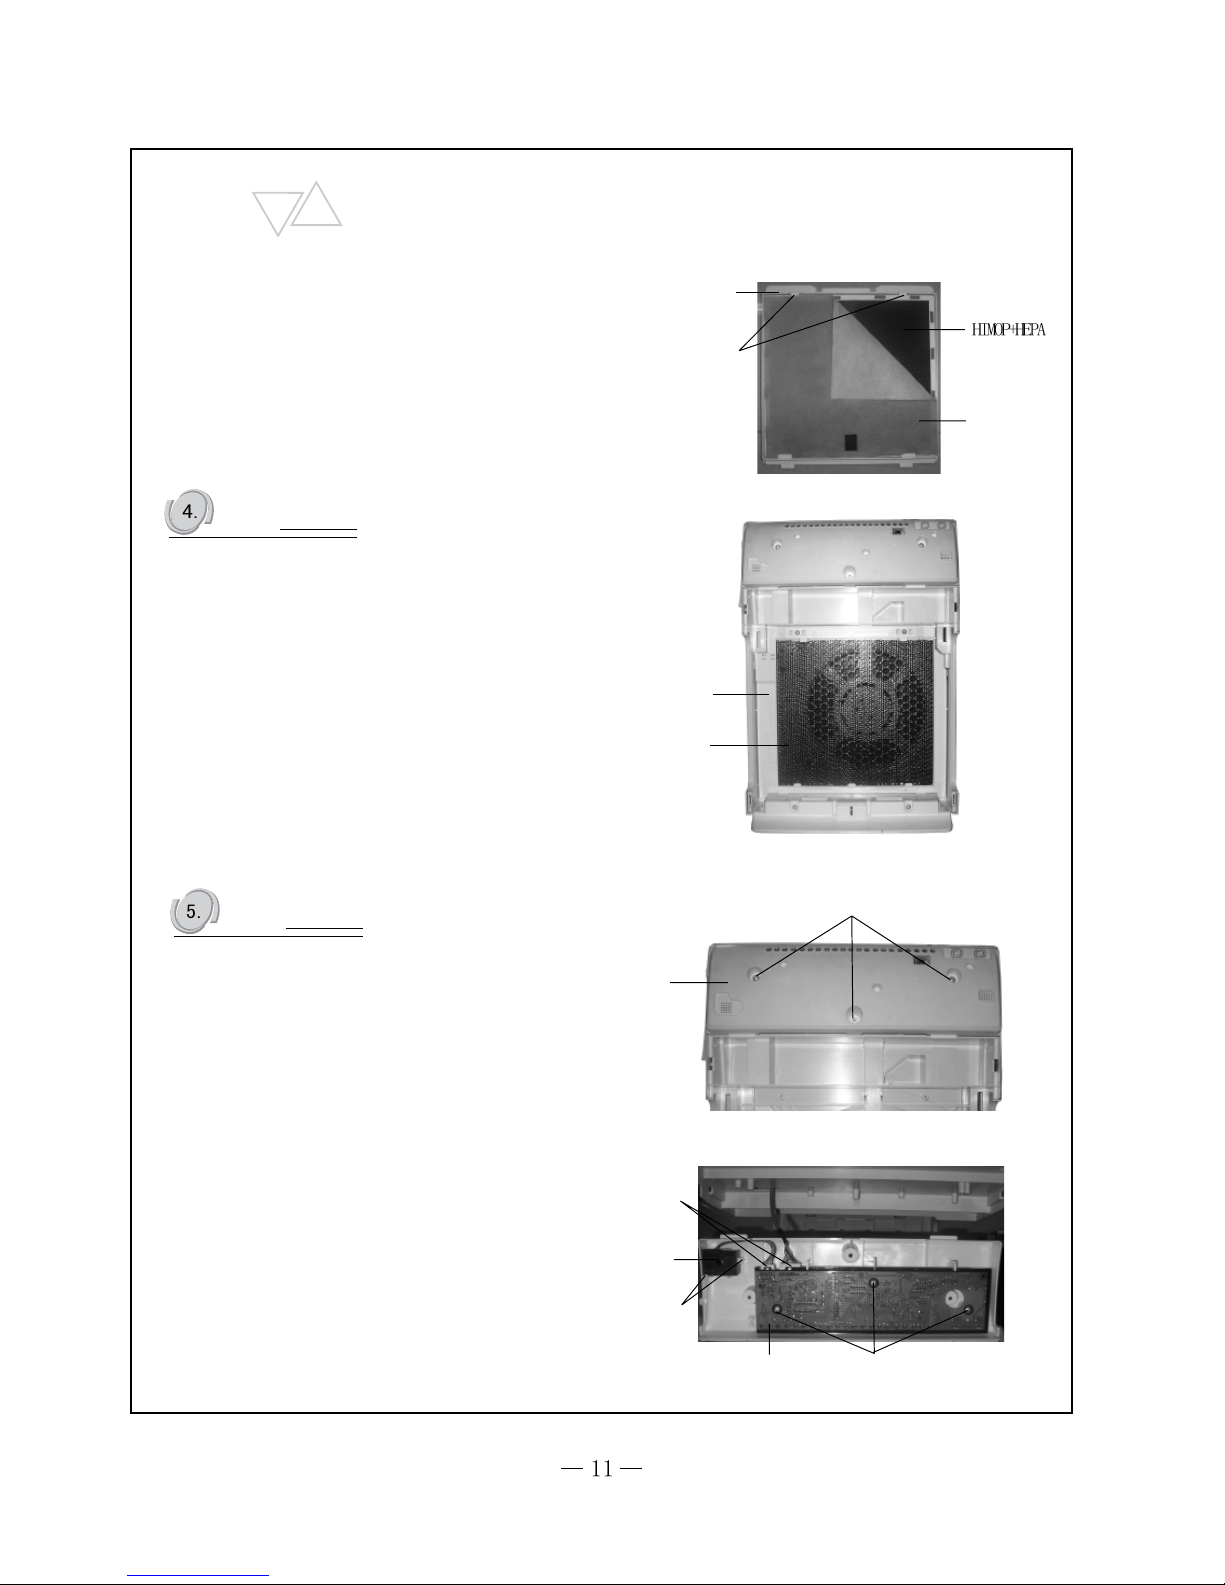
Operating Procedures / Photos
HIMOP
grid
clasp
filter
filter cotton
Disassemble active carbon filter
Remove the active carbon from grid and replace it.
Don't disasseble the active carbon grid.
active carbon grid
active carbon filter
screw
Disassemble display board
display box
cover
Unscrew the 3 screws on the display box cover to
removethe display box cover. Unscrew the 3 screws
fixing display
board, and loose the two insert components
which connect
mainboard and dust sensor to remove
the display board;
loose the 2 clasps on the dust sensor to
remove the dust
sensor.
insert component
dust sensor
clasp
display board
screw
Page 14
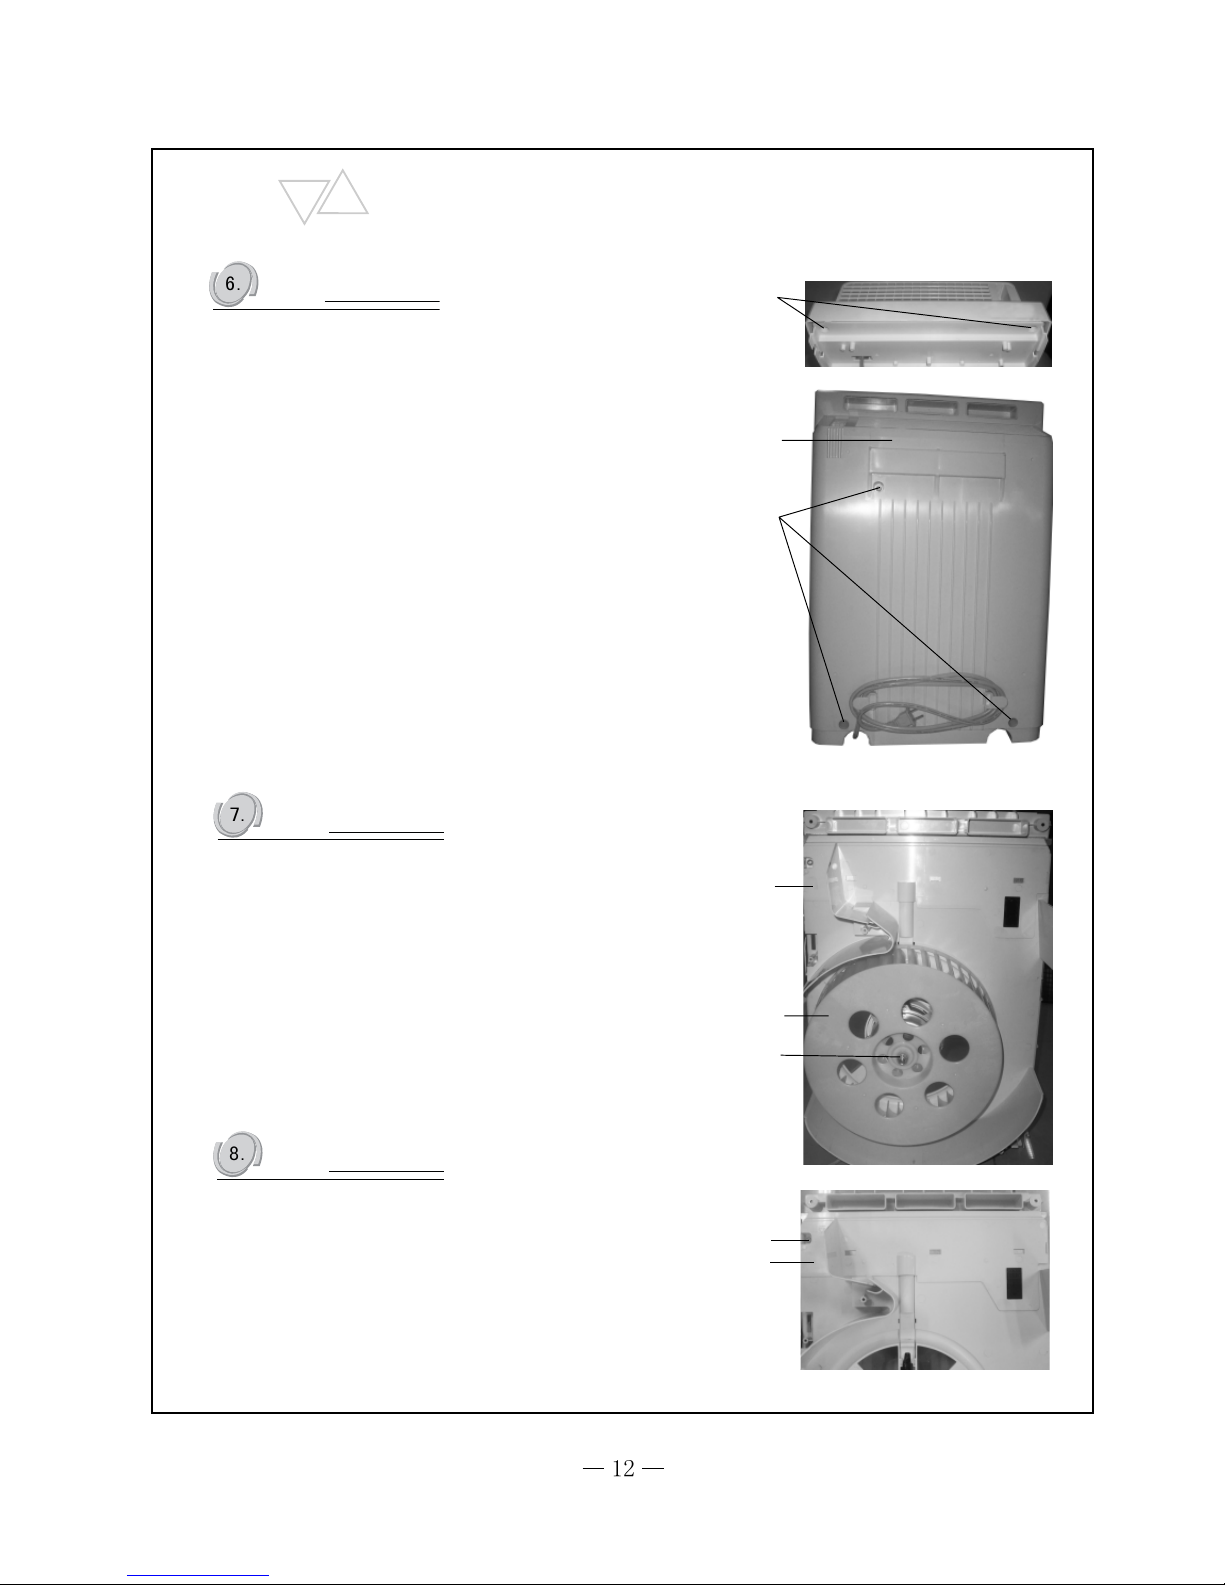
Operating Procedures / Photos
screw
screw
screw
Disassemble back cover
back cover
Unscrew 2 screws on the front side of front panel and
3 screws on the back cover to remove the back cover.
Disassemble centrifugal fan
Unscrew the nut on the centrifugal fan to remove the
centrifugal fan.
electric box cover
centrifugal fan
nut
Disassemble electric box
electric box
cover
Unscrew a screw on the electric box cover to remove
the electric box cover. Unscrew the screws fixing mainboard,
capacity, plasma and anion generator, and pull out the
motor insert component to remove the mainboard,
capacity, plasma and anion generator
Page 15
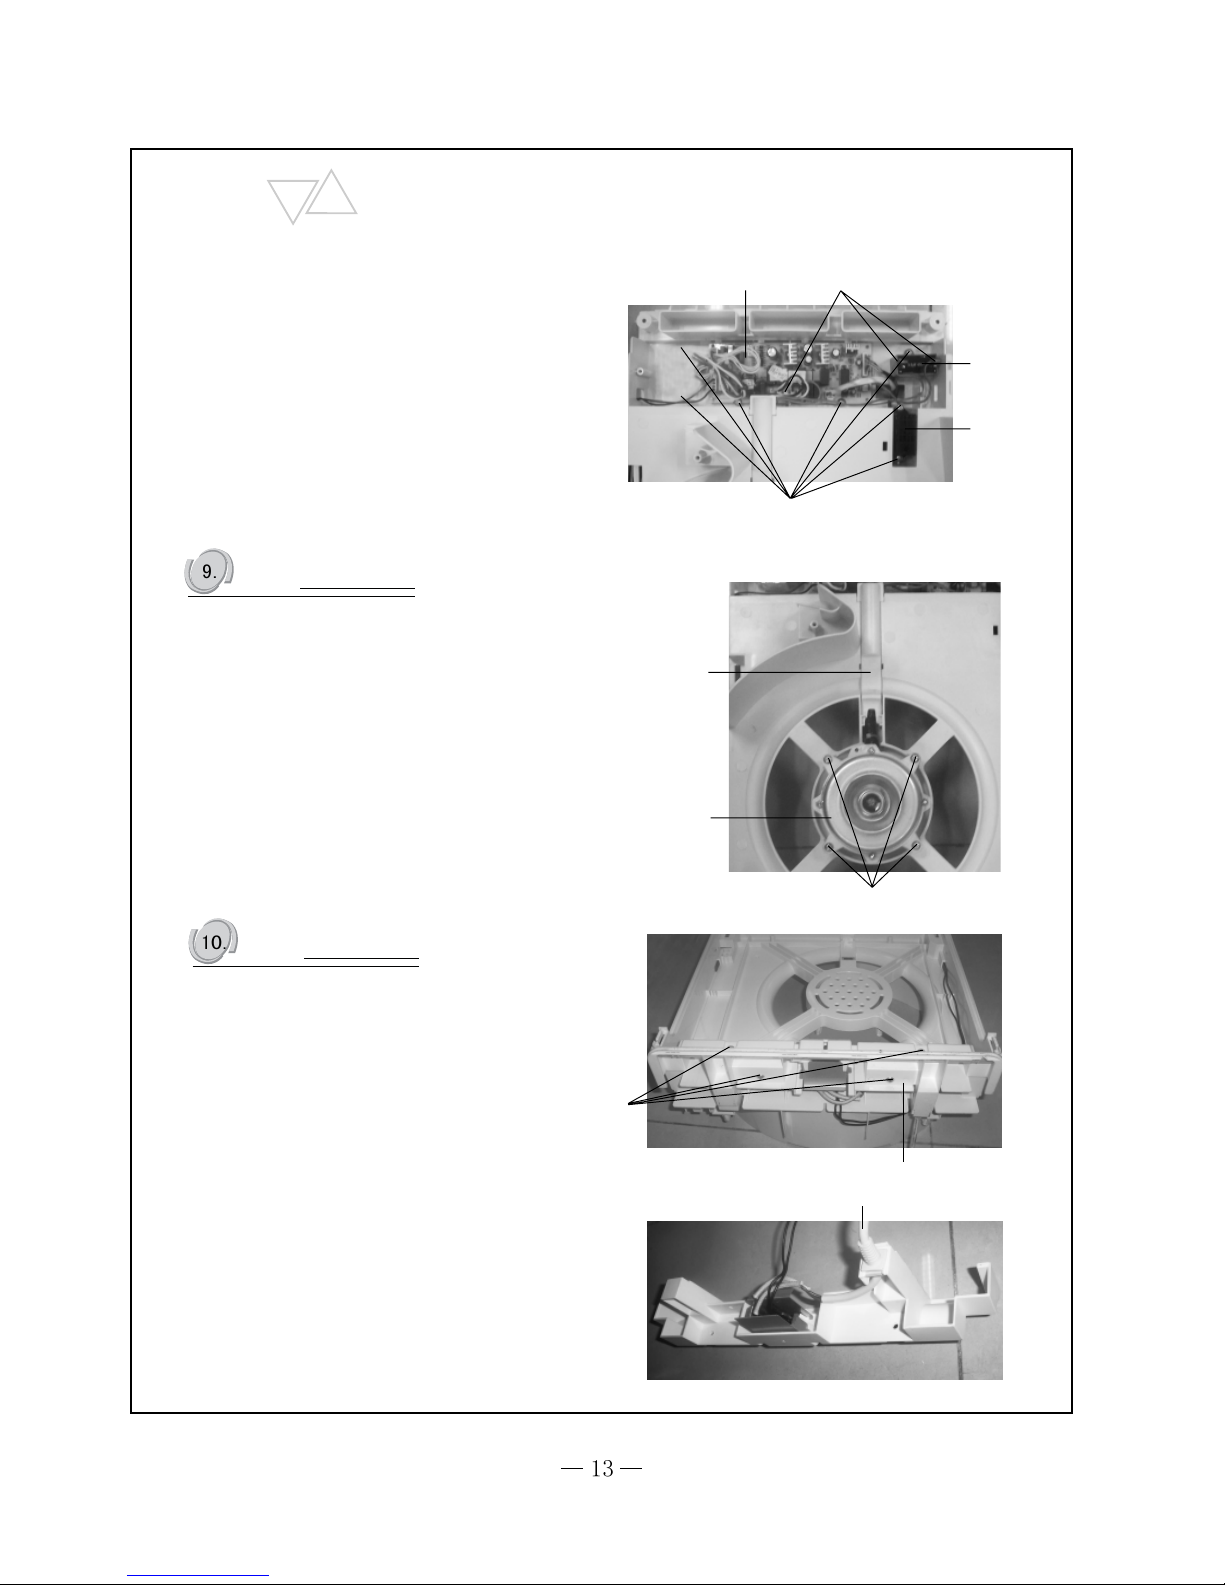
Operating Procedures / Photos
screw
screw
mainboard
motor insert component
capacity
plasma
and anion
generator
screw
Disassemble motor
Remove the motor wire press plate, unscrew the 4
screws fixing motor to remove the motor. (note: Don't
lost the gasket on the motor axes.)
motor wire
press plate
motor
Disassemble power cord
chassis
power cord
Unscrew the 4 screws on the chassis to remove the
chassis. Remove the power cord from groove and
pull the insert component out.
Page 16
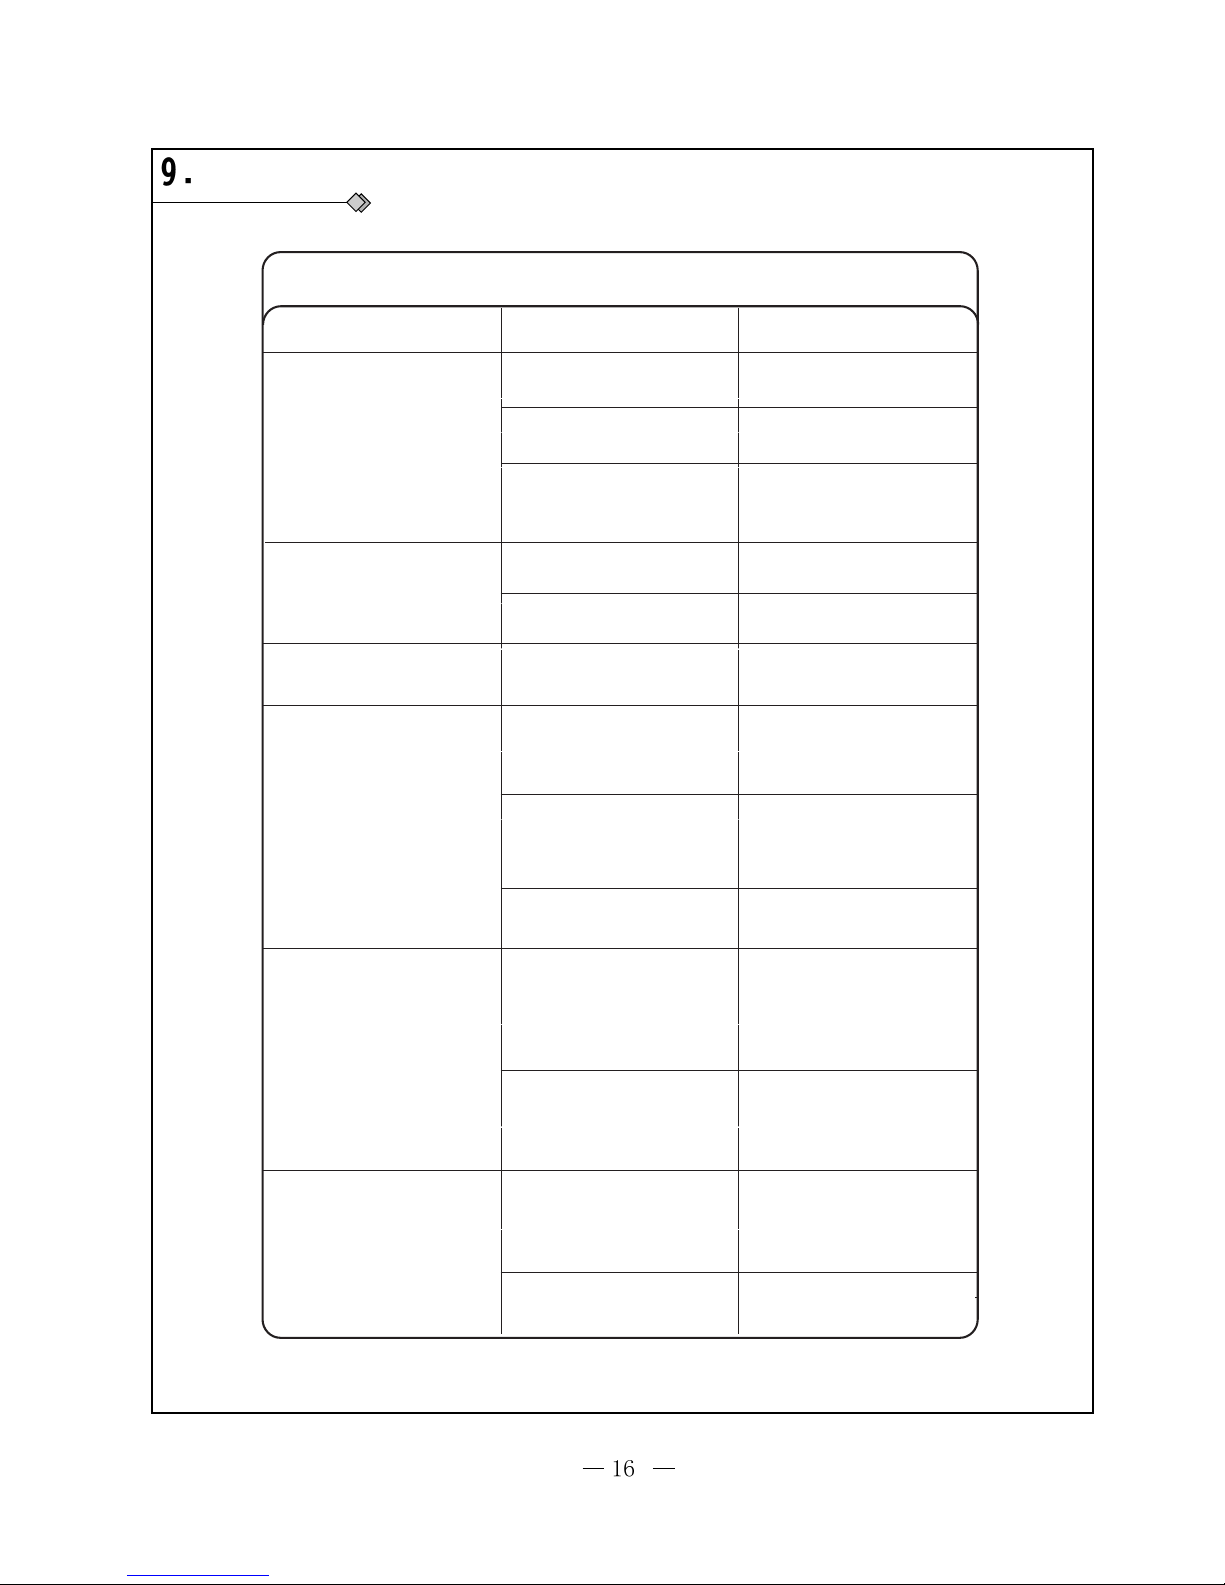
Please reaffirm the problems before asking for maintenance.
Symptoms
Check
Processing method
Is the power plugged in?
Plug the power supply
There is no air blowing
Is the panel correctly installed?
I Plug the power supply
Can not start
Whether the battery is dead?
The remote control
does not work
Are the positive and negative
poles installed reversely?
Does indoor fluorescent light
keep flickering for the reason
of lifespan?
Keep the machine in a distance
from the fluorescent
Install the battery correctly
Replace with new battery
Please contact the after-sales
service in this case
Do not achieved the
cleaning effect
Is it installed in unventilated
areas or are there any obstacles
near the machine?
Is there too much dust on the
filter components, filter cotton
and HIMOP + HEPA filter
components?
Is there too much odor and
smoke produced?
Remove obstacles
Clean the filters, and replace
filter cotton
Clean activated carbon filters
The TV signal is in
interference
Are there any TV, radio within 2
meters away from the machine
or is there any indoor antennas
near the machine?
Are there any power cords or
television sets, radio antenna
which are close to the machine?
Move the TV, radio, and indoor
antennas more than 2 meters
away from the machine.
Keep the power lines or television
sets, radio antenna as far as
possible away from the machine.
It smells in the air outlet
Is there lots of smell released
temporarily? (Many people
smoke or barbecue.)
Is the activated carbon filter not
cleaned or replaced for a long time?
The smell will be gradually
disappearing when the machine
runs for some time.
Maintain the activated carbon filters
Trouble-shooting
Page 17
PARTS GUIDE
SP-300A
AIR PURIFIER
Page 18
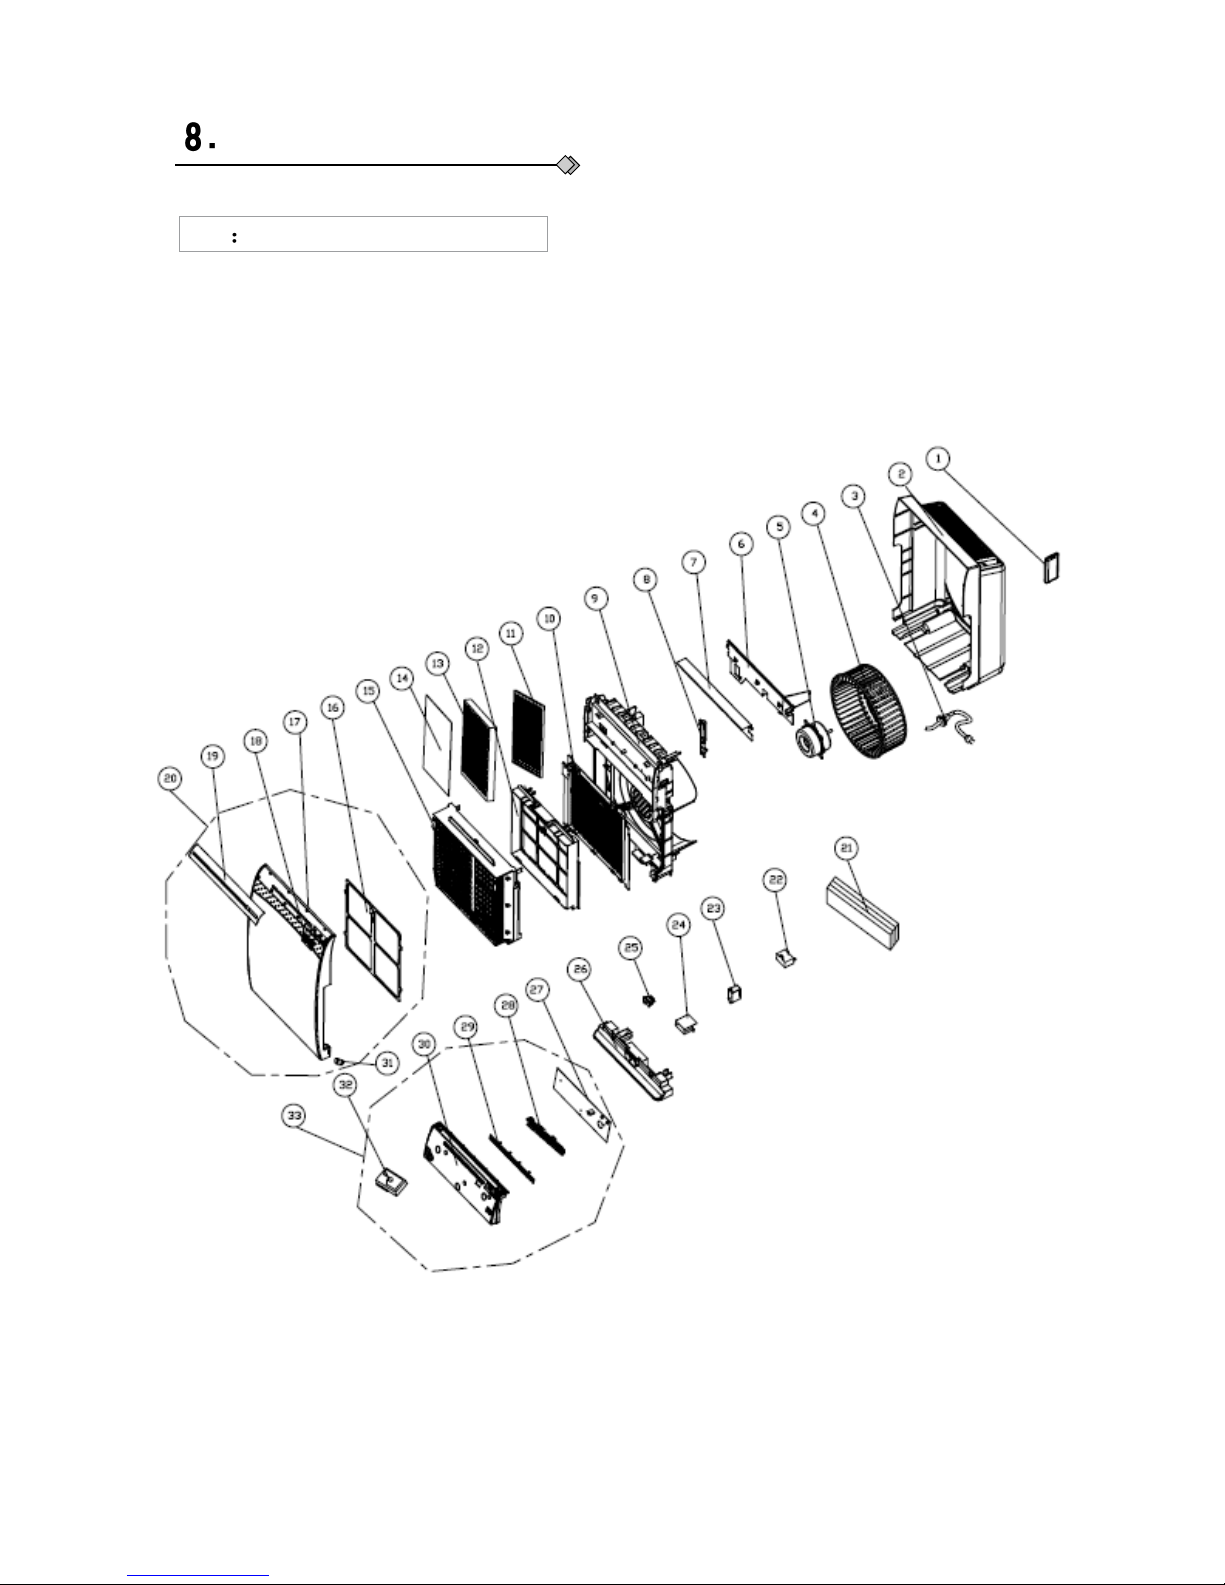
Assembly Drawing and Sparepart List
Assembly Drawing, List
Page 19
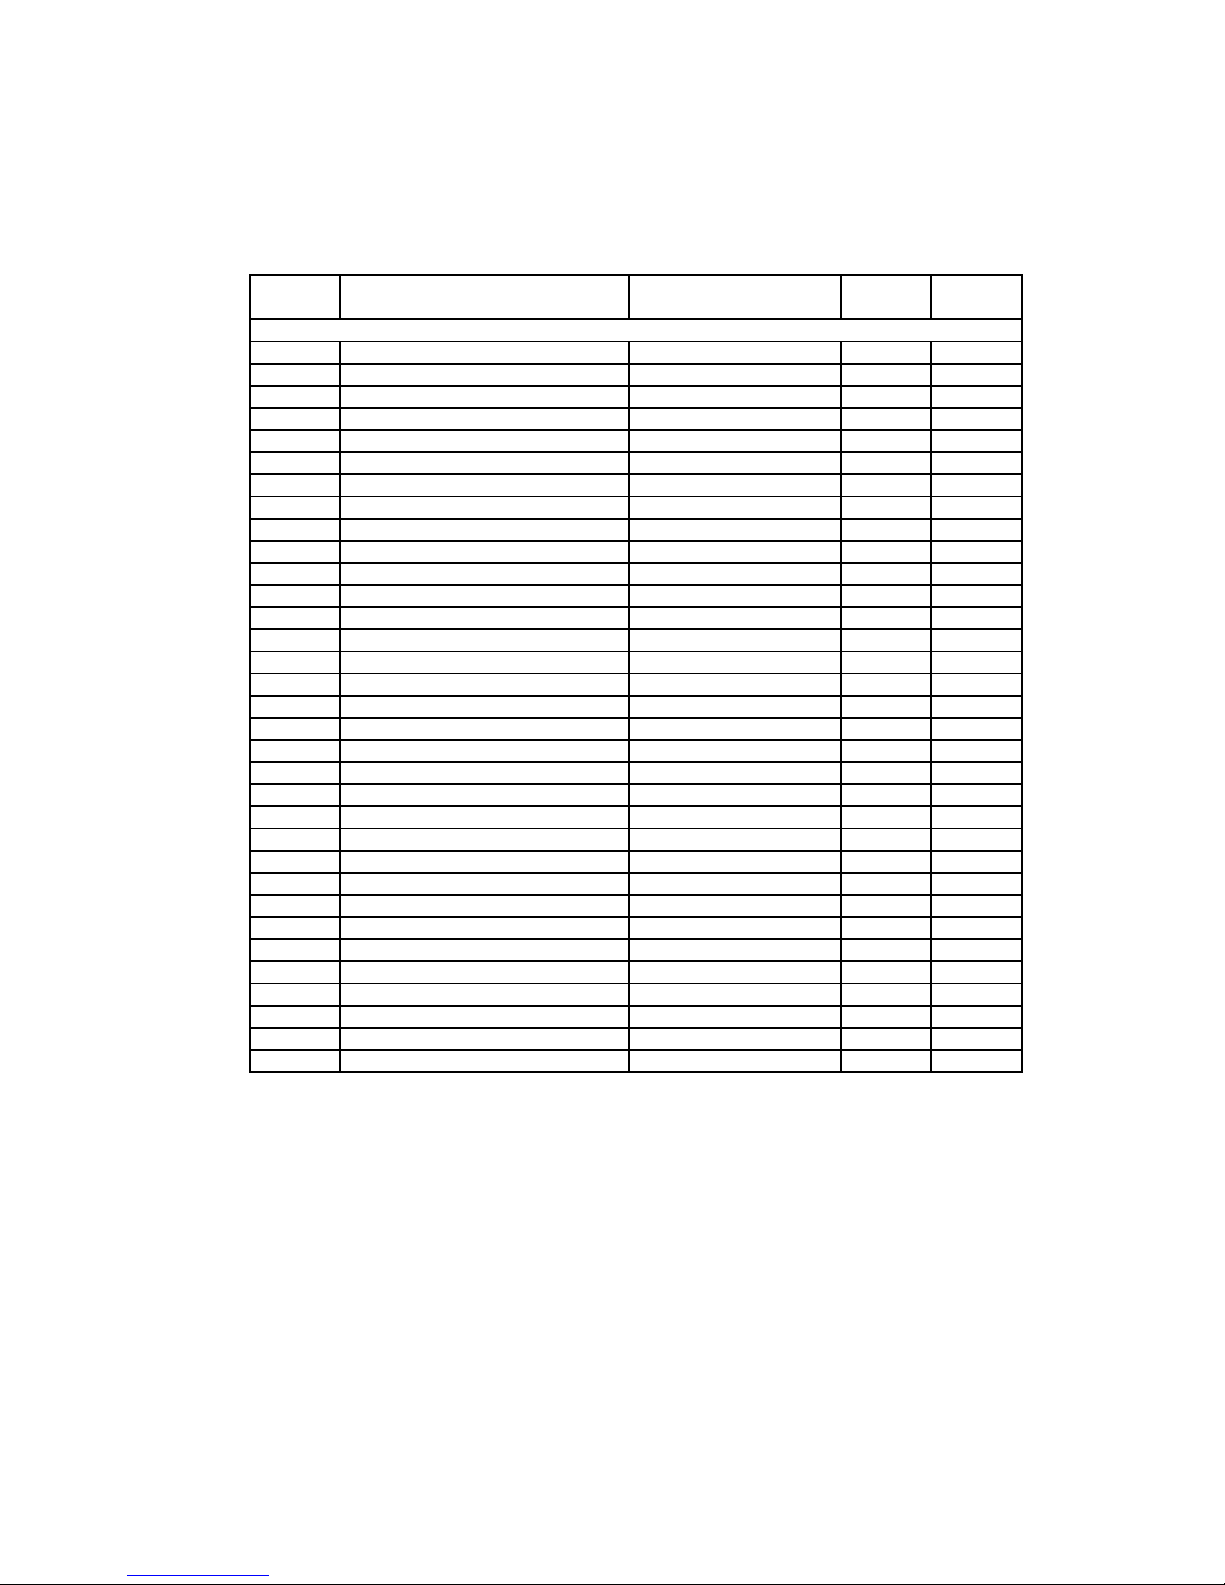
1 Remote Controller 30510081_K18260 1 AT
2 Rear Case 22206043 1 AS
3 Power Cord 4002037004 1 AK
4 Centrifugal fan 10316040 1 AM
5 Fan Motor 15016041 1 AV
6 Electric Box Cover 20126083 1 AE
7 Shield cover 01596003 1 AC
8 Wire Clamp 26116072 1 AB
9 Front Case 20006065 1 AU
10 Active carbon filter frame1 24216031 1 AL
11 Filter (Active carbon) 11126075 1 SPF-300A
12 HIMOP filter frame 24216032 1 AK
13 Filtering Sub-Assy 07216003 1 AD
14 Overload Protector none 0
15 Dust collecter support 24216030 1 AP
16 Filter Sub-Assy 11126014 1 SPF-300A
17 Front Panel 27226066005 1 AS
18 Button 45036024D 1 AE
19 Indication panel 2000606701 1 AG
20 Front panel assy 2000607301_K18260 1 AW
21 Filter cotton (living air device) 7513600301 1 SPF-300A
22 Capacitor CBB611A(3uF/450V) 33010027 1 AE
23 Plasma generator 11146001 1 AU
24 Cover of switch 01256007 1 AC
25 Button switch 45010601 1 AF
26 Base Frame 26156015 1 AK
27 Display board 30560011 1 AV
28 Lamp Seat 26156051 1 AD
29 LED board 22436015 1 AU
30 Display box 20116018 1 AF
31 Front Panel Clip 26256002 2 AB
32 soot sensor. 32210131 1 AM
33 Display box assy 20116025 1 BC
SP-300A
Parts List for SP-300A
The data are subject to change without notice.
Price
rank
qty
Part Code
Part Description
NO.
 Loading...