

Page 1

HIGH POWER MULTI SYSTEM
SERVICE MANUAL
EN
MS-E48AIN, MS-E56AIN
Outdoor unit
Page 2

“Originalinstructions”
IMPO
RTANT N
OTE:
Read this manual ca
r
efully befo
r
e installing
or operating your new air conditioning
unit. Make sure to save this manual for
futu
re r
efe
r
ence.
Page 3

Contents
PRODUCT ................................................................................................................... 1
1MODELS LIST ...................................................................................................................... 1
1.1Outdoor Unit .......................................................................................................................... 1
1.2 DB Module ............................................................................................................................. 1
2
PRODUCT DATA ..................................................................................................................
2
2.1
Product Data of Outdoor Unit ................................................................................................ 2
2.2 Product Data of DB Module .................................................................................................. 4
3
Working T emperature Range ................................................................................................. 4
4
PIPING DIAGRAM ............................................................................................................... 5
CONTROL ...................................................................................................................
. 6
1
OPERATION FLOWCHART ................................................................................................. 6
1.1
Cooling/Dry Operation ...........................................................................................................
7
1.2
Heating Operation ................................................................................................................
... 8
2
MAIN LOGIC ....................................................................................................................
.. ...9
2.1
Control Function of Outdoor Unit .......................................................................................... 9
2.2 Protection Function ............................................................................................................... 10
2.3
Other function ................................................................................................................
....... 11
2.4
Control Function of Indoor Unit ........................................................................................... 12
3
REMOTE CONTROLLER .................................................................................................. 15
3.1
Wired Remote Controller ..................................................................................................... 15
3.2
Wireless Remote Controller ................................................................................................. 2 0
4
Central Controller SCC-16 .................................................................................................... 2 3
4.1
General Introduction ...........................................................................................................
.. 23
4.2
Communication Network ...................................................................................................... 2 4
4.3
LCD ...........................................................................................................................
............ 25
4.4Buttons .................................................................................................................................. 25
INSTALLATI
ON ....................................................................................................... 27
1
PRECAUTIONS FOR INSTALLATION ............................................................................ 27
1.1Precautions for Installation ..................................................................................................
27
1.2
Key Points of Installation ....................................................................................................
. 29
Installation of the Outdoor Unit ........................................................................................... 3 5
3.9
Installation and Servicing Space .......................................................................................... 3 4
3.8
Outline Dimension of the Outdoor Unit .............................................................................. 3 4
3.7
Selection of Installation Location ........................................................................................ 3 3
3.6
Parts and Components of Unit ............................................................................................. 3 3
3.5
. 32Names of Main Parts ...........................................................................................................3.4
Precaution for Operation Test .............................................................................................. 3 2
3.3
. 32Precaution for Installation ...................................................................................................3.2
32
Precautions for R410A .........................................................................................................3.1
OUTDOOR UNIT INSTALLATION .................................................................................. 3 2
3
FLOW CHART OF INSTALLATION ................................................................................. 3 1
2
Page 4

4 DB MODULE INSTALLATION ......................................................................................... 3 6
4.1Precaution for Installation .................................................................................................... 36
4.2Names of Main Parts ............................................................................................................ 36
4.3
Selection of Installation Location ........................................................................................ 3 6
4.4
Outline Dimension and Servicing Space of DB3-16AF ...................................................... 3 7
4.5
Outline Dimension and Servicing Space of DB5-16AF ...................................................... 3 7
4.6Installation Instruction ......................................................................................................... 38
5
REFRIGERATION PIPING WORK ................................................................................... 4 0
5.1
Allowable Length and Drop Height of Connecting Pipe ..................................................... 4 0
5.2
Dimension of Connecting Pipe ............................................................................................ 4 0
5.3
Connection of Branch Pipe .................................................................................................. 4 0
5.4
Design Requirements for Oil Trap ....................................................................................... 41
5.5
Connection of Outdoor Unit Refrigerant Pipe ..................................................................... 4 3
5.6
Installation of Piping Adapter .............................................................................................. 4 3
5.7
Precaution for Connection ................................................................................................... 4 4
5.8Leak T est ............................................................................................................................... 46
5.9
Vacuum Operation ................................................................................................................
46
5.10
Refrigerant Charging ..................................................................................................... 4 7
6
Electrical Wiring Work......................................................................................................... 5 0
6.1
Wiring Connection ...............................................................................................................
50
6.2
Requirements of Power Circuit and Cable ........................................................................... 51
6.3
Ground Requirements .......................................................................................................... 51
6.4
Precautions of Electrical Wiring Work ................................................................................ 51
6.5
Precaution of Laying Wires .................................................................................................. 52
6.6
Electrical Wiring Work for Outdoor Unit ............................................................................ 52
6.7
Electrical Wiring Work for BU Module ............................................................................... 5 3
6.8
Instructions for DIP Switch .................................................................................................. 55
6.9
Electrical Wiring Work for Indoor Unit ............................................................................... 55
7
INSTALLATION OF DRAINAGE PIPELINE ................................................................... 56
Pressure Protection .................................................................... 6 6
Malfunction display: Low
2.2
Pressure Protection ................................................................... 6 5
Malfunction display: High
2.1
FLOW CHART OF TROUBLESHOOTING ...................................................................... 6 4
2
..... 62
Error description .............................................................................................................
1.3
62
Problem Handling ................................................................................................................
1.2
Check before Contacting Maintenance Serviceman ............................................................ 6 1
1.1
.... 61
Troubleshooting ...............................................................................................................
1
...................................................................................................... 61
NCE MAINTENA
Installation of Protective Layer on Connection Pipe ........................................................... 60
8
Key Points for Condensate Pipe Installation ........................................................................ 56
7.2
Material Quality Requirements for Condensate Pipe .......................................................... 5 6
7.1
ature sensor error ................................................................... 6 9
Malfunction display: Temper
2.7
Malfunction display: Indoor unit water full protection ........................................................ 6 9
2.6
Malfunction display: Communication error ......................................................................... 6 8
2.5
Malfunction display: Current protection .............................................................................. 6 7
2.4
e temperature protection ...................................................... 6 7
Malfunction display: Discharg
2.3
Page 5

2.8
Malfunction display: High/Low
pressure sensor error ........................................................ 7 0
3
POWER DISTRIBUTION ................................................................................................... 7 0
3.1
Diagram of Power Distribution ............................................................................................ 7 0
3.2
Wiring diagram ................................................................................................................
.... 71
4
THE RESISTANCES OF COMMON
TEMPERATURE SENSORS ................................. 7 2
4.1
15 K
Ω
................................................................................................................................... 72
4.2
20 K
Ω
................................................................................................................................... 73
4.3
50 K
Ω
................................................................................................................................... 74
5
DISASSEMBLY AND ASSEMBLY PROCEDURE OF MAIN PARTS ............................ 7 7
5.1
Outdoor Unit ..................................................................................................................
...... 77
PARTS GUIDE.............................................................................................................................. 82
Page 6

PRODUCT
1 MODELS LIST
1.1 Outdoor Unit
Model Product code
Capacity Capacity
Refriger
ant
Power supply
Appearance
Cooling
(kW)
Heating
(kW)
Ph, V, Hz
MS-E48AIN
CN860W0250 14.0 16.0
R410A 3,380~415,50
MS-E56AIN
CN860W0260 16.0 18.0
1.2 DB Module
Model Product code
Number of connectable
indoor units
Refrigerant
Power supply
Appearance
Min Max Ph, V, Hz
DB3-16AF EN0130050 1 3
R410A 1,220~240,50
DB5-16AF LN01300220 1 5
1
Page 7
2 PRODUCT DATA
2.1 Product Data of Outdoor Unit
Model Heat
pump MS-E48AIN
MS-E56AIN
Cooling capacity KW 14.0 16.0
Heating capacity KW 16.0 18.0
Nominal input
Cooling KW 4.60 5.2
Heating KW 4.25 4.7
EER/COP 2.7/3.2 2.65/3.5
Minimum NO. of connectable indoor units
2
2
Maximum NO. of connectable indoor units
8
9
Minimum No. of DB modules to be connected
1 1
Maximum No. of DB modules to be connected
3 3
T ot al capacity index of to be connected
indoor units
Min 50 50
Max 135 135
Power supply 3Ph,380~415V, 50Hz
Dimensions (H×W×D) mm 1345×900×340 1345×900×340
Net weight/Gross weight kg 116/125 116/125
Sound pressure level cooling/heating dB(A) 58 58
Fan
Refrigerant
Refrigerant oil
Compressor
Piping connections
Piping length
Height
Type Axial-flow
Air Flow Volume m3/h 7000 7000
Name R410A
Charge kg 4.95 4.95
Control
Electronic expansion valve
Type FV50S FV50S
Charge L 1.35 1.35
Type Inverter Rotary
Quantity 1
Gas mm
Φ15.9
Φ19.05
Liquid mm
Φ9.52
Φ9.52
System total m 135 145
OU-DB m 55 total
DB-IN m 80
90 1
room DB-IN m
15
OU-DB m
30
OU-IN m
30
m 15
Operation range
℃ 18~48
DB-DB/
IN-IN
Cooling DB
Heating
℃DB -10~24
Loading quantity
20' GP 25 25
40' GP 50 50
40' HQ 50 50
2
Page 8

Notes:
a. The rated cooling capacity data is measured under the following work condition: Indoor Temperature is 27℃
DB, 19℃WB. Outdoor Temperature is 35℃DB. The rated heating capacity data is measured under the following
work condition: Indoor Temperature is 20℃DB. Outdoor Temperature is 7℃DB, 6℃WB.
b. The data will change with the change of products. Refer to those parameters listed on nameplate.
c. Noise was tested in semi-silenced room, so the actual noise value will be a little higher for change of ambient.
3
Page 9

2.2 Product Data of DB Module
Model
DB3-16AF
DB5-16AF
Maximum numbers of connectable indoor units 3 5
Power Supply V-Ph-Hz 220~240-1-50
Connection port to
outdoor unit
Gas pipe(inner diameter) mm Φ15.9 Φ15.9
Liquid pipe(inner diameter) mm Φ9.52 Φ9.52
Connection Method Flare Flare
Connection port to
indoor unit
Gas pipe(inner diameter) mm Φ9.52 Φ9.52
Liquid pipe(inner diameter) mm Φ6.35 Φ6.35
Connection Method Flare Flare
Drainage pipe
External dia. mm Φ31 Φ31
Thickness mm 3 3
Net weight/Gross weight kg 8/10 9/11
Notes:
a. The rated cooling capacity data is measured under the following work condition: Indoor Temperature is 27℃
DB, 19℃WB. Outdoor Temperature is 35℃DB. The rated heating capacity data is measured under the following
work condition: Indoor Temperature is 20℃DB. Outdoor Temperature is 7℃DB, 6℃WB.
b. The data will change with the change of products. Refer to those parameters listed on nameplate.
c. Noise was tested in semi-silenced room, so the actual noise value will be a little higher for change of ambient.
3 W ork ing Temperature Range
Sorts
Indoor side state Outdoor side state
Dry bulb temp. ℃ Wet bulb temp. ℃ Dry bulb temp. ℃ Wet bulb temp. ℃
Rated Cooling 27 19 35 24
Max. cooling 32 23 48 26
Min. cooling 21 15 18 —
Rated Heating 20 15 7 6
Max. heating 27 — 24 18
Min. heating 20 15
-10
—
4
Page 10
4 PIPING DIAGRAM
Schematic Diagram of High Power Multi System
The units start to work once the power is switched on.
During the cooling operation, the low temperature, low pressure refrigerant gas from the heat exchanger of
each indoor unit gets together and then is taken into the compressor to be compressed into high temperature, high
pressure gas, which will soon go to the heat exchanger of the outdoor unit to exchange heat with the outdoo r air
and then is turned into refrigerant liquid. After passing through the DB module, the temperature and pressure of
the refrigerant liquid will further decrease and then go the main valve. After that, it will be divided and go to the
heat exchanger of each indoor unit to exchange heat with the air which needs to be conditioned. Consequently, the
refrigerant liquid become low temperature, low pressure refrigerant gas again. Such a refrigeration cycle goes
round and round to achieve the desired refrigeration purpose.
During the heating operation, the four-way valve is involved to make the refrigeration cycle run reversely.
The refrigerant radiates heat in the heat exchanger of the indoor unit (so do the electric heating devices) and
absorb heat in the heat exchanger of the outdoor unit for a heat pump heating cycle so as to achieve the desired
heating purpose.
DB
5
Page 11
CONTROL
1 OPERATION FLOWCHART
6
Page 12
1.1 Cooling/Dry Operation
Guide Louvers Swing
Is there Guide
Louver?
Cooling Operation
Is the process of
preventing restart operation?
(3 minutes)
Fan Motor:Operation
Temperature
Adjustment
Electronic Expansion
Valve:Capacity Conctrol
Fan Motor: Stop
Electronic Expansion Valve: Stop
Stop
Yes
No
No
Yes
Yes
No
(Go to the previous page)
7
Page 13
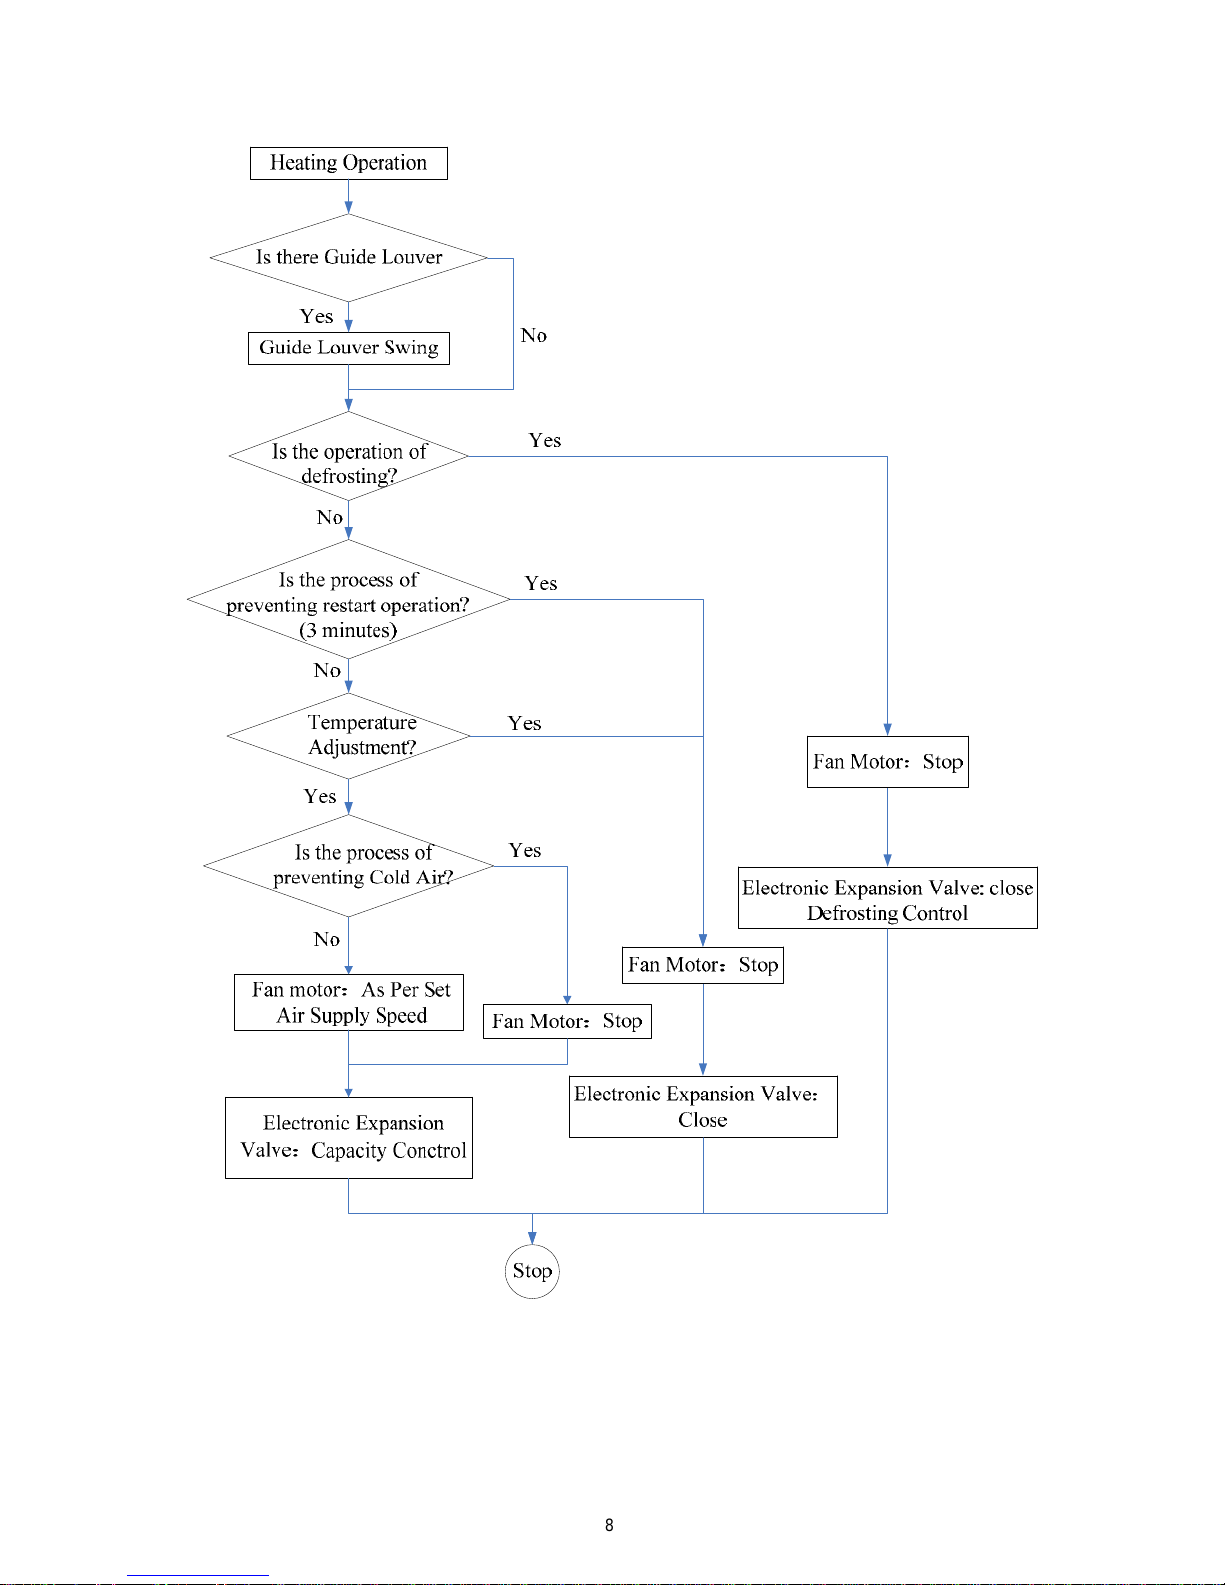
1.2 Heating Operation
8
Page 14

2 MAIN LOGIC
2.1 Control Function of Outdoor Unit
2.1.1 Cooling Mode
1) Cooling conditions and process:
If the compressor is in stop status and start the unit for cooling operation, when one of the indoor units
reaches the cooling operation condition, the unit starts cooling operation; in this case, the electronic expansion
valve, the outdoor fan and the compressor start operation.
2) Stop in cooling operation
a) Compressor stops
The compressor stops gradually, the outdoor fan stops after 1 min.
b) Some of the indoor units reach the stop condition (the compressor does not stop)
The compressor operates according to the required frequency. For the indoor unit with no requirement, the
corresponding electronic expansion valve is closed to 0P.
3) Cooling mode transfers to heating mode
When the unit transfers to heating mode, the 4-way valve is energized after the compressor runs for 40s. The
other disposals are the same as stopping in cooling mode.
4) 4-way valve:
In this mode, the 4-way valve is closed.
5) Outdoor fan control in cooling mode
The outdoor fan starts before 5s of the starting of compressor. The outdoor fan will run in high speed for 40s
after starting and then it will run in set speed.
The fan shall run at every speed for at least 80s. (When the quantity of indoor unit changes, the control part
will adjust the outdoor fan according to the quantity of indoor unit and outdoor temperature.); when the
compressor stops, the outdoor fan runs at present speed and stops after 1 min.
2.1.2 Dry Mode
1) The dry conditions and process are the same as those in cooling mode;
2) The status of 4-way valve: closed;
3) The temperature setting range: 16 ~ 30℃;
4) Protection function: the same as those in cooling mode;
5) In dry mode, the maximum value A of the capacity requirement percentage of single unit is 90% of that
in cooling mode. The open condition of the electronic expansion valve, outdoor fan and compressor is
the same as those in cooling mode.
2.1.3 Heating Mode
1) Heating conditions and process: When one of the indoor units reaches the heating operation condition,
the unit starts heating operation.
2) Stop in heating operation:
a) When all the indoor units reach the stop condition, the compressor stops and the outdoor fan stops after 1
min;
b) Some of the indoor units reach the stop condition. The compressor reduces the frequency immediately and
operates according to the required frequency;
c) Heating mode transfers to cooling mode (dry mode), fan mode:
The compressor stops;
The outdoor fan stops after 1min;
9
Page 15

The status of 4-way valve: energized;
3) Outdoor fan control in heating mode
The outdoor fan starts before 5s of the starting of compressor and then it will run in high speed for 40s; The
fan shall run at every speed for at least 80s; When the compressor stops, the outdoor fan stops after 1min.
4) Defrosting function
When the defrosting condition is met, the frequency of the compressor starts to decrease and wait for
defrosting; the electronic expansion valve of all indoor units open in big angle; the outdoor fan stops after the stop
of the 4-way valve, meanwhile, the 4-way valve reverses the direction; after the 4-way valve reverses the direction,
the frequency of the compressor starts to rise; then begin to calculate the time of defrosting, the frequency of the
compressor rises to reach the defrosting frequency.
5)
Oil-returned control in heating mode
a) Oil-returned condition
The whole unit is operating in low frequency for a long time
b) Oil-returned process in heating mode
The indoor unit displays “H1”.
c) Oil-returned finished condition in heating mode
The duration reaches 5min
2.1.4 Fan Mode
The compressor, the outdoor fan and the 4-way valve are closed; temperature setting range is 16~30℃.
2.2 Protection Function
2.2.1 Mode Conflict Protection of indoor unit
When the setting mode is different of different indoor unit, the unit runs in below status:
1) The mode of the first operating indoor unit is the basic mode, when compare the mode of the other
indoor units to see if there is a conflict. Cooling mode (dry mode) is in conflict with heating mode.
2) Fan mode is in conflict with heating mode and the heating mode is the basic mode. No matter which
indoor unit operates first, the unit will run in heating mode.
2.2.2 Overload Protection Function
When the tube temperature is a little low, the compressor raises the operation frequency; when the tube
temperature is a little high, the compressor frequency is restricted or lows down the operation frequency; when the
tube temperature is too high, the compressor protection stops running. If the discharge temperature protection
continuously appears for 6 times, the compressor can’t resume running. The compressor can resume running after
cutting off the power and then putting through the power. (If the running time of the compressor is longer than
7min, the protection times record will be cleared).
2.2.3 Discharge Protection Function
When the discharge temperature is a little low, the compressor raises the operation frequency; when the
discharge temperature is a little high, the compressor frequency is restricted or lows down the operation frequency;
when the discharge temperature is too high, the compressor protection stops running. If the discharge temperature
protection continuously appears for 6 times, the compressor can’t resume running. The compressor can resume
running after cutting off the power and then putting through the power. (If the running time of the compressor is
longer than 7min, the protection times record will be cleared).
10
Page 16

2.2.4 Communication malfunction
Detection of the quantity of installed indoor units and DB modules: After 3min of energizing, if the outdoor
unit does not receive the communication data of certain indoor unit, the outdoor unit will judge that indoor unit is
not installed and will treat it as it is not installed. If the outdoor unit receives the communication data of that
indoor unit later, the outdoor unit will treat that unit as it is installed.
2.2.5 Compressor high-pressure protection
1) When the high-pressure switch is detected cut off for 3s continuously, the compressor will enter
high-pressure protection as it stops when reaching set temperature. Meanwhile, the outdoor unit will
send the signal of “high-pressure protection” to the indoor units;
2) After the appearance of high-pressure protection, the compressor can resume running only after cutting
off the power and then putting through the power.
2.2.6 Compressor low-pressure protection
1) Low Pressure Protection for Shutdown
a). After the compressor stops for five minutes, if it is detected that the low pressure protection is work, then
a low pressure protection signal will be send out.
b). If it is detected continuously for three seconds that the low pressure protection is work after the
compressor stops for less than five minutes, then a low pressure protection signal will be send out. However, if the
low pressure protection occurs twice in one hour, then it becomes unrecoverable and has to be recovered by
powering the outdoor unit again.
2) Low Pressure Protection during the Operation
a) When it is detected continuously for three seconds that the low pressure protection is work, then the whole
unit should be shut off and a low pressure protection signal should be sent to the indoor unit.
b) On condition that a low pressure protection error occurs and the whole unit has stopped for more than
three minutes and it is detected continuously for six seconds that the low pressure protection switch is closed, then
this error can be eliminated. However, if the low pressure protection occurs twice in one hour, then it has to
eliminate the error by powering the outdoor unit again.
2.2.7 Compressor overload protection
If the compressor overload switch is detected having movement, the indoor unit will display the
corresponding malfunction as it stops when the indoor temperature reaching set temperature. When the
compressor stops for more than 3min and the compressor overload switch is reset, the unit will resume operation
status automatically. If the protection appears for more than 6 times (if the running time of the compressor is
longer than 30min, the protection times record will be cleared), the unit can not resume operation status
automatically, but can resume running only after cutting off the power and then putting through the power.
2.3 Other function
2.3.1 Refrigerant Recovery
The refrigerant can be recovered from the outdoor unit. When the unit is powered on and runs under the
COOL mode, it is available within five minute to go the refrigerant recovery mode by operate the testing board of
the outdoor unit with “Fo” displayed.
2.3.2 How to quit the refrigerant recovery:
When the refrigerant recovery has started, it will quit by operate the testing board of the outdoor unit or the
power is cut off.
11
Page 17

2.4 Control Function of Indoor Unit
2.4.1 Running Mode
1. COOL 2.DRY 3.HEAT 4.AUTO 5 FAN
2.4.2 Basic Functions of the System
1) COOL Mode
Under this mode, the fan and swing function goes as the set conditions, and the set temperature range is 16℃
~30℃.
2) DRY Mode
Under this mode, the fan will run at the low speed and the swing function is performed under the set
conditions. The set temperature range is 16~30℃.
3) FAN Mode
Under this mode, only the fan of the indoor unit runs. And if the auto speed is set, the fan will run under the
same condition as the COOL mode.
4) HEAT Mode
a) Under this mode, the set temperature range is 16℃~30℃.
b) The defrosting symbol “H1” will be displayed when the defrosting signal is received from the outdoor
unit.
5) AUTO Mode
a) When the ambient temperature is higher than 25℃, the unit will run as the COOL mode.
b) For the cooling and heating unit, if the ambient temperature is or lower than 22℃, the unit will run as the
HEAT mode.
c) When the indoor ambient temperature is higher than 22℃ but lower than 26℃, the unit which starts to
work under the AUTO or DRY mode will shift to the FAN mode, while the unit which starts to work under other
mode will keep the current running mode.
2.4.3 Other Control
1) Beeper Control
When the controller is powered on or it receives a valid either press button signal or remote control signal,
the beeper will utter a warning tone.
2) Auto Speed Control
a). Under the HEAT mode:
◆ If the ambient temperature is equal or higher than the set temperature, the fan will run at the low speed;
◆ If the ambient temperature minus 3℃ is equal or lower than the set temperature, the fan will run at the
medium speed;
◆ If the ambient temperature minus 3℃ is lower than the set temperature minus 3℃, the fan will run at
the high speed.
b). Under the COOL mode:
◆ If the ambient temperature is equal to or lower than the set temperature, the fan will run at the low
speed;
◆ If the ambient temperature is between the set temperature and the set temperature minus 3℃, the fan
will run at the medium speed;
◆ If the ambient temperature is higher than the set temperature plus 3℃, the fan will run at the high speed.
c). Under the FAN mode:
◆ The fan will run at the medium speed constantly.
◆ Once the fan starts, its speed cannot be changed unit it has run for at least 30 seconds at the currently set
12
Page 18

speed.
d) Under the HEAT Mode: (Ambient temperature herein is the temperature without temperature
compensation)
◆ When the ambient temperature is or lower than the set temperature, the indoor unit runs at the high
speed.
◆ When the ambient temperature is higher than the set temperature but lower than the set temperature plus
2℃, the indoor unit fan runs at the medium speed.
◆ When the ambient temperature is or lower than the set temperature plus 2℃, the fan runs at the low
speed.
e) Under the COOL and FAN Modes
◆ When the ambient temperature is or higher than the set temperature plus 3℃, the indoor unit runs at
high speed.
◆ When the ambient temperature is higher than the set temperature plus 1℃, but lower than the set
temperature plus 3℃, the indoor unit fan runs at the medium speed.
◆ When the ambient temperature is or lower than the set temperature plus 1℃, the fan runs at the low
speed.
f) Once the fan starts at a certain speed, it will keep running at this speed for no less than 30 seconds prior to
any changeover stated above.
3) AUTO Press Button
The whole unit will run under the AUTO mode by pressing this button when the unit is off. In this condition,
the fan of the indoor unit will run at the auto speed with the swing function activated. When the unit is on, it will
be turned off by pressing this button. This button is unavailable to the floor/ceiling unit.
4) Sleep
Under this mode, the proper sleep curve will be adopted in accordance with different set temperatures.
Under the COOL mode or the DRY mode, the temperature will go up by 1℃ after one hour and by another
1℃ after another hour, after that, the temperature will be kept on.
Under the HEAT mode, the temperature will go down by 1℃ after one hour and by another 1℃ after
another hour, after that, the temperature will be kept on.
5) Timer
a) Timer On
When the unit is powered on but in the idle condition, it is available to set when to start the unit. Then, when
the unit starts, it will run as the previously set mod. The set range of the timer is 0.5~24 hours with a interval of
0.5 hour.
b) Timer Off
When the unit is on, it is available to set when to stop the unit. The set range of timer is 0.5~24 hours with a
interval of 0.5 hour.
6) Memory
a) Memorizing Objects: modes (AUTO, COOL, DRY, FAN, HEAT), swing, set temperature, set fan speed,
etc.
b) When the indoor unit works without the wired controller, it will resume the working condition as the
power failure occurs after it is powered on again. When the indoor unit is with the wired controller, it is available
to set the memory function by pressing the corresponding buttons of the wired controller.
13
Page 19

c) When the indoor unit works without the wired controller, if the timer is not set for the last remote control
instruction, the system will memorize this last instruction and works following it; if the timer is set, it will be
canceled as the power failure occurs and will have to be reset.
d) When the indoor unit works with the wired controller, it will work as the message sent by the wired
controller after it is powered on again.
7) Selection of the Indoor Temperature Sensor
a) For the duct type indoor unit: Under the COOL, HEAT, DRY, or FAN mode, the return air
temperature sensor is adopted; while under the HEAT mode, it is the receiver temperature sensor.
For the cassette type, floor ceiling type indoor unit: Under all modes, the return air temperature sensor is
adopted.
b) When the duct type, cassette type, or the floor ceiling type indoor unit works with the wired controller, the
ambient temperature sensor can be set in the following four ways:
01: The indoor temperature sensor is set for the return air.
02: The indoor temperature sensor is set for the wired controller.
03: The indoor temperature sensor is set for the wired controller under the HEAT mode, and for the return air
under any other mode.
04: The indoor temperature sensor is set for the return air under the HEAT mode, and for the wired controller
under any other mode.
c) Setting of the Ambient Temperature Sensor of the Wired Controller XK19.
◆ When the unit is off, it is available to go to the debugging status by pressing the “Function” and “Timer”
buttons for five seconds, and the corresponding code will be displayed on the temperature area of the
wired controller. There are four kinds of codes which can be adjusted through the “▼”/“▲” button.
◆ The 03 is the default code. The setting of the ambient temperature sensor of the wired controller should
be memorized.
◆ The “Enter/Cancel” button shall be pressed to confirm and leave the setting. If there is no response to
the last button press within 20 seconds, then the system will quit the setting and go to the normal “Off”
status but with the setting still saved.
8) Switchover of the Defrosting Mode
On condition that the unit is off, if “H1” is not displayed on the wireless controller, then the unit will go to
the setting status of the “Defrosting Mode 1”as it is turned on through the wired controller. Then, once the indoor
unit receives this signal, it will soon send it to the outdoor unit. In contract, if “H1”is displayed, the unit will go
the setting status of the “Defrosting Mode 2”, and the indoor unit also will send this signal to the outdoor unit as
soon as it receives it.
On condition that the unit is off, it is available to switch over the “Defrosting Mode 1” and “Defrosting Mode
2” by pressing the “MODE” and “BLOW” buttons simultaneously.
9) Turbo
As soon as the controller receives the “Turbo” instruction, the fan of the indoor unit will run at the high
speed.
10) Blow
Blow Function: It is a function to automatically blow off the moist inside the exchanger of the indoor unit to
prevent mould growing after the unit is shut off.
a) On condition that this function is activated, when the “On/Off” press button is operated, the fan of the
indoor unit will still run for ten minutes (with the symbol “BLOW” displayed). At this time, the fan will stop as
this function is deactivated.
b) This function is unavailable under the AUTO, FAN, and HEAT modes.
14
Page 20

3 REMOTE CONTROLLER
3.1 Wired Remote Controller
3.1.1 Wired Controller XK19
It is designed for the cassette type, duct type and floor ceiling type indoor units.
◆ Outside View of the Wired Controller
◆ LCD of the Wired Controller
No. Symbols Description
1
Swing function.
2
Sleep function
3
Running modes of the indoor unit (Cooling, Dry, Fan, Heating and Auto).
4
Defrosting function for the outdoor unit.
5
Gate-control function.(this function is yet unavailable for this unit)
6
Lock function.
7
High, middle, low or auto fan speed of the indoor unit.
8
Shield functions (buttons, temperature, On/Off, Mode or Save is shielded or Save is
shielded by the remote monitor)
9
Turbo function.
10
Memory function (The indoor unit resumes the original set ting state after power failure and
then power recovery).
15
Page 21

11
Master wired controller (this function is yet unavailable for this unit).
12
It blinks under on state of the unit without operation of any button.
13
Energy-saving function.(this function is yet unavailable for this unit)
14
Ambient/preset temperature value.
15
Electric auxiliary heating function.(this function is yet unavailable for this unit)
16
Blow function.
17
Timing value.
18
Quiet function (two types: quiet and auto quiet).(this function is yet unavailable for this
unit)
19 SET It will be displayed under the debugging mode.
3.1.2 Buttons
Buttons on the Wired Controller
No. Name Function
1 Enter/cancel
① Function selection and cancellation.
② Press it for 5s to examine the outdoor ambient temperature.
2 ▲
① Running temperature setting of the indoor unit, range:16~30℃.
② Timer setting, range:0.5-24 hr.
6 ▼
3 Fan Setting of the high/middle/low/auto fan speed.
4 Mode Setting of the Cooling/Heating/Fan/Dry mode of the indoor unit.
5 Function Switchover among the functions of Swing/Sleep/Turbo/Save/E-heater/Blow /Quiet etc.
7 Timer Timer setting.
8 On/Off Turn on/off the indoor unit.
4+2 ▲+Mode
Press them for 5s under off state of the unit to enter/cancel the Memory function (If
memory is set, indoor unit after power failure and then power recovery will resume the
original setting state. If not, the indoor unit is defaulted to be off after power recovery.
Memory off is default before delivery.).
3 +6 Fan+▼
By pressing them at the same time under off state of the unit,
will be displayed on
the wired remote controller for the cooling only unit, while
will be displayed on the
wired remote controller for the cooling and heating unit.
16
Page 22

2 +6 ▲+▼
Upon startup of the unit without malfunction or under off state of the unit, press them at
the same time for 5s to enter the lock state, in which case, any other buttons won’t
respond the press. Repress them for 5s to quit this state.
3.1.3 Operation Instructions
1) On/Off
Press On/Off to turn on the unit and turn it off by another press.
2) Mode Setting
Under the “On” state of the unit, press Mode to switch the operation modes as the following sequence:
Cooling-Dry-Fan-Heating.
3) Temperature Setting
Press ▲ or ▼ to increase/decrease the preset temperature. If press either of them continuously, the
temperature will be increased or decreased by 1℃ every 0.5s.
In the Cooling, Dry or Heating mode, the temperature setting range is 16℃~30℃.
In the Fan mode, the setting temperature is fixed at 26℃.
In the Auto mode, the setting temperature is unadjustable.
4) Fan Setting
Under the “On”/“Off” state of the unit, press Fan and then fan speed of the indoor unit will change circularly.
5) Timer Setting
Under the “On”/“Off” state of the unit, press Timer to set timer off/on.
Timer on setting: press Timer, and then LCD will display “xx.x hour”, with “hour” blinking. In this case,
press ▲ or ▼ to adjust the timing value. Then press Enter/cancel to confirm the setting.
Timer off setting: press Timer, if LCD won’t display xx.x hour, and then it means the timer setting is
canceled.
Timer range: 0.5-24hr. Every press of ▲ or ▼ will make the set time increased or decreased by 0.5hr. If
either of them is pressed continuously, the set time will increase/ decrease by 0.5hr every 0.5s.
6) Swing Setting
Swing On: Press Function under on state of the unit to activate the swing function. In this case, it will blink.
After that, press Enter/cancel to make a confirmation.
Swing Off: When the Swing function is on, press Function to enter the Swing setting interface, with blinking.
After that, press Enter/cancel to cancel this function.
Notes:
a. Sleep, Save, Turbo, Blow or Quiet setting is the same as the Swing setting.
b. After the setting has been done, it has to press the key “Enter/cancel” to back to the setting status or quit
automatically five seconds later.
7) Sleep Setting
Sleep on: Press Function under on state of the unit till the unit enters the Sleep setting interface. After that,
press Enter/cancel to confirm the setting.
Sleep off: When the Sleep function is activated, press Function to enter the Sleep setting interface. After that,
press Enter/cancel to can this function.
Sleep off is default after power failure and then power recovery, and the sleep functions is unavailable under
the fan mode.
Sleep mode
In the Cooling or Dry mode, the temperature will increase by 1℃ after the unit runs under Sleep 1 for 1 hr
and 1℃ after another 1hr.After that, the unit will run at this temperature.
In the Heating mode, the temperature will decrease by 1℃ after the unit runs under Sleep 1 for 1hr and 1℃
after another 1hr. After that, the unit will run at this temperature.
17
Page 23

Notes:
a. During the above setting, if Function is pressed down or there is not any operatio n w ithi n 5s, slee p curve
setting will be canceled.
b. 26℃ is the default Sleep curve temperature before delivery. The wired controller will automatically
memorize the Sleep curve after the setting.
8) Turbo Setting
Turbo function: The unit at the high fan speed can realize quick cooling or heating so that the room
temperature can quickly approach the setting value.
In the Cooling or Heating mode, press Function till the unit enters the Turbo setting interface and then press
Enter/Cancel to confirm the setting.
When the Turbo function is acti va ted, press Function to enter the Turbo setting interface and then press
Enter/Cancel to cancel this function.
Notes:
a. When the Turbo function is activated, if the difference between the room temperature and set temperature
is at or below 2℃ (detected in successive 1 min.), the Turbo function will be automatically deactivated.
b. Turbo function is unavailable in the Dry and Fan mode. And the Turbo function is off after power failure
and then power recovery. If Quiet function is on, Turbo function will be canceled subsequently.
9) E-heater Setting
E-heater (auxiliary electric heating function): In the Heating mode, E-heater is allowed to be turned on for
improvement of efficiency.
Once the wired controller or the remote controller enters the Heating mode, this function will be turned on
automatically.
Press Function in the Heating mode to enter the E-heater setting interface and then press Enter/cancel to
cancel this function.
Press Function to enter the E-heater setting interface, if the E-heater function is not activated, and the n pr ess
Enter/Cancel to turn it on.
10) Blow Setting
Blow function: After the unit is turned off, the water in evaporator of indoor unit will be automatically
evaporated to avoid mildew.
In the Cooling or Dry mode, press Function till the unit enters the Blow setting interface and then press
Enter/Cancel to active this function.
When the Blow function is activated, press Function to the Blow setting interface and then press
Enter/Cancel to cancel this function.
Notes:
a. When the Blow function is activated, if turning off the unit by pressing On/Off or by the remote controller,
the indoor fan will run at the low fan speed for 10 min, with “BLOW” displayed on the LCD. While, if the Blow
function is deactivated, the indoor fan will be turned off directly.
b. Blow function is unavailable in the Fan or Heating mode.
11) Other Functions
Lock
Upon startup of the unit without malfunction or under the “Off” state of the unit, press ▲ and ▼ at the
same time for 5s till the wired controller enters the Lock function. In this case, LCD displays. After that, repress
these two buttons at the same time for 5s to quit this function.
Under the Lock state, any other button press won’t get any response.
Memory
Memory switchover: Under the “Off” state of the unit, press Mode and ▲ at the same time for 5s to switch
18
Page 24

memory states between memory on and memory off. When this function is activated, Memory will be displayed.
If this function is not set, the unit will be under the “Off” state after power failure and then power recovery.
Memory recovery: If this function has been set for the wired controller, the wired controller after power
failure will resume its original running state upon power recovery. Memory contents: On/Off, Mode, set
temperature, set fan speed, Save function and Lock function.
Enquiry of the Outdoor Ambient Temperature
Under the “On” or “Off” state of the unit, press Enter/Cancel for 5s, and the outdoor ambient temperature
will be displayed after a sound of click. This enquiry state will quit by pressing Function or On/Off or during the
temperature adjustment. If there is not any operation for 10s, it will also quit automatically.
3.1.4 Errors
If there is an error occurring during the operation of the system, the error code will be displayed on the LCD.
If multi errors occur at the same time, their codes will be displayed circularly.
Note: In event of any error, please turn off the unit and contact the professionally skilled personnel.
Error Error Code
High pressure protection E1
Low pressure protection E3
Discharge protection E4
Over-current protection P5
Communication error E6
Indoor water overflow protection E9
Mode conflict E7
Anti-freezing protection E2
Defrosting or oil returning for heating H1
Indoor ambient temperature sensor open/short circuit F1
Evaporator temperature sensor open/short circuit F2
Indoor unit (liquid valve) refrigerant pipe inlet temperature sensor error b5
Indoor unit (gas valve) refrigerant pipe outlet temperature sensor error b7
Condenser coil inlet temperature sensor open/short circuit A5
Condenser coil midway temperature sensor error F4
Condenser coil outlet temperature senor open/short circuit A7
Discharge air temperature sensor error F5
Outdoor ambient temperature sensor error F3
Module temperature sensor error oE
Outdoor unit overall error oE
19
Page 25

1) ON/OFF
Press this button to turn on the unit. Press this button again to turn off the unit.
2) -
Press this button to decrease set temperature. Holding it down above 2 seconds rapidly decreases set
temperature. In AUTO mode, set temperature is not adjustable.
3) +
Press this button to increase set temperature. Holding it down above 2 seconds rapidly increases set
temperature. In AUTO mode, set temperature is not adjustable.
4) MODE
Each time you press this button, a mode is selected COOL, DRY, FAN, and HEAT *, as the following:
*Note: Only for models with heating function.
After energization, AUTO mode is defaulted. In AUTO mode, the set temperature will not be displayed on
the LED of the indoor, and the unit will automatically select the suitable operation mode in accordance with the
room temperature to make indoor room comfortable.
5) FAN
This button is used for setting Fan Speed in the sequence that goes from AUTO,
, , ,
, , then back to Auto.
Low speed Low-Medium speed Medium speed
Medium-High speed High speed
6) SWING
20
2
Page 26
Press this button to set up &down swing angle, which circularly changes as below:
This remote controller is universal. If any command
, or is sent out, the unit will carry out the
command as
indicates the guide louver swings as:
7) I FEEL:
Press this button to turn on I FEEL function. The units automatically adjust temperature according to the
sensed temperature. Press this button again to cancel I FEEL function.
8)
Press this button to achieve the on and off of healthy and scavenging functions in operation status. Press this
button for the first time to start scavenging function; LCD displays“
”. Press the button for the second time to
start healthy and scavenging functions simultaneously; LCD displays“
” and “ ”. Press this button for the
third time to quit healthy and scavenging functions simultaneously. Press the button for the fourth time to start
healthy function; LCD display “
”. Press this button again to repeat the operation above.
9) SLEEP:
◆ Press this button, can select Sleep 1 (
), Sleep 2 ( ), Sleep 3 ( ) and cancel the Sleep, circulate
between these, after electrified, Sleep Cancel is defaulted.
◆ Sleep 1 is Sleep mode 1, in Cool or dry mode: sleep status after run for one hour, the main unit setting
temperature will increase 1℃, after 2 hours the setting temperature will increase 2℃, but the maximal setting
temperature is 30℃, then the unit will run at this setting temperature all along; In Heat mode: sleep status
after run for one hour, the setting temperature will decrease 1℃, after 2 hours the setting temperature will
decrease 2℃, but the minimal setting temperature is 16℃, then the unit will run at this setting temperature.
◆ Sleep 2 is sleep mode 2, that is air conditioner will run according to the presetting a group of sleep
temperature curve.
◆ Sleep 3- the sleep curve setting under Sleep mode by DIY:
① Under Sleep 3 mode, press "Turbo" button for a long time, remote control enters into user individuation
sleep setting status, at this time, the time of remote control will display "1hour ", the setting temperature
"88" will display the corresponding temperature of last setting sleep curve and blink (The first entering
will display according to the initial curve setting value of original factory);
② Adjust "+" and "-" button, could change the corresponding setting temperature, after adjusted, press
"Turbo" button for confirmation;
③ At this time, 1 hour will be automatically increased at the timer position on the remote control, (that are
"2 hours " or "3 hours " or "8 hours "), the place of setting temperature "88"will display the
corresponding temperature of last setting sleep curve and blink;
④ Repeat the above step (2) ~ (3) operation, until 8 hours temperature setting finished, sleep, curve
setting finished, at this time, the remote control will resume the original timer display; temperature
21
Page 27
display will resume to original setting temperature.
Sleep3- the sleep curve setting under SLEEP mode by DIY could be inquired:
◆ The user could accord to sleep curve setting method to inquire the presetting sleep curve, enter into user
individuation sleep setting status, but do not change the temperature, press "Turbo" button directly for
confirmation.
Note: In the above presetting or enquiry procedure, if continuously within 10s, there is no button pressed, the
sleep curve setting within 10s, there is no button pressed, the sleep curve setting status will be automatically quit
and resume to display the original displaying. In the presetting or enquiry procedure, press "ON/OFF" button,
"Mode" button, "Timer" button or "Sleep" button, the sleep curve setting or enquiry status will quit similarly.
10) TEMP:
Press this button, could select displaying the indoor setting temperature or indoor ambient temperature. When
the indoor unit firstly power on it will display the setting temperature, if the temperature's displaying status is
changed from other status to"
",displays the ambient temperature, 5s later or within 5s, it receives other
remote control signal that will return to display the setting temperature. If the users haven't set up the temperature
displaying status, that will display the setting temperature.
11) QUIET:
Press this button, the Quiet status is under the Auto Quiet mode (display "
"signal ) and Quiet mode
(display "
" signal) and Quiet OFF (there is no signal of ""displayed),after powered on, the Quiet OFF is
defaulted.
Note: the Quiet function cannot be set up in Fan and Dry mode; Under the Quiet mode
(Display "
" Under the Quiet mode (Display "" signal), the fan speed is not available.
12) CLOCK :
Press CLOCK button, blinking
. Within 5 seconds, pressing + or - button adjusts the present time.
Holding down either button above 2 seconds increases or decreases the time by 1 minute every 0.5 second and
then by 10 minutes every 0.5 second. During blinking after setting, press CLOCK button again to confirm the
setting, and then
will be constantly displayed.
13) T-ON/ T-OFF:
Press T-ON button to initiate the auto-ON timer. To cancel the auto-timer program, simply press this button
again.
After press of this button,
disappears and "ON "blinks. 00:00 is displayed for ON time setting. Within
5 seconds, press + or - button to adjust the time value. Every press of either button changes the time setting by 1
minute. Holding down either button rapidly changes the time setting by 1 minute and then 10 minutes. Within 5
Seconds after setting, press TIMER ON button to confirm.
Press T-OFF button to initiate the auto-off timer. To cancel the auto-timer program, simply press the button
again. TIMER OFF setting is the same as TIMER ON.
14) TURBO:
22
Page 28
Press this button to activate / deactivate the Turbo function which enables the unit to reach the preset
temperature in the shortest time. In COOL mode, the unit will blow strong cooling air at super high fan speed. In
HEAT mode, the unit will blow strong heating air at super high fan speed.
15) LIGHT:
Press LIGHT button to turn on the display's light and press this button again to turn off the display's light. If
the light is turned on,
is displayed. If the light is turned off, disappears.
16) X-FAN:
Pressing X-FAN button in COOL or DRY mode, the icon
is displayed and the indoor fan will continue
operation for 10 minutes in order to dry the indoor unit even though you have turned off the unit. After
energization, X-FAN OFF is defaulted. X-FAN is not available in AUTO, FAN or HEAT mode.
3.3.2 Guide for General Operation
1) Combination of "+"and "-" buttons: About lock
Press "+" and "-" buttons simultaneously to lock or unlock the keypad. If the remote controller is locked,
is displayed. In this case, pressing any button, blinks three times.
2) Combination of "MODE " and "-" buttons :
About switch between Fahrenheit and centigrade At unit OFF, press "MODE" and "-" buttons
simultaneously to switch between and .℃℉
3) Combination of " TEMP " and "CLOCK" buttons : About Energy-saving Function
Press “TEMP” and “CLOCK” simultaneously in COOL mode to start energy-saving function. Nixie tube on
the remote controller displays “SE”. Repeat the operation to quit the function.
4) Combination of "TEMP " and "CLOCK" buttons: About 8℃ Heating Function
Press “TEMP” and “CLOCK” simultaneously in HEAT mode to start 8℃ Heating Function Nixie tube on
the remote controller displays “
” and a selected temperature of “8℃”. (46℉ if Fahrenheit is adopted). Repeat
the operation to quit the function.
5) About Back-lighting Function
The unit lights for 4s when energizing for the first time, and 3s for later press.
a. Single control: it is intended to control the running parameters of a designated indoor unit individually.
conditioning system.
enient control to the air
ce shielding to realize convfurther, it also can set the weekly timer and long-distan
unit, including on/off, running mode, fan speed etc, and also perform the single control and centralized control,
Through this central controller, it is available to view and control those running parameters of the indoor
. 3 outdoor units and 16 indoor units
controlling up to
This central controller is a kind of regional controller, which is designed for free match units, capable of
4.1.1 Function Introduction
General Introduction
4.1
Central Controller SCC-16
4
23
Page 29
4.1.2 Scope of application
The central controller cannot be adapted to all kinds of indoor units and the wired remote controller must
be used in the indoor units. So the wall mounted and console types are beyond the scope of the central
controller.
4.2 Communication Network
Note: The central controller can connect with maximum up to
16 indoor units
.
Central
the communication module, which can extremely ease and simplify the installation.
This smart zone controller can be connected to the unit through the communication line without the need of
When some error occurs, the error symbol and the error code will be displayed to warn a quick maintenance.
parameter setting of the current running mode, set temperature, fan speed, weekly timer, shielding function etc.
After the debugging to the controller is finished, it can check the on-line indoor units and display the
e. Clock: it is intended to set and display the weekday, hour and minute.
long-distance control.
d. Weekly timer under single or centralized control: it is intended to set when to start/stop the unit through
b. Centralized control: it is intended to control the running parameters of all indoor units at the same time.
c. Shielding under single or centralized control: it is intended to shield the running parameter of the indoor
unit.
24
Page 30
4.3 LCD
No. Name Description
1 Fan speed It displays the fan speed of the indoor unit, high, medium, low and auto.
2 Running mode It displays the running mode of the indoor unit, auto, cool, dry, fan and heat.
3 System clock
It displays the current time (hour and minute) in 24-hour time system and also
the week day.
4 Shield It displays the shielded status, “ALL”, “TEMP”, “MODE” and “ON/OFF”.
5 Weekly timer It displays the timing period (unit: 0.5 hour) which will circulate every week.
6
Set temperature/
Indoor unit code
It displays the set temperature, indoor unit code (01-16), and symbols of Celsius
and Fahrenheit scale.
7 Control mode
It displays “CENTER” under the centralized control m ode and no display un der
the single control mode.
8
Ambient temperature/
Serial port
It displays the ambient temperature, serial port as well as symbols of Celsius and
Fahrenheit scale.
9
Indoor unit code/
on/
off status
Numbers indicate the indoor unit codes which will be displayed when the
corresponding indoor unit is online; “□” indicates the on/off status of the indoor
unit, that is, when it is bright, it m eans the unit is “On”; when it is gone out, it m eans
the unit is “Off”.
10 Error , Child lock
It displays the error codes when some error(s) arises and also “CHILD LOCK”
when this function is activated.
4.4 Buttons
4.4.1 Outline of Buttons
25
Page 31
4.4.2 Introduction to the Function of Buttons
No. Name Function Description
1 Mode It is used for the switchover among different modes.
2 Fan It is used to set the fan speed, high, medium, low or auto.
3 On/Off It is used to set the on/off status of the indoor unit.
4
▲
1. Under the single/centralized control status: It is used to set the r unning t em perature of
the indoor unit with max.30 and min.16 ;
℃℃
2. Under the timing setting status: It is used to set the timing period with max.24 hours
and min.0 hour;
3. Under the clock setting status: it is used to set the hour (max.:23, min.: 0) and minute
(max.:59, min.: 0) of the clock.
5
▼
6 Mon 1/9
It is used for the switchover between unit 1 and unit 9 ; Under the timing or clock setting
status, it indicates Monday.
7 Tue 2/10
It is used for the switchover between unit 2 an d unit 10; Under the timing or cloc k setting
status, it indicates Tuesday.
8 Wed 3/11
It is used for the switchover between unit 3 and unit 1 1; Under t he timing or clock setting
status, it indicates Wednesday.
9 Thu 4/12
It is used for the switchover between unit 4 an d unit 12; Under the timing or cloc k setting
status, it indicates Thursday.
10
Fri 5/13 It is used for the switchover between unit 5 and unit 13; Under the timing or clock setting
status, it indicates Friday.
11
Sat 6/14 It is used for the switchover between unit 6 and unit 14; Under t he timing or cloc k setting
status, it indicates Saturday.
12
Sun 7/15 It is used for the sw itchover between un it 7 and unit 15; Under the timing or clock setting
status, it indicates Sunday.
13 8/16 It is used for the switchover between unit 8 and unit 16.
14 Ti mer/Ti me
It is used to set the timing or on/off time of the selec ted indoor unit as well as to set th e
clock of the system.
17 All on/All off It is used to start/stop all indoor units.
16 Shield It is used to deactivate some or all functions of a single or a group the indoor unit(s).
15 Central It is used for the switchover between single and centralized control modes.
26
Page 32

INSTALLATION
1 PRECAUTIONS FOR INSTALLATION
1.1 Precautions for Installation
Before installation, please ensure the installing site, power ratings, possible operating range (pipe distance,
height difference between indoor and outdoor unit, power voltage) and installing space are correct and suitable.
To ensure correct installation, please make sure to read the Safety Considerations thoroughly before
starting the installation works.
After completing the installation and test run and confirming that all are normal, please introduce to the
client on how to use and repair the machine according to the Operating Instructions. Besides, please
deliver the considerations herein to the clients together with the Operating Instructions, and ask them to
keep properly.
Warning!
:It indicates improper operation which will lead to human casualty or severe injury.
Caution!
: It indicates improper operation which will lead to injury or property damage.
Warning !
The installation and relocation should be left to the appointed service center and must be installed by professional or
qualified persons. Otherwise, it maybe cause water leakage, electric shocks or fire etc.
Please install the air conditioner according to the instructions given in the installation instructions. Improper
installation may cause fall down, water leakage, electric shock or fire etc.
To install a large air-conditioning system in a small room, please make sure to take measures to prevent that the
refrigerant will not exceed the limit concentration in case of leakage. For the measures to prevent the refrigerant from
exceeding the limit concentration, please consult your dealer. If no proper measures, it might cause human suffocation
in case of refrigerant leakage.
Please install the unit on a solid place where is strong enough to support the weight of the unit; Otherwise, the unit
would fall down and cause injury or death.
Please keep the room well-ventilated and it could avoid oxygen deficit.
Electrical work should be carried out in accordance with the installation manual and the local laws and regulations.
Insufficient capacity or incomplete electrical work may cause electrical shock or fire etc.
Please use suitable cables and connect them securely. Please fix the terminal joints securely. The terminal
connection shall not be affected due to any external force applied onto the cable. Improper connection and fixing may
cause heating and fire accidents.
The power supply must adopt the special circuit with air switch protection and assure it has enough capaci ty ; T he
unit will be turned on or off according to your requirement automatically, please do not turn on or off the unit
frequently. Otherwise, disadvantage effect may be caused to the unit.
Never cut off or damage power cables and control wires. If the power cable and signal control wire were damaged,
it must be replaced by the manufacturer, its service agent or similarly qualified persons in order to avoid a hazard.
The electrical work should use a cable length enough to cover the entire distance with no connection. If it is
unavoidable, please make sure the connection should be reliable and the external forces will not act on the wires.
Otherwise it will cause electrical shock or fire etc.
When erecting or relocating the air conditioner, do not let any air enter into cooling circulation system except the
specified refrigerant. If any air is mixed, abnormal high pressure will occur in the cooling circulation system, thus
causing crack or human injury accidents.
27
Page 33

Do not use or store flammable, explosive, poisonous or other dangerous substances beside the air conditioner.
The compressor will vibrate sharply if the voltage is too low and damage the refrigerating system. Electrical
component are easy to damage if the voltage is too high.
The voltage should be stable; there shouldn’t be big fluctuation
Please take notice of the installation foundation of the unit after long use, if it is damaged, it may lead to the fall of
the unit and cause the injury.
The refrigerant pipes and accessories must be designed exclusively for R410A.
Caution!
Before installation, please check that whether the power supply corresponds with the requirement specified on the
nameplate and also check its security.
Before using the unit, please check the piping and wiring, ensure they are correct to avoid water leakage,
refrigerant leakage, electric shock, or fire etc.
Ground connection: connect to the ground reliably! The ground wire should be connected to the appropriative
grounding device of the building. If the appropriative grounding device is not available, please ask a professional to
install. Never connect the ground wire to gas pipe, water pipe, lightning rod, telephone line or other unreliable places
considered by a professional.
The total capacity of the indoor units which runs at the same time cannot exceed the capacity of the outdoor units;
otherwise, the cooling (heating) effect of each indoor unit would be lower than the nominal capacity.
If the supply power fails when the unit is running, then the indoor unit will send the “start” signal to the outdoor
unit three minutes later after the power recovery.
It must install an earth leakage breaker. Otherwise, it maybe cause electric shocks or fire etc.
Install the air conditioner, the power wire and transmission line must be more than one meter away from televisions
or radios which can emit electromagnetic waves to prevent image interference or noise. Otherwise, the unit maybe
cannot work.
The drain pipe should be installed as instructed in the manual to guarantee the proper drainage; meanwhile it should
be insulated to prevent condensing; otherwise the improper installation would cause water leakage and then wet the
household wares in the room.
Be sure to shut off the power supply when you do not use the air conditioner for a long time. Otherwise, the dusts
may accumulate in it, which may cause overheating or fire hazards.
Never standing on the outdoor unit or place objects on it. Person or objects fal ling from the unit may cause injury.
The air conditioner is not support to install in the circumstances as the following that where there is full of mist of
oil, corrosive gas, flammable gases, the acidic or alkaline vapor and the ocean.
Before startup of the compressor, please turn on the main power switch of the unit for more than 8 hours and it
makes sure that the heater belt of the compressor has been energized for at least eight hours! Once the compressor is
started, it must be guaranteed that it works continuously for at least 30 minutes, otherwise it would be damaged!
This appliance is not intended for use by persons (including children) with reduced physical, sensory or mental
capabilities, or lack of experience and knowledge, unless they have been given supervision or instruction concerning
use of the appliance by a person responsible for their safety. Children should be supervised to ensure that they do not
play with the appliance.
Never operate the unit with wet hands. Otherwise, it may cause electric shock.
Before cleaning and repairing, it is necessary to stop working and turn off the power supply. Otherwise, it may cause
electric shock or damage.
It is suggested to have a power-on test annually.
28
Page 34

1.2 Key Points of Installation
Installation Procedures Description and Acceptance Criteria
Material Selection and Equipment Inspection
◆ The materials specified on the engineering drawing shall be
purchased as specified (e.g. copper tube, thermal insulation
tube, PVC pipe, power cables, air switch, etc).
◆ The materials not specified on the engineering drawing shall
be purchased according to the actual quantity of works (e.g.
hanger frame, cable duct, etc).
◆ Check if the outdoor unit, indoor unit, DB modules,
communication wires and accessories are complete.
Installation of
indoor unit
Communica
tion wire
Connection
◆ The power cables shall be separated from communication
wires at a least distance of 2cm.
◆ To avoid breaking the communication wires, please do not use
strong force.
◆ For multiple units, please mark them properly.
◆ Switch on the unit, and ensure there is no display of
“Communication Wire Error E6”.
Address dial
code
◆ Each DB module and indoor unit under the same system has a
unique address dial code.
◆ The wired controller and its corresponding indoor unit have
the same address dial code.
Remote Control
◆ Select the remote control mode.
◆ The centralized controller and communication module shall be
installed free from the source of interference.
Power cord
◆ The power cable must meet the specifications.
Drainage
Pipe
Installation
◆ The PVC pipes must meet the specifications.
◆ A specific gradient must be provided along the water flow
direction.
◆ Carry out water detection after installation.
◆ Carry out thermal insulation to the drainage pipe only after the
water detection is accepted.
Thermal
insulation
◆ The thermal insulation tube must meet the specifications.
◆ Seal between the thermal insulation pipes to avoid air entry.
Installation of
connection pipes
Welding
◆ The copper tube must meet the specifications.
◆ Ensure it is dry and clean inside the tube.
◆ Make sure to charge nitrogen as required for protection when
welding the tubes.
◆ Please keep to the welding process and ensure the system free
of leakage.
◆ Add a dual-way filter on liquid pipe side
◆ For multiple systems, please mark them properly.
◆ Carry out leakage detection under pressure after welding.
Purge and make leakage
detection under pressure
◆ Purge the system clean.
◆ Keep the pressure for 24 hours
◆ Except for the influence by temperature, it is deemed
29
Page 35

acceptable if pressure drop is within 0.02MPa. (With the
temperature change by 1 , the pressure will change by ℃
approx. 0.01MPa)
Thermal insulation
◆ The thermal insulation tube must meet the specifications.
◆ Seal between the thermal insulation pipes to avoid air entry.
Installation of outdoor unit
◆ Select the installing position correctly.
◆ Build the foundation according to the anchor bolt position and
the dimension of outdoor unit
◆ Build the damping device properly.
◆ Avoid sharp knock when handling the outdoor unit. The
inclination angle shall not be higher than 15°.
Connection of indoor unit and outdoor unit
◆ Tighten the nuts.
◆ Provide proper protection to the outdoor connection pipe,
communication wires and power supply.
Leakage detection under pressure
◆ Keep the pressure for 24 hours. Except for the influence by
temperature, it is deemed acceptable if pressure drop is within
0.02MPa. (With the temperature change by 1℃, the pressure
will change by approx. 0.01MPa).
Vacuuming
◆ Establish vacuum simultaneously in the gas pipe and liquid
pipe;
◆ The vacuuming time shall be long enough.
◆ Put still for 1 hour after vacuuming. It is deemed acceptable if
the pressure will not rise.
Add refrigerant
◆ Add refrigerant according to the volume as specified on the
engineering drawing.
Open the valve of outdoor unit
Commissioning of complete unit
Remarks:
a. Described above are general working procedures. The procedures might vary with the site conditions.
b. For detailed installation rules, please see the description in each chapter
30
Page 36

2 FLOW CHART OF INSTALLATION
Design kicking-off
Material selection
Inspection of site installation position
Installation of indoor unit Installation of outdoor unit Installation of BU module
Installation of
remote
controller
Connection of
power cables
Installation of drainage pipes
Thermal insulation of connection pipes and drainage pipes
Installation of refrigerant pipes
Connection of
transmission
line
Connection of
power cables
Connection of
transmission
line
Assign the
address
Vacuum the system through
the gas and liquid valves
Open the valves
Refrigerant charging
Test run
As-bulit drawing
Delivery of the operating instructions
Installation of
piping adapter
Connection of
power cables
Leakage test
Commissioning of complete unit
31
Page 37

3 OUTDOOR UNIT INSTALLATION
3.1 Precautions for R410A
It is very strict that the refrigerant pipes should be clean and dry.
The R410A is a mixed refrigerant, when add the refrigerant to the unit, it must keep the refrigerant in its
liquid state. If the refrigerant is in gas state, the composition has been changed and the capability of the
unit will decrease.
When the refrigerant is leak out, please do not touch the leakage. Otherwise, it will result in frostbite.
It does not support to let a lot of refrigerant go into the ambient atmosphere, because it will strengthen
the green house effect. Otherwise, it will produce toxic gas when the refrigerant contacts with the fire.
3.2 Precaution for Installation
The unit is so heavy that it is more than 110kg, so more than two persons will be needed to remove the
unit. The package cannot bear it, so do not grasping it.
When remove the units, please place the hands on the corner and take care not to hurt the hands by the
fins.
It is very likely to dispose the waste to the garbage bin after the installation.
3.3 Precaution for Operation Test
In order to protect the compressor from vibrating during transportation and 2 metal gaskets are used. They
must be removed prior to commissioning and tied back the nut firmly; otherwise the unit might not be operated
well.
3.4 Names of Main Parts
NO. ① ② ③ ④ ⑤
Name Fan motor Axial Flow Fan Electric Box Gas side stop valve Liquid side stop valve
32
Page 38

3.5 Parts and Components of Unit
For the super free match series system, one outdoor unit is able to drive up to three DB modules and nine
indoor units which include cassette type, duct type, wall-mounted type, floor ceiling type and console type. The
outdoor unit will run as long as any one indoor unit receives the running command, and all indoor units stop once
the outdoor unit is turned off.
3.6 Selection of Installation Location
The installation of the air conditioner must be in accordance with the national and local laws and
regulations.
The quality of the installation will affect the capability of air conditioner directly. The installation
should be left to the appointed service center. Please contact your dealer after purchasing this machine.
Professional installation workers will provide installation and test services according to the installation
manual.
The air conditioner should not install in this place where the small animals exist, because they may
cause malfunctions, smoke or fire.
Please keep the area around the unit clean.
The outdoor unit must be installed on a firm and solid support which can withstand the weight and the
mounting surface must be horizontal plane.
There is enough space for the installation and maintenance.
DB
DB
DB
33
Page 39

The place should be well-ventilated, so the machine can absorb and discharge sufficient air.
Outdoor unit shall be installed close to the indoor unit, hence to minimize the length and bends of
cooling pipe.
Avoid place the outdoor unit under the windows or between the constructions, hence to prevent normal
operating noise from entering the room.
Do not install in the place where there is flammable or explosive gas exist or a place subject to severe
dust, salty fog and polluted air.
Installation at the following places might lead to the air conditioner malfunction. If it is unavoidable, please
contact the appointed service center.
A place which is full of machine oil;
A region with saline-sodic soil near the sea;
A place where the sulphide fog exists, such as the sulphur spring;
A place where the high frequency facilities exist, such as radio equipment, electric welder and medical
equipment;
An environment with special conditions.
3.7 Outline Dimension of the Outdoor Unit
3.8 Installation and Servicing Space
1) When the place of the installation is exposed to strong wind
When strong winds of 5 m/sec or more exist in the place of the installation, the outlet of the unit cannot face
the wind. If the wind blows against the outdoor unit's air outlet, it will cause deterioration of the operational
capacity and maybe break the fan.
2) In case of installing only one unit
In case obstacles exist around the unit, the required installation space is in the following figure. The unit of the
values is mm.
3) In case of installing multiple units(2 units or more)
In case multiple rows of series installation, the required installation space is in the following figure. The unit
of the values is mm.
34
Page 40

3.9 Installation of the Outdoor Unit
1) Check the installation location and ensure it is strength and level, so that the unit will not cause any
operating vibration or noise after installation.
2) In accordance with the foundation drawing in the following figure, please drill 4 holes in the installation
location.
A: The outlet side B: Bottom view (mm) C: Drain hole
3) Fix the unit securely with the foundation bolts. You can get the M10 or M8 foundation bolts, nuts and
washers from the market.
4) Rubber or spring shock absorbers should be used during the installation of the outdoor unit to meet the
noise and vibration requirements.
5) Screw the foundation bolts into the ground and it is better that their length is less than 20mm from the
foundation face.
35
Page 41

4.1 Precaution for Installation
The installation of the air conditioner must be in accordance with the national and local laws and
regulations.
The quality of the installation will affect the capability of air conditioner directly. The installation
should be left to the appointed service center. Please contact your dealer after purchasing this machine.
Professional installation workers will provide installation and test services according to the installation
manual.
The air conditioner should not install in this place where the small animals exist, because they may
cause malfunctions, smoke or fire.
Please keep the area around the unit clean.
4.2 Names of Main Parts
a) DB3-16AF b) DB5-16AF
NO. ① ② ③ ④
Name
Gas piping of indoor unit
side
Liquid piping of indoor
unit side
Hanger metal
Gas piping of outdoor unit
side
NO. ⑤ ⑥ ⑦ ⑧
Name
liquid piping of outdoor
unit side
Electrical box Drain hole Electrical equipment plate
4.3 Selection of Installation Location
The DB module is for indoor use. If installing in the outdoors, the location must be away from wind and
rain. Otherwise, it maybe causes water leakage, electric shocks or fire etc.
The DB module must be installed on a firm and solid support which can withstand the weight of the
module and the mounting surface must be horizontal plane. The DB module can be chosen to install in
the ceiling, such as the ceiling of parlor, corridor, balcony, storeroom and etc
There is enough space for the installation and maintenance.
Avoid direct sunlight or other heat sources exist
Do not install in location that is hot or humid for long periods of time.
Avoid the DB module installed in the bedroom and study, where these places need to be quiet
DB module cannot be installed in the place of inflammable and explosive materials and severe dust,
smoke and the other air pollution, such as the kitchen.
There is enough space to install drainage pipe, so that the condensed water can be discharged.
Caution!
Installation at the following places might lead to the air conditioner malfunction. If it is unavoidable, please
contact the appointed service center.
4 DB MODULE INSTALLATION
36
Page 42
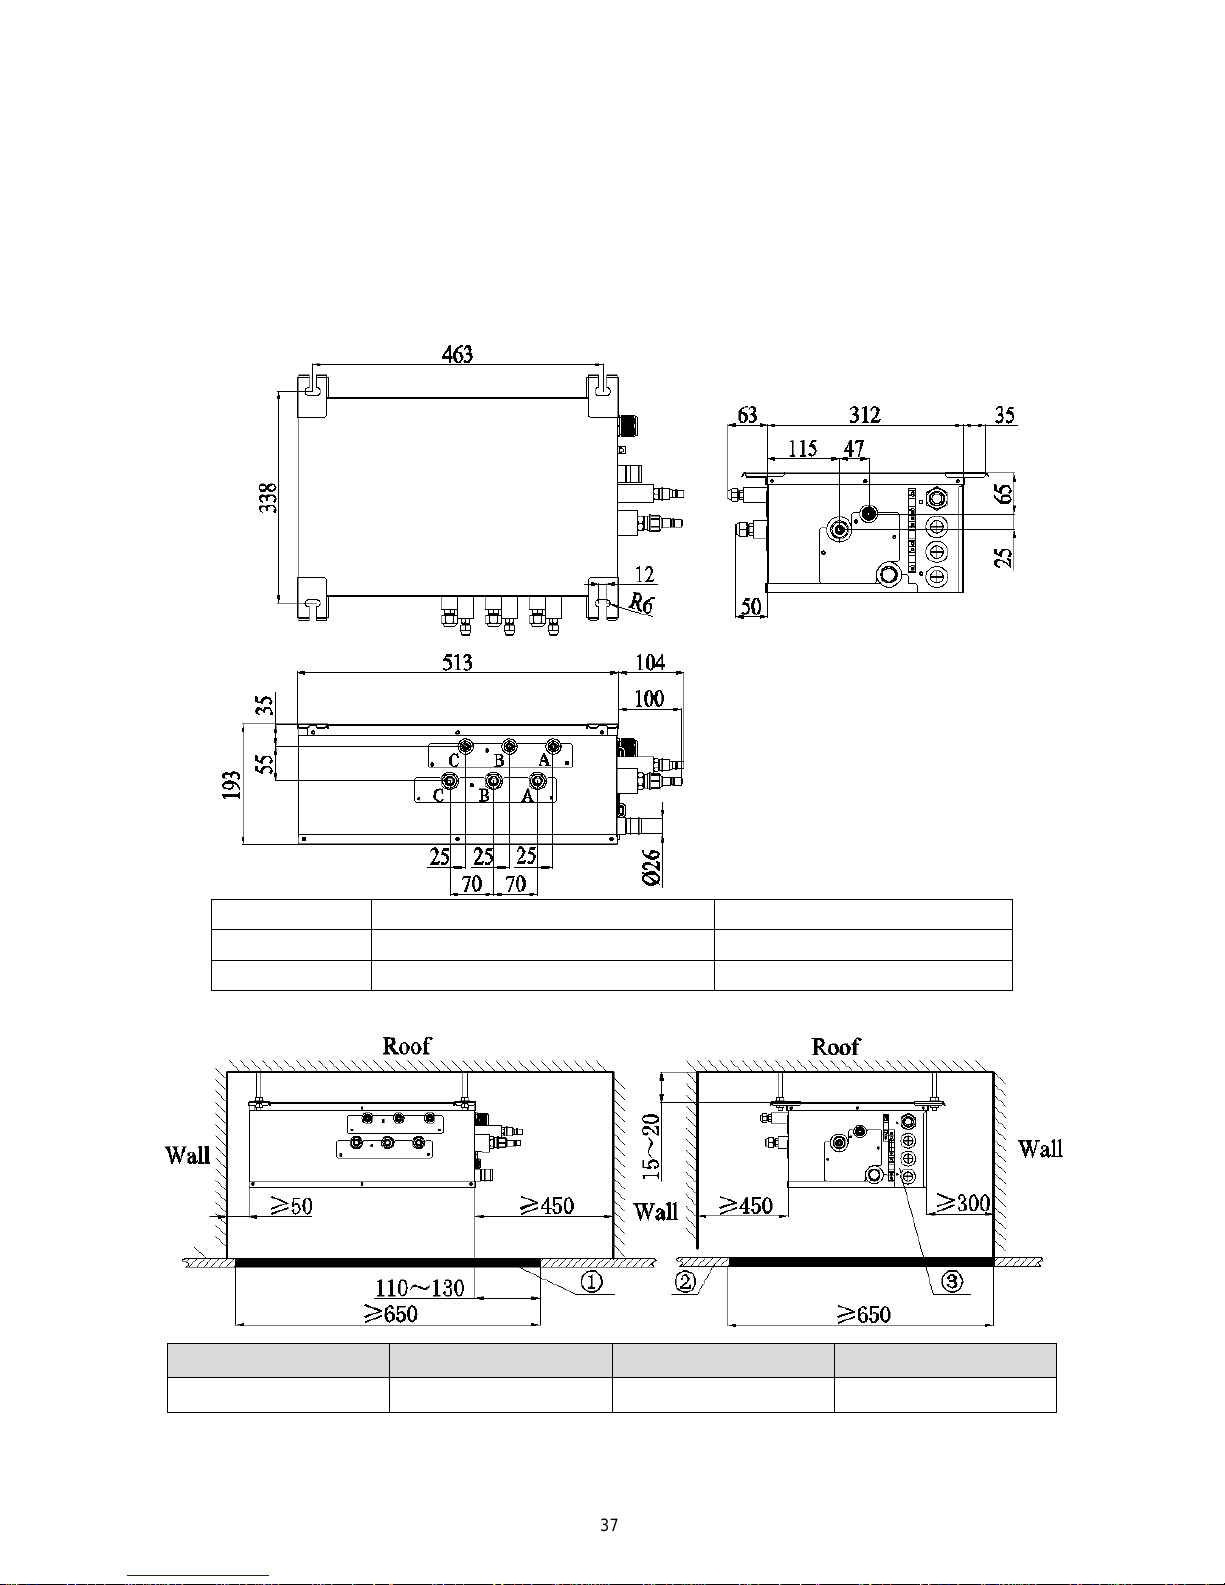
A place which is full of machine oil;
A region with saline-sodic soil near the sea;
A place where the sulphide fog exists, such as the sulphur spring;
A place where the high frequency facilities exist, such as radio equipment, electric welder and medical
equipment;
An environment with special conditions.
4.4 Outline Dimension and Servicing Space of DB3-16AF
1) Outline dimension
Sorts Indoor unit side (mm) Outdoor unit side (mm)
Liquid pipe Φ6.35 Φ9.52
Gas pipe Φ9.52 Φ15.9
2) Installation and service space
NO. ① ② ③
Name Servicing space Ceiling Electrical box side
4.5 Outline Dimension and Servicing Space of DB5-16AF
1) Outline dimension
37
Page 43
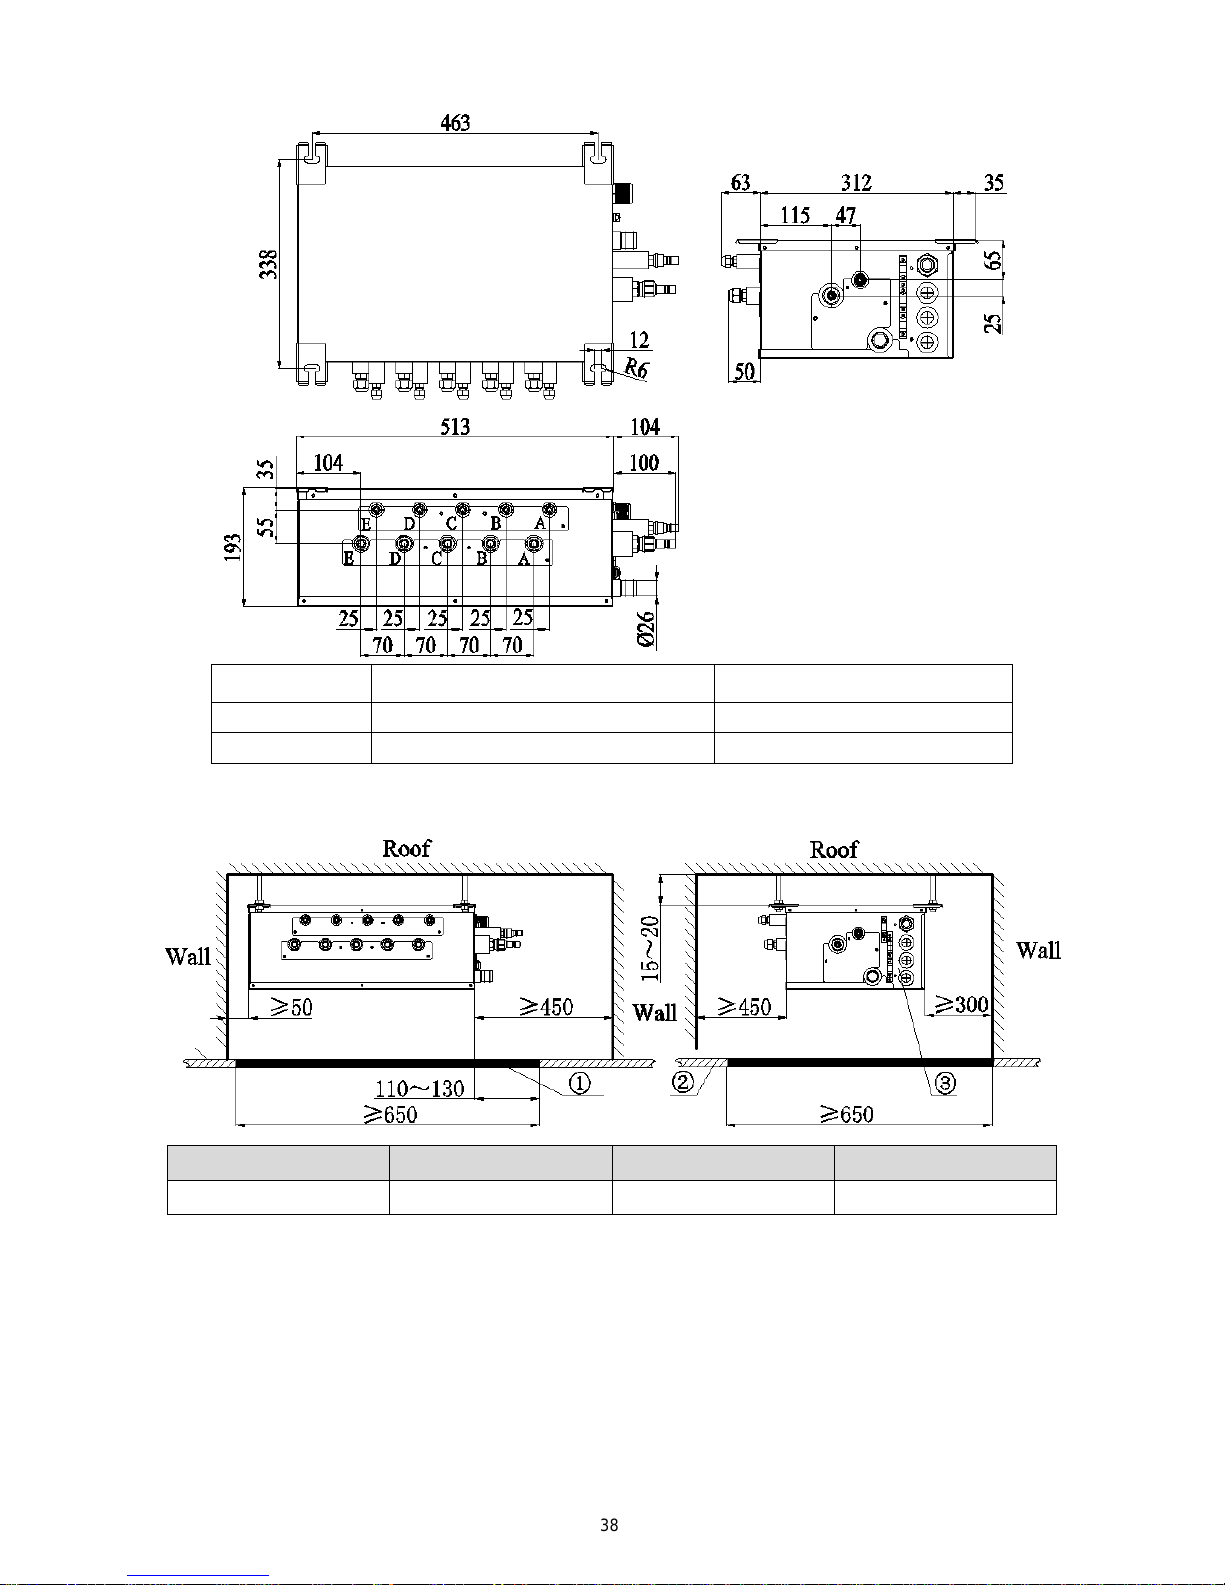
Sorts Indoor unit side (mm) Outdoor unit side (mm)
Liquid pipe Φ6.35 Φ9.52
Gas pipe Φ9.52 Φ15.9
2) Installation and service space
NO. ① ② ③
Name Servicing space Ceiling Electrical box side
4.6 Installation Instruction
1) Check the installation location and ensure it is strength and level. Otherwise, there should be enough space to
38
Page 44

install drainage pipe, so that the condensed water can be discharged.
2) Reference to the size of hanger metal and drill 4 holes in the installation location.
3) Hang the hanger bolts.
4) Fix the modules securely with the hanger bolts. You can get the M10 or M8 hanger bolts, nuts and washers
from the market.
5) Adjusting the nuts position, so that the DB module should be level in front/back and left/right.
39
Page 45
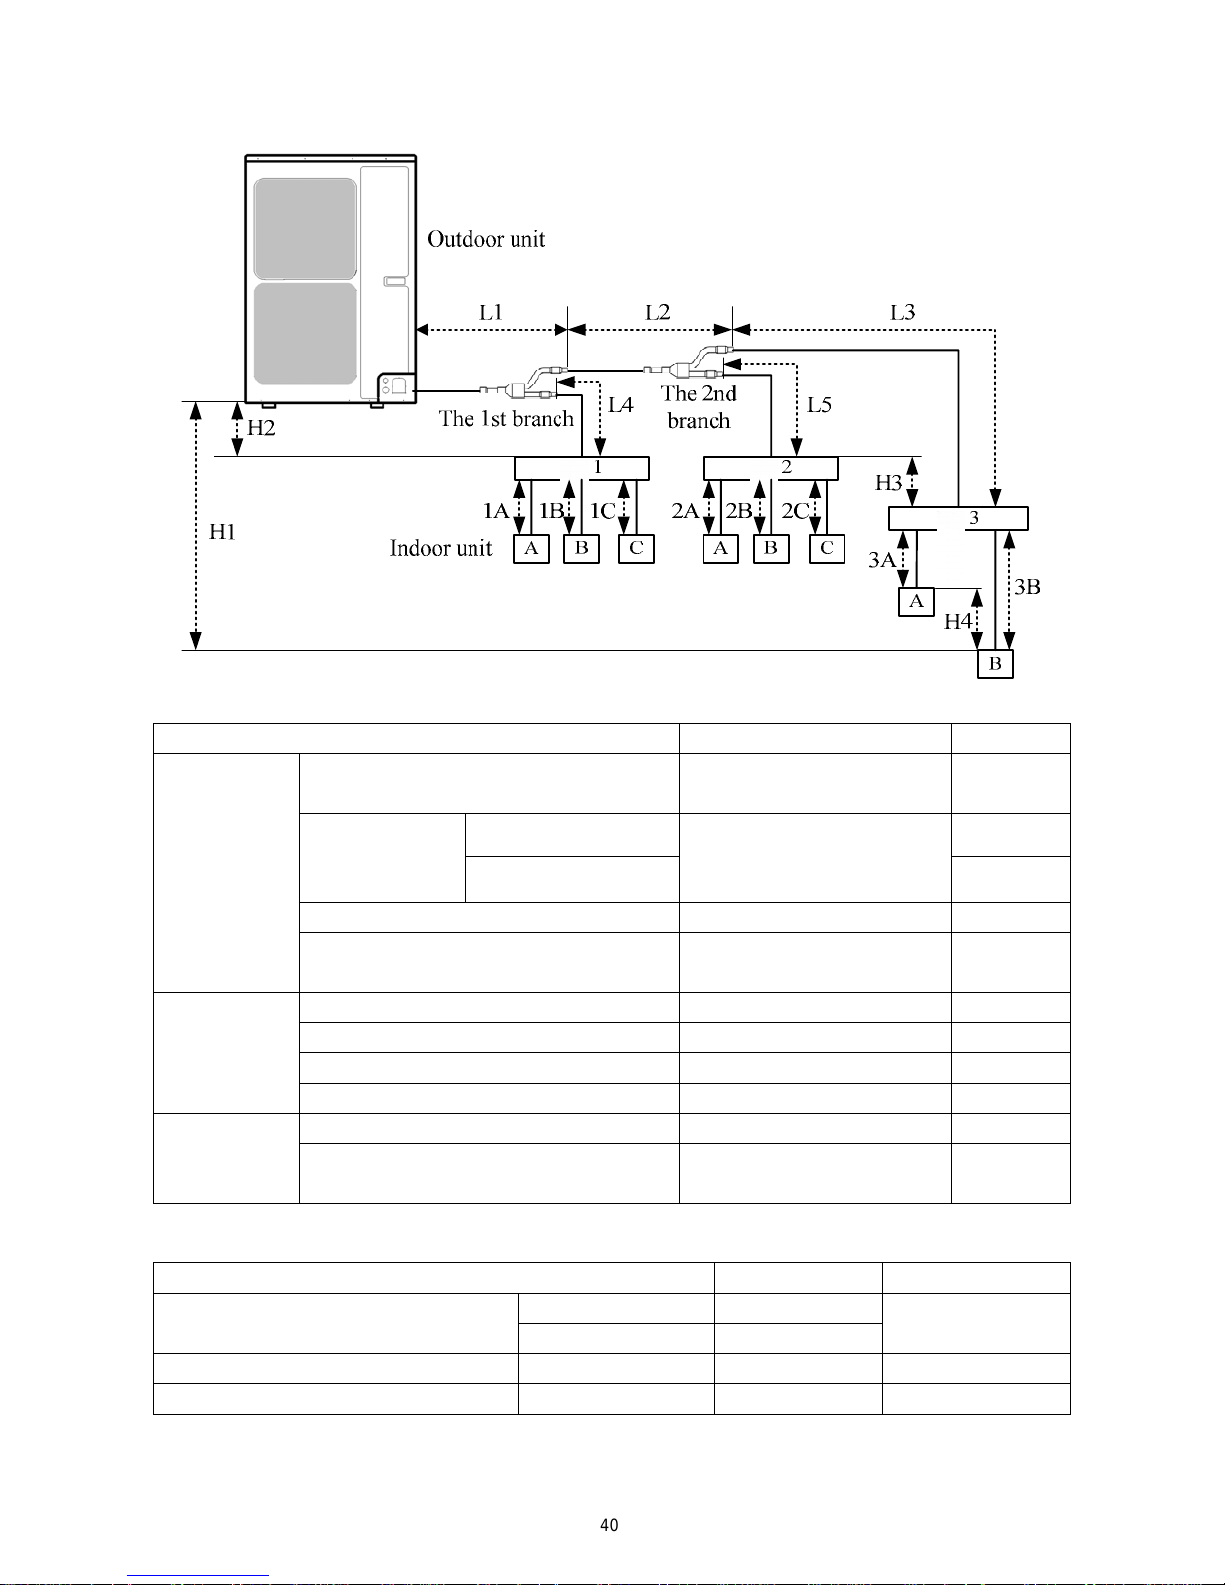
5.1 Allowable Length and Drop Height of Connecting Pipe
The sorts The pipes Length(m)
Maximum
allowable
length
L1+L2+L3+L4+L5 ≤55
unit and DB
Total length between outdoor unit and DB
Total length
between indoor
1A+1B+1C+2A+2B+2C+
3A+3B
≤80
modules
MS-E48AIN
MS-E56AIN
≤90
Between indoor unit and DB module 1A;1B;1C;2A;2B;2C;3A;3B
≤15
L4+1B;L2+L5+2A;
L2+L3+3B
≤40
Maximum
allowable
length
H1 ≤30
H2 ≤30
H3 ≤15
Between indoor unit and the 1st branch
Between outdoor and indoor units
Between outdoor units and DB
Between DB and DB modules
Between indoor and indoor units
H4 ≤15
Minimum
allowable
length
≥5
Between outdoor and the 1st branch L1
Between DB and the branch
L3;L4;L5
as possible
as short
DB module should be placed within the level between the outdoor unit and indoor unit.
5.2 Dimension of Connecting Pipe
Outdoor unit
Sorts Gas Pipe(mm) Liquid Pipe(mm)
MS-E48AIN Φ15.9
Φ9.52
MS-E56AIN Φ19.05
Between outdoor unit and the 1st branch The pipe L1 Φ19.05 Φ9.52
Φ9.52
Between the 1st and the 2nd branch The pipe L2
Φ15.9
5.3 Connection of Branch Pipe
1)
If two or three DB modules used, Y-type branch pipe of MS-01B will be chosen.
REFRIGERATION PIPING WORK
5
DB
DB
DB
40
Page 46
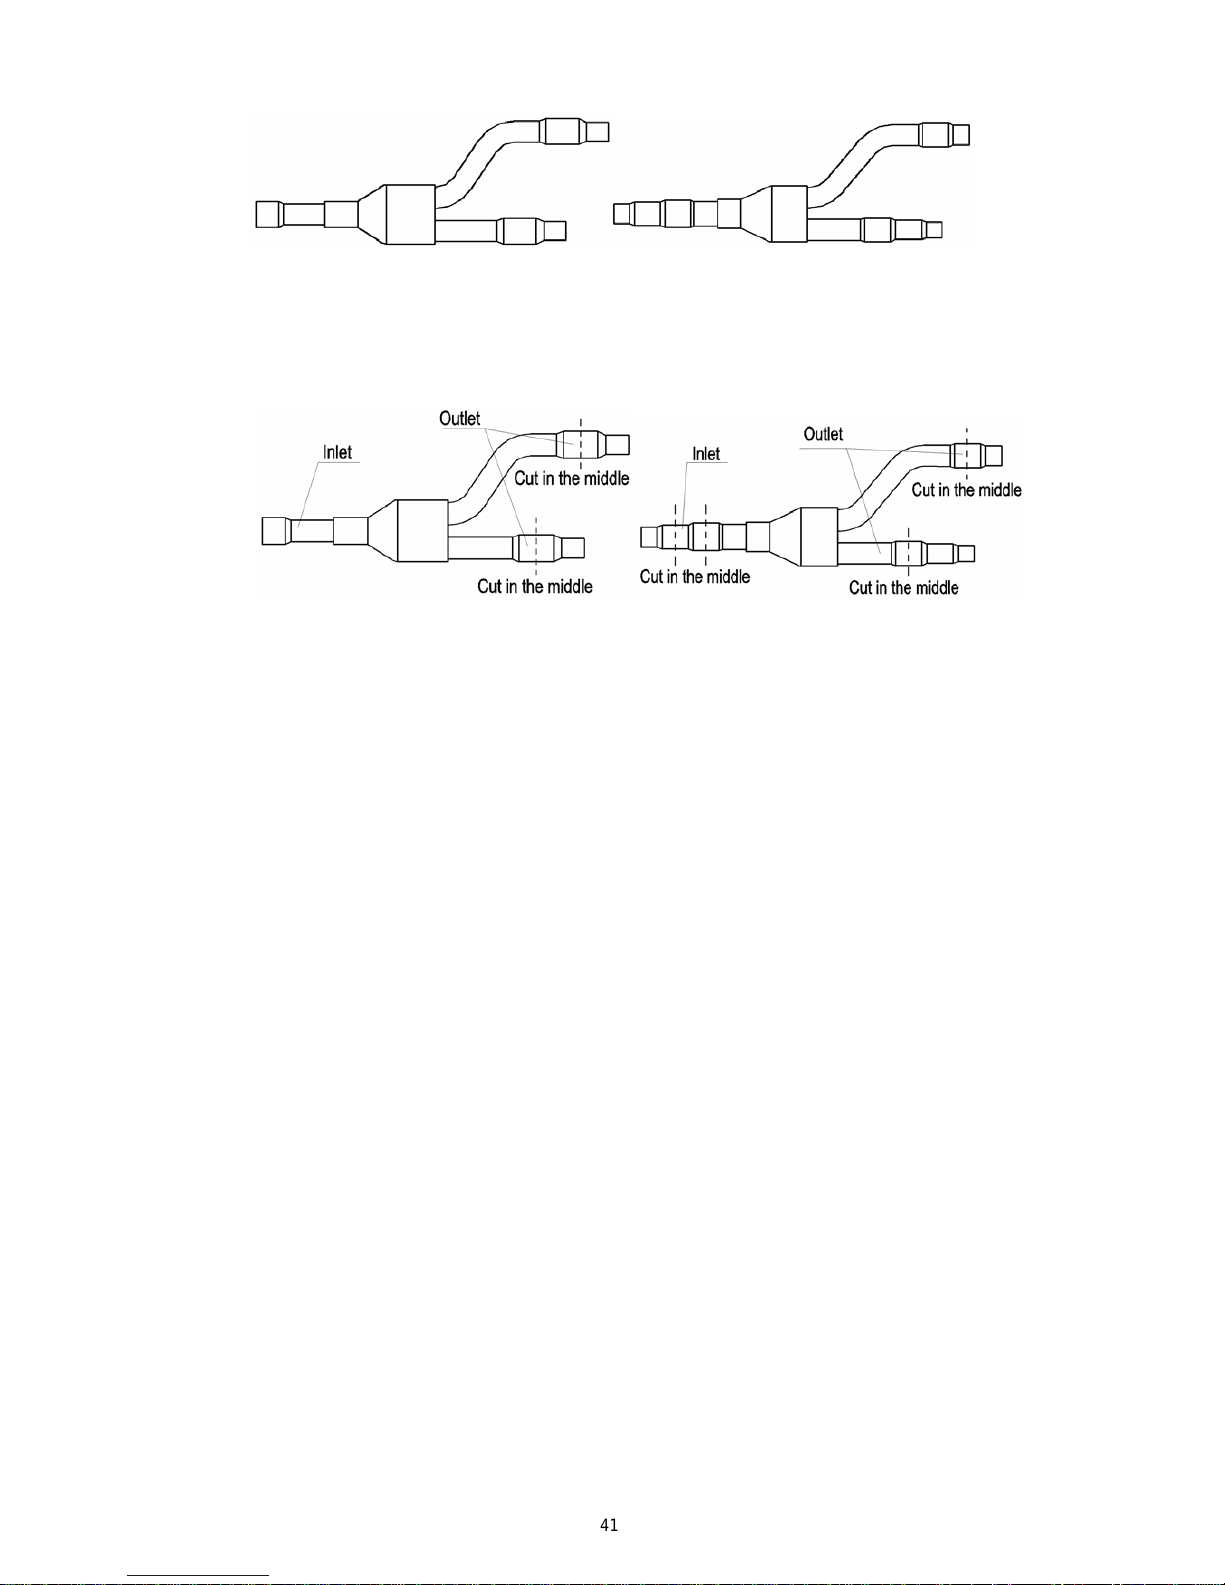
MS-01B (Liquid pipe) MS-01B (Gas pipe)
2) Y-type branch pipe is equipped with auxiliary tubes to adjust the diameter of different pipes. If the
dimension of the pipe selected is different from the dimension of branch pipe joint, Cut the copper tube
in the middle with tube cutter and clear up burrs. Please do that as following figure.
3) Y-type branch pipe must be installed in vertical or horizontal direction. In the inlet of the branch pipe,
keep at least 500mm straight pipe.
5.4 Design Requirements for Oil Trap
If the height different between the indoor unit and outdoor unit exceeds 6m, one oil trap shall be installed
every 6m from lower to upper on the vertical section of gas pipe. The oil trap shall be fabricated into two U-type
elbows or one return-type elbow. The height shall be 3~5 times the piping diameter.
Follow below for details on installation and fabrication of oil trap.
① The oil trap may be fabricated into U-type or return-type.
② If outdoor unit is below indoor unit, it is not needed to install oil trap on the vertical pipe of gas piping.
③ If the outdoor unit is below the indoor unit, it is not needed to install oil trap at the highest or lowest
position. If the outdoor unit is above the indoor unit, oil trap and stop elbow must be installed at the
lowest and highest position of the vertical pipe. See the schematics below:
④ Fabrication dimension of oil trap is as shown below:
⑤ See the schematics below:
Outdoor unit lower than indoor unit
41
Page 47
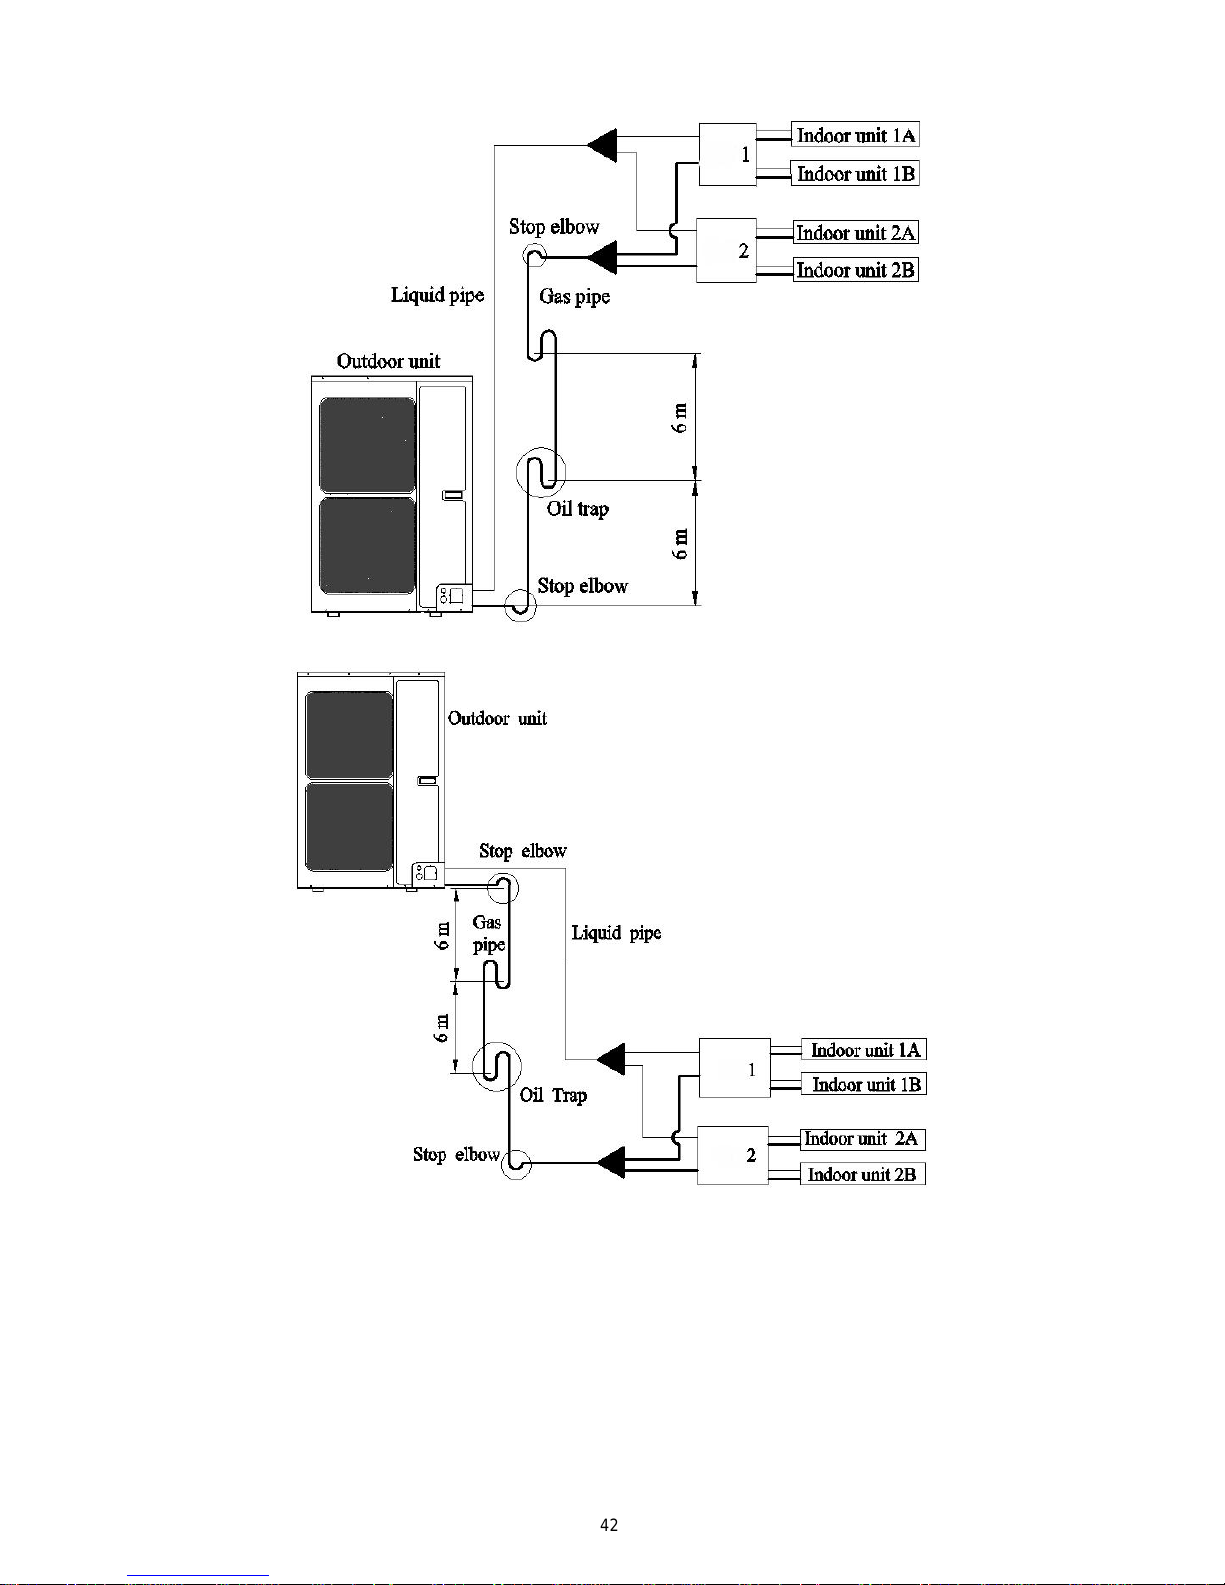
Outdoor unit higher than indoor unit
DB
DB
DB
DB
42
Page 48

NO. ① ② ③ ④
Name Coping plate Rear side plate Front side plate Gas side stop valve
NO. ⑤ ⑥ ⑦
Name Liquid side stop valve Right connection board Front connection board
NO. A B C D
Name Front connection Bottom connection Side connection Rear connection
1) Unscrew the coping plate, front side plate, right connection board and front connection board.
2) The refrigerant pipes can be installed in four directions, please choose the proper direction.
3) Knock the holes in the plate of the chosen direction with the drill and hammer.
4) Connect the pipes to the stop valves.
5) Bend the pipes to go through the knockout holes.
6) Cover the through-holes with seal ing materi als to p revent the wa ter, dust or small animals going into the
outdoor unit.
5.6 Installation of Piping Adapter
If the piping connection size of DB module does not match with that of the outdoor unit and indoor units, it
should prevail with the piping connection size of the outdoor unit and indoor units. Install the optional piping
adapters to the DB module, so that the piping connection size of BU module can match with that of the outdoor
unit and indoor units.
1) Piping adapter(Optional accessories)
NO. Name
Port A
(mm)
Port B
(mm)
1 Φ15.9→Φ19.05 Φ15.9 Φ19.05
2 Φ9.52→Φ12.7 Φ9.52 Φ12.7
3 Φ9.52→Φ15.9 Φ9.52 Φ15.9
4 Φ6.35→Φ9.52 Φ6.35 Φ9.52
Connection of Outdoor Unit Refrigerant Pipe
5.5
43
Page 49

2) Install the piping adapter
① Refer to the piping connection size of the outdoor unit and indoor units, the appropriate piping adapter
should be adopted.
② Align the flared end of copper tube with the center of pipe joint. Tighten the nuts with hands.
3) Sealing the unconnected port
If the port of DB module indoor side does not connected to one indoor unit, the port must be sealed to
prevent refrigerant leaks. Please tighten the flaring nuts of the unconnected port with torque wrench until you hear
a “click”.
Caution!
The unconnected ports must not be sealed well by the plastic flaring nuts but by the copper flaring nuts in the
accessories.
5.7 Precaution for Connection
5.7.1 Precaution for connection
1) Pipe connections should be follow the following rules:
① Outdoor unit shall be installed close to the indoor unit, hence to minimize the length and bends of
connection pipes.
② The height gap of outdoor unit and indoor units should be as small as possible
2) The brazing operation must be strictly in accordance with the process requirements. During the installation,
do not damage the pipeline.
5.7.2 The process of flaring
① Using the tube cutter to cut the connecting pipe in the appropriate place and remove the burrs.
② Install the nut before the flaring operation.
③ Check the flared portion, whether there is fractured or not.
5.7.3 Precaution for elbow operation
① The elbow operation could be done by hands. Be careful and do not damage the pipe.
44
Page 50

② The bending diameter of the pipeline must be greater than 200mm. The connection pipe cannot often be
bent or straightened. Otherwise it will harden and crack.
③ If the thermal insulation of the refrigerant pipe is not removed, please do not bend the pipe. Otherwise, it
maybe leads the pipe to crack. It is better to make an incision with a knife in the thermal insulation and
removes it. After elbow operation is finished, recover the thermal insulation with binding band.
5.7.4 The process of install refrigerant pipes
① Remove the screw caps from the pipes.
② Align the flared end of copper tube with the center of pipe joint. Tighten the nuts by hands. (If the flared
end of copper tube and the center of pipe joint are not in coaxial, it is hard to tighten the nuts by hands,
please do not tighten it with spanners, because the screw thread may be broken by force).
③ Tighten the flaring nuts with torque wrench until you hear a “click”. (The spanner and torque wrench
should be perpendicular to the refrigerant pipeline).
④ The following table for the torque required to tighten the nuts.
Pipe diameter Thickness of copper tube Tightening torque
Φ6.35 mm ≥0.8 mm 15~30 N·m
Φ9.52 mm ≥0.8 mm 35~40 N·m
Φ12.7 mm ≥0.8 mm 45~50 N·m
Φ15.9 mm ≥1.0 mm 60~65 N·m
Φ19.05 mm ≥1.0 mm 70~75 N·m
Caution!
During the connection of the indoor unit and DB module to the refrigerant pipe, never pull any joints of the
indoor unit and the DB module by force; otherwise the capillary pipe or other pipe may crack, which then
would result in leakage.
The refrigerant pipe should be supported by brackets, that is, don’t let the unit withstand the weight of it.
For the Super Free Match system, each pipe should be labeled to tell which system it belongs to avoid
mistaken inaccurate piping.
45
Page 51

5.8 Leak Test
1) Please make sure that the stop valves of the outdo or uni t are closed du ring the operation.
2) The leak test should be made by pressurizing nitrogen gas.
3) Turn on the Hi-knob and Lo-knob. The leak test should be done simultaneously at both the gas and
liquid stop valves.
4) Open the pressure reducing valve, pressurize the connection pipes to 1.0 MPa (10 bar) slowly, wait
fifteen minutes, and make sure that the pressure will not drop.
5) Rise the pressure to 4.0 MPa (40 bar) slowly, wait 24 hours, and make sure the pressure will not drop.
6) If the pressure does not decrease, the pipes have passed the test. Otherwise, look for where the gas leaks
from.
1: Outdoor unit
2: Liquid side stop valve
3: Gas side stop valve
4: Pressure-vacuum gauge
5: Hi-knob
6: Lo-knob
7: Pressure reducing valve
8: Nitrogen
5.9 Vacuum Operation
1) Make sure that the liquid and gas stop valve of the outdoor unit are closed fully during the operation.
2) As shown in the following figure, expel the gas from the refrigerant pipes by the vacuum pump.
3) Open the pump and turn on the knobs to evacuate the gas in the liquid and gas pipes. The vacuuming
should be done simultaneously at both the gas and liquid stop valves.
4) When the pressure of the system is less than -0.1Mpa (-1bar), keep the system for more than one hour
under the condition.
1: Outdoor unit
2: Liquid side stop valve
3: Gas side stop valve
4: Pressure-vacuum gauge
5: Hi-knob
6: Lo-knob
7: Vacuum pump
5) Turn off the knobs firstly and then the pump, and if the pressure of the pressure-vacuum gauge does not
rise within 2 hours, the system is under a vacuum . Otherwise, the system has leaked, please look for where
the gas leaks in.
46
Page 52

5.10 Refrigerant Charging
The refrigerant has been charged into the outdoor unit before shipped from the manufacturer, while
additional refrigerant still need be charged into the refrigerant pipe during the field installation.
5.10.1 Calculation of the Additional Refrigerant Charging
1) Get the refrigerant charge of the outdoor unit from the nameplate.
Note:
The refrigerant charge of the outdoor unit does not include the charged additionally in the indoor unit,
DB module and the refrigerant pipe.
For the length of the connecting pipe is decided on the field, the amount of additional refrigerant shall
be decided depending on the dimension and the length of the liquid pipe used on the field.
Record the additional refrigerant charge for future maintenance.
It does not need to add refrigerant if the total length of liquid pipe is within 30m.
2) Calculating the Mass of Additional Refrigerant
Additional Refrigerant Charge (kg) =
Σ
the Liquid Pipe Length of Φ6.35×0.022kg/m +Σ the Liquid Pipe
Length of Φ9.52×0.054kg/m-1.47(kg)
If the additional refrigerant charge is negative, it does not need to add the refrigerant.
3) Example: MS-E56AIN
Serial No. Model
Indoor unit 1 Cassette type MC-C12AI
Indoor unit 2 Duct type MC-D09AI
Indoor unit 3 Wall mounted type MS-H07AIZ
Indoor unit 4 Wall mounted
type MS-H09AIZ
Indoor unit 5 Duct type MC-D09AI
Indoor unit 6 Wall mounted type MS-H09AIZ
Serial No. Diameter(mm) Length(m)
L1 Φ9.52 20
L2 Φ9.52 10
L4 Φ9.52 10
1A Φ6.35 5
1B Φ6.35 5
1C Φ6.35 5
2A Φ6.35 5
2B Φ6.35 5
2C Φ6.35 5
DB
DB
47
Page 53

The total length of the liquid pipes: 20+10+10+5+5+5+5+5+5=70(m).
Thus, the total length is over than 30m, so the air conditioner needs to add refrigerant.
Additional refrigerant charge
Σ
the Liquid Pipe Length of Φ6.35×0.022kg/m +Σ the Liquid Pipe Length of Φ9.52×0.054kg/m-1.47(kg)
=(5+5+5+5+5+5)(m)×0.022kg/m+(20+10+10)(m)×0.054kg/m-1.47(kg)
=1.35(kg)
4) Additional refrigerant charge record
Diameter(mm) Total length(m) Additional refrigerant charge(kg)
Φ6.35
Φ9.52
Total
5.10.2 Procedures for adding refrigerant
NO. 1 2 3 4 5
Name Outdoor unit Service port Liquid side stop valve Gas side stop valve
Pressure-vacuum
gauge
NO. 6 7 8 9
Name Hi-knob Lo-knob R410A tank Scale
1) When the liquid and gas stop valves have not been opened, the system is under the vacuum:
① Refer to the left of the figure; connect the R410A tank to the system.
② Turn on the R410A tank and the Hi-knob; charge the R410A refrigerant into the system from the liquid
side stop valve. The Lo-knob should be closed completely.
③ Turn off the R410A tank and the Hi-knob immediately, when the adding refrigerant is enough.
④ Turn on the liquid and gas side stop valves in an anticlockwise direction slowly and completely.
2) If the pressure of the system is too high to charge refrigerant, you can do as follow.
① Turn on the liquid and gas side stop valves in an anticlockwise direction slowly and completely.
② Turn on the power of the air conditioner, and set cooling mode, running more than 0.5h when outside
temperature is higher than 18℃ DB.
a) Refer to the left of the figure; connect the R410A tank to the system.
b) Turn on the R410A tank and the Lo-knob, charge the R410A refrigerant into the system from the gas
side stop valve. The Hi-knob should be closed completely.
c) Turn off the R410A tank and the Lo-knob immediately, when adding refrigerant is enough.
③ Turn on the power of the air conditioner, and set heating mode, running more than 0.5h when outside
temperature is lower than 18℃ DB.
a) Refer to the right of the figure, connect the R410A tank to the system.
b) Turn on the R410A tank and the Hi-knob, charge the R410A refrigerant into the system from service
port. The Lo-knob should be closed completely.
48
Page 54

c) Turn off the R410A tank and the Hi-knob immediately, when adding refrigerant is enough.
Cautio!n
Make sure the liquid and gas side stop valves are opened completely after the installation.
Make sure the length of liquid pipe is exactly.
Additional refrigerant charge must be measured exactly.
Make sure that the refrigerant which charge into the unit is in liquid state.
Please prevent the refrigerant leakage from your body when remove the charging hose.
Please heat the refrigerant tank with hot water or hot air when the outside temperature is too low.
However, it must be forbidden to heat with fire directly, otherwise it may lead to explosion.
49
Page 55

6
Electrical Wiring Work
6.1
Wiring Connection
Precept 1
Precept 2
DB DB
DB
DB
DB
DB
DB
DB
DB
DB
DB
DB
DB
DB
DB
DB
DB
50
Page 56

6.2 Requirements of Power Circuit and Cable
Frequency 50Hz
Phase and voltage
Outdoor unit 3Ph, 380~415V
DB module 1Ph, 220V
Recommended cable of outdoor unit
(Pieces × Sectional area)
MS-E48AIN
5×2.5 mm
2
MS-E56AIN
Recommended cable of DB module
(Pieces × Sectional area)
3×0.75 mm
2
Transmission line (Pieces × Sectional area) 2×1.5 mm2
Recommended cable of indoor unit
(Pieces × Sectional area)
4×0.75mm
2
Capacity of the air switch
MS-E48AIN 20A
MS-E56AIN 20A
DB module 10A
Note:
The total length of the transmission line between th e outdoor uni t and the furthest DB m odule is not more
than 55m. Otherwise, the system cannot work possibility.
The specifications of the power cable and transmission line listed in the ta ble above are d etermined based
on the maximum power (maximum amps) of the unit.
The specifications of the power cable listed in the table above are applied to the conduit-guarded
multi-wire copper cable (like, YJV copper cable, consisting of PE insulated wires and a PVC cable jacket)
used at 40 and resistible to 90℃℃, and shall be at least those of ordinary polychloroprene sheathed cords
(code designation 60245 IEC 57). If the working condition changes, they shoul d be modified according to
the related national standard.
The specifications of the air switch listed in the table above are applied to the breaker with the working
temperature at 40 . If the working condition changes, they should be modified according to the related ℃
national standard.
The length of the recommended power cable should be less than 15 meters; otherwise, the diameter of the
power cable is not enough.
Mentioned power cable and transmission line length is just a reference value. It may be different
depending on the condition of installation, hum idity or materials, etc.
An all-pole disconnection switch having a contact separation of at least 3mm in all poles should be
connected in fixed wiring.
6.3 Ground Requirements
The air conditioner is classified into the Class I appliances, so its ground ways must be reliable.
The ground wire must be fixed on the screw hole with the sign as the right figure.
The yellow-green wire of the air conditioner is the ground wire and must be fixed by the tapping screw.
And it cannot be used for other purpose or cut off. Otherwise, it will cause the hazard of electric shock.
The reliable ground terminal should be provided and the ground wire cannot be connected to any of the
following places: a. Water pipe; b. Coal gas pipe; c. Sewage pipe; d. Lightning rod e. Telephone line f.
Other unreliable places considered by a professional.
6.4 Precautions of Electrical Wiring Work
The ground connection should be reliable and the ground wire should be connected to the dedicated
51
Page 57

device of the building by the professional.
The electric installation should be carried out by the professional as instructed by the local laws,
regulations and also this manual.
The air switch coupled with the leakage current protection switch must be equipped in the circuits, which
is of enough capacity and of both magnetic and thermal tripping functions in case of the short circuit and
overload.
The power supply of the outdoor unit and all the DB modules should be separately.
The electrical work should use a cable length enough to cover the entire distance with no connection. If it
is unavoidable, please make sure the connecti on s ho uld b e reli able, the external forces will not act on the
wires and the joint is not bared. Otherwise it will cause electrical shock or fire etc.
The power cable with the rated voltage and exclusive circuit for the air conditioning should be used.
Do not pull the power cable by force after it is installed.
The diameter of the power cable should be large enough and once it is damaged, it must be replaced by
the dedicated one.
The multi-wire copper cable should be used for the power cable and the transmission line.
6.5 Precaution of Laying Wires
1) Use a wire stripper to strip off a length of the insulation layer at the end of the wires;
2) Loosen the screws on the terminal block of the air conditioner;
3) Press the ends of the cable tightly onto the round terminals corresponding to the size of the screws.
4) Pass the screw through the round terminals and fix it onto the terminal block.
6.6 Electrical Wiring Work for Outdoor Unit
1) Knock the holes in the plate of the chosen direction with the hammer.
2) Place the rubber ring on the knockout hole.
3) Let the power cable and transmission line go through the knockout hole.
4) Connect the power cable of the outdoor unit to the L1, L2, L3, N terminals and as well as the ground
screw.
5) Connect the transmission line of the outdoor unit to the N(1), 2 terminals.
6) Fix the power cable and transmission line firmly by cable fixing clip.
7) Screw the coping plate, front side plate, right connection board, front connection board back.
8) Cover the through-holes with seal ing materi als to p revent the wa ter, dust or small animals going into the
outdoor unit.
Caution!
The transmission line and the power cable must be separated and separated with an interval of at least
2cm; otherwise it may be result in communication problem.
In order to protect the power cable and transmission line from damaging by the hole, the rubber ring
must be placed on the hole. Otherwise, it may cause electrical shock or fire etc.
52
Page 58
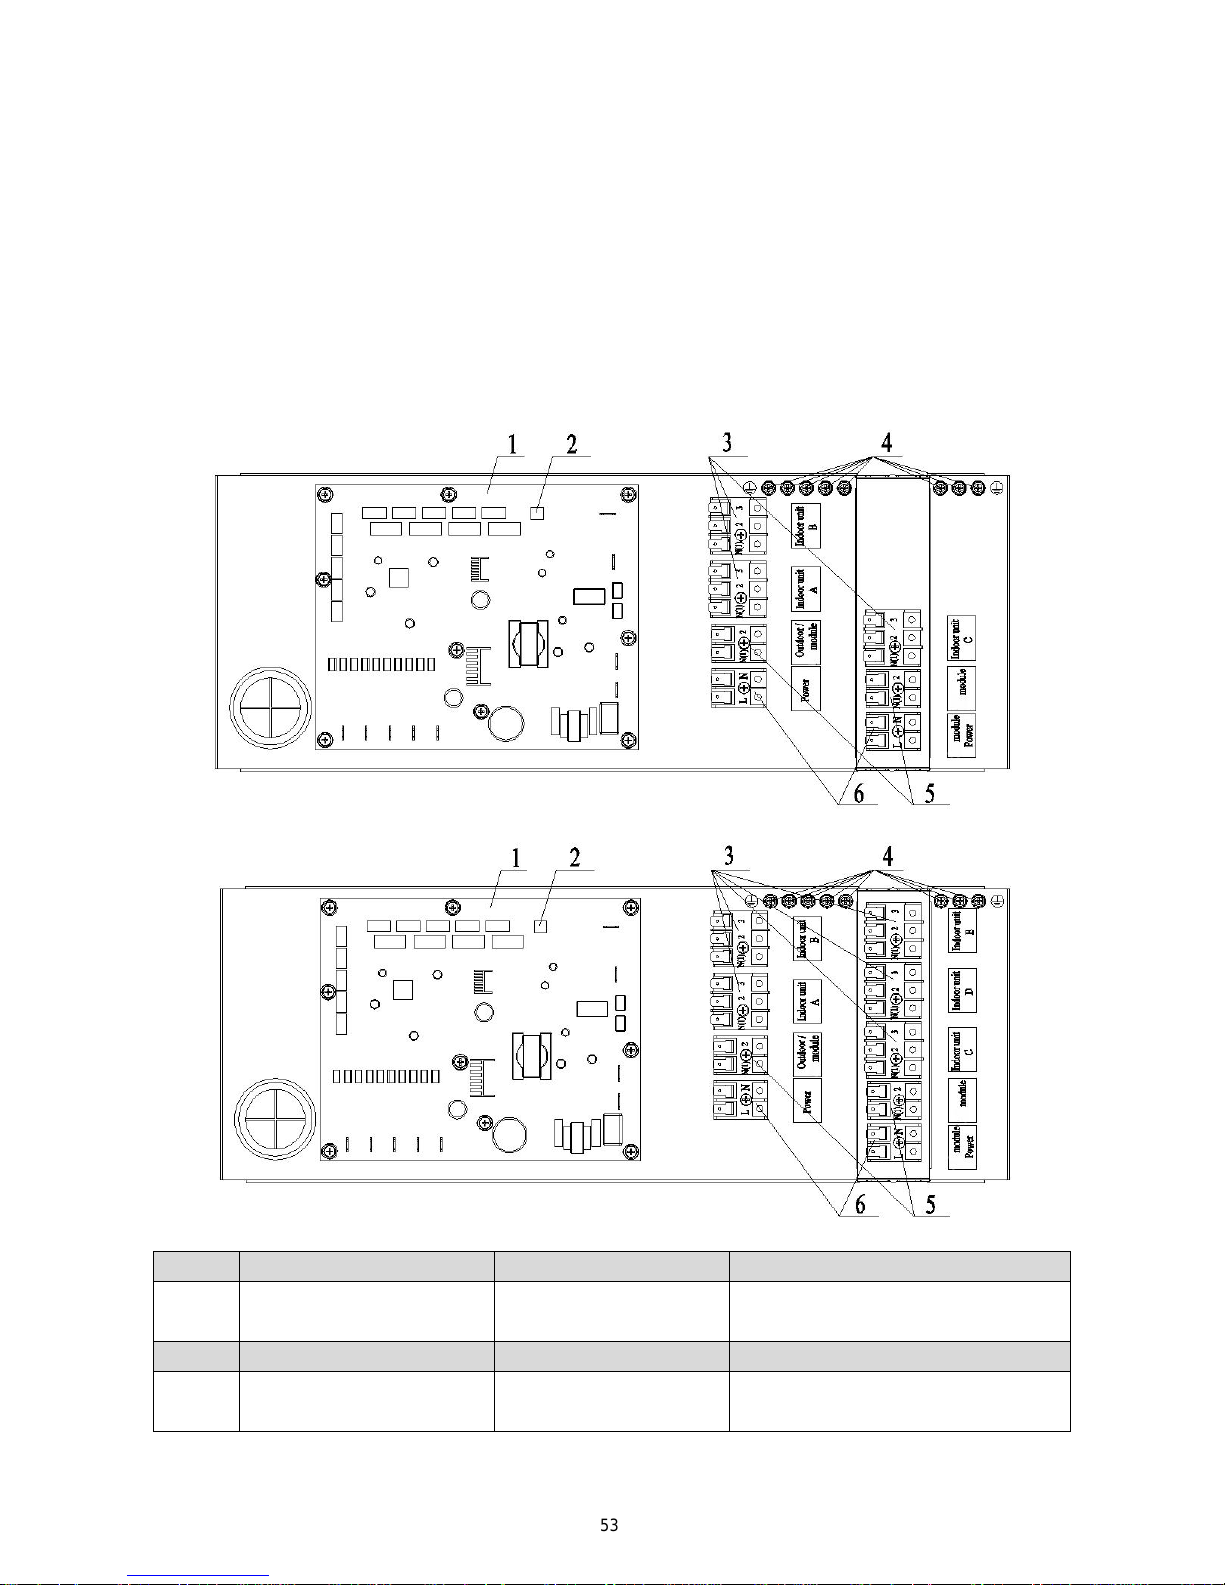
The power wire and transmission line must be more than one meter away from televisions or radios
which can emit electromagnetic waves to prevent image interference or noise. Otherwise, the unit
maybe cannot work.
Confirm the each cable connected to the terminal screw is exactly and securely after finishing the
electric work.
Fix each ground wire separately with the ground screw.
If the connecting wire is connected to the terminal incorrectly, the unit will not work normally.
6.7 Electrical Wiring Work for DB Module
1) Unscrew the electrical equipment plate.
2) The structure of behind the electrical equipment plate.
a) DB3-16AF
b) DB5-16AF
NO. 1 2 3
Name Printed circuit board DIP switch
Terminal black for indoor unit
power supply
NO. 4 5 6
Name Ground screw
Terminal black for
transmission line
Terminal black for DB module
power supply
3) Let the power cable and transmission line go through the rubber ring. In order to protect the power cable
DB
DB
DB
DB
DB
DB
53
Page 59
and transmission line from damaging by the hole, the rubber ring cannot fall from that, otherwise, it
may cause electrical shock or fire etc.
4) Connect the power cable of the DB module to the L, N terminals with the sign of Power and as well as
the ground screw.
5) Connect the transmission line of the DB module to the N(1), 2 terminals with the sign of Outdoor /DB
module.
6) If the power cable need to be connected to the other DB module, please connect the extra line to the L,
N terminals with the sign of DB module Power and as well as the ground screw.
7) If the transmission line need to be connected to the other DB module, please connect the extra line to the
N(1), 2 terminals with the sign of DB module.
8) Connect the power cable of the indoor unit to the N(1), 2 and 3 terminals with the sign of Indoor unit A
(B, C, D and E) and as well as the ground screw.
9) Fix the power cable and transmission line firmly by cable fixing clip.
10) Screw the electrical equipment plate.
Caution!
The transmission line and the power cable must be separated and separated with an interval of at least
2cm; otherwise it may be result in communication problem.
Confirm the each cable connected to the terminal screw is exactly and securely after finishing the electric
work.
Fix each ground wire separately with the ground screw.
When connecting indoor units, make sure to connect refrigerant pipes and power cables to the same
connection ports marked with matching signs.
If the connecting wire is connected to the terminal incorrectly, the unit will not work normally.
54
Page 60
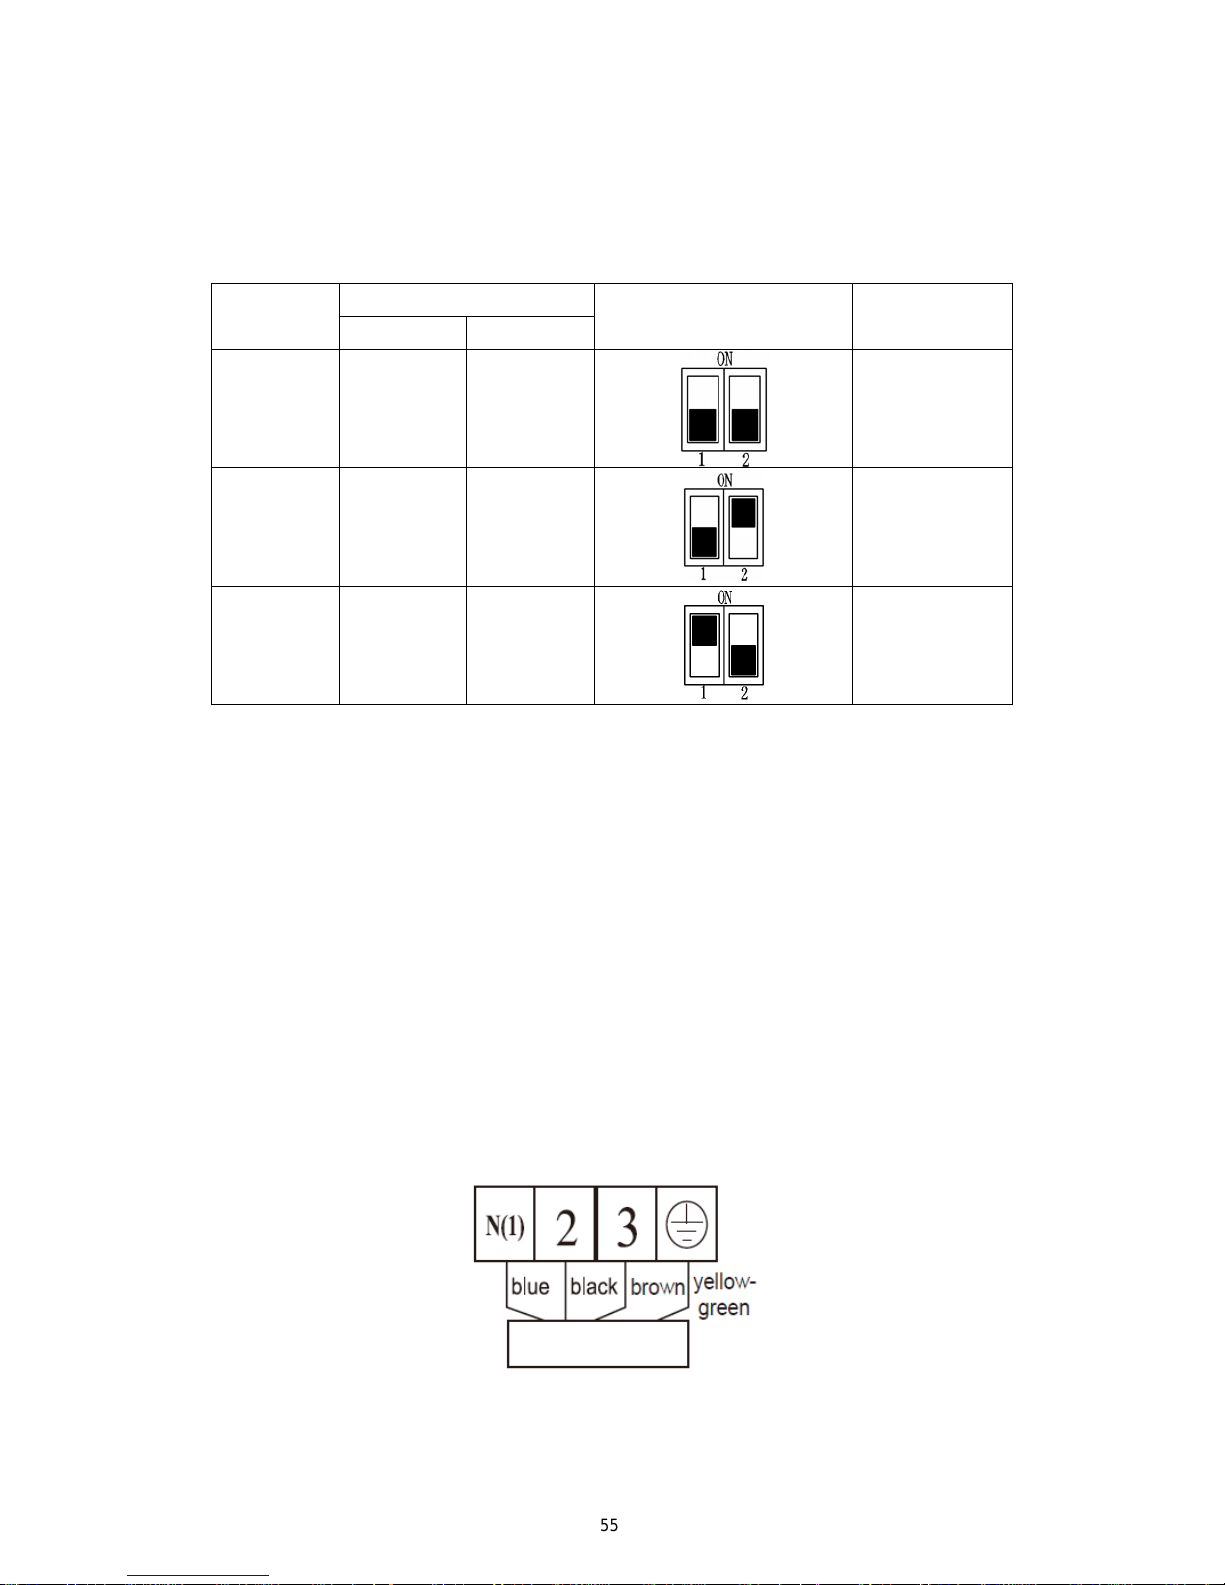
6.8 Instructions for DIP Switch
2 digits DIP is adopted to assign the address when using multi-DB modules and the address cannot be
repeated in the same unit.
One outdoor unit can connect to no more than 3 DB modules.
“ON” side means "ON" and the opposite side represents "OFF". (Note: The black part is lever.)
Number
DIP Code
Icon Address
DIP 1 DIP 2
1 OFF OFF DB 1
2 OFF ON DB 2
3 ON OFF DB 3
6.9 Electrical Wiring Work for Indoor Unit
1) Open surface panel.
2) Remove the electrical box cover.
3) Route the power connection cord from the back of the indoor u nit and pull it toward the front through
the wiring hole upward.
4) Connect the wiring (communication) through the piping hole of the chassis and the bottom of the
appliance upward, then connect the brown wire to the Terminal board “3”;black wire(the
communication wire) to the Terminal board“2”;blue wire to the Terminal board “N(1)”,and connect the
ground wire to the screw terminal on the electric box. Clamp them with the corresponding wire clamp
packed in the chassis.
5) Reassemble the electrical box cover.
6) Recover the surface panel.
7) The temperature of refrigerant circuit will be high, please keep the interconnection cable away from the
copper tube.
55
Page 61
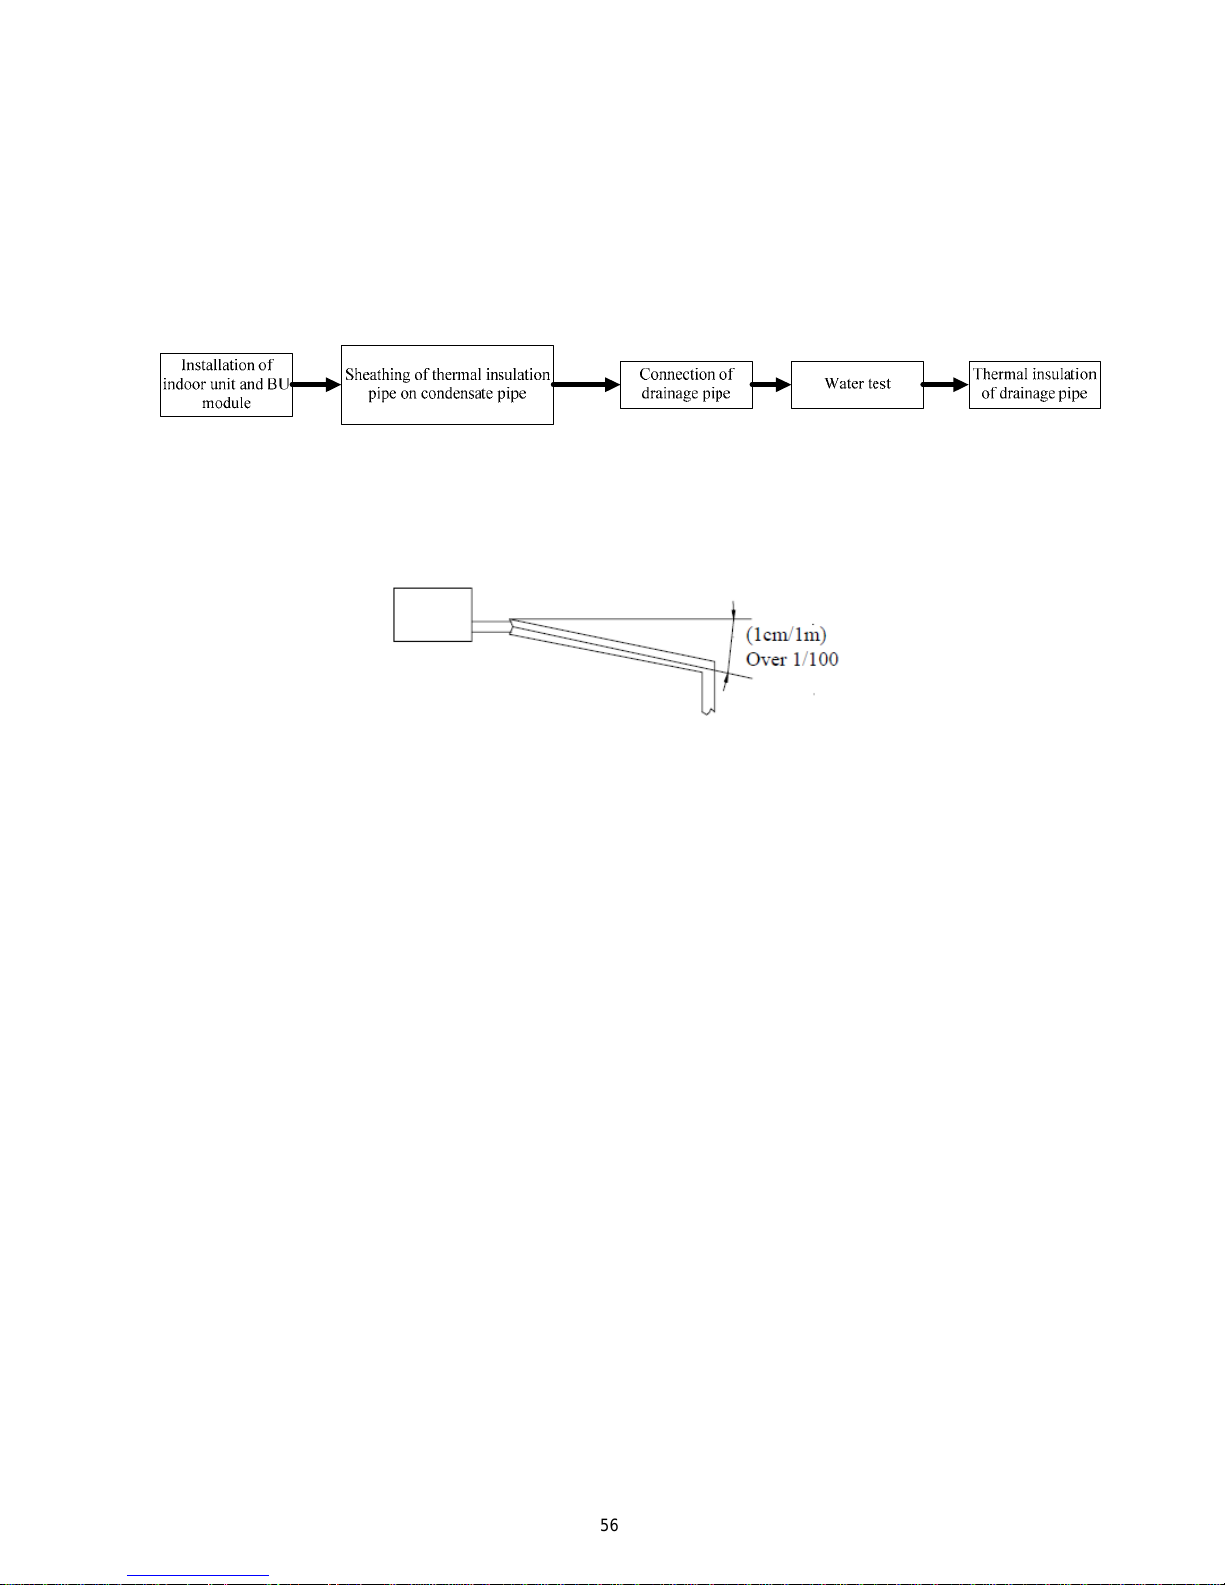
7
INSTALLATION OF DRAINAGE PIPELINE
7.1
Material Quality Requirements for Condensate Pipe
Generally, the condensate pipe shall be water supply U-PVC pipe, adhered by using special glue. The other
materials available include: PP-R pipe, PP-C pipe and hot-dipped galvanized steel pipe. It is not allowed to use
aluminum plastic composite pipe.
7.2 Key Points for Condensate Pipe Installation
1) Work Order
2) Determine the direction and elevation of condensate pipe before installation. To ensure the gradient
smooth and straight, avoid intersecting with other pipelines. The height of the clamp fixing the pipe
hanger frame shall be adjustable and fixed from the outer of thermal insulation.
3) The gradient of condensate pipe shall be over 1% and the gradient of main pipe shall not be less than
0.3%, while there shall be no overhanging slope.
4) When connecting the 3-way section of condensate pipe, the 2-way straight section on 3-way pipe shall
be on the same gradient. The two ends of 2-way section shall not have different gradient. See the
schematics below:
5) Confluence toward the horizontal pipe shall be best from the upper. Back flow is easy to occur if from
the lengthwise direction.
6) Do not tie the condensate pipe and refrigerant pipe together.
7) To ensure smooth drainage of condensate, a vent hole shall be set at the highest point of drainage pipe.
8) Carry out water flow test and full water test after the pipe connection is completed. On one hand, check
56
Page 62
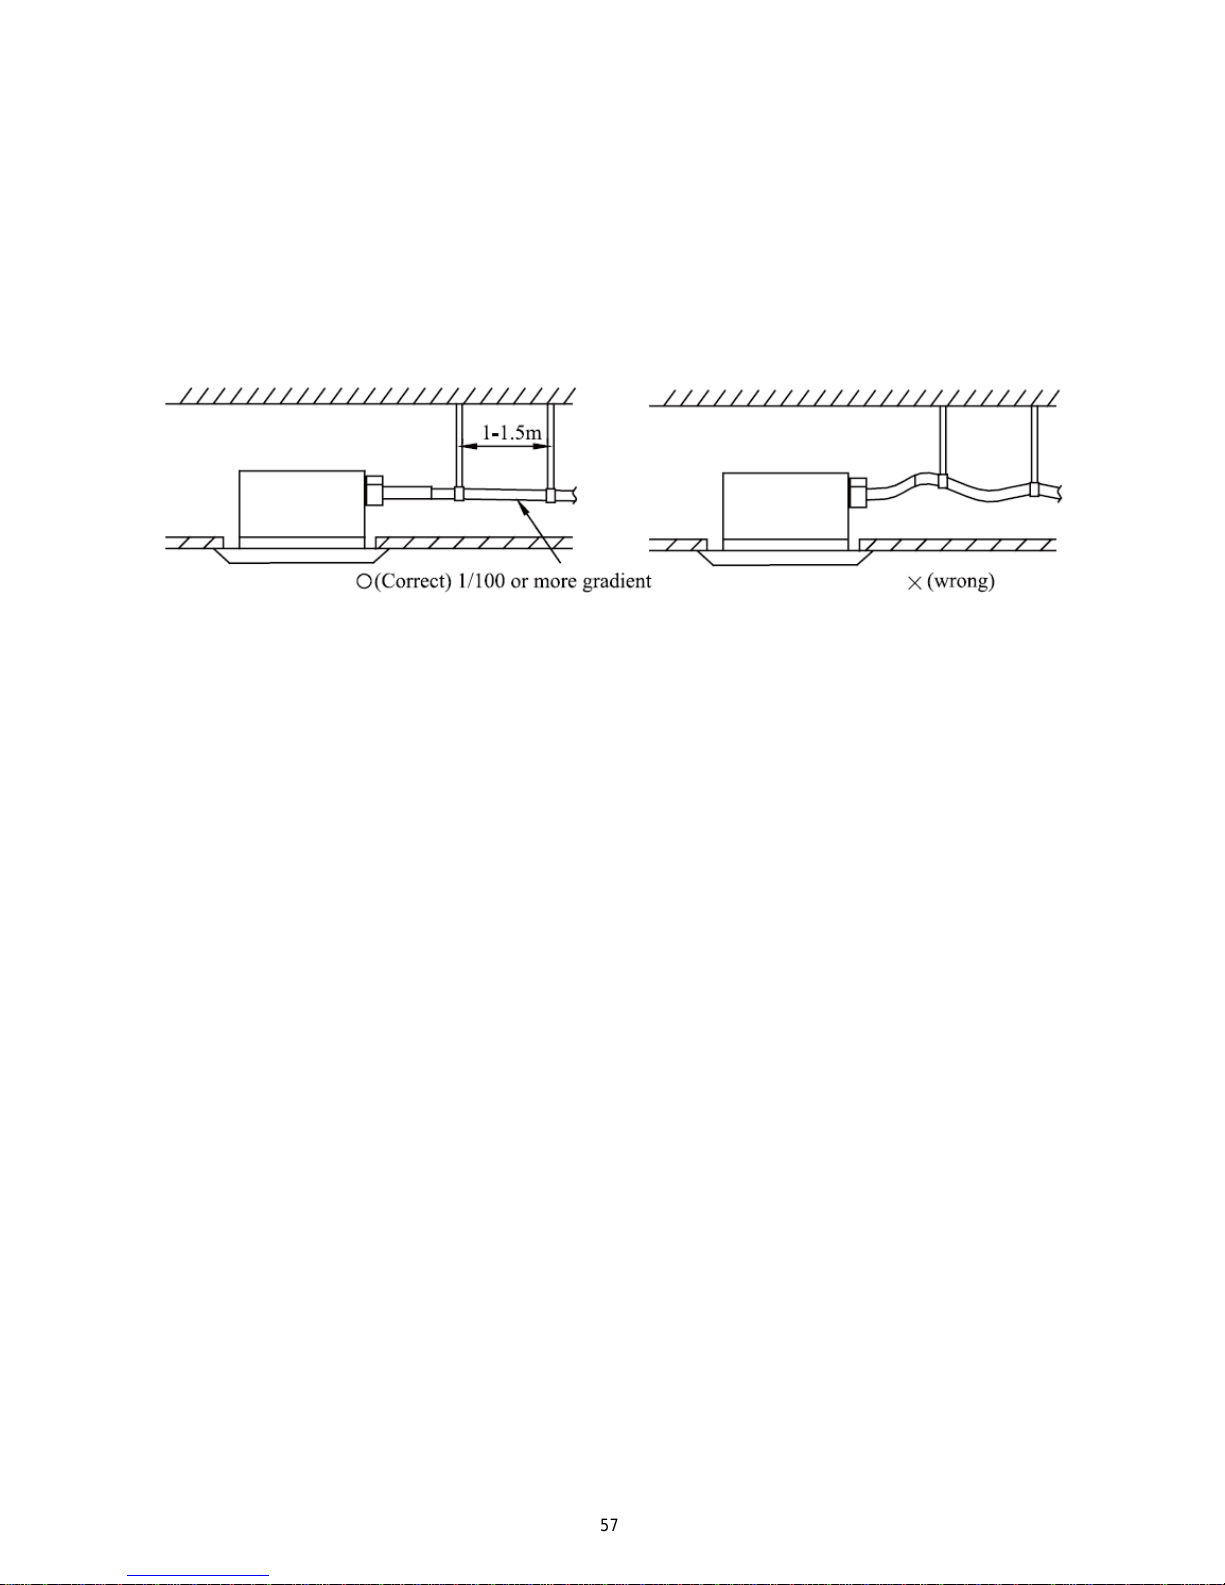
if the drainage is smooth; on another hand, check the piping system for any leakage.
9) Steel sheath shall be provided to the pipe crossing the wall or slab. The pipe joint shall not be positioned
within the sheath. The steel sheath shall be flush with the wall surface or slab base, but 20mm higher
than the slab base. The sheath shall not affect the pipe gradient. The clearance between pipe and sheath
shall be blocked by using flexible inflammable materials. The sheath shall not be used as the supporting
point of the pipe.
10) The joint of thermal insulation materials must be adhered by using special glue and then wrapped with
plastic tape having a width not less than 5cm to avoid condensing.
11) Ensure a gradient over 1% when connecting the drainage pipe to the indoor unit.
12) When connecting the drainage pipe to the indoor unit, please fix with the included pipe clamp and do
not use glue water, thus to ensure easy repair.
13) Installation requirements for auxiliary drainage pipe
The auxiliary drainage pipe must be thermally insulated:
14) The long drainage pipe may be fixed by using hanger bolts, thus to ensure a gradient of 1/100 (PVC
cannot be bent).
The spacing between the supports of horizontal pipe is 0.8-1.0m. Twisting will be caused and thus air bag
will be formed if the spacing is too high. Once the air bag is formed, the pump can only compress the air bag no
57
Page 63

matter how forcible it pushes, but there is no flowing water, thus resulting in abnormal water level. This will cause
flooding of the ceiling.
15) If the air flow of indoor unit is high, this might cause negative pressure and result in return suction of
outdoor air. Therefore, U-type water trap shall be designed on the drainage side of each indoor unit.
Install water trap as shown below;
Install one water trap for each unit.
Installation of water trap shall consider easy cleaning in the future.
16) Connection of drainage branch pipe to the standpipe or horizont al pi pe of draina ge m ain pi pe.
The horizontal pipe cannot be connected to the vertical pipe at a same height. It can be connected in a manner
as shown below:
NO1: 3-way connection of drainage pipe joint
58
Page 64

NO2: Connection of drain elbow
NO3: Connection of horizontal pipe
Drainage pipe is requisite for air conditioner unit. During cooling, the moisture in the air will condense on
the surface of evaporator. Such condensing water must be drained out of the unit. Meanwhile, the drainage pipe
has an important role to determine if the air conditioner can plays its full functions.
17) All the condensate pipes must be installed at a distance over 500mm from the electric box of the unit.
59
Page 65

8 Installation of Protective Layer on Connection Pipe
1) The refrigerant pipes should be insulated by the heat insulation material and plastic tape in order to
prevent water condensation and leakage.
2) Do not use the foam on the branch pipe as the material for heat insulation.
The heat insulation material: Heat resistance to 100 or more; ℃ Thickness of 9mm or more.
3) The joints of the system should be wrap ped wit h the he at insul ation m aterial an d no gap is allow ed on t he
joint of the system, as shown in the following figure.
4) Bundle the refrigerant pipe and transm ission line together wit h tape, and separate th em from the drain pipe
to prevent the condensate water overflowing.
5) Wrap the pipe from the bottom of the outdoo r unit to the top of the pip e where it enters the wa ll. Durin g
the wrapping, the later circle should cover half of the former one.
6) At intervals of about 1 meter, fix the refrigerant pipes to the wall with brackets, that is, don’t let the unit
withstand the weight of it or float it in the air.
Caution!
After the pipe is protected well enough, never bend it to form a small angle(<90°), otherwise it would
crack or break.
Do not wrap the refrigerant pipes very tight, otherwise the insulation effect would be weakened.
Additionally, make sure the drain hose is separated from the refrigerant pipes.
After that, cover the hole on the wall with sealing materials to prevent wind and noise going into the
room.
60
Page 66

MAINTENANCE
1 Troubleshooting
The unit does not
run at all
Warning!
a. In the event of abnormal conditions (like, stinky smell), please shut off the main power supply
immediately and then contact the SINCLAIR appointed service center; otherwise the continuous abnormal
running would damage the air conditioning unit and also would cause electric shock or fire hazard etc.
b. Do not repair the air conditioner personally but instead contact the professionally skilled personnel at the
SINCLAIR appointed service center, as th
e incorrect repair would cause electric shock or fire hazard etc.
1.1 Check before Contacting Maintenance Serviceman
Please check the following items before contacting the maintenance serviceman.
Conditions Causes Corrective actions
Broken fuse or breaker is off Replace the damaged fuse or close the breaker
Power off Restart the unit after power supply resumes
Power supply plug is loose Plug the power supply properly
The batteries voltage of the remote controller
is insufficient
Replace with new batteries
Remote controller is out of the control scope The distance shall be within 8m
The unit stops soon
after it starts
Air inlet or outlet of indoor unit or outdoor
unit is blocked
Remove the obstacles
Cooling or heating
is abnormal
Air inlet or outlet of indoor unit or outdoor
unit is blocked
Remove the obstacles
Temperature setting is improper
Adjust the setting of remote controller or wire
controller
Air speed is set too low
Adjust the setting of remote controller or wire
controller
Improper airflow direction
Adjust the setting of remote controller or wire
controller
Door or window is open Close the door or window
Under direct sunshine Hang curtain or blinders over the window
Too many people in the room
Too many heat sources indoors Reduce the heat sources
The filter screen is dirt or blocked Clean the filter screen
Note:
If the air conditioner still runs abnormally after the above check and handling, please contact the local
appointed service center and also give a description of the error occurred as well as the model of the unit.
61
Page 67

1.2 Problem Handling
The conditions listed below are not classified into errors.
Conditions Causes
The unit does not run
When restart the unit soon after it
is stopped
The overload protection switch of the unit let the
startup delayed for three minutes
As soon as power supply is on The unit will stand by for approximate one minute
The unit blows out mist When the cooling operation starts The hi-humidity air indoor is cooled quickly
The unit generates noise
The unit “clatters” as soon as it
starts running
It is the sound generated during the initialization of
the electronic expansion valve
The unit “swishes” during the
cooling operation
It is the sound when the refrigerant gas runs inside
the unit
The unit “swishes” when it is
started or stopped
It is the sound when the refrigerant gas stops running
The unit “swishes” when it is in
and after the running
It is the sound when the draining system is operating
The unit “squeaks” when it is in
and after the running
It is the sound of frication generated by the skin plate
etc which swells due to the temperature change
The unit blows out dust
When the unit restarts after it is
not used for a long time
The dust inside the unit is blown out again
The unit emits odors When the unit is running The odors absorbed in are blown out
1.3 Error description
Outdoor unit
If some error occurs when the unit is running, the error code will be displayed on the wired controller. Check
for more details about the meaning of each error.
Errors of definition
Main control display for outdoo r unit
Indoor unit
code
Yellow LED Red LED Green LED
The compressor is startup
Flash 1 time
IPM current protection
Flash 3 times
H5
IPM temperature protection
Flash 5 times
P8
PFC current protection
Flash 7 times
PFC temperature protection
Flash 8 times
P8
Low voltage protection
Flash 9 times
PL
High voltage protection
Flash 10 times
PH
Low pressure protection
Flash 11 times
High pressure protection
Flash 12 times
High pressure switch protection
Flash 13 times
Capacitor charging error
Flash 14 times
AC current protection
Flash 15 times
E5
Memory card error
Flash 16 times
Compressor demagnetizing protection
Flash 17 times
HE
Compressor desynchronizing
Flash 18 times
H7
Compressor phase lack
Flash 19 times
U2
Compressor phase circuit detection error
Flash 20 times
U1
Compressor power protection
Flash 21 times
L9
Compressor overload protection
Flash 22 times
H3
62
Page 68

Compressor discharge temperature
protection
Flash 23 times
E4
Lack of refrigerant or jam protection
Flash 31 times
F0
Normal operation
Flash 1 time
Frequency limitation for AC current
Flash 2 times
Oil returning
Flash 3 times
Defrosting
Flash 4 times
H1
Frequency limitation for IPM temperature
Flash 5 times
Frequency limitation for PFC temperature
Flash 6 times
Frequency limitation for compressor
overload
Flash 8 times
Frequency limitation for compressor
discharge temperature
Flash 9 times
Frequency limitation for low pressure
Flash 10 times
Frequency limitation for high pressure
Flash 11 times
Discharge temperature sensor error
Flash 12 times
F5
Outdoor temperature sensor error
Flash 13 times
F3
Suction temperature sensor error
Flash 15 times
Condenser temperature sensor error
Flash 16 times
A7
Sub-cool temperature sensor error
Flash 17 times
Low pressure sensor error
Flash 18 times
High pressure sensor error
Flash 19 times
Fan motor error for indoor unit
Flash 20 times
H6
Driving board is connected
Flash 1 time
Testing board is connected
Flash 2 times
Computer is connected
Flash 4 times
Indoor unit 1 is connected
Flash 5 times
Indoor unit 2 is connected
Flash 6 times
Indoor unit 3 is connected
Flash 7 times
Indoor unit 4 is connected
Flash 8 times
Indoor unit 5 is connected
Flash 9 times
Indoor unit 6 is connected
Flash 10 times
Indoor unit 7 is connected
Flash 11 times
Indoor unit 8 is connected
Flash 12 times
Indoor unit 9 is connected
Flash 13 times
Indoor unit anti-freeze protection
E2
Indoor temperature sensor error
F1
Indoor evaporator midway temperature
sensor error
F2
Temperature sensor error for liquid pipe of
BU module
b5
Temperature sensor error for gas pipe of
BU module
b7
Running mode conflicts
E7
Communication error
E6
63
Page 69

Water full error of indoor unit
E9
Refrigerant recovery mode
Fo
DB module
Errors
Indicating LED flashing times
Indoor unit
error code
Outdoor unit error code
Yellow LED Green LED Red LED
DB 1 is connected
Flash 1 time
DB 2 is connected
Flash 2 times
DB 3 is connected
Flash 3 times
Indoor unit A is connected
Flash 1 time
Indoor unit B is connected
Flash 2 times
Indoor unit C is connected
Flash 3 times
Indoor unit D is connected
Flash 4 times
Indoor unit E is connected
Flash 5 times
Indoor unit A gas tube
temperature sensor error
Flash 1 time
b7 b7 indoor unit address
Indoor unit A liquid tube
temperature sensor error
Flash 2 times
b5 b5 indoor unit address
Indoor unit B gas tube
temperature sensor error
Flash 3 times
b7 b7 indoor unit address
Indoor unit B liquid tube
temperature sensor error
Flash 4 times
b5 b5 indoor unit address
Indoor unit C gas tube
temperature sensor error
Flash 5 times
b7 b7 indoor unit address
Indoor unit C liquid tube
temperature sensor error
Flash 6 times
b5 b5 indoor unit address
Indoor unit D gas tube
temperature sensor error
Flash 7 time
b7 b7 indoor unit address
Indoor unit D liquid tube
temperature sensor error
Flash 8 times
b5 b5 indoor unit address
Indoor unit E gas tube
temperature sensor error
Flash 9 time
b7 b7 indoor unit address
Indoor unit E liquid tube
temperature sensor error
Flash 10 times
b5 b5 indoor unit address
2 FLOW CHART OF TROUBLESHOOTING
Service personnel shall collect the malfunction information as much as possible and research them thoroughly,
list these electrical parts which may cause malfunction, and shall be able to determine the specific reason and
solve the faulted parts. Observe the status of the complete device and do not observe the partial.
It is advised to start from the simple operation during analyzing, judging and confirming malfunction reason,
then conduct the complicated operations such removal of device, part replacement and refrigerant filling.
Find the malfunction reason carefully as unit may occur several malfunction at the same time and one
malfunction may develop into several malfunction, so entire system analysis shall be established to make the
judged result exact and credible.
64
Page 70

Malfunction display: High Pressure Protection
2.1
65
Page 71

Low pressure protection
Check the
pressure with a manometer:
is it really low?
Check work
mode of indoor unit:
is it properly set?
Check stop
valves: are they completely
open?
Check the
panel of outdoor unit: is it
firmly closed?
Check the
flow of the air inlet/outlet: is
it not blocked?
Check the
fans of indoor unit and outdoor
unit: is it run?
Check the
swing louver of indoor unit:
is it completely open?
Check the
indoor/outdoor filter and heat
exchange fin: is there filth
blockage?
Refrigerant pipe is blocked
Refer to Care and Maintenance
Measure swing motor and signal input
Measure the fan motor and signal input
Remove the barrier
Close the panel
Completely open the valve
Refer to Instruction Manual of indoor unit
Yes
No
Check
refrigerant in the system: is it
sufficient?
Mainly check the inlet and outlet of main pipe connecting
with each indoor unit and capillary of indoor and outdoor
units. Replace the parts like filter, capillary and so on
Charge refrigerant according to the amount specified in the
nameplate and calculated additional amount
Replace the outdoor unit mainboard
Check the
low pressure sensor: is
it normal?
Replace the low pressure sensor
Yes
Yes
Yes
Yes
Yes
Yes
Yes
Yes
Yes
No
No
No
No
No
No
No
No
No
Malfunction display: Low Pressure Protection
2.2
66
Page 72

2.3 Malfunction display: Discharge temperature protection
Discharge temperature protection
Measure the
discharge temperature: does it have
reached 125℃?
Check and repair the leakage of the unit. Charge
refrigerant according to the required volume
Replace the oudoor
unit mainboard
Measure
resistance value of discharge
temperature sensor: is it
correct(50KΩ)?
Replace relevant discharge
temperature sensor
Are the
electronic expansion valves
broken?
When the
discharge temperature is higher than
110℃, whether the compressor reduces
its capacity?
Check the
capacity demand of indoor units:
is it in the range of outdoor
unit capacty ?
Yes
Replace relevant electronic
expansion valve
Replace the oudoor
unit mainboard
Refer to the dial-up of indoor
and outdoor unit
No
Yes
Yes
Yes
Yes
No
No
No
No
2.4 Malfunction display: Current protection
Current protection
Check the
wiring of the compressor: is it
properly connected?
Is the current
value higher than the preset
value of protector?
Is the
high pressure normal?
Is the
voltage normal?
Replace the mainboard
Adjust the compressor
wiring
Replace the overcurrent
protector
Refer to high voltage
protection
Contact the power supply
company
Yes
No
Yes
Yes
Yes
No
No
No
67
Page 73

2.5 Malfunction display: Communication error
Communication error
Check the
cable of indoor unit: is it
properly connected?
Measure
the
transmission line: is it
through?
Check the
transmission line between outdoor
unit and BU module: is it properly
connected?
Check the
power of the unit: is it
turn on?
Check the orientation of plug
and socet
Replace the transimission line
Turn on the power
Yes
No
Are the
address of DB modules in the
same system repeated?
Yes
Check the orientation of plug
and socet
Change the repeated address codes
Is there
any equipment which can
emit electromagnetic waves near
the unit?
Remove the equipments 1
meter away from the unit
The transimission line is too long
Refer to the recommended
transmission line
Yes
Yes
Yes
Yes
Yes
No
No
No
No
No
68
Page 74
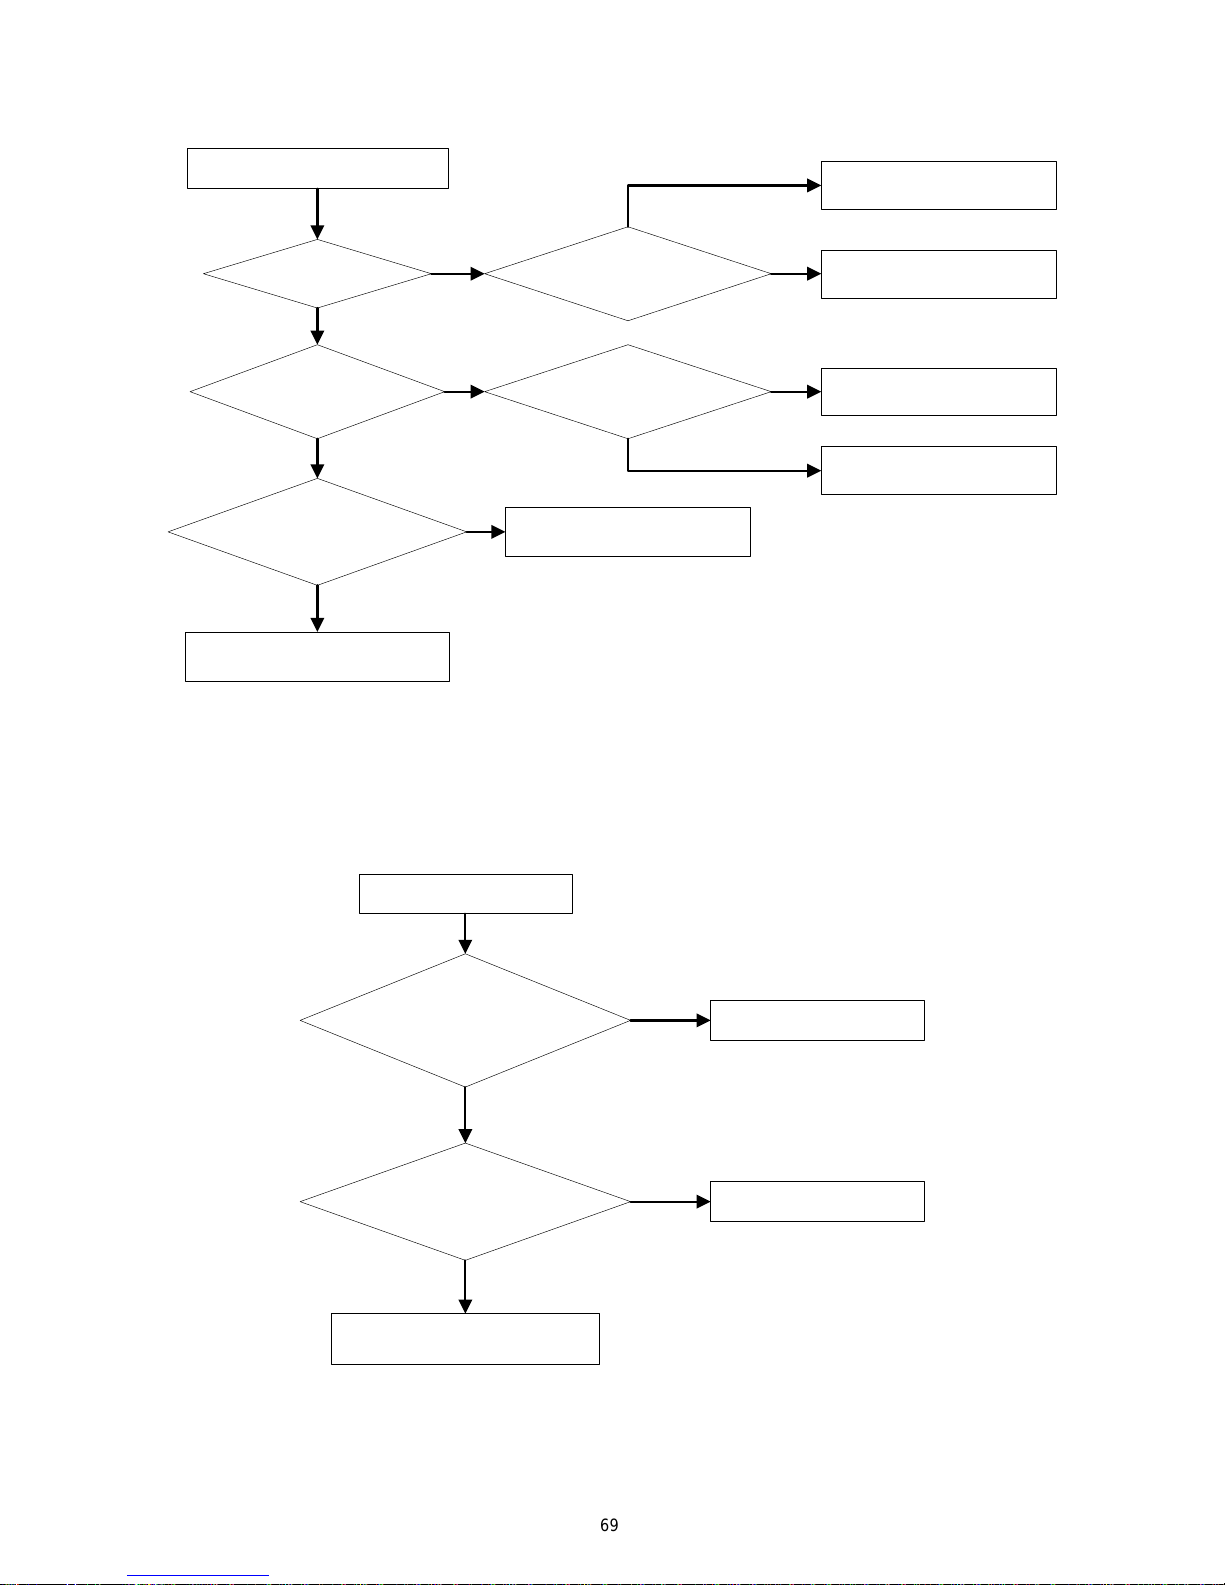
2.6 Malfunction display: Indoor unit water full protection
Water full protection
Is the water overflow?
Is the
water drainage pipe jammed or
water flows smoothly?
Check the
water drainage pump:
is it works?
Replace the mainboard of the
indoor unit
Adjust the water drainage pipe
Yes
No
Yes
Maintain the cables of water
drainage pump
Clear the water drainage pipe
Yes
Yes
No
No
Check the
Voltage of liquid level
switch : is it ok?
Maintain the liquid level
switch
Check the
Voltage of water drainage
pump : is it ok?
Replace the mainboard of the
indoor unit
Yes
Yes
No
No
2.7 Malfunction display: Temperature sensor error
The resistance value of discharge temperature sensor is 50 KΩ;
The resistance value of outside temperature sensor and inside temperature sensor are all 15 KΩ;
The others are 20 KΩ.
Temperature sensor error
The plug
on temperature sensor is correctly
connected to the socket on
mainboard, is it?
Remove the
temperature and measure its
resistance value: is it within
normal range?
Replace the mainboard of unit
Check the orientation of
plug and socket
Replace the temperature
sensor
Yes
No
Yes
No
69
Page 75

2.8 Malfunction display: High/Low pressure sensor error
Pressure sensor error
The plug
on pressure sensor is correctly
connected to the socket on
mainboard, is it?
Measure the
DC voltage value between black
line and green line of the sensor: is it
OK?(0.5~4.5V)
Replace the mainboard of outdoor
unit
Check the orientation of
plug and socket
Replace the pressure
sensor
Yes
No
Yes
No
3 POWER DISTRIBUTION
3.1 Diagram of Power Distribution
(The thick line represents power line while thin line represents the control line.)
70
Page 76
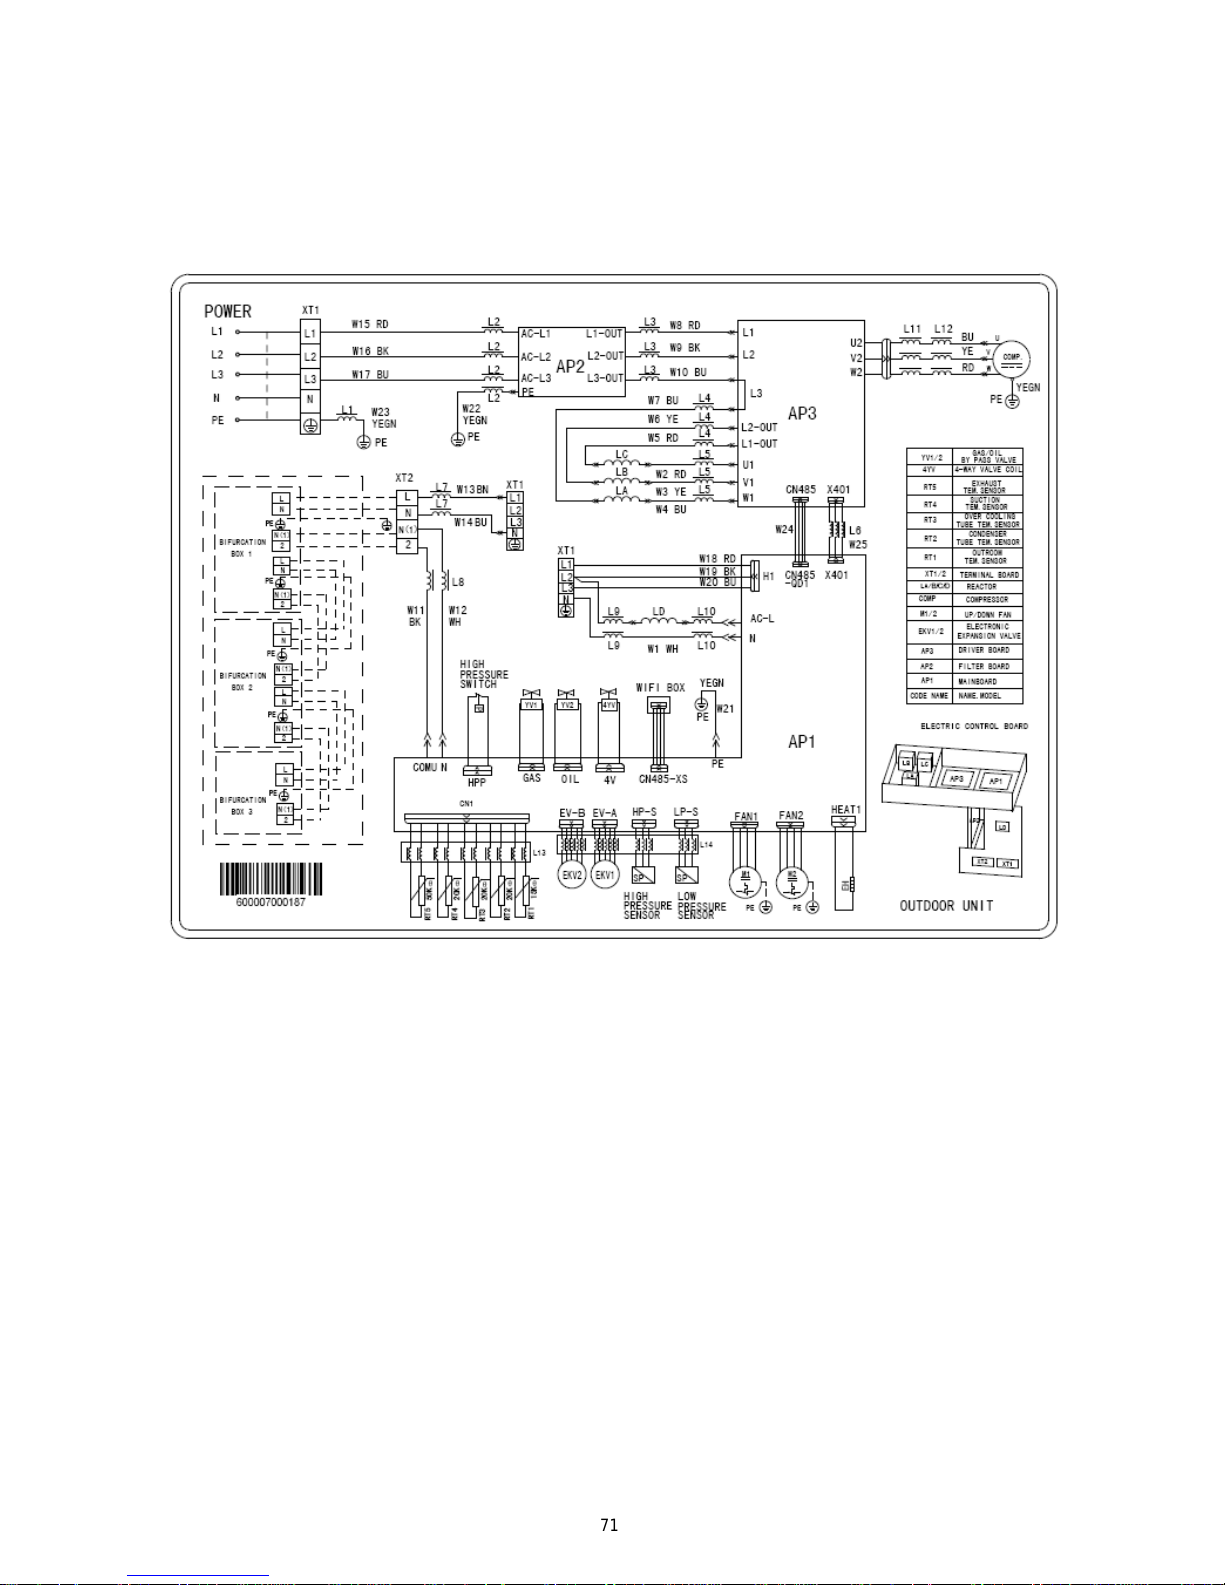
3.2 Wiring diagram
Note:
This drawing is just for reference; please always refer to the electric wiring stuck to the unit for actual wiring.
3.2.1 Outdoor unit
MS-E56AIN, MS-E48AIN
71
Page 77
4 THE RESISTANCES OF COMMON TEMPERATURE SENSORS
4.1 15 KΩ
Temp.
(℃)
Resistance
(kΩ)
Voltage
(15K/5V)
Voltage
(15K/3.3V)
Temp.
(℃)
Resistance
(kΩ)
Voltage
(15K/5V)
Voltage
(15K/3.3V)
-20 144.000 0.472 0.311 20 18.750 2.222 1.467
-19 138.100 0.490 0.323 21 17.930 2.278 1.503
-18 128.600 0.522 0.345 22 17.140 2.334 1.540
-17 121.600 0.549 0.362 23 16.390 2.389 1.577
-16 115.000 0.577 0.381 24 15.680 2.445 1.613
-15 108.700 0.606 0.400 25 15.000 2.500 1.650
-14 102.900 0.636 0.420 26 14.360 2.554 1.686
-13 97.400 0.667 0.440 27 13.740 2.610 1.722
-12 92.220 0.699 0.462 28 13.160 2.663 1.758
-11 87.350 0.733 0.484 29 12.600 2.717 1.793
-10 82.750 0.767 0.506 30 12.070 2.771 1.829
-9 78.430 0.803 0.530 31 11.570 2.823 1.863
-8 74.350 0.839 0.554 32 11.090 2.875 1.897
-7 70.500 0.877 0.579 33 10.630 2.926 1.931
-6 66.880 0.916 0.605 34 10.200 2.976 1.964
-5 63.460 0.956 0.631 35 9.779 3.027 1.998
-4 60.230 0.997 0.658 36 9.382 3.076 2.030
-3 57.180 1.039 0.686 37 9.003 3.125 2.062
-2 54.310 1.082 0.714 38 8.642 3.172 2.094
-1 51.590 1.126 0.743 39 8.297 3.219 2.125
0 49.020 1.172 0.773 41 7.653 3.311 2.185
1 46.800 1.214 0.801 42 7.352 3.355 2.215
2 44.310 1.265 0.835 43 7.065 3.399 2.243
3 42.140 1.313 0.866 44 6.791 3.442 2.272
4 40.090 1.361 0.899 45 6.529 3.484 2.299
5 38.150 1.411 0.931 46 6.278 3.525 2.326
6 36.320 1.461 0.965 47 6.038 3.565 2.353
7 34.580 1.513 0.998 48 5.809 3.604 2.379
8 32.940 1.564 1.033 49 5.589 3.643 2.404
9 31.380 1.617 1.067 50 5.379 3.680 2.429
10 29.900 1.670 1.102 51 5.179 3.717 2.453
11 28.510 1.724 1.138 52 4.986 3.753 2.477
12 27.180 1.778 1.174 53 4.802 3.787 2.500
13 25.920 1.833 1.210 54 4.625 3.822 2.522
14 24.730 1.888 1.246 55 4.456 3.855 2.544
15 23.600 1.943 1.282 56 4.294 3.887 2.566
16 22.530 1.998 1.319 57 4.139 3.919 2.586
17 21.510 2.054 1.356 58 3.990 3.949 2.607
18 20.540 2.110 1.393 59 3.848 3.979 2.626
19 19.630 2.166 1.429 60 3.711 4.008 2.646
72
Page 78

Temp.
(℃)
Resistance
(kΩ)
Voltage
(15K/5V)
Voltage
(15K/3.3V)
Temp.
(℃)
Resistance
(kΩ)
Voltage
(15K/5V)
Voltage
(15K/3.3V)
61 3.579 4.037 2.664 66 2.998 4.167 2.750
62 3.454 4.064 2.682 67 2.898 4.190 2.766
63 3.333 4.091 2.700 68 2.797 4.214 2.781
64 3.217 4.117 2.717 69 2.702 4.237 2.796
65 3.105 4.143 2.734 70 2.611 4.259 2.811
4.2 20 KΩ
Temp.
(℃)
Resistance
(kΩ)
Voltage
(15K/5V)
Voltage
(15K/3.3V)
Temp.
(℃)
Resistance
(kΩ)
Voltage
(15K/5V)
Voltage
(15K/3.3V)
-30 361.8 0.262 0.173 2 59.08 1.265 0.835
-29 339.8 0.278 0.183 3 56.19 1.313 0.866
-28 319.2 0.295 0.195 4 53.46 1.361 0.898
-27 300 0.313 0.206 5 50.87 1.411 0.931
-26 282.2 0.331 0.218 6 48.42 1.462 0.965
-25 265.5 0.350 0.231 7 46.11 1.513 0.998
-24 249.9 0.371 0.245 8 43.92 1.564 1.033
-23 235.3 0.392 0.259 9 41.84 1.617 1.067
-22 221.6 0.414 0.273 10 39.87 1.670 1.102
-21 208.9 0.437 0.288 11 38.01 1.724 1.138
-20 196.9 0.461 0.304 12 36.24 1.778 1.174
-19 181.4 0.497 0.328 13 34.57 1.833 1.209
-18 171.4 0.522 0.345 14 32.98 1.888 1.246
-17 162.1 0.549 0.362 15 31.47 1.943 1.282
-16 153.3 0.577 0.381 16 30.04 1.998 1.319
-15 145 0.606 0.400 17 28.68 2.054 1.356
-14 137.2 0.636 0.420 18 27.39 2.110 1.393
-13 129.9 0.667 0.440 19 26.17 2.166 1.429
-12 123 0.699 0.462 20 25.01 2.222 1.466
-11 116.5 0.733 0.484 21 23.9 2.278 1.503
-10 110.3 0.767 0.507 22 22.85 2.334 1.540
-9 104.6 0.803 0.530 23 21.85 2.389 1.577
-8 99.13 0.839 0.554 24 20.9 2.445 1.614
-7 94 0.877 0.579 25 20 2.500 1.650
-6 89.17 0.916 0.605 26 19.14 2.555 1.686
-5 84.61 0.956 0.631 27 18.32 2.610 1.722
-4 80.31 0.997 0.658 28 17.55 2.663 1.758
-3 76.24 1.039 0.686 29 16.8 2.717 1.793
-2 72.41 1.082 0.714 30 16.1 2.770 1.828
-1 68.79 1.126 0.743 31 15.43 2.822 1.863
0 65.37 1.171 0.773 32 14.79 2.874 1.897
1 62.13 1.218 0.804 33 14.18 2.926 1.931
73
Page 79
Temp.
(℃)
Resistance
(kΩ)
Voltage
(15K/5V)
Voltage
(15K/3.3V)
Temp.
(℃)
Resistance
(kΩ)
Voltage
(15K/5V)
Voltage
(15K/3.3V)
34 13.59 2.977 1.965 55 5.942 3.855 2.544
35 13.04 3.027 1.998 56 5.726 3.887 2.565
36 12.51 3.076 2.030 57 5.519 3.919 2.586
37 12 3.125 2.063 58 5.32 3.949 2.607
38 11.52 3.173 2.094 59 5.13 3.979 2.626
39 11.06 3.220 2.125 60 4.948 4.008 2.646
40 10.62 3.266 2.155 61 4.773 4.037 2.664
41 10.2 3.311 2.185 62 4.605 4.064 2.682
42 9.803 3.355 2.215 63 4.443 4.091 2.700
43 9.42 3.399 2.243 64 4.289 4.117 2.717
44 9.054 3.442 2.272 65 4.14 4.143 2.734
45 8.705 3.484 2.299 66 3.998 4.167 2.750
46 8.37 3.525 2.326 67 3.861 4.191 2.766
47 8.051 3.565 2.353 68 3.729 4.214 2.781
48 7.745 3.604 2.379 69 3.603 4.237 2.796
49 7.453 3.643 2.404 70 3.481 4.259 2.811
50 7.173 3.680 2.429 71 3.364 4.280 2.825
51 6.905 3.717 2.453 72 3.252 4.301 2.838
52 6.648 3.753 2.477 73 3.144 4.321 2.852
53 6.403 3.787 2.500 74 3.04 4.340 2.865
54 6.167 3.822 2.522 75 2.94 4.359 2.877
4.3 50 KΩ
Temp.
(℃)
Resistance
(kΩ)
Voltage
(15K/5V)
Voltage
(15K/3.3V)
Temp.
(℃)
Resistance
(kΩ)
Voltage
(15K/5V)
Voltage
(15K/3.3V)
-30 911.56 0.054 0.036 -14 342.83 0.142 0.094
-29 853.66 0.058 0.038 -13 323.94 0.150 0.099
-28 799.98 0.062 0.041 -12 306.23 0.158 0.104
-27 750.18 0.066 0.043 -11 289.61 0.167 0.110
-26 703.92 0.070 0.046 -10 274.02 0.176 0.116
-25 660.93 0.075 0.049 -9 259.37 0.186 0.123
-24 620.94 0.079 0.052 -8 245.61 0.196 0.129
-23 583.72 0.084 0.056 -7 232.67 0.206 0.136
-22 549.04 0.089 0.059 -6 220.5 0.217 0.143
-21 516.71 0.095 0.063 -5 209.05 0.228 0.151
-20 486.55 0.101 0.066 -4 198.27 0.240 0.158
-19 458.4 0.107 0.070 -3 188.12 0.252 0.167
-18 432.1 0.113 0.075 -2 178.65 0.265 0.175
-17 407.51 0.120 0.079 -1 169.68 0.278 0.184
-16 384.51 0.127 0.084 0 161.02 0.292 0.193
-15 362.99 0.134 0.088 1 153 0.307 0.202
74
Page 80

Temp.
(℃)
Resistance
(kΩ)
Voltage
(15K/5V)
Voltage
(15K/3.3V)
Temp.
(℃)
Resistance
(kΩ)
Voltage
(15K/5V)
Voltage
(15K/3.3V)
2 145.42 0.322 0.212 45 21.425 1.591 1.050
3 138.26 0.337 0.223 46 20.601 1.634 1.078
4 131.5 0.353 0.233 47 19.814 1.677 1.107
5 126.17 0.367 0.242 48 19.061 1.721 1.136
6 119.08 0.387 0.256 49 18.34 1.764 1.164
7 113.37 0.405 0.267 50 17.651 1.808 1.193
8 107.96 0.424 0.280 51 16.99 1.853 1.223
9 102.85 0.443 0.292 52 16.358 1.897 1.252
10 98.006 0.463 0.306 53 15.753 1.942 1.281
11 93.42 0.483 0.319 54 15.173 1.986 1.311
12 89.075 0.505 0.333 55 14.618 2.031 1.340
13 84.956 0.527 0.348 56 14.085 2.076 1.370
14 81.052 0.549 0.362 57 13.575 2.121 1.400
15 77.349 0.572 0.378 58 13.086 2.166 1.429
16 73.896 0.596 0.393 59 12.617 2.211 1.459
17 70.503 0.621 0.410 60 12.368 2.235 1.475
18 67.338 0.647 0.427 61 11.736 2.300 1.518
19 64.333 0.673 0.444 62 11.322 2.345 1.548
20 61.478 0.700 0.462 63 10.925 2.389 1.577
21 58.766 0.727 0.480 64 10.544 2.434 1.606
22 56.189 0.755 0.499 65 10.178 2.478 1.635
23 53.738 0.784 0.518 66 9.8269 2.522 1.664
24 51.408 0.814 0.537 67 9.4896 2.565 1.693
25 49.191 0.845 0.558 68 9.1655 2.609 1.722
26 47.082 0.876 0.578 69 8.9542 2.638 1.741
27 45.074 0.908 0.599 70 8.5551 2.695 1.778
28 43.163 0.941 0.621 71 8.2676 2.737 1.806
29 41.313 0.974 0.643 72 7.9913 2.779 1.834
30 39.61 1.008 0.665 73 7.7257 2.821 1.862
31 37.958 1.043 0.688 74 7.4702 2.862 1.889
32 36.384 1.078 0.711 75 7.2245 2.903 1.916
33 34.883 1.114 0.735 76 6.9882 2.943 1.943
34 33.453 1.151 0.759 77 6.7608 2.983 1.969
35 32.088 1.188 0.784 78 6.542 3.023 1.995
36 30.787 1.226 0.809 79 6.3315 3.062 2.021
37 29.544 1.264 0.835 80 6.1288 3.100 2.046
38 28.359 1.303 0.860 81 5.9336 3.138 2.071
39 27.227 1.343 0.886 82 5.7457 3.175 2.096
40 26.147 1.383 0.913 83 5.5647 3.212 2.120
41 25.114 1.424 0.940 84 5.3903 3.249 2.144
42 24.128 1.465 0.967 85 5.2223 3.285 2.168
43 23.186 1.507 0.994 86 5.0605 3.320 2.191
44 22.286 1.549 1.022 87 4.9044 3.355 2.214
75
Page 81

Temp.
(℃)
Resistance
(kΩ)
Voltage
(15K/5V)
Voltage
(15K/3.3V)
Temp.
(℃)
Resistance
(kΩ)
Voltage
(15K/5V)
Voltage
(15K/3.3V)
88 4.7541 3.389 2.237 110 2.4983 4.001 2.640
89 4.6091 3.423 2.259 111 2.4308 4.022 2.655
90 4.4693 3.456 2.281 112 2.3654 4.044 2.669
91 4.3345 3.488 2.302 113 2.3021 4.064 2.682
92 4.2044 3.520 2.323 114 2.2409 4.085 2.696
93 4.0789 3.551 2.344 115 2.1816 4.105 2.709
94 3.9579 3.582 2.364 116 2.1242 4.124 2.722
95 3.841 3.612 2.384 117 2.0686 4.143 2.734
96 3.7283 3.642 2.404 118 2.0148 4.162 2.747
97 3.6194 3.671 2.423 119 1.9626 4.180 2.759
98 3.5143 3.700 2.442 120 1.9123 4.197 2.770
99 3.4128 3.728 2.460 121 1.8652 4.214 2.781
100 3.3147 3.755 2.478 122 1.8158 4.232 2.793
101 3.22 3.782 2.496 123 1.7698 4.248 2.804
102 3.1285 3.809 2.514 124 1.7253 4.264 2.814
103 3.0401 3.834 2.531 125 1.6821 4.280 2.825
104 2.9547 3.860 2.547 126 1.6402 4.295 2.835
105 2.8721 3.884 2.564 127 1.5996 4.310 2.845
106 2.7922 3.909 2.580 128 1.5602 4.325 2.855
107 2.715 3.932 2.595 129 1.522 4.340 2.864
108 2.6404 3.956 2.611 130 1.485 4.354 2.873
109 2.5682 3.978 2.626
76
Page 82

5 DISASSEMBL Y AND ASSEMBLY PROCEDURE OF MAIN P AR TS
5.1 Outdoor Unit
5.1.1 Disassembly and Assembly of the plates
Remarks: Prior to the assembly of the plates, make sure the power supply is cut off.
Steps Illustrations Operation Instructions
1.Disconnect the
coping plate
a) Unscrew the fixed screws of the
coping plate;
b) Remove the coping plate.
2.Disconnect the front
side plate
a) Unscrew the fixed screw of the
front side plate;
b)
Remove the front side plate.
3.Disconnect the outer
case
a) Unscrew the fixed screws of the
outer case;
b)
Remove the outer case.
77
Page 83

4.Disconnect the left
side plate and rear side
plate
a) Unscrew the fixed screws of
left side plate and rear side
plate;
b)
Remove left side plate and rear
side plate.
5.1.2 Assembly and Disassembly of the Compressor
Remarks: Prior to the assembly of the compressor, make sure there is no refrigerant in the pipeline and the power
supply is cut off.
Steps Illustrations Operation Instructions
1.Remove the
power code of the
compressor
a) Unscrew the fixed
screws of power
code;
b) Remove the power
code.
Note: when removing the
power cord, please label
the power cord and the
terminals to avoid
misconnecting next time.
2.Remove the
connecting pipe
of the compressor
a) Solder the joint of
connecting pipe of
the compressor.
b) Pull out the
connecting pipe
Note: never let the flame
contact any other
component.
78
Page 84

3.Loose the fixed
screws of the
compressor base
Unscrew the fixed
screw of the compressor
base
4.Remove the
compressor away
from the seating
Remove and replace
the compressor.
Note: never let the flame
contact any other
component during the
replacement.
5.Fix the new
compressor on the
seating
Tighten the screws on
the seating of the new
compressor.
79
Page 85

6.Solder the
pipeline with the
suction and
discharge ports of
the compressor
Solder the connecting
pipe to make them
connected
Note: never let the
flame contact any other
component.
7.Reconnect the
power cords
a) Tighten the fixing
screw of the power
cord.
b) Connect the power
cord.
Note: mark the color
of the power cord and
corresponding terminal.
8.Put back the electric heating belt and the discharge temperature sensor etc.
9.Check and
screw back the
plates
a) Check if the pipe is
well connected.
b) Check if the parts and
wire well connected.
c) If there is no
problem, fix the
cover.
80
Page 86

5.1.3 Disassembly and Assembly of 4-way valve
Remarks: Prior to the assembly of the compressor, make sure there is no refrigerant in the pipeline and the power
supply is cut off.
Steps Illustrations Operation Instructions
1.Remove the magnet
coil of the 4-way valve
a) Unscrew the fixed
screws of the magnet
coil;
b) Remove the magnet
coil.
2.Disconnect the 4-way
valve and the
connecting pipe
Solder off the connecting
pipes.
Note: never let the flame
contact any other
component.
3.Replace the new
4-way valve
Install the new 4-way
valve
4.Solder the new 4-way
valve and install the
magnet coil.
Solder the connecting
pipes
Note: To avoid heat
damage the internal
structure of the 4-way,
wrap it to be brazed with
sufficient wet cloths.
81
Page 87

PARTS GUIDE
MS-E48AIN, MS-E56AIN
DB2-19SB, DB3-19SB, DB5-16AF
HIGH POWER MULTI SYSTEM
Page 88

Exploded view of unit MS-E48AIN
Page 89

No Description Part Code Actualization Qty Price Code
1 Rear Grill 01574100004 1
2 Condenser Assy 01124100105 1
3 Over-cooling Pipe Sub-assy 04534100044 1
4 Coping Sub-Assy 01264100019 1
5 Electric Box Cover none 0
6 Electric Box Assy 100002000252 1
7 Electronic Expansion Valve 43042800005 1
8 Clapboard Sub-Assy 017021000029 1
9 RetainingPlate(Motor Support) 012066000047 1
10 Motor Support Sub-Assy 017012000095 1
11 Discharge Tube Sub-assy 04534100021 1
12 Oil Separator 07424105 1
13 Sensor Sub-assy 39008252G 1
14 Left Side Plate 01314100013P 1
15 Axial Flow Fan 10434100004 2
16 Brushless DC Motor 1570410001301 1
17 Diversion Circle 10474100001 2
18 Front Side Plate 01314100012P 1
19 Cabinet 01514100002P 1
20 Front Grill 01574100009 2
21 Handle 26904100016 1
22 Front Connection Board 01344100002P 1
23 Cut off Valve 07334100016 1
24 Cut off Valve 07330000002 1
25 Strainer 07212001 2
26 Cut off Valve Sub-Assy 07304100011 1
27 Pressure Protect Switch 4602000902 1
28 Chassis Sub-Assy 000191000006 1
29 Magnet Coil 4304000415 1
30 Sensor (High Pressure) 322101032 1
31 4-way Valve 43000338 1
32 4-Way Valve Assy 030152000141 1
33 Magnet Coil 4300040029 1
34 Compressor Gasket none 0
35 Compressor and Fittings 00204100018 1
36 Nozzle for Adding Freon 06135201 1
37 Strainer A 07210022 2
38 Gas-liquid Separator 07424100014 1
39 Right Connection Board 01344100003P 1
40 Rear Side Plate Sub-Assy 01314100011P 1
41 One Way Valve 07130101 1
42 Handle 26904100016 1
43 Gas By-pass Sub- Assy 030082000013 1
44 Discharge Charge Valve 07334100002 1
45 Inhalation Tube Sub-assy 04574100011 1
46 Electric Expansion Valve Sub-Assy 43044100022 1
47 Nozzle for Adding Freon 06120012 2
48 capillary sub- assy(oil returning) 04004100011 1
MODEL: MS-E48AIN
Page 90

No Description Part Code Actualization Qty Price Code
49 Sensing Device 322101002 1
50 Electronic Expansion Valve 07334412 1
51 Electromagnetic Valve 43000054 2
52 Electric Expand Valve Fitting 4304413205 1
53 Radiator 49010252 2
54 Retaining Support(Radiator) 200115000004 1
55 Inductance Sub-Assy none 0
56 Reactor 43130192 3
57 Main Board 300027000010 1
58 Main Board 300027000013 1
59 Retaining Support(Driving Board) 200115000005 1
60 Testing Board 20017700007 1
61 Filter Board 300020000005 1
62 Terminal Board 42018000577 1
63 Terminal Board 42010274 1
64 Inductance 43128000014 1
The data are subject to change without notice.
MODEL: MS-E48AIN
Page 91

Exploded view of unit MS-E56AIN
Page 92
No Description Part Code Actualization Qty Price Code
1 Rear Grill 01574100004 1
2 Condenser Assy 01124100105 1
3 Over-cooling Pipe Sub-assy 04534100044 1
4 Coping Sub-Assy 01264100019 1
5 Electric Box Cover none 0
6 Electric Box Assy 100002000245 1
7 Electronic Expansion Valve 43042800005 1
8 Clapboard Sub-Assy 017021000029 1
9 RetainingPlate(Motor Support) 012066000047 1
10 Motor Support Sub-Assy 017012000095 1
11 Discharge Tube Sub-assy 04534100021 1
12 Oil Separator 07424105 1
13 Sensor Sub-assy 39008252G 1
14 Left Side Plate 01314100013P 1
15 Axial Flow Fan 10434100004 2
16 Brushless DC Motor 1570410001301 1
17 Diversion Circle 10474100001 2
18 Front Side Plate 01314100012P 1
19 Cabinet 01514100002P 1
20 Front Grill 01574100009 2
21 Handle 26904100016 1
22 Front Connection Board 01344100002P 1
23 Cut off Valve 07330000001 1
24 Cut off Valve 07330000002 1
25 Strainer 07212001 2
26 Cut off Valve Sub-Assy 07304100011 1
27 Pressure Protect Switch 4602000902 1
28 Chassis Sub-Assy 000191000006 1
29 Magnet Coil 4304000415 1
30 Sensor (High Pressure) 322101032 1
31 4-way Valve 43000338 1
32 4-Way Valve Assy 030152000140 1
33 Magnet Coil 4300040029 1
34 Compressor Gasket none 0
35 Compressor and Fittings 00204100018 1
36 Nozzle for Adding Freon 06135201 1
37 Strainer A 07210022 2
38 Gas-liquid Separator 07424100014 1
39 Right Connection Board 01344100003P 1
40 Rear Side Plate Sub-Assy 01314100011P 1
41 One Way Valve 07130101 1
42 Handle 26904100016 1
43 Gas By-pass Sub- Assy 030082000013 1
44 Discharge Charge Valve 07334100002 1
45 Inhalation Tube Sub-assy 04574100011 1
46 Electric Expansion Valve Sub-Assy 43044100022 1
47 Nozzle for Adding Freon 06120012 2
48 capillary sub- assy(oil returning) 04004100011 1
MODEL: MS-E56AIN
Page 93
No Description Part Code Actualization Qty Price Code
49 Sensing Device 322101002 1
50 Electronic Expansion Valve 07334412 1
51 Electromagnetic Valve 43000054 2
52 Electric Expand Valve Fitting 4304413205 1
53 Radiator 49010252 2
54 Retaining Support(Radiator) 200115000004 1
55 Inductance Sub-Assy none 0
56 Reactor 43130192 3
57 Main Board 300027000010 1
58 Main Board 300027000011 1
59 Retaining Support(Driving Board) 200115000005 1
60 Testing Board 20017700007 1
61 Filter Board 300020000005 1
62 Terminal Board 42018000577 1
63 Terminal Board 42010274 1
64 Inductance 43128000014 1
The data are subject to change without notice.
MODEL: MS-E56AIN
Page 94
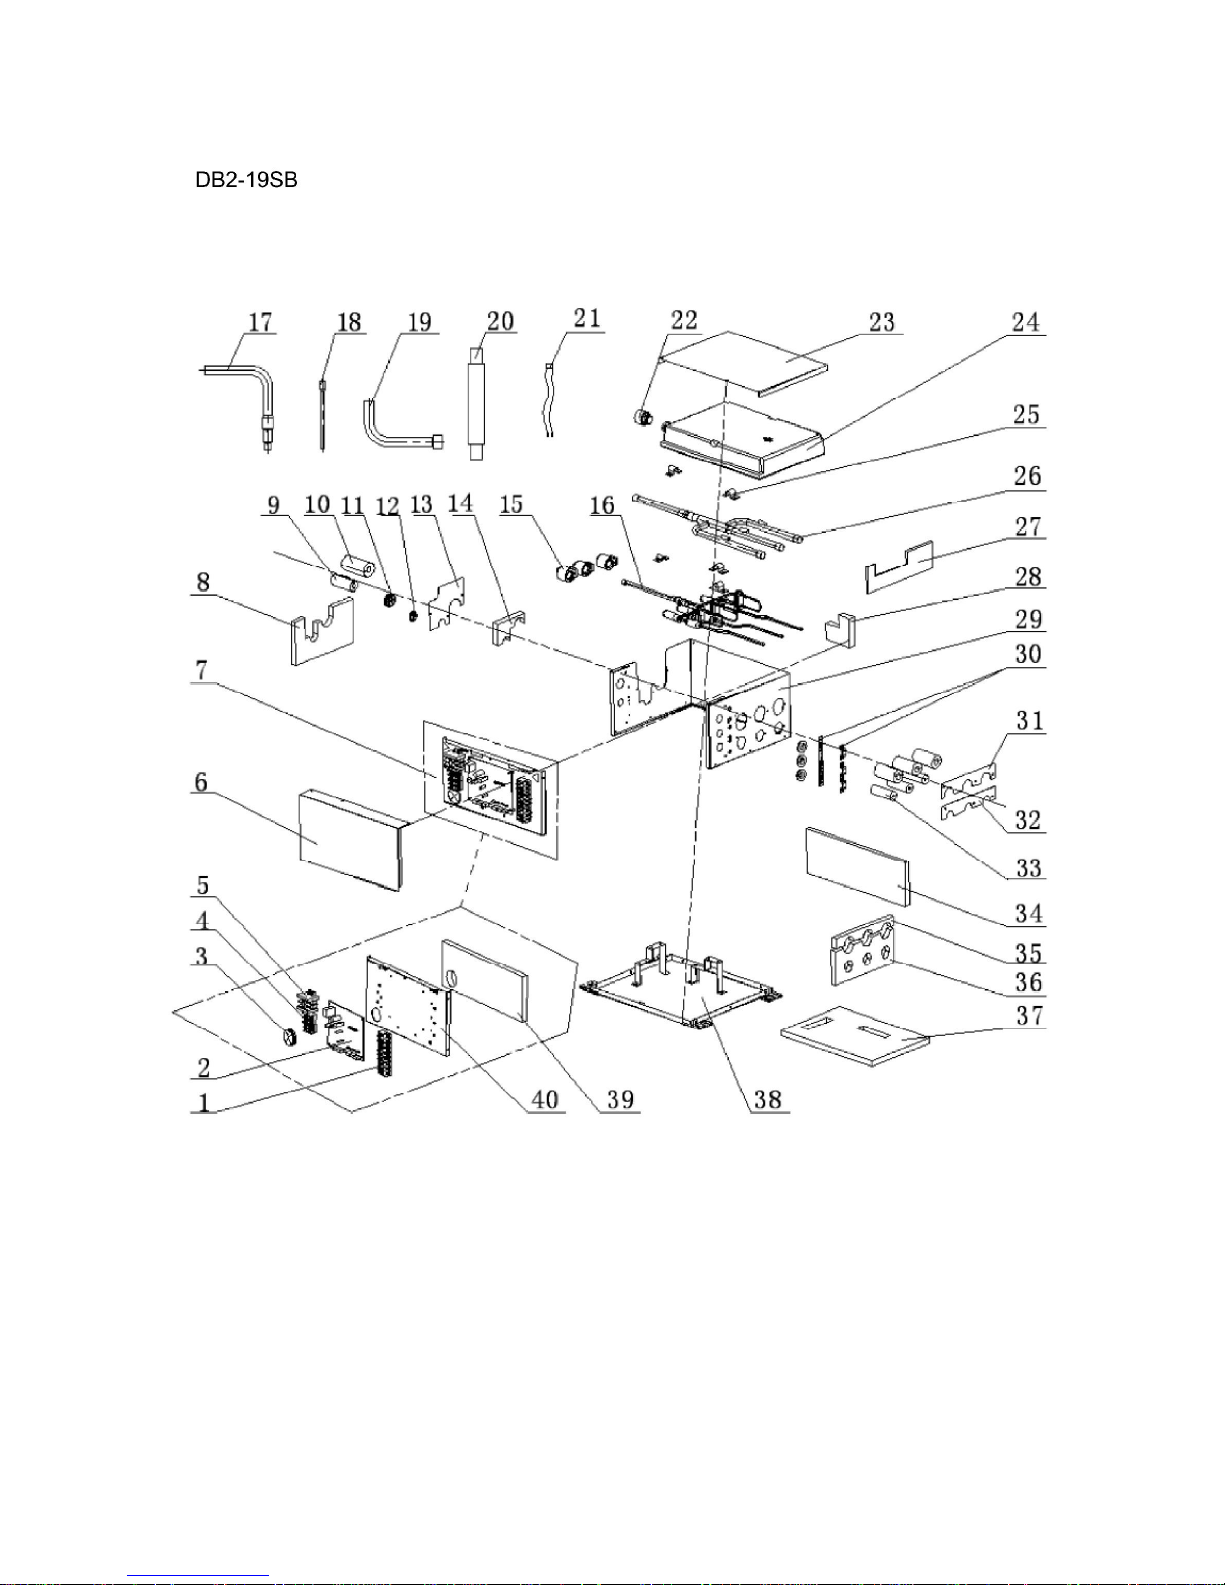
Page 95
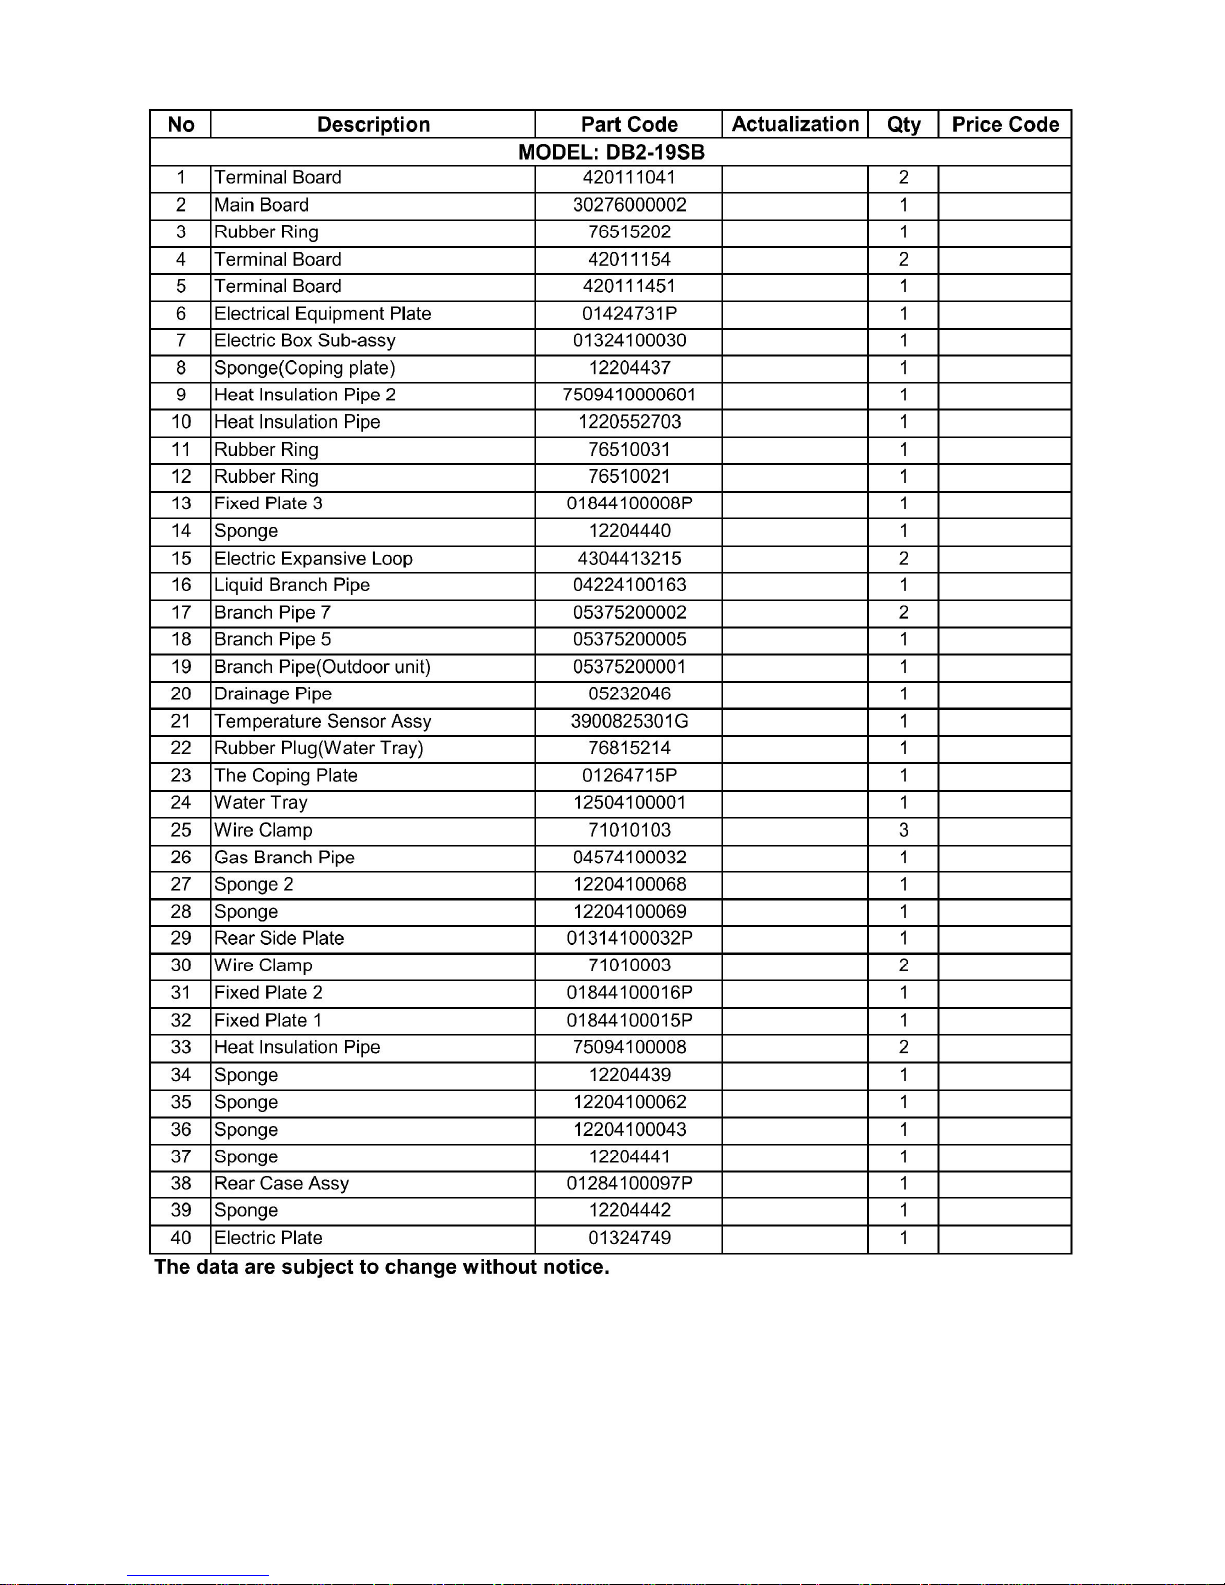
Page 96

Page 97

Page 98

Exploded view of distribution box DB5-16AF
Page 99

No Description Part Code Actualization Qty Price Code
1 Coping 01264100017P 1
2 Electric Component Mounting Plate assy 01324100023 1
3 Sponge 12204100052 1
4 Tube Clip 021400051 1
5 Tube Clip 021400052 1
6 Sponge NONE 0
7 Base Frame Sub-Assy 0128410001801P 1
8 Cable-Cross Loop 76510026 1
9 Wire Clamp 71010003 3
10 Insulation GasketF 70410524 1
11 Cable Cross Loop 76510021 3
12 Retaining Plate (Water Level Switch) 01844100017P 1
13 Sponge 12204100057 1
14 Sponge 12204100055 1
15 Retaining Plate (Water Level Switch) 01844100019P 1
16 Retaining Plate (Water Level Switch) 01844100018P 1
17 Sponge 12204100053 1
18 Sponge 12204100054 1
19 Side Plate 01314100037P 1
20 Choke Plug of Drain Pipe 76815214 1
21 Top Cover 01264100016P 1
22 Foam 12504100004 1
23 Divergence Gas Assy 04574100033H 1
24 Insulated pipe 75094100005 1
25 Insulated pipe 75094100006 5
26 Divergence Liquid Assy 04224100290H 1
27 Insulated pipe 75094100004 5
28 Tempreture Sensor clamp 02143022 5
29 Insulated pipe 75094100003 1
30 Electric Expand Valve Fitting 4304413208 1
31 Sensor Sub-assy 39008000044G 1
32 Terminal Board 4201115404 2
33 Terminal Board 4201115404 2
Terminal Board 42011154 2
34 Sign Label 62274100017 1
35 Terminal Board 420111041 5
36 Screw Assy 70110231 8
37 Clapboard Sub-Assy 01244100012 1
38 Module Stanchion 24213010 9
39 Sign Label 62211001 1
40 Sign Label 60335602 1
41 Cable Cross Loop 76510021 1
Cable-Cross Loop 76514801 1
42 Module Stanchion Seat 24213029 9
43 Screw 70140003 18
44 Pinboard 30276000003 1
MODEL: DB5-16AF
The data are subject to change without notice.
Page 100

NOTE CONCERNING PROTECTION OF
ENVIRONMENT
This product must not be disposed of via normal household waste after its service life, but must be
taken to a collection station for the recycling of electrical and electronic devices. The symbol on the
product, the operating instructions or the packaging indicate such disposal procedures. The materials
are recyclable in accordance with their respective symbols. By means of re-use, material recycling or
any other form of recycling old appliances you are making an important contribution to the protection
of our environment. Please ask your local council where your nearest disposal station is located.
INFORMATION CONCERNING USED REFRIGERANT
MEDIUM
This unit is containing fluorinated gases included in the Kyoto protocol. The maintenance and the liquidation must
be carried out by qualified personnel.
Type of refrigerant: R410A
The composition of the cooling medium R410A: (50% HFC-32, 50% HFC-125)
The quantity of the refrigerant: please see the unit label.
The value GWP: 2088 (1 kg R410A = 2,088 t CO2 eq)
GWP = Global Warming Potential
In case of quality problem or other please contact your local supplier or authorized service center.
Emergency number: 112
PRODUCER
SINCLAIR CORPORATION Ltd.
1-4 Argyll St.
London W1F 7LD
Great Britain
www.sinclair-world.com
This product was manufactured in China (Made in China).
REPRESENTATIVE
SINCLAIR EUROPE spol. s r.o.
Purkynova 45
612 00 Brno
Czech Republic
TECHNICAL SUPPORT
NEPA spol. s r.o.
Purkynova 45
612 00 Brno
Czech Republic
Tel.: +420 541 590 140
Fax: +420 541 590 124
www.sinclair-solutions.com
info@sinclair-solutions.com
 Loading...