

Fly with GPS Watch
Fly with GPS Watch
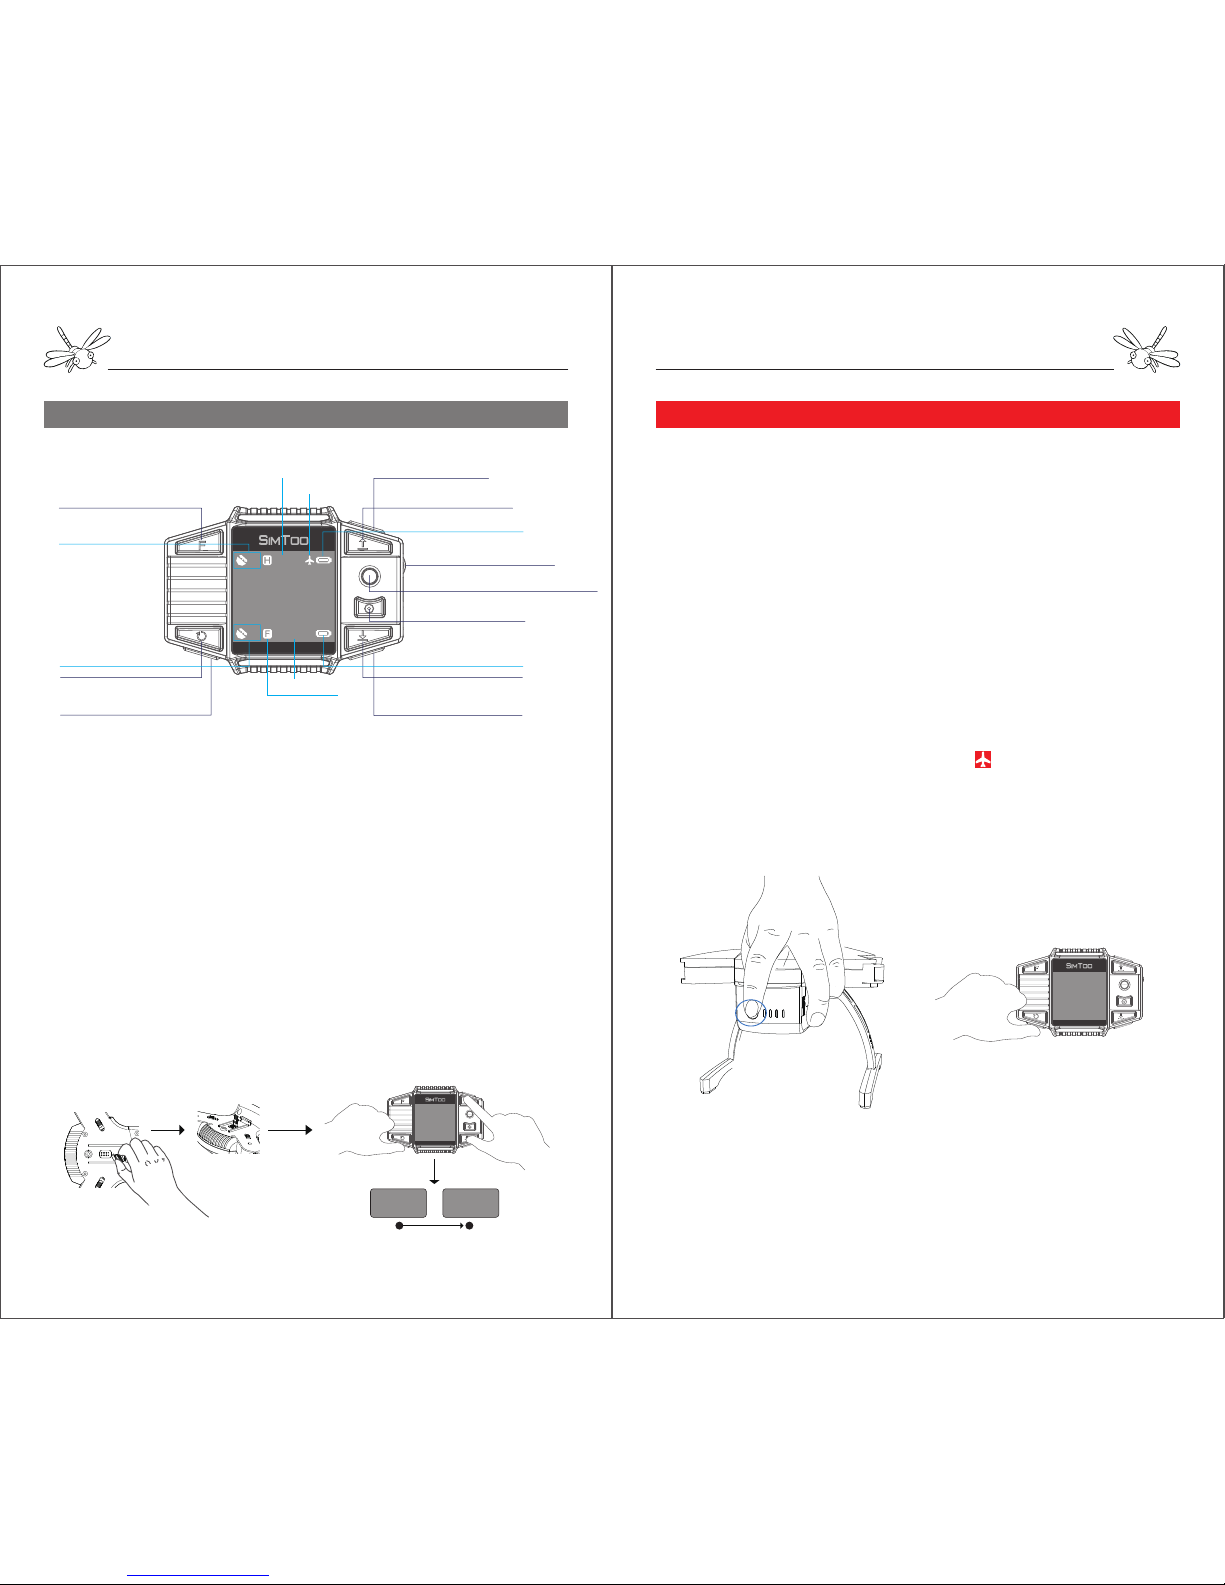
Instruction of RC Watch(Diagram 9) Preparations Pre-fly
Diagram 9:
Notes: Do not press two buttons at the same time which may interfere with each other.
Press the hover button first before switching one flight mode to another.
1 2
Bind code ... 0
NET ID:XXX
Bind code Begin ...
Bind to Watch
The aircraft is linked with remote controller by default before
sales. It is necessary to bind the codes again if the dragonfly is
going to be controlled with watch.
Codes Binding Procedures
Plug a small connector into the smaller needles on the gimbal
mount to make a short circuit. Turn on the aircraft and
immediately remove the connector. Then turn on the watch and
hold the take-off button and land button at the same time for a
few seconds until the watch says “Bind code begins…”. The
watch will get connected with the aircraft when the screen shows
the control interface.
①Power on/off(press&hold)
⑤Auto-take Off (press once)
⑥Auto land(press once)
Return-home(press&hold)
⑧Descend(press&hold)
②Gimbal Up/Down(Rotate
Up/Down)
⑩Auto-rotate(press once)
Orbit fly(press&hold)
④Hover(press once)
Arm Motors(press&hold)
⑨Follow-me(press once)
⑦Ascend(press&hold)
③Joystick
Aircraft GPS Signals
Watch GPS Signals
Aircraft Battery Level
Ready to fly
Flight Height
Watch Battery Level
Notes: If dragonfly receives no instruction for 10 minutes while powered on, it will
emit an alarm sound, which is a normal. You could either unlock the motors or turn
off the battery to stop that sound.
1. Place Dragonfly on a flat platform and turn on the battery by
pressing & hold the power button on the tail. The aircraft will
immediately start self-checking when the front red LEDs lights
and rear blue LEDs quickly flashes.
2. When the blue LEDs slowly flashes and the aircraft gives out
Di-Di sound, it indicates the checking of fly control system is
completed.
3. When the gimbal is level and the aircraft gives out another
Di-Di sound, it indicates that the gimbal is ready.
4. Turn on the watch by pressing & hold the power button. In a
few seconds the watch will get connected to the aircraft when the
screen shows the control interface. Wait until the aircraft gets at
least 10 GPS satellites and an icon of “ ” shows on the watch
before take-off. If the satellite signals are not stable, try it at
another place.
Stabilize
9
00.0m
00:00:00
16
Time
Follow Me Mode

Fly with GPS Watch
Fly with GPS Watch
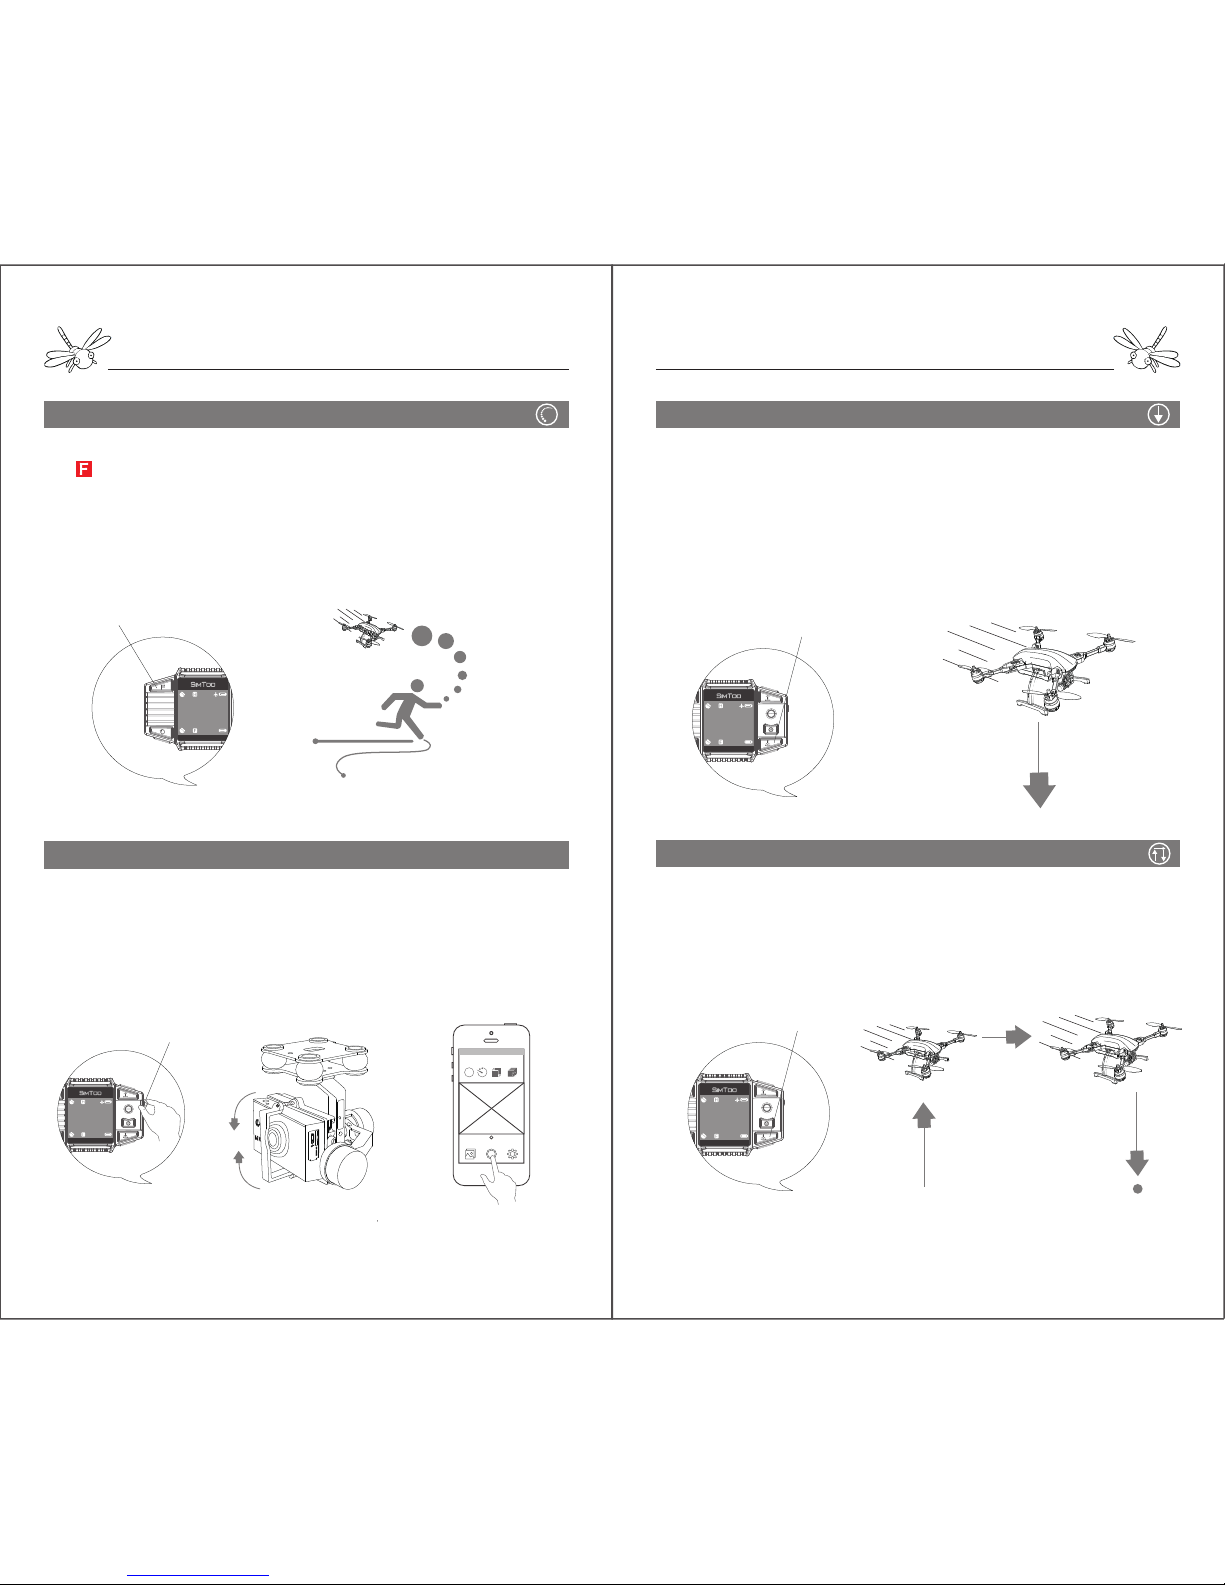
One Key to Take off Orbit Fly ( Point of Interest )
Rotating(Pan Shot)
5m
Press and hold the orbit fly button and dragonfly will fly in an
orbit around a center at the front. The radius of orbit is about 5
meters. The aircraft head will point to the center at all times.
During orbit fly, press the leftward button once and the orbit will
be 0.5 meter smaller. If press the right button, the orbit will be
0.5 meter larger. Pressing the hover button can stop the orbit fly
mode.
Press the orbit button once and dragonfly will keep rotating
autonomously in place clockwise. Tap on the hover button will stop
the rotating. This rotating mode is not only used for pan-shot but
also to turn the orientation of the aircraft.
Notes: The motors will stop rotating and be disarmed again if the aircraft doesn’t take off
within 6 seconds after unlock.
Basic Fly Control
Before take-off, press and hold the arm button to activate the
motors and check if they are rotating properly.
Press the take-off button when the motors are still rotating and
dragonfly will ascend to 5 meters and hover in place.
Push the joystick up and dragonfly will keep flying
forward. Push the joystick down and dragonfly will keep
flying backward.
Push the stick to the left and dragonfly will keep flying
leftward. Push the stick to the right and dragonfly will
keep flying rightward.
Press and hold the ascend button and dragonfly will
keep ascending autonomously until 30 meters high.
Press and hold the descend button and dragonfly will
keep descending autonomously until 5 meters high.
When you release the stick, dragonfly will immediately
hover in place.
Notes: the red LEDs indicate the front of the aircraft. Always be aware of the orientation
after chainging the position. Pressing and hold the joystick can turn off the red LEDs.
Armed
9
00.0m
00:00:00
16
Take off (press once)
5m
Take Off
9
00.0m
00:00:00
16
Orbit fly (press and hold)
Orbit
9
00.0m
00:00:00
16
Rotate
9
00.0m
00:00:00
16
Self rotate(press once)
Arm the motors(press&hold)
Fly with Remote Controller
Fly with GPS Watch
Follow Me
Notes: The image transmission range is around 50 meters. The video stream may be
delayed on the App if the aircraft flies too far from your mobile device.
Aerial Shooting
The angle of camera can be adjusted within 90 degree by turning
the dial on the watch.
Turn the dial up and the gimbal will tilt up. Turn it down and the
gimbal will tilt down.
Open the App connected with the camera and tap the red shutter
button in the middle to take photos or videos at any time in flight.
FHM
Burst Photo Video Short video
Frame rate Delay Interval Duration
Camera
Notes: keep an eye on the following path and ensure there are no obstacles in the way.
After the watch gets 8 follow-me GPS satellites and shows an
“ ”, press the follow me button once and start to move.
Dragonfly will autonomously follow behind you when you are 5
meters away. The aircraft will head to you wherever you go with
camera targeting on you at all times.
When you stop, the aircraft will hover near your head. You can
stop the follow-me mode by tapping the hover button.
Follow Me
9
00.0m
00:00:00
16
Follow-me (press once)
Stabilize
9
00.0m
00:00:00
16
Gimbal Dial
Land
Return Home
15 meters
Press the land button once and the aircraft will slowly land at its
current spot. Choose a safe and flat area for landing.
When dragonfly gets close to the ground, it will jump a few
times to find flat base.
The motors will stop rotating in 5 seconds after landing on the
ground.
In process of landing, you can still make it hover and change its
position if the landing area is not ideal.
Press and hold the land button and dragonfly will autonomously
ascend to 15 meters, slowly fly back to the take-off point and
land. If there is obstacle in the way of return-home, you can
make it hover and come back in other paths.
Return-home only works when the aircraft is 5 meters away from
the take-off point.
Land
9
00.0m
00:00:00
16
Land(press once)
RTH
9
00.0m
00:00:00
16
Return Home(press and hold)

Fly with Remote Controller
Fly with Remote Controller
Instruction of Remote Controller
Bind to the Remote Controller
The aircraft is connected to the remote controller by default. It is
necessary to bind the codes again if dragonfly is used with a new
remote controller or switched from watch control.
Codes Binding Procedures
Plug the small connector into the two smaller pins on the gimbal
mount. Turn on the aircraft and take off the connector to make
the aircraft short circuit. Then turn on the remote and hold the
hover button and land button at the same time for a few seconds
until the screen says “Bind code begin…” The remote will get
connected to the aircraft when the screen shows the control
interface.
TAKE OFF
CIRCLE
HOVER LANDING
RETURN HOME
ON/OFF
LCD Screen
Mobile Holder
Gimbal Pitch
Gimbal Yaw
ON
OFF
ON
OFF
1 2
Bind code ... 0
NET ID:XXX
Bind code Begin ...
Prepare the remote controller
1. Drive the mobile holder into the remote, fixing the nut on the
screw bar to make the holder face to you.
2. Adjust the holder to your desired postion, stretch the holder
clamp and attach your mobile device into the clamp. Connect
your mobile device to the camera through WIFI.
3. Put the aircraft on a flat place and turn it on.
4. The aircraft will be checking the control system and gimbal for
a few seconds.The self-checking will be completed when the blue
LEDs flash slowly and the gimbal is stabilized with a beep sound.
5. Turn on the remote by pushing up the switch button and wait
for a few seconds while it is connecting to the aircraft.
6. After dragonfly gets connected to the remote and collects 6
satellites, it is ready to take off.
ON
OFF
ON
OFF
ON
OFF
ON
OFF

Fly with Remote Controller
Fly with Remote Controller
Take Off
Position Control
1. Activate the motors by pushing the left stick to the lower right
corner and hold it for 3 seconds.
2. Tapping the take-off button on the left will make dragonfly launch
to 5 meters high and hover in place. You can also make dragonfly
take off by pulling up the stick.
ON
OFF
Notes: Slightly push the stick to avoid sudden or unexpected changes of position.
1. Push the left stick up and dragonfly will keep ascending.
2. Push the left stick down and dragonfly will keep descending.
3. Push the left stick to the left and dragonfly will keep
rotating left.
4. Push the left stick to the right and dragonfly will keep
rotating right.
5. To make dragonfly move forward, push the right stick up.
6. To make dragonfly move backward, push the right stick
down.
7. To make dragonfly move leftwards, push the right stick to
the left.
8. To make dragonfly move rightwards, push the right stick to
the right.
When the stick is back at the center, dragonfly will hover at its
current spot.
Control Calibration
In case that the joysticks are sometimes not in the central position, the
remote controller needs to be calibrated. Turn on the controller while
holding the takeoff button and land button until the screen says
“Start Cali”. Release the buttons, move the two sticks clockwise or
counter-clockwise circles and spin the two dials for a few times until all
numbers (C1-C6) on the screen turn green. Press and hold the hover
button to complete the calibration and enter the control interface with
a beep sound.
ON
OFF
Normal Mode & Advance Mode
Left Mode & Right Mode
The default control mode is beginner mode (NOR
MODE) which requires 6 GPS satellites to launch
dragonfly. In professional mode (ADV MODE), dragonfly
can take off without GPS signals limit and fly at a higher
speed and wider range. To switch the control modes,
hold the hover button and turn on the remote at the
same time. It is not recommended to choose
professional mode for beginners.
The left stick is set to control the power motors by default. The power control can be
switched to the right stick by holding the land button and turning on the remote. To switch
back to the left, turn on the remote and hold the take-off button.
ON
OFF
ON
OFF
ON
OFF
Power
Left Mode(American Hand) Right Mode(Japanese Hand)
Power
TIMES=
C1= C2=
C3= C4=
C5= C6=
C1=
C2=
C3=
C4=
C5=
C6=
CH2=1500Bar CH1=1500
CH3=1500
CH3=1500
CH4=1500
CH5=1500
Start Cali
Release Key
ON
OFF

Fly with Remote Controller
Fly with Remote Controller
1. Pressing & hold the take-off button will make
dragonfly autonomously fly in an orbit.
2. Tapping the H button will make dragonfly hover
at its current spot. Pressing & hold the H button
will turn off the front red LEDs.
3. Tapping the land button will make dragonfly
autonomously land at its current spot.
4.Pressing & hold the right button will make
dragonfly autonomously return to the home point.
You can also make dragonfly land by slowly pushing down the left
stick. Do not push down too hard or the aircraft may crash on the
ground. After landing, push the left stick to the lowest point and
hold for 5 seconds to shut down the motors.
The left dial is used to control the pitch of the gimbal within 90 degree.
The right dial is only used to adjust the gimbal to the front of the
aircraft.
Intelligent Fly
Gimbal control
ON
OFF
90º
ON
OFF
90º
An HD Video transmitter extends the transmission range up to 1km
working together with the remote controller. It is an optional
accessory which be added into the gimbal board as per
customer’s option.
Assemble a set of larger landing gears.
Fix a larger gimbal board with the HD transmitter inside under the
airframe by driving in a longer screw.
Connect the camera to the transmitter with a HDMI cable.
Turn on the camera, the aircraft and the remote controller.
After powered on, the transmitter will connect to a receiver inside
the remote controller by itself through 5.8G.
Connect your mobile device to the image receiver of remote
controller through WIFI. ( Wifi name: Simtoo, no passcode required )
Turn on the APP to check the video streamed from the camera.
HD Video Transmitter ( optional part )
Notes: With HD transmitter, the media is stored on your mobile device. For Iphone users,
please download another APP “SimtooII” to receive video stream from the HD transmitter.
HD Image Transmitter
HDMI Cable
Large Landing Gears

After Sales
Fly with Handheld Gimbal
1. If the watch or remote controller is powered off, dragonfly will
autonomously return home.
2. When the battery is low, the aircraft will emit an audible alarm
with the red LEDs flashing and autonomously land at its current
spot.
3. The control distance of watch is 50 meters and remote
controller is 1 km. If the aircraft flies out of the range and loses
connection, it will autonomously hover and return home.
Note the dragonfly drone is not a toy for children under the
age of 18.
Do not fly the drone near No-fly zone according to your local
regulations.
Please read through the user manual and make sure your
master full fly skills of dragonfly drone. Simtoo will not take any
responsibilities of damage, injury or financial loss by users’
misoperation.
Failsafe
Warranty
Disclaimer
We guarantee dragonfly drone to be free of manufacturing
and assembly defects for 12 months from the time of
purchase. During that period, we will repair or replace
products free of charge.However, this warranty does not
apply to any damage or subsequent damage due to users’
misuse, modification or as a result of failure to operate
according to instructions in this manual.
For updates of the product and user manual, please log on our
official webiste www.simtoo.com
If any questions about the product after purchase,
you could send email to service@simtoo.com. Our
staff will be at your service 7x24.
1. The handheld gimbal is an extra accessory used to take shots on
the ground with the gimbal and camera from the aircraft.
2. Mount the gimbal board under the handle and fasten with a screw.
3. Drive the mobile holder into the handheld gimbal and attach your
phone. (The holder is originally a part of the remote controller).
4. Turn on the camera and connect to your mobile APP through WIFI.
5. Turn on the handheld gimbal by pushing the switch button under
the handle. The LED on the top will turn green.
6. Pull out the base bracket, place the handheld gimbal on a flat
platform and let it run the self-checking for a few seconds.
7. After the checking is completed, the gimbal will be stabilized with
a beep sound.
8. Spin the dial on the back of the handle to tilt the camera up and
down.
9. Take photo or video by tapping on the mobile APP.
Handheld Gimbal (Optional accessory)
Mobile Holder
Charge time - 4 hours Battery Time - 2 hours
USB Port
Gimbal & Camera
Power Switch
Base Bracket
Gimbal Dial
Notes: Do not hold the handheld gimbal while it is doing self-checking.

Authorized Agency
 Loading...