

Page 1

SIMS, Inc.
SIMS III Manual
Page 2

Table of Contents
Chapter 1: SIMS III log in screen and toolbar ........................................................................................ 2
Chapter 2: .SIMS III Toolbar files menus ............................................................................................. 12
Chapter 3: SIMS III Edit account menu ................................................................................................ 25
Chapter 4: SIMS III edit add account .................................................................................................. 57
Chapter 5 : SIMS III Edit dealer account .............................................................................................. 64
Chapter 6: SIMS III Table Maintenance ............................................................................................... 82
Chapter 7: SIMS III Reports ............................................................................................................... 115
Chapter 8: SIMS III Service ............................................................................................................... 129
Chapter 9: SIMS III System ................................................................................................................ 148
Page 3

Chapter 1: SIMS III log in screen and toolbar
Page 4

SIMS III Log In Screen
Users must enter their user name and password
Password is not case sensitive
SIMS III Main Menu
In most of the fields, users can click on them and press F1 for help
Page 5
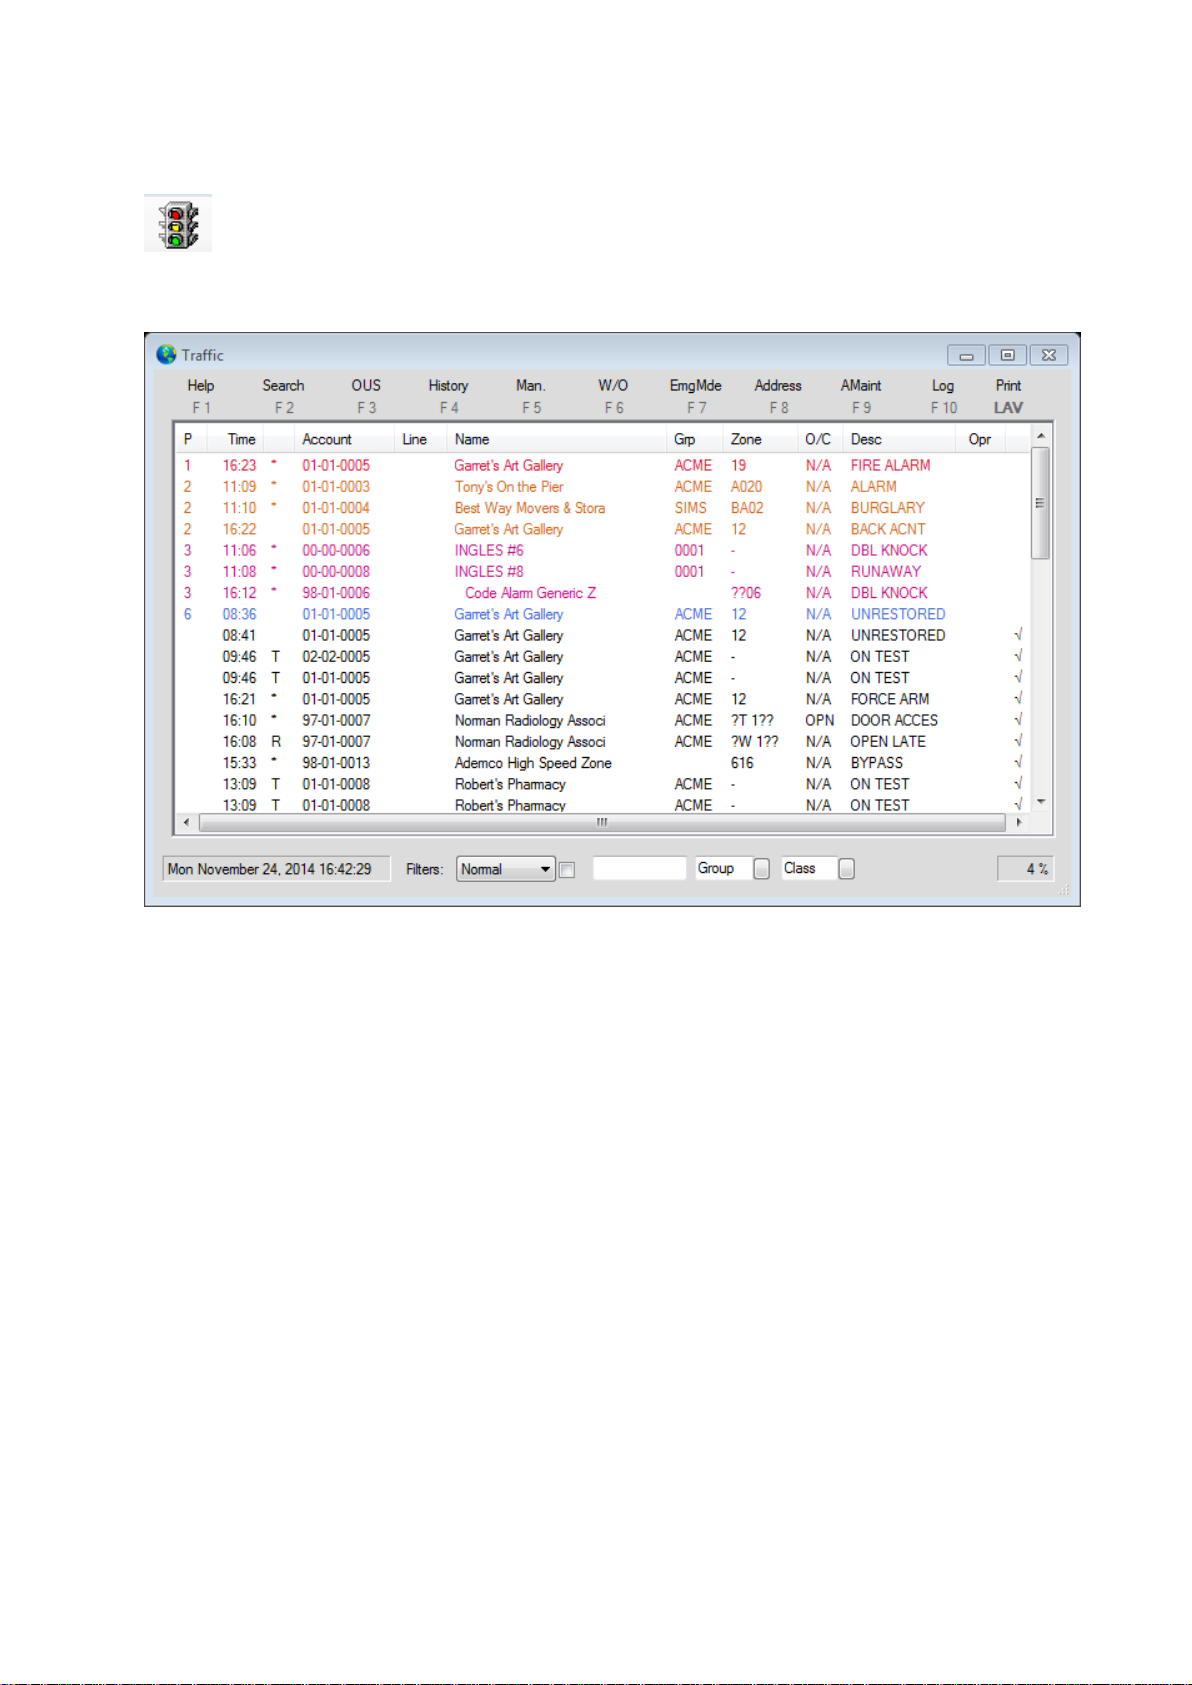
Alarm Traffic Screen. Displays traffic in real time
Traffic display
In the Traffic Display users can access:
Help Menu by clicking Help or F1
Account Search by clicking Search or F2
Out of Service by clicking OUS or F3
Parameters on Account Historical report [H-S-A.FWR] by clicking History or F4
Manual Alarm by clicking Man. or F5
Account Search (create work order) by clicking W/O or F6
Emergency Mode by clicking EmgMde or F7
Address Selection by clicking Address or F8
Account Search (Edit) by clicking AMaint or F9
Log on log of by clicking Log or F10
Report Viewer by clicking Print
Page 6
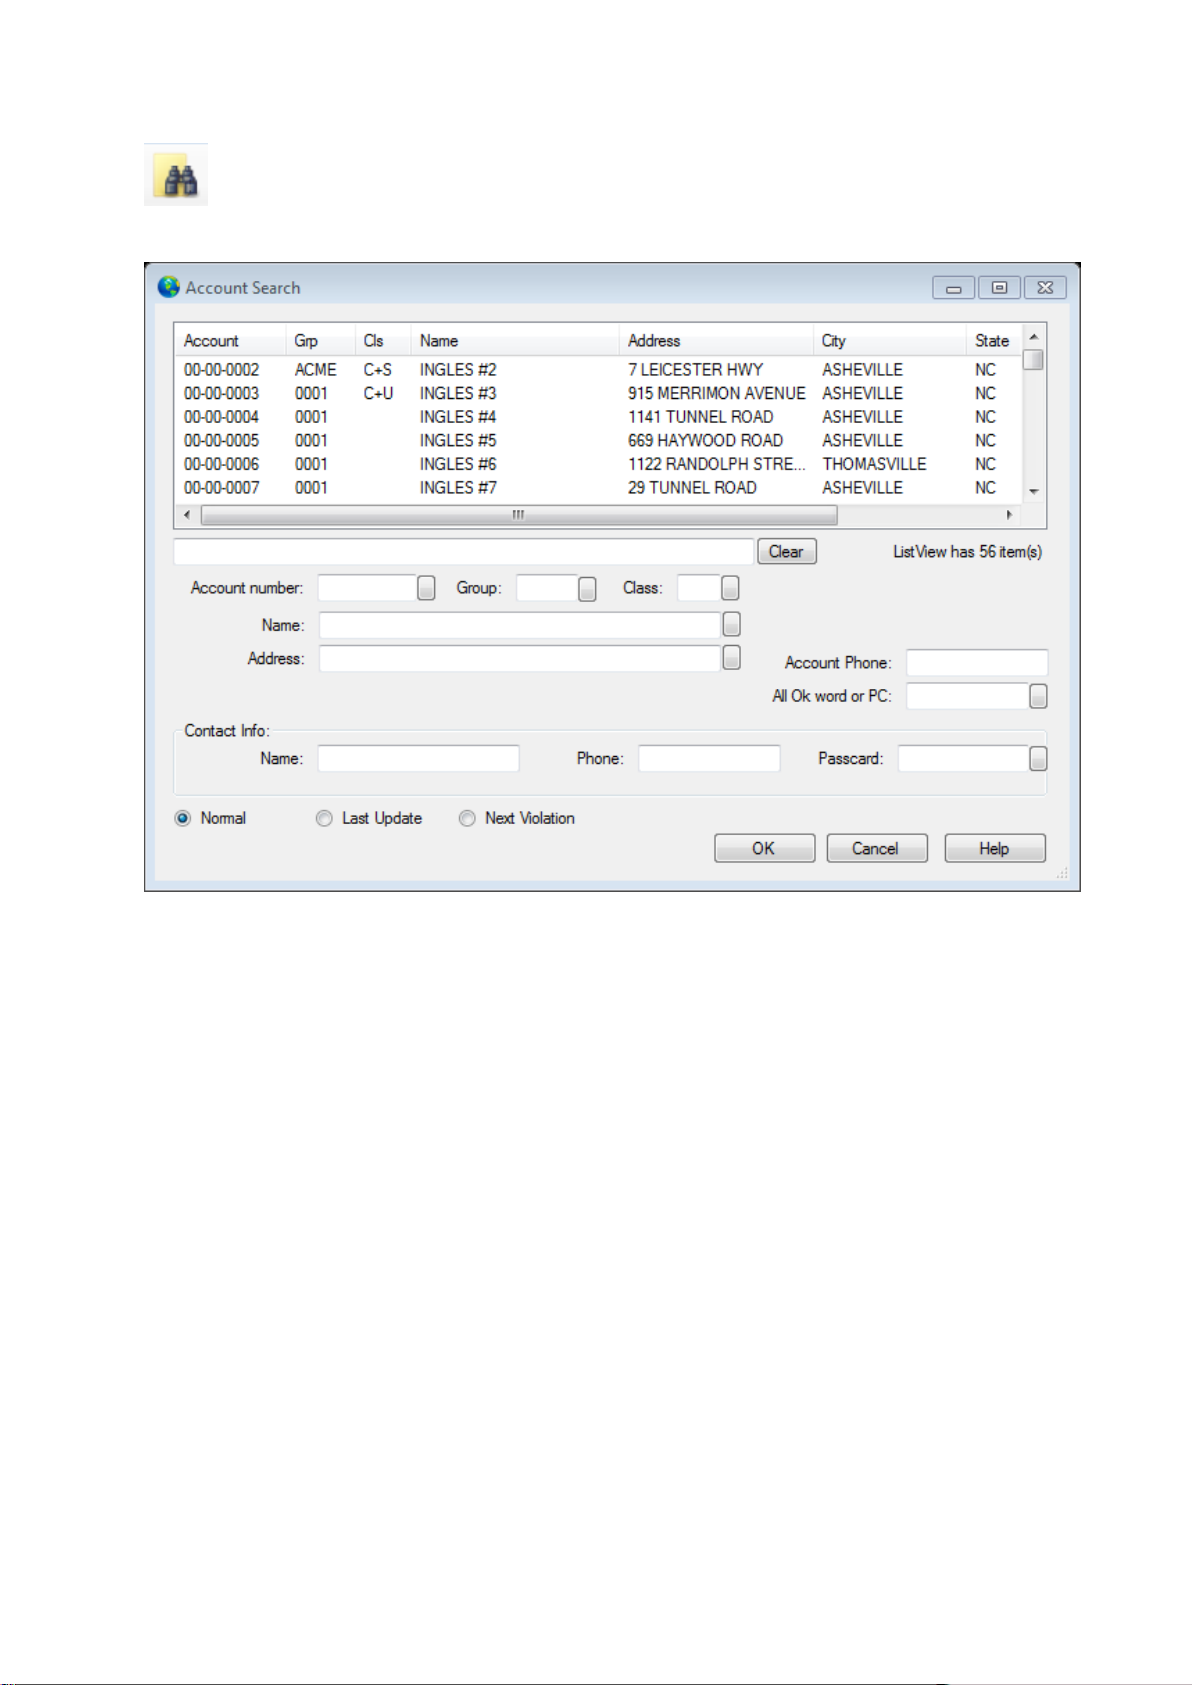
Find Accounts/Dealers. Displays Account Search
Account Search
Page 7

Edit Account
Account Search (Edit)
Generate Manual Alarm
Displays Manual Alarm entry
Page 8
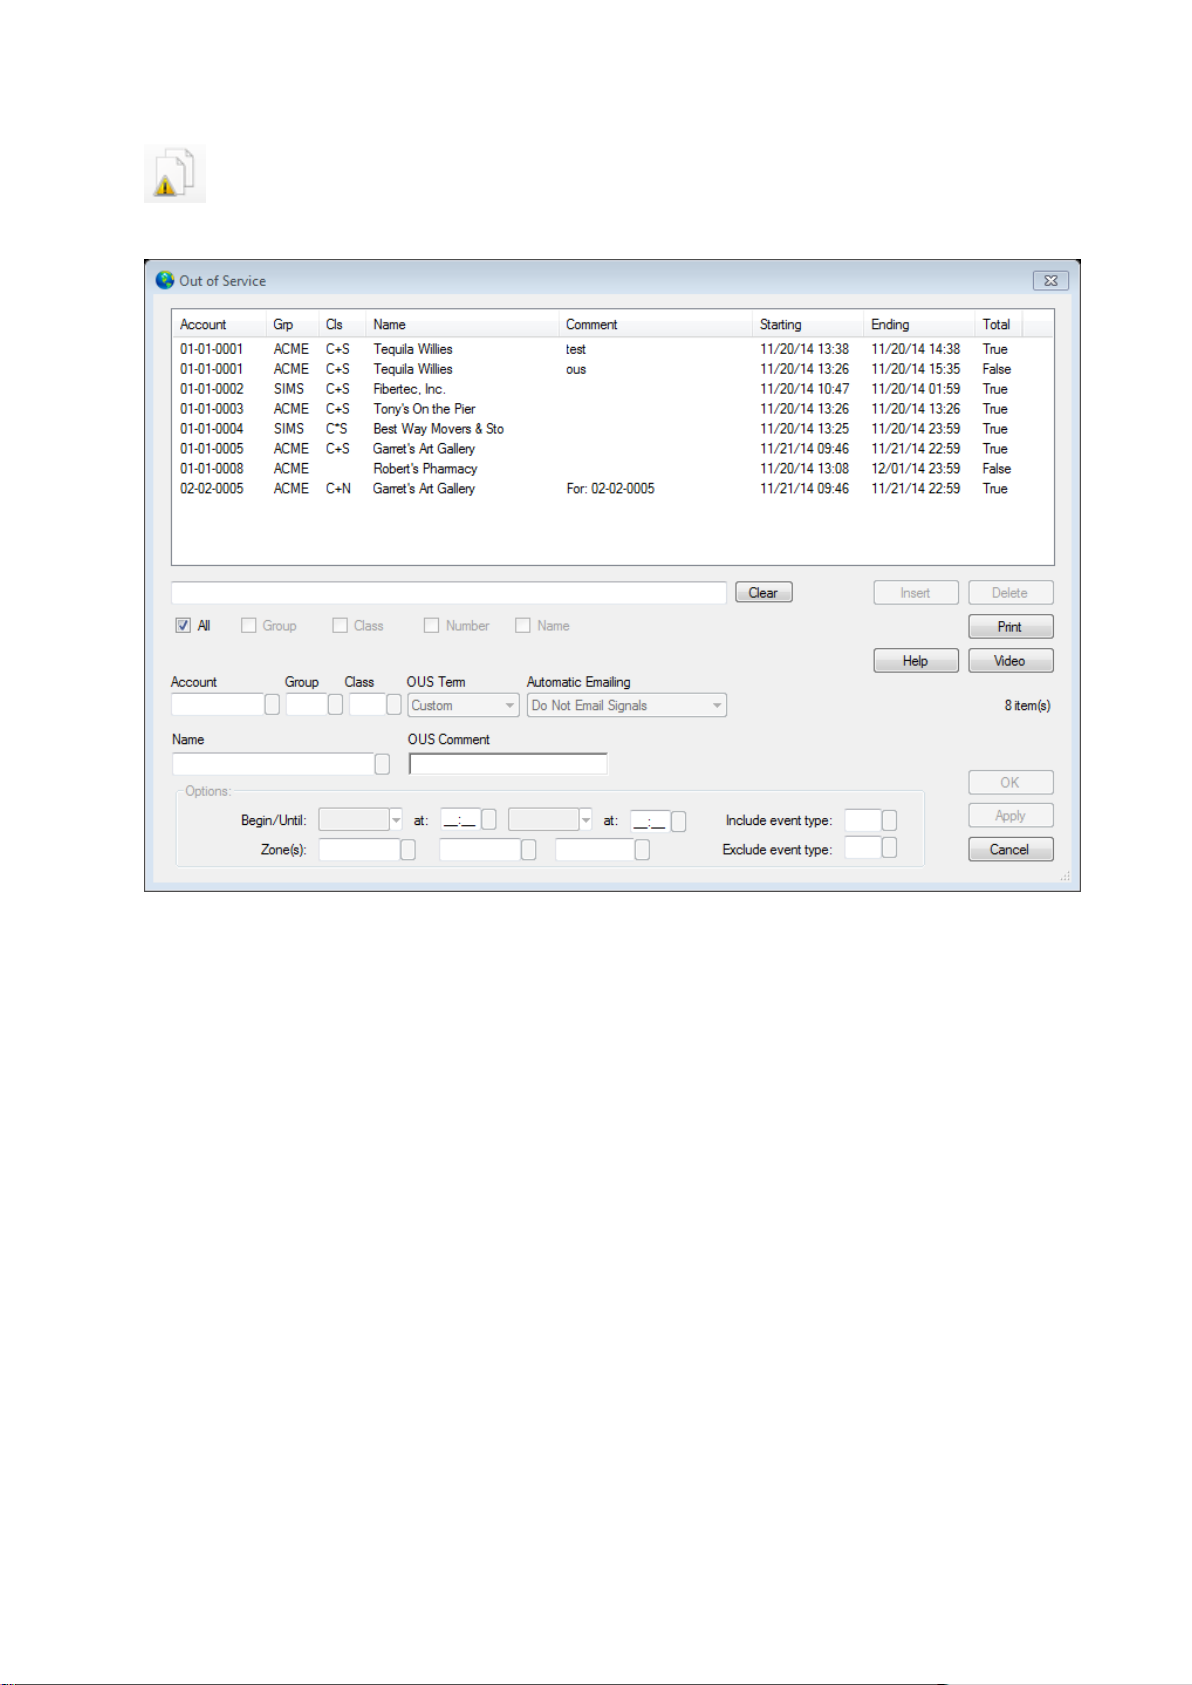
Out of service
Displays out of service
Page 9
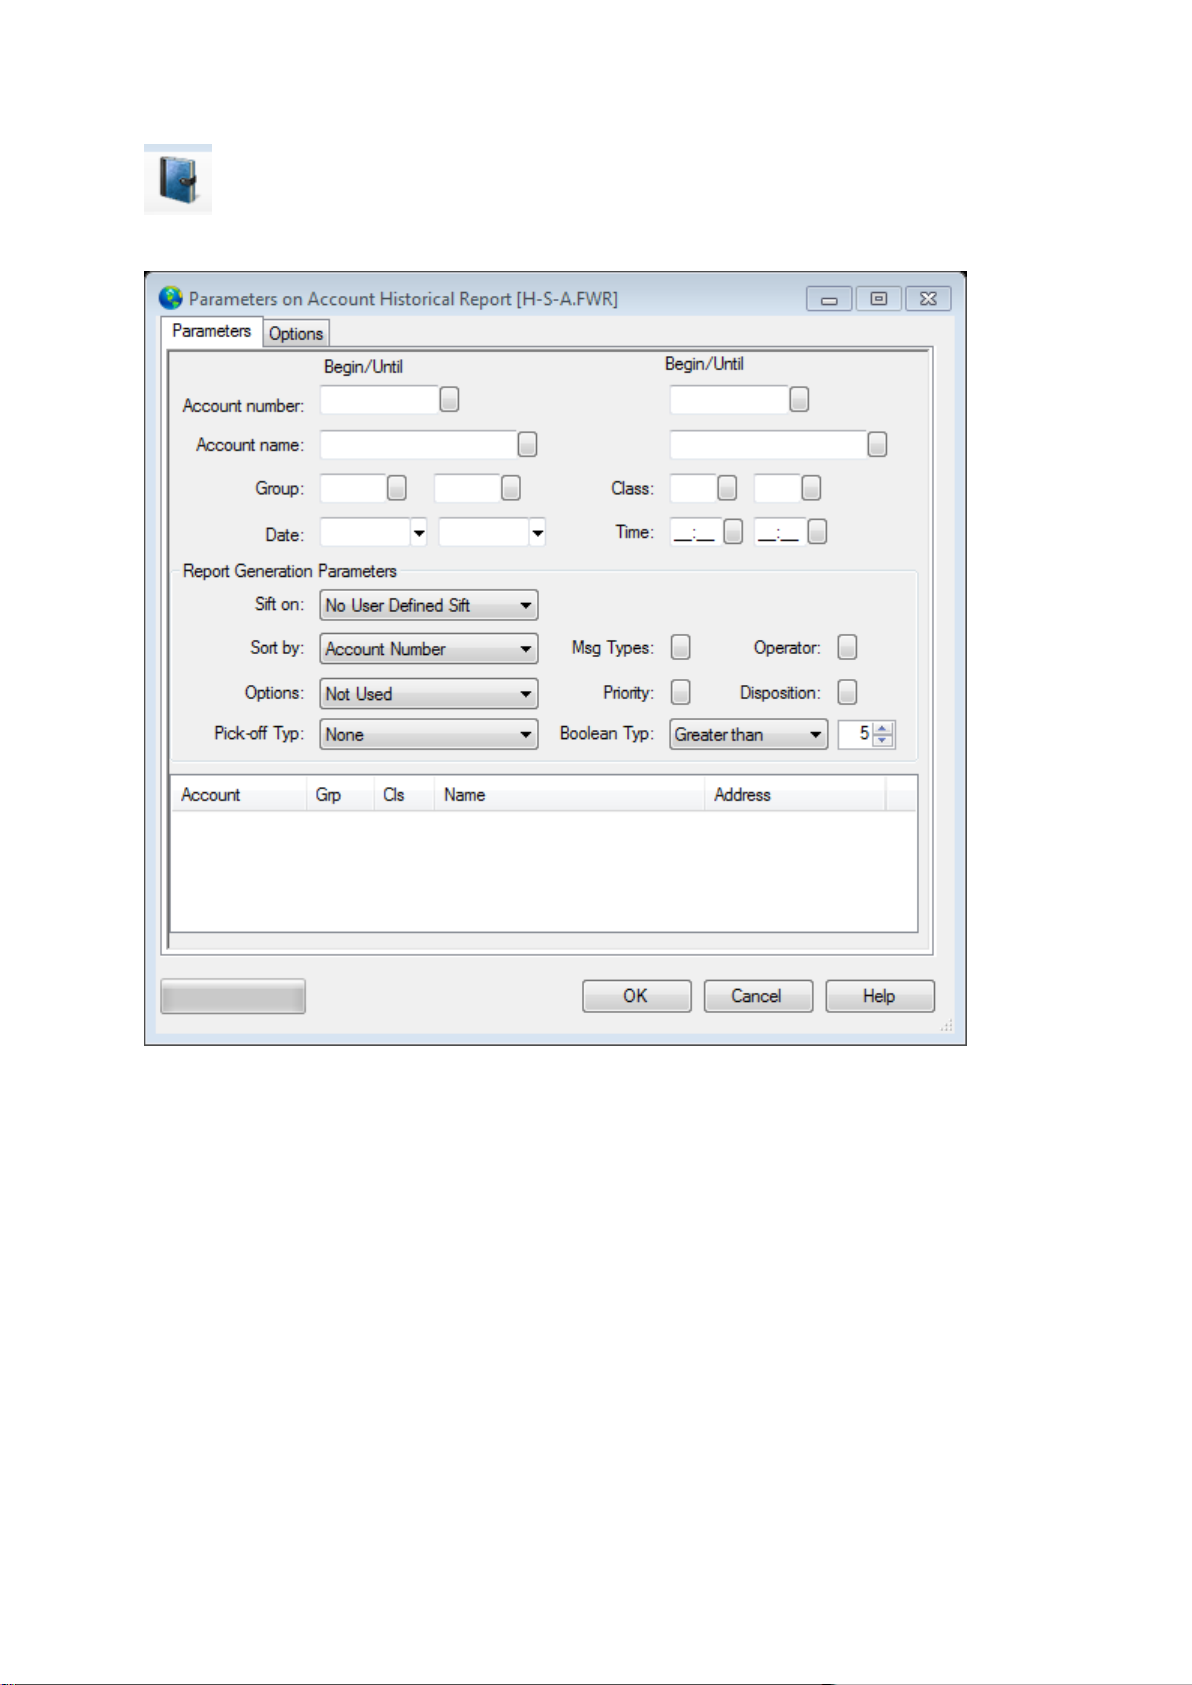
All events detail
Displays Parameters on Account Historical Report [H-S-A.Fwr]
Page 10
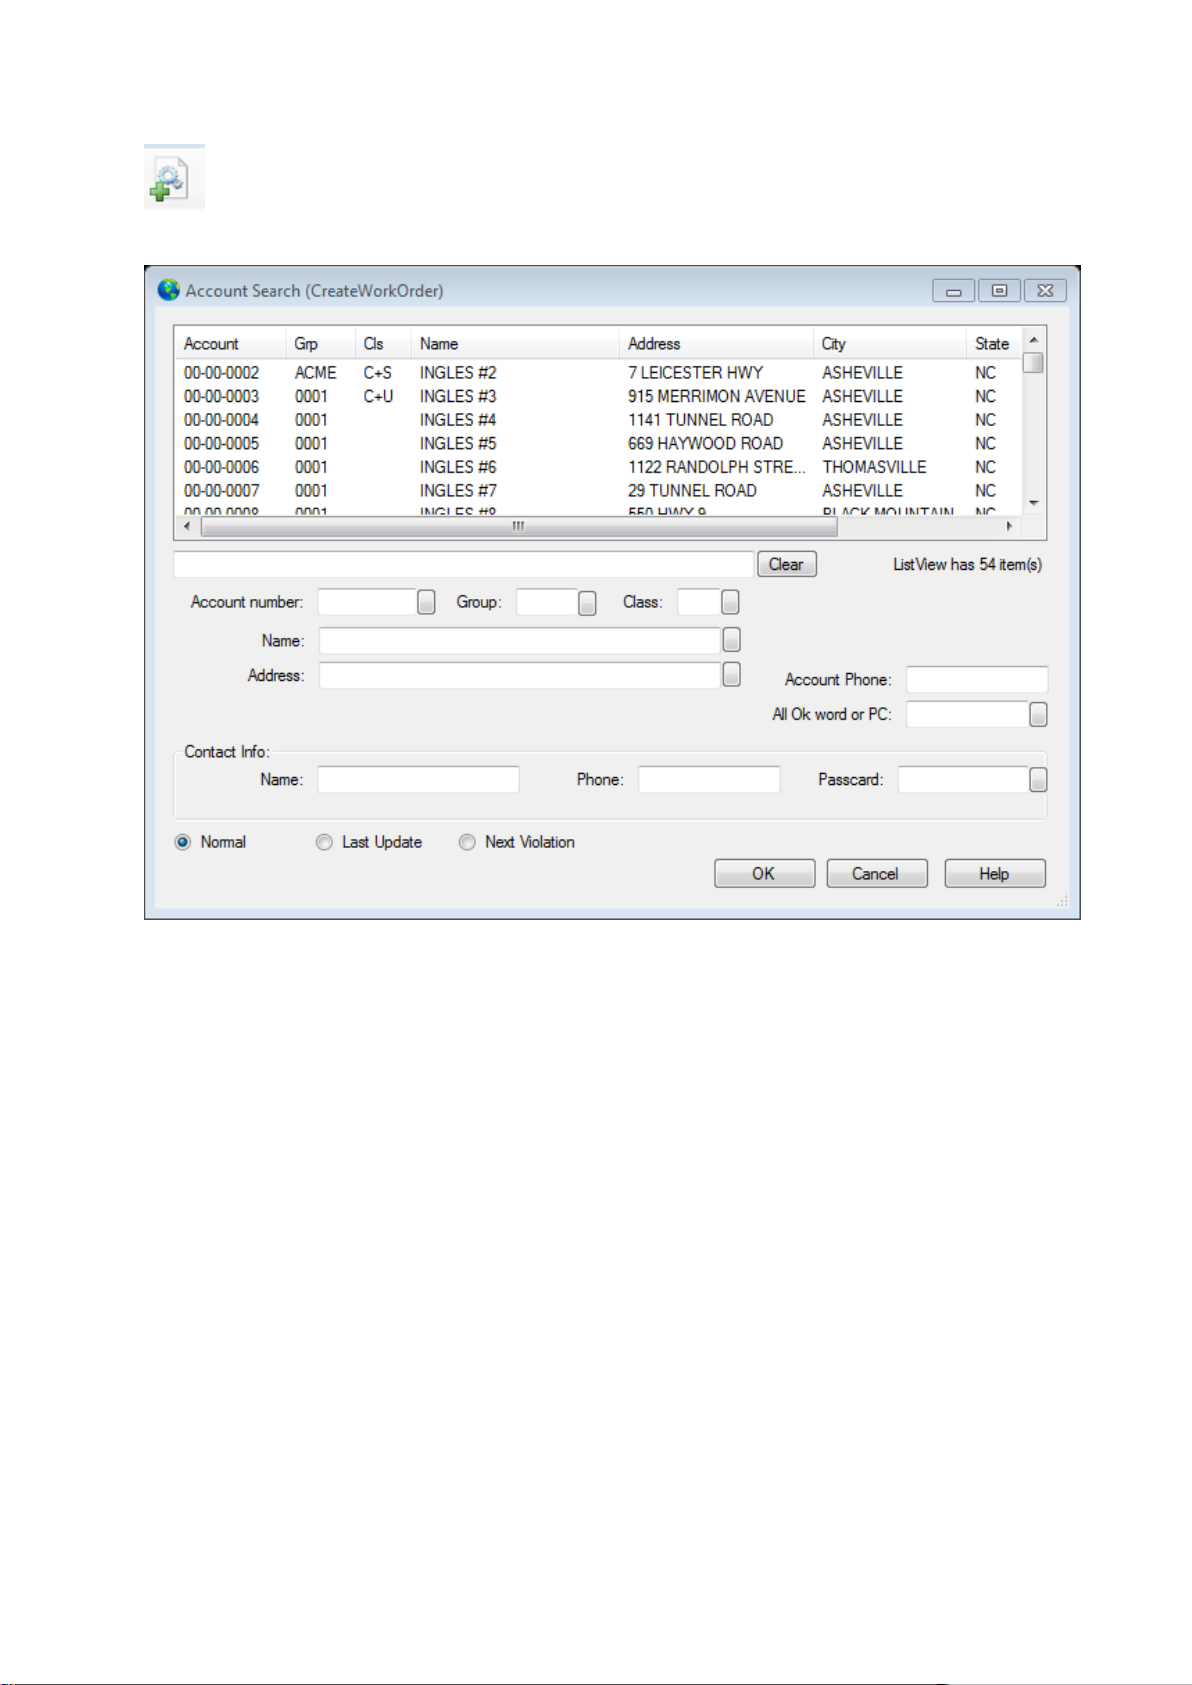
Generate Service work order
Displays Account Search (Create Work Order)
Page 11
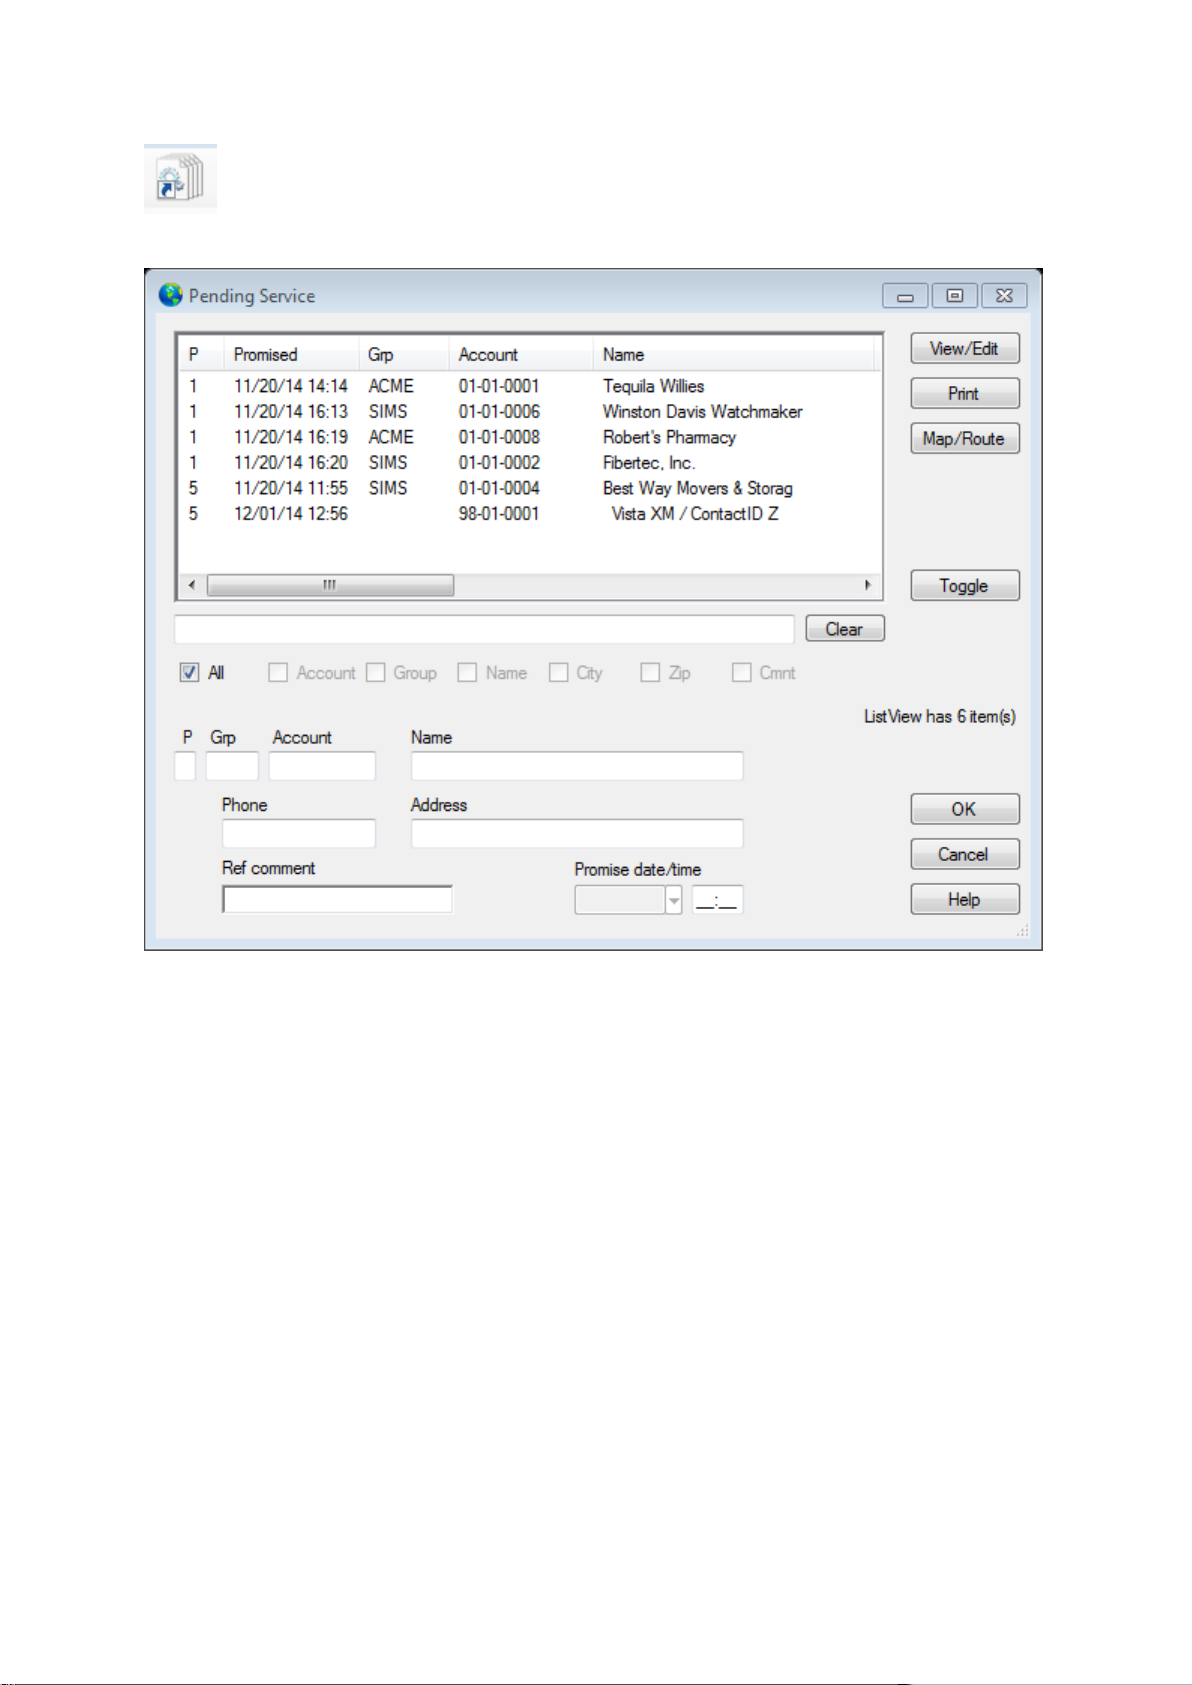
Edit/Complete Service Work Order
Displays Pending Service
Page 12
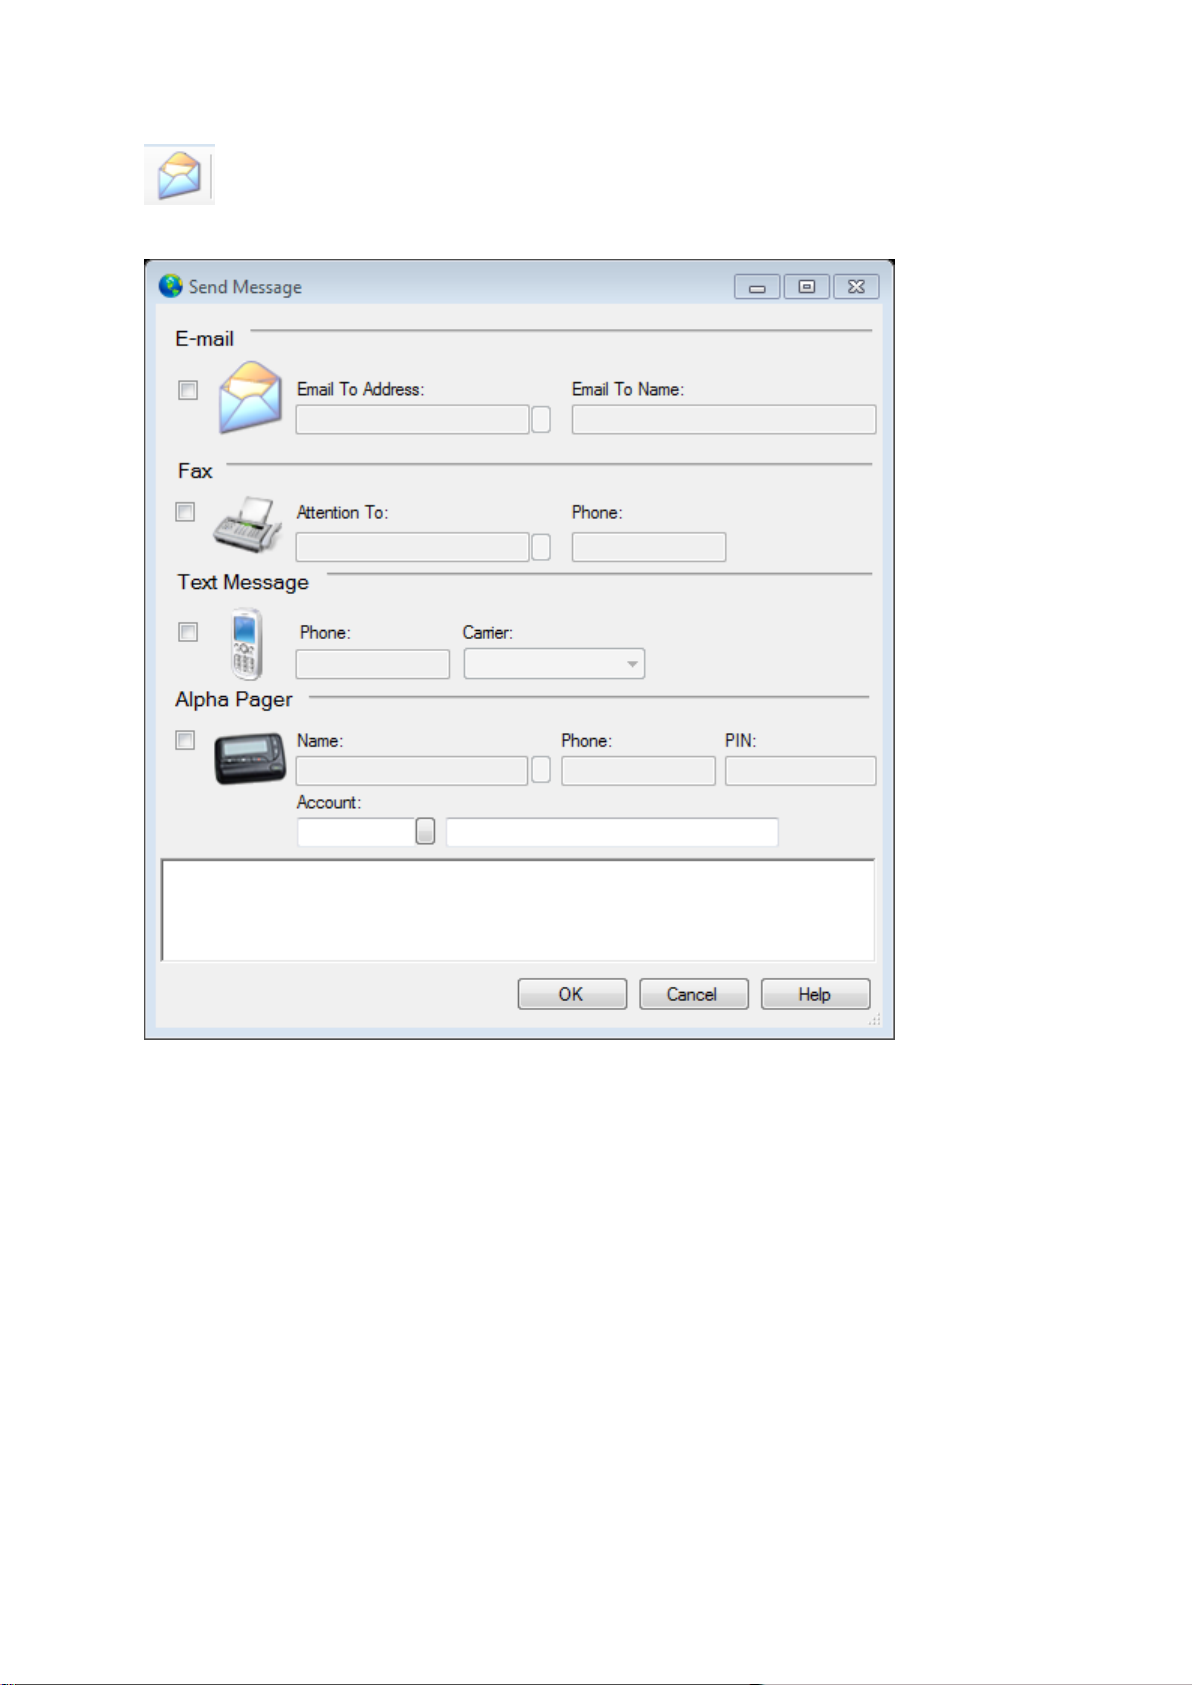
Send pager/email/fax message
Send Message
Page 13

Chapter 2: .SIMS III Toolbar files menus
Page 14
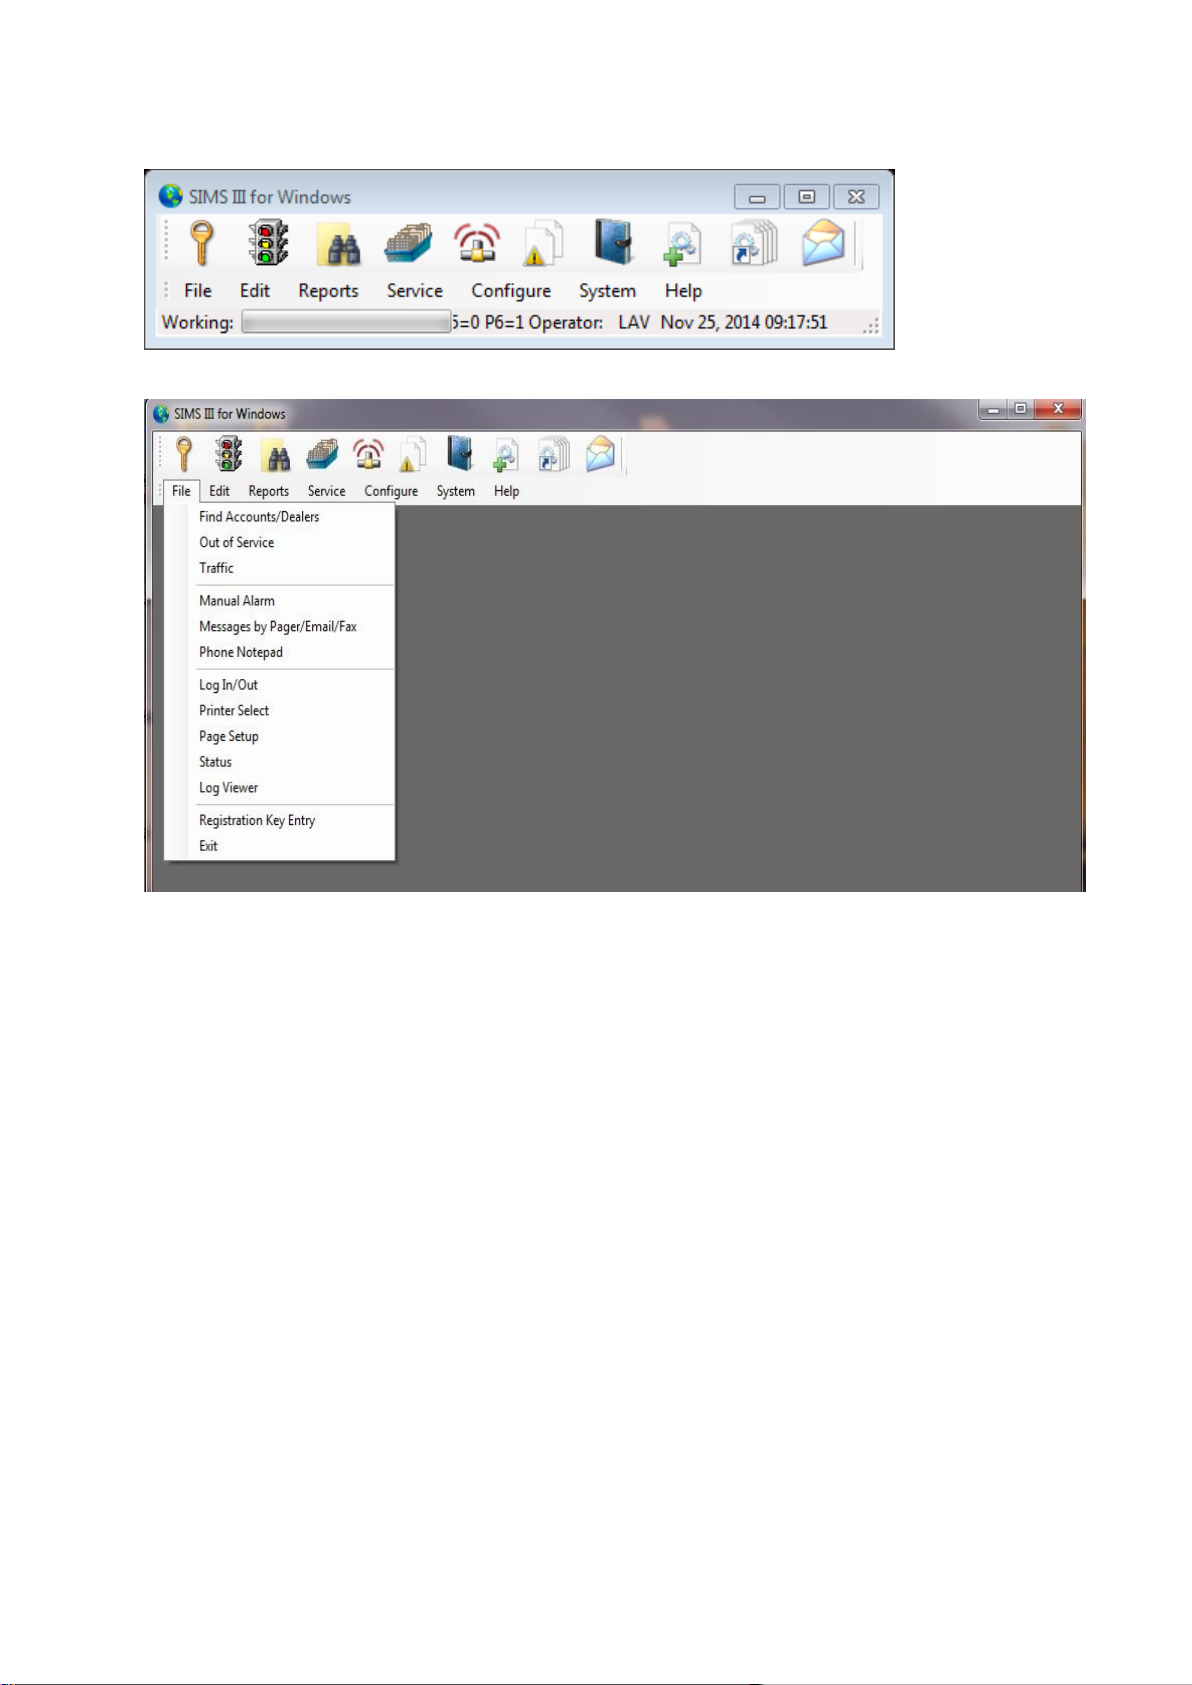
In most of the fields users can click on them and press F1 for help
File: menu
Under Find Accounts/Dealer users will be able to search for accounts by Account number, Group,
Class, Name, Address, Account Phone, All Ok word or PC, name, Phone and Passcard .
By selecting Normal option users will see the current status of accounts
By selecting Last Update users will see when the account was last updated (date and time)
By selecting Next Violation users will see next violation status (open or closed or date and time of
next violation)
Under Out of Service users will be able to place accounts and/or account zones out of service
temporarily or permanently.
For test purposes the technicians/operations personnel will be able to place account out of service.
The Out of Service dialog box is provided in order to allow subscribers to send in signals and to allow
them to auto-log (i.e., not require operator action). Operations personnel may place an account or an
account's zone(s) Out of Service either temporarily or permanently out of service. Additionally, an
account may be placed Out-of-Service at some future time (e.g., next week). After selecting this
option the Out of Service dialog box will be displayed.
Another way to put an account out of service is with the F5 hot key from the search, priority or
routine action mask
If Out Of Service as Read only is enabled you will not be able to perform updates within the Out-ofService dialog
Page 15
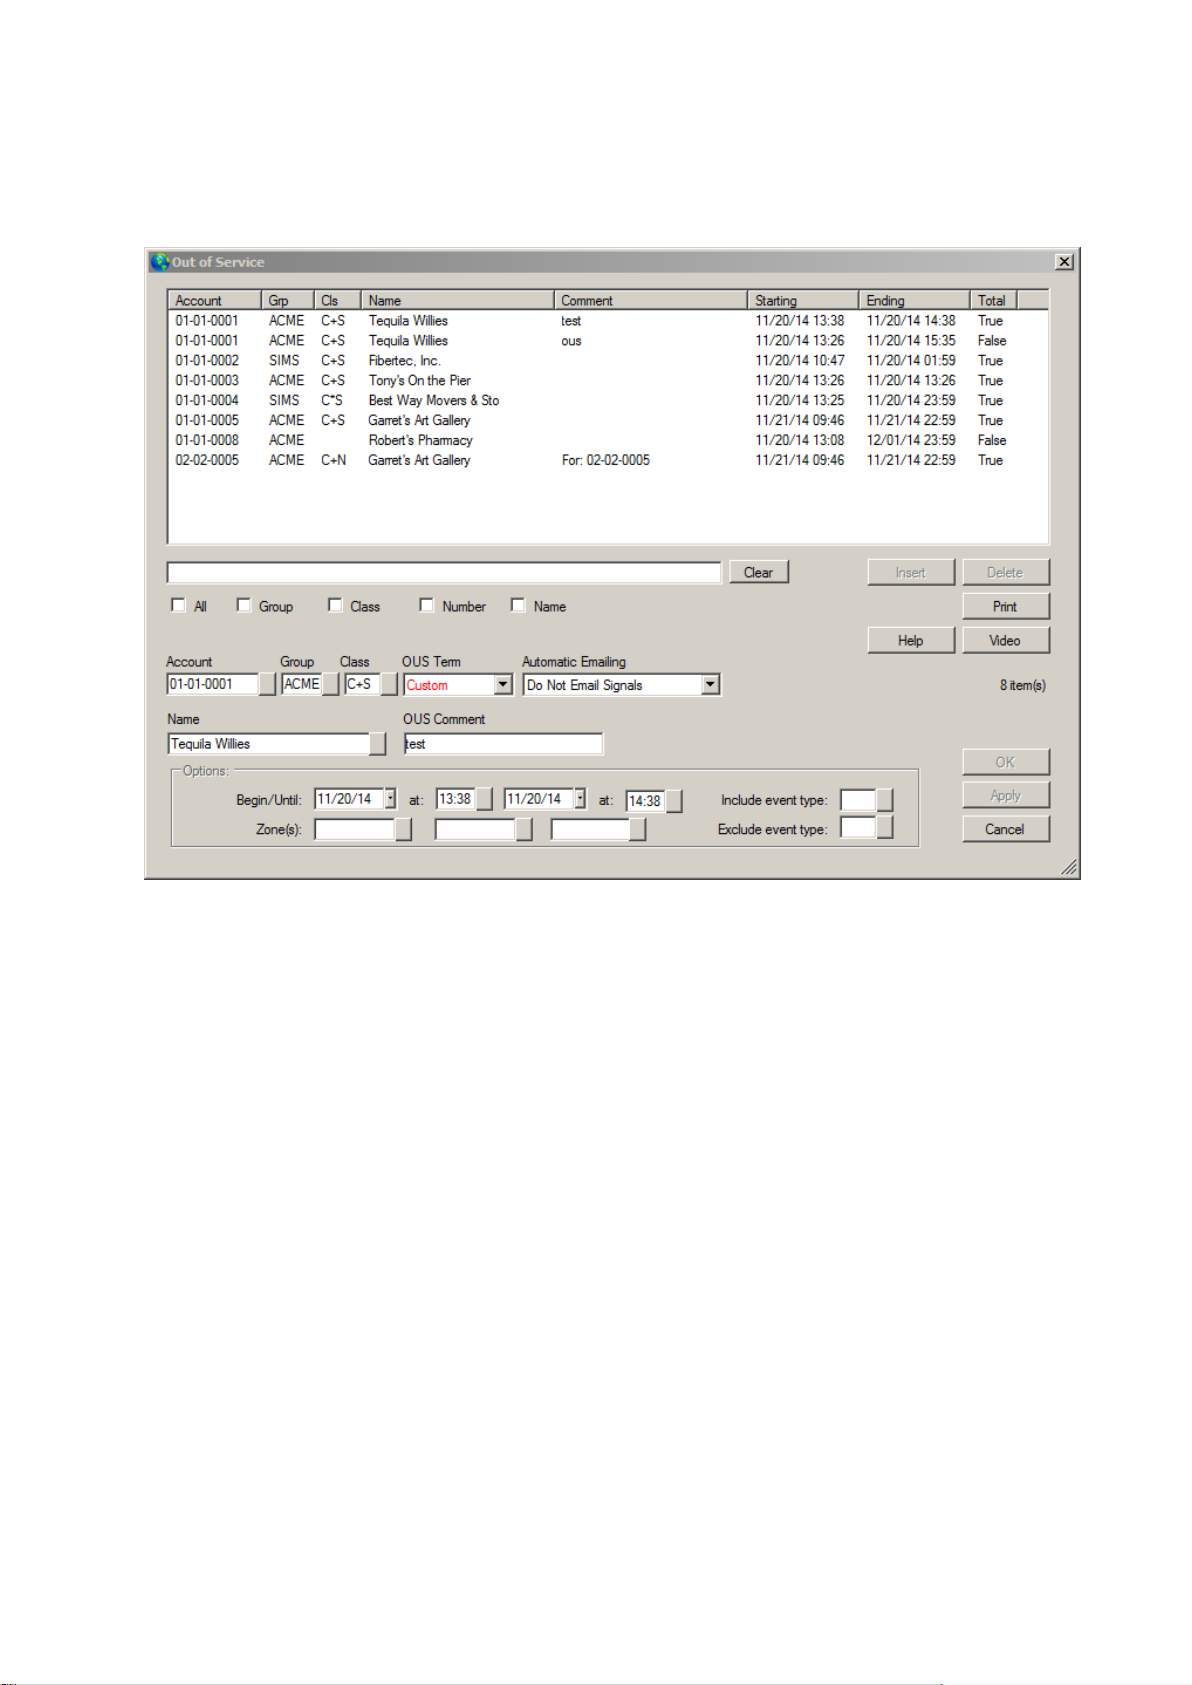
The maximum number of hours that an account that can be placed out of service is determined by the
MaxOUS located in the Premise tab of the account database.
How to add or edit an Out of Service entry
1. Click Insert button to insert a new entry into the list or, to edit an existing entry, click on the item
in the Out of Service List.
2. Select the account or accounts that you want to place out of service. You can do this by Group,
Class, Account Number, Account Name or combinations of these fields. You can type the
information manually or you can click the button adjacent to the fields and select an entry from the
Account Number Pick List.
3. Optional: Enter a comment about the out of service entry in the OUS Comment field.
4. Use the OUS Term drop box to select the period of time to put the account out of service for.
Options are: Custom, OUS for 1 hour, and OUS for 2 hours, OUS till noon, OUS till 5pm. If you
select the Custom, then you have to enter the Begin Date, Begin Time, Until Date and Until Time.
By default the Begin Date is the current date and the Begin Time is the current time. You can type
those dates and times manually or you can click the button adjacent to the file and select an entry from
the pick list.
8. Optional: If you wish to place a specific zone out of service enter the Zone(s) in the Zone 1 and/or
Zone 2 and/or Zone 3 fields. If all zones are to be placed out of service do not enter any zone
information.
Page 16

9. Optional: If you wish to place a specific Event Type out of service select the Include Event Type
field and enter the event type {or} click the button adjacent to the field and select an entry from the
Event Priority Level Pick List.
10. Optional: To exclude a specific Event Type from out of service select the Exclude Event Type
field and enter the event type {or} click the button adjacent to the field and select an entry from the
Event Priority Level Pick List.
11. Click Ok.
How to return an account/dealer to service.
1. Select the account/dealer you want to return to service and click the Delete button.
OR
2. Select the account/dealer you want to return to service and in the until Date/Time, put in the current
Date/Time.
Click OK.
Page 17
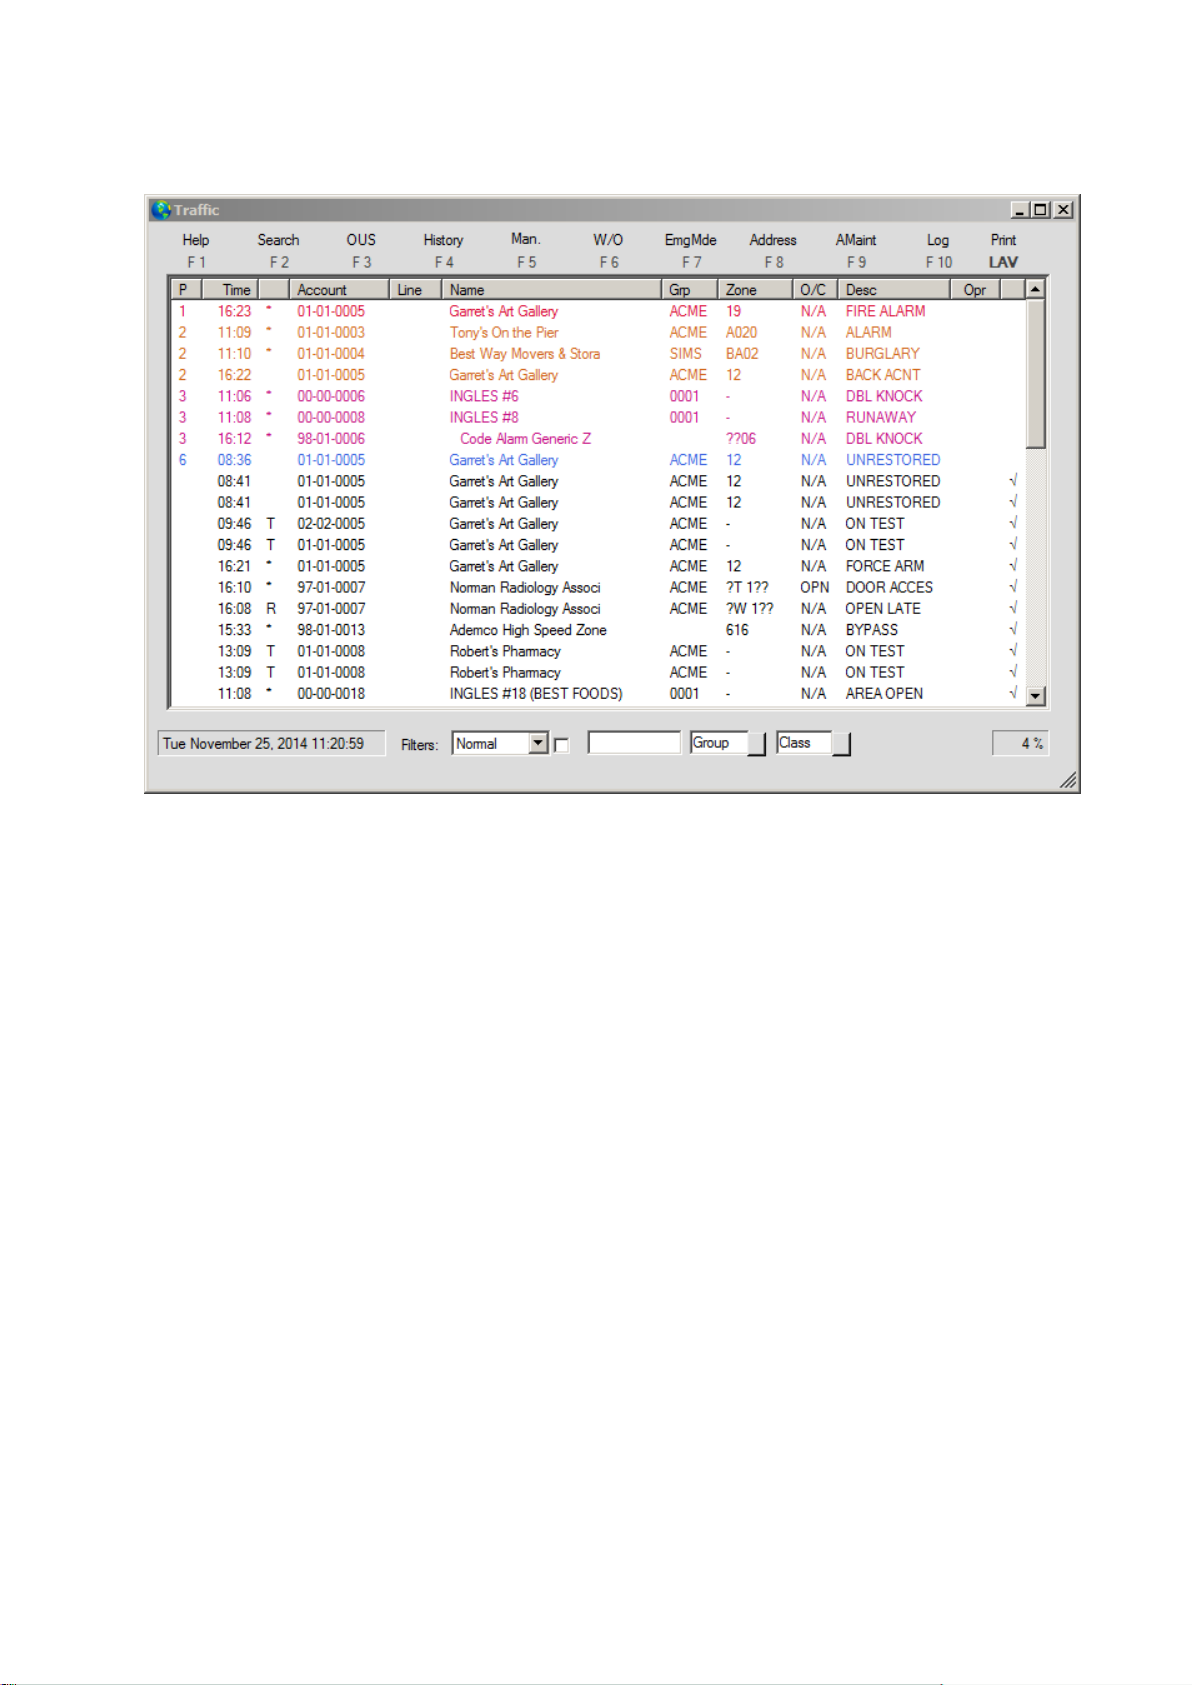
By selecting traffic menu from file menu, users will open traffic display:
This window contains pending and completed events received or manually generated. It allows
operators to see incoming traffic of alarms and to select the alarm (or alarms) they wish to act upon.
To display the traffic Window you can either go to "File | Traffic" from the SIMSIII main Window or
you can click on the traffic light icon located on the main Window of SIMSIII.
To select a pending event from the traffic display, you can double click the exception event in the
Traffic Display List or click the exception event in the Traffic Display List and strike Enter or click
Ok.
Traffic display placement:
The Events Area provides a prioritized display, based on their priority level and time received of
pending and previously completed events. Exception events (i.e. requiring operator action) are
assigned a priority level based on the event type (e.g., fire, burglary, panic etc.) while a 'check-mark'
to the right of the event designates previously completed or auto-logged (e.g., normal open, close and
test) events.
The SIMS III program normally prioritizes exception events (i.e. requiring operator action) in the
Traffic Display area using two criteria. This sorting is based on highest priority first along with the
oldest incoming signal time. Thus a Priority 1 signal received at 17:00 will take jurisdiction over a
Priority 1 signal received at 17:01, or a Priority 2 signal received at 16:59. In summary, the oldest,
highest priority events will appear at the top of the screen. Each later event of equivalent or lower
priority will be ranked downward. Auto-logged and/or previously completed exception events will be
placed beneath any pending events.
Page 18

Altering the traffic display order:
It is possible for operators to re-order the Traffic screen pending events. This allows operations
personnel to quickly shuffle the events so that all pending events may be grouped together by the
account name, then after review, return to the normal priority and time ranking method of displaying
events.
Operators can achieve this by clicking on the header corresponding to the column of the traffic screen
that they want to use as sort criteria. For example, to sort the events on the traffic screen by subscriber
name click on the header titled "Name". That will result on the events being sorted alphabetically by
subscriber name in ascending order. Click again on the same header to change the sorting to
descending order.
The same thing applies for all other headers. Click on the header titled "P" to restore the default
sorting (by priority).
Scrolling through the traffic display:
The traffic screen of SIMSIII has a display buffer for up to the number of signals the system is
configured for. Only a fraction of the signals are visible at the same time (the exact number of signals
displayed at the same time varies and depends on the size of the traffic window).
It must be clearly understood that all events in this display buffer are constantly being reorganized due
to the priorities (first) and times (second) of incoming signals. By way of this shuffling the operator
only has visual contact with a subset of the signals on screen at any time.
This is to say that if the operator has visual display of twenty priority 2 and 3 events and a priority 1
event is received, it will immediately be shuffled to the top of the display buffer and into the
operator's vision. Keep in mind that although only a fraction of the events may be visually seen at any
one time on the display, operations personnel have the ability to 'scroll' the screen if desired. They can
achieve this by keyboard or mouse. To scroll the traffic screen operator can slide the scroll bar on the
right side of the window. If they want to do it by keyboard they can use the following keys: Page Up,
Page Down, Up Arrow, Down Arrow, Home and End.
Traffic Screen Colors:
By default, each priority is represented on the traffic screen with a different text color and the same
background color (white). The color assigned to each priority level can be modify by going to
Edit/Table Maintenance/ Traffic colors and sound options
Audible Alerts:
SIMSIII is capable of playing audible alerts (wav files) on the workstation computer to alert the
operator of the presence of an alarm on the traffic screen. By default, each priority level (1 through 9)
has its own audible alert assigned. The audio file assigned to each priority level can be modified by
going to Edit/Table Maintenance/ Traffic colors and sound options
Under manual alarm users will be able to simulate signals which would normally transmit from the
receiver(s), generate signals in case of receiver malfunctions, and for testing purposes. After selecting
this option the Manual Alarm dialog box will be displayed
Page 19
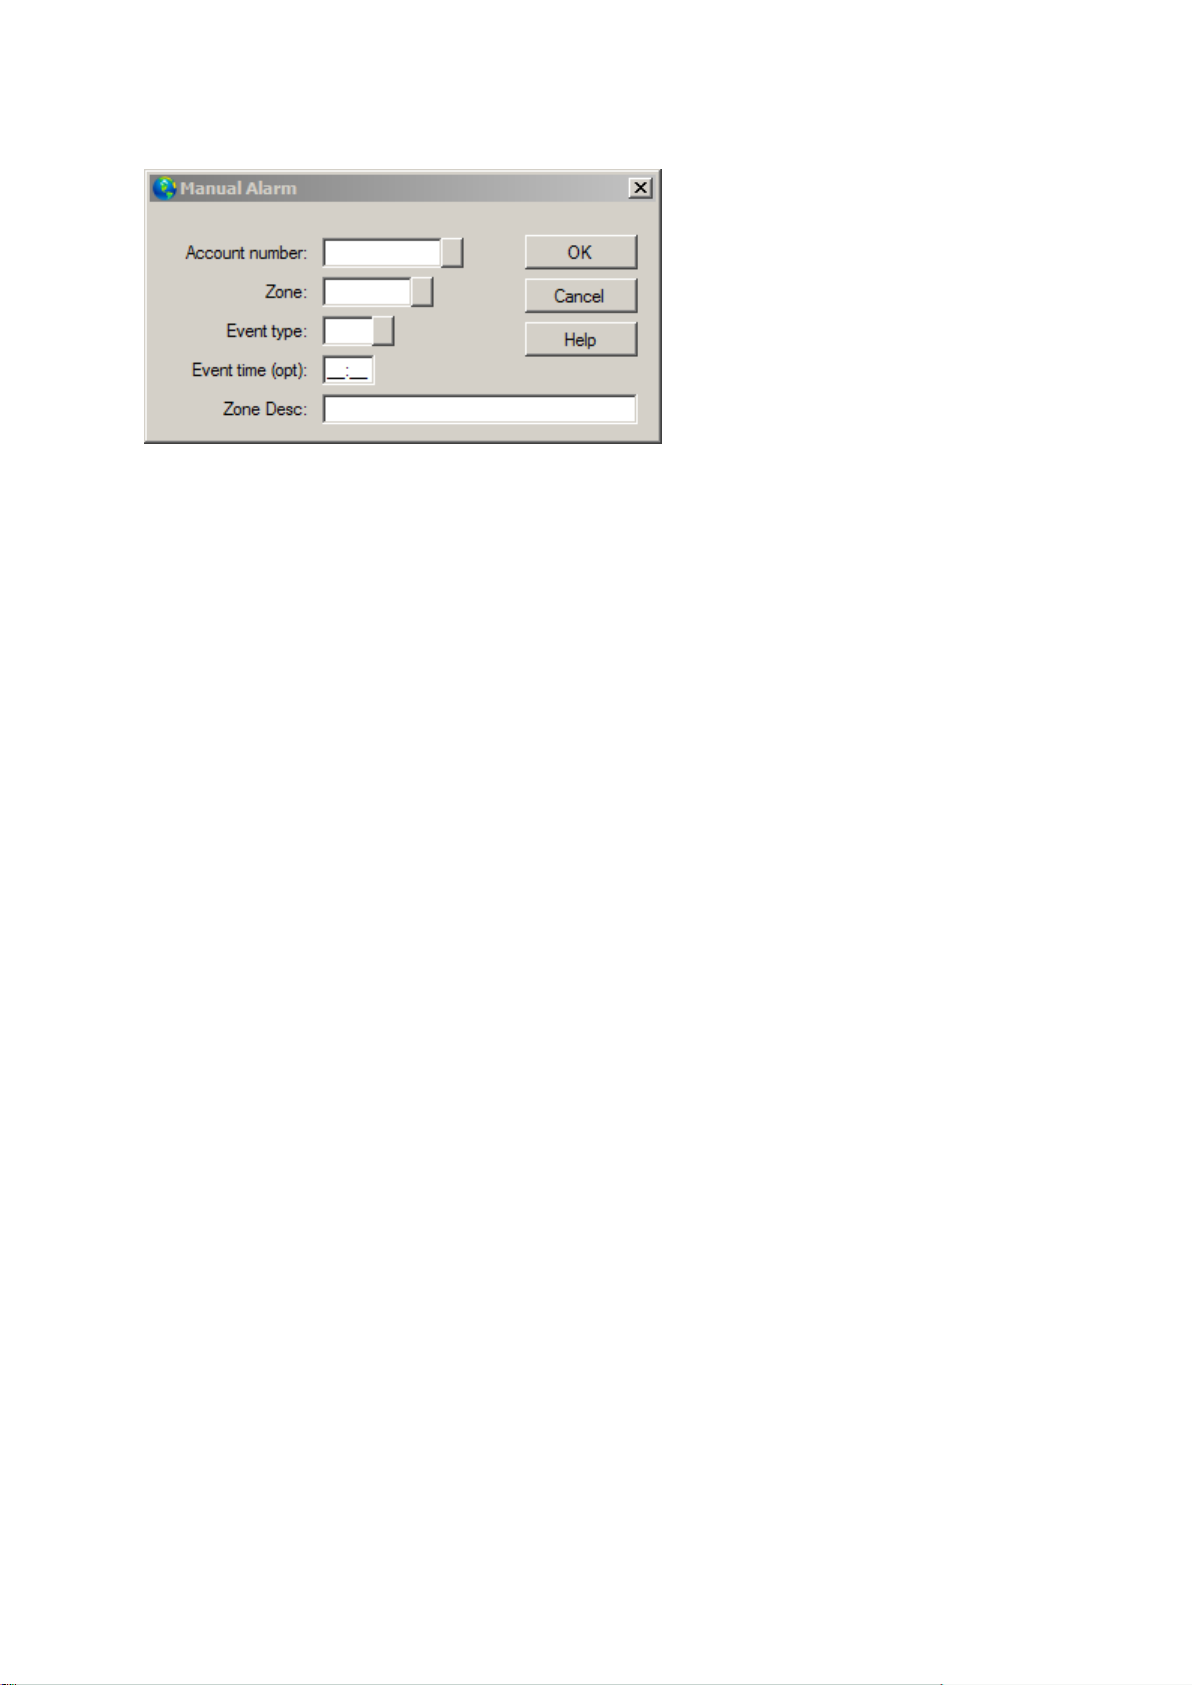
To create a Manual Alarm:
Select the Account Number field and enter the account number you wish to create the event
for {or} click the button adjacent to the field and select an entry from the Account Number
Pick List.
Select the Zone field and enter the zone you wish to crate the event for {or} click the button
adjacent to the field and select an entry from the Account Zone Pick List.
Optional: Select the Event Type field and enter the type of event to create {or} click the
button adjacent to the field and select an entry from the Event Priority Level Pick List.
Optional: Select the Event Time field and enter the time to create the event for {or} click the
button adjacent to the field and select an entry from the Time (Short) Pick List. Note that
entry of a non-current time will cause the event to be slightly out of chronological history
order.
Click Ok to create the event.
Messages by pager email fax
Allow users to send messages by page, fax, text or email.
Page 20
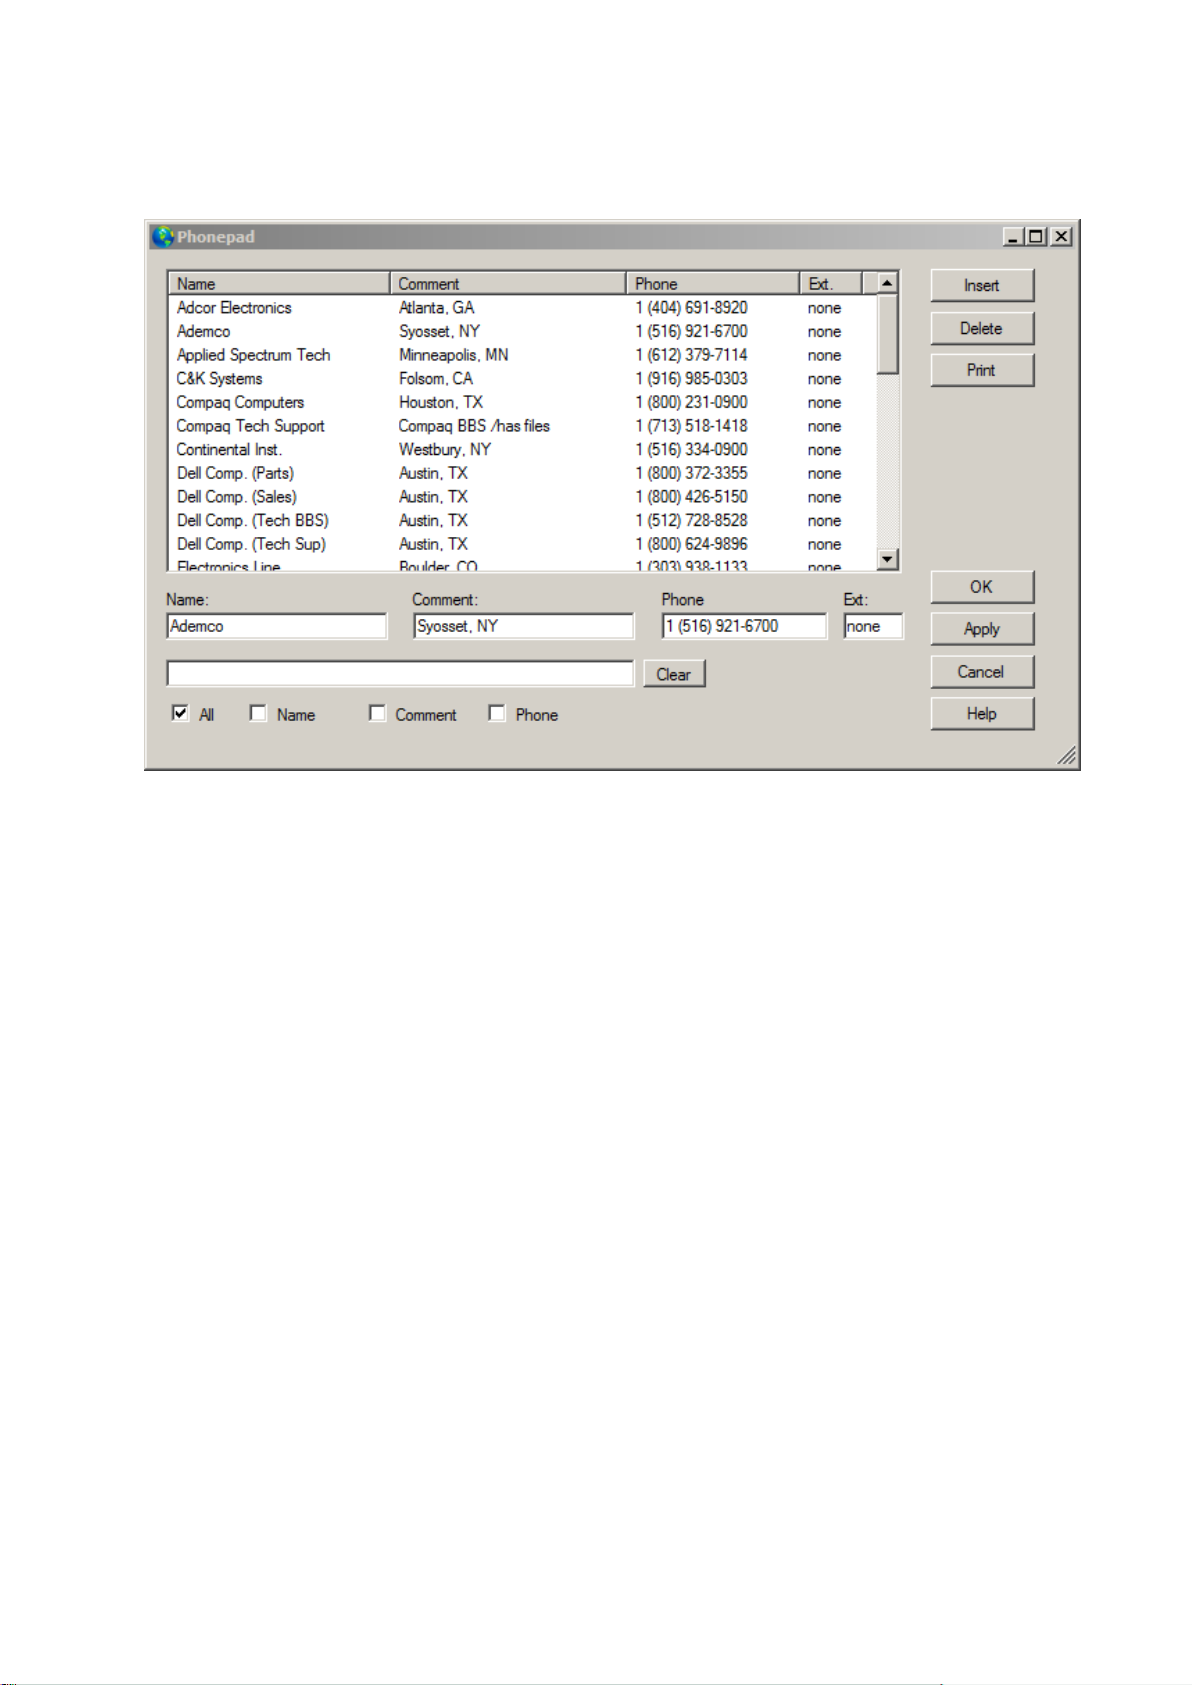
Phone notepad
Phonepad:
Phone pad in allowing users to add, delete or modify phone numbers and extensions as well as
companies names and their comments/locations
To add, editor or insert an entry into the Phonepad dialog box.
Click Add to insert a new entry into the list {or} click the Phonepad List entry you wish to
edit.
Select the Name field and enter the name.
Optional: Select the Comment field and enter a comment.
Select the Phone field and enter the phone number. If Phone Number Formatting option is
turned on, you do not need to insert parenthesis, hyphens or spaces as the program
will automatically format the phone number for you.
Optional: Select the Extension field and enter the phone extension.
Click Ok.
Log in/log out
Logs users in or out of the SIMS III program
Page 21
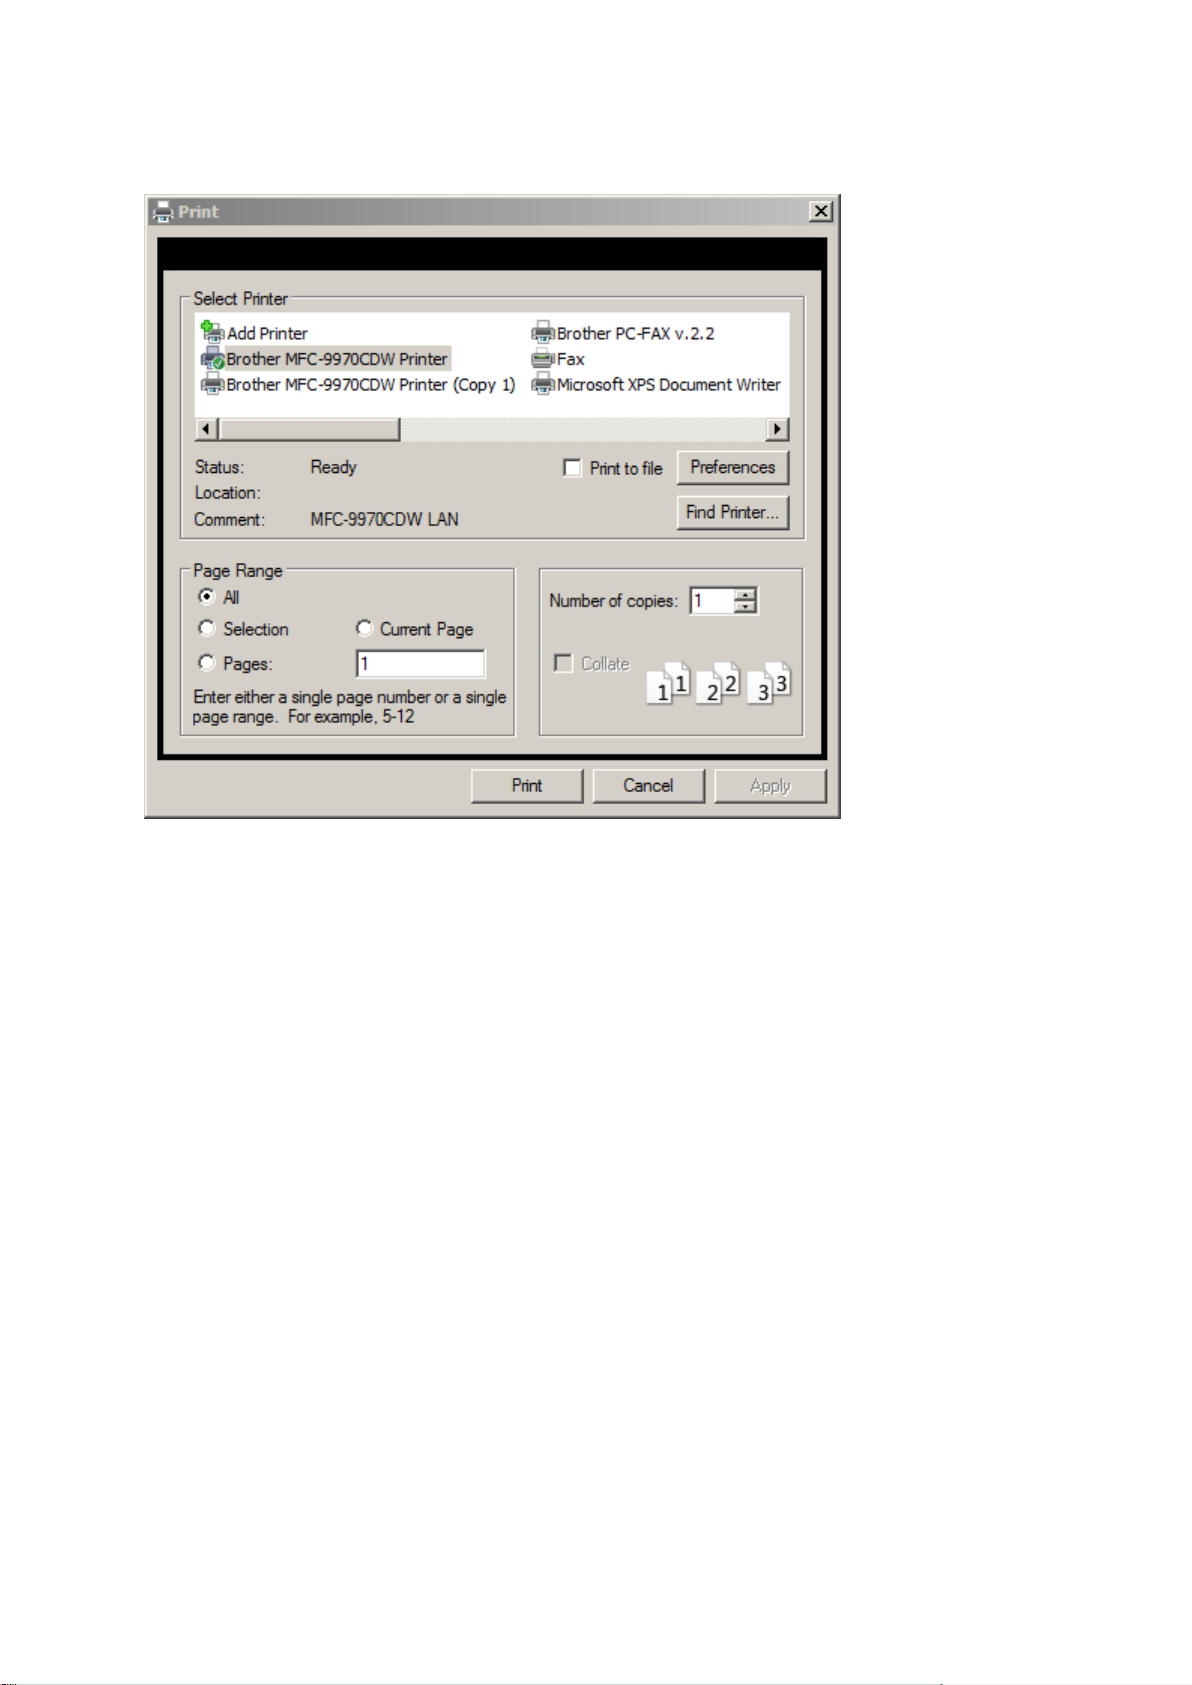
Printer Select:
Allows users to select a printer
Page setup look under preferences
Page 22
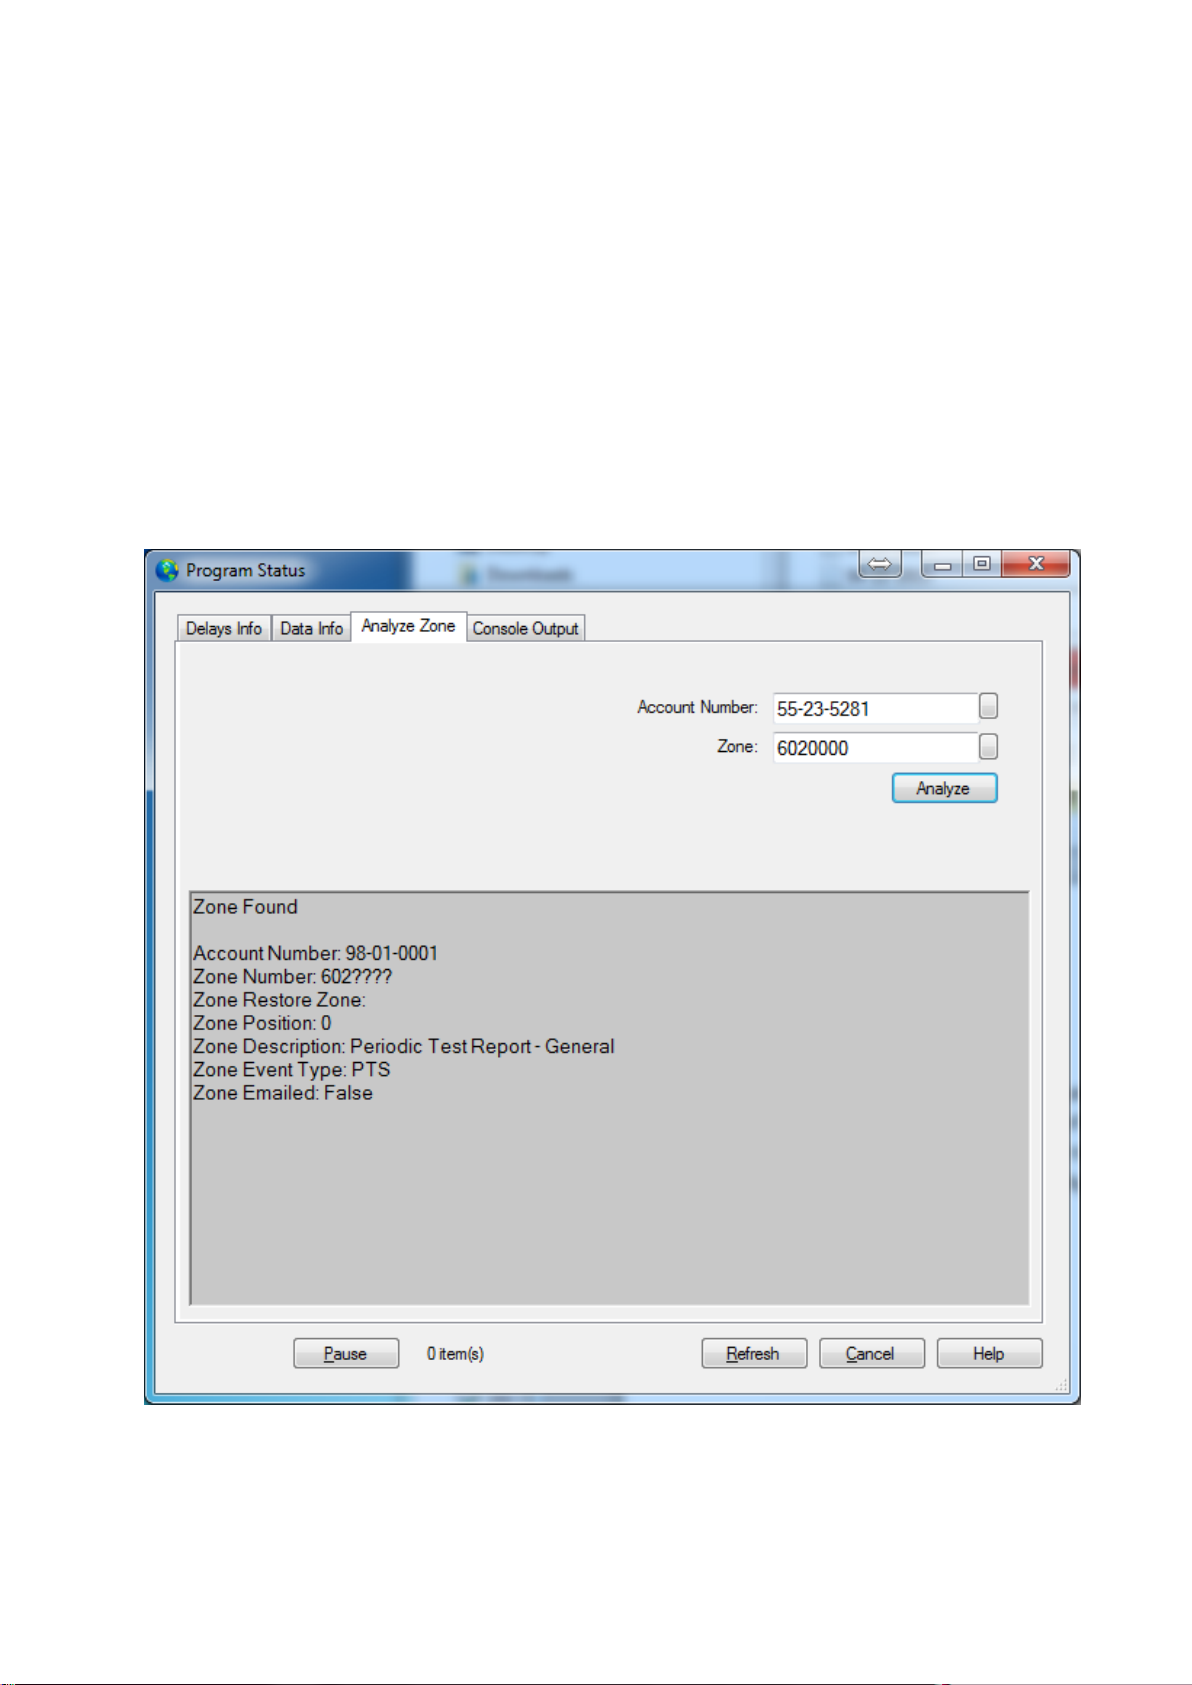
Program Status
This option displays the Program Status window which displays information about the internal
working of the program that can be required for troubleshooting purposes. One of the selections is
Analyze Zone. This will make it easier when trying to determine which account the zone was taken
from. It simplifies troubleshooting, especially when an account has multiple subaccounts and/or
zone accounts.
1. Select File
2. Click on Status
3. Select Analyze Zone
4. Enter the account in question along with the zone
5. Press Analyze
Page 23
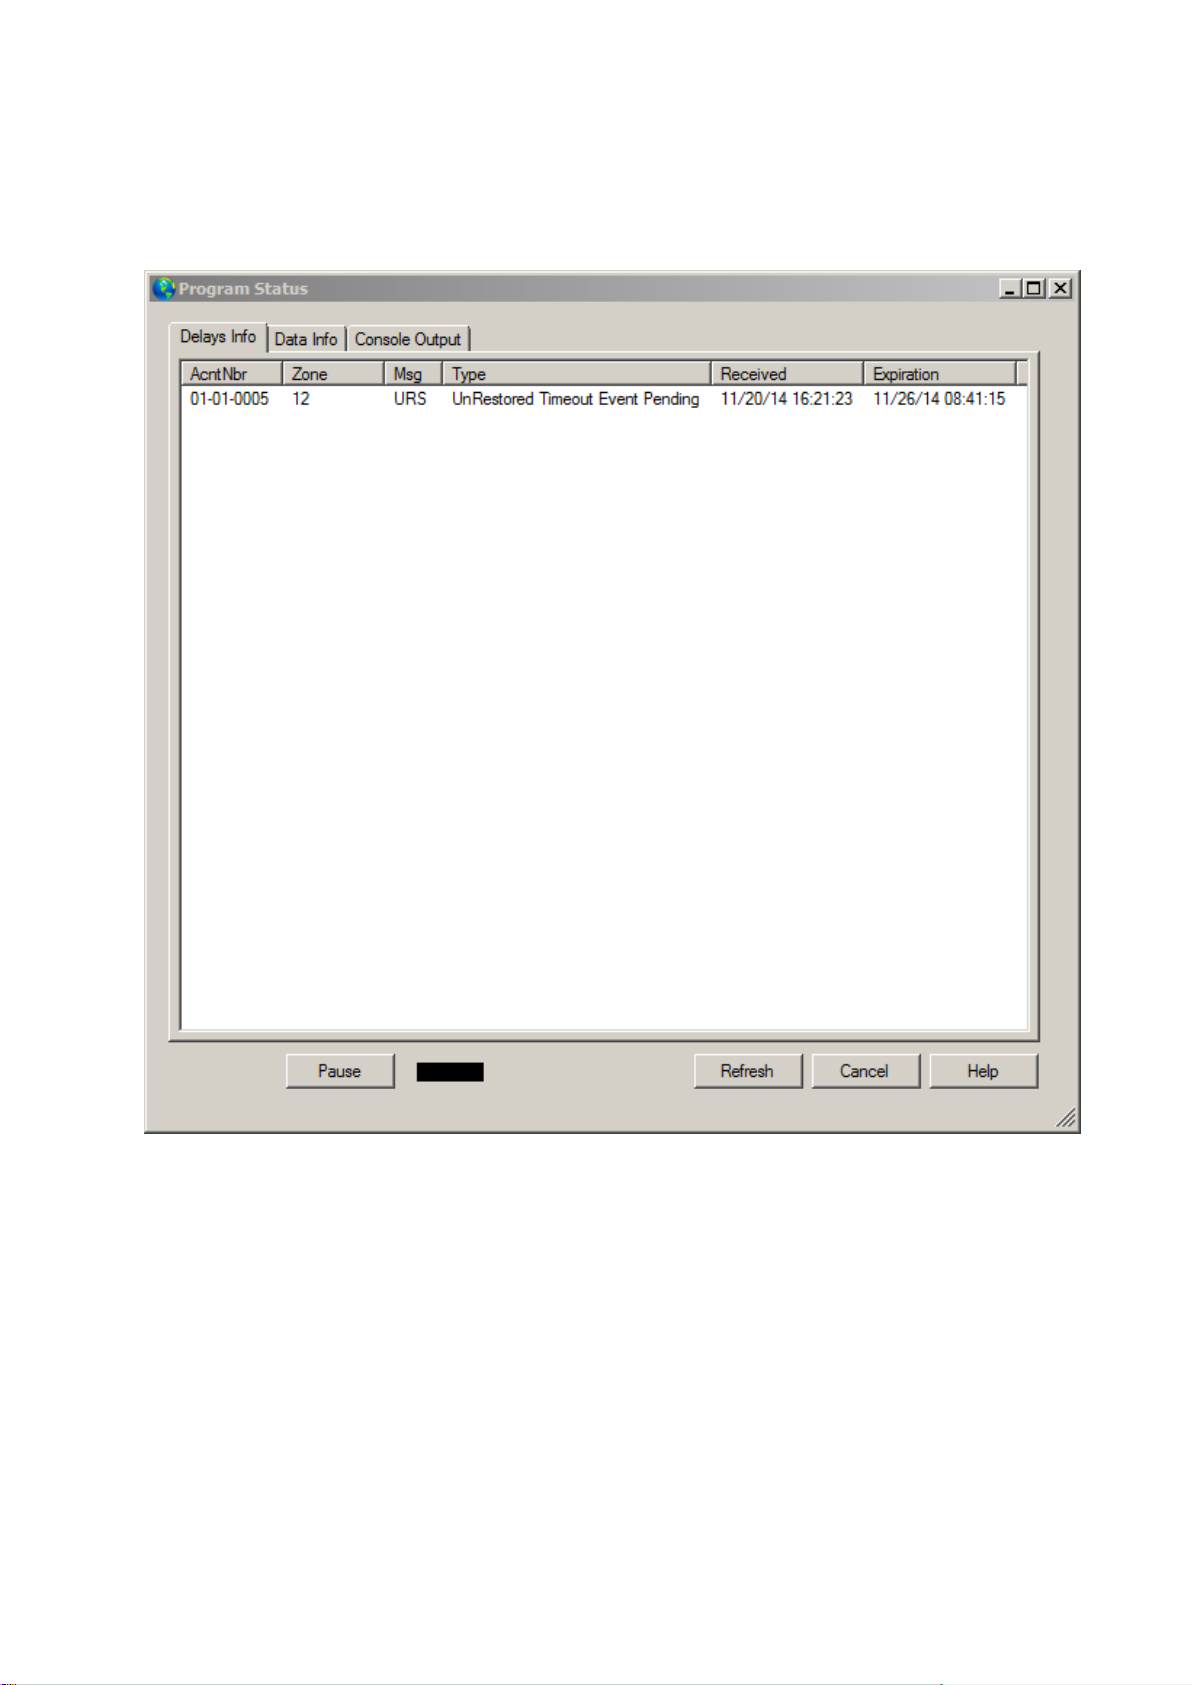
Delay Info Tab:
It shows all signals pending for restoration and all current delays (dealer delays, open/close delays
etc.).
Data Info Tab:
Page 24
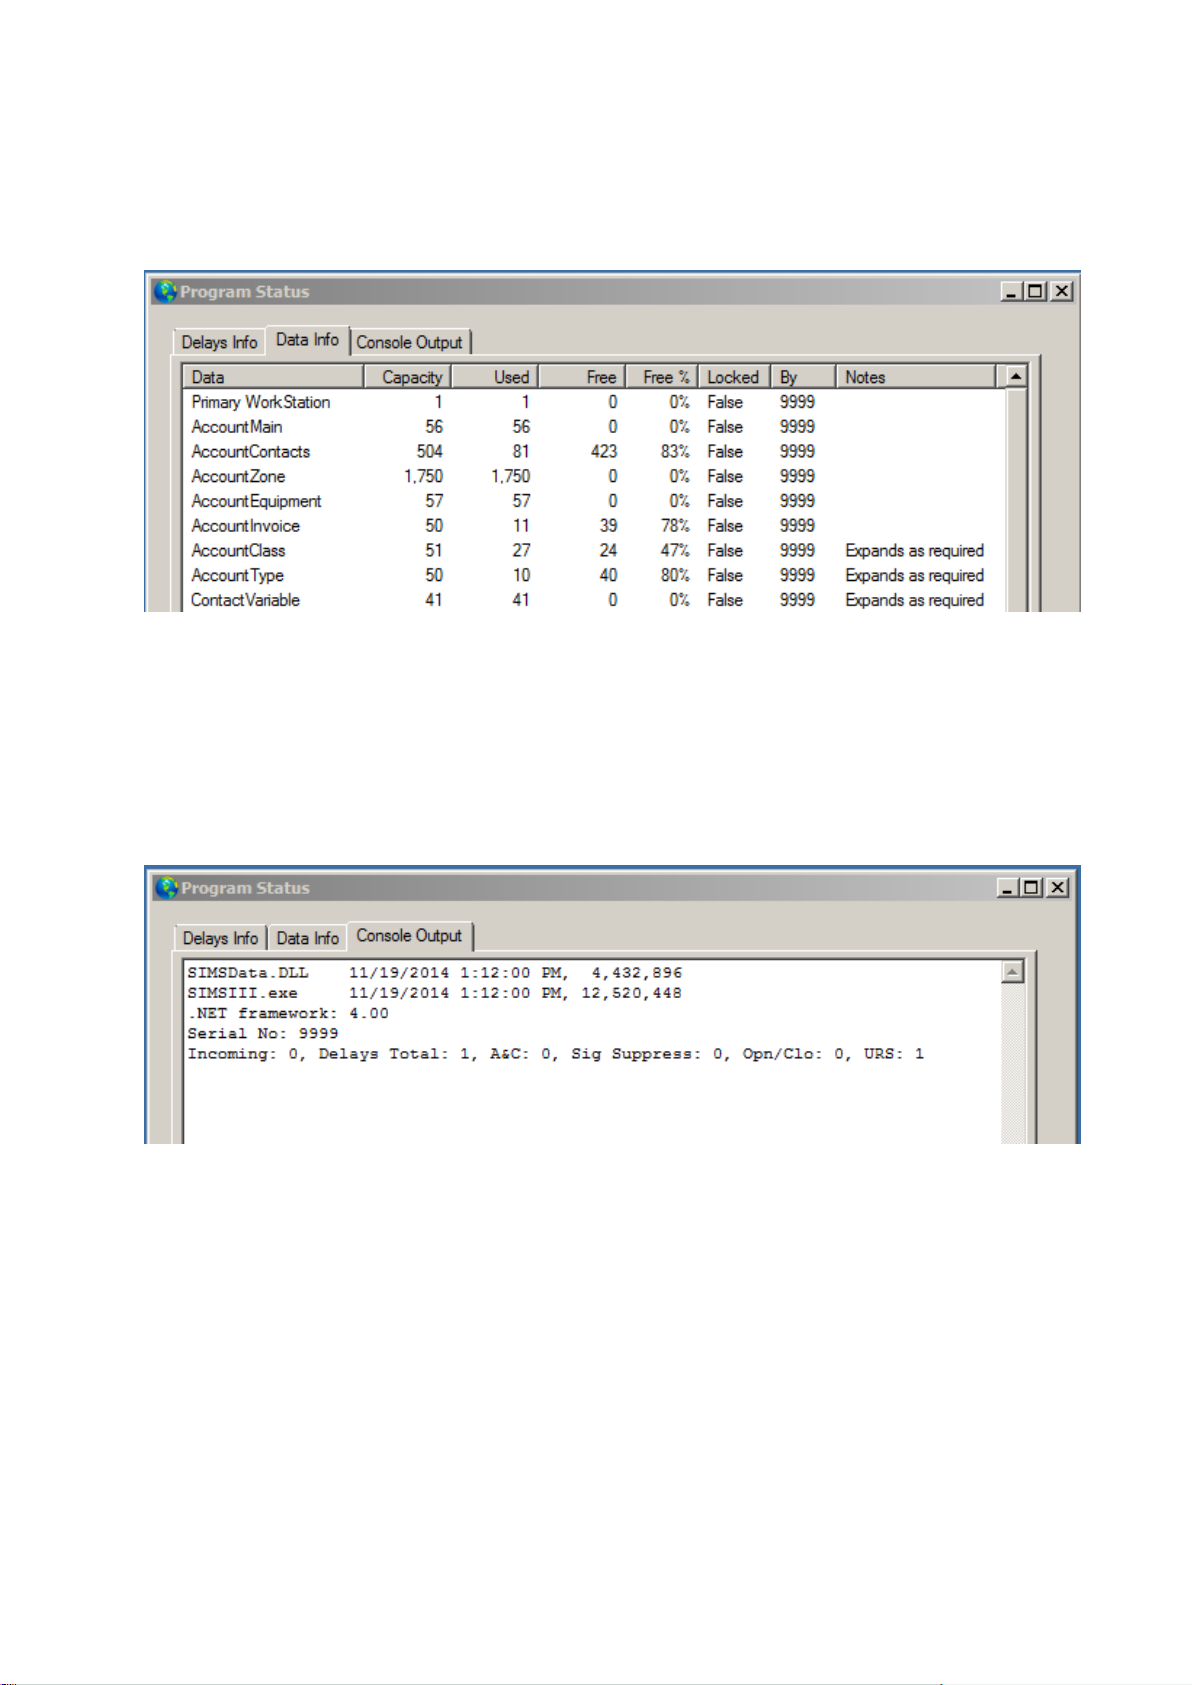
This tab provides information about the current status of the different files that made up the SIMS flat
file database. There is no reason to access this information during the normal operation of the program
but the technical support of SIMS might require this information during the process of
troubleshooting an issue with the program. The next figure shows a sample of how this screen looks.
Console Output Tab:
Most of the actions that SIMSIII performs, like opening a file, are logged in this console. There is no
reason to access this information during the normal operation of the program but the technical support
of SIMS might require this information during the process of troubleshooting an issue with the
program. The next figure shows a sample of how this screen looks.
Page 25
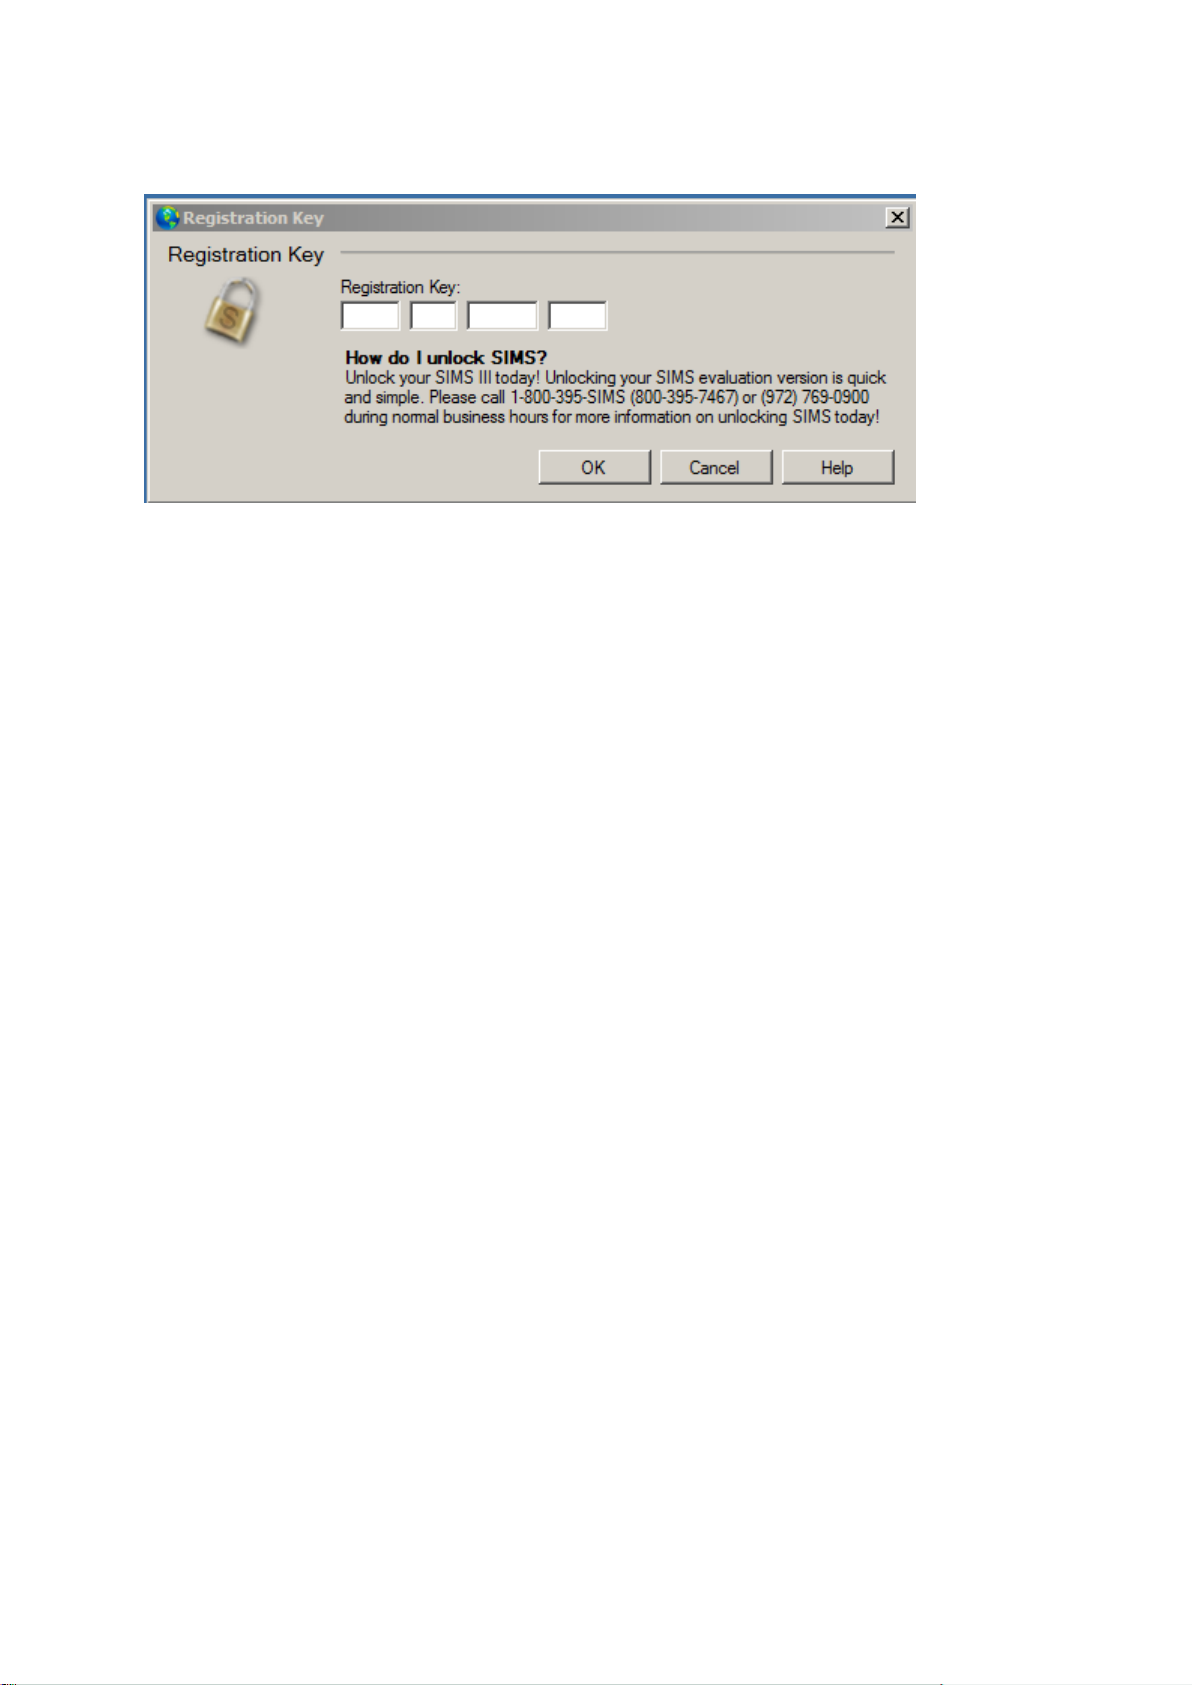
Registration Key Entry:
Exit
Exits the program
Page 26

Chapter 3: SIMS III Edit account menu
Page 27
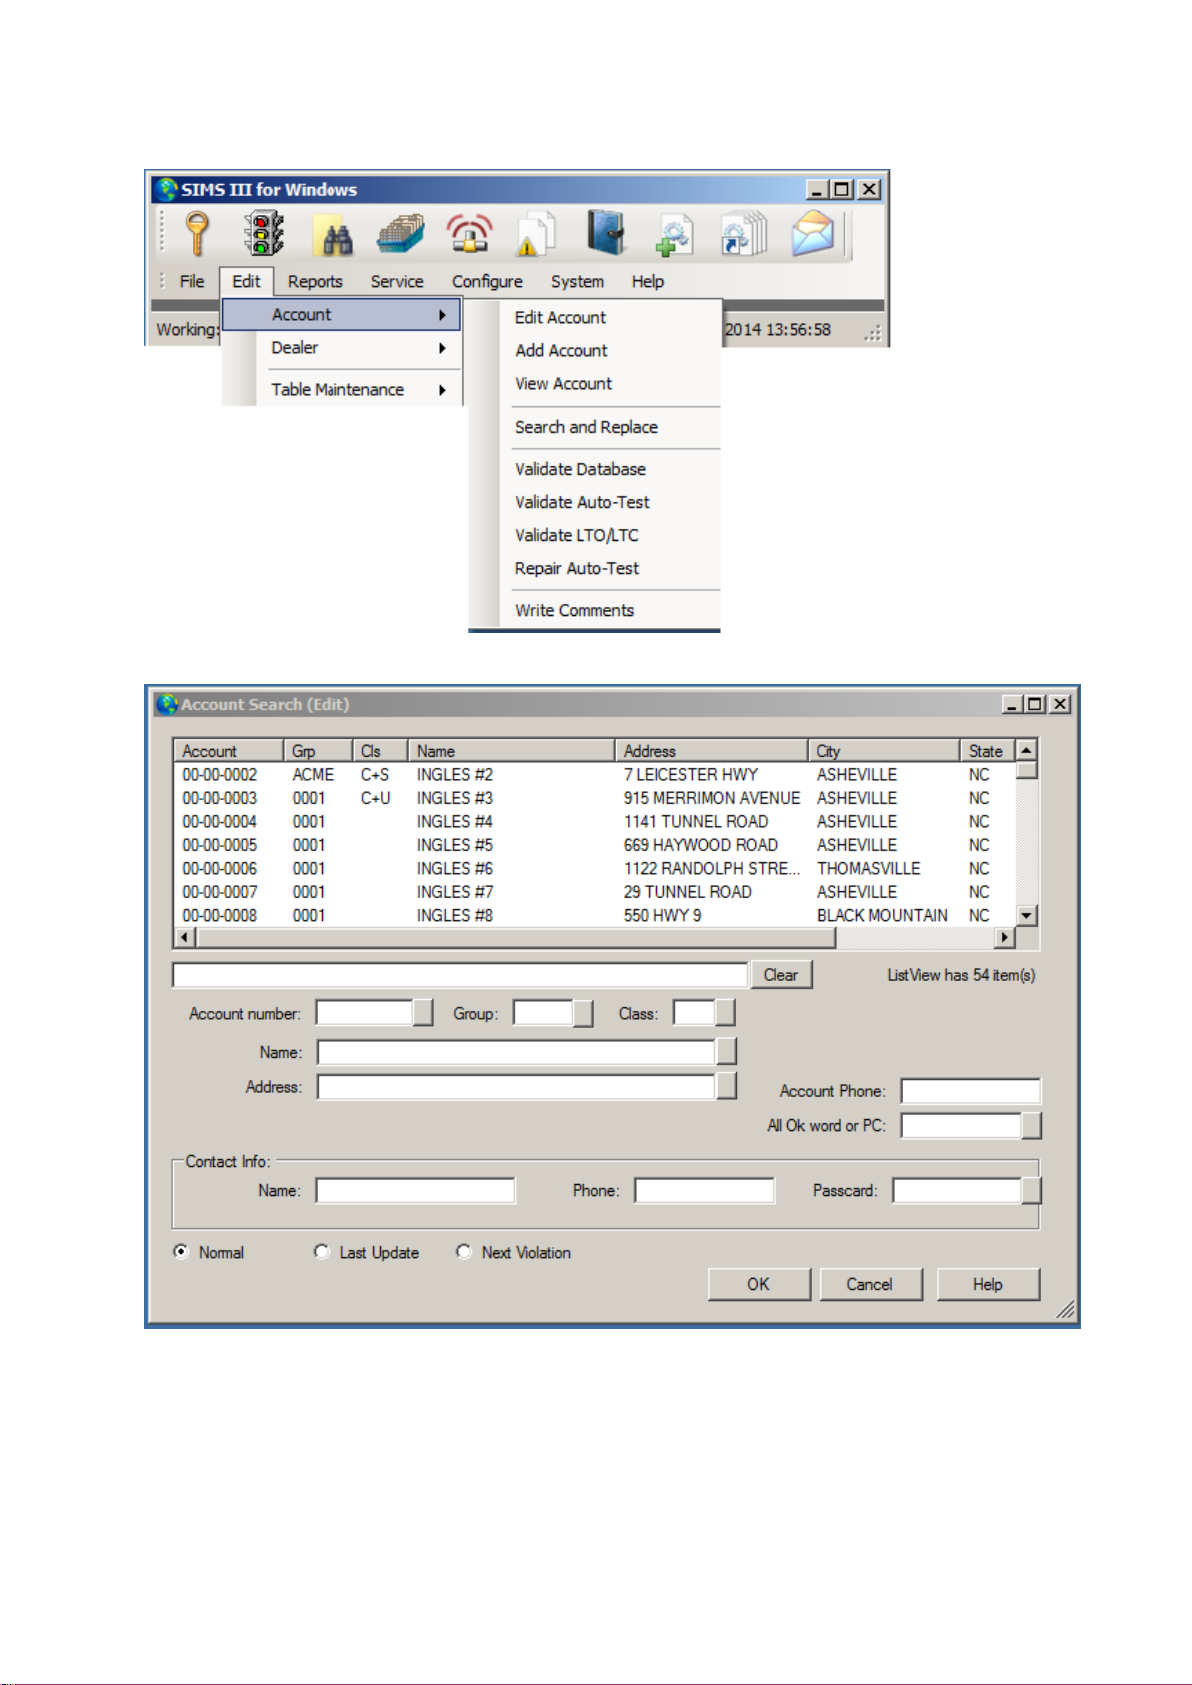
In most of the fields users can click on them and press F1 for help
Edit account:
Highlight the account you want to edit
Page 28
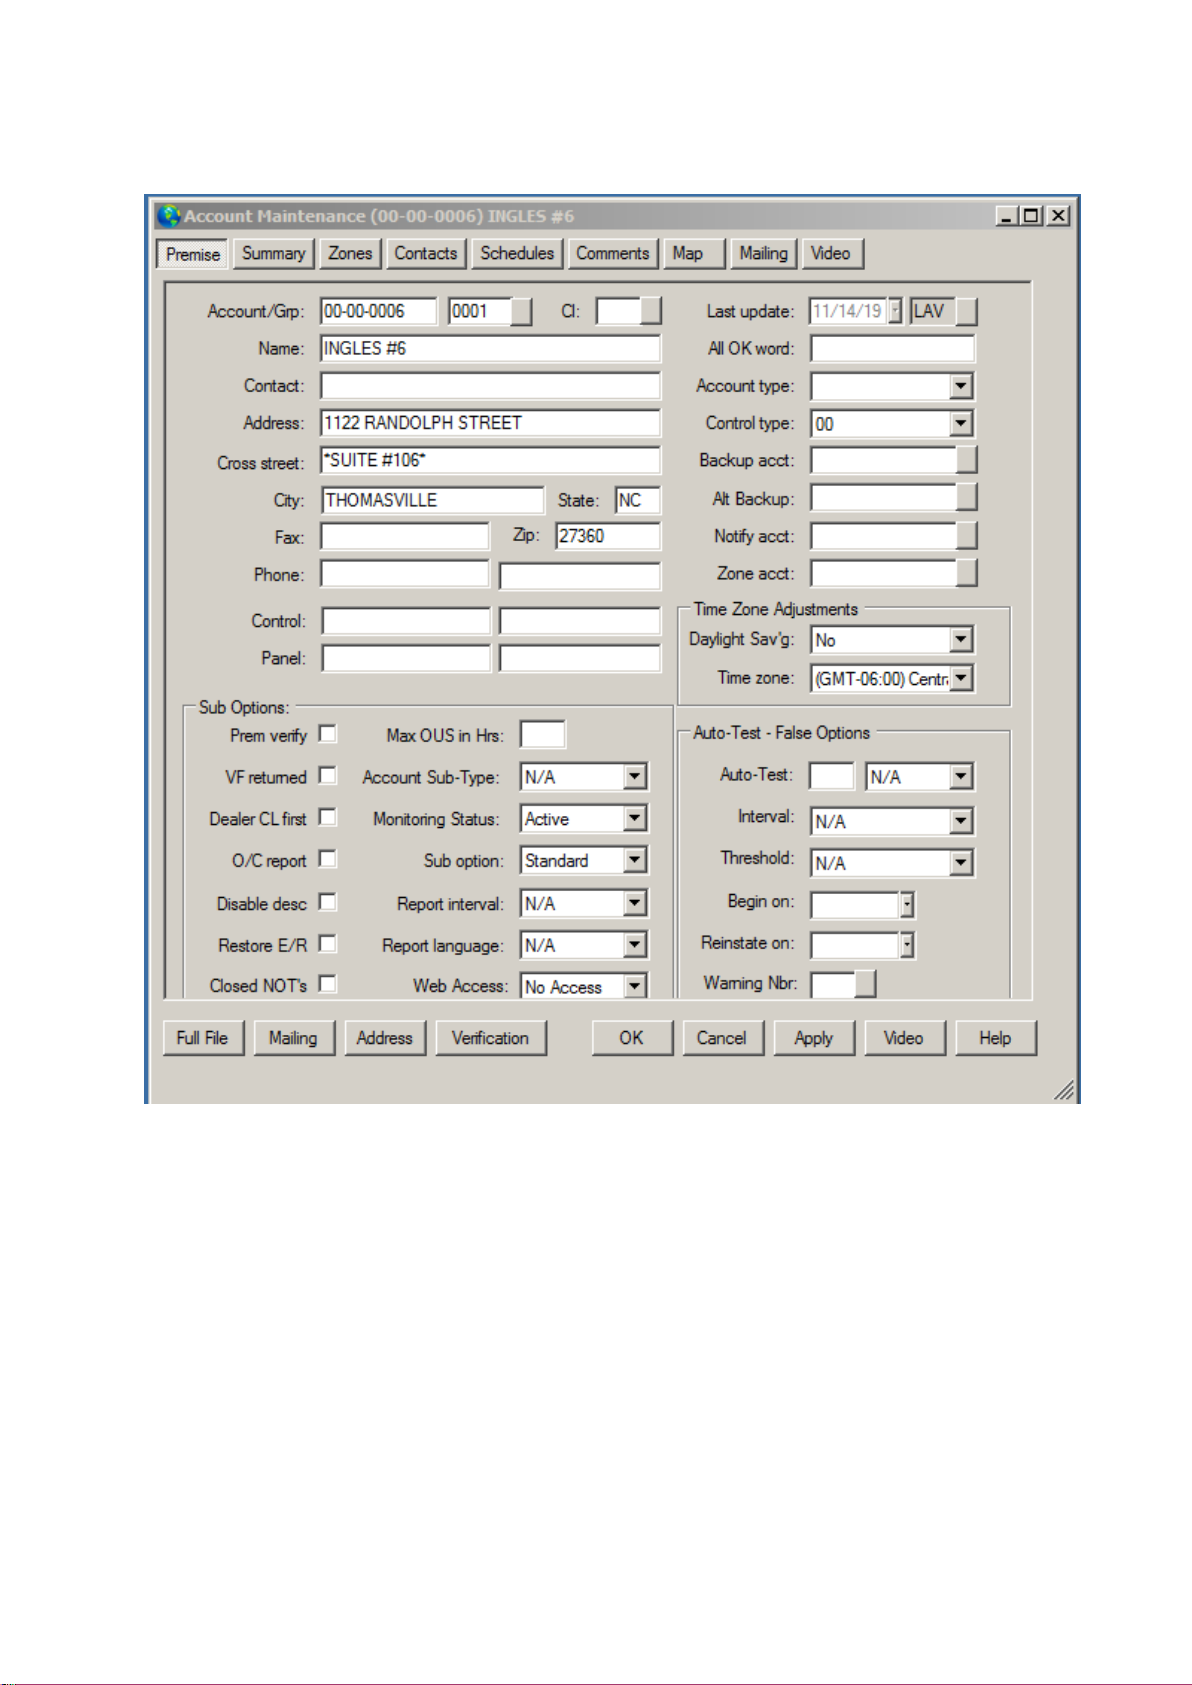
By double clicking on any of the fields in the list, user will see the following screen with the account
details.
In account maintenance users can change:
Premise:
The Premise tab of an account’s database contains information related to the subscriber location and
other important subscriber options.
Account Number:
The account number is comprised of three items: the receiver number, the line number and actual
account number programmed into the control communicator. The System Administrator through the
System Administration function defines both the receiver and line numbers when the receiver(s) are
configured for the program. However, the control unit account number should normally be entered as
four digits with leading zeroes if necessary.
Group:
This entry refers to the group or dealer (alarm company) the account is assigned to. Four
characters are provided to designate the company the account is being monitored for. Specific
Page 29

detailed information about the group is entered through the Edit Dealer in the Edit menu. A
button is provided adjacent to the field to present a list of available group selections.
Class (Cl):
The Class field allows entry (up to 3 characters) to specify the class the account is assigned to. The
class designation may be used to help differentiate account types (e.g., UL, etc.).
A button is provided adjacent to the field and allows a list to be presented containing selections. Items
in the list are entered in Account Classes.
Name is Account name
Contact: primary contact person
Address: physical address
Cross Street: Nearest major intersection
City
State
Zip
Fax
Phone Number
Last update:
This is a read only field that shows the date of the last account update and the initials of the operator
who made the update
All Ok Word:
The All OK Word field allows entry (up to 13 characters) of a password signifying an 'all ok' situation
at the premises. For example, if an alarm is received and the subscriber contacts the station wishing to
cancel it, they may provide the "All OK Word" to verify authorization. The All OK Word is provided
on all exception event screens for operations verification.
Account type:
The Account Type field allows entry (up to 13 characters) of a description whether the account is a
Commercial, Residential or other type. A button is provided adjacent to the field to present available
Account Type List selections.
Control Type:
The Control type field allows entry (up to 13 characters) of the type of control the premise is utilizing.
A button is provided adjacent to the field to present available Control Unit List selections.
Backup Account:
The Backup Account field allows entry (2 digit receiver number, 2 digit line number and up to 6 digit
account number) of the Backup Account (if one exists). An example of this type of redundancy is
when both a digital communication control and alternate control type such as radio are installed at the
same premise in case one is compromised or fails. If a backup system is not utilized leave the field
blank.
If you wish to match and confirm that the same event types (e.g. BUR) have been received from both
control units you may do so by enabling Backup Verify on the zone page of each account's database.
This will cause the program to expect a signal to be received from the alternate account within 60
seconds of receiving an exception event from the primary account. Otherwise, a "BAK" type event
will be generated for the non-reporting account.
A button is provided adjacent to the field to present a list of available Account Number selections.
Page 30

Alternative Backup (Alt Backup):
The Alternate Backup Account field operates similar to the Backup Account field
Notify Account:
The Notify Account field allows entry (2 digit receiver number, 2 digit line number and up to 6 digit
account number) of an account with a notification list to be 'linked' to this account.
An example would be a chain store that wishes its headquarters notified even when its local personnel
have been called.
An additional advantage is that when a notification link is utilized for accounts that have the same call
list, only one account's data need be changed. If a notification account link is not used leave this field
blank.
If call list entries are placed in the host account, and in addition a notify account is specified, the order
of precedence is the host account's call list first, followed by the notify account's call list.
A button is provided adjacent to the field to present a list of available Account Number selections.
Zone Account:
The Zone Account field allows entry (2 digit receiver number, 2 digit line number and up to 6 digit
account number) of an account with a zone list to be 'linked' to this account.
Many times common control units (e.g., ITI SX-V) transmit a fixed zone or zone condition that never
varies and therefore may be maintained in another account that is 'linked' to the host account.
An obvious advantage in this capability is that it does not require database entry of common items in
each account thus saving time and eliminating errors.
Additionally, when future capabilities are incorporated in the control units only one account need be
updated which will have an immediate and global effect upon all accounts that are linked to it.
After reviewing many of the formats used, it is not difficult to imagine that complex SIA, Contact ID
and Modem II control units and their receiver counterparts can require quite a bit of potential zone
descriptions and their resulting correct processing. In this arena a "Zone Account" can play a
significant role in eliminating data entry error and data duplication for multiple accounts.
In fact, entering a zone account should effectively cover all potential signals from the a control unit
allowing you to enter only the specific events you wish to override with explicit information
contained in the account itself.
A button is provided adjacent to the field to present a list of available Account Number selections
Control:
The Control field allows entry (up to 18 digits each) of the primary and secondary phone number the
control unit transmits on. If a receiver provides caller ID information to the automation system (e.g.,
Sur Gard) the program will automatically insert the information into the primary control phone
number. If Phone Number Formatting is turned on you do not need to insert parenthesis, hyphens or
spaces as the program will automatically format the phone number for you.
Panel:
The Primary Panel Phone field allows entry of the primary phone number the control unit dials when
reporting.
Time Zone Adjustments:
Daylight savings:
The Daylight Savings Time field allows an entry to determine the adjustment (if any) to be
used for the account.
Page 31

Time Zone:
Use this field to enter the account's time zone. For example, if the account's local time is 2 hours
before the station's then you should select "GMT-02:00". This allows adjustment to local time when
generating subscriber reports and entering temporary schedules.
Subscriber Options (Sub Options):
Premise verify (Prem verify):
The Premise Verify field allows you to designate whether the premises will be presented for
notification first on all priority action events.
Verification form returned (VF returned):
The Verification Form Returned field allows entry whether a verification form has been returned to
the central station.
Dealer CL first:
This field allows you to designate whether the order of the contacts is modified so that the contacts in
the Dealer Accounts appear immediately after the Premise Verify entries.
Open/close report (O/C report):
The Open/Close Report field allows an entry to designate if subscriber open/close reports should be
generated for the account.
Disable history description (Disable desc):
The Disable History Description field allows an entry to designate if writing the subscriber’s zone
information will be disabled.
Restore E/R:
To designate whether the compacted contact ID signal will be unpacked. This will allow complete
signal interpretation.
Closed NOT's:
The Closed No Tests field allows an entry to designate whether the test counters will only decrement
when the account is closed (armed). This may be necessary for accounts that only start test timers
when the account is closed.
Max OUS in Hrs.
Maximum number of hours that the account can be placed: out of service.
Account Sub-Type:
Method of signal reception
Audio
Video
GSM 2way
Monitoring Status:
The main purpose of this box is to determine if the account is Active (signals are process normally) or
Cancelled (all signals autolog). A reason to set an account to Cancelled could it be because the
account is not being monitored anymore or because it’s monitoring service has been cancelled.
Besides the Active and Cancelled status, there are other monitoring statuses that you can select.
Sub Option:
Subscriber options
The subscriber options field provides for entry of a parameter for specialized requirements
Page 32

Report interval:
This field allows entry of an identifier to specify the interval to run reports.
Report language:
Allows users to select different languages
Web Access:
Auto-Test-False Options:
Auto Test:
The Auto Test field allows entry of an interval amount to expect a signal from the premises. For
example, if the system transmits a test every 24 hours select "Daily".
A button is provided adjacent to the field to present a list of available Auto-Test Pick List selections.
Interval:
The Interval (period of false alarms) field allows to define the period of time during which false
alarms will be monitored.
The entry may be one of the following: 1 year, 180 days, 120 days, 90 days, 60 days, 30 days.
Threshold:
The Threshold (number of false alarms) field lets you define number of false alarms allowable during
the interval (described above) or a "U" for unlimited false alarms.
Begin on:
The Begin False Alarm Check field allows entry of the date to begin the false alarm checking on.
For example, if a false alarm ordinance became effective on November 1, 2009 and would only take
into account false alarms received on or after that date enter "11/01/09".
Reinstate on:
The Reinstate On field allows entry of the date (if a police response suspension has been issued) that
provides the date of police reinstatement of response to the premise.
Warning number:
The Warning Number field allows entry of a warning message number to present to the operator
during exception event processing.
Page 33
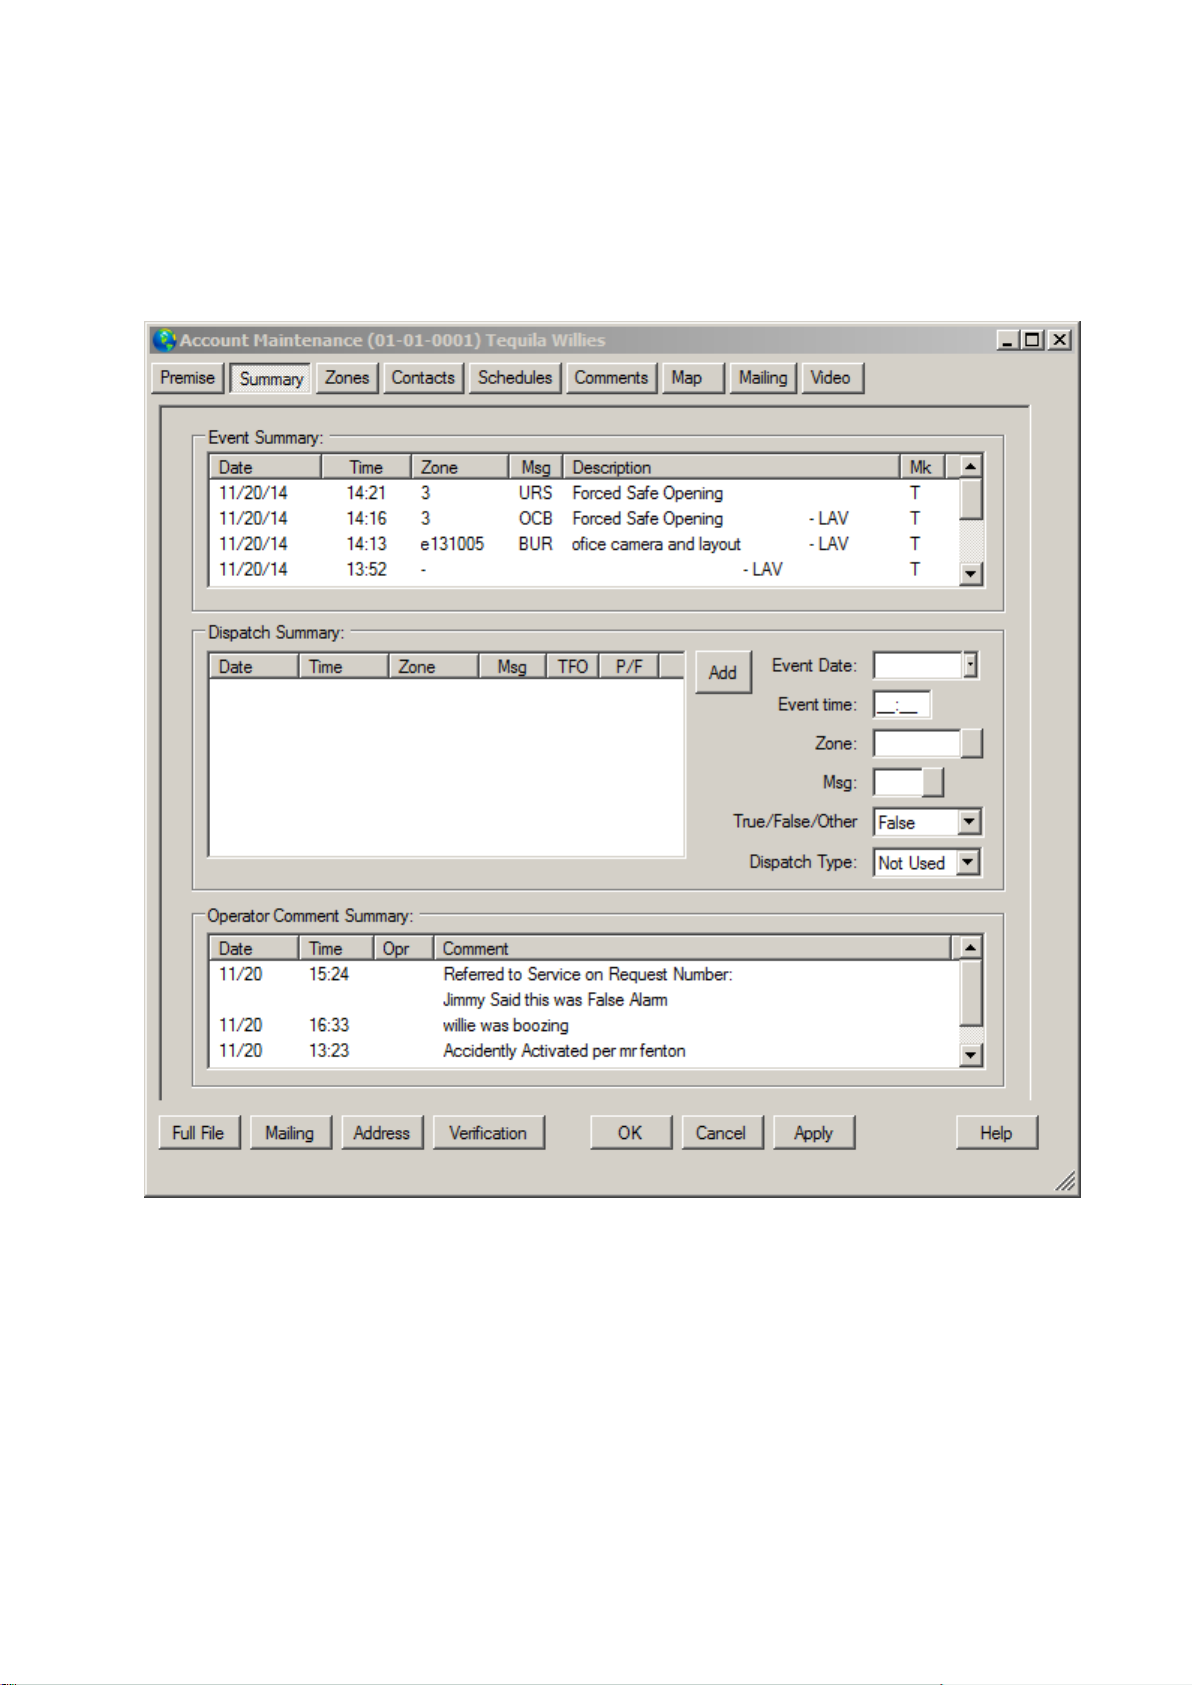
Account Maintenance:
Summary Tab:
This tab of the account database contains information related to the recent activity of the account.
This information includes: last signals (events) received, last dispatches and last operator comments.
Event Summary:
This list contains brief descriptions of the last eight events scrolls down as any new events are
received or manually generated (i.e. the oldest event is 'thrown away' as a new event is received).
This should not be misconstrued to mean that the SIMS III can only maintain 8 events for each
account, all events are written to the subscriber history file however, only the last 8 may be
'windowed' in an exception event display using this function.
Dispatch Summary:
This list let you view a summary of the last twelve (potentially) dispatched events while in an
exception event.
Page 34

Event Data:
Specifies the date
Event time:
Specifies the time
Zone:
Account Zone Selection
Msg:
Event Type Selection
True/False/Other:
TFO Allows operators to identify with dispatches were either a true or false alarm or other/unknown
alarm.
This field will allow you to label every one of the events from the dispatch summary as True, False or
Other. This way you can keep track of false alarms
Dispatch Type:
P/F Specifies the types of measurements were taken to resolve the situation.
For example: Call the fire or police department
Operator Comments Summary:
This list will show last three groups of operator comments while in an exception event.
Page 35
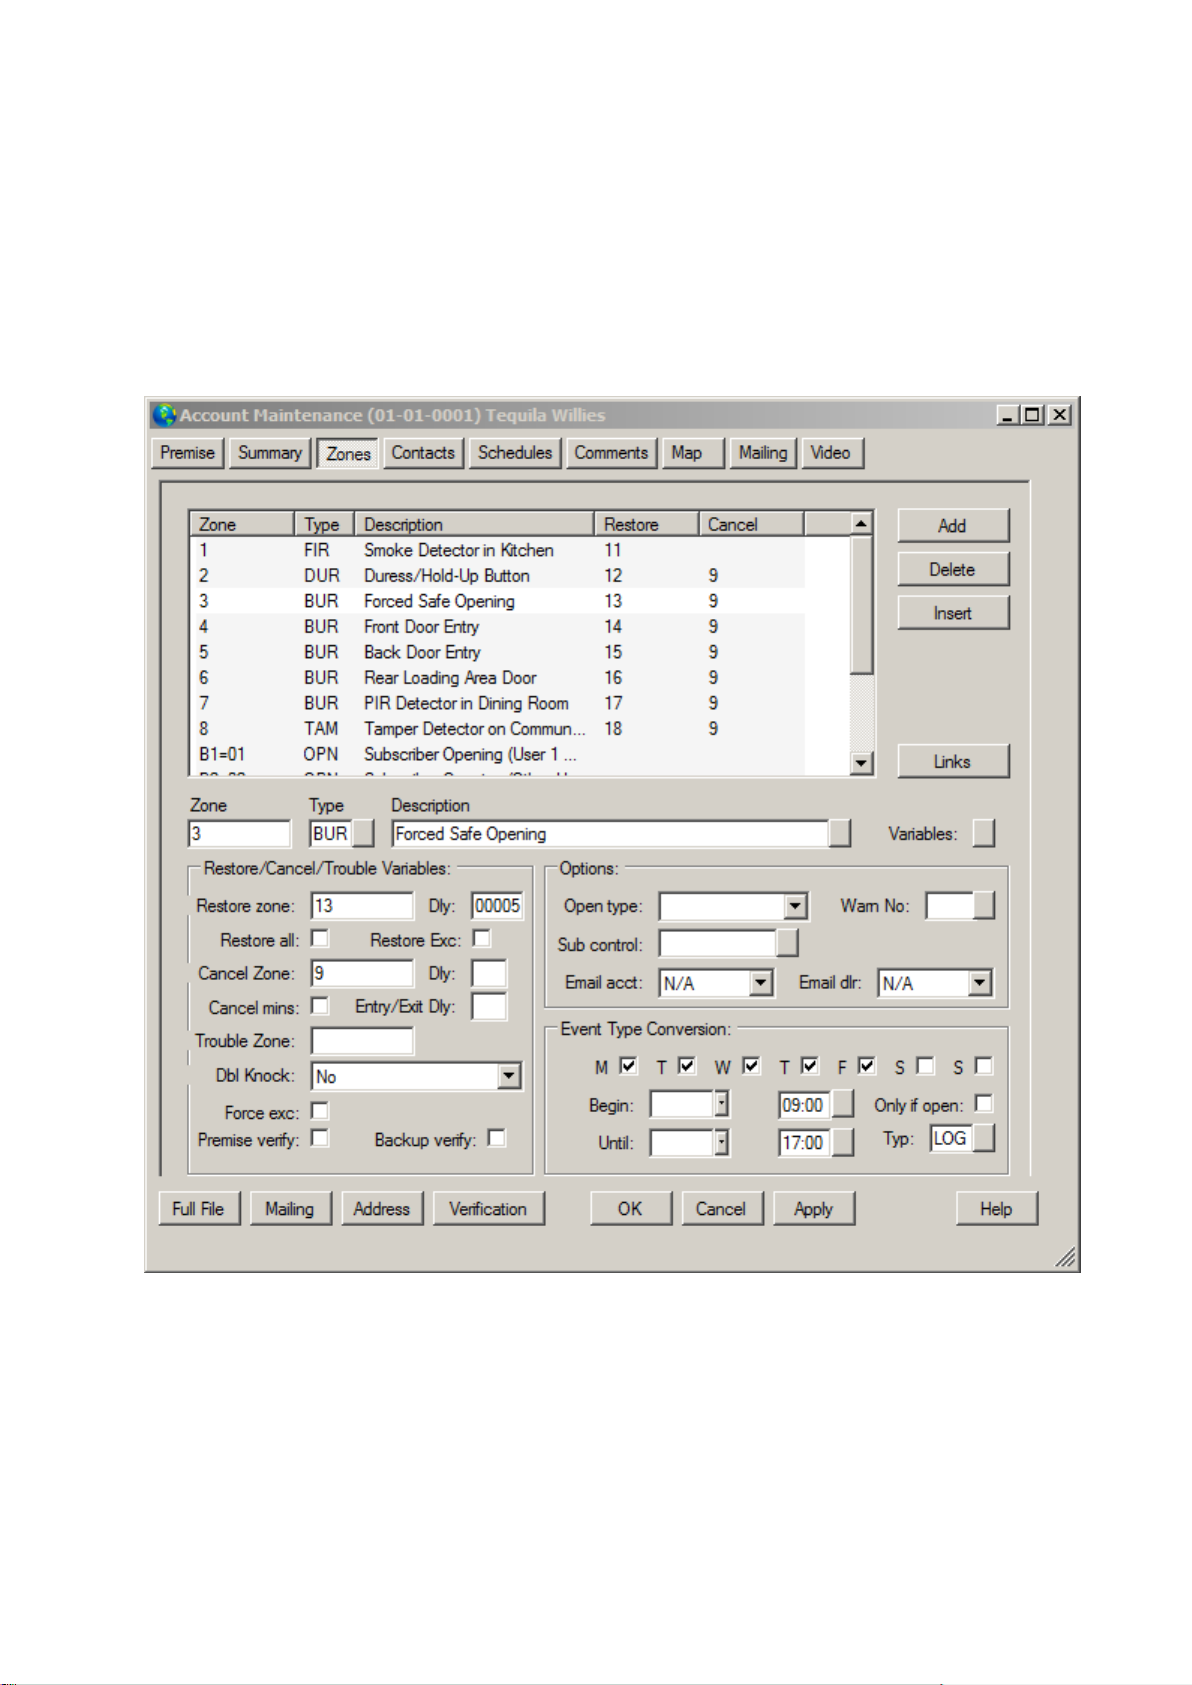
Zones Tab:
The Zone Tab of the Account Database allows you to list all the zones for the account.
Besides assigning an event type and a description to each zone, you can also define several parameters
that affect the way SIMSIII processes each signal.
For instance, you can have SIMSIII to convert a given signal into another depending of the time the
signal was received.
Remember that you don't have to enter every zone in each account's zone list.
The Zone Account field from the Premise Tab allows you to link the zone list of the account with a
generic list of zones.
Zone list:
This is the actual content of the account's zone list. By right clicking anywhere on this list you will
gain access to series of options such Exporting to Excel. These functions are common to virtually
every list inside SIMSIII. Use the Insert and Delete buttons to add and delete entries to the list.
This list of items can be sorted and exported in different ways
Zone:
The Zone field allows entry (up to 7 characters) of the code/zone transmitted from the control unit.
Normally only 1, 2 or 3 digits are transmitted by the control unit, however, to support SIA and some
Page 36

other formats additional characters may be required to define the event such as "HU12" to identify a
Time
Period
0060
1 Hour
0120
2 Hour
0240
4 Hour
0480
8 Hour
"Hold-Up zone 12". Using the zone condition identifiers in the conversion allows some signals such
as a restore to be converted to a completely different meaning such as a panic alarm. Using the
Wildcard ‘?’ for Zone Entry Using a question mark "?" when entering the zone is allowed which will
cause a match if any character is encountered at that location.
For example, a "B?" may be entered for an opening with any user number (i.e., Opening User 1
through Opening User F).
If you wish to override a wildcard entry you must place the entry before (i.e. nearer the top of the
display) the zone you wish to override.
Type:
The event message type allows entry (up to 3 characters) of the "Zone" previously entered and
provides a brief description (or mnemonic) of the event. This is used to prioritize the event if it’s an
exception, or to auto-log it if not. For example, if a "HU12" has been defined as the Zone and it is a
Hold-Up alarm you may define the event as a "HUA" (or Hold-Up Alarm). A button is provided
adjacent to the field to present a list of available selections.
Description:
The Zone Description field allows entry (up to 44 characters) of text describing the zone. If the event
type has been defined as an exception event, operations personnel will be presented with this text
during the processing of the exception event.
Restore/Cancel/Trouble/Variables:
Restore zone:
The Restore Zone field allows entry (up to 7 characters) and definition of the restore for the
corresponding "Zone" described previously. If the restore is received it will not remove the
corresponding Zone from active alarm processing (pending in Traffic/Menu) but will return the zone
to a normal (restored) state. Note that you may also wish to review Restore Delay in Minutes and
Restore All as they provide additional customization procedures.
Restore zone delay (Dly):
The Restore Delay in Minutes field allows entry (from 0000 - 9999) of a delay period in minutes to
await a restore (defined in the RST field) before creating a "URS" event. Some zones require a
mandatory zone restore within a specified time period. By entering a time in this field, you can define
the period that the program will expect a restore to be received within. Then, if no restore is received
within this time the program will automatically create a "URS" event for handling. For example:
Page 37

Restore all:
The Restore All Signals field allows an entry to define whether this Zone allows a 'global' restore of
all unrestored events. For example, if one or more unrestored signals are pending and this zone is
received, it will then cause all previously unrestored signals to be restored
Restore is Exception (Restore exc.):
The Restore Is Exception field allows an entry to define whether a restore will create an exception
event. Generally, restores are auto-logged however; this selection allows you to override this on a perzone basis by enabling this feature.
Cancel zone:
The Cancel field allows entry (up to 7 characters) of a code/zone that may be utilized to cancel a
previously transmitted alarm. The time period to await the cancel signal is defined in Alarm & Cancel
Delay. As a signal (e.g., zone 5) is received an event type will be generated (normally auto-logged)
and will be held for the time period specified waiting for a cancel. If the time period expires without
receiving the zone 9 an event will be generated. Otherwise, if the cancel is received within the time
period a "SAB" (Subscriber Abort - normally auto-logged) will be generated.
Thus, if a cancel is received within the entered alarm and cancel delay period the event is removed
from active processing, else after the time expires the event is presented to operations personnel for
event processing.
Do not enter the same zone in the 'Cancel' field as the one entered in the 'Zone' field. Additionally, the
same cancel code can be used for multiple zones.
Alarm and cancel zone delay (Dly):
The Alarm and Cancel Delay field allows entry (up to 3 digits 000 - 999) of a delay period to await an
Abort or Cancel (defined in the Cancel field) or an Opening before presenting the event for operator
processing. If the cancel, abort or opening is not received within this timeout period, the event will be
generated. On the other hand if the cancel is received within this timeout period, a "SAB" (Subscriber
Abort) will be software converted.
Alarm and cancel in minutes (Cancel mins):
The A&C Delay in Minutes field allows an entry to define if the delay period entered in Alarm &
Cancel Delay will be an interval in minutes as opposed to seconds.
Entry/exit delay:
The Entry/Exit Seconds Delay field allows entry (up to 3 digits 000-999) of a delay period in seconds
that is only applicable during scheduled opening and closing periods. This allows alarms and restores
to be matched during the opening/closing process. As alarms, restores and the open/close signal are
received they are held for the duration of the delay period.
After expiration of the delay time any unrestored events are presented as “BOE” (Break on
Entry/Break on Exit) events.
Trouble zone:
The trouble zone in this case, is for the Radionics format that also sometimes sends a trouble in the
same manner the restore or cancel is received. This will keep everything all in one line.
Note: This is only available in SQL
Trouble on zone T
Zone codes
Trouble on Provided Zone TRB ?T ???
Alarm on Provided Zone ?A???
Double knock:
Page 38

The Double Knock Suppression specifies whether the system will automatically log a single signal for
this zone. Subsequent trips occurring within a specified period will cause an exception event to be
generated. Typically zones using passive infrared and ultrasonic sensors are candidates for the Double
Knock feature. Double knock can also be used for situations requiring two separate signals to trigger
an exception event. When the double knock signal is received an event type of '?+?' when the signal is
auto-logged.
The Double Knock is enabled globally by Double Knock Suppression. The system-wide time period
in minutes is defined in Double Knock Suppression Interval.
Force Exception (Force exc):
The Force Exception field allows an entry to define whether the event, even if the event type is
normally auto-logged (e.g. BYP - Bypass/Shunt), to create an exception event on the traffic for
operator attention.
Premise verify:
The Premise Verify field allows an entry to designate whether the premises will be presented for
notification first on all priority action events for the specified zone.
The zone premises verify flag can be overridden by the Premise Verify entry on the premise page of
account maintenance.
Backup verify:
The Backup Account Verify field allows an entry to designate whether a signal of the same type (e.g.
BUR) should be expected from the backup account defined on page one of account maintenance. If a
'Y' is entered the system will expect a signal to be received from the Backup Account within 60
seconds (of receiving the event) from the other account. If no secondary signal is received, a "BAK"
event will be generated for the non-reporting account.
This helps determine if the backup system has been compromised or is malfunctioning.
Options:
Open type:
The Opening Type field allows entry (an 'O', 'R', or 'S', or non-entry) to override the schedule’s open
type on a per zone basis. See Open Type detailed explanations of opening types.
Restricting User Openings:
Occasionally, you may need to restrict some users or provide others with full premise access (e.g., the
owner) at any time. For example, one of the open/close users (user "1") has unrestricted access for
entry to the premises without generating an opening violation, however, all other users must obey the
scheduled opening time entry (i.e., other users entering the premises after hours that will generate an
"EOP - Early Open").
Warning number (Warn No.):
This field allows a three-digit number to be entered. This warning number screen can use as an
instruction field that pertains either to only this zone or group of zones (i.e. Two Way Audio, TVX
Video, etc.). During exception event processing this information will be presented to operations
personnel. Modifying these displays is covered in Warning Messages.
A button is provided adjacent to the field to present a list of selections
Sub control:
The Sub Control Account No. field allows entry (2 digit receiver number, 2 digit line number and up
to 6 digit account number) of an alternate account number to assign to zone to, if you wish. This
Page 39

allows different premise information to be presented to operations personnel in addition to area
opening/closing schedules. There is no theoretical limit to the redirection; however, a valid account
number must be entered for this redirection to another account to be properly processed. Additionally,
the appropriate zone information must be entered in the re-directed sub-control account else an "INV"
(Invalid Signal) will be applied to the sub-control account or a "NRE" (No Record Exists) if the
defined sub-control account is not entered in the database.
A button is provided adjacent to the field to present a list of selections.
Email account (Email acct):
This field allows you to setup a per zone email notification to the account (if using SIMSIII with
ComServer). The options available for this field are: No (no email notification), Primary (email
notification to the account's Primary email address), Alternate (email notification to the account's
Alternate email address) and Both (email notification to both, account's Primary email address and
account's Alternate email address).
Email dealer (Email delr):
This field allows you to setup a per zone email notification to the dealer (if using SIMSIII with
ComServer). The options available for this field are: No (no email notification), Primary (email
notification to the dealer's Primary dealer address), Alternate (email notification to the dealer's
Alternate dealer address) and Both (email notification to both, dealer's Primary email address and
dealer's Alternate email address).
Event Type Conversion:
The default field allows entry of an existing Mnemonic to be used for this zone when the day of week
and time/date criteria has been satisfied
Type:
Event priority selection
Zone Description
Page 40
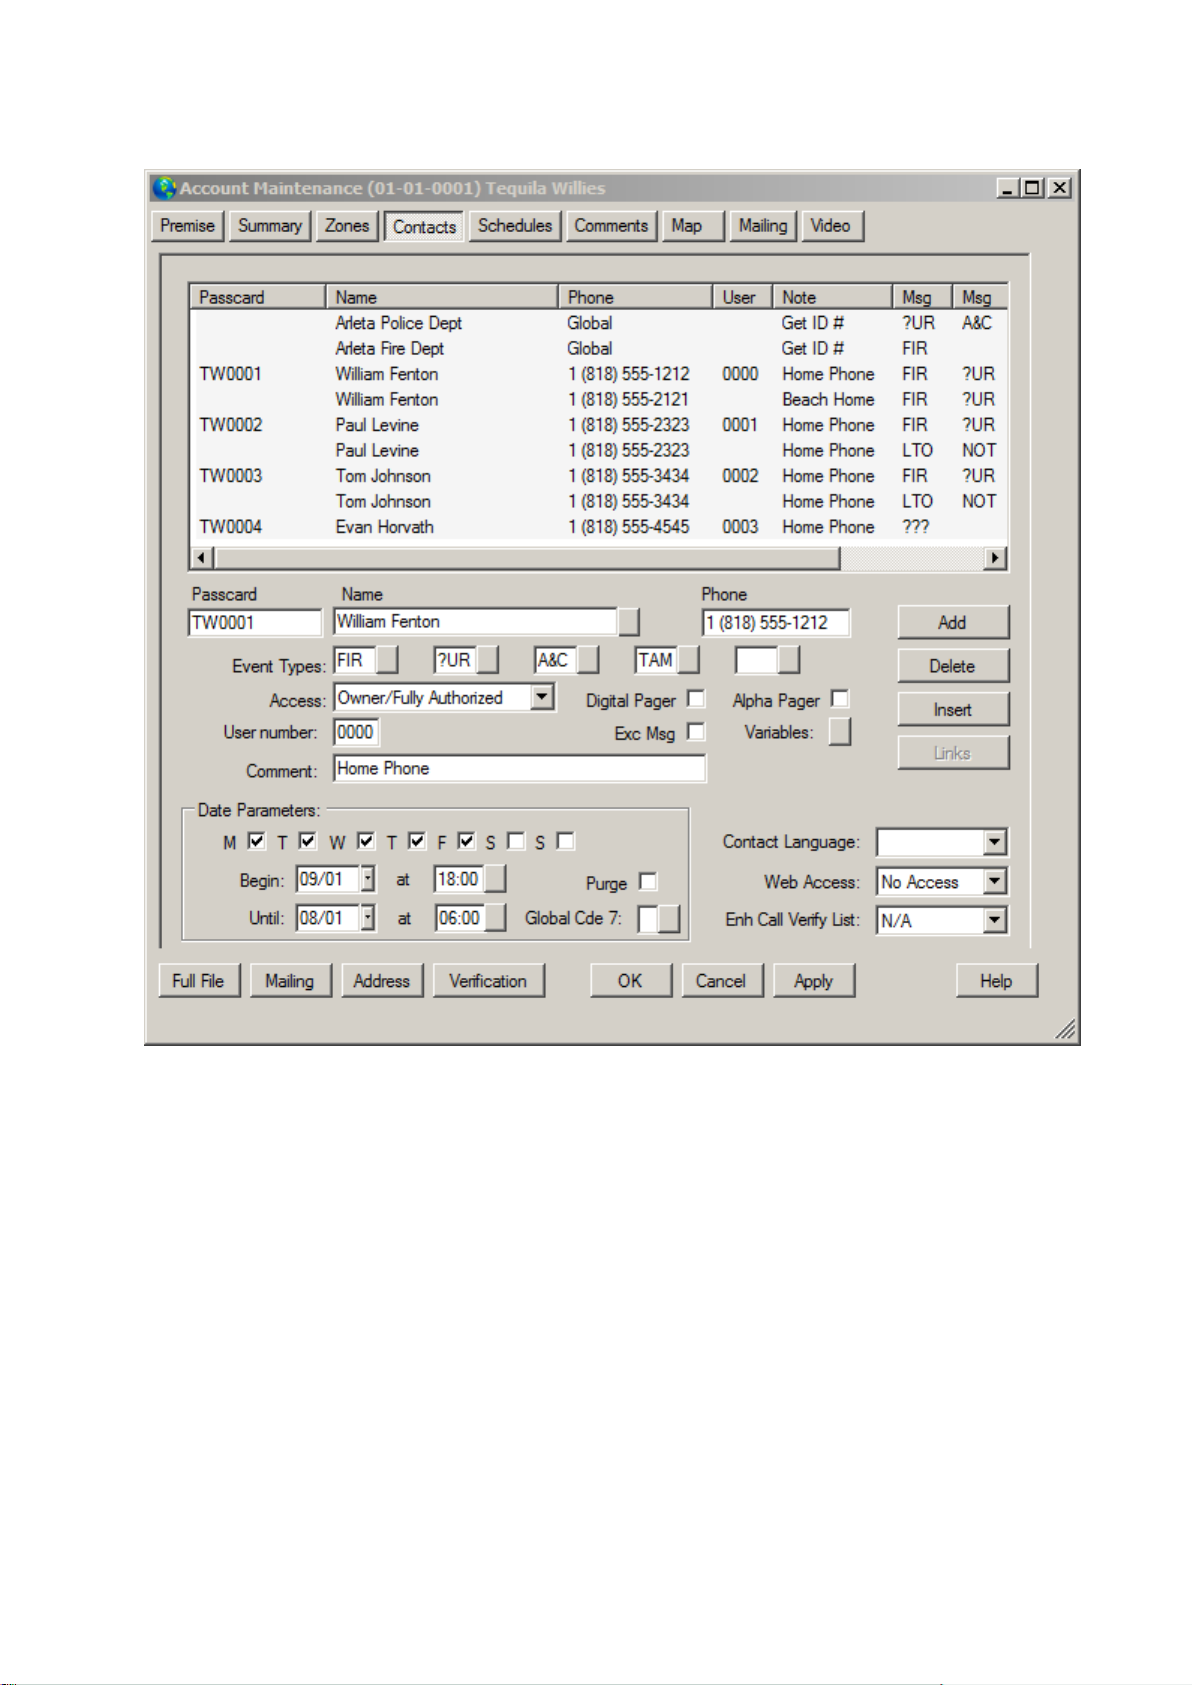
Contacts Tabs:
Page 41
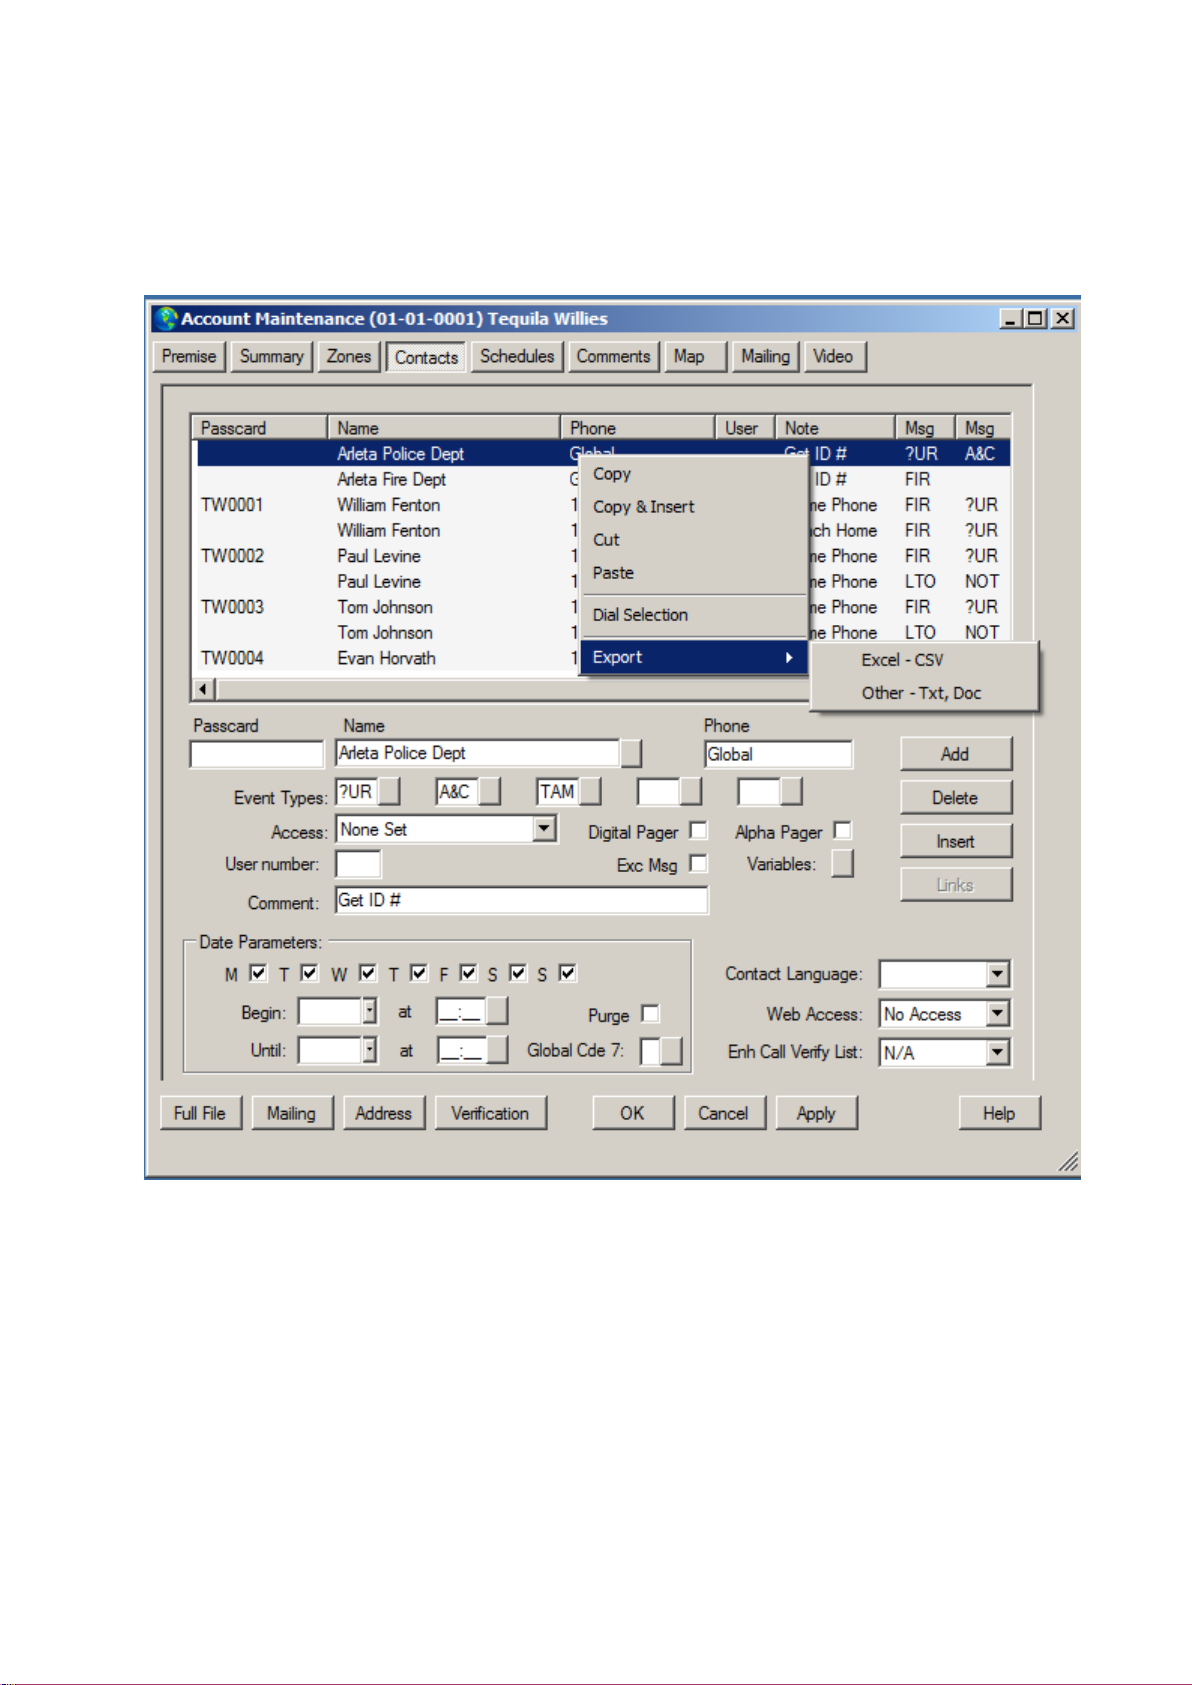
Contact List:
This is the actual content the account's contact list. By right clicking anywhere on this list you will
gain access to series of options like Exporting to Excel and Find/Replace. These functions are
common to virtually every list inside SIMSIII. Use the Insert and Delete buttons to add and delete
entries to the list.
Passcard:
The Passcard field allows entry (up to 10 characters) of an identifier for each person with access of
the premises or on the contact list. A passcard entry is not required (although strongly suggested) and
is used to verify that a person is who they state they are.
You should generally limit the passcard entry to a single word, number string or mixture to help avoid
entry errors by operators on verification checks. For example, "secret" is less prone to an entry error
than "top secret" or "topsecret".
Name:
The Name field allows entry (up to 21 characters) of a passcard holder and/or contact name. A button
is provided adjacent to the field to present available Global Phone List selections. If the contact has
been fetched from the global phone list, the phrase "Global" will be immediately placed in the Phone
Page 42

field. This allows a change to be made in the table entry (e.g. phone number) that will have an
immediate effect on accounts & not require re-entry of data.
Phone:
The Phone field allows entry (up to 18 characters) of the contact's phone number. Additionally, if the
Name was selected from the Global Phone List the phrase "Global" will be automatically entered in
the Phone field. This allows a change to be made in the table entry (e.g. phone number) that will have
an immediate effect on accounts & not require re-entry of data.
If Phone Number Formatting is turned on you do not need to insert parenthesis, hyphens or spaces as
the program will automatically format the phone number for you.
Event Types:
Field allows of up to 5 event types that the contact is presented for. For example, if a code "12" has
been assigned an event type of HUA (Hold-Up Alarm) and a "HUA" has been entered as a type to be
notified on for this contact name, then the name will be provided to personnel during an alarm.
A button is provided adjacent to the field to present available Event Priority Level List selections.
The wild card character "?" may be used when defining types of events to notify on (e.g., ?UR
matches BUR (BURglary) and DUR (DURess) type events.
Access:
The Access Level field allows entry of the level of premise access by the passcard holder. For
example, some individuals may not have access to enter the premises after hours. The Access Level is
utilized to flag special conditions in regards to subscriber personnel.
Digital Paper:
Enable Digital Pager if the Phone and Comment fields are to be used with an alphanumeric digital
pager
Alpha Pager:
Enable Alpha Pager if the Phone and Comment fields are to be used with an alphanumeric pager.
User Numbers:
The User Number field allows entry (3 digits, 000-999) of the user number, if the control unit can
transmit them. Entry of this information is mandatory if you wish to provide the person's name to the
subscriber on the Opening/Closing Reports.
Some ITI control unit user numbers are "0" – "9" and "A" – "Z". In the case of alphabetical user
numbers (e.g., "B") you must enter the decimal equivalent in order to include the name on reports. For
example, "A" is "010", "B" is "011" through "Z" which is "035".
Additionally, in the case of the ITI user numbers, you should enter "5" in Subscriber Options. To
include user names on reports you must enable Include User Names on Reports.
If the control unit only transmits 1 or 2 digit user numbers place leading zeroes before the actual
number (e.g. user 2 would be 002).
Comment:
The Comment allows entry (up to 10 characters) of a brief note about the contact name. For example,
a note about an extension number or that the contact is a neighbor.
In order to use Digital Paging insert the phrase 'Pager' in this field. This will modify the dialing
display and provide the return number entered in the Digital Pager Message.
Date Parameters:
Days of the week
Page 43

There is a checkbox for each day of the week. Use these fields to specify the days of the week during
which the contact person should be notified.
Purge:
The Purge field allows removal of the entry after expiration of the date. For example, enabling the
purge for an entry will completely remove the contact's entry after the From - To date has expired.
Alternatively, non-entry will leave the information available (and applicable) for the next year.
Global Cde 7:
Global Codes:
The Global Code field allows entry (1 character each for 7 entries) to designate the type of holiday
scheduling (if any) the account observes.
Begin and until dates:
The Date From - To fields allows entry (or non-entry for all dates) of the dates (inclusive) the person
is available for contact. For example, the owner vacations from January 1 - February 1, yet would like
to be notified of any "HUA" (Hold-Up Alarm) events. Assuming a HUA has been entered as a type to
be notified on, and a "HUA" event is received from Jan 1 - Feb 1 (inclusive) the name will be
provided for contact.
A button is provided adjacent to the field to present a list of common selections.
Begin and until times:
The Time Until - To fields allow entry (HH:MM) of the time the person is available (on previously
entered days of the week) for contact. For example, assume a time available entry of 08:00 - 17:00
(Monday - Friday) has been entered. A "HUA" event has also been designated as a type the contact is
notified on. At 13:00 on Wednesday a "HUA" (Hold-Up Alarm) is received. This satisfies all criteria
and the name is presented for notification. Conversely, if the event occurred Sunday, the contact name
would not be provided.
A button is provided adjacent to the field to present a list of common selections.
Contact Language:
Web Access:
Enhanced call verification:
Use this field as mean of determining if an alarm is legitimate or not by calling key holders before
dispatching. This field determines if that contact is used for ECV or not.
Page 44

Schedule Tab:
This is the place of the SIMSIII account database where you enter the schedule and other parameters
related to the processing of open/close signals.
This dialog box can be resized.
Page 45
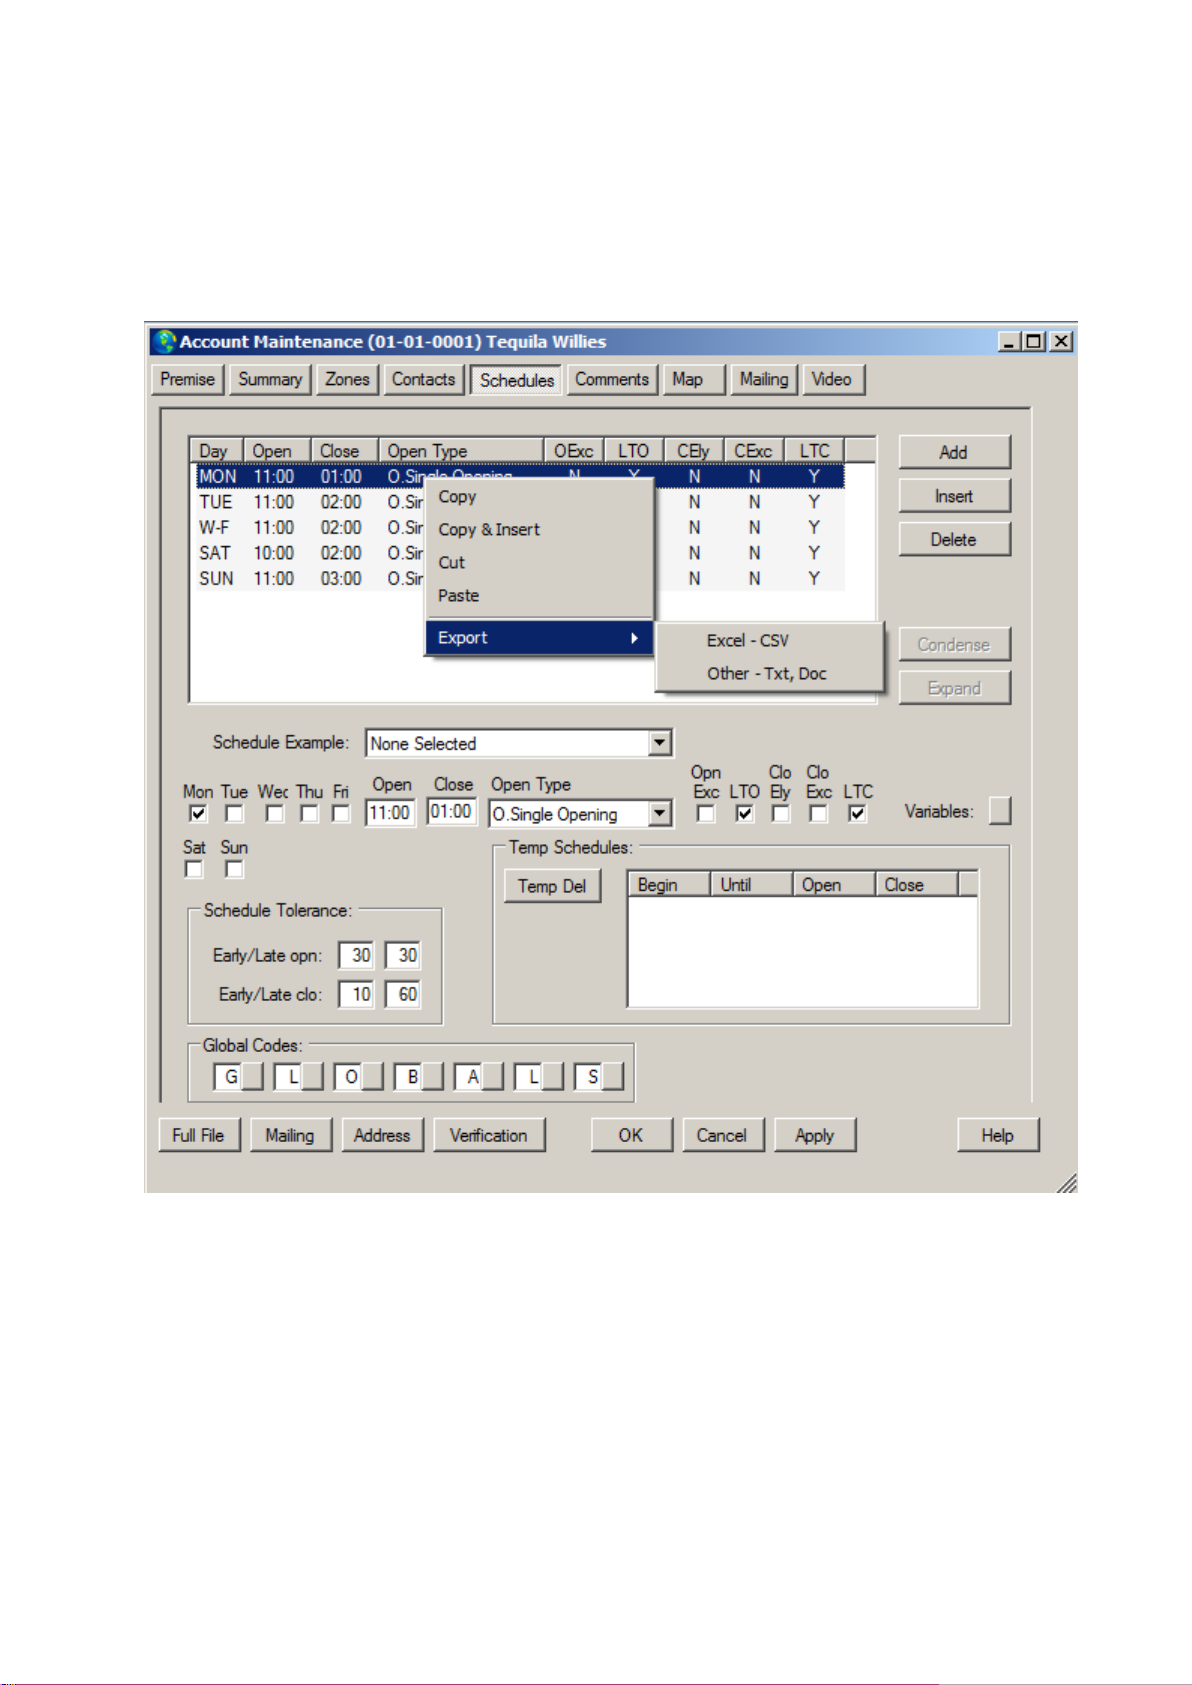
Schedule list:
This is the actual content the account's schedule list. By right clicking anywhere on this list you will
gain access to series of options like Exporting to Excel and Find/Replace. These functions are
common to virtually every list inside SIMSIII. Use the Insert and Delete buttons to add and delete
entries to the list.
This list of items can be sorted and exported in different ways
Day:
Use this field to select the days of the week during which the schedule is going to be effective
Open:
The Open field allow entry (hh:mm) of the time (if any) the premise is expected to open.
Close:
The Close Time field allow entry (hh:mm) of the time (if any) the premise is expected to close on the
specified day.
Open type:
Page 46

The Opening Type field allows you to define the opening type for the schedule. Here the pre-defined
Open type
Description
One Open p/day
Allows 1 opening per schedule entry if during the normal opening time plus or minus the early open
or late open tolerances. Openings occurring outside of this window will generate two types of signals
based on the time received and schedules entered (if any):
Early opening (EOP) if occurring outside the open and close schedule(s) inclusive of the early open,
late open and early close and late close tolerances. For example, an opening at 07:29 yet the schedule
is open at 08:00 and close at 17:00 with 30 minute early open, late open, early close and late close
tolerances. Additionally, an early opening will be created on subsequent openings after the first
opening.
Late Opening (LOP) if occurring after the open time and late opening tolerance yet before the
scheduled closing time including the late close tolerance. For example, an opening at 08:31 yet the
schedule is open at 08:00 and close at 17:00 with 30 minute early open, late open, early close and late
close tolerances.
Repeat Open
Allows all openings (ignores schedules, if any) to be auto-logged. This opening type is generally used
for systems that transmit open and closes yet schedule supervision is not required or desired.
Subsequent Open
Subsequent Opening allows any number of openings that occur within the schedules (including open
and close tolerances) to be auto-logged. Openings occurring outside the schedule (including the
tolerances) create an EOP - Early Opening.
x.x drs repeat
options:
This type of opening is to only check that the subscriber has closed by a certain time where x.x. is the
number of hours SIMSIII will wait for a close signal before generating a late to close (LTC) For
instance, if the option selected is "3.0 drs repeat", then SIMSIII will wait for
Open is exception Opn Exc:
The Open Is Exception field allows an entry to force an opening to be treated as an exception. If
enabled, note this will force the opening to be treated as an exception even if occurring within the
normal opening time and tolerance. This may be used to verify a premise opening by passcard holder
if the subscriber desires this capability.
Generate Late to Open (LTO):
The Generate Late-To-Open (LTO) field allows an entry to cause the software to generate a Late-ToOpen if the account has not opened by the entered opening time plus the Late Open tolerance. For
example, an opening of 08:00 has been entered and a late opening tolerance of 30 minutes. If
Generate Late to Open is enabled and no opening occurs before 08:30 then a Late-to-Open will be
generated by the software.
Close early (Clo Ely):
The Allow Early Close field allows an entry to allow the premise to close before their entered closing
time minus their Early Close Tolerance. Additionally, the Close Is Exception parameter can override
Page 47

the early close grace period on a per schedule basis and force the closing to create an exception event
even if occurring within the normal closing time.
Close is exception (Clo Exc):
The Close Is Exception field allows an entry to force a closing to be treated as an exception. If
enabled, note that this will force the closing to be treated as an exception even if occurring within the
normal closing time and tolerance.
Generate Late to Close (LTC):
The LTC field allows an entry to cause the software to generate a Late-To-Close if the account has
not closed by the entered closing time plus the Late Close Tolerance. For example, a closing of 03:00
has been entered and a late closing tolerance of 30 minutes. If the Generate Late To Close is enabled
and no closing occurs before 03:30 then a Late-to-Close will be generated by the software.
Schedule Tolerances:
Early open:
The Early Open Tolerance field allows an entry (2 digits 00 - 99 minutes) to allow the premise a
'grace' period before the entered opening time.
Early close:
The Early Close Tolerance field allows an entry (2 digits 00 - 99 minutes) to allow the premise a
grace period before the entered closing time.
Early Close overrides an early close tolerance and allows the account to close anytime on a per
schedule basis. Additionally, the Close Is Exception can override the early close tolerance on a per
schedule basis and force the closing to create an exception event even if occurring within the normal
closing time.
Late close:
The Late Close Tolerance field allows an entry (2 digits 00 - 99 minutes) to allow the premise a grace
period after the entered closing time. For example, assuming no closing has been received as of the
entered closing time plus the late close tolerance (and Generate Late To Close is enabled) the software
will create a Late-To-Close event.
Temporary Schedules:
This section of the Schedule Tab will show you any temporary schedule entered for the account. This
list contains the following information:
The temporary schedule Begin Date column provides the date the temporary schedule will begin to
take effect.
The temporary schedule Until Date column provides the date the temporary schedule will be in effect
until.
The temporary schedule Open Time column provides the time the account is expected to open.
The temporary schedule Close Time column provides the time the account is expected to close.
Note that you cannot add a temporary schedule from this dialog box. Adding temporary schedule
entries is accomplished through an exception event (see more details about this here. You can also do
a Search Account(F2) and then press F3 to enter a temp schedule. However, you can delete an entry
from the temporary schedule list from here. To do so, just select the temporary schedule to delete and
then click on the Temp Del button.
Global codes:
The Global Code fields allow entry of 7 characters to designate the type of holiday scheduling (if any)
the account observes. Note that these fields are specifically designed for matching and overriding any
Page 48

regular schedules during specified periods (e.g. holiday). When entering a Global Schedule, entry of
matching Global Codes will allow the software to override normal schedules for the duration of the
Global Schedule entry (e.g. account closed Christmas/New Year’s Day).
Page 49
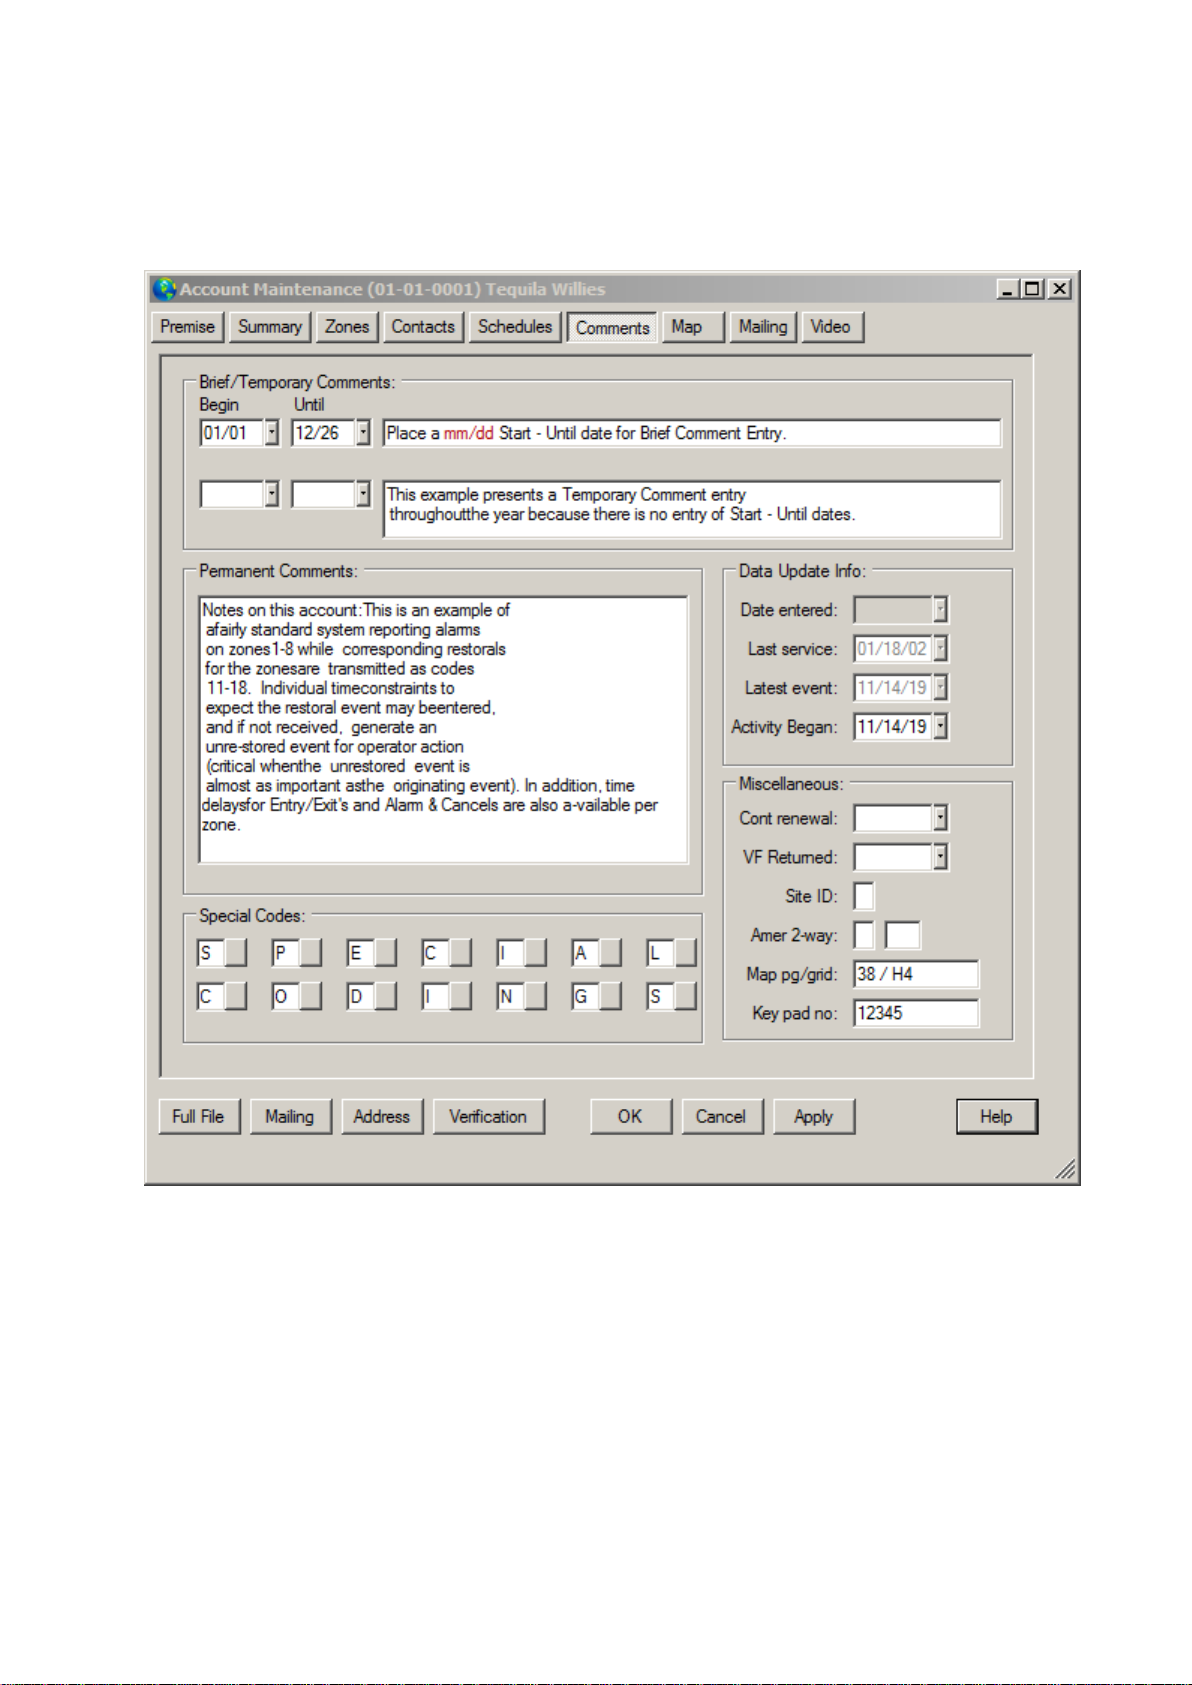
Comment Tab:
During the process of completing an event the operator needs to have access to relevant information
about the account. Part of that information is consigned in the form of Permanent and Temporary
(only valid for a period of time) Comments.
This is the place in SIMSIII where you can edit and setup those comments.
This dialog box can be resized
Brief/Temporary Comments:
Brief Comments Begin Date (Begin):
This field allows entry of a beginning month and day (if any) for Brief Comments.
If the Begin and until dates are left blank, the temporary comment will work as a permanent
comment.
Brief Comments until Date (Until):
This field allows entry of an until month and day (if any) for Brief Comments.
If the Begin and until dates are left blank, the temporary comment will work as a permanent comment.
Page 50

Brief Comments
The Brief Comments field allows entry (1 line up to 58 characters) of info about the account.
You must do a regeneration to remove any expired temporary comments before December 15 of the
current year.
Permanent Comments:
The Permanent Comments field allows entry (11 lines, up to 48 characters each) of general
information about the account. This information will be presented to operators in the Action Priority
Mask.
Data Update Info:
Date entered:
The date that the account was first created is inserted automatically by the program in this
field.
Last service:
This field contains the date that the last service work order was generated and is automatically
updated by the program.
Latest event:
This field contains the date that the last event was received and is automatically updated by the
program.
Activity began:
This field contains the date that the first event was received on and is inserted automatically by the
program.
Miscellaneous:
Contract Renewal (Cont renewal):
The Contract renewal field allows entry of the date the monitoring contract is to be renewed.
VF Returned:
The VF Returned field allows entry of the date the verification form was returned by the subscriber.
Site ID:
The Site ID allows entry of a character that can be used to identify an account belonging to specific
sites. An example would be several central stations sharing the same database, but responsible only
for specific accounts.
American Two-way Armer 2-way:
The American Two-Way ‘Header Character’ field allows entry of a three character command and
control string to be sent to the American Two-way Control Box. This unit is used for two-way voice
communications. This character must be a tilde ‘~’ or a caret ’^’.
Additionally a second field is provided for the American Two-Way control String is the second and
third characters of the control string to be sent to the American Two-way Control Unit. These
characters are defined by the manufacturer.
Map pg/grid:
The Map Page/Grid field allows entry (up to 9 characters) of a page and/or grid entry of the premise
location.
Key pad no:
Page 51

The Key Pad Number field allows entry (up to 9 characters) of the keypad number if you maintain a
set of keys to their premise.
Special Codes:
The Special Code field allows entry of user defined characters for your own customization. Any or all
of the 14 special code fields are available for use. Accounts may later be sorted, reports generated, etc.
based on these entries for common characteristics.
Map tab:
Map:
This tab will access Google Maps to show the location of the premises address in a map.
Page 52
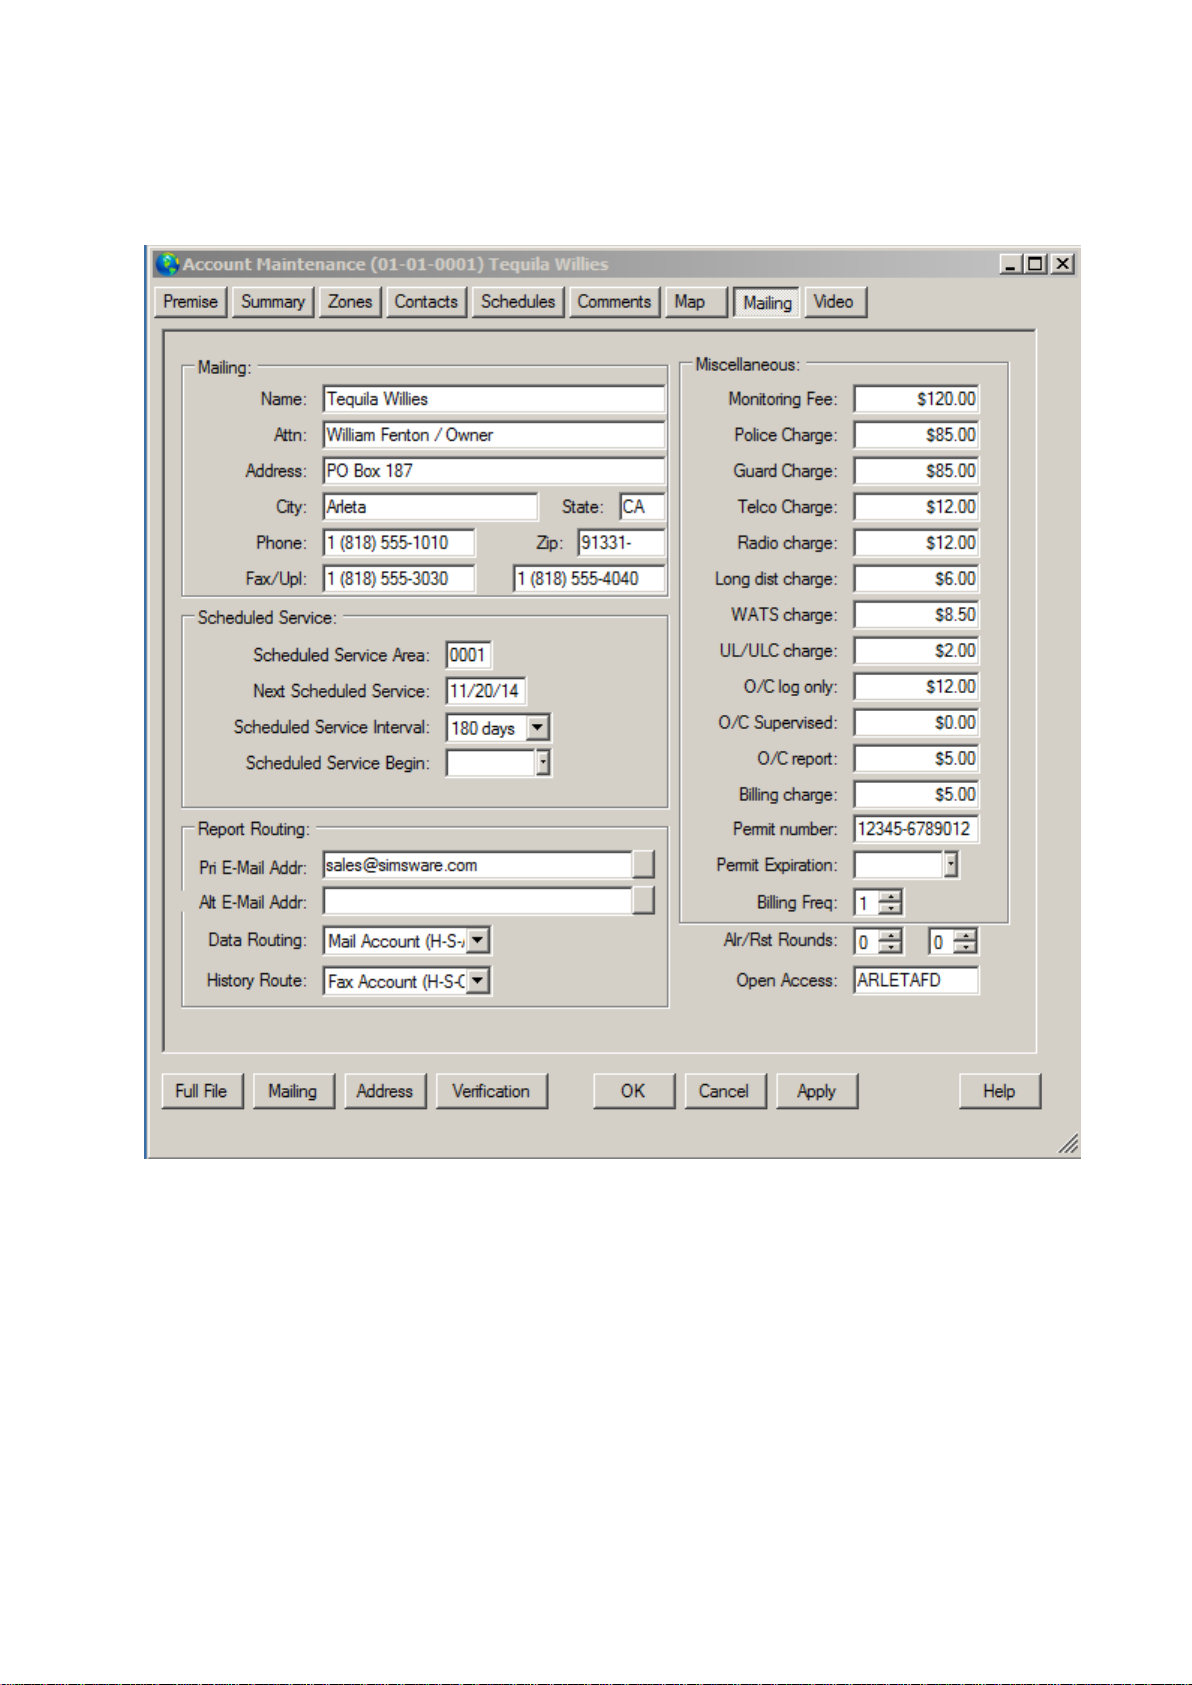
Mailing Tab:
Mailing:
This is the section of the account's database that lets you enter information related to mailing and
billing
Name:
The Name field allows entry (up to 37 characters) of the addressee to receive mailed reports. To copy
the entry from the premise Name field, leave this entry blank and either strike the tab or enter key
through the field.
Attention (Attn):
The Attention field allows entry (up to 37 characters) of a name for reports to be directed to. To copy
the entry from the premise Contact field, leave this entry blank and either strike the tab or enter key
through the field.
Address:
The Address field allows entry (up to 37 characters) of the street mailing address. To copy the entry
from the premise Address field, leave this entry blank and either strike the tab or enter key through the
field.
Page 53

City:
The City field allows entry (up to 25 characters) of the city to mail reports to.
State:
This field allows entry (up to three characters) of the state to mail the report to.
Zip:
The Zip code field allows entry (up to 10 digits) of the mailing address zip code. To copy the entry
from the premise Zip field, leave this entry blank and either strike the tab or enter key through the
field. A separate zip code database is maintained containing regional information specific to the zip
code such as city, state, time zone and other information. After entry of a zip code this database is
searched for a matching zip code entry. Depending on the results one of the following will occur:
If the zip code is not found a dialog box will be presented allowing entry of the regional information.
When entry is complete click Ok to add the information to the database, or click Cancel to not add the
information.
If only one entry for the zip code exists in the zip code database it’s regional information will be used.
If more than one entry for the zip code exists a dialog will be presented to select your choice.
Highlight the desired entry and click Ok, or click Cancel to not accept any of the selections.
Phone:
The Phone field allows entry (up to 18 characters) of the phone number at the mailing address
location. To copy the entry from the premise Phone (Primary) field, leave this entry blank and either
strike the tab or enter key through the field. If Enable Phone Number Formatting is turned on you do
not need to insert parenthesis, hyphens or spaces as the program will automatically format the phone
number for you.
Fax/Upl:
The Fax field allows entry (up to 18 characters) of a phone number a facsimile device is attached to at
the mailing address. If Phone Number Formatting is turned on you do not need to insert parenthesis,
hyphens or spaces as the program will automatically format the phone number for you.
The Upload field allows entry (up to 18 characters each) of a phone number to use in conjunction with
a modem at the mailing address. Transferring information through an upload link requires modems at
the transmitting and receiving sites. In addition, a printer at the receiving site may be used to print
reports as part of the Upload process. If Phone Number Formatting is turned on you do not need to
insert parenthesis, hyphens or spaces as the program will automatically format the phone number for
you.
Scheduled Service:
Scheduled Service Area:
The Service Area field allows entry (up to 4 characters) service or technician code.
Next Scheduled Service:
This field will show the date for the next schedule service. SIMS III calculates this date based on the
Interval and the Begin date.
Scheduled Service Interval:
The Interval field allows entry (from 001 to 999) of the number of days between scheduled service
calls. For example, an entry of 180 will call scheduled service to be performed approximately every 6
months. You will notice after entering the interval value and the start date, the next service call area
Page 54

will be filled in. In addition this information is provided in the Status of Account report. See
Scheduled Service Overview for information on posting these work orders.
Scheduled Service Begin:
The Begin Date field allows entry of a date to begin scheduled service on.
For example, if the interval is every 180 days and the begin date is January 1, 2009 the first scheduled
service will be approximately July 1, 2009.
Report Routing:
Pri E-Mail Addr:
Field for Primary E-Mail Address
Alt Email Addr:
Field for Alternative E-mail Address
Data Routing:
This field allows selection of the report routing for database related reports.
The database report routing selection allows operations personnel to sort on the desired method of
database report routing for this customer.
History Route:
This field allows selection of the report routing for history related reports.
The history report routing selection allows operations personnel to sort on the desired method of
historical report routing for this customer.
Miscellaneous:
Monitoring Fee:
This field allows entry of the monthly fee for basic monitoring.
Police Charge:
This field allows entry of the yearly or monthly fee for permit or registration.
Guard charge:
This field allows entry of the yearly or monthly fee for response service.
Telco charge:
This field allows entry of the monthly fee for supervised telephone line service.
Radio charge:
This field allows entry of the monthly fee for radio monitoring.
Long distance charge:
This field allows entry of the monthly long distance surcharge.
WATS charge:
This field allows entry of the monthly fee for WATS surcharge.
UL/ULC charge:
This field allows entry of the monthly fee for UL/ULC surcharge.
O/C - log only:
This field allows entry of the monthly fee for non-scheduled open/close signals.
Page 55

O/C – supervised:
This field allows entry of the monthly fee for supervising open/close schedules.
O/C – report:
This field allows entry of the monthly fee for printing and sending open/close reports.
Billing charge:
This field allows entry of the monthly fee for invoicing, mailing and collecting surcharge.
Permit number:
The Permit Number field allows entry (up to 13 characters) of a local permit number. A permit
number is sometimes required in various localities that must be provided if reporting to authorities.
The Permit Number is provided on all exception event screens.
Permit expiration:
This field allows entry of a date that the permit expires on. See Setting and obtaining the date format
for information on the syntax of date entry.
A button is provided adjacent to the field to present a list of common selections.
Billing frequency (Billin freq):
This field allows entry of the number of months between invoices
Alr/Rst Rounds:
Alarm/Restore rounds:
The alarm round field allows entry of the number of rounds a control transmits when reporting an
alarm condition.
The number of restore rounds field allows entry of the number of rounds a control transmits when in
reporting a restoral condition
Note that this is only applies to Secutron (McCulloh) receivers and controls. Leave this entry blank
for all other types of controls.
Open access:
The Open Access field allows for entry of an individual identifier for the Open Access architecture.
Page 56
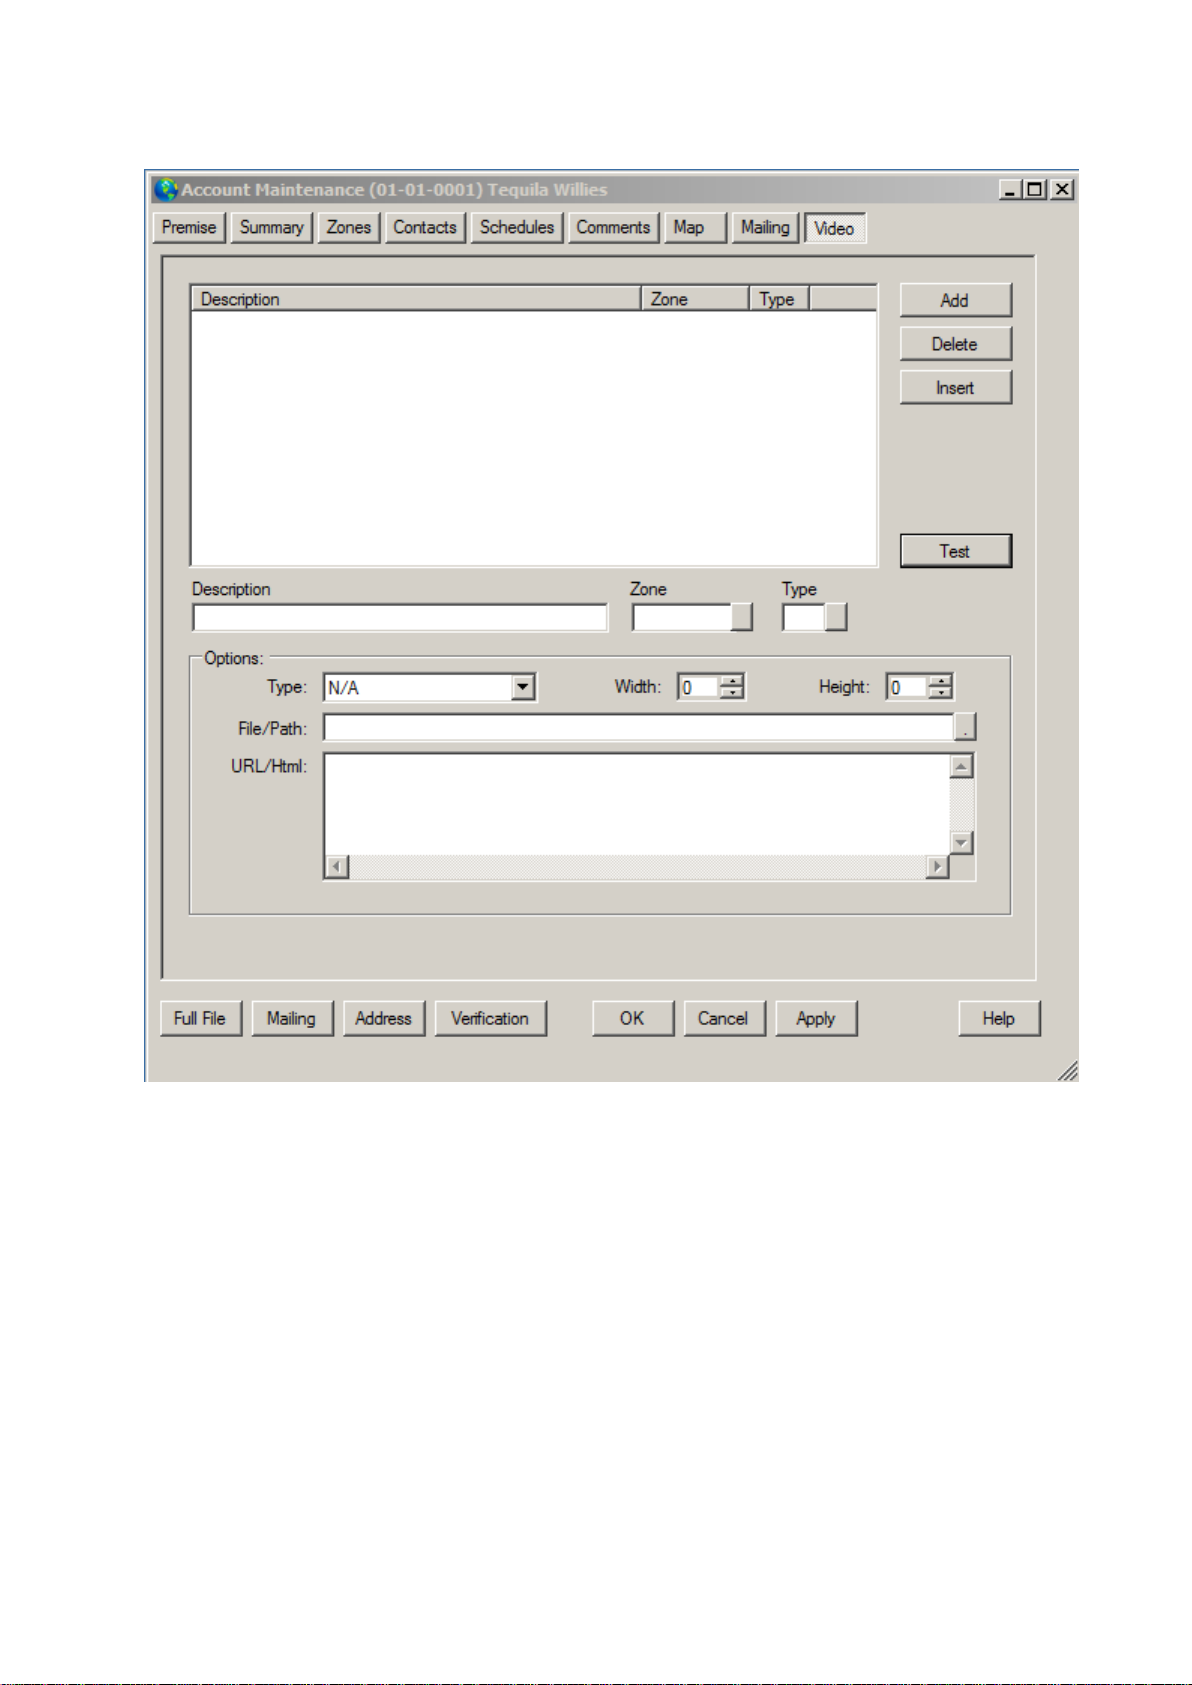
Video tab:
This tab works as an interface that allows you to link account's zones to an IP video camera
or to an Image file.
Video list:
This list shows all the zones that are linked to a picture/video source for the account. By right clicking
anywhere on this list you will gain access to series of options like Exporting to Excel and
Find/Replace. These functions are common to virtually every list inside SIMSIII. Use the Insert and
Delete buttons to add and delete entries to the list.
Description:
This field allows you to enter a description for the video/picture entry. For instance: "Parking lot
camera".
Zone:
Use this field to select the account's zone you want to link to a video/picture source.
Page 57

Type:
Use this field to select the event type you want to link to the video/picture source.
Options
Type:
This field allows you to define the type of source to link. Options are: HTML Code, Static URL,
Image File and Associated File.
Width:
Enter the width (in pixels) for the pop up screen that is going to display the video/picture.
Height:
Enter the height (in pixels) for the pop up screen that is going to display the video/picture.
File/Path:
If you are linking a zone to a file (for example, to an JPG picture) you must enter its path in this field.
URL/Html:
If you are linking a zone to an IP Video source (for example, a web cam) you must enter its
URL/HTML address here.
Page 58

Chapter 4: SIMS III edit add account
Page 59
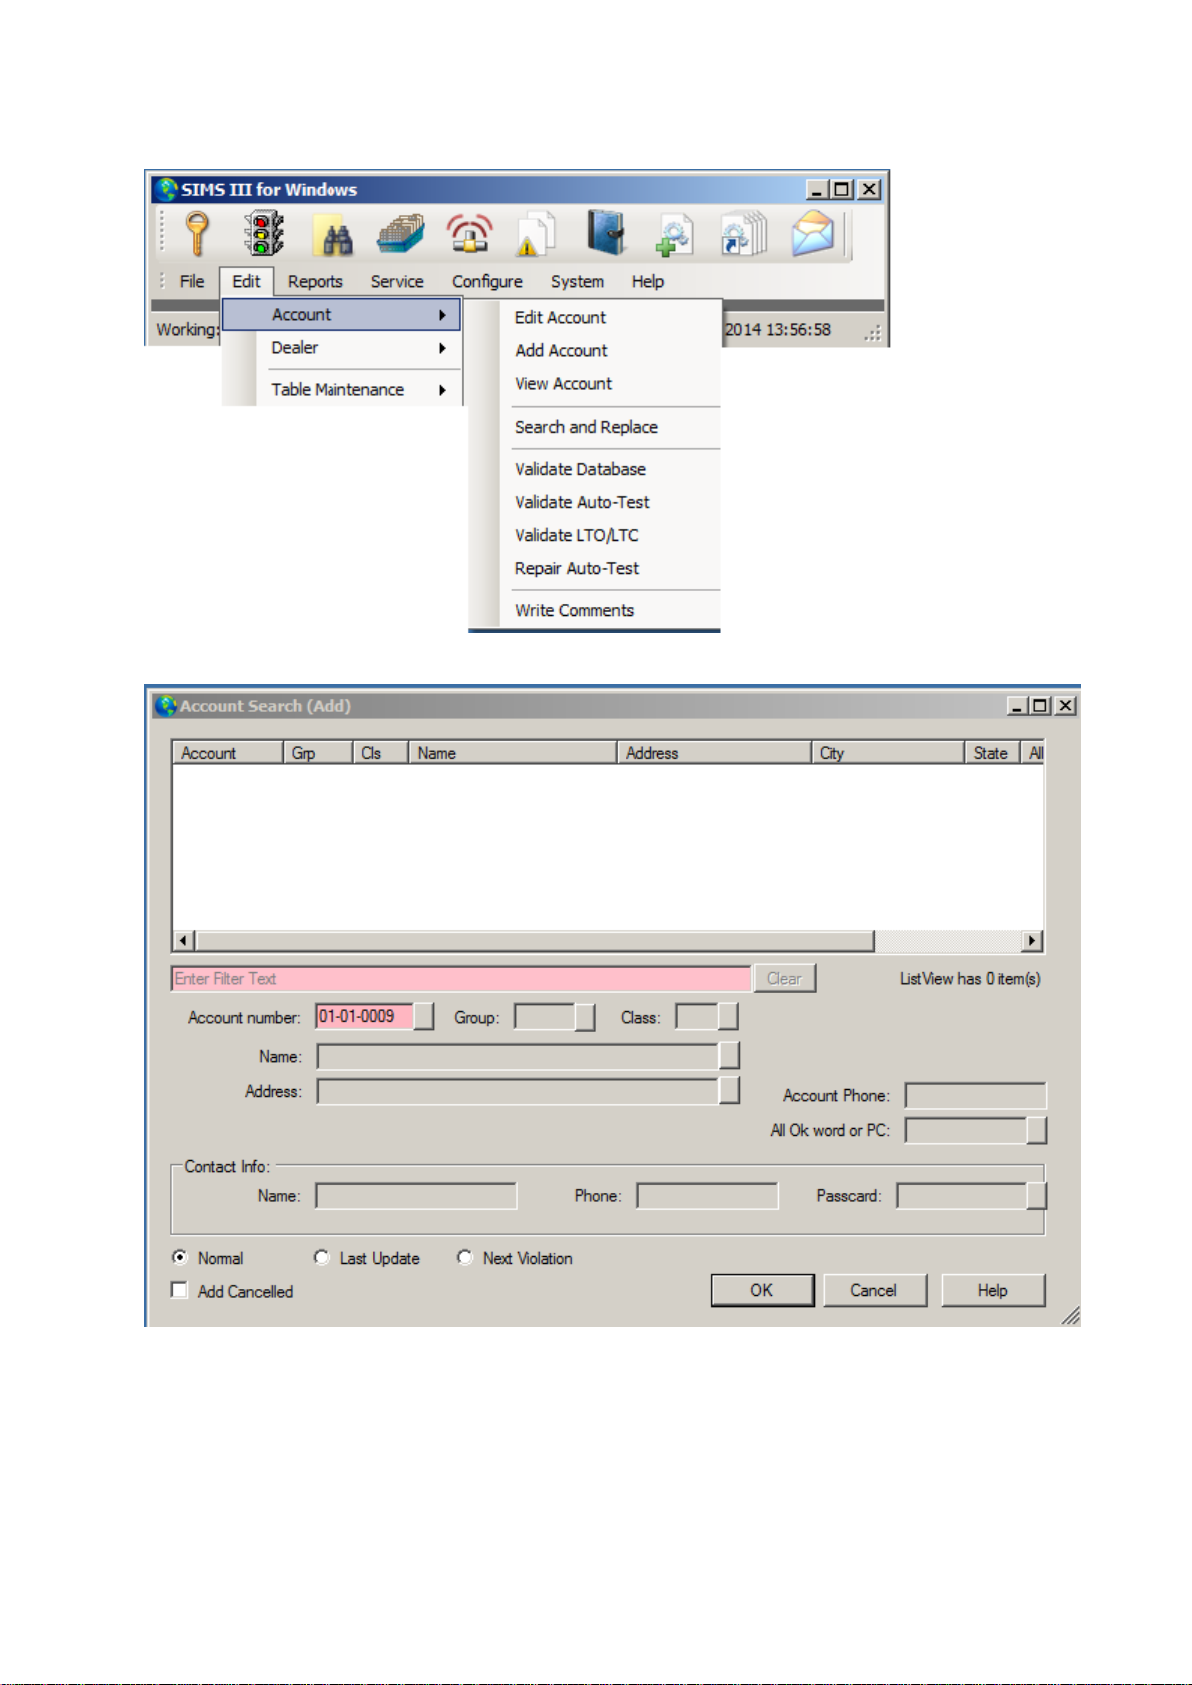
In most of the fields users can click on them and press F1 for help
Add Account
The account number is automatically generated
By clicking ok user will generate a new account and fill their information
Page 60
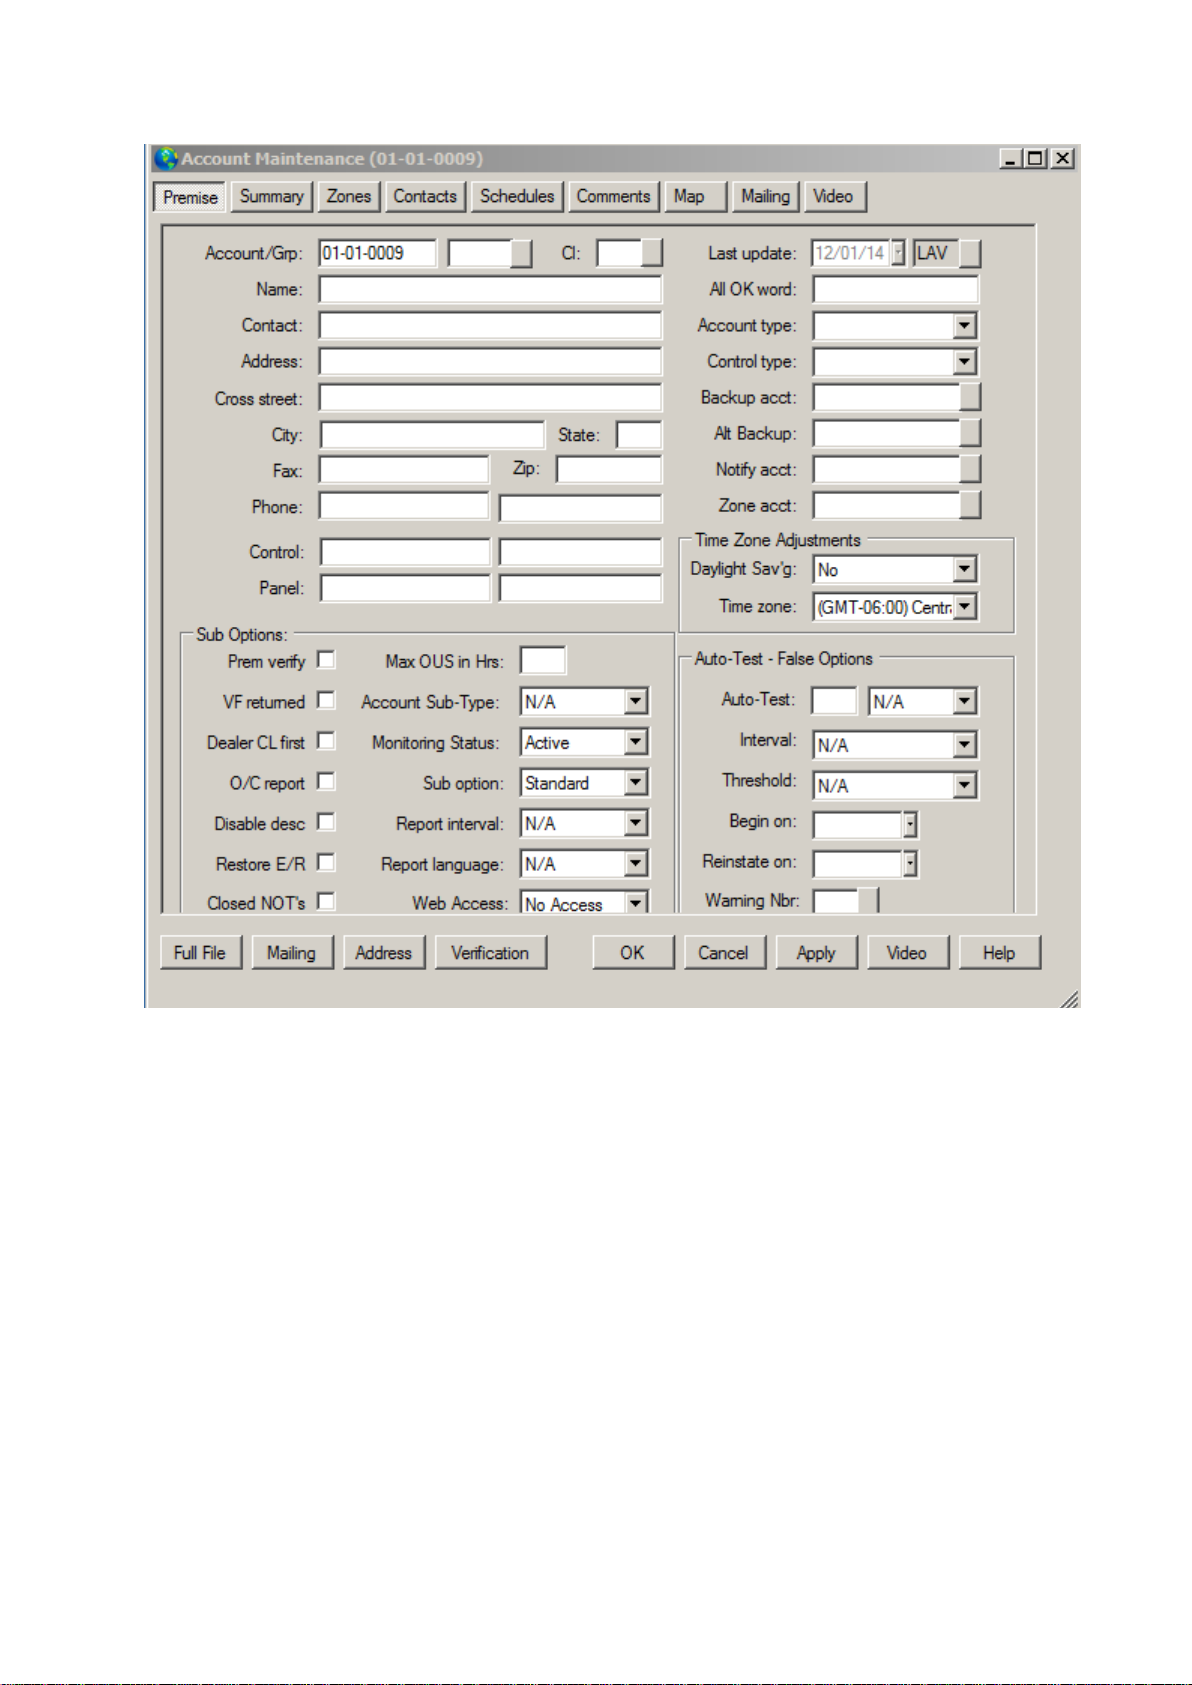
The dialog box is the same as in edit account options
In account maintenance user can add their information
For more information see SIMS III Edit account menu
Same fetchers applies to edit, accounts, view accounts except they are for viewing purposes only the
fields are locked
Page 61
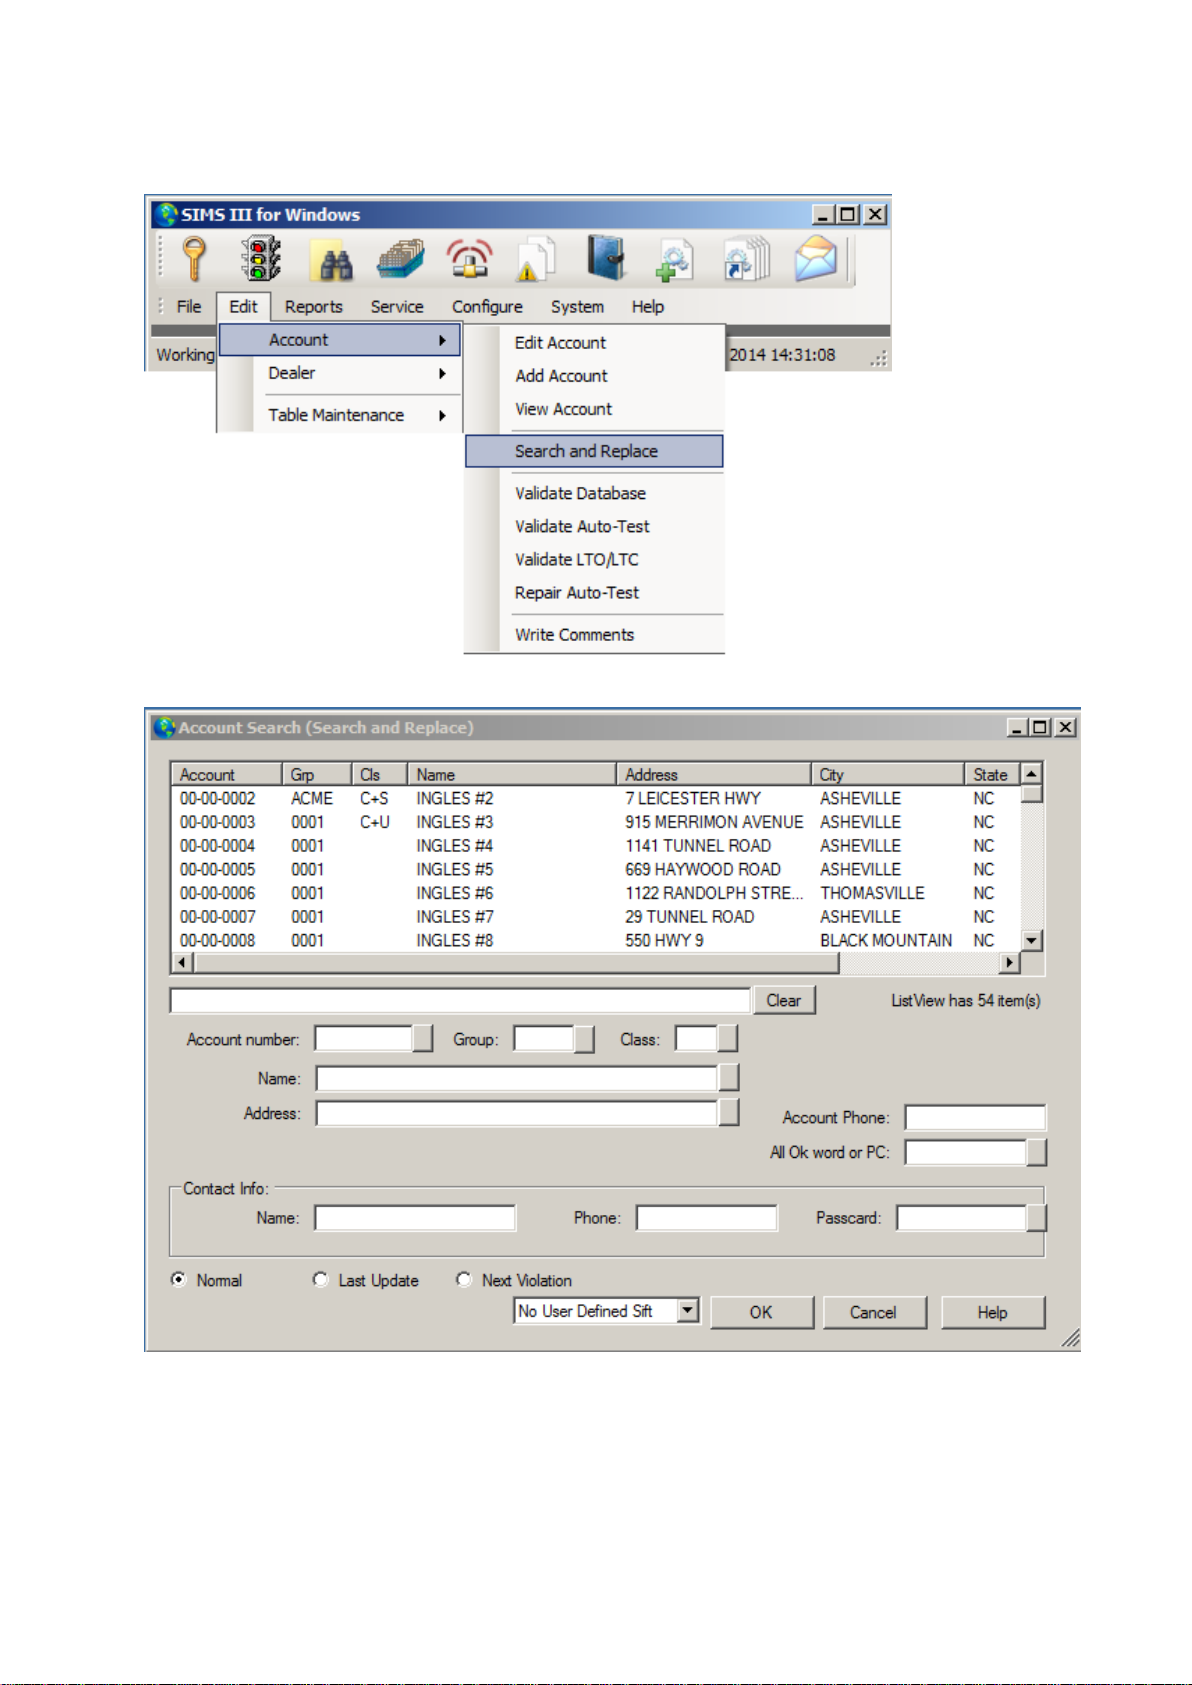
Search and Replace:
Search and Replace:
Under account search and replace users can simultaneously modify information in any given field by
double clicking on any field in the list.
Users can also narrow down their search by utilizing any of the given field s such as:
Account name, Group, Class, Name, Address and other fields shown in image above (Search and
replace).
Page 62
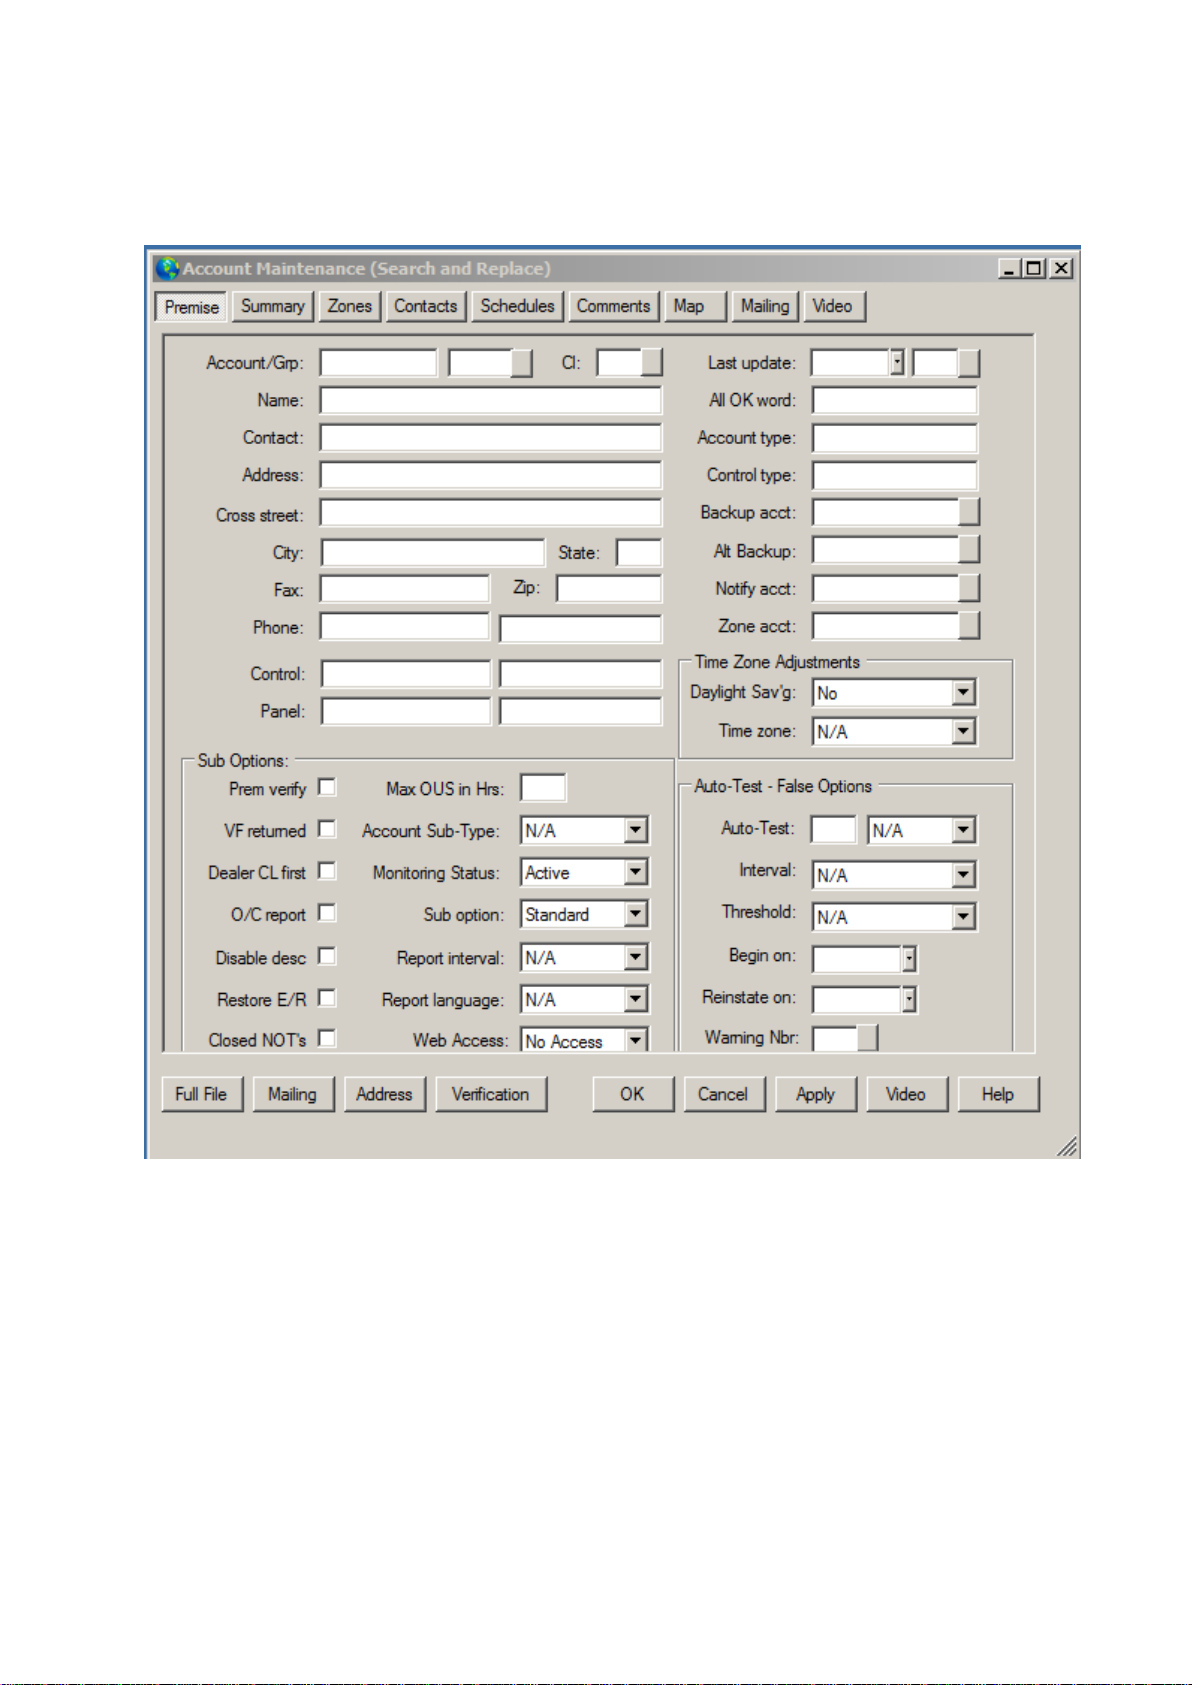
One’s the users have selected the account by double clicking on It they will be given an option to
modify any of the following fields.
Page 63

Account database validation:
Validates fields listed above against the database records
Validate auto test
Validate LTO/LTC
Repair auto test
Page 64
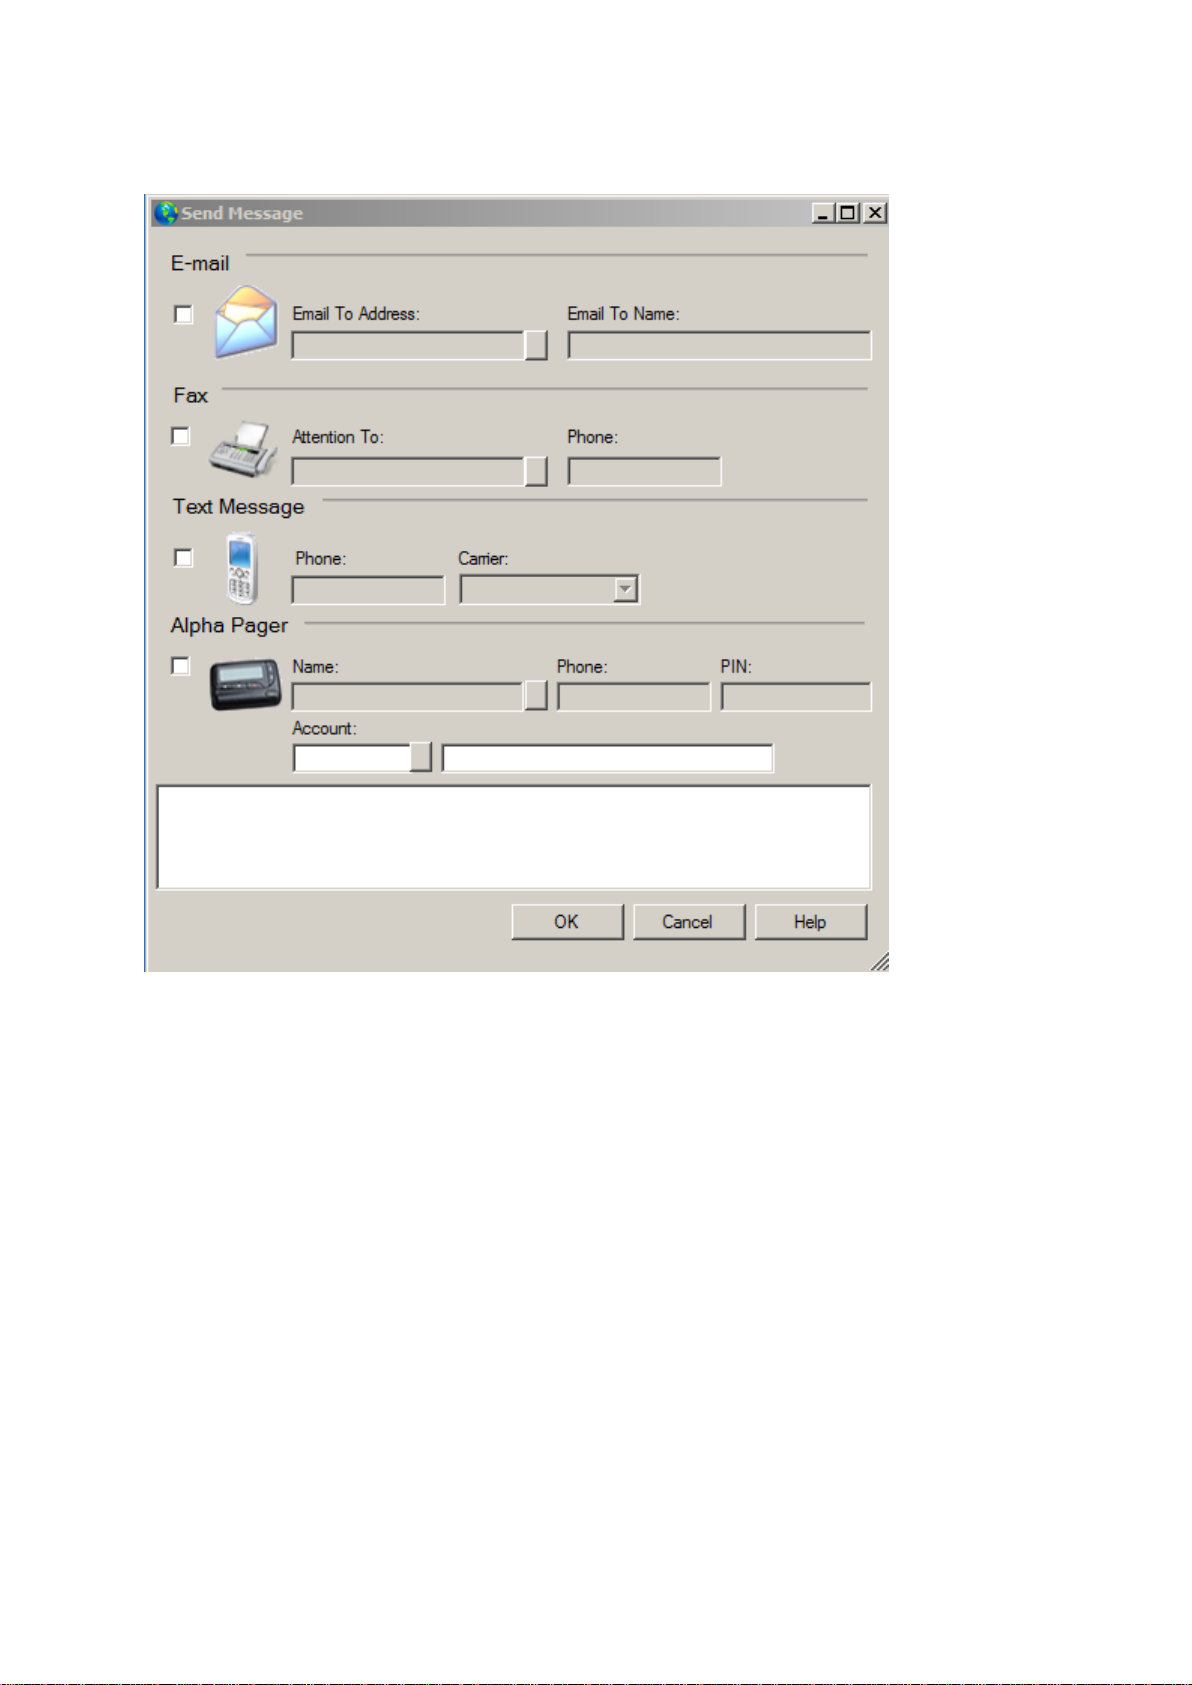
Write comments:
Opens Send message
Page 65

Chapter 5 : SIMS III Edit dealer account
Page 66
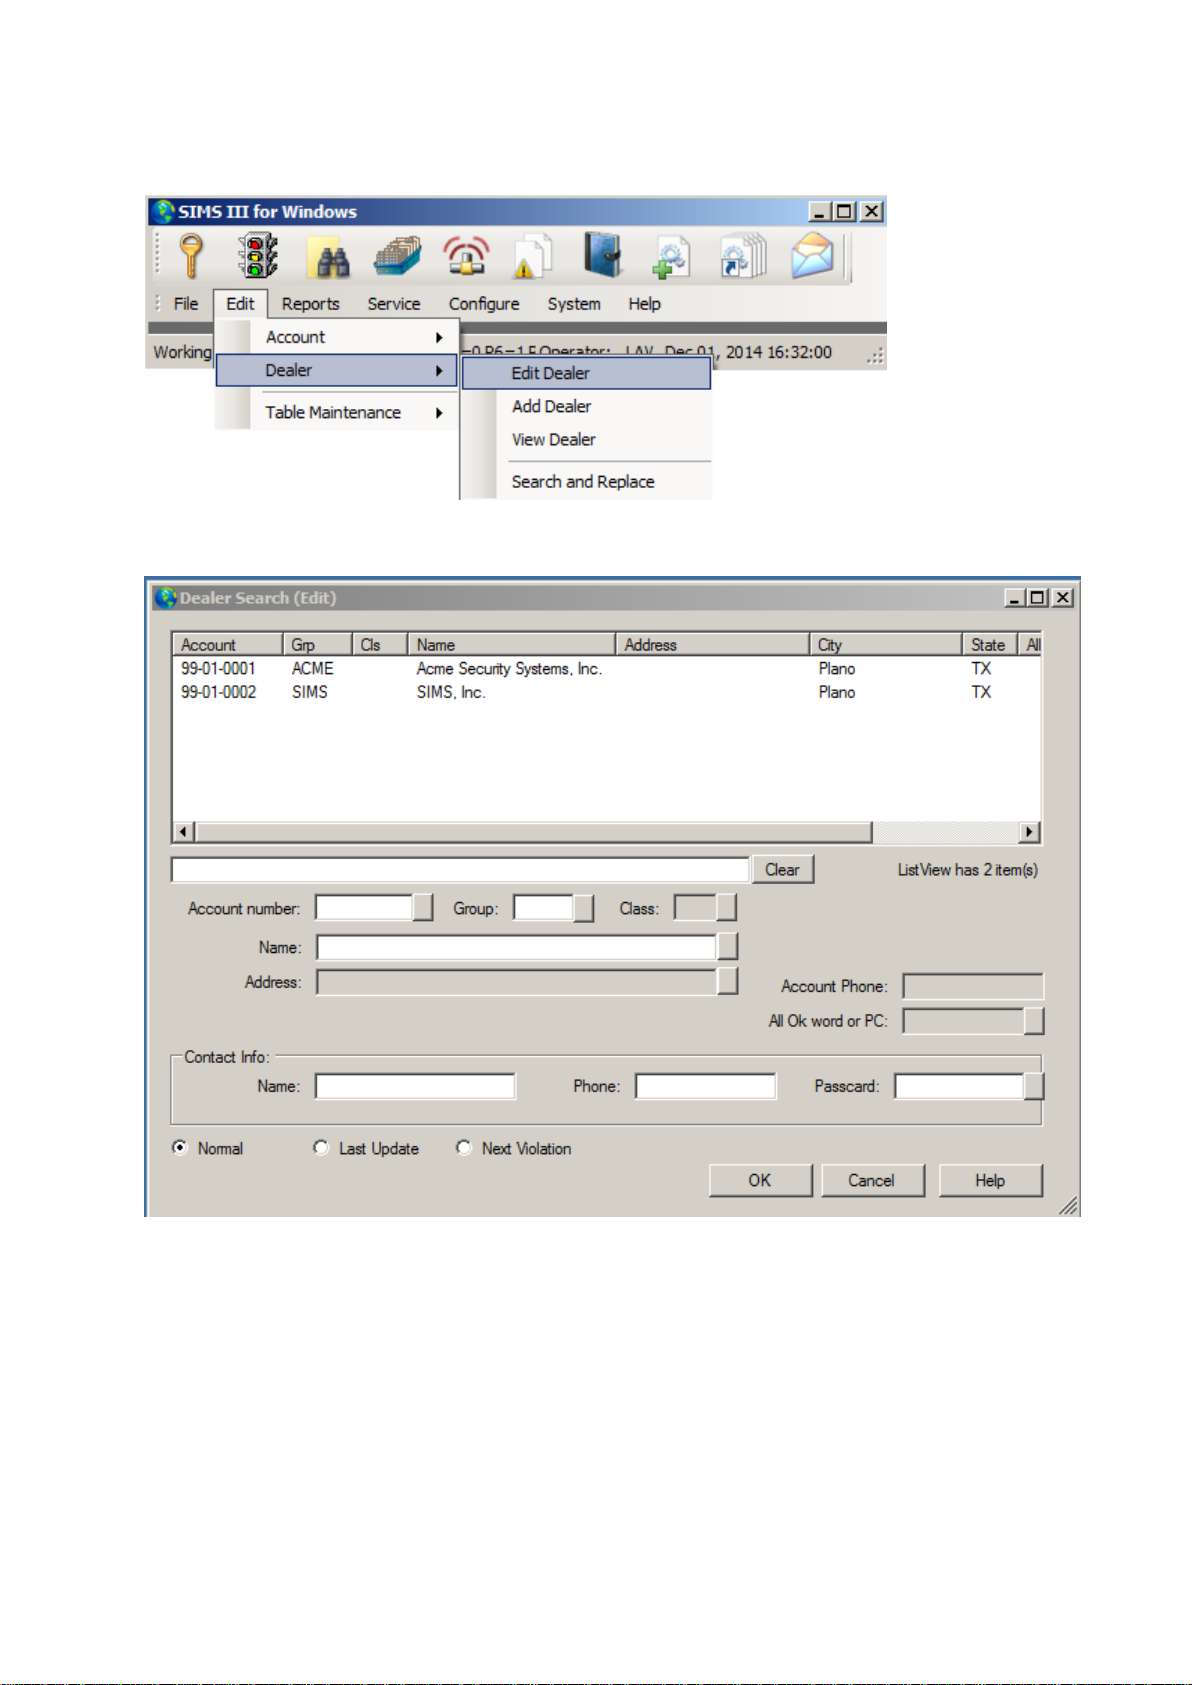
In most of the fields users can click on them and press F1 for help
How to edit a dealer:
Go to Edit | Dealer | Edit Dealer.
Edit Dealer Account
Select the specific account you wish to edit as described in Account Search Overview.
This selection allows database entry and/or updating of the dealer or "Account Group" information.
Additionally, after dealers are defined, a list containing the account group designations is available for
entry in a subscriber's database. This information is entered in a subscriber's account database in the
Group field.
The Dealer Maintenance dialog box will be displayed. From this dialog box you can have access to all
the fields of the dealer database. These fields are divided in 4 tabs or sections: Dealer, Call,
Comments, and Options.
Page 67

Dealer Tab:
This tab of the dealer database contains basic information for the dealer and other general setup
options.
Dealer/Grp:
The account number is comprised of three main items separated by hyphens. Contractor (dealer)
accounts must always begin with a '99'. The remainder of the numbers may be chosen as you desire
(e.g. "99-01-0001"). However, note that these additional numbers must be between 0 (zero) and 9
and/or B through F.
Group:
The Group field allows entry (up to 4 characters) of an abbreviation of the company. A corresponding
Group entry is provided in Edit Account for each account allowing the Central Station to assign
accounts to the proper dealer.
Page 68

Site ID:
The Site ID allows entry of a character that can be used to identify an account belonging to specific
sites. An example would be several central stations sharing the same database, but responsible only
for specific accounts.
Name:
The Name field allows entry (up to 37 characters) of the company name
Contact:
The Contact Name field allows entry (up to 37 characters) of the company owner or other responsible
individual.
Address:
The Address field allows entry (up to 37 characters) of the street address the company is located at.
City:
The City field allows entry (up to 25 characters) of the city the company is located in.
State:
The State field allows entry (up to 3 characters) of the company’s state.
Fax:
The Fax field allows entry (up to 18 characters) of a phone number a facsimile device is attached to at
the company.
Zip:
The Zip code field allows entry (up to 10 digits) of the premise zip code.
Phone:
The Phone field allows entry (up to 18 characters each) of two company phone numbers.
Email:
The Email address field allows entry of the recipient’s primary address when sending email.
Alt Email:
The Email address field allows entry of the recipient’s alternate address when sending email.
Reply-To-Email:
The Email address field allows entry of the recipient’s alternate address when sending email.
Special Codes:
The Special Code fields allow entry of user defined characters for your own customization. Any or all
of the 14 special code fields are available for use. Accounts may later be sorted, reports generated, etc.
based on these entries for common characteristics.
Business Hours:
This group of fields let you specify business hours for the dealers. You can enter up two schedules.
For each schedule there are seven fields representing each day of the week. Use them to specify the
days of the week during which the schedule is effective.
Last Update:
Page 69

The date of the last update is automatically placed in this field along with the initials of the operator
who made the changes.
Brief Name:
Dealer company name
License #:
Dealer license number
A/R Co:
Alarm Company name:
Use the A/R Company field to enter the Company code to assign the dealer to. This is required when
using the Accounting Receivable functions.
Notify dealr:
Select dealer from the list to notify them
Zone Acct:
Allows selecting account numbers
Database:
This field allows selection of the report routing for database related reports.
History:
This field allows selection of the report routing for history related reports.
Statistics:
This field allows selection of the report routing for statistical related reports.
OUS Alerts:
The Out of Service field specifies whether the dealer can place an account on test or Out of Service.
Callback:
Dealer primary call back number
Alt Callback:
Dealer alternative phone number
Miscellaneous:
Dispch Warn:
The Warning Number field allows an entry (000-999) specifying a warning message display to be
presented for operations personnel during exception event processing.
This warning screen will appear whenever entering a Dispatch/Routine Action Display, but after an
error for false alarm reduction screen and before the individual zone warning screens.
Servc Warn:
This warning number screen can be used as an instruction field that pertains to this group of accounts
(dealers). This warning will appear before work orders are routed
Password:
The Password field allows an entry (up to 13 characters) specifying a general password applicable for
the account group.
Accounts:
Page 70

The Accounts field displays the current number of accounts assigned to an account group. This
information is updated during regeneration of the AcntFile.Dat file or during a Rebuild and Resort
File(s).
Page 71
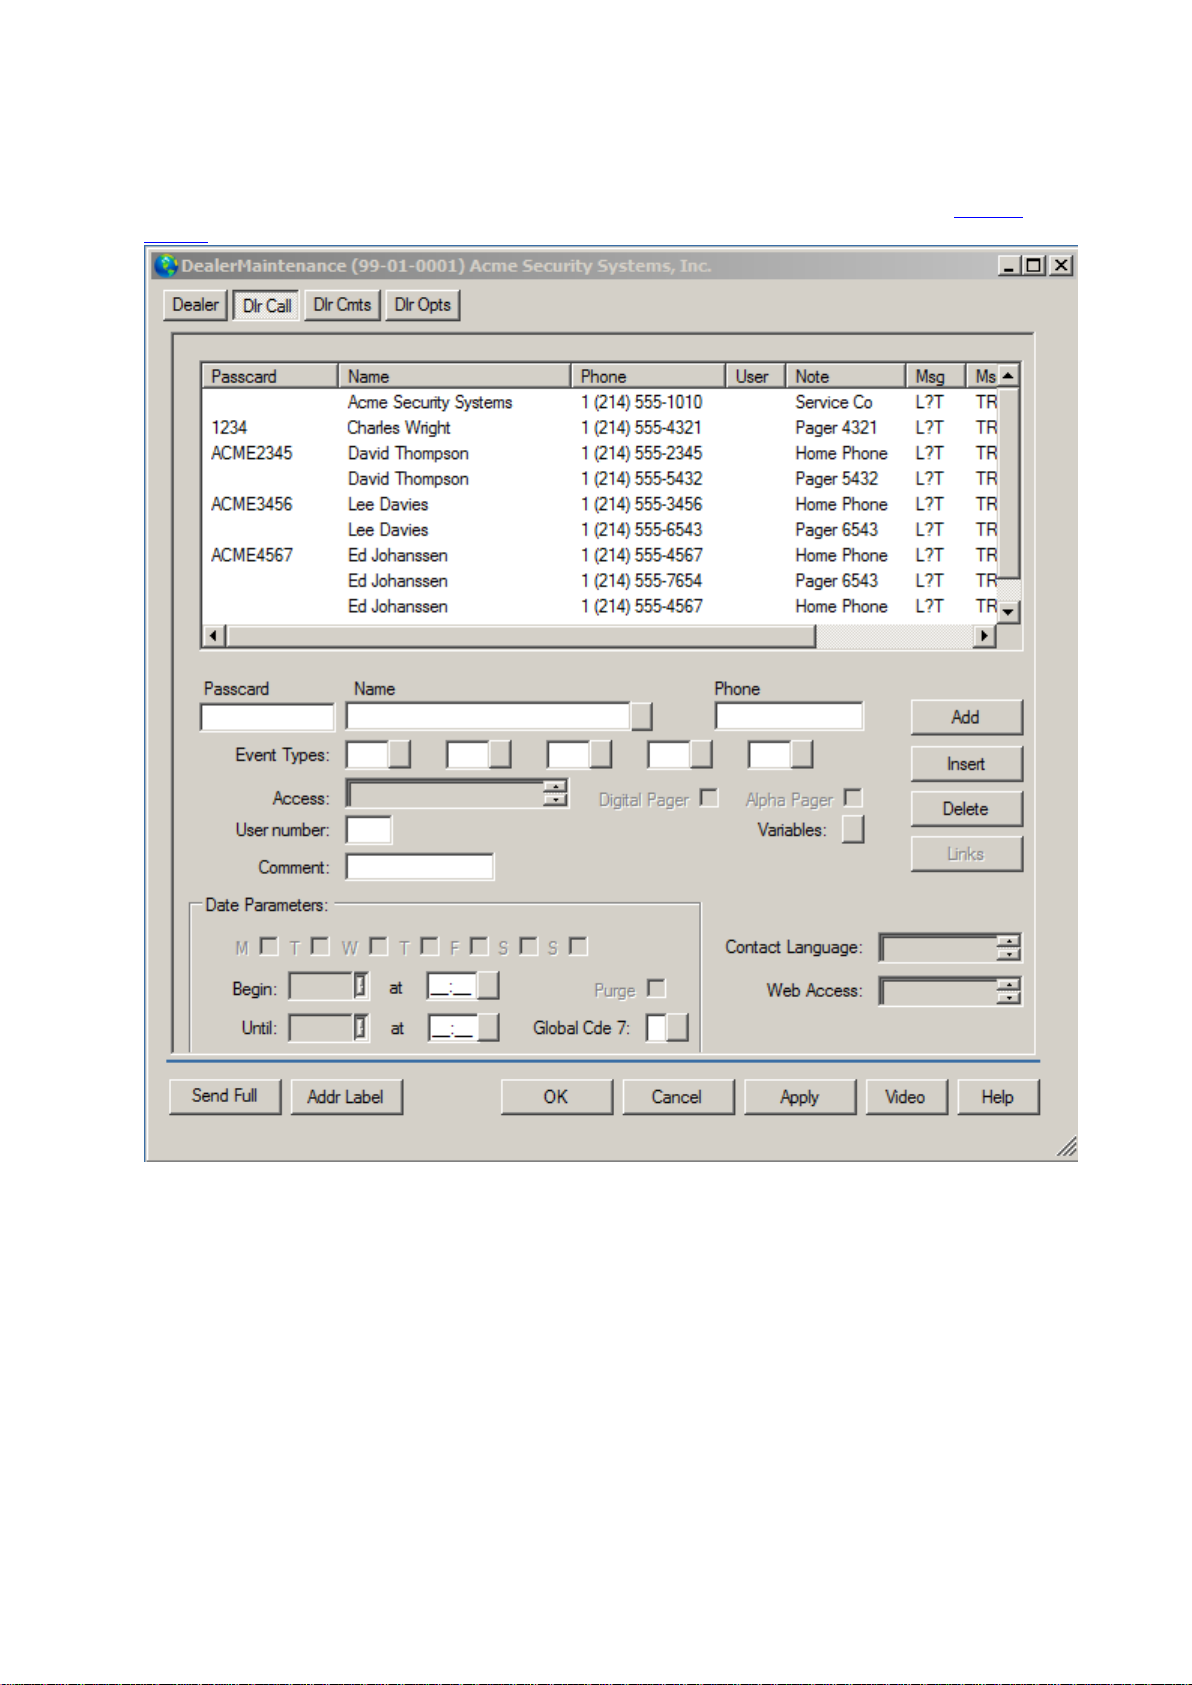
Dealer Call Tab
Dlr Call:
The dealer call tab lets you setup a call list for dealer. It works in the exact same way as the account
call tab, so you can refer to that section to learn how to use each one of its fields.
Page 72
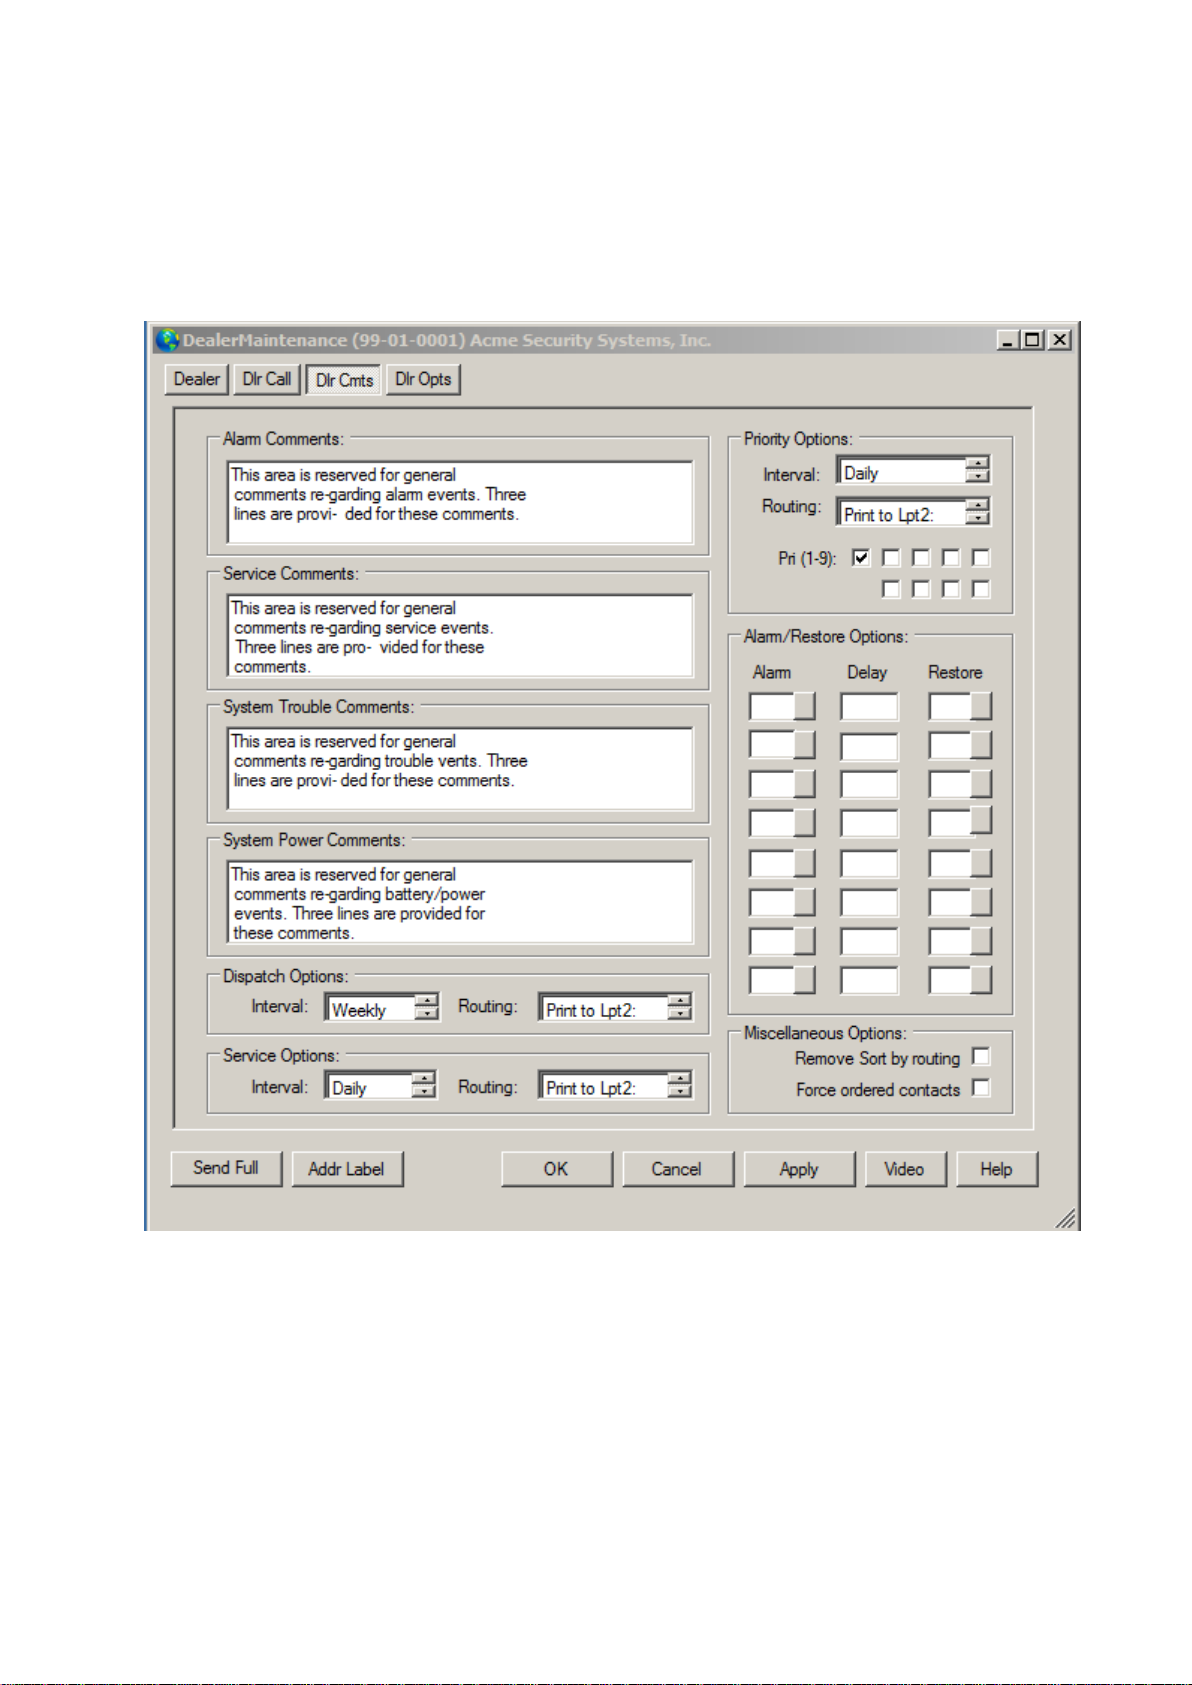
Comment Tab
Dlr Cmts:
SIMSIII allows you to define several types of comments (free text fields) that you can use to record
information that later will be displayed to the operators during the process of completing an alarm.
This tab from the dealer database will allow you to enter several comments that could be useful for
the operator during an event processing.
Alarm Comments:
The Alarm Comments field allows entry (up to 3 lines of 46 characters each) of information used to
assist operations personnel in handling the installation company's clients. These 'free form' comments
are available from any exception event display.
Service Comments:
The Service Comments field allows entry (up to 3 lines of 46 characters each) of information used to
assist operations personnel in handling the installation company's clients. These 'free form' comments
are available from any exception event display.
Page 73

System Trouble Comments:
The Trouble Notes field allows entry (up to 3 lines of 46 characters each) of information used to assist
operations personnel in handling the installation company's clients. These 'free form' comments are
available from any exception event display.
System Power Comments:
The Battery Notes field allows entry (up to 3 lines of 46 characters each) of information used to assist
operations personnel in handling the installation company's clients. These 'free form' comments are
available from any exception event display.
Dispatch Option
Interval:
This field allows an entry specifying how often a report outlining authority dispatches is sent to the
responsible party.
Routing:
The Dispatch Routing field allows an entry specifying the method of routing the dispatch report.
Service Options
Interval:
This field allows an entry specifying how often a report outlining Service Requests is sent to the
responsible party.
Routing:
The Service Routing field allows an entry specifying the method of routing the Service Request
Report.
Priority Options
Interval:
This field allows an entry specifying how often a report outlining Priority 1 - 9 events are sent to the
responsible party.
Routing:
The Priority Routing field allows an entry specifying the method of routing Priorities 1-8 report.
Pri(1-9):
The Priority Level fields allow an entry for each of the priority levels 1-9.
Alarm/Restore Options:
Use these fields to define dealer-wide delays that are imposed on all dealers’ accounts. The three
character mnemonic entered in the first row of fields (Alarm) will be delayed by the seconds specified
on the second row (Delay), so that the removing mnemonic may be received. A single mnemonic may
remove more than one signal. Use third row of field to specify restore delay.
Miscellaneous Options
Remove sort by routing:
The Remove Sort by Routing field allows an entry to define whether this account group will be
skipped when running reports out under the Sort By and then Group selection.
Force ordered contacts:
If enabled, then all accounts for the dealer must be called in the order they are listed on the call list.
This means, for example, that operator can’t call contact #1 and then contact #3 until they call contact
#2.
Note: Having this option enabled is only convenient under very specific circumstances. Most sites
will have this option off.
Page 74
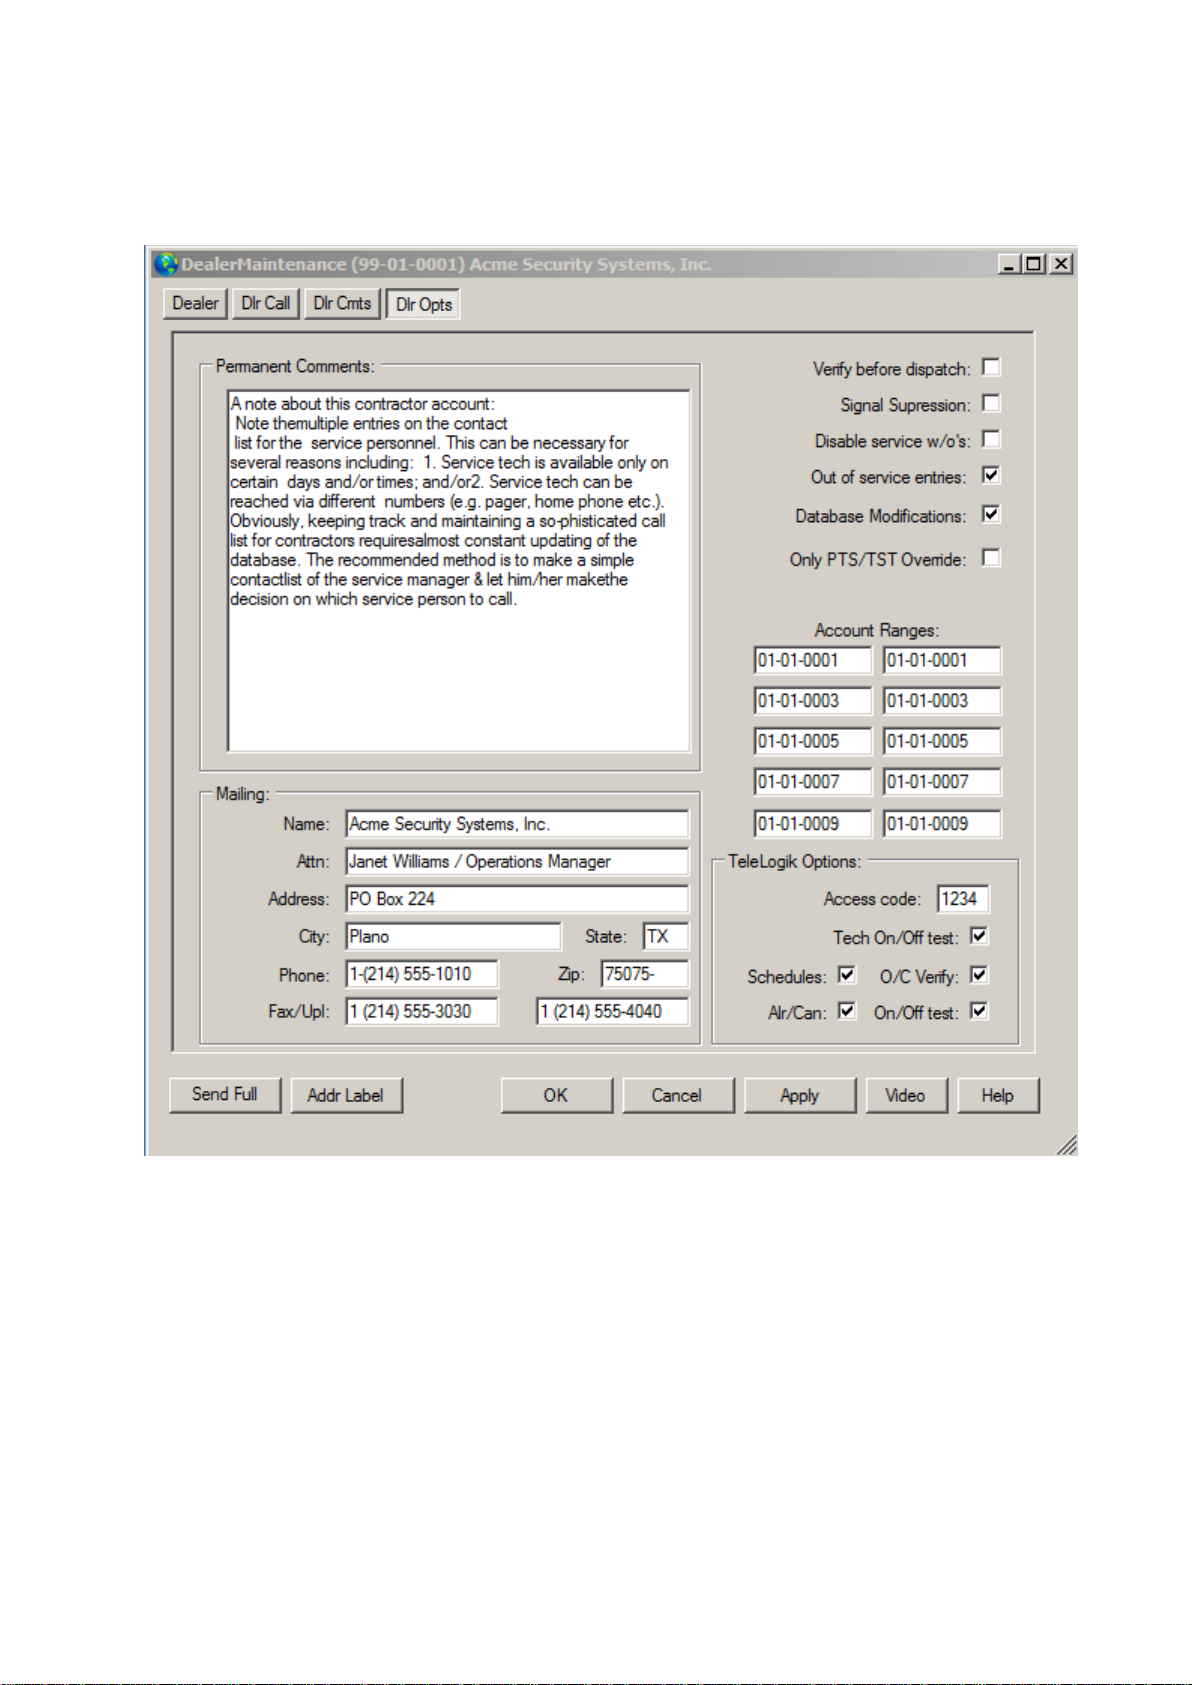
Option Tab
Dlr Opts:
This tab of the dealer database lets you enter permanent comments for the dealer, define the mailing
information, TeleLogik options and other parameters that affect the behavior of the dealer.
Permanent Comments:
The Permanent Comments field allows entry (up to 16 lines of 45 characters each) of information
used to assist operations personnel in handling the account group's clients. These 'free form'
comments are available from any exception event display.
Mailing:
Name
The Name field allows entry (up to 37 characters) of the addressee to receive mailed reports. To copy
the entry from the dealer Name field, leave this entry blank and either strike the tab or enter key
through the field.
Attention (Attn):
Page 75

The Attention field allows entry (up to 37 characters) of the addressee to receive mailed reports. To
copy the entry from the dealer Contact field, leave this entry blank and either strike the tab or enter
key through the field.
Address:
The Address field allows entry (up to 37 characters) of the mailing address for mailed reports. To
copy the entry from the dealer Address field, leave this entry blank and either strike the tab or enter
key through the field.
City:
The City field allows entry (up to 25 characters) of the city to mail reports to. To copy the entry from
the dealer City field, leave this entry blank and either strike the tab or enter key through the field.
State:
The State field allows entry (up to 3 characters) of the state to mail the report to. To copy the entry
from the dealer State field, leave this entry blank and either strike the tab or enter key through the
field.
Phone:
The Phone field allows entry (up to 18 characters each) of the phone number at the mailing address
location.
If Phone Number Formatting is turned on you do not need to insert parenthesis, hyphens or spaces as
the program will automatically format the phone number for you.
Zip:
The Zip code field allows entry (of up to 10 digits) of the mailing addresses zip code. To copy the
entry from the dealer Zip field, leave this entry blank and either strike the tab or enter key through the
field.
Fax/Upl:
The Fax field allows entry (up to 18 characters each) of the fax phone number at the mailing address
location.
If Phone Number Formatting is turned on you do not need to insert parenthesis, hyphens or spaces as
the program will automatically format the phone number for you.
Verify before dispatch:
This field allows an entry to define whether all the accounts assigned to the dealers group will require
a premise verify during any call list type of exception event.
Signal suppression:
The Signal Suppression field allows an entry to disable signal suppression for all accounts assigned to
the dealer.
Disable service w/o:
The Disable Service Work Orders field allows an entry to disable the use of Service Work Orders for
any account that is covered by this contractor.
Out of service entries:
The out of service field allows an entry that specifies whether the installation company can place an
account on test or out of service.
Database Modifications:
Page 76

The database modification field allows an entry that specifies if the installation company can request
or perform data entry modifications.
Only PTS/TST Override:
The Only TST/PTS (Test) Signals Reset Test Timers specifies whether the program will allow any
signals other than a TST or PTS event type to reset the auto-test timers.
Account ranges:
Use these fields to define valid account ranges for the dealer. This is necessary when dealers add their
own accounts via SIMS Web or through a remote connection. The account ranges guarantee that the
dealer can only put accounts in a certain line for instance. This prevents them from putting accounts
on a different dealer’s phone number.
TeleLogik options
Access code:
First four digits of Access ID required entering into the TeleLogik Menu system. These four digits
identify the dealer and must be numeric.
The TeleLogik is a touch-tone telephone access system. This system allows callers using a touch tone
telephone to perform functions such as placing accounts on test, off test, generating work orders, etc.
Tech on/off test:
The Technician Placement of Accounts On/Off Test field enables the dealers' technicians to place
accounts On Test and Off Test through the TeleLogik System.
Schedules:
The Schedule field enables the dealers' subscribers to modify their schedules with extensions of
opening and closing times through the TeleLogik System.
O/C verify:
The Subscriber Open/Close Verification field enables the dealers' subscribers to enter their passcode
to allow for user open/close verification through the TeleLogik System.
Alr/cancel:
The Alarm Cancellation field enables the dealers' subscribers to enter their passcode to cancel alarms
through the TeleLogik System
On/Off test:
The Placement of Account On/Off Test field allows the dealers' subscribers to place their accounts On
Test or Off Test through the TeleLogik System
Page 77

Add dealer:
Account number:
To add new dealer account users will input the new account number starting with 99-01-XXXX were
(XXXX) is the next number in line.
The fields are identical to edit dealer dialog box
Page 78
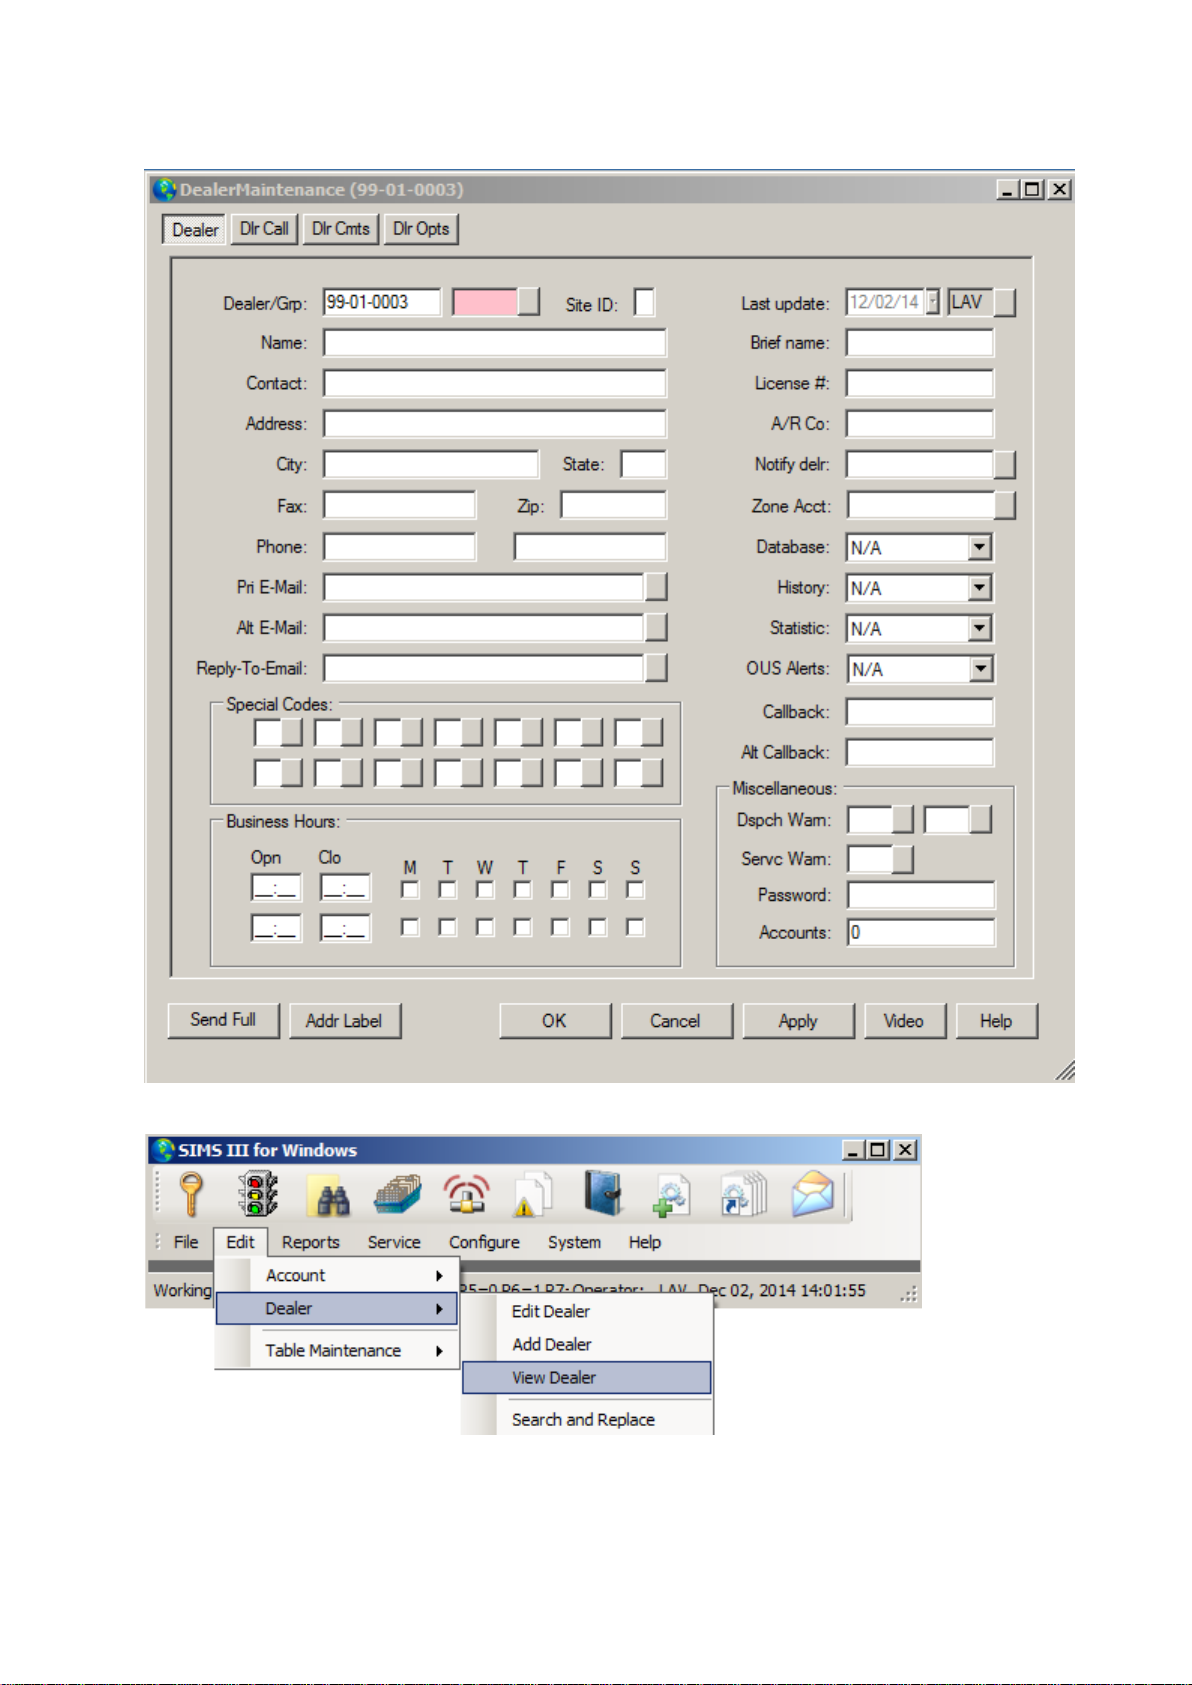
Add new dealer screen:
View Dealer:
Page 79
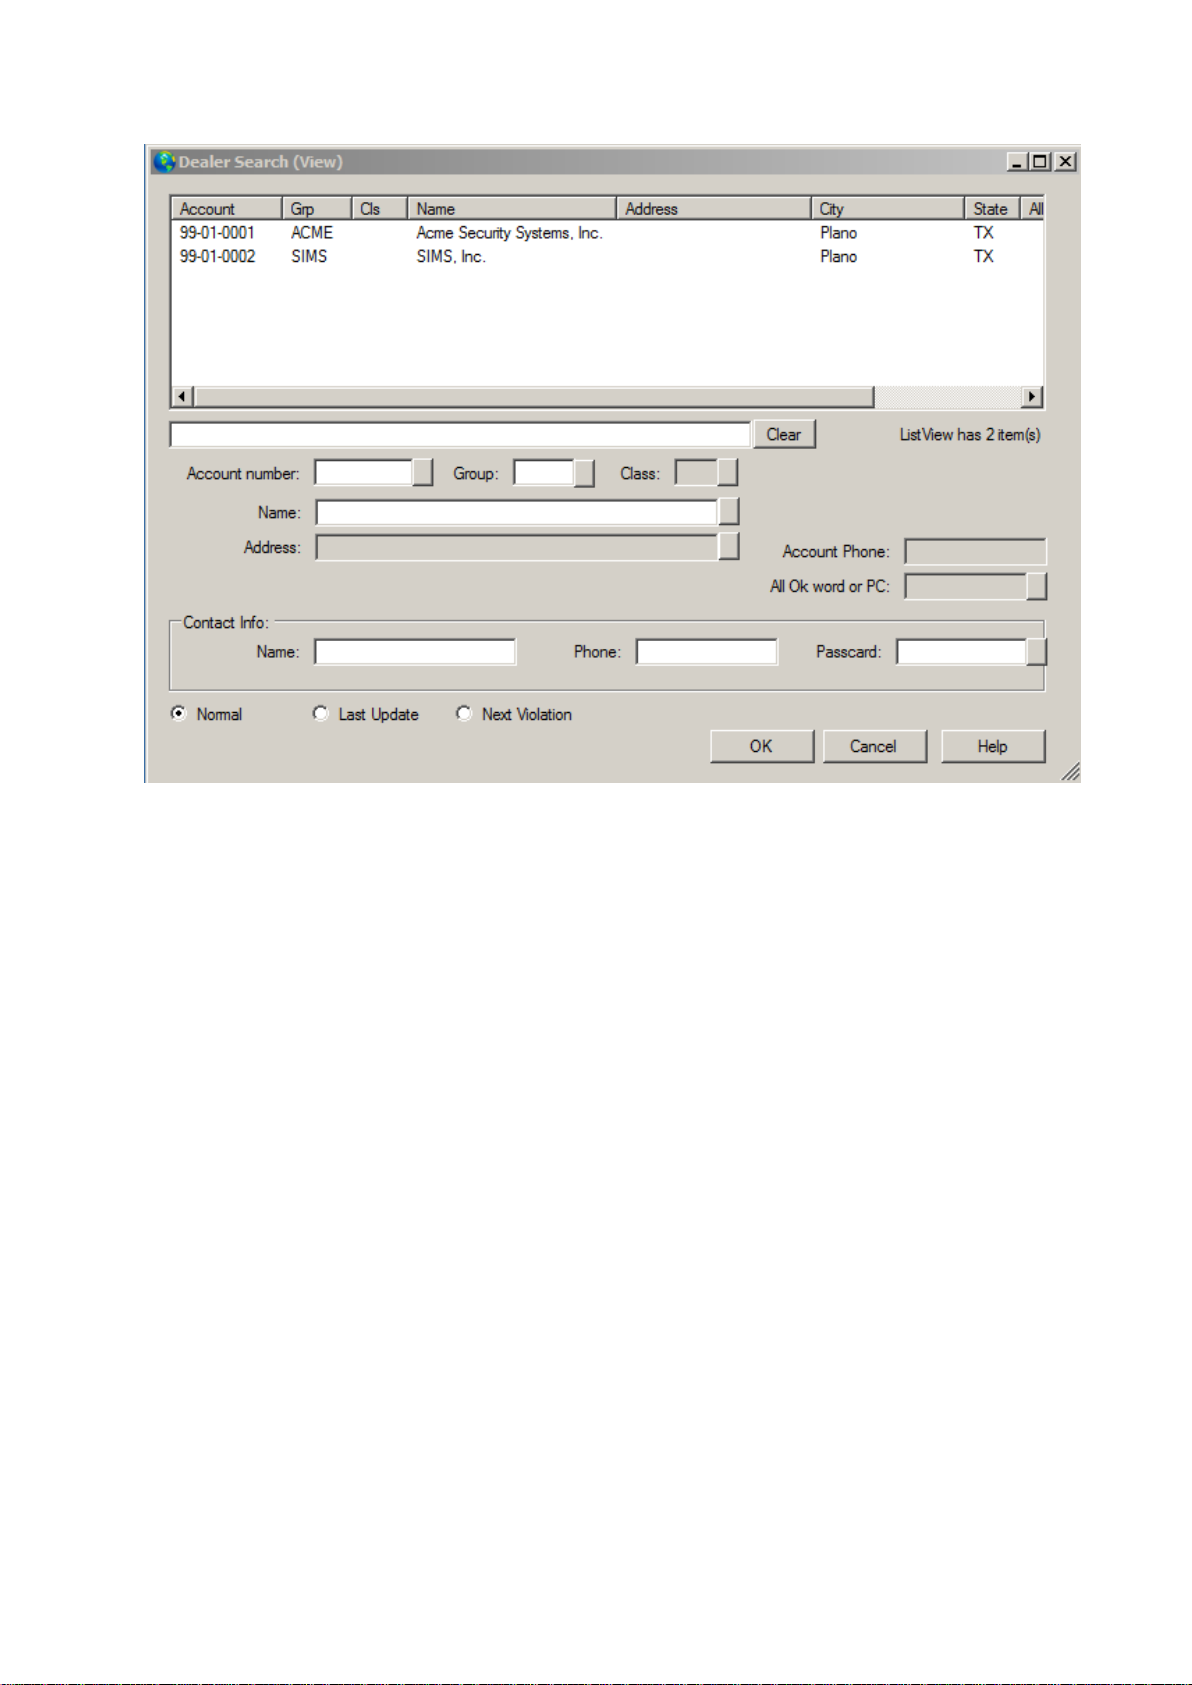
By double clicking on a dealer account users will be able to view dealer account information in dealer
maintenance (view) dialog box:
Page 80
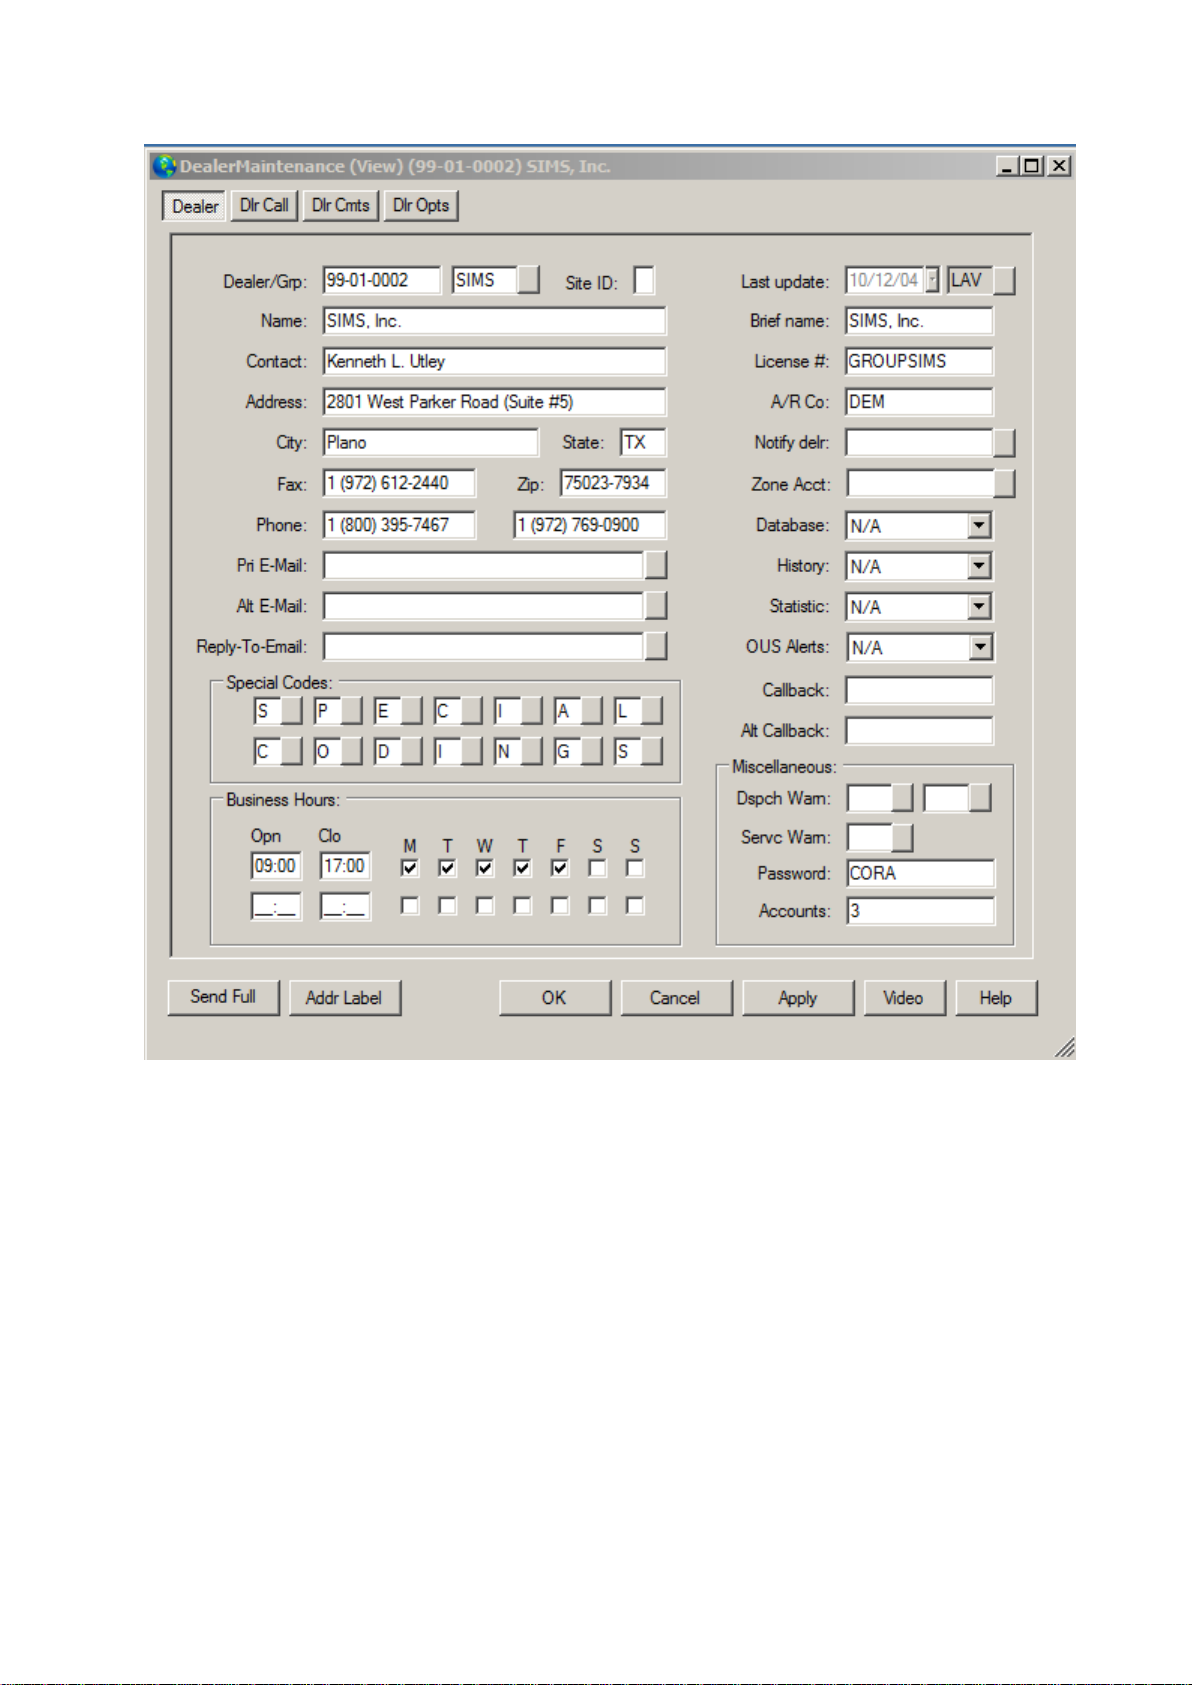
For more information about this dialog box please see dialer edit menu on page 1
Page 81
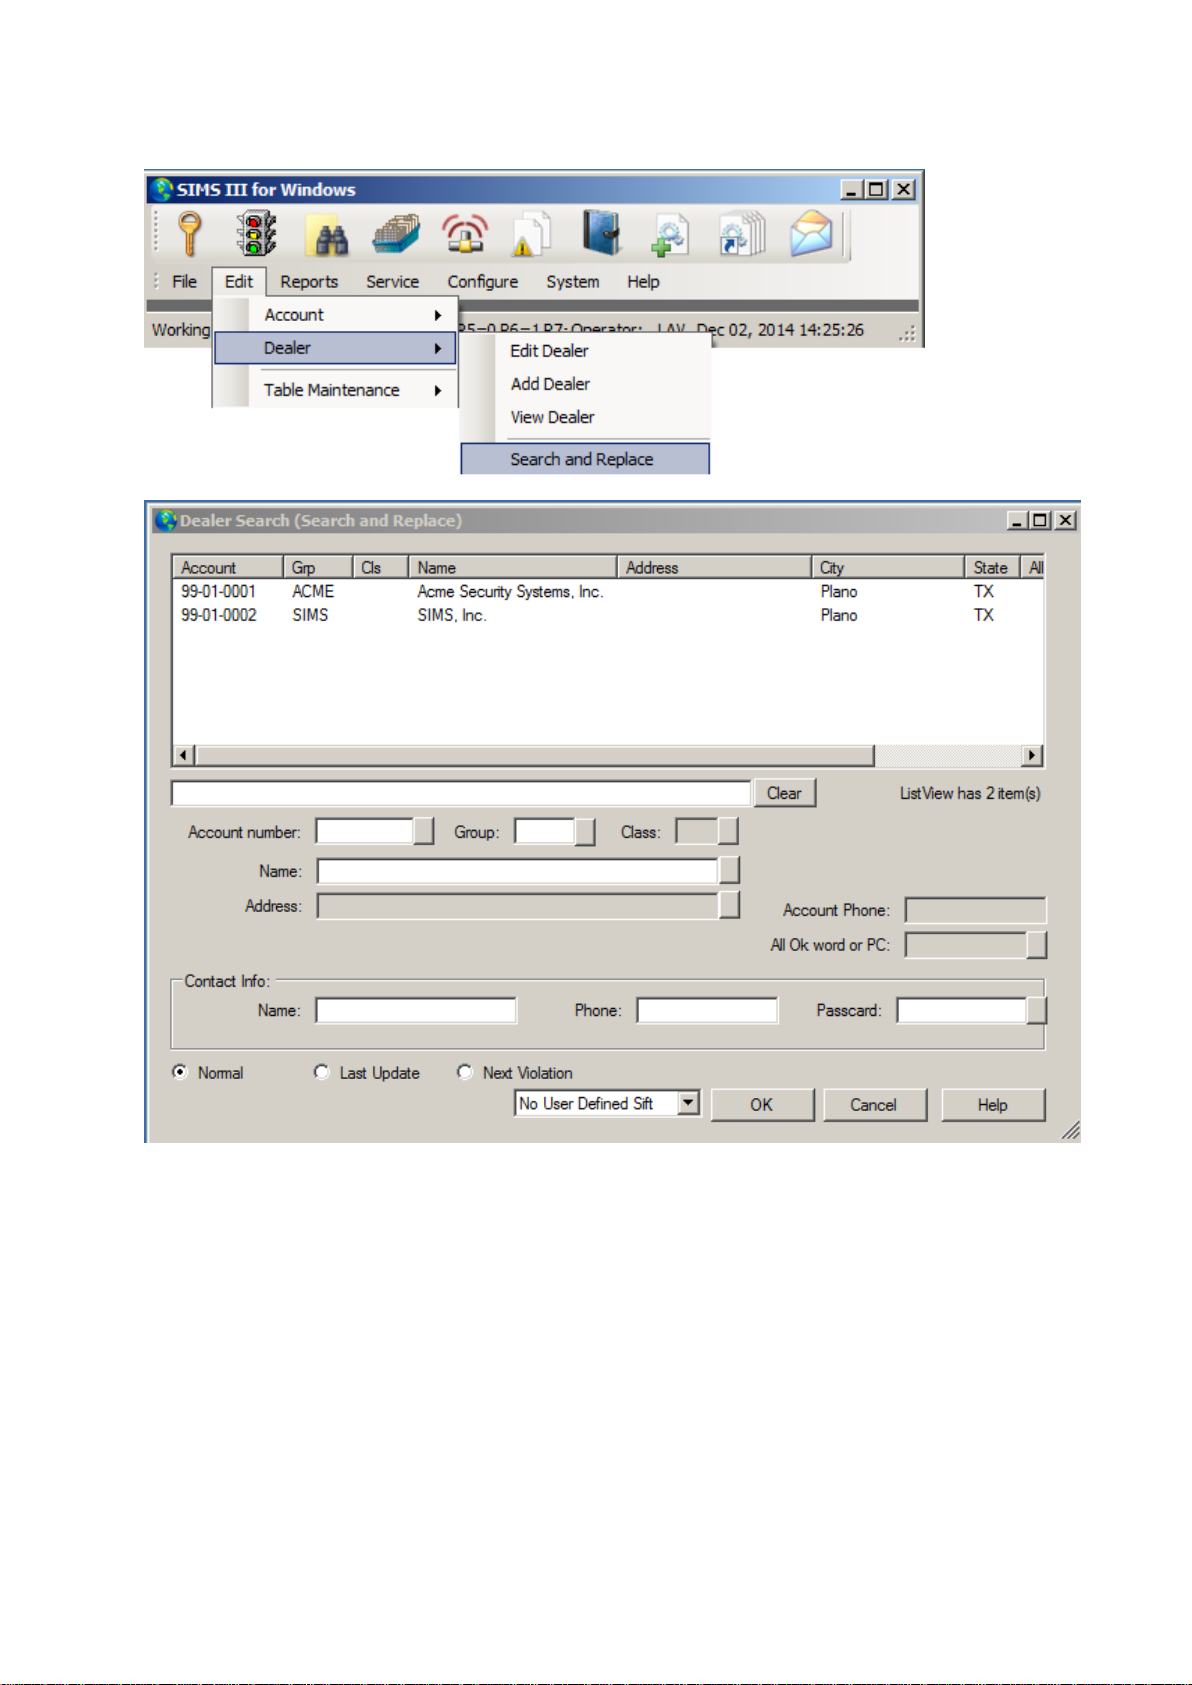
Dealer Account search and replace:
By double clicking on the account users will see: Dealer maintenance (Search and Replace)
dialog box.
Page 82
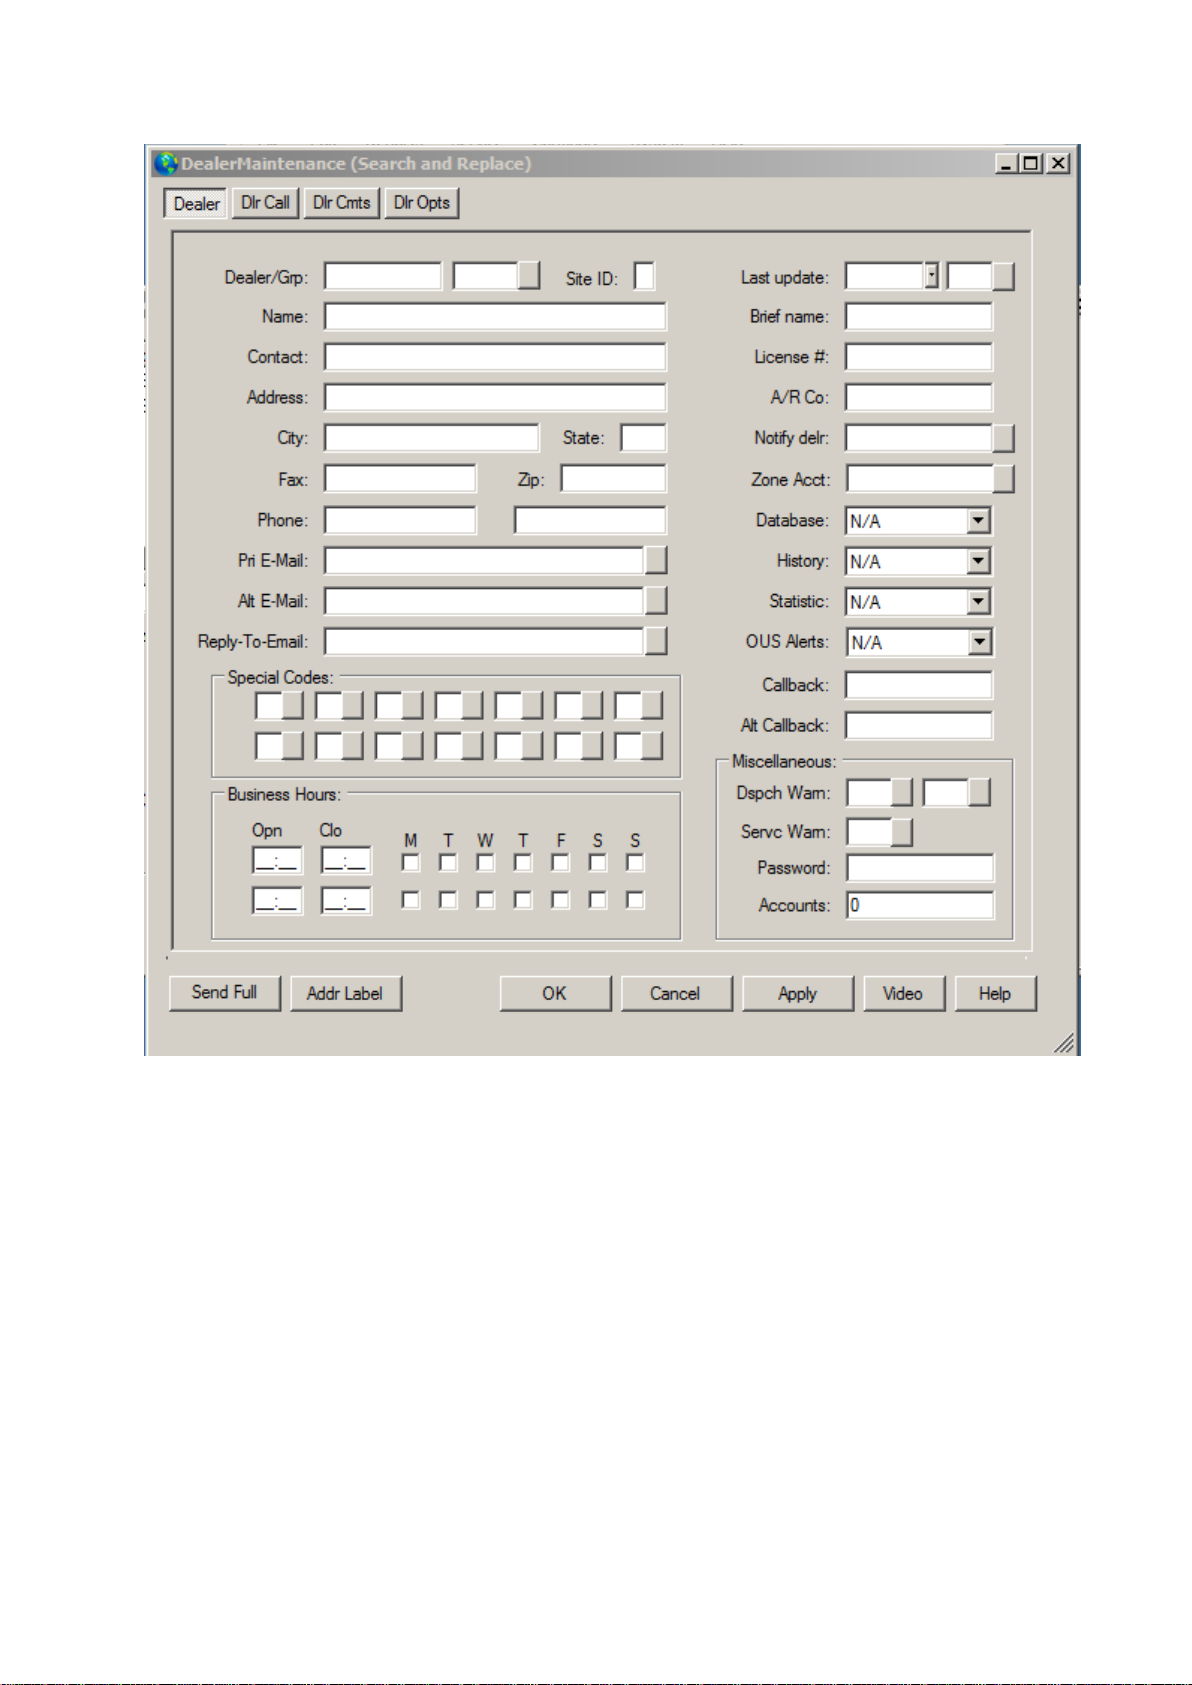
For more information about this dialog box please see dialer edit menu on page 1
In this menu the changes will apply to all the accounts under that dealer unlike edit menu were
changes apply only to the field that been changed
Page 83

Chapter 6: SIMS III Table Maintenance
Page 84
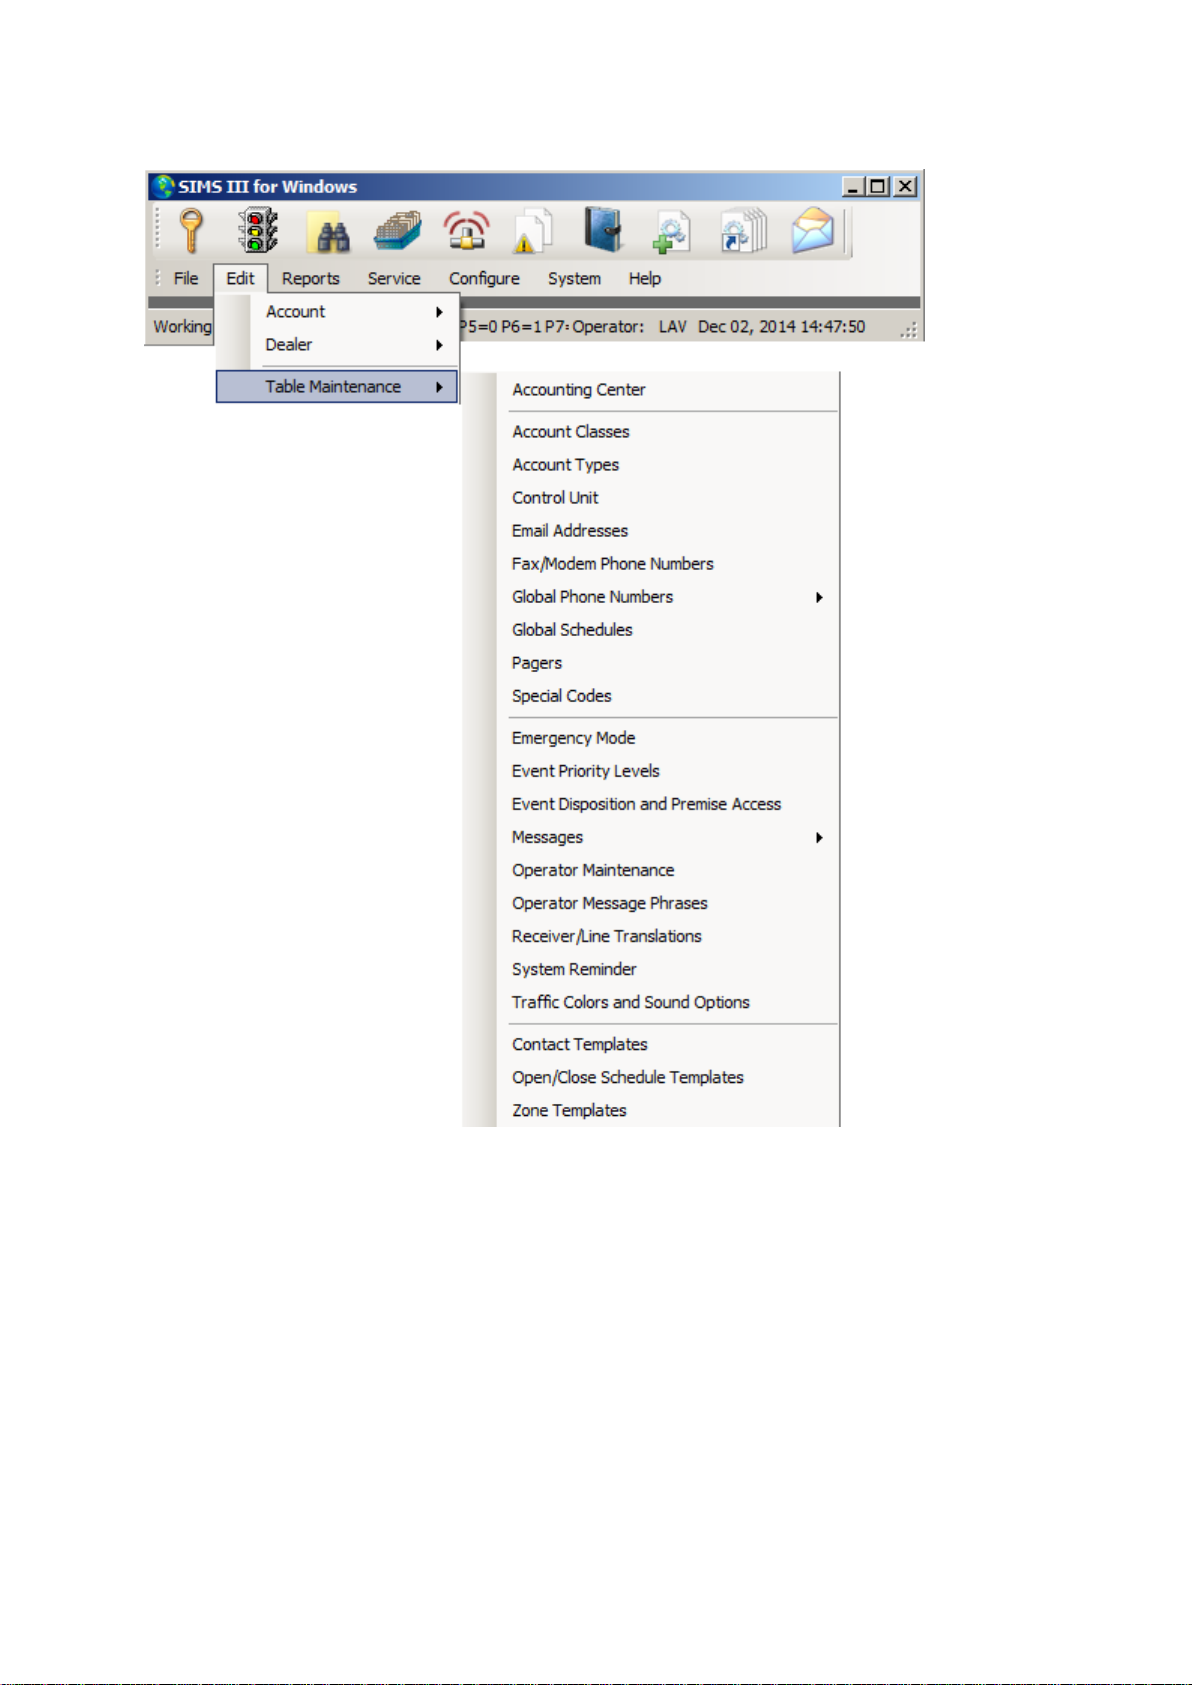
In most of the fields users can click on them and press F1 for help
Page 85
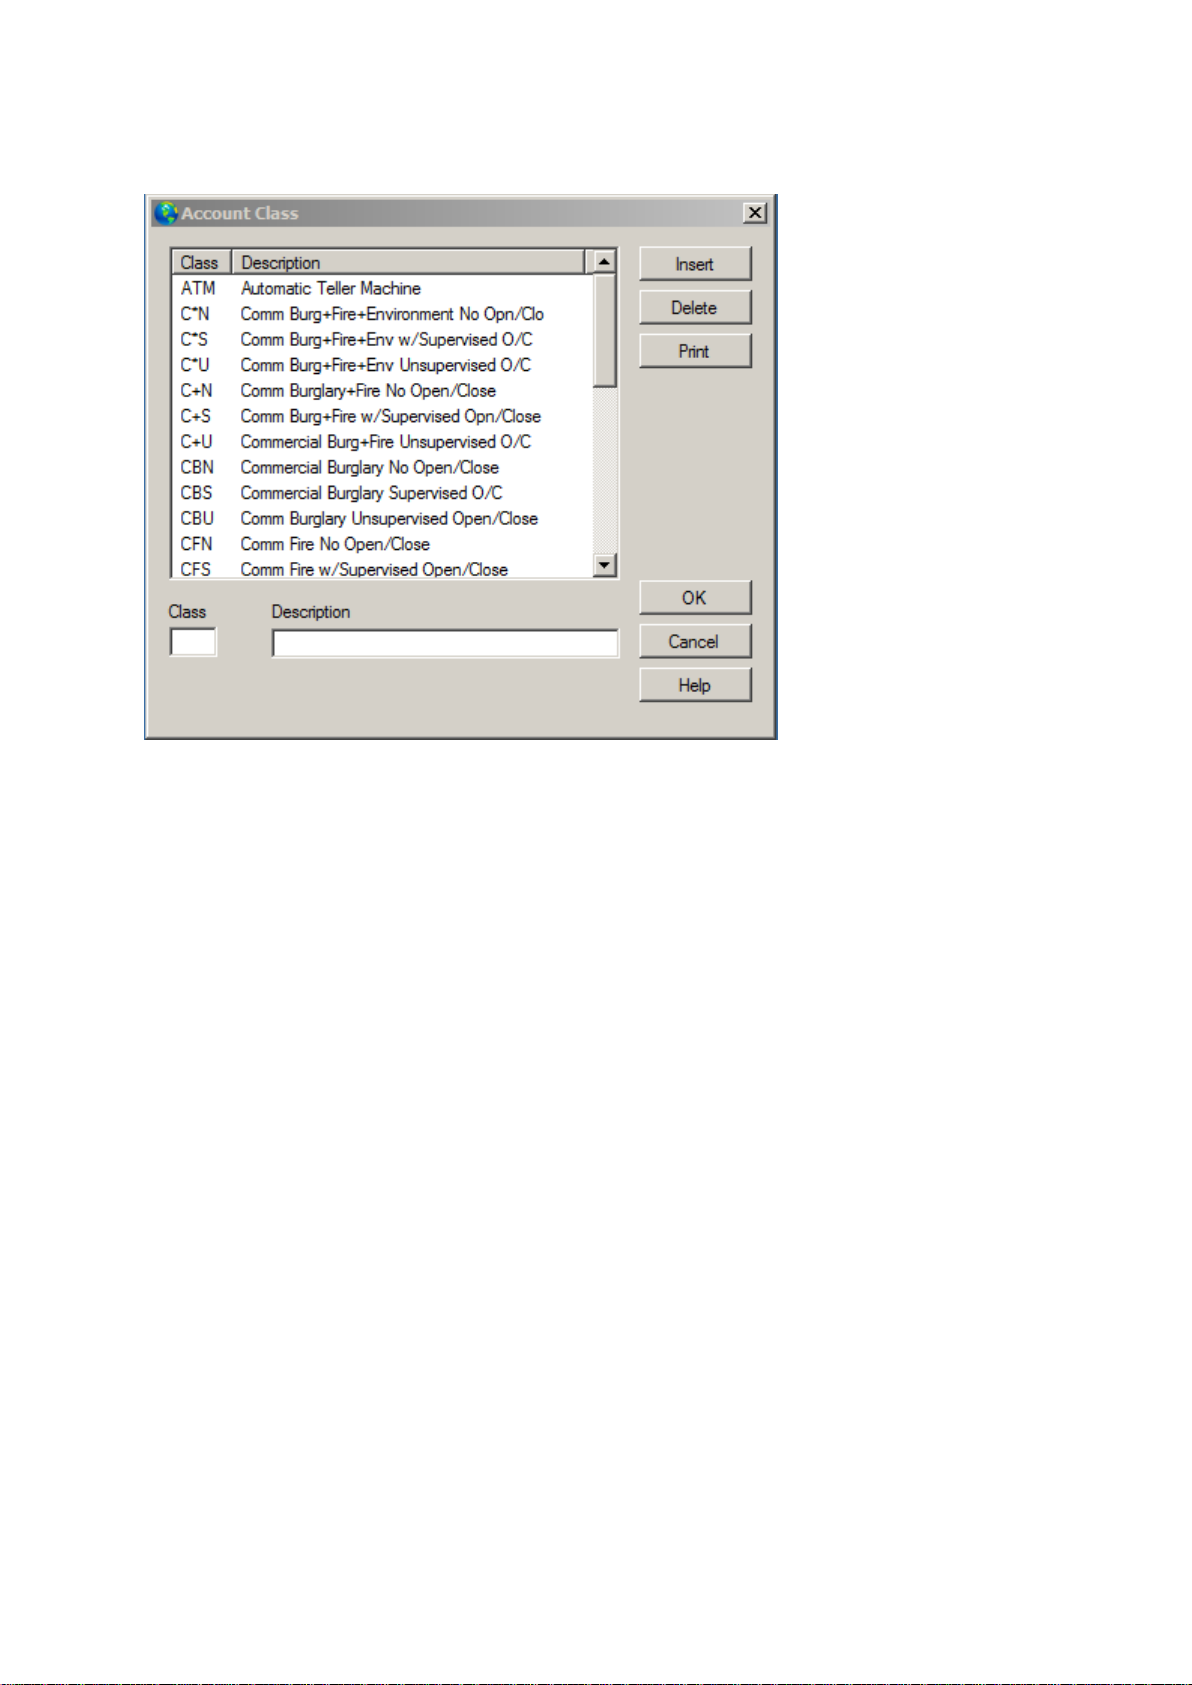
Account Class:
Account Classes:
Overview:
This selection allows entry of the up to three-character account class designator along with a brief
description for reference.
After account class types are defined, a list containing the class names is available for entry in the
subscriber's database.
This information is entered in an account in the Class field.
Click the Print button to display the Account Class List in a pre-view window. From that window,
you can save, print, email or fax the class information.
How to add or edit an account class entry:
Click Insert to insert a new entry into the list or, to edit an existing entry, click on the item in the
Account Class List.
Select the Class field and enter the type.
Optional: Select the Description field and enter information about the class.
Click Ok.
Page 86
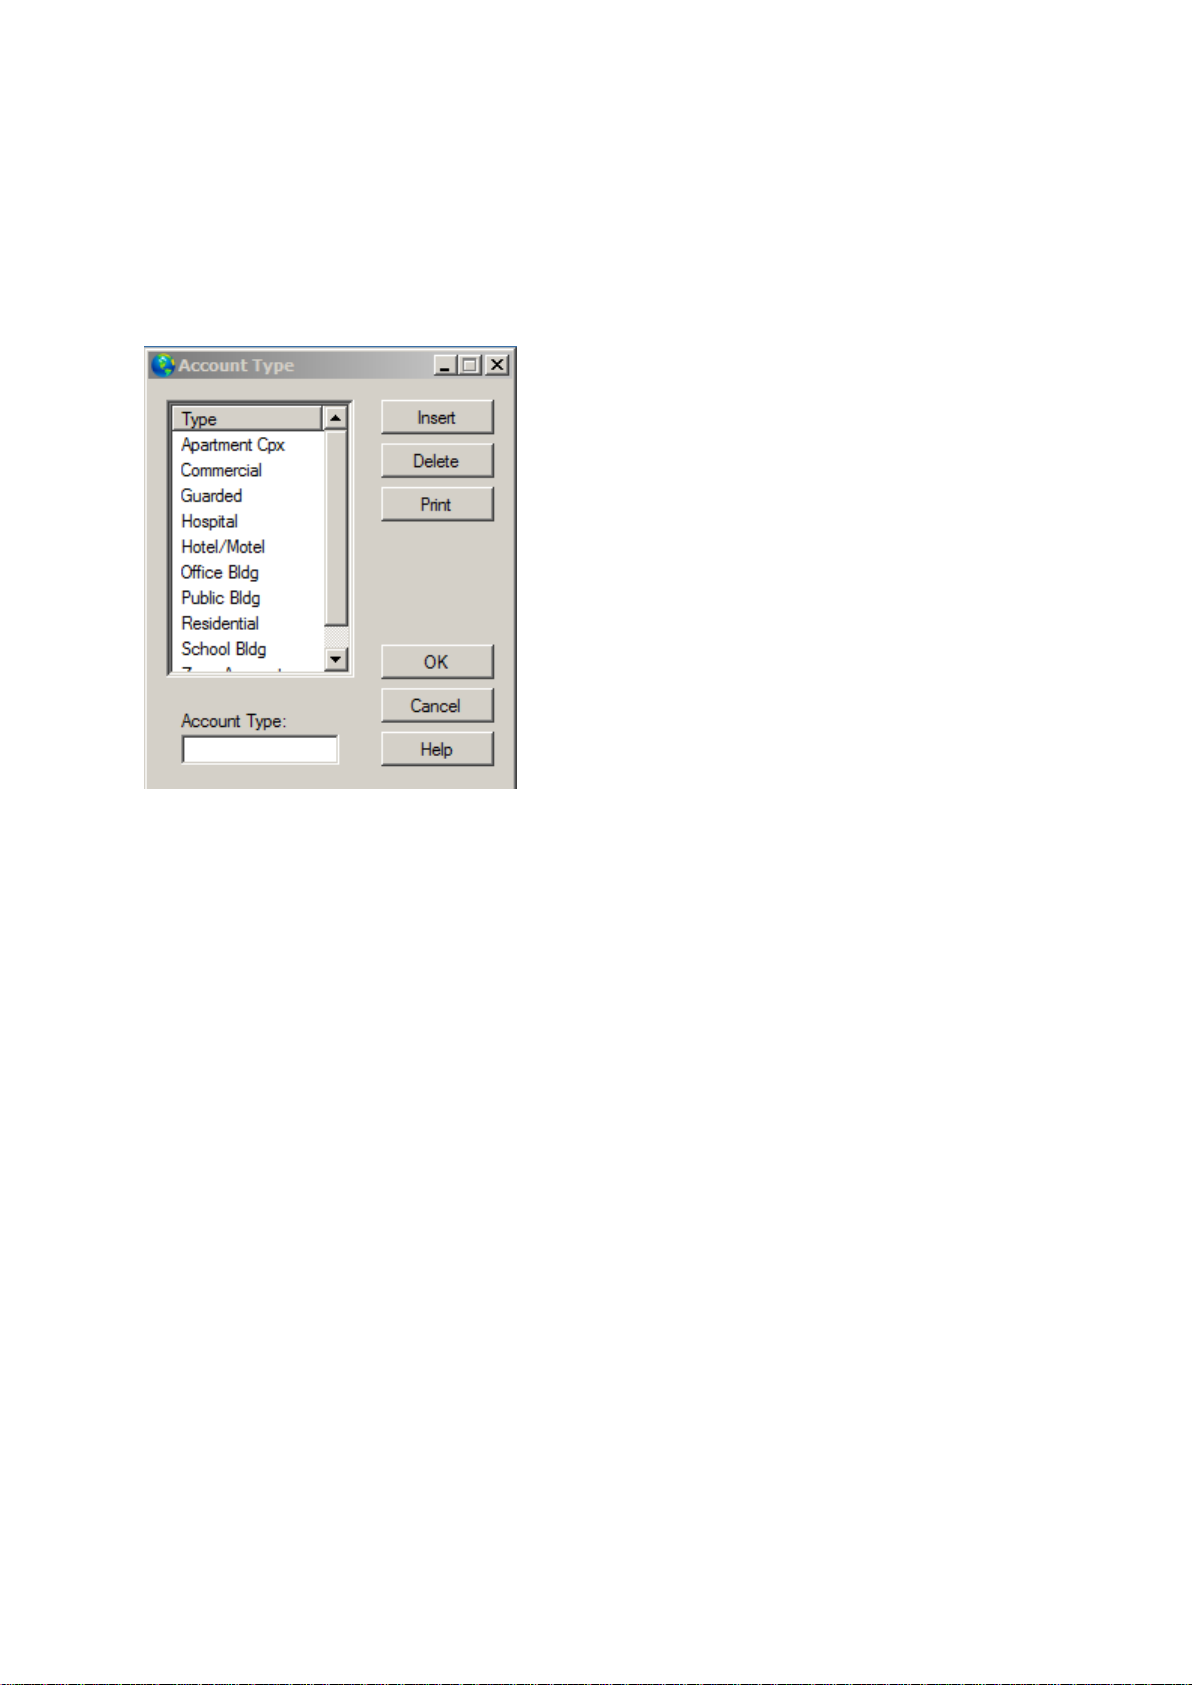
Account Type:
Overview
This selection allows entry of the up to thirteen-character account type designator. Generally these
entries are utilized to describe additional information about the account such as commercial,
residential, public building, hospital, etc. After account types are defined, a list containing the types is
available for entry in a subscriber's database. This information is entered in an account in the Account
Type field.
Click the Print button to display the Account Type List in a pre-view window. From that window,
you can save, print, email or fax the class information.
How to add or edit an account type entry:
Click Insert to add a new entry into the list or, to edit an existing entry, click on the item in the
Account Type List.
Select the Account Type field and enter the type.
Click Ok.
Page 87
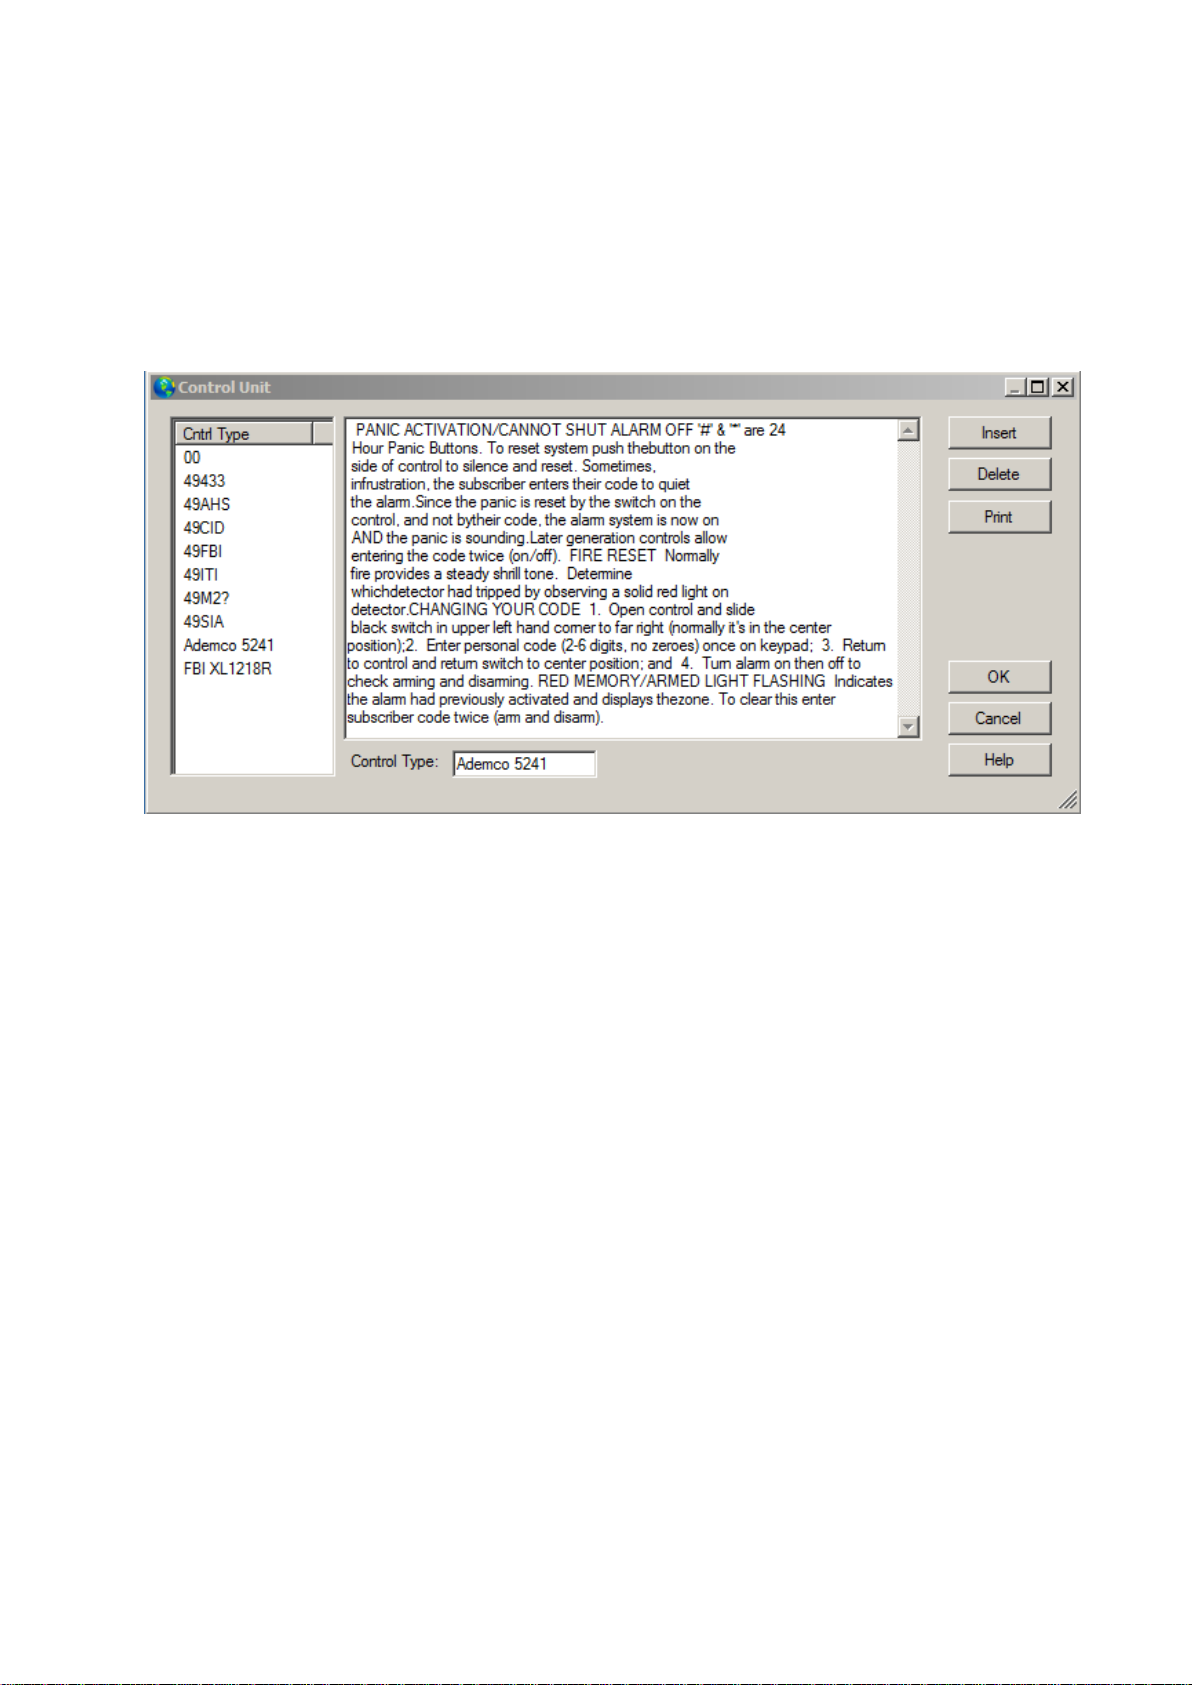
Control Unit:
Overview:
The Control Unit dialog allows entry and editing of control unit’s name and help instructions. This
information can be provided to operations personnel while in an exception event display.
Additionally, after control unit types are defined, a window containing the control unit name is
available for entry in a subscriber's database. This information is entered in an account in the Control
Type field.
How to add or edit a control unit entry
Click Insert button to add a new entry into the list or, to edit an existing entry, click on the item in the
Control Unit List.
Select the Type field and enter the control type.
Select the Description field and enter information about the control such as how to arm/disarm the
system, etc.
Click Ok.
Page 88
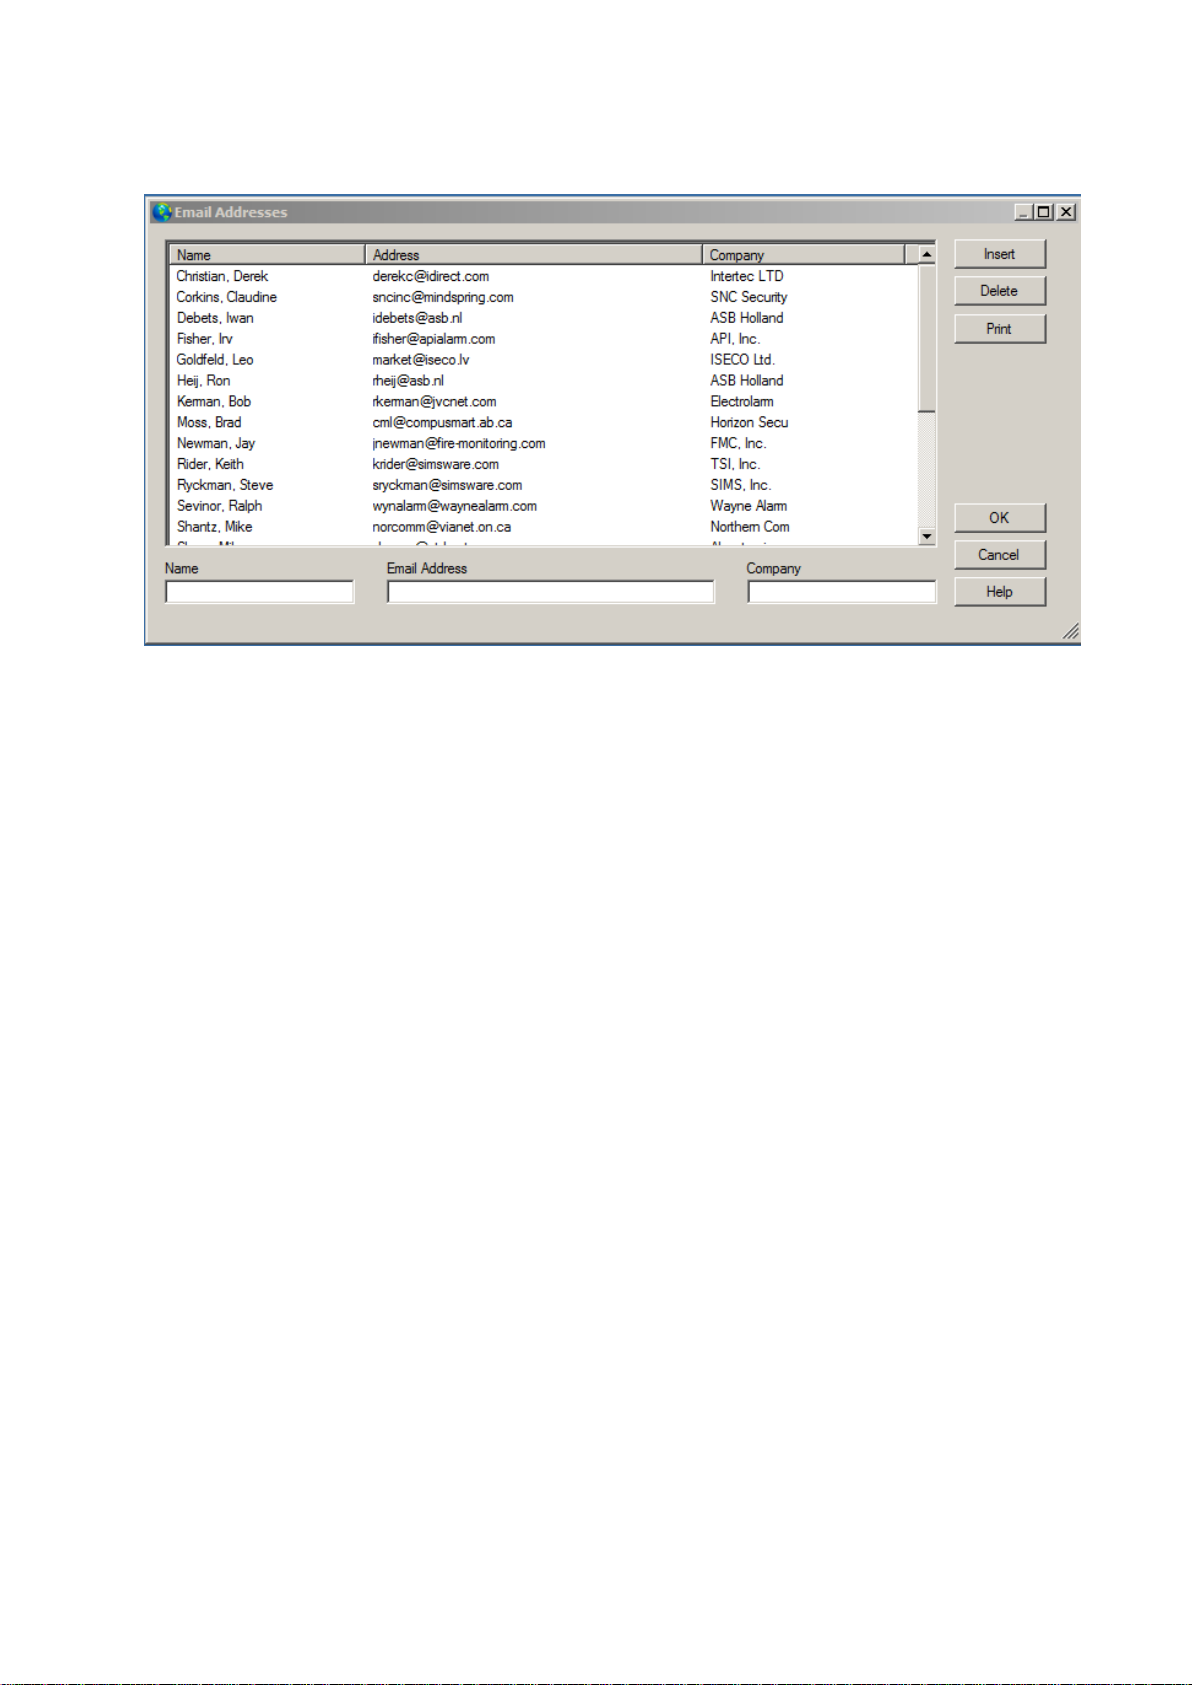
Email addresses:
Overview:
This option gives you access to review/edit the SIMSIII email address book. These addresses are
available from the Send Message dialog box
This list of items can be sorted and exported in different ways.
How to add or edit an email address entry:
Click the Insert button to add a new entry into the list or, to edit an existing entry, click on the item in
the Email List.
Select the Name field and enter the name.
Select the Email Address field and enter the address.
Optional: Select the Company field and enter the company.
Click Ok.
Page 89
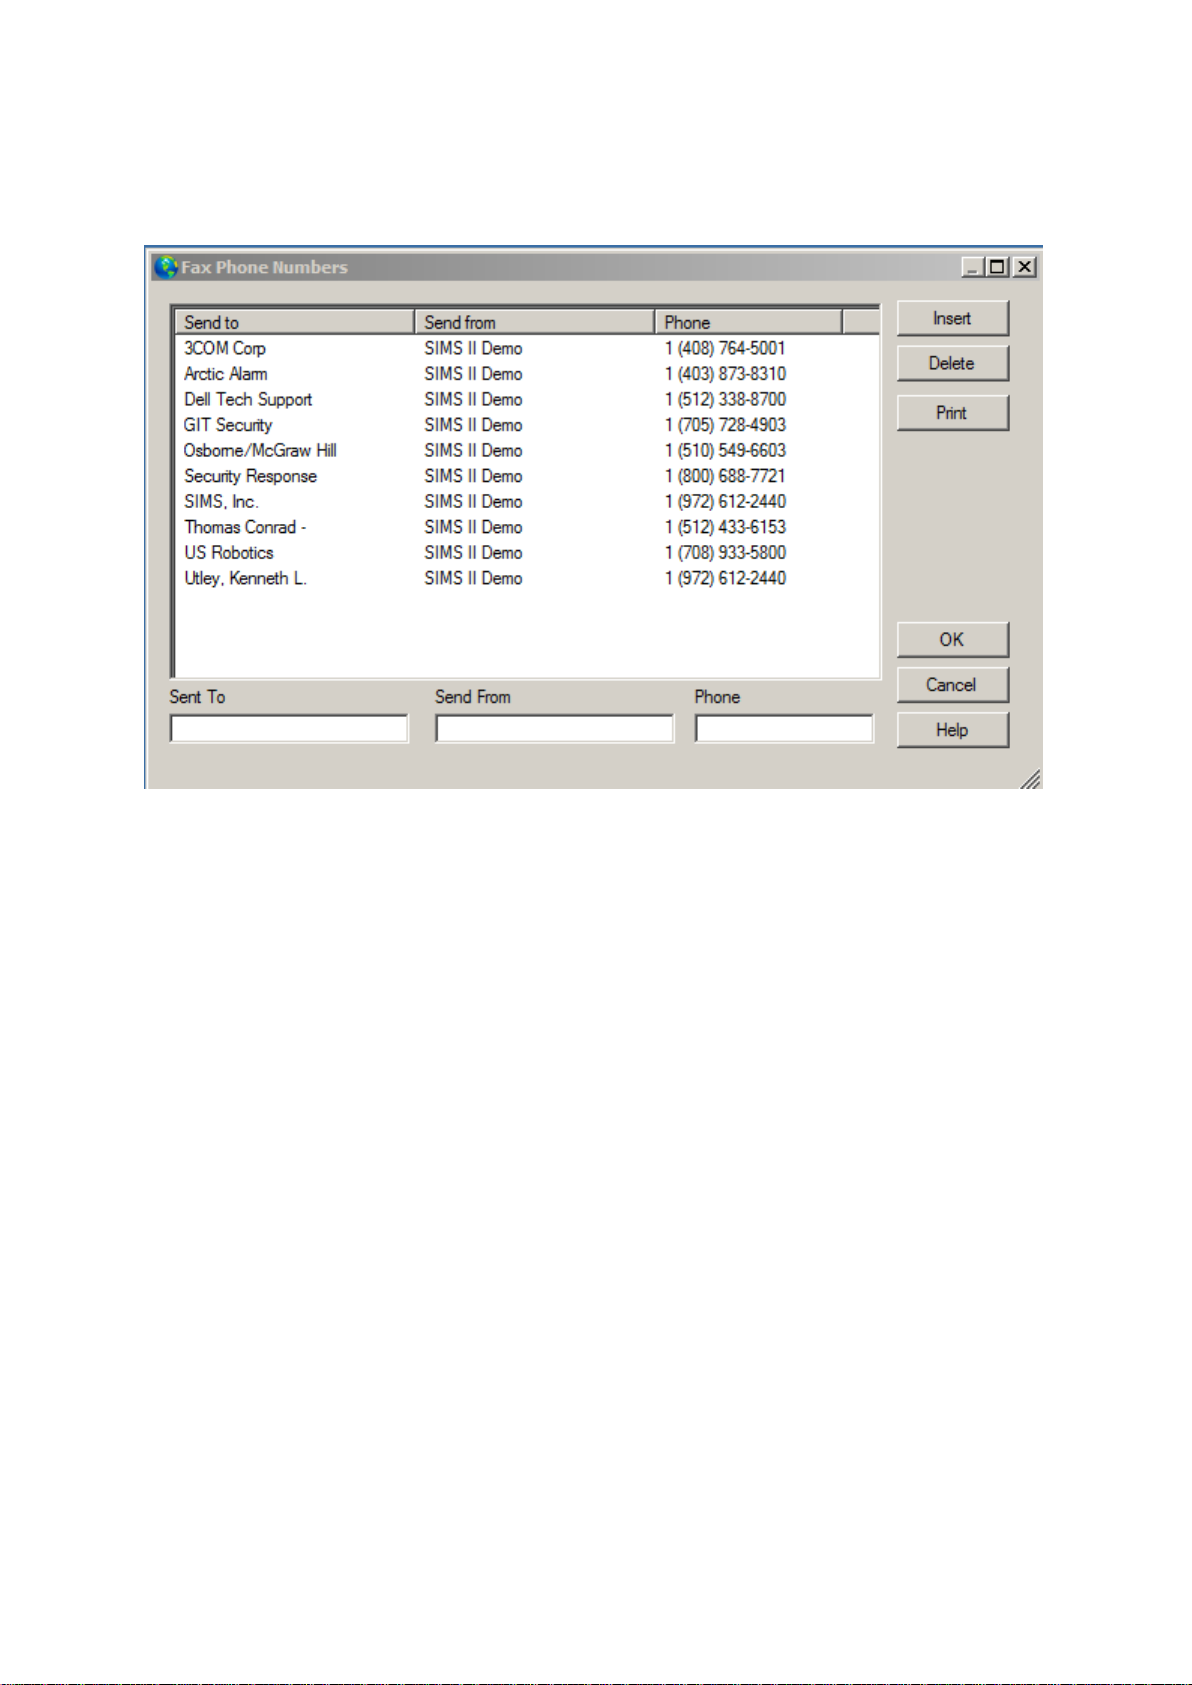
Fax/Modem Phone Numbers:
Overview:
This option gives you access to review/edit the SIMSIII fax/modem address book. These numbers are
available from the Send Message dialog box.
Click the Print button to display the Fax Phone Numbers List in a pre-view window.
From that window, you can save, print, email or fax the class information.
This list of items can be sorted and exported in different ways.
How to add or edit a fax/modem phone number entry
Click Insert to add a new entry into the list or, to edit an existing entry, click on the item in the
Faxmodem List.
Select the Send To field and enter the name to send to.
Select the Phone field and enter the phone number to send to.
Select the Send From field and enter the send from name.
Click Ok.
Page 90
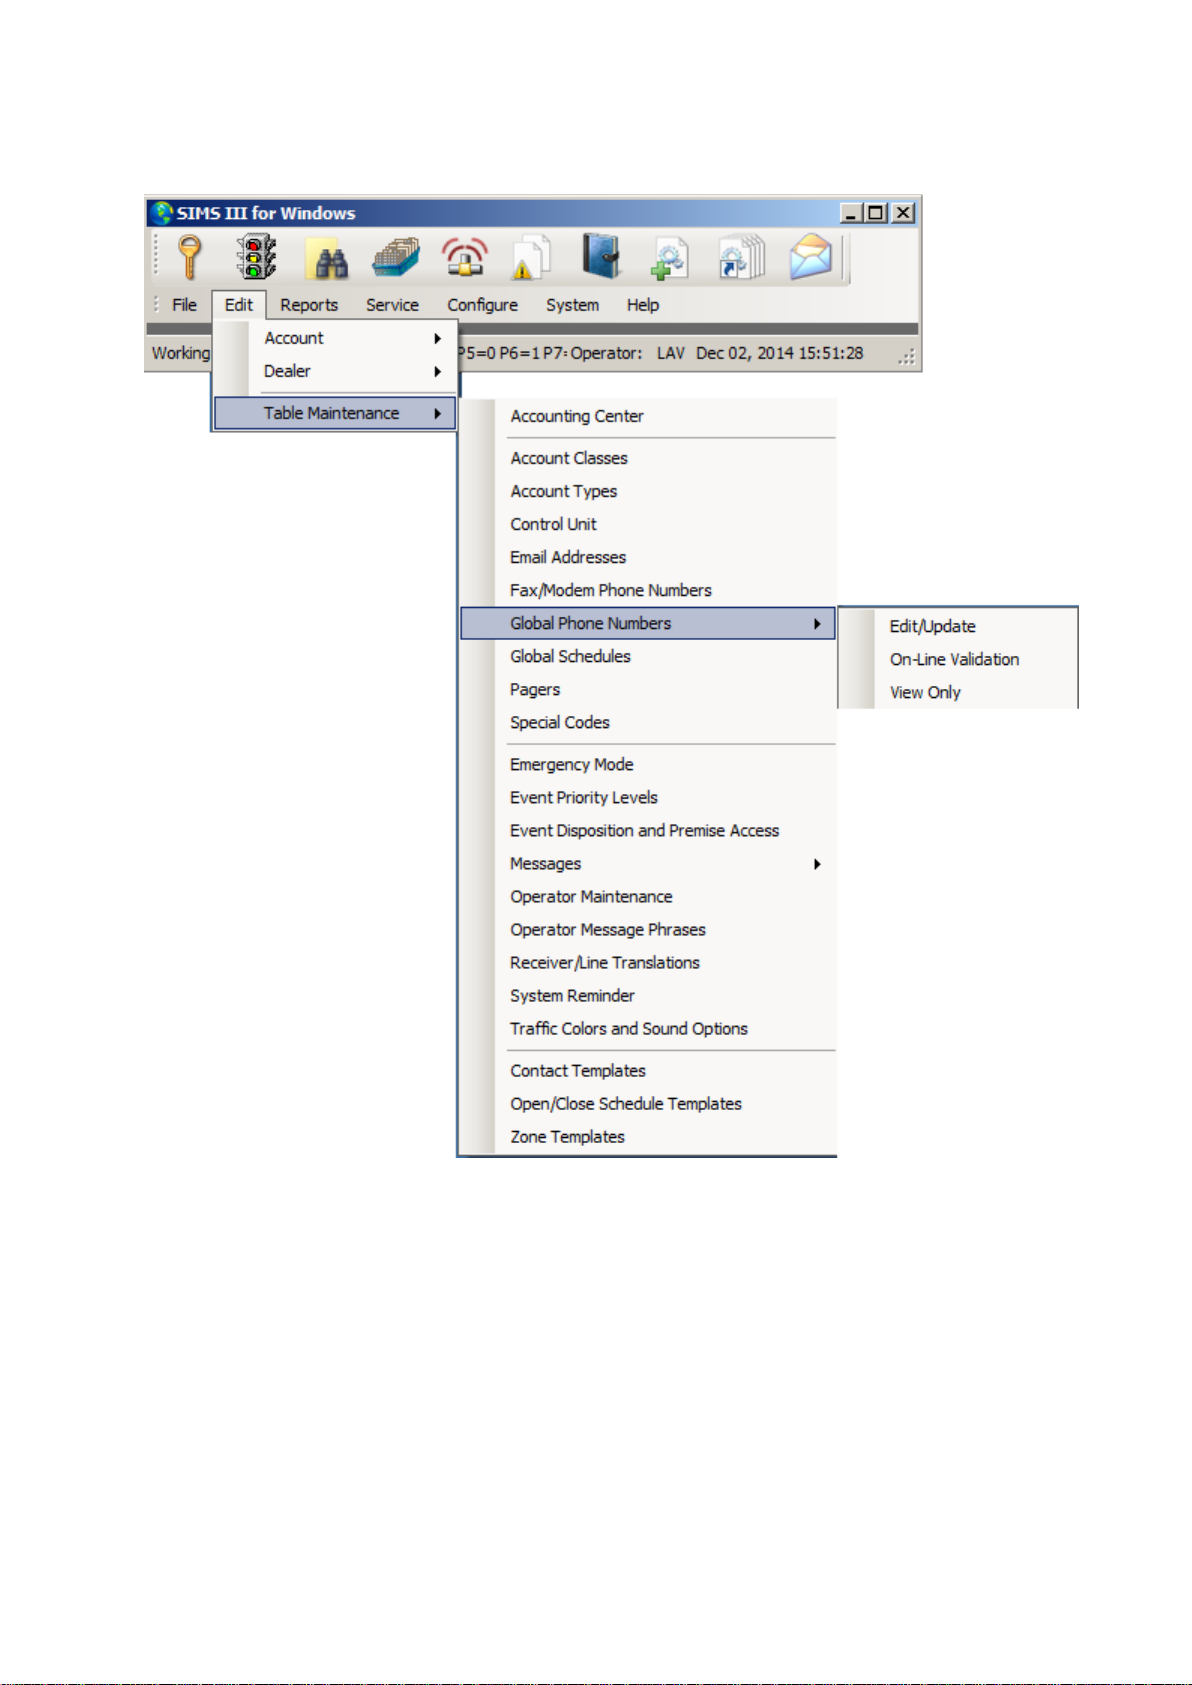
Global Phone Numbers:
Page 91
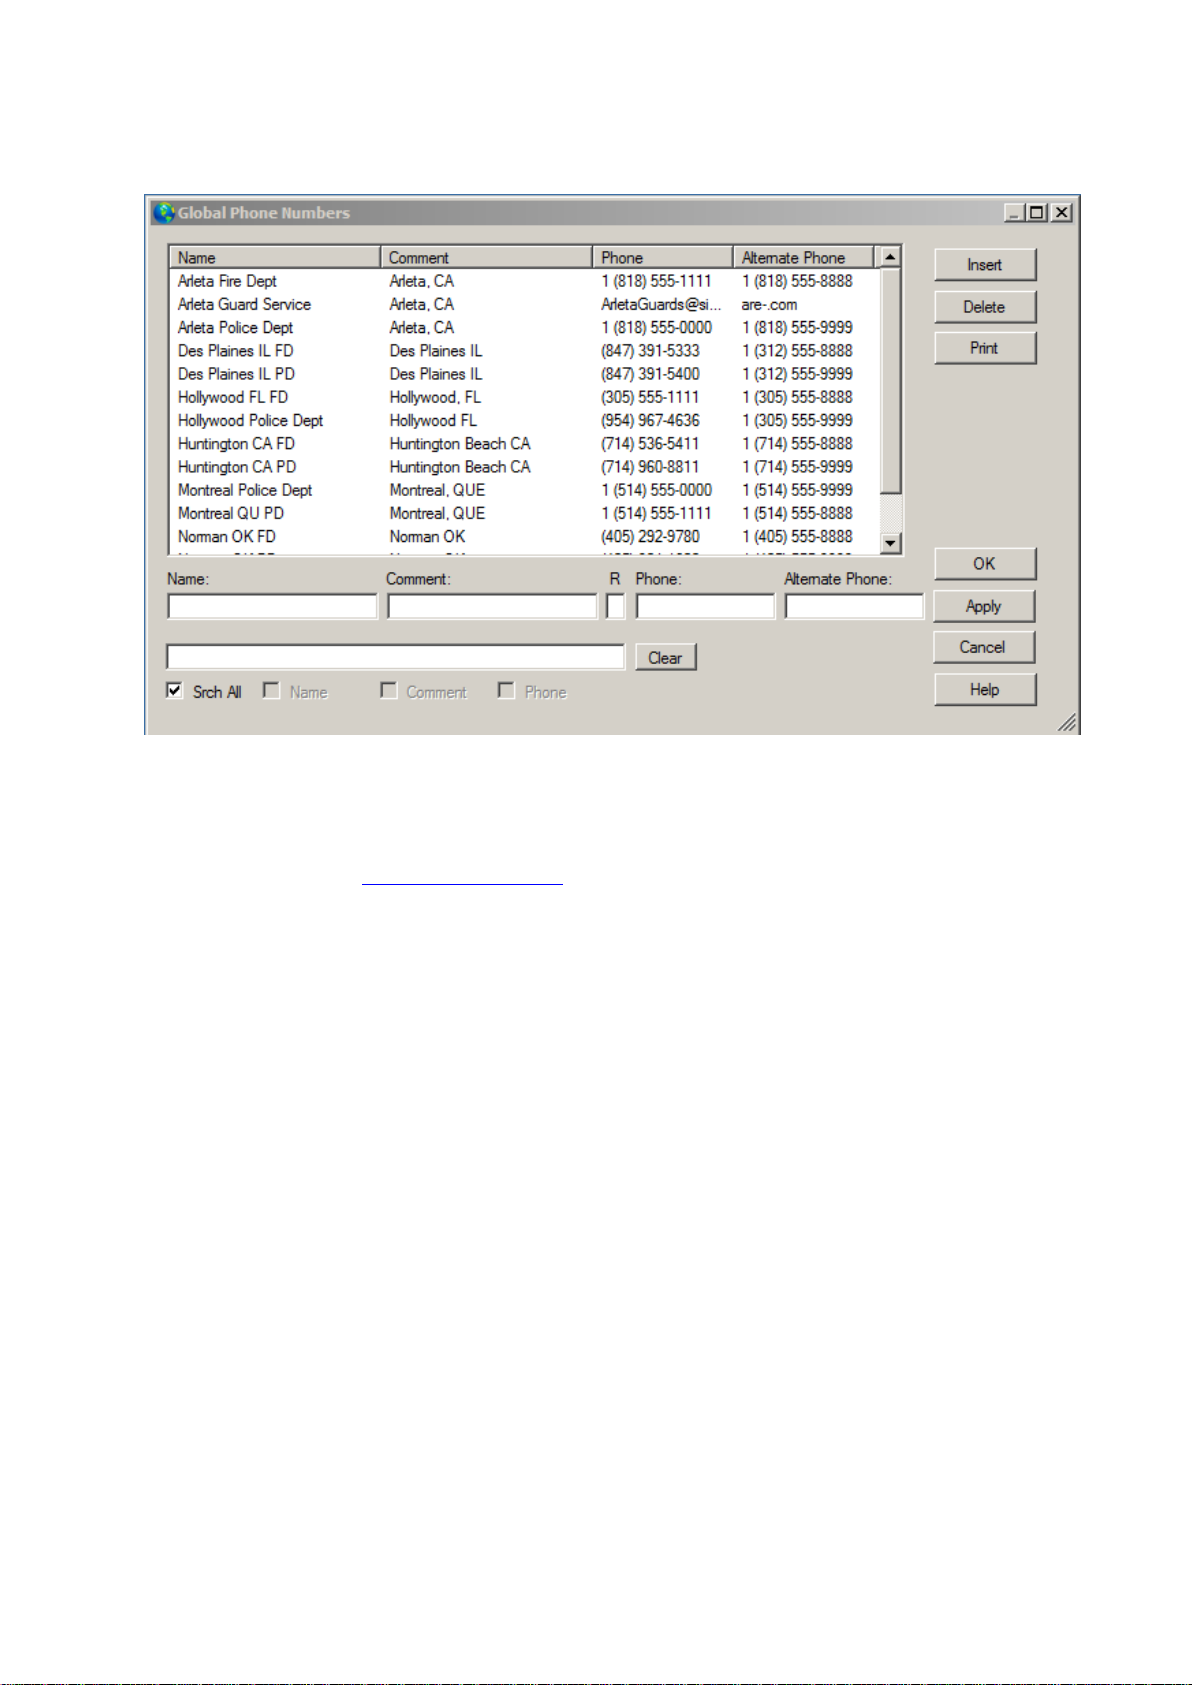
Edit/Update:
Overview:
This selection allows entry of telephone numbers (e.g., police, fire, medical, etc.) that may be used on
different accounts. Utilizing the Global Phone Numbers allows you to make a change in the phone
number and make an immediate effect on all accounts utilizing the table entry. A list containing these
entries is available in an account’s call list page for the Name field.
Click the Print button to display the Global Phone Numbers List in a pre-view window. From that
window, you can save, print, email or fax the class information.
How to add or edit a global phone number entry
Click Insert to add a new entry into the list or, to edit an existing entry, click on the item in the Global
Phone List.
Select the Name field and enter the name for the phone number.
Select the Phone field and enter information about the phone number.
Optional: Select the Comment field and enter a comment about the entry.
Optional: Select the (R) Routing Number field and enter information about the entry.
Click Ok.
Page 92

On-line validation:
Validate:
Validates all the fields
Show map Opens google map
By right clicking on the record users can copy, Edit/Update Authority, export to excel or text file.
Page 93

Grp Contacts:
Page 94
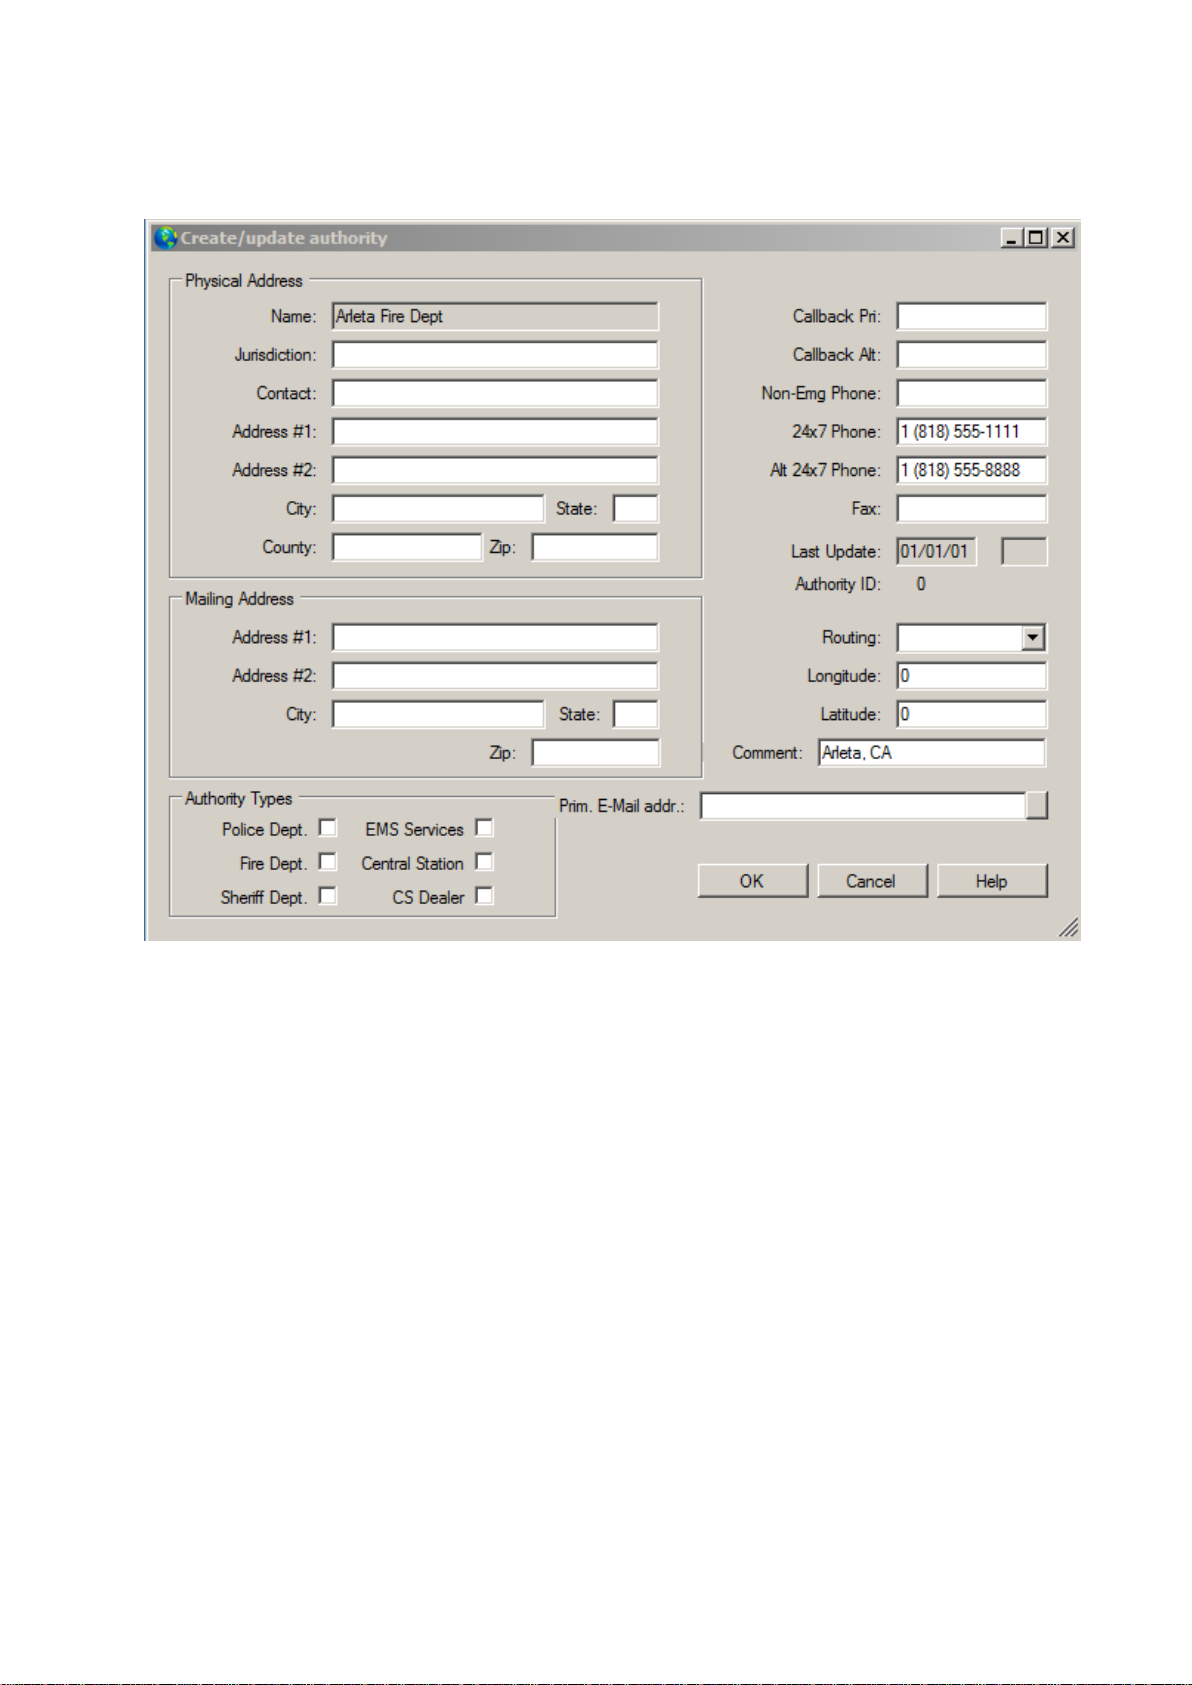
Edit/Update Authority:
Create/update authority:
Users can modify any of the fields
Page 95

Under edit, table maintenance, Global Phone Number, view only:
Click the Print button to display the Global Phone Numbers List in a pre-view window. From that
window, you can save, print, email or fax the class information.
Users can click on any record and copy the selected records and pasted in word or excel, Dial
selection
After clicking “Dial Selection”:
Page 96

Hang Up is closing a Dialing Selection.
Global Schedules:
Overview:
This option lets you manage the Global Schedule list. These are schedules that can be applied to all
accounts in the database depending on their Global Codes entries. This helps eliminate making
temporary schedule entries for accounts with matching characteristics (e.g., accounts following
national or religious holidays).
Page 97
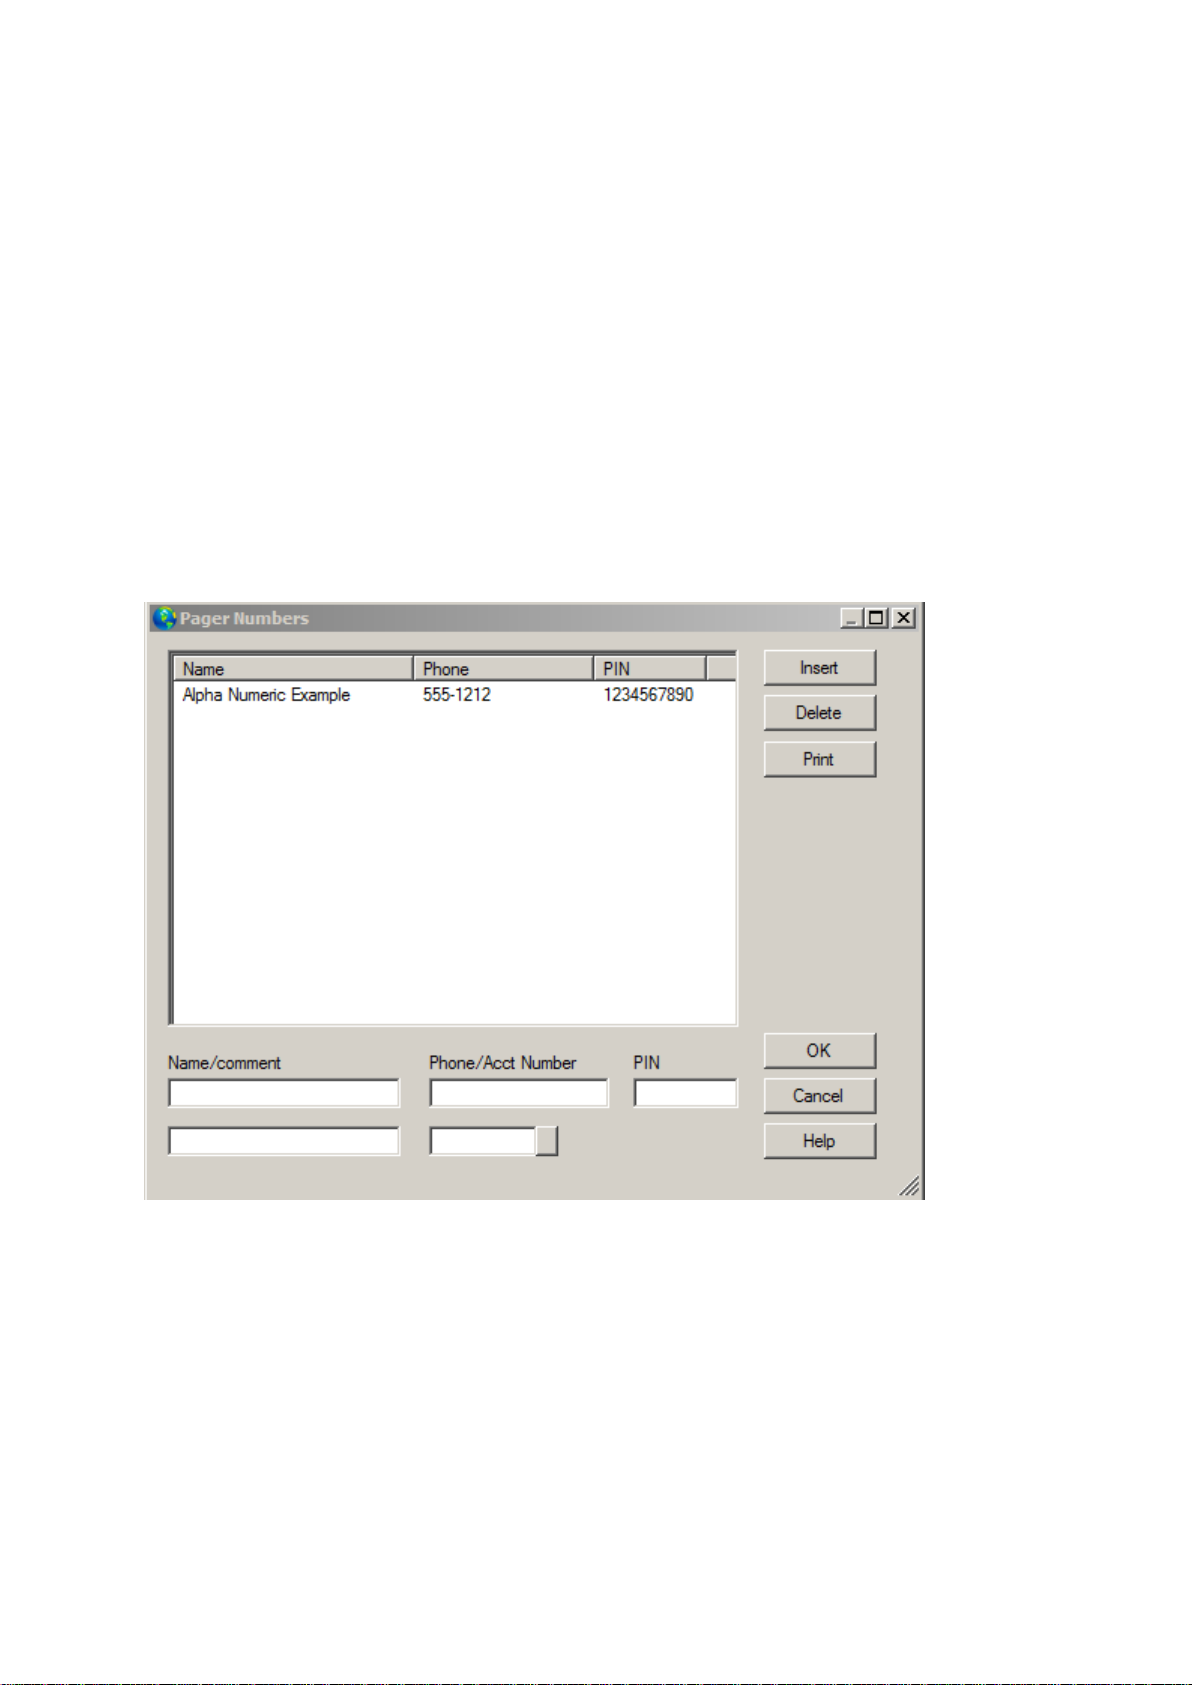
Click the Print button to display the Global Schedule List in a pre-view window. From that window,
you can save, print, email or fax the global schedules information.
How to add or edit a global schedule entry:
Click Insert button to add a new entry into the list or, to edit an existing entry, click on the item in the
Global Schedule List.
Select the Description field and enter a brief description about the schedule.
Select the Begin Date field and enter the date the schedule starts on.
Optional: Select the Open Time field and enter the opening time for the schedule.
Select the Until Date field and enter the date the schedule terminates on.
Optional: Select the Close Time field and enter the closing time for the schedule.
Mark the days of the week (e.g. Monday through Sunday) the schedule will be applied.
Select the Global Code 1 through Global Code 7 field(s) and enter the identifier for the schedule.
Click Ok.
Pager Numbers:
Overview:
This option gives you access to review/edit the SIMSIII pagers number list. These addresses are
available from the Send Message dialog box.
Click the Print button to display the Global Schedule List in a pre-view window. From that window,
you can save, print, email or fax the class information.
How to add or edit a pager number entry:
Click the Insert button to add a new entry into the list or, to edit an existing entry, click on the item in
the Pager List.
Select the Name field and enter the name of the pager recipient.
Select the Phone field and enter the phone number to send to.
Page 98
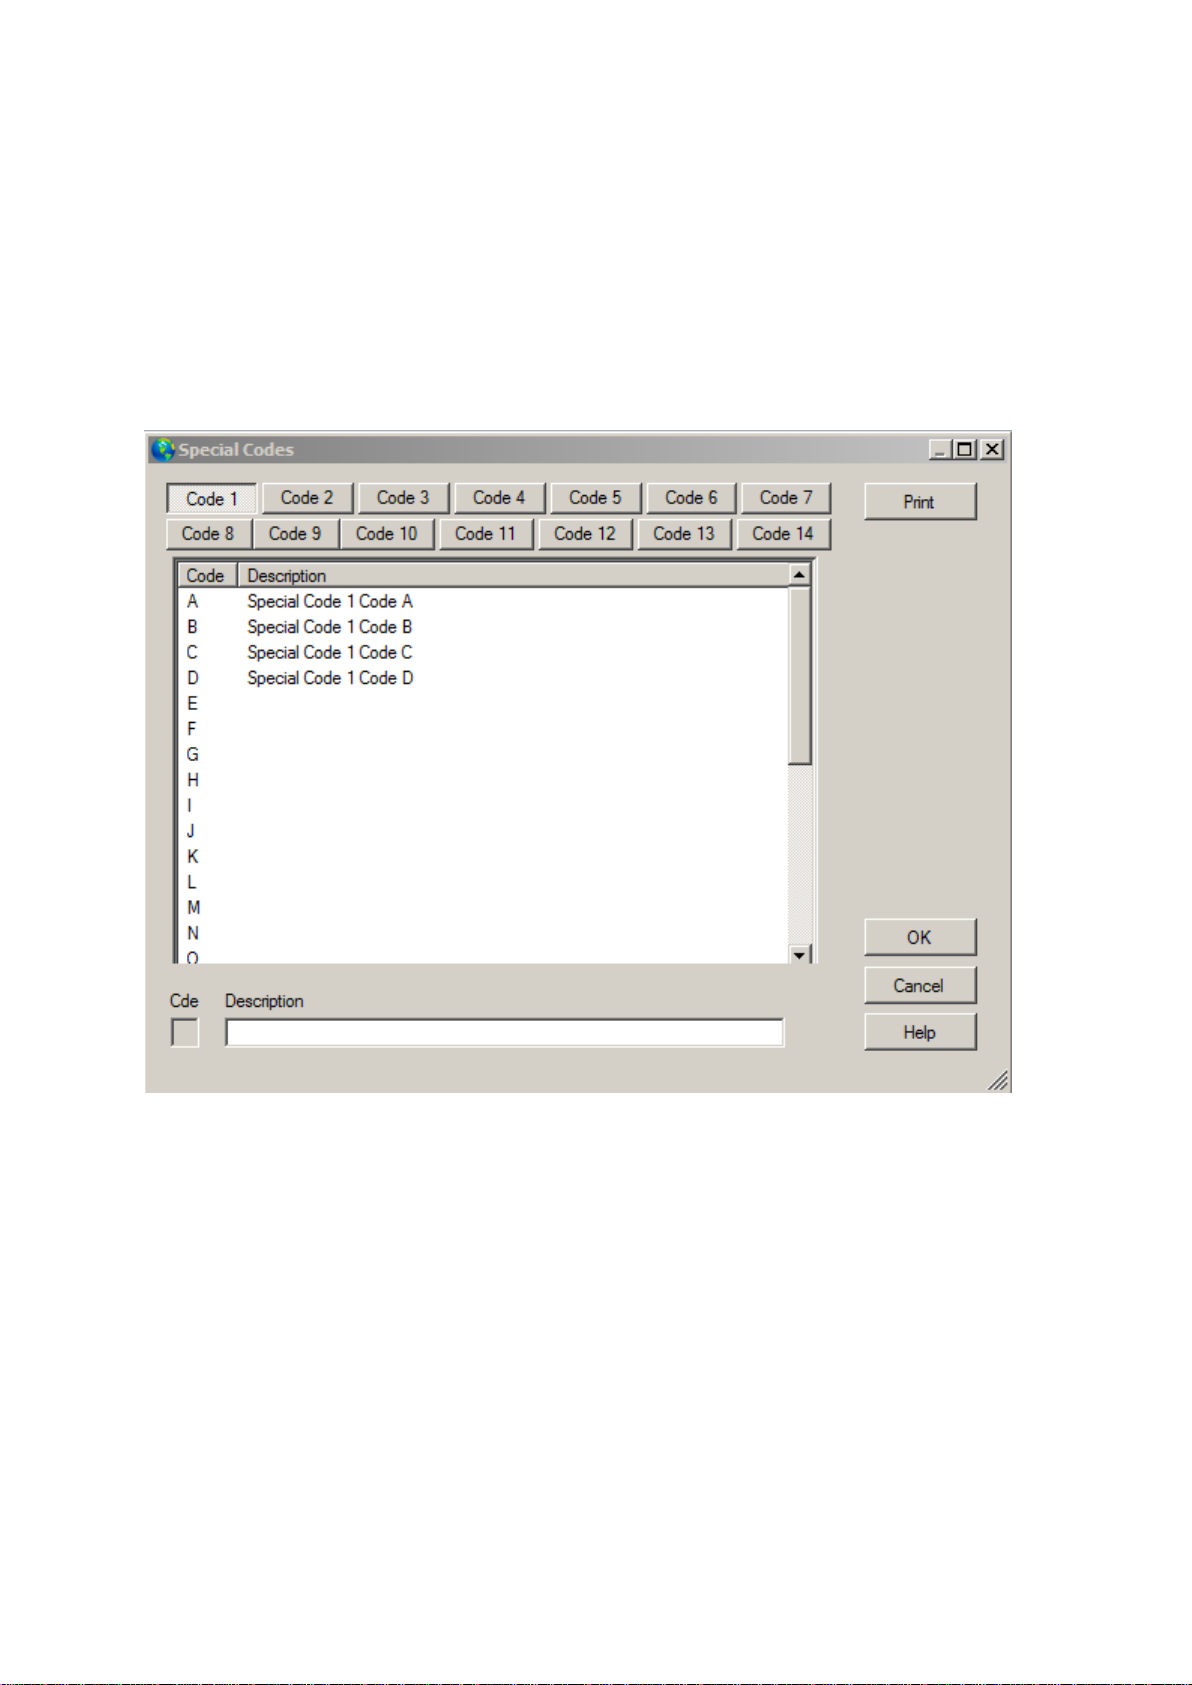
Select the PIN field and enter the recipient’s personal identification number.
Select the Comment field and enter a brief comment about the entry.
Click Ok.
Special Codes:
This dialog box allows definitions of up to 128 entries for each of the fourteen codes entered in an
account’s database. Additionally, a Description of the code’s meaning is provided. The Special Code
List contains 128 Code and Description entries for each of the 14 special codes.
Click the Print button to display the Special Codes List in a pre-view window. From that window,
you can save, print, email or fax the special codes information.
How to edit a special code entry
Click the button for the Special Code group you wish to edit.
Click the item in the Special Code List you wish to edit.
Select the Code field and enter the code.
Select the Description field and enter a brief description of the entry.
Click Ok.
Page 99
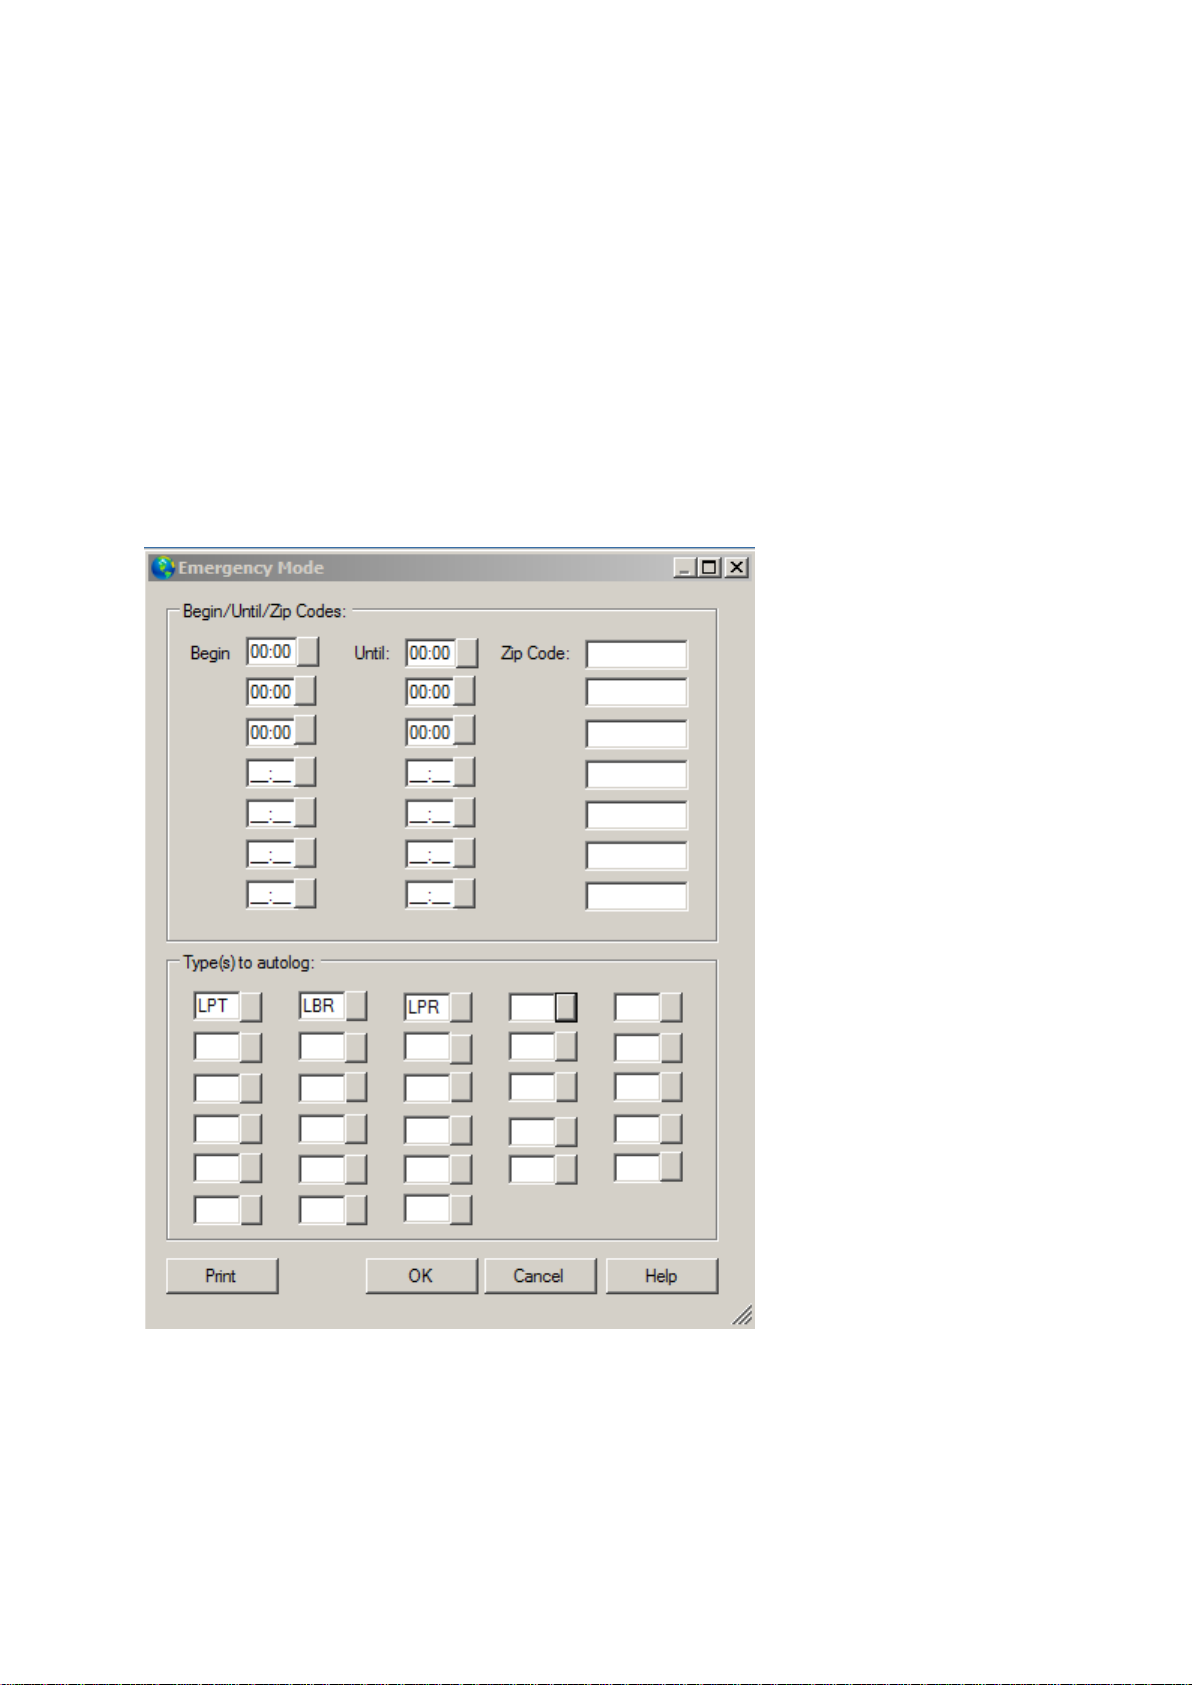
Emergency Mode:
Overview:
This Emergency Mode dialog allows operations personnel to cause event types (e.g., LPT - Low
Power Trouble) to be auto-logged for a temporary period. After invocation, enter the event types (e.g.,
LPT - Low Power Trouble) and Begin/until times. Additionally, the zip code should be entered to
only apply the emergency mode auto-log to accounts falling within its area(s). Wildcard characters
(e.g., '?') may be used in the Zip code field allowing only those events occurring within the specified
zip code area to be auto-logged (e.g., an entry of 123?? would encompass all zip codes beginning with
123).
Priority 1 and 2 events even if entered will not be auto-logged as this function is intended for
situations such as environmental conditions (e.g., power outages) that cause a barrage of events that
would normally require operator action.
Page 100
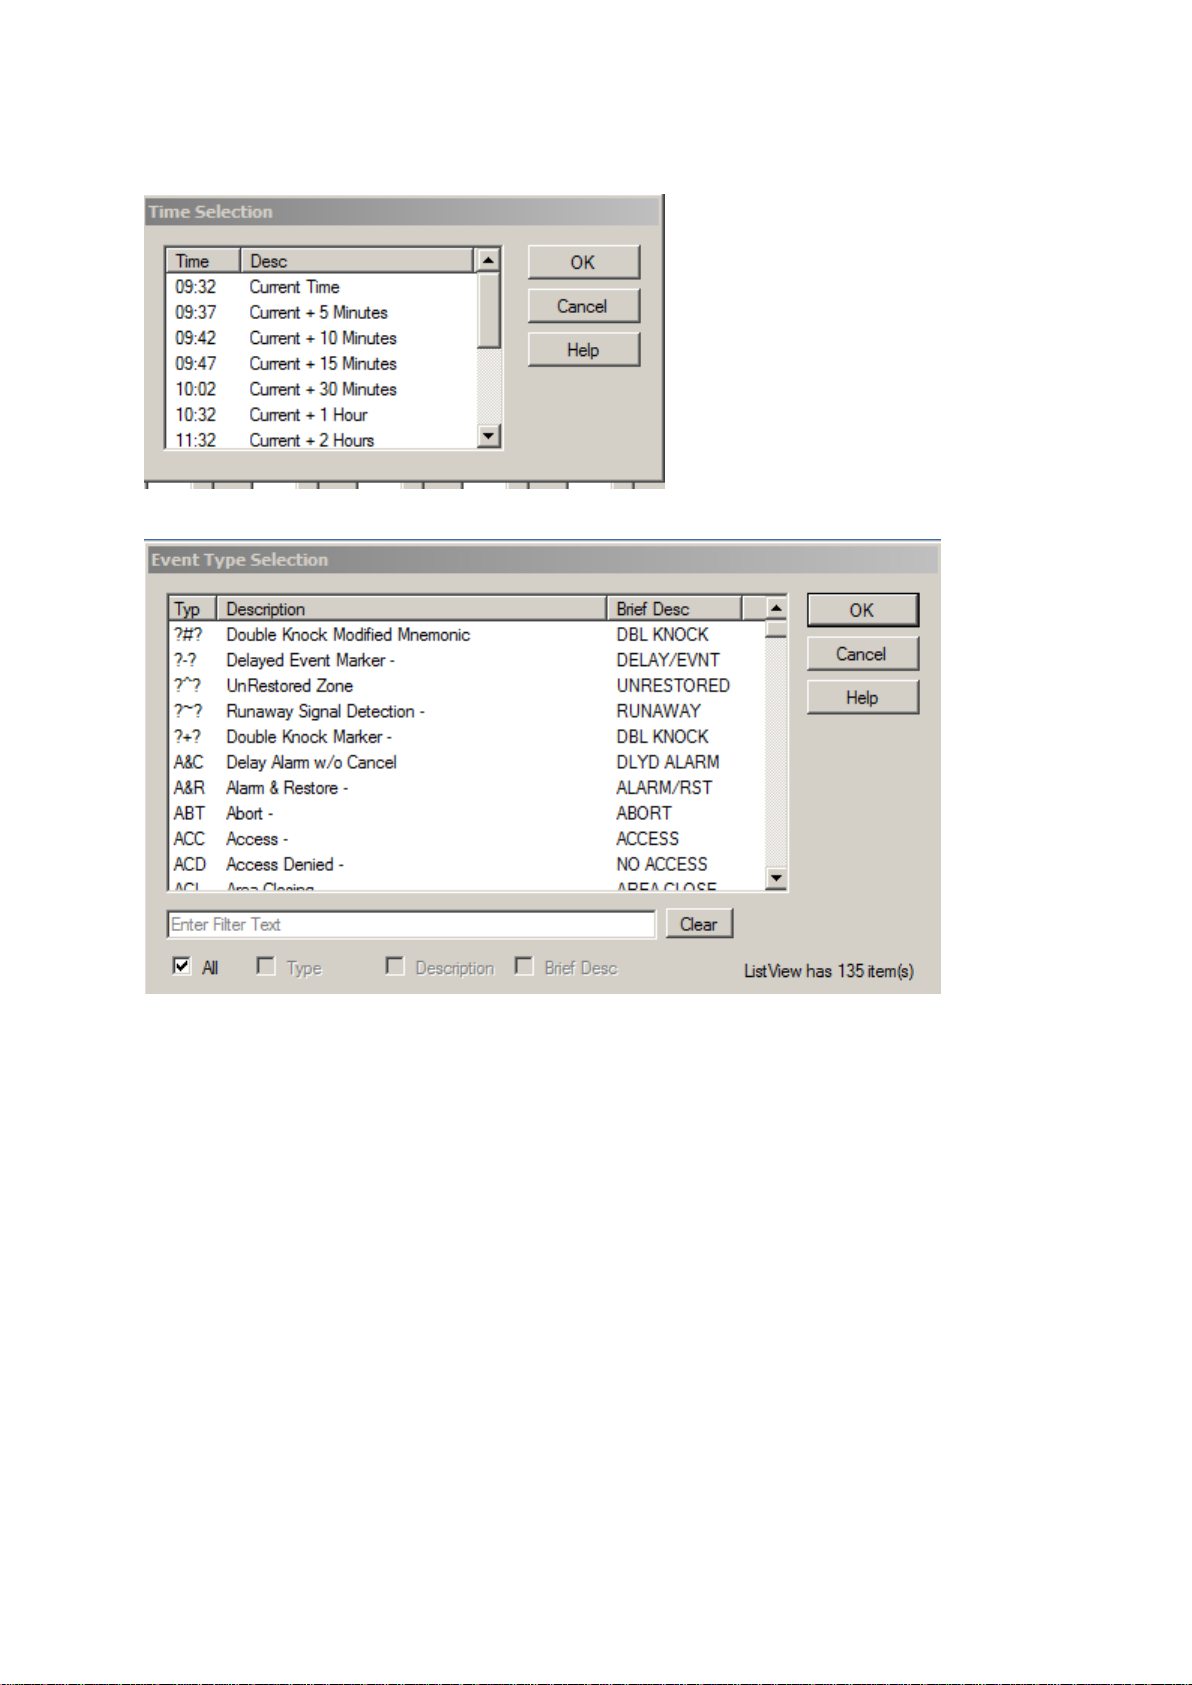
Clicking Begin or until options brings up the time selection dialog box
Type(s) to auto log:
 Loading...