

Page 1

ENGLISH
E5024 ECDIS System
Installation Manual
Page 2

Page 3

| 1
| E5024 ECDIS Installation Manual
Preface
As Navico is continuously improving this product, we retain the right to make changes to the
product at any time which may not be reflected in this version of the manual. Contact your
nearest distributor if you require any further assistance.
It is the owner’s sole responsibility to install and use the instrument and transducers in a
manner that will not cause accidents, personal injury or property damage. The user of this
product is solely responsible for observing safe boating practices.
NAVICO HOLDING AS AND ITS SUBSIDIARIES, BRANCHES AND AFFILIATES DISCLAIM ALL
LIABILITY FOR ANY USE OF THIS PRODUCT IN A WAY THAT MAY CAUSE ACCIDENTS, DAMAGE
OR THAT MAY VIOLATE THE LAW.
Governing Language: This statement, any instruction manuals, user guides and other
information relating to the product (Documentation) may be translated to, or has been
translated from, another language (Translation). In the event of any conflict between any
Translation of the Documentation, the English language version of the Documentation will be
the official version of the Documentation.
This manual represents the product as at the time of printing. Navico Holding AS and its
subsidiaries, branches and affiliates reserve the right to make changes to specifications
without notice.
Copyright
Copyright © 2015 Navico Holding AS.
Warranty
The warranty card is supplied as a separate document.
In case of any queries, refer to the brand web site of your display or system:
http://pro.simrad-yachting.com
Declarations and conformance
This equipment is intended for use in international waters as well as coastal sea areas
administered by countries of the E.U. and E.E.A.
Compliance Statements
The Simrad E5024 ECDIS system;
• complies with CE under EMC directive 2004/108/EC
• complies with the requirements of level 2 devices of the Radio-communications
(Electromagnetic Compatibility) standard 2008
For more information refer to our website:
http://pro.simrad-yachting.com
The Wheelmark
The Simrad E5024 ECDIS system is produced and tested in accordance with the European
Council Directive 96/98/EC of December 1996 on marine equipment, as last amended by
directive 2013/52/EU. This means that the system complies with the highest level of tests for
nonmilitary marine electronic navigation equipment existing today.
The Marine Equipment Directive 96/98/EC (MED), as amended by 2013/52/EU for ships
flying EU or EFTA flags, applies to all new ships, to existing ships not previously carrying such
equipment, and to ships having their equipment replaced.
This means that all system components covered by annex A1 must be type-approved
accordingly and must carry the Wheelmark, which is a symbol of conformity with the Marine
Equipment Directive.
Navico has no responsibility for the incorrect installation or use of the ECDIS system, so
it is essential for the person in charge of the installation to be familiar with the relevant
requirements as well as with the contents of the manuals, which covers correct installation
and use.
Page 4
2 |
| E5024 ECDIS Installation Manual
Warning
The user is cautioned that any changes or modifications not expressly approved by the party
responsible for compliance could void the user’s authority to operate the equipment.
This equipment generates, uses and can radiate radio frequency energy and, if not installed
and used in accordance with the instructions, may cause harmful interference to radio
communications. However, there is no guarantee that the interference will not occur in a
particular installation. If this equipment does cause harmful interference to radio or television
reception, which can be determined by turning the equipment off and on, the user is
encouraged to try to correct the interference by one or more of the following measures:
• Reorient or relocate the receiving antenna
• Increase the separation between the equipment and receiver
• Connect the equipment into an outlet on a circuit different from that of the receiver
• Consult the dealer or an experienced technician for help
Trademarks
• NMEA 2000 is a registered trademark of the National Marine Electronics Association
• Navionics is a registered trademark of Navionics SpA
• Simrad is a trademark of Kongsberg Maritime AS Company registered in the US and
other countries and is being used under license
• The terms HDMI and HDMI High-Definition Multimedia Interface, and the HDMI Logo
are trademarks or registered trademarks of HDMI Licensing LLC in the United States
and other countries
About this manual
This manual is a reference guide for installing the Simrad E5024 ECDIS system.
Important text that requires special attention from the reader is emphasized as follows:
¼ Note: Used to draw the reader’s attention to a comment or some important information.
!
Warning: Used when it is necessary to warn personnel that they should proceed
carefully to prevent risk of injury and/or damage to equipment/personnel.
Page 5

| 3
Contents | E5024 ECDIS Installation Manual
Contents
4 E5024 System overview
6 E5000 CPU
7 Hardware installation
7 Mounting location
7 E5000 processor installation
8 M570 trackball
8 M5024 series monitor installation
8 E0102 Alarm panel and SI80
8 LTSX50 trackball (Option)
9 Wiring
9 Guidelines
9 Power connection
10 External alarm
12 Connecting control devices
12 The CAN bus
14 NMEA 0183 device connection
15 Ethernet device connection
16 Getting ready to use the system
16 Installing the charts from the NavStick
18 Installing charts from other suppliers
18 Selecting charts to display
19 ECDIS Software setup
19 Chart settings
19 Vessel settings
23 Websocket interface connection
25 AIS settings
25 Radar targets settings
26 Radar settings
27 System settings
30 Alarms settings
33 Installation approval
33 Mechanical Installation
33 Power connection
33 External equipment
34 Spare parts and accessories
34 E5024 ECDIS system
34 NSO evo2 accessories
35 Ethernet cables
36 Supported data
36 ECDIS NMEA 0183 & NMEA 2000 supported sentences
38 E5000 Processor specications
39 Dimensional drawings
39 E5000 Dimensional drawings
39 LTSX50N8 trackball dimensional drawings
Page 6
4 |
E5024 System overview | E5024 ECDIS Installation Manual
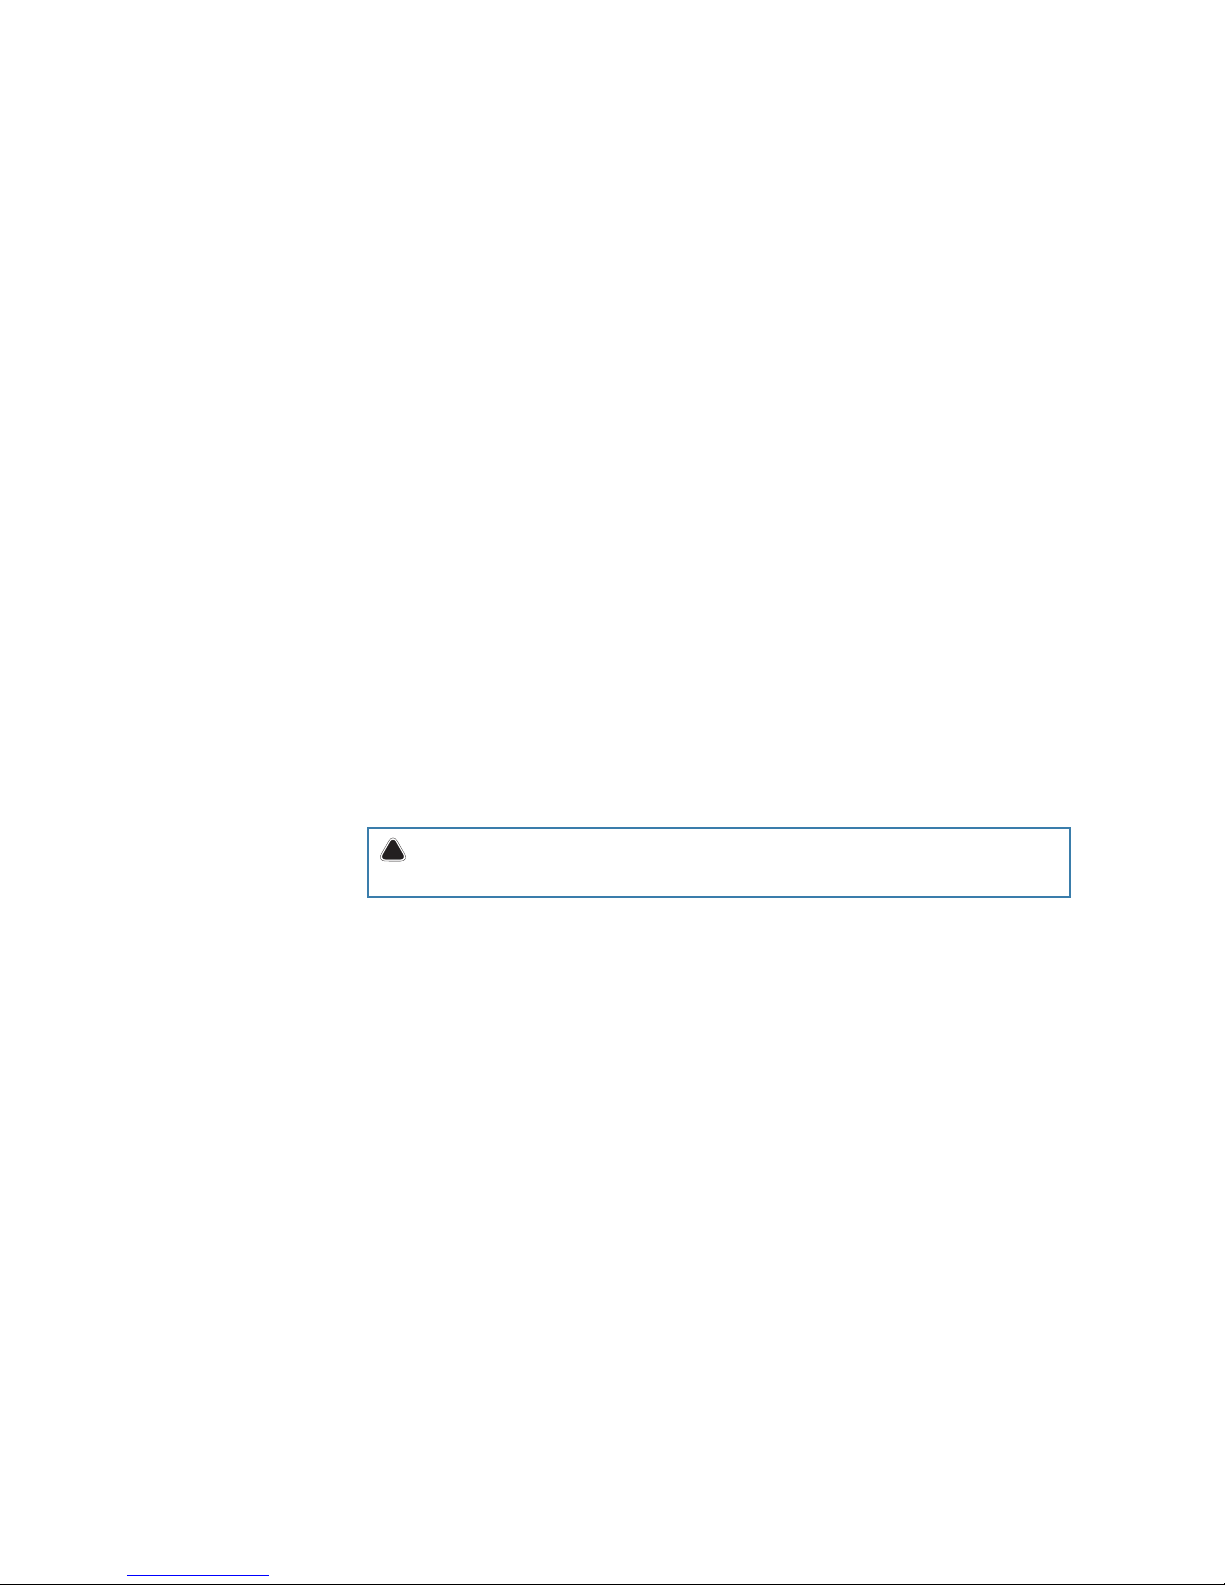
E5024 System overview
The E5000 Processor features two fast quad core CPUs, and dual monitor outputs to drive two
displays with independent information.
Each quad core CPU operates independently, one running ECDIS software, the other running
Navico’s NSO evo2 multifunction display software.
Connectivity options for data are broad, with an internal ethernet switch with three ports,
NMEA 0183 transmit and receive ports, and a connection point for a NMEA 2000 compliant
data bus.
Synchronizing the ECDIS CPU with a backup ECDIS device constitutes a PLECDIS system
(PaperLess ECDIS). Integration is possible with Navico ARGUS radar.
The Simrad M5024 monitor offers a low profile, high brightness solution for displaying
video from a variety of sources. M5024 monitors are color calibrated according to ECDIS
requirements. For installation and setup refer to the M5000 Series User Manual.
Separate documents are delivered for the NSO evo2. Refer to this documentation for
installation, configuration and operation of the NSO evo2 system. The manuals can be
downloaded from the product site on http://pro.simrad-yachting.com
SIMRAD
ALARM RESET
1
3
6
4
5
9
87
10
12
11
2
13
Item Description
1 M5024 – ECDIS CPU via HDMI 1 OUT
2 MO16/19/24, M5016-24 or other – NSO CPU via HDMI 2 OUT
3 HDMI cables
4 ECDIS Processor – containing ECDIS and NSO CPUs
5 NMEA 0183 – 3 ports for ECDIS CPU, 1 port for NSO CPU
6 Ethernet ports - 2x PoE, 1x standard
7 External alarm (Blue wire) on E5000 power cable
8 E0102 alarm panel – ECDIS CPU only
9 M570 wireless trackball and USB receiver
10 NMEA 2000 network
11 SI80 NMEA 0183 expansion module
12 NMEA 0183 HS ports for sources such as position, heading etc.
13 NavStick
1
Page 7
| 5
E5024 System overview | E5024 ECDIS Installation Manual
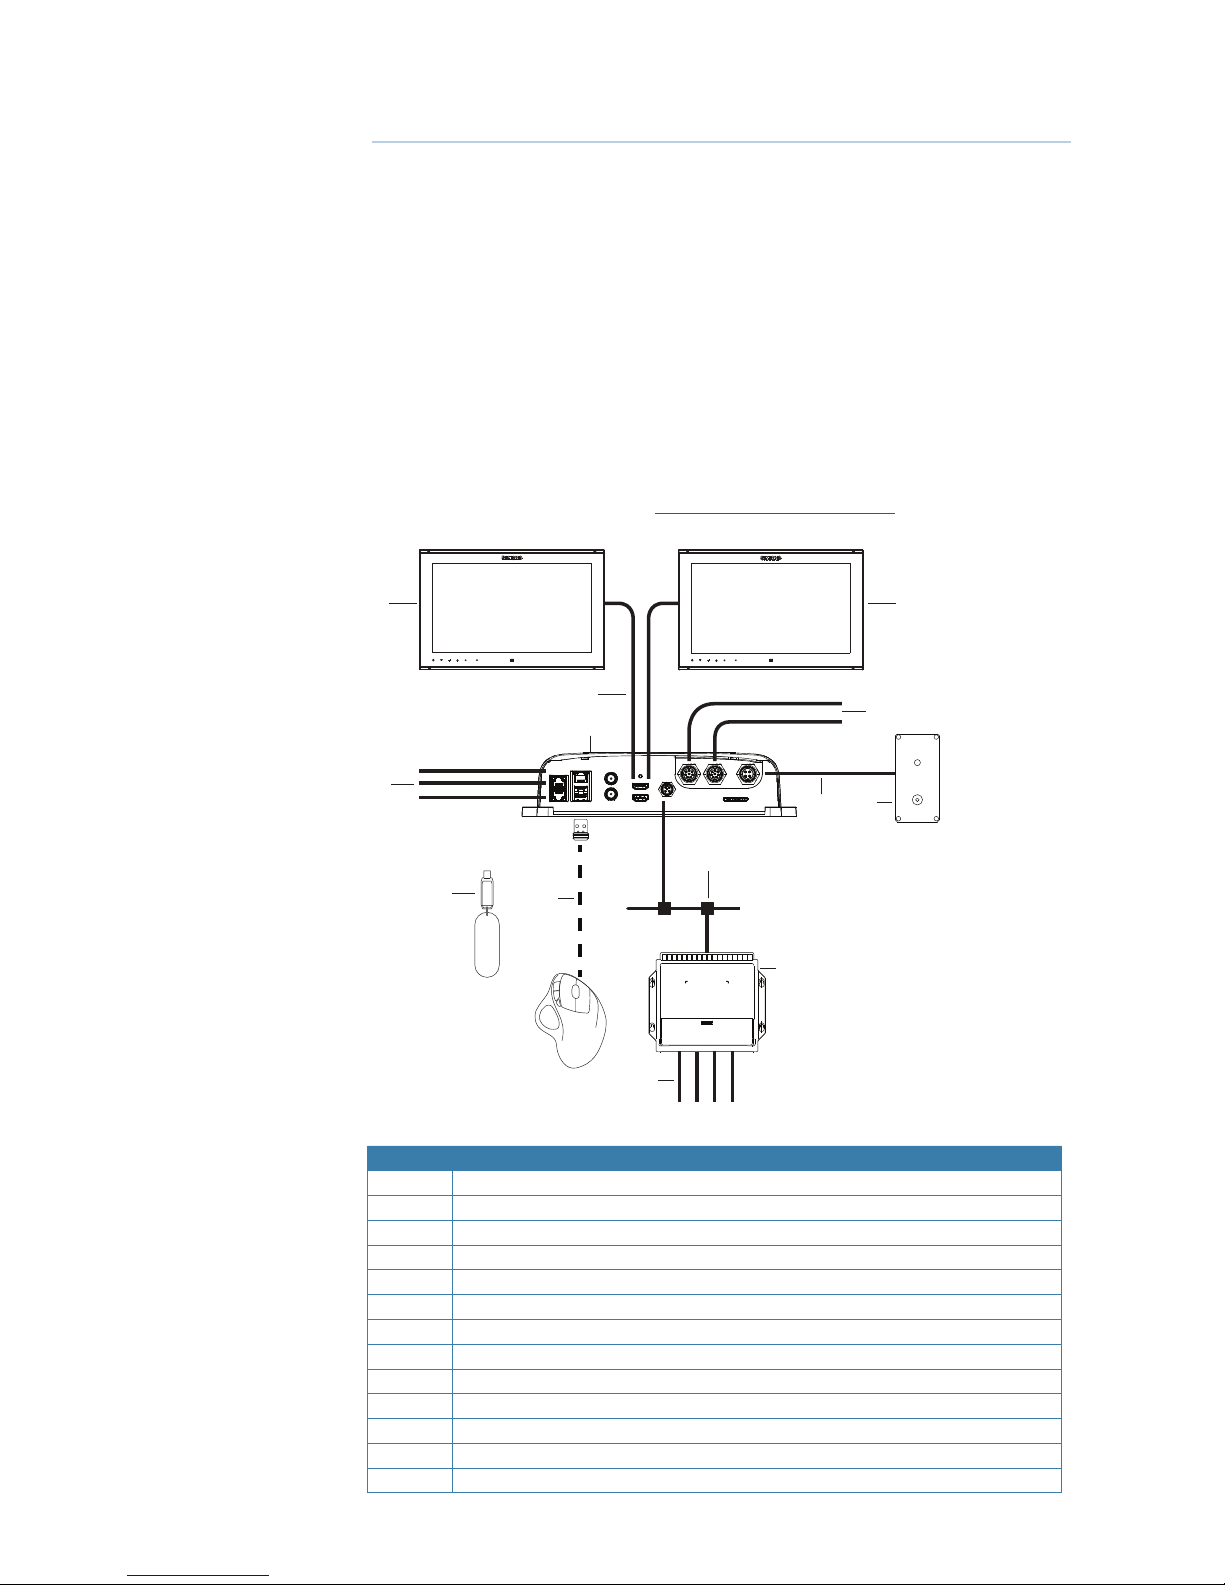
Included items in the E5000 box
1
2
3
4
5
ENGLISH
E5024 ECDIS system
Installation Manual
simrad-yachting.com
ENGLISH
E5024 ECDIS system
Installation Manual
simrad-yachting.com
ENGLISH
E5024 ECDIS system
Installation Manual
simrad-yachting.com
ENGLISH
E5024 ECDIS system
Installation Manual
simrad-yachting.com
Item Description Qty
1 E5000 ECDIS processor 1
2 Power cable, 4 core, 2 m 1
3 Serial cable, NMEA 0183, 2 m 2
4 Documentation pack:
E5024 Operator manual
E5024 Installation manual
Warranty card
1
1
1
5 Installation kit:
Cable retainer
Cable ties, 102 mm x 2.5 mm, black
Pan head screws, 19 mm x 3.5 mm, phillips #2
Pan head screws, 25 mm x 4 mm, phillips #2
2
20
4
4
Page 8
6 |
E5024 System overview | E5024 ECDIS Installation Manual
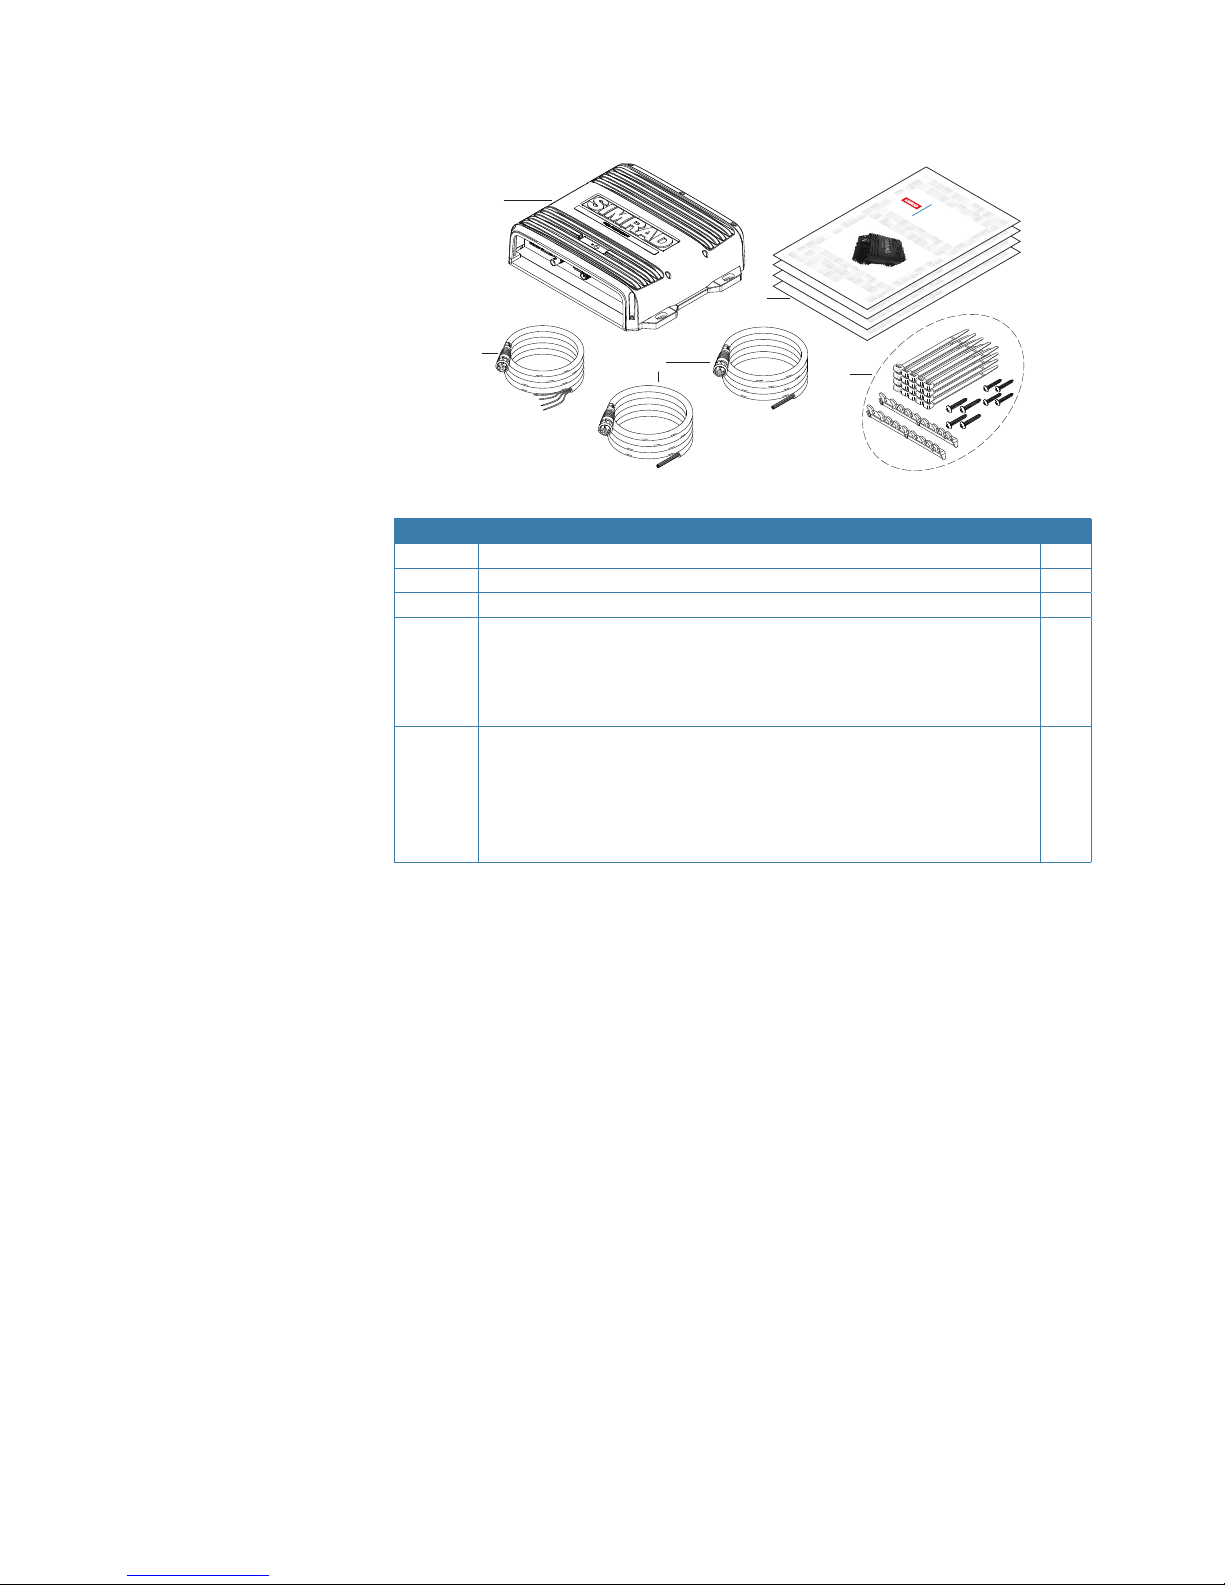
E5000 CPU
1 2
3
4
5 6
7
8 9
# Description ECDIS CPU NSO evo2 CPU
1 Ethernet Network ports with PoE 2 ports - shared
2 Ethernet Network port 1 port - shared
3 Video Input BNC sockets n/a 2 ports
4 NMEA 2000 port 1 port - shared
5 NMEA 0183 serial 3 1
6 Power connector shared
7 USB ports 2 n/a
8 HDMI sockets 1 1
9 SD card slot 1 port - shared
¼ Note: For NSO evo2 Installation refer to the separate NSO evo2 Installation Manual.
¼ Note: On the E5000 hardware there are some differences compared to a normal NSO evo2:
• The USB ports are dedicated to ECDIS and cannot be used in the NSO software
• The alarm output pin is dedicated to the ECDIS software, and will not be triggered by
NSO software
• There will only be one free serial input to the NSO software. This can be used for
Touch screen OR NMEA 0183 input
Page 9
| 7
Hardware installation | E5024 ECDIS Installation Manual
Hardware installation
Mounting location
Choose the mounting locations carefully before you drill or cut. Be sure to leave a direct path
for all of the cables.
Ensure that any holes cut are in a safe position and will not weaken the boat’s structure. If in
doubt, consult a qualified boat builder.
Before cutting a hole in a panel, make sure that there are no hidden electrical wires or other
parts behind the panel.
Do not mount any part where it can be used as a hand hold, where it might be submerged, or
where it will interfere with the operation, launching or retrieving of the boat.
Choose an area where the unit will not be subjected to excessive vibration, or heat.
Choose a location that will not expose the unit to conditions that exceed the IP rating.
Leave sufficient clearance to connect all relevant cables.
For compass safe distance check the back of the units.
For overall width and height requirements, see “E5000 Dimensional drawings” on page 39.
!
Warning: When installing, ensure appropriate safety equipment is used, e.g. ear muffs,
protective glasses, gloves and a dust mask.
Power tools may exceed safe noise levels, and can cast off dangerous projectiles.
The dust from many materials commonly used in boat construction may cause irritation or
damage to eyes, skin, and lungs.
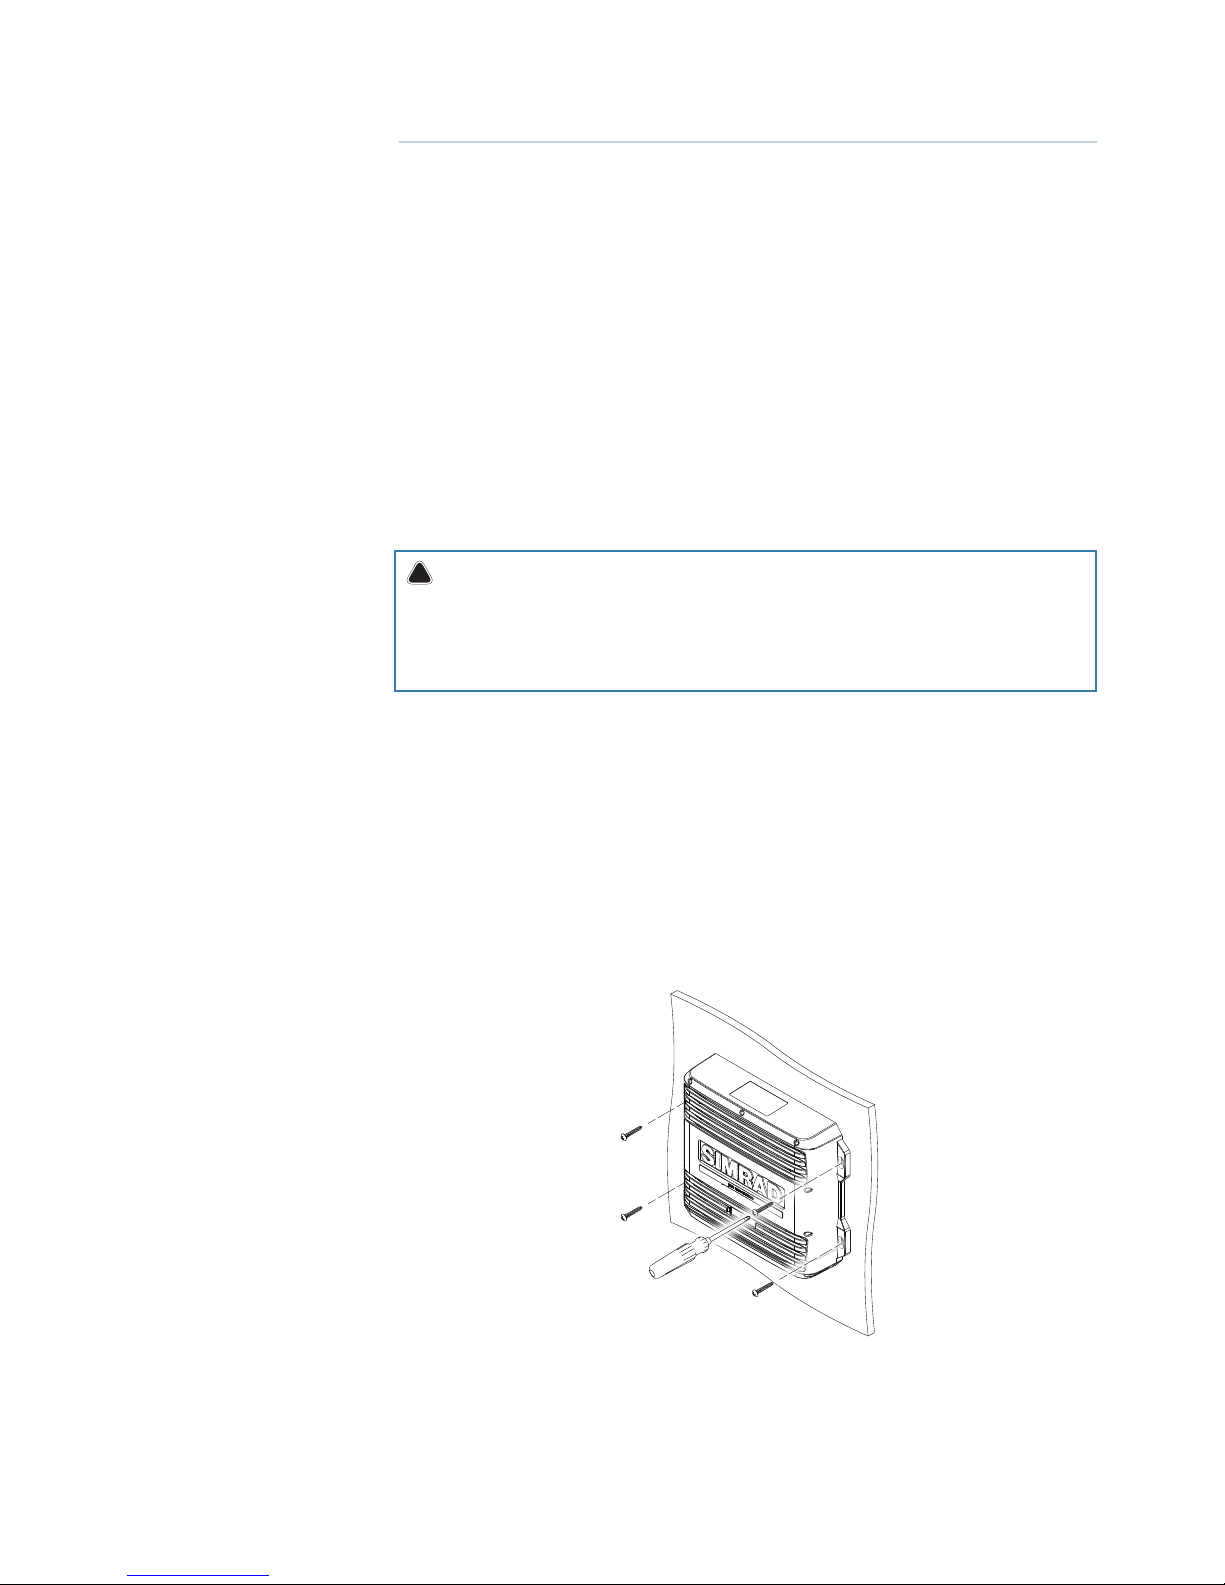
E5000 processor installation
Hold the processor up to the desired location on the mounting surface, and with a pencil or
marker, trace the ‘keyhole’ at each of the four mounting tabs. Remove the processor and mark
the center of the narrow end (top) of each ‘keyhole.’
The supplied fasteners can be used when installing the processor to a wooden or fiberglass
bulkhead. For steel or aluminium it may be preferable to use machine screws with lock nuts.
For supplied fasteners, pre-drill the holes at the marked points with no larger than a 2.7
mm drill bit. When drilling into fibreglass covered in gelcoat, it is recommended to carefully
remove the gelcoat layer with a small countersink bit after the hole has been drilled. This will
prevent the gelcoat from cracking as the fastener is tightened.
= PHILLIPS #2 (PH2)
2
Page 10

8 |
Hardware installation | E5024 ECDIS Installation Manual
M570 trackball
The M570 is a desktop trackball and can be fixed in place using self-adhesive velcro. Double
sided mounting tape is not recommended as it would impede battery replacement. The
M570 receiver must be plugged into one of the two USB ports on the E5000 processor.
¼ Note: To fulfill the ECDIS regulations, the trackball must be mounted in an illuminated loca-
tion!
M5024 series monitor installation
M50xx series monitors include installation instructions and mounting templates that should
be carefully read before commencing with installation.
The recommended means to connect the power supply and remote power signal to the
E5024 is as follows:
1. The remote power signal is required to be used for a compliant ECDIS system. It is
recommended that the remote power signal wire be connected to the main bridge or
conning station power circuit. This allows the ECDIS to be powered-up or down using the
main power signal circuit on the boat
2. It is further advised that the ECDIS system be powered from a power supply independent
from the remote power signal sharing a common ground
¼ Note: Nominal viewing distance is 1m. Do not install monitors in a location where this dis-
tance from the operator is exceeded.
E0102 Alarm panel and SI80
Refer to the separate documentation delivered with the units.
LTSX50 trackball (Option)
The optional LTSX50 is a panel mounted, waterproof (IP 68) trackball with scroll wheel.
The LTSX50 must be plugged into one of the two USB ports on the E5000 processor. For
dimensions see “LTSX50N8 trackball dimensional drawings” on page 39.
Page 11
| 9
Wiring | E5024 ECDIS Installation Manual
Wiring
For easier access to connectors, undo the two phillips screws visible on the bottom front of
the E5000 case, and remove the lower shroud.
Guidelines
Do not do this: Do this:
Do not make sharp bends in the cables Do make drip and service loops
Do not run cables in a way that allows water
to flow down into the connectors
Do cable tie all cables to keep them secure
Do not route the data cables in areas
adjacent to radar, transmitter, or large current
carrying cables
Do solder/crimp and insulate all wiring
connections, if extending or shortening
power or NMEA 0183 cables
Do leave room adjacent to connectors to
ease plugging and unplugging of cables
!
Warning: Before starting the installation, be sure to turn electrical power off. If power is
left on or turned on during the installation, fire, electrical shock, or other serious injury may
occur.
!
Warning: Ensure that the voltage of the power supply is compatible with the E5000
Processor.
!
Warning: The positive supply wire (red) should always be connected to (+) DC with
the supplied fuse or a circuit breaker (closest available to fuse rating).
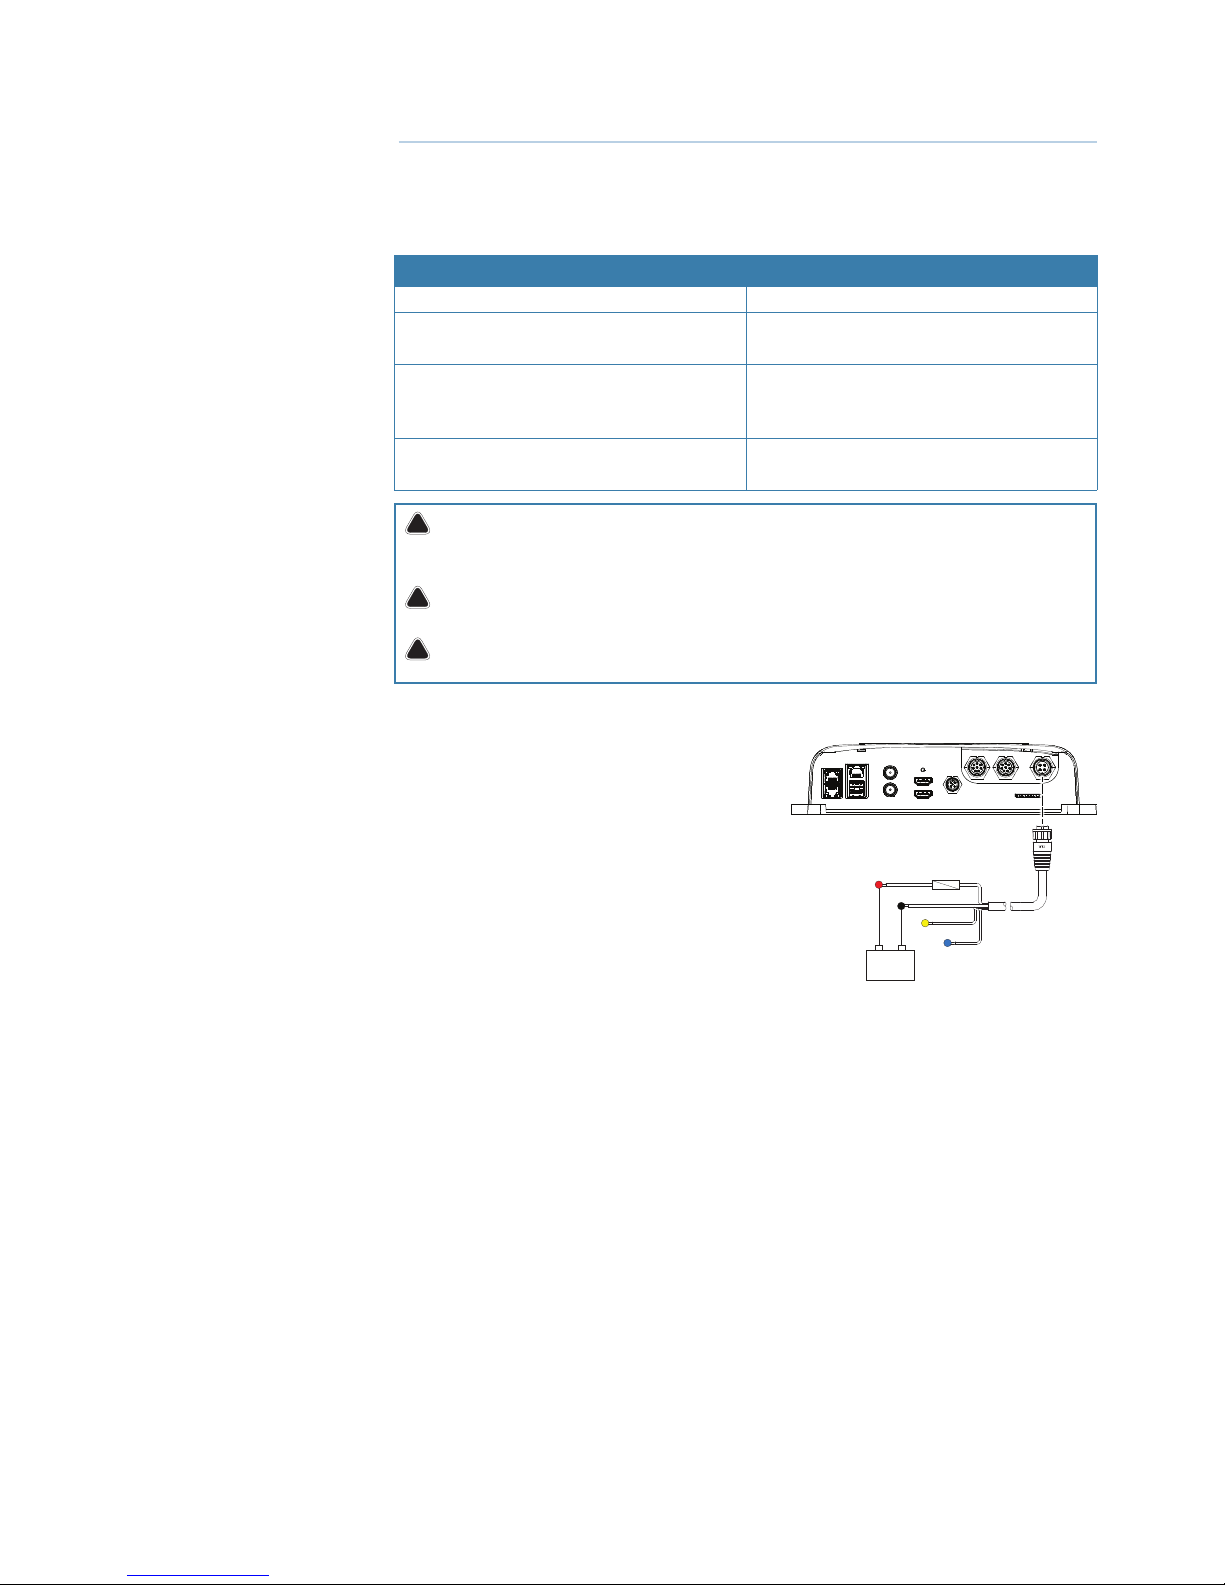
Power connection
The E5000 processor can be powered by either 12
V or 24 V DC. They are protected against reverse
polarity, under voltage and over voltage (for a
limited duration).
The supplied power cable has four cores:
• Red and Black: power into the system
• Yellow wire: external command
• Blue wire: connecting to an external alarm
Connect Red to (+) DC using a 3 amp fuse.
Connect Black to (-) DC. The processor can be
powered on and off using the power button on
the front of the case.
¼ Note: ECDIS requirements demand the system to automatically restart after a power-loss. For
ECDIS compliance, yellow wire must be connected to a switch / circuit breaker in such a way
that it is running at 12/24V during normal operation.
3
+
_
Page 12
10 |
Wiring | E5024 ECDIS Installation Manual
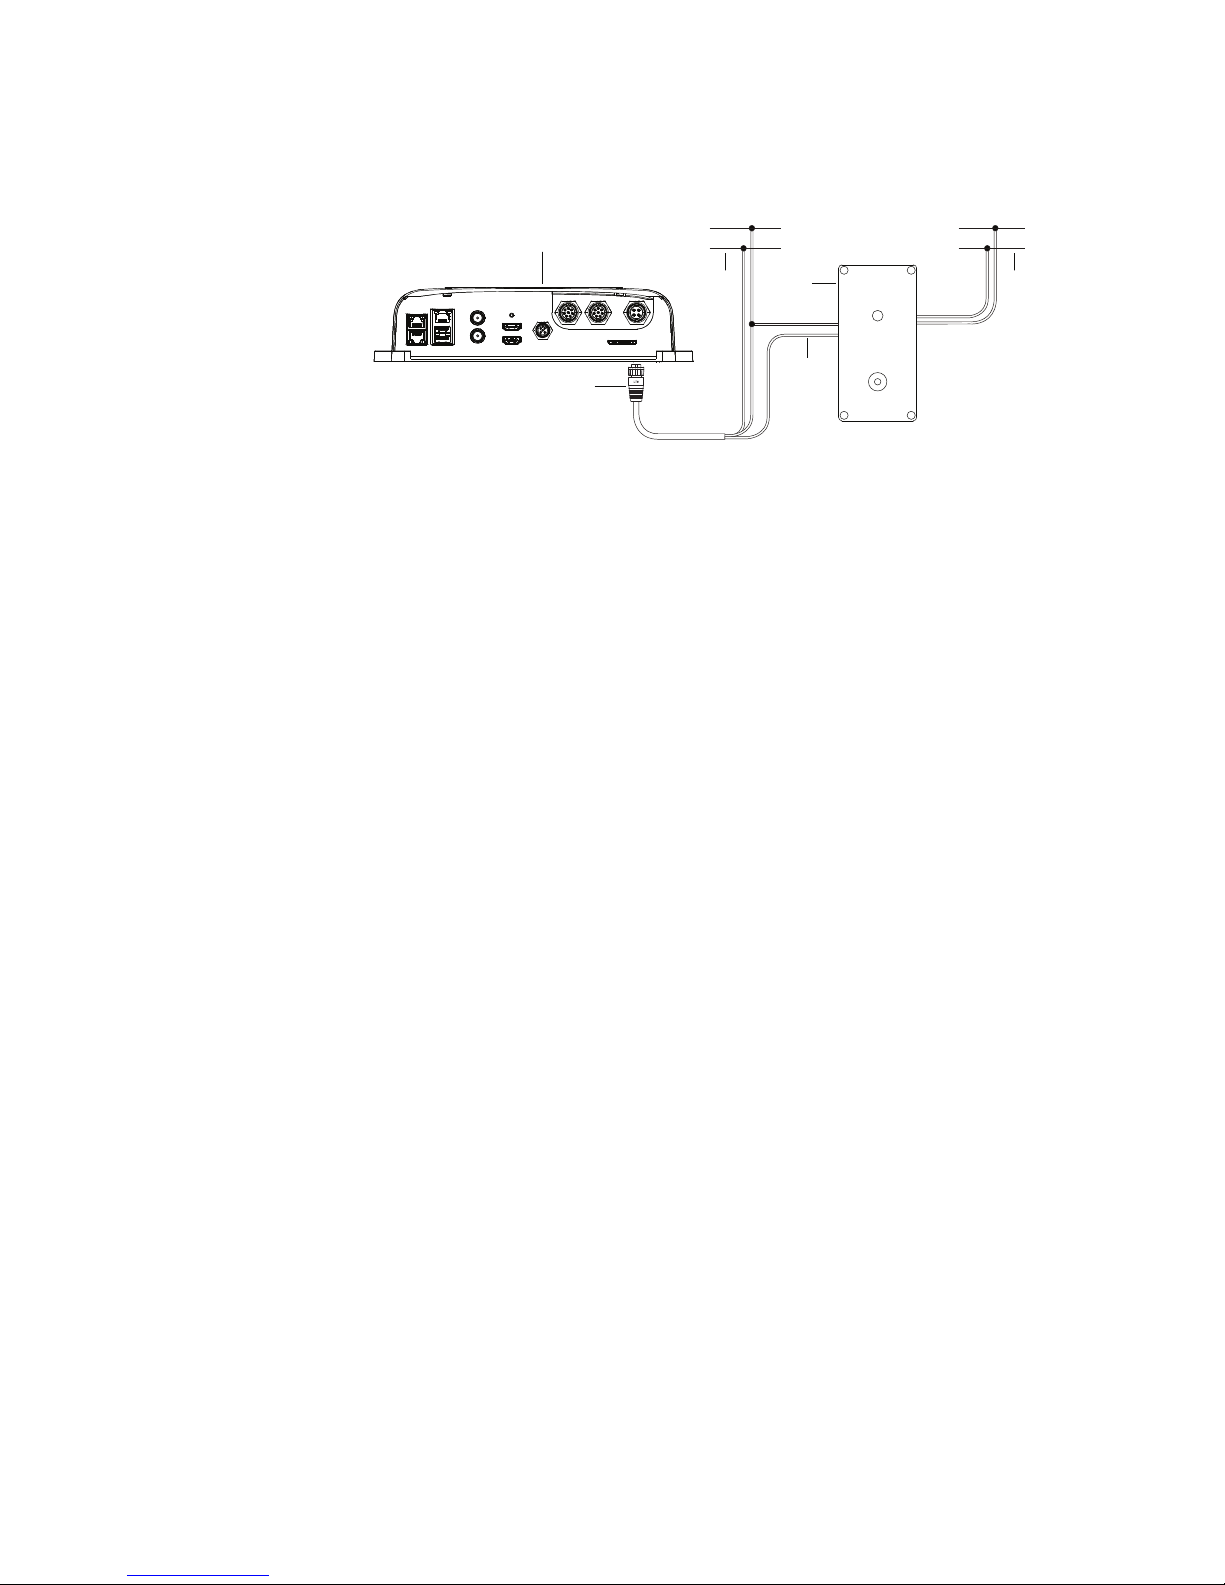
External alarm
The ECDIS CPU in the E5000 output alarms in the following way:
• The ECDIS CPU pulls the blue wire to GND (O V)
1
2
4
5
63
24 V
NEG
24 V
NEG
SIMRAD
ALARM RESET
1 E5000 processor
2 Powerplug E5000
3 Main power E5000
4 E0102 Alarm panel
5 Blue alarm pin E5000
6 E0102 separate power
For wiring details for the E0102, refer to the included manual.
¼ Note: The E5000 processor and E0102 alarm panel must have separate power supplies to be
compliant.
Page 13
| 11
Wiring | E5024 ECDIS Installation Manual
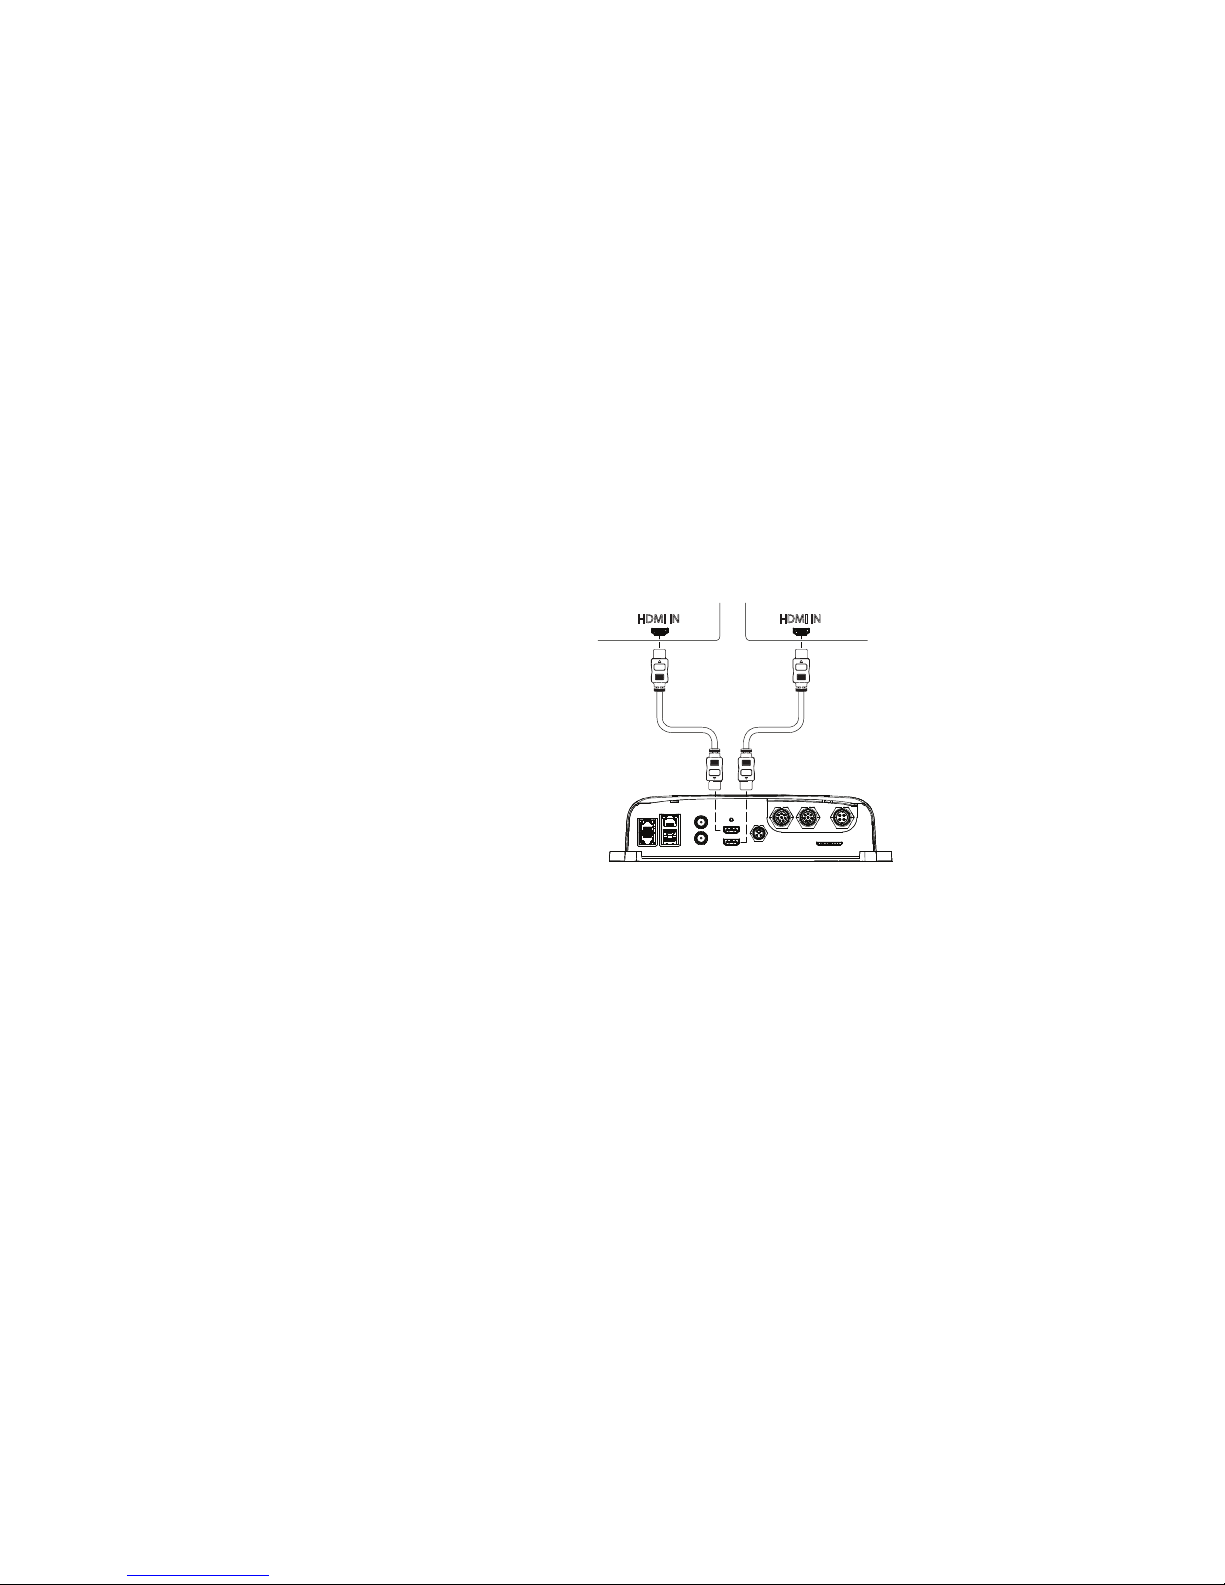
Connecting monitors
Two displays may be connected to the E5000 via the HDMI ports.
The ECDIS CPU (HDMI 1 OUT) must be connected to a Simrad M5024 to conform to IMO
requirements.
The NSO evo2 CPU (HDMI 2 OUT) can connect to a wide range of supported monitors; the
Simrad DI-15, MO-L 15/17/19, MO16/19/24 (T&P), legacy MO-19, B&G ZM series, and KEPMGB15T.
It is possible to use third party monitors on the NSO evo2 CPU, however, these should
conform to the supported resolution and refresh rates defined in “E5000 Processor
specications” on page 38.
¼ Note: LCD monitors intended for home/office use are not designed to operate in areas
exposed to direct sunlight, and will appear dark and difficult to read. Also, unless carefully
ventilated and protected from moisture, their service life will be greatly compromised in the
marine environment.
Monitors with a HDMI input may be directly connected to the HDMI 2 output.
HDMI INHDMI IN
M5024 ECDIS
monitor
NSO evo2
monitor
¼ Note: While the HDMI standard does not state maximum cable length, signal may be com-
promised on long runs. Only use Navico or other high quality HDMI certified cables. 3rd party
cables should be tested before installation. On runs over 10 m it may be required to add an
HDMI amplifier or use HDMI-CAT6 adaptors.
Page 14

12 |
Wiring | E5024 ECDIS Installation Manual
Connecting control devices
The ECDIS CPU must be connected to a M570 or LTSX50 trackball for control.
Plug the trackball into either USB port - it will be automatically detected and enabled for use.
M570 and LTSX50 trackball control
1
2
3
1 M570 trackball
2 E5000 processor
3 M570 receiver
¼ Note: Keep spare sets of batteries on hand at all times.
The CAN bus
Device connection
The E5000 processors are equipped with a NMEA 2000 compatible data port, which allows
the receiving and sharing of data from various sources.
Essential network information
• The standardized physical cables/connectors for the NMEA 2000 are ‘Micro-C’ and ‘Mini-C’,
directly derived from the automation industries ‘DeviceNET’ - ‘Micro-C’ being the more
commonly used size
• While most Simrad products now use ‘Micro-C’ cabling and connectors, some products still
use proprietary ‘SimNet’ connectors, which are easily made compatible via adaptor cables
• A network consists of a linear ‘backbone’ from which ‘drop cables’ connect to the CAN bus
compliant devices
• A single drop cable has a maximum length of 6 m (19.7 ft). The total length of all drop cables
combined should not exceed 78m (256 ft)
• A NMEA 2000 network using Micro-C cabling, has a maximum cable length of 100 m (328 ft),
between any two points
• A NMEA 2000 network needs to have a terminator at each end of the backbone. A terminator
can be a terminator blank plug
Planning and installing a network backbone
The Micro-C backbone needs to run between the locations of all products to be installed typically in a bow to stern layout - and be no further than 6 m from a device to be connected.
Choose from the following components to make up the backbone:
• Micro-C cables: 0.4 m (1.3 ft), 2 m (6.6 ft), 5 m (16.6 ft), and 9 m (29.5 ft) cables
• T-connector. Used to connect a drop cable to the backbone
• Micro-C power cable. Connected to backbone via a T-connector
¼ Note: Most NMEA 2000 devices can be connected directly to a Simrad SimNet backbone and
SimNet devices can be connected to a NMEA 2000 network by using adapter cables.
Page 15

| 13
Wiring | E5024 ECDIS Installation Manual
¼ Note: Simrad devices with Micro-C NMEA 2000 connectors are fully compatible with a SimNet
network by using a Micro-C to SimNet adapter cable.
Power the CAN bus
The network requires its own 12 V DC power supply protected by a 5 amp fuse or breaker. For
vessels fitted with 24 V systems, use a DC-DC converter to supply 12 V.
Connect power at any location in the backbone for smaller systems.
For larger systems introduce power at central point in the backbone to “balance” the voltage
drop of the network.
If an SI80 unit is included in the system, this unit should be used for powering the CAN bus
backbone.
¼ Note: Do not connect the CAN bus power cable to the same terminals as the engine start
batteries, autopilot computer, radar, bow thruster or other high current devices.
When you have a larger system with network power in the center of the backbone you
should make the installation such that the load / current draw from the devices in each side /
branch is equal.
+
_
T
T
9
8
5
3
7
4
6
21
1 N2K sensor
2 E5000 processor
3 SI80
4 Power source
5 ‘Drop’ cable (should not exceed 6 m (20 ft) each)
6 SI80 module congured with terminator. This SI80 is used to power the CAN bus
7 T connectors
8 Backbone
9 Terminator
Page 16

14 |
Wiring | E5024 ECDIS Installation Manual
NMEA 0183 device connection
The E5000 processor has four NMEA 0183 ports; three for the ECDIS CPU, and one for the NSO
evo2 CPU. Each port supports bi-directional NMEA 0183 traffic. The NMEA 0183 port for the
NSO evo2 CPU may be configured for either NMEA 0183 or touch screen control. Both the
baud rate and sentences output by both CPUs are configurable.
1
2
3
4
key
connector/
name
colour signal CPU
serial
ECDIS
1 Serial 1 / 1B brown
brown/white
green
green/white
NMEA 0183 RX_A
NMEA 0183 RX_B
NMEA 0183 TX_A
NMEA 0183 TX_B
ECDIS TTYS1
2 Serial 1 / 1A blue
blue/white
orange/white
orange
RS422_RX+
RS422_RX-
RS422_TX+
RS422_TX-
ECDIS TTYS0
3 Serial 2 / 2B brown
brown/white
green
green/white
NMEA 0183 RX_A
NMEA 0183 RX_B
NMEA 0183 TX_A
NMEA 0183 TX_B
ECDIS Serial TCP
4 Serial 2 / 2A blue
blue/white
orange/white
orange
RS422_RX+
RS422_RX-
RS422_TX+
RS422_TX-
NSO
¼ Note: NMEA 0183 devices communicate at 4800 baud, while NMEA 0183 - HS devices com-
municate at 38,400 baud. Set the serial port baud rate to the same rate as used by the connected equipment.
¼ Note: AIS is not internally bridged, so it must be connected to one NMEA 0183 port on each
CPU if required on both screens.
Page 17

| 15
Wiring | E5024 ECDIS Installation Manual
Additional NMEA 0183 inputs
If more than 3 NMEA 0183 ports or approved high speed NMEA 0183 outputs are required, an
SI80 can be connected to the NMEA 2000 network to provide additional ports.
2
3
1
1 E5000 processor
2 SI80
3 Backbone
Connection between the E5000 and SI80 should observe all network connection rules as
detailed in “The CAN bus” on page 12.
Refer to the SI80 installation guide for details on how NMEA 0183 connections are made.
¼ Note: The SI80 converts NMEA 0183 to NMEA 2000, so source setup should be done as if the
data originates from an NMEA 2000 source.
¼ Note: Only data from selected sources will be available for use on ECDIS. For more informa-
tion refer to “Websocket interface connection” on page 23.
Talkers and Listeners
Do not connect multiple Talkers to any serial input (Rx) of the unit. The NMEA 0183 standard
is not intended for this type of connection, and data will be corrupted if multiple devices
transmit simultaneously. The output, however, may drive multiple Listeners. The number
of receivers is finite, and depends largely on the receiving hardware. Typically driving three
devices is possible.
Ethernet device connection
Ethernet is used to interconnect high bandwidth devices such as radar, sonar, and other
CPUs. The E5000 processor has three ethernet ports, which are interconnected via an internal
ethernet switch.
To achieve a PLECDIS system (PaperLess ECDIS), two E5000 processors must be connected
together via ethernet to allow synchronization. The connection can be made using a standard
ethernet patch cable with RJ45 plugs at each end.
Page 18

16 |
Getting ready to use the system | E5024 ECDIS Installation Manual
Getting ready to use the system
Installing the charts from the NavStick
The E5024 system is delivered with a pre-installed overview chart. Detailed world-wide charts
are available on the NavStick USB drive included with the system. The charts are installed and
maintained by using the following services:
• NavTracker - a customized web interface from NAVTOR giving the navigator and ship
management full overview of chart usage, chart update history and chart management. The
customized NavTracker web interface is created and log-on details submitted to the user
when the charts are purchased
• NavSync - a PC program from NAVTOR used for receiving and updating the content on the
NavStick
The system allows for installing and using charts in S57 and S63 format from other chart
suppliers. Refer to “Installing charts from other suppliers” on page 18.
Before the charts can be copied from the NavStick to the E5024 system the following steps
must be performed:
1. Submit the User permit code to Navico
2. Verify your chart subscription from the NavTracker web site
3. Update the content of the NavStick to include chart updates and Chart permit codes
4. Copy content of the NavStick to the E5024 system
¼ Note: Step 1 is usually done in the office. The other steps are done when the system is in-
stalled and ready for configuration.
The next sections describe the required steps in detail.
Submitting the User permit code to Navico
A license code has to be obtained from Navico before the charts can be installed from the
NavStick. To obtain this code the system’s User permit code must be submitted to Navico.
The system’s User permit code is automatically generated in the E5000 computer. If the E5000
is replaced, a new User permit code has to be submitted to Navico to be able to use the
charts.
Insert a card in the SD card slot or a memory stick in the USB port on the E5000, and save the
User permit code from the System Settings dialog. This code is sent to Navico by email at
chartservice@navico.com.
¼ Note: You can NOT save the User permit code to the NavStick.
4
Page 19

| 17
Getting ready to use the system | E5024 ECDIS Installation Manual
Verifying or changing your chart subscription
When Navico receives the User permit from the vessel and the chart subscription is agreed,
Navico creates a custom account and a customized web site in NAVTOR NavTracker. From this
web site you can view and manage your subscription.
You log on to this system via a web browser (http://navtracker.navtor.com/) or as an iPhone,
iTouch or iPad app. Apps can be downloaded from iTunes Store for iOS or Google Play Store
for Android.
1. Log on to the NavTracker
2. Enter your email and password received from Navico when the subscription was agreed
3. Sign in to enter your customized NavTracker web site
4. Download the NavTracker User guide for detailed information about how to use the
NavTracke r
5. Verify that you subscription is correct, eventually request changes according to the guidelines
in the NavTracker User guide
When completed the NavTracker system will update you subscription information, and chart
updates and Chart permit codes for the purchased charts are prepared. These chart updates
and Chart permit codes are downloaded to the NavStick by using the NavSync program.
Updating the content of the NavStick
When the chart subscription is agreed, available chart updates and Chart permit codes for
the purchased charts are prepared. These files are downloaded to the NavStick by using the
NAVTOR NavSync program.
1. Download and install the NavSync program from http://navsync.navtor.com/ on your PC
• The NavSync icon is added to your desktop when the installation is completed
2. Insert the NavStick in the PC
3. Double-click on the NavSync icon to start the program
4. Follow the instructions on the screen to update the content of the NavStick with the latest
available charts
Copying the contents from the NavStick to the E5024 system
1. Insert the NavStick with the charts and the license code into the E5000 processor
2. Open the Chart managment menu, and select Install charts
3. Select Find and install charts
• The system will now automatically recognize the NavStick and list the content
4. Select the charts you want to install
5. Enter a new name or select an existing name for the SENC geodatabase destination
Selected charts and license codes are now copied to the E5024 system.
Page 20

18 |
Getting ready to use the system | E5024 ECDIS Installation Manual
Installing charts from other suppliers
The chart suppliers have different procedure for submitting Chart permit codes and charts.
For chart suppliers other than NAVTOR it is required to install Chart permits before charts can
be copied to the system. Refer to the supplier documentation for details.
Chart permits are copied to the system by using the Install permits menu option.
When Chart permits are installed, the charts have to be copied from an USB or SD drive to the
E5024 system by using the Find and install charts menu option.
Selecting charts to display
All chart databases installed in the E5024 system are listed in the Chart library.
Select the Display option for the chart databases you want to use.
If you have more than one database available, you can select to show multiple charts. The
system will however only display one chart at the time, and it will automatically select the
best chart available based on your vessel’s position.
Page 21

| 19
ECDIS Software setup | E5024 ECDIS Installation Manual
ECDIS Software setup
This chapter covers setup of the ECDIS CPU only. See the separate NSO evo2 Installation
manual for NSO evo2 setup.
The ECDIS CPU requires setup of critical information such as data sources, vessel dimensions,
and radar positioning before use.
The following sections focus on settings that typically will not require change once
configured. User preference settings and operation are covered in the operator manual.
The ECDIS settings options are accessed by selecting the Menu button. Select Settings to
view the available settings options.
¼ Note: Most screenshots shown have been cropped to optimize display of relevant content.
Chart settings
Refer to the E5024 ECDIS Operator Manual.
Vessel settings
Display settings
Refer to the E5024 ECDIS Operator Manual.
5
Page 22

20 |
ECDIS Software setup | E5024 ECDIS Installation Manual
Performance characteristics
Select Performance characteristics from the Vessel settings to enter vessel specific details.
The vessels dimensions are used to draw the ship’s outline on the chart approximately to
scale. The height, draft, and other performance characteristics constrain the user routes
created, and are related to grounding and safety checks.
¼ Note: The Common Reference Point is a common point selected on the ship (usually the con-
ning station), to which all sensors are referenced to.
The Common Reference Point must be set in relation to the measurements of your own ship.
Offset data must be entered correctly to compensate for the offset between the location of
your sensors.
Parameters
Select Parameters from the Vessel settings to enter vessel’s unique identification details.
¼ Note: The MMSI number is required to prevent own vessel’s AIS target appearing overlaid on
the vessel icon, and causing false alarms as a dangerous target.
Page 23

| 21
ECDIS Software setup | E5024 ECDIS Installation Manual
Sensors
The sensors are the external data sources such as GPS, Log, heading sensor, and AIS.
They interface to the E5000 via NMEA 0183, NMEA 2000, and ethernet. Sensors that are
connected via NMEA 2000 are bridged internally to ethernet, so selection is made as if the
sensors were an ethernet source.
Adding a sensor
On an unconfigured system the sensors page will be blank. Select New to add an instance of
the sensor type you wish to setup.
Communication settings
Select the newly created sensor icon to edit the communication settings.
The image above shows a typical sensor page. The upper section of the page is similar for all
sensors. The Mnemonic NMEA sentences (eg GLL, VTG) shown are dependent on the Sensor
type selected.
The following describes the settings:
Priority – Priority of the sensor if several sensors of the same type are registered; if the sensor
with the highest priority is lost, sensor with the next highest priority is used instead.
Timeout – Time period between the loss of connection with the sensor and triggering the
“source lost” alarm.
Talker ID – ID of the sensor used to distinguish between sensors of the same type, or sensors
sending the same NMEA sentences. This allows the system to listen only to a specific talker. A
wildcard (*) can be used to listen to messages from all sources of the type selected.
Page 24

22 |
ECDIS Software setup | E5024 ECDIS Installation Manual
Description – Description of the sensor - for identification purposes only.
Relay sentences – Enables vessel sensor parameters information to be relayed through the
ethernet connection made in a PLECDIS system.
Line type – The following types of connection are available:
• Serial - use to access the Port name, Baudrate and Data / Parity / Stop settings.
Port name on the device is always /dev/ttysx (“x” can be 0, 1 or 2). Baudrate and Data /
Parity / Stop needs to match the settings of the transmitting device
• TCP Server - use to access the Port settings
• TCP Client - use to access the Host and Port settings. It it used to collect sensor data
from the websocket application or other sources. Only one specific host and port will
receive data from the websocket. Other configurations may be used to obtain sensor
data from an Ehternet sensor system, for instance another ECDIS or a radar. For more
information refer to “Websocket interface connection” on page 23
• UDP Receiver - use to set the Host and Port settings which need to match the
transmitting device. Use UDP Receiver to access ethernet sensors using the UDP
protocol
• UDP Sender - use to set the Host and Port settings. Use UDP Sender to transmit
data using the UDP protocol. The Host should be set to 0.0.0.0 and Port number can
be any number between 10002 and 65535
• Serial TCP - use to access the Host and Baudrate settings. This is used to access the
3rd serial port located in the second serial connector. Refer to the Serial 2 / 2B table
section in “NMEA 0183 device connection” on page 14
Host – IP address of the ethernet device.
Port – Number of the UDP / TCP port to listen to or transmit through.
Sensor location – Position of the sensor on board the own vessel relative to the common
reference point.
Mnemonic – NMEA 0183 sentences to listen to.
Checksum – Indicates that checksum of sentences should be checked: if the checksum of a
sentence is wrong, the sentence is ignored; if the option is off, all sentences are processed.
NMEA 2000 sensors
The sensors connected via NMEA 2000 are internally bridged to ethernet, and should use the
following settings:
Line type: TCP client
Host: 127.0.0.1
Port: 2000
Deleting a sensor
To remove a sensor that is no longer required, open the sensor settings by choosing the
sensor icon. Select Delete at the bottom of the page.
Page 25

| 23
ECDIS Software setup | E5024 ECDIS Installation Manual
Line monitor - sensor data stream
To check that a sensor is providing data, open the sensor by selecting the sensor icon, then
select the Line monitor option in the top right corner. The data is shown in raw format, and
updated in real-time.
Websocket interface connection
The Simrad web interface is an easy to use web-style portal that lets you configure NMEA
2000 sensors. You can access the Sources, the Device list, and configure most of the hardware
available in the system.
¼ Note: An up to date web browser that supports websockets must be used to access the
Simrad web interface.
Page 26

24 |
ECDIS Software setup | E5024 ECDIS Installation Manual
Connecting to the web interface
Connect your PC directly to the E5000 via an ethernet cable.
1. Connect the PC to the E5000 via the ethernet port
2. Open web browser on the connected computer or device
3. Find the IP address for the ECDIS system by accessing the Menu, then Settings, followed by
System, and System information menu
4. Type the IP address into the web browser address bar
¼ Note: Ensure that your computer’s network settings are set so you can access this IP address
5. Once connected correctly the Simrad web interface home screen will appear
¼ Note: It will say Connected in the top right-hand corner of the screen next to the help tab. If
it says Not Connected then check the E5000 power and connections, and network activity
light on both devices.
¼ Note: A notification pop-up appears if your browser does not provide websocket support.
¼ Note: Connection via a network is possible, but to reduce potential issues, a direct connec-
tion is preferred.
Page 27

| 25
ECDIS Software setup | E5024 ECDIS Installation Manual
Web interface menus
The Web interface menu tabs can be found at the top of the web page. Select the desired
main menu and the available sub menu tabs will be shown directly below as indicated.
Web interface help les
Selecting the help tab located in the top righthand corner of the screen will show the help
files related to the current page or feature.
AIS settings
Refer to the E5024 ECDIS Operator Manual.
Radar targets settings
Refer to the E5024 ECDIS Operator Manual.
Page 28

26 |
ECDIS Software setup | E5024 ECDIS Installation Manual
Radar settings
Radar overlay conguration
With a compatible radar connected via ethernet, the radar PPI can be superimposed on the
chart screen.
• Check Enabled to turn on overlay
• The Data port setting should not need adjustment as is set by default for Simrad IMO radar
• Set the Data received timeout, to stop overlay if no fresh data is provided
• Set an approximate location on vessel for the radar scanner
¼ Note: Setting the sensor location for radar is important, as it will influence accuracy of radar
PPI placement over chart. This effect will be most noticeable when viewing chart at small
scales.
¼ Note: In order to overlay radar on chart display, a high accuracy heading source must be pres-
ent.
Page 29

| 27
ECDIS Software setup | E5024 ECDIS Installation Manual
System settings
Display
Used to change the color palette. For more information refer to the E5024 Operator Manual.
Sound
Used to turn the alarm sound On or O.
On-screen keyboard
Used to turn On / O the virtual keyboard.
Page 30

28 |
ECDIS Software setup | E5024 ECDIS Installation Manual
Units, date, and time
Set preferred units, and time and date settings.
Localization
Used for selecting the language available.
Users
The master user is the only preconfigured user, and has full access to all settings. If other users
are to be added, the first step is to assign a password for the master user. Ensure this password
is recorded and securely stored by the vessel’s master user.
Additional users can be added, and are automatically given restricted access. Restrictions
include inability to edit settings under Performance characteristics, Parameters, and
Sensors, which do not require changes in day to day operation.
SA certicates
The S-63 data protection scheme requires a Scheme Administrator certificate, or public key,
to be installed on the system. Usually it is pre-installed, but in case the System Administrator
issues a new certificate you must be able to install it on the system.
Installing SA certicates
To install an SA certificate:
1. Go to Settings, System, and then select SA certicates. A list of the currently installed SA
certificates found in the E5024 ECDIS system will open
¼ Note: When you open the SA certificates panel for the first time after the E5000 ECDIS system
launch, the SA certificates launch will start automatically. You can refresh the list using the
Refresh button found in the top left corner of the screen.
2. Install an SA certificate by selecting the Install button
. A window with certificate data
will open
3. Compare the data displayed with the SA certificate published on the web-site of the Scheme
Administrator and select OK if the data are identical or Cancel if you find any discrepancies
4. After selecting OK, the certificate is installed in the system and a message notifying you about
this appears
¼ Note: If you install a newly issued SA certificate, it overwrites the old certificate. If you install
an SA certificate from a different Scheme Administrator, it is installed alongside the previously
installed certificates.
Page 31

| 29
ECDIS Software setup | E5024 ECDIS Installation Manual
Deleting SA certicates
To delete an installed SA certificate:
1. Go to Settings, System, and then select SA certicates. A list of the currently installed SA
certificates found in the E50024 ECDIS system will open
2. Select the Delete button to delete an installed certificate and confirm the operation
Restoring deleted SA certicate
The last deleted SA certificate can be restored. To restore a deleted SA certificate:
1. Go to Settings, System, and then select SA certicates
2. Select the Restore *.CRT button and confirm the operation to have the last deleted SA
certificate restored
System information
See information about the ECDIS name, ECDIS version, SDK version and Presentation library
version.
You can change the ECDIS name by selecting the Change button. Select the new predefined ECDIS name from the dropdown list when you have more than one ECDIS in the
system. Each ECDIS in the system must have a unique name.
PLECDIS
To setup a PLECDIS system two or more E5000 devices need to be connected using a
standard RJ45 ethernet cable. After the connection is made you can share sensors, routes,
mariner objects, permits and maps from the system setup.
¼ Note: Setup of a PLECDIS system is described in the Synchronization section of this manual.
Synchronization
When operating the system with more than one ECDIS unit, it is possible to Synchronize data
between the systems. When clicking on Node Name an ECDIS name will be generated. This
name sholud be changed to match the name given to the other ECDIS that you have in your
network. It is also required that you input the correct IP address to the other ECDIS units that
you want to synchronize to.
If you check the Automatic backup the SENC geodatabases, Mariner objects, Routes,
Permits, and Conguration les are synchronized automatically.
¼ Note: Manual synchronization can be done by accessing the Menu, Too ls, and Backup ar-
rangement settings.
Page 32

30 |
ECDIS Software setup | E5024 ECDIS Installation Manual
Backup/Restore conguration
From the Backup/Restore configuration you are able to backup/restore all the configurations
done to the system. To be able to create a backup you need a USB memory stick or an SD
Card.
Copy error logs
For information refer to the E5024 Operator Manual.
Alarms settings
Grounding check settings
The Grounding check function is used to set a guard zone ahead of the own vessel to warn
you in case dangerous or caution objects are found inside the guard zone.
¼ Note: A Navigational caution will appear on the screen if dangerous or caution objects are
found within the guard zone.
Configuring the settings:
• Set a value in the Under keel clearance field, specifying the minimum acceptable margin of
depth between the keel and an underwater obstruction
• Set a value in the Height clearance field, specifying the height your vessel needs to pass
under an overhead object crossing its path
¼ Note: All depth and height values are related to the sounding and vertical datums of the
chart under the own vessel. Tides ARE NOT taken in consideration.
Page 33

| 31
ECDIS Software setup | E5024 ECDIS Installation Manual
• Select a method to calculate the length of the grounding check zone in the methods drop-
down list and enter a value to the value field. The following methods are available:
• Prediction time – the zone length is calculated based on the predicted position of
the own vessel after a specified period of time
• Safety distance – the zone length is calculated based on the specified distance
Select a shape for the grounding check zone in the Guard zone shape drop-down list. The
shapes available are: Cardioid and Sector.
• If the Sector shape is selected, specify the angle of the sector in the Zone angle field
• To display the zone on the chart, tick on the Show on chart check box. To hide the zone, tick
off the Show on chart check box
¼ Note: If the guard zone display is on, dangerous objects inside the zone are marked with red,
and caution objects are marked with yellow. If the guard zone display is off, objects are not
marked.
Lost AIS target alarm
ECDIS triggers a visible and audible warning in case an AIS target is lost. When the Lost AIS
target alarm is ticked on, the system alerts you if any AIS targets are lost within the range
specified. Any targets lost outside the specified range will not trigger an alarm.
You can select to turn off this alarm filter.
To turn On / O the lost AIS target alarm:
Open the alarms panel by accessing the Menu, then Settings, and Alarms.
• To turn the alarm off, tick off the Lost AIS target alarm check box. When the alarm is
off, an indication is displayed in the chart view
• To turn the alarm on, tick on the Lost AIS target alarm check box. The indication is
removed from the chart view
Page 34

32 |
ECDIS Software setup | E5024 ECDIS Installation Manual
Lost Radar Target Alarm
ECDIS triggers a visible and audible warning in case a dangerous radar target is lost. When the
Lost Radar target alarm is ticked on, the system alerts you if any radar targets are lost within
the range specified. Any targets lost outside the specified range will not trigger an alarm.
You can turn off this alarm filter.
To turn On / O the lost radar target alarm:
Open the alarms panel by accessing the Menu, then Settings, and Alarms.
• To turn the alarm off, tick off the Lost radar target alarm check box. When the alarm
is off, an indication is displayed in the chart view
• To turn the alarm on, tick on the Lost radar target alarm check box. The indication
is removed from the chart view
Page 35

| 33
Installation approval | E5024 ECDIS Installation Manual
Installation approval
Mechanical Installation
Description Refer Yes/No Comment
All units mounted as described
E5000
Monitor
Trackball/mouse
External alarm panel
Ethernet port used
CAN bus Powered and terminated to instructions
SI80 Connected
Power connection
Description Refer Yes/No Voltage
Power connected to E5000
Power connected to Extenal alarm panel
External equipment
External
equipment
connected
to Input/
Output
from E5000
system
Refer Yes/No Baudrate
Type of equipment/
sentence
Serial 1/1A input
Output
Serial 1/1B input
Output
Serial 2/2B input
Output
SI80 CH1 input
Output
SI80 CH2 input
Output
SI80 CH3 input
Output
SI80 CH4 input
Output
External Ethernet connections Refer Yes/No Type of equipment
Ethernet 1
Ethernet 2
Ethernet 3
6
Page 36

34 |
Spare parts and accessories | E5024 ECDIS Installation Manual
Spare parts and accessories
E5024 ECDIS system
Part Number Description
000-11247-001 Serial cable NMEA 0183 8-way 2m
000-11584-001 Serial cable NMEA 0183 8-way 10m
000-11248-001 HDMI cable 3m
000-11249-001 HDMI cable 10m
000-10425-001 SI80 NMEA Signal Interface
000-12375-001 LTSX50N8 trackball black panel mount ECDIS
000-12263-001 NavStick PRIMAR SENC
000-12376-001 NavStick UKHO SENC
000-12262-001 Logitech wireless M570 trackball
151-10380-001 M5024 Monitor (Only Monitor)
000-11781-001 M5024 Monitor
000-11780-001 E5000 ECDIS processor
151-10379-001 E5000 ECDIS processor (Only Processor)
000-00128-001 Power cable for E5000 processor
000-12264-001 E0102 Alarm Panel
NSO evo2 accessories
¼ Note: The latest information about NSO evo2 accessories can be found on the web.
NMEA 2000 compliant data cables
Part Number Description
000-0124-69 Micro-C starter kit:
120 ohm female terminator cap
120 ohm male terminator cap
Micro-C T-piece connector
Micro-C 2’ (0.61M) extension cable
Micro-C 15’ (4.55M) extension cable
Mirco-C power cable
000-10996-001 Micro-C 4-way T-piece connector
000-0127-52 Micro-C Terminator kit (male and female caps)
000-0119-79 Micro-C T-piece connector
000-0119-75 Mirco-C power cable
000-0119-88 Micro-C 2’ (0.61M) extension cable
000-0127-53 Micro-C 6’ (1.82M) extension cable
000-0119-86 Micro-C 15’ (4.55M) extension cable
000-0119-83 Micro-C 25’ (7.58M) extension cable
000-0127-45 SimNet - Micro-C adaptor kit:
Simnet cable joiner
SimNet to Micro–C male plug, 0.5m (cable for connection of a SimNet
device to a Micro-C backbone)
Micro-C T-piece connector
24005729 SimNet to Micro–C male plug, 0.5m (cable for connection of a SimNet
device to a Micro-C backbone)
24006199 SimNet to Micro-C female plug, 1m (cable for connection of a NMEA
2000 data device to SimNet backbone)
24006413 SimNet to Micro-C female, 4m (13 ft) (cable for connection of a NMEA
2000 data device to SimNet backbone)
7
Page 37

| 35
Spare parts and accessories | E5024 ECDIS Installation Manual
Ethernet cables
Part Number Description
000-0127-51 Ethernet cable yellow 5 Pin 2 m (6.5 ft)
000-0127-29 Ethernet cable yellow 5 Pin 4.5 m (15 ft)
000-0127-30 Ethernet cable yellow 5 Pin 7.7 m (25 ft)
000-0127-37 Ethernet cable yellow 5 Pin 15.2 m (50 ft)
000-11246-001 Ethernet adaptor cable, yellow 5 Pin - RJ45
Page 38

36 |
Supported data | E5024 ECDIS Installation Manual
Supported data
ECDIS NMEA 0183 & NMEA 2000 supported sentences
The following
data types are
supported on
E5000
NMEA 0183,
either as RS422
or Ethernet
N2k (RX only).
All N2k data is
translated to
NMEA 0183
before used in
ECDIS application
NMEA Sentence Receive Transmit Receive Translated from PGN
ACK –
Acknowledge
Alarm
x x
ALR – Set Alarm
State
x x
APB – Heading/
Track Controller
(Autopilot)
Sentence "B"
x
DBT – Depth
Below
Transducer
x x 128267
DPT – Depth x x 128267
DTM – Datum
Reference
x All NMEA2000 Data is
in WGS-84 Datum
GGA – Global
Positioning
System Fix Data
x x 129025,129029
GLL –
Geographic
Position
– Latitude/
Longitude
x x 129025,129029
GNS – GNSS Fix
Data
x x 129025,129029
HDT – Heading,
True
x x 127250
MWD – Wind
Direction &
Speed
x x
MWV – Wind
Speed & Angle
x x
RMC –
Recommended
Minimum
Specific GNSS
Data
x x 127258, 129025,
129026, 129033
ROT – Rate Of
Turn
x x 127251
THS – True
Heading and
Status
x x 127250
TLB – Target
Label
x
TLL – Target
Latitude and
Longitude
x
8
Page 39

| 37
Supported data | E5024 ECDIS Installation Manual
TNT - Proprietary
Track steering
sentence
x
TTD – Tracked
Target Data
x
TTM – Tracked
Target Message
x
TXT supplementary
to ALR with
more info
x
VBW – Dual
Ground/Water
Speed
x x 128259
VDM – AIS
VHF Data-link
Message
x
VDO – AIS VHF
Data-Link OwnVessel Report
x
VHW – Water
Speed and
Heading
x x 127250,128259
VTG – Course
Over Ground &
Ground Speed
x x 129026
ZDA – Time &
Date
x x 129033
Page 40

38 |
E5000 Processor specications | E5024 ECDIS Installation Manual
E5000 Processor specications
Mechanical/Environmental
Casing ABS plastic
Operating temp -15°C to +55°C
Water ingress IPx2
Weight - processor unit only 1060 grams
Dimensions (overall) 281 mm (W ) x 232 mm (H) x 65.5 mm (D)
Electrical
Operating voltage 9 - 31.2 V DC
Power consumption 45 W max, 1 W off (power connected to +ve supply)
Low power standby mode yes
Protection reverse polarity and temporary over-voltage to 36V
Alarm output current 1 A
CPUs iMX61 quad core (x2)
RAM DDR3 1GB
Storage 16 GB ECDIS / 8 GB NSO evo2
Conformity CE, C-Tick, HDMI
Interfaces
Ethernet 3 ports total - 1 & 2 are PoE (RJ45 socket)
NMEA 2000 (compliant) 1 port on rear (Micro-C male, LEN = 1)
Video input 2 ports on rear (BNC female. NTCS or PAL format)
Video output for NSO evo2
(60Hz nominal)
800x600 (SVGA 4:3)
1024x768 (XGA 4:3)
1280x720 (HD 16:9)
1366x768 (WXGA)
1920x1080 (Full HD 16:9)
1920x1200 (WUXGA 16:10)
1280x800 (16:10)
1280x1024 (SXGA 5:4)
Video output for ECDIS
(60Hz nominal)
1920x1080 (Full HD 16:9)
USB mass storage (Type A socket)
SD 32GB (Full size SD card socket)
NMEA 0183 port baud rate 4800, 9600, 19200, & 38400 (via proprietary cable)
RS422 port baud rate 1200, 2400, 4800, 9600, 19200, 38400, 57600, 115200
Charting support E5024 ECDIS system: S57 or S63 approved ENC charts
NSO evo2: Refer to NSO evo2 Operator Manual
9
Page 41

| 39
Dimensional drawings | E5024 ECDIS Installation Manual
Dimensional drawings
E5000 Dimensional drawings
232 mm (9.14”)
281 mm (11.05”)
R=2.5 mm
(0.1”)
R4.2 mm
(0.17”)
8.0 mm
(0.31”)
66 mm (2.58”)
265 mm (10.42”)
130 mm (5.13”)
¼ Note: The dimensional drawings for the monitor and alarm panel are found in a separate
document.
LTSX50N8 trackball dimensional drawings
116,00 mm
104,00 mm
118,00 mm
130,00 mm
59,70 mm
16,70 mm
2,00 mm41,00 mm
10
Page 42

Page 43

*988-10788-001*
 Loading...