

Simpson Strong-Tie QDPRO300SG2, QDPRO200G2, QDPRO250G2, QDPRO200SG2, QDPRORFG2 Operating Instructions Manual
...
PRO SYSTEMS
OPERATING INSTRUCTIONS
Attachments: QDPRO200G2, QDPRO200SG2,QDPRO250G2, QDPRO300SG2, QDPROLDHG2,
QDPRORFG2, QDPRO300SRFG2, QDPROPHG2, QDHSD60, QDHSD75, QDPROHX14G2,
QDPROHX516G2, QDPROPP150G2, QDPRO250DWG2, QDPROSD150G2, QDPROSDX150G2
SAVE THESE INSTRUCTIONS
QUICK START INSTRUCTIONS
Complete instructions inside
1. 2.
DRIVING SCREWS
Be sure screwgun is in
FORWARD.
Start screwgun before
applying driving pressure.
Continue to apply pressure,
keeping bit engaged until
screw is fully driven and
clutch releases.
Keep screwgun running
between screws.
3.
4.
Set driving depth
Correct grip
Pointed end first
Deeper
90°
Use with or without the
“stand-up” extension
www.strongtie.com
© 2016 Simpson Strong-Tie Company Inc. T-QDPROINSNA16

PARTS - SCHEMATIC - COMPONENTS
Attachment
G2 Locking Lever
Bit Release Key
Extension Mandrel
Depth Adjustment Wheel
Extension
inside extension
Handle
Nose Piece
Feed Pawl Lever
(Must be engaged in Feed
Pawl Assembly Slot)
Screwdriver Motor
Guide Tube
Mandrel inside attachment
Part #:
PMANDREL65 (QDPRO200, QDPROLDHG2,
QDPROPHG2)
PMANDREL75
QDPRO300SG2, QDPRORFG2
QDHSD75, QDPRO250DWG2
PMANDREL10 (PROPP150G2)
BPHXLB14G2
BPHXLB516G2
BPHXLBSDG2 (QDPROSD150G2)
Feed Pawl
Assembly
Using the correct driving bit is necessary.
The bit(s) included in each box of Quik Drive® screws should drive the entire box.
Variations in materials and driving technique can cause excessive wear. Additional bit packs are available for purchase.
Reference the description on the bit sticker in your box of screws or the screw box label to ensure correct selection.
Quik Drive
Drive Type / Size Bit
#2 square drive BIT2S for most screws with #2 recess and interior grade coating
#2U (Undersized) BIT2SU for most screws with #2 recess; exterior grade coating and stainless steel
#3 square drive BIT3S for most screws with #3 recess and interior grade coating
#3U (Undersized) BIT3SU for most screws with #3 recess; exterior grade coating and stainless steel
#2 phillips BIT2P for all Quik Drive screws with phillips recess
1/4" drive BITHEXLB14G2 for all Quik Drive screws with 1/4" hex head
5/16" drive BITHEXLB516G2 for all Quik Drive screws with 5/16" hex head
®
Systems utilize five recess drive types and sizes.
Bit
Bit Release Slot
(QDPRO200SG2, QDPRO250G2,
, QDHSD60,
)
(QDPROHX14)
(QDPROHX516)
Non-Skid Teeth
part # 150187
(QDPRO200SG2,
QDPRO250G2,
QDPRO300SG2)
TROUBLESHOOTING GUIDE
Quik Drive tools are easy to use. As with any power tool, there are a few basic things to remember.
PROBLEM SOLUTION
Screws won’t drive.
They spin for a second, then fall over
on their side. Little or no penetration.
Screws won’t drive completely.
They go down about halfway,
then the bit spins out.
Screws won’t drive completely.
They are almost completely driven but
won’t countersink completely.
Screws don’t advance properly
causing tool to jam.
Make sure the screwgun is not in reverse.
Check to be sure you are using the correct bit for the type of screws you are driving.
Check for bit wear. It may be time to install a new bit.
Push harder when driving.
Check the depth adjustment on the attachment. Reset if necessary.
You may have missed the substrate.
Example: In flooring, this will occur if you miss the joist.
Use only Quik Drive brand collated screws.
Be sure the screw strip is inserted correctly - pointed end first.
Lift the tool completely off the work surface after driving each screw.
Don’t drag screw strips on the work surface as you move to the next position.
Be sure the feed pawl assembly is intact and feed lever is engaged.
For further assistance, call 800-999-5099

OPERATING INSTRUCTIONS
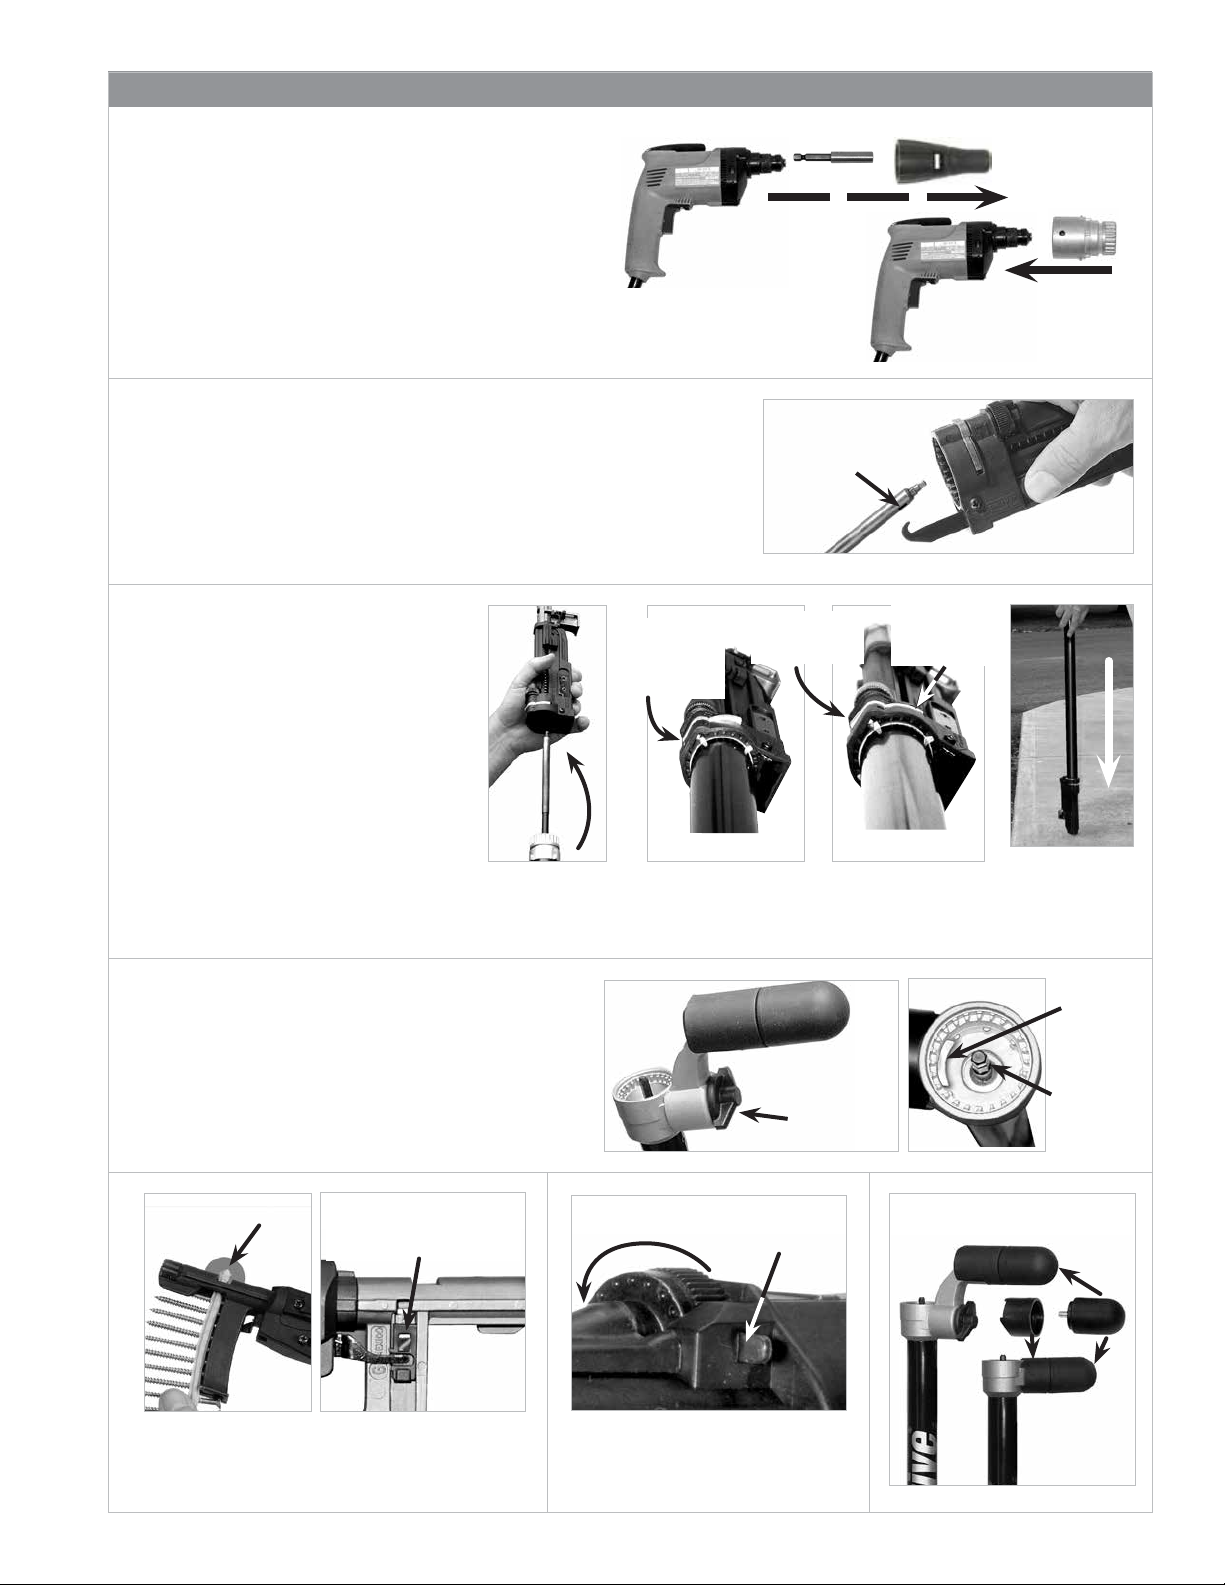
ATTACH ADAPTOR TO YOUR SCREWGUN
(If you purchased a complete system with screwgun;
skip this step)
• Remove nose-cone and bit holder from your screwgun
according to manufacturer’s directions (most will pull straight off).
• Replace with Quik Drive adaptor made for the screwgun.
Follow specific instructions included with Quik Drive
®
adaptor.
INSTALL CORRECT BIT
• Be sure you have the correct bit for the screws you are driving.
It’s a good practice to install one of the free bits included with
our screws when you open a new box.
• Remove the attachment and pull the mandrel from the unit.
Extend the bit release key and pry out the old bit.
Put a new bit in place and push against a solid surface until it snaps in place.
CONNECT ATTACHMENT
TO SCREWGUN OR EXTENSION
• Insert mandrel in extension or screwgun,
slide attachment on and push tight - until
the locking lever snaps in place.
• You can rotate the attachment any way
that is desired.
• New tools may be tight and hard to lock
in place. If so, just put the nose against a
solid surface and push down sharply
(see photo at far right).
Seat mandrel first,
then add
attachment
Locking Lever
flush with top
of tool
NOT locked on
Check locking lever position to be sure
attachment is locked on
To remove, unlock and pull
Insert end of bit
release key into
slot and pry out
the old bit
Depress at top
to release
Locking Lever
flush with
side of tool
Locked on
If new tool is
hard to lock on,
place nose on
solid surface
and push down
ATTACH EXTENSION TO SCREWGUN
• Turn the thumbscrew in the “off” direction (clockwise)
to move the internal clamp out of the way.
• Insert the screwgun, with G2 Adaptor attached, into the end
of the extension. Push tight and tighten thumbscrew.
• If it won’t fully insert, start the screwgun slightly until
the drives mesh.
Pointed end first
LOAD SCREWS
Insert a screw strip pointed end first, until they click in
place. Push release lever to unload.
Screw release lever
(silver) - push down
to unload
Turn thumbscrew
clockwise to
open clamp
DEEPER
DEPTH
RELEASE
SET DEPTH
Press DEPTH RELEASE to adjust.
Test in scrap material to achieve
optimal setting.
Internal
clamp
Hex end of
extension
drive shaft
ADJUST HANDLE HEIGHT

READ AND FOLLOW ALL INSTRUCTIONS
WHEN SERVICING USE ONLY IDENTICAL QUIK DRIVE
ATTENTION - Please see screwgun manufacturer’s instructions for safe use of electric power tools.
®
REPLACEMENT PARTS.
CHANGING NON-SKID TEETH On models with removable non-skid teeth, the nibs can
be reversed to protect some surfaces. (1) Insert a screw in the hole at top of nosepiece
and pry the nibs off. Replace by sliding onto front of nosepiece (2) and pressing against
a hard surface (3a - 3b).
CHANGING THE HEX MANDREL On QDPROHX14,
QDPROHX516, and QDPROHX516XL models, the
mandrel must be removed from the front nose.
(1) Remove retaining clip and washer (2) Slide
mandrel through front.
1 2 3a 3b
1 2
Quik Drive® PRO Attachments and Systems
are covered by one or more of the following patents.
6425306, 6439085, 6601480, 6941847
LIMITED LIFETIME WARRANTY
This Limited Lifetime Warranty applies to all Simpson Strong-Tie Quik Drive products and must be read in conjunction with the General Notes, Terms
and Conditions of Sale, and Corrosion Resistance information contained in the current Quik Drive Auto-Feed Screw Driving System catalog and at
www.strongtie.com/info, along with any information provided with a Simpson Strong-Tie product. Screwdriver motors and batteries that may be
supplied with the Products are manufactured by others and are warrantied by their respective manufacturers. Simpson Strong-Tie Company Inc.,
hereinafter (“Simpson Strong-Tie”), warrants the Products to the original purchaser to be free from substantial defects in material, manufacturing,
and design for the lifetime of the product, if properly stored, maintained and used. This Warranty does not cover normal wear and tear or any
Product that was: (1) purchased other than from an authorized Simpson Strong-Tie dealer, retailer or distributor; (2) modified or altered; (3) used
with any fasteners other than authentic Quik Drive
accordance with the printed materials provided with the Product as determined by Simpson Strong-Tie. Purchaser’s sole remedies are replacement
or repair upon return to Simpson Strong-Tie with proof of purchase (shipping prepaid by purchaser). To obtain warranty service go to www.strongtie.
com or contact Simpson promptly at (800) 999-5099. The repaired or replaced Product is warranted under the terms of this Warranty.
WHERE LAWFUL, SIMPSON STRONG-TIE DISCLAIMS ALL OTHER WARRANTIES, INCLUDING BUT NOT LIMITED TO IMPLIED WARRANTIES OF
MERCHANTABILITY AND FITNESS FOR A PARTICULAR PURPOSE. IN NO EVENT WILL SIMPSON BE LIABLE FOR INCIDENTAL, CONSEQUENTIAL,
PUNITIVE OR SPECIAL DAMAGES OR DIRECT OR INDIRECT LOSS OF ANY KIND, INCLUDING BUT NOT LIMITED TO PROPERTY DAMAGE AND
PERSONAL INJURY. ENTIRE LIABILITY OF SIMPSON STRONG-TIE IS LIMITED TO THE PURCHASE PRICE OF THIS PRODUCT. SOME STATES DO
NOT ALLOW LIMITATIONS ON IMPLIED WARRANTIES, OR THE EXCLUSION OR LIMITATION OF INCIDENTAL OR CONSEQUENTIAL DAMAGES, SO
THE ABOVE LIMITATIONS AND EXCLUSIONS MAY NOT APPLY TO YOU. THIS LIMITED WARRANTY GIVES YOU SPECIFIC LEGAL RIGHTS, AND
YOU MAY ALSO HAVE OTHER RIGHTS THAT VARY FROM STATE TO STATE.
®
fasteners; (4) improperly serviced; or (5) subject to negligence, excessive uses, or any use not in
800-999-5099 www.strongtie.com

PRO SYSTEMS
INSTRUCCIONES DE OPERACIÓN
Accesorios: QDPRO200G2, QDPRO200SG2,QDPRO250G2, QDPRO300SG2, QDPROLDHG2,
QDPRORFG2, QDPRO300SRFG2, QDPROPHG2, QDHSD60, QDHSD75, QDPROHX14G2,
QDPROHX516G2, QDPROPP150G2, QDPRO250DWG2, QDPROSD150G2, QDPROSDX150G2
CONSERVE ESTAS INSTRUCCIONES
INSTRUCCIONES RÁPIDAS PARA COMENZAR
Instrucciones completas en el interior
1. 2.
ATORNILLADO
Cerciórese que el control
de giro esté en AVANCE /
FORWARD.
Ponga la pistola atornilladora
en operación antes de aplicar
presión para atornillar.
Continúe aplicando presión
manteniendo la punta
enganchada en el tornillo hasta
que entre completamente y el
embrague se suelte.
Mantenga la pistola
funcionando entre tornillos.
3.
4.
Más (+)
primero
Gradúe la profundidad
Agarre correcto
Extremo con
punta primero
90°
Se usa con o sin
extensión
www.strongtie.com
© 2016 Simpson Strong-Tie Company Inc. T-QDPROINSNA16

ESQUEMA DE PIEZAS Y COMPONENTES
Accesorio
Leva de seguro G2
Palanca liberadora de
las puntas
Extensión
Extensión del mandril dentro de la extensión
Rueda de ajuste de profundidad
Leva del trinquete alimentador
(Debe enganchar en la ranura
del trinquete alimentador))
Handle
Nose Piece
Pistola atornilladora
Guide Tube
Ranura de liberación
de la puntas
Mandril dentro del adaptador
Pieza #:
PMANDREL65 (QDPRO200, QDPROLDHG2,
QDPROPHG2)
PMANDREL75
QDPRO300SG2, QDPRORFG2
QDHSD75, QDPRO250DWG2
PMANDREL10 (PROPP150G2)
BPHXLB14G2
BPHXLB516G2
BPHXLBSDG2 (QDPROSD150G2)
Trinquete
alimentador
(QDPRO200SG2, QDPRO250G2,
(QDPROHX14)
(QDPROHX516)
, QDHSD60,
)
Dientes
antideslizantes
pieza Nº 150187
(QDPRO200SG2,
QDPRO250G2,
QDPRO300SG2)
Use la punta correcta.
Las puntas que se incluyen en cada caja de tornillos deben alcanzar para todos los tornillos de la caja.
Las variaciones de los materiales y técnicas para atornillar pueden causar desgaste excesivo de las puntas. Puede comprar paquetes de puntas adicionales.
Refiérase a la descripción de la punta en la etiqueta de la caja de tornillos para seleccionar la punta correcta.
Los Sistemas Quik Drive emplean cinco tipos y tamaños diferentes de puntas.
Tipo / Tamaño Punta
Cuadrada #2 BIT2S para la mayoría de tornillos con ranura #2 con recubrimiento interior
#2U
(Subdimensionada) BIT2SU para la mayoría de los tornillos con muesca #2; recubrimiento para exterior y acero inoxidable
Cuadrada #3 BIT3S para la mayoría de tornillos con ranura #3 con recubrimiento interior
#3U
(Subdimensionada) BIT3SU para la mayoría de los tornillos con muesca #3; recubrimiento para exterior y acero inoxidable
#2 Phillips BIT2P para todos los tornillos Quik Drive con ranura Phillips
Cabezal de 1/4" BITHEXLB14G2 para todos los tornillos Quik Drive con cabeza hexagonal de 1/4"
Cabezal de 5/16" BITHEXLB516G2 para todos los tornillos Quik Drive con cabeza hexagonal de 5/16"
Punta de
atornillar
GUÍA DE DIAGNÓSTICO DE PROBLEMAS
Las herramientas Quik Drive son fáciles de usar. Como con cualquier otra herramienta motorizada, se deben recordar algunas cosas.
PROBLEMA SOLUCIÓN
Los tornillos no penetran. Giran por un instante y
caen de lado. Poca o ninguna penetración.
Los tornillos no penetran completamente, sólo
como hasta la mitad y la punta se sale.
Los tornillos penetran casi completamente, pero
no lo suficiente para avellanar.
Los tornillos no avanzan adecuadamente y
obstruyen la herramienta.
Asegúrese que el control de giro no esté en reversa.
Asegúrese de estar usando la punta correcta para el tipo de tornillo.
Revise el desgaste de la punta. Podría ser momento de cambiarla.
Presione más fuerte al atornillar.
Revisar la graduación de la profundidad y ajústela si fuese necesario.
Podría no estar penetrando en el substrato.
Ejemplo, al atornillar un piso, podría no estar atornillando en la viga.
Sólo use tornillos en sarta de la marca Quik Drive
Cerciórese de haber insertado la sarta correctamente, con la punta por delante.
Levante la herramienta completamente de la superficie de trabajo después de cada atornillada.
No arrastre la sarta de tornillos sobre la superficie de trabajo a medida que avanza a la siguiente posición.
Cerciórese que el trinquete alimentador esté intacto y que la leva de alimentación esté enganchada.
Si necesita ayuda, llame al 800-999-5099
INSTRUCCIONES DE OPERACIÓN
INSTALACIÓN DEL ADAPTADOR A SU PISTOLA ATORNILLADORA
(Si compró un sistema completo con pistola atornilladora,saltéese este paso)
• Desmonte el cono y el portapunta de su pistola atornilladora
siguiendo las instrucciones de su fabricante (en la mayoría sale
jalando derecho hacia fuera).
• Reemplácelo con el adaptador QuikDrive fabricado para su pistola
atornilladora. Siga las instrucciones específicas que se incluyen
con al adaptador Quik Drive.
INSTALE LA PUNTA CORRECTA
• Asegúrese de tener la punta correcta para los tornillos a usarse. Es una buena
práctica instalar una de las puntas que se incluyen gratis al abrir una caja nueva
de tornillos.
• Desmonte el adaptador y jale el mandril para sacarlo de la unidad. Extienda la
chaveta que libera la punta vieja y sáquela palanqueándola. Instale la punta nueva
y presiónela contra una superficie sólida hasta que enganche en posición.
INSTALACIÓN DEL ADAPTADOR EN LA PISTOLA
ATORNILLADORA O EN LA EXTENSIÓN
• Inserte el mandril en la extensión o en la
pistola atornilladora y empújela firmemente
Seguro al ras
con la parte
superior de la
herramienta
hasta que el seguro enganche en posición.
• Se puede rotar el adaptador en cualquier
dirección que se desee.
• Las herramientas nuevas podrían estar
más ajustadas y ser más difícil que el
seguro enganche. En ese caso,
simplemente apoye el cono contra una
superficie maciza y empuje con firmeza
(vea la foto del extremo derecho).
Primero asiente el
mandril y luego el
adaptador
SIN seguro
Asegúrese que el seguro esté enganchado.
Para sacar, suelte el seguro y jale
Inserte el extremo
de la chaveta que
libera la punta en
la ranura y
palanquee para
sacar la punta
vieja
Oprima
encima para
soltar
Seguro al ras
con el costado
de la
herramienta
Asegurada
Si a la herramienta
nueva fuese difícil
ponerle el seguro,
coloque el cañón en
una superficie sólida
y empuje hacia abajo
FIJE LA EXTENSIÓN AL ATORNILLADOR
• Gire el tornillo de ajuste manual en la dirección “aflojar” (en
sentido horario) para liberar el enganche interior.
• Con el adaptador G2 ya montado en el otro extremo de la
extensión, inserte el atornillador. Presione firmemente y ajuste
el tormillo de ajuste manual en sentido antihorario.
• Si no puede insertarlo por completo, arranque brevemente el
atornillador hasta que las transmisiones engranen
Extremo con punta
primero
Leva (plateada) para liberación del tornillo. Baje
para descargar los tornillos
.
CARGA Y DESCARGA DE TORNILLOS
Inserte una sarta nueva de tornillos con la punta por delante
hasta que enganche en posición. Para descargar la sarta,
baje la leva.
Gire el tornillo de
ajuste manual en
sentido horario
para liberar
el enganche
MÁS
PROFUNDIDAD
SEGURO DE
PROFUNDIDAD
GRADUACIÓN DE LA PROFUNDIDAD
Oprima el seguro para regular la profundidad.
Haga una prueba en un retazo de material
hasta lograr la profundidad ideal.
Enganche
interior
Extremo
hex. del eje
impulsor
AJUSTE LA ALTURA DE LA
EMPUÑADURA

LEA Y SIGA TODAS LAS INSTRUCCIONES.
AL DARLE SERVICIO A ESTA HERRAMIENTA USE SÓLO REPUESTOS IDÉNTICOS A LOS Quik Drive
ATENCIÓN: Para el uso seguro de las pistolas atornilladoras eléctricas, refiérase a las instrucciones de su fabricante
®
.
CAMBIO DE LOS DIENTES ANTIDESLIZANTES En los modelos con dientes antideslizantes,
se pueden volcar las puntas de dichos dientes hacia adentro, para proteger la superficie
a atornillar. (1) Inserte un tornillo en el orificio del extremo de la pieza de la nariz y haga
palanca para retirar los dientes. Vuelva a reinstalarlos presentándolos con las puntas hacia
adentro en la pieza de la nariz (2) y presionando contra una superficie dura (3a - 3b).
CAMBIO DEL MANDRIL HEXAGONAL En LOS
MODELOS QDPROHX14, QDPROHX516 Y
QDPROHX516XL, deberá quitar el mandril de la
nariz frontal. (1) Quite el gancho y la arandela (2)
Deslice el mandril por el frente.
1 2 3a 3b
1 2
Los Accesorios y Sistemas Quik Drive PRO
Están cubiertos por una o más de las siguientes patentes.
6425306, 6439085, 6601480, 6941847
GARANTÍA LIMITADA DE POR VIDA
Esta garantía limitada de por vida cubre todos los productos Simpson Strong-Tie Quik Drive y debe considerarse conjuntamente con las Notas
Generales, Términos y Condiciones de Venta y la información acerca de Resistencia a la Corrosión incluida en el catálogo actual de Sistema de
Alimentación Automática de Tornillos y en www.strongtie.com/info, junto con toda la información suministrada con todos los productos Simpson
Strong-Tie. Los motores y las baterías de los destornilladores que pueden venir con los productos están fabricados por otros y están garantizados por
sus respectivos fabricantes. Por la presente, Simpson Strong-Tie Company Inc., de aquí en adelante (“Simpson Strong-Tie”) garantiza al comprador
original de los productos contra defectos substanciales de materiales, fabricación y diseño durante toda la vida útil del producto, siempre que sea
almacenado, mantenido y usado correctamente. Esta garantía no cubre el desgaste normal debido al uso de cualquier producto que haya sido: (1)
comprado en otro lugar que no sea un distribuidor autorizado, tienda o representante de Simpson Strong-Tie; (2) modificado o alterado; (3) usado
con tornillos que no sean Quik Drive
a los indicados en el material impreso que acompaña a los productos tal como lo determina Simpson Strong-Tie. Las únicas compensaciones
para el comprador son el reemplazo o reparación de la unidad, luego de retornarla a Simpson Strong-Tie junto con un comprobante de compra
(envío prepago por el comprador). Para obtener servicio de garantía visite www.strongtie.com o llame a Simpson al (800) 999-5099. El producto
reemplazado o reparado está cubierto por los términos de esta garantía.
DONDE SEA ILEGAL, SIMPSON STRONG-TIE RENUNCIA A TODAS LAS DEMÁS GARANTÍAS, INCLUYENDO, SIN LIMITACIÓN, LAS GARANTÍAS
IMPLÍCITAS O APTITUD PARA UN PROPÓSITO EN PARTICULAR Y COMERCIABILIDAD. EN NINGÚN CASO SIMPSON SE HARÁ RESPONSABLE
POR DAÑOS INCIDENTALES, RESULTANTES, PUNITIVOS O ESPECIALES O PÉRDIDAS DIRECTAS O INDIRECTAS DE NINGÚN TIPO, INCLUYENDO,
SIN LIMITACIÓN, DAÑOS MATERIALES Y HERIDAS PERSONALES. TODA LA RESPONSABILIDAD SIMPSON STRONG-TIE DE QUEDA LIMITADA
AL PRECIO DE COMPRA DE ESTE PRODUCTO. ALGUNOS ESTADOS NO PERMITEN LIMITACIONES EN GARANTÍAS IMPLÍCITAS, O LA EXCLUSIÓN
O LIMITACIÓN DE DAÑOS INCIDENTALES O RESULTANTES, POR LO TANTO LAS LIMITACIONES Y EXCLUSIONES ANTERIORES PUEDEN NO
APLICARSE EN SU CASO. ESTA GARANTÍA LIMITADA LE PROPORCIONA DERECHOS LEGALES ESPECIALES Y USTED TAMBIÉN PUEDE TENER
OTROS DERECHOS, LOS QUE VARÍAN DE ESTADO A ESTADO.
®
originales; (4) reparado incorrectamente; o (5) sujeto a negligencia, uso excesivo, o cualquier uso contrario
800-999-5099 www.strongtie.com

PRO SYSTEMS
INSTRUCTIONS D'UTILISATION
Attachements: QDPRO200G2, QDPRO200SG2,QDPRO250G2, QDPRO300SG2, QDPROLDHG2,
QDPRORFG2, QDPRO300SRFG2, QDPROPHG2, QDHSD60, QDHSD75, QDPROHX14G2,
QDPROHX516G2, QDPROPP150G2, QDPRO250DWG2, QDPROSD150G2, QDPROSDX150G2
CONSERVEZ CES INSTRUCTIONS.
INSTRUCTIONS POUR UN DÉMARRAGE RAPIDE
Instructions complètes à l'intérieur
1. 2.
UTILISATION DE LA
VISSEUSE
Assurez-vous que la visseuse
pistolet est sur FORWARD
(MARCHE AVANT).
Démarrez la visseuse pistolet
avant d’appliquer de la
pression.
Continuez d'appliquer de la
pression,
mèche engagée jusqu'à ce
que la vis soit entièrement
insérée et que l’embrayage se
soit relâché.
Continuez de faire fonctionner
la visseuse pistolet entre les vis.
pour maintenir la
3.
4.
Extrémité pointue
d'abord
Plus
profond
Réglez la profondeur.
Prise en main correcte
90°
Utilisez avec ou sans
l’extension «stand-up»
(debout)
www.strongtie.com
© 2016 Simpson Strong-Tie Company Inc. T-QDPROINSNA16

SCHÉMA DES PIÈCES ET COMPOSANTS
Attachement
Mandrin d'extension
Levier de
verrouillage G2
Coulisse de déblocage de
la mèche
Molette d'ajustement de la
Extension
à l'intérieur de l'extension
Poignée
profondeur
Nez
Levier du cliquet
d'alimentation
(doit être engagé dans la fente
du cliquet d'alimentation)
Moteur de la visseuse
Tube-guide
Fente de déblocage de la mèche
Mandrin dans l'attachement
Référence:
PMANDREL65 (QDPRO200, QDPROLDHG2,
QDPROPHG2)
PMANDREL75
QDPRO300SG2, QDPRORFG2
QDHSD75, QDPRO250DWG2
PMANDREL10 (PROPP150G2)
BPHXLB14G2
BPHXLB516G2
BPHXLBSDG2 (QDPROSD150G2)
Cliquet
d'alimentation
Mèche
(QDPRO200SG2, QDPRO250G2,
, QDHSD60,
)
(QDPROHX14)
(QDPROHX516)
Dents
antidérapantes
référence 150187
(QDPRO200SG2,
QDPRO250G2,
QDPRO300SG2)
Il est nécessaire d’utiliser la mèche adéquate.
La ou les mèches incluses dans chaque boîte de vis Quik Drive® doivent suffire à visser la totalité des vis de la boîte.
Les variations des matériaux et de la technique de vissage peuvent entraîner une usure excessive. Des paquets de mèches supplémentaires sont disponibles.
Reportez-vous à la description de la mèche sur l'étiquette de la boîte de vis pour sélectionner la bonne mèche.
Les systèmes Quik Drive
Type/Taille d'entraînement Mèche
Entraînement carré n°2 BIT2S pour la plupart des vis à encoche n°2 et revêtement intérieur
n°2U (sous-dimensionnée) BIT2SU pour la plupart des vis à encoche n°2; revêtement extérieur et acier inoxydable
Entraînement carré n°3 BIT3S pour la plupart des vis à encoche n°3 et revêtement intérieur
#3U (sous-dimensionnée) BIT3SU pour la plupart des vis à encoche n°3; revêtement extérieur et acier inoxydable
n°2 cruciforme BIT2P pour toutes les vis Quik Drive à encoche cruciforme
Entraînement 1/4po
Entraînement 5/16po
®
utilisent cinq types et tailles d'entraînements.
BITHEXLB14G2
BITHEXLB516G2
pour toutes les vis Quik Drive à tête hexagonale de 1/4po
pour toutes les vis Quik Drive à tête hexagonale de 5/16po
GUIDE DE DÉPANNAGE
Les outils Quik Drive sont faciles d'utilisation. Comme tout outil électrique, quelques notions de base sont à retenir.
PROBLÈME SOLUTION
Les vis ne se vissent pas.
Elles tournent pendant une seconde puis se
retrouvent couchées
sur le côté. Il n’y a que peu
ou pas de pénétration.
Les vis ne se vissent pas entièrement.
Elles pénètrent environ jusqu'à mi-chemin,
puis la mèche tourne dans le vide.
Les vis ne se vissent pas entièrement.
Elles se vissent presque entièrement,
mais ne pénètrent pas complètement.
Les vis n'avancent pas correctement,
ce qui cause un blocage de l’outil.
Assurez-vous que la visseuse pistolet n'est pas en position Reverse (marche arrière).
Assurez-vous d’utiliser la mèche qui correspond au type de vis que vous utilisez.
Vérifiez l'usure de la mèche. Il est peut-être temps d'installer une nouvelle mèche.
Appliquez davantage de pression lorsque vous vissez.
Vérifiez l'ajustement de la profondeur sur l'attachement. Réajustez au besoin.
Il se peut que vous ayez manqué le support.
Par exemple, en cas de vissage dans le plancher, cela se produit si vous
manquez la solive.
Utilisez uniquement les vis assemblées de marque Quick Drive.
Assurez-vous d'avoir inséré correctement la bande de vis, avec l'extrémité
pointue d'abord.
Levez complètement l'outil de la surface de travail après l'installation de chacune des vis.
Ne traînez pas les bandes de vis sur la surface de travail lorsque vous passez à l'emplacement suivant.
Assurez-vous que le cliquet d'alimentation est intact et que le levier d'alimentation est engagé.
Pour obtenir plus d'aide, appelez le 800-999-5099.

INSTRUCTIONS D’UTILISATION
FIXEZ L'ADAPTATEUR À VOTRE VISSEUSSE PISTOLET.
(Si vous avez acheté un système complet avec visseuse pistolet,
ignorez cette étape)
• Retirez le nez du rotor et le porte-mèche de votre visseuse pistolet
selon les instructions du fabricant (la plupart se retireront directement).
• Remplacez-les par l'adaptateur Quick Drive conçu spécialement pour
la visseuse pistolet. Suivez les instructions spécifiques comprises avec
l'adaptateur Quick Drive
®
.
INSTALLEZ LA BONNE MÈCHE
• Assurez-vous de choisir la mèche correcte correspondant aux vis que vous utilisez.
Lorsque vous ouvrez une nouvelle boîte, c'est une bonne habitude d'installer l'une des mèches
gratuites incluses avec nos vis.
• Retirez l'attachement et tirez sur le mandrin pour le sortir de l'unité.
Sortez la coulisse de déblocage de la mèche et retirez la vieille mèche en faisant levier.
Installez une nouvelle mèche et poussez-la contre une surface solide jusqu'à ce qu'elle
s'enclenche.
CONNECTEZ L'ATTACHEMENT
À LA VISSEUSE PISTOLET OU À L'EXTENSION
• Insérez le mandrin dans l'extension ou la
visseuse pistolet, faites-y glisser l'attachement
et poussez jusqu'à ce que le levier de
verrouillage s'enclenche.
• Vous pouvez faire pivoter l'attachement dans le
sens de votre choix.
• Les nouveaux outils peuvent être serrés et
difficiles à verrouiller. Dans ce cas, il suffit de
placer le nez contre une surface solide et de
pousser fermement vers le bas (voir photo à
l'extrême droite).
Installez d'abord le
mandrin, puis
l'attachement.
Levier de
blocage
aligné sur le
côté de l'outil
NON verrouillé
Vérifiez la position du levier de verrouillage pour
vous assurer que l'attachement est bien verrouillé
Pour le retirer, déverrouillez et tirez.
Insérez l'extrémité de la
coulisse de déblocage
de la mèche dans la
fente et faites-levier
pour sortir
la vieille
mèche.
Enfoncez sur
le dessus
pour relâcher
Levier de
verrouillage
aligné sur le
côté de l'outil
Verrouillé
Si le nouvel outil
est difficile à
verrouiller, placez
le nez sur une
surface solide et
poussez vers le bas
ATTACHEMENT DE L'EXTENSION À LA VISSEUSE PISTOLET
• Tournez la vis de serrage dans la direction «off» (sens des aiguilles
d'une montre) pour placer le caleur interne en position excentrique.
• Insérez la visseuse pistolet avec l'adaptateur G2 fixé dans l'extrémité
de l'extension. Poussez et serrez la vis de serrage.
• Si vous ne parvenez pas à l'insérer complètement, démarrez
brièvement la visseuse pistolet jusqu'à ce que les transmissions
s'engrènent.
Extrémité pointue
d'abord
CHARGEMENT DES VIS
Insérez une bande de vis, l'extrémité pointue d'abord,
jusqu'à ce qu'elle s'enclenche. Poussez sur le levier de
déblocage pour décharger.
Levier de déblocage de vis
(argenté). Poussez vers le
bas pour décharger.
PLUS PROFOND
RÉGLAGE DE LA PROFONDEUR
Appuyez sur la SÉCURITÉ DE PROFONDEUR
pour procéder au réglage.
Faites un essai à l'aide de matières mises
au rebut pour arriver à un réglage optimal.
Tournez la vis de
serrage dans le sens
des aiguilles d'une
montre pour
ouvrir le caleur.
SÉCURITÉ DE
PROFONDEUR
Caleur
interne
Extrémité
hexagonale de
l'arbre
d'entraînement
de l'extension
AJUSTEMENT DE LA
HAUTEUR DE LA POIGNÉE

LISEZ ET RESPECTEZ TOUTES LES INSTRUCTIONS.
LORS DE LA MISE EN SERVICE, N'UTILISEZ QUE DES PIÈCES DE RECHANGE QUIK DRIVE
ATTENTION: Pour utiliser en toute sécurité votre visseuse pistolet électrique, veuillez consulter les instructions du fabricant.
®
IDENTIQUES.
REMPLACEMENT DES DENTS ANTIDÉRAPANTES Sur les modèles dotés de dents
antidérapantes amovibles, il est possible de retourner les pointes pour protéger
certaines surfaces. (1) Insérez une vis dans le trou en haut du nez et faites levier pour
retirer les dents. Remettez-les en place en positionnant les pointes vers l'extrémité du
nez (2) et en appuyant sur une surface rigide (3a et 3b).
REMPLACEMENT DU MANDRIN HEXAGONAL
Sur les modèles QDPROHX14, QDPROHX516 et
QDPROHX516XL, le mandrin doit être enlevé à partir
du nez avant.
(1) Retirez la clé de serrage et la rondelle
(2) Faites glisser le mandrin par l'avant.
1 2 3a 3b
1 2
Les attachements et systèmes Quik Drive® PRO
sont couverts par un ou plusieurs des brevets suivants:
6425306, 6439085, 6601480, 6941847
GARANTIE À VIE LIMITÉE
La garantie à vie limitée s'applique à tous les produits Simpson Strong-Tie Quik Drive et doit être lue conjointement avec les notes générales, les
conditions générales de vente et les informations de résistance à la corrosion contenues dans le catalogue actuel de systèmes de vissage autoalimentés Quik Drive et sur www.strongtie.com/info, ainsi que toute information fournie avec le produit Simpson Strong-Tie. Les moteurs et les
batteries des visseuses pouvant être fournis avec les produits sont fabriqués par des entreprises tierces et sont garantis par leurs fabricants respectifs.
Simpson Strong-Tie Company Inc., dénommée ci-après «Simpson Strong-Tie», garantit que les produits de l'acquéreur initial sont dépourvus de
défauts substantiels de matériaux, de fabrication et de conception pendant la durée de vie du produit, si ceux-ci sont correctement entreposés,
entretenus et utilisés. Cette garantie ne couvre pas l'usure normale ni tout produit ayant été: (1) acheté chez un revendeur, détaillant ou distributeur
non agréé par Simpson Strong-Tie, (2) modifié ou altéré, (3) utilisé avec toute fixation autre que les fixations Quik Drive
manière non conforme ou (5) sujet à la négligence, à une utilisation excessive ou à toute utilisation non conforme avec la documentation imprimée
fournie avec le produit, tel que défini par Simpson Strong-Tie. Les seuls recours de l'acquéreur sont le remplacement ou la réparation en retournant
le produit à Simpson Strong-Tie avec une preuve d'achat (expédition prépayée par l'acquéreur). Pour obtenir un service de garantie, rendez-vous
à www.strongtie.com ou contactez immédiatement Simpson au (800) 999-5099. Le produit réparé ou remplacé est garanti conformément aux
conditions de la présente garantie.
POUR AUTANT QUE CELA SOIT LICITE, SIMPSON STRONG-TIE RENONCE À TOUTES LES AUTRES GARANTIES, Y COMPRIS, SANS S'Y LIMITER,
LES GARANTIES IMPLICITES DE QUALITÉ MARCHANDE ET D'ADÉQUATION À UN USAGE PARTICULIER. SIMPSON NE SERA EN AUCUN CAS
TENU RESPONSABLE DES DOMMAGES ACCIDENTELS, CONSÉCUTIFS, PUNITIFS OU SPÉCIAUX, OU DE TOUT DOMMAGE DIRECT OU INDIRECT,
Y COMPRIS, SANS S'Y LIMITER, LES DOMMAGES MATÉRIELS ET LES BLESSURES PERSONNELLES. L'INTÉGRALITÉ DE LA RESPONSABILITÉ
DE SIMPSON STRONG-TIE EST LIMITÉE AU PRIX D'ACHAT DE CE PRODUIT. CERTAINS ÉTATS N'AUTORISENT PAS LES LIMITATIONS SUR LES
GARANTIES IMPLICITES, OU L'EXCLUSION OU LA LIMITATION DES DOMMAGES ACCIDENTELS OU CONSÉCUTIFS, PAR CONSÉQUENT IL EST
POSSIBLE QUE LES LIMITATIONS CI-AVANT NE S'APPLIQUENT PAS À VOUS. CETTE GARANTIE LIMITÉE VOUS DONNE DES DROITS SPÉCIAUX
ET VOUS POUVEZ DISPOSER D'AUTRES DROITS, LESQUELS VARIENT D'UN ÉTAT À UN AUTRE.
®
authentiques, (4) utilisé de
800-999-5099 www.strongtie.com
 Loading...