

Page 1
SWT7055LMWA
SWT7055TMWA
SWT6555TMWA
SWT6055TMWA
...................................................... .................................................
TOP-LOAD WASHING MACHINE USER MANUAL
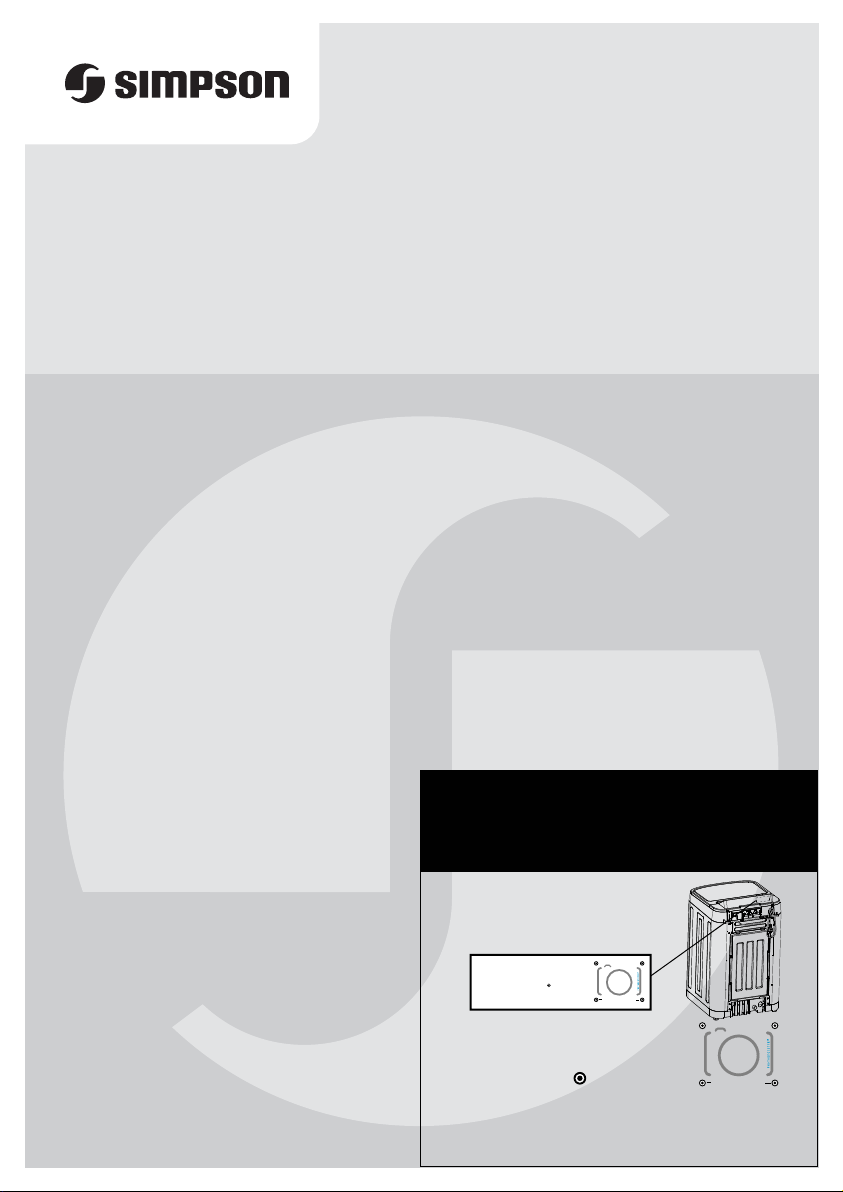
REGISTER YOUR TOP LOAD
WASHING MACHINE
WITH YOUR SMARTPHONE
Locate the label
1
on the back of the
top control panel
Easy register with your smartphone
1. Photograph the camera icon,
including the 4 dots(
2. Then text it to 0488 446 622
(Australia only)
Photograph the
2
camera icon, including
the 4 dots
Text to 0488 446 622
3
(Australia only )
© 2017 Electrolux Home Pr oducts Pty Ltd. ES T_PhotoRegister_F abric_70x70_Oct17
).
( )
00000000000
00000000000
Page 2
2
CONTENTS
SAFETY INFORMATION
1.
PRODUCT DESCRIPTION
2.
CONTROL PANEL
3.
WASHING INSTRUCTIONS
4.
DAILY USE
5.
CARING FOR YOUR WASHING MACHINE
6.
HELPFUL HINTS IN DEALING WITH WASHING PROBLEMS
7.
A GUIDE TO STAIN REMOVAL
8.
TROUBLE SHOOTING
9.
ENVIRONMENT CONCERNS ....................................................................... 3010.
WARRANTY .................................................................................................. 3111.
................................................................................................... 16
Important Information that may impact your Manufacturer’s Warranty
Adherence to the directions for use in this manual is extremely important for health and
safety. Failure to strictly adhere to the requirements in this manual may result in personal injury,
property damage and affect your ability to make a claim under the Electrolux manufacturer’s
warranty provided with your product. Products must be used, installed and operated in
accordance with this manual. You may not be able to claim on the Electrolux manufacturer’s
warranty in the event that your product fault is due to failure to adhere to this manual.
................................................................................. 2
.............................................................................. 5
.......................................................................................... 7
.......................................................................... 14
................................................... 20
....................... 23
..................................................................... 25
.................................................................................. 27
CUSTOMER CARE AND SERVICE
We recommend the use of original spare parts.
When contacting Service, ensure that you have the following data available.
The information can be found on the rating plate. Model, PNC, Serial Number.
Warning / Caution-Safety information.
General information and tips.
Environmental information.
Subject to change without notice.
1.
SAFETY INFORMATION
CONDITIONS OF USE
This appliance is intended to be used
in household and similar applications
such as:
-
Farm houses
-
By clients in serviced apartments,
holiday apartments and residential
type environments.
In the interest of your safety and to
ensure the correct use, before
installing and first using the appliance,
read this user manual carefully,
including its hints and warnings.
To avoid unnecessary mistakes and
accidents, it is important to ensure
that all people using the appliance are
thoroughly familiar with its operation
and safety features.
Save these instructions and make
sure that they remain with the
appliance if it is moved or sold, so
that everyone using it through its life
will be properly informed on
appliance use and safety.
new hose-sets supplied with the
appliance are to be used and that old
hose-sets should not be reused.
Page 3
1.1 GENERAL SAFETY
It is dangerous to alter the specifications or attempt to modify this
product in anyway.
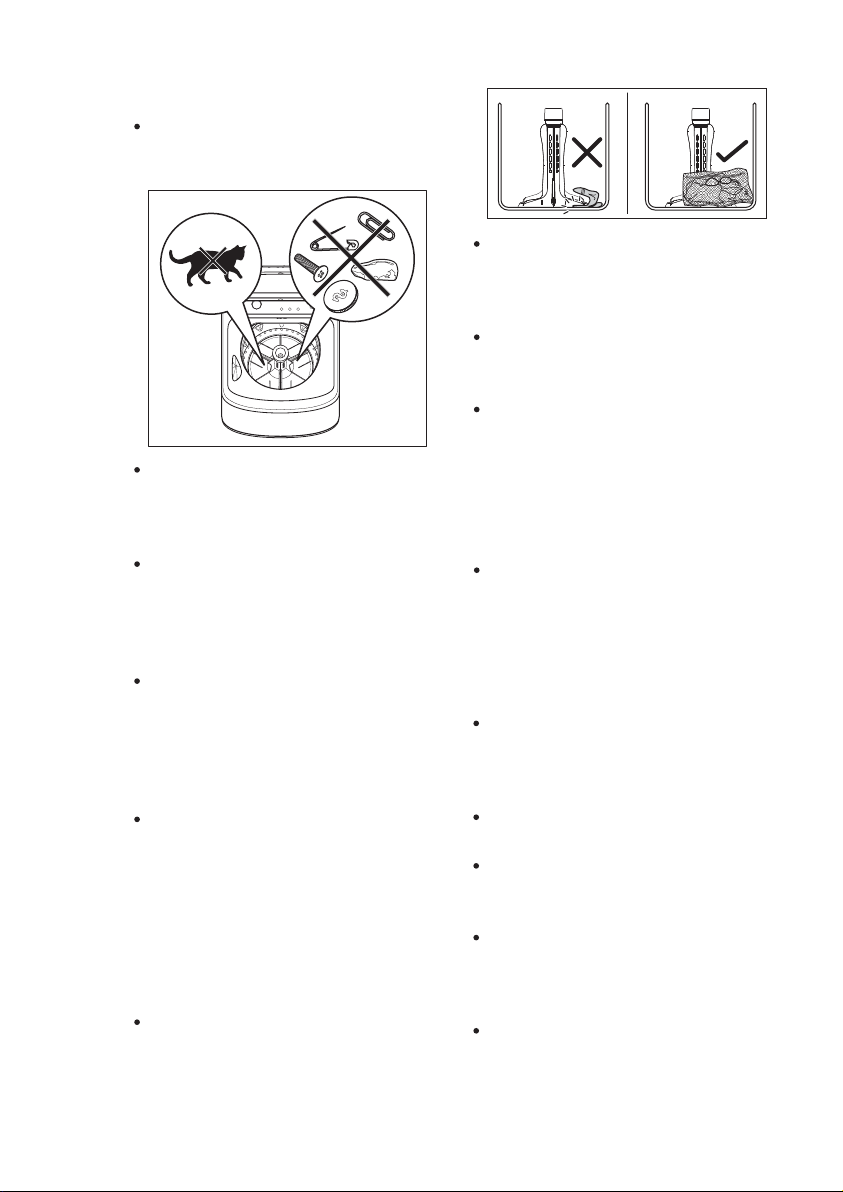
Make sure that small pets do not
climb into the washbowl. To avoid
this, please check into the washbowl before using the appliance.
Any objects such as coins, safety
pins, nails, screws, stones or any
other hard, sharp material can cause
extensive damage and must not be
placed into the machine.
Only use the advised quantities of
fabric softener and detergent.
Damage to the fabric can ensue if
you overfill. Refer to the manufacturer’s recommendations of quantities.
This appliance is not intended for
use by persons (including children)
with reduced physical, sensory or
mental capabilities, or lack of
experience and knowledge, unless
they have been given supervision or
instruction concerning use of the
appliance by a person responsible
for their safety.
Wash small items such as socks,
laces, washable belts etc in a
washing bag or pillow case as it is
possible for such items to slip down
between the tub and the agitator.
3
Do not use your washing machine
to wash articles with whale bones,
material without hems or torn
material.
Always unplug the appliance and
turn off the water supply after use,
clean and maintenance.
Under no circumstances should you
attempt to repair the machine
yourself. Repairs carried out by
inexperienced persons may cause
injury or serious malfunctioning.
Contact your local Service Centre.
Always insist on genuine spare parts.
If the supply cord is damaged,
should the appliance power supply
cable need to be replaced, this shall
be carried out by our Service Centre.
1.2 INSTALLATION
When unpacking the appliance,
check that it is not damaged. If in
doubt, do not use it and contact
the Service Centre.
Appliance should not be installed in
a humid place.
After having installed the appliance,
check that it is not standing on the
inlet and drain hose.
If the machine is situated on a
carpeted floor, please adjust the
feet in order to allow air to circulate
freely.
Always be sure, that there is no
water leakage from hoses and their
connections after the installation.
Page 4
4
Any plumbing work required to
install this appliance should be
carried out by a qualified plumber.
Any electrical work required to
install this appliance should be
carried out by a qualified electrician.
Connect the machine to an
earthed socket outlet.
If this appliance is supplied from a
cord extension set or electrical
portable outlet device, the cord
extension set or electrical portable
device must be positioned so that it
is not subject to splashing or
ingress of moisture.
Water pressures between minimum
50kPa and maximum 800kPa are
acceptable.
1.3 USE
This appliance is designed for
domestic use. It must not be used
for purposes other than those for
which it was designed.
Only wash fabrics which are
designed to be machine washed.
Follow the instructions on each
garment label.
Do not overload the appliance. See
the relevant section in the user
manual.
Before washing, ensure that all
pockets are empty and buttons and
zips are fastened. Avoid washing
frayed or torn articles and treat
stains such as paint, ink, rust, and
grass before washing.
Garments which have been in
contact with volatile petroleum
products should not be machine
washed. If volatile cleaning fluids are
used, care should be taken to
ensure that the fluid is removed from
the garment before placing in the
machine.
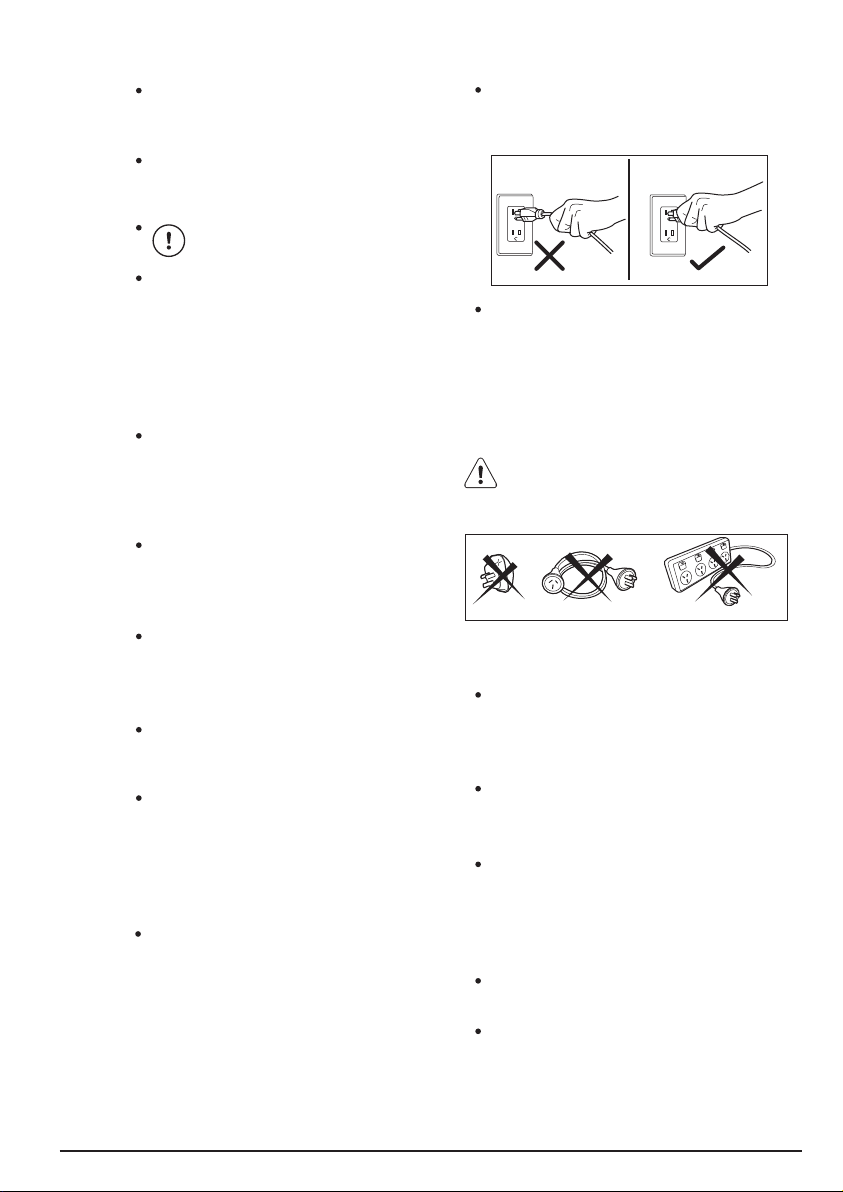
Never pull the power supply cable
to remove the plug from the socket,
always take hold of the plug itself.
Never use the washing machine if
the power supply cable, the control
panel, the working surface or the
base are damaged so that the
inside of the washing machine is
accessible.
For safety reasons do not use
double adaptors, extension
cords and multi-plug adapters.
1.4 CHILD SAFETY
This washing machine is not
intended for use by young children
or infirm persons without supervision.
Young children should be supervised to ensure that they do not
play with the appliance.
The packaging components (e.g.
plastic film, polystyrene) can be
dangerous to children - danger of
suffocation! Keep them out of
children’s reach.
Keep all detergents in a safe place
out of children’s reach.
Make sure that children or pets do
not climb into the washbowl.
Page 5
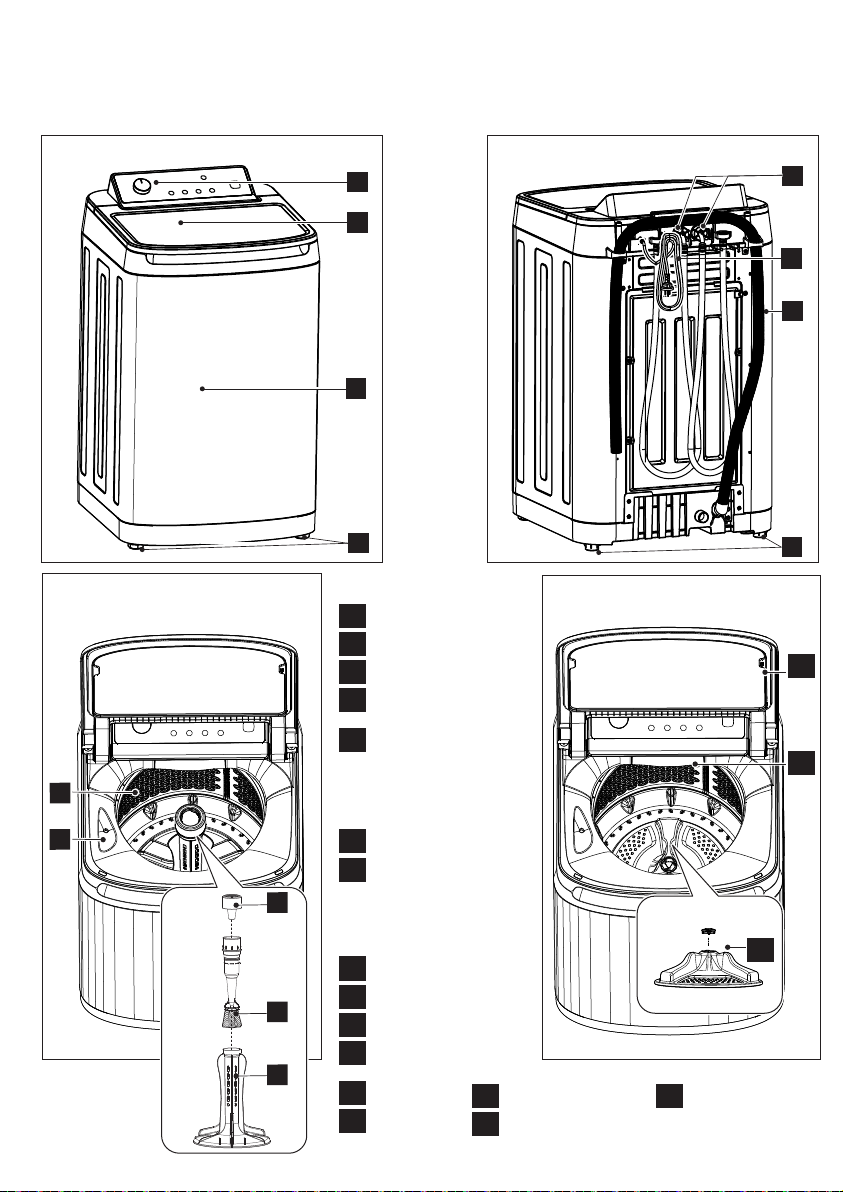
PRODUCT DESCRIPTION2.
WASHING MACHINE PARTS
2.1
FRONT VIEW BACK VIEW
1
2
3
5
5
6
7
INSIDE VIEW : SWT7055TMWA
SWT6055TMWA
SWT6555TMWA
9
10
11
12
13
4
PARTS LIST
1
Control Panel
2
Lid
3
Cabinet
4
Levelling
Adjustable Front Feet
Water Inlet Hose
5
- RED fittings
(Hot Water)
- BLUE fittings
(Cold Water)
Mains Cable
6
Outlet Hose/
7
Drain Hose (See
installation instructions
sheet to fit & position
drain hose)
Back Feet (fixed)
8
9
Wash Bowl
Bleach Dispenser
10
Fabric Softener
11
Dispenser
Lint Filter
12
Agitator
13
INSIDE VIEW : SWT7055LMWA
Low profile agitator
14
Softener Drawer
15
16
8
16
15
14
Magnet
Page 6
6
PRODUCT FEATURES
2.2
The Simpson wash system
1) Wash operation
The agitator & bowl rotates while it is filled
with water to immerse the clothes.
The agitator then rotate to move the
clothes so that the detergent can be
dissolved and activated at the selected
water temperature.
2) Agitation and dilution
After the wash operation is completed,
the bowl is filled with more water. The
agitator then moves in an energy efficient
mode, generating additional mechanical
actions.
Power Failure Recovery
When there is power failure while
machine is washing or rinsing or
spinning. The machine tries to save the
settings at which stage the machine is
doing and then when the power returns
back the machine will starts washing
from the stage where it is left off.
Button Response and Lights
Always press buttons gently. Watch the
lights on the control panel to see the
effect pressing a button or turning a
program selector knob has, and listen
for “BEEPS”.
When you press a button you will get a
short “BEEP” to acknowledge the entry. If
the option is not available at the time, the
machine will not allow you to select it, and
you will here the three short “BEEP” to
remind you the option is not available and
the display will show “ ” and flashing.
After the machine has started, the entire
wash option button will be disabled and
the display will show “ ” and flashing
with three short beeps to indicate the
button is disabled (except Start/Pause
button).
All functions of the washing
machine will stop when the lid is
open.
Enabling/Disabling End-of-Wash
Beeping Mode
(SWT7055TMWA /
SWT7055LWA/SWT6055TMWA)
This mode permits you to either enable
or disable the beeping at the end of the
wash. As an example, you might wish to
disable this beeping when you start a
wash before going to bed, so that when
the wash finished, it will not disturb you
through the night.
To change the “beeping” selection,
proceed as follows:
If you wish to disable end of wash
beeping, switch the machine ON and
wait for 7 seconds then press Rinse
option and Time adjust buttons
simultaneously until you hear 2 beeps.
Display will then show "bOF".
To enable again follow the steps above
until display shows "bOn".
NOTE:
All error beeping is not disabled by
this feature, such as a critical fault, or
lid open during fill/agitate/spin, or out
of balance during spinning.
Responding sound while pressing the
button is not disabled by this feature.
(Default is BEEP on)
Page 7
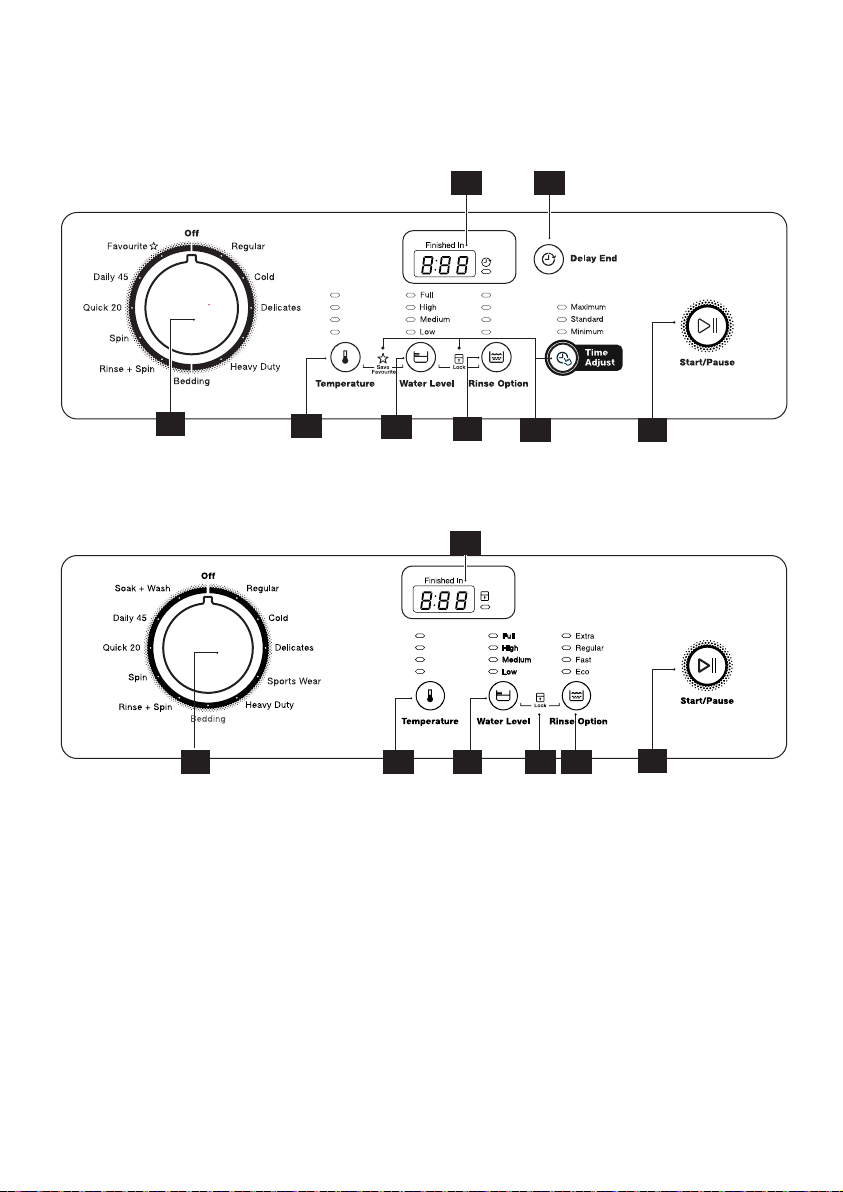
7
CONTROL PANEL3.
SWT7055LMWA / SWT7055TMWA
/ SWT6055TMWA
Sports Wear
3.1
3.2
SWT6555TMWA
Very Hot
Hot
Warm
Cold
3.3
Very Hot
Hot
Warm
Cold
3.4
3.6
3.83.6
Extra
Regular
Fast
Eco
3.5 3.7
3.1 3.2 3.3 3.4
3.5
3.7
Page 8
8
PROGRAM SELECTOR
3.1
KNOB
Turn the Program Selector knob to
choose the wash program you
want. The table “Your Program
Guide” shown on page 13 will help
you in selecting the right program.
The Program Selector knob is not a
timer. Once you select a wash
program, the Program Selector
knob will stay at that position for
the whole wash cycle.
3.2
WATER TEMPERATURES
BUTTON
For each wash program your
washing machine automatically
selects a suitable fill water
temperature. If you want to use a
different wash water temperature,
press the Temperature button
repeatedly.
The water temp lights will tell you
the temperature for each press of
the button.
You have four temperatures to
choose from Very hot, Hot, Warm,
and Cold.
The temperature of warm water will
depend on the temperature and
pressure of your hot and cold water
supplies. The recommended
temperature for warm is 35°C.
You can adjust the flow rate of the
water supplies to adjust the Warm
temperature. All rinse water
temperatures are cold.
Always check your label for the
washing temperature symbols
which the International Care
Labelling Code now uses
Cold, Warm, Hot.
NOTE:
If you have a cold water connection
ONLY and the hot inlet valve is
capped off (refer installation
instructions) you must select Cold
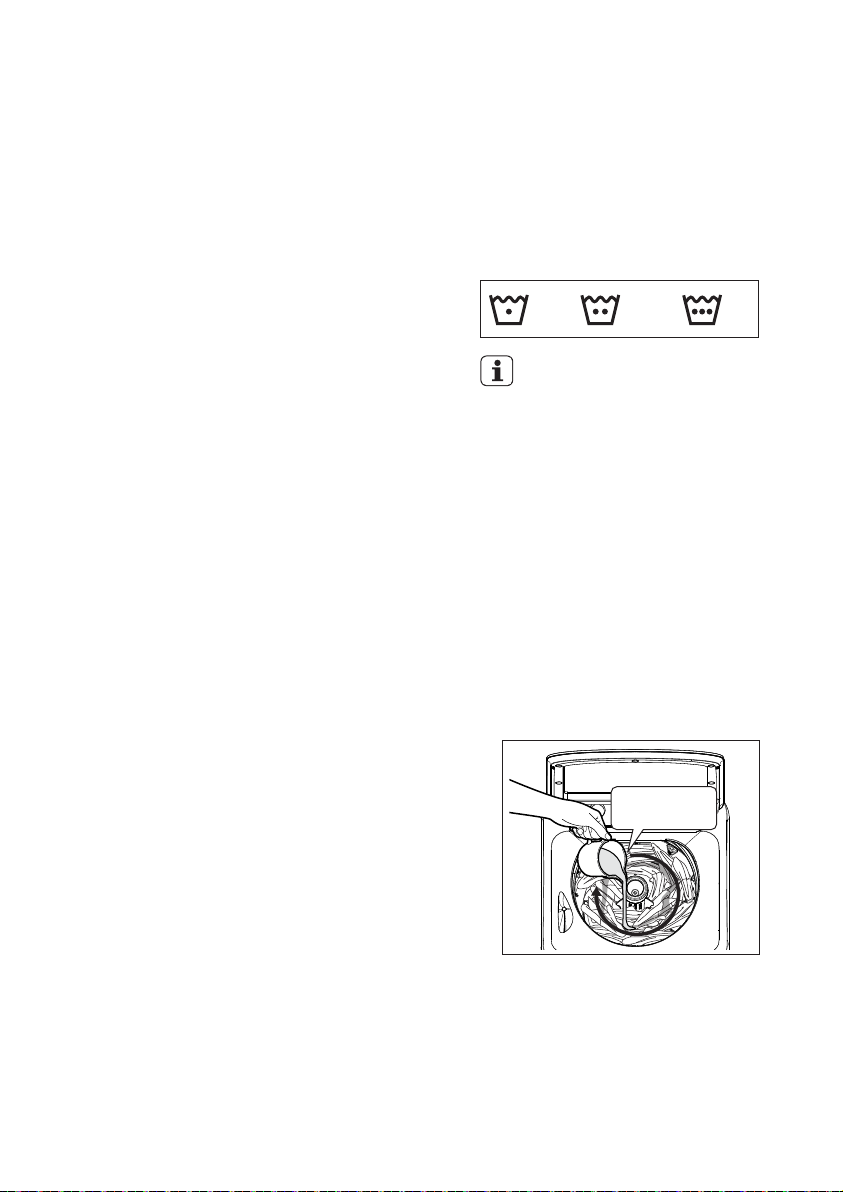
washes only. To fill detergent, you
must follow steps as below:
Measure the correct amount of
1.
powder detergent by following
the recommendations on the
package.
Mix powder detergent in one
2.
litre of hot or warm water.
Add the pre-mixed detergent to
3.
the wash load.
move around
agitator
NOTE :
SWT7055LMWA use low profile agitator on
page 5
Page 9
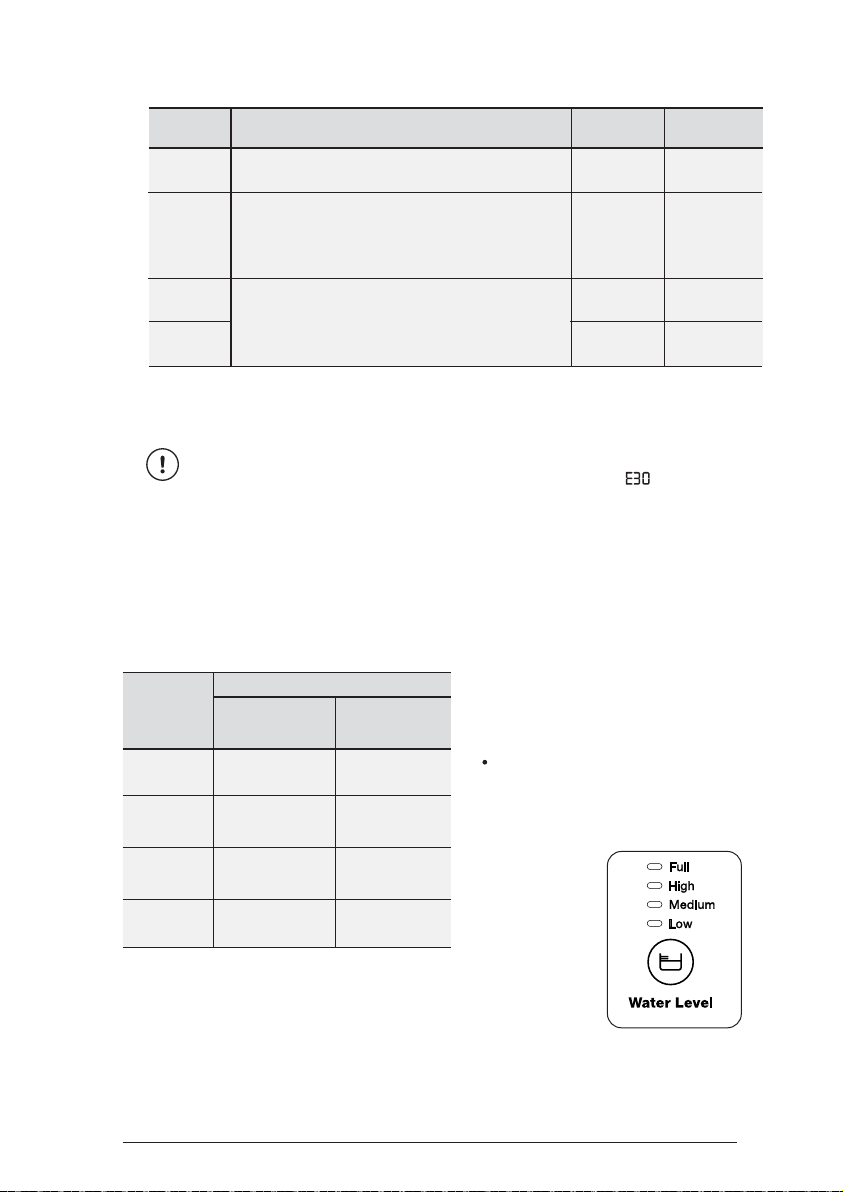
Proportion of Hot and Cold water based on temperature selection.
Temp.
Very hot
Descriptions
for normally soiled white cottons and linen
(e.g. teacloths, towels, tablecloths, sheets...).
Water from
HOT valve
100 % 0 %
Water from
COLD valve
for normally soiled, colourfast garments (e.g.
Hot
shirts, night dresses, pyjamas....) in linen,
cotton or synthetic fibres and for lightly
65 % 35 %
soiled white cotton (e.g.underwear).
Warm
Cold
for delicate items (e.g. net curtains), mixed
laundry including synthetic fibres and
woollens bearing the label pure new wool,
machine washable, non-shrink.
50 % 50 %
10 % 90 %
IMPORTANT: Components in the washing machine are designed to be used
with water no hotter than 70°C. If your water supply is too hot, you should
have a temperature limiting valve fitted by a qualified plumber.
Flood diagnostic is explained on page 27. You should refer to this if you
have water pouring onto the floorThe display will show “ ” and you will
hear rapid short beep continuously to remind you about this problem.
3.3
WATER LEVEL BUTTON
Choose the water level by pressing Water Level button. Use only the amount of
water you need for the wash load.
CHOOSE THE WATER LEVEL
9
Water
Level
Full
High
Medium
Low
1) Model SWT6055TMWA Maximum mass of dry cloth is 6.0 kg.
2) Model SWT6555TMWA Maximum mass of dry cloth is 6.5 kg.
3) Model SWT7055LMWA Maximum mass of dry cloth is 7.0 kg.
4) Model SWT7055TMWA Maximum mass of dry cloth is 7.0 kg.
Appropriate Clothes Load (kg)
Model
SWT6055TMWA
4 to 6.0 5 to 7
3 to 4.5 3 to 5
1.5 to 3 1.5 to 3
0 to 1.5 0 to 1.5
Model
SWT6555TMWA
SWT7055LMWA
SWT7055TMWA
1.
Choose the water level by pressing
Water Level button.
You can select:
Full, High , Medium and Low
2.
Use only the amount of water you
need for the wash load.
Page 10
10
3.4
RINSE OPTION BUTTON
Pressing the Rinse Option button to
choose the rinse type for your wash
load. For most washes the machine
automatically selects “Regular”
rinse for you.
There are four rinses to choose
from Extra, Regular, Fast and Eco.
Extra rinse, the machine fills
twice, giving you two deep
rinses.
Regular rinse, the machine fills
once, giving you one regular rinse.
Fast Rinse ,
time then Eco rinse by performing
only 3 Eco sprays but the amount of
water in each spray is increased.
Fast rinse uses less
Eco rinse, is a spray rinse giving
you maximum water saving.
After cycle has finished, You
must drain the water from
the washing tub by pressing
“Start/Pause” button to
continue the cycle.
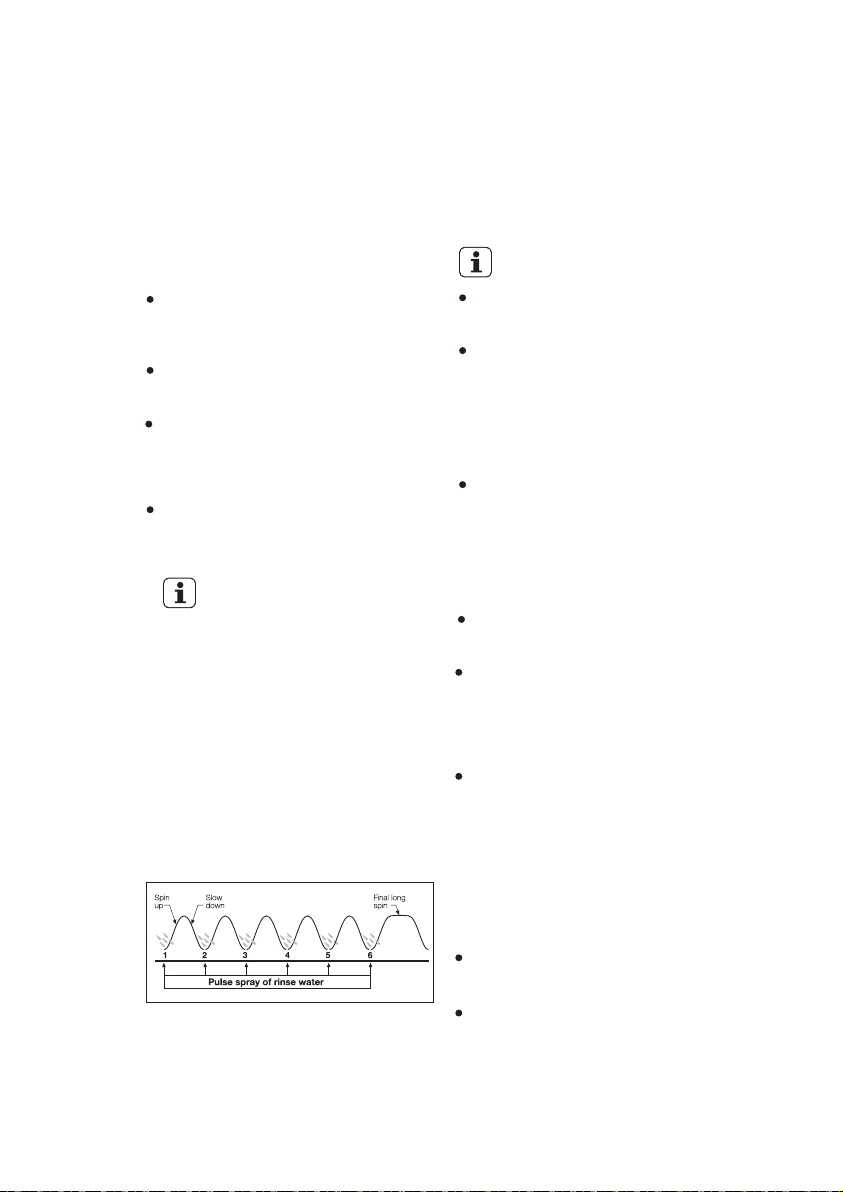
How does Eco Rinse work ?
When Eco rinse is used, rinse water
is sprayed into the washbowl in
pulses. After each pulse the
washbowl will spin to remove
detergent laden water from the
clothes.
The machine will go through a series
of maximum six pulses spray and
short spin cycles in this manner,
depending on program selection,
followed by a final long spin that
removes the water from the clothes
to complete the full wash program.
NOTE:
Compare this with Regular rinse
where much more water is used.
Regular rinse, water enters the
machine filling up to the wash
water level selected. The washer
agitates and finally empties the
rinse water through the drain
hose.
Extra rinse, this is special option
for those people who suffer from
allergies, this extra rinse will
provide two Regular rinses to
ensure all detergent residue has
been removed.
Eco Rinse and Fast Rinse
selected with Bedding
CANNOT be
program.
We strongly recommend you use Eco
rinse for your washes whenever you can.
There is considerable saving of water
when Eco is used instead of Regular or
Extra to rinse clothes.
Eco and Fast rinse is not designed
to be used with fabric softener.
Select Regular or
Extra rinse if you are
going to use fabric softener.
Regular rinse ensures the fabric
softener is correctly dispensed and
thoroughly removed from your clothes
during rinsing.
Daily 45 program rinse is fixed with
Regular rinse only
Quick20 program rinse is fixed with
Fast rinse only
Page 11
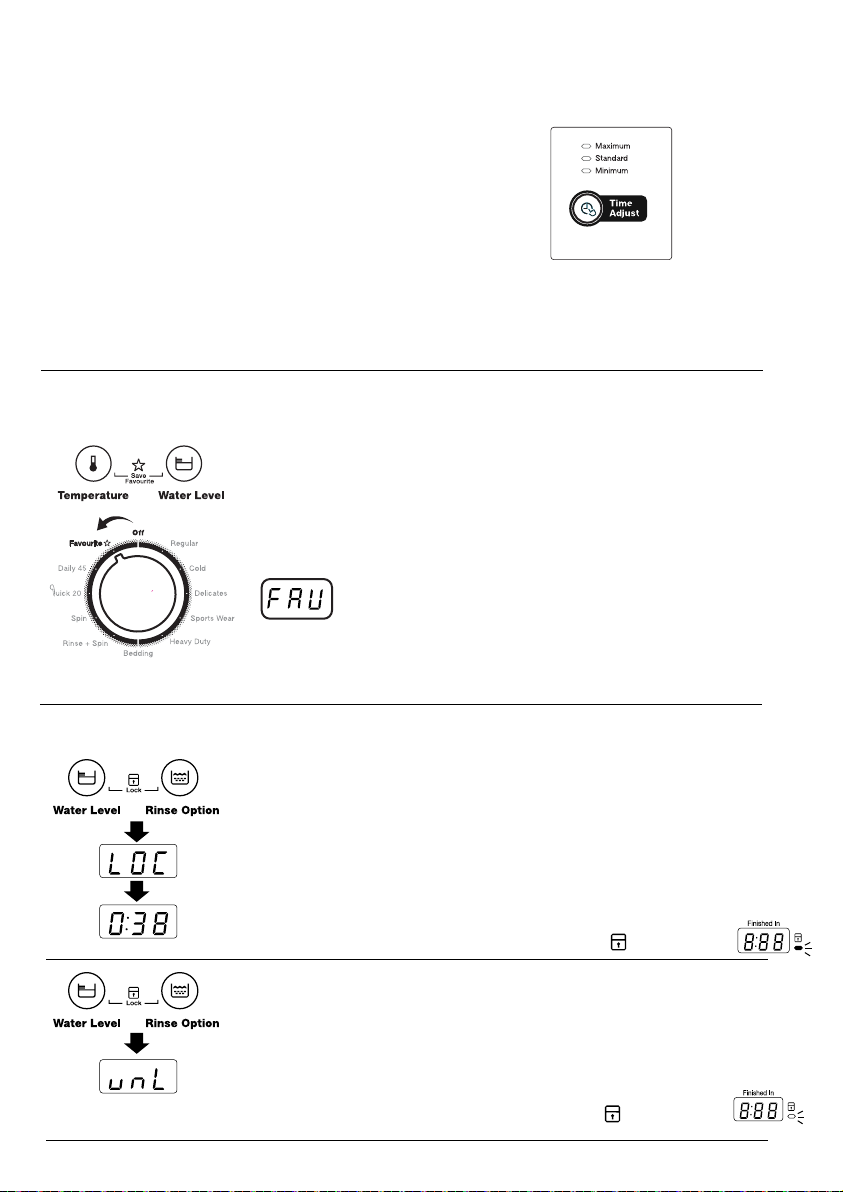
3.5 TIME ADJUST, FAVOURITE , CHILD LOCK
TIME ADJUST
(SWT7055TMWA / SWT7055LMWA / SWT6055TMWA)
This option allows you to increase/decrease washing time from
3 available options.
(Default is “Standard”)
: Standard > Minimum > Maximum
Time adjust is only applicate to
: Regular, Cold, Delicates, Hand Wash, Heavy Duty, Bedding
FAVOURITE
(SWT7055TMWA / SWT7055LMWA / SWT6055TMWA)
The favourite function is the ability to tailor individual wash features
and save them as a custom programme until the next time.
To save Favourite, select a wash program, Spin,Temperature,
Rinse then press and hold Temperature and Water Level buttons
simultaneously for > 2 seconds. Buzzer will sound then display will
show "FAV". The program is now stored for later use
by selecting Favourite via selector knob.
11
Selector Knob
CHILD LOCK
2sec
2sec
2sec
child lock
operate
Washing
time
Your appliance is provided with CHILD SAFETY LOCK which
permits you to leave the appliance unsupervised with the door
closed without having to worry that children might be injured by
or cause damage to the appliance.
To Activate the child lock :
: Hold down the “Water Level” and “Rinse Option” buttons at the
same time for 2 seconds.
when activated buzzer will sound then display
will show "LOC" for 2 seconds before going back
to standby mode showing wash time.
(Model SWT6555TMWA display shows “LOC” and icon will turn on)
To Deactivate the child lock :
: Hold down the “Water Level” and “Rinse Option” buttons at the
same time for 2 seconds.
When deactivated buzzer will sound then display will
show "unL" for 2 seconds then going back to
show washing time.
(Model SWT6555TMWA display shows “unL” and icon will turn off)
Page 12
12
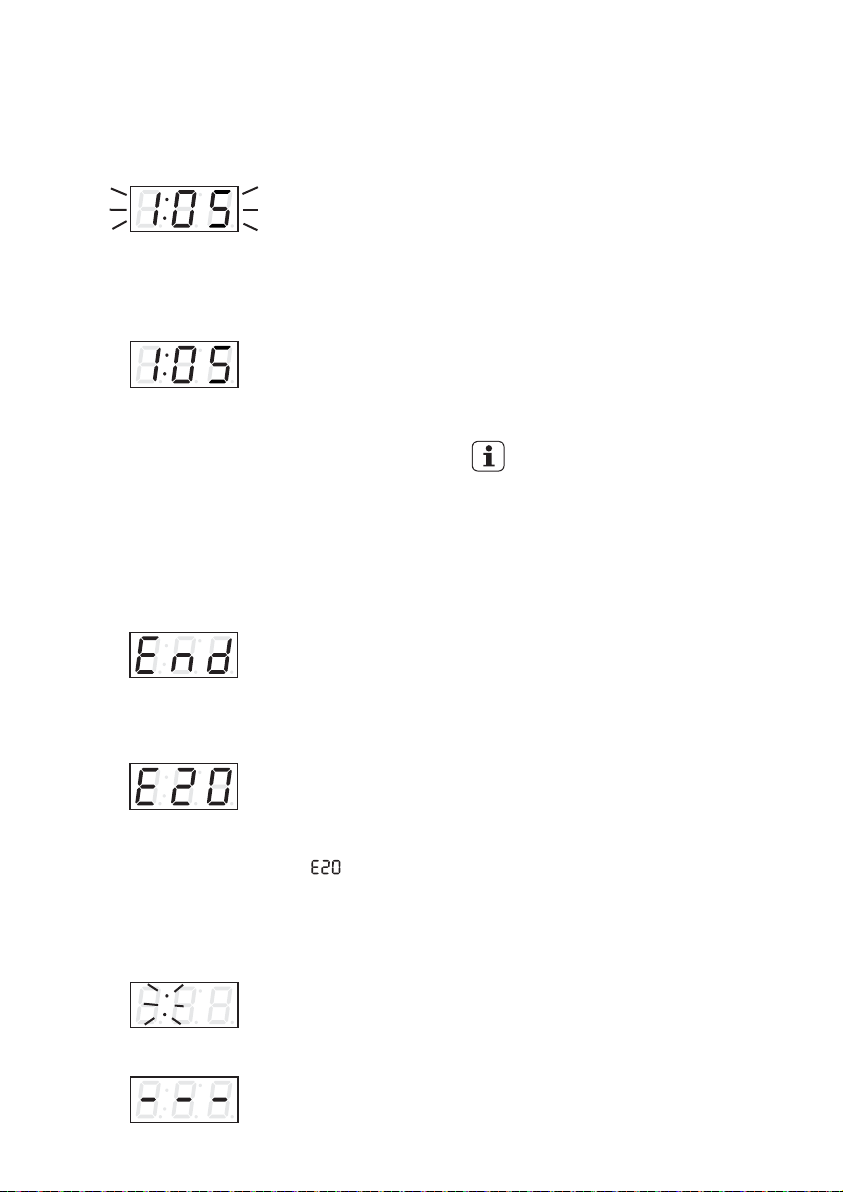
3.6 DISPLAY
The display shows the following
information:
Machine In Pause Mode
Time digits and colon LEDs at rate
of 1s.
Estimated time of the
selected program
After selecting a program, the
estimated time is displayed in hours
and minutes (for example 1.05).
The estimated time is calculated
automatically on the basis of the
maximum recommended load for
each program. After the program
has started, the time remaining is
updated every minute.
End Of Program
When the program is completed
display show will show “End”.
Alarm Codes
In the event of operating problems,
some alarm codes can be
displayed, for example (see
“Troubleshooting” and
“Troubleshooting fault displays” on
page 26, 27, 28).
Stand by/ Auto off
Incorrect Option Selection
Blink
Blink
Colon “:” LED
lights up,Static.
If an option is not compatible with
selected program, display will flash
"---" with 3 consecutive short
beeps.
3.7 START/PAUSE BUTTON
To start the selected program,
press the “Start/Pause” button.
If you have started your wash and
you wish to stop it for some reason,
press the “Start/Pause” button to
enter PAUSE mode. To restart the
program from the point at which it
was interrupted, press the
“Start/Pause” again.
If the lid has been opened any
time during operation of the
machine, the Start/Pause
button has to be pressed when
the lid is closed to continue
operation.
3.8 DELAY END OPTION
BUTTON
(SWT6055TMWA,SWT7055TMWA
,SWT7055LMWA)
Before you start the program, this
option makes it possible to delay the
end of the washing program by 2, 4,
6, 8, 10 or 12 hours, by pressing
Delay End button to choose the end
time as your wish. This option must
be selected after choosing the wash
program, and before pressing the
“Start/Pause” button. If after having
set the Delay-End option (and
pressed “Start/Pause” button) and
you wish the cancel or modify it,
follow the below steps:
-
set the washing machine to
PAUSE by press “Start/Pause”
button;
deselect the Delay-End option,
changing the status;
press the “Start/Pause” to start
the program.
Page 13
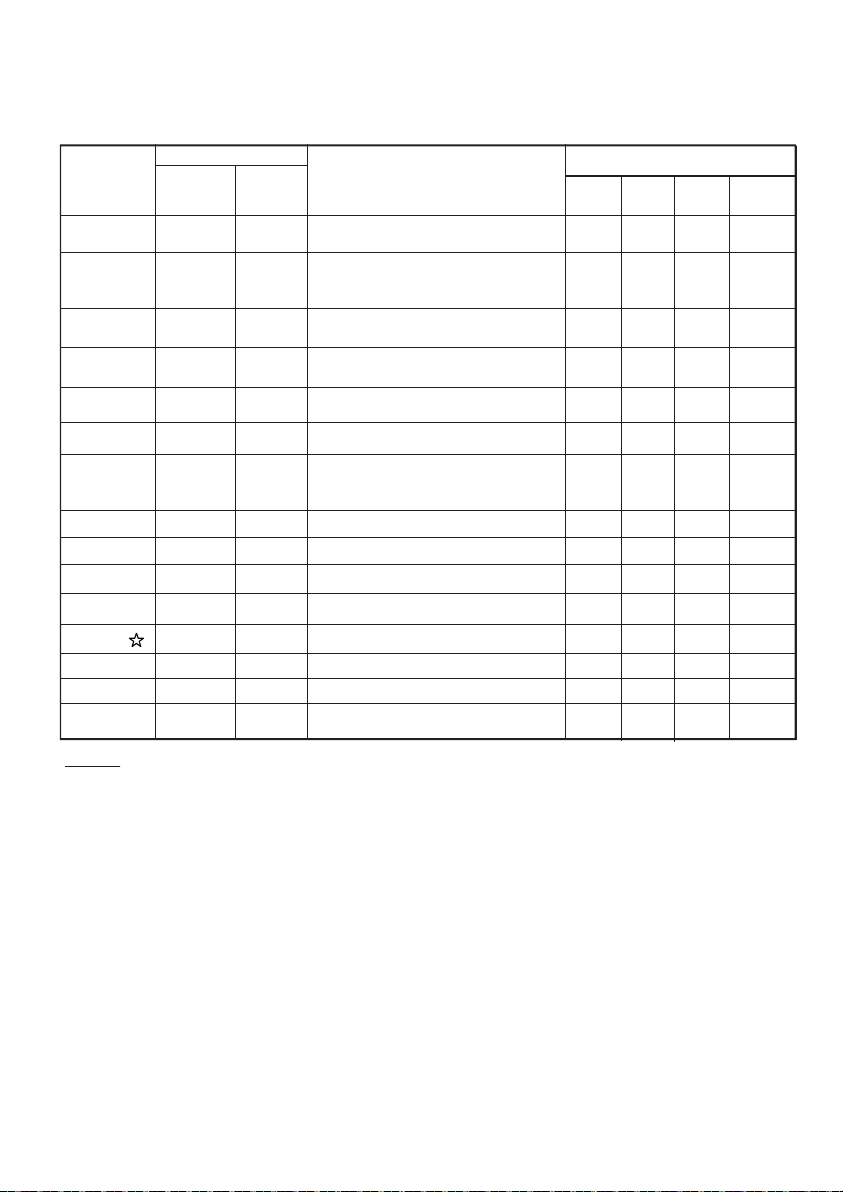
YOUR PROGRAM GUIDE
Available Model
Program Select this program
Regular *
Cold
Delicates
Sports Wear
Heavy Duty **
Bedding
Rinse+Spin
Spin
Quick 20
Daily 45
Soak & Wash
Favourite
Delay End
Child Lock
Favourite
(save)
Remarks
* “Regular wash, Warm Temp,Full Water Level, No Soak, Eco rinse, Maximum Time Adjust”
is recommended for a full load of normally soiled cottons.
*
“Regular Wash, Warm Temp, Full Water Level, No Soak, Eco Rinse”
is recommended for a full load of normally soiled cottons.
**
“Heavy Duty” has a built-in Soak period of 6 minutes.
SWT7055TMWA
SWT7055LMWA
SWT6055TMWA
Yes
Yes
Yes
Yes
Yes
Yes
Yes
Yes
Yes
Yes
Yes
Yes Yes
Yes
SWT6555TMWA
Yes
Yes
Yes
Yes
Yes
Yes
Yes
Yes
Yes
YesNo
No
No
No
For normally soiled cotton load at rated load
capacity.
For synthetic or mixed fabrics, underwear,
coloured garments, non-shirnk shirts,
blouses.
For lingerie, lace, trimmed and embroidered
items.
For a Sport ware fabrics labelled “Machine
Washable”
For a heavily soiled cotton wash load.
For bedding fabrics labelled “Machine
Washable”
For items that you want to rinse and spin eg.
clothes items you have hand washed in
a wash tub.
For very wet clothes to remove the water.
For a very small load of mixed fabrics.
For a small load of mixed fabrics.
For normally soiled cotton load.
For using favourite program.
For using Delay End program.
For using Child Lock program.
For using Favourite program.
(SWT7055TMWA/SWT7055LMWA/SWT6055TMWA)
(SWT6555TMWA)
13
Recommended
Water
Temp Spin
Level
Full WarmYes Yes
Full Cold High
Full Cold Medium
Full High
Full Warm High
Full Hot High
High Cold High
Warm
High
Regular
Regular
Regular
Regular
Regular
Regular
- - High -
Low Warm High Fast
Full High
Warm
Full Warm High
Regular
Regular
- -- -
- -- -
- -- -
- -- -
Rinse
Option
Regular
/Eco*
Page 14
14
WASHING INSTRUCTIONS4.
These Washing Instructions are of a
general nature and you should get good
wash results by following them.
However, due to the variables of fabric
types, soil levels, detergent types and
available program settings you may find
some combinations of these which do
not always result in the perfect wash.
If for example you see residuals of
detergent or soils on some items,
please read the section Residues on
washed items paragraph.
Over time you will learn what is the best
set-up of programs, detergent and load
sorting for different load types and soils.
4.1
SORT YOUR WASHING
INTO SEPARATE WASH
LOADS
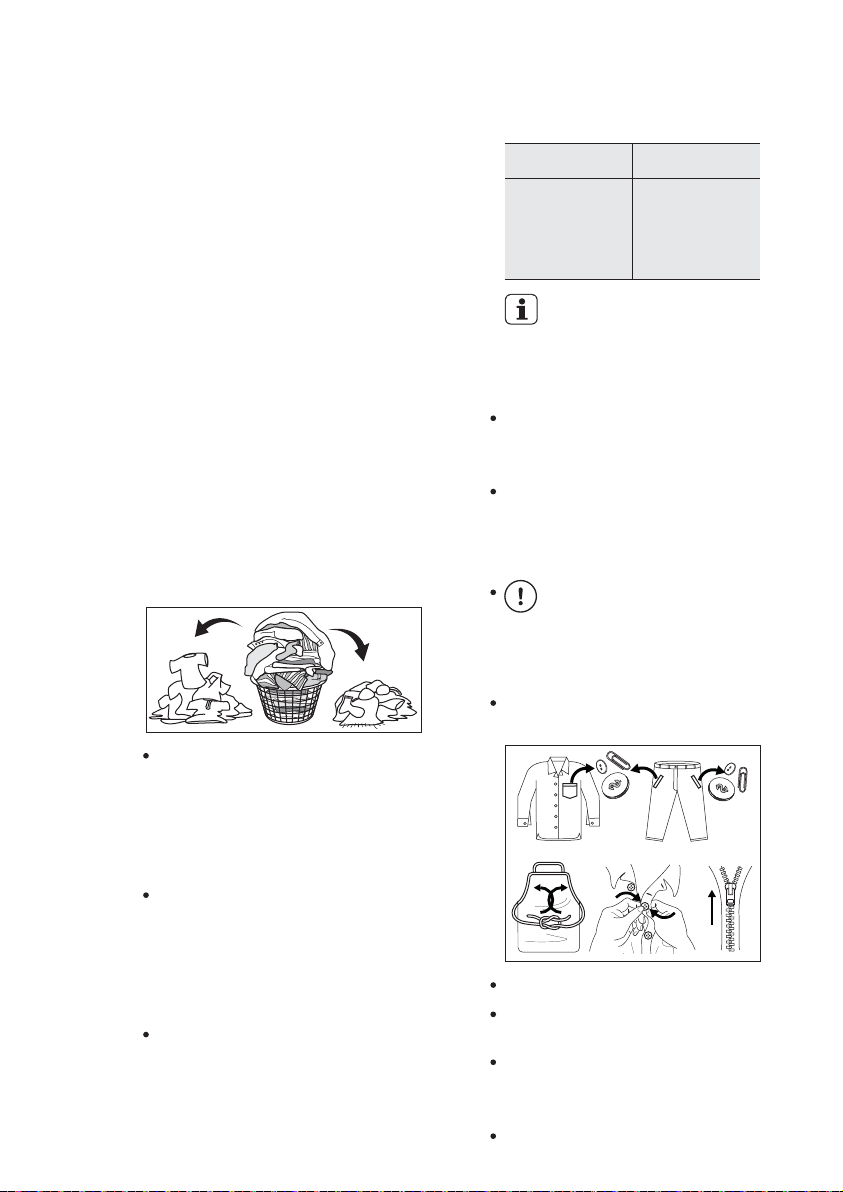
Each load of washing should
contain clothing which needs the
same washing conditions. For
example, you should not wash
delicate clothes with very dirty
work clothes.
Colour fast and non-colourfast
fabrics should be separated.
Knowing the type of fabrics you
have and how dirty they are will
help when you make selections
from the wash program options.
Some fabrics are lint collectors
and can pick up lint, dirt and
colour from other fabrics which
are lint producers. Some examples are listed below:
Lint collectors
- Corduroy
- Synthetics
- Permanent
press fabrics
NOTE:
Make sure that you wash lint
collectors separately from lint
producers.
Never wash whites and coloureds
together. Whites may lose their
“whiteness” in the wash.
New coloured items may run in
the first wash; they should
therefore be washed separately
the first time.
IMPORTANT!
Make sure that no metal objects
are left in the laundry (e.g. hair
clips, safety pins, pins).
Button up pillowcases, close zip
fasteners, hooks and poppers.
Tie any belts or long tapes.
Remove persistent stains before
washing.
Rub particularly soiled areas with
a special detergent or detergent
paste.
Treat curtains with special care.
Lint producers
- Towels
- Nappies
- Chenille/
Candlewick
Page 15
15
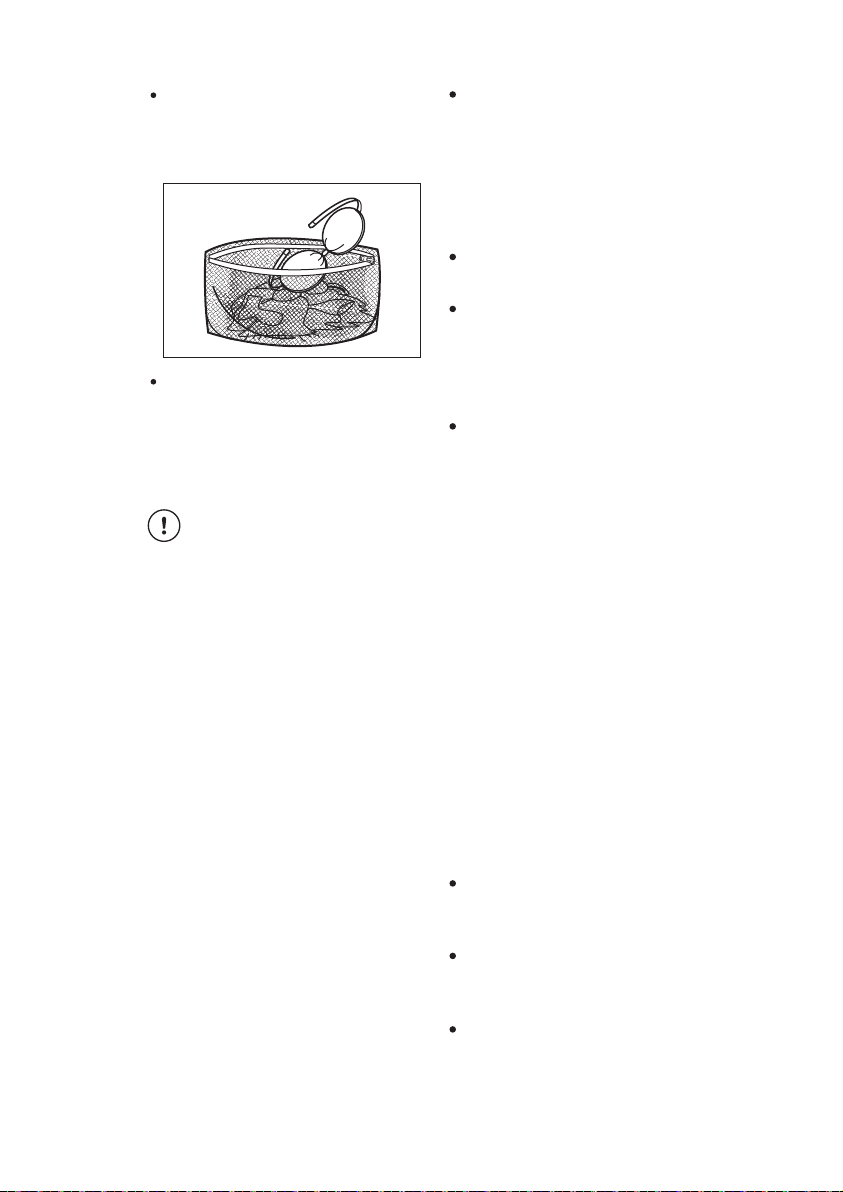
Wash bras, pantyhose and other
delicates in a mesh laundry bag,
which you can purchase from
your supermarket.
Remove hooks or tie them up in
a bag or net.
PRE-TREATMENT SPRAYS
4.2
AND STAIN REMOVERS
WARNING!
Pre-treatment sprays and stain
remover can damage plastic
components on your washing
machine.
If you use pre-treatment sprays or
stain removers, apply them to the
clothing well away from your
washing machine.
DETERGENT
4.3
Good washing results also depend
on the choice of detergent and use
of the correct quantities to avoid
waste and protect the environment.
Although biodegradable, detergents contain substances which, in
large quantities, can upset the
delicate balance of nature.
The choice of detergent will
depend on the type of fabric
(delicates, woollens, cottons, etc.),
the colour, washing temperature
and degree of soiling.
Don’t use the wrong type of detergent.
You must use a low sudsing detergent
designed for front load washing
machines or high efficiency top
loaders, such as Cold Power for Front
Loaders and High Efficiency Top
Loaders or detergents labelled “Matic”.
Don’t use soap-based products in
your washing machine.
Don’t use too much detergent. This
can result in excessive suds that can
cause low spin speeds, poor rinsing
and overloading the motor during spin
stages of the wash program.
Don’t use too little detergent because
you will get a poor wash. If you think
you need more, increase dosages by
only small amounts to avoid excessive
suds.
Quantity of detergent to be used
The type and quantity of detergent will
depend on the type of fabric, load size,
degree of soiling and hardness of the
water used.
Water hardness is classified in so-called
“degrees” of hardness.
Information on hardness of the water in
your area can be obtained from the
relevant water supply company, or from
your local authority.
Follow the product manufacturers’
instructions on quantities to use.
Not enough washing powder causes:
the washload to turn grey, greasy
clothes.
Too much washing powder causes:
sudsing, reduced washing effect,
inadequate rinsing.
Use less detergent if: you are washing
a small load, the laundry is lightly
soiled, large amounts of foam form
during washing.
Page 16
16
DAILY USE5.
STARTING YOUR WASH-
5.1
ING MACHINE
Connect the mains plug to the
1.
mains socket.
Turn the water tap on.
2.
LOAD THE WASHING
5.2
MACHINE
When loading the clothes into your
washing machine, there are four
things to remember:
4.
The load should contain only
three or four large items, for
example sheets. The rest of the
load should be small items. A
mixed load of large and small
items will wash cleaner than a
load of all large items.
ADD THE DETERGENT
5.3
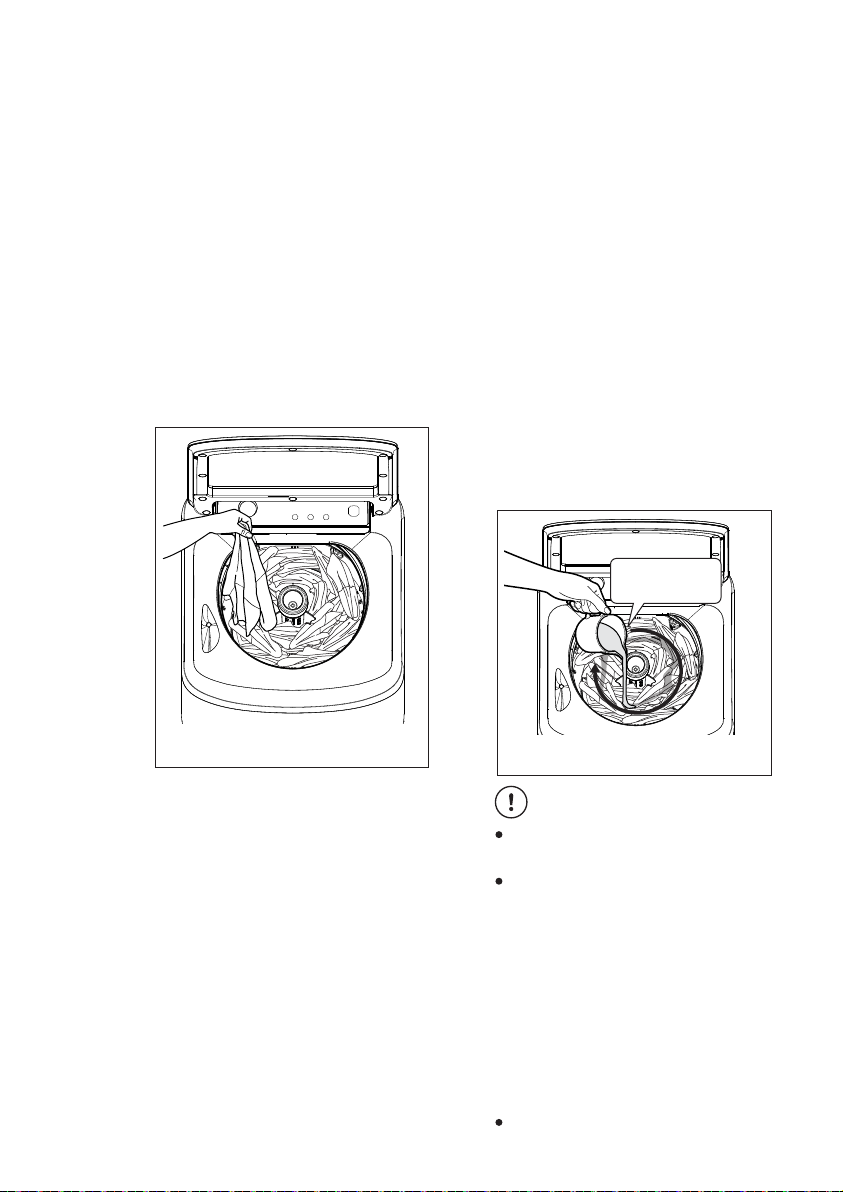
Measure the correct amount of
1.
powder or liquid detergent by
following the recommendations
on the package.
Mix detergent in one litre of hot
2.
or warm water.
Add the pre-mixed detergent to
3.
the wash load.
move around
agitator
NOTE :
SWT7055LMWA use low profile agitator on page 5
1.
Clothes must be loaded evenly
around the agitator. For best
results load small items first,
followed by large items.
For example, a typical load
should be loaded using the
following sequence:
handkerchiefs, wash cloths,
undershorts, pillow cases,
T-shirts, business shirts,
tablecloths, sheets, bath towels.
2.
Clothes must not be wrapped
around the agitator.
3.
The washing machine must not
be overloaded. Clothes must be
able to move during wash.
NOTE :
SWT7055LMWA use low profile agitator on page 5
Don’t do these things:
Using too little detergent will
give you a poor wash result.
Using excessive detergent will
create too much suds and may
cause overloading of the motor
during the spin stage of the
wash cycle. To avoid excessive
suds, reduce the amount of
detergent you use. It is best to
use detergent labelled low
sudsing. Good quality, front
load detergent will perform well
in this machine.
Use soap based products in
your washing machine.
Page 17
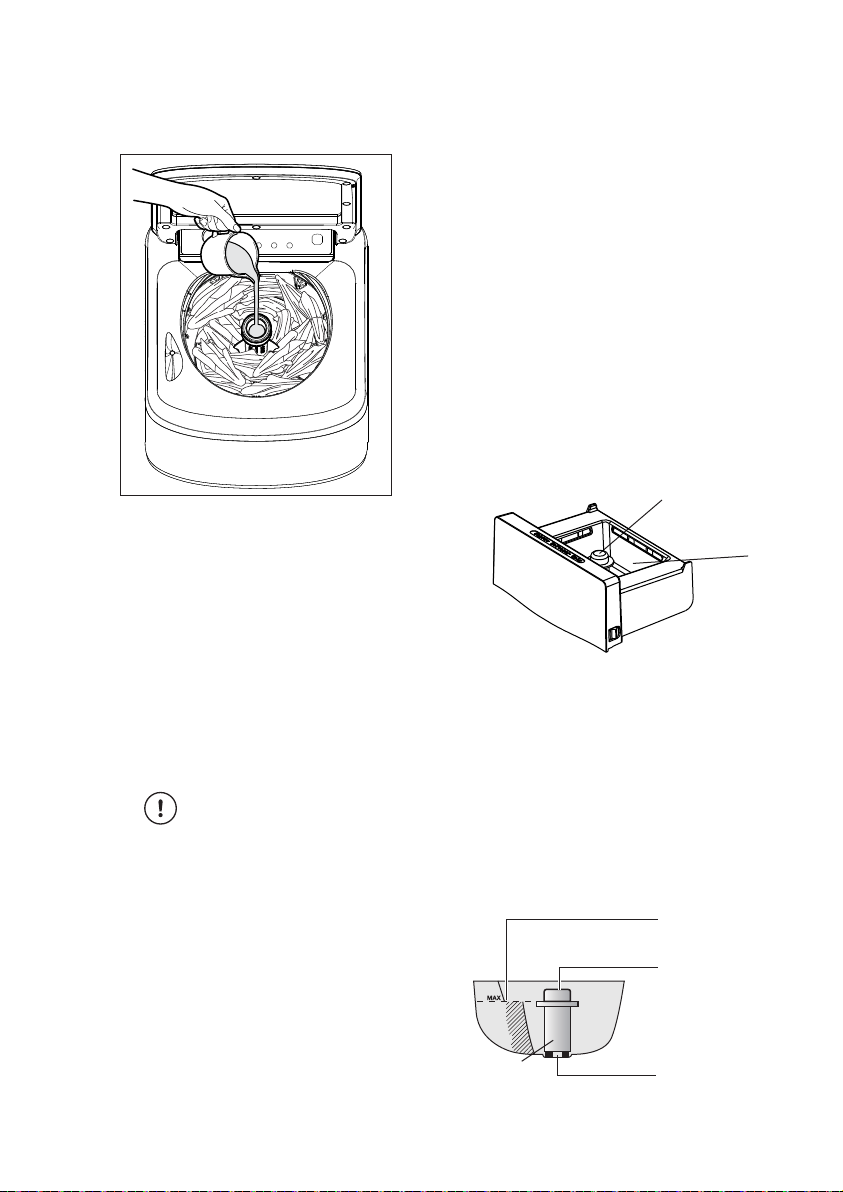
ADD FABRIC SOFTENER
5.4
FOR SWT6055TMWA
SWT6555TMWA
SWT7055TMWA
1.
Measure the correct amount of
fabric softener by following the
recommendations on the
package.
2.
Mix softener with an equal
amount of warm water but only
mix enough to fill to the line
marked inside the cup. The
softener cup holds 75ml.
Pour the mixed softener into the
3.
cup in the top of the agitator.
Do not overfill the cup.
Do not spill fabric softener
on the clothes as it may
stain them.
If you are going to use fabric
4.
softener, you must select the
Regular rinse option, ie deselect
the ECO RINSEoption.
NOTE: You do not have to use
fabric softener, your washing
machine will wash the clothes
perfectly well without it.
FOR SWT7055LMWA
Before adding softener to the dispenser,
make sure the siphon cap is pushed firmly
down onto the spigot in the drawer.
The softener will not siphon out if the cap is
incorrectly fitted, is missing or blocked with
residue. You are now ready to add fabric
softener.
Measure the correct amount as recommended on the softener package into a cup and
then pour it into the softener compartment of
the dispenser drawer.
Caution: Do not overfill the fabric
softener dispenser.
siphon cap
pushed down
Overfilling and then siphoning out too early
can cause softener and detergent to mix
resulting in staining problems.
The softener dispenser holds in the drawer
when filled up to the MAX marker. Any level
lower than MAX will function correctly.
Caution: Only for fabric softener.
Do not add detergent in this
compartment.
MAX - Do not fill above
this height
siphon cap
Push down siphon to
complete guide
Siphon Guide
17
add fabric
softener
Page 18
18
ADDING BLEACH
5.5
Bleaching of clothes can help to
remove stains, heavy soiling and to
kill bacteria.
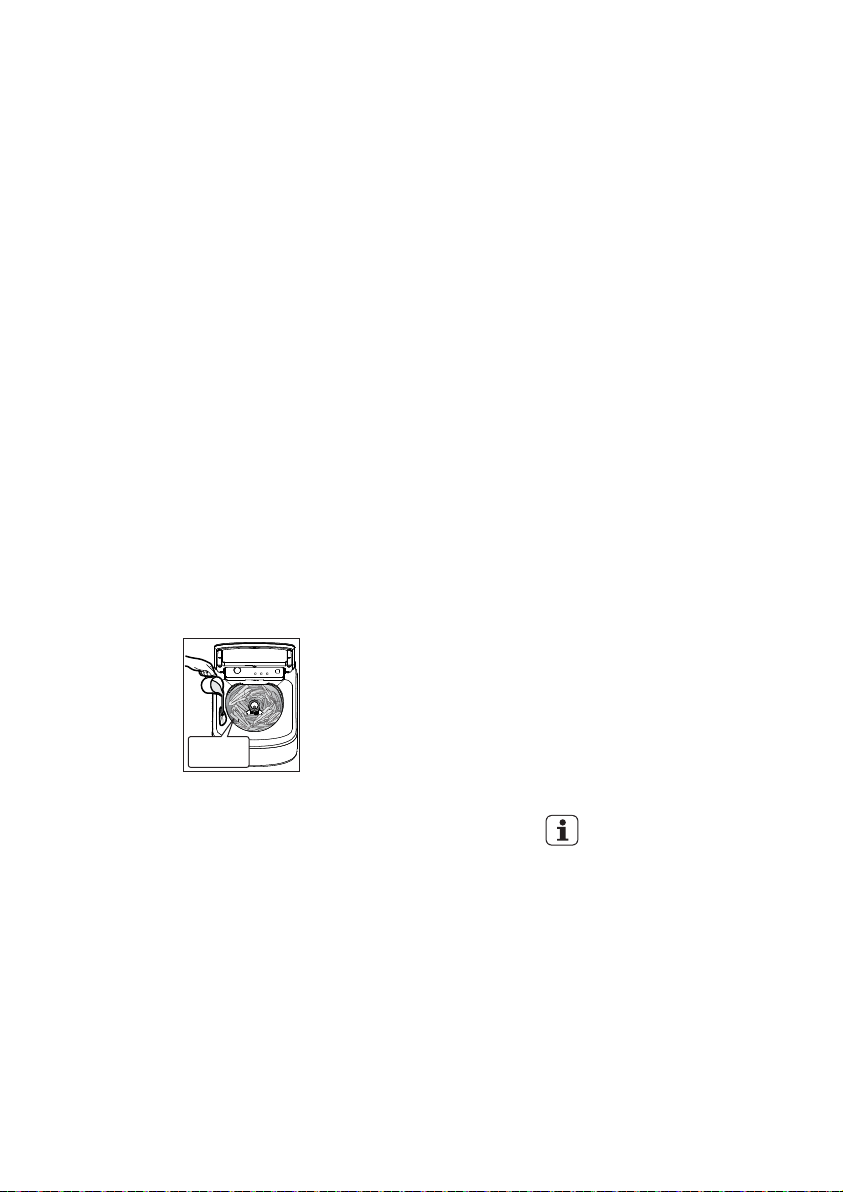
Oxygen Type
This is generally a powder type
bleach. Mix the required quantity
with water and pour down the
bleach hole in the top panel during
the fill when there is some water in
the washbowl.
Chlorine Type
This type of bleach should not be
mixed with detergent. Mix the
bleach with water as per the
instructions on the container.
How to soak with bleach,
as follows:
1.
Turn Program Selector to a
Regular Wash position.
2.
Press the Start/Pause button to
commence water fill.
3.
proceed
SETTING A PROGRAM
5.6
Turn the program selector to
1.
the required program.
-
Your washing machine is
now in STAND-BY-MODE
and ready to wash your
clothes.
-
The relevant light will light up.
-
The buzzer will sound.
-
The selector dial can be
turned either clockwise or
anticlockwise.
-
Once you selected a
program, the program
selected will stay at that
position for the whole of the
cycle.
-
The display shows the
program duration.
If the settings shown on the
control panel are what you
want to use, press the
Start/Pause button to start
your wash.
fill some of water
before pour
bleach solution
NOTE :
SWT7055LMWA use low profile
agitator on page 5
Pour the bleach solution down the
hole in the top panel during fill when
there is some water in the wash bowl.
Allow the machine to agitate for
4.
a few minutes, then let it
stand for the required time
by pressing Start/Pause
button to pause the
machine.
When soaking bleach reached
5.
to the required time, turn
Program Selector to Drain+Spin
position and press the
Start/Pause button to empty
the wash bowl.
If you want your laundry to be
2.
washed with functions different
from the one proposed by the
machine, press Temperature,
Water Level, Soak Time and
Rinse Option buttons.
NOTE:
Different functions can be
combined which is dependent
on the program selected.
When these buttons are
pressed, the corresponding
pilot lights come on.
If you want
3.
the washing program
to define the end of
, press
the “Delay End” button
repeatedly to choose your
machine end time.
Page 19
STARTING A PROGRAM
5.7
To start a program, press the
Start/Pause button, a default
program duration will be displayed
on the screen.
NOTE
INTERRUPTION OF A
5.9
PROGRAM
If you have started your wash and
you wish to stop it for some reason,
press the Start/Pause button to
enter PAUSE mode. Time digits and
colon LEDs blink.
19
When you select the Drain+Spin
program, there will be a delay of
at least 2 minutes before the
washing machine starts to spin.
This delay is a pump out (Drain)
period to ensure the bowl is
empty of water, which is necessary before spin commences.
Even though you may have only
put wet clothes into an empty
bowl, the delay before spin will
still occur to be safe and to
protect your washing machine.
CHANGING A PROGRAM
5.8
You can turn the Program Selector
Knob to a new program position at
any time. If you do move the
Program Selector Knob the effect
will be different depending on the
status of the machine at the time
you do this, as follows:
When the machine is running,
moving the Knob to a new
position will result in the machine
continuing the wash and the
display will show “ ” and
flashing with 3 consecutive short
beeps to remind you that this
option is not allowed.
Press the Start/Pause again. The
program will continue.
AT THE END OF THE
5.10
PROGRAM
-
The appliance stops automatically.
-
The display will show “ ”
-
Turn the Program Selector knob
to the position “Off”.
-
Remove the laundry from the
appliance. Make sure that the
washing tub is empty.
-
Keep the lid ajar, to prevent the
mildew and odours.
-
Turn off the water tap.
Page 20
20
CARING FOR YOUR WASHING MACHINE6.
Your washing machine will give you long
and trouble-free service, if you follow
the instructions in this section. These
instructions show you how to care for
your washing machine.
WHAT TO DO AFTER YOU
6.1
HAVE FINISHED YOUR
WASHING.
Turn the Program Selector
1.
knob to the position “Off”.
2.
Switch off the electricity at the
power point.
Turn off the water taps. This will
3.
extend the life of the inlet hoses.
4.
Leave lid open for a while. This
allows time for moisture inside
the washing machine to
evaporate and for any odours
to disperse.
6.2 CLEANING THE LINT FILTER
Lint is a collection of threads and
fluff which comes off your clothes
during washing. Your washing
machine collects this lint in the lint
filter. It is important to clean out this
lint filter preferably after each wash.
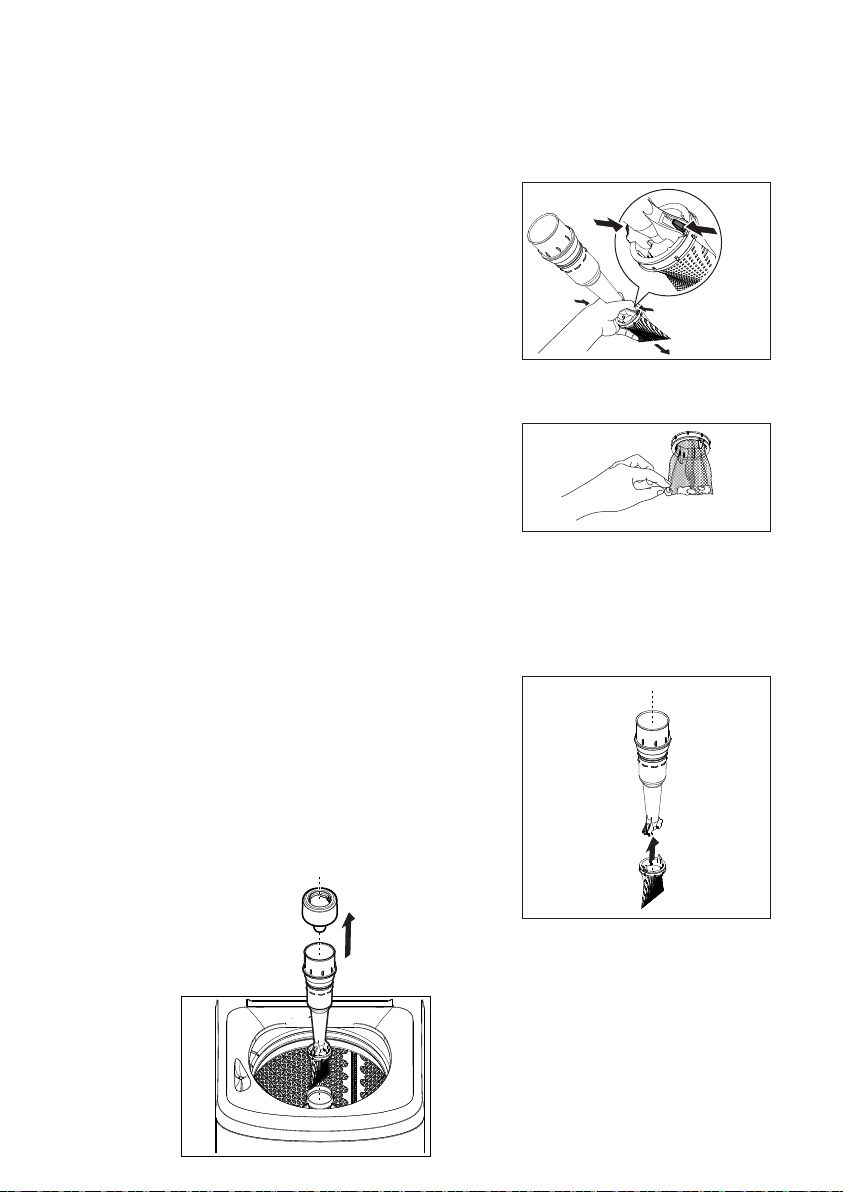
How to clean the lint filter:
SWT6055TMWA/SWT6555TMWA
SWT7055TMWA
1.
Remove the softener dispenser
cup and filter
column from
the centre
of the agitator.
2.
Unclip the filter bag from the
column.
Squeeze tabs
together and
3.
Turn the bag inside out and
remove the lint.
4.
Wash the filter bag and
dispenser cup in hot water.
5.
Reassemble the filter to the
column and place it back in the
centre of the agitator.
push out.
Page 21
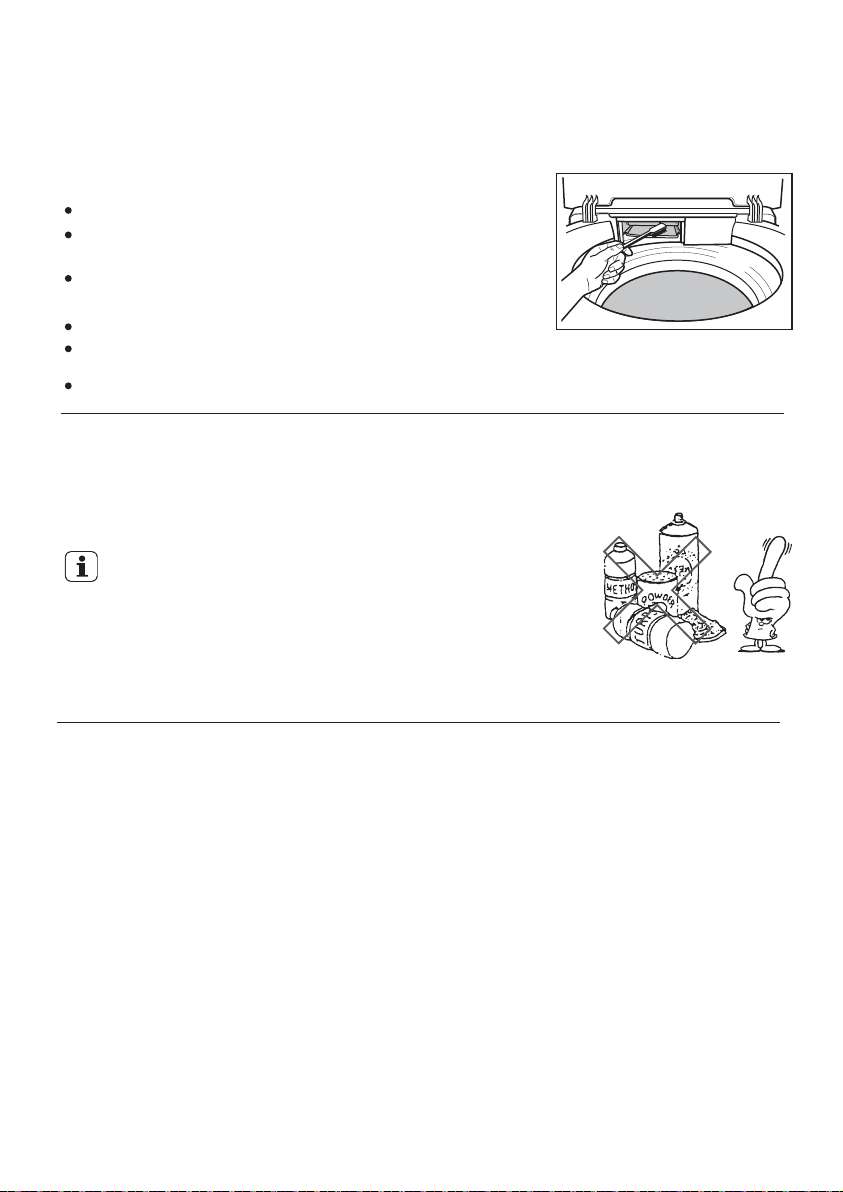
6.3 CLEANING THE DISPENSER (SWT7055LMWA)
The dispenser needs to be cleaned regularly, preferably after each wash. Inspect the
dispenser after each wash to see if there is any residue of detergent.
To do this proceed as follows:
Pull the dispenser drawer forward until it stops.
Lift the front of the drawer up and forward to remove
it from the runners.
Clean the dispenser drawer with hot water and a brush,
eg. an old toothbrush.
Dry the drawer.
Before replacing the dispenser back in its recess, clean the inside of the
drawer with an old toothbrush.
Put the dispenser back into its runners and close the drawer.
6.4 CLEANING YOUR WASHING MACHINE
To clean the inside and outside of your washing machine you should:
Wipe the surface with a mild dishwashing detergent and warm water.1.
Wipe dry with a soft cloth.2.
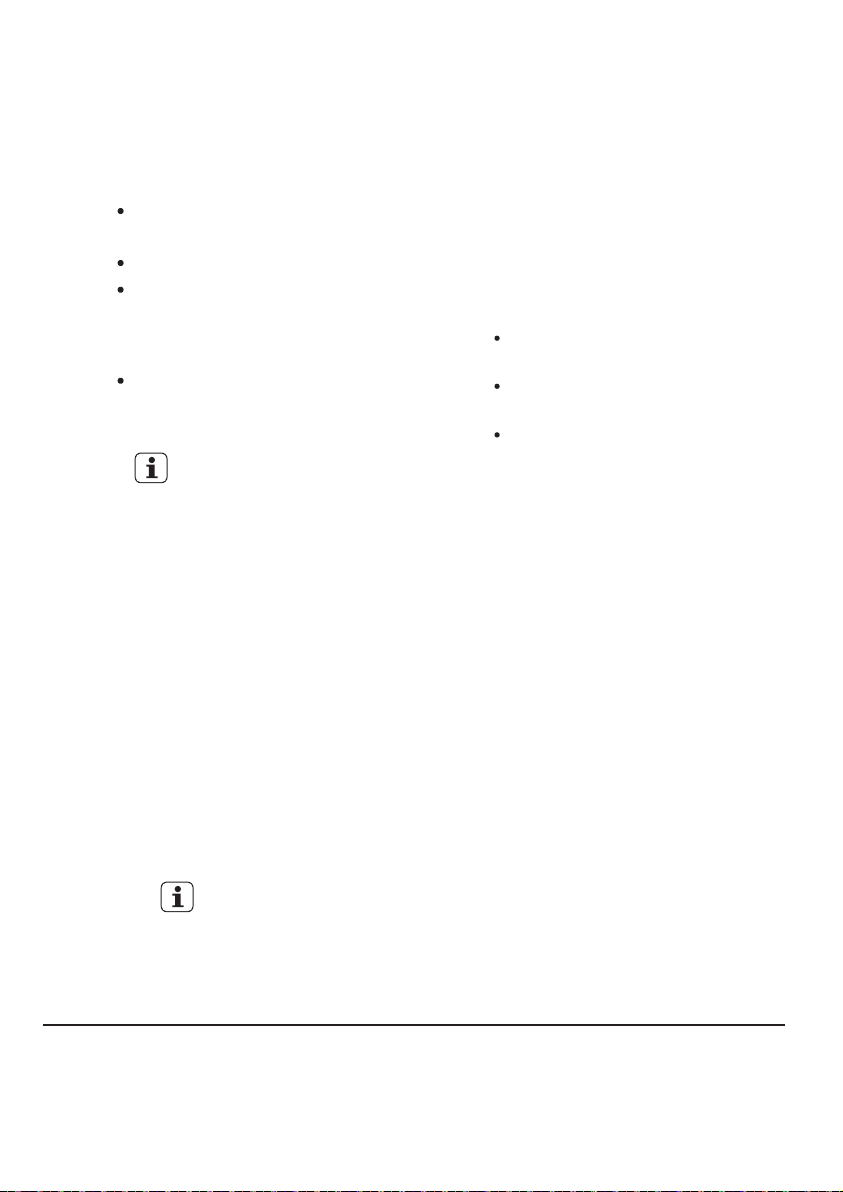
IMPORTANT:
Never use solvents, aerosol cleaners,
spray pack cleaners, glass, cleaners, metal
polishes, caustic materials, scourers or general
household cleaners on or near top panel
and lid, control panel or other parts of
your washing machine.
21
Page 22
22
6.5
CLEANING STAINS IN
THE WASHBOWL
Stains in the wash bowl can be
caused by:
metal objects such as bobby
pins, dressmaking pins and nails;
salt;
body oils and grease from very
dirty or sweaty clothes being
deposited around the top of the
washbowl;
excessive foam during wash if
incorrect or too much detergent
is used.
IMPORTANT:
Check all pockets before loading
clothes into your washing
machine.
Don’t leave wet clothing
(especially swimwear) in the bowl
for too long before you wash it.
AVOIDING BUILD UP OF
6.6
UNDISSOLVED
DETERGENTS
If you only wash with cold water,
undissolved detergent and body
oils will build up in the washing
machine. This build-up can cause
spotting on your clothes.
To avoid this build-up :
do not use too much fabric
softener with cold water;
select a hot water wash at least
once a month;
always dissolve the detergent in
one litre of warm water.
How To Clean the Stainless
Steel Wash Bowl :
1.
Wipe with a cleaning product
which is marked suitable for
stainless steel.
2.
Oily deposits can be removed
by wiping surfaces with a mild
dishwashing detergent and
warm water.
IMPORTANT:
Never use bleach cleaners or
steel wool to clean the
stainless steel washbowl.
Page 23
HELPFUL HINTS IN DEALING WITH WASHING
7.
PROBLEMS
7.1
RESIDUES ON WASHED
ITEMS
Some detergents have ingredients
which do not fully dissolve and as a
consequence, may leave white
residue or particles evident on the
surface of darker clothes in the
finished wash load. Similarly some
soils may not dissolve fully, resulting
in residue evident on lighter
coloured clothes.
If you are experiencing residue on
some clothes, the following tips will
help:
Check that you are using frontload
type detergent to minimise
over-sudsing. You may find
different brands of detergent give
better results. Liquid detergent
may be better than powder in
your situation.
Pre-mix the detergent thoroughly
in warm or hot water to improve
the dissolving.
Reduce detergent dosage to
between a 1/2 and 2/3 of the
manufacturer’s standard
recommendation to avoid over
concentration (the lower water
usage requires lower detergent
usage.)
Some residue maybe re-deposited lint, so be careful not to have
lint-producing items in a load
which has darker clothes.
Select deep rinse and not eco
rinse to help flush more particles
away.
Reduce the clothes load size per
wash to give more freedom for
the clothes to move around in the
wash bowl.
Use another program as below,
which has been designed to
minimise residual particles (they
are in order of increasing benefit
and will help you choose the best
program for your wash load.)
– The Colours Program
– The Heavy Duty Program
7.2
STAINED CLOTHES - HINTS
FOR REMOVING STAINS
The guide to stain removal on page
24 may assist you in stain removal.
Treat all stains as soon as possible.
The longer you leave a stain the
harder it will be to remove. Try
soakers and stain removers first.
If you use pre-treatment sprays or
stain removers, apply them to the
clothes items in a well ventilated
area away from your washing
machine.
Avoid the use of hot water on
stains as hot water will set stains.
Use light strokes and don’t rub
the stain remover into the fabric.
If you use a chlorine bleach,
follow the instructions on the
bottle and dilute it before putting
it on clothing.
Test coloured fabrics on an inside
seam for colour fastness before
using any stain removers or
bleaches.
Test synthetic fabric on an inside
seam before using any chemicals
or bleaches.
NOTE:
Chemicals referred to for stain
removal are available from your
local supermarket, hardware
store or the chemist.
23
Page 24
24
WARNING!
Pre-treatment sprays and stain
removers can damage plastic
components on your washing
machine.
Do no use dry cleaning fluids or
solvents near your washing
machine. These fluids will damage
your washing machine and may
cause an explosion.
7.3
YELLOWING OR GREYING CLOTHES
Problem Possible causes What to do
Incorrect wash times and
using insufficient detergent
which can cause redepositing of detergent on clothes.
Using incorrect type or too
much detergent can cause
Greyness
poor rinsing and poor spin
performance.
Mixing whites with very dirty
clothes, eg work clothes.
Using soap flakes instead
of laundry detergent.
CAUTION!
ONLY use low sudsing,
1.
front load washer detergent
in this machine, such as
Cold Power for Front
Loaders and High Efficiency
Top Loaders or detergent
labelled “Matic”.
2.
Re-sort load, then re-wash
using program selections
suitable for the fabric using
hot or warm water.
3.
If the water is very dirty or
very sudsy, repeat 2 above
reducing the amount of
detergent you use.
Yellowing
A build-up of oils in clothes
that come into close
contact with the skin, eg
underwear, T-shirts.
Ageing of clothes. Iron
deposits in the wash water.
Use of chlorine bleaches on
fabrics with resin finishes.
Incorrect drying.
Incorrect water temperatures ie. too hot or too cold.
Re-sort load, then re-wash
1.
using wash program
selections suitable for the
fabric using hot or warm
water.
2.
If the water is very dirty or
very sudsy, repeat 1 above
reducing the amount of
detergent you use.
NOTE: Synthetics which
have been washed in very
hot water will not respond
to any treatment.
Page 25
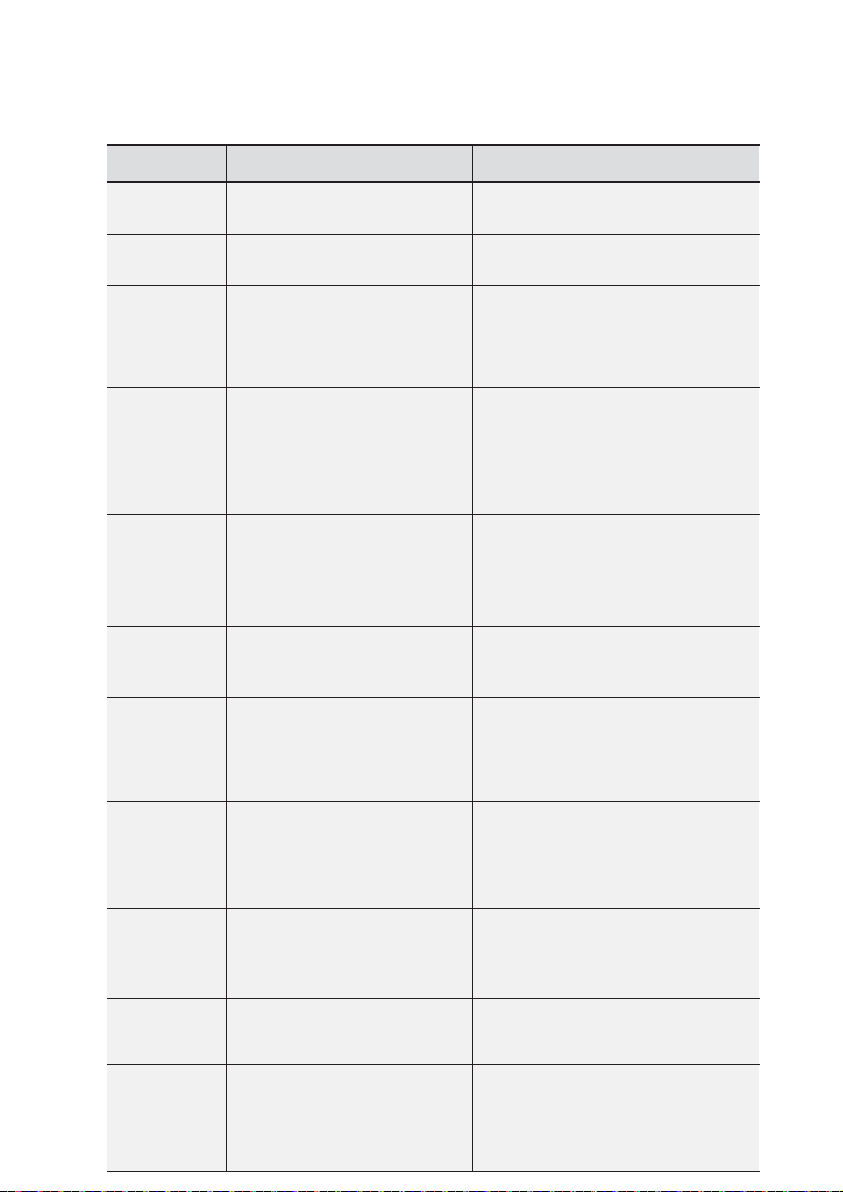
A GUIDE TO STAIN REMOVAL
8.
Stain White Cottons And Linens Washable Coloured Fabrics
Ball Point
Pen Ink
Spong with methylated spirit.
Bleach if required.
Same as for whites - use oxygen type
bleach.
25
Beetroot
Blood, Meat
Juice, Egg
(Dry Stain)
Blood, Meat
Juice, Egg
(Fresh Stain)
Candle Wax
Chewing
Gum
Chocolate
Coffee/tea
(Milk Or
Cream)
Coffee/tea
(Black), Fruit
Juice, White
Wine
Correcting
Fluid
Cosmetics
Rinse as soon as possible under
cold water. Bleach if necessary.
Cover area with meat tenderiser
(msg). Apply warm water to make
a paste. Wait 15-20 minutes.
Sponge with cool water or with
diluted bleach.
Rinse in cold water. If stain
remains, sprinkle with meat
tenderiser (msg). Let stand for
15-20 minutes. If stain still
remains, then sponge with diluted
bleach. Wash using hot water.
Scrape off excess, place stain
between clean white blotter or
several layers of facial tissue.
Sponge with dry cleaning fluid. If
spot remains, bleach.
Rub with ice to harden. Scrape
off excess with blunt knife.
Sponge with dry cleaning fluid.
Soak in warm water with
pre-soak product, and wash in
lukewarm water. Use dry
cleaning fluid (white spirits) to
remove any grease spots.
Rinse or soak in cold water. Work
detergent into stain. Thoroughly
rinse and dry. If a stain remains,
sponge with dry cleaning fluid. If
stain remains, bleach.
Pour boiling water through stain.
Bleach if necessary.
Scrape off as much as possible.
Rub clean with paint thinner or
white spirits.
Sponge with prewash stain
remover, liquid detergent or rub
with soap. If greasy stain persists,
soak in enzyme product then
wash.
Same as for whites - use oxygen type
bleach.
Same as for whites but select water
temperature suitable to fabric - use
oxygen type bleach.
Same as for whites but select water
temperature suitable to fabric - use
oxygen type bleach.
Same as for whites - use oxygen type
bleach.
Same as for whites.
Soak in warm water with pre-soak or
detergent solution. Treat any remaining
stain with oxygen bleach.
Same as for whites - use oxygen type
bleach.
Soak or rinse in cold water or sponge
with warm water and detergent. Use
oxygen type bleach.
Same as for whites.
Same as for whites.
Page 26
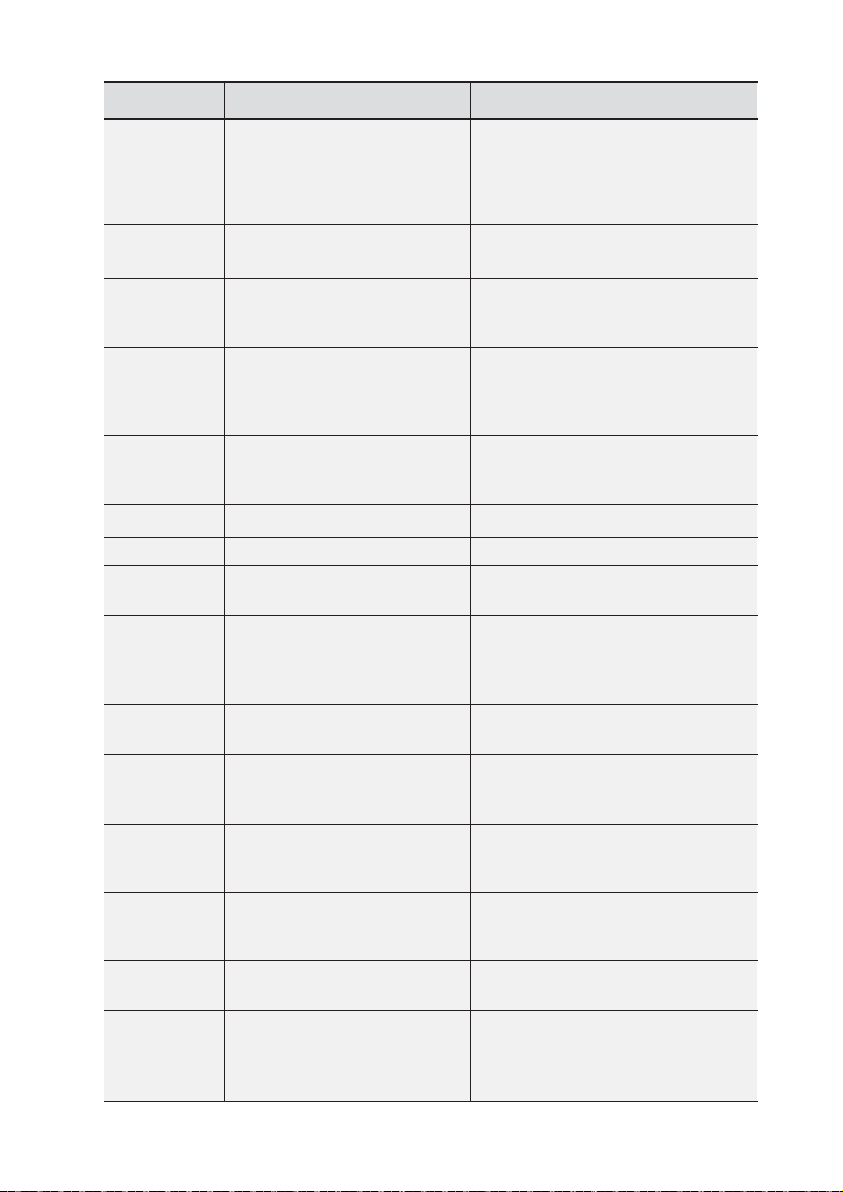
26
Stain White Cottons And Linens Washable Coloured Fabrics
Curries
Oil
Fruit
Grass,
Green
Vegetables
Ice Cream,
Cream Milk
Lipstick
Mildew
Mustard
Nail Polish
Paint (Oil
Based)
Red Wine
Scorch
Tomato
Sauce
Soak/rinse in lukewarm water
until a majority of the colour is
removed. Sponge with solvent to
break down any remaining fats
and oils then wash.
Sponge with dry cleaning fluid
(white spirits).
Sponge with warm water and
wash. Bleach remaining stain
with oxygen bleach.
Sponge with methylated spirit.
Wash using warm water.
Rinse or soak in cold water then
wash. If ice cream contains fruit
or chocolate treat as such.
Wash using hot water. Wash using warm water.Iodine
Apply oxalic acid and place in sun. Apply lemon juice and place in sun.Iron Rust
Rub with lard and wash using hot
water. Bleach if necessary.
Wash using hot water. Moisten
with lemon juice and let dry in
sun. If stain persists, bleach. Old
stains are hard to remove.
Wash using hot water and
bleach.
Sponge with dry cleaning fluid or
nail polish remover. Bleach
remove dye.
Scrape off fresh paint. Soften dry
paint with lard or oil, then sponge
with turpentine (turps).
Rub salt into the stain. Pour
boiling water through stain.
Bleach if necessary.
Moisten and place in sunlight.
Bleach if necessary.
Soak in cool water for 10 minutes.
Rub in liquid detergent then wash.
If stain persists, try dry cleaning
fluid or bleach.
Same as for whites. Check for colour
fastness before applying solvent.
Same as for whites.Fat/Grease/
Pour boiling water through stain.
Bleach remaining stain.
Same as for whites. Check colourfastness before applying methylated spirit.
For acetate, sponge with dry cleaning
fluid.
Same as for whites.
Rub with lard and wash using warm
water.
Same as for whites but select water
temperature to suit fabric.
Wash using warm water and use
oxygen bleach.
Sponge with dry cleaning fluid.
Same as for whites.
Same as for whites.
Usually a permanent stain. Brush
wools lightly with sandpaper.
Same as for whites - use oxygen type
bleach.
Page 27
27
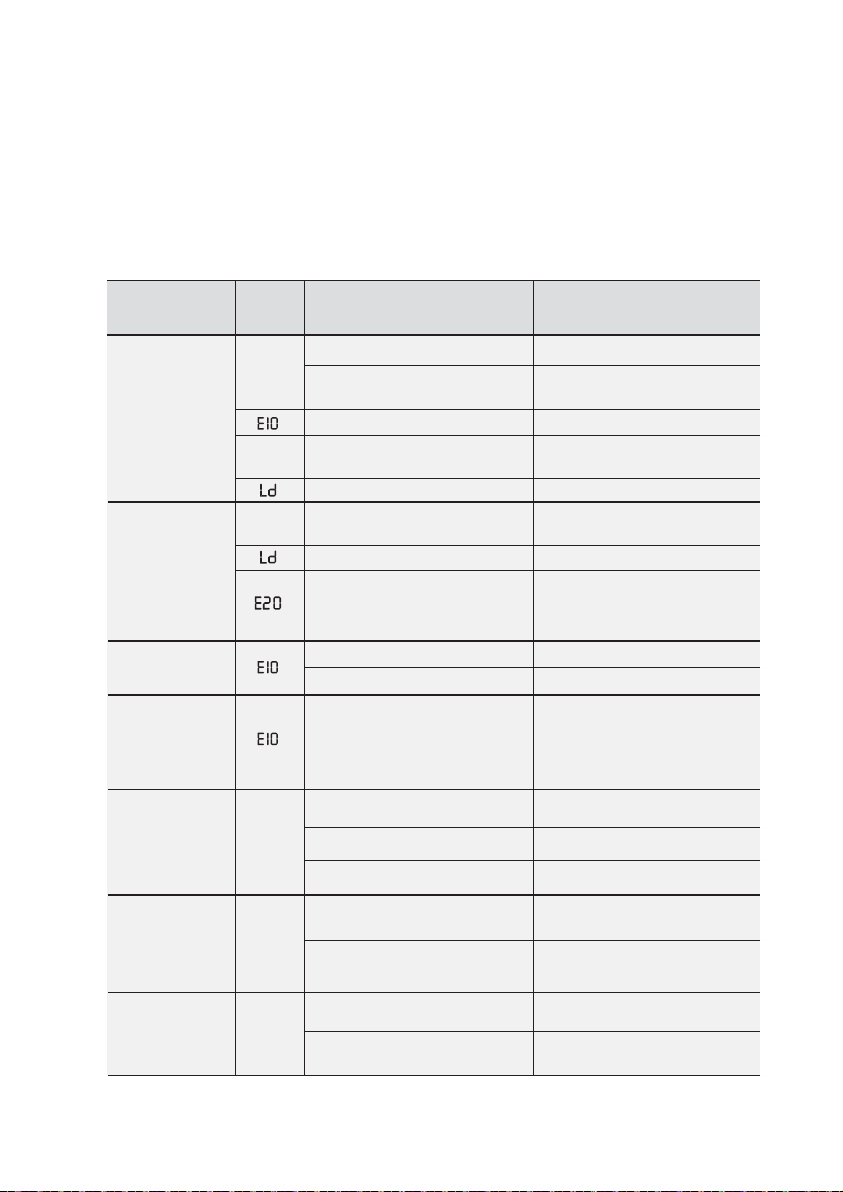
TROUBLE SHOOTING
9.
DO NOT call for service until you have checked the points listed below.
If you call for service and there is nothing wrong with your washing machine, you will
have to pay for the service call.
You will have to pay even when your washing machine is under warranty. Before you
call for service, check the points in the table below.
Problem Possible CausesDisplay
Code
Machine not
working.
EF0
Machine has
washed load
but will not
spinning.
Water in wash
bowl.
Will not fill
with water.
Water flowing
into wash
bowl
indefinitely.
Machine goes
out of balance
or vibrates
excessively
when spinning.
Water on floor.
EF0
EF0
What to do
Power not switched on.
No electricity supply through
the power point.
Water taps not turned on. Turn on taps.
Out of balance detected.
Lid not fully closed. Close lid.
Out of balance.
Lid not fully closed. Close lid.
Drain hose blocked.
Water taps not turned on.
Inlet hoses blocked.
Drain hose too low.
Machine not levelled.
Levelling feet not adjusted.
Clothes not evenly distributed.
Loose inlet hose connections.
Loose drain hose connections.
Switch on power point.
Check power point with
another appliance.
Open lid, redistribute load and
close lid.
Open lid, redistribute load,
close lid.
Check drain hose for blockage.
Wait a short while, press start
to continue.
Turn taps on.
Clean inlet hose filters.
Raise drain hose or fit a
syphon break.
Refer to installation instructions
for correct positioning of hose.
Level the machine properly.
Adjust feet to touch the floor.
Redistribute clothes evenly.
Check connections at taps and
rear of machine.
Check connections at rear of
machine.
Water splash.
Machine not levelled.
Water Level selection not
correct.
Level the machine properly.
See water level description
on page 9.
Page 28
28
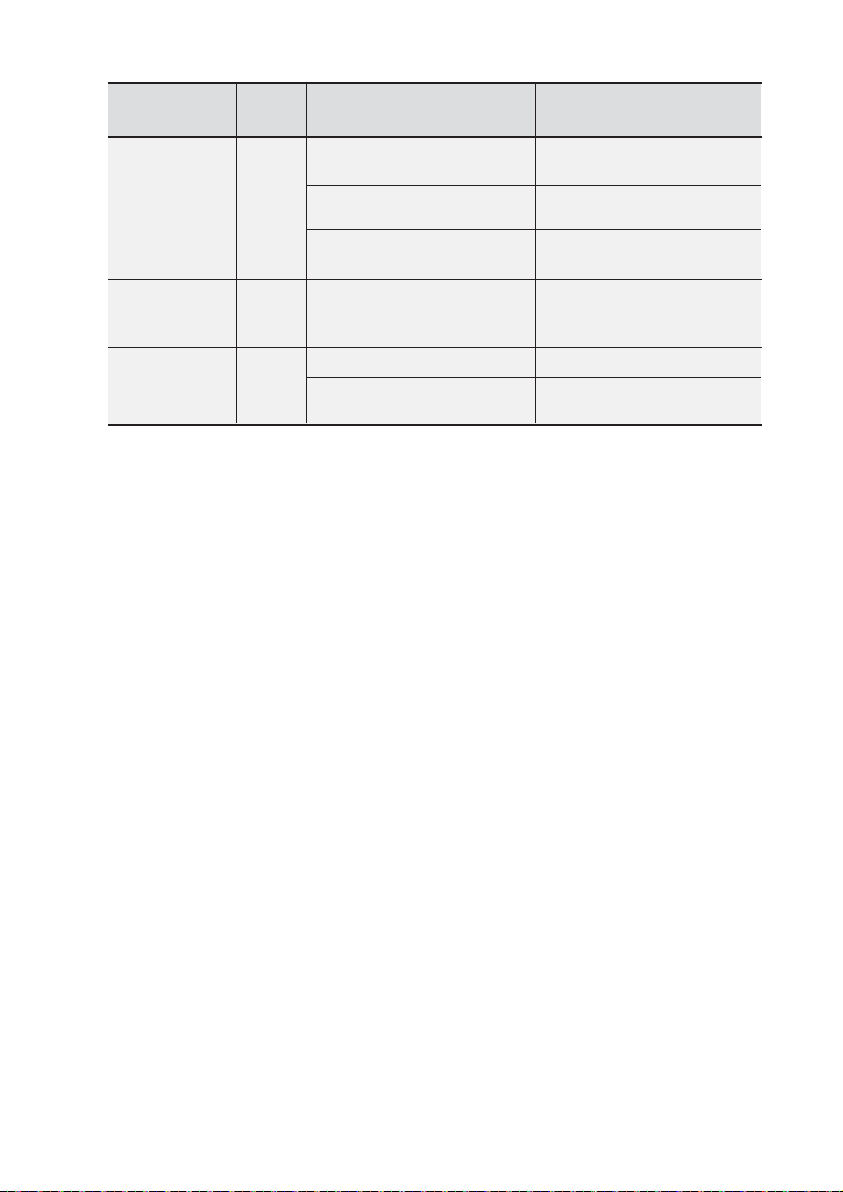
Problem Possible CausesDisplay
Code
Clothes still
dirty after wash
completed.
Scraping noise
on spin.
Humming,
clicking and
other noises.
What to do
Not enough or no detergent.
maximum load exceeded.
Incorrect wash program or
temperature selected.
Bra wire or other thin items
caught between inner and
outer washbowls.
Bowl rotation at start of wash. Normal noise.
Brake activation when
stopping after spin.
Check detergent use and
rewash clothes.
Remove some clothes and
rewash.
Reselect program or
temperature and rewash.
If the item is visible, remove it
with pliers.
Use a wash bag in future.
Normal noise.
Page 29
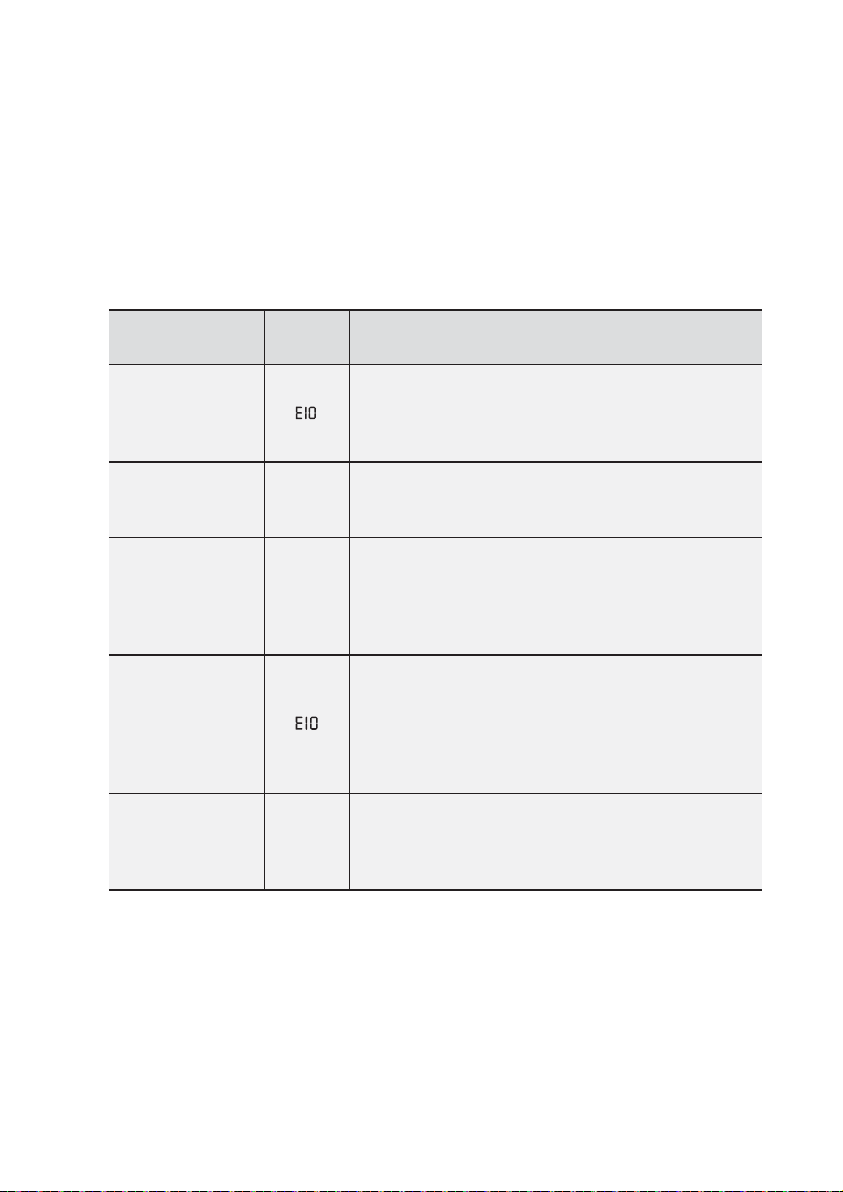
29
TROUBLESHOOTING FAULT DISPLAYS
If you have a problem with your washing machine and before you call service, make
sure you have followed ALL of the instructions that may remedy the problem. You
will find instructions in the ‘Troubleshooting’ section and in the table below.
When the washing machine detects a problem that requires your attention, you will
be alerted. The machine will warn you of this problem by displaying a fault code in
the digital display, accompanied by “Beeping”.
Fault information and the action you should take are described in the following table.
Description Display
Code
Not filling with
water
Flood
Draining problem
Loss of water,
while washing
Water level
problem
E30
E20
E30
Customer action (Summary)
Make sure both taps are on and hose filters are not
blocked. Raise drain hose if water is flowing out of drain
hose. Press “Start/Pause” to re-start wash.
If problem remains, call Service.
If the water is pouring onto the floor, turn OFF both taps.
Wait a few minutes to see if the fault is corrected.
If not, call Service.
Wait a few minutes to see if the fault is corrected.
If not, set the washing machine to PAUSE by press
“Start/Pause” button then check the drain hose for
blockage. Press “Start/Pause” to continue the wash.
If problem remains, call Service.
If water level in wash bowl is low and water is leaking on
the floor, rotate the PROGRAM KNOB to “Spin” program,
then press “Start/Pause” button.
Should this make things worse, turn off the machine and
call Service.
Otherwise, press “Start/Pause” to continue the wash.
Wait, this fault may clear itself. If not, rotate the
PROGRAM KNOB to “Spin” program, then press
“Start/Pause” button to drain the wash bowl.
If this problem is repeated, call Service.
Page 30
30
ENVIRONMENT CONCERNS
10.
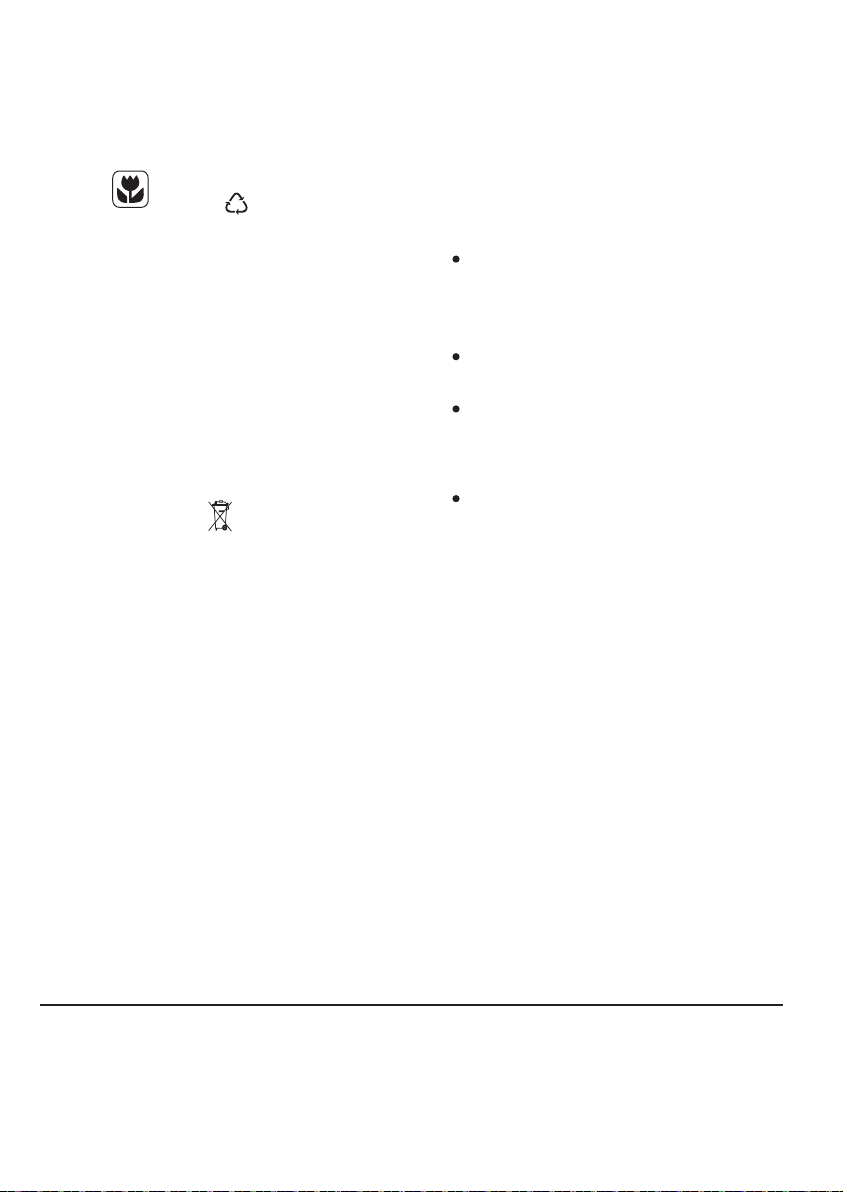
Packaging materials
The materials marked with the
symbol are recyclable.
>PE<=polyethylene
>PS<=polystyrene
>PP<=polypropylene
This means that they can be recycled
by disposing of them properly in
appropriate collection containers.
Old machine
Use authorised disposal sites for your
old appliance. Help to keep your
country tidy!
The symbol on the product or on its
packaging indicates that this product
may not be treated as household
waste.
Instead it shall be handed over to the
applicable collection point for the
recycling of electrical and electronic
equipment.
By ensuring this product is disposed of
correctly, you will help prevent potential
negative consequences for the
environment and human health, which
could otherwise be caused by
inappropriate waste handling of this
product.
For more detailed information about
recycling of this product, please contact
your local city office, your household
waste disposal service or the shop
where you purchased the product.
Ecological hints
To save water, energy and to help
protect the environment, we
recommend that you follow these tips:
Normally soiled laundry may be
washed without prewashing in order
to save detergent, water and time (the
environment is protected too!).
The machine works more economically if it is fully loaded.
With adequate pre-treatment, stains
and limited soiling can be removed;
the laundry can then be washed at a
lower temperature.
Measure out detergent according to
the water hardness, the degree of
soiling and the quantity of laundry
being washed.
Page 31
FOR SALES IN AUSTRALIA AND NEW ZEALAND
Warranty
APPLIANCE: SIMPSON WASHING MACHINES
This document sets out the terms and conditions of the product
warranties for Simpson Appliances. It is an important document.
Please keep it with your proof of purchase documents in a safe place
for future reference should there be a manufacturing defect in your
Appliance. This warranty is in addition to other rights you may have
under the Australian Consumer Law.
1. In this warranty:
(a) ‘ACL’ or ‘Australian Consumer Law’ means Schedule 2 to the
Competition and Consumer Act 2010;
(b) ‘Appliance’ means any Electrolux product purchased by you and
accompanied by this document;
(c) ‘ASC’ means Electrolux’s authorised serviced centres;
(d) ‘Simpson’ is the brand controlled by Electrolux Home Products Pty
Ltd of 163 O’Riordan Street, Mascot NSW 2020, ABN 51 004 762
341 in respect of Appliances purchased in Australia and Electrolux
(NZ) Limited (collectively “Electrolux”) of 3-5 Niall Burgess Road, Mount
(e) ‘Warranty Period’ means the period
(a) light globes, batteries,
(c) cosmetic damage which does not
Wellington, in respect of Appliances purchased in New Zealand;
warranty;
(f) ‘you’ means the purchaser of the Appliance not having purchased
the Appliance for re-sale, and ‘your’ has a corresponding meaning.
2. Application: This warranty only applies to new Appliances, purchased
and used in Australia or New Zealand and is in addition to (and does not
exclude, restrict, or modify in any way) other rights and remedies under
a law to which the Appliances or services relate, including any nonexcludable statutory guarantees in Australia and New Zealand.
3. Warranty Period: Subject to these terms and conditions, this warranty
continues for in Australia for a period of 24 months and in New Zealand
for a period of 24 months following the date of original purchase of the
Appliance.
• Inverter motor – Further 8 years
4. Repair or replace warranty: During the Warranty Period, Electrolux
or its ASC will, at no extra charge if your Appliance is readily accessible
for service, without special equipment and subject to these terms and
conditions, repair or replace any parts which it considers to be defective.
Electrolux may, in its absolute discretion, choose whether the remedy
for a valid warranty claim is repair or replacement. Electrolux or its
ASC may use refurbished parts to repair your Appliance. You agree that
any replaced Appliances or parts become the property of Electrolux.
5. Travel and transportation costs: Subject to clause 7, Electrolux will
bear the reasonable cost of transportation, travel and delivery of the
Appliance to and from Electrolux or its ASC. Travel and transportation will
be arranged by Electrolux as part of any valid warranty claim.
6. Proof of purchase is required before you can make a claim under this
warranty.
7. Exclusions: You may not make a claim under this warranty unless the
defect claimed is due to faulty or defective parts or workmanship. This
warranty does not cover:
(b) parts and Appliances not supplied by Electrolux;
Appliance;
or similar perishable parts;
in clause 3 of this
the operation of the
(d) damage to the Appliance caused by:
(i) negligence or accident;
(ii) misuse or abuse, including failure to properly maintain or service;
(iii) improper, negligent or faulty servicing or repair works done by
anyone other than an Electrolux authorised repairer or ASC;
(iv) normal wear and tear;
(v) power surges, electrical storm damage or incorrect power supply;
(vi) incomplete or improper installation;
(vii) incorrect, improper or inappropriate operation;
(viii) insect or vermin infestation;
(ix) failure to comply with any additional instructions supplied with
the Appliance;
In addition, Electrolux is not liable under this warranty if:
(a) the Appliance has been, or Electrolux reasonably believes that the
Appliance has been, used for purposes other than those for which
the Appliance was intended, including where the Appliance has
(b) the Appliance is
been used for any non-domestic purpose;
(c) the Appliance’s serial number or warranty seal has been removed
or defaced.
8. How to claim under this warranty: To enquire about claiming under
this warranty, please follow these steps:
(a) carefully check the operating instructions, user manual and the terms
of this warranty;
(b) have the model and serial number of the Appliance available;
(c) have the proof of purchase (e.g. an invoice) available;
(d) telephone the numbers shown below.
9. Australia: For Appliances and services provided by Electrolux in
Australia: Electrolux goods come with guarantees that cannot be
excluded under the Australian Consumer Law. You are entitled to a
replacement or refund for a major failure and for compensation for any
other reasonably foreseeable loss or damage. You are also entitled to
have the Appliance repaired or replaced if the Appliance fails to be of
acceptable quality and the failure does not amount to a major failure.
‘Acceptable quality’ and ‘major failure’ have the same meaning as
referred to in the ACL.
10. New Zealand: For Appliances and services provided by Electrolux
in New Zealand, the Appliances come with a guarantee by Electrolux
pursuant to the provisions of the Consumer Guarantees Act, the Sale
of Goods Act and the Fair Trading Act. Where the Appliance was
purchased in New Zealand for commercial purposes the Consumer
Guarantee Act does not apply.
11.
Electrolux and its agents including ASC may exchange information
in relation to you to enable Electrolux to meet its obligations under
this warranty. For more information on how we handle your personal
information, see our privacy policy at www.electrolux.com.au/other/
privacy/ or www.electrolux.co.nz/other/privacy/
without authority from Electrolux in writing;
You accept that if you make a warranty claim,
31
Before calling for service, please ensure that the steps listed in clause 8 above have been followed.
FOR SERVICE
or to
the address of your nearest
authorised service centre in Australia
PLEASE CALL 13 13 49
For the cost of a local call (Australia only)
FOR SERVICE
or to
the address of your nearest
authorised service centre in New Zealand
PLEASE CALL 0800 10 66 10
(New Zealand only)
SWMachine_Warr_Jan19
Important Notice
AUSTRALIA
ELECTROLUX HOME PRODUCTS
163 O’Riordan Street, Mascot NSW 2020
electrolux.com.au
NEW ZEALAND
ELECTROLUX (NZ) Limited
3-5 Niall Burgess Road, Mount Wellington
electrolux.co.nz
FOR SPARE PARTS IN AUSTRALIA
please visit shop.simpson.com.au or
FOR SPARE PARTS IN NEW ZEALAND
call 13 13 50
For the cost of a local call (Australia only)
or to
the address of your nearest
spare parts centre in New Zealand
PLEASE CALL 0800 10 66 20
(New Zealand only)
Page 32

www.simpson.com.au
G0028013-001-A12246403
Page 33
ARTWORK is 100% and is correct size when this line measures 80 mm
REVISION: DATE: DETAIL: REQUESTED BY: REMARK:
001 5 Feb 2020
Worawoot K.New create for Mini 7kg Agitator New Create
NOTE: THIS PAGE IS A GUIDELINE NOT AN ARTWORK
DO NOT PRINT
ID
COLOUR
Gray Scale1
Electrolux
BRAND
Worawoot K.
BY
-
DATE
100%
SCALE
This drawing contains confidential information and is the property of Aktiebolaget Electrolux, Stockholm, Sweden,
without whose permission it may not be copied, shown or handed to a third party or otherwise used, and it is to
be returned promptly upon request to Aktiebolaget Electrolux.
C ASIA
User Manual for MINI-SIMPSON
SWT7055LMWA,SWT6555TMWA
SWT6055TMWA, SWT7055TMWA
A12246403
Rev .01
G0028013 ARTWORK NO.:
TITLE
 Loading...