

Page 1
INSTALLATION INSTRUCTIONS
Thank you for buying this Washing Machine. It has been made for self installation by the customer.
Your dealer, Authorised Service centres or service technician can install it if you wish,
BUT YOU WILL HAVE TO PAY A FEE.
FAILURE TO FOLLOW THESE INSTRUCTIONS COULD RESULT IN DAMAGE
TO THE WASHING MACHINE WHICH MAY NOT BE COVERED BY WARRANTY.
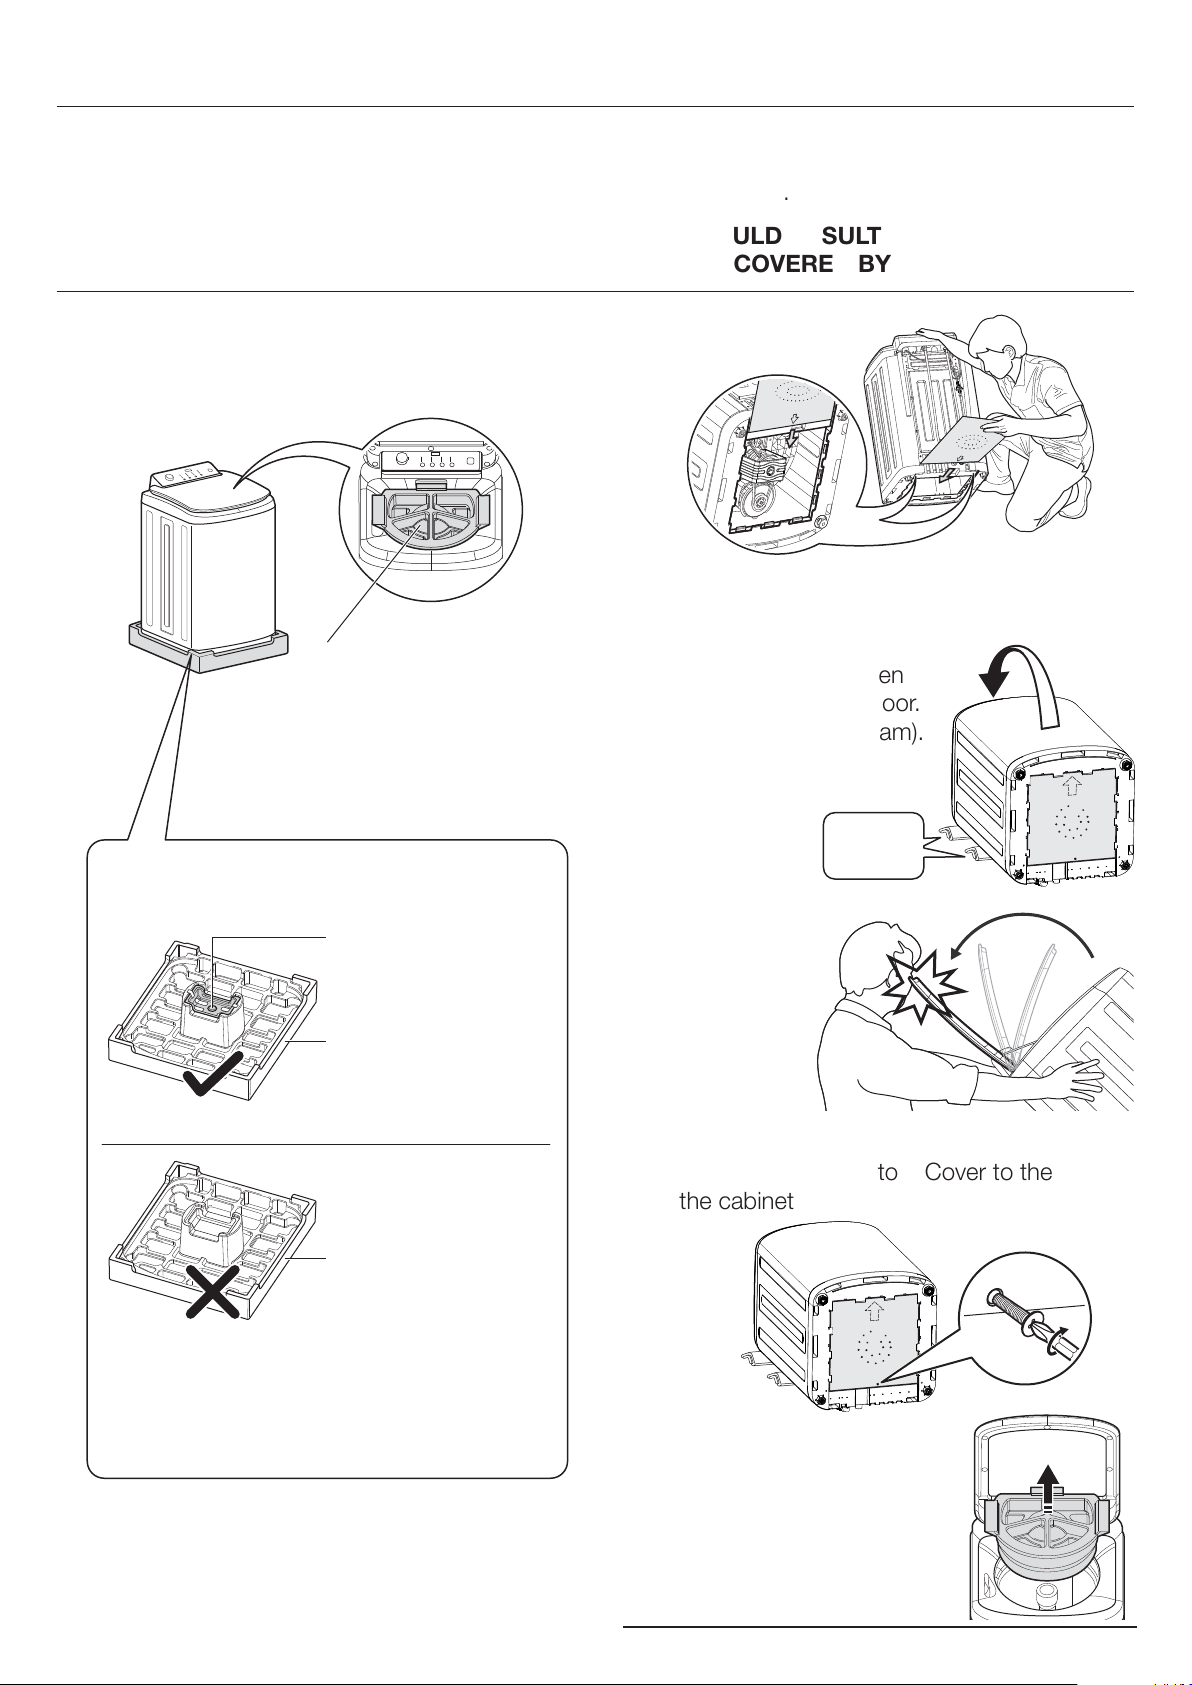
UNPACKING INSTRUCTIONS & BOTTOM
COVER INSTALLATION
Lift the machine out of the packaging base.1.
Lie down the washing machine on its back,
3.
taking care not to damage cabinet by placing
IMPORTANT:
The top polystyrene must
be removed LAST, for
protecting the drum from
hiting the cabinet when
the machine is tilted.
NOTE: After lifting the machine out, please
check packaging base as below:
two of the corner
packing pieces between
the machine and the floor.
(as shown in the diagram).
corner
packing
Plastic Motor Base
Polystyrene Base
All the packaging base should be removed.
Polystyrene Base
In case of packaging plastic motor base
remaining inside the product, please tilt the
machine to check and remove plastic
motor base from the washing machine
motor base.
Tilt the washing machine a little from back side
2.
and insert the Bottom Cover into the slot at
the bottom of the machine (as shown in the
diagram).
CAUTION:
Pay attention
to the
machine lid,
may hit your
body.
4.
Use the screw provided in the user manual
bag to secure the Bottom Cover to the bottom
of the cabinet
Lift the machine up to
5.
upright position and open
the washing machine lid.
Remove the top
polystyrene.
Page 2
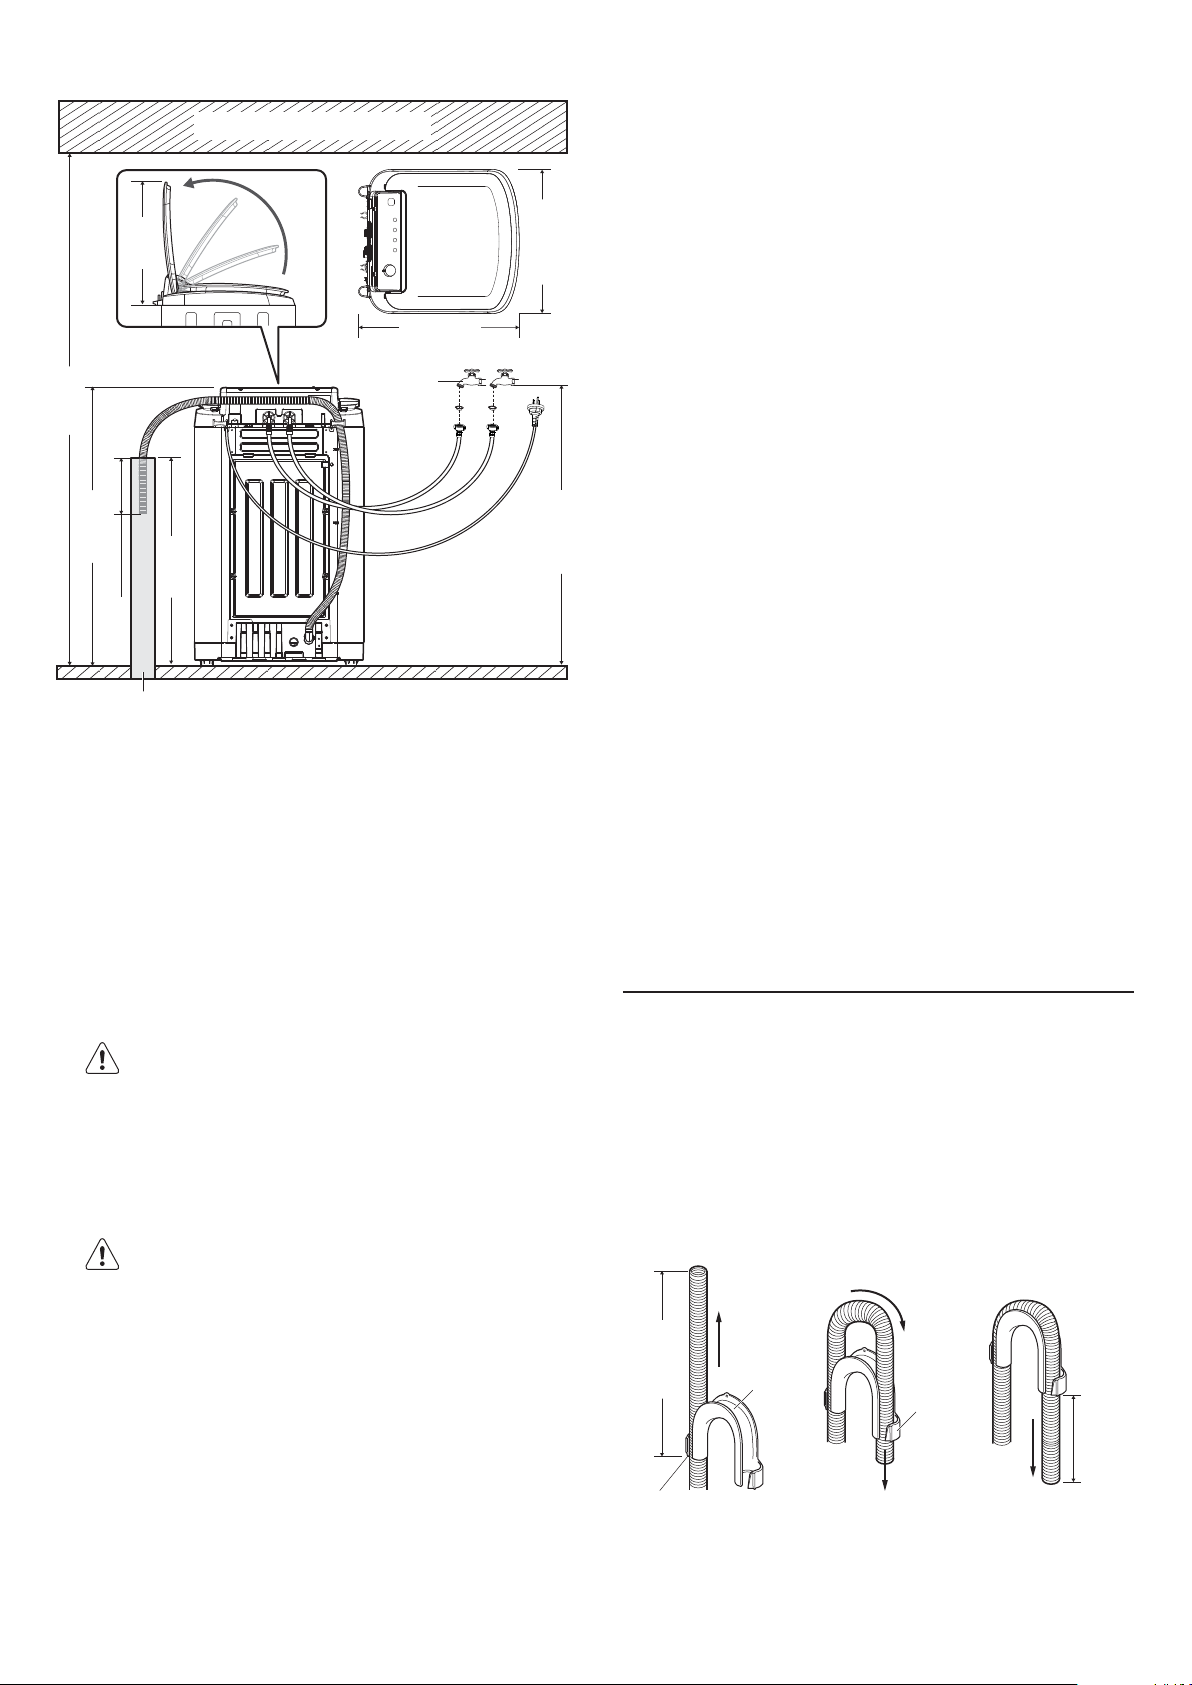
INSTALLATION REQUIREMENTS
Overhead Cupboards
554mm
D: 642mm
3/4” BSP
Thread
1500 Min.
H: 948mm
900 Min.
100mm Max.
32mm diameter extended
floor drain or 70 litres trough
Electrical: A properly earthed three pin power
1.
HotCold
1
3
3
0
0
0
0
m
m
m
m
point not more than 1500 mm from the
washing machine. It is not recommended that
an extension cord be used. If you need to use
an extension cord or portable outlet, make
sure that it is not subject to splashing or
ingress of moisture.
This machine is designed to operate on a
220-240 V, single-phase, 50 Hz supply.
“An incorrect power supply may void
your warranty.”
Check that your domestic electrical installation
can take the maximum load required (500 W),
also taking into account any other appliances
in use.
The manufacturer declines any
responsibility for damage or injury through
failure to comply with the above safety
precaution.
Your local Plumber can advise you on this.
Water pressures between 50-800kPa are
acceptable.
Floor Drain: The Washing Machine should be
3.
installed where a floor drain or hole (depending
on plumbing laws) is located. A floor drain is
W: 575mm
required to drain away any water which may
overflow from the washing machine due to a
hose leak or malfunction.
Area: For the washing machine a floor area of
4.
700 mm wide by 730 mm deep is required.
1
1
5
0
0
m
m
The floor should be firm and have a slope of
less than 20 mm in 600 mm. If you have
cupboards above the washing machine then
refer to the diagrams for clearance dimensions.
A 30 mm gap is required underneath the
1200mm Min.
washing machine when installed on a carpeted
floor.
Drain: A drain, either in the trough or as an
5.
extended floor drain at least 900 mm high and
32 mm diameter which can take a flow of 30
litres per minute of water and is less than 900
mm from the side of the machine.
Longer drain hoses can be purchased from
your dealer, Authorised Service Centres or
Spare Parts Centres if the drain or trough is
further away.
A storage trough that will hold 104 litres is
required if you are going to save all the wash
water.
INSTALLING DRAIN HOSE
Fitting hose former.
1.
Obtain hose former from inside the washbowl
and fit it to the drain hose. If your drain hose is
factory fitted you will need to pull the drain
hose from the hose transport retainer before
fitting the hose former.
bend hose
2.
Water: Cold and hot water taps with 3/4” BSP
threads less than 800 mm from the back of
the washing machine and at least 1200 mm
from the floor. Longer inlet hoses can be
purchased from Electrolux Home Products Pty.
Ltd. Spare Parts Centres or Authorised Service
Centres if the taps are further away.
If the HOT water temperature exceeds
70°C then a tempering valve must be fitted.
450 approx.
Pull apart to
insert hose.
Positioning of drain hose.
2.
Hose
Former
Pull apart
to insert
hose.
pull hose
Adjust the free length of hose to suit your
installation.
Adjust
length to
suit
trough.
Page 3

NOTE: It is important that the top of the drain
hose is above the joint between the washing
machine cabinet and the top panel (see picture).
INSTALLING INLET WATER HOSES
When installing this washing machine, use the
1.
hoses supplied. DO NOT USE OLD HOSES.
Adjust this
length to suit
your trough.
Trough
Top of drain hose must be above
the join (arrowed) between the
top panel and the cabinet.
DRAIN HOSE INSTALLATION OPTIONS
Trough
Ensure trough
is unplugged
to prevent
overflow or
siphon-back
of waste
water into
washing
machine bowl.
Trough
Bypass
The inlet hoses have the sealing washer fitted.
Take the inlet hose with the RED coloured end
2.
and connect to the hot water tap. Similarly
connect the hose with the BLUE end to the
cold water tap.
Make sure the connections are tight.
Water Tap
Filter and rubber washer
inside nut.
Twist
Inlet hose
3.
Turn the taps on and check that there are no
leaks from the connections.
If you only have a cold water tap, you must
4.
remove the inlet hose with the RED ends from
the washing machine and fit a blank cap with
a sealing washer to the HOT water inlet valve,
otherwise water will leak out of the valve.
NOTE: With cold water tap only, you must
only select cold water temperatures.
Extended Floor
Drain
32mm
diameter
extended floor
drain or 70
litres trough.
900mm Min.
100mm Max.
Part Number:
0065-200-012
A blank cap is available from Electrolux Home
Products Pty. Ltd. Spare Parts Centres or
Authorised Service Centres.
Turn off the water taps and move the washing
5.
machine into its final position.
Make sure that the inlet and drain hoses
do not kink.
Page 4

LEVELLING OF MACHINE
It is important that your washing machine
stands firm and level on the floor to ensure
correct operation.
Use a spirit level on the front and side panels
1.
of the washing machine to check the levels.
The spirit level should be used close to the
corners of the washing machine for accuracy.
By hand, or using a spanner if necessary, the
front legs are adjustable and the rear legs are
factory fitted in a fixed position (Unadjustable
legs have a round base).
Use a spirit level on the
front and side panels to
check the levels.
When the washing machine is levelled, try to
3.
rock it from corner to corner. If it does rock,
adjust the legs again until it is levelled and
does not rock.
Can rock
corner to
corner, please
adjust the legs
again.
Stable, does
not rock.
Tilt the washer a little to adjust the front legs.
If you do not have a spirit level, as a guide use
2.
the edge of a door frame, cupboard or bench
to check that the washing machine is levelled.
Never place cardboard, wood or similar
materials under the machine to compensate
for any unevenness in the floor.
OPERATION
Turn on the water taps and check for any
1.
leaks at the connections.
Connect the plug to a power-point and switch
2.
on power.
Your automatic machine is now ready for
3.
operation. Please refer to your Owner’s Manual
to understand the many features of your new
washing machine and for the operating
instructions.
Install the machine on a flat hard floor. Make
sure that air circulation around the machine is
not impeded by carpets, rugs etc.
Check that the machine does not touch the
wall or cupboard units.
A00275001-001-232014
 Loading...