

Page 1
PROFESSIONAL PRESSURE WASHER
INSTRUCTION
MAX.
RPM
MANUAL
MIN.
MANUEL
D’UTILISATION
MANUAL DE
INSTRUCCIONES
NOTE: Photographs and line drawings used in this manual are for reference only and do
not represent a specificmodel.
REMARQUE: Les photographies et schémas figurant dans ce guide sont incorporés
seulement à titre de référence et ne représentent pas un modelparticulier.
NOTA: Las fotografías y los dibujos lineales utilizados en este manual son solo referencias
y no representan un modelo específico.
If your pressure washer is not working properly or if there are parts missing or broken,
please DO NOT RETURN IT TO THE PLACE OF PURCHASE. Contact our Customer Service
Department at 1-877-362-4271 or www.simpsoncleaning.com
Si votre rondelle de pression ne travaille pas convenablement ou s'il y
a des parties manquant ou cassé, s'il vous plaît le PAS LE RETOURNE AU LIEU
D'ACHAT. Contacter notre département de service clients à 1-877-362-4271 o
www.simpsoncleaning.com
Si su lavadora a presión no trabaja correctamente ó encuentra partes rotas
ófaltantes, por favor NO LA REGRECE AL LUGAR DONDE LA COMPRO.
Contáctese con nuestro Departamento de Servicio al Cliente llamando al
1-877-362-4271 ou www.simpsoncleaning.com
IMPORTANT: Please make certain that the person who is to use this equipment carefully reads
and understands these instructions before operating.
IMPORTANT: Assurez-vous que toute personne qui utilisera cet équipement lise attentivement
ces instructions avant de l’utiliser.
IMPORTANTE: Aségurese por favor de que la persona que vaya a utilizar este equipo lea con
cuidado y comprenda estas instrucciones antes de operar.
VEA EL ESPAÑOL EN LA CONTRAPORTADA. INSTRUCTIVO DE OPERACIÓN,
CENTROS DE SERVICIO Y PÓLIZA DE GARANTÍA. ADVERTENCIA:
LÉASE ESTE INSTRUCTIVO ANTES DE USAR EL PRODUCTO.
SAVE THIS MANUAL FOR FUTURE REFERENCE
LISEZ ET CONSERVEZ CES INSTRUCTIONS
CONSERVE ESTAS INSTRUCCIONES PARA FUTURAS CONSULTAS
art No. 7110421 Rev. A MAY2020
P
Page 2

SAFETY GUIDELINES - DEFINITIONS
This manual contains information that is important for you to know and understand.
This information relates to protecting YOUR SAFETY and PREVENTING
EQUIPMENT PROBLEMS. To help you recognize this information, we use the
symbols below. Please read the manual and pay attention to thesesymbols.
DANGER: Indicates an imminently hazardous situation which, if not avoided,
will result in death or seriousinjury.
WARNING: Indicates a potentially hazardous situation which, if not avoided,
could result in death or seriousinjury.
CAUTION: Indicates a potentially hazardous situation which, if not avoided, may
result in minor or moderateinjury.
NOTICE: Indicates a practice not related to personal injury which, if not avoided,
may result in propertydamage.
IMPORTANT SAFETY INSTRUCTIONS
DANGER: Carbon Monoxide. Using an engine indoors can kill you in
minutes. Engine exhaust contains high levels of carbon monoxide (CO), a
poisonous gas you cannot see or smell. You may be breathing CO even if you
do not smell engine exhaust.
• NEVER use an engine inside homes, garages, crawlspaces or other partly
enclosed areas. Deadly levels of carbon monoxide can build up in these areas.
Using a fan or opening windows and doors does NOT supply enough freshair.
• ONLY use outdoors and far away from open windows, doors and vents. These
openings can pull in engineexhaust.
• Even when the engine is used correctly, CO may leak into your home. ALWAYS
use a battery-powered or battery backup CO alarm in your house. Read and
follow all directions for CO alarm before using. If you feel sick, dizzy or weak
at anytime, move to fresh air immediately. See a doctor. You could have carbon
monoxidepoisoning.
WARNING: Do not operate this unit until you read this instruction manual and
the engine instruction manual for safety, operation and maintenance instructions. If
you have any questions regarding the product, please contact our customer
service department at www.simpsoncleaning.com.
DANGER: Risk of injection or severe injury. Keep clear of nozzle. Do not
direct discharge stream at persons or live animals. This product is to be used
only by trainedoperators.
WARNING: This product and its exhaust can expose you to chemicals including
lead and lead compounds, and carbon monoxide, which are known to the State of
California to cause cancer and birth defects or other reproductive harm. For more
information go to www.P65Warnings.ca.gov.
WARNING: Always wear appropriate personal hearing and other protection
during use. Under some conditions and duration of use, noise from this product
may contribute to hearing loss.
2- ENG
Page 3

WARNING: This product may not be equipped with a spark-arresting muffler.
If the product is not equipped and will be used around flammable materials or
on land covered with materials such as agricultural crops, forest, brush, grass or
other similar items, then an approved spark arrester must be installed and is legally
required in the state of California. It is a violation of California statutes section
130050 and/or sections 4442 and 4443 of the California Public Resources Code,
unless the engine is equipped with a spark arrester, as defined in section 4442, and
maintained in effective working order. Spark arresters are also required on some
U.S. Forest Service land and may also be legally required under other statutes
andordinances.
SAVE THESE INSTRUCTIONS
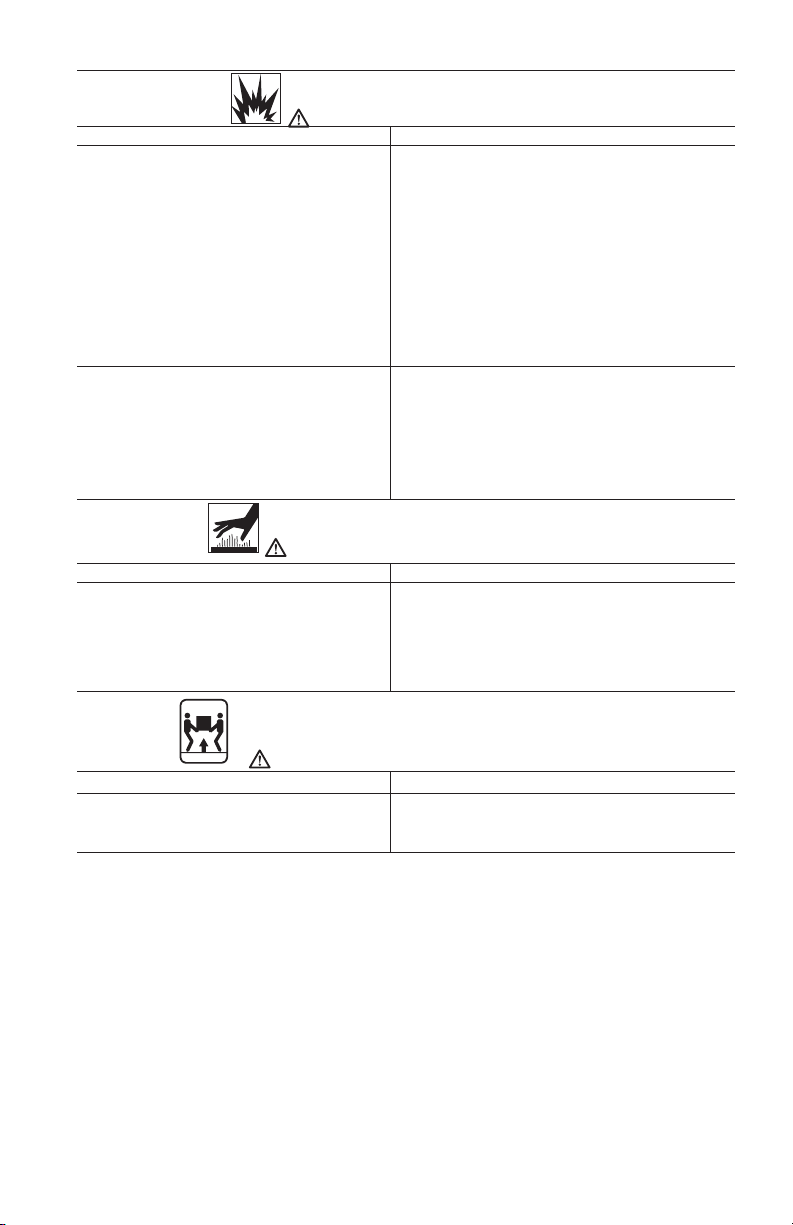
DANGER: RISK OF EXPLOSION OR FIRE
WHAT CAN HAPPEN HOW TO PREVENT IT
• Spilled gasoline and it’s vapors can
become ignited from cigarette sparks,
electrical arcing, exhaust gases and
hot engine components such as
themuffler.
• Heat will expand fuel in the tank which
could result in spillage and possible
fireexplosion.
• Operating the pressure washer in an
explosive environment could result in
afire.
• Materials placed against or near the
pressure washer can interfere with
its proper ventilation features causing
overheating and possible ignition of
thematerials.
• Muffler exhaust heat can damage
painted surfaces, melt any material
sensitive to heat (such as siding,
plastic, rubber, vinyl or the pressure
hose, itself), and damage liveplants.
• Improperly stored fuel could lead to
accidental ignition. Fuel improperly
secured could get into the hands of
children or other unqualifiedpersons.
• Use of acids, toxic or corrosive
chemicals, poisons, insecticides, or
any kind of flammable solvent with
this product could result in serious
injury ordeath.
• Shut off engine and allow it to cool before
adding fuel to thetank.
• Use care in filling tank to avoid spilling fuel.
Move pressure washer away from fueling
area before startingengine.
• Keep maximum fuel level 1/2" (12.7mm)
below bottom of filler neck to allow
forexpansion.
• Operate and fuel equipment in wellventilated areas free from obstructions.
Equip areas with fire extinguisher suitable
for gasolinefires.
• Never operate pressure washer in an area
containing dry brush orweeds.
• Always keep pressure washer a minimum
of 4' (1.2 m) away from surfaces (such
as houses, automobiles or live plants)
that could be damaged from muffler
exhaustheat.
• Store fuel in an OSHA approved container,
in a secure location away from workarea.
• Do not spray flammableliquids.
3 - ENG
Page 4
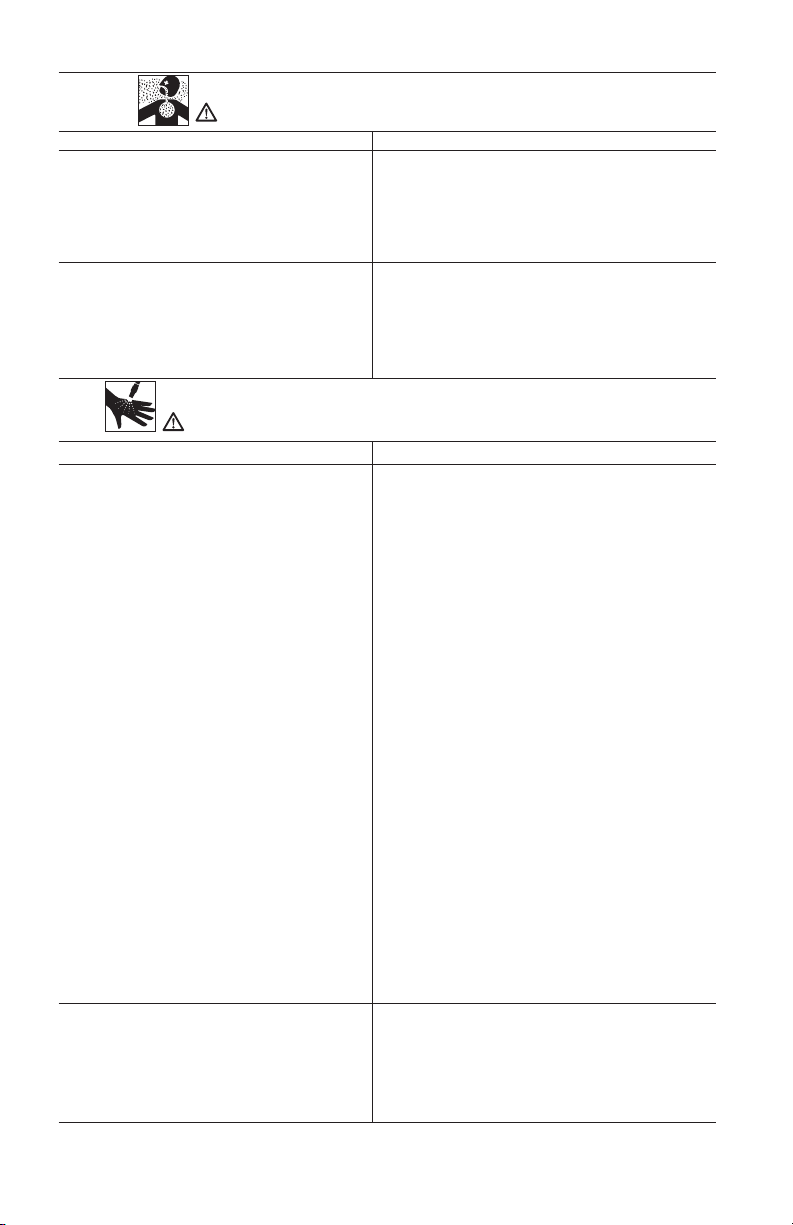
DANGER: RISK TO BREATHING (ASPHYXIATION)
WHAT CAN HAPPEN HOW TO PREVENT IT
• Breathing exhaust fumes will cause
• Operate pressure washer in a wellserious injury or death! Engine
exhaust contains carbon monoxide,
an odorless and deadlygas.
• Some cleaning fluids contain
• Never operate unit in or near a location
• Use only cleaning fluids specifically
substances which could cause injury
to skin, eyes orlungs.
DANGER: RISK OF FLUID INJECTION AND LACERATION
WHAT CAN HAPPEN HOW TO PREVENT IT
• Your pressure washer operates at fluid
• Inspect the high pressure hose regularly.
pressures and velocities high enough
to penetrate human and animal flesh
which could result in amputation or
other serious injury. Leaks caused
by loose fittings or worn or damaged
hoses can result in injection injuries.
DO NOT TREAT FLUID INJECTION
• Never touch, grasp or attempt to cover
AS A SIMPLE CUT! See a physician
immediately!
• Never place hands in front ofnozzle.
• Direct spray away from self andothers.
• Make sure hose and fittings are tightened
• Do not allow hose to contactmuffler.
• Never attach or remove wand or hose
• When using replacement lances or guns
• Injuries can result if system pressure
• To relieve system pressure, shut off
is not reduced before attempting
maintenance ordisassembly.
• Use only accessories rated equal
ventilated area. Avoid enclosed areas
such as garages, basements,etc.
occupied by humans oranimals.
recommended for high pressure washers.
Follow manufacturers recommendations.
Do not use chlorine bleach or any other
corrosive compound.
Replace the hose immediately if it is
damaged, worn, has melted from
contacting the engine, or shows any signs
of cracks, bubbles, pinholes, or other
leakage. Never grasp a high pressure
hose that is leaking ordamaged.
a pinhole or similar water leak on the
high pressure hose. The stream of
water IS under high pressure and WILL
penetrateskin.
and in good condition. Never hold onto
the hose or fittings duringoperation.
fittings while system ispressurized.
with this pressure washer, DO NOT use
a lance and/or lance/gun combination
that is shorter in length than what was
provided with this pressure washer as
measured from the nozzle end of the
lance to the guntrigger.
engine, turn off water supply and pull gun
trigger until water stopsflowing.
to or higher than the rating of the
pressurewasher.
4- ENG
Page 5
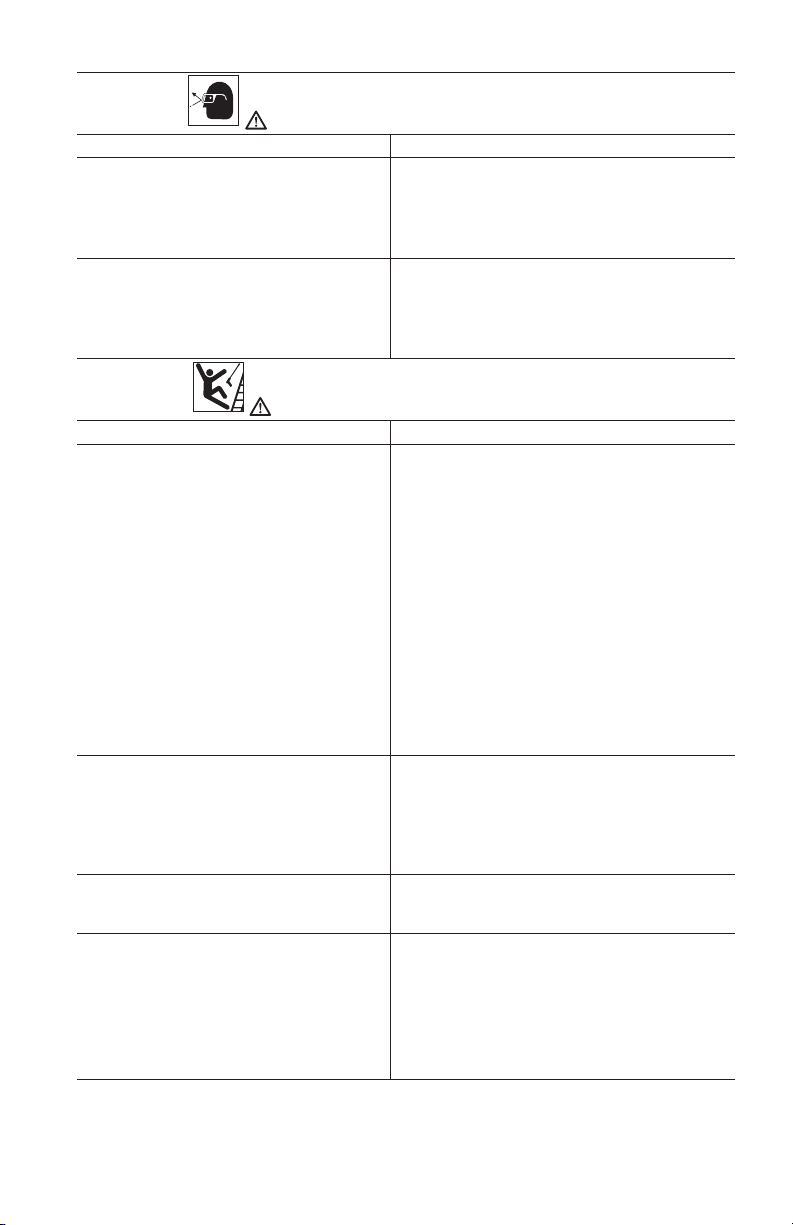
DANGER: RISK OF INJURY FROM SPRAY
WHAT CAN HAPPEN HOW TO PREVENT IT
• High-velocity fluid spray can cause
objects to break, projecting particles
at highspeed.
• Light or unsecured objects can
become hazardousprojectiles.
DANGER: RISK OF UNSAFE OPERATION
WHAT CAN HAPPEN HOW TO PREVENT IT
• Unsafe operation of your pressure
washer could lead to serious injury or
death to you orothers.
• If proper starting procedure is not
followed, engine can kickback causing
serious hand and arminjury.
• The spray gun/wand is a powerful
cleaning tool that could look like a toy
to achild.
• Reactive force of spray will cause
gun/wand to kickback, and could
cause the operator to slip or fall or
misdirect the spray. Improper control
of gun/wand can result in injuries to
self and others.
• Always wear ANSI-approved Z87.1
safety glasses. Wear protective clothing
to protect against accidentalspraying.
• Never point wand at or spray people
oranimals.
• Always secure trigger lock when
wand is not in service to prevent
accidentaloperation.
• Never permanently secure trigger in pullback (open)position.
• Do not use chlorine bleach or any other
corrosivecompound.
• Become familiar with the operation and
controls of the pressurewasher.
• Keep operating area clear of all persons,
pets andobstacles.
• Do not operate the product when fatigued
or under the influence of alcohol or drugs.
Stay alert at alltimes.
• Never compromise the safety features of
thisproduct.
• Do not operate machine with missing,
broken or unauthorizedparts.
• Never leave wand unattended while unit
isrunning.
• If engine does not start after two pulls,
squeeze trigger of gun to relieve pump
pressure. Pull starter cord slowly until
resistance is felt. Then pull cord rapidly
to avoid kickback and prevent hand or
arminjury.
• Keep children away from the pressure
washer at alltimes.
• Do not overreach or stand on an unstable
support.
• Do not use pressure washer while
standing on a ladder.
• Grip gun/wand firmly with both
hands. Expect the gun to kickback
whentriggered.
5 - ENG
Page 6
DANGER: RISK OF INJURY OR PROPERTY DAMAGE WHEN
TRANSPORTING OR STORING
WHAT CAN HAPPEN HOW TO PREVENT IT
• Fuel or oil can leak or spill and could
result in fire or breathing hazard.
Serious injury or death can result.
Fuel or oil leaks will damage carpet,
paint or other surfaces in vehicles
ortrailers.
• Oil could fill the cylinder and damage
the engine if the unit is not stored or
transported in an upright position.
• If pressure washer is equipped with
a fuel shut-off valve, turn the valve to
the OFF position before transporting to
avoid fuel leaks. If pressure washer is not
equipped with a fuel shut-off valve, drain
the fuel from tank before transporting.
Only transport fuel in an OSHA-approved
container.
• Always place pressure washer on
a protective mat when transporting
to protect against damage to vehicle
fromleaks.
• Always transport and store unit in an
upright position. Remove pressure
washer from vehicle immediately upon
arrival at yourdestination.
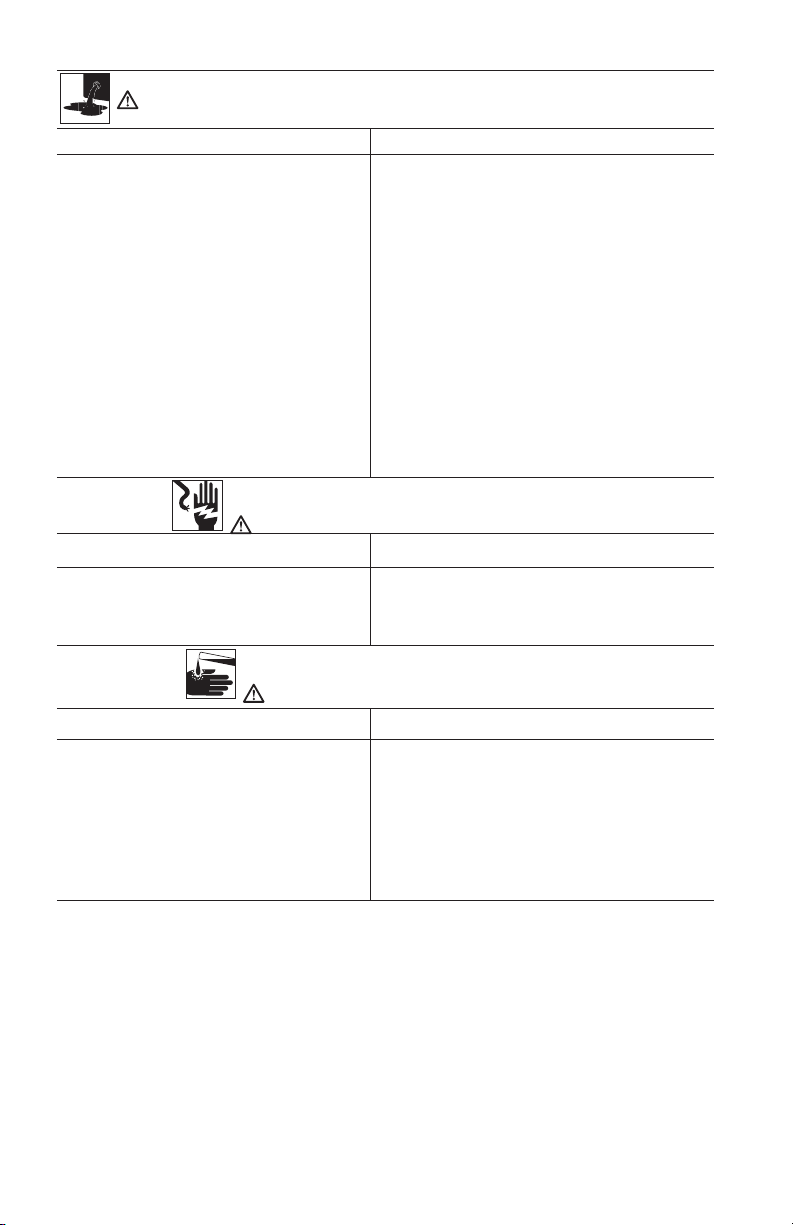
DANGER: RISK OF ELECTRICAL SHOCK
WHAT CAN HAPPEN HOW TO PREVENT IT
• Spray directed at electrical outlets or
switches, or objects connected to an
electrical circuit, could result in a fatal
• Unplug any electrically operated product
before attempting to clean it. Direct spray
away from electric outlets andswitches.
electricalshock.
DANGER: RISK OF CHEMICAL BURN
WHAT CAN HAPPEN HOW TO PREVENT IT
• Use of acids, toxic or corrosive
chemicals, poisons, insecticides, or
any kind of flammable solvent with this
product could result in serious injury
ordeath.
• Do not spray acids, gasoline, kerosene,
or any other flammable materials with this
product. Use only household detergents,
cleaners and degreasers recommended
for use with pressurewashers.
• Wear protective clothing to protect
eyes and skin from contact with
sprayedmaterials.
6- ENG
Page 7
WHAT CAN HAPPEN HOW TO PREVENT IT
WARNING: RISK OF BURSTING
• Over inflation of tires could result in
serious injury and property damage.
• High-velocity fluid spray directed at
pneumatic tire sidewalls (such as
found on automobiles, trailers and
the like) could damage the sidewall
resulting in serious injury.
WARNING: RISK OF HOT SURFACES
WHAT CAN HAPPEN HOW TO PREVENT IT
• Contact with hot surfaces, such as
engine exhaust components, could
result in seriousburn.
• Use a tire pressure gauge to check the
tires pressure before each use and while
inflating tires; see the tire sidewall for the
correct tire pressure.
NOTE:
Air tanks, compressors and similar
equipment used to inflate tires can fill small
tires similar to these very rapidly. Adjust
pressure regulator on air supply to no more
than the rating of the tire pressure. Add air
in small increments and frequently use the
tire gauge to prevent overinflation.
• On pressure washers rated above
1600 PSI (11032 kPa) use the widest
fan spray (40º nozzle) and keep the
spray a minimum of 8" (20 cm) from the
pneumatic tire sidewall. Do not aim spray
directly at the joint between the tire and
rim.
• During operation, touch only the control
surfaces of the pressure washer. Keep
children away from the pressure washer
at all times. They may not be able to
recognize the hazards of thisproduct.
WARNING: RISK OF INJURY FROM LIFTING
WHAT CAN HAPPEN HOW TO PREVENT IT
• Serious injury can result from
attempting to lift too heavy anobject.
SAVE THESE INSTRUCTIONS
FOR FUTURE USE
7 - ENG
• The pressure washer is too heavy to be
lifted by one person. Obtain assistance
from others beforelifting.
Page 8
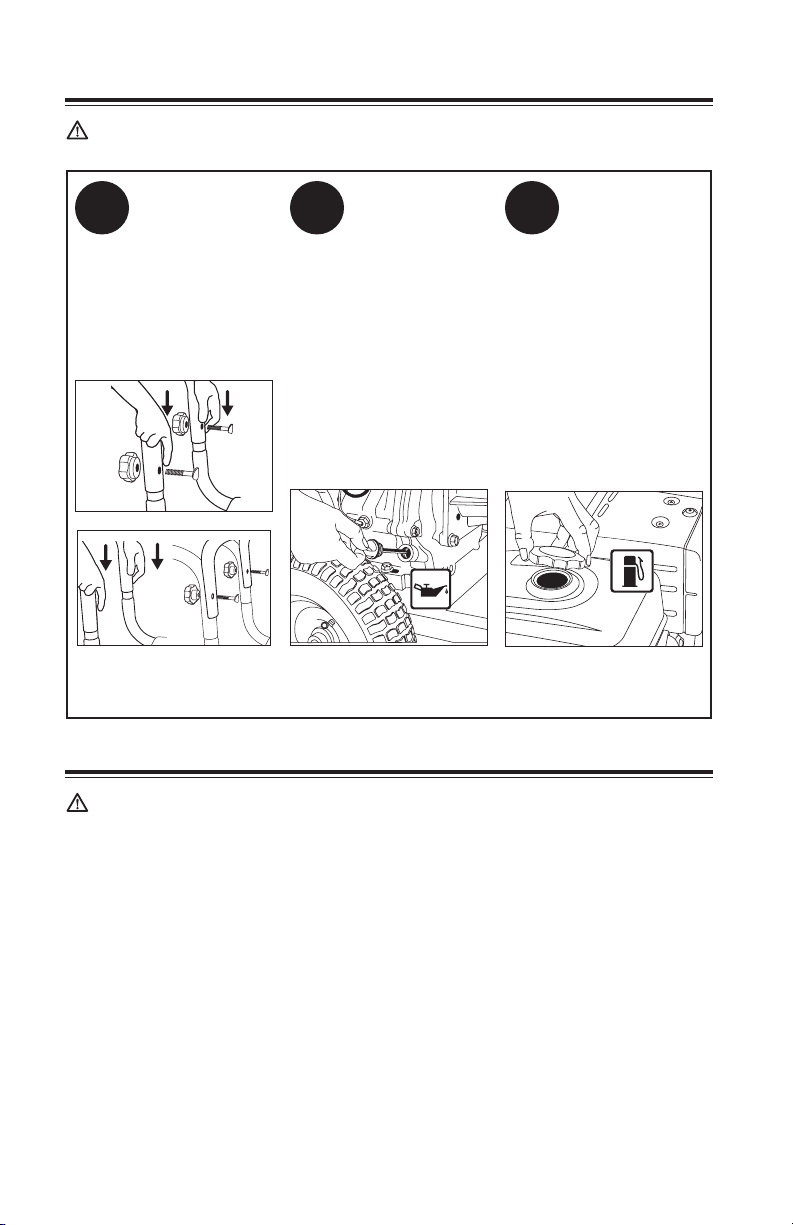
QUICK SETUP GUIDE
WARNING: To reduce the risk of injury, read the pressure washer instruction
manual and the engine instruction manual before operating pressure washer.
Install the
Handle
A
assembly onto the
frame. (if equipped) Align
holes in the top handle
with the mounting holes
in the handle assembly.
Secure with saddle
bolts and knobs.
IMPORTANT: Ethanol ShieldTM (sold separately) is a fuel stabilizer that helps
eliminate and prevent ethanol related problems in power equipment. Follow the
instructions on the container and add to the gasoline.
Slide the handle
without oil. Before
starting engine, add
the oil provided. Check
oil level prior to each
use. Refer to Engine
Owner’s Manual for
complete procedure.
OR
Add/Check Oil
B
The engine
is shipped
Add Gasoline
C
In a well
outdoor area add fresh,
high quality, unleaded
gasoline with a pump
octane rating of 86 or
higher. Do not overfill.
Wipe up spilled fuel
before starting the
engine. Refer to Engine
Owner's Manual for
complete procedure.
ventilated
QUICK START GUIDE
DANGER:
• Never run engine indoors or in enclosed, poorly ventilated areas. Engine
exhaust contains carbon monoxide, an odorless and deadly gas.
• Risk of fluid injection and laceration. When using the high-pressure setting,
DO NOT allow the high-pressure spray to come in contact with unprotected
skin, eyes or with any pets or animals. Serious injury will occur.
8- ENG
Page 9
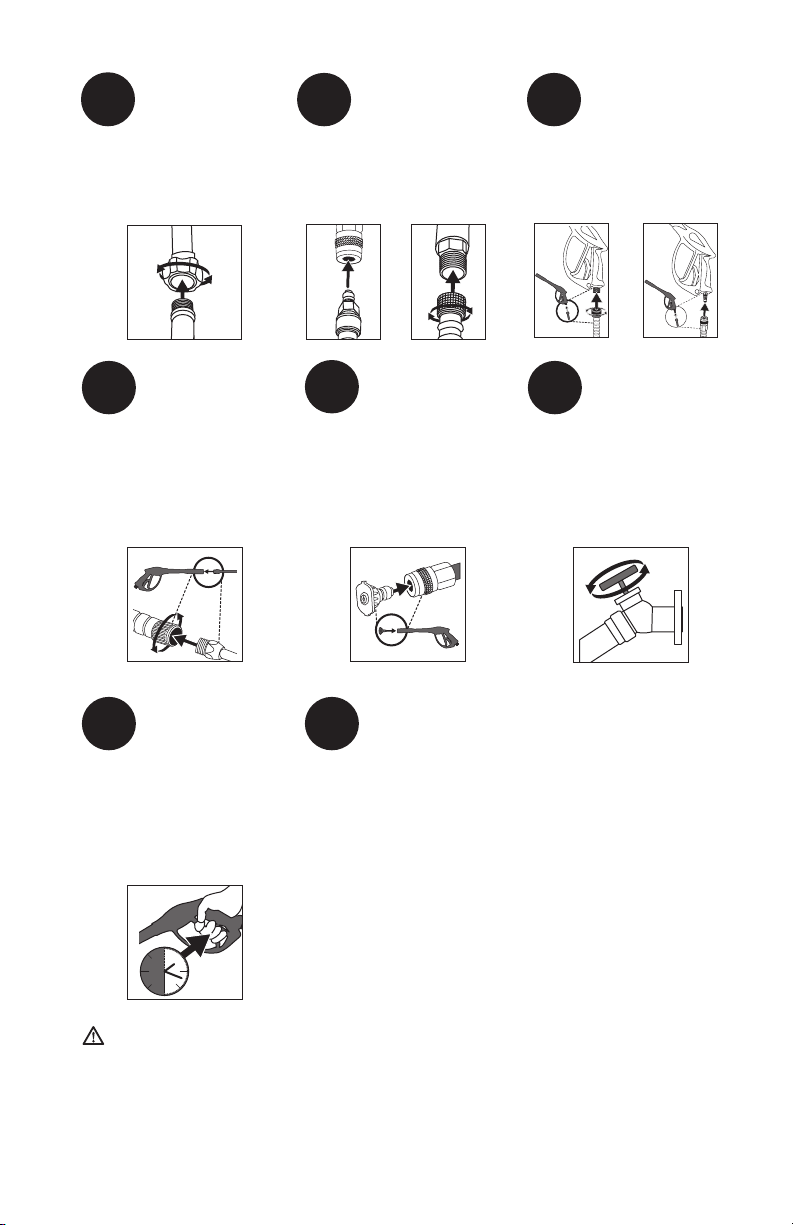
Connect Garden
30 S
Hose to Pump
1
garden hose to
the pump inlet.
Thread the
Connect High
Pressure Hose
2
to Pump
Connect the high
pressure hose to
the pump outlet.
Connect High
Pressure Hose
3
to Spray Gun
Thread the other end
of the high pressure
hose to the spray gun.
Connect Spray
Wand to Spray
4
Gun
Thread the spray
wand into the end
of the spray gun.
Release Air from
System
7
air from pump and
high pressure hose by
depressing trigger until a
steady stream of water is
present. Approximately
30 seconds.
Release all
OR
Connect QC
Nozzles to Spray
5
Wand
Pull quick connect
coupler back and insert
nozzle. Release quick
connect coupler and
twist nozzle to make sure
it is secure in coupler.
Start engine. See
Engine Owner's
8
Manual for
correct
procedure.
OR
Turn Water
Faucet
6
Completely On
Do not run the unit
without water supply
connected and turned on.
Use Cold Water Only.
WARNING: This Guide is not a substitute for reading the operator's manual.
User must read and understand operator's manual before using this product.
9 - ENG
Page 10
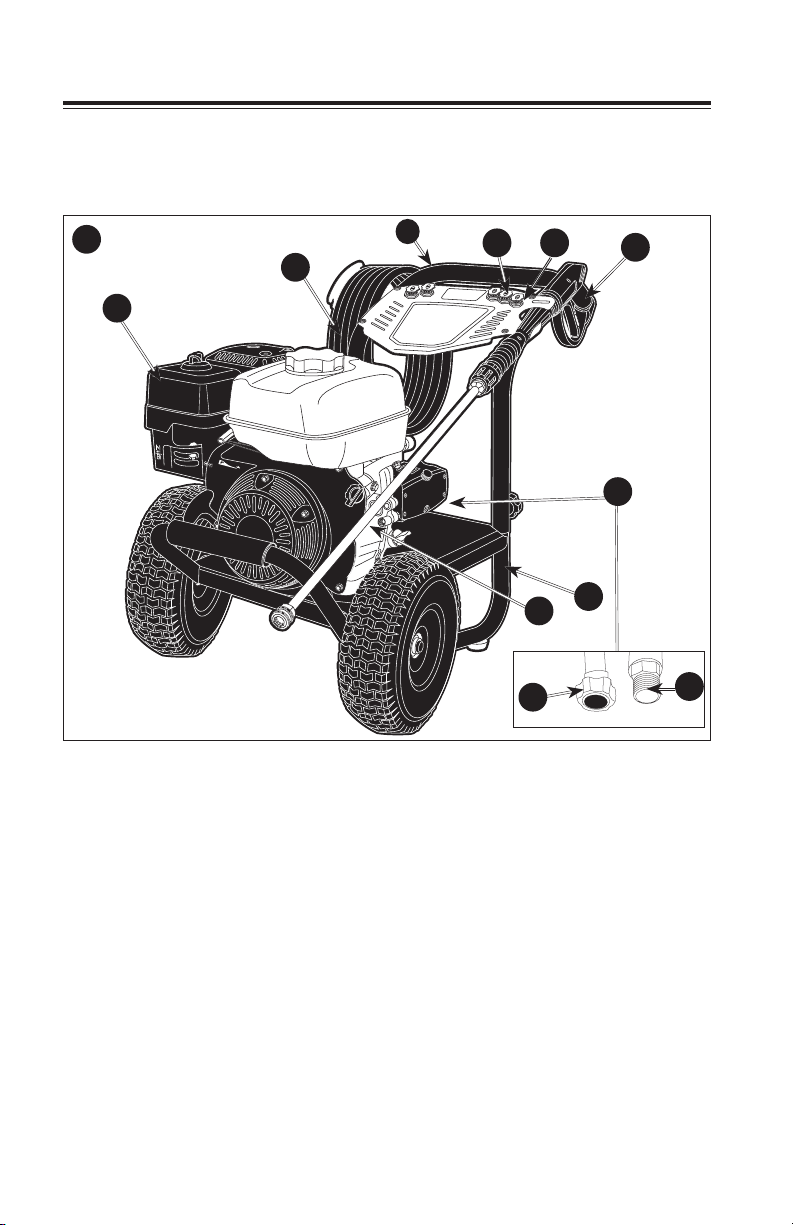
GET TO KNOW THE PRESSURE WASHER
NOTE: Photographs and line drawings used in this manual are for reference
only and do not represent a specificmodel.
Compare the illustrations with your unit to familiarize yourself with the location of
various controls and adjustments. Save this manual for future reference.
1
C
B
MAX.
RPM
MIN.
G
K L
E
J
D
A
H
I
BASIC ELEMENTS OF A PRESSURE WASHER (FIG. 1)
A. High Pressure Pump: Increases the pressure of the watersupply.
B. Engine: Drives the high pressure pump. Refer to the Engine Owner's Manual
for location and operation of enginecontrols.
C. High Pressure Hose: Carries the pressurized water from the pump to the gun
and spray wand.
D. Spray Gun: Connects with spray wand to control water flow rate, direction
andpressure.
E. Quick-Connect Spray Wand: Allows the user to quickly change out
high pressure nozzles. See How To Use Spray Wand instructions in
Operationsection.
F. Detergent Siphon Hose (not shown): Feeds cleaning agents into the pump to mix
with the water. See
in
Operation
G. Handle
H. Frame
I. Pump Outlet
How To Apply Chemicals/Cleaning Solvents
section.
instructions
10- ENG
Page 11
J. Pump Inlet
K. Quick Connect Nozzles
L. Nozzle Holder
BASIC ELEMENTS OF AN ENGINE
Refer to the Engine Owner's Manual for location and operation of enginecontrols.
Choke Control: Opens and closes carburetor chokevalve.
Starter Grip: Pulling starter grip operates recoil starter to crankengine.
Engine Switch: Enables and disables ignitionsystem.
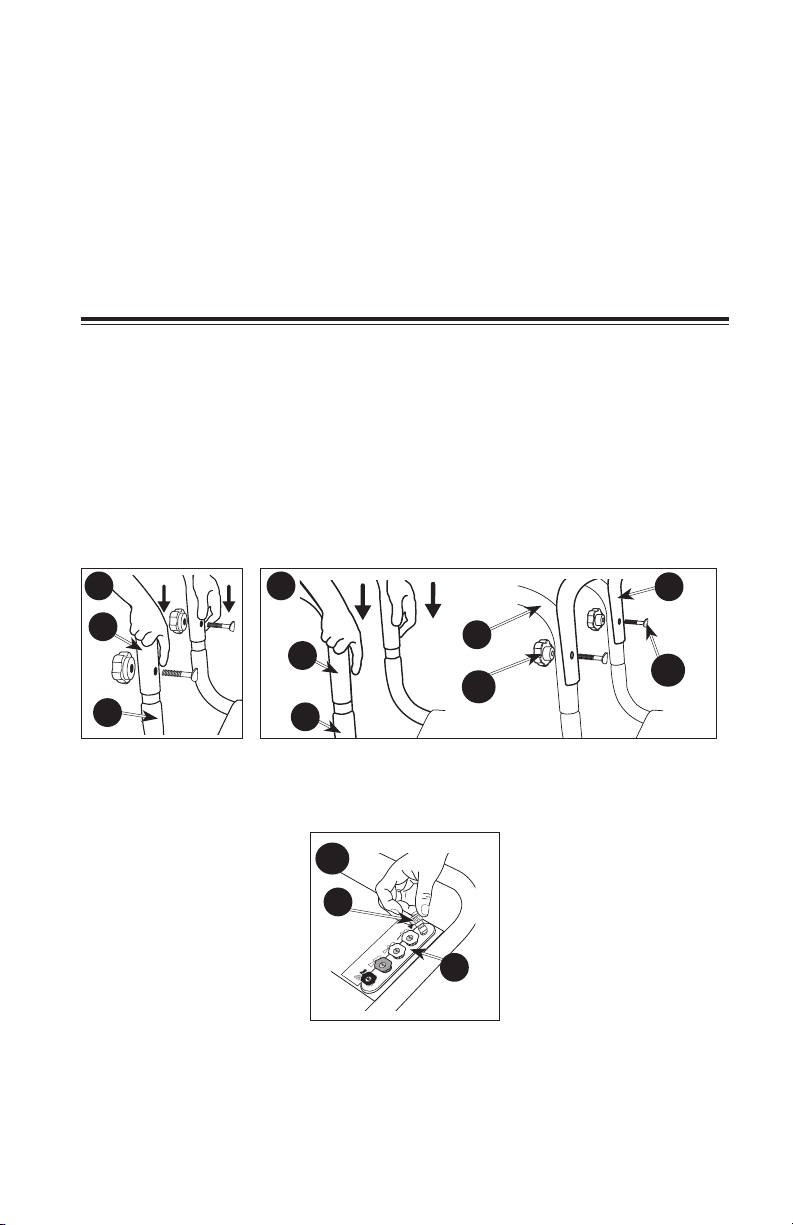
ASSEMBLY INSTRUCTIONS (FIG. 2–4)
1. Locate and remove all loose parts from thecarton.
2. Cut four corners of the carton from top to bottom and lay the panelsflat.
3.
(Figure 2) Slide the handle assembly (G) onto the frame (H)and secure with
saddle bolts andknobs.
OR
3. (Figure 2A) Align holes in the top handle (S) with the mounting holes in the
handle assembly (G). Insert saddle bolts (DD) through aligned holes and
secure top handle to handle assembly with knobs (EE). Tighten until snug.
NOTICE: Risk of personal injury. Avoid placing hands between handle and frame
when assembling to preventpinching.
2
2A
S
G
G
H
H
G
DD
EE
4. Remove the colored quick-connect nozzles (K) from the plastic bag and insert
them into correct grommet on the nozzle holder (L). Nozzles are color coded
to match colored nozzles on label.
2B
K
L
5. Connect wand (E) to gun (D). Tightensecurely.
11 - ENG
Page 12
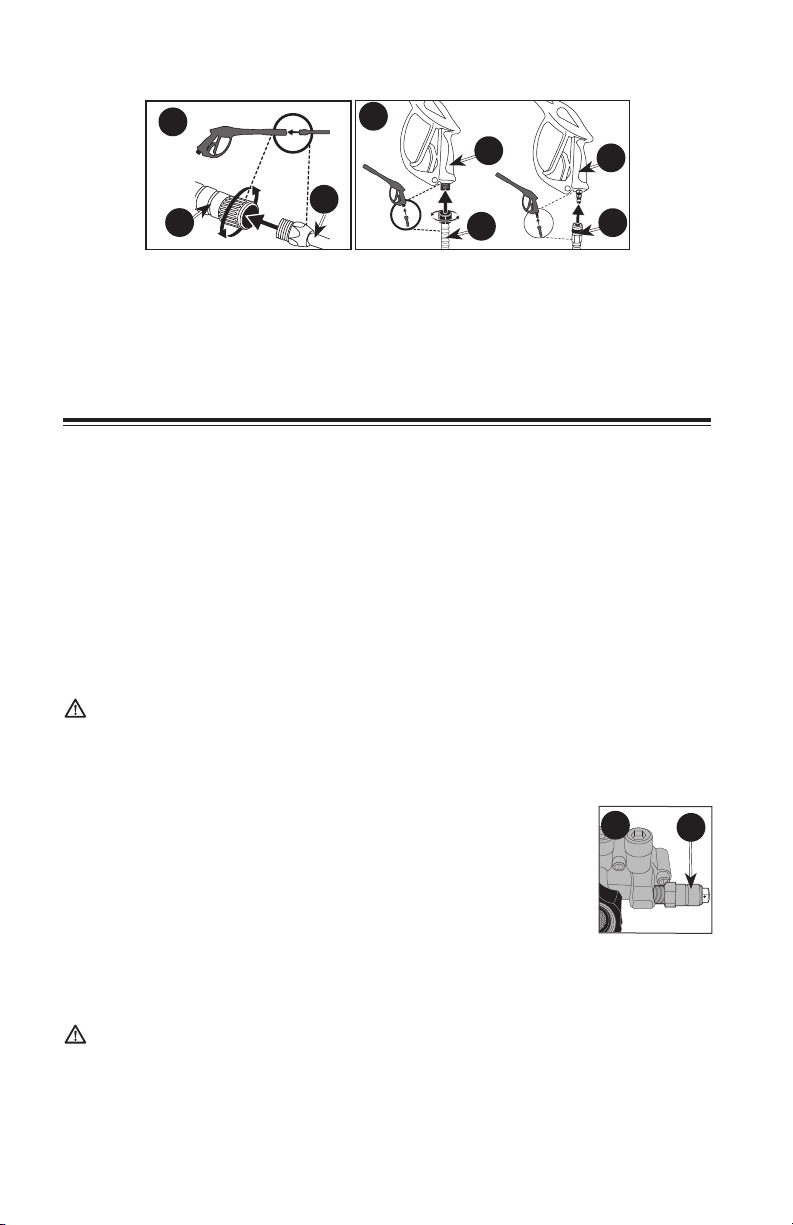
6. Attach high pressure hose (C) to gun (D). Tightensecurely.
3
D
4
D
E
OR
C
D
C
NOTICE: The engine is shipped without oil. Before starting engine, add the oil
provided. Damage to the engine will occur if the engine is run without oil, this
damage will not be covered underwarranty.
NOTICE: The high-pressure pump was filled with oil at the factory. Always check oil
level before using (refer to Maintenance for more information).
OPERATION
PRESSURE WASHER TERMINOLOGY
PSI: Pounds per Square Inch. The unit of measure for water pressure. Also used
for air pressure, hydraulic pressure, etc.
PSI*: Pounds per Square Inch. The unit of measure for water pressure. Also used
for air pressure, hydraulic pressure, etc.
GPM*: Gallons per Minute. The unit of measure for the flow rate of water.
* Rated Pressure and Rated Water Flow is within manufacturing tolerance of
(+/- 10%).
Bypass Mode: Allows water to re-circulate within the pump when the gun trigger is
not pulled. This feature allows the operator to release the trigger gun and reposition
themselves without having to turn the engine off in between cleaningactions.
WARNING: Do not allow the unit to run for more than two minutes without
the gun trigger being pulled. This could cause overheating and damage to
the pump. When the temperature inside the pump rises too high, the thermal
relief valve will open and release a spray of water from the pump to lower the
internal temperature. The valve will thenclose.
Thermal Relief Valve (P, Fig. 5): When the temperature inside the
pump rises too high, this valve will open and release a gush of
water in an effort to lower the temperature inside the pump. The
valve will thenclose. NOTE: Thermal relief valve location will vary
depending on the pump type.
Detergent Injection System: Mixes cleaners or cleaning solvents
with the water to improve cleaning effectiveness.
Water Supply: All pressure washers must have a source of water. The minimum
requirements for a water supply are 20 PSI and 5 Gallons Per Minute. If your water
source is a well, the garden hose length can only be 30ft. (9m) max.
WARNING: To reduce the possibility of contamination always protect
against backflow when connected to a potable watersystem.
5
P
12- ENG
Page 13
PRESSURE WASHER OPERATING FEATURES
PRESSURE ADJUSTMENTS (FIG. 6)
The pressure setting is preset at the factory to achieve optimum pressure and
cleaning. If you need to lower the pressure, it can be accomplished by these
methods.
1. Back away from the surface to be cleaned. The further away you are, the
less the pressure will be on the surface to becleaned.
2. Change to the 40˚ nozzle (white). This nozzle delivers a less powerful stream
of water and a wider spray pattern. Refer to How To Use SprayWand.
3. (if equipped) This pressure washer’s high
pressure pump is equipped with an additional
feature that allows the pressure setting to be
adjusted.
To lower the pressure, turn the pressure control knob on the pump counterclockwise to
the desired pressure.
To return the pump pressure to the factory setting, turn the pressure control
knob on the pump clockwise until itstops.
NOTICE: DO NOT overtighten the pressure control knob, if overtightened the knob
COULD break and result in immediate loss of water pressure and costly repairs to
theunit.
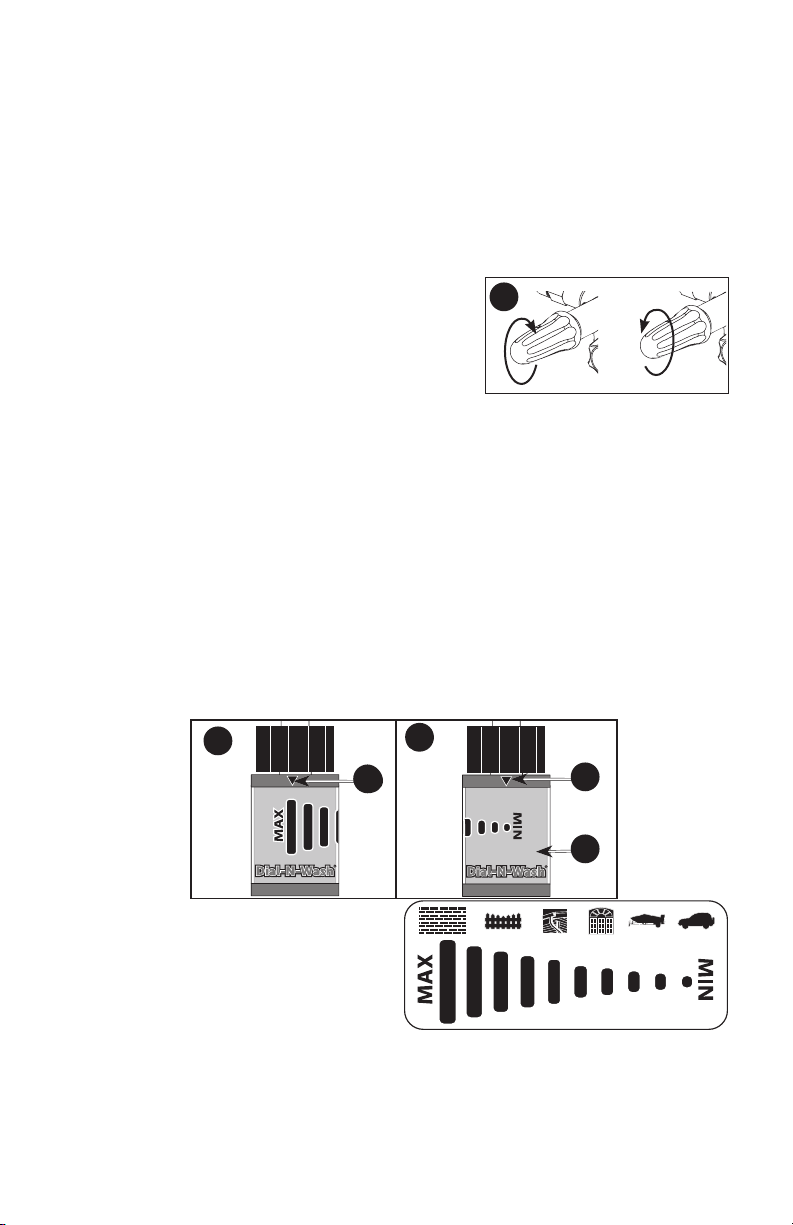
DIAL-N-WASH ADJUSTMENT (FIG. 7, 8) (IF EQUIPPED)
1. Choose the correct high pressure nozzle (0˚, 15˚ or 40˚) for the job to be
performed. Refer to How To Use SprayWand.
2. The Dial-N-Wash is shipped in the MAX pressure setting, the MAX pressure
bar is aligned with the arrow (R) on the collar as shown in Figure 7.
Rotating the Dial-N-Wash (Q) counterclockwise until it stops places it in the
MIN pressure setting, the arrow (R) will align with the MIN pressure bar as
shown in Figure 8.
6
+
-
7
8
R
R
Q
Adjust the pressure by rotating the
Dial-N-Wash (Q) clockwise for
higher pressure or
counterclockwise for lower
pressure, aligning the arrow with
the desired pressure bar on the
Dial-N-Wash.
NOTE: To apply chemicals the black low pressure nozzle must be installed and
the Dial-N-Wash must be in the MAX pressuresetting.
13 - ENG
Page 14

HOW TO USE SPRAY WAND
The nozzles for the spray wand are stored in the nozzle holder on the panel assembly.
Colors on the panel identify nozzle location and spray pattern. Refer to the following
chart to choose the correct nozzle for the job to beperformed.
CHANGING NOZZLES ON SPRAY WAND (FIG. 9)
DANGER: Risk of fluid injection. Do not direct discharge stream toward
persons, unprotected skin, eyes or any pets or animals. Serious injury
willoccur.
WARNING: Flying objects could cause risk of serious injury. Do not
attempt to change nozzles while pressure washer is running. Turn engine off
before changingnozzles.
1. Pull quick-connect coupler (E) back and insert nozzle (K).
9
2. Release quick-connect coupler and twist nozzle to
make sure it is secure incoupler.
WARNING: Flying object could cause risk of serious
injury. Ensure nozzle is completely inserted in quickconnect socket and quick-connect collar is fully engaged
K
E
(forward) before squeezing guntrigger.
NOZZLE COLOR SPRAY PATTERN USES SURFACES**
unpainted metal
or concrete;
DO NOT use on wood
Red
0˚
powerful
pinpoint for
spot cleaning of
hard, unpainted
surfaces or for
high reach areas
15˚
Yellow
intense cleaning
of unpainted
hard surfaces
grills, driveways, concrete
or brick walkways,
unpainted brick or stucco
Green
White
Black
25˚
40˚
low pressure
standard cleaning
nozzle for most
applications
cleaning of
painted or
delicate surfaces
applies cleaning
solutions
14- ENG
yard tools, sidewalks, lawn
furniture, unpainted siding,
stucco, gutters and eaves,
concrete, brick surfaces
auto/RV, marine, wood,
painted brick and stucco,
vinyl, painted siding
Low pressure spray is
safe on all surfaces.
Always verify compatibility
of cleaning solution
prior touse.
Page 15

**NOTICE: The high pressure spray from your pressure washer is capable of
causing damage to surfaces such as wood, glass, automobile paint, auto striping
and trim, and delicate objects such as flowers and shrubs. Before spraying, check
the item to be cleaned to assure yourself that it is strong enough to resist damage
from the force of the spray.
HOW TO APPLY CHEMICALS/CLEANING SOLVENTS (FIG. 10)
Applying chemicals or cleaning solvents is a low pressure operation. NOTE: Use
only soaps and chemicals designed for pressure washer use. Do not usebleach.
To Apply Chemicals:
1. Ensure detergent siphon hose (F, Figure 10) is attached
to barbed fitting location near high pressure hose
10
F
connection of pump as shown. NOTE: The barbed
fitting location will vary depending on the pump type.
2. Place other end of detergent siphon hose with
filter on it into container holding chemical/cleaning
solution. NOTE: For every 7 gallons of water pumped
1 gallon of chemical/cleaning solution will beused.
3. Install low pressure (black) nozzle into quick connect fitting of spray wand, see
How To Use Spray Wand paragraph in thissection.
4. After use of chemicals, place detergent siphon hose into container of clean
water and draw clean water through chemical injection system to rinse system
thoroughly. If chemicals remain in the pump, it could be damaged. Pumps
damaged due to chemical residue will not be covered underwarranty.
NOTE: Chemicals and soaps will not siphon if the black soap nozzle is not installed
on the spraywand.
STARTING (FIG. 11–14)
WARNING: To reduce the risk of injury, read the pressure washer instruction
manual and the engine instruction manual before starting pressurewasher.
DANGER: Risk of fluid injection and laceration. When using the high
pressure setting, DO NOT allow the high pressure spray to come in contact
with unprotected skin, eyes, or with any pets or animals. Serious injury
willoccur.
• Your washer operates at fluid pressures and velocities high enough to penetrate
human and animal flesh, which could result in amputation or other serious injury.
Leaks caused by loose fittings or worn or damaged hoses can result in injection
injuries. DO NOT TREAT FLUID INJECTION AS A SIMPLE CUT! See a physician
immediately!
DANGER: Carbon Monoxide. Using an engine indoors can kill you in
minutes. Engine exhaust contains high levels of carbon monoxide (CO), a
poisonous gas you cannot see or smell. You may be breathing CO even if you
do not smell engine exhaust.
• Breathing exhaust fumes will cause serious injury or death! Engine exhaust
contains carbon monoxide, an odorless and deadlygas.
• Operate pressure washer in a well-ventilated area. Avoid enclosed areas
such as garages, basements,etc.
• Never operate unit in or near a location occupied by humans oranimals.
15 - ENG
Page 16
WARNING: Risk of Fire, Asphyxiation and Burn. Never fill fuel tank when
engine is running or hot. Do not smoke when filling fueltank.
• Never fill fuel tank completely. Fill tank to 1/2" (12.7 mm) below bottom of filler
neck to provide space for fuel expansion. Wipe any fuel spillage from engine and
equipment before startingengine.
• DO NOT let hoses come in contact with very hot engine muffler during or
immediately after use of your pressure washer. Damage to hoses from contact with
hot engine surfaces will NOT be covered bywarranty.
NOTICE: Risk of property damage. Never pull water supply hose to move pressure
washer. This could damage hose and/or pumpinlet.
• DO NOT use hot water, use cold wateronly.
• Never turn water supply off while pressure washer engine is running or damage to
pump willresult.
• DO NOT stop spraying water for more than two minutes at a time. Pump operates in
bypass mode when spray gun trigger is not pressed. If pump is left in bypass mode
for more than two minutes internal components of the pump can bedamaged.
If you do not understand these precautions, please contact our customer service
department at www.simpsoncleaning.com
Prior to starting, refer to your engine manual for proper startingprocedure.
1. In a well ventilated outdoor area add fresh, high quality, unleaded gasoline with
a pump octane rating of 86 or higher. Do not overfill. Wipe up spilled fuel before
starting the engine. Refer to Engine Owner's Manual for correctprocedure.
IMPORTANT: Ethanol Shield
TM
(sold separately) is a fuel stabilizer that helps
eliminate and prevent ethanol related problems in power equipment. Follow the
instructions on the container and add to thegasoline.
NOTICE: Use of fuels with greater than 10% ethanol are
not approved for use in this product per EPA regulations
and will damage the unit and void thewarranty.
2. Check engine oil level. Refer to Engine Owner's Manual for correct procedure.
3. Check pump oil level. The oil level should come to the dot in the middle of the
sight glass. Refer to the Pump paragraph underMaintenance.
4. Connect the water hose to the water source. Turn the water source on to
remove all air from the hose. When a steady stream of water is present, turn
the water source off.
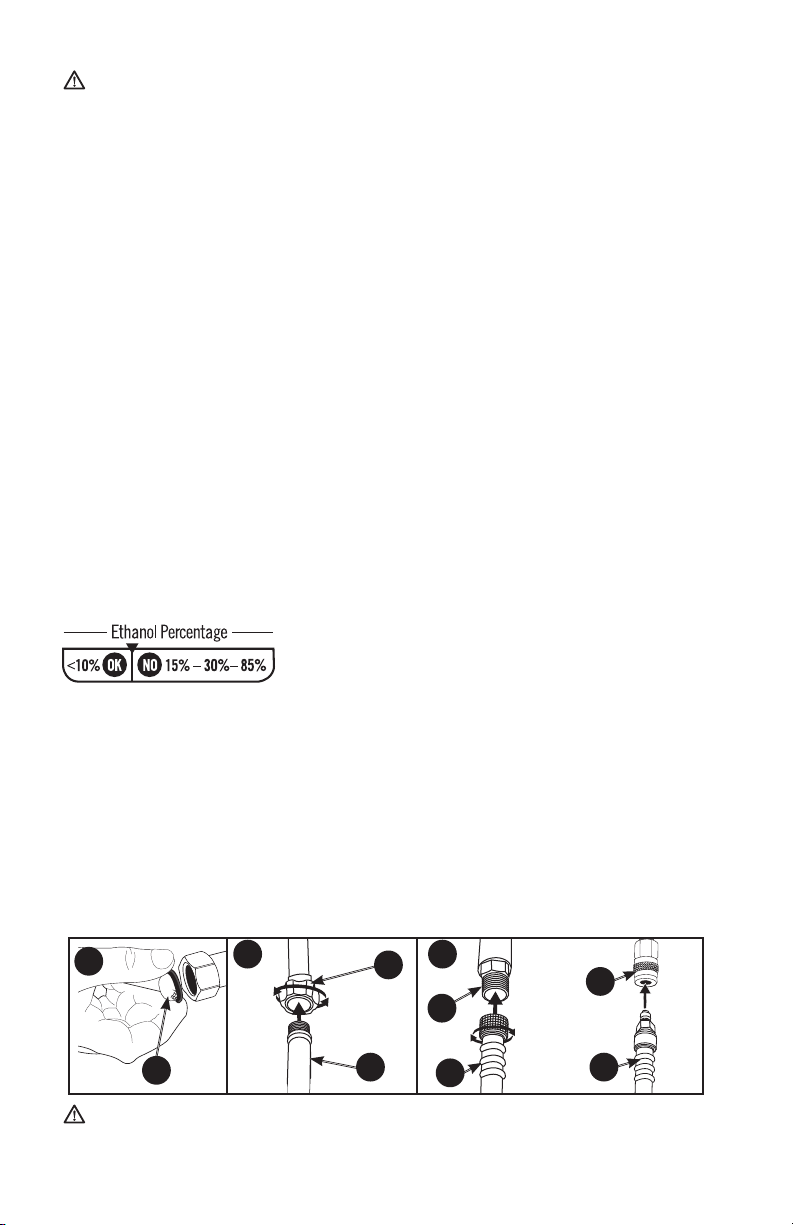
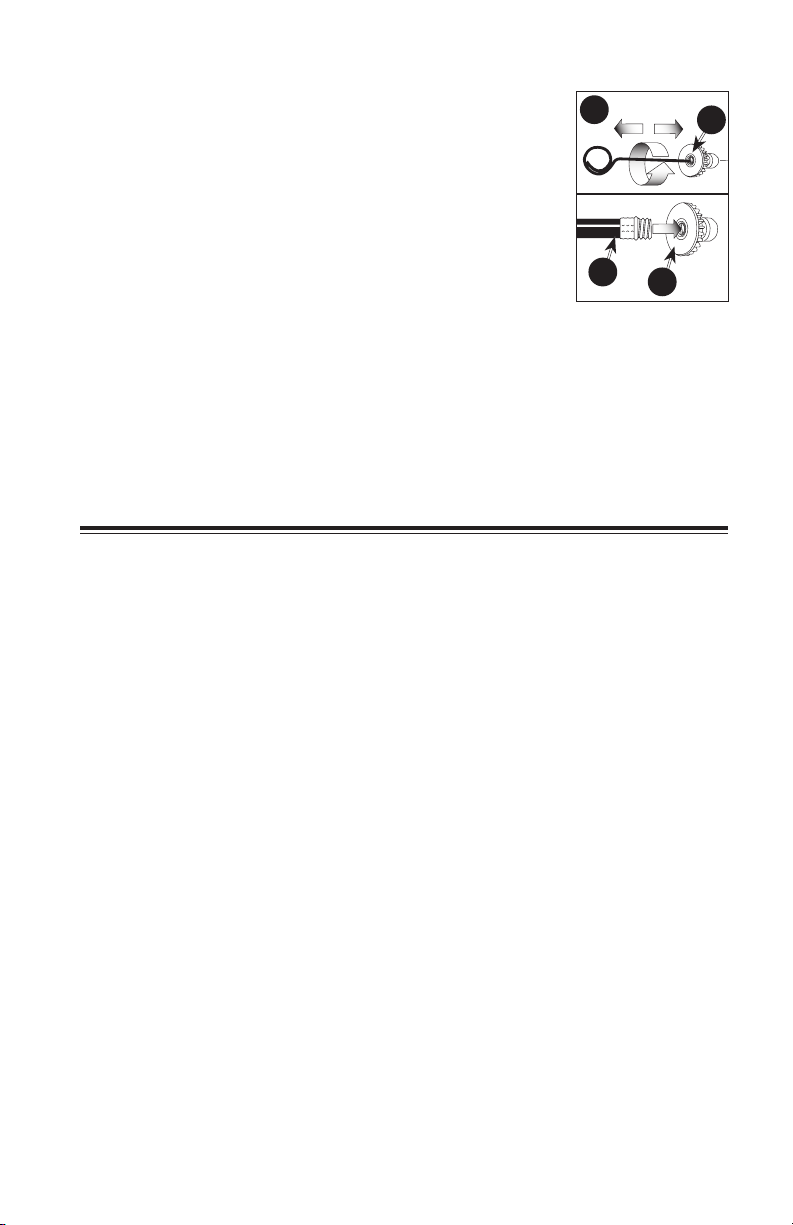
5. Verify the filter screen (M) is in water inlet of pump. NOTE: Convex side
facesout.
6. Connect water source (N) to pump inlet (J). NOTE: Water source must provide
a minimum of 5 gallons per minute at 20 PSI.
7. Connect
11
high pressure hose (C) to pump outlet (I).
12
13
J
I
I
OR
M
N
C
C
WARNING: To reduce the possibility of contamination always protect
against backflow when connected to a potable watersystem.
16- ENG
Page 17
8. Choose the correct nozzle for the job to be performed. See How To Use spray
Wand instructions in this section. NOTE: If applying a chemical or cleaning
solution, see How To Apply Chemicals/Cleaning Solvents instructions in
thissection.
9. Turn water source on.
NOTICE: Risk of property damage. Failure to do so could cause damage to
thepump.
10. Remove all air from the pump and high pressure hose by depressing trigger
until a steady stream of water is present.
11. Start engine. See Engine Owner's Manual for correct procedure.
WARNING: Risk of unsafe operation. If engine does not start after two
pulls, squeeze trigger of gun to relieve pump pressure. Pull starter cord slowly
until resistance is felt. Then pull cord rapidly to avoid kickback and prevent
hand or arminjury.
NOTE: If the oil level in the engine is low, the engine will not start. If the engine does
not start, check the oil level and add oil asneeded.
12. Depress trigger on gun to start water flow.
WARNING: Do not allow the unit to run for more than two minutes without
the gun trigger being pulled. This could cause overheating and damage to
the pump. When the temperature inside the pump rises too high, the thermal
relief valve will open and release a spray of water from the pump to lower the
internal temperature. The valve will thenclose.
WARNING: Risk of unsafe operation. Stand on a stable surface and
grip gun/spray wand firmly with both hands. Expect the gun to kick
whentriggered.
13. Release trigger to stop waterflow.
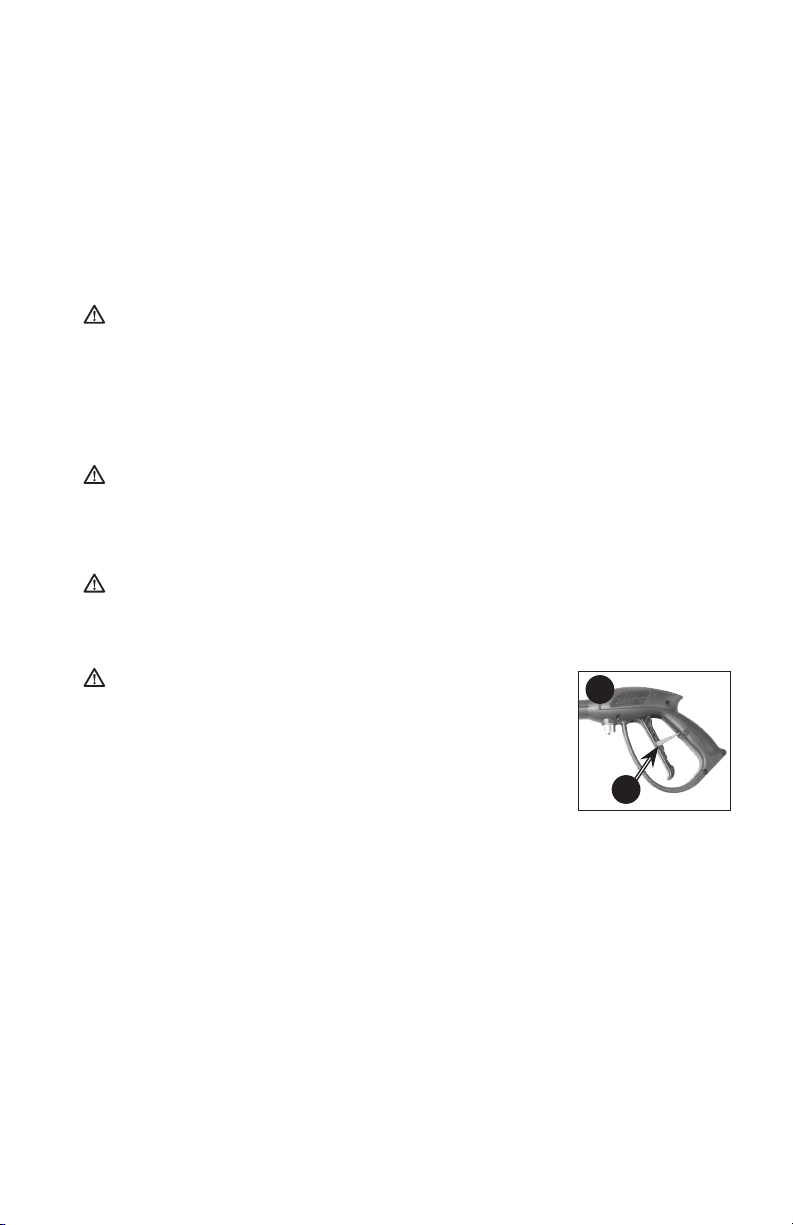
WARNING: Risk of injury from spray. Always engage
the trigger lock (O) when gun is not in use. Failure to do so
14
could cause accidentalspraying.
SHUTTING DOWN
1. After each use, if you have applied chemicals, place
detergent siphon hose into container of clean water and
draw clean water through chemical injection system to
rinse system thoroughly.
NOTICE: Risk of property damage. Failure to do so could cause damage to the
pump.
2. Turn engine off. See Engine Owner's Manual.
NOTICE: Risk of property damage. NEVER turn the water off with the enginerunning.
3. Turn water sourceoff.
4. Pull trigger on spray gun to relieve any water pressure in hose or spraygun.
NOTE: Failure to release system pressure will prevent removal of high pressure
hose from spray gun or pumpconnection.
5. See Storage section in this manual for proper storageprocedures.
O
17 - ENG
Page 18
MAINTENANCE
WARNING: Risk of burn hazard. When performing maintenance, you may
be exposed to hot surfaces, water pressure or moving parts that can cause
serious injury ordeath.
WARNING: Risk of fire hazard. Always disconnect, spark plug wire,
let the engine cool and release all water pressure before performing any
maintenance or repair. The engine contains flammable fuel. Do not smoke or
work near open flames while performingmaintenance.
To ensure efficient operation and longer life of your pressure washer, a routine
maintenance schedule should be prepared and followed. If the pressure washer is
used in unusual conditions, such as high-temperatures or dusty conditions, more
frequent maintenance checks will berequired.
ENGINE
Consult the Engine Owner's Manual for the manufacturer's recommendations
for any and all maintenance. NOTE: The engine drain plug is located at the rear of
theunit.
PUMP (FIG. 15)
NOTE: The Pump was filled with oil at the factory. The preferred oil is SIMPSON®
Premium Pump Crankcase Oil. If this oil is not available, an SAE 15W-40 oil may
be used. Change the pump oil after the first 50hours of operation and every 100
hours thereafter, or every 3months.
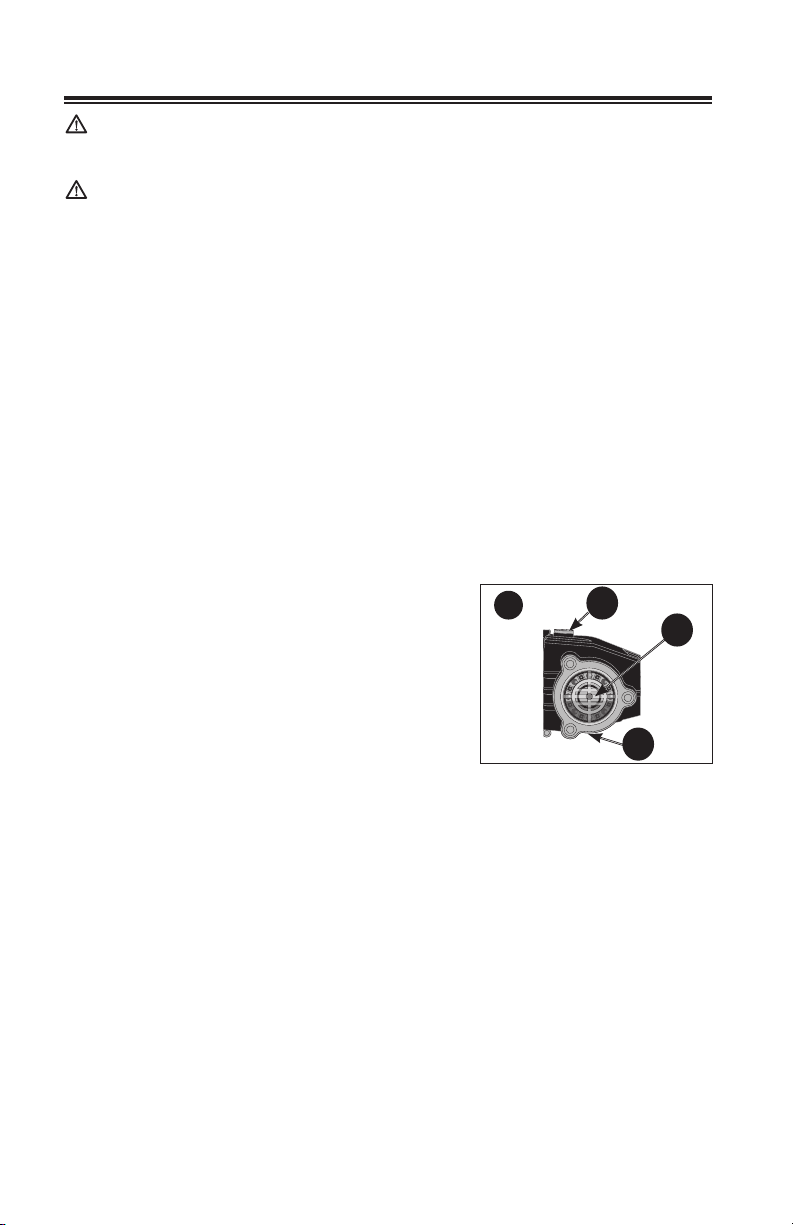
TO CHECK OIL
The oil level should come to the dot in the middle of
the sight glass (AA).
15
HOW TO CHANGE PUMP OIL
1. Loosen pump oil fill plug (BB).
2. Place a container under the pump oil drain plug
(CC).
3. Remove pump oil drainplug.
4. After oil is drained, replace pump oil drain plug.
Tightensecurely.
5. For AAA
TM
pumps, refill using SIMPSON® Premium Pump Crankcase Oil. If this
oil is not available, an SAE 15W-40 oil may be used.
For CAT Pumps
®
***, refill using a non-detergent hydraulic oil (ISO 68).
6. Replace pump oil fill plug and tightensecurely.
If there is a problem with the pump contact us at www.simpsoncleaning.com
*** CAT PUMPS
®
is a registered trademark of Diversified Dynamics Corporation.
CONNECTIONS
Connections on pressure washer hoses, gun and spray wand should be cleaned
regularly and lubricated with light oil or lithium grease to prevent leakage and
damage to the o-rings.
NOZZLE CLEANING (FIG. 16)
If the nozzle becomes clogged with foreign materials, such as dirt, excessive
pressure may develop. If the nozzle becomes partially clogged or restricted, the
pump pressure will pulsate. Clean the nozzle immediately using the nozzle kit
supplied and the following instructions:
BB
AA
CC
18- ENG
Page 19
1. Shut off the pressure washer and turn off the watersupply.
2. Pull trigger on gun handle to relieve any waterpressure.
3. Disconnect the spray wand from thegun.
16
K
4. Remove the high pressure nozzle (K) from the spray wand.
Remove any obstructions with the nozzle cleaning tool
provided and backflush with cleanwater.
5. Direct water supply (N) into nozzle to backflush loosened
particles for 30seconds.
6. Reassemble the nozzle to the wand.
7. Reconnect spray wand to gun and turn on watersupply.
N
K
8. Start pressure washer and place spray wand into high pressure setting totest.
CLEAN THE WATER INLET FILTER (FIG. 11)
This screen filter should be checked periodically and cleaned if necessary.
1. Remove filter by grasping end and removing it from water inlet of pump.
2. Clean filter by flushing it with water on bothsides.
3. Re-insert filter into water inlet of pump. NOTE: Convex side facesout.
NOTE: Do not operate the pressure washer without filter properly installed.
STORAGE
ENGINE
Consult the Engine Owner's Manual for manufacturer’s recommendations
forstorage.
TO PREVENT FUEL-RELATED PROBLEMS
1. Add Ethanol Shield
When adding a gasoline stabilizer, fill the fuel tank with fresh gasoline. If only
partially filled, air in the tank will promote fuel deterioration during storage. If
you keep a container of gasoline for refueling, be sure that it contains only
freshgasoline.
2. After adding a gasoline stabilizer, run the engine outdoors for 10 minutes
to be sure that treated gasoline has replaced the untreated gasoline in
thecarburetor.
3. Turn the fuel valve to the OFFposition.
4. Continue to run the engine until it stops from the lack of fuel in the carburetor
fuel bowl. Running time should be less than 3minutes.
PUMP
The manufacturer recommends using SIMPSON® / POWERWASHER® Pump
Guard or equivalent when storing the unit for more than 30 days and/or when
freezing temperatures are expected. SIMPSON
is environmentallyfriendly.
NOTE: Using pump guard helps provide proper lubrication to the internal seals of
the pump regardless of temperature or environment.
NOTICE: Risk of property damage. Use only SIMPSON
Pump Guard or equivalent. Other products could be corrosive and/or contain alcohol which may cause pumpdamage.
1. Turn off pressure washer and disconnect hoses frompump.
TM
fuel stabilizer following the manufacturer’s instructions.
®
/ POWERWASHER® Pump Guard
®
/ POWERWASHER
®
19 - ENG
Page 20

2. Unscrew bottle valve from Pump Guard bottle and remove seal.
3. Screw bottle valve back ontobottle.
4. Attach bottle to water inlet ofpump.
5. Squeeze bottle to inject contents intopump.
6. With ignition switch off, simultaneously pull starter rope and squeeze bottle.
Repeat until protector fluid exits pump outlet. NOTE: This step may require
twopeople.
ACCESSORIES
DANGER: Risk of fluid injection. When using replacement spray wands
or guns with this pressure washer, DO NOT use a spray wand and/or spray
gun/wand combination that is shorter in length than what was provided with
this pressure washer as measured from the nozzle end of the wand to the
guntrigger.
NOTICE: The use of any other accessory not recommended for use with this tool
could be hazardous. Use only accessories rated equal to or greater than the rating
of the pressurewasher.
SERVICE INFORMATION
Do not return this product to your retailer. Please contact our customer service
department at www.simpsoncleaning.com
LIMITED WARRANTY
The manufacturer of this product agrees to repair or replace designated parts that
prove defective within the warranty period listed below at the manufacturer’s sole
discretion. Specific limitations/extensions and exclusions apply.
This warranty covers defects in material and workmanship and not parts failure
due to normal wear, depreciation, abuse, accidental damage, negligence, improper
use, maintenance, water quality or storage. To make a claim under the terms of the
warranty, all parts said to be defective must be retained and available for return
upon request to a designated Warranty Service Center for warranty inspection. The
judgments and decisions of the manufacturer concerning the validity of warranty
claims are final.
These warranties pass through to the end user and are non-transferable. As a
factory authorized and trained Warranty Service Center, the factory will honor the
terms of all component warranties and satisfy claims of the appropriate warranty
provisions.
Normal wear items include, but are not limited to, valves and seals, which are not
covered by this warranty.
This warranty replaces all other warranties, express or implied, including without
limitation any warranties of merchantability or fitness for a particular purpose and
all such warranties are hereby disclaimed and excluded by the manufacturer. The
manufacturer’s warranty obligation is limited to repair and replacement of defective products as provided herein and the manufacturer shall not be liable for any
further loss, damages, or expenses – including damages from shipping, accident,
abuse, acts of God, misuse, or neglect. Neither is damage from repairs using parts
not purchased from the manufacturer or alterations performed by non-factory
authorized personnel. Failure to install and operate equipment according to the
guidelines put forth in the instruction manual shall void warranty.
20- ENG
Page 21

This warranty does not cover the following: machines used for rental purposes,
damage resulting from shipping (claims must be filed with freighter), accident,
abuse, act of God, misuse, or neglect. Neither is damage from repairs or alterations
performed by non-factory authorized personnel or failure to install and operate
equipment according to the guidelines put forth in the instruction manual.
The manufacturer will not be liable to any persons for consequential damage, for
personal injury, or for commercial loss.
RESPONSIBILITY OF ORIGINAL PURCHASER (INITIAL USER):
• To process a warranty claim on your SIMPSON® pressure washer, report the
concern to 1-877-362-4271 or cservice@fna-group.com for authorization
and direction to the nearest authorized service centre in your area.
• Retain original cash register sales receipt as proof of purchase for warranty
work.
• Use reasonable care in the operation and maintenance of the product as
described in the Owners Manual(s).
WARRANTY DOES NOT APPLY TO FAILURES DUE TO:
• Freight damage
• Damage due to chemical deterioration, scale build up, rust, corrosion or
thermal expansion
• Freeze damage
• Damage caused by parts or accessories not obtained from an authorized
dealer or not approved by the manufacturer.
• Normal wear of moving parts or components affected by moving parts.
NGINE AND EMISSIONS CONTROL SYSTEM
E
Covered by engine manufacturer warranty. See engine manual.
HIGH PRESSURE PUMP (DEFECTS IN MATERIAL AND WORKMANSHIP)
AAATM - Five (5) years from date of purchase
CAT Pumps®*** - Five (5) years from date of purchase
FRAME (DEFECTS IN MATERIAL AND WORKMANSHIP)
Ten (10) years from date of purchase.
ACCESSORIES (DEFECTS IN MATERIAL AND WORKMANSHIP)
Includes nozzles, hoses, spray guns, wands, tires, feet
Ninety (90) days from date of purchase.
OPERATIONAL
ISSUE
Engine will
not start
(see Engine
Owner's
Manual for
further engine
troubleshooting)
TROUBLE SHOOTING GUIDE
POSSIBLE CAUSE SOLUTION
No fuel Add fresh fuel
Pressure builds up after
two pulls on the recoil
starter or after initial use
Choke lever in the "No
Choke" position
Spark plug wire
not attached
21 - ENG
Squeeze gun trigger to relieve
pressure
Move choke to the "Choke"
position
Attach spark plug wire
Page 22

OPERATIONAL
ISSUE
No or low
pressure
(initial use)
Will not draw
chemicals
POSSIBLE CAUSE SOLUTION
Spray wand not in
high pressure
See How to Use Spray
Wand instructions in the
Operation Section
Low water supply Water supply must be at
least 5 gpm @ 20 PSI
Leak at high pressure
hose fitting
Repair leak. Apply sealant
tape if necessary
Nozzle obstructed See Nozzle Cleaning instructions
in the Maintenance section
Water filter screen
clogged
Remove and clean filter. See
Cleaning Water Inlet Filter
paragraph in the Maintenance
section for the correct procedure
Air in hose Turn off the engine, then the water
source. Disconnect the water
source from the pump inlet and
turn the water source on to remove
all air from the hose. When there is
a steady stream of water present,
turn water source off. Re-connect
water source to pump inlet and
turn on water source. Squeeze
trigger to remove remaining air
Choke in the
“Choke” position
High pressure hose
is too long
Spray wand not in
low pressure
Move choke to the “No Choke”
position
Use high pressure hose under
100 feet (30m)
See How to Use Spray
Wand paragraph in the
Operation Section
Chemical filter clogged Clean filter
Chemical screen not
in cleaning solution
Make sure end of detergent
siphon hose is fully submerged
into cleaning solution
Chemical too thick Dilute chemical. Chemical should
be the same consistency as water
Pressure hose is too long Lengthen water supply hose
instead of high pressure hose
Chemical build up in
chemical injector
Please contact our customer
service department at
www.simpsoncleaning.com
22- ENG
Page 23

OPERATIONAL
POSSIBLE CAUSE SOLUTION
ISSUE
No or low
pressure
(after period of
normal use)
Worn seal or packing Please contact our customer
service department at
www.simpsoncleaning.com
Worn or obstructed valves Please contact our customer
service department at
www.simpsoncleaning.com
Worn unloader piston Please contact our customer
service department at
www.simpsoncleaning.com
Water leaking at
gun/spray wand
Worn or torn o-ring Check and replace
Loose hose connection Tighten
connection
Water leaking
at pump
Loose connections Tighten
Piston packings worn Please contact our customer
service department at
www.simpsoncleaning.com
Worn or torn o-ring Please contact our customer
service department at
www.simpsoncleaning.com
Pump head or tubes
damaged from freezing
Please contact our customer
service department at
www.simpsoncleaning.com
Pump pulsates Nozzle obstructed See Nozzle Cleaning paragraph
in the Maintenance section
for the correct procedure
Oil leaking
at pump
Oil seals worn Please contact our customer
service department at
www.simpsoncleaning.com
Loose drain plug Tighten
Worn drain plug o-ring Check and replace
Worn fill plug o-ring Check and replace
Pump overfilled Check for correct amount
Incorrect oil used Drain and fill with correct
amount and type of oil
Vent plug is clogged Clean vent plug; blow air through
it to remove any blockage. If
problem persists, replace plug
Air filter filled with oil Clean and/or replace filter
element. Refer to Engine Owner's
Manual for correctprocedure.
23 - ENG
Page 24

MESURES DE SÉCURITÉ - DÉFINITIONS
Ce guide contient des renseignements importants que vous deviez bien saisir.
Cette information porte sur VOTRE SÉCURITÉ et sur LA PRÉVENTION DE
PROBLÈMES D'ÉQUIPEMENT. Afin de vous aider à identifier cette information,
nous avons utilisé les symboles ci-dessous. Veuillez lire attentivement ce guide en
portant une attention particulière à ces symboles.
DANGER : indique une situation dangereuse imminente qui, si elle n’est pas
évitée, causera la mort ou des blessures graves.
AVERTISSEMENT : indique une situation potentiellement dangereuse qui, si
elle n’est pas évitée, pourrait causer la mort ou des blessures graves.
ATTENTION: indique une situation potentiellement dangereuse qui, si elle n’est
pas évitée, peut causer des blessures mineures ou modérées.
AVIS : indique une pratique ne posant aucun risque de dommages corporels
mais qui par contre, si rien n’est fait pour l’éviter, pourrait poser des risques de
dommages matériels.
DIRECTIVES DE SÉCURITÉ IMPORTANTES
DANGER: monoxyde de carbone. Le fonctionnement d’un moteur à
l’intérieur provoque la mort en quelques minutes. L’échappement du moteur
contient des niveaux élevés de monoxyde de carbone (CO), un gaz toxique,
indoors et invisible. Il est possible que vous inhaliez du CO meme EN
L’ABSENCE de l’odeur de l’échappement du moteur.
• NE JAMAIS utiliser un moteur à l’intérieur d’une habitation, de garages, d’un
vide sanitare ou d’autres espaces partiellement clos. Ces endroits peuvent
accumuler des niveaux mortels de monoxyde de carbone, L’utilisation d’un
ventilateur ou l’ouverture des fenêtres et portes NE fournit PAS assez d’air
frais.
• Utiliser UNIQUEMENT à l’extériur et loin de fenêtres, portes et évents. En
effet, ces ouvertures peuvent asprier l’énchappement du moteur à l’intérieur
d’un espace.
• Même lors de l’utilisation correcte du moteur, le monoxyde de carbone
pourrait pénétrer dans l’habitation. TOUJOURS utiliser un advertisseur de
CO alimenté à pile ou un avertisseur do CO de secours à pile dans la maison.
Lire et repecter toutes les directives de l’avertisseur de CO avant son
utilisation. En cas de malaise, étourdissement ou faiblesse, à tout moment,
déplacer la personne à l’air frais immédiatement. Consulter un médecin. Ce
sont des signes d’intoxication oxycarbonée.
AVERTISSEMENT : ne pas utiliser l’appareil avant d’avoir lu le mode d’emploi, et
celui du moteur, et l’intégralité des directives de sécurité, d’utilisation et d’entretien.
Si vous avez n'importe quelles questions quant au produit, s'il vous plaît
contacter notre département de service clients à www.simpsoncleaning.com
DANGER : risque d’injection ou de blessure grave. S’éloigner de la buse.
Ne pas diriger le jet en direction de personnes. Ce produit ne doit être utilisé
que par des opérateurs formés.
24- FR
Page 25

AVERTISSEMENT : ce produit et son échappement peuvent vous exposer à
des produits chimiques, y compris le plomb et les composés à base de plomb, et
au monoxyde de carbone, qui sont reconnus par l’État de Californie pour causer
le cancer, des malformations congénitales et d’autres problèmes de reproduction.
Pour plus d’information, visitez le site www.P65Warnings.ca.gov
AVERTISSEMENT : portez toujours une protection de l’ouïe et les autres
équipements de protection individuelle pendant l’usage. Dans certaines conditions
et durées d’utilisation, le bruit de ce produit peut contribuer à une perte auditive.
AVERTISSEMENT : il est possible que le produit ne soit pas doté d’un silencieux
avec pare-étincelles. Si le produit n’en est pas équipé et qu’il est destiné à être
utilisé près de matières inflammables ou sur un terrain cultivé ou couvert d’arbres,
arbustes, herbes ou autres matières similaires, alors l’installation d’un pareétincelles homologué est obligatoire et exigée par la loi dans l’État de Californie.
Le produit sans cet équipement viole la législation californienne, section 130050
et/ou sections 4442 et 4443 du California Public Resources Code, à moins que le
moteur ne soit muni d’un pare-étincelles comme stipulé à la section 4442 et tenu
en bon état de fonctionnement. Les pare-étincelles sont exigés sur certaines terres
du Service des forêts américain et peuvent être également exigés par d’autres
législations ou ordonnances.
CONSERVER CES DIRECTIVES
DANGER : RISQUE D’EXPLOSION OU D’INCENDIE
CE QUI PEUT SE PRODUIRE COMMENT L’ÉVITER
• Les cigarettes, étincelles, arc
électrique, gaz d’échappement et
des parties chaudes du moteur telles
qu’un silencieux peuvent enflammer
l’essence déversée et ses vapeurs.
• Le combustible du réservoir se dilate
sous l’effet de la chaleur et pourrait
se solder par un déversement et un
incendie ou une explosion.
• Le fonctionnement de la laveuse
haute pression dans un milieu explosif
pourrait se solder par un incendie.
• Du matériel déposé contre ou près de la
laveuse haute pression peut interférer
avec les fonctionnalités d’aération
de l’équipement et provoquer une
surchauffe et l’allumage du matériel
(risque d’incendie).
• Éteindre le moteur et le laisser refroidir
avant de remplir le réservoir d’essence
• Être attentif et éviter de déverser de
l’essence lors du remplissage du
réservoir. Éloigner la laveuse haute
pression de la zone de ravitaillement
avant de démarrer le moteur.
• Laisser environ 12,7 mm (1/2 po) de
dégagement sous le bord du goulot de
remplissage pour permettre l’expansion
de l’essence.
• Utiliser et faire le plein d’essence de
l’équipement dans des zones bien
dégagées de tout obstacle. Installer un
extincteur adéquat dans les zones de
travail pour combattre les incendies à
base d’essence.
• Ne jamais utiliser la laveuse haute
pression dans une zone avec arbustes
ou broussailles secs.
25 - FR
Page 26

• La chaleur de l’échappement du
silencieux peut endommager des
surfaces peintes, faire fondre tout
type de matériel sensible à la chaleur
(comme du revêtement extérieur,
plastique, caoutchouc, vinyle ou
• Toujours éloigner la laveuse haute
pression d’au moins 1,2 m (4 pi) de
toutes surfaces (telles que desmaisons,
voitures, ou des plantes vivantes) qui
pourraient être endommagées par la
chaleur s’échappant du silencieux.
même le tuyau haute pression) et
nuire aux plantes vivantes.
• De l’essence mal entreposée pourrait
provoquer un allumage (incendie)
accidentel. Ranger l’essence de
façon sécuritaire pour en empêcher
l’accès aux enfants et à toutes autres
• Entreposer l’essence dans un
contenant homologué par la Loi sur la
santé et la sécurité du travail dans un
emplacement sécuritaire loin de la zone
de travail.
personnes non qualifiées.
• L'utilisation d'acides, de produits
chimiques toxiques ou corrosifs, de
• Ne pas vaporiser des liquides
inflammables.
poisons, d'insecticides ou de toute
sorte de solvant inflammable dans
ce produit pourrait provoquer des
blessures graves ou la mort.
DANGER : RISQUE D’ASPHYXIE
CE QUI PEUT SE PRODUIRE COMMENT L’ÉVITER
• Respirer les vapeurs d’échappement
provoquera de graves blessures voire,
un décès ! Les gaz d’échappement
des moteurs contiennent du
monoxyde de carbone, un gaz
inodore et mortel.
• Utiliser la laveuse haute pression dans
une zone bien aérée. Éviter les endroits
clos comme les garages, les sous-sols,
etc.
• Ne jamais utiliser l’appareil dans un
endroit habité par des hommes ou des
an maux.
• Certains liquides nettoyants
contiennent des substances pouvant
provoquer des blessures à la peau,
aux yeux ou au système respiratoire.
• Utiliser uniquement des liquides
nettoyants spécialement recommandés
pour les laveuses haute pression. Suivre
les recommandations des fabricants.
Ne pas utiliser de produit à blanchir au
chlore ou tout autre composé corrosif.
26- FR
Page 27

DANGER : RISQUE D’INJECTION ET DE LACÉRATION
CE QUI PEUT SE PRODUIRE COMMENT L’ÉVITER
• Votre laveuse haute pression
fonctionne à des pressions de liquides
et des vitesses suffisamment élevées
pour pénétrer la peau de l’homme
et animale, ce qui pourrait se solder
par une amputation ou autre blessure
grave. Des fuites provoquées par
des raccords lâches ou des tuyaux
usés ou endommagés peuvent se
solder par des blessures par injection.
NE PAS TRAITER UN INJECTION
DE LIQUIDE COMM UNE SIMPLE
COUPURE ! Consulter un médecin
immédiatement !
• Inspecter périodiquement le tuyau haute
pression. Remplacer immédiatement le
tuyau s’il est endommagé, usé, s’il a
fondu en contact avec le moteur ou
s’il démontre un signe de fissure, des
bulles, des trous d’épingle ou tout autre
fuite. Ne jamais saisir untuyau haute
pression quifuit ou est endommagé.
• Ne jamais toucher, saisir ou essayer
de couvrir un trou minuscule ou tout
autre fuite similaire sur le tuyau haute
pression. Le jet d’eau EST sous haute
pression et PÉNÈTRERA la peau.
• Ne jamais mettre les mains
devantl’embouchure.
• Éloigner le jet, ne pas le diriger vers soimême ou autrui.
• S’assurer que le tuyau et les raccords
sont serrés et en bon état. Ne jamais
s’agripper au tuyau ou aux raccords en
cours de fonctionnement.
• Ne pas mettre le tuyau en contact avec
le silencieux.
• Ne jamais attacher ou retirer le tube ou
les raccords du tuyau avec le système
sous pression.
• Si une lance ou un pistolet de rechange
est utilisé avec cette laveuse à pression,
NE PAS utiliser une lance et/ou une
combinaison lance et pistolet dont la
longueur est inférieure à celle des lance
et pistolet fournis avec cette laveuse à
pression; la mesure se fait de l’extrémité
de la buse à la détente du pistolet.
• Il y a risque de blessures si la pression
n’est pas réduite avant d’essayer
de procéder à un entretien ou un
démontage.
• Pour décompresser le système, éteindre
le moteur, fermer l’approvisionnement
en eau et enclencher la détente du
pistolet jusqu’à l’arrêt complet de
l’écoulement d’eau.
• Utiliser uniquement des accessoires de
classement égal ou supérieur à celui de
la laveuse haute pression.
27 - FR
Page 28

DANGER : RISQUE DE BLESSURE PAR JET
CE QUI PEUT SE PRODUIRE COMMENT L’ÉVITER
• Un jet de liquide à haute vitesse peut
briser des objets et projeter les éclats
à haute vitesse.
• Toujours porter des lunettes de sécurité
conformes à la norme ANSI Z87.1
Porter des vêtements protecteurs pour
se protéger de jets accidentels.
• Ne jamais diriger la lance ou le jet vers
une personne ou des animaux.
• Des objets légers ou mal fixés
peuvent se transformer en projectiles
dangereux.
• Toujours fixer solidement le verrou de
la détentelorsque le tube pulvérisateur
est inutilisé pour empêcher tout
fonctionnement accidentel.
• Ne jamais fixer, de façon permanente, la
détente en position arrière (ouverte).
DANGER : RISQUE D’UTILISATION DANGEREUSE
CE QUI PEUT SE PRODUIRE COMMENT L’ÉVITER
• Une utilisation dangereuse de
la laveuse haute pression pourrait
provoquer de graves blessures, voire
son propre décès ou celle d’autres
personnes.
• Ne pas utiliser de produit à blanchir au
chloreou tout autre composé corrosif.
• Se familiariser ave le fonctionnement
et les commandes de la laveuse haute
pression.
• Tenir la zone de travail exempte de
toutes personnes, animaux et obstacles.
• Ne pas utiliser le produit en cas de
fatigue ou sous l’emprise d’alcool ou de
drogues. Rester vigilant en tout temps.
• Ne jamais rendre inopérant les
caractéristiques de sécurité du produit.
• Ne pas utiliser l’appareil avec des
pièces manquantes, brisées ou non
autorisées.
• Ne jamais laisser le tube pulvérisateur
sans surveillance lors du fonctionnement
de l’appareil.
• Suivre la procédure de démarrage
correcte pour éviter l’effet de rebond
moteur qui provoquerait ainsi une
blessure grave à la main ou au bras.
• Si le moteur ne démarre pas après
deux tentatives, appuyer sur la détente
du pistolet pour décompresser la
pompe. Tirer délicatement la corde
du démarreur jusqu’à obtention d’une
résistance. Puis tirer rapidement sur
celui-ci pour éviter l’effet de rebond
moteur et empêcher toute blessure à la
main ou au bras.
28- FR
Page 29

• Le pistolet et le tube de pulvérisation
sont des outils de nettoyage puissants
• Garder la laveuse haute pression hors
de portée des enfants en tout temps.
qui ressemblent à un jouet pour un
enfant.
• Le pistolet et le tube de pulvérisation
réagissent à la pression du jet et
provoqueront un effet de rebond
qui pourrait faire glisser, ou tomber,
l’opérateur ou rediriger le jet. Une
maîtrise imparfaite du pistolet et de la
lance peut provoquer des blessures à
soi même et à autrui.
• Ne pas trop tendre les bras ou se tenir
debout sur une surface instable.
• Ne pas utiliser une laveuse haute
pression debout sur une échelle.
• Saisir solidement à deux mains
le pistolet/tube de pulvérisation.
S’attendre à un effet de rebond lors de
l’enclenchement de la détente.
DANGER : RISQUE DE BLESSURE OU DE DOMMAGE À LA
PROPRIÉTÉ LORS DU TRANSPORT OU DU RANGEMENT
CE QUI PEUT SE PRODUIRE COMMENT L’ÉVITER
• Il y a risque de fuite ou de
déversement d’essence ou d’huile
qui pourrait se solder par un incendie
ou des problèmes respiratoires,
des blessures graves, voire la mort.
Des fuites d’essence ou d’huile
endommageront les tapis, peinture ou
toutes autres surfaces de véhicules
ou de remorques.
• Il est possible que de l’huile remplisse
le cylindre et endommage le moteur
si l’appareil n’est pas rangé ou
transporté à la verticale.
• Si la laveuse haute pression est dotée
d’une soupape d’arrêt, FERMER la
soupape d’arrêt avant le transport
pour éviter toute fuite d’essence. S’il
n’y a pas de soupape d’arrêt, purger
l’essence du réservoir avant le transport.
Transporter l’essence uniquement dans
un contenant homologué par la Loi sur
la santé et la sécurité du travail.
• Toujours installer la laveuse haute
pression sur un revêtement protecteur
lors du transport pour protéger le
véhicule de tout dommage de fuites.
• Toujours transporter et ranger
l’appareil à la verticale. Retirer
immédiatement la laveuse haute
pression du véhicule dès l’arrivée à
destination.
DANGER : RISQUE DECHOC ÉLECTRIQUE
CE QUI PEUT SE PRODUIRE COMMENT L’ÉVITER
• Un jet en direction de prises
électriques ou d’interrupteurs
ou tout objet branché à un circuit
électrique pourrait se solder par un
• Débrancher tout produit fonctionnant
à l’électricité avant d’essayer de le
nettoyer. Éloigner le jet des prises
électriques et interrupteurs.
chocélectrique.
29 - FR
Page 30

DANGER : RISQUE DE BRÛLURE CHIMIQUE
CE QUI PEUT SE PRODUIRE COMMENT L’ÉVITER
• L’utilisation d’acides, de produits
chimiques toxiques ou corrosifs, de
poisons, d’insecticides, ou de tout type
de solvant inflammable avec le produit
risque de se solder par des blessures
graves, voire la mort.
Ne pas pulvériser d’acides, d’essence,
•
de kérosène ou toute autre matière
inflammable avec ce produit.
Utiliser uniquement des détergents
domestiques, des nettoyants et des
dégraissants recommandés avec la
laveuse haute pression.
• Porter des vêtements protecteurs pour
protéger les yeux et la peau contre le
contact avec les matériaux sous pression.
AVERTISSEMENT : RISQUE D’ÉCLATEMENT
CE QUI PEUT SE PRODUIRE COMMENT L’ÉVITER
•
Des pneus surgonflés pourraient
provoquer des blessures graves et
des dommages à la propriété.
• Utiliser un manomètre pour vérifier
la pression des pneus avant chaque
utilisation et lors du gonflage; consulter
le flanc de pneu pour obtenir la pression
correcte.
REMARQUE :
des réservoirs d’air,
des compresseurs et d’autres appareils
similaires utilisés pour gonfler les pneus
peuvent remplir de petits pneus à ces
pressions très rapidement. Régler
le régulateur de pression d’air à une
pression moindre que celle indiquée sur
le pneu. Ajouter l’air par petite quantité et
utiliser fréquemment le manomètre pour
empêcher un surgonflage.
• Tout liquide pulvérisé à haute vitesse
directement sur les flancs des pneus
(comme ceux que l’on retrouve sur les
voitures, remorques et autres véhicules
semblables) risque d’endommager
les flancs et d’entraîner des blessures
graves.
• Avec les laveuses haute pression cotées
au-dessus de 11032 kPa (1 600 PSI),
utiliser le jet en éventail le plus large (buse
de 40º) et maintenir le jet à au moins 200
mm (8 po) des flancs des pneus. Ne
pas diriger le jet directement sur le joint
séparant le pneu et la jante.
AVERTISSEMENT : ATTENTION SURFACES CHAUDES
CE QUI PEUT SE PRODUIRE COMMENT L’ÉVITER
• Le contact de surfaces chaudes
comme les composants
d’échappement moteur, pourrait
provoquer des brûlures graves
• En cours de fonctionnement, ne toucher
que les surfaces de commande de la
laveuse haute pression. Tenir en tout
temps les enfants à l’écart de la laveuse
haute pression. Ils n’ont pas assez de
jugement pour reconnaître les dangers
inhérents au produit.
30- FR
Page 31

AVERTISSEMENT : RISQUE DE BLESSURE EN SOULEVANT LE
PRODUIT
CE QUI PEUT SE PRODUIRE COMMENT L’ÉVITER
• Essayer de soulever un objet trop
lourd peut se solder par de graves
blessures.
• La laveuse haute pression est trop
lourde pour être soulevée par une seule
personne. Demander de l’aide avant de
la soulever.
CONSERVER CES DIRECTIVES
POUR UN USAGE ULTÉRIEUR
GUIDE D’INSTALLATION RAPIDE
AVERTISSEMENT: Pour réduire le risque de blessure, veuillez lire le manuel
d’instructions de la laveuse à pression et du moteur avant d’utiliser l’appareil.
Installation de
la poignée
A
de la poignée
Faites glisser la poignée
sur le cadre. (si équipé)
Aligner les perforations
de la manche sur celles
du montage. Le fixer
avec les boulons de
selle et les boutons.
IMPORTANT: Ethanol ShieldTM (vendu séparément) est un stabilisateur de
carburant qui aide à éliminer et à prévenir les problèmes liés à l'éthanol dans les
équipements de puissance. Suivez les instructions sur le contenant et ajouter
àl'essence.
Installation
livré sans huile. Avant
de démarrer le moteur,
ajouter l’huile fournie.
Vérifier le niveau d’huile
avant chaque utilisation.
Consultez le guide du
moteur pour connaître
la procédure appropriée.
OU
Ajouter / Voir
pétrole
B
Le moteur est
extérieur bien aéré,
ajoutez de l'essence
pure, sans plomb, de
haute qualité et ayant
un indice d'octane de
86 ou plus. Ne pas
trop remplir. Essuyez
l’essence déversée
avant de démarrer
le moteur. Consultez
le guide du moteur
pour connaître la
procédure appropriée.
Ajouter
l’essence
C
Dans un endroit
31 - FR
Page 32

GUIDE DE DÉMARRAGE RAPIDE
DANGER :
• Ne faites jamais tourner le moteur à l’intérieur ou dans un endroit clos, mal
aéré. Les émanations d’échappement contiennent du monoxyde de carbone,
un gaz inodore et mortel.
• Risque d’injection de liquide et de lacération. Lorsque vous utilisez le réglage
à haute pression, NE LAISSEZ PAS le jet à haute pression entrer en contact
avec la peau non protégée ou des animaux de compagnie ou autres. Des
blessures sérieuses surviendront.
Branchez le
tuyau
1
d’arrosage à la
pompe
Filetez le tuyau
d’arrosage à l’entrée
de la pompe.
Branchez la
lance
4
d’arrosage au
pulvérisation
Filetez la lance
d’arrosage dans
l’extrémité du pistolet
de pulvérisation.
pistolet de
Branchez le
tuyau
2
d’arrosage à la
pompe
Filetez le tuyau à
haute pression à la
sortie de la pompe.
OU
Branchez les
buses à
5
raccord rapide
à la lance
d’arrosage
Tirez sur le coupleur
et insérez la buse.
Relâchez le coupleur
à raccord rapide et
tournez la buse afin de
vous assurer qu’elle y
soit bien sécurisée.
Branchez la
lance
3
d’arrosage au
pulvérisation
Filetez la lance
d’arrosage dans
l’extrémité du pistolet
de pulvérisation.
Ne faites pas
fonctionner l’appareil si
l’alimentation d’eau n’est
pas branchée et ouverte.
Utilisez uniquement
de l’eau froide.
pistolet de
Ouvrez le
robinet d’eau
6
au complet
OU
32- FR
Page 33

Relâchez l’air
du système
7
tout l’air de la pompe
et du tuyau à haute
pression en appuyant
sur la gâchette jusqu’à
ce qu’un écoulement
constant d’eau soit
présent. Environ
30 secondes.
de l’opérateur. Vous devez lire et comprendre le manuel de l’opérateur avant
d’utiliser ce produit.
Relâchez
AVERTISSEMENT: Ce guide n’est pas un substitut pour la lecture du manuel
Démarrez le
moteur.
8
Consultez le
guide du
moteur pour
connaître la
procédure
appropriée.
33 - FR
Page 34

MIEUX CONNAÎTRE LA LAVEUSE HAUTE PRESSION
REMARQUE: Les photographies et schémas figurant dans ce guide sont
incorporés seulement à titre de référence et ne représentent pas un model
particulier.
Comparez les illustrations avec votre appareil afin de vous familiariser avec
l'emplacement des commandes et des réglages. Conservez ce guide pour les
références futures.
1
C
B
MAX.
RPM
MIN.
G
K L
E
D
A
H
J
I
ÉLÉMENTS DE BASE D’UNE LAVEUSE À PRESSION (FIG. 1)
A. Pompe à haute pression: Augmente la pression de la source d'eau.
B. Moteur : Entraîne la pompe à haute pression. Consultez le guide du moteur
pour connaître l’emplacement et l’utilisation des commandes du moteur.
C. Boyau à haute pression : Achemine l'eau sous pression de la pompe vers le
pistolet et la lance de vaporisation.
D. Pistolet de vaporisation : S'attache à la lance pour régler le débit d'eau, la
direction et la pression.
E. Tube de pulvérisation à branchement rapide : ce système permet à
l’utilisateur de changer rapidement les buses haute pression. Consultez la
partie intitulée Utilisation de la lance de vaporisation de Utilisation section.
F. Boyau de produit chimique (N'est pas montré sur le schéma): Alimente les
agents de nettoyage dans la pompe pour les mélanger avec l'eau. Consultez la
partie intitulée Application des produits chimiques/solvants de nettoyage
de Utilisation section.
G. Poignée
34- FR
Page 35

H. Cadre
I. Sortie de la pompe
J. Orifice d’admission de la pompe
K. Buses à changement rapide
L. Porte-buse
ÉLÉMENTS DE BASE DU MOTEUR
Consultez le guide du moteur pour connaître l’emplacement et l’utilisation des
commandes du moteur.
Commande d'étrangleur : Ouvre et ferme la soupape de l'étrangleur dans le
carburateur.
Poignée du démarreur : Tirer sur la poignée du démarreur fait fonctionner le
démarreur à rappel pour démarrer le moteur.
Interrupteur du moteur : Met en fonction ou hors fonction le système d'allumage.
D'ASSEMBLAGE (FIG. (2–4)
1. Identifier et retirer toutes les pièces détachées de la boîte pliante.
2. Couper les quatre coins de la boîte, du haut vers le bas, et mettre les côtés à
plat sur le sol.
3.
(Figure 2) Faites glisser la poignée (G) sur le cadre (H) et le fixer avec les
boulons de selle et les boutons.
OU
3. (Figure 2A) Aligner les perforations de la manche (S) sur celles du montage(G).
Inserer les boulons (DD) de verrou dans les perforations, bien les serrer pour
securiser la manche au montage (EE).
AVIS: Risque de blessures corporelles. Ne pas placer les mains entre le module et
le cadre pour éviter de se pincer les mains.
2
G
H
2A
S
G
G
EE
H
DD
4. Retirer du sac plastique les buses colorées (K) à changement rapide et les
insérer dans l’anneau correspondant sur le porte-buse (L). Les couleurs des
buses correspondent aux couleurs sur sur l'étiquette.
2B
K
L
35 - FR
Page 36

5. Attachez la lance (E) au pistolet (D) et bien serrer.
6. Attachez le boyau à haute pression (C) au pistolet (D) et bien serrer.
3
D
4
D
E
OU
C
D
C
AVIS: Le moteur est livré sans huile. Avant de démarrer le moteur, ajouter l’huile
fournie. Les dommages au moteur peuvent se produire si le moteur tourne sans
huile, ce dommage ne sera pas couvert par la garantie.
AVIS: le plein d’huile de la pompe haute pression a été fait en usine. Toujours
vérifier le niveau d’huile avant l’utilisation de la pompe (se reporter à la section
Entretien pour de plus amples renseignements).
UTILISATION
PRESSURE WASHER TERMINOLOGY
TERMINOLOGIE DES LAVEUSES À PRESSION
PSI *: livres par pouce carré. Une unité de mesure de pression d'eau. Également
utilisé pour la pression d'air, la pression hydraulique, etc. .
GPM *: Gallons par minute. L'unité de mesure du débit d'eau.
* La pression nominale et débit d'eau nominal est dans la tolérance de fabrication
de (+ / - 10%)
CU : Unités de nettoyage. GAL. PAR MIN. x PSI = CU. Parfois noté que L / min
(litres par minute).
Mode de dérivation : Permet à l'eau de recirculer dans la pompe lorsque la
détente n'est pas actionnée. Cette option permet à l’opérateur de libérer la
gâchette du pistolet et de se repositionner sans avoir à couper le moteur entre les
operations de nettoyage.
AVERTISSEMENT: ne laissez pas l'unité fonctionner pendant plus de
deux minutes sans la gâchette du pistolet tiré. Cela pourrait provoquer une
surchauffe et d'endommager la pompe. Lorsque la température à l'intérieur
de la pompe est trop élevée, la soupape de décharge thermique ouvrira et
libérer de l'eau à partir de la pompe pour abaisser la température interne.
Alors la vanne se ferme.
Soupape de surpression thermique (P, Fig. 5) : lorsque la
température à l’intérieur de la pompe dépasse un certain seuil
(température élevée), la soupape s’ouvrira et relâchera un jet
d’eau pour essayer d’abaisser la température à l’intérieur de la
pompe. La soupape se fermera par la suite. REMARQUE :
L’emplacement de la soupape de surpression thermique peut
varier selon le type de pompe.
Système d'injection de produit chimique : Mélange les nettoyants ou les
solvants de nettoyage avec l'eau pour augmenter l'efficacité de nettoyage.
Source d'eau : Toutes les laveuses à pression ont besoin d'une source d'eau. Les
exigences minimums pour la source d'eau sont de 20 PSI et de 19litres (5 gallons)
5
P
36- FR
Page 37

à la minute. Si votre source d’eau est un puits, la longueur du boyau d'arrosage
doit être limitée à 9m(30pi).
AVERTISSEMENT: pour réduire la possibilité de contamination, toujours
protéger le système contre les refoulements s’il est raccordé au système
d’apport en eau potable.
CARACTÉRISTIQUES DE FONCTIONNEMENT DE LA LAVEUSE À PRESSION
RÉGLAGE DE LA PRESSION (FIG. 6)
La pression est préréglée à l'usine afin d'obtenir une pression ainsi qu'un nettoyage
optimums. La pression peut être diminuée de la façon suivante.
1. Éloignez-vous de la surface à nettoyer. Plus vous êtes éloigné, moins sera
la pression sur la surface à nettoyer.
2. Installer la buse de 40° (blanche). La buse de 40° produit un jet d’eau moins
puissant et pulvérise sur une plus grande superficie. Se reporter à la section
Utilisation de la lance de vaporisation.
3. (Si équipé) La pompe à haute pression de ce
nettoyeur haute pression est équipée d’une
caractéristique d’un déchargeur réglable qui
permet d’ajuster le réglage de la pression.
Pour diminuer la pression, tournez le bouton
de contrôle de pression sur la pompe dans le
sens anti-horaire pour atteindre la pression souhaitée.
Pour retourner la pression vers la pression de réglage de l’usine, tournez le
bouton de contrôle de pression sur la pompe dans le sens horaire jusqu’à ce
qu’il s’arrête.
AVIS : NE TENTEZ PAS de tourner le bouton régulateur de pression au-delà de
l’arrêt intégré, car ceci causera des dommages à la pompe.
AVIS : NE serrez PAS TROP le bouton de contrôle de pression. Si le bouton est trop
serré, il PEUT se casser et ceci occasionnerait une perte immédiate de pression
d’eau ainsi que des coûts élevés de réparation à l’appareil.
AVIS : NE tentez PA S d'augmenter la pression de la pompe. Une pression plus
élevée que celle réglée à l'usine peut endommager la pompe.
CONFIGURATION DIAL-N-WASH (FIG. 7, 8) (SI ÉQUIPÉ)
1. Choisissez la buse haute pression (0˚, 15˚ ou 40˚) correspondant à vos besoins.
Consultez la section Utilisation de la lance de pulvérisation.
2. Au moment de son expédition, le régulateur Dial-N-Wash est réglé à la
puissance MAX. La ligne de pression MAX est alignée avec la flèche (R) de la
bague, tel qu’illustré dans la figure 7.
Faites tourner le régulateur Dial-N-Wash (Q) dans le sens contraire des
aiguilles d’une montre jusqu’au réglage MIN. La flèche (R) sera alignée avec la
ligne de pression MIN, tel qu’illustré dans la figure 8.
6
+
-
R
8
R
L
37 - FR
7
Page 38

Réglez la pression en faisant
tourner le régulateur Dial-N-Wash
(Q) dans le sens des aiguilles
d’une montre pour augmenter la
pression ou dans le sens contraire
pour diminuer la pression, en
alignant la flèche avec la ligne
indiquant la pression désirée du régulateur Dial-N-Wash.
REMARQUE: Pour l'application de produits chimiques installez la buse de
projection faible noir et faites tourner Dial-N-Wash au réglage de pression
«MAX».
UTILISATION DE LALANCE
Les buses du tube de pulvérisation sont rangées dans le porte-buse sur le panneau.
Les couleurs sur le panneau identifient la position de la buse et l’angle de pulvérisation. Se reporter au tableau suivant pour sélectionner la bonne buse pour le travail
souhaité.
CHANGEMENT DES BUSES SUR LE TUBE DE PULVÉRISATION (FIG. 9)
DANGER : risque d’injection de liquides. Ne pas diriger le jet en direction
de personnes, sur la peau et les yeux sans protection ou sur des animaux.
Une blessure grave se produira.
AVERTISSEMENT : la projection d’objets pourrait provoquer de graves
blessures. NE PAS essayer de changer de buse lorsque la laveuse haute
pression est en fonctionnement. Éteindre le moteur avant de changer de
buse.
1. Pousser vers l’arrière le coupleur à branchement rapide
(E) et insérer la buse (K).
9
2. Relâcher le coupleur et tourner la buse pour s’assurer
de la bonne fixation de celle-ci.
AVERTISSEMENT : la projection d’objets pourrait
provoquer de graves blessures. S’assurer que la buse
K
E
est complètement insérée sur la douille du dispositif
de branchement rapide et quele joint de blocage est complètement engagé
(vers l’avant) avant d’appuyer sur la détente du pistolet de pulvérisation.
Couleur de
la buse
Red
Jaune
Angle de
pulvérisation
0˚
15˚
Utilisations Surfaces*
application précise
et puissante pour le
nettoyage de taches, de
surfaces non peintes ou
de zones inaccessibles
nettoyage intense
de surfaces dures
non peintes
métal ou béton
non peint;
N’UTILISEZ pas
sur le bois
grils, entrées de
cour, passages
piétons en béton ou
briques et briques
ou stuc non peints
38- FR
Page 39

Couleur de
la buse
Vert
Angle de
pulvérisation
25˚
Utilisations Surfaces*
buse standard pour
presque toutes les
applications
outils de jardin, trottoirs, meubles de
jardin, parement non
peint, stuc, les gouttières et surplomb de
toit, surfaces en brique
40˚
Blanc
nettoyage de surfaces
peintes ou délicates
Automobile/VR,
bateau, bois, brique et
stuc peints, surface en
vinyle, parement peint
basse pression
applique des solutions
de nettoyage
la pulvérisation à
faible pression est
sécuritaire pour
Noir
toutes les surfaces;
toujours vérifier la
compatibilité des
solutions nettoyantes
avant leur utilisation
* AVIS : le jet sous haute pression de la laveuse haute pression est capable
d’endommager des surfaces comme le bois, le verre, les peintures d’automobiles,
les garnitures d’automobiles, les objets délicats comme les fleurs et les arbustes.
Avant de pulvériser, vérifier l’article à nettoyer et s’assurer qu’il est suffisamment
solide pour résister à la puissance du jet.
APPLICATION DES PRODUITS CHIMIQUES/SOLVANTS DE NETTOYAGE (FIG. 10)
L'application des solutions de nettoyage devrait être effectuée à basse pression.
REMARQUE : utilisez seulement des savons ou des produits chimiques qui sont
conçus spécialement pour une laveuse à pression. Ne pas utiliser de l'eau de
Javel.
Application de produits chimiques
1. Poussez le boyau de produit chimique (F, Figura 10)
dans le raccord cannelé, près du point de connexion
du boyau à haute pression de la pompe, tel qu'illustré.
REMARQUE : L’emplacement de l’embout barbelé
peut varier selon le type de pompe.
2. Placez l'autre extrémité du boyau de produit
chimique (l'extrémité avec le filtre) dans le contenant
avec le produit chimique/solution de nettoyage.
REMARQUE : pour chaque quantité de 26,5 litres (7 gallons) d'eau pompée,
3,8 litres (1 gallon) de produit chimique/solution de nettoyage seront utilisés.
3. Insérer la buse de basse pression (noire) sur le raccord à branchement
rapide du tube de pulvérisation, se reporter à la section Buses du tube de
pulvérisation.
4 Après avoir utilisé un produit chimique, placez le boyau de produit chimique
dans un récipient d'eau propre et aspirez de l'eau propre à travers le système
d'injection de produit chimique pour bien rincer le système. Si les produits
chimiques restent dans la pompe, celle-ci pourrait être endommagée. Les
pompes endommagées par un produit chimique ne sont pas couvertes par
lagarantie.
39 - FR
10
F
Page 40

REMARQUE : lors de l’utilisation de produits chimiques et de savons, la succion ne
fonctionnera pas si la buse noire à savon n’est pas insérée sur le tube de pulvérisation.
DÉMARRAGE (FIG. 11–14)
AVERTISSEMENT: afin de réduire le risque de blessures, lire le monde
d’emploi de la laveuse haute pression avant de la mettre en marche.
DANGER : risque d’injection de liquide et de lacération Lors du
fonctionnement à pression élevée, NE PAS laisser le jet à haute pression en
contact avec la peau et les yeux sans protection ou avec des animaux. Une
blessure grave se produira.
• La laveuse haute pression fonctionne à des pressions de liquides et des
vitesses suffisamment élevées pour pénétrer la peau humaine et animale, ce
qui pourrait se solder par une amputation ou autres blessures graves. Des
fuites provoquées par des raccords lâches ou des tuyaux usés ou endommagés peuvent se solder par des blessures par injection. NE PAS TRAITER
UNE INJECTION DE LIQUIDE COMME UNE SIMPLE COUPURE ! Consulter
un médecin.
DANGER: Monoxyde de carbone. Le fonctionnement d’un moteur à
l’intérieur provoque la mort en quelques minutes. L’échappement du moteur
contient des niveaux élevés de monoxyde de carbone (CO), un gaz toxique, indoors et invisible. Il est possible que vous inhaliez du CO meme EN
L’ABSENCE de l’odeur de l’échappement du moteur.
• Respirer les vapeurs d’échappement provoquera de graves blessures voire,
un décès ! Les gaz d’échappement des moteurs contiennent du monoxyde
de carbone, un gaz inodore et mortel.
• Utiliser la laveuse haute pression dans une zone bien aérée. Éviter les
endroits clos comme les garages, les sous-sols, etc.
• Ne jamais utiliser l’appareil dans un endroit habité par des hommes ou des
an maux.
AVERTISSEMENT: risque d’incendie, asphyxie et de brûlures. Ne jamais
faire le plein du réservoir avec le moteur en marche ou chaud. Ne pas fumer
lors du plein d’essence.
• NE JAMAIS remplir le réservoir au complet. Laisser environ 12,7 mm (1/2 po)
de dégagement sous le bord du goulot de remplissage pour permettre
l’expansion de l’essence. Essuyer toute trace d’essence du moteur et de
l’équipement avant de démarrer le moteur..
• NE PAS laisser les tuyaux en contact avec le silencieux chaud en cours de
fonctionnement ou immédiatement près l’utilisation de la laveuse haute
pression. Les dommages aux tuyaux, suite à un contact avec les surfaces
chaudes du moteur, NE sont PAS couverts par la garantie.
AVIS : Risque des dommages à la propriété. ne jamais tirer sur le tuyau
d’approvisionnement en eau pour déplacer la laveuse haute pression. Cette action
risque d’endommager le tuyau ou l’arrivée d’eau de la pompe.
• NE PAS utiliser d’eau chaude. Utiliser uniquement de l’eau froide.
• Ne jamais fermer l’arrivée d’eau lors du fonctionnement de la laveuse haute
pression, cela endommagera la pompe.
• NE PAS cesser la pulvérisation d’eau pour une période de plus de deux
minutes à chaque fois. La pompe fonctionne en mode de dérivation lorsque
la détente du pistolet de pulvérisation n’est pas engagée. Il y a risque
d’endommagement des composants internes de la pompe si elle demeure
en mode de dérivation pour plus de deux minutes.
40- FR
Page 41

Si vous ne comprenez pas ces mises en garde, s'il vous plaît contacter notre
département de service clients à www.simpsoncleaning.com pour obtenir de plus
amples instructions.
Avant de démarrage, l'appareil, consultez le guide du moteur pour connaître
la procédure de démarrage appropriée.
1. Dans un endroit extérieur bien aéré, ajoutez de l'essence pure, sans plomb, de
haute qualité et ayant un indice d'octane de 86 ou plus. Ne pas trop remplir.
Essuyez l’essence déversée avant de démarrer le moteur. Consultez le guide
du moteur pour connaître la procédure appropriée.
IMPORTANT: Ethanol Shield
TM
(vendu séparément) est un stabilisateur de
carburant qui aide à éliminer et à prévenir les problèmes liés à l'éthanol dans les
équipements de puissance. Suivez les instructions sur le contenant et ajouter à
l'essence.
AVIS : Utilisez de carburants dont la teneur en éthanol
est supérieure à 10 % ne sont pas approuvés pour une
utilisation dans ce produit par la réglementation de
l'EPA et risque d'endommager l'appareil et annuler la
garantie.
2. Vérifiez le niveau d’huile. Consultez le guide du moteur pour connaître la
procédure appropriée.
3. Vérifier le niveau d’huile de la pompe. Le niveau d’huile doit arriver à un point
dans le milieu du voyant. Reportez-vous au paragraphe Pompe en Entretien.
4. Raccorder le tuyau d’eau à l’approvisionnement d’eau. Faire couler de l’eau
dans le tuyau pour retirer toute bulle d’air. Dès que le jet d’eau est constant,
fermer l’approvisionnement d’eau.
5. Assurez-vous que l'écran filtrant (M) est dans l'orifice d'entrée d'eau de la
pompe. REMARQUE: Le côté conique doit être dirigé vers l'extérieur.
6. Branchez la source d'eau (N) à l'orifice d'entrée de la pompe (J).
REMARQUE: La source d'eau doit fournir un minimum de 19 litres (5 gallons)
par minute à 20 PSI.
7. Attachez le boyau à haute pression (C) à la sortie de la pompe (I).
11
12
M
N
13
J
I
C
I
OU
C
AVERTISSEMENT: pour réduire la possibilité de contamination, toujours
protéger le système contre les refoulements s’il est raccordé au système
d’apport en eau potable.
8. Pour sélectionner la bonne buse pour le travail souhaité. Consultez les directives
intitulées Utilisation de la lance de cette section. REMARQUE: Si vous
appliquez un produit chimique ou une solution de nettoyage. Si vous voulez
appliquer un produit chimique ou une solution de nettoyage, consultez la
partie intitulée Application des produits chimiques/solvants de nettoyage
de cette section.
9. Ouvrez le robinet de la source d'eau.
41 - FR
Page 42

AVIS : Risque des dommages à la propriété. Négliger de suivre cette directive
pourrait endommager la pompe.
10. Retirer toute trace de bulles d’air de la pompe et du tuyau haute pression en
appuyant sur la détente jusqu’à l’obtention d’un jet d’eau constant.
11. Démarrez le moteur. Consultez le guide du moteur pour connaître la
procédure appropriée.
AVERTISSEMENT : risque d’utilisation dangereuse Si le moteur ne
démarre pas après deux tentatives, appuyer sur la détente du pistolet pour
décompresser la pompe. Tirer lentement la corde du démarreur jusqu’à
obtention d’une résistance. Puis tirer rapidement sur celui-ci pour éviter
l’effet de rebond moteur et empêcher toute blessure à la main ou au bras.
REMARQUE : Si le niveau d’huile du moteur est bas, le moteur ne démarrera pas.
Dans ce cas, vérifier le niveau d’huile du moteur et ajouter de l’huile au besoin
12. Appuyez sur la détente du pistolet pour commencer la vaporisation d'eau.
AVERTISSEMENT: ne laissez pas l'unité fonctionner pendant plus de
deux minutes sans la gâchette du pistolet tiré. Cela pourrait provoquer une
surchauffe et d'endommager la pompe. Lorsque la température à l'intérieur
de la pompe est trop élevée, la soupape de décharge thermique ouvrira et
libérer de l'eau à partir de la pompe pour abaisser la température interne.
Alors la vanne se ferme.
AVERTISSEMENT : risque d’utilisation dangereuse Se tenir sur une
surface stable et saisir solidement le pistolet/la lance avec les deux mains.
S’attendre à un effet de rebond lorsque la détente du pistolet de pulvérisation
est engagée.
13. Relâchez la détente pour arrêter le débit d’eau.
AVERTISSEMENT : risque de blessure par jet.
Verrouiller la détente (O) lorsque le pistolet n’est pas
14
utilisé pour empêcher une pulvérisation accidentelle.
ARRÊT DE L'APPAREIL
1. Après chaque usage, si vous avez appliqué des produits
chimiques, placez le boyau de produit chimique dans un
récipient d'eau propre et aspirez de l'eau propre à travers
le système d'injection de produit chimique pour bien rincer le système.
AVIS : Risque des dommages à la propriété. Si vous n'exécutez pas cette étape,
cela risque d'endommager la pompe.
2. Arrêtez le moteur. Consultez le Guide du moteur.
AVIS : Risque des dommages à la propriété. Ne fermez JAMAIS le robinet d'eau
lorsque le moteur tourne.
3. Fermez le robinet de la source d'eau.
4. Appuyez sur la détente du pistolet de vaporisation pour dégager l’eau sous
pression dans le boyau ou dans le pistolet.
5. Consultez la section sur l'entreposage de ce guide pour connaître les
procédures d'entreposage appropriées.
O
42- FR
Page 43

ENTRETIEN
AVERTISSEMENT: risque de brûlure Lors d’un entretien, il y a présence de
surfaces d’eau chaudes, à pression élevée et de pièces mobiles qui peuvent
provoquer des blessures graves ou un décès.
AVERTISSEMENT: risque d’incendie Avant tout entretien ou réparation,
toujours débrancher le fil de la bougie, laisser refroidir le moteur et
décompresser toute pression d’eau. Le moteur contient un combustible
inflammable. Ne pas fumer ou travailler près de flammes nues lors d’un
entretien.
Afin d'assurer le bon fonctionnement et une durée de vie prolongée de votre
laveuse à pression, vous devez préparer et suivre un calendrier d'entretien régulier.
Si votre laveuse à pression est utilisée dans un environnement défavorable, tel
qu'à des températures élevées ou des conditions poussiéreuses, les vérifications
d'entretien doivent être exécutées plus souvent
MOTEUR
Consultez le guide du moteur pour connaître les recommandations du fabricant
concernant tous les services d’entretien. REMARQUE : Le bouchon de vidange du
moteur se situe à l'arrière de l'appareil.
POMPE (FIG. 15)
REMARQUE: le plein d’huile de la pompe a été fait en usine. L’huile est perferred
SIMPSON
disponible,15W-40 de SAE pourrait être utilisé. Changer le pétrole de pompe après
le premier 50 heures d’opération et chaque 100 heures par la suite, ou chaque
3mois.
VÉRIFICATION DU NIVEAU D’HUILE
Le niveau d’huile devrait atteindre le point au milieu
de la jauge visuelle(AA).
MÉTHODE DE VIDANGE DE L’HUILE DE LA POMPE
1. Desserrer la jauge bouchon du rés-ervoir d’huile
2. Déposer un contenant sous l’orifice de vidange
3. Retirer le bouchon de l’orifice de vidange.
4. Une fois la vidange terminée, revisser le bouchon. Serrer solidement.
5.
6. Replacer la jauge bouchon du réservoir d’huile de la pompe et serrer
Si il ya un problème avec la pompe à nous contacter au www.simpsoncleaning.com.
*** CAT PUMPS
®
Premium huile pour le carter de le pompe. Si ce pétrole n'est pas
15
BB
AA
de la pompe (BB).
de l’huile (CC).
CC
Pour les pompes AAA™, remplir à l'aide de l'huile de carter de pompe
Premium SIMPSON®. Si cette huile n'est pas disponible, une huile SAE 15W40 peut être utilisée.
Pour les pompes CAT
®
***, remplir à l'aide d'une huile hydraulique non
détergente (ISO 68).
solidement.
®
est une marque déposée de Diversified Dynamics Corporation.
43 - FR
Page 44

CONNEXIONS
Les connexions des boyaux de la laveuse à haute pression, du pistolet et de la
lance doivent être nettoyées régulièrement et lubrifiées avec une huile légère ou de
la graisse non soluble à l'eau afin d'éviter les fuites et dommages aux joints toriques.
NETTOYAGE DE LA BUSE (FIG. 16)
En cas d’obturation de la buse avec une matière étrangère (saletés par exemple),
une pression excessive peut se développer. En cas d’obturation ou de restreinte
partielle de la buse, la pression de la pompe pulsera. Nettoyer immédiatement la
buse à l’aide de la trousse de nettoyage fournie. Suivre les directives suivantes :
1. Éteindre la laveuse haute pression et fermer l’arrivée d’eau.
2. Enfoncer la détente du pistolet de pulvérisation pour décompresser toute
pression d’eau.
3. Débrancher le tube de pulvérisation du pistolet.
4. Retirer la buse haute pression (K) du tube de pulvérisation.
Retirer toute trace d’obstruction à l’aide de l’outil de
nettoyage de buse fourni puis rincer à l’eau fraîche en
sens contraire.
5. Diriger l’arrivée d’eau (N) dans la buse haute pression
pendant 30 secondes pour évacuer les particules
détachées.
6. Replacer la buse sur le tube de pulvérisation.
7. Rebrancher le tube de pulvérisation au pistolet puis ouvrir
l’arrivée d’eau.
8. Démarrer la laveuse haute pression et sélectionner la pression élevée pour
tester le pistolet de pulvérisation.
16
K
N
K
NETTOYAGE DU FILTRE D’ENTRÉE D’EAU (FIG. 11)
Cet écran filtrant devrait être vérifié périodiquement et nettoyé au besoin.
1. Saisissez l'extrémité du filtre et retirez-le de l'orifice d'entrée d'eau de la
pompe, tel qu'illustré.
2. Nettoyez le filtre en le rinçant à l'eau sur les deux côtés.
3. Réinsérez le filtre dans l'orifice d'entrée d'eau de la pompe. REMARQUE : Le
côté conique doit être dirigé vers l'extérieur.
REMARQUE : N'utilisez pas la laveuse à pression lorsque le filtre n'est pas posé
de façon appropriée.
ENTREPOSAGE
MOTEUR
Consultez le Guide du propriétaire du moteur pour connaître les recommandations
du fabricant en ce qui concerne l'entreposage.
POUR ÉVITER TOUT PROBLÈME LIÉ AU CARBURANT
1. Verser le Ethanol ShieldTM (vendu séparément) stabilisateur d’essence
conformément aux instructions du fabricant.
Lors de l’ajout de stabilisateur d’essence, remplir le réservoir d’essence
fraîche. Si le réservoir n’est que partiellement plein, l’air présent favorisera la
détérioration de l’essence durant le stockage. Si l’essence utilisée provient
d’un bidon, s’assurer qu’elle est fraîche.
44- FR
Page 45

2. Après avoir ajouté le stabilisateur, faire tourner le moteur à l’extérieur pendant
10 minutes pour s’assurer que l’essence non traitée est remplacée par
l’essence traitée dans le carburateur.
3. Mettre le robinet d’essence en position FERMÉ.
4. Continuez à laisser tourner le moteur jusqu'à ce qu'il s'arrête à cause du
manque de carburant dans la cuve du carburateur.
POMPE
Le fabricant recommande l’utilisation SIMPSON® / POWERWASHER® d’un liquide
protecteur de pompe/produit d’hivérisation lors de l’entreposage de l’appareil pour
une durée supérieure à 30jours et/ou lorsque des températures sous le point de
congélation sont prévues. SIMPSON
®
/ POWERWASHER® liquide protecteur de
pompe est respectueux de l’environnement.
REMARQUE : l’utilisation d’un liquide protecteur de pompe permet de lubrifier
correctement les joints internes de la pompe, quels que soient la température ou
l’environnement.
AVIS : risque de dommages matériels. Utiliser uniquement SIMPSON
POWERWASHER
®
Garde Pompe ou l'équivalent. D'autres produits pourraient être
®
/
corrosifs et / ou contiennent de l'alcool qui peut causer des dommages à la pompe.
1. Fermez le pulvérisateur à puissant jet d’eau et déconnectez les boyaus de la
pompe.
2. Dévissez le robinet de bouteille, de la bouteille Pump Guard, et enlevez le
sceau.
3. Vissez de nouveau le robinet sur la bouteille.
4. Attachez la bouteille à l’ouverture du pulvérisateur à puissant jet d’eau.
5. Pressez la bouteille pour injecter le contenu dans la pompe.
6. Avec contacteur d’allumage, simultanément tirer la corde du démarreur et
presser la bouteille. Répétez jusqu’à ce que le fluide protecteur sorties sortie
de la pompe. REMARQUE: Cette étape peut nécessiter deux personnes.
LAVEUSE À PRESSION
1. Vidange toute l'eau du tuyau à haute pression et l'envelopper sur le dévidoir
pour tuyau.
2. Vidangez toute l'eau du pistolet et de la lance. Pour ce faire, maintenez le
pistolet en position verticale, en dirigeant la buse vers le bas, et appuyez sur
la détente du pistolet. Rangez ces pièces dans le porte-pistolet.
3. Entreposez le boyau de produit chimique de façon à éviter tous dommages.
ACCESSOIRES
DANGER: Risque d’injection de liquides. Si une lance ou un pistolet de
rechange est utilisé avec cette laveuse à pression, NE PAS utiliser une lance
et/ou une combinaison lance et pistolet dont la longueur est inférieure à celle
des lance et pistolet fournis avec cette laveuse à pression; la mesure se fait
de l’extrémité de la buse à la détente du pistolet.
AVIS: l'utilisation de tout autre accessoire non recommandé avec cet outil pourrait
s'avérer dangereuse. Utiliser uniquement des accessoires de marque égal ou
supérieur à celui de la laveuse haute pression.
45 - FR
Page 46

RÉPARATIONS
Ne pas retourner cet appareil chez votre détaillant. s'il vous plaît contacter
notre département de service clients à www.simpsoncleaning.com
GARANTIE LIMITÉE
Le fabricant de ce produit consent à réparer ou à remplacer les pièces désignées
qui sont jugées défectueuses pendant la période de la garantie indiquée
ci-dessous, et ce à la seule discrétion du fabricant. Des limitations/extensions et
exclusions spécifiques s’appliquent.
Cette garantie couvre des défectuosités du matériel et de la main-dœuvre, mais
pas les défaillances de pièces causées par une usure normale, la dépréciation, un
usage abusif ou inapproprié, des dommages accidentels, la négligence, l'entretien,
qualité de l'eau ou l'entreposage. Pour toute réclamation en vertu de la garantie,
toute pièce jugée défectueuse doit être conservée et doit être disponible pour le
renvoi à un Centre de service sous garantie pour l’inspection sur demande. Les
jugements et décisions du fabricant concernant la validité des réclamations en
vertu de la garantie sont finals.
Ces garanties s’appliquent à l’utilisateur final et ne sont pas transférables. En tant
que Centre de service sous garantie autorisé par l’usine et ayant un personnel
formé, l’usine acceptera les conditions de toutes les garanties des composants
et satisfera les réclamations en vertu des dispositions appropriées des garanties.
Sans s’y limiter, les pièces qui subissent une usure normale comprennent les
soupapes et les joints d’étanchéité et ces pièces ne sont pas couvertes par cette
garantie.
Cette garantie remplace toute autre garantie expresse ou implicite, y compris mais
sans s’y limiter, les garanties de qualité marchande ou d’adaptation à un usage
particulier et, par la présente, toute garantie de ce genre est renoncée et exclue
par le fabricant. L’obligation du fabricant en vertu de la garantie est limitée à la
réparation ou au remplacement des produits défectueux, selon les dispositions
de la présente, et le fabricant ne sera pas responsable de toute perte ou dépense
ou tout dommage ultérieur - y compris les dommages subis lors de l’expédition,
dans un accident, suite à un usage abusif ou inapproprié, un acte de Dieu ou
la négligence. Également exclus de la garantie sont les dommages subis suite
à l’utilisation de pièces non achetées du fabricant et suite aux modifications
effectuées par un personnel non autorisé par l’usine. Tout manque de suivre les
directives figurant dans le guide d’instruction lors de l’installation et de l’utilisation
de l’équipement annulera la garantie.
Cette garantie ne couvre pas les situations suivantes : les machines utilisées
comme équipement de location, les dommages subis lors de l’expédition (de telles
réclamations doivent être soumises au transporteur), dans un accident ou suite
à un usage abusif ou inapproprié, un acte de Dieu ou la négligence. Également
exclus de la garantie sont les dommages subis à cause de réparations ou de
modifications effectuées par un personnel non autorisé par l’usine ou à cause de
l’installation ou de l’utilisation de l’équipement sans suivre les directives figurant
dans le guide d’instruction.
Le fabricant ne sera pas responsable pour les dommages indirects, les blessures
corporelles ou les pertes commerciales.
46- FR
Page 47

LA GARANTIE NE S’APPLIQUE PAS AUX DÉFAILLANCES CAUSÉES PAR :
• les dommages subis lors du transport
• Les dommages dus à la détérioration chimique, tartre, rouille, l'expansion
thermique ou à la corrosion
• les dommages subis par le gel
• les dommages causés par les pièces ou accessoires non achetés d’un
concessionnaire autorisé ou non approuvés par le fabricant.
• l’usure normale des pièces mobiles ou des composants affectés par les pièces
mobiles.
OTEUR
M
Couvert par la garantie du fabricant du moteur. Consultez le guide du moteur.
POMPE HAUTE PRESSION (DÉFECTUOSITÉS DANS LE MATÉRIEL OU LA MAIN-D’ŒUVRE)
AAATM - Cinq (5) ans de la date d’achat..
CAT Pumps®*** - Cinq (5) ans de la date d’achat.
CADRE (DÉFECTUOSITÉS DANS LE MATÉRIEL OU LA MAIN-D’ŒUVRE)
Dix (10) an de la date d’achat.
D'AUTRES COMPOSANTS (DÉFECTUOSITÉS DANS LE MATÉRIEL OU LA MAIN-D’ŒUVRE)
Comprend les buses, tuyaux, pistolets de vaporisation, lances, pneus, pieds
Quatre-vingt-dix (90) jours de la date d’achat.
GUIDE DE DÉPANNAGE
PROBLÈME CAUSE CORRECTION
Le moteur ne
démarre pas
(voir le Guide
du moteur
pour plus de
renseignements
sur le
dépannage
du moteur)
Aucun carburant Ajoutez du carburant
Niveau d’huile bas Faire l’appoint d’huile
Le filtre à air est
rempli d’huile
Nettoyer l’élément du filtre à air.
Se reporter au mode d’emploi
du moteur pour connaître
la procédure correcte
Accumulation de pression
après avoir tiré deux fois
sur le cordon de démarrage
ou après l'utilisation initiale
Le levier d'étrangleur est en
position sans étranglement
Appuyez sur la détente du pistolet
pour dégager la pression
Déplacez le levier d'étrangleur à la
position d'étranglement « Choke ».
« No Choke ».
Fil de bougie n'est
pas branché
Branchez le fil de la
bougie d'allumage
47 - FR
Page 48

PROBLÈME CAUSE CORRECTION
Aucune
pression ou
basse pression
(à l'utilisation
initiale)
La lance n'est pas en
position de haute pression
Alimentation en
eau insuffisante
Consultez les instructions
Utilisation de la lance de
vaporisation
Utilisation
La source d'eau doit
acheminer au moins 5 gal./
min à 137,9 kPa (20 PSI)
Fuite au raccord de
boyau à haute pression
Réparex la fuite. Appliquez du
ruban d'étanchéité au besoin
Buse obstruée Consultez les instructions
Nettoyage de la buses de
Écran de filtrage
d'eau obstrué
la section
Retirez le filtre et nettoyez-le.
Consultez les instructions
Entretien
Nettoyage du filtre d’entrée
d’eau
De l'air se trouve
dans le boyau
de la section Entretien
Arrêtez le moteur et fermez
ensuite le robinet de la source
d'eau. Débranchez la source
d'eau de l'orifice d'entrée de la
pompe et ouvrez le robinet de
la source d'eau pour purger l'air
du boyau. Lorsqu'un jet continu
d'eau paraît, fermez le robinet de
la source d'eau. Rebranchez la
source d'eau à l'orifice d'entrée
de la pompe et ouvrez la source
d'eau. Appuyez sur la détente
pour purger l'air qui reste
Le levier d'étrangleur est
en position « Choke » .
Déplacez le levier d'étrangleur
à la position sans étrangle-
ment «Choke».
Le boyau à haute
pression est trop long
Utilisez un boyau à haute
pression d'une longueur inférieure
à 30 mètres (100 pieds)
de la section
48- FR
Page 49

PROBLÈME CAUSE CORRECTION
Aucun produit
chimique
n'est aspiré
La lance n'est pas en
position de basse pression
Filtre de produit
Consultez le paragraphe Utilisation
de la lance de vaporisation
de la section Utilisation
Nettoyez le filtre
chimique obstrué
L'écran filtrant de
produit chimique n'est
pas submergé dans
le produit chimique
Le produit chimique
est trop épais
Assurez-vous que l'embout
du boyau de produit chimique
est entièrement submergé
dans le produit chimique
Diluez le produit chimique.
Le produit chimique devrait
avoir la consistance d'eau
Le boyau à haute
pression est trop long
Utilisez un boyau d'eau plus
long au lieu d'un boyau à
haute pression plus long
Une accumulation
de produit chimique
dans l'injecteur de
S'il vous plaît contacter notre
département de service clients
à www.simpsoncleaning.com
produit chimique.
Aucune pression
ou basse
pression (après
un certain temps
d'utilisation
normale)
Joint d'étanchéité
ou garniture usés
Soupapes usées
ou obstruées
S'il vous plaît contacter notre
département de service clients
à www.simpsoncleaning.com
S'il vous plaît contacter notre
département de service clients
à www.simpsoncleaning.com
Piston de déchargeur usé S'il vous plaît contacter notre
département de service clients
à www.simpsoncleaning.com
Fuite d'eau au
niveau de la
connexion du
pistolet/lance
Fuite d'eau
au niveau de
la pompe
Joint torique usé ou brisé Check and replaa Vérifiez
et remplacez
Connexion de boyau
Serrez
desserrée
Connexions desserrées. Serrez.
Garnitures de piston usées S'il vous plaît contacter notre
département de service clients
à www.simpsoncleaning.com
Joints toriques
usés ou brisés
S'il vous plaît contacter notre
département de service clients
à www.simpsoncleaning.com
S'il vous plaît contacter notre
département de service clients
à www.simpsoncleaning.com
Nettoyage de la buses de
la section Entretien
La pompe
fonctionne de
façon pulsée
La tête de la pompe ou les
tubes sont endommagés
à cause du gel
Buse obstruée Consultez les instructions
49 - FR
Page 50

PROBLÈME CAUSE CORRECTION
Fuite d’eau
à la pompe
Joints de l’huile usés S'il vous plaît contacter notre
département de service clients
à www.simpsoncleaning.com
Orifice de vidange
Serrer
non étanche
Joint torique de l’orifice
Vérifier et remplacer
de vidange usé
Joint torique du bouchon
Vérifier et remplacer.
de remplissage usé
Pompe trop pleine Vérifier la quantité correcte
Utilisation de
l’huile erronée
Bouchon de mise à
l’air libre obstrué
Vidanger et remplir avec la bonne
quantité et le bon type d’huile
Nettoyer le bouchon de mise à l’air
libre, souffler de l’air pour retirer
toute obstruction. Si le problème
persiste, remplacer le bouchon
Le filtre à air est
rempli d’huile
Nettoyer l’élément du filtre à air. Se
Guide du moteur pour connaître la
procédure correcte
50- FR
Page 51

DEFINICIONES DE NORMAS DE SEGURIDAD
Este manual contiene importante información para que usted sepa y comprenda.
Esta información se relaciona con la protección de SU SEGURIDAD Y LA
PREVENCIÓN DE PROBLEMAS AL EQUIPO. Para ayudarlo a reconocer esa
información, utilizamos los símbolos indicados más abajo. Sírvase leer el manual
y prestar atención a dichos símbolos.
PELIGRO: Indica una situación de peligro inminente que, si no se evita,
provocará la muerte o lesiones graves.
ADVERTENCIA: Indica una situación de peligro potencial que, si no se evita,
podría provocar la muerte o lesiones graves.
ATENCIÓN: Indica una situación de peligro potencial que, si no se evita,
posiblemente provocaría lesiones leves o moderadas.
AVISO: Se refiere a una práctica no relacionada a lesiones corporales que de
no evitarse puede resultar en daños a la propiedad.
INSTRUCCIONES DE SEGURIDAD IMPORTANTES
PELIGRO: Monoxido de carbono. Usar un motor en interiores lo matará en
minutes. El escape del motor contiene altos niveles de monóxido de carbono
(CO), un gas venenoso que no puede ver ni oler. Puede estar inhalando CO
aún si no huele los gases del escape del motor.
• NUNCA use un motor en el interior de casas, garajes, sótanos u otras áreas
parcialmente cerradas. En esas áreas se pueden acumular nivlese mortales de
monóxdo de carbono. Usar un ventilador o abrir puertas y ventanas NO suministra
suficiente aire fresco.
• SÓLO úselo en exteriores y lejos de ventilaciones, puertas y ventanas abiertas.
Estas aberturas pueden atraer el escape del motor.
• Aun cuando el motor se use correctamente, el CO se puede infiltrar en su hogar,
SIEMPRE utilice una alarma de CO a batería o con batería de reserva en la casa.
Antes de usar la alarma de CO, lea y siga todas las instrucciones. Si comienza
a sentir náuseas, mareos o debilidad, vaya a un lugar con aire fresco de inmediato.
Consulte a un médico. Es posible que se haya envenenado con monóxido de
carbono.
ADVERTENCIA: No opere esta unidad hasta que haya leído este
manual de instrucciones y el del motor y las instrucciones de seguridad,
operación y mantenimiento. Si tiene alguna consulta acerca del producto,
contáctese con nuestro Departamento de Servicio al Cliente llamando al
www.simpsoncleaning.com
PELIGRO: Riesgo de inyección o heridas graves. Manténgase alejado de
la boquilla. No apunte directamente la descarga a personas o a animales
vivos. Este producto sólo debe ser utilizado por operadores entrenados.
ADVERTENCIA: Este producto y su escape pueden exponerlo a productos
químicos, incluyendo plomo, compuestos de plomo y monóxido de carbono
que de acuerdo con el Estado de California producen cáncer y defectos
de nacimiento u otros daños reproductivos. Por mayor información visite
www.P65Warnings.ca.gov.
51 - SP
Page 52

ADVERTENCIA: Utilice siempre la apropiada protección, tanto auditiva como
de otro tipo, durante la utilización. En determinadas condiciones y con utilizaciones
prolongadas, el ruido generado por este producto puedecontribuir a la pérdida
deaudición.
ADVERTENCIA:
silenciador apagachispas. Si el producto no está equipado con este dispositivo y
se usará alrededor de materiales inflamables o sobre tierra cubierta con materiales
como cultivos agrícolas, bosques, malezas, césped u otros elementos similares,
debe instalarle un apagachispas aprobado. Éste es un requisito legal en el estado
de California. Que el motor no esté equipado con un apagachispas, como se define
en la sección 4442 del Código de Recursos Públicos de California, ni se mantenga
en un orden de trabajo eficaz, constituye una infracción a la sección 130050 y/o a
las secciones 4442 y 4443 de los estatutos de California. Los apagachispas también
se requieren en ciertas tierras del Servicio Forestal de los EE.UU. y pueden ser
obligatorios por ley en virtud de otros estatutos y ordenanzas.
Es posible que este producto no esté equipado con un
CONSERVE ESTAS INSTRUCCIONES
PELIGRO: RIESGO DE EXPLOSIÓN O INCENDIO
¿QUÉ PUEDE SUCEDER? CÓMO EVITARLO
• La gasolina derramada y sus
vapores pueden encenderse
a causa de chipas de cigarrillos,
arcos eléctricos, gases de escape
y componentes calientes del motor,
como el silenciador
• El calor expandirá el combustible
dentro del tanque, lo que podría
provocar un derrame y una posible
explosión incendio
• La operación de la lavadora a presión
en un entorno explosivo podría
provocar un incendio
• La colocación de materiales contra
o cerca de la lavadora a presión
puede interferir con la ventilación
adecuada del equipo, lo que
causaría un sobrecalentamiento y
podría encender los materiales.
• El calor del escape del silenciador
puede dañar las superficies pintadas,
derretir los materiales sensibles al
calor (como revestimientos interiores,
plástico, goma, vinilo o la propia
manguera de presión) y perjudicar a
las plantas naturales.
• Apague el motor y deje que se enfríe
antes de poner combustible en el tanque.
• Sea cuidadoso al llenar el tanque para
evitar el derrame de combustible. Aleje la
lavadora a presión del área combustible
antes de poner en marcha el motor.
• Llene el tanque hasta 12,7 mm (1/2") por
debajo de la parte inferior del cuello de
llenado, a fin de brindar espacio para la
expansión del combustible.
• Opere y coloque combustible al equipo
en áreas bien ventiladas y libres de
obstrucciones. Equipe las áreas con un
extintor de incendios adecuado para
incendios por gasolina.
• Nunca opere la lavadora a presión en un
área que tenga malezas secas.
• Mantenga siempre la lavadora a presión
a una distancia mínima de 1,2 m (4')
de las superficies (tales como casas,
automóviles o plantas naturales) que
podrían sufrir daños por el calor del
escape del silenciador.
52- SP
Page 53

• El combustible que no se almacena
en forma correcta podría causar
la ignición accidental. Si no se lo
• Almacene el combustible dentro de un
contenedor aprobado por OSHA en un
lugar seguro, lejos del área de trabajo.
resguarda adecuadamente, podría
terminar en manos de niños u otras
personas no calificadas.
• El uso de ácidos, productos químicos
• No rocíe líquidos inflamables.
tóxicos o corrosivos, venenos,
insecticidas o cualquier clase de
solventes inflamables con esta
unidad, podría ocasionar lesiones
serias o la muerte.
PELIGRO: RIESGO RESPIRATORIO (ASFIXIA)
¿QUÉ PUEDE SUCEDER? CÓMO EVITARLO
• La inhalación de vapores de escape
causará lesiones graves o la muerte.
El escape del motor contiene
monóxido de carbono, un gas
inodoro que es fatal.
• Algunos líquidos para limpieza
contienen sustancias que podrían
causar lesiones en la piel, los ojos o
los pulmones.
• Opere la lavadora a presión en un área
bien ventilada. Evite los lugares cerrados
como garajes, sótanos, etc.
• Nunca opere la unidad en un lugar en el
que haya otras personas o animales.
• Utilice solamente limpiadores
recomendados específicamente para
lavadoras a alta presión. Siga las
recomendaciones de los fabricantes. No
use lejía de cloro ni otro compuesto
corrosivo.
PELIGRO: RIESGO DE INYECCIÓN DE LÍQUIDO Y LACERACIÓN
¿QUÉ PUEDE SUCEDER? CÓMO EVITARLO
• Su lavadora a presión opera el
líquido con una presión y velocidad
lo suficientemente altas como para
penetrar la carne humana y animal,
y por ello podría ocasionar una
amputación u otra lesión grave. Las
pérdidas causadas por accesorios
sueltos o mangueras dañadas pueden
producir lesiones por inyección. NO
TRATE LA INYECCIÓN DE LÍQUIDO
COMO SI FUERA UN SIMPLE CORTE
Consulte al médico de inmediato.
• Inspeccione la manguera de alta presión
periódicamente. Reemplace la manguera
de inmediato si está dañada, gastada,
se derritió por contacto con el motor
o evidencia signos de grietas, burbujas,
agujeros u otros tipos de pérdida. Nunca
tome una manguera de alta presión que
tenga una pérdida o esté dañada.
• Nunca toque, tome ni trate de cubrir un
agujero o causa de pérdida de agua similar
en la manguera de alta presión. El flujo de
agua ESTÁ a alta presión y PENETRARÁ la
piel.
• Nunca coloque las manos frente a la
boquilla.
• No dirija el pulverizador hacia sí mismo u
otras personas.
53 - SP
Page 54

• Su lavadora a presión opera el
líquido con una presión y velocidad
lo suficientemente altas como para
penetrar la carne humana y animal,
y por ello podría ocasionar una
amputación u otra lesión grave. Las
pérdidas causadas por accesorios
sueltos o mangueras dañadas pueden
producir lesiones por inyección. NO
TRATE LA INYECCIÓN DE LÍQUIDO
COMO SI FUERA UN SIMPLE CORTE
Consulte al médico de inmediato.
(continuar)
• Asegúrese de que la manguera y los
accesorios estén ajustados y en buenas
condiciones. Nunca se sujete de la
manguera ni de los accesorios durante la
operación.
• No permita que la manguera entre en
contacto con el silenciador.
• Nunca coloque ni quite la varilla ni los
accesorios de la manguera mientras el
sistema esté presurizado.
• Cuando utilice las lanzas o pistolas de
repuesto con esta lavadora a presión, NO
utilice una lanza o una combinación de
lanza/pistola que sea más corta en longitud
que la que se suministró con esta lavadora
a presión. Esta longitud se mide desde el
extremo de la boquilla de la lanza hasta el
disparador de la pistola.
• Podría resultar herido si la presión
del sistema no se reduce antes de
intentar realizarle mantenimiento o
desarmarlo.
• Para aliviar la presión del sistema, apague
el motor, cierre el suministro de agua y hale
del disparador de la pistola hasta que deje
de salir líquido.
Use solamente accesorios, ya que tienen
•
una capacidad nominal igual o mayor que
la capacidad nominal de la lavadora a
presión.
PELIGRO: RIESGO DE LESIÓN POR PULVERIZACIÓN
¿QUÉ PUEDE SUCEDER? CÓMO EVITARLO
• La pulverización de líquidos a
alta velocidad puede hacer que
los objetos se rompan y lancen
partículas a gran velocidad.
• Use siempre gafas de seguridad
aprobadas según la ANSI Z87.1. Utilice
ropa que lo proteja de una pulverización
accidental.
• Nunca apunte el pulverizador a personas
o animales.
• Los objetos livianos o no asegurados
pueden convertirse en proyectiles
peligrosos.
• Asegure siempre el bloqueador del
disparadorcuando la varilla no esté en
uso para evitar la operación accidental.
• Nunca asegure el disparador hacia atrás,
en posición abierta permanente.
54- SP
Page 55

PELIGRO: RIESGO DE OPERACIÓN INSEGURA
¿QUÉ PUEDE SUCEDER? CÓMO EVITARLO
• La operación insegura de su lavadora
a presión podría producir lesiones
graves o la muerte, a usted mismo o
a otras personas..
• No utilice lejía de cloro ni otro compuesto
corrosivo.
• Familiarícese con las operaciones y los
controles de la lavadora a presión.
• Mantenga el área de operaciones libre de
personas, mascotas y obstáculos.
• No opere el producto cuando esté
cansado o bajo la influencia de alcohol
o drogas. Manténgase alerta en todo
momento.
• La operación insegura de su lavadora
a presión podría producir lesiones
graves o la muerte, a usted mismo o
a otras personas.. (continuar)
• Nunca anule las características de
seguridad de este producto.
• No opere la máquina si faltan piezas,
están rotas o no son las autorizadas.
• Nunca deje la varilla sin atenciónmientras
la unidad está en funcionamiento.
• Si no se sigue el procedimiento
de puesta en marcha adecuado,
el motor puede retroceder, lo que
podría causar daños graves a las
manos y los brazos..
• Si el motor no arranca después de halar
dos veces, apriete el disparador de la
pistola para aliviar la presión de la bomba.
Hale del cable de arranque lentamente
hasta sentir cierta resistencia. Entonces,
hale de él rápidamente para evitar el
retroceso y que se produzcan lesiones en
las manos o los brazos.
• La pistola/varilla pulverizadora es una
herramienta de limpieza poderosa,
• Mantenga a los niños alejados de la
lavadora a presión en todo momento.
que podría parecer un juguete ante
los ojos de un niño.
• La fuerza reactiva de la pulverización
hará que la pistola/varilla retroceda,
lo cual podría hacer que el operador
se resbale, caiga o apunte el
pulverizador hacia una dirección
incorrecta. El control inadecuado
de la pistola/varilla puede causar
lesiones al usuario y a otras personas.
• No se estire demasiado ni se pare en una
superficie que no brinde estabilidad.
• No use la lavadora a presión cuando esté
subido a una escalera.
• Agarre la pistola/varilla firmemente con
ambas manos. Espere que la pistola
retroceda cuando la dispare.
55 - SP
Page 56

PELIGRO: RIESGO DE LESIÓN O DAÑO A LA PROPIEDAD AL
TRANSPORTAR O ALMACENAR LA UNIDAD
¿QUÉ PUEDE SUCEDER? CÓMO EVITARLO
• Se puede producir una pérdida o
derrame de combustible y aceite,
lo cual podría generar peligro de
incendio o inhalación. Puede causar
lesiones graves o la muerte. Los
derrames de combustible o aceite
dañarán alfombras, pintura y
otras superficies de vehículos o o
remolques.
• Si la unidad no se almacena o
transporta en posición vertical, el
aceite podría llenar el cilindro y dañar
el motor.
• Si la lavadora a presión está equipada
con una válvula de cierre de combustible,
colóquela en la posición cerrada antes
de transportar la unidad, a fin de
evitar pérdidas de combustible. Si la
lavadora no está equipada con esta
válvula, drene el combustible del tanque
antes de transportarla. Sólo transporte
combustible en un contenedor aprobado
por OSHA.
• Coloque siempre la lavadora a presión en
un tapete protector cuando la transporte,
para proteger al vehículo de daños por
pérdidas.
• Siempre transporte y almacene la unidad
en posición vertical. Quite la lavadora a
presión del vehículo inmediatamente una
vez que haya llegado a destino.
PELIGRO: RIESGO DE DESCARGA ELÉCTRICA
¿QUÉ PUEDE SUCEDER? CÓMO EVITARLO
• La pulverización de tomacorrientes
o interruptores eléctricos, u objetos
conectados a un circuito eléctrico
podría provocar una descarga
• Desenchufe todos los productos que
operan con electricidad antes de intentar
limpiarlos. No dirija el pulverizador hacia
tomacorrientes e interruptores eléctricos.
eléctrica fatal.
PELIGRO: RIESGO DE QUEMADURA QUÍMICA
¿QUÉ PUEDE SUCEDER? CÓMO EVITARLO
• El uso de ácidos, químicos tóxicos o
corrosivos, venenos, insecticidas o
cualquier tipo de solvente inflamable
con este producto podría provocar
una lesión grave o la muerte
• No pulverice ácidos, gasolina, kerosén
o cualquier otro material inflamable con
este producto. Utilice sólo detergentes,
limpiadores y desgrasadores para uso
doméstico recomendados para lavadoras
a presión.
• Utilice ropa que le proteja los ojos y
la piel del contacto con los materiales
pulverizados.
56- SP
Page 57

ADVERTENCIA: RIESGO DE DE ESTALLIDO
¿QUÉ PUEDE SUCEDER? CÓMO EVITARLO
• El inflado excesivo de los neumáticos
podría causar lesiones graves y daño
a la propiedad.
• La pulverización de líquidos a alta
velocidad dirigida hacia los flancos
de los neumáticos (como los de
los automóviles, remolques y otros
vehículos similares) podría dañar el
flanco y provocar lesiones graves.
ADVERTENCIA: RIESGO DE SUPERFICIES CALIENTES
¿QUÉ PUEDE SUCEDER? CÓMO EVITARLO
• El contacto con superficies calientes,
tales como los componentes de
escape de motores, podría causar
quemaduras graves.
• Utilice un medidor de presión de
neumáticos para controlar la presión de
éstos antes de cada uso y mientras los
infla; observe el flanco para ver la presión
correcta del neumático.
NOTA: Los tanques de aire, los
compresores y el equipo similar que se
usa para inflar neumáticos pueden llenar
neumáticos pequeños como éstos con
mucha rapidez. Ajuste el regulador de
presión sobre el suministro de aire a un
valor no superior a la calificación de la
presión del neumático. Agregue aire en
forma gradual y use con frecuencia el
medidor de presión de neumáticos para
evitar inflarlos en exceso.
• En las lavadoras a presión de más
de 11032 kpa (1600 PSI) utilice la
pulverización en abanico más ancha
(boquilla de 40º) y pulverice a una
distancia mínima de 20 cm (8") del flanco
del neumático. No pulverice directamente
sobre la unión entre el neumático y el
borde.
• Durante la operación, toque solamente
las superficies de los controles de la
lavadora a presión. Mantenga a los niños
alejados de la lavadora a presión en
todo momento. Es posible que ellos no
reconozcan los peligros de este producto.
ADVERTENCIA: RIESGO DE LESIÓN POR LEVANTAR
MUCHO PESO
¿QUÉ PUEDE SUCEDER? CÓMO EVITARLO
• El intento de levantar un objeto
muy pesado puede provocar
lesionesgraves.
• La lavadora a presión es demasiado
pesada como para que la levante una
sola persona. Consiga la ayuda de otras
personas para levantarla.
CONSERVE ESTAS INSTRUCCIONES
PARA FUTURAS CONSULTAS
57 - SP
Page 58

GUÍA RÁPIDA
ADVERTENCIA: Para reducir el riesgo de heridas, lea el manual de
instrucciones de la lavadora a presión y el manual de instrucciones del motor antes
de usar la lavadora a presión.
Instale la manija
A
Deslice el
mango sobre el marco. (si
está equipado) Alinea los
orificios en el asa superior
con los orificios de
montaje en el ensamble
de manija. Asegúrelo con
los pernos y las manillas
ensamble del
O
viene sin aceite.
Antes de hacer funcionar
el motor, agregue el
aceite suministrado.
Revise el aceite antes
de cada uso. Consulte
el manual del usuario
del motor por el
procedimiento completo.
Agregue/revise
el aceite
B
El motor
Agregue
gasolina
C
ventilada y al exterior,
agregue gasolina
fresca, de alta calidad
y sin plomo con un
índice de octanaje
de 86 o mayor. No lo
llene de más. Limpie
todo el combustible
derramado antes de
encender el motor.
Consulte el manual del
usuario del motor por el
procedimiento completo.
En un área bien
IMPORTANTE: Ethanol ShieldTM (se vende por separado) es un estabilizador de
combustible que ayuda a eliminar y prevenir los problemas relacionados con el
etanol en equipos de potencia. Siga las instrucciones en el envase y añadir a
lagasolina.
GUÍA RÁPIDA
PELIGRO:
• Nunca haga funcionar el motor en el interior o en áreas cerradas o poco
ventiladas. Las emisiones del motor contienen monóxido de carbono, un gas
sin olor y letal.
• Riesgo de inyección de fluido y de cortes. Al usar el modo de alta presión,
NO permita que el rocío de alta presión entre en contacto con la piel
desprotegida, los ojos o con mascotas o animales. Causará heridas graves.
58- SP
Page 59

Conecte la
manguera de
1
jardín a la
bomba
Enrosque la manguera
de jardín a la entrada
de la bomba.
Conecte la
manguera de
2
alta presión a la
bomba
Conecte la manguera
de alta presión a la
salida de la bomba.
Conecte la
manguera de
3
alta presión a la
pistola
rociadora
Enrosque el otro
extremo de la manguera
de alta presión a la
pistola rociadora.
Conecte la vara
rociadora a la
4
pistola
rociadora
Enrosque la vara
rociadora al extremo de
la pistola rociadora.
Libere el aire del
sistema
7
de la bomba y de
la manguera de alta
presión presionando el
gatillo hasta que salga
un flujo continuo de
agua. Aproximadamente
30 segundos.
Libere el aire
O
Conecte las
boquillas QC a
5
la vara
rociadora
Tire el conector
rápido hacia atrás e
inserte la boquilla.
Suelte el conector rápido
y gire la boquilla para
verificar que esté bien
asegurada en el conector.
Ponga el motor
en marcha;
8
refiérase al
manual del
motor para
informarse del
procedimiento
correcto.
O
Abra
completamente
6
la llave del agua
No haga funcionar
la unidad sin el
suministro de agua
conectado y abierto.
Use agua fría solamente.
30 S
ADVERTENCIA: Comprender la Guia Rápido no equivale a leer el manual del
operador. El usuario debe leer y comprender el manual del operador antes de usar
este produto
59 - SP
Page 60

FAMILIARÍCESE CON LA LAVADORA A PRESIÓN
NOTA: Las fotografías y los dibujos lineales utilizados en este manual son
solo referencias y no representan un modelo específico
Compare las ilustraciones con su unidad para familiarizarse con la ubicación de
sus controles y regulaciones. Conserve este manual para referencias futuras.
1
C
B
MAX.
RPM
MIN.
G
K L
E
J
D
A
H
I
ELEMENTOS BÁSICOS DE UNA LAVADORA A PRESIÓN
A. Bomba de alta presión: Incrementa la presión del suministro de agua.
B. Motor: Acciona la bomba de alta presión. Consulte el manual del usuario del
motor.
C. Manguera de alta presión: Lleva el agua a presión desde la bomba a la
pistola y el tubo aplicador.
D. Pistola rociadora: Se conecta al tubo aplicador para controlar el volumen del
flujo del agua, su dirección y la presión.
E. Varillas pulverizadoras de conexión rápida: Permite al usuario el cambio
rápido de las boquillas de alta presión. Refiérase a las Cómo utilizar el tubo
aplicador instrucciones en Operación sección.
F. Manga de sifon de detergente (no mostrado): Alimenta los líquidos
limpiadores a la bomba para mezclarlos con agua. Refiérase a las instrucciones
para la aplicación de químicos y solventes limpiadores en Operación
sección.
G. Manillar
H. Marco
60- SP
Page 61

I. Salida de la bomba
J. Entrada de la bomba
K. Boquillas de conexión rápida
L. Portaboquillas
ELEMENTOS BÁSICOS DEL MOTOR
Consulte el manual del usuario del motor.
Control de cebado: Abre y cierra la válvula de cebado del carburador.
Manija de arranque: Tirando esta manija se acciona el arrancador con resorte de
retroceso que arranca el motor.
Llave interruptora de l motor: Conecta y desconecta el sistema de ignición del
motor.
INSTRUCCIONES PARA ARMAR (FIG. 2–4)
1. Busque todas las partes sueltas de la caja y retírelas.
2. Corte las cuatro esquinas de la caja desde la parte superior hacia abajo y
coloque los paneles en posición horizontal.
3.
(Figure 2) Faites glisser la poignée (G) sur le cadre (H) et le fixer avec les
boulons de selle et les boutons.
O
3. (Figure 2A) Aligner les perforations de la manche (S) sur celles du montage(G).
Inserer les boulons (DD) de verrou dans les perforations, bien les serrer pour
securiser la manche au montage (EE).
AVISO: Riesgo de lesión personal. Evite colocar las manos entre el mango y el
marco cuando realice el ensamblado para no pellizcarse.
2
G
H
2A
S
G
G
EE
H
DD
4. Saque las boquillas (K) de conexión rápida de la bolsa plástica e insértelas en
el portaboquillas (L). NOTA: Las boquillas están codificadas por colores que
coinciden con su abrazadera en el panel.
2B
K
L
5. Conecte el tubo aplicador (E) a la pistola (D) y ajústelo firmemente.
6. Conecte la manguera de alta presión (C) a la pistola (D) y ajústela firmemente.
61 - SP
Page 62

3
D
4
D
E
O
C
D
C
AVISO: El motor es despachado sin aceite. Antes de dar arranque motor, use el
aceite que se provee. Si used le da arranque al motor sin aceite ocasionará daños
irreparables en el motor, daños queno estarán cubiertos por la garantía.
AVISO: La bomba de alta presión se llenó con aceite en la fábrica. Controle siempre
el nivel de aceite antes de usar la unidad (consulte la sección Mantenimiento para
obtener más información).
OPERACIÓN
TERMINOLOGÍA DE LA LAVADORA A PRESIÓN
PSI *: Pounds per Square Inch. Lb/Pulg². Es una unidad de medida para la presión
del agua. Equivale a 49 pascales.
GPM *: Galones por minuto. Es la unidad de medida para el flujo de agua. Algunas
veces listado como L/min (litros x minuto).
* La presión nominal y el flujo de agua nominal están comprendidos dentro de las
tolerancias de fábrica (+/- 10%)
CU: (Unidades de limpieza) GPM multiplicadas por PSI lpm x kPa = Unidades
limpiadoras.
Modo de Derivación: Permite que el agua recircule dentro de la bomba cuando
el gatillo no está presionado. Esta característica permite al operador el liberar
el gatillo y reacomodarse sin necesidad de tener que apagar el motor en cada
movimiento de limpieza.
ADVERTENCIA: No permita que la unidad funcione durante más de dos
minutos sin que el gatillo de la pistola esté presionado. Esto podría causar un
sobrecalentamiento y daños a la bomba. Cuando la temperatura dentro de la
bomba se eleva demasiado, la válvula de descarga térmica se abre y libera un
chorro de agua de la bomba para reducir la temperatura interna. La válvula se
cierra por si misma después de esto.
La Válvula térmica de Alivio (P , Fig. 5): Cuando la temperatura
dentro de la bomba sube demasiado alto, esta válvula abrirá y
soltará un chorro de agua en un esfuerzo de bajar la temperatura
dentro de la bomba. La válvula entonces cerrará. NOTA: La
ubicación de la válvula de liberación térmica varía de acuerdo con
el tipo de bomba.
Sistema de Inyección de Productos Químicos: Mezcla los
limpiadores o solventes con agua para mejorar la eficiencia del lavado.
Suministro de agua: Todas las lavadoras a presión deben tener un suministro
de agua. Los requerimientos mínimos para el suministro del agua son 19 L/min a
138kPa (5 GPM a 20PSI). Si votre source d’eau est un puits, la longueur du boyau
d'arrosage doit être limitée à 9m(30pi).
AVERTENCIA: Para reducir la posibilidad de contaminación proteja
siempre el sistema contra la contracorriente cuando realice una conexión al
sistema de agua potable.
62- SP
5
P
Page 63

CARACTERÍSTICAS DE OPERACIÓN DE LA LAVADORA A PRESIÓN
REGULACIÓN DE LA PRESIÓN (FIG. 6)
La presión viene regulada de fábrica con el objeto de lograr la presión óptima para
la limpieza. Si usted necesitase reducir la presión, podrá hacerlo con los siguientes
métodos:
1. Retírese de la superficie por lavarse. Cuanto más alejado usted se
encuentre, menor presión habrá sobre la superficie a lavarse.
2. Cambie a la boquilla de 40˚ (blanca). Esta boquilla libera un flujo de
agua potente y un patrón de pulverización más ancho. Consulte la sección
Boquillas para la varilla pulverizadora.
3. (si está equipado) La bomba de alta presión
de esta lavadora a presión viene equipada
con una función de descarga ajustable que
permite ajustar el nivel de presión.
Para reducir la presión, gire la perilla de control de presión de la bomba en sentido contra
horario hasta la presión deseada.
Para volver la bomba a la presión original de fábrica, gire la perilla de control
de presión de la bomba en sentido horario hasta que se detenga.
AVISO: NO intente ajustar la perilla de control de presión más allá del tope incorporado ya que podría dañar la bomba.
AVISO: NO ajuste la perilla de control de presión de más. Si la ajusta de más,
la perilla PODRÍA romperse y perder inmediatamente la presión de agua con un
elevado costo de reparación de la unidad.
AVISO: NO intente incrementar la presión de la bomba. Una graduación superior a
la que trae de fábrica puede dañar la bomba.
AJUSTE DE DIAL-N-WASH (FIG. 7, 8) (SI ESTÁ EQUIPADO)
1. Elija la boquilla de alta presión adecuada (0˚, 15˚, 25˚ ó 40˚) para el trabajo a ser
realizado. Consulte Cómo usar la varilla rociadora.
2. Dial-N-Wash se despacha en el ajuste máximo de presión, con la barra de
presión máxima alineada con la flecha (R) en el cuello según muestra la
Figura7.
Girando Dial-N-Wash (Q) en sentido antihorario hasta que pare lo pone en el
ajuste mínimo de presión, con la flecha (R) alineada con la barra de presión
mínima según muestra la Figura 8.
7
8
6
+
-
R
R
L
63 - SP
Page 64

Ajuste la presión girando
Dial-N-Wash (Q) en sentido horario
para subir la presión o en sentido
antihorario para bajar la presión,
alineando la flecha con la barra de
presión deseada en Dial-N-Wash.
NOTA: Para aplicar productos
quimicos instale la boquilla negra de baja presión y gire el Dial-N-Wash a la
posición de MAX.
CÓMO UTILIZAR EL TUBO APLICADOR
Las boquillas para la varilla pulverizadora están guardadas en el soporte para
boquillas en el ensamblado del panel. Los colores del panel identifican la ubicación
de la boquilla y el patrón de pulverización. Consulte el cuadro siguiente a fin de
elegir la boquilla correcta para el trabajo por realizar.
CAMBIO DE LAS BOQUILLAS DE LA VARILLA PULVERIZADORA (FIG. 9)
DANGER: Riesgo de inyección de líquido. No dirija el flujo de agua hacia
personas, piel y ojos desprotegidos, ni animales o mascotas. Se producirán
lesiones graves.
ADVERTENCIA: Los objetos despedidos podrían causar lesiones graves.
NO intente cambiar las boquillas mientras la lavadora a presión está
funcionando. Apague el motor antes de hacerlo.
1. Tire el acople de conexión rápida (E) haciaatrás e inserte
9
la boquilla (K).
2. Libere el acople y gire la boquilla para asegurarse de
que está asegurada dentro del acople.
ADVERTENCIA: Los objetos despedidos podrían
causar lesiones graves. Asegúrese de que la boquilla
K
E
esté completamente insertada en el adaptador de
conexión rápida yque el anillo a presión de conexión rápida esté totalmente
trabado (hacia adelante) antes de oprimir el disparador de la pistola.
COLOR DE LA
BOQUILLA
Rojo
Amarillo
PATRÓN
(ABANICO) DE
ROCIADO
0˚
15˚
USOS SUPERFICIES **
gran capacidad de
localización para
limpiar manchas
en superficies
hormigón o metal
sin pintar
NO usar en madera
difíciles y sin pintar
o para alcanzar
áreas elevadas
limpieza intensa
de superficies
difíciles y sin pintar
parrillas, entradas
de automóviles,
sendas de ladrillo u
hormigón, estuco o
ladrillo sin pintar
64- SP
Page 65

COLOR DE LA
BOQUILLA
PATRÓN
(ABANICO) DE
USOS SUPERFICIES **
ROCIADO
25˚
Verde
boquilla estándar
de limpieza para
la mayoría de las
aplicaciones
herramientas de jardinería, muebles de
patio, paredes sin pintar, estuco, canaletas
y aleros, superficies
de concreto y ladrillo
40˚
Blanco
limpieza de
superficies
pintadas o
delicadas
Automóviles/
vehículos recreativos,
embarcaciones, madera,
estuco y ladrillo pintado,
vinilo, revestimiento
exterior pintado
low pressure
applies cleaning
solutions
la pulvérisation à faible
pression est sécuritaire
pour toutes les surfaces.
Negro
toujours vérifier la
compatibilité des
solutions nettoyantes
avant leur utilisation.
** AVISO: El chorro de alta presión de la lavadora puede dañar superficies
como: madera, vidrio, pintura de automóviles, molduras y decoraciones de
automóviles y objetos delicados tales como flores y arbustos. Antes de rociar,
examine el objeto a lavarse para asegurarse que sea lo suficientemente robusto
como para que no se dañe con la fuerza del chorro.
CÓMO EMPLEAR PRODUCTOS QUÍMICOS Y SOLVENTES PARA LIMPIEZA (FIG. 10)
El empleo de productos químicos o solventes para limpieza es una operación de
baja presión. NOTA: Utilice solamente jabones y productos químicos diseñados
para el uso en lavadoras a presión. No use blanqueadores.
Aplicación de productos químicos:
1. Verifique que la manguera del sifón de detergente
(F, Figura 10) esté colocada en el conector arponado
10
F
ubicado cerca de la conexión de la manguera de alta
presión de la bomba, como se muestra. NOTA: La
ubicación del acople estriado varía de acuerdo con
el tipo de bomba.
2. Coloque el otro extremo de la manga de sifon
de detergente (con su filtro instalado) dentro del
contenedor del producto químico o solución de limpieza.
NOTA: Se usa 3,8 litros de solución química limpiadora por cada 26,5 litros
de agua que se bombea.
3. Instale la boquilla de baja presión (negra) en el pico de conexión rápida
de la varilla pulverizadora. Consulte la sección Boquillas para la
varillapulverizadora.
65 - SP
Page 66

4. Luego de usar productos químicos, coloque la manga de sifon de un recipiente
con agua limpia y succiónela a través del sistema de inyección química, a fin
de enjuagar el sistema completamente. Las bombas dañadas por productos
químicos no serán cubiertas por la garantía.
NOTA: Los productos químicos y los jabones no se expulsarán si la boquilla negra
para jabón no está instalada en la varilla pulverizadora.
ARRANQUE (FIG. 11–14)
AVERTENCIA: Para reducir el riesgo de lesión, lea los manuales de
instrucciones de la lavadora a presión y del motor antes de poner en marcha
la unidad.
PELIGRO: Riesgo de inyección de líquido y laceración Cuando utilice
la configuración de alta presión, NO permita que el pulverizador entre
en contacto con personas, piel y ojos desprotegidos, ni con animales o
mascotas. Se producirán lesiones graves.
• Su lavadora opera el líquido con una presión y velocidad lo suficientemente
altas como para penetrar la carne humana y animal, y esto podría provocar una
amputación u otra lesión grave. Las pérdidas causadas por accesorios sueltos
o mangueras dañadas pueden provocar lesiones por inyección. NO TRATE LA
INYECCIÓN DE LÍQUIDO COMO SI FUERA UN SIMPLE CORTE. Consulte a un
médico de inmediato.
PELIGRO: Monoxido de carbono. Usar un motor en interiores lo matará en
minutes. El escape del motor contiene altos niveles de monóxido de carbono
(CO), un gas venenoso que no puede ver ni oler. Puede estar inhalando CO
aún si no huele los gases del escape del motor.
• La inhalación de vapores de escape causará lesiones graves o la muerte. El escape
del motor contiene monóxido de carbono, un gas inodoro que es fatal.
• Opere la lavadora a presión en un área bien ventilada. Evite los lugares cerrados
como garajes, sótanos, etc.
• Nunca opere la unidad en un lugar en el que haya otras personas o animales.
AVERTENCIA: Riesgo de incendio, asfixia y quemadura. Nunca llene el
tanque de combustible cuando el motor esté encendido o caliente. No fume
mientras llena el tanque.
• NUNCA llene el tanque de combustible por completo. Llene el tanque hasta
12,7 mm (1/2") por debajo de la parte inferior del cuello de llenado, a fin de
brindar espacio para la expansión del combustible. Limpie cualquier derrame de
combustible del motor y el equipo antes de poner en marcha el motor.
• NO deje que las mangueras entren en contacto con el silenciador del motor, que
estará muy caliente, durante o inmediatamente después de usar la lavadora a
presión. La garantía NO cubrirá el daño a las mangueras que se produzca por el
contacto con superficies muy calientes del motor.
AVISO: Riesgo de daño a la propiedad. Nunca tire de la manguera de suministro
de agua para mover la lavadora a presión. Esta acción podría dañar la manguera
y/o la entrada de la bomba.
• NO use agua caliente, sólo agua fría.
• NUNCA cierre el suministro de agua mientras el motor de la lavadora a presión esté
encendido, esto dañaría la bomba.
• NO detenga la pulverización de agua durante más de dos minutos por vez. La
bomba opera en modo de derivación cuando no se presiona el disparador de la
pistola pulverizadora. Si la bomba queda en modo de derivación durante más de
dos minutos, sus componentes internos podrían dañarse.
66- SP
Page 67

Si no comprende estas instrucciones, sírvase contáctese con nuestro Departamento
de servicio al cliente llamando al www.simpsoncleaning.com
Antes de arrancar, refiérase al procedimiento de arranque en el manual de
su motor.
1. En una zona bien ventilada externa, agregue gasolina nueva, de alta calidad,
sin plomo, identificada en el surtidor de combustible con 86 octanos o más.
No llene en exceso. Limpie cualquier derrame de combustible del motor y del
equipo antes de poner el motor en marcha. Para informarse del procedimiento
correcto, consulte el manual del usuario del motor.
IMPORTANTE: Ethanol Shield
TM
(se vende por separado) es un estabilizador de
combustible que ayuda a eliminar y prevenir los problemas relacionados con el
etanol en equipos de potencia. Siga las instrucciones en el envase y añadir a la
gasolina.
AVISO: Utilice a combustibles que contengan más de
10% de etanol no están aprobado para su uso en este
producto por reglamentos de la EPA y puede dañar la
unidad y anular la garantía.
2. Verifique el nivel de aceite del motor. Para informarse del procedimiento
correcto, consulte el manual del usuario del motor.
3. Revise el nivel de aceite de la bomba. El nivel de aceite debe llegar al punto
en el centro de la mirilla. Consulte el apartado Bomba en Mantenimiento.
4. Conecte la manguera de agua a la fuente de agua. Abra la fuente de agua para
quitarle todo el aire a la manguera. Cuando haya un flujo de agua constante,
apague la fuente de agua.
5. Verifique que la malla del filtro (M) esté en la entrada de agua de la bomba.
NOTA: El cono hacis afuera.
6. Conecte el suministro de agua (N) a la entrada de la bomba. NOTA: El agua
suministrada debe tener un promedio de 19 L/min a 138 kPa (5 GPM a 20 PSI)
7. Conecte la manguera de alta presión (C) a la salida de la bomba(I).
11
12
13
J
I
I
O
M
N
C
C
AVERTENCIA: Para reducir la posibilidad de contaminación proteja
siempre el sistema contra la contracorriente cuando realice una conexión al
sistema de agua potable.
8. Seleccione la boquilla correcta para el trabajo a realizar. Refiérase a las Cómo
utilizar el tubo aplicador instrucciones en esta sección. NOTA: Si intenta
aplicar una solución química o de limpieza, refiérase a las instrucciones Cómo
emplear productos químicos y solventes para limpieza en esta sección.
9. Abra el suministro de agua.
AVISO: Riesgo de daño a la propiedad. La acción contraria podría dañar la bomba.
10. Elimine todo el aire de la bomba y la manguera de alta presión presionando el
disparador hasta que haya un flujo constante de agua.
67 - SP
Page 68

11. Ponga el motor en marcha; refiérase al manual del motor para informarse del
procedimiento correcto.
AVERTENCIA: Riesgo de operación insegura. Si el motor no arranca
después de halar dos veces, apriete el disparador de la pistola para aliviar
la presión de la bomba. Hale del cable de arranque lentamente hasta sentir
cierta resistencia. Entonces, hale de él rápidamente para evitar el retroceso y
que se produzcan lesiones en las manos o los brazos.
NOTA: Si el nivel de aceite del motor es bajo, el motor no arrancará. Si el motor no
arranca, controle el nivel de aceite y agregue aceite según sea necesario.
12. Presione el gatillo de la pistola para iniciar el flujo del agua.
ADVERTENCIA: No permita que la unidad funcione durante más de dos
minutos sin que el gatillo de la pistola esté presionado. Esto podría causar un
sobrecalentamiento y daños a la bomba. Cuando la temperatura dentro de la
bomba se eleva demasiado, la válvula de descarga térmica se abre y libera un
chorro de agua de la bomba para reducir la temperatura interna. La válvula se
cierra por si misma después de esto.
AVERTENCIA: Riesgo de operación insegura. Párese en una superficie
estable y agarre la pistola/varilla firmemente con ambas manos. Espere que
la pistola retroceda cuando la dispare.
13. Suelte el gatillo para detener el flujo de agua.
PELIGRO: Riesgo de lesión por pulverización. Trabe el
bloqueador del disparador (O )cuando la pistola no esté en
14
uso, a fin de evitar la pulverización accidental.
APAGADO
1. Luego de cada uso, si usted ha utilizado productos
químicos, coloque la manga de sifon de detergente dentro
de un recipiente con agua limpia y succiónela a través del
sistema de inyección química, a fin de enjuagar el sistema completamente.
AVISO: Riesgo de daño a la propiedad. La acción contraria podría dañar la bomba.
2. Apagado del motor. Consulte el manual del usuario del motor.
AVISO: Riesgo de daño a la propiedad. NUNCA corte el suministro del agua
mientras el motor esté en marcha.
3. Corte el suministro del agua.
4. Presione el gatillo de la pistola rociadora para aliviar cualquier presión de agua
dentro de la manguera o la pistola rociadora.
NOTA: El no liberar la presión del sistema no permitirá remover la manguera
de alta presión de la pistola rociadora o de la conexión a la bomba.
5. Ver la sección Almacenaje en este manual para informarse del
procedimientoadecuado.
O
68- SP
Page 69

MANTENIMIENTO
ADVERTENCIA: Riesgo de quemadura. Cuando realice el mantenimiento,
es posible que se exponga a superficies calientes, presión de agua o partes
movibles, que pueden causar lesiones graves o la muerte.
ADVERTENCIA: Riesgo de incendio. Siempre desconecte el cable de la
bujía, deje que el motor se enfríe y libere toda la presión del agua antes de
realizar cualquier tarea de mantenimiento o reparación. El motor contiene
combustible inflamable. No fume ni trabaje cerca de llamas mientras hace el
mantenimiento.
Para asegurar el funcionamiento eficiente y una larga vida de su lavadora a presión,
se debe preparar y seguir un programa rutinario de mantenimiento. Si la lavadora
a presión se usa en condiciones inusuales, como de alta temperatura o polvo, se
requiere un mantenimiento más frecuente.
MOTOR
Para todas las operaciones de mantenimiento del motor, refiérase a las
recomendaciones del fabricante en el manual del usuario del motor. NOTA: El
tapón de drenaje del motor está ubicado en la parte posterior de la unidad.
BOMBA (FIG. 15)
NOTA: La bomba de alta presión se llenó con aceite en la fábrica. El aceite preferido es SIMPSON
no está disponible, un petróleo de SAE 15W-40 puede ser utilizado. Cambie el
petróleo de bomba después de las primeras 50 horas de operación y cada 100
horas después, o cada 3 meses.
PARA CONTROLAR EL ACEITE
1. El nivel de aceite debe llegar al punto que está en
el medio del visor (AA).
CÓMO CAMBIAR EL ACEITE DE LA BOMBA
1. Afloje el tapón para medición del nivel de aceite
(BB).
2. Coloque un recipiente debajo del tapón de dre-
naje de aceite (CC).
3. Retire el tapón de drenaje de aceite de la
bomba.
4. Reemplácelo después de que el aceite se haya drenado. Ajuste bien.
5. Para las bombas AAA™, vuelva a llenar usando el aceite del cárter de la
bomba SIMPSON® Premium. Si este aceite no está disponible, se puede usar
un aceite SAE 15W-40.
Para CAT Pumps® ***, vuelva a llenar usando un aceite hidráulico no detergente (ISO 68).
6. Reemplace el tapón para medición del nivel de aceite y asegure bien.
Si se presentase algún problema con la bomba, contáctese con nuestro
Departamento de servicio al cliente llamando al www.simpsoncleaning.com
*** CAT PUMPS
®
Premium aceite para el cárter de la bomba. Si este petróleo
15
®
es una marca registrada de Diversified Dynamics Corporation.
BB
AA
CC
69 - SP
Page 70

CONEXIONES
Las conexiones en las mangueras de la presión, la pistola y la varita del aerosol se
deben limpiar regularmente y lubricar con la grasa ligera del aceite o del litio para
prevenir salida y daño a los anilloso.
LIMPIEZA DE LA BOQUILLA (FIG 16)
Si la boquilla comienza a obstruirse con materiales extraños como suciedad, se
puede generar una presión excesiva. Si se obstruye o restringe parcialmente, la
presión de la bomba pulsará. Límpie la boquilla inmediatamente usando el juego
limpiador provisto y las siguientes instrucciones:
1. Apague la lavadora a presión y corte el suministro
de agua.
16
K
2. Apriete el gatillo de la pistola para aliviar la presión del
agua.
3. Desconecte el tubo aplicador de la pistola.
4. Saque la boquilla (K) del extremo del tubo aplicador.
Elimine cualquier obstrucción de la boquilla con la
herramienta limpiadora para boquilla provista y lávela en
dirección contraria con agua limpia.
N
K
5. Para eliminar las partículas sueltas, dirija el chorro de
agua (N) de la boquilla por 30 segundos a la boquilla por su lado de salida.
6. Reinstale la boquilla en el tubo aplicador. Ajústela firmemente para evitar
pérdidas.
7. Reconecte el tubo aplicador a la pistola y abra la llave de agua.
8. Para probar la boquilla, ponga en marcha la lavadora a presión y gradúe la
boquilla del tubo aplicador para el máximo de presión.
CÓMO LIMPIAR EL FILTRO DE ENTRADA DEL AGUA (FIG. 11)
Este filtro de malla debe revisarse periódicamente y limpiarse cuando sea
necesario.
1. Quite el filtro agarrándolo firmemente del extremo y sáquelo de la entrada del
agua a la bomba, como se muestra.
2. Limpie el filtro enjuagándolo con agua por ambos lados.
3. Reinserte el filtro en la entrada de agua de la bomba. NOTA: La parte cónica
hacia arriba.
NOTA: No opere la lavadora a presión sin el filtro instalado adecuadamente.
ALMACENAJE
MOTOR
Vea las recomendaciones para el almacenaje en el Para todas las operaciones
de mantenimiento del motor, refiérase a las recomendaciones del fabricante en el
manual del usuario del motor.
PARA IMPEDIR PROLEMAS RELACIONADOS CON EL COMBUSTIBLE:
1. Agregue el Ethanol Shield
gasolina siguiendo las instrucciones del fabricante. Cuando agregue un estabilizador para la gasolina, llene el tanque de combustible con gasolina fresca.
Si sólo está parcialmente lleno, el aire en el tanque promoverá el deterioro del
combustible durante el almacenaje. Si usted mantiene un recipiente con gasolina para el reabastecimiento, asegúrese que sólo contiene gasolina fresca.
TM
estabilizador (se vende por separado) para la
70- SP
Page 71

2. Después de agregar el estabilizador para la gasolina, ponga en marcha el
motor al aire libre por 10 minutos para asegurarse que la gasolina tratada
reemplazó a la gasolina no tratada en el carburador.
3. Gire la válvula de combustible a la posición CERRADA.
4. Siga haciendo funcionar el motor hasta que se pare por falta de combustible
en la taza de combustible del carburador. El tiempo de funcionamiento debe
ser menor que 3 minutos.
BOMBA
El fabricante recomienda que se utilice un SIMPSON® / POWERWASHER® protector/protector de invierno para bombas cuando almacene la unidad por más de
30 días o cuando estén pronosticadas heladas. SIMPSON
®
/ POWERWASHER
protector de Invierno para bombas es respeta el medio ambiente.
NOTA: El uso de un protector de invierno para bombas ayuda a brindarle una
lubricación adecuada a los sellos internos de la bomba, independientemente de la
temperatura o el entorno.
AVISO: Riesgo de daño a la propiedad. Use sólo SIMPSON
®
/ POWERWASHER
Guardia de Bomba o equivalente. Otros productos que podrían ser corrosivas y / o
contener alcohol que puede causar daños a la bomba.
1. Apague la lavadora a presión y desconecte las mangueras de a bomba.
2. Desenrosque la válvula del frasco de la guardia de bomba y retire el sello.
3. Vuelva a atornillar la válvula en el frasco.
4. Conecte el frasco a la entrada de la lavadora a presión.
5. Apriete el frasco para inyectar el contenido en la bomba.
6. Con interruptor de encendido, al mismo tiempo tirar de la cuerda de arranque
y apretar la botella. Repita hasta que toma protector fluido de la bomba sale.
NOTA: Este paso puede requerir dos personas.
LAVADORA A PRESIÓN
1. Drene toda el agua de la manguera de alta presión, enróllela y guárdela en la
base de la lavadora a presión.
2. Con la boquilla hacia abajo y la pistola y la varilla pulverizadoras en posición
vertical, apriete el disparador para drenar toda el agua de la pistola y la varilla.
Guárdelas en el soporte de la pistola.
3. Enrolle y fije la manguera del sifón de detergente para que no se dañe.
®
®
ACCESORIOS
PELIGRO: Riesgo de inyección de fluido. Al utilizar varas o pistolas de
repuesto con esta lavadora a presión, NO utiliza una vara y/o una combinación de pistola/vara rociadora que sea más corta que la originalmente
suministrada con esta lavadora a presión, midiéndolas desde el extremo de
la boquilla de la vara hasta el gatillo.
AVISO: El uso de accesorios no recomendados con esta herramienta puede
resultar peligroso. Use solamente accesorios de marca ya que tienen una capacidad
nominal igual o mayor que la capacidad nominal de la lavadora a presión.
71 - SP
Page 72

INFORMACIÓN DE SERVICIO
No regrese este producto al vendedor. Contáctese con nuestro Departamento
de servicio al cliente llamando al www.simpsoncleaning.com
GARANTÍA LIMITADA
El fabricante de estos productos acuerda en reparar o reemplazar las partes que
se encuentren defectuosas dentro del período de garantía indicado a continuación,
a su criterio. Algunas limitaciones, extensiones y exclusiones específicas tienen
efecto.
Esta garantía cubre defectos en materiales y mano de obra y no cubre la falla
de partes debido al desgaste normal, depreciación, abuso, daño accidental,
negligencia, uso inadecuado, mantenimiento, calidad del agua o almacenamiento.
Para realizar un reclamo bajo los términos de esta garantía, todas las partes
consideradas defectuosas deben conservarse y estar disponibles para retornarse
bajo pedido al centro de servicio de garantía designado para ser inspeccionadas.
La opinión y las decisiones del fabricante con respecto a la validez de los reclamos
de garantía son definitivas.
Esta garantía se otorga al usuario final y no es transferible. Como un centro de
servicio de garantía autorizado por el fabricante, la fábrica respetará los términos
de todas las garantías de los componentes y se encargará de los reclamos de las
garantías apropiadas.
Los artículos con desgaste normal incluyen, sin limitación, válvulas y sellos, los que
no están cubiertos por esta garantía.
Esta garantía reemplaza a todas las demás garantías explícitas o implícitas,
incluyendo, sin limitación, toda garantía de comercialización o adecuación a
usos particulares y el fabricante anula y excluye todas dichas garantías por
medio de la presente. La obligación de garantía del fabricante queda limitada
a reparar y reemplazar los productos defectuosos como aquí se indica y el
fabricante no se hace responsable de ninguna pérdida, daño o gasto subsiguiente,
incluyendo daños de transporte, accidente, abuso, fuerza mayor, uso inadecuado
o negligencia. Tampoco por los daños causados por reparaciones usando partes
que no se hayan comprado del fabricante o modificaciones realizadas por personal
no autorizado por la fábrica. El no instalar y utilizar el equipo de acuerdo con las
indicaciones del manual de instrucciones anularán la garantía.
Esta garantía no cubre lo siguiente: máquinas de alquiler, daños resultantes del
transporte (los reclamos deben hacerse a la compañía de transporte), accidente,
abuso, fuerza mayor, uso inadecuado o negligencia. Tampoco los daños causados
por reparaciones o modificaciones realizadas por personal no autorizado por la
fábrica o el no instalar y operar el equipo de acuerdo con las indicaciones del
manual de instrucciones.
El fabricante no será responsable ante ninguna persona por daños indirectos, por
daños personales o pérdidas comerciales.
RESPONSABILIDAD DEL COMPRADOR ORIGINAL (USUARIO INICIAL):
• Si desea procesar una reclamación de garantía para su equipo de lavado
con agua a presión SIMPSON®, informe el problema al 1-877-362-4271
o cservice@fna-group.com a fin de que lo autoricen y dirijan al centro de
servicio autorizado más cercano en su área.
• Conserve el recibo de venta original de caja como comprobante de la compra
para el trabajo de la garantía.
72- SP
Page 73

• Tenga un cuidado razonable en la operación y el mantenimiento del producto,
según se describe en los Manuales del usuario.
LA GARANTÍA NO CUBRE FALLAS CAUSADAS POR:
• Daños de envío
• Los daños debidos a deterioro químico, sarro, óxido, la expansión térmica o
la corrosión
• Daños por congelamiento
• Daños causados por partes o accesorios no obtenidos de un distribuidor
autorizado o no aprobado por el fabricante.
• Desgaste normal de partes móviles o componentes afectados por partes
móviles.
OTOR Y SISTEMA DE CONTROL DE EMISIONES
M
Cubierto por la garantía del fabricante del motor. Ver el manual del motor.
BOMBA DE ALTA PRESIÓN (DEFECTOS DE MATERIAL Y DE FABRICACIÓN)
AAATM - Cinco (5) años a partir de la fecha de compra.
CAT Pumps® ***- Cinco (5) años a partir de la fecha de compra.
ARMAZÓN (DEFECTOS DE MATERIAL Y DE FABRICACIÓN)
Diez (10) años a partir de la fecha de compra.
ACCESORIOS (DEFECTOS DE MATERIAL Y DE FABRICACIÓN)
Incluyendo boquillas, mangueras, pistolas y varillas rociadoras, neumáticos, pies
Noventa (90) días a partir de la fecha de compra.
GUÍA DE DIAGNÓSTICO DE
PROBLEMA CAUSA CORRECCIÓN
El motor no
arranca (vea
el diagnóstico
de problemas
en el manual
del usuario
del motor)
No hay
presión o
está baja al
comenzar
a usar
Sin combustible Agregar combustible fresco
Acumuláción de presión
después de tirar dos
veces de la cuerda del
arrancador o después
de iniciar su uso
La leva de cebado
(choke) está en la
posición de "No Choke"
El cable de la bujía
está desconectado
La boquilla del
tubo aplicador no
está graduada para
alta presión
Poca agua en el
suministro
Fuga en la conexión de la
manguera de alta presión
Boquilla obstruida Refiérase a las instrucciones
Apriete el gatillo de la pistola
para aliviar la presión
Mueva la leva de cebado a
la posición de "Choke"
Conecte el cable de la bují
Refiérase a las instrucciones
para el Uso del Tubo Aplicador
en la sección Operación
El suministro de agua debe
tener por lo menos 19 L/min a
138 kPa (5 GPM a 20 PSI)
Repare la fuga. Aplique cinta
selladora si fuese necesario
para el Limpiador de Boquillas
en la sección Mantenimiento
73 - SP
Page 74

PROBLEMA CAUSA CORRECCIÓN
No hay
presión o
está baja al
comenzar
a usar
La malla filtrante de
agua está obstruida
Elimine la obstrucción y limpie
la malla filtrante. Refiérase a las
instrucciones para el Cómo Limpiar
El Filtro De Entrada Del Agua
en la sección Mantenimiento
Aire en la manguera Apague el motor, luego corte el
suministro de agua y desconéctelo
de la entrada a la bomba. Abra
el suministro de agua para
eliminar todo el aire que haya en
la manguera. Cuando el flujo de
agua sea constante, cierrérrelo,
conéctelo a la entrada de la
bomba y ábralo. Apriete el gatillo
para eliminar el aire restante
La leva de cebado
(choke) está en la
Mueva la leva a la posición
de "No Choke"
posición de "Choke"
La manguera de
alta presión es
Utilice una manguera de alta presión
de menos de 30 m (100pies)
demasiado larga
No succiona
productos
químicos
El tubo aplicador
no está graduado
para baja presión
El filtro de productos
Vea el procedimiento para
el Uso del Tubo Aplicador
en la sección Operación
Limpie el filtro.
químicos está obstruído
La malla para químicos
no está en la solución
limpiadora
Asegúrese que el extremo de la
manga de sifon de detergente
esté sumergida completamente
en la solución limpiadora.
El producto químico está
demasiado espeso
Diluya más el producto
químico. Debe tener la misma
consistencia del agua
La manguera de
alta presión es
demasiado larga
Acumulación de
sedimentos químicos
en el inyector
Alargue la manguera de
suministro de agua en vez de
la manguera de alta presión
Contáctese con nuestro
Departamento de servicio
al cliente llamando al www.
simpsoncleaning.com
No hay
presión o está
baja después
de un tiempo
normal de uso
Sello o empaquetadura
gastada
Válvulas gastadas
u obstruídas
Contáctese con nuestro
Departamento de servicio
al cliente llamando al www.
simpsoncleaning.com
Contáctese con nuestro
Departamento de servicio
al cliente llamando al www.
simpsoncleaning.com
Pistón de descarga
gastado
Contáctese con nuestro
Departamento de servicio
al cliente llamando al www.
simpsoncleaning.com
74- SP
Page 75

PROBLEMA CAUSA CORRECCIÓN
Agua
goteando por
Anillo "O" gastado o roto Revíselo y cámbielo
Acople de manguera flojo Ajústelo
la conexión
de la pistola /
tubo aplicador
Agua
goteando de
la bomba
Acoples flojos. Ajústelo
Empaquetaduras del
pistón gastadas
Contáctese con nuestro
Departamento de servicio
al cliente llamando al www.
simpsoncleaning.com
Anillo "O" gastados
o rotos
Contáctese con nuestro
Departamento de servicio
al cliente llamando al www.
simpsoncleaning.com
Cabezal de la bomba
o tubos dañados por
congelamiento
Contáctese con nuestro
Departamento de servicio
al cliente llamando al www.
simpsoncleaning.com
La bomba
pulsa
Boquilla obstruida Refiérase a las instrucciones
para el Limpiador de Boquillas
en la sección Mantenimiento
Fuite d’eau
à la pompe
Joints de l’huile usés Contáctese con nuestro
Departamento de servicio
al cliente llamando al www.
simpsoncleaning.com
Orifice de vidange non
Serrer
étanche
Joint torique de l’orifice de
Vérifier et remplacer
vidange usé
Joint torique du bouchon
Vérifier et remplacer
de remplissage usé
Pompe trop pleine Vérifier la quantité correcte
Utilisation de l’huile
erronée
Bouchon de mise à
l’air libre obstrué
Vidanger et remplir avec la bonne
quantité et le bon type d’huile
Nettoyer le bouchon de mise à l’air
libre, souffler de l’air pour retirer
toute obstruction. Si le problème
persiste, remplacer le bouchon
El filtro de aire
lleno de aceite
Limpie y / o sustituir filtro de
aire. Consulte el manual del
usuario del moto para conocer
el procedimiento correcto
75 - SP
Page 76

Internet Address: www.simpsoncleaning.com
Warranty Registration via Internet
Adresse Internet:
Enregistrement de la garantie par Internet
Sitio Address:
Registro Garantía mediante Internet
Copyright. All Rights Reserved
Copyright. Todos los derechos reservados
Copyright. Tous droits réservés
Assembled in U.S.A with domestic and foreign components
Assemblé aux États-Unis avec des composants nationaux et étrangers
Ensamblado en los EE.UU. utilizando componentes domésticos e importados
www.simpsoncleaning.com
www.simpsoncleaning.com
FNA Group, Inc.
7152 99th Street
Pleasant Prairie, WI 53158
 Loading...