

Page 1
Page 2

SAFETY GUIDELINES - DEFINITIONS
This manual contains information that is important for you to know and understand.
This information relates to protecting YOUR SAFETY and PREVENTING
EQUIPMENT PROBLEMS. To help you recognize this information, we use the
symbols below. Please read the manual and pay attention to these symbols.
DANGER: Indicates an imminently hazardous situation which, if not avoided,
will result in death or serious injury.
WARNING: Indicates a potentially hazardous situation which, if not avoided,
could result in death or serious injury.
CAUTION: Indicates a potentially hazardous situation which, if not avoided, may
result in minor or moderate injury.
NOTICE: Indicates a practice not related to personal injury which, if not avoided,
may result in property damage.
IMpORTANT SAFETY INSTRUCTIONS
DANGER: Carbon Monoxide. Using an engine indoors can kill you in
minutes. Engine exhaust contains high levels of carbon monoxide (CO), a
poisonous gas you cannot see or smell. You may be breathing CO even if you
do not smell engine exhaust.
• NEVER use an engine inside homes, garages, crawlspaces or other partly
enclosed areas. Deadly levels of carbon monoxide can build up in these areas.
Usingafanoropeningwindowsanddoorsdoes NOTsupplyenoughfreshair.
• ONLY use outdoors and far awayfrom open windows, doors andvents. These
openingscanpullinengineexhaust.
• Evenwhentheengineisusedcorrectly,COmayleakintoyourhome.ALWAYS use
abattery-poweredorbatterybackupCOalarminyourhouse.Read and follow all
directions for CO alarm before using. Ifyoufeelsick,dizzyorweakatanytime,
move to fresh air immediately. See a doctor.You could have carbon monoxide
poisoning.
WARNING: Do not operate this unit until you read this instruction manual and
the engine instruction manual for safety, operation and maintenance instructions. If
you have any questions regarding the product, please contact our customer
service department at www.simpsoncleaning.com.
DANGER: Risk of injection or severe injury. Keep clear of nozzle. Do not
direct discharge stream at persons or live animals. This product is to be used
only by trained operators.
WARNING: This product and its exhaust contain chemicals known to the State
of California to cause cancer, birth defects or other reproductive harm. In addition, some cleaning products and dust contain chemicals known to the State of
California to cause cancer, birth defects or other reproductive harm. Wash hands
after handling.
2- ENG
Page 3
WARNING: This product may not be equipped with a spark-arresting muffler.
If the product is not equipped and will be used around flam ma ble ma teri als or
on land covered with materials such as agricultural crops, forest, brush, grass or
other similar items, then an ap proved spark arrester must be installed and is legally
required in the state of California. It is a violation of California statutes section
130050 and/or sec tions 4442 and 4443 of the California Public Re sourc es Code,
unless the engine is equipped with a spark arrester, as defined in section 4442, and
maintained in ef fec tive work ing order. Spark arresters are also required on some
U.S. For est Service land and may also be legally required under other statutes and
or di nanc es.
Save theSe inStructionS
DANGER: RISK OF EXPLOSION OR FIRE
WHAT CAN HAPPEN HOW TO PREVENT IT
• Spilled gasoline and it’s vapors can
becomeignitedfromcigarettesparks,
electrical arcing, exhaust gases and
hotengine components such asthe
muffler.
• Heatwillexpandfuelinthetankwhich
could result in spillage and possible
fireexplosion.
• Operatingthepressurewasherinan
explosiveenvironmentcouldresultin
afire.
• Materials placed against or near the
pressure washer can interfere with
itsproperventilationfeaturescausing
overheating and possible ignition of
thematerials.
• Muffler exhaust heat can damage
painted surfaces, melt any material
sensitive to heat (such as siding,
plastic, rubber, vinyl or the pressure
hose,itself),anddamageliveplants.
• Improperly stored fuel could lead to
accidental ignition. Fuel improperly
secured could get into the hands of
childrenorotherunqualifiedpersons.
• Use of acids, toxic or corrosive
chemicals, poisons, insecticides, or
any kind of flammable solvent with
this product could result in serious
injuryordeath.
• Shutoffengineandallow ittocoolbefore
addingfueltothetank.
• Usecareinfillingtanktoavoidspillingfuel.
Movepressurewasherawayfromfueling
areabeforestartingengine.
• Keepmaximumfuellevel1/2"(12.7mm)
below bottom of filler neck to allow for
expansion.
• Operate and fuel equipment in wellventilated areas free from obstructions.
Equipareaswithfireextinguishersuitable
forgasolinefires.
• Neveroperatepressurewasherinanarea
containingdrybrushorweeds.
• Always keep pressure washer a minimum
of4'(1.2 m)awayfromsurfaces(suchas
houses, automobiles or live plants) that
could be damaged from muffler exhaust
heat.
• StorefuelinanOSHAapprovedcontainer, in a secure location away from work
area.
• Donotsprayflammableliquids.
3 - ENG
Page 4

DANGER: RISK TO BREATHING (ASPHYXIATION)
WHAT CAN HAPPEN HOW TO PREVENT IT
• Breathing exhaust fumes will cause
serious injury or death! Engine
exhaust contains carbon monoxide,
anodorlessanddeadlygas.
• Some cleaning fluids contain
substanceswhichcouldcause injury
toskin,eyesorlungs.
DANGER: RISK OF FLUID INJECTION AND LACERATION
WHAT CAN HAPPEN HOW TO PREVENT IT
• Yourpressurewasheroperatesatfluid
pressuresandvelocitieshigh enough
topenetratehuman and animal flesh
which could result in amputation or
other serious injury. Leaks caused
byloosefittings orwornordamaged
hoses can result in injection injuries.
DO NOT TREAT FLUID INJECTION
ASA SIMPLE CUT! See a physician
immediately!
• Injuriescanresult if system pressure
is not reduced before attempting
maintenanceordisassembly.
• Operate pressure washer in a wellventilated area. Avoid enclosed areas
suchasgarages,basements,etc.
• Never operate unit in or near a location
occupiedbyhumansoranimals.
• Use only cleaning fluids specifically recommended for high pressure washers.
Follow manufacturers recommendations.
Donot use chlorine bleach or any other
corrosivecompound.
• Inspect the high pressure hose regularly.
Replace the hose immediately if it is
damaged, worn, has melted from
contactingtheengine,orshowsanysigns
of cracks, bubbles, pinholes, or other
leakage. Never grasp a high pressure
hosethatisleakingordamaged.
• Nevertouch,grasporattempttocovera
pinhole or similar water leak on the high
pressure hose. The stream of water IS
underhigh pressure andWILL penetrate
skin.
• Neverplacehandsinfrontofnozzle.
• Directsprayawayfromselfandothers.
• Makesurehoseandfittingsaretightened
and in good condition. Never hold onto
thehoseorfittingsduringoperation.
• Donotallowhosetocontactmuffler.
• Never attach or remove wand or hose
fittingswhilesystemispressurized.
• Whenusingreplacementlancesorguns
with this pressure washer,DO NOT use
a lance and/or lance/gun combination
that is shorter in length than what was
provided with this pressure washer as
measured from the nozzle end of the
lancetotheguntrigger.
• To relieve system pressure, shut off
engine,turnoffwatersupplyandpullgun
triggeruntilwaterstopsflowing.
• Use only accessories rated equal to or
higher than the rating of the pressure
washer.
4- ENG
Page 5
DANGER: RISK OF INJURY FROM SPRAY
WHAT CAN HAPPEN HOW TO PREVENT IT
• High-velocity fluid spray can cause
objectsto break, projecting particles
athighspeed.
• Light or unsecured objects can
becomehazardousprojectiles.
DANGER: RISK OF UNSAFE OPERATION
WHAT CAN HAPPEN HOW TO PREVENT IT
• Unsafe operation of your pressure
washercouldleadtoseriousinjuryor
deathtoyouorothers.
• If proper starting procedure is not
followed,enginecankickbackcausing
serioushandandarminjury.
• The spray gun/wand is a powerful
cleaningtoolthatcouldlooklikeatoy
toachild.
• Reactiveforceofspraywillcausegun/
wand to kickback, and could cause
theoperatortosliporfallormisdirect
the spray. Improper control of gun/
wandcanresultininjuriestoselfand
others.
• Always wear ANSI-approved Z87.1
safety glasses. Wear protective clothing
toprotectagainstaccidentalspraying.
• Never point wand at or spray people or
animals.
• Always secure trigger lock when wand
is not in service to prevent accidental
operation.
• Neverpermanentlysecure trigger inpullback(open)position.
• Donot use chlorine bleach or any other
corrosivecompound.
• Become familiar with the operation and
controlsofthepressurewasher.
• Keepoperatingarea clearofallpersons,
petsandobstacles.
• Donotoperatetheproductwhenfatigued
orundertheinfluenceofalcoholordrugs.
Stayalertatalltimes.
• Nevercompromisethe safetyfeaturesof
thisproduct.
• Do not operate machine with missing,
brokenorunauthorizedparts.
• Neverleavewandunattendedwhileunitis
running.
• If engine does not start after two pulls,
squeeze trigger of gun to relieve pump
pressure. Pull starter cord slowly until
resistanceisfelt.Thenpullcordrapidlyto
avoidkickbackandpreventhandorarm
injury.
• Keep children away from the pressure
washeratalltimes.
• Donotoverreachorstandonanunstable
support.
• Do not use pressure washer while
standingonaladder.
• Grip gun/wand firmly with both hands.
Expect the gun to kickback when
triggered.
5 - ENG
Page 6
DANGER: RISK OF INJURY OR PROP ER TY DAMAGE WHEN
TRANSPORTING OR STORING
WHAT CAN HAPPEN HOW TO PREVENT IT
• Fueloroilcanleakor spillandcould
result in fire or breathing hazard.
Serious injury or death can result.
Fuel or oil leaks will damage carpet,
paintorothersurfacesinvehicles or
trailers.
• Oilcouldfillthecylinderanddamage
theengineif the unitisnotstoredor
transportedinanuprightposition.
• Ifpressurewasherisequippedwithafuel
shut-off valve, turn the valve to the OFF
positionbeforetransportingtoavoidfuel
leaks.Ifpressurewasherisnotequipped
with a fuel shut-off valve, drain the fuel
fromtankbeforetransporting.OnlytransportfuelinanOSHA-approvedcontainer.
• Always place pressure washer on a
protective mat when transporting to
protect against damage to vehicle from
leaks.
• Always transport and store unit in an
upright position. Remove pressure
washer from vehicle immediately upon
arrivalatyourdestination.
DANGER: RISK OF ELEC TRI CAL SHOCK
WHAT CAN HAPPEN HOW TO PREVENT IT
• Spray directed at electrical outlets or
switches,orobjectsconnectedtoan
electricalcircuit,couldresultinafatal
electricalshock.
• Unpluganyelectrically operated product
beforeattemptingtocleanit.Directspray
awayfromelectricoutletsandswitches.
DANGER: RISK OF CHEMICAL BURN
WHAT CAN HAPPEN HOW TO PREVENT IT
• Use of acids, toxic or corrosive
chemicals, poisons, insecticides, or
anykindofflammablesolventwiththis
productcouldresultinseriousinjuryor
death.
• Do not spray acids, gasoline, kerosene,
oranyotherflammablematerialswiththis
product.Useonlyhouseholddetergents,
cleaners and degreasers recommended
forusewithpressurewashers.
• Wear protective clothing to protect
eyes and skinfrom contact withsprayed
materials.
6- ENG
Page 7
WHAT CAN HAPPEN HOW TO PREVENT IT
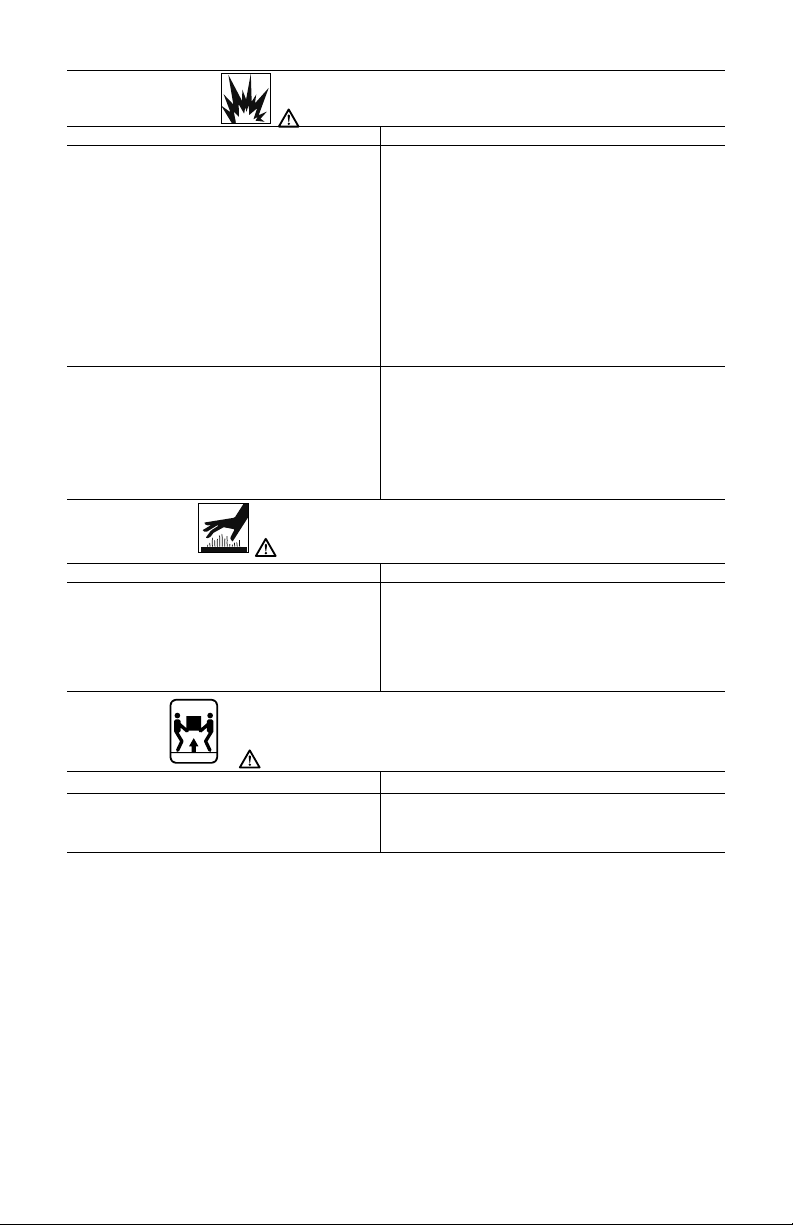
WARNING: RISK OF BURSTING
• Over inflation of tires could result in
seriousinjuryandpropertydamage.
• High-velocity fluid spray directed at
pneumatic tire sidewalls (such as
found on automobiles, trailers and
the like) could damage the sidewall
resultinginseriousinjury.
WARNING: RISK OF HOT SURFACES
WHAT CAN HAPPEN HOW TO PREVENT IT
• Contact with hot surfaces, such as
engine exhaust components, could
resultinseriousburn.
• Use a tire pressure gauge to check the
tires pressure before each use and while
inflating tires; see the tire sidewall for the
correcttirepressure.
NOTE:
Airtanks,compressorsandsimilar
equipmentusedtoinflatetirescanfillsmall
tires similar to these very rapidly. Adjust
pressureregulatoronairsupplytonomore
thantheratingofthetirepressure.Addair
insmallincrementsandfrequentlyusethe
tiregaugetopreventoverinflation.
• On pressure washers rated above
1600 PSI (11032 kPa) use the widest
fan spray (40ºnozzle) and keep the
sprayaminimumof8"(20cm)fromthe
pneumatictiresidewall.Donotaimspray
directlyat the jointbetween the tireand
rim.
• During operation, touch only the control
surfaces of the pressure washer. Keep
childrenaway from thepressure washer
at all times. They may not be able to
recognizethehazardsofthisproduct.
WARNING: RISK OF INJURY FROM LIFTING
WHAT CAN HAPPEN HOW TO PREVENT IT
• Serious injury can result from
attemptingtolifttooheavyanobject.
Save theSe inStructionS
for future uSe
• Thepressure washer is tooheavy to be
lifted by one person. Obtain assistance
fromothersbeforelifting.
7 - ENG
Page 8
8- ENG
QUICK SETUP GUIDE
WARNING: To reduce the risk of injury, read the pressure washer instruction manual and
the engine instruction manual before operating pressure washer.
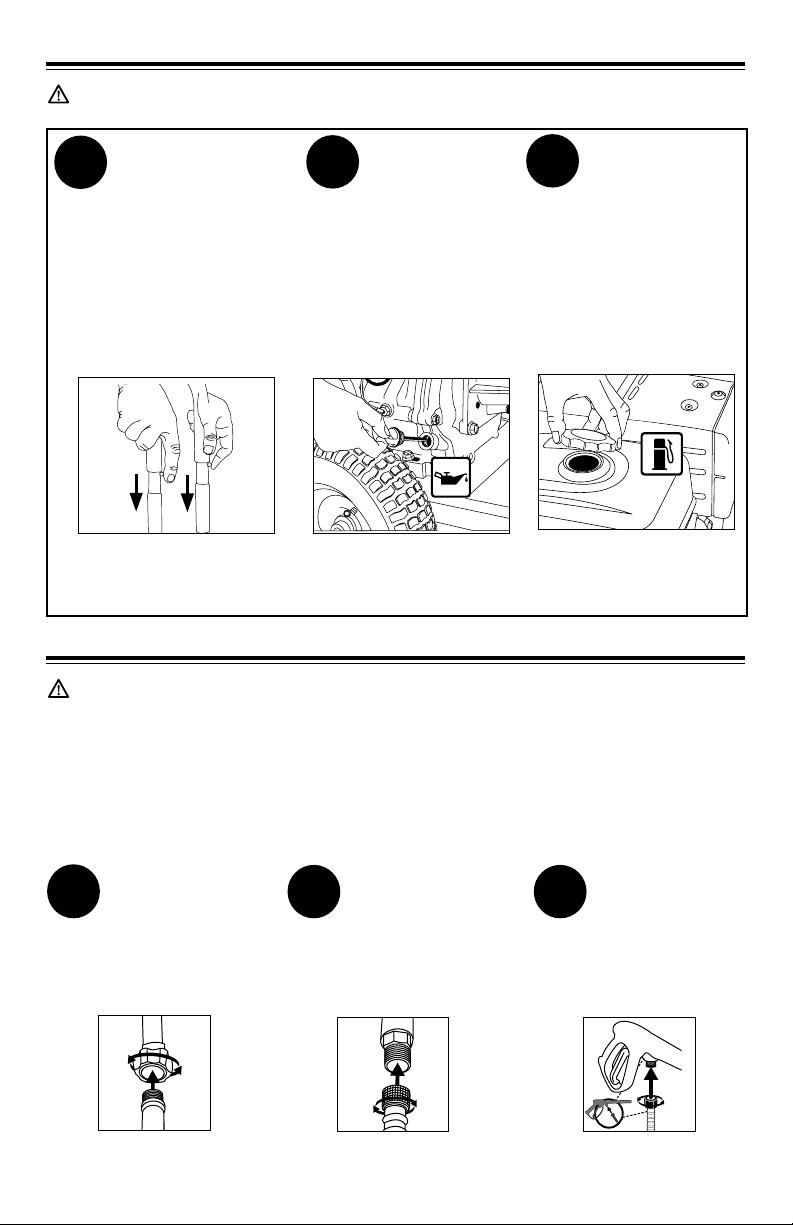
A
Install the Handle
Place handle onto
frame, depress
the snap buttons, and
slide the handle assembly
onto the frame until snap
buttons snap into place.
B
Add/Check Oil
The engine is
shipped without
oil. Before starting engine,
add the oil provided.
Check oil level prior to
each use. Refer to Engine
Owner’s Manual for
complete procedure.
C
Add Gasoline
In a well ventilated
outdoor area
add fresh, high quality,
unleaded gasoline with a
pump octane rating of 86
or higher. Do not overfill.
Wipe up spilled fuel before
starting the engine. Refer to
Engine Owner's Manual
for complete procedure.
IMPORTANT: Ethanol ShieldTM (sold separately) is a fuel stabilizer that helps eliminate
and prevent ethanol related problems in power equipment. Follow the instructions on the
container and add to the gasoline.
QUICK START GUIDE
DANGER:
t /FWFS SVO FOHJOF JOEPPST PS JO FODMPTFE QPPSMZ WFOUJMBUFE BSFBT &OHJOF FYIBVTU
contains carbon monoxide, an odorless and deadly gas.
t 3JTLPGGMVJEJOKFDUJPOBOEMBDFSBUJPO8IFOVTJOHUIFIJHIQSFTTVSFTFUUJOH%0/05
allow the high-pressure spray to come in contact with unprotected skin, eyes or with
any pets or animals. Serious injury will occur.
1
Connect Garden
Hose to Pump
Thread the garden
hose to the pump inlet.
See label #1 on unit.
2
Connect High
Pressure Hose to
Pump
Connect the high pressure
hose to the pump outlet.
See label #2 on unit.
3
Connect High
Pressure Hose to
Spray Gun
Thread the other end of
the high pressure hose
to the spray gun.
Page 9
9 - ENG
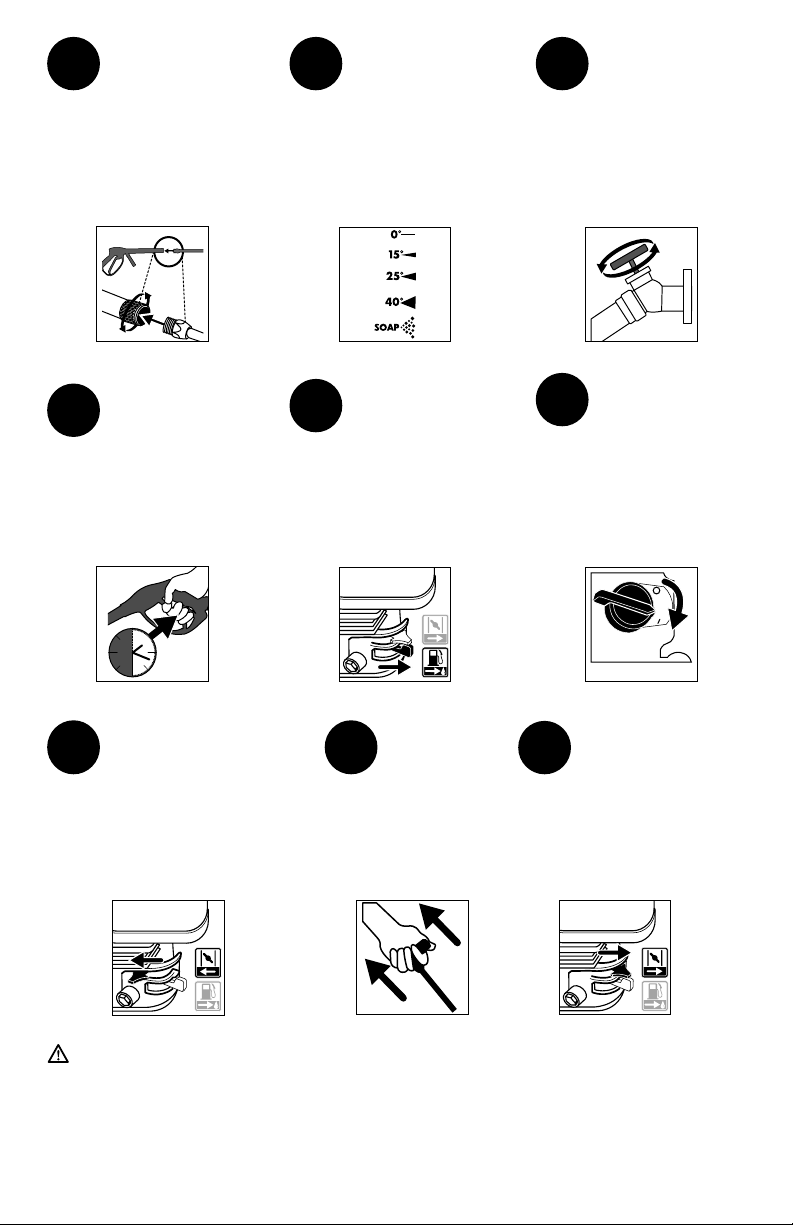
4
Connect Spray
Wand to Spray
Gun
Thread the spray wand into
the end of the spray gun.
5
Select a spray
pattern
Rotate the spray selector to
the desired setting
6
Turn Water
Faucet
Completely On
Do not run the unit
without water supply
connected and turned on.
Use Cold Water Only.
7
Release Air from
System
Release all air from
pump and high pressure
hose by depressing
trigger until a steady
stream of water is present.
Approximately 30 seconds.
30 S
8
Verify the Fuel
Switch is in the
ON Position
See label #8 on unit.
9
Verify the Engine
Switch is turned
to the ON
Position
See label #9 on unit.
OFF
ON
10
Move the Choke to
the CLOSED Position
See label #10 on unit.
WARNING: This Guide is not a substitute for reading the operator's manual. User must
read and understand operator's manual before using this product.
11
Pull the
Recoil Starter
Grip
Pull the recoil
starter grip to start
the engine.
See label #11 on unit.
12
Move the
Choke to the
OPEN Position
Gradually move
the Choke to the
OPEN Position after
engine starts.
See label #12 on unit.
Page 10
GET TO kNOW THE pRESSURE WASHER
NOTE: Photographs and line drawings used in this manual are for reference
only and do not represent a specific model.
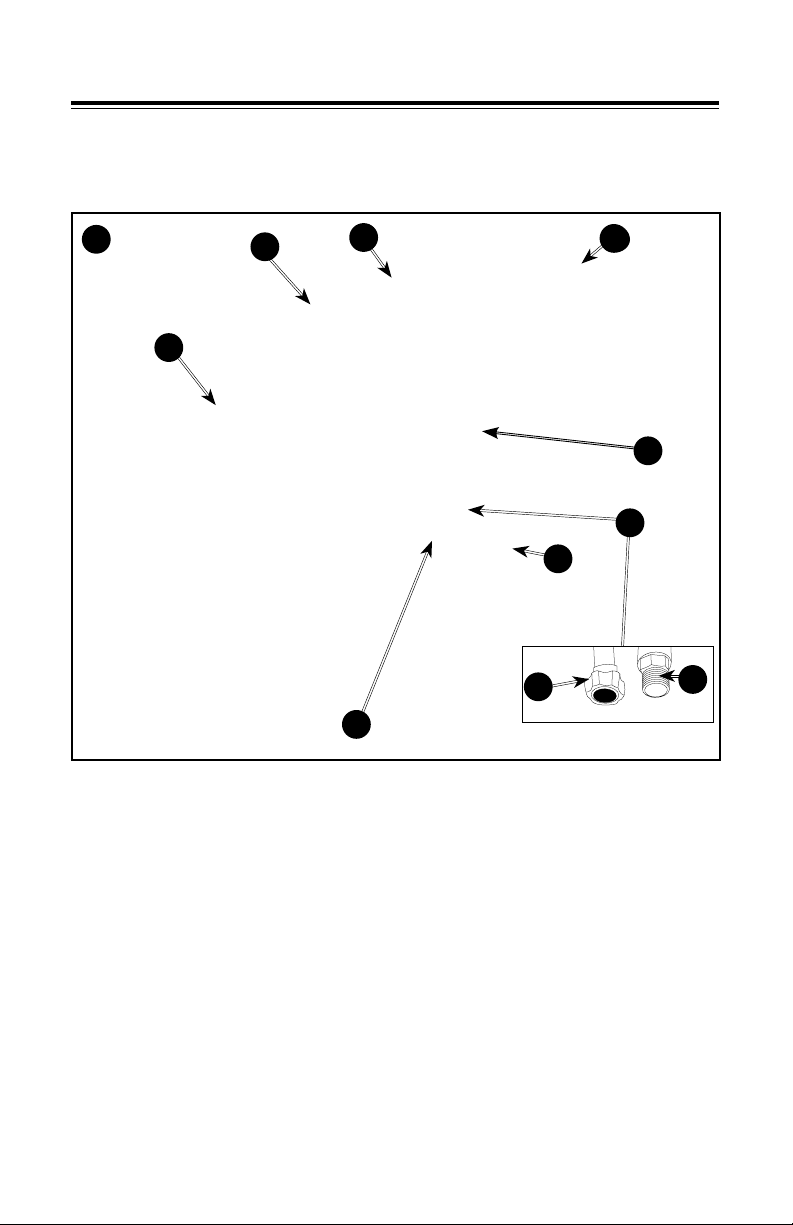
Compare the illustrations with your unit to familiarize yourself with the location of
various controls and adjustments. Save this manual for future reference.
1
B
C
G
J
K
D
E
A
H
I
BASIC ELEMENTS OF A pRESSURE WASHER (FIG. 1)
A. High Pressure Pump: Increases the pressure of the water supply.
B. Engine: Drives the high pressure pump. Refer to the Engine Owner's Manual
for location and operation of engine controls.
C. High Pressure Hose: Carries the pressurized water from the pump to the gun
and spray wand.
D. Spray Gun: Connects with spray wand to control water flow rate, direction and
pressure.
E. Spray Wand: See How To Use Spray Wand instructions in Operation section.
F. Detergent Siphon Hose (not shown): Feeds cleaning agents into the pump to mix
with the water. See
in
Operation
G. Handle
H. Frame
I. Pump Outlet
J. Pump Inlet
How To Apply Chemicals/Cleaning Solvents
section.
instructions
10- ENG
Page 11

K. 5n1 Multi-tip Nozzle
BASIC ELEMENTS OF AN ENGINE
Refer to the Engine Owner's Manual for location and operation of engine controls.
Choke Control: Opens and closes carburetor choke valve.
Starter Grip: Pulling starter grip operates recoil starter to crank engine.
Engine Switch: Enables and disables ignition system.
ASSEMBLY INSTRUCTIONS (FIG. 2–4)
1. Locate and remove all loose parts from the carton.
2. Cut four corners of the carton from top to bottom and lay the panels flat.
3.
Place handle (G) onto frame (H), depress the snap
buttons, and slide the handle assembly onto the frame
until snap buttons snap into place.
NOTICE: Risk of personal injury. Avoid placing hands
between handle and frame when assembling to prevent
pinching.
4. Connect wand (E) to gun (D). Tighten securely.
5. Attach high pressure hose (C) to gun (D). Tighten se cure ly.
3
D
4
E
2
G
H
D
C
NOTICE: The engine is shipped without oil. Before starting engine, add the oil
provided. Damage to the engine will occur if the engine is run without oil, this
damage will not be covered under warranty.
NOTE: The pump on this unit is maintenance free and requires no oil. If
there is a problem with the pump, contact our Customer Service Group on
www.simpsoncleaning.com as soon as possible.
OpERATION
pRESSURE WASHER TERMINOLOGY
PSI: Pounds per Square Inch. The unit of measure for water pressure. Also used
for air pressure, hydraulic pressure, etc.
GPM: Gallons per Minute. The unit of measure for the flow rate of water.
CU: Cleaning Units. GPM multiplied by PSI equals CU.
Bypass Mode: Allows water to re-circulate within the pump when the gun trigger is
not pulled. This feature allows the operator to release the trigger gun and reposition
themselves without having to turn the engine off in between cleaning actions.
11 - ENG
Page 12
WARNING: Do not allow the unit to run for more than two minutes without
the gun trigger being pulled. This could cause overheating and damage to
the pump. When the temperature inside the pump rises too high, the thermal
relief valve will open and release a spray of water from the pump to lower the
internal temperature. The valve will then close.
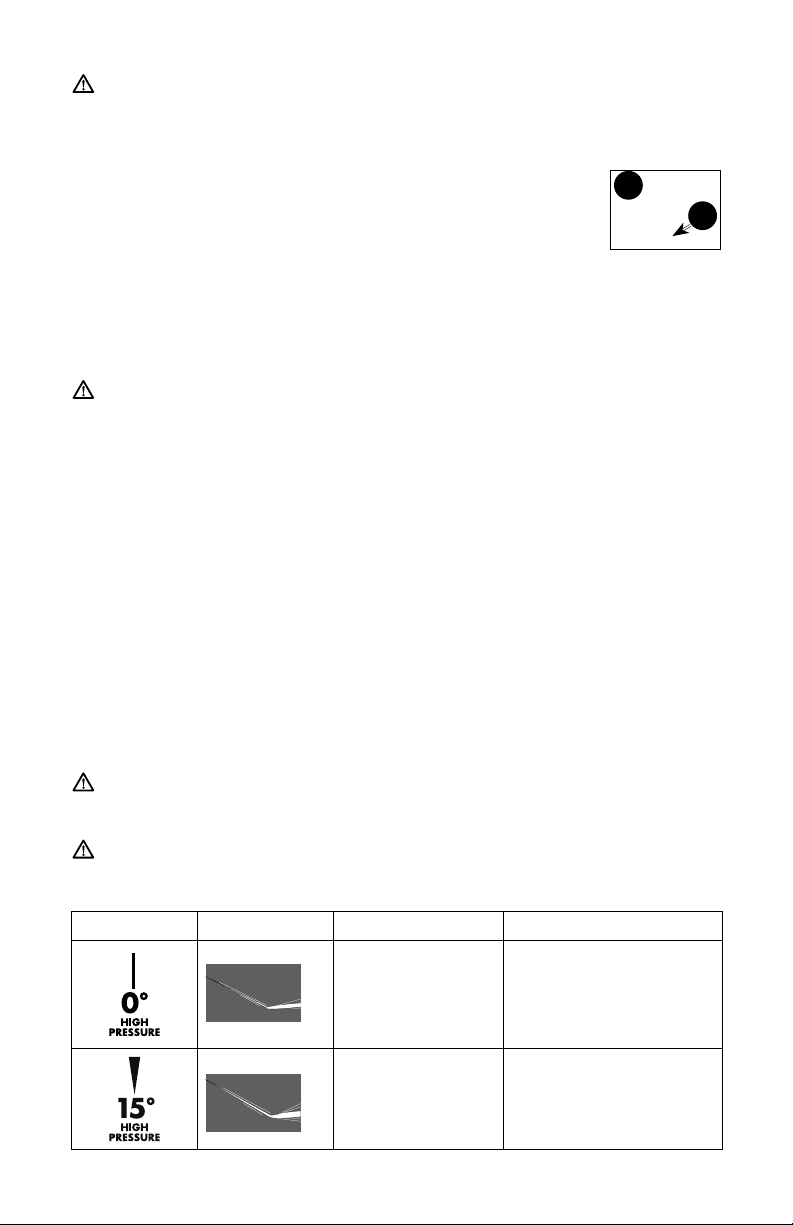
Thermal Relief Valve (L, Fig. 5): When the temperature inside the
pump rises too high, this valve will open and release a gush of water
in an effort to lower the temperature inside the pump. The valve will
5
L
then close.
Detergent Injection System: Mixes cleaners or cleaning solvents with the water
to improve cleaning effectiveness.
Water Supply: All pressure washers must have a source of water. The minimum
requirements for a water supply are 20 PSI and 5 Gallons Per Minute. If your water
source is a well, the garden hose length can only be 30ft. (9m) max.
WARNING: To reduce the possibility of contamination always protect
against backflow when connected to a potable water system.
pRESSURE WASHER OpERATING FEATURES
pRESSURE ADJUSTMENTS
The pressure setting is preset at the factory to achieve op ti mum pres sure and
cleaning. If you need to lower the pres sure, it can be accomplished by these methods.
1. Back away from the sur face to be cleaned. The further away you are, the
less the pressure will be on the surface to be cleaned.
2. Change to the 40˚ nozzle. This nozzle delivers a less powerful stream of water
and a wider spray pattern. Refer to How To Use Spray Wand.
NOTICE: DO NOT attempt to increase pump pressure. A higher pressure setting
than the factory set pressure may damage pump.
HOW TO USE SpRAY WAND
There are five spray pattern settings located on the 5n1 Multi-tip Nozzle. To select a
spray pattern, rotate the spray selector to the desired setting. Refer to the following
chart to choose the correct nozzle for the job to be performed.
DANGER: Risk of fluid injection. Do not direct discharge stream toward
persons, unprotected skin, eyes or any pets or animals. Serious injury will
occur.
WARNING: Flying objects could cause risk of serious injury. Do not attempt
to change nozzles while pressure washer is running. Turn engine off before
changing nozzles.
NOzzLE SpRAY pATTERN USES SURFACES*
powerful pinpoint
for spot cleaning
of hard, unpainted
surfaces or for
unpainted metal
or concrete;
DO NOT use on wood
high reach areas
intense cleaning
of unpainted
hard surfaces
12- ENG
grills, driveways, concrete
or brick walkways,
unpainted brick or stucco
Page 13
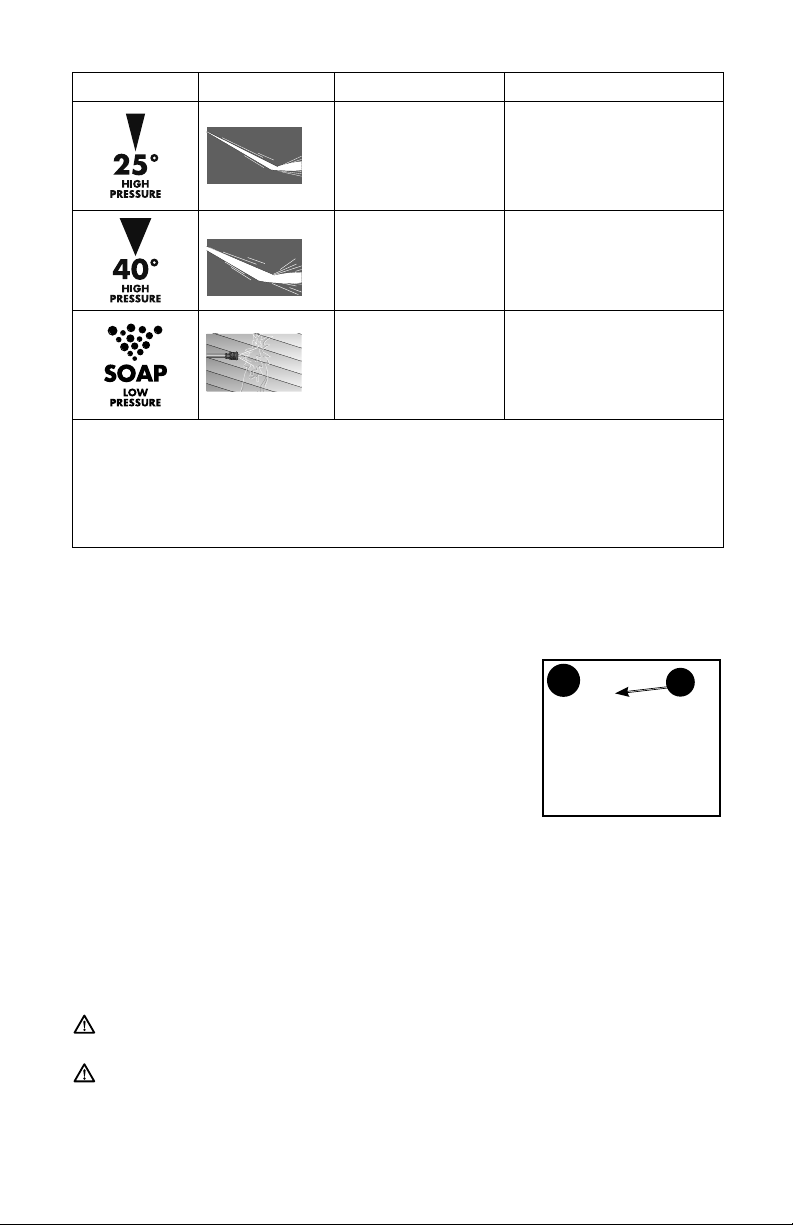
NOzzLE SpRAY pATTERN USES SURFACES*
standard cleaning
nozzle for most
applications
yard tools, sidewalks,
lawn furniture, unpainted
siding, stucco, gutters
and eaves, concrete,
brick surfaces
cleaning of
painted or delicate
surfaces
auto/RV, marine, wood,
painted brick and stucco,
vinyl, painted siding
low pressure applies cleaning
solutions
Low pressure
spray is safe on all
surfaces. Always verify
compatibility of cleaning
solution prior to use.
*NOTICE: The high pressure spray from your pressure washer is capable of
causing damage to surfaces such as wood, glass, automobile paint, auto striping
and trim, and delicate objects such as flowers and shrubs. Before spraying, check
the item to be cleaned to assure yourself that it is strong enough to resist damage
from the force of the spray.
HOW TO AppLY CHEMICALS/CLEANING SOLvENTS (FIG. 6)
Applying chemicals or cleaning solvents is a low pressure operation. NOTE: Use
only soaps and chemicals designed for pressure washer use. Do not use bleach.
To Apply Chemicals:
1. Ensure detergent siphon hose (F, Figure 6) is attached
tobarbed fitting location near high pressure hose
6
F
connection of pump as shown.
2. Place other end of detergent siphon hose with filter on
it into container holding chemical/cleaning solution.
NOTE: For every 7 gallons of water pumped 1 gallon
of chemical/cleaning solution will be used.
3. Select the SOAP setting on the 5n1 Multi-tip Nozzle,
see How To Use Spray Wand paragraph in this section.
4. After use of chemicals, place detergent siphon hose into container of clean
water and draw clean water through chemical injection system to rinse system
thoroughly. If chemicals remain in the pump, it could be damaged. Pumps
damaged due to chemical residue will not be covered under warranty.
NOTE: Chemicals and soaps will not siphon if the soap nozzle is not selected on
the 5n1 Multi-tip Nozzle.
STARTING (FIG. 7–10)
WARNING: To reduce the risk of injury, read the pressure washer instruction
manual and the engine instruction manual before starting pressure washer.
DANGER: Risk of fluid injection and laceration. When using the high
pressure setting, DO NOT allow the high pressure spray to come in contact
with unprotected skin, eyes, or with any pets or animals. Serious injury will
occur.
13 - ENG
Page 14
• Yourwasher operates at fluid pressuresandvelocitieshigh enough to penetrate
humanandanimalflesh, which couldresultinamputationorotherserious injury.
Leakscausedbyloosefittingsorwornor damaged hoses can result in injection
injuries.DONOTTREATFLUIDINJECTIONAS A SIMPLECUT!Seeaphysician
immediately!
DANGER: Carbon Monoxide. Using an engine indoors can kill you in
minutes. Engine exhaust contains high levels of carbon monoxide (CO), a
poisonous gas you cannot see or smell. You may be breathing CO even if you
do not smell engine exhaust.
• Breathingexhaust fumeswillcauseseriousinjuryordeath!Engineexhaust
contains carbon mon ox ide, an odorless and deadly gas.
• Operate pressure washer in a well-ventilated area. Avoid enclosed areas
such as ga rages, base ments, etc.
• Neveroperateunitinornearalocationoccupiedbyhumansoranimals.
WARNING: Risk of Fire, Asphyxiation and Burn. Never fill fuel tank when
engine is running or hot. Do not smoke when filling fuel tank.
• Never fill fuel tank completely.Fill tank to 1/2" (12.7 mm) below bottom of filler
necktoprovidespaceforfuel expansion.Wipeanyfuelspillagefromengineand
equipmentbeforestartingengine.
• DO NOT let hoses come in contact with very hot engine muffler during or
immediatelyafteruseofyourpressurewasher.Damagetohosesfromcontactwith
hotenginesurfaceswillNOTbecoveredbywarranty.
NOTICE: Riskofpropertydamage.Neverpullwatersupplyhosetomovepressure
washer. This could damage hose and/or pump inlet.
• DONOTusehotwater,usecoldwateronly.
• Neverturnwatersupplyoffwhilepressurewasherengineisrunningordamageto
pumpwillresult.
• DONOTstopsprayingwaterformorethantwominutesatatime.Pumpoperates
inbypassmodewhen spray guntriggerisnotpressed.If pump isleftinbypass
mode for more than two minutes internal components of the pump can be
damaged.
If you do not understand these precautions, please contact our customer service
department at www.simpsoncleaning.com
Prior to starting, refer to your engine manual for proper starting procedure.
1. In a well ventilated outdoor area add fresh, high quality, unleaded gasoline
with a pump octane rating of 86 or higher. Do not overfill. Wipe up spilled
fuel before starting the engine. Refer to Engine Owner's Manual for correct
procedure.
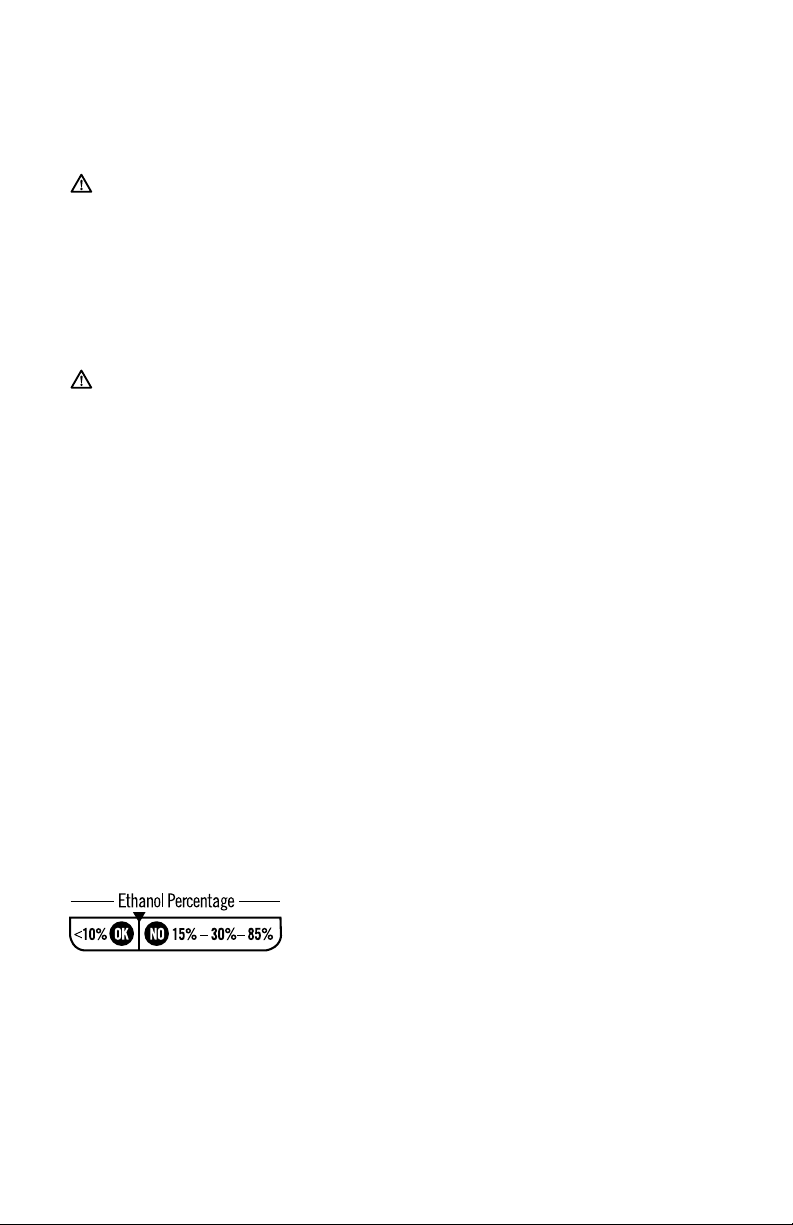
NOTICE: Useoffuelswithgreaterthan10%ethanolare
notapprovedforuseinthisproductperEPAregulations
andwilldamagetheunitandvoidthewarranty.
2. Check engine oil level. Refer to Engine Owner's Manual for correct procedure.
3. Connect the water hose to the water source. Turn the water source on to
remove all air from the hose. When a steady stream of water is present, turn
the water source off.
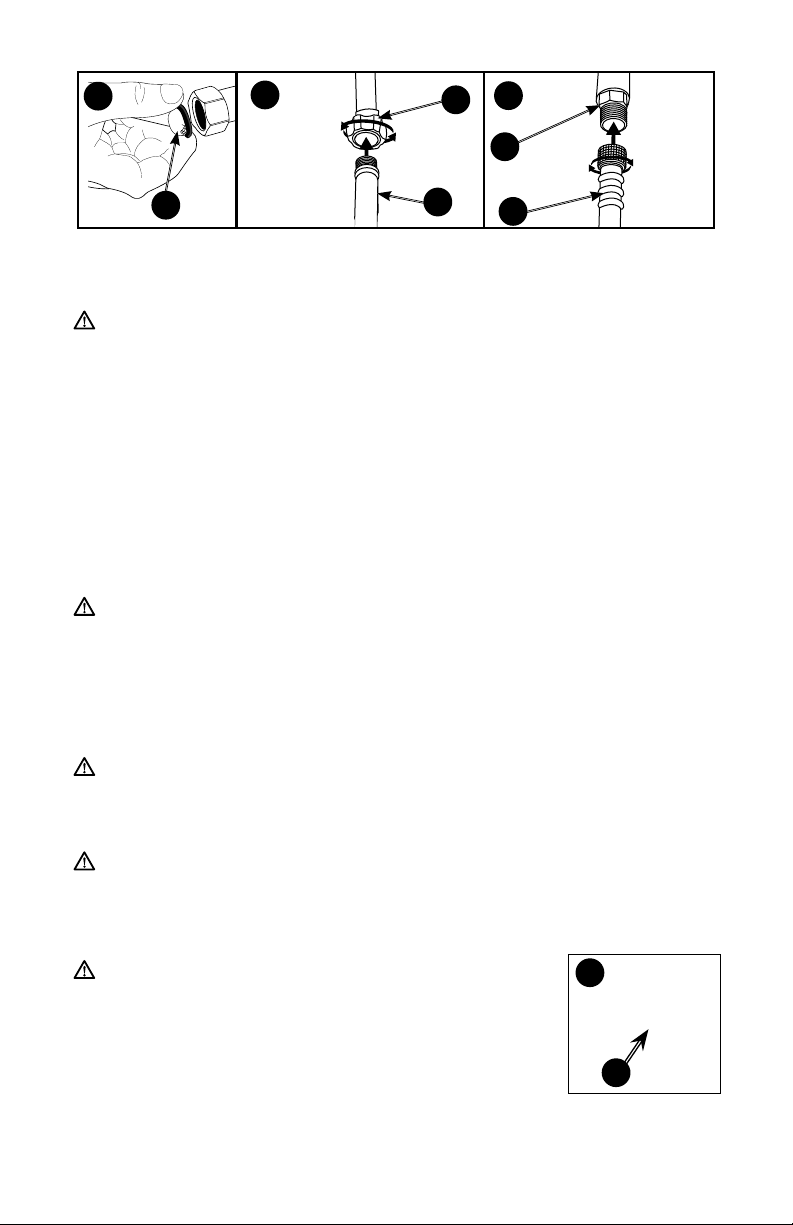
4. Verify the filter screen (M) is in water inlet of pump. NOTE: Convex side faces
out.
14- ENG
Page 15
7
8
9
J
I
M
N
C
5. Connect water source (N) to pump inlet (J). NOTE: Water source must provide
a minimum of 5 gallons per minute at 20 PSI.
6. Connect high pressure hose (C) to pump outlet (I).
WARNING: To reduce the possibility of contamination always protect
against backflow when connected to a potable water system.
7. Choose the correct nozzle for the job to be performed. See How To Use spray
Wand instructions in this section. NOTE: If applying a chemical or cleaning
solution, see How To Apply Chemicals/Cleaning Solvents instructions in this
section.
8. Turn water source on.
NOTICE: Risk of property damage. Failure to do so could cause damage to the
pump.
9. Remove all air from the pump and high pressure hose by depressing trigger
until a steady stream of water is present.
10. Start engine. See Engine Owner's Manual for correct procedure.
WARNING: Risk of unsafe operation. If engine does not start after two
pulls, squeeze trigger of gun to relieve pump pressure. Pull starter cord slowly
until resistance is felt. Then pull cord rapidly to avoid kickback and prevent
hand or arm injury.
NOTE: If the oil level in the engine is low, the engine will not start. If the engine does
not start, check the oil level and add oil as needed.
11. Depress trigger on gun to start water flow.
WARNING: Risk of unsafe operation. Stand on a stable surface and
grip gun/spray wand firmly with both hands. Expect the gun to kick when
triggered.
12. Release trigger to stop water flow.
WARNING: Do not allow the unit to run for more than two minutes without
the gun trigger being pulled. This could cause overheating and damage to
the pump. When the temperature inside the pump rises too high, the thermal
relief valve will open and release a spray of water from the pump to lower the
internal temperature. The valve will then close.
WARNING: Risk of injury from spray. Always engage
10
the trigger lock (O) when gun is not in use. Failure to do so
could cause accidental spraying.
SHUTTING DOWN
1. After each use, if you have applied chemicals, place
detergent siphon hose into container of clean water and
draw clean water through chemical injection system to
rinse system thoroughly.
O
15 - ENG
Page 16

NOTICE: Risk of property damage. Failure to do so could cause damage to the
pump.
2. Turn engine off. See Engine Owner's Manual.
NOTICE: Risk of property damage. NEVER turn the water off with the engine
running.
3. Turn water source off.
4. Pull trigger on spray gun to relieve any water pressure in hose or spray gun.
NOTE: Failure to release system pressure will prevent removal of high pressure
hose from spray gun or pump connection.
5. See Storage section in this manual for proper storage procedures.
MAINTENANCE
WARNING: Risk of burn hazard. When performing maintenance, you may
be exposed to hot surfaces, water pressure or moving parts that can cause
serious injury or death.
WARNING: Risk of fire hazard. Always disconnect, spark plug wire,
let the engine cool and release all water pressure before performing any
maintenance or repair. The engine contains flammable fuel. Do not smoke or
work near open flames while performing maintenance.
To ensure efficient operation and longer life of your pressure washer, a routine
maintenance schedule should be prepared and followed. If the pressure washer is
used in unusual conditions, such as high-temperatures or dusty conditions, more
fre quent maintenance checks will be required.
ENGINE
Consult the Engine Owner's Manual for the man u fac tur er's recommendations
for any and all maintenance. NOTE: The engine drain plug is located at the rear of
the unit.
pUMp
The pump was filled with oil at the factory. The pump on this unit is maintenance
free and requires no oil. If there is a problem with the pump contact us at
www.simpsoncleaning.com
CONNECTIONS
Connections on pressure washer hoses, gun and spray wand should be cleaned
regularly and lubricated with light oil or lithium grease to prevent leakage and
damage to the o-rings.
NOzzLE CLEANING (FIG. 11)
If the nozzle becomes clogged with foreign materials, such as dirt, excessive
pressure may develop. If the nozzle becomes partially clogged or restricted, the
pump pressure will pulsate. Clean the nozzle immediately using the nozzle kit
supplied and the following instructions:
1. Shut off the pressure washer and turn off the water supply.
2. Pull trigger on gun handle to relieve any water pressure.
3. Disconnect the spray wand from the gun.
16- ENG
Page 17
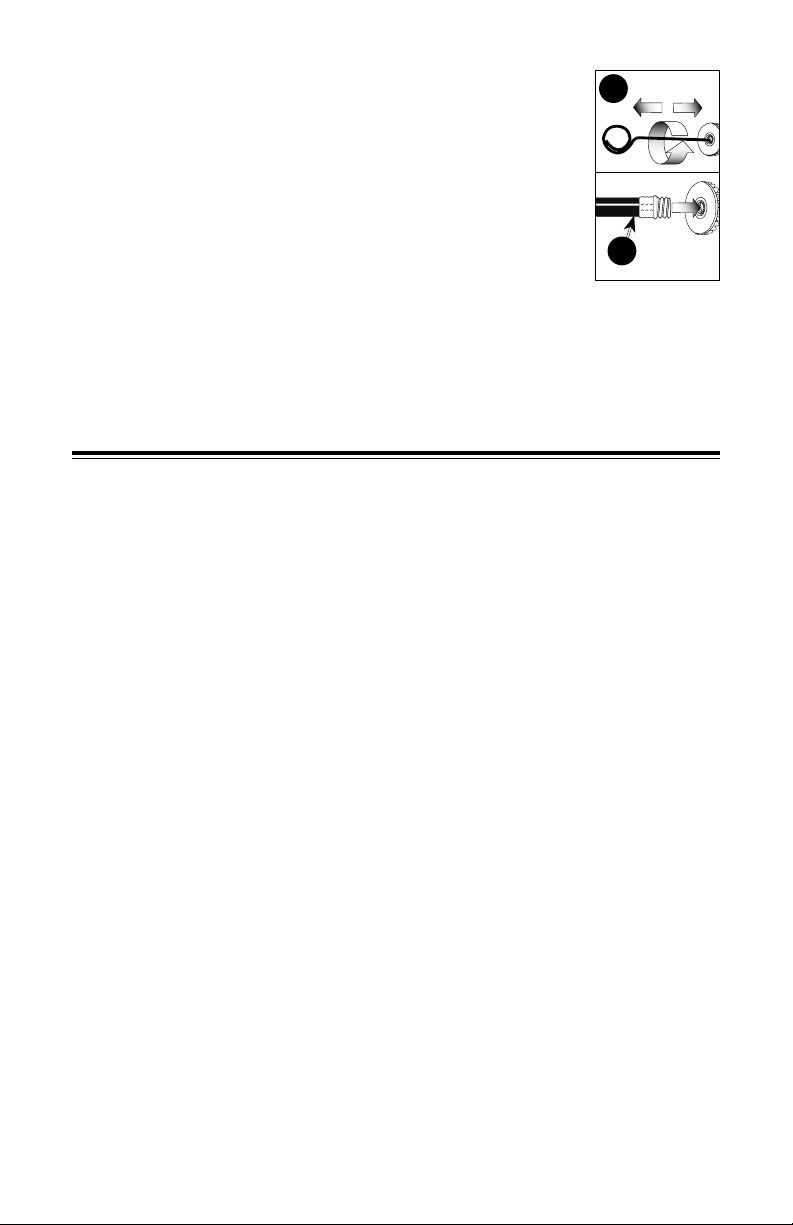
4. Remove any obstructions with the nozzle cleaning tool
provided and backflush with clean water.
11
5. Direct water supply (N) into nozzle to backflush loosened
particles for 30 seconds.
6. Reconnect spray wand to gun and turn on water supply.
7. Start pressure washer and place spray wand into high
pressure setting to test.
CLEAN THE WATER INLET FILTER (FIG. 8)
N
This screen filter should be checked periodically and cleaned if
necessary.
1. Remove filter by grasping end and removing it from water inlet of pump.
2. Clean filter by flushing it with water on both sides.
3. Re-insert filter into water inlet of pump. NOTE: Convex side faces out.
NOTE: Do not operate the pressure washer without filter properly installed.
STORAGE
ENGINE
Consult the Engine Owner's Manual for manufacturer’s recommendations for
storage.
TO pREvENT FUEL-RELATED pROBLEMS
1. Add Ethanol Shield
er’s instructions. When adding a gasoline stabilizer, fill the fuel tank with fresh
gasoline. If only partially filled, air in the tank will promote fuel deterioration
during storage. If you keep a container of gasoline for refueling, be sure that it
contains only fresh gasoline.
2. After adding a gasoline stabilizer, run the engine outdoors for 10 minutes
to be sure that treated gasoline has replaced the untreated gasoline in the
carburetor.
3. Turn the fuel valve to the OFF position.
4. Continue to run the engine until it stops from the lack of fuel in the carburetor
fuel bowl. Running time should be less than 3 minutes.
pUMp
The manufacturer recommends using SIMPSON® / POWERWASHER® Pump
Guard or equivalent when storing the unit for more than 30 days and/or when
freezing temperatures are expected. SIMPSON
is environmentally friendly.
NOTE: Using pump guard helps provide proper lubrication to the internal seals of
the pump regardless of temperature or environment.
NOTICE: Risk of property damage. Use only SIMPSON
PumpGuardorequivalent.Otherproductscouldbecorrosiveand/orcontainalco-
hol which may cause pump damage.
1. Turn off pressure washer and disconnect hoses from pump.
2. Unscrew bottle valve from Pump Guard bottle and remove seal.
3. Screw bottle valve back onto bottle.
4. Attach bottle to water inlet of pump.
TM
(sold separately) fuel stabilizer following the manufactur-
®
/ POWERWASHER® Pump Guard
®
/ POWERWASHER®
17 - ENG
Page 18

5. Squeeze bottle to inject contents into pump.
6. With ignition switch off, simultaneously pull starter rope and squeeze bottle.
Repeat until protector fluid exits pump outlet. NOTE: This step may require
two people.
pRESSURE WASHER
1. Drain all water from high pressure hose and wrap it onto hose wrap.
2. Drain all water from the spray gun and wand by holding spray gun in a vertical
position with nozzle end pointing down and squeezing trigger. Store in gun
holder.
3. Wrap up and secure detergent siphon hose so it is protected from damage.
ACCESSORIES
DANGER: Risk of fluid injection. When using replacement spray wands or
guns with this pressure washer, DO NOT use a spray wand and/or spray gun/
wand combination that is shorter in length than what was provided with this
pressure washer as measured from the nozzle end of the wand to the gun
trigger.
NOTICE: The use of any other accessory not recommended for use with this tool
could be hazardous. Use only accessories rated equal to or greater than the rating
of the pressure washer.
SpECIFICATIONS
Model MS60753
PSI Max* 2800 PSI
GPM Max* 2.3 gpm
High Pressure Hose 25 ft. (7.6 m)
Presure of Inlet Water 20–100 PSI
Inlet Water cold tap (100 °F max)
Soap Consumption Rate 10% max
*RatedPressureandRatedWaterFlowiswithinmanufacturingtoleranceof
(+/- 10%).
In a continued commitment to improve quality, the manufacturer reserves the right
to make component changes, design changes, or specification changes when
necessary and without notice.
SERvICE INFORMATION
Do not return this product to your retailer. Please contact our customer service
department at www.simpsoncleaning.com
LIMITED WARRANTY
90 DAY LIMITED WARRANTY ON pRODUCT COMpONENTS EXCLUDING pUMp
SIMPSON® warrants to the original purchaser that the wheels, gun, hose, wand, spray
nozzle(s) and other components of the
warranty are free from defects in material and workmanship for 90 days from the date
of purchase.
SIMPSON
18- ENG
®
pressure washer covered under this
Page 19

ONE YEAR LIMITED WARRANTY ON pUMp AND FRAME
SIMPSON
®
warrants to the original purchaser that the pump of the SIMPSON
®
pressure washer covered under this warranty is free from manufacturer’s defects in
material and workmanship for one year from the date of purchase. The one year limited
warranty applies to the pump only.
SIMPSON
®
will repair or replace, at SIMPSON®'s option, products or components
which have failed within the above warranty periods. Service will be scheduled
according to the normal work flow and business hours at the service center location,
and the availability of replacement parts. All decisions of
SIMPSON
®
with regard to this
limited warranty shall be final.
This warranty gives you specific legal rights, and you may also have other rights which
vary from state to state.
ENGINE WARRANTY
The engine warranty is covered under the terms and conditions as outlined by the
engine manufacture’s warranty contained herein and is sole responsibility of the engine
manufacturer.
RESpONSIBILITY OF ORIGINAL pURCHASER (INITIAL USER):
• To process a warranty claim on your
SIMPSON
®
pressure washer, report the
concern to www.simpsoncleaning.com for authorization and direction to the
nearest authorized service centre in your area.
• Retainoriginalcashregistersalesreceiptasproofofpurchaseforwarrantywork.
• Usereasonablecareintheoperationandmaintenanceoftheproductasdescribed
in the Owners Manual(s).
THIS WARRANTY DOES NOT COvER:
• Merchandise soldasreconditioned, usedasrental equipment,orfloor or display
models.
• Merchandisethathasbecomedamagedorinoperativebecauseofordinarywear,
misuse, cold, heat, rain, excessive humidity, water quality, freeze damage, use
of improper chemicals, negligence, accident, failure to operate the product in
accordance with the instructions provided in the Owners Manual(s) supplied with
the product, improper maintenance, the use of accessories or attachments not
recommended by
SIMPSON
®
, or unauthorized repair or alterations.
• Repairandtransportationcostsofmerchandisedeterminednottobedefective.
• Damage due to chemical deterioration,scalebuildup,rust, corrosion or thermal
expansion
• Costsassociatedwithassembly,requiredoil,adjustmentsorotherinstallationand
start-up costs.
• Expendablepartsoraccessoriessuppliedwiththeproductwhichareexpectedto
become inoperative or unusable after a reasonable period of use, including but not
limited to springs, nozzles, o-rings, washers, and similar accessories.
• Merchandisesoldby
SIMPSON
®
which has been manufactured by and identified
as the product of another company, such as gasoline engines. The product
manufacturer’s warranty, if any, will apply.
• ANY INCIDENTAL, INDIRECT OR CONSEQUENTIAL LOSS, DAMAGE,
OR EXPENSE THAT MAY RESULT FROM ANY DEFECT, FAILURE OR
MALFUNCTION OF THE PRODUCT IS NOT COVERED BY THIS WARRANTY.
Some states do not allow the exclusion or limitation of incidental or consequential
damages, so the above limitation or exclusion may not apply to you.
19 - ENG
Page 20
• IMPLIED WARRANTIES, INCLUDING THOSE OF MERCHANTABILITY OR
FITNESS FOR A PARTICULAR PURPOSE, ARE LIMITED TO ONE YEAR FROM
THE DATE OF ORIGINAL PURCHASE. Some states do not allow limitations on
how long an implied warranty lasts, so the above limitations may not apply to you.
TROUBLE SHOOTING GUIDE
OPERATIONAL
ISSUE
Engine will
not start
(see Engine
Owner's
Manual for
further engine
troubleshooting)
No or low
pressure
(initial use)
POSSIBLE CAUSE SOLUTION
No fuel Add fresh fuel
Pressure builds up after
two pulls on the recoil
Squeeze gun trigger to relieve
pres sure
starter or after initial use
Choke lever in the "No
Choke" position
Move choke to the "Choke"
po si tion
Spark plug wire not attached Attach spark plug wire
Engine switch in OFF
po si tion.
Choke lever in the "Choke"
position on a "hot" engine
or an engine that has been
Place engine switch
in ON position.
Move choke to the "No
Choke"
po si tion.
exposed to thermal heat
for a long period of time.
Spray wand not in
high pressure
See How to Use Spray
Wand instructions in the
Operation Section
Low water supply Water supply must be at
least 5 gpm @ 20 PSI
Leak at high pressure
hose fitting
Repair leak. Apply sealant
tape if necessary
Nozzle obstructed See Nozzle Cleaning
instructions in the
Maintenance section
Water filter screen clogged Remove and clean filter.
See Cleaning Water Inlet
Filter paragraph in the
Maintenance section for
the correct procedure
Air in hose Turn off the engine, then the
water source. Disconnect
the water source from the
pump inlet and turn the water
source on to remove all air
from the hose. When there
is a steady stream of water
present, turn water source
off. Re- con nect water source
to pump inlet and turn on
wa ter source. Squeeze trigger
to re move re main ing air
20- ENG
Page 21

OPERATIONAL
POSSIBLE CAUSE SOLUTION
ISSUE
No or low
pressure
(initial use)
Choke in the “Choke” position Move choke to the “No
Choke”
po si tion
High pressure hose is too long Use high pressure hose under
100 feet (30m)
Will not draw
chemicals
Spray wand not in
low pressure
See How to Use Spray
Wand paragraph in the
Operation Section
Chemical filter clogged Clean filter
Chemical screen not
in cleaning solution
Make sure end of
detergent siphon hose
is fully submerged into
cleaning solution
Chemical too thick Dilute chemical. Chemical
should be the same
consistency as water
Pressure hose is too long Lengthen water supply hose
instead of high pressure hose
Chemical build up in
chemical injector
Please contact our customer
service department at
www.simpsoncleaning.com
No or low
pressure
(after period of
normal use)
Worn seal or packing Please contact our customer
service department at
www.simpsoncleaning.com
Worn or obstructed valves Please contact our customer
service department at
www.simpsoncleaning.com
Worn unloader piston Please contact our customer
service department at
www.simpsoncleaning.com
Water leaking at
gun/spray wand
Worn or torn o-ring Check and replace
Loose hose connection Tighten
connection
Water leaking
at pump
Loose connections Tighten
Piston packings worn Please contact our customer
service department at
www.simpsoncleaning.com
Worn or torn o-ring Please contact our customer
service department at
www.simpsoncleaning.com
Pump head or tubes
damaged from freezing
Please contact our customer
service department at
www.simpsoncleaning.com
Pump pulsates Nozzle obstructed See Nozzle Cleaning
paragraph in the
Maintenance section for
the correct procedure
21 - ENG
Page 22

 Loading...