

Page 1
PREMIUM PRESSURE WASHER
INSTRUCTION MANUAL
MANUAL DE INSTRUCCIONES
MODELS
MODELO
2600/ 3000 PSI
2.3/2.5 GPM
MSV2623
If your pressure washer is not working properly or if there are parts missing or
broken, please DO NOT RETURN IT TO THE PLACE OF PURCHASE. Contact our
customer service department at www.simpsoncleaning.com.
Si su lavadora a presión no trabaja correctamente ó encuentra partes rotas
ófaltantes, por favor NO LA REGRECE AL LUGAR DONDE LA COMPRO.
Contáctese con nuestro Departamento de Servicio al Cliente llamando al
www.simpsoncleaning.com.
IMPORTANT: Please make certain that the person who is to use this equipment
carefully reads and understands these instructions before operating.
IMPORTANTE: Aségurese por favor de que la persona que vaya a utilizar este
equipo lea con cuidado y comprenda estas instrucciones antes de operar.
VEA EL ESPAÑOL EN LA CONTRAPORTADA. INSTRUCTIVO DE OPERACIÓN,
CENTROS DE SERVICIO Y PÓLIZA DE GARANTÍA. ADVERTENCIA:
LÉASE ESTE INSTRUCTIVO ANTES DE USAR EL PRODUCTO.
MSV3025
Save thiS manual for future reference
Part No. 7104572 Rev. 0 FEB 2011
Page 2
EASY INSTALLATION
WARNING: DO NOT OPERATE THIS UNIT UNTIL YOU READ THIS INSTRUCTION
MANUAL AND THE ENGINE INSTRUCTION MANUAL FOR SAFETY, OPERATION AND
MAINTENANCE INSTRUCTIONS.
INSTALACIÓN FÁCIL
AVERTENCIA: NO OPERE ESTE EQUIPO HASTA HABER LEÍDO Y ENTENDIDO
LAS INSTRUCCIONES DE SEGURIDAD, OPERACIÓN Y MANTENIMIENTO EN ESTE
MANUAL DEL OPERADOR Y EN EL MANUAL DEL PROPIETARIO DEL MOTOR.
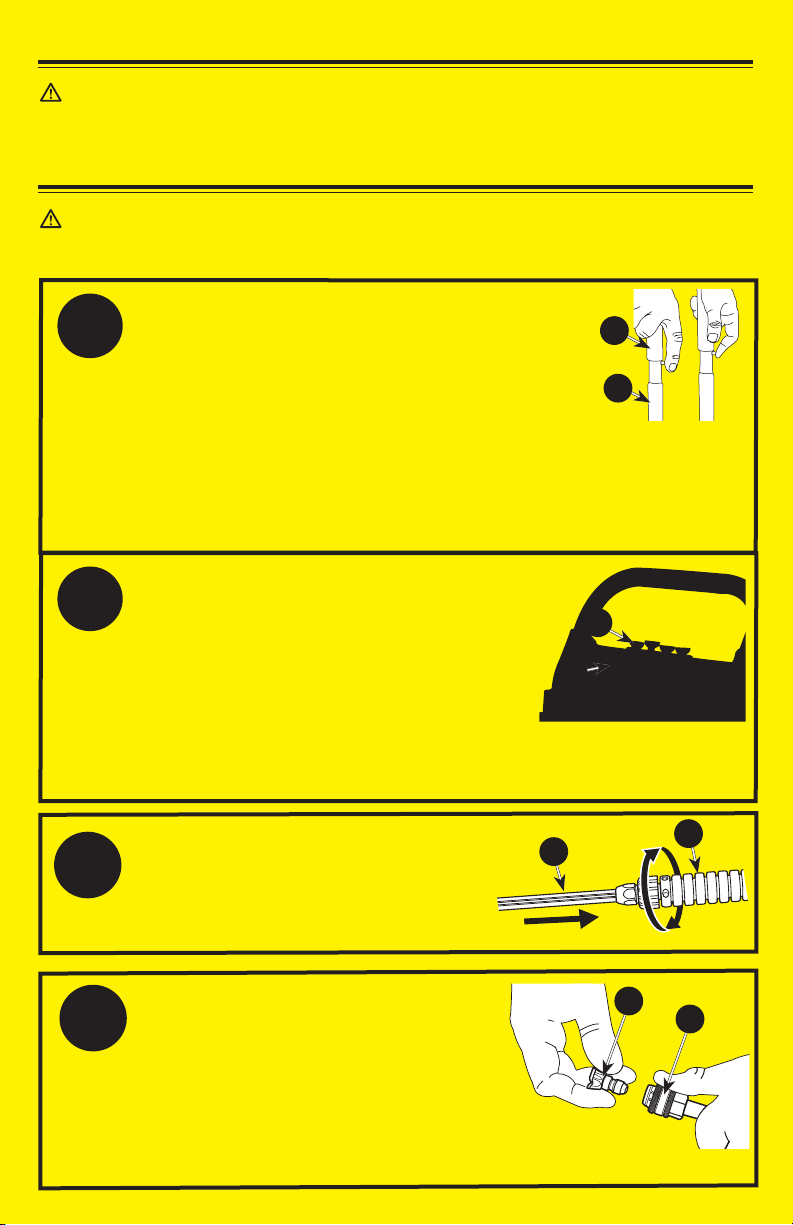
PLACE HANDLE (G) ONTO FRAME (H), DEPRESS THE
SNAP BUTTONS, AND SLIDE THE HANDLE ASSEMBLY
1
ONTO THE FRAME UNTIL SNAP BUTTONS SNAP INTO
PLACE.
NOTICE: Risk of personal injury. Avoid placing hands between handle
and frame when assembling to prevent pinching.
COLOQUE EL ENSAMBLE DEL MANGO (G) SOBRE EL MARCO
(H), OPRIMA LOS BOTONES DE ACCIÓN RÁPIDA Y DESLICE EL ENSAMBLE DEL
MANGO SOBRE EL MARCO HASTA QUE LOS BOTONES QUEDEN ASEGURADOS
EN EL LUGAR.
AVISO: Riesgo de lesión personal. Evite colocar las manos entre el mango y el marco
cuando realice el ensamblado para no pellizcarse.
REMOVE THE COLORED QUICK-CONNECT
NOZZLES (K) FROM THE PLASTIC BAG AND
2
INSERT THEM INTO CORRECT GROMMET ON
THE NOZZLE HOLDER. NOZZLES ARE COLOR
CODED TO MATCH COLORED NOZZLES ON
LABEL (Q).
RETIRE LAS BOQUILLAS DE CONEXIÓN RÁPIDA (K) DE
COLORES DE LA BOLSA PLÁSTICA E INSÉRTELAS EN
DE LA ARANDELA AISLANTE CORRECTA EN EL SOPORTE PARA BOQUILLAS.
LAS BOQUILLAS ESTÁN CODIFICADAS POR COLOR, PARA COINCIDIR CON LAS
BOQUILLAS COLOREADAS DEL ENSAMBLADO DEL ETIQUETA (Q).
G
H
K
Q
CONNECT WAND (E) TO GUN (D). TIGHTEN
3
SECURELY.
PISTOLA Y AJÚSTELO FIRMEMENTE.
SECURE IN COUPLER.
TIRE EL ACOPLE DE CONEXIÓN RÁPIDA (E)
HACIAATRÁS E INSERTE LA BOQUILLA (K).
LIBERE EL ACOPLE Y GIRE LA BOQUILLA PARA
ASEGURARSE DE QUE ESTÁ ASEGURADA DENTRO DEL ACOPLE.
CONECTE EL TUBO APLICADOR A LA
PULL QUICK-CONNECT COUPLER (E)
BACK AND INSERT NOZZLE (K).
4
RELEASE QUICK-CONNECT COUPLER
AND TWIST NOZZLE TO MAKE SURE IT IS
E
D
K
E
Page 3
7
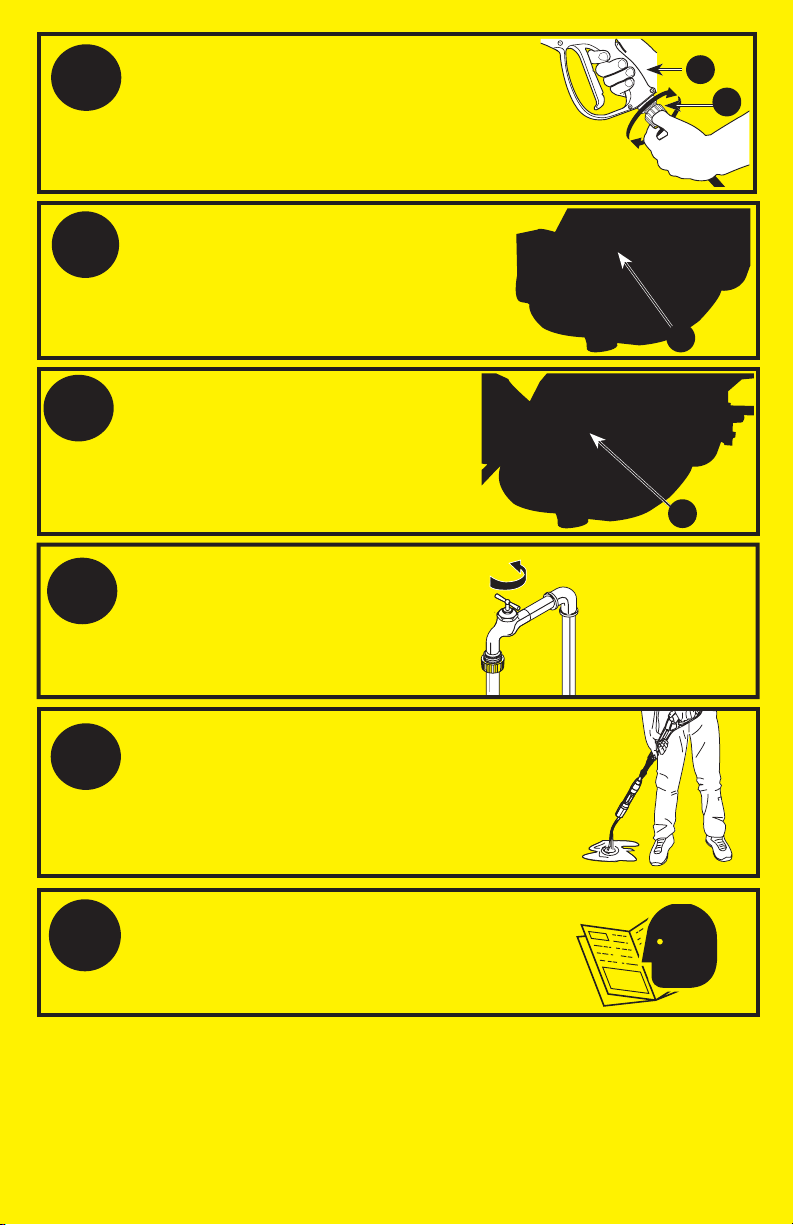
ATTACH HIGH PRESSURE HOSE (C) TO GUN
5
(D). TIGHTEN SE CURELY.
CONECTE LA MANGUERA DE ALTA PRESIÓN A
LA PISTOLA Y AJÚSTELA FIRMEMENTE.
6
CONNECT THE HIGH PRESSURE HOSE (C).
CONNECT EL TUBO DE ALTO PRESIÓN (C).
CONNECT THE GARDEN HOSE (N).
CONECTE LA MANGUERA DEL JARDÍN.
D
C
C
N
TURN INCOMING WATER ON.
8
NOTE: USE COLD WATER ONLY.
GIRE EL AGUA ENTRANTE.
NOTA: UTILIZAR SÓLO AGUA FRÍA
SQUEEZE AND HOLD TRIGGER UNTIL WATER
FLOW IS STEADY. RELEASE THE TRIGGER.
9
MANTENGA PULSADO EL ACCIONADOR
CONSTANTE. SUELTE EL ACCIONADOR.
10
DEL PROCEDIMIENTO CORRECTO.
NOTICE: THE ENGINE IS SHIPPED WITHOUT OIL. BEFORE STARTING ENGINE, ADD
THE OIL PROVIDED. DAMAGE TO THE ENGINE WILL OCCUR IF THE ENGINE IS RAN
WITHOUT OIL, THIS DAMAGE WILL NOT BE COVERED UNDER WARRANTY.
AVISO: EL MOTOR ES DESPACHADO SIN ACEITE. ANTES DE DAR ARRANQUE
MOTOR, USE EL ACEITE QUE SE PROVEE. SI USED LE DA ARRANQUE AL MOTOR
SIN ACEITE OCASIONARÁ DAÑOS IRREPARABLES EN EL MOTOR, DAÑOS QUENO
ESTARÁN CUBIERTOS POR LA GARANTÍA.
HASTA QUE EL CAUDAL DE AGUA SE VUELVA
START ENGINE. SEE ENGINE OWNERS MANUAL
FOR CORRECT PROCEDURE.
PONGA EL MOTOR EN MARCHA; REFIÉRASE
AL MANUAL DEL MOTOR PARA INFORMARSE
FULLY OPEN
ABRA
COMPLETAMENTE
Page 4
SAFETY GUIDELINES - DEFINITIONS
This manual contains information that is important for you to know and understand.
This information relates to protecting YOUR SAFETY and PREVENTING
EQUIPMENT PROBLEMS. To help you recognize this information, we use the
symbols below. Please read the manual and pay attention to these symbols.
DANGER: Indicates an imminently hazardous situation which, if not avoided,
will result in death or serious injury.
WARNING: Indicates a potentially hazardous situation which, if not avoided,
could result in death or serious injury.
CAUTION: Indicates a potentially hazardous situation which, if not avoided, may
result in minor or moderate injury.
NOTICE: Indicates a practice not related to personal injury which, if not avoided,
may result in property damage.
IMpORTANT SAFETY INSTRUCTIONS
DANGER: Carbon Monoxide. Using an engine indoors can kill you in
minutes. Engine exhaust contains high levels of carbon monoxide (CO), a
poisonous gas you cannot see or smell. You may be breathing CO even if you
do not smell engine exhaust.
WARNING: This product and its exhaust contain chemicals known to the
State of California to cause cancer, and birth defects and other reproductive
harm.
• NEVER use an engine inside homes, garages, crawlspaces or other partly
enclosed areas. Deadly levels of carbon monoxide can build up in these areas.
Using a fan or opening windows and doors does NOT supply enough fresh air.
• ONLY use outdoors and far away from open windows, doors and vents. These
openings can pull in engine exhaust.
• Even when the engine is used correctly, CO may leak into your home. ALWAYS use
a battery-powered or battery backup CO alarm in your house. Read and follow all
directions for CO alarm before using. If you feel sick, dizzy or weak at anytime,
move to fresh air immediately. See a doctor. You could have carbon monoxide
poisoning.
WARNING: Do not operate this unit until you read this instruction manual and
the engine instruction manual for safety, operation and maintenance instructions. If
you have any questions regarding the product, please contact our customer
service department at www.simpsoncleaning.com.
DANGER: Risk of injection or severe injury. Keep clear of nozzle. do not
direct discharge stream at persons. This product is to be used only by trained
operators.
4- ENG
Page 5
WARNING: This product may not be equipped with a spark-arresting muffler.
If the product is not equipped and will be used around flam ma ble ma teri als or
on land covered with materials such as agricultural crops, forest, brush, grass
or other similar items, then an ap proved spark arrester must be installed and
is legally required in the state of California. It is a violation of California statutes
section 130050 and/or sec tions 4442 and 4443 of the California
Public Re sourc es Code, unless the engine is equipped with a spark
arrester, as defined in section 4442, and maintained in ef fec tive
work ing order. Spark arresters are also required on some U.S. For est Service land
and may also be legally required under other statutes and or di nanc es.
WARNING: This product and its exhaust contain chemicals known to the State
of California to cause cancer, and birth defects or other reproductive harm. In
addition, some cleaning products and dust contain chemicals known to the State
of California to cause cancer, and birth defects or other reproductive harm. Wash
hands after handling.
Save theSe inStructionS
DANGER: RISK OF EXPLOSION OR FIRE
WHAT CAN HAPPEN HOW TO PREVENT IT
• Spilled gas o line and it’s vapors can
be come ignited from cigarette sparks,
electrical arcing, exhaust gas es and
hot engine components such as the
muffler.
• Heat will ex pand fuel in the tank which
could result in spillage and pos si ble
fire explosion.
• Operating the pressure washer in an
ex plo sive en viron ment could re sult in
a fire.
• Materials placed against or near the
pressure washer can in ter fere with
its proper ventilation fea tures caus ing
overheating and possible ig ni tion of
the materials.
• Muffler exhaust heat can damage
paint ed sur fac es, melt any material
sen si tive to heat (such as siding,
plastic, rub ber, vinyl or the pressure
hose, itself), and dam age live plants.
• Improperly stored fuel could lead to
acciden tal ignition. Fuel im prop er ly
secured could get into the hands of
children or oth er un qual i fied persons.
• Use of acids, toxic or cor ro sive
chemicals, poisons, in sec ti cides, or
any kind of flam ma ble solvent with
this product could re sult in se ri ous
injury or death.
• Shut off en gine and allow it to cool before
adding fuel to the tank.
• Use care in fill ing tank to avoid spill ing fuel.
Move pressure wash er away from fueling
area before start ing en gine.
• Keep maximum fuel level 1/2" (12.7mm)
be low bottom of filler neck to allow for
expansion.
• Operate and fuel equipment in well-ven tilat ed areas free from ob structions. Equip
areas with fire extinguisher suit able for
gas o line fires.
• Never op er ate pressure wash er in an area
containing dry brush or weeds.
• Always keep pressure washer a minimum
of 4' (1.2m) away from surfac es (such as
houses, au to mo biles or live plants) that
could be damaged from muffler exhaust
heat.
• Store fuel in an OSHA approved container, in a se cure location away from work
area.
• Do not spray flammable liquids.
5 - ENG
Page 6
DANGER: RISK TO BREATHING (ASPHYXIATION)
WHAT CAN HAPPEN HOW TO PREVENT IT
• Breathing ex haust fumes will cause
se ri ous injury or death! En gine
exhaust contains carbon mon ox ide,
an odorless and deadly gas.
• Some clean ing fluids con tain
substanc es which could cause injury
to skin, eyes or lungs.
DANGER: RISK OF FLUID INJECTION AND LACERATION
WHAT CAN HAPPEN HOW TO PREVENT IT
• Your pressure washer operates at fluid
pressures and velocities high enough
to penetrate human and animal flesh,
which could result in amputation or
other serious injury. Leaks caused
by loose fittings or worn or damaged
hoses can result in injection injuries.
DO NOT TREAT FLUID INJECTION
AS A SIMPLE CUT! See a physician
immediately!
• Injuries can result if system pressure
is not reduced before attempting
maintenance or disassembly.
• Operate pressure washer in a wellventilated area. Avoid en closed areas
such as ga rages, base ments, etc.
• Never op er ate unit in or near a lo ca tion
occupied by humans or animals.
• Use only clean ing fluids spe cif i cally recom mend ed for high-pressure washers.
Fol low manufacturers recommendations.
Do not use chlorine bleach or any other
corrosive compound.
• Inspect the high-pressure hose regularly.
Replace the hose immediately if it is
damaged, worn, has melted from
contacting the engine, or shows any signs
of cracks, bubbles, pinholes, or other
leakage. Never grasp a high-pressure
hose that is leaking or damaged.
• Never touch, grasp or attempt to cover a
pinhole or similar water leak on the highpressure hose. The stream of water IS
under high pressure and WILL penetrate
skin.
• Never place hands in front of noz zle.
• Direct spray away from self and others.
• Make sure hose and fit tings are tightened
and in good condition. Never hold onto
the hose or fittings during op er a tion.
• Do not allow hose to contact muf fler.
• Never attach or remove wand or hose
fittings while sys tem is pres sur ized.
• When using replacement lances or guns
with this pressure washer, DO NOT use
a lance and/or lance/gun combination
that is shorter in length than what was
provided with this pressure washer as
measured from the nozzle end of the
lance to the gun trigger.
• To relieve sys tem pres sure, shut off
engine, turn off water sup ply and pull gun
trigger until water stops flowing.
• Use only accessories rated equal to or
higher than the rating of the pressure
washer.
6- ENG
Page 7
DANGER: RISK OF INJURY FROM SPRAY
WHAT CAN HAPPEN HOW TO PREVENT IT
• High-velocity fluid spray can cause
objects to break, propelling particles
at high speed.
• Light or unsecured objects can
become hazardous projectiles.
DANGER: RISK OF UNSAFE OPERATION
WHAT CAN HAPPEN HOW TO PREVENT IT
• Unsafe op er a tion of your pressure
wash er could lead to se ri ous in ju ry or
death to you or others.
• If proper starting procedure is not
followed, engine can kickback causing
serious hand and arm injury.
• The spray gun/wand is a powerful
clean ing tool that could look like a toy
to a child.
• Reactive force of spray will cause gun/
wand to kickback, and could cause
the op er a tor to slip or fall or misdirect
the spray. Im prop er control of gun/
wand can re sult in in ju ries to self and
others.
• Always wear ANSI-approved Z87.1
safety glasses. Wear protective clothing
to protect against accidental spraying.
• Never point wand at or spray people or
animals.
• Always secure trigger lockwhen wand
is not in service to prevent accidental
operation.
• Never permanently secure trigger in pullback (open) position.
• Do not use chlorine bleach or any other
corrosive compound.
• Be come fa mil iar with the op er a tion and
con trols of the pressure washer.
• Keep operating area clear of all persons,
pets and obstacles.
• Do not operate the product when fatigued
or under the influence of alcohol or drugs.
Stay alert at all times.
• Never defeat the safety fea tures of this
prod uct.
• Do not op er ate machine with missing,
broken or un au tho rized parts.
• Never leave wand unattended while unit is
running.
• If engine does not start after two pulls,
squeeze trigger of gun to relieve pump
pressure. Pull starter cord slowly until
resistance is felt. Then pull cord rapidly to
avoid kickback and prevent hand or arm
injury.
• Keep chil dren away from the pressure
washer at all times.
• Do not over reach or stand on an unstable
support.
• Do not use pressure washer while
standing on a ladder.
• Grip gun/wand firmly with both hands.
Expect the gun to kickback when
triggered.
7 - ENG
Page 8
DANGER: RISK OF INJURY OR PROP ER TY DAMAGE WHEN
TRANSPORTING OR STORING
WHAT CAN HAPPEN HOW TO PREVENT IT
• Fuel or oil can leak or spill and could
result in fire or breathing hazard. Se rious in ju ry or death can re sult. Fuel or
oil leaks will dam age carpet, paint or
oth er surfaces in ve hi cles or trailers.
• Oil could fill the cylinder and damage
the engine if the unit is not stored or
transported in an upright position.
• If pressure washer is equipped with a fuel
shut-off valve, turn the valve to the OFF
position before transporting to avoid fuel
leaks. If pres sure wash er is not equipped
with a fuel shut-off valve, drain the fuel
from tank before trans port ing. Only transport fuel in an OSHA-approved container.
Al ways place pressure washer on a
protective mat when transporting to
protect against dam age to vehicle from
leaks.
Always transport and store unit in an
upright position. Re move pres sure
washer from vehicle immediately upon
arrival at your destination.
WARNING: RISK OF BURSTING
WHAT CAN HAPPEN HOW TO PREVENT IT
• Over inflation of tires could result in
serious injury and property damage.
• Use a tire pressure gauge to check the
tires pressure before each use and while
inflating tires; see the tire sidewall for the
correct tire pressure.
NOTE:
Air tanks, compressors and similar
equipment used to inflate tires can fill small
tires similar to these very rapidly. Adjust
pressure regulator on air supply to no more
than the rating of the tire pressure. Add air
in small increments and frequently use the
tire gauge to prevent over inflation.
• High-velocity fluid spray directed at
pneumatic tire sidewalls (such as
found on automobiles, trailers and
the like) could damage the sidewall
resulting in serious injury.
• On pressure washers rated above 1600
psi (11032kPa) use the widest fan spray
(40º nozzle) and keep the spray a minimum
of 8" (20 cm) from the pneumatic tire
sidewall. Do not aim spray directly at the
joint between the tire and rim.
WARNING: RISK OF HOT SURFACES
WHAT CAN HAPPEN HOW TO PREVENT IT
• Con tact with hot sur fac es, such as
engines exhaust com po nents, could
result in se ri ous burn.
• During op er a tion, touch only the control
surfaces of the pres sure washer. Keep
children away from the pres sure washer
at all times. They may not be able to
recognize the haz ards of this product.
8- ENG
Page 9
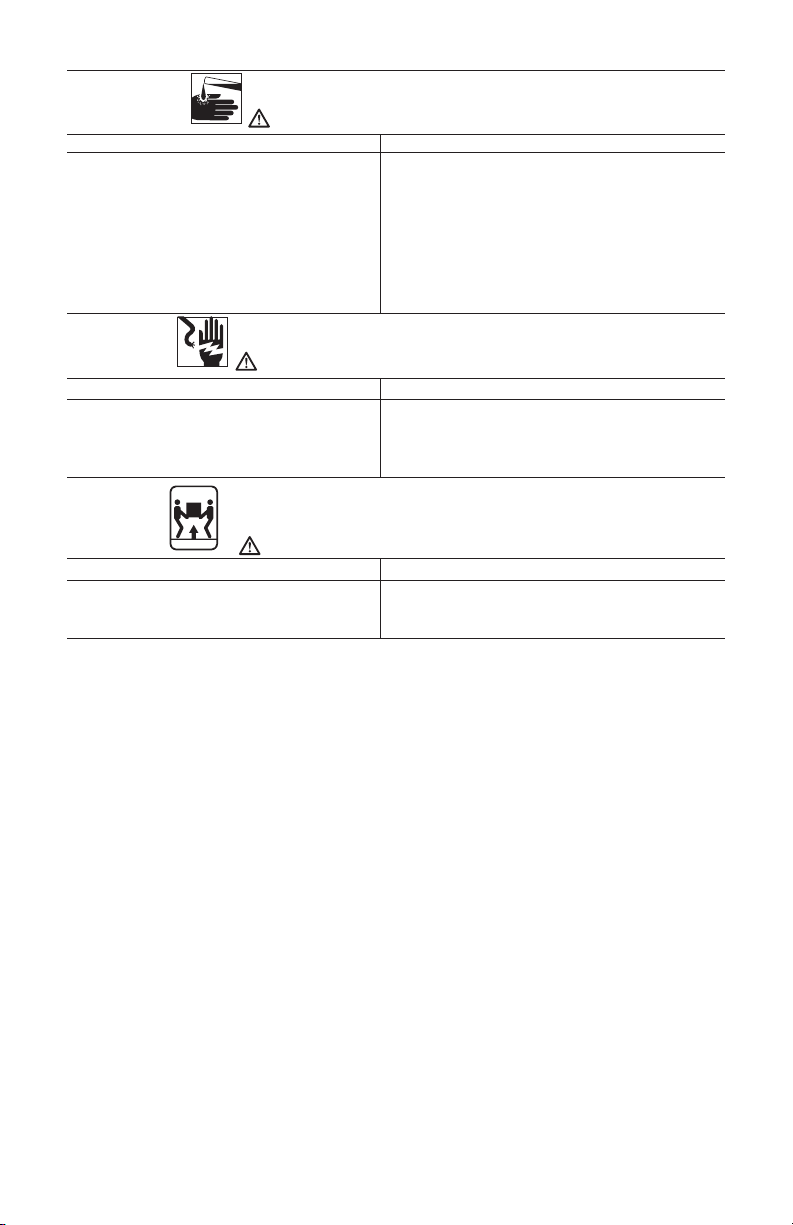
WARNING: RISK OF CHEMICAL BURN
WHAT CAN HAPPEN HOW TO PREVENT IT
• Use of acids, toxic or corrosive
chemicals, poisons, in sec ti cides, or
any kind of flam ma ble solvent with this
product could re sult in se ri ous injury or
death.
WARNING: RISK OF ELEC TRI CAL SHOCK
WHAT CAN HAPPEN HOW TO PREVENT IT
• Spray di rect ed at elec tri cal outlets or
switch es, or ob jects con nect ed to an
elec tri cal circuit, could re sult in a fatal
electrical shock.
WARNING: RISK OF INJURY FROM LIFTING
WHAT CAN HAPPEN HOW TO PREVENT IT
• Serious injury can result from
attempting to lift too heavy an object.
Save theSe inStructionS
for future uSe
• Do not spray ac ids, gasoline, ker o sene,
or any other flammable materials with this
product. Use only household de ter gents,
cleaners and degreasers recommended
for use with pres sure washers.
• Wear pro tec tive clothing to protect
eyes and skin from con tact with sprayed
materials.
• Unplug any elec tri cal ly op er at ed product
before attempting to clean it. Direct spray
away from electric out lets and switches.
• The pressure washer is too heavy to be
lifted by one person. Obtain assistance
from others before lifting.
9 - ENG
Page 10
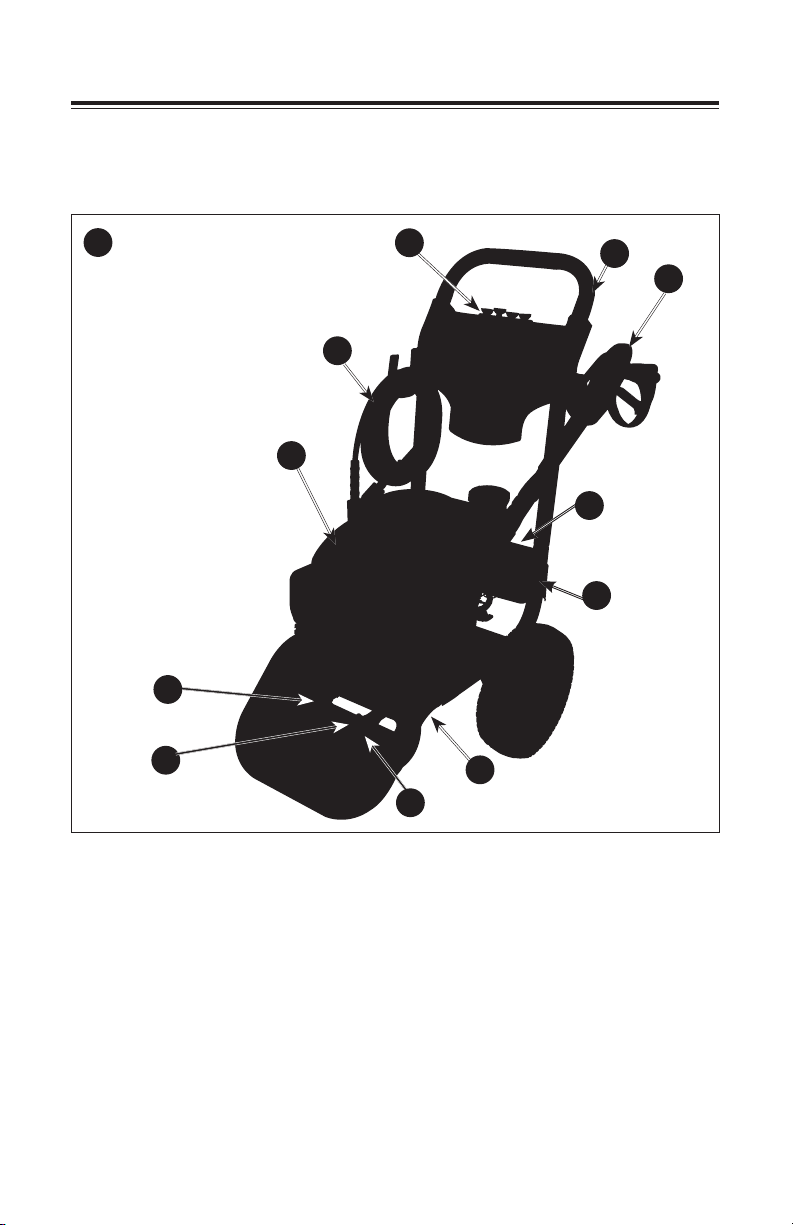
GET TO KNOW THE pRESSURE WASHER
NOTE: Photographs and line drawings used in this manual are for reference
only and do not represent a specific model.
Compare the illustrations with your unit to familiarize yourself with the location of
various controls and adjustments. Save this manual for future reference.
1
C
B
I
J
K
A
E
G
D
L
H
BASIC ELEMENTS OF A pRESSURE WASHER (FIG. 1)
A. High Pressure Pump
B. Engine: Drives the high pressure pump. Refer to the engine manual for location
and operation of engine controls.
C. High Pressure Hose: Carries the pressurized water from the pump to the gun
and spray wand.
D. Spray Gun: Connects with spray wand to control water flow rate, direction,
and pressure.
E. Quick-Connect Spray Wand: Allows the user to quickly change out high-
pressure nozzles. See How To Use Spray Wand instructions in Operation
section.
F. Detergent Siphon Hose
pump to mix with the water. See
instructions in
Operation
(not shown)
(MSV2623)
How To Apply Chemicals/Cleaning Solvents
section.
: Increases the pressure of the water supply.
(not shown): Feeds cleaning agents into the
10- ENG
Page 11
G. Handle
H. Frame
I. Pump Outlet
J. Pump Inlet
K. Quick Connect Nozzles
L. On Board Detergent Tank (MSV3025):
to mix with the water. See
instructions in
Operation
How To Apply Chemicals/Cleaning Solvents
section.
Feeds cleaning agents into the pump
BASIC ELEMENTS OF AN ENGINE
Refer to the engine manual for location and operation of engine controls.
Choke Control: Opens and closes carburetor choke valve.
Starter Grip: Pulling starter grip operates recoil starter to crank engine.
Engine Switch: Enables and disables ignition system.
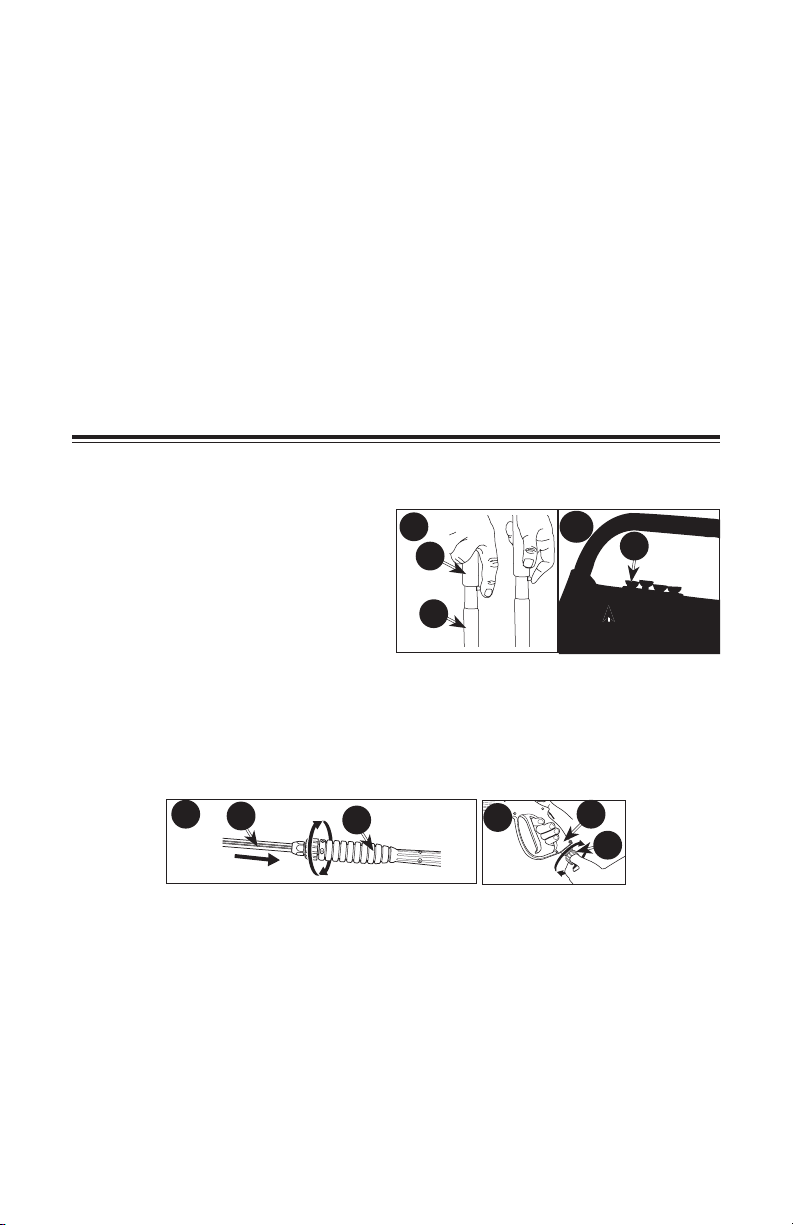
ASSEMBLY INSTRUCTIONS (FIG. 1– 4)
1. Locate and remove all loose parts from the carton.
2. Cut four corners of the carton from top to bottom and lay the panels flat.
3.
Place handle (G) onto frame (H),
depress the snap buttons, and slide
the handle assembly onto the frame
until snap buttons snap into place.
NOTICE: Risk of personal injury. Avoid
placing hands between handle and
frame when assembling to prevent
pinching.
4. Remove the colored quick-connect nozzles (K) from the plastic bag and insert
them into correct grommet on the nozzle holder. Nozzles are color coded to
match colored nozzles on label (Q).
5. Connect wand (E) to gun (D). Tighten securely.
6. Attach high pressure hose (C) to gun (D). Tighten se cure ly.
3
E
2
G
H
D
4
2A
K
Q
D
C
NOTE: The pump on this unit is maintenance free and requires no oil. If
there is a problem with the pump, contact our Customer Service Group on
www.simpsoncleaning.com as soon as possible.
NOTICE: The engine is shipped without oil. Before starting engine, add the oil
provided. Damage to the engine will occur if the engine is ran without oil, this
damage will not be covered under warranty.
11 - ENG
Page 12
OpERATION
pRESSURE WASHER TERMINOLOGY
PSI: Pounds per Square Inch. The unit of measure for water pressure. Also used
for air pressure, hydraulic pressure, etc. Sometimes noted as “Bar”, another unit
of measure.
GPM: Gallons per Minute. The unit of measure for the flow rate of water.
CU: Cleaning Units. GPM multiplied by psi equals CU.
Bypass Mode: Allows water to re-circulate within the pump when the gun trigger is
not pulled. This feature allows the operator to release the trigger gun and reposition
themselves without having to turn the engine off in between cleaning actions.
NOTICE: Allowing the unit to run for more than two minutes without the gun
trigger being pulled could cause overheating and damage to the pump. Do not let
the pressure washer run for more than two minutes in Bypass Mode. Turn off the
engine and relieve the pressure in the gun during these extended situations.
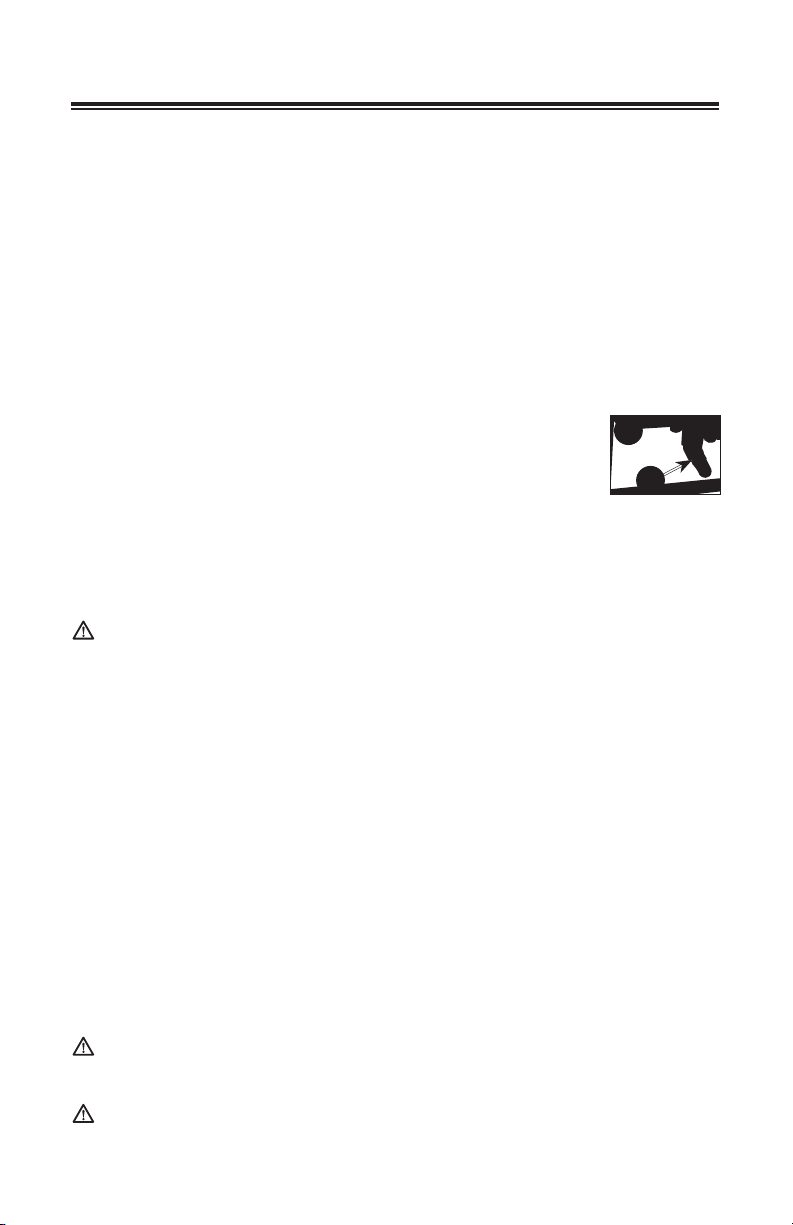
Thermal Relief Valve (P): When the temperature inside the pump
rises too high, this valve will open and release a gush of water in an
effort to lower the temperature inside the pump. The valve will then
close.
Detergent Injection System: Mixes cleaners or cleaning solvents with the water
to improve cleaning effectiveness.
Water Supply: All pressure washers must have a source of water. The minimum
requirements for a water supply are 20 psi and 5 Gallons Per Minute. If your water
source is a well, the garden hose length can only be 30 ft. (9 m) max.
WARNING: To reduce the possibility of contamination always protect
against backflow when connected to a potable water system.
pRESSURE WASHER OpERATING FEATURES
pRESSURE ADJUSTMENTS
The pressure setting is preset at the factory to achieve op ti mum pres sure and
cleaning. If you need to lower the pres sure, it can be accomplished by these methods.
1. Back away from the sur face to be cleaned. The further away you are, the
less the pressure will be on the surface to be cleaned.
2. Change to the 40˚ nozzle (white). This nozzle delivers a less powerful stream
of water and a wider spray pattern. Refer to How To Use Spray Wand.
NOTICE: DO NOT attempt to increase pump pressure. A higher pressure setting
than the factory set pressure may damage pump.
HOW TO USE SpRAY WAND
The nozzles for the spray wand are stored in the nozzle holder on the panel assembly.
Colors on the panel identify nozzle location and spray pattern. Refer to the following
chart to choose the correct nozzle for the job to be performed.
CHANGING NOzzLES ON SpRAY WAND
DANGER: Risk of fluid injection. Do not direct discharge stream toward
persons, unprotected skin, eyes or any pets or animals. Serious injury will
occur.
WARNING: Flying objects could cause risk of serious injury. Do not attempt
to change nozzles while pressure washer is running. Turn engine off before
changing nozzles.
12- ENG
5
P
Page 13
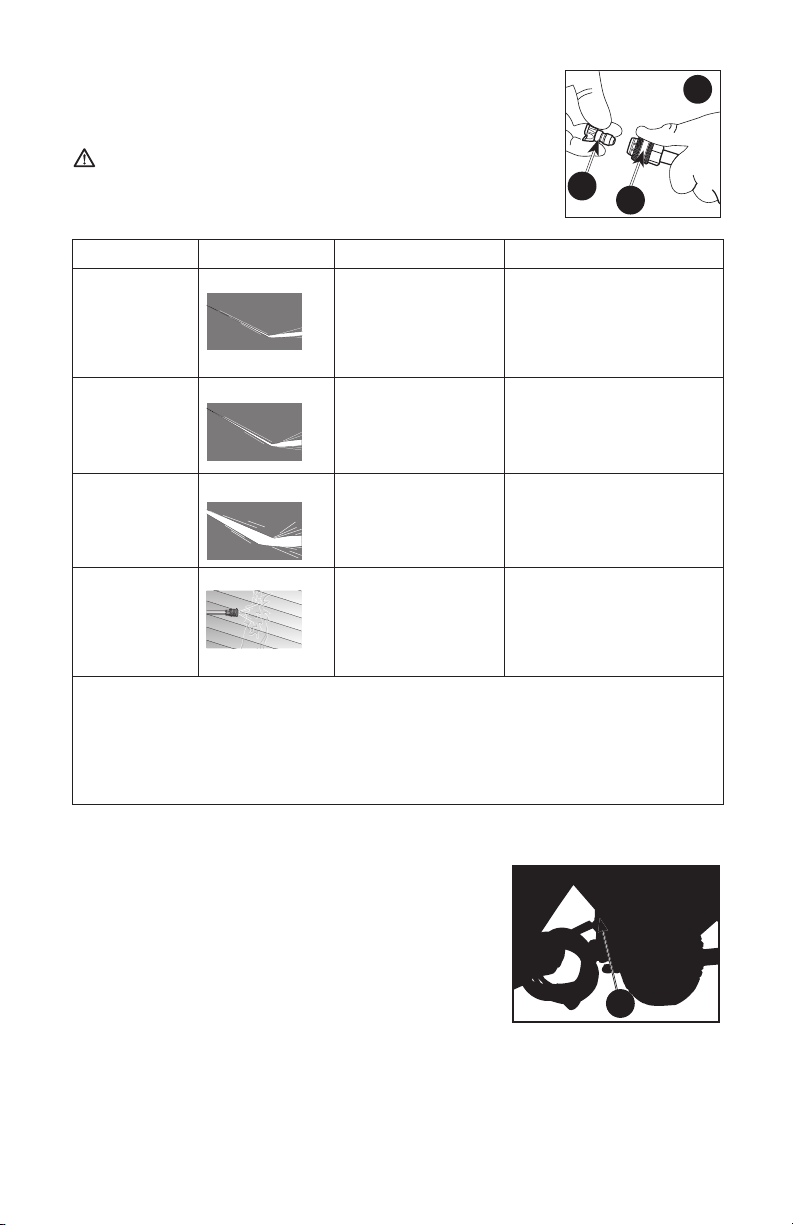
1. Pull quick-connect coupler (E) back and insert nozzle (K).
2. Release quick-connect coupler and twist nozzle to make
sure it is secure in coupler.
WARNING: Flying object could cause risk of serious
injury. Ensure nozzle is completely inserted in quickconnect socket and quick-connect snap ring is fully
engaged (forward) before squeezing gun trigger.
NOzzLE COLOR SpRAY pATTERN USES SURFACES*
Red
0˚
powerful pinpoint
for spot cleaning
of hard, unpainted
surfaces or for
unpainted metal
or concrete;
DO NOT use on wood
high reach areas
Yellow
15˚
intense cleaning
of unpainted
hard surfaces
grills, driveways, concrete
or brick walkways,
unpainted brick or stucco
6
K
E
White
Black
40˚
low pressure
cleaning of
painted or delicate
surfaces
applies cleaning
solutions
Auto/RV, marine, wood,
painted brick and stucco,
vinyl, painted siding
Low pressure
spray is safe on all
surfaces. Always verify
compatibility of cleaning
solution prior to use.
*NOTICE: The high pressure spray from your pressure washer is capable of causing damage to surfaces such as wood, glass, automobile paint, auto striping and
trim, and delicate objects such as flowers and shrubs. Before spraying, check the
item to be cleaned to assure yourself that it is strong enough to resist damage
from the force of the spray.
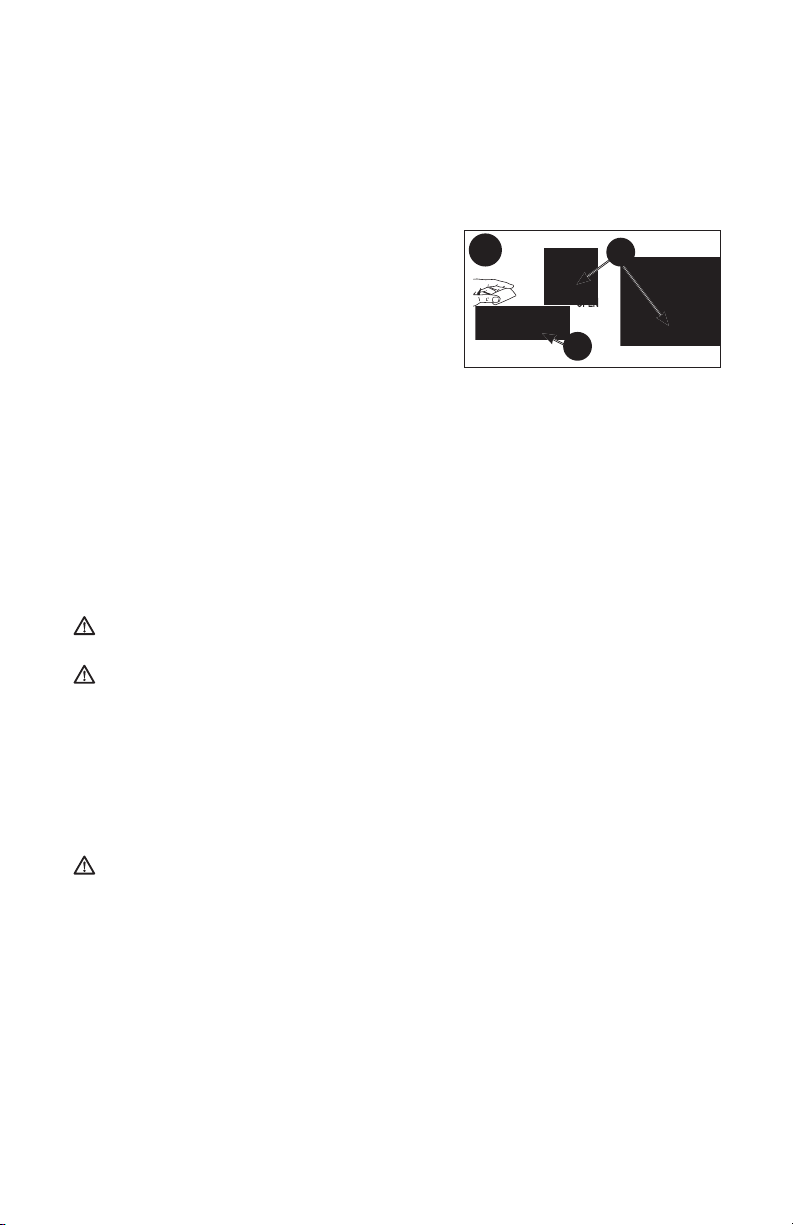
HOW TO AppLY CHEMICALS/CLEANING SOLVENTS (FIG. 7)
Applying chemicals or cleaning solvents is a low pressure operation. NOTE:
Use only soaps and chemicals designed for pressure
washer use. Do not use bleach.
7A
To Apply chemicals (MSV2623):
1. Press detergent siphon hose (F, Figure 7A) onto
barbed fitting located near high pressure hose
connection of pump as shown.
2. Place other end of detergent siphon hose with
F
filter on it into container holding chemical/cleaning
solution. NOTE: For every 7 gallons of water pumped 1 gallon of chemical/
cleaning solution will be used.
3. Install low pressure (black) nozzle into quick connect fitting of spray wand, see
How To Use Spray Wand paragraph in this section.
13 - ENG
Page 14
4. After use of chemicals, place detergent siphon hose into container of clean
water and draw clean water through chemical injection system to rinse system
thoroughly. If chemicals remain in the pump it could be damaged. Pumps
damaged due to chemicals will not be covered under warranty.
NOTE: Chemicals and soaps will not siphon if the black soap nozzle is not installed
on the spray wand.
To Apply chemicals (MSV3025):
1. Fill your detergent tank (L, Figure 7B) with
pre-mixed cleaning solutions designed for
7B
R
pressure washer use.
2. Check and make sure the valve (R) for the
tank is in the OPEN” position. NOTE: For
every 7 gallons of water pumped 1 gallon of
L
chemical/cleaning solution will be used.
3. Install low pressure (black) nozzle into quick connect fitting of spray wand, see
How To Use Spray Wand paragraph in this section.
4. After use of chemicals, refill your detergent tank with clean water and operate
your chemical injection system to rinse it thoroughly. If chemicals remain in
the pump it could be damaged. Pumps damaged due to chemicals will not be
covered under warranty.
NOTE: After use turn valve (R) to CLOSED position.
NOTE: Chemicals and soaps will not siphon if the black soap nozzle is not installed
on the spray wand.
STARTING (FIG. 8–11)
WARNING: To reduce the risk of injury, read the pressure washer instruction
manual and the engine instruction manual before starting pressure washer.
DANGER: Risk of fluid injection and laceration. When using the highpressure setting, DO NOT allow the high-pressure spray to come in contact
with unprotected skin, eyes, or with any pets or animals. Serious injury will
occur.
• Your washer operates at fluid pressures and velocities high enough to penetrate
human and animal flesh, which could result in amputation or other serious injury.
Leaks caused by loose fittings or worn or damaged hoses can result in injection
injuries. DO NOT TREAT FLUID INJECTION AS A SIMPLE CUT! See a physician
immediately!
WARNING: Risk of Fire, Asphyxiation and Burn. Never fill fuel tank when
engine is running or hot. Do not smoke when filling fuel tank.
• Never fill fuel tank completely. Fill tank to 1/2" )12.7mm) below bottom of filler
neck to provide space for fuel expansion. Wipe any fuel spillage from engine and
equipment before starting engine.
• Never run engine in doors or in en closed, poorly ven ti lat ed areas. En gine exhaust
con tains carbon mon ox ide, an odorless and deadly gas.
• DO NOT let hoses come in contact with very hot engine muffler during or
immediately after use of your pressure washer. Damage to hoses from contact with
hot engine surfaces will NOT be covered by warranty.
NOTICE: Risk of property damage. Never pull water supply hose to move pres sure
washer. This could damage hose and/or pump inlet.
14- ENG
Page 15
• DO NOT use hot water, use cold water only.
• Never turn water supply off while pressure washer engine is running or damage to
pump will result.
• DO NOT stop spraying water for more than two minutes at a time. Pump operates
in bypass mode when spray gun trigger is not pressed. If pump is left in bypass
mode for more than two minutes internal components of the pump can be
damaged.
If you do not understand these precautions, please contact our customer service
department at www.simpsoncleaning.com!
Prior to starting, refer to your engine manual for proper starting procedure.
1. In a well ventilated outdoor area add fresh, high quality, unleaded gasoline
with a pump octane rating of 86 or higher. Do not overfill. Wipe up spilled
fuel before starting the engine. Refer to Engine Owners Manual for correct
procedure.
2. Check engine oil level. See Engine Owners Manual for correct procedure.
3. Connect the water hose to the water source. Turn the water source on to
remove all air from the hose. When a steady stream of water is present, turn
the water source off.
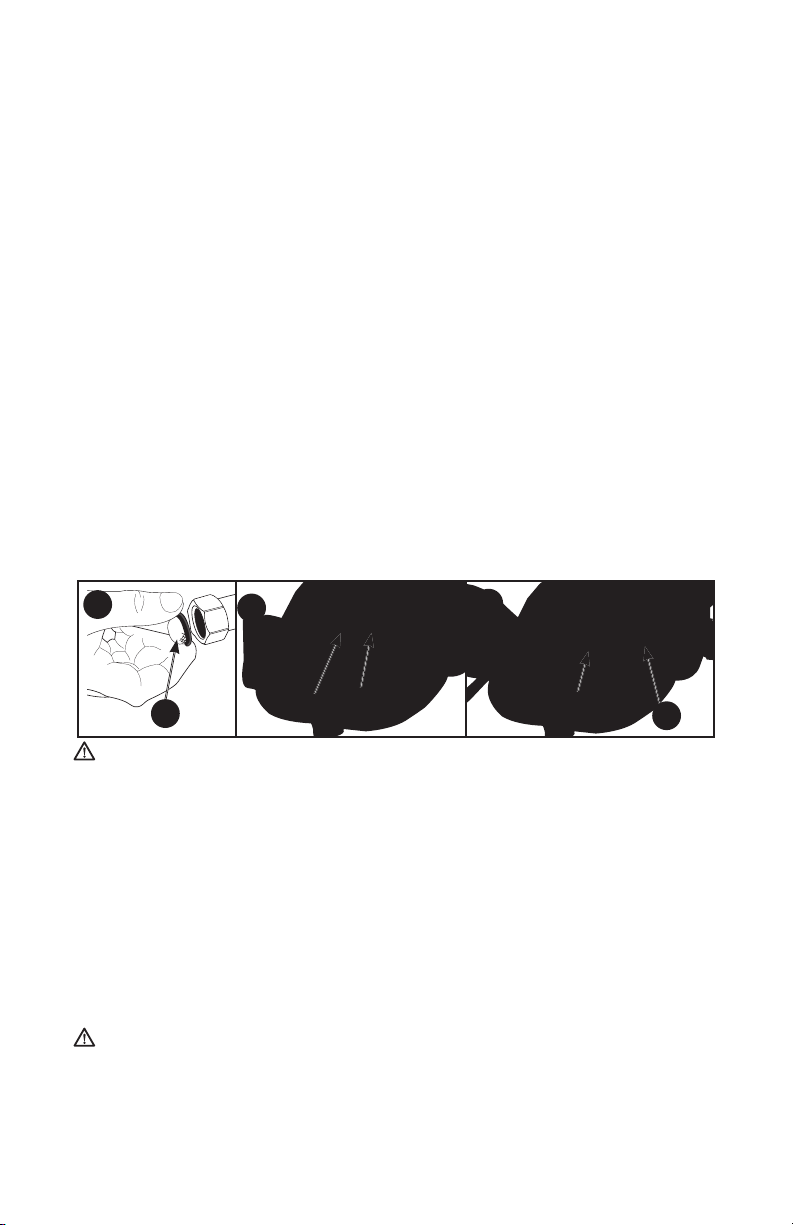
4. Verify the filter screen (M) is in water inlet of pump. NOTE: Cone side faces
out.
5. Connect
high pressure hose (C) to pump outlet (I).
6. Connect water source (N) to pump inlet (J). NOTE: Water source must provide
a minimum of 5 gallons per minute at 20 psi.
8
M
9
I
C
10
N
J
WARNING: To reduce the possibility of contamination always protect
against backflow when connected to a potable water system.
7. Choose the correct nozzle for the job to be performed. See How To Use spray
Wand instructions in this section. NOTE: If applying a chemical or cleaning
solution, see How To Apply Chemicals/Cleaning Solvents instructions in this
section.
8. Turn water source on.
NOTICE: Risk of property damage. Failure to do so could cause damage to the
pump.
9. Remove all air from the pump and high pressure hose by depressing trigger
until a steady stream of water is present.
10. Start engine. See Engine Owners Manual for correct procedure.
WARNING: Risk of unsafe operation. If engine does not start after two
pulls, squeeze trigger of gun to relieve pump pressure. Pull starter cord slowly
until resistance is felt. Then pull cord rapidly to avoid kickback and prevent
hand or arm injury.
11. Depress trigger on gun to start water flow.
15 - ENG
Page 16
WARNING: Risk of unsafe operation. Stand on a stable surface and
grip gun/spray wand firmly with both hands. Expect the gun to kick when
triggered.
12. Release trigger to stop water flow.
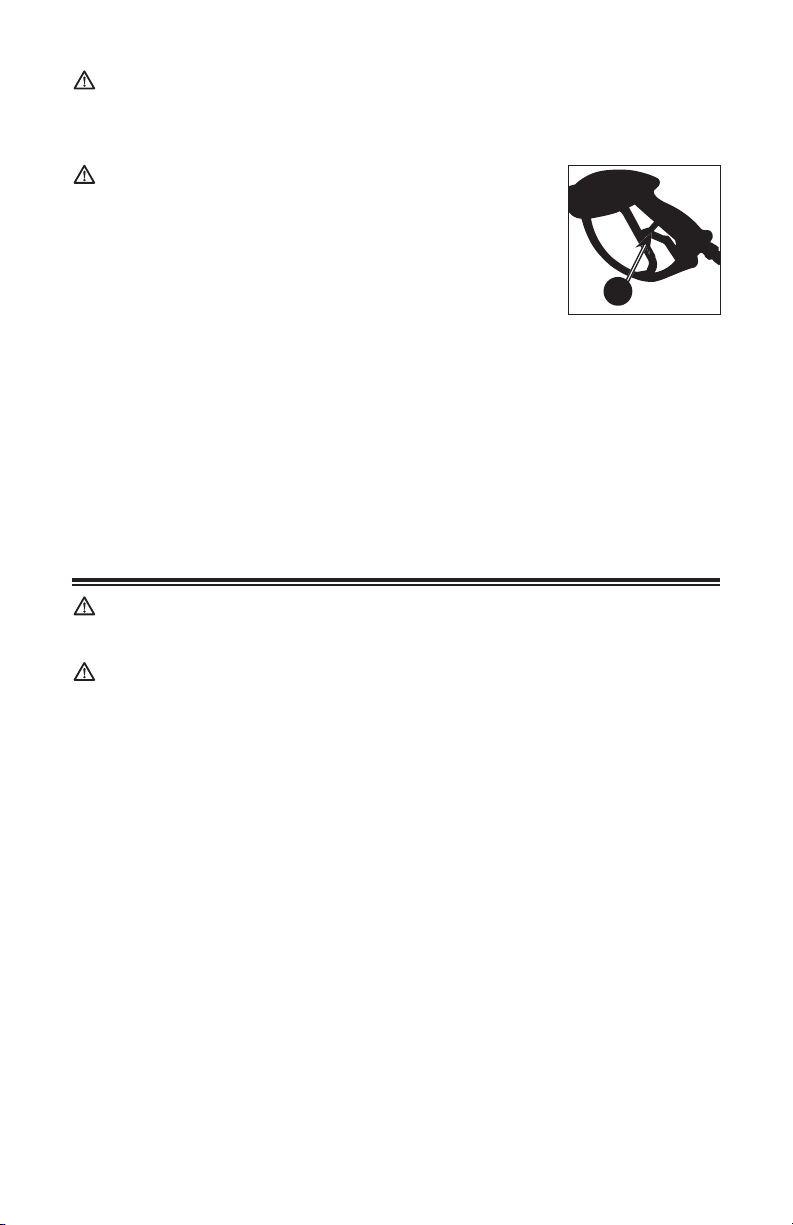
WARNING: Risk of injury from spray. Always engage the
trigger lock (O) when gun is not in use. Failure to do so
could cause accidental spraying.
11
SHUTTING DOWN
1. After each use, if you have applied chemicals, place
detergent siphon hose into container of clean water and
draw clean water through chemical injection system to
rinse system thoroughly.
NOTICE: Risk of property damage. Failure to do so could cause damage to the
pump.
2. Turn engine off. See Engine Owner’s Manual.
NOTICE: Risk of property damage. NEVER turn the water off with the engine
running.
3. Turn water source off.
4. Pull trigger on spray gun to relieve any water pressure in hose or spray gun.
5. See Storage section in this manual for proper storage procedures.
O
MAINTENANCE
WARNING: Risk of burn hazard. When performing maintenance, you may
be exposed to hot surfaces, water pressure or moving parts that can cause
serious injury or death.
WARNING: Risk of fire hazard. Always disconnect, spark plug wire,
let the engine cool and release all water pressure before performing any
maintenance or repair. The engine contains flammable fuel. Do not smoke or
work near open flames while performing maintenance.
To ensure efficient operation and longer life of your pressure washer, a routine
maintenance schedule should be prepared and followed. If the pressure washer is
used in unusual conditions, such as high-temperatures or dusty conditions, more
fre quent maintenance checks will be required.
ENGINE
Consult the Engine Owners Manual for the man u fac tur er's recommendations for
any and all maintenance. NOTE: The engine drain plug is located at the rear of the
unit.
pUMp
The pump was filled with oil at the factory. The pump on this unit is maintenance
free and requires no oil. If there is a problem with the pump contact us at
www.simpsoncleaning.com
CONNECTIONS
Connections on pressure washer hoses, gun and spray wand should be cleaned
regularly and lubricated with light oil or lithium grease to prevent leakage and
damage to the o-rings.
16- ENG
Page 17
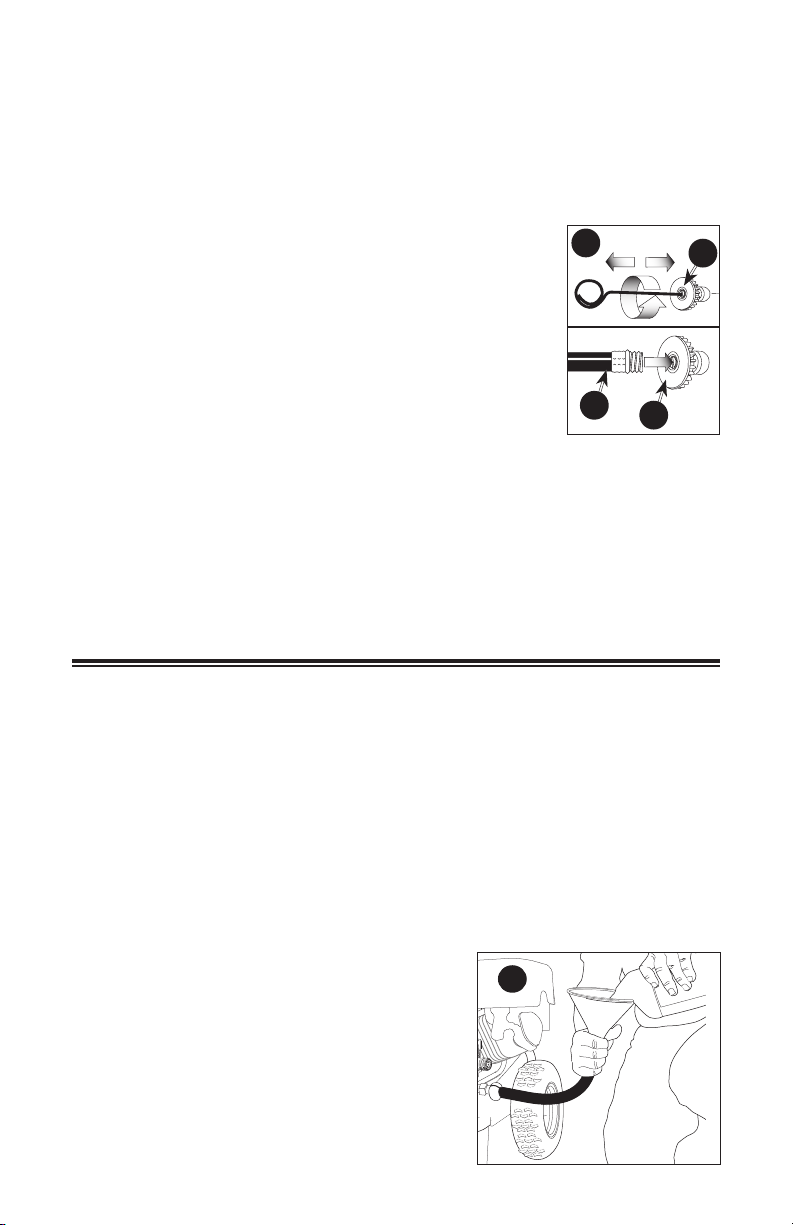
NOzzLE CLEANING (FIG. 12)
If the nozzle becomes clogged with foreign materials, such as dirt, excessive
pressure may develop. If the nozzle becomes partially clogged or restricted, the
pump pressure will pulsate. Clean the nozzle immediately using the nozzle kit
supplied and the following instructions:
1. Shut off the pressure washer and turn off the water supply.
2. Pull trigger on gun handle to relieve any water pressure.
3. Disconnect the spray wand from the gun.
4. Remove the high-pressure nozzle (K) from the spray wand.
12
K
Remove any obstructions with the nozzle cleaning tool
provided and backflush with clean water.
5. Direct water supply (N) into spray wand to backflush
loosened particles for 30 seconds.
6. Reassemble the nozzle to the wand.
7. Reconnect spray wand to gun and turn on water supply.
8. Start pressure washer and place spray wand into high
N
K
pressure setting to test.
CLEAN THE WATER INLET FILTER (FIG. 8)
This screen filter should be checked periodically and cleaned if necessary.
1. Remove filter by grasping end and removing it from water inlet of pump.
2. Clean filter by flushing it with water on both sides.
3. Re-insert filter into water inlet of pump. NOTE: Cone side faces out.
NOTE: Do not operate the pressure washer without filter properly installed.
STORAGE
ENGINE
Consult the Engine Owners Manual for manufacturer’s recommendations for
storage.
PUMP (FIG. 13)
NOTICE: The manufacturer recommends using a pump protector/winterizer when
storing the unit for more than 30 days and/or when freezing temperatures are
expected. FREEZE DAMAGE IS NOT COVERED BY THE WARRANTY.
Pump protector/winterizer is usually available at the store where the pressure
washer was purchased. If a pump protector/winterizer is not available, RV
antifreeze needs to be run through the pump as outlined in the steps below.
NOTE: Using a pump protector/winterizer or RV antifreeze is to provide proper
lubrication to the internal seals of the pump regardless of temperature or
environment.
1. Obtain a funnel, 6 ounces (170 mL) of RV
Antifreeze, and a 16" to 36" (40-91 cm)
section of garden hose with a male hose
connector attached to one end.
NOTICE: Risk of Property Damage. Use only RV
Antifreeze. Any other antifreeze is corrosive and
can damage the pump.
2. Disconnect the spark plug wire.
17 - ENG
13
Page 18
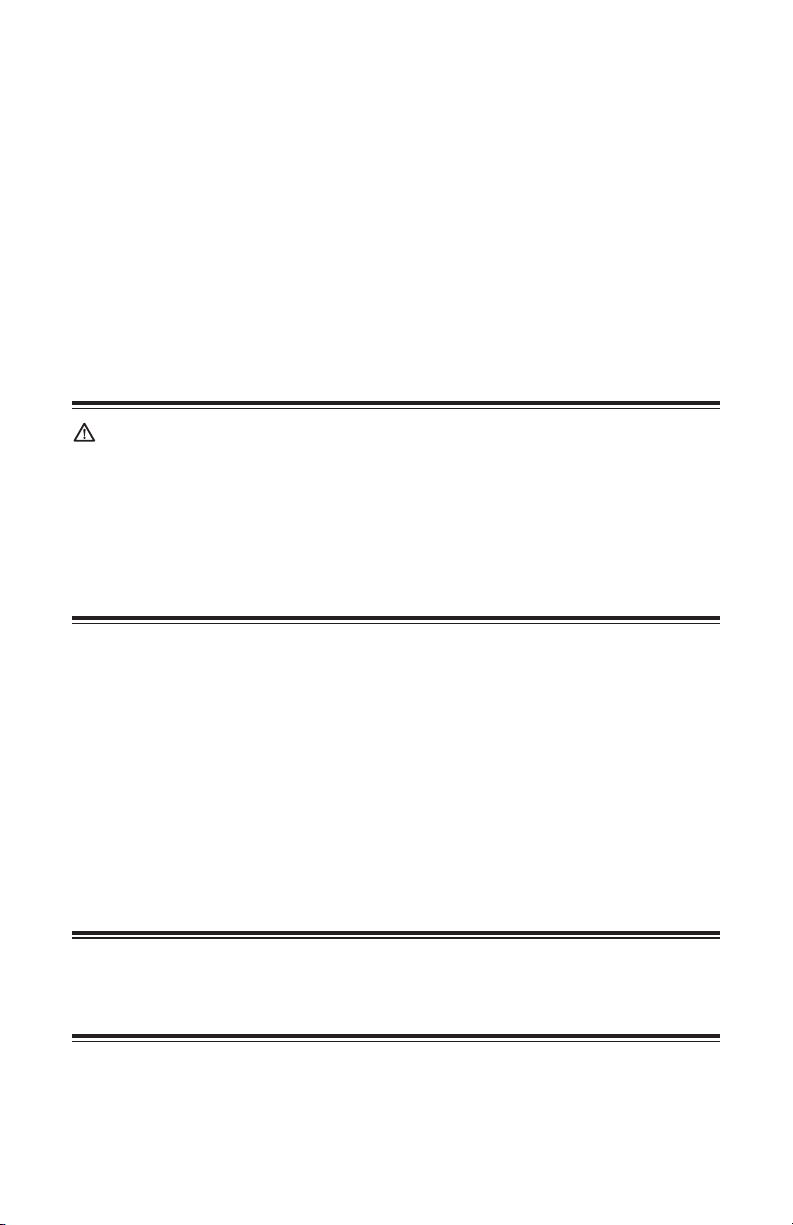
3. Connect the length of garden hose to the water inlet of the pump.
4. Add RV Antifreeze to hose as shown.
5. Pull starter rope slowly several times until antifreeze comes out of the high
pressure hose connection of the pump.
6. Remove garden hose from water inlet of pump.
7. Reconnect spark plug wire.
pRESSURE WASHER
1. Drain all water from high pressure hose and wrap it onto hose wrap.
2. Drain all water from the spray gun and wand by holding spray gun in a vertical
position with nozzle end pointing down and squeezing trigger. Store in gun
holder.
3. Store detergent siphon hose, if so equipped, so it is protected from damage.
ACCESSORIES
DANGER: Risk of fluid injection. When using replacement lances or guns
with this pressure washer, DO NOT use a lance and/or lance/gun combination
that is shorter in length than what was provided with this pressure washer as
measured from the nozzle end of the lance to the gun trigger.
NOTICE: The use of any other accessory not recommended for use with this tool
could be hazardous. Use only accessories rated equal to or greater than the rating
of the pressure washer.
SpECIFICATIONS
Model MSV2623 MSV3025
PSI Max* 2600 psi 3000 psi
GPM Max* 2.3 gpm 2.5 gpm
High Pressure Hose 25 ft. (7.6 m) 25 ft. (7.6 m)
Presure of Inlet Water 20–100 psi 20–100 psi
Inlet Water cold tap cold tap
Soap Consumption Rate 10% max 10% max
* Water flow and maximum pressure ratings determined in accordance with
PWMA standard PW101.
In our effort towards Continuous Improvement, specifications are subject to
change without notice.
SERVICE INFORMATION
Do not return this product to your retailer. Please contact our customer service
department at www.simpsoncleaning.com.
LIMITED WARRANTY
90 DAY LIMITED WARRANTY ON pRODUCT COMpONENTS EXCLUDING pUMp
SIMPSON© warrants to the original purchaser that the wheels, gun, hose, wand, spray
nozzle(s) and other components of the
warranty are free from defects in material and workmanship for 90 days from the date
of purchase.
SIMPSON
18- ENG
©
pressure washer covered under this
Page 19

ONE YEAR LIMITED WARRANTY ON pUMp AND FRAME
SIMPSON
©
warrants to the original purchaser that the pump of the SIMPSON
pressure washer covered under this warranty is free from manufacturer’s defects in
material and workmanship for one year from the date of purchase. The one year limited
warranty applies to the pump only.
SIMPSON
©
will repair or replace, at SIMPSON©'s option, products or components
which have failed within the above warranty periods. Service will be scheduled
according to the normal work flow and business hours at the service center location,
and the availability of replacement parts. All decisions of
SIMPSON
©
with regard to this
limited warranty shall be final.
This warranty gives you specific legal rights, and you may also have other rights which
vary from state to state.
ENGINE WARRANTY
The engine warranty is covered under the terms and conditions as outlined by the
engine manufacture’s warranty contained herein and is sole responsibility of the engine
manufacturer.
RESpONSIBILITY OF ORIGINAL pURCHASER (INITIAL USER):
• To process a warranty claim on your
SIMPSON
©
pressure washer, report the
concern to www.simpsoncleaning.com for authorization and direction to the
nearest authorized service centre in your area.
• Retain original cash register sales receipt as proof of purchase for warranty work.
• Use reasonable care in the operation and maintenance of the product as described
in the Owners Manual(s).
THIS WARRANTY DOES NOT COVER:
• Merchandise sold as reconditioned, used as rental equipment, or floor or display
models.
• Merchandise that has become damaged or inoperative because of ordinary wear,
misuse, cold, heat, rain, excessive humidity, freeze damage, use of improper
chemicals, negligence, accident, failure to operate the product in accordance
with the instructions provided in the Owners Manual(s) supplied with the product,
improper maintenance, the use of accessories or attachments not recommended
SIMPSON
by
©
, or unauthorized repair or alterations.
• Repair and transportation costs of merchandise determined not to be defective.
• Costs associated with assembly, required oil, adjustments or other installation and
start-up costs.
• Expendable parts or accessories supplied with the product which are expected to
become inoperative or unusable after a reasonable period of use, including but not
limited to springs, nozzles, o-rings, washers, and similar accessories.
• Merchandise sold by
SIMPSON
©
which has been manufactured by and identified
as the product of another company, such as gasoline engines. The product
manufacturer’s warranty, if any, will apply.
• ANY INCIDENTAL, INDIRECT OR CONSEQUENTIAL LOSS, DAMAGE,
OR EXPENSE THAT MAY RESULT FROM ANY DEFECT, FAILURE OR
MALFUNCTION OF THE PRODUCT IS NOT COVERED BY THIS WARRANTY.
Some states do not allow the exclusion or limitation of incidental or consequential
damages, so the above limitation or exclusion may not apply to you.
• IMPLIED WARRANTIES, INCLUDING THOSE OF MERCHANTABILITY OR
FITNESS FOR A PARTICULAR PURPOSE, ARE LIMITED TO ONE YEAR FROM
THE DATE OF ORIGINAL PURCHASE. Some states do not allow limitations on
how long an implied warranty lasts, so the above limitations may not apply to you.
©
19 - ENG
Page 20
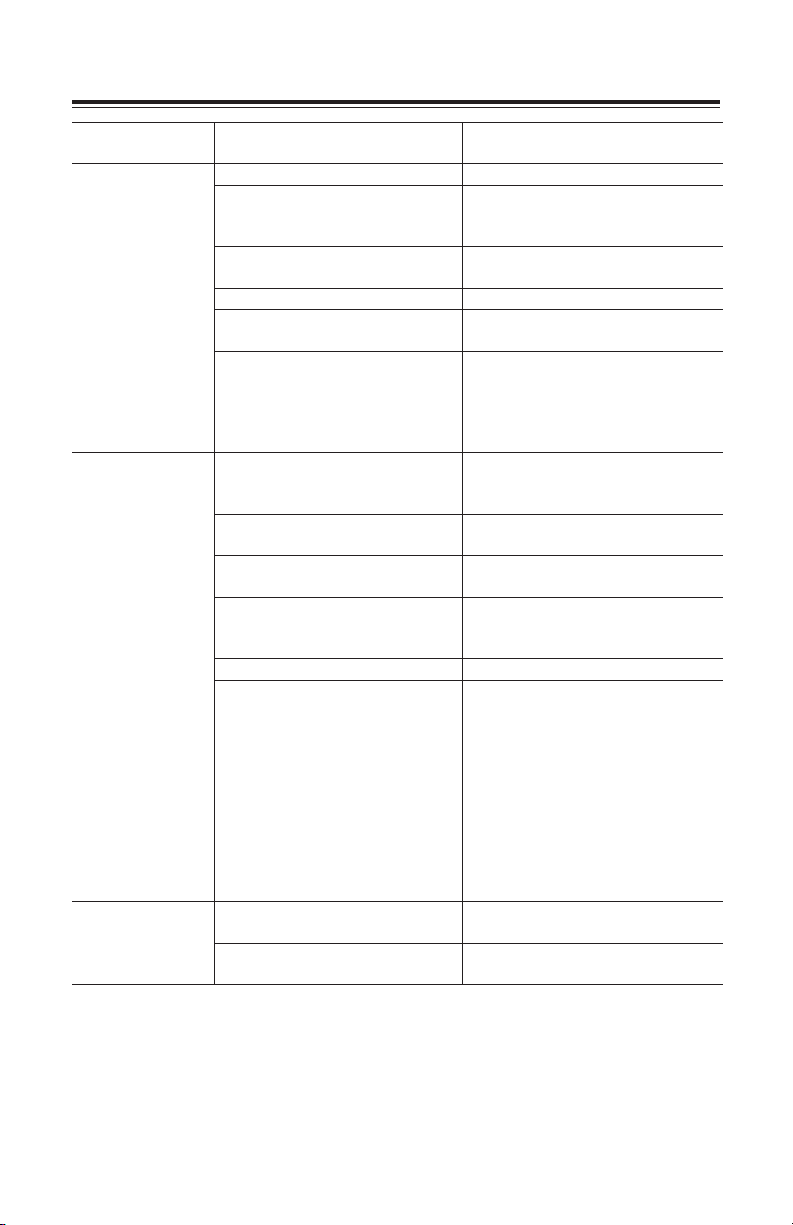
TROUBLE SHOOTING GUIDE
OPERATIONAL
ISSUE
Engine will not
start (see Engine
Manual for
further engine
troubleshooting)
No or low
pressure
(initial use)
No or low
pressure
(initial use)
POSSIBLE CAUSE SOLUTION
No fuel. Add Fuel.
Pressure builds up after
two pulls on the recoil
starter or after initial use.
Choke lever in the "No
Choke" position.
Spark plug wire not attached. Attach spark plug wire.
Engine switch in OFF
po si tion.
Choke lever in the "Choke"
position on a "hot" engine
or an engine that has been
exposed to thermal heat
for a long period of time.
Spray wand not in
high pressure.
Low water supply. Water supply must be at
Leak at high pressure
hose fitting.
Nozzle obstructed. See Nozzle Cleaning
Water filter screen clogged. Remove and clean filter.
Air in hose. Turn off the engine, then the
Choke in the “Choke”
position.
High pressure hose
is too long.
Squeeze gun trigger to relieve
pres sure.
Move choke to the "Choke"
po si tion.
Place engine switch
in ON position.
Move choke to the "No Choke"
po si tion.
See How to Use Spray
Wand instructions in the
Operation Section.
least 5 gpm @ 20 psi.
Repair leak. Apply sealant tape
if necessary.
instructions in the
Maintenance section.
water source. Disconnect the
water source from the pump
inlet and turn the water source
on to remove all air from the
hose. When there is a steady
stream of water present, turn
water source off. Re- con nect
water source to pump inlet and
turn on wa ter source. Squeeze
trigger to re move re main ing air
Move choke to the “No Choke”
po si tion.
Use high pressure hose under
100 feet (30m).
20- ENG
Page 21
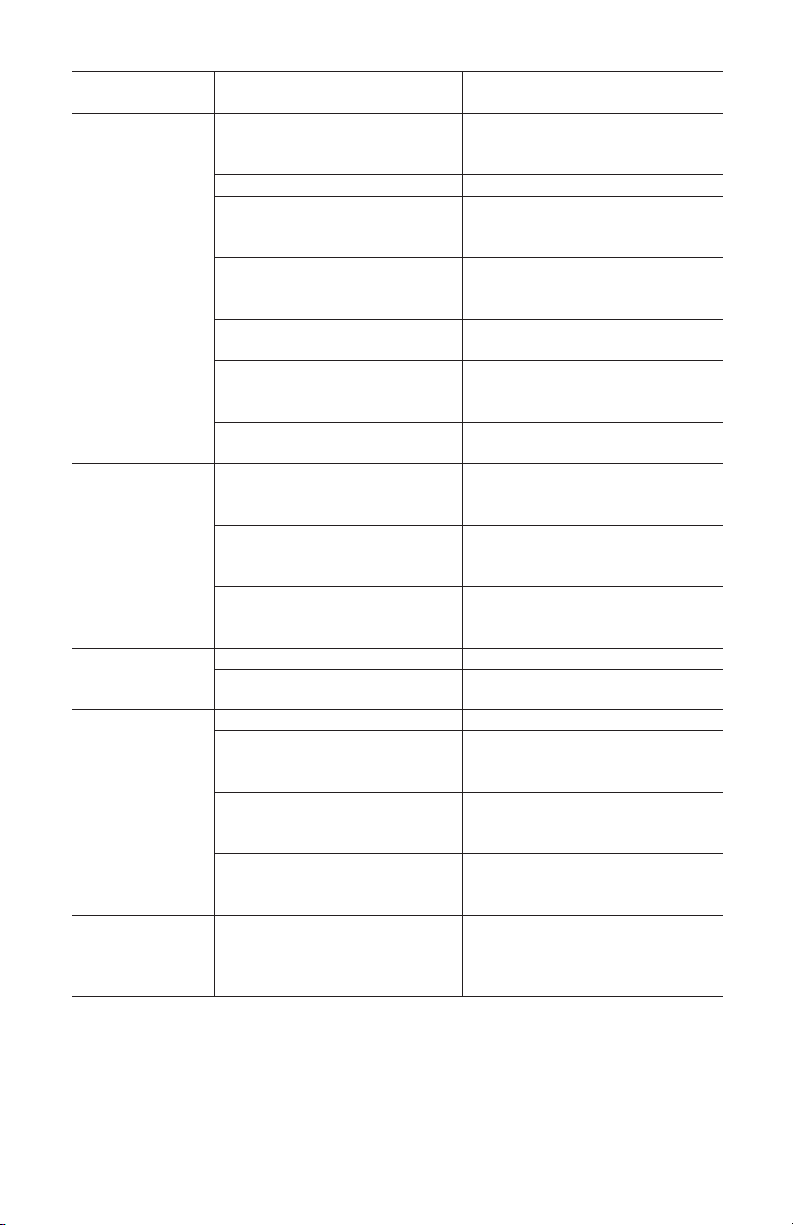
OPERATIONAL
POSSIBLE CAUSE SOLUTION
ISSUE
Will not draw
chemicals
Spray wand not in
low pressure.
See How to Use Spray
Wand paragraph in the
Operation Section.
Chemical filter clogged. Clean filter.
Chemical screen not in
cleaning solution.
Make sure end of detergent
siphon hose is fully submerged
into cleaning solution.
Chemical too thick. Dilute chemical. Chemical
should be the same
consistency as water.
Pressure hose is too long Lengthen water supply hose
instead of high pressure hose.
Chemical build up in
chemical injector.
Please contact our customer
service department at
www.simpsoncleaning.com.
No or low
pressure
(after period of
normal use)
Tank valve (R) in the CLOSED
position.
Worn seal or packing Please contact our customer
Worn or obstructed valves. Please contact our customer
Make sure tank valve (R) is in
the OPEN position.
service department at
www.simpsoncleaning.com.
service department at
www.simpsoncleaning.com.
Worn unloader piston. Please contact our customer
service department at
www.simpsoncleaning.com.
Water leaking at
gun/spray wand
Worn or broken o-ring. Check and replace.
Loose hose connection. Tighten.
connection
Water leaking
at pump
Loose connections. Tighten.
Piston packings worn. Please contact our customer
service department at
www.simpsoncleaning.com.
Worn or broken o-rings. Please contact our customer
service department at
www.simpsoncleaning.com.
Pump head or tubes
damaged from freezing.
Please contact our customer
service department at
www.simpsoncleaning.com.
Pump Pulsates Nozzle obstructed. See Nozzle Cleaning
paragraph in the
Maintenance section for
the correct procedure.
21 - ENG
 Loading...