

welcoming • sophisticated • inspiring
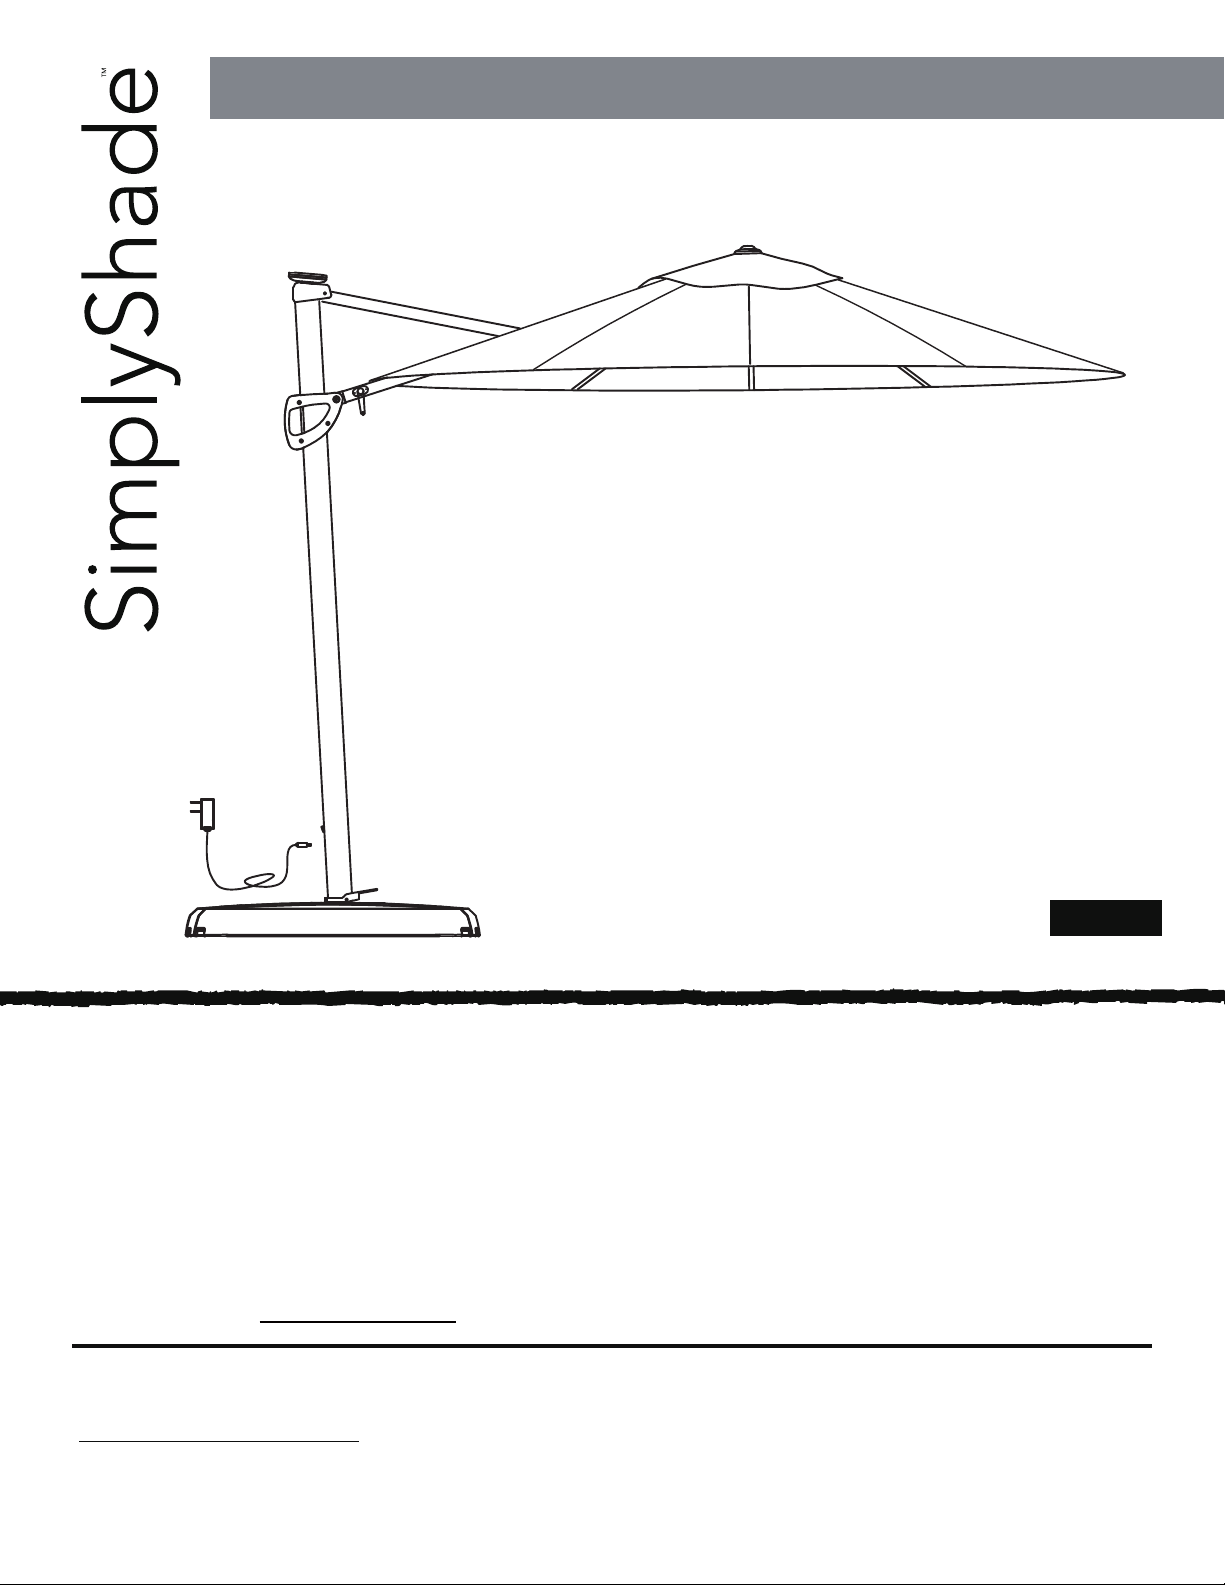
ITEM# 804780/876120
11 FT LED CANTILEVER UMBRELLA
MODEL# AG45RLD-LS-3/4
PLEASE RETAIN YOUR RECEIPT. WARRANTY CLAIMS
WILL NOT BE RECOGNIZED WITHOUT A DATED RECEIPT.
Purchase Date
Questions, problems, missing parts? Before returning to your reta
service department at 1-844-230-9904,8 a.m. – 8 p.m., EST, Monday - Friday, or visit
www.myshadesource.com for more information.
iler, call our customer
nglish
E
1
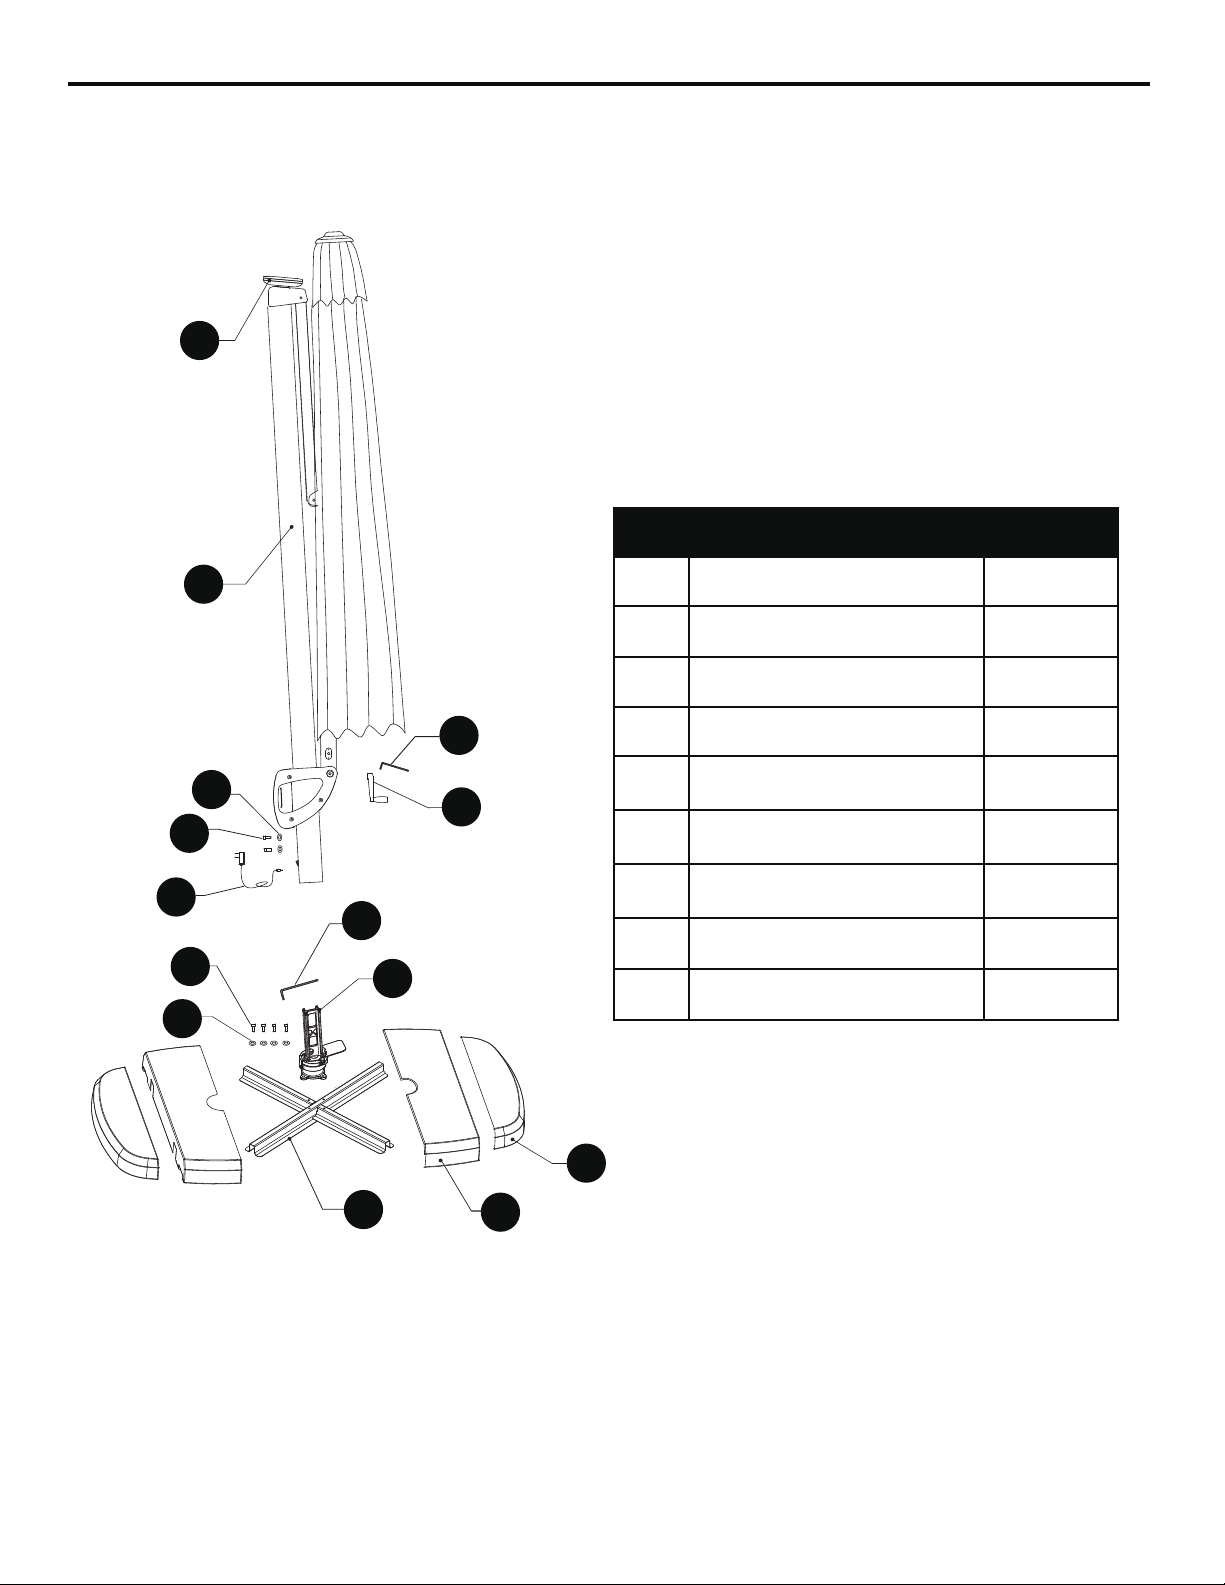
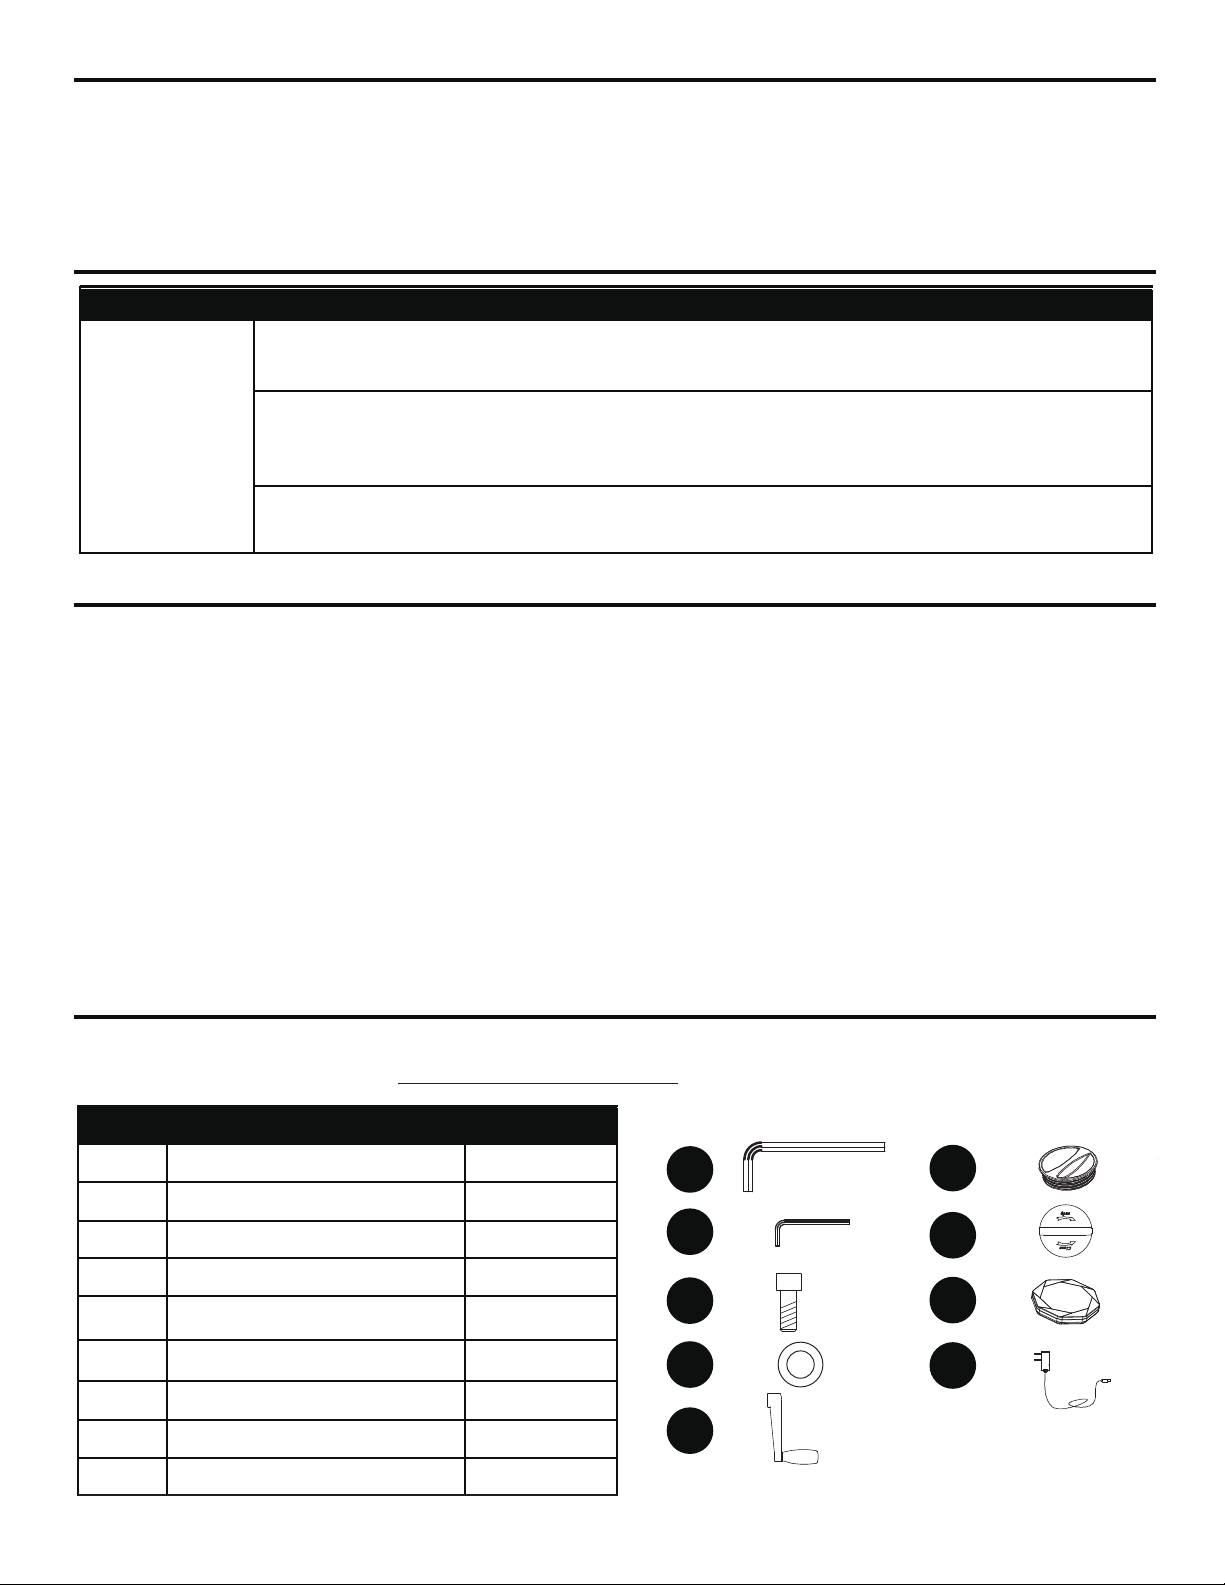
PACKAGE CONTENTS
Thank you for purchasing the SimplyShade 11-ft LED Cantilever Umbrella.
B
PART DESCRIPTION QUANTITY
CC
F
CC
DD
A
DD
AA
A Umbrella 1
BB
EE
B Solar Panel
C Rotating Hub
D 1
E
Metal Stand
Plastic Base Interior 2
1
1
E1 Plastic Base Exterior 2
F
FF
C
GG
E1
AC Adapter
Base Plug
Pole Cap
1
4
1
D
E
NOTE: The Solar Panel (B) contains two lithium batteries (2 x 2200mAh). Do not attempt
to open the solar panel when in use.
AC Adapter (F)
Input: 100V~240V AC, Output: 4.2V DC
2
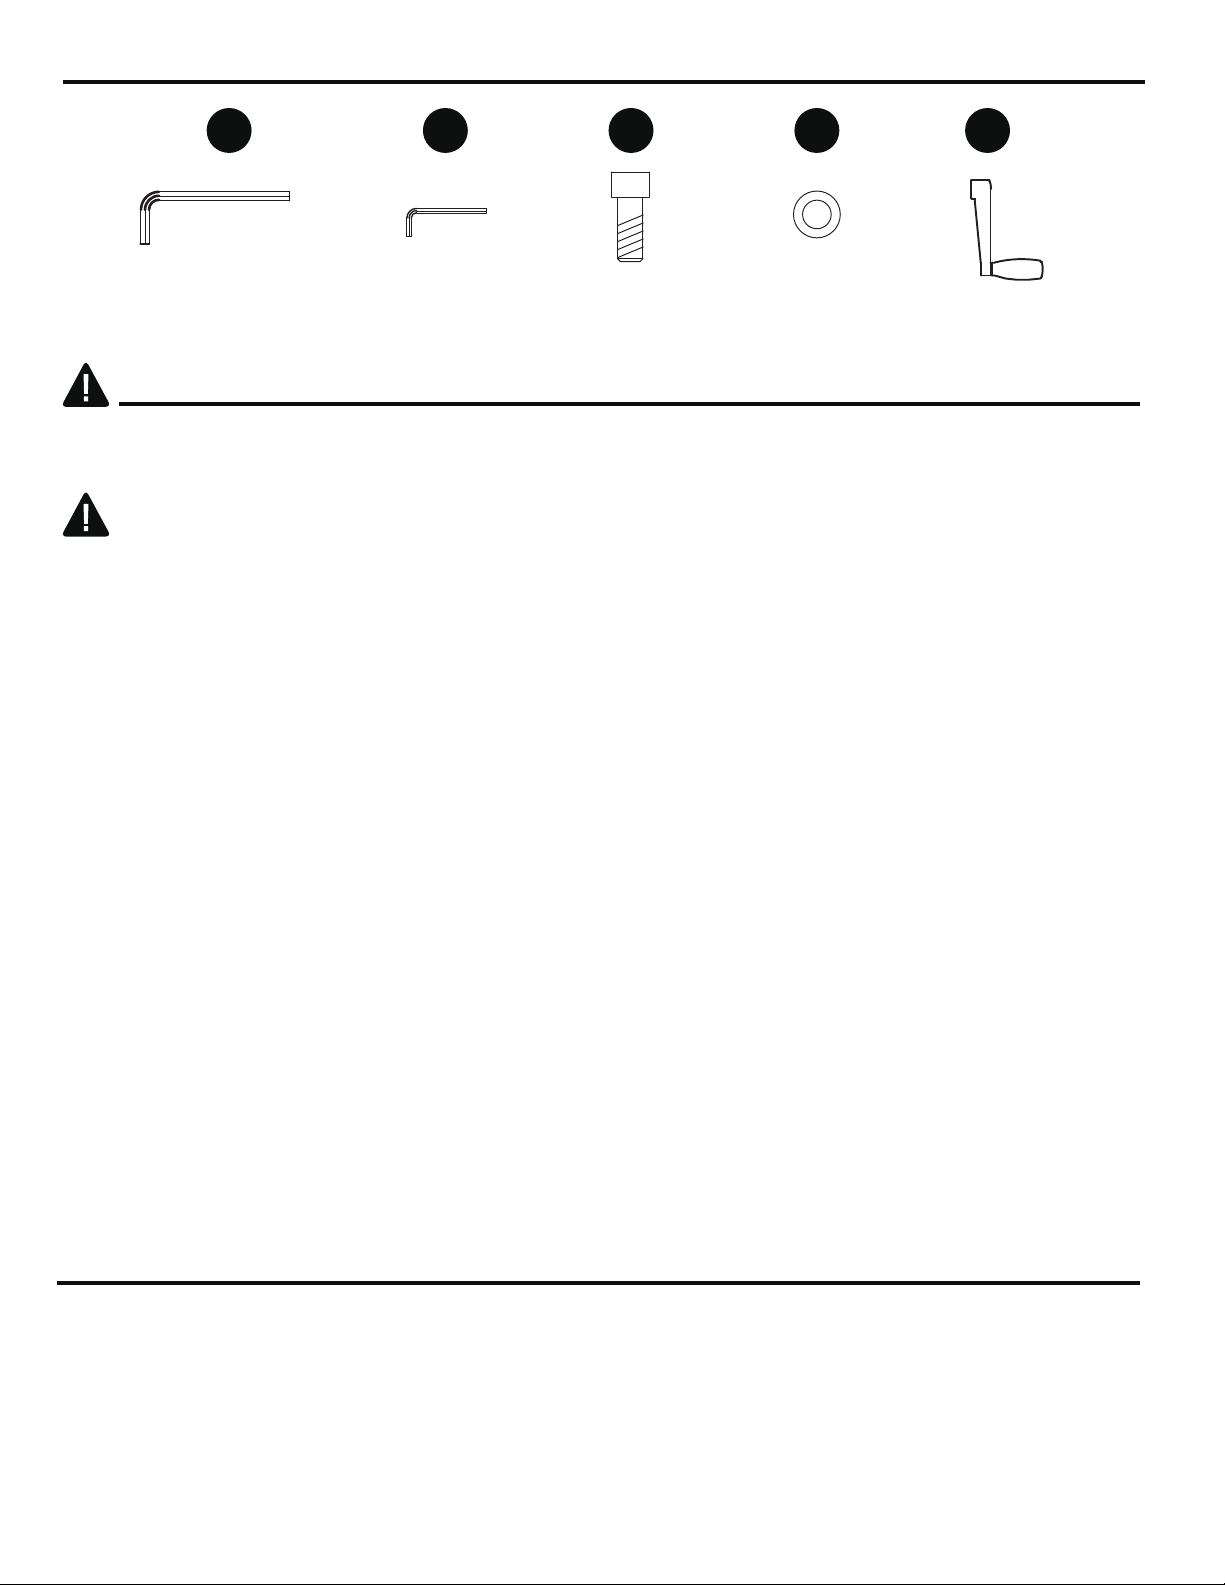
HARDWARE CONTENTS (not shown to actual size)
AA BB CC DD EE
Large Wrench
Qty: 1
SAFETY INFORMATION
Please read and understand this entire manual before attempting to assemble, operate or install the
product.
WARNING
Assemble on a soft, clean, non-abrasive surface to avoid damage to the item. Item is heavy. Use care
when handling. May require two adults for safe assembly. Crank the umbrella to its closed position
during windy weather conditions.
This outdoor umbrella is designed and made for personal non-commercial use. It should not be used as a
toy or a tool. Children under age of 16 should not be engaged in the assembly, removal or disassembly.
Children under the age of 10 should be supervised by a competent adult while using this furniture.
NOTE: This equipment has been tested and found to comply with the limits for a Class B digital device,
pursuant to Part 15 of the FCC Rules. These limits are designed to provide reasonable protection against
harmful interference in a residential installation. This equipment generates, uses and can radiate radio
frequency energy and, if not installed and used in accordance with the instructions, may cause harmful
interference to radio communications. However, there is no guarantee that interference
will not occur in a particular installation. If this equipment does cause harmful interference to radio or
television reception, which can be determined by turning the equipment off and on, the user is
encouraged to try to correct the interference by one or more of the following measures:
-- Reposition or relocate the receiving antenna.
-- Increase the separation between the equipment and receiver.
-- Connect the equipment into an outlet on a circuit different from that to which the receiver is connected.
-- Consult the dealer or an experienced radio/TV technician for help.
Small Wrench
Qty: 1
Bolt
Qty: 6
Washer
Qty: 6
Crank Handle
Qty: 1
CAUTION
To prevent personal injury or damage, always take down the umbrella when not in use, during windy
conditions or in rain. Do not operate or attempt to charge the umbrella when water is present so as to
prevent damage to the electrical components.
PREPARATION
Before beginning the assembly of product, make sure all parts are present. Compare parts with
package contents list and hardware contents list. If any part is missing or damaged, do not attempt to
assemble, install or operate the product.
Estimated Assembly Time: 40 minutes
Tools Required for Assembly (included): Wrench
3

ASSEMBLY INSTRUCTIONS
1. Assemble the Metal Stand (D) by overlapping the
metal bars together on the ground in a cross pattern as
shown.
2. Line up the holes in the Rotating Hub (C) on top of
the Metal Stand (D). Secure the Rotating Hub (C) to
the Metal Stand (D) with 4pcs Bolts (CC) and 4pcs
Washers (DD). Tighten with the Large Wrench (AA).
1
2
D
AA
CC
DD
Hardware Used
AA
CC
DD
Large Wrench
Bolt
Washer
x 1
x 4
x 4
3. Remove each Base Plug (FF) by turning counter-
clockwise . Fill each section of Base (E/E1) with
50-lbs to 60-lbs of sand (not included), 220-lbs for all
four, pouring water into the base intermittently to help
pack the sand. Screw the Base Plug (FF) clockwise
back into place.
Ensure that the rubber gasket is present on the Base
Plug (FF) to prevent the Base (E/E1) from leaking.
When filling, leave a small void in the base to allow
room for the water to expand when it freezes in the
winter.
3
C
D
E/E1
sand
water
open
close
FF
FF
Base Plug
x 4
Each section requires a minimum of
50-lbs of sand. Water alone will not
support the weight of the cantilever.
4
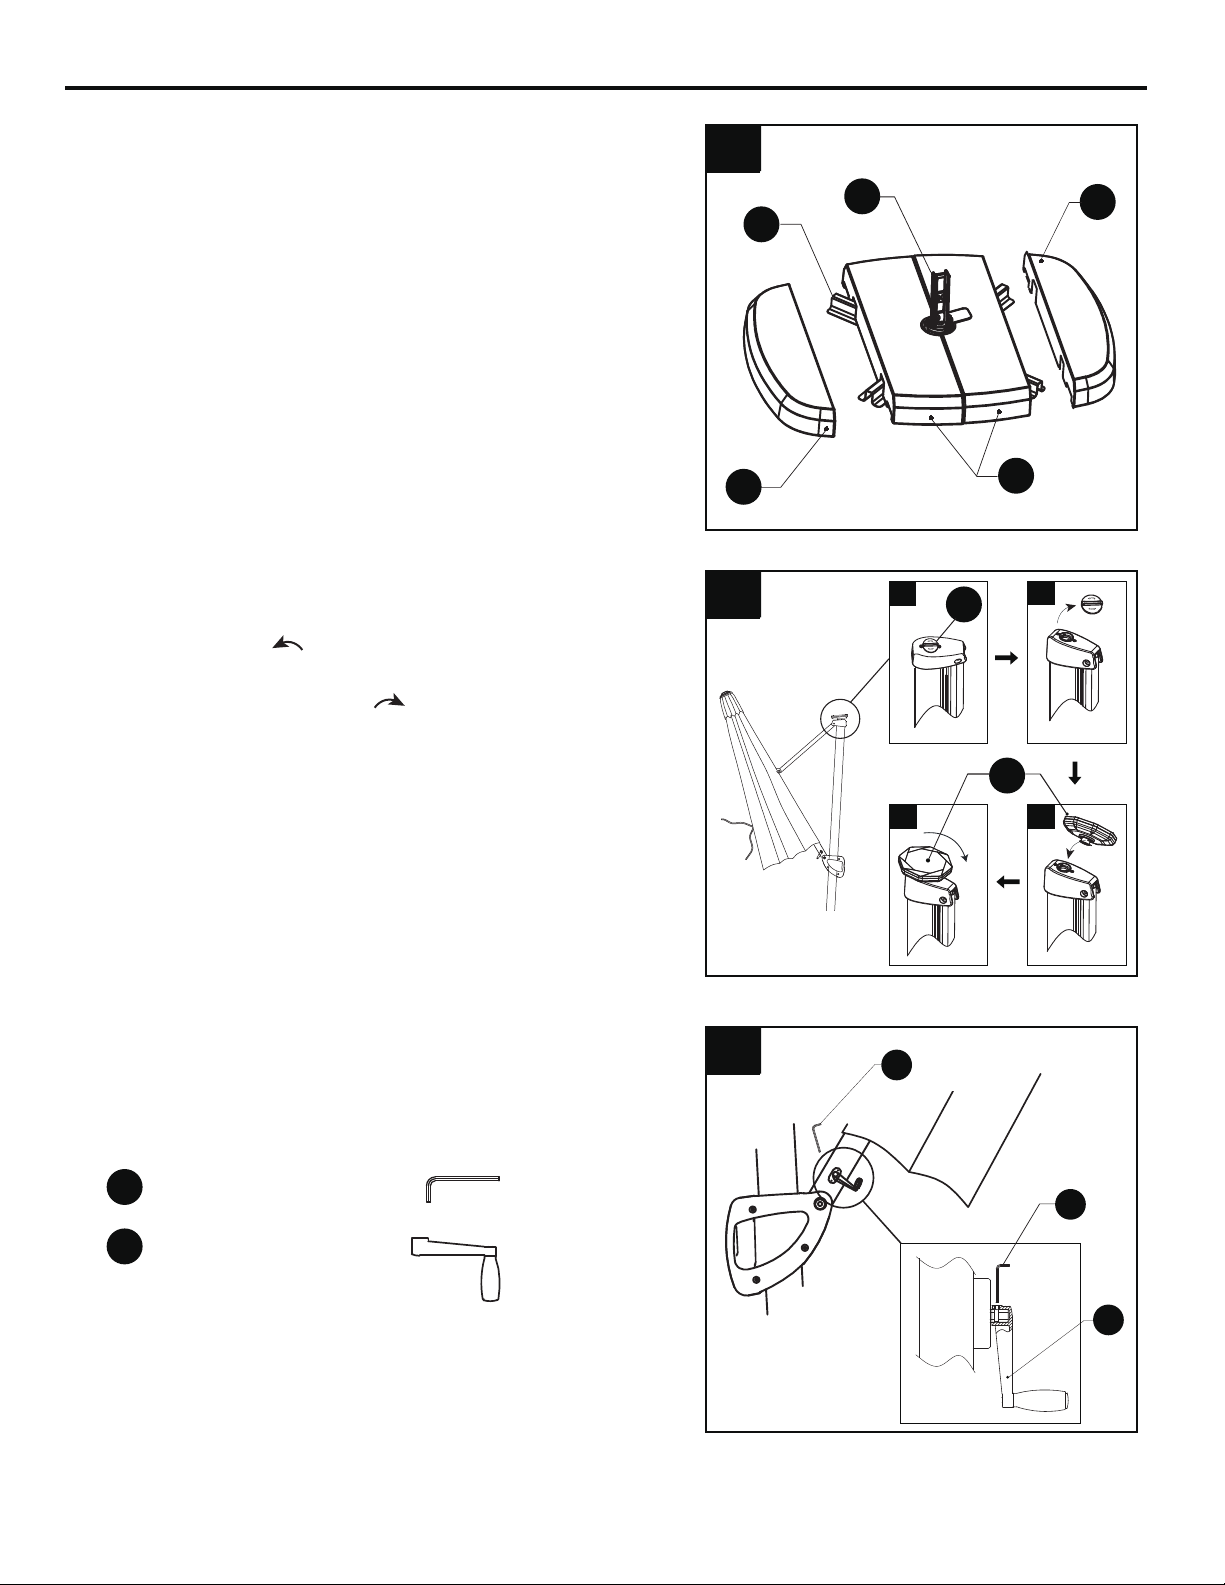
ASSEMBLY INSTRUCTIONS
4. Assemble the Plastic Base (E/E1) by interlocking
the 4pcs together onto the Metal Stand (D).
You may need to reposition the pedal on the Rotating
Hub (C) in this step. To do this, press down on the
pedal and rotate either direction to reach desired
position.
4
C
D
E1
5. To install the Solar Panel (B), remove the Pole
Cap (GG) on top of the pole by turning in a counter-
clockwise direction . Insert the tabs on the bottom
of the Solar Panel (B) into the slots on the top of the
pole and twist in a clockwise direction
approximately 1/4 turn until it is secure.
Save the Pole Cap (GG) for future use. To extend the
life of the Solar Panel (B), it is recommended to
remove the solar panel and replace the pole cap thru
the winter or during extended periods when the
umbrella is not in use.
6. Fit the Crank Handle (EE) over the crank
mechanism. Secure the Crank Handle (EE) onto the
crank mechanism using the Small Wrench (BB) to
tighten the setscrew.
5
6
E1
BB
E
i
GG
iv
ii
B
iii
BB
EE
Small Wrench
Crank Handle
x 1
x 1
5
BB
EE

ASSEMBLY INSTRUCTIONS
7. Line up the two holes in the bottom of the Umbrella
(A) pole with the Rotating Hub (C) and slide the
Umbrella (A) pole down over the Rotating Hub (C) .
Using the Large Wrench (AA), secure the Umbrella
(A) pole to the Rotating Hub (C) with 2pcs Bolts (CC)
and 2pcs Washers (DD) .
AA
CC
DD
Large Wrench
Bolt
Washer
x 1
x 2
x 2
OPERATING INSTRUCTIONS
8. With the umbrella in an upright position, unfasten the
Storage Tie from around the canopy. Gently spread the
umbrella ribs and fabric by hand to free up parts that
may have become wedged during shipping.
7
8
AA
CC
DD
A
C
E
EE
CAUTION: When cranking the umbrella open, if you feel
resistance and the canopy is not opening, do not force
the Crank Handle (EE). Gently spread the umbrella ribs
by hand and shake the fabric, then continue to crank
open.
To prevent undue stress on the cranking system, do not
attempt to crank open the umbrella from the lowest
position. Open the umbrella canopy by (1) gripping the
lever on the vertical slide handle, then slowly raise to a
convenient height. Release the slide handle to lock into
place. (2) Slowly turn the Crank Handle (EE) in a
clockwise direction until the canopy is fully opened.
WARNING: DO NOT open the umbrella in a counterclockwise direction. It will not stay open and may
close unexpectedly.
9. With the canopy fully opened, grip the lever on the
vertical slide handle and raise or lower the canopy to
desired angle. Release the slide handle to lock into
place. To close the umbrella, turn the Crank Handle
(EE) counter-clockwise .
9
1
2
Storage Tie
6

OPERATING INSTRUCTIONS
10. To rotate the Umbrella (A) canopy horizontally,
place foot on the foot pedal of the Rotating Hub (C)
and hands on the umbrella pole. Depress the pedal
and rotate the umbrella in either direction to reach
desired position. Release foot pedal to lock into place.
WARNING: Always close the umbrella and secure the
canopy to the umbrella pole with Storage Tie when not
in use and during high winds or rain. Failure to do so
may result in personal injury and/or damage.
11. To operate the LED lights, press the rocker switch
located on the umbrella pole on or off.
10
A
C
11
NOTE:
a) The Solar Panel (B) contains two lithium batteries
(2 x 2200mAh). Press the switch to the off position
during daylight to allow the solar panel to charge
the batteries. Charging time is dependent on the
amount of sunlight, however, 8 hours is
recommended.
b) The batteries can also be charged using the
100V~240V AC Adapter (F) by plugging it into the
umbrella pole as shown. Charging time is
approximately 5 - 6 hours.
c) If the batteries are dead, the lights will operate with
the AC Adapter (F) plugged in. The red light on the
AC Adapter (F) indicates power is present.
d) Keep the umbrella unplugged and the AC Adapter
(F) stored in a dry location when not in use.
Light Switch
F
100V~240V AC
7
CARE AND MAINTENANCE
. Before using, clean the product completely with a soft, dry towel.
. Wash with a mild solution of soap and water; rinse dry completely. Do not use strong detergent or
abrasive cleaners.
. Store the product in a cool, dry location away from sunlight.
. Store the umbrella out of bad weather or high winds.
TROUBLESHOOTING
PROBLEM POSSIBLE CAUSE
1. The solar panel may not be properly installed. Remove the solar panel and repeat Step 5,
ensuring that the fixed barrel connectors line up correctly.
The umbrella
lights only work
when plugged in
2. The batteries may be dead. Press the switch to the OFF position. With the solar panel properly
installed, allow approximately 8 hours of sunlight on the solar panel or 6 hours with the AC adapter
plugged in to charge the batteries.
3. If the lights do not work after troubleshooting steps 1 and 2, please contact customer service to
further diagnose the problem.
ONE- YEAR LIMITED WARRANTY
Umbrella frames are warranted for a period of one (1) year.
Exceptions: Items used for commercial, contract or other non-residential purposes, display models,
items purchased as-is, or items damaged due to acts of nature, vandalism, misuse or improper
assembly are not covered. Discoloration or fading of the finish or fabrics as a result of exposure to
the elements, chemicals or spills are not covered. Tabletop glass breakage, corrosion or rusting of
hardware and damages to frames or welds caused by improper assembly, misuse or natural causes
are not covered.
Warranty to the original purchaser is non-transferable. All warranty claims require a dated sales
receipt. Any replacement of warranted items will be in the original style and color, or a similar style
and color if the original is unavailable or has been discontinued. We do not reimburse for
transportation or delivery costs, or compensate the individual or any outside party for assembling or
disassembling the product.
REPLACEMENT PARTS LIST
For replacement parts, call our customer service department at 1-844-230-9904, 8 a.m. - 8 p.m.,
EST, Monday - Friday, or visit www.myshadesource.com for more information.
DESCRIPTION PART#PART
AA 6#
BB Small Wrench
CC
DD
EE
FF
GG
B
F
Large Wrench
2.5#
Bolt
Washer
D10
A92
Crank Handle NA
Base Plug
Pole Cap
Solar Panel
AC Adapter
E-11-036
E-04-151
G-03-007
G-09-027
AA
BB
CC
DD
EE
FF
GG
B
F
8
 Loading...