


BURLINGTON / PORTLAND / BERKSHIRE
CONSOLE TABLE
REQUIRES 2 PEOPLE
FOR EASE OF ASSEMBLY
TABLE CONSOLE
ITEM /NUMBER NUMÉRO D’ARTICLE
REQUIERT 2 PERSONNES
POUR FACILITER
L'ASSEMBLAGE
3AXCBUR-003
USER ASSEMBLY GUIDE
GUIDE D’ASSEMBLAGE
Like us on
& share your pictures and
comments to be eligible
for exclusive promotions.
TM
Suivez-nous sur
partagez vos photos et vos
commentaires afin d’être admissibles
à des promotions exclusives.
TM
TM
1/12

BURLINGTON / PORTLAND / BERKSHIRE
CONSOLE TABLE
TABLE CONSOLE
IMPORTANT: Please read this manual carefully before beginning assembly of this product.
Keep this manual for future reference.
IMPORTANT
Veuillez conserver ce manuel pour toute référence ultérieure.
Safety Information / Renseignements sur la sécurité
-
: Veuillez lire attentivement ce manuel avant de commencer l'assemblage de ce produit.
Identify all the parts and hardware. Do not discard of the packaging until you have checked that you have all
of the parts and hardware required. Hardware package may have spare parts.
WARNING
: This item contains small parts which can be swallowed by children and pets. Keep children
and pets away during assembly. To avoid danger of suffocation, always keep plastic bags away from
children and pets.
We recommend that you assemble this unit on a carpeted floor to avoid scratches.
We do not recommend the use of power tools for assembly as this could damage the unit.
Only use manual tools.
Requires 2 people for ease of assembly.
Repérez toutes les pièces et la quincaillerie. Ne jetez pas l'emballage jusqu'à ce que vous ayez vérifié que
vous avez toutes les pièces et la quincaillerie nécessaires. L'emballage de la quincaillerie pourrait contenir
des pièces de rechange.
AVERTISSEMENT
enfants et les animaux de compagnie. Veillez à maintenir les enfants et les animaux à l'écart durant
l'assemblage. Pour éviter les risques d'étouffement, conservez toujours les sacs de plastique hors de la
portée des enfants et des animaux.
Nous vous conseillons d'assembler cet article sur un plancher muni d'un tapis pour éviter des égratignures.
Nous déconseillons l'utilisation d'outils à alimentation électrique car cela pourrait endommager l'article.
Veuillez utiliser des outils manuels seulement.
Nécessite 2 personnes pour faciliter l'assemblage.
: Cet article contient des petites pièces qui pourraient facilement être avalées par les
-
Care and Maintenance / Soin et entretien
?
To clean, use a soft or slightly damp cloth, then wipe with a clean, dry cloth.
?
Dust with soft dry cloth.
?
Do not use ammonia-based cleaning products, as they will damage the finish.
?
Do not leave liquids or damp cloths on this furniture.
?
To avoid dulling of the finish, do not place furniture in direct sunlight.
?
Please inspect and tighten all screws or bolts on a regular basis to ensure proper performance and
safety of your item.
?
Pour nettoyer, utilisez un chiffon doux, légèrement humide et essuyez ensuite avec un chiffon propre et sec.
?
Époussetez avec un chiffon doux et sec.
?
N'utilisez pas de produits de nettoyage à base d'ammoniaque puisque cela endommagerait le fini.
?
Ne laissez pas de liquides ou des chiffons humides sur ce meuble.
?
Pour éviter que le ternissement du fini, ne placez pas le meuble sous la lumière directe du soleil.
?
Veuillez vérifier et serrer toutes les vis et tous les écrous de façon régulière afin de garantir le rendement
et la sécurité de votre article.
2/12

BURLINGTON / PORTLAND / BERKSHIRE
CONSOLE TABLE
TABLE CONSOLE
A B C1
Side
Coâteù
2 PIECES
2 PIEØCES
D E E1
F F1 G
Divider
Seùparateur
1 PAIR
1 PAIRE
Drawer Side
Coâteù du tiroir
1 PIECE
1 PIEØCE
1 PIECE
1 PIEØCE
Drawer Side
Coâteù du tiroir
Top
Dessus
C
Drawer Front
Avant du tiroir
Centre Shelf
Tablette Centrale
1 PIECE
1 PIEØCE
Bottom Shelf
Tablette infeùrieur
1 PIECE
1 PIEØCE
Drawer Front
Avant du tiroir
2 PIECES
2 PIEØCES
Drawer Back
Arrieøre du tiroir
1 PAIR
1 PAIRE
G1
2 PIECES
2 PIEØCES
Drawer Back
Arrieøre du tiroir
2 PAIRS
2 PAIRES
H I
3 PIECES
3 PIEØCES
Drawer Bottom
Bas du tiroir
REQUIRES 2 PEOPLE FOR EASE OF ASSEMBLY
REQUIERT 2 PERSONNES POUR FACILITER L'ASSEMBLAGE
1 PIECE
1 PIEØCE
1 PIECE
1 PIEØCE
HARDWARE / QUINCAILLERIE
1 2 3 5
Allen Key Screw
Vis Allen
M6x30mm
36 SPIECE
36 PIEØCES
Cam Lock Pin
Goujons de Serrage
Cam Lock
Verrou
24 SETS
24 ENSEMBLES
Allen Key
Clef Allen
1 PIECE
1 PIEØCE
4
Phillips screw round head
Vis cruciforme aø teâte ronde
M4 x 15mm
12 SPIECE
12 PIEØCES
Back Panel
Panneau arrieøre
Handle
Poigneùe
4 SETS
4 ENSEMBLES
3/12
BURLINGTON / PORTLAND / BERKSHIRE
CONSOLE TABLE
TABLE CONSOLE
Components - Key Diagram / Diagramme des principaux composants
B
I
C1
F1
G1
H
D
D
F1
E1
F
F
H
4/12

BURLINGTON / PORTLAND / BERKSHIRE
CONSOLE TABLE
TABLE CONSOLE
NOTICE / AVIS
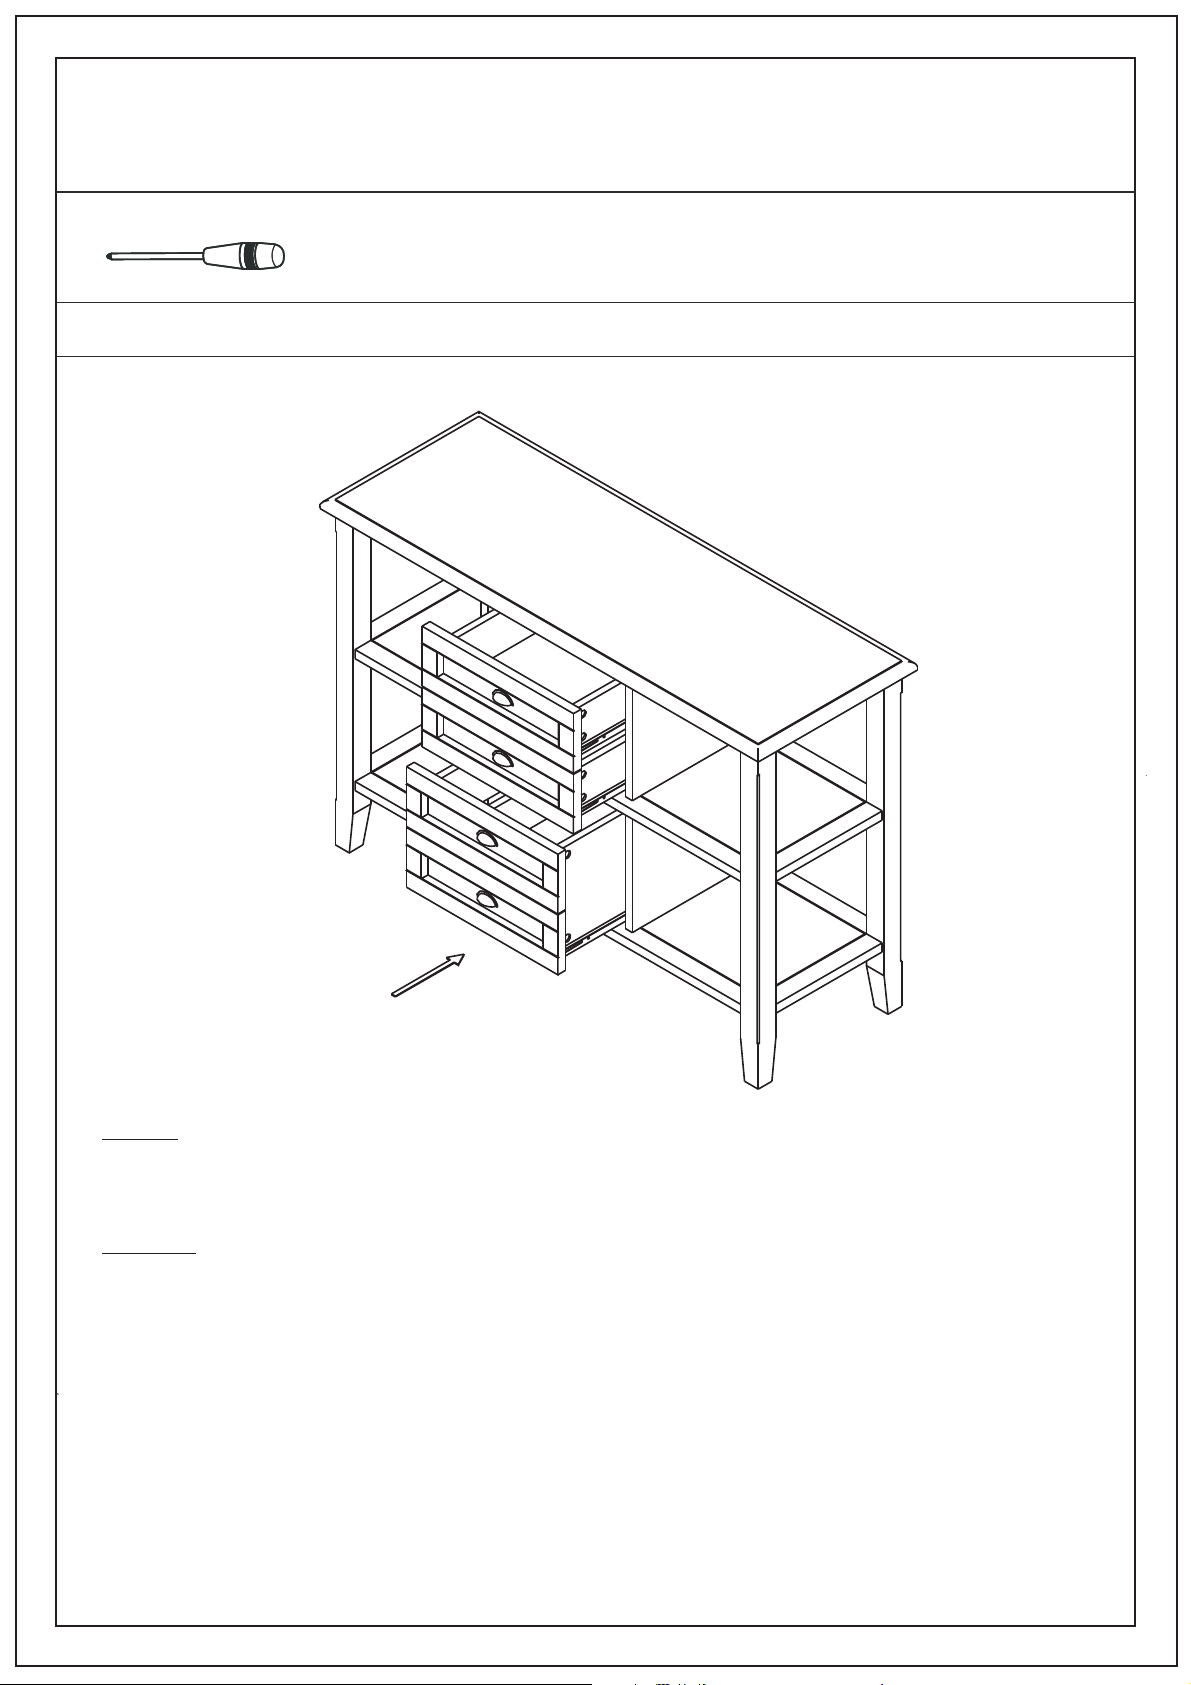
Please use a screwdriver for the screws. The screwdriver is not included in the pack.
Please use a screwdriver for the screws. The screwdriver is not included in the pack.
SVP utilisez un tournevis pour les vis. Le tournevis n’est pas fourni avec le produit.
SVP utilisez un tournevis pour les vis. Le tournevis n’est pas fourni avec le produit.
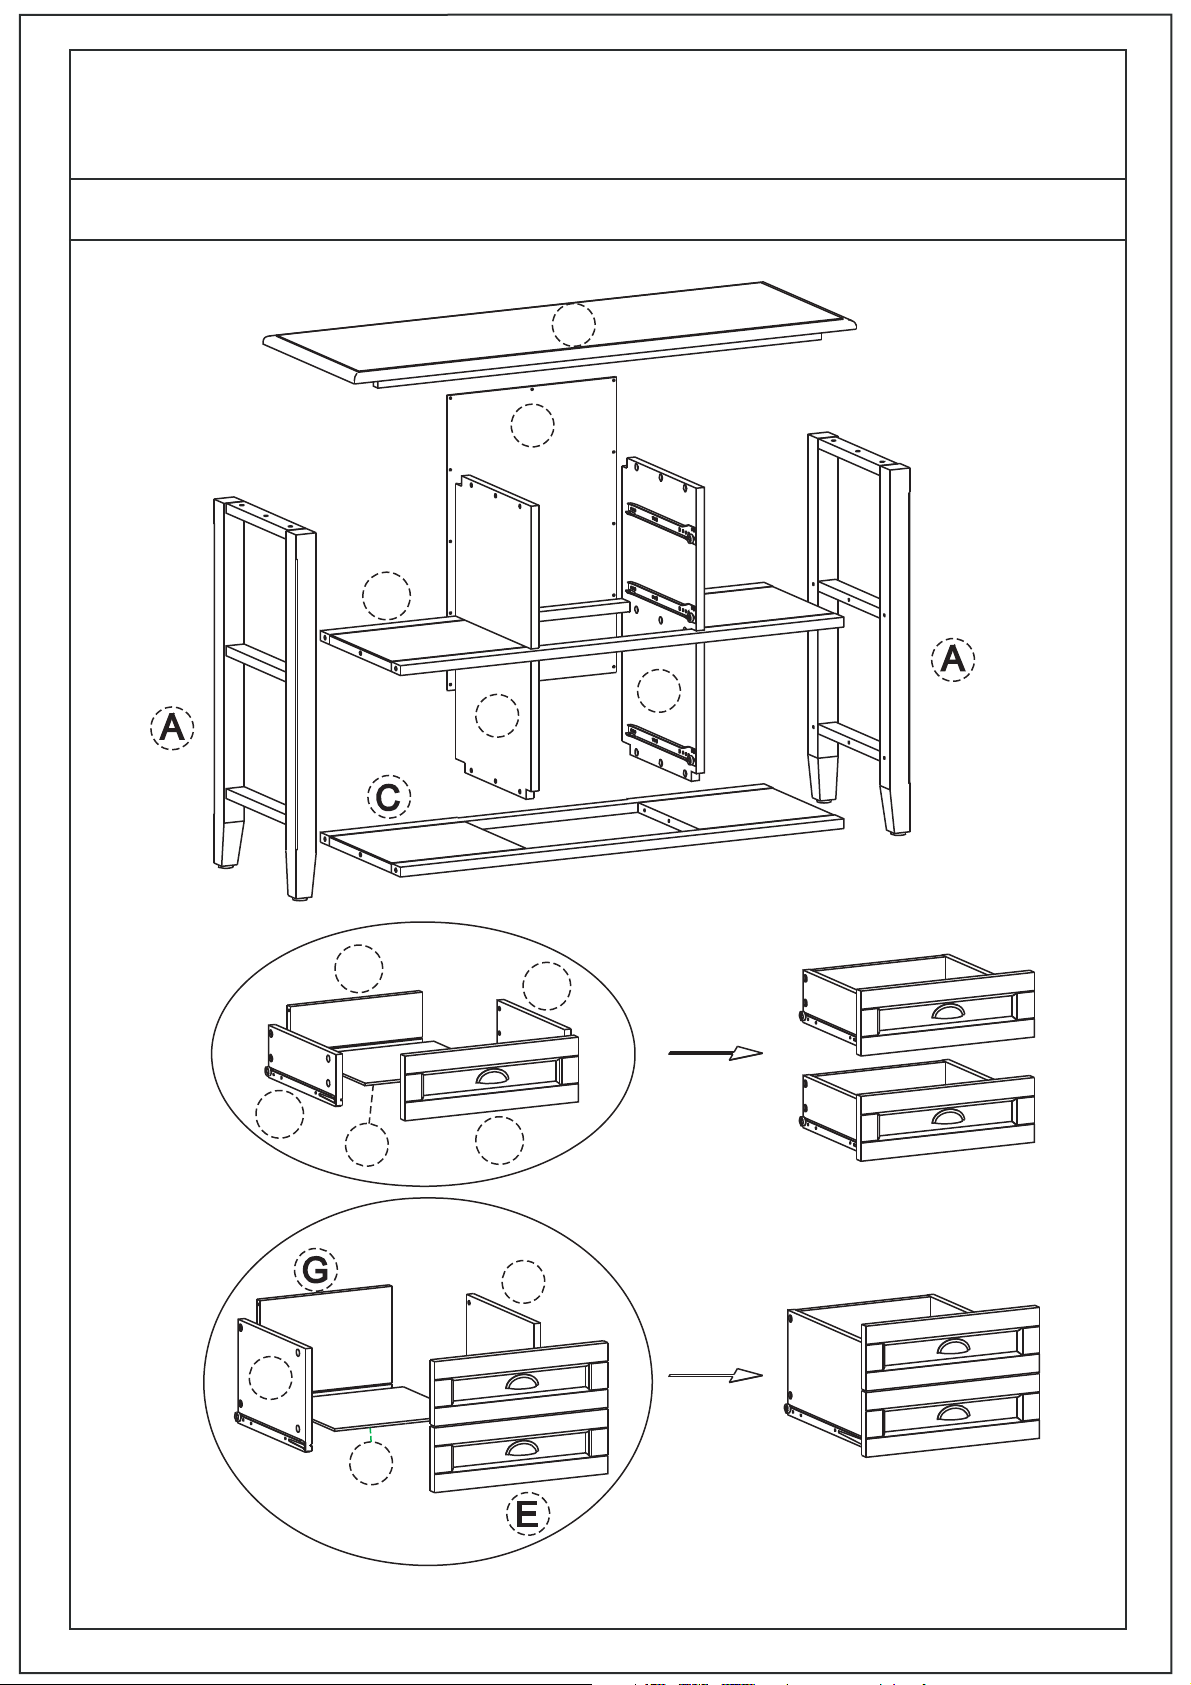
ASSEMBLY INSTRUCTIONS / INSTRUCTIONS D’ASSEMBLAGE
F1
F1
STEP 1
1. Attach 4 Cam Lock Pins 2 to back of Drawer Front E1 .
2. Align
3. Insert 2 Cam Lock 2 into pre-drilled holes on each Drawer Side F1 .
4. Use flathead screwdriver to secure Cam Locks.
EÙTAPE 1
1. Fixer 4 goujons de serrage 2 au dos de la Avant du tiroir E1 .
2. Aligner les du tiroir F1 .
3. Inseùrer 2 Verrous 2 dans les trous
4. Utiliser un tournevis aø teâte plate pour fixer solidement les Verrous.
Cam Lock Pins with pre-drilled holes and attach Drawer Sides F1 .
goujons de serrage avec les trous preùperceùs et relier les coteùs
preùperceùs de chaque coâteù du tiroir F1 .
F1
E1
E1
STEP 2
1. Slide Drawer Bottom H firmly into slots on Drawer Side F 1 and Drawer Front E1 .
EÙTAPE 2
1. Faire glisser le bas du tiroir H dans les coulisses Coâteù du tiroir F1 et aø la Avant du tiroir E1 .
5/12

BURLINGTON / PORTLAND / BERKSHIRE
CONSOLE TABLE
TABLE CONSOLE
NOTICE / AVIS
Please use a screwdriver for the screws. The screwdriver is not included in the pack.
Please use a screwdriver for the screws. The screwdriver is not included in the pack.
SVP utilisez un tournevis pour les vis. Le tournevis n’est pas fourni avec le produit.
SVP utilisez un tournevis pour les vis. Le tournevis n’est pas fourni avec le produit.
ASSEMBLY INSTRUCTIONS / INSTRUCTIONS D’ASSEMBLAGE
G1
H
F1
STEP 3
1. Align Drawer back G1 with Drawer bottom H and press firmly into slot .
2. Attach back using 2 Allen key screws 1 through pre-drilled holes on each side.
3. Use Allen key 3 to tighten. Do not over tighten.
EÙTAPE 3
Aligner I’arrieøre du tiroir G1 avec le bas du tiroir H et presser fermement
1. .
2. Fixer
3.
I’arrieøre au moyen de 2 Vis allen 1 dans les trous preùoerceùs de chaque coâteù.
Utiliser la Clef allen 3 pour serrer. Ne pas trop serrer.
F1
STEP 4
1. Use Phillips screwdriver to attach Handle 5 to Drawer Front E .
EÙTAPE 4
1. Utiliser un tournevis aø teâte eùtoile pour fixer la poigneùe 5
de tiroir E .avant
Repeat Step 1-4 for the second drawer .
Reùpeùter les e1tapes 1 aø 4 pour le deuxieøme tiroir .
6/12

BURLINGTON / PORTLAND / BERKSHIRE
CONSOLE TABLE
TABLE CONSOLE
NOTICE / AVIS
Please use a screwdriver for the screws. The screwdriver is not included in the pack.
Please use a screwdriver for the screws. The screwdriver is not included in the pack.
SVP utilisez un tournevis pour les vis. Le tournevis n’est pas fourni avec le produit.
SVP utilisez un tournevis pour les vis. Le tournevis n’est pas fourni avec le produit.
ASSEMBLY INSTRUCTIONS / INSTRUCTIONS D’ASSEMBLAGE
F
F
STEP 5
1. Attach 4 Cam Lock Pins 2 to back of Drawer Front E .
2. Align
3. Insert 2 Cam Lock 2 into pre-drilled holes on each Drawer Side F .
4. Use flathead screwdriver to secure Cam Locks.
EÙTAPE 5
1. Fixer 4 goujons de serrage 2 au dos de la Avant du tiroir E .
2. Aligner les du tiroir F .
3. Inseùrer 2 Verrous 2 dans les trous
4. Utiliser un tournevis aø teâte plate pour fixer solidement les Verrous.
Cam Lock Pins with pre-drilled holes and attach Drawer Sides F .
goujons de serrage avec les trous preùperceùs et relier les coteùs
preùperceùs de chaque coâteù du tiroir F .
F
E
F
STEP 6
1. Slide Drawer Bottom H firmly into slots on Drawer Side F and Drawer Front E .
EÙTAPE 6
1. Faire glisser le bas du tiroir H dans les coulisses Coâteù du tiroir F et aø la Avant du tiroir E .
7/12

BURLINGTON / PORTLAND / BERKSHIRE
CONSOLE TABLE
TABLE CONSOLE
NOTICE / AVIS
Please use a screwdriver for the screws. The screwdriver is not included in the pack.
Please use a screwdriver for the screws. The screwdriver is not included in the pack.
SVP utilisez un tournevis pour les vis. Le tournevis n’est pas fourni avec le produit.
SVP utilisez un tournevis pour les vis. Le tournevis n’est pas fourni avec le produit.
ASSEMBLY INSTRUCTIONS / INSTRUCTIONS D’ASSEMBLAGE
F
STEP 7
F
1. Align Drawer back G with Drawer bottom H and press firmly into slot .
2. Attach back using 2 Allen key screws 1 through pre-drilled holes on each side.
3. Use Allen key 3 to tighten. Do not over tighten.
EÙTAPE 7
Aligner I’arrieøre du tiroir G avec le bas du tiroir H et presser fermement
1. .
2. Fixer
3.
I’arrieøre au moyen de 2 Vis allen 1 dans les trous preùoerceùs de chaque coâteù.
Utiliser la Clef allen 3 pour serrer. Ne pas trop serrer.
STEP 8
1. Use Phillips screwdriver to attach Handle 5 to Drawer Front E .
EÙTAPE 8
1. Utiliser un tournevis aø teâte eùtoile pour fixer la poigneùe 5
de tiroir E .avant
8/12

BURLINGTON / PORTLAND / BERKSHIRE
CONSOLE TABLE
TABLE CONSOLE
NOTICE / AVIS
Please use a screwdriver for the screws. The screwdriver is not included in the pack.
Please use a screwdriver for the screws. The screwdriver is not included in the pack.
SVP utilisez un tournevis pour les vis. Le tournevis n’est pas fourni avec le produit.
SVP utilisez un tournevis pour les vis. Le tournevis n’est pas fourni avec le produit.
ASSEMBLY INSTRUCTIONS / INSTRUCTIONS D’ASSEMBLAGE
1
3
STEP 9
1. Insert 6 Allen Key Screws 1
2. Use Allen key 3 to tighten. Do not over-tighten.
EÙTAPE 9
1. Inserer 6 Vis Allens 1 dans les trous situeùs au centre du 2 Seùparateurs D pour fixer les
(3 Vis / chaque).
2.
Utiliser la Clef Allen 3 pour serrer. Ne pas trop serrer.
through pre-drilled holes on centre of 2 Dividers D into Centre Shelf C1 (3 Screws / each).
1
Tablette Centrale C1
STEP 10
1. Insert 6 Allen Key Screws 1
2. Use Allen key 3 to tighten. Do not over-tighten.
EÙTAPE 10
1. Inserer 6 Vis Allens 1 dans les trous situeùs au tablette du 2 Seùparateurs D pour fixer les
(3 Vis / chaque).
2.
Utiliser la Clef Allen 3 pour serrer. Ne pas trop serrer.
through pre-drilled holes on bottom of 2 Dividers D into Bottom Shelf C (3 Screws / each).
Tablette infeùrieur C
9/12

BURLINGTON / PORTLAND / BERKSHIRE
CONSOLE TABLE
TABLE CONSOLE
NOTICE / AVIS
Please use a screwdriver for the screws. The screwdriver is not included in the pack.
Please use a screwdriver for the screws. The screwdriver is not included in the pack.
SVP utilisez un tournevis pour les vis. Le tournevis n’est pas fourni avec le produit.
SVP utilisez un tournevis pour les vis. Le tournevis n’est pas fourni avec le produit.
ASSEMBLY INSTRUCTIONS / INSTRUCTIONS D’ASSEMBLAGE
2
STEP 11
1. Attach 6 Cam Lock Pins 2 to each Side A using guide holes .
2. Align
3. Insert 12 Cam Locks 2 into pre-drilled holes on Centre Shelf C1 and Bottom shelf C ( 6 Cam Locks / each ) .
4. Use flathead screwdriver secure Cam Locks.
EÙTAPE 11
1. Fixer 6 goujons de serrage 2 au chaque Coâteù A en se guidant sur les trous .
2. Aligner les C.
3. Inseùrer 12 Verrous 2 dans les trous
4. Utiliser un tournevis aø teâte plate pour fixer solidement les Verrous.
Cam Lock Pins with pre-drilled holes on Centre Shelf C1 and Bottom shelf C .
goujons de serrage avec les trous preùperceùs et relier les Tablette centrale C1 et Tablette infeùrieure
preùperceùs de Tablette centrale C1 et Tablette infeùrieure C ( 6 Verrous / chaque ).
10/12

BURLINGTON / PORTLAND / BERKSHIRE
CONSOLE TABLE
TABLE CONSOLE
NOTICE / AVIS
Please use a screwdriver for the screws. The screwdriver is not included in the pack.
Please use a screwdriver for the screws. The screwdriver is not included in the pack.
SVP utilisez un tournevis pour les vis. Le tournevis n’est pas fourni avec le produit.
SVP utilisez un tournevis pour les vis. Le tournevis n’est pas fourni avec le produit.
ASSEMBLY INSTRUCTIONS / INSTRUCTIONS D’ASSEMBLAGE
3
STEP 8
1. Insert 12 Allen Key Screws 1 into pre-drilled holes on 2 Sides A and 2 Dividers D into Top B ( 3 Screws / each ).
2. Use Allen Key 3 to tighten. Do not over tighten .
EÙTAPE 8
1. Inseùrer 12 Vis allen 1 dans les trous preùperceùs de 2 Coâtesù A et 2 Seùparateurs D pour fixer les Dessus B (3 Vis / chaque).
2. Utiliser une Clef allen 3 pour serrer. Ne pas trop serrer.
I
STEP 12
1. Use Phillips round head screws 4 to attach Back panel I to back of console table.
2. Use Phillips screwdriver to snugly tighten screws .
EÙTAPE 12
1. Utiliser de 4 fixer les Panneau arrieøre I aø table console.
2. Utiliser un tournevis aø teâte eùtoile pour visser les vis de1licatement,
Vis cruciforme aø teâte ronde
11/12
BURLINGTON / PORTLAND / BERKSHIRE
CONSOLE TABLE
TABLE CONSOLE
NOTICE / AVIS
Please use a screwdriver for the screws. The screwdriver is not included in the pack.
Please use a screwdriver for the screws. The screwdriver is not included in the pack.
SVP utilisez un tournevis pour les vis. Le tournevis n’est pas fourni avec le produit.
SVP utilisez un tournevis pour les vis. Le tournevis n’est pas fourni avec le produit.
ASSEMBLY INSTRUCTIONS / INSTRUCTIONS D’ASSEMBLAGE
STEP 13
1. Insert assembled drawer into slots on assembled table.
2. Drawer can be inserted into table’s opening.
EÙTAPE 13
1. Inseùrer les tioirs assembleùs dans les coulisses du table.
2. Les tiroir peuvent eâtre inseùreùs dans les ouvertures du table.
12/12
 Loading...