

Simplicity Symmetry SYMST, Symmetry SYMUSA, Symmetry SYMCLNT, Symmetry SYMCL, Symmetry SYM Owner's Manual
...
(The chances are you’re
never going to read me)
Owner’s Manual
all models
www.simplicityvac.com


1
IMPORTANT SAFETY INSTRUCTIONS .............................................................. 2
Polarization instructions .................................................................................. 3
Description of the vacuum .............................................................................. 4
Before using your Symmetry for the first time ................................................ 6
Operation
Unwinding the power cord .............................................................................. 7
Turning vacuum on / off ................................................................................. 8
Vacuuming carpet ........................................................................................... 9
Vacuuming hard surfaces ............................................................................... 9
Carpet height adjustment ............................................................................... 9
Vacuuming under furniture .............................................................................. 10
Carrying the vacuum ...................................................................................... 11
Attachment Cleaning
Wand cleaning ................................................................................................ 12
Cleaning tools ................................................................................................. 13
Adjusting the suction power ........................................................................... 14
Optional cleaning tools ................................................................................... 15
Connecting attachment hose .......................................................................... 16
Maintenance and Care
When to change the vacuum bag/Full bag indicator light .............................. 17
Replacing the vacuum bag ............................................................................ 18
When to change the filters .............................................................................. 19
Replacing the filters ........................................................................................ 19
Removing and reinstalling bottom plate ......................................................... 21
Replacing the agitator belt ............................................................................ 22
Lifetime belt protection warranty ...................................................................... 23
Replacing the headlight bulb ......................................................................... 24
Edge cleaning ................................................................................................ 24
Annual checkup reminder ............................................................................... 24
Problem Solving Guide
Unclogging nozzle and hose .......................................................................... 25
Thermal motor protection ................................................................................ 26
Jammed brushroll ............................................................................................ 26
Trouble shooting .............................................................................................. 27
How to contact your Authorized Retailer ........................................................ 27
Visit Simplicity online ....................................................................................... 27
Warranty ................................................................................................................. 28
Contents

2
IMPORTANT SAFETY INSTRUCTIONS
When using an electrical appliance, basic precautions should always be followed,
including the following:
READ ALL INSTRUCTIONS BEFORE
USING THIS APPLIANCE
The manufacturer cannot accept responsibility for damage
caused when the appliance is not used according to the
instructions, or for uses other than those for which it
was intended.
To reduce the risk of fire, electric shock or injury:
• Do not leave appliance when plugged in.
Unplug from outlet when not in use and
before servicing.
• WARNING: ELECTRIC SHOCK COULD
OCCUR IF USED OUTDOORS OR ON
WET SURFACES.
• Do not allow to be used as a toy. Close
attention is necessary when used by or
near children.
• Use only as described in this manual.
Use only manufacturer’s recommended
attachments.
• Do not use with damaged cord or plug. If
appliance is not working as it should, has
been dropped, damaged, left outdoors,
or dropped into water, return it to your
Authorized Retailer for service.
• Do not pull or carry by cord, use cord as
a handle, close a door on the cord, or pull
cord around sharp edges or corners. Do
not run appliance over cord. Keep cord
away from heated surfaces.
• Do not unplug by pulling on cord. To
unplug, grasp the plug, not the cord.
• Do not handle plug or appliance with
wet hands.
• Do not put any object into openings. Do
not use with any opening blocked; keep
free of dust, lint, hair and anything that
may reduce air ow.
• Keep hair, loose clothing, ngers and all
parts of body away from openings and
moving parts.
• Do not pick up anything that is burning or
smoking, such as cigarettes, matches or
hot ashes.
• Do not use without vacuum bag and/or
lters in place.
• Turn off all controls before unplugging.
• Use extra care when cleaning on stairs.
• Do not use to pick up ammable or
combustible liquids, such as gasoline, or
use in areas where they may be present.
• Do not attempt to service the unit while
appliance is plugged in.
SAVE THESE INSTRUCTIONS.
WARNING:
3
POWER CORD, 2-WIRE POLARIZED CORD
Household Models: SYME, SYMENT, SYMST, SYMDL,
SYMPBP, SYM, SYMUSA, SYMCLNT,
SYMCL, SYMS, SYMD, SYMPNT &
SYMP
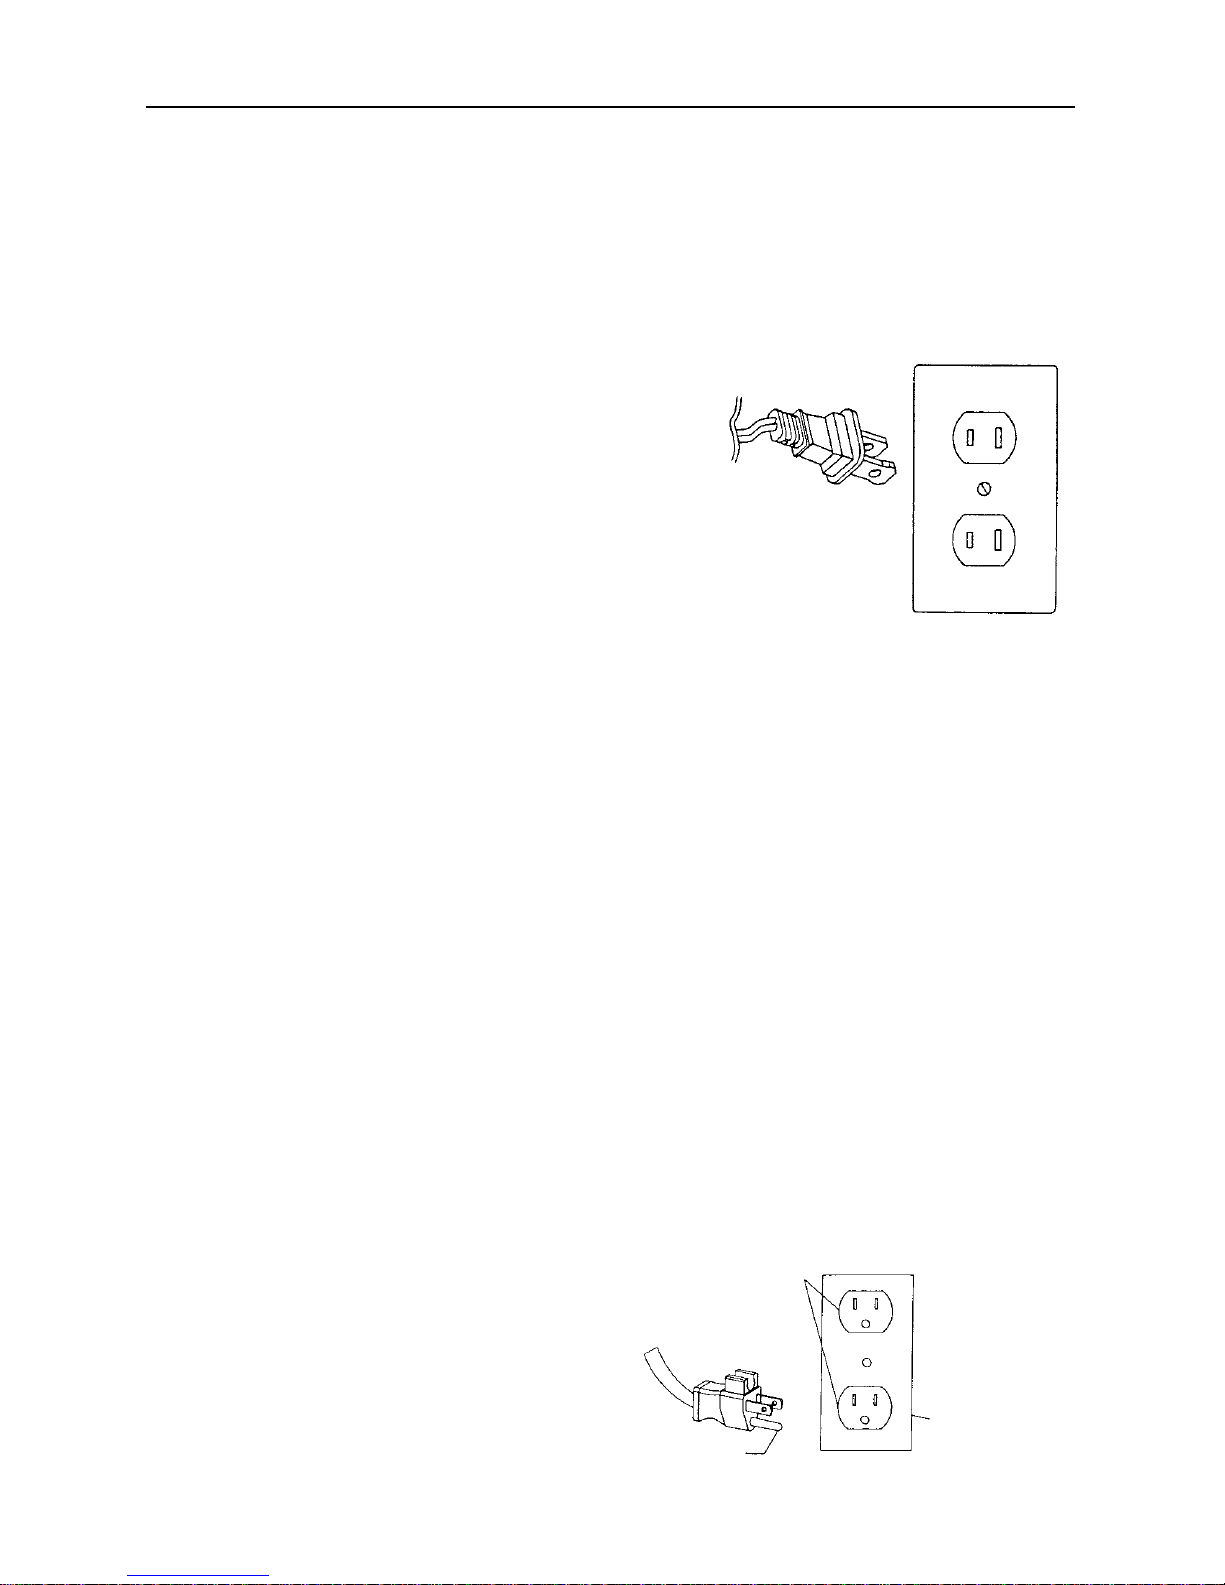
To reduce the risk of electric shock, this product
is equipped with a polarized alternating current
line plug (a plug having one blade wider than the
other). This plug will fit into the power outlet only
one way. This is a safety feature. If you are unable to
insert the plug fully into the outlet, try reversing the
plug. If the plug should still fail to fit, contact a
qualified electrician to replace the obsolete outlet. Do
not defeat the safety purpose of the polarized plug.
Polarization Instructions
Grounding Instructions
Commercial Models: SYMCNT, SYMC & SYMCBP
This vacuum cleaner must be grounded. If it should malfunction or break down,
grounding provides a path of least resistance for electric current to reduce the risk of
electric shock. This vacuum cleaner is equipped with a cord having an equipment-
grounding conductor and grounding plug. The plug must be plugged into an
appropriate outlet that is properly installed and grounded in accordance with all local
codes and ordinances.
This vacuum cleaner is for use on a nominal 120-volt circuit and has a ground plug
(see illustration). Make sure the vacuum is connected to an outlet having the same
configuration as the plug. No adapter should be used with this vacuum.
Grounded
Outlet
Grounding
Grounded
Outlet Box
WARNING – Improper connection of
the equipment-grounding conductor
can result in the risk of electric shock.
Check with a qualified electrician or
service person if you are in doubt
as to whether the outlet is properly
grounded. Do not modify the plug
provided with the vacuum – if it will
not fit the outlet, have a proper outlet
installed by a qualified electrician.
4
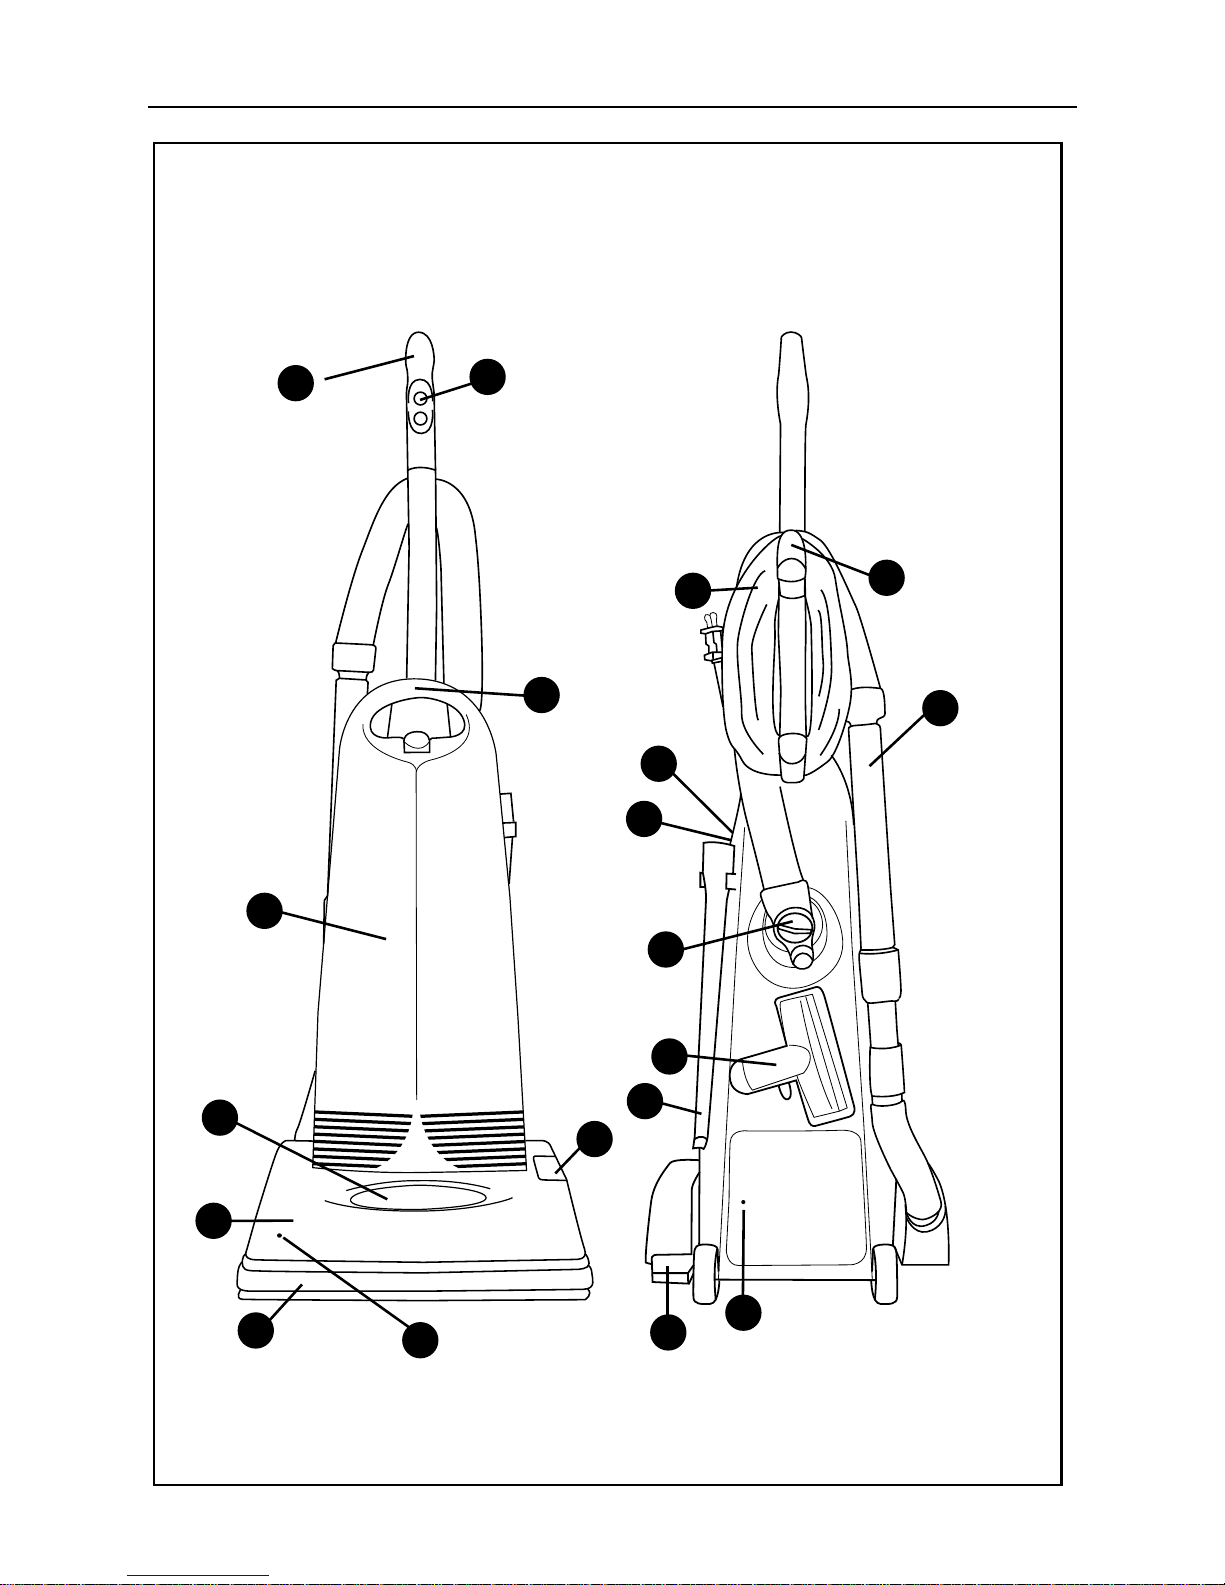
Description of the Vacuum
6
18
17
5
13
16
10
9
11
8
7
2
4
3
1
12
14
15
19

5
1 Ergonomic handle
2 Main on / off power switch
(for models SYMDL, SYMPBP, SYM, SYMS, SYMD, SYMPNT, SYMP,
SYMCNT, SYMC & SYMCBP)
3 Power Cord
4 Carrying handle
5 Bag compartment cover (to replace vacuum bag)
6 Xenon headlight (for all models except SYMUSA, SYME & SYMENT)
7 Vacuum nozzle
8 Furniture guard
9 Carpet / Floor selector (for models SYMDL, SYMPBP, SYM, SYMUSA,
SYMPNT & SYMP)
10 Quick release cord hook
11 Ready Reach
™
tools
(for models SYME, SYMST, SYMDL, SYMPBP, SYM, SYMUSA, SYMCL,
SYMS, SYMD, SYMP, SYMC & SYMCBP)
12 Suction control dial
13 Combination dusting / upholstery brush
(for models SYME, SYMST, SYMDL, SYMPBP, SYM, SYMUSA, SYMCL,
SYMS, SYMD, SYMP, SYMC & SYMCBP)
14 Crevice tool
(for models SYME, SYMST, SYMDL, SYMPBP, SYM, SYMUSA, SYMCL,
SYMS, SYMD, SYMP, SYMC & SYMCBP)
15 Thermal reset button
16 Full bag / clog indicator
(for models SYMPBP, SYM, SYMD, SYMPNT, SYMP, SYMCNT, SYMC &
SYMCBP)
17 Main on / off power switch (for models SYME, SYMENT, SYMST, SYMCLNT,
SYMCL & SYMUSA)
18 Handle release pedal
19 Brushroll jam indicator (for models SYMPBP & SYMCBP)
Description of the Vacuum
6
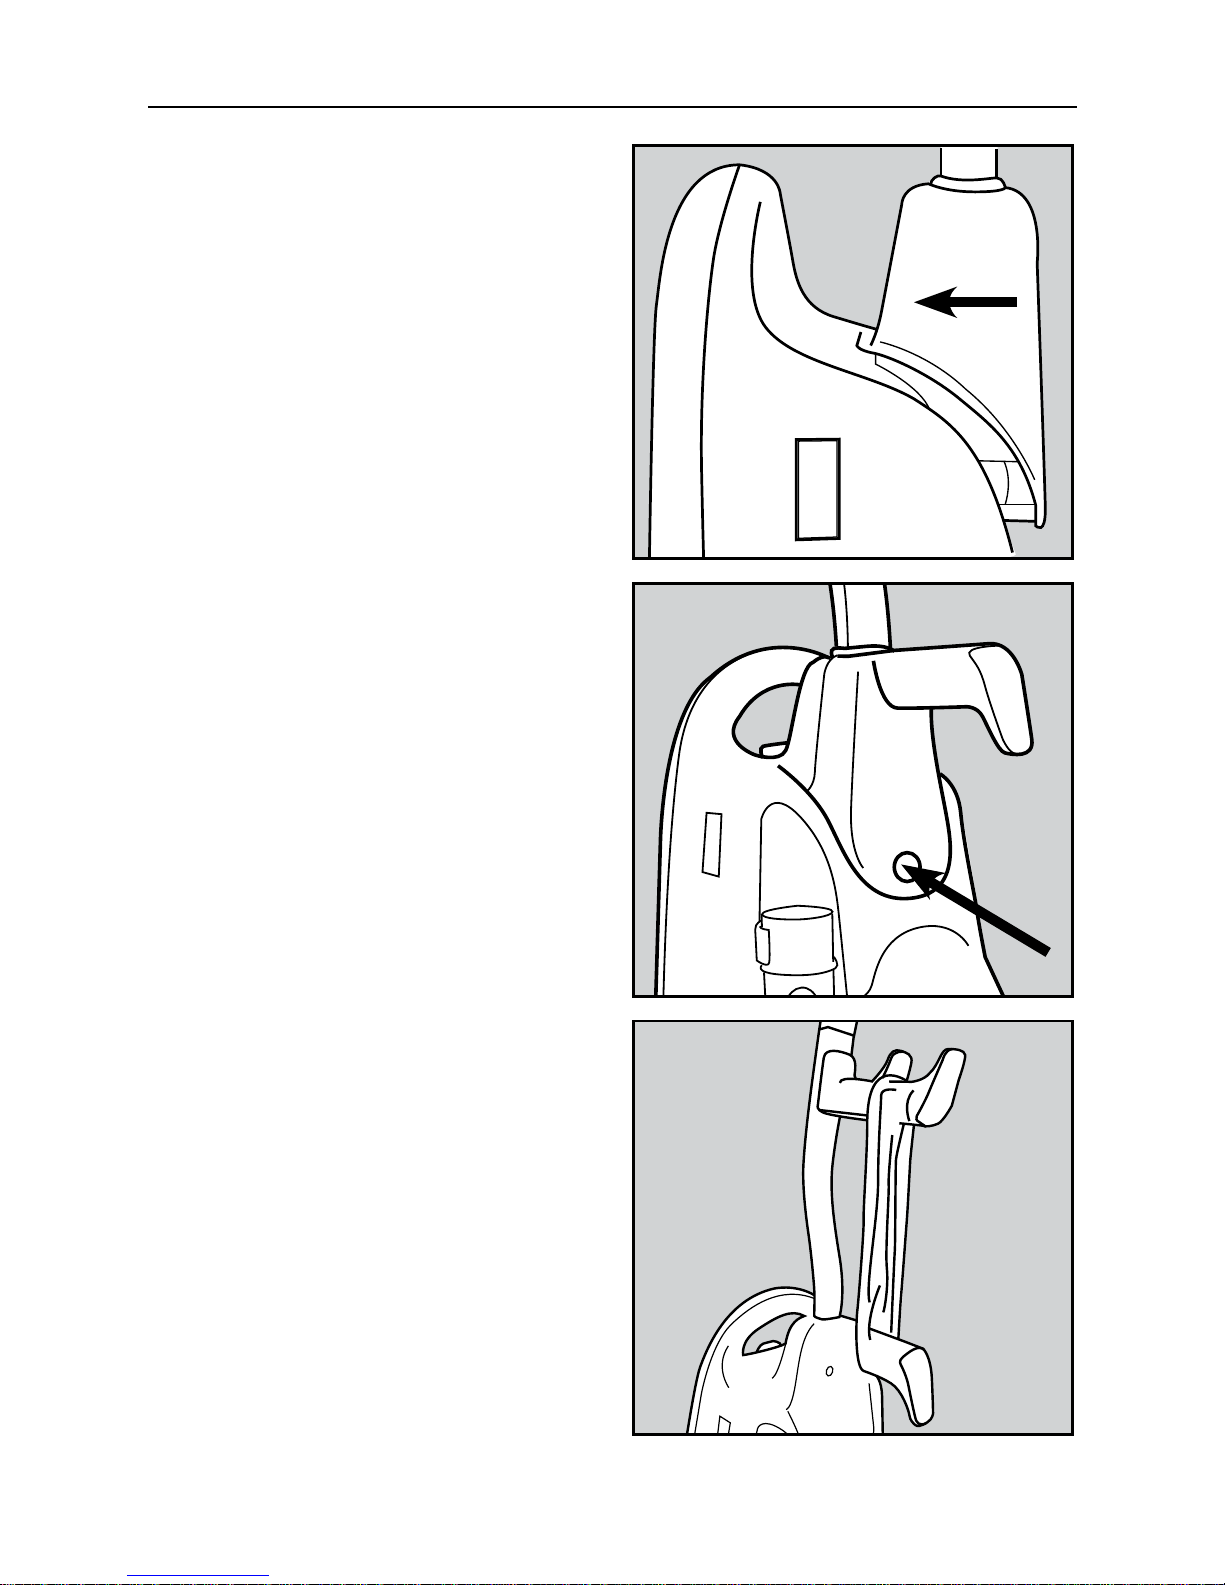
Before Using your Symmetry for the First Time
Attaching the handle to the vacuum
The vacuum cleaner and the handle are
packed separately.
• After first removing the handle screw,
position the handle behind the vacuum
cleaner and level with the top of the
unit. Hold the power cord down and
away from the vacuum while the handle
is being attached. Make sure that the
switch on the handle is positioned
toward the front of the vacuum cleaner.
• On the bottom of the handle are two
“T-shaped” rails that slide forward onto
two guides located on the top of the
vacuum cleaner. Line up the handle so
that the “T” rails will slide into the guides
and push the handle forward.
• Insert the handle screw and tighten
securely.
• Turn the upper cord storage hook to
the upright position and wind the power
cord around the cord storage hooks
when storing the vacuum cleaner.
7
Operation
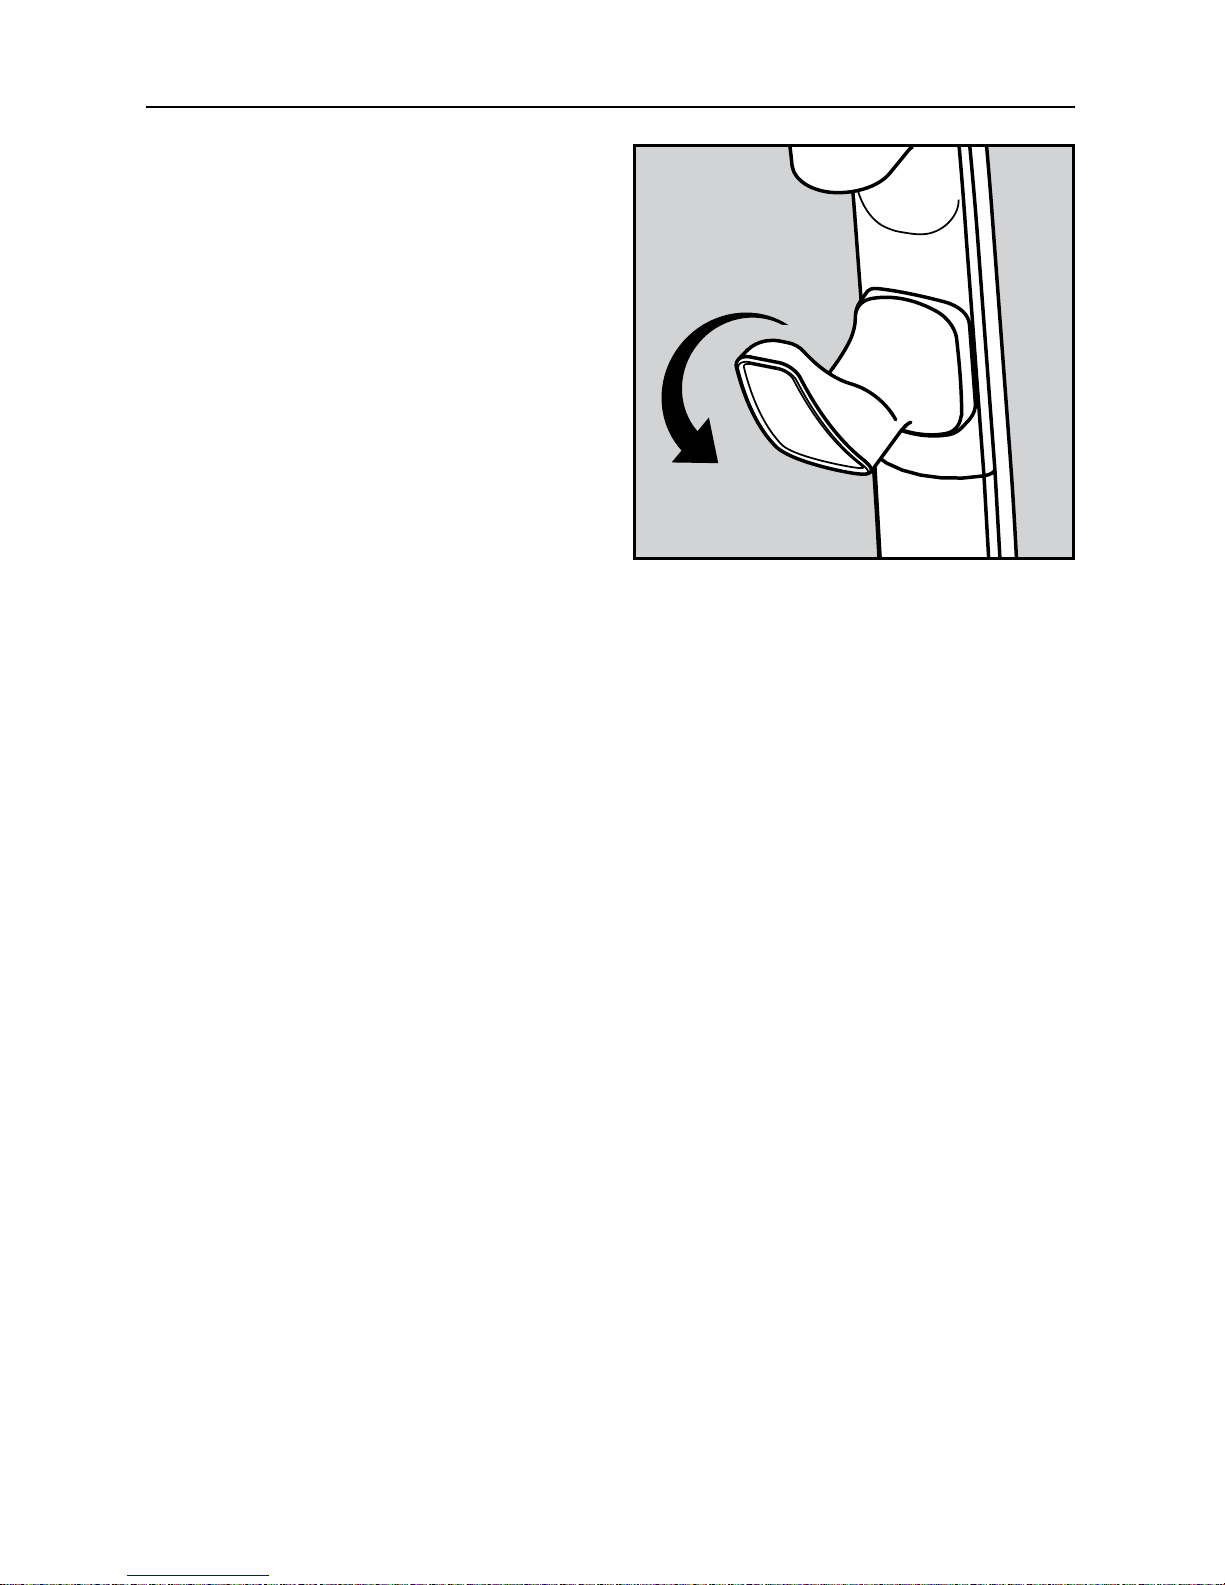
Unwinding the power cord
• The upper cord hook rotates to allow for
quick access to the power cord.

8
Operation
On / Off switch
Models: SYMDL, SYMPBP, SYM, SYMS,
SYMD, SYMPNT, SYMP, SYMCNT,
SYMC & SYMCBP
• To start the vacuum cleaner, ip the
“on / off” switch located on the handle
to the “on” position.
• To stop the vacuum cleaner, ip the “on /
off” switch to the “off” position.
• Turn the vacuum cleaner off before
unplugging from electrical outlet.
On / Off switch
Models: SYME, SYMENT, SYMST,
SYMUSA, SYMCLNT & SYMCL
• To start the vacuum cleaner, ip the
“on / off” switch located on the side of
the bag compartment to the “on” position
as indicated on the switch.
• To stop the vacuum cleaner, ip the
“on / off” switch to the “off” position
as indicated on the switch.
• Turn the vacuum cleaner off before
unplugging from electrical outlet.
Off
On
 Loading...