

Page 1
Milestone AV Technologies
6436 City West Parkway
Eden Prairie, MN 55344 USA
Customer Service
888-333-1376 • 952-225-6011 • info@simplicityav.com
www.simplicityav.com
©2012 Milestone AV Technologies, a Duchossois Group Company.
All rights reserved. Simplicity is a Milestone brand.
All other brand names or marks are used for identi cation purposes and are trademarks of their respective owners.
6903-002007 <02>
SLF4 Instruction Manual
Scan here to view
product demo and install
videos or visit mnt.tv/105
Page 2

6903-002007 <02>
2
English How to use this manual
For best results, reference both the text and illustrations.
OR
Select one item or the other.
OPT
This item is optional
English Text Pages 3-13
Français Utilisation de ce guide
Pour obtenir de meilleurs résultats, reportez-vous à la fois au texte et aux illustrations.
OR
Sélectionnez un article ou l’autre.
OPT
Cet article est facultatif.
Texte français page 14
Español Cómo usar este manual
Para obtener mejores resultados, consulte el texto y las ilustraciones.
OR
Seleccione uno de los elementos.
OPT
Este elemento es opcional.
Texto en español página 16
Page 3
6903-002007 <02>
3
IMPORTANT SAFETY INSTRUCTIONS – SAVE THESE INSTRUCTIONS – PLEASE READ ENTIRE MANUAL PRIOR TO USE
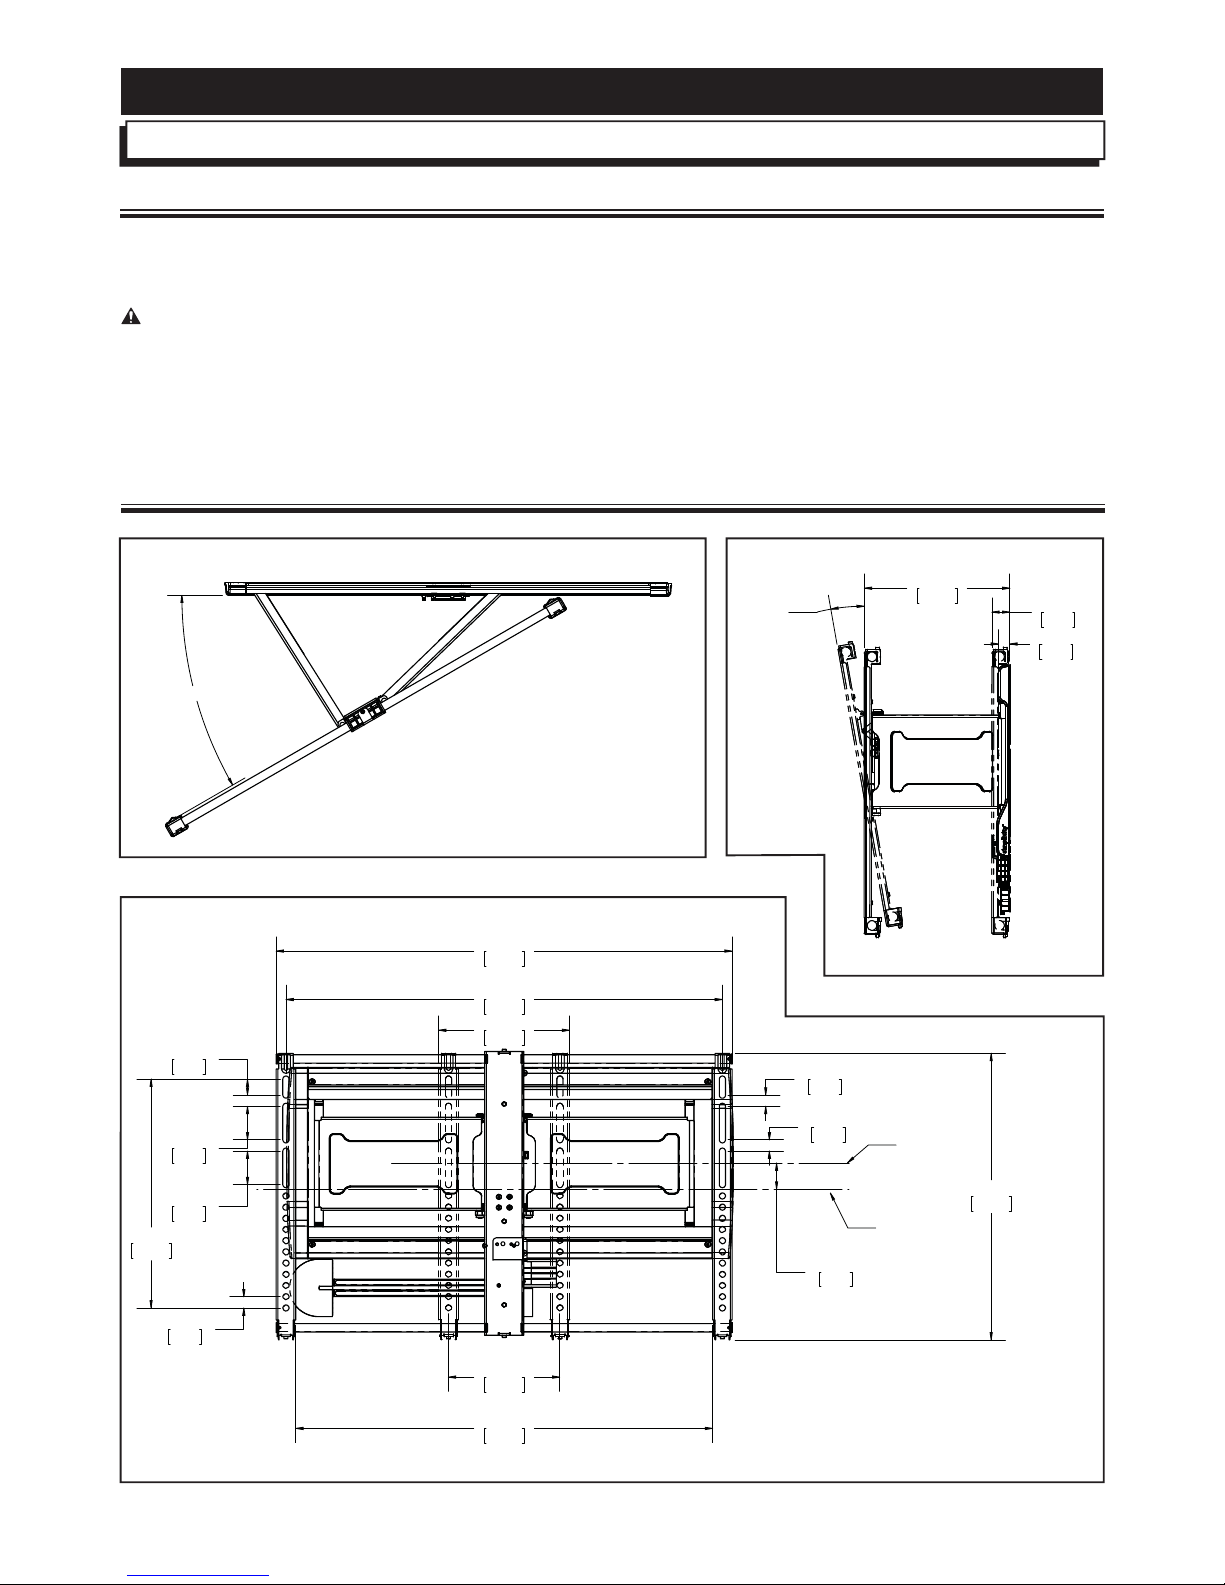
Speci cations
Ù Weight capacity-DO NOT EXCEED: 56.7 kg (125 lb.) includes TV and any accessories
Ù Swivel: ±30°
Ù T
ilt: +0° to –10°
Ù Level: ±1.5°
CAUTION: Avoid potential personal injuries and property damage!
Ù Do not use this product for any purpose not explicitly speci ed by manufacturer.
Ù The wall must be capable of supporting ve times the weight of the monitor and mount combined.
Ù T
his product is not designed for use in metal stud walls!
Ù If y
ou do not understand these instructions, or have doubts about the safety of the installation, assembly or use of this product,
contact Customer Service or call a quali ed contractor.
Ù Manufacturer is not responsible for damage or injury caused by incorrect assembly or use.
Technical Speci cations
English
30.00°
7.85
199.5
9.23
234.5
30.78
781.8
29.40
746.8
32.16
816.8
20.20
513.2
16.14
410.0
0.79
20.1
1.13
28.7
0.79
20.1
2.37
60.2
0.79
20.1
2.37
60.2
1.84
46.7
WALL PLATE
CENTERLINE
TV BRACKET
CENTERLINE
10.26
260.7
10.00°
0.80
20.2
1.27
32.2
Page 4
6903-002007 <02>
4
M4 M6 / M8
M8 x 40mm
M6 x 14mm
M6 x 40mm
M4 x 30mm
14mm
M4 x 12mm
M8 x 16mm
24mm
5/16 x 2¾ in.
M3 1/8 in.
M4 x 25mm
5/32 in.
10-32 x 3/8 in.10-32 x 3/4 in.
[01] x 1 [02] x 2
[03] x 2
[05] x 1
[04] x 1
[06] x 1
[07] x 4 [08] x 4
[09] x 4 [10] x 4
[11] x 4
[13] x 4
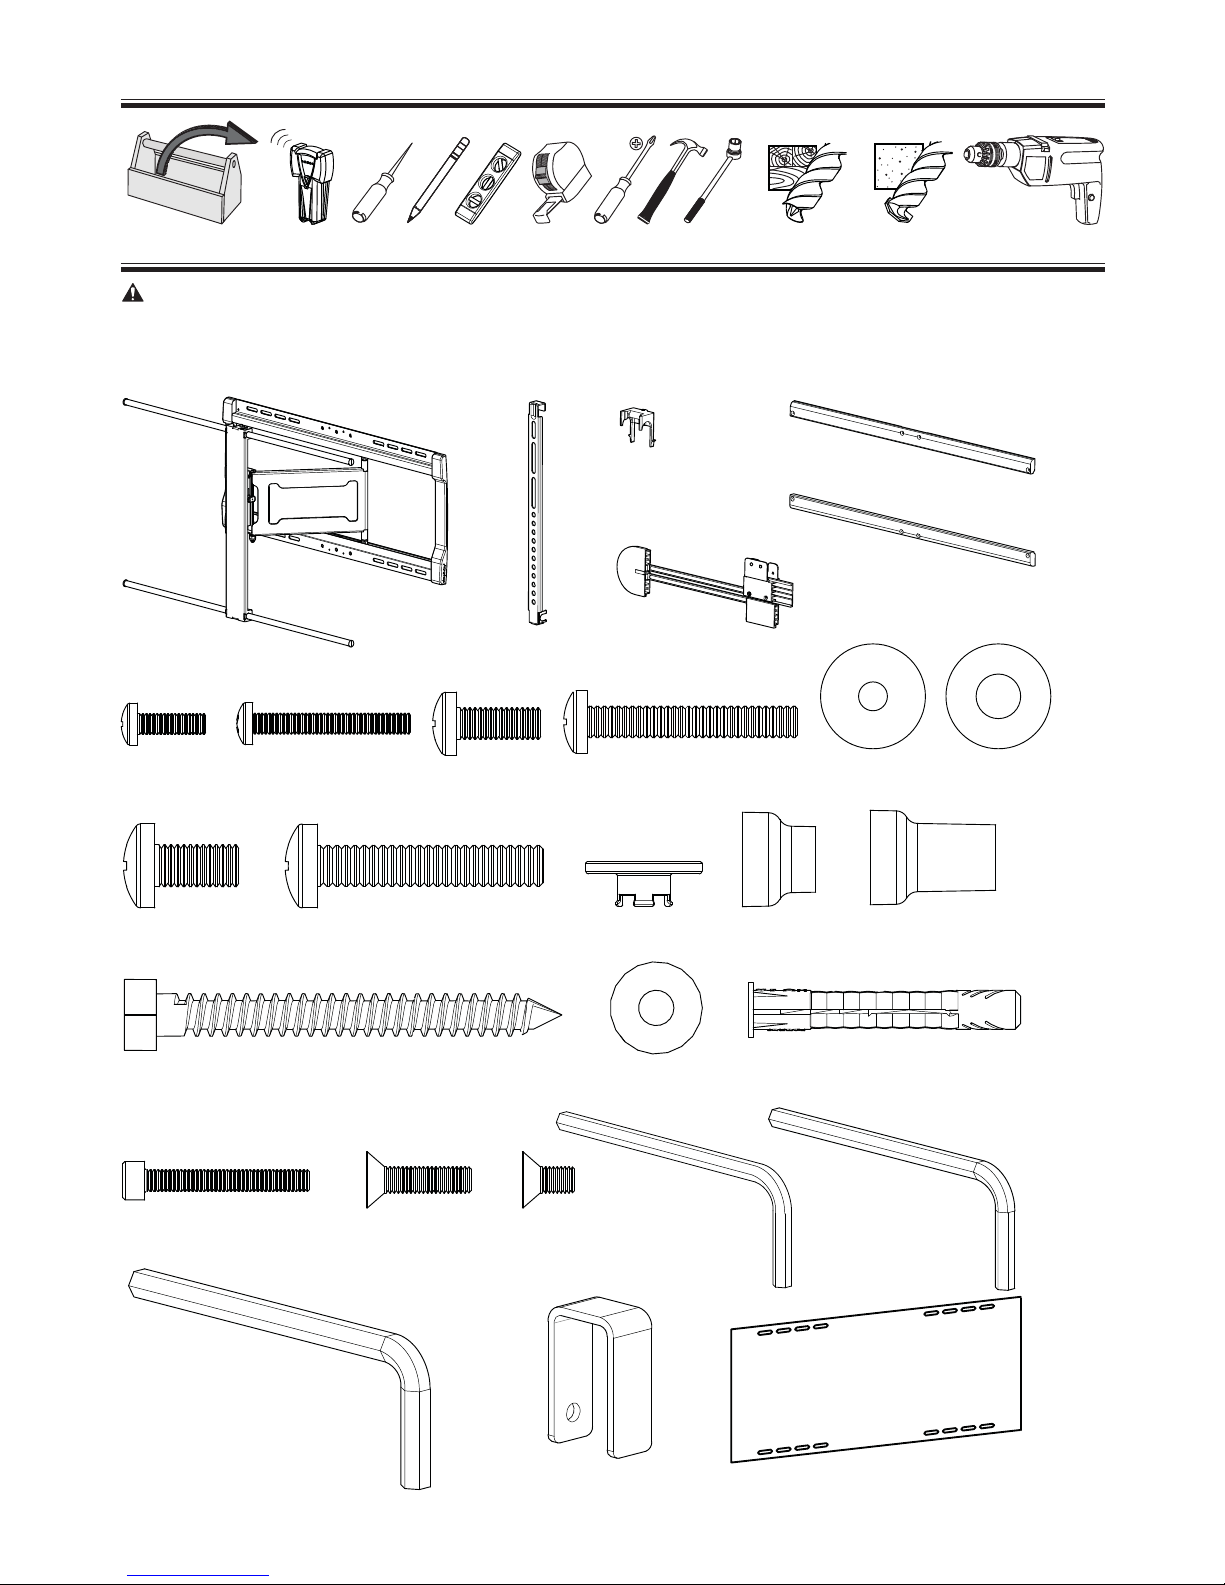
Supplied Parts and Hardware
WARNING: This product contains small items that could be a choking hazard if swallowed.
Before starting assembly, verify all parts are included and undamaged. If any parts are missing or damaged, do not return the damaged
item t
o your dealer; contact Customer Service. Never use damaged parts!
NOTE: M4, M6, or M8 describes the diameter, mm describes the length of screws that are labeled M# X ##mm. Not all hardware included will
be used.
Required Tools
[12] x 4
[14] x 4
[15] x 4
[16] x 4
[18] x 4
[17] x 4
[19] x 4
[20] x 4
[21] x 2
[22] x 8
[23] x 2
[26] x 1
[25] x 1
[24] x 1
[27] x 1
13mm
(1/2 in.)
5.5mm
(7/32 in
.)
10mm
(3/8 in.
)
[28] x 1
Page 5

6903-002007 <02>
5
Page 6
6903-002007 <02>
6
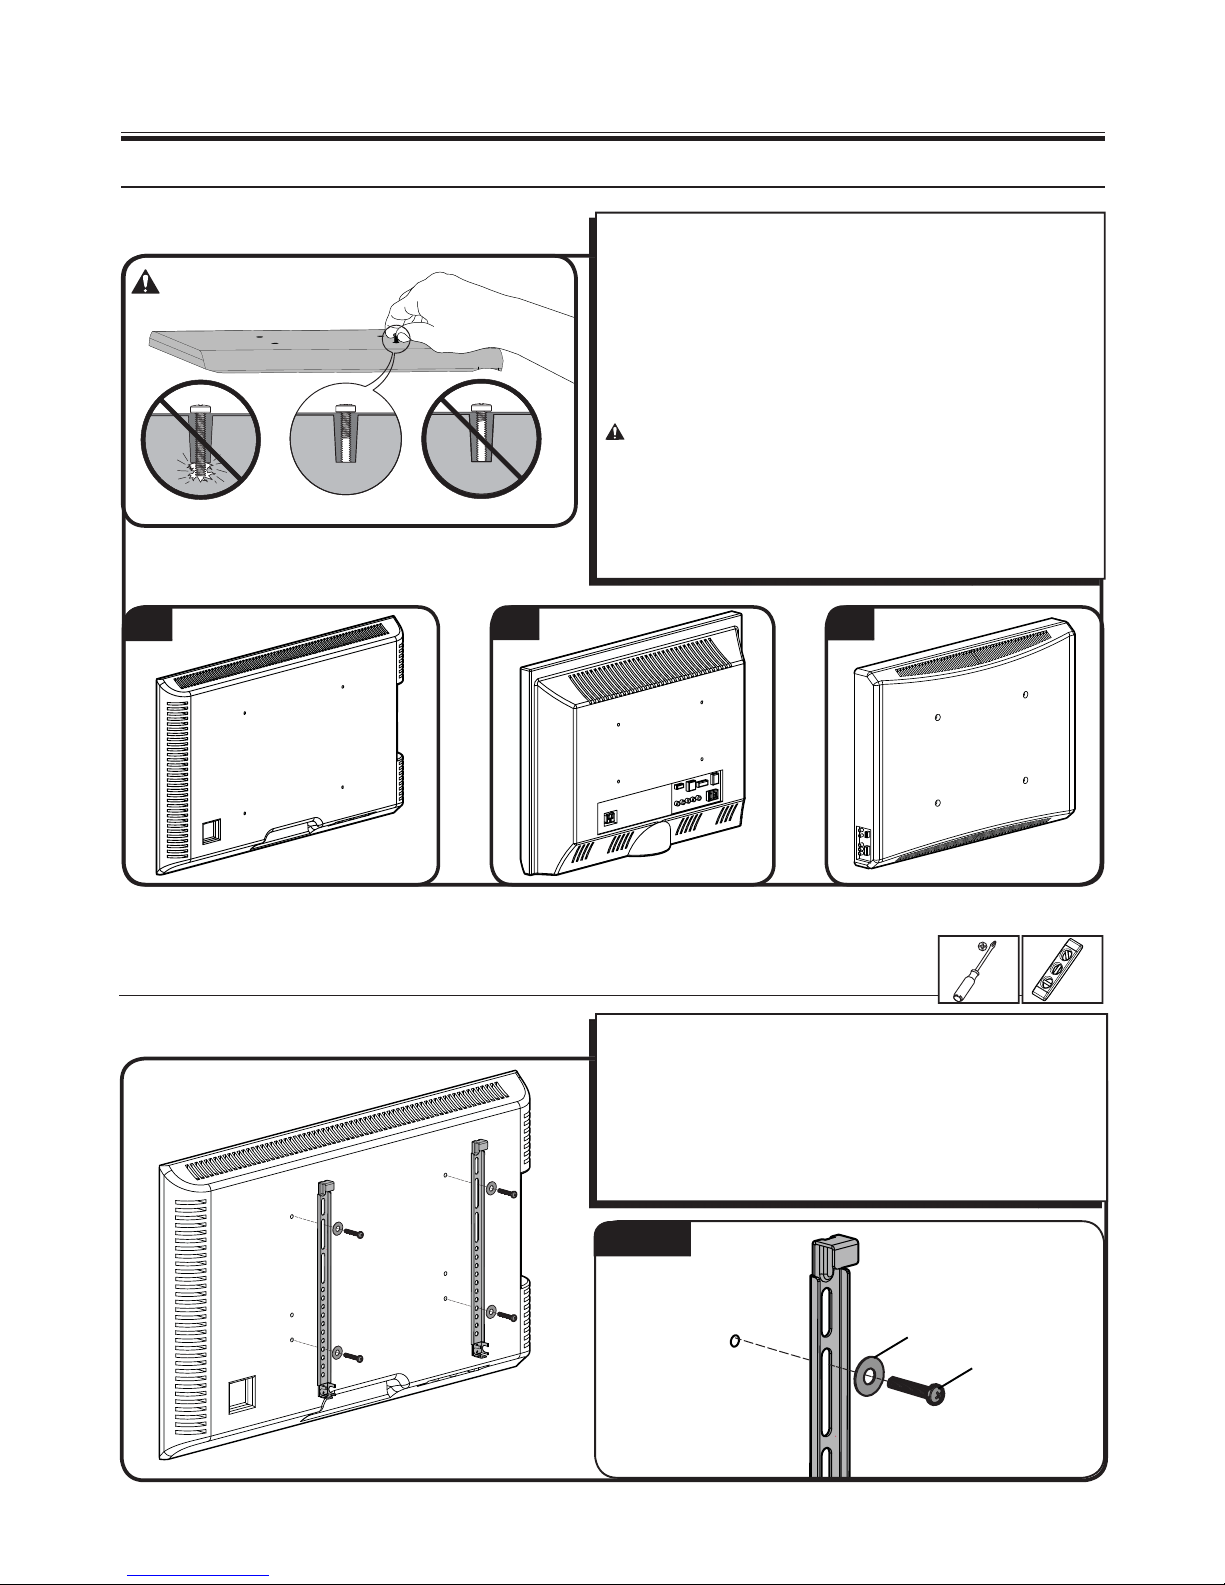
1 Select TV Hardware and Mount TV Brackets
Your TV type will help you determine which hardware con guration to
use. Match your type of TV to the suggested hardware con guration
on the next page.
A. Installation option without spacers (TVs with at
backs)
B. Installation option using 14mm spacers (TVs with irregular backs)
C. Installation option using 24mm spacers (For TVs with irregular
backs that require more length than the 14mm spacer provides.)
Hand thread screws into the threaded inserts on the back of your TV
to determine the correct screw diameter (M4, M6, or M8).
CAUTION: Avoid potential personal injuries and property
damage! Verify that there are adequate threads to secure the brackets
to the monitor. If you encounter resistance, stop immediately
and contact customer service. Use the shortest screw and spacer
combination to accommodate your needs. Using hardware that is too
long may damage your TV.
B
C
1-1 Select the hardware diameter and length
A
M4/M6/M8
1-2 Attach brackets to a TV with a at back
[07, 09, 13]
[11, 12]
In step 1-1 if you selected the:
M4 x 12mm bolt [07] use the M4 washer [11].
M6 x 14mm bolt [09] use the M6/M8 washer [12].
M8 x 16mm diameter bolt [13] use the M6/M8 washer [12].
Con rm that the brackets are level on the back of the TV.
If you require additional space for cables, recesses, or protrusions,
choose one of the con gurations at right.
Page 7

6903-002007 <02>
7
In step 1-1 if you selected the:
M4 x 30mm bolt [08] use the M4 washer [11] and spacer [16].
M6 x 40mm [10] use the M6/M8 washer [12] and spacer [17].
M8 x 40mm [14] use the M6/M8 washer [12] and spacer [17].
Con rm that the brackets are level on the back of the TV.
Standard con gurations are shown. For special applications,
or if you are uncertain about your hardware selection, contact
Customer Service.
M4
M6/M8
1
[02]
[15]
[02]
[15]
1-2 Attach brackets to a TV with an irregular back
2
[16, 17]
Attach shoulder washers [15] and spacers to the brackets [02]
1. Push the shoulder washer [15] through the appropriate
openings of the brackets [02].
2. Snap shoulder washer [15] into the spacer you selected in
step 1-1.
If you need more room to accommodate cables, recesses, or
protrusions, use the 24mm spacer [17].
[16]
[17]
[15]
[15]
[11]
[12]
[08]
[10, 14]
Page 8

6903-002007 <02>
8
[28]
41 - 61 cm
(16 - 24 in.)
< 16 mm
(5/8 in.)
2 Mount the Wall Plate
Wood stud
5.5mm
(7/32 in.)
13 mm
(1/2 in.)
2-1 Locate studs
2-2 Mark the wall
Verify the center of the stud(s) using an awl, a thin nail, or an edge to
edge stud nder.
CAUTION: Avoid potential personal injuries and property
damage!
Ù Any material covering the wall must not exceed 16 mm (5/8 in.).
Ù Minimum wood stud size: common 2 x 4 in. (nominal 1.5 x 3.5 in.).
For assistance in determining wall plate location, see Height Wizard at
simplicityav.com. Level the wall plate template [28] and mark the hole
locations.
2-3 Drill pilot holes
2-4 Tighten lag bolts
CAUTION:
Avoid potential injuries or property damage! Pilot
holes MUST be drilled to a depth of 75 mm (3 in.), using a 5.5 mm (7/32
in.) diameter drill bit.
75 mm
(3 in.)
CAUTION:
Avoid potential injuries or property damage!
Improper use could reduce the holding power of the lag bolt. To
avoid potential injuries or property damage
Ù DO NOT over-tighten the lag bolts [18].
Ù Tighten the lag bolts [18] only until the washers [19] are pulled
rmly against the wall plate [01].
[01]
[19]
[18]
Page 9

6903-002007 <02>
9
2 Mount the Wall Plate
Solid concrete or concrete block
2-1 Mark the wall
2-2 Drill pilot holes
2-3 Insert anchors and lag bolts
13 mm
(1/2 in.)
10 mm
(3/8 in.)
75 mm
(3 in.)
CAUTION:
Avoid potential injuries or property damage!
Ù Pilot holes MUST be drilled to a depth of 75 mm (3 in.) using a 10
mm (3/8 in.) diameter drill bit.
Ù Never drill into the mortar between blocks.
Insert lag bolt anchors [20]. Then insert lag bolts [18] through the
wall plate [01] and into the anchors.
CAUTION:
Avoid potential injuries or property damage!
Improper use could reduce the holding power of the lag bolt. To
avoid potential injuries or property damage:
ÙBe sure the anchors [20]
are seated ush with the
concrete surface.
ÙTighten the lag bolts [18]
only until the washers [19]
are pulled rmly against
the wall plate [01].
ÙDO NOT over-tighten the lag
bolts [18].
For assistance in determining wall plate location, see Height Wizard at
simplicityav.com
Level the wall plate template [28] and mark the hole locations.
CAUTION:
Avoid potential injuries or property damage!
Ù Mount the wall plate [01] directly onto the concrete surface.
Ù Minimum solid concrete thickness: 8 in.
Ù Minimum concrete block size: 8 x 8 x 16 in.
[20]
[20]
[01]
[18]
[19]
[28]
Page 10

6903-002007 <02>
10
3 Attach Clips and Covers
3-1 Install cable management
Slide the arms of the wall plate [01] together and insert the slide lock
[27] into place. This will lock the arms into full extension making the
following steps easier.
Use the 1⁄8 in. hex key [25] and four screws [22] to secure the rear panel
(R) of the cable management assembly [05] between the lower cover
[06] and the wall plate [01].
Install the front panel (F) of the cable management system to the
back side of the face plate [01] using two screws [23].
Use the 1⁄8 in. hex key [25]
and screws [22] to mount the upper cover.
[04]
[05]
[22]
[06]
[25]
[23]
[22]
[05]
(R)
(F)
[27]
Page 11

6903-002007 <02>
11
4 Hang your TV onto the Wall Plate
Be sure to hook the TV brackets onto the interface, as shown.
CAUTION:
Avoid potential injuries or property damage!
HEAVY! You will need assistance with this step.
[03]
[21]
[01]
4-1 Attach caps
Attach click caps [03] to the interface [01] using screws [21].
[24]
Page 12

6903-002007 <02>
12
5 Cable Management
[05]
Plug the required cables into the TV.
Slide the three covers of the wire managment assembly [05] o
the front (face plate mount), rear (wall plate mount), and center
( oating).
Route the wires and/or cables through the three sections.
Replace the covers.
Page 13

6903-002007 <02>
13
6 Adjustments and Storage
[27]
[01]
[01]
[27]
A
B
6-2 Storage
After setup is complete, remove slide lock from the locking position A
and t it into the grooves of one of the slides for storage B.
6-1 Adjustments
1. Adjust up/down tilt tension by hand or using the M3 hex key [24].
2. Adjust level.
[24]
[26]
Page 14

6903-002007 <02>
14
Français
CONSIGNES DE SÉCURITÉ IMPORTANTES – CONSERVEZ CES INSTRUCTIONS – VEUILLEZ LIRE ATTENTIVEMENT LE MANUEL AVANT
D’UTILISER CE PRODUIT
Caractéristiques techniques Voir à la page 3
Ù Capacité de charge – NE PAS DÉPASSER: 56,7 kg (125lb) incluant le téléviseur et tous les accessoires.
Ù Pivotement: ±30°
Ù Inclinaison: de +0° à –10°
Ù Niveau: ±1.5°
ATTENTION: Évitez les dommages matériels et les blessures!
Ù Ne pas utiliser ce produit à d’autres ns que celles spéci ées par le fabricant.
Ù Le mur doit pouvoir supporter cinq fois le poids total du moniteur et du support.
Ù Ce produit n’est pas conçu pour être utilisé sur des murs dont les montants sont en métal!
Ù Si vous ne comprenez pas toutes ces instructions ou si vous avez des doutes sur la sécurité de l'installation, du montage ou de l’utilisation de ce produit, veuillez
contacter un installateur quali é ou le service à la clientèle.
Ù Le fabricant n’est pas responsable des blessures ou des dommages causés par une mauvaise utilisation ou un montage incorrect.
Caractéristiques techniques Voir à la page 3
Pièces et quincaillerie fournies Voir à la page 4
AVERTISSEMENT: Ce produit contient de petites pièces qui peuvent représenter un risque d’étou ement.
Avant de commencer l’assemblage, assurez-vous que toutes les pièces sont présentes et qu’elles ne sont pas endommagées. Si une pièce est manquante ou
endommagée, ne retournez pas les pièces endommagées à votre revendeur. Contactez plutôt le service clientèle. N’utilisez jamais de pièces endommagées!
REMARQUE: M4, M6, ou M8 décrit le diamètre et mm décrit la longueur des vis qui sont identi ées M# X ##mm. Les pièces comprises ne doivent pas nécessairement
être toutes utilisées.
Outils nécessaires Voir à la page 4
1-2 Attachez les brides de montage au téléviseur dont l’arrière est plat Voir à la page 6.
À l'étape 1-1, si vous avez choisi:
le boulon M4 x 12mm [07] utilisez la rondelle M4 [11].
le boulon M6 x 14mm [09] utilisez la rondelle M6/M8 [12].
le boulon M8 x 16mm [13] utilisez la rondelle M6/M8 [12].
Assurez-vous que les supports sont l’horizontale (à niveau) derrière le téléviseur.
Si vous avez besoin de plus d’espace à cause des câbles, des creux ou des protubérances, sélectionnez l'une des con gurations ci-dessous.
1 Sélectionnez la quincaillerie et le support de xation pour le téléviseur Voir à la page 6.
1-1 Sélectionnez le diamètre et la longueur de la quincaillerie Voir à la page 6.
Le type de téléviseur vous aidera à choisir la con guration de la quincaillerie à utiliser. Faites correspondre votre type de téléviseur à l'une des con gurations de
quincaillerie suggérées à la page suivante.
A. Option d'installation sans entretoises (téléviseur à dos plat).
B. Option d'installation avec des entretoises de 14mm (téléviseur avec dos irrégulier).
C. Option d'installation avec des entretoises de 24mm (pour les téléviseurs avec un dos irrégulier qui nécessitent plus long que les 14mm donnés par les entretoises.)
Serrez à la main les vis dans les ori ces letés au dos du téléviseur a n de déterminer le diamètre de vis approprié (M4, M6, ou M8).
ATTENTION: Évitez les dommages matériels et les blessures! Assurez-vous qu’il y a su samment de lets pour installer solidement les supports sur le moniteur.
Si vous sentez une résistance, arrêtez immédiatement et contactez le Service à la clientèle. Utilisez la combinaison la plus courte possible de vis et d’entretoise nécessaire.
L'utilisation d'une quincaillerie trop longue pourrait endommager le téléviseur.
1-2 Attachez les brides de montage au téléviseur avec dos irrégulier Voir à la page 7.
Attachez les rondelles à épaulement [15] et les entretoises aux brides de montage.
1. Poussez la rondelle à épaulement [15] dans les ori ces appropriés des supports [02].
2. Pressez la rondelle à épaulement [15] dans l’entretoise que vous avez sélectionnée à l'étape 1-1.
Si vous avez besoin de plus d’espace à cause des câbles, des creux ou des protubérances, vous pouvez utiliser l'entretoise de 24mm [17].
À l'étape 1-1, si vous avez choisi:
le boulon M4 x 30mm [08] utilisez la rondelle M4 [11] et l'entretoise [16].
la vis M6 x 40mm [10] utilisez la rondelle M6/M8 [12] et l'entretoise [17].
la vis M6 x 40mm [14] utilisez la rondelle M6/M8 [12] et l'entretoise [17].
Assurez-vous que les supports sont l’horizontale (à niveau) derrière le téléviseur.
Les con gurations standard sont illustrées. Consultez le Service à la clientèle pour toute application particulière ou si vous avez des doutes quant à la quincaillerie à utiliser.
Page 15

6903-002007 <02>
15
6-2 Rangement Voir la page 13
Une fois l’installation terminée, retirez la pièce bloquante en U de la position verrouillée A et rentrez-la dans la rainure de l’une des glissières de rangement B.
2 Installation sur des murs à montant de bois Voir la page 8
3-1 Mettez en place le dispositif de gestion des câbles Voir à la page 10
Utilisez la clé hexagonale de ⁄ po [25] et quatre (4) vis [22] pour xer solidement le panneau arrière (R) du dispositif de gestion de câbles [05] entre le cache inférieur
[06] et la plaque murale [01].
Installez le panneau avant (F) du système de gestion des câbles sur l'arrière de la plaque avant [01] en utilisant deux (2) vis [23].
Utilisez la clé hexagonale de ⁄po [25] et des vis [22] pour x
er le cache supérieur.
2-1 Trouvez les montants Voir à la page 8
Pour obtenir de l'aide a n de déterminer l’emplacement de la plaque murale, consultez l'assistant de montage à simplicityav.com.
Véri ez le centre du montant à l’aide d’un poinçon ou d’un clou n, ou utilisez un localisateur bord à bord.
ATTENTION: Évitez les dommages matériels et les blessures!
Ù L’épaisseur du matériau de revêtement de mur ne doit pas excéder 16mm (5/8po).
Ù Dimension minimale du montant de bois: commune 51x102mm (2x4po) (nominale 38x89mm/1,5x3,5po).
2-2 Marquez l'emplacement sur le mur Voir à la page 8
Mettez le gabarit de plaque murale [28] à niveau et marquez les emplacements des trous.
2-3 Percez les trous de guidage Voir à la page 8
ATTENTION: Évitez tout dommage matériel ou blessure! Les avant-trous DOIVENT être percés à une profondeur de 75mm (3po) à l’aide d’un foret de 5,5mm
(7/32po).
2-4 Serrez les boulons tire-fond Voir à la page 8
ATTENTION:
Évitez tout dommage matériel ou blessure! Une utilisation inadéquate peut réduire la force de rétention du boulon tire-fond. A n d’éviter tout
dommage matériel ou blessure:
Ù NE PAS trop serrer les boulons tire-fond [18].
Ù Serrez les boulons tire-fond [18] jusqu'à ce que les rondelles [19] s’appuient fermement sur la plaque murale [01].
2 Montage sur béton coulé ou blocs de béton Voir à la page 9
2-1 Marquez l'emplacement sur le mur Voir à la page 9
Pour obtenir de l'aide a n de déterminer l’emplacement de la plaque murale, consultez l'assistant de montage à simplicityav.com.
Mettez le gabarit de plaque murale [28] à niveau et marquez les emplacements des trous.
ATTENTION:
Évitez tout dommage matériel ou blessure!
Ù Montez la plaque murale [01] directement sur la surface de béton.
Ù Épaisseur minimale du béton coulé: 203mm (8po)
Ù Dimension minimale du bloc de béton: 203mm x 203mm x 406mm (8 x 8 x 16po)
2-2 Percez les trous de guidage Voir à la page 9
ATTENTION: Évitez tout dommage matériel ou blessure!
Ù Les avant-trous DOIVENT être percés à une profondeur de 75mm (3po) à l’aide d’un foret de 10mm (3/8po).
Ù Ne jamais percer dans le mortier entre les blocs.
2-3 Insérez les douilles à expansion et les boulons tire-fond Voir à la page 9
Insérez les douilles à expansion des boulons tire-fond [20]. Insérez ensuite les boulons tire-fond [18] dans la plaque murale [01] et dans les douilles.
ATTENTION: Évitez tout dommage matériel ou blessure! Une utilisation inadéquate peut réduire la force de rétention du boulon tire-fond. A n d’éviter tout
dommage matériel ou blessure:
Ù Assurez-vous que les douilles à expansion [20] ne dépassent pas de la surface de béton.
Ù Serrez les boulons tire-fond [18] jusqu'à ce que les rondelles [19] s’appuient fermement sur la plaque murale [01].
Ù NE PAS trop serrer les boulons tire-fond [18].
3 Fixez les clips et les caches Voir à la page 10
Glissez les bras de la plaque murale [01] ensemble et insérez la pièce bloquante en U [27] à sa place. Les bras seront ainsi bloqués en position entièrement étendue
facilitant l'exécution des prochaines étapes.
4 Accrochez le téléviseur à la plaque murale Voir à la page 11
Assurez-vous d'accrocher les supports du téléviseur sur l'interface, comme illustré.
ATTENTION:
Évitez tout dommage matériel ou blessure! LOURD! Vous aurez besoin de quelqu’un pour vous aider à cette étape.
5 Gestion des câbles Voir à la page 12
Branchez les câbles nécessaires au téléviseur.
Glissez les trois caches du système de gestion des câbles [05] pour les enlever de l’avant (support de plaque avant), de l'arrière (support de plaque murale) et du centre ( ottant).
Passez les ls et/ou câbles dans les trois sections.
Remettez les caches.
4-1 Fixez les capuchons à déclic Voir à la page 11
Fixez les capuchons à déclic [03] à l'interface [01] à l'aide de vis [21].
6 Réglages et rangement Voir la page 13
6-1 Réglages Voir la page 13
1. Réglez la tension d’inclinaison vers le haut/bas à la main ou à l'aide de la clé hexagonale M3 [24].
2. Réglage du niveau.
Page 16

6903-002007 <02>
16
Español
INSTRUCCIONES DE SEGURIDAD IMPORTANTES. CONSERVE ESTAS INSTRUCCIONES. LEA TODO EL MANUAL ANTES DE USAR EL PRODUCTO.
Especi caciones Ver página 3
Ù Peso máximo admitido —NO LO EXCEDA—: 56,7 kg (125 lb), televisor y accesorios incluidos
Ù Rotación: ±30°
Ù Inclinación: +0° a –10°
Ù Nivelación: ±1,5°
PRECAUCIÓN: Evite lesiones y daños materiales.
Ù No utilice este producto para ningún otro propósito que no sea el explícitamente especi cado por el fabricante.
Ù La pared debe soportar cinco veces el peso del televisor y el soporte juntos.
Ù Este producto no está diseñado para ser instalado en paredes con montantes metálicos.
Ù Si no entiende las instrucciones o si tiene dudas acerca de la seguridad de la instalación, del ensamblado o del uso del producto, contáctese con el servicio de
atención al cliente o llame a un técnico cali cado.
Ù El fabricante no se responsabiliza por ningún daño o lesión resultante del montaje incorrecto o del uso indebido.
Especi caciones técnicas Ver página 3
Piezas y elementos de jación suministrados Ver página 4
ADVERTENCIA: Este producto contiene piezas pequeñas que, si fuesen tragadas, podrían producir as xia.
Antes de iniciar el ensamblaje, compruebe que todas las piezas estén incluidas y en buenas condiciones. Si faltan piezas o alguna está dañada, no devuelva el artículo al
distribuidor; póngase en contacto con el servicio de atención al cliente. Nunca utilice piezas deterioradas.
NOTA: M4, M6 y M8 hacen referencia al diámetro. El símbolo mm indica la longitud de los tornillos identi cados como M# x ## mm. No todos los elementos de jación
incluidos deberán utilizarse.
Herramientas necesarias Ver página 4
1-2 Fijar las placas de sujeción a un televisor de dorso plano Ver página 6
Si en el paso 1-1 seleccionó el:
tornillo M4 de 12 mm [07], use la arandela M4 [11].
tornillo M6 de 14 mm [09], use la arandela M6/M8 [12].
tornillo M8 de 16 mm [13], use la arandela M6/M8 [12].
Veri que que las placas de sujeción estén niveladas en el dorso del televisor.
Si necesita más espacio para cables, concavidades o protuberancias, elija una de las siguientes con guraciones.
1 Seleccionar los elementos de jación e instalar las placas de sujeción Ver página 6
1-1 Seleccionar el diámetro y la longitud de los elementos de jación Ver página 6
La elección de los elementos de jación dependerá del tipo de televisor que desee instalar. A continuación, sugerimos elementos de jación para cada tipo de televisor.
A. Instalación sin espaciadores (televisores con dorso plano)
B. Instalación con espaciadores de 14 mm (televisores con dorso irregular)
C. Instalación con espaciadores de 24 mm (televisores con dorso irregular que requieren más espacio del que brindan los espaciadores de14 mm)
Enrosque manualmente los tornillos en los encastres roscados de la parte posterior del televisor a n de determinar el diámetro correcto de los tornillos (M4, M6 o M8).
PRECAUCIÓN: Evite lesiones y daños materiales. Veri que que las roscas sean adecuadas para jar las placas de sujeción al televisor. Si encuentra resistencia,
deténgase de inmediato y contáctese con el servicio de atención al cliente. Utilice la combinación más corta de tornillo y separador según las necesidades. Utilizar
elementos de jación demasiado largos puede dañar el televisor.
1-2 Fijar las placas de sujeción a un televisor con dorso irregular Ver página 7
Fijar las arandelas de soporte [15] y los espaciadores a las placas de sujeción
1. Pase las arandelas de soporte [15] por los ori cios correspondientes de las placas de sujeción [02].
2. Haciendo presión, je la arandela de soporte [15] al espaciador seleccionado en el paso 1-1.
Si necesita más espacio para cables, concavidades o protuberancias, use el espaciador de 24 mm [17].
Si en el paso 1-1 seleccionó el:
tornillo M4 de 30 mm [08], use la arandela M4 [11] y el espaciador [16].
tornillo M6 de 40 mm [10], use la arandela M6/M8 [12] y el espaciador [17].
tornillo M8 de 40 mm [14], use la arandela M6/M8 [12] y el espaciador [17].
Veri que que las placas de sujeción estén niveladas en el dorso del televisor.
Se ilustran las con guraciones estándar. Si desea información sobre aplicaciones especiales o si tiene dudas sobre la elección de los elementos de jación, contáctese con
el servicio de atención al cliente.
Page 17

6903-002007 <02>
17
6-2
Almacenamiento Ver página 13
Una vez nalizada la con guración, quite el dispositivo de bloqueo de la posición de bloqueo A y colóquelo en las ranuras de una de las guías para almacenaje B.
2 Instalar en pared con montantes de madera Ver página 8
3-1 Instalar organizador de cables Ver página 10
Use la llave hexagonal de ⁄ de pulgada [25] y cuatro tornillos [22] para jar el panel posterior (R) del organizador de cables [05] entre la cubierta inferior [06] y la placa mural [01].
Fije el panel frontal (F) del organizador de cables a la parte posterior de la placa frontal [01] mediante dos tornillos [23].
Utilizando la llav
e hexagonal de ⁄ de pulgada [25] y tornillos [22], coloque la cubierta superior.
2-1 Localizar los montantes Ver página 8
Si necesita ayuda para determinar la ubicación de la placa mural, utilice el asistente de instalación (Height Wizard) disponible en simplicityav.com.
Veri que el centro de los montantes con un punzón, un clavo delgado o un detector de bordes de montantes.
PRECAUCIÓN: Evite lesiones y daños materiales.
Ù El material que recubre la pared no debe exceder los 16 mm (5/8 de pulgada).
Ù Tamaño mínimo de los montantes de madera: común 51 mm x 102 mm (2 pulg. x 4 pulg.) (nominal: 38 mm x 89 mm o 1,5 pulg. x 3,5 pulg.)
2-2 Marcar la pared Ver página 8
Nivele la plantilla de la placa mural [28] y marque la ubicación de los ori cios.
2-3 Realizar los ori cios guía Ver página 8
PRECAUCIÓN: Evite lesiones y daños materiales. Los ori cios guía DEBEN realizarse con una mecha de 5,5 mm (7/32 de pulgada) de diámetro hasta una
profundidad de 75 mm (3 pulgadas).
2-4 Ajustar los tornillos Ver página 8
PRECAUCIÓN:
Evite lesiones y daños materiales. El uso indebido podría reducir la capacidad de retención de los tornillos. Para evitar lesiones y daños materiales:
Ù NO ajuste en exceso los tornillos [18].
Ù Ajuste los tornillos [18] solamente hasta que las arandelas [19] queden rmes contra la placa mural [01].
2 Instalar en pared de hormigón o de ladrillos de cemento Ver página 9
2-1 Marcar la pared Ver página 9
Si necesita ayuda para determinar la ubicación de la placa mural, utilice el asistente de instalación (Height Wizard) disponible en simplicityav.com.
Nivele la plantilla de la placa mural [28] y marque la ubicación de los ori cios.
PRECAUCIÓN:
Evite lesiones y daños materiales.
Ù Instale la placa mural [01] directamente sobre la super cie de hormigón.
Ù Espesor mínimo de la pared de hormigón: 203 mm (8 pulgadas)
Ù Tamaño mínimo de los ladrillos de cemento: 203 mm x 203 mm x 406 mm (8 pulg. x 8 pulg. x 16 pulg.)
2-2 Realizar los ori cios guía Ver página 9
PRECAUCIÓN: Evite lesiones y daños materiales.
Ù Los ori cios guía DEBEN realizarse con una mecha de 10 mm (3/8 de pulgada) de diámetro hasta una profundidad de 75 mm (3 pulgadas).
Ù Nunca perfore el cemento que une los ladrillos.
2-3 Insertar los tacos y los tornillos Ver página 9
Inserte los tacos [20]. Luego, pase los tornillos [18] por la placa mural [01] e insértelos en los tacos.
PRECAUCIÓN: Evite lesiones y daños materiales. El uso indebido podría reducir la capacidad de retención de los tornillos. Para evitar lesiones y daños materiales:
Ù Cerciórese de que los tacos [20] queden nivelados respecto de la super cie de hormigón.
Ù Ajuste los tornillos [18] solamente hasta que las arandelas [19] queden rmes contra la placa mural [01].
Ù NO ajuste en exceso los tornillos [18].
3 Colocar los sujetadores y las cubiertas Ver página 10
Deslice los brazos de la placa mural [01] juntos e inserte el dispositivo de bloqueo [27] en su lugar. Esto bloqueará los brazos en su máxima
extensión y facilitará los pasos siguientes.
4 Colgar el televisor en la placa mural Ver página 11
Cerciórese de enganchar las placas de sujeción en la placa de conexión, como se muestra en la ilustración.
PRECAUCIÓN:
Evite lesiones y daños materiales. ELEMENTO PESADO. Necesitará ayuda en este paso.
5 Organizar los cables Ver página 12
Enchufe los cables necesarios al televisor.
Deslice las tres cubiertas del sistema organizador de cables [05] para abrir los módulos frontal (placa frontal), posterior (placa mural) y medio ( otante).
Pase los cables por las tres secciones.
Cierre las cubiertas.
4-1 Colocar las cubiertas de sujeción Ver página 11
Fije las cubiertas de sujeción [03] a la placa de conexión [01] con un tornillo [21].
6 Ajuste y almacenamiento Ver página 13
6-1 Ajuste Ver página 13
1. Ajuste la tensión de inclinación hacia arriba o hacia abajo en forma manual o con la llave hexagonal M3 [24].
2. Ajuste el nivel
Page 18

6903-002007 <02>
18
English
Milestone AV Technologies and its a liated corporations and subsidiaries (collectively, “Milestone”),
intend to make this manual accurate and complete. However, Milestone makes no claim that the
information contained herein covers all details, conditions, or variations. Nor does it provide for every
possible contingency in connection with the installation or use of this product. The information
contained in this document is subject to change without notice or obligation of any kind. Milestone
makes no representation of warranty, expressed or implied, regarding the information contained
herein. Milestone assumes no responsibility for accuracy, completeness or su ciency of the
information contained in this document.
Français
Milestone AV Technologies et ses sociétés a liées et ses liales (collectivement dénommées
« Milestone »), se sont e orcées de rendre ce manuel précis et complet. Cependant, Milestone ne
garantit pas que les informations qu’il contient couvrent tous les détails et toutes les conditions
ou variations. Il ne pare pas non plus à toute éventualité relative à l’installation ou à l’utilisation de
ce produit. Les informations contenues dans ce document peuvent faire l’objet de modi cations
sans avertissement ou obligation préalable quelconque. Milestone ne donne aucune garantie
explicite ou implicite quant aux informations contenues dans le manuel. Milestone n’assume aucune
responsabilité quant à l’exactitude, l’exhaustivité ou la su sance des informations contenues dans
ce document.
Español
Milestone AV Technologies y sus empresas asociadas y liales (colectivamente “Milestone”) tienen
la intención de que este manual sea preciso y completo. Sin embargo, Milestone no garantiza que
la información que contiene incluya todos los detalles condiciones y variaciones, ni que contemple
toda posible contingencia en conexión con la instalación y uso de este producto. La información
contenida en este documento es susceptible de ser modi cada sin aviso ni obligación de ningún tipo.
Milestone no hace ninguna manifestación de garantía, explícita o implícita, respecto a la información
contenida este documento. Milestone no asume ninguna responsabilidad por la exactitud, integridad
o su ciencia de la información contenida en este documento.
 Loading...