

Simplicity Prestige Series, Prestige 27HP Hydro 2WD, Prestige 27HP Hydro 4WD Operator's Manual
Page 1
en
Operator’s Manual
es
Manual del usuario
27HP Hydro Tractors
Mfg. No. Description
2690953 Prestige, 27HP Hydro 2WD w/PS RMO Tractor Only
2690954 Prestige, 27HP Hydro 4WD w/PS RMO Tractor Only
Mower Decks
Mfg. No. Description
1695177 54” Mower Deck
1595266 54” Mower Deck
Prestige Series
1752401
Revision B
Page 2

2
Page 3
2
3
A
B
C
B
A
4
H
5
G
F E
D
C
A
B
C
A
B
6
A
B
7
3'4"
(1m)
A
B
396 Lbs.
(180kg)
10˚
20' (6m)
3
Page 4
8
A
9
A
D
B
C
E
10
11
A
C
Thicker Spoke
Faces Seat
Radio más
grueso hacia el
asiento
A
B
4
Page 5
CONTENTS
Illustrations .......................................................................................................... 3
Contents ............................................................................................................... 5
Operator Safety ...................................................................................................6
Features and Controls ......................................................................................12
Operation ...........................................................................................................16
Maintenance ......................................................................................................19
Troubleshooting ................................................................................................ 22
Warranties ..........................................................................................................24
Specifi cations ....................................................................................................26
Parts and Accessories ......................................................................................26
General Information
Thank you for purchasing this quality-built SIMPLICITY riding mower. We’re pleased that you’ve placed your confi dence
in the SIMPLICITY brand. When operated and maintained according to the instructions in this manual, your SIMPLICITY
product will provide many years of dependable service.
This manual contains safety information to make you aware of the hazards and risks associated with mowers and how
to avoid them. Because Briggs & Stratton Power Products Group, LLC does not necessarily know all the applications
this mower could be used for, it is important that you read and understand these instructions. Save these original
instructions for future reference.
Product Identifi cation Tag
Product Identification Tag
Model / Modéle / Model xxxxxxxx
Serial / Sèrie / Serie xxxxxxxxxx
Briggs & Stratton Power Products Group, L.L.C.
Milwaukee, WI 53201 USA
Product Reference Data
When contacting your authorized dealer for replacment
parts, service, or information you MUST have these
numbers.
Record your model name/number, manufacturer’s identifi ca-
tion numbers, and engine serial numbers in the space provided for easy access. These numbers can be found in the
locations shown.
PRODUCT REFERENCE DATA
Model Description Name/Number
Unit MFG
Number
Mower Deck MFG Number
Dealer Name
ENGINE REFERENCE DATA
Engine Make
Unit SERIAL Number
Mower Deck SERIAL
Date Purchased
Engine Model
Number
Product ID Tag
The Illustrated Parts List for this machine can be downloaded from www.simplicitymfg.com. Please provide model and
serial number when ordering replacement parts.
Copyright © 2011 Briggs & Stratton Power Products Group, LLC
Milwaukee, WI, All rights reserved.
SIMPLICITY is a trademark of Briggs & Stratton Power Products
Group, LLC Milwaukee, WI USA.
en
Engine Type/Spec
Engine Code/Serial Number
5
Page 6
OPERATOR SAFETY
Operating Safety
Power equipment is only as safe as the operator. If it is misused, or
not properly maintained, it can be dangerous! Remember, you are
responsible for your safety and that of those around you.
Use common sense, and think through what you are doing. If you
are not sure that the task you are about to perform can be safely
done with the equipment you have chosen, ask a
professional: contact your local authorized dealer.
Read the Manual
The operator’s manual contains important safety information you
need to be aware of BEFORE you operate your unit as well as DURING operation.
Safe operating techniques, an explanation of the product’s features
and controls, and maintenance information is included to help you
get the most out of your equipment investment.
Be sure to completely read the Safety Rules and Information found
on the following pages. Also completely read the Operation section.
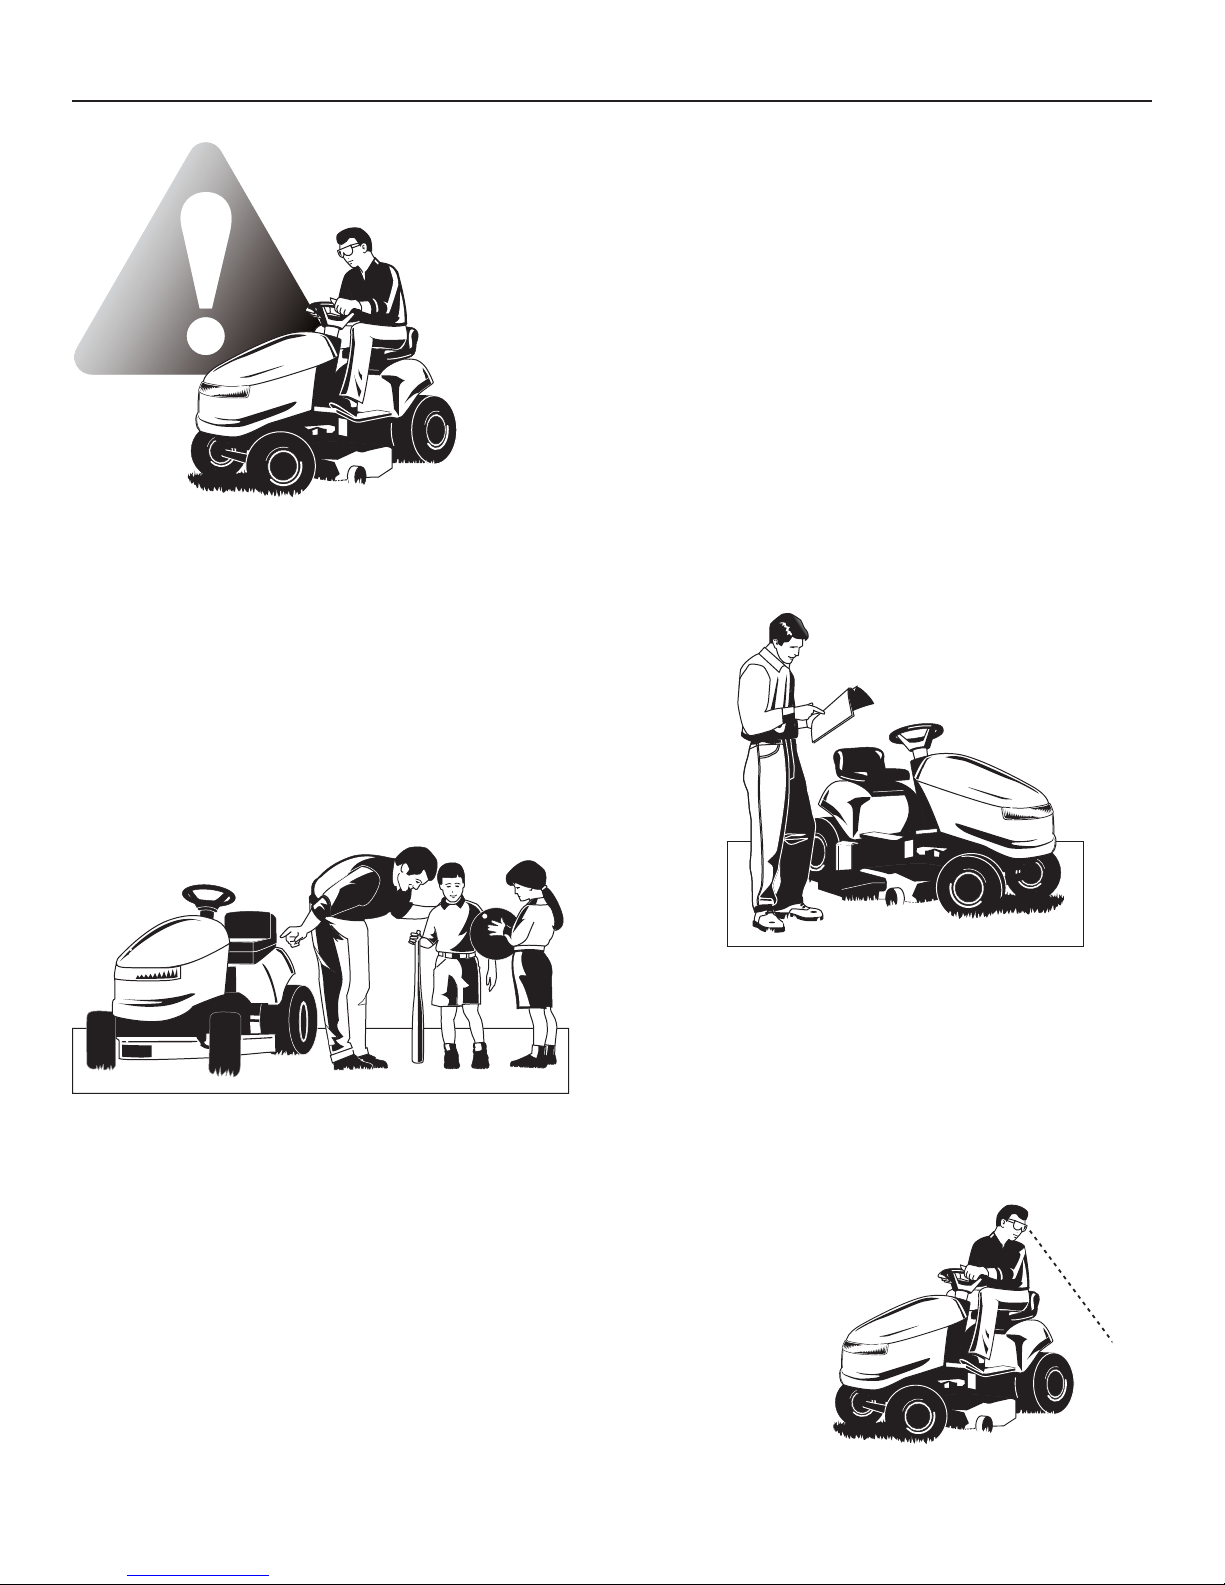
Children
Tragic accidents can occur with children. Do not allow
them anywhere near the area of operation. Children are
often attracted to the unit and mowing activity. Never assume that children will remain where you last saw them. If
there is a risk that children may enter the area where you
are mowing, have another responsible adult watch them.
DO NOT GIVE CHILDREN RIDES ON THIS UNIT! This
encourages them to come near the unit in the future while it
is running, and they could be seriously hurt. They may then
approach the unit for a ride when you are not expecting it,
and you may run over them.
6
Reverse
Do not mow in reverse unless absolutely necessary. Always look down
and behind before
and while traveling in
reverse even with the
mower blades disengaged.
www.simplicitymfg.com
Page 7
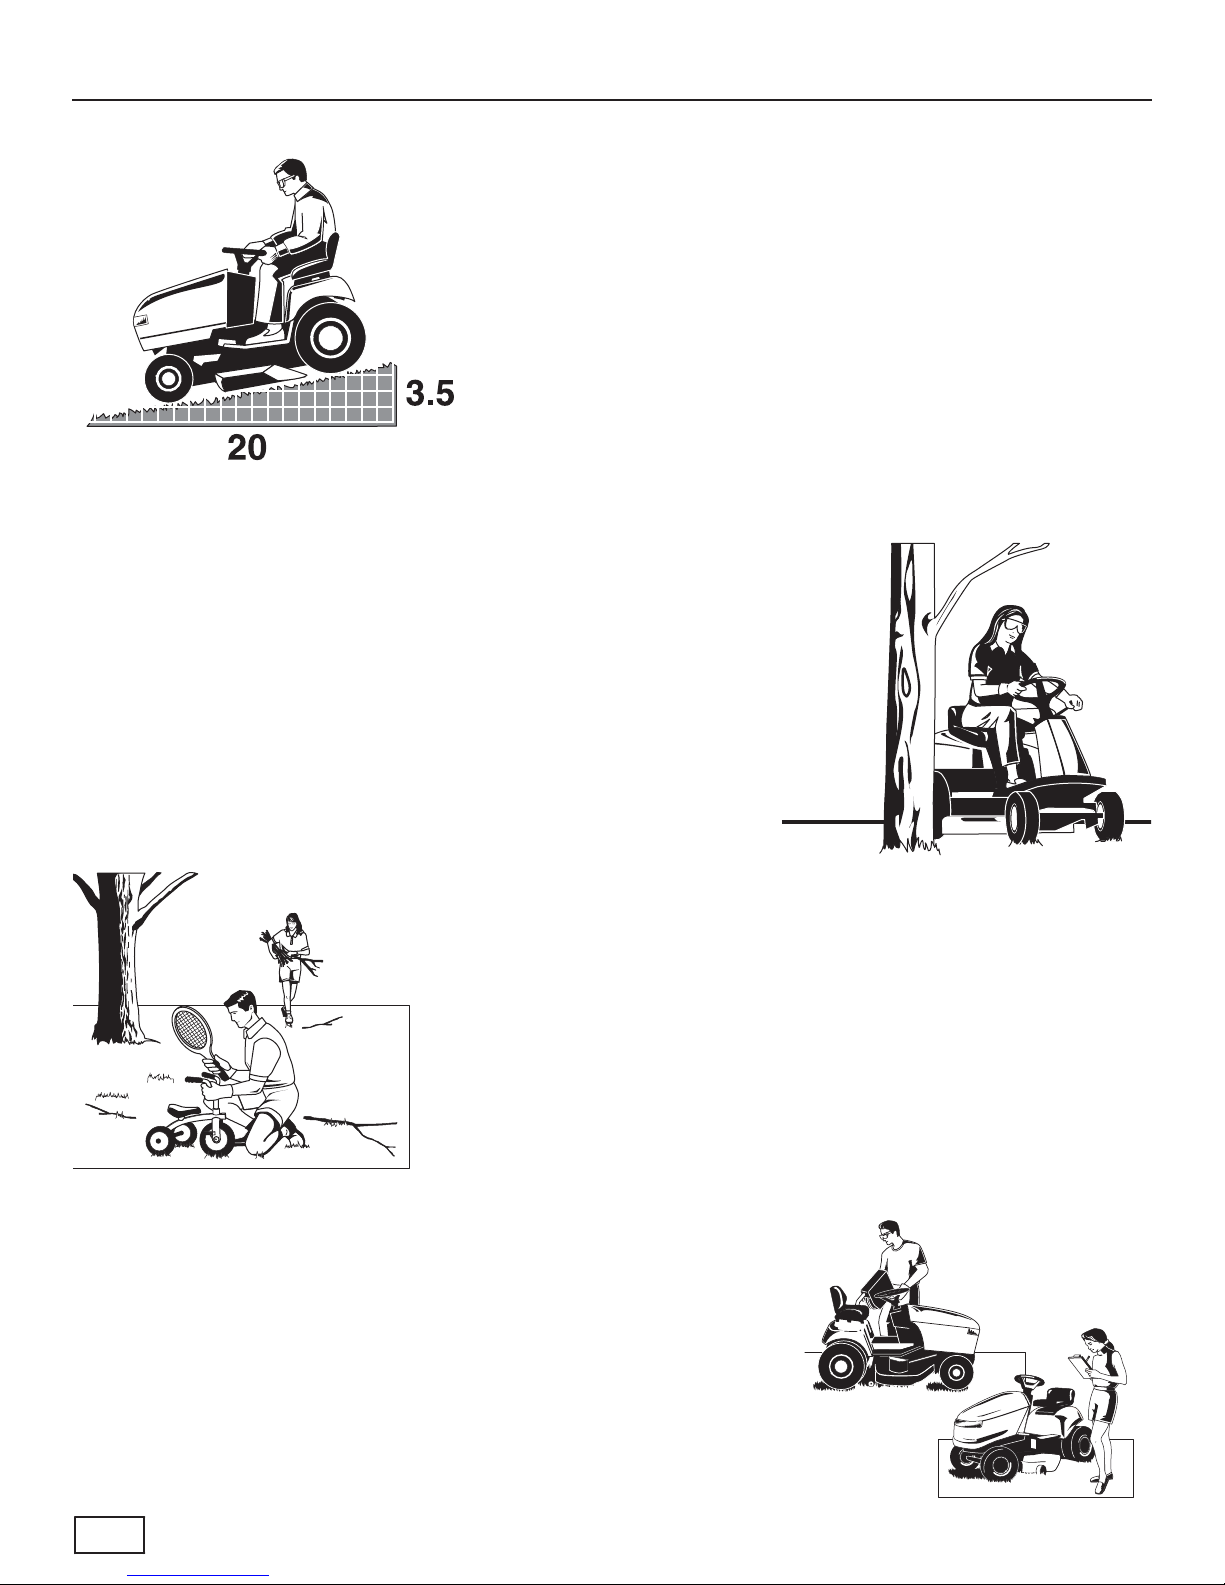
Slope Operation
You could be seriously injured or even killed if you use this unit on too
steep an incline. Using the unit on a slope that is too steep or where you
don’t have adequate traction can cause you to lose control or roll over.
A good rule of thumb is to not operate on any slope you cannot back up
(in 2-wheel drive mode). You should not operate on inclines with a slope
greater than a 3.5 ft (1,5 m) rise over a 20.0 ft (6,0 m) length. Always
drive up and down slopes: never cross the face.
Also note that the surface you are driving on can greatly impact stability
and control. Wet grass or icy pavement can seriously affect your ability
to control the unit.
If you feel unsure about operating the unit on an incline, don’t do it. It’s
not worth the risk.
Moving Parts
This equipment has many moving parts that can injure you or someone else. However, if you are seated in the seat properly, and follow all the rules in this book, the
unit is safe to operate.
The mower deck has spinning mower blades that can amputate hands and feet.
Do not allow anyone near the equipment while it is running!
To help you, the operator, use this equipment safely, it is equipped with an operatorpresent safety system. Do NOT attempt to alter or bypass the system. See your
dealer immediately if the system does not pass all the safety interlock system
tests found in this manual.
OPERATOR SAFETY
Thrown Objects
This unit has spinning mower blades. These blades can pick up and throw debris that could seriously injure a bystander. Be sure to clean up the area to be
mowed BEFORE you start mowing.
Do not operate this unit without the entire grass catcher or discharge guard (defl ector) in place.
Also, do not allow anyone in the area while the unit is running! If someone does
enter the area, shut the unit off immediately until they leave.
Fuel and Maintenance
Gasoline is extremely fl ammable. Its vapors are also extremely fl ammable and
can travel to distant ignition sources. Gasoline must only be used as a fuel, not
as a solvent or cleaner. It should never be stored any place where its vapors
can build up or travel to an ignition source like a pilot light. Fuel belongs in an
approved, plastic, sealed gas can, or in the tractor fuel tank with the cap securely closed. Spilled fuel needs to be cleaned up immediately.
Proper maintenance is critical to the safety and performance of your unit. Be
sure to perform the maintenance procedures listed in this manual, especially periodically testing the safety system.
en
7
Page 8

OPERATOR SAFETY
Read these safety rules and follow them closely. Failure to obey these rules could result in loss of control
of unit, severe personal injury or death to you, or bystanders, or damage to property or equipment. This
mowing deck is capable of amputating hands and feet and throwing objects. The triangle in text signi fi es important cautions or warnings which must be followed.
GENERAL OPERATION
1. Read, understand, and follow all instructions in the
manual and on the unit before starting.
2. Do not put hands or feet near rotating parts or under
the machine. Keep clear of the discharge opening at
all times.
3. Only allow responsible adults, who are familiar with
the instructions, to operate the unit (local regulations
can restrict operator age).
4. Clear the area of objects such as rocks, toys, wire,
etc., which could be picked up and thrown by the
blade(s).
5. Be sure the area is clear of other people before mowing. Stop the unit if anyone enters the area.
6. Never carry passengers.
7. Do not mow in reverse unless absolutely necessary.
Always look down and behind before and while travelling in reverse.
8. Never direct discharge material toward anyone.
Avoid discharging material against a wall or obstruction. Material may ricochet back toward the operator.
Stop the blade(s) when crossing gravel surfaces.
9. Do not operate the machine without the entire grass
catcher, discharge guard (defl ector), or other safety
devices in place.
10. Slow down before turning.
11. Never leave a running unit unattended. Always disengage the PTO, set parking brake, stop engine, and
remove keys before dismounting.
12. Disengage blades (PTO) when not mowing. Shut off
engine and wait for all parts to come to a complete
stop before cleaning the machine, removing the grass
catcher, or unclogging the discharge guard.
13. Operate the machine only in daylight or good artifi cial
light.
14. Do not operate the unit while under the infl uence of
alcohol or drugs.
15 Watch for traffi c when operating near or crossing
roadways.
16. Use extra care when loading or unloading the unit
into a trailer or truck.
17. Always wear eye protection when operating this unit.
18. Data indicates that operators, age 60 years and
above, are involved in a large percentage of power
equipment-related injuries. These operators should
evaluate their ability to operate the equipment safely
enough to protect themselves and others from injury.
19. Follow the manufacturer’s recommendations for
wheel weights or counterweights.
20. Keep in mind the operator is responsible for accidents
occurring to other people or property.
21. All drivers should seek and obtain professional and
practical instruction.
22. Always wear substantial footwear and trousers.
Never operate when barefoot or wearing sandals.
23. Before using, always visually check that the blades
and blade hardware are present, intact, and secure.
Replace worn or damaged parts.
24. Disengage attachments before: refueling, removing
an attachment, making adjustments (unless the adjustment can be made from the operator’s position).
25. When the machine is parked, stored, or left unattended, lower the cutting means unless a positive
mechanical lock is used.
26. Before leaving the operator’s position for any reason,
engage the parking brake (if equipped), disengage
the PTO, stop the engine, and remove the key.
27. To reduce fi re hazard, keep the unit free of grass,
leaves, & excess oil. Do not stop or park over dry
leaves, grass, or combustible materials.
28. It is a violation of California Public Resource Code
Section 4442 to use or operate the engine on or near
any forest-covered, brush-covered, or grass-covered
land unless the exhaust system is equipped with a
spark arrester meeting any applicable local or state
laws. Other states or federal areas may have similar
laws.
TRANSPORTING AND STORAGE
1. When transporting the unit on an open trailer, make
sure it is facing forward, in the direction of travel. If
the unit is facing backwards, wind lift could damage
the unit.
2. Always observe safe refueling and fuel handling practices when refueling the unit after transportation or
storage.
3. Never store the unit (with fuel) in an enclosed poorly
ventilated structure. Fuel vapors can travel to an ignition source (such as a furnace, water heater, etc.)
and cause an explosion. Fuel vapor is also toxic to
humans and animals.
8
4. Always follow the engine manual instructions for
storage preparations before storing the unit for both
short and long term periods.
5. Always follow the engine manual instructions for
proper start-up procedures when returning the unit to
service.
6. Never store the unit or fuel container inside where
there is an open fl ame or pilot light, such as in a
water heater. Allow unit to cool before storing.
www.simplicitymfg.com
Page 9

OPERATOR SAFETY
SLOPE OPERATION
Slopes are a major factor related to loss-of-control and tipover accidents, which can result in severe injury or death.
Operation on all slopes requires extra caution. If you cannot back up the slope or if you feel uneasy on it, do not
operate on it.
Control of a walk-behind or ride-on machine sliding on a
slope will not be regained by the application of the brake.
The main reasons for loss of control are: insuffi cient tire
grip on the ground, speed too fast, inadequate braking, the
type of machine is unsuitable for its task, lack of awareness of the ground conditions, incorrect hitching and load
distribution.
1. Mow up and down slopes, not across.
2. Watch for holes, ruts, or bumps. Uneven terrain could
overturn the unit. Tall grass can hide obstacles.
3. Choose a slow speed so that you will not have to
stop or change speeds while on the slope.
4. Do not mow on wet grass. Tires may loose traction.
5. Always keep unit in gear especially when traveling
down slopes. Do not shift to neutral and coast downhill.
6. Avoid starting, stopping, or turning on a slope. If tires
lose traction, disengage the blade(s) and proceed
slowly straight down the slope.
7. Keep all movement on slopes slow and gradual. Do
not make sudden changes in speed or direction,
which could cause the machine to rollover.
8. Use extra care while operating machines with grass
catchers or other attachments; they can affect the
stability of the unit. Do not use on steep slopes.
9. Do not try to stabilize the machine by putting your
foot on the ground (ride-on units).
10. Do not mow near drop-offs, ditches, or embankments. The mower could suddenly turn over if a
wheel is over the edge of a cliff or ditch, or if an edge
caves in.
11. Do not use grass catchers on steep slopes.
12. Do not mow slopes you cannot back up them.
13. See your authorized dealer/retailer for recommendations of wheel weights or counterweights to improve
stability.
14. Remove obstacles such as rocks, tree limbs, etc.
15. Use slow speed. Tires may lose traction on slopes
even through the brakes are functioning properly.
16. Do not turn on slopes unless necessary, and then,
turn slowly and gradually downhill, if possible.
WARNING
Never operate on slopes greater than 17.6 percent
(10°) which is a rise of 3-1/2 feet (106 cm) vertically in
20 feet (607 cm) horizontally.
When operating on slopes use additional wheel
weights or counterweights. See your dealer/retailer
to determine which weights are available and
appropriate for your unit.
Select slow ground speed before driving onto
slope. In addition to front weights, use extra caution
when operating on slopes with rear-mounted grass
catchers.
Mow UP and DOWN the slope, never across the
face, use caution when changing directions and DO
NOT START OR STOP ON SLOPE.
CHILDREN
Tragic accidents can occur if the operator is not alert to the
presence of children. Children are often attracted to the
unit and the mowing activity. Never assume that children
will remain where you last saw them.
1. Keep children out of the mowing area and under the
watchful care of another responsible adult.
2. Be alert and turn unit off if children enter the area.
3. Before and during reverse operation, look behind and
down for small children.
4. Never carry children, even with the blade(s) off. They
may fall off and be seriously injured or interfere with
safe unit operation. Children who have been given
rides in the past may suddenly appear in the mowing
area for another ride and be run over or backed over
by the machine.
5. Never allow children to operate the unit.
6. Use extra care when approaching blind corners,
shrubs, trees, or other objects that may obscure vision.
EMISSIONS
1. Engine exhaust from this product contains chemicals
known, in certain quantities, to cause cancer, birth
defects, or other reproductive harm.
2. Look for the relevant Emissions Durability Period and
Air Index information on the engine emissions label.
TOWED EQUIPMENT (RIDE-ON UNITS)
1. Tow only with a machine that has a hitch designed
for towing. Do not attach towed equipment except at
the hitch point.
2. Follow the manufacturer’s recommendations for
weight limit for towed equipment and towing on
slopes.
3. Never allow children or others in or on towed equipment.
4. On slopes, the weight of the towed equipment may
cause loss of traction and loss of control.
5. Travel slowly and allow extra distance to stop.
6. Do not shift to neutral and coast down hill.
en
IGNITION SYSTEM
1. This spark ignition system complies with Canadian
ICES-002.
9
Page 10

OPERATOR SAFETY
SERVICE AND MAINTENANCE
Safe Handling of Gasoline
1. Extinguish all cigarettes, cigars, pipes, and other
sources of ignition.
2. Use only approved gasoline containers.
3. Never remove the gas cap or add fuel with the engine
running. Allow the engine to cool before refueling.
4. Never fuel the machine indoors.
5. Never store the machine or fuel container where
there is an open fl ame, spark, or pilot light such as
near a water heater or other appliance.
6. Never fi ll containers inside a vehicle or on a truck bed
with a plastic bed liner. Always place containers on
the ground away from your vehicle before fi lling.
7. Remove gas-powered equipment from the truck or
trailer and refuel it on the ground. If this is not possible, then refuel such equipment on a trailer with a
portable container, rather than from a gasoline dispenser nozzle.
8. Keep nozzle in contact with the rim of the fuel tank
or container opening at all times until fueling is complete. Do not use a nozzle lock-open device.
9. If fuel is spilled on clothing, change clothing immediately.
10. Never over-fi ll the fuel tank. Replace gas cap and
tighten securely.
11. Use extra care in handling gasoline and other fuels.
They are fl ammable and vapors are explosive.
12. If fuel is spilled, do not attempt to start the engine but
move the machine away from the area of spillage and
avoid creating any source of ignition until fuel vapors
have dissipated.
13. Replace all fuel tank caps and fuel container caps securely.
Service & Maintenance
1. Never run the unit in an enclosed area where carbon
monoxide fumes may collect.
2. Keep nuts and bolts, especially blade attachment
bolts, tight and keep equipment in good condition.
3. Never tamper with safety devices. Check their proper
operation regularly and make necessary repairs if
they are not functioning properly.
4. Keep unit free of grass, leaves, or other debris buildup. Clean up oil or fuel spillage. and remove any fuelsoaked debris. Allow machine to cool before storage.
5. If you strike an object, stop and inspect the machine.
Repair, if necessary, before restarting.
6. Never make adjustments or repairs with the engine
running.
7. Check grass catcher components and the discharge
guard frequently and replace with manufacturer’s recommended parts, when necessary.
8. Mower blades are sharp. Wrap the blade or wear
gloves, and use extra caution when servicing them.
9. Check brake operation frequently. Adjust and service
as required.
10. Maintain or replace safety and instructions labels, as
necessary.
11. Do not remove the fuel fi lter when the engine is hot
as spilled gasoline may ignite. Do not spread fuel line
clamps further than necessary. Ensure clamps grip
hoses fi rmly over the fi lter after installation.
12. Do not use gasoline containing METHANOL, gasohol
containing more than 10% ETHANOL, gasoline additives, or white gas because engine/fuel system damage could result.
13. If the fuel tank must be drained, it should be drained
outdoors.
14. Replace faulty silencers/muffl ers.
15. Use only factory authorized replacement parts when
making repairs.
16. Always comply with factory specifi cations on all settings and adjustments.
17. Only authorized service locations should be utilized
for major service and repair requirements.
18. Never attempt to make major repairs on this unit unless you have been properly trained. Improper service
procedures can result in hazardous operation, equipment damage and voiding of manufacturer’s warranty.
19. On multiple blade mowers, take care as rotating one
blade can cause other blades to rotate.
20. Do not change engine governor settings or overspeed the engine. Operating the engine at excessive
speed can increase the hazard of personal injury.
21. Disengage drive attachments, stop the engine, remove the key, and disconnect the spark plug wire(s)
before: clearing attachment blockages and chutes,
performing service work, striking an object, or if the
unit vibrates abnormally. After striking an object,
inspect the machine for damage and make repairs
before restarting and operating the equipment.
22. Never place hands near the moving parts, such as a
hydro pump cooling fan, when the tractor is running.
(Hydro pump cooling fans are typically located on top
of the transaxle).
23. Units with hydraulic pumps, hoses, or motors: WARNING: Hydraulic fl uid escaping under pressure may
have suffi cient force to penetrate skin and cause
serious injury. If foreign fl uid is injected into the skin
it must be surgically removed within a few hours by
a doctor familiar with this form of injury or gangrene
may result. Keep body and hands away from pin
holes or nozzles that eject hydraulic fl uid under high
pressure. Use paper or cardboard, and not hands,
to search for leaks. Make sure all hydraulic fl uid connections are tight and all hydraulic hoses and lines
are in good condition before applying pressure to the
system. If leaks occur, have the unit serviced immediately by your authorized dealer.
24. WARNING: Stored energy device. Improper release of springs can result in serious personal injury.
Springs should be removed by an authorized technician.
25. Models equipped with an engine radiator: WARNING: Stored energy device. To prevent serious bodily
injury from hot coolant or steam blow-out, never attempt to remove the radiator cap while the engine
is running. Stop the engine and wait until it is cool.
Even then, use extreme care when removing the cap.
10
www.simplicitymfg.com
Page 11
SS
OO
SSTTOO
PP
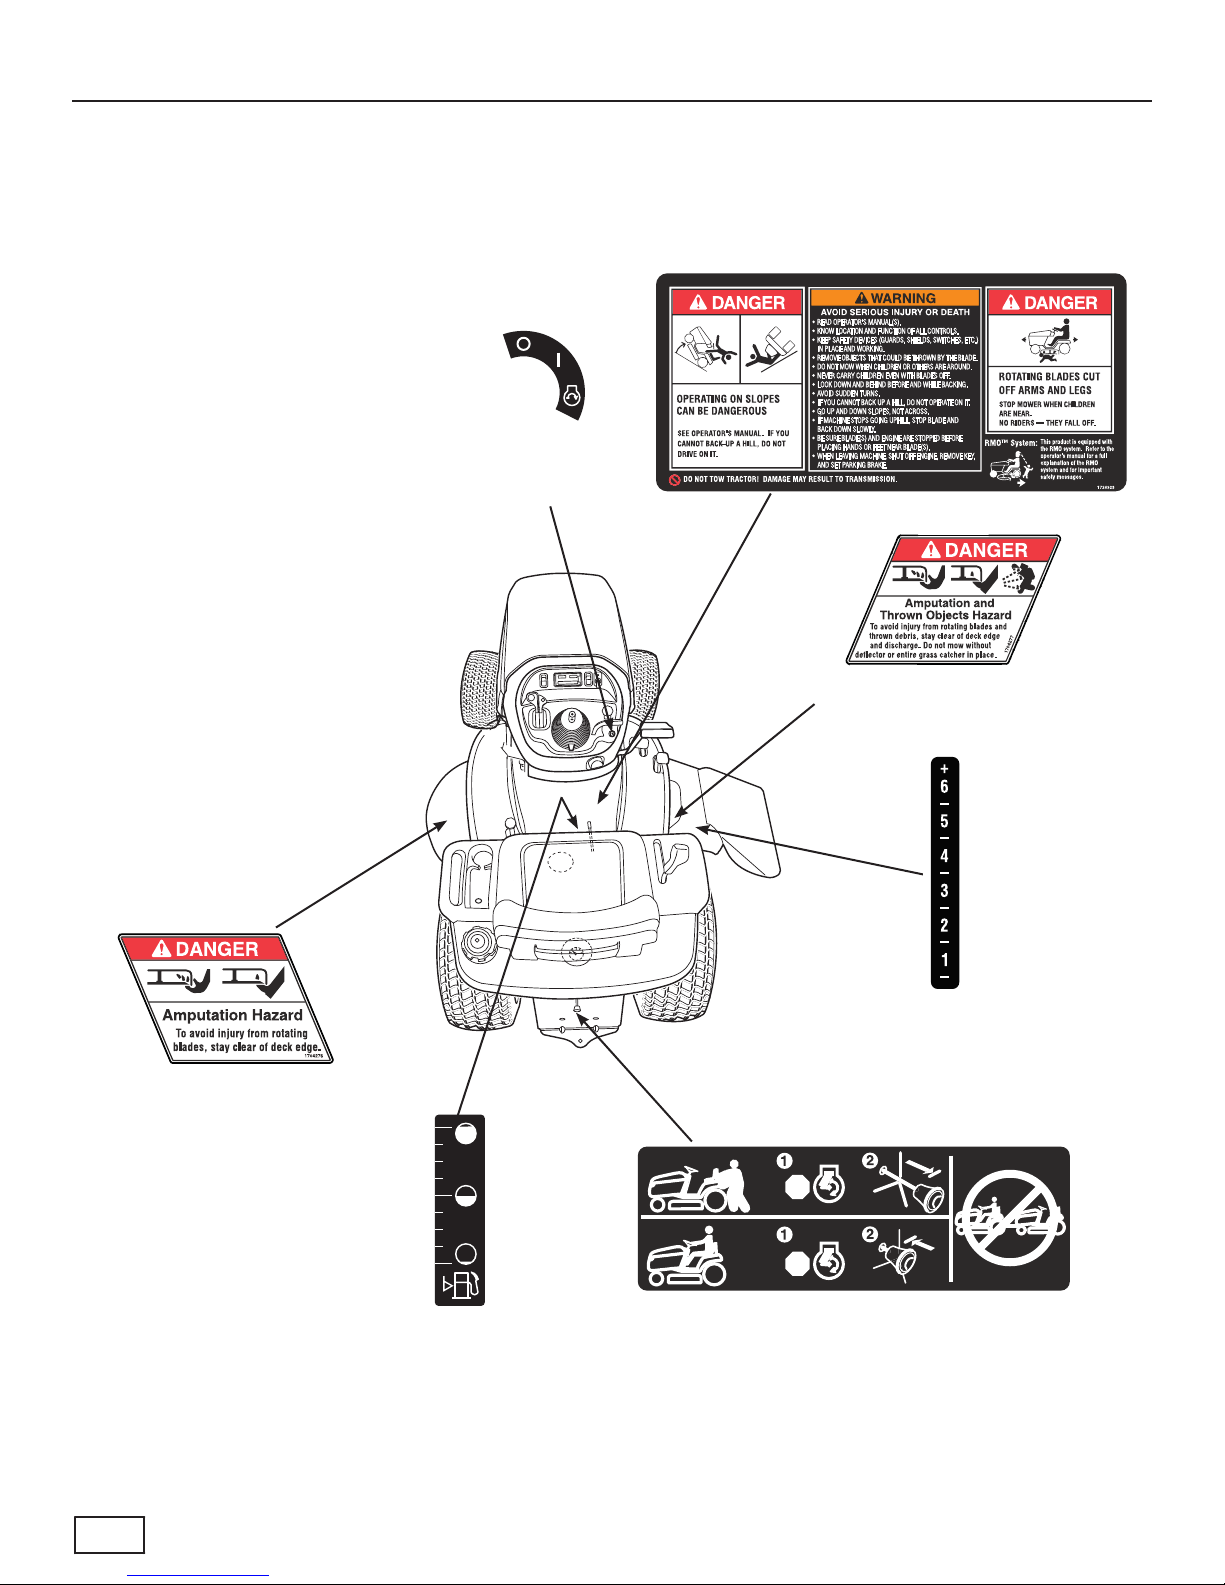
Decal Locations
OPERATOR SAFETY
Decal - Operating Instructions,
Part No. 1726923
Ignition Switch
Positions
Part No. 1722806
Danger, Rotating Blades,
Part No. 1704276
1730172
Fuel Level
Part No. 1730172
Danger, Rotating Blades,
Part No. 1704277
Decal - Cutting
Height
Part No. 1721197
PP
1723160
Transmission
Release
Part No. 1723160
en
11
Page 12
FEATURES AND CONTROLS
12V
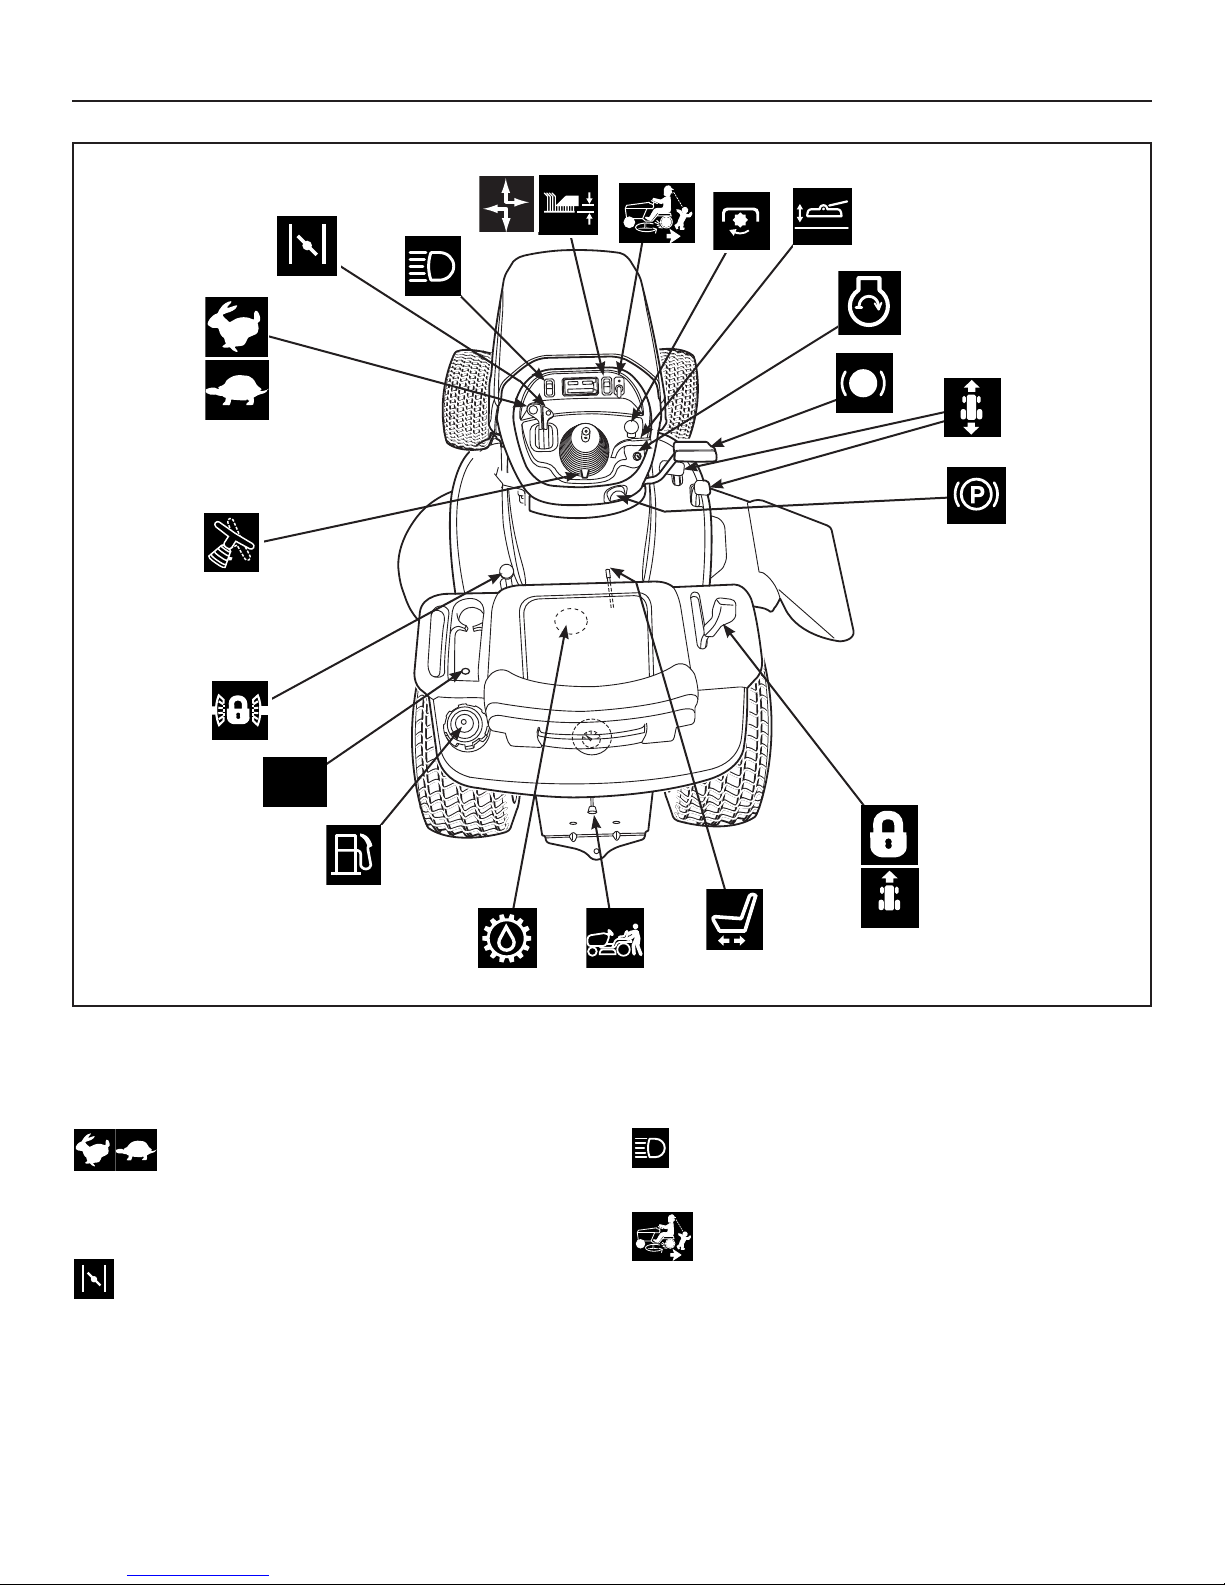
Tractor Controls Figure 1
Tractor Controls
Throttle Control
The throttle controls engine speed. Move the throttle forward to increase engine speed and back to decrease engine speed. Always operate at FULL throttle.
Choke
Close the choke for cold starting. Open the choke once the
engine starts. A warm engine may not require choking.
Move the lever forward to close the choke.
Headlights
The light switch turns the tractor headlights on and off .
Reverse Mowing Option (RMO)
The Reverse Mowing Option allows for mowing (or use of
other PTO driven attachments) while traveling in reverse.
If you choose to mow or operate another attachment in
reverse, turn the RMO key after the PTO is engaged. The
L.E.D. light will illuminate, and the operator can then mow
in reverse. Each time the PTO is disengaged the RMO
needs to be reactivated if desired.
12
www.simplicitymfg.com
Page 13

FEATURES AND CONTROLS
PTO Switch
The PTO (Power Take-Off ) switch engages and disen-
gages attachments that use the PTO. To engage the PTO,
pull UP on the switch. Push DOWN to disengage. Note that
the operator must be seated fi rmly in the tractor seat for the
PTO to function.
Ignition Switch
The ignition switch starts and stops the engine, it has three
positions:
OFF Stops the engine and shuts off the electri-
cal system.
RUN Allows the engine to run and powers the
electrical system.
START Cranks the engine for starting.
NOTE: Never leave the ignition switch in the RUN position
with the engine stopped–this drains the battery.
Brake Pedal
Depressing the brake pedal applies the tractor brake.
Seat Adjustment Lever
The seat can be adjusted forward and back. Move the
lever, position the seat as desired, and release the lever to
lock the seat into position.
Transmission Release Lever
The transmission release lever deactivates the transmission
so that the tractor can be pushed by hand. See Pushing
the Tractor by Hand.
Transmission Oil Expansion Chamber
Transmission oil is added through the transmission oil expansion chamber. It also serves as extra holding capacity
for oil as the transmission heats up and the oil expands.
See the Engine Manual for oil level check and fi ll proce-
dures.
Fuel Tank
To remove the cap, turn counterclockwise. On models with
a dashboard display, the fuel gauge is part of the dashboard. Models without a dashboard display have a fuel
gauge located under the seat.
Ground Speed Pedals
The tractor’s forward ground speed is controlled by the
forward ground speed control pedal. The tractor’s reverse
ground speed is controlled by the reverse ground speed
control pedal.
Depressing either pedal will increase ground speed. Note
that the further down the pedal is depressed, the faster the
tractor will travel.
Parking Brake
The parking brake knob is used to lock the parking brake
when the tractor is stopped. Fully depressing the brake pedal
and pulling up on the knob engages the parking brake
Mower Height of Cut Adjustment
The cutting height adjustment switch controls the mower
cutting height. The cutting height is infi nitely adjustable be-
tween 1.0” and 4.0” (2.5 and 10.2 cm).
Cruise Control
The cruise control is used to lock the ground speed control
in forward. Move the lever forward until the desired ground
speed is reached. To disengage the cruise control move
the lever back. In the event you need to stop quickly, depressing the brake pedal will also return the cruise control
to neutral.
12V
12-Volt Power Outlet
The power outlet is 12V-DC. Accessory must be rated at 14
amps or less.
Diff erential Lock Pedal
Depressing this pedal locks the transmission diff erential,
locking both rear wheels into “drive”.
Use this feature if the tractor is stuck because one wheel
is slipping. Engage the diff erential lock at slow ground
speeds only.
Steering Tilt Adjust
Use the tilt knob located on the bellows to release the pivot
mechanism and pivot the wheel to the desired position. Release the tilt knob to lock in position.
en
13
Page 14

FEATURES AND CONTROLS
Attachment Lift Control Lever
When using the mower deck, lift the deck off the ground
while transporting to and from the job site. DO NOT cut
with the mower in the raised, transport position. The attachment lift control lever raises and lowers attachments
that utilize the tractor’s hydraulic lift cylinder. Pushing the
lever forward lowers the attachment while pulling the lever
back raises the attachment.
IMPORTANT NOTE - The attachment lift will not work
when the parking brake is engaged.
Parking Brake Function
Applying the Parking Brake - See Figure 2. To lock the
parking brake, release the ground speed pedals (A), fully
depress the brake pedal (B), pull UP on the parking brake
knob (C), and then release brake pedal.
Releasing the Parking Brake - See Figure 2. To release
the parking brake, fully depress the brake pedal (B) and
push the parking brake knob (C) DOWN.
IMPORTANT NOTE: The tractor’s hydraulic attachment lift
will not work when the parking brake is engaged.
Automatic Controlled Traction
What is Automatic Controlled Traction?
Automatic Controlled Traction (ACT) is an exclusive
feature of our transmissions that provides improved traction. ACT applies a preset amount of torque to both rear
wheels even if one starts slipping (a transmission without
ACT will lose traction completely if one rear wheel starts
slipping). This preset torque is just enough to provide
additional traction, and still allow the wheels to turn at different speeds in a tight turn without damaging the lawn.
What to Expect from Your ACT Tractor
For the most part, while using your tractor you will not
notice ACT working, and you will simply become accustomed to increased traction an ACT transmission
provides.
Under certain circumstances the ACT system limit can
be exceeded, and one of the rear wheels may slip (for instance if trying to turn up a hill while accelerating). This
is normal. If you start to lose traction, do not speed up.
Instead, slow to a stop, straighten the steering wheel,
and slowly accelerate. Stopping the tractor allows the
transmission to regain more traction.
12-Volt Power Outlet
The 12-volt accessory plug is located in the left side pod. It
can be used to power small electronic devices. The accessory must be rated at 14 amps or less.
NOTE: Operating a 12-volt accessory, especially with the
engine at idle, may cause battery discharge. When not using
the accessory plug it must be covered with the rubber plug
to prevent moisture from causing a short circuit. Entrance of
water into plug can cause a short circuit.
14
www.simplicitymfg.com
Page 15

FEATURES AND CONTROLS
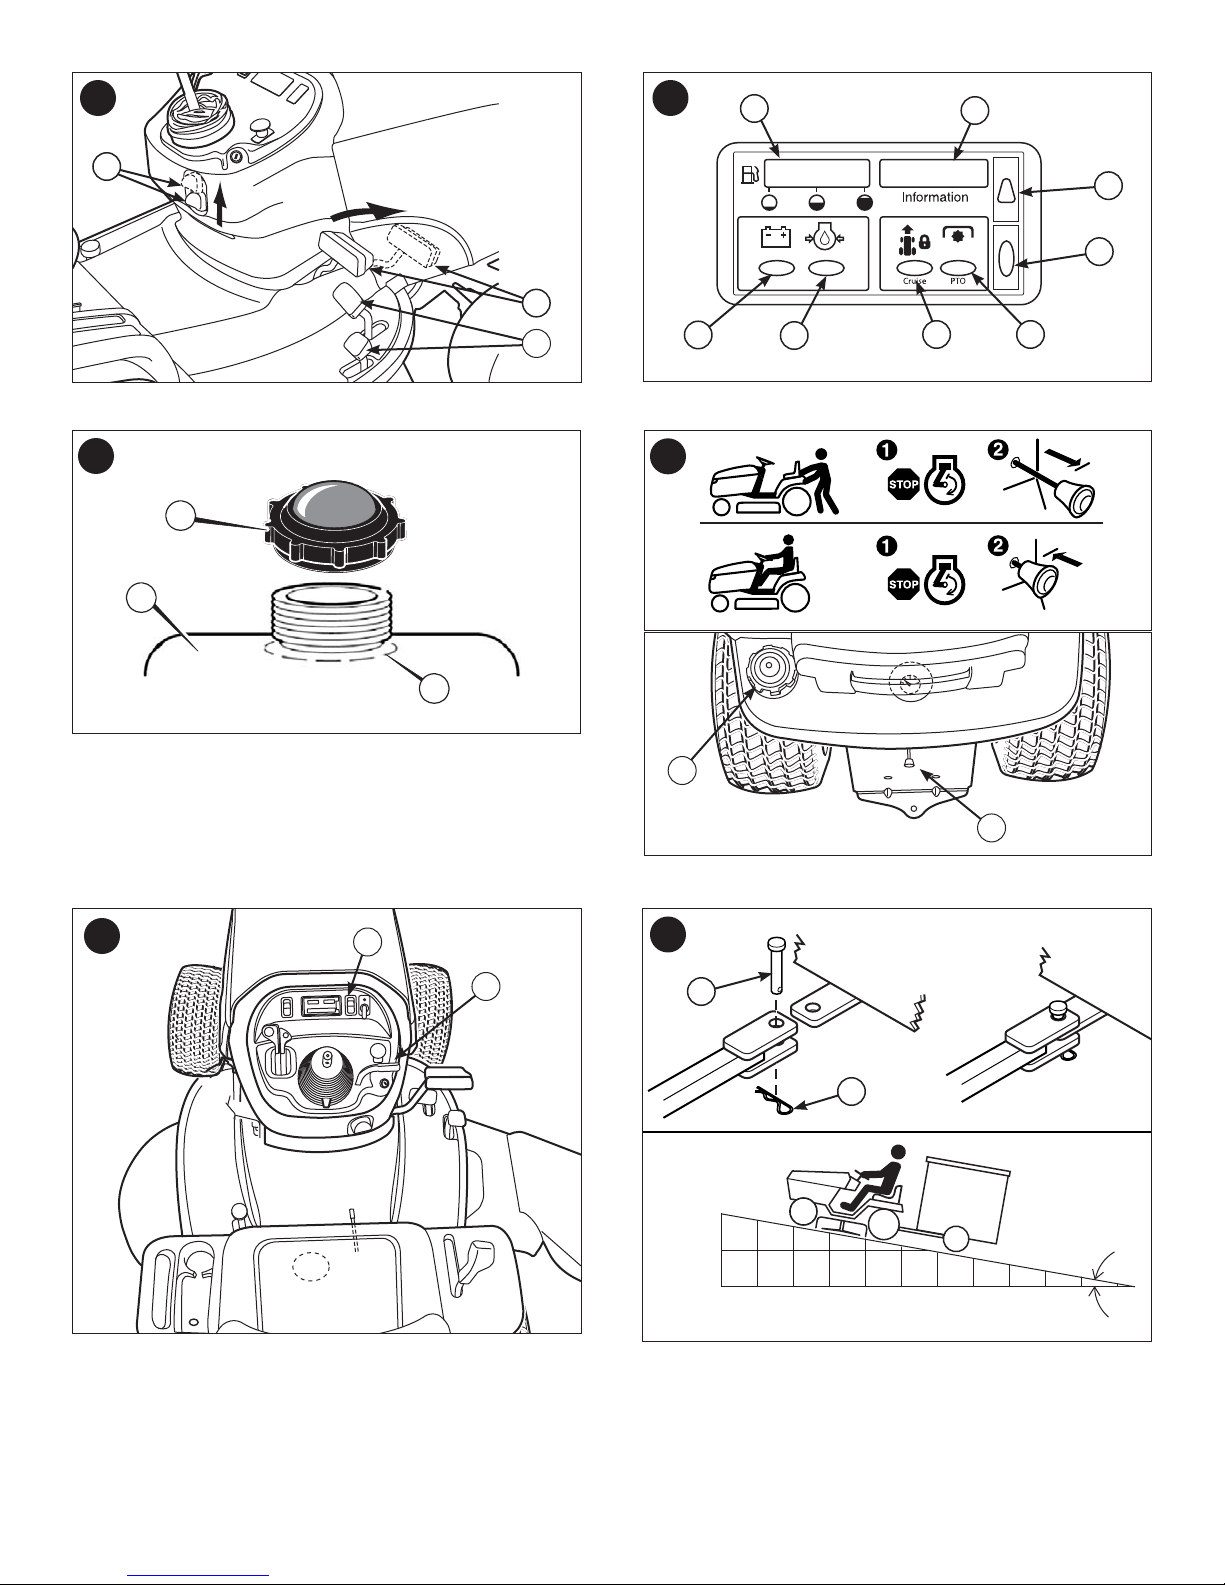
Dashboard Display & Functions
Display Items
Refer to Figure 3.
A. FUEL LEVEL
Indicates the amount of fuel in the fuel tank. Left is empty;
right is full.
B. HOUR METER / CLOCK / SERVICE INDICATOR
Displays the clock, hour meter, and maintenance reminder.
The hour meter measures the number of hours the key
has been in the RUN position. The hour meter will fl ash
an initial oil change indicator at 5 hours, and a lubrication reminder every 50 hours. These reminders display
for approximately two hours and will automatically reset
themselves.
NOTE: The hour meter will register the passage of time
when the key is in the RUN position, even if the engine is
not running. The hour meter has a self contained power
source so the total hours are always visible.
C. SELECT BUTTON
Used to set the clock and reset the maintenance reminder.
D. SET BUTTON
Used to set the clock and reset the maintenance reminder.
E. PTO LIGHT
Indicates the PTO switch is in the ON position.
F. CRUISE CONTROL LIGHT
Indicates that the cruise control is engaged.
G. LOW OIL PRESSURE LIGHT
Indicates that the engine oil pressure is low. The light will
turn on when the tractor is fi rst started and then go out. IF
THIS LIGHT TURNS ON WHILE THE TRACTOR IS IN
USE, TURN THE ENGINE OFF IMMEDIATELY. Contact
your authorized dealer for service.
H. LOW VOLTAGE LIGHT
Indicates that the electrical system voltage is low. The light
will turn on when the tractor is fi rst started and then go out.
IF THIS LIGHT TURNS ON WHILE THE TRACTOR IS IN
USE, TURN THE ENGINE OFF IMMEDIATELY. Contact
your authorized dealer for service.
Functions
DASHBOARD DISPLAY MODELS
Display Total Running Hours - When the key switch is
fi rst turned to the RUN position, all warning indicators will
light and the total running hours will be displayed. Be sure
all lights are functioning.
Display PTO Hours - Turn the key OFF, engage the PTO,
and turn the key to RUN (engine off ).
Set the Clock - Start the engine, leave the engine running. Depress the select button (C, Figure 3) for three (3)
seconds and release. Depress set button and HOLD to
advance time. Depress select button to select minutes.
Depress and HOLD set button (D) to advance time. Leave
alone for 5 seconds and clock will activate. Shut off engine.
Demonstration Mode - With the engine off , hold down the
set button (D) and turn the key switch to RUN.
Maintenance Reminder - A maintenance reminder will
display in the information window (B) after the fi rst 5 hours
of operation, and then after every 50 hours. The reminder
will automatically reset after 5 hours. The reminder can be
manually reset by turning the key switch from OFF to RUN
(with engine off ) and then depressing the set (D) and select
(C) buttons simultaneously for 5 seconds.
en
15
Page 16

OPERATION
Safety Interlock System Tests
This unit is equipped with a Safety Interlock System. Do
not attempt to bypass or tamper with the switches and
devices.
Test 1 — Engine should NOT crank if:
• PTO switch is ON, OR
• Brake pedal is NOT fully depressed (parking brake
OFF), OR
• The cruise control lever is NOT in NEUTRAL.
Test 2 — Engine SHOULD crank if:
• PTO switch is OFF, AND
• Brake pedal is fully depressed (parking brake ON),
AND
• The cruise control lever is in NEUTRAL.
Test 3 — Engine should SHUT OFF if:
• Operator rises off seat with PTO engaged, OR
• Operator rises off seat with brake pedal NOT fully depressed (parking brake OFF).
Test 4 — Check Mower Blade Stopping Time
Mower blades and mower drive belt should come to a
complete stop within fi ve seconds after electric PTO
switch is turned OFF. If mower drive belt does not stop
within fi ve seconds, readjust the PTO clutch as described
in the MAINTENANCE section or see your dealer.
Test 5 — Reverse Mow Option (RMO) Check
• Engine should shut off if reverse travel is attempted
if the PTO has been switched on and RMO has not
been activated.
• RMO light should illuminate when RMO has been activated.
NOTE: Once the engine has stopped, the PTO switch
must be turned off after the operator returns to the seat
in order to start the engine.
WARNING
If the unit does not pass a safety test, do not
operate it. See your authorized dealer.
Adding Fuel
WARNING
Fuel and its vapors are extremely fl ammable
and explosive.
Fire or explosion can cause severe burns or
death.
When Adding Fuel
• Turn engine off and let engine cool at least 3
minutes before removing the fuel cap.
• Fill fuel tank outdoors or in well-ventilated area.
• Do not overfi ll fuel tank. To allow for expansion of
the fuel, do not fi ll above the bottom of the fuel tank
neck.
• Keep fuel away from sparks, open fl ames, pilot
lights, heat, and other ignition sources.
• Check fuel lines, tank, cap, and fi ttings frequently
for cracks or leaks. Replace if necessary.
• If fuel spills, wait until it evaporates before starting
engine.
1. Clean the fuel cap area of dirt and debris. Remove
the fuel cap (A, Figure 4).
2. Fill the fuel tank with fuel. To allow for expansion of the
fuel, do not fi ll above the bottom of the fuel tank neck.
3. Reinstall the fuel cap.
Starting the Engine
WARNING
Fuel and its vapors are extremely fl ammable
and explosive.
Fire or explosion can cause severe burns or
death.
When Starting Engine
• Ensure that spark plug, muffl er, fuel cap and air
cleaner (if equipped) are in place and secured.
• Do not crank engine with spark plug removed.
• If engine fl oods, set choke (if equipped) to OPEN/RUN
position, move throttle (if equipped) to FAST position
and crank until engine starts.
16
www.simplicitymfg.com
Page 17

OPERATION
WARNING
Engines give off carbon monoxide, an
odorless, colorless, poison gas.
Breathing carbon monoxide can cause
nausea, fainting or death.
• Start and run engine outdoors.
• Do not start or run engine in enclosed area, even if
doors or windows are open.
NOTICE: This engine was shipped from Briggs & Stratton
without oil. Before you start the engine, make sure you
add oil according to the instructions in this manual. If you
start the engine without oil, it will be damaged beyond
repair and will not be covered under warranty.
1. While sitting in the operator’s seat, fully depress the
brake pedal or set the parking brake.
2. Make sure that your feet are not depressing the
ground speed control pedals and that the cruise control lever is in NEUTRAL.
3. Disengage the PTO clutch.
4. Set the throttle to FULL.
5. Close the choke.
NOTE: A warm engine may not require choking.
6. Insert the ignition key and turn it to START.
7. After the engine starts, move the engine throttle control to SLOW. Warm up the engine by running it for at
least a minute.
8. Set throttle to FULL.
NOTE: In the event of an emergency the engine can be
stopped by simply turning the ignition switch to STOP.
Use this method only in emergency situations. For normal engine shut down follow the procedure given in
Stopping the Tractor and Engine.
Driving the Tractor
1. Sit in the seat and adjust the seat so that you can comfortably reach all the controls and see the dashboard
display.
6. Depress the forward ground speed control pedal to
travel forward. Release the pedal to stop. Note that the
further down the pedal is depressed the faster the tractor will travel.
7. Stop the tractor by releasing the ground speed control
pedals, setting the parking brake, and stopping the engine (see Stopping the Tractor and Engine).
Mowing
1. Set the mower cutting height to the desired level and
set the gauge wheels to the appropriate position (if
equipped).
2. Engage the parking brake. Make sure the PTO switch
is disengaged.
3. Start the engine (see Starting the Engine).
4. Set the throttle to FULL.
5. Engage the PTO (Mower Deck).
6. Begin mowing.
7. When fi nished, shut off the PTO and raise the mower
using the attachment lift control lever.
8. Stop the engine (see Stopping the Tractor and
Engine).
WARNING
The engine will shut off if the reverse ground speed
pedal is depressed while the PTO is on and the
RMO has not been activated. The operator should
always turn the PTO off prior to driving across
on roads, paths or any area that maybe used by
other vehicles. Sudden loss of drive could create a
hazard.
WARNING
Mowing in reverse can be hazardous to bystanders.
Tragic accidents can occur if the operator is not
alert to the presence of children. Never activate
RMO if children are present. Children are often
attracted to the unit and the mowing activity.
2. Engage the parking brake.
3. Make sure the PTO switch is disengaged.
4. Start the engine (see Starting the Engine).
5. Disengage the parking brake and release the brake
pedal.
en
17
Page 18

OPERATION
Mowing in Reverse (RMO)
If an operator chooses to mow in reverse, the RMO system can be used. To use the Reverse Mowing Option
(RMO) turn the RMO key after the PTO is engaged. The
L.E.D. light will illuminate, and the operator can then mow
in reverse. Each time the PTO is engaged the RMO needs
to be reactivated if desired. The key should be removed
to restrict access to the RMO feature.
Attachment Operation in Reverse
If an operator chooses to operate a PTO driven attachment in reverse, the RMO system can be used. To use
the Reverse Mowing Option (RMO) turn the RMO key
after the PTO is engaged. The L.E.D. light will illuminate,
and the operator can then operate the attachment in reverse. Each time the PTO is disengaged the RMO needs
to be reactivated if desired. The key should be removed
to restrict access to the RMO feature.
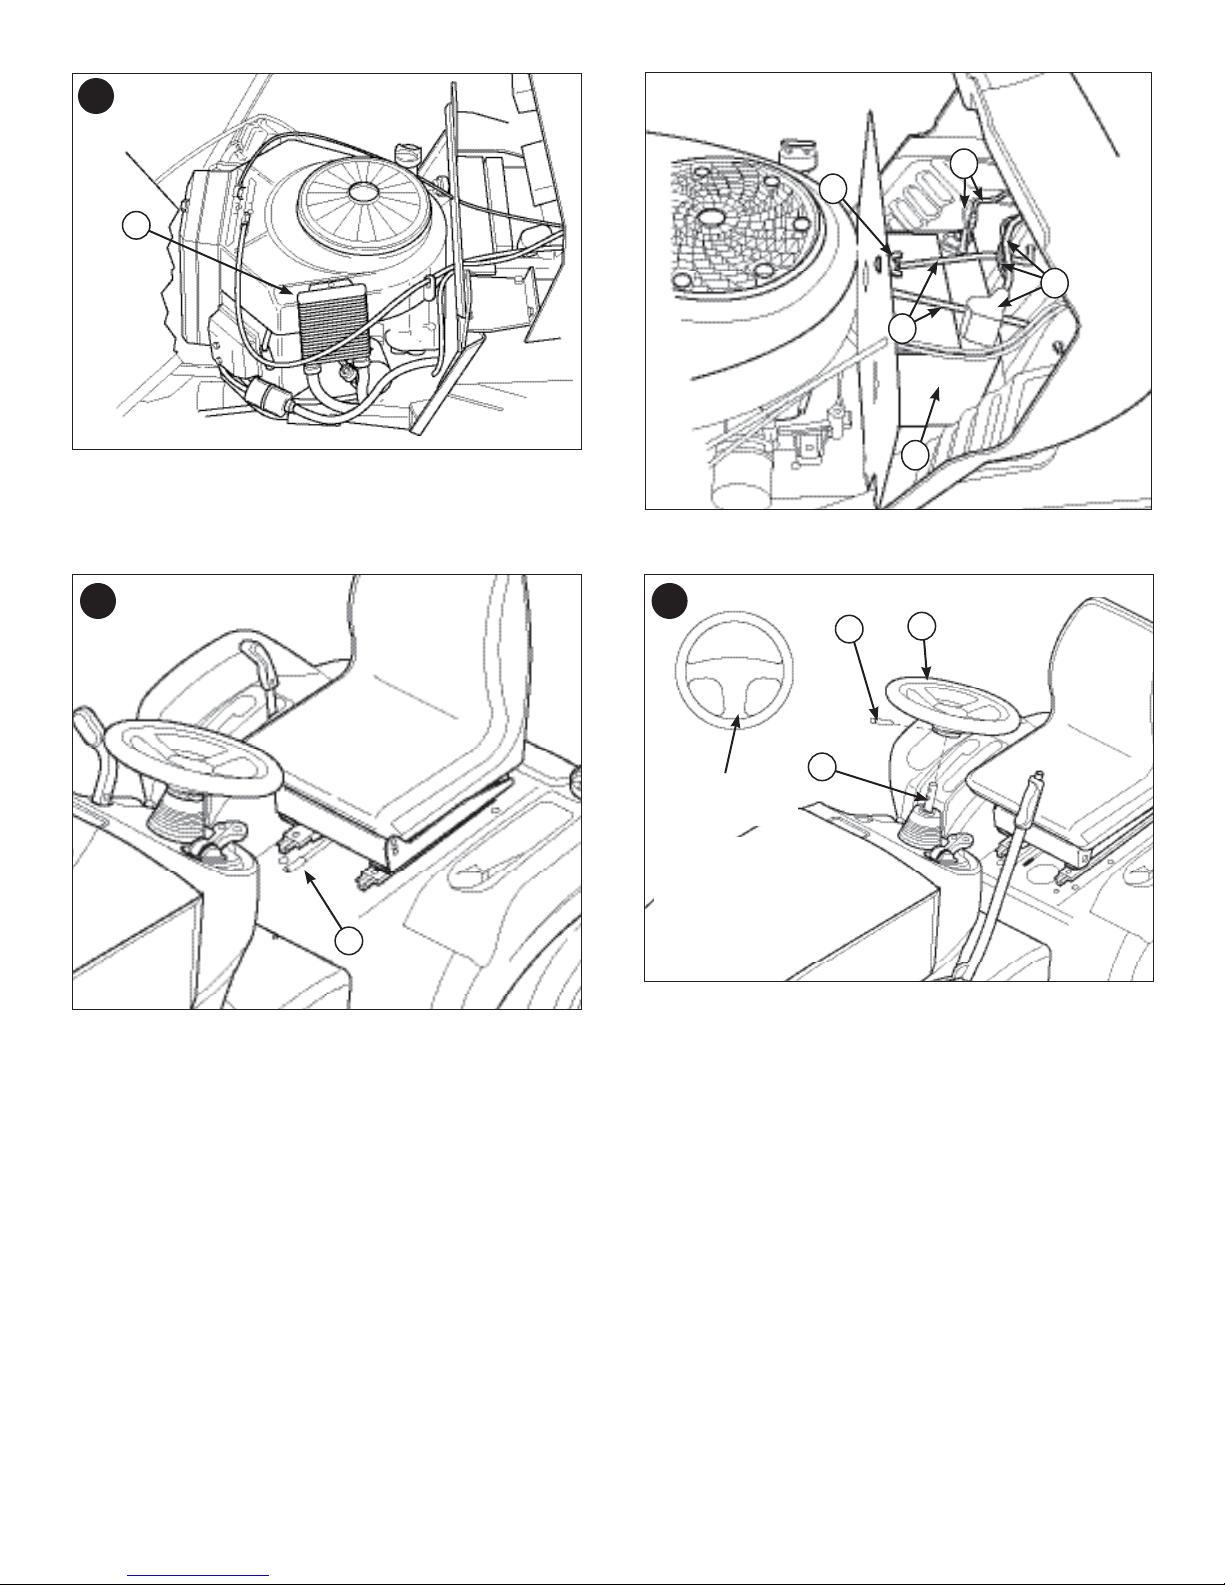
Pushing the Tractor by Hand
1. Disengage the PTO and turn the engine off.
2. Push the lever approximately 2-3/8” (6 cm) to release
the transmission (B, Figure 5).
3. The tractor can now be pushed by hand.
DO NOT TOW TRACTOR
Towing the unit will cause transmission damage.
• Do not use another vehicle to push or pull
this unit.
• Do not actuate the transmission release
valve lever while the engine is running.
Adjusting Mower Cutting Height
The height-of-cut switch (A, Figure 6) adjusts the mower
cutting height. Press the switch UP to raise the mower
cutting height and DOWN to lower the mower cutting
height. The cutting height is infi nitely adjustable between
1.0” and 4.0” (2,5 and 10,2 cm).
Attachment Lift Control
The attachment lift control lever (B, Figure 6) raises and
lowers attachments that utilize the tractor’s hydraulic lift
cylinder. Pushing the lever forward lowers the attachment
while pulling the lever back raises the attachment.
Attaching a Trailer
The maximum horizontal drawbar force allowed is 444
Newton. The maximum vertical drawbar force is 222
Newton. This equates to a 396 lbs (180 kg) trailer on a 10
degree hill. Secure the trailer with an appropriately sized
clevis pin (A, Figure 7) and clip (B).
Stopping the Tractor and Engine
WARNING
Fuel and its vapors are extremely
fl ammable and explosive.
Fire or explosion can cause severe burns or
death.
• Do not choke the carburetor to stop engine.
1. Return the ground speed control(s) to NEUTRAL.
2. Disengage the PTO and wait for all moving parts to
stop.
3. Set the throttle to FULL.
4. Turn the ignition switch to OFF. Remove the key.
18
www.simplicitymfg.com
Page 19

Maintenance Chart
MAINTENANCE
TRACTOR AND MOWER
Every 8 Hours or Daily
Check safety interlock system
Clean debris off tractor and mower deck
Clean debris from engine compartment
Every 25 Hours or Annually *
Check mower blade stopping time
Check tractor and mower for loose hardware
Check tire pressure
Every 50 Hours or Annually *
Check tractor brakes
Clean battery and cables
See Dealer Annually to
Lubricate tractor and mower
Check mower blades **
* Whichever comes fi rst
** Check blades more often in regions with sandy soils or
high dust conditions.
ENGINE
First 5 Hours
Change engine oil - see engine manual
Every 8 Hours or Daily
Check engine oil level - see engine manual
Every 25 Hours or Annually *
Clean engine air fi lter and pre-cleaner **
Every 50 Hours or Annually *
Change engine oil
Replace oil fi lter
Annually
Replace air fi lter
Replace pre-cleaner
See Dealer Annually to
Inspect muffl er and spark arrester
Replace spark plug
Replace fuel fi lter
Clean engine air cooling system
* Whichever comes fi rst
** Clean more often in dusty conditions or when airborne
debris is present.
Check Tire Pressure
Tire pressure should be checked periodically, and maintained
at the levels shown in the chart. Note that these pressures may
differ slightly from the “Max Infl ation” stamped on the side-wall
of the tires. The pressures shown provide proper traction, improve cut quality, and extend tire life.
Size PSI bar
16 x 6.5-8 12-15 0,68-0,82 bar
Checking Tire Pressure.eps
24 x 12.0-12 6-8 0,41-0,55 bar
Check Mower Blade Stopping Time
Mower blades and mower drive belt should come to a complete stop within fi ve seconds after the electric PTO switch
is turned off.
1. With tractor in neutral, PTO disengaged and operator in
seat, start the engine.
2. Look over the left-hand footrest at the mower drive belt.
Engage the PTO and wait several seconds. Disengage
the PTO and check the amount of time it takes for the
mower drive belt to stop.
3. If mower drive belt does not stop within fi ve seconds,
see an authorized dealer.
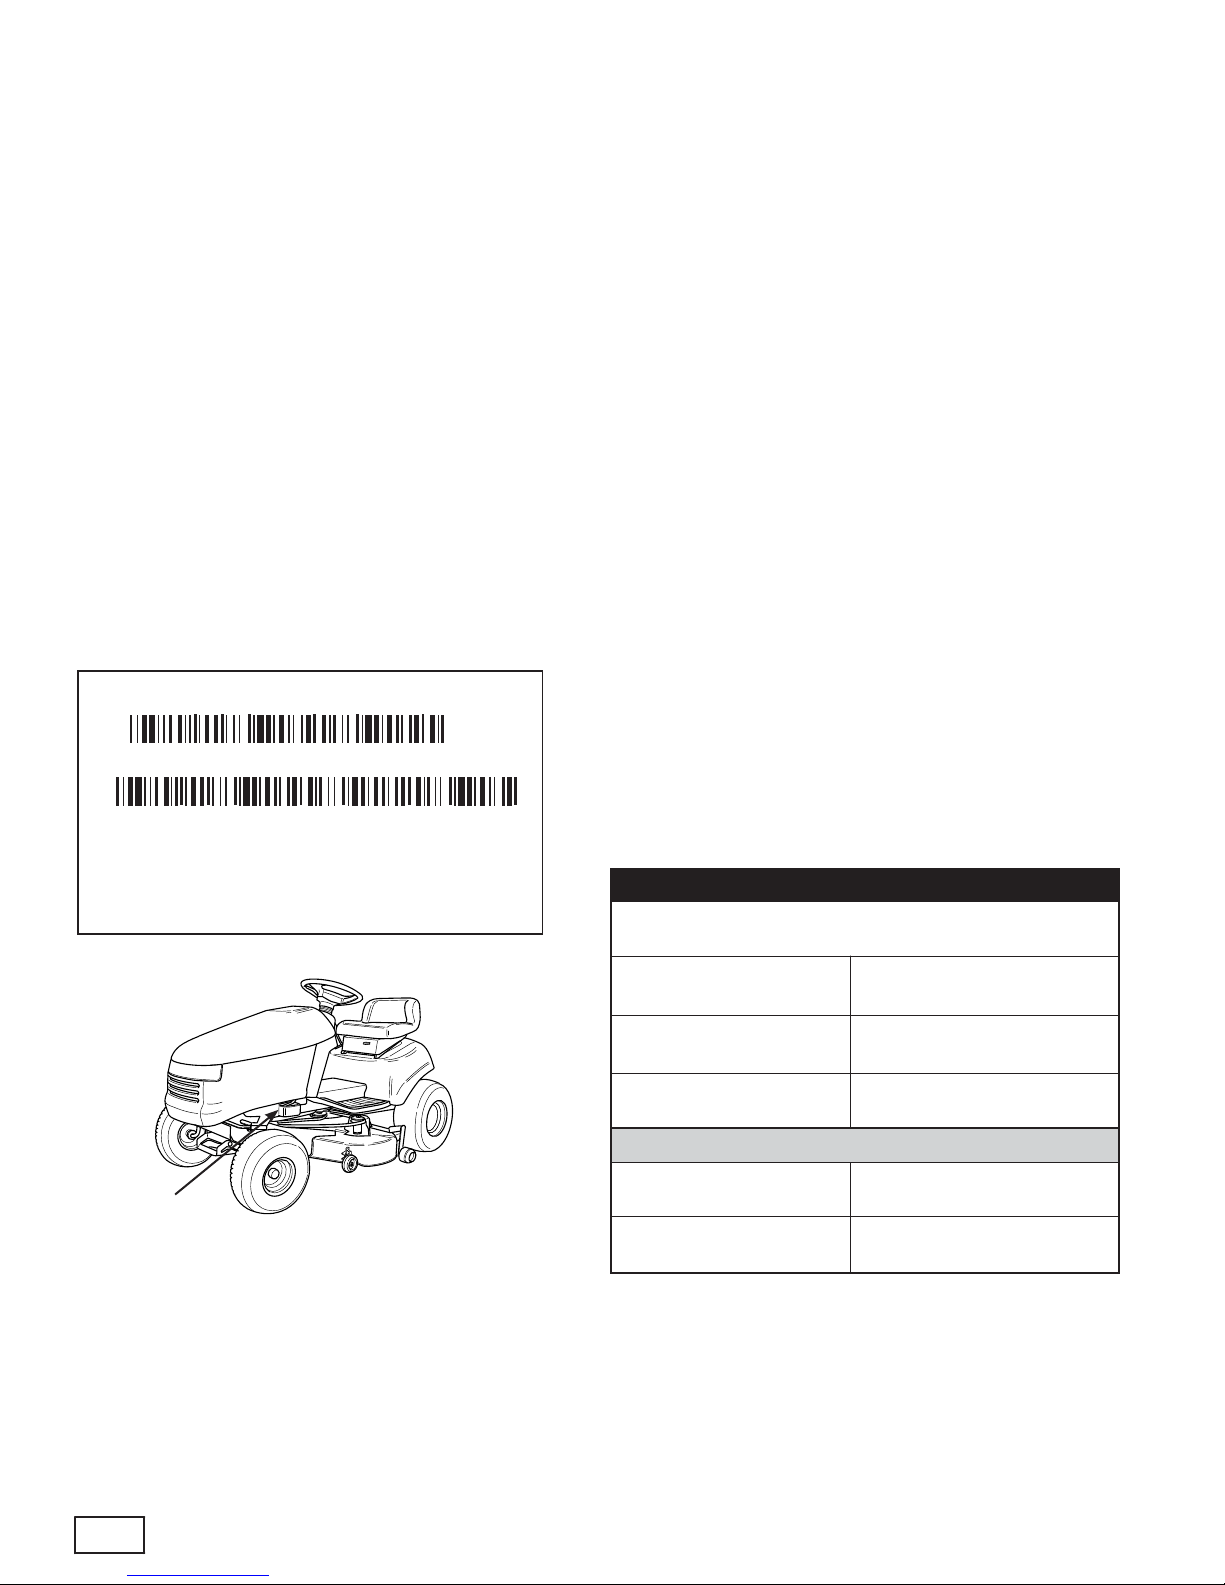
Check/Clean Oil Cooler
The engine oil cooler is located on the side of the engine
(A, Figure 8) and should be cleaned with compressed air at
regular intervals or if dirty.
en
19
Page 20

MAINTENANCE
Battery Maintenance
WARNING
When removing or installing battery cables,
disconnect the negative cable FIRST and
reconnect it LAST. If not done in this order,
the positive terminal can be shorted to the
frame by a tool.
Cleaning the Battery and Cables
1. Disconnect the cables from the battery, negative cable
fi rst (A, Figure 9).
2. Remove the battery hold-down strap (B) and battery.
3. Clean the battery compartment with a solution of baking soda and water.
4. Clean the battery terminals and cable ends with a wire
brush and battery terminal cleaner until shiny.
5. Reinstall the battery in the battery compartment, and
secure with the battery hold-down strap.
6. Reattach the battery cables, positive cable fi rst (C).
7. Coat the cable ends and battery terminals with petroleum jelly or non-conducting grease.
Seat Adjustment
The seat can be adjusted forward and back. Move the lever
(A, Figure 10), position the seat as desired, and release the
lever to lock the seat into position.
Steering Wheel Adjustment
1. Use a suitable punch to remove the roll pin (A, Figure
11) at the base of the steering wheel (B).
2. Pull down on the rubber boot to expose the two holes
in the steering shaft (C).
3. Align the hole in the steering wheel with the appropriate steering shaft hole and install the roll pin.
NOTE: Steering wheel is factory installed with the roll pin
in the bottom hole.
Battery Charging
WARNING
Keep open fl ames and sparks away from
the battery; the gasses coming from it are
highly explosive. Ventilate the battery well
during charging.
A dead battery or one too weak to start the engine may
be the result of a defect in the charging system or other
electrical component. If there is any doubt about the cause
of the problem, see your dealer. If you need to replace the
battery, see the Cleaning the Battery and Cables section.
To charge the battery, follow the instructions provided by
the battery charger manufacturer as well as all warnings
included in the Operator Safety section of this manual.
Charge the battery until fully charged. Do not charge at a
rate higher than 10 amps.
20
www.simplicitymfg.com
Page 21

MAINTENANCE
Storage
WARNING
Never store the unit (with fuel) in an enclosed,
poorly ventilated structure. Fuel vapors can travel to
an ignition source (such as a furnace, water
heater, etc.) and cause an explosion. Fuel
vapor is also toxic to humans and animals.
When Storing Fuel Or Equipment With Fuel In Tank
• Store away from furnaces, stoves, water heaters or
other appliances that have pilot lights or other ignition
sources because they can ignite fuel vapors.
Equipment
Disengage the PTO, set the parking brake, and remove
the key.
Battery life will be increased if it is removed. Put in a cool,
dry place and fully charged about once a month. If the
battery is left in the unit, disconnect the negative cable.
Fuel System
Fuel can become stale when stored over 30 days. Stale
fuel causes acid and gum deposits to form in the fuel system or on essential carburetor parts. To keep fuel fresh,
use Briggs & Stratton FRESH START® fuel stabilizer,
available as a liquid additive or a drip concentrate cartridge.
There is no need to drain gasoline from the engine if a
fuel stabilizer is added according to instructions. Run the
engine for 2 minutes to circulate the stabilizer throughout
the fuel system. The engine and fuel can then be stored
up to 24 months.
If gasoline in the engine has not been treated with a fuel
stabilizer, it must be drained into an approved container.
Run the engine until it stops from lack of fuel. The use of
a fuel stabilizer in the storage container is recommended
to maintain freshness.
Engine Oil
While the engine is still warm, change the engine oil. See
Engine Manual.
Before starting the unit after it has been stored:
• Check all fl uid levels. Check all maintenance items.
• Perform all recommended checks and procedures
found in this manual.
• Allow the engine to warm up for several minutes before use.
en
21
Page 22

TROUBLESHOOTING
Troubleshooting the Tractor
PROBLEM LOOK FOR REMEDY
Brake pedal not depressed. Fully depress brake pedal.
Engine will not
turnover or start.
Engine starts hard or
runs poorly.
Engine knocks.
PTO (electric clutch) switch is in
ON position.
Cruise control engaged. Move knob to NEUTRAL/OFF position.
Out of fuel. If engine is hot, allow it to cool, then refi ll the fuel tank.
Engine fl ooded. Disengage the choke.
Fuse is blown. See authorized dealer.
Battery terminals require
cleaning.
Battery discharged or dead. Recharge or replace battery.
Wiring loose or broken. Visually check wiring. If wires are frayed or broken, see authorized dealer.
Solenoid or starter motor faulty. See authorized dealer.
Safety interlock switch faulty. See authorized dealer.
Water in fuel. See authorized dealer.
Gas is old or stale. See authorized dealer.
Fuel mixture too rich. Clean air fi lter.
Engine has other problem. See authorized dealer.
Low oil level. Check/add oil as required.
Using wrong grade oil. See Engine Manual.
Place in OFF position.
See Cleaning the Battery and Cables section.
Excessive oil
consumption.
Engine exhaust is
black.
Engine runs, but tractor
will not drive.
Engine running too hot. See authorized dealer.
Using wrong grade oil. See Engine Manual.
Too much oil in crankcase. Drain excess oil.
Dirty air fi lter. See Engine Manual.
Choke closed. Open choke.
Ground speed control pedals
not depressed.
Transmission release lever in
PUSH position.
Parking brake is engaged. Disengage parking brake.
Traction drive belt is broken or
slipping.
Depress pedals.
Move into DRIVE position.
See authorized dealer.
22
www.simplicitymfg.com
Page 23

Troubleshooting the Tractor (Continued)
PROBLEM LOOK FOR REMEDY
Brake will not hold.
Internal brake worn. See authorized dealer.
Steering linkage is loose. See authorized dealer.
TROUBLESHOOTING
Tractor steers hard or
handles poorly.
Improper tire infl ation. See Check Tire Pressure section.
Front wheel spindle bearings
dry.
Troubleshooting the Mower
PROBLEM LOOK FOR REMEDY
Mower will not raise.
Mower cut is uneven.
Mower cut is rough
looking.
Engine stalls easily
with mower engaged.
Lift linkage not properly attached
or damaged.
Mower not leveled properly. See authorized dealer.
Tractor tires not properly
infl ated.
Engine speed too slow. Set to full throttle.
Ground speed too fast. Slow down.
Mower has other problem. See authorized dealer.
Engine speed too slow. Set to full throttle.
Ground speed to fast. Slow down.
Dirty or clogged air fi lter. See Engine Manual.
Cutting height set too low. Cut tall grass at maximum cutting height during fi rst pass.
Engine not up to operating
temperature.
See authorized dealer.
See authorized dealer.
See Check Tire Pressure section.
Run engine for several minutes to warm-up.
Starting mower in tall grass. Start the mower in a cleared area.
Excessive mower
vibration.
Engine runs and tractor
drives, but mower will
not drive.
en
Mower has other problem. See authorized dealer.
PTO not engaged. Engage the PTO.
Mower has other problem. See authorized dealer.
23
Page 24

24
www.simplicitymfg.com
Page 25

en
25
Page 26

SPECIFICATIONS
ENGINE:
27 HP Kohler
Make Kohler
Model Command CV740S
Horsepower 27 @ 3600 rpm
Displacement 44.2 cu in. (725 cc)
Electrical System Alternator: 15 amp Reg.
Battery: 12 Volt, 500 CCA
Oil Capacity 64 oz (1,9 L)
CHASSIS:
Fuel Tank Capacity Capacity: 4.0 Gallons (15,1 L)
Front Wheels Tire Size: 16 x 6.5-8
Infl ation Pressure: 12-15 psi (0,68-0,82 bar)
Rear Wheels Tire Size: 24 x 12.0 -12
Infl ation Pressure: 6-8 psi (0,41-0,55 bar)
TRANSMISSION:
K71
Type Hydrostatic Tuff Torq K71
Hydraulic Fluid 10w 30 Premium Engine Oil
Capacity 4.8 qt (4,6 L)
Speeds Forward: 0-7.2 MPH (0-11,6 km/h)
@ 3400 rpm Reverse: 0-4.5 MPH (0-7,2 km/h)
Continuous Torque 410 ft-lbs (554 Nm)
Output
Drawbar Rating 440 lbs (200 kg)
Maximum Weight 728 lbs (330 kg)
on Axle
MOWER:
Width of Cut 46” (116,8 cm)
54” (137,2 cm)
Number of Blades 3
Base Deck Platform Side Discharge
Cutting Height 1.0 - 4.0 in. (2,5 - 10,2 cm)
Cutting Positions Infi nite
DIMENSIONS:
Overall Length 75” (191 cm)
Overall Width 42” (107 cm)
Height 50” (127 cm)
Power Rating
The gross power rating for individual gas engine models is labeled in accordance with SAE (Society of Automotive Engineers) code J1940 (Small Engine Power & Torque Rating Procedure), and rating performance has been obtained and
corrected in accordance with SAE J1995 (Revision 2002-05). Torque values are derived at 3060 RPM; horsepower values
are derived at 3600 RPM. Net power values are taken with exhaust and air cleaner installed whereas gross power values
are collected without these attachments. Actual gross engine power will be higher than net engine power and is aff ected
by, among other things, ambient operating conditions and engine-to-engine variability. Given the wide array of products
on which engines are placed, the gas engine may not develop the rated gross power when used in a given piece of power
equipment. This diff erence is due to a variety of factors including, but not limited to, the variety of engine components (air
cleaner, exhaust, charging, cooling, carburetor, fuel pump, etc.), application limitations, ambient operating conditions (temperature, humidity, altitude), and engine-to-engine variability. Due to manufacturing and capacity limitations, Briggs & Stratton may substitute an engine of higher rated power for this Series engine.
PARTS AND ACCESSORIES
See an authorized dealer.
26
www.simplicitymfg.com
Page 27

ÍNDICE
Ilustraciones ........................................................................................................3
Índice .................................................................................................................... 5
Seguridad del usuario .........................................................................................6
Características y controles ............................................................................... 13
Operación ...........................................................................................................16
Mantenimiento ................................................................................................... 19
Resolución de problemas .................................................................................22
Garantía .............................................................................................................. 24
Especifi caciones ...............................................................................................25
Componentes y accesorios ..............................................................................25
Información general
Gracias por haber adquirido este cortacésped SIMPLICITY de alta calidad. Le agradecemos la confi anza que ha
depositado en la marca SIMPLICITY. Si usa y realiza el mantenimiento del equipo de conformidad con las instrucciones
de este manual, su producto SIMPLICITY le ofrecerá muchos años de funcionamiento fi able.
Este manual contiene información de seguridad para advertirle sobre los peligros y riesgos asociados a cortacéspedes
y cómo evitarlos. Debido a que Briggs & Stratton Power Products Group, LLC no conoce todas las aplicaciones para las
cuales se puede utilizar este cortacésped, es importante que usted lea y comprenda estas instrucciones. Conserve estas
instrucciones originales para consultarlas en el futuro.
Etiqueta de identifi cación
Product Identification Tag
Model / Modéle / Model xxxxxxxx
Serial / Sèrie / Serie xxxxxxxxxx
Briggs & Stratton Power Products Group, L.L.C.
Milwaukee, WI 53201 USA
Datos de referencia del producto
Anote su nombre/número de modelo, los números de
identifi cación del fabricante y los números de serie del
motor en el espacio facilitado al efecto para tener un
acceso fácil a los mismos. Estos números se encuentran
en las ubicaciones mostradas.
Cuando se ponga en contacto con el distribuidor
autorizado para pedir piezas de sustitución,
reparaciones o información, DEBE tener disponibles
estos números.
DATOS DE REFERENCIA DEL PRODUCTO
Nombre/número de descripción del modelo
Número MFG de la unidad Número de SERIE de la unidad
Número MFG de la cubierta del
cortacésped
Nombre del distribuidor Fecha de compra
DATOS DE REFERENCIA DEL MOTOR
Marca del motor Modelo del motor
Número de SERIE de la cubierta del cortacésped
Etiqueta de identifi cación
La lista de componentes con fotografías para esta máquina puede descargarse en www.simplicitymfg.com. Proporcione
el modelo y el número de serie cuando solicite componentes de reemplazo.
Copyright © 2011 Briggs & Stratton Power Products Group, LLC
Milwaukee, WI. Reservados todos los derechos.
SIMPLICITY es una marca comercial de Briggs & Stratton Power Products
Group, LLC Milwaukee, WI, EE.UU.
es
Tipo/especifi caciones del motor Código/número de serie del motor
5
Page 28

SEGURIDAD DEL USUARIO
¡Enhorabuena! Ha comprado usted un equipo de calidad superior para su
jardín. Nuestros productos están diseñados y fabricados para satisfacer o
superar todas las normas de la industria con respecto a la seguridad.
Este equipo sólo es tan seguro como su operador. Si se usa indebidamente o no se mantiene de la manera correcta, puede ser peligroso.
Recuerde, usted es responsable de su propia seguridad así como de la
seguridad de quienes lo rodean.
Aplique su sentido común y considere detenidamente lo que está haciendo. Si no está seguro de que la tarea que vaya a realizar se puede
hacer de manera segura con el equipo que escogió, pregúntele a un profesional: hable con su distribuidor local autorizado.
Lea el manual
El manual del operador contiene información de seguridad importante que necesita tener presente ANTES de que opere su unidad,
así como también DURANTE la operación.
El manual incluye técnicas de operación segura, una explicación de
las funciones y controles del producto e información sobre mantenimiento, todo ello con el fi n de ayudarlo a aprovechar al máximo su
inversión en el equipo.
Asegúrese de leer todas las reglas y la información de seguridad
que se encuentran en las próximas páginas. Lea también toda la
sección de Operación.
Seguridad operativa
Niños
Pueden ocurrir accidentes trágicos a los niños. No permita
que se acerquen al área de operación. Con frecuencia
los niños se ven atraídos por la unidad y la actividad de
segado. Nunca asuma que los niños se quedarán en el
lugar en donde los vio por última vez. Si existe el riesgo de
que puedan entrar niños al área donde está segando, pida
a otro adulto responsable que los vigile.
¡ NO PASEE NI—OS EN ESTA UNIDAD! Eso los alienta
a acercarse a la unidad en el futuro, mientras está en marcha, y podrían resultar gravemente heridos. Podrían acercarse a la unidad para que los paseen cuando no los esté
esperando, y puede atropellarlos.
6
Reversa
No siegue en reversa a menos que
sea absolutamente necesario. Mire
siempre hacia abajo
y hacia atrás antes
de echarse en reversa, incluso si
las cuchillas de la
segadora no están
activadas.
www.simplicitymfg.com
Page 29

Operación en pendientes
Usted puede resultar gravemente lesionado o incluso muerto si utiliza
esta unidad en una pendiente demasiado pronunciada. Utilizar esta
unidad en una pendiente demasiado pronunciada o donde no tiene
una tracción adecuada puede hacerle perder el control sobre la unidad o volcarse.
Un buen criterio general es no operar en una pendiente donde no
se pueda echar en reversa (en modo de tracción en dos ruedas). No
debe usar el tractor en terrenos con una inclinación superior a los 1,5
m (3,5 ft) sobre una longitud de 6,0 m (20 ft). Maneje siempre hacia
arriba y hacia abajo por las pendientes: nunca transversalmente.
Asimismo, tenga en cuenta que la superfi cie en la que maneja puede
afectar en gran medida la estabilidad y el control. El pasto húmedo
o el pavimento helado verdaderamente pueden afectar su habilidad
para controlar la unidad.
Si se siente inseguro de operar la unidad por una pendiente, no lo
haga. No vale la pena el riesgo.
Piezas móviles
Este equipo tiene muchas piezas móviles que pueden lesionarlo a usted o a
alguien más. No obstante, si usted está debidamente sentado en el asiento y
sigue las reglas en este libro, la unidad es segura de operar.
La cubierta de la segadora tiene cuchillas giratorias que pueden amputar manos
y pies. No permita que nadie se acerca mientras el equipo esté encendido.
Para ayudar al operador a usar este equipo de manera segura, éste se encuentra equipado con un sistema de seguridad que funciona con el operador
presente. NO intente alterar ni desviar el sistema. Consulte de inmediato a su
distribuidor si el sistema no pasa todas las pruebas del sistema de bloqueo de
seguridad que se encuentran en este manual.
SEGURIDAD DEL USUARIO
Objetos arrojados
Esta unidad tiene cuchillas giratorias. Estas cuchillas pueden coger y arrojar
fragmentos que podrían lesionar gravemente a un espectador. Asegúrese de
limpiar la zona que segará ANTES de encender la segadora.
No opere esta unidad sin que estén completamente instalados el receptor de
pasto o el protector de expulsión (defl ector).
Además, no permita que nadie ingrese al área mientras la unidad esté funcionando. Si alguien ingresa al área, apague de inmediato la unidad hasta que la
abandone.
Combustible y mantenimiento
La gasolina es altamente infl amable. Los vapores también son extremadamente
infl amables y pueden recorrer grandes distancias para llegar a una fuente de
ignición. Use la gasolina sólo como combustible, pero no cobo solvente ni
como limpiador. Nunca la almacene en un lugar donde los vapores puedan
acumularse o desplazares a una fuente de ignición como una llama piloto.
Ponga el combustible en un contenedor aprobado y sellado de plástico, o en
el tanque de combustible del tractor con el tapón fi jamente cerrado. Limpie
el combustible derramado de inmediato.
El mantenimiento adecuado es muy importante para la seguridad y rendimiento
de la unidad. Asegúrese de realizar los procedimientos de mantenimiento indicados en el manual, en especial las pruebas periódicas al sistema de seguridad.
es
7
Page 30

SEGURIDAD DEL USUARIO
Lea estas reglas de seguridad y sígalas con cuidado. Hacer caso omiso de ellas puede ocasionar la pérdida del
control sobre la unidad, lesiones corporales graves o la muerte a usted o a los espectadores, o daños a la propiedad o
al equipo. Esta cubierta de segadora puede amputar manos y pies y arrojar objetos. El triángulo en el
texto representa precauciones o advertencias importantes que deben tomarse en cuenta.
OPERACIÓN GENERAL
1. Lea, entienda y siga todas las instrucciones en el
manual y en la unidad antes de arrancar.
2. No acerca las manos ni los pies a las partes giratorias
o debajo de la máquina. Manténgase alejado de la
abertura de expulsión en todo momento.
3. Sólo permita que un adulto responsable, que esté
familiarizado con las instrucciones, opere la unidad
(los reglamentos locales pueden restringir la edad del
operador).
4. Retire de la zona objetos como piedras, juguetes, etc.,
que pueden ser cogidos y arrojados por las cuchillas.
5. Asegúrese de que no haya gente en la zona antes de
segar el pasto. Detenga la unidad si alguien entra en
la zona.
6. Nunca lleve pasajeros.
7. No siegue el pasto en reversa a menos que sea absolutamente necesario. Mire siempre hacia abajo y
hacia atrás antes de echarse en reversa y mientras lo
hace.
8. Nunca dirija el material de expulsión directamente
hacia alguien. Evite expulsar el material contra una
pared o una obstrucción. El material puede rebotar
y pegarle al operador. Detenga las cuchillas cuando
cruce por superfi cies cubiertas con grava.
9. No opere la máquina si no están en su lugar el receptor de pasto completo, el protector de expulsión (defl ector) u otros dispositivos de seguridad.
10. Reduzca la velocidad antes de girar.
11. No deje nunca la unidad operando sin supervisión.
Desactive siempre el PTO, accione el freno de mano,
detenga el motor y quite las llaves antes de desmontar.
12. Desacople las cuchillas (PTO) cuando no esté segando el pasto. Apague el motor y espere a que
todas las partes se detengan por completo antes de
limpiar la máquina, quitar el receptor de pasto o desatascar el protector de expulsión.
13. Opere la máquina sólo a la luz del día o con una
buena luz artifi cial.
14. No opere la unidad si está bajo la infl uencia de alcohol o drogas.
15 Tenga cuidado con el tráfi co si opera cerca de alguna
calle.
16. Tenga mucho cuidado al cargar o descargar la unidad en un remolque o camioneta.
17. Siempre protéjase los ojos cuando opere esta unidad.
18. Los datos indican que operadores de 60 años y
más están involucrados en un gran porcentaje de
lesiones asociadas con equipos motorizados. Estos
operadores deben evaluar su habilidad para operar el
equipo con la sufi ciente seguridad para protegerse a
sí mismos y a otros de lesiones.
19. Siga las recomendaciones del fabricante respecto a
los pesos y contrapesos para ruedas.
20. Recuerde que el operador es responsable de los accidentes que ocurran a otra gente o propiedad.
21. Todos los conductores deben pedir y obtener instrucciones profesionales y prácticas.
22. Siempre use zapatos cerrados y pantalones. Nunca
opere la unidad descalzo o con sandalias.
23. Antes de su uso, siempre revise visualmente que las
cuchillas y sus piezas metálicas estén presentes, intactas y afi anzadas. Reemplace las partes dañadas
o desgastadas.
24. Desacople los accesorios antes de: cargar combustible,
quitar un accesorio, hacer ajustes (a menos que el
ajuste pueda hacerse desde el puesto del operador).
25. Cuando la máquina está estacionada, almacenada
o se deje sin supervisión, baje los medios de corte a
menos de que use una traba mecánica positiva.
26. Antes de dejar el puesto del operador por cualquier
razón, accione el freno de mano (si viene equipado
con uno), desacople el PTO, detenga el motor y quite
la llave.
27. Para reducir el peligro de incendio, mantenga la unidad libre de pasto, hojas y aceite excesivo. No se
detenga ni estacione sobre hojas secas, pasto o materiales combustibles.
TRANSPORTE Y ALMACENAJE
1. Cuando se transporta la unidad sobre un remolque
abierto, asegúrese de que mire hacia el frente, en
dirección del desplazamiento. Si la unidad está mirando
hacia atrás, la fuerza del aire puede dañar la unidad.
2. Obedezca siempre las prácticas seguras para la
carga y el manejo de combustible al momento de
cargar combustible en la unidad y después del transporte o almacenamiento.
3. Nunca almacene la unidad (con combustible) en
una estructura cerrada con poca ventilación. Los
vapores del combustible pueden viajar a una fuente
de ignición (como un horno, calentador de agua, etc.)
y ocasionar una explosión. Los vapores del combustible también son tóxicos para los humanos y los
animales.
8
4. Siga siempre las instrucciones del manual del motor
respecto a las preparaciones de almacenamiento
antes de almacenar la unidad, ya sea por períodos
cortos o largos.
5. Siga siempre las instrucciones del manual del motor
respecto a los procedimientos apropiados de arranque cuando reintegre la unidad al servicio.
6. Nunca almacene la unidad ni el contenedor de combustible en un lugar cerrado, donde haya una llama
abierta o una llama piloto, como sucede con un
calentador de agua. Deje enfriar la unidad antes de
almacenarla.
www.simplicitymfg.com
Page 31

SEGURIDAD DEL USUARIO
OPERACIÓN EN PENDIENTES
Las pendientes son un factor importante que se relacionan con accidentes por pérdida de control y volcaduras,
los cuales pueden ocasionar lesiones graves o la muerte.
Cualquier operación en una pendiente exige precauciones
extremas. Si no puede echarse en reversa en una pendiente o se siente inquieto en ella, no opere en ella.
No se puede recuperar el control de una máquina de
empujar o montable accionando el freno cuando ésta se
desliza por una pendiente. Las principales razones para
perder el control son: agarre insufi ciente de las ruedas en
la tierra, velocidad muy alta, frenado inadecuado, el tipo
de máquina es inadecuada para la labor, falta de conocimiento sobre las condiciones de la tierra, enganche y
distribución de la carga incorrectos.
1. Siegue el pasto hacia arriba y hacia abajo por la pendiente, no de un lado al otro.
2. Tenga cuidado con los baches, las raíces o los topes.
Un terreno accidentado puede provocar la volcadura
de la unidad. El pasto alto puede ocultar obstáculos.
3. Opte por una velocidad lenta de modo que no tenga
que detenerse o cambiar de velocidad mientras esté
en la pendiente.
4. No siegue el pasto mientras está mojado. Las ruedas pueden perder la tracción.
5. Siempre mantenga la unidad con el cambio puesto,
en especial al viajar pendiente abajo. No cambie a
neutral para bajar por inercia por la pendiente.
6. Evite arrancar, detenerse o dar la vuelta en una pendiente. Si las ruedas pierden la tracción, desacople
las cuchillas y proceda lentamente y en línea recta
pendiente abajo.
7. Mantenga todos los movimientos en la pendiente
lentos y graduales. No haga cambios bruscos de
velocidad o dirección, pues esto podría hacer que se
vuelque la máquina.
8. Tenga mucho cuidado mientras opera las máquinas
con receptores de pasto u otros accesorios; pueden
afectar a la estabilidad de la unidad. No las use en
pendientes pronunciadas.
9. No intente estabilizar la máquina poniendo el pie en
el piso (en unidades montables).
10. No siegue el pasto cerca de barrancos, zanjas o
diques. La segadora podría volcarse repentinamente
si una rueda cae por el borde de un acantilado o
zanja o si se derrumba una orilla.
11. No use los receptores de pasto en pendientes pronunciadas.
12. No siegue el pasto en pendientes en las cuales no
pueda echarse en reversa.
13. Hable con su distribuidor o concesionario autorizado
respecto a recomendaciones sobre pesos o contrapesos para ruedas para mejorar la estabilidad.
14. Quite obstáculos tales como piedras, ramas de árboles, etc.
15. Use la velocidad lenta. Las ruedas pueden perder la
tracción en las pendientes, incluso cuando los frenos
funcionan debidamente.
16. No dé vuelta en una pendiente a menos que sea
necesario y, entonces, gire lenta y gradualmente
pendiente abajo, si es posible.
EQUIPO REMOLCADO (UNIDADES MONTABLES)
1. Remolque la unidad solamente con una máquina que
tenga un enganche diseñado para remolcar. No enganche el equipo remolcado en otro lugar que no sea
en el punto de enganche.
2. Siga las recomendaciones del fabricante respecto al
es
ADVERTENCIA
No opere nunca en pendientes mayores a 17.6 por
ciento (10°) lo cual es una inclinación de 106 cm
verticalmente en 607 cm horizontalmente.
Cuando opere en pendientes, use pesos o contrapesos
adicionales para las ruedas. Hable con su
distribuidor o concesionario para determinar qué tipo
de pesos existen y son apropiados para su unidad.
Opte por una velocidad de avance lenta antes de
subir la pendiente. Además de los pesos delanteros y
traseros, tenga mucho cuidado al operar en pendientes
con receptores de pasto montados en la parte trasera.
Siegue el pasto de la pendiente de ARRIBA hacia
ABAJO y VICEVERSA, no de un lado al otro; tenga
cuidado al cambiar de dirección y NO ARRANQUE NI
SE DETENGA EN LA PENDIENTE.
límite de peso para el equipo remolcado y el remolcado en pendientes.
3. Nunca permita que los niños u otras personas se
suban al equipo remolcado.
4. En las pendientes, el peso del equipo remolcado
puede ocasionar la pérdida de tracción y de control.
5. Trasládese lentamente y conceda una distancia adicional para frenar.
6. No cambie a neutral para bajar por inercia por la pendiente.
NIÑOS
Pueden ocurrir accidentes trágicos si el operador no está
alerta a la presencia de niños. Los niños a menudo se ven
atraídos por la unidad y el segado del pasto. Nunca asuma
que los niños se quedarán en el lugar en donde los vio por
última vez.
1. Mantenga a los niños lejos de la zona del segado del
pasto y bajo el cuidado atento de otro adulto responsable.
2. Esté alerta y apague la unidad si los niños ingresan
en la zona.
3. Antes y durante la operación en reversa, mire hacia
atrás y hacia abajo por si hay niños pequeños.
4. No lleve nunca niños, ni siquiera con las cuchillas
apagadas. Se pueden caer y salir gravemente heridos o interferir con la operación segura de la unidad.
Los niños que ya fueron paseados anteriormente pueden aparecer repentinamente en la zona de segado
del pasto para que les den otro paseo y ser atropellados por la máquina.
5. No permita nunca que los niños operen la unidad.
6. Tenga mucho cuidado cuando se acerque a esquinas
fuera de su ángulo de visión, arbustos, árboles u
otros objetos que pueden difi cultar la visión.
EMISIONES
1. Las emisiones del motor de este producto contienen
químicos que se sabe que, en ciertas cantidades, pueden causar cáncer, defectos de nacimiento u otros
daños reproductivos.
2. Busque la información relevante sobre el Período de
durabilidad de las emisiones y el índice del aire en
las etiquetas de emisiones del motor.
SISTEMA DE ENCENDIDO
1. Este sistema de encendido por chispa cumple con la
norma ICES-002 de Canadá.
9
Page 32

SEGURIDAD DEL USUARIO
SERVICIO Y MANTENIMIENTO
Manejo seguro de la gasolina
1. Apague cigarros, puros, pipas y demás fuentes de ignición.
2. Use sólo los contenedores aprobados para gasolina.
3. No quite nunca el tapón de la gasolina ni cargue
combustible con el motor encendido. Deje enfriar el
motor antes de cargar combustible.
4. No cargue nunca combustible en la máquina en espacios cerrados.
5. No almacene nunca la máquina ni el contenedor de
combustible donde haya una llama, chispa o piloto
expuestos, como por ejemplo cerca de un calentador
de agua u otro dispositivo.
6. No llene nunca los contenedores dentro de un vehículo
o en la caja de una camioneta con recubrimiento
plástico. Coloque siempre los contenedores en el
piso y lejos de su vehículo antes del rellenado.
7. Retire el equipo accionado por gasolina de la camioneta o remolque y cargue el combustible estando
éste en el piso. Si eso no es posible, entonces cargue el combustible en el equipo colocado en el remolque con un contenedor portátil, en vez de usar un
dispensador de gasolina.
8. Mantenga el dispensador en contacto con el borde
del tanque de gasolina o con la abertura del contenedor en todo momento hasta que termine de cargar el
combustible. No use un dispensador que tenga un
dispositivo para mantenerlo abierto.
9. Si se derrama combustible sobre su ropa, cámbiese
de ropa inmediatamente.
10. No llene nunca demasiado el tanque de gasolina.
Coloque nuevamente el tapón de la gasolina y apriételo fi rmemente.
11. Tenga mucho cuidado en el manejo de la gasolina y
otros combustibles, ya que éstos son infl amables y
los vapores son explosivos.
12. Si se derrama combustible, no arranque el motor
sino, más bien, mueva la máquina lejos del área de
derrame y evite crear alguna fuente de ignición hasta
que se hayan disipado los vapores del combustible.
13. Vuelva a colocar fi rmemente los tapones del tanque
de gasolina y del contenedor de combustible.
Servicio y mantenimiento
1. Nunca ponga en marcha la unidad en un área cerrada donde se pueden acumular los gases de
monóxido de carbono.
2. Mantenga apretadas las tuercas y pernos, en especial los pernos de ajuste para las cuchillas, y mantenga el equipo en buenas condiciones.
3. No haga nunca cambios indebidos a los dispositivos
de seguridad. Revise su operación adecuada con
regularidad y asegúrese de hacer las reparaciones
necesarias si no funcionan debidamente.
4. Mantenga la unidad libre de pasto, hojas y demás
acumulación de fragmentos. Limpie derrames de
aceite o combustible y quite cualquier fragmento
impregnado de combustible. Siempre deje enfriar la
máquina antes de almacenarla.
5. Detenga la máquina e inspecciónela si golpea contra un objeto. Repárela, de ser necesario, antes de
volver a arrancar.
6. Nunca realice ajustes ni reparaciones con el motor encendido.
7. Revise los componentes del receptor de pasto y el
protector de expulsión a menudo y reemplácelos con
partes recomendadas por el fabricante, cuando sea
necesario.
8. Las cuchillas de la segadora están afi ladas. Envuelva la cuchilla o use guantes y tenga mucho cuidado cuando las repare.
9. Revise la operación de los frenos con frecuencia.
Ajuste y dé mantenimiento según se requiera.
10. Mantenga o reemplace las etiquetas de seguridad y
de instrucciones, según sea necesario.
11. No quite el fi ltro de la gasolina cuando el motor está
caliente ya que la gasolina que se derrame se puede
incendiar. No extienda las abrazaderas de la tubería
del combustible más allá de lo necesario. Asegúrese
de que las abrazaderas agarren fi rmemente la
manguera sobre el fi ltro después de la instalación.
12. No use gasolina que contenga METANOL, gasohol
con más de 10% de ETANOL, aditivos para gasolina
ni gasolina blanca porque podría ocasionar daños al
motor o al sistema de combustible.
13. Si debe drenar el tanque de gasolina, hágalo al aire
libre.
14. Reemplace los silenciadores y mofl es defectuosos.
15. Use sólo las partes de repuesto autorizadas de fábrica al reparar la unidad.
16. Obedezca siempre las especifi caciones de fábrica
respecto a las confi guraciones y ajustes.
17. Sólo acuda a lugares autorizados de servicio si requiere de servicio y reparaciones mayores.
18. No intente nunca hacer reparaciones mayores en
esta unidad, a menos que tenga la preparación para
ello. Los procedimientos inadecuados de servicio
pueden ocasionar peligros en la operación, daños al
equipo y anulación de la garantía del fabricante.
19. En las segadoras con más de una cuchilla, tenga
cuidado, ya que hacer girar una cuchilla puede hacer
que las otras cuchillas también giren.
20. No cambie las confi guraciones del limitador de velocidad del motor ni acelere demasiado el motor. Operar
el motor a una velocidad excesiva puede incrementar
el riesgo de una lesión corporal.
21. Desacople los accesorios de conducción, detenga el
motor, quite la llave y desconecte los cables de la bujía:
antes de desatorar obstrucciones en accesorios y
tolvas, reparar la unidad, después de golpear contra un objeto, o si la unidad vibra de modo anormal.
Después de golpear contra un objeto, inspeccione la
máquina para ver si fue dañada y repare la unidad
antes de volver a arrancar y operar el equipo.
22. Nunca acerca sus manos a las piezas móviles, como
el abanico de enfriamiento de la bomba hidráulica,
cuando el tractor está encendido. (Los abanicos de
enfriamiento de las bombas hidráulicas normalmente
se encuentran encima del transeje).
23. En unidades con bombas hidráulicas, mangueras o
motores: ADVERTENCIA: El fl uido hidráulico que se
fuga bajo presión tiene la sufi ciente fuerza para penetrar la piel y ocasionar lesiones graves. Si se inyecta
un fl uido extraño bajo la piel, un médico, familiarizado
con esta forma de lesión, debe sustraerlo quirúrgicamente en unas cuantas horas, de lo contrario, puede
causar gangrena. Mantenga el cuerpo y las manos
lejos de los orifi cios de regulación o inyectores que
expulsan fl uido hidráulico bajo alta presión. Use
papel o cartón, y no las manos, para buscar fugas.
Asegúrese de que las conexiones del fl uido hidráulico
estén fi jas y que las mangueras y líneas hidráulicas
estén en buenas condiciones antes de ejercer presión sobre el sistema. Si hay fugas, mande la unidad
de inmediato a reparación con su distribuidor autorizado.
24. ADVERTENCIA: Aparato con energía acumulada. El
desenganche indebido de los resortes puede causar
lesiones corporales graves. Los resortes los debe
quitar un técnico autorizado.
25. Modelos equipados con un radiador para motor: ADVERTENCIA: Aparato con energía acumulada. No
intente nunca quitar el tapón del radiador mientras el
motor está encendido, así evitará lesiones corporales
graves, ocasionadas por líquido refrigerante caliente
o erupción de vapor. Detenga el motor y espere
hasta que se haya enfriado un poco. Incluso entonces, tenga mucho cuidado al quitar el tapón.
10
www.simplicitymfg.com
Page 33

SS
OO
SSTTOO
PP
Ubicaciones de las calcomanías
SEGURIDAD DEL USUARIO
Calcomanía - Instrucciones de funcionamiento
N° de pieza 1726923
Posiciones del
interruptor de
ignición
N° de pieza 1722806
Peligro, cuchillas giratorias
N° de pieza 1704276
1730172
Nivel de combustible
N° de pieza 1730172
Peligro, cuchillas giratorias
N° de pieza 1704277
Calcomanía - Altura
de corte
N° de pieza 1721197
PP
1723160
Liberación de la transmisión
N° de pieza 1723160
es
11
Page 34

CARACTERÍSTICAS Y CONTROLES
12V
Funciones de control Figura 1
Funciones de control
Control de la mariposa
La mariposa controla la velocidad del motor. Mueva la mariposa hacia delante para aumentar la velocidad del motor y
hacia atrás para disminuirla. Siempre opere a TODA MARCHA.
Estrangulador
Cierre el estrangulador para los arranques en frío. Abra el
estrangulador una vez que arranque el motor. Es posible
que un motor caliente no necesite estrangulamiento. Mueva
la palanca hacia delante para cerrar el estrangulador.
Faros
El interruptor de luz enciende y apaga los faros del tractor.
Opción de corte en marcha atrás
(RMO)
La opción de corte de césped marcha atrás (RMO, por sus
siglas en inglés) le permite cortar césped, o usar otros accesorios de accionamiento de toma de fuerza, mientras se
mueve marcha atrás. Si elige cortar el césped u operar otro
accesorio marcha atrás, gire la llave de opción de corte
de césped marcha atrás después de accionar la toma de
fuerza. La luz del LED se encenderá y el operador podrá
cortar el césped marcha atrás. Si se desea la opción de cortar el césped marcha atrás, debe reactivarse cada vez que
se accione la toma de fuerza.
12
www.simplicitymfg.com
Page 35

CARACTERÍSTICAS Y CONTROLES
Interruptor de toma de fuerza
El interruptor de toma de fuerza engancha y desengancha
los accesorios que usan la toma de fuerza. Para accionar
la toma de fuerza, presione HACIA ARRIBA en el interruptor. Presione HACIA ABAJO para desenganchar. Tome en
cuenta que el operador debe encontrase sentado fi rmemente
en el asiento del tractor para que la toma de fuerza funcione.
Interruptor de encendido
El interruptor de encendido arranca y detiene el motor, y
cuenta con tres posiciones:
APAGADO Detiene el motor y apaga el sistema
eléctrico.
ENCENDIDO Permite que el motor funcione y ali-
menta el sistema eléctrico.
ARRANQUE Enciende el motor para el arranque.
NOTA: Nunca deje el interruptor de encendido en la posición
de ENCENDIDO con el motor detenido, ya que esto agota la
batería.
Pedal del freno
Al presionar el pedal del freno, se activa el freno del tractor.
Pedales del acelerador
El pedal del acelerador controla la velocidad de avance del
tractor hacia delante. El pedal del acelerador de marcha atrás
controla la velocidad de reversa del tractor.
Al presionar cualquiera de los pedales, aumentará la velocidad de avance. Tome en cuenta que, mientras más presione
el pedal, más rápido avanzará el tractor.
Freno de estacionamiento
La perilla del freno de estacionamiento se usa para bloquear
el freno de estacionamiento cuando se detiene el tractor. Al
presionar por completo el pedal del freno y al tirar hacia arriba la perilla, se acciona el freno de estacionamiento.
Ajuste de la altura de corte del
cortacésped
El interruptor de ajuste de la altura de corte controla la altura
de corte del cortacésped. La altura de corte es infi nitamente
ajustable entre 2,5 y 10,2 cm (1 pulg. y 4 pulg.).
Control de crucero
El control de crucero se usa para fi jar el control del acelerador en avance. Mueva la palanca hacia delante hasta llegar
a la velocidad de avance deseada. Para desenganchar el
control de crucero mueva la palanca hacia atrás. Si necesita
detenerse rápidamente, soltar el pedal de freno también hará
que el control de crucero vuelva a neutro.
Palanca de ajuste del asiento
El asiento puede ajustarse hacia delante y hacia atrás. Mueva
la palanca, coloque el asiento en la posición que desee y
suelte la palanca para fi jar el asiento en dicha posición.
Palanca de liberación de la transmisión
La palanca de liberación de la transmisión desactiva la transmisión de manera que el tractor pueda empujarse manualmente. Consulte la sección Empuje manual del tractor.
Cámara de expansión de aceite de la
transmisión
Se agrega aceite de transmisión a través de la cámara
de expansión de aceite de la transmisión. También sirve
como capacidad adicional del contenedor de aceite ya que
al calentarse la transmisión, el aceite se expande. Vea el
Manual del motor para obtener información sobre los procedimientos de medición de nivel y el llenado de aceite.
Depósito de combustible
Para retirar la tapa, gírela en el sentido contrario al de las
agujas del reloj. En los modelos con una pantalla de tablero
de instrumentos, el indicador de combustible forma parte de
este último. Los modelos sin pantalla de indicador de instrumentos tienen un indicador de combustible ubicado bajo el
asiento.
12V
Toma corriente de 12 voltios
El tomacorriente es de 12 V CC. Los accesorios deben estar
clasifi cados para 14 amperios o menos.
Pedal de bloqueo del diferencial
Cuando se presiona este pedal, se bloquea el diferencial
de transmisión trabando ambas ruedas traseras en “drive”
(desplazamiento).
Utilice esta característica si el tractor queda atorado
porque patina una rueda. Accione el bloqueo del dife-
rencial solo a velocidades de desplazamiento lentas.
Ajuste de la inclinación del volante
Use la perilla de inclinación ubicada en los fuelles para
liberar el mecanismo de giro y gire el volante a la posición
deseada. Libere la perilla de inclinación para trabarlo en
esa posición.
es
13
Page 36

CARACTERÍSTICAS Y CONTROLES
Palanca de control de elevación de
accesorios
Al usar la plataforma del cortacésped, levante la plataforma del suelo al transportar desde y hacia el lugar de
realización del trabajo. NO corte con el cortacésped en
la posición elevada de transporte. La palanca de control
de elevación de accesorios eleva y baja accesorios que
utilicen el cilindro de elevación hidráulica del tractor. Si se
empuja la palanca hacia adelante, el accesorio baja, y si
se tira de la palanca hacia atrás, el accesorio se eleva.
NOTA IMPORTANTE – El elevador de accesorios no funcionará con el freno de estacionamiento accionado.
Función de freno de estacionamiento
Activación del freno de estacionamiento: Para colocar
el freno de estacionamiento, suelte los pedales del acelerador (A, Figura 2), presione por completo el pedal de
freno (B), tire hacia ARRIBA la perilla del freno de estacionamiento (C) y luego suelte el pedal de freno.
Cómo soltar el freno de estacionamiento: Para soltar el
freno de estacionamiento, suelte por completo el pedal de
freno (B, Figura 2) y tire la perilla del freno de estacionamiento (C) hacia ABAJO.
Tomacorriente de 12 voltios
El enchufe auxiliar de 12 voltios se ubica en el receptáculo
lateral izquierdo. Puede usarse para alimentar dispositivos
electrónicos pequeños. Los accesorios deben estar clasifi cados para 9 amperios o menos.
NOTA: Hacer funcionar un accesorio de 12 voltios, en
especial con el motor en marcha lenta, puede provocar
la descarga de la batería. Cuando no se use el enchufe
auxiliar, debe cubrirse con el tapón de goma a fi n de evitar
que la humedad provoque un cortocircuito. El ingreso de
agua al interior del enchufe puede provocar un cortocircuito.
Tracción de control automático
¿Qué es la tracción de control automático?
La tracción de control automático (ACT, por sus siglas
en inglés) es una función exclusiva de nuestras transmisiones que brinda una tracción mejorada. La ACT
aplica una torsión uniforme preestablecida a ambas ruedas si una de ellas comienza a resbalar (una transmisión
sin ACT perderá la tracción por completo si una rueda
trasera comienza a resbalar). Esta torsión preestablecida es sufi ciente para brindar tracción adicional y aun así
permitir que las ruedas giren a distintas velocidades en
un giro pronunciado sin dañar el cortacésped.
Qué se puede esperar de su tractor
con ACT
La mayoría del tiempo no notará que la ACT está trabajando mientras esté usando su tractor y simplemente se
acostumbrará a la tracción aumentada que brinda una
transmisión ACT.
En algunos casos se puede exceder el límite del sistema
ACT y una de las ruedas traseras puede resbalar (por
ejemplo, si intenta subir una cuesta mientras acelera).
Esto es normal. Si comienza a perder tracción, no
acelere. En lugar de eso, disminuya la velocidad hasta
detenerse, enderece el volante y acelere lentamente. La
detención del tractor permite que la transmisión recupere
más tracción.
14
www.simplicitymfg.com
Page 37

CARACTERÍSTICAS Y CONTROLES
Pantalla y funciones del tablero de instrumentos
Pantalla del tablero de instrumentos
Consulte la Figura 3.
A. NIVEL DE COMBUSTIBLE
Indica la cantidad de combustible en el depósito. A la
izquierda se encuentra vacío y a la derecha se encuentra
lleno.
B. CONTADOR HORARIO/RELOJ/INDICADOR DE
MANTENIMIENTO
Muestra el reloj, el contador horario y el recordatorio de
mantenimiento.
C. BOTÓN DE SELECCIÓN
Se usa para confi gurar el reloj y reiniciar el recordatorio
de mantenimiento.
D. BOTÓN DE CONFIGURACIÓN
Se usa para confi gurar el reloj y reiniciar el recordatorio
de mantenimiento.
E. LUZ DE LA TOMA DE FUERZA
Indica que el interruptor de la toma de fuerza está en la
posición ENCENDIDO.
F. LUZ DEL CONTROL DE CRUCERO
Indica que el control de crucero está activado.
G. LUZ DE BAJA PRESIÓN DEL ACEITE
Indica que la presión de aceite del motor está baja. La
luz se enciende cuando el tractor recién se arranca y
luego se apaga. SI ESTA LUZ SE ENCIENDE MIENTRAS EL TRACTOR SE ESTÁ UTILIZANDO, APAGUE
EL MOTOR DE INMEDIATO. Consulte con su distribuidor autorizado para obtener mantenimiento.
H. LUZ DE BAJO VOLTAJE
Indica que el voltaje del sistema eléctrico está bajo. La
luz se enciende cuando el tractor recién se arranca y
luego se apaga. SI ESTA LUZ SE ENCIENDE MIENTRAS EL TRACTOR SE ESTÁ UTILIZANDO, APAGUE
EL MOTOR DE INMEDIATO. Consulte con su distribuidor autorizado para obtener mantenimiento.
Funciones del tablero de instrumentos
MODELOS DE LA PANTALLA DEL TABLERO DE INSTRUMENTOS
Mostrar el total de horas de funcionamiento: Cuando
el interruptor de la llave recién se gira hasta la posición
de ENCENDIDO, todos los indicadores de advertencia
se iluminan y se muestra el total de horas de funcionamiento. Asegúrese de que todas las luces estén funcionando.
Mostrar horas de la toma de fuerza: Gire la llave hasta
la posición de APAGADO, enganche la toma de fuerza,
y gire la llave hasta la posición de ENCENDIDO (motor
apagado).
Confi gurar el reloj: Arranque el motor y déjelo en funcionamiento. Presione el botón de selección (C, Figura
3) por tres (3) segundos y suéltelo. Mantenga PRESIONADO el botón de confi guración (D) para avanzar el
tiempo. Presione el botón de selección para seleccionar
los minutos. Mantenga PRESIONADO el botón de confi guración (D) para avanzar el tiempo. Suéltelo por 5 se-
gundos y el reloj se activará. Apague el motor.
Modo de demostración: Con el motor apagado, mantenga presionado el botón de confi guración (D) y gire el
interruptor de la llave hasta la posición de ENCENDIDO.
Recordatorio de mantenimiento: Se muestra un recordatorio de mantenimiento en la ventana de información
(B) luego de las primeras 5 horas de operación y luego
cada 50 horas. El recordatorio se reinicia automáticamente luego de 5 horas. El recordatorio se puede reiniciar manualmente al girar el interruptor de la llave desde
la posición APAGADO hasta la posición ENCENDIDO
(con el motor apagado) y luego presionando los botones
de confi guración (D) y de selección (C) al mismo tiempo
por 5 segundos.
es
15
Page 38

OPERACIÓN
Pruebas del sistema de bloqueo de
seguridad
Esta unidad está equipada con un sistema de interbloqueo
de seguridad. No intente evitar ni modifi car los interruptores
y los dispositivos.
Prueba 1: El motor NO debe arrancar si:
• el interruptor de toma de fuerza está en ACTIVADO, O
• el pedal del freno NO se presiona por completo (freno
de estacionamiento SUELTO), O
• la palanca de control de crucero NO está en NEUTRO.
Prueba 2: El motor DEBE arrancar si:
• el interruptor de toma de fuerza está APAGADO Y
• el pedal del freno se encuentra presionado por completo
(freno de estacionamiento ACTIVADO) Y
• la palanca de control de crucero está en NEUTRO.
Prueba 3: El motor se debe APAGAR si:
• el operador se levanta del asiento con la toma de fuerza
activada; O
• el operador eleva el asiento con el pedal del freno SIN
presionarlo por completo (freno de estacionamiento
SUELTO).
Prueba 4: Revise el tiempo de detención de las cuchil-
las del cortacésped
Las cuchillas y la correa de transmisión del cortacésped
deben detenerse completamente dentro de cinco segundos
luego de apagar el interruptor de toma de fuerza eléctrico.
Si la correa de transmisión del cortacésped no se detiene
dentro de cinco segundos, vuelva a ajustar el embrague de
la toma de fuerza, según se describe en la sección MANTENIMIENTO, o consulte a su distribuidor.
Prueba 5: Revise la opción de corte de césped marcha
atrás (RMO)
• El motor debe apagarse cuando se intente dar marcha
atrás si se ha activado la toma de fuerza y no se ha activado la marcha atrás.
• La luz de corte de césped marcha atrás debe encenderse cuando se haya activado esta función.
NOTA: Una vez detenido el motor, se debe apagar el interruptor de toma de fuerza luego de que el operador vuelva a
sentarse para arrancar el motor.
ADVERTENCIA
Si la unidad no pasa una prueba de seguridad, no la
opere. Consulte a su distribuidor autorizado.
Cómo agregar combustible
ADVERTENCIA
El combustible y sus vapores son
extremadamente infl amables y
explosivos.
Un incendio o una explosión pueden causar
graves quemaduras o la muerte.
Cuando Aprovisione con Combustible
• Apague el motor y deje que el motor se enfríe por lo
menos 3 minutos antes de remover la tapa de
combustible.
• Llene el tanque de combustible en exteriores o en un
área bien ventilada.
• No llene demasiado el tanque de combustible. Para
permitir la expansión del combustible no llene por
encima de la parte inferior del cuello del tanque de
combustible.
• Mantenga el combustible a distancia de chispas,
llamas abiertas, testigos piloto, calor y otras fuentes
de encendido.
• Compruebe con frecuencia si existen grietas o fugas
en las mangueras de combustible, el tanque, la tapa y
en los accesorios. Cámbielos si es necesario
• Si se derramó combustible, espere hasta que se haya
evaporado antes de darle arranque al motor.
1. Limpie el área de la tapa de combustible de polvo y
desechos. Retire la tapa de combustible (A, Figura 4).
2. Llene el tanque de combustible (B) con combustible.
Para permitir la expansión de la gasolina, no lo llene
por encima de la parte inferior del cuello del tanque de
combustible (C).
3. Re-instale la tapa de combustible.
Arranque del motor
ADVERTENCIA
El combustible y sus vapores son
extremadamente infl amables y explosivos.
El fuego o las explosiones pueden causar
quemaduras graves o incluso la muerte.
Cuando arranque el motor:
• Asegúrese de que la bujía, el silenciador, la tapa del
depósito de combustible y el purifi cador de aire (si lo
tiene) se encuentren en su lugar y estén fi jos.
• No haga girar el motor sin que la bujía esté colocada
en el equipo.
• Si se inunda el motor, ajuste el estrangulador (si lo
tiene) en la posición ABIERTA/ENCENDIDA, mueva
el control de la mariposa (si la tiene) a la posición
RÁPIDO y arranque el motor hasta que encienda.
16
www.simplicitymfg.com
Page 39

OPERACIÓN
ADVERTENCIA
Los motores emiten monóxido de carbono, un
gas venenoso que carece de olor y de color.
Respirar monóxido de carbono puede
ocasionar náuseas, desmayos o la muerte.
• Dele arranque al motor y opérelo en exteriores.
• No le de arranque al motor ni lo opere en un área
encerrada, aun cuando las puertas o las ventanas se
encuentren abiertas.
AVISO: Este motor ha sido enviado desde Briggs
& Stratton sin aceite. Antes de arrancar el motor,
asegúrese de agregar aceite según las instrucciones de
este manual. Si arranca el motor sin aceite, se dañará
de manera irreparable y la garantía no lo cubrirá.
1. Sentado en el asiento del operador, presione el pedal
del freno a fondo o engrane el freno de estacionamiento.
2. Asegúrese que sus pies no presionen los pedales
de control de velocidad de desplazamiento y que la
palanca de control de crucero esté en neutral.
3. Desengrane el embrague del PTO.
4. Coloque el acelerador en PLENO.
5. Cierre el estrangulador.
NOTA: Posiblemente, el motor caliente no requiera el
uso del estrangulador.
6. Inserte la llave de ignición y gírela a ARRANCAR.
7. Después de que el motor haya arrancado, mueva el
control de acelerador del motor a LENTO. Caliente el
motor dejándolo en marcha durante por lo menos un
minuto.
8. Coloque el acelerador en PLENO.
NOTA: En el caso de una emergencia, se puede detener
el motor simplemente girando el interruptor de la ignición
a PARAR. Use este método sólo en situaciones de
emergencia. Para apagar el motor normalmente siga el
procedimiento proporcionado en Detención del tractor
y el motor.
6. Presione el pedal del acelerador para avanzar. Suéltelo para detenerse. Tome en cuenta que mientras
más presione el pedal, más rápido avanzará el tractor.
7. Detenga el tractor soltando los pedales del acelerador,
colocando el freno de estacionamiento y deteniendo el
motor (consulte Detención del tractor y el motor).
Corte de césped
1. Ajuste la altura de corte del cortacésped hasta el nivel
deseado y las ruedas reguladoras en la posición adecuada (si se incluyen).
2. Enganche el freno de estacionamiento. Asegúrese de
que el interruptor de toma de fuerza no esté activado.
3. Arranque el motor (consulte Arranque del motor).
4. Baje por completo el cortacésped con la palanca el-
evadora de enganche.
5. Ajuste la mariposa A TODA MARCHA.
6. Accione la toma de fuerza (plataforma del corta-
césped).
7. Comience a cortar el césped.
8. Cuando termine, apague la toma de fuerza y suba el
cortacésped mediante la palanca de control elevadora
de enganche.
9. Detenga el motor (consulte Detención del tractor y el
motor).
ADVERTENCIA
El motor se apagará si presiona el pedal de la
velocidad de avance marcha atrás mientras la
toma de fuerza está activada y el corte de césped
marcha atrás no se ha activado. El operador
siempre debe apagar la toma de fuerza antes
de cruzar calles, caminos o cualquier zona por
donde puedan transitar otros vehículos. Si pierde
el control de la conducción de manera repentina,
puede resultar peligroso.
Conducción del tractor
1. Siéntese en el asiento y ajústelo de modo que pueda
alcanzar todos los controles y ver la pantalla del
tablero de instrumentos cómodamente.
2. Enganche el freno de estacionamiento.
3. Asegúrese de que el interruptor de toma de fuerza no
esté activado.
4. Arranque el motor (consulte Arranque del motor).
5. Suelte el freno de estacionamiento y el pedal del
freno.
es
ADVERTENCIA
El corte de césped marcha atrás puede ser
peligroso para los transeúntes. Pueden ocurrir
accidentes graves si el operador no está atento
ante la presencia de niños. Nunca active el corte
de césped marcha atrás en presencia de niños.
Los niños suelen sentirse atraídos por la unidad y
por la actividad de cortar el césped.
17
Page 40

OPERACIÓN
Corte del césped marcha atrás
Se puede usar el sistema de corte de césped marcha
atrás si un operador decide hacerlo. Para usar la opción
de corte de césped marcha atrás, gire la llave de corte
de césped marcha atrás luego de haber enganchado la
toma de fuerza. La luz del LED se encenderá y el operador podrá cortar el césped marcha atrás. Si se desea
la opción de cortar el césped marcha atrás, debe reactivarse cada vez que se accione la toma de fuerza. Se
debe retirar la llave para restringir el acceso a la función
RMO.
Operación de accesorios marcha atrás
Se puede usar un accesorio de toma de fuerza en marcha atrás si un operador decide hacerlo. Para usar la
opción de corte de césped marcha atrás, gire la llave
de corte de césped marcha atrás luego de haber enganchado la toma de fuerza. La luz del LED se encenderá y el operador podrá cortar con el accesorio marcha
atrás. Si se desea la opción de cortar el césped marcha
atrás, debe reactivarse cada vez que se accione la toma
de fuerza. Se debe retirar la llave para restringir el acceso a la función RMO.
Ajuste de la altura de corte del cortacésped
El interruptor (A, Figura 6) de altura de corte ajusta la altura de operación del cortacésped (consulte la Figura 1).
Presione el interruptor hacia ARRIBA para subir la altura
de corte del cortacésped y hacia ABAJO para bajarla. La
altura de corte es infi nitamente ajustable entre 2,5 y 10,2
cm (1 pulg. y 4 pulg.).
Control de elevación de accesorios
La palanca de elevación de accesorios (B, Figura 6)
eleva y baja accesorios que utilicen la conexión de elevación hidráulica del tractor. Para bajar un accesorio,
empuje la palanca de elevación hacia adelante; para
elevarlo, tire de la palanca de elevación.
Enganche de un remolque
La fuerza horizontal máxima que soporta la barra de
enganche es de 444 Newton. La fuerza vertical máxima
que soporta la barra de enganche es de 222 Newton.
Esto corresponde a un remolque de 180 kg. (396 lb) en
una cuesta de 10 grados. Sujete el remolque con un
pasador de horquilla (A, Figura 7) y un sujetador (B) del
tamaño adecuado.
Empuje manual del tractor
1. Desenganche la toma de fuerza y apague el motor.
2. Tire la palanca de transmisión de la liberación (B,
Figura 5) hacia atrás 6 cm (2-3/8 pulg.) para bloquearlo en la posición de liberación.
3. Ahora se puede empujar el tractor manualmente.
NO REMOLQUE EL TRACTOR
El remolque de la unidad provocará daños en
la transmisión. • No utilice ningún tipo de vehículo para empujar o tirar de la unidad.
• No accione la palanca de la válvula de liberación de la transmisión con el motor en funcionamiento.
Detención del tractor y el motor
ADVERTENCIA
El combustible y sus vapores son
extremadamente infl amables y explosivos.
El fuego o las explosiones pueden causar
quemaduras graves o incluso la muerte.
• No estrangule el carburador para detener el
motor.
1. Vuelva a colocar el/los control(es) de velocidad de
desplazamiento en NEUTRAL.
2. Desengrane el PTO y espere que todas las piezas
móviles se detengan.
3. Coloque el acelerador en PLENO.
4. Gire la llave de ignición a APAGADO. Quite la llave.
18
www.simplicitymfg.com
Page 41

Tabla de mantenimiento
MANTENIMIENTO
TRACTOR Y CORTACÉSPED
Cada 8 horas o diariamente
Revise el sistema de interbloqueo de seguridad
Limpie los desechos del tractor y de la plataforma del
cortacésped
Limpie los desechos del compartimiento del motor
Cada 25 horas o anualmente *
Revise la presión de los neumáticos
Revise el tiempo de detención de las cuchillas del
cortacésped
Revise las piezas metálicas sueltas en el tractor y en el
cortacésped
Cada 50 horas o anualmente *
Limpie la batería y los cables
Revise los frenos del tractor
Consulte al distribuidor anualmente para
Lubricar el tractor y el cortacésped
Revisar las cuchillas del cortacésped **
* Lo que suceda primero
** Revise las cuchillas más a menudo en regiones con
condiciones de suelos arenosos o con mucha cantidad de
polvo.
MOTOR
Primeras 5 horas
Cambie el aceite del motor
Cada 8 horas o diariamente
Revise el nivel de aceite del motor
Cada 25 horas o anualmente *
Limpie el fi ltro y el predepurador de aire del motor **
Cada 50 horas o anualmente *
Cambie el aceite del motor
Cambie el fi ltro de aceite
Anualmente
Cambie el fi ltro de aire
Cambie el predepurador de aire
Consulte al distribuidor anualmente para
Inspeccionar el silenciador y el amortiguador de chispas
Reemplazar la bujía
Reemplazar el fi ltro de combustible
Limpiar el sistema de refrigeración de aire del motor
* Lo que suceda primero
** Limpie más a menudo en condiciones polvorientas o
cuando hayan desechos transportados por el aire.
Verifi cación de la presión de los neumáticos
La presión de los neumáticos se debe revisar en forma
periódica y mantenerse en los niveles que aparecen en
la tabla. Tome en cuenta que dichas presiones pueden
tener leves diferencias con respecto al “infl ado máximo”
que aparece en la cara lateral de los neumáticos. Las
presiones mostradas proporcionan la tracción adecuada,
mejoran la calidad del corte y prolongan la vida útil del
neumático.
Tamaño PSI bar
16 x 6.5-8 12-15 0,68-0,82 bar
Checking Tire Pressure.eps
24 x 12.0-12 6-8 0,41-0,55 bar
Revise el tiempo de detención de las cuchillas del cortacésped
Las cuchillas y la correa de transmisión del cortacésped
deben detenerse completamente dentro de cinco segundos luego de apagar el interruptor de toma de fuerza eléctrico.
1. Con el tractor en neutro, la toma de fuerza desactivada
y el operador en el asiento, arranque el motor.
2. Revise el reposapiés de la izquierda en la correa de
transmisión del cortacésped. Accione la toma de fuerza
y espere algunos segundos. Desactive la toma de
fuerza y verifi que la cantidad de tiempo que demora la
correa de transmisión en detenerse.
3. Si la correa de transmisión del cortacésped no se detiene en cinco segundos, vuelva a ajustar el embrague
o consulte con su distribuidor.
Verifi cación/limpieza del refrigerador de
aceite
El refrigerador de aceite del motor está ubicado en el
costado del motor (A, Figura 8) y se debe limpiar con aire
comprimido en intervalos regulares o cuando esté sucio.
es
19
Page 42

MANTENIMIENTO
Mantenimiento de la batería
ADVERTENCIA
Cuando retire o instale los cables de la batería,
desconecte el cable negativo EN PRIMER LUGAR
y reconéctelo EN ÚLTIMO LUGAR, ya que, si no
lo hace en este orden, el terminal positivo puede
hacer cortocircuito al tocar el chasis con una herramienta.
Limpieza de la batería y de los cables
1. Desconecte los cables de la batería, primero el cable
negativo (A, Figura 9).
2. Retire la sujeción de la batería (B) y ésta última.
3. Limpie el compartimiento de la batería con una solución de bicarbonato de sodio y agua.
4. Limpie los terminales y extremos de cables de la
batería con un cepillo de alambre y con un limpiador
especializado hasta que estén brillantes.
5. Vuelva a instalar la batería en el compartimiento de la
batería y fíjela con la sujeción.
6. Vuelva a conectar los cables de la batería, el cable
positivo primero (C).
7. Cubra los extremos del cable y los terminales de la
batería con vaselina o con grasa aislante.
Ajuste del asiento
El asiento puede ajustarse hacia delante y hacia atrás.
Mueva la palanca (A, Figura 10), coloque el asiento en
la posición que desee y suelte la palanca para fi jar el
asiento.
Ajuste del volante
1. Use un punzón adecuado para retirar el pivote de ro-
dillo (A, Figura 11) en la base del volante (B).
2. Tire hacia abajo la funda de goma para exponer los
dos orifi cios en el árbol de la dirección (C).
3. Alinee el orifi cio en el volante con el orifi cio correspondiente en el árbol de la dirección e instale el pivote de
rodillo.
NOTA: El volante se instala en fábrica con el pivote de rodillo en el orifi cio inferior.
Carga de la batería
ADVERTENCIA
Mantenga las llamas expuestas y las chispas
lejos de la batería; los gases que provienen de
ésta son altamente explosivos. Ventile en
forma correcta la batería durante la carga.
Una batería muerta o con poca carga para arrancar el
motor puede ser el resultado de un defecto en el sistema
de carga u otros componentes eléctricos. Si tiene alguna
duda con respecto al origen del problema, consulte con
su distribuidor. Si necesita cambiar la batería, consulte la
sección Limpieza de la batería y de los cables.
Para cargar la batería, siga las instrucciones que brinda
el fabricante del cargador de la batería y también todas
las advertencias que se incluyen en la sección Seguri-
dad del usuario de este manual. Cargue la batería hasta
que esté cargada completamente. Pero no lo haga a una
velocidad mayor que 10 amperios.
20
www.simplicitymfg.com
Page 43

MANTENIMIENTO
Almacenaje
ADVERTENCIA
Nunca almacene la unidad (con combustible)
en una estructura cerrada y con poca
ventilación. Los vapores del combustible
pueden trasladarse a una fuente de ignición
(tal como una caldera, un calentador de agua,
etc.) y causar una explosión. El vapor del
combustible también es tóxico para seres
humanos y animales.
Al almacenar combustible o equipos con combustible
en el tanque
• Almacenar lejos de calderas, estufas, calentadores de
agua u otros aparatos con luces-piloto u otras fuentes
de ignición, ya que pueden prender fuego a vapores
de la gasolina.
Equipo
Desengrane el PTO, desengrane el freno de
estacionamiento y retire la llave.
La vida útil de la batería será superior si se la retira.
Colóquelo en un lugar fresco y seco y cárguelo por
completo alrededor de una vez al mes. Si se deja la
batería en la unidad, desconecte el cable negativo.
Aceite de motor
Mientras el motor sigue estando caliente, cambie el aceite
del motor. Consulte el Manual del Motor.
Antes de poner en marcha la unidad después de su
almacenaje:
• Verifi que todos los niveles de líquido. Verifi que todos
los ítems de mantenimiento.
• Realice todas las verifi caciones y los procedimientos
recomendados en este manual.
• Permita que el motor se caliente durante varios
minutos antes de utilizarlo.
Sistema de combustible
El combustible puede echarse a perder cuando se lo
almacena más de 30 días. El combustible echado a perder
provoca la formación de depósitos de ácido y goma en
el sistema de combustible o en piezas esenciales del
carburador. Para mantener fresco el combustible, utilice el
estabilizador de combustible FRESH START® de Briggs
& Stratton disponible como aditivo líquido o cartucho
concentrado de goteo.
No es necesario drenar la gasolina del motor si se agrega
un estabilizador de combustible de acuerdo con las
instrucciones. Ponga en marcha el motor por 2 minutos
para circular el estabilizador por todo el sistema de
combustible. Luego, se puede almacenar el motor y el
combustible por hasta 24 meses. Si no se ha tratado a la
gasolina en el motor con un estabilizador de combustible,
se lo debe drenar en un recipiente aprobado. Ponga
en marcha el motor hasta que se detenga por falta de
combustible. Se recomienda el uso de un estabilizador de
combustible en el recipiente de almacenaje para mantener
la frescura.
es
21
Page 44

LOCALIZACIÓN DE FALLAS
Localización de fallas del tractor
PROBLEMA BUSQUE SOLUCIÓN
El pedal del freno no está presionado. Presione por completo el pedal del freno.
El motor no funciona
ni arranca.
El motor no arranca
bien o no funciona
bien.
El interruptor de toma de fuerza (embrague eléctrico) se encuentra en la
posición de ENCENDIDO.
El control de crucero está accionado. Mueva la perilla a la posición de NEUTRO/APAGADO.
Combustible agotado. Si el motor está caliente, déjelo enfriar y vuelva a llenar el
Motor ahogado. Suelte el estrangulador.
El fusible está quemado. Consulte con su distribuidor autorizado.
Los terminales de la batería requieren
limpieza.
La batería está descargada o agotada. Recargue o cambie la batería.
El cableado está suelto o roto. Revise visualmente el cableado. Si los cables están raídos o
Solenoide o motor de arranque defectuosos.
Interruptor de interbloqueo de seguridad defectuoso.
Hay agua en el combustible. Consulte con su distribuidor autorizado.
La gasolina es antigua o está muy
usada.
La mezcla de combustible es demasiado rica.
El motor tiene otro problema. Consulte con su distribuidor autorizado.
Colóquelo en la posición de apagado.
depósito de combustible.
Consulte la sección Limpieza de la batería y de los cables.
rotos, consulte con el distribuidor autorizado.
Consulte con su distribuidor autorizado.
Consulte con su distribuidor autorizado.
Consulte con su distribuidor autorizado.
Limpie el fi ltro de aire.
El motor da golpes.
Excesivo consumo de
lubricante.
El tubo de escape
está ennegrecido.
El motor funciona
pero el tractor no
avanza.
22
Bajo nivel de aceite. Compruebe o reponga el aceite según sea necesario.
Uso de aceite de grado incorrecto. Consulte el manual del motor.
El motor se calienta demasiado al funcionar.
Uso de aceite de grado incorrecto. Consulte el manual del motor.
Exceso de aceite en el cárter. Drene el exceso de aceite.
El fi ltro de aire está sucio. Consulte el manual del motor.
El estrangulador está cerrado. Abra el estrangulador.
Los pedales del acelerador no están
presionados.
La palanca de liberación de la transmisión se encuentra en la posición de
EMPUJE.
El freno de estacionamiento está accionado.
La correa de transmisión de tracción
está rota o se resbala.
Consulte con su distribuidor autorizado.
Presione los pedales.
Muévala hasta la posición de MARCHA.
Desenganche el freno de estacionamiento.
Consulte con su distribuidor autorizado.
www.simplicitymfg.com
Page 45

LOCALIZACIÓN DE FALLAS
Localización de fallas del tractor (continuación)
PROBLEMA BUSQUE SOLUCIÓN
El freno no se mantiene.
La dirección del tractor está dura o su
manejo es defi ciente.
Localización de fallas del cortacésped
PROBLEMA BUSQUE SOLUCIÓN
El cortacésped no se
eleva.
El freno interno está desgastado. Consulte con su distribuidor autorizado.
La conexión de la dirección está
suelta.
Infl ado incorrecto de los neumáti-
cos.
Los rodamientos del eje de la rueda
delantera están secos.
El varillaje de elevación no está
conectado en forma adecuada o
presenta daños.
Consulte con su distribuidor autorizado.
Consulte la sección Verifi cación de la presión de los neumáti-
cos.
Consulte con su distribuidor autorizado.
Consulte con su distribuidor autorizado.
El corte que hace
el cortacésped es
desigual.
El corte que hace el
cortacésped tiene un
aspecto irregular.
El motor se atasca
fácilmente con el cortacésped en marcha.
Vibraciones excesivas
en el cortacésped.
El motor funciona y el
tractor tiene tracción,
pero el cortacésped
no se mueve.
El cortacésped no está bien nivelado.
Los neumáticos del tractor no están
infl ados adecuadamente.
La velocidad del motor es demasiado lenta.
La velocidad de avance es demasiado rápida.
El cortacésped tiene otro problema. Consulte con su distribuidor autorizado.
La velocidad del motor es demasiado lenta.
La velocidad de avance es demasiado rápida.
El fi ltro de aire está sucio u ob-
struido.
Altura de corte demasiado baja. Corte el césped con la máxima altura en la primera pasada.
Conducto de descarga atascado. Corte césped con la descarga apuntando hacia una zona cor-
El motor no alcanza la temperatura
de funcionamiento.
Arranque del cortacésped en
césped alto.
El cortacésped tiene otro problema. Consulte con su distribuidor autorizado.
La toma de fuerza no está enganchada.
El cortacésped tiene otro problema. Consulte con su distribuidor autorizado.
Consulte con su distribuidor autorizado.
Consulte la sección Verifi cación de la presión de los neumáti-
cos.
Ajústelo a toda marcha.
Disminúyalo.
Ajústelo a toda marcha.
Disminúyalo.
Consulte el manual del motor.
tada previamente.
Arranque el motor durante algunos minutos para calentarlo.
Arranque el motor en un área limpia.
Enganche la toma de fuerza.
es
23
Page 46

24
www.simplicitymfg.com
Page 47

ESPECIFICACIONES
MOTOR:
Kohler de 27 HP
Fabricado por Kohler
Modelo Courage SV740S
Caballos de fuerza 27 a 3600 rpm
Desplazamiento 725 cc (44,2 pulg. cúbicas)
Sistema eléctrico Alternador: 15 amperios Reg.
Batería: 12 voltios, 500 CCA
Capacidad de aceite 1,9 litros (64 oz)
CHASIS:
Capacidad del depósito Capacidad: 15,1 L (4,0 galones)
de combustible
Ruedas delanteras Tamaño de los neumáticos: 16 x 6,5-8
Presión de infl ado: 0,68-0,82 bar (12-15 psi)
Ruedas traseras Tamaño de los neumáticos: 24 x 12,0-12
Presión de infl ado: 0,41-0,55 bar (6-8 psi)
TRANSMISIÓN:
K71
Tipo Tuff Torq K71 hidrostática
Líquido hidráulico Aceite de motor de primera calidad 10w 30
Capacidad 4,6 L (4,8 cuarto de galón)
Velocidades a 3400 rpm Avance: 11,6 km/h (0-7,2 MPH)
Marcha atrás: 7,2 km/h (0-4,5 MPH)
Salida de fuerza de 554 Nm (410 lb/pie)
torsión continua
Potencia de la barra 200 kg (440 lb)
de enganche
Peso máximo en el eje 330 kg (728 lb)
CORTACÉSPED:
Ancho de corte 116,8 cm (46 pulg.)
137,2 cm (54 pulg.)
Número de cuchillas 3
Plataforma de cubierta base Descarga por lado
Altura de corte 2,5-8,0 cm (1,0-4,0 pulg.)
Posiciones de corte Infi nito
DIMENSIONES:
Largo total 191 cm (75 pulg.)
Ancho total 107 cm (42 pulg.)
Altura 127 cm (50 pulg.)
Clasifi cación de Potencia
La clasifi cación de potencia total para los modelos individuales de motores a gas se etiqueta de acuerdo con el código
J1940 de SAE (Sociedad de Ingenieros Automotrices) (Procedimiento de Clasifi cación de Potencia & Torque del Motor
Pequeño) y la clasifi cación de desempeño se ha obtenido y se ha corregido de acuerdo con SAE J1995 (Revisión 2002-
05).Los valores de Torque se derivan a 3060 RPM; los valores de potencia se derivan a 3600 RPM. Los valores netos de
potencia se toman con escape y fi ltro de aire instalado mientras que los valores de potencia total se recogen sin estos ac-
cesorios. La potencia total real del motor puede ser mayor que la potencia neta del motor y estar afectada por, entre otras
cosas, condiciones ambientales de operación y variabilidad de motor a motor. Dado el amplio conjunto de productos en
los cuales son puestos los motores, el motor a gas podría no desarrollar la potencia total nominal cuando sea usado en
una parte dada del equipo acoplado. Esta diferencia se debe a una variedad de factores que incluyen, sin limitarse a, l avierdad de componentes del motor (fi ltro de aire, sistema de escape, sistema de carga, sistema de enfriamiento, carburador,
bomba de combustible, etc.), limitaciones de la aplicación, condiciones ambientales de operación (temperatura, humedad,
altitud), y a la variabilidad de motor a motor. Debido a las limitaciones de fabricación y capacidad Briggs & Stratton puede
sustituir un motor de potencia nominal más alta por esta Serie de motor.
PIEZAS Y ACCESORIOS
Consulte con su distribuidor autorizado.
es
25
Page 48

Briggs & Stratton Power Products Group, L.L.C.
P.O. Box 702
Milwaukee, WI 53201-0702
1-800-837-6836
www.simplicitymfg.com
 Loading...