

Page 1
(The chances are you’re
never going to read me)
Owner’s Manual
www.simplicityvac.com
1
Page 2

IMPORTANT SAFETY INSTRUCTIONS
When using an electrical appliance, basic precautions should always be followed, including
the following:
READ ALL INSTRUCTIONS BEFORE
USING THIS APPLIANCE
The manufacturer cannot accept responsibility for damage
WARNING:
To reduce the risk of fire, electric shock or injury:
caused when the appliance is not used according to the
instructions, or for uses other than those for which it
was intended.
• Do not leave appliance when plugged in.
Unplug from outlet when not in use and
before servicing.
• WARNING: ELECTRIC SHOCK COULD
OCCUR IF USED OUTDOORS OR ON
WET SURFACES.
• Do not allow to be used as a toy. Close
attention is necessary when used by or
near children.
• Use only as described in this manual.
Use only manufacturer’s recommended
attachments.
• Do not use with damaged cord or plug. If
appliance is not working as it should, has
been dropped, damaged, left outdoors,
or dropped into water, return it to your
Authorized Retailer for service.
• Do not pull or carry by cord, use cord as
a handle, close a door on the cord, or pull
cord around sharp edges or corners. Do
not run appliance over cord. Keep cord
away from heated surfaces.
• Do not unplug by pulling on cord. To
unplug, grasp the plug, not the cord.
• Hold plug when rewinding the power cord
to prevent the cord from whipping.
• Do not handle plug or appliance with
wet hands.
• Do not put any object into openings. Do
not use with any opening blocked; keep
free of dust, lint, hair and anything that
may reduce air flow.
• Keep hair, loose clothing, ngers and all
parts of body away from openings and
moving parts.
• Do not pick up anything that is burning or
smoking, such as cigarettes, matches or
hot ashes.
• Do not use without vacuum bag in place.
• Turn off all controls before unplugging.
• Use extra care when cleaning on stairs.
• Do not use to pick up ammable or
combustible liquids such as gasoline or
use in areas where they may be present.
• Do not attempt to service the unit while
appliance is plugged in.
• Do not use vacuum to pick up water or
any wet materials.
SAVE THESE INSTRUCTIONS.
Page 3

Contents
Safety Precautions 4
Replacing Vacuum Bag and Filters 5
Description and Operation 6-8
Using the Compact Power Nozzle 9-10
Maintenace and Care 11-1 2
Troubleshooting Guide 13
Owner’s Information 14
Warranty 15
Page 4

Safety Precautions
This vacuum cleaner should be used for normal, dry household dust and dirt. The manufacturer
cannot be held responsible for any damage caused by use or operation of the vacuum contrary
to these instructions. If the vacuum is wrongly operated for a purpose other than that for which
it is intended, no liability can be accepted for any possible damage.
• Do not vacuum areas which contain moisture or water, flammable matter, needles, pins,
razor blades, matches, cigarettes, etc., since they may damage the vacuum or vacuum bag.
• When rewinding the power cord, hold the plug before pressing the cord rewind button to
prevent the cord from whipping.
• Make sure a vacuum bag and filters are always in place.
• This product is equipped with a polarized alternating current line plug (a plug having one
blade wider than the other). This plug fits into the power outlet only one way. This is a safety
feature. If you are unable to insert the plug fully into the outlet, try reversing the plug. If the
plug should still fail to fit, contact an electrician to replace the obsolete outlet. Do not defeat
the safety purpose of the polarized plug.
4
Page 5
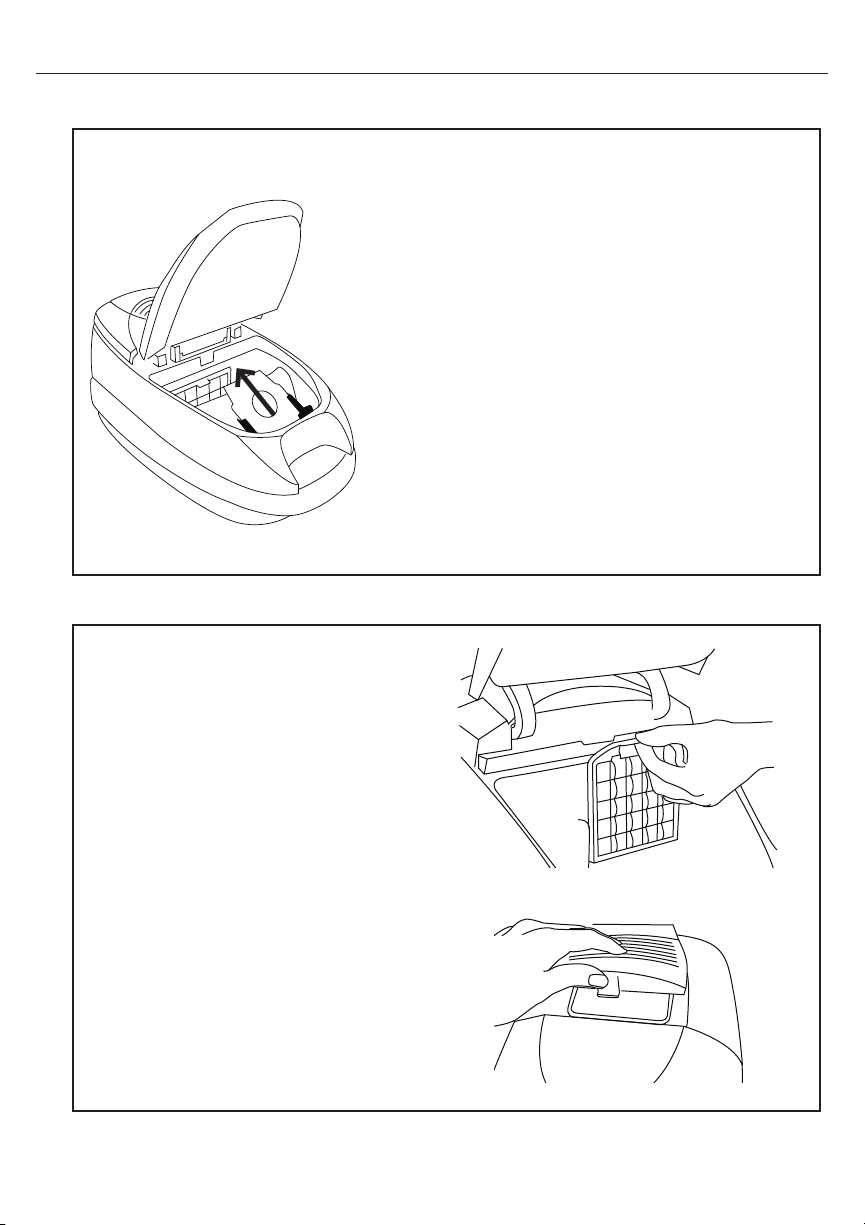
Replacing the vacuum bag
Replacing Vacuum Bag and Filters
Change the vacuum bag when the full bag indicator
light is flashing RED or suction power is weak. The
bag compartment will not close without a bag in the
unit or if the bag is not properly installed.
1. Open the bag compartment.
2. Pull the tab on the cardboard bag collar, closing
the bag while removing it from the bag holder.
3. Remove and discard the used bag.
NOTE: The HiFlow™ HEPA bag cannot be reused.
4. Slide a new bag into the bag holder until it
clicks into place.
Replacing the secondary filter
1. Open the bag compartment and locate
the filter behind the vacuum bag. For
better access to the secondary filter,
remove the bag.
2. Pull the filter holder out toward you.
3. Remove the used filter and replace it with
a new filter.
4. Slide the filter holder back in place and
replace the bag.
Replacing the HEPA filter
1. Push in and lift off the filter cover on the
top of the vacuum.
2. Lift out the used HEPA filter and replace
with a new filter.
NOTE: The HEPA filter cannot be washed
and reused.
5
Page 6

Description and Operation
Hose Adapter
• When separating the
hose from the canister
body, pull the hose
adapter while pressing
the buttons.
Storage
• Insert the tab on the neck of the
wand into either groove on
canister body to store
the wand.
Hard Surface Floor Tool
• For use on tile, hard wood
and linoleum floors.
3-n-1 Tool
• The single tool
conveniently converts
from a premium
dusting brush to a
deluxe upholstery tool
to a crevice tool.
Wand
Wand Release Button
Compact Power Nozzle
6
Page 7

On-Board Cleaning Tools
Cord RewindOn/Off Switch
Dusting
Brush
On/Off Switch
3-n-1 Tool
Upholstery
Handle
Handle
Release
Button
Tool
Crevice
Tool
Full Bag Indicator Light
• If the flashing red indicator light appears:
- Change the vacuum bag
- If the vacuum bag is not full, but the full bag
indicator light is flashing red, check the hose
for a clog.
• When cleaning with a tool (dusting brush, upholstery
tool or crevice tool), the flashing red indicator light
may appear. In this case, continue cleaning.
7
-
Power Control
+
Page 8

Description Continued
Reset Button
Wand Extension Grip (to extend wand)
Compact Power Nozzle
Telescopic Wand
Handle
Wand Storage Tab
Wand Release Button
Soft Furniture Guard
Headlight
Wand Extension Grip
(to extend wand)
Wand Release Button
On/Off Switch
Compact Power Nozzle
Telescopic Wand
Handle
8
Page 9

Using the Compact Power Nozzle
Turning On the Power Nozzle
The power nozzle can only be turned on if
the canister is also turned on (canister on /
off switch is located on the main body). The
power nozzle on / off switch is located on the
handle. Simply press the switch forward to
engage the power nozzle.
Using the Power Nozzle
After turning on the canister, lower the wand
by stepping on the top of the power nozzle
and pulling the wand toward you. Then turn
on the power nozzle.
Removing and Inserting the Wand
Removing the wand from the power nozzle
allows you to use cleaning tools for baseboard
or ceiling cleaning. To do this, first turn the
power nozzle and canister off. Then,
press the wand release button and pull
the wand out.
To reinsert the wand into the power nozzle,
simply press the wand back into the neck of
the power nozzle. The wand will then “click”
into place.
9
Page 10

Using the Compact Power Nozzle
Brushroll Jam Protection
Your power nozzle is equipped with a circuit
breaker safety system that protects it from a
jammed situation. Common items that cause
jammed brushrolls include socks, excessive
threads, corners of area rugs, etc.
If your power nozzle shuts off:
• Turn off the vacuum cleaner and power nozzle
then unplug the power cord.
• Remove the object preventing the brushroll
from turning.
• Locate the circuit breaker button on the back
of the power nozzle and press it to reset the
breaker.
If the nozzle shuts off again, repeat these steps
to correct the problem. If this does not correct
the problem, contact your authorized Simplicity
retailer for further assistance.
10
Page 11

Removing the Brushroll
IMPORTANT: Before performing any
maintenance on the power nozzle, always
unplug the vacuum cleaner and disconnect
the wand.
The brushroll may need to be removed at
times, to cut threads that have become
tangled around it or to replace the belt
(see “Replacing the Belt”).
To remove the brushroll, turn the nozzle over
and loosen the two large screws. Lift off the
baseplate.
Pull the brushroll out and remove the
endcap.
To reinstall the brushroll, replace the
endcap and loop the belt over the end of
the brushroll. Reinsert the brushroll into the
nozzle making sure the long sides of the
endcaps slide into the bottom housing.
Maintenance and Care
To replace the baseplate, insert the tabs on
each end of the baseplate into the grooves
of the bottom housing.
Tighten the two large screws. Make sure
the tabs on the front of the base plate are
snapped securely in place in the bottom
housing.
11
Page 12

Maintenance and Care
Replacing the Belt
IMPORTANT: Before performing any
maintenance on the power nozzle, always unplug
the vacuum cleaner and disconnect the wand.
To replace the belt, you must first remove the
brushroll (See “Removing the Brushroll”). Then
remove the 3 screws on each side of the bottom
of the nozzle. Lift off the top cover and remove
the belt.
To install a new belt, loop one end of the belt
around the motor pulley then loop the other end
of the belt around the brushroll.
Replace the top cover, making sure the reset
button lines up through the cover and the front
tabs snap securely in place.
Replace the three screws on each side of the
bottom of the nozzle. Then replace the brushroll
and base plate (see “Removing the Brushroll”).
12
Page 13

Troubleshooting Guide
Please check each item below if you have trouble with your vacuum.
Unplug the vacuum from the power supply before servicing.
Problem Check Point Possible Solution
Suction power is weak. Vacuum bag If vacuum bag is
full, replace it.
Wand or hose If clogged or blocked,
remove the object.
The vacuum does not work. Is the hose adapter inserted Insert it completely.
into the suction opening of the
vacuum completely?
When the vacuum bag is full Turn the vacuum off and
or any of the accessories are unplug the vacuum.
blocked, the over-heating Check the vacuum
protection for the motor bag and accessories
is activated. and remove any
blockages. The
vacuum can be turned
on again after approximately
20 minutes.
Power cord does not rewind. Power cord Pull the power cord out a
little and press the cord
rewind button again.
Power cord won’t pull out of Power cord Do not pull it out by force.
the vacuum. Rewind it a little by
pressing the cord rewind
button and try pulling it
out again.
Specifications
Model: CINCH.1
Rating: 120V/60Hz
Amps: 11.5
13
Page 14

Owner’s Information (keep this for your records)
The model and serial number of this product may be found on the bottom of the unit. You
should note the model and serial number of your unit in the spaces provided below, and
retain this book as a permanent record of your purchase.
Date of purchase ____________________________________________________
Serial number _______________________________________________________
Model number ______________________________________________________
Purchased from:
Store name _______________________________________________________
Address _______________________________________________________
City, State, Zip ______________________________________________________
Telephone _______________________________________________________
For Best Performance:
• Keep your canister clean and in good operating condition.
• Change vacuum bags once a month or when the bags are 2/3 full to maximize
cleaning performance.
• Always use genuine vacuum bags and replacement parts. Use of other products may
result in poor cleaning performance, potential vacuum cleaner damage and may void
vacuum warranty. Genuine products are designed for maximum cleaning performance.
• Have your canister checked periodically by your Authorized Simplicity Vacuum Retailer.
• Use only Authorized Simplicity Vacuum Retailers for parts or service.
• Store your canister carefully in a dry area.
• For optimum cleaning performance and safety, follow your owner’s manual instructions.
14
Page 15

Warranty
What is Covered:
This warranty covers any defects in material and workmanship in your new
Simplicity vacuum and applies exclusively to the original purchaser.
How Long Coverage Lasts:
Warranty coverage for the Simplicity Cinch canister lasts two years. Warranty
for the Simplicity canister motor lasts seven years. Household models used
commercially are only warranted for 90 days.
What is Not Covered:
• Damage to the vacuum which occurs from neglect, abuse, alterations,
accident, misuse or improper maintenance.
• Normal replacement items: lters, lightbulbs and disposable bags.
What Simplicity Vacuums Will Do:
This warranty provides, at no cost to you, all labor and parts to place this
vacuum in correct operating condition during the warranted period.
How to Get Service:
Warranty service can only be obtained by presenting the vacuum to an
Authorized Simplicity Vacuum Retailer. A proof-of-purchase and product
serial number will be required before service is rendered. To locate your
nearest Simplicity Vacuum Retailer, please call 1-888-9-SIMPLY or visit
the Simplicity Vacuum website at www.simplicityvac.com.
THIS WARRANTY IS EXCLUSIVE AND IN LIEU OF ANY AND ALL OTHER
WARRANTIES WHETHER WRITTEN, ORAL, EXPRESSED OR IMPLIED,
(INCLUDING ANY WARRANTY OF MERCHANTABILITY OR FITNESS FOR
A PARTICULAR PURPOSE). THIS WARRANTY DISCLAIMS LIABILITY FOR
INCIDENTAL, OR CONSEQUENTIAL DAMAGES.
How State Law Applies:
This warranty gives you specic legal rights, and you may also have other rights
which vary from state to state.
15
Page 16

www.simplicityvac.com
16
LVOM-CINCH©2008 Tacony Corporation
 Loading...