

Simplicity 653,654,Landlord,Sovereign Operator's Manual

OPERATOR’S
MANUAL
LANDLORD
&
SOVEREIGN
MFG. NO. 655
MFG. NO. 654
MFG. NO. 657
MFG. NO. 653

Safety
Ge”e‘d Read the Operating and Service lnstrudfions
.
carefully. Be thoroughly familiar with the
controls and the proper use of fhe equipment.
Never allow children to operate the machine.
Do not allow adults to operate it without
.
proper instruction.
Do not carry passengers.
Keep the area of
operafion clear of all
persons, particularly small children.and pets.
When using any attachments, never direct
discharge of material toward bystanders nor
allow anyone near the vehicle while in
operation.
Make sure
a. tractor and attachments are in good
operating condition,
b. all safety devices and shields are in place
and in good working
condition,~and
c. all adjustments (cutting height, etc.), have
been made.
Preparation . Handle gasoline with care - it is highly
l
Clear the work area of objects which might
flammable. be picked up and thrown.
a. Use approved gasoline container.
b.
Never
remove the cap of
.the
fuel tank or
add gasoline to a running or hot engine,
.or fill the fuel tank
iridoors.
Wipe up
spilled gasoline.
l Do not run the engine indoors:‘Exhaust
fumes are dangerous.
l Disengage all attachment clutches and shift
into neutral before attempting to start the
engine.
l
Wear heavy footwear. Do not operate tractor
when barefoot or when wearing open sandals
or
canvas
shoes.
l Disengage power to attachments and stop
engine before unclogging attachment chutes.
l Disengage
powerto attachment(s) and
stop
the
engine before leaving the operatorP position.
.
. Disengage power fo attachment(s) Ind stop the
engine before making any repairs or adjustments. .
. When
usino
the vehicle wirh mower. proceed
as
follows:-
a. Mow onlv in davliqht or in aood artificial
light.
.
b. Never make a cutting
height adjustment
while the engine is running.
c. Check the blade mounting bolts for proper
tightness at frequent intervals.
l Do not stop or start suddenly when going
uphill or downhill. Mow up and down the face
of steep slopes; never across the face. .
l Reduce speed on slopes and in sharp turns to
prevent tipping or loss of control. Use .
extreme caution when changing direction on
slopes.
l Stay alert fbr holes in The terrain and other
hidden hazards. Be extra careful when
operating on wet or slippery surfaces. .
l The vehicle and attachments should be
stopped and inspected for damage after
striking a foreign objecr. and the damage
should be repaired before restarting and
operating the equipment.
Watch out for traffic when crossing or near
roadways.
If equipment begins to vibrate abnormally
-
disengage power to atrachments and stop
engine at once. Inspect for damage and correct
before starting up tractor.
Use care when pulling loads or using heavy
equipment.
a. Use only
drawbar hitch point.
b. Limit loads to those you can safely control.
c. Do not turn sharply. Use care when backing.
d. Use weights when suggested in the owner’s
manual.
Disengage
power
to atrachment(s) when
transporting or not in use.
Take all possible precautions when leaving
the vehicle unattended, such as disengaging
the power take-off, lowering the attachment(s).
shifting into neutral,
setting
the parking brake,
stopping the engine. and removing the key.
Keep the vehicle and attachments in good
operating condition, and keep safety devices
in place.
Maintenance
and Storage
. Keep all nuts. bolts, and screws tight to be
l
To reduce fire hazard. keep the engine free of
sure the equipment is in safe working
grass. leaves, or excessive grease.
condition.
l Never
store
the equipment with gasoline in the
l Do not change the engine governor settings
tank inside a building where fumes may reach
or overspeed the engine.
an open flame or spark. Allow the engine
to
cool before
storing
in any enclosure.
. . .

Congratulations on your
purchase
of the Simplicity
trac-
tar. We know you bought this machine to make your lawn
and garden work easier. You bought the right machine to
do it. So that
you can get the very most from your pm-
chase, we would consider it a personal favor if you would
take time to study this manual before using your tractor
and its attachments. It will increase the chance of adding
you to our long list of satisfied customers. Also, before al-
lowing others to operate your tractor, be
sure
they read
and understand the safety precautions and operation
sec.
tion of this manual. For your own safety and that of your
family and friends, periodically review the safety tips
found on the inside front cover and page two of this man-
uai
SIMPLICITY’S NEW EQUIPMENT WARRANTY
The Company warrants Simplicity products to be free from
defects
in material and workmanship, except
the Company makes no warranty, express or implied, with respect to tires, engines, generators and voltage
regulators, which
are
warranted by their
respective
manufacturers. Any part
covered
by this warranty which
is
proven
defective within one year (45 days for equipment used for rental, municipal or commercial
purposes) under normal
use,
from date of purchase, will be replaced without charge, provided such
part
is
returned to the factory, (if requested), and is found to be defective upon examination at the factory. This
warranty
does not apply to any Simplicity products altered outside of the Simplicity factory. THE
FOREGOING WARRANTY IS IN LIEU OF ALL OTHER WARRANTIES, EXPR ESS OR IMPLIED. OF
MERCHANTABILITY, FITNESS FOR A PARTICULAR PURPOSE, PERFORMANCE, OR OTHERWISE.
The Company’s obligation under its warranty is
strictly and exclusively limited to the replacement of
such
parts,
and
in no
event
shall the Company be liable for any other damages, whether direct. immediate,
incidental, special, or consequential. Simplicity Manufacturing Company, Inc.,
reselves
the right to modify
or change specifications without prior notification. There are no warranties which extend beyond the
description of any Simplicity product.
TABLE OF CONTENTS:..
OWNER’S MANUAL
LANDLORD
&
SOVEREIGN
MFG. NO. 855
MFG. NO. 854
MFG. NO.
857
MFG. NO. 653
WARRANTY
SAFETY INFORMATION
FEATURES
OPERATION
CONTROLS AND HOW TO USE THEM
BEFORE STARTING
STARTING THE ENGINE
STOPPING THE ENGINE
CONTROLLING TRACTOR GROUND SPEED
STOPPING
TROUBLE SHOOTING
ADJUSTMENTS
STARTER-GENERATOR
SEAT
SAFETY INTERLOCK
P.T.O. CLUTCH
& BELT STOPS
VARIABLE SPEED DRIVE
HYDROSTATIC TRANSMISSION
’
BRAKE ADJUSTMENT, FOOT PEDAL
BRAKE ADJUSTMENT, PARKING
MAINTENANCE
EVERY 5 HOURS
EVERY 25 HOURS
EVERY 100 HOURS
SERVICE
GENERAL REPAIRS
OFF SEASON STORAGE
STARTING AFTER STORAGE
REPLACEMENT PARTS
SPECIFICATIONS
ACCESSORIES
1
2
3
4
4
~6
8
9
9
9
10
11
11
11
11
12
12
13
13
14
15
15
15
18
18
18
18
19
19
20
24
1

:: .:
: :
,,:.;
,.,
PROTECT YOURSELF AND OTHERS
n Know the controls and how to stop quickly -- READ THE
OWNER’S MANUAL.
. Do not allow children or young teenagers
to
Operate
Ve
hicle or adults to operate it without proper
inStrUCtion.
. Do not carry passengers. Keep children and pets a safe
distance
away.
. Clear work area of objects which might be picked UP and
thrown.
m
Disengage all clutches and shift into neutral before Starting
engine.
E Disengage power to implement (9 and stop engine
before
leaving operator position.
n Disengage power to implement
(s)
and
Stop
engine
before
making any repairs or adjustments.
. Disengage power to implement
(s)
when transporting or
not in use.
. Take precautions, such as disengaging power take-off.
lowering implements, shifting into neutral, setting parking
brake. stopping engine and removing key when leaving vehicle unattended.
n Don’t stop
oxtart
suddenly when going uphill or downhill.
n Reduce speed on slopes and in sharp turns to prevent tip-
ping or loss of control.
. Stay alert for holes in terrain and other hidden hazards.
n Use care when pulling loads or using heavy equipment.
A. Use only approved
drawbar
hitch points.
8.
Limit loads to those you can safely control.
C. Don’t turn too sharp, and use care when backing.
D. Use counterweight
(s)
or wheel weights when
sug
gested
in owner’s manual.
Watch out for traffic when crossing or near roadways.
n When using any attachments, never direct discharge of ma-
terial toward bystanders nor allow anyone near vehicle
while in
operatitin.
fl Handle gasoline with care -- it is highly flammable.
A. Use approved gasoline container.
6.
Never remove cap or add gasoline to a running or
hot engine or fill fuel tank indoors. Wipe up spilled
gasoline.
C. Replace gasoline cap securely.
D. Open doors if engine is run in garage exhaust
qanes
are dangerous.
n Keep vehicle and attachments in good operating condition
and keep safety devices in place. Use guards as instructed
in owner’s manual.
w
Do not operate equipment when barefoot or wearing
open
sandals. Always wear substantial footwear.
2
m
Do not put hands or feet near or under rotetins parts.
Keep clear of discharge opening at all times.
n Before cleaning, inspecting, adjusting, or repairing the trac-
tor or any attachments stop the engine,
reri~ove
the igni-
tion key (electric start models) and be sure all blades and
other moving parts have stopped.
n
Stop blade
1s)
when crossing gravel drive, walks or roads.
n After striking a foreign object stop the mower and
remove
the ignition key. Thoroughly inspect the mower for any
damage, and repair the damage before restarting and
operating the mower.
w
If your equipment should start to vibrate abnormally, stop
the engine and check immediately for the cause. Vibration
is generally a warning of trouble.
W
Do not run the engine indoors.
n Look to be
sure
that children are not behind the tractor,
before backing up.
n When mowing with a tractor mounted mower, mow
up-
and-down on slopes, never across or horizontally. To prevent the danger of overturning, exercise extreme caution
when stopping, starting or changing direction.
n Check blade and engine mounting bolts for proper tight-
ness at frequent intervals.
=A
n Keep all nuts. bolts, and screws tight to be sure equip-
ment is in safe working condition.
n Never store equipment with gasoline in the tank inside of
a building where fumes may reach an open flame or spark.
Allow engine to cool before storing in any enclosure.
n To reduce fire hazard keep engine free of grass, leaves or
excessive grease.
n Never operate any attachment without all guards, deflec-
tors, and other protective covering in place.
n Keep the area of operation
clear~of
all persons, particularly
small children, and pets.
n Thoroughly inspect the area where the equipment is to be
used and remove all stones, sticks, wiie, bones and other
foreign
objects.
n Check fuel before starting engine. Do not fill gasoline tank
when engine is running or while engine is still hot. Wipe
off any spilled gasoline before starting engine. Do not
smoke when fueling engine or around open gasoline containers.
n Mow only in daylight or in good artificial light.
n Do not change engine governor, settings or overspeed
engine.

SlMPLIClTY
OFFERS YOU-
OPERATION
Easy to get on and off. Full length foot rest is convenient
step. Controls are
out~of
the way.
Quick, simple starting. High capacity battery. Key-control-
led electric starter/generator.
Easy steering. Large steering wheel and gear reduction
pro-
vide low steering effort.
Simple control of engine speed. Single lever has adjustable
friction lock.
Choice of ground speed control. Pick from
TV
wo transmis-
sions.
Hydrostatic Drive for full range of ground speeds in
forward or reverse without clutching. Variable Speed Drive
provides
s&en
speeds in each gear plus flip shift
second-
+n-r~~c=r~e
shiftinn
lbsina
clutch.
Comfortable foot support Large area foot rests permit
changing foot position without resting feet on mower.
Reduced noise and vibration, Enclosed, large
vOlUme
muffler lowers engine noise. Synchro-balanced engine
(Sovereign) and massive frame (Sovereign and Landlord)
minimizevibration.
RELIABILITY
Increased engine life.
Briggs &
Stratton engine has
stellite
valves with rotators.
Durable power t
rain. Transmission differential and bevel
oear
housing are all of hardened gear construction. Roll-
Y
ing contact bearings
sumcrt all moving
p21*+
Good traction on sidehills
.a”,+ c,inn.aru c,,rfzaroc
At,.
L”II,~LIb lllllllr”
“‘IJ “lI3FI~
ential
provides traction on
y
sidehills and ice, yet doesn’t
scuff
lawns
on turns.
Precise attachment po-
sitioning. Standard
manual lift has notched sector for fixed
positioninq and a
&at
cam so attach-
merits
can follow
ground contour.
SAFETY
Single action stopping. Large clutch/brake
pedal has outer lip, retains foot even when icy;
declutches
in first half of travel and applies brake
when depressed further.
Protection from hazardous parts. Belts and drives are
shielded. Muffler and exhaust pipe are enclosed by hood
and grill.
Unobstructed view. Low profile hood. Headlights illumi-
nate wide area, do not reflect from
snow
thrower.
Easily identified control action. Controls are logicallv
grouped and clearly marked as to function and direction.
COMFORT
Soft, comfortable ride. Double bead rim wheels retain
tires at
Idw
air pressure.
Comfortable Seat. Position is adjustable to match opera-
tor’s size.
Hydrostatic transmission
handler
hioh
loads,
Simple access to en-
gine and power train.
Hood unlatches and
nivots
forward.
Se?’
.
“me
T
is open at bottom.
Easy
to change oil. Optional e-
lapsed time meter indicates when oil
change is required. Oil fill and drain pipes
are
readily accessible.
No fuse replacement, Automatic reset circuit breaker
eliminates fuses.
Differential needs no adjustment. Eight springs and hard-
ened wear plates automatically adjust limited slip action.
EQUIPMENT

::.
.::
;,:
,..
‘::
OPERATION
CONTROLS AND HOW TO USE THEM
Picture yourself seated on your Landlord or Sovereign
tractor. ‘Before starting the engine, lets learn how to use
each of the safe, easy to reach controls. (The numbers on
figures
1 thru 7 correspond to the paragraph numbers be-
low.
1. Ignition Switch: When turned clockwise to the first po-
sition, the ignition is turned “ON”. Turn past the “ON”
position to
actua@
the starter. (If the starter does not ac-
tuate, be sure the transmission shift lever on variable speed
~models
or the hydrostatic control lever on hydrostatic
models is in the neutral position). Release the key as
soon
as the engine starts. Return the key to the vertical position
to stop the engine. ALWAYS REMOVE THE IGNITION
KEY WHEN CLEANING, ADJUSTING OR
tiEPAIRING
THE TRACTOR OR ANY ATTACHMENT OR WHEN
LEAVING THE VEHICLE UNATTENDED.
FIGURE 1
2. Engine Speed Control Lever. The engine speed control
lever should be moved forward toward the FAST position
to increase engine speed and back toward the SLOW position to decrease engine speed.
3. Choke Control Knob: Pull the choke control knob all
the way out when starting the engine. As
soon
as the en-
gine starts, push the control knob all the way in. The
4
choke control should be pushed all the way in whenever
the engine is running.
4. Generator Warning Light: The generator light will
warn
you if the generator or voltage regulator on your tractor is
not functioning properly. It is normal for the generator
light to come on when the ignition switch is in the ON position and the engine is stopped
or running at low speed.
The light should go out when the engine is running at
higher speeds. If it does not, the generator a voltage regulator, is not functioning properly. Check the generator
belt adjustment (see
adj. page 11). See your Simplicity
dealer if the light will not go out after the belt is adjusted.
FIGURE 2
5. Light Switch: (Standard equipment on Sovereign
-
Optional on Landlord). Place the toggle switch in the “UP”
position to turn on lights. To avoid the battery being
ac-
cidentally run down, the ignition switch must also be in
the “ON” position for the lights to work. DO NOT OPER-
:.:
.:,
;.:7
..~..
.~::
FIGURE 3
ATE THE LIGHTS FOR OVER 10 MINUTES WHEN
THE GENERATOR LIGHT IS ON OR THE BATTERY
MAY DISCHARGE ENOUGH SO IT WILL NOT START
THE ENGINE.
6. Fuel Gauge and Filler Cap: The gauge measures the level
of fuel in the tank. Turn the cap counterclockwise to remove for adding gasoline.
7. Hourmeter IOptional): The hourmeter is used to record
the number of hours the engine runs, though it will operate any time the ignition switch is ON even if the engine
isn’t running.
FIGURE 4
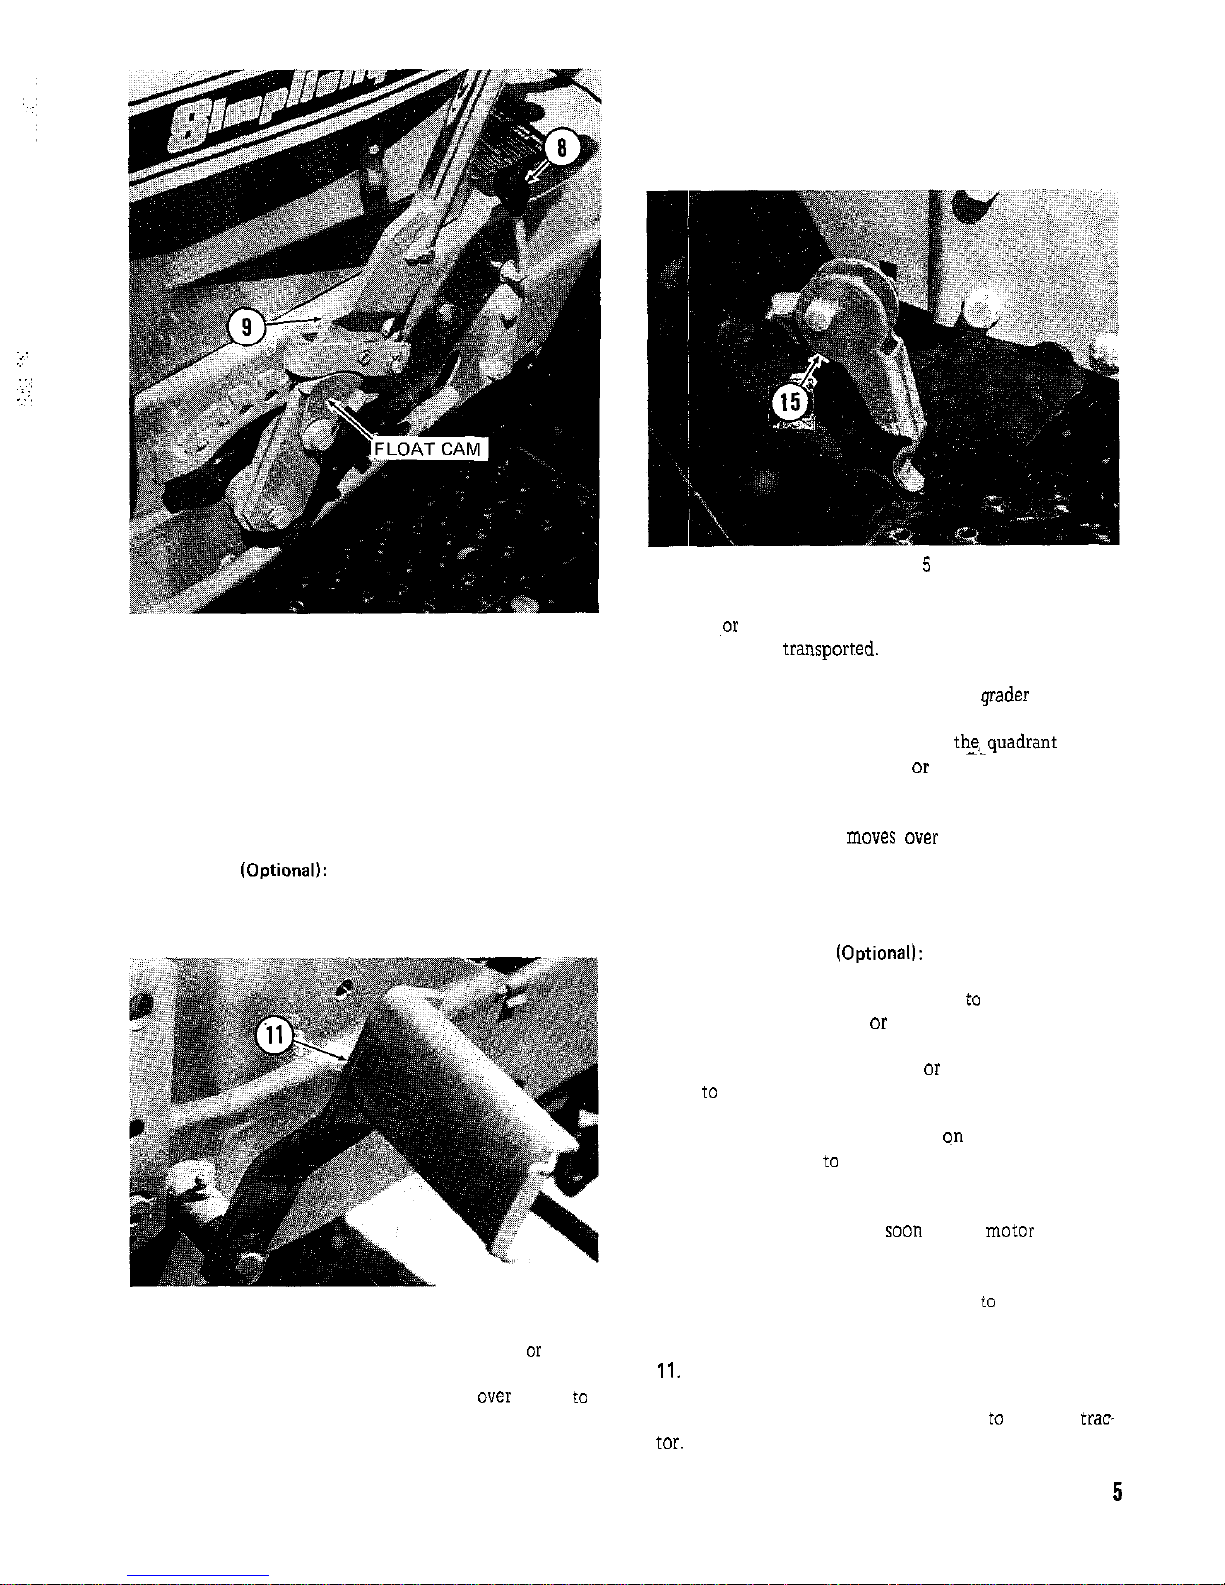
8. Power Take-Off Control Lever: The power takeoff lever
controls power to attachments such as a mower or sickle
bar which are driven by the center power take-off unit.
Pull the lever up and forward until it snaps
over center
to
engage the P.T.O. Pull it back and down to disengage. The
tractor engine should be running at 112 to full engine
speed when the power take-off is engaged to absorb the
initial effort of the added load. ALWAYS DISENGAGE
THE P.T.O. AND WAIT UNTIL ALL ATTACHMENTS
HAVE STOPPED MOVING BEFORE LEAVING THE
TRACTOR SEAT.
FIGURE
5
9. Lift Lever: The lift lever is used for lifting the rotary
mower
,or
other attachments out of the operating position
so they can he
transport.ed.
By using the notches and pin
holes provided in the quadrant, you can regulate the operating height of attachments such as the grader blades and
snow throwers. The thumb button on top of the handle is
pressed to disengage the latch from
thequadrant so the
lever can be moved forward or back as required and
locked in position. Placing the float cam in the “UP” position will allow the lift lever to “float” through any position as an attachment
moves
over rough surfaces. SEE
THE ATTACHMENT BOOK FOR SPECIFIC INFORMATION ON HOW THE LIFT LEVER SHOULD BE USED
WITH YOUR ATTACHMENTS.
10. Power Lift Switch (Optionall: The Power Lift Switch
controls the electrically operated power lift unit. Push the
toggle switch forward when you wish to raise a center or
rear mounted attachment
or lower a front mounted at-
tachment. Pull it back toward you to raise a front mounted attachment or lower a center or rear mounted attachment
to
the operating position. The power lift will immed-
iately stop and hold in any position when you release the
toggle switch. The height indicator qn the left side of the
tractor can be used
to determine what position the lift is
in. The lift motor will ratchet when it has reached the end
of its travel. It is not harmful to the unit, but you should
release the toggle switch as
soon
as the motor begins to
ratchet to prevent unnecessary wear. If the motor is allowed to ratchet for an extended period of time, a circuit
breaker will open disconnecting power
to
the lift motor.
It will automatically reset itself after a few minutes.
11.
Clutch and Brake Pedal: Depressing the pedal will first
disengage the tractor drive clutch. As you continue to depress the pedal the brakes will be applied to stop the trae
for.
CAUTION: ON HYDROSTATIC TRACTORS THE
5
BRAKES WILL NOT FUNCTION IF THE GEAR SHIFT
LEVER AT THE REAR OF THE TRACTOR IS
IN THE
FIGURE 6
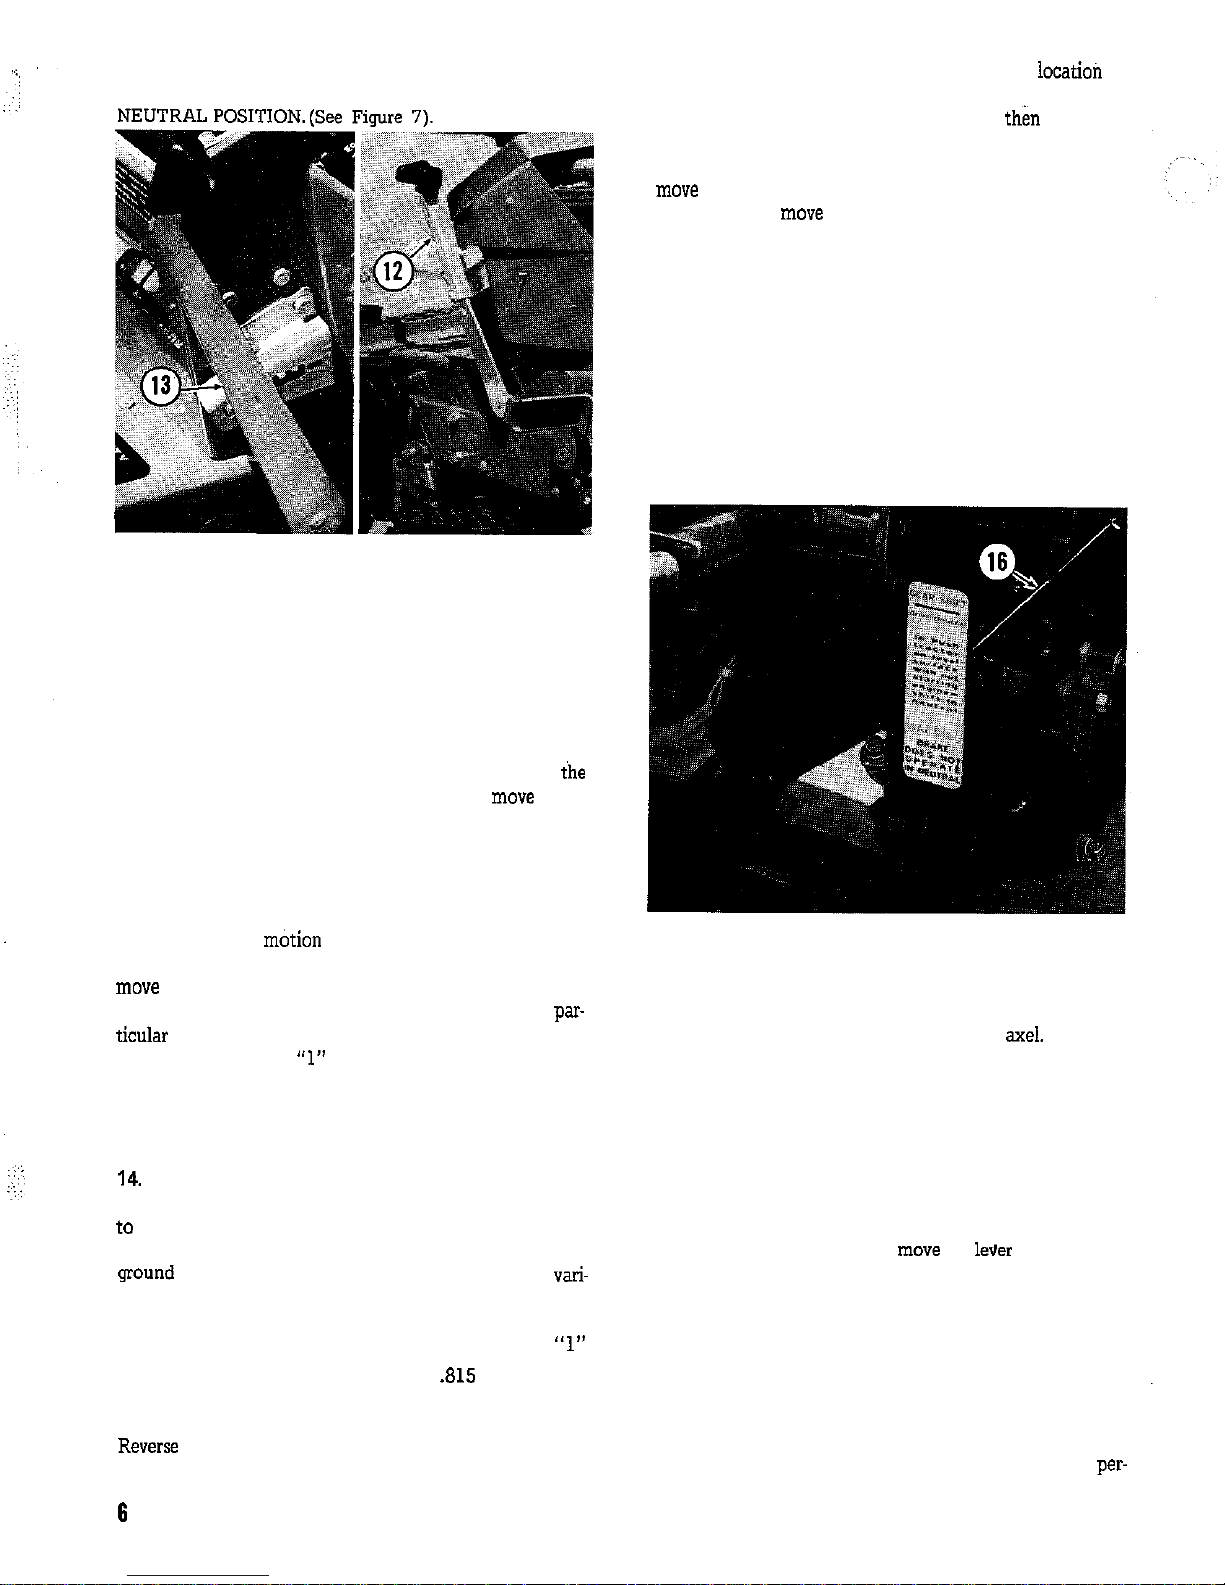
12. Hydrostatic Speed Control: (Tractors With Hydrostatic
Transmission): Travel speed of the hydrostatic equipped
tractors is controlled by the control lever at the right of
the instrument panel. Place your hand on top of the control and squeeze the lever so the control can be moved. It
must be in the notched “NEUTRAL” position to start the
engine. The further it is moved forward from this position,
the greater the tractor ground speed forward will be in relation to the engine speed. Moving the lever back from
ihe
“NEUTRAL” position will allow the tractor to
move
in reverse. THE GEAR SHIFT LEVER AT THE REAR OF
THE TRACTOR MUST BE IN THE DRIVE POSITION.
13. Variable Speed Control (Tractors With Variable Speed
Transmission): Tractor ground speed can be changed while
the tractor is in
m&on by moving the Variable Speed
Control Lever. Place your hand on top of the control and
move
it to the desired position. Pushing it all the way for-
ward to position 7 will give the greatest speed in any
pa-
titular
transmission gear (see item 14). Pulling it all the
way back to position “1” the lowest speed. NEVER ATTEMPT TO MOVE THE VARIABLE SPEED LEVER
UNLESS THE ENGINE IS RUNNING AND THE FOOT
PEDAL IS RELEASED.
14.
Transmission Shift Lever (Tractors with Variable
Speed Transmission): The transmission shift lever is used
to select the desired transmission gear speed and direction.
There are three forward and one reverse position. The
ground speed for each depends on the position of the vati-
able speed lever discussed in paragraph 13.
Gear
Variable Control at “7” Variable Control at “1”
First 1.56 MPH .815 MPH
Second
3.65 MPH 2.04
MPH
Third
6.1 MPH 3.36 MPH
ReVerSe
3.14 MPH 1.73
MPH
6
The diagram printed on the panel shows the
locatioi~
of
each position. To shift the transmission into reverse or second, pull the shift lever back toward you,
then push it all
the way to the right or left into the desired position. To
shift into first or third, push the shift lever forward and
move
it left or right all the way to the desired position. Do
not attempt to
move
the shift lever unless the foot pedal
(item 11) is depressed and tractor motion is stopped. The
shift lever must be in the neutral “Start,” position for the
engine to start.
15. Parking Brake Lock: To lock the parking brake, grasp
the lock and pull it upward and back until the handle rests
against the footrest. To release, pull the top portion away
from the footrest and down. The parking brake is located
on the right side of tractors equipped with Hydrostatic
Transmission and on the left side of those with Variable
Speed Transmission.
FIGURE 7
16. Gear Disconnect Lever (Hydrostatic Models Only):
The gear disconnect lever located at the right rear of tractors equipped with the hydrostatic transmission is used to
disengage the transmission from the rear
axel. With the
lever in the NEUTRAL position the tractor may be moved
without engine power. WHEN THE GEAR DISCONNECT
LEVER IS MOVED TO THE NEUTRAL POSITION, THE
BRAKES WILL NOT FUNCTION. NEVER DISENGAGE
DISCONNECT LEVER WHEN TRACTOR IS ON AN INCLINE UNLESS TIRES ARE PROPERLY BLOCKED. Be
sure the hydrostatic control lever is in the NEUTRAL position before attempting to engage or disengage the Gear
Disconnect Lever. To engage,
move
the lever to the vertical
position until it snaps into the spring clip. Disengage by
pulling the spring lock up and moving the disconnect as far
as possible to the right.
BEFORE STARTING
Though your Simplicity dealer may have performed the
before starting checks listed below, we suggest you
per-
sonally check each one so that you will become familiar
with them and also to insure that your tractor is ready to
go the first time you use it.
1. Tire Inflation: The tractor is shipped with all tires in-
flated to 25 PSI. Before operating, reduce pressure in all
tires. The front tires 12 to 15 PSI and rear to 6 to 8 PSI.
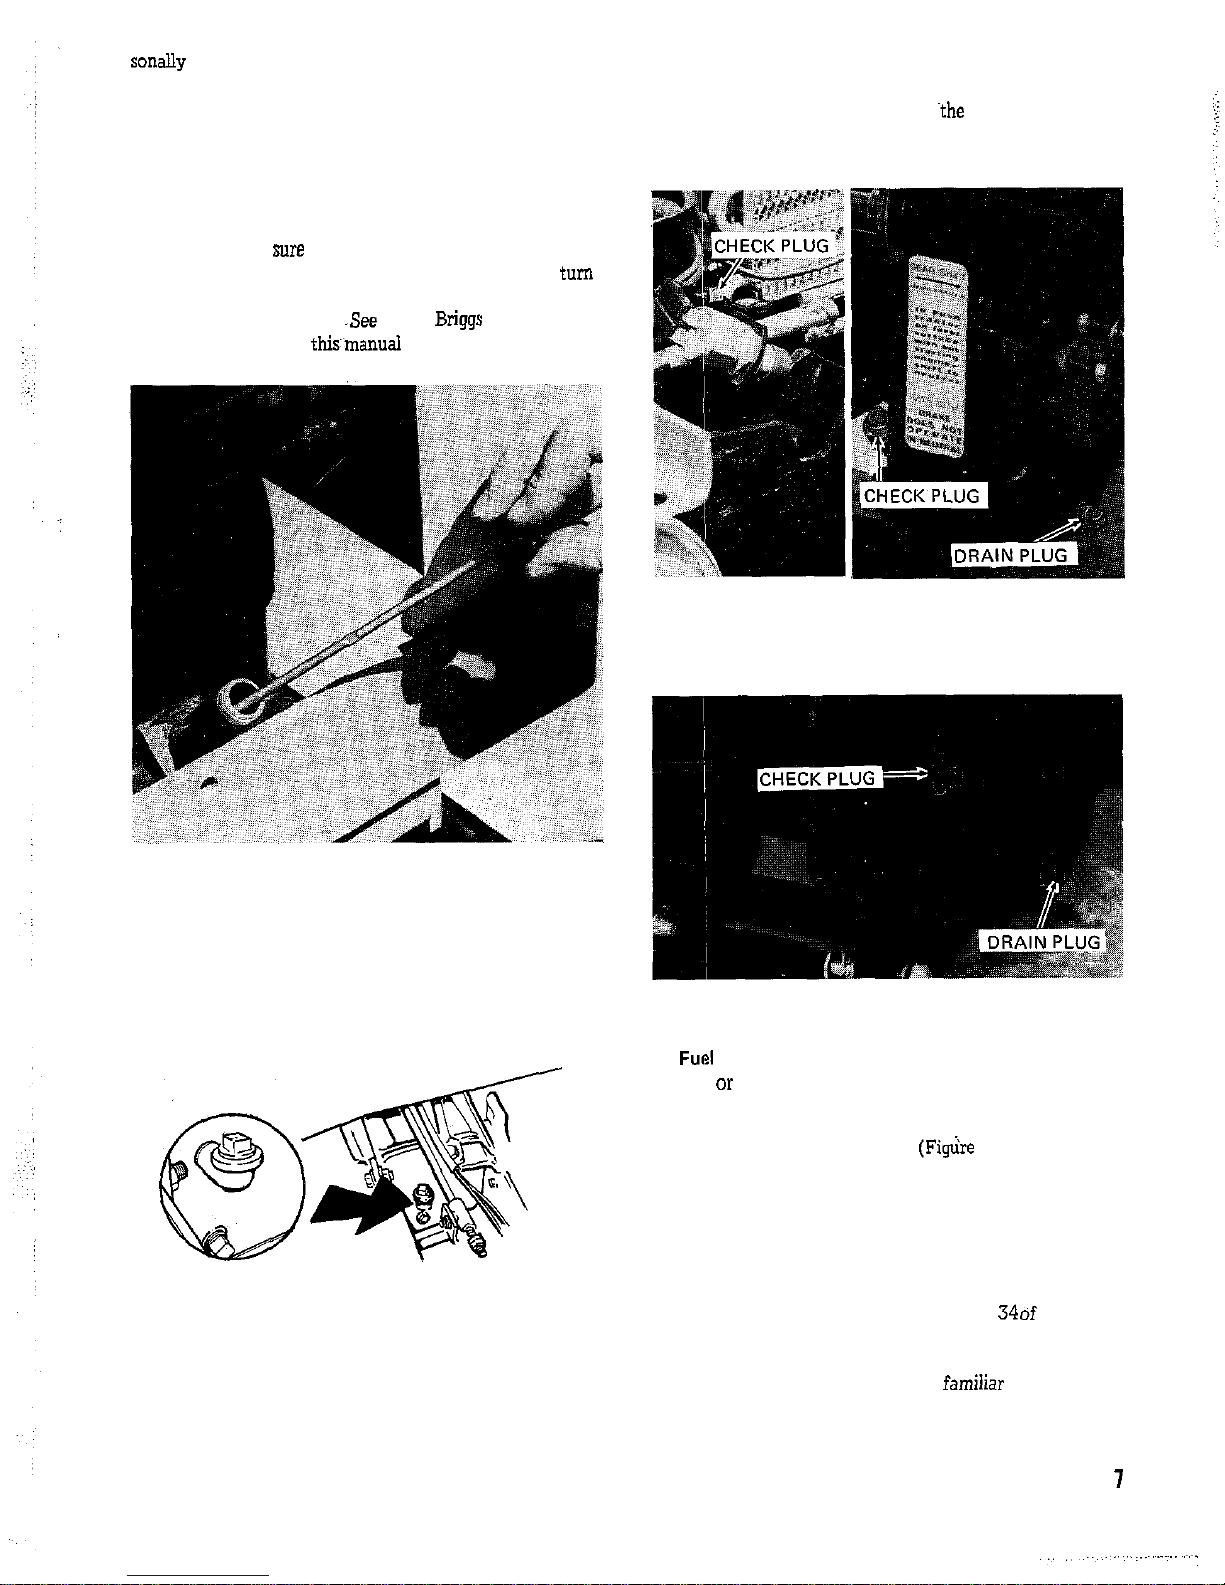
2. Engine Oil: Be
sure
the oil in the crankcase is at the
proper level. Remove the dipstick, wipe it clean, and turn
it back in. When removed again, oil should show up to the
full mark. See figure 8.
-See
your
Briggs
and Stratton
manual and page 15 of this’manual for grade and weight of
oil to use.
FIGURE 8
3. Transfer Gear Case Oil: Remove the pipe plug from the
elbow at the rear of the gear case. Oil should be present at
the top of the filler elbow. If it is not, fill with 90 weight
transmission oil.
FIGURE 9
4. Transmission Oil (Hydrostatic Models): Remove the in-
spection plug at the side of the reservoir to check the oil in
the hydrostatic pump. Oil should be level with the bottom
edge of this hole. If it is not see page 17 under Maintenance. Remove the pipe plug from
~the
elbow on the axle
housing. Oil should be level with the top of the elbow. If
it is not see page 17 under Maintenance.
FIGURE 10
(Variable Speed): Remove the fill plug on the right side of
the transmission. Oil should be level with the bottom edge
of this hole. See page 17 of Maintenance.
FIGURE 11
5.
Fuel
Supply: Fill fuel tank completely with clean, fresh,
leaded or non-leaded “Regular” grade automotive gasoline.
(DO NOT MIX OIL WITH GASOLINE) Store gasoline in
small quantities as prolonged storage produces gum. See
page 9 item 6 of this manual.
(Fig&e 12).
6. Battery: Be sure the battery is filled to the proper level
with electrolyte and the vent holes on each cap are open.
See page 18.
7. Lubrication: Lubricate all grease fittings and oil lubri-
cation points shown in figures 32 through 346f the Main-
tenance section of this manual.
8. Attachments: Read and become famiiiar with the AT-
TACHMENTS MANUAL which refers to attachments you
will be using with your tractor. IMPORTANT: If you are
7
 Loading...