

Page 1
OPERATOR’S
MANUAL
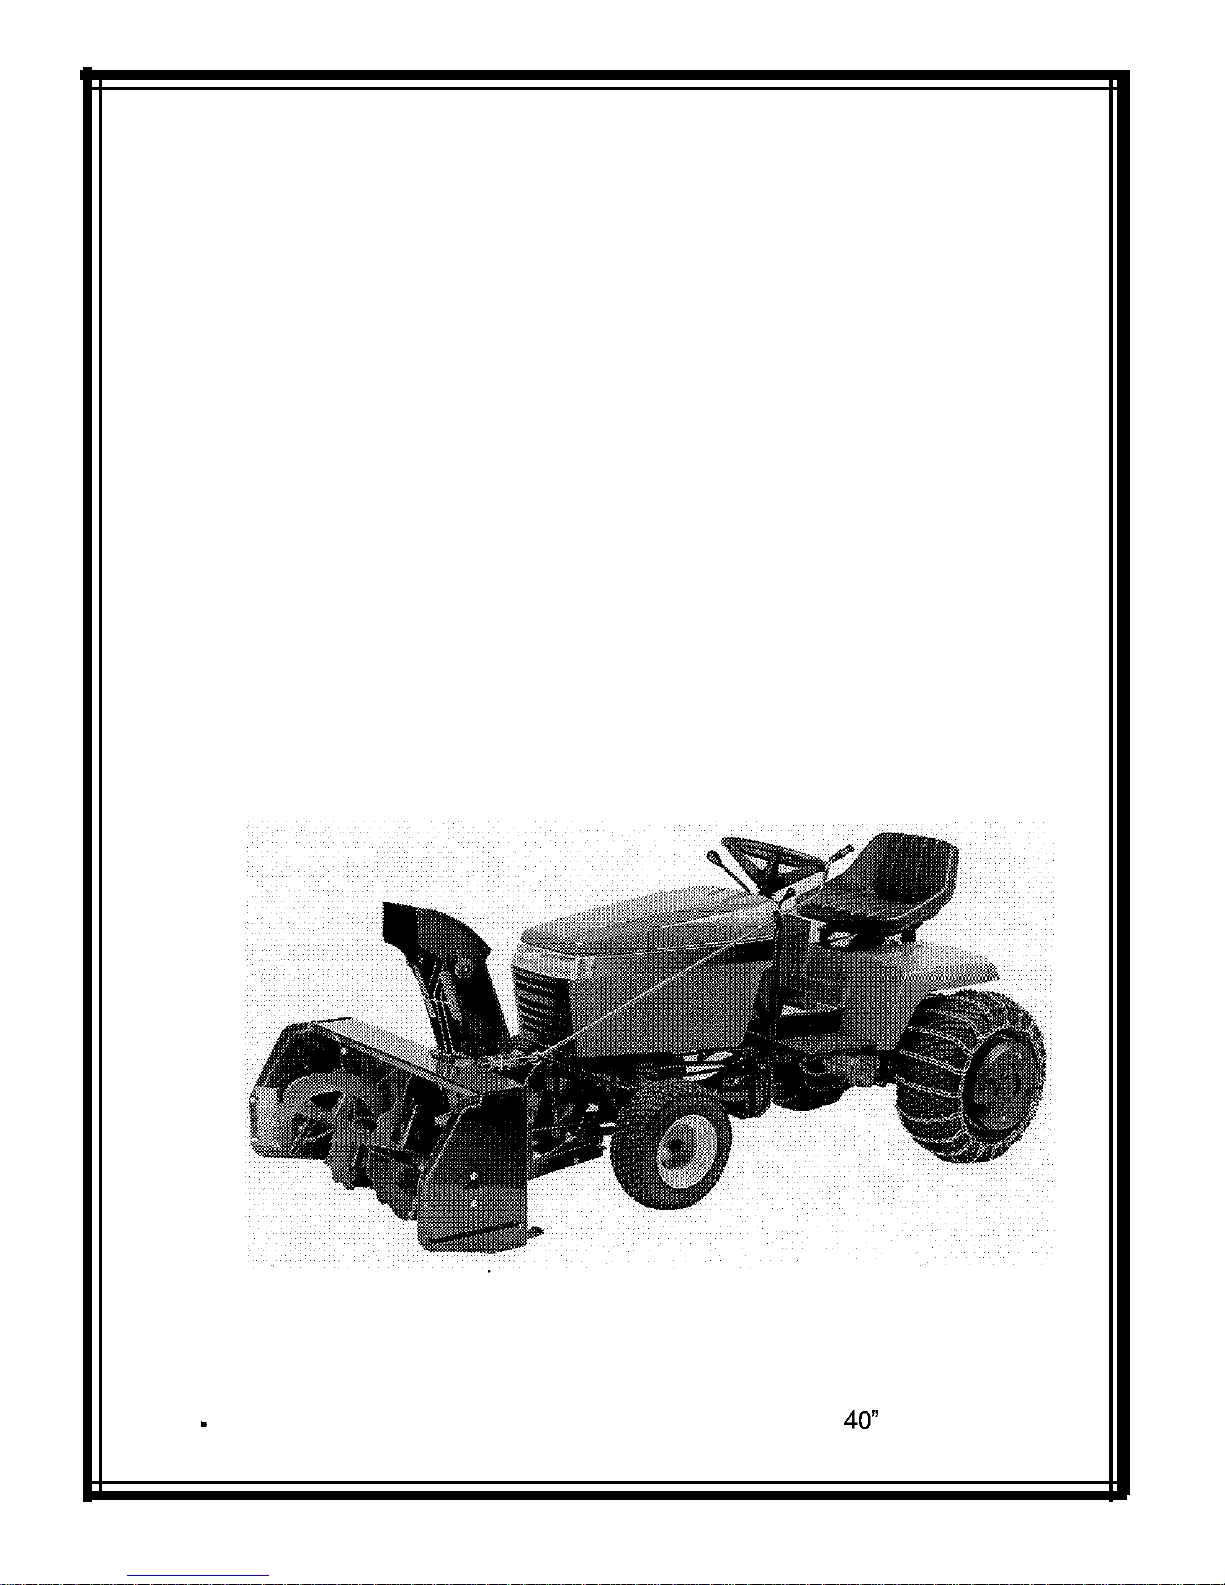
40” SNOWTHROWER
FORM - 1713518-03
40”
SNOWTHROWER
Mfg. No. 1692356
Page 2

Simplicity Manufacturing Inc.
500 N. Spring Street
P.O. Box 997
Port Washington, WI 53074-0997
U.S.A.
Page 3

40” SNO WTHRO WER
Required Accessories
Wheel weights and a rear weight carrier are
required when installing this attachment on your
unit. These accessories will improve traction, thereby making the snowthrower more efficient. For addi-
tional traction, tire chains are also recommended.
Broadmoor:
Rear Wheel Weights
1690555
Rear Weight Carrier
1692742
40# Weight (2 Req. With Carrier)
1692625
Landlord:
Rear Wheel Weights
Rear Weight Carrier
40#
Weight (3 Req. With Carrier)
1693160
1692743
1692625
For operation on slopes greater than 15%
(8.5”)
rear
weights, tire chains and wheel weights are recom-
mended. Never operate on slopes greater than 30%
(16.7”). Sea Operation on Slopes, page 3.
NOTE: Large Lift Lever Kit (part no. 1691832) is
required for Broadmoor/LT/2600/1600 Series trac-
tors, if not already factory installed.
TABLE OF CONTENTS
Safety Rules
Required
Accessories.. ..............................................
1
General.. ...................................................................
.z
Preparation
...............................................................
.2
Operation..................................................................
.2
Safety Decals.. ...........................................................
3
Parts Identification
Snowthrower..
...........................................................
.4
Hitch -All
Models.......................................................
.5
Assembly
Skid Shoes..
..............................................................
.6
Push Frame Assembly.. .............................................
6
Snowthrower Chute ..................................................
.6
Spout Control.. ...........................................................
7
Hitch Assembly..
.........................................................
7
Installation - Electric Lift Models
Attaching
Hitch To Tractor........................................
.8
Installing
Lift Rod.. .....................................................
10
Reverse
Electric Lift Wiring.......................................
.I0
Installation - Manual Lift Models
Assemble I Install Lift Lever.Early Models..
.............
11
Assemble / Install Lift Lever - Later Models
...............
12
IAttaching Hitch To Tractor..
......................................
13
Installing Lift Rod ......................................................
.14
Removing
the
Snowthrower..
............................15
Adjustments
Belt Adjustment.........................................................
.I5
Scraper Adjustment ...................................................
16
Skid Shoes Adjustment..
............................................
16
Auger Drive
Chain ....................................................
.I6
Deflector
...................................................................
,16
Lift Rod Adjustment - Electric Lift Models
..................
17
Lift Rod Adjustment
-
Manual Lift Models.................
.17
Operation
Controls ....................................................................
.18
Checks Before
Starting.. ...........................................
.18
Transporting..
.............................................................
18
Starting and Stopping ................................................
18
Operation On Slopes ................................................
.I8
Snow Removal
Suggestions.....................................
.I8
Maintenance
Lubrication ................................................................
.I9
Daily Storage
.............................................................
19
Off-Season Storage..................................................
.19
Troubleshooting
.................................................
20
Minor Repair
Shear Bolt
Replacement.. .........................................
.21
Belt Replacement
.....................................................
.22
Hardware Identification &Torque Specs..........2 4
Page 4

40” SNOWTHROWER
SAFETYRULES
A
Read these safety rules and follow them closely. Failure to obey these roles could result in loss of control
of vehicle, severe personal injury to yourself or bystanders, or damage to property or equipment. The
tri-
ang/e A
in the text signifies important cautions or warnings which must be followed.
A
ALL WARNING, CAUTION, and instructional
messages on this attachment and on your
tractor should be carefully read and obeyed. Personal bodily injury can result when these instructions are not followed.
A
WARNING
If the auger stalls or the chute plugs, DISEN-
GAGE THE ELECTRIC CLUTCH, STOP THE
ENGINE, REMOVE THE KEY AND SET THE
PARKING BRAKE. WAIT FOR MOVING
PARTS TO STOP. Remove the foreign object
or clear the spout with piece of wood before
restarting the engine. Never place hands into
auger housing or spout to clear jammed
object. Auger may rotate when object is
removed.
-
Read this manual and the tractor Operator’s
Manual carefully. Be thoroughly familiar with the
controls and the proper use of the equipment.
l
Never allow children to operate the machine. Do
not allow adults to operate it without proper
instruction.
l
Do not carry passengers.
l
Use only attachments or accessories designed
for your machine. See your dealer for a complete
list of recommended attachments or accessories.
l
Keep the area of operation clear of all persons,
particularly small children and pets.
l
Never discharge toward bystanders.
l Make sure:
a. all nuts and screws are tight and snowthrower
is in good operating condition.
b. all safety devices and shields
are‘;, place and
in good working condition.
c. all adjustments are correct before using unit.
Preparation
l Never attempt to make any adjustments while
engine is running.
l
Thoroughly inspect the area where the
snowthrower is to be used and remove all door
mats, sleds, boards, wires and other foreign
objects.
l
Adjust skid shoe height to clear gravel or crushed
rock surface.
Operation
l
Always clear snow up and down the face of
slopes, and never across the face. Exercise
extreme caution when changing direction on
slopes. Do not attempt to clear steep slopes.
l
Exercise extreme caution when operating on or
crossing gravel drives, walks, or roads. Stay alert
for hidden hazards or traffic.
l
After striking an object or if unit starts to vibrate
abnormally, stop the engine, disengage electric
clutch, and remove the key. Check for the cause
and any damage before restarting. Before inspect-
ing, make sure all moving parts have stopped.
l
Take all possible precautions before leaving operator’s position. Disengage the electric clutch,
lower the attachment, set the parking brake, stop
the engine and remove the key.
l
Never operate snowthrower near glass enclosures, automobiles, window wells, dropoffs, etc.
without proper adjustment of snow discharge
angle.
l
Do not operate machine at high transport speeds
on slippery surfaces. Use care when backing.
-
Disengage power to snowthrower when transporting or not in use.
l
Never operate the snowthrower without good visibility or light. always be sure your feet are properly
placed on the foot rests and keep a firm hold on
the steering wheel.
Page 5
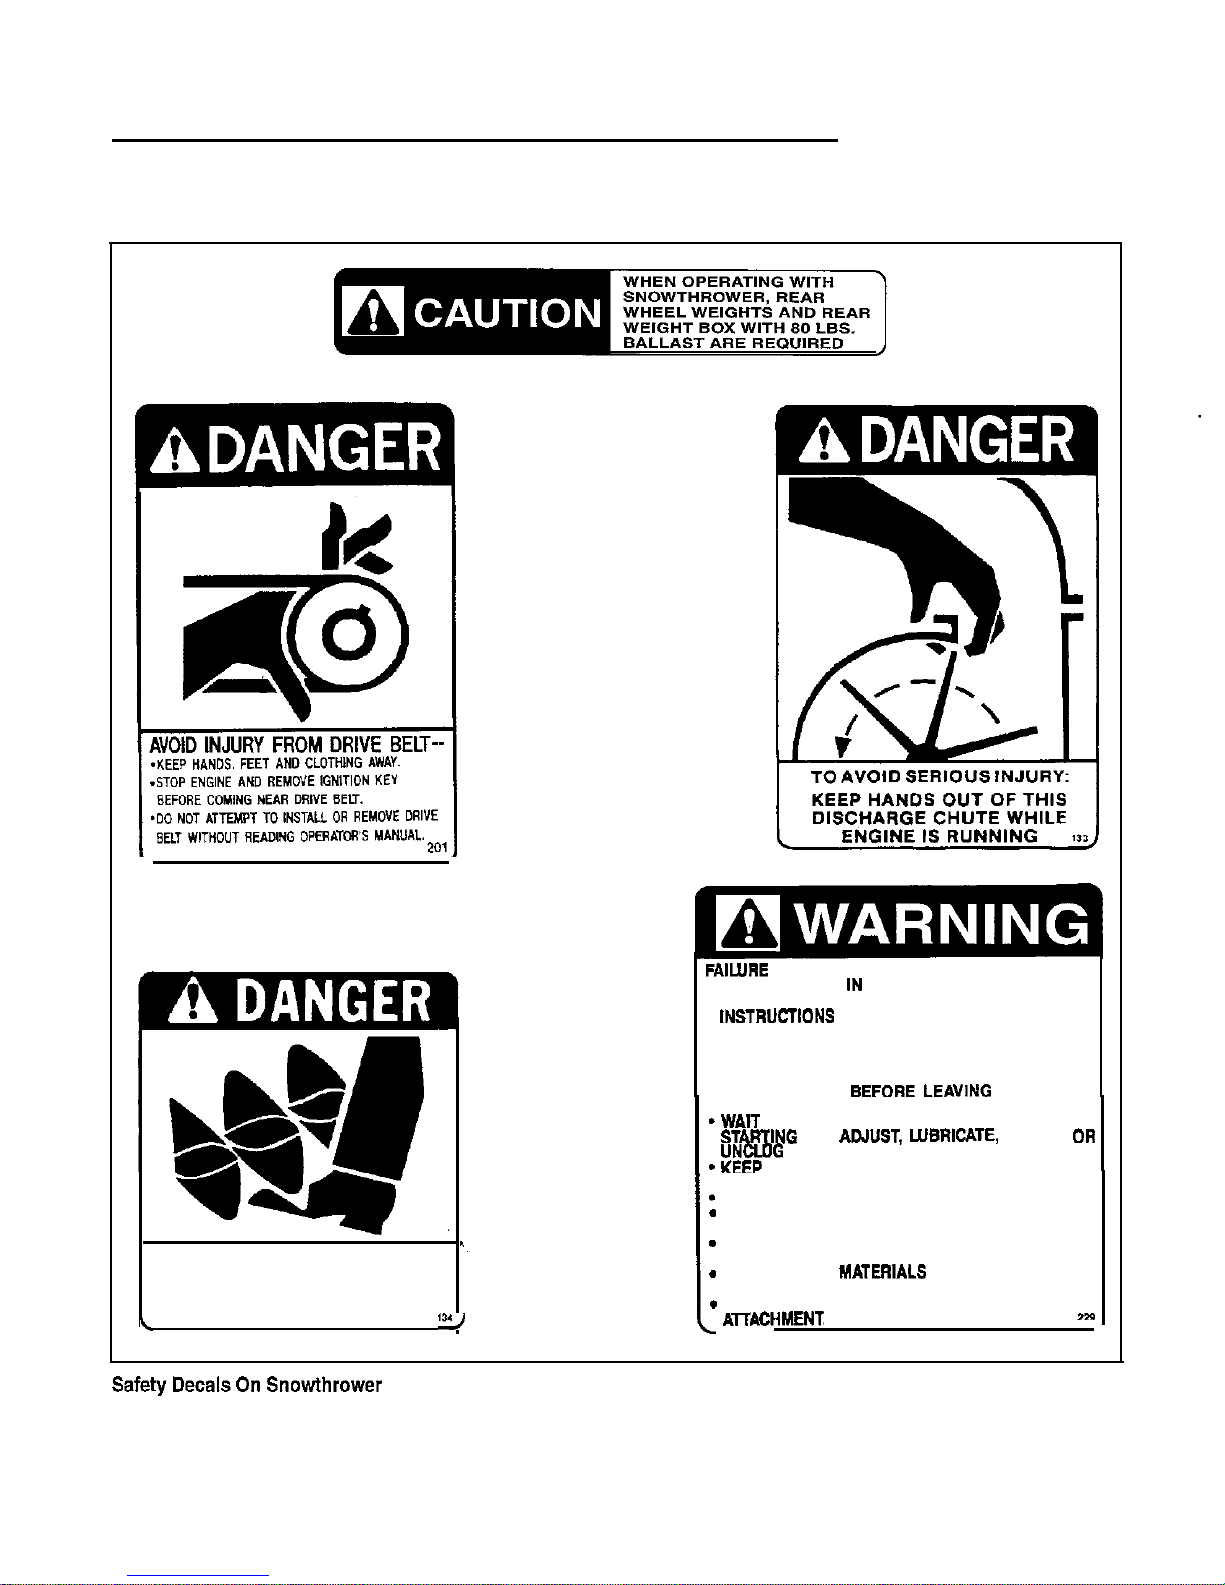
40” SNO WTHRO WER
Safety Decals
“~
AVOID INJURY FROM
ROTATING AUGER
KEEP HANDS, FEET AND
\
CLOTHING AWAY
sm.,
FA,L”RE TO FOLLOW SAFE OPERATING PROCEDU-
RES MAY RESULT IN INJURY.
. FOR SAFE OPERATION FOLLOW ALL OPERATING
,NSTR”CT,ONS ANS SAFETY PRECAUTIONS IN
OPERATOR’S MANUAL.
. EYE PROTECTION MUST SE WORN AT ALL TIMES.
. KEEP HANDS, FEET AND CLOTHING AWAY FROM
POWER DRIVEN PARTS.
. STOP ENGINE
SEFORE LEAWNG OPERATOR
.
.
.
I
.
.
.
.
POSITION.
WA,T
FOR ALL MOVEMENTS TO STOP BEFORE
STARTlNG TO ARIUST, WBRICATE, CLEAN OR
UNCLDG THE MACHINE.
KEEP THE AREA OF OPERATION CLEAR OF ALL
PERSONS AND ANIMALS.
KEEP ALL GUARDS AND SHIELDS IN PLACE.
NEVER DIRECT DISCHARGE TOWARD BY-
STANDERS, BUILDINGS, CARS ETC.
ALWAYS “SE A DUST MASK WHEN WORKING IN
DUSTY CONDITIONS.
KEEP PLASTIC
,“ATERIALS AWAY FROM INTENSE
“EAT AND OPEN FLAME.
NEVER ALLOW PASSENGERS ON THE
ATTACt-‘“7
2s
3
Page 6
40” SNOWTHROWER
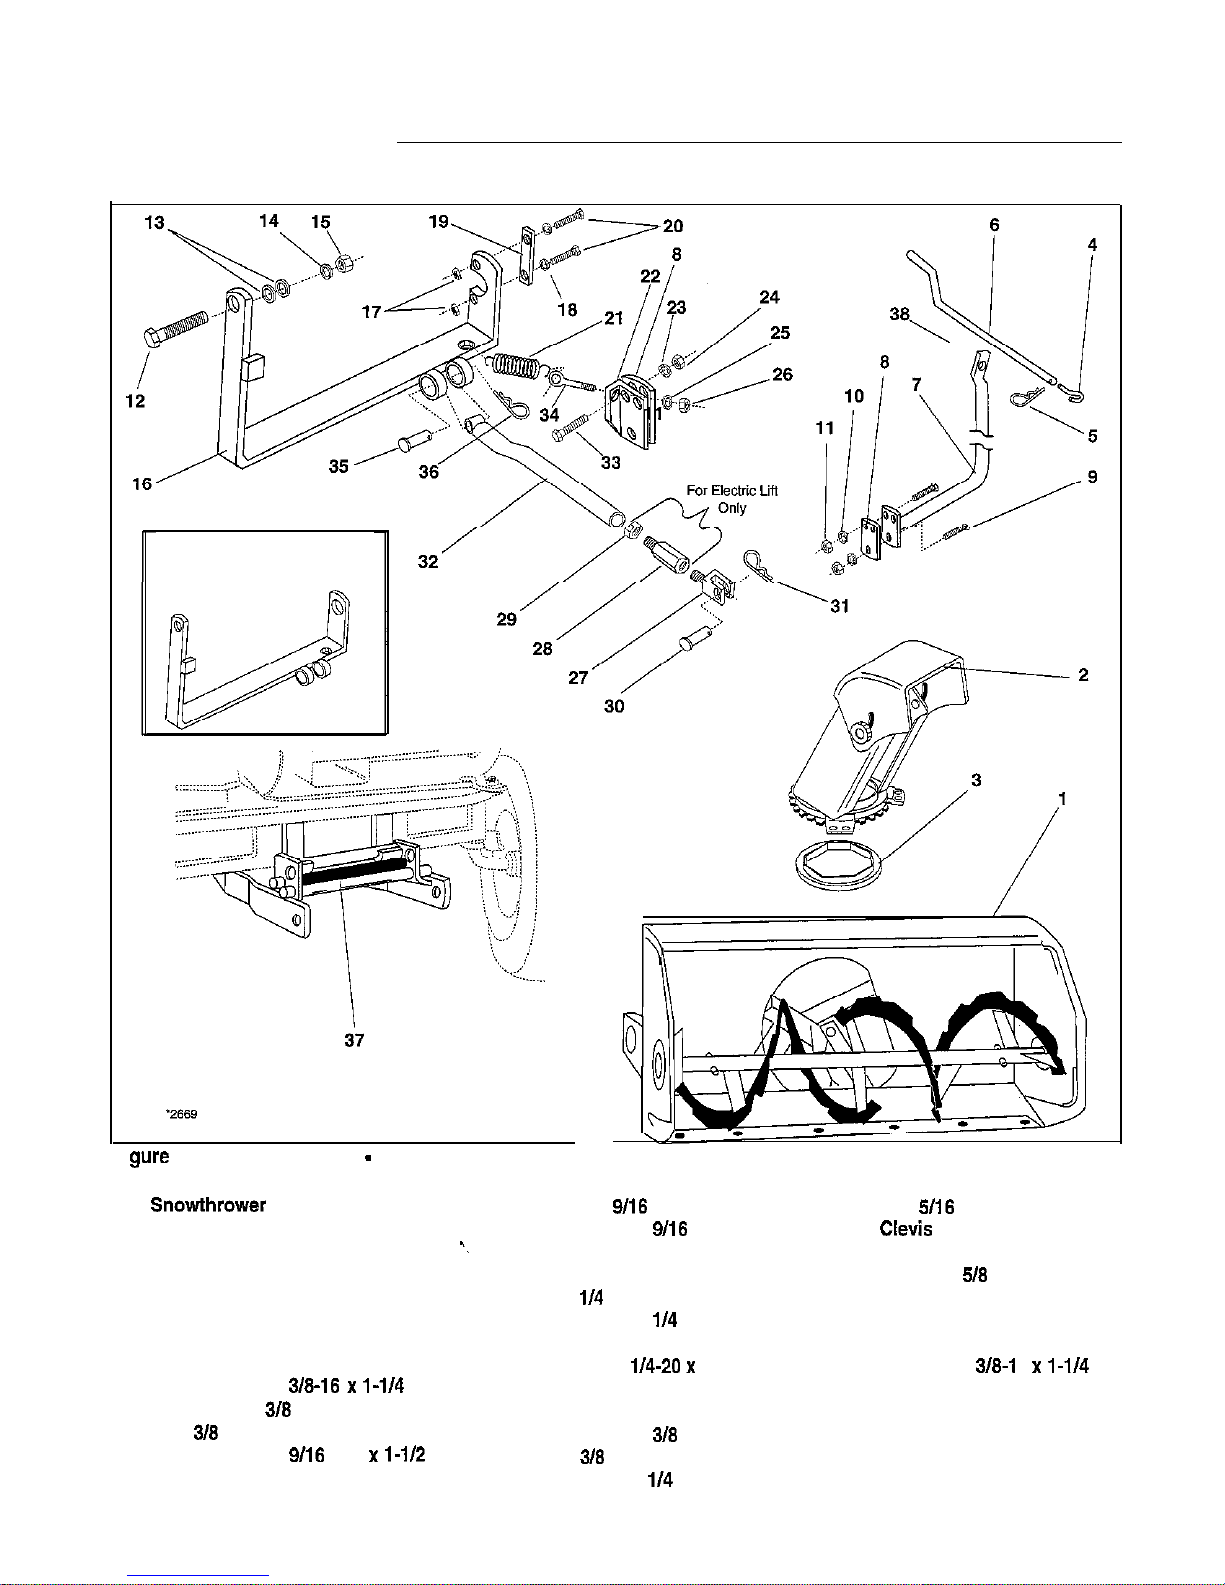
PARTS IDENTIFICATION
Later Model
One-Piece Bracket
gure 1. Snowthrower Assy. - Part No. 1692356
1.
Snowthrower Assy.
2.
Chute Assy.
3.
Anti-Friction Insert
4.
Eye Hook
5.
Hairpin Clip
6. Spout Control Rod
7.
support
8.
Brackets
9. Capscrew, Hex,
318-16 x
l-114
10.
Lockwasher,
3/8
11.
Nut,
316
12.
Capscrew, Hex, 9/16 -NC x
l-1/2
13.
Washer,
9116
14.
Lockwasher,
9118
., 15.
Nut
‘16.
Lift Bracket
17.
Nut,
114
18.
Lo&washer,
l/4
19.
Plate
20. Capscrew, l/4-20 x 1
21. Spring
22. Bracket
23. Lockwasher,
318
24. Nut, 3/8
25.
Flat washer,
114
4
26. Nut,
5116
27. Clevis
28.
Rod Extension
29.
Nut, Full, 5/8
30.
Pin
31.
Hairpin Clip
32. Lift Rod
33. Capscrew,
318-l 6 x
l-114
34.
Eye Hook
35. Pin
36. Hairpin Clip
37. spacer
38. Bushing
Page 7
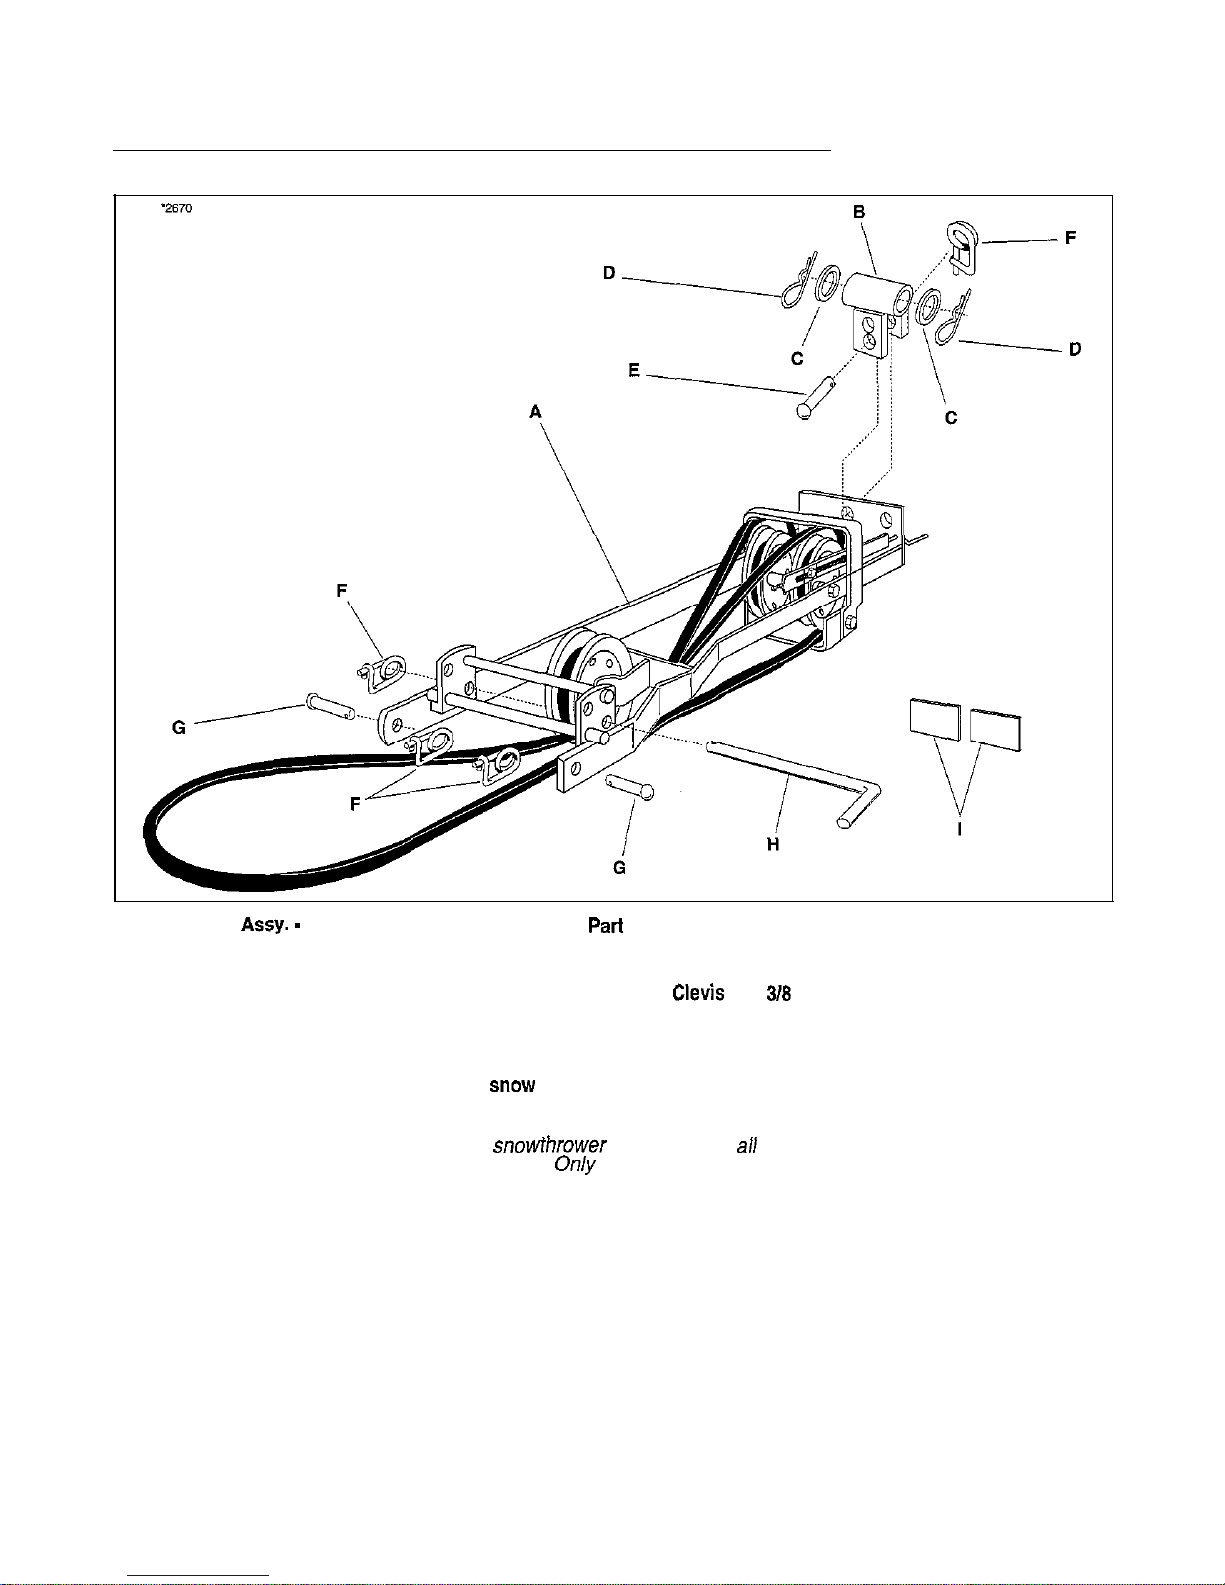
40” SNOWTHROWER
Figure 2. Hitch Assy. - Part No. 1692040 for Electric Lift; Part No. 1692041 for Manual Lift Assy
A. Hitch Assy. E. Pin
B. Rear Support Assy.
F. Spring Clip (Qty. 4)
C. Washers (Qty. 2)
G.
Clevis Pin,
3/&l
(Qty. 2)
D. Hairpin Clip (Qty. 2) H. Rod
I.
Reflectors (Qty. 2)
*Attach reflectors to rear lip of seat deck. If
sncw cab is installed, make sure reflectors are not obstructed.
NOTE: Hitch assembly is required to install
snowthrower to tractor. Not
a//
parts packaged with the hitch assy. are
used when installing this 40” snowthrower. Only parts used for installation are shown in Figure 2.
Page 8
40” SNOWTHROWER
/ I
Figure 3. Skid Shoe
A. Carriage Bolt
B. Skid Shoe
D. lockwashers
E. Nuts
C. Flatwashers F. Carriage Bolt
SNOWTHROWER ASSEMBLY
NOTE: Before attempting any of
the
assembly and
installation procedures, check to make sure you
have
a// the
kit
parts.
Parfs lists and illustrations are
shown in Figures 1 & 2. Discard parts nor used with
your specific tractor and snowblower.
Important: Torque all bolts according to torque speci-
fication table in the back of this manual, unless otherwise specified.
Skid Shoes
1.
See Figure 3. Install the skid shoes using
5/16” x
1”
carriage bolts (A), flatwashers (C), lockwash-
ers (D), and nuts (E) as shown. Adjust skid
shoes according to surface conditions.
Push Frame Assembly
1.
See Figure 4. Insert push frame assembly (A)
in snowblower assembly and attach using four
7/16” x
1 l/4” bolts
(8).
Loosely secure the two
bolts closest to collector housing with flatwashers
(C), lockwashers (D), and nuts (E) and secure other
bolts with lockwashers (D) and nuts (E).
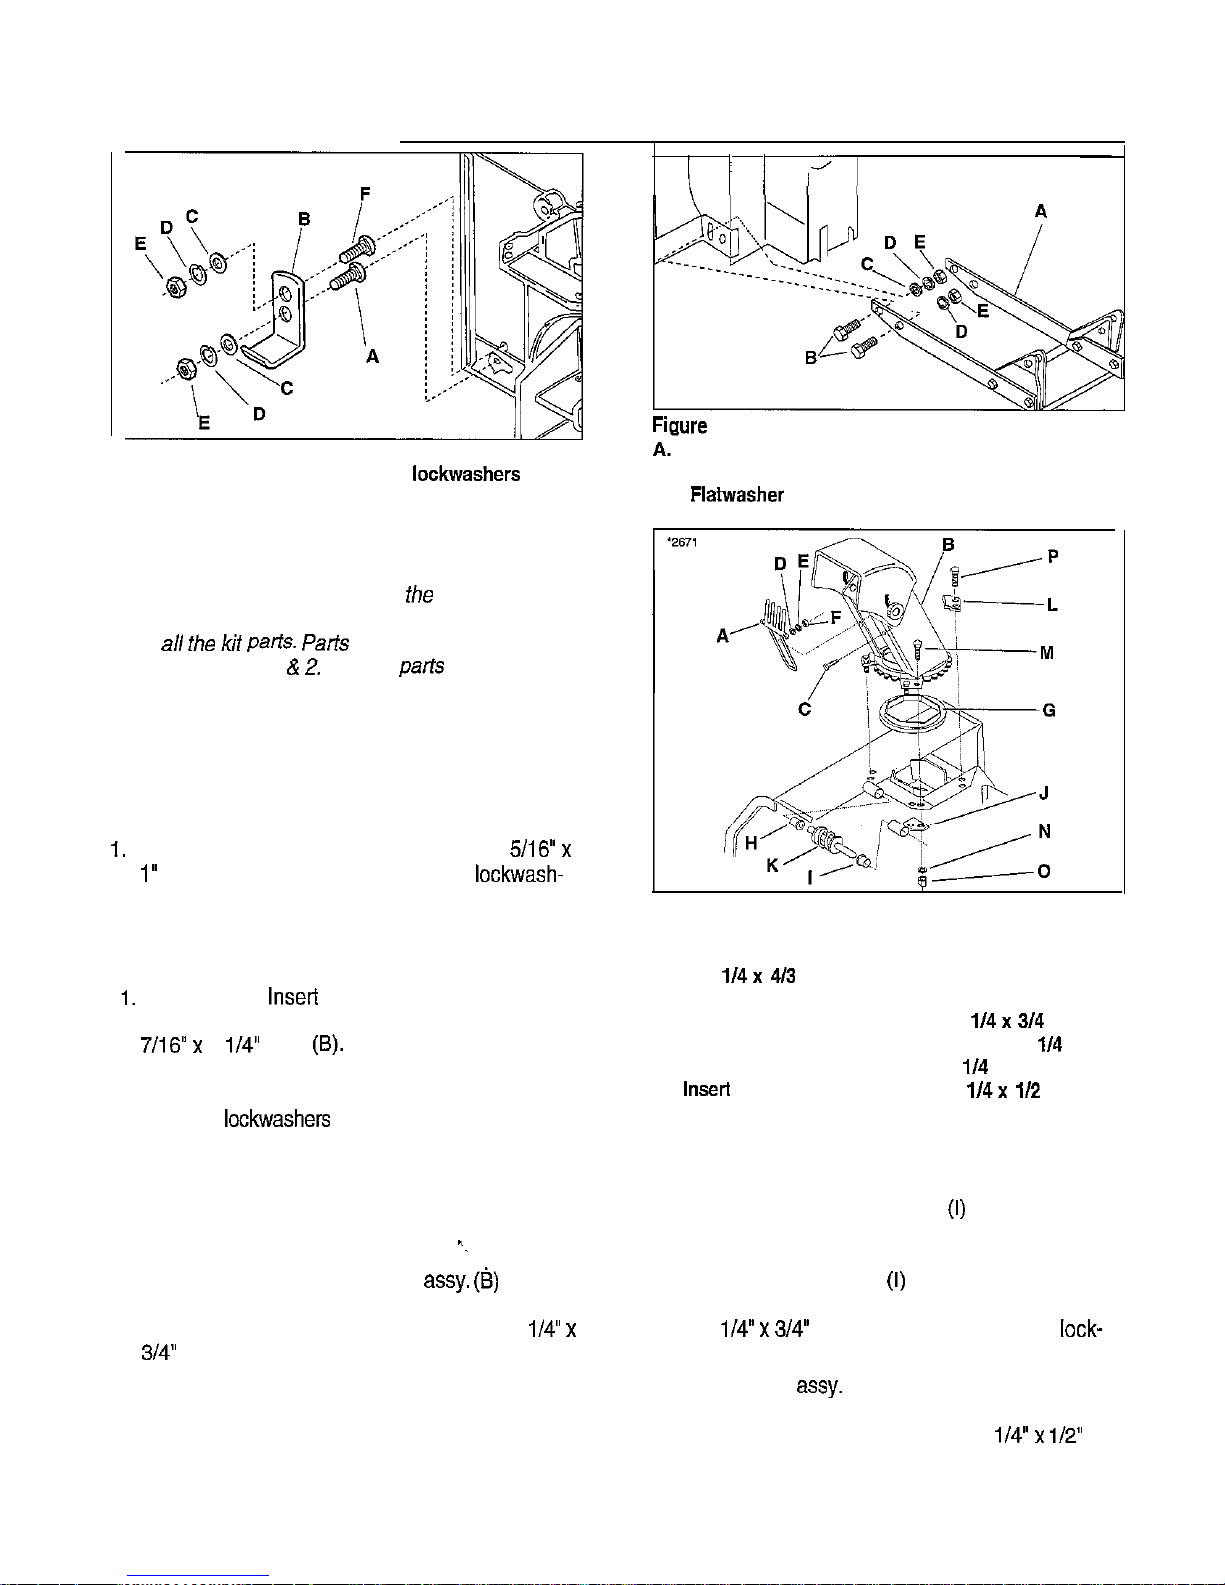
Snowthrower Chute
1. See Figure 5. The left rear bracket (J) should be
assembled as shown. If it is not, assemble it to
the snowthrower housing.
“_
2. Install hand guard (A) on chute
assy. (8)
with the
top portion inside the chute and the bottom section outside the chute base ring. Place two
i/4”
x
3/4’ bolts (C) with the head on the outside of
chute, through the chute then through the hand
guard and secure with a flatwasher, lo&washer
and nut (D, E, F,). Tighten securely.
3. Place plastic anti-friction insert (G) over chute
base, placing nipple on upper side and toward
center of impeller housing.
Figure
4. Push Frame
A.-
Push Frame Assy.
B. Bolts
C.
Flatwasher
D. Lockwasher
E. Nuts
Figure 5. Spout Assembly
A. Hand Guard
I. Plastic Bushing (long)
B. Chute
J. Left Rear Bracket
C. Bolt,
1/4x
4/3 (Qty. 4) K. Rotation Worm
D. Flatwasher L. Ret. Plates (Qty. 3)
E. Lockwasher M. Bolts,
1/4x
3/4 (Qty. 2)
F. Nut
N. Lo&washer,
114
G. Plastic Anti-Friction 0. Nut,
II4
IllSWl
P. Bolts
1/4x l/Z
(Qty. 6)
H. Plastic Bushing (short)
4. Insert shortest plastic bushing (H) in snowblower
tube weldment.
5. Insert longest plastic bushing
(I) in rear bracket
(J), grease both ends of rotation worm and place
rotation worm (K) in bushing (H). Install rotation
worm (K) with bushing (I) on the underside of
chute (base up) with one retaining plate (L) using
two
l/4” x
3/4”
bolts (M), secure bolts with
lock-
washers (N) and nuts (0).
6. Install chute
assy.
(B) over plastic insert (G)
(applying grease in between) and secure with
three retaining plates (L) using six
l/4” x
l/2’
bolts (P). Lock all bolts with lockwashers (N) and
nuts (0). Tighten securely.
6
Page 9

Installing Spout Control
1. See Figure 6. Loosely assemble spout control
rod support to left side of hitch using bracket and
hardware supplied with snowthrower.
2. See Figure 6. Install spout control rod (F) through
support and attach to spout using eye hook (G)
and clip (H).
S.Tighten bracket mounting hardware, making sure
spout control rod (F) is free to turn.
If necessary, reposition rod support (A).
HITCH ASSEMBLY
1. See Figure 7. Tilt snowthrower assembly onto
front side and remove the plastic cover (A).
2. See Figure 7. Remove the capscrews (B), nuts
(C) and bearing support cover (D) in order to
expose the belt pulley. Remove two carriage
bolts from inside of bearing flange.
NOTE: Do not remove any other hardware at this
time or misalignment of
pu//ey and other
parts
will occur.
3. See Figure 8. Install hitch assy. (A) to
snowthrower using the pins (B) and safety clips
(C) supplied. Position hitch assy. forward until it
rests on chute.
NOTE: See Figure 8. For Landlord/l 700
/2700
models, attach the the hitch to to the upper
holes on the snowthrower. Use the lower
holes
forBroadmoor/1600/2600 models.
4. Carefully roll the belt onto the pulley.
5. Install the bearing support plate,carriage bolts,
capscrews and nuts as shown in Figure 6. Install
plastic cover.
6. Install the belt on all pulleys (see Figure 9).
Figure 9. Belt Routing
A. V Pulley
D. Back-Side Idler Pulley
B. Back-Side Idler Pulley E. Back-Side Idler Pulley
C. V Idler Pulley F. PTO Pulley
I
Figure 6. Spout Control
A. Rod Support
E. Nut, 3/E-16 (Qty. 3)
B. Bracket
F. Rod
C. Capscrew, Hex,
G. Eye Hook
316
116 x1-114
(txy.
3)
H. Hairpin Clip
D. Lo&washer (Qty. 3)
40” SNOWTHROWER
Figure 7. Bearing and Belt Pulley Cover
A. Plastic Cover
C. Nut, Flange, 5/16-18
8. Capscrew,
5116-16
x
112
D. Bearing Support Plate
Fiaure 6. lnstallina Hitch Assv.
A.-Hitch Assy.
-
B. Pin
C. Hairpin Clip
Landlord I
-
17001
2700
roadmoor I
16001
2600
7
Page 10

Figure 10. Removing Mower Lift Assy.
A. Capscrew, Hex Hd.
G. Lift Arm Assy.
S/l 6-l 8 x iv8
H. Lift Tube Assy.
6. Nut,
5116-16
I. Pivot Bracket
C. Lift Support J. Washer
D. Large Hairpin Clip K. Pin (short)
E. Washer L. Pin (long)
F. Shaft Assy.
INSTALLATION
-
ELECTRIC LIFT
MODELS
Attaching Hitch To Tractor
1.
See Figure 10. Remove the large hairpin clip (D)
and washer (E) from the left side of shaft assy.
(F). Pull shaft assy. out from right side.
NOTE: Parts H , K & L are not used when installing
snowthrower hitch but should be retained to
convert tractor back to mower operation,.
2. See Figure 11. Install shaft assy. (F) through lift
arm assy. (G), one washer (I), new rear support
assy. (H) and other washer
(I) supplied in the kit.
3. See Figure 11. Secure the new rear support
assy. (H) between the two holes on the shaft
assy. (F) and the two washers
(I)using hairpin
clips (J) supplied with the snowthrower.
4. See Figure
11.
Secure left end of shaft (F) to
pivot bracket (K) using original washer(E) and
large hairpin clip (D). Rear support assy. (H)
should hang down loose.
5. Slide hitch and snowblower assy. under tractor
so back plate of hitch assy. is under rear support
assy. (H, Figure 11).
6.Tum wheels fully to the left. Lift front of
snowthrower hitch assy. and install it into the
tractor front hitch as shown in Figure 12.
40” SNOWTHROWER
Figure 11. Installing Rear Support Assy.
A. Capscrew, Hex Hd., G. Lift Arm Assy.
5116-l
8 x 7/a H. Rear Support
Assy:
8. Nut,
5116-18
I. Washers’
C. Lift Support* J. Hairpin Clip
D. Large Hairpin Clip K. Pivot Bracket
E. Washer F. Shaft Assy.
*Supplied with
Snowthrower
Figure 12. Attaching Snowthrower Hitch to
Tractor Hitch
A.Tractor Hitch Brackets c. Spacer
B. Rod, Latch D. Safety Clip
7. See Figure 12. Install the rod, latch (B),
spacer(C) and hairpin clip (D) supplied with
snowthrower.
6
Page 11

40” SNOWTHROWER
8. See Figure 13. Secure the rear backing plate of
snowthrower hitch to the rear support assy. using
the pin (A) and hairpin clip (B) supplied with the
snowthrower.
Upper Hole for Broadmoor I1 600 / 2600
Lower Hole for Landlord
I1700 I2700
9. See Figure 14. Turn belt adjuster handle (C) to
move trunnion (A) completely forward. Install belt
onto the electric clutch pulley. Turn belt adjuster
handle until trunnion is located between the
marks as shown for proper belt tension.
NOTE:
If trunnion cannot be p/aced between marks,
loosen capscrew
(0,
Figure 14) and reposi-
tion idler
pulley (E) as necessary.
Figure 13. Attaching Snowthrower Hitch to Rear
Support Assy.
A. Pin B. Safety Clip
I
Figure 14. Installing Belt
A.
Trunnion
8. Tension Spring Assy.
C. Handle
D.
Capscrew
E. Pulley
9
Page 12

40” SNOWTHROWER
installing Lift Rod
1. See Figure 15. Assemble clevis (A), rod exten-
sion
(6,
for electric model only), and nut (C) to lift
rod (D). Turn rod extension and clevis into rod
about halfway. Do not tighten jam nut at this
time.
2. See Figure 15. Install the lift rod assy. (D) to the
electric lift arm assy (E). Secure with pin (F) and
cotter pin (G) supplied with the snowthrower.
3.Turn the ignition key on. See Figure 15. Activate
the electric lift until the lift rod clevis (A) aligns
with the front hitch bracket. Secure the clevis to
the hitch bracket using the pin (H) and hairpin
clip
(I) supplied with the snowthrower.
4. Adjust snowthrower lift height by turning clevis in
or out to achieve desired lift height then tighten
nut against clevis. Average snowthrower lift
height is 6”.
NOTE: Snowthrower lift height affects the amount of
downward pressure applied to the
snowthrower. Lengthening the rod increases
18
height and decreases downwardpres-
sure while shortening the rod decreases lift
height and increases downward pressure.
Reverse Electric Lift Wiring
The electric lift control switch on dash is used to lift
or lower the mower deck and front attachments on
the tractor. Pushing the top of the switch lowers the
mower/attachments while pushing the bottom of the
switch raises the mower/attachments.
This
40”
snowthrower attachment, when attached to
the existing switch, works in the opposite manner.
For the switch to work properly with this attachment,
it is necessary to reverse the wiring at the electric lift
motor assembly as follows.
1. Locate the two wire leads (A and B, Figure 16) connected to the electric lift assy. You will find them
under the seat deck and in front of the right, rear
wheel.
2. Reverse the position of the two leads in the
wiring harness.
3.The snowthrower will now work properly with the
lift control switch.
NOTE: Change the wires leads back to their original
position when removing snowthrower so
switch operating position is correct for
mower and other attachments.
I
FRONT IiTCH BRACKET
Figure 15. Lift Rod Assembly - Electric Lift Models
A. Clevis
E. Lift Arm Assy.
6. Rod Extension
F. Pin
C. Jam Nut G. Cotter Pin
D. Lift Rod Assy.
H. Pin
I. Hairpin Clip
Figure 16. Electric Lift Motor Wires
A. Red Wire
B. Black Wire
10
Page 13

40” SNO WTHRO WER
INSTALLATION - MANUAL LIFT
MODELS
Assemble I Install Lift Lever
-
Early Models
NOTE: Use these instructions for models with a
two-piece lift lever bracket (A, Figure 18).
NO JE: When installing the snowthrower on
Broadmoor models, it
will be necessary to
install lift /ever kit, part no. 1691832. Follow
the instructions supplied with the kit.
1.
See Figure 17. Remove the hairpin (A) and
washer (B) from left side of manual lift lever assy.
CC).
2. Later style lift lever assy. is equipped with a separate mower lift tube (see note, Figure 17).
Remove the lift tube.
NOTE: Mower lift tube is not required for
snowthrower installation but should be
retained to convert tractor back to mower
operation.
3.See Figure 18. Assemble lift bracket (A) from kit
to lift lever assy. (B) using the hardware supplied
(J, G, H &
I).
4. See Figure 18. Assemble the rear support
assy.
(K) to the lift lever
assy.
(B) using the washers (L)
and hairpin clips (M) supplied.
5. Install the complete lift lever assy. to the tractor
and connect it to the left pivot bracket (D, Figure
17) using the original washer(B) and hairpin clip
(A) as shown in Figure 17. Rear support assy. (K,
Figure 18) should hang down loose.
NOTE: When installed, there should be no side-to-side
end play in lift /ever assy.
If
there is end play,
adjust pivot bracket (D, Figure 17) until no end
play exists.
NOTE: See inset Figure 18. It is necessary to remove
the notch from the lift handle bracket as shown
to
allow
the
snowthrower
to float during
Figure 17. Manual Lift Assy.
A. Hairpin Clip
C. Lift Assy.
B. Washer
D. Pivot Bracket
EMOVE
THIS
NOTCH
Figure 16. Manual Lift Brackets
A. Lift Bracket
H. Lockwasher, S/16
B. Lift Lever Assy.
I. Nut, S/16
C. Capscrew, 1/4-20x 1 J. Capscrew 114-40x 1.5
D. Lockwasher,
l/4
K. Rear Support Assy.
E. Plate L. Hairpin Clip
F. Nut,
l/4
M. Washer
G. Washer,
S/l6
11
Page 14

40” SNOWTHROWER
Assemble
/
Install Lift Lever - Later
Models
NOTE: Use these instructions for mode/s equipped
with a one-piece lift /ever bracket
(E,
Figure
19).
NOTE: When installing the snowthrower on manual
lift mode/s, it will be necessary to install lift
lever kit,
pari no. 1691832.
NOTE: See inset Figure 19. It is necessary to
remove the notch from the lift handle bracket
as shown to
allow the snowthrower to float
during
snowfhrower
operation.
Refer to Figures 19 and 20.
1.
Attach the lift bracket guide (A) to the quadrant
(B) using spacers (C), 5/16-18x i-1/4
cap-
screws, lockwashers, and nuts. Do not tighten at
this time.
2. Assemble the quadrant
(8)
and bracket (E).
a.
Depress the release button on the top of the
lift lever (D) and rotate until the lever latch
clears the quadrant.
b.
Separate the quadrant (B) and lift lever (D).
c.
Assemble the quadrant (B) and bracket (E).
d.
Insert the lift lever rod (D) through the right
side of the quadrant (B).
e.
Insert the lift lever rod (D) through the left side
of the quadrant (B) and the left side of the lift
bracket (E). See Figure 19 inset.
f.
Fully insert the lift rod (D) through the quad-
rant and bracket, and lock the lever latch in
the quadrant
(6).
g
Secure the bracket (E) to the lift lever(D)
using one 1/4-20x i-1/2” capscrew (F), two
9/16
washers (G), one
9/16
lo&washer(H),
and nut as shown in Figure 19.
3. Pry up the two rear plastic ratchet fasteners holding the footrest mat on the left and right foot rests
4. Install the pivot bracket
(I) to the underside of the
left footrest using 5/i 6-18 x
7/8”
capscrew and
nut.
5. Assemble the lift bracket (J) to the underside of
the right footrest using 5/16-i 8 x
7/8
capscrews
and nuts. Tighten securely.
6. Install the rear hitch bracket(K),
hairpin
clips (L)
and large washers (M) on the lift lever rod (A).
7. Slide the pivot rod through the pivot bracket
(I)
and install the washer and hairpin clip.
6. Mount the quadrant (B) onto the lift bracket(J).
9. Tighten all capscrews. Be sure lift lever assembly is securely clamped to the foot rest and the
lever latch is unobstructed.
NOTE: A@ust bracket
(I)
until no end play exists.
Remove the notch from the lift handle
bucket
as shown in Figure 19.
r
rIgwe
IY P
Z”.
rJ,anua, LlTl aracKers
A. Lift Bracket Guide H. Lockwasher,
9/16
B. Quadrant I. Pivot Bracket
c. Spacer J. Lift Bracket
D. Lift Lever & Rod K. Rear Hitch Bracket
E. Bracket L. Hair Pin Clips
F. Capscrew,
1/4x
l-l/Z
M. Large Washers
G. Washer,
9116
12
Page 15

snowthrower operation.
Attaching Hitch To Tractor
1. Slide hitch and snowblower assy. under tractor
so back plate of hitch assy. is under rear
suppoii
assy.
P.Tum
wheels fully the left. Lift front of snowthrower hitch assy. and install it into the tractor front
hitch as shown in Figure 21.
3. See Figure 21. Install the rod latch (B), spacer
(C) and safety clip (D) supplied with snowthrower.
4. See Figure 22. Secure the rear backing plate of
snowthrower hitch to the rear support assy.
using the pin (A) and safety clip (B) supplied with
the snowthrower.
5. Install the belt on all pulleys (see Figure 23).
6. See Figure 24. Turn belt adjuster handle (C) to
move trunnion completely forward. Install belt
onto the electric clutch pulley. Turn belt adjuster
handle until trunnion is located between the
marks as shown for the proper belt tension.
If trunnion cannot be placed between marks,
loosen
capscrew (D, Figure 24) and reposition
idler pulley (E) as necessary. The pivot bracket
40” SNOWTHROWER
Figure 21. Attaching Snowthrower Hitch To Tractor
A. Tractor Hitch Brackets C. Spacer
B. Rod, Latch
D. Safety Clip
Upper Hole for
Lower Hole for Landlord
II700 I2700
F
:igure
22. Attaching Snowthrower Hitch To Rear
Support ASSy.
A. Pin B. Safety Clip
I
,
Figure 23. Belt Routing
A. V Pulley
D. Back-Side Idler Pulley
B. Back-Side Idler Pulley E. Back-Side
idler
Pulley
C. V Idler Pulley F. PTO Pulley
13
Figure 24. Adjusting Belt Tension
A. Trunnion D.
Capscrew
B. Spring Tension Bracket
E. Idler Pulley
C. Handle F. Pivot Bracket
Page 16

40” SNOWTHROWER
(F) should be perpendicular to snowthrower
hitch.
Installing Lift Rod
1. See Figure 25. Assemble clevis (M) to lift rod (A).
Turn clevis into rod about halfway.
2. See Figure 25. Install the lift rod assy. (A) to the
lift arm assy. bracket. Secure with pin (B) and
cotter pin (C) supplied with
snowthrower.
3. See Figure 25. Attach the large spring (D) to the
bracket from the top as shown.
4. See Figure 25. Loosely mount the spring brackets (E & F) to the hitch using hardware supplied
(G, H
& I).
5. Position the manual lift fully to the rear.
6. See Figure 25. Attach the eye hook (J) to the
spring (D) and then fasten it to the bracket (E)
using the flat washer(K) and nut(L). Threads
should protrude through bracket just enough to
start the nut onto the eye hook.
7.Tighten the bracket (E & F) mounting hardware
securely.
8. Hold the eye bolt to keep it from turning and tighten nut to the end of eye bolt threads.
9. Position the manual lift lever fully forward.
lO.See Figure 25. Turn clevis (M) until it aligns with
mounting hole on hitch. Connect the clevis to the
hitch using the pin (N) and clip (0) supplied.
11
.Adjust snowthrower lift height by turning clevis in
or out to achieve desired lift height. Average
snowthrower lift height is 6”.
NOTE: Snowthrower lift height affects the amount of
downward pressure applied to the
snowthrower. Lengthening the rod increases
lift height and decreases
downwardpres-
Figure 25. Installing Lift Rod
-
Manual Lift Models
A. Lift Rod Assy. I. Nut,
316
6. Pin J.
EyeHook
C. Cotter Pin K. Lockwasher,
l/4
D. Large Spring L. Nut,
5116
E. Bracket, outer M. Clevis
F. Bracket, inner N. Pin
G. Capscrew,
316-16 x
l-114 0. Hairpin Clip
H. Lockwasher,
3/E
P. Pivot Bracket
14
Page 17

40” SNOWTHROWER
sure while shorfening the rod decreases lift
height and increases downward pressure.
REMOVING THE SNOWTHROWER
Remove the snowthrower by reversing the steps outlined in the Installation procedures. Please note the
following:
Install all pins and hairpin clips into appropriate hole
locations on hitch and snowthrower for storage.
NOTE: On mode/s equipped with electric
lift,
change the electric lift wires leads (A and
S,
Figure 26) back to their original position
when removing snowthrower so switch
oper-
To avoid personal injury, use extreme care
hitch. Place lift lever fully rearward and
loosen
eyebolt
hardware (K & L, Figure 25)
before attempting to remove spring.
. Electric Lift Motor Wires
/,:..-
sting position is correct for mower and other
attachments. See Reverse Electric Lift
Wiring on page
IO.
ADJUSTMENTS
NOTE: The following adjustments apply to the
A
WARNING
Before performing adjustments, stop the
engine and remove the key. Place tractor
and snowthrower on a level surface.
Engage the tractor parking brake. Wait for
all moving parts to stop.
Belt Adjustment
See Figure 27. Turn belt adjuster
handje
(C) until
trunnion (A) is located between the mart&shown.
NOTE: If trunnion cannot be p/aced between marks,
loosen
capscrew (0) and reposition idlerpul-
/ey (E) as necessary.
MARKS
E
P
Figure 27. Adjusting Belt Tension
A. Trunnion
D.
Capscrew
B. Spring Tension Bracket
E. Idler Pulley
C. Handle F. Pivot Bracket
15
Page 18

40” SNOWTHROWER
Scraper Adjustment
The snowthrower assembly can be tilted forward
to achieve increased scraper contact with ground.
1.
To adjust snowthrower angle, loosen the two
capscrews on each side of the snowthrower as
shown in Figure 28.
2. Tilt snowthrower forward to desired angle and
tighten the capscrews.
Skid Shoe Adjustment
When operating on a smooth, hard surface such as
concrete or asphalt, adjust the skid shoes to allow
3/16” -
i/4” clearance between scraper bar and
ground surface.
Figure 2s. Scraper Bar and Skid Shoe Adjustment
When operating on a rough surface, such as gravel,
adjust the skid shoes to allow l/2” -
5/8”
clearance
between scraper bar and ground surface.
1.
Rest each side of the scraper bar on wood blocks
about one inch high, with scraper bar level with
ground surface.
2. See Figure 26. Loosen the hardware holding
each skid show and move the skid shoes up or
down.
3. With both skid shoes adjusted properly and par-
allel to the ground surface, tighten hardware
securely.
Auger Drive Chain
Chain tension should be set so that deflection in the
middle of the chain is
112”.
1. See Figure 29. Loosen the two idler arm bolts
located on the right side of the snowthrower
housing.
2.Adjust tensioner to achieve proper chain deflec-
tion, then tighten both idler arm bolts.
Deflector
The position of the deflector determinesthe height
and distance snow will be thrown. Most snow throw-
ing can be done with the deflector all the way up.
To adjust, loosen both hand knobs (Figure 29) on
each side of the deflector, position deflector to
desired position then tighten both knobs.
Figure 29. Auger Drive Chain Adjustment
16
Page 19

Lift Rod Adjustment
40” SNOWTHROWER
NOTE: Snowthrower lift height affects the amount
of downward pressure applied to the
snowthrower. Lengthening the rod increases lift height and decreases downward pressure while shortening the rod decreases
lift
height and increases downward pressure.
Average snowthrower lift height is 6”.
ELECTRIC LIFT MODELS
1 .Adjust snowthrower lift height by turning clevis
(A, Figure 30) and/or extension rod (B) in or out
to achieve desired lift height.
2. Tighten nut(C) against clevis.
I
FRONT HiTCH BRACKET
Figure 30. Lift Rod Assembly - Electric Lift Models
A. Clevis
E. Lift Arm Assy.
B. Rod Extension F. Pin
C. Jam Nut G. Cotter Pin
D. Lift Rod Assy.
H. Pin
I. Hairpin Clip
MANUAL LIFT MODELS
1
See Figure 31. Place lift lever in fully forward posi-
tion Turn clevis (M) until it aligns with mounting
hole on hitch. Connect the clevis to the hitch
using the pin (N) and clip (0) supplied.
2.Adjust snowthrower lift height by turning clevis in
or out to achieve desired lift height. Average
snowthrower lift height is 6”.
Figure 31. Installing Lift Rod
A. Lift Rod Assy.
B. Pin
C. Cotter Pin
D. Large Spring
E. Bracket, outer
F. Bracket, inner
G. Capscrew,
318-16 x
l-114
H. Lockwasher.
318
- Manual Lift Models
I. Nut, 3/8
J.
EyeHook
K. Lockwasher,
l/4
L. Nut, 5/16
M. Clevis
N. Pin
0. Hairpin Clip
P. Pivot Bracket
17
Page 20

40” SNOWTHROWER
OPERATION
Read and understand all operating instructions in the
tractor Operator’s Manual.
Controls
See Figure 32.
A. Manual Lift Lever. Used to raise snowthrower.
Press button on top, pull lever back to raise
snowthrower or forward to lower, then release
button.
6. Electric Clutch Switch. Disengages/engages
the electric clutch to start and stop the
snowthrower drive belt.
C.Spout Control Rod. Rotate to change direction
of snow discharge.
D. Electric Lift Switch. On models equipped with
electric lift, depress top of switch to lower
snowthrower, depress bottom of switch to raise
snowthrower.
E. Deflector Knob.
Loosen both knobs to adjust
deflector.
Checks Before Starting
1.
Refer to the Maintenance section on the following
page and perform any needed care. Also, refer to
the tractor Operator’s Manual and perform any
steps listed under Normal Care.
2. Remove any objects from the work area which
might be caught in or thrown by the auger.
3. Clear the auger of any ice particles which may
cause damage to auger.
4. Adjust the skid shoes to desired height. See the
Adjustments section.
5. Make sure all hardware is present and secure.
Transporting
Disengage the electric clutch and then raise the
snowthrower. Adjust ground speed according to surface conditions. Select a low ground speed when
transporting on a slippery surface.
~,
Starting And Stopping
1.
Start the tractor engine. Set engine speed at full
throttle
2. Lower the snowthrower.
3. Engage the electric clutch.
4. Select the appropriate ground speed.
Figure 32. Snowthrower Controls
A. Manual Lifl Lever
B. Electric Clutch Switch
C. Spout Control Rod
D. Electric Lift Switch
E. Deflector Knob
5.To stop the tractor, depress the clutch/brake
pedal. To stop the snowthrower, disengage the
electric clutch.
6. Before leaving the seat, stop the engine, set the
parking brake, remove the key and wait for moving parts to stop.
Operation On Slopes
A
WARNING
Never operate on slopes greater than 30
percent (16.7O) which is a rise of three feet
(.9
m) vertically in 10 feet (3.1m) horizontally. When operating on slopes greater
than 15 percent (8.50) one wheel weight
on each rear wheel and tire chains are
recommended. Select slow ground speed
before driving onto a slope. Avoid using
brakes to control speed. Drive up and
down the face of slopes, and never across
the face. Use caution when changing
directions and DO NOT STOP OR START!
Snow Removal Suggestions
*Determine the best snow removal pattern before
beginning. Wind direction is an important factor
to consider.
*Rotate the spout and adjust chute deflector to
discharge snow downwind. Plan the pattern so
that you avoid throwing snow on cleared areas
and on yourself as your are operating.
18
Page 21

40” SNOWTHROWER
Daily Storage
A
WARNING
To prevent damaging the snowthrower,
always raise it before turning or backing
up with the tractor.
*When land contour permits, it is best to travel in
the longest direction to minimize turning.
l In very deep or heavy snow, it may be necessary
to make the first pass with snowthrower partially
raised, backing up every few feet to clear the
snow left on the surface. Also, it may be necessary to slice off less than the full width of the
auger or to reduce ground speed.
*If
the snow stops flowing freely from the spout,
use reverse gear to back away until snowthrower
clears itself.
A
WARNING
If the auger stalls or the chute plugs, DISENGAGE THE ELECTRIC CLUTCH, STOP
THE ENGINE AND REMOVE THE KEY.
SET THE PARKING BRAKE. WAIT FOR
MOVING PARTS TO STOP. Remove the
foreign object or clear the spout with
piece of wood before restarting engine.
Never place hands into auger housing or
spout to clear jammed object. Auger may
rotate when object is removed.
MAINTENANCE
A
WARNING
All maintenance, lubrication, adjustment
and storage instructions must be done
with engine off and all drives disengaged.
Lubrication
Drive Chains: Lubricate with chain saw chain lubri-
cant every 2 hours of operation and at the end of
each operation.
Chute Rotation System: Oil chute base, rotation
worm bushings and rotation hook every 8
t~ours
of
operation.
A
WARNING
To prevent an explosion or fire, never
store tractor with fuel in tank inside a
building where open flames or sparks are
present.
1.
Run the snowthrower a few minutes after blowing
snow to clear snow from blower and impeller, this
prevents freeze up of auger and impeller.
2. Allow tractor engine to cool before storing in any
enclosure.
Off-Season Storage
1. Remove the snowthrower from the tractor.
2. Use water pressure or a brush to thoroughly
clean the housing.
3. Paint or lightly coat with oil any area where paint
has been worn or chipped away.
4. Lubricate the snowthrower.
5. Store the snowthrower and hitch assy. in a dry
place.
19
Page 22

40” SNOWTHROWER
TROUBLESHOOTING
Locate the problem you’ve encountered below.
Check the possible causes one at a time in the order
listed. Correct any problems that are found and operate the snowthrower to see if you have eliminated
the problem.
l.Snowthrower
auger does not rotate.
a. Electric clutch not engaged. Engage electric
clutch. see Operation section.
b. Foreign material blocking auger. STOP engine.
Remove key. Unplug auger with piece of wood.
c.
Snowthrower drive belt slipping. See Adjustment
section and adjust drive belt.
d. Drive chain broken. Replace parts as required.
e.Auger shear bolts broken. Replace shear bolts.
See your parts list for proper replacement bolt.
P.Auger rotates, but snow not thrown far
enough.
a. Engine RPM too slow. Operate engine at full
throttle.
b. Ground speed too fast. Use slower ground
speed.
c.
Snowthrower discharge spout clogged. STOP
engine. Remove key. Unplug discharge chute.
d. Check impeller shear bolt.
3Scraper
bar does not clean all the way down
when operating on a smooth, hard surface.
a. Skid shoes not properly adjusted. Adjust skid
shoes. See Adjustment section.
4.Snowthrower picks up and throws stones on
gravel drive.
a. Skid shoes not properly adjusted. Adjust skid
shoes. See Adjustment section.
b.Too much down pressure on snowthrower. Use
the tractor lift lever to slightly increase height or
adjust the snowthrower lift rod height as
described in the Adjustments
sectioh.
5.Tractor
does not have sufficient traction.
a.Tractor is too light at rear wheels. See Required
Accessories on page 1.
A
WARNING
To avoid serious injury, perform maintenance on the tractor or snowthrower only
when the engine is stopped, parking
brake is set, and all moving parts have
stopped. Always remove the ignition key
before beginning the maintenance or troubleshooting procedures to prevent accidental starting of the engine.
G.Tractor not stable on sloping surfaces.
a. Ground speed too fast. Reduce ground speed.
b.Tractor not properly weighted. See Required
Accessories on page 1.
c.Tire pressure incorrect. Front tire pressure
should be 22-25 psi: rear tires should be
6-8
psi. Tire pressure should be equal on both sides
of tractor.
d. Slope grade is too steep. See Operation On
Slopes.
7.Auger does not stop when electric clutch is
disengaged.
a. Electric clutch brake not operating properly. See
your dealer for adjustment or repair.
20
Page 23

40” SNOWTHROWER
Figure 33. Drive ASSemDlY
A. Fan Shear Bolt
B. Auger Shear Bolt
MINOR REPAIR
Shear Bolt Replacement
1. Remove the back plastic cover (Figure 34).
2. Remove the damaged shear bolt
(A, B, Figure 33).
3. Install a new shear bolt.
4. Reinstall the back plastic cover.
5. Check snowthrower for damage and test run,
Figure 34. Back Plastic Cover
21
Page 24

40” SNOWTHROWER
Figure 35. Adjusting Belt Tension
A. Trunnion
D.
Capscrew
B. Spring Tension Bracket
E. idler Pulley
C. Handle
F. Pivot Bracket
Belt Replacement
1. Loosen the trunnion handle (C, Figure 35) and
remove the belt from the PTO pulley (F, Figure
36).
2. Loosen all the idler pulleys (B, C, D, Figure 36)
and remove the belt from the idlers.
3. Remove the back plastic cover (see Figure 37).
36. Belt Routing
A. Snowthrower V Pulley
8. Snowthrower Back-Side Idler Pulley
C. V Idler Pulley
D. Back-Side Idler Pulley
E. Back-Side Idler Pulley
F. PTO Pulley
Figure 37. Back Plastic Cover
22
Page 25

40”
SNO
WTHRO WER
Figure 33. Drive Assembly
4. See Figure 38. Remove the two carriage bolts
(B) and nuts (A) securing the bearing flange (E).
3. Remove the three flange capscrews (C, Figure
38) securing the bearing support plate (D).
6. Remove the bearing support plate (D).
7. Remove the old drive belt from the snowthrower
drive pulley.
8. Install a new belt on the snowthrower drive pulley.
10.
Route the belt as shown in Figure 36. Note that
the flat backside of the belt rides on the backside
idler pulleys and the front V side of the belt rides
in the V pulleys.
11
.Tighten
all idler pulleys.
12. See Figure 35. With the snowthrower drive belt
installed, trunnion (A) should be between marks
on spring tension bracket (B) for correct belt tension. Turn belt tension handle (C)to move
trun-
nion forward or rearward until in between marks.
9. Reinstall the flanges (E) and bearing support
plate (D). Secure using the hardware removed in
steps 4-6.
13. If trunnion cannot be placed between marks,
loosen
capscrew (D, Figure 35) and reposition
idler pulley (E) as necessary. The pivot bracket
(F) should be perpendicular to snowthrower
hitch. Retighten
capscrew (D) and repeat step 2.
23
Page 26

Hardware Identification & Torque Specifications
Common Hardware Types
8
‘d
Washer
@
Lo&washer
@3
Hex Nut
Standard Hardware Sizing
When a washer or nut is identified as
IQ”,
this is the
Nominal size, meaning the inside diameter is
II2
inch; if a
second number is present it represent the threadsperinch
When bolt or capscrew is identified as
112
- 16 x 2”, this
means the Nominal size, or body diameter is
l/2
inch; the
second number represents the
threadsperinch (16 in this
example, and the final number is the body length of the
bolt or screw (in this example 2 inches long).
The guides and ruler furnished below are designed to
help
you
select the appropriate hardware and tools.
Inside
Diameter
Screw.
II2
x 2
tl
I
Body
Diameter
Torque Specification Chart
FOR STANDARD MACHINE HARDWARE (Tolerance r 20%)
p;$are
@
0
f$j
SAE Grade 2 SAE Grade 5
SAE
Grade 8
Size Of
Mbs
in/lbs
jgm
Hardware lt/lbs
Nm.
ftilbs
Nm.
ftllbs
Nm.
8-32
79
2.1
30
3.4
41
4.6
8-36
20
2.3 31 3.5
43 4.9
1 O-24
27 3.1 43 4.9
60 6.8
1
O-32
31 3.5 49 5.5
68 7.7
l/4-20 66 7.6 8 10.9
12 16.3
l/4-28 76 8.6 10 13.6
14 19.0
5/l
6-l 8
11 15.0 17 23.1
25
34.0
5116-24
12 16.3 19 25.8
27 34.0
318-16
20 27.2 30 40.8
45 61.2
318-24
23 31.3 35 47.6
50 68.0
7116-14
30 40.8 50 68.0
70 95.2
7116-20
35 47.6 55 74.8
80 108.8
l/2-13 50 68.0 75 102.0
110 149.6
l/2-20 55 74.8 90 122.4
120 163.2
9116-12
65 88.4 110 149.6
150
204.0
g/16-18
75 102.0 120 163.2
170 231.2
518-l 1
90 122.4 150 204.0
220 299.2
518-l 8
100 136 180 244.8
240 326.4
314-l 0
160 217.6
260
353.6
386 525.0
314-16
180 244.8 300 408.0
420 571.2
718-g
140 190.4 400 544.0
600 816.0
718-14
155 210.8 440 598.4
660 897.6
1-8
220 299.2 580 788.8
900 1,244.0
l-12 240 326.4 640 870.4
1,000 1,360.O
NOTES
1.
These torque values are to be used for all hardware
excluding: locknuts, self-tapping screws, thread forming
scrsws, sheet metal screws and socket head setscrews.
2. Recommended seating torque values for locknuts:
a.
for prevailing torque locknuts - use 65% of grade 5
torques.
b.
for flange whizlock nuts and screws use 135% of
grade 5 torques.
3. Unless otherwise noted on assembly drawings, all torque
values must meet this specification.
Wrench & Fastener Size Guide
114”
Bolt or Nut 5/16” Bolt or Nut
Wrench--7Hg” Wrench-1R”
3/8” Bolt or Nut
Wrench-9116”
7/16” Bolt or Nut
112”
Bolt or Nut
Wrench
(Bolt)-5/8”
Wrench-314”
Wrench (Nut)-11118”
24
 Loading...