

Page 1
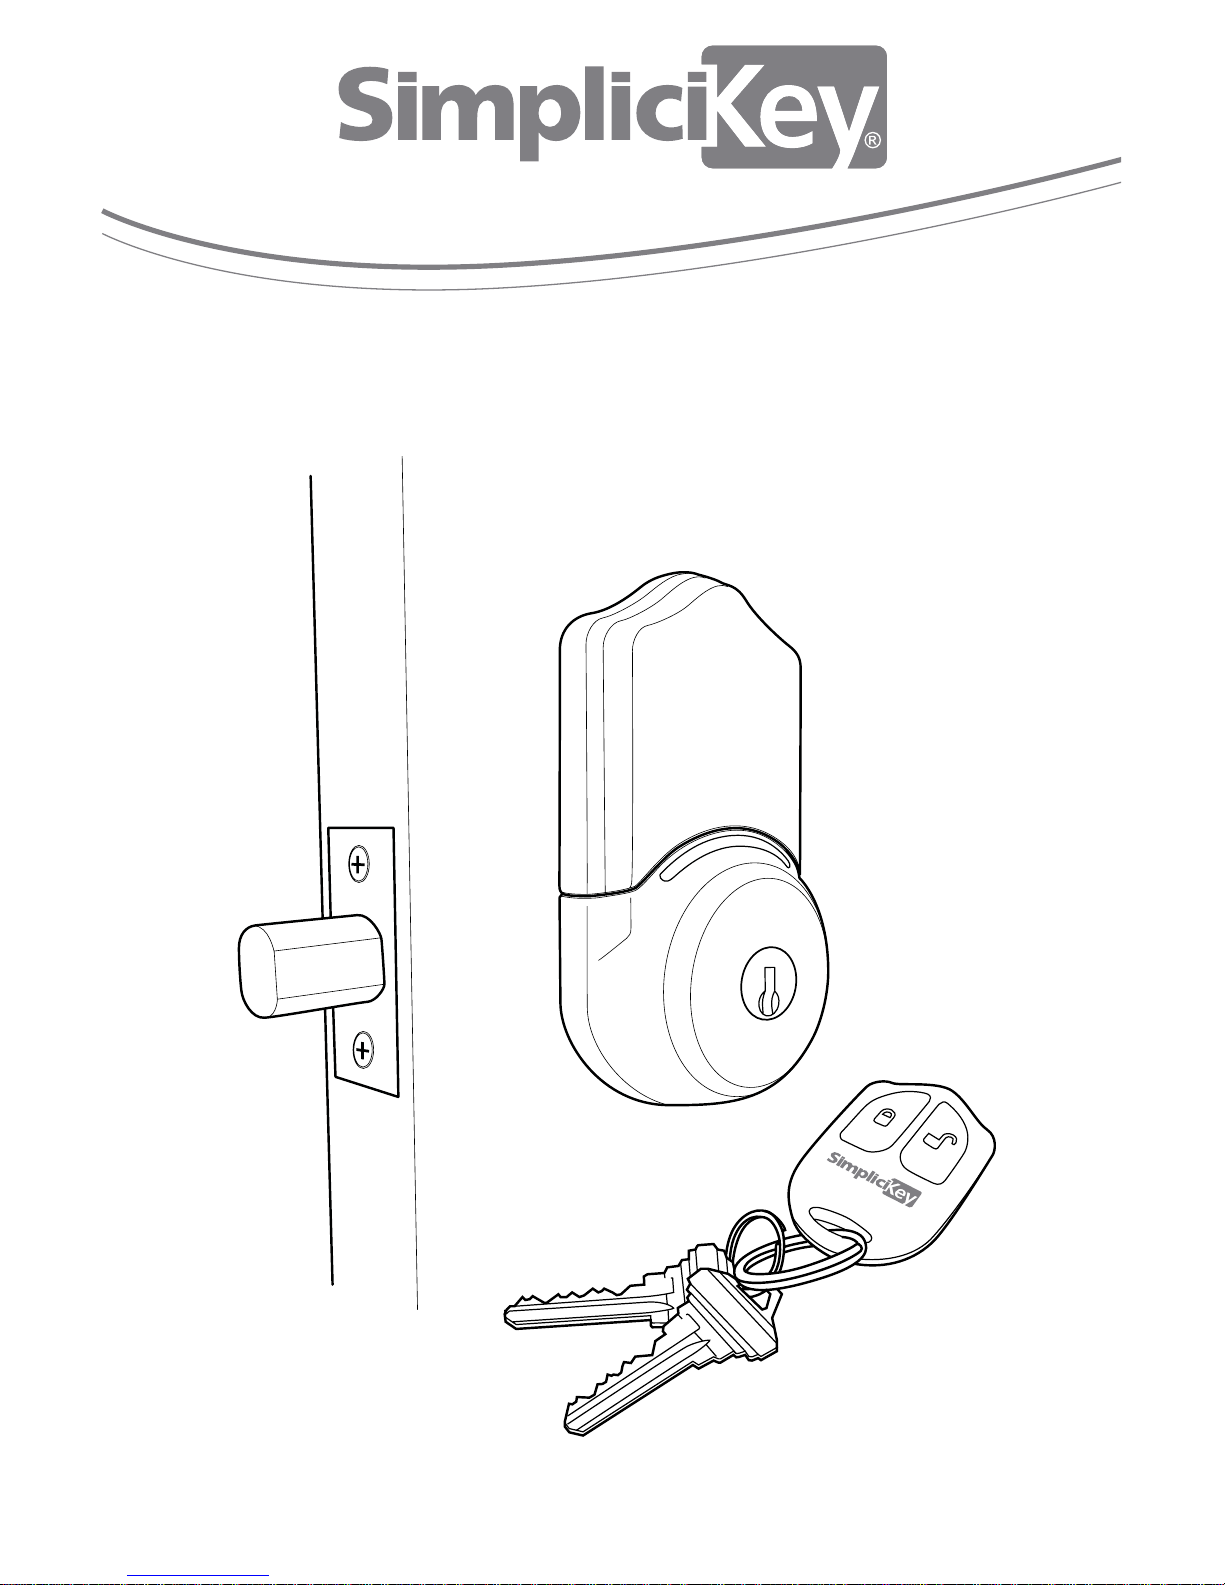
REMOTE CONTROL ELECTRONIC DEADBOLT
PROGRAMMING & OPERATIONS MANUAL
DO NOT THROW AWAY UNTIL YOU HAVE
SAFELY STORED YOUR ADMIN CODE
Page 2
Parts List
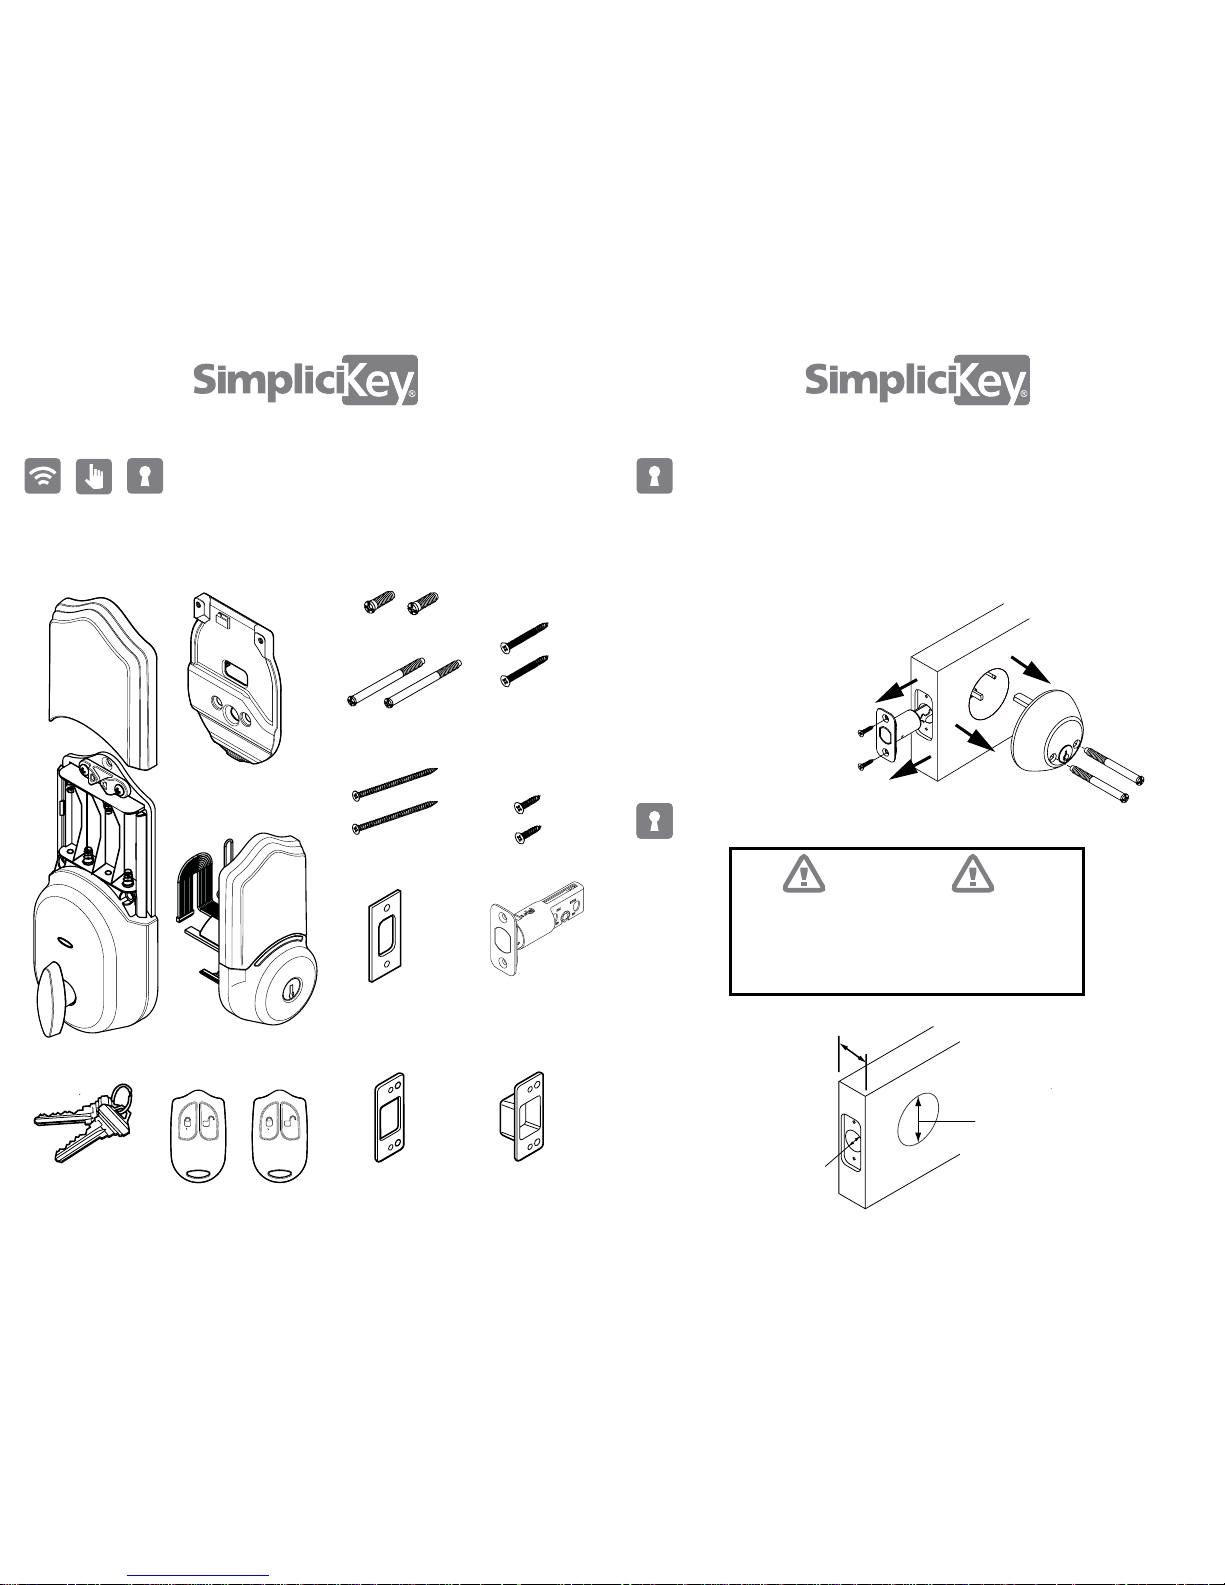
First things rst -- make sure have all of the necessary components in your
SimpliciKey package.
1 interior lock 1 interior plate
1 exterior lock
2 short bolts
2 long bolts
2 strike wood
screws
1 strike plate
1 reinforcement
plate
2 remote control
keyfobs
2 keys
1 deadbolt lock
1 strike box
2 short wood
screws
2 long
wood screws
32
LOCK INSTALLATION INSTRUCTIONS
1. Remove Existing Deadbolt
2. Check Cutout Size
Critical Point
First, remove the two interior screws
securing the lock.
Next, remove the interior and
exterior lock components.
Finally, take out the existing deadbolt
slide assembly.
Stop to measure the cutouts for the lock
components. If the main cutout is 2-1/8 inches in
diameter, and latch cutout is 1 inch, you’re ready
to go. If not, you may need to use the Advanced
Guide to help you adjust your door.
2 1/8”
1”
2” Thick ness Max
Page 3
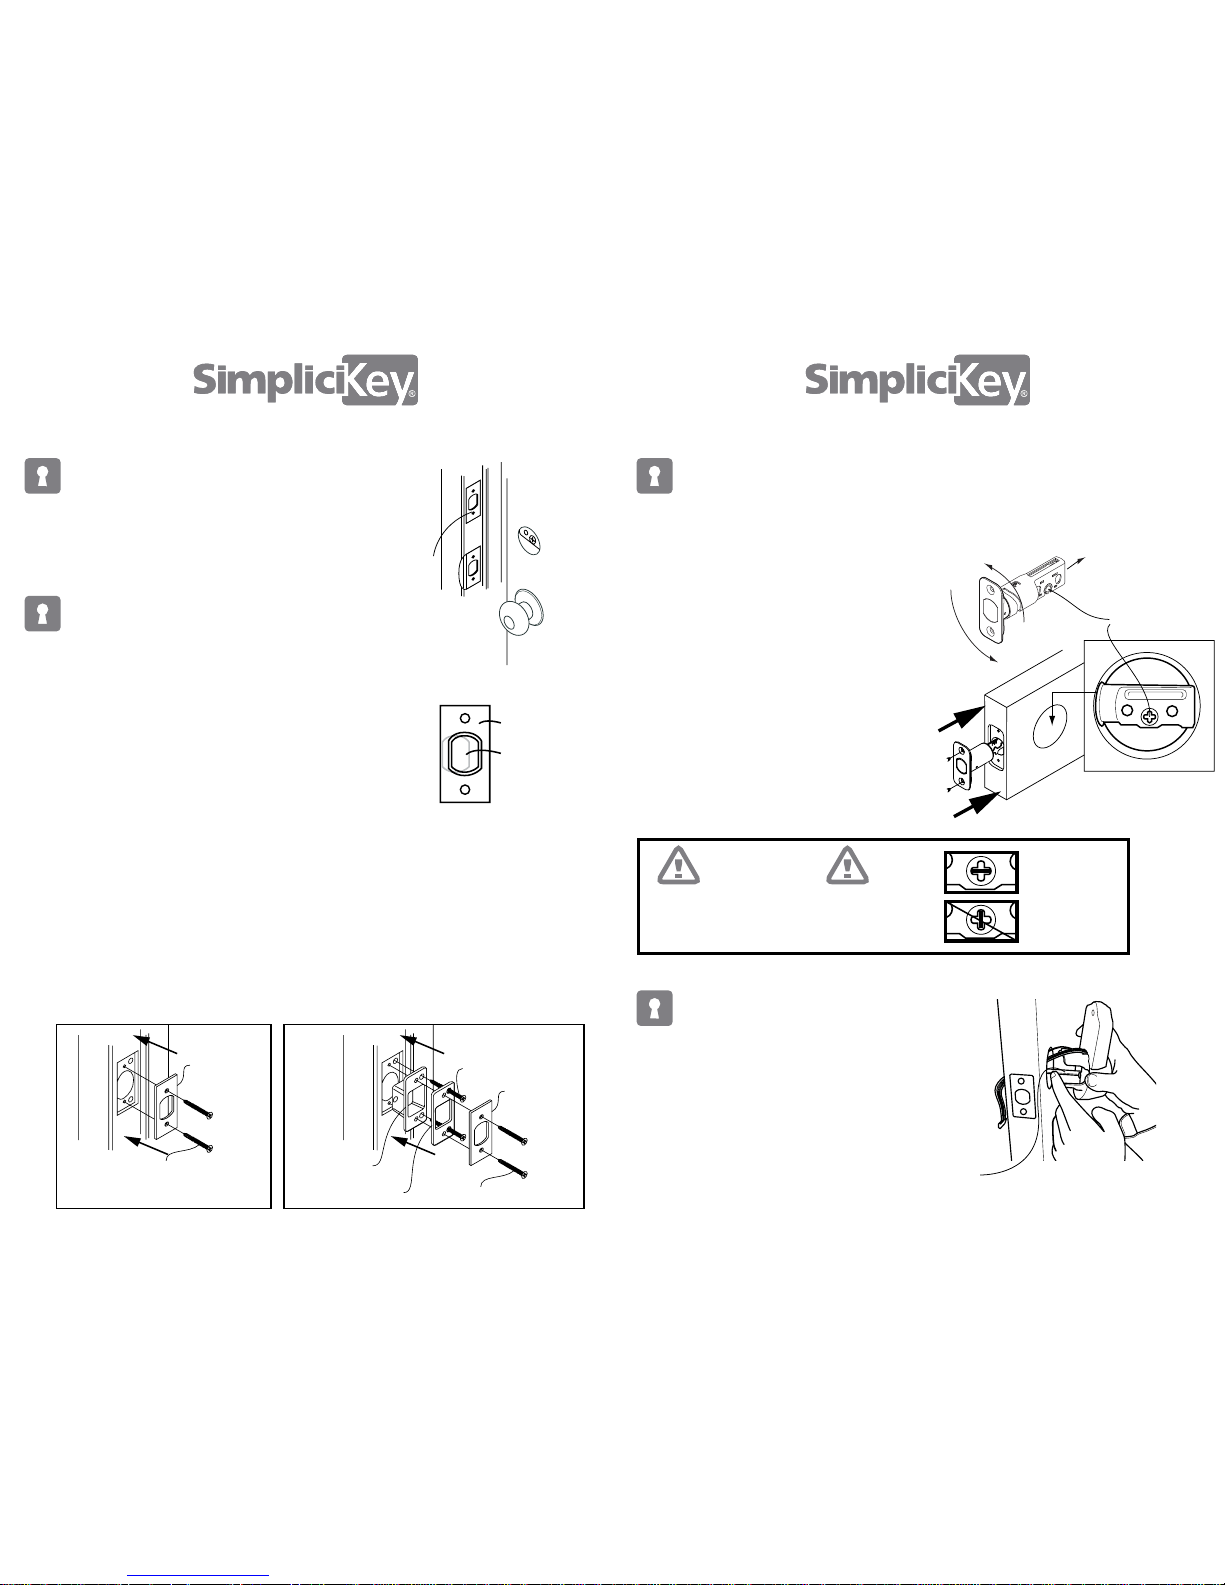
Slide the wires above the
deadbolt slide assembly.
Horizontal
at bar
Cross-hairs
Critical Point
Correct
Incorrect
Insert the at bar horizontally into the
cross-hairs of the deadbolt slide assembly.
6. Install Exterior Lock
5. Install New Deadbolt
Place deadbolt into door, check to see if
cross-hairs are centered.
To adjust the deadbolt length, twist the
deadbolt slide assembly to extend and
center in cutout.
Make sure cross-hairs are on the
lower part of the assembly.
Check that the plate sits ush
with the door.
Secure the deadbolt plate to the
door with two short wood screws
1
8
0
°
4 5
First, remove the two existing strikeplate
screws.
Remove the strike plate and any other
hardware behind the plate.
Standard Installation
Long wood screw
Strike plate
Strike plate
Strike wood screw
Strike box
Reinforcement plate
Long wood screw
Enhanced Security Installation
Strike plate
Strike plate
Deadbolt
Install the strike plate, then tighten screws.
For added security, and greater aesthetic appeal in the
door frame, install the strike box and reinforcement
plate. This may require additional door preparation to
make sure the strike plate remains ush with the door
frame.
Place strike plate into door frame to check that the
plate sits ush with the frame. Make sure the deadbolt freely slides into the strike plate when the door is
closed by rotating the thumbturn.
Conrm that the deadbolt is aligned properly with the
strike plate by pressing the lock button on a remote
control keyfob with the door closed.
If the deadbolt is not properly aligned with the strike
plate, refer to the Advanced Guide to help you adjust
the strike plate position.
3. Remove Existing Strike Plate
4. Install New Strike Plate
Page 4
6 7
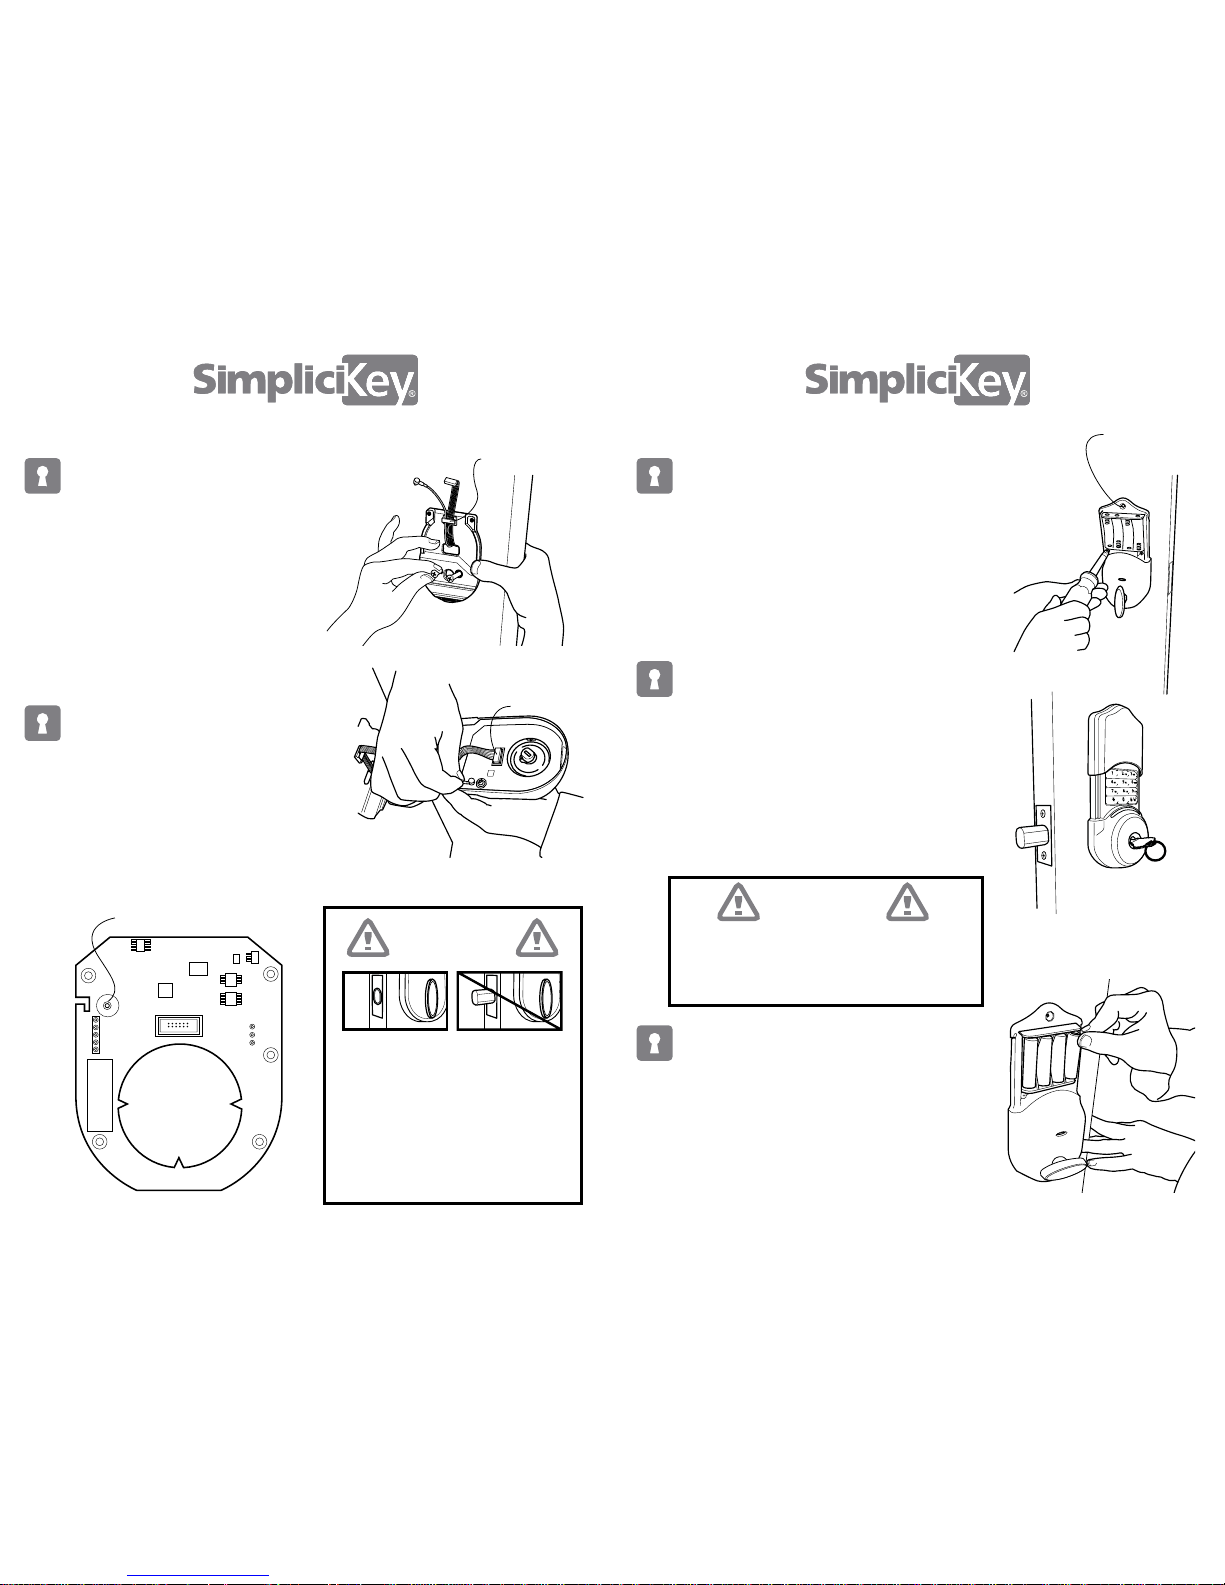
Plastic clip
Connect Antenna Here
J4
7. Install Interior Plate
8. Attach Wires
Slide wires through wire hole of
interior lock plate. Be sure to keep
wires out of the way by sliding both
wires into the plastic clip on the
interior plate.
Insert two long bolts through plate,
latch, and thread into external lock,
securing all pieces snugly.
Attach the black connector to the port
on the green circuit board with the
white rectangle around it labeled J4.
Attach other connector to the port on
the green circuit board just below the
top left screw. CONNECT ANTENNA is
labeled (see picture ).
Correct Incorrect
Critical Point
Do not skip this step or the lock
will not operate correctly.
Conrm that the deadbolt is retracted during the entire installation.
Thumbturn should be in a vertical
position with deadbolt retracted as
shown in (A).
(B) (A)
Guide excess wiring into cavity above the green
circuit board. Align thumbturn with at bar to
mount to interior plate. (Thumbturn must be in
the vertical position and deadbolt must remain
retracted). Attach interior lock to interior plate
with the two short bolts through holes under
battery case. Be careful not to pinch the wires
as you install the lock.
Optional wood
screw hole for
increased
security.
Insert key into cylinder and turn to extend
deadbolt to locked position. If the deadbolt
will not extend, or there is resistance when
turning, double-check that all previous
steps have been completed successfully.
Remove key.
If the deadbolt still will not extend, call
Technical Support at 1-800-785-6595.
Install four AA batteries in the compartment
on interior lock.
Lock will automatically locate door position to
determine right-hand / left hand orientation
Slide battery cover into place, concealing the
battery compartment.
10. Test the Manual Deadbolt
11. Install Batteries
Critical Point
Make sure the door is open and the deadbolt
is free to auto-locate. Do not press any buttons
until lock activity stops and conrmation tone
sounds.
9. Install Interior Lock
CONNECT ANTENNA
Page 5
8 9
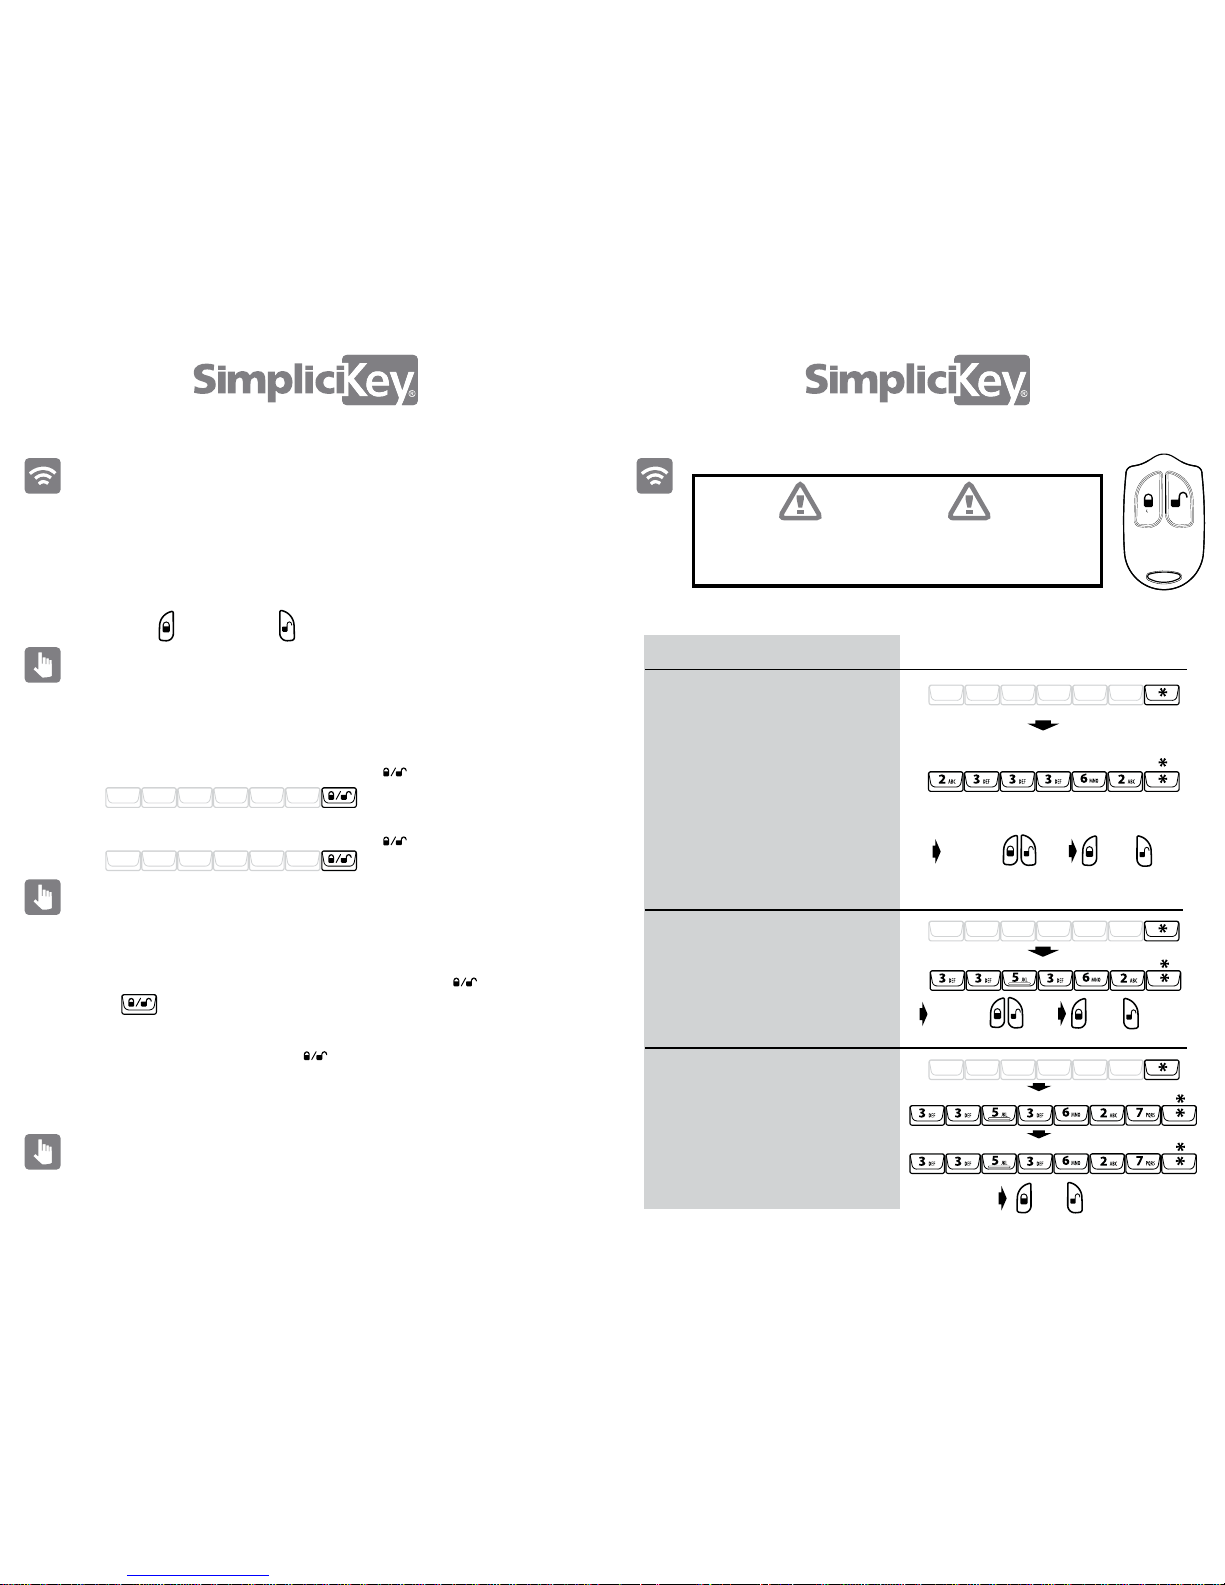
STOP! Test your keyfobs now before attempting to program.
SimpliciKey comes factory programmed with the keyfobs included
in the package. If the keyfobs are not registered with your lock, or to
add additional keyfobs (up to the maximum limit of 8), please see the
instructions on page 8.
For your security, SimpliciKey requires that you enter your own Key
Codes to activate this feature. Please see the instructions on page 9 to
add up to 16 Key Codes.
For your convenience, the keypad has options for quiet operation and
faster locking, with instructions on page 10.
SimpliciKey oers a bump-resistant 6-pin keyway should you choose
to use a metal key for entry.
When simple lock is ON, pressing the Lock/Unlock button ( ) will lock the
door.
When simple lock is OFF, the user will have to enter the Key Code
and press the Lock/Unlock button ( ) to lock the door as shown above in
Step 2.
When quiet lock is OFF, the keypad will emit softer tones during operation.
When Unlocked:
When Locked:
Enter your Key Code and Lock/ Unlock button ( ) to lock
Enter your Key Code and Lock/ Unlock button ( ) to unlock
1. Remote Control Keyfob
2. Keypad Key Codes
3. Keypad Settings
4. Manual Key Use
Press to Lock
Press to Unlock
Key Code
Key Code
DAILY USE INSTRUCTIONS
Enter Admin Code
Enter Admin Code
Enter Admin Code
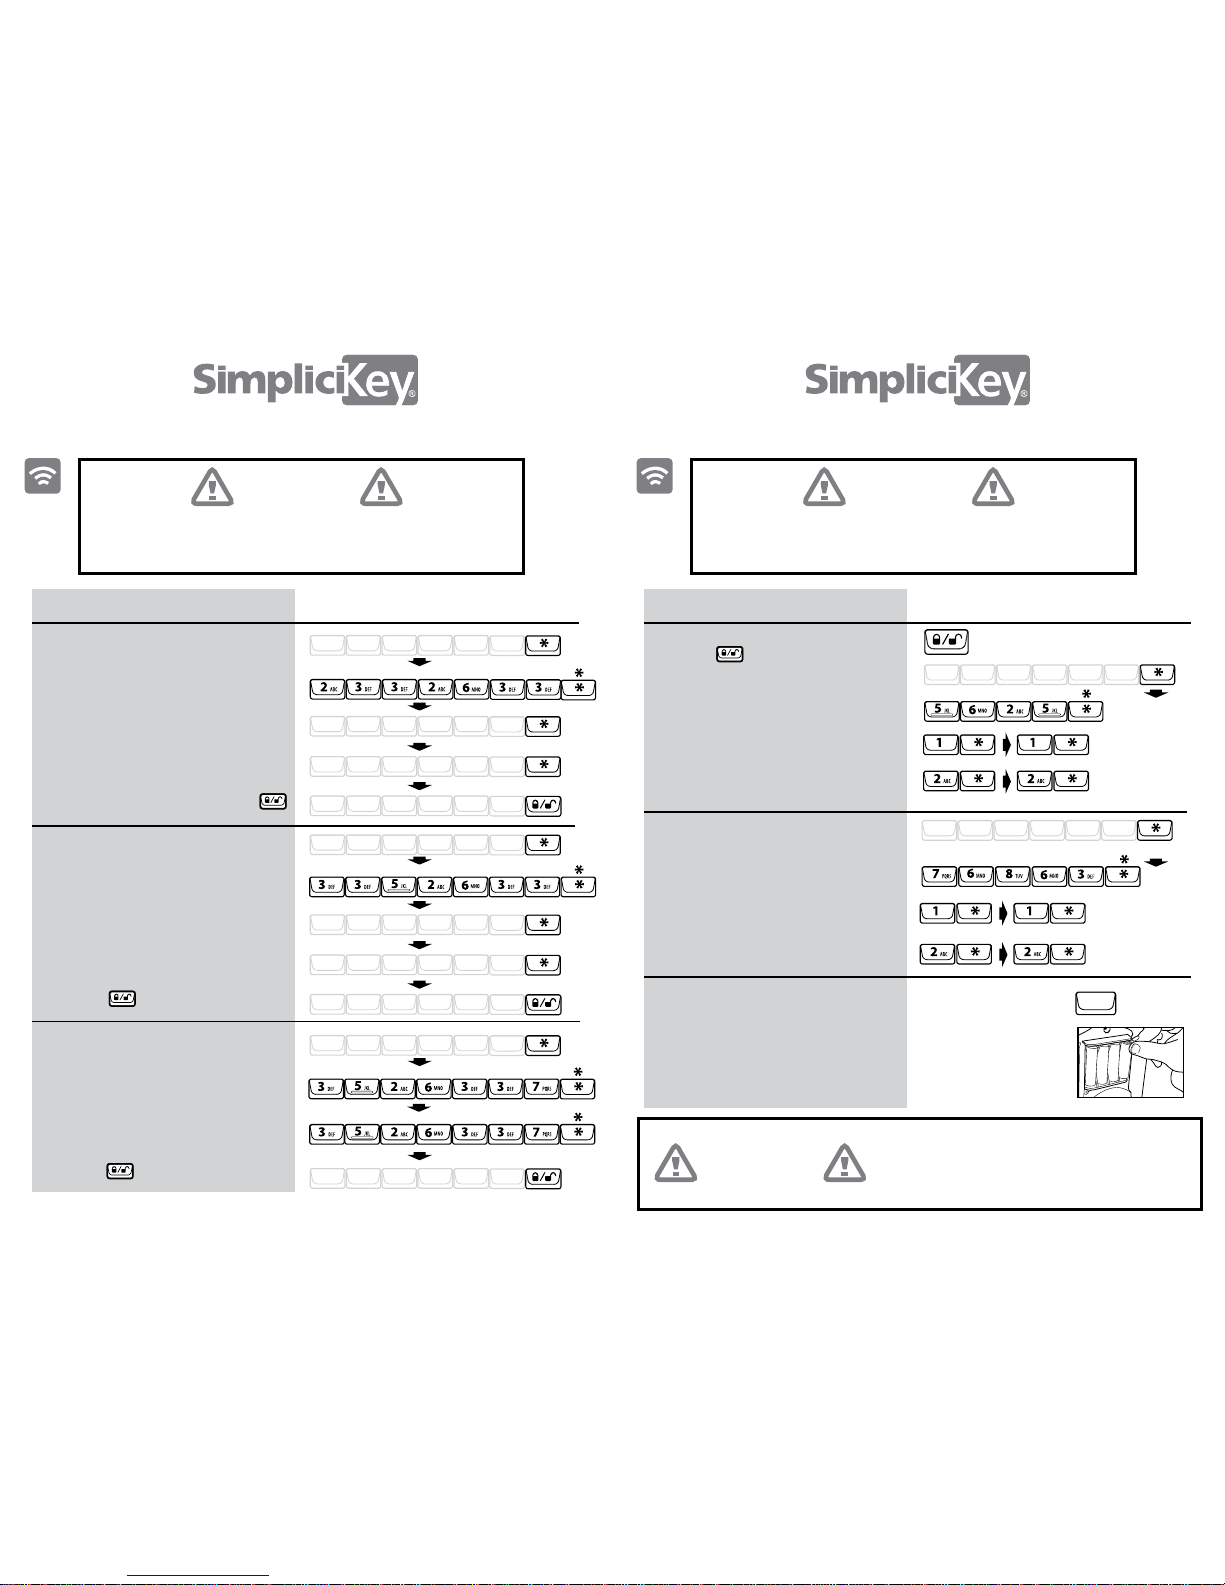
REMOTE CONTROL KEYFOB INSTRUCTIONS
Command
Add Remote Control Keyfob
Delete an Individual Remote Control
Keyfob
Delete all Remote Control Keyfobs
1. Enter your Admin Code, press *
1. Enter your Admin Code, press *
1. Enter your Admin Code, press *
2. Enter “ADD FOB”, press *
2. Enter “DEL FOB”, press *
2. Enter “DEL FOBS”, press *
3. Repeat “DEL FOBS”, press *
4. Test the keyfobs to conrm
3. Press and hold either keyfob button
4. Test the keyfob
3. The blue LED below the keypad
will begin to ash. You will have
nine seconds to register your keyfob.
4. While the blue light is ashing, press
both keyfob buttons for no more than 1
second. If you do not get the happy
tone, press both buttons immediately
again. If the tone is happy, then you’re
right, if it sounds like a chirp then start
ove r.
Press
Your administration code (Admin Code) can be found on the
back of this booklet. The Admin Code can be changed by
following instructions on page 12.
The lock may time out if too much time passes between entering
commands. If this happens, you will need to start over.
A - D - D - F - O - B -
D - E - L - F - O - B -
D - E - L - F - O - B - S -
D - E - L - F - O - B - S -
Press and
hold
Press and
hold either
Test
both
Test
both
Test
both
Critical Point
STOP! Test your keyfobs now before attempting to program.
Page 6
1110
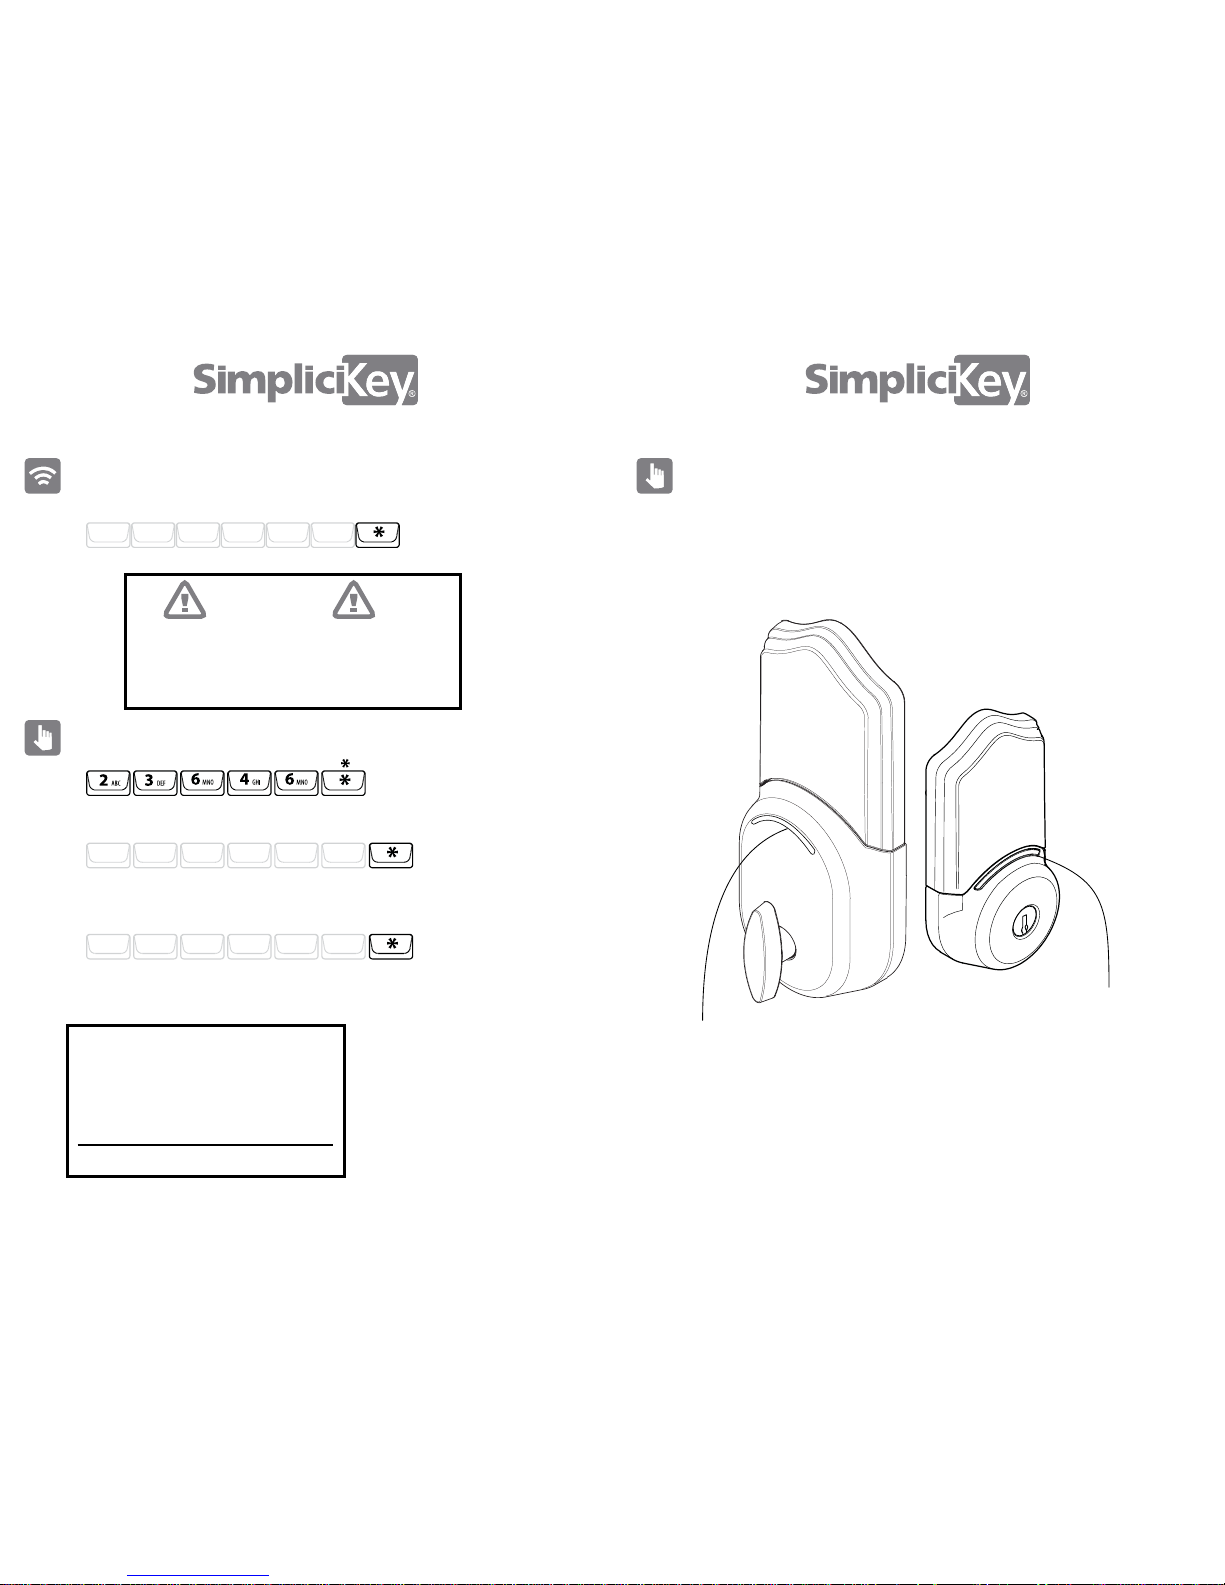
KEYPAD INSTRUCTIONS KEYPAD INSTRUCTIONS
Command Command
Add Key Code
Delete a Key Code
Delete all Key Codes
1. Enter your Admin Code, press *
1. Enter your Admin Code, press *
1. Enter your Admin Code, press *
2. Enter “ADD CODE”, press *
2. Enter “DEL CODE”, press *
2. Enter “DL CODES”, press *
3. Repeat “DL CODES”, press *
4. Test the deleted Key Codes,
press
3. Enter the Key Code to be deleted,
press *
4. Repeat the Key Code to be deleted,
press *
5. Test the deleted Key Code,
press
3. Enter the new Key Code, press *
NOTE: Code can be 4-7 digits
*If error tone, start over
4. Repeat the new Key Code, press *
5. Test the new Key Code, press
Press Press
Your administration code (Admin Code) can be found on the
back of this booklet. The Admin Code can be changed by
following instructions on page 12.
Your administration code (Admin Code) can be found on the
back of this booklet. The Admin Code can be changed by
following instructions on page 12.
A - D - D - C - O - D - E -
Enter Admin Code
Enter Admin Code
Enter Admin Code
Enter
Enter
Repeat
Repeat
Test
Test
Test
New Key Code
Key Code to Delete
New Key Code
Key Code to Delete
New Key Code
Delete Key Code
Delete Key Code
D - E - L - C - O - D - E -
- C - O - D - E -
- C - O - D - E -
Command
Simple Lock Feature
Quiet Lock Feature
Master Reset Feature
Enables to lock
without entering a Key Code
Turn on / off keypad sounds
Clears all stored codes, settings,
and remote control keyfobs.
All codes and keyfobs will need to
be reprogrammed after performing
this feature.
Remove one battery
Press and hold any
button and re-insert the
4th battery. Continue
holding button for about
5 seconds after battery
has been inserted
If the keypad ashes and a multi-tone alert
goes o at any point while in admin mode, you
have taken too long and will have to start over
from the rst step.
1. Enter your Admin Code, press *
1. Enter your Admin Code, press *
2. Enter “SOUND” and press *
To turn sound ON, press 1, *
and repeat
To turn sound OFF, press 2, *
2. Enter “LOCK” and press *
To turn simple lock ON, press 1, *
and repeat
To turn simple lock OFF, press 2, *
and repeat
Enter Admin Code
L/ UL Button (used for locking only)
To turn on simple lock
To turn o simple lock
To turn on sound
To turn o sound
L - O - C - K -
Enter Admin Code
S - O - U - N - D -
Critical Point
Critical Point Critical Point
S -
-
D - L
SD - L
Page 7
12 13
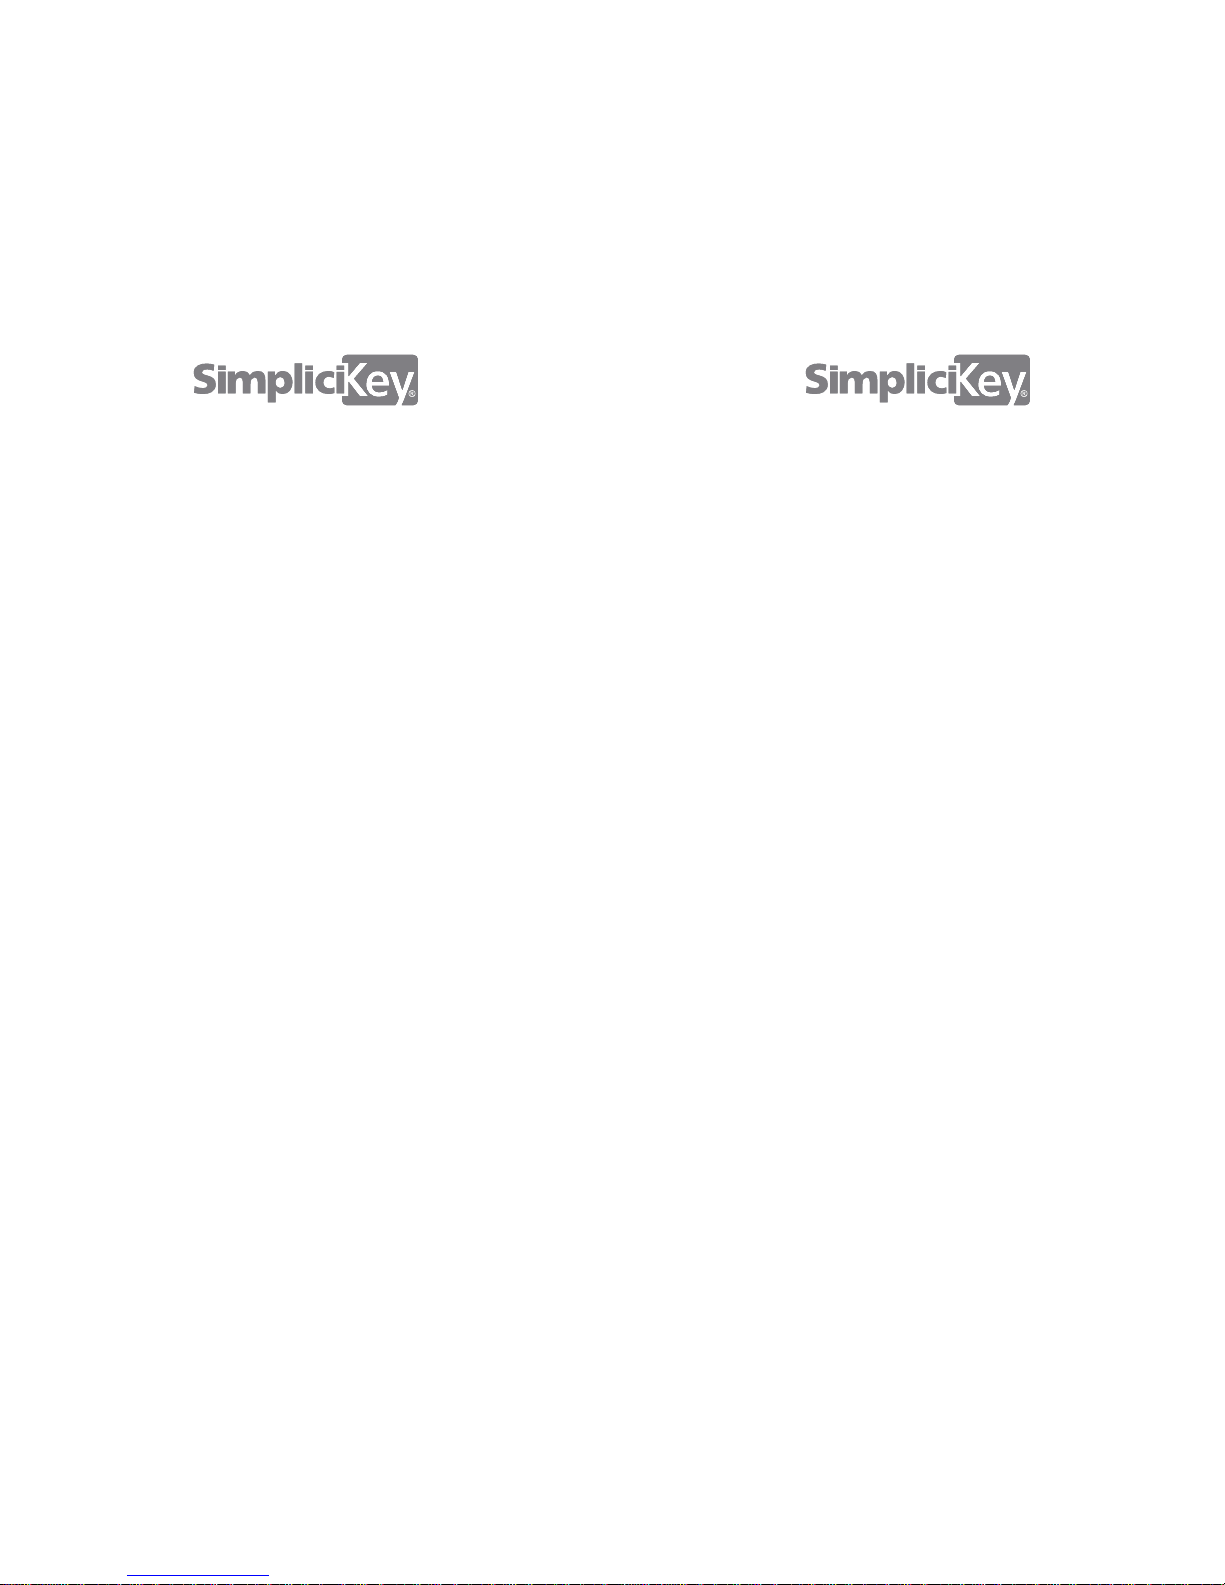
CHANGING YOUR USER ADMIN CODE
New Admin Code
New Admin Code
New Admin Code
Enter your Default Admin Code (see below) or the existing User Admin
Code and press the * key to begin Admin mode.
Next, enter ADMIN (23646) on the keypad and press the * key.
Next, enter a new 4–6 digit Admin Code and then press the * key.
Finally, repeat your entry of your new 4–6 digit Admin Code and then
press the * key.
You will then receive the nal conrmation tone and the keypad will ash
twice to let you know that the User Admin Code has been changed.
Default Admin Code
Critical Point
If the keypad ashes and a multi-tone alert
goes o at any point in admin mode, you have
taken too long and will have to start over from
the rst step.
We recommend that you write down
your new Admin Code here and keep
this manual in a safe place.
New Admin Code
A - D - M - I - N -
WARNING: SimpliciKey submits that no lock,
by itself, can provide complete security. As
with other mechanical and electronic
locking devices, the security of this lock has
the potential to be compromised. We remind
all our customers to exercise good safety
procedures as part of your home security
plan. SimpliciKey locks are manufactured to
ANSI Grade 2 specications. For added levels
of security, consult a qualied locksmith or
security expert.
When the 4 (AA) batteries get low, SimpliciKey will emit an alert tone and the low
battery indicator LED and exterior LED will ash for approximately 15 seconds.
Please be sure to replace your batteries at this time in order to ensure proper
operation of SimpliciKey.
LOW BATTERY INDICATOR
Low Battery Indicator LED
Exterior LED
DO NOT THROW AWAY UNTIL YOU HAVE SAFELY STORED YOUR ADMIN CODE
Page 8
14
INSTRUCTIONS FOR USE:
Always purchase the correct size and grade of battery
most suitable for the intended use.
Clean the battery contacts and also those of the device
prior to battery installation.
Ensure the batteries are installed correctly with regard
to polarity (+ and - ).
Remove batteries from equipment which is not to be
used for an extended period of time.
Remove used batteries promptly.
INSTRUCCIONES DE USO:
Compre siempre el tamaño y grado correcto de la batería
más adecuado para el uso previsto.
Limpie los contactos de la batería y también los del dispositivo
antes de la instalación de la batería.
Asegúrese que las baterías están instaladas correctamente
en relación con la polaridad (+ y -).
Retire las pilas del equipo que no va a ser utilizado durante
un período prolongado de tiempo.
Retire las pilas usadas.
15
Changes or modications not expressly approved by
SimpliciKey could void the user’s authority to operate the
equipment.
This device complies with Industry Canada licence-exempt RSS
standard(s). Operation is subject to the following two conditions:
(1)this device may not cause interference, and (2) this device
must accept any interference, including interference that may
cause undesired operation of the device.
Le présent appareil est conforme aux CNR d’Industrie Canada
applicables aux appareils radio exempts de licence. L’exploitation
est autorisée aux deux conditions suivantes : (1) l’appareil ne doit
pas produire de brouillage, et (2) l’utilisateur de l’appareil doit
accepter tout brouillage radioélectrique subi, même si le
brouillage est susceptible d’en compromettre le
fonctionnement.
Page 9
16
Note: This equipment has been tested and found to comply
with the limits for a Class B digital device, pursuant to part 15
of the FCC Rules. These limits are designed to provide
reasonable protection against harmful interference in a
residential installation. This equipment generates, uses and can
radiate radio frequency energy and, if not installed and used in
accordance with the instructions, may cause harmful
interference to radio communications. However, there is no
guarantee that interference will not occur in a particular
installation. If this equipment does cause harmful interference
to radio or television reception, which can be determined by
turning the equipment o and on, the user is encouraged to
try to correct the interference by one or more of the following
measures:
- Reorient or relocate the receiving antenna.
- Increase the separation between the equipment and receiver.
- Connect the equipment into an outlet on a circuit dierent
from that to which the receiver is connected.
- Consult the dealer or an experienced radio/TV technician for
help.
17
Notes:
Page 10
18
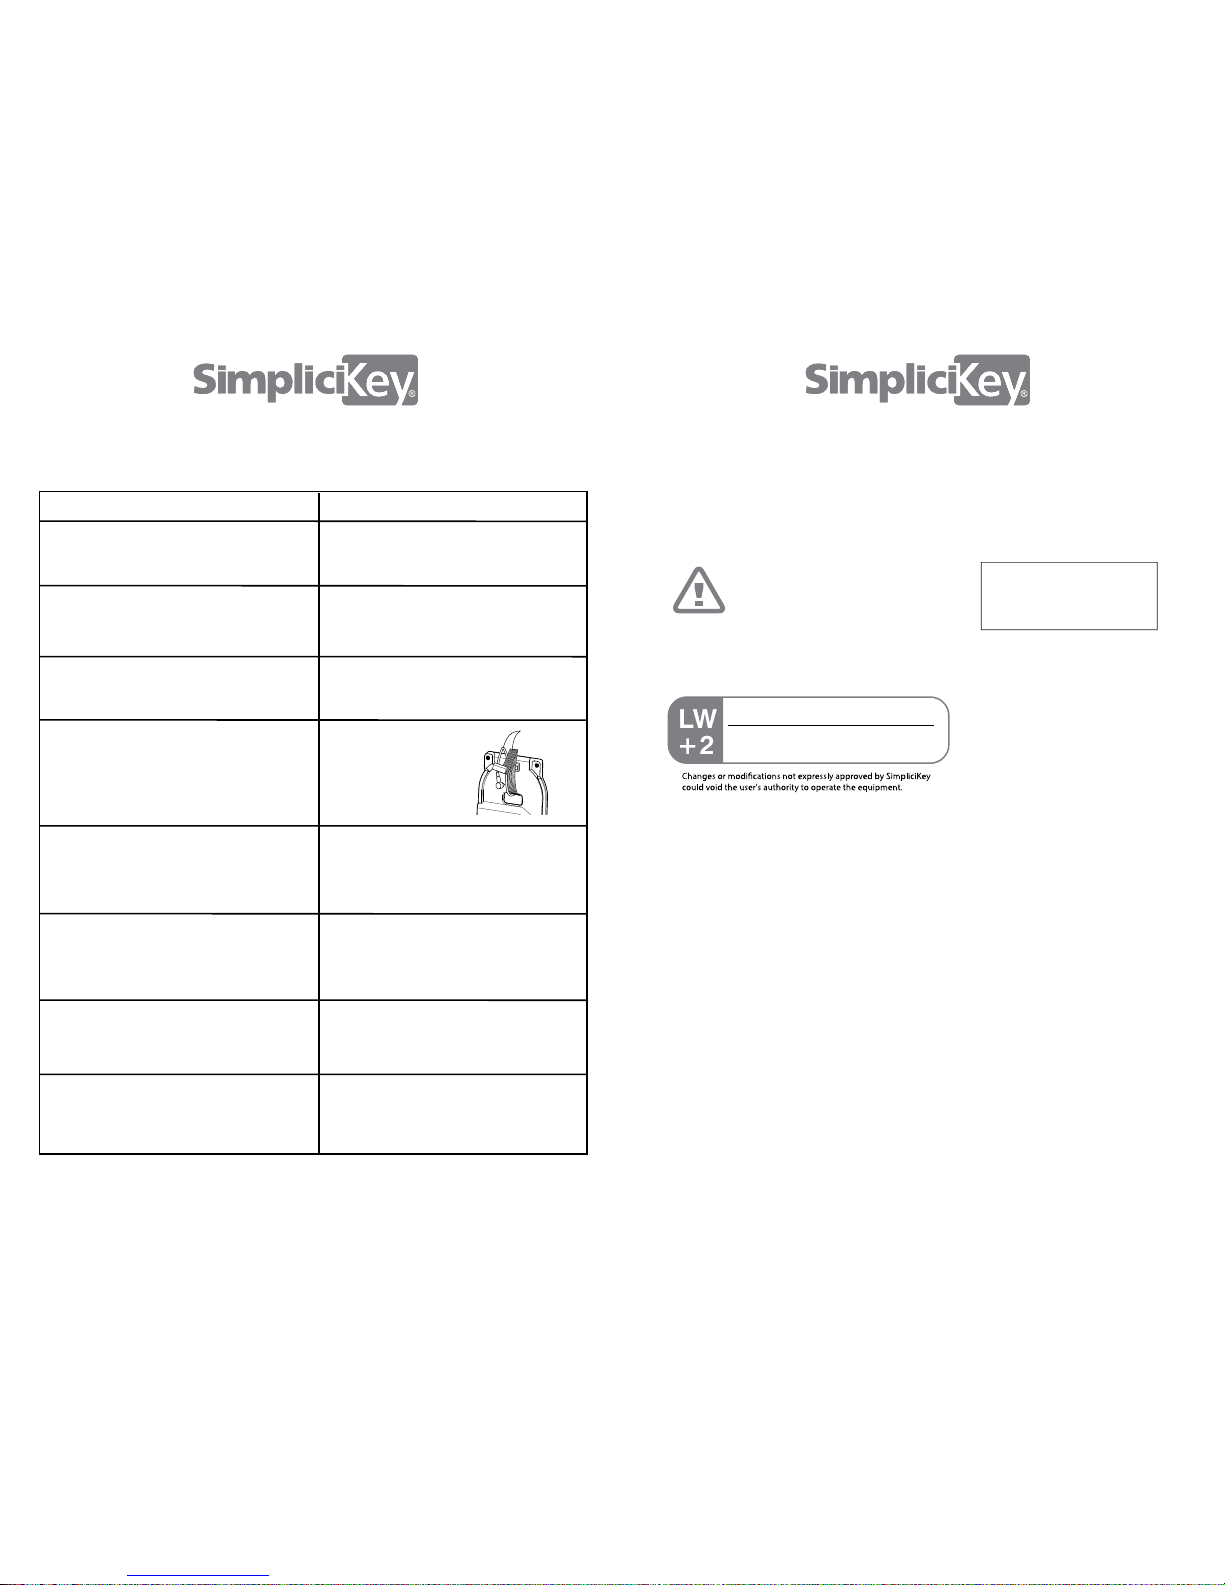
Troubleshooting Tips:
Question Solution
Why are the keyfob buttons
reversed? (lock button unlocks,
unlock button locks.)
Check to make sure the at bar is horizontal through the cross-hairs during
installation. (page 5)
Check to make sure the at bar is
horizontal through the cross-hairs
during installation. (page 5)
Check to make sure the batteries
are charged and installed
properly.
Check to make sure
the wires are inside
the clip and not
pinched during
installation. (page 6)
Why doesn’t the keypad respond
when I press the buttons?
Why doesn’t my pre-programmed
keyfob get a response from the
lock?
Why doesn’t the latch fully extend
when I rotate the thumbturn?
Why doesn’t the keypad respond
when I press the buttons?
Check to make sure both wires are
connected. (page 5)
Check that the batteries are installed
correctly.(page 6)
Check to make sure both wires are
connected. (page 5)
Check that the batteries are installed
correctly.(page 6)
Check that the deadbolt is retracted and
the thumbturn is vertical during
installation. (page 5)
Manually check the deadbolt to make
sure it is aligned with the strike plate.
(pages 4, 6)
Why doesn’t my pre-programmed
keyfob get a response from the
lock?
Why does the auto-locate feature
keep giving me an error tone
during installation?
Why does the lock give an error
tone when the door is closed and
lock button is pressed?
19
www.SimpliciKey.com
1 (800) 785-6595
For additional tips and troubleshooting, please visit
Keep this code safe
Mantén este código
en un lugar seguro
Place Label Here
Coloca la Etiqueta Aquí
Default Admin Code/Código Predeterminado de Administrador
© SimpliciKey 2013
Lifetime limited finish and mechanical warranty
2-year electronic warranty
Garantía limitada de por vida para el acabado y el
sistema mecánico
Garantía de 2 años para el sistema electrónico
This device complies with Part 15 of the FCC Rules.
Operation is subject to the following two conditions:
(1) this device may not cause harmful interference
(2) this device must accept any interference received,
including interference that may cause undesired
operations
DO NOT THROW AWAY UNTIL YOU HAVE
SAFELY STORED YOUR ADMIN CODE
Revision 3-2
 Loading...