

Page 1
Resetting the Code/Combination
Simplex 5000
Note: There is no way to determine a forgotten, unknown or lost combina-
tion code from the front or outside of the lock. However, it can be reset and
recovered or reset and changed to a new code by following the steps in this
section.
5000 Series FAQ
Resetting the Code/Combination From a Lost Code
Warning: Since this procedure is of a technical nature, only technically
trained personnel in the lock and hardware eld should undertake this
operation. For further assistance, call the Kaba Access Control technical
support line at 800-849-TECH (8324) or 336-725-1331 between 8AM and
5PM Eastern Standard Time, Monday through Friday (except holidays).
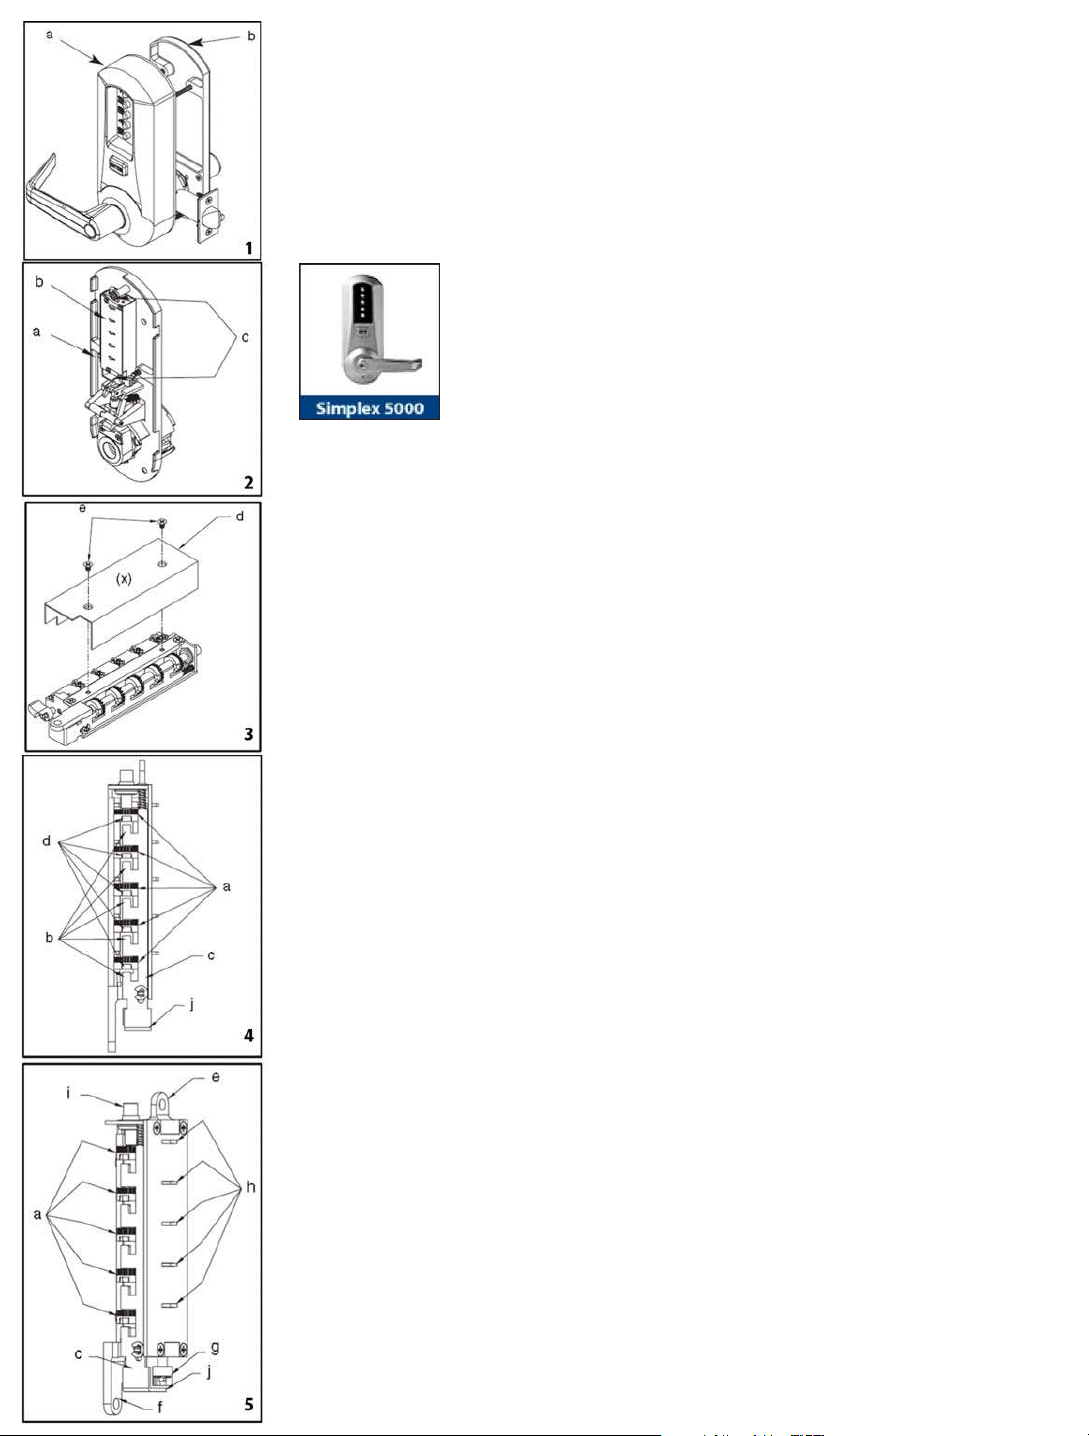
1. Removing Lock From Door
Remove both the outside unit assembly (a) and the inside unit
assembly (b) (see gure 1). Reverse procedures from sections E and F of
this manual.
2. Removing Combination Chamber Assembly
Carefully remove the base plate of outside unit assembly (a) by
removing the 2 Phillips screws (one screw may be found under an
inspection sticker).
Remove the combination chamber assembly (b) from the base plate by
removing the 2 Phillips screws (c) (see gure 2).
Remove the 3-sided dust cover (d) to fully expose the chamber by
removing 2 small Phillips screws (e) (see gure 3). May be 1 screw (x) in
newer models.
3. Resetting and Recovery of Current Code
To reset the code gears (a), each one of the 5 “L” shaped legs (b) of the
unlocking slide (c) must engage snugly with the corresponding code
gear pocket (d) next to it (see gure 4).
Position the chamber in one hand, as shown (see gure 5). Hold
chamber by the top screw tab (e) and bottom screw tab (f).
Rotate the reset cam (g) back toward you with your nger, towards the
key stems (h) as far as it will go and then release. Now look at the code
gears (a) and the unlocking slide (c). Note that some or all 5 of the code
gear pockets (d) are rotated away from the “L” shaped legs (b) as if out of
alignment. Typically each code gear pocket will be at a slightly dierent
distance compared to the other.
Page 2

Note: Sometimes two dierent gear pockets are away from alignment by
exactly the same distance – this indicates that the current code uses two dierent number buttons (example, 2 and 4) depressed at the same time as part of
the code combination.
Using a small at blade screw driver or your thumbnail, depress the key
stem which corresponds to the gear pocket which has been rotated the
farthest away (out of alignment) from the “L” shaped leg. When
depressed, the key stem(s) should stay down and the corresponding
gear pocket(s) should move closer to its corresponding “L” leg, closer to
alignment. Record the key stem number. This is the rst number of your
combination.
Note: If two gear pockets are at the same distance, depress both of these
corresponding key stems at the same time.
Continue by pressing the key stem that corresponds to the gear pocket
that was the next furthest away (do not include gear pockets that have
already been rotated). Record each key stem number that is depressed.
Continue this procedure until all ve gear pockets are aligned with their
corresponding “L” shaped legs on the unlocking slide. The combination
is the recorded numbers, in the order recorded.
Note: If you depress the wrong key stem by mistake, rotate the reset cam back
toward you, (toward the key stems and release). This resets the code gears and
you must repeat the above procedure, Step 3.
4. Clearing the Current Code and Setting a New Code
Note: Align the code gear pockets with the “L” shaped legs.
Depress the code change button (i) located on top of the combination
chamber once and release (see gure 6).
Rotate the reset cam back toward you with your nger (toward the key
stems) as far as it will go and release.
Enter your new combination code by depressing the key stem
corresponding to the rst number (1 through 5) of your code. For
example, if the new code is 3-2-5, then you would depress 3 rst, then 2
and nally 5. Record this new combination code for future reference.
Push the shoulder (j) at the bottom of the Unlocking slide up toward the
code change button and release. If each of the 5 “L” shaped legs of the
unlocking slide engages snugly inside its corresponding code gear
pocket, then it conrms that the new code has been successfully
changed. Rotate the reset cam (g) back toward you and release.
Note: If all 5 “L” shaped legs do not align fully with their corresponding
code gear pockets, repeat the procedures 3 and 4.
Page 3

5. Reinstalling Chamber Assembly Into Lock and Retesting
Reinstall the 3-sided dust cover over the combination chamber with the 2 small
Phillips screws removed (may be 1 screw in newer models).
Reinstall the combination chamber assembly to the base plate with the 2 Phillips
screws removed.
Reinstall the base plate on to the outside lock assembly with the 2 Phillips screws
removed. Make sure all parts have been reinstalled correctly.
6. Reinstall Lock on Door
By following the procedures in Sections E and F of this manual.
7. Retest New Code With Lock on Door
By entering the new numbers followed by the “ENTER” button and rotating the outside
lever/knob. The lock should open and the latch should retract.
For technical assistance please call
1-800-849-TECH (8324) or 336-725-1331
KAA1164 0108
 Loading...