

Page 1
OaSimplex
4903 Audible/Visible and
4904 Visible Units
Installation Instructions
iktaiiation Procedure
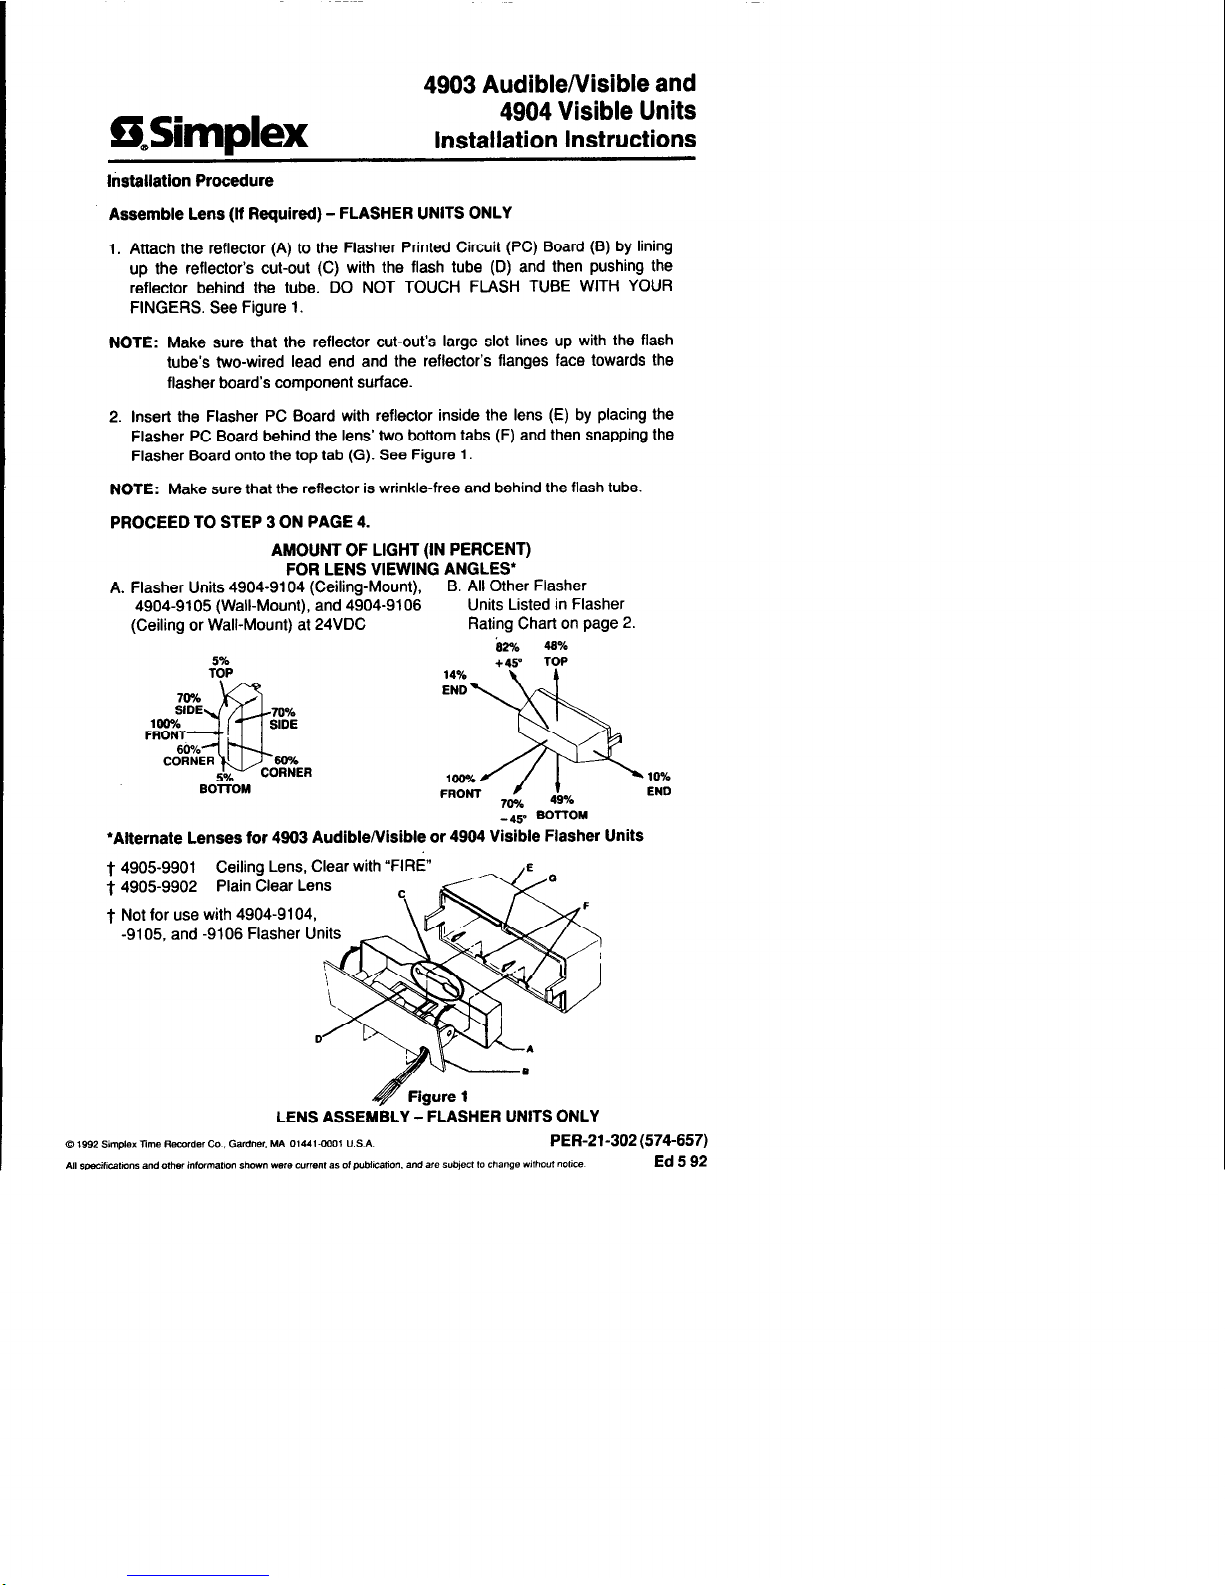
Assemble Lens (if Required) - FLASHER UNITS ONLY
1. Attach the reflector (A) to the Flasher Printed Circuit (PC) Board (B) by lining
up the reflector’s cut-out (C) with the flash tube (D) and then pushing the
reflector behind the tube. DO NOT TOUCH FLASH TUBE WITH YOUR
FINGERS. See Figure 1.
NOTE: Make sure that the reflector cut-out’s large slot lines up with the flash
tube’s two-wired lead end and the reflector’s flanges face towards the
flasher board’s component surface.
2. Insert the Flasher PC Board with reflector inside the lens (E) by placing the
Flasher PC Board behind the lens’ two bottom tabs (F) and then snapping the
Flasher Board onto the top tab (G). See Figure 1.
NOTE: Make sure that the reflector is wrinkle-free and behind the flash tube.
PROCEED TO STEP 3 ON PAGE 4.
AMOUNT OF LIGHT (IN PERCENT)
FOR LENS VIEWING ANGLES’
A. Flasher Units 4904-9104 (Ceiling-Mount),
B. All Other Flasher
4904-9105 (Wall-Mount), and 4904-9106
Units Listed in Flasher
(Ceiling or Wall-Mount) at 24VDC Rating Chart on page 2.
b2% 4s%
‘Alternate Lenses for 4903 Audible/Visible or 4904 Visible Flasher Units
t 4905-9901
Ceiling Lens, Clear with “FIR&
t 49059902
Plain Clear Lens
T Not for use with 4904-9104,
-9105. and -9106 Flasher Units
D
LENS ASSEMBLY - FLASHER UNITS ONLY
Q ,992 smplex Tim* Rec‘ndB, co, Gardner. MA 0144-0001 U.S.A. PER-21-302 (574-657)
All specil,catm”s an.3 other i”‘cmla,w” Show” were c”r,en, as 0, pubhcahon. and am subject 10 change Wltho”t nOw*
Ed592
Page 2
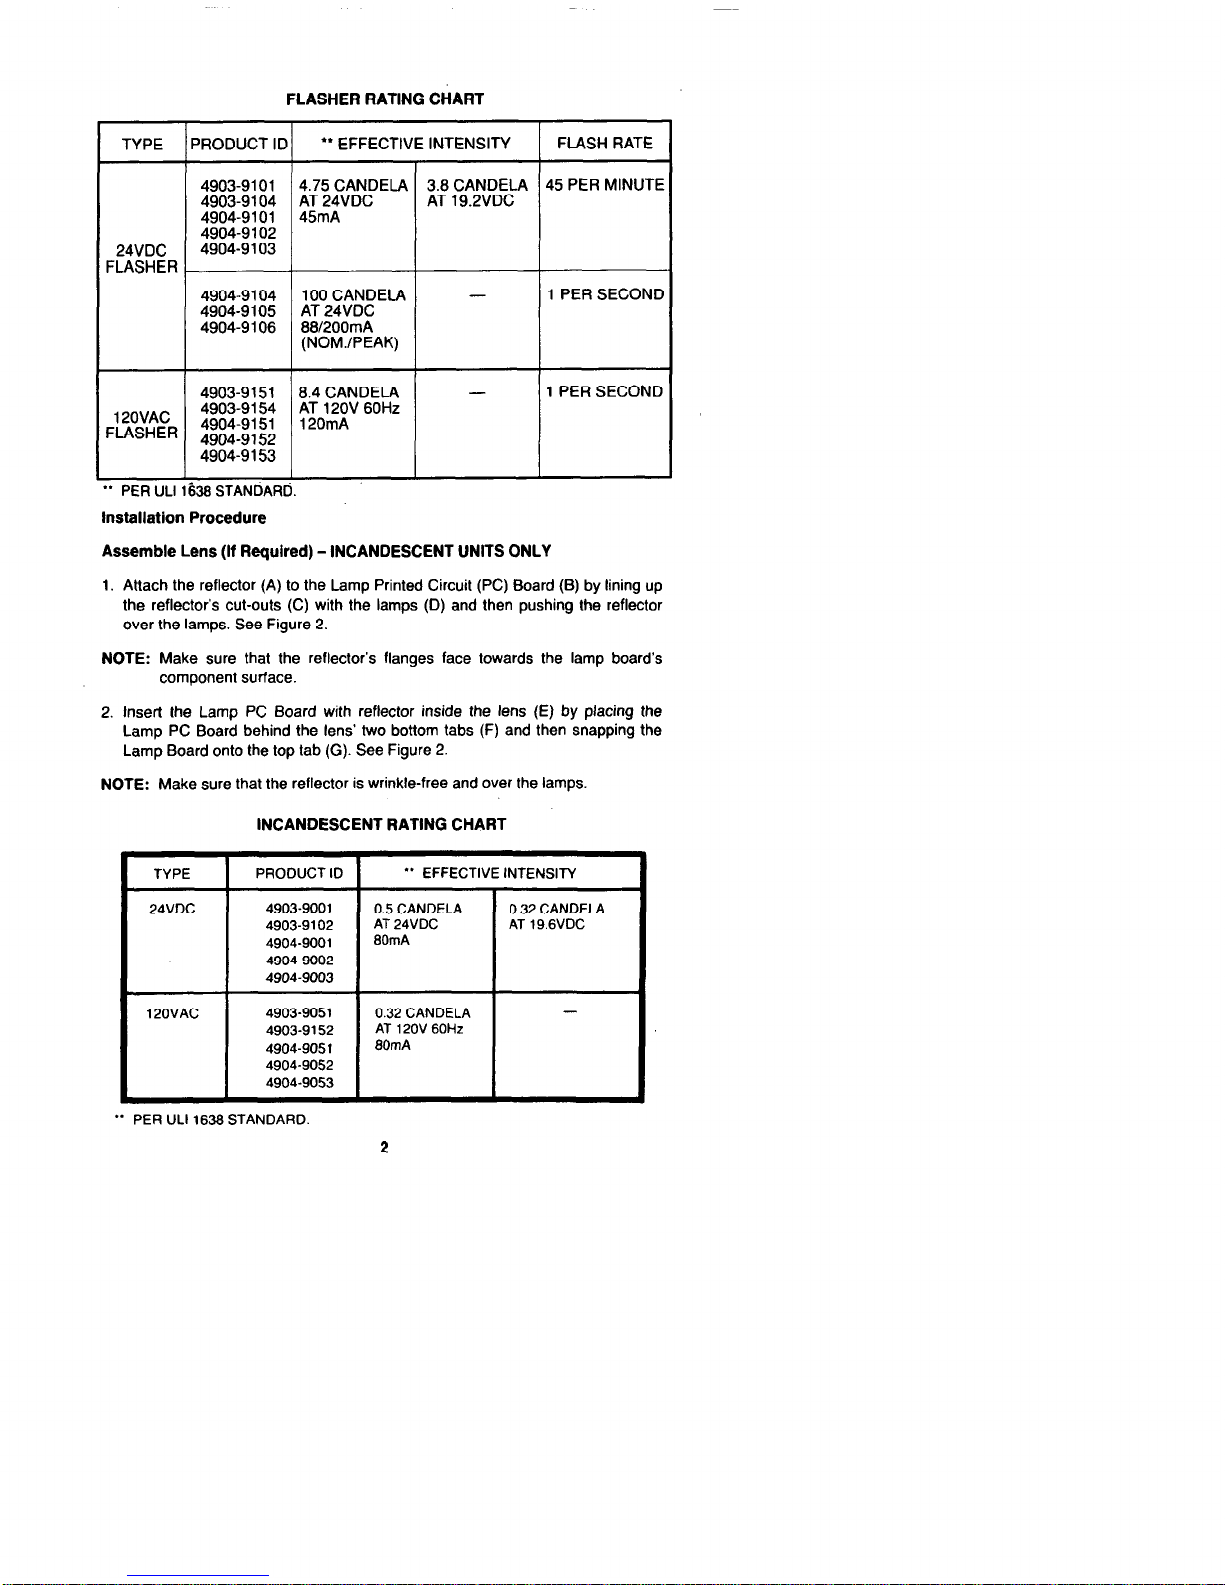
FLASHER RATING CHART
TYPE PRODUCT ID ** EFFECTIVE INTENSITY FLASH RATE
4904-9104 100 CANDELA -
1 PER SECOND
4904-9105 AT 24VDC
4904-9106 88/200mA
(NOMJPEAK)
4903-9151
8.4 CANDELA -
1 PER SECOND
1 POVAC 4903-9154
AT 12OV 60Hz
FLASHER 4904-9151
120mA
4904-9152
4904-9153
I
I I I
I
** PER ULI 1638 STANDARD.
installation Procedure
Assemble Lens (if Required) - INCANDESCENT UNITS ONLY
1. Attach the reflector (A) to the Lamp Printed Circuit (PC) Board (B) by lining up
the reflector’s cut-outs (C) with the lamps (D) and then pushing the reflector
over the lamps. See Figure 2.
NOTE: Make sure that the reflector’s flanges face towards the lamp board’s
component surface.
2. Insert the Lamp PC Board with reflector inside the lens (E) by placing the
Lamp PC Board behind the lens’ two bottom tabs (F) and then snapping the
Lamp Board onto the top tab (G). See Figure 2.
NOTE: Make sure that the reflector is wrinkle-free and over the lamps.
INCANDESCENT RATING CHART
TYPE
24VDC
PRODUCT ID ** EFFECTIVE INTENSITY
4903-9001 0.5 CANDELA
0.32 CANDELA
4903-9102
AT 24VDC
AT 19.6VDC
4904-9001 80mA
4904-9002
4904-9003
120VAC
4903-9051 0.32 CANDELA
-
4903-9152
AT 12OV 60Hz
4904-905 1 80mA
4904-9052
4904-9053
** PER ULI 1638 STANDARD
2
Page 3

AMOUNT OF LIGHT (IN PERCENT)
FOR LENS VIEWING ANGLES (FOR PAODUCT ID
NUMBERS IN THE INCANDESCENT RATING CHART
ON PAGE 2)
79%
TOP
99%
A
+49
15%
END
199%
-450
131%
0Ol-lOM
*Alternate Lenses for 4903 AudibleAMble or 4904 Visible Incandescent
Units
j 4905-9904 Ceiling Lens, White with “FIRE”
t 4905-9905 Plain White Lens
t Not for use with 4904-9104,
-9105, and -9106 Flasher Units
Figure 2
LENS ASSEMBLY - INCANDESCENT UNITS ONLY
Page 4
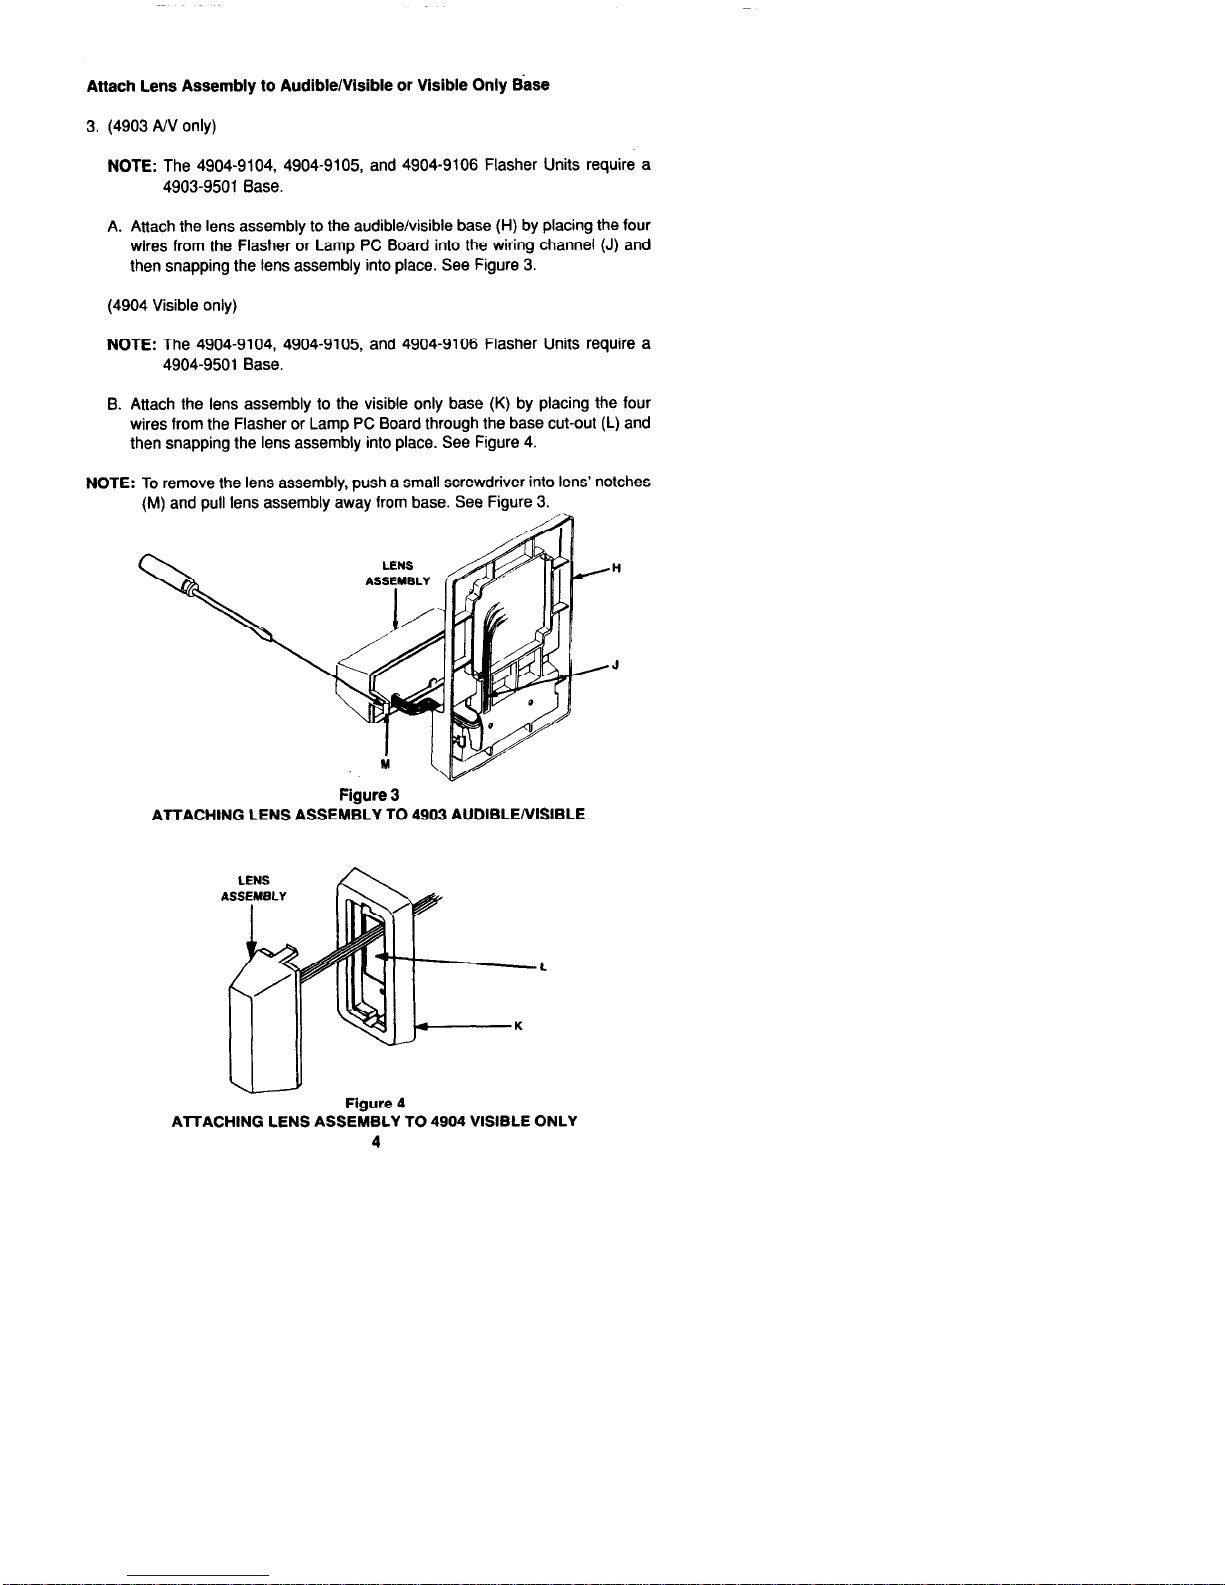
Attach Lens Assembly to Audible/Visible or Visible Only Base
3. (4903 AN only)
NOTE: The 4904-9104, 4904-9105, and 4904-9106 Flasher Units require a
4903-9501 Base.
A. Attach the lens assembly to the audible/visible base (H) by placing the four
wires from the Flasher or Lamp PC Board into the wiring channel (J) and
then snapping the lens assembly into place. See Figure 3.
(4904 Visible only)
NOTE: The 4904-9104, 4904-9105, and 4904-9106 Flasher Units require a
4904-9501 Base.
B. Attach the lens assembly to the visible only base (K) by placing the four
wires from the Flasher or Lamp PC Board through the base cut-out (L) and
then snapping the lens assembly into place. See Figure 4.
NOTE: To remove the lens assembly, push a small screwdriver into lens’ notches
(M) and pull lens assembly away from base. See Figure 3.
Figure 3
ATTACHING LENS ASSEMBLY TO 4903 AUDIBLE/VISIBLE
Figure 4
A-ITACHING LENS ASSEMBLY TO 4904 VISIBLE ONLY
4
Page 5

Mount Audible/Visible or Visible Only Assembly to Electrical Back BOX
4. For flasher units only, connect wires as shown in Figure 5,6,7,6,9, 10, or 11.
For incandescent units only, connect wires as shown in Figure 12,13, or 14 (for
coded or non-coded systems).
NOTlFlCATlON APPLIANCE
HORN. BELL, CHIME,
BUZZER, ETC.
L ELK-DC
NOTES:
1. WIRE NUTS ARE NOT SUPPLIED.
2. ISOLATE AND TAPE UNUSED LEADS.
3. NOTIFICATION APPLIANCE IS RATED PER INDIVIDUAL NAMEPLATE.
Figure 5
WIRING DIAGRAM FOR 4903-9101, -9104
OR 4904-9101, -9102, -9103 WITH NOTIFICATION APPLIANCE
(FLASHER 21-28VDC)
-DC LOUT
I
IN
Y
A
//
I
NOTES:
1. WIRE NUTS ARE NOT SUPPLIED.
2. ISOLATE AND TAPE UNUSED LEADS.
3. NOTlFlCATlON APPLIANCE IS RATED PER INDIVIDUAL NAMEPLATE.
4. USE TWISTED-SHIELDED WIRE FOR ALL MAPNET?
PHONE, OR AUDIO WIRING RUN WlTH FLASHER
UNlT WIRING. FOR SYSTEM WIRING SPECIFICATIONS.
SEE 900-036 FOR 2120 CONTROLS AND 900-0S2 FOR
4100 CONTROLS.
Figure 6
WIRING DIAGRAM FOR 4903-9101, -9104
OR 4904-9101, -9102, -9103 WITH SPEAKER
(FLASHER 21-28VDC)
Page 6

I
TWISTEDSHEkl%ED
SEE
NOTE
4
I
RED-DC
NOTlFlCATlON APPLIANCE
HORN, BELL, CHIME,
BUZZER, ETC.
NOTES:
1. WIRE NUTS ARE NOT SUPPLIED.
2. ISOLATE AND TAPE UNUSED LEADS.
3. NOTlFlCATlON APPLIANCE IS RATED PER INDIVIDUAL NAMEPLATE.
4. USE TWISTED-SHIELDED WIRE FOR ALL MAPNET”,
PHONE, OR AUDIO WIRING RUN WlTH FLASHER
UNIT WIRING. FOR SYSTEM WIRING SPECIRCATIONS,
SEE 9OD.036 FOR 2129 CONTROLS AND 900-082 FOR
41W CONTROLS.
Figure 7
WIRING DIAGRAM FOR 4903-9151,
-9154 OR 4904-9151, -9152, -9153
WITH SPEAKER/NOTIFICATION APPLIANCE
(FLASHER 12OV)
RED-DC
NOTIFICATION APPLIANCE
HORN, BELL, CHIME, ETC.
NOTES:
1. WlRE NUTS ARE NOT SUPPLIED.
2. ISOLATE AND TAPE UNUSED LEADS.
3. NOTlFlCATlON APPLIANCE IS RATED PER INDIVIDUAL NAMEPLATE.
Figure 8
WIRING DIAGRAM FOR 4903-9101,
-9104 OR 4904-9101, -9102, -9103 WITH NOTIFICATION APPLIANCE
(FLASHER 21-28VDC)
8
Page 7

NOTES:
1. WIRE NUTS ARE NOT SUPPLIED.
.2. ISOLATE AND TAPE UNUSED LEADS.
3. NOTIFICATION APPLIANCE IS RATED PER INDIVIDUAL NAMEPLATE.
4. “SE TWlSTEDSHlELDED WIRE FOR ALL MAPNET*,
PHONE, OR AUDIO WIRING RUN WlTH FLASHER
UNIT WIRING. FOR SYSTEM WIRING SPECIFICATIONS.
SEE SOD-036 FOR 2120 CONTROLS AND 9OWS2 FOR
4100 CONTROLS.
TWIGTED-
YIELDED
WIRF
WIRING DIAGRAM FOR 4904-9104,
Figure 9
-9105, OR -9106 WITH 4903-9501 BASE AND
SPEAKER (FLASHER 2%28VDC)
RED-DC
\ +ouT
-- I /RED
CODED -DC
OR
NON-CODED
NOTES:
1. WIRE NUTS ARE NOT SUPPLIED.
2. ISOLATE AND TAPE UNUSED LEADS.
3. NOTIFICATION APPLIANCE IS RATED PER INDIVIDUAL NAMEPLATE.
m
NOTlFlCATlON APPLIANCE
HORN, SELL, CHIME, ETC.
cl
Figure 10
WIRING DIAGRAM FOR 4904-9104,
-9105, OR -9106 WITH 4903-9501 BASE AND NOTIFICATION
APPLIANCE (FLASHER 21-28VDC)
7
Page 8

NOTES:
1. WIRE NUTS ARE NOT SUPPLIED.
2. ISOLATE AND TAPE UNUSED LEADS.
Figure 11
WIRING DIAGRAM FOR 4904-9104,
-9105, OR -9106 WITH 4904-9501 BASE
(FLASHER 2%28VDC)
+DC{
-DC{
NOtlFlCATlON APPUANCE
tifiNi~E~LdCHIME,
. .
NOTES:
1. WIRE NUTS ARE NOT SUPPLIED.
2. ISOLATE AND TAPE UNUSED LEADS.
3. NOTIFICATION APPLIANCE CIRCUIT IS
RATED PER INDIVIDUAL NAMEPLATE.
Figure 12
WIRING DIAGRAM FOR 4903-9001, -9102 OR
4904-9001, -9002, -9003 WITH NOTIFICATION APPLIANCE
(INCANDESCENT 21-28VDC)
Page 9

t
I”
25 VRMS
AUDIO o*
I
+DC
-DC
-0v
NOTES:.
AUDIO
1. WIRE NUTS ARE NOT SUPPLI
2. ISOLATE AND TAPE UNUSED LEADS.
3. NOTlFlCAllON APPLIANCE IS RATED PER INDIVIDUAL NAMEPLATE.
4. USE TWISTED-SHIELDED WIRE FOR ALL MAPNETm,
PHONE, OR AUDIO WIRING RUN WlTH FLASHER
UNlT WIRING. FOR SYSTEM WIRING SPECIFICATIONS,
SEE 900-036 FOR 2120 CONTROLS AND SOWS2 FOR
4tW CONTROLS.
Fiaure 13
WIRING DIAGRAM FOR 4903-9001, -9102
OR 4904-9001, -9002, -9003 WITH SPEAKER
(INCANDESCENT 21-28VDC)
NOTES:
+DC{
120 VAC
t
NEUTf
-DC{
1
NOTlFlCATlON APPLIANCE
HORN, BELL, CHIME,
BUZZER, ETC.
1. WIRE NUTS ARE NOT SUPPLIED.
2. ISOLATE AND TAPE UNUSED LEADS.
3. NOTlFlCATlON APPLIANCE IS RATED PER INDIVIDUAL NAMEPLATE.
4. USE TWISTED-SHIELDED WIRE FOR ALL MAPNET’,
PHONE, OR AUDIO WIRING RUN WITH FLASHER
UNIT WIRING. FOR SYSTEM WIRING SPECIFICATIONS,
SEE 900.036 FOR 2120 CONTROLS AND 9W-032 FOR
4100 CONTROLS.
Figure 14
WIRING DIAGRAM FOR 4903-9051,
-9152
OR 4904-9051, -9052,
-9053 WITH
SPEAKER/NOTIFICATION APPLIANCE
(INCANDESCENT 12OV)
9
Page 10

5. (4903 AN only)
A. Mount audible/visible base and notification appliance to back box as
shown in Figure 15, 16, or 17.
NOTES
1. See Figure 1 (Flasher Units Only) or Figure 2 (Incandescent Units Only) for
amount of light seen from several lens viewing angles.
2. When mounting the notification appliance to the audible/visible base (and
the resulting assembly to the back box), complete the following steps:
a. Line up the notification appliance mounting holes with the audible/
visible base holes.
b. Insert a 8-32 x 3” screw through a top hole of both the notification
appliance and the audible/visible base and loosely fasten assembly to
back box.
c. Insert another 8-32 x 3” screw through a bottom hole of both the
notification appliance and the audible/visible base and securely fasten
assembly to back box.
l
When mounting assembly to back box, ensure that visible unit wires
stay in the wiring channel of the base as shown in Figure 3.
SEE NOTE 1
1. ALWAYS MOUNT6” OR lo” BELL
‘.
ABOVE LENS ASSEMBLY AND
AS LAST STEP OF MOUNTING
PROCEDURE.
2. UNLIKE THE NOTIFICATION
APPLIANCES SHOWN IN FIGURES 16 (L 17 WHICH MAY BE
MOUNTED ABOVE OR BELOW
THE LENS ASSEMBLY, A CINCH
OR IO-INCH BELL MUST BE
MOUNTED ABOVE THE LENS
ASSEMBLY.
Figure 15
MOUNTING 6” OR 10” BELL TO 4903 AUDIBLE/VISIBLE
10
Page 11

NOTES: NOTES:
1. ALWAYS MOUNT CHIME OR
4” BELL AS LAST STEP OF
MOUNTING PROCEDURE.
2. BACK BOX IS A 4” SQUARE BOX.
1. ALWAYS MOUNT CHIME OR
4” BELL AS LAST STEP OF
MOUNTING PROCEDURE.
2. BACK BOX IS A 4” SQUARE BOX.
Figure 16
MOUNTING 4” BELL OR CHIME TO 4903 AUDIBLE/VISIBLE
NOTE: BACK BOX IS A 4” SQUARE BOX.
Figure 17
MOUNTING HORN, SPEAKER,
OR BUZZER TO 4903 AUDIBLE/VISIBLE
11
Page 12

l
(See Figure 18) For surface or retrofit mounting, follow the procedure below:
1. Mount 2975-9145 back box (N) to wall.
2. Attach 4905-9903 retrofit/surface mounting plate (P) to back box (N).
3. Mount audible/visible assembly to plate (P).
Figure 18
RETROFIT OR SURFACE MOUNTING
FOR 4903 AUDIBLE/VISIBLE
(4904 Visible
only)
B. Mount visible only assembly to single-gang back box (0) as shown in
Figure 19)
NOTE: See Figure 1 (Flasher Units Only) or Figure 2 (Incandescent Units Only)
for amount of light seen from several lens viewing angles.
Figure 19
ATTACHING VISIBLE ONLY ASSEMBLY
TO SINGLE-GANG BACK BOX
PER-21-302 (574-657)
Ed592
 Loading...