

Page 1
R
Document: Installation Manual
Part: Color Touchscreen LCD Annunciator
Product: 4007ES Panels
Cautions
and Warnings
FCC RULES AND REGULATIONS – PART 15 - This equipment has been tested and found to comply with the limits for a Class A digital device
pursuant to Part 15 of the FCC Rules. These limits are designed to provide reasonable protection against harmful interference when the equipment is
operated in a commercial environment. This equipment generates, uses, and can radiate radio frequency energy and, if not installed and used in accordance with the instruction manual, may cause harmful interference to radio communications. Operation of this equipment in a residential area is likely to
cause harmful interference in which case the user will be required to correct the interference at his own expense.
\
READ AND SAVE THESE INSTRUCTIONS- Follow the instructions in this installation manual. These instructions
must be followed to avoid damage to this product and associated equipment. Product operation and reliability depend upon
proper installation.
DO NOT INSTALL ANY SIMPLEX® PRODUCT THAT APPEARS DAMAGED- Upon unpacking your Simplex
product, inspect the contents of the carton for shipping damage. If damage is apparent, immediately file a claim with the carrier and notify an authorized Simplex product supplier.
ELECTRICAL HAZARD - Disconnect electrical field power when making any internal adjustments or repairs. All repairs
should be performed by a representative or authorized agent of your local Simplex product supplier.
Introduction The Color Touchscreen LCD Annunciator for 4007ES panels* provides remote annunciation of
the Fire Alarm Control Panel (FACP) status. Visual status is provided by the touchscreen and by
the LEDs. Audible annunciation is provided through a piezo sounder. Access to Annunciator
switch functions can be enabled or locked using the keyswitch. A maximum of six color
touchscreen annunciators can be installed on a 4007ES panel.
* 4007ES panels include the 4007ES hybrid panels and the 4007ES panels with IDNAC
notification. From this point on, they will be referred to as 4007ES.
Compatibility The 4007ES panel needs to be at revision 3.02.07 or higher to support the Color Touchscreen
LCD Annunciator.
The following annunciators, boxes, and brackets are compatible with 4007ES panels:
In this
publication
Reference
Documents
Part Number Description
4606-9202 Color Touchscreen LCD Annunciator, Red
4606-9205 Color Touchscreen LCD Annunciator, Platinum
2975-9461 Color Touchscreen LCD Annunciator, Surface Mount Box, Red
2975-9462 Color Touchscreen LCD Annunciator, Surface Mount Box, Platinum
2975-9463 Color Touchscreen LCD Annunciator, Retrofit, Semi-flush bracket, Red
2975-9464 Color Touchscreen LCD Annunciator, Retrofit, Semi-flush bracket, Platinum
Reference Documents ................................ 1 Wire Length Tables ..................................... 5
Module Overview ........................................ 2 Communication Wiring Length Tables ........ 6
General Mounting Information .................... 3 Address Setting ........................................... 6
General Wiring Guidelines .......................... 3 Mounting Instructions .................................. 8
Specific Wiring Guidelines .......................... 3 Verification Procedure ................................. 8
Wiring .......................................................... 4 Remote Annunciator Specifications ............ 9
Refer to the following documents for more information on how to program and use the remote
annunciator.
Document Number Title
579-1165 4007ES Operator’s manual
579-1167 4007ES Programmer’s manual
© 2015 Tyco Fire Protection Products. All rights reserved. Specifications and other information shown were current as of publication and
are subject to change without notice.
TYCO, SIMPLEX, and the product names listed in this material are marks and/or registered marks. Unauthorized use is strictly prohibited.
579-1172
Rev. A
Page 2
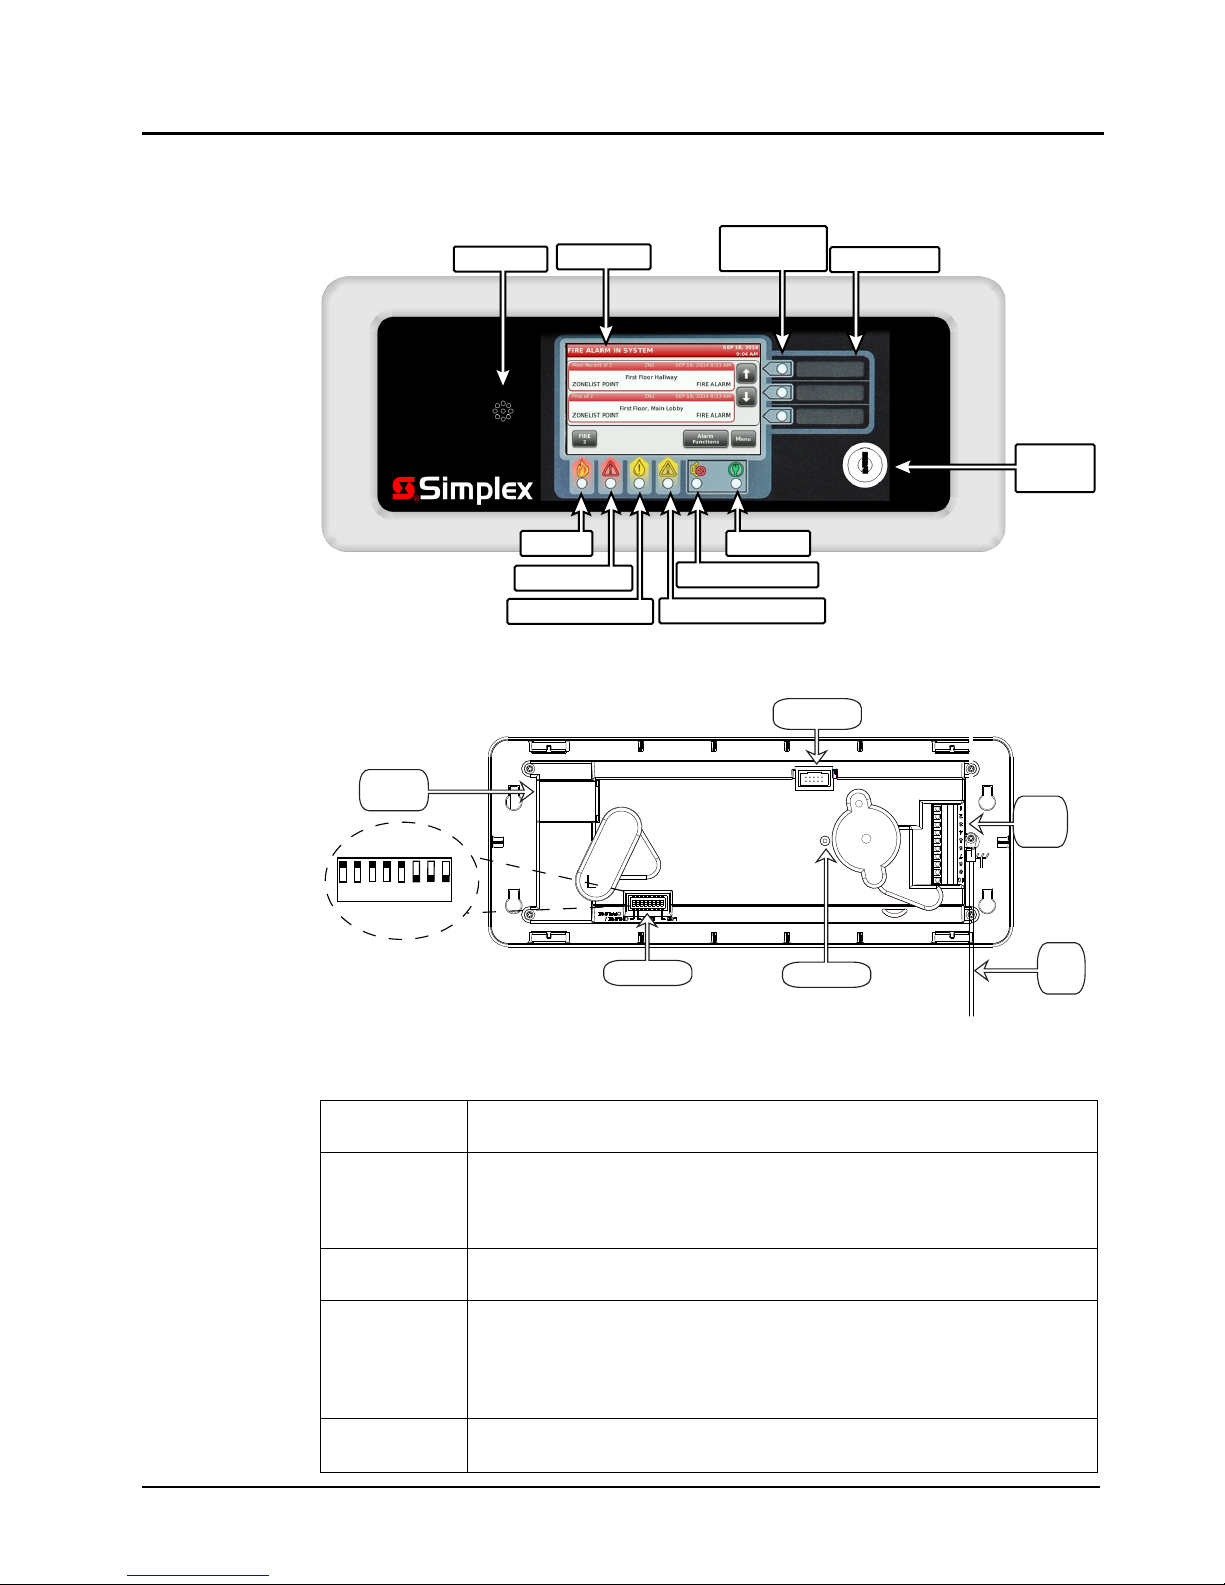
Piezo
Power LED
Touchscreen
Bi-Color User
Defined LEDs
Slide-in Labels
Keyswitch
Supervisory LED
Priority 2 LED
Fire LED
Alarm Silenced LED
Trouble LED
ON
OFF
1 2 3 4 5 6 7 8
USB Port
Serial
Service Port
Reset Switch
Ground
Harness
TB1
Address Switch
Color Touchscreen LCD Annunciator Installation Instructions, Continued
Module
Overview
Refer to Figure 1 for the remote annunciator front view and to Figure 2 for the back layout.
Figure 1. Remote Annunciator Front View
Serial Service
Port (P2)
USB port (P5) Allows downloading fonts and MsgLib information. To access the USB port,
Address
Switch (SW-2)
Reset Switch
(SW1)
Service Mode
Jumper
Figure 2. Remote Annunciator Back View
Table 1. Remote Annunciator Main Back Components
Not yet available. Future use.
remove the trim plate and then unscrew the annunciator from the back box
(see Figure 6). For more information about the thumb drive, refer to the
Programmer’s Manual, 579-1167.
Sets FACP address and communications online or offline.
Short press (< 5 seconds) to activate a software reset (warm start).
Press and hold (> 5 seconds) to force a hardware reset (warm start).
Unless the annunciator CPU appears to be locked up, the software
controlled reset should be used. A warm start preserves the logs and the
disabled status of points in the disabled state.
To access the service mode jumper, the cover plate needs to be removed.
IMPORTANT: Factory use only. Do not remove.
2
Page 3

Color Touchscreen LCD Annunciator Installation Instructions, Continued
General
Mounting
Information
General Wiring
Guidelines
Flush-mount annunciators
• In masonry walls or plasterboard walls, use a RACO 944 identify as a 5-gang box (2½ in /
64 mm deep) box or its equivalent.
Surface mount annunciators
• Use a 2975-9461 box (2½ in/64 mm deep), red.
• Use a 2975-9462 box (2½ in/64 mm deep), platinum.
Semi-flush-mount annunciators
For mounting to an existing six-gang box, masonry box, 2975-9206 box, or 2975-9217 box:
• Use bracket 2975-9463 (1¾ in/44.5 mm), red.
• Use bracket 2975-9464 (1¾ in/44.5 mm), platinum.
• All wiring must be copper conductors only.
• Wire lengths in excess of the maximum lengths (see Table 2 through Table 5) are not
permitted.
• If shielding is used:
- Metallic continuity of the shield must be maintained throughout the entire length of cable.
- The entire length of the cable must have a resistance greater than 1 X 10
ground.
- The shield must connect to a SHIELD terminal at each annunciator and must be
terminated only at the main panel.
• Underground wiring must be free of water.
• Wires must not be run through elevator shafts.
• Wire runs in plenums must be in conduit unless rated for plenum use.
• Splicing is permitted provided that:
- All such connections are soldered (rosin-core solder), crimped in metal sleeves, or
encapsulated with an epoxy resin;
- When solder or crimped metal sleeves are used, the junction is insulated with a highgrade
electrical tape as sound as the original insulating jacket;
- The shield’s continuity is maintained throughout the cable’s length.
• Only system wiring can share the same conduit.
6
ohms to Earth
Specific Wiring
Guidelines
• 24V power wiring must be power limited and communication wiring is supervised and power
limited.
• The Remote Annunciator cannot be used with wiring that goes outside the building (above or
below ground), unless overvoltage suppression is provided at both ends for both the
communication and the power wiring. Communication and power wiring must meet the
following requirements:
1. Simplex Model 2081-9044 overvoltage protectors (200 mA or less):
- There are no restrictions on wire routing, however, the maximum wire length is 2500 feet.
2. Simplex Model 2081-9027 (200 mA maximum) or Model 2081-9028 (5-amp maximum)
isolated loop circuits protectors:
- For underground wiring, select the appropriate isolated loop circuit protector. The circuit
wiring must be run in a separate parallel wiring trough, separated from any commercial
power distribution wiring.
- For overhead wiring, select the appropriate isolated loop circuit protector. The wiring is
limited to one contiguous property and the total wire length must not exceed 2500 feet.
The circuit wiring must be run on separate poles, separated from any poles supporting
commercial power distribution wiring. The circuit wiring must be run in parallel with
direct relation to the commercial power distribution. The separation is a minimum distance
(whichever is greater) of 100 feet, or the maximum span between any two adjacent poles
of either the system’s circuit or the commercial power distribution circuit.
• For maximum wire lengths with or without circuit protectors, see Table 2 through Table 5.
• If the interconnected control unit is not used to provide operating power to the annunciator, a
regulated power-limited, UL-listed 24VDC power supply for fire protective signaling must
be used.
• 12-18 AWG twisted pair wiring is required for RUI communications.
• In accordance with NFPA 70, Article 250, a dedicated Earth ground connection must be
provided to the back box.
3
Page 4

7 8 9 10
24V
24C (0V)
1 2 3 4 5 6
- COMM
+ COMM
SHIELD
IN OUT
IN OUT IN OUT
IN OUT IN OUT
7 8 9 10
24V
24C (0V)
1 2 3 4 5 6
+COMM
-COMM
SHIELD
IN OUT
IN OUT IN OUT
IN OUT IN OUT
Color Touchscreen
LCD Annunciator
7 8 9 10
24V
24C (0V)
1 2 3 4 5 6
+COMM
-COMM
SHIELD
IN OUT
IN OUT IN OUT
IN OUT IN OUT
RUI
4007ES PSU
B+
B-
A+
A-
Color Touchscreen
LCD Annunciator
24+
24-
AUX Power
Color Touchscreen LCD Annunciator Installation Instructions, Continued
Wiring Note: To prevent Electrostatic Discharge (ESD), use a wrist strap assembly that connects to
ground. Ensure power is OFF before installing or servicing the annunciator.
To properly install the remote annunciator:
1. Terminate the annunciator’s RUI communication and power lines (Figure 3).
Figure 3. Terminating the COMM and Power Line
TB1-1: 24V IN from FACP Power Supply or
TB1-2: 24V OUT to Next Annunciator
Previous Annunciator
TB1-3: 24C IN from FACP Power Supply or
TB1-4: 24C OUT to Next Annunciator
Previous Annunciator
TB1-5: +COMM IN
+RUI communications from FACP or Previ-
TB1-6: +COMM OUT
+RUI communications to Next Annunciator
ous Annunciator
TB1-7: -COMM IN
-RUI communications from FACP or Previous
TB1-8: -RUI communications to Next
Annunciator
Annunciator
TB1-9: SHIELD IN TB1-10: SHIELD OUT
2. Connect the ground harness (see Figure 2) to the metal back box’s Earth ground.
3. Connect the RUI wiring from COMM+ and COMM- on the remote annunciator to RUI
terminal on the 4007ES panel power supply (see Figure 4).
4. Set Jumper P1 on the 4007ES for Class A or Class B wiring.
5. To power the remote annunciator, connect the cable from 24+ and 24- on the 4007ES power
supply to 24V and 24C (0V) on the remote annunciator (Figure 4).
Figure 4. Wiring Diagram
4
Page 5

Color Touchscreen LCD Annunciator Installation Instructions, Continued
Wire Length
Tab le s
Power Wiring
Length Tables
Table 2 and Table 3 show the maximum wire lengths possible for the power wiring. Table 4 and
Table 5 shows the maximum wire lengths for the communication wiring.
• When using multiple annunciators and runs, the total of all runs must not exceed 10,000 ft.
(304.8 m) (including T-Taps).
• Four 2081-9044 Overvoltage Protectors or four 2081-9028 Isolated Loop Circuit Protectors are
the maximum number permitted on any single communication loop.
Table 2. Wire Length with 2081-9044 Overvoltage Protectors
Total Current
(Amps)
0.100 2,500 ft.
0.200 2,500 ft.
Table 3. Without Transient Suppression (or with 2081-9028 Isolated Loop Circuit Protectors)
Total Current
(Amps)
0.100
0.200
0.300
0.400
0.500
0.600
0.700
0.800
0.900
1.000
1.100
1.200
With 2081-9027 Isolated Loop Circuit Protectors
0.100 2,500 ft.
0.200 2,500 ft.
12 AWG
(3.309 mm²)
(762 m)
(762 m)
12 AWG
(3.309 mm²)
2,500 ft.
(762 m)
2,500 ft.
(762 m)
2,500 ft.
(762 m)
2,361 ft.
(719.63 m)
1,889 ft.
(575.76 m)
1,574 ft.
(479,75 m)
1,349 ft.
(411.17 m)
1,181 ft.
(359.96 m)
1,049 ft.
(319.73 m)
944 ft.
(287.73 m)
859 ft.
(261.82 m)
787 ft.
(239.87 m)
(762 m)
(762 m)
14 AWG
(2.801 mm²)
2,500 ft.
(762 m)
1,782 ft.
(543.15 m)
14 AWG
(2.801 mm²)
2,500 ft.
(762 m)
2,500 ft.
(762 m)
1,980 ft.
(603.5 m)
1,485 ft.
(452.62 m)
1,188 ft.
(362.1 m)
990 ft.
(301.75 m)
849 ft.
(258.77 m)
743 ft.
(226.46 m)
660 ft.
(201.16 m)
594 ft.
(181 m)
540 ft.
(164.59 m)
495 ft.
(150.87 m)
2,500 ft.
(762 m)
1,782 ft.
(543,15 m)
16 AWG
(1.309 mm²)
2,371 ft.
(722.68 m)
889 ft.
(270.96 m)
16 AWG
(1.309 mm²)
2,500 ft.
(762 m)
1,482 ft.
(451.71 m)
988 ft.
(301.14 m)
741 ft.
(225.85 m)
593 ft.
(180.74 m)
494 ft.
(150.57 m)
423 ft.
(128.93 m)
371 ft.
(113.08 m)
329 ft.
(100.27 m)
296 ft.
(90.22 m)
269 ft.
(81.99 m)
247 ft.
(75.28 m)
2,371 ft. 2,371 ft.
(722,68 m)
889 ft.
(270.96 m)
18 AWG
(0.823 mm²)
1,409 ft.
(429.46 m)
705 ft.
(214.88 m)
18 AWG
(0.823 mm²)
2,349 ft.
(715.97 m)
1,175 ft.
(358.14 m)
783 ft.
(238.65 m)
587 ft.
(178.91 m)
470 ft.
(143.25 m)
392 ft.
(119.48 m)
336 ft.
(102.41 m)
294 ft.
(89.61 m)
261 ft.
(79.55 m)
235 ft.
(71.62 m)
214 ft.
(65.22 m)
196 ft.
(59.74 m)
1,409 ft.
(429.46 m)
705 ft.
(214.88 m)
5
Page 6

ON
OFF
(DIP Switch shown is set at address 31)
12345678
Most Significant Bit
Least Significant Bit
Color Touchscreen LCD Annunciator Installation Instructions, Continued
Communication
Wiring Length
Tables
12 AWG (3.309 mm²) 14 AWG (2.801 mm²) 16 AWG (1.309 mm²) 18 AWG (0.823 mm²)
2,500 ft.
(762 m)
Table 5. Without Transient Suppression (or with 2081-9028 Isolated Loop Circuit Protectors)
12 AWG
(3.309 mm²)
2,500 ft.
(762 m)
Table 4. With 2081-9044 Overvoltage Protectors
2,500 ft.
(762 m)
14 AWG
(2.801 mm²)
2,500 ft.
(762 m)
2,450 ft.
(746.76 m)
16 AWG
(1.309 mm²)
2,500 ft.
(762 m)
1,650 ft.
(502.92 m)
18 AWG
(0.823 mm²)
2,349 ft.
(715.97 m)
With 2081-9027 Isolated Loop Circuit Protectors
2,500 ft.
(762 m)
2,500 ft.
(762 m)
2,450 ft.
(746.76 m)
1,650 ft.
(502.92 m)
Address Setting Switch SW2 is a bank of eight dip switches. From left to right (see Figure 5) these switches are
designated as SW2-1 through SW2-8. The function of these switches is as follows:
• SW2-1. This switch enables communication between the card
and the FACP CPU. Set this switch to ON for normal
operation.
• SW2-2 through SW2-8. These switches set the card address
for the FACP. Refer to Table 6 for a complete list of the switch
settings for all of the possible card addresses. Each card must
be set to the address assigned in the FACP programmer.
Figure 5. DIP Switch SW2
6
Page 7

Color Touchscreen LCD Annunciator Installation Instructions, Continued
Address Setting Table 6. Address Chart
Address SW 2-2 SW 2-3 SW 2-4 SW 2-5 SW 2-6 SW 2-7 SW 2-8 Address SW 2-2 SW 2-3 SW 2-4 SW 2-5 SW 2-6 SW 2-7 SW 2-8
1 ON ON ON ON ON ON OFF 61 ON OFF OFF OFF OFF ON OFF
2 ON ON ON ON ON OFF ON 62 ON OF F OFF OFF OFF OFF ON
3 ON ON ON ON ON OFF OFF 63 ON OFFOFFOFFOFFOFFOFF
4 ON ON ON ON OFF ON ON 64 OFF ON ON ON ON ON ON
5 ON ON ON ON OFF ON OFF 65 OFFONONONONONOFF
6 ON ON ON ON OFF OFF ON 66 OFF ON ON ON ON OFF ON
7 ON ON ON ON OFF OFF OFF 67
8 ON ON ON OFF ON ON ON 68 OFF ON ON ON OFF ON ON
9 ON ON ON OFF ON ON OFF 69 OFFONONONOFFONOFF
10 ON ON ON OFF ON OFF ON 70 OFF ON ON ON OFF OFF ON
11 ON ON ON OFF ON OFF OFF 71 OFFONONONOFFOFFOFF
12 ON ON ON OFF OFF ON ON 72 OFF ON ON OFF ON ON ON
13 ON ON ON OFF OFF ON OFF 73 OFF ON ON OFF ON ON OFF
14 ON ON ON OFF OFF OFF ON 74 OFF ON ON OFF ON OFF ON
15 ON ON ON OFF OFF OFF OFF 75 OFF ON ON OFF ON OFF OFF
16 ON ON OFF ON ON ON ON 76 OFF ON ON OFF OFF ON ON
17 ON ON OFF ON ON ON OFF 77 OFFON ONOFFOFFONOFF
18 ON ON OFF ON ON OFF ON 78 OFF ON ON OFF OFF OFF ON
19 ON ON OFF ON ON OFF OFF 79 OFF ON ON OFF OFF OFF OFF
20 ON ON OFF ON OFF ON ON 80 OFF ON OFF ON ON ON ON
21 ON ON OFF ON OFF ON OFF 81 OFF ON OFF ON ON ON OFF
22 ON ON OFF ON OFF OFF ON 82 OFF ON OFF ON ON OFF ON
23 ON ON OFF ON OFF OFF OFF 83 OFF ON OFF ON ON OFF OFF
24 ON ON OFF OFF ON ON ON 84 OFF ON OFF ON OFF ON ON
25 ON ON OFF OFF ON ON OFF 85 OFF ON OFF ON OFF ON OFF
26 ON ON OFF OFF ON OFF ON 86 OFF ON OFF ON OFF OFF ON
27 ON ON OFF OFF ON OFF OFF 87 OFF ON OFF ON OFF OFF OFF
28 ON ON OFF OFF OFF ON ON 88 OFF ON OFF OFF ON ON ON
29 ON ON OFF OFF OFF ON OFF 89 OFFONOFFOFFON ONOFF
30 ON ON OFF OFF OFF OFF ON 90 OFF ON OFF OFF ON OFF ON
31 ON ON OFF OFF OFF OFF OFF 91 OFFONOFFOFFONOFFOFF
32 ON OFF ON ON ON ON ON 92 OFF ON OFF OFF OFF ON ON
33 ON OFF ON ON ON ON OFF 93 OFF ON OFF OFF OFF ON OFF
34 ON OFF ON ON ON OFF ON 94 OFF ON OFF OFF OFF OFF ON
35 ON OFF ON ON ON OFF OFF 95 OFF ON OFF OFF OFF OFF OFF
36 ON OFF ON ON OFF ON ON 96 OFF OFF ON ON ON ON ON
37 ON OFF ON ON OFF ON OFF 97 OFF OFF ON ON ON ON OFF
38 ON OFF ON ON OFF OFF ON 98 OFF OFF ON ON ON OFF ON
39 ON OFF ON ON OFF OFF OFF 99 OFF OFF ON ON ON OFF OFF
40 ON OFF ON OFF ON ON ON 100 OFF OFF ON ON OFF ON ON
41 ON OFF ON OFF ON ON OFF 101 OFF OFF ON ON OFF ON OFF
42 ON OFF ON OFF ON OFF ON 102 OFF OFF ON ON OFF OFF ON
43 ON OFF ON OFF ON OFF OFF 103 OFF OFF ON ON OFF OFF OFF
44 ON OFF ON OFF OFF ON ON 104 OFF OFF ON OFF ON ON ON
45 ON OFF ON OFF OFF ON OFF 105 OFF OFF ON OFF ON ON OFF
46 ON OFF ON OFF OFF OFF ON 106 OFF OFF ON OFF ON OFF ON
47 ON OFF ON OFF OFF OFF OFF 107 OFF OFF ON OFF ON OFF OFF
48 ON OFF OFF ON ON ON ON 108 OFF OFF ON OFF OFF ON ON
49 ON OFF OFF ON ON ON OFF 109 OFF OFF ON OFF OFF ON OFF
50 ON OFF OFF ON ON OFF ON 110 OFF OFF ON OFF OFF OFF ON
51 ON OFF OFF ON ON OFF OFF 111 OFFOFF ON OFFOFFOFFOFF
52 ON OFF OFF ON OFF ON ON 112 OFF OFF OFF ON ON ON ON
53 ON OFF OFF ON OFF ON OFF 113 OFFOFFOFFONONONOFF
54 ON OFF OFF ON OFF OFF ON 11 4 OFF OFF OFF ON ON OFF ON
55 ON OFF OFF ON OFF OFF OFF 115 OFF OFF OFF ON ON OFF OFF
56 ON OFF OFF OFF ON ON ON 116 OFF OFF OFF ON OFF ON ON
57 ON OFF OFF OFF ON ON OFF 117 OFF OFF OFF ON OFF ON OFF
58 ON OFF OFF OFF ON OFF ON 11 8 OFF OFF OFF ON OFF OFF ON
59 ON OFF OFF OFF ON OFF OFF 119 OFF OFF OFF ON OFF OFF OFF
60 ON OFF OFF OFF OFF ON ON
OFF
ON ON ON ON OFF OFF
7
Page 8

#8-32
screws
Trim plate
LCD
annunciator
2975-9463 or
2975-9464 Bracket
Keyswitch
User-defined
labels
6-gang box or
Mansonry box
#8-32
screws
Trim plate
LCD
annunciator
2975-9461 or
2975-9462 box
User-defined
labels
Keyswitch
Color Touchscreen LCD Annunciator Installation Instructions, Continued
Mounting
Instructions
1. Using the four provided screws, mount the annunciator in its back box (see Figure 6 for semiflush mounting and Figure 7 for surface mounting).
2. Label the separate user-defined labels with the appropriate designation.
3. Carefully pull the top of the label pocket forward and insert the user-defined labels.
4. Gently push on the trim plate to snap it in place, over the annunciator.
Verification
Procedure
Figure 6. Semi-flush mounting for retrofit installation
When the installation is completed, verify that the remote annunciator is working properly.
If the annunciator displays the message “Error communicating with Master” or if the annunciator
fails to power, check the wiring. If the wiring is correct, call technical support. If the annunciator
is not wired properly and is not communicating with the FACP, error messages are displayed and
an audible signal is emitted. Also, a card missing trouble is displayed at the FACP.
For Programming changes, please refer to the Programmer’s Manual, 579-1167.
Figure 7. Surface mounting
8
Page 9

Color Touchscreen LCD Annunciator Installation Instructions, Continued
Remote
Annunciator
Specifications
Table 7. Remote Annunciator Specifications
Operating Conditions:
Operating Temperature Range
Operating Humidity Range
Power Supply 24 VDC Nominal/18 VDC minimum at power input terminals of
Maximum Current Draw Backlight ON at 24 VDC: 70 mA
o
32
F - 120oF (0oC-49oC)
Up to 93% relative humidity at 100
annunciator to allow for wiring losses.
Backlight dimmed at 24 VDC: 45 mA
o
F (38oC), non-condensing.
9
Page 10

R
579-1172
Rev. A
 Loading...