

Page 1
UPGRADEABLE FLASH DRIVE
QUICK START
Congratulations on purchasing the Napster™
upgradeable flash drive from SimpleTech.
The Napster upgradeable flash drive works with virtually
any PC-compatible or Apple
USB port, running Microsoft
Unlike other flash drives on the market, you can increase the drive’s storage capacity by
simply installing a higher capacity Secure Digital™ (SD) or MultiMediaCard™ (MMC)
digital media card.
Whether you’re at home, at work, or on the road, with flash drive you can carry you most
important data wherever you go.
What You Should Have
• Napster upgradeable flash drive
• Digital media card
• 5 free song downloads from Napster (
• Free 2-week Napster To Go™ trial membership (see Napster insert for details)
• StorageSync CD
• USB extension cable
• Neck strap
• Quick Start guide (this guide)
If any item is missing or damaged, contact your local reseller or retailer for replacement.
This quick start guide includes instructions for connecting and using the Napster
flash drive with Windows and Macintosh computers. You may also want to consult
your computer’s user manual to determine if there are any additional instructions
related to the installation and use of USB devices.
®
Macintosh® computer with a
®
Windows® 98SE, ME, 2000, XP or Mac OS®9.2 and later.
see Napster insert for details)
Page 2
MINIMUM SYSTEM REQUIREMENTS
®
Windows
Users
•
Pentium® class, 200MHz PC or compatible•iMac®, G3, G4, G5 and iBook
•
32MB RAM (or as required by system)
•
Windows 98SE, ME, 2000, XP
•
Available USB 2.0/1.1 port
®
Mac
Users
•
32MB RAM (or as required by system)
•
Mac OS 9.2 and later
•
Available USB 2.0/1.1 port
®
INSTALLATION REQUIREMENTS
No tools or special equipment are required to install the flash drive.
Windows ME, 2000 and XP
No drivers are required. Plug the flash drive into an available USB port and Windows will
install the files needed to use the drive.
Windows 98SE
Go to www.simpletech.com/support and download the Windows 98SE driver for the
Napster flash drive to your local computer. To install the driver, double-click on the
downloaded file and follow the on-screen instructions. When installation completes,
restart your computer.
Mac OS 9.2 and later
No drivers are required. Plug the flash drive into an available USB port and your
computer will automatically detect the drive.
For optimal performance, install the latest updates from Apple on your
computer. Download the updates from www.apple.com or open the software
update tool located in the Mac OS X system preferences folder. In Mac OS 9,
the software update tool is located in the control panel folder.
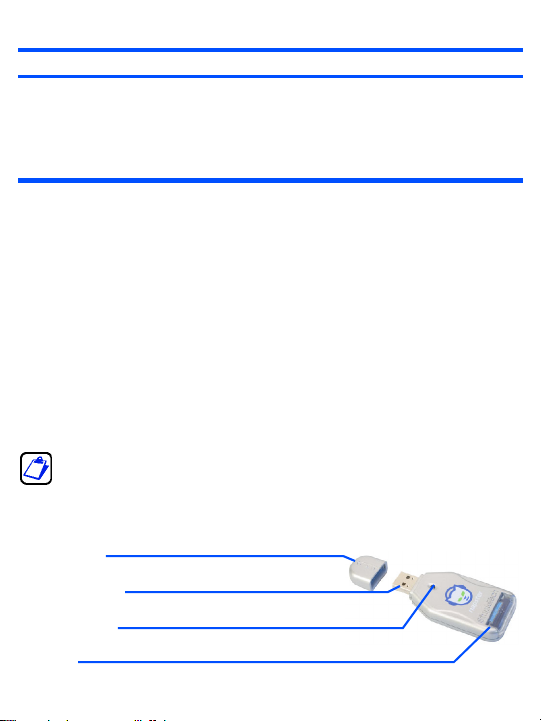
VISUAL TOUR
Protective Cap
Protects USB plug when the flash drive is not in use.
USB Plug (Type A)
USB interface for connecting the flash drive to your computer.
Activity Indicator
Illuminates to indicate drive read/write activity.
Card Slot
Port for inserting digital media cards into the flash drive.
2
Page 3

INSTALLING THE DIGITAL MEDIA CARD
1 Open the card slot cover. To open the cover,
slide the cover toward the rear of the flash
drive, then lift and rotate it to the open
position.
2 With the label side facing up, slide the media
card into the card slot until you hear a “click”—
indicating that the card is properly seated.
3 Close the card slot cover.
To remove a media card, press the card into the spring loaded card slot. When you hear
a click, release the card, then remove it from the card slot. Close the card slot cover.
Setting Write Protection
The Secure Digital (SD) media card included with the
flash drive has a write protection switch to prevent users
from accidentally erasing the data on the card. To
enable write protection, slide the switch aft to the locked
position. To disable write protection, slide the switch
forward to the unlocked position.
When write protection is enabled, you cannot
format or write data to the digital media card.
Write
Protect
Switch
Card Slot
Cover
Lock
Digital
Media
Card
CONNECTING THE FLASH DRIVE
Remove the protective cap, then plug the flash drive
into the USB connector on your computer.
If you are running Windows 98SE, install the
Windows 98SE driver before connecting flash
drive to your computer.
SimpleTech recommends that you avoid using
the USB port on Macintosh computer keyboards.
This port may not have enough power to
adequately support the USB 2.0 interface.
3
Page 4

If necessary, use the USB extension cable to connect the flash drive to your computer.
To connect using the USB extension cable, connect the larger socket end of the
extension cable to the flash drive. Plug the other end of the cable into the computer’s
USB port.
VIEWING FILES ON THE FLASH DRIVE
You can save, copy, move and delete files on the flash drive just as you would on any
other drive on your computer.
Viewing Files in Windows
In Windows Explorer, the Napster
flash drive appears as a “Removable
Disk”, mapped to your computer. To
access files on the flash drive, open
My Computer to view the storage
devices attached to your computer.
Then, click the flash drive’s disk icon
(the drive letter assigned to the flash
drive depends on the computer’s
hardware configuration).
Viewing Files in Mac OS
In Mac OS Finder, the Napster
flash drive is represented by a
drive icon on the desktop.
Unnamed drives display as a
“NO NAME” drive. To access
files on the flash drive, doubleclick on the drive’s desktop
icon.
4
 Loading...