

Page 1
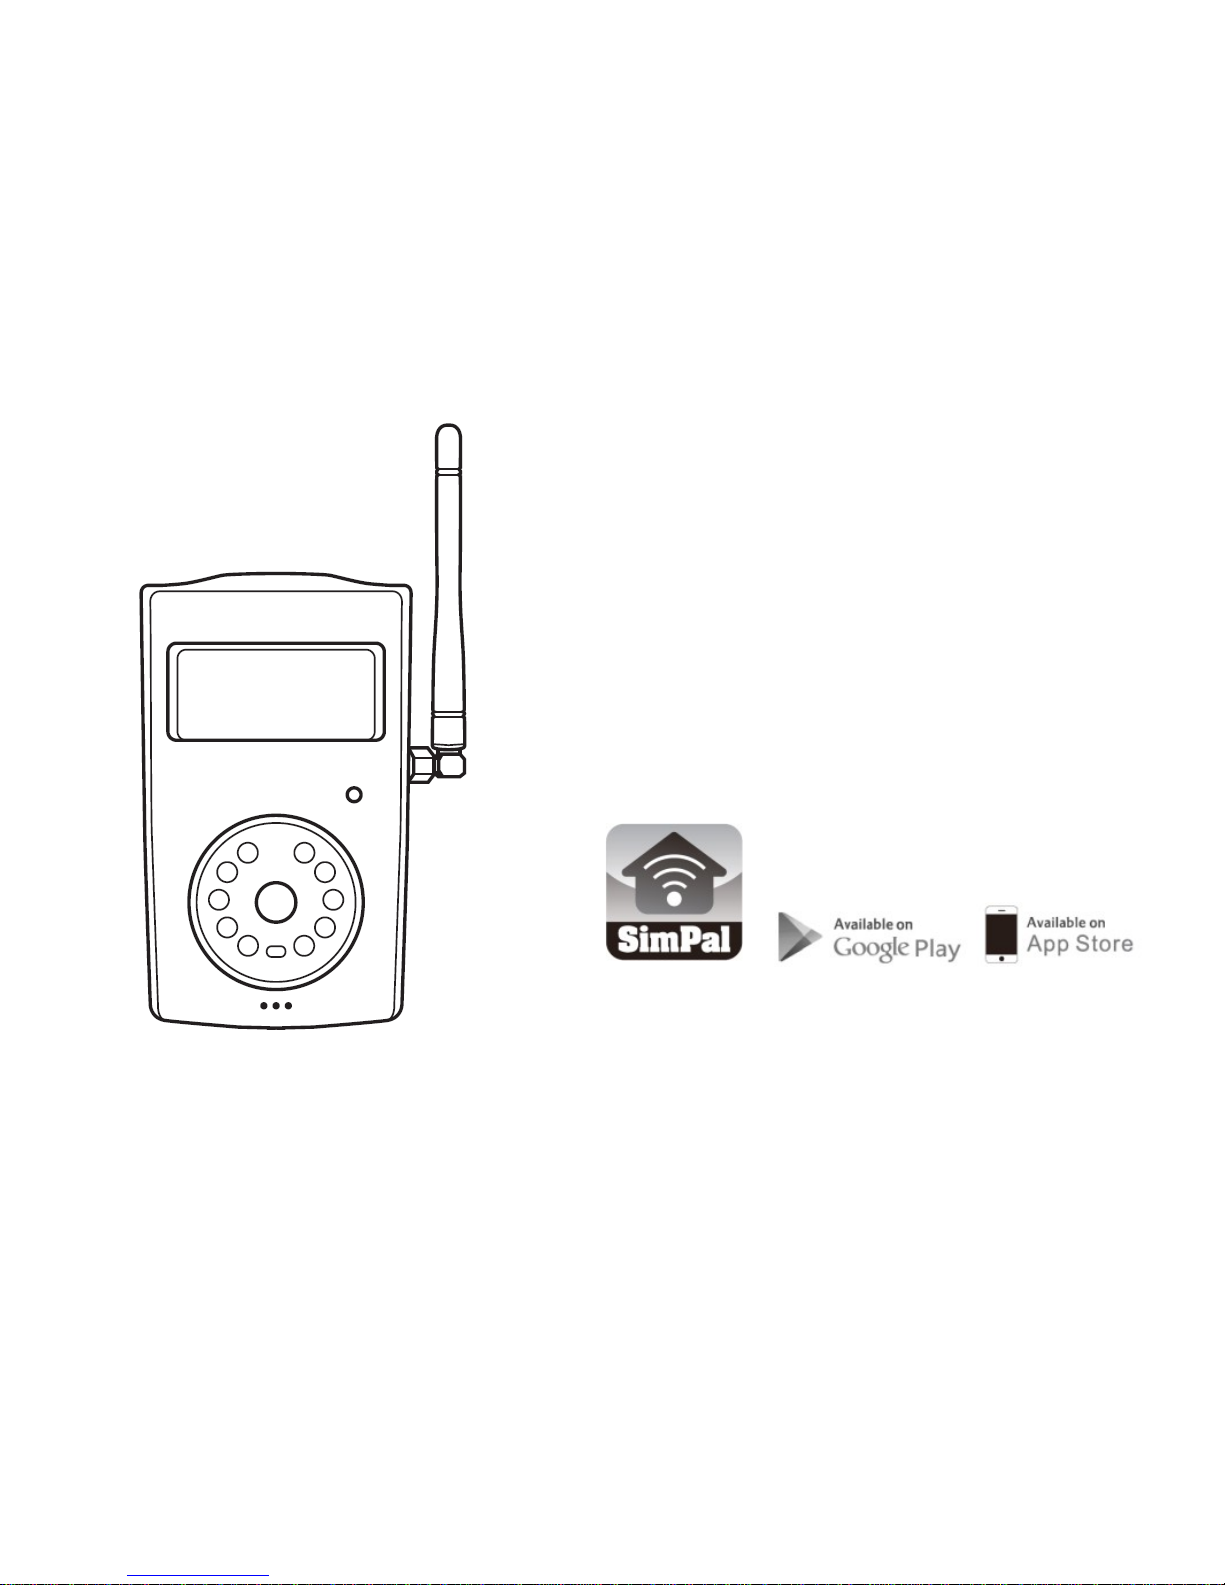
SimPal-G4
Security Camera
User Manual
Manual version 2.2
APP Management and Settings
SimPal-G4
Page 2

SimPal-G4 Security Camera User Manual
SimPal-G4 security Camera
SimPal-G4 camera is a remote image-capturing device, schedule send
images to your e-mail. With built-in PIR detector, connecting 16pcs
wireless sensor, once motion detected or sensor trigger, auto sending
images to your e-mail.
Stand alone working camera, sending images to e-mail via WiFi network.
Even WiFi no available, it can sending images via GPRS/HSDPA/UMTS
by install GSM SIM card on camera. SMS, voice calling support when SIM
card installed.
Details of the function and advanced operation of this camera are
described in this instruction manual.
2
Page 3

SimPal-G4 Security Camera User Manual
CHAPTER 1 STRUCTURE INSTRUCTION ...................................................................... 4
1.1 Package contents ....................................................... 4
1.2 Products instructions ................................................. 4
1.3 Light indicator and Beeper ........................................ 5
CHAPTER 2 INSTALLATION ............................................................................................ 6
2.1 Accessories installation ............................................. 6
2.2 The power adapter and battery ................................. 6
2.3 Install mounting bracket ............................................ 8
CHAPTER 3 START TO USE CAMERA .......................................................................... 9
3.1 Power on/ off ............................................................... 9
3.2 Set phone number and receiver e-mail address ...... 9
3.3 Set WiFi and GRPS network .................................... 10
3.4 Adjust camera date time ........................................... 11
3
Page 4

SimPal-G4 Security Camera User Manual
3.5 Capture images to e-mail ......................................... 12
3.6 Schedule send images ............................................. 12
3.7 Motion detection alarm ............................................ 13
3.7 Pairing remote control .............................................. 14
3.8 Pairing wireless sensors .......................................... 15
CHAPTER 4 ADVANCED SETTINGS ............................................................................ 17
4.1 Voice call alert ........................................................... 17
4.2 Configure sender e-mail ........................................... 17
4.3 Temperature alarm .................................................... 18
4.4 LED status indicator ................................................. 19
4.5 Night vision LED lights ............................................. 19
4.6 Reset to factory settings .......................................... 20
CHAPTER 5 MAIN TECHNICAL PARAMETERS .......................................................... 21
4
Page 5

SimPal-G4 Security Camera User Manual
1. First time use, need to install SIM card to set WiFi and e-mail
account.
2. After set WiFi and e-mail, it can remove SIM card, camera only
working at WiFi network. Auto sending images e-mail when
motion detected or schedule send images e-mail according
settings.
3. SMS and voice calling alarm support by install SIM card, the
operator will charge for SMS and voice calling service.
5
Page 6
SimPal-G4 Security Camera User Manual
4. This product is a wireless signal transmission device. Keep it
away from area which no allow wireless signals.
Chapter 1 Structure instruction
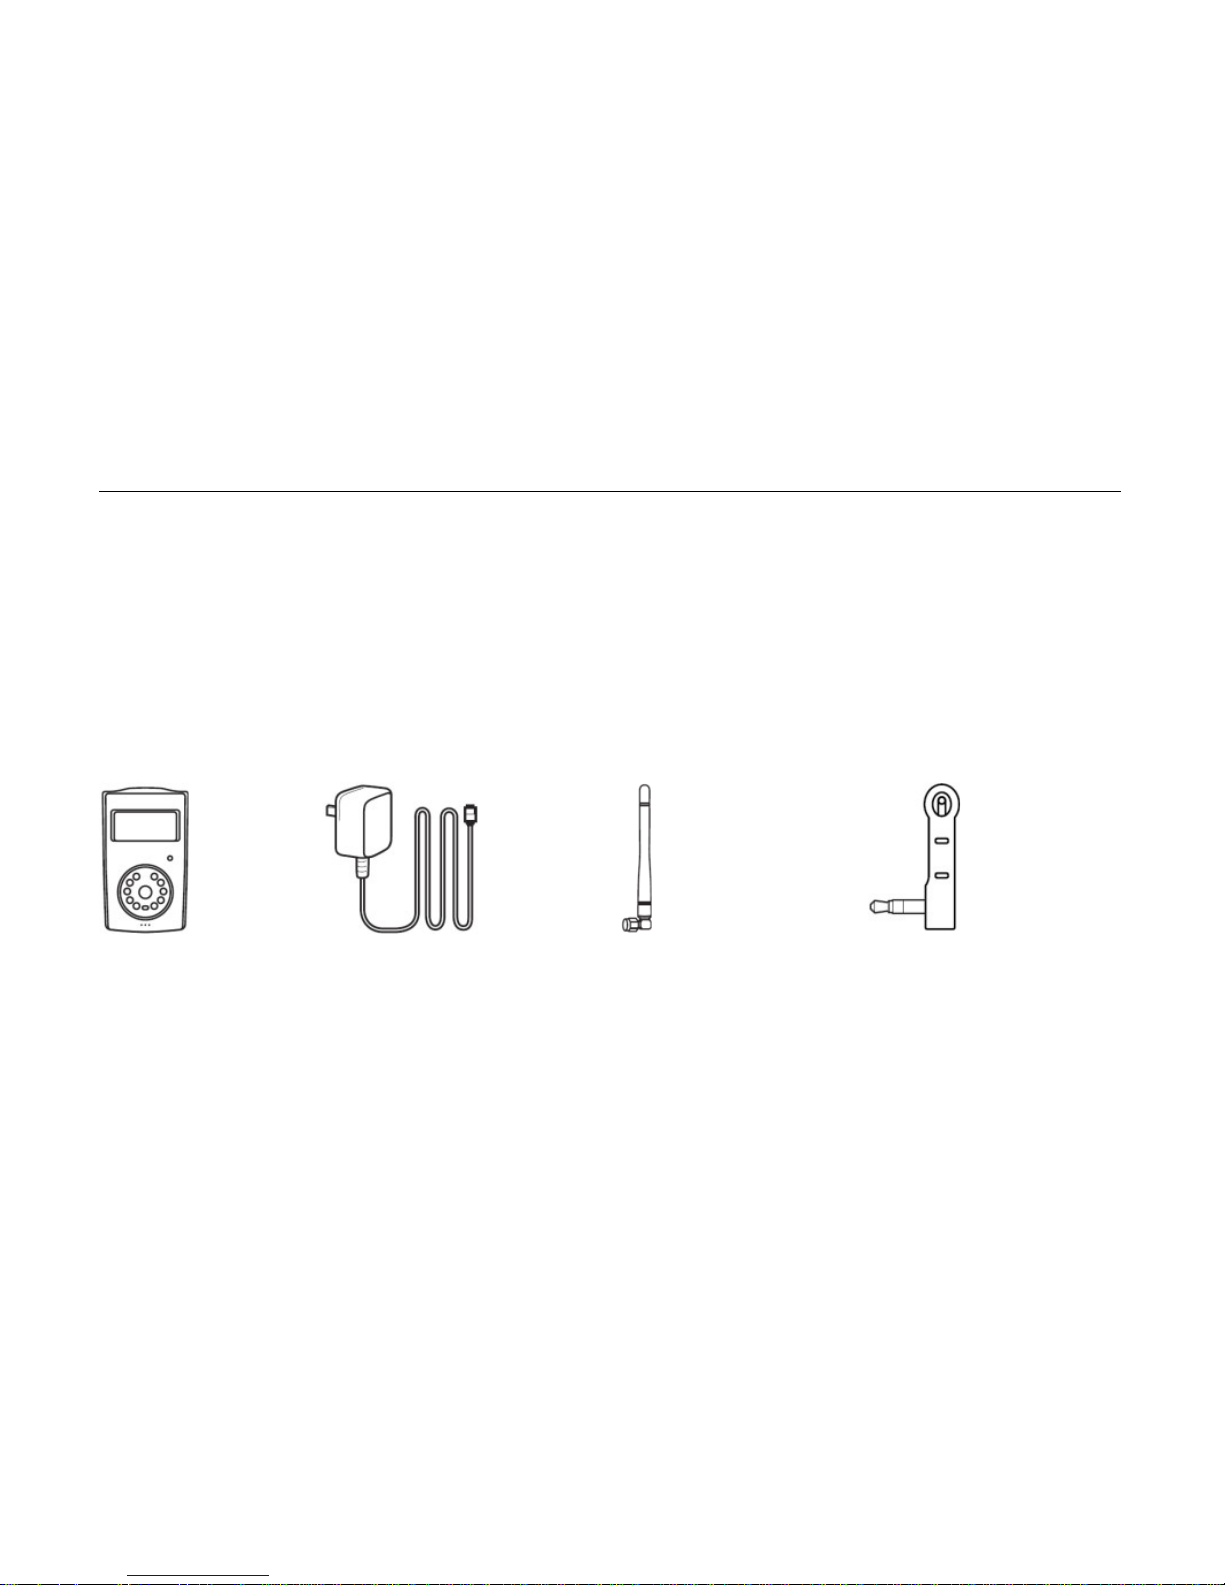
1.1 Package contents
Camera main unit
1 unit
Power adapter(12V/1A)
1 pcs
GSM antenna
1 pcs
Temperature sensor
1 pcs
6
Page 7
SimPal-G4 Security Camera User Manual
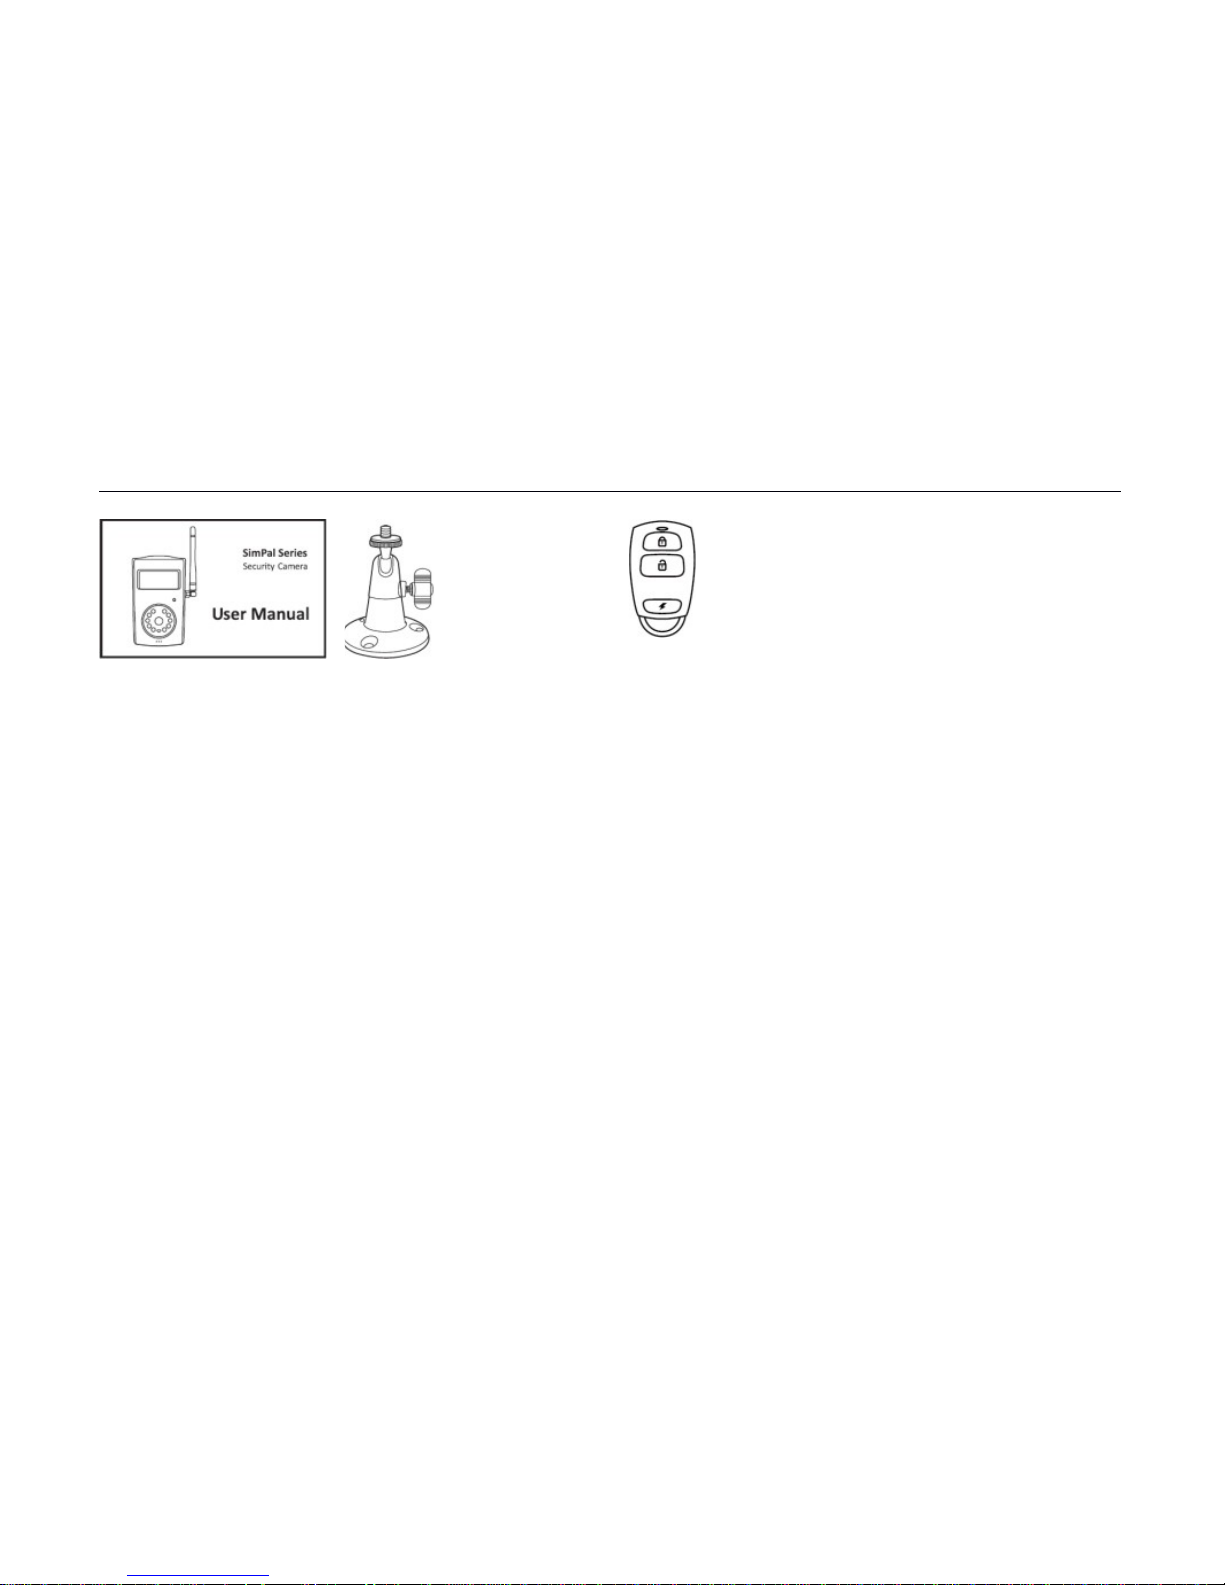
User manual
1 pcs
Mounting bracket
1 set
Remote control
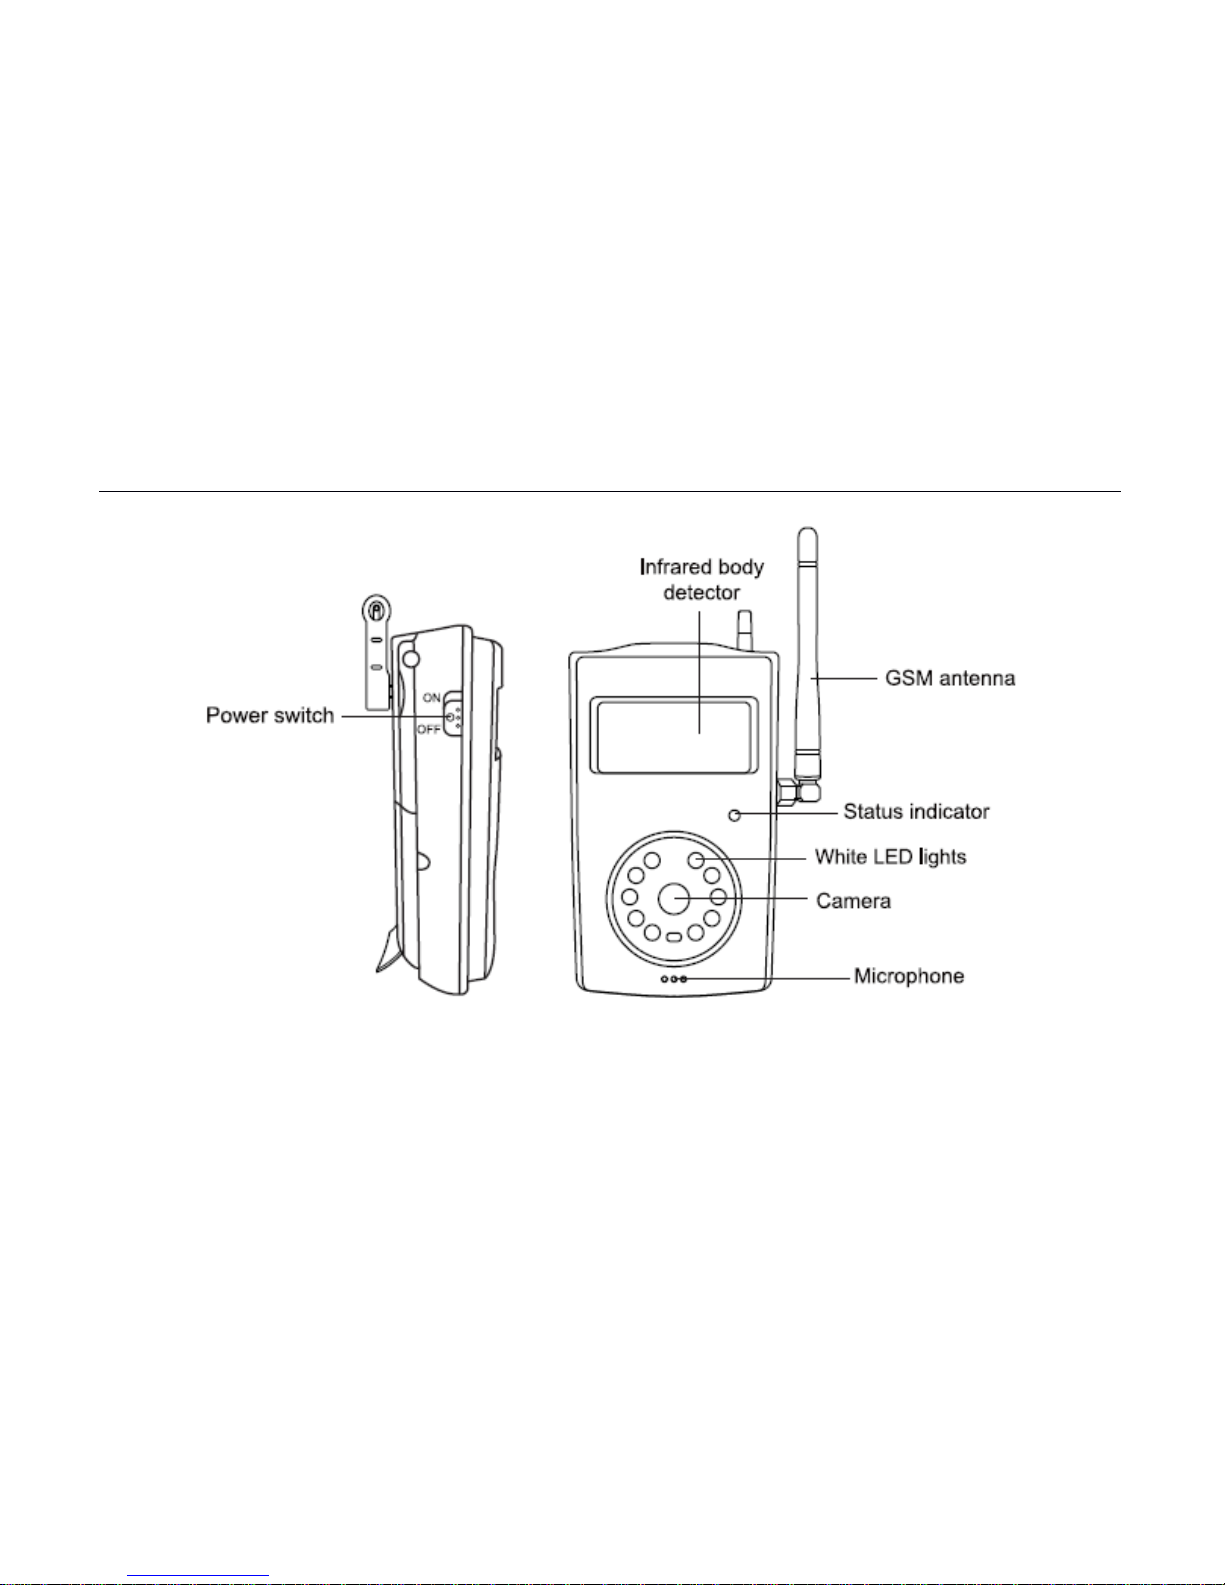
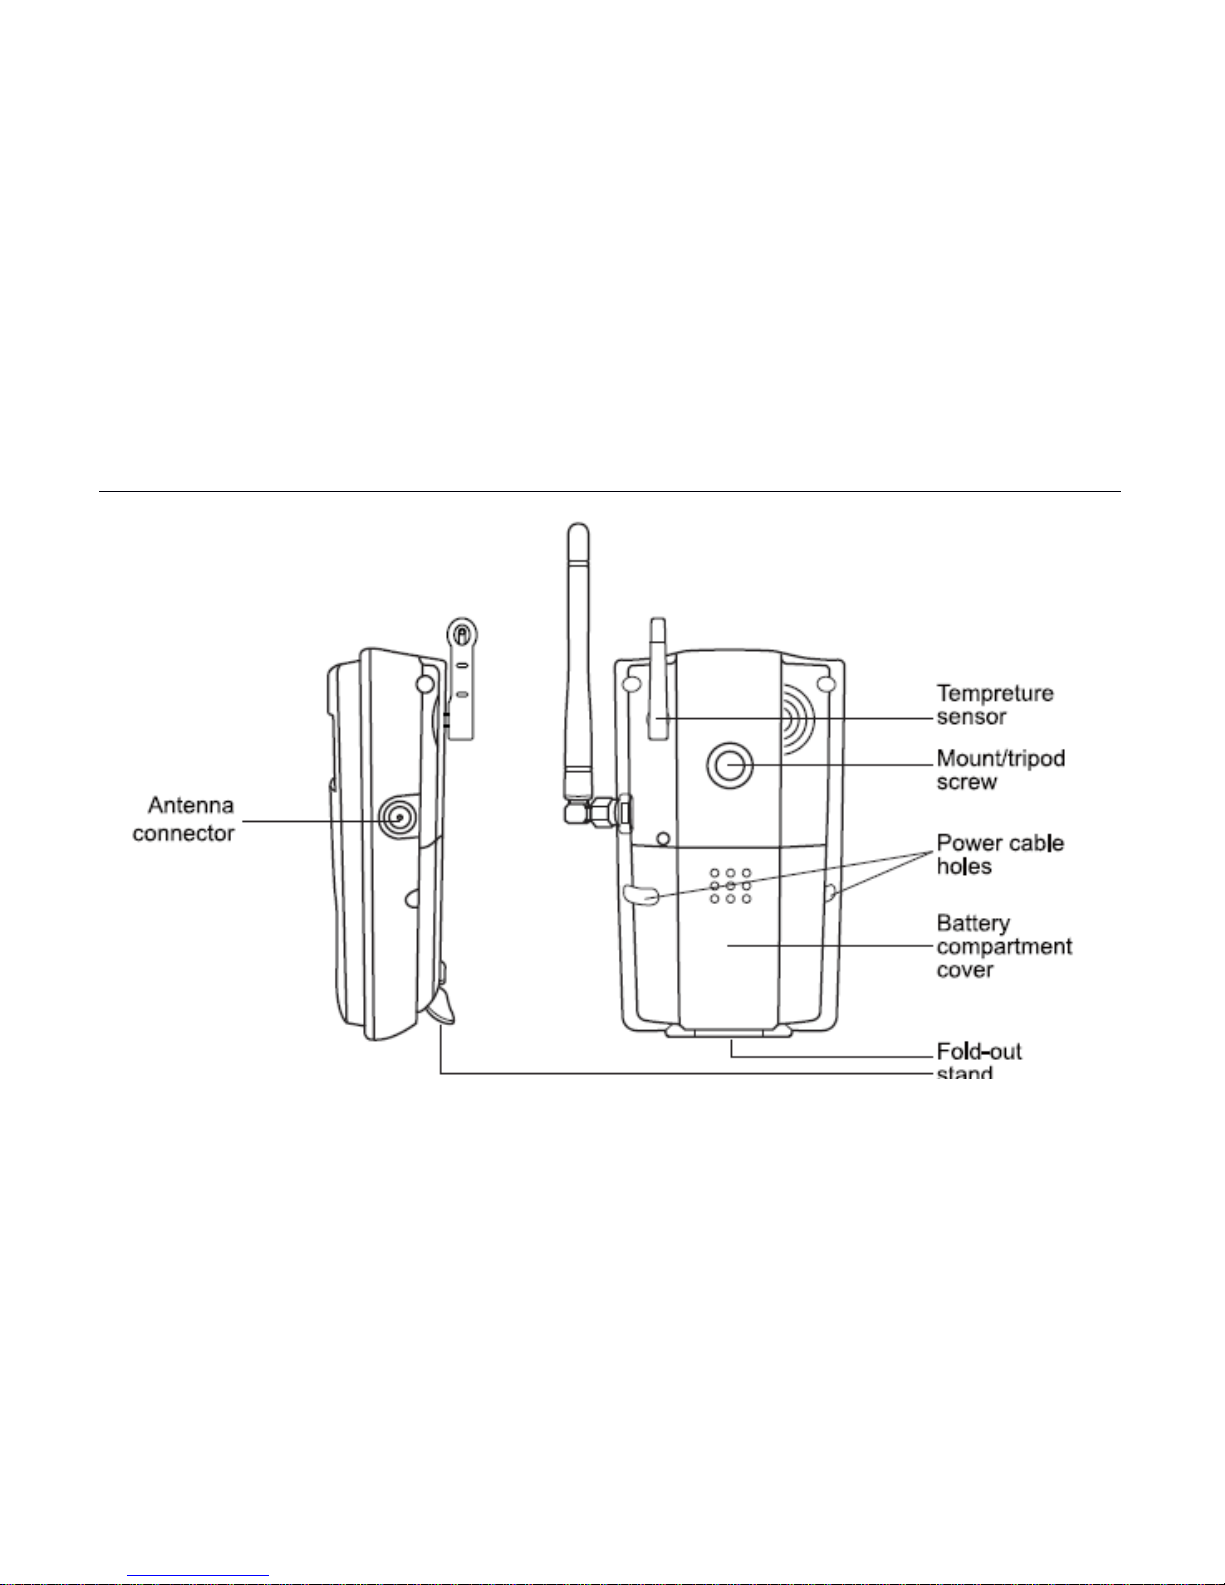
1.2 Products instructions
7
Page 8
SimPal-G4 Security Camera User Manual
8
Page 9
SimPal-G4 Security Camera User Manual
9
Page 10
SimPal-G4 Security Camera User Manual
Figure 1: SimPal camera instructions
Tip: Keep the camera lens clean to insure best imaging quality.
10
Page 11
SimPal-G4 Security Camera User Manual
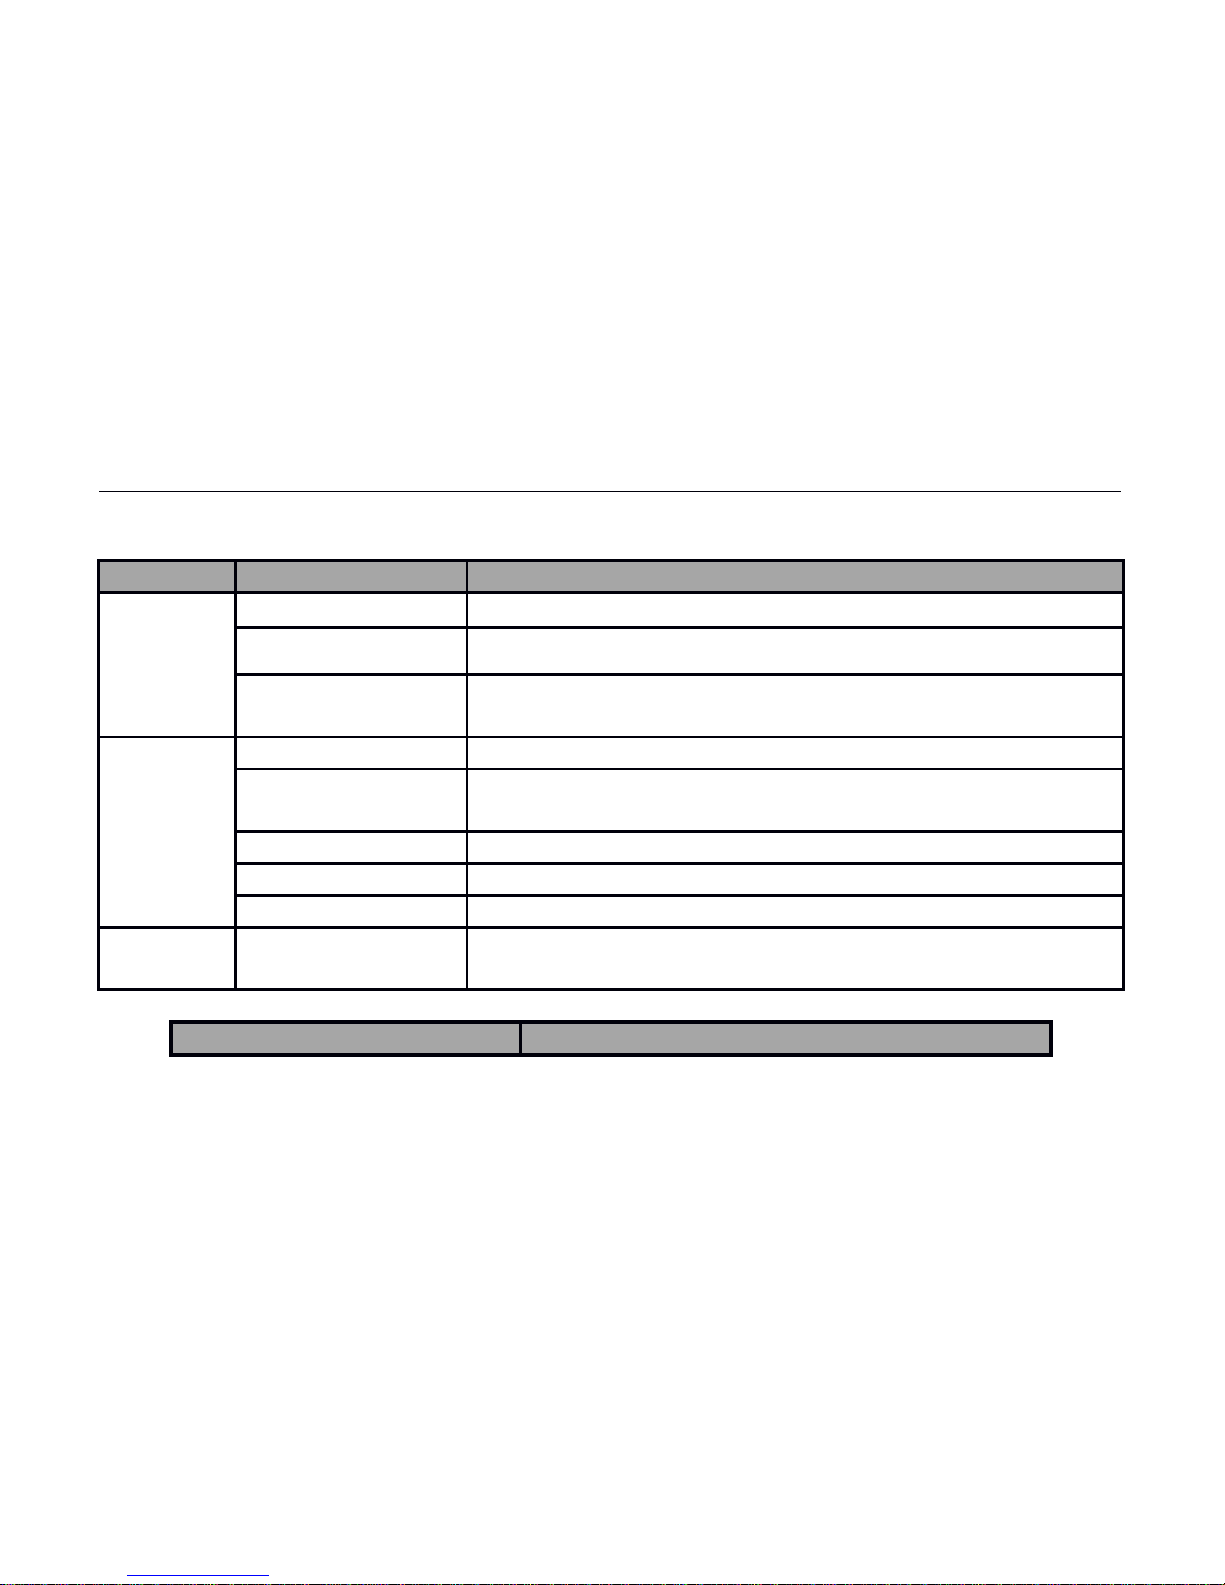
1.3 Light indicator and Beeper
Color Action Status
Red
Flash slowly Searching the network.
Flash quickly Sensor alarm or PIR alarm.
Constant Light
Can not register GSM or WiFi network, or the remote
camera damaged.
Green
Constant Light Armed status.
Flash twice per
2 seconds
Alarm-suspension status
Flash slowly Disarm status.
Flash quickly Sending SMS or e-mail
Light 2 seconds Successfully reset factory setting
Red and
Green
Two color lights
alternately
Loading sensor or Pairing remote control
Note: Slow flash 1 time per second, quick flash 2 times per second.
Beeper Status
11
Page 12

SimPal-G4 Security Camera User Manual
Long beep (2 seconds) Register GSM or WiFi network success
Short beep
Enter sensor loading mode
Enter remote control pairing mode
Sensor pair success
Remote control pair success
Arm by remote control
Short beep twice Disarm by remote control
Short beep three times
Sensor already paired
Remote control already pared
Sensor reach max quantity 16pcs
Remote control reach max quantity 5pcs
12
Page 13

SimPal-G4 Security Camera User Manual
Chapter 2 Installation
2.1 Accessories installation
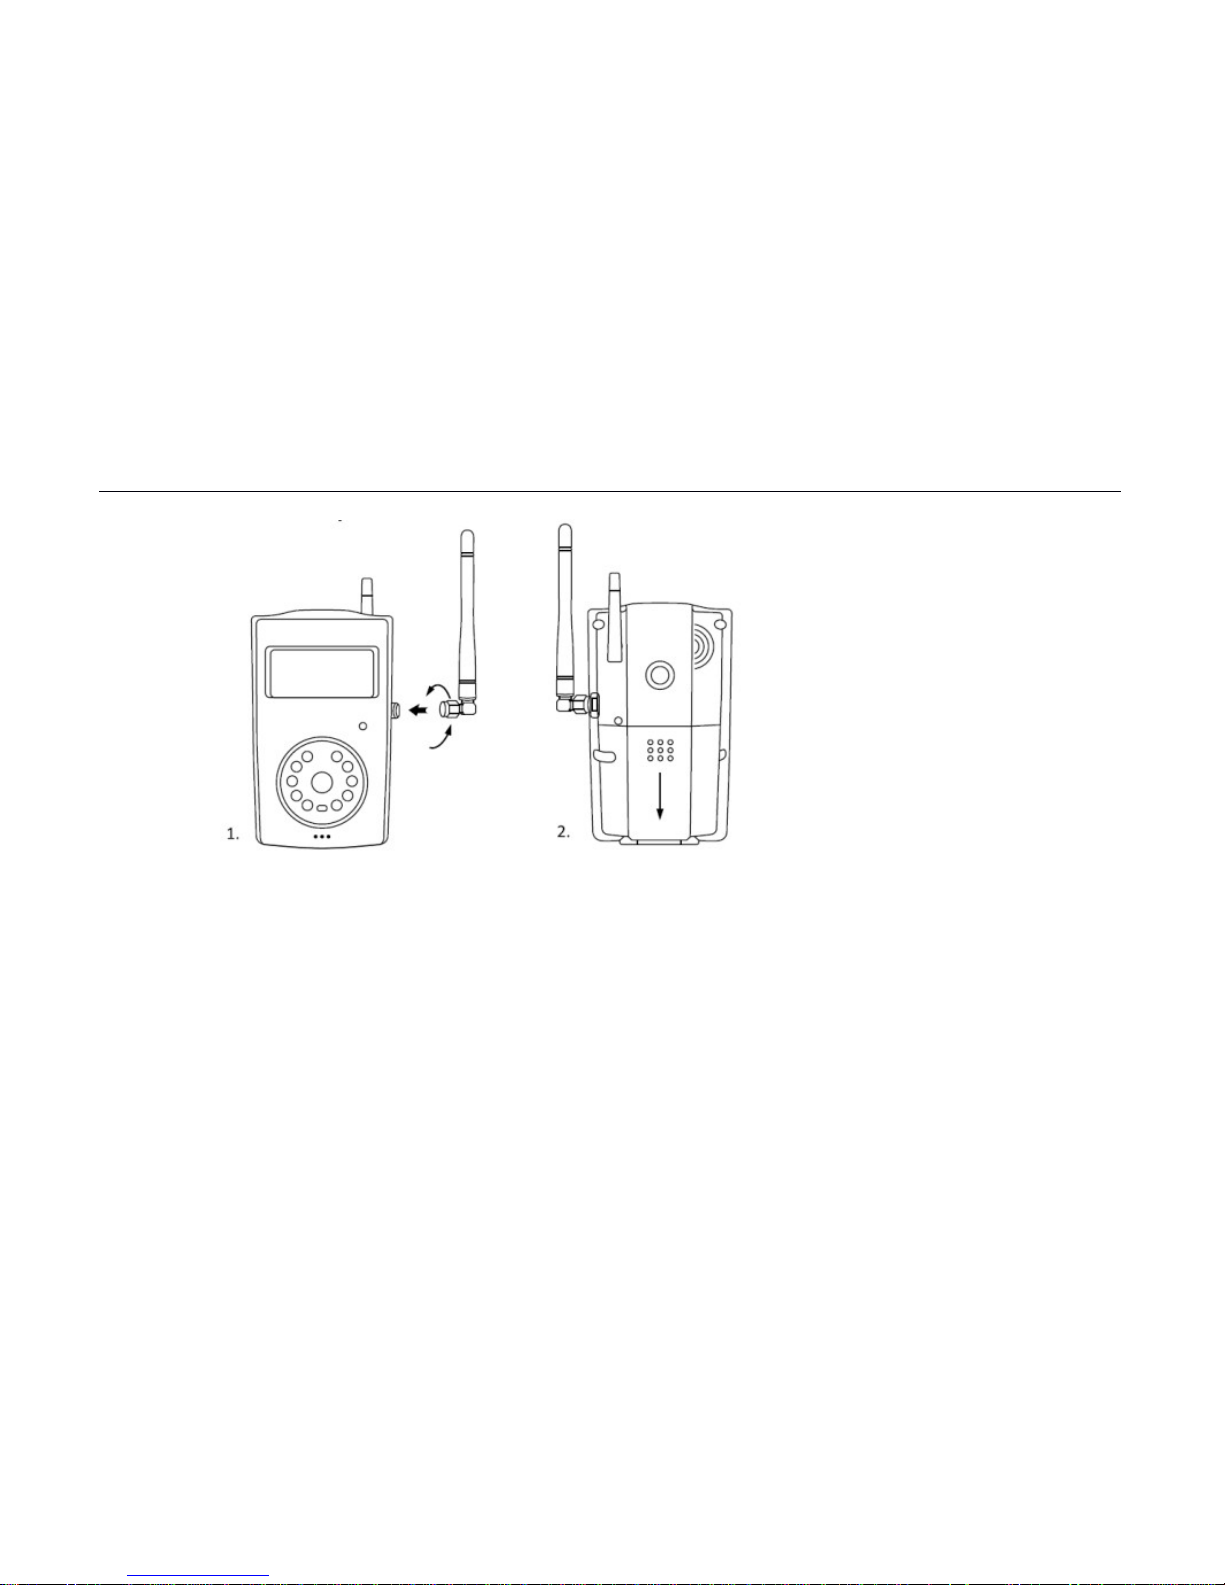
Installing the antenna
Mount the supplied antenna into the Antenna Connector on the camera.
13
Page 14
SimPal-G4 Security Camera User Manual
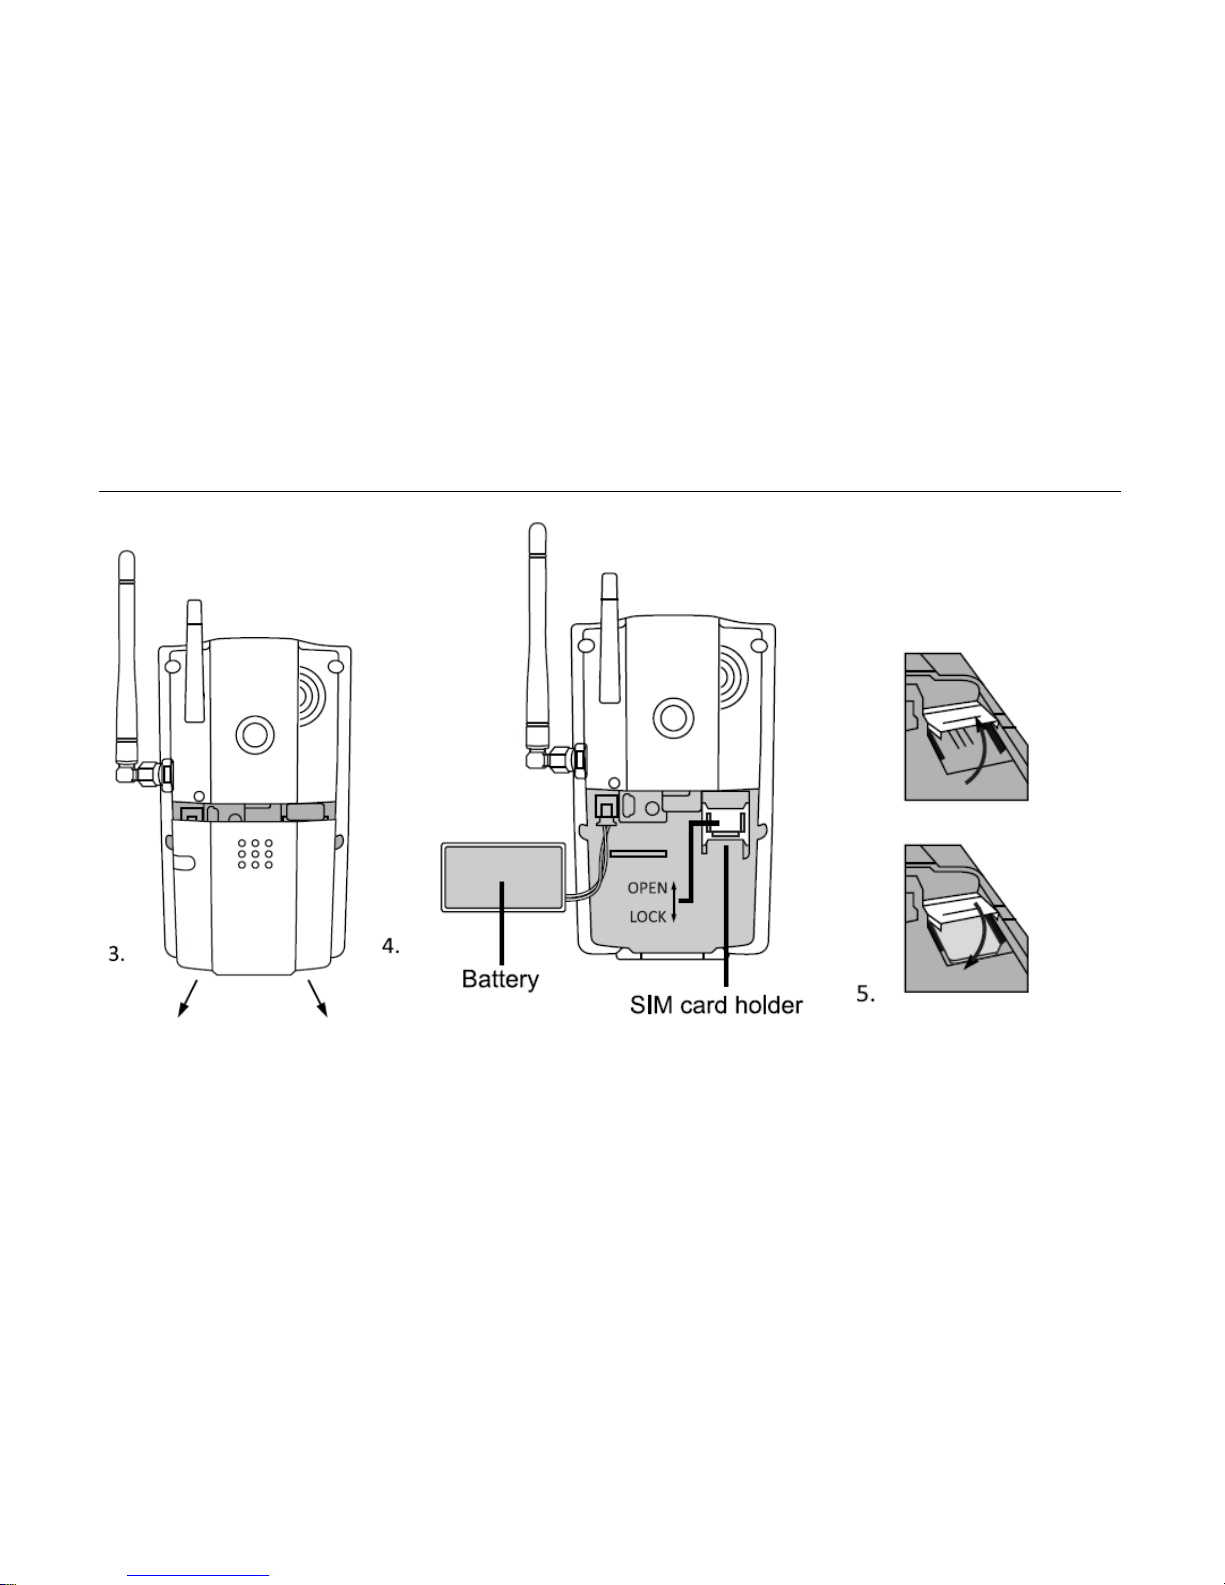
Installing the SIM card
14
Page 15
SimPal-G4 Security Camera User Manual
15
Page 16

SimPal-G4 Security Camera User Manual
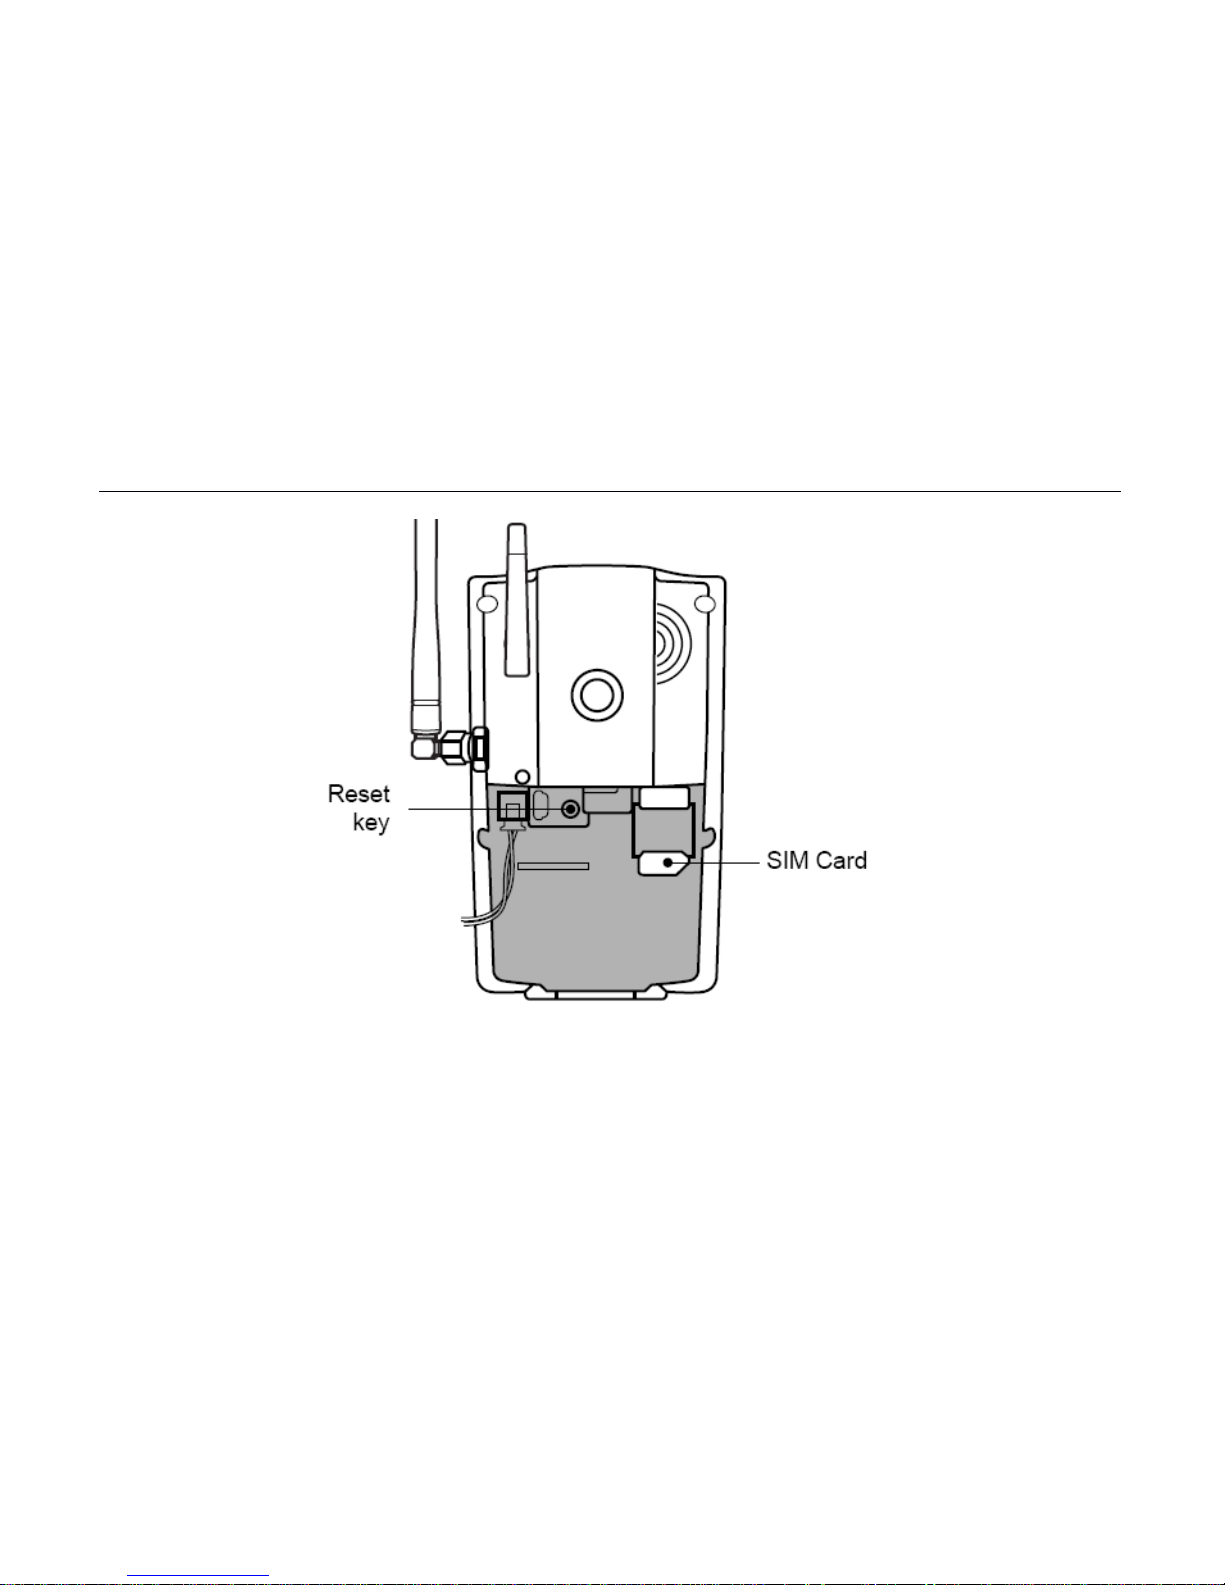
Remove the Battery Compartment Cover from the rare of camera and a SIM
card holder will be found.
Open the SIM card holder.
Insert the SIM card carefully into the card holder. Make sure that the golden
connectors on the card are facing downwards.
Close the SIM card holder.
Mount the Battery Compartment Cover
2.2 The power adapter and battery
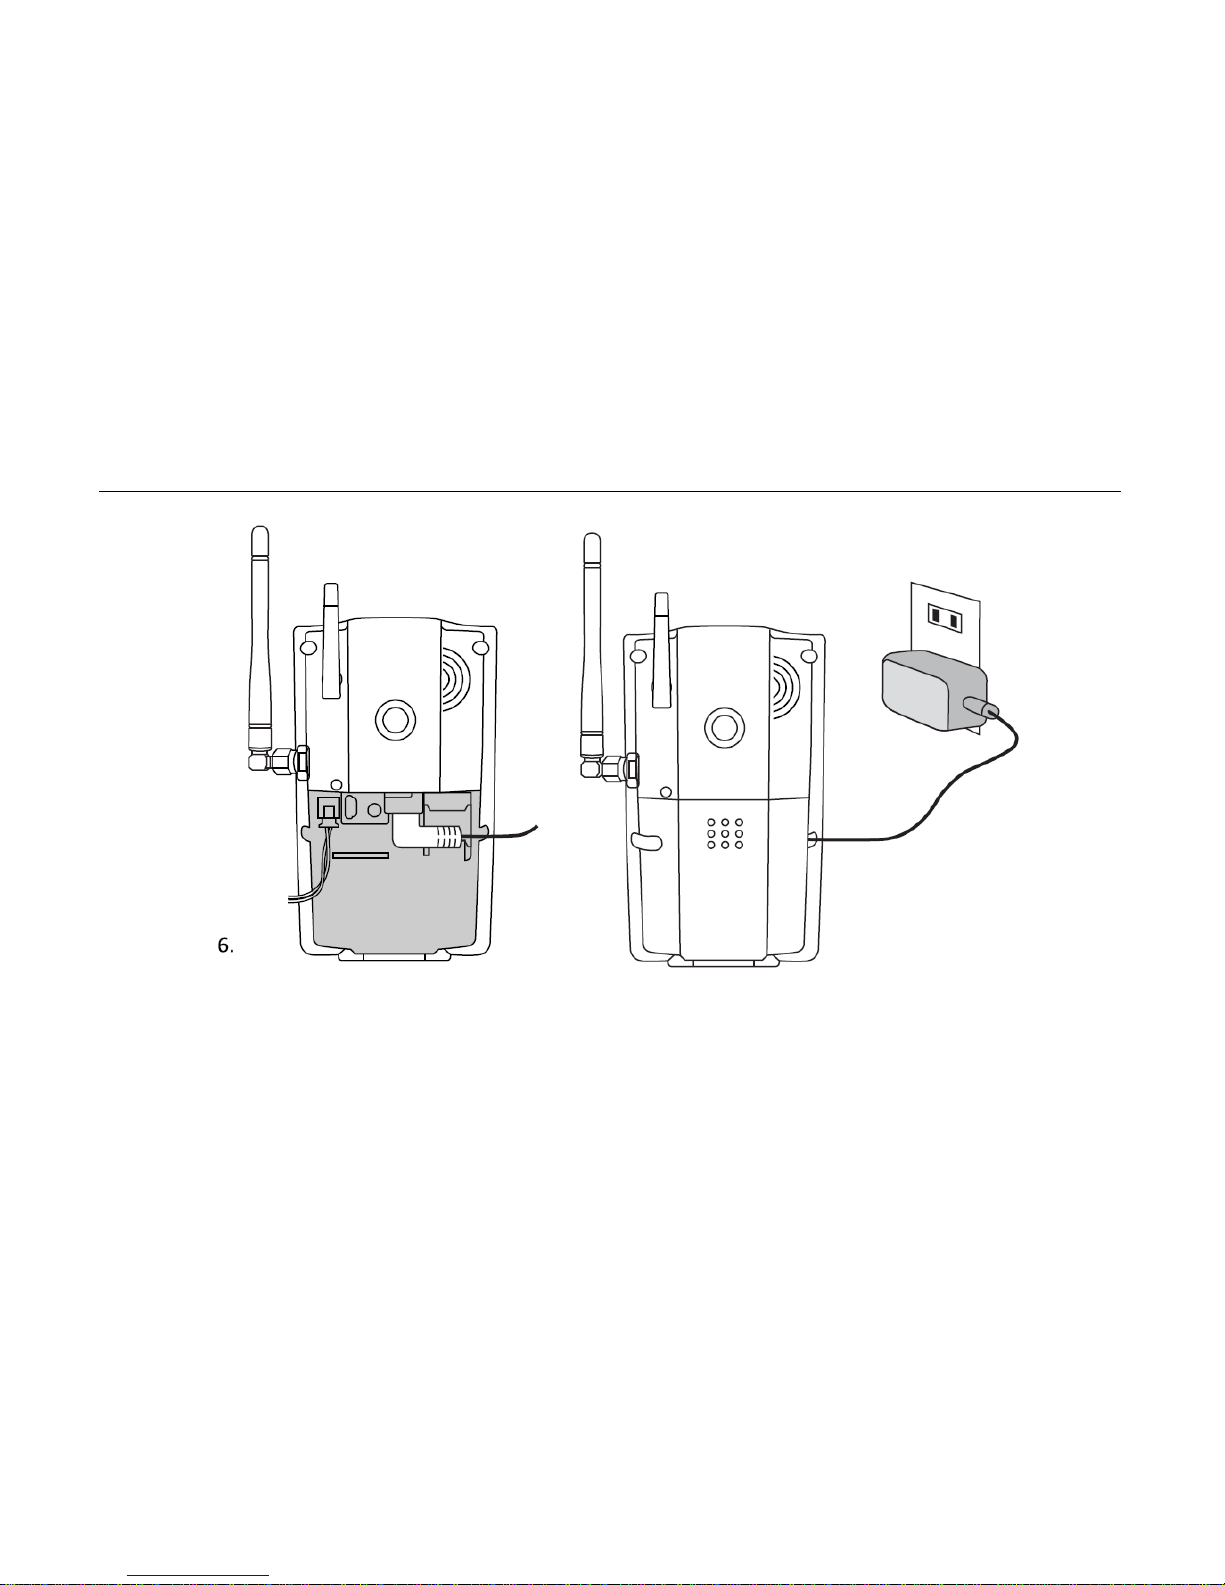
Connecting to the power adapter
16
Page 17
SimPal-G4 Security Camera User Manual
Plug power connector to camera DC power interface and connect the adapter
17
Page 18
SimPal-G4 Security Camera User Manual
to an AC power.
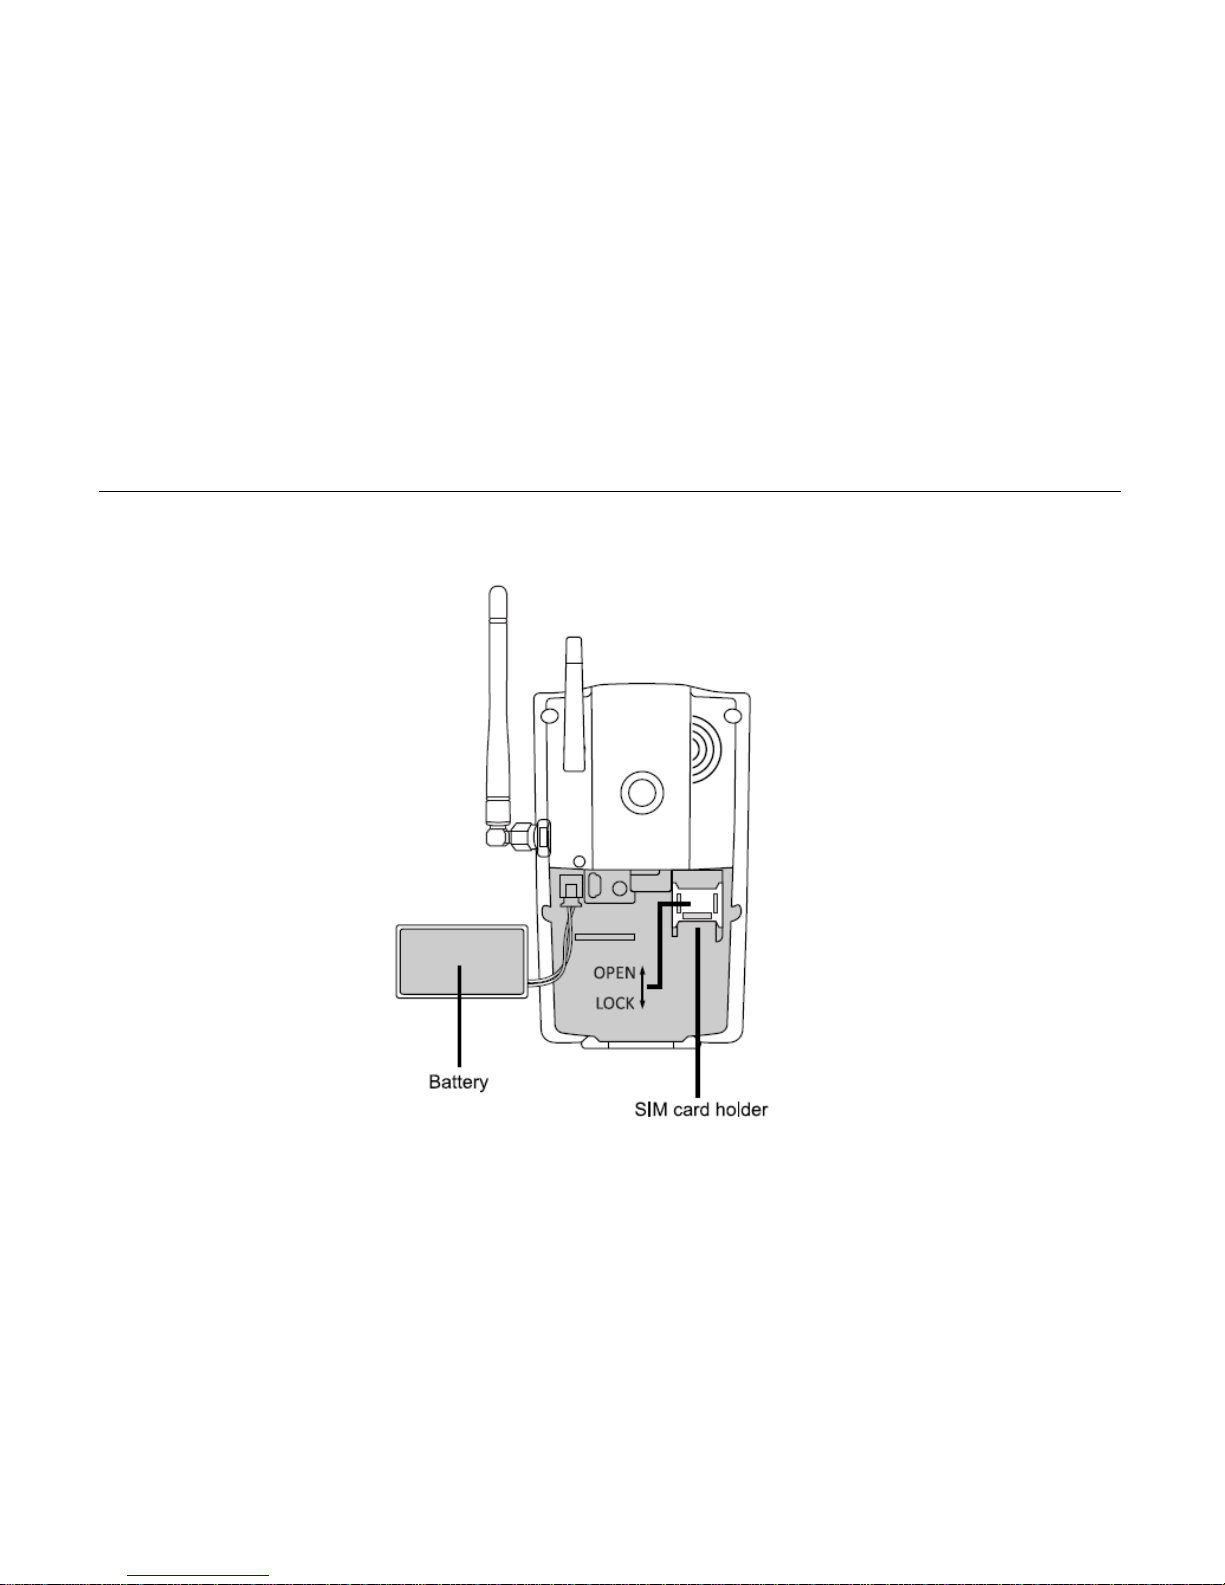
built-in rechargeable Lithium battery
18
Page 19
SimPal-G4 Security Camera User Manual
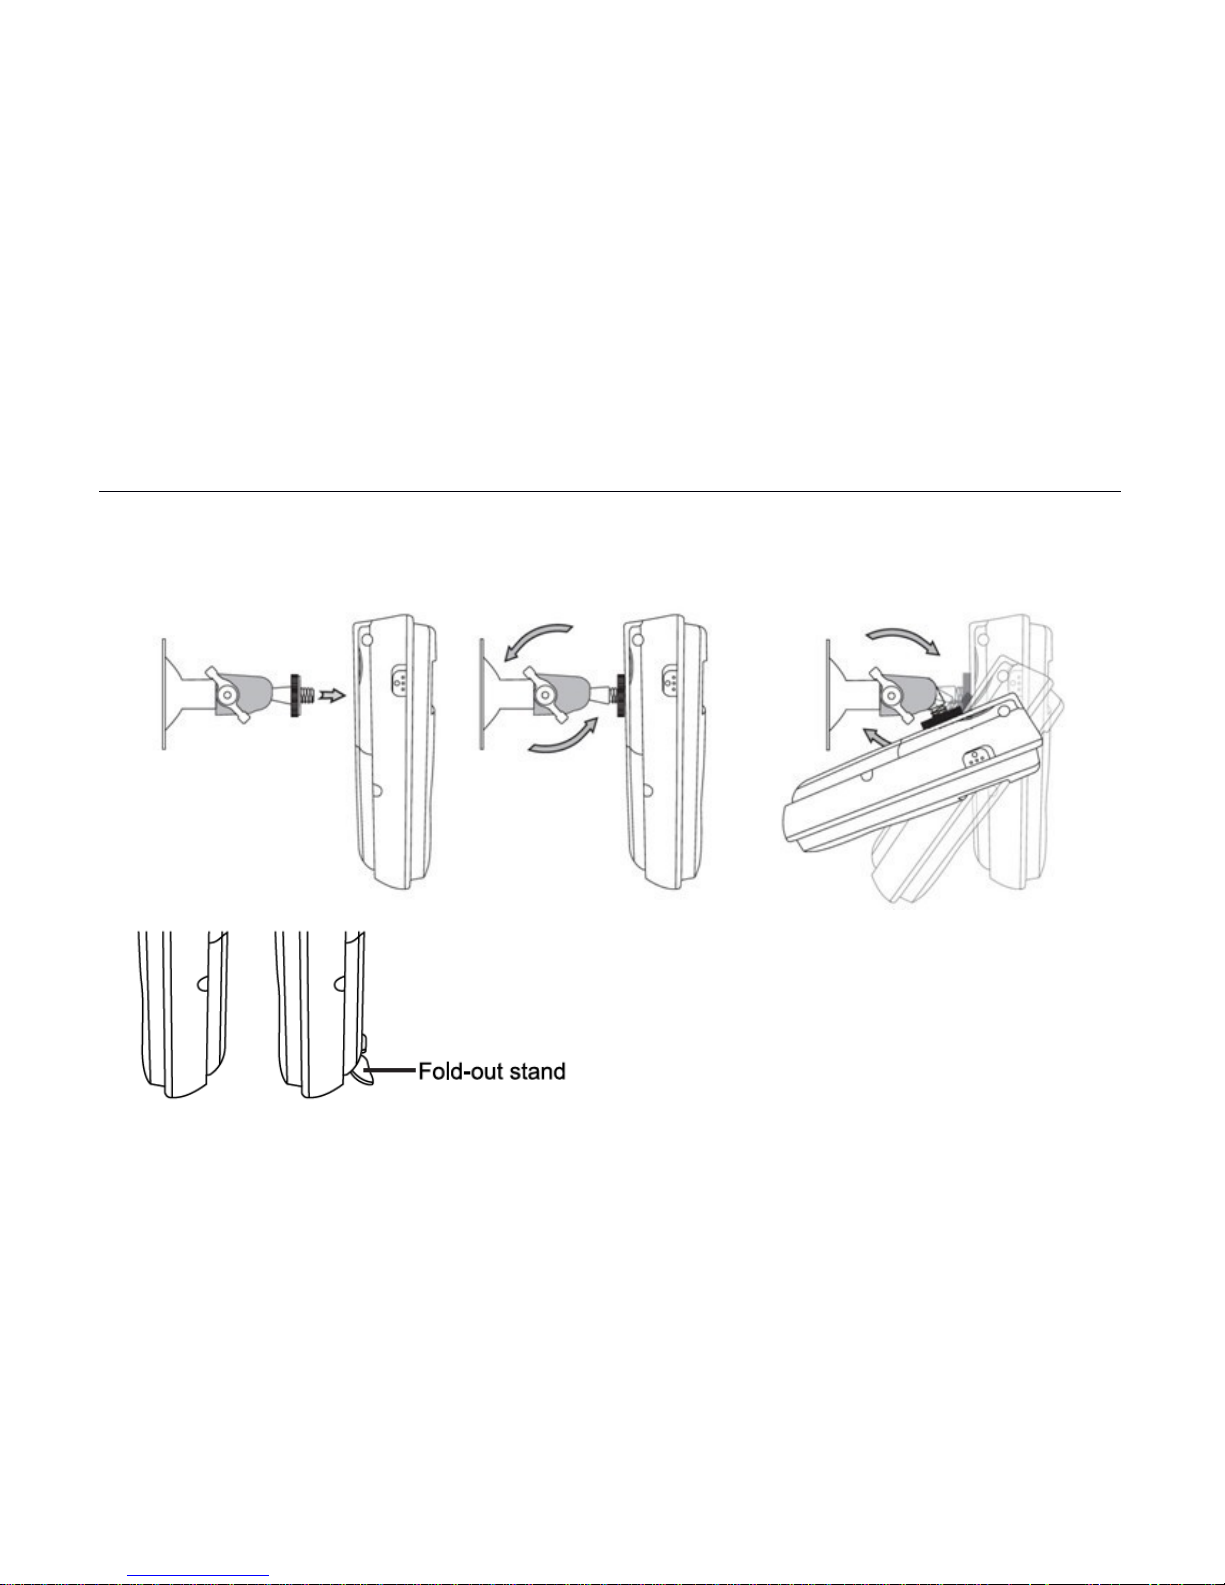
2.3 Install mounting bracket
The camera has a bottom bracket
by
19
Page 20

SimPal-G4 Security Camera User Manual
which it can stand on the table.
20
Page 21
SimPal-G4 Security Camera User Manual
Chapter 3 Start to use camera
3.1 Power on/ off
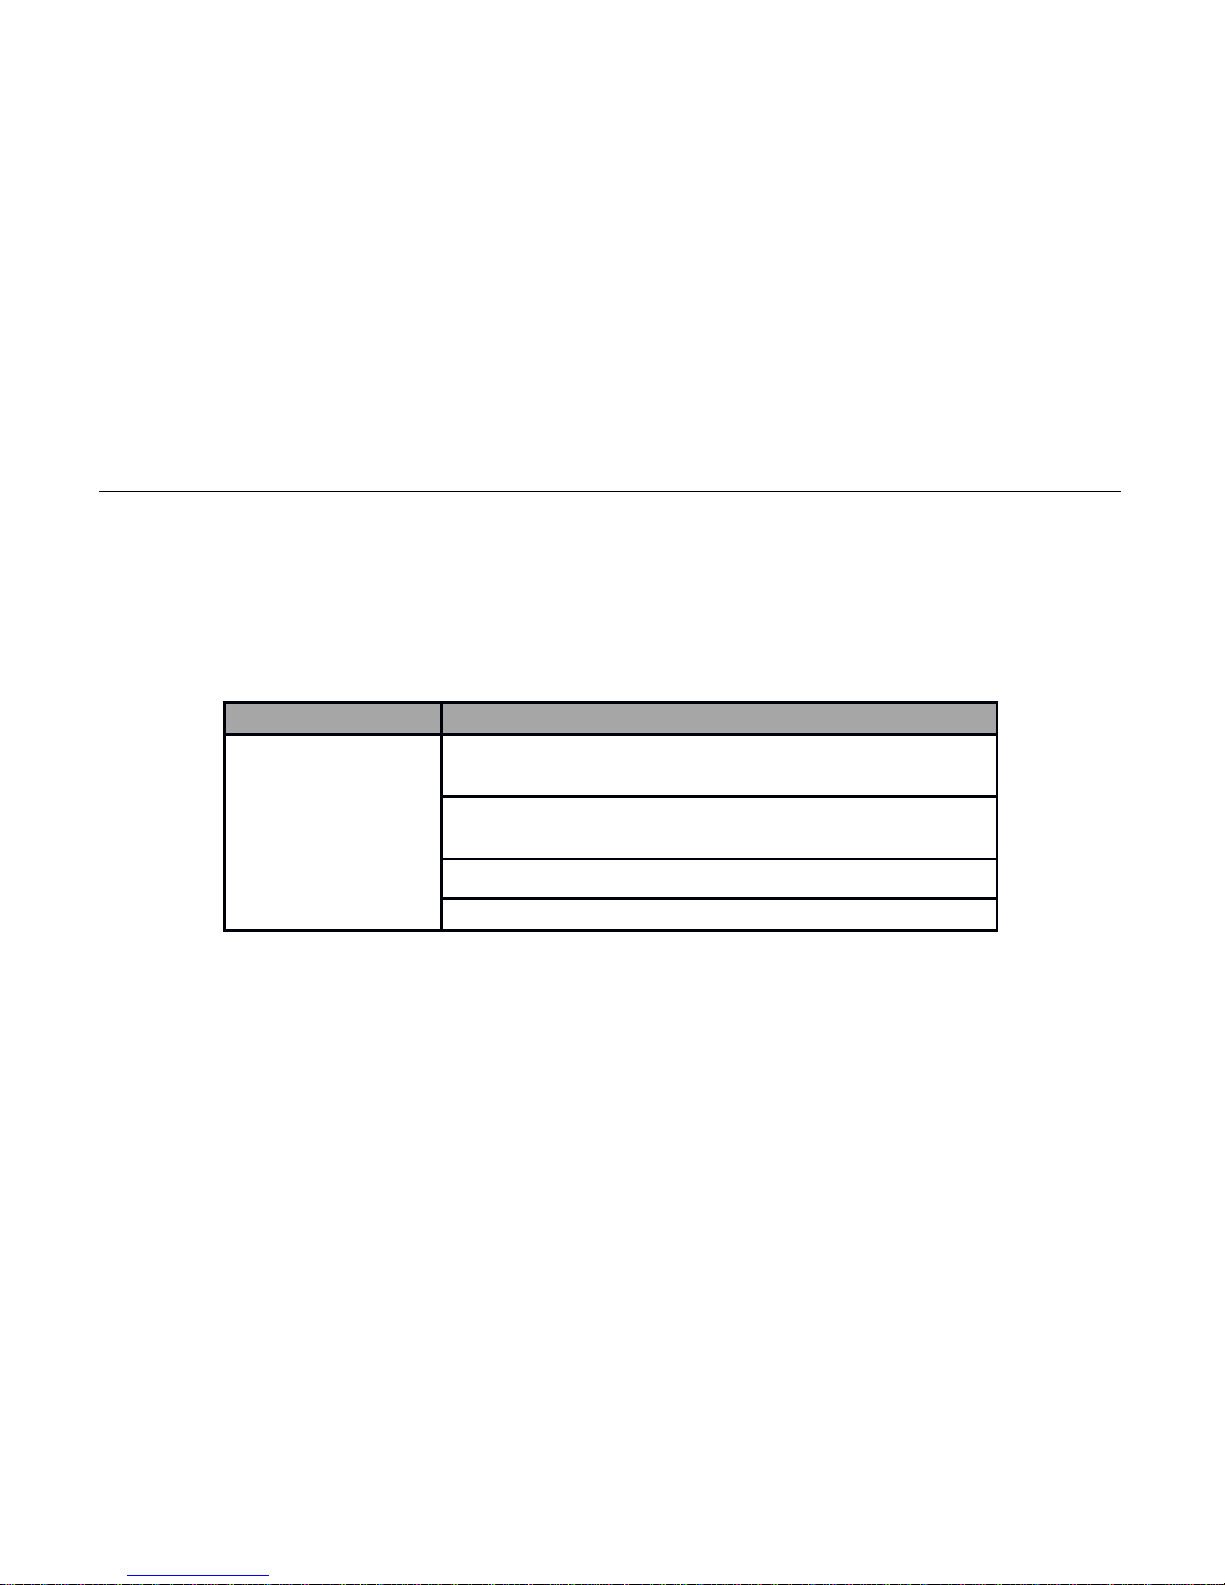
Power on:
Operation Indicator light
Turn the power
switch to “On”
position.
Red light on 1 seconds, then off 20
seconds..
Red light flashing slowly for about 5
seconds.
A “Beep…” tone will be heard.
Green light means register network success.
Power off:
Turn the power switch to downside “OFF” position.
21
Page 22

SimPal-G4 Security Camera User Manual
3.2 Set phone number and receiver e-mail address
Camera can store 5 phone number and 5 e-mail address, it will sending images to all
stored e-mail address; when SIM card installed, it will sending SMS to all stored
numbers.
The first number send SMS to register camera, this number will store as Master
number, all other numbers only can add by Master number.
Master sends following SMS to camera from your mobile phone (the phone number will
be the Master number) to:
Setup master number: #00# (1)
If the camera reply master number already exists, please refer the Reset Factory
Setting parts to delete old master number.
Register Master number e-mail address: #09#e-mail# (2)
Add other user number and e-mail:
Master user sends following SMS message in order to:
22
Page 23

SimPal-G4 Security Camera User Manual
Register other user number or e-mail: #07# phone-number # (3)
#07# e-mail # (4)
Max 4 numbers and 4 e-mail address can be added by #07# command.
Master user sends following SMS message in order to:
Delete all user numbers and e-mails: #27# (5)
3.3 Set WiFi and GRPS network
3.3.1 Set-up WIFI network
First time use, need to send SMS to set WiFi network, camera will store the WiFi
account permanently.
Setting WIFI SSID and Password: #38#SSID#Password# (8)
The SSID is name of WIFI network. Both SSID and Password are case sensitivity, only
input correct WIFI name and password can success connect the WIFI.
23
Page 24

SimPal-G4 Security Camera User Manual
Check WIFI status: #38# (9)
“WIFI – Disconnect” means do not connect to WIFI success.
“SSID Name” WIFI – CONNECTED means already success connected to WIFI “SSID
Name” network.
3.3.2 Cellular data parameters setting
Noted: this function only supported when SIM card installed.
When WiFi network no available, you can install the SIM card and sending images by
GPRS. Request installed SIM card GPRS data traffic function activated. Operator will
charge for GPRS data traffic.
Turn on data traffic:
Master number sending following SMS to
Turn on cellular data: #24#1# (10)
After this command, camera will auto set correct APN settings from firmware.
If camera do not find correct APN setting from firmware and can not send e-mail,
24
Page 25

SimPal-G4 Security Camera User Manual
You can setup APN parameters manually as following command:
#24#APN#Username#Password#MCC#MNC# proxy#port#type# (11)
For example: #24#internet###505#03##80#default#
If the User name and Password is empty, only leave blank and separate with #.
Normally the type is “default”.
MCC and MNC must be filled with correct value.
3.4 Adjust camera date time
Camera will auto adjust date and time from incoming SMS message:
Sync data time: #000# (7)
3.5 Capture images to e-mail
Master send following SMS to capture images to e-mail
Get image to Master e-mail: #05# (12)
25
Page 26
SimPal-G4 Security Camera User Manual
3.6 Schedule send images
Noted: Setting request SIM installed, camera will stored settings and schedule send
images even SIM card removed.
Master sends following SMS message in order to:
Set schedule send images parameters:
#43#0#WorkDay#StartTime#EndTime#IntervelTime#.. (13)
WorkDay: one digit, the values lie in the range of “0” to “9”.
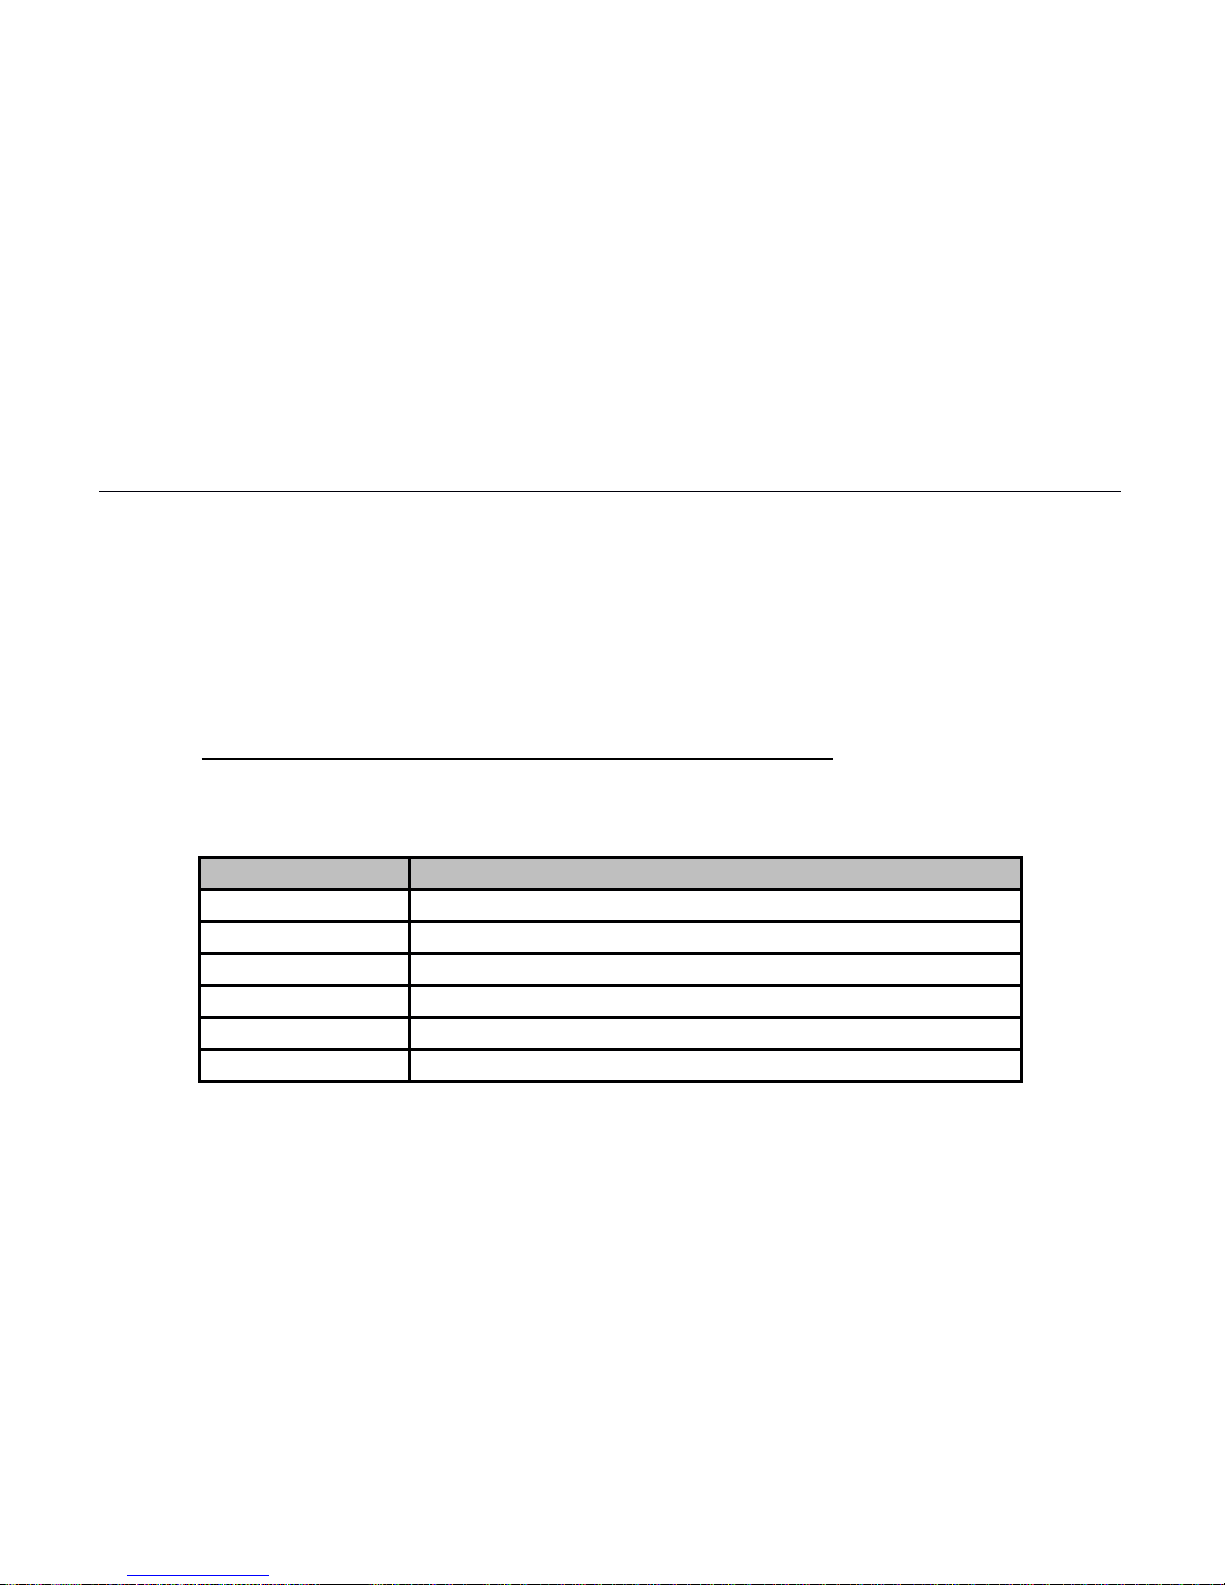
The following table contains the descriptions of each value:
Value Corresponding day
0 Everyday
1 Monday
2 Tuesday
3 Wednesday
4 Thursday
5 Friday
26
Page 27

SimPal-G4 Security Camera User Manual
6 Saturday
7 Sunday
8 Monday to Friday
9 Weekend
StartTime and EndTime: Be consists of 4 digits (hh:mm) and works on a 24
hour clock. For example: 0000 means time 00:00(hh:mm), 2359 means time
23:59(hh:mm). the EndTime can be earlier than StartTime, it will set as end of
next day.
IntervalTime: This consists of 2 or 3 digits and has values in the range of “5” to
“480” minutes.
For example: #43#0# 0 # 2100 #0800#10# The camera will reply SMS following:
Schedule capture images function: OFF
Receive mode: Email
Everyday
Time: 21:00-08:00
Interval: 10 minutes.
27
Page 28

SimPal-G4 Security Camera User Manual
Activate schedule send images: #06#1# (14)
Master sending this command to activate Schedule sending images functions.
Deactivate schedule send images: #06#0# (15)
3.7 Motion detection alarm
Built-in PIR detector only working when camera in ARM mode, there are three methods
to ARM camera:
1. Press arm button on remote control (Refer “remote control instruction”)
2. Sending following SMS to
ARM camera: #01# (16)
3. Calling the camera, and hand up calling once hearing ringing tone.
After 30 seconds, camera enter ARM mode, camera will send SMS and picture e-mail
when PIR detect human motion.
User can use following method to disarm camera:
1. Press disarm button on remote control (Refer “remote control instruction”)
2. Sending following SMS to
DISARM camera: #02# (17)
28
Page 29
SimPal-G4 Security Camera User Manual
3. Calling the camera, and hand up calling once hearing ringing tone.
3.7 Pairing remote control
Remote control work with camera to arm, disarm or make emergency alarm by pressing
remote control buttons, Original remote control paired in factory, you can buy extra
remote control and pair with camera, up to 5 remote controls can work with one camera.
Paring remote control method as following:
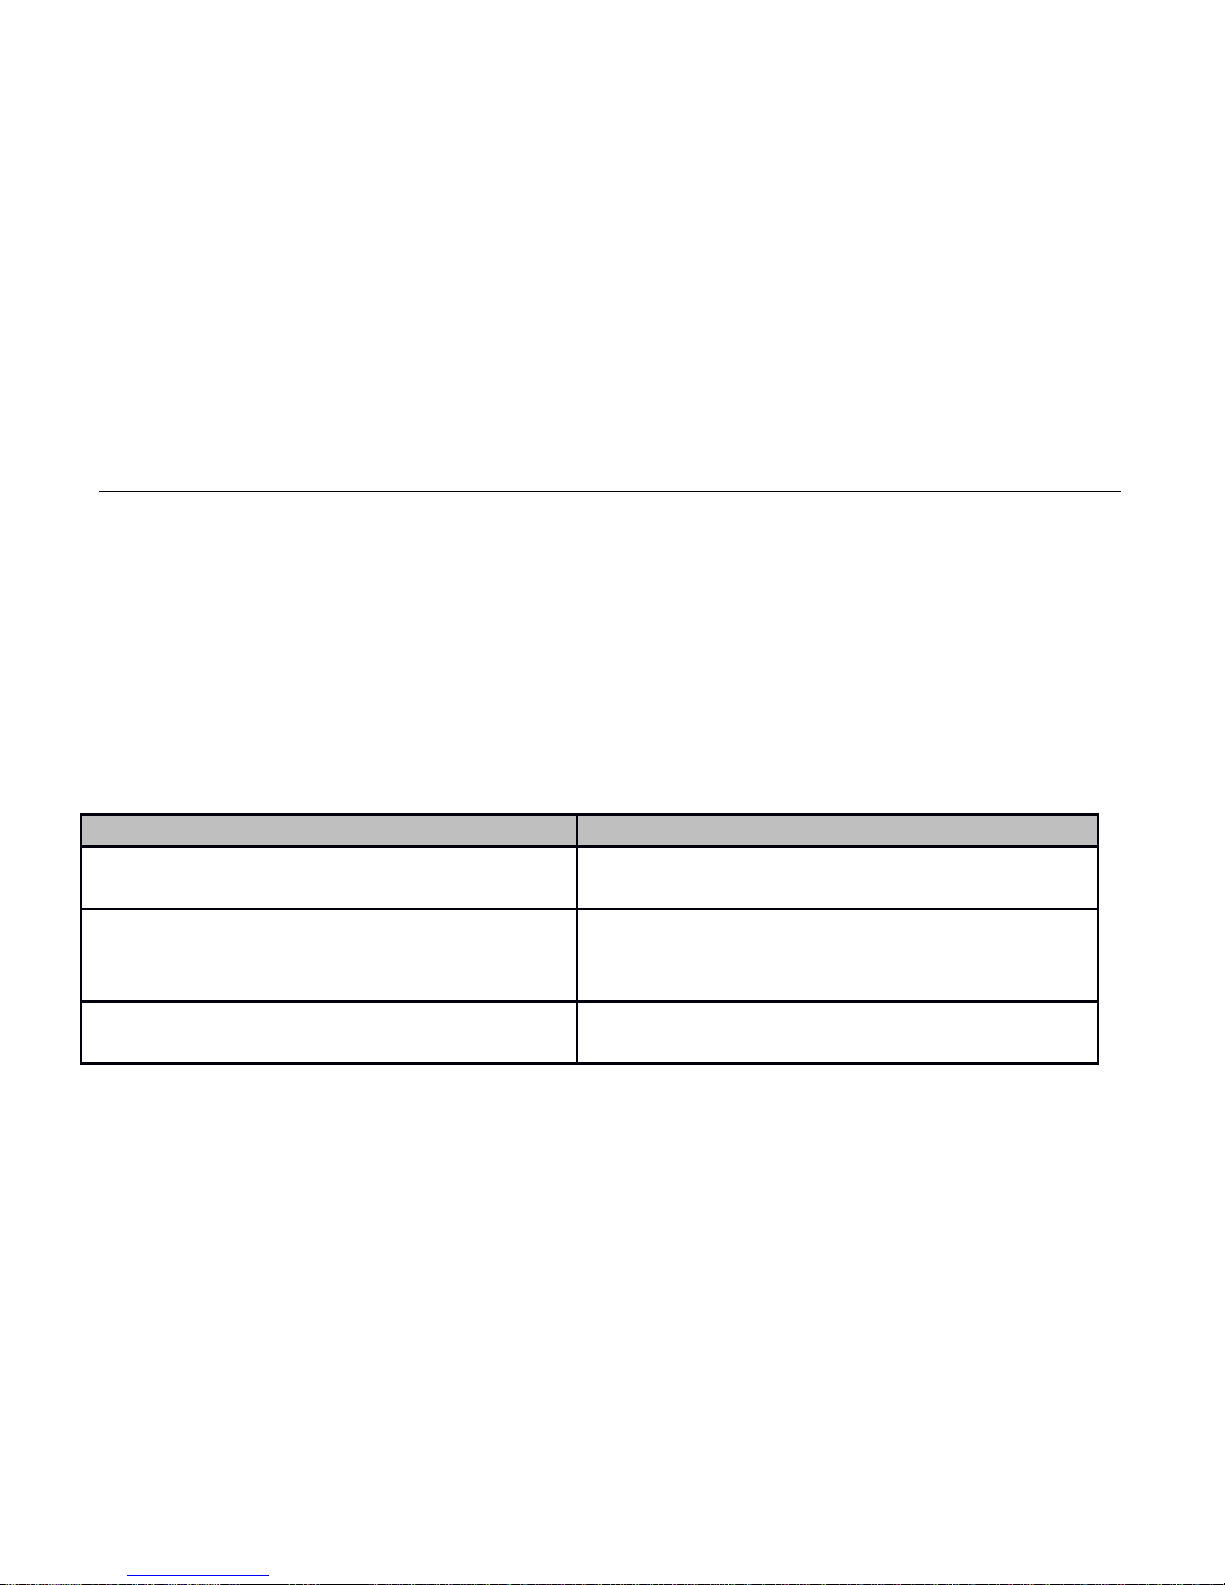
Operations Status
1. Press and hold the Reset button for
1 seconds
Indicator light turns to orange (Learning
mode)
2. Press any button on the remote
control (with battery inside) to send a
signal to camera
camera will emit a “Beep” tone and
indicator will turn green for 2S. (Added
successfully.)
3. Press the Reset button to exit the
learning mode or waiting for 15
Indicator light turns green, flashing or
constantly light. (Exit learning mode)
29
Page 30
SimPal-G4 Security Camera User Manual
seconds to auto-exit.
3.7.1 Remote control instruction
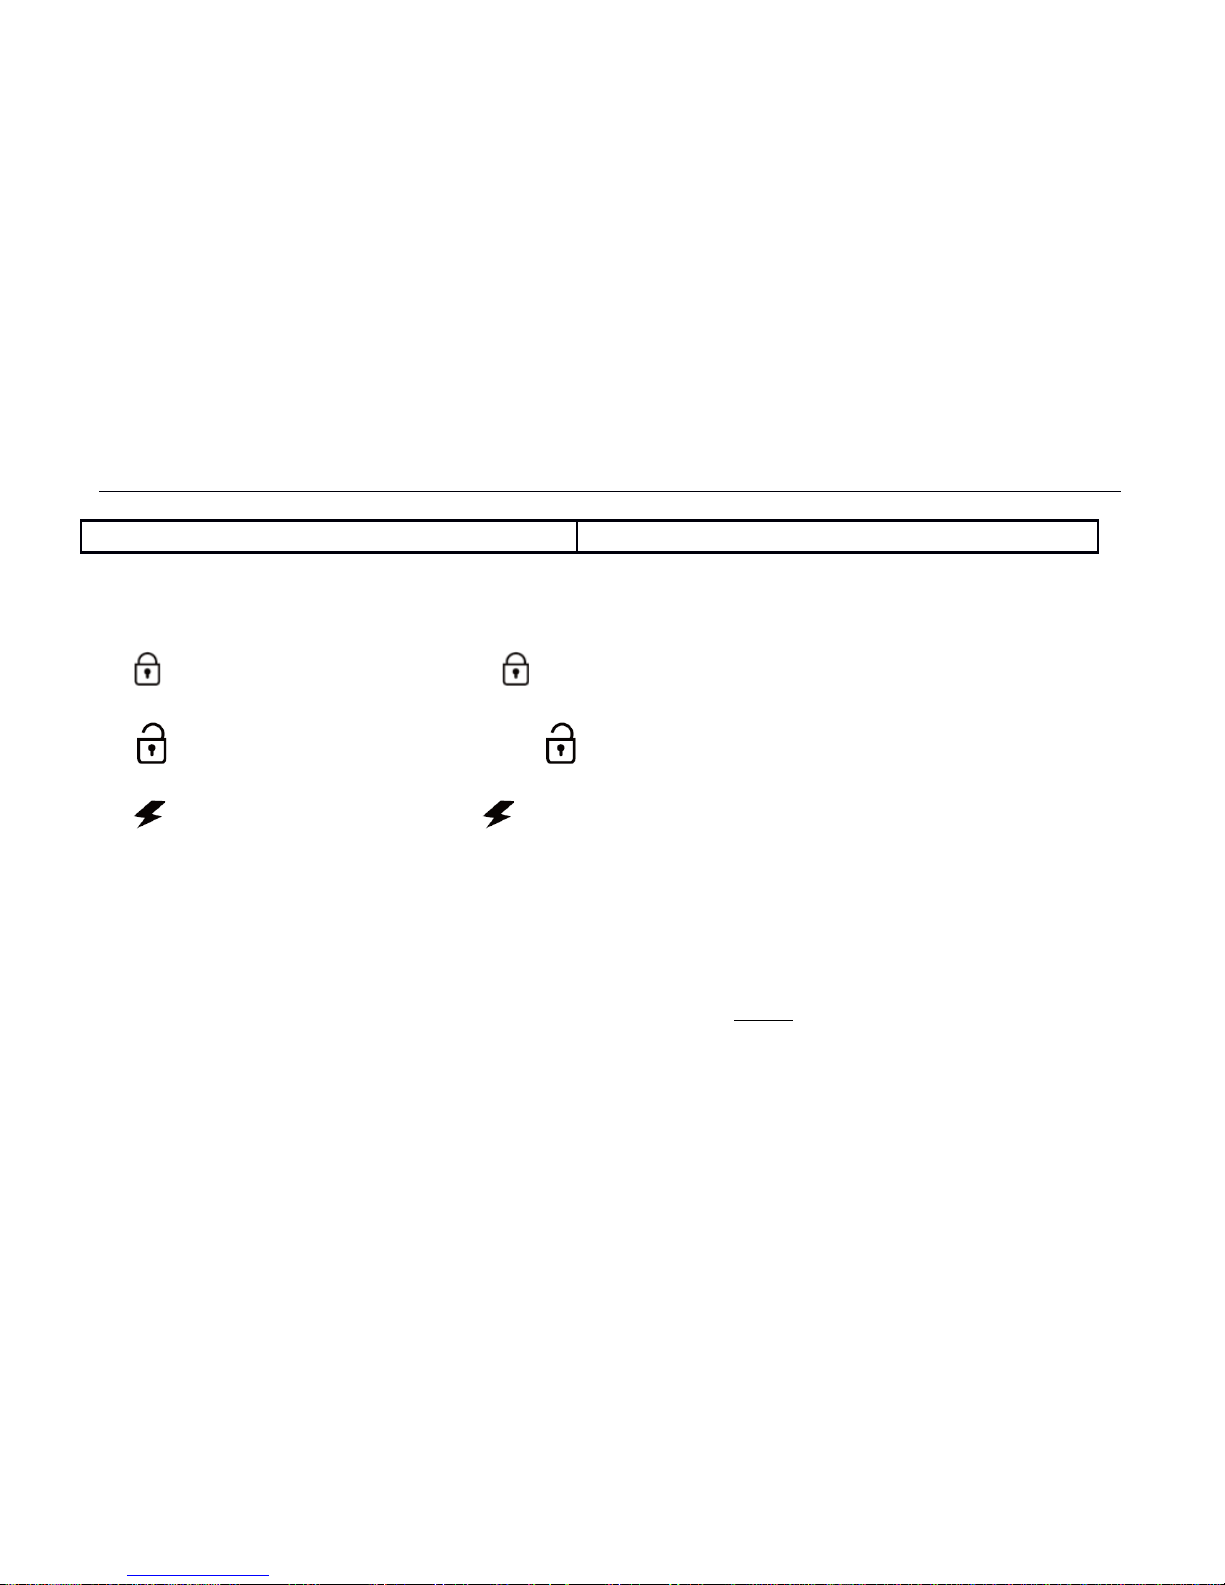
There are three buttons on the remote control:
A. Arm SimPal camera :When is pressed, camera will beep and enter arm mode
after 30 seconds delay arm. LED indicator constantly light in arm mode.
B. Disarm SimPal camera :When is pressed, camera will beep twice and LED
indicator slowly flash green. Camera working in disarm mode.
C. Emergency button :When is pressed, LED indicator rapidly flash in RED color.
Camera will sending images by e-mail immediately. When SIM card installed, it will
sending SMS to all numbers.
3.7.2 Removed remote control
Master user sends following SMS message in order to:
Remove all remote controls from the camera: #29# (18)
30
Page 31

SimPal-G4 Security Camera User Manual
3.8 Pairing wireless sensors
Noted: this function only supported when SIM card installed.
Optional 433MHz wireless sensor, such as wireless PIR detector, wireless door magnet,
wireless smoke detector etc. can be set as an alarm sensor of the camera. Up to 16pcs
wireless sensors and wireless panic buttons can be pair with camera.
There are two types wireless sensor for camera:
Alarm sensor: sensor only alarm when the camera in arm mode, for example: door
sensor, PIR detector work as alarm sensor.
Emergency sensor: sensor will always alarm even camera in disarm mode, smoke
detector, gas detector, panic button work as emergency sensor.
3.8.1 Pair wireless sensor
1. Power on the wireless sensor.
31
Page 32

SimPal-G4 Security Camera User Manual
2. Master sends following SMS message to make camera enter loading mode:
Pairing Alarm sensor: #08#1# Sensor-name # (19)
Pairing Emergency sensor: #08#2# Sensor-name # (20)
Sensor-name is used for identify different sensors affiliated with each camera.
It can be numbers and English characters.
Up to 9 characters can be included in the Sensor-name.
3. After hear camera beep and received SMS reply, trigger the wireless sensor
immediately.
4. When camera receives the sensor signal, it will Beep and send a notification
SMS: Sensor – PAIRED.
3.8.2 Check sensor status
Master sends following SMS message to:
Check paired sensors: #08# (21)
32
Page 33

SimPal-G4 Security Camera User Manual
Camera will reply SMS and list all sensors which already paired with this camera.
3.8.3 Remove sensor
Master sends following SMS message to:
Remove one sensors: #28# Sensor-name # (22)
Remove all sensors: #28# (23)
Sensor-name should be the existing sensor which the user wants to remove.
33
Page 34

SimPal-G4 Security Camera User Manual
Chapter 4 Advanced settings
4.1 Voice call alert
Noted: this function only supported when SIM card installed.
Master sends following SMS message to:
Deactivate voice call alert upon alarm triggering (Default): #13#0# (24)
Activate voice call alert upon alarm triggering: #13#1# (25)
Camera will call all stored phone numbers 3 times. Once someone answer the calling,
camera will stop calling next number..
4.2 Configure sender e-mail
Camera default preset one test e-mail address as sender e-mail, you can change to
your own e-mail to better protect your privacy. The command to set sender e-mail as
following:
34
Page 35

SimPal-G4 Security Camera User Manual
#26#e-mail#password#SMTP#SMTP port#Type#tls# (26)
E-mail: The email address use to sendi out e-mail from this camera.
Password: This is the password to log in sender email account, need to fill with letter or
number.
SMTP: Simple Mail Transfer Protocol. Request activate e-mail SMPT service by log-in
web and check e-mail settings.
SMTP port: the port for SMTP.
Type: setting email SMTP or SMTPS protocol. value 0 means SMTP, value 1 means
SMTPS.
Tls: this is encryption of hotmail and outlook, only hotmail or outlook need to activated
this function. 0 means deactivated TLS, 1 means activated TLS.
Example e-mail setting as following:
Gmail: the SMTP port is 465, and need to select SMTPS, deactivated TLS.
#26#[email protected]# PASSWORD#smtp.gmail.com#465#1#0#
Outlook, Hotmail: the SMTP port is 587, and select SMTP, activated TLS.
35
Page 36

SimPal-G4 Security Camera User Manual
#26#[email protected]#PASSWORD#smtp.live.com#587#0#1#
Company email: It need to switch the SMTP server to IP address or e-mail
provider original SMTP server, and select SMTP, deactivated TLS.
#26#[email protected]#PASSWORD#218.85.138.181#25#0#0#
It will send one confirm email to sender email inbox after configure successfully.
Two public testing e-mail accounts can be set for your camera, setting command as
following:
Testing e-mail 1: #26#[email protected]#simpal509#smtp.qq.com#465#1#0#
Testing e-mail 2:
#26#[email protected] #509testcam#smtp.live.com#587#0#1#
Noted:
Before setup sender e-mail, suggest log in same e-mail address on web, check
36
Page 37

SimPal-G4 Security Camera User Manual
whether receive confirm e-mail. Once you received “TEST - e-mail”, it means
already set the sender e-mail success.
Make sure this e-mail account activate SMTP service.
First time setup e-mail may blocked by e-mail provider, it will send notification e-
mail to inform blocked unknown device login, need to log in your e-mail account
on web and select allow this device login. For Gmail, need to click following link
to turn on access of less secure app.
https://www.google.com/settings/security/lesssecureapps After that try to setup e-
mail again by sending SMS command.
4.3 Temperature alarm
Noted: this function only supported when SIM card installed.
A range of temperature can be pre-set onto the camera. In this case, if the
surroundings temperature is detected out of the pre-set temperature range, camera will
auto-send the SMS alarm message to user’s mobile phone.
37
Page 38

SimPal-G4 Security Camera User Manual
Master sends following SMS message in order to:
Check temperature reading: #15# (24)
Activate temperature monitoring: #15#1# (25)
Set limits of temperature: #16#MinTemp#MaxTemp# (26)
MinTemp and MaxTemp: The values can be set within the range of -10 to
50 centigrade degree.
Deactivate temperature monitoring: #15#0# (27)
4.4 LED status indicator
LED status indicator will display in different ways to show the working status. It can be
turns off to make camera private and avoid to be found easily.
Master sends following SMS message in order to:
Turn off LED status indicator: #31#0# (28)
38
Page 39

SimPal-G4 Security Camera User Manual
Turn on LED status indicator (Default): #31#1# (29)
4.5 Night vision LED lights
There are 10pcs LED light help lighting when capture images in dark environment.
Master sending following SMS to set
Night vision LED lighting mode: #20#mode# (30)
Mode represent LED working mode, There are three mode of LED lighting:
#20#1# set “Auto mode”, LED will auto turn on when camera detect dark
environment.
#20#2# set “Constantly ON”, LED will always lighting when camera make photo
shooting.
#20#0# set “OFF mode”. LED will always OFF
39
Page 40

SimPal-G4 Security Camera User Manual
4.6 Reset to factory settings
You can reset the camera to factory setting if forgot the master number or camera do
not work normally.
After reset factory setting, camera will delete all settings; you need to setup master and
receiver e-mail address again:
Make camera in working mode and registered network.
Remove the battery cover; the reset button is near the DC power connector.
Keep pressing the reset button for 5 seconds, camera will beep 2 seconds.
Then the camera reset to factory setting successfully.
40
Page 41

SimPal-G4 Security Camera User Manual
Chapter 5 Main technical parameters
Power adaptor Input: 100V~240V/50Hz Output: 12V 1A DC
Operating temperature -10℃~+45℃
Store temperature -20℃~+60℃
Relative humidity 10-90%,without condensation
Working band
GSM 850/900/1800/1900MHZ WCDMA
/HSUPA 2100MHz (850/1900 Mhz Optional)
WiFi protocol 2.4G 802.11b 802.11g 802.11n
Wireless sensor receiving band 433MHz
Max. wireless sensors 15 units
Remote control receiving band 433MHz
Effective distant of the remote
control
20 meters (wide area)
41
Page 42

SimPal-G4 Security Camera User Manual
Image format JPEG
Image resolution 320×240, 800×480, 1280×768
Camera pixel 5.0 Megal pixel
Camera Shooting angel 68 degree
Best shooting distance at night 5meters≤
Detect distance of build-in PIR
sensor
5 meters≤
Listen in distance 5 meters≤
Lithium battery (Inner) 1200mAh
Battery standby time 12 hours(Affected by network)
42
 Loading...