

Page 1
Kurzanleitung
DE
Quick guide
EN
Guide abrégé
FR
Korte handleiding
NL
Guida breve
IT
Kort vejledning
DA
Snabbguide
SW
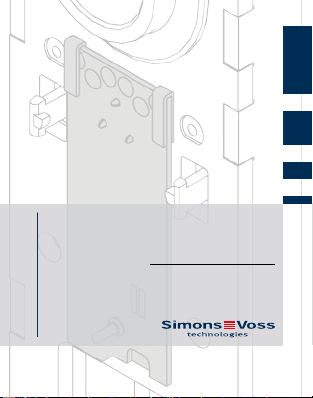
WaveNet LockNode (SH 3062)
SR21.020300
09.09.2019
Page 2

deutsch ...........................................................................
english .............................................................................
français ...........................................................................
nederlands .....................................................................
italiano ............................................................................
dansk ...............................................................................
svensk..............................................................................
3
15
27
39
51
63
74
Page 3
1. Hinweise 3 / 88 | DE
1. Hinweise
VORSICHT
Durch fehlerhaft installierte oder programmierte SimonsVoss-Komponenten kann der Zugang durch
eine Tür versperrt werden. Für die Folgen fehlerhafter Installationen, wie nicht möglicher Zugang zu
verletzten Personen, Sachschäden oder andere
Schäden, haftet die SimonsVoss Technologies
GmbH nicht.
ACHTUNG
Beschädigung durch elektrostatische Entladung (ESD)
Dieses Produkt enthält elektronische Bauteile, die durch
elektrostatische Entladungen beschädigt werden können.
1. Verwenden Sie ESD-gerechte Arbeitsmaterialien (z.B.
Erdungsarmband).
2. Erden Sie sich vor Arbeiten, bei denen Sie mit der Elektronik in Kontakt kommen könnten. Fassen Sie dazu geerdete metallische Oberflächen (z.B, Türzargen, Wasserrohre oder Heizungsventile).
Page 4
1. Hinweise
ACHTUNG
Beschädigung durch Öle, Fette, Farben und Säuren
Dieses Produkt enthält elektronische Bauteile, die durch
Flüssigkeiten aller Art beschädigt werden können.
Halten Sie Öle, Fette, Farben und Säuren vom Produkt
fern.
ACHTUNG
Fehlfunktionen durch beschädigte Anschlussleitung
Eine beschädigte Anschlussleitung kann möglicherweise
das Signal nicht mehr korrekt übertragen. Es kann zu Funktionsfehlern kommen.
1. Beschädigen Sie die Anschlussleitung nicht.
2. Wenn die Abdeckungen sich schwergängig aufsetzen
lassen, prüfen Sie die Position des LockNodes.
HINWEIS
Die Installation und Inbetriebnahme setzt Kenntnisse in den Bereichen der Türmechanik und -zulassungen, Elektronikmontage und im Umgang mit der
SimonsVoss-Software voraus. Der Einbau darf nur
durch geschultes Fachpersonal durchgeführt wer-
4 / 88 | DE
Page 5
2. Einbau 5 / 88 | DE
den.
HINWEIS
Alle Anweisungen müssen beim Anschluss und Einbau genau befolgt werden. Diese Anweisungen und
jegliche Anweisungen bezüglich der Wartung sollten
von der den Einbau vornehmenden Person an den
Benutzer weitergegeben werden.
HINWEIS
Änderungen bzw. technische Weiterentwicklungen
können nicht ausgeschlossen und ohne Ankündigung umgesetzt werden.
HINWEIS
Sollten Abweichungen von Inhalten in Fremdsprachenversionen der Dokumentation bestehen, gilt im
Zweifelsfalle das deutsche Original.
2. Einbau
ü Abdeckung und Inlay des SmartHandle demontiert
(siehe Kurzanleitung oder Handbuch des SmartHandle).
ü Erdung durchgeführt (z.B. an Heizkörper)
Page 6
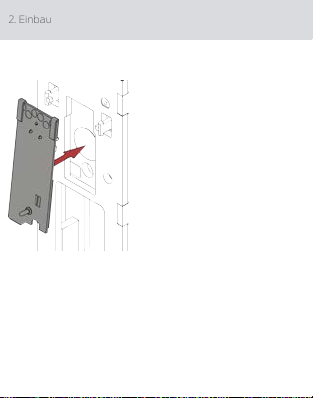
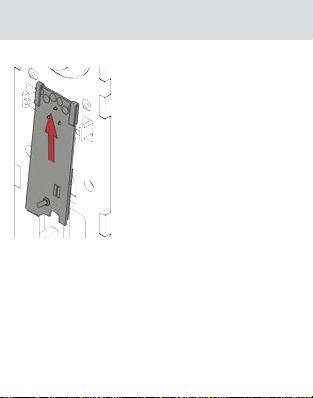
2. Einbau
1. Setzen Sie den LockNode wie gezeigt auf die Platte der
Unterbaugruppe des SmartHandles.
2. Schieben Sie den LockNode bis zum Anschlag in Pfeil-
6 / 88 | DE
Page 7

2. Einbau 7 / 88 | DE
richtung.
9 LockNode liegt flächig auf der Unterbaugruppe.
3. Verbinden Sie die Anschlussleitung des LockNodes mit
Page 8
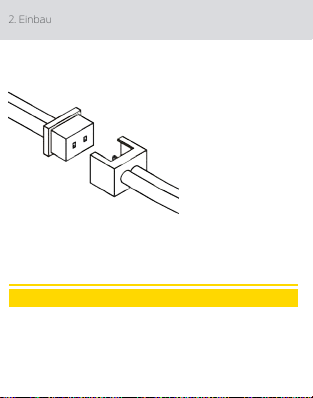
2. Einbau
der Anschlussleitung des SmartHandles.
9 SmartHandle piept und blinkt 4x rot.
4. Verstauen Sie überschüssiges Anschlusskabel in der Unterbaugruppe des SmartHandles.
ACHTUNG
Fehlfunktion durch Witterungseinflüsse
Die Steckverbindungen sind auch in der WP-Variante nicht
spritzwassergeschützt. Wenn Feuchtigkeit an die Kontakte
gelangt, dann kann die Datenübertragung gestört werden.
Verstauen Sie die Steckverbindungen der Kabel im In-
8 / 88 | DE
Page 9

2. Einbau 9 / 88 | DE
nenbereich des SmartHandles.
5. Setzen Sie Cover und Inlay des SmartHandles wieder
auf (siehe Kurzanleitung oder Handbuch des SmartHandles).
Die goldfarbene Metallklammer auf dem LockNode verbindet den LockNode mechanisch und elektrisch (Pluspol) mit
dem SmartHandle. Wenn Sie Abdeckung und Inlay wieder
montiert haben, dann kontaktiert der federgelagerte Metallstift das Inlay (das Inlay dient dann als Antenne).
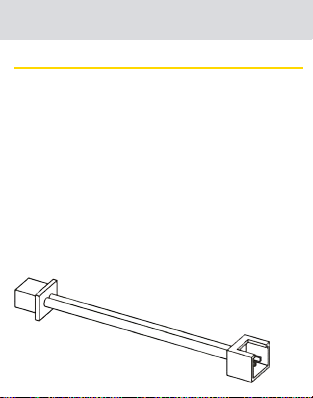
2.1. Adapterkabel SO
Der Einbau des LockNodes in folgende Varianten des
SmartHandle Scandinavian Oval erfordert ein im Lieferumfang enthaltenes Adapterkabel:
SHB****051***3**
SHB****961***3**
SHE****051***3**
Page 10
3. Technische Daten
Dieses Adapterkabel verbindet den LockNode auf der Außenseite des Beschlags mit der Elektronik auf der Innenseite
des Beschlags.
ACHTUNG
Fehlfunktion durch Feuchtigkeit
Das Adapterkabel ist nicht für den Einsatz in feuchten Umgebungen geeignet.
Verwenden Sie das Adapterkabel nicht für die WP-Aus-
führungen der genannten SmartHandles.
10 / 88 | DE
3. Technische Daten
Maße 45 mm × 17 mm × 12 mm
Stromversorgung
3 VDC (Batterien des SmartHandles)
Page 11

3. Technische Daten 11 / 88 | DE
Standby (ohne Datenüber-
Betriebsstrom
Sensitivität -95 dBm
Batterielebensdauer
Reichweite
Umgebungsbedingungen
tragung): ca. 6 µA
Aktiv (mit Datenübertragung): ca. 30 mA
Bis zu 5 Jahre Standby
oder
bis zu 150000
Schließvorgänge
Bis zu 30 m (umgebungsabhängig)
-15 °C bis +50 °C (Bei -15°C
steht noch 45% der Batteriekapazität bei Raumtemperatur zur Verfügung.)
Wetterfeste Ausführung
(.WP) verfügbar
Funkemissionen
SRD (WaveNet)
868,000 MHz) 868,600 MHz
<25 mW ERP
Page 12
https://
.
12 / 88 | DE
https://
4. Konformitätserklärung
Es liegen keine geografischen Beschränkungen innerhalb der
EU vor.
4. Konformitätserklärung
Hiermit erklärt die SimonsVoss Technologies GmbH , dass
der Artikel WN(M).LN.I.SH(.MP) folgenden Richtlinien entspricht:
2014/53/EU "Funkanlagen"
2014/30/EU "EMV"
2011/65/EU "RoHS"
2012/19/EU "WEEE"
sowie der Verordnung (EG) 1907/2006 "REACH"
Der vollständige Text der EU-Konformitätserklärung ist unter der folgenden Internetadresse verfügbar:
www.simons-voss.com/de/zertifikate.html
5. Hilfe und weitere Informationen
Infomaterial/Dokumente
Detaillierte Informationen zum Betrieb und zur Konfiguration
sowie weitere Dokumente finden Sie auf der SimonsVossHomepage im Downloadbereich unter Dokumente (
www.simons-voss.com/de/downloads/dokumente.html
).
Page 13

4. Konformitätserklärung 13 / 88 | DE
Anleitungen
Detaillierte Informationen zum Betrieb und zur Konfiguration
finden Sie im Internet auf unserer Homepage unter
www.smartintego.com.
Konformitätserklärungen und Zertifikate
Konformitätserklärungen und Zertifikate zu diesem Produkt
finden Sie auf der SimonsVoss-Homepage im Zertifikatsbereich (
https://www.simons-voss.com/de/zertifikate.html
Informationen zur Entsorgung
Entsorgen Sie das Gerät (WN(M).LN.I.SH(.MP)) nicht
mit dem Hausmüll, sondern gemäß der europäischen
Richtlinie 2012/19/EU bei einer kommunalen
Sammelstelle für Elektro-Sonderabfälle.
Recyceln Sie defekte oder verbrauchte Batterien gemäß
der europäischen Richtlinie 2006/66/EG.
Beachten Sie örtliche Bestimmungen zur getrennten
Entsorgung von Batterien.
Führen Sie die Verpackung einer umweltgerechten
Wiederverwertung zu.
Hotline
Bei technischen Fragen hilft Ihnen die SimonsVoss Service-
).
Page 14
4. Konformitätserklärung
Hotline unter +49 (0) 89 99 228 333 (Anruf in das deutsche
Festnetz, Kosten variieren je nach Anbieter).
FAQ
Informationen und Hilfestellungen zu SimonsVoss-Produkten finden Sie auf der SimonsVoss-Homepage im FAQ-Bereich (
https://faq.simons-voss.com/otrs/public.pl
SimonsVoss Technologies GmbH
Feringastraße 4
85774 Unterföhring
Deutschland
14 / 88 | DE
).
Page 15

1. Important 15 / 88 | EN
1. Important
CAUTION
Access through a door may be blocked due to incorrectly installed or incorrectly programmed SimonsVoss components. SimonsVoss Technologies
GmbH is not liable for consequences of incorrect installation, such as blocked access to injured persons, physical damage or any other losses.
ATTENTION
Damage resulting from electrostatic discharge (ESD)
This product contains electronic components that may be
damaged by electrostatic discharges.
1. Use ESD-compliant working materials (e.g. Grounding
strap).
2. Ground yourself before carrying out any work that could
bring you into contact with the electronics. For this purpose, touch earthed metallic surfaces (e.g. door frames,
water pipes or heating valves).
Page 16
1. Important 16 / 88 | EN
ATTENTION
Damage resulting from liquids
This product contains electronic components that may be
damaged by liquids of any kind.
Keep liquids away from the electronics.
ATTENTION
Malfunctions due to damaged connecting cable
A damaged connecting cable may no longer be able to
transmit the signal correctly. Functional errors may occur.
1. Do not damage the connecting cable.
2. If the covers are difficult to put on, check the position of
the LockNode.
IMPORTANT
Specialist knowledge in door mechanics, door approvals, electronic system installation and the use
of SimonsVoss software is required to install the
system and put it into operation. Only trained specialists may install the system.
Page 17
2. Installation 17 / 88 | EN
IMPORTANT
You must follow all instructions precisely when
connecting and installing the product. The person
installing the system should hand these instructions
as well as any maintenance instructions over to the
user.
IMPORTANT
Modifications or further technical developments
cannot be excluded and may be implemented
without notice.
IMPORTANT
Should there be differences in the content of other
language versions of this documentation, the German version applies in cases of doubt.
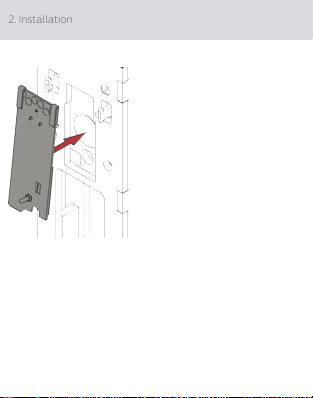
2. Installation
ü SmartHandle cover and inlay removed (see Quick Start
Guide or SmartHandle manual).
ü Grounding completed (e.g. on radiator)
1. Place the LockNode on the plate of the SmartHandle
Page 18
2. Installation
subassembly as shown.
2. Push the LockNode as far as it will go in the direction of
18 / 88 | EN
Page 19
2. Installation 19 / 88 | EN
the arrow.
9 LockNode lies flat on the subassembly.
3. Connect the connecting cable of the LockNode with the
Page 20

2. Installation
connecting cable of the SmartHandle.
9 SmartHandle beeps and flashes red 4 times.
4. Store excess connection cable in the SmartHandle subassembly.
ATTENTION
Malfunction due to weather influences
Even in the WP version, the plug connections are not splashproof. If moisture reaches the contacts, data transmission
may be disturbed.
Store the cable connectors in the inside area of the
20 / 88 | EN
Page 21
2. Installation 21 / 88 | EN
SmartHandle.
5. Replace the cover and inlay of the SmartHandle (see
Quick Start Guide or SmartHandle Manual).
The gold-coloured metal clip on the LockNode connects the
LockNode mechanically and electrically (positive pole) with
the SmartHandle. When you have mounted the cover and
inlay again, the spring-loaded metal pin contacts the inlay
(the inlay then acts as an antenna).
2.1. Adapter cable SO
The installation of the LockNode in the following versions of
the SmartHandle Scandinavian Oval requires an adapter
cable included in the scope of delivery:
SHB****051***3**
SHB****961***3**
SHE****051***3**
Page 22
3. Technical specifications
This adapter cable connects the LockNode on the outside
of the fitting with the electronics on the inside of the fitting.
ATTENTION
Malfunction due to moisture
The adapter cable is not suitable for use in humid environments.
Do not use the adapter cable for the WP versions of the
SmartHandles mentioned.
22 / 88 | EN
3. Technical specifications
Dimensions 45 mm × 17 mm × 12 mm
Power supply
Operating current
Sensitivity -95 dBm
3 VDC (batteries of
SmartHandles)
Standby (without data
transmission): approx. 6 µA
Active (with data transmission): approx. 30 mA
Page 23

4. Declaration of conformity 23 / 88 | EN
Battery life
Read range
Ambient conditions
Up to 5 years standby or
up to 150000 closing
operations
Up to 30 m (depending on
environment)
-15 °C to +50 °C (At -15°C,
45% of the battery capacity
is still available at room
temperature.)
Weatherproof version (.WP)
available
Radio emissions
SRD (WaveNet)
There are no geographical restrictions within the EU.
4. Declaration of conformity
The company SimonsVoss Technologies GmbH hereby declares that article WN(M).LN.I.SH(.MP) complies with the
following guidelines:
2014/53/EU "Radio equipment"
868.000 MHz) -
868.600 MHz
<25 mW ERP
Page 24
5. Help and other information
2014/30/EU "EMC"
2011/65/EU "RoHS"
2012/19/EU "WEEE"
and regulation (EG) 1907/2006 "REACH"
The full text of the EU Declaration of conformity is available
at the following internet address:
voss.com/en/certificates.html
5. Help and other information
Information material/documents
You will find detailed information on operation and configuration and other documents under Informative material/
Documents in the Download section on the SimonsVoss
website (
https://www.simons-voss.com/en/downloads/
documents.html
Instruction manuals
You will find detailed information on operation and configuration online on our homepage at www.smartintego.com.
Declarations of conformity
You will find declarations of conformity for this product in
the Certificate section on the SimonsVoss website (
www.simons-voss.com/en/certificates.html
).
https://www.simons-
.
24 / 88 | EN
).
https://
Page 25
5. Help and other information 25 / 88 | EN
Information on disposal
Do not dispose the device (WN(M).LN.I.SH(.MP)) in the
household waste. Dispose of it at a collection point for
electronic waste as per European Directive 2012/19/EU.
Recycle defective or used batteries in line with European
Directive 2006/66/EC.
Observe local regulations on separate disposal of
batteries.
Take the packaging to an environmentally responsible
recycling point.
Hotline
If you have any questions, the SimonsVoss Service Hotline
will be happy to help you on +49 (0)89 99 228 333 (German fixed network; call charges vary depending on the operator).
FAQs
You will find information and help for SimonsVoss products
in the FAQ section on the SimonsVoss website (
faq.simons-voss.com/otrs/public.pl
SimonsVoss Technologies GmbH
https://
).
Page 26

5. Help and other information
Feringastrasse 4
85774 Unterföhring
Germany
26 / 88 | EN
Page 27
1. Remarques 27 / 88 | FR
1. Remarques
ATTENTION
Un composant de fermeture SimonsVoss mal ins-
tallé ou mal programmé peut bloquer un accès au
niveau d’une porte. SimonsVoss Technologies
GmbH décline toute responsabilité pour les consé-
quences d’installations impropres, comme l’accès
impossible à des personnes blessées, les dom-
mages matériels ou d’autres dommages.
ATTENTION
Endommagement lié à une décharge électrostatique
(DES)
Ce produit contient des composants électroniques susceptibles d’être endommagés par des décharges électrostatiques.
1. Utilisez du matériel de travail adapté à la DES (par ex. un
bracelet de mise à la terre).
2. Reliez-vous à la terre avant de commencer les travaux
pendant lesquels vous pouvez être en contact avec le
système électronique. Saisissez pour cela des surfaces
métalliques mises à la terre (par ex. huisseries de porte,
Page 28

1. Remarques
conduites d’eau ou vannes de chauffage).
ATTENTION
Endommagement lié à des liquides
Ce produit contient des composants électroniques susceptibles d’être endommagés par tout type de liquide.
Tenez les liquides à l’écart du système électronique.
ATTENTION
Dysfonctionnements dus à un câble de raccordement endommagé
Un câble de raccordement endommagé peut ne pas être
capable de transmettre le signal correctement. Il peut en
découler des dysfonctionnements.
1. N'endommagez pas le câble de raccordement.
2. Si les couvercles deviennent difficiles à mettre en place,
vérifiez la position du LockNode.
REMARQUE
L'installation et la mise en service requièrent des
connaissances en matière de mécanique des portes
et d'accès aux portes, de montage électronique et
28 / 88 | FR
Page 29

1. Remarques 29 / 88 | FR
dans l'utilisation du logiciel SimonsVoss. L’installation ne doit être effectuée que par du personnel
qualifié.
REMARQUE
Toutes les instructions doivent être strictement respectées lors du raccordement et du montage. La
personne ayant effectué le montage doit communiquer ces prescriptions ainsi que toutes les prescriptions relatives à la maintenance à l'utilisateur.
REMARQUE
Les modifications et nouveaux développements
techniques ne peuvent pas être exclus et peuvent
être mis en œuvre sans préavis.
REMARQUE
Si le contenu de la documentation devait varier en
fonction des versions en langues étrangères, alors la
version originale en allemand reste la seule pertinente en cas de doutes.
Page 30

2. Montage
30 / 88 | FR
2. Montage
ü Couvercle et incrustation de la SmartHandle démontés
(voir la notice d'utilisation courte ou le manuel de la
SmartHandle).
ü Mise à la terre effectuée (par exemple, au corps de
chauffe)
1. Placez le LockNode comme l'indique la plaque du sousmodule de la SmartHandle.
2. Poussez le LockNode jusqu'en butée dans le sens de la
Page 31

2. Montage 31 / 88 | FR
flèche.
9 Le LockNode repose à plat sur le sous-module.
3. Raccordez le câble de raccordement du LockNode avec
Page 32

2. Montage
celui de la SmartHandle.
9 La SmartHandle émet un bip et clignote 4fois en
rouge.
4. Rangez l'excès de câble de raccordement dans le sousmodule de la SmartHandle.
ATTENTION
Dysfonctionnement dû aux intempéries
Les connexions enfichables ne sont pas protégées des éclaboussures, même dans la version WP. Si de l'humidité parvient jusqu'aux contacts, la transmission des données peut
32 / 88 | FR
Page 33

2. Montage 33 / 88 | FR
être perturbée.
Rangez les connexions enfichables des câbles à l'inté-
rieur de la SmartHandle.
5. Remettez en place le couvercle et l'incrustation de la
SmartHandle (voir la notice d'utilisation courte ou le
manuel de la SmartHandle).
Le clip en métal de couleur dorée du LockNode raccorde le
LockNode mécaniquement et électriquement (pôle plus) à
la SmartHandle. Si vous avez remonté le couvercle et l'incrustation, la tige de métal à ressort entre en contact avec
l'incrustation (cette dernière fait alors office d'antenne).
2.1. Câble d'adaptation SO
Le montage du LockNode dans les versions suivantes de la
SmartHandle à profil scandinave nécessite le câble d'adaptation fourni:
SHB****051***3**
SHB****961***3**
SHE****051***3**
Page 34

3. Caractéristiques techniques
Ce câble d'adaptation raccorde le LockNode situé à l'extérieur de la ferrure avec le système électronique situé à l'intérieur.
ATTENTION
Dysfonctionnement dû à l'humidité
Le câble d'adaptation ne convient pas à une utilisation en
environnements humides.
N'utilisez pas le câble d'adaptation pour les versions WP
de la SmartHandle mentionnée.
34 / 88 | FR
3. Caractéristiques techniques
Dimensions 45mm×17mm×12mm
Alimentation en tension
3VCC (piles de la SmartHandle)
Page 35

3. Caractéristiques techniques 35 / 88 | FR
Veille (sans transmission de
Courant de service
Sensibilité -95dBm
Durée de vie des piles
Portée
Conditions ambiantes
données): env. 6µA
Actif (avec transmission de
données): env. 30mA
Jusqu'à 5ans en veille ou
jusqu'à 150000
processus de fermeture
Jusqu'à 30m (selon l'environnement)
-15°C à +50°C (à -15°C,
45% de la capacité de pile à
température ambiante restent disponibles.)
Version résistante aux intempéries (.WP) disponible
Funkemissionen
SRD (WaveNet)
Il n'y a pas de restrictions géographiques au sein de l'UE.
868,000 MHz) 868,600 MHz
<25 mW ERP
Page 36

4. Déclaration de conformité
4. Déclaration de conformité
La société SimonsVoss Technologies GmbH déclare par la
présente que l'article WN(M).LN.I.SH(.MP) est conforme
aux directives suivantes
2014/53/EU "Dispositif de radio"
2014/30/EU "EMV"
2011/65/EU "RoHS"
2012/19/EU "WEEE"
et le règlement (EG) 1907/2006 "REACH"
Le texte intégral de la déclaration de conformité CE est disponible à l'adresse Internet suivante :
voss.com/fr/certificats.html
5. Aide et autres informations
Documentation/documents
Les informations détaillées concernant le fonctionnement
et la configuration peuvent être consultées sur la page d’accueil de SimonsVoss dans la section téléchargements sous
documentation (
chargements/documents.html
Instructions
Vous trouverez des informations détaillées concernant le
.
https://www.simons-voss.com/fr/tele-
).
36 / 88 | FR
https://www.simons-
Page 37

4. Déclaration de conformité 37 / 88 | FR
fonctionnement et la configuration sur notre page d'accueil
sous www.smartintego.com.
Déclarations de conformité
Les déclarations de conformité relatives à ce produit
peuvent être consultées sur la page d’accueil SimonsVoss,
dans la section certificats (
fr/certificats.html
Informations sur l'elimination
Ne jetez pas l’appareil (WN(M).LN.I.SH(.MP)) avec vos
ordures ménagères mais dans un point de collecte
communal pour appareils électriques et appareils
spéciaux conformément à la directive européenne
2012/19/UE.
Recyclez les piles défectueuses ou usées conformément
à la directive européenne 2006/66/CE.
Veuillez tenir compte des dispositions locales
applicables concernant la collecte séparée des piles.
Recyclez l’emballage d’une manière écologique.
Hotline
En cas de questions techniques, contactez la Hotline SimonsVoss au +49 (0) 89 99 228 333 (appel vers le réseau
https://www.simons-voss.com/
).
Page 38

4. Déclaration de conformité
fixe allemand, coût variable en fonction de l'opérateur).
FAQ
Les informations et aides relatives aux produits SimonsVoss
peuvent être consultées sur la page d’accueil de SimonsVoss dans la section Section FAQ (
voss.com/otrs/public.pl
SimonsVoss Technologies GmbH
Feringastrasse 4
85774 Unterföhring
Allemagne
).
https://faq.simons-
38 / 88 | FR
Page 39

1. Aanwijzingen 39 / 88 | NL
1. Aanwijzingen
VOORZICHTIG
Door foutief geïnstalleerde of geprogrammeerde SimonsVoss-componenten kan de doorgang door
een deur geblokkeerd zijn. Voor de gevolgen van
verkeerde installatie, zoals geen toegang tot gewonden, materiële of andere schade is SimonsVoss
Technologies BV niet aansprakelijk.
LET OP
Beschadiging door elektrostatische ontlading (ESD)
Dit product heeft elektronische componenten die kunnen
worden beschadigd door een elektrostatische ontlading.
1. Maak gebruik van ESD-conforme materialen (bijv. aardingsarmband).
2. Zorg dat u geaard bent voor werkzaamheden waarbij u
met de elektronica in contact kunt komen. Gebruik hiervoor geaarde metalen oppervlakken (bijv. Deurposten,
waterleidingen of verwarmingsbuizen).
Page 40

1. Aanwijzingen 40 / 88 | NL
LET OP
Beschadiging door vloeistoffen
Dit product heeft elektronische componenten die kunnen
worden beschadigd door elk type vloeistof.
Houd vloeistoffen uit de buurt van de elektronica.
LET OP
Storingen door beschadigde aansluitkabel
Een beschadigde aansluitkabel kan het signaal eventueel
niet meer correct doorgeven. Er kunnen zich storingen voordoen.
1. Zorg dat u de aansluitkabel niet beschadigt.
2. Wanneer de afdekkingen moeilijk aan te brengen zijn,
controleer dan de positie van de LockNode.
AANWIJZING
De installatie en inbedrijfstelling vereist kennis van
deurmechanismen en -vergunningen, elektronische
montage en de omgang met de SimonsVoss software. De montage mag alleen worden uitgevoerd
door deskundigen.
Page 41

2. Montage 41 / 88 | NL
AANWIJZING
Alle instructies dienen bij de montage en aansluiting
nauwlettend in acht genomen te worden. Deze instructies en eventuele aanwijzingen betreffende het
onderhoud moeten aan de installateur worden
doorgegeven door de gebruiker.
AANWIJZING
Aanpassingen of nieuwe technische ontwikkelingen
kunnen niet uitgesloten worden en worden gerealiseerd zonder aankondiging.
AANWIJZING
Indien afwijkingen van de inhoud in vertaalde versies
van de documentatie optreden, geldt in geval van
twijfel de tekst van het Duitse origineel.
2. Montage
ü Afdekking en inlay van de SmartHandle gedemonteerd
(zie korte handleiding of manual van de SmartHandle).
ü Aarding uitgevoerd (bijv. via de verwarming)
1. Plaats de LockNode volgens de afbeelding op de plaat
Page 42

2. Montage
van de onderbouwgroep van de SmartHandle.
2. Schuif de LockNode tot de aanslag in de richting van de
42 / 88 | NL
Page 43

2. Montage 43 / 88 | NL
pijl.
9 De LockNode ligt vlak op de onderbouwgroep.
3. Verbind de aansluitkabel van de LockNode met die van
Page 44

2. Montage
de SmartHandle.
9 De SmartHandle piept en knippert 4x rood.
4. Werk overtollige aansluitkabel weg in de onderbouwgroep van de SmartHandle.
LET OP
Storing door weersinvloeden
De stekkerverbindingen zijn ook in de WP-variant niet beschermd tegen spatwater. Wanneer de contacten vochtig
worden, kan de gegevensoverdracht worden gestoord.
Werk de stekkerverbindingen van de kabels weg in de
44 / 88 | NL
Page 45

2. Montage 45 / 88 | NL
binnenkant van de SmartHandle.
5. Plaats de cover en inlay van de SmartHandle weer terug
(zie korte handleiding of manual van de SmartHandle).
De goudkleurige metalen klem op de LockNode verbindt deze mechanisch en elektrisch (pluspool) met de SmartHandle. Wanneer u de afdekking en inlay weer hebt gemonteerd,
maakt de verende metalen stift contact met de inlay (de inlay fungeert dan als antenne).
2.1. Adapterkabel SO
Voor de montage van de LockNode in de volgende varianten
van de SmartHandle Scandinavian Oval is de meegeleverde
adapterkabel nodig:
SHB****051***3**
SHB****961***3**
SHE****051***3**
Page 46

3. Technische gegevens
De adapterkabel verbindt de LockNode aan de buitenzijde
van het beslag met de elektronica aan de binnenzijde van
het beslag.
LET OP
Storing door vocht
De adapterkabel is niet geschikt voor gebruik in een vochtige
omgeving.
Gebruik de adapterkabel alleen voor de WP-uitvoeringen
van de genoemde SmartHandles.
46 / 88 | NL
3. Technische gegevens
Afmetingen 45 mm × 17 mm × 12 mm
Stroomverzorging
Bedrijfsstroom
Gevoeligheid -95 dBm
3 VDC (batterijen van de
SmartHandle)
Stand-by (zonder gegevensoverdracht): ca. 6 µA
Actief (met gegevensoverdracht): ca. 30 mA
Page 47

4. Verklaring van overeenstemming 47 / 88 | NL
Levensduur van batterijen
Reikwijdte
Omgevingsvoorwaarden
Max. 5 jaar stand-by of
maximaal 150.000 cycli
Tot 30 m (afhankelijk van de
omgeving)
-15 °C tot +50 °C (bij -15°C
is nog 45% van de batterijcapaciteit bij kamertemperatuur beschikbaar.)
Weerbestendige versie
(.WP) leverbaar
Radio-emissies
SRD (WaveNet)
Er zijn geen geografische beperkingen binnen de EU.
4. Verklaring van overeenstemming
Het bedrijf SimonsVoss Technologies GmbH verklaart hierbij
dat artikel WN(M).LN.I.SH(.MP) voldoet aan de volgende
richtlijnen
2014/53/EU "Radioapparatuur"
2014/30/EU "EMC"
868,000 MHz) 868,600 MHz
<25 mW ERP
Page 48

https://www.si-
.
48 / 88 | NL
).
5. Hulp en verdere informatie
2011/65/EU "RoHS"
2012/19/EU "WEEE"
en de verordening (EG) 1907/2006 "REACH"
De volledige tekst van de EU-conformiteitsverklaring is beschikbaar op het volgende internetadres:
mons-voss.com/nl/certificaten.html
5. Hulp en verdere informatie
Informatiemateriaal/documenten
Gedetailleerde informatie over het gebruik en de configuratie, alsook overige documentatie vindt u op de homepage
van SimonsVoss in het menupunt Downloads onder Documenten (
https://www.simons-voss.com/nl/downloads/documenten.html
Instructies
Gedetailleerde informatie over de bediening en de configuratie kunt u vinden op onze homepage onder www.smartintego.com.
Conformiteitsverklaringen
Conformiteitsverklaringen voor dit product vindt u op de homepage van SimonsVoss onder het menupunt Certificaten
(
https://www.simons-voss.com/nl/certificaten.html
).
Page 49

5. Hulp en verdere informatie 49 / 88 | NL
Informatie over verwijdering
Voer het apparaat (WN(M).LN.I.SH(.MP)) niet af als
huishoudelijk afval, maar overeenkomstig de Europese
Richtlijn 2012/19/EU bij een gemeentelijke inzamelpunt
voor speciaal elektrotechnisch afval.
Zorg voor recycling van defecte of gebruikte batterijen
volgens de Europese Richtlijn 2006/66/EG.
Neem de plaatselijke bepalingen in acht voor de
gescheiden afvoer van batterijen.
Voer de verpakking af naar een instantie voor
milieuvriendelijke recycling.
Hotline
Bij technische vragen is de SimonsVoss Service Hotline u
graag van dienst onder +49 (0) 89 99 228 333 (telefoongesprek in het vaste Duitse telefoonnet, kosten afhankelijk van
de aanbieder).
FAQ
Informatie en hulp voor SimonsVoss-producten vindt u op
de homepage van SimonsVoss in het menupunt FAQ (
ps://faq.simons-voss.com/otrs/public.pl
).
htt-
Page 50

5. Hulp en verdere informatie
SimonsVoss Technologies GmbH
Feringastraße 4
85774 Unterföhring
Duitsland
50 / 88 | NL
Page 51

1. Note 51 / 88 | IT
1. Note
ATTENZIONE
L'errato montaggio o l'errata programmazione dei
componenti SimonsVoss può determinare l'impos-
sibilità di transito attraverso una porta. SimonsVoss
Technologies GmbH declina altresì ogni responsa-
bilità per le conseguenze di un'errata installazione,
quali ad es. l'impossibilità di accedere a persone fe-
rite, danni materiali o altri danni.
AVVISO
Danni dovuti a scariche elettrostatiche (ESD)
Il presente prodotto contiene componenti elettronici che
potrebbero subire danni in conseguenza di scariche elettrostatiche.
1. Utilizzare materiali di lavori conformi ai requisiti ESD (ad
es. fascetta antistatica al polso).
2. Effettuare la messa a terra dell’operatore prima di eseguire lavori in cui è possibile entrare in contatto con parti
elettroniche. A tale scopo, toccare una superficie metallica opportunamente messa a terra (ad es. telaio porta,
tubi dell’acqua o valvole di riscaldamento).
Page 52

1. Note 52 / 88 | IT
AVVISO
Danni dovuti a fluidi
Il presente prodotto contiene componenti elettronici che
potrebbero subire danni dovuti a liquidi di qualunque tipo.
Tenere i componenti elettronici lontani da liquidi.
AVVISO
Malfunzionamenti per linea di collegamento danneggiata
Un cavo di collegamento danneggiato potrebbe non trasferire più correttamente il segnale. E potrebbe indurre errori
nel funzionamento.
1. Non danneggiate il cavo di collegamento.
2. Verificate la posizione del LockNode se le coperture di
protezione si innestano con difficoltà.
NOTA
L'installazione e la messa in funzione presuppongono conoscenze nell'ambito della meccanica della
porta, delle autorizzazioni porta, del montaggio
dell'elettronica e del software SimonsVoss. Il montaggio deve essere eseguito solo da personale specializzato e addestrato.
Page 53

2. Installazione 53 / 88 | IT
NOTA
Durante il collegamento e il montaggio, seguire
scrupolosamente tutte le istruzioni. Tali istruzioni,
così come quelle relative alla manutenzione, vanno
consegnate all'utente dall'addetto al montaggio.
NOTA
Non si escludono modifiche o perfezionamenti tecnici, anche senza preavviso.
NOTA
In presenza di divergenze di contenuto nelle versioni
in lingua straniera della documentazione, fa fede
l'originale in tedesco.
2. Installazione
ü Copertura e inserto dello SmartHandle smontati (vedi
libretto o manuale dello SmartHandle).
ü Messa a terra eseguita (a corpo riscaldante, per
esempio)
1. Posizionate il LockNode sulla piastra dell’unità inferiore
Page 54

2. Installazione
di assemblaggio dello SmartHandle, come indicato.
2. Spingete il LockNode nel senso della freccia, fino all’ar-
54 / 88 | IT
Page 55

2. Installazione 55 / 88 | IT
resto.
9 LockNode posizionato piatto sull’unità inferiore di
assemblaggio.
3. Unite il cavo di collegamento del LockNode al cavo di
Page 56

2. Installazione
collegamento dello SmartHandle.
9 Lo SmartHandle emette un bip e lampeggia 4x a
luce rossa.
4. Stipate il cavo di collegamento eccedente nell’unità inferiore di assemblaggio dello SmartHandle.
AVVISO
Malfunzionamento da condizioni atmosferiche
Anche nella variante WP, gli attacchi a innesto non sono
protetti da spruzzi d'acqua. La trasmissione dei dati può ri-
56 / 88 | IT
Page 57

2. Installazione 57 / 88 | IT
sultare disturbata se arriva umidità ai contatti.
Stipate gli attacchi a innesto dei cavi nel vano interno
dello SmartHandle.
5. Rimontate copertura e inserto dello SmartHandle (vedi
libretto o manuale dello SmartHandle).
La clip metallica color oro sul LockNode realizza il collegamento meccanico ed elettrico (polo positivo) del LockNode
allo SmartHandle. Se avete rimontato copertura e inserto, lo
spinotto metallico montato su molla realizza il contatto
dell’inserto (l’inserto funge da antenna).
2.1. Cavo adattatore SO
L’installazione del LockNode nelle varianti sottostanti dello
SmartHandle Ovale Scandinavo richiede un cavo adattatore fornito a corredo:
SHB****051***3**
SHB****961***3**
SHE****051***3**
Page 58

3. Dati tecnici
Questo cavo adattatore collega il LockNode sul lato esterno
della cerniera all’elettronica sul lato interno della cerniera.
AVVISO
Malfunzionamento dovuto a umidità
Il cavo adattatore non è indicato per l’uso in ambienti umidi.
Non utilizzate il cavo adattatore per le versioni WP degli
SmartHandle ricordati.
58 / 88 | IT
3. Dati tecnici
Dimensioni 45 mm × 17 mm × 12 mm
Tensione di alimentazione
3 VDC (batterie dello SmartHandle)
Page 59

3. Dati tecnici 59 / 88 | IT
Stand-by (senza trasmissio-
Corrente di esercizio
Sensibilità -95 dBm
Durata della batteria
Raggio di azione
Condizioni ambientali
ne dati): ca. 6 µA
Attivo (con trasmissione dati): ca. 30 mA
Fino a 5 anni in stand-by
o
Fino a 150000 operazioni
di chiusura
Fino a 30 m (in base all’ambiente circostante)
Da -15 °C a+50 °C (A -15°C
è ancora disponibile 45%
della capacità della batteria
a temperatura ambiente.)
Disponibile il modello resistente alle intemperie (WP)
Emissioni radio
SRD (WaveNet)
868,000 MHz) 868,600 MHz
<25 mW ERP
Page 60

4. Dichiarazione di conformità
Non esistono restrizioni geografiche all'interno dell'UE.
4. Dichiarazione di conformità
La società XY SimonsVoss Technologies GmbH dichiara che
l'articolo WN(M).LN.I.SH(.MP) è conforme alle seguenti linee guida
2014/53/EU "Apparecchiature radio"
2014/30/EU "CEM"
2011/65/EU "RoHS"
2012/19/EU "WEEE"
e il regolamento (EG) 1907/2006 "REACH"
Il testo integrale della dichiarazione di conformità UE è disponibile al seguente indirizzo Internet:
mons-voss.com/it/certificati.html
5. Supporto e ulteriori informazioni
Materiale informativo/Documenti
Maggiori informazioni sul funzionamento e sulla configurazione nonché ulteriori documenti sono riportati nella homepage di SimonsVoss, nell’area Download alla voce Documenti (
https://www.simons-voss.com/it/download/docu-
menti.html
).
.
60 / 88 | IT
https://www.si-
Page 61

4. Dichiarazione di conformità 61 / 88 | IT
Manuali
Per informazioni dettagliate sul funzionamento e sulla configurazione, consultare la nostra homepage all'indirizzo
www.smartintego.com.
Dichiarazioni di conformità
Le dichiarazioni di conformità relative a questo prodotto sono riportate nella homepage di SimonsVoss nell’area Certificati (
https://www.simons-voss.com/it/certificati.html
Informazioni sullo smaltimento
Il dispositivo (WN(M).LN.I.SH(.MP)) non va smaltito fra i
rifiuti domestici, ma conferito presso un centro di
raccolta comunale per rifiuti elettronici speciali in
conformità con la Direttiva Europea 2012/19/UE.
Riciclare le batterie guaste o esauste ai sensi della
Direttiva Europea 2006/66/CE.
Osservare le disposizioni locali in materia di smaltimento
speciale delle batterie.
Conferire l’imballaggio presso un punto di raccolta ai fini
del riciclaggio ecologico.
Assistenza tecnica
In caso di domande tecniche, il servizio di assistenza tecnica
).
Page 62

4. Dichiarazione di conformità
di SimonsVoss è disponibile al numero di telefono +49 (0)
89 99 228 333 (chiamata su rete fissa tedesca, i costi variano a seconda dell'operatore).
FAQ
Per informazioni e consigli utili sui prodotti SimonsVoss,
consultare la homepage di SimonsVoss, area FAQ (
faq.simons-voss.com/otrs/public.pl
SimonsVoss Technologies GmbH
Feringastraße 4
85774 Unterföhring
Germania
).
62 / 88 | IT
https://
Page 63

1. Bemærkninger 63 / 88 | DA
1. Bemærkninger
FORSIGTIG
I tilfælde af forkert installerede eller programmerede SimonsVoss-komponenter, kan adgangen til en
dør være spærret. SimonsVoss Technologies GmbH
hæfter ikke for tingsskader eller andre skader, så
som manglende adgang til sårede personer, som
følge af fejlagtig montering.
BEMÆRK
Beskadigelse på grund af elektrostatisk afladning (ESD)
Dette produkt indeholder elektroniske komponenter, som
kan blive beskadiget på grund af elektrostatisk afladning.
1. Brug ESD-beskyttede arbejdsmaterialer (f.eks. jordforbindelsesbånd).
2. Opret jordforbindelse før arbejde, hvor du kan komme i
kontakt med elektronikken. Indfat i denne forbindelse
jordforbundne metaloverflader (f.eks. dørkarme, vandrør
eller varmeventiler).
Page 64

1. Bemærkninger 64 / 88 | DA
BEMÆRK
Beskadigelse på grund af væske
Dette produkt indeholder elektroniske komponenter, som
kan blive beskadiget på grund af alle typer væsker.
Hold væsker væk fra elektronikken.
BEMÆRK
Fejlfunktioner der skyldes beskadiget tilslutningsledning
En beskadiget tilslutningsledning vil muligvis ikke længere
kunne overføre signalet korrekt. Dette kan medføre funktionsfejl.
1. Tilslutningsledningen må ikke beskadiges.
2. Hvis det virker svært at sætte afdækningerne på, skal du
kontrollere LockNodes’ position.
ADVARSEL
Installationen og idriftsættelsen kræver forkundskaber inden for områderne dørmekanik, dørregistrering, elektronikmontering og arbejde med SimonsVoss-softwaren. Monteringen skal altid udføres af
uddannet fagpersonale.
Page 65

2. Montering 65 / 88 | DA
ADVARSEL
Alle anvisninger skal følges nøje ved tilslutning og
montering. Disse anvisninger og alle anvisninger om
vedligeholdelse skal overdrages til brugeren af den
person, der foretager monteringen.
ADVARSEL
Ændringer eller tekniske videreudviklinger kan ikke
udelukkes og kan foretages uden forudgående varsel.
ADVARSEL
Hvis der er indholdsmæssige afvigelser i versionerne
på fremmedsprog, gælder den tyske original i tvivlstilfælde.
2. Montering
ü Afmonter afdækning og indsats på SmartHandle (se
den korte beskrivelse eller SmartHandle-håndbogen).
ü Opret jordforbindelse (fx på varmelegeme)
1. Anbring LockNode som vist på SmartHandles under-
Page 66

2. Montering 66 / 88 | DA
komponentplade.
Page 67

2. Montering 67 / 88 | DA
2. Før LockNode i pilens retning indtil den raster.
9 LockNoden skal ligge fladt på
underkomponentenheden.
3. Forbind LockNodes tilslutningsledning med SmartHand-
Page 68

2. Montering
les tilslutningsledning.
9 SmartHandle bipper og blinker rødt 4x.
4. Anbring overskydende tilslutningskabel i SmartHandles
underkomponentenhed.
BEMÆRK
Fejlfunktion der skyldes vejrforhold
Stikforbindelser er ikke stænktætte, heller ikke i WP-varianten. Hvis kontakter bliver fugtige, kan dette forstyrre dataoverførslen.
Anbring kablernes stikforbindelser i SmartHandles ind-
68 / 88 | DA
Page 69

2. Montering 69 / 88 | DA
vendige område.
5. Sæt SmartHandles cover og indsats på igen (se den korte beskrivelse eller SmartHandle-håndbog).
De guldfarvede metalklemmer på LockNode forbinder LockNode mekanisk og elektrisk (pluspol) med SmartHandle.
Når du har monteret cover og indsats på ny, kontakter den
fjederbelastede metalstift indsatsen (indsatsen fungerer
som antenne).
2.1. Adapterkabel SO
For at montere LockNode i følgende varianter af SmartHandle Scandinavian Oval, kræver det et adapterkabel, der
medfølger:
SHB****051***3**
SHB****961***3**
SHE****051***3**
Page 70

3. Tekniske data
Dette adapterkabel forbinder LockNode på beslagets yderside med elektronikken på beslagets inderside.
BEMÆRK
Fejlfunktion der skyldes fugt
Adapterkablet er ikke egnet til anvendelse i fugtige områder.
Anvend ikke adapterkablet i WP-versioner for de nævnte
SmartHandles.
70 / 88 | DA
3. Tekniske data
Dimensioner 45 mm × 17 mm × 12 mm
Strømforsyning
Driftsstrøm
Følsomhed -95 dBm
Batterileveti:
3 VDC (batterier til SmartHandle)
Standby (uden dataoverførsel): ca. 6 µA
Aktiv (med dataoverførsel):
ca. 30 mA
Op til 5 års standby eller
Op til 150,000
lukkeoperationer
Page 71

4. Overensstemmelseserklæring 71 / 88 | DA
Rækkevidde
Omgivelsesbetingelser
Op til 30 m (afhængigt af
omgivelser)
-15 °C til +50 °C (ved -15°C
står der 45 % af batterikapaciteten til rådighed sammenlignet med ved stuetemperatur.)
Vejrbestandig udførelse
(.WP) tilgængelig
Radio emissioner
SRD (WaveNet)
Der er ingen geografiske begrænsninger inden for EU.
4. Overensstemmelseserklæring
Hermed erklærer SimonsVoss Technologies GmbH at varen
WN(M).LN.I.SH(.MP) overholder følgende retningslinjer:
2014/53/EU "Udstyr station"
2014/30/EU "EMC"
2011/65/EU "RoHS"
2012/19/EU "WEEE"
868,000 MHz) 868,600 MHz
<25 mW ERP
Page 72

https://www.si-
.
https://www.si-
https://
).
72 / 88 | DA
).
5. Hjælp og flere oplysninger
såvel som forordningen (EG) 1907/2006 "REACH"
Den fulde ordlyd af EU-overensstemmelseserklæringen er
tilgængelig på følgende internetadresse:
mons-voss.com/dk/certifikater.html
5. Hjælp og flere oplysninger
Infomateriale/dokumenter
Detaljerede oplysninger om drift og konfiguration samt yderligere dokumenter kan findes på SimonsVoss hjemmeside i
downloadområdet under Dokumenter (
mons-voss.com/dk/downloads/dokumenter.html
Anvisninger
Detaljerede informationer vedr. drift og konfiguration findes
på internettet på vores hjemmeside under www.smartintego.com.
Overensstemmelseserklæringer
Overensstemmelseserklæringer for dette produkt findes på
SimonsVoss hjemmeside i certifikatområdet (
www.simons-voss.com/dk/certifikater.html
Oplysninger om bortskaffelse
Enheden (WN(M).LN.I.SH(.MP)) må ikke bortskaffes
med husholdningsaffaldet, men skal afleveres på den
kommunale affaldsplads, jf. det europæiske direktiv
Page 73

5. Hjælp og flere oplysninger 73 / 88 | DA
2012/19/EU.
Brugte eller defekte batterier skal genanvendes jf. det
europæiske direktiv 2006/66/EG.
Overhold de lokale bestemmelser for separat
bortskaffelse af batterier.
Aflever emballagen til miljørigtig genanvendelse.
Hotline
Ved tekniske spørgsmål hjælper SimonsVoss Service-Hotline gerne på telefon +49 (0) 89 99 228 333 (Opkald på tysk
fastnet, prisen varierer af udbyder).
FAQ
Information og assistance med SimonsVoss produkter findes på SimonsVoss hjemmeside i FAQ sektionen (
faq.simons-voss.com/otrs/public.pl
SimonsVoss Technologies GmbH
Feringastraße 4
D - 85774 Unterföhring
Tyskland
).
https://
Page 74

1. OBS. 74 / 88 | SV
1. OBS.
SE UPP
Felaktigt installerade eller programmerade
komponenter för system från SimonsVoss kan leda
till att dörrar spärras. SimonsVoss Technologies
ansvarar inte för konsekvenserna av felaktig
installation såsom spärrat tillträde till skadade
personer, materiella skador eller andra typer av
skador.
OBS
Skada på grund av elektrostatisk urladdning (ESD)
Den här produkten innehåller elektroniska komponenter
som kan skadas av elektrostatiska urladdningar.
1. Använd alltid ESD-anpassat arbetsmaterial (t.ex.
jordningsarmband).
2. Jorda dig före alla arbeten där du kan komma i kontakt
med elektronik. Det gör du genom att fatta tag i en
jordad metallyta (såsom dörrkarmar, vattenrör eller
värmeventiler).
Page 75

1. OBS. 75 / 88 | SV
OBS
Skada på grund av vätskor
Den här produkten innehåller elektroniska komponenter
som kan skadas av alla typer av vätskor.
Låt inte elektroniken komma i kontakt med vätskor.
OBS
Felfunktioner på grund av skadad anslutningsledning
En skadad anslutningsledning kan eventuellt inte längre
överföra signalen korrekt. Detta kan orsaka funktionsfel.
1. Se till att anslutningsledningen inte skadas.
2. Om det är svårt att montera kåporna, kontrollera
positionen av LockNode.
INFO
För installation och driftsättning krävs kunskaper
inom områdena för dörrmekanik,
tillträdesrättigheter, elinstallationer samt hantering
av SimonsVoss-programvaran. Installation får
endast genomföras av utbildad fackpersonal.
Page 76

2. Montering
INFO
Följ alla anvisningar mycket noggrant vid anslutning
och installation. De här anvisningarna och övriga
anvisningar gällande underhåll ska vidarebefordras
till användaren av den personal som genomför
installationen.
INFO
Ändringar eller teknisk vidareutveckling kan inte
uteslutas och kan komma att genomföras utan
föregående meddelande om detta.
INFO
Om innehållet i versioner på andra språk än tyska
avviker från den tyska originaltexten gäller den
tyska versionen vid tveksamheter.
76 / 88 | SV
2. Montering
ü SmartHandles kåpa och inlägg demonterade (se
snabbguide eller handbok för SmartHandle).
ü Skyddsjordning klar (t.ex. på ett element)
1. Lägg LockNode enligt bilden på plattan i SmartHandles
Page 77

2. Montering 77 / 88 | SV
innerbeslag.
Page 78

2. Montering
2. Skjut LockNode till anslag i pilens riktning.
9 LockNode ligger plant på innerbeslaget.
3. Koppla LockNodes anslutningsledning till SmartHandles
78 / 88 | SV
Page 79

2. Montering 79 / 88 | SV
anslutningsledning.
9 SmartHandle piper och blinkar rött fyra gånger.
4. Samla överflödig anslutningsledning inuti SmartHandles
innerbeslag.
OBS
Felfunktion på grund av väderpåverkan
Stickkontakterna är inte skyddade mot vattenstänk ens i
WP-varianten. Fukt som kommer in i kontakterna kan störa
dataöverföringen.
Samla överflödiga stickkontakter på ledningen inuti
Page 80

2. Montering
SmartHandle.
5. Sätt tillbaka SmartHandles kåpa och inlägg (se
snabbguide eller handbok för SmartHandle).
Den guldfärgade metallklämman på LockNode skapar en
mekanisk och elektrisk (pluspol) koppling mellan LockNode
och SmartHandle. När du har monterat tillbaka kåpan och
inlägget, kommer den fjäderbelastade metallstiften i
kontakt med inlägget (inlägget fungerar sedan som
antenn).
2.1. Adapterkabel SO
För montering av LockNode i följande varianter av
SmartHandle Scandinavian Oval krävs en adapterkabel
som medföljer leveransen:
SHB****051***3**
SHB****961***3**
SHE****051***3**
80 / 88 | SV
Page 81

3. Tekniska data 81 / 88 | SV
Adapterkabeln ansluter LockNode på beslagets utsida med
elektroniken på beslagets insida.
OBS
Felfunktion på grund av fukt
Adapterkabeln är inte lämpad för användning i fuktiga
miljöer.
Använd inte adapterkabeln i de väderbeständiga
varianterna av nämnda SmartHandle.
3. Tekniska data
Mått 45 mm × 17 mm × 12 mm
Spänningsförsörjning
3 VDC (batterierna i
SmartHandle)
Page 82

3. Tekniska data
Standby (utan
Strömförbrukning
Känslighet -95 dBm
Batteriernas livslängd
Räckvidd
Omgivningsvillkor
dataöverföring): ca 6 µA
Aktiv (med dataöverföring):
ca 30 mA
Upp till 5 år i standbyläge
eller
upp till 150000
låsningar
Upp till 30 m (beror på
omgivningen)
-15–+50 °C (vid -15 °C med
45 % återstående
batterikapacitet vid
rumstemperatur.)
Väderbeständigt utförande
(.WP) tillgängligt
Utsläpp radio
SRD (WaveNet)
868,000 MHz) 868,600 MHz
82 / 88 | SV
<25 mW ERP
Page 83

4. Försäkran om överensstämmelse 83 / 88 | SV
Det finns inga geografiska begränsningar inom EU.
4. Försäkran om överensstämmelse
Häri förklarar SimonsVoss Technologies GmbH att varan
WN(M).LN.I.SH(.MP) uppfyller följande riktlinjer:
2014/53/EU "Stationsutrustning"
2014/30/EU "EMC"
2011/65/EU "RoHS"
2012/19/EU "WEEE"
liksom förordningen (EG) 1907/2006 "REACH"
Den fullständiga texten till EU-försäkran om
överensstämmelse finns på följande internetadress:
www.simons-voss.com/se/certifikat.html
5. Hjälp och ytterligare information
Infomaterial/dokument
Detaljerad information om drift och konfiguration samt
andra dokument finns på SimonsVoss webbplats under
rubriken Dokument (
nerladdningar/dokument.html
Anvisningar
Närmare information om drift och konfiguration finns på vår
ttps://www.simons-voss.com/se/
).
https://
.
Page 84

4. Försäkran om överensstämmelse
webbplats www.smartintego.com.
Försäkringar om överensstämmelse
Försäkringar om överensstämmelse för denna produkt finns
på SimonsVoss webbplats under rubriken Certifikat
(
https://www.simons-voss.com/se/certifikat.html
Informationen är öppen
Produkten (WN(M).LN.I.SH(.MP)) får inte slängas i
hushållssoporna utan ska lämnas in på en kommunal
uppsamlingsplats för elektriskt och elektroniskt avfall i
enlighet med direktiv 2012/19/EU.
Defekta eller uttjänta batterier ska återvinnas i enlighet
med direktiv 2006/66/EG.
Beakta gällande lokala bestämmelser gällande separat
bortskaffande av batterier.
Avfallshantera förpackningsmaterial på ett miljövänligt
sätt.
Hotline
Vid tekniska frågor, kontakta SimonsVoss servicehotline på
+49 (0) 89 99 228 333 (samtal i det fasta nätet i Tyskland,
samtalstaxa beroende på leverantör).
84 / 88 | SV
).
Page 85

4. Försäkran om överensstämmelse 85 / 88 | SV
FAQ
Information om och hjälp med SimonsVoss produkter finns
på SimonsVoss webbplats under rubriken Vanliga frågor
(
https://www.simons-voss.com/se/nerladdningar/
support.html
SimonsVoss Technologies GmbH
Feringastraße 4
85774 Unterföhring
Tyskland
).
Page 86

4. Försäkran om överensstämmelse 86 / 88 | SV
Page 87

4. Försäkran om överensstämmelse 87 / 88 | SV
Page 88

 Loading...