

Page 1

MANUAL LSM–TRANSPONDERTERMINAL
Page 1
1.0 GENERAL INFORMATION
1.1. AREA OF USE
The transponder terminal is a combination between a wall-mounted reader and its
associated software application. This combination is used to re-programme transponders. It allows the administrator to prepare changes and updates to the transponder configuration which are implemented when the user activates the transponder, but the administrator does not need to present when the update actually
takes place.
1.2. PREREQUISITES
The following components are required to use the transponder terminal:
• LSM.BUSINESS an installed LSM Business Edition as a minimum
• LSM.ONLINE online module
• Installed and configured Comm Node server
• Server network connection
• Transponder terminal network connection
• Communication between server and transponder terminal;
you will need to take router and firewall configuration into account!
Note:
Please note that the program and its associated configuration tool are only available
in English.
Contact your IT department in advance regarding questions about setting up the internal network connection. System administrator rights are required for software installation and configuration.
Version: Juli 2012 v1.6
Page 2

MANUAL LSM–TRANSPONDERTERMINAL
Page 2
2.0 INITIAL OPERATION OF TRANSPONDER TERMINAL
PROCEDURE
• Hardware configuration
• Software installation
• Configuration of software components
2.1. HARDWARE CONFIGURATION
To put the transponder terminal into operation, you need to connect it to an accessible IP network. We recommend using a DHCP server to ensure better availability.
The configuration can then be carried out either using the 'XTAdminXXL' program as
described in the next section or by entering the IP address in the browser (see Section 2.1.5).
Note:
Any changes which differ from the configuration specified by SimonsVoss may
mean that the device switches to a non-defined status. This may result in the
device no longer
being operable.
Version: Juli 2012 v1.6
Page 3
MANUAL LSM–TRANSPONDERTERMINAL
Page 3
2.1.1 INSTALLATION OF THE XTADMINXXL APPLICATION
The XTAdminXXL tool can be used to configure the transponder terminal. This program will enable you to look for the transponder terminal even if you do not know the
IP address. You can find the program at:
INFOCENTER – DOWNLOADS – ADDITIONAL DOWNLOADS
IINFOCENTER DOWNLOADS
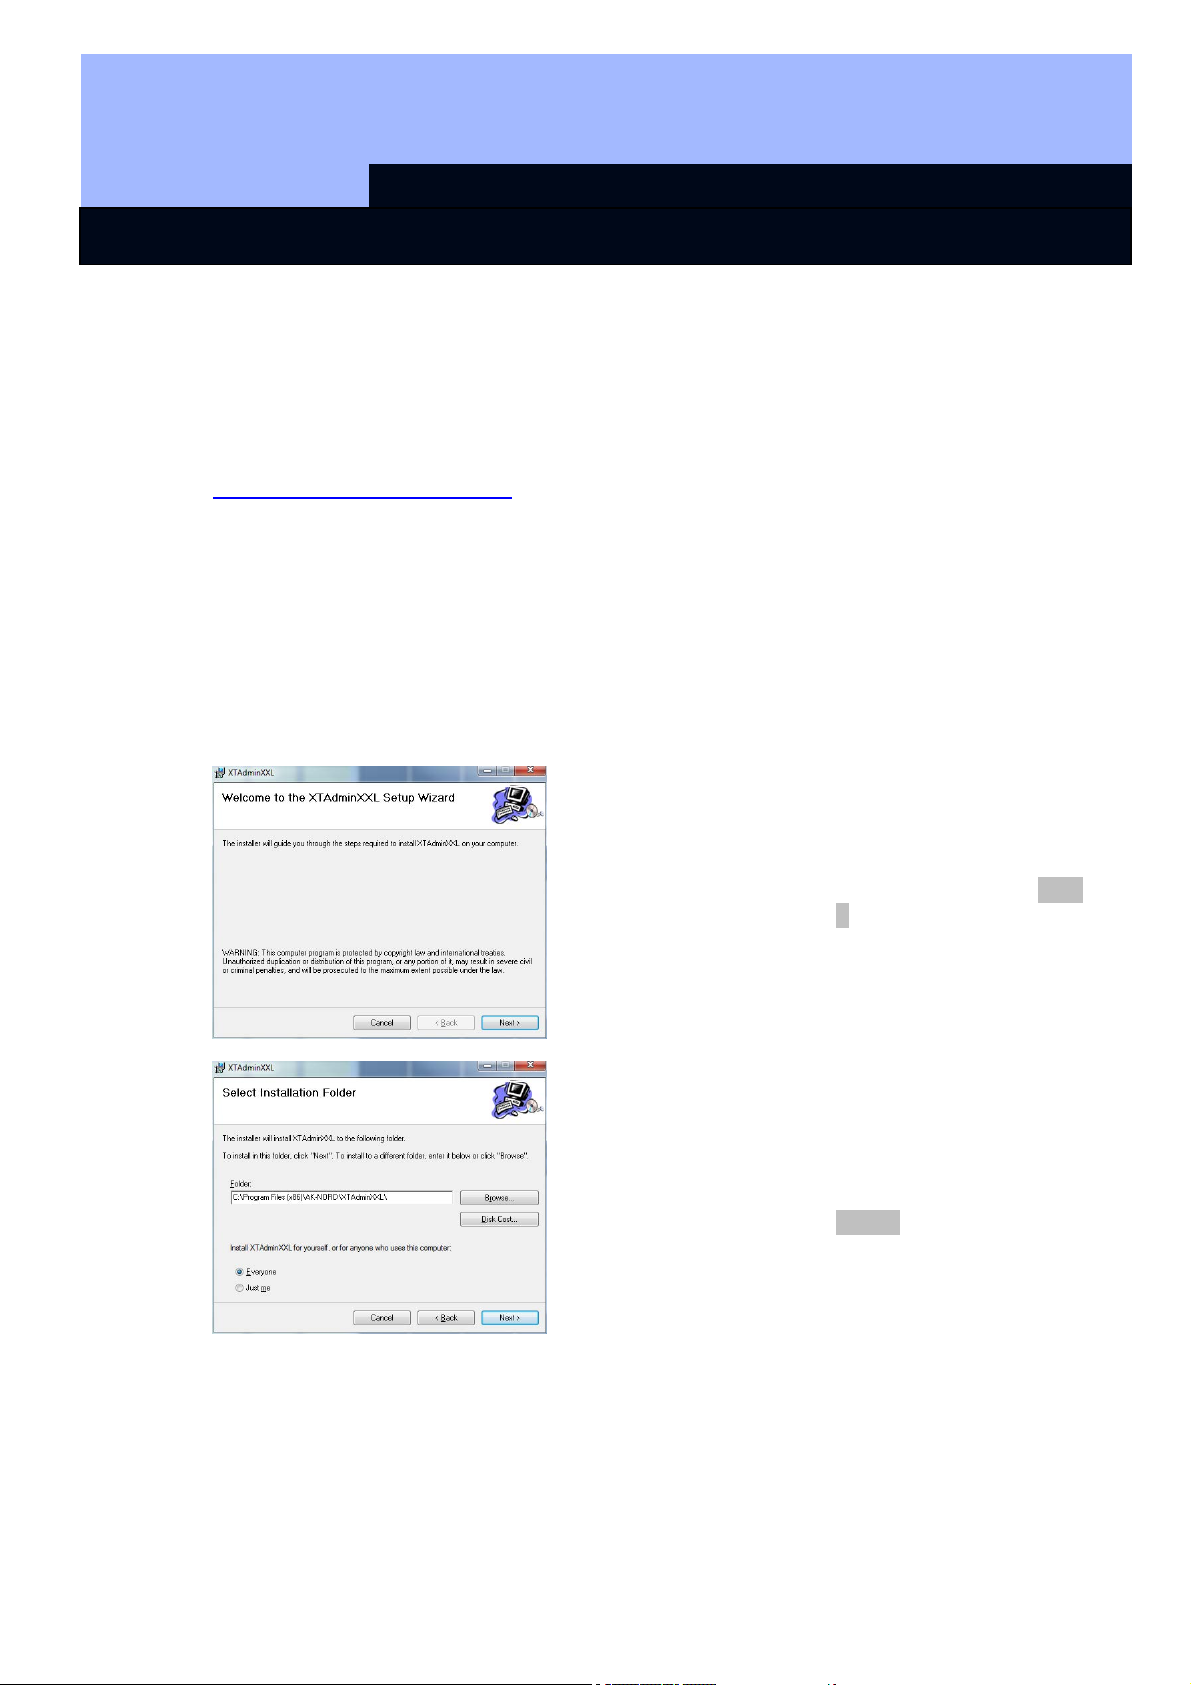
Launch for the installation routine:
Setup.exe
• Start the installation
• Process the individual steps
Note:
Please note that you need system administrator rights to install the transponder terminal.
on the SimonsVoss internet site.
Confirm by pressing Next
> to start installation.
Select the installation folder and confirm by pressing
Next > to start installation
Version: Juli 2012 v1.6
Page 4
Page 4
MANUAL LSM–TRANSPONDERTERMINAL
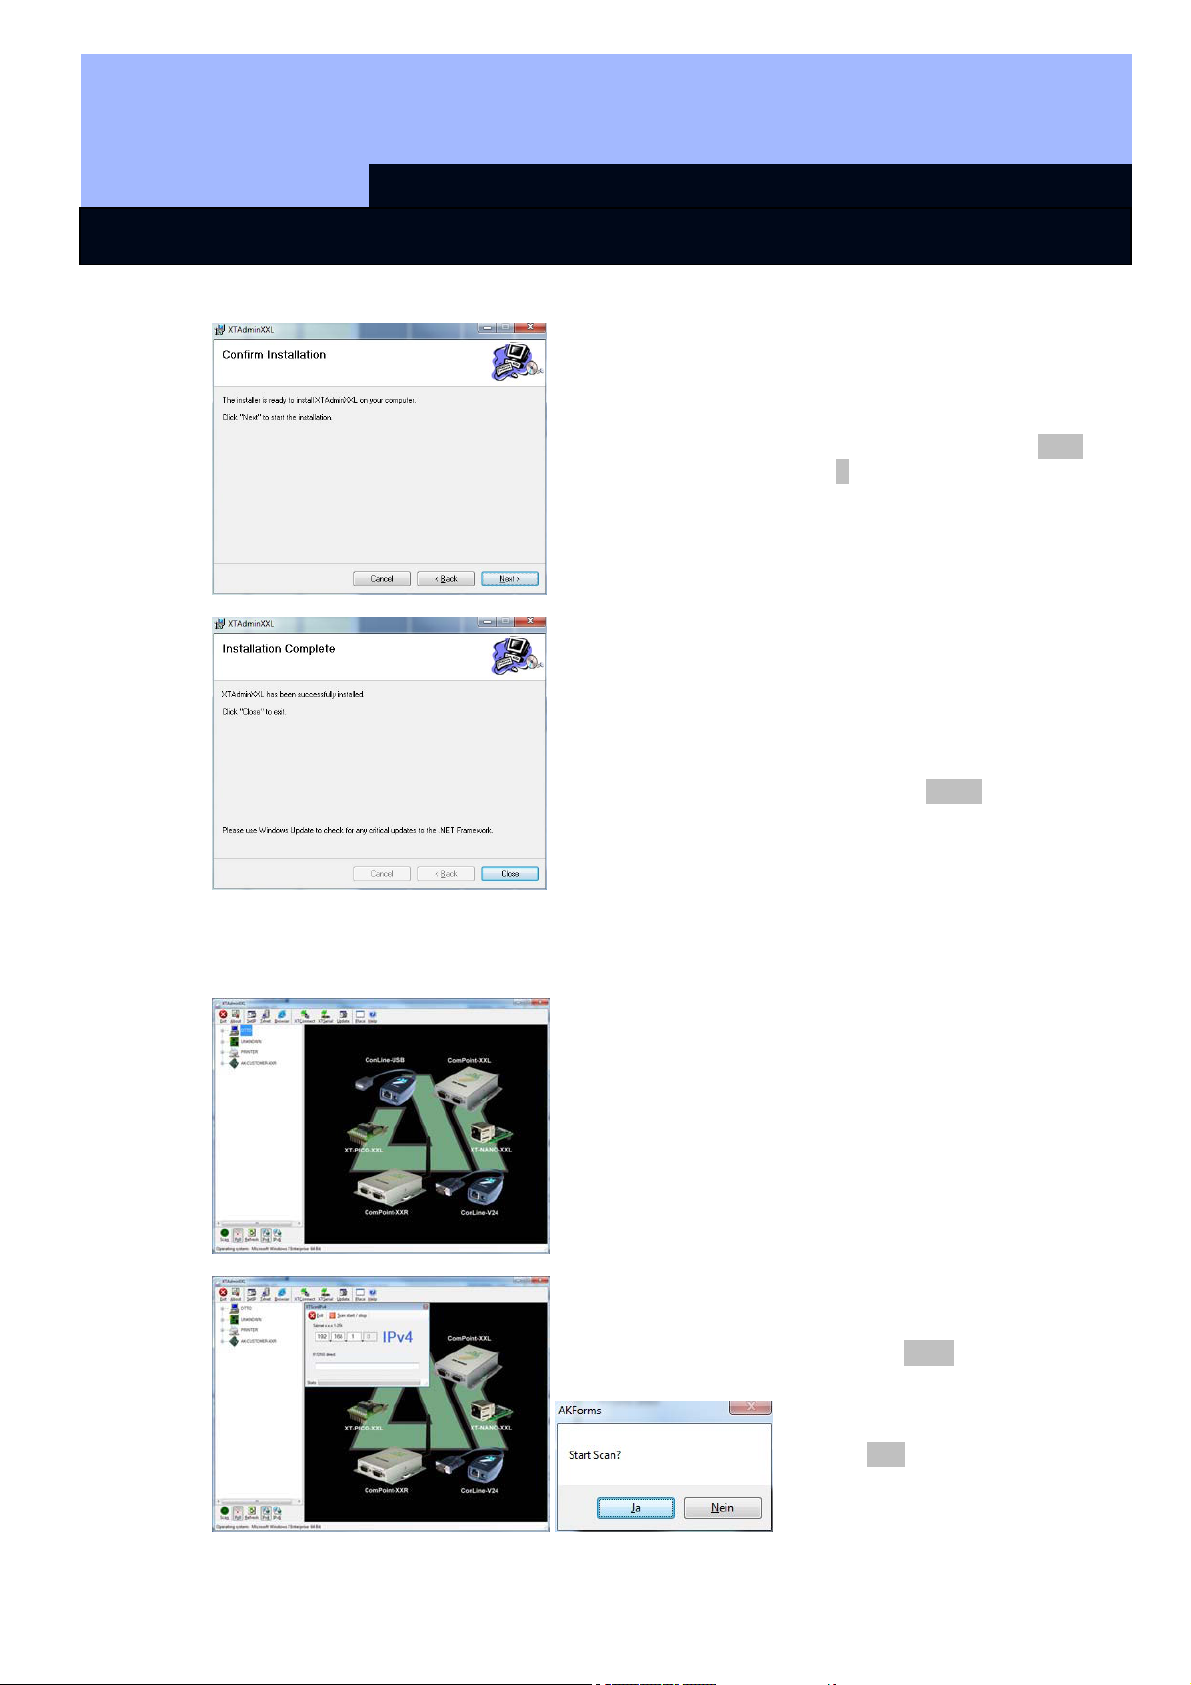
Confirm by pressing Next
> to start installation.
Installation has now been
successfully completed.
Finish the installation by
pressing Close.
2.1.2 SETTING THE IP ADDRESS ON THE TRANSPONDER TERMINAL
Launch the 'XTAdminXXL' application.
Once the application is
launched, you will see the
configuration tool as
shown on the left.
Select Scan, then enter
the required network segment, start the scan and
accept prompt by clicking
on Yes
Version: Juli 2012 v1.6
Page 5
MANUAL LSM–TRANSPONDERTERMINAL
Page 5
2.1.3 SETTING UP THE STANDARD GATEWAY
Launch the 'XTAdminXXL' application.
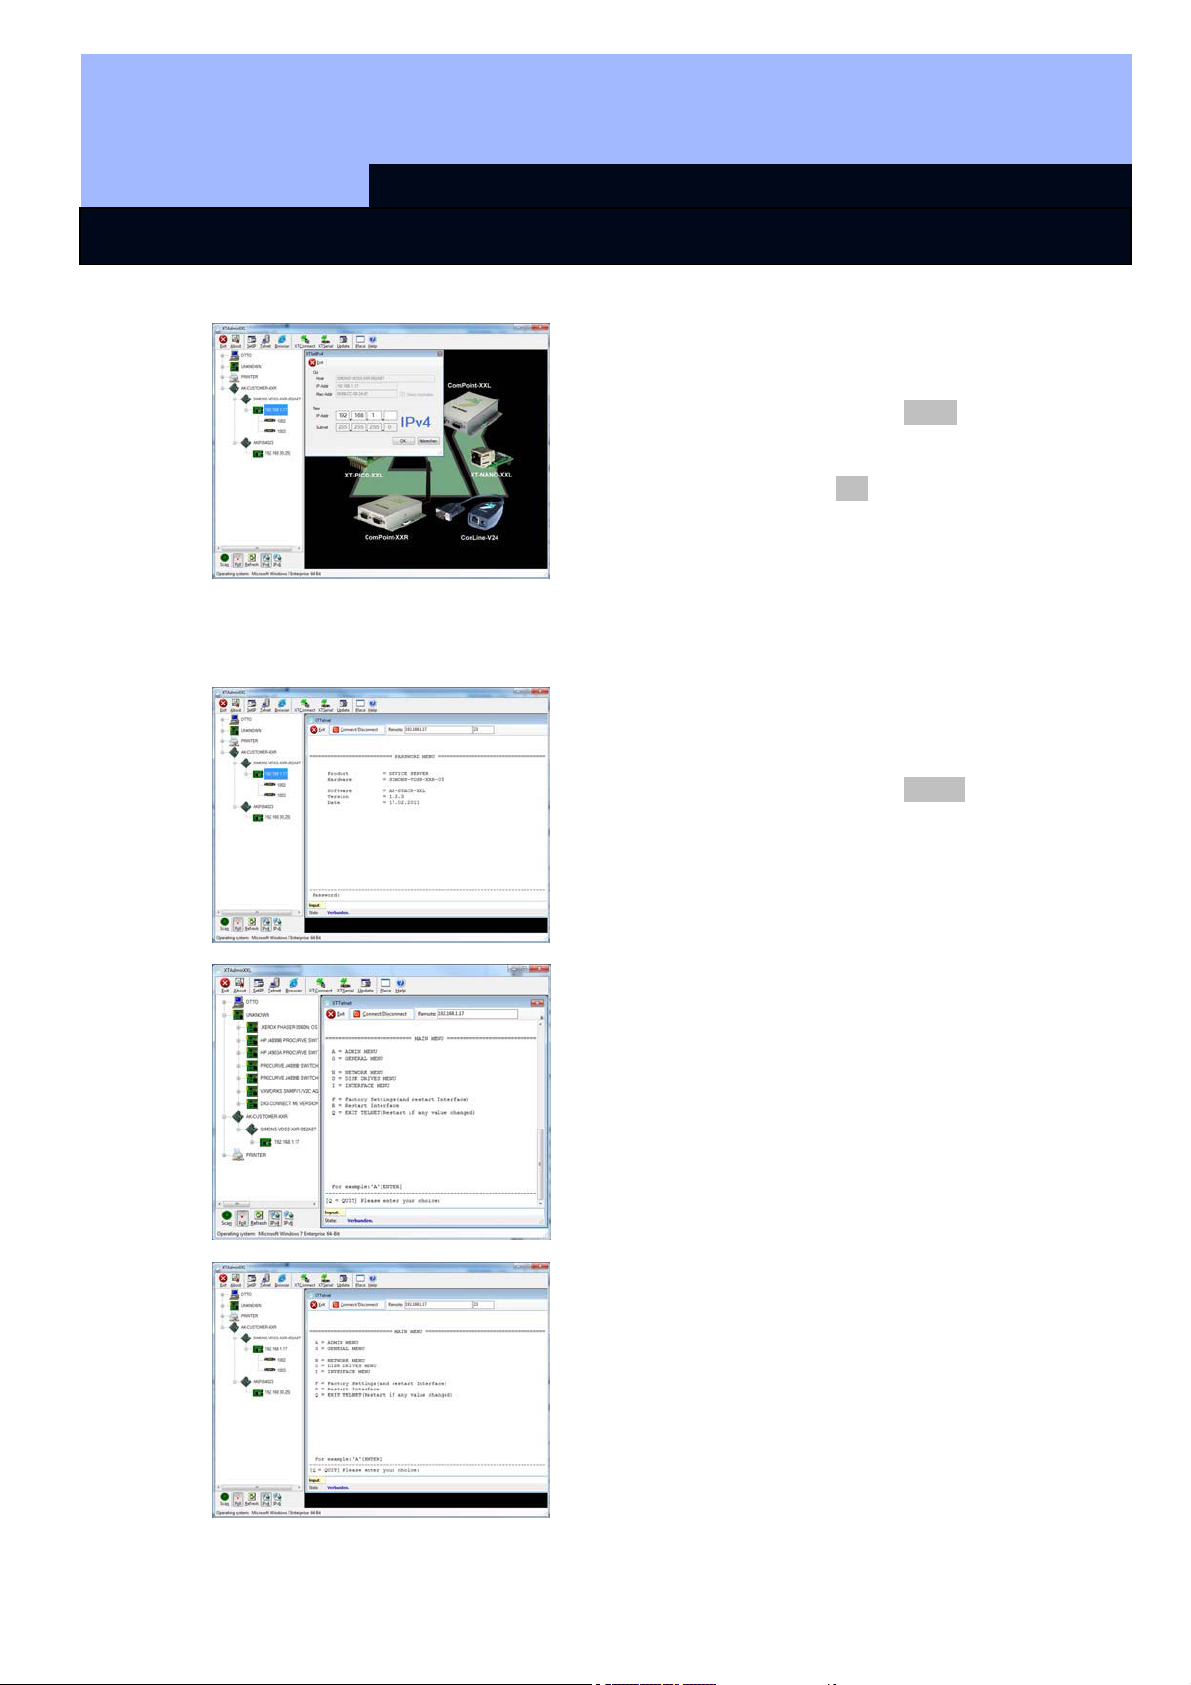
Select SetIP, then enter
the required IP address
and confirm by clicking on
OK.
Select Telnet and enter the
password 'XT' to register
the components.
First change the login
password for security reasons by entering 'A', confirm by pressing 'Enter'
and then type in '7=*****' in
the prompt, whereby '*****'
represents your own
password and confirm by
pressing 'Enter'.
Select "N" for NETWORK
MENU and then confirm by
pressing 'Enter'
Version: Juli 2012 v1.6
Page 6
Page 6
MANUAL LSM–TRANSPONDERTERMINAL
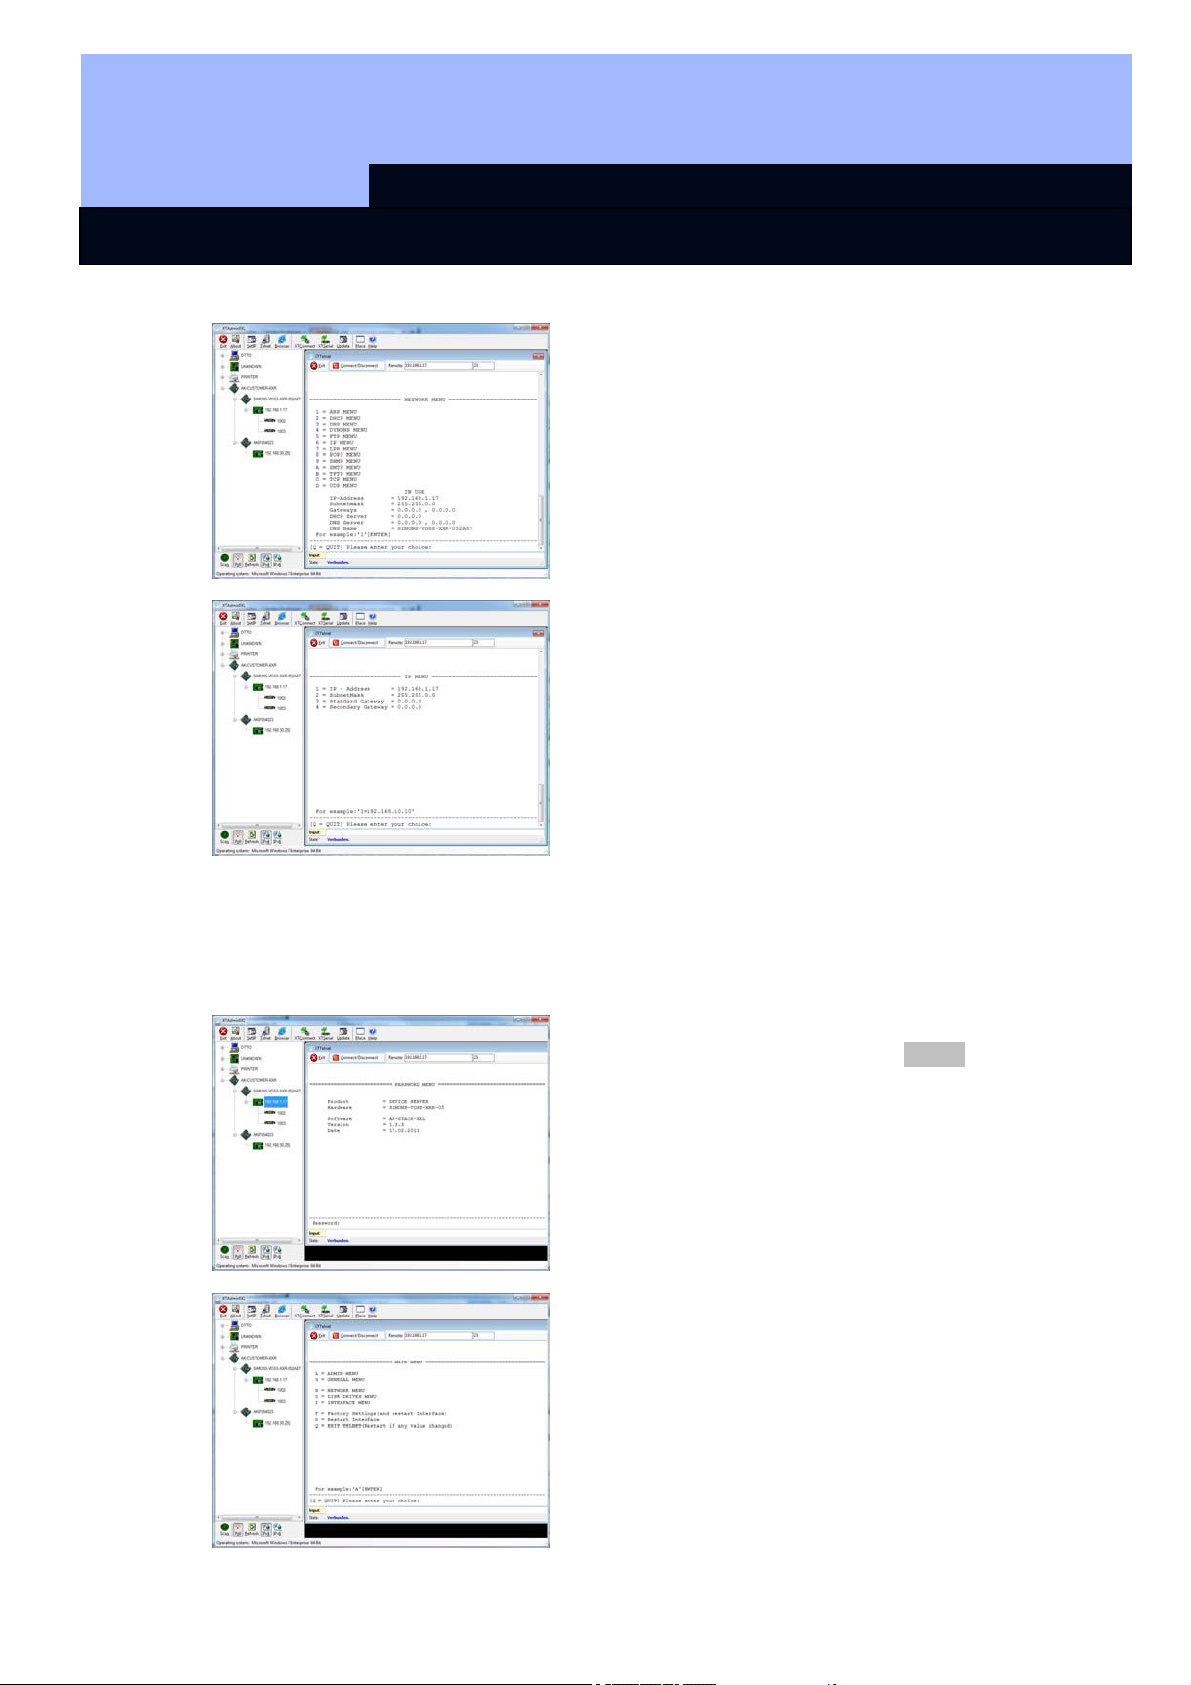
Select '6' for IP MENU and
then confirm by pressing
'Enter'
Please check the address
in Row 3. If necessary,
change the address by
entering
'3=XXX.XXX.XXX.XXX' in
the prompt and then confirm by pressing 'Enter'.
Then reboot the transponder terminal by pressing the button on the bottom, righthand side of the housing.
2.1.4 CONFIGURING THE SMART CD MODULE IN THE TRANSPONDER TERMINAL
Launch the 'XTAdminXXL' application.
Select Telnet, highlight the
IP address of the required
device in the left-hand tree
structure and then enter
the password 'XT' or the
new password that you
created to register the
components.
Select 'I' for INTERFACE
MENU and then confirm by
pressing 'Enter'
Version: Juli 2012 v1.6
Page 7

Page 7
MANUAL LSM–TRANSPONDERTERMINAL
Select '1' for Smart CD
Settings MENU and then
confirm by pressing 'Enter'
Then reboot the transponder terminal by pressing the button on the bottom, righthand side of the housing.
2.1.5 CONFIGURATION IN A BROWSER
Select '1' for Config Menu
and then confirm by pressing 'Enter'
Please check the value in
Row 'b=Emceed'. If necessary, change the value in
'c000' by typing ‘b=c000’ in
the prompt and then confirm by pressing 'Enter'.
Position the mouse in the
lower left-hand corner as
indicated. You can also
access the configuration
masks by clicking on the
link. The configuration process is as described in the
previous section.
Version: Juli 2012 v1.6
Page 8

MANUAL LSM–TRANSPONDERTERMINAL
Page 8
2.1.6 TESTING THE TRANSPONDER TERMINAL
The transponder terminal functions and settings can be tested using the 'TestTransTerm.exe' software. You need to launch the software in the directory where the
TestTransTerm.exe file is saved.
This test enables you to check the readout from a G2 Lock (cylinder, Smart Relay required) and the event button function (right-hand side of the housing).
Possible launch parameters (prompt):
-h, --host <IP addr> : IP address of target host
--portUDP <port> : UDP communication port (default 1003)
--portTCP1 <port> : TCP1 communication port (default 1003)
--portTCP2 <port> : TCP2 communication port (default 1002)
-w, --waitCycle <millisec> : time interval between two test cycles(default 10000)
-c, --waitOnCD <millisec> : time interval for waiting of CD answer(default 7000)
-b, --waitOnButton <sec> : time interval for waiting of button press(default 5)
-r, --cycleCount <times> : the number of test cycles, "0" means undetermined workflow
(default: 0)
-?, --help : this message
Example:
D:\>TestTransTerm.exe -h 192.168.1.17 -w 4000 -c 3000 -b 5 -r 1
Version: Juli 2012 v1.6
Page 9

Page 9
MANUAL LSM–TRANSPONDERTERMINAL
Example:
Example (everything written in a single row):
\TestTransTerm>TestTransTerm.exe -h
192.168.1.17 -w 4000 -c 3000 -b 5 -r 1
D:\>TestTransTerm.exe -h 192.168.1.17 -w 4000 -c 3000 -b 5 -r 1
2012/06/30 12:02:40: Sent: <STI>
2012/06/30 12:02:40: Recv: <00000 41>
2012/06/30 12:02:40: Sent: <STI>
2012/06/30 12:02:40: Recv: <11000 41>
2012/06/30 12:02:40: Sent: <TMP>
2012/06/30 12:02:40: Recv: < 41>
2012/06/30 12:02:40: Rear side temperature: 41
2012/06/30 12:02:41: Sent: <DP1>
2012/06/30 12:02:41: Recv: <DP1>
2012/06/30 12:02:41: Sent: <SM1>
2012/06/30 12:02:41: Recv: <SM1>
2012/06/30 12:02:41: Sent: <DPWOK 2012/06/30 12:02:41>
2012/06/30 12:02:41: Recv: <DPW>
2012/06/30 12:02:41: Sent: 10 02 0E 11 1E 00 0E F0 00 00 00 00 00 02 00 00 20 00
02 00 00 0A D5 10 03
2012/06/30 12:02:44: Recv: 0E 11 1E 00 20 DE 0A 20 16 00 1A 14 00 00 00 17 27
00 00 00 42 00 00 00 00 00 00 92 2F 09 88 00 65 95 30 8B 02 80 4A
2012/06/30 12:02:48: Now let's test the button...
2012/06/30 12:02:49: Button has been pressed OK!
Results:
Cycles : 1
Sockets : OK
Smart CD : OK
Button : OK
Temperature read : OK
Temperature value : 41 C
D:\>
Alternatively, you can also launch the software using a batch file (start.bat).
Version: Juli 2012 v1.6
Page 10

MANUAL LSM–TRANSPONDERTERMINAL
Page 10
2.2. RESETTING TO ORIGINAL DELIVERY SETTINGS
Important:
Whenever you press this button, you will always need to re-configure the device. This may not
The blue factory default reset button on the rear of the transponder terminal resets
the settings to their initial state. This will only function after a restart.
Procedure when switched off:
• Press and hold down factory default reset button
• Power on
• Wait until the message = 'Factory reset' appears
• Release factory default reset button
Procedure when switched on:
• Press and hold down factory default reset button
• Restart using the Telnet menu or the reset button on the lower wall of the
transponder terminal
• Wait until the message = 'Factory reset' appears
• Release factory default reset button
You should prevent this button being activated unintentionally.
be possible on site during installation.
2.3. SOFTWARE INSTALLATION
Two additional software components are required to use the transponder terminal:
• Service, which provides communication between the terminal and the database
• Console, which is used to display status and configure the terminal
Launch for the installation routine:
TransTerm_setup_3_1.exe
• Start the installation
• Process the individual steps
Note:
Please note that you need system administrator rights to install the transponder terminal.
Version: Juli 2012 v1.6
Page 11

Page 11
MANUAL LSM–TRANSPONDERTERMINAL
Confirm by pressing Next
to start the installation
.
Read the licence conditions and accept. Then
select Next.
Enter the user details and
then select Next.
Then confirm by pressing
Next.
Version: Juli 2012 v1.6
Page 12

Page 12
MANUAL LSM–TRANSPONDERTERMINAL
Select complete installation by pressing Complete
and confirm by pressing
Next.
Then confirm by pressing
Install.
Finish the installation by
pressing on Finish.
The programs are installed in the following folders by default:
Service C:\Program Files (x86)\SimonsVoss\TransponderTerminalService
Console C:\Program Files (x86)\SimonsVoss\TransponderTerminal\Console
Checking the service:
the 'SimonsVoss Transponder Terminal Server'
service must be functional
after installation.
Version: Juli 2012 v1.6
Page 13

MANUAL LSM–TRANSPONDERTERMINAL
Page 13
2.4. SOFTWARECONFIGURATION
The two additional software components must be added and configured after installation.
2.4.1 SETTING UP COMMUNICATION NODE – COMM NODE SERVER
The Comm Node server is required to allocate tasks to the other network nodes and
forward feedback signals to the database.
The Comm Node server should have been installed when the software was set up for
operation. You can check this is the case as described below. If it has not yet been
installed, please do so now. You will find the installation instructions in the 'Communication node' section in the 'LSM – IT Administration' manual.
Checking the Comm Node server
• Launch LSM
• Log on
• Enter user name and password (as administrator)
• Â Network
• Â Communication node
• Use the arrow keys to navigate through the projects saved in the database
EXPLANATION
'Name'
'Computer name'
'IP port'
'Description'
'Connections'
Ping
Config files
Transmit
Test
Æ
Name of the connection in the software
Æ
Name of computer where the component is
installed
Æ
IP port used for communication
Æ
Blank field to describe the connection
Æ
Local connections used to address programming devices
Æ
Tests the connection to the component
Æ
Generates the configuration files
Æ
The new configuration settings are transmitted to the available Comm Node.
Æ
Tests the connection to the highlighted connection device
Version: Juli 2012 v1.6
Page 14

Page 14
MANUAL LSM–TRANSPONDERTERMINAL
Edit
Add
Remove
Æ
Connection can be edited
Æ
Connection can be added
Æ
Connection can be removed
You can verify availability
and, consequently, the
correct functioning of the
Comm Node by using the
PING function.
The Comm Node will receive current data if you
activate the Transmit function.
2.4.2 SETTING UP COMMUNICATION NODES – TRANSTERM SERVICE
The TransTerm service provides communication between the transponder terminal
and the database.
PROCEDURE
• Launch LSM
• Log on
• Enter user name and password
• Â Network
• Â Communication node
• New
• Add configuration data (see below)
• Generate and save Config files
• Copy files (netcfg.xml, appcfg.xml, msgcfg.xml) into the 'TransTerm service'
installation directory and re-launch the service
'Name'
'Computer name'
Æ
Name of the connection in the software
Æ
Name of computer where the component is
installed
Version: Juli 2012 v1.6
Page 15

Page 15
MANUAL LSM–TRANSPONDERTERMINAL
'IP port'
'Description'
Æ
Æ
2.4.3 GENERATE CONFIGURATION FILES
GENERAL INFORMATION
The configuration files are needed to inform a communication node (Comm Node)
which devices are connected and how it can access the database.
PROCEDURE
• Launch LSM
• Log on
• Enter user name and password (as administrator)
• Â Network
• Â Communication node
• New or select existing communication node
• Add or check configuration data
• Generate and save Config files
• Copy files (netcfg.xml, appcfg.xml, msgcfg.xml) into the 'SimonsVoss Comm
Node Server' installation directory
• Left-click Windows start button
• Select Run button
• Enter 'services.msc' command in the dialogue box and accept
• Re-start 'SimonsVoss Comm Node server'
IP port used for communication
Blank field to describe the connection
NOTE:
• The files can also be created on any computer with a GUI and then saved via
the network.
• The config files must be generated again each time that you change a Comm
Node's configuration and then copied or transmitted to the Comm Node directory.
• If the Comm Node is set up as a service, it must be stopped and re-launched
manually if major changes are made, such as a change to the name of the
computer.
• The user who starts the 'SimonsVoss Comm Node server' service must be authorised to communicate via the network.
2.4.4 SETTING UP COMMUNICATION NODES – TRANSTERM CONSOLE
The TransTerm console is used to display status and configure the transponder terminal.
PROCEDURE
• Launch LSM
• Log on
• Enter user name and password (as administrator)
Version: Juli 2012 v1.6
Page 16

Page 16
MANUAL LSM–TRANSPONDERTERMINAL
• Â Network
• Â Communication node
• New
• Add configuration data (see below)
• Generate and save Config files
• Copy files (netcfg.xml, appcfg.xml, msgcfg.xml) into the 'TransTerm console'
installation directory
'Name'
'Computer name'
'IP port'
'Description'
Æ
Æ
Æ
Æ
2.4.5 GENERATE CONFIGURATION FILES
GENERAL INFORMATION
The configuration files are needed to inform a communication node (Comm Node)
which devices are connected and how it can access the database.
PROCEDURE
• Launch LSM
• Log on
• Enter user name and password (as administrator)
• Â Network
• Â Communication node
• New or select existing communication node
• Add or check configuration data
• Generate and save Config files
• Copy files (netcfg.xml, appcfg.xml, msgcfg.xml) into the 'SimonsVoss Comm
Node server' installation directory
• Left-click Windows start button
• Select Run button
• Enter 'services.msc' command in the dialogue box and accept
Name of the connection in the software
Name of computer where the component is
installed
IP port used for communication
Blank field to describe the connection
Version: Juli 2012 v1.6
Page 17

Page 17
MANUAL LSM–TRANSPONDERTERMINAL
• Re-start 'SimonsVoss Comm Node server'
NOTE:
• The files can also be created on any computer with a GUI and then saved via
the network.
• The config files must be generated again each time that you change a Comm
Node's configuration and then copied or transmitted to the Comm Node directory.
• If the Comm Node is set up as a service, it must be stopped and re-launched
manually if major changes are made, such as a change to the name of the
computer.
• The user who starts the 'SimonsVoss Comm Node server' service must be authorised to communicate via the network.
2.4.6 SETTING UP IP ADDRESSES
The 'TransTerm service' installation directory contains a file called 'nodes.csv', where
all transponder terminals need to be entered with their respective IP address data:
Name Address Port 1 Port 2 Port 3
Host1 192.168.x.y 1003 1002 1003
Host2 192.168.x.y 1003 1002 1003
Host3 192.168.x.y 1003 1002 1003
Version: Juli 2012 v1.6
Page 18

MANUAL LSM–TRANSPONDERTERMINAL
Page 18
3.0 CONFIGURATION
3.1. PROCEDURE
Launch the "Transponder Terminal 3.1" software in the start menu.
Once the software has
been launched, you will
see the login mask shown
here on the left-hand side.
Log on using the LSM user
name which is authorised
to programme the transponders.
'Database'
'Remote server'
'User'
‘Password’
Æ
LSM database file path (file structure)
\\[SERVERNAME]\ Share
name\lsmdb\lsmdb.add
Æ
Setting which can be used to access the
database
Æ
User name
Æ
Associated password
Select the 'TransTerm service' added in Section
2.4.2.
You are now in the console used to monitor and
control the transponder
terminal.
Version: Juli 2012 v1.6
Page 19

MANUAL LSM–TRANSPONDERTERMINAL
Page 19
3.2. OPERATING THE TRANSPONDER TERMINAL CONSOLE
The console can be used to display the status of the individual transponder terminals.
Other options can also be selected.
'Counter'
'State'
Load nodes
Start server
Stop server
'Results'
'Today only'
Refresh
Hosts
Æ
Overview of the different status messages
Æ
Overview of the current operating time
Log enabled:
logging of status messages
Read deactivation log:
readout of acknowledgements on a transponder for deactivations
Æ
The individual entries for the different transponder terminals in the 'nodes.csv' are reimported.
Æ
The 'SimonsVoss Transponder Terminal
server' is launched.
Æ
The 'SimonsVoss Transponder Terminal
server' is shut down.
Æ
Activities log on the transponder terminal.
Æ
Filters results to show today's entries only
Æ
Updates the overview of results on the lefthand side
Æ
Overview of the transponder terminals entered.
Version: Juli 2012 v1.6
Page 20

Page 20
'Hosts'
Check CD
MANUAL LSM–TRANSPONDERTERMINAL
Additional data can be
retrieved in the overview
for the individual transponder terminals.
The programming device
integrated into the transponder terminal can also
be checked using the
Check CD.
Æ
Overview of the integrated transponder terminals (from nodes.csv)
Æ
Checks and displays the
programming device
firmware in the transponder
terminal
'Host'
Refresh
Temperature
Æ
Provides the current values for the transponder terminal selected under 'Hosts'
Æ
Updates the status overview
Æ
Displays the temperatures logged
Version: Juli 2012 v1.6
 Loading...