

Page 1
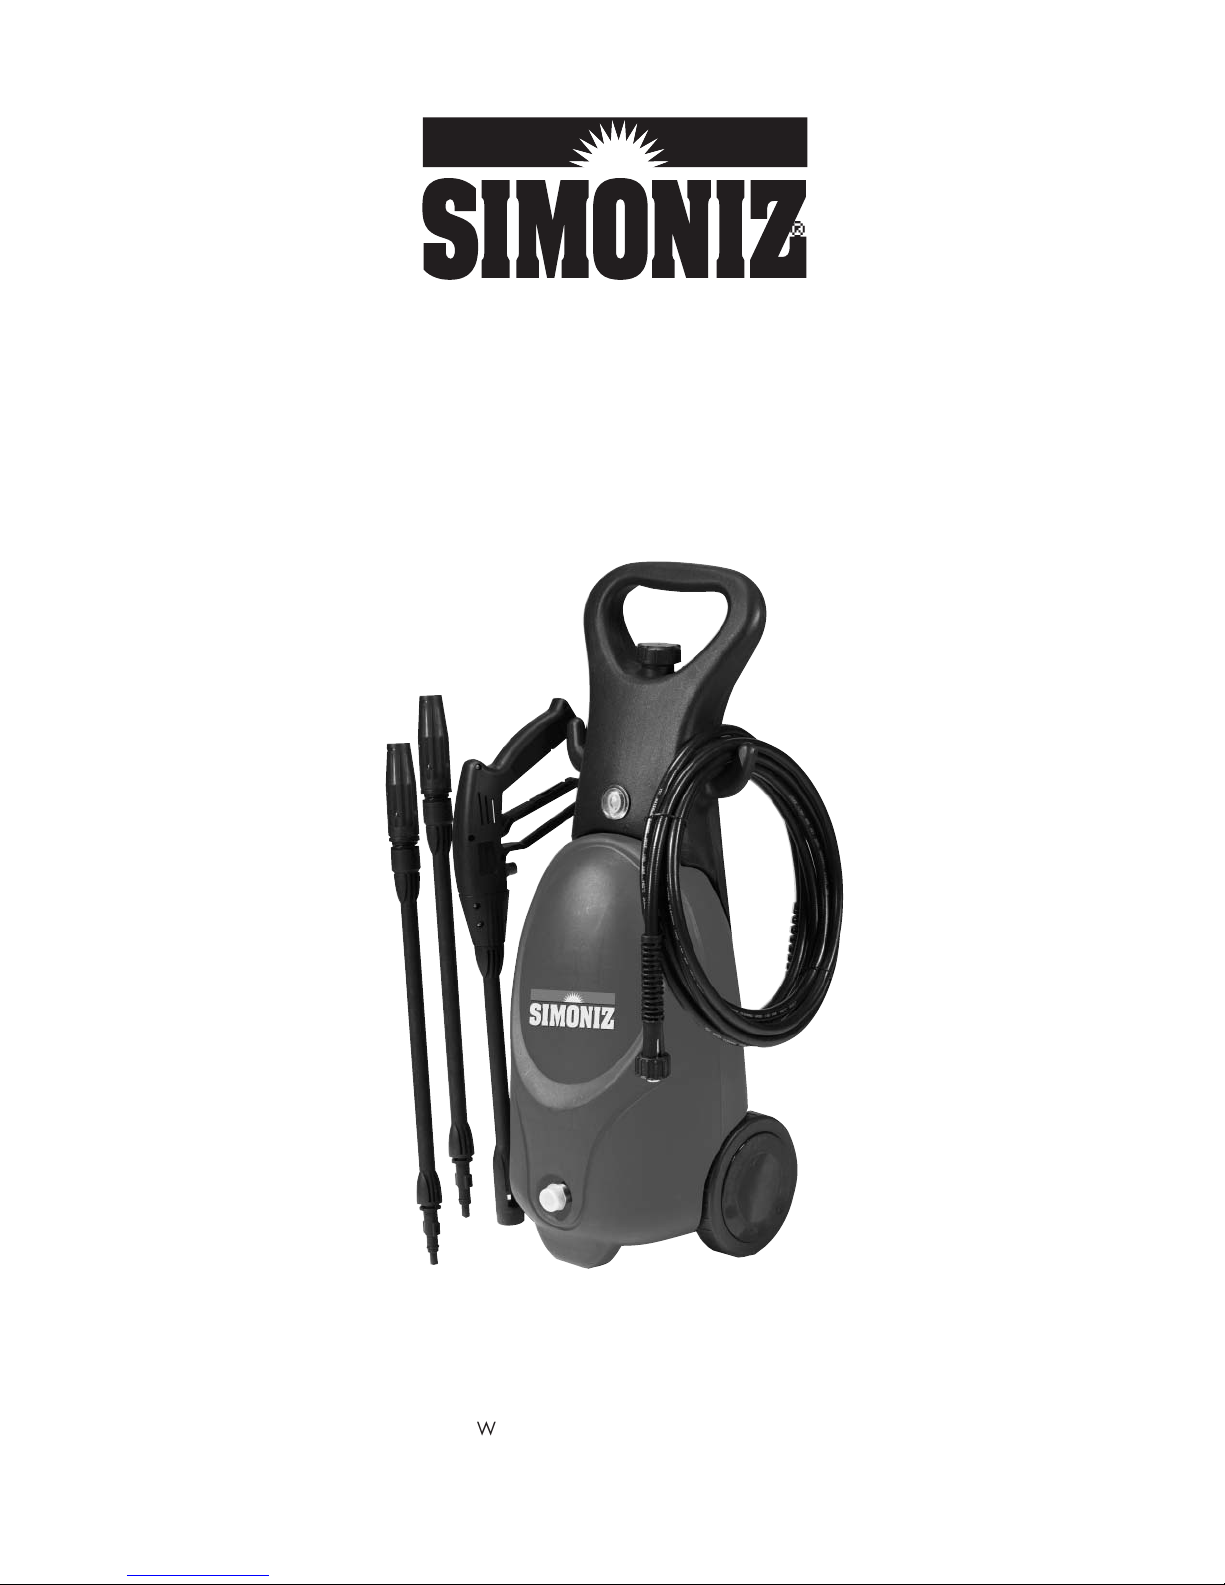
Operator's Manual
Manual del Operador
Model:
SPD-220
Modelo:
SPD-220
®
Warranty Registration by Internet
Simoniz USA
201 Boston Turnpike
Bolton, CT 06043
1-888-SIMONIZ
1-888-746-6649
Registro GarantÌa mediante Internet
Internet Address: www.simonizusa.com
Dirección de Internet: www.simonizusa.com
Page 2

INDEX
1.0 SAFETY AND OPERATION RULES ........ page 3
2.0 SAFETY FEATURES .................................. page 7
ÍNDICE
1.0 NORMAS OPERATIVAS Y DE
SEGURIDAD ........................................... pag. 3
2.0 CARACTERÁSTICAS RELATIVAS
A LA SEGURIDAD ................................ pag. 7
3.0 INSTALLATION .......................................
3.1 HIGH PRESSURE HOSE ................. page 8
3.2 WATER CONNECTION ................. page 8
3.3 POWER SUPPLY
CONNECTION ................................
4.0 OPERATING INSTRUCTIONS ............. page 10
4.1 START UP
PROCEEDURE
4.2 TURBO NOZZLE page 11
4.3 USE OF CHEMICAL page 12
4.4 CLEANING TECHNIQUES ........... page 12
5.0 USER MAINTENANCE ......................... page 17
5.1 CONNECTIONS .............................. page 17
5.2 NOZZLE ............................................. page 17
5.3 LUBRICATION ................................... page 18
5.4 WATER SCREEN .............................. page 18
5.5 COOLING SYSTEM ........................
6.0 MOVING AND STORAGE
INSTRUCTIONS ..................................... page 19
7.0 TROUBLESHOOTING ............................ page 20
8.0 REPLACEMENT PARTS AND
ACCESSORIES ......................................... page 22
9.0 TECHNICAL DATA ................................. page 23
10.0 WARRANTY page 24
.............................................
................................
........................
............................................
page 8
page 9
page 10
page 18
3.0 INSTALACIÓN ....................................... pag. 8
3.1 MANGUERA DE
ALTA PRESIÓN ............................... pag. 8
3.2 CONEXIÓN DEL AGUA .............. pag. 8
3.3 ENLACE DE LA
ALIMENTACIÓN ELÉCTRICA ........ pag. 9
4.0 INSTRUCCIONES DE USO ................. pag. 10
4.1 PROCEDIMIENTO DE
ARRANQUE ....................................... pag. 11
4.2 USO DE PRODUCTOS
QUÍMICOS ........................................ pag. 12
4.3 TÉCNICAS DE LIMPIEZA .............. pag. 12
5.0 MANUTENCIÓN USUARIO .............. pag. 17
5.1 CONEXIONES ................................
5.2 BOQUILLA ........................................
5.3 LUBRICACIÓN ................................ pag. 18
5.4 PANTALLA AGUA .......................... pag. 18
5.5 SISTEMA DE REFRIGERACIÓN .... pag. 18
6.0 MANIPULACIÓN Y
ALMACENAMIENTO
INSTRUCCIONES
7.0 LOCALIZACIÓN Y CORRECCIÓN
DE LAS AVERÍAS pag. 21
8.0 PIEZAS DE REPUESTO Y
ACCESORIOS ......................................... pag. 22
9.0 DATOS TÉCNICOS .............................. pag. 23
................................
........................................
pag. 17
pag. 17
pag. 19
10.0 GARANTÍA
2
............................................
page 24
Page 3
1.0 SAFETY AND OPERATION
RULES
Safety precautions are essential when any mechanical
equipment is involved. These precautions are necessary
when using, storing, and servicing mechanical
equipment. Using this equipment with the respect and
caution demanded will considerably lessen the
possibilities of personal injury. If safety precautions are
overlooked or ignored, personal injury or property
damage may occur.
The following symbols shown below are used
extensively throughout this manual. Always heed these
precautions, as they are essential when using any
mechanical equipment.
This warning symbol identifies specific
instructions or procedures which, if not
WARNING
CAUTION
This unit was designed for specific applications. It should
not be modified and/or used for any application other
than that which it was designed.
WARNING
1. Read this manual carefully - know your equipment.
2. Outlets with a third prong ground are required.
3. Do not touch plug or outlet with wet hands.
4. Avoid accidental starts. Move switch on unit to
5. Water spray must never be directed towards any
6. Never carry your pressure washer by the cord. Do
7. To prevent damage, the cord should not be crushed,
8. This product is provided with a Ground Fault Circuit
correctly followed could result in personal injury or death.
This caution symbol identifies specific
instructions or procedures which, if not
strictly observed, could result in damage
to, or destruction of equipment.
When using this product, basic precautions
should always be followed, including the
following:
Consider the applications, limitations, and the
potential hazards specific to your unit.
Do not use without grounded prong.
"OFF" position before connecting or disconnecting
cord to electrical outlets.
electric wiring or directly towards the pressure
washer machine itself or fatal electric shock may
occur.
not pull on the cord to disconnect from the outlet.
placed next to sharp objects or near a heat source.
Interrupter built into the power cord plug. If
replacement of the plug or cord is needed, use
only identical replacement parts.
1.0 NORMAS OPERATIVAS Y DE
SEGURIDAD
Cuando se trata de un equipo mecánico, las
precauciones inherentes a la seguridad son esenciales.
Por ello es necesario adoptar dichas precauciones durante el uso, la transferencia y la manutención del equipo
mec·nico. Utilizando los aparatos con el respeto y la
cautela requeridos, las posibilidades de provocar daños
personales disminuirán notablemente. Si estas
precauciones de seguridad fueren descuidadas o
ignoradas, se podrían verificar daños a las personas o
al equipo.
Los símbolos que describiremos a continuación son
utilizados ampliamente en el presente manual.
Tengan siempre en cuenta dichas precauciones puesto
que son esenciales cuando se utiliza el equipo mecánico.
ADVERTENCIA
PRECAUCIÓN
Esta unidad ha sido diseñada para aplicaciones
específicas. No hay que aportar modificaciones y/o
utilizarla para aplicaciones diferentes de aquellas para
las cuales ha sido diseñada.
ADVERTENCIA
1. Lean atentamente el presente manual para conocer
su equipo. Tomen en debida consideración sus
aplicaciones, limitaciones y los potenciales riesgos
específicos para su unidad.
2. Son necesarias salidas con un tercer enchufe de
masa. No utilicen sin ese enchufe.
3. No toquen el enchufe o la toma con las manos
mojadas.
4. Eviten encendidos accidentales. Coloquen el
interruptor en "OFF" antes de conectar o desconectar
el cable eléctrico a una toma.
5. No dirijan nunca el chorro del agua sobre
instalaciones eléctricas o sobre la misma
hidrolimpiadora de alta presión, con el fin de evitar sacudidas eléctricas.
6. No utilicen el cable para mover la hidrolimpiadora
de alta presión. No tirar del cable para desconectar
el equipo de la toma.
7. Con el fin de evitar daños, el cable no debe ser
aplastado, no debe ser colocado cerca de objetos
cortantes ni de fuentes de calor.
8. Este artículo es suministrado con un Interruptor
de Circuitos de Aver as de Tierra insertado en
el enchufe del cable de alimentación. Si fuere
necesario cambiar el enchufe o el cable, utilicen
3
piezas de solo piezas de repuestos idénticas.
Es
el símbolo que identifica las instrucciones para procedimientos específicos;
si no son seguidas correctamente
pueden provocar daños personales o
la muerte.
Este símbolo identifica las instrucciones
de procedimientos específicos que si no
son observadas rigurosamente pueden
provocar daños o hasta la destrucción
del equipo mismo.
Cuando el equipo es utilizado, hay que
seguir precauciones básicas, entre las
cuales:
Page 4

9. Stay alert, watch what you are doing.
10. Follow maintenance instructions specified in this
manual.
11. Check power cords before using. Damaged cords
can reduce performance of pressure washer or
cause a fatal electric shock.
12. The narrow pin point stream is very powerful. It is
not recommended for use on painted surfaces,
wood surfaces or items attached with an adhesive
backing.
13. Keep operating area clear of all persons.
14. To reduce the risk of injury, close supervision is
necessary when this product is used near children
15. Always use both hands when operating pressure
washer to maintain complete control of the wand.
16. Do not touch nozzle or water spray while operating.
17. Wear safety goggles while operating.
18. Disconnect power plug from the outlet when not in
use and prior to the detaching of the high pressure
hose.
19. Never tie knots or kink the high pressure hose as
damage could result.
20. Prior to starting the pressure washer in cold
weather, be sure ice has not formed in any part of
the equipment.
21. Carefully observe all chemical instructions and
warnings before using.
22. The pressure washer should not be used in areas
where gas vapors may be present. An electric spark
could cause an explosion or fire.
23. To minimize the amount of water getting into the
pressure washer, the unit should be placed as far
as possible from the cleaning site during operation.
24. To prevent accidental discharge, the spray gun
should be secured by locking trigger when not in
use.
25. Do not operate this product when fatigued or under
the influence of alcohol or drugs.
26. To allow free air circulation, the pressure washer
should NOT be covered during operation.
27. Know how to stop the product and bleed pressure
quickly. Be thoroughly familiar with the controls.
28. Do not over reach or stand on unstable support.
Keep good footing and balance at all times.
29. "WARNING - Risk of injection or injury - Do not
direct discharge stream at persons."
See below for grounding instructions
30.
31. Keep the high pressure hose connected to the
pressure washer and the spray gun while the
system is pressurized. Disconnecting the hose
while the unit is pressurized is dangerous and
may cause injury.
9. Estén atentos y miren bien lo que está haciendo.
10. Para la manutención, sigan las instrucciones
presentadas en el presente manual.
11. Antes del uso controlen los cables eléctricos. Los
cables dañados no sólo reducen las prestaciones
de la hidrolimpiadora de alta presión, sino que
pueden provocar sacudidas eléctricas.
12. El chorro estrecho y preciso es muy
potente. No se aconseja para el uso sobre
superficies pintadas, sobre superficies de madera
o sobre objetos con respaldo adhesivo.
13. Alejen a las personas del área de trabajo.
14. Para reducir los riesgos de daños, es absolutamente
necesario efectuar un control atento cuando el
producto es utilizado cerca de los niños.
15. Usen siempre ambas manos cuando se utiliza la
hidrolimpiadora de alta presión, con el fin de mantener un completo control de la varilla.
16.No toquen la boquilla o el chorro de agua cuando
está en funcionamiento.
17. Durante el uso, utilicen gafas de protección.
18. Desconecten el enchufe eléctrico de la toma cuando
no está en uso e, igualmente, antes de despegar la
manguera de alta presión.
19.Nunca haga nudos o retuerza la manguera de alta
presión porque podría causarle daño.
20. En las estaciones frías, antes de poner en
funcionamiento la hidrolimpiadora, controlen que
no se haya formado hielo en alguna parte del equipo.
21. Observen escrupulosamente todas las instrucciones
químicas y las advertencias antes del uso.
22. La hidrolimpiadora no debería utilizarse en áreas
donde hayan vapores gaseosos. Una eventual
chispa elÈctrica podrÌa provocar una explosión o
un incendio.
23. Para reducir al máximo la cantidad de agua que
podría entrar en la hidrolimpiadora de alta
presión, durante el uso, colocarla lo más lejos
posible de la zona que debe ser limpiada.
24. Con el fin de evitar escapes accidentales, cuando
no está en uso, la pistola de chorro debe estar
asegurada con el gatillo de bloqueo.
25. No utilicen el equipo cuando estén muy cansados o
cuando estén bajo la influencia de alcohol o de drogas.
26. Durante el uso, NO cubran la hidrolimpiadora de
alta presión con el fin de permitir una ventilación
adecuada.
27. Aprendan cómo bloquear el producto o purgar la
presión rápidamente. Adquieran los debidos
conocimientos acerca de los diferentes comandos.
28.No se estire o se pare sobre un soporte inestable.
Asuman siempre una posición firme y segura.
29. ADVERTENCIA.- Riesgo de insuflación o de daños.
No orienten el flujo contra las personas."
30. Para la puesta a tierra, véanse las siguientes
instrucciones.
31. Mantenga la manguera de alta presión
conectada a la hidrolimpiadora y la pistola
rociadora mientras el sistema está presurizado.
Desconectar la manguera mientras la unidad
está presurizada es peligroso y puede causar
daño.
4
Page 5
Do not leave the pressure washer unattended while
32.
the power switch is on.
33.
Only use extension cords that are intended for
outdoor use. These cords are identified by a
marking "Acceptable for use with outdoor
appliances, store indoors when not in use". Use
only extension cords having an electrical rating
not less than the rating of this product. Do not
use damaged extension cords.
This unit is equipped with a Ground Fault Circuit
34.
Interrupter (GFCI). When connecting the GFCI to the
receptacle, the indicator should appear red. If the
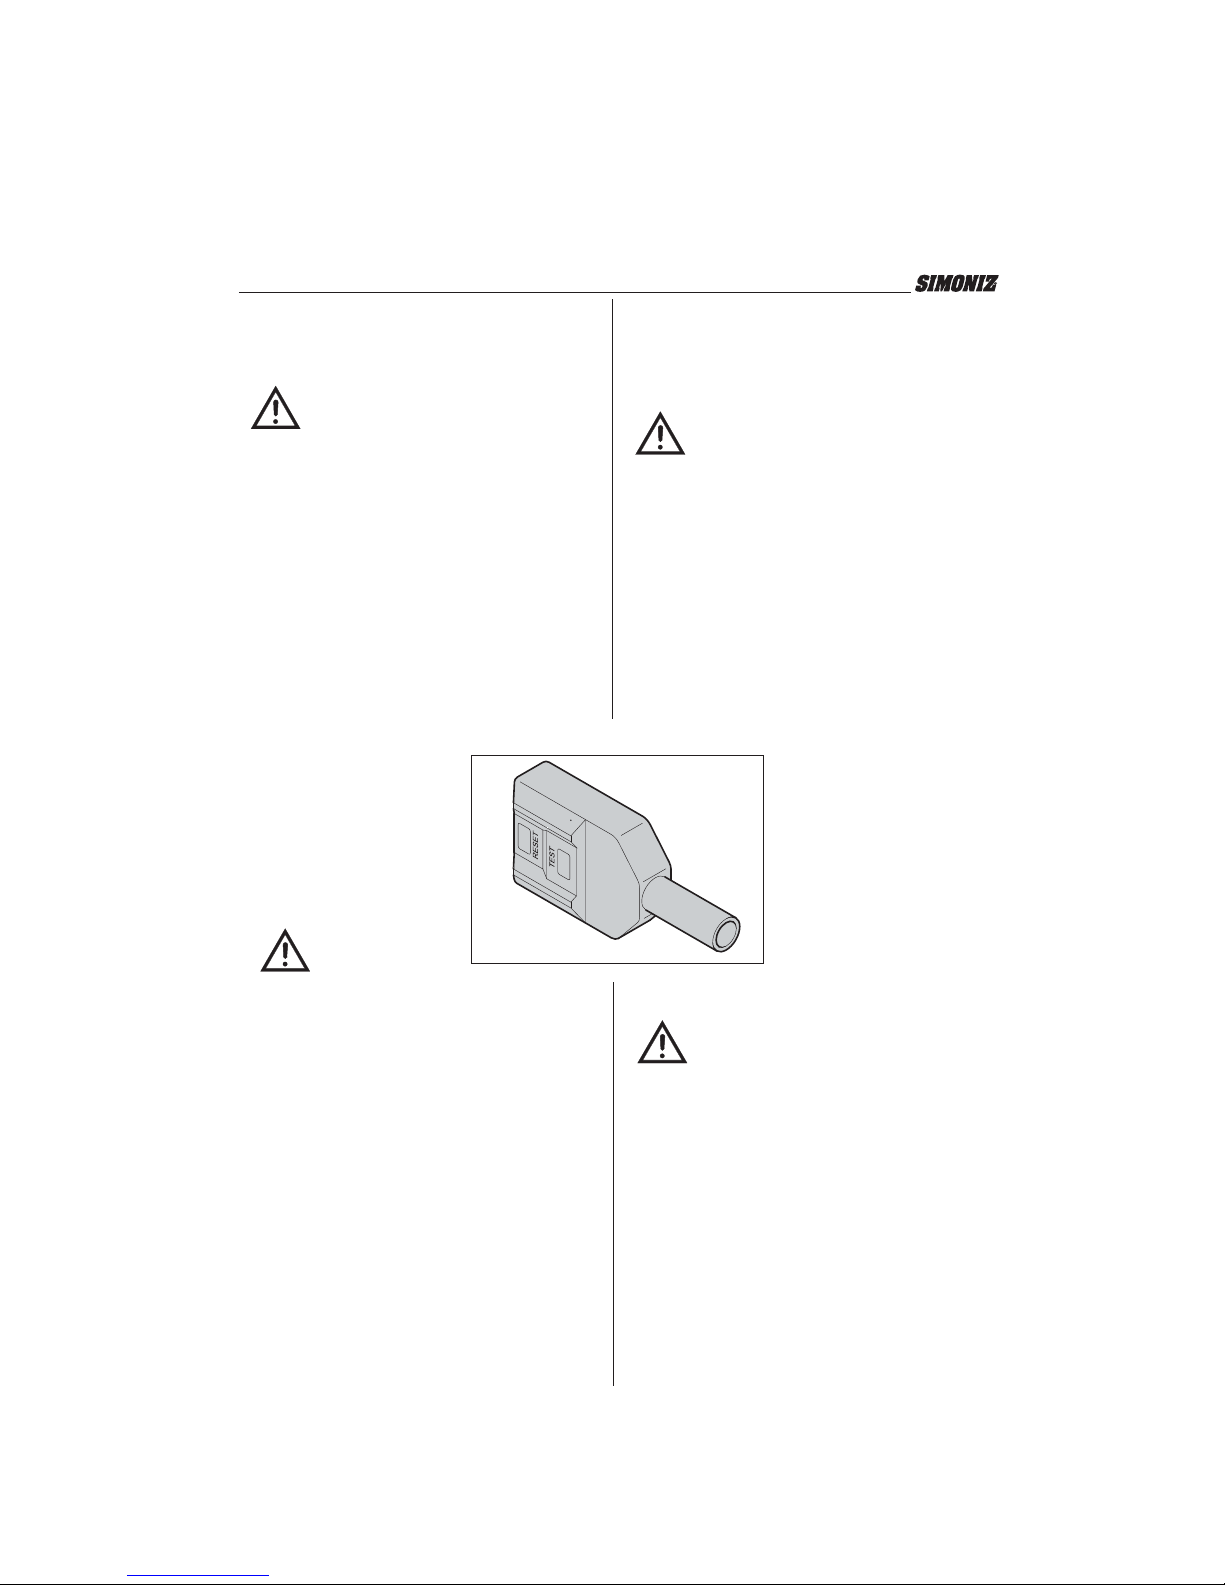
indicator is not red, depress the RESET button on the
GFCI until the indicator appears red. If the indicator
does not appear red, please see Section titled
“Troubleshooting” for more information.
This pressure washer is provided with a ground fault
circuit interrupter (GFCI) built into the plug of the
power supply cord. This device provides additional
protection from the risk of electric shock. Should
replacement of the plug or cord become necessary,
use only identical replacement parts that include
GFCI protection.
"SAVE THESE INSTRUCTIONS"
GROUNDING INSTRUCTIONS
This product must be grounded. If it should malfunction
or breakdown, grounding provides a path of least
resistance for electric current to reduce the risk of electric
shock. This product is equipped with a cord having an
equipment-grounding conductor and a grounding plug.
The plug must be plugged into an appropriate outlet
that is properly installed and grounded in accordance
with all local codes and ordinances.
WARNING: Improper connection of the
equipment-grounding conductor can result
in a risk of electrocution. Check with a
qualified electrician or service person if
WARNING
you are in doubt as to whether the outlet
is properly grounded. Do not modify the
plug provided with the product if it will
not fit the outlet installed by a qualified
electrician. Do not use any type of adaptor
with this product.
32. No deje la hidrolimpiadora desatendida
mientras el interruptor de poder está en
encendido.
33. Solo use extensiones que son hechas para uso
afuera. Estas extensiones estan identificadas
con la advertencia: “Aceptable para ser
utilizada con aparatos eléctricos al aire libre,
cuando no esté en uso guárdela dentro.” Solo
use extensiones con un grado eléctrico no
menor que que el grado eléctrico de este
producto. No use extensiones dañadas.
34. Esta unidad está equipada con un Circuito
Interruptor de Averías de Tierra (GFCI).
Cuando está conectando el GFCI al
receptáculo, el indicador deberá aparecer rojo.
Si el indicador no está rojo, apriete el botón
RESET en la unidad GFCI hasta que el
Indicador aparezca en rojo. Si el indicador no
aparece en rojo, por favor, vea la Sección
titulada “Localización y Corrección de las Averías”
para mayor información.
Esta hidrolimpiadora está dotada con un circuito
interruptor de averías de tierra (GFCI) construído
dentro del enchufe del cable suplidor de energía.
Este dispositivo provee protección adicional contra
el riesgo de descarga eléctrica. Si se hace
necesario el reemplazo del enchuche o el cable,
solo use repuestos idénticos que incluyan la
protección de GFCI.
“GUARDE ESTAS INSTRUCCIONES”
ISTRUCCIONES PARA LA CONEXIÓN A TIERRA
Este producto debe conectarse a tierra. En caso de
funcionamiento defectuoso o de avería, la puesta a
tierra suministra un recorrido de resistencia mínima
para la corriente eléctrica con el fin de reducir el riesgo
de sacudidas. El equipo está dotado de un cable que
incluye un conductor y enchufe de tierra. El enchufe
debe ser introducido en una toma apropiada, instalada
en modo idóneo y con puesta a tierra según lo
establecido por las leyes y disposiciones locales.
IMPORTANTE:
La conexión inapropiada
entre el equipo y el conductor de tierra
puede provocar sacudidas eléctricas. Si
tienen dudas sobre la idónea puesta a
ADVERTENCIA
tierra de la toma, consulten con un
electricista o con un encargado de la
manutención. No modifiquen el enchufe
suministrado con el equipo; en caso contrario, adapten la toma instalada con la
ayuda de un electricista cualificado. No
5
utilicen adaptadores para este equipo.
Page 6
DISE—O PIEZASPARTS DRAWING
c
B
D
J
Back of Pressure
Washer
E
G
I
(base of unit in back)
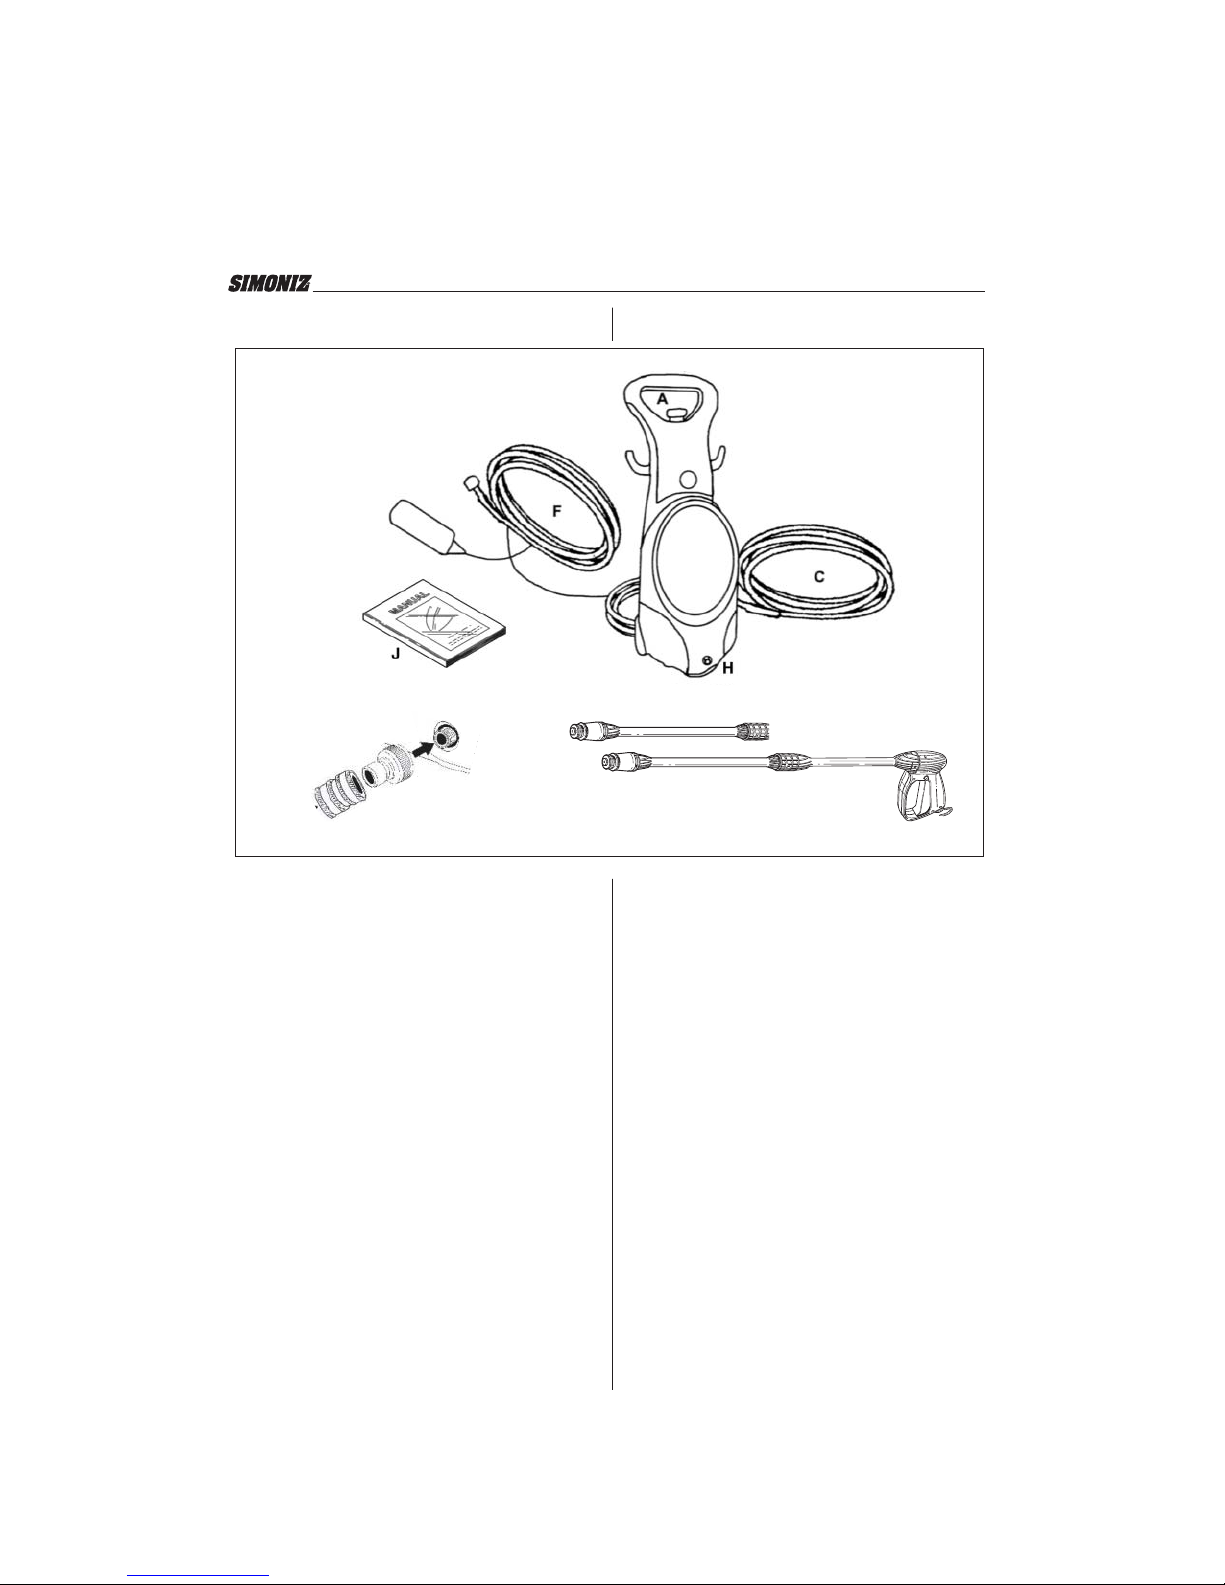
PARTS LIST
a
High pressure washer
b
Trigger Gun
c
High Pressure Hose
d
Fan Lance
e
Quick connect for water inlet (2 pieces)
f
Electric cord
g
GFCI
h
High pressure outlet
i
Water inlet
LISTA PIEZAS
a
b
c
d
e
f
g
h
i
Desague de alta presión (DESAGUE)
Entrada de agua con filtro (ENTRADA)
Boquilla turbo
Manual
Cable de poder con enchufe
Pistola de chorro y sequro
Manqeura de alta persíon
Interruptor de prender/apagar
Botella de jabón
j
Manual
j
Conector rápido
Enchufe GFCI
6
Page 7
2.0 SAFETY FEATURES
2.0 CARACTERÍSTICAS RELATIVAS
A LA SEGURIDAD
WARNING: The pressure washer is also
equipped with a main power ON/OFF
switch located on the unit. It should always
WARNING
AUTOMATIC ON/OFF – TOTAL STOP SYSTEM (TSS)
The motor on this pressure washer does not run
continuously, only when the trigger is squeezed.
After following the start-up procedures in this manual,
turn the pressure washer on and squeeze the trigger
for activation.
GROUND-FAULT CIRCUIT-INTERRUPTER
PROTECTION
This pressure washer is provided
with a ground-fault circuitinterrupter (GFCI) built into the
plug of the power supply cord. This
device provides additional
protection from the risk of electric
shock. Should replacement of the
plug or cord become necessary,
use only identical replacement
parts that include GFCI protection.
WARNING
WARNING:
extension cords are not
are plugged into
found in circuit boxes or protected
Use only 3-wire extension cords that have 3-prong
grounding-type plugs and 3-pole cord connectors that
accept the plug from the product.
Use only extension cords that are intended for outdoor
use. These extension cords are identified by a marking
"Acceptable for use with outdoor appliances; store
indoors while not in use".
Use only extension cords having an electrical rating
higher than the rating of the product.
Do not use damaged extension cords. Examine
extension cord before using and replace if damaged.
Do not abuse extension cord and do not pull on any
cord to disconnect. Keep cord away from heat and
sharp edges. Always disconnect the extension cord from
the receptacle before disconnecting the product from
the extension cord.
be moved to the off position when the
pressure washer is not being used to
prevent possible injury or damage.
EXTENSION CORDS
recommended unless they
a ground-fault circuit-interrupter
receptacles.
ADVERTENCIA:
presión está también dotada de un
interruptor eléctrico principal ON/OFF.
Cuando la hidrolimpiadora no está en uso,
ADVERTENCIA
ENCENDIDO/APAGADO AUTOMÁTICO
- SISTEMA DE INTERRUPCIÓN TOTAL (TSS)
El motor de este aparato limpiador a presión no funciona
continuamente, sino cuando se aprieta el gatillo. Después
de seguir los procedimientos de puesta marcha en este
manual encienda la hidrolimpiadora de presión y aprieten
el gatillo para activarlo.
PROTECCIÓN CON UN INTERRUPTOR DE
CIRCUITO DE AVER_AS DE TIERRA
EXTENSIONES
ADVERTENCIA
Utilicen exclusivamente extensiones de 3 conductores
que posean enchufes con puesta a tierra de 3 polos y
conectores tripolares aptos para el enchufe del equipo.
Usen exclusivamente extensiones para uso exterior.
Dichas extensiones están marcadas por la frase "Aptas
para uso exterior: si no las utilizan, almacene dentro
mientras no esté en uso".
Usen solamente extensiones con una potencia eléctrica
superior a la potencia nominal del equipo.
No utilicen extensiones dañadas. Antes del uso,
controlen la extensión y si está dañada substitúyanla.
No la usen en modo incorrecto y no tiren del cable
para desenchufar. Tengan a las extensiones lejos de
fuentes de calor y de ángulos cortantes. Siempre
desconecte la extensión del receptáculo antes de
desconectar el producto de la extensión.
7
es necesario que dicho interruptor esté
colocado siempre en OFF para prevenir
posibles accidentes o daños.
ADVERTENCIA:
extensiones si éstas no están conectadas
a un interruptor de circuito de averías de
tierra seguridad, puesto en cajas del
circuito o en tomas protegidas.
La hidrolimpiadora de
La hidrolimpiadora est· dotada
de un interruptor diferencial
automático de seguridad (GFCI)
montado en el enchufe del cable
de alimentación eléctrica. Dicho
dispositivo suministra una
protección adicional contra el
riesgo de sacudidas. Si fuere
necesario substituir el enchufe o
el cable, utilicen exclusivamente
repuestos similares provistos de
protección GFCI.
No se aconseja el uso de
Page 8
When using an extension cord, observe the
specification below:
Cuando se utilizan extensiones, respeten las siguientes
características:
Cable Length Wire Gauge
Up to 50 ft. 14 AWG
50 to 100 ft. 12 AWG
WARNING: To reduce the risk of
electrocution, keep all connections dry and
WARNING
WATER CONNECTION
off the ground. Do not touch plug with wet
hands.
Back of Pressure
Washer
J
3.2
ATTENTION:
Proper water connection.
3.0 INSTALLATION
3.1 HIGH PRESSURE HOSE
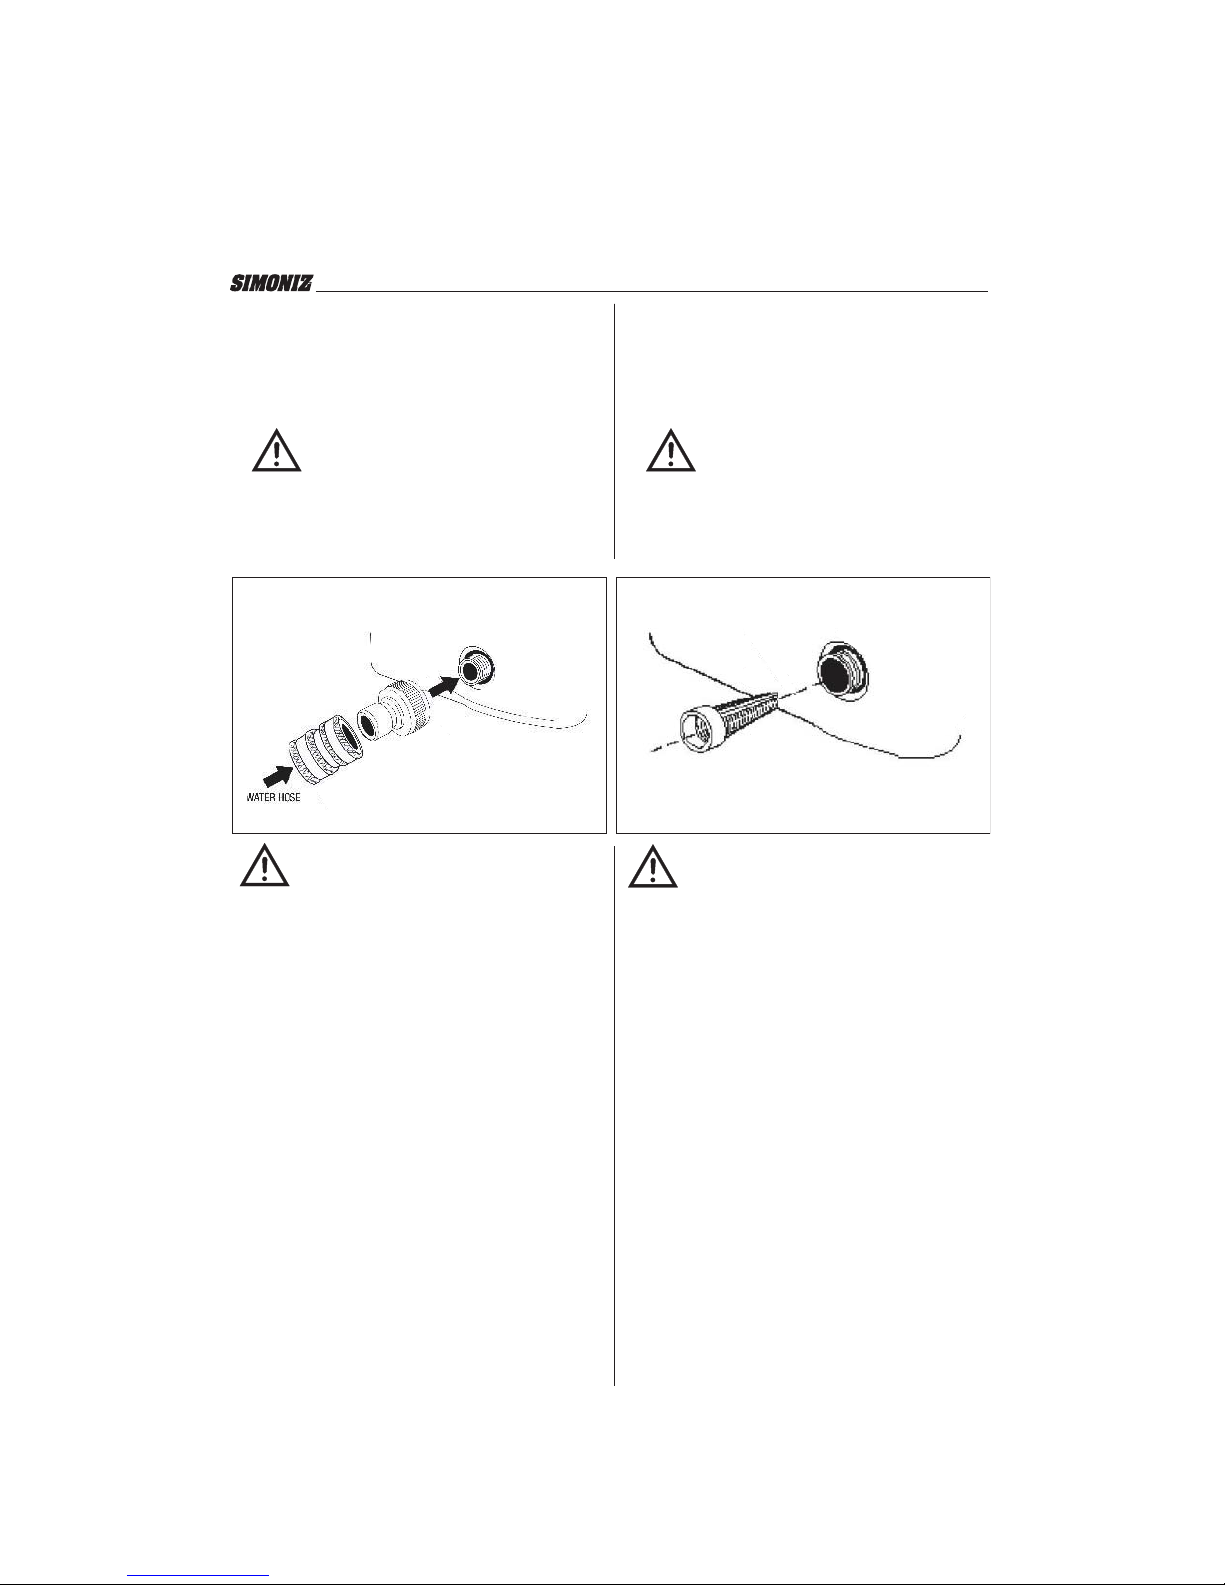
Remove the plastic water plug before attaching the high
pressure hose by carefully inserting the fitting with
the o-ring into the high pressure outlet and
tightening the threader nut by hand.
Longitud cable Calibres cable
Hasta 50 pies 14 AWG
De 50 a 100 pies 12 AWG
IMPORTANTE: Para reducir la posibilidad
de que el cable sea fulminado, mantengan
ATENCIÓN
CONEXIÓN DEL AGUA
la extensión seca y fuera de tierra. No toquen
el enchufe con las manos mojadas.
Back of Pressure
Washer
5.4
ADVERTENCIA:
Unión del agua apropriada
3.0 INSTALACIÓN
3.1 MANGUERA DE ALTA PRESÍON
Remueva el enchufe plástico de agua antes de conectar la
manguera de alta presión insertando cuidadosamente
el acopalmiento con el anillo “o” en la válvula de alta
presión, apretando la tuerca a mano.
3.2 WATER CONNECTION
Remove plastic water plug. Attach male nipple of quick
connect to the pressure washer inlet. Attach the larger
female part of the quick connect to the garden hose.
Slide the collar on the female side of quick connect back,
push the female part onto the male part and release the
collar. The quick connect should not pull apart. To
disconnect the garden hose, slide the collar back and
pull female section away from the male nipple on the
machine.
3.2 CONEXIÓN DEL AGUA
Remueva el enchufe plástico de agua. Adjunte la entrerosca macho de conección rápida a la entrada de la
hidrolimpiadora. Adjunte la parte hembra más larga del
conector rápido, a la manguera de jardín. Deslice
de nuevo el collar sobre el lado hembra del conector
rápido, empuje la parte hembra en la parte macho y
suelte el collar. El conector rápido no deberia separarse.
Para desconectar la manguera de jardín, deslice
el collar de nuevo y hale la sección hembra lejos de la
entrerosca macho de la máquina.
8
Page 9
3.3 POWER SUPPLY CONNECTION
The pressure washer is factory-equipped with an
electrical cord and a Ground Fault Circuit Interrupter
(GFCI) power plug.
This cord should only be connected to an electrical outlet
installed in accordance with local safety regulations.
3.3 ENLACE DE LA ALIMENTACIÓN
ELÉCTRICA
La hidrolimpiadora está dotada de serie de un cable
eléctrico y de un enchufe de alimentación con
interruptor diferencial autom·tico de seguridad (GFCI).
El cable deber· ser conectado únicamente a una toma
eléctrica instalada en conformidad con las normativas
locales de seguridad.
NOTE: The power supply must be 120v, 60hz and a
minimum 15 amp circuit.
WARNING: Test GFCI before each use.
DO NOT use pressure washer if test below
WARNING
fails.
GFCI Test Procedures:
1. Plug GFCI into power receptacle
2. Press reset button
3. Press test button.
4. Press reset button again for use.
This unit is equipped with a Ground Fault Circuit Interrupter
(GFCI). When connecting the GFCI to the receptacle, the
indicator should appear red. If the indicator is not red,
depress the RESET button on the GFCI until the indicator
appears red. If the indicator does not appear red, please
see Section titled “Troubleshooting” for more information.
NOTE: The GFCI must be reset each time the pressure
washer is connected to an electrical outlet. Reset by
simply pushing the reset button on the GFCI power plug.
WARNING
A. Connect only to properly grounded outlet. Do not
remove grounding pin.
B. Inspect cord before using. Do not use if cord is
damaged.
C. Keep all connections dry and off the ground.
D. Do not touch plug with wet hands.
E. The pressure washer is provided with a ground-
fault circuit interrupter built into the power plug. If
replacement of the plug or cord is needed, use
only identical replacement parts. Contact Customer
Service for proper replacement parts.
Extension cords are not recommended unless they are
plugged into a receptacle protected by a ground fault
circuit interrupter. Any extension cord used should be
14 AWG and no longer than 50 feet to prevent
excessive voltage loss. Use only extension cords
intended for outdoor use. These extension cords are
identified by a marking "Acceptable for use with
outdoor appliances; store indoors when not in use".
NOTA: La corriente eléctrica deberá ser de 120V,
60 Hz con un circuito de por lo menos 15 amp.
ADVERTENCIA:
Pruebe el interruptor
diferencial automático de seguridad
(GFCI) antes del uso. No utilicen la
ADVERTENCIA
hidrolimpiadora si si la prueba de abajo
falla.
Procedimiento para probar el GFCI:
1. Conectar el GFCI en la toma de alimentación
2. Presionar RESET
3. Presione el botón de prueba.
4. Presionar nuevamente RESET antes del uso
Este aparato está equipada con un Interruptor de
Circuito de Averías deTierra. (GFCI). Al conectarse
el GFCI al enchufe, el indicador debe aparecer en rojo.
Si el indicador no está rojo, opriman el botón RESET en
el GFCI hasta que el indicador se ilumine rojo. Si el
indicador no aparece en rojo, por favor véanse la
Sección titulada “Resolución de problemas” para
obtener más información.
NOTA: El GFCI debe ser reajustado
cada vez que se conecte la
hidrolimpiadora a una toma eléctrica.
Reajuste simplemente empujando el
botón de RESET en el enchufe de poder
ADVERTENCIA
A.
Conecten sólo a una toma con una puesta a tierra
del GFCI.
idónea. No extraigan el enchufe de tierra
B.
Inspeccione el cable antes del uso. Si está dañado,
no lo utilice.
.
C
Mantengan secas y fuera de tierra todas las
conexiones
D.
No toquen el enchufe con las manos mojadas
.
E
La hidrolimpiadora es suministrada con un interruptor
de circuito de averías de tierra. Instalado en el
enchufe de alimentación. Si es necesario substituir el
enchufe o la toma, usen sólo piezas de repuesto del
mismo tipo. Para una substitución correcta, contacten
la Oficina de Asistencia Clientes.
No se aconseja el uso de extensiones a menos que
sean enchufadas en un receptáculo protegido por un
interruptor de circuito de averías en tierra. Cualquier extensión
utilizada debe ser del tipo 14 AWG y la longitud no
debe superar los 50 pies con el fin de prevenir una
excesiva dispersión de tensió n. Utilicen sólo extensiones
para uso exterior. Tales extensiones están señaladas con
la siguiente frase: "Idóneas para uso exterior; almacenar
en lugar cerrado cuando no es utilizada."
9
Page 10
4.0 OPERATING INSTRUCTIONS
4.0 INSTRUCCIONES DE USO
WARNING: Risk of injection or injury.
WARNING
4.1 START-UP PROCEDURE
1.
2. Make sure the unit is plugged in and the GFCI
3. Release gun safety if locked.
Do not direct discharge stream at persons.
It is very important to bleed the gun before using the
pressure washer. Refer to the “Assembly Instructions”
to assemble the pressure washer. To bleed the gun,
simply connect the garden hose to the pressure
washer and squeeze the trigger BEFORE turning the
electrical supply on. This allows any air trapped inside
the pressure washer and gun to be removed before
using the unit. Continue holding trigger for
approximately one minute to allow any excess air out
of the unit. Water will flow through the gun at low
pressure during this procedure. For more bleeding tips,
see the section titled “Operating Instructions.”
HAS BEEN RESET.
ADVERTENCIA: Riesgo de impregnación
o de daños. NO descarguen el flujo sobre
ADVERTENCIA
4.1 PROCEDIMIENTO DE PUESTA EN MARCHA
1.
2. Asegúrense de que el enchufe del equipo esté
3. Liberen la seguridad de la pistola si está
las personas.
Es muy importante vaciar la pistola antes de usar
la hidrolimpiadora. Refiérase a las “Instrucciones
de Ensamblaje” para ensamblar la hidrolimpiadora.
Para vaciar la pistola, simplemente conecte la
manguera de jardín a la hidrolimpiadora y apriete
el gatillo ANTES de poner la fuente de poder en
encendido. Esto permite que cualquier aire atrapado
dentro de la hidrolimpiadora y la pistola, sea
removido antes de usar la unidad. Continúe
apretando el gatillo por aproximadamente 1 minuto
para permitir que cualquier exceso de aire salga
de la unidad. El agua fluirá a través de la pistola
a baja presión durante este procedimiento. Para más
consejos sobre vaciado, vea la sección titulada
“Instrucciones de Operación.”
conectado y que el GFCI HAYA SIDO REAJUSTADO.
bloqueada.
4. Be sure the ON/OFF Switch is in the off position.
To allow air to escape from the hose, squeeze trigger
on the gun until there is a steady stream of water.
5. Remove any dirt or foreign matter from the gun
outlet and the male connector of the wand.
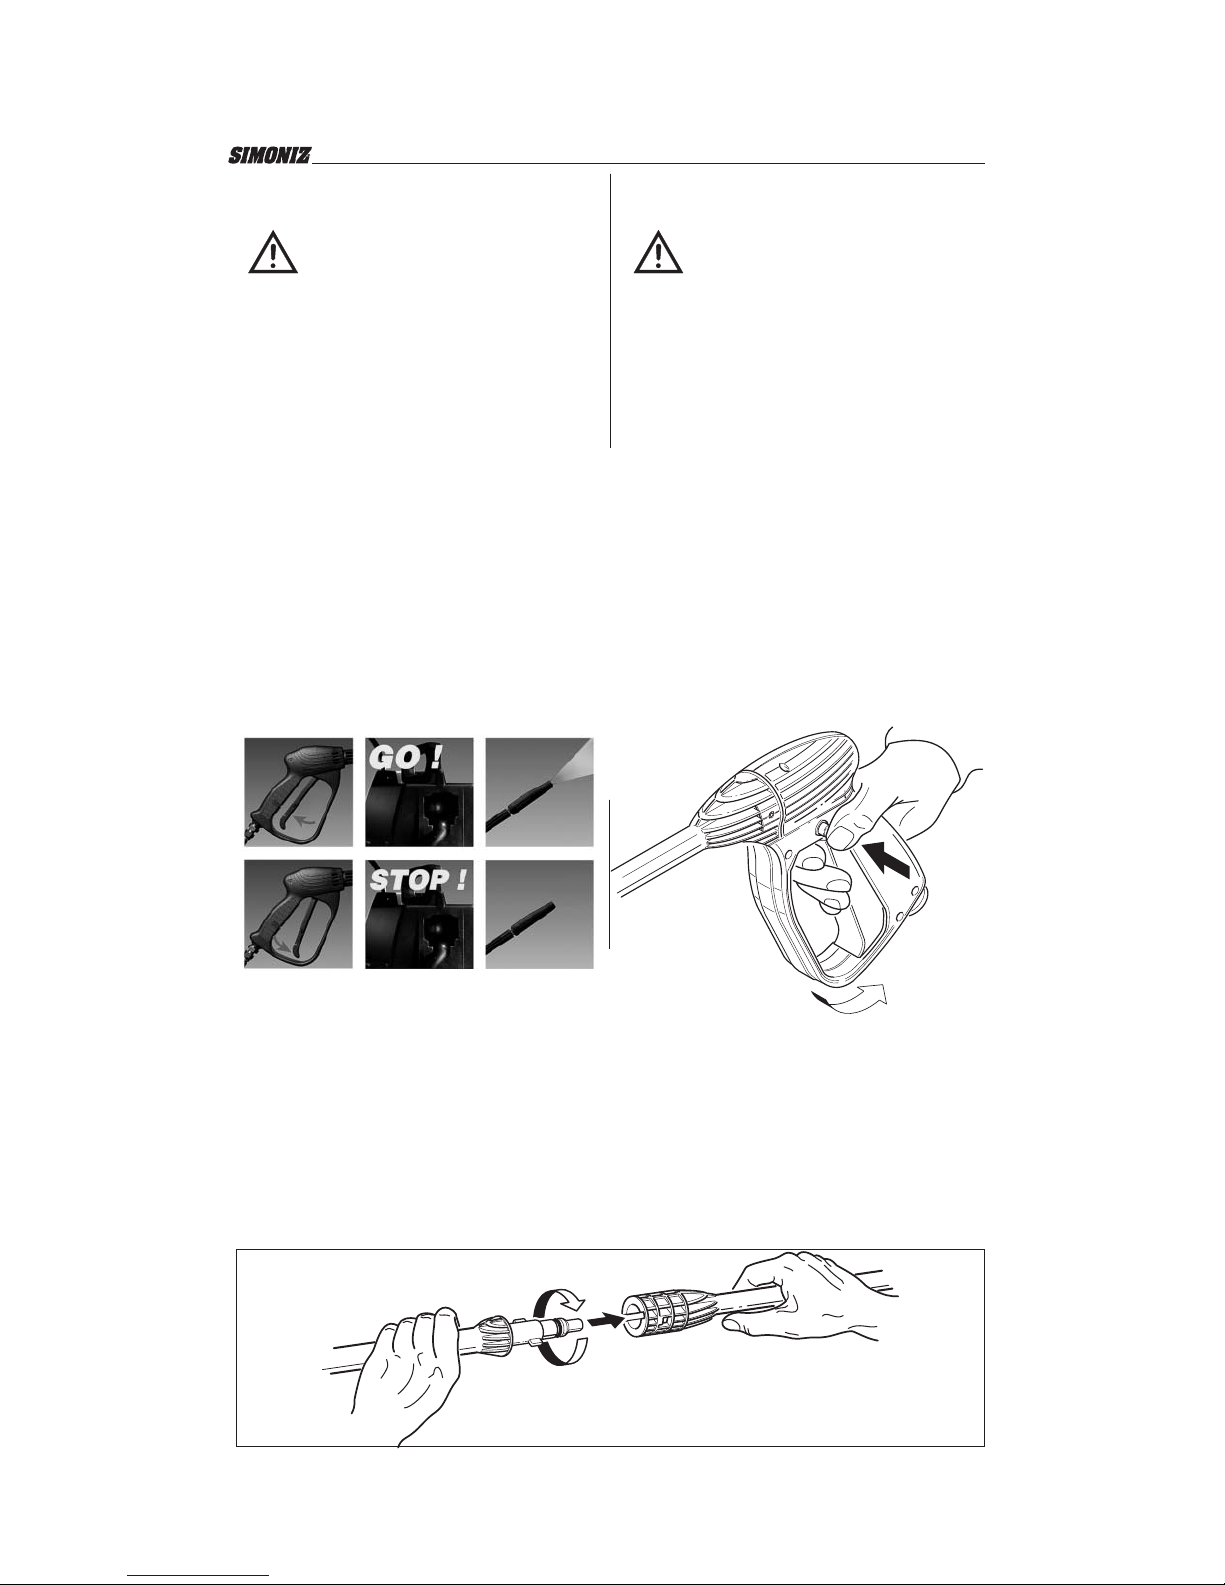
6. Insert the wand into the gun's quick connect
coupling by pushing firmly and twisting wand 1/4
of a turn to lock into place.
NOTE: Make sure wand is locked.
4.
Asegúrense de que el interruptor encendido/apagado
está en la posición de apagado. Con el fin de permitir
la salida de aire de la
de la pistola hasta que salga un flujo continuo de agua
5.
Extraigan la suciedad o los materiales extraños de la
salida de la pistola y conector macho de la varilla.
6. Introduzca la varilla en el conector rápido de
la pistola empujando firmemente y girando la
varilla _ de giro para fijarla en posición.
NOTA: Asegúrese que la varilla está fija.
10
manguera, aprieten el gatillo
Page 11
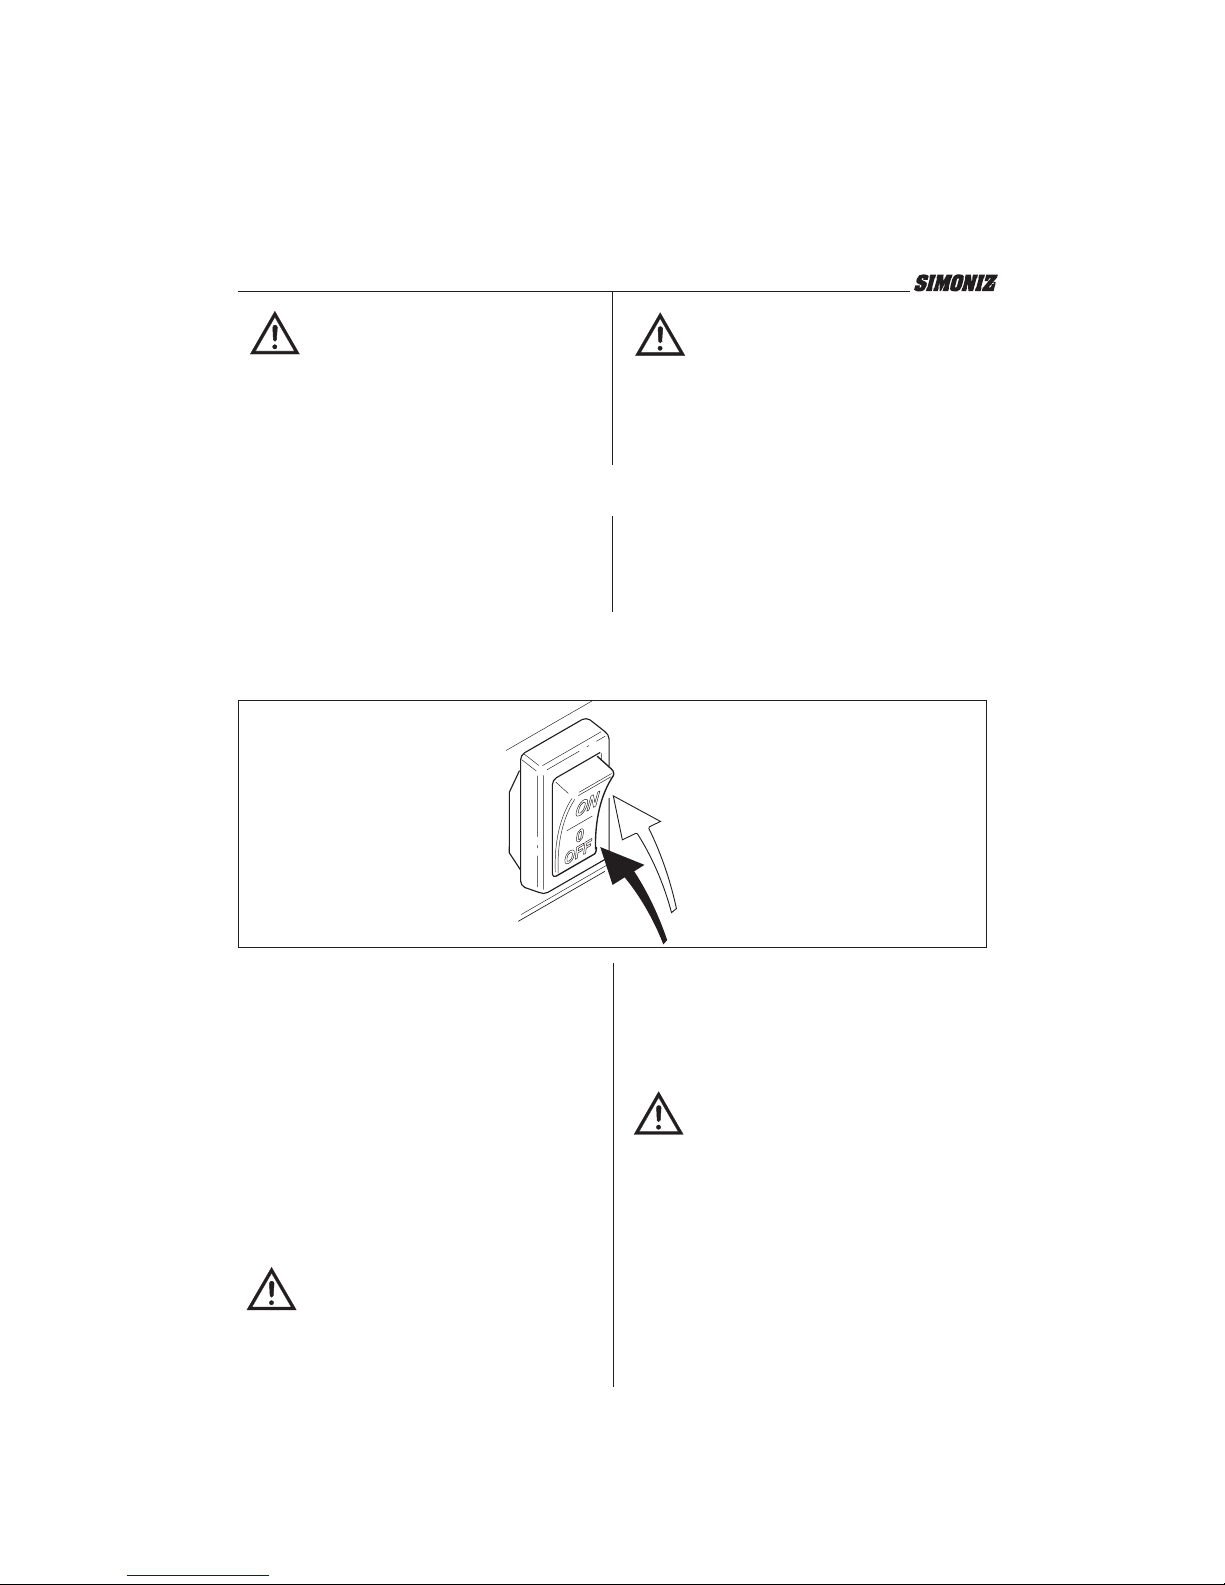
WARNING
WARNING: if the wand is not securely
locked into place, it could be ejected under
high pressure when operating the gun,
possibly causing injury or damage.
ADVERTENCIA
ADVERTENCIA: Si el lanzador no está
bien bloqueado en su sede, cuando se
utiliza la pistola, podrÌa ser expulsada
debido a la alta presión, causando
posiblemente heridas o daño.
AUTOMATIC ON/OFF – TOTAL STOP SYSTEM (TSS)
The motor on this pressure washer does not run continuously,
only when the trigger is squeezed. After following the
start-up procedures in this manual, turn the pressure washer
on and squeeze the trigger for activation.
4.2 TURBO NOZZLE & FAN LANCE
High Pressure Turbo Spray.
The Fan Lance is used when different spray patterns are
required. It adjusts from a wide spray to a pinpoint spray
for maximizing the concentration of the pressure. Use care
when using the pinpoint spray. Twist the nozzle to change
the spray pattern. The Fan Lance is also used when chemical
will be dispensed from the pressure washer. Please see
section 4.3 for the dispensing of cleaning products.
ACTIVACIÓN/DESACTIVACIÓN AUTOMÁTICA
- SISTEMA DE INTERRUPCIÓN TOTAL (TSS)
El motor de esta hidrolimpiadora a presión no funciona
continuamente, sino cuando se aprieta el gatillo. Después
de seguir los procedimientos de puesta en marcha,
encienda la hidrolimpiadora y aprieten el gatillo para
activarlo.
ON / OFF SWITCH
4.2BOQUILLA TURBO
Rociado Turbo de Alta Presión.
PRECAUCIÓN: No mueva la boquilla
para ajustar la presión. La posición de alta
presión de la boquilla turbo es con el fin de
PRECAUCIÓN
maximizar el efecto limpiador. Mantenga
en todo momento la varilla de rociado un
mínimo de 6 a 8 inches lejos de la superficie
a limpiar.
CAUTION: Do not move the nozzle to
adjust pressure. The high-pressure turbo
nozzle position is intended for maximum cleaning effect. Keep the spray
CAUTION
lance a minimum of 6" to 8" away from the
cleaning surface at all times.
11
Page 12
NOTE: The pressure of the spray on the surface you are
cleaning increases as you move the wand closer
to the surface.
NOTA:
La presión del chorro sobre la superficie que están
limpiando aumenta en proporción al acercamiento
del lanzador sobre la superficie misma.
4.3 USE OF CHEMICAL
CAUTION: use chemicals only
CAUTION
recommend for pressure washers.
1. Open a container of Simoniz Pressure Washer
Matched Chemicals and fill detergent reservoir on top
of the pressure washer.
2. The Adjustable Fan Lance must be used to dispense the
cleaning products. If the Adjustable fan lance is not already
installed on the unit please refer to section 4.1 for the wand
installation. In order from the detergent to be dispensed the
Adjustable Fan Lance needs to be put in the detergent mode.
To do this twist and pull the nozzle at the end of wand. The
first time this is done it may be difficult to get the nozzle to
pop out. Keep steady pressure on it while pulling out.
3. Pull trigger to start the flow of the detergent. The pressure
will drop significantly when applying the detergent. This is
normal and necessary fore the unit to dispense the
detergents.
NOTE: Turbo spray nozzle will not dispense Simoniz
Pressure Washer Chemical unless foamer bottle
is attached to the end of the Turbo Wand.
4.4 CLEANING TECHNIQUES
When cleaning with the pressure washer use Simoniz
Pressure Washer Job Matched Chemicals to ensure a
quick soaking of the dirt, allowing the high pressure
water to penetrate and remove the dirt more effectively.
(continued)
4.3 USO DE PRODUCTOS QUÍMICOS
PRECAUCIÓN: utilicen solamente productos
químicos recomendados para la
PRECAUCIÓN
hidrolimpiadora.
1. Abra un envase de Simoniz Pressure Washer Matched
Chemicals y llene la botella de espuma.
2. Inspeccione visualmente el colador al final de la botella
de espuma para verificar que no está obstruido.
3. Adjunte la botella de espuma al final de la lanza. La
presión bajará significativamente mientras la botella de
jabón está puesta. Esto es normal y necesario para poder
dispensar el jabón de la botella.
NOTA: La boquilla de rociado turbo no dispensará Simoniz
Pressure Washer Chemical a menos que la botella
de espuma este adjunta al final de la Varilla Turbo.
4.4 TÉCNICAS DE LIMPIEZA
Cuando limpie con la hidrolimpiadora use Simoniz
Pressure Washer Job Matched Chemicals para asegurar
un remojado rápido del sucio, permitiendo al agua a
alta presión penetrar y remover el sucio más efectivamente.
(continuado)
12
Page 13

The keys to enhancing the effectiveness of any pressure
cleaning job are as follows:
Las claves para intensificar la eficiencia de cualquier
limpiado de alta presion son las siguientes:
1. Proper surface preparation
2. Job matched chemicals
● Matching the right detergent with the soil load and
surface to be cleaned
3. Specific product usage
● How to properly use the job matched chemicals
PROPER SURFACE PREPARATION
Proper surface preparation with Simoniz pressure spray
products will enhance the performance of your Simoniz
pressure washer, and will make difficult jobs easy.
Simoniz pressure spray products will provide the chemical
energy required to remove road film, grease, oil, algae,
mildew and other such environmental stains from a variety
of hard surfaces. Simoniz pressure spray products will
emulsify and break down surface contaminants that can
be then flushed away by the Simoniz high-pressure water
streams.
Proper surface preparation generally includes the
following steps:
1. Always match the proper Simoniz pressure spray
product to the proper cleaning job.
2. Always pre-rinse the surface and surrounding areas
with fresh water.
3. Apply the job-specific Simoniz pressure spray product
under low pressure, and allow it to remain on the
surface for 1-3 minutes. Never allow the Simoniz
pressure spray product to dry on the surface.
1. Preparacion adecuada de la superficie
2. Uso de los quimicos apropiados
● Emparejando el detergente indicado con la
cantidad de sucio
3. Uso del producto específico
● Como usar químicos apropiados al trabajo.
PREPARACION ADECUADA DE LA SUPERFICIE
Preparacion correcta de la superficie con productos para
presion de chorro Simoniz intensificara el desarrollo de su
hidrolimpiadora y hara facil los trabajos dificiles.
Los productos para presion de chorro Simoniz proporcionaran
la energia quimica para remover manchas en el pavimento,
grasa, alga, aceite, moho y otras manchas ambientales en diferentes
tipos de superficies. Los productos para presion de chorro
Simoniz ayudara a emulsionar y descomponer contaminantes
que puede entonces ser lavado por el chorro de agua de alta
presión de Simoniz.
La preparacion correcta de la superficie generalmente incluye
los siguientes pasos:
1. Siempre use el producto para presion de chorro Simoniz
apropiado para el tipo de trabajo.
2. Siempre remoje la superficie y las areas alrededor de ella
con agua limpia.
3. Aplique el producto para presion de chorro Simoniz adecuado
a baja presion y dejelo en la superficie de 1-3 minutos. Nunca
permita que el producto se seque en la superficie.
4. For extra stubborn stains, agitate with a stiff broom
or brush.
5. Rinse at high pressure in a long, sweeping motion,
keeping the spray nozzle approximately 3–6 inches
from the cleaning surface. For vertical surfaces,
always clean from the bottom of the surface to the top.
For horizontal surfaces, clean from left to right.
Before cleaning any surface, an inconspicuous area
should be cleaned to test spray pattern and distance for
maximum cleaning results.
If painted surfaces are peeling or chipping, use extreme
caution as pressure washer may remove the loose paint
from the surface.
4. Para manchas dificiles, talle con una escoba o cepillo de cerdas
duras.
5. Enjuague a alta presion en movimientos de barrido largos
manteniendo la boquilla de rociado aproximadamente 3-6
pulgadas de la superficie a limpiar. Para superficies verticals
siempre limpie de abajo hacia arriba. Para superficies horizontals
limpie de izquierda a derecha.
Antes de limpiar cualquier superficie, se recomienda limpiar una
area pequena para poner a prueba el tipo de chorro y distancia
adecuadas para obtener los mejores resultados de limpiado.
Si las superficies pintadas se estan pelando use extremada
precausion ya que el agua a alta presion puede remover la
pintura suelta de la superficie.
13
Page 14

JOB MATCHED CHEMICALS
QUIMÍCOS APROPIADOS AL TRABAJO
Simoniz takes the “guesswork” out of matching the right
pressure washing chemical to the right cleaning job.
The following charts demonstrate which different pressure
washing chemicals are required. When selecting job
matched chemicals, it’s not just the surface to be cleaned
that is taken into consideration, but also the amount of soil
and contaminants that must be factored in.
Simoniz Pressure Washing Chemical to be Used
Surface to be Cleaned:
Deck & Fence Mildew Cleaner
Natural wood decks
Painted wood decks
Mildew stains
House & Siding Wash
Vinyl & aluminum siding
Heavy Duty Degreaser
Sidewalks
Driveways
Cement patios
Brick (homes)
Stone patios
Barbecue grills
Outdoor power equipment
Gardening tools
Patio & lawn furniture
Car & Boat Wash
Cars, boats, motorcycles
Window & Screen Wash
Window & screen washing
Con Simoniz ya no es necesario adivinar cual es el quimico
adecuado para un trabajo de limpiado.
Las siguientes tablas demuestran qué diferentes tipos de
quimicos para alta presion son necesarios, Cuando se
seleccionan los químicos apropiados al trabajo, no solamente
se toma en consideracion la superficie a limpiar sino tambien
el tipo de manchas y contaminantes.
La Superficie a Limpiar:
El Quimico de Alta Presion Simoniz a Usar
Limpiador de Moho para patio y Revestimiento Exterior
Patio de madera natural
Patio de madera pintada
Manchas de moho
Limpiador de casa y bardas
Revestimiento exterior de vinil y aluminio.
Degrasador Industrial
Banquetas
Entrada al estacionamiento
Patios de cemento
Ladrillos (casas)
Patios de piedra
Parrillas
Equipo de jardin
Herramientas de jardineria
Muebles de patio y de jardin
Limpiador de Coches y Barcos
Coches, barcos, motocicletas
Limpiador de Ventanas y Rejillas
Para limpiado de ventanas y rejillas.
SPECIFIC PRODUCT USAGE
Deck Cleaning
Product: Simoniz Deck & Fence Mildew Cleaner
Pre-rinse deck and surrounding area with fresh water.
Fill detergent reservoir on top of the pressure washer. Be
sure that the Turbo Wand has been removed and the
Adjustable Fan Lance is attached. Put the Fan Lance into
dispensing mode (see section 4.3) and pull the trigger to
start the flow of detergent. Apply to surface to be cleaned
at low pressure. For best results, limit your work area to
smaller sections of approximately 25 square feet. Allow
Simoniz Deck & Fence Mildew Cleaner to remain on surface
1-3 minutes. Do not allow detergent to dry on surface. Rinse
at high pressure in along sweeping motion keeping the spray
nozzle approximately 3-6 inches from the cleaning surface.
Always clean from top to bottom and from left to right. When
moving on to a new section of the cleaning surface, be sure to
overlap the previous section to eliminate stop marks and
ensure a more even cleaning result.
For tenacious, hard to remove mildew stains, a pretreatment
may be required. Using a pump-up sprayer, add 1 cup of
Simoniz Deck & Fence Mildew Cleaner to 1 gallon of water.
For added mold and mildew effectiveness, add 1 cup of
USO ESPECIFICO DEL PRODUCTO
Limpiado de Patio
Producto: Simoniz Deck and Fence Mildew Cleaner Remoje
el patio con agua limpia. Llene la botella con Simoniz Deck
and Fence Mildew Cleaner y conecte la botella al lanzador
de chorro. Aplique a la superficie a baja presion. Para mejores
resultados, limite su area de trabajo a pequenas secciones de
25 pies cuadrados. Deje el Simoniz Deck and Fence Mildew
Cleaner actuar en la superficie de 1-3 minutos. No permita
que el detergente se seque en la superficie. Enjuague a alta
presion con movimientos de barrido largos manteniendo la
boquilla de chorro a aproximadamente 3-6 pulgadas de la
superficie a limpiar. Siempre limpie de arriba hacia abajo y
de izquierda a derecha. Cuando se mueva a una nueva sección
de la superficie a limpiar, asegúrese de repasar la sección anterior
a fin de eliminar las marcas de parada y asegurar una limpieza
más pareja.
Para manchas dificiles de moho, puede ser necesario tratar
la superficie primero. Usando una bomba de rociado, agregue
una taza de Simoniz Deck and Fence Mildew Cleaner
a un galón de agua. Para mejores resultados agregue una
taza de blanqueador de ropa. Aplique solucion a la
superficie a limpiar comenzando en la parte de abajo. Deje
la solucion en la superficie por aproximadamente 1-3 minutos,
14
Page 15

household bleach. Pump sprayer and apply solution to the
surface to be cleaned starting at the bottom. Allow solution
to remain on the surface for approximately 1-3 minutes, not
allowing it to dry. Agitate with a stiff broom and rinse with
pressure washer thoroughly from bottom of surface to the top.
House & Vinyl Siding
Product: Simoniz House & Siding Wash
Fill detergent reservoir on top of the pressure washer. Be sure
that the Turbo Wand has been removed and the Adjustable
Fan Lance is attached. Put the Fan Lance into dispensing mode
(see section 4.3) and pull the trigger to start the flow of detergent.
Apply to surface to be cleaned at low pressure (for best results,
limit your work area to sections of approximately 6 feet and always
apply from bottom to top). Allow Simoniz House & Siding Wash
to remain on surface 1-3 minutes. Do not allow detergent to
dry on surface. If surface appears to be drying, simply wet
down with fresh water. If needed, use the special Wash
Brush attachment to remove stubborn dirt. Rinse at high
pressure from top to bottom in an even sweeping motion
keeping the spray nozzle approximately 6 inches from the
cleaning surface.
For removal of difficult rust and gutter stains, a low pressure
pretreatment may be required. Apply as above, allowing
solution to remain on the surface for approximately 1-3
minutes, not allowing it to dry. Agitate with a soft bristle
brush and rinse with pressure washer thoroughly from the
bottom of surface to the top using the turbo nozzle spray
wand. For added mold and mildew effectiveness, add one
cup of household bleach to the cleaner.
Cement Patios, Brick and Stone
Product: Simoniz Heavy Duty Degreaser
Fill detergent reservoir on top of the pressure washer. Be sure
that the Turbo Wand has been removed and the Adjustable Fan
Lance is attached. Put the Fan Lance into dispensing mode (see
section 4.3) and pull the trigger to start the flow of detergent.
Apply to surface being cleaned at low pressure. For best results,
limit your work area to smaller sections of approximately 25 square
feet. Allow Simoniz Heavy Duty Degreaser to remain on surface
1-3 minutes. Do not allow detergent to dry on surface. Rinse
at high pressure in a sweeping motion keeping the spray
nozzle approximately 3-6 inches from the cleaning surface.
Always clean from top to bottom and from left to right.
For hard to remove environmental stains, a second
application of Simoniz Heavy Duty Degreaser may be
required. Apply as above, allowing the solution to remain
on the surface for approximately 1-3 minutes, not allowing
it to dry. Agitate with a stiff broom and rinse with pressure
washer thoroughly using the turbo nozzle spray wand.
CARS, BOATS & MOTORCYCLES – CLEANING
Product: Simoniz Car & Boat Wash
Fill detergent reservoir on top of the pressure washer. Be sure that
the Turbo Wand has been removed and the Adjustable Fan
Lance is attached. Put the Fan Lance into dispensing mode (see
section 4.3) and pull the trigger to start the flow of detergent.
Apply to surface being cleaned at low pressure. For best results,
clean one side of vehicle at a time and always apply detergent
from bottom to top. Do not allow detergent to dry on surface.
If needed, use the optional Wash Brush attachment to remove
stubborn dirt. Rinse at high pressure in a sweeping motion
keeping the spray nozzle approximately 6" to 8" from
15
no permitiendo que se seque. Talle con una escoba de
cerdas duras y enjuague completamente a alta presion de
abajo hacia arriba de la superficie.
Limpiado de Casa y Revestimiento Exterior de Vinil
Producto: Simoniz House and Siding Wash
Llene la botella de espuma con Simoniz House and
Siding Wash y conecte la botella al lanzador de chorro.
Aplique a la superficie a baja presion. (para mejores
resultados, limite su area de trabajo a pequenas secciones
de 6 pies y siempre appliqué detergente de abajo hacia
arriba). Permita que Simoniz House & Siding Wash permanezca
en la Superficie de 1-3 minutos. No permita que el detergente
se seque en la superficie. Si la superficie comienza a secarse
aplique agua limpia. Si es necesario use el cepillo especial
anexo para manchas dificiles. Enjuague a alta presion de
arriba hacia abajo en un movimiento parejo manteniendo la
boquilla de chorro aproximadamente a 6 pulgadas de la
superficie de limpiado.
Para remover manchas dificiles de oxidacion y de canal de
tejado puede ser necesario un tratamiento del area a baja
presion. Aplique como descrito arriba, dejando la solucion en
la superficie de 1-3 minutos, no permitiendo que se seque. Talle
con un cepillo de cerdas suaves y enjuague completamente a
alta presion de abajo hacia arriba usando la boquilla reguladora
de chorro. Para una agregada efectividad reguladora de chorro.)
en moho, agregue al limpiador una taza del cloro de utilización
casera.
Patios de Cemento, Ladrillo y Piedra
Producto: Simoniz Heavy Duty Degreaser
Llene la botella de espuma con Simoniz Heavy Duty
Degreaser y conecte la botella al lanzador de chorro.
Aplique a la superficie a baja presion. Para mejores
resultados, limite su area de trabajo a pequenas secciones
de 25 pies quadrados. Deje el Simoniz Heavy Duty
Degreaser actuar en la superficie de 1-3 minutos. No
permita que el detergente se seque en la superficie.
Enjuague a alta presion con movimientos de barrido
largos manteniendo la boquilla de chorro a
aproximadamente 3-6 pulgadas de la superficie a limpiar.
Siempre limpie de arriba hacia abajo y de izquierda a
derecha.
Para remover manchas ambientales dificiles una segunda aplicacion
de Degrasador Industrial Simoniz sera necesaria. Aplique como
arriba descrito, deje la solucion en la superficie de 1-3 minutos,
no permitiendo que se seque. Talle con un cepillo de cerdas duras
y enjuague completamente a alta presion usando la boquilla de
alta presion.
LIMPIADO DE COCHES, BARCOS Y MOTOCICLETAS
Producto: Simoniz Car & Boat Wash
Llene la botella de espuma con Car & Boat Wash y adjunte
la botella al final de la Varilla Turbo. Aplique a la superficie
a baja presion. Para mejores resultados, limpie un lado del
vehiculo primero siempre appliqué el detergente de abajo hacia
arriba. No permita que el detergente se seque en la superficie. Si
es necesario, use el el cepillo especial anexo para remover manchas
dificiles. Enjuague a alta presion con movimientos de barrido largos
manteniendo la boquilla de chorro a aproximadamente 6-8 inches
de la superficie a limpiar. (la distancia debe incrementar cuando
se estén enjuagando superficies que se estan pelando u otras
superficies sensibles). Siempre limpie de arriba hacia abajo y
de izquierda a derecha. Para mejores resultados, seque la superficie
con un trapo suave y seco.
Page 16

16
the cleaning surface (distance should increase when
rinsing pin striping or other sensitive surfaces). Always
clean from top to bottom and from left to right. For best
results, wipe surface dry with a chamois or soft dry cloth.
For removal of tenacious stains caused by road film, bugs,
algae or water line stains (on boats), a second application
of Simoniz Car & Boat Wash may be required. Apply as
above, allowing the solution to remain on the surface for
approximately 1-3 minutes, not allowing it to dry. Agitate
with a soft broom and rinse thoroughly.
CARS, BOATS & MOTORCYCLES – WAXING
Product: Simoniz Car & Boat Wax
Wash the vehicle or boat prior to wax application. There
is no need to dry the vehicle or boat prior to applying the
Simoniz Car & Boat Wax. Rinse soap bottle thoroughly.
Fill detergent reservoir on top of the pressure washer. Be
sure that the Turbo Wand has been removed and the
Adjustable Fan Lance is attached. Put the Fan Lance into
dispensing mode (see section 4.3) and pull the trigger to
start the flow of detergent.
Apply Simoniz Car & Boat
Wax to the vehicle with low pressure, moving around the
vehicle in a clockwise fashion. Allow solution to remain
on the surface for approximately 1 minute, not allowing
it to dry. High pressure rinse thoroughly from the bottom
of the surface to the top. For best results, wipe surface dry
with a chamois or soft cloth to avoid water spots.
Barbecue Grills, Outdoor Power Equipment &
Gardening Tools
Product: Simoniz Heavy Duty Degreaser
Pre-rinse cleaning surface with fresh water. Fill detergent
reservoir on top of the pressure washer. Be sure that the
Turbo Wand has been removed and the Adjustable Fan
Lance is attached. Put the Fan Lance into dispensing mode
(see section 4.3) and pull the trigger to start the flow of
detergent. Apply to surface being cleaned at low pressure.
For best results, limit your work area to smaller sections of
approximately 25 square feet. Allow Simoniz Heavy Duty
Degreaser to remain on surface 1-3 minutes. Do not allow
detergent to dry on surface. Rinse at high pressure in a
sweeping motion keeping the spray nozzle approximately
3-6 inches from the cleaning surface. Always clean from
top to bottom and from left to right.
For removing of baked on stains and heavy grease, a
second application of Simoniz Heavy Duty Degreaser may
be required. Apply as above, allowing solution to remain
on the surface for approximately 1-3 minutes, not allowing
it to dry. Agitate with a stiff brush and rinse with pressure
washer thoroughly from bottom of surface to the top.
Patio & Lawn Furniture
Product: Simoniz Heavy Duty Degreaser
Pre-rinse cleaning surface with fresh water. Fill detergent
reservoir on top of the pressure washer. Be sure that the
Turbo Wand has been removed and the Adjustable Fan
Lance is attached. Put the Fan Lance into dispensing mode
(see section 4.3) and pull the trigger to start the flow of
detergent. Apply to surface being cleaned at low pressure.
For best results, limit your work area to smaller sections of
approximately 25 square feet. Allow Simoniz Heavy Duty
Degreaser to remain on surface 1-3 minutes. Do not allow
detergent to dry on surface. Rinse at high pressure in a
sweeping motion keeping the spray
Para remover manchas dificiles de pavimento, insectos y
manchas de agua (en barcos) podria ser necesaria una
segunda aplicación de Simoniz Car & Boat Wash.
Aplique como arriba descrito, deje la solucion
en la superficie de 1-3 minutos, no permitiendo que se
seque. Talle con un cepillo de cerdas duras y enjuague
completamente a alta presion.
CARROS, BOTES Y MOTOCICLETAS - ENCERADO
Producto: Limpiador de Coche y Barcos Simoniz.
Lave el vehículo o bote antes de aplicar la cera. No hay
necesidad de secar el vehículo antes de aplicar Simoniz
Car & Boat Wax. Enjuague meticulosamente la botella
de jabón Llene la botella de espuma con Car & Boat Wax
y adjunte la botella al extremo de la Varilla Turbo. Aplique
Simoniz Car & Boat Wax al vehículo a baja presión,
moviendose alrededor del vehículo en el sentido
de las agujas del reloj. Permita que la solución permanezca en el
vehículo por aproximadamente 1 minuto, no permitiendo que se
seque. Enjuáguelo a alta presión minuciosamente desde abajo hacia
arriba de la superficie. Para mejores resultados, seque la superficie con
una gamuza o paño suave para evitar manchas de agua.
Parrillas, Equipo de Jardin y Herramientas de
Jardin
Producto: Simoniz Heavy Duty Degreaser
Enjuague la superficie a limpiar con agua limpia. Llene
la botella de espuma con Simoniz Heavy Duty
Degreaser y conecte la botella al lanzador de chorro.
Aplique a la superficie a baja presion. (para mejores
resultados, limite su area de trabajo a pequenas
secciones de 25 pies cuadrados. Permita que el Simoniz
Heavy Duty Degreaser permanezca en la superficie
de 1-3 minutos. No permita que el detergente
se seque en la superficie. Enjuague a alta presion con
movimientos de barrido manteniendo la boquilla de
chorro a aproximadamente 3-6 pulgadas de la
superficie a limpiar. Siempre limpie de arriba hacia
abajo y de izquierda a derecha.
Para remover manchas del horno y grasa pesada, podría
requerirse una segunda aplicación de Simoniz Heavy Duty
Degreaser. Aplique como se explica arriba, permitiendo
que la solución permanezca en la Superficie por aproximadamente1-3 minutos, no permitiendo que se seque.
Cepíllelo con un cepillo duro y enjuague abundantemente
con agua a presión desde abajo hacia arriba de la superficie.
Muebles de Patio y Jardin
Producto: Simoniz heavy Duty Degreaser
Introduzcan el tubo de sifón en Degrasador Industrial
Simoniz y conecte la botella al lanzador de chorro.
Aplique a la superficie a baja presion. Para mejores
resultados, limite su area de trabajo a pequenas
secciones de 25 pies cuadrados. Permita que el Simoniz
Heavy Duty Degreaser permanezca en la superficie de
1-3 minutos. No permita que el detergente se seque en
la superficie. Enjuague a alta presion con movimientos
de barrido largos manteniendo la boquilla de chorro a
aproximadamente 3-6 pulgadas de la superficie a
limpiar. Siempre limpie de arriba hacia abajo y de
izquierda a derecha.
(continued)
Page 17

nozzle approximately 3-6 inches from the cleaning surface.
Always clean from top to bottom and from left to right.
For removing extremely stubborn stains, use the rotating
nozzle spray wand.
For hard to remove environmental stains, a second
application of Simoniz Heavy Duty Degreaser may be
required. Apply as above, allowing the solution to remain
on the surface for approximately 1-3 minutes, not allowing
it to dry. Agitate with a stiff brush and rinse with pressure
washer thoroughly using the turbo nozzle spray wand.
Window & Screen Washing
Product: Simoniz Window & Screen Wash
Pre-rinse windows and surrounding area with fresh water.
Fill detergent reservoir on top of the pressure washer. Be sure
that the Turbo Wand has been removed and the Adjustable
Fan Lance is attached. Put the Fan Lance into dispensing
mode (see section 4.3) and pull the trigger to start the flow
of detergent. Apply solution under low pressure to the
windows to be cleaned from the bottom to the top. Allow
solution to remain on the surface for approximately 1-3
minutes, not allowing it to dry. High pressure rinse thoroughly
from bottom of surface to top.
For windows with a heavy environmental film, gentle
agitation may help. Once the Simoniz Window & Screen
Wash has been applied to the surface, agitate with a soft
bristle brush and rinse with pressure washer thoroughly
from the bottom of the surface to the top.
5.0 MAINTENANCE
CONNECTIONS
5.1
• This pressure washer is supplied with a closed lubrication
system, so no addition of oil is needed.
• Check all hoses and accessories for damage prior to use.
• Check the inlet filter periodically for deposits. Clean this
filter regularly for maximum performance.
5.2 NOZZLE
Clogging of the nozzle causes the pump pressure to be
too high and cleaning is immediately required.
Separate the nozzle from the wand by twisting
1.
and pulling at the center of the wand. See bottom
of page 10.
2. Clear the nozzle using a small paper clip or other
small object so as not to enlarge the nozzle opening.
Pare remover manchas dificiles de grasa una segunda
aplicacion de Degrasador Industrial Simoniz puede ser
necesaria. Aplique como arriba descrito, deje la solucion en
la superficie de 1-3 minutos, no permitiendo que se seque.
Talle con un cepillo de cerdas duras y enjuague
completamente a alta presion de abajo hacia arriba.
Lavado de ventanas y Rejillas
Producto: Simoniz Window & Screen Wash
Enjuague las ventanas y el area alrededor con agua
limpia. Llene la botella de espuma con Simoniz Window
& Screen Wash y Adjunte la botella al lanzador de chorro.
Aplique a las ventanas a limpiar a baja presion de abajo
hacia arriba. Deje la solucion enla superficie de 1-3 minutos,
no permitiendo que se seque. Enjuague con la hidrolimpiadora
minuciosamente utilizando la boquilla turbo de la varilla
rociadora.
Para ventanas con manchas dificiles, talle suavemente.
Cuando el Simoniz Window & Screen Wash ha sido
aplicado a la superficie, talle con un cepillo de cerdas suaves
y enjuague conpletamente con agua a presion de abajo
hacia arriba.
5.0 MANUTENCIÓN
5.1
CONEXIONES
• Esta hidrolimpiadora está dotada con un sistema cerrado
de lubricación, de modo que no se requiere ninguna adición
de aceite.
• Chequee todas las mangueras y accesorios por daños antes de usarla.
• Chequee el filtro interior periódicamente por depósitos.
Limpie este filtro regularmente para una máxima ejecución.
5.2 BOQUILLA
La obturación de la boquilla provoca el aumento de la
presión de la bomba y. Se requiere una limpieza inmediata.
1. Separe la boquilla de la varilla girando y halando en el
centro de la varilla. Ver la parte inferior de la pag.10.
Limpie la boquilla utilizando un clip de papel u otro objeto
2.
pequeño para no alargar la abertura de la boquilla.
Arrancar de nuevo la hidrolimpiadora y apretar el gatillo
de la pistola de rociar. Si la presión es todavía muy alta, repita los
pasos 1 y 2 de arriba.
Restart the pressure washer and depress the
trigger on the spray gun. If the pressure is still
too high, repeat above items 1 and 2.
17
Page 18
5.3 LUBRICATION
The pressure washer is designed with a permanent
lubrication system. Conventional oil check and oil
changes are not necessary.
5.3 LUBRICACIÓN
La hidrolimpiadora ha sido creada con un sistema de
lubricación permanente. No son necesarios controles
convencionales ni la substitución de aceites.
NOTE: IN CASE OF OIL LEAKAGE, CONTACT THE
SIMONIZ USA CUSTOMER SERVICE DEPT. AT
1-888-SIMONIZ (1-888-746-6649) CONCERNING
REPAIR. A SMALL AMOUNT OF OIL LEAKAGE IS
NORMAL.
5.4 WATER SCREEN
The pressure washer is equipped with a water inlet
screen to protect the pump.
CAUTION: If the screen is not kept clean,
the flow of water to the pressure washer
CAUTION
will be restricted and the pump may be
damaged.
● To clean inner conical water screen, remove quick
connect and remove the filter screen from the pump
inlet.(see page 8)
● Backflush screen to clean
● Replace screen and quick connect immediately to
prevent any foreign matter from entering the pump.
CAUTION: Do not damage the screen
while removing or cleaning. Any foreign
particles entering the pump may damage
CAUTION
the pump.
NOTA: EN EL CASO DE PÉRDIDA DE ACEITE,
CONTACTEN AL SERVICIO CLIENTES DE LA SOCIEDAD
SIMONIZ USA (1-888-746-6649), SECCIÓN
REPARACIONES.UNA PEQUEÑA PÉRDIDA DE ACEITE
ES NORMAL.
5.4 PANTALLA AGUA
La hidrolimpiadora está dotada de una pantalla de
introducción de agua para proteger la bomba.
PRECAUCIÓN: Si no se mantiene limpia la
pantalla, el flujo del agua hacia la
PRECAUCIÓN
hidrolimpiadora se ve limitado y la bomba puede dañarse.
● Para limpiar la pantalla cónica más interna del agua,
extraigan la unión rápida y la pantalla de plástico de
introducción de la bomba.
● La pantalla de retorno flujo debe estar limpia.
● Substituyan inmediatamente la pantalla y la unión
rápida para evitar que entre material extraño en
la bomba.
PRECAUCIÓN:
No dañen la pantalla cuando
la extraen y la limpian. Cualquier partícula
extraña que pudiera entrar en las bombas,
PRECAUCIÓN
podría dañarla.
5.5 COOLING SYSTEM
The air vents, located in and around the pressure
washer, must be kept clean and free of any obstructions
to ensure proper air cooling of the motor during
operation.
WARNING: prevent water from
penetrating the vents of the pressure
washer to minimize the risk of damage to
CAUTION
the machine and to reduce the risk of shock
to the operator.
5.5 SISTEMA DE REFRIGERACIÓN
Los respiraderos de aire dentro y alrededor de la hidrolimpiadora
y a su alrededor, deben ser mantenidos limpios de
cualquier obstrucción para garantizar la refrigeración
del motor con aire limpio durante el uso.
ADVERTENCIA: Eviten que el agua penetre
en los respiraderos de la hidrolimpiadora
ATENCIÓN
para que el riesgo de dañar la máquina sea
mínimo y para reducir el peligro de sacudida
eléctrica al operador.
18
Page 19
S
w
the
4
A
to
6.0
MOVI
NG AND STORAG
INSTRUCTIONS
CAUTION:
washer in a location where the te
perature will not fall below
CAUTIO
If you must store your
here the temperature is below
follo
1.Shut off water su
2.Tip the unit on its side with the
3.Insert a sm
.Turn on unit without co
nother method
d
1.Stop the pre
2.Restart the
CAUTIO
pump in this ma
N
to permanent damage if frozen
FREEZE DAMAGE IS NOT COVERED
THE WARRANTY.
chance
of damage
wing procedure
s
pray gun by d
the garden hose fr
leave the high pre
pointing up.
inlet and pour in
antifreeze
circulate
the trigger to dispel antifreeze or water in the line
After approximately 5 seconds,
and disconnec
f
reeze will serve as a r
storage and help preven
rain
and high
Squeeze the trigger
water fr
(ab
from the high
all
fu
.
the antif
of reducing risks of f
your m
achine a
ssure was
pre
ssure hose.
om the
pre
out 5 seconds) until water no longer dis
CAUTION: Do not run the unit for more
than 5 second
N
connected
Always store your pressure
chine i
s susceptib
pre
ssure was
to your m
:
pply and
epressing the trigger. Disco
om the
ssure hose co
nnel (
approximately 1/2 cup of
reeze in the pump
t the high
s follows
of the discharge gun
wand and hose
ssure was
pre
ssure outlet
.
her in a location
32˚F,
you
can minimize
achine b
y ut
relieve pre
pre
ssure was
nnected.
inlet connection
to
preven
t s
pilling) in
nnecting garden hose
turn off the unit
pre
ssure hose. The anti-
ust
preventative durin
t the pistons from sticking
reeze damage is
:
her and detach
.
her and let it run briefl
.
s without water supply
E
32˚F. The
ilizing t
ssure in t
nnec
her, but
to t
system. Pu
su
pply hose
to drain all
charge
he
he
to
he
m-
le
BY
t
ll
.
g
.
y
6.0
MANI
PULACIÓN Y
ALMACENAMIENTO IN
PRE
CAUCIÓN: Almacenen
hidrolimpiadora en un local cuya
temperatura no desciend
PRECAUCIÓ
.
Si alm
tem
el riesgo de daño del equipo siguiendo el siguiente
procedimiento:
1.C
2.I
3.Introduzcan un pequeño embudo (
4.G
Otr
provocados por el
en el
1.Detengan la hidrolim
s
2.Pongan nuevamente en marcha la hidrolimpiado
PRECAUCIÓ
debajo d
N
congelamiento, la bomba d
equipo está sujeta a daño perma
nente. LOS DAÑOS PROVOCADOS
POR EL HIELO NO ESTÁN CUBIE
POR LA GARANTÍA.
acenan la hidrolimpiadora en un lo
peratura es inferior a l
ierren la alimentación del agua de la varilla
presión en la pi
gat
illo. Desco
hidrolimpiadora, pero dejen co
manguera de alta
nclinen el apara
introducción hacia arriba
escapes) en la apertura de introdu
introduz
can 1/2 taza de anticong
iren hacia arriba el equipo sin co
manguera de jardín, para hacer circular el
anticongelante por el sistema de la bomba. Tiren el
gat
illo para hacer salir el anticongelante
Después de un
equipo y desconecten la mangu
El anticong
oxidación durante el almacenamien
agarrotamien
o método
modo siguiente
manguera de
Presio
nen el gat
hacer salir
manguera
y déjenla en
período (unos 5 segundos) hasta que no s
por la salida de la alta
PRE
por más de 5
la fuente de agua
N
e los
32˚F. En el caso de
os 32˚F, pueden disminuir
stola de chorro presionando
necten la mangu
presión
.
to sobre un lado con la unión de
.
os 10 segund
elante servirá como
to de l
os pistones
para redu
toda el agua del ì
.
cir l
hielo consiste en des
:
alimentación
illo de la pistola de des
fu
ncionamien
CAUCIÓN:
os
piadora y desconecten la
presión
segund
STR
UCCION
la
a por
e este
RTOS
cal donde la
era de jardÌn de la
nectada la
para prevenir
cción e
elante
.
nectar la
os giren hacia abajo
y la de alta presión
to du
o el agua
era de alta
.
riesg
lanzadorî
.
N
o utilicela unidad
.
presión
prevención de
to y evitar·
os de dañ
cargar el equipo
carga para
y de la
rante un brev
ale más agu
os sin conectar
E
-
y
el
.
el
.
la
os
.
ra
e
a
19
Page 20

7.0 TROUBLESHOOTING
PROBLEM POS SIBLE C AUSE COR RECT ION
THE PRESSURE WASHER HAS OR
WILL NOT MAINTAIN PRESSURE
THE PRESSURE WASHER MAKES
EXCESSIVE NOISE
THE MOTOR DOES NOT RUN CONTINUOUSLY WHEN TRIGGER IS
SQUEEZED/THE MOTOR BUZZES
WHEN TURNED ON, BUT DOES
NOT START
THE MOTOR STOPS RUNNING
WHILE IN USE
WHEN THE SWITCH IS IN THE “ON”
POSITION THE MACHINE WILL NOT
START
THE PUMP DOES NOT REACH
ADEQUATE PRESSURE OR FLUCTUATES
UNIT WILL NOT DISPENSE SOAP
1. Excessive air in waterline and pump
1. Air intake is blocked
2. Valves are worn, dirty, or clogged
3. Filter is dirty
1. Thermal safety valve has tripped
1. Net voltage lower than suggested
1. Electrical socket is faulty
2. Voltage is inadequate
3. GFCI trips
4. Thermal safety switch trips
5. Power cord is not plugged in
1. Water inlet filter is clogged
2. Pump is drawing air
3. Suction valves are clogged/worn
4. Diameter of garden hose too small
5. Water supply is restricted
6. Insufficient water supply
1. Soap reservoir is empty
2. Fan Lance is not installed
3. Fan Lance is not in detergent
Dispensing mode
1. Turn unit and water supply off/
Bleed system/Hold trigger down
1. Check the intake valves
2. Check, clean or replace valves
3. Check, clean, or replace filter
1. Turn off and let cool
1. Check that the voltage is adequate
1. Check plug, socket, fuses
2. Check that the voltage is adequate
3. Reset/Try another outlet
4. Turn off and let cool
5. Plug in power cord
1. Remove and clean filter
2. Tighten connections/bleed system
3. Clean or replace valves
4. Replace with _ inch garden hose
5. Check hose for kinks or leaks
6. Fully open water source
1. Fill reservoir with Simoniz Pressure
Washer solution
2. Remove Turbo Wand and attach
Fan Lance
3. Pull and twist slightly on the
nozzle to get it to pop out
20
Page 21

7.0 LOCALIZACIÓN Y CORRECCIÓN DE LAS AVERÍAS
PROBLEMA POSIBLE CAUSA CORRECCIÓN
LA HIDROLIMPIADORA TIENE O NO
MANTIENE LA PRESIÓN
LA HIDROLIMPIADORA
HACE RUIDOS EXCESIVOS
EL MOTOR NO FUNCIONA
CONTINUAMENTE CUANDO EL
GATILLO ES APRETADO/EL MOTOR
ZUMBA CUANDO ES ENCENDIDO,
PERO NO ARRANCA
EL MOTOR DEJA DE FUNCIONAR
CUANDO SE ESTÁ UTILIZANDO
CUANDO EL INTERRUPTOR ESTÁ
AUN EN “ENCENDIDO”
LA MÁQUINA NO ARRANCA
1. Aire excesivo en la línea
de agua y la bomba
1. La entrada de aire está bloqueada
2. Las válvulas estan gastadas, sucias
o tapadas
3. El filtro está sucio
1. La válvula de seguridad
térmica ha sido activada
1. El voltaje neto es menor
que el sugerido
1. La toma eléctrica esta fallando
2. El voltaje es inadecuado
3. Se activa el GFCI
4. El interruptor térmico se activa
5. El cable de poder no
está enchufado
1. Apague la unidad y la fuente que
surte el agua/Vacíe el sistema/
Apriete el gatillo
1. Chequee la válvula de entrada
2. Chequee, limpie o reemplace
las válvulas
3. Chequee, limpie o reemplace el filtro
1. Apáguela y déjela enfriar
1. Chequee que el voltaje sea
adecuado
1. Chequee el enchufe, tomacorriente
y fusibles
2. Chequee que el voltaje es adecuado
3. Reajuste/pruebe otro tomacorriente
4. Apáguelo y déjelo enfriar
5. Enchufe el cable de poder
LA BOMBA NO ALCANZA UNA
ADECUADA PRESIÓN O FLUCTUA
1. El filtro interno del agua está tapado
2. La bomba está sacando aire
3. Las válvulas de succión estan
tapadas/gastadas
4. El diámetro de la manguera de
jardín es muy pequeño
5. El abastecimiento de agua esta
restringuido
6. El abastecimiento de agua es
insuficiente
1. Remueva y limpie el filtro
2.
Apriete la conexión/ drene el sistema
3. Limpie o reemplace las válvulas
4. Reemplace con una manguera de
jardín de ___ inches
5. Chequee la manguera por
retorcedura o filtración
6.
Abra completamente la fuente de agua
21
Page 22
8.0 REPLACEMENT PARTS AND
ACCESSORIES
8.0 PIEZAS DE REPUESTOS Y
ACCESORIOS
THE FOLLOWING LIST OF ACCESSORIES AND
REPLACEMENT PARTS ARE AVAILABLE AT
WWW.SIMONIZUSA.COM.
IF YOU DO NOT HAVE INTERNET ACCESS PLEASE
CONTACT CUSTOMER SERVICE FOR MORE
INFORMATION AT 1-888-SIMONIZ (1-888-746-6649)
Description Descripción
SOFT BRISTLE HAND BRUSH CEPILLO MANUAL DE CERDA S SUA V ES
25 FOOT EXTENSION HOSE EXTENSIÓN DE MANGUERA DE 25 PIES
ROTARY BRUSH CEPILLO GIRATORIO
ENSAMBLAJE DE MANGUERA DE ALTA
REPLACEMENT HIGH PRESSURE HOSE
AND GUN ASSEMBLY
VARIABLE NOZZLE ASSE MBLY (W/O
WAN D)
INLET SCREEN, EXTERIOR REJILLA ENTRADA, EX TERIOR
NOZZLE CLEANER LIMPIADOR BOQUILLA
GARDEN HOSE QUICK C OUPLING MANGUERA DE JARDIN CON
TURBO NO ZZLE ASSEMBLY W/O
WAN D
W
AND (1 PIECE
FLOOR BRUSH
)
LA SIGUIENTE LISTA DE ACCESORIOS Y
REPUESTOS ESTAN DISPONIBLES EN:
WWW.SIMONIZUSA.COM
SI USTED NO TIENE ACCESO A INTERNET, POR FAVOR,
CONTACTE EL SERVICIO AL CLIENTE PARA MAYOR
INFORMACION AL: 1-888-SIMONIZ (1-888-746-6649)
PRESIÓN Y PISTOLA
GRUPO B OQUILL
LANZADOR)
ACOPLAMIENTO RÁPIDO
ENSAMBLAJE DE BOQUILLA
TURBO SIN VARILLA
VARILLA (1 PIEZA)
CEPILLO DE PISO
A VARIABLE (W/O
22
Page 23
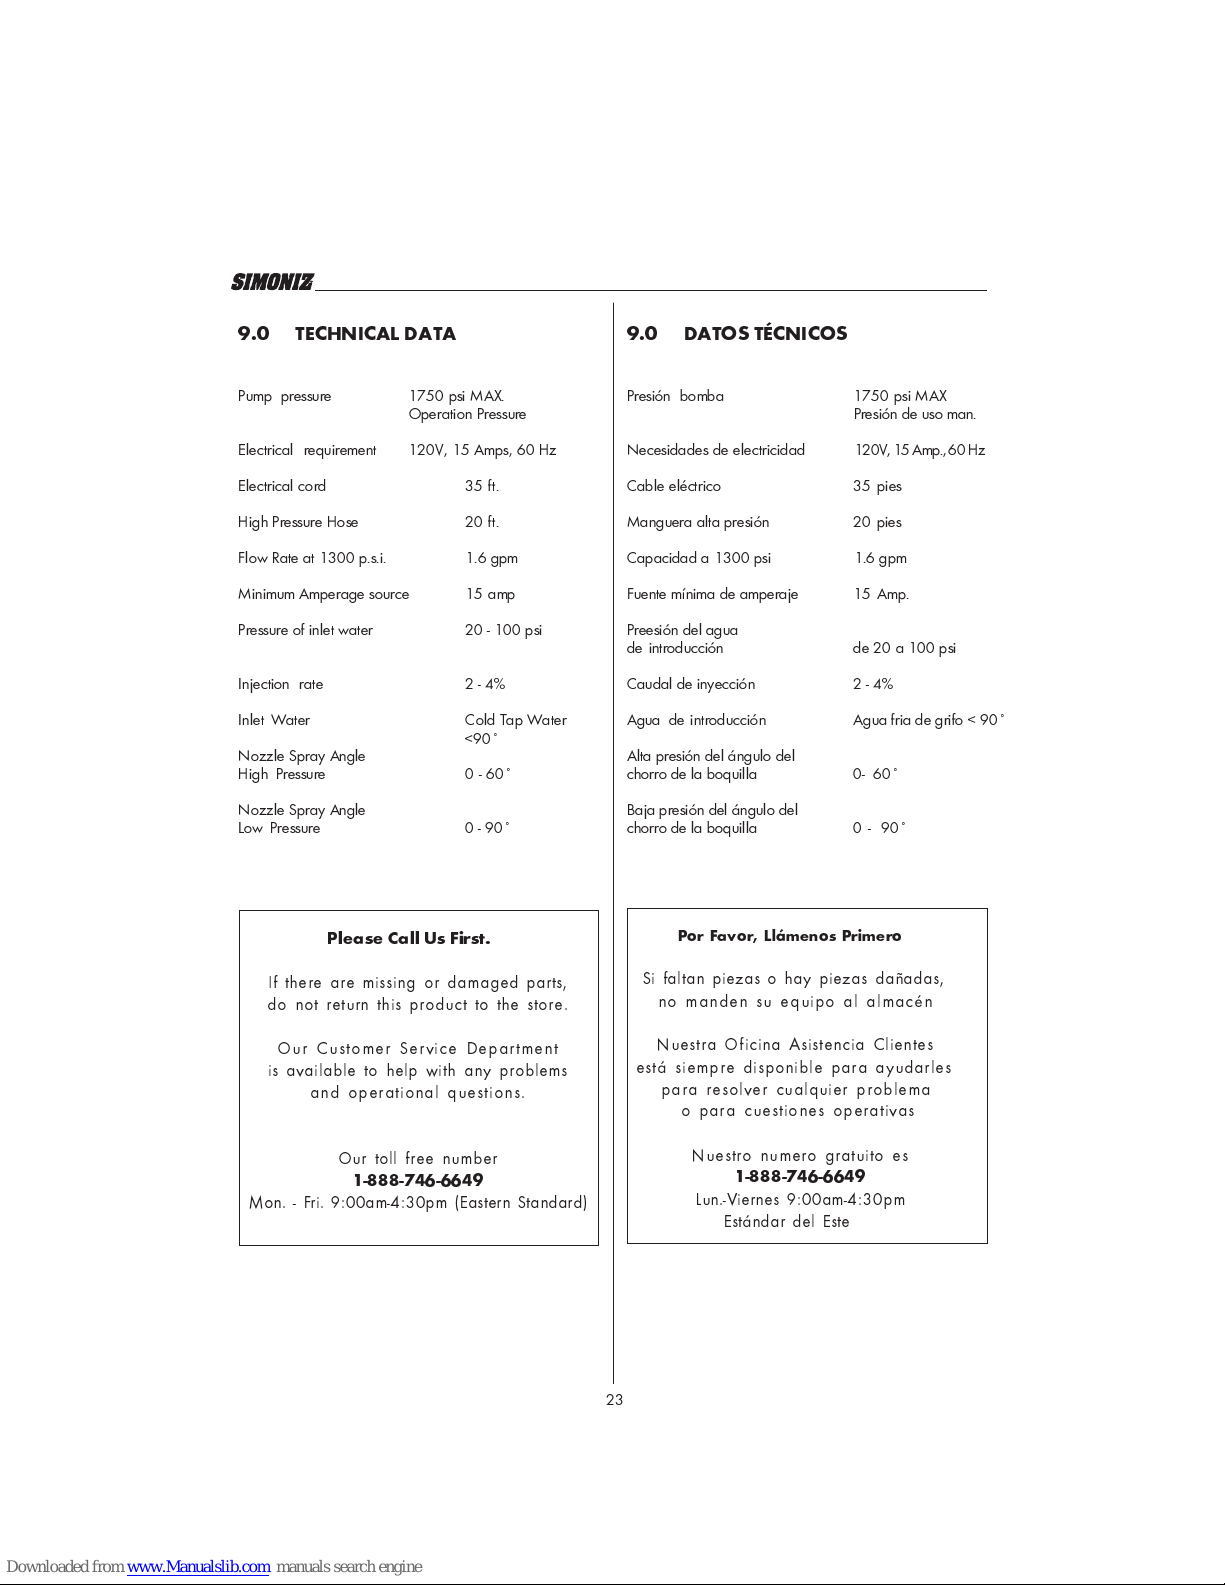
9.0
TECHNICAL DATA
P
ump p
ressure
1750 psi
Operation P
MAX.
ressure
9.0
DATOS TÉCNIC
P
resión bomb
OS
a
1750 psi
P
MAX
resión de uso man.
Electrical requireme
Electrical cor
High Pressure Hose
Flow Rate at 1300 p.s
Mini
mum Amperage sourc
P
ressure of inlet wat
Injection rat
Inlet Water
Nozzle Spray Angle
High Pressure
Nozzle Spray Angle
Low Pressure
nt
d
.i. 1.6 gpm
er
e
120V, 15 Amps, 60
e
Please Call Us First
If th
ere are missing or damaged parts,
do
not return this product to the store
Hz
35 ft
.
20 ft
.
15 a
mp
20 -
100 ps
i
2 - 4
%
Cold Tap Water
<90˚
0 - 60˚
0 - 90˚
.
Necesidades de electricidad
Cable eléctrico
Manguera alta p
Capacidad a 1300 ps
Fuente mínima de amperaje
P
reesión del agua
de introducción
Caudal de inyecció
Agua de introducció
Alta presión del ángulo del
chorro de la boquilla
Baja p
resión del ángulo del
chorro de la boquilla
resió
n
i1.
n
n
Por Favor, Llámenos
Si faltan piezas o hay piezas dañadas
.
no manden su equipo al almacé
120V, 15 Amp., 60
35 pies
20 pies
6 g
pm
15 Amp.
de 20 a 100 ps
2 - 4%
Agua fria de grifo < 90
0- 60
˚
0 - 90˚
Primer
o
i
,
n
Hz
˚
Our Customer Service Department
is available to help with any problem
and operational questions.
Our toll free numb
1-888-746-664
Mon. - Fri. 9:00am-4:30pm (Eastern Standard
Nuestra Oficina Asistencia Clientes
s
está siempre disponible para ayudarl
para
resolver cualquier problem
o para cuestiones operativa
er
9
)
23
Nuestro numero gratuito
1-888-746-664
9
Lun.-Viernes 9:00am-4:30
Estándar del Est
e
es
a
s
es
pm
Page 24

10.0 WARRANTY 10.0 WARRANTY
Limited Warranty
This product is warranted by Simoniz to the original retail
consumer against defects in material and workmanship
for a period of 1 year on machine, 90 days on
gun and hose assembly, from the date of retail purchase
and is not transferable. This one year warranty applies
only to products used in consumer applications. This
warranty does not apply to rental or commercial
applications.
Please complete and return the enclosed Customer
Information Card so that we can reach you in the
unlikely event a safety recall is needed. Register by
Internet at www.simonizusa.com. Return of this card is
not required to validate this warranty.
WHAT IS COVERED: Replacement parts and labor.
WHAT IS NOT COVERED: This warranty does not
include such parts as nozzles which must be replaced
as part of normal maintenance of the equipment, rather
than as the result of a defect. Transportation charges
to Simoniz USA for defective products.
Transportation charges to consumer for repaired
products. Damages caused by abuse, accident,
improper repair, or failure to perform normal
maintenance. Use of improper chemicals or
noncompliance with the operators manuals instructions.
Sales outside of the United States. Any other
expense including consequential damages,
incidental damages, or incidental expenses, including
damage to property. Some states do not allow the
exclusion or limitation of incidental or consequential
damages, so the above limitation or exclusion may not
apply to you. This warranty does not cover damage
resulting from failure to observe any of the following
conditions:
1) The inlet water pressure must be between 20 and
100 p.s.i.
2) The inlet water temperature must not exceed 90˚
degree F.
3) The unit should not be stored in areas where
temperatures may drop below 32 degrees F.
IMPLIED WARRANTIES: Any implied warranties,
including the implied Warranties of Merchantability
and fitness for a particular purpose, are limited in
duration to one (1) year from the date of retail purchase.
Some states do not allow limitations on how long an
implied warranty lasts, so that above limitation may
not apply to you.
Garantía limitada
Este producto está garantizado por Simoniz
al consumidor minorista original contra defectos
de material y de fabricación, por un perÌodo de
un año a partir de la fecha de compra al por menor
y no es transferible. La garantÌa de un año se
refiere solamente a los productos usados en
aplicaciones del cliente. La presente garantÌa
no se refiere a aplicaciones de alquiler.
Les rogamos completen y restituyan la anexa Ficha informativa del Cliente, para poder llegar hasta Uds. en
la improbable eventualidad de que se haga necesario
reclamar la mercancía por motivos de seguridad. Registro por Internet al sitio: www.simonizusa .com. La
restitución de dicha ficha no es necesaria a los fines de
la validez de la presente garantía.
LA GARANTÍA CUBRE: piezas en substitución y
mano de obra.
EXCLUSIONES DE LA COBERTURA EN
GARANTÍA: la presente garantía no incluye aquellas
piezas que, como las boquillas, deben ser substituidas
como piezas de normal manutención del equipo, y no
como consecuencia de un defecto. Los gastos por
transporte a Simoniz USA por los productos
defectuosos. Los gastos de transporte al consumidor por
los productos reparados. Los daños causados por un
mal uso, accidente, reparación impropia o falta de
manutención.
El empleo de productos químicos inadecuados y el no
respeto de las instrucciones del manual para el uso. Las
ventas fuera de los Estados Unidos o de Canada.
Cualquier otro gasto que comprenda daños indirectos,
daños accidentales o gastos accidentales, incluidos los
daños a la propiedad. Algunos Estados no permiten la
exclusión o la limitación de los daños accidentales o
indirectos; por lo tanto, dicha limitación o exclusión
podría no ser referida a Uds. La presente garantÌa no
cubre los daños resultantes de la falta de observación
de alguna de las siguientes condiciones:
)La presión del agua en entrada debe estar entre
1
los 20 y los 100 p.s.i.
)La temperatura del agua en entrada no debe su-
2
perar los 90˚ F
) El equipo no debe ser almacenado en zonas donde
3
la temperatura puede llegar por debajo de los 32˚
F.
GARANTÍAS IMPLÍCITAS: cualquier garantía
implícita, incluidas las garantías implícitas de
comerciabilidad e idoneidad con un fin
particular, est· limitada en la duración a un (1)
año a partir de la fecha de la compra al por
menor. Algunos Estados no admiten limitaciones
sobre la duración de la garantía implícita; por lo
tanto, dicha limitación podría no referirse a Uds.
24
Page 25

HOW TO OBTAIN WARRANTY:
Attach to the product your name, address, description
of the problem, phone number and proof of date of
retail purchase (sales slip) and return authorization number.
Call our Customer Service Department at 1-888SIMONIZ for a return authorization number, or unit will
be refused. Package and return the product (transportation
charges prepaid) to:
CÓMO OBTENER LA GARANTÍA:
Anexen al producto su nombre, domicilio, descripción
del problema, n˙mero de teléfono y comprobante de
la fecha de la compra al por menor ...(recibo de compra)
y retorne el númerode autorización.
Llamen por teléfono a nuestra Oficina de Asistencia a
los Clientes al No. 1-888-SIMONIZ para recibir un
número de autorización para la restitución, de lo contrario, el equipo no será aceptado. Embalen y restituyan
el producto (gastos de transporte prepagados) a:
Simoniz USA
201 Boston Turnpike
Bolton, Connecticut 06043
Attn: Pressure Washer Service Dept.
To the extent any provision of this warranty is prohibited
by federal, state or municipal law, and cannot be
preempted. It shall not be applicable. This warranty
gives you specific rights, and you may also have other
rights which vary from state to state.
Simoniz USA
201 Boston Turnpike
Bolton, Connecticut 06043
Attn: Pressure Washer Service Dept.
Cualquiera de las cláusulas de la presente
garantía no ser· aplicable en el caso de
prohibición por parte de un Estado o de una
administración comunal federal y no pueda ser
substituida. La presente garantía les confiere
derechos específicos y Uds. pueden tener
también otros derechos que varían de un
Estado a otro.
 Loading...