

Page 1
SDMK2
Digital Drum pads
user’s Manual
www.simmonsdrums.net
Page 2

One (1) Year Limited Warranty
Subject to the limitations set forth below, Simmons® hereby represents and warrants that the components of this product shall be free from defects
in workmanship and materials, including implied warranties of merchantability or fitness for a particular purpose, subject to normal use and service,
for one (1) years to the original owner from the date of purchase.
Retailer and manufacturer shall not be liable for damages based upon inconvenience, loss of use of product, loss of time, interrupted operation
or commercial loss or any other incidental or consequential damages including but not limited to lost profits, downtime, goodwill, damage to or
replacement of equipment and property, and any costs of recovering, reprogramming, or reproducing any program or data stored in equipment
that is used with Simmons® products. This guarantee gives you specific legal rights. You may have other legal rights which vary from state
to state. Some states do not allow limitations on how long an implied warranty lasts, so the above limitation may not apply to you.
Simmons
P.O. Box 5111
Thousand Oaks, CA 91359-5111
All trademarks and registered trademarks mentioned herein are recognized as the property of their respective holders.
Made in China. 0707-7896
FCC Statements
1. Caution: Changes or modifications to this unit not expressly approved by the party responsible for compliance could void
the user’s authority to operate the equipment.
2. Note: This equipment has been tested and found to comply with the limits for a Class B digital device, pursuant to Part 15 of the FCC Rules.
These limits are designed to provide reasonable protection against harmful interference in a residential installation. This equipment generates,
uses, and can radiate radio frequency energy and, if not installed and used in accordance with the instructions, may cause harmful interference
to radio communications. However, there is no guarantee that interference will not occur in a particular installation. If this equipment does cause
harmful interference to radio or television reception, which can be determined by turning the equipment off and on, the user is encouraged to
try to correct the interference by one or more of the following measures:
•Reorient or relocate the receiving antenna.
•Increase the separation between the equipment and receiver.
•Connect the equipment into an outlet on a circuit different from that to which the receiver is connected.
•Consult the dealer or an experienced radio/TV technician for help.
Page 3

SDMK2
www.simmonsdrums.net
1
… on your purchase of the Simmons SDMK2 Digital Drum Pads. To get the most
enjoyment, we recommend that you review this manual at least once, then
refer back to it often to learn more about specific functions.
Taking Care of Your Digital Drum Pads
Location
• To avoid deformation, discoloration, or more serious damage, do not expose the unit to direct sunlight,
high temperature sources, or excessive humidity.
Power Supply
• Turn the power switch off when the SDMK2 is not in use.
• The AC adapter should be unplugged from the AC outlet if the SDMK2 will not be used for an extended
period of time.
• Avoid plugging the AC adapter into an AC outlet that is also powering high-consumption appliances such
as electric heaters or televisions. Also avoid using multi-plug adapters since these can reduce sound quality,
cause operation errors, and result in possible damage.
• To avoid damage, turn off the SDMK2’s power switch and all related devices prior to connecting
or disconnecting cables.
Handling and Transport
• Never apply excessive force to any part.
• Unplug cables by gripping plugs firmly. Do not pull on cables.
• Physical shocks caused by dropping or bumping can result in serious damage.
Cleaning
• Clean with a dry, soft cloth.
• A slightly damp cloth may be used to remove stubborn grime and dirt.
• Never use cleaners such as alcohol or thinner.
Electrical Interference
• The SDMK2 contains electronic circuitry that may cause interference if placed too close to radio or television
receivers. If this occurs, move the SDMK2 further away from the affected equipment.
Service and Modification
• There are no user serviceable parts in the SDMK2.
• Do not attempt to open the SDMK2 or make any change to circuits or parts. This will void the warranty.
welcome
and
Congratulations!
Page 4

SDMK2 digital drum pads User’s Manual
Digital DRUm pads
Setting Up 3
Power Supply 3
Using Headphones 3
Control Panel 4
Front Panel 4
Rear Panel 4
Playing the Demo Song 5
Playing a Rhythm 6 - 7
Selecting a Rhythm 6
Adjusting the Tempo 6
Tap Start 7
Drum Pad Indicators 7
Chord Accompaniment 7
Playing the Pads 8-9
Pad Names 8
Assigning a Voice to a Pad 8-9
Playing the Rhythm Game 10-11
How to Play 10-11
Specifications 12
Appendix 13
Percussion Voice List 13
Effect Voice List 13
Rhythm List 13
Table of Contents
2
Page 5
SDMK2
www.simmonsdrums.net
3
SETTING UP
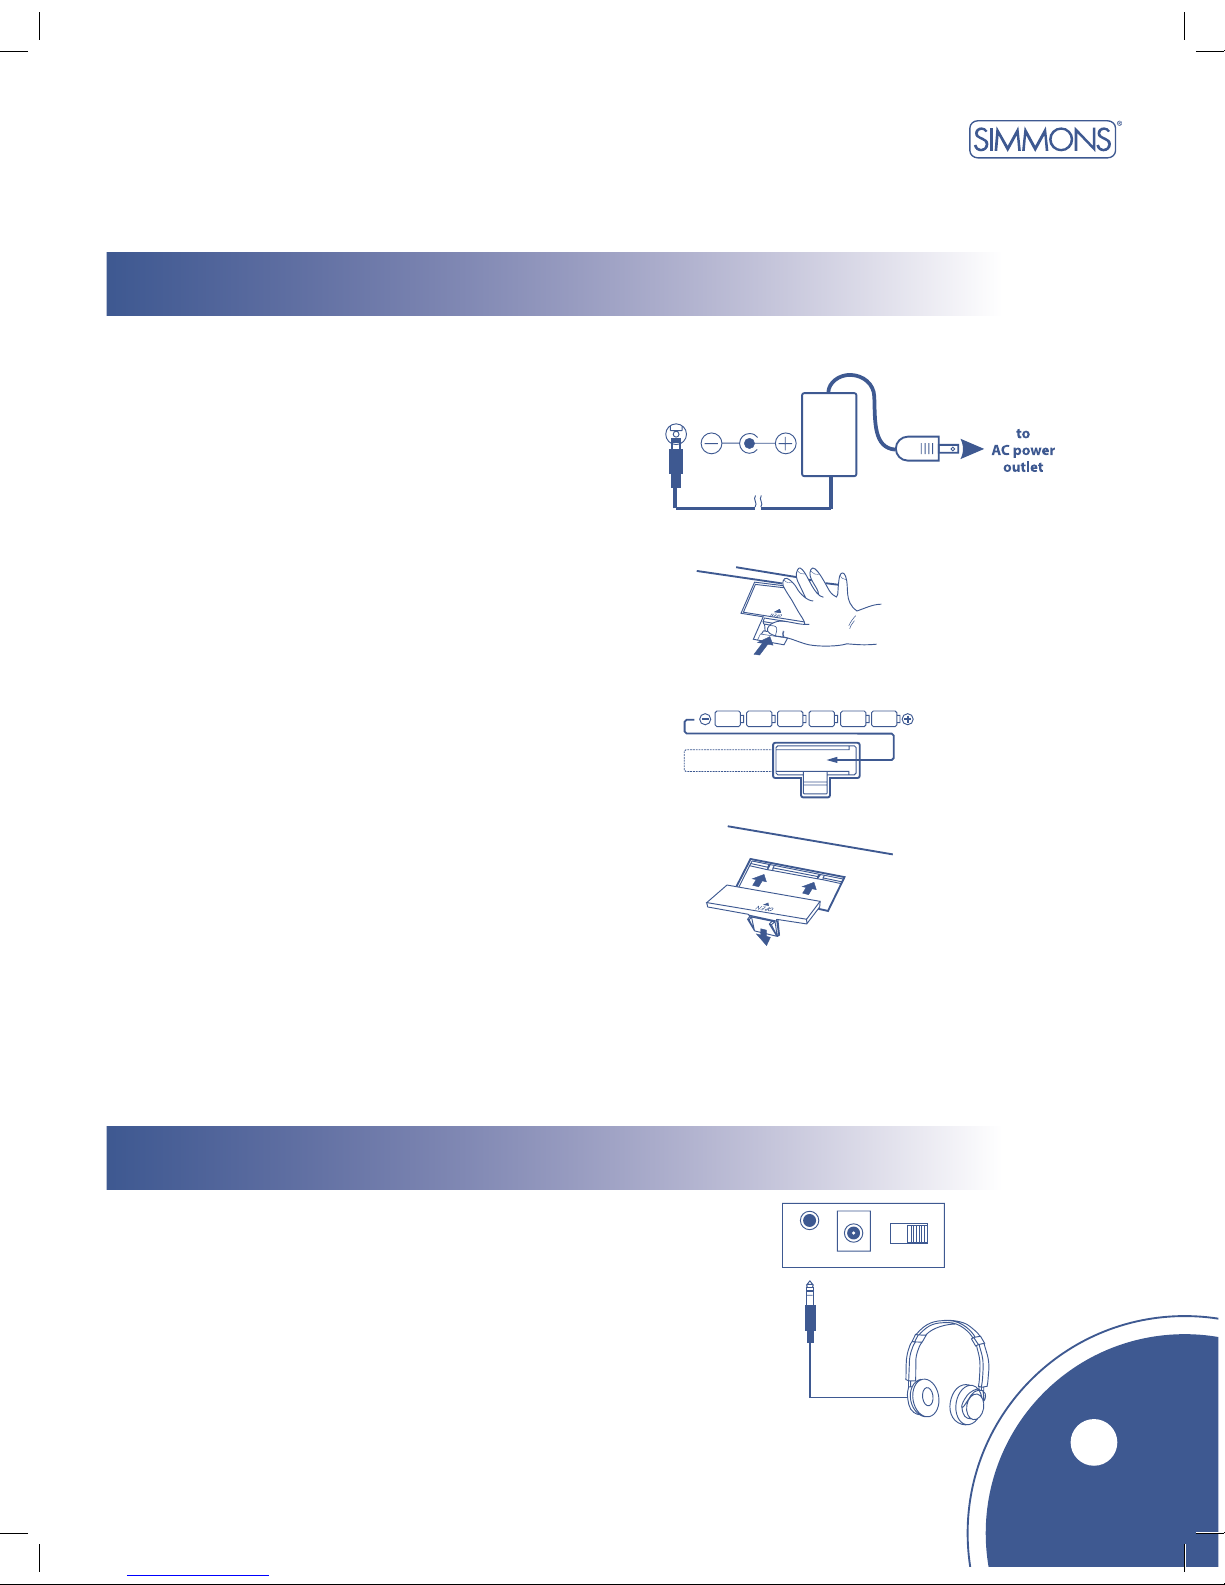
Your SDMK2 will run on batteries or from the power adapter included.
Using an AC Adapter
Connect the power adapter to the DC IN jack located
on the rear panel of the unit, and plug the AC
power adapter into an AC power outlet. Do not use
adapters other than the one specified. The technical
specification of the adapter is 9V DC output, 800mA,
center positive type.
Using Batteries
1 Open the battery compartment cover on
the underside of the unit.
2 Insert six “C” size batteries. When inserting
the batteries, be careful to follow the
polarity markings in the illustration.
3 Close the battery compartment.
An optional set of stereo headphones can be connected to the
Headphone Jack located on the rear panel. When a pair of
headphones are plugged into the jack, the internal speakers
will switch off automatically – perfect for private practice
or late night playing. If you want to use an external sound system,
the Headphone Jack can also be used to connect the SDMK2
to a stereo system or mixing console.
* Turn all equipment off before making any connections.
Power supply
Using headphones
NOTE: Power will be automatically drawn from the AC adapter if an optional AC adapter is connected while batteries are installed in the instrument.
CAUTION: It is recommended that you replace worn batteries as soon as possible. When battery voltage drops, the display will dim and/or the sound will become
distorted. When this occurs, replace the batteries with a complete set of six new batteries of the same type.
NEVER mix old and new batteries, different types of batteries (alkaline, magnesium, etc.), batteries by different makers, or batteries from the same maker but of
different types. Misuse may cause the instrument to become hot, resulting in fire or battery leakage. Also, to prevent damage due to battery leakage, remove all
batteries from the instrument when it is not to be used for an extended period of time. Batteries left in an unused instrument will also loose their power over time.
Page 6
SDMK2 digital drum pads User’s Manual
Digital DRUm pads
4
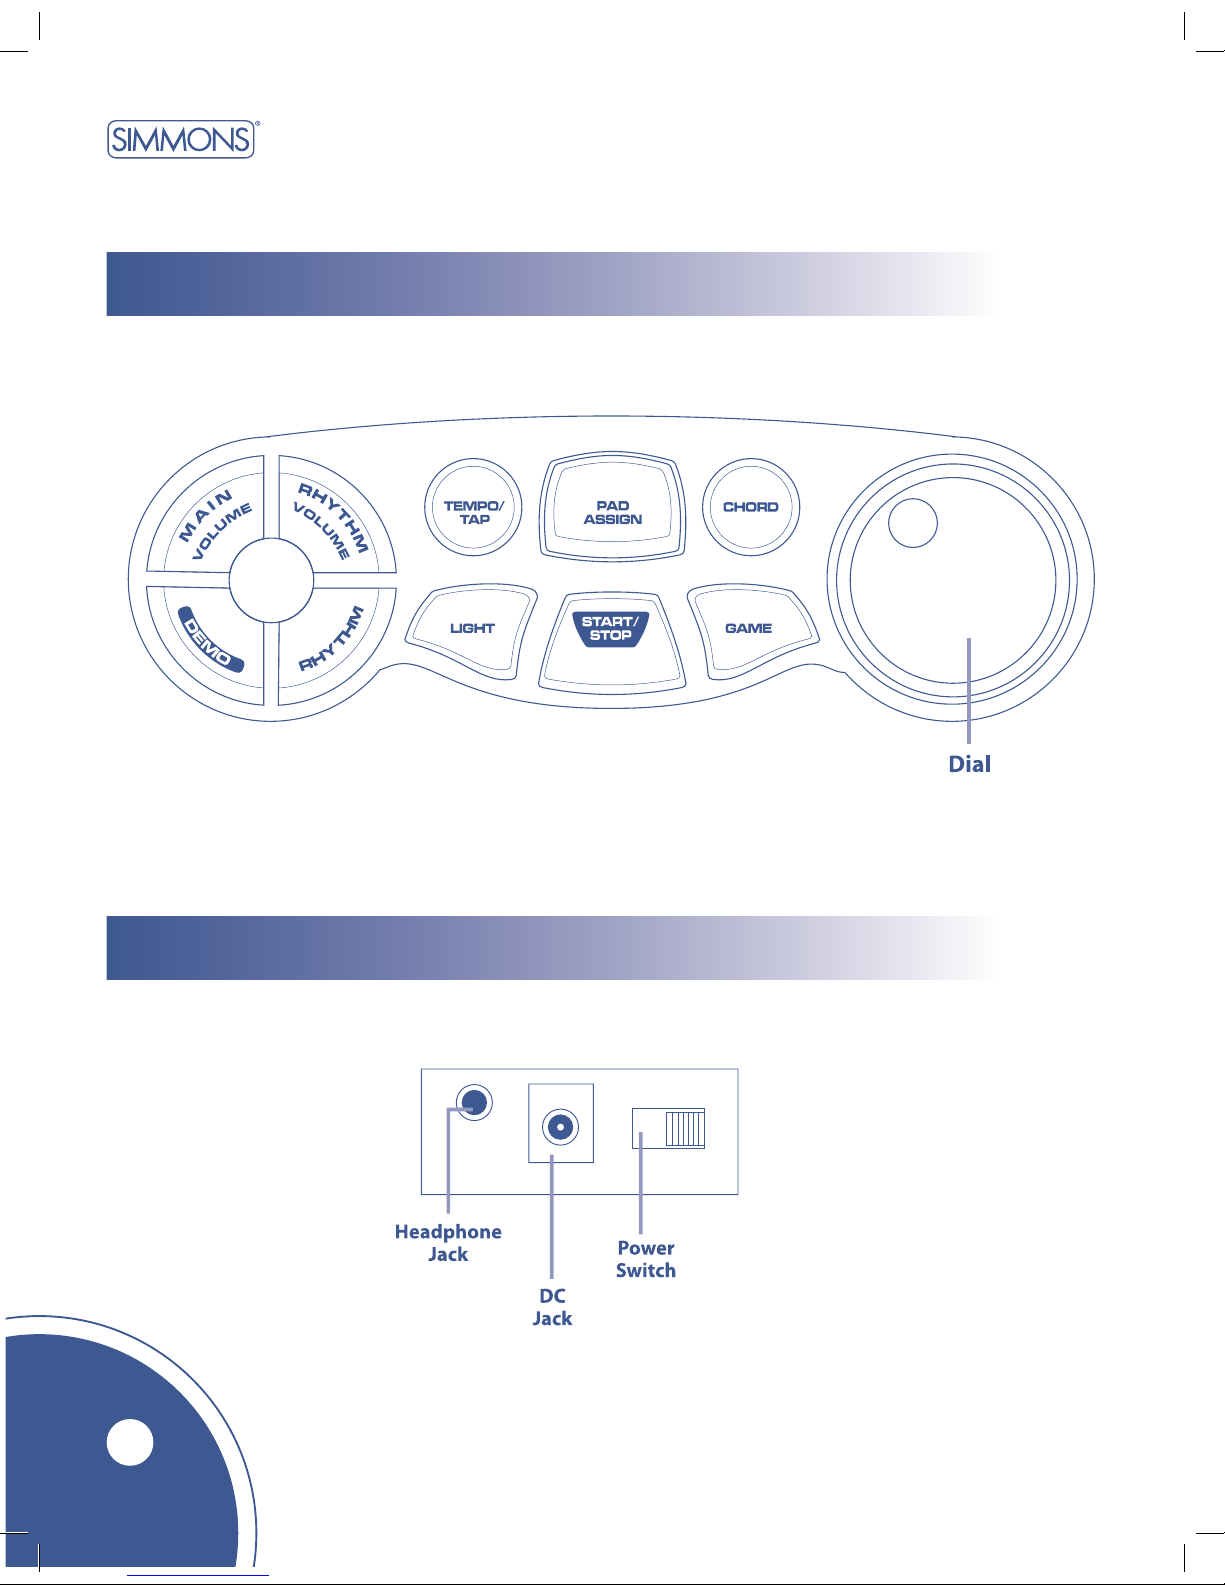
control panel
FRONT PANEL
REAR PANEL
Page 7
SDMK2
www.simmonsdrums.net
Playing the Demo Song
5
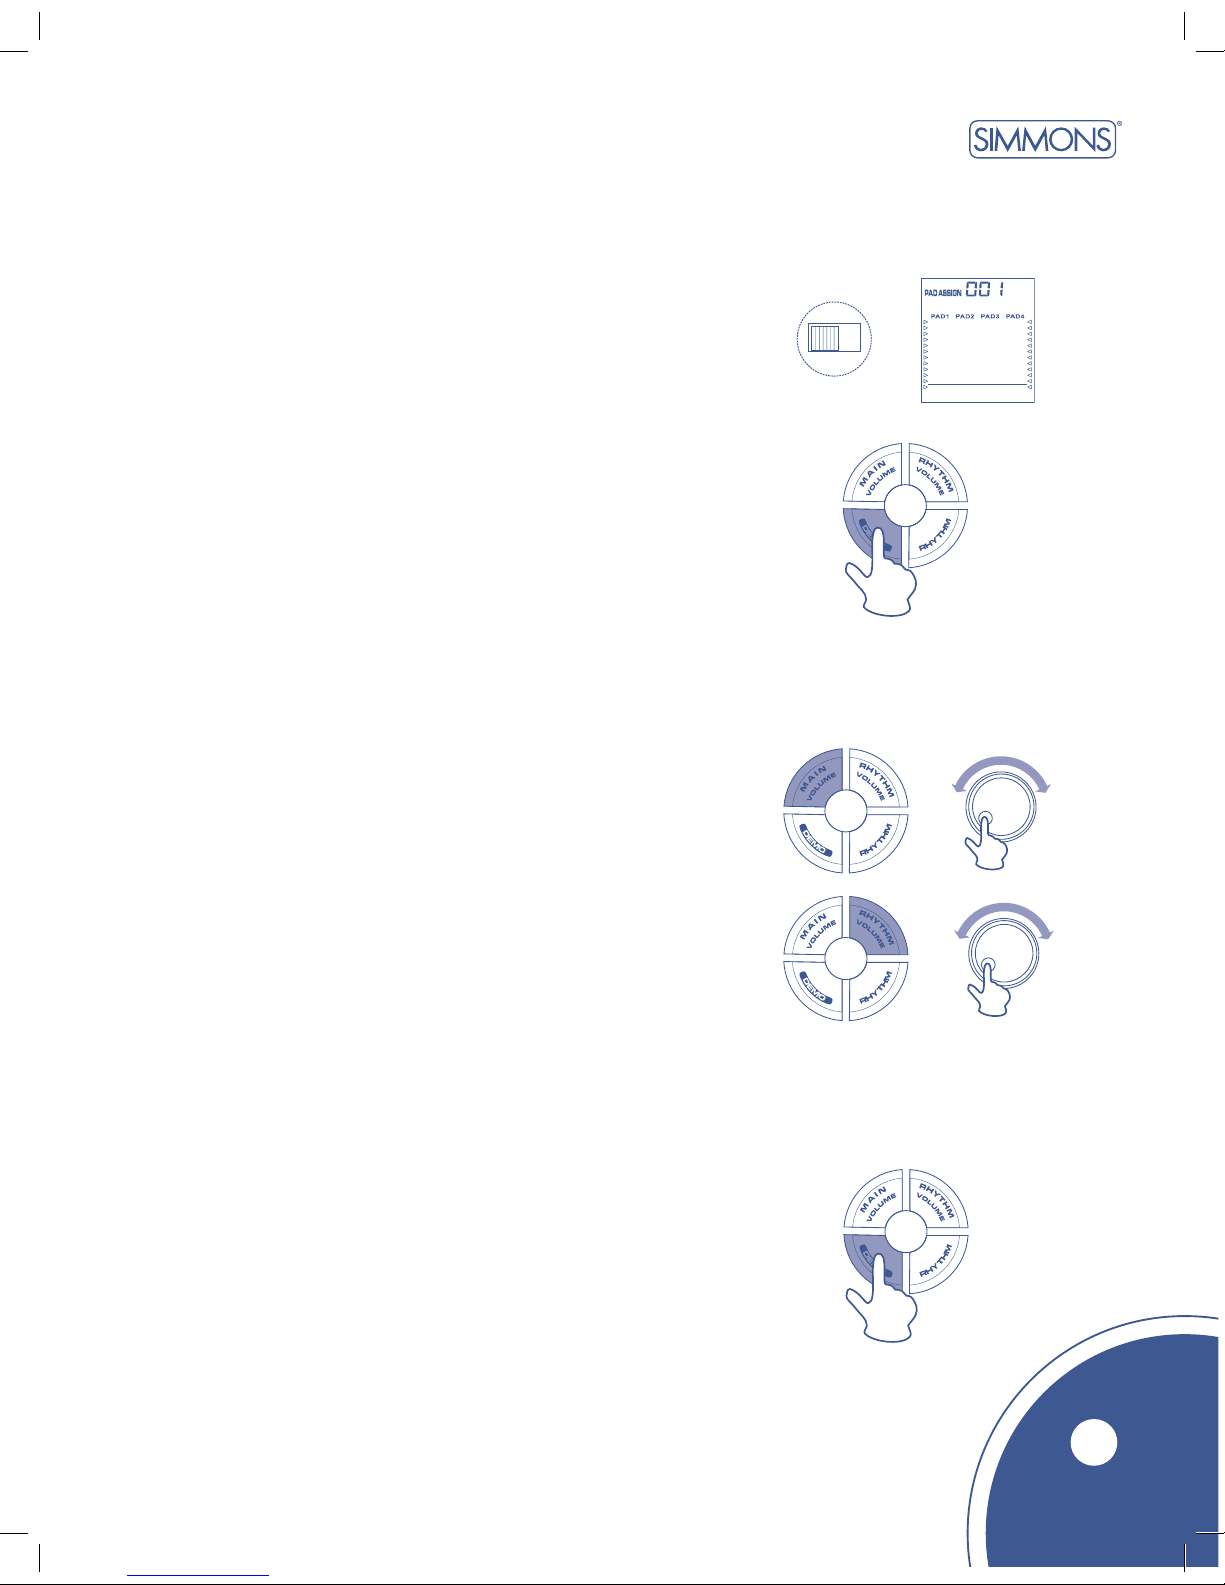
Turn on Power
Turn [POWER] switch on. The LED display will light up.
Start the Demo Song
Press the [DEMO] button, the demo song will start and the
Learning indicator will light up. At this time, the demo song
is in learning mode. The drum pad indicators will flash as they
follow the demo song rhythm.
Main Volume
The overall volume level of the instrument is controlled
by the [MAIN VOLUME] button. Press the [MAIN VOLUME]
button and rotate the Dial to adjust the volume.
Rhythm Volume
The demo song’s volume level is controlled by the [RHYTHM
VOLUME] button. The Rhythm Volume can be used to adjust the
balance between the song accompaniment (in this case “demo”)
and your own performance on the pads. Press the [RHYTHM
VOLUME] and rotate the Dial to adjust the volume.
Stop the Demo Song
Press the [DEMO] button again to stop the demo song.
Page 8
SDMK2 digital drum pads User’s Manual
Digital DRUm pads
Playing a Rhythm
Selecting a Rhythm
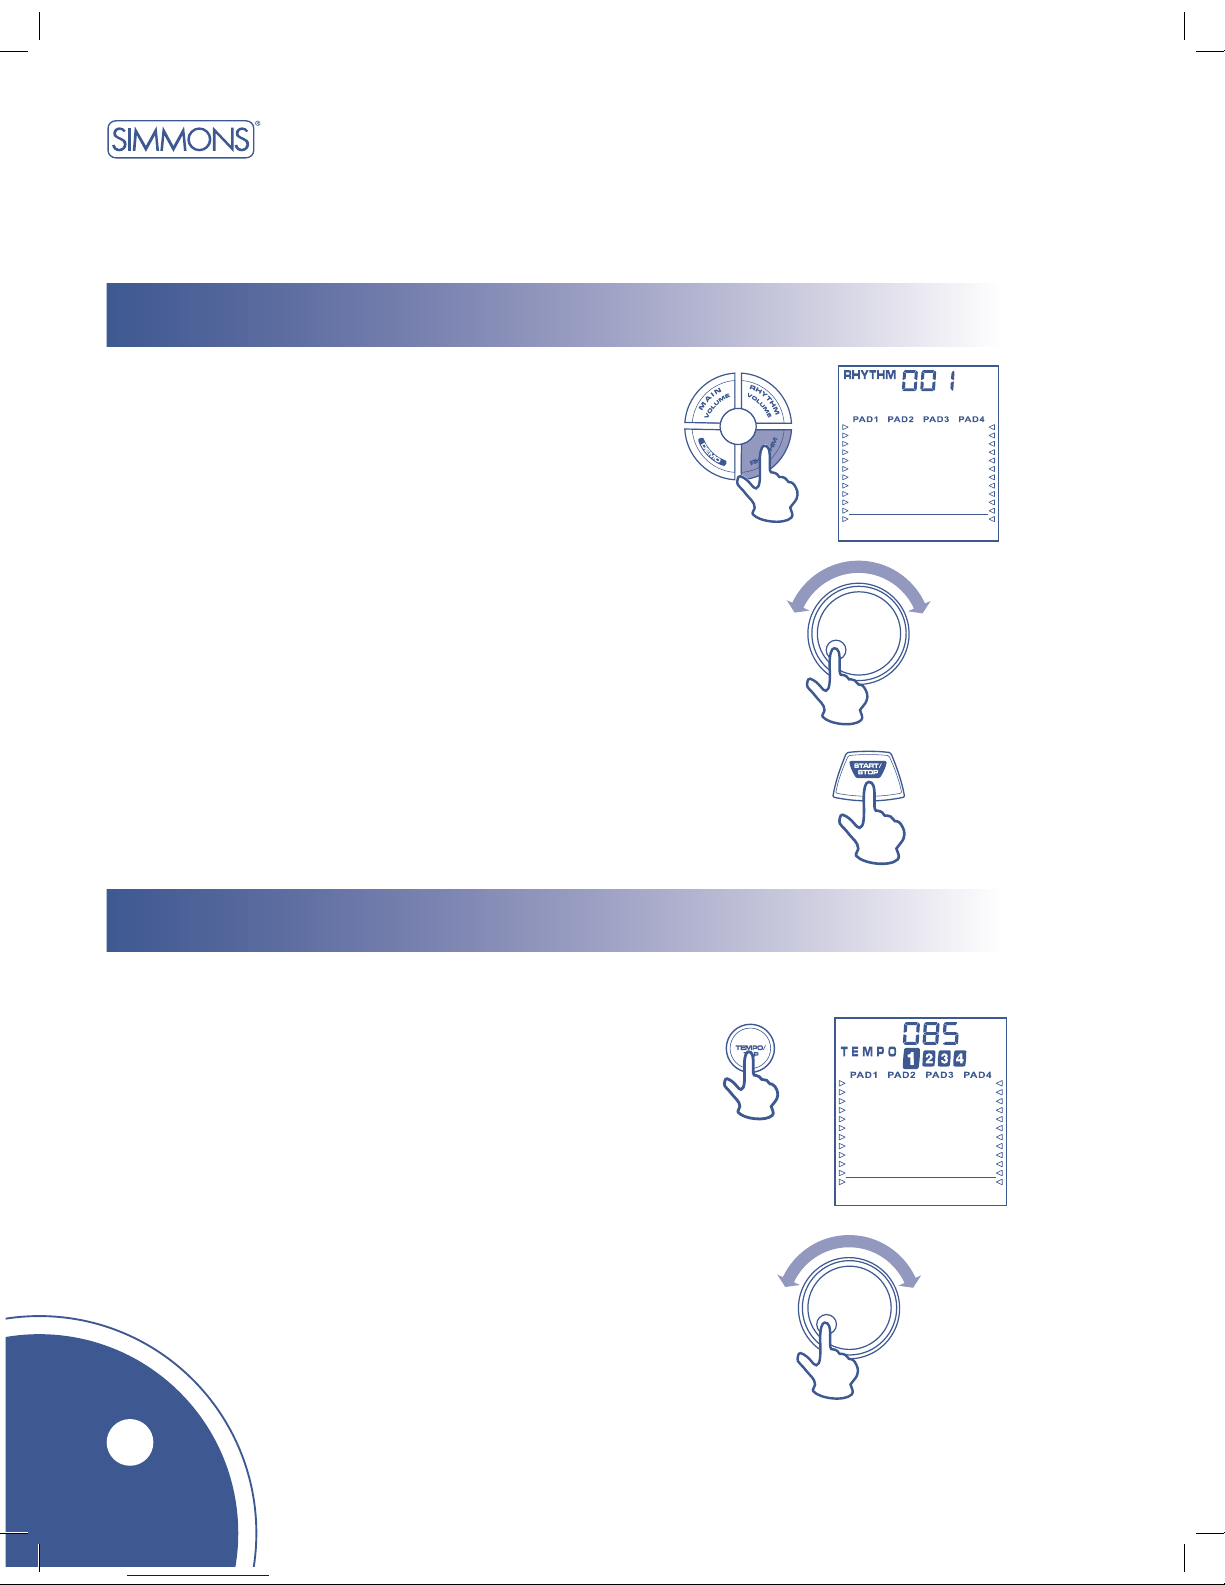
Your SDMK2 features 50 different rhythms that can be used to provide accompaniment.
Press the [RHYTHM] button and the currently selected
rhythm number will appear on the display.
Use the Dial to select a rhythm.
Press the [START/STOP] button to start playback.
NOTE: You can also use the Tap function to start
rhythms (see page 7).
6
Adjusting the Tempo
Press the [TEMPO/TAP] button and the current tempo
will appear on the display
Use the Dial to adjust the tempo speed. Rotate the Dial
counter-clockwise to slow down, or rotate it clockwise to
speed up.
The rhythm tempo can be set between 40 and 240 beats per minute.
Page 9
SDMK2
www.simmonsdrums.net
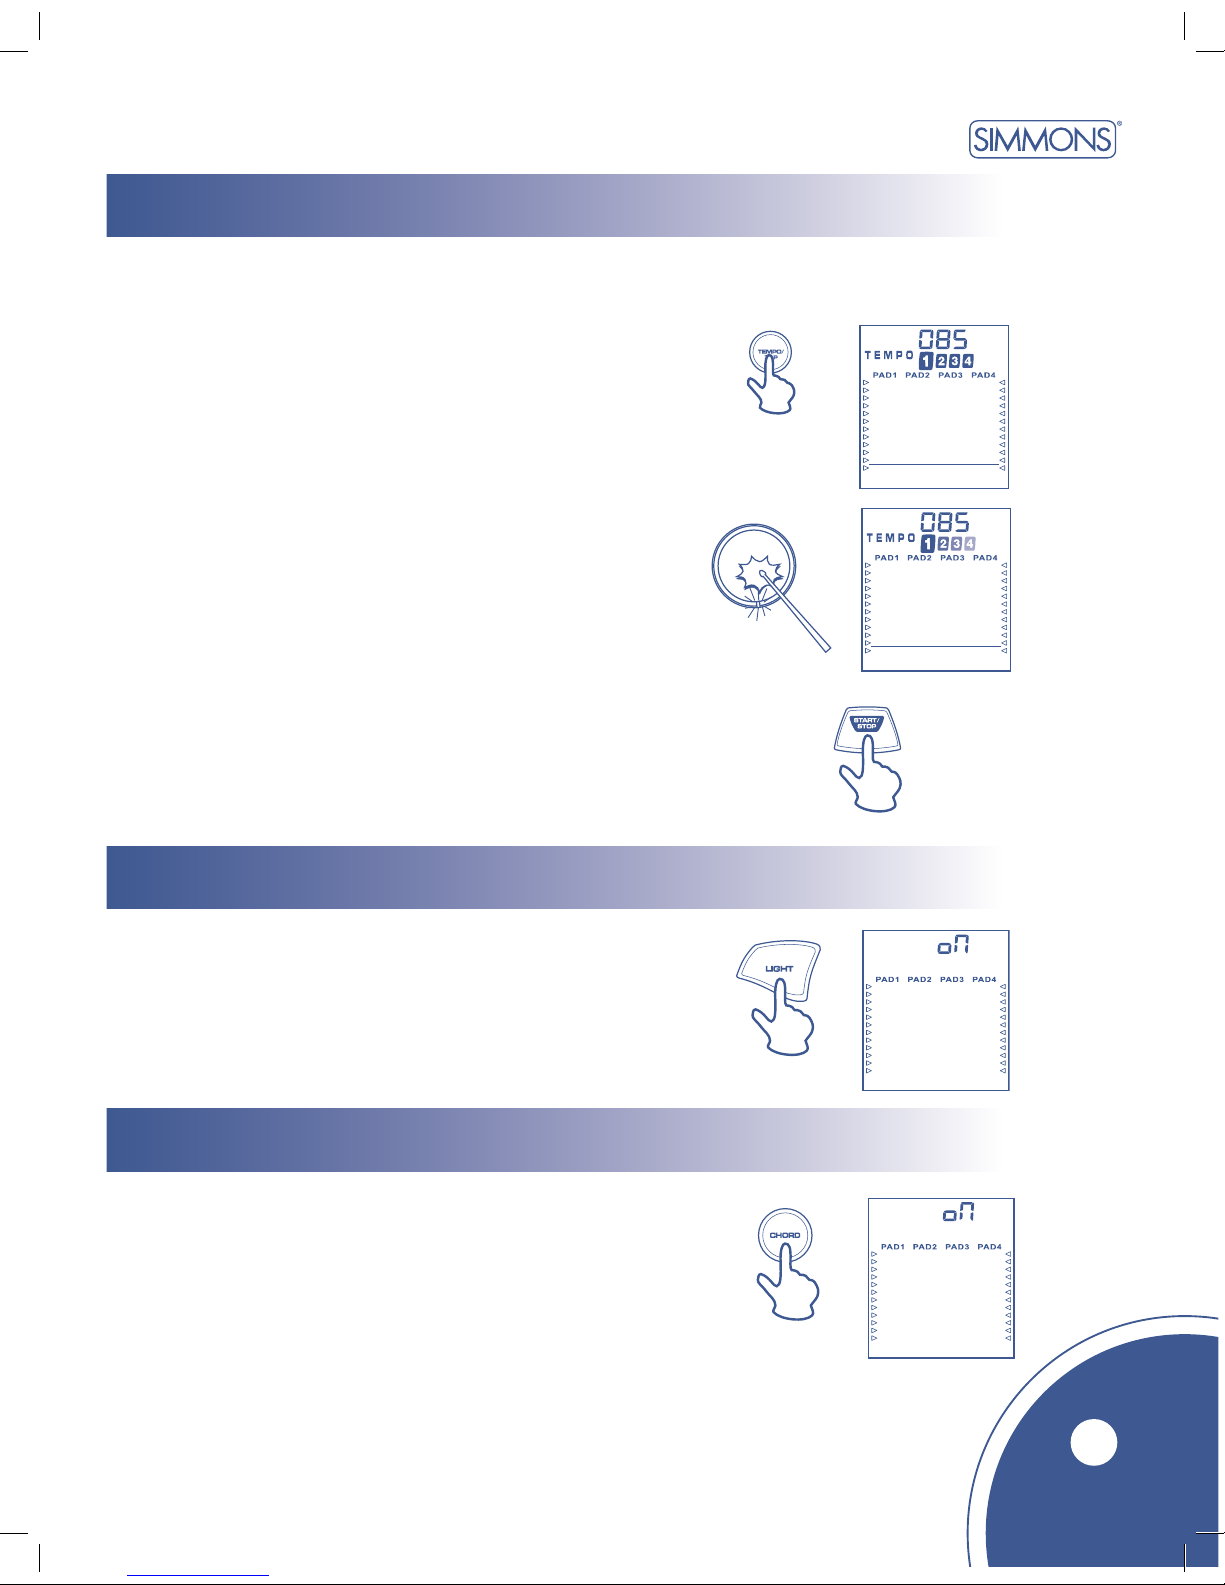
Press the [TEMPO/TAP] button and the current tempo
will appear on the display
Strike any pad four times. The tempo will correspond to
the speed of the last two pad strikes.
To stop playback, press the [START/STOP] button.
Tap Start
The Tap Start function allows you to set the overall tempo as well as start the accompaniment.
The accompaniment will play back at the Tap Tempo.
Drum Pad Indicators
Chord Accompaniment
7
You can turn the Drum Pad indicators on or off
anytime while playing. Press the [LIGHT] button
once and the status will appear on the display.
You can turn the Chord accompaniment on or off during
playback or when the accompaniment has stopped.
Press the [CHORD] button once and the status will
appear on the display.
Page 10
SDMK2 digital drum pads User’s Manual
Digital DRUm pads
Playing the Pads
Pad Names
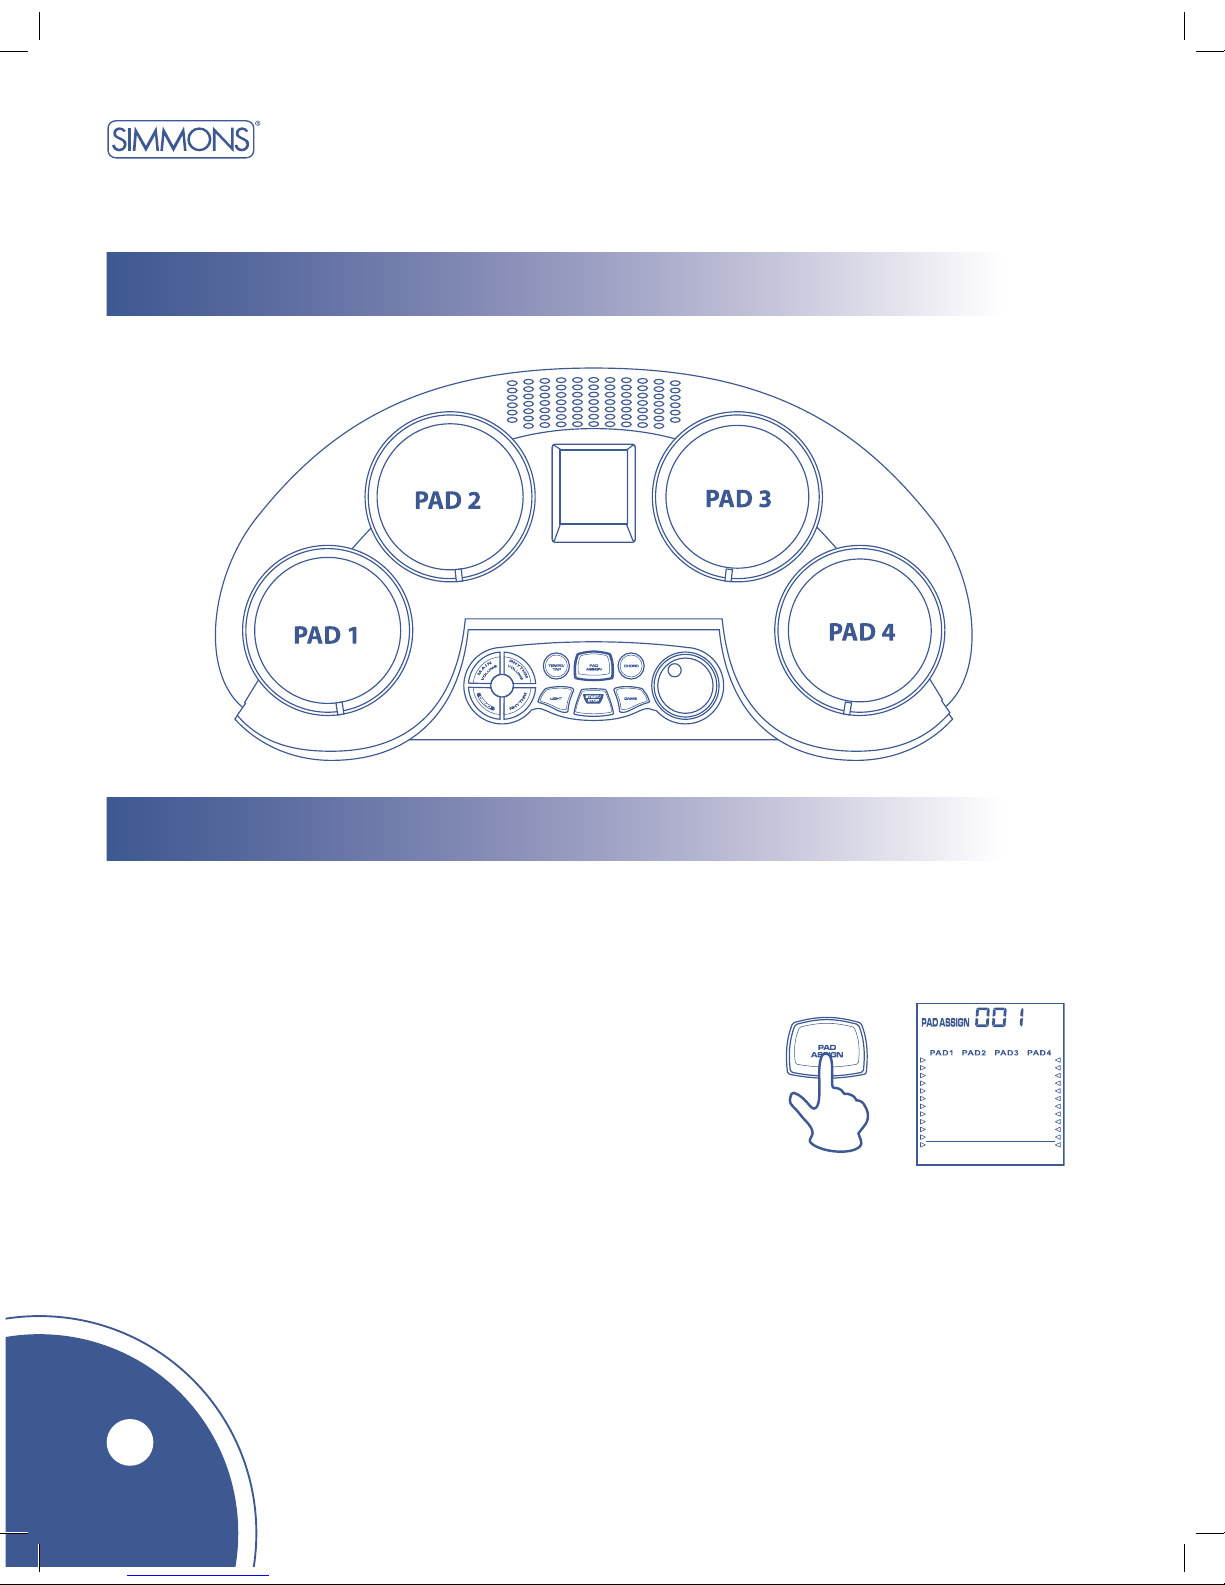
The SDMK2 has a total of 40 percussion sounds and 10 sound effects that can be
assigned to each of the 4 drum pads.
Press the [PAD ASSIGN] button. The Pad Assign
indicator appears on the display and the indication
light below the pad lights up.
Assigning a Voice to a Pad
8
Page 11
SDMK2
www.simmonsdrums.net
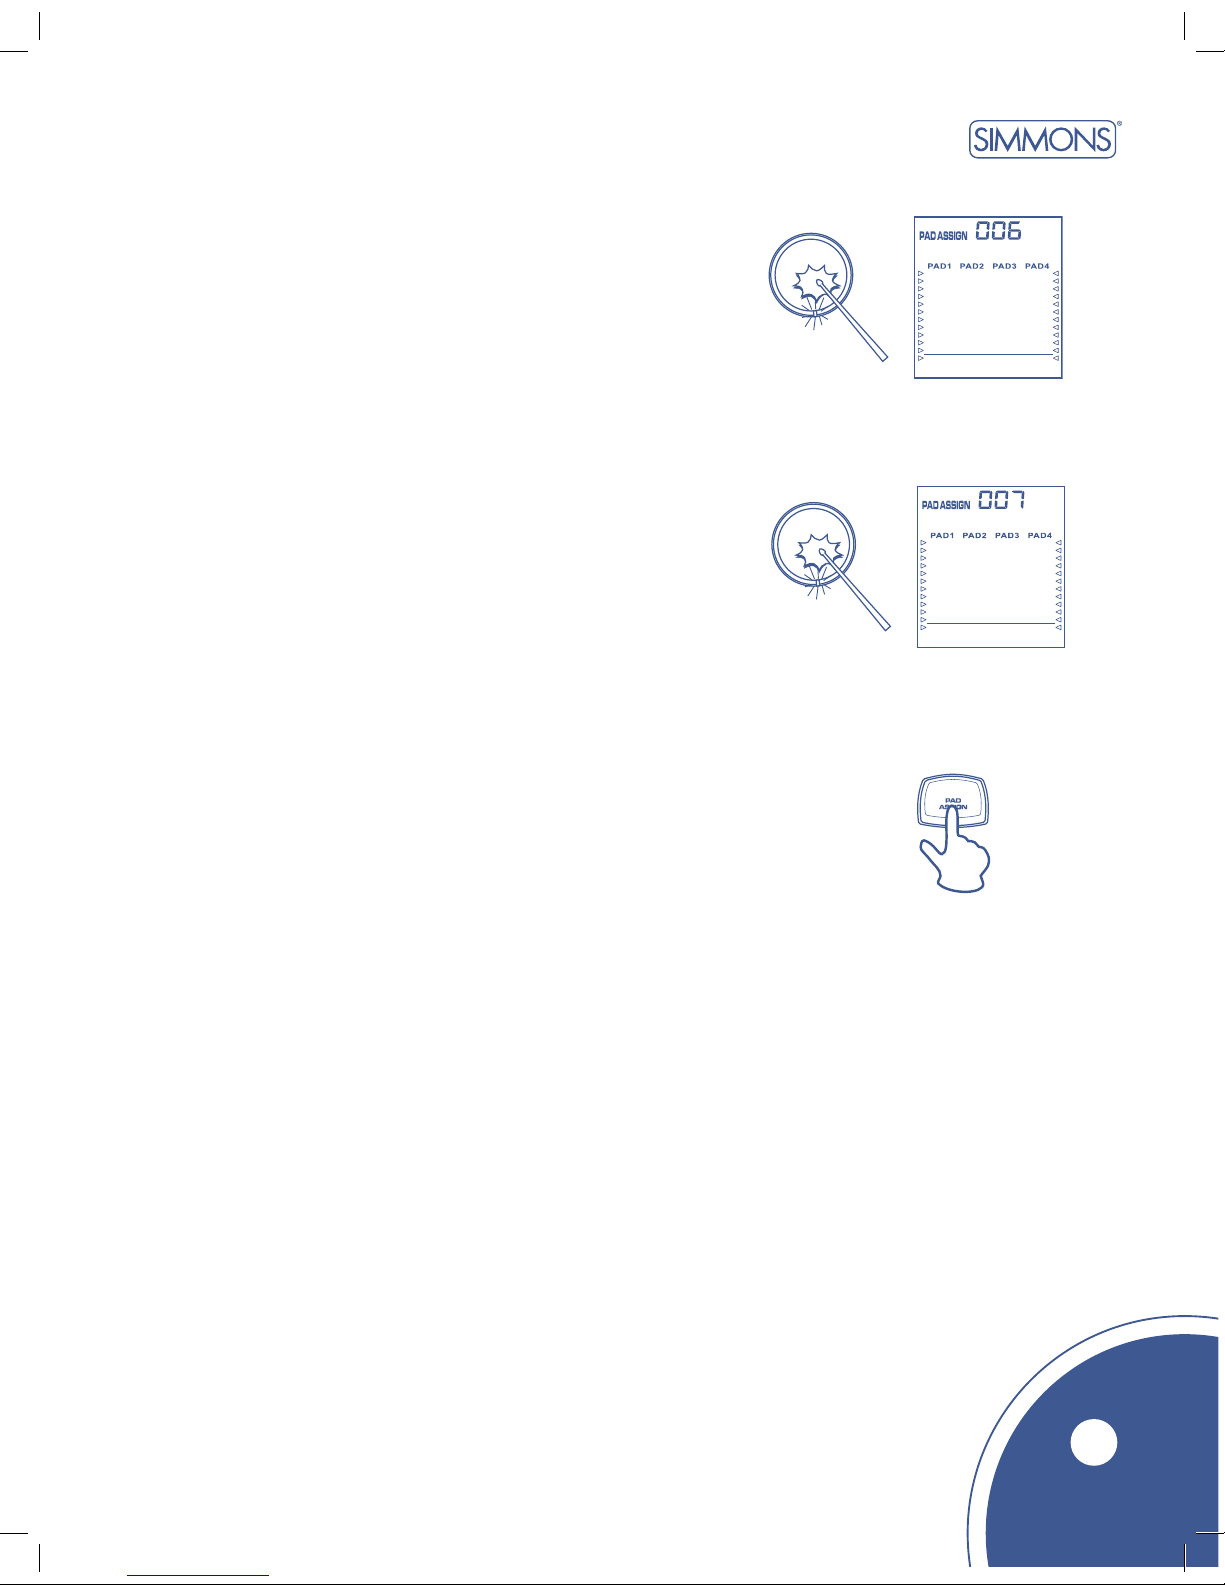
Strike the pad that you want to assign. For example, strike
Drum Pad 2 and the indicator below Drum Pad 2 lights up,
and the display will show the current percussion number.
You can strike the pad repeatedly until you reach the
desired voice.
When you have finished selecting your desired percussion
voice, press the [PAD ASSIGN] button to confirm.
Repeat these steps to assign voices to other drum pads.
NOTE: Newly assigned percussion sounds will overwrite
previously assigned percussion sounds.
9
Page 12
SDMK2 digital drum pads User’s Manual
Digital DRUm pads
Playing the rhythm Game
How to Play
10
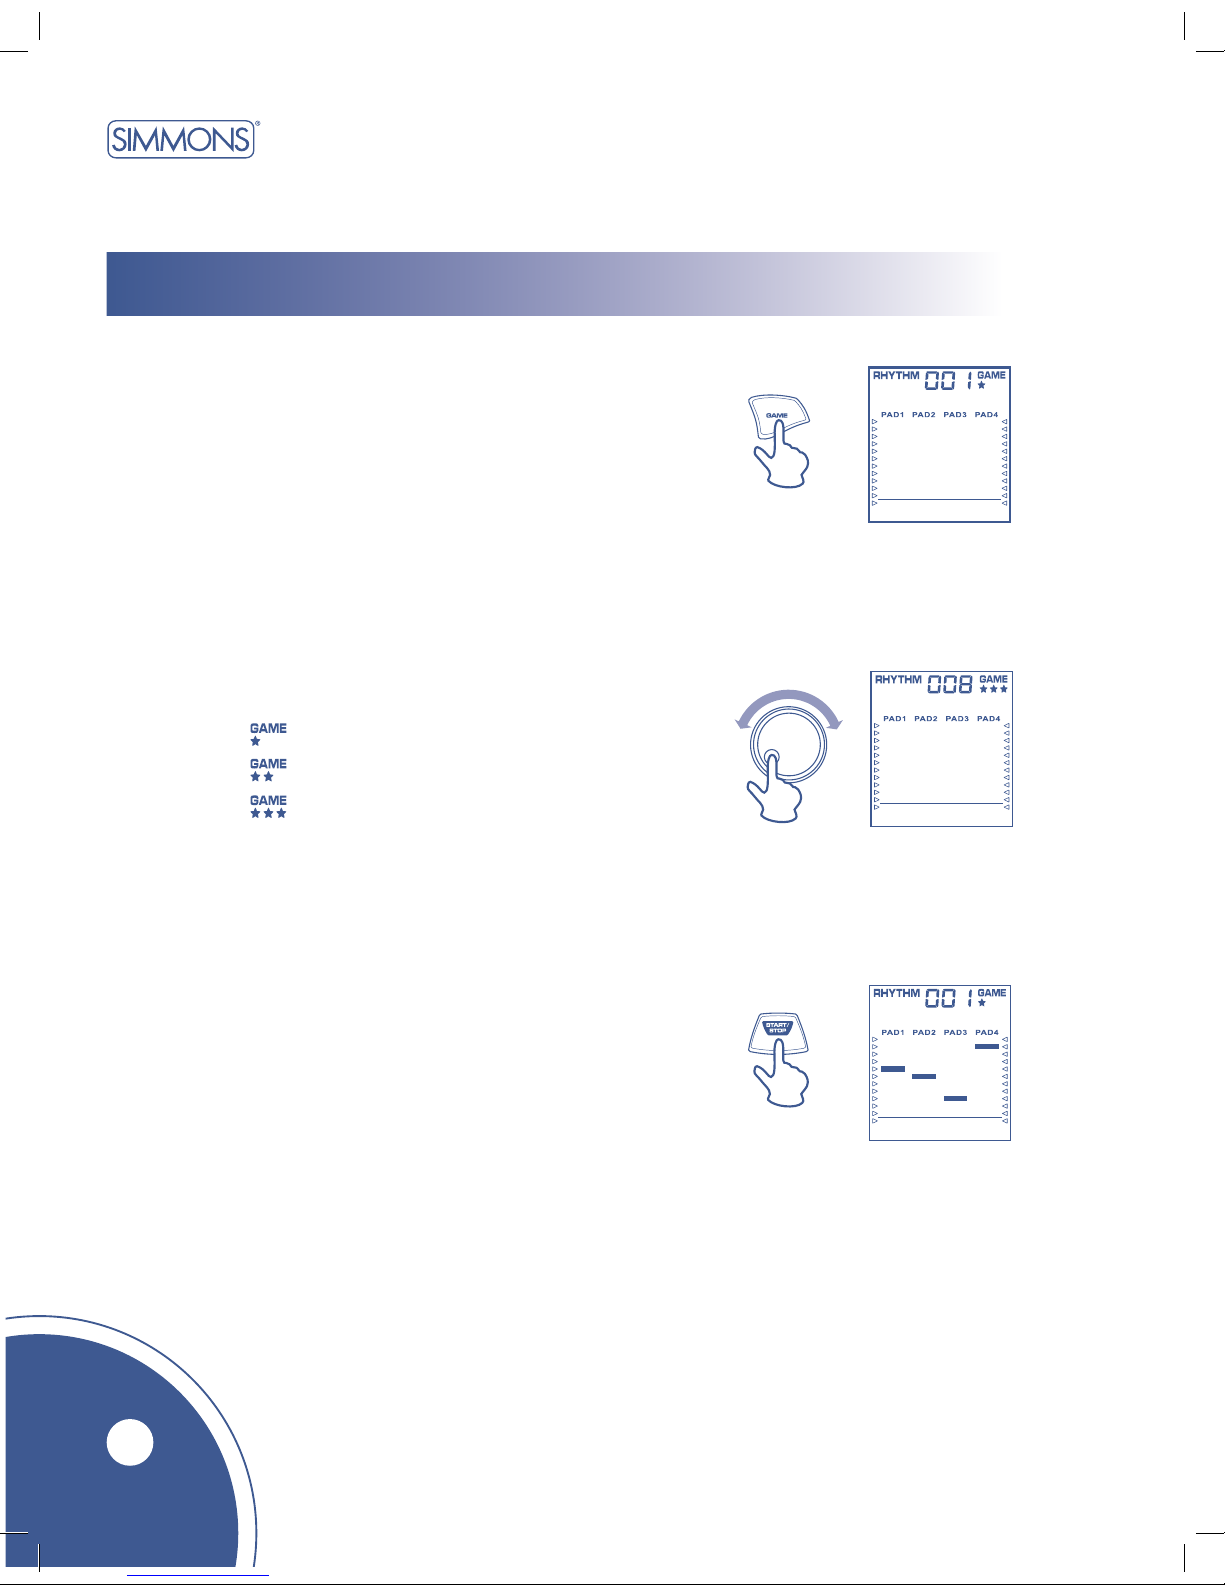
Press the [GAME] button and the game indicator will
appear on the display.
Rotate the Dial to select a rhythm. Each rhythm has its
own difficulty level shown below the game indicator:
Press the [START/STOP] button. Bars will start falling
from the top of the screen. Each bar represents a pad.
The goal is to strike the corresponding pad before the
bar reaches the line at the bottom of the display.
Easy
Normal
Hard
=
=
=
Page 13

SDMK2
www.simmonsdrums.net
Score Comment
0-29 Ok
30-59 Good
60-79 Very Good
80-100 Excellent
11
After playing an entire rhythm three times, the game
will stop and your score will be displayed. A voice
will grade your performance.
The game will automatically restart after displaying
your score for three seconds. To stop the game, just press
[START/STOP] at any time. Press the [GAME] button
to exit the game.
Page 14

SDMK2 digital drum pads User’s Manual
Digital DRUm pads
specifications
Model SDMK2
Pads: 4 Touch-Sensitive Drum Pads with Indication Lights
Drum Voices: 40 Percussion Voices + 10 Effects
Rhythms: 50
Demo Song: 1
Panel Controls: Power On/Off, Main Volume, Rhythm Volume
Demo, Rhythm, Tempo/Tap, Pad Assign, Chord,
Light, Start/Stop, Game, Dial
Connectors: Headphones
Power Source: Six “C” size batteries
DC 9V adaptor, 800mA
Dimensions: 18”(W) X 10”(D) X 6”(H)
Weight: 3.3lbs (without batteries)
12
Page 15

SDMK2
www.simmonsdrums.net
Appendix
# Name
Bass Drum Hard
Bass Drum
Bass Drum Rock
Bass Drum H
Bass Drum Analog L
01
02
03
04
05
Bass Drum
# Name
Snare Drum
Side Stick
Snare M
Snare H Hard
Snare Drum Rock L
SD Rock Rim
Analog Rim Shot
Analog Snare 1
Analog Snare H
06
07
08
09
10
11
12
13
Hi-Hat Closed
Hi Hat Open
Hi-Hat Pedal
Analog HH-Closed 1
Analog HH-Open
14
15
16
17
Hi-Hat
Floor Tom L
Low Tom
Mid Tom L
High Tom
18
19
20
21
Tom
Crash Cymbal 1
Analog Cymbal
22
23
Crash
Ride Cymbal 1
24
Ride
Percussion
Metronome Click
Metronome Bell
Hand Clap
Tambourine
Cowbell
Hi Bongo
Low Bongo
Conga H Open
Conga L
Timbale H
Cabasa
Maracas
Claves
Triangle Open
Triangle Mute
Analog Cowbell
25
26
27
28
29
30
31
32
33
34
35
36
37
38
39
40
# Name # Name
One
Two
Three
Four
OK
Good
Very Good
Excellent
FX
BLJ Trill
41
42
43
44
45
46
47
48
49
50
Bass Drum
8 Beat
8 Beat Ballad
8 Beat Pop
8 Beat Rock
Rock 1
Rock 2
Hard Rock
Heavy Metal 1
Heavy Metal 2
01
02
03
04
05
06
07
08
09
8 Beat
16 Beat
16 Beat Ballad
16 Beat Pop
16 Beat Funk
10
11
12
13
16 Beat
Funk
Funk Pop
Blues Funk
14
15
16
Funk
Pop Dance
Disco
House
Hip-Hop
Rap
Shuffle
Slow Rock
Soul
17
18
19
20
21
22
23
24
Dance
Pop Dance
Disco
House
Hip-Hop
Rap
Shuffle
Slow Rock
Soul
17
18
19
20
21
22
23
24
Jazz
Reggae 1
Reggae 2
Bossa Nova
Samba
Latin Rock
Cha-Cha
Mambo
Rhumba
32
33
34
35
36
37
38
39
Latin
Country
Country Rock
40
41
Country
March
Polka
Waltz 1
Waltz 2
42
43
44
45
March & Waltz
SFX 1
SFX 2
SFX 3
SFX 4
SFX 5
46
47
48
49
50
Sound Effect
Percussion
Voice List
Effect
Voice List
Rhythm
List
13
Page 16

www.simmonsdrums.net
 Loading...