

Page 1
SD5K
Digital Drum kit
user Manual
www.simmonsdrums.net
Page 2

FCC Statements
1. Caution: Changes or modifications to this unit not expressly approved by the party responsible for compliance could void
the user’s authority to operate the equipment.
2. Note: This equipment has been tested and found to comply with the limits for a Class B digital device, pursuant to Part 15 of the FCC Rules.
These limits are designed to provide reasonable protection against harmful interference in a residential installation. This equipment generates,
uses, and can radiate radio frequency energy and, if not installed and used in accordance with the instructions, may cause harmful interference
to radio communications. However, there is no guarantee that interference will not occur in a particular installation. If this equipment does cause
harmful interference to radio or television reception, which can be determined by turning the equipment off and on, the user is encouraged to
try to correct the interference by one or more of the following measures:
•Reorient or relocate the receiving antenna.
•Increase the separation between the equipment and receiver.
•Connect the equipment into an outlet on a circuit different from that to which the receiver is connected.
•Consult the dealer or an experienced radio/TV technician for help.
Page 3

SD5K
www.simmonsdrums.net
… on your purchase of the Simmons SD5K Electronic Drum Kit. To get the most
enjoyment from it, we recommend that you skim through this manual at least
once, then refer back to it often to learn more about specific functions.
Taking Care of Your Digital Drum Set
Location
• To avoid deformation, discoloration, or more serious damage, do not expose the unit to direct sunlight,
high temperature sources, and excessive humidity.
Power Supply
• Turn the power switch OFF when the SD5K is not in use.
• The AC adapter should be unplugged from the AC outlet if the SD5K is not to be used
for an extended period of time.
• Avoid plugging the AC adapter into an AC outlet that is also powering a high-consumption appliance
such as electric heaters or televisions. Also avoid using multi plug adapters since these can reduce
sound quality, cause operation errors and possibly damage.
• To avoid damage, turn OFF the SD5K’s power switch and all related devices prior to connecting
or disconnecting cables.
Handling and Transport
• Never apply excessive force to controls, connectors, and other parts.
• Unplug cables by gripping the plug firmly. Do not pull on the cable.
• Disconnect all cables before moving the module.
• Physical shocks caused by dropping, bumping, or placing heavy objects on the module can result
in scratches and more serious damage.
Cleaning
• Clean the module with a dry, soft cloth.
• A slightly damp cloth may be used to remove stubborn grime and dirt.
• Never use cleaners such as alcohol or thinner.
• To avoid discoloration, do not place vinyl objects on top of module.
Electrical Interference
• The module contains digital circuitry and may cause interference if placed too close to radio or
television receivers. If this occurs, move the SD5K further away from the affected equipment.
Service and Modification
• There are no user serviceable parts in the drum module.
• Do not attempt to open the drum module or make any change in the circuits
or parts of the unit. This would void the warranty.
Congratulations!
1
Page 4
SD5K
Digital Drum User’s Manual
Digital Drum Kit
Module Controls 3
Front Panel 3
Rear Panel 4
Side Panel 4
Connections 5
Pads and Pedal 5
MIDI Device 6
Audio Equipment 6
CD Player 6
Headphones 6
Power Supply Jack 6
Functions 7
Power Switch 7
Main Volume 7
Selecting a Drum Kit 7
Metronome 7
Playing a Song 8
Selecting 8
Listening 8
Song Volume 8
Song Tempo 8
Tap Tempo Function 9
Muting the Drum Part 9
Playing with a Click 9
Lighting Guide Function 9
Creating a User Drum Kit 10
Setting a Drum Voice 10
Adjusting Pad Volume 10
Adjusting Pad Tuning 10
Saving Drum Kit Voices 11
Parameters 11
Pad Sensitivity 11
Pad Rejection 12
Reverb 12
Factory Settings 12
Specifications 13
Voice List 14
Preset Kit List 15
Song List 15
MlDl Implementation Chart 16
2
Table of Contents
Page 5
SD5K
www.simmonsdrums.net
3
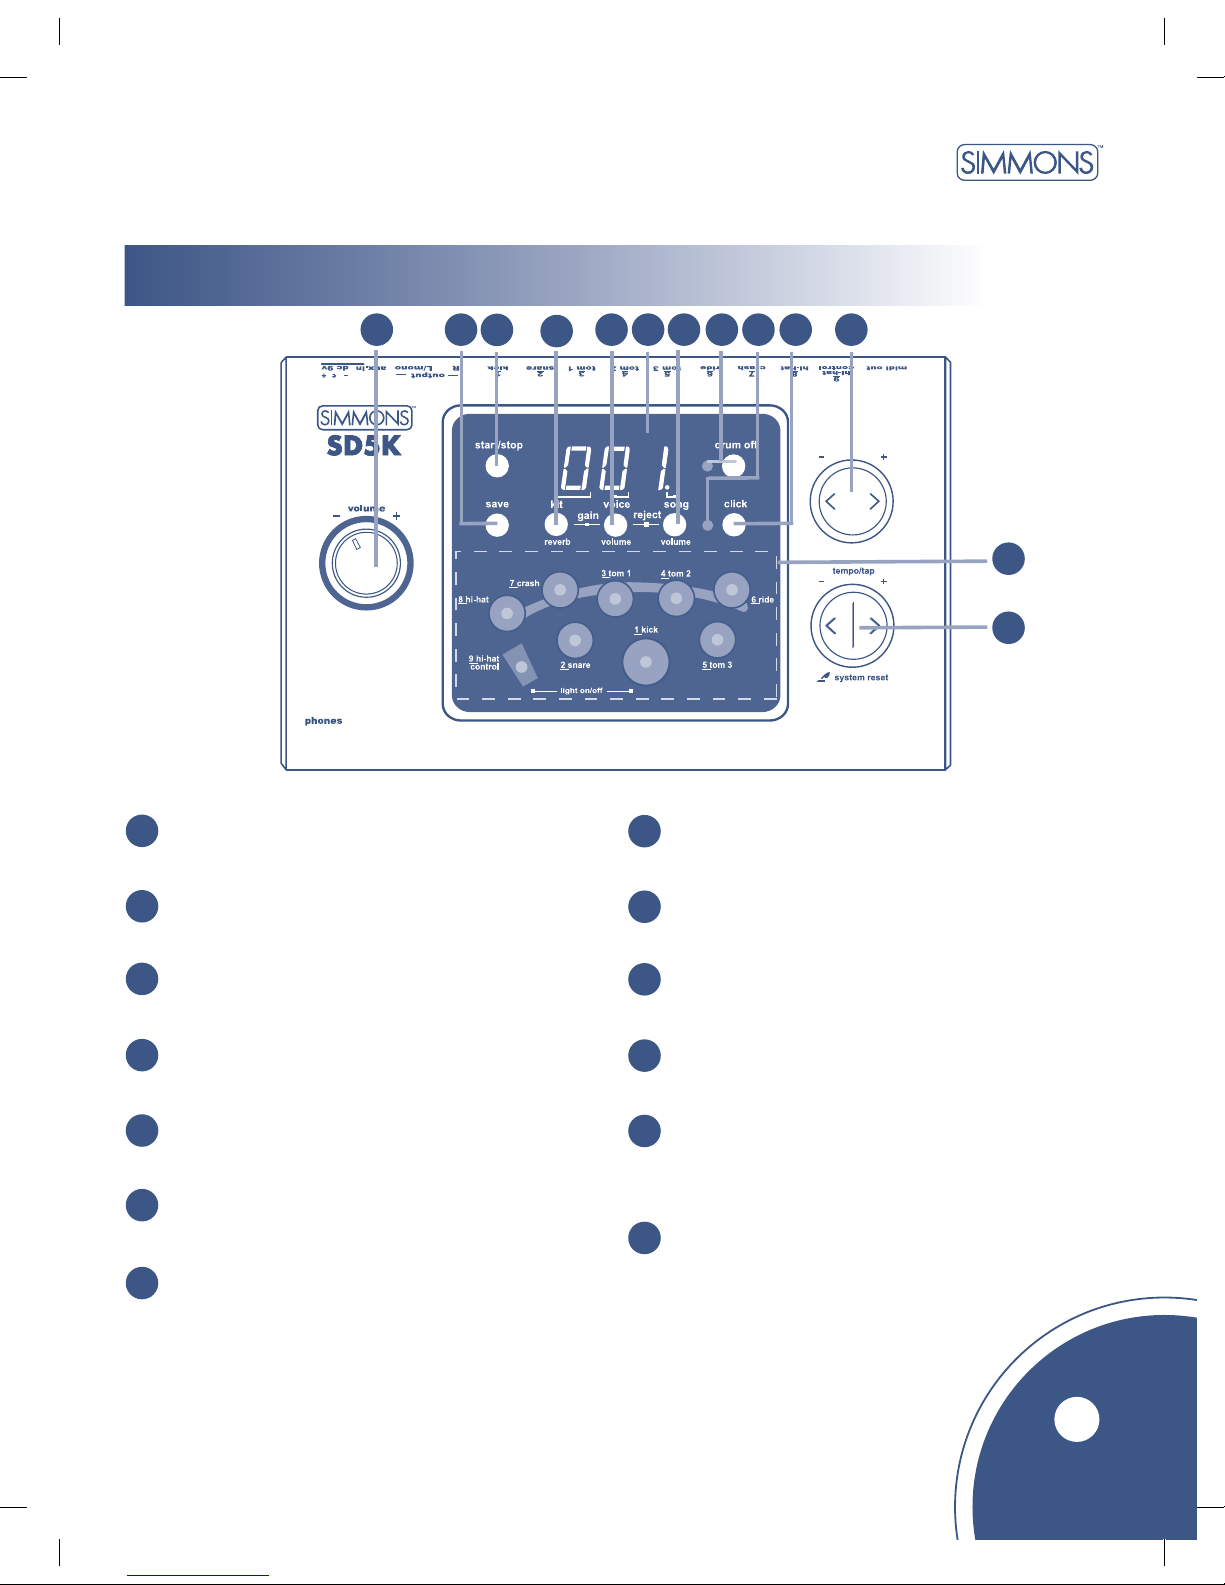
module Controls
Front Panel
Volume Knob
Controls headphones and line output volume.
1
2
[save] Button
Saves User Kit settings.
3
[start / stop] Button
Starts and stops the selected song.
4
[kit / reverb] Button
Displays the drum kit number or reverb setting.
5
[voice / volume] Button
Displays the voice number, volume value, or pitch value.
6
3 Digit LED Display
Displays the parameters of current menu mode.
7
[song / volume] Button
Displays the song number or accompaniment volume value.
[drum off] Button and Indicator
Turns on and turns off the song’s drum track.
8
9
Beat Indicator
Displays metronome or song beat.
10
[click] Button
Turns metronome on and off.
11
[+] and [ - ] Buttons
Changes the value of the selected parameter.
12
Pad Select Buttons and Indicators
In Voice Mode, it selects and displays current pad.
In Song Mode, it displays which pads are being
triggered by the Drum Track.
13
[tempo - / +] and [tap] Buttons
Changes current tempo.
1
2
3
4
5
6
7
8
9
10
11
12
13
Page 6
User’s Manual
Digital Drum Kit
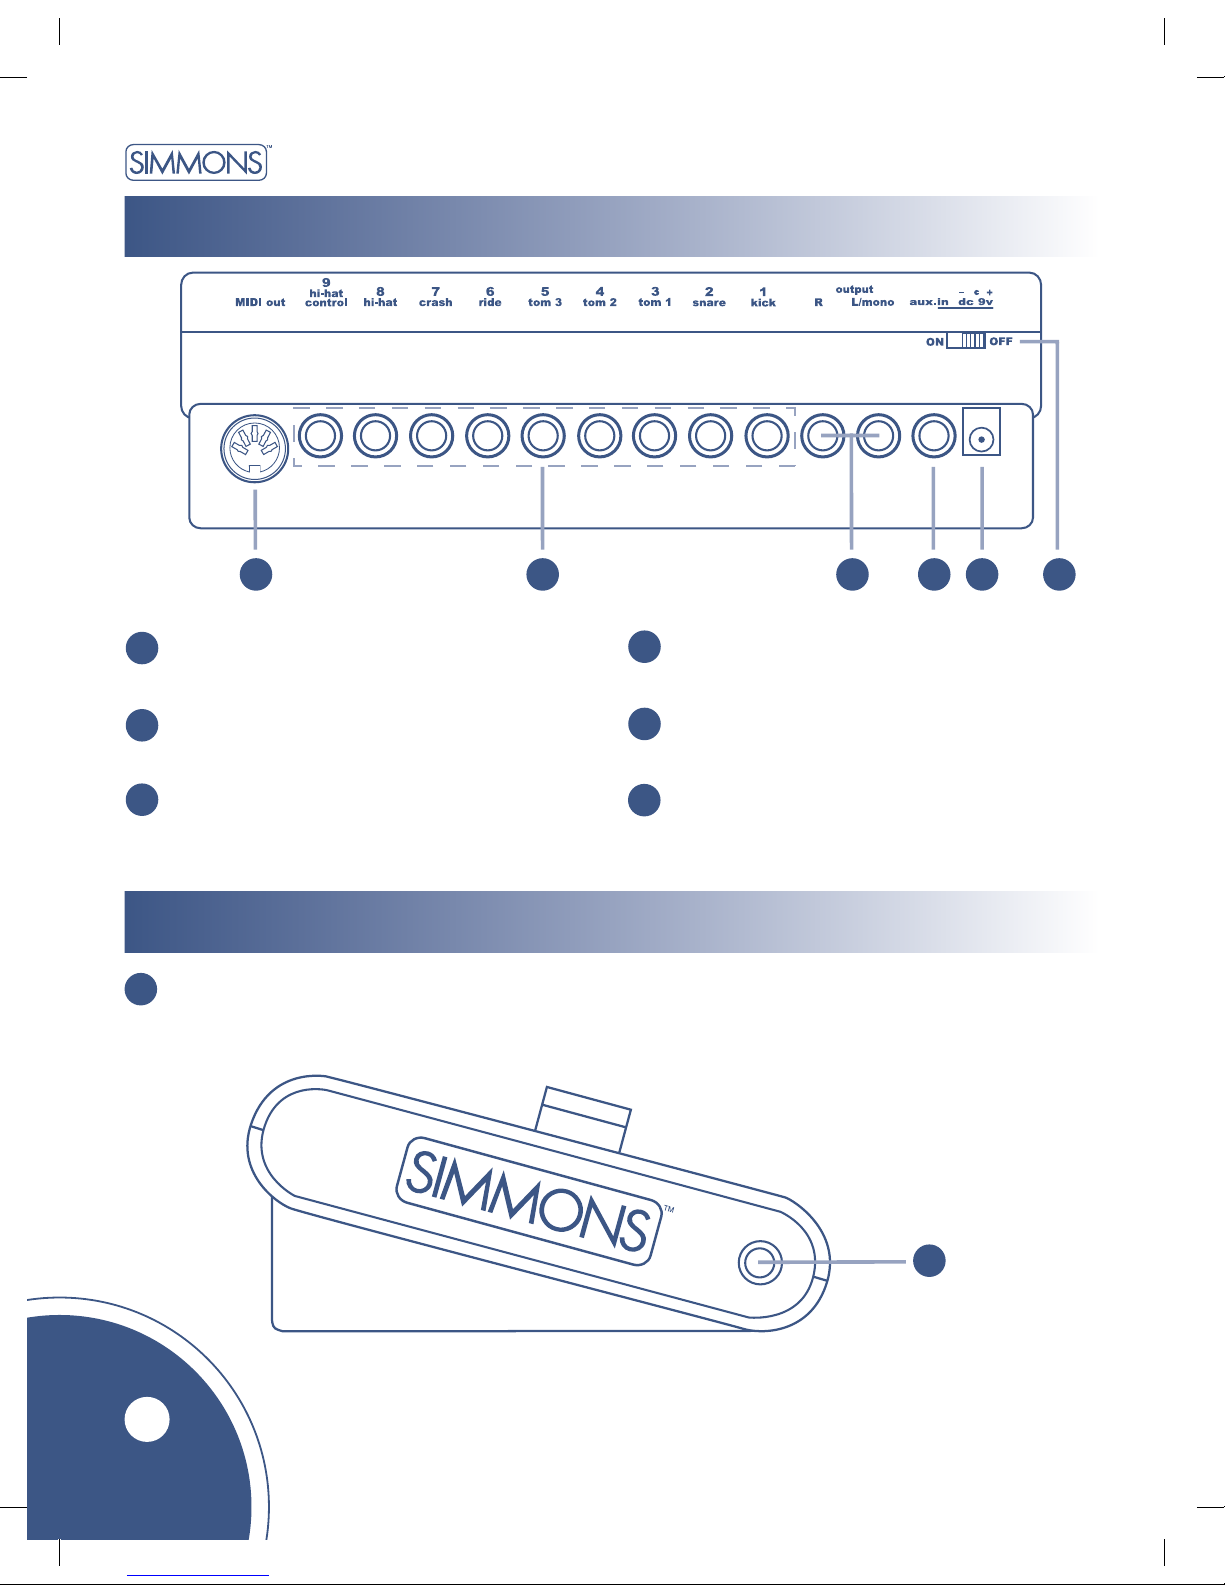
Rear Panel
Side Panel
4
MIDI Out Jack
Connection for an external sound module.
14
15
16
Trigger Input Jacks
Connections for pads, cymbals, hi-hat control, kick trigger.
Output Jacks (R, L/mono)
Connection for an amplifier or audio system. For single
output use the L/mono jack.
Aux.in Jack
TRS connection for an external sound source.
17
18
19
Power Supply Jack (DC 9V)
Connects AC adapter.
Power Switch
Turns power on/off.
20
20 Phones Jack
Connection for stereo headphones. (Connecting headphones will not mute output jacks.)
14 15 16 17 18 19
20
Page 7
SD5K
www.simmonsdrums.net
connections
Pads and Pedals
5
CAUTION!
To avoid damage, turn OFF the SD5K’s power switch and all related devices
prior to connecting or disconnecting cables.
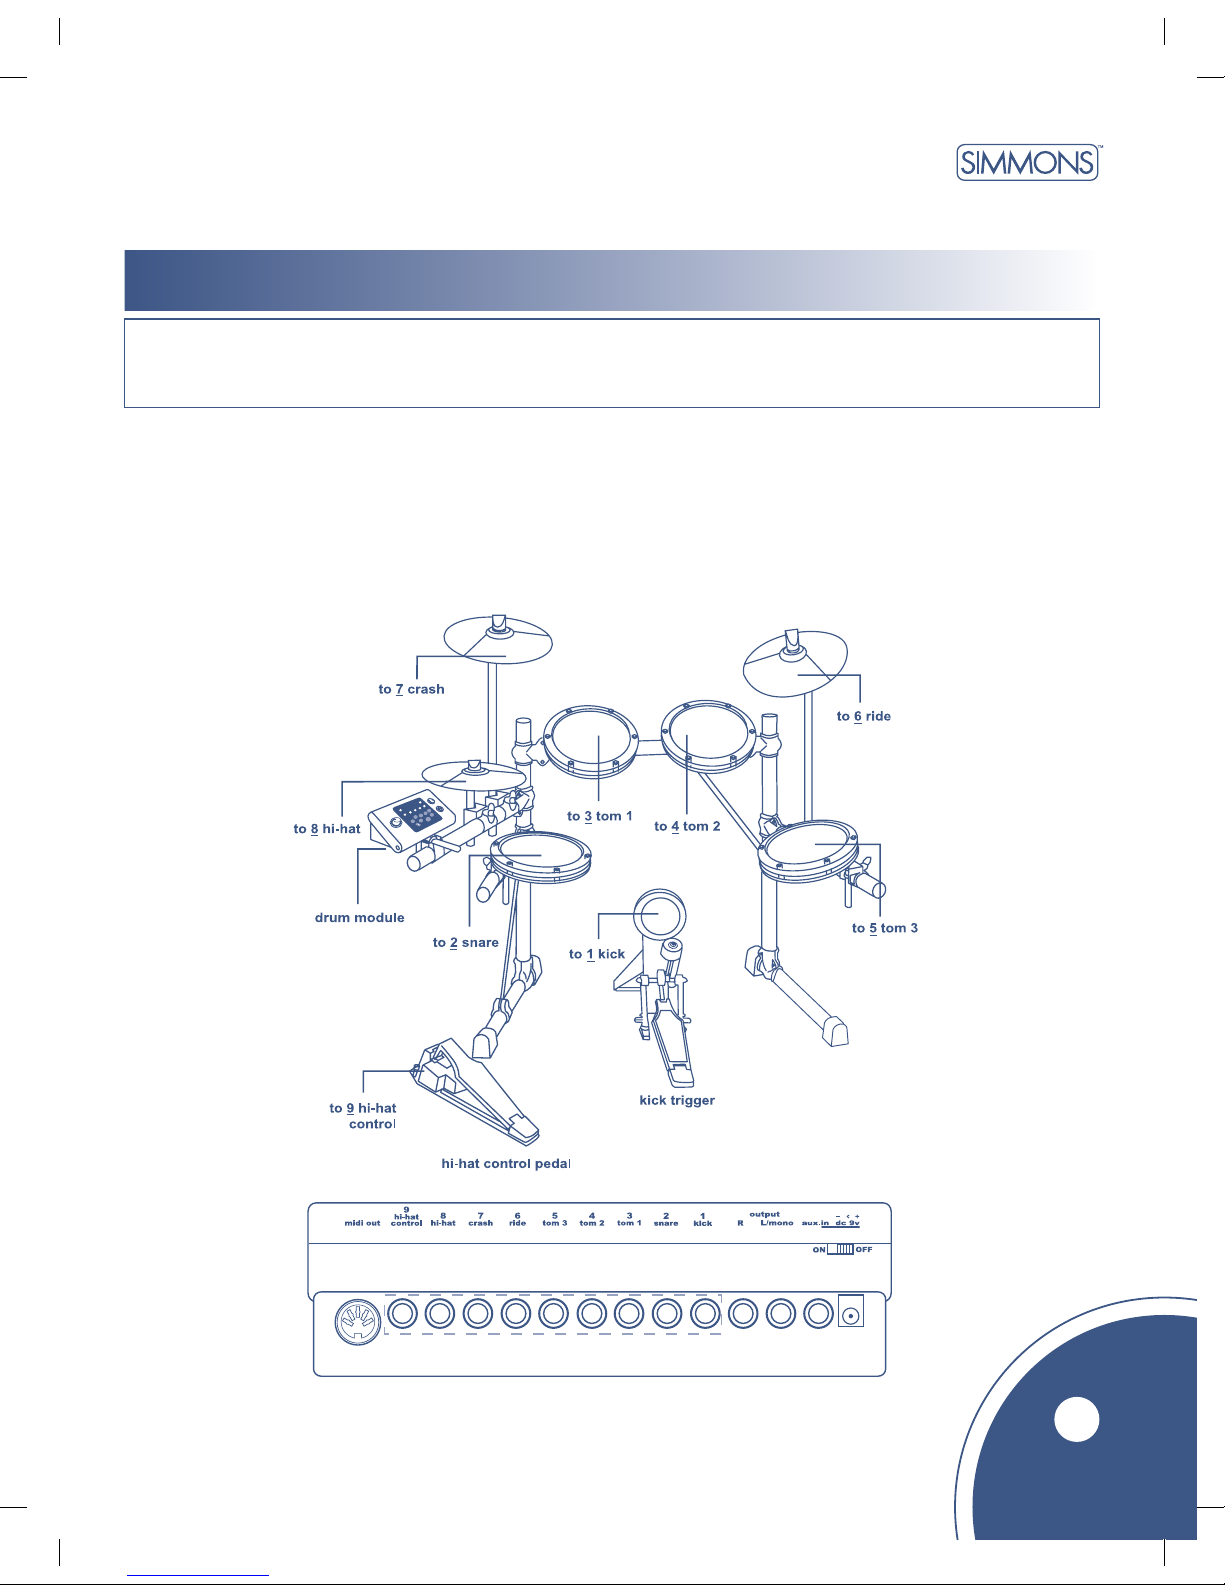
Pads and Pedal:
Using the provided cables, connect each pad to its corresponding trigger input jack.
Note:
1. Similar to an acoustic drum kit, the hi-hat pad functions as a “closed hi-hat” when the pedal is stepped on.
When the pedal is released, it functions as an “open hi-hat.”
2. The trigger area of a cymbal pad (ride, crash or hi-hat) is near the edge of the pad.
Page 8
User’s Manual
Digital Drum Kit
midi device
audio equipment
cd player
power supply jack
6
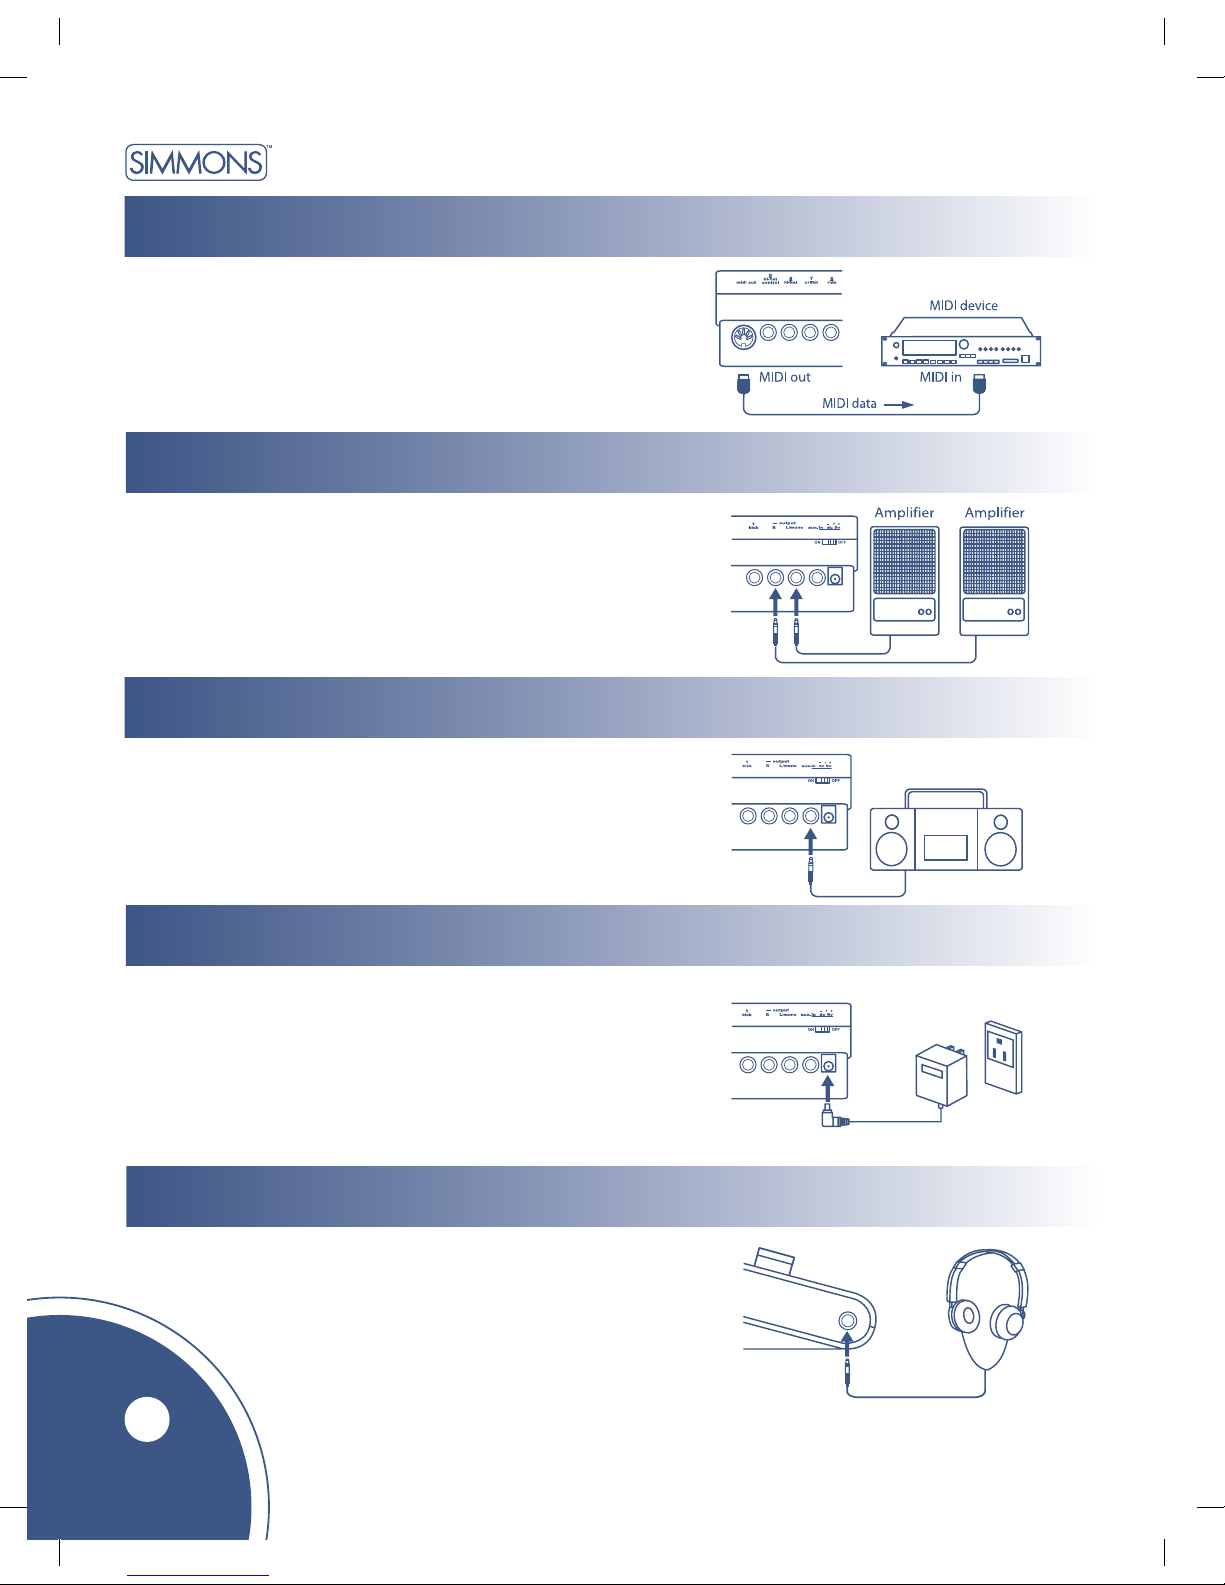
1. Use a MIDI cable to connect the MIDI OUT jack on the drum
module to the MIDI IN jack on an external MIDI device.
2. The module will output all the MIDI codes generated by pads
and pedal via the MIDI output connector. Metronome click
and song MIDI data are excluded.
1. When using an amplifier, connect the Output L/MONO
and R jacks on the rear panel to the input of the amplifier.
(For mono playback, use the L/MONO jack; for stereo
playback, connect both L/MONO and R jacks.)
2. The volume is adjusted with the VOLUME knob.
1. Connect the audio output of a CD player or other audio
source to the stereo AUX IN TRS jack on the rear panel.
2. The signal can be mixed with the drum signal,
allowing you to play along.
headphones
An optional set of stereo headphones can be connected to the
PHONES jack located on the side of the drum module.
Make sure the power is switched OFF.
Connect the power adapter to the DC IN jack on the rear panel.
Note:
1. To protect speakers, amplifiers and drum module from
damage, rotate volume knob to minimum volume level
before switching power ON.
2. Make sure the power is switched OFF when connecting
drum module with external devices.
Page 9
SD5K
www.simmonsdrums.net
Power Switch
functions
main volume
selecting a drum kit
metronome
7
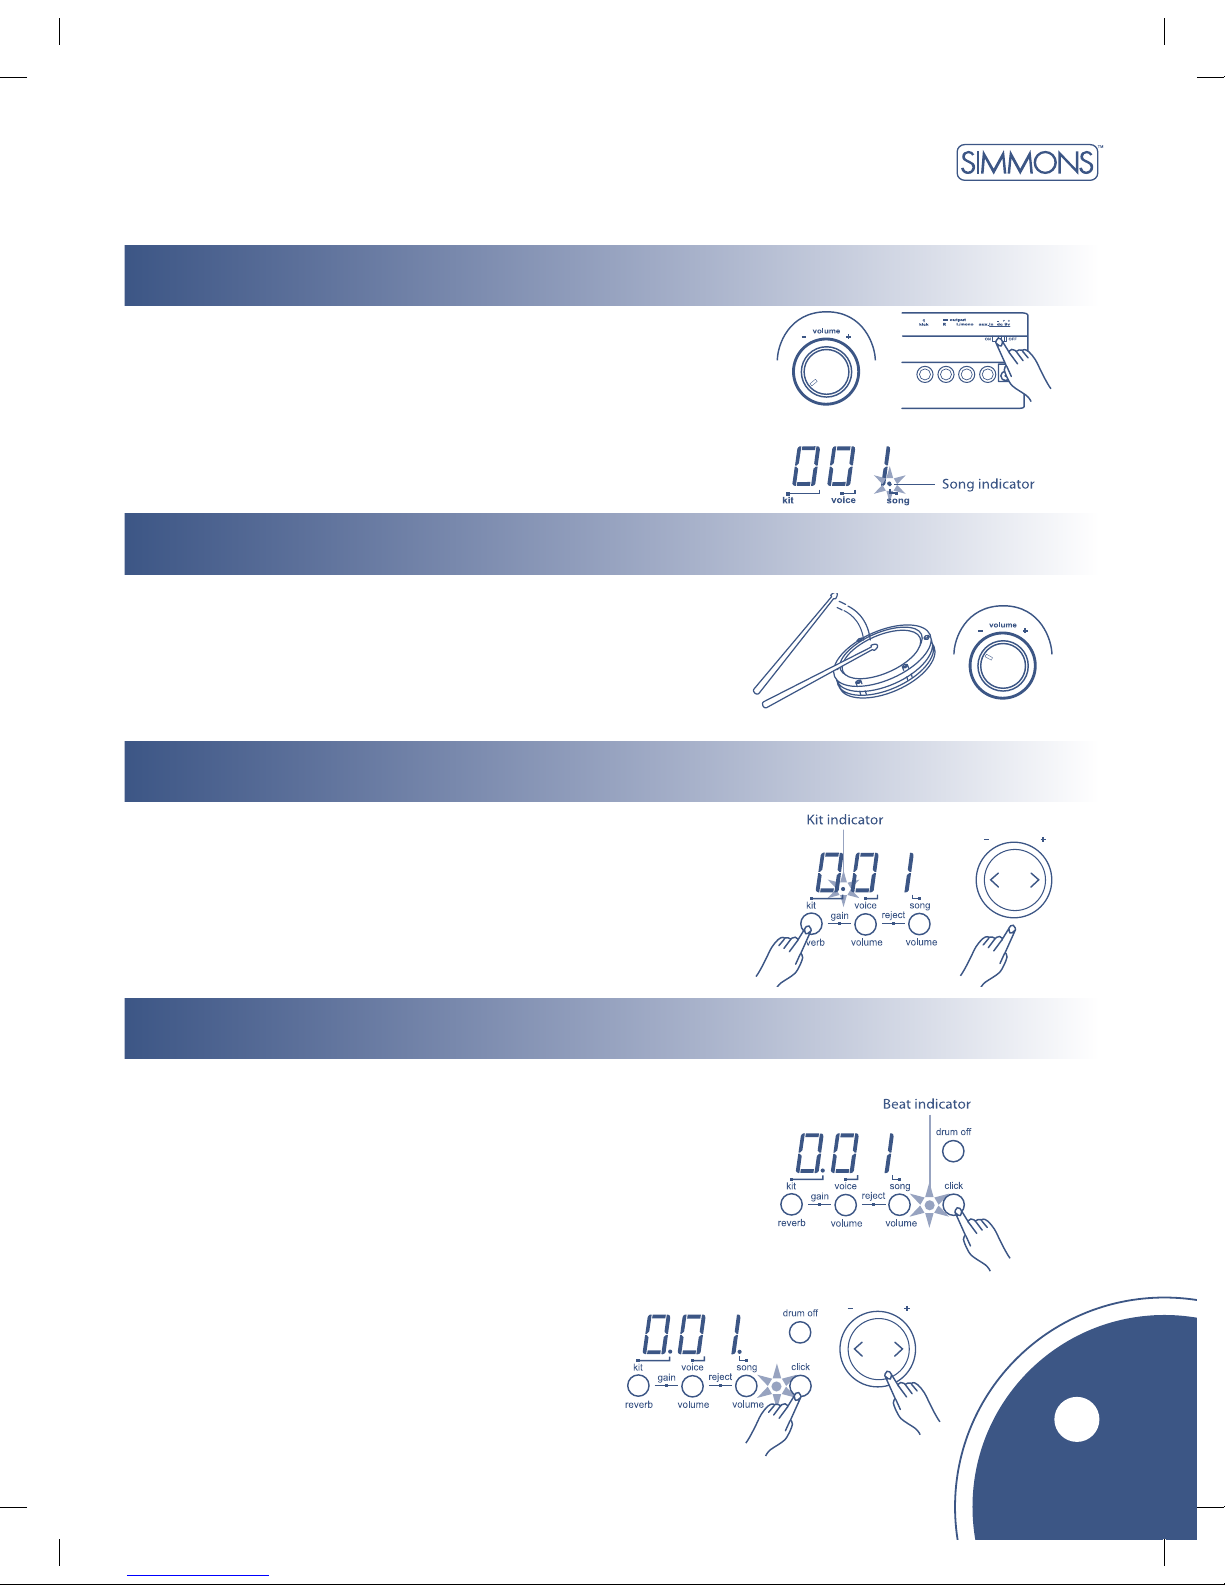
After confirming that all connections have been completed,
rotate the volume knob to the left (minimum volume level)
before switching the power on.
Set the power switch to “ON” position. The song indicator
lights up and the display will show song number 001.
While hitting a pad, gradually rotate the volume knob
until a comfortable volume level is reached.
The unit comes with 22 (001-022) preset drum kits
and 10 user kits (023-032). (Reference kit list: page 15.)
1. Press [kit] button
The Kit indicator lights up and the display will show the current kit number.
2. Press [ + ] or [ - ] buttons to select the drum kit number
(001–032) you want to use.
1. Press the [click] button to start the metronome.
The beat indicator flashes and the click sound will play.
2. Press the [tempo +] or [tempo - ] buttons to set the metronome beat.
3. Press the [click] button again to stop the metronome.
Adjust the volume of the click sound by holding down the
[click] button and press the [ + ] or [ - ] buttons to adjust
the volume of the click sound; the metronome will
automatically play. To cancel metronome, press
[click] again.
Click sound volume will be reset
to default on next power-up.
Page 10
User’s Manual
Digital Drum Kit
playing a song
selecting
listening
song volume
song tempo
8
The module contains 48 preset songs.
Note: The preset song setting is 001 when you power up.
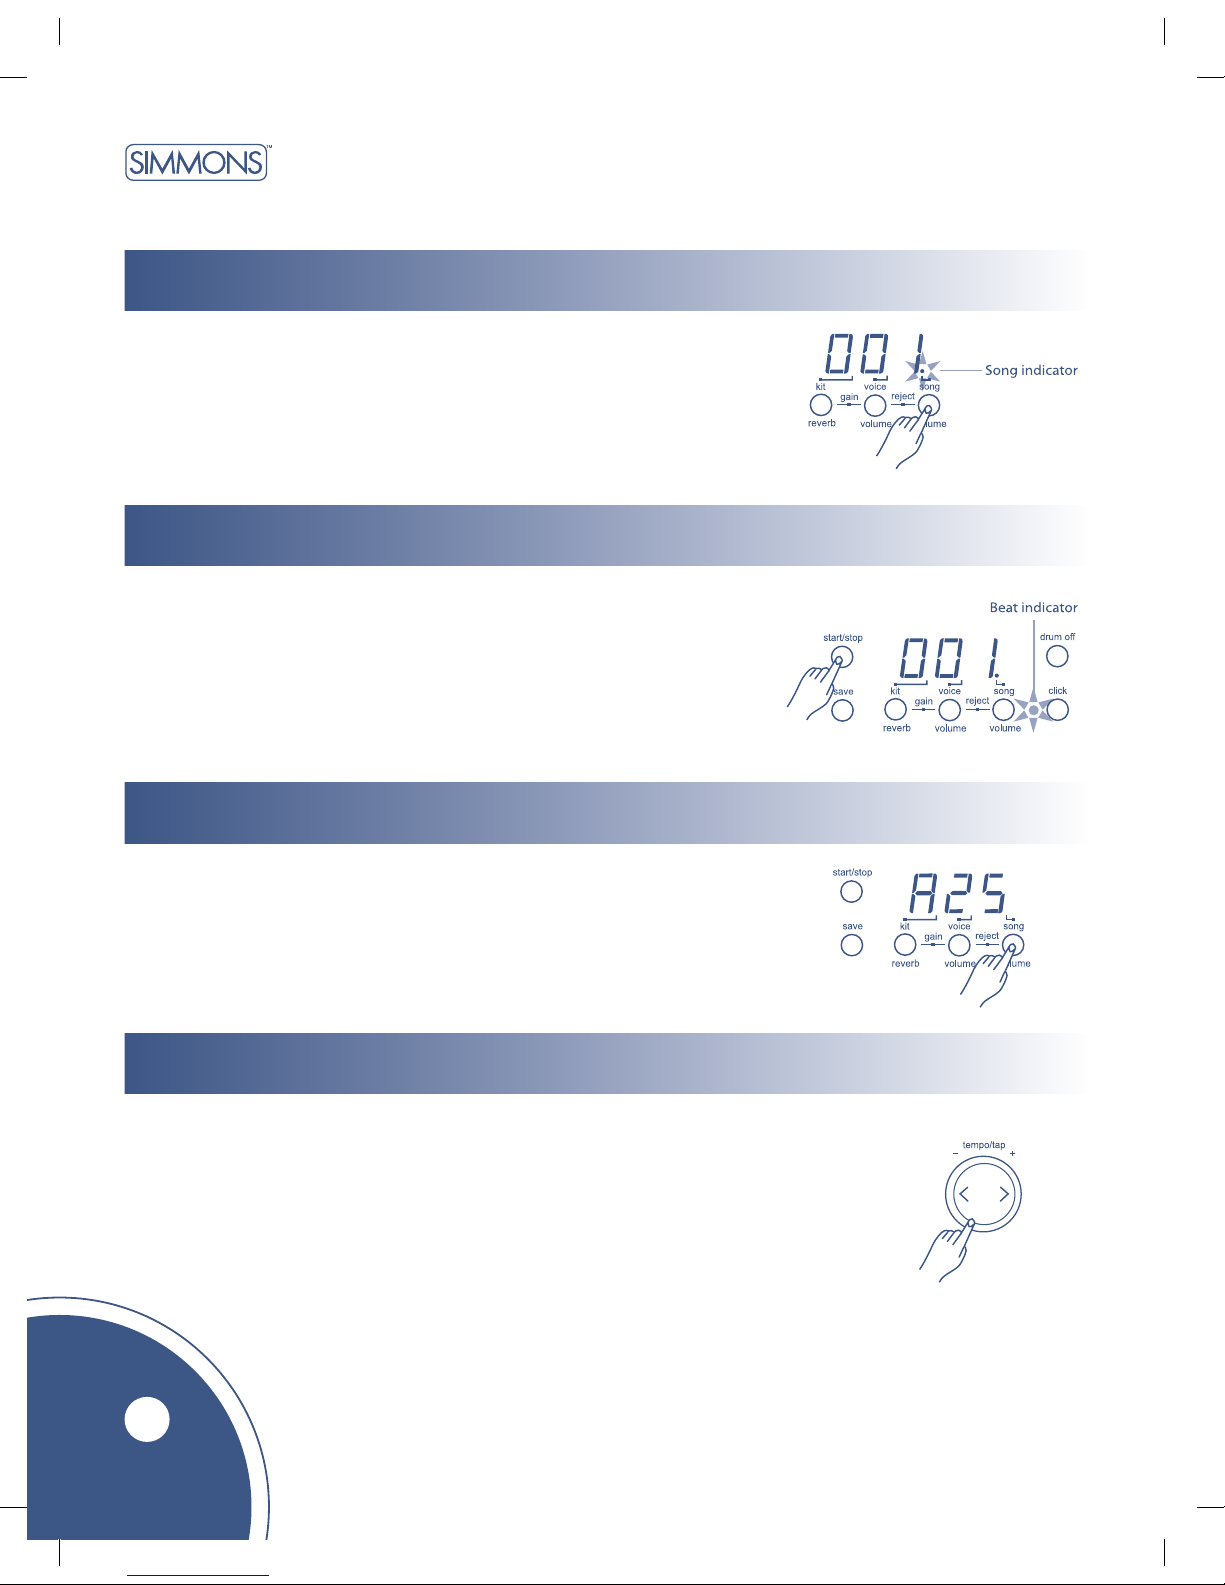
1. Press [song/volume] button.
The song indicator lights up and the current song number will appear.
2. Press [+] or [ - ] buttons to select song. Song numbers 001-048
are preset songs. (Reference song list is on page 15.)
1. Press [start/stop] button. The beat indicator will flash at the song tempo.
After count-in, the song will start playback from the beginning.
2. The song will stop when it reaches the end. You can stop the
song during playback by pressing the [start/stop] button.
The click indicator flashes at the first beat of each measure.
The pad indicator will show which pad the drum track is triggering.
Note: The pad indicators can be turned off by pressing both
[hi-hat] control and [kick] buttons at the same time.
1. Press the [song / volume] button to select song volume.
Display will show: “AXX” (XX = level value, 00 to 31)
2. Press [+] or [ - ] buttons to adjust the volume of song accompaniment.
1. Press the [tempo + ] or [tempo - ] buttons. Display will show the current tempo value.
2. Press the [tempo +] or [tempo - ] buttons to increase or decrease the tempo.
(tempo value in the range of 30 to 280)
Holding down the [tempo +] or [tempo - ] button for faster tempo change.
Press [tempo +] and [tempo - ] buttons at the same time to reset the
tempo to default value.
Note:
About 2 seconds after you stop pressing the [Tempo] button,
the display changes to show your selected song, voice or kit
number instead of tempo value.
Page 11
SD5K
www.simmonsdrums.net
tap tempo function
muting the drum part
playing with a click
lighting guide function
9
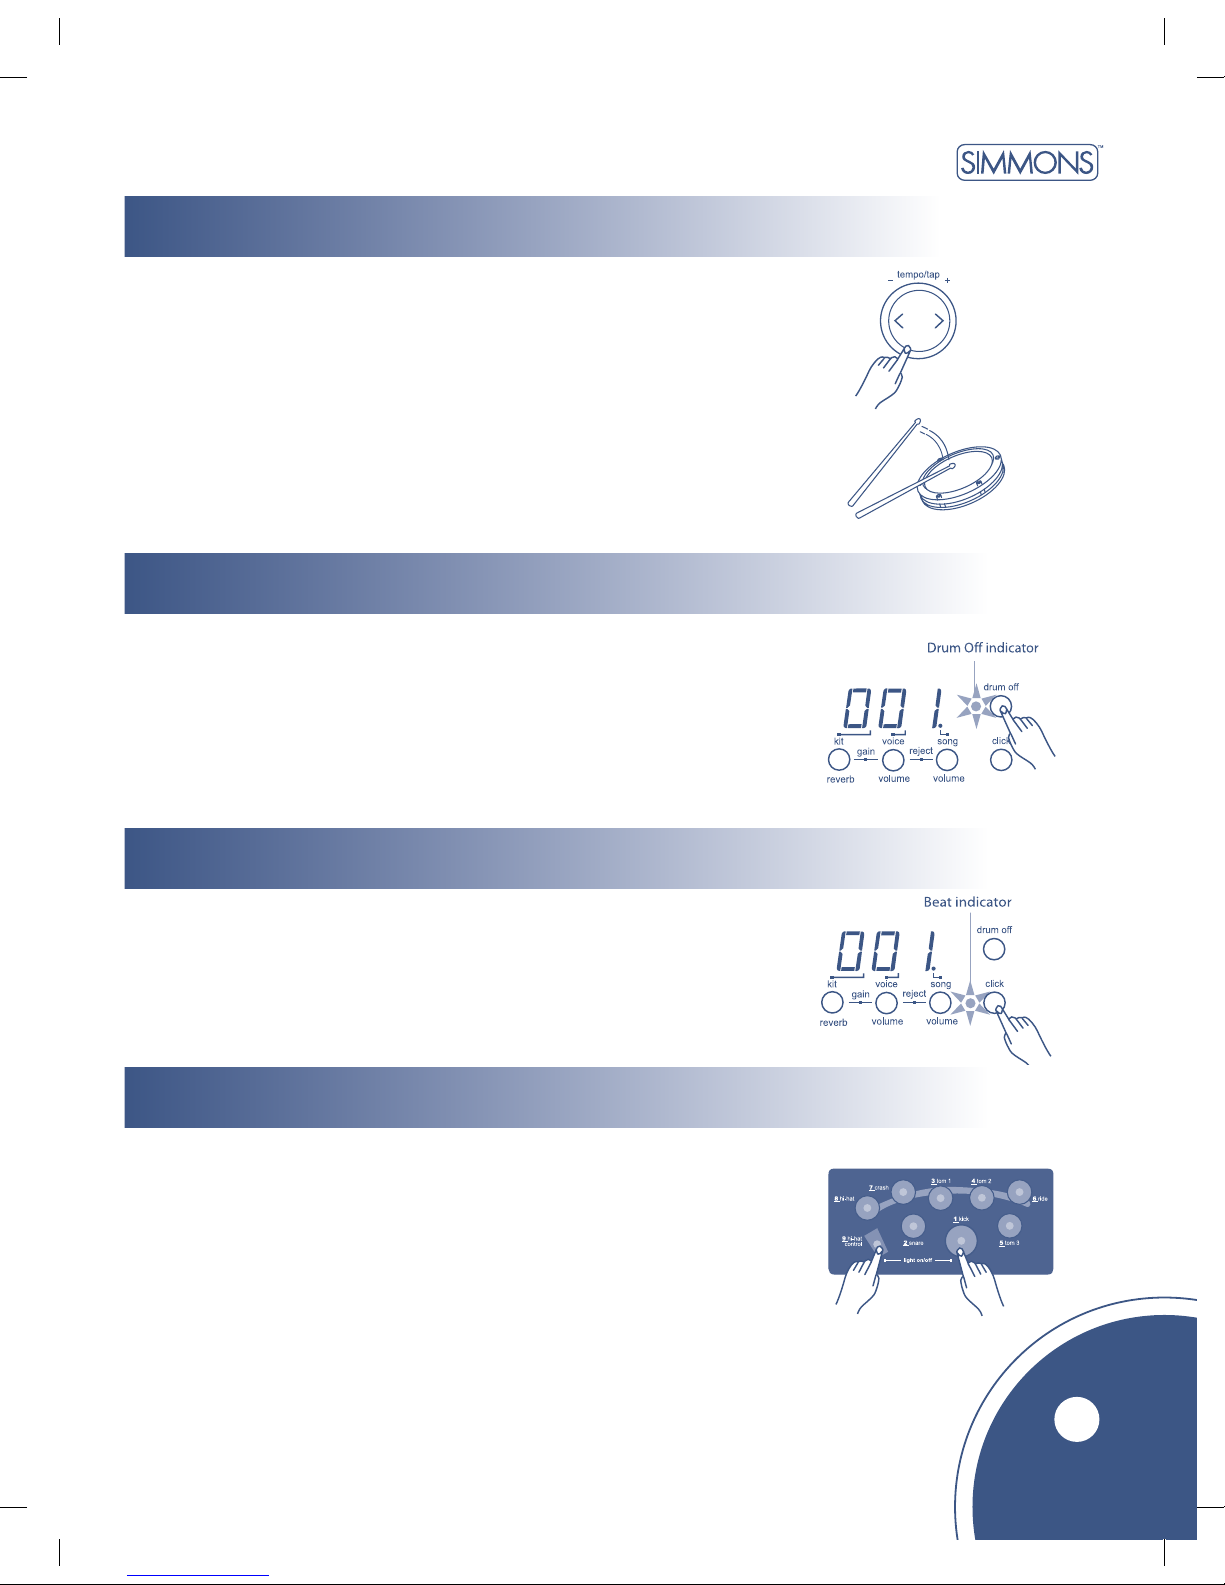
This function allows you to set the song’s tempo by tapping in the tempo on any pad.
1. Press the [tempo/tap] button. Display shows the current tempo value.
2. Tap on the pad to match the tempo you want. Tap on the pad 4 times. Only the
last two beats will be detected and will set your desired tempo.
3. The song will start playing at the tempo you set. When the song is playing, you cannot
change the tempo with this tap tempo function. However, you can still use the [tempo - ]
or [tempo + ] buttons to adjust the tempo.
Note:
Any pad can do the tap tempo function. If there is no valid tap input,
display will quit to the previous menu after 2 seconds.
1. Press [drum off] button. The Drum Off indicator lights up.
The drum mute function is active.
2. Press [start/stop] button to playback the song. The drum part
in the song will be muted.
3. To cancel the drum mute function, press the [drum off] button again.
The Drum Off indicator light turns off.
The drum mute function can be used during song playback.
1. Press the [click] button to start the metronome.
Pressing song [start/stop] while metronome is playing will
cause the metronome to revert to the first beat of the count-in.
2. Press the [click] button again to stop the metronome.
It will not stop automatically.
The lighting guide function shows you how to play each song.
1. Select the song number you want to practice.
2. Press the [drum off] button.
3. Press the [start/stop] button to start song play.
4. Play drums, following the illuminated pads.
During song playing, you can change the Tempo.
Press the [hi-hat control] + [kick] buttons to turn off all the pad indicators.
Press the [hi-hat control] + [kick] buttons again to turn on all the pad indicators.
Page 12
User’s Manual
Digital Drum Kit
creating a user drum kit
setting a drum voice
adjusting pad volume
10
The unit comes with 237 high quality percussion sounds that you can assign to any
of the 4 drum pads, 3 cymbals, hi-hat control and kick pad. Use them to create your
own custom drum kit. (Reference voice list: page 14) Kit numbers 023–032 are
reserved for saving your own drum kit.
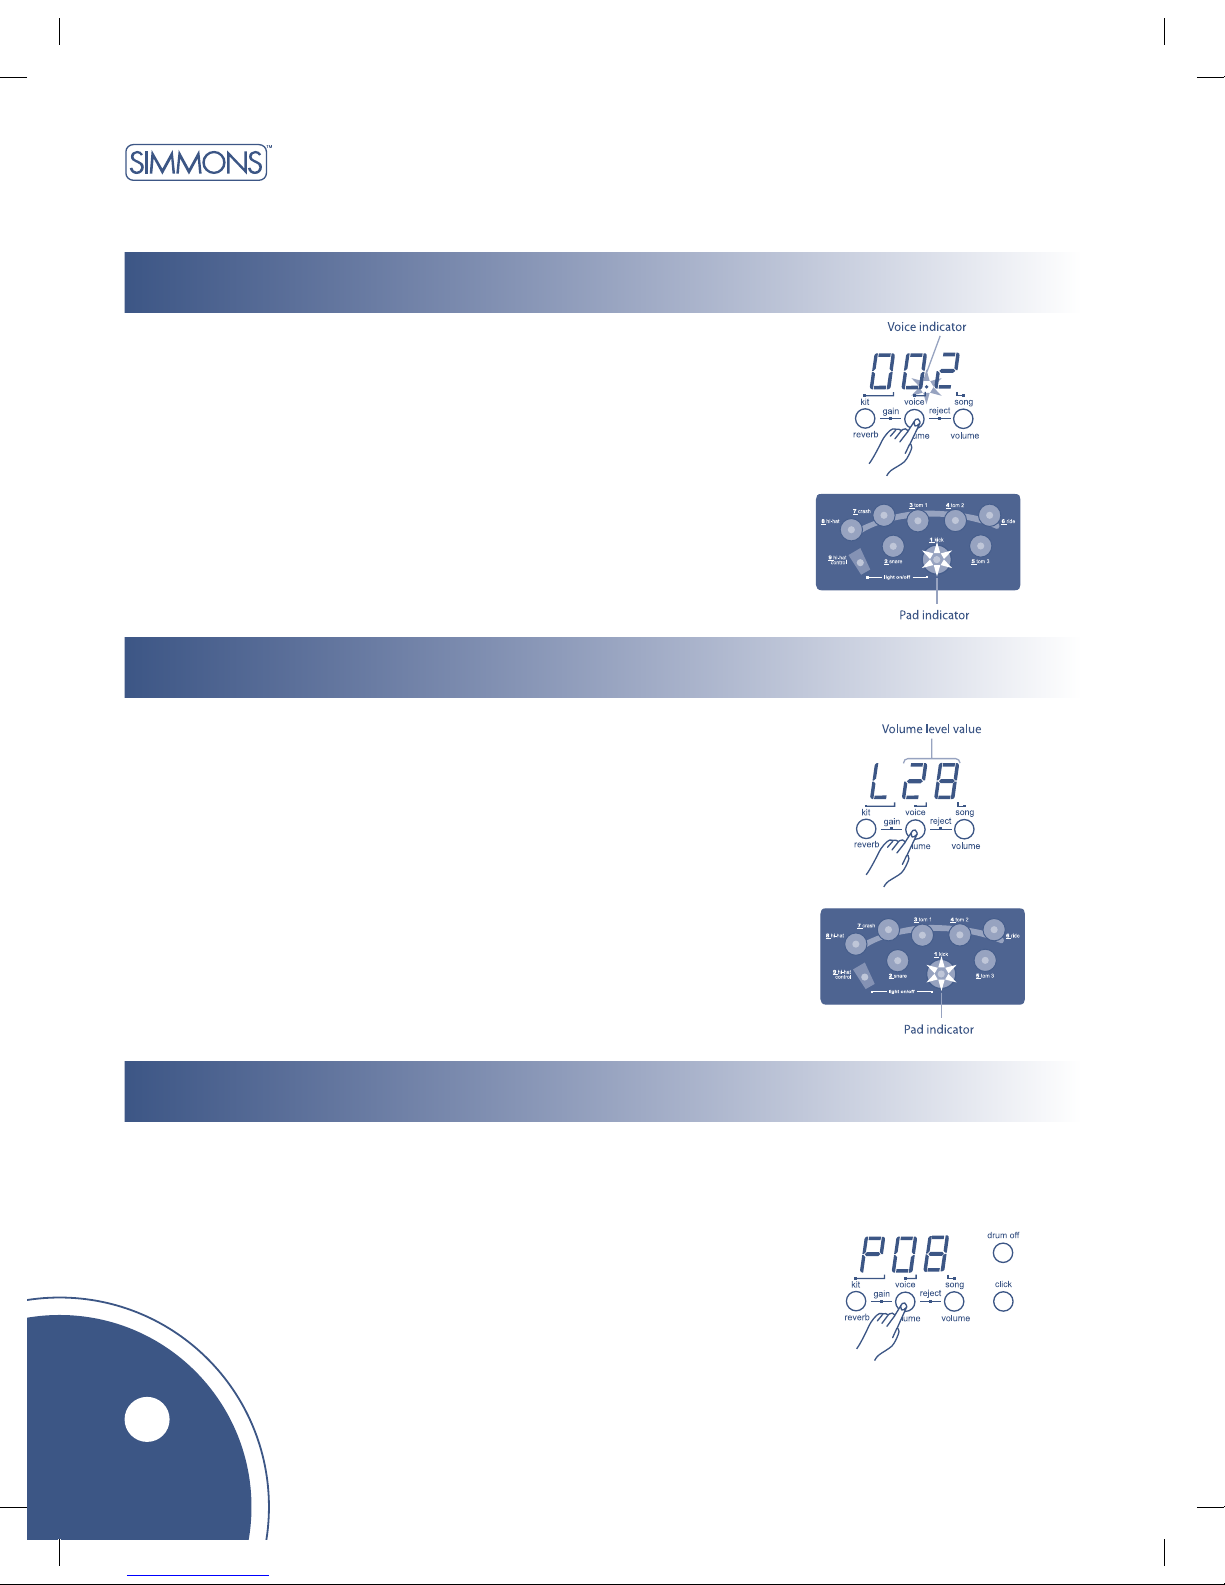
1. Press the [voice] button. The voice indicator lights up and the display
shows the voice number of the last pad played.
2. Press the [pad] button or hit the pad you want to set. The pad indicator
lights up and the display shows the current voice number of the selected pad.
3. Press [+] or [ - ] buttons to select the voice number you want to assign.
4. Repeat steps 2 and 3 to set the voice for other pads.
This function allows you to adjust the volume level of each voice in the kit.
1. Press the [voice/volume] button to select the volume level setting
until the display shows: “LXX”. (XX = level value, 00 to 31) The
pad button indicator lights up and the display will show the current
volume level of the selected pad.
3. Press the [PAD] button or hit the pad you want to adjust.
4. Press the [+] or [ - ] buttons to increase or decrease the pad volume.
5. Repeat steps 3 and 4 to adjust the volume of other pad voices.
This function allows you to set the pitch of each drum pad voice.
1. Press the [voice/volume] button to select the pitch until the setting display shows:
“P XX”. (XX = value, 00 to 15, original pitch is P08.) The pad button indicator
lights up, and the display shows the current pitch setting of the selected pad.
2. Press the [PAD] button or hit the pad you want to adjust.
3. Press the [+] or [ - ] buttons to set the pitch you want.
4. Repeat steps 2 and 3 to set the pitch of other pad voices.
Note:
Press the [+] and [ - ] buttons at the same time
to reset pitch to its default value (P08).
adjusting pad tuning
Page 13
SD5K
www.simmonsdrums.net
saving drum kit voices
parameters
pad sensitivity
11
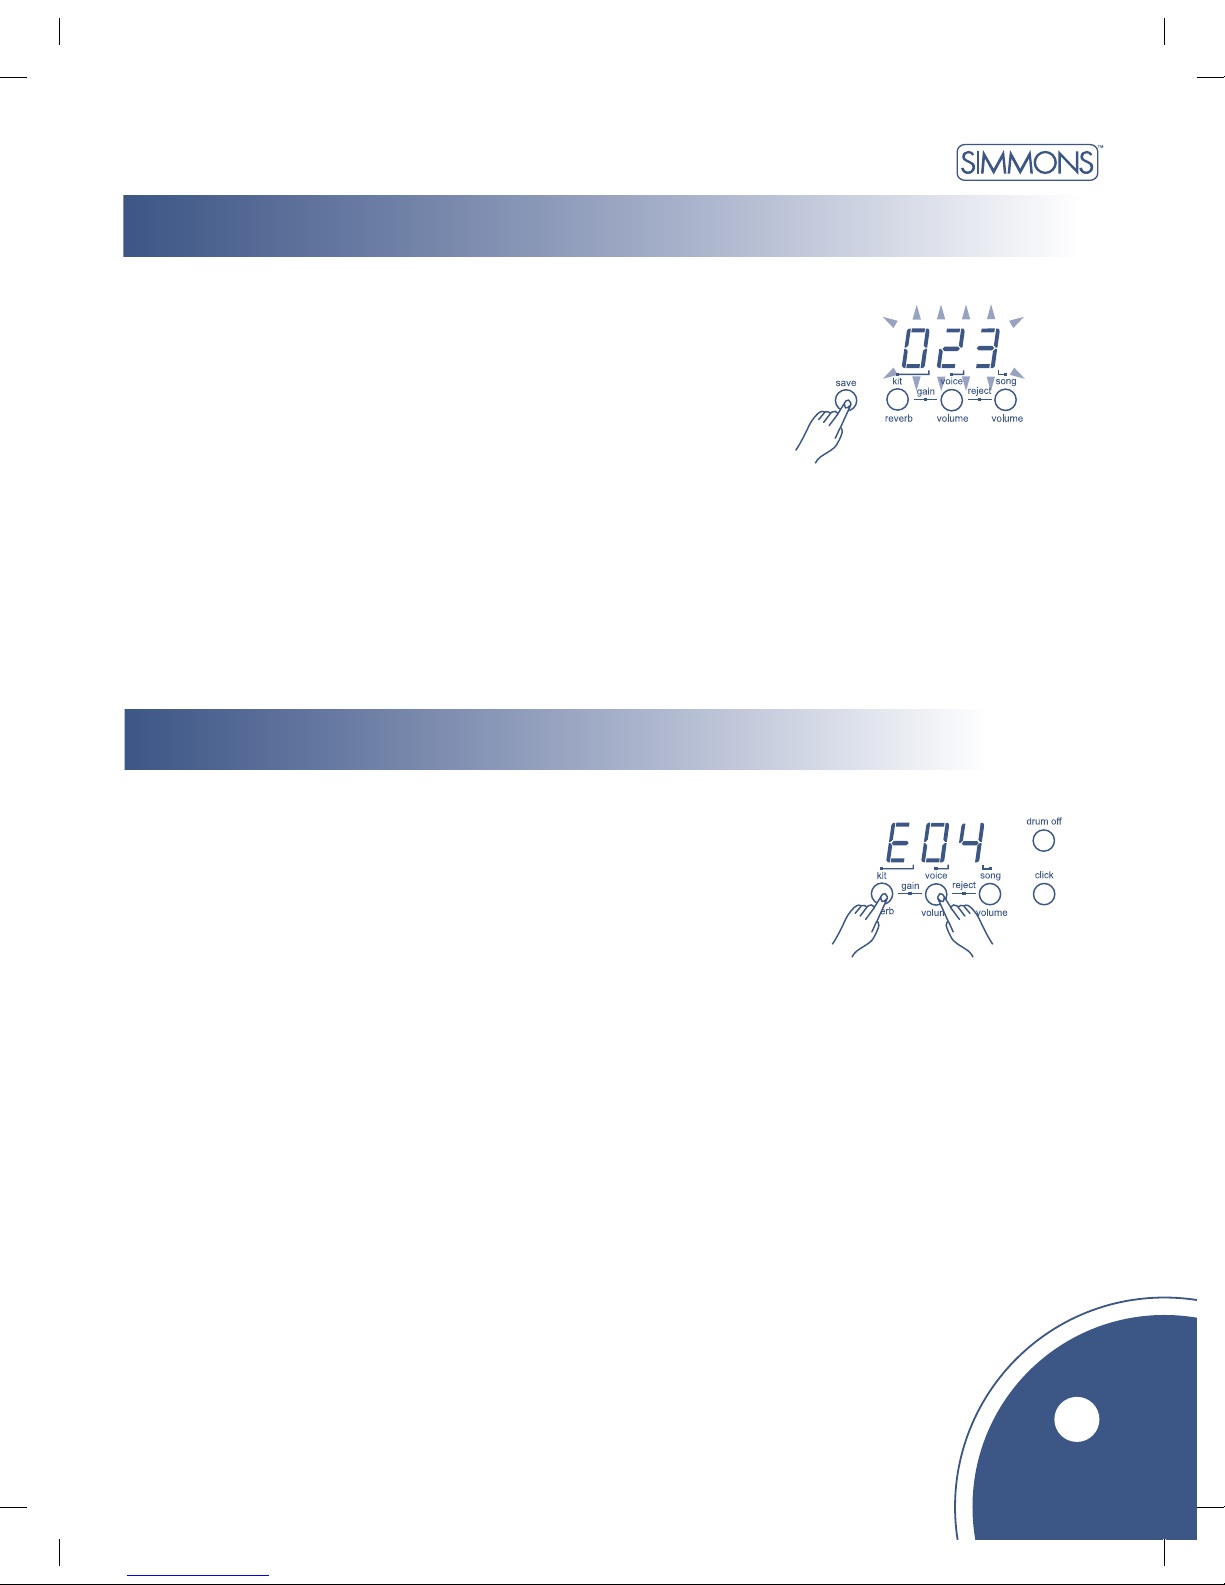
Make sure you save your customized kit; otherwise, your drum kit
will be erased when you turn off the unit or change kit selection.
1. Press [save] button. Kit number 023 will flash.
2. Press [+] or [ - ] buttons to set the kit number (023-032)
for saving your drum kit.
3. Press [save] button again.
Note:
To cancel the save operation, press the [voice] button.
You can adjust the sensitivity (gain) of the inputs from pads.
1. Hold down [kit/reverb] and press [voice / volume] buttons. Display
shows: “EXX”, the pad sensitivity value is indicated. (XX=gain level value,
00 to 15)
2. Press [pad] button or hit the pad you want to set.
The pad indicator will light up.
3. Press [+] or [ - ] buttons to adjust the sensitivity of pads.
(Range: 00 -15) Large values will produce high sensitivity even if the
pad is hit softly. Lower values will produce low sensitivity even if
the pad is hit forcefully.
4. Repeat steps 2 and 3 to set the voice for another pad.
Note:
1. After adjusting the sensitivity value, you can save them into
memory. In the sensitivity mode, press the [save] button.
You will then be returned to the previous display.
2. If the drum remains untouched for 10 seconds, the LED will return
to the previous display.
3. If you turn off the power without saving, you will lose the changes
you have just made.
4. This parameter affects all kits.
Page 14
User’s Manual
Digital Drum Kit
reverb
factory settings
12
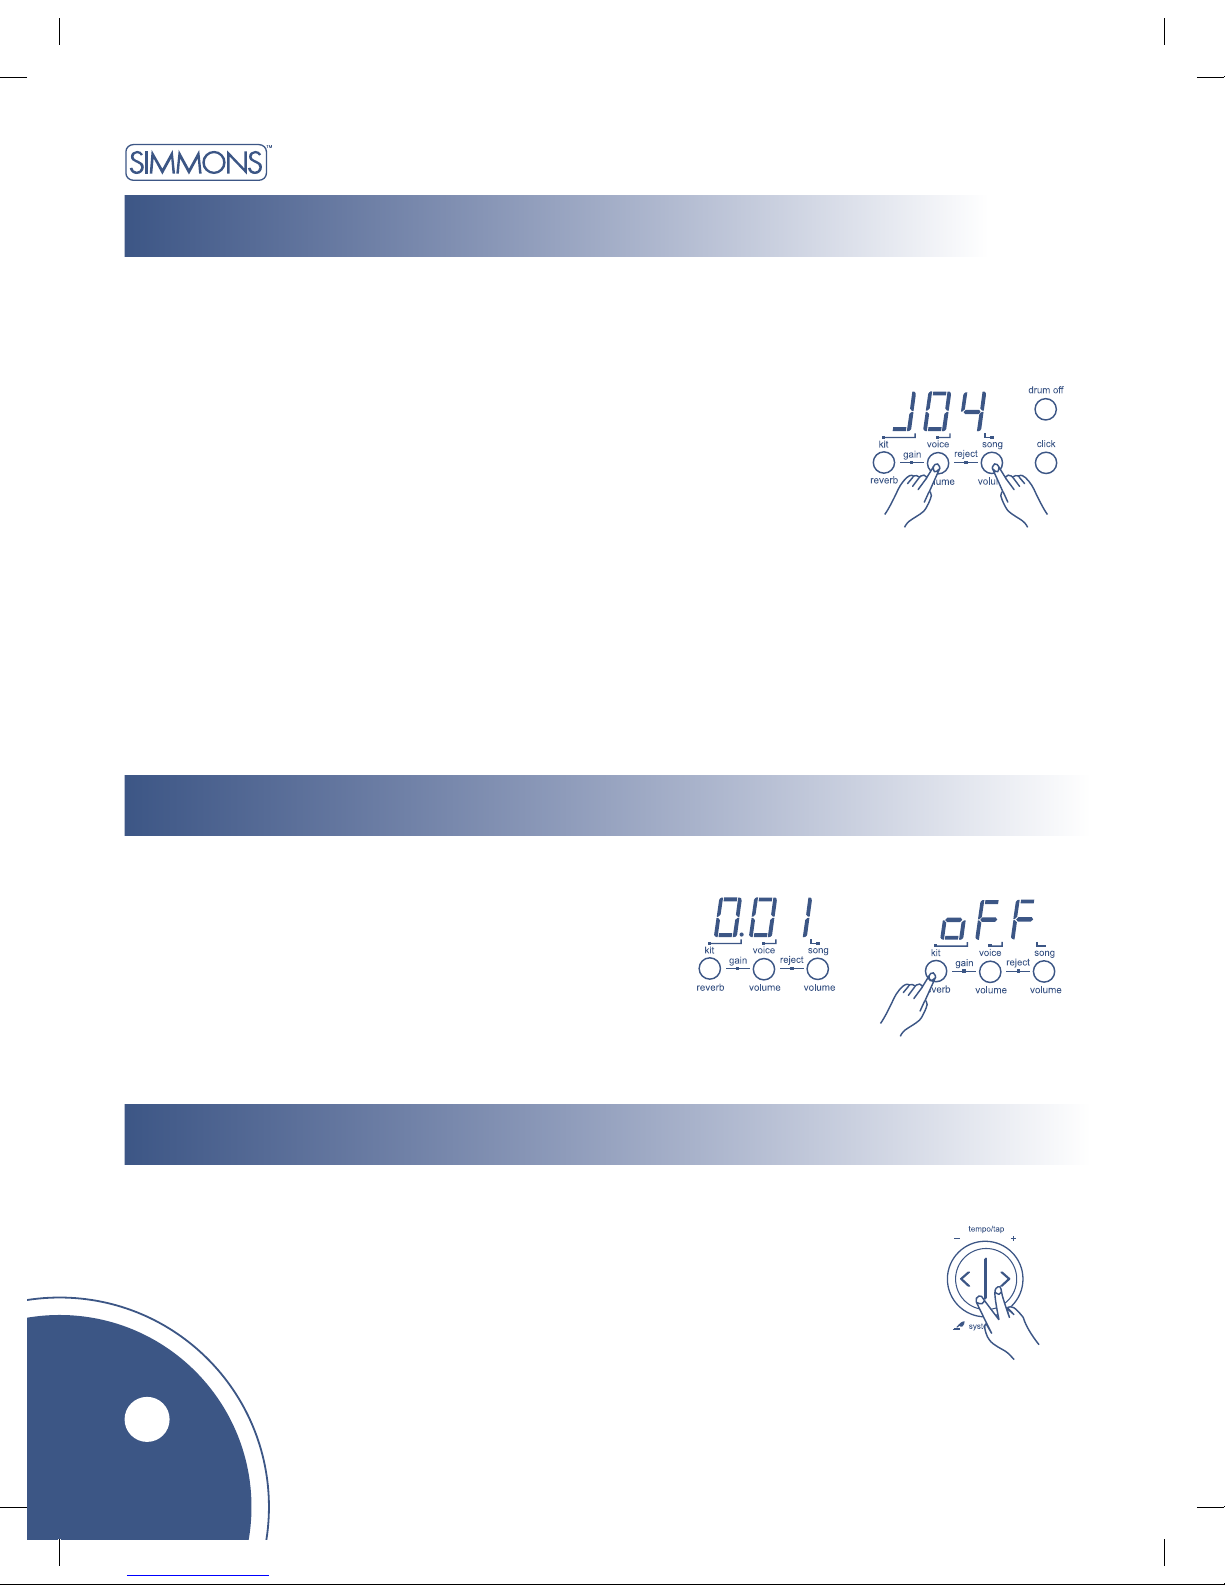
This function sets the reverb effect of the drum.
1. In “kit mode,” press the [kit] button again. The display
will show the current reverb setting.
2. Press [+] or [ - ] buttons to turn on or turn off the reverb.
This feature resets the drum module to its original factory presets.
1. Turn the power off.
2. Turn on the power while holding the [tempo - ] and [tempo +] buttons.
pad rejection
Prevents crosstalk caused by pads or drums connected to other inputs.
It sets a “gate” under which other pads cannot mis-trigger neighboring ones.
1. Hold down [voice/volume] and press [song/volume] buttons. Display shows:
“JXX’, the rejection value is indicated. (XX=rejection level value, 00 to15)
2. Press [pad] button or hit the pad you want to set. The pad indicator lights up.
3. Press [+] or [ - ] buttons to adjust the rejection of pads. Range : 00 –15
4. Repeat steps 2 and 3 to set the voice for another pad.
Note:
1. After adjusting the rejection value, you can save them into memory.
In the rejection mode, press the [save] button. You will then be
returned to the previous display.
2. If the drum remains untouched for 10 seconds, the LED will return to the previous display.
3. If you turn off the power without saving, you will lose the changes you have just made.
4. This parameter affects all kits.
Page 15

SD5K
www.simmonsdrums.net
specifications
13
Drum Pad: 4 drum pads, 3 cymbal pads,1 hi-hat control pedal, 1 kick pad
Voices: 237 voices
Drum kits: 22 preset kits, 10 user kits
Song presets: 48
Controls: POWER SWITCH, START/STOP, SAVE, KIT/REVERB, VOICE/VOLUME, SONG/VOLUME, DRUM
OFF, CLICK, HI-HAT, CRASH, RIDE, HI-HAT CONTROL, SNARE, TOM 1, TOM 2, TOM3, KICK,
VOLUME, + / - , TEMPO + / - , TAP
Display: LED display
Connections: MIDI OUT
Hi-hat control
Hi-hat
Crash
Ride
Snare
Tom 1
Tom 2
Tom 3
Kick
Output (R & L/MONO)
Aux in (Stereo TRS)
Power Supply: AC adapter (DC 9V)
Page 16

User’s Manual
Digital Drum Kit
voice list
14
Acoustic Bass Drum
001 Room BD
002 Tight BD
003 Loose BD
004 Reso BD
005 Small BD
006 Muffled BD
007 Pop BD
008 Jazz BD
009 Pillow BD
010 Gated BD
011 90’s BD
012 Metal BD
013 Rock BD
014 Orchestra BD
015 BigDrum
016 BigDrum Roll
Electronic Bass Drum
017 Hi-Hop BD
018 TR BD
019 Pulse BD
020 Techno BD
021 Space BD
022 Filter BD
023 Reverse BD
024 SDS Thump BD
025 SDS 80’s BD
026 SDS E-Thump BD
027 SDS Bright BD
Acoustic Snare Drum
028 Standard SD
029 Tight SD
030 Rock SD
031 Crack SD
032 Muffled SD
033 Birch SD 1
034 Birch SD 2
035 Wood SD 1
036 Piccolo SD 1
037 Wood SD 2
038 Maple SD
039 Gated SD
040 Studio SD1
041 Studio SD 2
042 Birch SD 3
043 Crackless SD 1
044 Power SD 1
045 Crackless SD 3
046 Power SD 2
047 Huge SD
048 Crackless SD 2
049 Snappy SD
050 Vinyl SD
051 Deep Gate SD
052 Metal SD 1
053 Metal SD 2
054 Metal SD 3
055 SideStick 1
056 SideStick 2
057 Tight Wood SD
Brush Snare Drum
058 Brush Roll SD
059 Hard Brush SD
060 Hit Brush SD
061 Short Brush SD
062 Soft Brush Roll SD
063 Soft Brush SD 1
064 Muffled Brush
065 Soft Brush SD 2
Row Drum
066 Row Drum 1
067 Row Drum 2
068 Row Drum 3
Electronic Snare Drum
069 Short TR SD 1
070 Long TR SD 1
071 Long TR SD 2
072 TR RimShot
073 Bright E-SD
074 Gated E-SD
075 Reverse Snare
076 Tight E-SD
077 Analog Clap
078 Analog Brush
079 Short TR SD 2
080 Elect Brush Hit
081 Elect Brush SD
082 SDS 80’s SD
083 SDS E-SD
084 SDS Bend SD
085 SDS Thump SD
086 SDS Clap
Acoustic Tom
087 Standard Tom 1
088 Standard Tom 2
089 Standard Tom 3
090 Standard Tom 4
091 Jazz Tom 1
092 Jazz Tom 2
093 Jazz Tom 3
094 Jazz Tom 4
095 Brush Tom 1
096 Brush Tom 2
097 Brush Tom 3
098 Brush Tom 4
099 Rods Tom 1
100 Rods Tom 2
101 Rods Tom 3
102 Rods Tom 4
103 Power Tom 1
104 Power Tom 2
105 Power Tom 3
106 Power Tom 4
107 Huge Tom 1
108 Huge Tom 2
Electronic Tom
109 TR Tom 1
110 TR Tom 2
111 TR Tom 3
112 TR Tom 4
113 TR Tom 5
114 TR Tom 6
115 Detune Tom 1
116 Detune Tom 2
117 Detune Tom 3
118 Elect Tom 1
119 Elect Tom 2
120 Elect Tom 3
121 Elect Tom 4
122 SDS Classic A Tom 1
123 SDS Classic A Tom 2
124 SDS Classic A Tom 3
125 SDS Classic B Tom1
126 SDS Classic B Tom 2
127 SDS Classic B Tom 3
128 SDS Classic C Tom 1
129 SDS Classic C Tom 2
130 SDS Classic C Tom 3
131 SDS Short Tom 1
132 SDS Short Tom 2
133 SDS Short Tom 3
134 SDS Pitch Bend
Cymbal
135 20” Standard Crash
136 18” Bright Crash
137 16” Bright Crash
138 18” Dark Crash
139 16” Dark Crash
140 Splash 1
141 Splash 2
142 Reverse Cymbal
143 Crescendo Roll
144 20” Dark Crash
145 Bell Ride
146 Soft Ride
147 Rivet Ride
148 Small Splash
149 Cymbals 1
150 Cymbals 2
151 Gong 1
152 Gong 2
153 Hand China 1
154 Hand China 2
155 Plates
156 Short Plates
157 Small Gong
Hi-Hat
158 Standard Closed HH
159 Analog Closed HH
160 TR Closed HH
161 Mid-open HH
162 Dark Closed HH 1
163 Dark Closed HH 2
164 Open HH
165 Long Open HH
166 Bright Open HH
167 Open HH 1
168 Open HH 2
169 Standard Open HH
170 HH Pedal 1
171 HH Pedal 2
172 TR open HH
Percussion
173 Agogo Low
174 Agogo High
175 Bell Tree
176 Bongo High
177 Bongo Low
178 Shaker
179 Cabasa
180 Castanets
181 Hand Clap
182 Claves 1
183 Claves 2
184 Bata Drum
185 Conga Slap Low
186 Conga Slap High
187 Elect Conga Low
188 Open Conga
189 Elect Conga High
190 Cowbell
191 Short Cowbell
192 Cuica High
193 Cuica Low
194 Finger Snaps
195 Guiro Long
196 Guiro Short
197 HiQ Zap
198 Sleigh Bells
199 Maracas 1
200 Maracas 2
201 Metronome Bell
202 Metronome Click
203 Scratch
204 Metal Shaker
205 Surdo
206 Mute Surdo
207 Open Tabla High
208 Open Tabla Low
209 Mute Tabla Low
210 Mute Tabla High
211 Dumbek
212 Talking Drum 1
213 Talking Drum 2
214 Talking Drum 3
215 Tambourine
216 Timbale High
217 Timbale Low
218 Timpani High
219 Timpani Low
220 Open Triangle
221 Mute Triangle
222 VibraSlap
223 Whistle
224 Triangle
225 Wood Low
226 Wood High
227 Board
228 Lotus Drum
229 Bambu Drum
230 Woodblock
231 Fish Guiro
232 Granite Block 3
233 Granite Block 1
234 Granite Block 2
235 Granite Block 4
236 Open Finger Cymbal
237 Mute Finger Cymbal
# Name
# Name
# Name
# Name
Page 17

SD5K
www.simmonsdrums.net
drum kit list
song list
15
User Programmable Kits
23 (Electronic 5)
24 (Electronic 6)
25 (Standard 1)
26 (Standard 2)
27 (Dance 1)
28 (Jazz Stick)
29 (Room 1)
30 (Electric)
31 (Brush)
32 (Room Stick)
# Name
# Name
# Name Beat Tempo
Factory Preset Kits
1 Standard 1
2 Standard 2
3 Room 1
4 Room Stick
5 Rhythm & Blues
6 Jazz
7 Jazz Stick
8 Brush
9 Brush 2
10 Latin 1
11 Latin Stick
001 Guitar Funk 4/4 105
002 Fusion 1 4/4 100
003 Folk Pop 4/4 100
004 Rock 1 4/4 156
005 Blues 4/4 88
006 Newage 4/4 98
007 Organ Funk 4/4 90
008 Drum & Bass 4/4 156
009 Pop 8 Beat 4/4 86
010 Dance 4/4 142
011 Slow Rock 1 4/4 70
012 Slow Pop 1 4/4 120
013 Rock Pop 1 4/4 120
014 Blues Ballad 4/4 62
015 Slow R & B 1 6/8 70
016 Slow Pop 2 4/4 80
017 Jazz Ballad 4/4 100
018 Pop Ballad 4/4 110
019 Guitar Ballad 4/4 130
020 Slow Ballad 4/4 100
021 Waltz 3/4 100
022 Slow Rock 2 6/8 112
023 Rock Pop 2 4/4 120
024 Slow Latin 4/4 100
025 Beguin 4/4 100
026 Reggae 4/4 78
027 Shuffle 4/4 115
028 Slow R & B 2 4/4 65
029 Rock N’Roll 1 4/4 160
030 8Beat 1 4/4 90
031 8Beat 2 4/4 116
032 16Beat 4/4 75
033 March 4/4 116
034 Bossanova 4/4 138
035 Slow Funk 4/4 80
036 Fusion 2 4/4 110
037 Rock N’Roll 2 4/4 150
038 Hard Rock 4/4 163
039 Rock Pop 3 4/4 100
040 Funk 1 4/4 90
041 Funk 2 4/4 172
042 Jazz 6/8 150
043 Disco 4/4 140
044 House 4/4 130
045 Mambo 4/4 180
046 R & B 1 4/4 130
047 R & B 2 4/4 98
048 Pop Dance 4/4 88
# Name Beat Tempo
# Name
Factory Preset Kits
12 Percussion 1
13 Percussion 2
14 Dance 1
15 Dance 2
16 Orchestral
17 Jungle
18 Electric
19 Electronic 1
20 Electronic 2
21 Electronic 3
22 Electronic 4
Page 18
User’s Manual
Digital Drum Kit
midi implementation chart
16
Basic Default 10 ch
Channel Changed X
Default X
Mode Messages X
Altered **************
Note 0–127
Number: True voice **************
Velocity Note on 0 9nH, V= 1–127
Note off X (9nH.V=0)
After Key’s X
Touch Channel’s X
Pitch Bend X
Control 0 X Bank Select
Change 1 X Modulation
5 X Portamento Time
6 X Data Entry
7 X Volume
10 X Pan
11 X Expression
64 X Sustain Pedal
65 X Portamento ON/OFF
66 X Sostenuto Pedal
67 X Soft Pedal
80 X Reverb Program
81 X Chorus Program
91 X Reverb Level
93 X Chorus Level
120 X All Sound OFF
121 X Reset All Controller
123 X All Notes OFF
Program X
Change: True # X
System Exclusive X
System : Song Position X
Common : Song Select X
: Tune X
System : Clock X
Real Time : Commands X
Aux : Local ON/OFF X
: All Notes OFF X
Messages : Active Sense X
: Reset X
Function Transmitted Remarks
0: YES
X: NO
Page 19

One (1) Year Limited Warranty
Subject to the limitations set forth below, Simmons™ or hereby represents and warrants that the components of this product shall be free from defects
in workmanship and materials, including implied warranties of merchantability or fitness for a particular purpose, subject to normal use and service,
for One (1) years to the original owner from the date of purchase.
Retailer and manufacturer shall not be liable for damages based upon inconvenience, loss of use of product, loss of time, interrupted operation
or commercial loss or any other incidental or consequential damages including but not limited to lost profits, downtime, goodwill, damage to or
replacement of equipment and property, and any costs of recovering, reprogramming, or reproducing any program or data stored in equipment
that is used with Simmons™ products. This guarantee gives you specific legal rights: you may have other legal rights which vary from state
to state. Some states do not allow limitations on how long an implied warranty lasts, so the above limitation may not apply to you.
Simmons
P.O. Box 5111
Thousand Oaks, CA 91359-5111
All trademarks and registered trademarks mentioned herein are recognized as the property of their respective holders.
Made in China. 0607-7724
Page 20

www.simmonsdrums.net
 Loading...