

Page 1
BUILT-IN COOKTOP
Electric
H10-20-260-138 Rev 002
USER MANUAL
GB
Page 2

Dear User,
Our objective is to make this product provide you with the best
output which is manufactured in our modern facilities in a careful
working environment, in compliance with total quality concept.
Therefore, we suggest you to read the user manual carefully before
using the product and, keep it permanently at your disposal.
Note: This user manual is prepared for more than one model. Some
of the features specied in the Manual may not be available in your
appliance.
All our appliances are only for domestic use, not for commercial use.
“Conforms with the WEEE Regulations.”
2
Page 3
CONTENS
Important Warnings
Introduction Of The Appliance 6
Control Panel
Electrical Connection Scheme
Important Warnings 8
Installation Of Cooktop 9
Correct Place For Installation 10
Counter Cutting Sizes And Installation Of Your Cooktop
Usage Of Your Cooktop
Electrical Heater Power Values Quick 12
Maintenance And Cleaning 13
Roubles And Solution Proposals 14
Environmentally-Friendly Disposal And
Package Information 14
4
7
7
11
12
3
Page 4

IMPORTANT WARNINGS
1. WARNING:Before touching the connection terminals,
all supply circuit should be disconnected.
2. WARNING: Risk of re; do not store the food materials
on the cooking surface.
3. WARNING: If the surface is cracked, unplug the
device to prevent any risk of electric shock.
4. WARNING: Any inadvertent cooking made with fats
and oils can be dangerous and cause re.
5. WARNING: During usage the reachable sections can
be hot. Keep the small children away.
6. WARNING: The appliance and its reachable sections
become hot during usage.
7. The setting conditions of this appliance is
indicated on the label. (Or data tag)
8. WARNING: The appliance is intended for cooking
only. It must not be used for other purposes like room
heating.
9. “These instructions are applicable for countries of
which symbols are indicated on the appliance. If the
country symbol is not available on the appliance, in
order to adapt the appliance to the conditions of such
country, the technical instructions should be read.”
10. Do not use steam cleaners to clean the appliance.
4
Page 5

11. NEVER try to extinguish a re with water, rst
disconnect the mains supply and then using, for
example a lid or blanket, cover the re.
12. Unless continuous supervision is provided, the
children of age 8 or below should be kept away.
13. Pay attention for not to touch the heating
elements.
14. This appliance can be used by children aged
from 8 years and above and persons with reduced
physical, sensory or mental capabilities or lack of
experience and knowledge if they have been given
supervision or instruction concerning use of the
appliance in a safe way and understand the hazards
involved.
5
Page 6

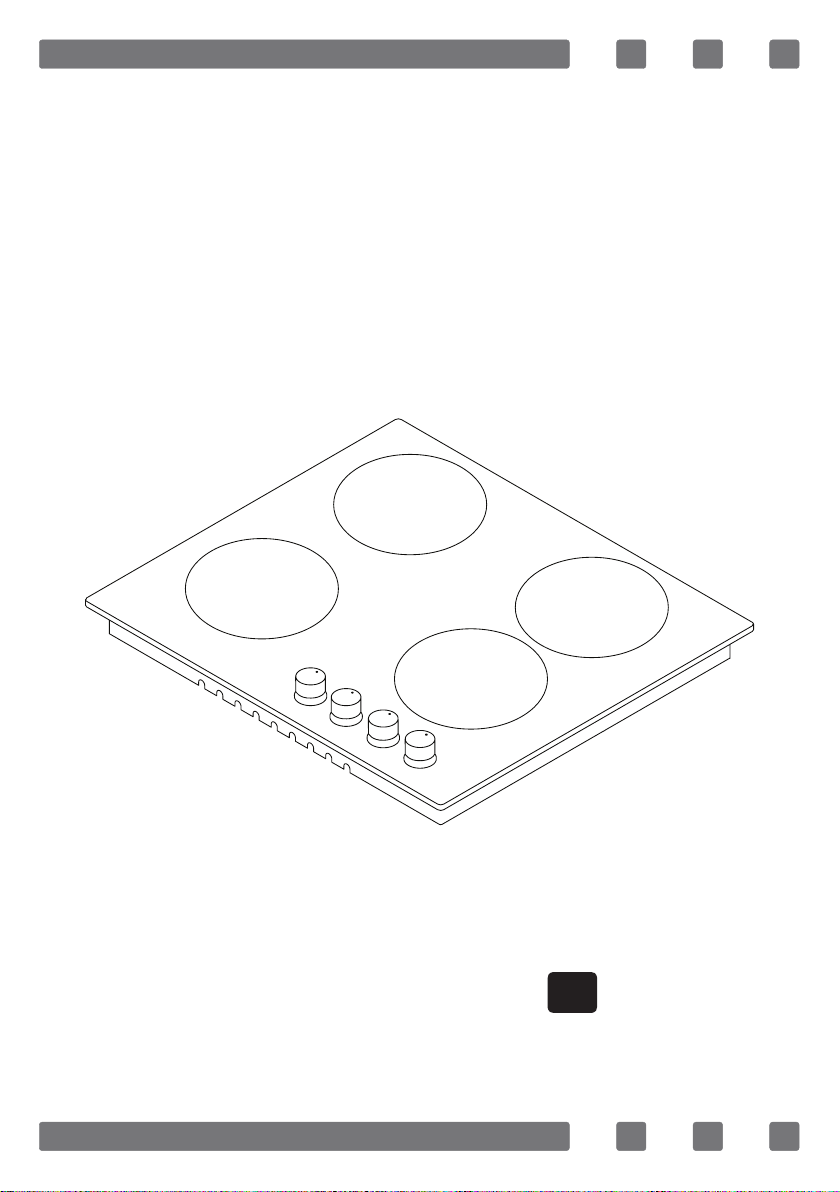
INTRODUCTION OF THE APPLIANCE
1
3
2
4
1- Heater Positions
2- Glass or Metal Surface
3- Control Switches
4- Hotplate
5- Ovaldual Heater
6- Double Heater
6
5
6
Page 7

CONTROL PANEL
Cooktop Panel Visual of 30 cm
Cooktop Panel Visual of 45 cm
Cooktop Panel of 60 cm
ELECTRICAL CONNECTION SCHEME
Get electrical connection of your appliance done to authorized person
in line with the following scheme.
220-240V~50/60H
380-415 3N~50/60Hz
L3
Live
Phase
H05 VV-F 3G 4 mm² H05 VV-F 5G 1,5 mm² H05 VV-F 4G 1,5 mm²
L2
L1
Neutral
Neutre
Earth
Terre
Erdung
380-415 2N~50/60Hz220-240V~50/60Hz
L2
L1
Neutral
Neutre
Earth
Terre
Erdung
7
Page 8

IMPORTANT WARNINGS
Electrical Connection and Safety
1. Setting conditions of this appliance is indicated in tag or data plate.
2. Your appliance should be plugged in a fuse appropriate for electric
power. If necessary, it is recommended that installation is done by
authorized service.
3. Your appliance is congured in accordance with electrical supply of
220-240V AC/380-415V3N AC 50/60Hz.
4. If main electrical network is different from these values, contact
with your authorized service.
5. Electrical connections of your appliance should only be made to
the fuses having suitably wired grounding (grounded) system. If no
convenient fuse is available in the place where your appliance is to be
installed, contact with authorized service immediately. Manufacturing rm
is not responsible denitely for the damages that fuses whose grounding
is not made and connected to the appliance can cause.
6. Plug of the appliance should be close to be accessed easily to the
fuse whose grounding is made without use of extension cord.
7. Do not allow contacting the power cable of your appliance with hot
regions. Similarly, keep away it from sharp edges and corners.
8. If feeder cord is damaged, this cord should be replaced either by
manufacturer or its service agency or same degree qualied personnel
in order to hinder a dangerous situation.
9. Wrong electrical connection may give damage to the appliance.In
this case, your appliance will remain out of guarantee scope. Electrical
connection of your appliance should be done by authorized service.
10. During operation of cooktop, some parts may be hot. When you also
bring switches closed position, it may remain hot for a while. Children
should be kept away every time and not be left without observation. Do
not touch surface of cooktop while warning lights ashes. When you bring
your appliance closed position, hot parts being still dangerous are stated
with warning lights. (Vitroceran models).
8
Page 9

INSTALLATION OF COOKTOP
1. Turn the cooktop down and place on smooth ground.
2. In order to prevent entrance of foreign substances and liquids
between cooktop and counter, apply the paste given in package to the
sides of lower guard of counter. For corners, curl paste and increase
curls till lling corner gaps.
3. Turn cooktop again and align with and place on counter.
4. Fasten up your cooktop on counter by using the clamp and screws
supplied.
roving
Figure 1
9
Page 10

5. When product is mounted on a drawer, if it is possible to touch
lower side of product, this section should be separated with a wooden
shelf.
min. 30 mm
Figure 2
6. While mounting cooktop on a closet, as shown in the gure above, in
order to separate between closet and cooktop, a shelf should be mounted.
If it is mounted on a built-in oven, there is no need to do that.
7. If your cooktop will be mounted next to right or left wall, the
minimum distance between wall and cooktop should be 50 mm.
CORRECT PLACE FOR INSTALLATION
Product is designed in
accordance with the kitchen counters supplied from
market. A safe distance
should be left between the
product and kitchen walls
and furniture.
If hood/aspirator will be
650 mm min.
installed over your appliance, obey to the recommendation of hood/aspirator
manufacturer for assembly
height. (min. 65 cm)
The gap that cooktop is to
be placed on the counter
should be cut in line with
cooktop installation dimensions.
For installation of the product, the rules specied in local standards
related to electricity should be complied.
10
Page 11

COUNTER CUTTING SIZES AND INSTALLATION OF YOUR COOKTOP
Pay attention to the drawings and dimensions given below while
making cooktop installation and adjusting counter cutting sizes.
min. 60 mm
min. 60 mm
520 mm
270 mm
min. 60 mm
Cooktop Of 30cm
520 mm
560 mm
min. 60 mm
Cooktop Of 60cm
300 mm
490 mm
590 mm
490 mm
min. 60 mm
min. 60 mm
min. 60 mm
min. 110 mm
520 mm
410 mm
min. 60 mm
520 mm
560 mm
Cooktop Of 70cm
440 mm
490 mm
min. 60 mm
Cooktop Of 45cm
690 mm
490 mm
min. 60 mm
min. 60 mm
min. 60 mm
520 mm
810 mm
Cooktop Of 90cm
860 mm
490 mm
min. 60 mm
min. 60 mm
11
min. 60 mm
400 mm
960 mm
Cooktop Of 100cm
990 mm
370 mm
min. 60 mm
Page 12

USAGE OF YOUR COOKTOP
Usage of Hotplate
You can operate electric cooktops by turning the button on control
panel you want to use to the level you desire. Cooktop powers as per
levels are given in the following table.
LEVEL 1 LEVEL 2 LEVEL 3 LEVEL 4 LEVEL 5 LEVEL 6
80mm 200W 250W 450W --- --- ---
145mm 250W 750W 1000W --- --- ---
180mm 500W 750W 1500W --- --- ---
145mm Rapid 500W 1000W 1500W --- --- ---
180mm Rapid 850W 1150W 2000W --- --- ---
145mm 95W 155W 250W 400W 750W 1000W
180mm 115W 175W 250W 600W 850W 1500W
145mm Rapid 135W 165W 250W 500W 750W 1500W
180mm Rapid 175W 220W 300W 850W 1150W 2000W
ELECTRICAL HEATER POWER VALUES QUICK
Ø140mm
Commutator
Ø180mm
Commutator
Ø180mm
Regulator
Ø140/250mm
Ovaldual
Ø120/180mm
Double
LEVEL
1800 W1800W1800W1800W1800W1800W1800W1800W1800
1000W1000W1000W1000W1000W1000W1000W1000W1000W1800
LEVEL 2LEVEL3LEVEL4LEVEL 5LEVEL 6LEVEL7LEVEL8LEVEL
1
130 W206W350W500W850W1200
W
180 W470W790W850W1230W1700
W
700W700W700W700W700W700W700W700W700W1700
--- --- --- ---
--- --- --- ---
MAK.
9
W
---
W
W
True False False False
12
Page 13

MAINTENANCE AND CLEANING
Before starting to maintenance or cleaning, rstly unplug the plug
supplying electricity to cooktop and turn down gas valve. If cooktop is
hot, wait for cooling down.
1. For the purpose that your cooktop has long and economic life,
regular cleaning and maintenance should be performed on your cooktop.
2. Do not clean your cooktop with scratching tools such as bristle
brush, wire wool or knife. Do not use abrasive, scratching, acid materials
or detergent.
3. Following mopping parts of your cooktop with soapy cloth, rinse
it, later rinse well with a soft cloth.
4. Clean glass surfaces with special glass cleaning substances. As
scratching of glass surfaces leads to breaking, while cleaning glass
surfaces, do not use abrasive cleaners or sharp metal scrapers.
5. Do not clean your cooktop with steamy cleaners.
6. In the course of cleaning your cooktop, never use ammable
materials such as acid, thinner and gas.
7. Do not wash plastic and aluminium parts of your cooktop in
dishwasher.
8. Clean vinegar, lemon, salt, coke and similar acid and alkaline
containing substances poured on your cooktop immediately.
9. In time, cooktop buttons turns hard or never turn any more, in
such circumstances, it may be necessary that buttons are changed.
The change should only be done by authorized service.
Figure 3
13
Page 14

TROUBLES AND SOLUTION PROPOSALS
You can solve the troubles you can encounter at your product by
checking the following points before calling technical service.
If cooktop does not operate;
• Check if power cable of cooktop is plugged in.
• Examine with safe ways if electric exists on network.
• Audit fuses.
• Control whether damage is available on power cable.
ENVIRONMENTALLY-FRIENDLY DISPOSAL
Dispose of packaging in an environmentally-friendly
manner.
This appliance is labelled in accordance with European
Directive 2012/19/EU concerning used electrical and
electronic appliances (waste electrical and electronic
equipment - WEEE). The guideline determines the
framework for the return and recycling of used
appliances as applicable throughout to the EU.
PACKAGE INFORMATION
Packaging materials of the product are manufactured from recyclable
materials in accordance with our National Environment Regulations.
Do not dispose of the packaging materials together with the domestic
or other wastes. Take them to the packaging material collection points
designated by the local authorities.
14
 Loading...